

Page 1
WWW.VINVENTIONS.COM
NOMASENSE O2 P300 & P6000
USER GUIDE
Page 2
WWW.VINVENTIONS.COM
O2 P300 & P6000
CONTENT
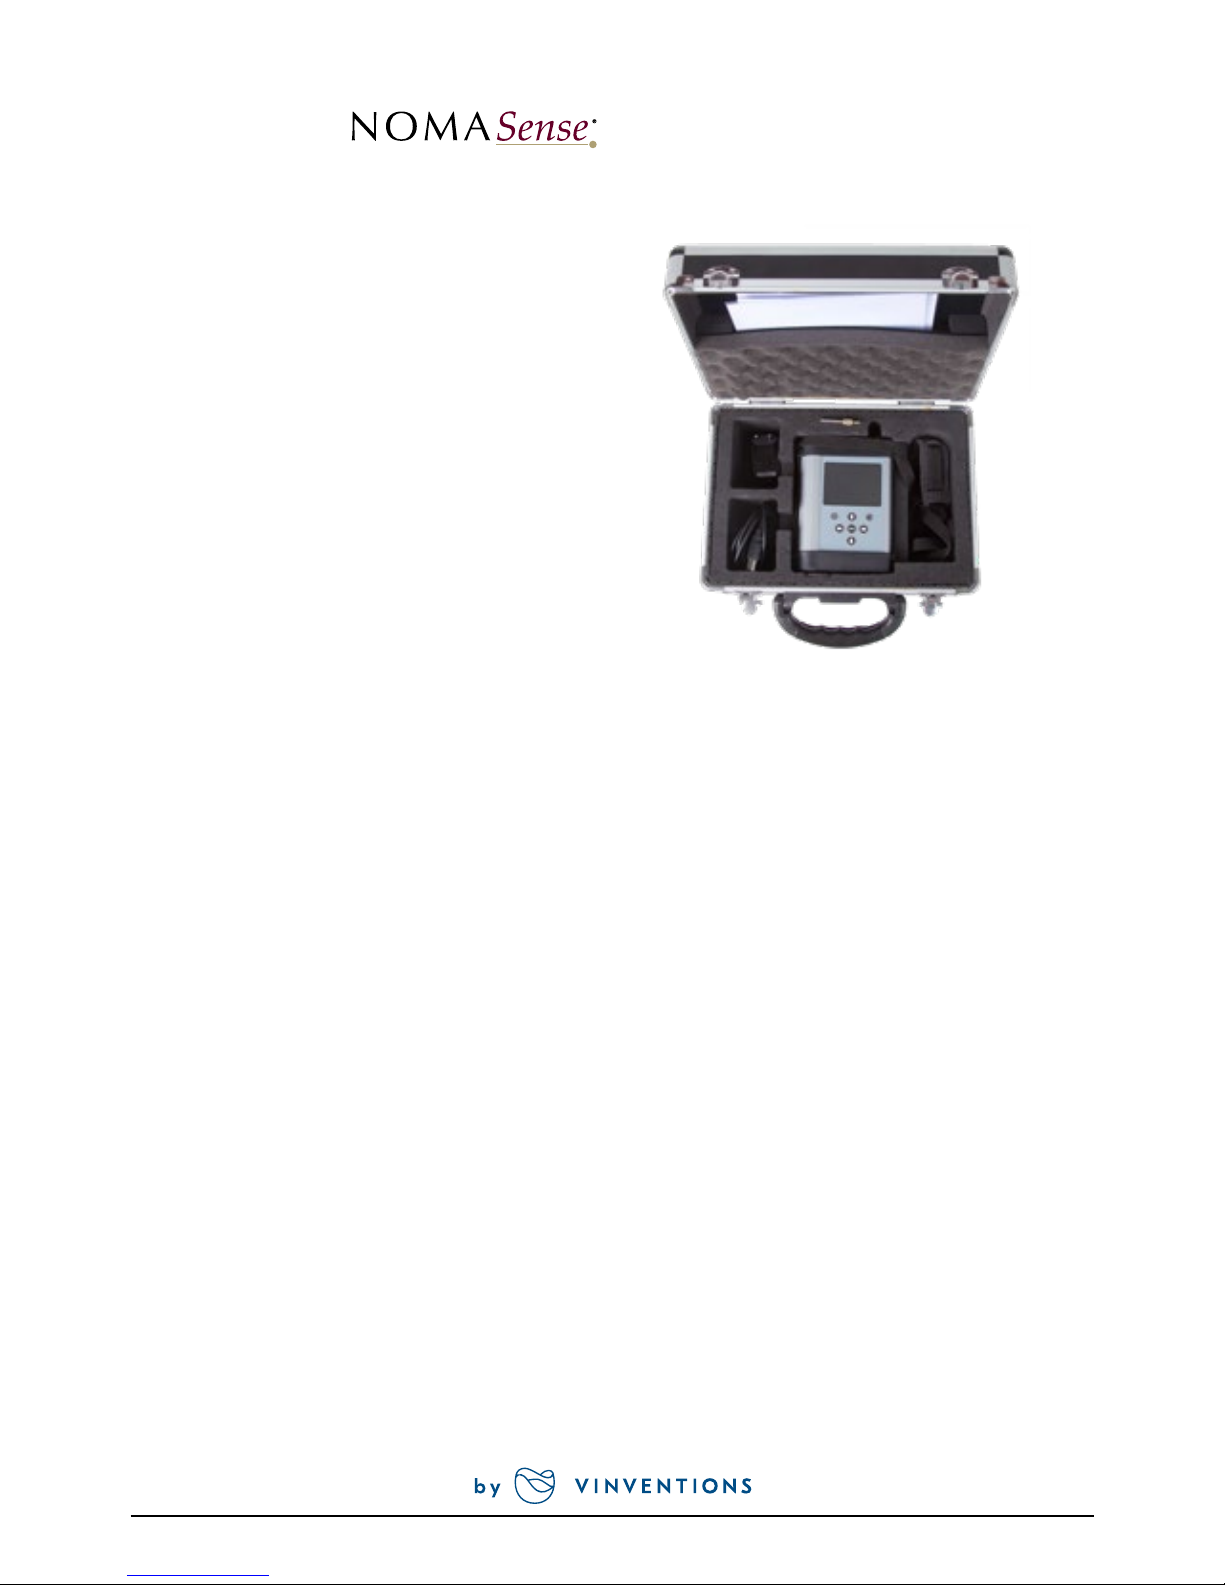
• NomaSense or O2 P300 or P6000 oxygen
analyzer
• USB cable
• USB-Power adapter (5 VDC, min. 1 A) with
dierent connector pieces
• USB stick including the Datamanager Software
• Temperature probe PT100
• Short optical fiber
OPTIONAL
• Oxygen-sensitive chemical optical sensors (PSt3 or PSt6)
• Dipping probe (PSt3 or PSt6)
• Starter kit of accessories: white pen, spatula, silicone glue, one set of syringes, filling level gauge
ADDITIONALLY REQUIRED EQUIPMENT NOT SUPPLIED
• PC/notebook for comfortable data transfer and export:
System requirements:
Microsoft® Windows® XP, Vista™, 7, or 8; Processor power according to minimum requirements of the
respective operating system
Fig. 1 Case with all delivered equipment
Page 3
WWW.VINVENTIONS.COM
O2 P300 & P6000
DESCRIPTION OF THE DEVICE
TOP PANEL
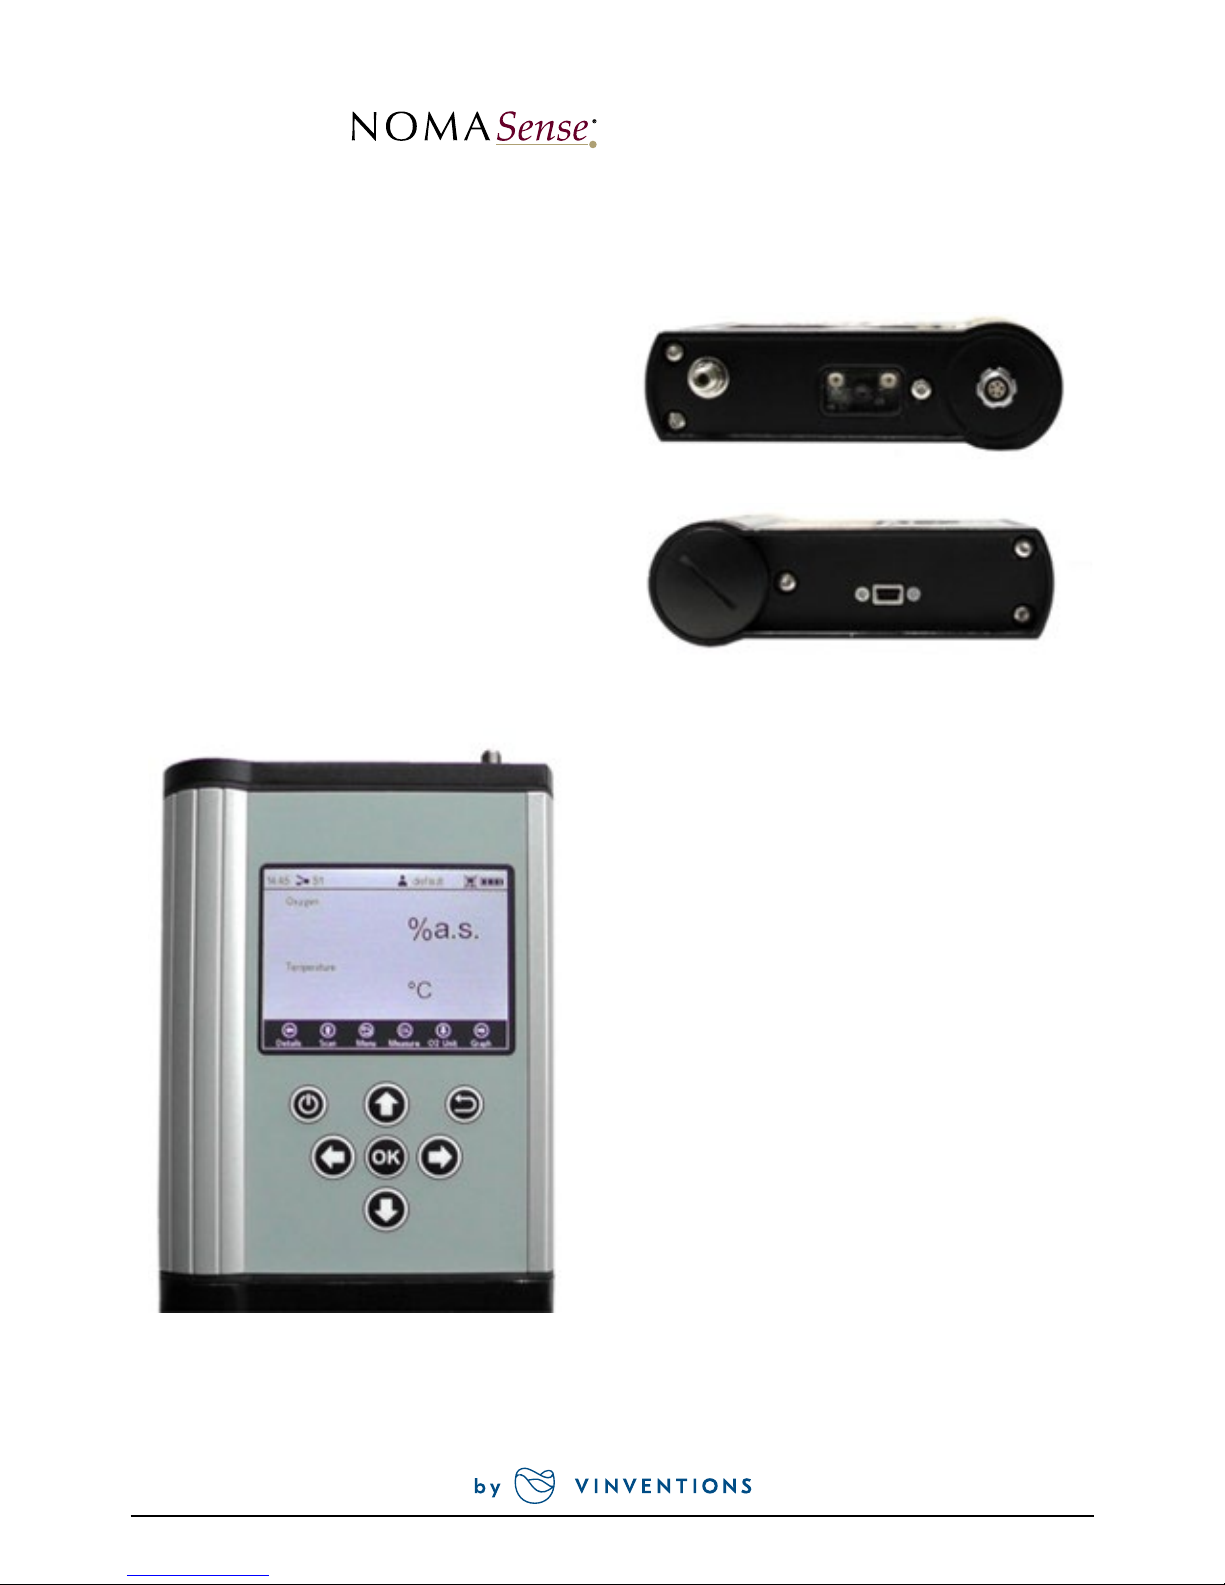
The top panel is equipped with a connector for the
fiber optic sensor, a connector for the temperature
sensor, and the QR code reader.
BOTTOM PANEL
The bottom panel is equipped with the USB
connector for charging the battery or connecting
the device to a PC/notebook. A screw cap gives
access to the battery compartment.
CONTROL PANEL
The NomaSense O2 P300 and P6000 are completely
stand-alone devices. The LCD display and the
buttons allow operating the transmitter without
connection to a PC/notebook. In the lower part
of the display the functions of the buttons in the
respective menu, submenu or window are shown.
Use the buttons for navigating on the screen, and
to make settings; pressing the respective button
will perform the respective function (see Fig. 4).
Fig. 4 Control panel of the NomaSense O2 P300 & P6000
Fig. 3 Transmitter bottom panel
Fig. 2 Transmitter top panel
SMA
BAT T
USB
QR
TEMP
Page 4
WWW.VINVENTIONS.COM
O2 P300 & P6000
GETTING STARTED
1. INSTALLATION SETUP
• Remove the red rubber cap from the optical sensor
connector (SMA)
• Remove the protective cap from the male plug on the optical
fiber and insert it in the SMA connector of the NomaSense
O
2
P300/P6000. The safety nut has to be screwed on.
• Insert the temperature probe by matching the two red marks
of the connector and the plug.
2. STARTING THE DEVICE
• Hold the button on the control panel to turn on
the device, after some automatic tests you reach the
measurement screen directly.
• The navigation bar at the bottom shows the functions of the
respective control buttons.
• The status bar at the top shows the time, the name of the
current selected sensor, the name of the current user, a
symbol indicating if logging is activated or not and the
battery status.
3. CREATE A NEW SENSOR WITH
A QR CODE
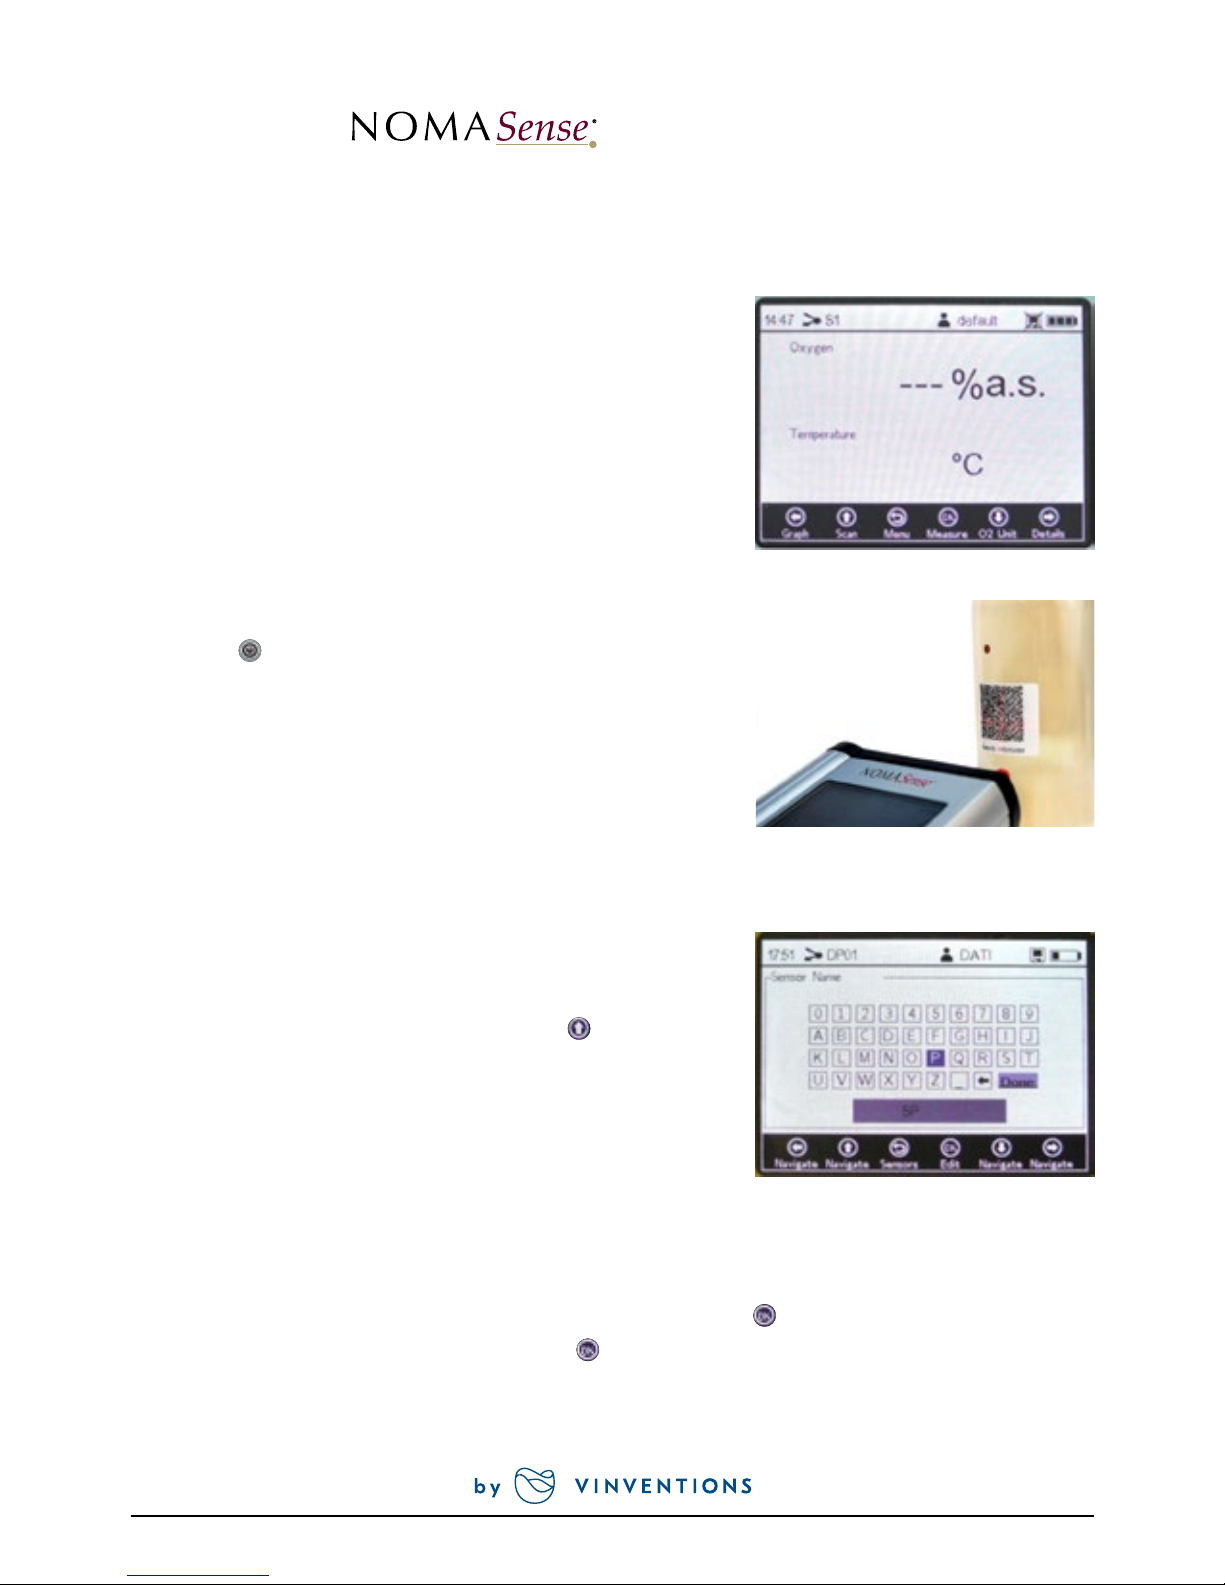
• Activate the QR code reader by pressing the (Scan) button
while on the measurement screen.
• Place the respective sensor QR code (delivered with your
oxygen sensor) about 10 cm from the NomaSense O
2
P300/
P6000 ; the target cross has to be aimed at the QR code.
Reducing or increasing the distance between QR code and
QR code reader can speed up the scanning process.
• A notification window opens on the screen, when the
scanning process is done.
• A keyboard screen opens. Use the navigation arrows to type in the new Sensor Name.
• When you have finished typing go to the Done button and press
.
• The new sensor shows in the sensor list. Press
once more to select the new sensor
and the display will switch to the measurement screen automatically.
Fig. 6 Scanning sensor QR code
Fig. 5 Measurement screen
Fig. 7 Keyboard screen to enter Sensor Name
Page 5
WWW.VINVENTIONS.COM
O2 P300 & P6000
4. CREATE A NEW SENSOR MANUALLY
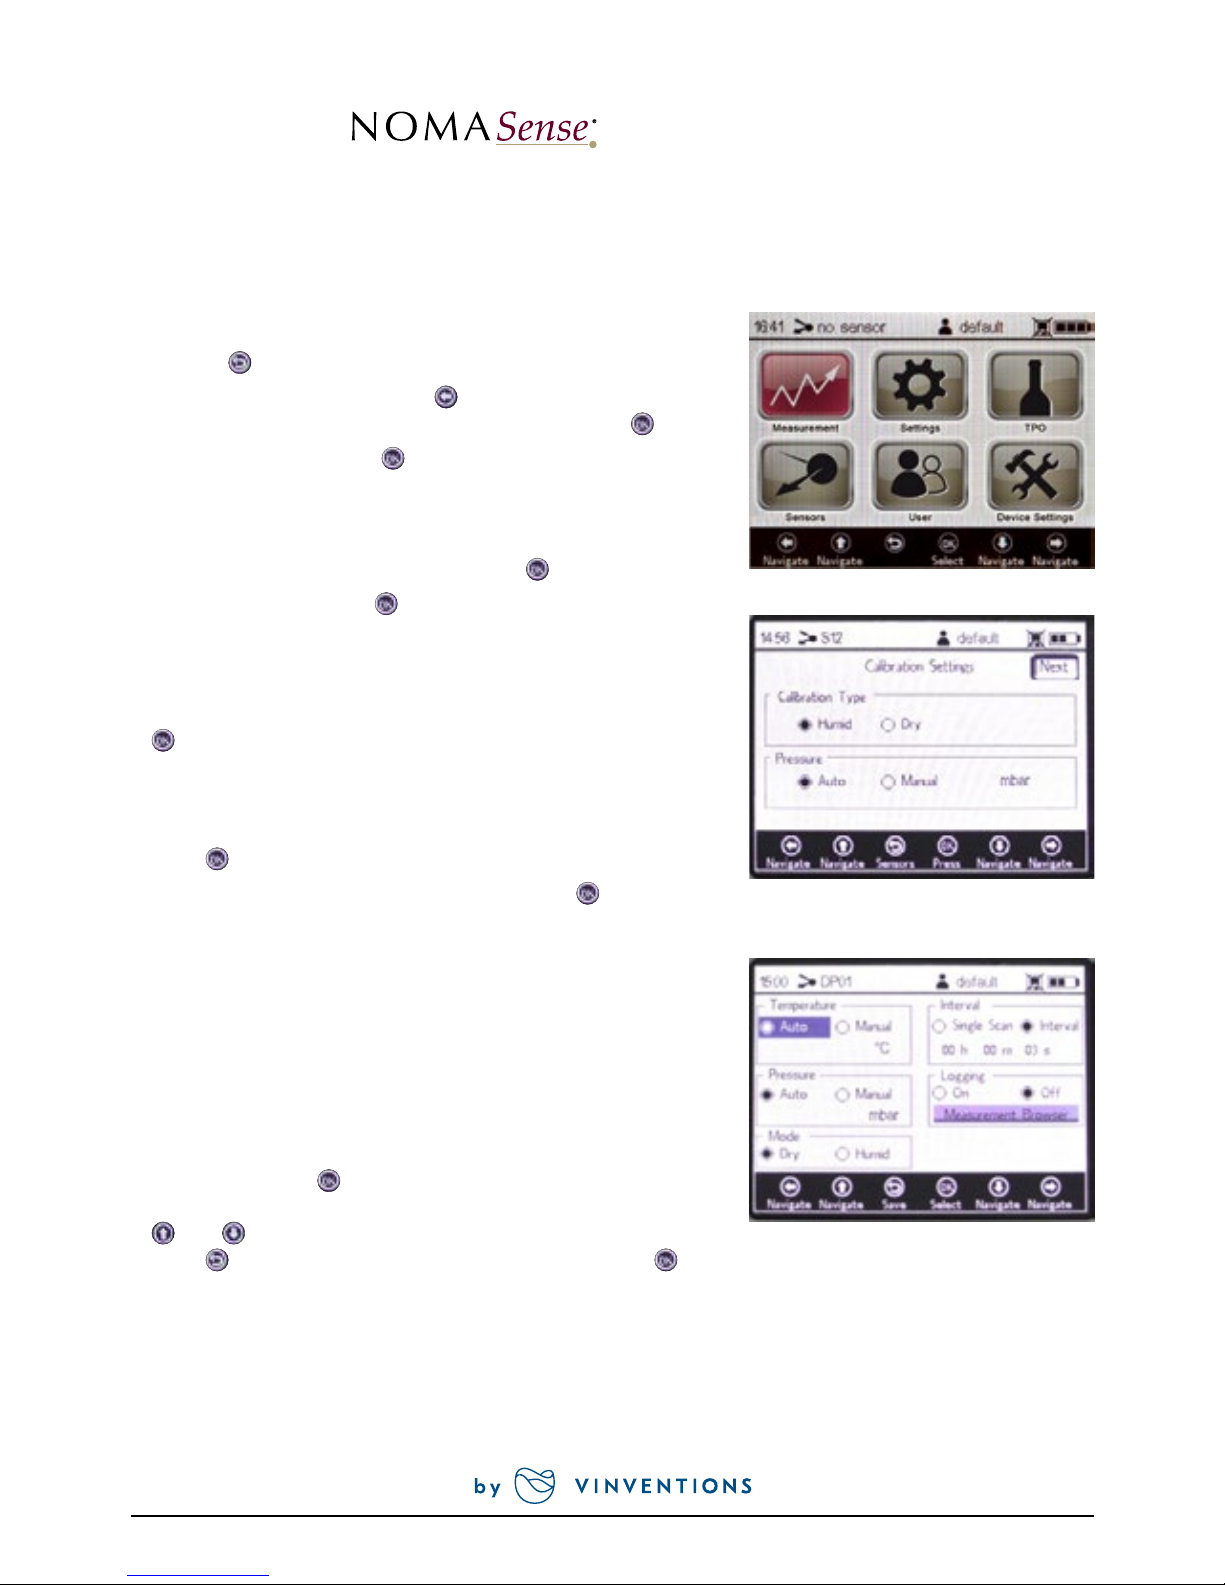
• Use the button to switch to the Main menu.
• Select “Sensors” and press the
button to edit the sensor
list. A window appears; select New Sensor and press
.
• Select Manual and press
.
• In the Sensor Settings you have to choose the Sensor type
of your new sensor (NomaSense O
2
P300: PSt3 ; NomaSense
O2 P6000: PSt3 or PSt6). Then move to the upper right of
the screen to the Next button and press
.
• Select Humid and press
. Then change the calibration
values to the values stated on the sensor´s Final Inspection
Protocol.
• When you have adjusted all the calibration values move to
the upper right of the screen to the Next button and press
.
• A keyboard screen opens. Use the navigation arrows to type
in the new Sensor Name.
• When you have finished typing go to the Done button and
press
.
• The new sensor shows in the sensor list. Press
once more
to select the new sensor and the display will switch to the
measurement screen automatically.
5. TUNE THE MEASUREMENT SETTINGS
• Select “Meas. Settings” in the Main menu and change
Measurement Settings:
• Change settings for Temperature and Pressure
compensation. Use the arrow buttons to navigate between
input fields. Press
to get into editing mode and change
the respective setting or value (one digit at a time) with the
and buttons. To cancel and leave the editing mode
press . When you have adjusted an input field press
the button again to save the changes.
• Select Single Scan for a single measurement or Interval
for continuous measurement at a certain time interval
Fig. 8 Main menu screen –Sensors selected
Fig. 9 Calibration Data screen
Fig. 10 Measurement Settings screen
Page 6
WWW.VINVENTIONS.COM
O2 P300 & P6000
• To save measurements select Logging On and go to Measurement Browser. Use the button to
create a new measurement file. A keyboard screen opens. Use the navigation arrows to type in the
new Measurement Name.
• When you have finished typing go to the Done button and press
.
• The new measurement file shows in the Measurements list. Press
once more to select the new file
and the display will switch to the measurement screen automatically.
6. MEASUREMENT
Start the measurements by pressing the button on the measurement screen. When performing interval
measurements pressing again will stop the measurement process.
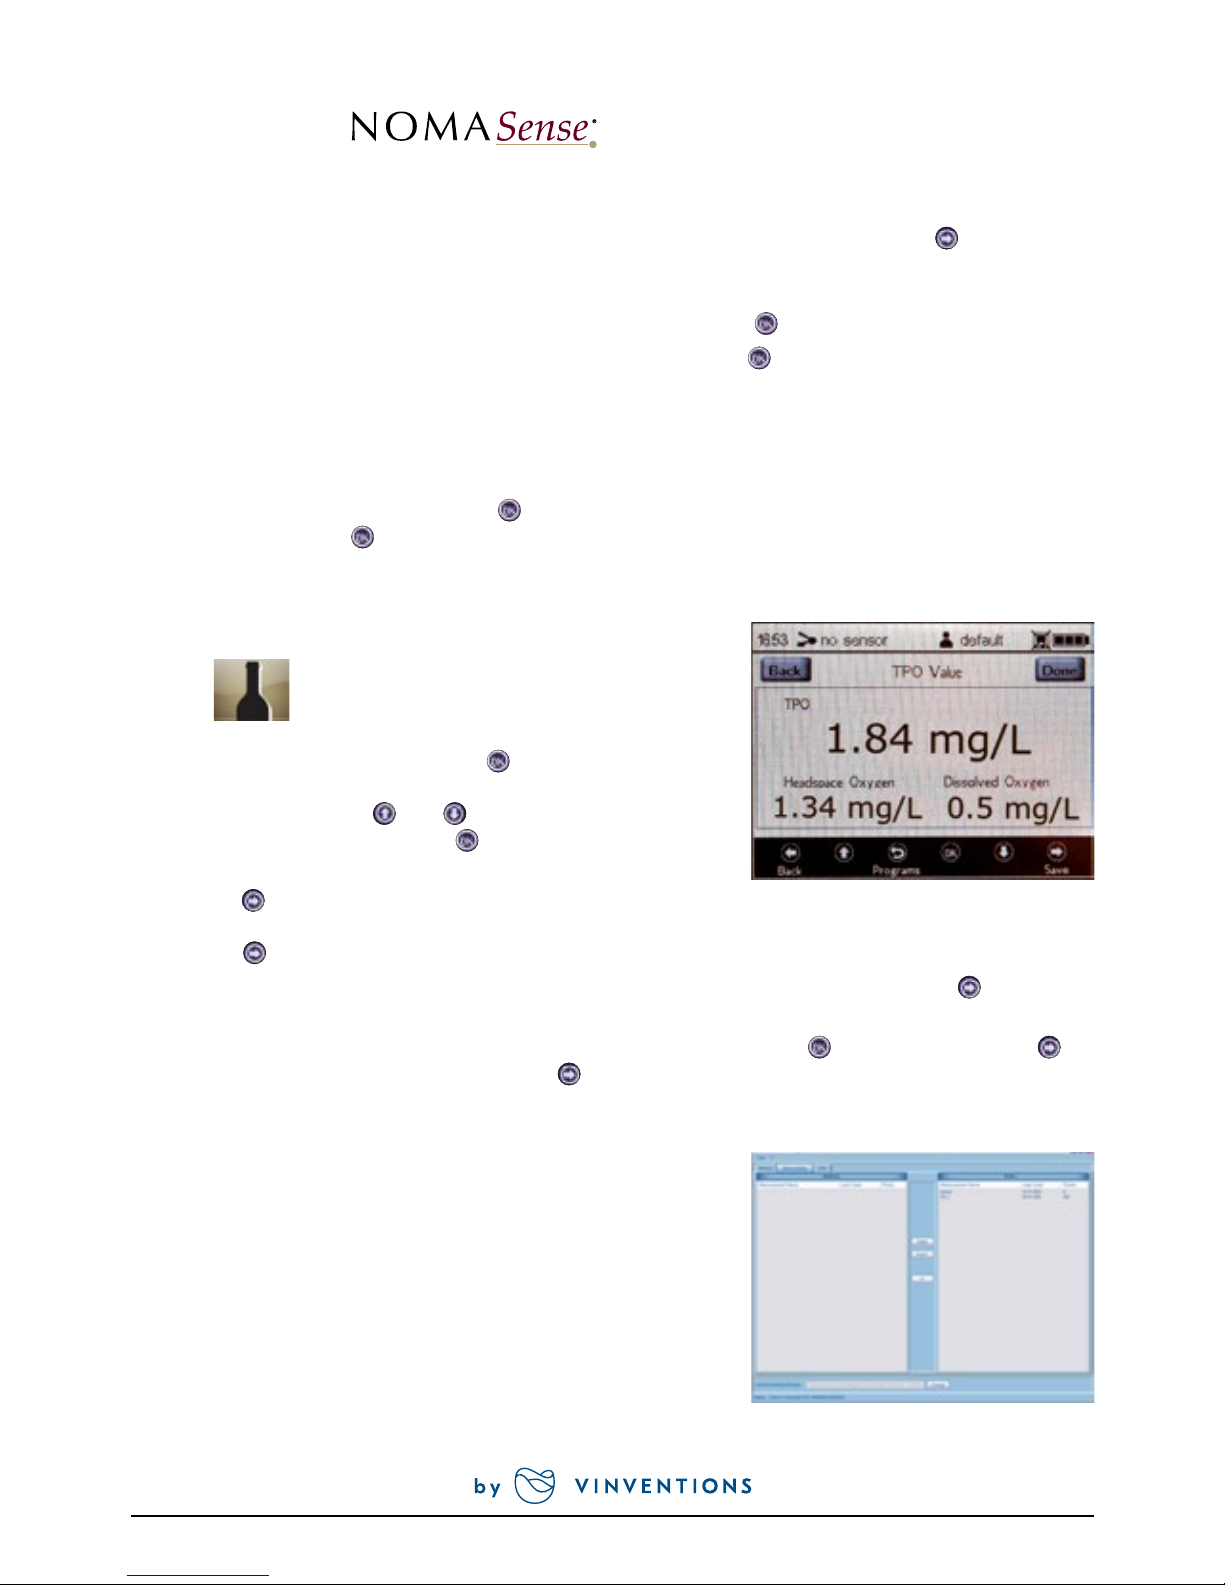
7. MEASURE TPO TOTAL PACKAGE OXYGEN
• Select in the Main menu.
• Change Bottle Constants by using the arrow buttons to
navigate between input fields. Press
to get into editing
mode and change the respective setting or value (one
digit at a time) with the
and buttons. When you have
adjusted an input field press the button again to save the
changes.
• Press the
button to go to the next screen. Enter the
Miscellaneous Numbers about the bottle if necessary and
press the button to go to the next screen.
• Put the optical fiber in front of the Headspace sensor and press to measure. Press the
button to
go to the next screen.
• Put the optical fiber in front of the Dissolved Oxygen sensor and press
to measure. Press the
button to calculate the TPO value. Press the
button one more time to go back in the Main menu
and save the calculation if Logging is on.
8. TRANSFER YOUR MEASUREMENT DATA
TO A PC / NOTEBOOK
• Connect the NomaSense O2 P300/P6000 to the PC/
notebook via USB.
• Insert the supplied USB stick into the respective drive. In the
software file click “NomaSense Datamanager_x.x.x.x_Setup_
FW.exe”. Follow the instructions in the setup wizard for
installing the Datamanager software.
Fig. 12 NomaSense Datamanager
Fig. 11 TPO calculation screen
Page 7
WWW.VINVENTIONS.COM
O2 P300 & P6000
• Open the Datamanager software after installation and select a working directory in which your P300 /
P6000 data is going to be stored.
• The connected device shows automatically in the software; go to the Measurements tab on top.
• Select your measurement file from the list in the Device box on the right side of the screen, and use
the
button. A dialog opens in which you can choose the directory to save the measurement
file in. The measurement file will be saved as .csv file.
9. GENERATE A QR CODE
• Connect the NomaSense O2 P300/P6000 to the PC/
notebook via USB.
• Open the Datamanager software and go to the Sensors tab
on top.
• Select the respective sensor in the database box and press
the
button.
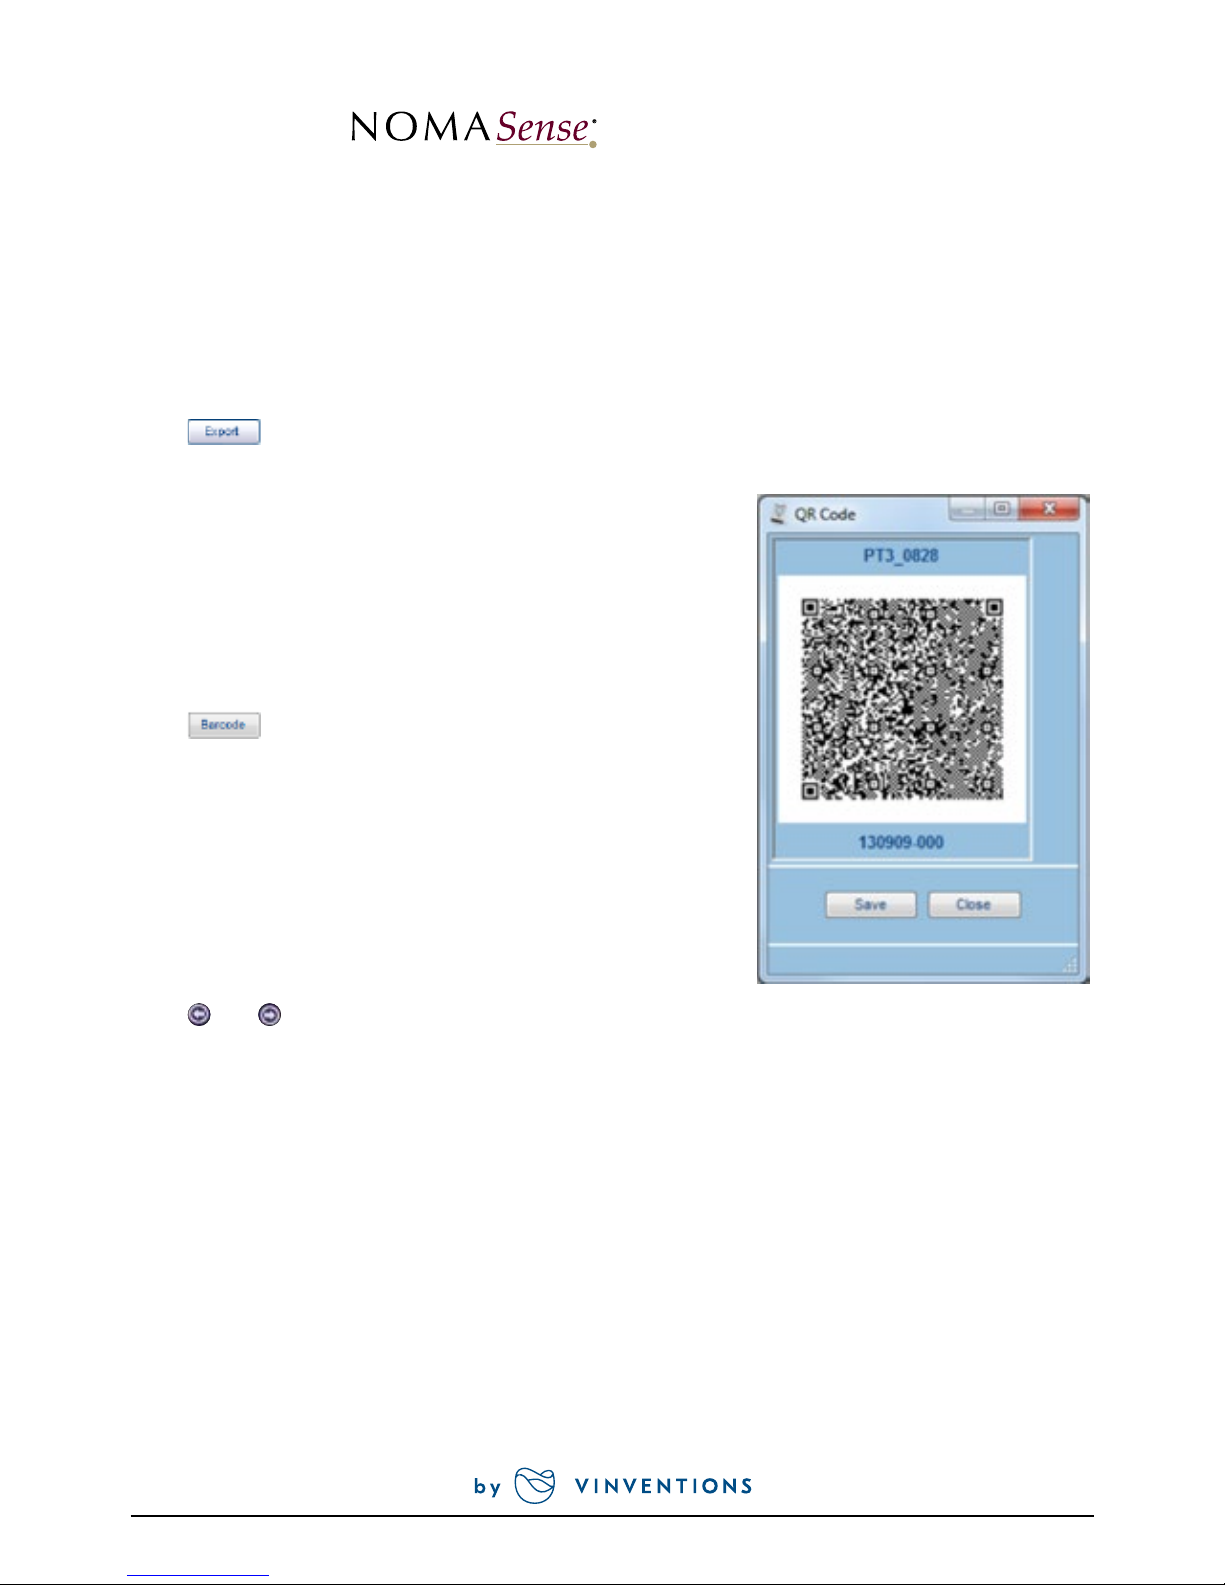
• A window opens showing the generated QR code (Fig. 11).
Save the QR code and print it. Please make sure the printer
resolution is set to at least 600dpi.
10. TUNE THE DEVICE SETTINGS
• Select ”Device Settings” in the Main menu
• The Device Settings menu is divided into four screens: Device
Settings, Energy Management, Sensor Details and About. Use
the
and buttons to switch between screens.
• In the device settings screen, you can notably change the backlight o time and the LED intensity, in
case the device warns you about too low or too high signal.
• In the Energy Management screen, the Turn device o time and the display brightness can be
changed.
• The About screen and Sensor Details screen give information about the device and the current sensor
calibration.
Fig. 13 QR code window
Page 8

WWW.VINVENTIONS.COM
O2 P300 & P6000
MENU STRUCTURE
Main
Measurement
➔ Simple ➔ Oxygen
➔ Temperature
➔ Details ➔ Oxygen (+ phase angle,
amplitude)
➔ Temperature
➔ Measurement Name
➔ General (measurement settings)
➔ Graph
Settings
➔ Temperature ➔ Auto
➔ Manual
➔ Pressure ➔ Auto
➔ Manual
➔ Interval ➔ Single Scan
➔ Interval
➔ Logging ➔ On
➔ O
➔ Measurement Browser ➔ Select
➔ Delete
➔ New
Device Settings
➔ Device Settings ➔ Time
➔ Date
➔ Backlight o after
➔ LED Intensity
➔ Energy Management ➔ Turn device o after…
➔ Long Term Measurement
➔ Display Brightness
➔ Sensor all sensor data
➔ About Serial Number, LED Status, Firmware
Version
User
➔ User list ➔ Select
➔ Delete
➔ New
Page 9

WWW.VINVENTIONS.COM
O2 P300 & P6000
MENU STRUCTURE
Main
Sensors
➔ Sensor list ➔ Select
➔ Edit List ➔ Delete Sensor
➔ New Sensor ➔ Barcode
➔ Manual ➔ Sensor Settings ➔ Sensortype
➔ Sensor
Constants
➔ Calibration
Data
➔ Dry / Humid
➔ Cal0 T0
➔ Cal2nd T2nd
➔ O
2
-2nd > pATM
➔ Sensor Name
➔ New ➔ Barcode
➔ Manual ➔ Calibration
Settings
➔ Calibration
Typ e
➔ Dry
➔ Humid
➔ Pressure ➔ Auto
➔ Manual
➔ Calibration
Temp.
➔ T0 ➔ Auto
➔ Manual
➔ T2nd ➔ Auto
➔ Manual
➔ Calibration ➔ Present Values Phase Temperature
Pressure
➔ Set Cal0
➔ Set Cal2nd O
2
-2nd
TPO
➔ Bottle constants ➔ Bottle size
➔ Headspace size
➔ Bottle neck
diameter
➔ Misc numbers ➔ Bottle number
➔ Filling head
number
➔ Corking head
number
➔ Measurement
Headspace
Oxygen
➔ Measurement
Dissolved
Oxygen
➔ TPO Value
Page 10
WWW.VINVENTIONS.COM
CONTACT US FOR YOUR CUSTOMIZED SOLUTION
Vinventions LLC | 400 Vintage Park Dr. | Zebulon, NC 27597 | U.S.A. | Tel : +1 919-460-2200 | vinventions.com
Vinventions | ZI Les Plénesses | Chemin de Xhénorie 7 | B-4890 Thimister-Clermont | Belgium | Tel : +32 87 63 88 20
NOMASENSE O2 P300 & P6000
 Loading...