

Page 1
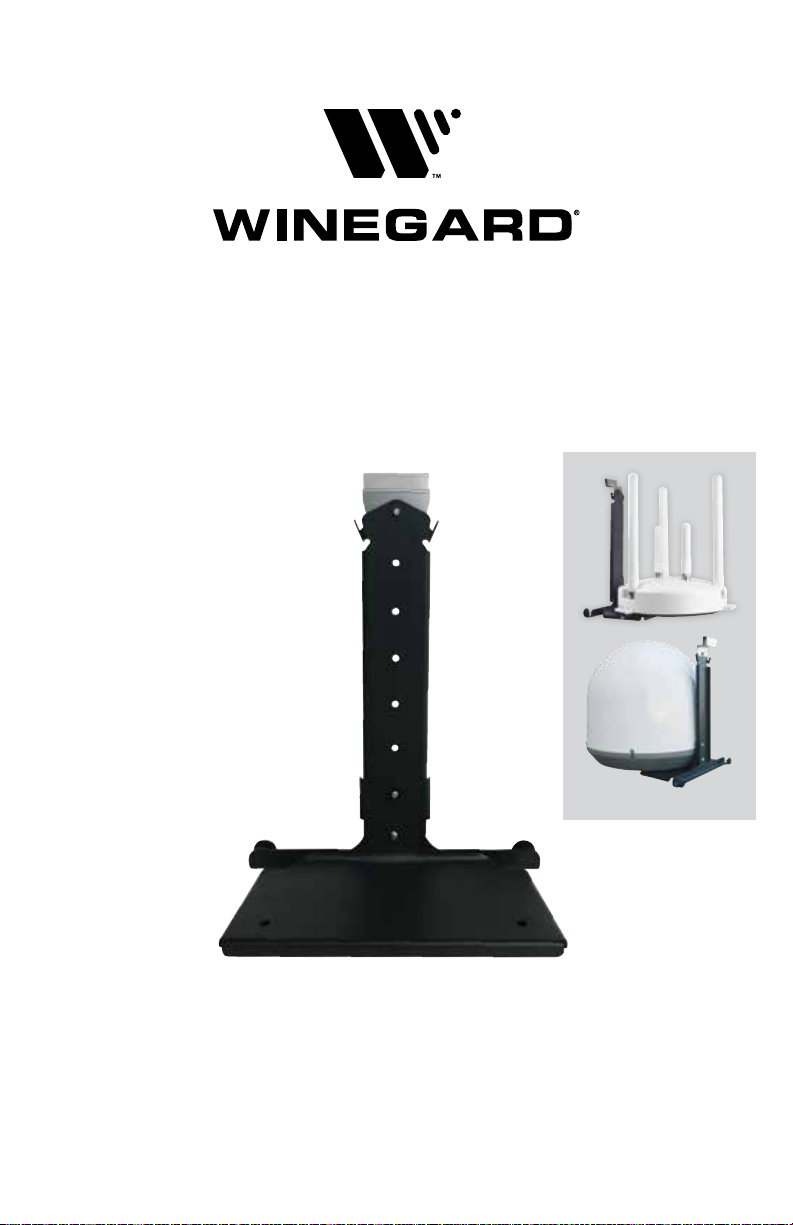
Assembly, Installation, & Operation Manual
MT-SM30 Window Mount
(Ex tender/Antenna not included)
Manual disponible en español en
www.winegard/support
www.winegard.com/trucking
For help, email [email protected]
or call 1-800-788-4417
2452336
Rev2 6-18
Page 2
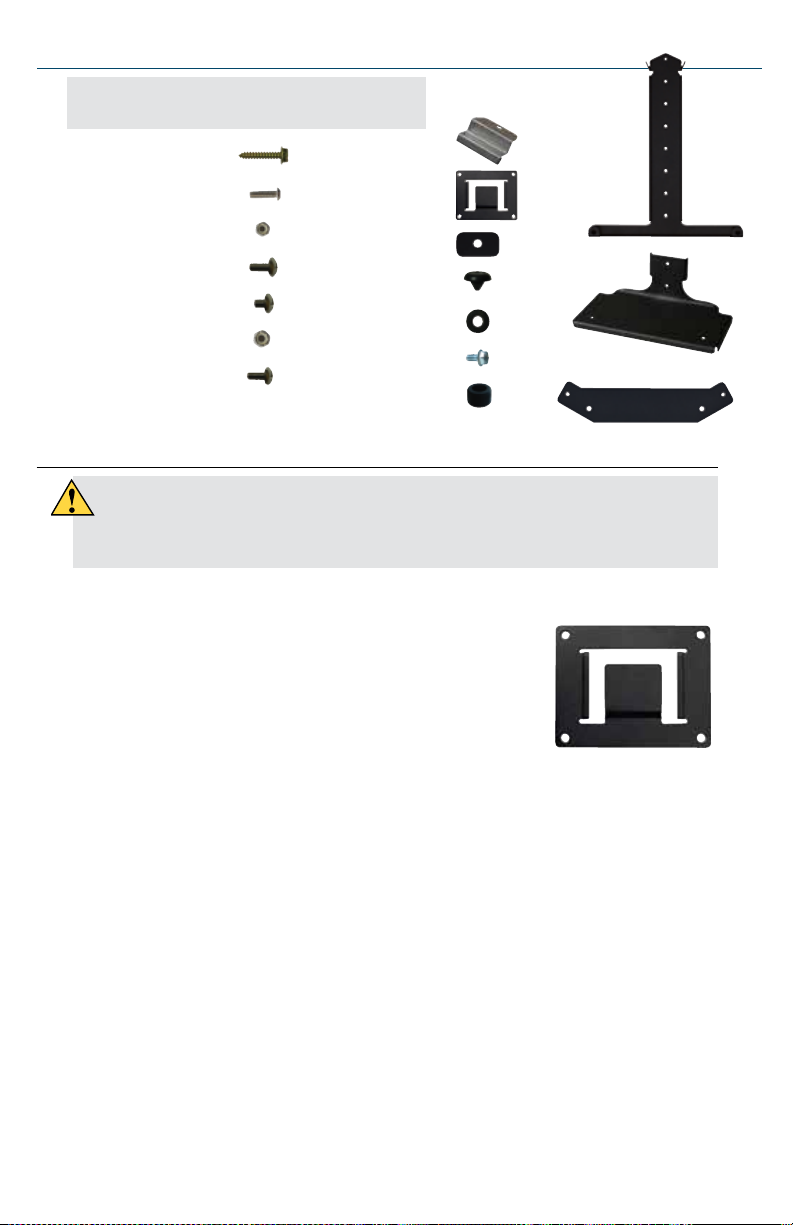
Parts
Top
Recommended Tools, not Provided:
Phillips screwdriver 5/16" drive, 1 - adjustable wrench
Mounting Screw (10)
10-32 x 3/4” Screw (3)
10-32” Nylock Nut (4)
10-32 x 1/2” Screw (2)
10-32 x 1/4” Screw (1)
1/4-20 x .5 Nylock Nut (2)
1/4-20 x .5 Screw (2)
Exterior Bracket (2)
Spacer (3)
Rubber Bumper (2)
Rubber Washer
Foot Screw (4)*
Rubber Foot (4)*
*Included with antenna unit
3" x 3" Film Plastic (2)
(not shown)
Clip
Back
Support
Base
ConnecT Adapter Plate
Installation of Exterior Brackets (Use optional)
Consult with the vehicle manufacturer to determine the best location for the
exterior brackets, keeping in mind the location of wires and other internal
components.
After the antenna/extender has been secured to the mount,
the assembly can be hung on the edge of a window or
on the provided exterior brackets. The exterior brackets
will enable the assembly to be hung on the exterior of the
vehicle. Complete the following steps to install the exterior
brackets on the vehicle.
Choose a location on the exterior of the vehicle for the
1.
exterior brackets. Consider possible obstructions to the
satellite line-of-sight and where cables will be run.
2.
Clean the areas where the exterior brackets will be installed on the vehicle.
Position an exterior bracket over one of the chosen locations for installation,
3.
making sure that the top of the exterior bracket is oriented upwards (see image to
right for reference). Keep in mind that the antenna assembly should be level frontto-back and side-to-side for best operation.
4.
Trace around the edge of the bracket, and mark pilot holes through the bracket.
5.
Drill the pilot holes.
6.
Apply sealant in the traced area.
Mount the exterior bracket with four of the provided mounting screws.
7.
Apply sealant over the screws.
8.
If using the second exterior bracket repeat steps 3–8.
9.
Page 3
Specifications
•
For use with the Winegard Carryout G2+ antenna
(Models GM-6000 and GM-6035), Winegard Pathway
X1 antenna (Models PA-2000, PA-2035, PA2000R,
PA2035R), or Winegard ConnecT (Models WF-4000,
WF-4035, WF-3000, WF-3035)
•
For stationary use only
•
Height (once assembled): 13.35", Width: 10.25"
•
Extends 5.75" from vehicle
•
Adjustable vertical mounting settings every 1.5"
•
Window clip swivels 90° to easily
level antenna
•
Mount weight: 2 lbs
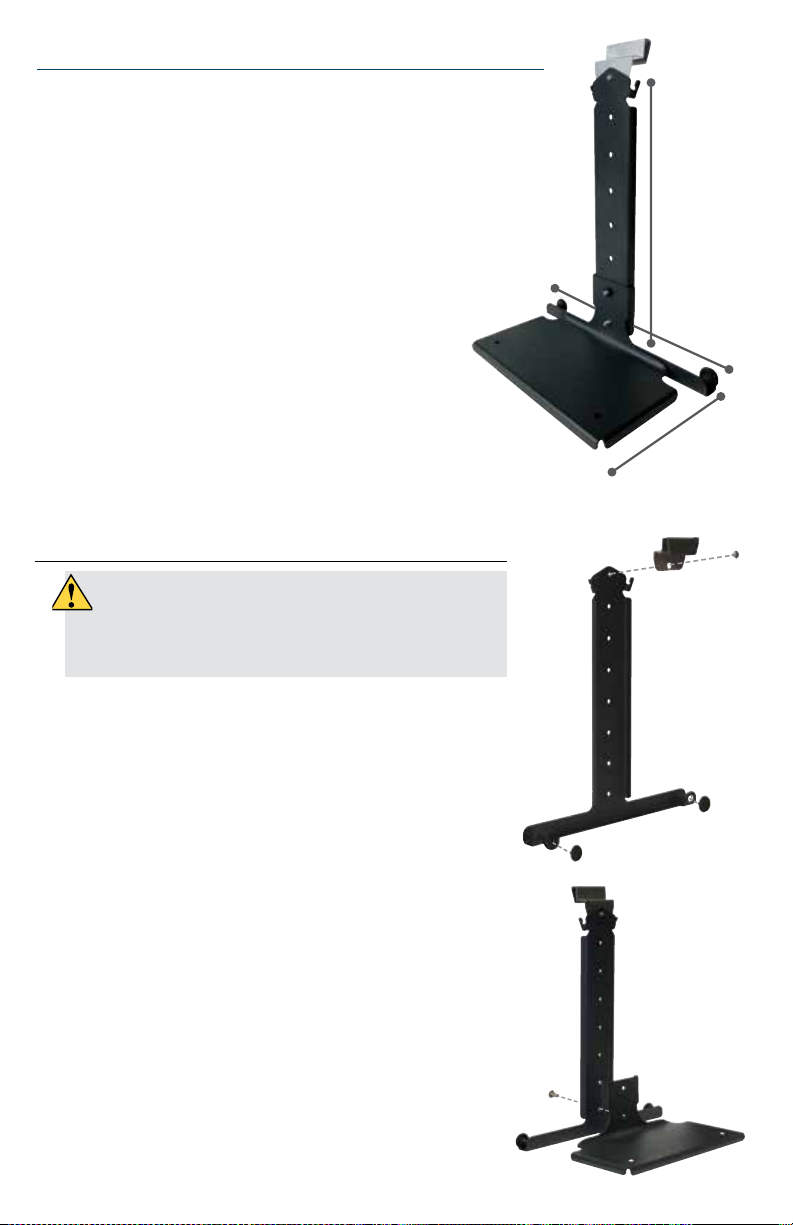
Assembling the Window Mount
13.35"
10.25"
5.75"
Failure to install in accordance with product
manufacturer’s installation and assembly
instructions could result in property damage,
personal injury, and/or death.
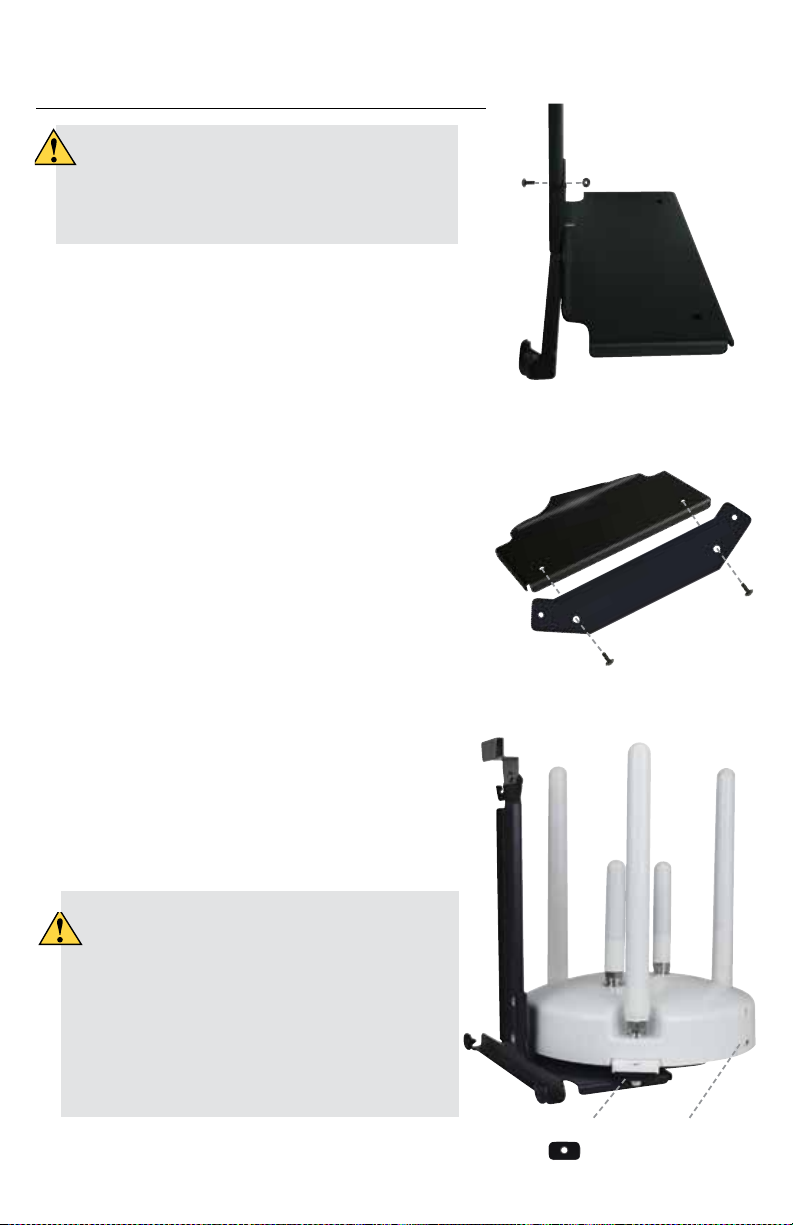
Align the hole in the clip with the press nut at the
1.
top of the the back support. The hole in the clip
should fit around the raised lip of the press nut.
Insert a 10-32 x 1/4" screw through the aligned
holes in the clip and back support, and tighten.
2.
Push the two rubber bumpers through the two
holes in the bottom of the back support. Make
sure the rubber bumpers are fully installed before
proceeding, as these will prevent the mount from
scratching the vehicle.
3.
Determine the preferred height of the window
mount base against the back support.
Align the bottom hole in the window mount base
4.
with the preferred hole in the back support. Insert
a 10-32 x 1/2" screw through the aligned holes in
the back support and base plate. Tighten.
Before proceeding to the next section, decide
5.
where cables should exit in relation to the mount.
Step 1
Step 2
Step 3
Page 4
Securing the Satellite Antenna
to the Mount
Failure to install in accordance with product
manufacturer’s installation and assembly
instructions could result in property damage,
personal injury, and/or death.
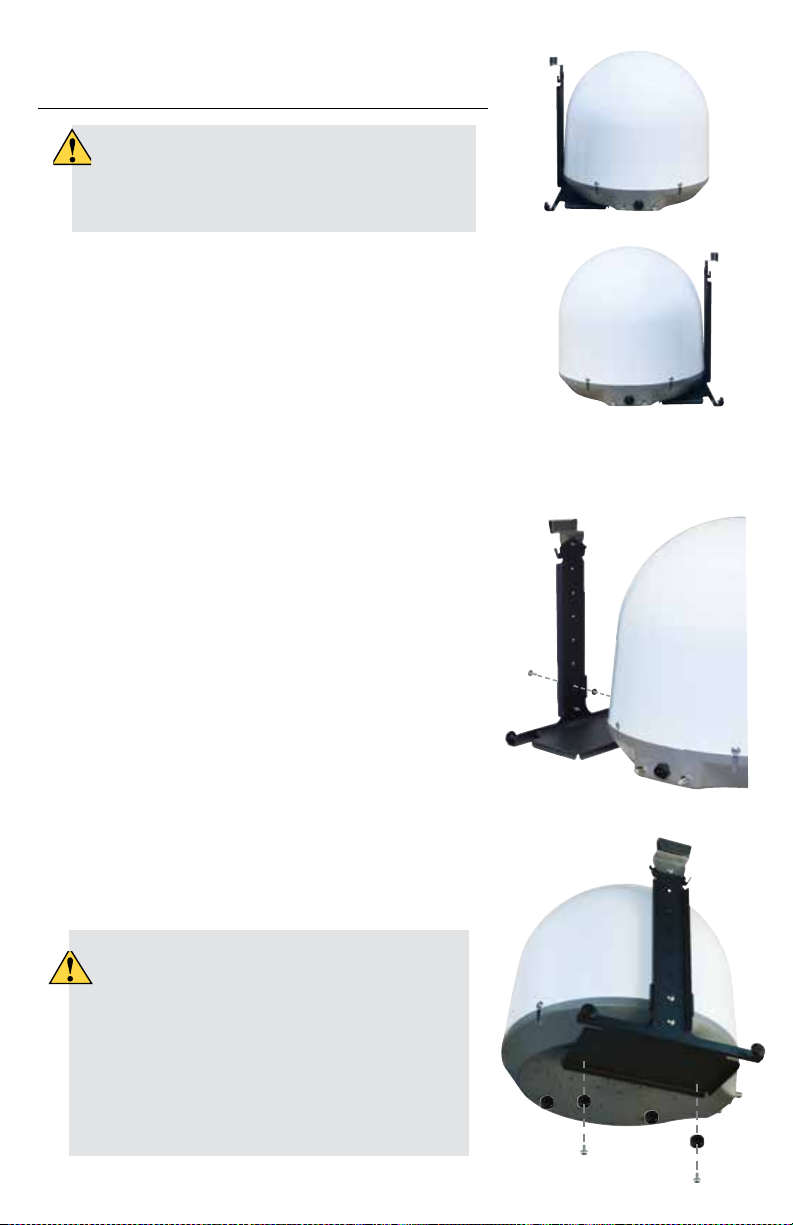
1.
Choose one of two configurations for antenna
orientation, considering the position of the cable
ports. Do not secure the antenna to the mount
assembly at this time.
Remove the two rubber feet and two foot screws
2.
that sit on the mount base from the bottom of
the antenna. Set aside until step 7.
3.
Remove the dome screw closest to the back
support with a 5/16” drive.
4.
Align the hole in the dome (where the dome
screw was removed) with the aligned holes in the
window mount base and back support.
Install the dome screw through the aligned holes
5.
in the back support and window mount base.
Configuration #1
Configuration #2
Steps 4-6
Install the rubber washer on the dome screw,
6.
and install the dome screw through the dome.
Tighten.
To complete the installation, position the flat side
7.
of the two rubber feet against the holes on the
bottom of the window mount base, and install
the two screws through the aligned holes in the
rubber feet, window mount base, and antenna
base. Tighten to 40 in*lbs.
Only hang the window mount assembly on
the window when the vehicle is parked and
the antenna is in use; store the window
mount assembly when not in use.
Model MT-SM30 window mount should only
be deployed when the vehicle is stationary.
Do not use while the vehicle is moving.
Remove prior to traveling.
Step 7
Page 5
Securing the ConnecT Extender
to the Mount
Failure to install in accordance with product
manufacturer’s installation and assembly
instructions could result in property
damage, personal injury, and/or death.
Insert the other provided 10-32 x 1/2” screw
1.
into the top hole of the base and back support.
Tighten to the matching 10-32 nylock nut.
Align the holes on the ConnecT adapter plate
2.
with the holes on the window mount base,
making sure the other 2 holes on the adapter
point back towards the back support.
3.
Insert the 1/4 – 20 x .5 screws (2) through the
adapter plate and into the window mount base.
Tighten each screw with the matching 1/4 – 20
nylock nut.
4.
Next, you will need the ConnecT extender,
(2) spacers, (2) 10-32 X 3/4” screws, and (2)
matching 10-32 nylock nuts. With the cable
entry plate of the ConnecT pointing away from
the back support, either on the left or the
right side, place a spacer between each of the
ConnecT’s feet and the ConnecT adapter plate.
Insert a 10-32 X 3/4” screw through each
foot/spacer/adapter (2) and tighten with the
matching 10-32 nylock nuts (2).
Step 1
Steps 2-3
Step 4
Back
Only hang the window mount assembly on
the window when the vehicle is parked and
the antenna is in use; store the window
mount assembly when not in use.
Model MT-SM30 window mount should only
be deployed when the vehicle is stationary.
DO NOT use while the vehicle
is moving. Remove prior to traveling.
Spacer
Cable entry
plate
Page 6

Hanging the Window Mount
Only hang the window mount assembly on an exterior bracket when the
vehicle is parked and the antenna is in use; store the window mount
assembly when not in use. Model MT-SM30 window mount should only
be deployed when the vehicle is stationary. Do not use while the vehicle is
moving. Remove prior to traveling.
Once ready to use the antenna, hang the window mount assembly on the window
or exterior bracket.
If hanging the assembly on the vehicle window, apply the plastic film where the
mount will be hung on the window, and then slide the clip over the plastic film.
The window may need to remain slightly open when the window mount is on the
window.
If hanging the assembly on the exterior bracket, make sure the sealant is dry,
and slide the clip into the exterior bracket. When placing the antenna on the
optional exterior bracket, ensure that the window mount is properly secured to
the optional exterior bracket; failure to secure properly may result in injury.
Before Traveling
Turn off all power.
1.
2.
Disconnect all cables (power and/or coax) from the Winegard product.
Carefully remove the antenna/extender and window mount from the window or
3.
exterior bracket.
4.
Store inside the vehicle while traveling.
Warnings
Do not walk under the window mount assembly when deployed.
The window mount should be carefully hung when attaching to the window, or
the window may be damaged.
Care should be taken when using the window mount in inclement weather.
When placing the antenna on the optional exterior bracket, ensure that
the window mount is properly secured to the optional exterior bracket;
failure to secure properly may result in injury.
Model MT-SM30 window mount is intended for stationary use only and
must be removed prior to traveling. Do not deploy the window mount while
the vehicle is in motion.
Page 7

WINEGARD MOBILE PRODUCTS LIMITED WARRANTY
(2 YEARS PARTS; 1 YEAR LABOR)
Winegard Company warrants this product against defects in materials or workmanship for a period of two (2) years from the
date of original purchase. During year one (1) of such warranty, Winegard Company will also pay authorized labor costs to
an authorized Winegard dealer to repair or replace defective products. No warranty claim will be honored unless at the time
the claim is made, Customer presents proof of purchase to an authorized Winegard dealer (to locate the nearest authorized
Winegard dealer, contact Winegard Company, 3000 Kirkwood Street, Burlington, Iowa 52601, Telephone 800-288-8094 or visit
www.winegard.com). Customer must provide proof of purchase with a dated sales receipt for the Winegard product to verify
the product is under warranty. If the date of purchase cannot be verified, the warranty period shall be considered to begin
thirty (30) days after the date of manufacture.
If a defect in material or workmanship is discovered, Customer may take the product to an authorized Winegard dealer
for service. Customer must provide proof of purchase to verify the product is under warranty. If the product is brought to an
authorized Winegard dealer for service prior to expiration of year one (1) of the warranty period and a defect in material or
workmanship is verified by Winegard Technical Services, Winegard Company will cover the Winegard dealer’s labor charges
for warranty service. The Winegard dealer must contact Winegard Technical Services in advance for pre-approval of the
service. Approval of the service is at the sole discretion of Winegard Company.
Alternatively, Customer may ship the product prepaid to Winegard Technical Services (located at 2736 Mt. Pleasant Street,
Burlington, Iowa 52601, Telephone 800-788-4417). Customer must return the product along with a brief description of the
problem and provide Winegard Technical Services with Customer’s name, address, and phone number. Customer must
also provide proof of purchase to verify the product is under warranty. If the product is returned before the expiration of the
warranty period, Winegard Company will (at its option) either repair or replace the product.
This Limited Warranty does not apply if the product has been damaged, deteriorates, malfunctions or fails from: improper
installation, misuse, abuse, neglect, accident, tampering, modification of the product as originally manufactured by Winegard
in any manner whatsoever, removing or defacing any serial number, usage not in accordance with product instructions or
acts of nature such as damage caused by wind, lightning, ice or corrosive environments such as salt spray and acid rain. This
Limited Warranty also does not apply if the product becomes unable to perform its' intended function in any way as a result of
the television signal provider making any changes in technology or service.
RETURN AUTHORIZATION POLICY
A Return Material Authorization (RMA) is required prior to returning any product to Winegard Company or Winegard Warranty
Services under this warranty policy. Please call our Technical Services Department at 800-788-4417 or send an email to
[email protected] to obtain the RMA number. Please furnish the date of purchase when requesting an RMA number.
Enclose the product in a prepaid package and write the RMA number in large, clear letters on the outside of the package. To
avoid confusion or misunderstanding, a shipment(s) without an RMA number(s) or an unauthorized return(s) will be refused
and returned to Customer freight collect.
WINEGARD COMPANY DOES NOT ASSUME ANY LIABILITIES FOR ANY OTHER WARRANTIES, EXPRESS OR IMPLIED,
MADE BY ANY OTHER PERSON.
ALL OTHER WARRANTIES WHETHER EXPRESS, IMPLIED OR STATUTORY INCLUDING WARRANTIES OF FITNESS FOR A
PARTICULAR PURPOSE AND MERCHANTABILITY ARE LIMITED TO THE TWO YEAR PERIOD OF THIS WARRANTY.
In states that do not allow limitations on implied warranties, or the exclusion of limitation of incidental or consequential
damages, the above limitations or exclusions do not apply.
Some states do not allow limitations on how long an implied warranty lasts, or the exclusion of limitation of incidental or
consequential damages, so the above limitations or exclusions may not apply to you.
This warranty gives Customer specific legal rights. Customer may also have other rights that may vary from state to
state.
WS-MOBWARREV3 Rev. 10/14
Page 8

www.winegard.com/trucking
For help, email [email protected] or call 1-800-788-4417
Disclaimer: Although every ef fort has been made to ensure that the information in
this manual is correct and complete, no company shall be held liable for any errors or
omissions in this manual. Information provided in this manual was accurate at time of
distribution. If the antenna and/or mount do(es) not function as expected, please contact
Winegard by emailing [email protected] or calling 1-800-788-4417.
Winegard, Carr yout, ConnecT and Pathway are registered trademarks of Winegard Co.
Winegard Company • 3000 Kirkwood Street • Burlington, IA 52601
1-800-288-8094 • Fax 319-754-0787 • www.winegard.com
Printed in U.S.A. ©2014 Winegard Company Rev2 6-18 2452336
 Loading...