

Page 1
INSTALLATION INSTRUCTIONS
®
WINEGARD
18" Digital Satellite Antenna
Truck/RV Mount
Model MM-3200 Antenna
Models MM-3084, MM-3002 & MM-3003
ANTENNA/MOUNT MADE IN U.S.A.
U.S. Patent 5,532,710
NOTE: The MM-3084 Mount Pipe and
MM-3002/3003 Clamp Brackets are not
supplied with MM-3200.
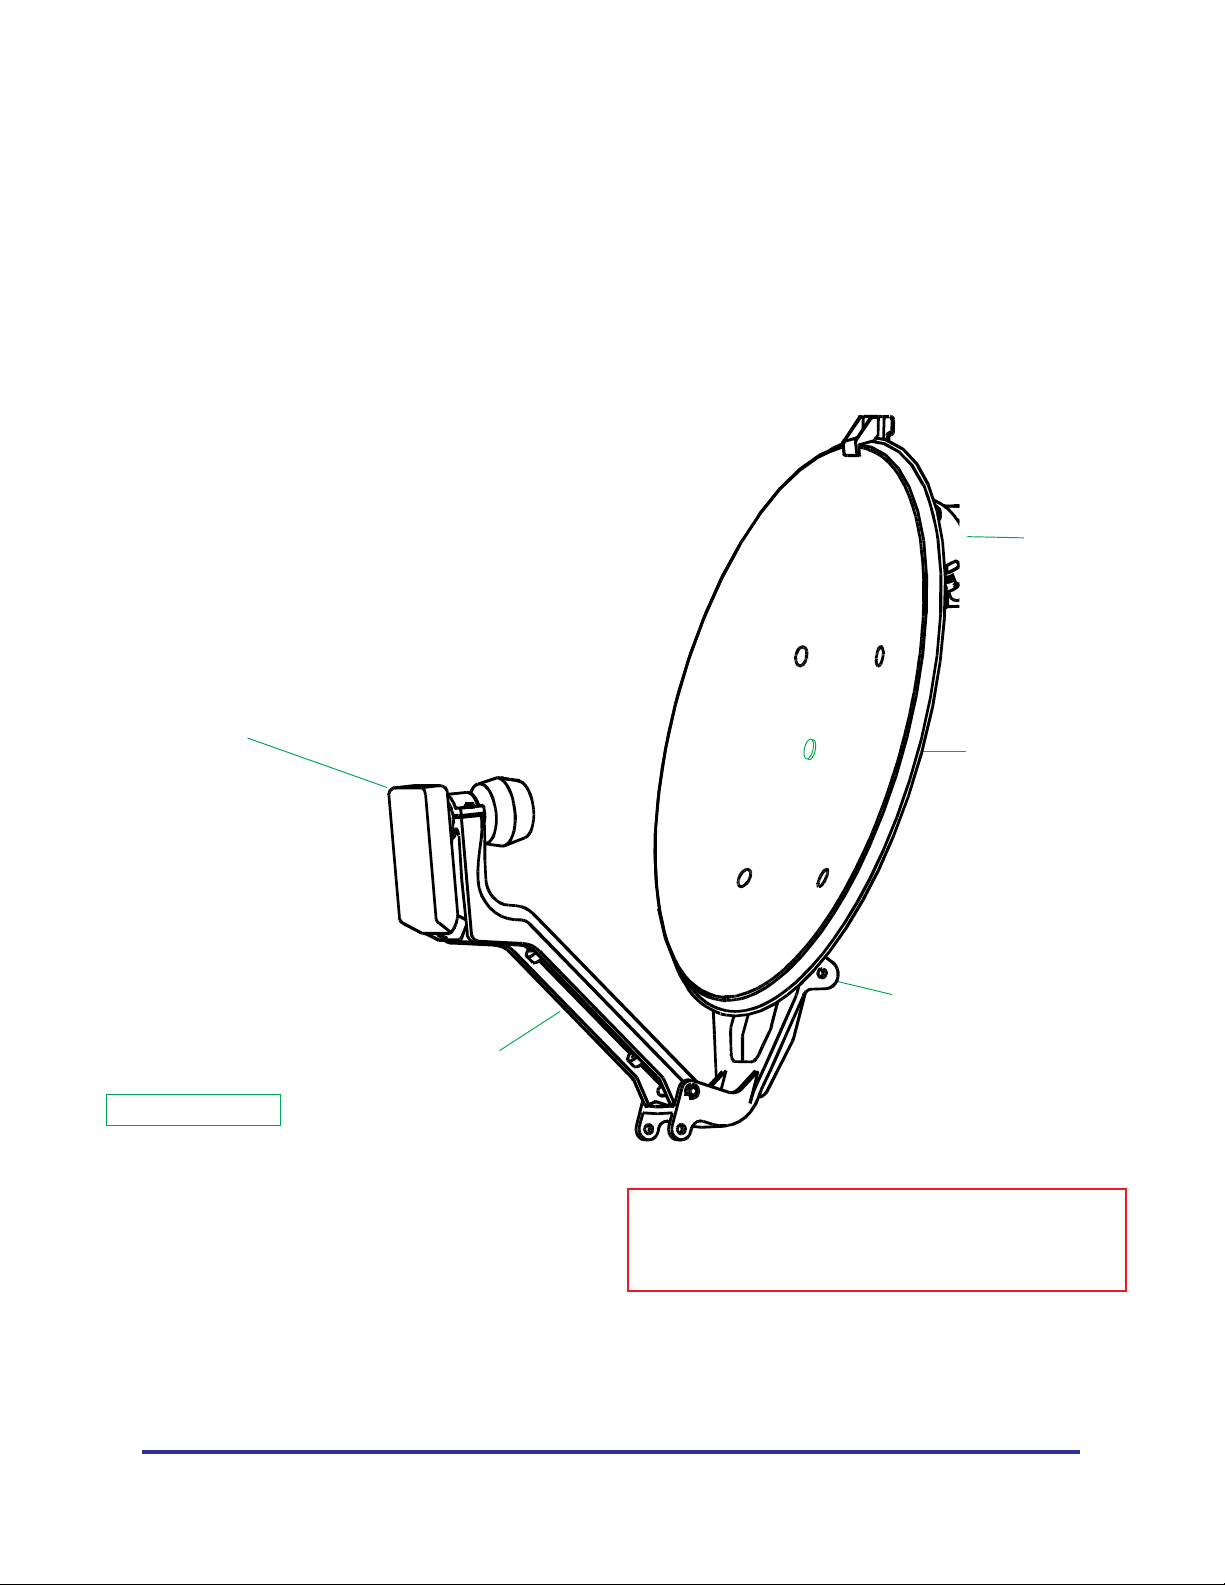
LNBF
Feed Support
Elevation
Assembly
18" Antenna
Backup Support
UNPACKING
After unpacking the system, verify that you have the
following: antenna/mount, elevation assembly, feed
support w/LNBF & coaxial cable attached, compass and
storage bag. If you do not, call Winegard Company at
1-800-288-8094 between the hours of 8:00 a.m. and
3:30 p.m central time, Monday through Friday.
Winegard Company • 3000 Kirkwood St. • Burlington, IA 52601-2000
319/754-0600 • FAX 319/754-0787
Printed in U.S.A. © Winegard Company 1999 2451160 Rev. 10/99
NOTE: Before proceeding with installation of
satellite antenna/mount, viewing enclosed
installation video is recommended.
Page 2
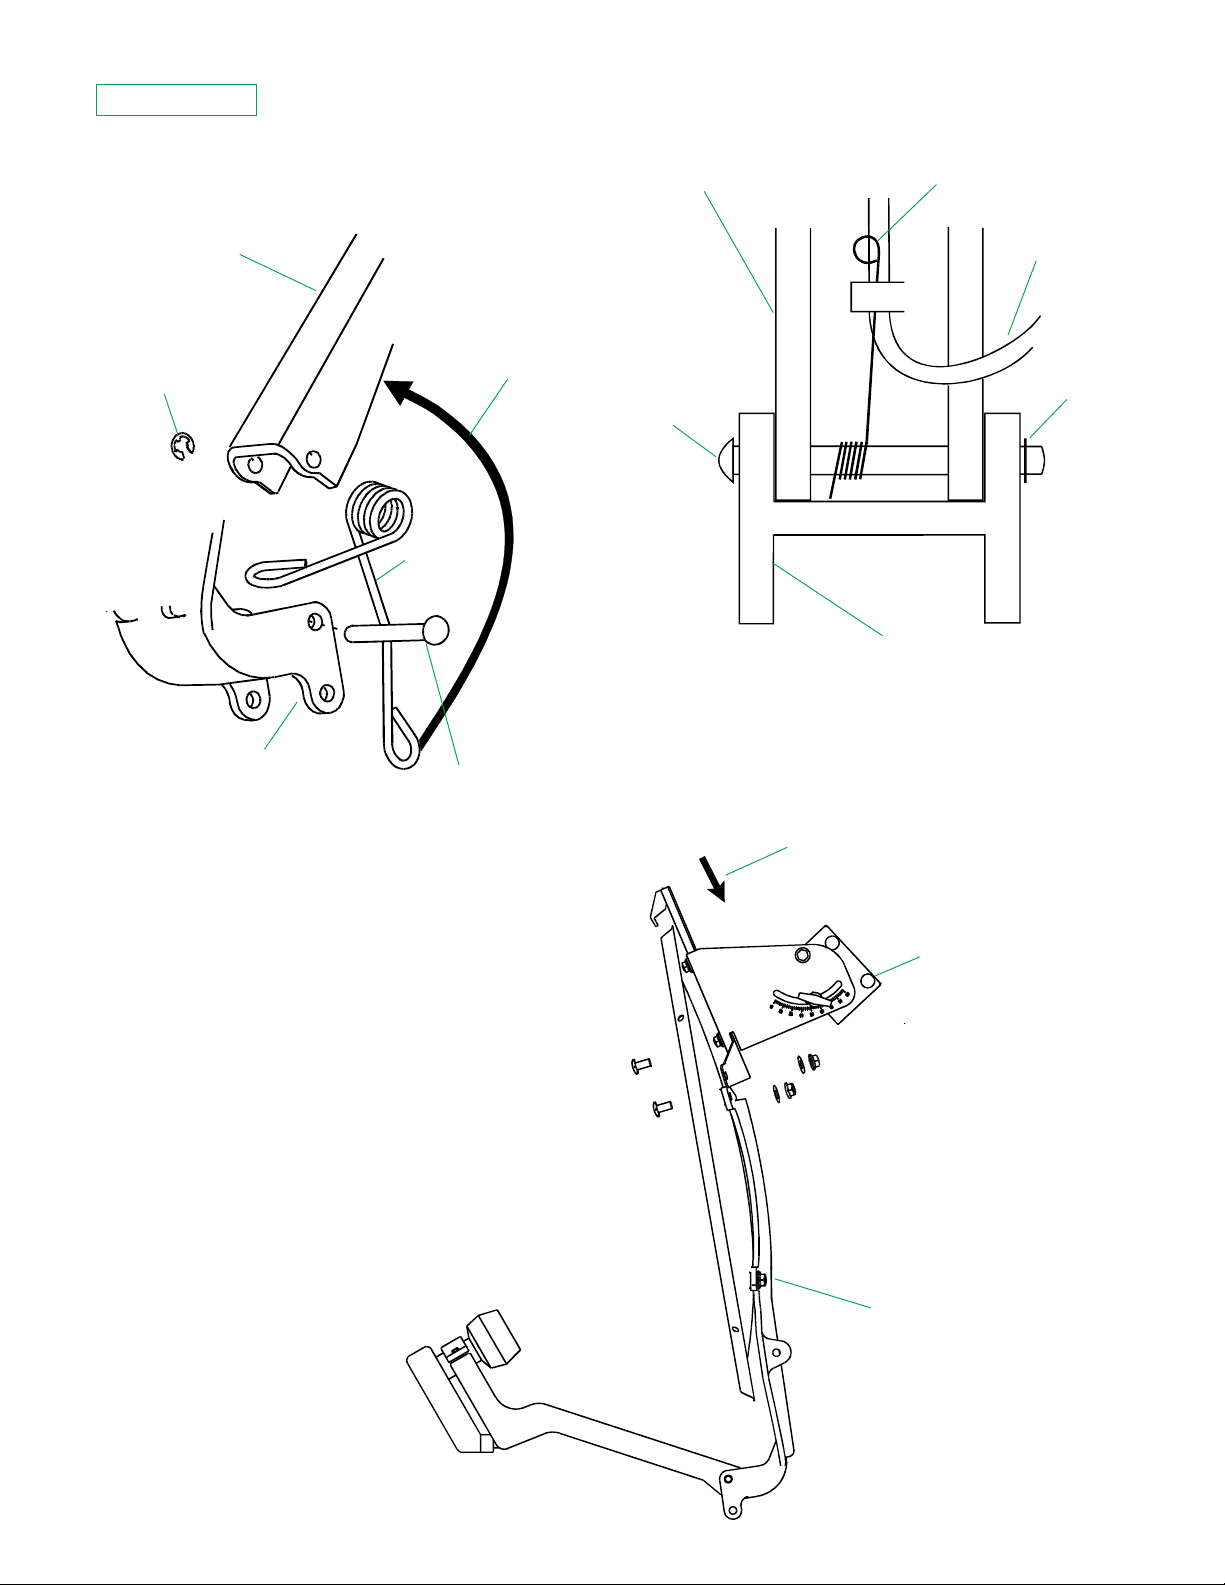
ASSEMBLY
STEP 1. Attach feed support to the backup support.
See Figures 1 & 2. Make sure spring is locked into
place.
Feed Support
E-Clip
After inserting pin,
swing long part of
spring up into the
feed support and
snap into place
under cable clip.
Spring
Feed Support
Pin
Spring
Coax Downlead
from LNBF
E-Clip
Backup Support
Backup Support
Pin
FIGURE 1
STEP 2. Remove the two top bolts from the backup
support and attach the elevation assembly to antenna.
See Figure 3. Tighten bolts securely.
FIGURE 2
Slide elevation
assembly into place
Elevation Assembly
FIGURE 3
2
Backup Support
Page 3
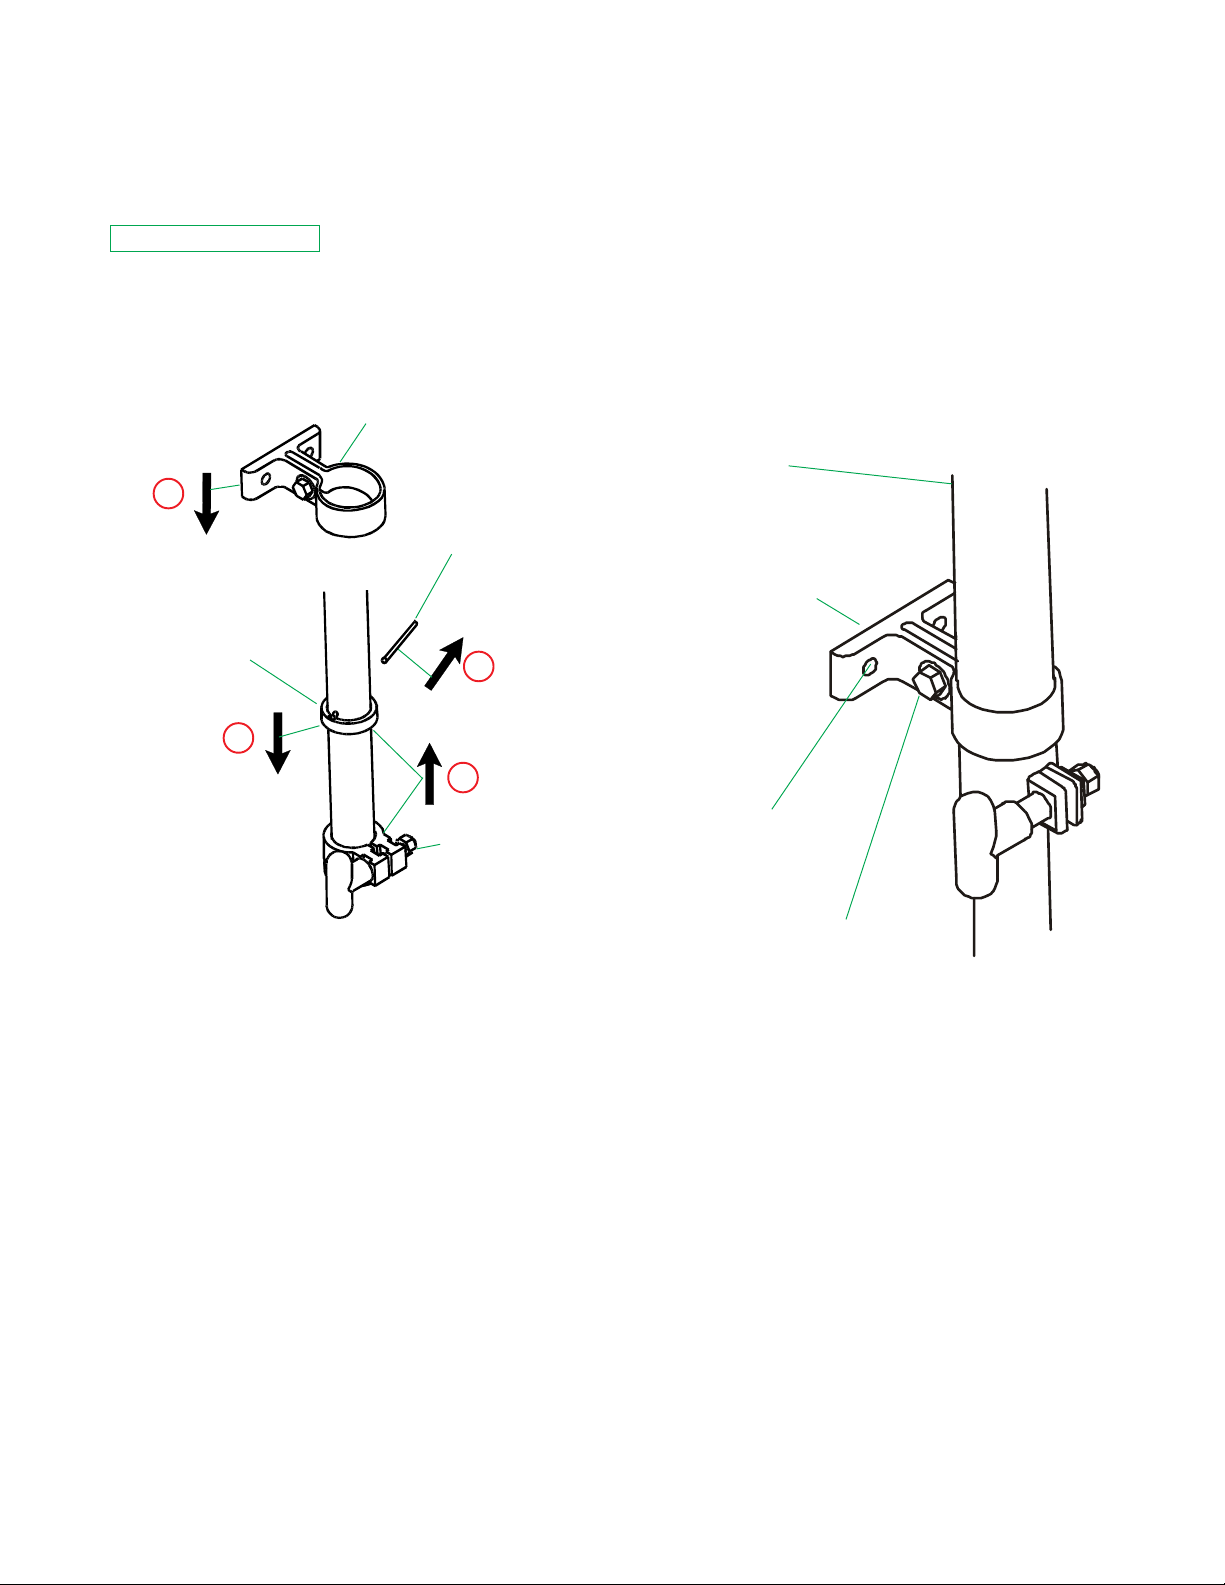
STEP 3. Attach the MM-3084 (pipe that antenna
mounts on) to your truck/RV. If using the MM-3002
clamp brackets, proceed to step 9. If using the MM3003 clamp brackets, proceed to step 4.
MM-3003 Assembly
STEP 4. Disassemble pipe per number sequence
shown in Figure 4 so that you can slide both MM-3003
brackets onto the pipe.
MM-3003
4
Pin
Stop Collar
1
2
3
STEP 7. Use (4) 5/16" x 1-1/2" bolts supplied to secure
pipe clamp brackets to side of truck/RV. See Figure 5.
Try to maintain as much separation between the
clamp brackets as possible. See Figure 7. It is
recommended that you attach the top clamp with one
bolt, then check vertical alignment before attaching
bottom clamp and finishing top.
Make sure pipe
is vertical
Try to maintain as
much separation
between the
clamp brackets
as possible.
See Figure 7,
page 4.
Elevation
FIGURE 4
STEP 5. Reassemble pipe after sliding both clamp
brackets onto pipe; make sure the stop collar snaps
firmly onto the pin.
STEP 6. Determine where you want to mount the
pipe. It is recommended that you try to bolt into
something solid on your truck/RV and someplace close
to a window so you can listen/watch your TV when
tuning the system. Make sure pipe is vertical (straight
up and down), this will make finding the satellite(s)
easier. Also make sure antenna will clear top of
truck/RV (if possible). NOTE: A second set of
clamp brackets and pipe is recommended for other
side of truck. Winegard Company cannot recommend
specific mounting locations because of the many truck/
RV styles.
Clamp
Use (2) 5/16" x 1-1/2"
bolts supplied per
clamp
Tighten bolt to prevent
pipe from moving
FIGURE 5
STEP 8. Tighten clamp bracket bolts to prevent pipe
from moving, See Figure 5. You are now ready to aim
the antenna; proceed to Operation, page 5.
Rev. 5/99
3
Page 4

MM-3002 Assembly
STEP 9. Slip the small plastic shims over the handrail/
ladder and the large plastic shims over the MM-3084
pipe. See Figure 6.
Slip plastic clamp
grips over pipes as
shown (if using using
rubber shims, place
between clamp
brackets and pipes).
NOTE: If MM-3002 comes with eight (8) rubber
shims instead of the 4 plastic clamp grips. Insert
rubber shims between clamp brackets and MM3001 pipie and handrail/ladder. See Figure 6.
STEP 10. Attach clamp brackets to pipe and handrail/
ladder using carriage bolts, nuts and washers supplied
with MM-3002. Do not crush handrail/ladder. Try to
maintain as much separation between the clamp brackets
as possible. See Figure 7. Make sure pipe is vertical
(straight up and down). Your now ready to aim the
antenna; proceed to Operation, page 5.
(4) 5/16-18
Hex Nuts
FIGURE 6
(4) 5/16-18 x 1-3/4"
Carriage Bolts
Handrail/Ladder
MM-3084 Pipe with
MM-3002 Clamp Brackets
(4) 5/16"
Washers
Try to maintain
maximum separation
between clamps
MM-3084 Pipe with
MM-3003 Clamp Brackets
Rev. 5/99
4
FIGURE 7
Page 5

OPERATION
STEP 1. Set antenna onto pipe. See Figure 8. Make
sure elevation clamp fits into keyway on pipe. The
antenna can be secured in place using a small
padlock to prevent theft.
Elevation Clamp
Aim antenna in
direction of satellite
STEP 2. Connect coax from LNBF to receiver. Optional
Winegard exterior cable/TV receptacle (WA-1024)
available for easy coax connection into cab.
STEP 3. Connect coax from receiver to TV.
STEP 4. Plug in the receiver and TV.
STEP 5. Turn TV and receiver ON.
STEP 6. Tune TV to ch. 3 or 4 (output from receiver).
STEP 7. Determine azimuth (compass heading) and
elevation required for your position. Refer to Quick
Reference Guide or receiver manual.
STEP 8. Loosen elevation clamp knobs. Set antenna
elevation to correct elevation. Align degree of elevation
required with pointer washer at the clamp knob. See
Figure 9. Tighten clamp
knobs.
Attach
padlock here
Pipe Elevation
Clamp
Elevation Clamp
Knob
Pointer
Pointer shown
FIGURE 9
STEP 9. Using the compass provided, determine which
direction (azimuth) you need to aim antenna. See
Figure 10.
Red part of needle
indicates North.
at 56o of elevation
Azimuth
Clamp
Raise pipe until
antenna has a
clear line of site
to the satellite
Rotate pipe
slowly to the
correct azimuth
FIGURE 8
IMPORTANT
NOTE: Stand away from your truck/RV (15' min.) to
find the correct azimuth. The metal in your truck/RV
can give you an incorrect reading.
FIGURE 10
STEP 10.Raise the antenna so that it has clear view of
the satellite, tighten the pipe elevation clamp. See
Figure 8. This keeps pipe from sliding down.
5
Page 6

NOTE: The most common problem people
experience is moving the antenna too fast. You
must move the antenna
VERY
slowly so that the
receiver can acquire and process the digital signal.
This takes a few seconds so be patient. After the
first couple of times of setting up the system you
will get the knack of acquiring the signal quickly.
STEP 11. Slowly rotate the antenna 2o then wait 2
seconds, then rotate again in the direction of the satellite.
The signal is digital, so it takes the receiver a few
seconds to process the signal. It is very important
that you move the antenna
very slowly
.
STEP 12. Adjust azimuth (direction) for best picture
then tighten azimuth clamp to keep pipe from rotating.
See Figure 6.
STEP 13. Contact your receiver's programmer to order
programming. Remember, until you activate a
programming service, you will only receive preview
channels.
NOTE: If you do not get a picture, check the following:
1. Make sure antenna has a clear view of the high
power satellites; no buildings, trees, etc.
blocking the view.
2. Make sure coax connections are good.
3. Check coax for breaks, crimps, cuts etc.
4. If pipe is not vertical (vehicle is not level), you
will have to adjust the elevation to compensate.
5. Make sure TV is tuned to correct channel.
6. Verify that you have the correct elevation and
azimuth.
If you still do not get a picture, lower the elevation
angle 2° and repeat steps 8 through 10. If this is not
successful, raise the elevation angle 4° and repeat
steps 8 through 10. If you still do not get a picture,
contact Winegard Service Dept.
CAUTION: DO NOT DROP ANTENNA. IF ANTENNA
IS DAMAGED, IT WILL REDUCE THE GAIN (HOW
MUCH SIGNAL THE ANTENNA SENDS TO THE
RECEIVER) OF THE ANTENNA. THIS CAN RESULT
IN A LOSS OF SIGNAL. DO NOT DAMAGE LNBF.
TWO YEAR LIMITED WARRANTY
Winegard Company warrants this Winegard product
(excluding receiver) against any defects in materials or
workmanship within two (2) year from date of purchase.
No warranty claim will be honored unless at the time
the claim is made, you present proof of purchase to an
authorized Winegard dealer (if unknown, please contact
Winegard Company, 3000 Kirkwood Street, Burlington,
Iowa 52601-2000, telephone 319-754-0600).
Winegard Company (at its option) will either repair or
replace the defective product at no charge to you. This
warranty covers parts, but does not cover any costs
incurred in removal, shipping or reinstallation of the
product. This limited warranty does not apply if the
product is damaged, deteriorates, malfunctions or fails
from: misuse, improper installation, abuse, neglect,
accident, tampering, modification of the product as
originally manufactured by Winegard, usage not in
accordance with product instructions or acts of nature
such as damage caused by wind, lightning, ice or
corrosive environments such as salt spray and acid
rain.
The Two Year Warranty is provided on the condition
that the equipment is properly delivered with all handling
and freight charges prepaid to your Winegard dealer
for repair or return to our factory at the above address.
Winegard dealers will arrange for the replacement or
repair and return to you, without charge, the product
which failed due to defective material or workmanship.
WINEGARD COMPANY WILL NOT ASSUME ANY
LIABILITIES FOR ANY OTHER WARRANTIES,
EXPRESS OR IMPLIED, MADE BY ANY OTHER
PERSON.
ALL OTHER WARRANTIES WHETHER EXPRESS,
IMPLIED OR STATUTORY INCLUDING
WARRANTIES OF FITNESS FOR A PARTICULAR
PURPOSE AND MERCHANTABILITY ARE LIMITED
TO THE ONE YEAR PERIOD OF THIS WRITTEN
WARRANTY.
The foregoing shall be the sole and exclusive remedy
of any person whether in contract, tort or otherwise,
and Winegard shall not be liable for incidental or
consequential damage or commercial loss, or from any
other loss or damage except as set forth above.
Some states do not allow limitations on how long an
implied warranty lasts, or the exclusion of limitation of
incidental or consequential damages, so the above
limitations or exclusions may not apply to you.
This warranty gives you specific legal rights and you
may also have other rights which vary from state to
state.
Rev. 10/99
6
Page 7

EXPLODED PARTS VIEW
2745342
Clamp
Bracket
(2) 2200089
Knob
2160218
10-32 Keps
Hex Nut
1140302
#10 Flat Washer
(4) 2160334
1/4-20 x 1/2"
Carriage Bolt
(2) 3200377
Clamp Bushing
(2) 2160352
1/4-20 x 1"
Carriage Bolt
(2) 3140306
Pointer Washer
(6) 2160024
1/4 Flat Washer
(4) 2160228
1/4-20 Hex Nut
2160331
1/4-20 x 2-1/2"
Bolt
2745876
Elevation Frame
Bracket
2160220
1/4-20 Nylock
Hex Nut
2745875
Elevation Support
Bracket
3200378
Top Clamp
2160172
10-32 x 1/2" Screw
2745260
46 cm Reflector
(4) 2160361
5/16-18 x 5/8"
Flat Head Bolt
2240019
Rubber bumper
(2) 2160130
#4 x 1/2 Screw
3721504
Feed Clamp
2200904
46 cm Feed
Support Arm
Rev. 2/2001
(4) 2160027
5/16" Washer
(4) 2160230
5/16-18 Hex Nut
2200921
Reflector Bracket
2160696
E-Clip
2160821
Torsion Spring
2780193
LNBF
2160691
Pin
2753024
15' Coax
W/Weather Boot
7
Page 8

EXPLODED PARTS VIEW
If you require a replacement part, call Winegard
Company at 1-800-288-8094 between the hours of
8:00 a.m. and 3:30 p.m central time, Monday through
Friday. Credit card orders only.
3200375
Stop Ring
3200376
Elevation Lock
(2) 2160027
5/16" Flat Washer
(2) 2200088
T-Handle
2160835
Pin
3710290
Rotate Tube
(2) 2160289
5/16-18 Nylock
Hex Nut
(2) 2160286
5/16-18 Square Nut
3200374
Rotate Bushing
(must be assembled onto
fixed tube before rotate
tube is inserted)
3200372
Elevation Clamp Bushing
(must be assembled onto
fixed tube w/2200373
before rotate tube is
inserted)
3710285
Fixed Tube
3200373
Elevation Clamp Bushing
(must be assembled onto
fixed tube w/2200372
before rotate tube is
inserted)
2200175
Plug
8
Printed in U.S.A. © Winegard Company 1999 2451160 Rev. 2/2001
 Loading...