

Wine Cell'R WC18FGBK Instruction Manual
13
SINGLE ZONE CELLAR
WC18FGBK
INSTRUCTION MANUAL
This manual contains important information including
safety and
installation instructions
of the appliances. Please read it carefully
before use and follow al safety information & instructions.
It is recommended to keep this manual for easy reference so that
you can be familiar with the operation of the appliance.

14
--CONTENTS--
IMPORTANT SAFETY INFORMATION .................................................................. 15
STRUCTURE AND INSTALLATION ...................................................................... 16
ACCESSORY INSTALLATION BEFORE OPERATING ........................................ 16
UNPACKING AND CLEANING THE WINE COOLER ........................................... 16
OPERATING THE WINE COOLER ........................................................................ 17
WORKING CLIMATE .............................................................................................. 17
WINE STORAGE .................................................................................................... 17
CONTROL PANEL ................................................................................................ 18
POWER ON/OFF CONTROL .................................................................................. 18
UNLOCKING THE CONTROL PANEL ................................................................... 18
INTERIOR LIGHTING ON/OFF CONTROL ............................................................ 18
TEMPERATURE DISPLAY WINDOW .................................................................... 19
TEMPERATURE SETTING ..................................................................................... 19
SELECTING FAHRENHEIT(ºF) & CELSIUS (ºC) DISPLAY .................................. 19
CARE AND MAINTENANCE .................................................................................. 19
CLEANING THE WINE COOLER ........................................................................... 19
POWER FAILURE .................................................................................................. 20
MOVING THE WINE COOLER ............................................................................... 20
ENERGY SAVING TIPS .......................................................................................... 20
REVERSE THE DOOR SWING .............................................................................. 20
TROUBLE SHOOTING ........................................................................................... 22
WARRANTY REGISTRATION CARD .................................................................... 24

15
IMPORTANT SAFETY INFORMATION
Before using the appliance, please properly position and install it as described in this
manual. To avoid the risk of fire, electrical shock, or injury when using the appliance,
follow these basic precautions:
•
The appliance is intended to be used exclusively for the storage of wine.
•
Make sure the voltage/current marked on the rating label corresponds with your
supply voltage. Plug into a grounded 3-pin outlet, do not remove grounding pin, do
not use an adapter, and do not use an extension cord.
•
It is recommended that a separate circuit, serving only your appliance be
provided.
•
Never clean the appliance parts with flammable fluids which may create a fire
hazard or explosion. And do not store or use gasoline or other flammable vapors
and liquids in the vicinity of the appliance.
•
Do not connect or disconnect the electric plug when your hands are wet.
•
Unplug the appliance or disconnect power before cleaning, maintenance or
servicing. Failure to do so can result in electrical shock or death.
•
Do not attempt to repair or replace any part of the appliance unless it is specifically
recommended in this manual. All other servicing should be referred to a qualified
technician.
•
Ensure enough peoples to move and install the appliance to avoid any damage to
the appliance or injury to the peoples.
•
To ensure proper ventilation for the appliance, the front of the unit must be
completely unobstructed. Locate the unit away from direct sunlight and sources of
heat (stove, heater, radiator, etc.).
•
The fuse (or circuit breaker) size should be 15 amps or higher.
•
It is important for the appliance to be leveled in order to work properly. You may
adjust the appliance’s feet to level it.
•
This appliance intended for use by persons with sufficient experience and
knowledge of electrical appliances. Any other persons (including children) should
be supervised or given instruction concerning use of the appliance by a person
responsible for their safety.
•
Children should be supervised to ensure that they do not play with the appliance.
•
Do not use solvent-based cleaning agents of abrasives on the interior. These
cleaners may damage or discolor the interior.
•
Do not use this appliance for other than its intended purpose.
•
The use of attachments not recommended by the manufacturer may be
hazardous.
•
When you dispose the appliance, take off the door and leave the shelves in place
so that children may not easily climb inside. And make sure the coolant circuit,
particularly the heat exchanger at the back/bottom of the unit is not be damaged.
The symbol on the product or its packaging indicates that this product is not to
be handled as normal household waste and it is to be taken to a recycling
collection point for electrical and electronic goods.
16
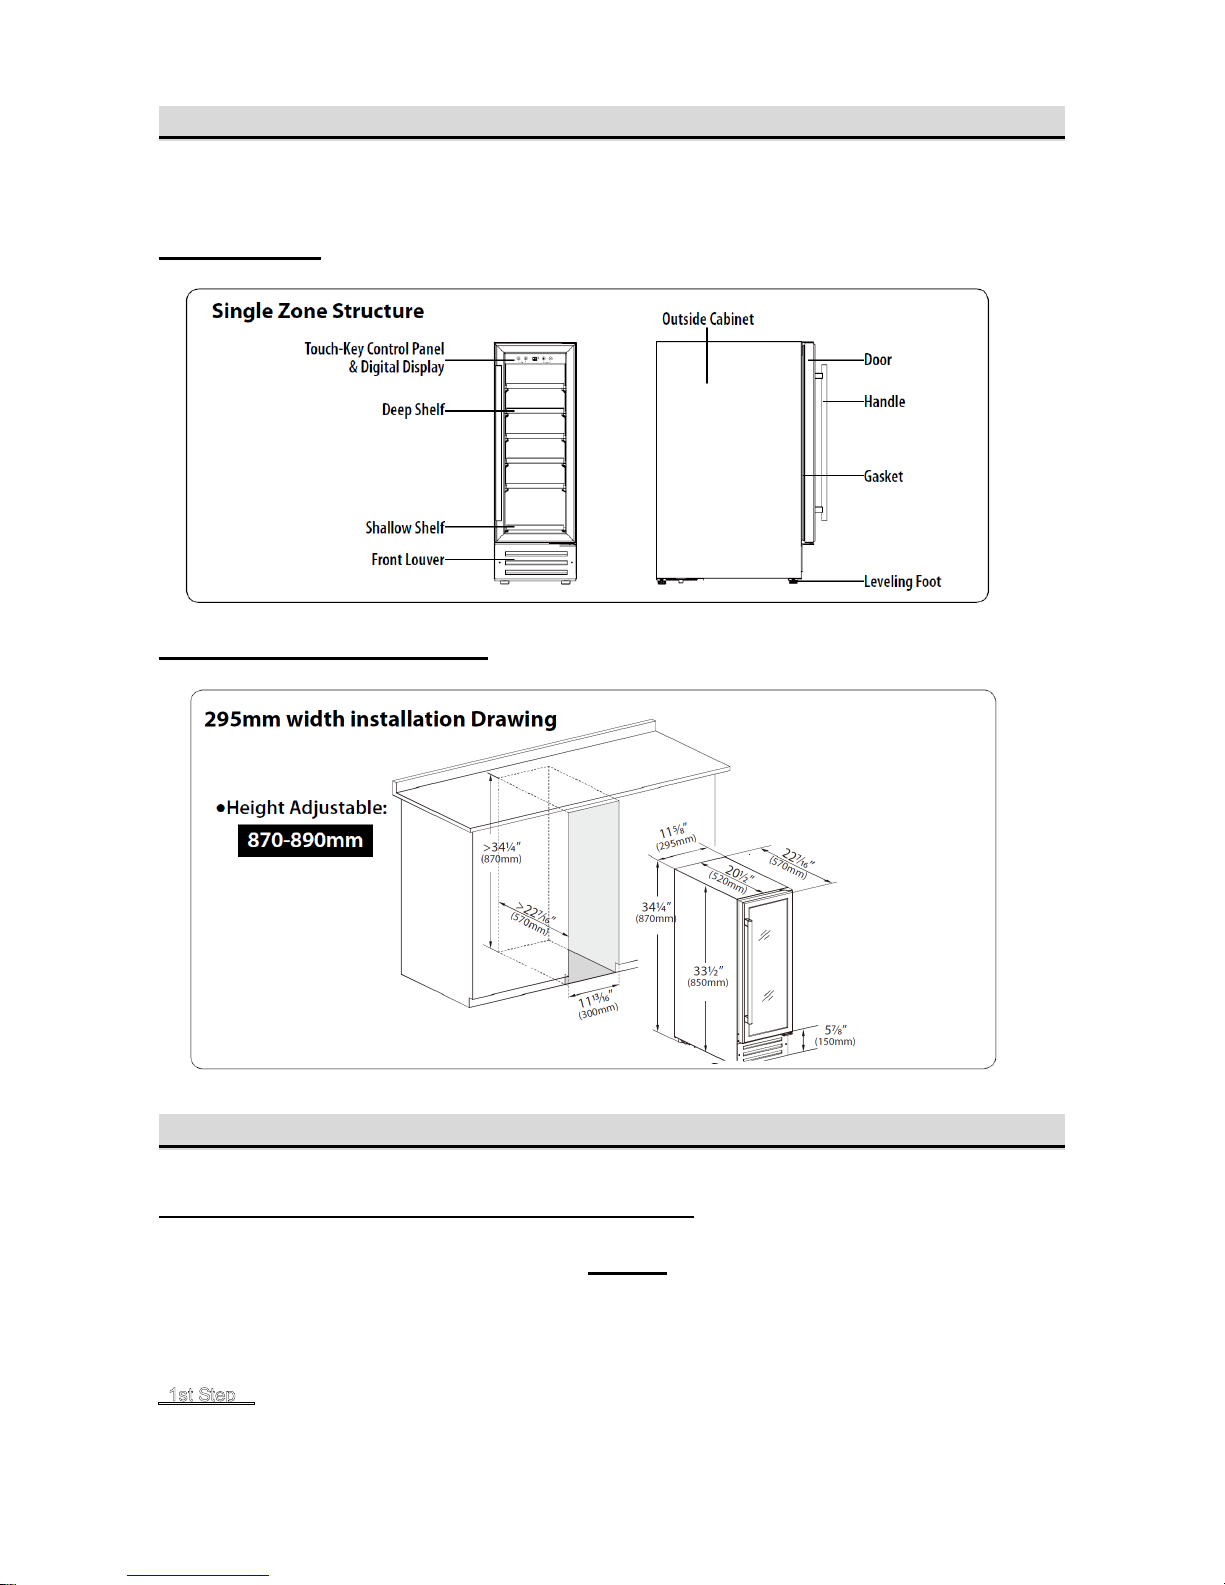
STRUCTURE AND INSTALLATION
The following pictures only show the structure of the appliance. The dimension and shelf
quantity may differ among the models of the same series.
STRUCTURE
INSTALLATION DRAWING
ACCESSORY INSTALLATION BEFORE OPERATING
UNPACKING AND CLEANING THE WINE COOLER
•
Remove the exterior and interior packing materials.
•
Let the appliance stand upright for approximately
24 hours
before connecting it to the power source, which
helps to reduce the possibility of a cooling-system malfunction from handling during transportation.
•
Use a soft cloth to clean the interior surface with water.
•
Install the door handle provided with the appliance by following these steps:
- Remove the gasket on the internal
Door to expose the two screw holes
.
 Loading...