

Page 1
QUARX2
manual
Page 2

Page 3
3
Windtech
w w w . w i n d t e c h . e s
QUARX 2
23-25-27-29
flight manual
Page 4

4
> index
> congratulations –––––––––––––––––––––––––––––– 05
> warning & liability ––––––––––––––––––––––––––– 06
> construction & materials –––––––––––––––––––––– 06
> certification ––––––––––––––––––––––––––––––––– 07
> best glide ––––––––––––––––––––––––––––––––––– 07
> flight –––––––––––––––––––––––––––––––––––––– 08
--launch –––––––––––––––––––––––––––––––––––––– 08
--strong wind ––––––––––––––––––––––––––––––––––– 08
> thermal flying ––––––––––––––––––––––––––––––– 09
> flying in turbulence –––––––––––––––––––––––––– 09
--asymmetric tuck ––––––––––––––––––––––––––––––– 10
--frontal tuck ––––––––––––––––––––––––––––––––––– 10
--asymmetric stall (spin) –––––––––––––––––––––––––––– 11
--landing –––––––––––––––––––––––––––––––––––––– 11
> weather to fly ––––––––––––––––––––––––––––––– 12
> emergency procedures & quick descent techniques – 12
--big ears –––––––––––––––––––––––––––––––––––––– 12
--spiral drive ––––––––––––––––––––––––––––––––––– 12
--b stall ––––––––––––––––––––––––––––––––––––––– 13
> maintenance –––––––––––––––––––––––––––––––– 14
> warranty ––––––––––––––––––––––––––––––––––– 14
> technical specifications–––––––––––––––––––––––––15
> line measurements ––––––––––––––––––––––––––––16
> flight log ––––––––––––––––––––––––––––––––––– 22
Page 5
5
> congratulations
Congratulations on the purchase of your new paraglider
The QUARX 2 is a very versatile wing and has been designed for all types of recreational flying, from long cross country and competition flying, to relaxing smooth evening and
morning soaring flights.
We strongly recommend that before you even unfold the QUARX 2 you read this
manual carefully in order to be aware of any general limitations, performance characteristics, take off and flight characteristics, landing procedures, dealing with emergency
situations and general maintenance.
We appreciate your feedback, so please send us your comments, positive or negative, in
regard to the
Windtech
range.
You are the best feedback and support for future products, and please remember that we
are always happy to give you any help & advice.
best winds
>
Windtech
team
Page 6
6
> warning & liability
This manual has been created to give the pilot help and hints to help with the correct operation of this wing. By no means is this a substitute of a training course, or appropriate
experience gained with years and hours of airtime, nor is this manual intended to give
pilot´s knowledge regarding flight safety.
Windtech
assumes that the purchasing pilot has the appropriate pilot's licence, has
taken a training course, and has the suitable ability and enough experience to safely fly
the QUARX 2.
This manual cannot be used for operational purposes. The flight log & registration card
must be filled and stamped by the dealer & returned to
Windtech
in order to claim on
the guarantee.
The use of this paraglider is entirely at the user's own risk. As with any adventure sport
paragliding is a high risk activity-especially without taking the appropriate precautions therefore it must be absolutely understood that
Windtech
& the dealer do not accept
any responsibility for accidents, losses, injuries, direct or indirect damage following the
use or misuse of this product.
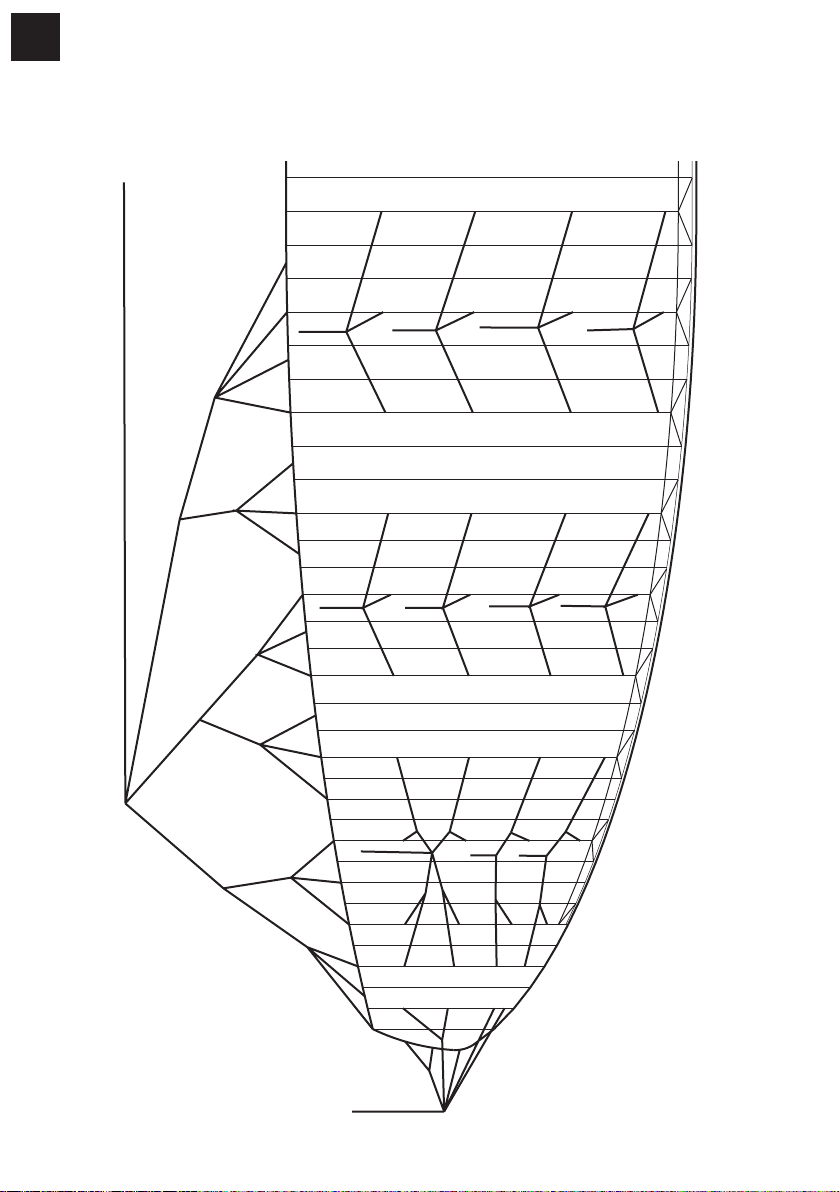
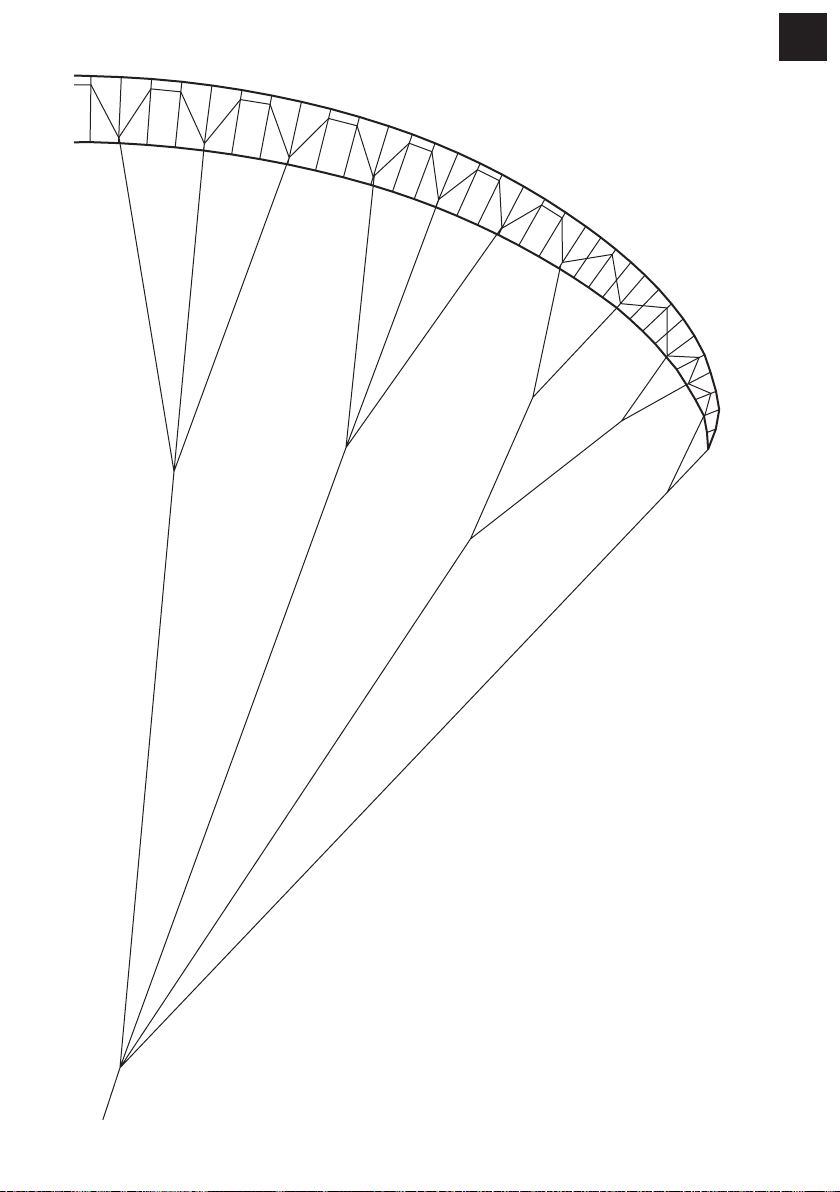
> desing materials
The QUARX 2 is a DHV 2 glider
that offers total security, along with
beautiful handling & incredible performance. The performance is very
high due to a well-defined structure
with 67 cells, with an internal structure comprised of diagonals of different types, depending on the width
of the cell and an optimized line
layout to reduce the overall number
of lines.
-cloth
The upper and lower panels are made with 44 gr. Porcher Marine Skytex nylon. The ribs
are made with stronger (slighly heavier grade) nylon of to prevent aerofoil deformation,
even after several years of intensive use. Rib (cell wall) reinforcements are made of Dacron
180 gr. Line attachment points are made of polyester.
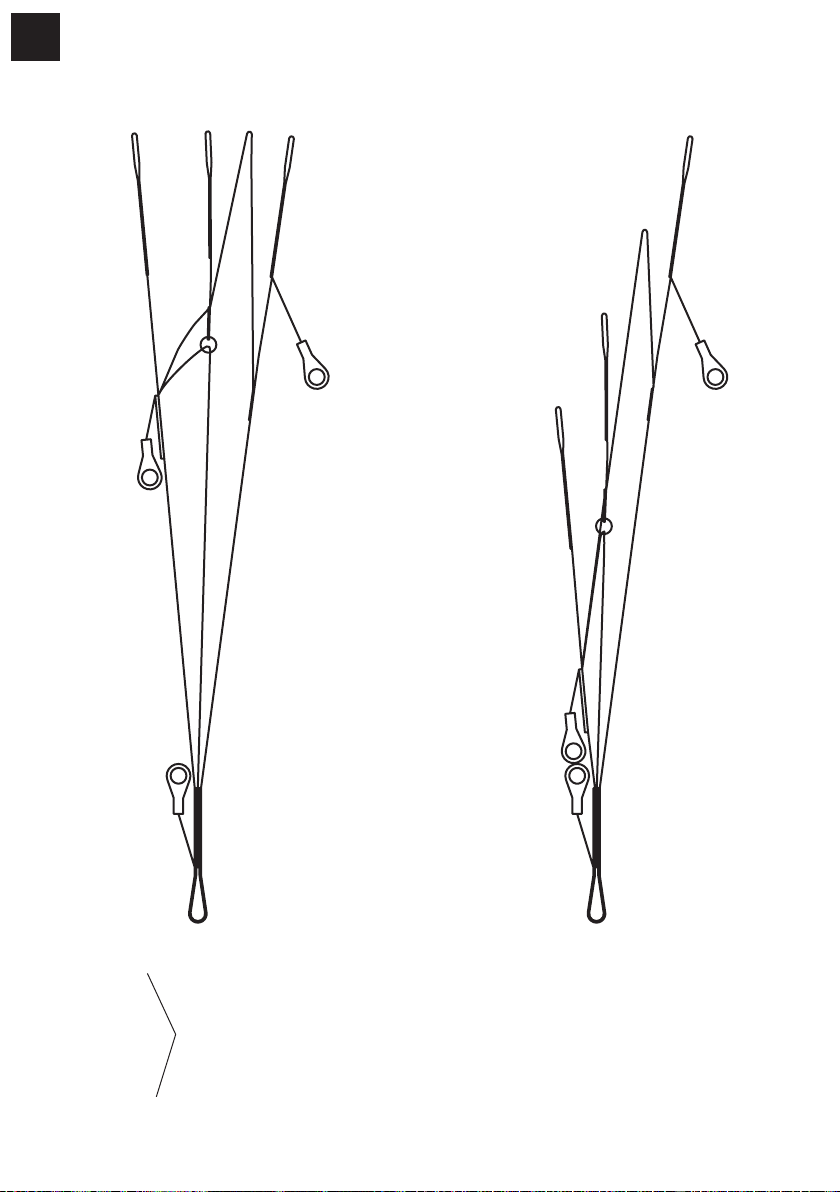
--lines
The lines are made of Superaramid kevlar covered with a polyester sheath for protection
against wear, UV and abrasion. The lower section of the brake lines is made from
Dyneema. This material is less prone to failure after repeated use through the brake
Page 7
7
pulleys. The riser karabiners, also called "Maillons Rapide", are made with stainless steel
of 800 Dan. Risers are made of pre-stretched polyester of 900 Dan.
> certification
The QUARX 2 is a paraglider of a intermediate level that has passed the tests of the
DHV level 2 with great success. This glider has successfully passed the DHV shock test
with a weight equal to the maximum total (all up) take-off weight. This means that the
paraglider is certified to resist to a load of 8 (eight) times the gravitational acceleration
(8 G´s).
As regards the weight range of the glider, ALWAYS be certain that you are within the
correct weight range of the glider. To fly under-weight or over-weight can adversely
affect the stability of the QUARX 2 & flown as such it will no longer be a certified glider.
> best glide & the speed system
Best glide in nil wind, and still air, is obtained at “trim” speed- that is brakes fully released and no accelerator (speed bar) applied. It is always best to fly with a light pressure
on the brakes, keeping a “feel” on the wing in case of unexpected turbulence.
When flying into (against the) wind a better glide can be obtained by using the speed
system. The following is rough guide line as to
how much speed system to apply:
-With around 10 km/h of head wind, best glide
is obtained with 25% accelerator applied.
-With around 15-25 km/h of head wind, best
glide is obtained with 50% accelerator applied.
-With around +25 km/h of head wind, best
glide is obtained with 75-100% accelerator
applied.
When flying downwind (wind from behind ) the
best glide is obtained between 0% brake and
10% of brake.
The QUARX 2 is a DHV
2 accelerated but
using the accelerator system close to the
ground is not advisable & it should be released
as soon as turbulent air is encountered.
Note that the glide angle is not affected by the
wing loading, but that the security is.
Always fly a glider that is the correct size for
Page 8
8
you, and remember that if your flying weight is below the stated minimum, the speed
range will diminish and inflation problems may appear. Also the handling will degrade in
turbulent conditions, and it will be easier to sustain collapses. If your flying weight is
above the stipulated weight range, this will result in a higher minimum speed and faster
landing speed and the stall speed of the glider will also be higher.
The QUARX 2 has a brake of medium weight resistance (from 1.5 to 3 kg of force) for
the majority of manoeuvres. To reach the stall (never recommended on any type of paraglider), requires more than 9kg.
> flight
Each and every glider has a checklist note passed though our strict quality control in the
factory. This included line measurement, ground inflation and flight testing. Contact your
distributor for more information about this, and if your glider has not been pre-inflated
ask him to do so for you. Every glider should be test flow before it is sold.
Note that each glider has a unique sticker attached to the centre airfoil with the serial
number, type of glider, size and weight range.
We recommend that your first flight on your new glider be on a gentle slope in calm con-
ditions before making your any
further higher flights, just to
check the glider and for you to
get used to flying it. We also
recommended that you use a
harness that has an ABS cross
strap system and the maximum
width possible for the chest strap
is 38 cm between karabiners.
For you own safety, we strongly
recommend the use of back protection, helmet and Wind-SOS
reserve.
>launch
Choose an open space free of any
obstacles, especially trees and
power lines.
Open your glider in a slight horseshoe arc (semi-circle) & thoroughly check that you have
no knots or line twists. Make sure your helmet is securely fastened & clip into your harness making sure all straps are securely fastened.
Connect risers to your harness making certain that your karabiners are fully closed & you
Page 9
9
have no twists in the risers.
> strong wind
We recommended that the reverse launch is the best technique when the wind is strong
at take off.
There are many reverse launch methods/techniques which the pilot can learn. To progress
well with your flying, and to be a good pilot, it is necessary to master at least one of the
techniques. If you can achieve 100% control your glider on the ground then you will be
a better, safer pilot in the air & this will also help you to understand the dynamics of a
paraglider in flight.
> thermal flying
The QUARX 2 is truly a pleasure to thermal with. To achieve the best sink rate the
pilot should use around 35% of inside
brake (on the turning side) and 25% of
outside brake whilst using weight shift to
help maximise the efficiency or turn.
Easing off on the outside brake can change
the steepness of the turn, and help with the
your efficiency in the thermal. This is a
more advanced technique & should be
practised with an instructor and/or experienced pilot to perfect it.
With the harness chest strap pulled tight
weight shift is less effective but the security will be increased and the wing feel more
“solid”, & vice versa. The maximum chest strap distance karabiner to karabiner should be
38 cm.
> flying in turbulence
Most pilots want to enjoy the pleasures of thermal and coss-country flight.
One thing to always consider is that normally these flying conditions are rougher, stronger and sometimes unpredictable and more difficult to handle which can lead to unstable situations such as collapses. There will always be some level of turbulence associated
with thermals.
If you progress at a nice steady rate, and keep safe, you will find thermal flying will become a pleasure. With qualified instruction you will actually learn faster, learning how to
optimise your thermal skills. A safety (SIV) course is something to consider, as these teach
you how to deal correctly with unstable situations such as collapses, rapid descent manoeuvres, stalls ands spins, and so you will get far more from your flying.
Page 10

10
With the correct technique & qualified instruction the pilot can learn to help stop collapses by flying “actively” & recover the wing more quickly, by the giving the correct input,
when collapses occur. Remember, the glider is tested to recover and so it is always better
to under-react than to over-react. Over reacting to a situation can prevent the glider from
self-recovering, and recovering air speed, and cause it to enter further unstable situations.
> asymmetrical tuck/collaps
An asymmetric tuck / collapse is when part (one side) of the wing ( say 20% or even anything up to 90% of the span) tucks or collapses, usually induced by turbulence but sometimes also though poor pilot control in turns and wing-overs.
The QUARX 2 is tested and certified to automatically recover without correction by the
pilot, but with the correct input the pilot can minimise any turning, and height lose, and
help the glider recover more quickly.
There are 3 basic steps to follow immediately if you have a collapse:
1: Weight shift to the flying side of your glider (away from the collapsed side). This helps
stop the rotation & increases pressure in the wing in the inflated side.
2: If needed apply the correct amount of brake to the open (flying) side to slow any rotation (spiral) induced by the collapse. Be very careful not to use too much brake as its possible to stall the flying side of the glider, and enter further unstable situations which may
be harder to recover from than the collapse itself.
3: Once the glider has straightened out, or the spiral has slowed, smoothly pull down the
brake on the collapsed side, with a long stroke/pump, & the deflated side of the glider
should re-inflate. As the glider re-opens release the brake immediately but progressively.
With instruction & experience the above will become a reflex action, and the correct
input to give will become second nature to the experienced pilot.
> front/symmetrical tuck collapse
A front tuck /collapse is a symmetric tuck of the leading edge of the wing, starting from
the centre of the canopy to the wing tip. This can be either a tucking of just the central
part of the leading edge of the glider, which can sometimes cause a front 'horseshoe' or
'rosette-ing' of the glider, or even a complete 'blow-out' of the whole canopy in extreme
situations.
When flying, a front tuck may occur while leaving a strong thermal, or more often while
using the speed system in turbulent air, or sometimes whilst flying down-wind of another
paraglider & being 'waked' by the wing tip vortices of the glider and turbulence wake turbulence of the pilot.
Remember, the pilot can learn to help stop collapses by flying 'actively', but if a front tuck
does occur it will easily clear itself. Re-inflating the wing can be helped by correct pilot
Page 11

11
input and, once the glider is overhead, symmetrically applying 40 % of both brakes &
then releasing immediately will get pressure back in to the glider and speed up the recovery. Do not brake when the glider is behind you, as this can stall the wing, but wait for
the glider to come forwards above your head, then brake.
>
Asymmetric stall (spin)
This is a very difficult situation for the pilot to provoke with the QUARX 2, given it's
very low stall speed, you have to really abuse the controls a lot to manage it. Even so, this
situation can be induced if, say, the pilot is turning very slowly in a thermal (near the stall
point), and wants to tighten the turn even more, and at the same time as smoothly lifting the outside brake (which is the correct thing to do), if the pilot simultaneously brakes more on the inside brake, this may stall the inside wing which will then go into spin.
One half of the wing flies forwards, whilst the other flies backwards (negative). In this
case to return to normal flight, one has to raise the inside brake, returning air speed to
the inside wing, which will cause the wing to surge and dive forwards. This dive can be
more or less violent, depending on what stage that the flat spin is in, how much the spin
had been allowed to develop, and the moment at which the brake is lifted. If the pilot
wants to intervene to dampen this dive, they will have to adopt a position (roughly) of
something more than half brake, which must then be released as soon as the dive is stopped, or the wing may then go back into a stall or spin. Another option is to put the glider directly into a full stall immediately that the spin is entered, and from this the exit is
more symmetric with less chance of a twist.
> landing
Choose a large field clear of all obstructions & in a clean laminar airflow.
A different technique is needed for different wind strengths. Every landing should be judged differently even if it’s your local site.
On final approach the pilot should have hands up (keeping a feel of the wing in case of
unexpected turbulence) so the glider has energy for a flare. In light or nil winds the pilot
will need a committed symmetric flare at around 1 meter above the ground.
In stronger winds less of a flare is needed & the pilot must judge this for himself through
practice & training from a qualified instructor.
The flight is not finished, and the pilot is never fully safe, until the glider is safely controlled on the ground.
Avoid letting the glider land on the leading edge. If the glider lands with force on the leading edge it is possible to burst the inner cells and walls of the wing and you should carefully examine the wing for any damage to the joining of the ribs to the cells..
> weather to fly
If in doubt whatosoever about the weather and flying conditions, then do not launch!
Page 12

12
Before going flying you should check the weather forecast & always ask more experienced pilots about the conditions expected for the day. Never fly if there weather conditions are unsuitable, especially with any of the following present or even threatening:
Strong wind; Rain; Thunderstorms; Cumulus Nimbus; or Cumulus Congestus. If you are
already in the air then get down safely before it's too late! Always be aware of the weather changing & if in doubt land as quickly as is safely possible.
Even though the QUARX 2 is DHV 2 this is not a guarantee against flying in turbulent
air. Remember that even an airline jet can crash due to rotors and bad weather!
>emergency procedures & quick descent techniques
The following techniques are more advanced & should be practiced ONLY with qualified
radio supervision and adequate safety back up. Always be prepared and consider what
will happen if things go wrong! With enough altitude it is possible to safely master these
manoeuvres ready for the day you may need them for real!
More radical’s manoeuvres such as full stall, asymmetrical stall and flat spin are not described in our manual. In order to perform these manoeuvres you should do a special safety
course with the correct instructor & over the water with a rescue boat standing by, and
all safety precations taken.
> bigs ears
Big Ears is the simplest descent technique & can be very useful for top landing.
Sit upright in your harness & with the brakes in your hands reach up to the OUTSIDE 'A'
line. Make sure that you have the correct line, and be careful not to pull down the whole
'A' riser on one side which could induce a collapse.
Once you are sure that you have the correct line pull out & down, and the tips of your
glider should fold under symmetrically.
You should be applying NO brake, as you could stall the wing in this way. Steering is
done by weigh-shift.
To recover, release the outer 'A' lines & the QUARX 2 will return to normal flight.
> spiral dive
The Spiral dive is performed by starting a series of 360 degrees turns, gradually pulling
one brake harder and harder and weight shifting into the turn. Pull more inside brake, and
weight shift harder, for a faster spiral dive but be careful not to stall one side and enter
a spin in this way. Ease off on the inside brake, and weight-shift less hard, to regain level
flight. Like this, the pilot can control the bank angle and the sink rate of the glider in the
Spiral dive. Always remember that whilst in the Spiral dive you are drifting with the wind,
Page 13

13
and it is very easy to become disorientated.
This manoeuvre is not approved for bank angles higher than 60 º. At this upper limit the
sink rate of the canopy is approximately 10 m/s and the overload is equal to 2G's.
For bank angles higher than 60 degrees the sink rate can achieve 20 m/s but the greater
overload (High gravitational forces - G's) can cause eyesight and equilibrium problems,
and cause some people to 'black out' (faint), which consequently can make the manoeuvre extremely dangerous.
To recover from a spiral dive, the inner brake must be progressively and slowly released,
until the canopy assumes normal flight, and angle of bank, again. A good rule of thumb
is to use the same number of 360-degree turns as you did on entry on exit to give a safe
and progressive pullout. If you release hands up from a tight spiral dive you will experience a big surge followed by a dive. (In turbulent air this can result in a collapse.) The
QUARX 2 has been tested for this but it is advisable to learn the correct exit method,
i.e. progressively release the inside brake.
> b stall
The B-line stall is a real stall even though the wing appears to be flying above your head
the laminar airflow over the wing is completely lost. During B-Stall, the canopy falls perpendicularly to the ground (straight down, but drifting with the wind) at a sink rate of 5
to 12 m/s, with an angle of attack of 90 degrees.
To enter a B-Stall, it is necessary to sit upright in your harness, reach up with the brakes
still in your hands (preferably with the toggles around your wrists) & securely clutch each
B risers in each hand at the top near the Maillons Rapides (quick links). To enter the Bline stall, pull down symmetrically on the B risers. (About 40 cm)
The force initially is quite hard (up to about 15cm) but for the last part the force required to pull down is less. Keep your weight centred in the harness, and keep the risers held
at a symmetric level to each other. The more B riser pulled the faster the decent rate, but
the glider can become unstable with a very deep B-line.
To return the glider to normal flight conditions:
Ease up the B-risers SYMMETRICALLY for 50% (25-cm of B-line still held) holding some
pressure, then symmetrically completely and rapidly release them. If necessary, control
the surging forward of the canopy by gently braking when the glider is in front of you.
What you are trying to achieve is to not shock-load the glider by an immediate release
from a deep B-line, whilst at the time not easing off too slowly and risking a deep stall
in turbulent conditions. Releasing the B-lines from a deep B-line position works fine (&
if unsure whilst attempting the manoeuvre simply release the B-lines together from this
position) but puts unnecessary load on the glider.
If necessary, control the surging forward of the canopy by gently braking when the glider
is in front of you. Do not brake too hard as you may cause the wing to enter a full stall
Page 14

14
in this way, and let the brakes back up as soon as the surge has stopped.
> maintenance
Store the paraglider in a dry space away from chemical agents, UV light and high temperature. If the canopy has been packed wet it is necessary to reopen it and let it dry before packing away for a sustained period. Keep the canopy and lines clean, as dirt may penetrate into the fibres and damage them.
Clean the paraglider only with fresh water and a soft sponge. If you are unfortunate to
land in the sea & survive! Hose/soak the glider with fresh water & dry completely.
Absolutely avoid contact with chemical agents like oil, petrol, solvent and similar, which
can damage the fabric and its surface covering.
We strongly recommend you to have a full inspection of the paraglider by
Windtech
or
the distributor at least once a year. Besides this you should check periodically the lines,
cloth and stitching.
Every 150hrs. or once a year, which ever comes first, change all bottom lines. This is very
important to maintain the flying and safety characteristics of the wing. The rest of the
lines must also be checked and if they have deteriorated then they need to be changed.
Test some of the lines that are not changed for minimum 40% of the rated strength. If
the line fails you should replace them all before using your glider.
Small tears in the sail can be repaired by using adhesive spinnaker cloth, which we supply
with every new glider. If you need more of this material, you can buy it from some yatch
chandlers, sail repair centres, and some other such places.
Large tears, any sewing or structural repairs, or tears along seam lines or line attachment
points, of the paraglider must be carried out only by the manufacturer or authorised service centres.
> warranty
This glider carries a one-year guarantee from defects due to materials and manufacturing.
If a product is deemed to be defective by
Windtech
, the warranty covers the repair or
replacement of the defective product only.
Windtech
will not be responsible for any
costs, losses or damages incurred as a result of loss of this product.
Windtech
is not responsible for mailing costs or material costs used other than what is
found to be defective.
This warranty does not cover damage caused by misuse, abuse, neglect or normal wear &
tear including damage due to excessive sun exposure, damage caused by improper handling & damage caused by anything other than defects in material & workmanship.
Page 15

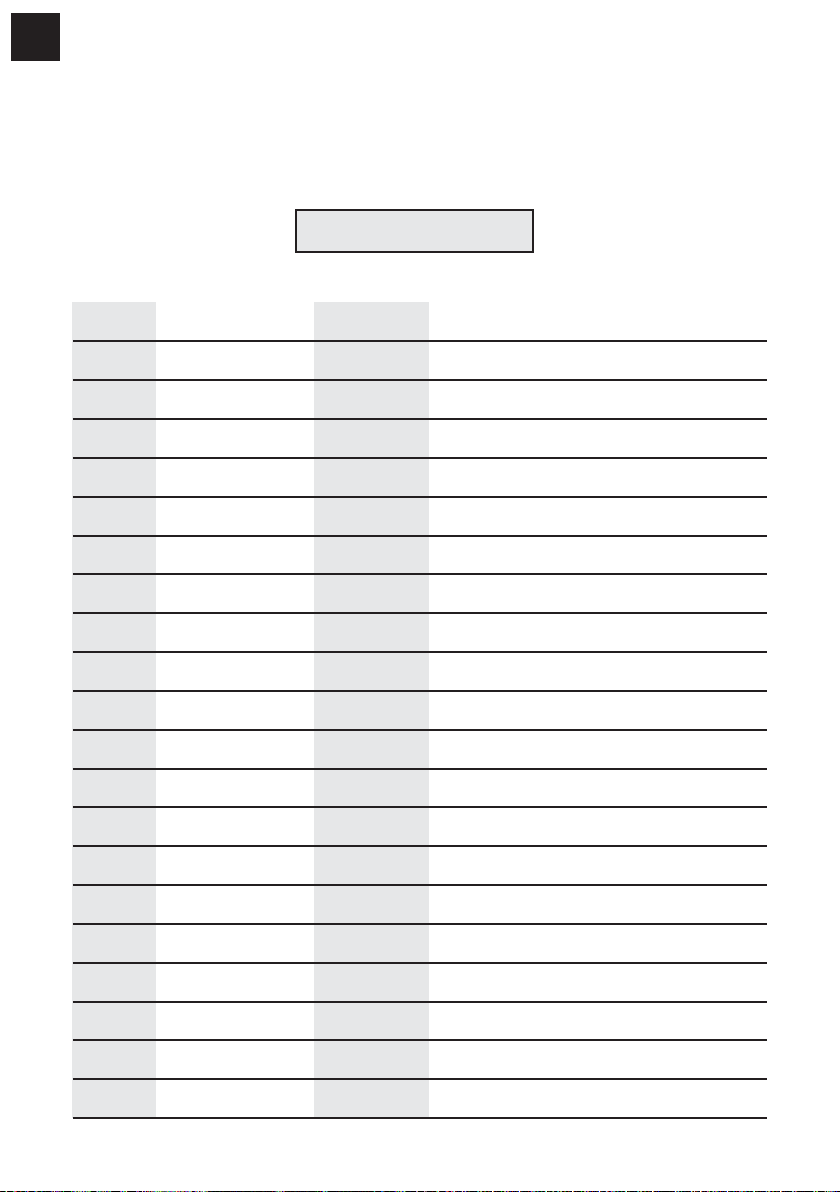
15
size
area (m
2
)
projected area (m
2
)
span (m)
projected span (m)
aspect ratio
projected aspect ratio
max chord (m)
min. chord (m)
nº cells
line lenght (m)
pilot weight (kg)
weight in fly
min-max speed*
max speed trim*
DHV certification
23
22,74
20,16
11,18
9,33
5,5
4,32
2,56
0,55
67
7,13
42-62
60-80
23-52
37
25
24,75
21,96
11,66
9,74
5,5
4,32
2,67
0,57
67
7,41
57-72
75-90
23-52
37
2
27
26,85
23,81
12,15
10,14
5,5
4,32
2,79
0,6
67
7,7
67-87
85-105
23-52
37
2
29
28,92
25,65
12,6
10,52
5,5
4,32
2,89
0,62
67
7,95
82-102
100-120
23-52
37
2
QUARX 2
* speeds with medium range weight pilot at sea level and normal lines.
| technical specifications |
Page 16

16
QUARX 2 - 29
394 + 20
258
133
112,5
515.5
99,5
145
197
197
197
96,5
88
83
145
88
102,5
124,5
124,5
95
94,5
95
93,5
101
100
124,5
95,5
124,5
249
502,5
254
214
207,5
553
94
95
88
540
211
117,5
107,5
538
65,5
63,5
93
54
22
560
258
249
498.5
253,5
214
207,5
536
211
108
106
99
106
142
142
21
113
106
530
142
58,5
64,5
58,5
159,5
50,5
154
33
134
103,5
258
249
253,5
214
207,5
544
211
110 ,5
102
106
535,5
142
62,5
63,5
29
64
30
31
32
1
258,5
2
3
4
249
5
508.5
6
7
8
253
9
10
214,5
11
12
13
207,5
14
15
16
17
210,5
18
19
112
20
21
22
23
102
24
25
26
27
28
Page 17
17
QUARX 2 - 27
381 + 20
249
249
249
1
249
2
3
4
128,5
108,5
497
95,5
93
140
190
190
85
80
140
85
99
91,5
91
120
91,5
120
90
97,5
240
484,5
245
206,5
200
533,5
203,5
113
240
480,5
244,5
206
200
521
517
203,5
104
240
490
244,5
206
200
524,5
203,5
106,5
240
5
6
7
8
244
9
10
207
11
12
13
200
14
15
16
17
203
18
19
108
20
21
22
103,5
96,5
190
120
120
519
90,5
92
85
63 61
91,5
89,5
52,5
24,5
540
95,5
102
102
137
137
56,5
56,5
48,5
20,5
129
100
109
98,5
102
102
516
511
137
137
60,5
61
62
62
30
31
148,5
154
32
33
23
98,5
24
25
26
27
28
29
Page 18
18
QUARX 2 - 25
366+20
239
239
239
1
239
2
3
123,5
230
230
230 234,5
4
230
5
104
477
91,5
89,5
134
81,5
77
134
81,5
182
190
190
95
512
88
87,5
115
88
115
86,5
93,5
92,5
115
87
88,5
115
465
234,5
198 192
500
195
108,5
99,5
498
131,5
88
81,5
60,5
58,5
86
50
23,5
518,5
461,5
234,5
198
192
496
195,5
100
490,5
142,5
94,5
98
131,5
495,5
58,5
59,5
148
32
33
91,5
98
98
131,5
54,5
54
46,5
124
19,5
104,5
470,5
199
192
503,5198
195,5
102,5
192
194,5
103,5
20
21
22
23
94,5
24
98
25
131,5
26
27
28
58
29
59,5
30
31
234,5
19
6
7
8
9
10
11
12
13
14
15
16
17
18
Page 19

19
QUARX 2 - 23
330+20
229
229
229
1
229
2
3
19
224,5
4
5
221
6
7
8
9
10
11
12
13
14
15
16
17
18
118
100
457,5
88
85,5
129
175
175
175
78
73,5
129
78
91
84
110 ,5
83,5
84
110,5
83
89,5
89
110 ,5
110 ,5
221
445,5
225
190
184
491
187
104
95
477,5
83,5
84,5
58
84
56,5
82,5
78
48
22,5
497
479,5
221
442
225
189,5
184
475,5
187,5
95,5
87,5
94
94
126
126
18,5
92
100,5
94
470
126
52
52
57
136,5
141,5
44,5
118,5
221
451
224,5
189,5
184
482,5
187
98
190,5
184
186,5
99,5
20
21
22
90,5
94
475
126
55,5
56
24
25
26
27
28
23
90,5
29
57
30
31
32
33
Page 20
20
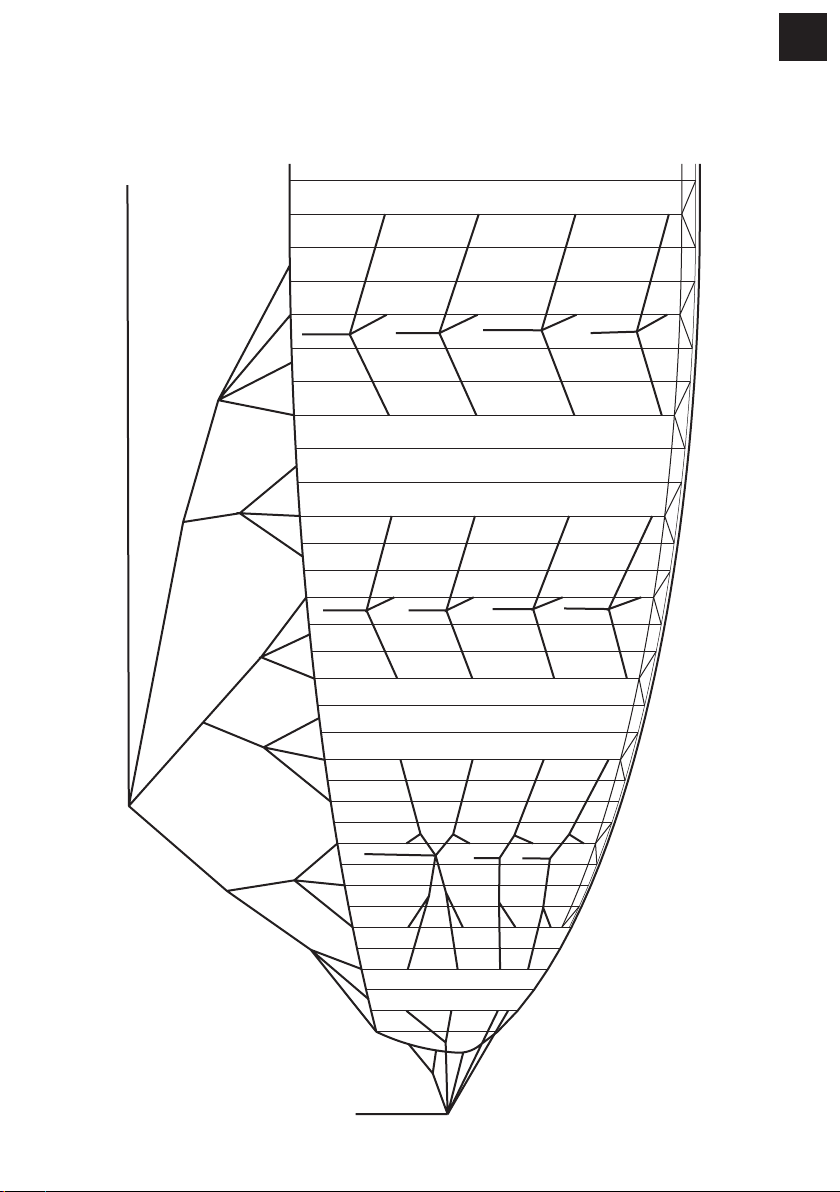
B
A
C
D
D
C
B
A
A
B
C
D
= 50cm
A = 31
B = 33,5
C = 41
D = 50
cm
cm
cm
cm
Page 21
21
Page 22
22
QUARX 2
| flight log |
size
date site duration flight details
Page 23

Page 24
QUARX2
POWERED BY WINDTECH
| francisco rodríguez · 7 | 33201 g i j ó n | spain | p.o. box · 269 33280 |
|
p# · 34 985 357 696 | fax · 34 985 340 778 |
|
email · info@windtech.es | web · www.windtech.es |
 Loading...