

Page 1

Pro STAR Industries
1590-A N. Harvey Mitchell PKWY
Bryan, TX 44503
979-779-9399 1-800-262-7104
The following symbols are used throughout this guide as
indicated in their descriptions:
HAZARD INTENSITY LEVEL
There are three levels of hazard intensity identified by
signal words -WARNING and CAUTION and FOR
SAFETY. The level of hazard intensity is determined by
the following definitions:
WARNING
WARNING - Hazards or unsafe practices, which could
result in severe personal injury or death.
CAUTION
CAUTION - Hazards or unsafe practices, which could
result in minor personal injury or product or property
damage.
FOR SAFETY To Identify actions, which must be
followed for safe operation of equipment.
The following information signals indicate potentially
dangerous conditions to the operator or equipment.
Read this guide carefully. Know when these conditions
can exist. Locate all safety devices on the machine.
Then, take necessary steps to train machine operators.
Report machine damage or faulty operation
immediately. Do not use the machine if it is not in proper
operating condition.
For SAFETY:
DO NOT OPERATE MACHINE:
•• Unless Trained and Authorized
•• Unless Operation Guide is Read and
understood.
•• In Flammable or Explosive areas.
WHEN USING MACHINE:
•• Go slow on grades.
•• Do not carry riders on machine.
BEFORE LEAVING OR SERVICING MA CHINE:
•• Stop on level surfaces.
•• Turn oft machine.
WHEN SERVICING MACHINE:
••Avoid moving parts. Do not wear loose jackets,
shirts, or sleeves when working on machine.
•• Use only Windsor approved replacement parts.
SAFETY
WARNING
To reduce the risk of fire, electric shock, or injury:
1. Use only as described in this manual. Use only
manufacturer’s recommended attachments.
2. Use indoors only. Do not use outdoors and do not
expose to rain.
3. Machine can cause a fire when operating near
flammable vapors or materials. Do not operate this
machine near flammable fluids, dust or vapors.
4. Do not pick up flammable fluids, dust or vapors.
5. Do not vacuum anything that is burning or smoking,
such as cigarettes, matches, or hot ashes.
6. Do not handle the plug or machine with wet hands.
7. Do not leave the machine unattended. Unplug machine
from outlet when not in use and before servicing.
8. Do not unplug machine by pulling on cord. To unplug,
grasp the plug, not' the cord.
9. Do not use with damaged cord or plug. Follow all
instructions in this manual concerning grounding the
machine.
10. If the machine is not working properly, has been
dropped, damaged, left outdoors, or dropped into water,
return it to an Authorized service center.
11. Do not pull or carry by cord, use cord as a handle, close
a door on cord, or pull cord around sharp edges or
corners.
12. Do not pull/run machine over cord. Keep cord away from
heated surfaces.
13. Do not allow to be used as a toy. Close attention is
necessary when used near children.
14. Do not operate machine with any opening blocked. Keep
openings free of debris that may reduce airflow.
15. Keep hair, loose clothing, fingers, and all parts of the
body away from openings and moving parts.
16. Do not use machine as a step.
17. Connect to a properly grounded outlet. See Grounding
Instructions.
18. Do not pickup health endangering dust or contaminants.
WAVE Instructions page 1
Page 2

Pro STAR Industries
1590-A N. Harvey Mitchell PKWY
Bryan, TX 44503
979-779-9399 1-800-262-7104
This Owner’s Guide contains valuable information
about the operation, maintenance, serial and pail
numbers for repairs of your Windsor machine.
Please read this introductory page thoroughly to
become familiar with the contents of the owner’s
guide, making the information you are looking for
easier to locate.
The owner’s guide consists of multiple sections of
reference information, and the remainder contains
part number information for ordering pails for the
machine. At the top of each page is the name of
the particular section. This way you can quickly
locate each section more easily
REFERENCE SECTIONS
The reference information sections of this
guide
are as follows; General Information,
Grounding Information, Operation, Set Up,
Maintenance.
GENERAL INFORMATION
This section of the guide contains safety
precautions. The Safety Precautions are an
overview of the safety measures to be
observed when operating and maintaining the
machine.
OPERATION
The Operation section of the guide contains
the in formation needed to operate the
machine. There is a complete list of
instruments and controls on the machine, an
overview of machine operation, and in formation on how to transport and store the
machine.
MAINTENANCE
information on the suggested maintenance
procedures and adjustments to keeping the
machine in top operating condition. The
section includes a maintenance schedule and
the areas of the machine to be addressed.
Each subject of maintenance is covered in
more detail in such areas as Lubrication,
Motors and Electrical System.
PART SECTIONS
To easily locate the part needed, please refer
to page 2 for component locations to find the
general area where the part is located. Use
the information to quickly locate the correct
component. The remain ing sections of the
guide contain part number, information for
ordering repair parts for the machine. The
guide contains part number information on
every model of machine model available.
Therefore there will be part number
information in your guide, which you will not
need to refer to when placing an order.
ORDERING REPAIR PARTS
If you are in need of technical assistance
contact your WINDSOR Distributor or Service
Center for further assistance.
Once you have located a part to order, call
your local WINDSOR distributor. Make sure
to have the machine’s serial number and your
Owner’s Guide with you to aid in ordering the
correct
The Maintenance section contains the
component.
WAVE Instructions page 2
Page 3
1590-A N. Harvey Mitchell PKWY
979-779-9399 1-800-262-7104
WARNING
1. To avoid electric shock use indoors only.
2. To reduce risk of fire, do not use volatile substances.
INSPECTION
Carefully unpack and inspect your wide area vacuum for
shipping damage. Each unit is operated and thoroughly
inspected before shipping, and any damage is the
responsibility of the carrier, who should be notified
immediately.
ELECTRICAL
The WAVE operates on a standard 15-amp 115 volt AC
circuit. This is the typical wall receptacle found in
household and light industrial environments. Voltages
below 105 volts or above 125 volts could cause serious
damage to motors. *Special voltage models available. A
wiring diagram is mounted inside the rear control panel of
machine. A copy of the wiring diagram is included in this
Owner’s Guide.
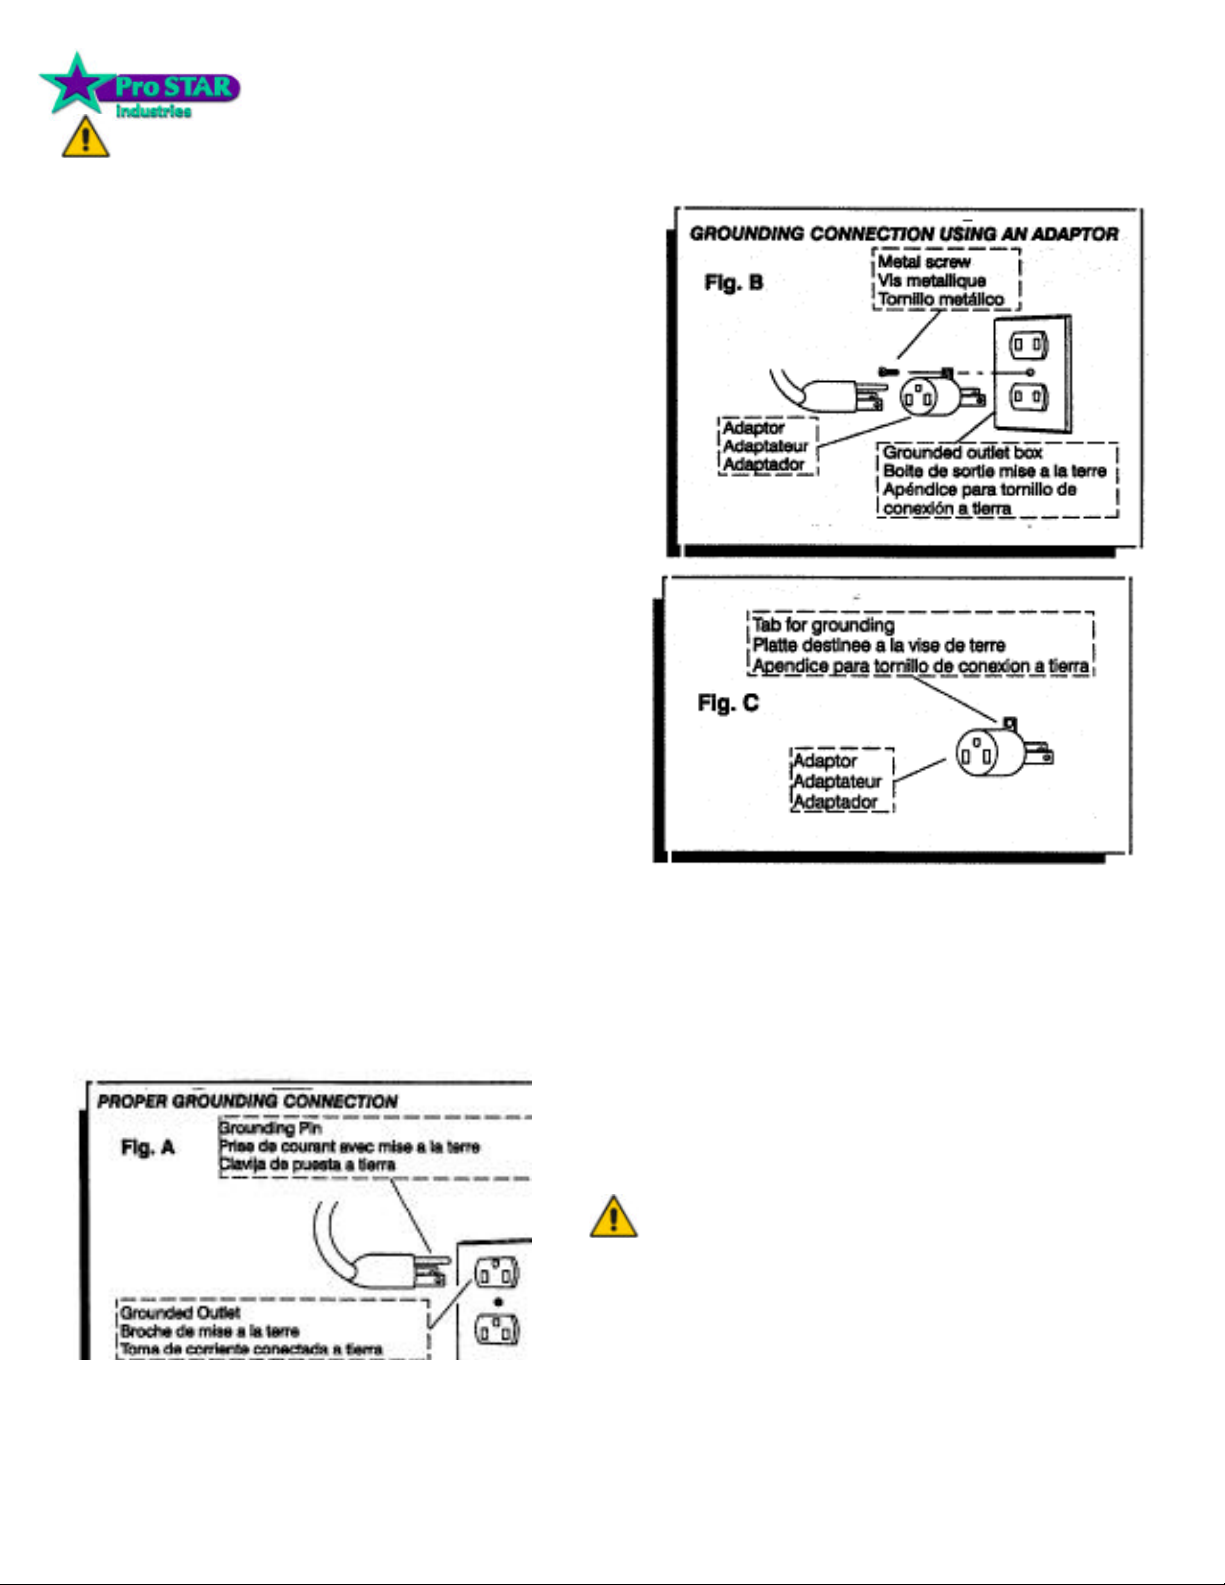
GROUNDING INSTRUCTIONS:
This appliance must be grounded. If it should malfunction
or break down, grounding provides a path of least
resistance for electric current to reduce the risk of electric
shock. This appliance is equipped with a cord having an
equipment-grounding conductor and grounding plug. The
plug must be inserted into an appropriate outlet that is
properly installed and grounded in accordance with all
local codes and ordinances.
This appliance is for use on a nominal 120-volt circuit, and
has a grounded plug that looks like the plug in Fig. A. A
temporary adaptor that looks like the adaptor in Fig. B may
be used to connect this plug to a 2-pole receptacle as
shown in Fig. B, if a properly grounded outlet is not
available. The temporary adaptor should be used only until
a properly grounded outlet can be installed by a qualified
electrician.
The green colored rigid ear, lug, or the like extending from
the adaptor must be connected to a permanent ground
such as a properly grounded outlet box cover. Whenever
the adaptor is used, it must be held in place by a metal
screw.
Pro STAR Industries
Bryan, TX 44503
Grounding Information
NOTE:In Canada, the use of a temporary adaptor is not permitted by
the Canadian Electrical Code.
NOTE: Au Canada, I’utiisation d’un adaptateur temporaire n’est pas
autorisee par le Code canadien de l’electricite.
EXTENSION CORDS:
This wide area vacuum is designed to operate on a
standard 15 amp 115 volt, 60hz, AC household current.
Check the voltage shown on the serial number plate is
suitable for the supply available. Voltages below 105 volts
or above 125 volts could cause damage to the motors.
If an extension cord is used, the wire size must be at least
one size larger than the power cord on the machine: The
WAVE is equipped with a 75 ft. 14/3 power cord.
WARNING
Improper connection of the equipmentgrounding conductor can result in a risk of
electric shock. Check with a qualified
electrician or service person if you are in doubt
as to whether the outlet is properly grounded.
Do not modify the plug provided with the
appliance - If it will not fit the outlet; have a
proper outlet installed by a qualified electrician.
WAVE Instructions page 3
Page 4
1590-A N. Harvey Mitchell PKWY
979-779-9399 1-800-262-7104
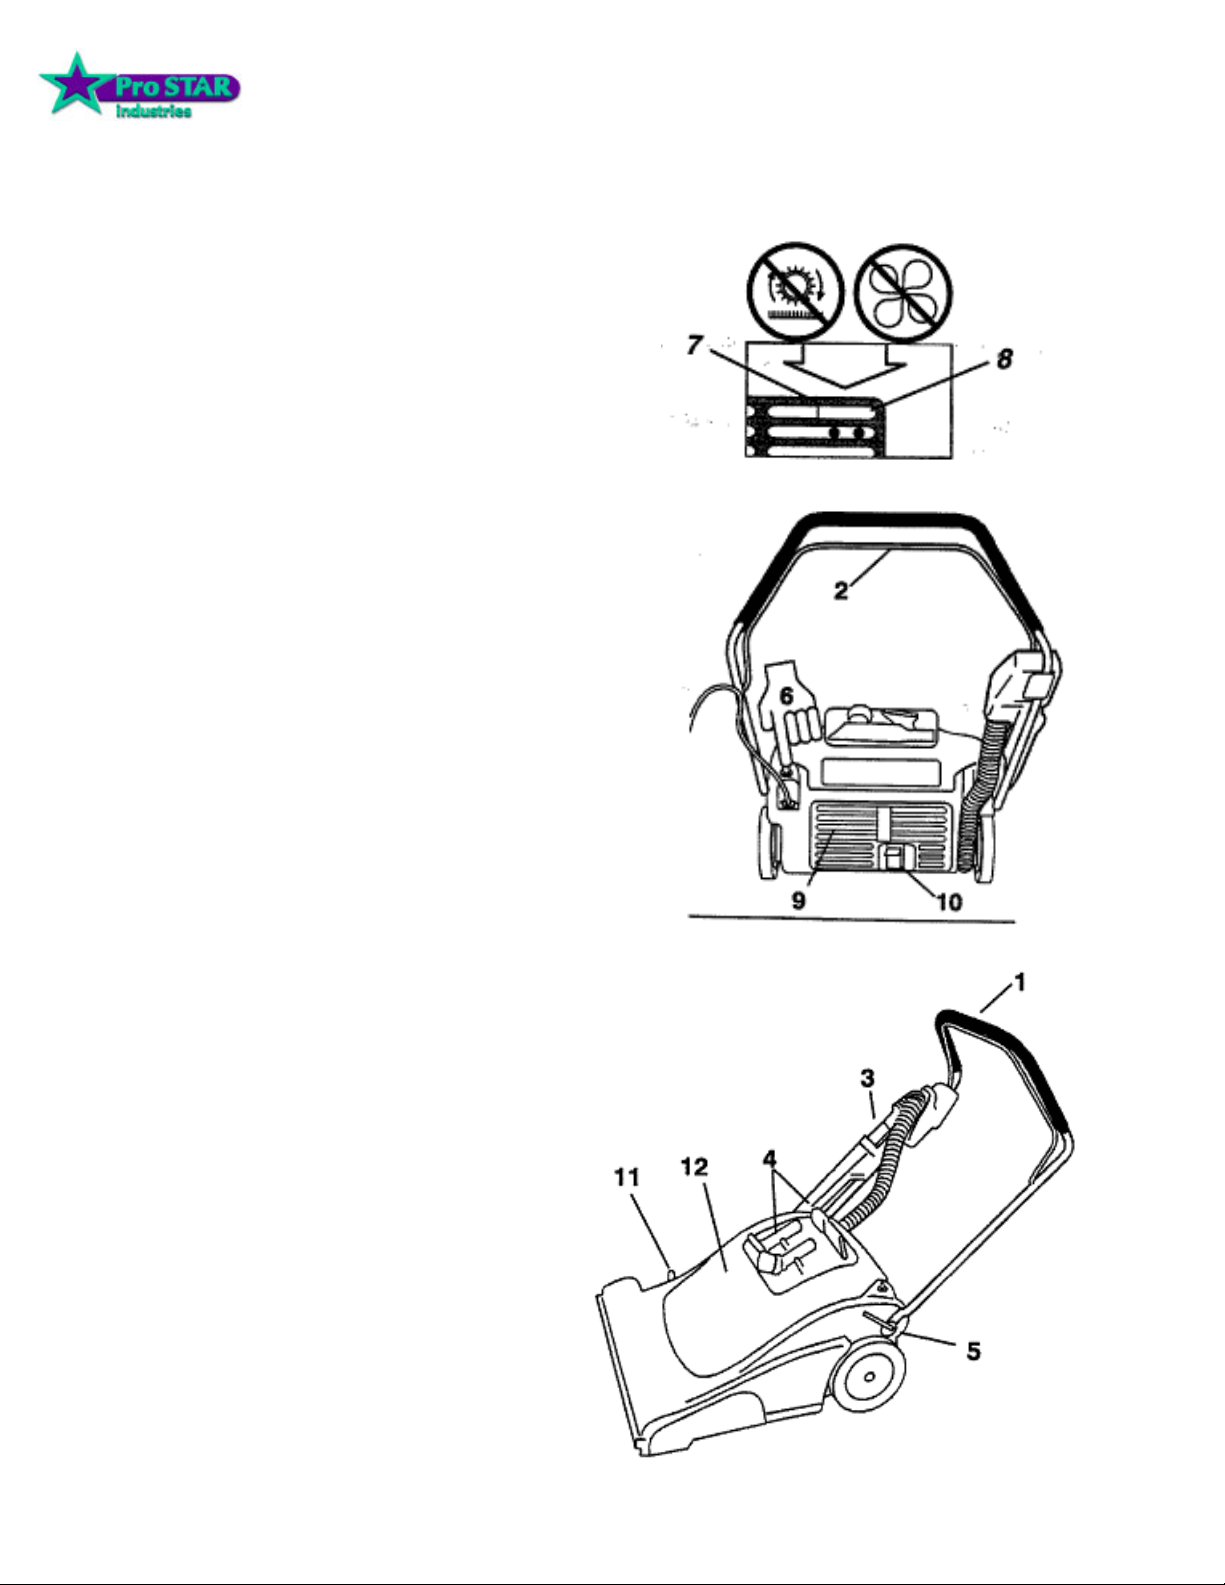
OPERATION CONTROLS
1. Main Handle. Adjusts for operator comfort and
storage.
2. Brush on/off lever. Activates brush when
depressed.
3. Accessory vacuum hoseand wand. Allows
operator to clean edges, recessed, ledges,
upholstery, etc.
4. Detail tools Dusting brush, crevice and
upholstery tools for above the floor cleaning.
Dusting brush comes with adapter for
attachment directly to hose. Upholstery and
crevice tool connect directly to both the hose
and the wand. The crevice tool fits loosely on
the wand.
5. Handle Adjustment Lever. Located on the
left side of handle. Pull away from handle to
loosen, adjust handle and press parallel to
handle to tighten.
6. Vac on/off switch. Turns on and off vac
motor.
7. Brush motor curcuit breaker. Provides
overcurrent
protection for the brush motor.
8. Vac motor circuit breaker. Provides
overcurrent
protection for the vacuum motors.
9. Exhaust filter. Filters exhaust air for safe and
quiet operation.
10. Accessory hose activation pedal. Press
pedal down to use the accessory hose. Lift up
with toe for normal use.
11. Brush adjustment lever. Allows operator to
adjust brush to proper height for the carpet. (1)
for low nap carpet, (5) for thick nap. Position
(6) is storage.
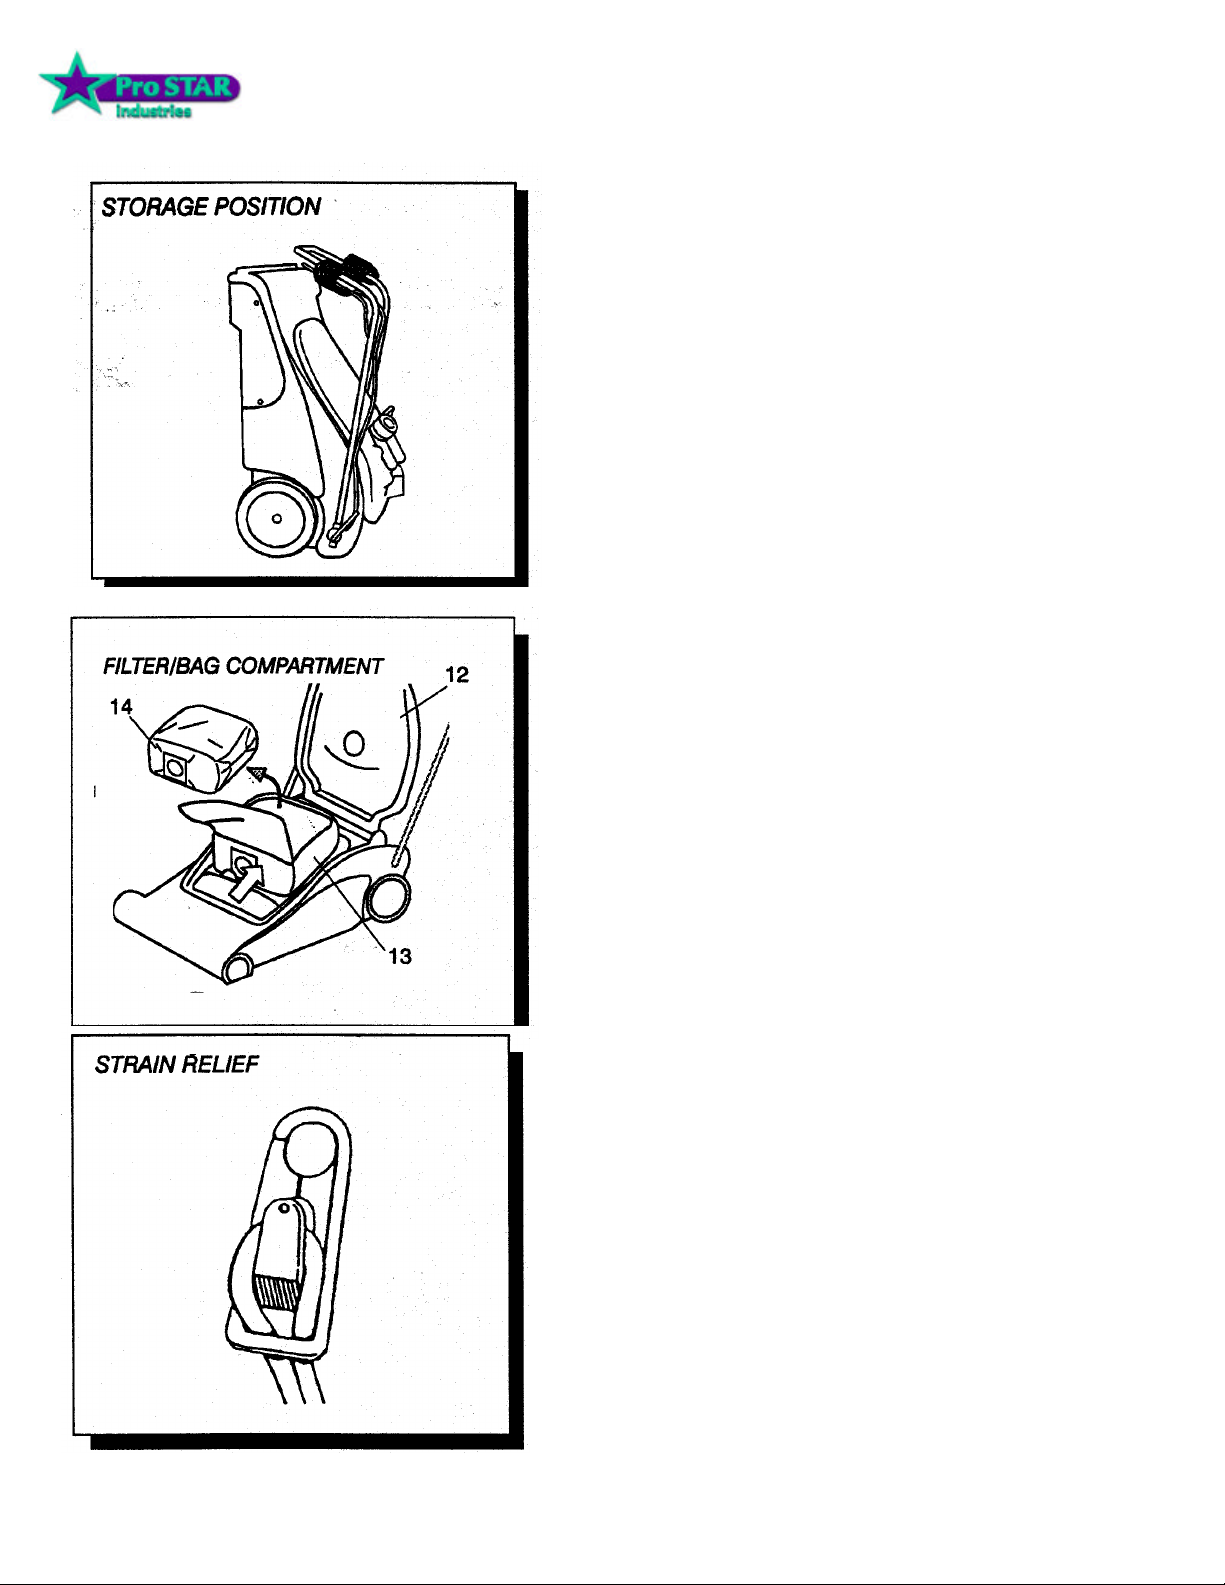
12. Dust bag cover. Raise to allow access to dust
bag and vac motors.
13. Cloth dust bag. High filtration cloth bag with
zipper opening to access paper bag.
14. Paper bag. Fits within cloth bag for clean and
easy dust removal.
Pro STAR Industries
Bryan, TX 44503
WAVE Instructions page 4
Page 5
Pro STAR Industries
1590-A N. Harvey Mitchell PKWY
Bryan, TX 44503
979-779-9399 1-800-262-7104
WAVE SET UP
1. Take machine out of storage position
by lowering onto all four wheels.
2. Adjust handle to comfortable position
at waist level by opening adjustment lever on
left side of machine and moving handle. Lock
back into position by closing adjustment lever.
3. Install cloth filter bag inside the main
body by pushing the rubber collar over the
chute.
4. Unzip the cloth bag and place the
paper bag inside. Push the rubber gasket seal
over the chute. Zip cloth bag closed taking
care not to damage the paper bag and close
lid.
5. Attach the detail tools to the top of the
dust bag cover by pressing the appropriate
tool into the clips.
6. Take the accessory wand and attach
to the hose and insert wand into the wand
holster.
7. Strain relief.
NOTE: Attach strain relief/cord retainer
to the power cord.
1. Make a loop in power cord
approximately
12” from receptacle end.
2. Slide cord loop through slot in retainer
arm. Pull slack cord back through slot to
secure. Attach retainer to handle.
WAVE Instructions page 5
Page 6
HOW IT OPERATES
Pro STAR Industries
1590-A N. Harvey Mitchell PKWY
Bryan, TX 44503
979-779-9399 1-800-262-7104
HOW IT OPERATES
This machine is a portable, easy to use wide area vacuum
designed for use indoors, in a commercial or light industrial
environment.
When operating as a carpet vacuum, soil is lifted from the
carpet surface by a rotating brush and carried into a removable bag by the vacuum motors.
1. Large debris such as paper cups, plates, etc.,
should be picked up before starting the cleaning
process.
2. Plan your cleaning route to work away from the
electrical source. Move machine forward at a steady
pace.
CLEANING
1. Adjust handle to comfortable position at waist level
or higher.
2. Use your finger to depress the Vacuum switch at
the base of the handle to activate the vacuum.
3. To adjust brush height, move the Brush Adjustment
lever on the right side to the correct setting for the
carpet being vacuumed. Lower brush gradually until
firm brush contact is heard.
WARNING
KEEP MACHINE MOVING WHILE BRUSH ENGAGED.
DAMAGE TO CARPET COULD OCCUR IF NOT MOVING.
NOTE: Always return brush to storage position after using
machine.
4. Depress the brush lever at the handle to start the
brush.
5. Move forward at a steady pace for through cleaning.
Run machine more slowly over extremely soiled areas.
6. Use the right side of the machine for edge cleaning.
7. To use the accessory wand and detail tools,
depress the foot lever in the back of the machine.
8. To keep the vacuum operating at maximum
efficiency, check the dust bag regularly. Empty when
1/2 to 3/4 full. Always use with disposable paper bag
for best results.
9. When finished vacuuming, coil the cable by hand by
looping into about a 3 foot diameter, Hang coiled cable
over handle. Wrap the end around the cable loop to
secure.
10. Return brush to storage position.
WAVE Instructions page 6
Page 7
Pro STAR Industries
1590-A N. Harvey Mitchell PKWY
Bryan, TX 44503
979-779-9399 1-800-262-7104
NOTE: THE FOLLOWING SERVICE ITEMS SHOULD BE PERFORMED BYAN AUTHORIZED SER VICE FACILITY ORAUTHORIZED
SERVICE PERSONNEL. ALL PARTS REFERRED TO IN THESE
INSTRUCTIONS CAN BE IDENTIFIED BY USING THE PARTS LISTS
AND ILLUSTRATIONS ON THE FOLLOWING PAGES.
WARNING
REMOVE MACHINE POWER CORD FROM ELECTRICAL
SOURCE BEFORE MAKING ANY REPAIRS OR ADJUSTMENTS
TO THE MACHINE.
TO ACCESS BELT/BRUSH MOTOR
1. Place machine in the upright storage position.
2. Remove (3) screws holding belt cover to chassis.
3. Loosen brush motor and roll belt off brush pulley.
4. Remove (5) screws holding brush housing to
chassis- (3) Located on front of housing,
(2) Located on rear of housing.
5. Remove (2) screws from each end of brush housing and remove
brush assembly.
6. Inspect/replace brush and bearings as required.
the brush is equipped with a yellow wear indicator bristIes. The brush
should be replaced when it wears down to the height of the yellow
bristles.
7. When installing belt push down on motor for proper tension.
8. When reinstalling brush, check belt for proper tension.
TO ACCESS AND REMOVE VAC MOTOR
AND FILTERS.
1. Open lid cover.
2. Remove (2) screws from each/both vac motor brackets.
REMOVAL OF VAC MOTOR CARBON BRUSHES
1. Access vac motors as described above.
2. Vac motor can be lifted out and electrically disconnected.
—
WARNING
THE GREEN GROUND MUST ATTACH THE MOTOR TO THE
POWER CORD FOR SAFE OPERATION. SEE THE WIRING
DIAGRAM.
NOTE: WHEN REPLACING ELECTRICAL COMPONENT PARTS
REFER TO WIRING DIAGRAM FOR PROPER CONNECTION.
NOTE: THE VAC MOTOR IS PROTECTED BY A CIRCUIT BREAKER
LOCATED IN THE SWITCH PANEL. THE BREAKER WILL ONLY
TRIP UNDER CONDITIONS OF ABUSE.
BRUSH MOTOR
1. Access belt and brush as described above.
2. Disconnect spring holding frame to brush motor housing.
3. Remove (4) bolts holding motor housing to the chassis and lift out
motor asm.
4. Remove brush motor pulley and (2) bolts holding motor to bracket
lift out brush motor.
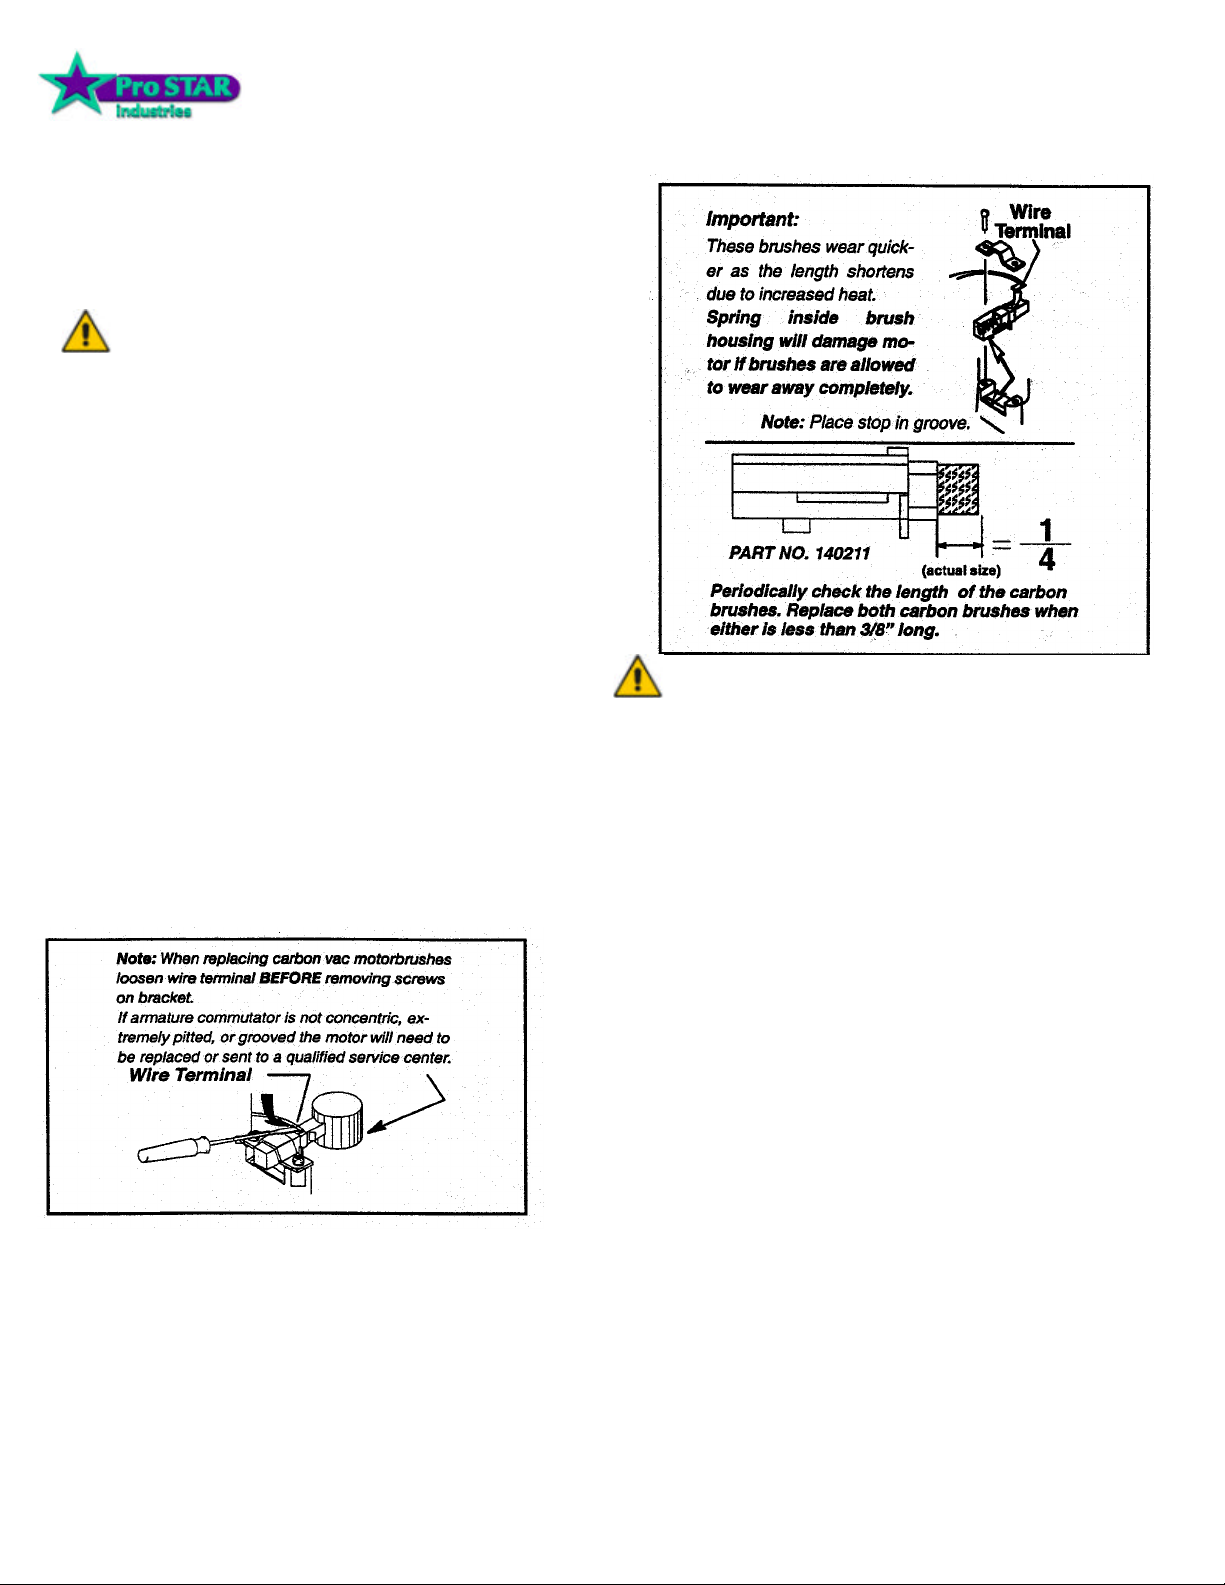
CARBON BRUSH (PART NO. 140212)
1. Access belt and brush as described above.
2. Remove brush caps. NOTE: BRUSHES SHOULD BE
REPLACED WHEN WORN TO 3/8” OR LESS.
NOTE: BEFORE REINSTALLING BRUSH MOTOR BRACKET
M
ASSEMBLY IT’S RECOMMENDED THAT THE REAR
SPRING BE RECONNECTED TO THE FLAPPER
ASSEMBLY.
WAVE Instructions page 7
Page 8

MAINTENANCE
DAILY MAINTENANCE
1. Shake down bag daily.
2. Check power cord for damaged or frayed
insulation.
3. Return brush adjustment lever to store RE”
position when the machine is not in use.
4. Check for and remove any lint or debris
around brush and brush housing.
REGULAR/PERIODIC MAINTENANCE
1. Every 4 to 6 months remove wheels, clean
axles, and apply a thin coat of silicone lubricant to axles.
2. The filter bag can be washed twice before
losing the filtering capability. This should be done using
a mild detergent in cool water and hung up to drip-dry.
3. Inspect and clean vac motor filters.
4. Periodically inspect all hoses, electrical
cables, filters, gaskets and connections on your
machine. Frayed or cracked hoses should be repaired or
replaced to eliminate v acuum loss.
5. The electrical cable must be well insulated, if
the cable insulation is broken or frayed, repair or replace
it immediately. Don’t take chances with electrical fire or
shock
SUGGESTED SPARE PARTS LIST
BELT 11041
PAPER BAGS 140168
(PACKAGE OF 10)
VAC MOTOR FILTER 34012
REAR EXHAUST FILTER 34309
CLOTH BAG 140164
VACUUM MOTOR
CARBON BRUSH 140211
BRUSH MOTOR
CARBON BRUSH
2 REQUIRED PER MOTOR 140212
Pro STAR Industries
1590-A N. Harvey Mitchell PKWY
Bryan, TX 44503
979-779-9399 1-800-262-7104
WAVE Instructions page 8
Page 9

Pro STAR Industries
1590-A N. Harvey Mitchell PKWY
Bryan, TX 44503
979-779-9399 1-800-262-7104
Trouble Shooting Chart
Condition Corrective Action
No Power To Machine:
Dead electrical circuit breaker in fuse box Check building circuit breaker.
Faulty power cord Test power cord for continuity I Replace if necessary.
Power switch failure Test switch for continuity. Replace if necessary
Faulty circuit breaker Test circuit breakers for continuity/ Replace if necessary.
Intemal wiring problem With the machine unplugged, check for, and correct, any loose wire
connections inside the machine at the switches and terminal block.
Electrical Shock:
Equipment not grounding Follow grounding instructions exactly.
Receptacle not grounded Have an electrician inspect the building’s wiring.
Internal electrical problem Ensure that the machine’s wiring matches the appropriate wiring diagram.
Check for and correct any loose wire conneetions~ Replace any wires or
components which are short circuiting.
Vacuum Motor Soeed Varies or Doesn’t Run:
Circuit breaker tripped Reset vac motor circuit breaker (13 amp).
Faulty vac circuit breaker Check for continuity I Replace as necessary.
Intemal wiring problem With the machine unplugged, check for, and correct, any loose wire
connections inside the machine at the switches and terminal block.
Power switch failure Test switch for continuity I Replace if necessary.
Wom motor brushes Replace if less than 1I4”.
Brush Motors do not run:
Circuit breaker tripped Reset brush motor circuit breaker (2 amp).
Faulty brush circuit breaker Check for continuity / Replace as necessary.
Internal wiring problem With the machine unplugged, check for, and correct; any loose wire
connections inside the machine at the switches and terminal block.
Fautly brush switch Remove leads and check switch for continuity. Replace.
Wom motor brushes Replace if less than 3/8”.
Mechanical problems Higher amp draws may indicate a mechanical problem. Find parts which are not moving freely
Faulty brush motor If the belt, circuit breaker, and switch have been tested and found in good
Loss Of Vacuum :
Bag full Replace
Flapper in correct position FLOOR TOOL
Damaged lid gasket Replace
Accessory tool clogged Clean out tool, ensure free airflow.
Vac hose damaged Replace
Debris Chute Clogged Remove chute access PN 05125 and clean chute out.
and repair or replace.
working order, the brush motor may need to be replaced.
WAVE Instructions page 9
 Loading...