

Page 1
WWW.MANUALS.WS
WWW.MANUALS.WS
MODEL POWER SOURCE
VGR2 BATTERY
Beginning with Serial# 1000081028
y
Read instructions before operating the machine.
H
98953 05/05/05
Page 2

WWW.MANUALS.WS
WWW.MANUALS.WS
MACHINE DATA LOG/TABLE OF CONTENTS
MODEL
- _____________________________________
TABLE OF CONTENTS
DATE OF PURCHASE - _________________________
SERIAL NUMBER - ____________________________
SALES REPRESENTATIVE - ____________________
DISTRIBUTOR NAME - _________________________
Copyright 2001 Windsor Industries, Printed in U.S.A.
Data Log / Table of Contents ............................ 2
Technical Specifications ................................... 3
Safety Precautions ........................................... 4
Battery Installation & Removal .......................... 5
Battery Information........................................... 6
Operation Controls........................................... 7
Operations....................................................... 8
Accessory Tools and Maintenance .................... 9
Maintenance .................................................... 10
Service Schedule ............................................. 13
Propel Handle Assembly. ..................................14
Drive and Brush Assembly................................16
Pump, Vac, Manifold and
Brush Motor Assemblies ...................................18
Rear Tower Electrical Assemblies ......................20
Handle, Microswitch and
Cable Assemblies.............................................22
Control Panel Assemblies .................................24
Vac Shoe Assembly..........................................26
Tank, Cover and Hardware ................................28
Wiring Diagram .................................................30
Warranty..........................................................31
2
98953 02/14/04
Page 3

WWW.MANUALS.WS
WWW.MANUALS.WS
TECHNICAL SPECIFICATIONS
ITEM MEASURE
Electric Propelling Motor (1)-1/4 hp DC (186 watts) with solid state
variable speed forward and reverse with
safety shut-off.
Electric Vacuum Motors (2)- 3 stage, 1.3 hp (970 watts), 5.7 inch
(14.5cm) diameter motors in parallel,
provide 152 cfm (4.25m/min.), 74 inches
(188 cm) water lift total. Electric shut-off.
Electric Brush Motors (1)- 0.4 hp (298 watts) permanent
Electrical 36 Volt DC
Batteries (3)- 12 volt, @ 185 A/H, in a (Optional)
Solution Pump 100 PSI, diaphragm style pump
Cleaning Speed Variable speeds from 0-130 ft/min
Solution Capacity 40 gallons (151 ltr)
Recovery Capacity 35 gallons (132 ltr)
Brush Speed 1000 RPM
Vacuum Shoe 28” (71 cm) wide, cast aluminum, tension
Wheels:
Front: (2) 10” dia. (25 cm) by 2.5” wide (6.4 cm)
Rear: (2) 4” dia. (10 cm) casters
Weight:
Empty: 240 lbs. (109 kg)
W/ Batteries 645 lbs. (260 kg)
Length 60” (152 cm)
Storage Position 52” (132 cm)
Height 43” (109 cm)
Width 30” (76 cm)
magnet, DC.
removable battery pack.
(39.6m/min) Transport 0-130; Cleaning
0-110
pulley adj., floating and pivoting.
SIDE VIEW
TOP VIEW
VGR2 98953 12/18/01
3
Page 4

WWW.MANUALS.WS
WWW.MANUALS.WS
IMPORTANT SAFETY INSTRUCTIONS
!
WARNING:
When using a battery powered appliance, basic precaution
must always be followed, including the following:
READ ALL INSTRUCTIONS BEFORE USING THIS MACHINE.
To reduce the risk of fire, electric shock, or injury:
Do not use outdoors or expose to moisture.
Do not operate in standing water.
Machines can cause a fire when operated near flammable vapors or materials. Do not operate this
machine near flammable fluids, dust, vapors or gas. Do not pickup burning materials such as cigarettes
or matches.
Operate this machine only from the rear of the machine.
Maintenance and repairs must be done by qualified personnel.
Store machine inside. Keep the electrical components of the machine dry.
Wear eye protection when working near batteries. Do not put any type of metal objects across the
battery terminals or on top of the batteries.
Lead acid batteries generate gasses which can cause an explosion. Keep sparks and flames away
from the batteries. Charge the batteries only in well ventilated area.
Make sure all warning and caution labels are legible and properly attached to the machine.
Maintain adjustments on machine as per specifications noted in the owner’s guide.
SAVE THESE INSTRUCTIONS
IMPORTANT SHIPPING NOTE
Carefully unpack your Voyager and inspect it for shipping damage. Any damages which occurred
during shipping are the responsibility of the carrier, who must be notified immediately.
4
VGR2 98953 12/18/01
Page 5
WWW.MANUALS.WS
WWW.MANUALS.WS
BATTERY INSTALLATION & REMOVAL (W/ BATTERY CART)
!
WARNING:
!
CAUTION:
!
CAUTION:
!
CAUTION:
A
(REF)
Key
P/N
Description
* NOTE: ONLY THE NEW “VCT”
WEAR EYE PROTECTION AND PROTECTIVE CLOTHING WHEN WORKING
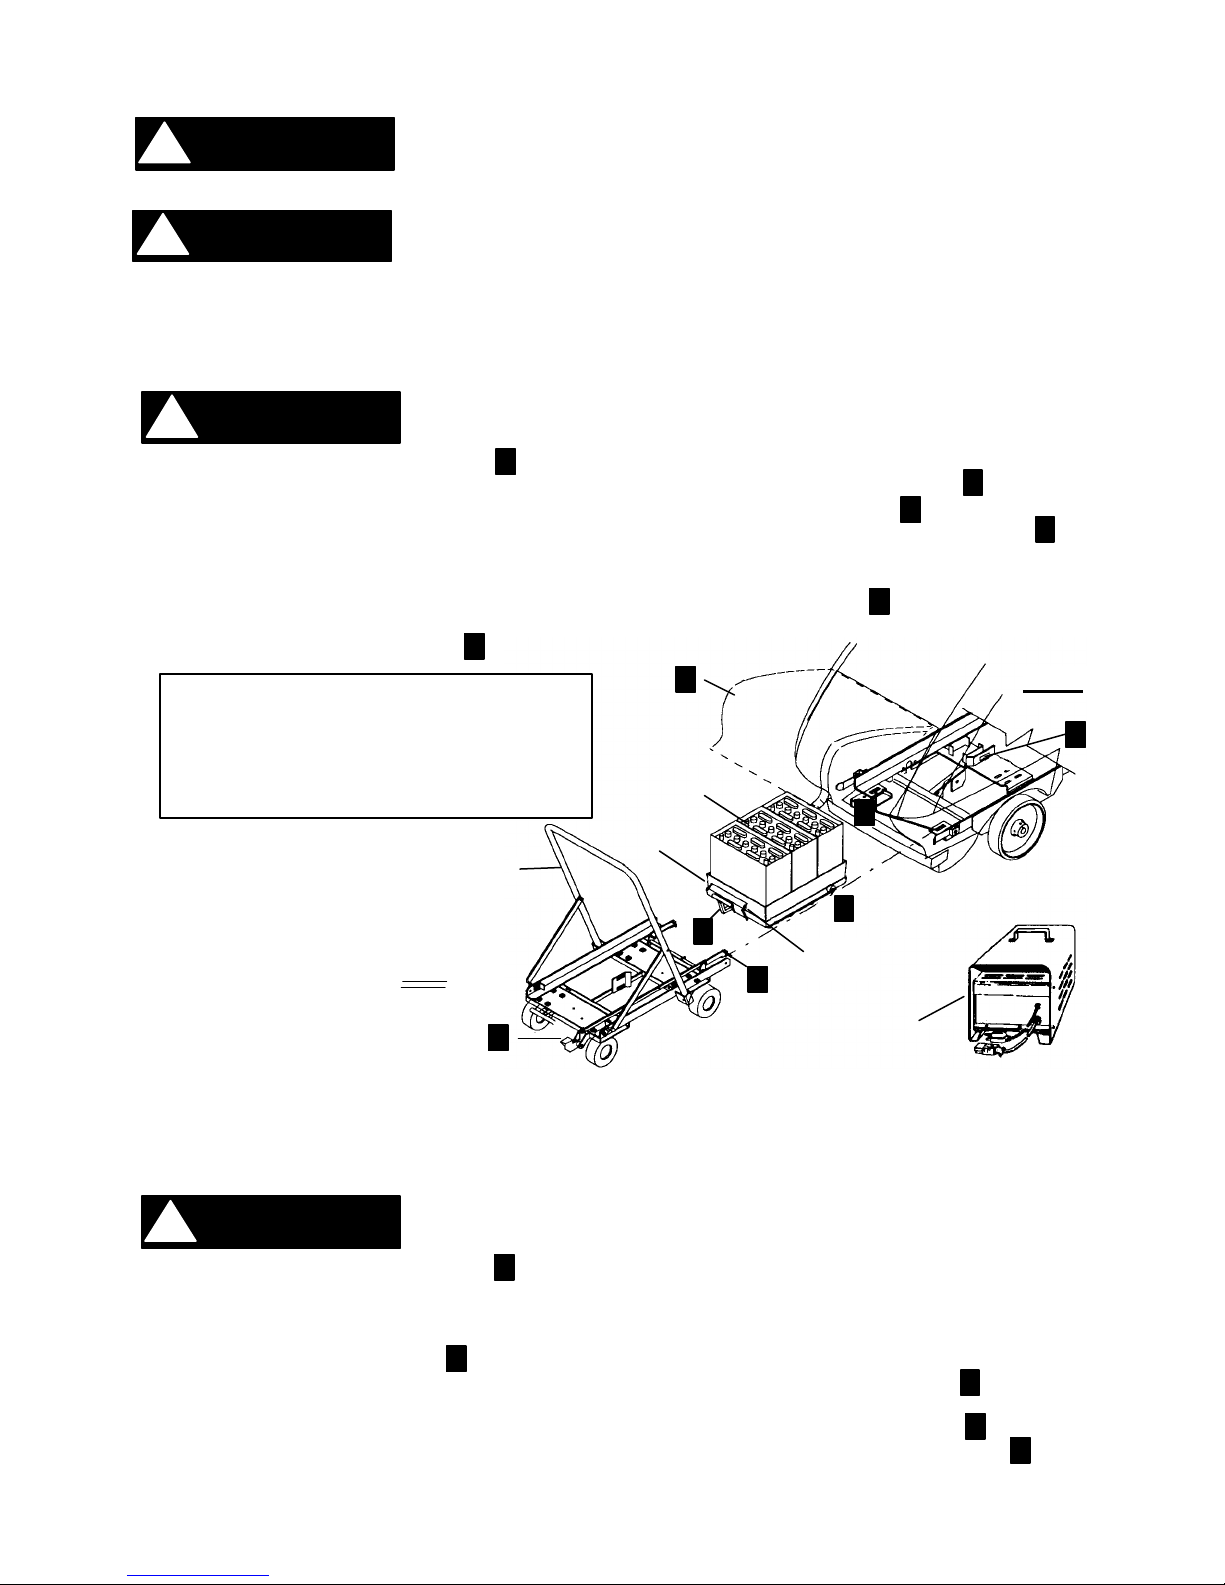
BATTERY INSTALLATION AND REMOVAL
1. Remove the vac shoe hose from tank, lay dome back and slowly open tank to upright position.
2. Install (3) batteries in machine by placing them in battery tray liner provided. (See diagram page 6)
3. Connect battery wires according to diagram on page 6.
INSTALLATION OF BATTERIES
WITH BATTERIES.
FOLLOW THE PROCEDURES CAREFULLY.
FOLLOW PROCEDURES CAREFULLY, BE SURE TO KEEP HANDS AND
FEET CLEAR FROM ROLLING BATTERY TRAY.
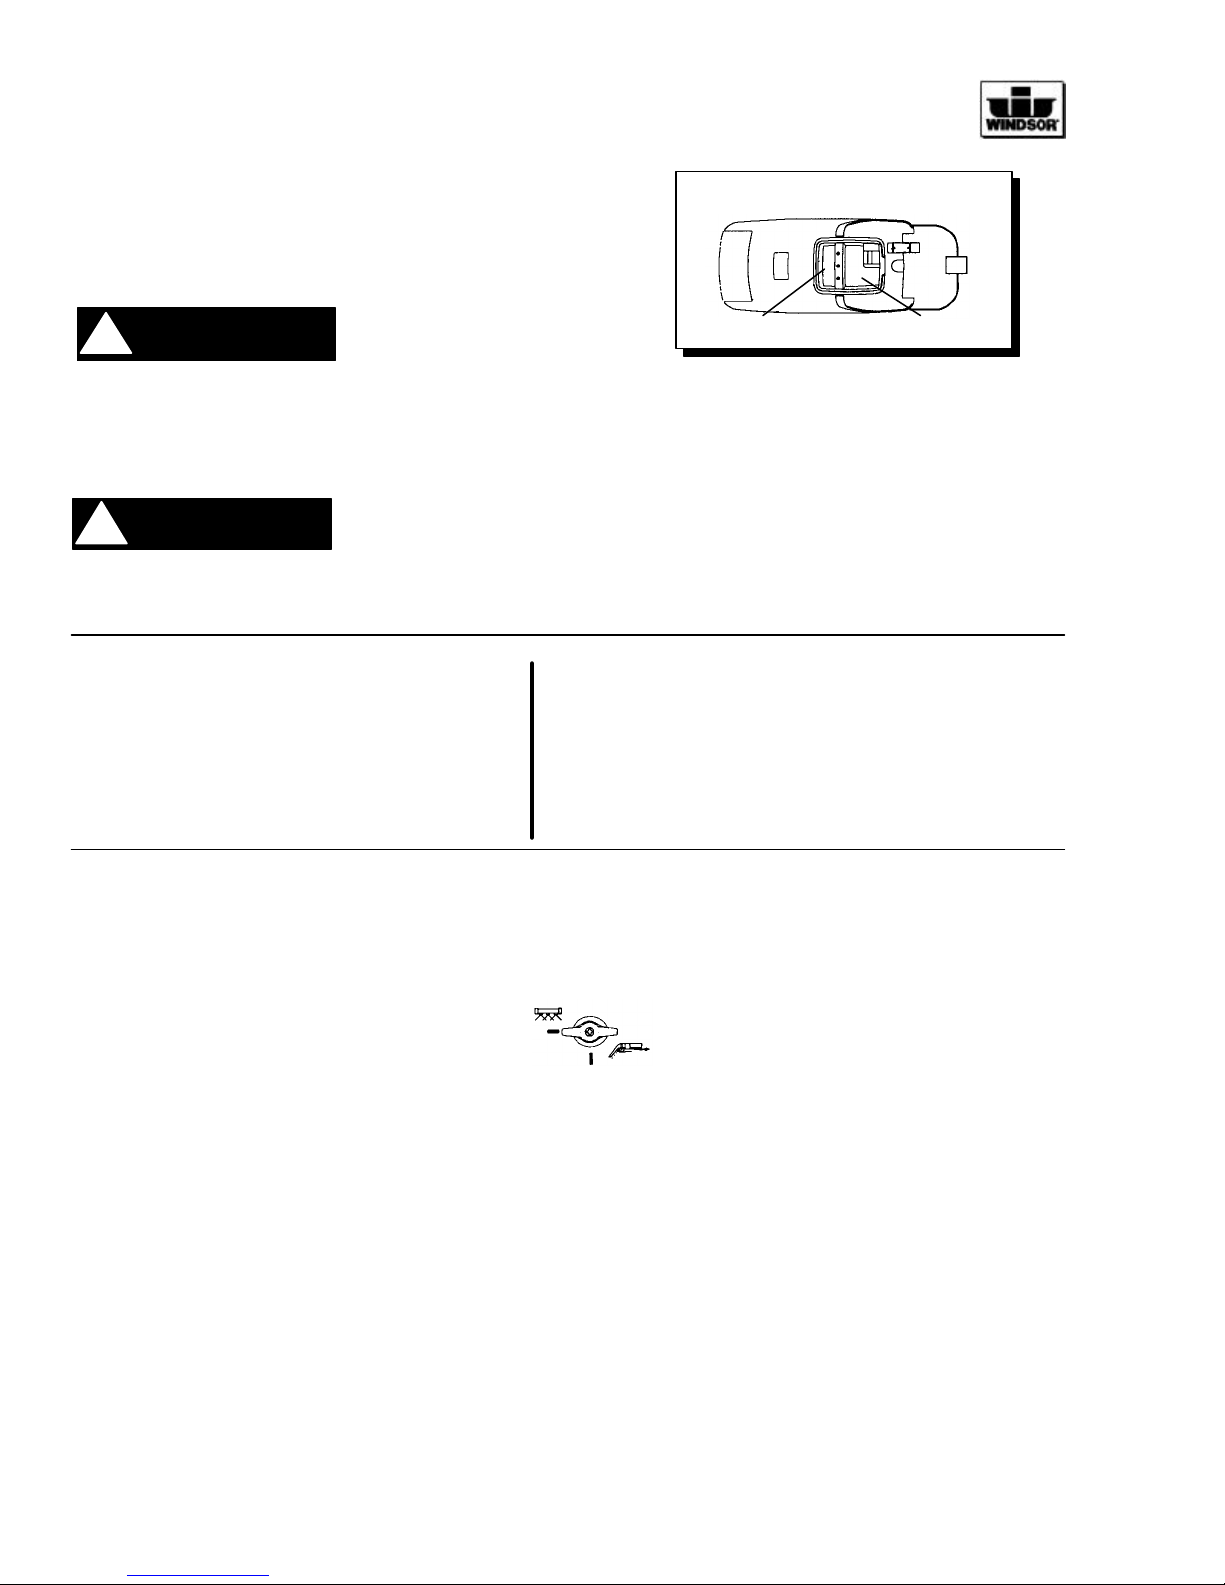
1. Make sure the battery door is open.
2. Roll the Battery Cart up to the front of the machine, (aligning the front of the two frames).
3. Push the cart until the latches lock into the tabs on the front of the machine frame.
4. Pull the handle on the Battery Tray. (This releases the locking mechanism on the cart.) Fig 1 & 2
5. Push the batteries into the machine until the locking mechanism on the frame is engaged. (This can be heard
by a “Snapping” sound.) Fig 1.
6. Press the foot pedal on the front of the cart and roll the cart from the machine.
7. Attach battery cable from the batteries to receptacle on front of machine by pressing down on right hand side
of locking bracket. (p/n 140190)
1 VCT CART, BATTERY REMOVAL
2 78243 TRAY, VGRB BATTERY LINER
3 78369 TRAY ASSEMBLY BATTERY
4 02143 (3) BATTERY, 12 VOLT
5 02267 CHARGER, 36 VOLT
CART AND NEW TRAY ASSEMBLY
WILL WORK WITH THE VOYAGER
2. PREVIOUS CARTS AND TRAYS,
IN ANY COMBINATION, WILL NOT
WORK.
A
F
F
C
E
B
D
FIG. 1
E
1
4
C
2
B
D
140190
G
5
REMOVAL OF BATTERIES
BEFORE REMOVING BATTERY TRAY PLEASE FOLLOW THE INSTRUCTION SHEET 98439.
If you did not receive this sheet please contact Windsor Industries for this instruction sheet.
1. Make sure the battery door is open.
2. Disconnect battery cable from receptacle on front of machine.
3. Roll the cart up to the front of the machine aligning the front of the two frames.
4. Push the cart until the latches lock into the tabs located on the front of the machine. (The tabs cannot be seen
when batteries are installed.)
5. The latches are engaged when a “Snapping” sound is heard. Pull the handle on the tray. (This releases the
locking mechanism on the machine frame.) (Fig 1 & 2) Continue to pull handle until the battery pack rolls and
locks onto cart. (The locking mechanism is engaged when a “Snapping” sound is heard.)
6. Press the foot pedal located on the cart and roll the batteries and cart away from the machine.
FOLLOW PROCEDURES CAREFULLY, BE SURE TO KEEPS HANDS AND
FEET
A
B
VGR2 98953 12/18/01
D
G
F
5
Page 6
WWW.MANUALS.WS
WWW.MANUALS.WS
BATTERY INFORMATION
!
WARNING:
!
WARNING:
!
WARNING:
NOTE:
Following you will
ANDERSON
Molex
FRONT OF
VIEW: Looking down on machine.
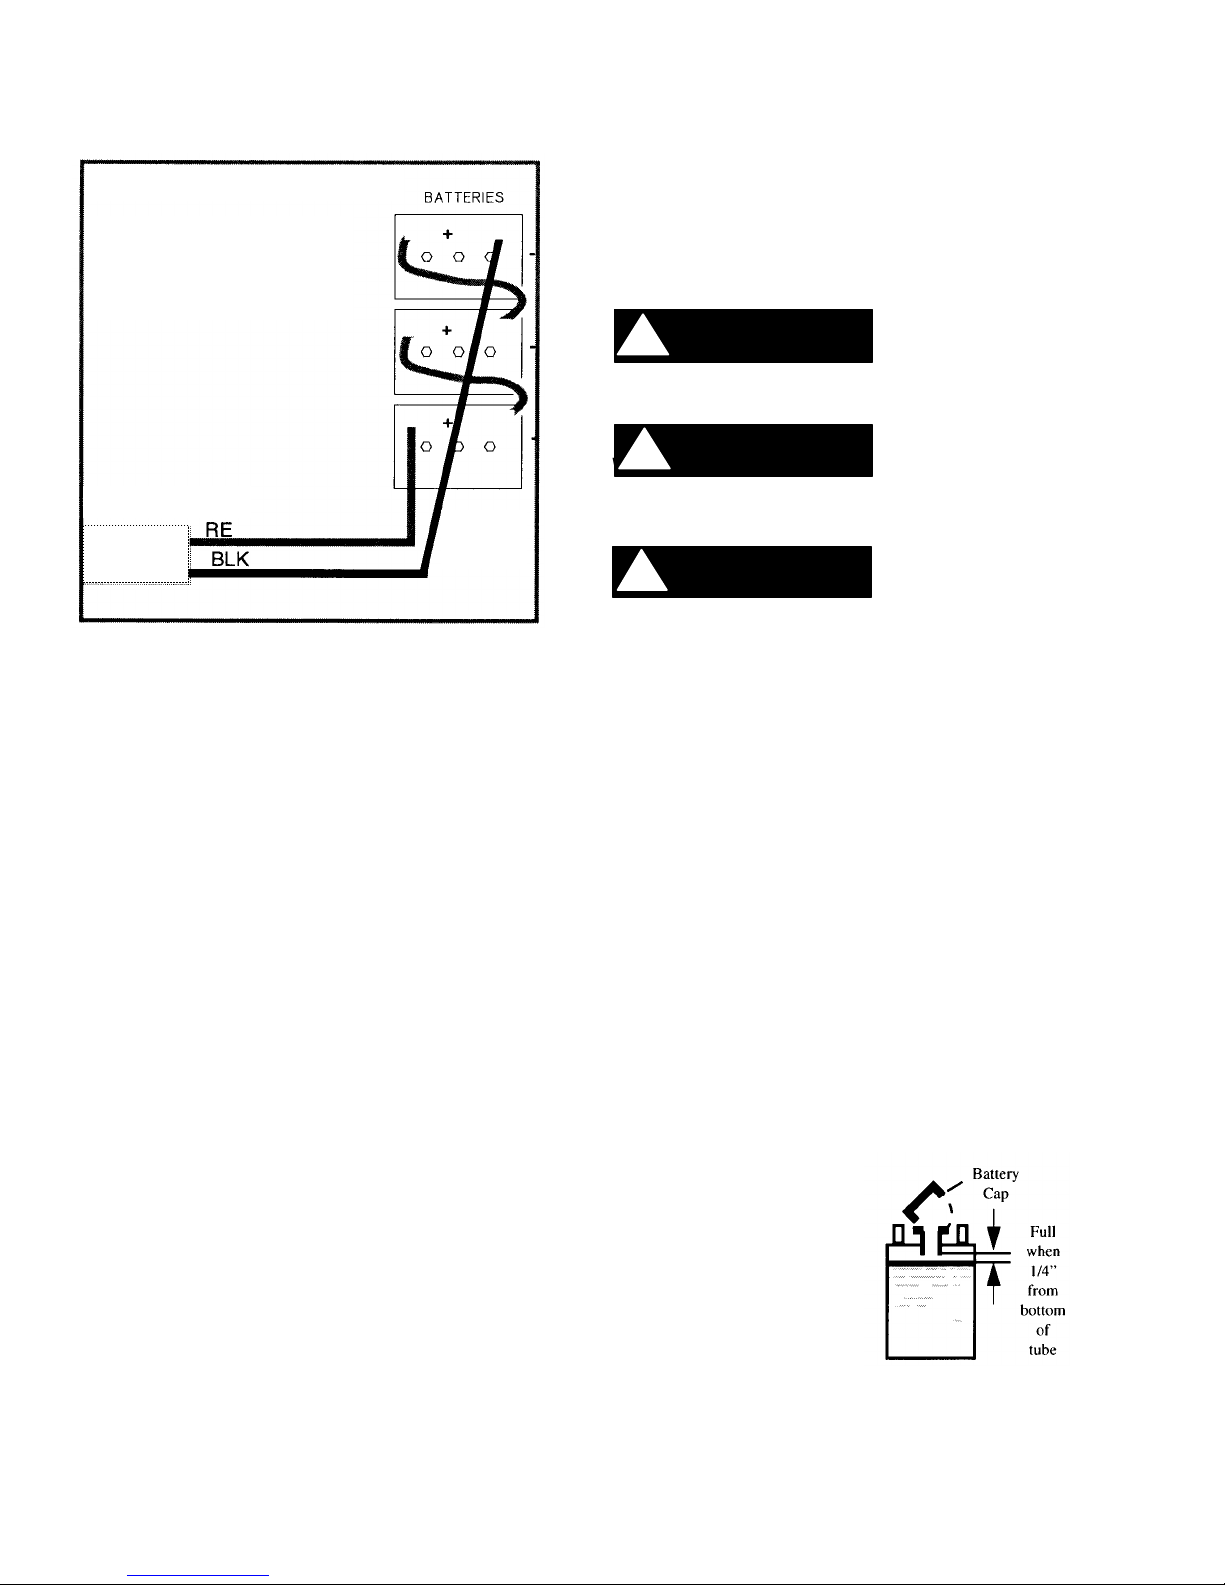
find the recommended
battery arrangement for the
VOYAGER2
BATTERY CHANGING PROCEDURE:
Charge the batteries once battery level indicator is
near the level “0”. Do not let the batteries
completely drain before changing. Avoid charging
the batteries before the amber light comes on.
DO NOT SMOKE, HAVE OPEN FLAMES, OR
SPARKS NEAR BATTERIES AT ANY TIME.
WEAR EYE PROTECTION AND PROTECTIVE
CLOTHING WHEN WORKING WITH BATTERIES.
MACHINE
connector
BATTERY MAINTENANCE
1. When cleaning batteries use a solution of baking
soda and water. (Do not allow cleaning fluid to
enter inside battery cells.)
2. Keep a proper electrolyte level in the battery
cells.
3. Wipe down the battery tops at least once a
week. If a cell should accidentally overflow,
clean it immediately.
4. Test the battery connection with a hydrometer at
least once a week.
5. Ensure that all connections are tight and that all
corrosion is removed.
6. Every 4 to 6 months remove batteries from the
machine and clean the battery compartment.
7. Follow the Safety Procedures.
ACCESSORIES
02143 Battery. 12V DC, 185 Amp Hour
00267 Charger, automatic 36V (20 amp) 115V
02264 Charger, automatic 36V (20 amp) 230V
INTERNATIONAL
VCT Battery cart system for service
78243 Battery tray liner
VXK Battery Exchange Kit
ACCESSORY TOOLS:
DHTK Deluxe Hand Tool Kit
DDH Double Dry Hand Tool
HFT 14” Flip Tool
89227 Standard Wand
89226 Deluxe Professional Wand
39128 12” Hose set
CHARGE BATTERIES IN A WELL VENTILATED
AREA WITH BATTERY DOOR OPEN.
1. Use a 36 volt, 20 amp maximum output, D.C.
charger which turns itself off when the batteries
are fully charged. The charger must have a
connector that matches the machine’s battery
connection.
2. Read the instructions and warnings provided by
the battery charger manufacturer.
3. Set the charger in a well ventilated area on a
level surface. Make sure cords will easily reach
outlets on both machine and wall.
4. Connect the charger to D.C. outlet on the
machine first.
5. Connect the A.C. power cord to properly
grounded wall socket. NEVER MAKE THE A.C.
CONNECTION FIRST, HAZARDOUS SPARKS
MAY RESULT.
6. After the batteries are completely charged,
disconnect the charger from the A.C. wall
socket.
7. Once the charger is disconnected from the A.C.
wall socket it is safe to disconnect the charger
from the machine.
8. When batteries are
fully charged, check
the electrolyte level by
removing the caps on
top of batteries. If
necessary, fill the
cells with distilled
water as shown in the
diagram to the right.
Be careful not to
overfill the cells.
6
VGR2 98953 12/18/01
Page 7
WWW.MANUALS.WS
WWW.MANUALS.WS
OPERATION CONTROLS
40
10
DRAIN
TO VAC SHOE
SIGHT
3
SEE BELOW
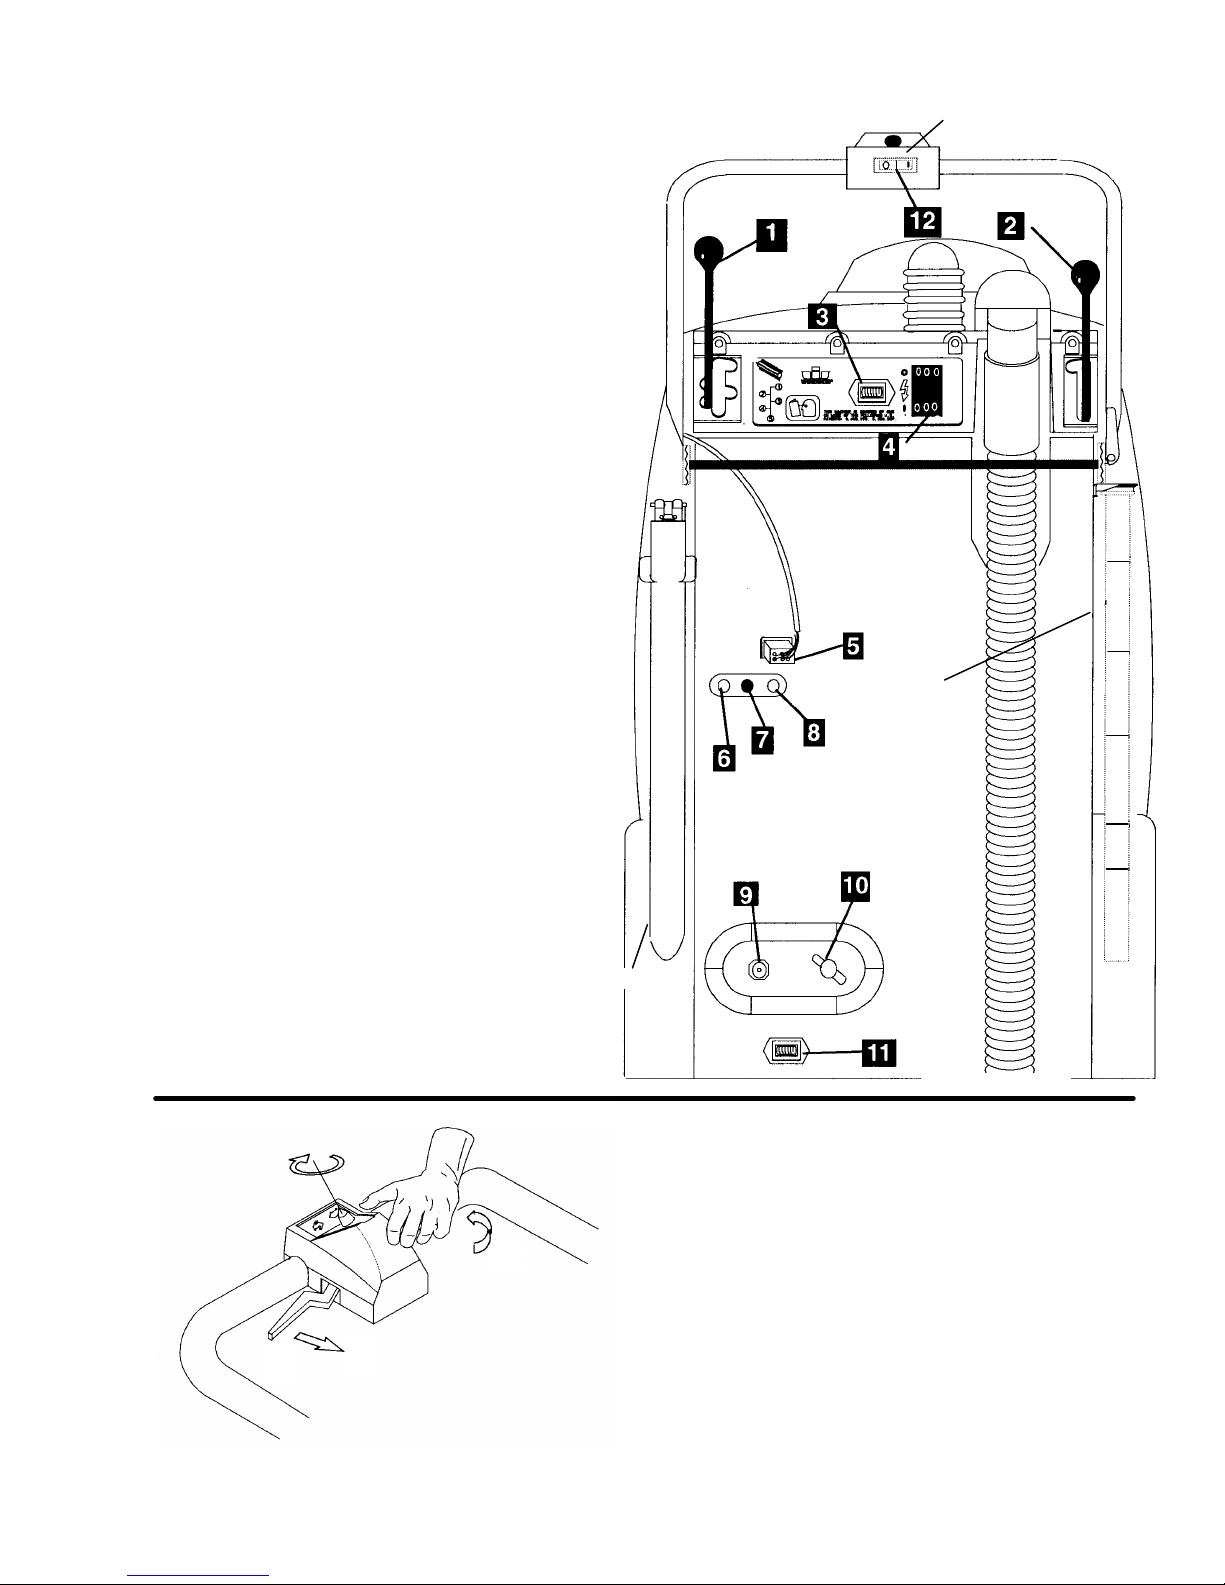
1. Brush Height Adjustment. Raises and adjusts
the height if the brush.
2. Vac Shoe Lift Lever. Lifts the vac shoe up or
down and switches vac motor off and on.
3. Battery Charge Meter. Indicates the level of
charge that the batteries are holding.
4. Main Power Switch. Turns ON and OFF the
machine.
5. Drive Handle Control Connection. This is
where Drive Control Connection Assembly is
attached to rear panel.
6. Drive Motor Circuit Breaker. 16 amp Protects
the dirve motor mechanism.
7. Vac Motor Circuit Breaker. 35 amp Protects
the vacuum motors.
8. Brush Motor Circuit Breaker. 15 amp
Protects the brush motor.
9. Accessory Tool Hookup. Used for various
auxiliary cleaning tools.
10. Spray Position Switch. Controls the spray
adjustment between manifold and accessory
tools.
11. Hour Meter. Records the use time.
12. Pump Switch. Turns ON and OFF the pump
FILL
TUBE
GAL
30
GAL
20
GAL
GAL
5
GAL
1
4
2
VGR2 98953 12/18/01
VOYAGER DRIVE CONTROLS
1. The speed the machine will travel is regulated by
the knob located on the controls which are found
on the main handle. Turn the knob to the right to
increase the speed of the machine.
2. Squeezing one or both of the control levers will
propel the machine forward are the selected
speed.
3. Releasing both control levers will stop the
machine.
4. Pressing forward on the levers moves the
machine backwards at the selected speed.
7
Page 8
WWW.MANUALS.WS
WWW.MANUALS.WS
OPERATIONS
SOLUTION TANK
RECOVERY TANK
!
CAUTION:
!
WARNING:
Fill the solution tank to the desired level according to the marked
gauge on the clear hose on the right side of the tank.
DO NOT FILL PAST THE INLET LIP.
TOP VIEW OF TANK
IF A BUCKET IS USED TO FILL THE TANK, BE SURE IT IS CLEAN. DO NOT OVERFILL TO AVOID
POSSIBLE DISTORTION OF THE FLEXSOL DIAPHRAGM OR SOLUTION TANK. DO NOT USE WATER
TEMPERATURE THAT EXCEEDS 140°F (60°C). LIQUID DETERGENTS ARE PREFERRED, however if a
powered detergent is used, be sure it is fully dissolved. NOTE: If suitable powered detergent is used, premix
with hot water before filling the solution tank.
DO NOT PUT DEFOAMER, SOLVENTS, SPOTTER OR PRESPRAY
CHEMICALS IN THE SOLUTION TANK.
The internal parts of the pump used in the extractor are suitable for use with most carpet cleaning chemicals.
However, it is susceptible to chemical attack from cleaning substances, such as hydrocarbon solvents and
chlorinate bleaches. These noncombustible materials are not of the type normally used for carpet cleaning.
CHEMICALS:
SUITABLE CHEMICALS NONCOMPATIBLE CHEMCIALS
Alkalis Soaps Aldehydes Chlorinated Hydrocarbons
Detergents Vinegar Aromatic Hydrocarbons Lysol*
Hydroxides D-Limonene @ SP Butyls Methyl Ethel Ketone (MEK)
@ When properly diluted Carbon Tetrachloride Perchorethylene (perc)
* Registered Trademark Chlorox* Phenolics
Chlorinated Bleaches Trichlorethylene
FILLING THE VOYAGER
1. Remove the Dome.
2. Use a CLEAN bucket or hose to fill solution tank with hot water not to exceed 140°F (60°C). Do not fill above lower tank lip. Add non-
foaming carpet extraction chemical at recommended proportion. NOTE: If suitable powdered detergent is used, premix with hot
water filling the solution tank.
BEGIN CLEANING
1. Adjust handle to comfortable position at waist level.
2. Turn solution valve, located on bottom of rear position.
3. Turn MAIN POWER switch ON.
4. Adjust SPEED CONTROL KNOB on handle to set desired maximum speed.
5. Turn SOLUTION switch ON.
6. Lower BRUSH using left hand lever until contact with carpet is reached. Brush motor will start automatically.
NOTE: Incorrect brush height may trip circuit breaker or cause belt slippage. To correct, raise brush and reset circuit breaker
located on rear panel.
7. Lower VACUUM using right hand lever. Vacuum motor will start automatically.
8. Depress SPEED LEVER to propel machine. Speed is controlled by lever up to the maximum set on CONTROL KNOB.
NOTE: For protection, the Voyager will not operate in reverse when brush is on.
CLEANING PROCEDURE
1. Operate machine in parallel passes, overlapping 2 inches on each pass. Turn SOLUTION switch OFF on turns. Propel machine gently
into turns. Abnormal turns may activate vacuum motor shut-off. Clean perimeter last.
2. Run machine more slowly over spots or extremely soiled areas.
3. Use right side of VOYAGER when cleaning against walls.
4. Turn SOLUTION switch OFF 3 feet before completing a cleaning pass to ensure all solution is vacuumed from carpet.
CAUTION: WHILE OPERATING MACHINE, CHECK FOR EXCESSIVE FOAM BUILD-UP IN RECOVERY TANK. IF EXCESSIVE
FOAM IS PRESENT, ADD DEFOAMER SOLUTION TO RECOVERY TANK OR EMPTY RECOVERED SOLUTION.
5. To speed dry, use a WINDBLOWER fan and ensure building ventilation system is ON.
6. Empty recovery tank when full by releasing dump hose and removing stopper. NOTE: Vacuum motor will stop if recovery tank is full.
7. Turn MAIN POWER switch OFF after use.
NOTE: Check the Circuit Breaker if the Voyager does not start.
8
VGR2 98953 12/18/01
Page 9

WWW.MANUALS.WS
WWW.MANUALS.WS
ACCESSORY TOOLS & MAINTENANCE
!
CAUTION:
!
WARNING:
ACCESSORY
1. Attach the auxiliary solution hose to the output nipple A.
2. Disconnect hose at vac shoe using and connect vac hose using
coupler (22071) that is included with Voyager machine.
3. Turn the solution control valve B to
4. Press the Pump switch “ON”.
5. Lower the vac lever to the “ON” position to start the vac motor.
6. Make sure the solution control valve is returned to the
7. position before using the Voyager for self-contained
carpet cleaning.
CLEANUP AND STORAGE
Empty the Recovery Tank directly into the floor drain. After each use, rinse tank (including the float-off) with fresh
water. Periodically inspect the recovery tank and decontaminate if necessary, using a Hospital Guide Virucide or
a 1-10 bleach to water solution. This will dissipate the exposure to blood born or infectious contamination. Waste
water shoud be disposed of properly. Clean the inside of the recovery dome also.
Empty the Solution Tank by detaching the sight hose and empty directly into the floor drain.
Flush the Solution System with 1 gallon of CLEAN water.
Never allow recovered solution to remain in tank when not in use; nor allow
usused solution to remain in the solution tank when in storage. Inspect and
clean the filter located at the pump port. Remove and rinse with hot water.
PERIODIC MAINTENANCE
A
B
EVERY TWO WEEKS:
Clean the solution system by diluting 2 gallons of clean water with a quart of white vinegar (acetic acid) in the
solution tank. Run the solution through the system to remove chemical buildups which could eventually cause it to
plug up.
EVERY 500 HOURS:
Oil the front drive wheel bearings by removing the phillips screw “A” and by
loosening the (2) set screws “B” located on the outside of wheel assembly. Slide
the wheel off the axle and apply 6 drops of 10W oil to bearings. Be careful not to
lose the key in shaft.
INSPECTION
B
A
Remove the batteries (using the battery cart if available) before making any
adjustments or repiars to the Voyager2.
To expose working parts for inspection, lay dome back on handle, grasp tank at solution opening and tilt the tank
forward until “NOSE” of tank rests on floor.
VGR2 98953 12/18/01
9
Page 10

WWW.MANUALS.WS
WWW.MANUALS.WS
ACCESSORY TOOLS & MAINTENANCE
!
WARNING:
!
CAUTION:
Important:
Per
iodically check the length of the carbon brushes. Replace
Vacuum Motor Carbon Brushes Replacement (
Carbon
If armature commutator is grooved, extremely pitted or not
Note:
Carbon
Brushes
If armature commutator is grooved, extremely pitted or not
Important:
Periodically check the length of the carbon brushes. Replace
ONLY QUALIFIED MAINTENANCE PERSONNEL
ARE TO FERFORM THE REPAIRS.
Remove the batteries (using the “Battery Cart” if
available) before making any adjustments or repairs
to the Voyager2.
WHEN REPLACING THE ELECTRICAL PARTS
REFER TO THE MACHI NE WIRING DIAGRAM
FOR PROPER CONNECTIONS.
REAR PANEL REMOVAL
Remove the vac shoe hose from tank, lay dome
back, remove handle and open the front battery
door. Open the tank slowly to upright position.
Remove (2) top and (2) bottom screws on rear
panel.
TANK REPAIR
The tanks are made of Polyethylene. Small holes or
crack can be repaired by using heat. Apply low heat
from a torch to the damaged are until the material is
softened. Use a screw driver blade or other flat head
metal tool to seal damaged area.
VACUUM MOTOR REMOVAL
1. Turn main power off.
2. Remove the rear Control Panel and open tank to
upright position.
3. Disconnect the hose from the vac motor intake.
4. Disconnect the vac motor leads from the
terminal couplers & ground post.
5. Remove the (3) screws holding the vac motor to
the rear frame and remove the vac motor.
6. To inspect the motor brushes, remove the brush
holder assembly. Brushes should be replaced
when worn to 3/8 inch or about 750 operating
hours. After second brush replacement,
armature commutator should be checked for
pitting and concentricity. Vacuum motors can be
repaired, but such repairs should be made by a
qualified motor repair shop.
7. Clean out dust using a vacuum to prevent injury
to eyes or contamination of the bearings.
Brushes
End Cap
concentric, the motor will need to be replaced or sent to a
qualified service center.
These brushes wear quicker as the length shortens due to
increased heat. Spring inside brush housing will damage
motor if brushes are allowed to wear away completely.
both carbon brushes when either is less than 3/8" (9.5mm)
long.
Vacuum Motor Carbon Brushes Replacement (Windsor)
Place
stop in
groove.
concentric, the motor will need to be replaced or sent to a
qualified service center.
These brushes wear quicker as the length shortens due to
increased heat. Spring inside brush housing will damage
motor if brushes are allowed to wear away completely.
both carbon brushes when either is less than 3/8" (9.5mm)
long.
3
[9.5mm]
8
Ametek)
3/8 (9.5mm)
End Cap
10
98953 02/14/04
Page 11

WWW.MANUALS.WS
WWW.MANUALS.WS
MAINTENANCE
11
BRUSH MOTOR
IDLER PULLEY
(REF.)
BRUSH
PULLEY
(REF.)
BELT
SOLUTION PUMP REMOVAL
1. Turn main power off.
2. Disconnect the two pump wire leads.
3. Remove (4) screws holding the pump to the main frame.
4. Lift the pump out to access solution inlet and disconnect from the pump head.
Refer to the pump drawing page 16 for replacement parts.
BELT / BRUSH ASSEMBLY REMOVAL
1. Turn main power off.
2. Use brush height adjustment lever to lower brush to its lowest
position.
3. Remove the belt guard.
4. Now remove the brush pulley guard.
5. Loosen tension in belt by moving idler pulley clockwise.
Simultaneously remove belt from motor pulley, while holding idler
pulley. Once belt has been removed from motor pulley, slowly let
idler pulley rotate counterclockwise. Do not loosen spring.
6. Remove the screw from each end of the brush shaft.
7. Swing the brush assembly out of the housing to remove the belt.
PULLEY (REF.)
11027
(REF.)
98953 02/14/04
Page 12

WWW.MANUALS.WS
WWW.MANUALS.WS
MAINTENANCE
SIDE VIEW OF VAC SHOE
REF.
REF.
REF.
TRACKING
REF.
NUTS. REF.
REF.
SQUARE
6
1
34 82
MANIFOLD / SPRAY JETS
To prevent clogged jets due to alkaline build -up, the spray system should be flushed with 1 gallon of clean hot
water at the end of each work day. The VOYAGER2 is equipped with “quick change” jets that can be easily
removed for cleaning. To remove – push jet in and rotate. Do not use pins or wire to remove obstruction as this
will damage jet and alter spray pattern.
1 66095 PLUG, 1/8 NPT HEX BRASS
2 44052 JETBODY, BRASS W/SEAL
3 54138 MANIFOLD ASM, 3 JET
4 40033 HOSEBARB, 1/4 MP T X 3/8 90D
5 66052 PIN, 1/8 X 1.0 ROLL
6 73576 SPRING, 2” X .600 OD
7 44060 JET, 8002 MINI-QUICK REPLACEMENT
8 44051 JET SEAL, MINI QUICK
9 54162 MANIFOLD A
VAC SHOE TRACKING
To adjust shoe tracking, move eyebolts in or out to increase or decrease spring force, respectively, until desired
tracking is reached.
VAC SHOE DOWNPRESSURE
NOTE: DOWNPRESSURE IS FACTORY SET AND SHOULD NOT REQUIRE ADJUSTMENT.
If adjustment of downpressure is required, turn black knob on top of vac shoe clockwise to increas e
downpressure and counterclockwise to decrease downpressure.
CASTER ASM.
VAC SHOE
PIVOT ASM.
VAC SHOE ANGLE
NOTE: THE ANGLE OF THE VAC SHOE IS FACTORY
SET AND SHOULD NOT REQUIRE ADJUSTMENT.
Periodically inspect the vac shoe angle by resting it
on a hard, flat surface. Use a square to verify a 90°
angle between the floor and vertical surface of the
vac shoe.
If adjustment is required, remove one socket on each
lower arm (from the vac shoe or bracket) and turn
clockwise or counterclockwise to change the angle to
the recommended 90°. Attach the socket on each
arm to its respective location and recheck the angle
using the square. Repeat if necessary.
REF.
VAC SHOE
DOWNPRESSURE KNOB
PIVOT ASM.
SOCKET
ARM
REF.
ADJUSTMENT
9
VAC SHOE
FLAT SURFACE
1
5
“Quick
Change
Jets”
VAC SHOE
VERTICAL
SURFACE
OF VAC
SHOE
90°
12
98953 02/14/04
Page 13

WWW.MANUALS.WS
WWW.MANUALS.WS
MAINTENANCE
SERVICE SCHEDULE
MAINTENANCE DAILY WEEKLY QUARTERLY
Check recovery dome and gasket for
damage and cleanliness
Check batteries after charging, add
water if necessary *
Check brush – should be clean with no
lint or strings attached *
Inspect vac shoe for blockage; remove
fibers with coat hanger, etc.
Check hoses for wear, blockages, or
damage *
Check handles, switches, and knobs
for damage *
Check vac motor intake filter and clean *
Run one gallon of water through
system
Clean out recovery tank and check
float valve to make sure it moves freely *
Clean out solution tank and remove
and clean vacuum intake screen *
Clean outside of all tanks and check for
damage
Run vac motor for at least one minute
to allow motor to dry *
Store with dome off tank to allow the
tank to dry *
Check batteries for corrosion, cracks,
and evidence of overheating
Check all bearings for noise *
Check all gaskets for wear and leakage
Check vacuum intake screen for
damage; replace if necessary *
Check pump pressure; observe spray
pattern and check with gauge if
necessary
Check and clean solution screen *
Check belts for wear and replace as
necessary *
Check brush for wear; ensure bristles
are not damaged *
Check cables for fraying *
Check the spray bar (manifold) for
damage; replace if broken or bent
Check condition of vac shoe and frame
for damage *
Check overall performance of machine *
Check vac motor carbon brushes *
Check chains for wear and lube as
necessary *
*
*
*
*
*
*
*
*
98953 02/14/04
13
Page 14

WWW.MANUALS.WS
WWW.MANUALS.WS
PROPEL HANDLE ASSEMBLY
16
17
1
2
4
15
8
9
30
10
VIEW: CONNECTION DETAIL
5
29
22
14
11
29
12
13
12
30
7
23
26
6
18
25
3
24
15
28
27
20
21
19
Color AWG Position
Blue 20 1
Black 20 2
27
14
Brown 20 3
Orange 20 4
White 20 5
Red 20 6
28
VGR2 98953 10/19/02
Page 15

WWW.MANUALS.WS
WWW.MANUALS.WS
PROPEL HANDLE ASSEMBLY
REF PART NO. QTY DESCRIPTION
1 27551 1 COVER, PROPEL HANDLE
2 70406 4 SCREW, 10B X 3/8 PHSM BLK
3 87018 4 WASHER, #10 X 9/16 OD
4 57236 2 NUT, 10-32 HEX NYLOCK BLK
5 71116 1 SUPPORT, LEVER PIVOT
6 67271 2 ROD, HANDLE LEVER PILOT
7 51186 2 LEVER, PROPEL CTRL HANDLE
8 66184 1 PIN, CLEVIS 1/4 X 2.438
9 62705 1 PLATE ASSEMBLY, PROP. CTRL.
10 70209 2 SCR, 10-32 X 1.75 PHMS
11 36136 1 GUIDE, LEVER CENTERING
12 14866 2 BUSHING, PROPEL CONTROL
13 73236 1 SPRING, COMP. .36D X .12L X .04W
14 66191 1 PIN, CLEVIS 3/16 X 1/2
15 80604 2 RING, RUE COTTER 1/4”
16 72087 1 SWITCH, 36VDC SPST ILLUM.
17 57028 4 NUT, 10-24 TINNERMAN
18 48043 1 KNOB, PT26/32 SPEED CONTROL
19 880092 1 WIRE ASM, HANDLE TO POWER
20 57024 1 NUT, 3/8-27 PANEL
21 70084 1 SET SCREW, 8-32 X 3/16 KCP
22 66183 1 PIVOT, POTENTIOMETER
23 36123 2 GRIP, CLP HANDLE, X 9.5”
24 51184 2 LOCK, HANDLE ADJUSTMENT
25 70228 4 SCREW, 10-32 X 1/4 PHSM
26 38183 1 HANDLE, VGRB MAIN
27 88748 1 WIRE ASM., VGR. HANDLE
28 27554 1 CONN., MOLEX 6 PIN RECEPT. (M)
29 70088 4 SCR, 10-32 X 1/2 PPHMS
30 87016 6 WASHER, #10 LOCK EXT. STAR
SERIAL NO.
FROM
NOTES:
Installation and adjustment of potentiometers for drive control speed
STEP PROCEDURE
1 Turn the speed potentiometer fully clockwise. (Max. speed)
2 Measure the potentiometer resistance at connector (#27) BROWN and BLACK wires.
The resistance should measure 2200-2800 ohms in neutral, 4800-5000 ohms in forward,
and 0-200 ohms in reverse. If adjustment is necessary loosen set screw (#21) and adjust
potentiometer T for 2500 ohms in Neutral. Tighten set screw (#21).
3 Turn the main switch power on.
4 If the machine moves when control lever is in neutral adjust the direction potentiometer
until movement stops.
VGR2 98953 10/19/02
15
Page 16

WWW.MANUALS.WS
WWW.MANUALS.WS
DRIVE & BRUSH ASSEMBLY
TO BELT #35
PAGE 20
16
VGR2 98953 10/19/02
Page 17

WWW.MANUALS.WS
WWW.MANUALS.WS
DRIVE BRUSH ASSEMBLY
Replacement of Drive Motor brushes (p/n 40063):
REF
1 89078 2 WHEEL, 10” X 2 –1/2” BORE
2 81003 3 FLANGETTE, 1” BEARING PAIR
3 70305 4 SCREW, 5/16-18 X 3/4 HHCS
4 57113 4 NUT, 5/16-18 NYLOCK PLTD
5 81002 3 BEARING, 1” BORE
6 29156 1 DIFFERENTIAL
7 48052 2 KEY, 1/4 X 1/4 X 2-1/2
8 87008 2 WASHER, 1/4 ID X 1-1/4 OD
9 41288 1 HOUSING, BRUSH
10 27569 1 CHAIN, #40 1/2 PITCH X 39
11 27343 1 CHAIN, MASTER LINK, #40 1/2
12 73567 1 SPROCKET, #40 11 TOOTH
13 53610 1 MOTOR ASM, VGR 36V
14 70432 4 SCREW, 5/16-24 HHCS SS
15 87166 4 WASHER, 5/16 EXT. LOCK
16 87090 8 WASHER, 1/4 ID X 3/4 OD PLTD
17 41320 1 HOUSING ASSEMBLY
18 70104 2 SCREW, 3/8-16 X 3/4 BHMS
19 12022 1 BRUSH, VGRB
20 09019 2 BEARING, BRUSH
21 57104 7 NUT, 10-32
22 73606 2 SPACER, .50 OD X .38 ID X .260 L
23 64103 1 PULLEY, BRUSH VGRB
24 27607 1 COVER, BRUSH CORE
25 03091 1 AXLE, BRUSH DRIVE
26 36175 1 GUARD, VOYAGER SPLASH
27 67106 1 RETAINER, SPLASH GUARD
28 70088 7 SCREW, 10-32 X 1/2 PPHMS
29 73578 1 SPRING, 4.00 .75 OD EXT
30 87025 4 WASHER, 1/4 LOCK EXT STAR
31 70011 4 SCREW, 1/4-20 X 5/8 PPHMS
32 09025 2 BEARING, 1/2 ID NYLINER
33 67094 2 RING, 1/2 EXT. SNAP
34 70088 8 SCREW, 10-32 X 1/2 PPHMS SS
35 67098 1 RING, TOLERANCE
36 140063 1 BRUSH SET, 36V VGR DRIVE
37 70267 1 SHOULDER BOLT, 5/16 OD X 1.25
38 64101 1 PULLEY ASM., VGR
39 87029 1 WASHER, 5/16 FLAT SAE
40 87030 1 WASHER, 3/8 ID X 3/4 OD NYL
41 73307 1 SPRING, COMP. .88D X 1.4L X .1W
42 57047 1 NUT, 1/4-20 NYLOCK PLTD
43 67093 1 RING, 1 1/8 INT. SNAP
44 87074 1 WASHER, WAVE
45 12508 1 BRUSH ASM, VGR
46 62820 1 PLATE, VGR PULLEY
PART
NO.
QTY DESCRIPTION
SERIAL NO.
FROM
NOTES:
1. Using a standard head screwdriver, remove cap
covering brush inlet.
2. Using a pair of needle nosed pliers, gently remove brush (including spring) and replace with new part.
VGR2 98953 10/19/02
17
Page 18

WWW.MANUALS.WS
WWW.MANUALS.WS
PUMP, VAC, MANIFOLD & BRUSH MOTOR ASSEMBLIES
!
CAUTION:
112518
13
*45624
26
30
13
*38
(REF)
ASM PAGE 20
13
246*45
(REF)
272236271232823517161433154813233634
*3832101813
40
31
29
3941892010181384421433757
REPLACEMENT PART FOR THIS ITEM 19
ON PAGE 19
181312
42
461347
Replacement of Motor brushes (#28)
TURN POWER OFF.
1. Using a standard head screw driver,
remove cap covering brush inlet.
2. Using a pair of needle nose pliers,
gently remove brush (including
spring) and replace with new part.
SEE VALVE
*NOTE: HOSES ARE MARKED AS SUCH
TO CLARIFY FLOW PATH OF SOLUTION,
NOTE: ORDER (73785) TO GET
REPLACEMENT SCREEN FOR STRAINER
(73573) ITEM 20.
18
VGR2 98953 10/19/02
Page 19

WWW.MANUALS.WS
WWW.MANUALS.WS
PUMP, VAC, MANIFOLD & BRUSH ASSEMBLIES
19
PUMP HEAD REPLACEMENT
VALVE ASM
DIAPHRAM ASM.
REF
1 53622 1 MOTOR ASM, 36VDC VGR2
2 64022 1 PULLEY, POLY-V BELT
3 70074 2 SET SCREW, 10-32 X 1/4 KCP
4 99873 2 TAPE, 5/8 X 1/4 X 3” PORON
5 20005 2 CLAMP, 5/16 NYLON
6 70011 16 SCREW, 1/4-20 X 5/8 HHCS
7 70088 1 SCREW, 10-32 X 1/2 PPHMS
8 57104 12 NUT, 10-32 W/ STAR WASHER
9 14454 1 BRACKET, VALVE
10 22003 2 COUPLER, 3/8 FPT X FPT
11 70253 4 SCREW, 10-32 X 1.25 PHMS
12 39486 1 HOSE, 3/8 NYLOBRAID X 2”
13 20042 8 CLAMP, 3/8 HOSE (D-SLOT)
14 040-03 2 CASTER SWIVEL 4” 250# CPCTY
15 70305 8 SCREW, 5/16-18 X 3/4 HHCS
16 62394 2 PLATE, SPRING HOOK
17 73240 2 SPRING, 1/2 X 2.25L EXTENSION
18 40034 4 HOSEBARB, 3/8 MPT X 3/8 90D
19 65166 1 PUMP ASM, 36VDC VGR2
20 73573 1 STRAINER, 3/8 NPT 80 MESH
21 880101 1 WIRE ASM, VGR MAIN POWER
22 70329 4 SCREW, 1/4-20 X 3/4 PHMS
23 70066 5 SCREW, 10-32 X 3/4 PPHMS
24 87025 12 WASHER, 1/4 LOCK EXT STAR
25 87018 4 WASHER, #10 X 9/16 OD
26 73566 6 SPACER, 1/2 OD X 3.0 W/ 1/4-20
27 57047 4 NUT, 1/4-20 NYL SELF LOCK
28 140066 1 BRUSH, 36V VGR BRUSH MTR
29 73576 1 SPRING, 0.6 OD X 2.0L COMPR
30 53782 2 VAC MOTOR ASM, 36VDC
- 140658 1 BRUSH SET, VAC MTR 53204 SERVICE ONLY
- 140686 1 BRUSH SET, 24V/36V VAC WINDSOR SERVICE ONLY
31 66095 2 PLUG, 1/8 MPT HEX BRASS
32 54139 1 MANIFOLD ASM, VGR 3-JET
33 87067 8 WASHER, 5/16 LOCK INT STR.
34 14902 1 BRACKET, VGR MANIFOLD
35 11027 1 BELT, BRUSH DRIVE ASSEMBLY
36 40033 1 HOSEBARB, 1/4 MPT X 3/8 90D
37 34270 1 FRAME, VGR2 MAIN
38 39204 1 HOSE, 3/8 NYLOBRAID X 29”
39 44060 3 JET, 8002 MINI -QUICK
40 66052 1 PIN, 1/8 X 1” ROLL
41 44052 3 JETBODY, MINI-QUICK W/ SEAL
42 34308 1 FRAME, VGR2 REAR
43 70261 2 SCREW, 6-32 X 1.0 PHMS PLTD.
44 57116 2 NUT, 6-32 E/ STAR WASHER
45 39365 1 HOSE ASM, 3/8 ID NYLOBR X 25
46 39499 1 HOSE, 3/8 X 13
47 12-800398 1 Y FITTING
PART
NO.
QTY DESCRIPTION
SERIAL NO.
FROM
PUMP REPLACEMENT PARTS
NOTES:
(65151)
(84145)
98953 02/14/04
(29188)
Page 20

WWW.MANUALS.WS
WWW.MANUALS.WS
REAR TOWER ELECTRICAL ASSEMBLIES
3331185333114
REAR TOWER
CUTAWAY
2213191618120171421SUPPLIED W/ VALVE ASM.
COVER.
2
1
NOTE: SUPPLIED WITH RELAY
TO #*45
SEE DETAIL “A”
2
1
DETAIL “A”
84140 – VALVE ASM.
PARTS BREAKDOWN
15
32
23
24
29
26
28
25
7
27
10
1
REF.
PAGE
16
2
31
TO #*38
PAGE
16
NOTES:
12
INSTALLED ON OUTSIDE OF
LOCATE @ PORT MARKED “P” OR “2”
30
LOCATE @ PORT MARKED “A” OR “1”
9
6
20
VGR2 98953 10/19/02
Page 21

WWW.MANUALS.WS
WWW.MANUALS.WS
REAR TOWER ELECTRICAL ASEMBLIES
NO.
NO.
REF
1 40038 HOSEBARB, 1/4 MPT X 3/8 H 45DEG.
2 51184 LOCK, HANDLE ADJ.
3 57125 NUT, 5/16-24 HEX JAM
4 62561 PLATE, NEGATIVE POST
5 67005 RIVET, 1/8 OD WHT AL
6 70162 SCREW, 10-32 X 3/8 PHMS SS
7 70228 SCREW, 10-32 X 1/4 PHMS SS
8 70289 SCREW, STUD, 5/16-18 X 2.12 BRASS
9 87016 WASHER, #10 LOCK EXT STAR
10 87018 WASHER, #10 X 9/16 OD
11 87092 WASHER, 5/16 X 3/4 BRASS
12 84140 VALVE ASM, 36V
13 22072 COUPLING, 1/4 ANCHOR
14 31016 ELBOW, 1/4 NPT
15 87095 WASHER, #10 FLAT PLTD.
16 56012 NIPPLE, 1/4 FPT QD
17 56014 NIPPLE, 1/4 CLOSE
18 56048 NIPPLE, 1/4 X 1.75
19 78308 TEE, 1/4 STREET
20 84168 VALVE, 120V 110PSI SOLENOID
21 84065 VALVE, 1/4 FPT BALL
22 36019 GROMMET, 5/16 ID X 9/16 GRV.
23 57116 NUT, 6-32 W/ STAR WASHER
24 14020 TERMINAL BLOCK, 115V (3-4-3)
25 57106 NUT, 8-32 W/ STAR WASHER
26 73734 SPACER, .166ID X .313OD X .75L
27 27672 CONTROLLER, 36VDC PROPEL MOTOR
28 57047 NUT, 1/4-20 NYLOCK PLTD.
29 67315 RELAY, 36VDC 100AMP HVY DUTY
30 36020 GROMMET, 5/8 ID X 1.12 OD
31 70488 SHOULDER BOLT, 5/16 OD X 3/4 L
32 87029 WASHER, 5/16 FLAT SAE
33 57113 NUT, 5/16-18 NYLOCK PLTD
PART
DESCRIPTION
SERIAL
NOTES:
VGR2 98953 10/19/02
21
Page 22

WWW.MANUALS.WS
WWW.MANUALS.WS
HANDLE, MIRCOSWITCH AND CABLE ASSEMBLIES
NOTE: FOR BRUSH AND REVERSE SWITCHES, ALIGN THE TWO SWITCHES AND CHECK TO
789
6
12101
2
BRUSH HOUSING
6
1
872
3
4
5
4
5
VIEW: LEFT SIDE OF
REAR PANEL
VIEW: RIGHT SIDE
OF REAR PANEL
BRUSH & REVERSE SWITCH
SHOWN.
REF.
REF.
11
20
3
REF.
18
4
5
1
2
REF.
REF.
20
3
19
REF.
REF.
9
REF.
12
13
REF.
REF.
10
11
15
16
17
14
18
19
BEND UP
ALIGN
&
HOLD
REF.
SEE THAT THE ACTUATOR TABS ARE EVEN TO WITHIN 1/16 INCH. IF REQUIRED, BEND THE
LOWER TAB UP TO MATCH THE HIGHER TAB.
INSTALL THE SWITCHES WITH THE SCREWS LOOSE ENOUGH TO ALLOW THE TOP SCREW
TO SLIDE IN THE MOUNTING SLOT. WITH THE LEVER IN THE TOP POSITION, SLIDE THE
SWITCHES BACK UNTIL THEY BOTH CLICK, TIGHTEN THE SWITCHES IN THIS POSITION.
22
VGR2 98953 10/19/02
Page 23

WWW.MANUALS.WS
WWW.MANUALS.WS
HANDLE, MICROSWITCH & CABLE ASSEMBLIES
NO.
NO.
REF
1 48030 2 KNOB, PT17/20 BLACK
2 38186 2 HANDLE, BRUSH/VAC CONTROL
3 27559 2 CLEVIS, 3/8-16 UNC ROD END
4 51170 2 LEVER ASM, HANDLE PIVOT
5 70117 2 SHOULDER BOLT, 5/16 OD X 1.0 L
6 73220 2 SPACER, EPB CABLE/CASE HARD
7 87013 2 WASHER, 1/4 ID X 5/8 OD SS
8 87025 2 WASHER, 1/4 LOCK EXT STAR SS
9 70011 2 SCREW, 1/4-20 X 5/8 HHCS SS
10 72082 3 SWITCH, SOL LEVER BENT
11 57163 4 NUT, 4-40 W/ STAR WASHER
12 70401 4 SCR, 4-40 X 1.25 PHMS
13 27486 1 CABLE, BRUSH LIFT
14 27488 1 CABLE, VAC SHOE LIFT
15 70187 2 SCREW, 10-24 X 1/2 PHTC –F16 87018 2 WASHER, #10 X 9/16 OD
17 36179 1 GUARD, SPLASH
18 66073 3 PIN, COTTER 1/16” X 3/4” L PLTD
19 66116 3 PIN, CLEVIS 1/4” X 3/4” PLTD
20 70088 4 SCR, 10-32 X 1/2 PPHMS SS
PART
QTY DESCRIPTION
SERIAL
NOTES:
VGR2 98953 10/19/02
23
Page 24

WWW.MANUALS.WS
WWW.MANUALS.WS
CONTROL PANEL ASSEMBLY
29
NOTE: HARDWARE
320191715111086
12823132213021974
333435
SUPPLIED WITH METER.
2
15
17
24
VGR2 98953 10/19/02
Page 25

WWW.MANUALS.WS
WWW.MANUALS.WS
CONTROL PANEL ASSEMBLY
NO.
NO.
PROPEL
REF
1 27710 1 COVER, REAR VOYAGER 2 TRIMMED
2 54144 1 METER, 36V BATTERY CHARGE LEVEL
3 72130 2 SWITCH, SPST 2-POSITION ROCKER
4 70056 2 SCREW, 6-32 X 1/2 PPHMS
5 OPEN - -
6 57109 1 NUT, 7/16-28 PANEL
7 54092 2 METER, 0-60 VDC HOUR
8 57132 2 NUT, 3/8-27 DRESS PANEL
9 57116 1 NUT, 6-32 W/ STAR WASHER PLTD
10 14944 1 BREAKER, 16A 250 VAC 50 VDC
11 14688 1 BREAKER, 35 AMP 50 VDC MTR.
12 14700 1 BREAKER, 15 AMP BRUSH MTR.
13 04082 1 ADAPTER, “Y” FITTING MODIFIED
14 51142 1 LEVER, HANDLE LOCK
15 87018 4 WASHER, #10 X 9/16 OD
16 87090 2 WASHER, 1/4 ID X 3/4 OD PLTD
17 70066 4 SCREW, 10-32 X 3/4 PPHMS
18 OPEN - 19 39481 1 HOSE, VAC X 20”
20 34308 1 FRAME, REAR W/O PLENUM
21 39313 2 HOSE, 1.5 BLUE VAC X 20”
22 20063 4 CLAMP, 1.75 WORM GEAR X .312
23 20046 1 CLAMP, 2.25” WORM GEAR
24 57032 1 NUT, 3/8-16 SERRATED FLG. PLT.
25 80604 1 RING, RUE COTTER 1/4”
26 66133 1 PIN, CLEVIS 3/16” X 7/8” I
27 67273 1 ROD, VOY HANDLE ADJ.
28 78271 1 TUBE, VOY HANDLE ADJ.
29 47200 1 KIT, VOYAGER ADJUSTMENT PLATE
30 50776 1 LABEL, WARNING FOR SAFTEY
31 98721 1 SERVICE TAG NOT SHOWN
32 14382 1 BAND, SERVICE TAG NOT SHOWN
33 500548 1 LABEL, MAIN SWITCH
34 500547 1 LABEL, CIRCUIT BREAKER
35 50540 1 LABEL, VALVE POSITION
PART
QTY DESCRIPTION
SERIAL
NOTES:
HANDLE
ASM.
24
16
16
28
25
14
27
26
VGR2 98953 10/19/02
15
25
Page 26

WWW.MANUALS.WS
WWW.MANUALS.WS
VAC SHOE ASSEMBLY
7
5
811910121314
REAR
25
9
(REF)
GREASE
1
2
17
19
20
24
15
3
6
5
4
NOTE: #24 SPRINGS
ATTACH TO #17
EYEBOLT.
16
VAC SHOE ASM.
18
21
22
17
22
23
25
26
9
10
MAIN
FRAME
17
27
26
VGR2 98953 10/19/02
Page 27

WWW.MANUALS.WS
WWW.MANUALS.WS
VAC SHOE ASSEMBLY
A
REF PART NO. QTY DESCRIPTION
1 70351 13 SCREW, 10-32 X 3/8 HHTR W/ STAR
2 62391 1 PLATE, VAC SHOE COVER
3 35124 1 GASKET, VGR VAC SHOE PLATE
4 85031 1 VAC SHOE, VGR2 28”
5 87003 4 WASHER, 3/8 ID X 7/8 OD SS
6 89059 2 WHEEL, PT20 SQUEEGEE BUMPER
7 70368 2 SCREW, 3/8-16 X 1-3/4 HHCS
8 140197 1 BRACKET, VAC SHOE LINKAGE PLTD
9 87025 9 WASHER, 1/4 LOCK EXT STAR
10 70011 5 SCREW, 1/4-20 X 5/8 HHCS PLTD
11 05070 2 ARM ASM, SQUEEGEE
12 70298 4 SHOULDER BOLT, 5/16 X 3/8L
13 87029 4 WASHER, 5/16 FLAT SAE
14 87030 8 WASHER, 3/8 ID X 3/4 OD NYL
15 57047 4 NUT, 1/4-20 NYLOCK
16 140192 1 BRACKET ASM, VAC SHOE PIVOT
17 70263 3 EYEBOLT 8-32 X 1; 1/4 EYE PIT
18 57026 2 NUT, 8-32 NYLOCK
19 48031 1 KNOB, VAC SHOE ADJ.
20 87013 1 WASHER, 1/4 ID X 5/8 OD SS
21 54-501623 2
22 57029 12 NUT, 1/4-28 HEX SS
23 14029 4 BALL JOINT ASM, 1/4-28 HD
24 73426 2 SPRING, EXT. .43D X 2.50L X .047W
25 14820 2 BUSHING, FLANGED 3/4 ID X 7/8 OD
26 87008 1 WASHER, 1/4 ID X 1-1/4 PD PLTD
27 90006 1 ZERK, GREASE
RD, 1/4-28 X 2-1/2 SST
SERIAL
NO.
NOTES:
MOUNTING OF VAC SHOE
AND CASTER SPRING
ASSEMBLY.
VAC SHOE
CABLE ASM.
(REF)
NOTE: USE 90° TOOL TO VERIFY
THAT VAC SHOE IS ADJUSTED
CORRECTLY TO 90° ANGLE.
NOTE: SPRING ATTACHES
FROM CASTER TO VAC SHOE
BRACKET (BOTH SIDES).
NOTE: ANGLE
DJUSTMENT NUTS
FOR VAC SHOE.
VGR2 98953 05/05/05
27
Page 28

WWW.MANUALS.WS
WWW.MANUALS.WS
TANK, COVER & HARDWARE ASSEMBLY
58
535747
34
8
94061
*10
26
27
47
34
59
60
29
16
64
68
7
29
14
51
28
18
41
62
42
44
67
43
36
26
40
26
22
20
21
17
63
19
11
56
66
35
5
30
55
54
29
6
27
70
23
1
33
69AB
27
26
4
32
13AB
52
49
49
31
41
15
25
50
52
48
12
38
39
45
24
46
37
17
3
27
*65
2
28
VGR2 98953 06/28/03
Page 29

WWW.MANUALS.WS
WWW.MANUALS.WS
TANK, COVER AND HARDWARE PARTS LIST
REF PART NO. QTY DESCRIPTION
1 75393 1 TANK ASM., VGRB W/ DIAPHRAGM
2 27472 1 COVER, LEFT TANK VGRB
3 27673 1 COVER, BELT GUARD VGRB
4 27684 1 COVER, BATTERY COMP.
5 27473 1 COVER, RIGHT SIDE TANK
6 28054 1 DOME, VOYAGER TANK
7 27557 1 COVER, SIGHT WINDOW
8 35199 1 GASKET, VGR SIGHT WIN
9 62345 2 PLATE, REAR FRAME TANK MNT
10 34305 1 FLOAT, SHUT OFF
11 78122 1 TUBE, 1.5 PVC X 1.88 IN
12 40090 2 HOSEBARB, 1/4 MPT X 3/8 45°
13A 66251 1 PIVOT ASM., TANK RIGHT
13B 66250 1 PIVOT ASM., TANK LEFT
14 39476 1 HOSE ASM., 2” DIA.
15 70085 4 SCREW, 1/4-20 X 1/2 PPMHS
16 39481 1 HOSE, 2” VAC X 20”
17 20064 2 CLAMP, 2.0” WORM GEAR X .312W
18 20063 1 CLAMP, 1.75” WORM GEAR X .312
19 04032 1 ADAPTER, 1.5 MPT X 1.5FS PVC
20 78499 1 TETHER, DRAIN PLUG
21 40019 1 HOSEBARB, 1.5 DOUBLE MCHD
22 66227 1 PLUG, DRAIN HOSE
23 70481 6 SCREW, 1/4-20 X 3/4 BHCS
24 89059 2 WHEEL, PT20 SQG. BUMPER
25 89231 1 BRACKET ASM., GUIDE WHEEL
26 70361 14 SCREW, 10-32 X 1/2 PHTR PLT
27 87018 12 WASHER, #10 X 9/16 OD
28 70201 4 SCREW, 1/4-20 X 3/4 FHMS PLTD
29 20046 3 CLAMP, 2.25” WORM GEAR
30 73198 1 SPACER, 2.26 OD X 1.91 ID X 2.51
31 41305 1 HINGE, VGR DOOR LEFT
32 41303 1 HINGE, VGR DOOR RIGHT
33 40036 1 HOSEBARB, 1.5 MPT X 1.5
34 81379 2 FITTING, SEALED BULKHEAD
35 35095 1 GASKET, VGRB DOME
36 39408 1 HOSE, SOL. DRAIN W/ STAMP
37 39472 1 HOSE, 1.5 DRAIN X 24”
38 20042 4 CLAMP, 3/8 ID HOSE
39 39451 2 HOSE, 3/8 NYLOBRAID X 11
40 87016 4 WASHER, #10 LCK EXT STAR
41 70011 5 SCREW, 1/4-20 X 5/8 HHCS
42 14899 1 BRACKET, DRAIN HOSE PLUG
43 40053 1 HOSEBARB, SOL. HOSE MTG
44 57047 1 NUT, 1/4 X 20 NYLOCK PLTD
45 70368 2 SCREW, 3/8-16 X 1.75 HHMS
46 57022 2 NUT, 3/8-16 LOCK SS
47 57044 2 NUT, HEX BRASS 3/8 NPT
48 87151 6 WASHER, 1/4 SPLIT LOCK
49 87025 8 WASHER, 1/4 LOCK EXT STAR SS
50 57236 2 NUT, 10-32 HEX NYLOCK BLK.
51 40051 1 HOSEBARB, 3/4 MPT X 1” HOSE PV
52 41304 2 BRACKET, VOYAGER HINGE
53 57104 8 NUT, 10-24 W/ STAR WASHER
54 78211 1 TUBE, 1.5 PVC X 3.31
55 04075 1 ADAPTER, 1.5 FPT X 1.5 FS PVC
56 34140 1 FILTER, VAC INTAKE 10 MESH
57 140193 1 BRACKET, VGR FLOAT
58 70209 2 SCR, 10-32 X 1.75 PHME PLTD
59 87131 2 WASHER, #80R #10 FLAT W/NEO.
60 20005 1 CLAMP, 5/16 NYLON
61 140194 1 BRACKET, RECOVERY HOSE MTG.
62 87013 1 WASHER, 1/4 ID X 5/8 OD SS
63 28056 1 DOME ASM., VGR2
64 04082 1 ADAPTOR, Y-FITTING MODIFIED
65 70088 2 SCREW, 10-32 X 1/2 PPHMS
66 500009 1 LABEL, WARNING EXPLOSION
67 66380 3 PLATE, SPACER
68 70114 2 SCR, #10 X 3/4 TYPE B
69A 50917 1 LABEL, TANK RIGHT
69B 50918 1 LABEL, TANK LEFT
70 50941 1 LABEL, WINDSOR LOGO
SERIAL NO.
FROM
NOTES:
VGR2 98953 06/28/03
29
Page 30

WWW.MANUALS.WS
WWW.MANUALS.WS
WIRING DIAGRAM VOYAGER 2
30
VGR2 98953 10/19/02
 Loading...