

Page 1
TITA
N
M
WET/DRY VACUU
Record the model and serial number
located on the blue data label.
Owner’s Guide
WARNING
Unplug this machine before making
repairs or adjustments. Be sure all
electrical connections are correct and
that the wiring matches APPROPRIATE
diagram before plugging this machine
into an electrical outlet.
1. Maintenance and repairs
Use these numbers when calling upon the
Windsor dealer for parts and service.
MODEL : ______________________
SERIAL NO. : __________________
PURCHASE DATE : ____________
Contents:
1. Product Information
2. Warnings (English)
3. Warnings (French)
4. Warnings (Spanish)
5. Grounding Instructions
6. Maintenance
must only be done by
qualified personnel.
2. Using non-Windsor parts to
repair this machine will
void the warranty.
8. Servicing Vac Motor
9. Wiring Diagrams
10. Tank Squeegee Assemblies
12. Duct-Cord-Cover Assemblies
14. Lower/UpperHead Assemblies
16. Trouble Shooting
17. Notes
18. Warranty
D
TITAN 98165 2/14/01
Page 2

IMPORTANT SAFETY INSTRUCTIONS
When using an electrical appliance, basic precaution must
always be followed, including the following:
READ ALL INSTRUCTIONS BEFORE USING THIS MACHINE.
WARNING
• Do not operate without filters (dry or wet) in place.
• Use only as described in this manual. Use only manufacturer’s recommended attachments.
• Use indoors only. Do not use outdoors and do not expose to rain.
• Machine can cause a fire when operating near flammable vapors or materials. Do not operate this
machine near flammable fluids, dust or vapors.
• Do not pick up flammable fluids, dust or vapors.
• Do not vacuum anything that is burning or smoking, such as cigarettes, matches, or hot ashes.
• Do not handle the plug or machine with wet hands.
• This machine is not suitable for picking up health endangering dust.
• Do not leave the machine unattended. Unplug machine from outlet when not in use and before servicing.
To reduce the risk of fire, electric shock, or injury:
This machine is for commercial use.
• Do not unplug machine by pulling on cord. To unplug, grasp the plug, not the cord.
• Do not use with damaged cord or plug. Follow all instructions in this manual concerning grounding the
machine.
• If the machine is not working properly, has been dropped, damaged, left outdoors, or dropped into
water, return it to an Authorized service center.
• Do not pull or carry by cord, use cord as a handle, close a door on cord, or pull cord around
sharp edges or corners.
• Do not pull/run machine over cord. Keep cord away from heated surfaces.
• Do not allow to be used as a toy. Close attention is necessary when used by or near children.
• Do not operate machine with any openings blocked. Keep openings free of debris that may
reduce airflow.
• Keep hair, loose clothing, fingers, and all parts of the body away from openings and moving
parts.
• Use extra caution when cleaning on stairs
. Do not use machine as a step.
• Connect to a properly grounded outlet. See Grounding Instructions.
• Maintenance and repairs must be done by qualified personnel.
• Rotating fan blades inside the cover. Before opening cover, switch off machine. Wait until the
fan/brush stops completely or dust and debris may be ejected.
SAVE THESE INSTRUCTIONS
2
98165 07/01/97
Page 3

IMPORTANTES MESURES DE SÉCURITÉ
L’utilisation d’un appareil électrique demande certaines précautions:
LIRE TOUTES LES INSTRUCTIONS AVANT DE FAIRE
FONCTIONNER (CET APPAREIL)
AVERTISSEMENT
Pour réduire les risques d’incendie, de choc électrique ou de
blessure:
• Cet appareil ne doit être connecter qu a des prises ayant une sortie de terre. Se
reporter aux instructions de mise à la terre.
• Ne pas laisser l’appareil sans surveillance lorsqu’il est branché. Débrancher lorsque
l’appareil n’est pas utilisé et avant l’entretien.
• Avertissement. Pour reduire les risques de choc electrique, ne pas utiliser à
l exterieur et ne pas aspirer de matières humides.
• Ne pas permettre aux enfants de jouer avec l’appareil. Une attention particulière est
nécessaire lorsque l’appareil est utilisé par des enfants ou à proximité de ces derniers.
• N’utiliser que conformément à cette notice avec les accessoires recommandés par le
fabricant.
• Ne pas utiliser si le cordon ou la fiche est endommagé. Retourner l’appareil à un atelier de
réparation s’il ne fonctionne pas bien, s’il est tombé ou s’il a été endommagé, oublié à
l’extérieur ou immergé.
• Ne pas tirer soulever ou traîner l’appareil par le cordon. Ne pas utiliser le cordon comme une
poignée, le coincer dans l’embrasure d’unée porte ou l’appuyer contre des arêtes vives ou
des coins. Ne pas faire rouler l’appareil sur le cordon. Garder le cordon à l’écart des
surfaces chaudes.
• Ne pas débrancher en tirant sur le cordon. Tirer plutôt la fiche.
• Ne pas toucher la fiche ou l’appareil lorsque vos mains sont humides.
• N’insérer aucun objet dans les ouvertures. Ne pas utiliser l’appareil lorsqu’une ouverture est
bloquée. S’assure que de la poussière, de la peluche, des cheveux ou d’autres
matières ne réduisent pas le débit d’air.
• Maintenir les cheveux, les vêtements amples, les doigts et toutes les parties du corps à
l’écart des ouvertures et des pièces mobiles.
• Ne pas aspirer de matiéres en combustion ou qui dégagent de la fumée, comme des
cigarettes, des allumettes ou des cendres chaudes.
• Ne pas utiliser l’appareil si le sac à poussière ou le filtre n’est pas en place.
• Mettre toutes les commandes à la position ARRÊT avant de débrancher l’appareil.
• Usser de prudence lors du nettoyage des escaliers.
• Ne pas aspirer des liquides inflammables ou combustibles, comme de l’essence, et ne pas
faire fonctionner dans des endroits où peuvent se trouver de tels liquides.
• Ventilateur sous ce couvèrcle. Arretèr la machine avant D’ouvtir le couvercle. Attendre
que le ventilateur ait fini de tourner.
• Cette machine ne peut être utilisée pour aspirer des poussières dangereuses pour
la santé
CONSERVER CES INSTRUCTIONS
98165 2/1/99
3
Page 4

INSTRUCCIONES IMPORTANTES PARA
SU SEGURIDAD
Durante la utilzación de un dispositivo eléctrico hay que tener en cuenta una
serie de medidas básicas de precaución, que incluyen las siguientes
AD VERTENCIA
Para reducir el riesgo de incendios, descargas eléctricas
o lesiones:
• Conecte la aspiradora solamente a tomas de corriente con puesta a tierra. Tenga en
cuenta las instrucciones.
• No deje nunca el aparato conectado a la red. Después de su uso, y antes de cualquier revisión o
reparación, desconecte el aparato de la toma de corriente.
• No usar nunca el aparato al aire libre, ni sobre superfivies húmedas.
• No permita que se utilice el aparato como un juguete. Hay que prestar especial atencion al
utilizarlo en las cercanias de ninos.
• Utilzar el aparato sólo como se describe en este manual. Emplear exclusivamente los
accesorios recomendados por el fabricante.
• No poner en marcha el aparato con un cable eléctrico deteriorado. Si el aparato no funciona
como deberia, si se ha caido, danado, si ha permanecido al aire libre o si se ha caido al agua,
dirijase a un taller de servicio.
• No tire del aparato ni lo transporte utilzando el cable eléctrico; no use el cable a modo de asa, ni
cierre una puerta con el cable pillado; no tienda el cable en torro a aristas vivas o esquinas. No
pase con el aparato por encima del cable. Mantenga el cable simpre lejos de superficies
calientes.
• No desconecte el enchufe de la red tirando del cable. Para desconectar el aparato
hay que tirar del enchufe, no del cable..
• No maneje el enchufe ni el aparato con las manos húmedas..
• No introduzca ningún objeto en las aberturas del aparato. No utilice el aparato mientras esta
bloqueada uns de las aberturas; evite la penetración de polvo, hilachas, pelos o cualquier objeto
que pueda inhibir la circulación del aire.
• Mantenga su cabello, la ropa suelta, los dedos y todas las partes de su cuerpo alejadas de las
aberturas y piezas en movimiento.
• No utilice el aspirador para recoger cuerpos en llamas o humeantes, tales como cigarrillos,
cerillas o cenizas calientes.
• No utilizar nunca el aspirador sin la bolsa y/o los filtros colocados en su lugar
previsto.
• Desconecte todos los interruptores antes de desenchufar el aspirador..
• La aspiradora no es adecuada para recoger agentes que dañen la salud.
• Tenga especial cuidado al manejar la aspiradora en una escalera..
• No utilice el aspirador para recoger liquidos inflamables o combustibles, tales como
gasolina, ni maneje el aspirador en zonas donde pueda haber liquidos de este tipo..
CONSERVE ESTAS INSTRUCCIONES A MANO
4
98165 07/01/97
Page 5
THIS PRODUCT IS FOR COMMERCIAL USE ONLY.
t
p
A
A
A
A
A
ELECTRICAL:
In the USA this vacumm operates on a standard 15 amp
115 volt A.C. power circuit (120V nominal). Special
voltage models are available for international
applications. The amp, hertz, and voltage are listed on
the data label found on each machine. Using voltages
above or below those indicated on the data label will
cause serious damage to the motors.
EXTENSION CORDS:
If an extension cord is used, the wire size must be at least
one size larger than the power cord on the machine, and
must be limited to 50 feet (15.5m) in length.
ADVERTISSEMENT:
Un conducteur de terre mal raccorde peut entrainer
un risque de choc electrique. Consulter un elctricien
ou un technicien d’entretien qualifie si vous n’etes
pas certain que la prise est corectement mise a la
terre. Ne pas modifier la fiche fournie avec l’appareilsi elle ne peut etre inseree dans la prise, faire
installer une prise adequate par un electricien
qualifie.
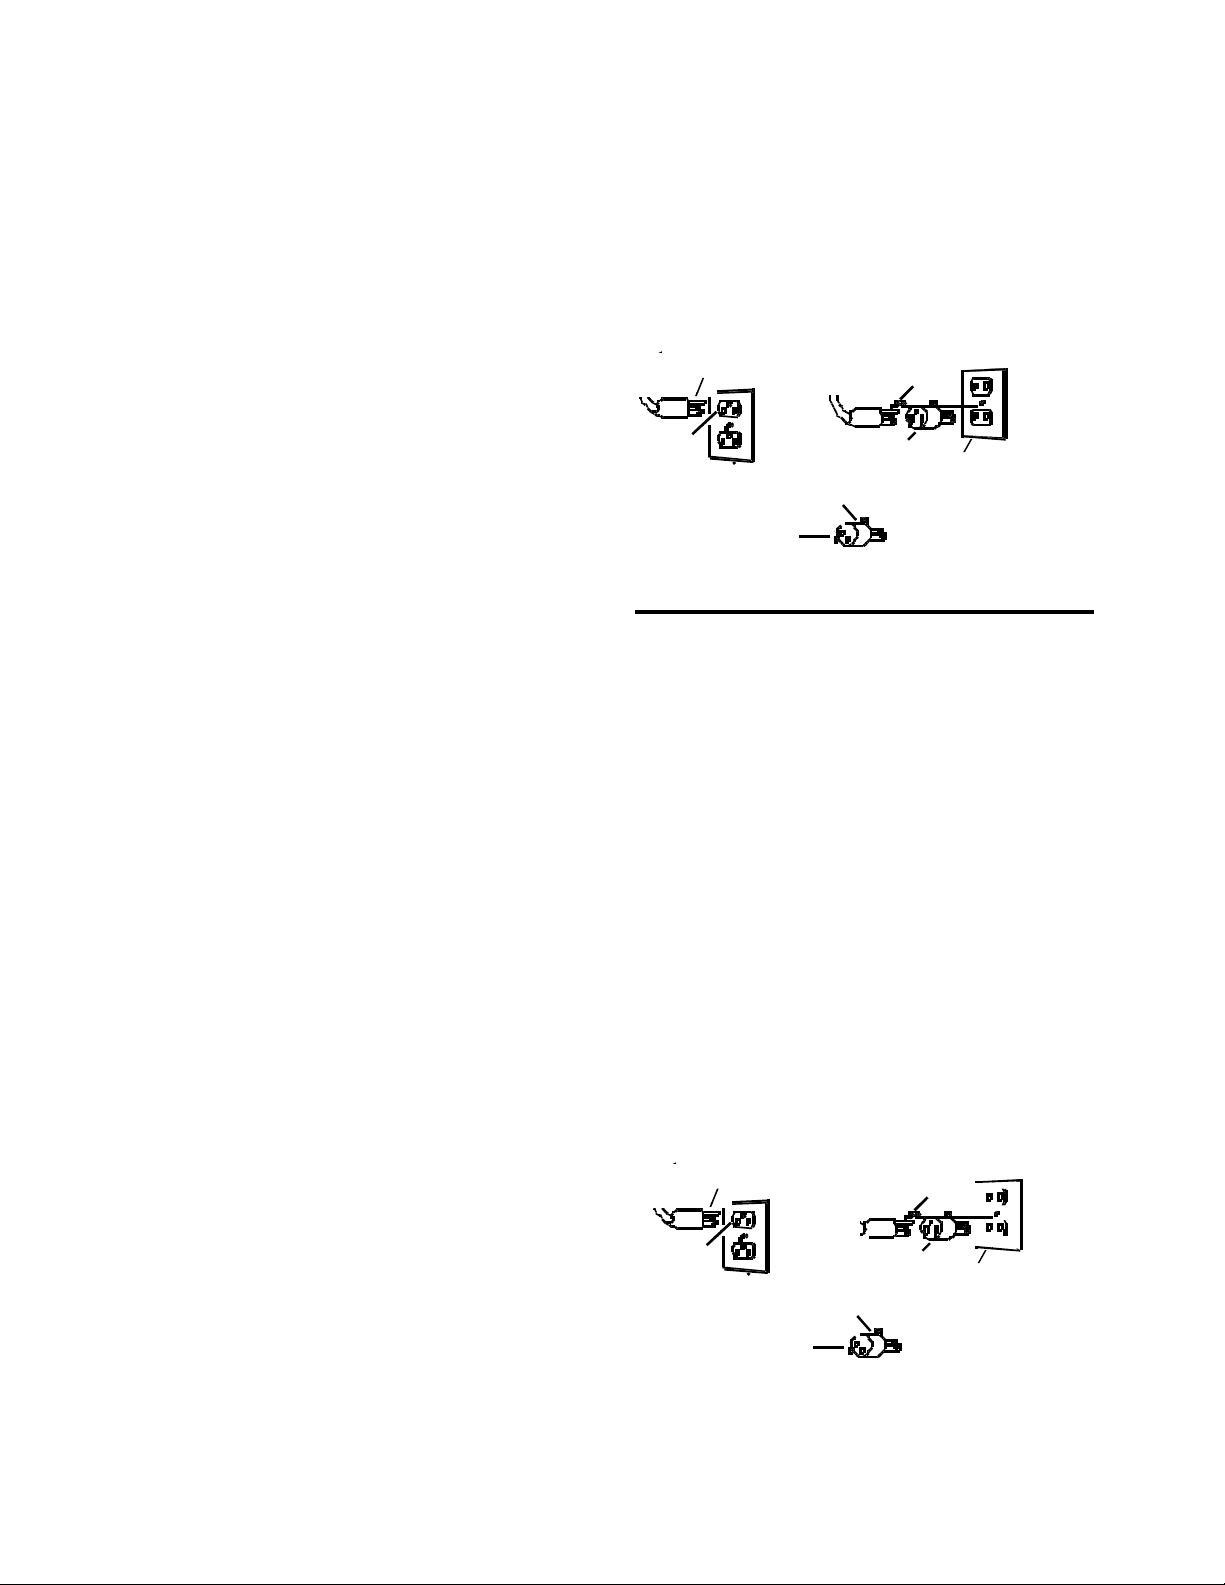
PROPER GROUNDING
Grounding Pin
Prise de cou r an t av ec mi se a la terre
Vis metallique
Metal Screw
Fig. B
GROUNDING INSTRUCTIONS:
This appliance must be grounded. If it should
malfunction or break down, grounding provides a path of
least resistance for electrical current to reduce the risk of
electric shock. This appliance is equipped with a cord
having an equipment-grounding conductor and grounding
plug. The plug must be inserted into an appropriate
outlet that is properly installed and grounded in
accordance with al local codes and ordinances.
This appliance is for use on a nominal 120-volt circuit,
and has a grounded plug that looks like the plug in “Fig.
A”. A temporary adaptor that looks like the adaptor in
“Fig. C” may be used to connect this plug to a 2-pole
receptacle as shown in “Fig. B”, if a properly grounded
outlet is not available. The temporary adaptor should be
used only until a properly grounded outlet (Fig. A) can be
installed by a qualified electrician. The green colored
rigid ear, lug, or the like extending from the adaptor must
be connected to a permanent ground such as a properly
grounded outlet box cover. Whenever the adaptor is
used, it must be held in place by a metal screw.
WARNING:
Improper connection of the equipment-grounding
conductor can result in a risk of electric shock.
Check with a qualified electrician or service person if
you are in doubt as to whether the outlet is properly
grounded. Do not modify the plug provided with the
appliance-if it will not fit the outlet, have a proper
outlet installed by a qualified electrician.
INSTRUCTIONS VISANT LA MISE A LA TERRE
Cet appareil doit etre mis a la terre. En cas de
defaillance ou de panne eventuelles, la mise a la terre
fournit au courant un emin de moindre resistance qui
reduit le risque de choc l’electrique. Cet appareil est
pourvu d’un cordon muni d’un conducteur de terre et
d’une fiche avec broche de terre. La fiche doit etre
branchee dans une prise appropriee correctement
installee et mise a la terre conformement aux reglements
et ordonnances municipaux.
Grounded
Outlet
roche
e mise
la terre
NOTE: In Canada, the use of a temporary adaptor is no
ermitted by the Canadian Electrical Code
NOTE: Au Canada, l’utilisation d’un adaptateur temporaire
n’est pas autorisee par le Code canadien de l’electricite.
Fig. A
INSTRUCCIONES PARA LA PUESTA A TIERRA
Este dispositivo tiene que ser puesto debidamente a
tierra.Si se produce una avena o rotura, la conexion a
tierra constituye el camino de menor resistencia para la
corriente electrica, reduciendose el riesgo de descargas
peligrosas. El aparato cuenta con un cable conductor de
puesta a tierra y un enchufe con clavija de puesta a
tieraa de acuerdo con las normas y ordenanzas locales.
ADVERTENCIA
Si se conecta de modo inadecuado el conductor de
puesta a tierra del aparato pueden producirse descargas
electricas peligrosas para el usuario. En caso de dudas,
pedir a un electricista debidamente cualificado o a un
tecnico del serviso postventa que verifique que la toma
de corriente esta bien puesta a tierra. Si el enchufe
suministrado con el aparato no se adapta a la toma de
corriente disponible, no hay que modificar el enchufe,
sino dirigirse a un electricista para que instale una toma
corriene adecuada.
PROPER GROUNDING
Clavija de puesta a tierra
Torna de
corriente
conectada a
tierra
DVERTENCIA: En Canada, la Canadien Electrical
Code prohibe el uso de adaptadores temporales.
T/SG 98165 03/24/00
daptateur-
Platte destinee a la vise
de terre
Tab For Grounding
Adaptor
daptateur
Fig. A
pendice para tornillo
de conexion a tierra
daptador
Adaptor
Fig. C
Tornillo metalico
Adaptador
Fig. C
Grounded Outlet Box
Boite de sortie mise
a la terre
Fig. B
Apendice para tornillo
de conexion a tierra
5
Page 6
6
T/SG 98165 7/1/97
Page 7

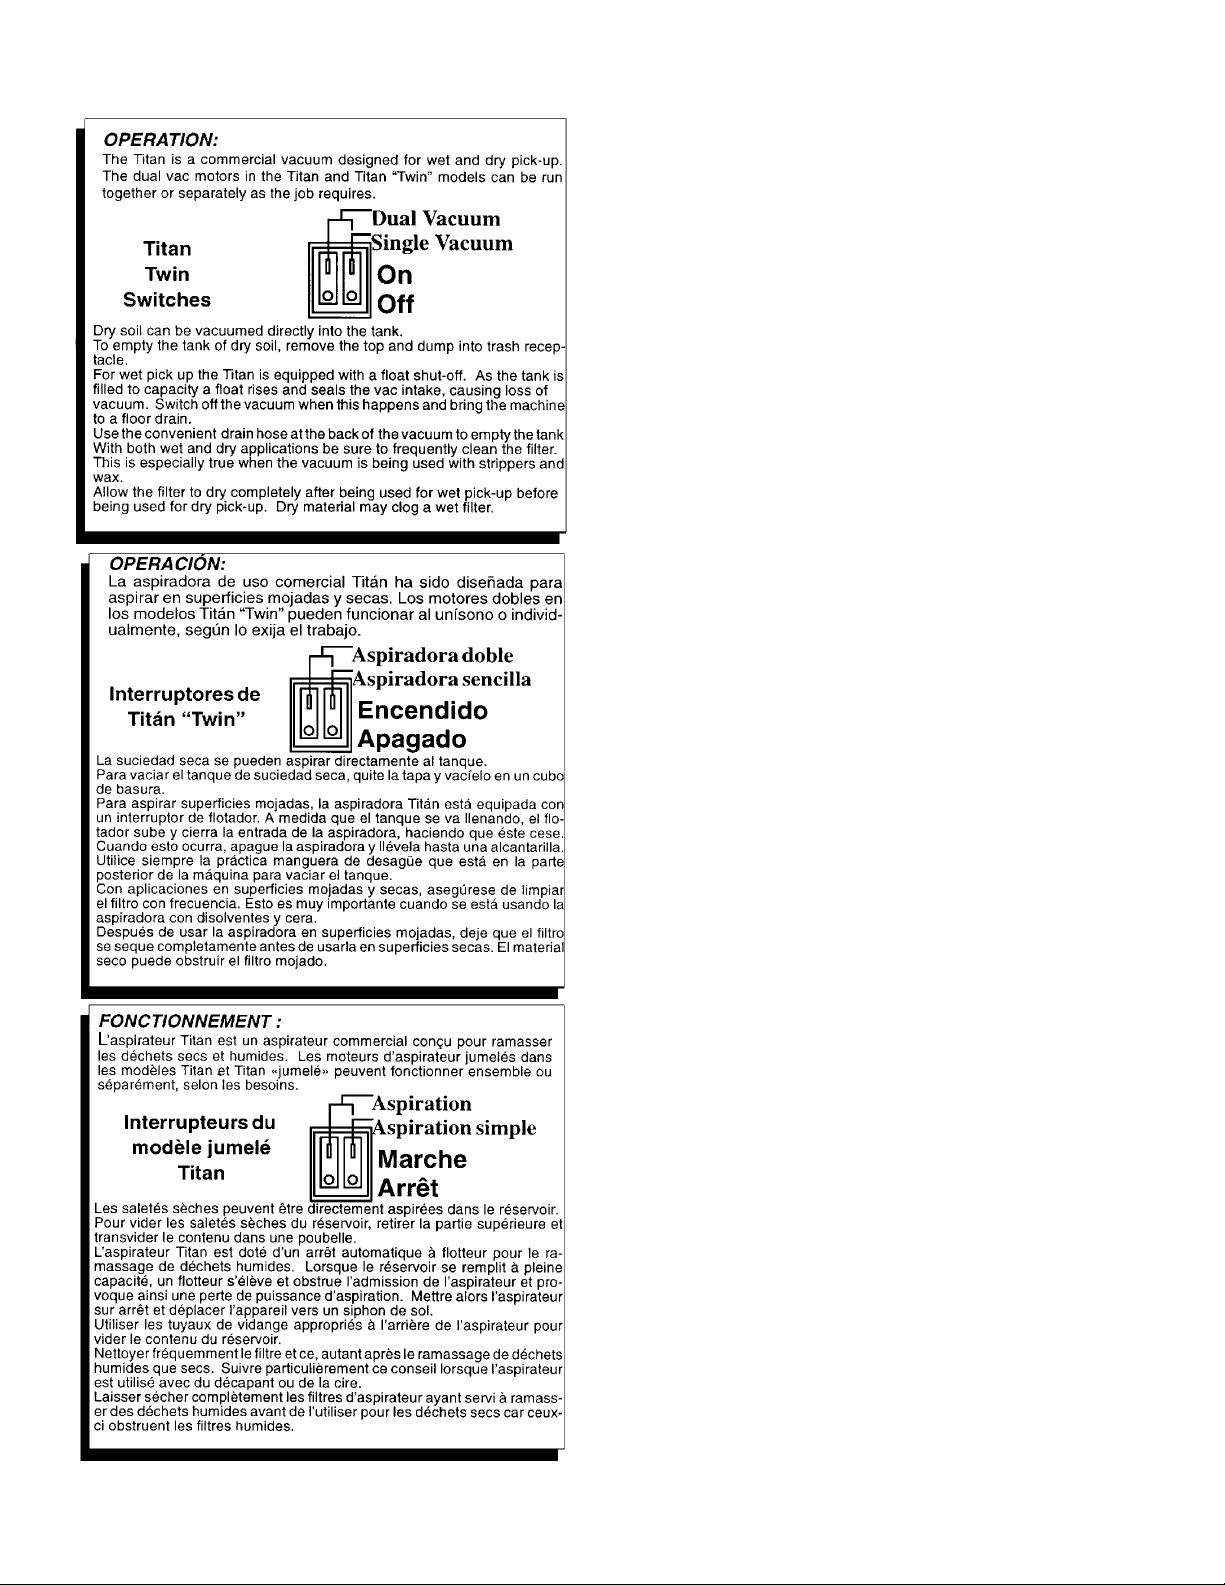
Caution: Strippers and some detergents
produce foam which will damage the vac motors.
The vac shut-off may not be sensitive to all
foams. Be sure to check that the tank is not
filling with foam. Use a defoaming agent to
avoid pulling foam through vac motor. Should
vac motor become wet, remove source of
overflow and immediately run vac motor open to
dry.
DAILY MAINTENANCE:
(At the end of each working day):
1. After each use, rinse tank with fresh water.
Periodically inspect the recovery tank and
decontaminate if necessary, using a Hospital
Grade Virucide or a 1:10 bleach to water
solution. Waste water should be disposed of
properly.
2. Remove head assembly and allow tank to dry.
3. Remove filters for cleaning or to allow to dry.
4. Inspect hoses for wear. Frayed or cracked
hoses should be replaced to avoid vacuum loss.
5. Inspect power cord for wear. This cable will lay
on wet surfaces. To prevent electrical shock
replace cords with frayed or cracked insulation
immediately.
PERIODIC MAINTENA NCE:
(Every six to twelve months):
1. Check filter for wear, replace dirt saturated filters
that do not respond to normal cleaning.
2. Inspect gasket seals and replace those which
have begun to leak.
3. Examine carbon motor brushes and
commutator, replace or repair as necessary.
See page 8.
SERVICING THE FILTER:
The filter is accessed by lifting the head assembly
off the tank.
To remove the filter, pn 341 93, loosen the black
knob, pn 48046, located in the center. This knob
should always be “finger tight”, don’t over-tighten.
With both wet and dry applications be sure to
frequently clean the filter. This is especially true
when the vacuum is being used with strippers and
wax.
Allow the filter to dry after being used for wet pickup.
NOTE: Filters used for wet pick-up including stripper
must be thoroughly cleaned before being allowed to
dry.
Worn filters can affect vacuum performance.
Replace the filter when it becomes worn out and
normal cleaning will not restor e vac perfor mance.
GASKETS:
There are several gaskets in the Titan which must
have a good seal for the machine to operate
properly.
The gaskets on the vac motors should be replaced
together in the event that one wears out and begins
to leak.
The gasket inside the head assembly must contact
the tank all around. When repairing this gasket, pn
99862, apply glue to the ends and at the corners to
insure long life. Any instant adhesi ve which does
not attack ABS plastic will work, (CA40H by 3M or
equivalent).
There is a large gasket between the tank plate, pn
62307, and motor support/sound plate, pn 62370
(twin), pn 62371 (single). In the unlikely event this
gasket begins to leak, separate the two plates as
shown in the assembly drawing on page 9 and
remove the old gasket completely, then apply the
new gasket pn 35107 (both twin and single), taking
care to line it up correctly.
To replace the vac hose elbow gasket, pn 35103, it
will be necessary to remove the main cover and
loosen the nut which holds the elbow in place.
Always be sure the cover seats in the groove on the
elbow when putting it back on.
The gasket, pn 35066, located inside the filter cage,
pn 27240, must be in place to insure that no fluid
enters the vac motor if an over flow should occur.
T/SG 98165 7/1/97
7
Page 8

Servicing the Vac Motor
To access the vac motor (s) remove the (6) screws which attach the main cover to the head
assembly and set the cover to one side. The carbon motor brushes can now be serviced, to replace
the motor assembly or service the vac motor gasket it will be necessary to open the vac exhaust
chamber, remove the (9) screws around the edge of the exhaust chamber plate and remove the two
screws from each vac motor connecting it to the vac chamber plate. When re-installing the vac
motor(s) be sure the vac shut-off disc(s), pn 62798, are in place. See page 9.
Attach Ground Wire to the post nearest the
terminal block.
WARNING
Ground wire, pn 88623, must attach the motor to
the terminal block, and the terminal block must
be attached to the ground wire from the power
cord for safe operation.
8
T/SG 98165 7/1/97
Page 9

WIRING DIAGRAMS
100V Twin
T16/2-J
T/SG 98165 7/1/97
T10J, T16J
9
Page 10

TANK ASSEMBLY
SQUEEGEE ASSEMBLY
(SUPER GULP MODELS ONLY)
30
31
30
10
T/SG 98165 10/18/99
Page 11

TANK ASSEMBLY
REF PART NO. DESCRIPTION
1A 75166 Tank, 16 Gallon
1B 75169 Tank, 10 Gallon
2 18011 Caster, 3” Swivel
3 87025 Washer, ¼ Star
4 70011 Scr, ¼-20 x 5/8 HHMS
5 78258 Tube, Squeegee Pivot
6 87008 Washer, ¼-20 x 1.25 Flat
7 70019 Scr, ¼-20 x 1.25 HHMS
8 62357 Plate, Squeegee Lock
9 67104 Ring, 5/8 External Snap
10 87088 W asher, 5/8 Flat
11 89074 W heel, 8” Dia. W/ .62 Bore
12A 03064 Axle, 16 Gallon Tank
12B 03071 Axle, 10 Gallon Tank
13 87090 W asher, 1/4ID x 3/4OD pltd.
14A 39404 Hose, 1.5 Drain 20” (16)
14B 39244 Hose, 1.5 Drain 14.5” (10)
15 66152 Plug, Drain Hose
16 27188 Cord Assembl y, Drain Plug
17 40019 Hosebarb, 1. 5 Double Machined
18 20002 Clamp. 2” Nyl on Ratc het
19 70052 Scr, 8-32 x 3/8 PHMS
20 87007 W asher, #8 Star
21 87017 Washer, #8 Flat
22 14520 Bracket , Drain Hose
23 66016 Plug, 7/8 Dress
24A 38178 Handle, 16 Gallon
24B 38179 Handle, 10 Gallon
25 50543 Label, Main Tank
26 50545 Label, Super Gulp
27 70018 Scr, ¼-20 x 1.0 HHCS SS
28 70020 Scr, ¼-20 x 1/2HHMS
29 87013 W asher, 1/4ID x 5/8OD SS
30 51281 Latch, Flexible Draw
31 70170 Scr, 10-24 X ¾ PPHMS PLTD
SERIAL NO.
FROM
NOTES:
SQUEEGEE ASSEMBLY (SUPER GULP MODELS ONLY)
REF PART NO. DESCRIPTION
1 57112 Nut, 5/16 External Snap
2 14926 Brkt, Squeegee Rev. Wheel
3 66108 Pin, Squeegee Roller
4 67103 Ring, 5/16 External Snap
5 87024 Washer, 3/8 Star
6 89058 Wheel, Squeegee Roller
7A 70469 Scr, 3/8-16 x 1/2HHMS
7B 70470 Scr, 3/8-16 x 5/8 HHMS
8 87016 Washer, #10 Lock Ext.
9 87029 Washer, 5/16 Flat SAE
10 73600 Shoe Asm, Outter Squeegee
11 73557 Shoe, Squeegee Asm 24” Inner
12 73605 Squeegee Blade, 27” Maize
13 66016 Plug, 7/16 Dress
14 57113 Nut, 5/16-18 Lock
15 70195 Scr, 10-32 x 1.25 SS
16 51178 Lever, Squeegee
17 57104 Nut,10-32 w/ St ar Washer
18 62384 Plate, Squeegee Pivot
19 34225 Frame, Assembly Squeegee
T/SG 98165 10/18/99
SERIAL NO.
FROM
NOTES:
11
Page 12

VAC COOLING DUCT
12
T/SG 98165 2/14/01
Page 13

VAC COOLING DUCT
REF PART NO. DESCRIPTION
1 34216 Foam, Duct Bottom
2 OPEN
3A 29168 Duct, 120V TT Vac Cooling Twin
3B 29167 Duct, 120V T Vac Cooling Single
4A 29169 Duct, w/ Foam, 120V Twin
4B 29166 Duct w/ Foam, 120V Single
5 70430 Scr, #8-18 x 3/8 PHP Single
6 87017 Washer, #8 Flat Single
7 71112 Support, 115V Vac Duct Single
SERIAL NO.
FROM
NOTES:
MAIN COVER ASSEMBLY
REF PART NO. DESCRIPTION
1 26006 Cord End, 125V 15A NEMA
2 73505 Strain Relief, 1/2NPT
3 57040 Nut, 1/2NPT Conduit
4A 27443 Cover, Standard Single
4B 27529 Cover Twin Only
5 34217 Foam, Cover
6A 72125 Switch, 16 (4) SPST 16 (4) a rckr 16/2 & 16/2J’s
6B 72076 Switch, 16 (4) A DPST Rckr. Singles & I Twins
7 27376 Clip, Switch Retaining
8 87095 Washer, #10 Flat
9 70440 Scr, 10-24 x 5/8 PHMS
10A 50544 Label, Twin
10B 50542 Label, Single
11A 50567 Label, 1017 UL/CSA Warning
11B 50577 Label, Warning Caution Japan
12 50742 Label, Warning Explosion Hrz.
13 50776 Label, For Safety
SERIAL NO.
FROM
NOTES:
T/SG 98165 2/14/01
13
Page 14

UPPER HEAD ASSEMBLY
LOWER HEAD ASSEMBLY
18
14
19
T/SG 98165 10/18/99
Page 15

UPPER HEAD ASSEMBLY
REF PART NO. DESCRIPTION
1 35107 Gasket, Support Plate
2 62798 Plate, Vac Shut-Off Disc
3A 62370 Plate, Twin Motor Support
3B 62371 Plate, Single Motor Support
4 87017 Washer, #8 Flat
5 70429 Scr, #8-18 x 3/4PHP H-L
6A 53742 Motor Asm, 115V Twin
6B 53751 Motor Asm, 115V Single
6C 53756 Motor Asm, 100V Twin & Single
7A 27539 Chamber, Twin Exhaust
7B 27540 Chamber, Single Exhaust
8 87095 Washer, #10 Flat
9 OPEN
10 OPEN
11 OPEN
12 OPEN
13A 50686 Label, 115V Twin Wiring
13B 50546 Label, 115V Single W iring
13C 50687 Label, 100V Twin Wiring
13D 50592 Label, 100V Single Wiring
14 57104 Nut, 10-32 w/ Star Washer
15 70386 Scr, 10-32 x 1.0 PHMS
16 70114 Scr, #10 x ¾ Polyfast
SERIAL NO.
FROM
NOTES:
REF PART NO. DESCRIPTION
1 35103 Gasket, Hose Elbow
2 31061 Elbow, Swivel
3 22037 Clip, Hose Lock
4 62307 Plate, Tank
5 35179 Gasket, Tank Plate
6 34193 Filter, Wet/ Dry Cartridge
7 48046 Knob, ¼-20
8 73516 Standoff, ¼-20 x ½
9 87025 Washer, ¼ Star
10 87087 Washer, M8 x 25 pltd
11 27240 Cage, Wet/Dry Filter
12 34116 Float, Vac Shut-Off Ball
13 35066 Gasket, Float Shut-Off
14 57164 Nut, 2” NPT
15 62470 Plate, Su ppor t Basket
16 57047 Nut, ¼-20 Loc k
17 70430 Scr, #8-18 x 3/8 PHP
18 48070 Keeper, Front Mount Blk
19 70608 Scr, 1 ¼” Coarse Blk Deck
LOWER HEAD ASSEMBLY
SERIAL NO.
FROM
NOTES:
T/SG 98165 10/18/99
15
Page 16

DAILY MAINTENANCE:
(At the end of each working day):
1. Rinse tank
2. Remove cover and allow to dry.
3. Remove filters for cleaning or to allow to dry.
4. Inspect hoses for wear. Frayed or cracked
hoses should be replaced to avoid vacuum
loss.
5. Inspect power cord for wear. This cable will
lie on wet surfaces. To prevent electrical
shock replace cords with frayed or cracked
insulation immediately.
TROUBLESHOOTING CHART:
PROBLEM POSSIBLE CAUSE
No Power to Machine Dead electric al circuit
Power switch failure
Faulty power cord
Electrical Shock Equipment not grounding
Receptacle not grounded
Internal wiring problem
Vac motor speed Worn motor brushes
varies or doesn’t run
Loss of vacuum Broken vac hose
NOTE: Maintenance and repairs must be done by qualified personnel. Using non-Windsor parts to repair this machine wil l void
the warranty. A complete service manual is available upon request which includes wiring diagrams, parts lists, part diagrams and
basic repair instructions for the entire machine. Contact an authorized Windsor dealer for complete details.
Motor worn out
Motor has overheated
Faulty switch
Worn out vac motor
Lint clogging vac motor
Loose cuffs on vac hose
Vac motor seals leaking
Lint or dirt clogging vacuum
hose or tool
Faulty vac housing seals
SOLUTION
Check building circuit breaker or fuse box.
Replace.
Replace.
Follow grounding instructions exactly.
Contact an electrician to check buildings wiring.
Have a trained service technician check machine’s wiring.
Replace.
Replace.
Clear air obstruction and wait for motor to cool down.
Replace.
Replace.
Replace.
With power off, clean motor.
Tighten cuffs turning counterclockwise.
Replace.
With power off, clean out obstruction.
Replace.
16
T/SG 98165 7/24/97
Page 17

NOTES:
T/SG 98165 7/1/97
17
Page 18

LIMITED WARRANTY
Windsor Industries, Inc. warrants new machines against defects in material and workmanship
under normal use and service to the original purchaser. The warranty period is subject to the
conditions stated below.
3 YEARS FOR PARTS AND 1 YEAR FOR SERVICE LABOR
Exceptions: Rotationally molded polyethylene tanks carry a 6 year parts and 1 year service
labor warranty.
motors, and belts, and a 1 year service labor warranty. SENSOR
warranty on vacuum motors and belts, and a 1 year service labor warranty. Extractor brush
motors, pump motors, pc boards and electronics, vac motors (other than
VERSAMATIC
SENSOR®), pumps, and FLEXSOL™ diaphragms, all RADIUS™, all AXCESS™ and
TITAN™1 carry a 1 year parts and service labor warranty. Propane equipment has a 1 year
parts and service warranty. The Onan® engines have a 3 year manufacturers’ warranty. The
Honda® engines have a 2 year manufacturers’ warranty. The engine warranty is administered
through the engine manufacturer and must be repaired at an authorized service center.
Normal wear items including, but not limited to, belts, brushes, capacitors, carbon brushes,
casters, clutches, cords, filters, finishes, gaskets, hoses, light bulbs, rectifiers, switches, squeegees, bearings, pulleys, relays, actuating cables, tires and wheels will be warranted for
manufacturing defects for 90 days from the purchase date.
The warranty commences on the purchase date by the original end user from an authorized
Windsor Agent, subject to proof of purchase. The Machine Registration Card must be
completed and returned immediately at the time of purchase. If proof of purchase cannot be
identified, the warranty start date is 90 days after date of sale to an authorized Windsor
distributor. Parts replaced or repaired under warranty are guaranteed for the remainder of the
original warranty period.
®
models carry a 3 year warranty on brush motors, vacuum
®
models carry a 2 year
VERSAMATIC® and
90 DAY WARRANTY EXTENSION AVAILABLE
Upon receipt of the Machine Registration Card, Windsor will extend the warranty period an
additional 90 days from the purchase date. Does not include items warranted 90 days for
manufacturing defects.
STATED WARRANTIES ARE IN LIEU OF ALL OTHER WARRANTIES,
EXPRESSED OR IMPLIED.
Any statutory implied warranties, including any warranty of merchantability or fitness for a
particular purpose, are expressly limited to the duration of this written warranty. Windsor will not
be liable for any other damages, including but not limited to indirect or special consequential
damages arising out of or in connection with the furnishing; performance, use or inability to use
the machine. This remedy shall be the exclusive remedy of the buyer.
This warranty shall not apply to: 1.damage in transit; 2.misuse or abuse(including the use of
incompatible or corrosive chemicals or overloading of capacity); 3. failure due to lack of proper
maintenance and care (including cleaning); 4.any design alterations performed by an
organization not authorized or specified by Windsor; 5.batteries and chargers. 6. high pressure
washing. 7.electrical components exposed to moisture.
If difficulty develops during the warranty period, contact the authorized Windsor Agent from
whom the product was purchased. Windsor, Inc. may elect to require the return of components
to validate a claim. Any defective part to be returned must be shipped freight pre-paid to an
authorized Windsor Distributor/Service Center or to the Windsor factory.
USE OF PARTS NOT APPROVED BY WINDSOR, INC.
WILL VOID ALL WARRANTIES.
This warranty is valid only for all products sold after July 1, 1995. A product sold before that
date shall be covered by the limited Warranty in effect at the date of sale to the original
purchaser.
ã 1999 Windsor Industries, Inc. All rights reserved. REVISED 0 3/24/99
 Loading...