

Page 1

HA
RD
FLOOR
SC
RU
BBE
R
(ELECTRIC VERSIONS)
Operating Instructions
(ENG)
MIEL
SMOWN:
TC20T
MODEL:
TCZOE
-
(20”
Non-
Traction)
VOLTAGE
115V
QEsr
.
. .
for
Continuous Improvement.
Wipgsor’s
Quality Management System
is
Certified
IS0
9QOl.
C€
IPX4
Read these instructions before operating the machine.
TC20E
98447
03/13/00
Page 2

MACHINE
DATALOG
MODEL
.
DATE
OF
PURCHASE
.
SERIAL NUMBER
.
SALES REPRESENTATIVE
.
DISTRIBUTOR NAME
.
OPERATIONS GUIDE NUMBER . 98447
PUBLISHED . 7/1/96
@Copyright 1996 Windsor Industries. Printed in U.S.A.
TABLE
OF
CONTENTS
Cover
......................
1
Data Log / Table of Contents
....
2
Safety Precautions
............
3
Safety Precautions (cont.)
......
4
Safety/Operations
.............
5
Operation Controls
............
6
Maintenance
.................
7
Maintenance (cont.)
...........
8
Maintenance (cont.)
...........
9
Trouble Shooting Guide
........
10
Wiring Diagram
(1
15V)
.........
11
Tanks. and Frame Assembly
....
12
Tanks and Frame Parts List
.....
13
2
Squeegee Assembly
..............
14
Squeegee Assembly Parts List
......
15
Valve Assembly
..................
16
Valve Assembly Parts List
..........
17
Scrub Deck Assembly
.............
18
Scrub Deck Assembly Parts List
.....
19
Mechanical Controls
..............
20
Mechanical Controls Parts List
......
21
Control Panel Assembly
...........
22
Control Panel Assembly Parts List
...
23
Vac Motor
Assembly
..............
24
Scrub Deck Assembly (Hex Drive)
...
25
Warranty
.......................
26
TC
I
7/20 984 1 7 7/1/97
Page 3

SAFETY
IMPORTANT SAFETY INSTRUCTIONS
When using an electrical appliance, basic precautions should always be fallowed, including the following:
READ ALL INSTRUCTIONS BEFORE USING MACHINE
TO
REDUCE THE RISK OF FIRE, ELECTRIC SHOCK, OR INJURY:
Connect machine to a properly grounded outlet only. See grounding instructions.
Do not leave appliance when plugged in. Unplug from outlet when not in use and before servicing.
Do not use outdoors on wet surfaces.
Do not allow to be used as a toy. Close attention is necessary when used by
or
near children.
Use only as described in this manual. Use only manufacturers recommended attachments.
Do not use with damaged cord or plug. If appliance is not working as it should, has been dropped, damaged,
left outdoors, or dropped into water, return it to an authorized service center.
Do not pull or carry by cord, use cord as a handle, close a door on a cord, or pull cord around sharp edges or
corners. Do not run appliance over cord. Keep cord away from
heated surfaces.
Do not unplug by pulling on cord.
To
unplug, grasp the plug, not the cord.
Do not handle plug or appliance with wet hands.
Do not put any object into openings. Do not use with any opening blocked; keep free of dust, lint, hair, and
anything that may reduce air flow.
Keep hair, loose clothing, fingers, and all parts of body away from opening and moving parts.
Do not pick up anything that is burning or smoking, such as cigarettes, matches, or hot ashes.
Turn
off
all controls before unplugging.
Do not use to pick up flammable or combustible liquids such as gasoline or use in areas where they may be
present.
Rotating fan blades inside the cover. Before opening cover, switch
off
machine. Wait until the fan/brush stops
completely or dust and debris may be ejected.
Dry mop floor before using.
SAVE
THESE INSTRUCTIONS
TCPOE
98447 7/1/97
3
Page 4

SAFETY
The following symbols are used throughout this
guide as indicated in their descriptions:
HAZARD
INTENSITY LEVEL
There are three levels of hazard intensity identified
by signal words
-
WARNING, CAUTION and
FOR
SAFETY.
The level of hazard intensity is deter
-
mined by the following definitions:
WARNING
-
Hazards or unsafe practices which
COULD result in severe personal injury or death.
CAUTION
-
Hazards or unsafe practices which could
result
in
minor personal injury or product or property
damaae.
FOR SAFETY:
To Identify actions which must be
followed for safe operation of equipment.
The following information signals indicate potentially
dangerous conditions to the operator or equipment.
Read this guide carefully. Know when these conditions
can exist. Locate all safety devices on the machine.
Report machine damage or faulty operation immediate
-
ly. Do not use the machine
if
it is not proper operating
condition.
For SAFETY:
DO
NOT OPERATE MACHINE:
0
Unless Trained and Authorized
0
Unless Operation Guide is Read and
In
Flammable or Explosive areas.
Go slow on grades and slippery
Use care when backing machine.
Do not carry riders on machine.
Always follow basic safety and
traffic rules.
understood.
WHEN USING MACHINE:
surfaces
.
0
0
0
0
0
BEFORE LEAVING OR SERVICING
MACHINE:
0
Stop on level surfaces.
0
Turn off machine.
WHEN SERVICING MACHINE:
0
Avoid moving parts. Do not wear loose
jackets, shirts, or sleeves when working on
machine.
Block machine wheels before jacking
machine up.
Use hoist or jack of adequate capacity
to
lift machine.
Use
Windsor approved replacement parts.
0
0
0
WHEN TRANSPORTING MACHINE
INA TRAILER:
0
Make sure the ramp angle
is
no more than
Make sure ramp
is
clean and dry.
Remove squeegee assembly
&
brushes
before loading.
Align the machine on a level surface ten
(10)
feet behind the ramp.
Push machine up ramp carefully.
Securelv fasten the machine to the trailer.
lo",
and the ramp is strong enough to
support the machine.
0
0
Put ramp into position.
0
0
0
0
~
THIS PRODUCT IS FOR COMMERCIAL
USE
ONLY.
EL
ECTRICA
L:
In the USA this scrubber operates on a standard 15 amp
11
5
volt A.C. power circuit (120V nominal). Special voltage mod
els are available for international applications. The amp,
hertz, and voltage are listed on the data label found on each
machine. Using voltages above
or
below those indicated on
the data label will cause serious damage to the motors.
GROUNDING INSTRUCTIONS:
This appliance must be grounded.
If
it should malfunction or
break down, grounding provides a path of least resistance
for
electric current to reduce the risk of electric shock. This ap
pliance is equipped with a cord having an equipment-ground-
ing conductor and grounding plug. The plug must be inserted
into an appropriate outlet that is properly installed and
grounded
in
accordance with all local codes and ordinances.
Improper connection of the equipment
-
grounding con
ductor can result in a risk of electric shock. Check with
a qualified
electrician or service person if you are in
doubt as to whether the outlet is properly grounded.
Do
not modify the plug provided with the appliance - if it will
not fit the outlet, have a proper outlet installed by a qual
ified electrician.
This appliance is for use on a nominal 120
-
volt circuit, and
has a grounded plug that looks like the plug in
"
Fig.
A
"
below.
A temporary adaptor that looks like the adaptor in
"
Fig.
C
below may be used to connect this plug to a 2-pole receptacle
as shown in
"
Fig. B" below. The temporary adaptor should
be used only until a properly grounded outlet (Fig. A) can be
installed by a qualified electrician. The green colored rigid
ear, lug, or the like extending from the adaptor must be con
-
nected to a permanent ground such as a properly grounded
outlet box cover. Whenever the adaptor is used, it must be
held
in
place by a metal screw.
NOTE: Check local electrical codes before using an
adaptor. Adaptors are not allowed in Canada.
4
TCPOE
98447 7/1/97
Page 5

SAFETY/OPERA
TIONS
EXTENSION CORDS:
PREPARING FOR OPERA
TION(Cont..)
If
an
extension cord is used, the wire size
must
be at least one
size larger than the power cord on the machine, and the cord
must
be
a type SJTW/SSTW:A.
HOW IT OPERATES
The
TRIDENT COMPACT
is a walk-behind scrubber.
The main scrubbing components include a
solutiodrecovery
tank,
single disc-type brush or pad, a rear squeegee and a vac
-
uum
motor.
Detergent solution and water flow from the solution
tank
to
the scrub brush. The rotating brush scrubs the floor. As the
machine moves forward, the rear squeegee collects the dirty
solution and channels it into
the
vacuum
of
the squeegee pickup
hose. The pickup hose deposits the dirty solution into the re
-
covery tank.
PREPARING FOR OPERATION
(PERFORM DAILY
MAINTENANCE
AS
SHOWN
ON
PAGE
7.)
Fill
Solution
Tank
1.)
2.)
Remove cover and fill. (see item
19,
page
14)
Use a clean bucket or hose to fill the tank
with water.
3.)
Add a cleaning concentrate for use in automatic floor
scrubbers. Closely follow the manufacturer’s instructions
found on container. Read ingredients listed on the container
to ensure compatible chemicals
are
used.
Use only the suitable chemicals listed below. Using incom
patible chemicals may damage the machine. Damages of
this type are not covered under the
WINDSOR Three Year
Protection Plan. Carefully read ingredients on manufac
turer’s label before using any product in this machine.
I
I
SUITABLE INCOMPATIBLE
CHEMICALS CHEMICALS
Alkalis
Aldehydes
Defoaming Agents Carbon Tetrachloride
Detergents
Chlorinated Hydrocarbons
Hydroxides
Methyls (MEK)
Perchlorethylene(per)
Phenols
Trichlorethylene
D
-
Limonene
4.)
Plug the power cords together and twist into locked
position. Attatch the power cord to the yellow strain
relief as shown. Plug power cord into a properly
grounded wall outlet.
5.)
Turn vacuum motor switch on and
off
to make sure
there is electrical power at machine.
OPERATING THE MACHINE
(PERFORM
DAILYMAINTENANCEAS
SHOWN
ON
PAGE
7.)
1.
Adjust the operator control handle to a
comfortable position. (see item
3,
page
6)
2.
Switch on main power switch. (see item
1,
page
5)
3.
Release solution. (Pull solution control lever
rearward.) (see item
6,
page
6)
NOTE:
The
amount of solution can be regulated during
operation depending
on
the type of
floor
and the
traverse speed
of
the machine. Pulling the lever
farther rearward releases more solution.
4.
Switch on brush drive motor. (see item
1,
page
6)
5.
Switch on vacuum motor. (see item
2,
page
6)
6.
Lower scrub deck. Pull scrub deck lift lever
rearward. (see item
8,
page
6)
is
stationary.
7.
Lower squeegee. Pull squeegee lift lever
back. (see item
7,
page
6)
NOTE:
Adjust
squeegee as shown on page
9.
8.
Move machine forward bv aDDlvinrr even
,.
-
-
pressure on the main haidle . Forward motion is
assisted by the scrubbing action of the
brushlpad
driver.
Take extra care not to run machine over cord or
catch cord on squeegee when turning.
7.
Plan your cleaning route to work away from the
electrical source. Move machine forward at a
steady pace
TCPOE
98447 7/1/97
5
Page 6
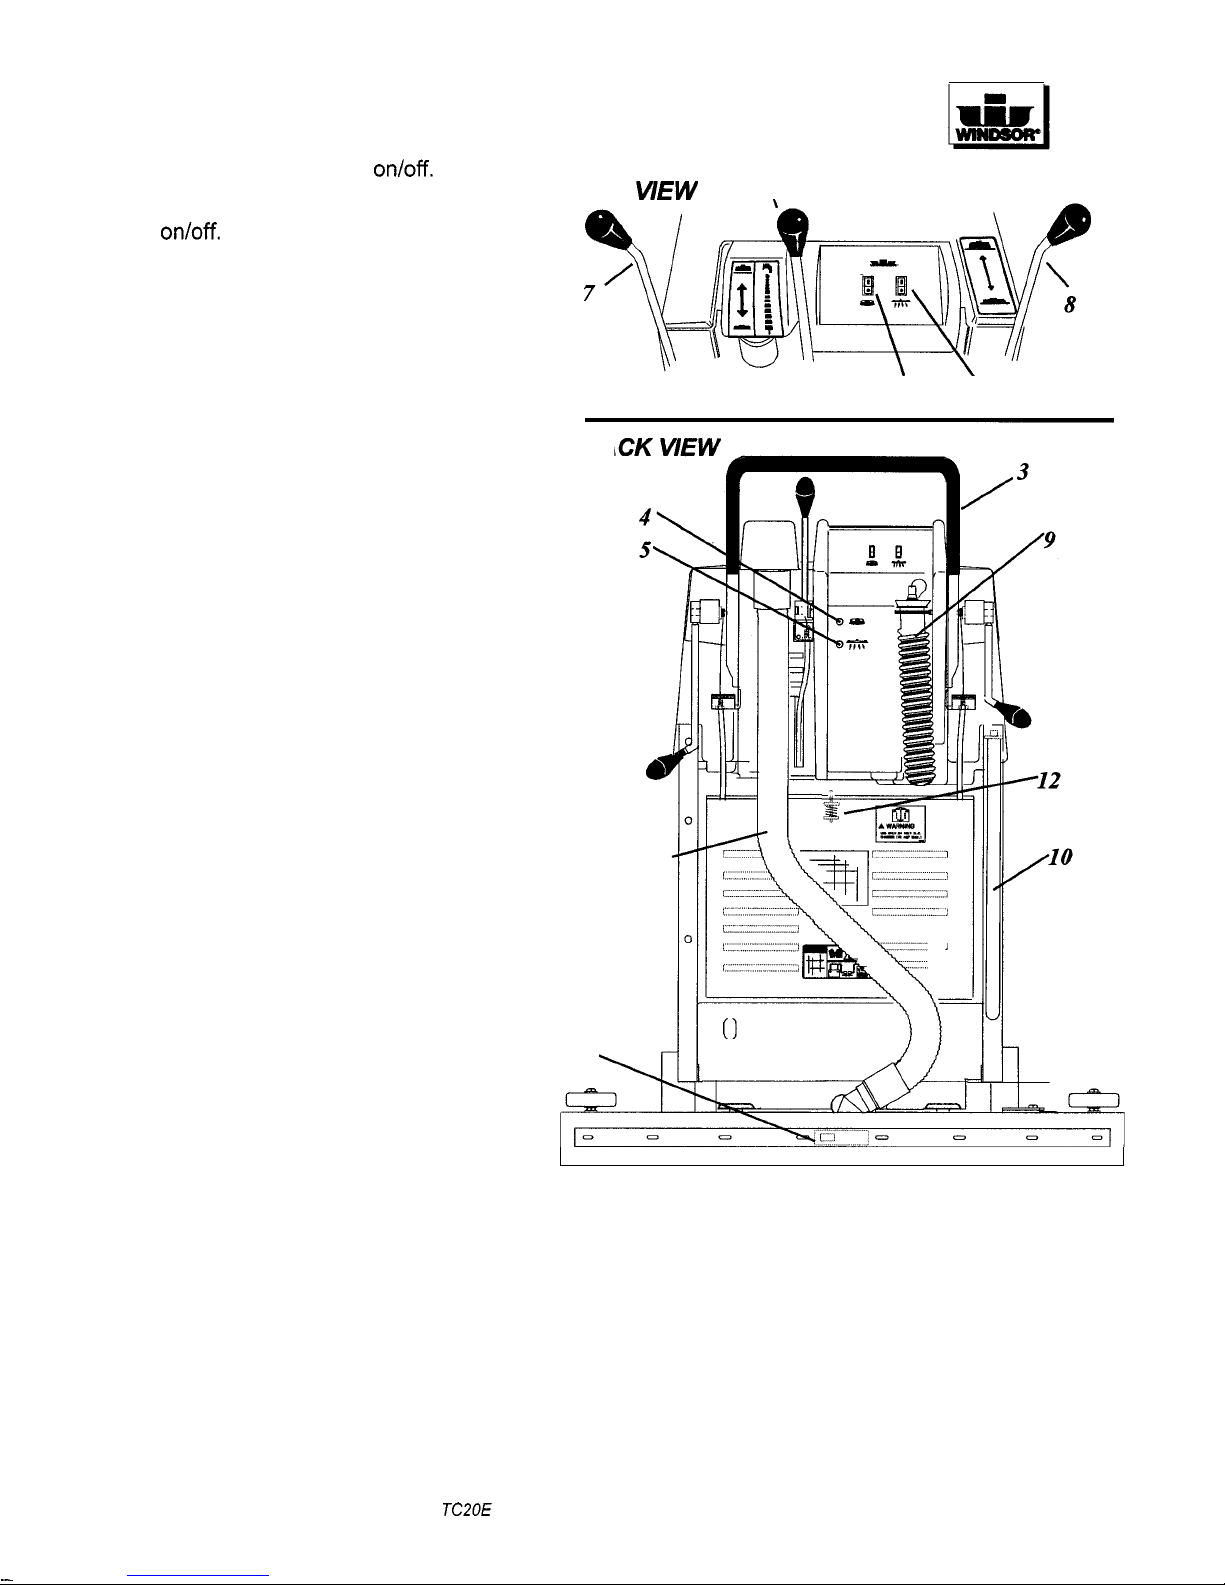
OPERATION CONTROLS
1
2
3
4
5
6
7
8
9
10
11
12
Brush Switch.
Turns brush on/off.
Vacuum Switch.
Turns vacuum
motor
on/off.
Main Handle.
Brush Motor Circuit Breaker.
Protects brush motor from overheating.
Vacuum Motor Circuit Breaker.
Protects vacuum motor from overheating.
Solution Lever.
Controls the amount of
solution flow to the floor.
Squeegee Lift Lever.
Raises and
lowers squeegee.
Scrub Deck Lift Lever.
Raises and lowers
scrub deck.
Recovery Tank Drain Hose.
Solution Tank Drain Hose.
Squeegee Release Latch.
Releases
the rear squeegee blade for adjustment
or replacement.
Battery Compartment Door Latch.
Opens
back
13
Vacuum Hose.
of machine for access to batteries.
11
6
TOP
VIEW
\
\
2
1
BA
d
13
'
r
1
(1
4
6
TCSOE
98447 7/1/97
Page 7

MAINTENANCE
Maintenance Item
Check Vac Hose Connections
Clean the Squeegee Blades
Inspect Brush or Pad
Before Starting
the Work Period
Daily Weekly Monthly Annually
*
*
*
End of Work
@
Period
Inspect power cord for wear
Before Storing
*
NOTE:
Drain & Rinse Tanks
*
Inspect Vac Fan
Foam
Breaker
I*I
I I
I
Remove the BrushPad
Check
the
BrushLPad for Damage and or wear
Clean Squeegee Blades
&
Foam Breaker
*
*
*
Remove lint build-up
from
screen in the recovery tank well.
Remove tank lid and allow recoverv to
drv
between uses.
Raise Squeegee Assembly
I*I
I I I
*
*
Inspect Tanks and Hoses
Inspect all Motors for Carbon
Motor Brush wear.
*
*
Check Solution Strainer
I
I*I
I
I
Check Casters & Wheels for proper lubrication
I
I*I
I
I
7.
2.
2.
Details on these maintenance items can be found on the following pages.
This cable will lay on wet surfaces. To prevent electrical shock immediatly
replace cords with frayed or cracked insulation.
Periodically inspect the recovery tank and decontaminate if necessary,
using a Hospital Grade
Virucide or a
7-70
bleach to water solution.
Wastewater should be disposed of properly.
Occasionally check in line filter screen, rinse with hot water if necessary.
Frayed or cracked hoses should be replaced to avoid vacuum or solution
pressure loss.
3.
4.
LUBRICATION:
The following symbols are found throughout the manual indicating the items
requiring lubrication:
@
Apply Grease
Use Spray Lubricant.
Thread Locker (Red or blue).
EXAMPLE:
Use Anti-Seize when repairing.
TCZOE
98447 7/1/97
7
Page 8
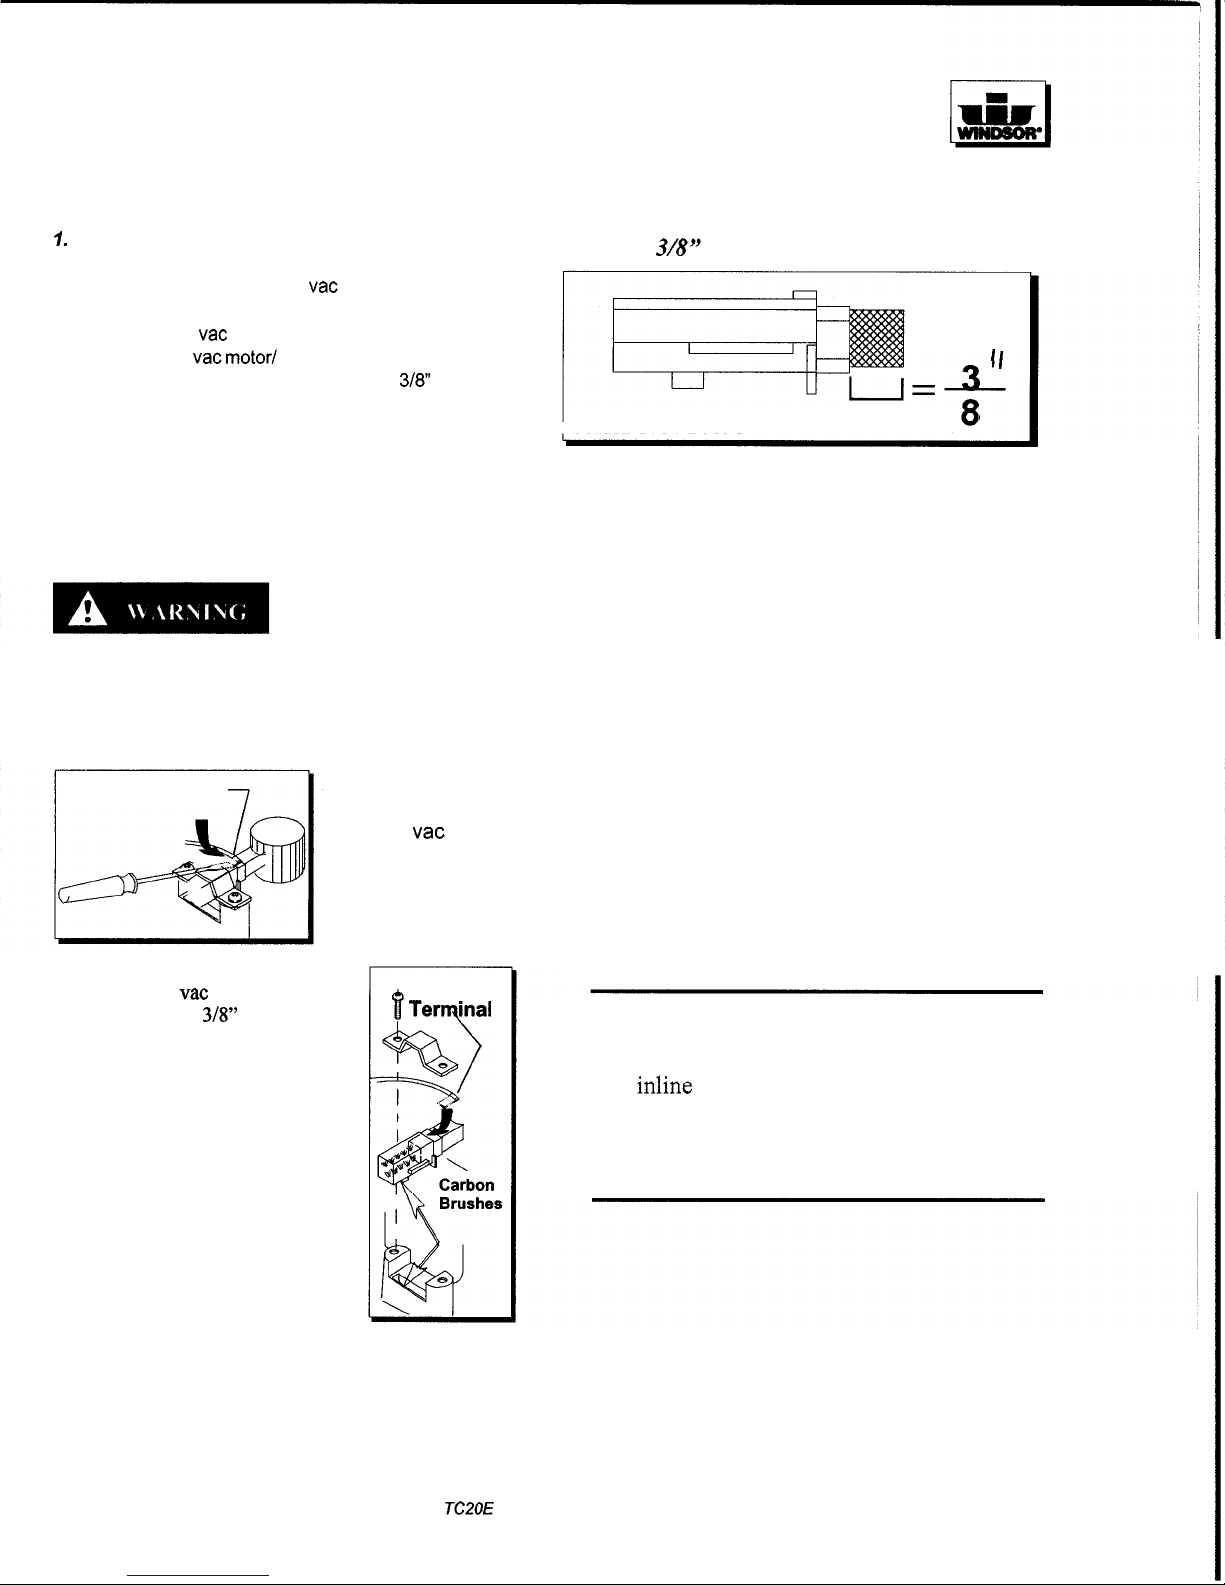
MAINTENANCE
VACUUM
MOTOR
7.
2.
3.
4.
After the machine has been used for any wet pick
-
up, allow the vacuum motor to
run
1-2 minutes, to
help reduce moisture build
-
up
in
the vacuum mo
tor. Drying out the vacuum motor after each use
will extend the life of your vacuum motor.
Disconnect battery leads and remove batteries
from compartment.
Remove
(6)
bolts holding vac motor/ plate
assembly to recovery tank.
Disconnect
vac motor lead from connector
and
lift
out vac motor/ plate assembly.
Check motor brushes. When wom to
3/8"
replace
both brushes.
Hazardous Voltage. Shock can result. Disconnect batteries before working on machine. Only
qualified personnel should work inside ma
-
chine.
Wire Terminal
7
Important:
Replace carbon
vac
motor brushes
if worn
down
to
318"
in length.
These brushes wear quicker
as
the
length shortens due to increased
heat.
Spring inside brush housing will
damage motor
if
brushes are al-
lowed to completely wear away
Note: Place stop
in groove.
Important:
When replacing
carbon
vac motor
brushes loosen wire
terminal
BEFORE
re
moving screws on
bracket.
Wire
8
Terrqinal
NOTE: Periodically check the length
of
the car
bon brushes. Replace carbon brushes which are
less than
3/8"
long.
II
I
PART NO.
14695
U
BRUSH
Brush
Installation:
1.
Slide brush or pad driver under drive plate.
2.
Align one metal lug on the brush or
pad driver with the scrub deck sight hole and a
keyhole in the drive plate.
3.
Raise the brush or pad driver upward
and twist clockwise until locked.
Brush
Removal:
1.
Raise brush or pad driver off floor.
2.
Reach under brush or pad driver and rotate
so
that the metal lug in the drive plate is visible
through the scrub deck sight hole.
3.
Quickly twist brush or pad driver counterclockwis
to release.
SOLUTION STRAINER
1.
An inline solution strainer
is
located under chassis
behind left wheel. Remove sediment bowl and
screen periodically and rinse clean with hot water.
Be careful not to misplace the gasket.
8
TCSOE
98447 7/1/97
Page 9

SQUEEGEE ASSEMBLY
Before and during use of machine, use a damp cloth to wipe
the outside and inside
of
squeegee to remove buildup of for
-
eign material
on
the squeegee blades. This prevents streaking
and residue
on
the floor.
Squeegee wear:
After extended use, the squeegee blades will wear. To im
prove squeegee performance and extend wear, proceed as
follows:
1.
Turn
off
all switches and place the machine
on
a level surface. Raise the squeegee to
the transport position.
Loosen knobs
on
the left and right hand
sides
of
squeegee until squeegee can be
removed from the squeegee bracket.
Loosen the fasteners
on
front of squeegee
to replace or adjust front blade.
Unlatch rear squeegee latch to replace rear blade.
2.
3.
4.
Adjusting Squeegee Assembly
ber
-t
knob
1.
2.
Lower the squeegee and move the machine
forward.
Observe the level of the squeegee for an
even curl along the length of the blade. Use
camber adjustment knob to achieve even curl if
required.
Adjust the down pressure nut located
on
squeegee
mounting assembly.
Do not apply excessive force.
3.
MAINTENANCE
SQUEEGEE DEFLECTION
INCORRECT
NOTENOUGH
TOO
MUCH
TCPOE
98447 7/1/97
Page 10

TROUBLE
SHOOTING
GUIDE
Dead electrical circuit
Power switch failure
Faulty power cord
I
1
Faulty switch
Vac motor, hose or dome gasket
I
Improper solution hose connection
Prop
Screen in filter clogged
Valve clogged
Check building circuit breaker or fuse box
Replace
Replace
Follow grounding instructions exactly.
Contact an electrician to check building’s wir
-
ing.
Have a trained service technician check
machine’s wiring
Replace
Replace
Replace
Center and seal dome over tank.
Replace or repair using acrylic plastic cement
only.
With power
off
clean screen.
Tighten cuffs turning counterclockwise.
Replace.
Wash out with hose. Pick lint out with a wire.
Replace.
Check for positive connection
Remove and clean with hot water.
Clean or replace if damaged. Check to be
sure
filter screen is in place. Be sure to pre
-
mix
cleaning
chemicals.
TCZOE
98447 7/1/97
Page 11

4
+
J
WHT
880094
76050
VACUUM SWITCH
SWITCH
REARVIEW
I
c
BRUSH
CIRCUIT BREAKER
I
BLK
BRUSH SWITCH
POWER
IN
Page 12

TA
NKS AND FRAME
22
I2
REAR
VIEW
TC20E
98447
12-01
-
99
Page 13

TANKSAND
FRAME
PARTS LIST
Ref
PartNo.
CNy
Description
1
20046
2 CLAMP
9.
2
25
HVSt
2
87090
11
WASHER,
1/4FlAT
3 27759
1
CUFF,
1.5’
BLK HOSE
4 27188
1
CORD, DRAIN HOSE PLUG
5
27282
1
CUFF, 1.5 SLIP X 1.5 HOSE
6
L1416
1
ww
7 28055 1 DOME, TC MODIF.
8
34303
1
FRAME,MAlN
9
34305
1 FLOAT, RECOVERY SHUT-OFF
10
35060
1
GASKET,DOME
11 39472 1
,.
DKAlN
12 39383 1 HOSEASM,VAC
13 40019 1 HOSEBARB, 1.5 DOUBLE
14
50485
1 LABEL, WINDSOR LOGO
15
50742
1
LABEL, EXPLOSION WARNING
16
8081
9
2
WASHtK,.31-
17A 50518 2 LABEL, TC17 “COMPACT’
178 50519 2 LABEL, TC20 “COMPACT’
18
-
OPEN
19 51138 1 LID, SOLUTION TANK
20
51041
3 NUT, 1/4-20
NvmcR
PLI
U
21
03058
1 AXLE, WHEEL 17.8 L X .625 OD
22
61 320 1 PANELASM,REAR
23 661 52 1 F‘LUG,DRAlNHOSE
24 70010 6 SCR, 1/4-20 X 1.5 HHCS
26 70114 3 SCR,
#I0 X 3/4 POLYFAST
27 70251 3
SET SCREW, 1/4-20 X
1
HHMS
28 70393 2 SET SCREW,
1/4-20 X 1.25L
29
81 379
1
FllTING, SEALED BULKHEAD
30
34306
1 I-UAMmtAKtK
31 75152
1
TANK,SOLUTlON
32
75234
1
TANK,RECOVERY
33
89181 2 WHEEL.MAlN
34 57119 4 NUT, 3/8-16 HEX NYLOCK PLTD
35
IW72
4
St
I
YGK, s/lbmGP
36 87025 2 WASHER, 114 STAR
37
27266 2 CAP,WHEELHUB
38
-
OPEN
39 70266 4 SCR, 3/8
-
16 X 1
.O
HHCS GR5 PLTD
40
21408
2
COLLAKASM,AXLt
41
-
OPEN
42 87003
8
WASHER,
3/8
ID X 7/8
OD
SS
43
-
OPEN
44 73437 4 SPACER, 1
.OO
OD X
.688
ID X
.3L
45
78294
1
TUBt,VACMGF(SRMOD.
46 36150 1 GASKET,VAClNTAKE
47 34258 1
INTAKE,
FILTER VAC
48
27417
1
CORD,1/8XIT‘
49 70191 2 SCREW, 1032 X 1R HKTC TYPE 23
50
14665
1
BKKT.,
mBt
51
-
OPEN
52
-
OPEN
/
53 39338 1 HOSE, 1.5 BLU VAC X 45”
54
27051 1 CABLE TIE, 11.38” UUCSA
55
4W13 1 HOSEBAKB,
18
MITX
112
56
57044 1 NUT, 3/8 NPT HEX BRASS
57
40022
1 HOSEBARB, 1R MPTX 1R POLY
58
20042 1 CLAMP, 3/8 HOSE PSLOT
59 39380 1 HOSE, 1R ID NYLOBRAID
6”
60
VPtN
61
-
OPEN
62
-
OPEN
63
20002
1
CLAMP.2NYLON
5001372-
TCPOE
98447 12-01-99
13
Page 14

SQUEEGEE ASSEMBLY
A
58
-7
35
-%
l*l
SQUEEGEE
SUB
ASSEMBLY
35
--t
v
-
1
9
79
74
TCPOE
98447
1
I/l
1/99
Page 15

SQUEEGEE ASSEMBLY PARTS LISTT
57
58
60
61
62
59
87080 1 WASHER,
.5
X
1.25
FLAT GR8 PLTD
87083 11 WASHER, 5/16 SPLIT LOCK PLTD
871 78 1 WASHER,
5/8lD
X 2 X
.5
THK
871 37
2
WASHER, 5/81D X 2.00D X 3/32 THK
89059
2
WHEEL, SQUEEGEE BUMPER
-
OPEN
TC20E
98447 I 1
/I 1/99
15
Page 16

VALVE
GROUP
8
(FROM
SOLUTION TANK)
10
(SOLUTION DRAIN
HOSE)
w'
-
Detail
-A-
16
TCPOE
98447 3/26/98
Page 17

VALVE ASSEMBLY PARTS LIST
2 140146 1 Brkt, Solution Valve Mtg.
3 20042 3 Clamp, 3/8 Hose
4 27372
1
CAP,STRAlNER
5
27726
1
Cable, Solution
6 70088 2 Scr, 10
-
32 x 1/2 PPHMS SS
7 57104 1 Nut, 10
-
32 w/star washer PLTD
8 39380 1 Hose, 1/2 id nylobraid
6
"
9 39381
1
Hose, 1/2 ID Clear x 22
"
10 39444 1 Hose, 1/2x5" Clear
11
-
-
OPEN
12 73383
1
STRAINER, 3/8 NPT 20 MESH
13
-
-
OPEN
14 40027 2 Hosebarb, 3/8
MPTxl/2
90"nyl
15 OPEN
16 41 184
1
Housing, strainer
17
OPEN
18
-
-
OPEN
19 57030
5
NUT, 10-32 NYLOCK PLTD
20 59021
1
O-ring, filter seal
21
-
-
OPEN
22 70066
1
Scr, 10-32 x 3/4 PPHMS
SS
23 40013
1
Hosebarb, 3/8 MPT x 1/2
24 70403 1 Scr,
#I0 x 112 Polyfast Ph Phil
25 73405 1 Screen, 80 mesh
26 78212
1
Tee, 3/8 FPT
(All models except
X)
TCPOE
98447 3/26/98
17
Page 18

SCRUB
DECKASSEMBLY
23
I'
18
TCPOE
98447 3/26/98
Page 19

SCRUB DECK ASSEMBLY PARTS LIST
serial
No..
I
From
To
Notes
Ref
PsrtNo.
Qty
Descriptlon
1 20077 1 CLAMP,
WUKM
#HS356
I
I
2 27527
1
CONDUIT,
PT17E
BRUSH
MOTOR
-
OPEN
34 80604
TCPOE 98447 3/26/98
19
Page 20

MECHANICAL CONTROLS ASSEMBL
Y
n-11
37
-
44
->
47
-
32
44
-9
26
-
Q
____
20
TCPOE
98447
03/13/00
Page 21

MECHANICAL CONTROLS PARTS LIST
Serial
No.
From
To
Ref
PartNo.
Qty
Deilecrtption
Notes:
1 140153 2 BEARING, .753 X .627 X 1.0 L
2 27413 2 CABLE, REAR CMPRT. DOOR
3
-
OPEN
4 73659
1
STANDOFF, 1/4-20 X 1
.O
HEX INS
5
27724 1 CABLE,SCRUBDECK
6 27725 1 CABLE,SQUEEGEE
7 27726
1
CABLE,SOLUTION
8 29151 1 DOOR, REAR COMPARTMENT
9 38184 1 HANDLEW1FOAM
-
36132
-
GRIP, HANDLEX21.5”
-
38208
-
HANDLE, TC17/20 MAIN
10
-
OPEN
11 48030 3 KNOB, HANDLE
12 70251 1 SET SCR, 1/4
-
20 X 1.0 PLTD
13
-
OPEN
14 50477
1
LABEL, PT17 CHARGER WARNING
15 51 142
1
LEVER, HANDLE CLAMP
16 51184 4 LOCK, HANDLEADJ.
17 51185 1
LEVER,SOLUTlON
18 57006 4 NUT,1/4-20HEX
19
-
OPEN
20 57032 1 NUT, 3/8
-
16 SERRATED FLNG.
21 50926 1 LABEL, OPERATIONAL SLOPE
22 66068
1
PIN, 1/8X5/8ROLL
24 66116 2 PIN, 1/4 X 314 CLEVIS
25 80604 4 RING, RUE COTTER 1/4 PLTD
26 66133
1
PIN, 3/16 X .88 L CLEVIS
27 66055 2 PIN, ROLL
114 X 1.0 L
28 66257 2 PIVOT, CABLE LEVER
29 67138
1
RING,3/8EXTSNAP
30 67224 1 ROD,HANDLEADJ.
31 67226 1 ROD, CMPRTMNT DOOR LOCK
32 67360 1 ROD ASM, SCRUB DECK LIFT
33 67361 1 ROD ASM, SQUEEGEE LIFT
23
-
OPEN
34
-
OPEN
35
-
OPEN
36
-
OPEN
37 70228 8 SCR, 10-32 X 1/4 PHMS
SS
38 70298 2 SHOULDER BOLT, 5/160DX3/8L
40 73236 1 SPRING, 1.12 COMPRESSION
41 73169
1
STRAIN RELIEF, CORD HOOK
42 78220
1
TUBE,HANDLEADJ.
43 87003 1 WASHER, 3/8 ID X 718 OD
44 87018 12
WASHER,#IOFLAT
45 87029 2 WASHER,5/16FLAT
46 87030 2 WASHER, 3/8 X 3/4 NYLON
47 87080 2 WASHER,
1/2” FLAT
49 66270 1 PIN CLEVIS, 3/16 X .75 L
39
-
OPEN
48
-
OPEN
50
70249 1 SCR, 1/4-20X1.25 HHCS PLTD
51
-
OPEN
52 61320
1
PANELASM,REAR
TCPOE
98447
03/13/00
21
Page 22

CONTROL PANEL ASSEMBLY
-
21
12
REAR VIEW
(CONTROL PANEL)
22 TC20E 98447 2/4/99
Page 23

CONTROL PANEL ASSEMBLY PARTS LIST
serial
No.
Fm
Po
Notesr:
Ref
Partk.
Qty
Dsgcrfption
1 140074 2 BREAKER,
9A
CIRCUIT
2 14520 1 CLIP, DRAIN HOSE
3 14462 1 TERM. BLOCK,
25A
250V 1-1-2
4 23556
1
WIRE ASM, TC-E PIGTAIL
5 57040 1 NUT, 1/2 MPT CONDUIT
6 57049 6
NUT,6-32NYLOCKSS
7 57104
2
NUT, 10-32 W/STAR WSHR PLTD
8 57106 3 NUT, 8
-
32 W/STAR WSHR PLTD
9 57132 2 NUT, 3/8
-
27 DRESS PANEL
10 61341
1
PANEL, CONTROL COVER
11 67029 1 RECTIFIER, BRIDGE
12 67382 1 RELAY. DPST
-
NO 30A
13 70248 3 SCR, 8
-
32
X
1
.O
PHMS BLK NYL.
14 70394 14 SCR, 6
-
32 X 1/2 THMS BLK
15 72067 2
SWITCH, 125V SPST LIT
RKR
W/BT
16 78373 1 TRANSFORMER ASM,
11
5V/24V
17 87161 6 WASHER,MFLAT
18 57047 2 NUT, 1/4-20 NYLOCK PLTD
19 57030
1
NUT, 10-32 NYLOCK PLTD
20 87090 2 WASHER, 1/4
-
20 X 3/4 OD PLTD
21 50486
1
LABEL, SQUEEGEE/SOLUTION
22 50487 1 LABEL,SCRUBDECK
24 32042 1 ENCLOSURE, CONTROL PANEL
25 14942 2 BOOT, 3/8 CIRCUIT BREAKER
26 87018 1 WASHER,
#I0 X 9/16 OD
27 50776
1
LABEL,FORSAFETY
23 57157 8 NUT, 6-32 U-TINNERMAN
TCPOE
98447 2/4/99
23
Page 24

N-:
Val
No.
Ref
PartNo.
Qty
Oesffiptlon
Fwan
To
1 27519 1 COVER,VACMOTOR
2
53778 1 VAC MOTOR ASM, TC17/20E
3 62360
1
PLATEASM, PT17EVAC
5
701 14 4 SCR, #I0 X 3/4 POLYFAST
6 73419 3
SPACER,VACMOTOR
4 70085 6 SCR, 1/4-20 X 1/2 PHMS
7 57030 6 NUT, 10
-
32 NYLOCK PLTD
8 70607 6 SET SCREW, 10
-
32 X 1
.OO
9 87018 6 WASHER, #I0 X 9/16 OD
10 87025 6 WASHER, 1/4 STAR
11 87090
1
WASHER, 1/4 ID X 3/4 OD PLTD
12 20035 2 CLAMP, 7/16 DIA NYLON UL
24
TCPOE
98447 3/26/98
Page 25

7-
’1
I
I-
6
2
48040 1 KEY, 1/4
SQ. X 1
.OO
3 70305
1 SCR, 5/16
-
18 X 3/4 HHCS PLTD
4 87029 1 WASHER, 5/16 FLAT SAE
5
87067 1 WASHER, 5/16 LCK INT STAR PLTD
6
81578 1 PAD DRIVER ASM,
20
POLY
7 70577
1 SCR. 3/8
-
16 X 3.5 SCHS STL
8
78362 1 TUBE,
50
OD .058W .85L DOM
9 73576 1 SPRING, COMP
.60D
X
2.0L X .045W
10
48025R
1 KNOB, 1.75 X 3.8-16 F
BRUSH AND PAD
(20’3
OPTION LIST:
P/N
DESCRIPTION
02340 PAD DRIVER, 20” HEX
02357 BRUSH, 20” POLYPROPYLENE HEX
02358 BRUSH, 20” NYLON HEX
02359
02360
02361
BRUSH, 20” NYLON POLISH HEX
BRUSH, 20” MILD
GRIT
HEX
BRUSH, 20” SUPER AGGRESSIVE HEX
TCPOE 98447 3/26/98
25
Page 26

LIMITED WARRANTY
Windsor Industries, Inc. warrants new machines against defects in material and workmanship
under normal use and service to the original purchaser. The warranty period is subject to the
conditions stated below.
3 YEARS FOR PARTS AND 1 YEAR FOR SERVICE LABOR
Exceptions: Rotationally molded polyethylene tanks carry a 6 year parts and 1 year service
labor warranty.
motors, and belts, and a 1 year service labor warranty. SENSOR
warranty on vacuum motors and belts, and a 1 year service labor warranty. Extractor brush
motors, pump motors, pc boards and electronics, vac motors (other than
VERSAMATIC
SENSOR®), pumps, and FLEXSOL™ diaphragms, all RADIUS™ and TITAN™ Wet/Dry
Vacs carry a 1 year parts and service labor warranty. Propane equipment has a 2 year
manufactured parts warranty. The
Honda® /Kawasaki® engines have a 2 year manufacturers’ warranty. NOTE: The engine
warranty is administered through the engine manufacturer and must be repaired at an
authorized service center.
Normal wear items including, but not limited to, belts, brushes, capacitors, carbon brushes,
casters, clutches, cords, filters, finishes, gaskets, hoses, light bulbs, rectifiers, switches, squeegees, bearings, pulleys, relays, actuating cables, tires, Propane batteries and wheels will be
warranted for manufacturing defects for 90 days from the purchase date.
The warranty commences on the purchase date by the original end user from an authorized
Windsor Agent, subject to proof of purchase. The Machine Registration Card must be
completed and returned immediately at the time of purchase. If proof of purchase cannot be
identified, the warranty start date is 90 days after date of sale to an authorized Windsor
distributor. Parts replaced or repaired under warranty are guaranteed for the remainder of the
original warranty period.
®
models carry a 3 year warranty on brush motors, vacuum
®
models carry a 2 year
VERSAMATIC® and
®
Onan
engines have a 3 year manufacturers’ warranty. The
90 DAY WARRANTY EXTENSION AVAILABLE
Upon receipt of the Machine Registration Card, Windsor will extend the warranty period an
additional 90 days from the purchase date. Does not include items warranted 90 days for
manufacturing defects.
STATED WARRANTIES ARE IN LIEU OF ALL OTHER WARRANTIES,
EXPRESSED OR IMPLIED.
Any statutory implied warranties, including any warranty of merchantability or fitness for a
particular purpose, are expressly limited to the duration of this written warranty. Windsor will not
be liable for any other damages, including but not limited to indirect or special consequential
damages arising out of or in connection with the furnishing; performance, use or inability to use
the machine. This remedy shall be the exclusive remedy of the buyer.
This warranty shall not apply to: 1.damage in transit; 2.misuse or abuse(including the use of
incompatible or corrosive chemicals or overloading of capacity); 3. failure due to lack of proper
maintenance and care (including cleaning); 4.any design alterations performed by an
organization not authorized or specified by Windsor; 5.batteries and chargers. 6. high pressure
washing. 7.electrical components exposed to moisture.
If difficulty develops during the warranty period, contact the authorized Windsor Agent from
whom the product was purchased. Windsor, Inc. may elect to require the return of components
to validate a claim. Any defective part to be returned must be shipped freight pre-paid to an
authorized Windsor Distributor/Service Center or to the Windsor factory.
USE OF PARTS NOT APPROVED BY WINDSOR, INC.
WILL VOID ALL WARRANTIES.
This warranty is valid only for all products sold after July 1, 1995. A product sold before that
date shall be covered by the limited Warranty in effect at the date of sale to the original
purchaser.
z 1999 Windsor Industries, Inc. All rights reserved. REVISED 05/01/02
 Loading...