

Page 1

English 3
Français 17
Español 31
Radius 30
5.962-625.0 2015980 08/07
Page 2

2
Page 3

English 3
Only trained and authorized persons shall
be permitted to operate a powered unit. Operators of powered units shall be qualified
as to visual, auditory, physical, and mental
ability to operate the equipment safely according to the following points.
Personnel who have not been trained to operate powered units may operate a unit for
the purposes of training only, and only under the direct supervision of the trainer. This
training should be conducted in an area
away from other units, obstacles, and pedestrians.
The operator training program should include the user’s policies for the site where
the trainee will operate the unit, the operating conditions for that location, and the specific unit the trainee will operate. The
training program shall be presented to all
new operators regardless of previous experience.
The training program shall inform the trainee that:
The primary responsibility of the operator is
to use the unit safely following the instructions given in the training program.
The training program shall emphasize safe
and proper operation to avoid injury to the
operator and others and prevent property
damage, and shall cover the following areas:
A Fundamentals of the powered units(s)
the trainee will operate, including:
(1) characteristics of the powered
unit(s), including varations between the
units in the workplace;
(2) similarities and differences from automobiles;
(3) significance of nameplate data,
warnings, and instructions affixed to the
unit;
(4) operating instructions and warnings
in the operating manual for the unit, and
instructions for inspection and maintenance to be performed by the operator;
(5) type of motive power and its characteristics;
(6) method of steering;
(7) braking method and characteristics;
(8) visibility, forward and reverse;
(9) stability characteristics with and
without load, with and without attachments;
(10) controls-location, function, method
of operation, identification of symbols;
(11) battery charging;
(12) guards and protective devices for
the specific type of unit;
(13) other characteristics of the specific
unit;
B Operating environment and its effect on
unit operation, including:
(1) floor or ground conditions including
temporary conditions;
(2) ramps and inclines;
(3) battery charging facilities;
(4) narrow aisles, doorways, overhead
wires and piping, and other areas of limited clearance;
(5) areas where the unit may be operated near other powered units, other vehicles, or pedestrians;
(6) operation near edge of dock or edge
of improved surface;
(7) other special operating conditions
and hazards which may be encountered.
C Operation of the powered unit, includ-
ing:
(1) proper preshift inspection and approved method for removing from service a unit which is in need repair;
(2) parking and shutdown procedures;
(3) other special operating conditions
for the specific application.
D Operating safety rules and practices, in-
cluding:
(1) provisions of the section „OPERATING SAFETY RULES AND PRACTICES“ in this document.
(2) other rules, regulations, or practices
specified by the employer at the location
where the unit will be used.
E Operational training practice, including:
(1) if feasible, practice in the operation
of a powered unit shall be conducted in
an area separate from other workplace
activities and personnel:
(2) training practice shall be conducted
under the supervision of the trainer;
(3) training practice shall include the actual operation or simulated performance
of all operating tasks such as maneuvering, traveling, stopping, starting, and
other activities under the conditions
which will be encountered in the use of
the unit.
Safe operation is in the responsibility of the
operator.
The operator shall develop safe working
habits and also be aware of hazardous conditions in order to protect himself, other personnel, the unit, and other material.
The operator shall be familiar with the operation and function of all controls and instruments before undertaking to operate the
unit.
Before operating the unit, operators shall
have read and be familiar with the operator’s manual for the particular unit being operated and they shall also abide by the
safety rules and practices in the following
paragraphs.
Before operating any unit, the operator
shall be familiar with unusual operating
conditions which may require additional
safety precautions or special operating instructions.
Before starting to operate the unit:
A be in operating position;
B place directional controls in neutral;
C turn switch to ON position.
Do not start or operate the unit, any of its
functions or attachments, from any place
other than from the designated operator’s
position.
Keep hands and feet inside the operator’s
designated area.
Understand unit limitations and operate the
unit in a safe manner so as not to cause injury to personnel. Safeguard pedestrians at
all times.
A Do not drive a unit up to anyone sta n d-
ing in front of an object.
B Ensure that personnel stand clear of
rear swing area before conducting turns
and maneuvers.
C Exercise particular care at cross aisles,
doorways, and other locations where
pedestrians may step into the path of
travel of the unit.
Before leaving the operator’s position:
A bring the unit to a complete stop;
B place the directional controls in neutral;
C apply the parking brake;
In addition, when leaving the unit unattended:
A stop the engine or turn off the controls;
B if the unit must be on an incline, block
the wheels.
Maintain a safe distance from the edge of
ramps, platforms, and other similar working
surfaces.
When powered units are driven on and off
highway trucks or trailers, the brakes on the
highway trucks or trailers shall be applied
and wheel chocks or other positive mechanical means shall be used to prevent
unintentional movement of highway trucks
and trailers.
When powered units are driven on and off
semitrailers that are not coupled to a tractor, supports may be needed to prevent upending or corner dipping.
Report all accidents involving personnel,
building structures, and equipment to the
supervisor or as directed.
Do not add to, or modify the unit.
Do not block access to fire aisles, stairways
or fire equipment.
Observe all traffic regulations including authorized plant speed limits. Under normal
traffic conditions, keep to the right. Maintain
a safe distance, based on speed of travel,
from the unit ahead; keep the unit under
control all times.
Yield the right of way to pedestrians and
emergency vehicles such as ambulances
and fire trucks.
Do not pass another unit traveling in the
same direction at intersections, blind spots,
or at other dangerous locations.
Operator Qualifications
Operator Training
OPERATING SAFETY RULES
AND PRACTICES
Operator Responsibility
General
Traveling
Page 4

4 English
Cross railroad tracks at an angle wherever
possible. Do not park closer than 6 ft (1800
mm) to the nearest rail of a railroad track.
Keep a clear view of the path of travel and
observe for other traffic, personnel, and
safe clearances.
Ascend or descend grades slowly, and with
caution. Avoid turning, if possible, and use
extreme caution on grades, ramps, or inclines; normally travel straight up and
down.
Under all travel conditions, operate the unit
at a speed that will permit it to be brought to
a stop in a safe manner.
Make starts, stops, turns, or direction reversals in a smooth manner so as not shift load
and/or overturn the unit.
Do not indulge in stunt driving or horseplay.
Slow down for wet and slippery floors.
Before driving over a dockboard or bridge
plate, be sure that it is properly secured.
Drive carefully and slowly across the dockboard or bridge plate, and never exceed its
rated capacity.
Do not drive units onto any elevator unless
specially authorized to do so. Do not exceed the capacity of the elevator. Approach
elevators slowly, and then enter squarely
after the elevator car is properly leveled.
Once on the elevator, neutralize the controls, shut off power, and set brakes. It is
advisable that all other presonnel leave the
elevator before the unit is allowed to en te r
or leave.
When negotiating turns, reduce speed to a
safe level consistent with the operating environment. Make the turns smoothly.
Motorized hand unit operation requires special safety considerations as follows:
A never operate with greasy hands;
B foot protection is recommended;
C do not ride on the unit;
D keep feet clear of unit frame while oper-
ating.
E always keep hands and fingers inside
the protected area of the control handle;
F be cautious when traveling in reverse
due to steering characteristics;
G use caution when turning into an aisle;
H never travel at a speed greater than nor-
mal walking speed (approximately 3.5
mph [5.6 km/h]);
I always place both hands on the control
handle when operating;
J always operate with ohe hand on con-
trols.
At the beginning of each shift and before
operating the unit, check its conditon, giving
special attention to the following:
A condition of tires
B if pneumatic tires, check inflation pres-
sures
C warning and safety devices
D lights
Ebattery
F controls
G chains and cables
H limit switches
I steering mechanism
J additional items or special equipment as
specified by the user and/or manufac-
turer
If the unit is found to be in need of repair or
in any way unsafe, or contributes to an unsafe condition, the matter shall be reported
immediately to the user’s designated authority, and the unit shall not be operated
until it has been restored to safe operating
condition.
If during operation the unit becomes unsafe
in any way, the matter shall be reported immediately to the user’s designated authority, and the unit shall not be operated until it
has been restored to safe operating condition.
Do not use open flames when checking
electrolyte level in storage batteries.
Do not make repairs or adjustments unless
specifically authorized to do so.
Operation of the unit may be hazardous if
maintenance is neglected or repairs, rebuilds, or adjustments are n ot performed i n
accordance with the manufacturer’s design
criteria. Therefore, maintenance facilities
(on or off premises), trained personnel, and
detailed procedures shall be provided.
Parts manuals and maintenance manuals
may be obtained from the unit manufacturer.
In unusual cases not covered by the manuals referred above, consult the unit manufacturer.
Maintenance and inspection of the unit
shall be performed in conformance with the
following practices:
A a schedules planned maintenance, lu-
brication, and inspection system shall
be followed; consult the manufacturer’s
recommendations;
B only tranined and authorized personnel
shall be permitted to maintain, repair,
adjust, and inspect the unit, and in ac-
cordance with manufacturer’s specifica-
tions.
Before starting inspection and repair of the
unit:
A raise drive wheels free of floor or dis-
connect battery and use chocks or other
positive unit positioning devices;
B block chassis before working on them;
C disconnect battery before working on
the electrical system;
D the charger connector shall be plugged
only into the battery connector and nev-
er into the unit connector.
Operation of the unit to check performance
shall be conducted in an authorized area
where safe clearance exists.
A Before starting to operate the unit:
(1) be in operating position;
(2) place directional controls in neutral;
(3) turn switch to ON position;
(4) check function of steering, warning
devices, and breaks;
B Before leaving the unit:
(1) stop unit;
(2) place directional controls in neutral;
(3) stop the engine or turn off power;
(4) turn off the control circuit;
(5) if the unit must be left on an incline,
block the wheels.
Avoid fire hazards and have fire protection
equipment present in the work area. Do not
use any open flame to check the level or to
check for leakage of any fluid, especially
battery electrolyte. Do not use open pans of
fuel or flammable cleaning fluids for cleaning parts.
Properly ventilate work area, vent exhaust
fumes, and keep shop clean and dry.
Brakes, steering mechanisms, control
mechanisms, warning devices, articulating
axle stops, and frame members shall be
carefully and regularly inspected and maintanined in safe operating condition.
Any unit not in safe operating condition
shall be removed from service.
Precautions. Repairs shall not be made in
Class I, Class II, and Class III locations.
Repairs to the electrical system of batterypowered units shall be performed only after
the battery has been disconnected.
Operating Temperature. Where temperature of any part of the unit is found to be in
excess of its normal operating temperature
and creates a hazardous condition, the unit
shall be removed from service and shall not
be returned to service until the cause for
such overheating has been eliminated.
Fire Prevention. The unit shall be kept in a
clean condition and reasonably free of lint,
excess oil, and grease. Noncombustible
agents are preferred for cleaning the unit.
Flammable liquids [those having flash
points at or above 100°F (37,8°C)] are not
allowed. Precautions regarding toxicity,
ventilation, and fire hazard shall be appropriate for the agent or solvent used.
Nameplate Visibility: The unit type designations as shown on the nameplate and the
type markers shall not be covered over with
paint so that their identification information
is obscured.
Operator care of the unit
MAINTENANCE AND RE-
BUILD PRACTICES
FIRE SAFETY STANDARD
Maintenance
Page 5

English 5
This section shall apply to batteries used in
electric units. The two types of batteries
commonly used are lead and nickel-iron.
They contain corrosive chemical solutions,
either acid or alkali, and, therefore , present
a chemical hazard. While being charged,
they give off hydrogen and oxygen, which,
in certain concentrates, are explosive.
Battery-charging installations shall be located in areas designated for that purpose;
such areas shall be kept free of extraneous
combustible materials. Facilities shall be
provided for the following:
A Flushing spilled electrolyte;
B Fire protection;
C Protecting charging apparatus from
damage by trucks; and
D Adequate ventilation for dispersal of
fumes from gasing batteries.
Where on-board chargers are used, charging shall be accomplished at locations designated for that purpose, taking into
account the electrical requirements of the
charger and facilities for fire protection.
Exception: Flushing faclilties shall not be
required if charging is accomplished without removing the battery from the vehicle.
Where handling acid concentrates greater
than 50 percent acid (above 1.400 specific
gravity), an eye-wash fountain shall be provided.
A conveyor, overhead hoist, or equivalent
material handling equipment shall be provided for handling batteries.
Chain hoists shall be equipped with loadcabin containers. Where a hand hoist is
used, uncovered battries shall be covered
with a sheet of plywood or other nonconducting material to prevent the hand chain
from shorting on cell connectors or terminals. A properly insulated spreader bar
shall be used with any overhead hoist.
Reinstalled or new batteries shall meet or
exceed the battery type marked on the unit.
Reinstalled batteries shall be positioned
properly and secured in the unit.
A carboy tilter or siphon shall be provided
where acid in carboys is used. When diluting concentrated sulfuric acid to make up
electrolyte, the acid ALWAYS shall be added to the water - not the reverse. Battery
maintenance personnel shall wear protective clothing such as eye protection, long
sleeves, and gloves.
Exception: Removal and replacement of
batteries shall not require the use of protective clothing.
Trained and authorized personnel shall
change or charge batteries.
Electrical installations shall be in accordance with NFPA 70, National Electrical
Code, and any local ordinances.
Units shall be positoned properly and
brakes shall be applied before attempting to
change or charge batteries.
Where charging batteries, the vent caps
shall be kept in place to avoid electrolyte
spray. Care shall be taken to ensure that
vent caps are functioning. The battery (or
compartment cover(s) shall be open to dissipate heat and gas.
Smoking shall be prohibited in the charging
area.
Precautions shall be taken to prevent open
flames, sparks, or electric arcs in batterycharging areas.
Tools and other metallic objects shall be
kept away from the tops of uncovered batteries.
Changing and Charging Storage
Batteries
Page 6

6 English
Please read and comply with
these instructions prior to the
initial operation of your appliance. Retain
these operating instructions for future reference or for subsequent possessors.
Before first start-up it is definitely necessary to read the safety indications Nr.
5.956-250!
Safety instructions 6
Function 6
Proper use 7
Environmental protection 7
Operating and Functional Elements 8
Before Startup 9
Start up 10
Operation 10
Shutdown 11
Maintenance and care 11
Accessories 13
Troubleshooting 14
Technical specifications 15
Your sales outlet should be informed about
any transit damage noted when unpacking
the product.
– Warning and information plates on the
machine provide important directions
for safe operation.
– In addition to the information contained
in the operating instructions, all statutory safety and accident prevention regulations must be observed.
Danger
Risk of injury!
Danger of tipping if gradient is too high.
– The gradient in the direction of travel
should not exceed 12%.
Danger of tipping on unstable ground.
– Only use the machine on sound surfac-
es.
Danger of tipping with excessive sideways
tilt.
– The gradient perpendicular to the direc-
tion of travel should not exceed 12%.
– It is important to follow all safety instruc-
tions, rules and regulations applicable
for driving motor vehicles.
– The operator must use the appliance
properly. He must consider the local
conditions and must pay attention to
third parties, in particular children, when
working with the appliance.
– The appliance may only be used by per-
sons who have been instructed in han-
dling the appliance or have proven
qualification and expertise in operating
the appliance or have been explicitly
assigned the task of handling the appli-
ance.
– The appliance must not be operated by
children, young persons or persons
who have not been instructed accordingly.
Î Never leave the machine unattended
so long as the engine is running. The
operator may leave the appliance only
when the engine has come to a standstill, the appliance has been protected
against accidental movement, if necessary, by applying the immobilization
brake and the ignition key has been removed.
Note
Warranty claims will be entertained only if
you use batteries and chargers recommended by Windsor.
– Always follow the instructions of the
battery manufacturer and the charger
manufacturer. Please follow the statutory requirements for handling and disposing batteries.
– Never leave the batteries in a dis-
charged state; recharge them as soon
as possible.
– Always keep the batteries clean and dry
to avoid battery drain. Protect the batteries and avoid contact with impurities
such as metal dust.
– Do not place tools or similar items on
the battery. Risk of short-circuit and explosion.
– Do not work with open flames, generate
sparks or smoke in the vicinity of a battery or a battery charging room. Danger
of explosion.
– Do not touch hot parts of the machine
such as the drive motor (risk of burns).
– Be careful while handling battery acid.
Follow the respective safety instructions!
– Used batteries are to be disposed ac-
cording to the EC guideline 91/ 157
EWG or the corresponding national
regulations in an environment-friendly
manner.
Danger
To avoid risks, all repairs and replacement
of spare parts may only be carried out by
authorized customer service personnel.
– Only use accessories and spare parts
which have been approved by the manufacturer. The exclusive use of original
accessories and original spare parts
ensures that the appliance can be operated safely and troublefree.
– At the end of the operating instructions
you will find a selected list of spare
parts that are often required.
Danger
indicates an immediate threat of danger.
Failure to observe the instruction may result in death or serious injuries.
몇 Warning
indicates a possibly dangerous situation.
Failure to observe the instruction may result in light injuries or damage to property.
Note
indicates useful tips and important information.
The sweeper operates using the overthrow
principle.
– The side brushes (1) clean the corners
and edges of the surface and move dirt
and debris into the path of the roller
brush.
– The rotating roller brush (2) moves the
dirt and debris directly into the waste
container (3).
– The dust raised in the container is sep-
arated by the dust filter (4) and the filtered clean air is drawn off by the
suction fan (5).
Contents
Safety instructions
General notes
Drive mode
Battery-operated machines
Accessories and Spare Parts
Symbols on the appliance
Please do not sweep away
any burning substances
such as cigarettes, match
sticks or similar objects.
Risk of being squeezed or
hurt at the belts, sidebrushes, containers, pushing handle.
Symbols in the operating instruc-
tions
Function
Page 7

English 7
Use this appliance only as directed in these
operating instructions.
Î The machine with working equipment
must be checked to ensure that it is in
proper working order and is operating
safely prior to use. Otherwise, the appliance must not be used.
– This sweeper has been designed to
sweep dirt and debris from indoor as
well as outdoor surfaces.
– The appliance is not intended for street
cleaning.
– The machine is not suitable for vacuum-
ing dust which endangers health.
– The machine may not be modified.
– Never vacuum up explosive liquids,
combustible gases or undiluted acids
and solvents. This includes petrol, paint
thinner or heating oil which can gener-
ate explosive fumes or mixtures upon
contact with the suction air. Acetone,
undiluted acids and solvents must also
be avoided as they can harm the mate-
rials on the machine.
– Do not sweep/vacuum up any burning
or glowing objects.
– The machine is only suitable for use on
the types of surfaces specified in the
operating instructions.
– The machine may only be operated on
the surfaces approved by the company
or its authorized representatives.
– The machine may not be used or stored
in hazardous areas. It is not allowed to
use the appliance in hazardous loca-
tions.
– The following applies in general: Keep
highly-flammable substances away
from the appliance (danger of explo-
sion/fire).
–Asphalt
– Industrial floor
– Screed
– Concrete
– Paving stones
– Carpet
Proper use
Suitable surfaces
Environmental protection
The packaging material can be
recycled. Please do not throw
the packaging material into
household waste; please send
it for recycling.
Old appliances contain valuable materials that can be recycled; these should be sent for
recycling.. Batteries and accumulators contain substances
that must not enter the environment. Please dispose off old
devices, batteries and rechargeable batteries properly.
Page 8

8 English
1 Push handle
2 Lever to raise and lower the bulk waste
flap
3 Lever for forward drive
4Cover
5 Roller brush
6 Side brushes
7 Bulk waste flap
8 Waste container
9Dust filter
10 Drive wheels
11 Guiding roll with fixed position brake
12 Front sealin g stri p
13 Side sealing strip
14 Rear sealing strip (at the waste contain-
er)
15 Fastener of the side brush
16 Charger
17 Fastening screw for slider
1 Main switch
2 Lever for lowering and raising the side-
brush
3 Locking screw of the dust filter cover
4 Locking bow of the waste container
5 Filter cleaning for dust filter
6 Wet/dry flap
Remove the key:
Turn the main switch using "0" position and
pull it out.
Operating and Functional Elements
Operating field
Main switch
0/OFF Motor off
1 Motor on
A Remove the key
B Battery display
Page 9

English 9
Note
The hood is unlocked with the same key as
the main switch. The key can be removed
now, when the hood is unlocked.
Î Insert the key for the main switch into
the hood lock and rotate in a clockwise
direction by 90°.
Î Pull the hood lock out by the key.
Î Open the device hood.
Î Close cover.
Î Close the device hood with the main
switch key.
To unload the machine, proceed as follows:
Î Remove the cardboard.
Î Remove the wooden blocks that secure
the wheels and raise the device from
the pallette by hand.
Î Release parking brake.
Î Loosen the fastening screws.
Î Align the pushing handle.
Î Tighten the fastening screws.
Note
Remove the waste container and move the
pushing handle to the front prior to tilting
the appliance. Do not rest the appliance on
the pushing handle.
Î Clip side brush on to driver and screw
on.
Please observe the following warning notes
when handling batteries:
Danger
Risk of explosion! Do not put tools or similar
on the battery, i.e. on the terminal poles
and cell connectors.
Danger
Risk of injury! Ensure that wounds never
come into contact with lead. Always clean
your hands after having worked with batteries.
Danger
Risk of fire and explosion!
– Smoking and naked flames are strictly
prohibited.
– Rooms where batteries are charged
must have good ventilation because
highly explosive gas is emitted during
charging.
Danger
Danger of cautic material!
– Rinse thoroughly with lots of clear water
if acid gets into the eye or comes in contact with the skin.
– Then consult a do ctor immediately.
– Wash off the acid If it com es in contact
with the clothes.
Î Open the device hood.
Î Set the batteries on to the motor carrier.
Î Secure the batteries with the holding
strap.
몇 Warning
Pay attention to correct poles.
Î Connect pole terminal (red cable) to
positive pole (+).
Î Fit the connection wires to the batteries.
Î Connect pole terminal to negative pole
(-).
Note
Before removing the battery, make sure
that the negative pole lead is disconnected.
Check that the battery pole and pole terminals are adequately protected with pole
grease.
몇 Warning
Charge the batteries before com missioning
the machine.
Danger
Risk of electric shock. Observe supply network and fuse protection. Only use the
charger in dry rooms with sufficient ventilation.
Danger
Risk of injury! Comply with safety regulations on the handling of batteries. Observe
the directions provided by the manufacturer
of the charger.
Danger
Risk of injury! The charger should be used
only if the mains cable is in an undamaged
state. Get the manufacturer, the customer
service agent or a qualified person to immediately replace a damaged mains cable.
Note
Normally, the machine is equipped with
maintenance-free batteries.
Î Open the device hood.
Î Insert the plug of the charger into the
socket.
Note
The charger has electronic controls and automatically switches off the charging process. All functions of the machine are
automatically shut down during the charging process.
The battery display shows the progress of
the charging process when the plug is inserted:
Open the device hood.
Close device hood
Before Startup
Unloading
Installing the pushing handle
Install side brush
Batteries
Safety notes regarding the batteries
Observe the directions on the
battery, in the instructions for
use and in the vehicle operating instructions!
Wear an eye shield!
Keep away children from acid
and batteries!
Risk of explosion!
Fire, sparks, open light, and
smoking not allowed!
Danger of caustic material!
First aid!
Warning note!
Disposal!
Do not throw the battery in the
trash bin!
Installing and connecting the batteries
Charge the batteries
Batteries are being
charged
glows yellow
Batteries are charged glows green
Page 10

10 English
Î Disconnect the mains plug.
Î Wrap the mains cord around the handle
of the charger.
Î Close cover.
Note
Start the appliance only when the hood is
closed.
Î Park the sweeper on an even surface.
Î Switch off engine.
Î Lock parking brake.
Î Check charging status of battery.
Î Check side brush.
Î Check roller brush.
Î Shake off dust filter.
Î Empty waste container.
Note
For description, see section on Care and
maintenance.
Î Release parking brake.
Start the motor.
Î Turn the main switch to position “1”.
Note
The sweep roller and the side-brushes start
rotating.
Î Pull the lever for forward drive.
Note
The drive speed for forward drive can be
adjusted steplessly depending on the position of the lever.
Î Release the lever for forward drive. De-
vice comes to a halt.
Driving over fixed obstacles which ar e
1.2 in (30mm) high or less:
Î Raise bulk waste flap.
Î Drive forwards slowly and carefully.
Driving over fixed obstacles which ar e
more than 1.2 in (30 mm) high:
Î Only drive over these obstacles using a
suitable ramp.
Danger
Risk of injury! If the bulk waste flap is open,
stones or gravel may be flung forwards by
the roller brush. Make sure that this does
not endanger persons, animals or objects.
몇 Warning
Do not sweep up packing strips, wire or
similar objects as this may damage the
sweeping mechanism.
Note
To achieve an optimum cleaning result, the
driving speed should be adjusted to take
specific situations into account.
Note
To sweep up larger items u p t o a h eight of
2.0 in (50 mm), e.g. cigarette packs, the
bulk waste flap must be raised briefly.
Raising bulk waste flap:
Î Pull the lever for raising the bulk waste
flap.
Lowering the bulk waste flap:
Î Release the lever for raising the bulk
waste flap.
Note
An optimum cleaning result can only be
achieved if the bulk waste flap has been
lowered completely.
Î Move the lever to lower the side brush
to the front. The side brush will be low-
ered.
Note
During operation, the waste container
should be emptied at regular intervals.
Note
During operation, the dust filter should be
shaken off and cleaned at regular intervals.
Î Close wet/dry flap
Î Open wet/dry flap.
Note
This protects the filter from moisture.
The battery display shows the charging status of the batteries during operation:
Î Pull the handle of the filter clean-off out
several times and reinsert it.
Note
– Make sure the seal strip is not damaged
while emptying the waste container.
– The max. load of the waste container is
88.2 lb s (40 kg).
Î Shake off dust filter.
Î Pull lock bow of the waste container up-
ward.
Î Pull out the waste container.
Î Empty waste container.
Î Push in the waste container.
Î Push lock bow of the waste container
downward.
Switch off engine.
Î Turn the main switch to position “0”.
Î The side-brushes lift up.
Î Lock parking brake.
Î Turn the main switch using "0" position
and pull it out.
몇 Warning
The appliance must be secured against
slippage during transport.
Î Switch off engine.
Î Turn the main switch using "0" position
and pull it out.
Î Lock parking brake.
Î Secure the wheels of the machine with
wheel chocks.
Î Secure the machine with tensioning
straps or cables.
Charger is defective glows red
Battery poled or is not
connected
slowly blinks
red
Battery defective blinks red fast
After charging
Start up
General notes
Inspection and maintenance work
Operation
Starting the machine
Drive the machine
Drive forward
Dry run
Driving over obstacles
Sweeping mode
Sweeping with bulk waste flap raised
Sweeping with side brushes
Sweeping dry floors
Sweeping damp or wet floors
Battery display
full glows green
30% capacity remain-
ing
glows yellow
10% capacity remaining
blinks red
Protection against total
discharge; the appliance is switched off
glows red
Cleaning the dust filter
Emptying waste container
Turn off the appliance.
Transport
Page 11

English 11
1 Tie-down area above the pushing han-
dle
2 Tie-down area under the device hood
Note
– Observe markings for fixing points on
base frame (chain symbols).
– Do not kink the bowden or sheathed ca-
bles.
If the sweeper is going to be out of service
for a longer time period, observe the following points:
Î Park the sweeper on an even surface.
Î Switch off engine.
Î Turn the main switch using "0" position
and pull it out.
Î Lock parking brake.
Î Lock the sweeper to ensure that it does
not roll off.
Î Raise roller brush. Thus, engage both
adjustment levers in the top boring.
Î The side-brushes lift up.
Î Clean the inside and outside of the
sweeper.
Î Park the machine in a safe and dry
place.
Î Disconnect batteries.
Î Charge batteries and recharge approx.
every 2 months.
– Maintenance work may only be carried
out by approved customer service outlets or experts in this field who are familiar with the respective safety
regulations.
– Mobile appliances used for commercial
purposes aer subject to safety inspections according to VDE 0701.
몇 Warning
Risk of damage! Do not clean the appliance
with a water hose or high-pressure water
jet (danger of short circuits or other damage).
Danger
Risk of injury! Wear dust mask and protective goggles.
Î Open the device hood.
Î Clean machine with a cloth.
Î Blow through machine with com-
pressed air.
Î Close cover.
Î Clean the machine with a damp cloth
which has been soaked in mild detergent.
Note
Do not use aggressive cleaning agents.
Daily maintenance:
Î Check the sweeping roller and the side
brush for wear and wrapped belts.
Î Check function of all operator control el-
ements.
Î Check functioning of all indicator lamps.
Weekly maintenance:
Î Check tension, wear and tear and func-
tioning of the drive belts.
Î Check the smooth running of the brush
cables and the moveable parts
Î Check the gasket in the sweeping area
for position and wear.
Î Check the sweeping track of the sweep-
ing roller.
Î Clean the dust filter.
Note
For description, see section on Care and
maintenance.
Note
Where maintenance is carried out by the
customer, all service and maintenance
work must be undertaken by a qualified
specialist. If required, a specialized Windsor dealer may be contacted at any time.
Maintenance to be carried out after 20 operating hours:
Î Carry out initial inspection.
Maintenance to be carried out every 100
operating hours
Maintenance to be carried out every 300
operating hours
Maintenance to be carried out every 500
operating hours
Note
In order to safeguard warranty claims, all
service and maintenance work during the
warranty period must be carried out by the
authorized Windsor Customer Service in
accordance with the maintenance booklet.
Preparation:
Î Park the sweeper on an even surface.
Î Turn the main switch using "0" position
and pull it out.
Î Lock parking brake.
Danger
Risk of injury!
The engine requires approx. 3-4 seconds
to come to a standstill once it has been
switched off. During this time, stay well
clear of the working area.
– Pull out the battery plug or clamp the
batteries while working on the electrical
unit.
– Allow the machine sufficient time to cool
down before carrying out any maintenance and repair work.
– Do not touch any h ot parts, such as the
drive motor.
Note
Remove the waste container and move the
pushing handle to the front prior to tilting
the appliance. Do not rest the appliance on
the pushing handle.
Î Switch off the appliance prior to clean-
ing and performing any maintenance
tasks or replacing parts.
This must be adjusted if the drive performance of the appliance becomes insufficient when driving uphill.
Î Loosen counter-nut.
Î Adjust the adjustment screw.
Î Tighten the counter-nut.
Î Lock parking brake.
Î Remove the waste container.
Î Remove belts or cords from roller
brush.
Replacement is due if a visible deterioration in sweeping performance caused by
bristle wear is evident.
Note
Remove the waste container and move the
pushing handle to the front prior to tilting
the appliance. Do not rest the appliance on
the pushing handle.
Î Lock parking brake.
Î Remove the waste container.
Î Tilt the appliance rearward.
Î Lift the waste flap, press in the bearing
cap and swivel the roller brush toward
the front.
Î Pull out roller brush.
Shutdown
Maintenance and care
General notes
Cleaning
Cleaning the inside of the machine
External cleaning of the appliance
Maintenance intervals
Maintenance by the customer
Maintenance by Customer Service
Maintenance Works
General notes on safety
Adjust the Bowden cable of the acceleration drive
Checking roller brush
Replacing roller brush
Page 12

12 English
Î Attach the new roller brush to the drive
pin (left).
Î Engage the bearing cup into the boring
of the roller brush swinging arm on the
opposite side.
몇 Warning
Risk of damage! Make sure that no bristles
are jammed into the boring of the roller
brush swinging arm.
Note
Once the new roller brush has be e n in stalled, the sweeping track must readjusted.
Î Raise the sweeper from the front and
drive it on to a smooth, even surface
covered with a visible layer of dust or
chalk.
Î Lock parking brake.
Î Let the sweeping roller rotate for ap-
prox. 15-30 seconds.
Î Raise the sweeper at the front and drive
it towards the side.
The sweeping track should have an even
rectangular shape which is between 1.2
and 1.6 in (30 and 40 mm) wide.
Adjust sweeping track:
Î Adjust the left and right adjustment le-
vers and engage into the same boring.
– Engage adjustment lever into the lower
boring (+): Sweeping track becomes
bigger
– Engage the adjustment lever into the
upper boring (-): Sweeping track becomes smaller
Î Check sweeping mirror.
Replacement is due if a visible deterioration in sweeping performance caused by
bristle wear is evident.
Note
Remove the waste container and move the
pushing handle to the front prior to tilting
the appliance. Do not rest the appliance on
the pushing handle.
Î Unscrew 3 screws from the underside
of the side brush.
Î Remove the wiper blade.
Î Clip new side brushes on to driver and
screw on.
Adjustment is necessary if a visible deterioration in sweeping performance caused by
side-brush is evident.
Î Release the wing nut.
Î Adjust the adjustment screw.
Î Tighten the wing nut.
– Adjustment is necessary if the front
waste flap cannot be raised wide
enough.
– The Bowden cable needs to be re-
leased a little if the sweeper results become poorer, for e.g. due to the wearing
of the front lip.
Î Loosen counter-nut.
Î Adjust the adjustment screw.
Î Tighten the counter-nut.
Note
Remove the waste container and move the
pushing handle to the front prior to tilting
the appliance. Do not rest the appliance on
the pushing handle.
Front sealing flap
Î Loosen the fastening screws of the side
skirt.
Î Adjust or replace sealing strip.
Î Set the distance between the sealing
strip and the floor so that the bottom
edge trails behind at a distance of between 0-0.4 in (0-10 mm).
Î Adjust side skirt.
Î Tighten the fastening of the side skirt.
Rear flap
Î Remove the waste container.
Î Loosen the fastening screws of the side
skirt.
Î Adjust or replace sealing strip.
Î Set the distance between the sealing
strip and the floor so that the bottom
edge trails behind at a distance of between 0-0.4 in (0-10 mm).
Î Tighten the fastening of the side skirt.
Side skirts
Î Loosen the fastening screws of the side
skirt.
Î Adjust or replace sealing strip.
Î To set the floor clearance, insert a
sheet with a thickness of max. 0.08 in
(2 mm) under the sealing strip.
Î Adjust side skirt.
Î Tighten the fastening of the side skirt.
Danger
Empty waste container before replacing
dust filter. Wear a dust mask when working
around the dust filter. Observe safety regulations on the handling of fine particulate
material.
Î Lock parking brake.
Î Shake off dust filter.
Î Open the locking screw of the dust filter
cover in a counterclockwise direction.
Î Lift the dust filter cover.
Î Replace dust filter Make sure the dust
filter is inserted correctly (see figure).
Î Screw in the locking screw all the way.
몇 Warning
If the locking screw is not tightened all the
way, there may be damages.
Note
Make sure when installing the new filter
that the fins are not damaged.
Check and adjust roller brush sweeping
track
Setting range (-) 1...10 (+)
Minimum sweeping track 1
Maximum sweeping track 10
New roller brush 1...3
Replacing side brush
Adjust side-brush lowering
Adjust the raising of the front waste flap
Adjusting and replacing sealing stri ps
Replacing dust filter
Page 13

English 13
The fuses are located in the charger.
Replacing fuses
Accessories
Hard side-brushes 6.905-625.0
For removing stubborn dirt in the external
area; resistant to moisture.
Roller-brush, soft 6.906-886.0
With natural bristles especially for fine
dust sweeping on smooth indoor floors.
Not resistant to wetness; not for abrasive
surfaces.
Roller-brush, hard 6.906-885.0
For removing stubborn dirt in the external
area; resistant to moisture.
Roller brush, antistatic
6.906-950.0
Carpet sweeping unit 2.641-571.0
Includes: Lint trap, antistatic roller brush,
triple steering roller
Page 14

14 English
Troubleshooting
Fault Remedy
Appliance cannot be started Close appliance hood
Charge the batteries
Check overload fuse
Inform Windsor Customer Service.
Engine is running but machine is not moving Adjust the Bowden cable of the acceleration drive
Checking the V-Belt
Inform Windsor Customer Service.
Device comes to halt while climbing a slope Drive over a path with lesser slope
Check overload fuse
Adjust the Bowden cable of the acceleration drive
Checking the V-Belt
Inform Windsor Customer Service.
Machine is not sweeping properly Check roller brush and side brushes for wear, replace if necessary.
Check function of bulk waste flap
Release the Bowden cable of the bulk waste flap (adjustment screw)
Check belts for tension and functioning; replace, if required
Adjust roller mirror
Replacing roller brush
Inform Windsor Customer Service.
Dust gathers in the machine Check function of bulk waste flap
Release the Bowden cable of the bulk waste flap (adjustment screw)
Check dust filter, clean or replace
Empty waste container
Replace sealing profile at the waste container
Check the seal on the dust filter
Check sealing strips for wear, adjust or replace as required
Poor cleaning performance at edges Adjust side-brush lowering
Replace side brush
Lower the side brushes
Check the drive belt of the side brush
Inform Windsor Customer Service.
Side-brush raising does not function Check Bowden cable of the side-brush raising
Inform Windsor Customer Service.
The new roller brush brushes against the waste
container
Correct the setting of the sweep track; for this, engage both adjustment levers into the
upper boring (1...3)
Page 15

English 15
Technical specifications
Radius 30
Machine data
Length x width x height (pushing handle unfolded) in (mm) 56.3 x 29.5 x 46.9 (1430 x 750 x 1190)
Length x width x height (pushing handle folded in) in (mm) 45.7 x 29.5 x 36.6 (1160 x 750 x 930)
Weight (without batteries) lbs (kg) 174.2 (79)
Weight (with batteries) lbs (kg) 275.6 (125)
Driving and sweeping speed mph (km/h) 2.8 (4.5)
Climbing capability (max.) % 12
Roller brush diameter in (mm) 10.4 (265)
Side brush diameter in (mm) 16.1 (410)
Surface area, max. ft
2
/h (m2/h) 36600 (3400)
Working width without side brushes in (mm) 21.7 (550)
Working width with side-brush in (mm) 29.5 (750)
Volume of waste container gal (l) 10.6 (40)
Protection type, drip-proof -- IPX 3
Engine
Type -- DC permanent solenoid motor
Direction of rotation, right
Voltage V 24
Rated current A 22
Rated power W 400
Speed 1/min 2750
Type of protection -- IP 20
Electrical fuses
Central A 50
Protection against total discharge -- via relay
Filter and vacuum system
Filter surface area, fine dust filter ft
2
(m2) 19.4 (1.8)
Category of use – filter for non-hazardous dust -- L
Nominal vacuum, suction system psi (kPa) 0.07 (0.5)
Nominal volume flow, suction system gpm (l/s) 712.4 (45)
Working conditions
Temperature °F (°C) 23...104 (-5...+40)
Air humidity, non-condensing % 0 - 90
Noise emission
Sound pressure level (EN 60704-1) dB(A) 64
Guaranteed sound power level (2000/14/EC) dB(A) 81
Machine vibrations
Vibration total value (ISO 5349)
Upper limbs m/s
2
1.19
Page 16

16 English
1 Check the sweeping roller/sweeping
belt for wear and wrapped belts.
2 Check the sweeping track and the func-
tion of the roller brush and the side
brush/sweeping band.
3 Check tension, wear and tear and func-
tioning of the drive belts/drive chain.
4 Check the smooth running of the brush
cables and the moveable parts
5 Check functioning of all operating ele-
ments and control lamps.
1 Check tension, wear and tear and func-
tioning of the drive belts/drive chain.
2 Check the smooth running of the brush
cables and the moveable parts
3 Check the seal strips on the dust filter
and the function of the filter shaker.
4 Check the gasket in the sweeping area
for position and wear.
5 Check the sweeping track and the func-
tion of the roller brush and the side
brush/sweeping band.
6 Clean and check the dust filter, replace
if necessary.
7 Check the sweeping roller/sweeping
belt for wear and wrapped belts.
8 Check functioning of all operating ele-
ments and control lamps.
1 Check current-carrying lines and con-
tacts for damages and oxidation.
2 Check the differential axle for play.
3 Check drum brake for function and set-
ting.
4 Check the seal profile on the waste con-
tainer and the brush roller box.
5 Grease the drive chain.
6 Check the batteries as required by
manufacturer.
7 Clean the battery surfaces.
1 Check the carbon brushes in the en-
gine.
Only for authorized technicians!
Maintenance Works
After the first month or 5 operating
hours
Every 50 operating hours
Additional maintenance work every 100
operating hours or semi-annually
Additional maintenance work every 500
operating hours or annually
Page 17

Français 17
Seules les personnes formées et habilitées
sont autorisées à utiliser une unité motorisée. Les opérateurs de ces unités doivent
avoir les aptitudes visuelles et auditives
ainsi que les capacités physiques et mentales requises pour utiliser cet équipement en
toute sécurité.
Les personnes n'ayant pas été formées à
l'utilisation des unités motorisées sont autorisées à se servir de ce type d'appareil uniquement dans le cadre de formations, et ce
sous la surveillance directe d'un formateur.
En outre, les formations doivent être effectuées dans des zones exemptes de tout
obstacle, d'autres unités et de piétons.
Le programme de formation doit comprendre l'apprentissage du règlement et des
conditions d'utilisation propres au site dans
lequel les utilisateurs feront usage de l'unité
ainsi qu'une initiation à l'emploi du modèle
particulier d'unité qui sera utilisé. Le programme de formation sera proposé à tous
les nouveaux utilisateurs, quelle que soit
leur expérience antérieure.
Au cours de la formation, le stagiaire sera
informé des points suivants :
Sa responsabilité principale est d'utiliser
l'unité en toute sécurité, en respectant les
instructions prescrites dans le cadre du programme de formation.
Le programme de formation portera essentiellement sur l'utilisation correcte et en toute sécurité de l'appareil afin d'éviter toute
blessure de l'utilisateur ou d'un tiers et de
prévenir les dégâts matériels. Elle abordera
en outre les aspects suivants :
A Caractéristiques principales de l'unité
ou des unités motorisées que le stagiaire utilisera, incluant :
(1) caractéristiques de l'unité/des unités
motorisée(s), y compris variations entre
les diverses unités présentes sur le poste de travail ;
(2) similitudes et différences avec les
automobiles ;
(3) signification des données de plaque
signalétique, des mises en garde et des
instructions apposées sur l'unité
motorisée ;
(4) consignes d'utilisation et mises en
garde du manuel d'utilisation de l'unité
motorisée et instructions relatives aux
contrôles et opérations d'entretien incombant à l'utilisateur ;
(5) type de force motrice et ses
caractéristiques ;
(6) méthode de conduite ;
(7) méthode de freinage et ses
caractéristiques ;
(8) visibilité avant et arrière ;
(9) caractéristiques de stabilité avec et
sans chargement ainsi qu'avec et sans
accessoires ;
(10) emplacement des commandes,
fonctions, instructions d'utilisation, identification des symboles ;
(11) chargement de la batterie ;
(12) dispositifs de protection et de sécurité pour le type d'unité précis ;
(13) autres caractéristiques de l'unité
précise ;
B Environnement de mise en oeuvre et
ses effets sur le fonctionnement de l'unité incluant :
(1) état du sol, avec prise en compte
des conditions temporaires ;
(2) rampes et pentes ;
(3) dispositifs de chargement de la
batterie ;
(4) allées étroites, portes, câbles aériens, tuyauterie et autres zones difficiles d'accès ;
(5) zones où l'unité est susceptible
d'être utilisée près d'autres unités motorisées, d'autres véhicules ou des piétons ;
(6) utilisation à proximité d'un bord de
quai ou d'un terrain viabilisé ;
(7) d'autres conditions d'utilisation et risques peuvent se présenter.
C Fonctionnement de l'unité motorisée in-
cluant :
(1) contrôle minutieux avant la prise de
poste et méthode appropriée pour la
mise hors service d'une unité motorisée
nécessitant des réparations ;
(2) procédures relatives au stationnement et à l'arrêt ;
(3) autres conditions d'utilisati o n pa rticulières pour l'application spécifique.
D Règles de sécurité et pratiques relatives
à l'utilisation, notamment :
(1) dispositions de la section "REGLES
DE SECURITE ET PRATIQUES RELATIVES A L'UTILISATION" de ce document.
(2) autres règles, réglementations ou
pratiques précisées par l'employeur
pour l'endroit où l'unité sera utilisée.
E Exercices pratiques d'utilisation,
notamment :
(1) si possible, une utilisation pratique
des unités motorisées doit être effectuée dans une zone éloignée du personnel et de toute autre activité exercée
sur le lieu de travail :
(2) cet exercice pratique sera réalisé
sous la surveillance du formateur ;
(3) il consistera en l'utilisation concrète
de l'appareil ou en des simulations de
toutes les tâches telles que les manœuvres, le déplacement, l'arrêt, le démarrage et autres commandes réalisées
dans des conditions similaires à celles
qui seront rencontrées lors de l'utilisation de l'unité.
L'utilisateur est responsable de l'utilisation
en toute sécurité de l'appareil.
L'utilisateur devra mettre en œuvre des habitudes de travail fiables et être conscient
des facteurs pouvant représenter des risques afin de prévenir toute mise en danger
de sa propre personne, des tiers, de l'unité
et de tout autre équipement.
Avant d'utiliser l'appareil, l'utilisateur devra
avoir acquis une connaissance approfondie
des fonctions et du fonctionnement de toutes les commandes et de tous les instruments.
Avant d'utiliser l'appareil, l'utilisateur devra
avoir lu et s'être familiarisé avec le manuel
d'utilisation de l'appareil en question. Il devra par ailleurs se conformer aux règles de
sécurité et pratiques décrites dans les paragraphes suivants.
Avant d'utiliser quelque appareil que ce soit,
l'utilisateur doit être conscient des éventuelles
conditions d'utilisation inhabituelles pouvant
nécessiter des précautions de sécurité supplémentaires ou la mise en œuvre d'instructions d'utilisation particulières.
Avant d'utiliser l'autolaveuse motorisée :
A se mettre en position de service ;
B régler les commandes de direction en
position neutre ;
C mettre le commutateur sur ON.
Ne pas démarrer ou utiliser l'appareil, ni
aucune de ses fonctions ou accessoires, à
partir d'un autre endroit que celui réservé à
l'utilisateur.
Conserver les mains et les pieds à l'intérieur de la zone désignée pour l'opérateur.
Apprécier les limites de l'appareil et utiliser
ce dernier en respectant les règles de sécurité de manière à ne pas blesser le personnel. Toujours protéger les piétons.
A Ne pas diriger l'unité vers une personne
se tenant devant un objet.
B S'assurer qu'aucun individu ne se trouve
dans la zone située à l'arrière de l'appareil
avant de procéder à des manœuvres et
aux changements de direction.
C
Etre particulièrement attentif dans les croi-
sements, à l'approche de portes et à tout
autre endroit où des piétons risquent d'ap-
paraître sur le parcours de l'unité.
Avant de quitter le poste de l'utilisateur :
A arrêter l'appareil ;
B régler les commandes de direction en
position neutre ;
C actionner le frein à main ;
De plus, lorsque vous laissez l'unité sans
surveillance :
A éteindre le moteur ou arrêter toutes les
commandes ;
B si l'appareil doit stationner sur une pen-
te, caler les roues.
Conserver une distance de sécurité avec
les bords des rampes, des plates-formes et
de toutes les autres surfaces de travail du
même type.
Qualifications de l'opérateur
Formation de l'opérateur
REGLES DE SECURITE ET
PRATIQUES RELATIVES A
L'UTILISATION
Responsabilité de l'utilisateur
Généralités
Page 18

18 Français
Lors du chargement et du déchargement des
unités dans des camions ou remorques, les
freins de ces derniers doivent être actionnés.
En outre, installer des cales de roue ou tout
autre dispositif de blocage mécanique similaire afin de prévenir les déplacements involontaires des camions ou des remorques.
Lors du chargement et du déchargement
d'unités motorisées dans des semi-remorques non tractées, des supports peuvent
s'avérer nécessaires pour éviter tout renversement ou basculement sur les côtés.
Signaler tout incident affectant des membres du personnel, des bâtiments ou du
matériel au chef d'équipe ou conformément
aux instructions reçues.
Ne pas ajouter d''accessoires à l'appareil ni
le modifier de quelque manière que ce soit.
Ne pas stationner à un endroit où l'appareil
risque d'entraver les issues de secours, les
cages d'escaliers ou les équipements de
lutte contre l’incendie.
Respecter le code de la route, y compris les
limites de vitesse des chantiers. Dans des
conditions de circulation normales, serrer à
droite. Maintenir une distance de sécurité
avec le véhicule qui précède, en fonction de
la vitesse. Garder le contrôle de l'unité en
toutes circonstances.
Céder la priorité aux piétons ainsi qu'aux
véhicules d'urgence comme les ambulances et les camions de pompiers.
Ne pas dépasser une autre unité circulant
dans la même direction au niveau des croisements, des angles morts ou tout autre
endroit dangereux.
Traverser les voies ferrées à angle droit
lorsque c'est possible. Ne pas garer l'appareil à moins de 1,8 m de la voie ferrée ou du
rail le plus proche.
Veiller à conserver une vue bien dégagée
du trajet à emprunter et être attentif à la circulation des autres véhicules, aux déplacements des membres du personnel, ainsi
qu'aux espaces de dégagement.
Monter et descendre les côtes lentement et
avec prudence. Si possible, éviter de tourner et faire particulièrement attention en
côte et sur les rampes où il faut normalement se déplacer en ligne droite.
Quelles que soient les conditions de circulation, conserver une vitesse permettant
d'arrêter l'appareil en toute sécurité.
Lors du démarrage et de l'arrêt, ainsi que
dans les virages et lors des changements
de direction, effectuer les manœuvres sans
à-coups afin de ne pas renverser le chargement et/ou l'unité.
Ne jamais adopter de conduite dangereuse
(cascades, acrobaties etc.)
Ralentir sur les sols mouillés et glissants.
Avant de déplacer l'appareil sur un pont de
chargement ou un pont de laison, s'assurer
que celui-ci est correctement sécurisé.
Avancer prudemment et lentement sur le
pont de chargement ou pont de liaison. Ne
jamais dépasser la charge maximale autorisée.
Ne pas monter des unités sur un élévateur
à moins d'y avoir été spécialement autorisé.
Ne pas dépasser la capacité de l'élévateur.
Dans ce cas, approcher lentement de l'élévateur et entrer tout droit lorsque celui-ci est
arrêté à niveau. Ensuite, placer les commandes de l'appareil en position neutre,
couper le contact et serrer le frein de stationnement. Il est préférable que les membres du personnel éventuellement présents
dans l'ascenseur en sortent avant l'entrée
ou la sortie de l'unité.
Dans les virages, ralentir et adopter une vitesse de sécurité adaptée à l'environnement d'utilisation. Les virages doivent être
abordés sans à-coups.
Le fonctionnement manuel de l'unité motorisé requiert la prise en compte des consignes de sécurité qui suivent :
A ne jamais l'utiliser en ayant les mains
grasses ;
B il est recommandé de revêtir une pro-
teciton pour les pieds ;
C ne pas chevaucher l'unité ;
D garder les jambes à distance du châssis
de l'unité pendant le fonctionnement.
E toujours conserver les mains et les
doigts dans la zone protégée de la poi-
gnée de contrôle ;
F faire attentio n lors du déplacement en
marche arrière en raison des caractéris-
tiques de direction ;
G faire attention lors du changement de
direction ;
H ne jamais dépasser la vitesse normale
d'un piéton (env. 5,6 km/h - 3,5 mph) ;
I
toujours placer les deux mains sur la poi-
gnée de contrôle lors du fonctionnement ;
J piloter avec toujours une main sur les
commandes.
Au début de chaque prise de poste et avant
chaque utilisation de l'unité, vérifier l'état de
l'appareil, en inspectant tout particulièrement les éléments suivants :
A état des pneus
B sur les pneumatiques, vérifier la pres-
sion de gonflage
C fonctionnement de l'avertisseur et
autres dispositifs de sécurité
D dispositifs d'éclairage
Ebatterie
F commandes
G chaînes et câbles
H interrupteurs de fin de course
I mécanisme de direction
J autres éléments ou dispositifs supplé-
mentaires, conformément aux instruc-
tions de l'exploitant et/ou du fabricant.
Si le véhicule a besoin d'être réparé ou présente un risque quelconque, l'utilisateur
doit le signaler immédiatement à son responsable et ne pas utiliser l'appareil avant
résolution du problème.
Si, en cours d'utilisation, le véhicule s'avère
dangereux de quelque façon que ce soit, signaler immédiatement le problème au res-
ponsable concerné et cesser l'utilisation de
l'appareil avant résolution du problème.
Ne pas éclairer les batteries à l'aide d'un flamme vive pour vérifier le niveau d'électrolyte.
Ne pas effectuer de réparations ou réglages à
moins d'y être expressément autorisé.
L'utilisation de l'appareil peut devenir dangereuse si l'entretien est négligé ou si la remise en état ou les réglages nécessaires ne
sont pas effectués en conformité avec les
recommandations du fabricant. Par conséquent, il est nécessaire de prévoir des ateliers de maintenance, à l'intérieur ou
l'extérieur des bâtiments, avec du personnel dûment formé, ainsi que d'établir des
procédures détaillées.
Il est possible d'obtenir des guides des pièces détachées ainsi que des manuels d'entretien auprès du fabricant de l'unité.
Dans certains cas rares, non traités par ces
manuels de référence, consulter directement le fabricant de l'unité.
La maintenance et l'inspection de l'appareil
doivent être effectuées conformément aux
procédures suivantes :
A Les intervalles prescrits pour la mainte-
nance, la lubrification et le contrôle du
système doivent être respectés; se reporter aux instructions du fabricant ;
B La maintenance, les réparations, les ré-
glages et l'inspection de l'appareil doivent être confiés exclusivement à des
personnes formées et habilitées et effectués conformément aux recomman-
dations du fabricant.
Avant de commencer toute inspection ou
réparation de l'unité :
A soulever les roues motrices du sol ou
débrancher la batterie et utiliser des ca-
les de roues ou un autre procédé méca-
nique conçu pour assurer
l'immobilisation de l'unité ;
B bloquer le châssis avant toute interven-
tion sur celui-ci ;
C débrancher la batterie avant d'intervenir
sur le système électrique ;
D brancher le connecteur du chargeur ex-
clusivement sur le connecteur de la bat-
terie et jamais sur celui de l'appareil.
Le contrôle du fonctionnement de l'unité
doit être effectué dans une zone autorisée
et sécurisée.
A Avant d'utiliser l'autolaveuse
motorisée :
(1) se mettre en position de service ;
(2) régler les commandes de direction
en position neutre ;
(3) mettre le commutateur sur ON ;
(4) contrôler le fonctionnement de la di-
rection, des avertisseurs et des freins ;
Déplacement
Entretien de l'appareil par l'utilisa-
teur
PROCEDURES D'ENTRE-
TIEN ET DE REMISE EN
ETAT
Page 19

Français 19
B Avant de quitter l'unité :
(1) arrêter l'unité ;
(2) régler les commandes de direction
en position neutre ;
(3) couper le moteur ou mettre hors
tension ;
(4) arrêter le circuit de commande ;
(5) si l'appareil doit stationner sur une
pente, caler les roues.
Eviter les risques d'incendie et s'assurer
que les locaux sont dotés des équipements
nécessaires pour la lutte contre l'incendie.
Ne jamais éclairer les batteries à l'aide
d'une flamme vive pour vérifier le niveau
des liquides ou contrôler pour détecter une
fuite, en particulier de l'électrolyte. Ne jamais utiliser de bacs ouverts contenant du
carburant ou des produits de nettoyage inflammables pour nettoyer les composants
de l'autolaveuse motorisée.
Ventiler suffisamment la zone de travail,
aérer pour évacuer les gaz d'échappement
et veiller à ce que l'atelier soit toujours propre et sec.
Inspecter régulièrement les freins, la direction, les mécanismes de commande et de
direction, les avertisseurs et les maintenir
en parfait état de marche pour qu’ils puissent être utilisés sans danger.
Tout appareil dont le fonctionnement représente un risque doit être mis hors service.
Précautions. Les réparations ne doivent
pas être effectuées dans les zones de classe I, II et III.
La batterie doit être débranchée avant toute
réparation sur le système électrique d'une
unité motorisée.
Température de service. Si la température d'un composant de l'unité dépasse la
température de service normale et, par
conséquent, devient source de danger,
l'unité doit être mise hors service et ne pas
être réutilisée tant que la source de surchauffe n'a pas été réparée.
Prévention des incendies.
L'unité doit être
tenue propre et dans la mesure du possible,
protégée des peluches, des déversements
d'huile et de la graisse. L'utilisation de produits non inflammables est recommandée
pour le nettoyage de l'autolaveuse motorisée. Les liquides inflammables dont le point
d'ignition est égal ou supérieur à 37,8 °C
(100 °F) ne sont pas autorisés. Prendre les
mesures appropriées concernant la toxicité,
l'aération, et les risques d'incendie selon le
produit ou solvant utilisé.
Visibilité de la plaque signalétique : Les
données techniques figurant sur la plaque
signalétique de l'appareil ne doivent pas
être recouvertes de peinture et les informations d'identification doivent rester visibles.
Cette section concerne les batteries utilisées sur des unités électriques. Les
deux types de batteries généralement utilisées sont les batteries au plomb et les batteries au ferro-nickel. Elles contiennent des
composants chimiques corrosifs (acide ou
alcalin) et représentent donc un risque chimique. Lors du chargement, les batteries
dégagent de l'hydrogène et de l'oxygène
qui, dans certaines conditions, peuvent se
combiner pour former un mélange explosif.
Le chargement des batteries doit être effectué dans des endroits désignés à cet effet,
où aucune matière combustible ne doit être
stockée. Des équipements doivent être prévus pour :
A rincer les déversements d'électrolyte ;
B lutter contre l'incendie ;
C protéger le matériel de chargement des
endommagements par des véhicules et
D pour assurer un e ventilation suffisante
afin d'évacuer les fumées produites par
les batteries à essence.
Lorsque des chargeurs embarqués sont utilisés, le chargement doit être effectué dans des
endroits prévus à cet effet, en fonction des
exigences électriques du chargeur et des
équipements pour la lutte contre l'incendie.
Exception : Les produits de rinçage ne sont
pas nécessaires si le chargement est effectué sans retirer la batterie du véhicule.
Lors de la manipulation de concentrations
d'acide supérieures à 50 % (densité au-delà de
1 400), une douche oculaire est indispensable.
Un transporteur, un palan suspendu ou
autre équipement de manutention doit être
prévu pour la manipulation des batteries.
Les appareils de levage à chaîne doivent être
équipés de chaînes de levage. Lorsque des
appareils de levage manuels sont utilisés, les
batteries ouvertes doivent être recouvertes
d'une feuille de contreplaqué ou autre matériau non conducteur afin d'éviter les courtscircuits de la chaîne de manœuvre au niveau
des pontets de connexion ou des bornes. Un
palonnier correctement isolé doit être utilisé
avec les palans suspendus.
La capacité des batteries rechargées ou
batteries neuves doit être égale ou supérieure à celle indiquée sur l'appareil. Installer les batteries rechargées correctement
dans l'appareil.
Un vide-tourie ou un siphon devra être prévu dans les locaux où de l'acide en touries
est utilisé. Lors de la dilution d'acide sulfurique concentré pour obtenir de l'électrolyte,
l'acide doit TOUJOURS être ajouté à l'eau
et non l'inverse. Les membres du personnel
procédant à l'entretien des batteries doivent
porter des vêtements de protection, tels
que des verres protecteurs, des manches
longues et des gants.
Exception : Le démontage et le remplacement des batteries ne nécessite pas l'utilisation de vêtements de protection.
Seules les personnes compétentes et habilitées sont autorisées à procéder au démontage et au chargement des batteries.
Les installations électriques doivent être conformes au NFPA 70 code national électrique
américain ainsi qu'aux règlements locaux.
L'unité doit être en position adéquate et les
freins doivent être actionnés avant toute
tentative de remplacement ou de chargement des batteries.
Lors du chargement des batteries, le capuchon d'évacuation doit rester en place de
façon à éviter toute projection d'électrolyte.
Prendre soin de vérifier que les capuchons
d'évacuation fonctionnent. Ouvrir le couvercle de la batterie (ou du compartiment de
batterie) afin d'évacuer chaleur et gaz.
Il est interdit de fumer dans la zone dédiée
au chargement de la batterie.
Les mesures nécessaires doivent être prises pour éviter les flammes vives, les étincelles et les arcs électriques dans les zones
de chargement des batteries.
Ne jamais poser des outils ou autres objets
mécaniques sur des batteries ouvertes.
NORMES DE SECURITE IN-
CENDIE
Entretien
Remplacement et chargement des
batteries
Page 20

20 Français
Lisez attentivement ce mode
d’emploi avant la première utilisation de l’appareil et respectez les conseils y figurant. Conservez ce mode
d’emploi pour une utilisation ultérieure ou
un éventuel repreneur de votre matériel.
Avant la première mise en service, vous devez impérativement avoir lu les consignes
de sécurité N° 5.956-250 !
Consignes de sécurité 20
Fonction 20
Utilisation conforme 21
Protection de l’environnement 21
Eléments de commande et de fonction22
Avant la mise en service 23
Mise en service 24
Fonctionnement 24
Remisage 25
Entretien et maintenance 25
Accessoires 27
Assistance en cas de panne 28
Caractéristiques techniques 29
Contacter le revendeur en cas de constatation d'une avarie de transport lors du déballage de l'appareil.
– Afin d'assurer un fonctionnement sans
danger, observez les avertissements et
consignes placés sur l'appareil.
– Outre les instructions figurant dans le
mode d'emploi, il est important de prendre en considération les consignes générales de sécurité et de prévention
contre les accidents imposées par la loi.
Danger
Risque de blessure !
Risque de basculement en cas de pente
trop forte.
– Dans le sens de la marche, ne pas mon-
ter des pentes supérieures à 12%.
Risque de basculement en cas de sol instable.
– N'utilisez la machine que sur des sols
stabilisés.
Risque de basculement en cas de pente latérale trop importante.
– N'empruntez aucune pente supérieure
à 12% dans le sens perpendiculaire au
sens de la marche.
– Doivent être respectées les mesures de
règlement, les règles et les décrets qui
sont valables pour les automobiles.
– L’utilisateur doit utiliser l’apparei l de fa-
çon conforme. Dans la circulation, il doit
prendre en considération les données
locales et lors du maniement de l’appa-
reil, il doit prendre garde aux tierces
personnes, et en particulier aux enfants.
– L'appareil doit uniquement être utilisée
par des spécialistes qui sont instruits
dans la manoeuvre ou par des person-
nes qui peuvent justifiée leur aptitude
d'utilisation et qui sont explicitement
mandatées pour l'utilisation.
– Ne jamais laisser des enfants ou des
adolescents utiliser l'appareil.
Î Pendant le fonctionnement du moteur,
l'appareil doit être tous le temps surveillée. L'utilisateur ne peut sortir de
l'appareil que lorsque le moteur s'arrête,
l'appareil est assurée contre des mouvements involontaires, le frein d'arrêt,
en cas écheant est actionné et la clé de
contact est rétirée.
Remarque
La garantie n'est valide qu'en cas d'utilisation des batteries et chargeurs recommandés par Windsor.
– Il est impératif de respecter les instruc-
tions de service du fabricant de batterie
et du fabricant du chargeur. Il convient
également d'observer la législation en
vigueur en matière d'utilisation des batteries.
– Ne jamais laisser les batteries déchar-
gées. Les recharger le plus tôt possible.
– Pour éviter les fuites de courants, les
batteries doivent toujours être propres
et sèches. Protéger les batteries contre
l'encrassement, par exemple contre les
poussières métalliques.
– Ne pas poser d'outils ou d'objets similai-
res sur la batterie. Risque de court-circuit et d'explosion.
– Ne jamais approcher une flamme,
émettre d'étincelles ou fumer à p r oxi mi té d'une batterie ou d'une station de
charge pour batteries. Risque d'explosion.
– Ne toucher aucune pièce chaude, telle
que le moteur (risque de brûlure).
– Prendre garde lors de la manipulation
de l'acide de batterie. Respecter les
consignes de sécurité qui s'appliquent !
– Toute batterie usée doit être éliminée
conformément à la directive CE 91/ 157
CEE ou les directives nationales respectives relatives à la de protection de
l'environnement.
Danger
Afin d'éviter tout danger, seul le service
après-vente agréé est habilité à effectuer
des réparations ou à monter des pièces de
rechanger sur l'appareil.
– Utiliser uniquement des accessoires et
des pièces de rechange autorisés par le
fabricant. Des accessoires et des pièces de rechange d’origine garantissent
un fonctionnement sûr et parfait de l’appareil.
– Une sélection des pièces de rechange
utilisées le plus se trouve à la fin du
mode d'emploi.
Danger
Signale un danger imminent. Le non-respect de cette consigne peut être source
d'accidents mortels ou de blessures graves.
몇 Avertissement
Signale une situation potentiellement dangereuse. Le non-respect de cette consigne
peut entraîner des blessures légères ou
des dégâts matériels.
Remarque
Signale des conseils d'utilisation et d'importantes informations.
La balayeuse fonctionne selon le principe
du balayage par soulèvement et projection.
– Le balai latéral (1) nettoie les angles et
les bordures de la surface à balayer et
achemine les déchets dans la zone
d'action de la brosse rotative.
– La brosse rotative (2) rejette directe-
ment les déchets dans le bac à poussières (3).
– La poussière qui se soulève dans le ré-
servoir est recueillie par le filtre à poussières (4) et l'air filtré est aspiré par
l'aspirateur (5).
Table des matières
Consignes de sécurité
Consignes générales
Condition de roulage
Appareils fonctionnant avec une batterie
Accessoires et pièces de rechange
Symboles sur l'appareil
Ne pas balayer d'objets en
feu ou brûlants, comme
par.ex. des cigarettes, des
allumettes ou autre.
Risque d'écrasement et de
coupure à la courroie, au
balai latéral, au réservoir,
à l'étrier de poussée.
Symboles utilisés dans le mode
d'emploi
Fonction
Page 21

Français 21
L'utilisation de l'appareil doit être faite en
conformité avec les consignes figurant
dans les instructions de service.
Î Il est nécessaire de contrôler l'état et la
sécurité du fonctionnement de l'appareil
et de ses équipements avant toute utilisation. Ne pas utiliser l'appareil si son
état n'est pas irréprochable.
– Cette balayeuse est conçue pour le ba-
layage de surfaces encrassées en intérieur et en extérieur.
– L'appareil n'est pas destiné au nettoya-
ge de voies publiques.
– Cet appareil n'est pas conçu pour aspi-
rer des poussières nocives.
– Aucune transformation ne doit être ef-
fectuée sur la machine.
– Ne jamais aspirer ni balayer de liquides
explosifs, de gaz inflammables, ni d'acides ou de solvants non dilués ! Il s'agit
notamment de substances telles que
l'essence, les diluants pour peintures,
ou le fuel, qui, en tourbillonnant avec
l'air aspiré, risqueraient de produire des
vapeurs ou des mélanges, ou de substances telles que l'acétone, les acides
ou les solvants non dilués, qui pourraient altérer les matériaux constitutifs
de l'appareil.
– N’aspirer ou ne balayer aucun objet en
flamme ou incandescent.
– Cet appareil convient uniquement pour
les revêtements de sol mentionnés
dans le mode d'emploi.
– Il doit exclusivement être utilisé sur des
surfaces autorisées par l'entrepreneur
ou son représentant.
– Il est interdit de séjourner dans la zone
à risque. Il est interdit d’exploiter l’appareil dans des pièces présentant des risques d’explosion.
– En règle générale, il convient : d'éloi-
gner les matériaux facilement inflammables de la machine (risque d'explosion
ou d'incendie).
– Asphalte
– Sol industriel
– Chape coulée
– Béton
–Pavé
– Tapis
Utilisation conforme
Revêtements appropriés
Protection de l’environne-
ment
Les matériaux constitutifs de
l’emballage sont recyclables.
Ne pas jeter les emballages
dans les ordures ménagères,
mais les remettre à un système
de recyclage.
Les appareils usés contiennent
des matériaux précieux recyclables lesquels doivent être
apportés à un système de recyclage. Les batteries et les
accumulateurs contiennent
des substances ne devant pas
être tout simplement jetées.
Pour cette raison, utiliser des
systèmes de collecte adéquats
afin d'éliminer les batteries et
les accumulateurs.
Page 22
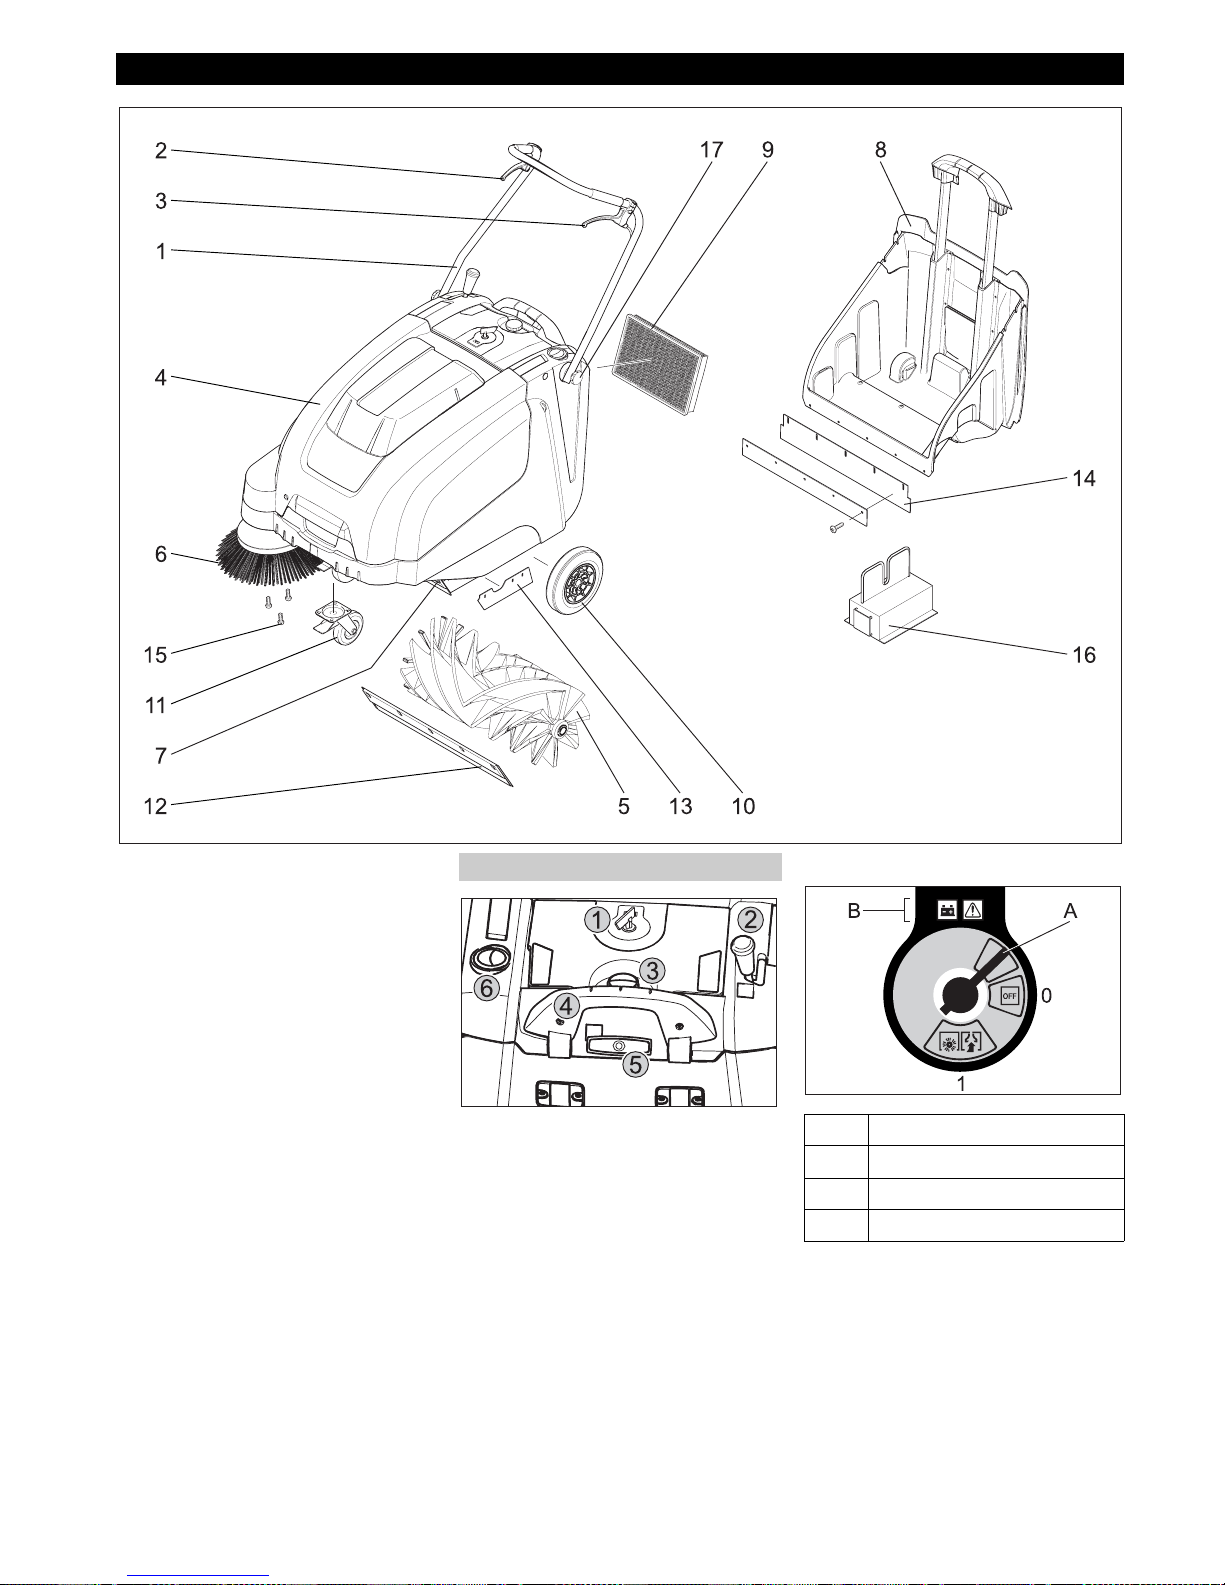
22 Français
1 Guidon de poussée
2 Levier pour relever ou bien abaisser la
trappe de salissures grossières
3 Levier pour la marche avant
4 Capot
5 Brosse rotative
6 Balai latéral
7 Trappe à gros déchets
8 Bac à poussières
9 Filtre à poussières
10 Roues d'en traînement
11 Roulettes pivotantes et frein de station-
nement
12 Baguette d'étanchéité avant
13 Bague d'étanchéité arrière
14 Couteau d'étanchéité arrière (à la pou-
belle)
15 Fixation du balai latéral
16 Chargeur
17 Vis de fixation de l'anse de poussée
1 Interrupteur principal
2 Levier pour abaisser et lever le balai la-
téral
3 Vis de serrage du capot du filtre à pous-
sière
4 Etrier de fermeture du bac à poussière
5 Nettoyage pour le filtre à poussières
6 Clapet sol sec/sol humide
Retirer la clé :
Tourner la clé du sectionneur général audelà de la position "0" et la retirer.
Eléments de commande et de fonction
Zone de commande
Interrupteur principal
0/OFF Moteur hors de service
1 Moteur marche
A Retirer la clé
B Affichage de la batterie
Page 23

Français 23
Remarque
Le capot de l'appareil est verrouillé avec la
clé de l'interrupteur principal. La clé ne peut
être retirée que lorsque le capot de l'appareil est verrouillé.
Î Insérer la clé de l'interrupteur principal
dans la fermeture du capot et tourner de
90° dans le sens horaire.
Î Retirer la clé de la fermeture du capot.
Î Ouvrir le capot de l'appareil.
Î Fermer le capot.
Î Fermer le capot de l'appareil avec la clé
du sectionneur général.
Pour décharger cet appareil, procéder comme suit :
Î Retirer le carton.
Î Retirer les cales de bois bloquant les
roues et soulever l'appareil de la palette
à la main.
Î Desserrer le frein.
Î Desserrer les vis de fixation.
Î Redresser le guidon de poussée.
Î Serrer les vis de fixation.
Remarque
Avant de basculer l'appareil, retirer le bac à
poussières et pivoter le guidon de poussée
vers l'avant. Ne pas poser l'appareil sur le
guidon de poussée.
Î Fixer un nouveau balai et serrer les
écrous.
Respecter impérativement ces consignes
en cas de manipulation des batteries :
Danger
Risque d'explosion ! Ne jamais déposer
d'outils ou d'objets similaires sur les bornes
et les barrettes de connexion de la batterie.
Danger
Risque de blessure ! Ne jamais mettre en
contact des plaies avec le plomb. Prendre
soin de toujours se laver les mains après
avoir manipulé la batterie.
Danger
Risque d'incendie et d'explosion!
– Il est interdit de fumer ou de faire brûler
des objets.
– Les espaces dans lesquelles sont char-
gé les batteries doivent être bien aère,
puisque au chargement peut apparaître
du gaz très explosif.
Danger
Risque de brûlure!
– Des éclaboussures d'acide dans l'oeil
ou sur la peau laver avec l'eau.
– Après voir immédiatement le médecin.
– Laver les vêtements salés avec l'eau.
Î Ouvrir le capot de l'appareil.
Î Disposer les batteries sir le support mo-
teur.
Î Sécuriser les batteries avec une bande
de maintien.
몇 Avertissement
Veiller à respecter les polarités appropriées.
Î Monter la cosse (câble rouge) sur le
pôle plus (+) de la batterie.
Î Visser la ligne de connexion à la batte-
rie.
Î Monter la cosse sur le pôle moins (-) de
la batterie.
Remarque
Il convient de toujours débrancher le pôle
moins en premier lors du démontage de la
batterie. Enduire les pôles de la batterie et
les cosses de graisse pour les protéger.
몇 Avertissement
Charger les batteries avant de mettre l'appareil en service.
Danger
Risque d'électrocution. Faire attention au
réseau de conduction de courant et à la
protection par fusibles. Utiliser le chargeur
seulement dans des pièces sèches et suffisamment aérée.
Danger
Risque de blessure ! Respecter les consignes de sécurité pour l'utilisation de batteries. Lire avec attention le mode d'emploi
du chargeur de batterie.
Danger
Risque de blessure ! Le chargeur peut être
uniquement mis en service, lorsque le câble secteur n'est pas endommagé. Un câble secteur endommagé doit être substitué
immédiatement par le fabricant, le service
après-vente ou une personne qualifiée.
Remarque
L'appareil est équipé en série de batteries
sans maintenance.
Î Ouvrir le capot de l'appareil.
Î Brancher la fiche secteur du chargeur
dans la prise.
Remarque
Le chargeur dispose d'un réglage électronique et met fin automatiquement à la procédure de charge. Lors de la procédure de
charge, toutes les fonctions de l'appareil
sont automatiquement interrompues.
Le témoin de contrôle de la batterie indique
la progression de la procédure de charge
lorsque la fiche secteur est branchée :
Ouvrir le capot de l'appareil
Fermer le capot de l'appareil
Avant la mise en service
Déchargement de la machine
Monter le guidon de poussée
Monter les balais latéraux
Batteries
Consignes de sécurité
Respecter les consignes situées sur la batterie, dans les
instructions de service et dans
le mode d'emploi du véhicule !
Porter des lunettes de
protection !
Tenir les enfants à l'écart des
acides et des batteries !
Risque d'explosion!
Toute flamme, matière incandescente, étincelle ou cigarette est interdite à proximité de
la batterie !
Risque de brûlure!
Premiers soins !
Attention !
Mise au rebut !
Ne pas mettre la batterie au
rebut dans le vide-ordures !
Montage et branchement des batteries
Charger les batteries
Les batteries sont
chargées
Le témoin s'allume (jaune)
Les batteries sont
chargées
Le témoin s'allume (vert)
Page 24

24 Français
Î Débrancher le câble d'alimentation.
Î Enrouler le câble d'alimentation autour
de la poignée du chargeur.
Î Fermer le capot.
Remarque
Mise en service uniquement avec le capot
fermé.
Î Garer la balayeuse sur une surface pla-
ne.
Î Couper le moteur.
Î Serrer le frein de stationnement.
Î Vérifier le niveau de charge de la batte-
rie.
Î Contrôler les balais latéraux.
Î Vérifier la brosse rotative.
Î Nettoyer le filtre à poussières.
Î Vider le bac à poussières.
Remarque
Voir description au chapitre Entretien et
maintenance.
Î Desserrer le frein.
Lancer le moteur.
Î Tourner le sectionneur général sur la
position "1".
Remarque
La brosse rotative et le balai latéral tournent.
Î Tirer le levier pour la marche avant.
Remarque
La vitesse de translation peut être rélée en
continu pour l'avancée vers l'avant selon la
position du levier.
Î Relâcher le levier pour la marche avant.
L'appareil reste immobile.
Franchir des obstacles fixes jusqu'à 1.2 in
(30 m m) de hauteur :
Î Relever la trappe à gros déchets.
Î Franchir l'obstacle avec précaution en
avançant lentement.
Franchir des obstacles fixes de plus de
1.2 in (30 mm) de hauteur :
Î Le véhicule ne peut franchir ces obsta-
cles qu'avec une rampe appropriée.
Danger
Risque de blessure ! Lorsque la trappe à
gros déchets est ouverte, la brosse rotative
peut projeter des pierres ou des graviers
vers l'avant. Veiller à ne mettre en danger
aucune personne, animal ou objet.
몇 Avertissement
Ne balayer ni bandes adhésives, ni fils de
fer ou autres matériaux risquant de détériorer le mécanisme de balayage.
Remarque
Adapter la vitesse du véhicule en fonction
du lieu pour obtenir un résultat de balayage
optimal.
Remarque
La trappe à gros déchets doit être brièvement levée pour permettre l'aspiration d'objets pouvant aller jusqu'à 2.0 in (50 mm) de
hauteur, comme les paquets de cigarettes.
Relever la trappe à gros déchets :
Î Tirer le levier pour soulever la trappe à
gros déchets.
Abaisser la trappe à gros déchets :
Î Relâcher le levier pour soulever la trap-
pe à gros déchets.
Remarque
Pour obtenir un résultat optimal, la trappe à
gros déchets doit être intégralement abaissée.
Î Positionner le levier pour abaisser le ba-
lai latéral vers l'avant. Les balais laté-
raux sont abaissés.
Remarque
Le bac à poussières doit être vidé régulièrement pendant l'utilisation de la balayeuse.
Remarque
Le filtre à poussières doit être nettoyé régulièrement pendant l'utilisation de la balayeuse.
Î Fermer le clapet sol sec/sol humide
Î Ouvrir le clapet sol sec/sol humide
Remarque
Le filtre est ainsi protégé de l'humidité.
L'affichage de la batterie affiche pendant le
fonctionnement l'état de charge des batteries :
Î Tirer plusieurs fois la poignée du net-
toyage du filtre et la glisser à l'intérieur.
Remarque
– En vidant le réservoir à poussière, faire
attention à ce que la barre d'étanchéité
ne soit pas endommagée.
– La charge maximale autorisée du réci-
pient à poussière est de 88.2 lbs
(40 kg).
Î Nettoyer le filtre à poussières.
Î Tirer l'anse de fermeture du réservoir à
poussière vers le haut.
Î Retirer le bac à poussières.
Î Vider le bac à poussières.
Î Insérer le bac à poussières.
Î Pousser l'anse de fermeture du réser-
voir à poussière vers le bas.
Couper le moteur.
Î Tourner le sectionneur général sur la
position "0".
Î Lever les balais latéraux.
Î Serrer le frein de stationnement.
Î Tourner la clé du sectionneur général
au-delà de la position "0" et la retirer.
몇 Avertissement
Au transport, l'appareil doit être assurer
contre un déplacement.
Î Couper le moteur.
Î Tourner la clé du sectionneur général
au-delà de la position "0" et la retirer.
Î Serrer le frein de stationnement.
Le chargeur est en
panne
Le témoin s'allume (rouge)
La batterie n'est pas
bien pôle ou n'est pas
branchée
Le témoin clignote lentement (rouge)
Batterie défectueuse Le témoin cli-
gnote rapidement (rouge)
Après la procédure de charge
Mise en service
Consignes générales
Travaux de contrôle et de mainte-
nance
Fonctionnement
Démarrage de la machine
Déplacer la balayeuse
Avancer
Ralenti
Franchissement des obstacles
Balayage
Balayage avec trappe à gros déchets relevée
Balayage avec balais latéraux
Balayage de sols secs
Balayage de sols humides ou mouillés
Affichage de la batterie
plein Le témoin s'al-
lume (vert)
30% de capacité restante
Le témoin s'allume (jaune)
10% de capacité restante
le témoin clignote (rouge)
Protection contre un
bas déchargement,
l'appareil s'arrête
Le témoin s'allume (rouge)
Nettoyer le filtre à poussières
Vider le bac à poussières.
Mise hors service de l'appareil
Transport
Page 25

Français 25
Î Sécuriser le véhicule à l'aide de cales
sous les roues.
Î Arrimer la machine avec des sangles ou
des cordes.
1 Zone de fixation au-dessus du guidon
de poussée
2 Zone de fixation en dessous du capot
de l'appareil
Remarque
– Respecter les points d'arrimage symbo-
lisés par des chaînes situées sur le
châssis (symboles de chaîne).
– Ne pas plier de câble sous gaine ou
Bowden.
Respecter les instructions suivantes si la
machine doit rester inutilisée pendant un
certain temps :
Î Garer la balayeuse sur une surface pla-
ne.
Î Couper le moteur.
Î Tourner la clé du sectionneur général
au-delà de la position "0" et la retirer.
Î Serrer le frein de stationnement.
Î Sécuriser la balayeuse afin qu'elle ne
puisse rouler librement.
Î Relever la brosse. Pour cela, enclen-
cher les deux leviers de réglage dans le
percage supérieur.
Î Lever les balais latéraux.
Î Nettoyer l'intérieur et l'extérieur de la
balayeuse.
Î Garer la machine dans un endroit proté-
gé et sec.
Î Débrancher les batteries.
Î Charger les batteries tous les 2 mois
environ.
– Les maintenaces doivent être unique-
ment effectuées par des services d'assistances au client autorisés ou par des
spécialistes.
– Les appareils utilisés industriellement à
des locaux différents doivent être avoir
effectués une révision de protection selon VDE 0701.
몇 Avertissement
Risque d'endommagement ! L’appareil ne
peut être nettoyé à l'eau avec un flexible ou
au jet haute pression (Danger de court-circuits ou autres dégâts).
Danger
Risque de blessure ! Porter un masque et
des lunettes de protection.
Î Ouvrir le capot de l'appareil.
Î Essuyer le véhicule avec un chiffon.
Î Nettoyer le véhicule à l'air comprimé.
Î Fermer le capot.
Î Nettoyer l'extérieur du véhicule avec un
chiffon humide et un détergent doux.
Remarque
N'utiliser aucun détergent corrosif.
Maintenance quotidienne :
Î Contrôler le degré d'usure du balai-
brosse et de la balayeuse latérale et vérifier l'enroulement des bandes.
Î Vérifier le fonctionnement de tous les
éléments de commande.
Î Vérifier le fonctionnement de toutes les
lampes témoin.
Maintenance hebdomadaire :
Î Contrôler la tension, l'usure et la fonc-
tion des courroies d'entraînements.
Î Contrôler la manoeuvrabilité des câbles
sous gaine et des pièces mobiles.
Î Vérifier le réglage et le degré d'usure
des joints dans le domaine de balayage.
Î Vérifier la surface de balayage de la
brosse rotative.
Î Nettoyer le filtre à poussières.
Remarque
Voir description au chapitre Entretien et
maintenance.
Remarque
Tous les travaux d'entret ien qui rel èvent du
client doivent être effectués par une personne qualifiée. A tout moment, celle-ci
peut faire appel à un technicien Windsor.
Maintenance après 20 heures de service :
Î Effectuer la première inspection.
Maintenance toutes les 100 heures de
service :
Maintenance toutes les 300 heures de
service :
Maintenance toutes les 500 heures de
service :
Remarque
Pour éviter de perdre le bénéfice de la garantie, veuillez confier au service aprèsvente Windsor agréé tous les travaux de
maintenance et d'entretien pendant la durée de la garantie.
Préparation :
Î Garer la balayeuse sur une surface pla-
ne.
Î Tourner la clé du sectionneur général
au-delà de la position "0" et la retirer.
Î Serrer le frein de stationnement.
Danger
Risque de blessure !
Le moteur continue à tourner 3 ou 4 secondes après l'arrêt. Ne pas s'approcher de la
zone de travail pendant ce laps de temps.
– Débrancher ou couper la fiche des bat-
teries en cas de travaux à la machine
électrique
– Laisser suffisamment refroidir la machi-
ne avant d'entreprendre des travaux de
maintenance ou des réparations.
– Ne toucher aucune pièce chaude, telles
que le moteur.
Remarque
Avant de basculer l'appareil, retirer le bac à
poussières et pivoter le guidon de poussée
vers l'avant. Ne pas poser l'appareil sur le
guidon de poussée.
Î Avant de nettoyer et de procéder à a
maintenance de la machine et de changer des pièces, la machine doit être
mise hors tension.
Un réglage est nécessaire lorsque l'énergie
motrice de la machine est insuffisante lors
de montées.
Î Desserrer le contre-écrou
Î Régler la vis de réglage.
Î Serrer le contre-écrou.
Î Serrer le frein de stationnement.
Î Retirer le bac à poussières.
Î Ôter les fils et bandes de la brosse rota-
tive.
Il est nécessaire de remplacer la brosse
lorsque le nettoyage devient moins efficace
à cause de l'usure des crins.
Remarque
Avant de basculer l'appareil, retirer le bac à
poussières et pivoter le guidon de poussée
vers l'avant. Ne pas poser l'appareil sur le
guidon de poussée.
Î Serrer le frein de stationnement.
Î Retirer la poubelle.
Î Verser l'appareil en avant.
Remisage
Entretien et maintenance
Consignes générales
Nettoyage
Nettoyage intérieur du véhicule.
Nettoyage extérieur de l'appareil
Fréquence de maintenance
Maintenance par le client
Maintenance par le service après-vente
Travaux de maintenance
Consignes de sécurité générales
Régler le câble Bowden du mécanisme
d'entraînement
Contrôler la brosse rotative.
Changer la brosse rotative
Page 26

26 Français
Î Lever la trappe à gros déchets, enfon-
cer le coussinet et pivoter la brosse rotative vers l'avant.
Î Extraire la brosse rotative.
Î Placer une nouvelle brosse rotative sur
les tenons d'entraînement (à gauche).
Î Enclencher le coussinet dans l'orifice du
dispositif de basculement de brosse rotative sur le côté en face.
몇 Avertissement
Risque d'endommagement ! Faire attention, à ce qu'aucun poil ne soit pris dans
l'orifice du basculement de brosse rotative.
Remarque
Après le montage de la nouvelle brosse rotative, il convient de régler à nouveau la trace de balayage.
Î Soulever la balayeuse à l'avant et la fai-
re avancer sur un sol plan et lisse, visiblement recouvert de poussière ou de
craie.
Î Serrer le frein de stationnement.
Î Faire tourner la brosse rotative pendant
15 à 30 secondes.
Î Soulever la balayeuse à l'avant et la
mener sur le côté.
La trace de balayage doit former un rectangle régulier d'une largeur de 1.2 à 1.6 in (30
à 40 mm).
Régler la trace de balayage :
Î Régler les leviers de réglage gauche et
droit et les enclencher dans le même
orifice.
– Enclencher le levier de réglage dans
l'orifice le plus profond (+): la trace de
balayage gagne en largeur
– Enclencher le levier de réglage dans
l'orifice le plus haut (+): la trace de balayage devient plus étroite
Î Contrôler la surface de balayage.
Il est nécessaire de remplacer la brosse
lorsque le nettoyage devient moins efficace
à cause de l'usure des crins.
Remarque
Avant de basculer l'appareil, retirer le bac à
poussières et pivoter le guidon de poussée
vers l'avant. Ne pas poser l'appareil sur le
guidon de poussée.
Î Dévisser 3 vis sur le côté inférieur du
balai latéral.
Î Enlever le balai latéral.
Î Fixer un nouveau balai sur l'entraîneur
et serrer les écrous.
Il est nécessaire de procéder à un réglage
lorsque le nettoyage devient moins efficace
à cause de l'usure des crins.
Î Desserrer les écrous-papillons.
Î Régler la vis de réglage.
Î Serrer à fond les écrous-papillons.
– Un réglage est nécessaire quand la
trappe à gros déchets ne peut plus être
suffisamment levée.
– Lorsque le balayage perd en efficacité,
par ex. par usure de la lèvre frontale, le
câble Bowden doit être légèrement relâché.
Î Desserrer le contre-écrou
Î Régler la vis de réglage.
Î Serrer le contre-écrou.
Remarque
Avant de basculer l'appareil, retirer le bac à
poussières et pivoter le guidon de poussée
vers l'avant. Ne pas poser l'appareil sur le
guidon de poussée.
Baguette d'étanchéité avant
Î Dévisser la fixation de la barre d'étan-
chéité.
Î Régler la barre d'étanchéité ou bien la
changer
Î Régler la baguette avant de sorte qu'el-
le s’incurve et présente une traîne de 0
à 0.4 in (0 à 10 mm).
Î Orienter la baguette d'étanchéité.
Î Serrer la fixation de la barre d'étanchéi-
té.
Baguette d'étanchéité arrière
Î Retirer le bac à poussières.
Î Dévisser la fixation de la barre d'étan-
chéité.
Î Régler la barre d'étanchéité ou bien la
changer
Î Régler la baguette avant de sorte qu'el-
le s’incurve et présente une traîne de 0
à 0.4 in (0 à 10 mm).
Î Serrer la fixation de la barre d'étanchéi-
té.
Baguettes d'étanchéité latérales
Î Dévisser la fixation de la barre d'étan-
chéité.
Î Régler la barre d'étanchéité ou bien la
changer
Î Insérer une cale d'épaisseur de 0.08 in
(2 mm) afin de régler l'écartement avec
le sol.
Î Orienter la baguette d'étanchéité.
Î Serrer la fixation de la barre d'étanchéi-
té.
Contrôler et régler la trace de balayage
Plage de réglage (-) 1...10 (+)
Trace de balayage mini-
male
1
Trace de balayage maximale
10
Nouvelle brosse rotative 1...3
Remplacer les balais latéraux
Régler l'abaissement du balai latéral
Régler le levage de la trappe à gros déchets
Régler et remplacer les baguettes
d'étanchéité
Page 27
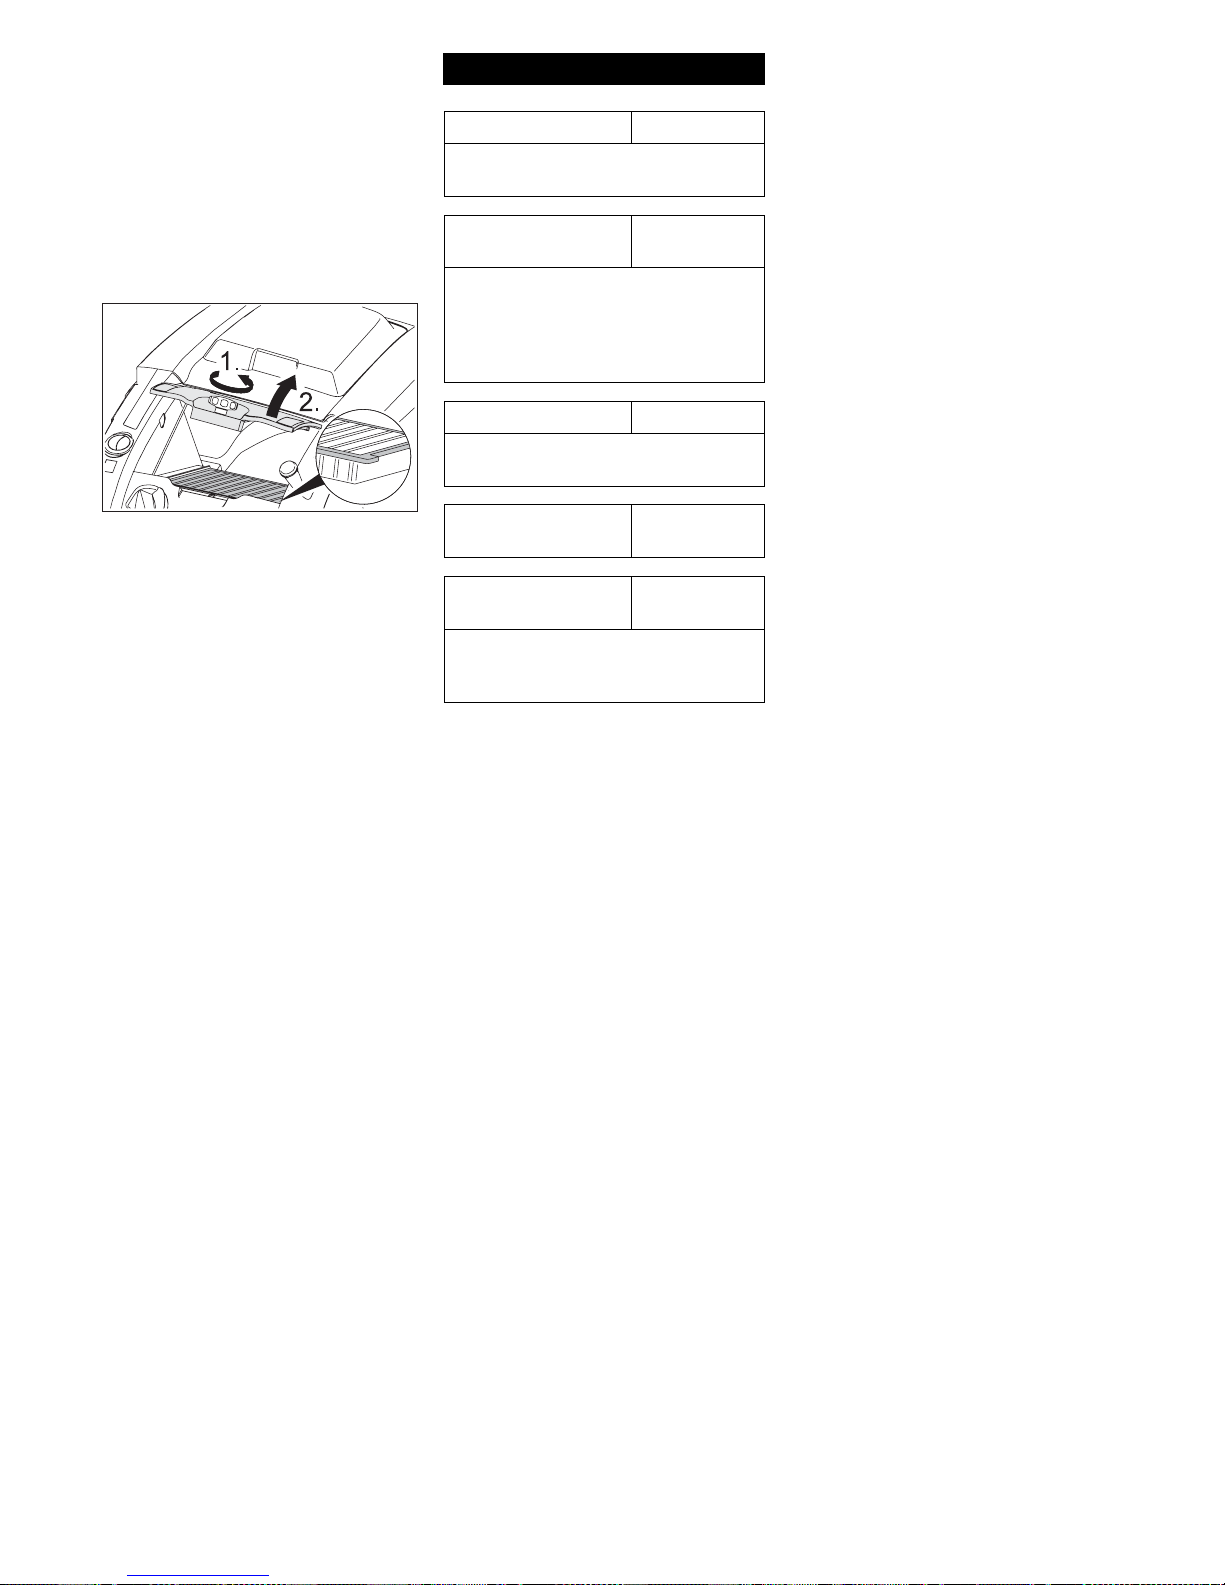
Français 27
Danger
Vider le bac à poussières avant de procéder au remplacement du filtre. Porter un
masque de protection pour effectuer des
travaux de maintenance sur le système de
filtration. Respecter les consignes de sécurité concernant la manipulation de fines
poussières.
Î Serrer le frein de stationnement.
Î Nettoyer le filtre à poussières.
Î Tourner la vis de serrage du couvercle
de filtre à poussière dans le sens inverse aux aiguilles d'une montre.
Î Relever le couvercle du filtre à poussiè-
re
Î Remplacer le filtre à poussières Res-
pecter la position de montage correcte
du filtre à poussière (voir illustration).
Î Visser la vis de serrage jusqu'en butée.
몇 Avertissement
Si la vis de serrage n'est pas vissée jusqu'en butée, des détériorations peuvent
survenir.
Remarque
Lors du montage du nouveau filtre, veiller à
ne pas endommager les lamelles.
Les fusibles se trouvent dans le chargeur.
Remplacer le filtre à poussières
Remplacer les fusibles
Accessoires
Balais latéraux, durs 6.905-625.0
Pour retirer les salissures adhérant fortement en extérieur, résistante à l'humidité.
Brosse rotative, souple
6.906-886.0
Avec crin naturel spécial pour le balayage des poussières fines sur des sols lisses en intérieur. Pas résistant à
l'humidité, par pour les surfaces abrasives.
Brosse rotative, dure 6.906-885.0
Pour retirer les salissures adhérant fortement en extérieur, résistante à l'humidité.
Brosse rotative, antistatique
6.906-950.0
Tapis unité de balayage
2.641-571.0
Comporte : Tamis à peluches, brosse rotative antistatique, 3 fois galets de guidage
Page 28

28 Français
Assistance en cas de panne
Panne Remède
Il est impossible de mettre l'appareil en marche Fermer le capot.
Charger les batteries
Contrôler le fusible de surcharge
Contacter le service après-vente Windsor.
Le moteur tourne mais le véhicule reste sur place. Régler le câble Bowden du mécanisme d'entraînement
Contrôler la courroie trapézoïdale.
Contacter le service après-vente Windsor.
L'appareil s'arrête lors de déplacement sur une
montée
Prendre un chemin avec une pente moins abrupte
Contrôler le fusible de surcharge
Régler le câble Bowden du mécanisme d'entraînement
Contrôler la courroie trapézoïdale.
Contacter le service après-vente Windsor.
Le balayage n'est pas effectif Vérifier l'usure de la brosse rotative et des balais latéraux, les remplacer si nécessai-
re.
Vérifier le fonctionnement de la trappe à gros déchets
Relâcher le câble Bowden de la trappe à gros déchets (vis de réglage)
Contrôler la tension et le fonctionnement des courroies, si nécessaire, les remplacer
Régler la trace de balayage
Changer la brosse rotative
Contacter le service après-vente Windsor.
De la poussière s'échappe de l'appareil Vérifier le fonctionnement de la trappe à gros déchets
Relâcher le câble Bowden de la trappe à gros déchets (vis de réglage)
Vérifier le filtre à poussières, le nettoyer ou l'échanger
Vider le bac à poussières
Remplacer le profilé d'étanchéité sur le bac à poussières
Contrôler le joint du filtre à poussière
Contrôler l'usure des baguettes d'étanchéité, régler la hauteur si nécessaire ou les
remplacer
Le balayage des bordures n'est pas satisfaisant Régler l'abaissement du balai latéral
Changer les balais latéraux
Abaisser les balayeuses latérales.
Contrôler les courroies de transmission de la balayeuse latérale
Contacter le service après-vente Windsor.
Le levage des balais latéraux ne fonctionne pas Contrôler le câble Bowden du levage des balais latéraux
Contacter le service après-vente Windsor.
Une nouvelle brosse rotative effleure le bac à
poussière
Corriger le réglage de la trace de balayage, pour cela enclencher les deux leviers de
réglage dans chaque orifice le plus haut (1...3)
Page 29

Français 29
Caractéristiques techniques
Radius 30
Caractéristiques de la machine
Longueur x largeur x hauteur (anse de poussée relevée) in (mm) 56.3 x 29.5 x 46.9 (1430 x 750 x 1190)
Longueur x largeur x hauteur (anse de poussée relevée) in (mm) 45.7 x 29.5 x 36.6 (1160 x 750 x 930)
Poids (sans batteries) lbs (kg) 174.2 (79)
Poids (avec batteries) lbs (kg) 275.6 (125)
Vitesse de conduite et de balayage mph (km/h) 2.8 (4.5)
Pente (max.) % 12
Diamètre de la brosse rotative in (mm) 10.4 (265)
Diamètre des balais latéraux in (mm) 16.1 (410)
Capacité de balayage max. ft
2
/h (m2/h) 36600 (3400)
Largeur de balayage sans balais latéraux in (mm) 21.7 (550)
Largeur de travail avec les balais latéraux in (mm) 29.5 (750)
Volume du bac à poussières gal (l) 10.6 (40)
Type de protection contre la pluie -- IPX 3
Moteur
Type -- Moteur à courant continu et aimant per-
manent
Sens de rotation droit
Tension V 24
Courant nominal A 22
Puissance nominale W 400
Vitesse de rotation 1/min 2750
Type de protection -- IP 20
Sécurité électrique
Central A 50
Protection anti-déchargement -- via relais
Système de filtration et d'aspiration
Surface de filtrage pour poussières fines ft
2
(m2) 19.4 (1.8)
Catégorie d'utilisation du filtre pour poussières non toxiques -- L
Dépression nominale du système d'aspiration psi (kPa) 0.07 (0.5)
Débit volumique nominal du système d'aspiration gpm (l/s) 712.4 (45)
Conditions environnement
Température °F (°C) 23...104 (-5...+40)
Hygrométrie, non-condensée % 0 - 90
Emissions sonores
Niveau de pression acoustique (EN 60704-1) dB(A) 64
Niveau de puissance sonore garanti (2000/14/EC) dB(A) 81
Vibrations de l'appareil
Valeur globale de vibrations (ISO 5349)
Dimensions des membres supérieurs m/s
2
1.19
Page 30

30 Français
1 Contrôler le degré d'usure de la brosse
rotative et du balai latéral /de la bande
de balayage et vérifier l'enroulement
des bandes.
2 Contrôler la trace de balayage et le
fonctionnement de la brosse rotative et
du balai latéral / de la bande de balayage.
3 Contrôler la tension, l'usure et la fonc-
tion des courroies d'entraînement / de la
chaîne d'entraînement.
4 Contrôler la manoeuvrabilité des câbles
sous gaine et des pièces mobiles.
5 Vérifier le fonctionnement de tous les
éléments de commande et des lampes
témoins.
1 Contrôler la tension, l'usure et la fonc-
tion des courroies d'entraînement / de la
chaîne d'entraînement.
2 Contrôler la manoeuvrabilité des câbles
sous gaine et des pièces mobiles.
3 Contrôler les baguettes d'étanchéité sur
le filtre à poussières et le fonctionnement du vibreur de filtre.
4 Vérifier le réglage et le degré d'usure
des joints dans le domaine de balayage.
5 Contrôler la trace de balayage et le
fonctionnement de la brosse rotative et
du balai latéral / de la bande de balayage.
6 Nettoyer le filtre à poussières et le con-
trôler, si nécessaire le remplacer.
7 Contrôler le degré d'usure de la brosse
rotative et du balai latéral /de la bande
de balayage et vérifier l'enroulement
des bandes.
8 Vérifier le fonctionnement de tous les
éléments de commande et des lampes
témoins.
1 Contrôler le degré d'endommagement
et d'oxydation des conduites et des con-
tacts .
2 Contrôler le jeu de l'axe de différentiel.
3 Contrôler le fonctionnement et le régla-
ge du frein de stationnement.
4 Contrôler les profilés d'étanchéité sur le
bac à poussières et le bloc de brosse ro-
tative.
5 Graisser la chaîne d'entraînement.
6 Contrôler les batteries selon les indica-
tions du fabricant.
7 Nettoyer la surface des batteries.
1 Contrôler les balais de charbon du mo-
teur.
Uniquement pour le personnel spécialisé et autorisée !
Travaux de maintenance
Après le premier mois ou 5 heures de
service
Toutes les 50 heures de service
Travaux d'entretien supplémentaires
toutes les 100 heures de fonctionnement
ou semestriellement.
Travaux d'entretien supplémentaires
toutes les 500 heures de service ou annuellement.
Page 31

Español 31
Sólo se permitirá operar un aparato motorizado a personas formadas y autorizadas.
Los operarios de aparatos motorizados deberán estar cualificados y tener la capacidad visual, auditiva, física y mental para
operar equipos de forma segura de acuerdo con los siguientes puntos.
Aquel personal que no haya sido formado
para trabajar con aparatos motorizados solamente podrán utilizarlos para fines de entrenamiento, y sólo bajo supervisión directa
del entrenador. Este entrenamiento deberá
ser llevado a cabo en un área alejada de
otros aparatos, obstáculos y peatones.
El programa de entrenamiento de operarios
incluirá las políticas de usuario del lugar en
que la persona que esté haciendo el curso
vaya a trabajar con el aparato, las condiciones de funcionamiento de dicha ubicación,
y el aparato con el que este trabajará. El
curso se ofrecerá a todos los operarios sin
tener en cuenta la experiencia previa.
El programa de entrenamiento informará al
participante del curso de:
la principal responsabilidad del operario es
usar el aparato de forma segura según las
instrucciones del programa de entrenamiento.
El programa de entrenamiento deberá hacer especial hincapié en la operación segura y correcta para evitar lesiones al operario
y a terceros y evitar daños materiales, y cubrirá las siguientes áreas.
A Principios fundamentales de aparato(s)
motorizados que el participante al curso
operará, incluido:
(1) características de los aparato(s) motorizado(s), incluidas las variaciones
entre los aparatos en el lugar de trabajo;
(2) similaridades y diferencias con respecto a automóviles;
(3) importancia de los datos de la placa
identificadora, advertencias e instrucciones aplicables al aparato motorizado;
(4) instrucciones de funcionamiento y
advertencias del manual de funcionamiento para el aparato e instrucciones
para la inspección y mantenimiento que
deba realizar el operario;
(5) tipo de energía motriz y sus características;
(6) método de control;
(7) método de freno y características;
(8) visibilidad delantera y trasera;
(9) características de estabilidad con y
sin carga, con o sin complementos;
(10) ubicación de controles, funcionamiento, método de operación, identificación de símbolos;
(11) recarga de batería;
(12) dispositivos de seguridad y protección para el tipo de aparato específico;
(13) otras caracterísitcas de la unidad
específica;
B Ambiente de trabajo y su efecto sobre el
funcionamiento del aparato, incluido:
(1) condiciones del pavimiento osuelo
incluidas condiciones temporales;
(2) rampas e inclinaciones;
(3) dispositivos de recarga de batería;
(4) pasillos estrechos, entradas, cableado elevado y tuberías, y otras áreas de
acceso limitado;
(5) áreas en las que el aparato trabaje
cerca de otros aparatos motorizados,
otros vehículos o peatones;
(6) trabajo cerca del borde de muelle o
superficie elevada;
(7) otras condiciones especiales de funcionamiento y problemas que se puedan encontrar.
C Funcionamiento del aparato motoriza-
do, incluido:
(1) inspección correcta previa al comienzo del turno y método autorizado
para retirar de funcionamiento un aparato que necesite ser reparado o revisado;
(2) procedimientos de aparcamiento y
apagado;
(3) otras condiciones especiales de funcionamiento para el dispositivo específico.
D Normas y prácticas de segurid ad para
el funcionamiento, incluido:
(1) disposiciones de la sección "Normas
y prácticas de seguridad para el funcionamiento" en este documento.
(2) otras normas, reglas o prácticas especificadas por el empleador en el lugar
donde se vaya a poner en funcionamiento el aparato motorizado.
E Prácticas de entrenamiento de funcio-
namiento, incluido:
(1) si es posible, se practicará el funcionamiento del aparato motorizado en un
áreas separada del personal y del lugar
donde se realicen actividades de trabajo;
(2) las prácticas de entrenamiento se
llevarán a cabo bajo la supervisión del
entrenador;
(3) la práctica de entrenamiento incluirá
el funcionamiento en sí o un funcionamiento simulado de todas las tareas tales como maniobra, avance, parada,
arranque y otras actividades que se encontrarán en el uso del aparato motorizado.
El operario es responsable de un funcionamiento seguro.
El operario creará unos hábitos de trabajo
seguros y estará al tanto de condiciones
peligrosas para protegerse a sí mismo, a
otros miembros del personal, el aparato
motorizado y otros materiales.
El operario estará familiarizado con el trabajo y funcionamiento de todos los controles e instrumentos antes de poner en
funcionamiento el equipo.
Antes de poner el funcionamiento el aparato, los operarios tendrán que leer y estar familiarizados con el manual del operario de
la unidad en concreto y también cumplirán
con las normas y prácticas de seguridad indicadas en los siguientes párrafos.
Antes de poner en funcionamiento cualqueir unidad, el operario se familiarizarán
con las condiciones inusuales de funcionamiento que puedan requerir precauciones
de seguridad adicionales o instrucciones
de funcionamiento especiales.
Antes de poner el marcha el equipo:
A colocar en la posición de funcionamien-
to;
B colocar los controles de dirección en
posición neutra;
C poner el interruptor en posición ON.
No arrancar ni poner en funcionamiento la
unidad, cualquiera de sus funciones o complementos, en otro sitio que no sea la posición designada de operario.
Mantener las manos y los pies dentro del
área de operario designada.
Comprender las limitaciones de la unidad y
poner en funcionamiento la unidad de forma segura para no causar daño al personal. Salvaguardar peatones en todo
momento.
A No conducir el aparato motorizado en
dirección a una persona que se encuen-
tre en frente de un objeto.
B Asegurarse de que el personal se man-
tiene apartado del área de giro trasera
antes de realizar vueltas y maniobras.
C Poner especial cu idado a la hora de
cruzar pasillos, entragas, y otros luga-
res por los que los peatones puedan pa-
sar poner la ruta del aparato.
Antes de dejar la posición del operario:
A parar completamente el equipo;
B colocar los controles de dirección en
posición neutra;
C poner el freno de estacionamiento;
Además de esto, cuando se deja el aparato
desatendido:
A parar el motor o apagar los controles;
B si el equipo tiene que estar en una incli-
nación, bloquear las ruedas.
Mantenerse a una distancia segura del borde de rampas, plataformas y otras superficies de trabajo.
Cuando se suba o baje aparatos motorizados a camiones o remolques de carretera,
poner frenos, cuñas a las ruedas u otro tipo
de mecanismo para evitar que los camiones o remolques de carretera se muevan
de forma no intencionada.
Siempre que se suba o baje aparatos motorizados a tráilers que no estén acoplados
a un tractor, puede que sea necesario utilizar apoyos para evitar que se tumbe o vaya
hacia una esquina.
Formación del operario
Formación del operario
NORMAS Y PRÁCTICAS DE
SEGURIDAD PARA EL FUN-
CIONAMIENTO
Responsabilidad del operario
Generalidades
Page 32

32 Español
Informe al supervisor o a la persona indicada de todos los accidentes en el que hayan
estado involucrados personal, estructuras
del edificio, y equipamiento.
No realice modificaciones ni añadidos al
equipo.
No bloquear el acceso a las salidas de
emergencias de incendios, escaleras o
equipo antiincendios.
Respetar todas las normas de circulación
incluidos los límites de velocidad autorizados en la planta. En condiciones de tráfico
normales, manténgase a la derecha. Mantenerse a una distancia segura, basada en
la velocidad de conducción, de la parte delantera del equipo; y tener la unidad bajo
control en todo momento.
Ceder el paso a peatones y vehículos de
emergencias como ambulancias o camiones de bomberos.
No adelante otro aparato que vaya en la
misma dirección en cruces, puntos ciegos u
otros lugares peligrosos.
Cruce vías de tren en ángulo siempre que
sea posible. No aparcar a menos de 1800
mm de la vía del tren.
Mantener una buena vista del camino por el
que conduce y preste atención al tráfico,
personal y seguridad.
Subir o bajar inclinaciones lentamente, y
con precaución. Evitar dar la vuelta, si es
posible, y tener especial precaución en
cuestas, rampas o inclinaciones; conducir
normalmente en línea recta.
Operar el equipo siempre a una velocidad
que permita parar de manera segura.
Arrancar, parar, dar la vuelta y cambiar de
dirección con cuidado para no ladear y/o
volcar el aparato.
No permita realizar escenas peligrosas ni
juguetear con el equipo.
Reducir la velocidad en suelos húmedos y
resbaladizos.
Antes de conducir sobre un muelle o puente, asegúrese de que esté bien seguro.
Conducta con cuidado y lentamente por el
muelle o puente, y no exceda nunca la capacidad indicada.
No conducir el aparato en ningún ascensor
a no ser que se haya autorizado específicamente. No exceda la capacidad del ascensor. Acérquese lentamente al ascensor, y
entre de forma directa cuando la caja del
ascesor esté correctamente en posición.
Cuando esté dentro del ascensor, neutralice los controles, apague el interruptor, y
ponga los frenos. Se recomienda que todo
el personal salga del ascensor antes de
que entre el aparato motorizado.
Al sortear curvas, reduzca la velocidad a un
nivel seguro de acuerdo con el ambiente de
funcionamiento. Sortear las curvas con
cuidado.
El funcionamiento manual motorizado requiere una serie de consideraciones de seguridad tal y como se indica a continuación:
A no trabaje nunca con manos engrasa-
das;
B se recomienda utilizar calzado de segu-
ridad;
C no montarse en el aparato;
D mantenga los pies alejados del bastidor
del aparato mientras esté en funciona-
miento.
E mantener siempre las manos y los de-
dos dentro del área protegida del man-
go de control;
F tenga cuidado cua ndo avance marcha
atrás debido a las características de
maniobra;
G tenga cuidado cuando de la vuelta en
un pasillo;
H no avance nunca con una velocidad su-
perior a la velocidad de paseo normal
(aprox. 3.5 mph [5.6 km/h]);
I coloque siempre ambas manos en el
mango de control mientras esté en fun-
cionamiento;
J opere siempre con una mano en los
controles.
Al comienzo de cada turno y antes de poner
en funcionamiento el aparato motorizado,
comprobar su estado, prestar especial
atención a lo siguiente:
A estado de las ruedas
B si las ruedas son neumáticas, compro-
bar la presión del aire
C dispositivos de advertencia y seguridad
D luces
E batería
F controles
G cadenas y cables
H interruptores de límites
I mecanismo de control
J objetos adicionales o equipo especial
tal y como especifica el usuario y/o fa-
bricante
Si el equipo necesita ser reparado o es inseguro, o favorece una situación insegura,
se deberá informar del problema inmediatamente al encargado designado por el
usuario, y no se pondrá en funcionamiento
el equipo hasta que se recupere el estado
de funcionamiento seguro.
Si el equipo se vuelve inseguro de cualquier modo durante su funcionamiento, se
deberá informar del problema inmediatamente al encargado designado por el usuario, y no se pondrá en funcionamiento el
equipo hasta que se recupere el estado de
funcionamiento seguro.
No usar llamas directas cuando se comprueba el nivel de electrolitos en las baterías de almacén.
No realizar reparaciones o ajustes a no ser
que se autorizado específicamente.
El funcionamiento del equipo puede resultar peligros si no realiza el mantenimiento o
se llevan a cabo reparaciones, reconstrucciones o ajustes que no correspondan con
los criterios de diseño del fabricante. Por lo
tanto, se deben poner a disposición lugares
de mantenimiento (en el mismo local o en
otro lugar), personal cualificado, y procedimientos detallados.
El fabricante del aparato motorizado puede
suministrar manuales de piezas y mantenimiento.
En casos excepcionales, no incluidos en
los manuales anteriormente mencionados,
consulte al fabricante del aparato motorizado.
El mantenimiento e inspección de la unidad
se realizará de acuerdo con las siguientes
prácticas:
A a un mantenimiento planificado, le se-
guirán lubricación e inspección del sistema: consulte las recomendaciones
del fabricante.
B sólo se permitirá realizar mantenimien-
to, reparaciones, ajustes e inspecciones del equipo a personal formado y
autorizado y de acuerdo con las especi-
ficaciones del fabricante.
Antes de comenzar la inspección y reparación del aparato motorizado:
A elevar las ruedas del suelo o desconec-
tar la batería y usar cuñas u otros meca-
nismos positivos para para posicionar el
aparato;
B bloquear el chasis antes de trabajar en
él;
C desconectar la batería antes de trabajar
en el sistema eléctrico;
D el conector del cargador sólo se enchu-
fará en el conector de la batería y nunca
en el conector de la unidad.
La puesta en marcha del aparato motorizado para comprobar el funcionamiento se
llevará a cabo en un área autorizada segura.
A Antes de poner el marcha el equipo:
(1) colocar en la posición de funciona-
miento;
(2) colocar los controles de dirección en
posición neutra;
(3) poner el interruptor en posición ON;
(4) comprobar el funcionamiento de los
dispositivos de dirección, advertencia y
frenos;
B Antes de dejar el equipo:
(1) parar el equipo;
(2) colocar los controles de dirección en
posición neutra;
(3) parar el motor o apagar el interrup-
tor;
(4) apagar el circuito de control;
(5) si se tiene que dejar el equipo en
una inclinación, bloquear las ruedas.
Evitar los riesgos de incendios y tener equipo de protección de incendios en el área de
trabajo. No usar cualquier llama directa
para comprobar el nivel que cualquier fluido
o comprobar la fuga de cualquier fluido, especialmente electrolitos de la batería. No
usar recipientes abiertos de fuel o líquidos
inflamables de limpieza para las limpiar las
piezas.
Transporte
Cuidados del equipo realizados
por el operario
MANTENIMIENTO Y PRÁCTICAS DE RECONSTRUCCIÓN
Page 33

Español 33
Ventilar correctamente el área de trabajo,
dejar salir humos de escape, y mantener la
tienda limpia y seca.
Los frenos, mecanismos de dirección, control, dispositivos de advertencia, topes de
eje articulados, y componentes del bastidor
serán inspeccionados cuidadosamente y
con regularidad y se mantendrán en condiciones de funcionamiento seguras.
Cualquier unidad que no esté en un estado
de funcionamiento seguro será retirada de
servicio.
Precauciones. No se realizarán reparaaciones en ubicaciones de clase I, clase II y
clase III.
Sólo se realizarán reparaciones del sistema eléctrico de aparatos a batería cuando
esta se haya desconectado.
Temperatura de funcionamiento.. Cuando la temperatura de cualquier pieza de un
aparato motorizado es superior a la normal
y supone un peligro, se retirará el aparato
de servicio y no se volverá a poner en funcionamiento hasta que no se haya solucionado la causa del sobrecalentamiento.
Prevención de incendios. Se mantendrá
el equipo limpio y sin pelusas, exceso de
aceite y grasa en la medida de lo posible.
Es preferible utilizar productos no combustibles para limpiar el equipo. No está permitido utilizar líquidos inflamables [aquellos
que tengan puntos de inflamación de o superior a 37,8ºC (100ºF)]. Se deberá tomar
precauciones ante la toxicidad, ventilación
e incendios con el producto o disolvente
usado.
Visibilidad de la placa identificadora: Las
denominaciones de tipo de equipo se indican en la placa identificadora y no se deben
cubrir las marcas de tipo con pintura para
que no se vea la información de identificación.
Esta sección se refiere a las baterías usadas en los aparatos eléctricos. Los dos tipos de baterías más usados son plomo y
níquel-hierro. Contienen soluciones químicas corrosivas, como ácido o álcali y, por lo
tanto, representan un peligro químico.
Mientras se cargan, emiten hidrógeno y
oxígeno, que, en determinadas concentraciones, son explosivos.
La instalación de carga de batería debe estar ubicada en áreas designadas para este
fin; dichas áreas deben estar libres de materiales combustibles externos. Se deberán
ofrecer lugares para:
A tirar electrolitos derramados;
B Protección anti incendios;
C proteger el cuerpo de carga de daños
ocasionados por el vehículo, y
D ventilación adecuada para dispersión
de humos de baterías gaseantes.
Cuando se usan cargadores a bordo, se
deberá realizar la recarga en los lugares
designados para ello, y se deberán tener en
cuenta las exigencias eléctricas del cargador y los servicios de protección anti incendios.
Excepción: No será necesario disponer de
servicio de eliminación si se recarga sin retirar la batería del vehículo.
En los casos en que la concentración de
ácido es superior al 50% (por encima de
1400 de gravedada específica) se debe suministrar una fuente para lavar los ojos.
Se deberá suministrar un montacargas elevado de transporte, o un dispositivo de manipulación de materiales similar para
manipular las baterías.
Los montacargas de cadena deben estar
equipados con contenedores de cadena de
carga. Cuando se usa un montacargas manula, se cubrirán las baterías descubiertas
con una hoja de contrachapado u otro manterial no conductor para evitar que la cadena manual provoque un cortacircuito en
conectores de células o terminales. Se usará una barra esparcidora aislada correctamente con cualquier montacargas elevado.
Las baterías reinstaladas o nuevas deberán cumplir o superar el tipo de batería indicado en la unidad. Las baterías
reinstaladas deben ser colocadas y aseguradas correctamente en la unidad.
Se suministrará un inclinador de garrafón o
sifón cuando se use ácido en garrafones.
Cuando se diluya ácido sulfúrico concentrado para hacer electrolitos, SIEMPRE se
añadirá el ácido al agua, no a la inversa. El
personal de mantenimiento de batería utilizará ropa y gafas de seguridad, manga larga y guantes.
Excepción: quitar y sustituir baterías no requiere el uso de ropa de seguridad.
Sólo personal formado y autorizado cambiará o cargará las baterías.
Las instalaciones eléctricas deben cumplir
el NFPA 70, el código eléctrico nacional, y
todas las normativas locales.
Colocar correctamente el aparato motorizado y poner los frenos antes de cambiar o
cargar baterías.
Al cambiar baterías, los tapones de ventilación deben estar en su sitio para evitar pulverizar electrolitos. Se debe poner especial
cuidado en asegurar que los tapones de
ventilación funcionan. La(s) tapa(s) de la
batería (o compartimento) deben estar
abiertar para dejar salir el calor y el gas.
Está prohibido fumar en la zona de carga.
Se deben tomar precauciones para evitar
llamas directas, chispas o arcos eléctricos
en las zonas de carga de baterías.
Las herramientas y otros objetos metálicos
se mantendrán alejados de las partes superiores de las baterías descubiertas.
NORMA DE SEGURIDAD
CONTRA INCENDIOS
Mantenimiento
Cambiar y cargar las baterías de
almacén
Page 34

34 Español
Antes de poner en marcha por
primera vez el aparato, lea el
presente manual de instrucciones y siga las
instrucciones que figuran en el mismo.
Conserve estas instrucciones para su uso
posterior o para propietarios ulteriores.
¡Antes de la primera puesta en marcha lea
sin falta las instrucciones de uso y las instrucciones de seguridad n.° 5.956-250!
Indicaciones de seguridad 34
Función 34
Uso previsto 35
Protección del medio ambiente 35
Elementos de operación y funcionamiento
36
Antes de la puesta en marcha 37
Puesta en marcha 38
Funcionamiento 38
Parada 39
Cuidados y mantenimiento 39
Accesorios 41
Ayuda en caso de avería 42
Datos técnicos 43
Si al desembalar el aparato comprueba daños atribuibles al transporte, rogamos se
dirija a su vendedor.
– Las placas de advertencia e indicado-
ras colocadas en el aparato proporcionan indicaciones importantes para un
funcionamiento seguro.
– Además de las indicaciones contenidas
en este manual de instrucciones, deben
respetarse las normas generales vigentes de seguridad y prevención de accidentes.
Peligro
Peligro de lesiones
Peligro de vuelco ante pendientes demasiado acentuadas.
– En la dirección de marcha sólo se admi-
ten pendientes de hasta 12%.
Peligro de vuelco ante una base inestable.
– Mueva el aparato únicamente sobre
una base firme.
Peligro de vuelco ante una inclinación lateral demasiado pronunciada.
– En sentido transversal a la marcha sólo
se admiten pendientes de hasta 12%.
– Deben tenerse en cuenta básicamente
las especificaciones y los reglamentos
que rigen para los automóviles.
– El usuario debe utilizar el aparato con-
forme a las instrucciones. Durante los
trabajos con el aparato, debe tener en
cuenta las condiciones locales y evitar
causar daños a terceras personas, so-
bre todo a niños.
– El aparato sólo debe ser utilizado por
personas que hayan sido instruidas en
el manejo o hayan probado su capaci-
dad al respecto y a las que se les haya
encargado expresamente su utilización.
– Los niños y los adolescentes no deben
utilizar el aparato.
Î El aparato no debe permanecer jamás
sin vigilar mientras el motor esté en
marcha. El usuario debe abandonar el
equipo sólo con el motor parado, el seguro contra movimientos accidentales
colocado y, en caso necesario, con el
freno de estacionamiento accionado y
sin la llave de encendido.
Nota
Tendrá derecho de garantía sólo si utiliza
baterías y cargadores recomendados por
Windsor.
– Es imprescindible respetar las indica-
ciones de funcionamiento del fabricante
de la batería y del cargador. Es imprescindible respetar las recomendaciones
vigentes para la manipulación de baterías.
– No dejar las baterías descargadas, car-
garlas de nuevo tan pronto como sea
posible.
– Para evitar corrientes de fuga, mante-
ner las baterías siempre limpias y secas. Proteger de suciedades, por
ejemplo con polvo de metal.
– No colocar herramientas o similares so-
bre la batería. Riesgo de cortocircuito y
explosión.
– No manipular con llama directa, ni ge-
nerar chispas o fumar cerca de una batería o en el lugar donde se cargue la
batería. Peligro de explosiones.
– No toque componentes calientes, como
el motor de accionamiento (peligro de
quemaduras).
– Tenga precaución cuando trate con áci-
do de baterías. ¡Es imprescindible respetar las normativas de seguridad
correspondientes!
– Se deben eliminar las baterías usadas
respetando el medioambiente y de
acuerdo con la normativa de la UE 91/
150 CEE o la normativa nacional vigente correspondiente.
Peligro
Para evitar riesgos, es necesario que las
reparaciones y el montaje de piezas de repuesto sean realizados únicamente por el
servicio técnico autorizado.
– Sólo deben emplearse accesorios y pie-
zas de repuesto originales o autorizados por el fabricante. Los accesorios y
piezas de repuesto originales garantizan el funcionamiento seguro y sin averías del aparato.
– Podrá encontrar una selección de las
piezas de repuesto usadas con más frecuencia al final de las instrucciones de
uso.
Peligro
Indica la presencia de un peligro inminente.
El incumplimiento de las indicaciones puede provocar la muerte o lesiones muy graves.
몇 Advertencia
Hace alusión a una situación potencialmente peligrosa. El incumplimiento de las indicaciones puede provocar lesiones leves o
daños materiales.
Nota
Muestra consejos de manejo y ofrece información importante.
La escoba mecánica funciona según el
principio de rosca.
– Las escobas laterales (1) limpian rinco-
nes y bordes de la superficie de barrido
y transportan la suciedad hacia la banda del cepillo rotativo.
– El cepillo rotativo (2) transporta la sucie-
dad directamente hacia el depósito de
basura (3).
– El polvo arremolinado en el depósito se
separa a través del filtro (4), y el aire
puro filtrado es succionado por el aspirador (5).
Índice de contenidos
Indicaciones de seguridad
Indicaciones generales
Manejo
Aparatos operados con batería
Accesorios y piezas de repuesto
Símbolos en el aparato
No barrer objetos incendiados o ardiendo, como
cigarrillos, cerilla o similares.
Riesgo de aplastamiento y
cortes en la correa, escobilla lateral, recipiente y
estribo de empuje.
Símbolos del manual de instruccio-
nes
Función
Page 35

Español 35
Utilice el aparato únicamente de conformidad con las indicaciones del presente manual de instrucciones.
Î Antes de utilizar el equipo con sus dis-
positivos de trabajo, compruebe que
esté en perfecto estado y que garantice
la seguridad durante el servicio. Si no
está en perfecto estado, no debe utilizarse.
– Esta escoba mecánica está diseñada
para barrer superficies sucias en la
zona interior y exterior.
– El aparato no está creado para la lim-
pieza de calles.
– El aparato no es apto para aspirar pol-
vos nocivos para la salud.
– No se debe efectuar ningún tipo de mo-
dificación en el aparato.
– ¡No aspire/barra nunca líquidos explosi-
vos, gases inflamables ni ácidos o disolventes sin diluir! Entre éstos se
encuentran la gasolina, los diluyentes o
el fuel, que pueden mezclarse con el
aire aspirado dando lugar a combinaciones o vapores explosivos. No utilice
tampoco acetona, ácidos ni disolventes
sin diluir, ya que ellos atacan los materiales utilizados en el aparato.
– No aspire/barra objetos incandescen-
tes, con o sin llama.
– El aparato es apto únicamente para los
revestimientos indicados en el manual
de instrucciones.
– La máquina debe ser conducida única-
mente sobre las superficies especificadas por la empresa o su representante.
– Está prohibido permanecer en la zona
de peligro. Está prohibido usar el aparato en zonas en las que exista riesgo de
explosiones.
– Norma de validez general: Mantenga le-
jos del aparato los materiales fácilmente inflamables (peligro de explosión/
incendio).
–Asfalto
– Piso industrial
–Pavimento
– Hormigón
– Adoquín
– Alfombra
Uso previsto
Revestimientos adecuados
Protección del medio ambien-
te
Los materiales empleados
para el embalaje son reciclables y recuperables. No tire el
embalaje a la basura doméstica y entréguelo en los puntos
oficiales de recogida para su
reciclaje o recuperación.
Los aparatos viejos contienen
materiales valiosos reciclables
que deberían ser entregados
para su aprovechamiento posterior. Las baterías y los acumuladores contienen
sustancias que no deben entrar en contacto con el medio
ambiente. Por este motivo, entregue los aparatos usados, las
baterías y acumuladores en los
puntos de recogida previstos
para su reciclaje.
Page 36

36 Español
1 estribo de empuje
2 Palanca para elevar y bajar la tapa para
suciedad gruesa
3 Palanca para avance hacia delante
4 Capó del aparato
5 Cepillo rotativo
6 escoba lateral
7 Tapa de suciedad basta
8 Depósito de basura
9 filtro de polvo
10 Ruedas de accionamiento
11 Rodillo-guía con freno de estaciona-
miento
12 Cubrejuntas delantero
13 Cubrejuntas laterales
14 Cubrejuntas trasera (en el depósito de
suciedad)
15 Fijación de la escoba lateral
16 cargador
17 Tornillo de fijación del estribo de empu-
je
1 Interruptor principal
2 Palanca para bajar y elevar la escoba
lateral
3 Tornillo de cierre de la tapa del filtro de
polvo
4 Estribo de cierre del depósito de basura
5 Limpieza de filtro para filtro de polvo
6 Tapa de variante en húmedo/en seco
Retire la llave:
Girar hacia afuera la llave del interruptor
principal por la posición "0" y extraer.
Elementos de operación y funcionamiento
Panel de control
Interruptor principal
0/OFF Motor desconectado
1 Motor encendido
A Retire la llave
B Indicación de batería
Page 37

Español 37
Nota
El capó del aparato se bloquea con la llave
del interruptor principal. La llave sólo se
puede quitar cuando el capó del aparato
está bloqueado.
Î Introducir la llave del interruptor princi-
pal en el cierre del capó y girar 90º en el
sentido de las agujas del reloj.
Î Extraer la llave del cierre del capó.
Î Abrir el capó del aparato.
Î Cierre el capó del aparato.
Î Cierre el capó del aparato con la llave
del interruptor principal.
Durante la descarga, proceda como se indica a continuación:
Î Retirar la caja.
Î Retirar las cuñas para asegurar las rue-
das y elevar el aparato con mano del
palet.
Î Suelte el freno de estacionamiento.
Î Suelte los tornillos de fijación.
Î Alinear el estribo de empuje.
Î Apretar los tornillos de fijación.
Nota
Antes de bascular el aparato y extraer el
depósito de suciedad y girar hacia delante
el estribo de empuje. No colocar el aparato
sobre el estribo de empuje.
Î Coloque la escoba lateral en el arrastra-
dor y atornille.
Al manipular baterías, tenga siempre en
cuenta las siguientes advertencias:
Peligro
Peligro de explosiones. No coloque herramientas u otros objetos similares sobre la
batería, es decir, sobre los terminales y el
conector de elementos.
Peligro
Peligro de lesiones No deje nunca que el
plomo entre en contacto con las heridas.
Luego de trabajar con las baterías, límpiese siempre las manos.
Peligro
¡Peligro de incendios y explosiones!
– Está prohibido fumar y exponer el lugar
a una llama directa.
– Los lugares en los que se cargue bate-
rías tienen que estar bien ventilador ya
que se genera un gas muy explosivo a
la hora de cargar.
Peligro
¡Peligro de causticación!
– Enjuagar con agua las salpicaduras de
ácido en los ojos o en la piel.
– A continuación llamar inmediatamente
al médico.
– Lavar la ropa sucia con agua.
Î Abrir el capó del aparato.
Î Colocar las baterías sobre el soporte
del motor.
Î Asegurar las baterías con la cinta de su-
jeción correspondiente.
몇 Advertencia
Asegúrese de colocar la polaridad correctamente.
Î Conecte el borne de polo (cable rojo) al
polo positivo (+).
Î Atornillar el conducto de conexión con
las baterías.
Î Conecte el borne de polo al polo nega-
tivo (-).
Nota
Al desmontar la batería, verifique que primero se desemborne el cable del polo negativo. Controle que los polos y los
respectivos bornes tengan suficiente protección mediante grasa.
몇 Advertencia
Cargar las baterías antes de poner el aparato en funcionamiento.
Peligro
Peligro por descarga eléctrica. Tener en
cuenta la línea eléctrica la protección por
fusible. ¡Utilice el cargador únicamente en
cuartos secos dotados de suficiente ventilación!
Peligro
¡Peligro de lesiones! Al manipular baterías,
tenga en cuenta las normas de seguridad.
Observe las instrucciones del fabricante del
cargador.
Peligro
¡Peligro de lesiones! El aparato sólo se
puede poner en funcionamiento si el cable
no está dañado. Si el cable está dañado,
tiene que ser sustituido inmediatamente
por el fabricante, servicio técnico o una persona cualificada.
Nota
El aparato está dotado de serie con baterías que no precisa mantenimiento.
Î Abrir el capó del aparato.
Î Enchufar el cargador en la clavija.
Nota
El cargador está regulado electrónicamente y finaliza el proceso de carga automáticamente. Todas las funciones del aparato
se interrumpen automáticamente durante
el proceso de carga.
El indicador de la batería muestra el avance
del proceso de carga si se tiene el enchufe
conectado:
Abrir el capó del aparato
Cierre el capó del aparato
Antes de la puesta en marcha
Descarga
Montar el estribo de empuje
Montar la escoba lateral
Baterías
Indicaciones de seguridad para las baterías
Tenga en cuenta las indicaciones presentes en la batería,
en las instrucciones de uso y
en el manual del vehículo.
Use protección para los ojos
Mantenga a los niños alejados
del ácido y las baterías
Peligro de explosiones
Prohibido hacer fuego, producir chispas, aplicar una llama
directa y fumar
¡Peligro de causticación!
Primeros auxilios
Nota de advertencia
Eliminación de desechos
No tire la batería al cubo de la
basura
Montaje y conexión de las baterías
Cargar las baterías
Page 38

38 Español
Î Desenchufe el cable de red.
Î Enrollar el cable sobre el asa del carga-
dor.
Î Cierre el capó del aparato.
Nota
Puesta en marcha sólo con el capó del aparato cerrado.
Î Coloque la escoba mecánica sobre una
superficie plana.
Î Apague el motor.
Î Active el freno de estacionamiento.
Î Comprobar el estado de carga de la ba-
tería.
Î Controle las escobas laterales.
Î Controle el cepillo rotativo.
Î Limpiar el filtro de polvo.
Î Vacíe el depósito de basura.
Nota
Descripción, véase el capítulo "Cuidado y
mantenimiento"
Î Suelte el freno de estacionamiento.
Arrancar el motor.
Î Girar el interruptor principal en la posi-
ción "1".
Nota
Los cepillos rotativos y las escobas laterales giran.
Î Tirar de la palanca para avance hacia
delante.
Nota
La velocidad de desplazamiento se puede
regular por niveles según la posición de la
palanca para desplazamiento hacia delante.
Î Soltar de la palanca para avance hacia
delante. El aparato se para.
Pasaje por encima de obstáculos fijos de
hasta 1.2 in (30 mm):
Î Levante la tapa de suciedad basta.
Î Pase hacia delante lenta y cuidadosa-
mente.
Pasaje por encima de obstáculos fijos de
más de 1.2 in (30 mm):
Î Los obstáculos deben superarse sólo
con una rampa adecuada.
Peligro
Peligro de lesiones Cuando la tapa de suciedad basta está abierta, el cepillo rotativo
puede arrojar piedras o gravilla hacia delante. Cerciórese de que no exista riesgo
para personas, animales u objetos.
몇 Advertencia
No barra cintas de embalaje, alambres o similares, ya que ello puede provocar daños
en el sistema mecánico.
Nota
Para obtener un óptimo resultado de limpieza, hay que adaptar la velocidad a las
particularidades.
Nota
Para barrer elementos más grandes, con
una altura de hasta 2.0 in (50 mm), por
ejemplo, cajetillas de tabaco, es necesario
levantar brevemente la tapa de suciedad
gruesa.
Levante la tapa de suciedad basta:
Î Tirar de la palanca para levantar la tapa
de suciedad gruesa.
Bajar la tapa de suciedad gruesa:
Î Soltar la palanca para levantar la tapa
de suciedad gruesa.
Nota
Sólo podrá obtenerse un resultado de limpieza óptimo cuando la tapa de suciedad
basta esté completamente abajo.
Î Poner la palanca hacia delante para ba-
jar la escoba lateral. La escoba lateral
se baja.
Nota
Durante el funcionamiento, el depósito de
basura debe vaciarse a intervalos regulares.
Nota
Durante el funcionamiento, el filtro de polvo
debe limpiarse a intervalos regulares.
Î Cerrar la tapa de variante en húmedo/
en seco.
Î Abrir la tapa de variante en húmedo/en
seco.
Nota
De este modo, el filtro está protegido contra
la humedad.
El indicador de la batería muestra el estado
de carga de las baterías durante el funcionamiento:
Î Mover varias veces el mango de limpie-
za de filtro de un lado a otro.
Nota
– Al vaciar el depósito de basura se debe
procurar no dañar el cubrejuntas.
– La carga máxima permanente del depó-
sito de suciedad es de 88.2 lbs (40 kg).
Î Limpiar el filtro de polvo.
Î Tirar hacia arriba del estribo de cierre
del depósito de suciedad.
Î Extraiga el depósito de suciedad.
Î Vacíe el depósito de basura.
Î Introducir el depósito de suciedad.
Î Presionar hacia abajo el estribo de cie-
rre del depósito de suciedad.
Apague el motor.
Î Girar el interruptor principal en la posi-
ción "0".
Î Elevar la escoba lateral.
Se están cargando las
baterías
se ilumina en
amarillo
Las baterías están cargadas
se ilumina en
verde
el cargador está defectuoso
se ilumina en
rojo
batería de polarización
inversa o no conectada
parpadea lentamente en rojo
batería defectuosa parpadea rápi-
damente en
rojo
Después del proceso de carga
Puesta en marcha
Indicaciones generales
Trabajos de inspección y manteni-
miento
Funcionamiento
Puesta en marcha del aparato
Conducción del aparato
Avance
Marcha en vacío
Pasaje por encima de obstáculos
Servicio de barrido
Barrido con tapa de suciedad basta levantada
Barrido con escobas laterales
Barrido de pisos secos
Barrido en pisos húmedos o mojados
Indicación de batería
lleno se ilumina en
verde
30% de capacidad restante
se ilumina en
amarillo
10% de capacidad restante
parpedeo en
rojo
protección contra descarga total, el aparato
se apaga
se ilumina en
rojo
Limpiar el filtro de polvo
Vaciado del depósito de basura
Desconexión del aparato
Page 39

Español 39
Î Active el freno de estacionamiento.
Î Girar hacia afuera la llave del interruptor
principal por la posición "0" y extraer.
몇 Advertencia
El aparato se debe asegurar para que no se
deslice durante el transporte.
Î Apague el motor.
Î Girar hacia afuera la llave del interruptor
principal por la posición "0" y extraer.
Î Active el freno de estacionamiento.
Î Fije el aparato con calzos en las ruedas.
Î Asegure el aparato con cinturones de
sujeción o cuerdas.
1 Área de fijación sobre el estribo de em-
puje.
2 Área de fijación bajo el capó del aparato
Nota
– Tenga en cuenta las marcas de suje-
ción en el bastidor base (símbolos de
cadenas).
– No doblar los cables Bowden ni los ca-
bles de mando.
Cuando la escoba mecánica no se usa durante un periodo prolongado, tenga en
cuenta los siguientes puntos:
Î Coloque la escoba mecánica sobre una
superficie plana.
Î Apague el motor.
Î Girar hacia afuera la llave del interruptor
principal por la posición "0" y extraer.
Î Active el freno de estacionamiento.
Î Asegurar la escoba mecánica contra
movimientos accidentales.
Î Levante el cepillo rotativo. Encajar para
ello ambas palancas de ajuste en el orificio superior.
Î Elevar la escoba lateral.
Î Limpie el aparato por dentro y por fuera.
Î Coloque el aparato en un lugar seco y
protegido.
Î Desemborne las baterías.
Î Cargue las baterías aproximadamente
cada dos meses.
– El mantenimiento correctivo debe ser
llevado a cabo únicamente por una oficina autorizada de servicio al cliente o
por personal especializado, familiarizado con todas las normas de seguridad
pertinentes.
– Los equipos ambulantes de uso indus-
trial deben someterse al control de seguridad según la norma VDE 0701.
몇 Advertencia
¡Peligro de daños en la instalación! La limpieza del aparato nunca se debe llevar a
cabo con una manguera o un chorro de
agua a alta presión (peligro de cortocircuitos y otros daños).
Peligro
Peligro de lesiones Utilice máscara antipolvo y gafas protectoras.
Î Abrir el capó del aparato.
Î Limpie el aparato con un trapo.
Î Aplique aire comprimido.
Î Cierre el capó del aparato.
Î Limpie el aparato con un trapo húmedo,
embebido en una solución jabonosa
suave.
Nota
No utilice detergentes agresivos.
Mantenimiento diario:
Î Comprobar el desgaste de los cepillos
rotativos y la escoba lateral y si hay cintas enrolladas.
Î Compruebe el funcionamiento de todos
los elementos de mando.
Î Compruebe el funcionamiento de todos
los pilotos de control.
Mantenimiento semanal:
Î control de la tensión, grado de desgaste
y funcionamiento de las correas de ac-
cionamiento.
Î Compruebe la facilidad de movimiento
de las piezas móviles y los cablen
Bowden.
Î Compruebe el ajuste y el grado de des-
gaste de los cubrejuntas en la zona de
barrido.
Î Comprobar el nivel de barrido del cepi-
llo rotativo.
Î Limpiar el filtro de polvo.
Nota
Descripción, véase el capítulo "Cuidado y
mantenimiento"
Nota
Todos los trabajos de servicio y mantenimiento a cargo del cliente deben ser realizados por personal especializado con la
debida cualificación. En caso de necesidad, un distribuidor de Windsor siempre estará a disposición para cualquier consulta.
Mantenimiento tras 20 horas de servicio:
Î Realización de la primera inspección
Mantenimiento cada 100 horas de servicio
Mantenimiento cada 300 horas de servicio
Mantenimiento cada 500 horas de servicio
Nota
Para conservar la garantía, es necesario
que durante el tiempo de su vigencia todos
los trabajos de servicio y mantenimiento
sean llevados a cabo por un servicio técnico autorizado de Windsor conforme al cuaderno de mantenimiento.
Preparativos:
Î Coloque la escoba mecánica sobre una
superficie plana.
Î Girar hacia afuera la llave del interruptor
principal por la posición "0" y extraer.
Î Active el freno de estacionamiento.
Peligro
Peligro de lesiones
El motor requiere aprox. 3-4 segundos de
marcha por inercia tras la detención. Durante este intervalo de tiempo es imprescindible mantenerse alejado de la zona de
accionamiento.
– Al trabajar en la instalación eléctrica,
saque el enchufe de batería o desemborne las baterías.
– Antes de realizar cualquier trabajo de
mantenimiento y reparación, deje que el
aparato se enfríe lo suficiente.
– No toque componentes calientes, como
el motor de accionamiento.
Nota
Antes de bascular el aparato y extraer el
depósito de suciedad y girar hacia delante
el estribo de empuje. No colocar el aparato
sobre el estribo de empuje.
Î Antes de realizar tareas de limpieza y
mantenimiento o cambiar piezas, se
debe desconectar el aparato.
Es necesario ajustar cuando al subir una
cuesta la fuerza propulsora del aparato no
es suficiente.
Î Suelte las contratuercas.
Î Ajustar el tornillo de ajuste.
Î Apriete la contratuerca.
Î Active el freno de estacionamiento.
Î Extraer el depósito de basura.
Î Extraiga las cintas y los cordones del
cepillo rotativo.
Es necesario realizar el cambio cuando el
resultado del barrido empeora ostensiblemente debido al desgaste de las cerdas.
Transporte
Parada
Cuidados y mantenimiento
Indicaciones generales
Limpieza
Limpieza interna del equipo
Limpieza externa del equipo
Intervalos de mantenimiento
Mantenimiento a cargo del cliente
Mantenimiento a cargo del servicio de
atención al cliente
Trabajos de mantenimiento
Indicaciones generales de seguridad
Ajustar el cable Bowden del accionamiento de avance.
Control del cepillo rotativo
Reemplazo del cepillo rotativo
Page 40

40 Español
Nota
Antes de bascular el aparato y extraer el
depósito de suciedad y girar hacia delante
el estribo de empuje. No colocar el aparato
sobre el estribo de empuje.
Î Active el freno de estacionamiento.
Î Extraer el depósito de basura.
Î Inclinar el aparato hacia atrás.
Î Levantar la tapa para suciedad gruesa,
presionar los cuencos sobre rodamientos y girar hacia delante el cepillo rotativo.
Î Quite el cepillo rotativo.
Î Insertar un nuevo cepillo rotativo sobre
la espiga de transmisión (izquierda).
Î Encajar el cuenco sobre rodamientos
en el lado opuesto en el orificio de la
biela del cepillo rotativo.
몇 Advertencia
¡Peligro de daños en la instalación! Prestar
atención para que no entre ninguna cerda
en el orificio de la biela del cepillo rotativo y
quede atascada.
Nota
Tras el montaje del nuevo cepillo rotativo, la
superficie de barrido debe reajustarse.
Î Elevar la parte delantera y trabajar con
la escoba mecánica sobre un suelo liso
y plano, que esté cubierto de forma visible con polvo o arcilla.
Î Active el freno de estacionamiento.
Î Girar el cepillo rotativo aprox. 15-30 se-
gundos.
Î Elevar la parte delantera de la escoba
mecánica y desplazar hacia el lateral.
La superficie de barrido forma un rectángulo regular, que tiene entre 1.2 y 1.6in (30 y
40 mm) de ancho.
Ajuste la superficie de barrido:
Î Reajustar la palanca de ajuste izquierda
y derecha y encajar en el mismo orificio.
– Encajar la palanca de ajuste en el orifi-
cio profundo (+): La superficie de barrido aumenta
– Encajar la palanca de ajuste en el orifi-
cio superior (+): La superficie de barrido
disminuye
Î Comprobar el nivel de barrido.
Es necesario realizar el cambio cuando el
resultado del barrido empeora ostensiblemente debido al desgaste de las cerdas.
Nota
Antes de bascular el aparato y extraer el
depósito de suciedad y girar hacia delante
el estribo de empuje. No colocar el aparato
sobre el estribo de empuje.
Î desenroscar 3 tornillos de la parte infe-
rior de la escobilla lateral.
Î Extraer la escoba lateral.
Î Coloque la escoba lateral nueva en el
arrastrador y atornille.
Es necesario reajustar cuando el resultado
del barrido empeora ostensiblemente debido al desgaste de las cerdas.
Î Suelte las tuercas de mariposa.
Î Ajustar el tornillo de ajuste.
Î Apriete las tuercas de mariposa.
– Es necesario reajustar cuando no se
puede elevar lo suficiente la tapa de suciedad gruesa.
– Si el resultado de barrido empeora, p.ej.
por desgaste del labio delantero, se
debe soltar ligeramente el cable
Bowden.
Î Suelte las contratuercas.
Î Ajustar el tornillo de ajuste.
Î Apriete la contratuerca.
Nota
Antes de bascular el aparato y extraer el
depósito de suciedad y girar hacia delante
el estribo de empuje. No colocar el aparato
sobre el estribo de empuje.
Cubrejuntas delantero
Î Aflojar la fijación de la lámina de estan-
queidad.
Î Reajustar el cubrejuntas o cambiarlo.
Î Ajuste la distancia al suelo de manera
tal que se pliegue hacia atrás con un
juego de 0-0.4 in (0-10 mm).
Î Alinee el cubrejuntas.
Î Apretar la fijación de la lámina de estan-
queidad.
Cubrejuntas trasero
Î Extraer el depósito de basura.
Î Aflojar la fijación de la lámina de estan-
queidad.
Î Reajustar el cubrejuntas o cambiarlo.
Î Ajuste la distancia al suelo de manera
tal que se pliegue hacia atrás con un
juego de 0-0.4 in (0-10 mm).
Î Apretar la fijación de la lámina de estan-
queidad.
Cubrejuntas laterales
Î Aflojar la fijación de la lámina de estan-
queidad.
Î Reajustar el cubrejuntas o cambiarlo.
Î Para ajustar la distancia al suelo, inter-
cale un elemento de máx. 0.08 in
(2 mm) de espesor.
Î Alinee el cubrejuntas.
Î Apretar la fijación de la lámina de estan-
queidad.
Peligro
Antes de cambiar el filtro de polvo, vacíe el
depósito de basura. Para efectuar trabajos
en el sistema de filtro, utilice una máscara
antipolvo. Observe las normas de seguridad referidas al tratamiento de polvos finos.
Control y ajuste de la superficie de barrido del cepillo rotativo
Zona de ajuste (-) 1...10 (+)
Zona de barrido mínimo 1
Zona de barrido máximo 10
Nuevo cepillo rotativo 1...3
Reemplazo de la escoba lateral
Ajustar la bajada de la escoba lateral
Ajustar la elevación de la tapa de suciedad gruesa.
Ajuste y cambio de los cubrejuntas
Cambio del filtro de polvo
Page 41
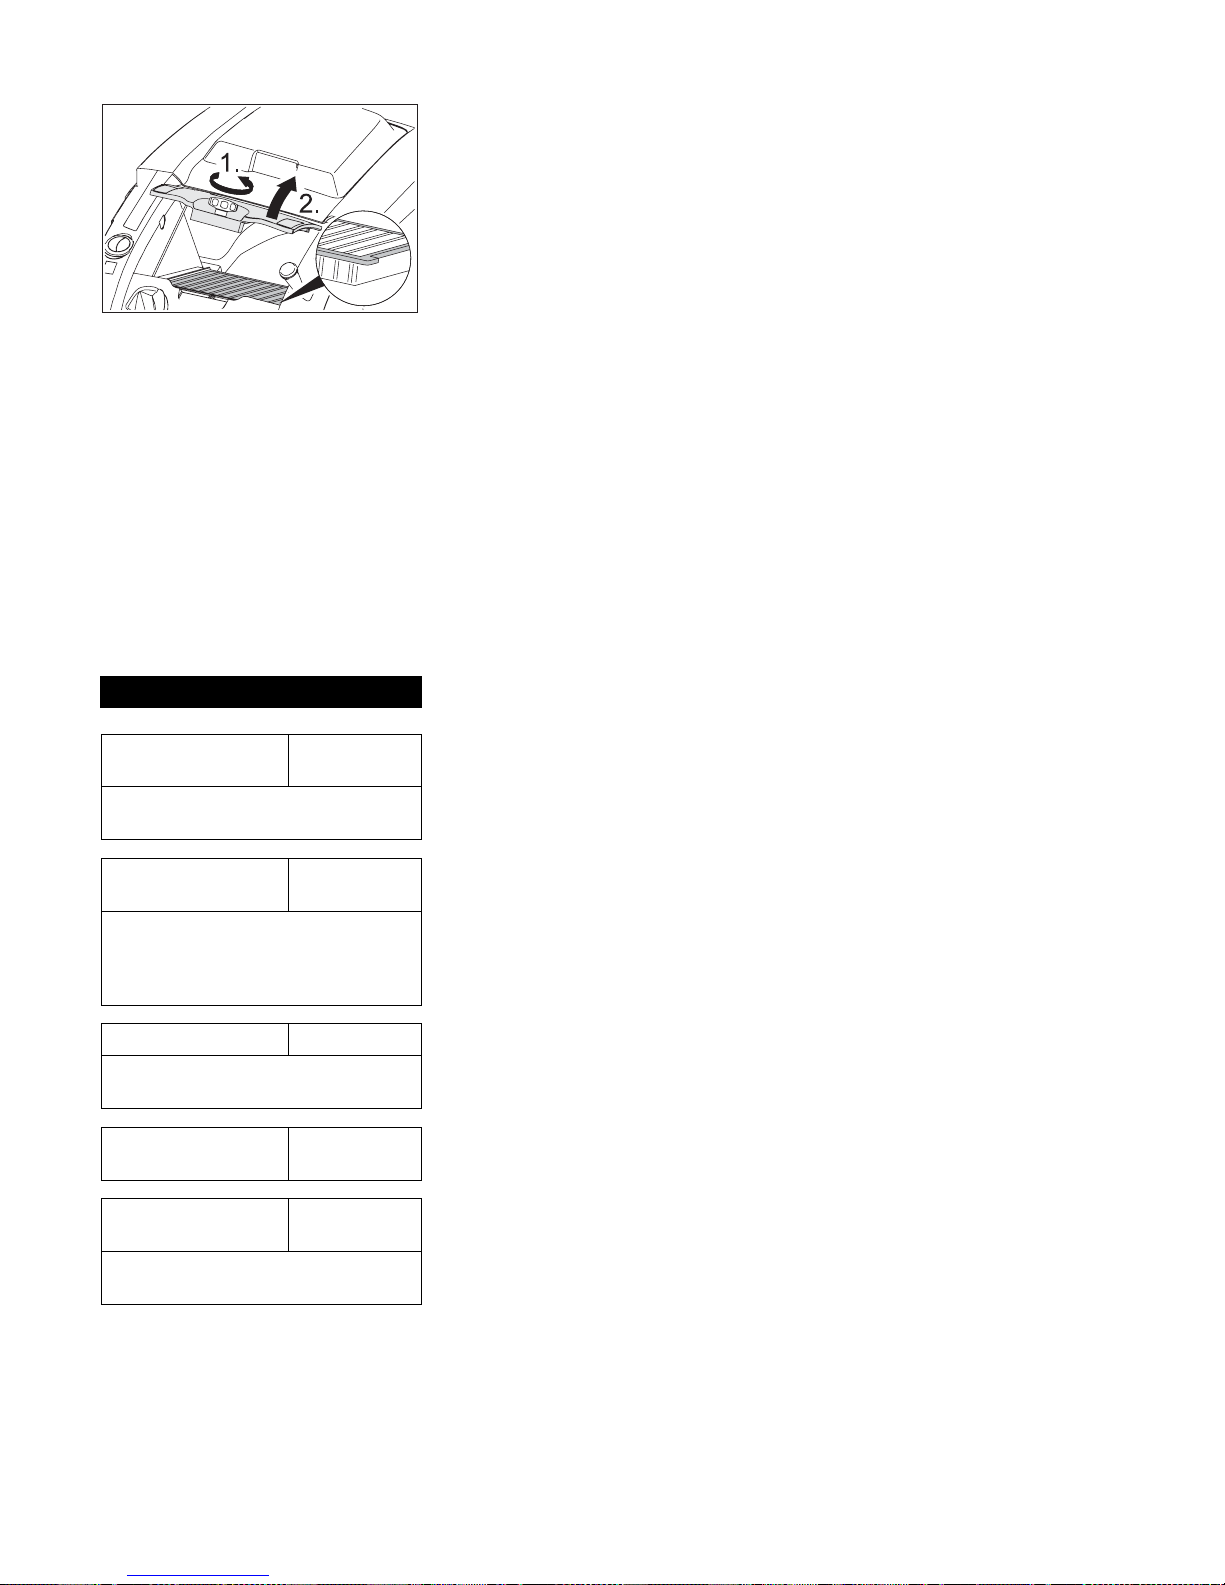
Español 41
Î Active el freno de estacionamiento.
Î Limpiar el filtro de polvo.
Î Girar el tornillo de cierre de la tapa del
filtro de polvo en la dirección contraria a
las agujas del reloj.
Î Levantar la tapa del filtro de polvo.
Î Cambio del filtro de polvo. Procurar
montar correctamente el filtro de polvo
(véase figura).
Î Girar el tornillo de cierre hasta el tope.
몇 Advertencia
Si no se gira el tornillo de cierre hasta el tope, se pueden producir daños.
Nota
En el montaje del nuevo filtro, evitar que se
dañen las láminas.
Los fusibles se encuentran en el cargador.
Cambiar el fusibles
Accesorios
Escobilla lateral,
dura
6.905-625.0
Para eliminar la suciedad resistente en
exteriores, resistente a la humedad.
Rodillo rotativo sua-ve6.906-886.0
Con cerdas naturales especialmente
para barrer polvo fino en suelos lisos en
interiores. No es resistente a la humedad, no apto para superficies abrasivos.
Rodillo rotativo duro 6.906-885.0
Para eliminar la suciedad resistente en
exteriores, resistente a la humedad.
Cepillo rotativo, antiestático
6.906-950.0
Unidad de barrido
para alfombras
2.641-571.0
Contiene: filtro para pelusas, rodillo rotativo antiestático, rueda triple
Page 42

42 Español
Ayuda en caso de avería
Avería Modo de subsanarla
No se puede poner en marcha el aparato Cierre el capó del aparato
Cargar las baterías
Comprobar el fusible de sobrecarga
Póngase en contacto con el servicio técnico de Windsor.
El motor funciona, pero el equipo no se pone en
marcha
Ajustar el cable Bowden del accionamiento de avance.
Comprobar las correas trapezoidales.
Póngase en contacto con el servicio técnico de Windsor.
El aparato se para al subir por una cuesta Desplazarse por un camino menos inclinado
Comprobar el fusible de sobrecarga
Ajustar el cable Bowden del accionamiento de avance.
Comprobar las correas trapezoidales.
Póngase en contacto con el servicio técnico de Windsor.
El aparato no barre bien Compruebe el grado de desgaste en el cepillo rotativo y las escobas laterales; en
caso necesario, realice el cambio
Compruebe el funcionamiento de la tapa de suciedad basta
Soltar el cable de Bowden de la tapa de suciedad gruesa (tornillo de ajuste)
Comprobar la tensión de la correa y su funcionamiento, cambiar si es necesario
Reajuste la superficie de barrido
Reemplazo del cepillo rotativo
Póngase en contacto con el servicio técnico de Windsor.
El aparato levanta polvo Compruebe el funcionamiento de la tapa de suciedad basta
Soltar el cable de Bowden de la tapa de suciedad gruesa (tornillo de ajuste)
Revise el filtro de polvo; límpielo o cámbielo
Vacíe el depósito de basura
Cambiar el perfil obturador del depósito de suciedad
Comprobar la junta del filtro de polvo.
Compruebe el grado de desgaste en los cubrejuntas; en caso necesario, realice el
ajuste o el cambio
Barrido deficiente en los costados Reajustar la bajada de la escoba lateral
Reemplace las escobas laterales
Bajar las escobas laterales
Comprobar las correas trapezoidales de la escoba lateral
Póngase en contacto con el servicio técnico de Windsor.
La elevación de la escoba lateral no funciona Comprobar el cable Bowden de la elevación de la escoba lateral
Póngase en contacto con el servicio técnico de Windsor.
El nuevo cepillo rotativo roza el depósito de basu-raCorregir el ajuste de la zona de barrido, encajar para ello ambas palancas de ajuste
en el orificio inmediatamente superior de cada uno (1...3)
Page 43

Español 43
Datos técnicos
Radius 30
Datos del equipo
Longitud x anchura x altura (estribo de empuje abierto) in (mm) 56.3 x 29.5 x 46.9 (1430 x 750 x 1190)
Longitud x anchura x altura (estribo de empuje cerrado) in (mm) 45.7 x 29.5 x 36.6 (1160 x 750 x 930)
Peso (sin baterías) lbs (kg) 174.2 (79)
Peso (con baterías) lbs (kg) 275.6 (125)
Velocidad de desplazamiento y barrido mph (km/h) 2.8 (4.5)
Capacidad ascensional (máx.) % 12
Diámetro del cepillo rotativo in (mm) 10.4 (265)
Diámetro de las escobas laterales in (mm) 16.1 (410)
Potencia máx. ft
2
/h (m2/h) 36600 (3400)
Anchura de trabajo sin escobas laterales in (mm) 21.7 (550)
Ancho de trabajo con escoba lateral in (mm) 29.5 (750)
Capacidad del depósito de basura gal (l) 10.6 (40)
Clase de protección contra caída de gotas de agua -- IPX 3
Motor
Modelo -- Motor de reluctancia permanente de c.c.
Dirección de giro derecha
Tensión V 24
Corriente nominal A 22
Potencial nominal W 400
Número de revoluciones 1/min 2750
Clase de protección -- IP 20
Fusible de red eléctrico
Central A 50
Protección contra la descarga total -- mediante relé
Sistema de filtrado y aspiración
Superficie activa del filtro para polvo fino ft
2
(m2) 19.4 (1.8)
Categoría de aplicación: filtro para polvos no nocivos para la salud -- L
Depresión nominal del sistema de aspiración psi (kPa) 0.07 (0.5)
Caudal volumétrico nominal del sistema de aspiración gpm (l/s) 712.4 (45)
Condiciones ambientales
Temperatura °F (°C) 23...104 (-5...+40)
Humedad del aire, sin condensación % 0 - 90
Emisión sonora
Nivel de presión acústica (EN 60704-1) dB(A) 64
Nivel de potencia acústica garantizado (2000/14/CE) dB(A) 81
Vibraciones del aparato
Valor total de la vibración (ISO 5349)
Miembros superiores m/s
2
1.19
Page 44

44 Español
1 Comprobar el desgaste de los cepillos
rotativos y la escoba lateral/cinta barredora y si hay cintas enrolladas.
2 Comprobar la superficie de barrido y el
funcionamiento del cepillo rotativo y la
escoba lateral/cinta barredora.
3 control de la tensión, grado de desgaste
y funcionamiento de las correas/cadenas de accionamiento.
4 Compruebe la facilidad de movimiento
de las piezas móviles y los cablen
Bowden.
5 Compruebe el funcionamiento de todos
los elementos de mando y los pilotos de
control.
1 control de la tensión, grado de desgaste
y funcionamiento de las correas/cadenas de accionamiento.
2 Compruebe la facilidad de movimiento
de las piezas móviles y los cablen
Bowden.
3 Comprobar las cubrejuntas del filtro de
polvo y el funcionamiento del vibrador
de filtros.
4 Compruebe el ajuste y el grado de des-
gaste de los cubrejuntas en la zona de
barrido.
5 Comprobar la superficie de barrido y el
funcionamiento del cepillo rotativo y la
escoba lateral/cinta barredora.
6 Limpiar el filtro de polvo e inspeccionar,
cambiar si fuese necesario.
7 Comprobar el desgaste de los cepillos
rotativos y la escoba lateral/cinta barredora y si hay cintas enrolladas.
8 Compruebe el funcionamiento de todos
los elementos de mando y los pilotos de
control.
1 Comprobar si los cables conductores
de corriente y los contactos están dañados u oxidados.
2 Comprobar la holgura del eje diferen-
cial.
3 Comprobar el funcionamiento y ajuste
del freno de ajuste.
4 Comprobar los perfiles de junta del de-
pósito de suciedad y la caja de cepillos
rotativos.
5 Engrasar la cadena de accionamiento.
6 Inspeccionar las baterías de acuerdo
con las indicaciones del fabricante.
7 Limpiar la parte superior de las baterias.
1 Comprobar las escobillas del motor.
¡Sólo para personal técnico autorizado!
Trabajos de mantenimiento
Tras el primer mes o 5 horas de servicio
Cada 50 horas de servicio
Trabajos de mantenimiento adicionales
cada 100 horas de servicio o semianualmente
Trabajos de mantenimiento adicionales
cada 500 horas de servicio o anualmente
Page 45

Windsor Industries, Inc. warrants new machines against defects in material and
workmanship under normal use and service
to the original purchaser. Any statutory implied warranties, including any warranty of
merchantability or fitness for a particular
purpose, are expressly limited to the duration of this written warranty. Windsor will not
be liable for any other damages, including
but not limited to indirect or special consequential damages arising out of or in connection with the furnishing, performance,
use or inability to use the machine. This
remedy shall be the exclusive remedy of the
buyer. The warranty period is subject to the
conditions stated below.
Subject to conditions outlined below, Windsor Industries warrants rotationally molded
PE housings and parts on all of its machines to be free from defects in material
and workmanship, under normal use and
service for ten (10) years to the original
owner.
Under this warranty we guarantee the performance of non-polyethylene parts and
components to be free from defects for up
to three (3) years or up to 2,500 hours of operation, whichever comes first, to the original end user. Parts replaced or repaired
under this warranty are guaranteed for the
remainder of the original warranty period.
(See table below)
Service labor charges are covered for up to
three (3) years or up to 2,500 hours of operation, whichever comes first, from the date
of purchase through authorized Windsor
service provider. No travel coverage is extended for cord-electric models. See table
below for each general product model warranty coverage.
Extractor brush motors, ALL pump mo-
tors, ALL PC boards and electronics,
ALL Vacuum motors (other than VERSAMATIC®, SENSOR® and FLEXAMATIC®), ALL pumps, and
diaphragms/Tank bags carry a one (1)
year parts and service labor warranty.
The Eagle-Robin® engines have three
(3) year manufacturer’s warranty. The
Honda® and Kawasaki® engines have
two (2) year manufacturer’s warranty.
NOTE: The engine warranty is administered through the engine manufacturer
and must be repaired at an authorized
service center.
Normal wear items and accessories including, but not limited to, belts, brushes, FLEXAMATIC® foot pedal, capacitors, carbon
brushes, casters, clutches, cords, filters,
finishes, gaskets, hoses, light bulbs, rectifiers, switches, squeegees, bearings, pulleys, relays, actuating cables, wheels, tires,
and propane tanks will be warranted for
manufacturing defects for 90-days from the
purchase date. The warranty commences
on the purchase date by the original end
user from an authorized Windsor agent,
subject to proof of purchase. The Machine
Registration Card must be completed and
returned immediately at the time of purchase. If proof of purchase cannot be identified, the warranty start date is 90 days
after the date of sale to an authorized Windsor distributor. Parts replaced or repaired
under warranty are guaranteed for the remainder of the original warranty period.
WINDSOR INDUSTRIES
North American New Machine Warranty
Effective on all products shipped AFTER January 24, 2007
Limited Warranty
10 / 3 Warranty: 10 Years Polyethylene
(PE) Housings, 3 Years Parts, and Service Labor
Product PE Housing &
Parts
Non- PE Parts Service Labor Travel
Rider / Stand up Scrubbers 10 years 3 years or 2000 hours 3 years or 2000 hours 6 Months
Rider Sweepers 10 years 3 years 3 years 6 Months
Walk Behind Scrubbers 10 years 3 years or 2500 hours 3 years or 2500 hours 6 Months
Walk Behind Sweepers 10 years 3 years 3 years 6 Months
Battery Burnishers 10 years 3 years 3 years 6 Months
Extractors / Compass 10 years 3 years 3 years Polishers / Elec. Burnishers / GH 10 years 3 years 3 years Wide Areas Vacuums 10 years 3 years 3 years VacPak Vacuums 10 years 1 year 1 year Tracer/Flex Sweepers/Scrubbers 10 years 3 years 3 months 90 days
Air Movers / Dri-matic / TITAN
TM
/Rombus/Priza 1 year 1 year 1 year Canister Vacuum 1 year 1 year 1 year Wet/Dry Vacuum 1 year 1 year 1 year Broom 1 year 1 year 1 year Steamer 1 year 1 year 1 year Propane Burnishers / Strippers - 2 years 1 year -
VERSAMATIC® / FLEXAMATIC® Brush motor, Vacuum motor, Belts, Swivel Neck – 3 years All other parts/Labor – 1 year
SENSOR® Vacuum motor, Belts – 2 years All other parts/Labor – 1 year
Product exceptions and Exclusions:
Page 46

Upon receipt of the Machine Registration
Card, Windsor will extend by 90 days, from
the date of purchase, all items included under the one-year provision. This applies
only to one-year items and does not include
90-day wear items.
1 Any product that has been subject to
abuse, misuse, neglect or unauthorized
alteration (including the use of incompatible or corrosive chemicals or overloading of capacity).
2 Products that have experienced ship-
ping or freight damage.
3 Repairs necessary to correct any failure
due to improper pre-delivery service
and inspection by the selling deal er.
4 Excessive time for cleaning units in
preparation for repair.
5 Any repairs resulting from poor initial
service work or improper diagnosis.
6 Tune-up parts such as plugs, plug wires
and condensers.
7 Any design alterations performed by an
organization not authorized or specified
by Windsor.
8 Battery and charger warranties are han-
dled directly with the manufacturer (Tro-
jan® batteries and Lester® chargers).
9 High-pressure washing
10 Electrical components exposed to mois-
ture.
If difficulty develops during the warranty period, contact the authorized Windsor agent
from whom the product was purchased.
Windsor Industries, Inc. may elect to require the return of components to validate a
claim. Any defective part to be returned
must be shipped freight prepaid to an authorized Windsor Distributor/Service Center
or to the Windsor factory.
This warranty is valid only for all products
Shipped/Sold AFTER January 24, 2007. A
product sold before that date shall be covered by the limited warranty in effect at the
date of sale to the original purchaser.
Windsor Industries reserves the right to
change its warranty policy without notice – 98864-Rev7 01/24/07
Windsor Industries, Inc. - a Castle Rock Industries company - 1351 W. Stanford Ave.
/ (303) 762-1800 / 800-444-7654 / FAX
(303) 865-2775
90 Day Warranty Extension Available
This Warranty Shall Not Apply To:
Use Of Parts Not Approved By Windsor
Industries, Inc. Will Void All Warranties
Page 47

Radius 30
 Loading...