

Page 1
Deutsch
CONTENTS:
1
2
3
4
5
7
8
9
10
11
12
13
14
Diagram
Safety Instructions (english)
Operation
Maintenance cont. (english)
Safety Instructions (deutsch)
Operation
Maintenance cont. (deutsch)
Control Panel
Tank Assemblies
Brush Drive Assembly
Plumbing Assemblies
Wiring Diagram
Model
-
I
Maintenance (english)
Maintenance (deutsch)
Handle Assembly
Frame Assembly
PSP-IG
98130
Rev.
1
Page 2
A
DIA GRAM
DIA
G
RA
MM
A
I
50540
C
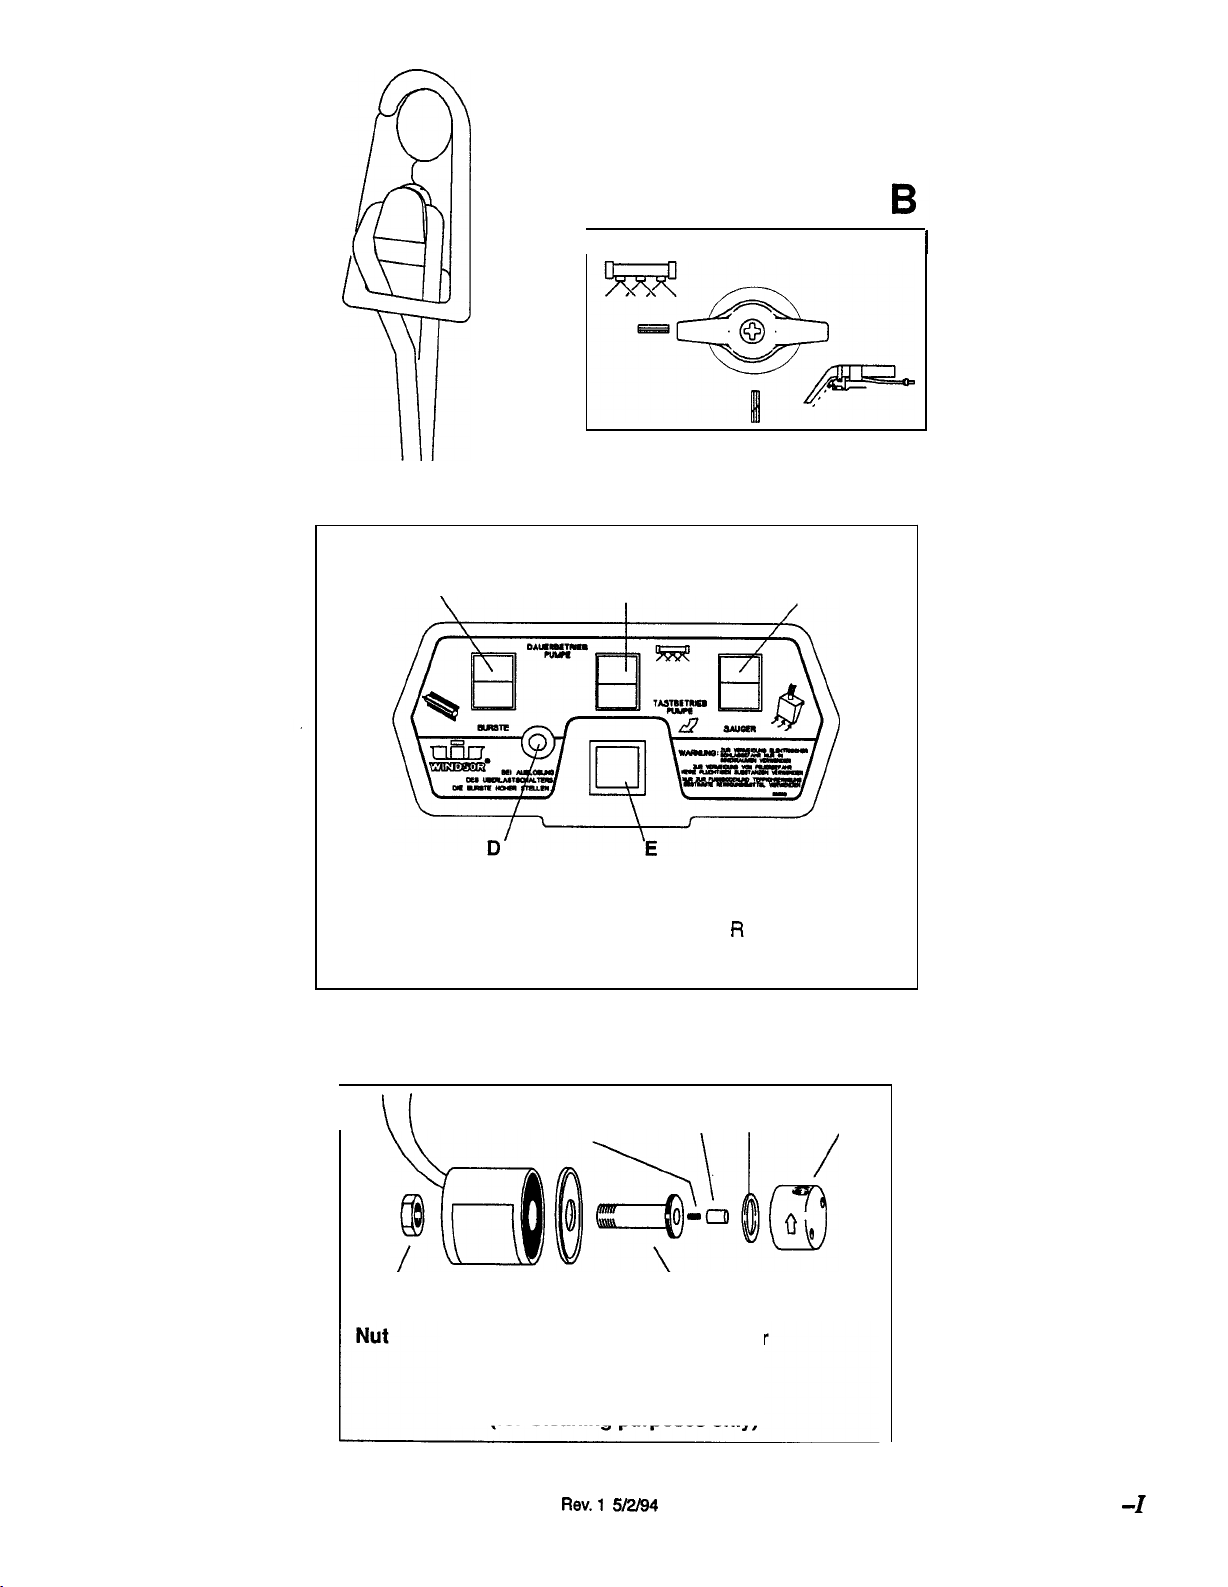
Switch Panel
\
B
C
A- BRUSH A-BU RSTE
-
CONTINUOUS PUMP B-DAUERBETRIEB PUMPE
B
-
VACUUM C-SAUG
C
D-CI RCU
-
INTERMITTENT PUMP E-TASTBETRI
E
I
IT
BREAKER D-UBERLASTKNOPFES
SPRING PLUNGER SEAL VALVE
E
EB
PUM
\
Coil Washer Plunger
Solenoid Valve Assembly
(for Cleaning purposes only)
PE
D
BODY
1
PASSPORT
Page 3
ENGLISH
IMPORTANT SAFETY
INSTRUCTIONS
When
using
an
he
must
all
machine.
This
machine
.
CAUTION:
designed
are
deemed
WARNING:
THE
ELECTRICAL SHOCK
OR
Do
not
operate without filten
2.
Use only
Use
3.
Use
Do
4.
Machines
near
not
fluids.
.
Do
materials
6.
hot
7.
Do
wet
8.
Unplug machine
use
9.
Turn
machine.
To
12.
outdoors.
to
13.
handle.
around
cord away
15.
Do
attention is necessary
16.
openings blocked.
7.
as
manufacturers
indoors
not
expose
can
operate
his
dust.
or
not
pick up
such
may
be
not
ashes.
not
handle
hands.
not
leave
and before servicing.
off
all
controls
not unplug machine
grasp
not
use
with
the machine is not
or
an Authorized
not
carry
dose
sharp
from
not allow
Do
operate
hat
may
of
lhe
appliance.
always
be
is
for
RISK
OF
INJURY:
in this
Do
to
rain.
cause
a
fire
machine
vapors.
as
present.
as
cigarettes. matches,
he
plug
of
the
machine
from
before
by
the plug, not
damaged
damaged.
dropped into
by
he
cord,
a
edges
to
heated
be used
Keep
reduce
away
cord.
surfaces.
as
when
from
is
not
dust
TO
REDUCE
FIRE,
manual.
use
outdoors.
when
materials.
near
or
combustible
or
machine
unplugging
puling
properly.
water,
center.
cord
cord.
used
with any
openings
operated
where
wih
on
plug.
cord
Keep
Close
by
free
Do
or
or
in
card.
it
a
or
of
and
18.
extra
caution
when
cleaning
on
Do
not
use
by
21.
equipment
be
22.
machine
qualified
when
off.
or
or
as
repairs
personnel.
changing
Equipment
must
replacement
a
step.
plugged
be
unplugged.
of
-
connections.
be
clone
the
when
motor must
the
must
not
be
used
if
a
certain
to
equipment.
stability
unauthorized
for
23.
he
be
If
a
machine
persons,
damages
has
connections
ensured.
is
altered
or
injuries
been
connectors
by
is
not
responsible
that
me
may occur.
SAVE THESE
INSTRUCTIONS
INSPECTION
Carefully
shipping damage. Each unit
thoroughly inspected before shipping, and
damage
should
unpack
and
the responsibility
be
immediately.
inspect your extactor
the
for
and
any
who
ELECTRICAL
This
AC circuit
240
Volts
panel
Make
chine
operates
Voltages
cause
Wring diagram
machine.
WARNING:
are
on
power
using the
nameplate
card
to
on
a standard
below
220
serious damage
is
mounted
correct
before
inside
230
or
to
control
Volt
as
ma
-
POWER SUPPLY CORDS
IMPORTANT
The
wires
in
cordance
Green-and-Yellow:
markings
proceed
as
The wife
must
be connected
mat is
marked
symbol.
identifying
the mains teads are cobured in
the
not
wires
in
correspond
the
code:
Live
with
in
is
to
me
terminal in the
he
or
Rev.
1
your
by
or
of
plug,
dug
ac
-
wire
that
is
nected
letter
The
wire
nected
coloured
to
the
or
coloured Black.
is
coloured
the
coloured
Red.
is
marked
Brown
is
marked
must
must
be
be
with
con
con
the
CHEMICALS
WARNING:
Care
must
be
cals.
exercised
Chemicals are poisonous and
risk
Read and
regarding dangers and correct us
WARNING
CAUTION:
tor
suitable
for
from
hydrocarbon sokents and chlorinated bleaches.
These
SUITABLE
Alkalis
Cbrox
Hydroxides
Oxygen Bleaches
Vinegar
White
'Registered Trademark
NON
Aldehydes
Carbon fewchloride
Chlorinated Hydrocarbons
Methyls
Phenols
used
CHEMICALS
Bleach'
Fabric
Softener'
Monday Bleach'
Hydrocarbons
FILLING
1.
2
set
3.
CAUTION:
EXCEEOS
he
upper
aside.
Use a clean
NOT USE WATER TEMPERATURE THAT
Add
use
in
hot water extractors at
noted
in
use of
all
follow
can
the manufacturer's
:
used
in
use
with
they
are susceptible
deaning substances, such
for
carpet deaning.
CHEMICALS
THE
PASSPORT
dear
dome
from
from
to
a nonfoaming concentrate
C.
solution rank with
on
he
container.
F)
the ex&-
carpet cleaning
not
upper tank.
machine
the
chemi
pose
chemical
as
of
the
and
-
-
-
a
-
2
Page 4
NOTE:
hot
A.
powdered
water before
Reinstall
hoses
are
snug
soap
is
used.
tank and dome.
OPERATING THE
PASSPORT
WARNING
TIONS before
attention to
cord.
Only
condition.
NOTE: Vacuum
of
cord. Make bop
(DIAGRAM A.
2.
Adjust brush height by turning knob
front
of
indicates carpet
LOW
HIGH
NOTE: lrPcouett move height
brush circuit breaker
reset circuit breaker.
3.
Turn
ING' position.
(DIAGRAM
4.
Plug power
Turn
switch.
NOTE:
tank may cause water andlor foam
enter
the
the
breaker
will
6.
dispense
backwards.
12
inches
pass.
CAUTION:
While
operating machine, check
foam
foam
is
present,
covecy tank
7.
Empty
full.
CAUTION
DO
not
use
tank. unless it
tank cnn damage
he
spray
operating,
care
and
use
of
operate
surface
if
carpet
in
power
Prom
)
machine. Pointer
height.
-
1
to
valve
to
'CARPET CLEAN
!%??
cord
into
a
grounded wall
C:
he
vacuum switch and brush
water
vacuum
vacuum motor and
trip.
intermittent pump
cleaning
Release
before
will ensure
in
recovery
:
me
rendering
This
solution.
pump switch about
the end
the
add
a defoamer solutlon
tank when approximately
CLEAN. Sediment
cord
and make
end.
on
Raise
tank.
tank.
Make
INSTRUC
power supfly
is
in
sure
to
power
side
may
cause
brush
and
loam
the
over
vacuum circuit
to
each cleaning
solution
excessive
If
to
the
in
pump
and
it is
-
dog
ACCESSORY TOOLS
The
-
PASSPORT
the
following
Turn
solution
TOOL
(DIAGRAM
2.
Remove
dome
accessory
3.
Attach
to
brass quick
side
of
4.
Remove
5.
Fill
per
6.
on
switches only.
CAUTION:
Damage
is
easily
with
water temperaNre abwe
valve
-
position
recovery
and
tool
in
vacuum hose
hose
machine.
dome
and
tank with
tank
vacuum and continuous pump
Do
not
to
carpel could ocwr.
adapted
Never
to
'ACCESSORY
its place.
recovery
on
brush switch.
for
operate acces-
from
accessory
left
dome.
use
from
C.
machine.
be
,
repaired
solution
electrical
times.
cable
cable
or
replace
chances
and connecuons
Frayed
pressure
cable
cable
insulation
it
immediately.
with
or cracked
loss.
lie
must
screws
broken
an
PROTECT FROM
FREEZING
If
it
a methyl hydrate (window washer) antifreeze
NOTE:
system antifreeze.
Add
2.
Turn
3.
from
Do
on
tank
must
not
tank.
pump
necessary
4
"
protected
use
solutionsprays
lo
C
on
hoses
to
eliminate vacuum
Because
on
wet
carpet
be
well
insulated
kept Tght.
or
bayed. repair
take
or
shock
store
the
or
to
of
your
should
and
If
with
MAINTENANCE
INSTRUCTIONS
1.
Before making
he
machine, disconnect
1.
2.
Inspect and
3.
to
-
flush pumping
of
dean
4.
Rinse
5.
6.
Check
if
required.
NOTE: Always
'store'
any
adjustments
unused cleaning solution.
clean
solution
system
hot
water.
lank
any lint
or
debris
spray
position.
and dean solenoid
store
machine
power
1
dean
or
repairs
cord
screen.
to
2
water.
brush
from
brush
to
and
in
2.
3.
1.
3.
4.
PERIODIC MAINTENANCE
1.
Twice
a
hot water)
(mixed
as
This
will
help
residue
in
2.
If
spray
spray tips, wash
vinegar
and
NOTE:
Do
jets
3.
turned
not
as
this
will
spray jets continue
off.
cleaning.
or
system.
the solenoid valve
a white vinegar
quart
vinegar
an
prevent
become clogged,
to
through
build-up
them
blow dry.
use
pins, wires. etc. lo clnan
to
drip alter punip
MAINTENANCE
extractor.
of
alkaline
Instructions
of
COMPONENTS
1.
2.
is
WARNING
Only
to
perform
Unplug
repairs.
connections.
to
(he
machine
following repairs.
lor
proper ei%fric;II
BRUSH ASSEMBLY
Remove belt guard, brush pulley guard
and bearing
Loosen
(2)
hex
motor dawnwards and remove beit
from
motor pulley.
Remove
Replace brush
required.
When re.inslalng brush, check belt
proper tension.
not
hex
retighten
nuts,
brush
rotate
nuts.
ACCESS
Lilt
off
recovery tank
solution-drain
Remove
(A)
bolts holding lank to
Raise tank
torn
and
rank and tay
each
on
assembly
or
from
bearings
should
To
rearward anu
CHASSIS
and
set
hose
pull soiulim
Remove
pump
aside
end
be
belt.
of
studs
.
.
taught
brush
and
(Do
hose
hose
PASSPOR
T-I
5/2/94
Page 5
WARNING
The
internal
outer hose
in
machine. paying panicular attention
outer hose
me
to
unlikely
is
protect
event
hoses as
not
damped.
are
the
a solution hose
encased
components
CAUTION
NOT
OVERTIGHTEN
and exhaust ports in pump head..
on
BRUSH DRIVE MOTOR
When
My for
proper
motor
refer
belt tension adjusmenL
Brush
to
in
an
which
DO
h
-
VAC MOTOR REMOVAL
motor
2.
Remove
Loosen
LOWER
5.
Remove
chassis and lift-out motor.
electrical
hoses
strain reliel
handle
screws holding
air intake
connections.
chassis oudet
nut
and remove
bolts.
motor
plate
the
to
VAC MOTOR BRUSHES
To
inspect motor brushes,
assembly. Brushes
to
inch
repairs
shop.
or
should
should
hours. After
mature
and concenlricity. Vac
but
such
motor
repair
after
be
be
about
made
replaced
can
be
by
a
the
for
repaired
qualified
VAC SHOE
When
shoulder
low vac shoe
height adjusting screw.
grease
on
the adjusting screw
operation.
to
shoe,
do
move
up and down with tho
A
light
not overdghfen
coat
of
will
ensure
(2)
when
ar
al
-
-
4
PASSPORT-I
Page 6

DEUTSCH
E
RH ElTSH
Gebrauch eines elsklrischen
Die einschlagigen UnfalhrehUtungs-
Vor Gebrauch der Maschine
die Absaugung gesundheilsgefahrdender
IN
die
erhdhte
Maschine
W
sind
nicht
EIS
FEUER; STROMSCHLAG
ODER
ZU
1.
Keine Benuaung ohm eingebauten
Filter.
2.
Benutrung
und rnit
Zu behdr.
3.
Nicht irn
dern
nur
vorn
E
einem
au
13.
Nicht
am
Kabel
ziehen,
Kabel
einklemmen
und Kanten ziehen.
14.
15.
Maschine
Nicht
17. Haare.
anderen Kdrperteile von Olfnungen und
Besondere Vorsicht bei der
19.
Maschine nicfit als Treppenstufe
20.
Die
21.
Maschine, beirn Auswechseln von Teilen
oder
Funktion, ist der
22.
oder
mit der Maschine Uber das
Maschine darf nicht als Spielzeug
in
der
Maschine arbeiten wenn
lose
Reinigen und
vorn
Hersteller
abgegebenen
23.
nicht
Kabel
ziehen.
als
von
des
WARNUNG:
Vor
vorhanden ist
werden.
WARNUNG:
Vorsicht ist geboten
Sie den Hersteileranweisungen betuglic9
Gebrauch von Chemi-
ein
WARNUNG:
Die
Gebrauch
geeignet
Alkali
Clorox
der
Bleach'
ff
fur
den
die
4.
wenn sie
werden. Also kein
von brennbaren
5.
Keine brennbaren
nicht
6.
7. Maschine und
8.
ziehen.
9.
in
in
Stecker
der Nahe
am
11
oder
Stecker
Freien gestanden oder ist
in
von
brennbaren
und
oder
aufsaugen und
arbeiten.
oder
oder
nicht
Sleeker
in
Nahe
rnit naRen
Wasser
Maschine schlieOen
Herstellen
aus.
H
IN
W
I
NS P
E
0
N
werden
vor
dern
werden muR.
V
Molorschaden Mhren.
240
Volt
kann
und
die
an
230
der
Volt
220
an der
White Monday
Bleach'
Aldehyde
Clorox'
DES
PASSPORT
1.
2.
Den
oberen Auffangbehtllter vom Gerat
entfernen und
3.
Den
vorn
P
A
SSPO
R
Rev.
T
-
?
5/2/94
5
Page 7

sauberen Eimer niit heiOem Wasser
fullen. Ein
Beachlung der
fur
den Gebrauch in
dern BehBller
VORSICHT:
DARF
UBER
ANMERKUNO:
Seifenpulver
BETRIEB
WASSERTEMPERATUR NlCHT
50'
C
sein.
Bei der Verwendung
dieses
vor
werden.
Den
wieder
in der Kappe sitzen.
in
DES
PASSPORT
von
dem FUllen des
WARNUNG:
Sie
bnlreiben. und achlen Sie besonders auf den
einwandfreiem Stromkabel.
I
Oen
vom Ende eine Schlaufe machen.
2.
Die Biirstenhthe durch den an der Vor
derseite
NIEDRIG
HOCH
ANMERKUNG:
dle WICHTIGEN
A)
Der
an.
ca.
13
rnrn
ca.
rnm
-
ca.
oder hdher
VORSICHT:
geben.
7.
Der Auffangbehiiller
wenn
VORSICHT:
dann zum
er SAUBER
wodurch das
Der
PASSPORT
mil den Windsor
WARNUNG:
50
"
C
belreiben.
Den LBsunqshahn aul
stellen.
2.
Den Auffangsclilauch (weisse
seiner
3.
Den
der links am GerLt befindlichen Schnelhrer
bindungsfassung
4.
Kappe
5.
Den Ldsungstank enlsprechend den
6.
den Saugschlauch
und
Herstellers
Man
Messing befeslgen.
Fallen
wenn
SW/
in
6. Vom
Fasern
7.
Abgelagerte Fasern und Schmulrleile von
1.
Essig auf ca. 4 Liter Wasser)
Dadurch wird die Anlagerung von Alkali
2
einer Verstopfung
waschen und
ANMERKUNG:
3.
der Pumpe.
Answeisungen).
4.
und Maschinenansch1i)sse mussen in
werden, um
oder
sein und die
oder
Feuer und Slronischlagl
von
dern Geh5use
mil einer
oder
(enlsprechend
der
Keine Nadeln. OrBhfe. wc.
das Soienoidventil
repariert oder
verhuten
Wenn
sie sofort repariert
einem
die
FROSTSCH UTZ
Wlrd
einer
der
-
.
Filler
das
so
4
In
den
3.
Den
REINIGUNG' Position stellen.
(DIAGRAMM
4.
5.
Den
ANMERKUNG:
6
Den Schailer 'Tastbetrieb' drilcken.
wird.
aufgesogen wird. den
C:
Sauger
-
in
den Saugrnolor
voilkommnn vom Teppich
vor dern
Ende
6
die
7.
Nur die Sauger.
Urn
den
TAG
WARTUNG
Vor
Den
Rest
2.
Den Filtereinsatz irn Ldsungsbehalter
3.
4.
Den Auffangbsfiliter
saubnrom Wasser spulen.
5.
ca.
Rev.
(Waschmittel
E
ANMERKUNG:
2. Die
3.
Den
Rest des Fmstschu~rnittels aus
dem
Keine hhylenglykoi
in
den
den
WARTUNG ANWEISUNGEN
WARNUNG:
o
4
8
Liter
und
I.
2.
3
genden Reparaturen dilrfen nur
Vor
die richligen eiektrishcen Ver
P
sich
A
S
S
P
O
R
T
-
?!
Page 8

Den
entfernen.
2. (2)
herausdrehen und den freibriemen
Die Biirstenmontage
entfernen.
llch
Beim Wiedereinsetzen der
Spannung
Er
der Treibriemenspannung die
anziehen.
Motor
Lager
den
ZUZANG ZU DEN
Motor
nach
(2)
Motor
der
vom
die
ANTRIEBSMOTOR
BURSTENMONTAGE
Spannungseinstellung des Treibriernens
beachten.
Motors
die richtige
AUSBAU DES
VAKUUMMOTORS
Den
des Vakuummotors abnehmen.
2.
Schallpult abnehmen und elektrische
3. Den
4.
Die Dehnungsschutzschraube
die
(2)
5.
Die Schrauben
und den
des LuftkBhlungseinlasses
Vakuumschlauch
am
Fahrgestell befestigt
Motor
herausheben.
vom
und
2.
3.
(4)
am Fahrgestell befestigt ist. entfernen.
4.
Den
entfernen.
vom
WARNUNG:
den unwahrscheinlichen Fall eines
Komponenten
Schlauch umgeben. Die SchlBuche
genau wie ursprtlnglich geliefert wieder
VO
RS
Beim Wiedereinsetzen
FEST ANZIEHEN. da dadwch
Ansaug
Pumpenkopfes
von
einem
der
Schlauch
in den
entfernen.
die Reparaturen durch qualifiriertes
nicht ru strengangezogen werden.
lose
genug
-
Die BOrsten sollten
1
an
oder nach
werden.
Nach
750
P
A
SSPO
R
T
-
?
Rev.
Page 9

8
Rev.
1
P
A
SS
POR
T
-
?
Page 10

VAC
LIST:
Rev.
1
9
Page 11

TANK
ASSEMBLIES
PARTS
10
LIST:
31 14042 Bushinn, 1.63
32 98130 Manual,
PSP-IG
ID
I
PASSPORT-I
Page 12

DRIVE ASSEMBLY
,
PARTS
KEY
LIST
PART
03069
12005
24 70020
25 87025
26 41114
27
57030
NO.
DESCRIPTION
Axle, Brush
Brush
1/4-20 x 112
Washer,
Housing,
Nut,
Brush
10-32
HHMS
Star
5/2/94
11
Page 13

VAC SHOE ASSEMBLY
16
PARTS LIST
KEY
PART NO. DESCRIPTION
I
12
Rev.
1
P
A
SS
P
O
R
T
-
?
Page 14

PLUMBING ASSEMBLIES
PARTS
LIST:
PUMP ASSEMBLY 651151
PUMP REPAIR KIT 47176
PASSPOR
T-I
COVER 27057
5/2/94
\
230V MOTOR 5301 7
13
Page 15

WIRING DIAGRAM
93218
230V
MOTOR
2
CIRCUIT
BREAKER
14
Page 16

15
PASSPORT-I
 Loading...