

Page 1
GROUTHOG
TILE AND GROUT MACHINE
Operating Instructions (ENG)
MODEL: GH3 (115V)
10050060
N
86038000 07/14/08
PRV NO. 98108
Read instructions before operating the machine.
Page 2

SAFETY
!
When using an electrical appliance, basic precaution
IMPORTANT SAFETY INSTRUCTIONS
must always be followed, including the following:
READ ALL INSTRUCTIONS BEFORE USING THIS MACHINE.
WARNING:
Use only indoors. Do not use outdoors or expose to rain.
Use only as described in this manual. Use only manufacturer’s recommended components a nd attachments.
If the machine is not working properly, has been dropped, damaged, left outdoors, or dropped into water, return
it to an authorized service center.
Do not operate the machine with any openings blocked. Keep openings free of debris that may reduce airflow.
This machine is not suitable for picking up hazardous dust.
Machine can cause a fire when operating near flammable vapors or materials. Do not op erate this machine near
flammable fluids, dust or vapors.
This machine is suitable for commercial use, for example in hotels, schools, hospitals, factories, shops
and offices for more than normal housekeeping purposes.
Maintenance and repairs must be done by qualified personnel.
During operation, attention shall be paid to other persons, especially children.
When leaving unattended, secure against unintentional movement.
The machine shall only be operated by instructed and authorized persons.
When leaving unattended, switch off or lock the main power switch to prevent unauthorized use.
Do not handle the plug or machine with wet hands.
Do not unplug machine by pulling on cord. To unplug, grasp the plug, not
Do not use with damaged cord or plug. Follow all instructions in this manual concerning grounding the ma chine.
Do not pull or carry by cord, use cord as a handle, close a door on cord, or pull cord around sharp e dges or
corners.
Do not pull/run machine over cord. Keep cord away from heated surfaces.
Connect to a properly grounded outlet. See Grounding Instructions.
Do not allow to be used a s a toy. Close attention is necessary when used by or near children.
Do not use machine as a step.
Use extra caution when cleaning stairs.
Keep hair, loose clothing, fingers, and all parts of the body away from openings and moving parts.
Before opening cover, switch off machine. Wait until the fan/brush stops completely or dust and debris
may be ejected.
To reduce the risk of fire, electric shock, or injury:
the cord.
2
SAVE THESE INSTRUCTIONS
GROUTHOG 86038000 05/17/07
Page 3
INSPECTION
Please carefully unpack and inspect your
GROUTHOG for shipping damage. Each unit is
operated and thorougly inspected before shipment,
and any damaged is the responsibliltiy of the
delivering carrier who should be notified immediately.
ELECTRICAL
The Grouthog is designed to operate on a standard
15 amp, 115 volt, 60 hz, AC household current.
Check that the voltage shown on the serial number
plate is suitable for the supply available. Voltages
below 105 volts or above 125 volts could cause
damage to the motor.
* 230/250 volt 50 hz models are available.
NOTE: The GROUTHOG is equipped with a safety
relay switching system that prevents accidental motor
start-up. If the power cord is unplugged during use,
the machine will not start when reconnected, until the
the ‘ON’ switch is depressed.
GROUNDING INSTRUCTIONS
This applicance must be grounded. If it should
malfunction or break down, grounding provides a
path of least resistance for electric current to reduce
the risk of electric shock. This appliance is equipped
with a cord having an equipment-grounding
conductor and grounding plug. The plug must be
inserted into an appropriate outlet that is properly
installed and grounded in accordance with all local
codes and ordinances.
Improper connection of
the equipmentgrounding conductor can result in a risk of
electric shock. Check with a qualified electrician
or service person if you are in doubt as to
whether the outlet is properly grounded. Do not
modify the plug provided with the appliance. If it
will not fit the outlet, have a proper outlet
installed by a qualified electrician.
SAFETY
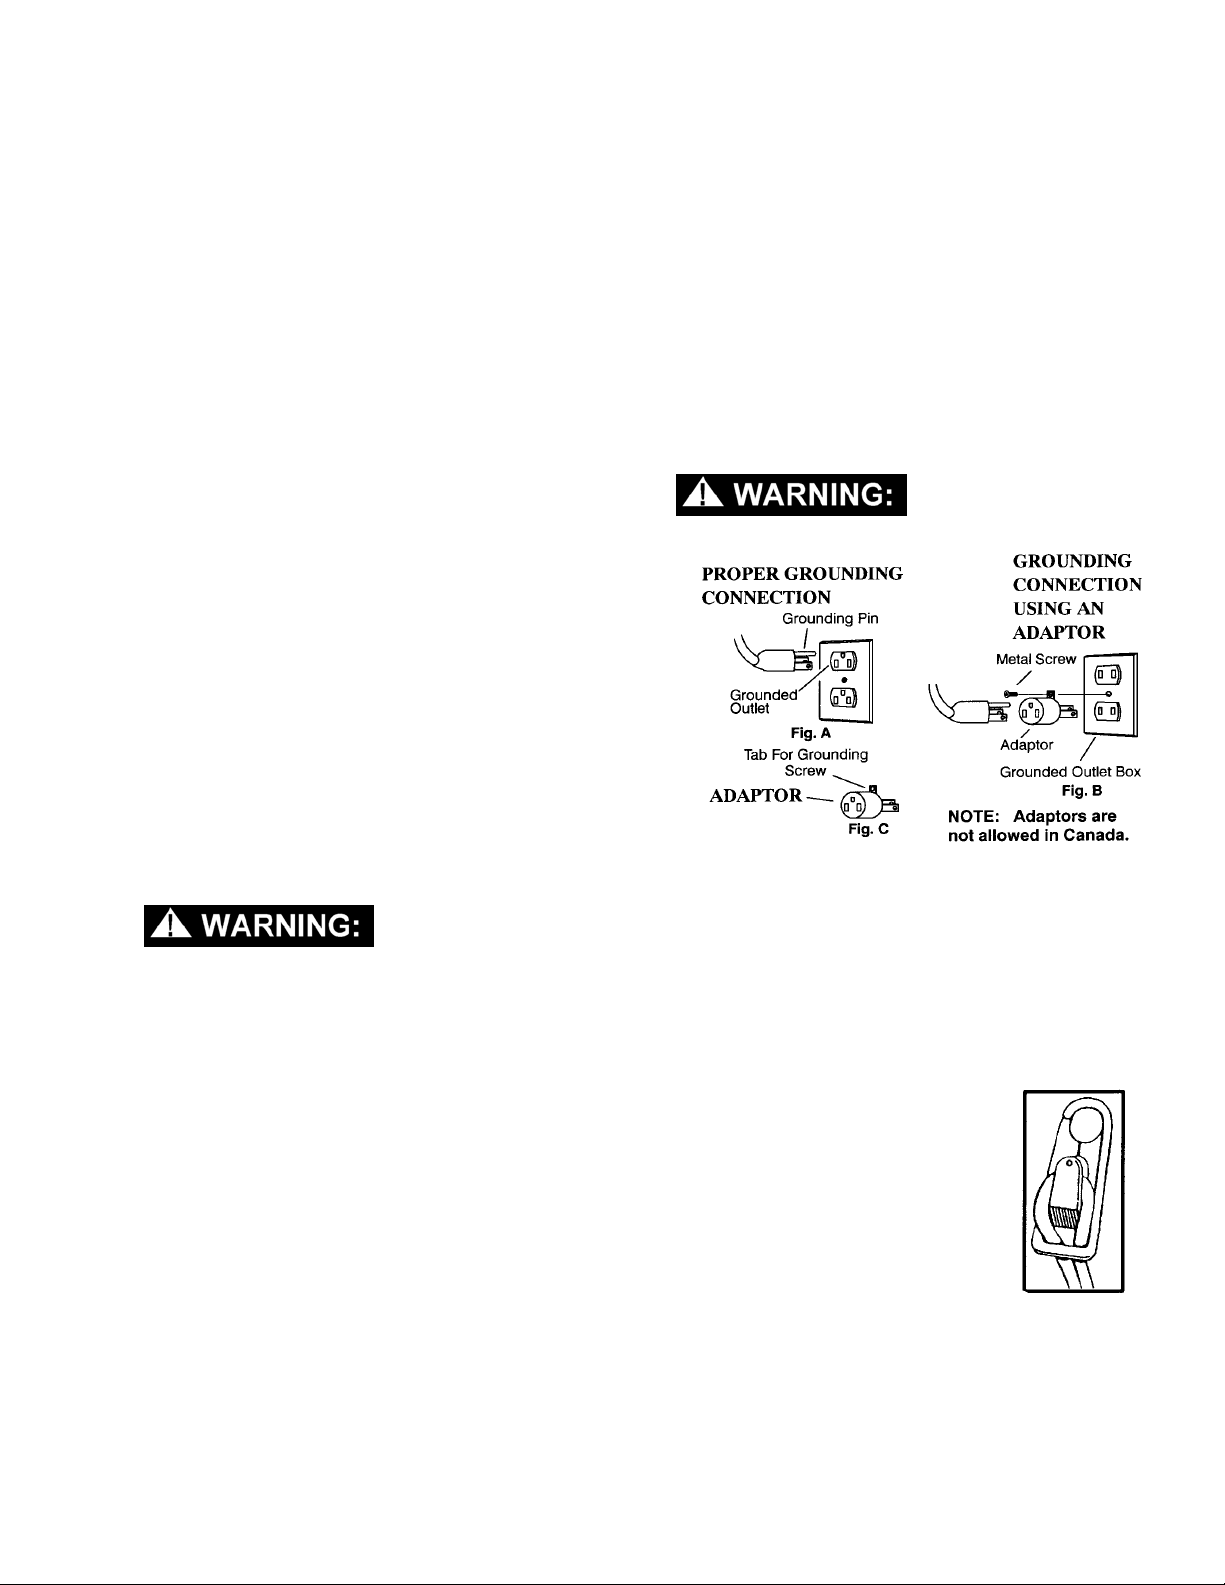
This appliance is for use on a nominal 120-volt
circuit, and has a grounded plug that looks like the
plug in “Fig. A” below. A temporary adaptor that
looks like the adaptor in “Fig. C” below may be used
to connect this plug to a 2-pole receptacle as shown
in “Fig. B” below, if properly grounded outlet is not
available. The temporay adaptor should be used
only until a properly grounded outlet (Fig. A) can be
installed by a qualified electrician. The green colored
rigid ear, lug, or the like extending from the adaptor
must be connected to a permanent ground such as a
properly grounded outlet box cover. Whenever the
adaptor is used, it must be held in place by a metal
screw.
To avoid electrical
shock, use indoors only.
EXTENSION CORDS
If an extension cord is used, the wire size must be at
least one size larger than the power cord on the
machine and should be limited to 50 feet in length.
Extension cord must be three wire grounded. The
machine is equipped with a 18/3-40’ power cord.
EQUIPMENT SETUP
NOTE: Attach stain relief/cord retainer to the power
cord.
1. Make a loop in power cord
approximately 18” from main
housing.
2. Slide cord loop through slot in
retainer arm. Pull slack cord
back though slot to secure.
GROUTHOG 86038000 05/17/07
3
Page 4

OPERATION
SELECT THE RIGHT CHEMICAL FOR THE JOB:
1. For greasy or oily soil – Use a heavy-duty
degreaser.
2. For sealer or old wax - Use a heavy-duty
stripper.
3. For soap residue and lime build-up – Use a mild
acidic cleaner.
4. For routine maintenance – Use an all-purpose
cleaner.
Consult your Windsor
dealer for proper
chemicals. Always follow directions on the
container of the chemical being used.
SELECT THE RIGHT BRUSH FOR THE JOB:
1. For routine maintenance use the Universal
STANDARD Brush.
2. For cleaning groutlines use the Universal
AGRESSOR Brush.
CLEANING PROCEDURE
1. Remove trash receptacles, etc., from the area to
be cleaned.
2. Sweep or dust mop the floor.
3. Remove gum, labels or other debris from the
surface with a scraper.
4. Apply the pre-mixed solution generously with a
wet mop (or use optional tank) to a section of the
floor. Let solution stand for 5 to 10 minutes. Do
not allow solution to dry on the floor.
5. Plug the power cord of the machine into a
properly grounded outlet.
6. Adjust handle to a comfortable height.
7. Depress the “ON” switch to start machine.
(Depress the “OFF” switch to stop machine.)
The brush-drive motor is
thermally protected and
should an overload condition occur causing the
motor to stop, the machine will not start until the
“ON” switch is depressed.
8. Start cleaning at the farthest corner and work
toward the door. For best results, pull machine
backwards at a steady pace.
9. Keep the machine moving to avoid possible
damage to the grout.
10. Use a bristle hand brush to clean inside corners
and small areas not accessible by machine.
11. After scrubbing, rinse floor with clean water. Use
a wet vacuum to pick up loosened dirt an
solution.
12. Groutlines will appear dark at first, but will lighten
after they dry.
4
GROUTHOG 86038000 05/17/07
Page 5

DAILY MAINTENANCE
1. Before storing the machine, clean exterior.
Remove brush and rinse clean with hot water.
2. Periodically inspect electrical cable and
connections. Because the cable will lie on wet,
abrasive floors, the cable must be well insulated.
If the insulation is broken or frayed, repair or
replace immediately.
3. Remove wheels periodically and apply silicone
lubricant to the axle.
SERVICING THE GROUTHOG
Always disconnect the
power cord from electrical
source before making repairs or adjustments.
BRUSH REMOVAL
1. Place handle in upright position. Tilt machine
back with handle resting on floor.
2. Loosen Knob Assembly (item 20) holding the left
bearing block (item 29).
3. Remove bearing block from the frame and brush
core.
4. Remove brush (item 33) from the right bearing
block (item 38). When re-installing the brush,
make sure that the guide pins (item 30) on both
ends are properly aligned with the holes in the
brush core and the bearing block (items 29) is
correctly seated.
BELT REPLACEMENT
1. Remove main cover (item 73 held on by (4)
screws). Remove bottom belt guard (item 34
held on by (2) screws).
2. Using an allen wrench, remove the screw holding
the right bearing block (item 56).
3. Remove bearing block along with the old belt.
Replace belt and bearing block. Check belt for
proper tension and alignment (see Motor
Replacement for belt adjustment).
GROUTHOG 86038000 05/17/07
MAINTENANCE
BEARING REPLACEMENT
Using a small torch, heat the aluminum bearing block
just enough to allow the bearing and shaft (items 31
and 32, respectively) to be removed.
Use a bearing puller to remove old bearing. When
replacing bearing, use a socket or metal sleeve just
large enough to slip over the shaft and still contact
the inner bearing race. Use an arbor press or vise to
press new bearings on shaft. Re-heat aluminum
block just enough to allow re-assembly of bearing
and shaft.
Do not overheat block as
this will damage the bearing.
MOTOR REPLACEMENT
1. Remove motor cover (item 73 held on by (4)
screws).
2. Remove (4) screws holding motor (item 60).
Disconnect motor lead and remove motor.
3. When re-installing the motor use a straight edge
to realign pulleys. A screw driver can be used to
adjust tension.
4. NOTE: Belt should be adjusted to snug fit to
prevent slipping. DO NOT OVERTIGHTEN.
5
Page 6

WIRING DIAGRAM
886
115V GH3
BLACK 86268310
PRV NO. 88240
BLACK
86268150
PRV NO.
88165
BLACK 86268150
PRV NO. 88165
BLACK 86268600
PRV NO. 88421
BLACK 86268170
PRV NO.
BLACK 86268150
PRV NO. 88165
18
6
GROUTHOG 86038000 05/17/07
Page 7

THIS PAGE LEFT BLANK INTENTIONALLY
GROUTHOG 86038000 05/17/07
7
Page 8

GROUT HOG ASSEMBLY
62
81
61
68
39
59
58
57
39
40
31
35 34
54
41
38
63
60
56
55
37
30
43
66
28
64
42
63
52
53
42
30
67
65
33
17
18
44
AB
69
10
64
48
47
45
71
70
72
51
46
74
30
73
69
50
45
49
17
18
19
21
20
30
28
38
23
24
22
75
45
16
28
15
3
25
14
22
13
9
18
10
76
3
12
77
5
4
7
3
3
78
80
79
FRAME
4
1
2
6
8
35
32
31
GROUTHOG 86038000 07/14/08
29
27
23
26
11
10
6
FRAME
Page 9

GROUT HOG ASSEMBLY
REF PART NO. PRV NO. DESCRIPTION
1 86278140 70002 SHOULDER BOLT, 3/8 OD X 2.0 L
2 86259660 89038 WHEEL, GH 4" DIA.
3 86010680 87030 WASHER, 3/8 ID X 3/4 OD NYLON
4 86278910 87003 WASHER, 3/8 ID X 7/8 OD SS
5 86005750 57113 NUT, 5/16-18 HEX NYLOCK
6 86274050 70078 SCR, 5/16 X 3/8 PHSB PH SS DL
7 86091970 14222 BRKT ASM, GH HANDLE ADJ.
8 - OPEN -
9 86226780 73044 SPRING, EXT .44 D X 2.25 L X .054 W
10 86005720 57106 NUT, 1/4-20 HEX NYLOCK
11 76006490 70013 SCR, 8-32 X 3/4 PHMS SS
12 86273920 70049 SCR, 1/4-20 X 1.75 PHMS SS
13 86264220 6605 9 PLUG, GH HANDLE PIVOT
14 86005680 57047 NUT, 1/4-20 HEX NYLOCK
15 86273740 70010 SCR, 1/4-20 X 1.5 HHCS SS
16 86093390 66058 PIVOT, GH HANDLE
17 86010630 87013 WASHER, 1/4 ID X 5/8 OD SS
18 86010660 8702 5 WASHER, 1/4 LOCK EXT STAR SS
19 86273830 70020 SCR, 1/4-20 X 1/2 HHCS SS DL
20 86028070 48013 KNOB ASM, GH BEARING BLOCK
21 86028470 73183 SHIELD ASM, GH3 SPLASH
22 86010690 87068 WASHER, 1/8 RIVET BACKUP
23 86233060 20001 CLAMP, BAG SUPPORT
24 86086930 73157 SHIELD, GH SPLASH
25 86086340 67063 ROD, GH SPLASH SHLD HANGER
26 86086330 67062 ROD, GH SPLASH SHLD ROLLER
27 86264380 67061 ROLLER, SPLASH SHIELD
28 86273070 67005 RIVET, 1/8 OD WHT AL
29 86027310 14215 BLOCK ASM, GH LH BEARING
30 86272180 66060 PIN, ROLL 1/4" X 3/4" L
31 86228560 09021 BEARING, GH BRUSH SHAFT
32 86094050 7316 1 SHAFT/HUB ASM, GH DRIVEN
33A 86283940 12019 BRUSH, GH UNIVERSAL STANDARD
33B 86283950 14248 BRUSH, GH ALL PURPOSE AGGRESSOR
34 86064140 36045 GUARD, GH3 BELT
35 86006650 70177 SCR, 10-32 X 1/2 FHMS SS
36 - OPEN -
37 86094060 73163 SHAFT/HUB ASM, GH BRUSH DRIVE
38 86027320 14216 BLOCK ASM, GH RH BEARING
39 86277940 70126 SET SCR, 1/4-28 X 1/4 KCP
40 86250440 64029 PULLEY, GH BRUSH 20L050
41 86007670 73166 SNAP RING, EXTERNAL
42 86090230 87015 WASHER, 9/16 ID X 1.06 OD SS
43 86197300 1407 9 BUSHING, 1/8 FPT X 1/4 MPT HEX
44 86273780 70015 SCR, 1/4-20 X 3/4 HHCS SS
45 86226390 2721 8 CAP, GH FRAME TUBE
46 86273860 70025 SCR, 10-32 X 3/4 IHHMS UN SL SS
47 86273930 70051 SCR, 8-32 X 1/2 PPHMS
48 86005700 57104 NUT, 10-32 W/STAR WASHER PLTD
SERIAL NO.
FROM
NOTES:
GROUTHOG 86038000 05/17/07
9
Page 10

GROUT HOG ASSEMBLY
REF PART NO. PRV NO. DESCRIPTION
49 86092320 34111 FRAME, GH3 MAIN
50 86090390 89037 WEIGHT, GROUT HOG COUNTERBALANCE
51 86251350 67064 RELAY, 120V SPDT
52 86197560 40015 HOSEBARB, 1/4 FPT X 3/8
53 86237150 35065 GASKET, GH3 COVER
54 86076200 36051 GUSSET, GH3
55 86279090 87067 WASHER, 5/16 LOCK INT. STAR PLT
56 86277940 70126 SET SCR, 1/4-28 X 1/4 KCP DL
57 86229270 11011 BELT, GH3 DRIVE
58 86250430 64028 PULLEY, GH MOTOR 10L050
59 86271110 57123 NUT, 1/4-20 CAPTIVE (.074 W)
60 86247080 53113 MOTOR, 115V 1/3 HP W/T.O.
61 86274160 70110 SCR, 10-24 X 3/4 PHTC -F-
62 86244960 50211 LABEL, GROUTHOG MAIN
63 86256610 72015 SWITCH, SPDT 20A SNAP-ACTION
64 86279110 87075 WASHER, 3/8 ID INT. LOCK
65 86005670 57040 NUT, 1/2 NPT CONDUIT
66 86244990 50228 LABEL, GH WARNING
67 86244970 50212 LABEL, GROUTHOG ON
68 - OPEN -
69 86234710 27237 COVER, SWITCH PROTECTIVE
70 86245160 50399 LABEL, L1500 WARNING
71 86256200 73200 STRAIN RELIEF, 1/2 NPT FLEX
72 86244980 50213 LABEL, GROUTHOG OFF
73 86063380 27230 COVER, GH3 BLUE
74 86245260 50490 LABEL, 115V GH3 WIRING
75 86234100 23075 CORD ASM, 18/3 X 40 SJT, YL GH3
76 86006800 70361 SCR, 10-32 X 1/2 PHTR PLT
77 86076740 41144 HOOK, CORD
78 86256170 73169 STRAIN RELIEF, CORD HOOK
79 86092630 38079 HANDLE, GH MAIN
80 86232340 50352 CARD, GH3 INSTRUCTION
81 86245650 50776 LABEL, FOR SAFETY
SERIAL NO.
FROM
NOTES:
10
GROUTHOG 86038000 05/17/07
 Loading...