

Page 1

86041040 – K 02/18/08
PRV NO. 980226
Operating Instructions (ENG)
MODELS: FM12
10120030
FM15
10120040
Read instructions before operating the machine.
Page 2

MACHINE DATA LOG/OVERVIEW
86041040 08/28/07
2
YOUR DEALER
Name: __________________________________________________________________________________________________
Address: _______________________________________________________________________________________________
Phone Number: __________________________________________________________________________________________
MODEL _______________________________________
DATE OF PURCHASE ___________________________
SERIAL NUMBER ______________________________
SALES REPRESENTATIVE # _____________________
Copyright 2007 Windsor Industries, Printed in USA
Page 3

TABLE OF CONTENTS
86041040 08/28/07
3
Machine Data Log/Overview...........................2
Table of Contents............................................3
HOW TO USE THIS MANUAL
How to use this Manual................................... 1-1
SAFETY
Important Safety Instructions ..........................2-1
Important Safe Guards....................................2-2
Grounding Instructions.................................... 2-3
OPERATIONS
Technical Specifications.................................. 3-1
Components.................................................... 3-2
Controls........................................................... 3-2
Assembly.........................................................3-3
Machine Operation..........................................3-3
Power Head .................................................3-4
Foot Pedal.................................................... 3-4
Light Indicators............................................. 3-5
MAINTENANCE
Brush Roller. ...................................................4-1
Filter/Bag Replacement...................................4-1
Filter Bag...................................................... 4-1
Motor Protection Filter..................................4-1
Exhaust Filter ............................................... 4-1
Removing Blockages. .....................................4-2
GROUP PARTS LIST
Power Head.....................................................5-1
Optional Attachments......................................5-1
Miscellaneous Spare Parts. ............................5-1
Parts List .........................................................5-2
Warranty..........................................................5-7
Machine Registration Card..............................5-9
Page 4

HOW TO USE THIS MANUAL
86041040 08/28/07
1-1
This manual contains the following sections:
- HOW TO USE THIS MANUAL
- SAFETY
- OPERATIONS
- MAINTENANCE
- PARTS LIST
The HOW TO USE THIS MANUAL section will tell
you how to find important information for ordering
correct repair parts.
Parts may be ordered from authorized Windsor
dealers. When placing an order for parts, the
machine model and machine serial number are
important. Refer to the MACHINE DATA log which
is filled out during the installation of your machine.
The MACHINE DATA log is located on the inside
of the front cover of this manual.
The model and serial number of your machine is
on the bottom back-end of the machine.
The SAFETY section contains important
information regarding hazard or unsafe practices
of the machine. Levels of hazards is identified that
could result in product or personal injury, or severe
injury resulting in death.
The OPERATIONS section is to familiarize the
operator with the operation and function of the
machine.
The MAINTENANCE section contains preventive
maintenance to keep the machine and its
components in good working condition. They are
listed in this general order:
- Filters
- Blockages
The PARTS LIST section contains assembled
parts illustrations and corresponding parts list. The
parts lists include a number of columns of
information:
- REF – column refers to the reference
number on the parts illustration.
- PART NO. – column lists the part
number for the part.
- PRV NO. - reference number.
- QTY – column lists the quantity of the
part used in that area of the machine.
- DESCRIPTION – column is a brief
description of the part.
- SERIAL NO. FROM – column
indicates the first machine the part
number is applicable to. When the
machine design has changed, this
column will indicate serial number of
applicable machine. The main
illustration shows the most current
design of the machine. The boxed
illustrations show older designs. If
column has an asterisk (*), call
manufacturer for serial number.
- NOTES – column for information not
noted by the other columns.
NOTE: If a service or option kit is installed on your
machine, be sure to keep the KIT INSTRUCTIONS
which came with the kit. It contains replacement
parts numbers needed for ordering future parts.
NOTE: The number on the lower left corner of the
front cover is the part number for this manual.
MODEL _____________________________________
DATE OF PURCHASE ________________________
SERIAL NUMBER ____________________________
SALES REPRESENTATIVE # ___________________
Copyright 1995 Windsor Industries, Printed in USA
Page 5

86041040 08/28/07
2-1
IMPORTANT SAFETY INSTRUCTIONS
When using an electrical appliance, basic precaution must always be followed,
including the following:
READ ALL INSTRUCTIONS BEFORE USING THIS MACHINE.
WARNING: To reduce the risk of fire, electric shock, or injury:
1. Do not leave appliance when plugged in. Unplug from outlet when not in use and before servicing.
2. Do not use outdoors or on wet surfaces.
3. Do not use near small children. Do not allow to be used as a toy. Close attention is necessary when used
by or near children.
4. Use only as described in this manual. Use only manufacturer’s recommended attachments.
5. Do not use with damaged cord or plug. If appliance is not working as it should, has been dropped,
damaged, left outdoors, or dropped into water, return it to a service center.
6. Do not pull or carry by the cord, use cord as a handle, close a door on cord, or pull cord around sharp
edges or corners. Do not run appliance over cord. Keep cord away from heated surfaces.
7. Do not unplug by pulling on cord. To unplug, grasp the plug, not the cord.
8. Do not handle plug or appliance with wet hands.
9. Do not put any object into openings. Do not use with any opening blocked; keep free of dust, lint, hair,
and anything that may reduce air flow.
10. Keep hair, loose clothing, fingers and all parts of body away from openings and moving parts. Do not
place fingers or other body parts under vacuum unless unplugged.
11. Do not pick up anything that is burning or smoking, such as cigarettes, matches, or hot ashes.
12. Do not use without dust bag and/or filters in place. Do not wash filters.
13. Turn off all controls before unplugging.
14. Use extra care when cleaning on stairs.
15. Do not use to pick up flammable or combustible liquids such as gasoline or use in areas where they may
have been present.
16. Machines can cause fire when operated near flammable vapors or materials. Do not operate this machine
near flammable fluids, dust or vapors.
17. Maintenance and repairs must be done by qualified personnel.
18. Use only identical replacement parts. See instructions for servicing of appliances.
19. Do not use machine as a step.
20. If used on plush carpet or carpet with thick padding, do not leave machine in one place with machine
turned on.
21. Do not re-use bags. Once full, discard and replace with a new bag.
22. Always turn off this appliance before connecting or disconnecting motorized nozzle.
23. Do not touch the brush roller while the machine is plugged in. Brush may unexpectedly restart. To reduce
the risk of injury from moving parts, unplug before servicing.
24. The vacuum has an electronic overload protection. The power head could shut itself off if used on certain
carpets. If that should occur, turn off the machine, unplug it and look for a blockage. If there is no
blockage, reduce the load on the brush roller by adjusting the brush height to a higher level (up to 4)
25. Store the vacuum in a dry place at room temperature. When the vacuum is not in use, you should wrap
the cord on the cable hooks.
26. Any other servicing should be performed by an authorized service representative.
SAVE THESE INSTRUCTIONS
Page 6

86041040 08/28/07
2-2
Page 7

86041040 08/28/07
2-3
GROUNDING
PIN
GROUNDED
OUTLET
ADAPTER
METAL SCREW
TAB FOR
GROUNDING SCREW
GROUNDED
OUTLET BOX
(A) (B)
(C)
Page 8

TECHNICAL SPECIFICATIONS
86041040 08/28/07
3-1
VACUUM PORTION: (Carry unit)
ITEM DIMENSION/CAPACITY
Vacuum Motor High Performance, single stage
Vacuum Motor Rated Power 1000 Watts
Vacuum Motor Maximum Power 1200 Watts
Suction 225 Mbar (2300 mm WS)
Waterlift 92 in (234 cm)
Air Flow 102 cfm (48 l/s)
Filter Bag Capacity 3.5 litres, 3 layer, enclosed, top-loading
Weight
-FM12
-FM15
17 lbs (7.7 kg)
17.4 lbs (7.9 kg)
Dimensions - Height 48 in (123 cm)
Housing Injection molded, high impact ABS and PP plastic
Cable 40 in (12 M) 18/3 SJT
POWER HEAD: (Detachable Head unit)
ITEM DIMENSION/CAPACITY
Brush Motor Rated Power
- 12 in (30 cm)
- 15 in (38 cm)
175 Watt
200 Watt
Working Width of Powerhead
- FM12
- FM15
12 in (30 cm)
15 in (38 cm)
Brush Drive
Non-slip Tooth Belt, enclosed, electronic safety clutch
and speed control.
Brush Speed 2700 rpm (5400 brush contacts per minute)
Wheels 2 in (5.2 cm) dia. rubberized
Page 9
COMPONENTS/CONTROLS
86041040 08/28/07
3-2
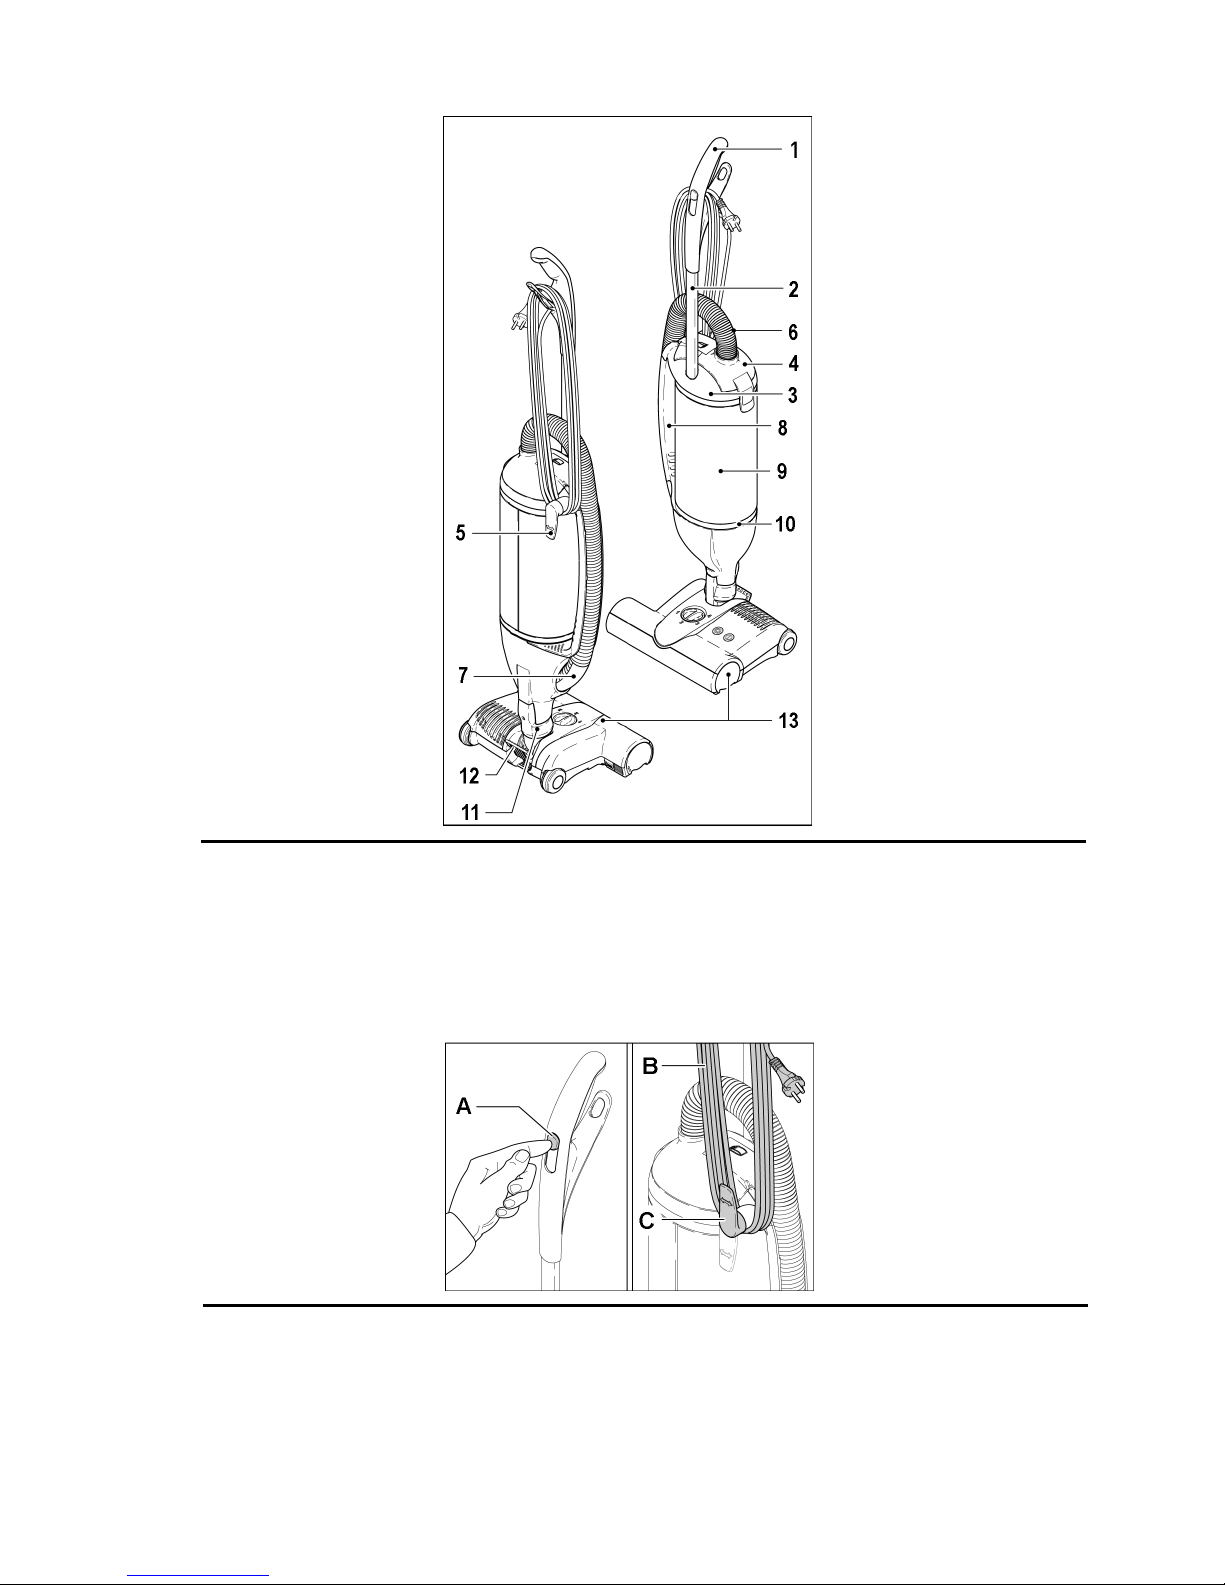
1. Handle
2. Tube
3. Dust Bag Housing
4. Filter Cover
5. Cable Hook
6. Hose
7. Hose Handle
8. Carrying Handle
9. Exhaust Filter
10. Filter Retaining Rings
11. Swivel Neck
12. Foot Pedal
13. Power Head (12” - 15”)
A. On/Off Switch
B. Power Cord
C. Cable Hook
Page 10
ASSEMBLY/OPERATION
86041040 08/28/07
3-3
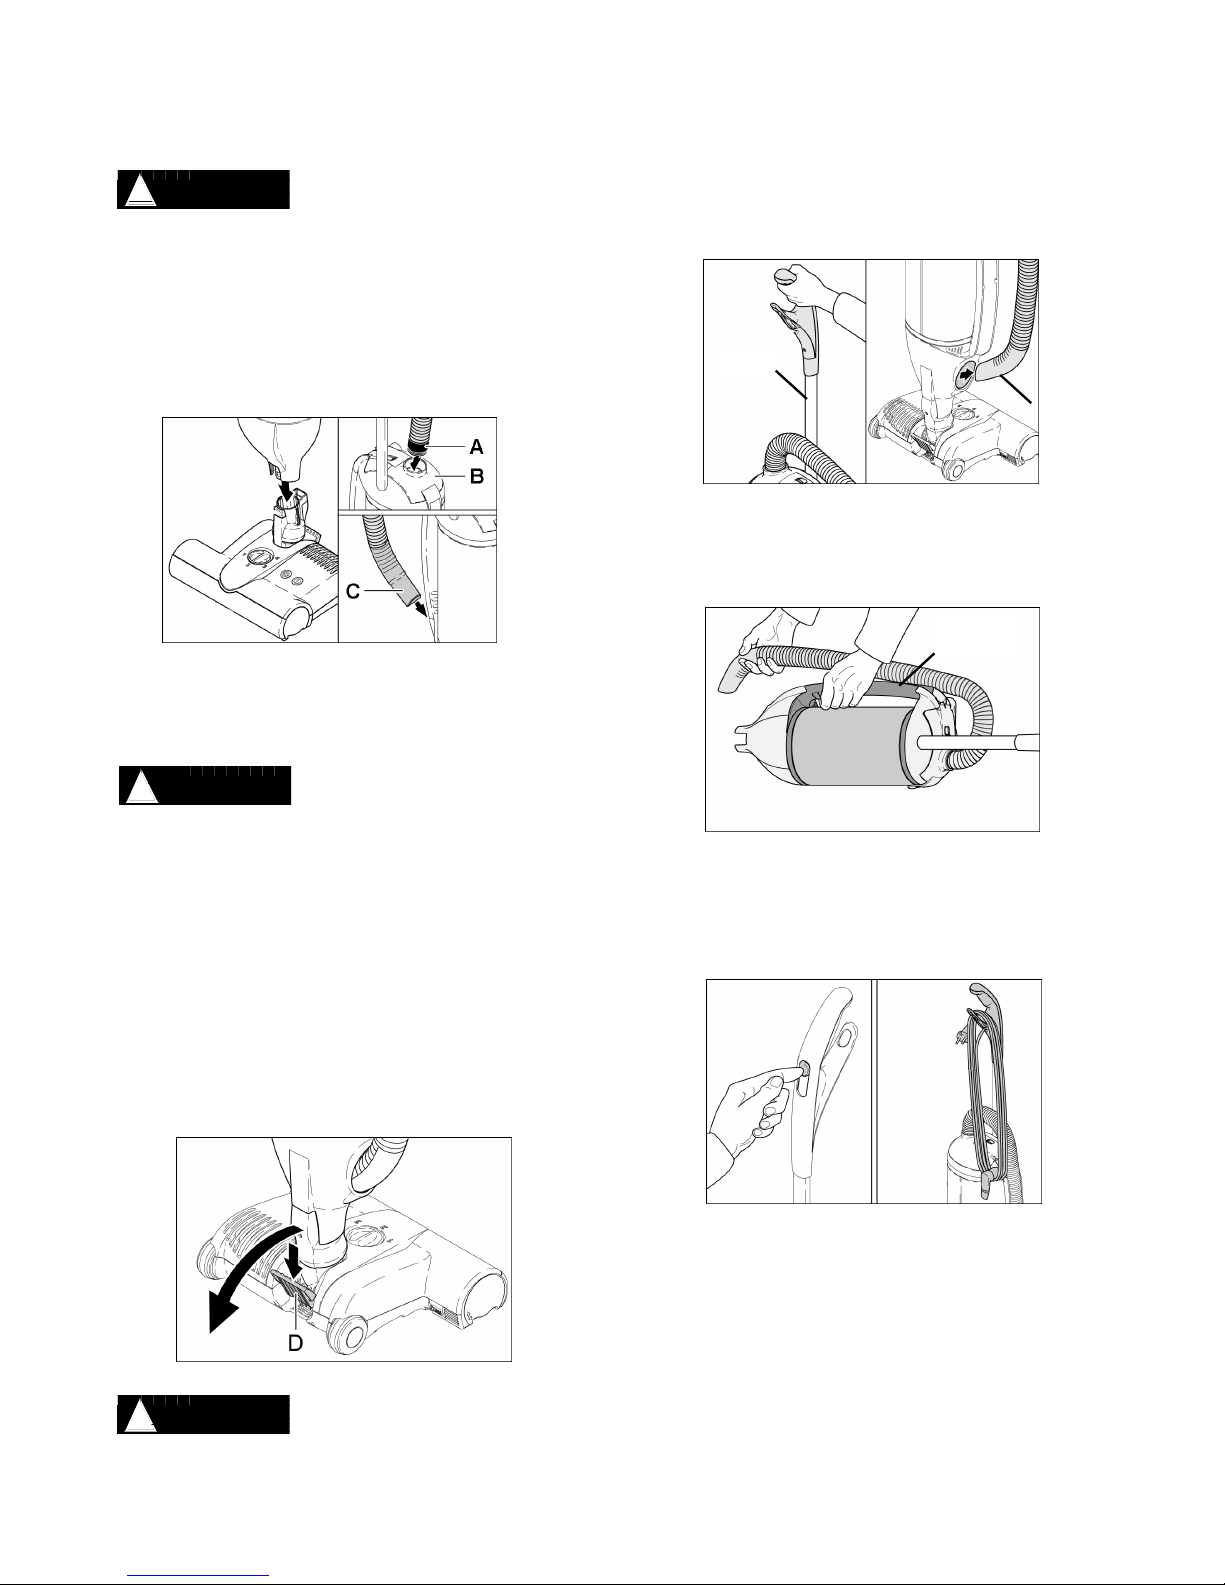
ASSEMBLY
Please read all instructions before
using this machine.
1. Carefully attach the brush nozzle to the vacuum
cleaner through the fitting at the bottom of the
vacuum until it locks. [See below]
2. Push the black end of the hose [A] into the
connection on the filter cover [B].
3. Insert the hose handle [C] into the suction opening
on the side and press the hose into its place on
the side of the machine, as shown.
OPERATION
Your Flexamatic is operated with an electric power brush.
The machine can be used in the upright position.
When locking the vacuum in the
upright position, please ensure the
bag housing is clicked in place, face forward to the center
or the unit could overturn.
Please ensure that the On/Off switch is in the OFF
position. Turn the cable hook to release the power cable
and plug into the walls main outlet.
Now you may start your machine by moving the power
switch to the ON position.
To use the power head (12” or 15” model):
1. Press the foot pedal [D] on the rear of the power
head and lower the machine handle to an angled
position. The brush motor will then turn on.
When using the hose and
attachments, keep the machine in
upright position.
The hose handle can be removed from
the side of the vacuum and can be used
with or without attachments. Also
maintain a grasp on the machine when
using the hose as it could tip if the hose
is pulled too far.
The machine can also be used without
the power head. You can easily carry
the machine by using the carrying
handle.
When you have finished using the
machine, turn it off by moving the power
switch to the OFF position. Then unplug
the power cable and wind it into the
cable hook and handle.
! CAUTION
! CAUTION
! CAUTION
Handle
Hose
Handle
Carrying
Handle
Page 11

OPERATION
86041040 08/28/07
3-4
Important instructions for
use on the power head.
The brush roller is off and stopped when the
machine is in the upright position and the handle is
completely locked in place.
NOTE: If you have the machine handle at an
angle, the brush roller will spin.
Leaving the machine in a stationary position for an
extended period of time while the brush roller is
spinning may cause damage to your carpet.
Recommended items to be aware of with regard to
your Flexamatic.
• Be sure NOT to allow carpet edges or
fringe into the brush.
• This machine could cause damage to
loosely woven carpets or rugs, wool loop
carpets, long piled carpets, or very soft
and sensitive floor coverings.
• We do NOT recommend using the power
head to clean old or specially valuable
hand-crafted carpets.
• If you have uneven flooring, the metal part
underneath the machine may scratch the
surfaces.
• Please carry the machine over high
thresholds.
POWER HEAD
The rotating design of the swivel neck allows the
power head to move in any direction, making it
easily maneuverable around obstacles.
The power head also has an adjustable brush
height and to-the-edge brush action for effective
all around cleaning.
FOOT PEDAL
By pushing the foot pedal and lowering the
handle, you activate the power head and the
brush begins spinning.
Failure to use the Foot Pedal will cause damage
to the unit.
! CAUTION
! WARNING
Page 12

OPERATION
86041040 08/28/07
3-5
INDICATOR LIGHTS
The electronic brush control constantly monitors
the status of the brush, communicating the status
through the lights on top.
Green and Red: The brush is not fully engaged in
the carpet. The height adjustment should be
lowered. If the height adjustment is at the lowest
setting, the brush is worn and needs to be
replaced.
Green light ONLY: Brush is working well.
NOTE: Recommend selecting a brush height that
is only one level beneath that at which the green
and red lights are on.
Red light ONLY: Brush is blocked. Turn off
machine, unplug and remove blockage. [see
maintenance section]
Page 13

MAINTENANCE
86041040 08/28/07
4-1
! CAUTION
BRUSH ROLLER
To remove the brush roller, press the button and
turn the bearing downward.
Turn the brush slightly to the right and pull it out.
We recommend to regularly remove threads and
hair, which have been wound around the brush
roller.
FILTERS
When the orange bag full indicator is showing,
airflow is reduced. This could be because the
filter bag is full, the filters are clogged or there
may be a blockage.
CHANGING THE FILTER BAG
1. Remove the filter bag by opening the latch
on the side of the bag housing.
2. Close the filter bag with the sealing cap
and lift it out
The procedure to replace the bag is illustrated
on the front of each bag.
NOTE: You cannot close the bag housing if
the bag is fitted incorrectly.
CHANGING FILTERS
Motor Protection Filter
NOTE: This filter can only be accessed by removing
the filter bag.
1. Lift the motor protection filter up by the
bracket.
2. Replace with new. NOTE: Make sure filter
fits in position tightly.
3. Put filter bag back in place.
The filter should be changed when it is dirty, at
minimum. No later then replacing 20 filter bags.
Exhaust Filter
NOTE: Recommended to replace every time you
replace the Motor Protection Filter.
1. Carefully remove the filter retaining rings
and put them to the side.
2. Pull the enforcement strips of the filter out
of the housing slot.
3. Remove the filter from the housing.
4. Replace with new in reverse order.
Be sure the filter is fitted correctly in the housing
slot and retaining rings are installed correctly.
NOTE: If the filter is NOT installed correctly it will be
ineffective.
Use ONLY genuine Windsor
replacement parts to ensure
effectiveness and safety.
DO NOT wash any filters.
Page 14

MAINTENANCE
86041040 08/28/07
4-2
REMOVING BLOCKAGES
If your bag full indicator light remains lit after
you have changed bags and/or filters this is
an indication that there may be a blockage
somewhere in your unit.
It is important to keep all areas of the
system free from blockage, as this may
damage your unit or its components.
Check for suction at the end of hose. If
you can only feel a small amount of
suction, there is a block in your hose.
To remove:
1. Loosen the safety ring on
the lid.
2. Remove the hose from the
machine.
3. Reverse the airflow through
the hose by putting the hose
handle in the connecting
tube of the filter cover.
4. Stretch the hose in the spot
where the blockage may be
and open/close the end of
hose until blockage is
removed.
Check the suction port at the opening
for the hose handle. Remove any
debris you may find.
Check the suction neck of the power
head. Remove any debris you may
find.
Check the trap-door on the bottom of
the power head. Remove any debris
you may find.
Check between the suction neck and
trap-door within the power head, as
obstacles may become lodged in the
travel path. Remove any debris you
may find.
Never clean down
the hose with a stick
or pointed object.
Trap Door
! CAUTION
Safety Ring
Hose
Hose Handle
Hose Handle
Opening
(Suction Port)
Suction
Neck
Filter Cover
Opening
Page 15
86041040 – K 02/18/08
PRV NO. 980226
MODELS: FM12
10120030
FM15
10120040
Instrucciones de funcionamiento (SPA)
Lea las instrucciones antes de operar la máquina
Page 16

REGISTRO DE DATOS DE LA MÁQUINA/RESEÑA
86041040 08/28/07
2SPA
SU DISTRIBUIDOR
Nombre: ________________________________________________________________________________________________
Domicilio: _______________________________________________________________________________________________
Número de teléfono: ______________________________________________________________________________________
MODELO _______________________________________
FECHA DE COMPRA ___________________________
NÚMERO DE SERIE ______________________________
REPRESENTANTE DE VENTAS ____________________
Copyright 2007 Windsor Industries, Printed in USA
Page 17

ÍNDICE
86041040 08/28/07
3SPA
Registro de datos de la máquina/descripción. 2
Índice............................................................... 3
CÓMO UTILIZAR EL MANUAL
Cómo utilizar el manual...................................1-1
SEGURIDAD
Instrucciones importantes de seguridad ........2-1
FUNCIONAMIENTO
Especificaciones técnicas. ..............................3-1
Componentes.................................................. 3-2
Controles......................................................... 3-2
Ensamblado. ...................................................3-3
Funcionamiento de la máquina.......................3-3
Cabezal motor.............................................. 3-4
Pedal de pie. ................................................3-4
Luces indicadoras........................................ 3-5
MANTENIMIENTO
Rodillo cepillador.............................................4-1
Reemplazo del filtro o de la bolsa................... 4-1
Bolsa del filtro ..............................................4-1
Filtro de protección del motor ......................4-1
Filtro del escape........................................... 4-1
Eliminación de bloqueos. ................................4-2
LISTA DE PIEZAS DE RECAMBIO
Cabezal motor .................................................5-1
Accesorios opcionales.....................................5-1
Piezas varias de recambio. .............................5-1
Garantía...........................................................5-7
Page 18

CÓMO UTILIZAR EL MANUAL
86041040 08/28/07
1-1SPA
El manual contiene las siguientes secciones:
- CÓMO UTILIZAR EL MANUAL
- SEGURIDAD
- FUNCIONAMIENTO
- MANTENIMIENTO
- LISTA DE PIEZAS
La sección CÓMO UTILIZAR EL MANUAL le
indica cómo encontrar la información importante
necesaria para pedir las piezas de recambio
correctas.
Las piezas pueden solicitarse a los distribuidores
autorizados de Windsor. Al realizar el pedido de
piezas, es importante saber el modelo y el número
de serie de la máquina. Consulte el registro
DATOS DE LA MÁQUINA que se completó
durante la instalación de la máquina. Dicho
registro de DATOS DE LA MÁQUINA está situado
en la parte interior de la portada de este manual.
El modelo y número de serie de su máquina están
ubicados en el extremo inferior de la parte
posterior de la máquina.
La sección SEGURIDAD contiene información
importante acerca de los usos de la máquina que
pueden resultar peligrosos o poco seguros. Se
identifican los niveles de riesgo que pueden
ocasionar lesiones personales o dañar el
producto, y aquellos que pueden provocar
lesiones graves que ocasionen la muerte.
El objetivo de la sección FUNCIONAMIENTO es
familiarizar al operario con el manejo y el
funcionamiento de la máquina.
La sección MANTENIMIENTO incluye
instrucciones sobre mantenimiento preventivo,
para mantener la máquina y sus componentes en
buenas condiciones de funcionamiento. Están
clasificadas en el siguiente orden general:
- Filtros
- Bloqueos
La sección LISTA DE PIEZAS contiene
ilustraciones de las piezas ensambladas y la
correspondiente lista de piezas. Incluye además
varias columnas con información:
- REF – esta columna se refiere al
número de referencia en la ilustración
de piezas.
- No DE PIEZA – esta columna indica
el número correspondiente a la pieza.
- PRV NO. – número de referencia
- CANT – esta columna enumera la
cantidad de piezas usadas en esa
parte de la máquina.
- DESCRIPCIÓN – esta columna es
una breve descripción de la pieza.
- No DE SERIE DESDE – esta columna
indica la primera máquina a la que se
puede aplicar el número de la pieza.
Si cambia el diseño de la máquina,
esta columna indica el número de
serie de la máquina aplicable. La
ilustración principal muestra el diseño
más actual de la máquina. Las
ilustraciones en los cuadros muestran
diseños anteriores. Si la columna
contiene un asterisco (*), llame al
fabricante para conocer el número de
serie.
- NOTAS – esta columna contiene la
información no incluida en las otras
columnas.
NOTA: Si en la máquina se incluye un juego de
servicio u opciones, asegúrese de conservar las
INSTRUCCIONES DEL JUEGO que acompañan
al mismo. Éste contiene los números de piezas de
recambio necesarios para solicitar piezas en el
futuro.
NOTA: El número en la esquina izquierda más
baja de la portada es el número para este manual.
MODELO
FECHA DE COMPRA
NÚMERO DE SERIE
REPRESENTANTE DE VENTAS
Copyright 1995 Windsor Industries, Impreso en los EE.UU.
Page 19

86041040 08/28/07
2-1SPA
INSTRUCCIONES IMPORTANTES DE SEGURIDAD
Al usar un aparato eléctrico, siempre se deben tomar precauciones básicas, entre las que se
incluyen las siguientes:
LEA TODAS LAS INSTRUCCIONES ANTES DE UTILIZAR LA MÁQUINA.
ADVERTENCIA: Para reducir el riesgo de incendio, descargas eléctricas y lesiones:
1. No deje la máquina enchufada. Debe desenchufarla cuando no se encuentra en uso y antes de repararla.
2. No la utilice en el exterior o en superficies mojadas.
3. No la utilice cerca de niños pequeños. No permita que se la emplee como juguete. Preste mucha atención
cuando sea utilizada por niños o cerca de ellos.
4. Utilícela sólo del modo descrito en este manual. Utilice solamente los accesorios recomendados por el
fabricante.
5. No la utilice si el cable o el enchufe están dañados. Si la máquina no funciona adecuadamente, se ha caído,
ha sufrido daños, fue olvidada en el exterior, o ha caído al agua, llévela a un servicio técnico.
6. No tire de la máquina ni la traslade tomándola del cable, no utilice el cable como una manija, no enganche el
cable con las puertas ni lo enrosque alrededor de bordes o ángulos filosos. No haga funcionar la máquina
sobre el cable. Mantenga el cable alejado de superficies calientes.
7. No desenchufe la máquina tirando del cable. Para desenchufarla, tire del enchufe, no del cable.
8. No manipule el enchufe ni la máquina con las manos húmedas.
9. No coloque objetos en las aberturas. No utilice la máquina si alguna abertura está bloqueada, manténgala libre
de polvo, pelusas, cabellos y de todos los objeto que pueden reducir el caudal de aire.
10. Mantenga el cabello, la ropa holgada, los dedos y todas las partes del cuerpo alejadas de las aberturas y de
las piezas móviles. No coloque los dedos ni otras partes del cuerpo debajo de la aspiradora a menos que se
encuentre desenchufada.
11. No aspire objetos que estén ardiendo o humeando, como cigarrillos, cerillas o cenizas calientes.
12. No utilice la máquina si la bolsa o los filtros no están en su lugar. No lave los filtros.
13. Desconecte todos los controles antes de desenchufar la máquina.
14. Sea extremadamente precavido al limpiar escaleras.
15. No utilice la máquina para aspirar líquidos inflamables o combustibles tales como gasolina ni la utilice en
superficies donde hayan estado dichos líquidos.
16. La máquina puede provocar un incendio al funcionar cerca de vapores o materiales inflamables. No maneje la
máquina cerca de fluidos, polvo o vapores inflamables.
17. Personal debidamente capacitado debe realizar el mantenimiento y las reparaciones.
18. Utilice únicamente piezas de reemplazo idénticas. Consulte las instrucciones para realizar la reparación de las
máquinas.
19. No utilice la máquina como escalera.
20. Si se la utiliza sobre alfombras afelpadas o alfombras espesas de fieltro no deje la máquina encendida en un
solo lugar.
21. No utilice repetidamente las bolsas. Una vez que la bolsa está llena, deséchela y reemplácela por una nueva.
22. Apague siempre la máquina antes de conectar o desconectar la boquilla mecánica.
23. No toque el rodillo cepillador mientras la máquina está enchufada. El cepillado podría volver a comenzar de
forma inesperada. Para reducir el riesgo de lesiones causadas por las piezas móviles desenchufe la máquina
antes de repararla.
24. La aspiradora tiene un dispositivo electrónico de protección contra sobrecargas. El cabezal motor se puede
apagar si se lo utiliza en determinadas alfombras. Si eso sucede apague la máquina, desenchúfela y verifique
si está bloqueada. Si no lo está, reduzca la carga en el rodillo cepillador mediante el ajuste de la altura del
cepillo a un nivel superior (de hasta 4)
25. Almacene la aspiradora en un lugar seco, a temperatura ambiente. Cuando no se utiliza la máquina se debe
enrollar el cable en su gancho.
26. Todas las demás reparaciones debe realizarlas un representante de servicio técnico autorizado.
GUARDE ESTAS INSTRUCCIONES
Page 20

Precauciones importantes
86041040 08/28/07
2-2SPA
Los accidentes por uso inapropiado sólo podrán evitarse por las personas que utilicen la maquina. Para prevenirse de
daños, deben observarse las precauciones básicas de seguridad, incluyendo las siguientes:
Lea y siga todas las instrucciones de
Seguridad.
Esta aspiradora se ha diseñado para ser segura cuando se utiliza para efectuar las funciones de limpieza. En caso de
que llegara a ocurrir algún daño a las piezas eléctricas o mecánicas, la aspiradora deberá ser reparada por WINDSOR
o alguna estación de servicio competente antes de usar a fin de evitar daño adicional a la máquina o lesión corporal al
usuario.
Un cable eléctrico dañado podría causar choque eléctrico o incendio. Observe las siguientes precauciones para
minimizar esta posibilidad:
No opere la máquina sobre el cable eléctrico.
Evite cerrar puertas sobre el cable, halarlo sobre bordes agudos colocar objetos con bordes agudos sobre él.
No enrolle el cable más apretado de lo necesario para que permanezca en los ganchos para ese efecto.
Al desconectar el cable eléctrico, tómelo de la clavija. Si hala el cable en si, podría dañar el aislamiento y las
conexiones internas con la clavija.
Su aspiradora crea succión y contiene un cepillo giratorio. Para evitar lesiones corporales por la succión o debido a las
piezas móviles, el cepillo de la aspiradora no deberá colocarse sobre, ni cerca de, prendas de vestir holgadas, joyería,
cabello o superficies del cuerpo mientras esté conectada a una toma eléctrica. La aspiradora no deberá usarse para
aspirar prendas de vestir en uso. Mantenga a los niños alejados de la aspiradora cuando ésta esté en funcionamiento
o enchufada.
Si utiliza las aspiradoras en alfombras de felpa o de acolchado espeso, desconecte la unidad cuando la palanca de
mando esté en posición vertical. Cuando utilice las herramientas accesorias, mantenga el cepillo para el piso alejado
de la alfombra, manteniendo la palanca de mando en la posición trabada y bajando la palanca de mando con una mano
para levantar el cepillo para el piso. Maneje los accesorios con la otra mano.
Siempre conecte la aspiradora en una toma de corriente de pared estándar. El uso de una extensión o portalámparas
que no posean la capacidad de portar energía eléctrica correcta podría resultar en un choque eléctrico o peligro de
incendio.
Desconecte la máquina antes de darle servicio, como por ejemplo, para cambiar las bolsas o las bandas. En caso de
que la máquina se encendiera inadvertidamente, podría incurrir alguna lesión corporal a causa de las piezas móviles.
Desconecte la máquina antes de retirar la cabeza principal. No utilice su aspiradora en áreas donde se encuentren,
presentes vapores o polvos inflamables o explosivos para evitar la posibilidad de un incendio o explosión. Algunos
líquidos para limpieza pueden producir dicho tipo de vapores. Las áreas donde se han utilizado líquidos para limpieza
deberán dejarse secar por completo antes de aspirarse.
Para evitar el peligro de incendio, no aspire cerillos, cenizas de hoguera ni materiales humeantes.
Mantenga su área de trabajo bien iluminada para evitar aspirar materiales dañinos (como por ejemplo líquidos, objetos,
agudos, o sustancias en combustión) y evitar accidentes por tropiezos.
Use cautela al operar la aspiradora sobre superficies irregulares, como por ejemplo escalones. Al caerse una máquina
podría causar lesiones corporales o daños mecánicos. También se evitarán accidentes causados por tropiezos sobre
la máquina si esta se guarda en un lugar adecuado donde no estorbe inmediatamente después de usarse.
Guarde su aspiradora en el interior en un área fresca y seca que no esté expuesta a los elementos para evitar choque
eléctrico o daño a la máquina.
La supervisión deberá ser extremadamente estricta para evitar daños cuando la aspiradora se utilice en la presencia
de niños o cuando se permita a un niño usarla. No permita que los niños jueguen con la aspiradora y nunca la deje
conectada y desatendida.
GUARDE ESTAS INSTRUCCIONES
ADVERTEINCIA: SI SE UTILIZA AL AIRE LIBRE O SOBRE
SUPERFICIES HÚMEDAS PRDRÍA OCURRIR
UN CHOQUE ELĖCTRICO
Page 21

INSTRUCCIONES PARA LA PUESTA A TIERRA
86041040 08/28/07
2-3SPA
Este dispositivo tiene que ser puesto debidamente a tierra. Si se produce una avería o rotura, la
conexión a tierra constituye el camino de menor resistencia para la corriente eléctrica, reduciéndose el
riesgo de descargas peligrosas. El aparato cuenta con un cable con conductor de puesta a tierra y un
enchufe con clavija de puesta a tierra. Hay que conectar el enchufe a una toma de corriente adecuada,
instalada y puesta a tierra de acuerdo con las normas y ordenanzas locales.
ADVERTENCIA
Si se conecta de modo inadecuado el conductor de puesta a tierra del aparato pueden producirse
descargas eléctricas peligrosas para el usuario. En caso de dudas, pedir a un electricista
debidamente cualificado o a un técnico del servicio postventa que verifique que la toma de corriente
está bien puesta a tierra. Si el enchufe suministrado con el aparato no se adapta a la toma de corriente
disponible, no hay que modificar el enchufe, sino dirigirse a un electricista para que instale una tome de
corriente adecuada.
El aparato está dimensionado para su conexión a una red de 120 Voltios de tensión nominal, y cuenta
con un enchufe con clavija de puesta a tierra como el que se muestra en la figura A. Si no se dispone
de una toma de corriente con puesta a tierra, puede utilizarse un adaptador temporal como el que se
muestra en las figuras B y C para conectar el aparato a una toma de corriente de 2 polos como la que
aparece en la figura B. Hay que emplear este adaptador solamente durante el tiempo necesario hasta
que el electricista haya instalado una toma de corriente conectada debidamente a tierra (figura A). La
lengüeta, argolla o elemento similar de color verde que sobresale del adaptador tiene que ser
conectada a una toma de tierra permanente, tal como la cubierta metálica de puesta a tierra de la caja
de enchufe. Siempre que se utilice el adaptado hay que mantener esta toma tierra en su posición con
ayuda de un tornillo metálico.
Advertencia: en Canadá, la Canadian Electrical Code prohíbe el uso de adaptadores temporales.
ADAPTADOR
TORNILLO METALICO
(A) (B)
(C)
TOMA DE CORRIENTE
CONECTADA A TIERRA
CLAVIJA DE
PUESTA A TIERRA
CAJA DE ENCHUFE
CON TOMA
DE CORRIENTE
CONECTADA A
TIERRA
APENDICE PARA
TORNILLO DE CONEXION
A TIERRA
Page 22

ESPECIFICACIONES TÉCNICAS
86041040 08/28/07
3-1SPA
PIEZA DE ASPIRACIÓN: (Unidad transportable)
ELEMENTO DIMENSIÓN/CAPACIDAD
Motor de aspiración De alto rendimiento, de una sola etapa
Potencia nominal del motor de aspiración 1000 Vatios
Potencia máxima del motor de aspiración 1200 Vatios
Succión 225 Mbar (2300 mm WS)
Altura de agua 234 cm. (92 pulgadas)
Caudal de aire 102 cfm (48 l/s)
Capacidad de la bolsa del filtro de 3,5 litros, 3 capas, incorporada, de carga superior
Peso
-FM12
-FM15
7,7 kg (17 libras)
7,9 kg (17,4 libras)
Dimensiones - Altura 123 cm. (48 pulgadas)
Alojamiento
Moldeado por inyección, ABS de alto impacto y
plástico PP
Cable 12 M (40 pulgadas) 18/3 SJT
CABEZAL MOTOR: (Cabezal desmontable)
ELEMENTO DIMENSIÓN/CAPACIDAD
Potencia nominal del motor del cepillo
- 30 cm. (12 pulgadas)
- 38 cm. (15 pulgadas)
175 Vatios
200 Vatios
Ancho de limpieza del cabezal motor
- FM12
- FM15
30 cm
38 cm
Accionamiento del cepillo
Correa dentada antideslizante, incorporada, embrague
electrónico de seguridad y control de velocidad.
Velocidad de cepillado 2700 rpm (5400 contactos del cepillo por minuto)
Ruedas
5,2 cm (2 pulgadas) de diámetro, impregnadas de
caucho
Page 23

COMPONENTES/CONTROLES
86041040 08/28/07
3-2SPA
1. Manija
2. Caño
3. Alojamiento de la
bolsa
4. Cubierta del filtro
5. Gancho para el cable
6. Manguera
7. Manija de la
manguera
8. Manija
9. Filtro de escape
10. Anillos de retención del filtro
11. Cuello giratorio
12. Pedal de pie
13. Cabezal motor (12” - 15”)
A. Interruptor de Encendido/ Apagado
B. Cable de energía
C. Gancho para el cable
Page 24

ENSAMBLADO/FUNCIONAMIENTO
86041040 08/28/07
3-3SPA
ENSAMBLADO
Por favor, lea todas las
instrucciones antes de utilizar la
máquina.
1. Conecte cuidadosamente la boquilla del cepillo a
la aspiradora, a través del accesorio ubicado en la
base de la aspiradora, hasta que quede trabada.
[Ver a continuación]
2. Empuje el extremo negro de la manguera [A]
dentro de la conexión ubicada en la tapa del
filtro [B].
3. Inserte la manija de la manguera [C] en la abertura
de succión ubicada al costado y presione la
manguera hasta que quede en su sitio en el
costado de la máquina, como se indica.
FUNCIONAMIENTO
La aspiradora Flexamatic funciona con un cepillo eléctrico.
La máquina se puede usar en posición vertical.
Cuando trabe la aspiradora en
la posición vertical, por favor,
verifique que el alojamiento de
la bolsa esté bien cerrado, si queda hacia delante, hacia el
centro de la unidad, podría volcarse.
Por favor, verifique que el interruptor de
Encendido/Apagado (On/Off) esté en la posición Apagado
(OFF). Gire el gancho para soltar el cable a fin de
enchufarlo al tomacorriente principal de pared.
Ahora puede poner en marcha la máquina poniendo el
interruptor en la posición Encendido (ON).
Para usar el cabezal motor (para el modelo de 12” ó 15”):
1. Oprima el pedal de pie [D] ubicado en la parte
posterior del cabezal motor y baje la manija de la
máquina hasta que quede en ángulo. Entonces se
enciende el motor de los cepillos.
Cuando utilice la manguera y los
accesorios, mantenga la máquina en la
posición vertical.
La manija de la manguera se puede
extraer del costado de la aspiradora y se
puede utilizar con o sin los accesorios.
Mantenga bien agarrada la máquina
cuando utilice la manguera ya que
puede volcarse si se tira demasiado de
la manguera.
La máquina también se puede usar sin
el cabezal motor. Puede transportar
fácilmente la máquina utilizando la
manija.
Una vez que terminó de utilizar la
máquina, apáguela moviendo el
interruptor hasta la posición de Apagado
(OFF). Luego desenchufe el cable y
enrósquelo en el gancho y la manija.
Manija
Manija
Manija
de la
!
PRECAUCION
!
PRECAUCION
!
PRECAUCION
Page 25

FUNCIONAMIENTO
86041040 08/28/07
3-4SPA
Instrucciones
importantes
relacionadas con el
cabezal motor.
Cuando la máquina está en posición vertical y la
manija está trabada completamente en su lugar, el
rodillo cepillador se apaga y se detiene.
NOTA: Si mantiene la manija de la máquina en
ángulo, el rodillo cepillador girará.
Si deja la máquina en la misma posición durante
mucho tiempo mientras el rodillo cepillador está
girando puede dañarse la alfombra.
Información importante que debe tener presente
para la operación de la máquina Flexamatic.
• Asegúrese de que NO se introduzcan en
el cepillo los bordes de las alfombras ni
los flecos.
• Esta máquina podría dañar las alfombras
o los tapetes con trama abierta, las
alfombras de lana, las alfombras tupidas o
los revestimientos para pisos muy suaves
y sensibles.
• NO se recomienda el uso del cabezal
motor para limpiar alfombras artesanales
antiguas o especialmente valiosas.
• Si el piso es desigual, la pieza metálica
ubicada debajo de la máquina puede
rayar las superficies.
• Por favor, levante la máquina para subir
umbrales altos.
CABEZAL MOTOR
El diseño rotativo del cuello giratorio permite que
el cabezal motor se mueva en todas
direcciones, facilitando su manipulación cuando
hay obstáculos.
El cabezal motor tiene también altura regulable
del cepillo y puede limpiar hasta el borde para
lograr una limpieza eficaz y completa.
PEDAL DE PIE
Si oprime el pedal de pie y baja la manija, se
activa el cabezal motor y el cepillo comienza a
girar.
La unidad sufrirá daños en caso de no utilizar el
Pedal de Pie.
!
PRECAUCION
!
ADVERTENCIA
Page 26

FUNCIONAMIENTO
86041040 08/28/07
3-5SPA
LUCES INDICADORAS
El control electrónico del cepillo supervisa
constantemente el estado del cepillo y lo transmite
mediante las luces ubicadas en la parte superior.
Verde y Roja: El cepillo no está totalmente
enganchado en la alfombra. Se debe bajar el
ajuste de la altura. Si el ajuste de la altura está en
la posición más baja, el cepillo está desgastado y
es necesario reemplazarlo
SOLO luz Verde: El cepillo funciona bien.
NOTA: Se recomienda elegir una altura para el
cepillo que se encuentre sólo un nivel por debajo
de aquel en el que las luces verde y roja están
prendidas.
SOLO luz Roja: El cepillo está bloqueado.
Apague la máquina, desenchúfela y desbloquee el
cepillo. [Consulte la sección sobre mantenimiento]
Page 27

MANTENIMIENTO
86041040 08/28/07
4-1SPA
RODILLO CEPILLADOR
Para sacar el rodillo cepillador, oprima el botón
y gire el cojinete hacia abajo.
Gire el cepillo levemente hacia la derecha y tire
del mismo hacia afuera.
Recomendamos eliminar regularmente los hilos
y los cabellos que quedan enroscados en el
rodillo cepillado.
FILTROS
Cuando el indicador naranja señala que la bolsa
está llena se reduce el flujo de aire. Esto puede
suceder si la bolsa del filtro está llena, si los
filtros están obturados o si el cepillo está
bloqueado.
CAMBIO DE LA BOLSA DEL FILTRO
1. Saque la bolsa del filtro abriendo el
seguro ubicado en el costado del
alojamiento de la bolsa.
2. Cierre la bolsa del filtro con el tapón
hermético y levántela
El procedimiento para reemplazar la bolsa se
ilustra en el frente de cada bolsa.
NOTA: No se puede cerrar el alojamiento de
la bolsa si la misma no está colocada
correctamente.
CAMBIO DE LOS FILTROS
Filtro de protección del motor
NOTA: Sólo se puede acceder a este filtro sacando
la bolsa del filtro.
1. Levante el filtro de protección del motor
usando el soporte.
2. Reemplácelo con uno nuevo.
3. Vuelva a poner la bolsa del filtro en su
lugar.
Se debe cambiar el filtro como mínimo cuando está
sucio. Antes de reemplazar 20 bolsas del filtro.
Filtro del escape
NOTA: Se recomienda reemplazarlo cada vez que
reemplace el filtro de protección del motor.
1. Saque cuidadosamente los anillos de
retención del filtro y colóquelos a un
costado.
2. Saque las bandas de refuerzo del filtro a
través de la ranura del alojamiento.
3. Saque el filtro del alojamiento.
4. Reemplácelo con uno nuevo siguiendo el
orden inverso.
Compruebe que el filtro está bien colocado en la
ranura del alojamiento y que los anillos de retención
están colocados correctamente.
NOTA: Si NO coloca bien el filtro no funcionará
eficazmente.
Utilice SOLAMENTE piezas de reemplazo Windsor
originales para asegurar efectividad y seguridad.
NO lave los filtros.
!
PRECAUCION
Page 28

MANTENIMIENTO
86041040 08/28/07
4-2 SPA
DESBLOQUEO DE LA MÁQUINA
Si el indicador de bolsa llena sigue
encendido después de cambiar las bolsas y
/ o los filtros, indica que alguna parte de la
unidad puede estar bloqueada.
Es importante mantener libres de bloqueos
a todas las partes del sistema ya que los
mismos pueden dañar su unidad o sus
componentes.
Verifique si existe succión en el
extremo de la manguera. Si hay
poca succión significa que la
manguera está bloqueada.
Para eliminar el bloqueo:
1. Afloje el anillo de seguridad
ubicado en la tapa.
2. Retire la manguera de la
máquina.
3. Invierta el flujo de aire que
pasa a través de la
manguera, colocando la
manija de la manguera en
el tubo de conexión de la
tapa del filtro.
4. Estire la manguera en el
punto donde supone que se
encuentra el bloqueo y abra
/cierre el extremo de la
manguera hasta eliminar el
bloqueo.
Verifique el orificio de succión
ubicado en la abertura de la manija
de la manguera. Elimine los
residuos que encuentre.
Verifique el cuello de succión del
cabezal motor. Elimine los residuos
que encuentre.
Verifique la trampilla ubicada en la
base del cabezal motor. Elimine los
residuos que encuentre.
Verifique el paso entre el cuello de
succión y la trampilla dentro del
cabezal motor ya que los obstáculos
pueden quedar atrapados en el
mismo. Elimine los residuos que
encuentre.
No limpie nunca
la manguera con
un palo ni con
objetos puntiagudos.
A
nillo de
seguridad
Mangu
Manija de la
A
bertura de la
manija de la
manguera (Orificio
de succión)
Cuello de
succión
A
bertura de la
tapa del filtro
Trampilla
!
PRECAUCION
Page 29

86041040 – K 02/18/08
PRV NO. 980226
MODELS: FM12
10120030
FM15
10120040
Instructions sure le fonctionnement (FRE)
Lisez les instructions avant d’utiliser la machine.
Page 30

DONNÉES SUR LA MACHINE/REVUE
86041040 08/28/07
2FRE
VOTRE VENDEUR
Nom: __________________________________________________________________________________________________
Adresse: _______________________________________________________________________________________________
Téléphone: _____________________________________________________________________________________________
MODELE _______________________________________
DATE D’ACHAT ________________________________
NUMERO DE SERIE ______________________________
REPRESENTANT # _____________________________
Copyright 2007 Windsor Industries, Printed in USA
Page 31

TABLE DES MATIERES
86041040 08/28/07
3FRE
Données sur la machine/Revue...................... 2
Table des matières.......................................... 3
COMMET UTILISER CE MANUEL
Comment utiliser ce manuel............................1-1
SECURITE
Importantes informations sur la sécurité
2-1
OPERATIONS
Spécifications techniques................................ 3-1
Composants ....................................................3-2
Commandes....................................................3-2
Assemblage. ...................................................3-3
Utilisation de la machine. ................................3-3
Tête d’alimentation.......................................3-4
Pédale. .........................................................3-4
Indicateurs lumineux.................................... 3-5
ENTRETIEN
Rouleau à balai. ..............................................4-1
Remplacement des filtres/du sac.................... 4-1
Sac............................................................... 4-1
Filtre de protection moteur........................... 4-1
Filtre sur l’échappement ..............................4-1
Elimination des bouchons. ..............................4-2
LISTE DES PIECES DU GROUPE
Tête d’alimentation..........................................5-1
Accessoires optionnels....................................5-1
Pièces diverses. ..............................................5-1
Garantie...........................................................5-6
Page 32

COMMENT UTILISER CE MANUEL
86041040 08/28/07
1-1FRE
Ce manuel comprend les parties suivantes
- COMMENT UTILISER CE MANUEL
- SECURITE
- OPERATIONS
- ENTRETIEN
- LISTE DEES PIECES
La partie COMMENT UTILISER CE MANUEL donne la
manière de trouver des informations importantes pour
commander des pièces correctes
Les pièces peuvent être commandées auprès de
concessionnaires Windsor autorisés. Los de la
commande de pièces, il est important de donner le
modèle et le numéro de série. Se référer au tableau de
données sur la machine fait pendant l’installation et
votre machine. Le tableau de données sur la machine
est situé à l’intérieur du couverture avant de ce manuel.
Ce modèle et le numéro de série de votre machine sont
en bas de l’arrière de la machine.
La partie SECURITE contient d’importantes informations
sur les risques ou les pratiques insécurisées de la
machine. Le niveau des risques est identifié et peut
causer des dommages au produit ou des blessures
personnelles, ou des blessures sévères causant la mort.
La partie OPERATIONS est destinée à familiariser
l’opérateur avec l’opération et la fonction de la machine.
La partie ENTRETIEN contient un entretien préventif
pour conserver la machine et ses composants en bon
état de fonctionnement. Ils sont énumérés dans la
commande globale.
- Filtres
- Blocages
La partie LISTE DES PIECES contient des illustrations
de parties assemblées et les listes de pièces
correspondantes. La liste des pièces comprend un
certain nombre de colonnes de renseignements.
- REF – Cette colonne se réfère au numéro
de référence de l’illustration des pièces
- NO DE LA PIECE – Cette colonne donne
la liste des numéros des pièces.
-
N° PRV – numéro de référence.
- QUANTITE – Cette colonne donne la liste
des quantités de la pièce utilisée dans
cette zone de la machine
- DESCRIPTION – Cette colonne est une
courte description de la pièce.
- NO DE SERIE. – Cette colonne indique la
première machine à laquelle s’applique la
pièce. Si la conception de la machine a
changé, cette colonne. Indique le numéro
de série de la machine à laquelle elle
s’applique. L’illustration principale présente
le modèle le plus courant de la machine
Les illustrations encadrées. présentent les
modèles plus anciens. Si les colonnes
comportent une astérisque (*) appeler le
fabriquant pour avoir le numéro de série.
- NOTES Les colonnes d’information ne
sont pas indexées par les autres colonnes.
REMARQUES: Si un kit de service ou de choix est
installé sur votre machine, assurez-vous que vous
gardez les INSTRUCTIONS qui ont été livrées avec le
kit. Elles contiennent des numéros de pièces de
rechange qui sont nécessaires pour des commandes
futures.
REMARQUES: Le nombre sur le coin gauche
inférieur de la couverture est le numéro de la pièce
pour ce manuel.
MODELE _____________________________________
DATE D’ACHAT _______________________________
NUMERO DE SERIE ____________________________
REPRESENTANT # ____________________________
Propriété 1995 de Windsor Industries. Imprimé aux Etats-Unis.
Page 33

86041040 08/28/07
2-1FRE
INSTRUCTIONS IMPORTANTES SUR LA SECURITE
Lors de l’utilisation d’appareils électriques, il faut toujours suivre des précautions de
base, y compris ce qui suit :
LISEZ TOUTES LES INSTRUCTIONS AVANT D’UTILISER LA MACHINE.
AVERTISSEMENT: Pour réduire les risques d’incendie, d’électrocution ou de blessure
1. Ne laissez pas l’appareil branché. Débranchez le de la prise s’il n’est pas utilisé et avant une
visite.
2. Ne pas utiliser à l’extérieur ou sur des surfaces humides.
3. Ne pas utiliser près de jeunes enfants. Ne laissez pas utiliser comme jouet. Une attention étroite
est nécessaire si on utilise près d’enfants ou par des enfants
4. Utilisez seulement selon la description dans ce manuel. Utilisez seulement les pièces
recommandées par le fabricant
5. Ne pas utiliser avec un câble ou une prise endommagés. Si l’appareil ne fonctionne pas, il doit
être abandonné, S’il y a des portes extérieures endommagées ou si cela a été mis dans l’eau,
renvoyer au centre de réparations.
6. Ne pas tire ou porter avec le câble, utiliser le câble comme poignée, fermer une porte sur un
câble, ou tirer le câble autour d’angles vifs. Ne pas utiliser l’appareil sur le câble. Laissez le câble
loin des surfaces chaudes.
7 Ne pas débrancher par tirage sur le câble. Pour débrancher, saisir la fiche, pas le câble.
8. Ne pas manipuler l’appareil ou le fiche avec des mains humides.
9. Ne pas mettre d’objet dans les ouvertures. Ne pas utiliser si des ouvertures sont bouchées.
Gardez loin de la poussière; du coton, des cheveux et de tout ce qui peut réduire le débit d’air.
10. Gardez les cheveux, les vêtements lâches, les doigts et toutes les parties du corps loin des
ouvertures et des pièces en mouvement. Ne pas mettre les doigts ou d’autres parties du corps
dans le vide si ce n’est pas débranché
11. Ne pas ramasser quoi que ce soit qui brûle, fume, tel que des cigarettes, des allumettes ou des
cendres chaudes
12. Ne pas utiliser sans sac à poussière et/ou autre filtre en place. Ne pas laver les filtres.
13. Arrêter toutes les commandes avant de débrancher.
14. Faire très attention lors du nettoyage d’escaliers.
15. Ne pas utiliser pour ramasser des liquides inflammables ou combustibles comme de l’essence, ni
utiliser dans des zones qui peuvent en avoir contenu.
16. Les machines peuvent causer des incendies si elles sont utilisées près de vapeurs ou matières
inflammables. Ne pas utiliser cette machine près de fluides, poussières ou vapeurs inflammables.
17. L’entretien et les réparations doivent être faits par du personnel qualifié.
18. N’utiliser que des pièces de rechange identiques. Voir les instructions sur les réparations
19. Ne pas utiliser la machine comme marche
20. Si on l’utilise sur des tapis à peluche ou des tapis épais, ne pas laisser la machine à un endroit si
elle est sous tension.
21. Ne pas réutiliser les sacs. Une fois pleins, jeter et remplacer par un sac neuf.
22. Toujours arrêter l’appareil avant la connexion ou la déconnexion de la buse motorisée.
23. Ne pas toucher aux rouleaux à brosse si la machine est branchée. Les brosses peuvent
redémarrer sans prévenir. Pour réduire le risque de blessure par les pièces mobiles, débranchez
avant toute réparation.
24. Le vide a une protection électronique contre les surcharges. L’alimentation se coupe si on l’utilise
sur certains tapis. Si cela se produit, arrêter la machine, débrancher et rechercher le bourrage..
S’il n’y en a pas, réduire la charge sur les rouleaux de balais en réglant plus haut la hauteur des
balais (jusqu’à 4)
25. Ranger l’aspirateur dans un endroit sec à température ambiante. Si l’aspirateur n’est pas utilisé,
mettre le câble sur les crochets à câble.
26. Tout autre service doit être exécuté par un représentant autorisé pour le service
GARDEZ CES INSTRUCTIONS
Page 34

INSTRUCTIONES VISANT LA MISE A LA TERRE
86041040 08/28/07
2-2FRE
Cet appareil doit être mis à la terre. En cas de défaillance ou de panne éventuelle, la mise à la terre fournit au
courant un chemin de moindre resistance qui réduit le risque de choc électrique. Cet appareil est pourvu d’un
cordon muni d’un conducteur de terre et d’une fiche avec broche de terre. La fiche doit être branchée-dans une
prise appropriée correctement installée et mise à la terre conformément aux règlements et ordonnances
municipales.
AVERTISSEMENT
Un conducteur de terre mal raccordé peut entraîner un risque de choc électrique. Consulter un électricien ou un
technicien d’entretien qualifié si vous n’étés pas certain que la prise est correctement mise 8 la terre. Ne pas
modifier la fiche fournie avec l’appareil si elle ne peut-être insérée dans las prise, faire installer une prise
adéquate par un électricien qualifie.
Cet appareil est destine à un circuit de 120 V et est muni d’une fiche de terre semblable à celle illustrée par le
croquis A. Un adaptateur temporaire semblable à celui illustré par les croquis B et C peut être utilise pour
brancher cette fiche a une prise bipolaire comme l’illustre croquis B si une prise avec mise à la terre n’est pas
disponible. L’adaptateur temporaire devrait être utilise seulement jusqu'à ce qu’une prise avec mise à la terre soit
installée par un électricien qualifie. L’oreille rigide ou le crochet ou autre dispositif semblable, de couleur verte,
prolongeant adaptateur doit être raccorde à un élément correctement mis à la terre comme le couvercle d’une
boite de sortie mis à la terre. L’adaptateur dout être fixé par une vis métallique.
Note. Au Canada, l’utilisation d’un adaptateur temporaire n’est pas autorisée par le Code canadien de l’electricite.
Adaptateur
Vis metallique
(A) (B)
(C)
Prise de cuourant
avec mise a la terre
Boite de sortie
mise a la terre
Platte destinee a
la vise de terre
Broche de mise
a la terre
Page 35

MESURES DE PRECAUTIONS IMPORTANTES
86041040 08/28/07
2-3FRE
Lire et suivre toutes
les instructions de sécurité
Cet aspirateur est conçu pour fonctionner sans danger lorsqu’il est utilise pour nettoyer. Au cas ou des pieces
mécaniques ou électriques étaient endommagées, l’aspirateur doit être répare par WINDSOR ou une autre
entreprise de services d’entretien qualifiée avant d’être utilise à nouveau, afin d’éviter que d’autres dommages ne
soin en causes à l’appareil ou qu’un accident n’arrive A l’utilisateur.
Un cordon électrique endommage peut provoquer un choc électrique et/ou incendie. Pour limiter ce risque, il faut
prendre les précautions suivantes :
Ne pas passer l’aspirateur sur le cordon électrique.
Eviter de coincer le cordon électrique dans les protes fermées, de le tendre sur des pourtours pointus ou
de mettre des objets tranchants dessus.
Ne pas serrer plus que nécessaire pour enrouler le cordon autour des crochets qui le maintiennent en
place.
Pour débrancher le cordon electrique, tirer au niveau de la prise. Tirer sur le cordon même risque
d’endommager sa gaine isolante et les connexions intérieures avec la prise.
Votre appareil crée une aspiration et contient une brosse qui tourné. Pour éviter les accidents causes par
l’aspiration ou par des pieces en mouvement dans l’appareil, la brosse de l’aspirateur doit être maintenir à l’écart
de vêtements, de bijoux, des cheveux ou de parties du corps lorsque l’aspirateur est branche. Ne pas utiliser
l’appareil pour aspirer les vêtements portés par l’utilisateur ou une autre personne. Maintenir les enfants A l’écart
de aspirateur lorsqu’il est en marche ou branche.
Lorsque utilise sur un tapis à longs poils ou un tapis épais arrêter l’aspirateur lorsque le manche est en position
verticale. Pour utiliser les accessoires, maintenir la brosse écartée du tapis en gardant le manche en position
bloquée et en l’abaissant d’uno main pour soulever la brosse du tapis. Utiliser les accessoires avec l’autre main.
Veiller à toujours brancher votre aspirateur dans une prise de courant standard. L’usage d’un cordon de rallonge
ou d’une douille de capacité de courant impropre risque de créer un choc électrique ou un danger d’incendie.
De brancher l’aspirateur avant de l’entretenir, par exemple, en changer le sac ou la courroie. Si l’appareil se
mettait en marche, un accident pourrait être provoqué par les pieces en mouvement de l’aspirateur. Débrancher
le cordon avant de détacher la tête de l’aspirateur.
Ne pas utiliser l’aspirateur dans les endroits où il existe des vapeurs ou des poussières inflammables et/ou
explosives pour éviter les risques d’incendie ou d’explosion. Certains produits liquides de nettoyage peuvent
créer ce genre de vapeurs. Les surfaces qui ont été nettoyées a l’aide de ces produits dovient être complètement
sèches et bien aérées avant qu’on ne puisse y passer l’aspirateur.
Afin d’éviter le danger d’incendie, ne pas aspirer d’allumettes, de cendres de cheminée ou de matières dégageant
de la fumée.
Veiller A ce que l’endroit aspire soit bien éclairé pour éviter d’aspirer des objets nuisibles (tels que liquides, objets
tranchants ou matières inflammables) et de trébucher.
Faire preuve de prudence en utilisant l’aspirateur sur les surfaces irrégulières telles que des escaliers. La chute
de Paspirataeur risque de provoquer un accident et/ou d’endommager l’appareil. Ranger l’aspirateur dans en
endroit a l‘écart immédiatement apres l’avoir utilise permet également d’éviter les accidents causes par le fait de
trébucher sur l‘appareil.
Ranger l’aspirateur A l’intérieur, dans un endroit frais et sec A l’abri des changements climatiques afin d’éviter un
choc electrique et/ou l’endommagement de l’appareil.
Faire très attention lorsque l’aspirateur fonctionne A proximité des enfants ou s’ils l’utilisent eux-mêmes. Interdire
aux enfants de jouer avec l’aspirateur et ne jamais le laisser branche et sans surveillance.
CONSERVER CES INSTRUCTIONS
ATTENTION: RISQUE DE CHOC ELECTRIQUE EN CAS D’USAGE
A L’EXTERIEUR OU SUR SURFACE HUMIDE
Page 36

SPECIFICATIONS TECHNIQUES
86041040 08/28/07
3-1FRE
PARTIE ASPIRATEUR (Unité portable)
ELEMENT
DIMENSION/CAPACITE
Moteur de l’aspirateur Performance élevée. Un étage
Puissance nominale 1000 Watts
Puissance maximale du moteur 1200 Watts
Aspiration 225 Mbar (2300 mm WS)
Prise d’eau 92 pouces (234 cm)
Débit d’air 102 cfm (48 l/s)
Capacité du sac filtrant 3,5 litres, 3 couches, chargement par le haut
Poids
-FM12
-FM15
17 lbs (7,7 kg)
17.4 lbs (7,9 kg)
Dimensions – hauteur 48 pouces (123 cm)
Caisse Moulage par injection, gros chocs Plastique ABS et PP
Câble 40 pouces (12 m) 18/3 SJT
ALIMENTATION : (Unité détachable)
ELEMENT
DIMENSION/CAPACITE
Puissance du moteur à balais
- 12 pouces (30 cm)
- 15 pouces (38 cm)
175 Watt
200 Watt
Largeur de travail
- FM12
- FM15
30 cm
38 cm
Commande par balais
Courroie dentée non glissante, embrayage
électronique de sécurité et commande de la vitesse.
Vitesse des balais 2700 t/m, (5400 contacts des balais/minute)
Roues 2 pouces (5,2 cm) de diamètre, caoutchoutées
Page 37

COMPOSANTS/COMMANDES
86041040 08/28/07
3-2FRE
1. Poignée
2. Tube
3. Logement du sac à poussière
4. Couvercle du filtre
5. Crochet du câble
6. Hôte
7. Poignée du tuyau
8. Poignée de transport
9. Fitre d’échappement
10. Bagues de retenue du filtre
11. Bascule
12. Pédale
13. Tête d’alimentation (12” – 30mm,
ou 15” – 38 mm):
A. Commutateur Marche/Arrêt
B. Câble d’alimentation
C. Crochet à câble
Page 38

ASSEMBLAGE/ FONCTIONNEMENT
86041040 08/28/07
3-3-FRE
ASSEMBLAGE
Veuillez lire toutes les
instructions avant d’utiliser
cette machine.
1. Attacher avec soin la buse à l’aspirateur en
montant au bas de l’aspirateur jusqu’à verrouillage
(voir ci-dessous)
2. Pousser l’extrémité noire du tuyau (A) dans la
connexion dans le couvercle du filtre (B)
3. Insérer la poignée du tuyau ( C) dans l’ouverture
d’aspiration sur le côté et presser le tuyau à sa
place à l’extrémité de la machine , comme illustré.
FONCTIONNEMENT
Votre Flexamatic est utilisé avec une brosse électrique.
Vous pouvez utiliser l'aspirateur lorsqu'il est en position
debout.
Quand on verrouille
l’aspirateur en position
debout, veuillez vous assurer que le logement du sacs est
en place, avec la face en avant sinon l’unité peut se
renverser.
Veuillez vous assurer que le commutateur On/Off est sur
la position OFF. Tourner le crochet du câble pour libérer le
câble d’alimentation et brancher dans la prise de courant
murale.
Vous pouvez maintenant démarrer la machine en mettant
le commutateur sur la position ON.
Pour utiliser la tête d’alimentation (modèle 12’’ ou 15‘’)
1. Appuyez sur la pédale (D) à l’arrière de la tête
d’alimentation et abaisser la poignée en position
angulaire. Le moteur à balais est alors sous
tension.
Lors de
l’utilisation
du tuyau
et accessoires, laissez la machine
debout.
La poignée à tuyau peut être retirée du
côté de l’aspirateur et peut être utilisée
ave ou sans accessoires. Garder aussi
la main sur la machine lors de
l’utilisation du tuyau car elle peut
basculer si le tuyau est trop tiré.
La machine peut aussi être utilisée sans
tête d’alimentation. Vous pouvez
facilement porter la machine en utilisant
la poignée de portage.
Lorsque vous avez fini d’utiliser la
machine, arrêtez la en mettant le
commutateur en position OFF. Puis
débranchez la fiche du câble et entourez
le sur la crochet à câble.
Poignée de
transport
Poignée
Poignée
du tuyau
! ATTENTION :
! ATTENTION :
! ATTENTION :
Page 39

OPERATION
86041040 08/28/07
3-4FRE
!
A
VERTISSEMEN
T
Instructions
importantes sur
l’utilisation de la tête
d’alimentation.
Lez rouleau à brosses est arrêté si la machine est
en position debout et si la poignée est bien
verrouillée en place.
REMARQUES: Si la poignée de la machine est
selon un angle, le rouleau à balais tourne.
En laissant la machine dans une position
stationnaire pendant un temps long alors que le
rouleau à balais tourne, ceci peut endommager le
tapis.
Points recommandés à surveiller concernant votre
Flexamatric.
• Ne laissez pas les bords du tapis ou les
franges entrer dans les balais
• Cette machine peut endommager les tapis
tissés, les tapis en boucles, les tapis
veloutes ou les couvertures de sols douces
et sensibles.
• Nous ne recommandons pas l’utilisation
de la tête d’alimentation pour nettoyer des
vieux ou spécialement coûteux tapis
• Si vous avez un sol inégal, la partie
métallique sous la machine peut griffer la
surface
• Veuillez porter la machine au dessus de
seuils élevés.
TETE D’ ALIMENTATION
Le modèle tournant permet à la tête d’alimentation
de se déplacer dans tous les sens, en la rendant
facilement manœuvrable autour des obstacles.
La tête d’alimentation comporte aussi une hauteur
réglable de balai et une action du balai au bord
pour un nettoyage effectif général.
PEDALE
En poussant sur la pédale et en abaissant la
poignée, vous actionnez la tête d’alimentation et
les balais commencent à tourner.
Si vous ne poussez pas la pédale, vous risquez
d'endommager la machine.
! ATTENTION :
Page 40

OPERATION
86041040 08/28/07
3-5FRE
LUMIERES INDICATRICES
La commande électronique des balais surveille
constamment l’état des balais, en communiquant
cet état par la lampe de dessus.
Verte et Rouge. Le balai n’est pas entièrement
engagé dans le tapis. La hauteur doit être réduite.
Si le réglage de la hauteur est au plus bas, la
brosse est usée et a besoin d’être remplacée.
Lampe Verte SEULE. La brosse fonctionne
correctement .
REMARQUES:Nous recommandons de choisir
une hauteur de brosse qui n’est qu’à un niveau en
dessous de celui auquel les lampes verte et rouge
sont allumées.
Lampe Rouge SEULEMENT Le balai est bouché
Arrêter la machine, débranchez et enlevez le
bouchon (voir la partie entretien).
Page 41

ENTRETIEN
86041040 08/28/07
4-1FRE
ROULEAU A BALAI
Pour enlever le rouleau à balai appuyer sur le
bouton et tourner vers le bas le roulement.
Tourner le balai légèrement vers la droite et le
tirer pour le sortir.
Nous recommandons l’enlèvement régulier de
fils et de cheveux qui ont été entourés sur le
rouleau.
FILTRES
Lorsque l’indicateur orange du sac se voit, le
débit d’air est réduit. Ceci pourrait être causé
par le fait que le sac-filtre est plein, que les
filtres sont bouchés ou qu’il y ait un bouchon.
CHANGEMENT DU SAC FILTRANT
1. Enlever le sac filtrant en ouvrant la trappe
sur le côté du logement des sacs.
2. Fermez le sac avec le capuchon de
fermeture et sortez le.
La procédure de remplacement de sac est illustrée
sur le devant de chaque sac
REMARQUES: On ne peut pas fermer le portesac si le sac est monté incorrectement.
CHANGEMENT DES FILTRES
Filtre de protection du moteur
REMARQUES: On ne peut accéder à ce filtre
qu’en sortant le sac
1. Soulevez le haut du filtre de protection du
moteur par le coude
2. Remplacer par le nouveau.
3. Remettre en place le sac.
Le filtre doit être changé lorsqu’il est sale, au
minimum. Pa plus tard que le remplacement de 20
sacs.
Filtre d’échappement
REMARQUES: Recommandation de le remplacer
chaque fois qu’on remplace la filtre de protection
Moteur.
1. Enlever soigneusement les bagues de
rétention du filtre et mettez les de côté.
2. Pousser les bandes de renfort du filtre pour
les sortir par la fente.
3. Sortir le filtre du logement.
4. Remplacer par le nouveau filtre dans
l’ordre inverse.
Assurez vous que le filtre est monté correctement
dans la trappe du logement et que les sacs ainsi que
les bagues de rétention.
REMARQUES: Si le filtre n’est pas monté
correctement, il sera inefficace
N’utiliser que des pièces d’origine Windsor pour
garantir l’efficacité et le sécurité.
NE PAS LAVER les filtres
! ATTENTION :
Page 42

ENTRETIEN
86041040 08/28/07
4-2FRE
ENLEVEMENT DES BOUCHONS
Si votre lampe indicatrice que le sac est
plein reste allumée après le changement de
sacs et/oui de filtres, ceci est une indication
qu’il peut y avoir un bouchon quelque part
dans l’unité.
.
Il est important de garder toutes les zones
libres de bouchons car cela peut
endommager votre machine ou ses
composants.
Vérifier l’aspiration en bout de tuyau.
Si on ne peut sentir qu’une faible
aspiration, il y a un bouchon dans votre
tuyau.
Pour l’enlever:
1. Libérer la bague de
sécurité sur le couvercle.
2. Enlever le tuyau de la
machine.
3. Inverser le débit d’air dans
le tuyau en mettant la
poignée du tuyau dans le
tube de connexion du
couvercle du filtre.
4. Tirer sur le tuyau là où peut
se trouver le bouchon et
ouvrir/fermer l’extrémité du
tuyau jusqu’à ce que le
bouchon soit éliminé.
Vérifier l’ouverture d’aspiration près de
l’ouverture de la poignée du tuyau.
Enlever tout débris trouvé.
Vérifier l’aspiration de la tête
d’alimentation. Eliminer tout debris que
vous trouveriez.
Vérifier la trappe en bas de la tête
d’alimentation. Enlever tout débris
trouvé.
Vérifier entre le coude d’aspiration et
la trappe dans la tête d’alimentation car
des bouchons peuvent se loger sur le
chemin. Enlever tout débris trouvé.
Ne jamais nettoyer le tuyau avec un bâton
ou un objet pointu.
Bague de
Tuyau
Poignée du tuyau
Ouverture de la
poignée du tuyau
(ouverture d’aspiration)
Coude
d’aspiration
Ouverture de la
couverture de
filtre
Trappe
! ATTENTION :
Page 43

PARTS
86041040 08/28/07
5-1
POWER HEAD
OPTIONAL ATTACHMENTS
SPARE PARTS
Ref Description Notes
1 POWER HEAD 12” FM12 Only
2 POWER HEAD 15” FM15 Only
Ref Part No. Prv. No. Description Notes
1 86143670 1081HG CLIPS, ATTACHMENT
2 86140860 1092JE CREVICE TOOL, GRY
3 86146300 1491HG UPHOLSTERY NOZZLE, GRY
4 86141000 1094HG DUSTING BRUSH, GRAY
Ref Part No. Prv. No. Description Notes
1 86284780 7015WI FILTER, EXHAUST
2 86284790 7029WI FILTER BAG
3 86284770 7012
FILTER, MOTOR
PROTECTION
4A 86004950 5010WI BRUSH ROLLER 12” FM12 Only
4B 86138490 2838WI BRUSH ROLLER 15” FM15 Only
Page 44

86041040 08/28/07
5
-
2
POS.
PRODUCT
CODE
PRV
NO.
DESCRIPTION
1 86137750 7135DG AIR DUCT
2 86146820 7065 INTERNAL WIRING ET
3 86142920 7096 INTERNAL CABLE
4 86144780 01016ER SCR, 4X16-T20 STS
5 86146510 7057HG VALVE COVER
6 86139960 7102ER
PRINTED CIRCUIT
BOARD 120V
7 86145180 7098 SOUND INSULATION
8 86146380 1047 VAC MOTOR SEAL
9 86144740 7009 RUBBER MOUNTING
10 86143660 7041ER VAC MOTOR 120V
11 86138380 05140S CARBON BRUSH SET
12 86141270 7001 DUST BAG HOUSING
13 86284770 7012
FILTER, MOTOR
PROTECTION
14 86142510 7080ER HANDLE TUBE
15 86144830 0127ER SCR M 4X10
16 86146830 7068ER INTERNAL WIRING
17 86146490 7025 VALVE DISC
18 86146500 7026 VAVLE SPRING
19 86142680 7090HG HOSE DUCT
20 86139340 7027HG CABLE HOOK
21 86140850 7092BL
COVER, DUST BAG
HOUSING
22 86144790 01017ER SCR, 4X20-T20 STS
23 86284790 7029WI FILTER BAG
24 86141660 7091BL FILTER COVER
25 86284780 7015 WI EXHAUST FILTER
26 86141460 7017 HG
EXHAUST FILTER
CLAMP
27 86143170 7003BL LOWER HOUSING
28 86146250 7076HG TUBE PLUG
29 86142520 7163HG HANDLE GRIP CPL
30 86139350 7126BL CABLE 120V, US
31 86145140 7035BL SLIDING BUTTON
32 86142500 7073HG HANDLE FRAME
33 86145480 05138
ROCKER SWITCH, 2
POL.
34 86142670 7050SB HOSE DUCT
35 86139110 1030UL CABLE CLAMP
36 86016900 0103ER SCREW C 3,9X16
37 86292570 - CABLE GROMMET
38 86141670 7094ER
FILTER INDICATOR,
CPL.
39 86144630 7018OR
RETAINING RING,
CPL.
FLEXAMATIC 12 120V
Page 45

86041040 02/18/08
5-
3
POS.
PRODUCT
CODE
PRV
NO.
DESCRIPTION
100 86139640 2324HG CHASSIS ET1
101 86138840 2302HG BUMPER 12”
102 86138130 2314HG BEARING BLOCK LH
103 86138220 2923 BELT 333 3M HTDII-6
104 86004950 5010WI BRUSH ROLLER 12”
105 86138120 2313HG BEARING BLOCK RH
106 86145260 2929 SPRING
107 86137840 2316HG ASM PILE ADJUST
108 86137710 2909VO ACCESS DOOR
109 86143990 2304HG
REAR BOTTOM
PLATE, 12”
110 86139090 2931HG PILE ADJUST BUTTON
111 86146600 2306HG WHEEL
112 86141710 2937OR FOOT PEDAL
113 86137830 2308HG
SWIVEL NECK ASM
TS
114 86146810 0877
WIRING SWIVEL
NECK
115 86140630 2947HG COVER, TS-NECK
116 86144990 2950ER SEGMENTS, TS-NECK
117 86139080 1737ER RELEASE BUTTON
118 86140650 2952HG
BUTTON COVER TS-
NECK
119 86145920 2945HG SWIVEL NECK SLIDE
120 86140640 2951HG
SOCKET COVER TS-
NECK
121 86144820 01027ER
SCR F 3.9X9.5 DIN
7981
122 86138140 2954
SWIVEL NECK
BEARING
123 86145400 2311
SWIVEL NECK
SUPPORT, RH
124 86145410 2312
SWIVEL NECK
SUPPORT, LH
125 86145500 0882
SWITCH SWIVEL
NECK
126 86137930 2928 AXLE
127 86144810 01021ER SCR F3.9X13 DIN 968
128 86143500 2973ER
BRUSH MOTOR 12V
175W
129 86138390 05141S
BRUSH SET, CARBON
VAC MTR
130 86144800 01020ER SCR, F3.9X21 DIN 968
131 86144160 2983ER
POWER SUPPLY ETI
175W
132 86140500 2320BL
COVER POWER HEAD
ET1
133 86144840 0176TER
SCR M4X30 DIN 7985
(PKG10
134 86309030 -
BRUSH MOTOR
PULLEY FM
FLEXAMATIC 12 120V
134
Page 46

86041040 08/28/07
5
-
4
POS.
PRODUCT
CODE
PRV
NO.
DESCRIPTION
1 86137750 7135DG AIR DUCT
2 86146820 7065 INTERNAL WIRING ET
3 86142920 7096 INTERNAL CABLE
4 86144780 01016ER SCREW STS 4X16-T20
5 86146510 7057HG VALVE COVER
6 86139960 7102ER
PRINTED CIRCUIT
BOARD 120V
7 86145180 7098 SOUND INSULATION
8 86146380 1047 VAC MOTOR SEAL
9 86144740 7009 RUBBER MOUNTING
10 86143660 7041ER VAC MOTOR 120V
11 86138380 05140S
PAIR OF CARBON
BRUSHES
12 86141270 7001 DUST BAG HOUSING
13 86284770 7012 MOTOR FILTER
14 86142510 7080ER HANDLE TUBE
15 86144830 0127ER SCREW M 4X10K
16 86146830 7068ER INTERNAL WIRING
17 86146490 7025 VALVE DISC
18 86146500 7026 VAVLE SPRING
19 86142680 7090HG HOSE DUCT
20 86139340 7027HG CABLE HOOK
21 86140850 7092BL
COVER, DUST BAG
HOUSING
22 86144790 01017ER
SCREW STST 4X20-
T20
23 86284790 7029WI DUST BAG
24 86141660 7091BL FILTER COVER
25 86284780 7015 WI EXHAUST FILTER
26 86141460 7017 HG
EXHAUST FILTER
CLAMP
27 86143170 7003BL LOWER HOUSING
28 86146250 7076HG TUBE PLUG
29 86142520 7163HG HANDLE GRIP CLP.
30 86139350 7126BL CABLE 120V, US
31 86145140 7035BL SLIDING BUTTON
32 86142500 7073HG HANDLE FRAME
33 86145480 05138
ROCKER SWITCH, 2
POL.
34 86142670 7050SB HOSE DUCT
35 86139110 1030UL CABLE CLAMP
36 86016900 0103ER SCREW C 3,9X16
37 86292570 - CABLE GROMMET
38 86141670 7094ER
FILTER INDICATOR,
CPL.
39 86144630 7018OR
RETAINING RING,
CPL.
FLEXAMATIC 15 120V
Page 47

86041040 02/18/08
5-
5
POS.
PRODUCT
CODE
PRV
NO.
DESCRIPTION
100 86139650 2325HG CHASSIS, ET2
101 86138850 2303HG BUMPER, ET2,CPL
102 86138130 2314HG
BEARING BLOCK,
LEFT CPL.
103 86138220 2923 BELT 333 3M HTDII-6
104 86138490 2838WI BRUSH ROLLER, CPL.
105 86138120 2313HG
BEARING BLOCK,
RIGHT CPL.
106 86145260 2929 SPRING
107 86137840 2316HG ADM. PILE ADJUST.
108 86137710 2909VO ACCESS DOOR ET
109 86144000 2305HG
REAR BOTTOM
PLATE, CPL.
110 86139090 2931HG PILE ADUST. BUTTON
111 86146600 2306HG WHEEL, CPL.
112 86141710 2937OR FOOT PEDAL
113 86137830 2308HG
SWIVEL NECK ASM.
CPL.
114 86146810 0877
WIRING SWIVEL
NECK
115 86140630 2947HG COVER
116 86144990 2950ER SEGMENTS
117 86139080 1737ER RELEASE BUTTON
118 86140650 2952HG BUTTON COVER
119 86145920 2945HG SWIVEL NECK SLIDE
120 86140640 2951HG SOCKET COVER
121 86144820 01027ER SCREW F 3,9X9,5
122 86138140 2954
SWIVEL NECK
BEARING
123 86145400 2311
SWIVEL NECK
SUPPORT, RIGHT
124 86145410 2312
SWIVEL NECK
SUPPORT, LEFT
125 86145500 0882
WIRING SWIVEL
NECK SWITCH
126 86137930 2928 AXLE
127 86144810 01021ER SCREW F3,9X13
128 86143510 2974ER
BRUSH MOTOR 12V
200W
129 86138390 05141S
PAIR OF CARBON
BRUSHES, 120V
130 86144800 01020ER SCREW, F 3,9X21
131 86144170 2984ER
PRINTED CIRCUIT
BOARD ET2-200W
132 86140510 2322BL
POWER HEAD COVER
ET2
133 86144840 0176TER SCREW AM 4X30
134 86309030 -
BRUSH MOTOR
PULLEY FM
FLEXAMATIC 15 120V
134
 Loading...