

Page 1
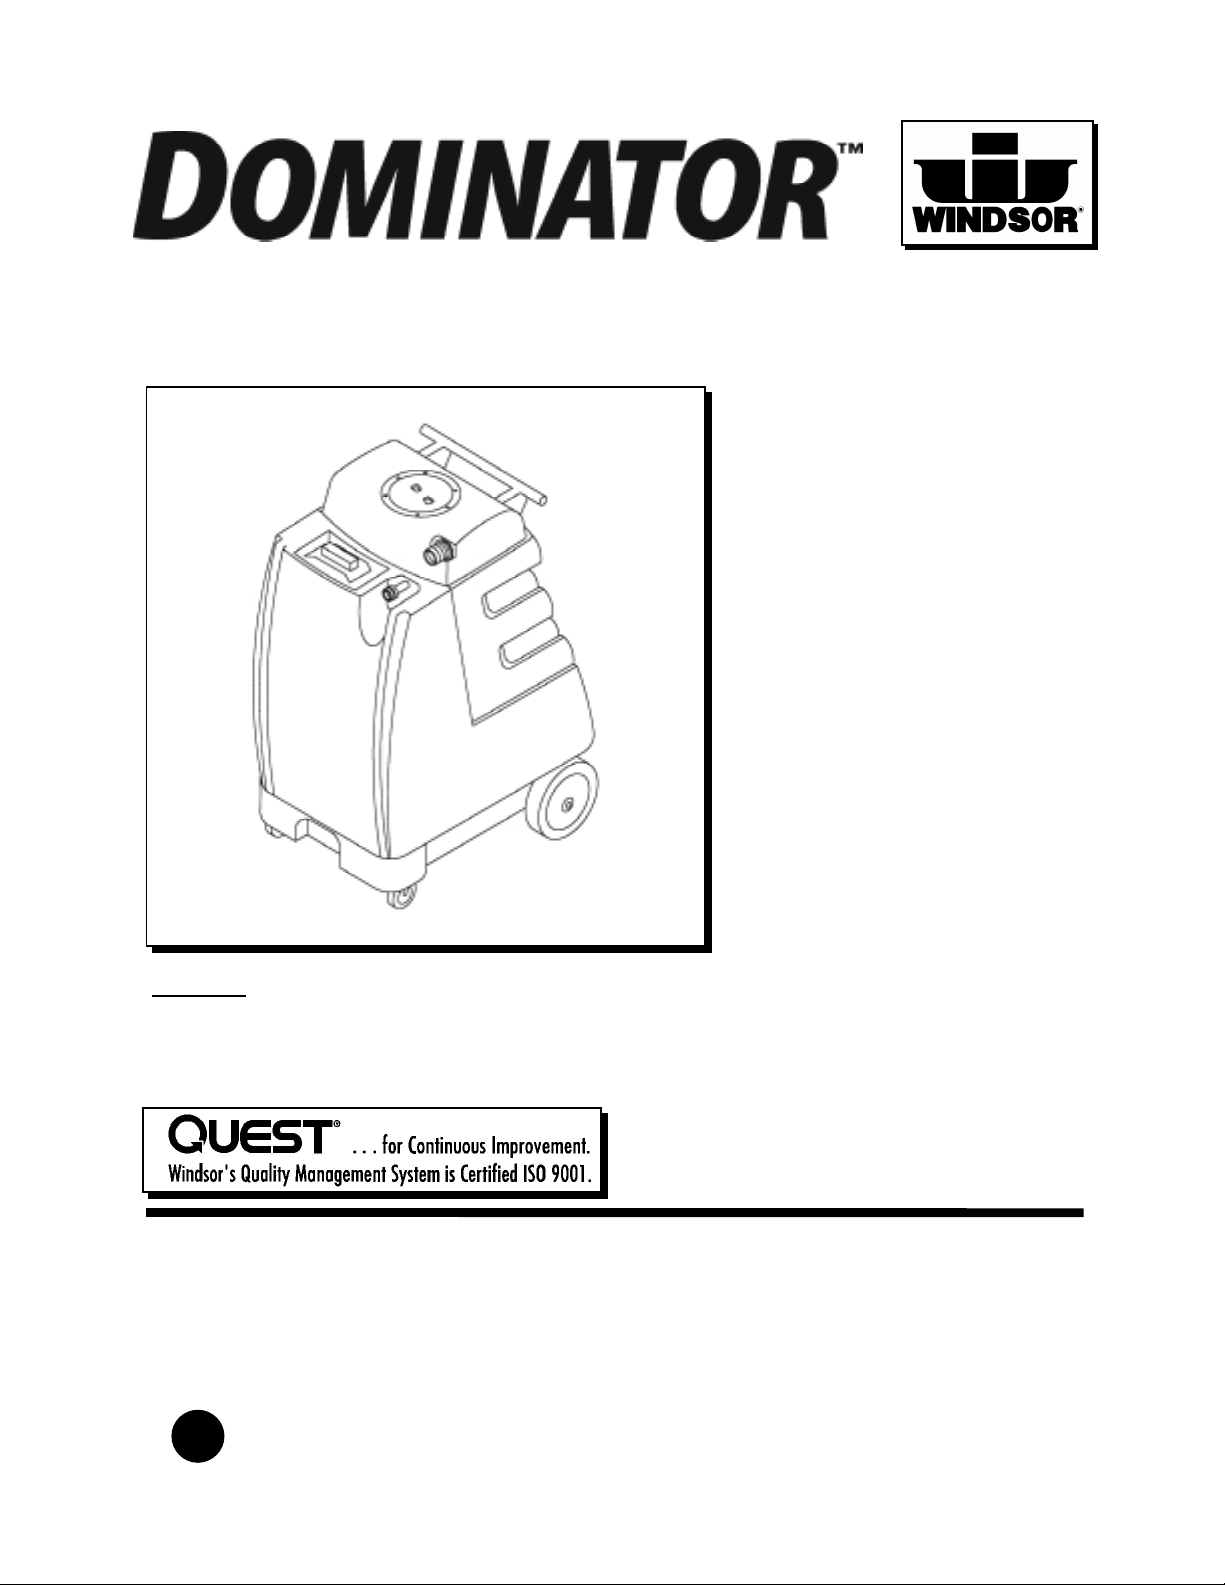
CARPET EXTRACTOR
Operating Instructions (ENG)
MODEL: D250 (115V)
D250IE (230V)
Prior to Serial No. 1000054536
F
98637 04/25/02
Read these instructions before operating the machine
Page 2

SAFETY INSTRUCTIONS
IMPORTANT SAFETY INSTRUCTIONS
When using an electrical appliance, basic precaution
must always be followed, including the following:
READ ALL INSTRUCTIONS BEFORE USING THIS MACHINE.
This machine is for commercial use.
WARNING:
Connect to a properly grounded outlet. See Grounding Instructions.
Do not leave the machine unattended. Unplug machine from outlet when not in use and before
maintenance or service.
Use only indoors. Do not use outdoors or expose to rain.
Do not allow machine to be used as a toy. Close attention is necessary when used by or near
children.
Use only as described in this manual. Use only manufacturer’s recommended components and
attachments.
Do not use damaged electrical cord or plug. Follow all instructions in this manual concerning grounding
the machine. If the machine is not working properly, has been dropped, damaged, left outdoors, or
dropped into water, return it to an authorized service center.
Do not pull or carry machine by electrical cord, use as a handle, close a door on cord, or pull cord
around sharp edges or corners.
Do not run machine over cord. Keep cord away from heated surfaces.
Do not unplug machine by pulling on cord. To unplug, grasp the electrical plug, not the electrical cord.
Do not handle the electrical plug or machine with wet hands.
To reduce the risk of fire, electric shock, or injury:
Do not operate the machine with any openings blocked. Keep openings free of debris that may reduce
airflow.
This machine is intended for cleaning carpet only.
Do not vacuum anything that is burning or smoking, such as cigarettes, matches, or hot ashes.
This machine is not suitable for picking up health endangering dust.
Turn off all controls before unplugging.
Machine can cause a fire when operating near flammable vapors or materials. Do not operate this
machine near flammable fluids, dust or vapors.
This machine is suitable for commercial use, for example in hotels, schools, hospitals,
factories, shops and offices for more than normal housekeeping purposes.
Maintenance and repairs must be done by qualified personnel.
If foam or liquid comes out of ma chine, switch off imme diately.
SAVE THESE INSTRUCTIONS
D-250 98637 01/19/99
2
Page 3
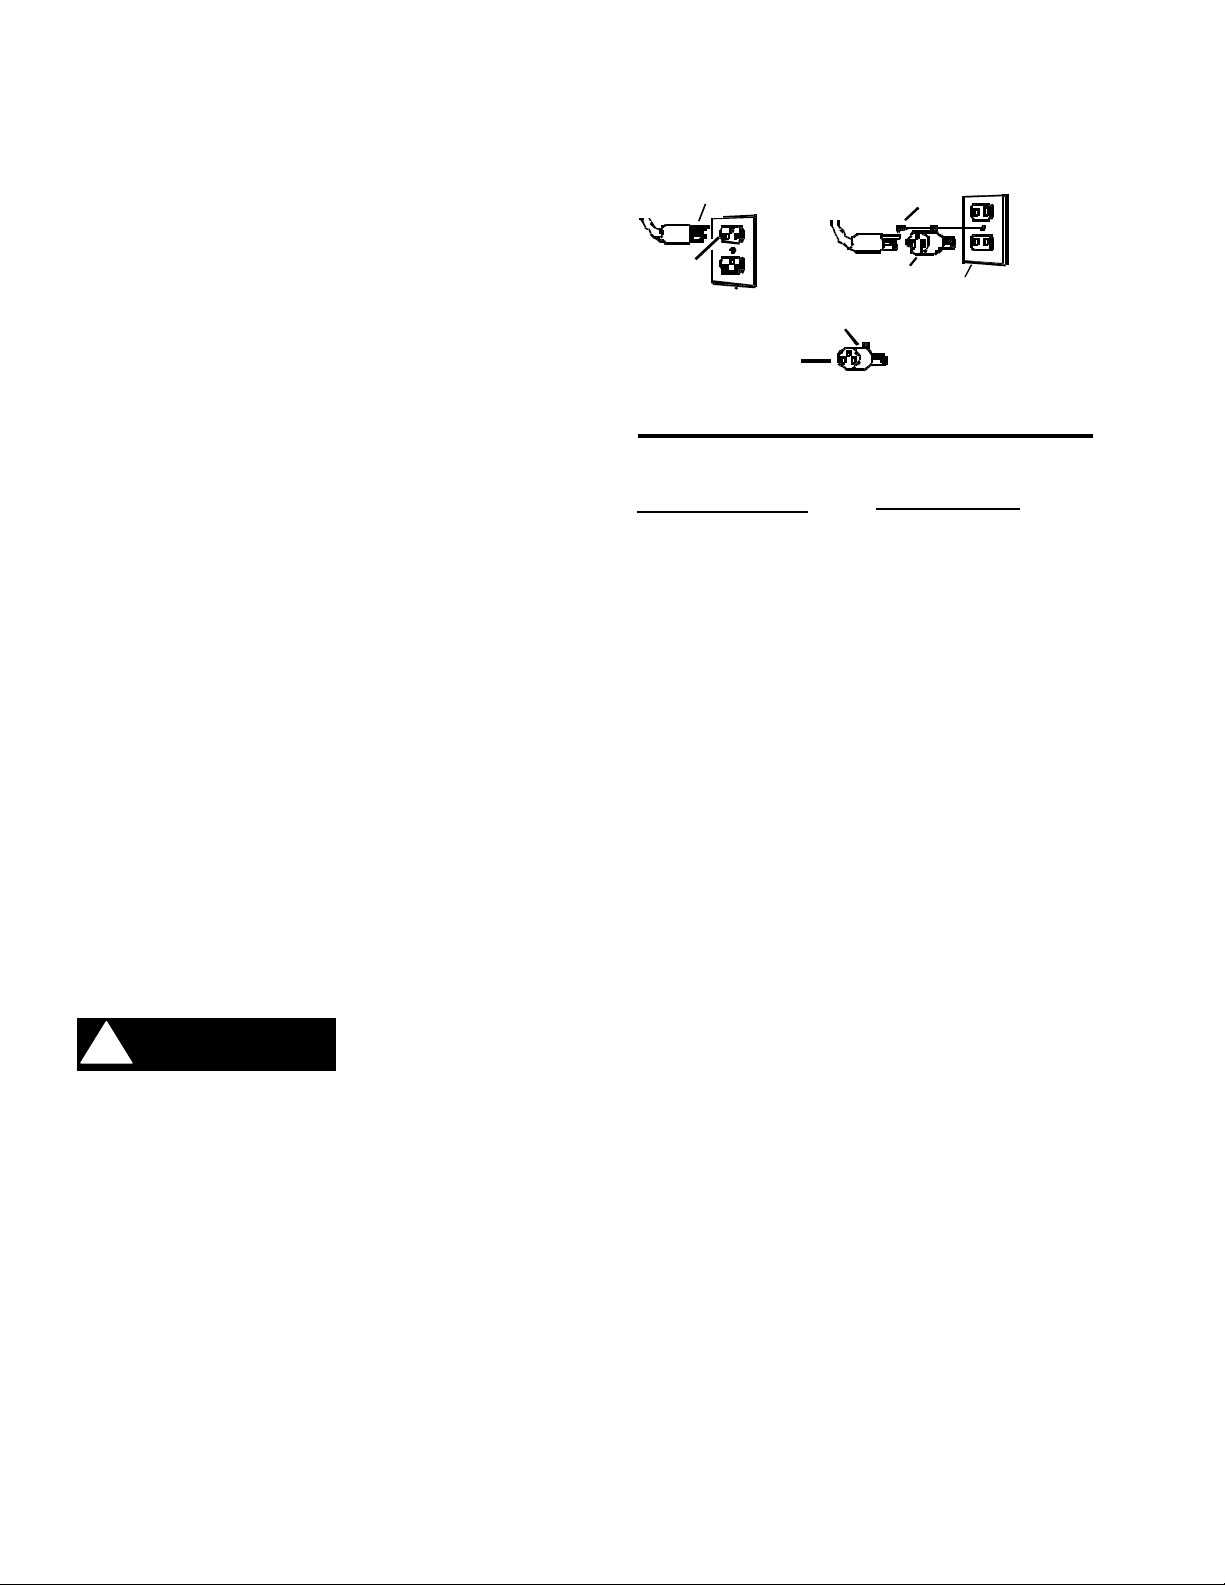
GROUNDING INSTRUCTIONS
t
p
e
A
A
A
THIS PRODUCT IS FOR COMMERCIAL USE ONLY.
ELECTRICAL:
The amp, hertz, and voltage are listed on the
data label found on each machine. Using
voltages above or below those indicated on the
data label will cause serious damage to the
motors.
GROUNDING INSTRUCTIONS:
This appliance must be grounded. If it should
malfunction or break down, grounding provides a
path of least resistance for electric current to
reduce the risk of electric shock. This appliance
is equipped with a cord having an equipmentgrounding conductor and grounding plug. The
plug must be inserted into an appropriate outlet
that is properly installed and grounded in
accordance with all local codes and ordinances.
The D250 is for use on a nominal 115-volt circuit,
and has a grounded plug that looks like the plug
in “Fig. A”. A temporary adaptor that looks like
the adaptor in “Fig . C” may be used to connect
this plug to a 2-pole receptacle as shown in “Fig.
B”, if a properly grounded outlet is not available.
The temporary adaptor should be used only until
a properly grounded outlet (Fig. A) can be
installed by a qualified electrician. The green
colored rigid ear, lug, or the like extending from
the adaptor must be connected to a permanent
ground such as a properly grounded outlet box
cover. Whenever the adaptor is used, it must be
held in place by a metal screw.
The D250IE is for use on a nominal 230-volt
circuit.
WARNING:
Improper
connection of the
equipment-grounding conductor can result in a
risk of electric shock. Check with a qualified
electrician or service person if you are in doubt as
to whether the outlet is properly grounded. Do
not modify the plug provided with the appliance if it will not fit the outlet, have a proper outlet
installed by a qualified electrician.
PROPER GROUNDING (115V)
Grounding Pin
Grounded
Outlet
Fig. A
Tab For Grounding Screw
Adaptor
NOTE: In Canada, the use of a temporary a daptor is no
ermitted by the Canadian Electrical Cod
CHEMICALS
Suitable Chemicals
lkalis
Detergents
Hydroxides
Soaps
Vinegar
Metal Screw
Adaptor
Grounded Outlet Box
Fig. B
Fig. C
Non-Compatible
ldehydes
romatics Hydrocarbons
SP Butyls
Carbon Tetrachloride
Clorox*
Chlorinated Bleaches
Chlorinated Hydrocarbons
Lysol*
Methyl Ethel Ketone (MEK)
Perchorethylene (perc)
Phenolics
Trichlorethylene
D-Limonene
Warning:
Using the incompatible chemicals listed above
will damage the machine. Damages of this
type are not covered under the 6-3-1 warranty.
Carefully read ingredients on manufacturer's
label before using any product in this machine.
3
D-250 98637 04/25/02
Page 4

OPERATIONS
CARPET INSPECTION:
Determine precisely what areas you are
going to clean. Note problem areas in the
carpet or tack strip. Look for loose carpet,
heavily damaged areas, discolored stains,
or grease spots that will require prespotting.
Note the carpet type. Check the availability
of hot water, drains, and suitable electrical
outlets. If the carpet is loose or worn, have
it repaired before attempting to clean it.
Plan the cleaning route, work from the most
remote area towards the exit. Try not to
travel over the cleaned areas when getting
fresh water or dumping old. Furniture
should be moved out away from the walls
before cleaning. If furniture is moved back
in place before carpet is completely dry,
place plastic or foil protectors under the
legs to prevent possible carpet staining.
When poss i ble use a Windblower (WB3)
and open all windows and doors to speed
carpet drying.
ACCESSORIES:
The D-250 can be used with the following
Windsor equipment: Deluxe Hand Tool
(DHT), Pile Jogger(PJ2A), Standard Floor
Wands(SFW, SW, SW-PRO, PROW), &
Wind Blower carpet dryer(WB3). Contact
an authorized Windsor dealer for
assistance in choosing the right equipment .
GENERAL INFORMATION:
On heavily soiled carpets, or on areas of
high foot traffic, it may be necessary to
use a prespray or traffic lane cleaner
applied with a Pro-Spray. Do not add
presprays to the machine's solution tank. If
a spotter is used, follow the manufacturer's
instructions exactly as printed on the label.
Remove the spotter with the floor tool when
done, spotter left in the carpet may bleach
or brown it permanently.
As the carpet is being cleaned, check to
see if there is foam building up in the
recovery bucket. Add a little defoaming
compound to the recovery tank but never to
the solution tank.
For infrequent use or long periods of
storage, flush the system with a
neutralizing solution of 1 quart white
vinegar mixed with 2 gallons hot water.
Flush the system with clean hot water after
neutralizing.
For hose fitting lubrication, use a light
silicone lubricant which will not damage orings.
PROTECT THIS MACHINE FROM
FREEZING.
D-250 98637 0 1/15/99
4
Page 5

OPERATIONS
EQUIPMENT SET-UP:
1.) Plug power cable from machine into
properly grounded wall outlet.
2.) Turn vacuum motor switch on and off
to make sure there is electrical power at
machine.
3.) Connect vac hose to machine. Slide
the swivel cuff over the outlet on the tank.
4.) Connect the hose set to the machine
and wand. Pull back the knurled collar on
the quick disconnect coupler and push onto
the connection on the chassis. To avoid
leaks, check to be sure a positive
connection was made.
5.) Using a clean container, fill the
solution tank with clean, hot water. Mix in a
non-foaming cleaning concentrate for use in
hot water extraction machines following the
manufacturer's instructions, as printed on
the container. When using a powder
cleaner, premix with hot water in a clean
container before adding to the solution
tank.
6.) Turn pump and vacuum switch to the on
position.
NOTES:____________________________
___________________________________
___________________________________
___________________________________
___________________________________
___________________________________
___________________________________
___________________________________
___________________________________
___________________________________
___________________________________
___________________________________
___________________________________
___________________________________
___________________________________
___________________________________
___________________________________
___________________________________
___________________________________
___________________________________
___________________________________
___________________________________
Serial
Number:____________________________
_____________
7.) Start cleaning.
5
Date
Purchased__________________________
______________
D-250 98637 01/19/99
Page 6

MAINTENANCE
DAILY MAINTENANCE:
(At the end of each working day) :
1.) Flush the entire system, including floor tool, hand tool, etc., with 1 to 3 gallons of clean,
hot water.
2.) Vacuum out the solution tank .
3.) Rinse tank with fresh water. Periodically inspect the recovery tank and decontaminate if
necessary, using a Hospital Grade Virucide or a 1-10 bleach to water solution. Waste
water should be disposed of properly.
4.) Remove lint build-up from the float shut-off screen in the recovery tank . (Occasionally
check filter screen at the bottom of the solution tank and rinse clean with hot water if
necessary).
5.) Inspect hoses for wear. Frayed or cracked hoses should be replaced to avoid vacuum
or solution pressure loss.
6.) Inspect power cord for wear or damage. This cable will lay on wet carpet. To prevent
electrical shock replace cords that are frayed or have cracked insulation immediately.
7.) Ensure automatic shut-off ball is working properly.
8.) Clean all dirt and obstructions from drain valve and gaskets to prevent possible leakage
and premature wear.
9.) Run clean water through solution pump when work is complete.
10.) Empty both tanks and rinse, run vacuum (s) for at least one minute to dry motor(s).
11.) Store with access covers removed to allow tanks to dry.
PERIODIC MAINTENANCE
1.) Twice a month, flush a white vinegar solution (One quart vinegar to two gallons of
water) or anti-browning solution (mixed as directed) through the extractor, turning pump
switch on/off several times, flush with clean water. This will prevent build-up of alkaline
residue in the system.
2.) Check hoses for wear, blockages, or damage. Frayed or cracked hoses should be
repaired or replaced to eliminate vacuum or solution pressure loss.
3.) Check all handles, switches, knobs, electrical cables and connections on your machine for
damage. If the cable insulation is broken or frayed, repair or replace it immediately. Don’t
take chances with electrical fire or shock.
4.) Clean out solution tank and remove and clean solution screen.
5.) Clean outside of all tanks and check for damage.
Monthly Maintenance
1.) Check all bearings for noise and wear.
2.) Check all gaskets for wear and leakage.
3.) Check pump pressure; observe spray pattern and check with gauge if necessary.
4.) Check overall performance of machine.
5.) Grease piston inside pressure regulator.
SEMI-ANNUALLY
1.) Check vacuum motor brushes.
D-250 98637 0 1/19/99
6
Page 7

MAINTENANCE
WARNING:
THE FOLLOWING REPAIRS.
VACUUM MOTOR REPLACEMENT
1. Turn off all switches and unplug machine.
2. Remove recovery tank.
3. Locate the vacuum motor wires and
disconnect at the connector.
4. Remove the vacuum motor.
5. Reverse process to install vacuum motor.
ONLY QUALIFIED MAINTENANCE PERSONNEL ARE TO PERFORM
Vac Motor Carbon Brushes Replacement
End Cap
Carbon Brushes
Note: When replacing carbon vac motor brushes
loosen wire terminal BEFORE removing screws on
bracket.
If armature commutator is not concentric, extremely
pitted, or grooved the motor will need to be replaced
or sent to a qualified service center to restore vac
performance.
Wire Terminal
WARNING: The green
ground wire must be
attached for safe
operation.
See wiring diagram.
Wire
Terminal
SOLUTION PUMP REPLACEMENT
1. Turn off all switches and unplug the
machine.
2. Remove recovery tank.
3. Remove solution hoses from fittings in
pump.
4. Remove the (2) screws that fasten the
pump to the frame.
5. Reverse process to install pump.
Important:
These brushes wear quicker
as the length shortens due to
increased heat.
Spring inside brush
housing will damage motor
if brushes are
allowed to wear away
completely.
Note:
Place
stop in
groove.
3/8
Periodically check the length of the carbon brushes.
Replace both carbon brushes when eit her is les s
than 3/8" long.
7
D-250 98637 06/19/00
Page 8

MAINTENANCE & TROUBLESHOOTING
8
D-250 PUMP MAINTENANCE
Per manufacturer’s recommendations the following maintenance should be performed
utilizing noted kits:
1.) 500 hours-Kit 55250751 replaces the V-packing, wave washer, packing spreader and
plunger guide.
2.) 500 hours-Kit 55250753 replaces the CAM bearing and insert.
3.) 1000 hours-kit 55250752 valve assembly and o-rings.
NOTE: Maintenance and repairs must be done by qualified personnel. Using nonWindsor parts to repair this machine will void the warranty. Contact an authorized
Windsor dealer for complete details.
TROUBLE SHOOTING CHART :
PROBLEM POSSIBLE CAUSE SOLUTION
No power to Dead electrical circuit Check building circuit breaker or fuse
machine box.
Faulty power cord Replace.
Electrical shock Equipment not grounding Follow grounding instructions exactly.
Receptacle not grounded Contact an electrician to check
building's wiring.
Internal wiring problem Have a trained service technician check
machine's wiring.
Vac motor speed Worn motor brushes Replace.
varies or doesn't run
Motor worn out Replace.
Faulty switch Replace.
Loss of Loose vacuum dome Center and seal dome over tank.
Vacuum
Crack in dome or Replace or repair using acrylic plastic
poor joint cement only.
Lint or dirt clogging With power off clean screen.
vacuum screen
Loose cuffs on vacuum Tighten cuffs turning counterclockwise.
hose
Vac motor seals leaking Replace.
Floor tool vac chamber Wash out with hose. Pick lint out with a
clogged wire.
Vac motor, hose, or Replace.
dome gasket
D-250 98637 1/15/99
Page 9

TROUBLESHOOTING CONT.
Solution hose Corrosion on fittings Clean with steel wool.
fitting hard to Soak in acetic acid (white vinegar).
connect Lubricate lightly with silicone base
lubricant.
Carpet not Severe soil conditions Make several passes at right angles to
getting clean. other. Use a prespray.
Carpet too wet Over saturation Adjust solution pressure to lower setting.
Make several passes without spray.
Carpet browning Leaving carpet too wet Check for loss of vac pressure.
Too much chemical in Check label for correct solution
concentration. .
Solution not Solution hose connection Check for positive connection
flowing properly
Faulty pump Repair or replace.
Faulty floor tool valve Repair or replace.
Faulty pump switch Repair.
TECHNICAL SPECIFICATIONS
POWER TYPE
ELECTRICAL: 115 V, 60 Hz, 15 Amps per power cable ((D250)
230 V, 50 Hz, 15 Amps (D250IE)
ELECTRIC VACUUM MOTOR: (1) –2/1.25 HP, 2 stage, Waterlift –150” (381cm)
SOLUTION PUMP: 250 psi, adj.
SOLUTION CAPACITY: 17 gallons (64.3ltr)
RECOVERY CAPACITY: 15 gallons (56.75ltr)
GENERAL DIMENSIONS/WEIGHT
WEIGHT: 97 lbs. ( 44 kg)
LENGTH: 20” (50.80 cm)
HEIGHT: 36” (91.44 cm)
WIDTH: 16” (40.64 cm)
POWER CABLE: 2-25’ (6.35 m) (D250)
1-25' (6.35 m) (D250IE)
9
D-250 98637 06/19/00
Page 10

115V WIRING DIAGRAM
D-250 98637 11/07/00
10
Page 11

230V WIRING DIAGRAM
11
D250 98637 06/19/00
Page 12

THIS PAGE LEFT BLANK INTENTIONALLY
D250 98637 06/19/00
12
Page 13

RECOVERY TANK ASSEMBLY
6
7
5
2
3
1
8
4
9
10
11
12
13
14
15
16
17
32
31
16
30
29
16
28
33
34
13
35
18
16
19AB
16
20
36
D-250 98637 11/07/00
21
22
23
24
27
25
26
Page 14

RECOVERY TANK ASSEMBLY
REF PART NO. QTY DESCRIPTION
1 05151 1 TUBE ASM, RECOVERY TANK
2 500009 1 LABEL, WARNING
3 260-64A 1 ACCESS COVER CLEAR 6” W/RIM
4 70546 6 SCR, 8 X 3/4 PFHT/S BLK ZINC
5 090-12A 1 FLOAT CAGE ASSY COMPLETE SLIP
6 240-46 1 FLOAT SCREEN ADAPTER 30 DEGREE
7 300-08 1 FL HD WD SCREW PH 6 X 1/2 SS
8 78460 1 TUBE, 1.5 PVC X 16.5
9 04032 1 ADPTR, 1.5 MPT X 1.5 FS PVC
10 320-05 2 VELCRO STRAPS
11 370-06A 1 DUMP VALVE 1-1/2 M THREAD
12 31032 1 ELBOW, 1.5 FS X FS 45D PVC
13 390-26 3 SPACER NYLON 1/4 ID X 1/2 OD
14 110-26B 1 GASKET VAC BRACKET
15 360-24 1 PLATE, VAC
16 87013 13 WASHER, 1/4 ID X 5/8 OD SS
17 35011 1 GASKET, 3/8T 5.7 VAC FAN SEAL
18 065-92 3 VAC SPACER 2 1/4 II STAGE
19A 360-04A 1 VACUUM 110V TWO STAGE 116392-0
19B 360- 0 6 1 VACUUM 116213 220V SM 2 ST G
20 70250 1 SCR, 1/4-20 X 3.5 HHCS PLTD
21 87016 3 WASHER, #10 LOCK EXT STAR SS
22 70335 1 SCR, 10-32 X 1/2 PHTR GRN/GRND
23 20063 1 CLAMP, 1.75” WORM GEAR X .312
24 39337 1 HOSE, 1.5 BLK VAC X 24”
25 27508 1 CUFF, VAC HOSE BLU
26 20046 1 CLAMP, 2.25” WORM GEAR
27 880292 1 WIRE, 4” GRN/14 76010 X 76014
28 75334 1 TANK, RECOVERY DB DK GRY
29 70015 2 SCR, 1/4-20 3/4 HHCS SS DL
30 065-25 1 TANK BRACE ASM, D/B
31 70020 2 SCR, 1/4-20 X 1/2 HHCS SS NP
32 40001R 1 HOSEBARB, 1.5 MPT X 1.5
33 39574 1 HOSE ASM, 1/4 HP SLTN 16.5FT
34 150-44A 1 VAC HOSE 16-1/2’ W/CUFFS 1 1/2
35 47356 1 KIT, HOSE ASM W/BAG DOM50
36 150-65 1 HOSE BAG 24” X 36”
SERIAL NO.
FROM
NOTES:
D-250 98637 11/07/00
14
Page 15

SOLUTION TANK ASSEMBLY
12A
230V
14
15
20
13
14
15
16
18
19
20
12B
13
16
17
21
31
26B
25
24
23
17
21
30
29
28
27
31
25
24
23
22
40
41
42
44
30
27
26A
6
5
7
8
8
9
10
11
29
28
33
34
37
38
8
39
43
35
36
38
8
45
46
4
3
2
1AB
67
68
41
69
70
32
60
8
54
53
52
46
51
50
49
48
47
38
63
66
65
64
63
62
38
58
57
8
61
59
38
56
55
15
D-250 98637 11/07/00
Page 16

SOLUTION TANK ASSEMBLY
REF PART NO. QTY DESCRIPTION
1A 360-04A 1 VACUUM 110V TWO STAGE 116392-0
1B 360-06 1 VACUUM 116213 220V SM 2 STG
2 05152 1 TUBE ASM, VAC EXHAUST
3 50009 1 PAN HD SH MTL SCREW 10 X 1/2 SS
4 88208 1 WIRE, 21” GRN/14 76001 X 76010
5 87016 1 WASHER, #10 LOCK EXT STAR SS
6 70335 1 SCR, 10-32 X 1/2 PHTR GRN/GRND
7 70663 3 SCR, 1/4-20 X 3 1/4 HHCS PLT
8 87013 18 WASHER, 1/4 ID X 5/8 OD SS
9 065-92 3 VAC SPACER 2 1/4 II STAGE
10 35011 1 GASKET, 3/8T 5.7 VAC FAN SEAL
11 360-24A 1 PLATE ASM, VAC 90 DEG
12 070-08 1 FAN 105 CFM AXIAL
13 61367 1 PANEL ASM, CONT. 3 SW W/HEAT
14 070-08A 1 FAN FINGER GUARD
15 70626 4 SCR, #10 X 3/4 PPHST HI-LO BLK
16 70018 1 SCR, 1/4-20 X 1 HHCS SS
17 330-02 3 ROCKER SWITCH 2 PRONG
18 060-04A 1 CORD 25’ BLK 14/3 SJTW/A PLUG
19 060-04 1 CORD 25’ BLK 12/3 SJTW/A PLUG
20 170-41 2 LABEL CIRCUIT INTERUPTER
21 170-31 1 HEATER MATE WARNING T AG
22 73195 2 STRAIN RELIEF, 1/2 NPT (.48M)
23 330-06 1 TOGGLE SWITCH BOOT
24 330-05 1 TOGGLE SWITCH
25 3350-04 1 TOGGLE SWITCH PLATE ON/OFF
26 51116 1 LIGHT ASM, 115V BRUSH WEAR
27 22046 1 CLIP, NEON LAMP
28 500345 1 LABEL, DOM3 SWITCH W/HEAT
29 57040 2 NUT, 1/2 NPT CONDUIT
30 140-11 2 KNOB RT/TANK
31 57105 3 NUT, 1/4-20 HEX W/STAR WASHER
32 87217 1 WASHER, 9/16 ID MCHD
33 030-16 1 ELBOW, 1/4 NPT STREET LONG 90D
34 010-02 1 AXLE ASM, RIGHT
35 151-50C 1 DB 200PSI PUMP TO QD
36 70088 1 SCR, 10-32 X 1/2 PPHMS SS NP
37 20008 1 CLAMP, 5/8 NYLON UL/USA
38 70020 20 SCR, 1/4-20 X 1/2 HHCS SS NP
39 065-26 1 HEATER MOUNT ASM, D/B
40 31017 1 ELBOW, 1/4 FPT X FPT UNION
41 56014 2 NIPPLE, 1/4 CLOSE
42 41396 1 HEATER ASM, DB COMPLETE
43 31021 1 ELBOW, 1/4 NPT 45D STREET
44 151-51C 1 DB 200PSI PUMP TO HEATER
45 31016 1 ELBOW, 1/4 NPT STREET
46 20042 2 CLAMP, 3/8 HOSE (D-SLOT)
47 40047 1 HOSEBARB, 1/4NPT X 1/2H 90D DL
48 250-79 1 PUMPTEC 200PSI PUMP & MOTOR
49 66017 2 PLUG, 1/4 BRASS PIPE
50 39174 1 HOSE, 1/2 WIRE BOUND X 23”
SERIAL NO.
FROM
NOTES:
D-250 98637 11/07/00
16
Page 17

SOLUTION TANK ASSEMBLY CONT'.
REF PART NO. QTY DESCRIPTION
51 065-28A 1 PLATE, PUMP MOUNT
52 40013 1 HOSEBARB, 3/8 MPT X 1/2 DL
53 31026 3 ELBOW, 3/8NPT STREET
54 70232 2 SCR, 10-32 X 3/8 PPHMS SS
55 57196 2 NUT, 1/2 PUSH-ON DOME CAP
56 040-06 1 WHEEL 8” BLK CENTERED HUB
57 010-01 1 AXLE ASM, LEFT
58 065-28 2 DIAMONDBACK 200 PUMP SUPPORT
59 040-03 1 CASTER SWIVEL 4” SWIVEL
60 290-08 1 SOL SCREEN (ACORN) W/RUB BASE
61 75349 1 TANK, SOLUTION DOM 250 DK BLU
62 500378 2 LABEL, DOMINATOR
63 280-02 2 RIVIT AL. 3/16 X 1/2 CLOSED
64 390-24 2 WASHER 1/4 X 5/8 BONDED NEOPRN
65 140-12 1 KNOB 1/4-20 X 3/4 S/S CUPPOINT
66 27912 1 CHAIN ASM, #10 BEAD S/S W/EVES
67 260-71 2 SOLUTION COVER D/B
68 56012 1 NIPPLE 1/4 FPT QD
69 250-35 1 D/B BPR 200PSI
70 151-50B 1 HOSE, 42” GRY 3/8 1/4 MPTXCUT
SERIAL NO.
FROM
NOTES:
17
D-250 98637 06/19/00
Page 18

SUGGESTED SPARE PARTS
SUGGESTED SPARE PARTS
DESCRIPTION PART NUMBER PAGE/REF
FUSE 55100041 15/203
BPR KIT 55250331 15/191
THERMOSTAT 55130149
THERMOSTAT 55130143
KIT, PACKING PUMP 55250751
KIT, BEARING PUMP 55250752
KIT, VALVE PUMP 55250753
CARBON BRUSHES, VAC MOTOR 115V 140370
VAC MOTOR ASM, 115V UPPER 5536032 13/111A
VAC MOTOR ASM, 115V LOWER 5536033 15/131A
VAC MOTOR ASM, 230V UPPER 55360321 13/111B
VAC MOTOR ASM, 230V LOWER 55360331 15/131B
PUMP, 200 PSI 115V 5525079 15/168A
PUMP, 200 PSI 230V 55250791 15/168B
SWITCH 5533002 15/142
8” GRAY RUBBER WHEEL 5504006 15/171
WHEEL CAP 1/2 5504007 15/172
4” CASTER 5504003 15/177
SOLUTION TANK KNOB 5514012 15/180
SWITCH PLATE KNOB 5514011 15/141
ACCESS COVER 55260641 13/114
STRAINER 5529008 15/199
SEAL, DUMP VALVE 5537008
PANEL LAMP 110V 5505030 15/146A
PANEL LAMP, 230V 5505031 15/146B
TOGGLE SWITCH, 115V 5533005 15/147A
TOGGLE SWITCH, 230V 55330051 15/147B
HOSE, PRIMING 5515076 15/204
NOTES:
D-250 98637 06/19/00
18
Page 19

LIMITED WARRANTY
Windsor Industries, Inc. warrants new machines against defects in material and workmanship
under normal use and service to the original purchaser. The warranty period is subject to the
conditions stated below.
3 YEARS FOR PARTS AND 1 YEAR FOR SERVICE LABOR
Exceptions: Rotationally molded polyethylene tanks carry a 6 year parts and 1 year service
labor warranty.
motors, and belts, and a 1 year service labor warranty. SENSOR
warranty on vacuum motors and belts, and a 1 year service labor warranty. Extractor brush
motors, pump motors, pc boards and electronics, vac motors (other than
VERSAMATIC
SENSOR®), pumps, and FLEXSOL™ diaphragms, all RADIUS™, all AXCESS™ and
TITAN™1 carry a 1 year parts and service labor warranty. Propane equipment has a 1 year
parts and service warranty. The Onan® engines have a 3 year manufacturers’ warranty. The
Honda® engines have a 2 year manufacturers’ warranty. The engine warranty is administered
through the engine manufacturer and must be repaired at an authorized service center.
Normal wear items including, but not limited to, belts, brushes, capacitors, carbon brushes,
casters, clutches, cords, filters, finishes, gaskets, hoses, light bulbs, rectifiers, switches, squeegees, bearings, pulleys, relays, actuating cables, tires and wheels will be warranted for
manufacturing defects for 90 days from the purchase date.
The warranty commences on the purchase date by the original end user from an authorized
Windsor Agent, subject to proof of purchase. The Machine Registration Card must be
completed and returned immediately at the time of purchase. If proof of purchase cannot be
identified, the warranty start date is 90 days after date of sale to an authorized Windsor
distributor. Parts replaced or repaired under warranty are guaranteed for the remainder of the
original warranty period.
®
models carry a 3 year warranty on brush motors, vacuum
®
models carry a 2 year
VERSAMATIC® and
90 DAY WARRANTY EXTENSION AVAILABLE
Upon receipt of the Machine Registration Card, Windsor will extend the warranty period an
additional 90 days from the purchase date. Does not include items warranted 90 days for
manufacturing defects.
STATED WARRANTIES ARE IN LIEU OF ALL OTHER WARRANTIES,
EXPRESSED OR IMPLIED.
Any statutory implied warranties, including any warranty of merchantability or fitness for a
particular purpose, are expressly limited to the duration of this written warranty. Windsor will not
be liable for any other damages, including but not limited to indirect or special consequential
damages arising out of or in connection with the furnishing; performance, use or inability to use
the machine. This remedy shall be the exclusive remedy of the buyer.
This warranty shall not apply to: 1.damage in transit; 2.misuse or abuse(including the use of
incompatible or corrosive chemicals or overloading of capacity); 3. failure due to lack of proper
maintenance and care (including cleaning); 4.any design alterations performed by an
organization not authorized or specified by Windsor; 5.batteries and chargers. 6. high pressure
washing. 7.electrical components exposed to moisture.
If difficulty develops during the warranty period, contact the authorized Windsor Agent from
whom the product was purchased. Windsor, Inc. may elect to require the return of components
to validate a claim. Any defective part to be returned must be shipped freight pre-paid to an
authorized Windsor Distributor/Service Center or to the Windsor factory.
USE OF PARTS NOT APPROVED BY WINDSOR, INC.
WILL VOID ALL WARRANTIES.
This warranty is valid only for all products sold after July 1, 1995. A product sold before that
date shall be covered by the limited Warranty in effect at the date of sale to the original
purchaser.
ã 1999 Windsor Industries, Inc. All rights reserved. REVISED 03/24/9 9
 Loading...