

Page 1
86404590 A 08/31/15
VersamaticPlus 14 & 18 240V
Vacuum
Operating Instructions (ENG)
MODEL: 1.012-058.0
VSP14IA
1.012-054.0
VSP18IA
From Serial No. #__________________
If Serial Number not listed,
Contact Manufacturer
Page 2
2 86404590 VERSAMATICPLUS 14 & 18
Machine Data Label
Warranty Registration
Thank you for purchasing a Kärcher North America product. Warranty registration is quick
and easy. Your registration will allow us to serve you better over the lifetime of the product.
To register your product go to :
http://warranty.karcherna.com/
For customer assistance:
1-800-444-7654
Page 3

3
Table of Contents
Machine Data Label . . . . . . . . . . . . . . . . . . . . . . . . 2
Table of Contents . . . . . . . . . . . . . . . . . . . . . . . . . 3
How To Use This Manual . . . . . . . . . . . . . . . . . . . 4
Safety
IMPORTANT SAFETY INSTRUCTIONS . . . . . . . 5
GROUNDING INSTRUCTIONS . . . . . . . . . . . . . . 7
Operations
Components . . . . . . . . . . . . . . . . . . . . . . . . . . . . . 8
Assembling The Vacuum Cleaner . . . . . . . . . . . . 9
Brush Controller . . . . . . . . . . . . . . . . . . . . . . . . . 10
Filter Level Indicator . . . . . . . . . . . . . . . . . . . . . . 10
Swivel Neck Latch. . . . . . . . . . . . . . . . . . . . . . . . 10
Maintenance
Changing The Brush Strip. . . . . . . . . . . . . . . . . . 11
Changing The Paper Bag . . . . . . . . . . . . . . . . . . 11
Changing The Motor Filter . . . . . . . . . . . . . . . . . 11
Changing Exhaust Filter . . . . . . . . . . . . . . . . . . . 12
Clearing Blockages . . . . . . . . . . . . . . . . . . . . . . . 12
Replacing The Printed Circuit Board. . . . . . . . . . 13
Replacing Vacuum Motor . . . . . . . . . . . . . . . . . . 13
Changing The Brush Roller. . . . . . . . . . . . . . . . . 14
Replacing The Brush Roller Pulley . . . . . . . . . . . 14
Replacing The Swivel Neck . . . . . . . . . . . . . . . . 14
Removing The Swivel Neck Cover . . . . . . . . . . . 15
Changing The Electronic Controller . . . . . . . . . . 15
Replacing the Foot Pedal . . . . . . . . . . . . . . . . . . 15
Troubleshooting . . . . . . . . . . . . . . . . . . . . . . . . . 16
Technical Data VSP 14 (VSP 18) . . . . . . . . . . . . 16
Parts List
Tools, Bags & Filters. . . . . . . . . . . . . . . . . . . . . . 18
Upper Housing . . . . . . . . . . . . . . . . . . . . . . . . . . 20
Power Head-VSP 14. . . . . . . . . . . . . . . . . . . . . . 22
Power Head-VSP 18. . . . . . . . . . . . . . . . . . . . . . 24
Wiring Diagram . . . . . . . . . . . . . . . . . . . . . . . . . . 26
Suggested Spare Parts. . . . . . . . . . . . . . . . . . . . 27
86404590 VERSAMATICPLUS 14 & 18
Page 4

4
How To Use This Manual
This manual contains the following sections:
• How to Use This Manual
•Safety
• Operations
• Maintenance
•Parts List
The HOW TO USE THIS MANUAL section will tell
you how to find important information for ordering
correct repair parts.
Parts may be ordered from authorized dealers. When
placing an order for parts, the machine model and
machine serial number are important. Refer to the
MACHINE DATA box which is filled out during the
installation of your machine. The MACHINE DATA
box is located on the inside of the front cover of this
manual.
The model and serial number of your machine is
located on the bottom-back of the machine.
The SAFETY section contains important information
regarding hazardous or unsafe practices of the
machine. Levels of hazards are identified that could
result in product damage, personal injury, or severe
injury resulting in death.
The OPERATIONS section is to familiarize the
operator with the operation and function of the
machine.
The MAINTENANCE section contains preventive
maintenance to keep the machine and its components in good working condition. They are listed in
this general order:
• Dust Bag
• Filters
• Blockage
•Brush strips
• Troubleshooting
The PARTS LIST section contains assembled parts
illustrations and corresponding parts list. The parts
lists include a number of columns of information:
• ITEM – column refers to the reference num-
ber on the parts illustration.
• PART NO. – column lists the part number for
the part.
• REF NO. – reference number.
• DESCRIPTION – column is a brief descrip-
tion of the part.
• NOTES – column for information not noted by
the other columns.
NOTE: If a service or option kit is installed on your
machine, be sure to keep the KIT INSTRUCTIONS
which came with the kit. It contains replacement
parts numbers needed for ordering future parts.
NOTE: The manual part number is located on the
lower left corner of the front cover.
Model:
Date of Purchase:
Serial Number:
Dealer:
Address:
Phone Number:
Sales Representative:
86404590 VERSAMATICPLUS 14 & 18
Page 5

5
Safety
IMPORTANT SAFETY INSTRUCTIONS
When using this machine, basic precaution
must always be followed, including the following:
READ ALL INSTRUCTIONS BEFORE USING THIS MACHINE.
To reduce the risk of fire, electric shock, or injury:
1. Do not leave appliance when plugged in. Unplug from outlet when not in use and before servicing.
2. Do not use outdoors or on wet surfaces.
3. Do not use near small children. Do not allow to be used as a toy. Close attention is necessary when used by
or near children.
4. Use only as described in this manual. Use only manufacturer's recommended attachments.
5. Do not use with damaged cord or plug. If appliance is not working as it should, has been dropped,
damaged, left outdoors, or dropped into water, return it to a service center.
6. Do not pull or carry by the cord, use cord as a handle, close a door on cord, or pull cord around sharp edges
or corners. Do not run appliance over cord. Keep cord away from heated surfaces.
7. Do not unplug by pulling on cord. To unplug, grasp the plug, not the cord.
8. Do not handle plug or appliance with wet hands.
9. Do not put any object into openings. Do not use with any opening blocked; keep free of dust, lint, hair, and
anything that may reduce air flow.
10. Keep hair, loose clothing, fingers and all parts of body away from openings and moving parts. Do not place
fingers or other body parts under vacuum unless unplugged.
11. Do not pick up anything that is burning or smoking, such as cigarettes, matches, or hot ashes.
12. Do not use without dust bag and/or filters in place. Do not wash filters.
13. Turn off all controls before unplugging.
14. Use extra care when cleaning on stairs. Do not use to pick up flammable or combustible liquids such as
gasoline or use in areas where they may have been present.
15. Machines can cause fire when operated near flammable vapors or materials. Do not operate this machine
near flammable fluids, dust or vapors.
16. Maintenance and repairs must be done by qualified personnel.
17. Connect to a properly grounded outlet only. See Grounding Instructions.
18. Do not use machine as a step.
19. If used on plush carpet or carpet with thick padding, do not leave machine in one place with machine turned
on.
20. Do not use the handle in the dust bag housing to carry the machine.
READ AND SAVE THESE INSTRUCTIONS
86404590 VERSAMATICPLUS 14 & 18
Page 6

6
Safety
IMPORTANT SAFEGUARDS
Accidents due to misuse can only be prevented by those using the machine. To guard against injury, basic
safety precautions should be observed, including the following:
Read and follow all safety instructions.
Electric shock could occur if used outdoors or on wet surfaces.
The vacuum cleaner is designed to be safe when used to perform cleaning functions. Should damage occur to
electrical or mechanical parts, cleaner should be repaired by a competent service center before using in order to
avoid further damage to machine or physical injury to user.
A damaged power cord could cause electrical shock and/or fire. To minimize this possibility observe the
following precautions:
Do not run cleaner over power cord.
Avoid closing doors on power cord pulling it around sharp edges, or placing sharp-edged objects upon it.
Wind cord no tighter than is necessary to retain it on the cord hooks.
When disconnecting power cord from electrical outlet, grasp the plug. Pulling it out by the cord itself can
damage cord insulation and internal connections to plug.
Your vacuum cleaner creates suction and contains a revolving brush. To avoid bodily injury from suction or
moving parts, vacuum cleaner brush should not be placed against, or in close proximity of loose clothing,
jewelry, hair or body surfaces while cleaner is connected to electrical outlet. Cleaner should not be used to
vacuum clothing while it is being worn. Keep children away from machine when in operation or plugged in.
If used on plus carpet or carpet with thick padding, turn off unit when handle is in upright position. When using
accessory tools, keep floor bush off carpet by keeping handle in locked position and lowering handle with on
hand to raise bush off floor. Operate accessories with other hand.
Always plug your cleaner into a standard wall outlet. Use of extension cord or light socket with inadequate
current-carry capacity could result in electric shock or fire hazard.
Disconnect cleaner from electrical outlet before servicing, such as changing bags or belts. You could receive
bodily injury from moving parts of machine should switch accidentally turned on. Disconnect cleaner from electrical outlet before detaching power head.
Do not use your vacuum cleaner in areas where flammable and/or explosive vapor or dust is present to avoid
possibility of fire or explosion. Some cleaning fluids can produce such vapors. Areas on which cleaning fluids
have been used should be completely dry and thoroughly aired before being vacuumed.
To avoid fire hazard, do not pick up matches, fireplace ashes, or smoking material with cleaner.
Keep your work area well lighted to avoid picking up harmful materials (such as liquids, sharp objects, or burning
substances) and avoid tripping accidents.
Use care when operating the cleaner on irregular surfaces such as stairs, as falling cleaner could cause bodily
injury and/or mechanical damage. Proper storage of machine in an out-of-way area immediately after use will
also prevent accidents caused by tripping over cleaner.
Store your vacuum indoors in a cool, dry area not exposed to the weather to avoid electrical shock and/or
cleaner damage.
Exercise strict supervision to prevent injury when using vacuum cleaner near children or when child is allowed
to operate vacuum cleaner. Do not allow children to play with vacuum cleaner and never leave cleaner plugged
in and unattended.
SAVE THESE INSTRUCTIONS
86404590 VERSAMATICPLUS 14 & 18
Page 7

7
Safety
GROUNDING INSTRUCTIONS
ELECTRICAL
The amp, hertz, and voltage are listed on the data label found on each machine. Using voltages above or below
those indicated on the data label will cause serious damage to the motors.
EXTENSION CORDS
If an extension cord is used, the wire size must be at least one size larger than the power cord on the machine,
and must be limited to 50 feet (15.5m) in length.
GROUNDING INSTRUCTIONS
This appliance must be grounded. If it should malfunction or break down, grounding provides a path of least
resistance for electric current to reduce the risk of electric shock.The plug must be inserted into an appropriate
outlet that is properly installed and grounded in accordance with all local codes and ordinances.
Improper connection of the equipment-grounding conductor can result in a risk of electric shock.
Check with a qualified electrician or service person if you are in doubt as to whether the outlet is
properly grounded. Do not modify the plug provided with the appliance - if it will not fit the outlet, have
a proper outlet installed by a qualified electrician.
86404590 VERSAMATICPLUS 14 & 18
Page 8

8
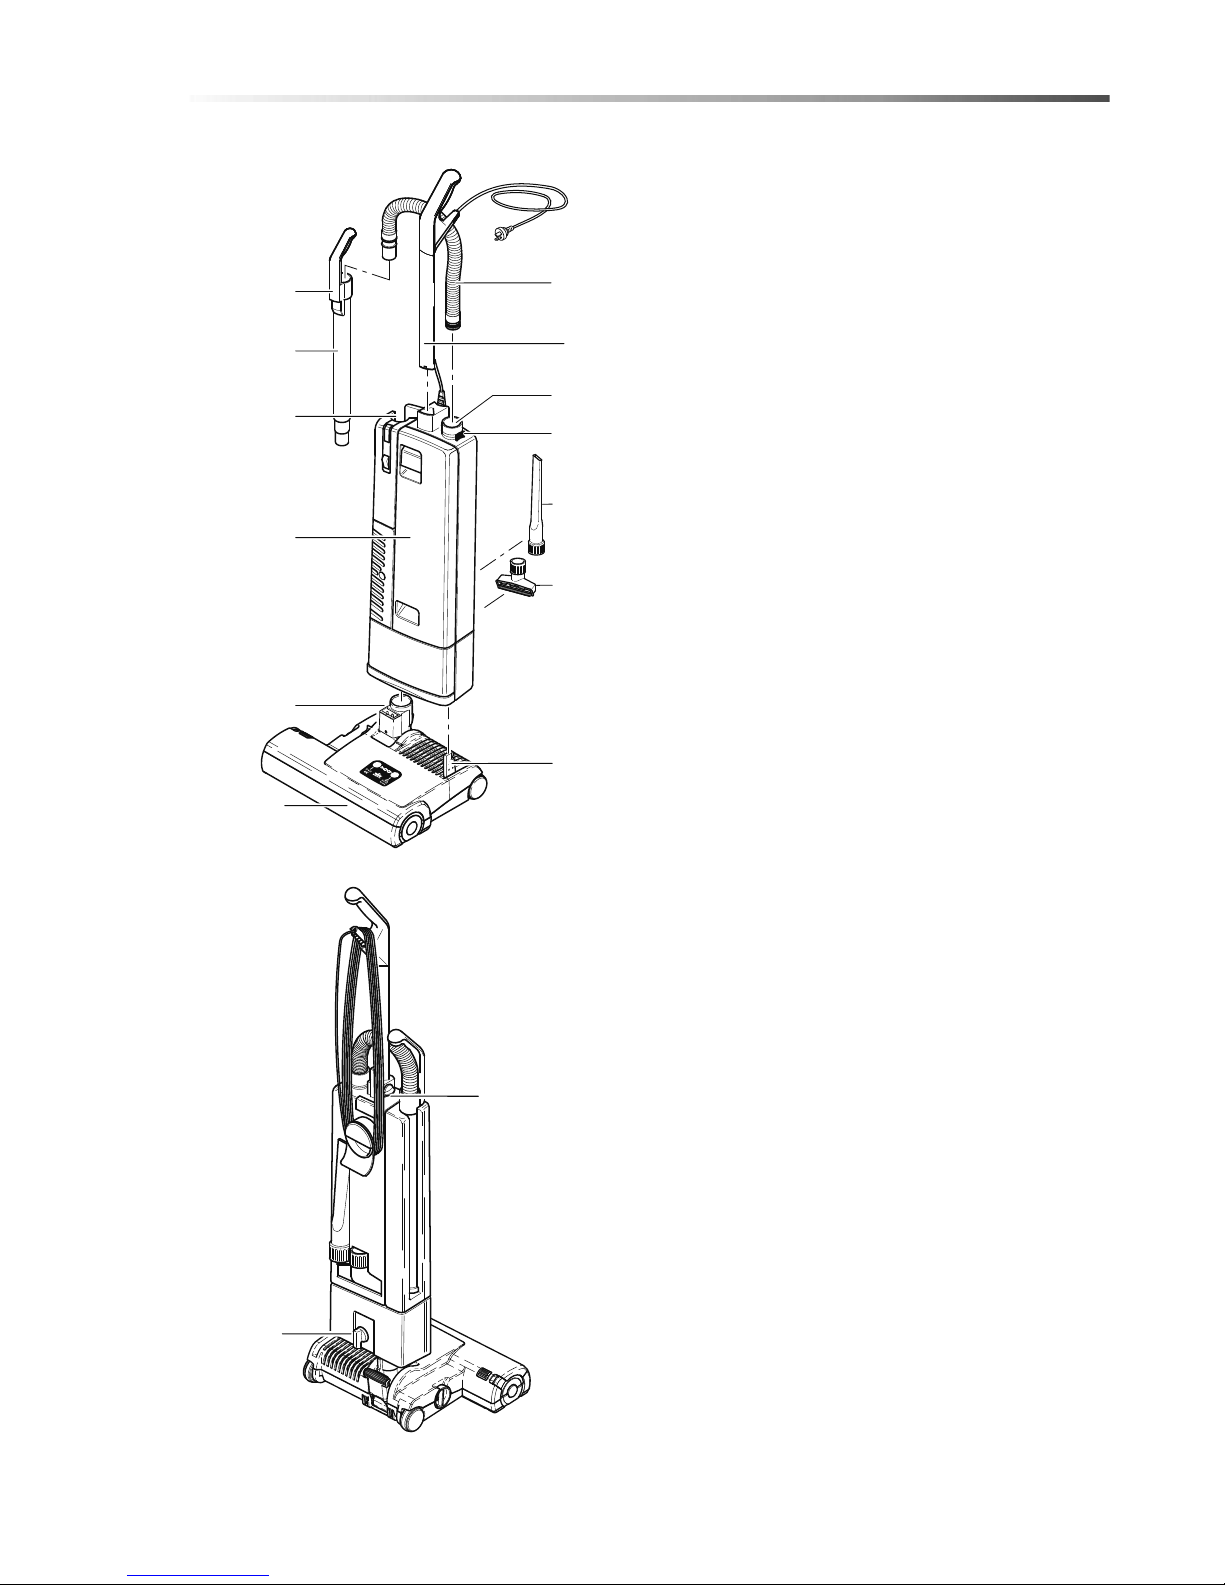
Operations
Components
1. Handle grip
2. Handle assembly
3. Bag full indicator
4. On / Off switch
5. Cover release latch
6. Exhaust filter cover
7. Front cover
8. Motor cover
9. Power head
10. Locking catch
11. Foot pedal
12. Hose
13. Retaining ring
14. Cable
15. Attachment tube handle
16. Handle catch
17. Carrying handle
18. Cable hook
19. Attachment tube
20. Dust bag housing
21. Crevice nozzle
22. Upholstery nozzle
23. Pile adjustment knob
86404590 VERSAMATICPLUS 14 & 18
2
10
17
18
20
21
22
11
3
15
4
6
9
2
1
5
7
12
14
13
15
16
19
23
1
2
9
8
Page 9
9
Operations
Assembling The Vacuum Cleaner
Put the power head (9) on the floor with swivel neck
(26) and support lever (27)in upright position.
Turn the locking catch (10) on the filter bag housing
(20) to the left and place the housing carefully on the
swivel neck and the support lever.
NOTE: Ensure that the catch is engaged.
To lock the handle turn the handle catch (16) at the
handle joint of the filter bag housing (20) forward, then
slide the handle assembly (2) in as far as possible
and lock it with the handle catch (16).
Insert the attachment tube (19) into its storage
position on the side of the machine. The attachment
tube handle (15) must be placed on the tab (24). Slide
the proper end of the hose into the filter bag housing,
insert the black hose end into the connecting tube
(25) and slide it in completely. To unlock the hose
press the retaining ring (13) at the housing connection.
86404590 VERSAMATICPLUS 14 & 18
16
2
10
15
19
24
20
26
9
2
13
12
25
27
22
21
Page 10

10
Operations
Brush Controller
The electronic brush controller monitors the
operation of the brush.
Green light: Brush set correctly and running.
Green and red light: Brush too high. Adjust the
brush setting by turning the pile adjustment knob (23)
to lower setting.
If the green and red light are still on at position
number one the brush strip is worn out and must be
replace.
Red light blinking: The brush is blocked and is not
turning. Switch machine off, unplug from the socket
and clear the blockage.
Filter Level Indicator
If warning light (3) comes on check:
• Is the dust bag full?
• Is there a blockage in the hose (12) or power
head (9)?
Swivel Neck Latch
To release the machine from the upright position
depress the foot pedal (11).
86404590 VERSAMATICPLUS 14 & 18
2
23
2
11
9
3
12
Page 11

11
Maintenance
Unplug machine from electrical outlet before doing
any maintenance.
Changing The Brush Strip
To replace brush strip, push button (32), remove the
side plate (26) and rotate the brush so that the brush
strip (27) can be pulled out of the opening. Ensure
that the new brush strip is fully inserted, then press
the side plate back into place.
NOTE: Ensure plate is locked in place.
Changing The Paper Bag
If red light (3) shows, change paper filter bag.
Pull cover release latch (5) forward and lift the cover
from the dust bag housing. Slide the dust bag sealing
plate (28) from the holder (29). slide the sealing plate
(28) of a new bag into the holder and push firmly in.
Insert cover into dust bag housing. Push it forward
then lock it in place by pushing down the cover
release latch.
Changing The Motor Filter
Motor filter (30) should to be replaced after 20 filter
bags have been used. Lift the front of the filter slightly
and slide it out of the slot. Install new filter and press
firmly ensuring filter is completely in place.
NOTE: Hospital grade filters are available.
86404590 VERSAMATICPLUS 14 & 18
26 27
32
30
3
5
28
29
Page 12

12
Maintenance
Changing Exhaust Filter
Change the exhaust filter (31) always with the motor
filter. Press the button (45) and slide the exhaust
cover (6) to the side.
Never use the machine without correctly
installing the filters.
Clearing Blockages
Visually check the hose, and connecting tube (25) for
blockages. Blockages in the hose can be cleared by,
holding it upright with one hand, blocking the top and
switching on the machine. If necessary rapidly lift
your hand on and off the end of the hose.
Check for blockage in the swivel neck of the power
head and under the orange trap door located on the
bottom of the power head.
Check the passage between the two openings in the
power head for blockage also.
NOTE: Never use a stick or sharp object to clear
the hose
86404590 VERSAMATICPLUS 14 & 18
31
45
6
25
Page 13

13
Maintenance
Replacing The Printed Circuit Board
Remove Exhaust Filter Cover (6).
Remove the three screws on the vacuum tube cover
(42). Disconnect the wires and slide the circuit board
(43) out.
Install new board, attach wires and install cover.
Replacing Vacuum Motor
Remove the power head from the upper body.
Remove the dust bag housing bumper (44) and
remove the four screws on the motor cover (8).
Slide vacuum motor out and install new motor. Reassemble cover and bumper.
86404590 VERSAMATICPLUS 14 & 18
8
44
42
43
Page 14
14
Maintenance
Changing The Brush Roller
Remove the power head from the upper body.
To remove the power head cover, push the button
(32), remove the side plate (26) and remove the four
(VSP14) or five (VSP18) large screw (27) from underneath the chassis. The cover and the button (32) can
then be lifted off.
Push the belt (29) off the motor pulley (30), remove
the bumper (41). Remove the three screws from both
brush bearing blocks (46 & 47). Lift the bearing
blocks out and replace the brush roller.Re-assemble
bearing blocks, bumper, install belt, side plate and
cover. Attach upper body to power head.
Replacing The Brush Roller Pulley
To remove the brush roller pulley (35) hold the roller
in one hand and turn the pulley in a clockwise direction.
To remove the motor pulley (36), insert a screw driver
into a groove and give a light tap in a counterclockwise direction. The loosened pulley can then be
removed.
Replacing The Swivel Neck
To remove the swivel neck (37) take out the two small
screws (38) from the swivel neck supports (39) then
lift the swivel neck assembly from the chassis.
NOTE: On re-assembly ensure that the wires from
the swivel neck are not trapped when the power
head cover is replaced.
86404590 VERSAMATICPLUS 14 & 18
27
27
27
26
32
35
36
38
38
39
37
39
X
27
47
27
46
41
27
29
30
Page 15

15
Maintenance
Removing The Swivel Neck Cover
To remove the swivel neck cover, take out the
retaining screw (38) and slide the cover (40)
downwards then lift out. On re-assembly check that
the wires do not become trapped.
Changing The Electronic Controller
To change the electronic controller (41), disconnect
the lead from the motor. Lift the controller upwards
and then disconnect the lead from the swivel neck.
Replacing the Foot Pedal
Remove the power head from the upper housing.
Remove the cover from the power head. Remove the
retaining screw. Insert a screw driver in the notch on
the axle and slide the axle out. Remove and replace
foot pedal. Re-assemble.
NOTE: Ensure that at re-assembly, the axle (0)
notch (40) is visible as shown
86404590 VERSAMATICPLUS 14 & 18
41
41
X
0
40
38
40
Page 16

16
Notes:
Troubleshooting
Technical Data VSP 14 (VSP 18)
PROBLEM CAUSE SOLUTION
Brush not turning
Hose nozzle not far enough into neck Reposition hose nozzle into neck
Brush jammed Turn off machine, clear brush and restart
Brush strip not fully inserted Push brush strip in all the way
Broken belt Replace belt
Red light stays on at
lowest brush setting
(#1)
Brush worn Replace brush strip
Full bag light on, or
poor suction
Full dust bag Replace bag
Hose clogged Remove and clean hose
Neck clogged
Disconnect floor head from vac tank and
clean neck
Bag not properly installed Re-insert bag correctly
Exhaust or motor filter clogged Clean or replace filter
Back cover leaking air
Re-Install dust bag, motor filter and back
cover to ensure tight fit all around
Full bag light off
when vacuum hose
is blocked or bag is
full
Sensor out of adjustment
Remove back door and use small screw-
driver to turn screw behind light, counter-
clockwise
Back door won’t
close
Bag not properly installed Re-insert bag correctly
Motor filter not in position Re-insert filter correctly
Machine won’t turn
on
Faulty electrical circuit
Have machine check by qualified service
person
ITEM DIMENSION/CAPACITY
Voltage 240V, 50 hz
Vacuum floor 4,2 amp
Air flow 117 cfm
Dust bag 1,3 gal, 3-layer
Brush motor 0,7 (0,8) amp
Brush width 12 3/4 (16/3/4) inches
Brush drive Non slip drive belt with electronic overload protection
Brush strip Replaceable
Height 48 inches
Width 14 (18) in
Weight 16 (18) lbs
86404590 VERSAMATICPLUS 14 & 18
Page 17

86404590 A 08/31/15
VERSAMATICPLUS 14 & 18 240V
VACUUM
Mode d'emploi (FRA)
MODEL: 1.012-058.0
VSP14IA
1.012-054.0
VSP18IA
De série n ° #______________
Si le numéro de série ne figure pas,
contacter le fabricant
Page 18

2 86404590 VERSAMATICPLUS 14 & 18
Données de la Machine
Modèle :
Date d’achat :
Numéro de série :
Détaillant :
Adresse :
Numéro de téléphone :
Représentant commercial:
Enregistrement de la garantie
Merci d'avoir acheté un produit Kärcher North America. L'enregistrement de la garantie
est facile et rapide. Votre enregistrement nous permettra de mieux vous servir tout au long
de la durée de vie de votre produit.
Pour enregistrer votre produit, consultez :
http://warranty.karcherna.com/
Pour l'assistance client:
1-800-444-7654
Page 19

3
Table des matières
Données de la Machine. . . . . . . . . . . . . . . . . . . . . 2
Table des matières . . . . . . . . . . . . . . . . . . . . . . . . 3
Comment utiliser ce manuel. . . . . . . . . . . . . . . . . 4
Sécurité
CONSIGNES DE SÉCURITÉ IMPORTANTES . . 5
FONDRE DES INSTRUCTIONS . . . . . . . . . . . . . 7
Opérations
Composantes . . . . . . . . . . . . . . . . . . . . . . . . . . . . 8
Montage de l’aspirateur . . . . . . . . . . . . . . . . . . . . 9
Contrôleur de la brosse. . . . . . . . . . . . . . . . . . . . 10
Indicateur de niveau du filtre. . . . . . . . . . . . . . . . 10
Loquet du collet pivotant . . . . . . . . . . . . . . . . . . . 10
Entretien
Remplacement de la bande de la brosse . . . . . . 11
Remplacement du sac en papier . . . . . . . . . . . . 11
Remplacement du filtre du moteur . . . . . . . . . . . 11
Remplacement du filtre d'évacuation . . . . . . . . . 12
. . . . . . . . . . . . . . . . . . . . . . . . . . . . . . . . . . . . . . 12
Élimination des blocages . . . . . . . . . . . . . . . . . . 12
Remplacement de la plaque des
circuits imprimés . . . . . . . . . . . . . . . . . . . . . . . 13
Remplacement du moteur d’aspiration . . . . . . . . 13
Remplacement du rouleau de la brosse . . . . . . . 14
Remplacement de la poulie du rouleau de la brosse
14
Remplacement du collet pivotant . . . . . . . . . . . . 14
Retrait du couvercle du collet pivotant . . . . . . . . 15
Remplacement du contrôleur électronique . . . . . 15
Remplacement de la pédale . . . . . . . . . . . . . . . . 15
Dépannage . . . . . . . . . . . . . . . . . . . . . . . . . . . . . 16
Données techniques VSP 14 (VSP 18) . . . . . . . 16
Pièces
Parts - Tools, Bags & Filters . . . . . . . . . . . . . . . . 18
Upper Housing . . . . . . . . . . . . . . . . . . . . . . . . . . 20
Power Head-VSP 14. . . . . . . . . . . . . . . . . . . . . . 22
Power Head-VSP 18. . . . . . . . . . . . . . . . . . . . . . 24
Wiring Diagram . . . . . . . . . . . . . . . . . . . . . . . . . . 26
Suggested Spare Parts. . . . . . . . . . . . . . . . . . . . 27
86404590 VERSAMATICPLUS 14 & 18
Page 20

4
Comment utiliser ce manuel
Ce manuel contient les sections suivantes :
• Comment utiliser ce manuel
•Sécurité
• Opérations
• Entretien
• Liste des pièces
La section COMMENT UTILISER CE MANUEL vous
dira comment trouver des informations importantes
pour commander les pièces de rechange correctes.
Les pièces peuvent être commandées auprès
des revendeurs agréés. Lorsque vous passez une
commande de pièces, le modèle de la machine et le
numéro de série de la machine sont importants.
Consultez la case DONNÉES DE LA MACHINE qui
est remplie lors de l'installation de votre machine.
La case DONNÉES DE LA MACHINE se trouve sur la
deuxième de couverture de ce manuel.
Le modèle et le numéro de série de votre machine se
trouvent sur l’arrière-inférieur de la machine.
La section SÉCURITÉ contient des informations
importantes concernant les utilisations dangereuses
ou risquées de la machine. Les catégories de risques
identifiés comprennent des risques qui pourraient
endommager le produit, provoquer des blessures
corporelles ou des blessures graves entraînant la mort.
La section OPÉRATIONS familiarise l'opérateur avec
le fonctionnement et les fonctions de la machine.
La section ENTRETIEN contient les mesures
d'entretien préventif pour maintenir la machine et ses
composants en bon état. Elles sont énumérées dans
cet ordre général :
• Sac à poussière
• Filtres
• Obstruction
• Bandes de la brosse
• Dépannage
La section LISTE DES PIÈCES contient des
illustrations des pièces assemblées et la liste des
pièces correspondantes. Les listes de pièces
comprennent un certain nombre de colonnes
informatives :
• ITEM - la colonne se réfère au numéro de
référence sur l'illustration des pièces.
• PART NO.- cette colonne indique le numéro
de chaque pièce
• REF NO. - numéro de référence.
• DESCRIPTION – la colonne contient une
brève description de la pièce.
• NOTES – colonne pour les informations non
traitées par les autres colonnes.
REMARQUE : Si un kit d'entretien ou kit optionnel
est installé sur votre machine, conservez
soigneusement les INSTRUCTIONS DU KIT
accompagnant le kit. Il les numéros des pièces de
rechange nécessaires pour commander de
nouvelles pièces.
REMARQUE : La référence du manuel se trouve
dans le coin inférieur gauche de la couverture.
Modèle :
Date d’achat :
Numéro de série :
Détaillant :
Adresse :
Numéro de téléphone :
Représentant commercial:
86404590 VERSAMATICPLUS 14 & 18
Page 21

5
Sécurité
CONSIGNES DE SÉCURITÉ IMPORTANTES
Lorsque vous utilisez cette machine, les précautions de base
doivent toujours être suivies, notamment :
LIRE TOUTES LES INSTRUCTIONS AVANT D'UTILISER CETTE MACHINE.
Pour réduire les risques d’incendie, de choc électrique
ou de blessure :
1. Ne pas laisser l'appareil sans surveillance lorsqu'il est branché. Débrancher l'appareil lorsqu'il n'est pas
utilisé et avant toute opération d'entretien.
2. Ne pas utiliser à l’extérieur ou sur des surfaces humides.
3. Ne pas utiliser à proximité de jeunes enfants. Cet appareil n’est pas un jouet. Une surveillance étroite est
impérative lorsqu’il est utilisé par des enfants ou à proximité.
4. N'utiliser que conformément aux instructions de ce manuel. N'utiliser que les accessoires recommandés
par le fabricant.
5. Ne pas utiliser un cordon ou une fiche endommagé(e). Si l'appareil ne fonctionne pas correctement, s'il a
chuté, a été endommagé, laissé à l'extérieur ou s'il est tombé dans l'eau, le renvoyer à un centre de
service.
6. Ne pas tirer sur ou transporter par le cordon, utiliser le cordon comme une poignée, fermer une porte sur
le cordon ou tirer le cordon autour de bords ou d'angles pointus. Ne pas faire rouler l'appareil sur le cordon.
Tenir le cordon éloigné des surfaces chaudes.
7. Ne pas débrancher l’appareil en tirant sur le cordon. Pour débrancher, saisir la fiche et non le cordon.
8. Ne pas manipuler la fiche ou l'appareil avec les mains mouillées.
9. Ne pas insérer d'objets dans les ouvertures. Ne pas utiliser le produit si l’une des ouvertures est obstruée.
Retirer la poussière, les peluches et les cheveux, ou tout autre élément pouvant réduire la circulation
de l’air.
10. Tenir les cheveux, les vêtements amples, les doigts ou toute autre partie du corps éloignés des ouvertures
et des pièces en mouvement. Ne pas placer les doigts ou autres parties du corps sous l'aspirateur, à moins
que l’appareil ne soit débranché.
11. Ne pas aspirer des choses qui brûlent ou fument, comme des cigarettes, des allumettes ou des
cendres chaudes.
12. Ne pas utiliser sans le sac à poussière et/ou les filtres en place. Ne pas laver les filtres.
13. Placer toutes les commandes sur la position d’arrêt avant de débrancher l’appareil.
14. Faire particulièrement attention lors du nettoyage des escaliers. Ne pas utiliser pour ramasser des liquides
inflammables ou combustibles tels que l'essence ou dans les zones où ils peuvent avoir été présents.
15. Les machines peuvent provoquer un incendie lorsqu'elles sont utilisées à proximité de vapeurs ou de
matériaux inflammables. Ne pas utiliser cette machine en présence de fluides, de poussière ou de vapeurs
inflammables.
16. L’entretien et les réparations doivent être effectués par du personnel qualifié.
17. Brancher seulement à une prise correctement mise à la terre. Voir les instructions de mise à la terre.
18. Ne pas utiliser la machine comme escabeau.
19. Si elle est utilisée sur une moquette ou un tapis à poils longs avec un rembourrage épais, ne pas laisser
la machine au même endroit lorsqu'elle est en fonctionnement.
20. Ne pas utiliser la poignée du boîtier du sac à poussière pour transporter la machine.
LIRE ET CONSERVER CES INSTRUCTIONS
86404590 VERSAMATICPLUS 14 & 18
Page 22

6
Sécurité
MESURES DE SÉCURITÉ IMPORTANTES
Les accidents dus à une mauvaise utilisation peuvent uniquement être évités par ceux qui utilisent la machine. Pour
se prémunir contre les blessures, les précautions de sécurité de base doivent être observées, notamment :
Lisez et suivez toutes les consignes de sécurité.
Un choc électrique peut se produire si vous utilisez la machine à
l'extérieur ou sur des surfaces humides.
L'aspirateur est conçu pour être sûr lorsqu'il est utilisé pour exécuter des fonctions de nettoyage. En cas
d'endommagement de pièces électriques ou mécaniques, l’aspirateur doit être réparé par un centre de service
compétent avant d'être utilisé afin d'éviter de causer des dommages supplémentaires à la machine ou des
blessures corporelles à l'utilisateur.
Un cordon d'alimentation endommagé peut causer un choc électrique et/ou un incendie. Afin de minimiser cette
possibilité, observez les précautions suivantes :
Ne pas faire fonctionner l'aspirateur sur un cordon électrique.
Éviter de fermer les portes sur le cordon d'alimentation, de le tirer le long de bords tranchants ou de placer des
objets coupants sur le cordon.
Ne pas serrer le cordon plus que nécessaire afin de le maintenir sur les crochets.
Lorsque vous débranchez le cordon d'alimentation de la prise électrique, saisissez la fiche. Le tirer par le
cordon peut endommager l’isolation du cordon et les connexions internes à la fiche.
Votre aspirateur produit une aspiration et contient une brosse rotative. Pour éviter des blessures corporelles
résultant de l'aspiration ou des pièces mobiles, la brosse de l’aspirateur ne doit pas être placée contre ou à
proximité des vêtements amples, des bijoux, des cheveux ou des surfaces du corps pendant que l'aspirateur est
branché à une prise électrique. L’aspirateur ne doit pas être utilisé pour nettoyer des vêtements pendant qu'ils
sont portés. Tenir les enfants éloignés lorsque la machine est en fonctionnement ou branchée.
Si elle est utilisée sur un tapis à poils longs ou un tapis avec un rembourrage épais, éteignez l'appareil lorsque
la poignée est en position verticale. Lors de l'utilisation des accessoires, maintenez la brosse de sol surélevée
par rapport au tapis en maintenant la poignée en position verrouillée et en abaissant la poignée avec la main
pour soulever la brosse du tapis. Utilisez les accessoires avec l'autre main.
Toujours brancher votre aspirateur sur une prise murale standard. L'utilisation d'une rallonge ou d’une douille
avec une capacité insuffisante de transmission de l’électricité peut entraîner un choc électrique ou un incendie.
Débranchez l'aspirateur de la prise électrique avant l'entretien, comme le remplacement des sacs ou des
courroies. Vous pourriez vous blesser à cause des pièces mobiles de la machine, si celle-ci s'est
accidentellement allumée. Débranchez l’aspirateur de la prise électrique avant de détacher l’électrobrosse.
N’utilisez pas votre aspirateur dans les endroits où des vapeurs ou de la poussière inflammable(s) et/ou
explosive(s) sont présentes, afin d’éviter les risques d'incendie ou d'explosion. Certains liquides de nettoyage
peuvent produire de telles vapeurs. Les superficies sur lesquelles des liquides de nettoyage ont été utilisés
doivent être complètement séchées et bien aérées avant d'être aspirées.
Pour éviter tout risque d'incendie, n’aspirez pas des allumettes, des cendres de cheminée ou des éléments qui fument.
Gardez votre zone de travail bien éclairée pour éviter de ramasser des matériaux nocifs (tels que les liquides,
des objets tranchants ou des substances incandescentes) et pour éviter de trébucher.
Soyez prudent lorsque vous utilisez l’aspirateur sur des surfaces irrégulières telles que les escaliers, car la
chute de l’aspirateur peut causer des blessures corporelles et/ou des dommages mécaniques. Un rangement
adéquat de la machine dans un endroit à l'écart immédiatement après usage permettra également d'éviter les
accidents causés par le trébuchement sur l’aspirateur.
Rangez votre aspirateur à l’intérieur, dans un endroit frais et sec, pas exposé aux intempéries afin d’éviter un
choc électrique et/ou d’endommager l’aspirateur.
Exercez un contrôle rigoureux pour éviter les blessures lors de l'utilisation de l'aspirateur à proximité des
enfants ou lorsqu'un enfant est autorisé à utiliser l'aspirateur. Ne laissez pas les enfants jouer avec l’aspirateur
et ne laissez jamais l'aspirateur branché et sans surveillance.
CONSERVEZ CES INSTRUCTIONS
86404590 VERSAMATICPLUS 14 & 18
Page 23

7
Sécurité
FONDRE DES INSTRUCTIONS
L'ampère, les hertz, et la tension sont énumérés sur l'étiquette de données trouvée sur chaque machine.
Utilisant des tensions au-dessus ou au-dessous de ceux indiqués sur l'étiquette de données causera le sérieux
dommage aux moteurs.
CORDES DE PROLONGATION
Si une corde de prolongation est employée, la taille de fil doit être au moins une taille plus grande que le cordon
de secteur sur la machine, et doit être limitée à 50 pieds (15.5m) de longueur.
FONDRE DES INSTRUCTIONS
Cet appareil doit être fondu. S'il fonctionne mal ou décompose, fondre fournit un chemin de moindre résistance
pour que le courant électrique réduise le risque de décharge électrique. La prise doit être insérée dans une
sortie appropriée qui est correctement installée et fondue selon tous les codes locaux et ordonnances.
Le raccordement inexact du conducteur équipement-fondant peut avoir comme conséquence un risque
de décharge électrique. Vérifiez avec un électricien ou une personne qualifié de service si vous êtes
dans le doute de savoir si la sortie est correctement fondue. Ne modifiez pas la prise équipée d'appareil
- s'il n'adaptera pas la sortie, faites installer une sortie appropriée par un électricien qualifié.
86404590 VERSAMATICPLUS 14 & 18
Page 24

8
Opérations
Composantes
1. Prise de la poignée
2. Poignée
3. Indicateur de sac plein
4. Commutateur On/Off (Marche/Arrêt)
5. Loquet de dégagement du couvercle
6. Couvercle du filtre d'évacuation
7. Capot avant
8. Capot moteur
9. Électrobrosse
10. Cliquet de blocage
11. Pédale
12. Tuyau
13. Bague de retenue
14. Câble
15. Poignée du tube de fixation
16. Cliquet de la poignée
17. Poignée de transport
18. Crochet de câble
19. Tube de fixation
20. Boîtier du sac à poussière
21. Embout suceur
22. Embout pour meubles rembourrés
23. Bouton de réglage de la hauteur
86404590 VERSAMATICPLUS 14 & 18
2
10
17
18
20
21
22
11
3
15
4
6
9
2
1
5
7
12
14
13
15
16
19
23
1
2
9
8
Page 25
9
Opérations
Montage de l’aspirateur
Placez l’électrobrosse (9) sur le plancher avec le
collet pivotant (26) et le levier de support (27) en
position verticale.
Tournez le cliquet de blocage (10) sur le boîtier du
sac filtrant (20) vers la gauche et placez
soigneusement le boîtier sur le collet pivotant et le
levier de support.
REMARQUE : Assurez-vous que le cliquet
est engagé.
Pour verrouiller la poignée, tournez le cliquet de la
poignée (16) au niveau du joint de poignée du boîtier
du sac filtrant (20) vers l'avant, puis faites glisser la
poignée (2) à l’intérieur le plus profondément possible
et verrouillez-la avec le cliquet de la poignée (16).
Insérez le tube de fixation (19) dans sa position de
rangement sur le côté de la machine. La poignée
du tube de fixation (15) doit être placée sur la patte
(24). Faites glisser l'extrémité adéquate du tuyau
dans le boîtier du sac filtrant, insérez l'extrémité noire
du tuyau dans le tube connecteur (25) et faites-le
glisser complètement à l’intérieur. Pour déverrouiller
le tuyau, appuyez sur la bague de retenue (13) au
raccord du boîtier.
86404590 VERSAMATICPLUS 14 & 18
16
2
10
15
19
24
20
26
9
2
13
12
25
27
22
21
Page 26

10
Opérations
Contrôleur de la brosse
Le contrôleur électronique de la brosse surveille le
fonctionnement de la brosse.
DEL verte : Brosse correctement installée et
fonctionnelle.
DEL verte et rouge : Brosse trop élevée. Ajustez le
réglage de la brosse en tournant le bouton de
réglage de la hauteur (23) sur un réglage inférieur.
Si les voyants vert et rouge sont encore allumés à la
position numéro 1, la bande de la brosse est usée et
doit être remplacée.
Le voyant rouge clignote : La brosse est obstruée et
ne tourne pas. Mettez la machine hors tension,
débranchez la prise et dégagez l'obstruction.
Indicateur de niveau du filtre
Si le voyant d’avertissement (3) s’allume, vérifiez :
• Est-ce que le sac à poussière est plein ?
• Y a t-il une obstruction dans le tuyau (12)
ou l’électrobrosse (9) ?
Loquet du collet pivotant
Pour libérer la machine de la position verticale,
appuyez sur la pédale (11).
86404590 VERSAMATICPLUS 14 & 18
2
23
2
11
9
3
12
Page 27

11
Entretien
Débrancher la machine de la prise électrique
avant d’exécuter tout entretien.
Remplacement de la bande de la brosse
Pour remplacer la bande de la brosse, appuyez sur le
bouton (32), retirez la plaque latérale (26) et tournez
la brosse de sorte que la bande de la brosse (27)
puisse être retirée de l'ouverture. Assurez-vous que
la nouvelle bande de la brosse soit complètement
insérée, puis appuyez sur la plaque latérale pour la
remettre en place.
REMARQUE : Assurez-vous que la plaque soit
bien en place.
Remplacement du sac en papier
Si le voyant rouge (3) s’allume, remplacez le sac
filtrant en papier.
Poussez le loquet de dégagement du couvercle
(5) vers l’avant et soulevez le couvercle du boîtier du
sac à poussière. Faites glisser la plaque d'étanchéité
du sac à poussière (28) hors du support (29). Faites
glisser la plaque d'étanchéité (28) d'un nouveau sac
dans le support et poussez fermement. Insérez le
couvercle dans le boîtier du sac à poussière.
Poussez-le vers l'avant, puis bloquez-le en place en
poussant le loquet de dégagement du couvercle.
Remplacement du filtre du moteur
Le filtre du moteur (30) doit être remplacé lorsque
20 sacs filtrants ont été utilisés. Soulevez légèrement
l'avant du filtre et faites-le glisser hors de la fente.
Installez le nouveau filtre et appuyez fermement, pour
assurer que le filtre est complètement en place.
REMARQUE : Des filtres de qualité hospitalière
sont disponibles.
86404590 VERSAMATICPLUS 14 & 18
26 27
32
30
3
5
28
29
Page 28

12
Entretien
Remplacement du filtre d'évacuation
Remplacez toujours le filtre d'évacuation (31) en
même temps que le filtre du moteur (45). Appuyez
sur le bouton et faites glisser le couvercle
d'évacuation (6) sur le côté.
N’utilisez jamais la machine sans installer
correctement les filtres.
Élimination des blocages
Contrôlez visuellement le tuyau et le tube connecteur
(25) pour vérifier qu'il n'y a pas d'obstructions. Les
obstructions dans le tuyau peuvent être éliminées
en le tenant en position verticale d'une main, en
bloquant la partie supérieure et en mettant la machine
en marche. Si nécessaire, apposez et retirez
rapidement votre main de l’extrémité du tuyau.
Vérifiez l'absence d'obstructions dans le collet
pivotant de l’électrobrosse et sous la trappe orange
située dans la partie inférieure de l’électrobrosse.
Vérifiez l'absence d'obstructions dans le passage
entre les deux ouvertures de l’électrobrosse.
REMARQUE : Ne jamais utiliser un bâton ou un
objet pointu pour dégager le tuyau.
86404590 VERSAMATICPLUS 14 & 18
31
45
6
25
Page 29

13
Entretien
Remplacement de la plaque des
circuits imprimés
Retirez le couvercle du filtre d'évacuation (6).
Retirez les trois vis sur le couvercle du tube
d’aspiration (42). Débranchez les fils et faites glisser
la plaque des circuits imprimés (43) vers l'extérieur.
Installez la nouvelle plaque, attachez les fils et
remontez le couvercle.
Remplacement du moteur d’aspiration
Retirez l’électrobrosse de la partie supérieure
du corps.
Retirez le pare-chocs du boîtier du sac à poussière
(44) et retirez les quatre vis sur le capot du moteur (8).
Faites glisser le moteur d'aspiration et installez le
nouveau moteur. Remontez le capot et le pare-chocs.
86404590 VERSAMATICPLUS 14 & 18
8
44
42
43
Page 30

14
Entretien
Remplacement du rouleau de la brosse
Retirez l’électrobrosse de la partie supérieure
du corps.
Pour retirer le couvercle de l’électrobrosse, appuyez
sur le bouton (32), retirez la plaque latérale (26) et les
quatre (VSP14) ou cinq (VSP18) grandes vis (27)
situées sous le châssis. Le couvercle et le bouton
(32) peuvent ensuite être enlevés.
Poussez la courroie (29) pour la détacher de la poulie
du moteur (30), retirez le pare-chocs (41). Retirez les
trois vis sur les deux corps de palier de la brosse
(46 et 47). Soulevez les corps de palier et remplacez
le rouleau de la brosse. Remontez les corps de
palier, le pare-chocs, installez la courroie, la plaque
latérale et le couvercle. Attachez la partie supérieure
du corps à l’électrobrosse.
Remplacement de la poulie du rouleau
de la brosse
Pour retirer la poulie du rouleau de la brosse (35),
tenez le rouleau d'une main et tournez la poulie dans
le sens des aiguilles d'une montre.
Pour retirer la poulie du moteur (36), insérez un
tournevis dans une rainure et donnez un léger coup
dans le sens contraire des aiguilles d'une montre. La
poulie desserrée peut alors être enlevée.
Remplacement du collet pivotant
Pour enlever le collet pivotant (37), retirez les deux
petites vis (38) des supports du collet pivotant (39),
puis soulevez l'assemblage du collet pivotant pour le
séparer du châssis.
REMARQUE : Lors du remontage, assurez-vous
que les fils du collet pivotant ne sont pas piégés
lorsque le couvercle de l’électrobrosse est
remplacée.
86404590 VERSAMATICPLUS 14 & 18
27
27
27
26
32
35
36
38
38
39
37
39
X
27
47
27
46
41
27
29
30
Page 31

15
Entretien
Retrait du couvercle du collet pivotant
Pour enlever le couvercle du collet pivotant, retirez la
vis de fixation (38) et faites glisser le couvercle (40)
vers le bas, puis soulevez-le. Lors du remontage,
assurez-vous que les fils ne soient pas coincés.
Remplacement du contrôleur
électronique
Pour remplacer le contrôleur électronique (41),
débranchez le câble du moteur. Soulevez le
contrôleur en position verticale et débranchez le
câble du collet pivotant.
Remplacement de la pédale
Retirez l’électrobrosse du boîtier supérieur. Retirez
le couvercle de l’électrobrosse. Retirez la vis de
fixation. Insérez un tournevis dans l'encoche sur
l'essieu et faites glisser l’essieu pour le retirer. Retirez
et remplacez la pédale. Remontez le tout.
REMARQUE : Vérifiez que lors du remontage,
l’encoche (40) de l'essieu (0) est visible comme indiqué
86404590 VERSAMATICPLUS 14 & 18
41
41
X
0
40
38
40
Page 32

16
Entretien
Dépannage
Données techniques VSP 14 (VSP 18)
PROBLÈME CAUSE SOLUTION
La brosse ne
tourne pas
L'embout du tuyau n'est pas enfoncé assez
profondément dans le collet
Repositionnez l'embout du tuyau dans le
collet
Brosse coincée
Arrêtez la machine, débloquez la brosse
et redémarrez
Bande de la brosse pas complètement
insérée
Poussez la bande de la brosse pour
qu’elle soit complètement insérée
Courroie cassée Remplacez la courroie
Le voyant rouge
reste allumé sur le
réglage le plus bas
de la brosse (# 1)
Brosse usée Remplacez la bande de la brosse
Indicateur de sac
plein allumé, ou
aspiration faible
Sac à poussière plein Remplacez le sac
Tuyau obstrué Démontez et nettoyez le tuyau
Collet bouché
Retirez la brosse de sol du réservoir de
l'aspirateur et nettoyez le tuyau
Sac mal installé Réinstallez le sac correctement
Filtre d’évacuation ou filtre du moteur
bouché
Nettoyez ou remplacez le filtre
Fuite d'air au niveau du couvercle arrière
Réinsérez le sac à poussière, le filtre du
moteur et le couvercle arrière pour que
tout s'emboîte bien fermement
Indicateur de sac
plein éteint lorsque
le tuyau d’aspiration
est bouché ou le
sac est plein
Capteur mal ajusté
Retirez le capot arrière et utilisez un petit
tournevis pour tourner la vis située
derrière le voyant dans le sens inverse
des aiguilles d'une montre
Capot arrière ne se
ferme pas
Sac mal installé Réinstallez le sac correctement
Le filtre du moteur n'est pas en position Réinstallez le filtre correctement
La machine ne
démarre pas
Circuit électrique défectueux
Faites vérifier la machine par un
réparateur qualifié
ÉLEMENT DIMENSION/CAPACITÉ
Tension 240 V, 50 Hz
Moteur d'aspiration 1 000 watts
Colonne d'eau 2 040 mm
Débit d'air 55 I / sec
Moteur de brosse 175 (200) watts
Capacité sac Poussière 5,3 litres
Largeur de Travail 325 mm
Barrette de brosse Interchangeable
Hauteur 1 225 mm
Largeur 360 (460) mm
Poids 8 (9) kg
86404590 VERSAMATICPLUS 14 & 18
Page 33

1786404590 VERSAMATICPLUS 14 & 18
Spare Parts List
(1.012-054.0, 1.012-058.0)
VERSAMATICPLUS 240V
From Serial No. #______________
If Serial Number not listed,
Contact Manufacturer
Page 34

18
Parts - Tools, Bags & Filters
86404590 VERSAMATICPLUS 14 & 18
3
2
1
1
2
3
4
ATTACHMENTS BAGS & FILTERS
OPTIONAL ATTACHMENTS
1
2
2
2
1
Page 35

1986404590 VERSAMATICPLUS 14 & 18
Parts - Tools, Bags & Filters
ACCESSORIES
BAGS & FILTERS
OPTIONAL ATTACHEMENTS
ITEM PART NO. REF NO. DESCRIPTION NOTES
1 86319290 1491sw UPHOLSTERY NOZZLE, BLACK
2 86319300 1092sw CREVICE NOZZLE, BLACK
ITEM PART NO. REF NO. DESCRIPTION NOTES
1 86000500 5300 FILTER BAG PACK
2 86141370 1878 EXHAUST FILTER 34/470
3 86143430 1825 MOTOR FILTER
4 86142690 1875 HOSPITAL GRADE FILTER
ITEM PART NO. REF NO. DESCRIPTION NOTES
1 86137690 1495KN EXTENSION HOSE
2 86409690 1084sw EXTENSION TUBE, BLACK
3 86409700 1094gs ROUND BRUSH VSM-TK, GRAY BLACK
Page 36

20
Upper Housing
86404590 VERSAMATICPLUS 14 & 18
55
57
24
34
58
32
33
31
27
7
9
2
56
54
47
48
40
49
50
52
51
38
37
39
35
46
46a
44
25
58
58
45
60
53
23
43
8
6
28
29
30
28a
28a
4
1
5
10
17
16
20
18
3
59
58
12
15
14
13
11
58
58
21
26
42
61
1936
41
22
Page 37

2186404590 VERSAMATICPLUS 14 & 18
Upper Housing
ITEM PART NO. REF NO. DESCRIPTION NOTES
1 86407670 1037ES HANDLE GRIP, COMPLETE
2 86407680 1596SW HANDLE COVER
3 86144830 0127ER SCR, M4 X 10
4 86408890 1874/1dg CABLE VSP W/AUS PLUG
5 86142150 1848 HANDLE
6 86408900 1831bg DUST BAG HOUSING, BASALT GRAY
7 86408200 1835bg INTERNAL COVER 370/470, BASALT GRAY
8 86144930 5289 SEAL, FILTER TUBE
9 86144900 5043 SEAL
10 86408080 5424KG RETAINING RING, KARCHER GRAY
11 86319250 1823sw CLIP, DUST BAG HOUSE-SR12
12 86319140 5359SW GROMMET, BLACK
13 86146170 0502 TERMINAL BLOCK
14 86139110 1030UL CABLE CLAMP
15 86408220 1812bg COVER, VSE BRUSH STRIP, BASALT GRAY
16 86408230 1814kg CARRYING HANDLE, KARCHER GRAY
17 86145350 5146 STOP SPRING (HOOK)
18 86408240 1813kg CABLE HOOK, KARCHER GRAY
19 86408250 1859kg HANDLE CATCH, KARCHER GRAY
20 86140040 0161 CLIP 4 DIN 6799
21 86408260 0850kg LOCKING CATCH, KARCHER GRAY
22 86143100 1811 LOCKING ROD
23 86146190 1012N TERMINAL BLOCK
24 86408270 1807bg CONNECTOR, BASALT GRAY
25 86331740 1836 FEMALE CONTACT HOLDER 240V
26 86145170 1851 SOUND INSULATION
27 86146380 1047 VAC MOTOR SEAL
28 86331750 1845 VAC MOTOR 240V/1000W
28a 86139410 05118S CARBON BRUSH SET 230/240V
29 86143400 1821 MOTOR COVER
30 86352880 1822-1 MOTOR SUPPORT VSP
31 86143010 1027 LEAF SPRING
32 86139970 1073 CLAMP
33 86140230 1824 CONNECTING ROD
34 86143430 1825 MOTOR FILTER
35 86144390 1934ER PRINTED CIRCUIT BOARD 240V
36 86141680 1860 FITTING
37 86408280 1852bg VACUUM TUBE COVER, BASALT GRAY
38 86143040 1869hg LENS, BAG LIGHT INDICATOR
39 86408290 1830zg SWITCH BUTTON, ZINC YELLOW
40 86145220 1862 SPRING
41 86331760 1833 INTERNAL CABLE 240V
42 86141370 1878 EXHAUST FILTER 370/470
43 86408300 1802bg EXHAUST FILTER COVER, BASALT GRAY
44 86408310 1853BG MOTOR COVER 370/470 DUAL MOTOR, BG
45 86408320 1804bg DUST BAG HOUSING BUMPER, BASALT GRY
46 86141840 5454 FRONT COVER SEAL
46a 86408330 1846bg FRONT COVER COMPLETE, BASALT GRAY COMPLETE WITH SEAL
47 86408340 1818zg COVER RELEASE, ZINC YELLOW
48 86144970 6040 SEAL, RELEASE COVER
49 86143940 1819 PLASTIC AXLE COVER
50 86138040 1847 BAG HOLDER, CPL
51 86144760 5091 SAFETY CATCH SPRING
52 86144750 1817 SAFETY CATCH
53 86000500 5300 SENSOR FILTER BAG PACK (10PK)
54 86319200 5045sw EXTENSION TUBE, BLACK
55 86142650 5040sb HOSE, SENSOR SILVER
56 86319290 1491sw UPHOLSTERY NOZZLE, BLACK
57 86319300 1092sw CREVICE NOZZLE, BLACK
58 86147030 0102ER SCR, M3,9 X 13 MM DIN 7981
59 86147040 0103ER SCR, M3,9 X 16 MM DIN 7981
60 86142690 1875 HOSPITAL GRADE FILTER
61 86408350 1884kg RETAINING BUTTON, KÄRCHER GRAY
Page 38

22
Power Head-VSP 14
86404590 VERSAMATICPLUS 14 & 18
114a
109
127
130
128
100
136
126
101
102
110
142
108
138
137
137
103
103
138
120
110
108
104
139
138
141
139
132
115
114
136
138
121
116
129
138
138
107
134
133
131 107
138
131a
131a
112
123
138
111
113
105
X
X
125
106
138
124
122
140
117
119
118
106
136
136
135
105a
Page 39

2386404590 VERSAMATICPLUS 14 & 18
Power Head-VSP 14
ITEM PART NO. REF NO. DESCRIPTION NOTES
100 86407840 20200SW CHASSIS 14", BLACK
101 86363140 20204GS REAR BOTTOM TEMPLATE, GRAY BLACK
102 86407850 20109SW BUMPER, BLACK
103 86363160 20115 RETAINING BRACKET
104 86407860 20107GS REAR BOTTOM PLATE, GRAY BLACK
105 86407870 20230EK FOOT PEDAL, ZINC YELLOW
105a 86378430 20140ER AXLE, FOOT PEDAL
106 86363190 20136ER SWIVEL NECK BEARING
107 86322280 2306SW WHEEL, BLACK
108 86363200 2014ER AXLE CLAMP
109 86363210 20126ER PILE ADJUSTMENT AXLE
110 86407880 2608gs PILE ADJUSTMENT WHEEL, GRAY BLACK
111 86146220 2833 THRUST MEMBER
112 86407890 20128EK ADJUSTMENT BUTTON, ZINC YELLOW
113 86145270 4019 SPRING
114 86364910 2975ER BRUSH MOTOR 230/240V, 175W
114a 86138390 05141S BRUSH SET, CARBON VAC MTR
115 86309030 2319 BRUSH MOTOR PULLEY FM
116 86138220 2923 BELT, 333 3M HTDII-6
117 86364920 20232ER SWIVEL NECK ASSEMBLY
118 86364930 0895ER WIRE, SWIVEL NECK 2-WIRE
119 86145840 2602hg SWIVEL NECK COVER 370/470
120 86363260 20217ER SWIVEL NECK SUPPORT
121 86363270 20218ER SWIVEL NECK SUPPORT L.H
122 86363710 0897ER SWITCH LEVER
123 86363410 20129ER LEAF
124 86139970 1073 CLAMP
125 86363280 2919ER BRUSH PULLEY
126 86364940 20164ER
PRINTED CIRCUIT BOARD 240V, 175W
127 86363300 4098ER BRUSH ASSEMBLY CPL
128 86002440 2046 BRUSH STRIP 14”
129 86363310 20123ER BEARING BLOCK L.H.
130 86407900 20117EK BEARING BLOCK R.H., BLACK
131 86407910 20120EK BRUSH ROLLER RELEASE, KARCHER GRAY
131a 86363340 20121ER SPRING
132 86145450 2653hg SUPPORT LEVER
133 86345580 2651 RETURN SPRING
134 86407920 20220BGP POWER HEAD COVER VSP 14", BASALT GRAY
135 86407930 20118EK SIDE PLATE, BLACK
136 86144790 01017ER SCR, 4X20-T20 STS
137 86144850 0197ER SCR,M4X12 MM W/WASHER
138 86363370 01036ER SCREW M4 X 14
139 86147170 0176 SCREW M4 X 30
140 86147030 0102ER SCR, M3,9 X 13 MM DIN 7981
141 86407940 20124EK ACCESS DOOR, ZINC YELLOW
142 86363400 20127ER LEVER
Page 40

24
Power Head-VSP 18
86404590 VERSAMATICPLUS 14 & 18
114a
109
130
128
131a
131a
100
136
126
101
102
110
108
138
139
137
137
103
103
103
138
120
106
142
110
108
104
139
138
141
139
132
115
114
136
138
121
116
129
138
106
138
107
134
133
131
107
138
112
123
138
111
113
105
X
X
127
125
138
124
122
140
117
119
118
136
136
135
105a
Page 41

2586404590 VERSAMATICPLUS 14 & 18
Power Head-VSP 18
ITEM PART NO. REF NO. DESCRIPTION NOTES
100 86407840 20202SW CHASSIS 18”, BLACK
101 86363140 20205GS REAR BOTTOM PLATE
102 86407850 20110SW BUMPER, LONG, BLACK
103 86363160 20115 RETAINING BRACKET
104 86408160 20108GS REAR BOTTOM PLATE, GRAY BLACK
105 86407870 20230EK FOOT PEDAL, ZINC YELLOW
105a 86378430 20140ER AXLE, FOOT PEDAL
106 86363190 20136ER SWIVEL NECK BEARING
107 86322280 2306SW WHEEL, BLACK
108 86363200 2014ER AXLE CLAMP
109 86363210 20126ER PILE ADJUSTMENT AXLE
110 86407880 2608gs PILE ADJUSTMENT WHEEL, GRAY BLACK
111 86146220 2833 THRUST MEMBER
112 86407890 20128EK ADJUSTMENT BUTTON, ZINC YELLOW
113 86145270 4019 SPRING
114 86364960 3260ER BRUSH MOTOR 230/240V, 200W
114a 86138390 05141S BRUSH SET, CARBON VAC MTR
115 86309030 2319 BRUSH MOTOR PULLEY FM
116 86138220 2923 BELT, 333 3M HTDII-6
117 86364920 20232ER SWIVEL NECK ASSEMBLY
118 86364930 0895ER WIRE, SWIVEL NECK 2-WIRE
119 86145840 2602hg SWIVEL NECK COVER 370/470
120 86363260 20217ER SWIVEL NECK SUPPORT
121 86363270 20218ER SWIVEL NECK SUPPORT L.H
122 86363710 0897ER SWITCH LEVER
123 86363410 20129ER LEAF
124 86139970 1073 CLAMP
125 86363280 2919ER BRUSH PULLEY
126 86364980 20168ER PRINTED CIRCUIT BOARD 220/230V, 200W
127 86372960 4099ER BRUSH ASSEMBLY CPL 18"
128 86001640 4028 BRUSH STRIP, 18" MODEL U19840
129 86363310 20123ER BEARING BLOCK L.H.
130 86407900 20117EK BEARING BLOCK R.H., BLACK
131 86407910 20120EK BRUSH ROLLER RELEASE, KARCHER GRAY
131a 86363340 20121ER SPRING
132 86145450 2653hg SUPPORT LEVER
133 86345580 2651 RETURN SPRING
134 86408180 20221BGP POWER HEAD COVER VSP18, BASALT GRAY
135 86407930 20118EK SIDE PLATE, BLACK
136 86144790 01017ER SCR, 4X20-T20 STS
137 86144850 0197ER SCR,M4X12 MM W/WASHER
138 86363370 01036ER SCREW M4 X 14
139 86147170 0176 SCREW M4 X 30
140 86147030 0102ER SCR, M3,9 X 13 MM DIN 7981
141 86407940 20124EK ACCESS DOOR, ZINC YELLOW
142 86363400 20127ER LEVER
Page 42

26
Wiring Diagram
86404590 VERSAMATICPLUS 14 & 18
M
P
M
240 V~
Brush Motor Switch
Interruptor del motor de cepillo
Interrupteur de moteur de brosse
Hose
Manguera
Flexible
Resistor
Resistencia eléctrica
Resistance
On / O Switch
Interruptor principial
de encendido/apagado
Interrupteur
principal
Indicator
Valve
Válvula indicadora
Valve de securite
Neon lamp
Diodo
Diode
Terminalboard
Tablero de conexiones
Barette de Connection
Handle tube
Tubo de manija
Tube de manche
Brush Motor
Motor de cepillo
Moteur de brosse
Electronic Control
Motor de cepillo
Contrôle électronique
Vacuum Motor
Motor de aspiración
Moteur d’aspiration
Terminalboard
Tablero de conexiones
Boitier de raccord
Static “Electrode”
"Electrodo" estático
Electrode anti-statique
Page 43

2786404590 VERSAMATICPLUS 14 & 18
Suggested Spare Parts
PART NO. PRV NO. DESCRIPTION
SERIAL NO.
FROM
NOTES
86000500 5300 SENSOR FILTER BAG PACK (10PK)
86141370 1878 EXHAUST FILTER 370/470
86143430 1825 MOTOR FILTER
86138220 2923 BELT, 333 3M HTDII-6
86408890 1874/1dg CABLE VSP W/AUS PLUG
86002440 2046 BRUSH STRIP, 14"
86001640 4028 BRUSH STRIP, 18" MODEL U19840
Page 44

86404590-A 08/31/15 06485K
 Loading...