

Page 1
U
SER
M
ANUAL
Caution of risks
Page 2
WindRunner™ self-balancing electric vehicle user’s manual
2
Just the same as any other means of transportation, when you ride the WindRunner ™, you
may lose control, fall, and become seriously injured in a crash. Therefore, please carefully
read this manual and got experienced. With safe riding skills, you may reduce or avoid any
hazards and risks.
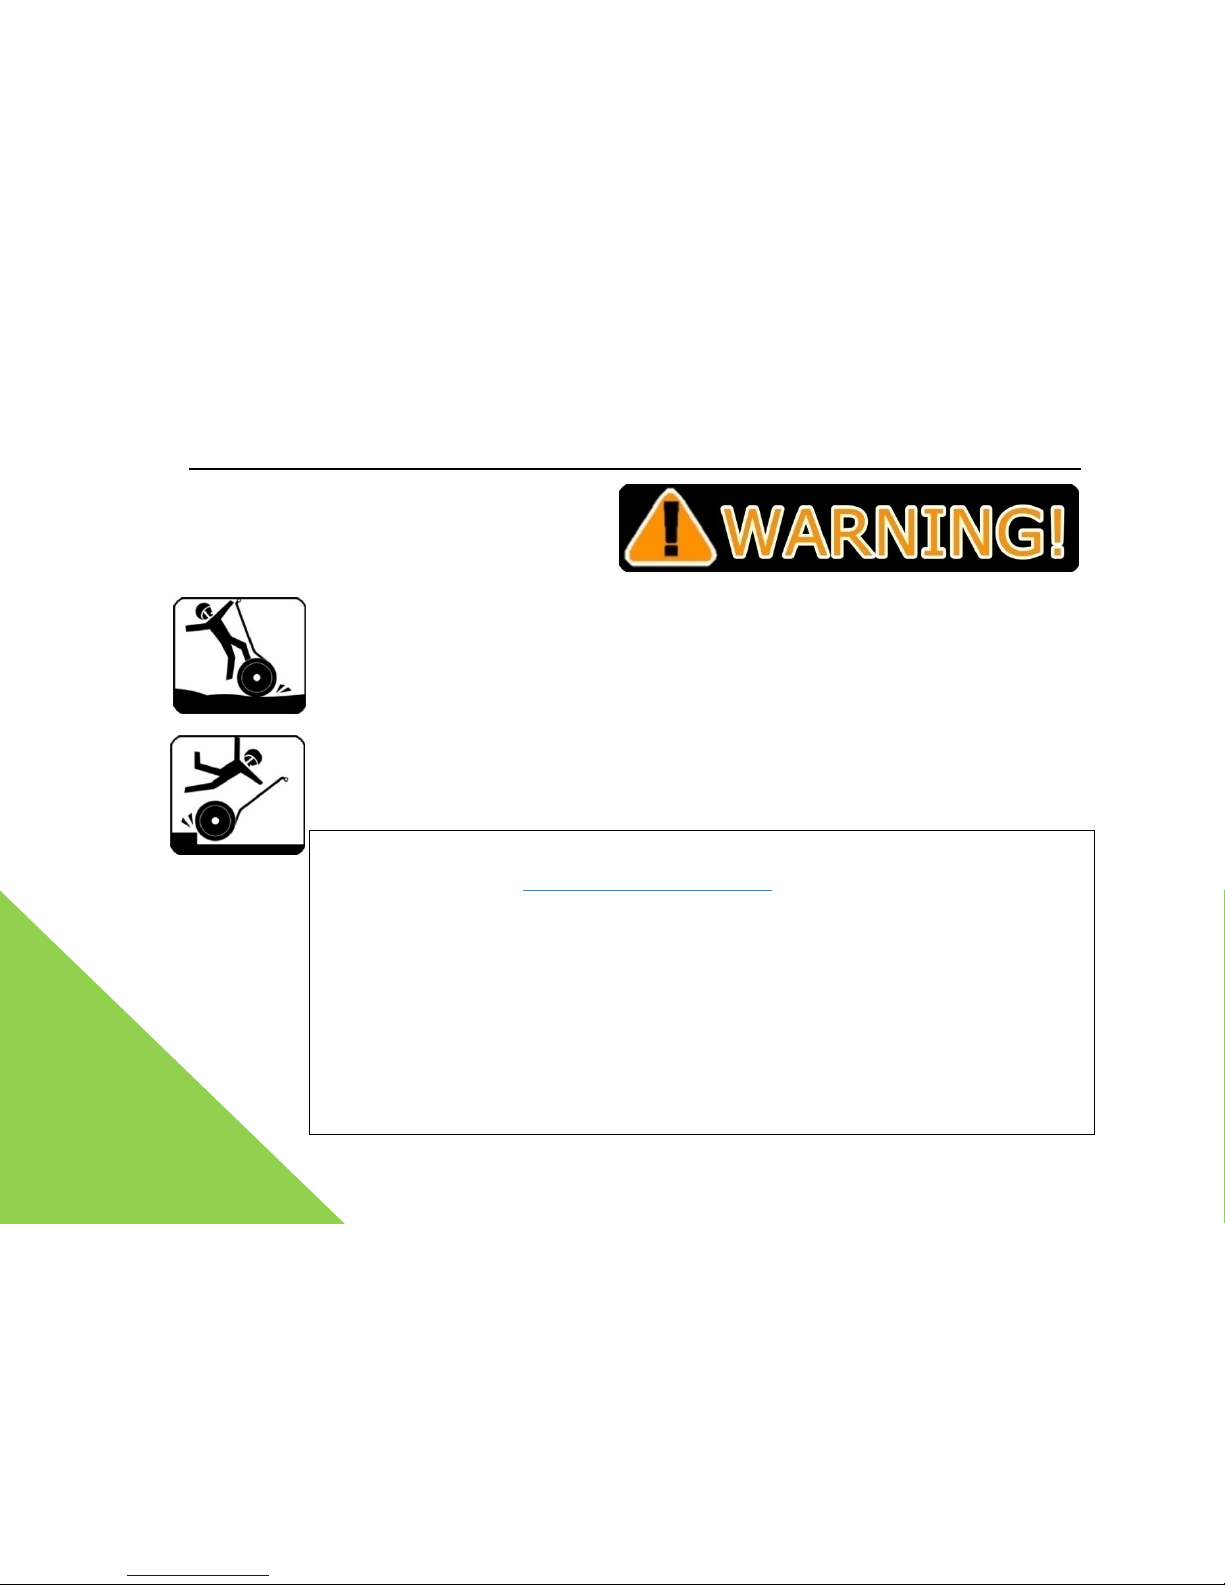
The figure on the left shows some unsafe riding situations. For example, the wet and Slippery
surface of the road may cause your WindRunner to skid around and fall; Carefully read this
manual to avoid any hazards and risks.
For a further understanding of potential hazards and safe riding skills, login to our
official website ™: http://www.windrunner.cn/en for a “ safe riding instruction video”.
This manual will explain all of the operating instructions and precautions associated with
using the WindRunner ™ to you. You must carefully read, and obey this manual.
Beijing UPTECH Robotics Technology Co., Ltd shall never be liable for any consequences
incurred on account of improper and wrong operations.
Please buy or rent the WindRunner ™ from distributors authorized by UPTECH Robotics.
If not, you may suffer the loss of our warranty and after-sale service. You may consult
the local dealer listed on our official website.
Page 3

WindRunner™ self-balancing electric vehicle user’s manual
3
Trademark registration and legal notices
The WindRunner ™ is a trademark of Beijing UPTECH Robotics
Technology Co., Ltd (hereafter briefly called UPTECH or UPTECH
Robotics). ARM® is the trademark of ARM Company. Any other
trademarks mentioned in this manual and all concerning rights shall be
the proprietary of their owners. UPTECH reserves all rights for
WindRunner ™, and “8-shape logo”.
This manual was compiled by UPTECH. UPTECH owns all copyrights
of this manual and without the prior formal permission from UPTECH, any
organizations and persons are forbidden to duplicate or distribute all or
part of this manual to others.
Page 4

WindRunner™ self-balancing electric vehicle user’s manual
4
About this manual
Thank you for your choosing our WindRunner ™ electric self-balancing vehicle. This
manual will help you:
follow all the safe riding instructions, and obey the riding skills listed in
this manual, and you can enjoy a safe and pleasant ride.
to ensure a better riding experience.
to perform the basic operations of WindRunner ™ before riding.
to master routine maintenance, and also, contact of after-sale services.
to Understand all aspects of performance, maintenance skills, and
troubleshooting, to solve any problems as soon as possible.
This manual derives accordingly, and is applicable for: WindRunner ™G1 series
including G1U, G1X.
Page 5
WindRunner™ self-balancing
electric vehicle user’s manual
Please pay close attention to the following marks and
meanings
understand them well.
improper use and/or
operation can cause
serious loss of property
or heavy injury/death
improper operation may
cause malfunction or
heavy damage to your
WindRunner
Helps you to rider better
and easier
5
. Carefully read, and
Page 6

WindRunner™ self-balancing electric vehicle user’s manual
6
Contents
Caution of risks ................................................................................................................................. 1
Trademark registration and legal notices ................................................................................................. 3
About this manual ................................................................................................................................ 4
1. Introduction of WindRunner™ ...........................................................................................................11
1.1 How do a WindRunner work? .......................................................................................................11
1.2 Model of WindRunner G1 series ...................................................................................................12
1.3 Illustration of G1U/G1X ..............................................................................................................13
2. Install a new WindRunner .................................................................................................................14
2.1 Check the package content .........................................................................................................14
2.2 Check the S/N ...........................................................................................................................16
2.3 Assembly ..................................................................................................................................17
2.3.1 Tools required and preparations ............................................................................................18
2.3.2 Assemble the operating bar ..................................................................................................18
2.4 Intelligent remote keys ...............................................................................................................20
2.4.1 Function list ........................................................................................................................21
2.5 Test riding ................................................................................................................................22
3. Operating modes .............................................................................................................................25
3.1Standby mode ............................................................................................................................25
Page 7

WindRunner™ self-balancing electric vehicle user’s manual
7
3.2 Power assistant mode .................................................................................................................26
3.3 Balance mode ............................................................................................................................27
3.2.1 Beginner mode- 5km/h max .................................................................................................28
3.2.2 Speed limit mode- 10km/h max ............................................................................................28
3.2.3 Normal mode- 20km/h max ..................................................................................................29
3.4 Lock mode ................................................................................................................................30
4. Use the intelligent remote keys .........................................................................................................31
4.1 ON/OFF ....................................................................................................................................31
4.2 mode switch ..............................................................................................................................31
4.3 Lock mode ................................................................................................................................34
4.4 Battery indication.......................................................................................................................35
4.5 Replace the battery of the key .....................................................................................................37
5. How to ride .....................................................................................................................................38
5.1 Before ride ................................................................................................................................38
5.2 Starting the WindRunner ............................................................................................................40
5.3 Verify the startup of beginner mode .............................................................................................40
5.4 Prior to get on ...........................................................................................................................41
5.5 Get on ......................................................................................................................................43
5.6 Move forward and backward ........................................................................................................44
5.7 Decelerate and stop ...................................................................................................................46
5.8 Make a turn ..............................................................................................................................48
Page 8

WindRunner™ self-balancing electric vehicle user’s manual
8
5.9 Get off ......................................................................................................................................49
5.10 Use the power assistant mode ...................................................................................................50
5.11 Use the lock mode....................................................................................................................52
6. Safe riding instructions ....................................................................................................................54
6.1 You must strictly obey ................................................................................................................54
6.2 Strictly forbidden .......................................................................................................................55
6.3 Driving manners/safe riding ........................................................................................................58
6.4 Active protection instruction ........................................................................................................60
6.5 Intelligent safe alarm/protection ..................................................................................................62
7. Charging and battery maintenance ....................................................................................................66
7.1 Introduction of battery ...............................................................................................................66
7.2 Charging ...................................................................................................................................67
7.3 battery maintenance ..................................................................................................................69
7.3.1 Assembly / disassembly the battery pack ...............................................................................70
7.3.2 Improve the cycle life of the battery pack ...............................................................................70
7.4 Transport and recycle of the battery pack .....................................................................................73
8. Routine maintenance .......................................................................................................................73
8.1 Keep cleanness ..........................................................................................................................74
8.2 Check whether the screw is loose or not .......................................................................................75
8.2 Check the inflation pressure of tire ...............................................................................................75
8.3 Storage ....................................................................................................................................76
Page 9

WindRunner™ self-balancing electric vehicle user’s manual
9
8.4 handling ...................................................................................................................................76
8.5 Repair ......................................................................................................................................77
9. Troubles and alarms ........................................................................................................................78
9.1 FAQs and troubleshooting ...........................................................................................................78
9.2 List of alarm information codes ....................................................................................................80
9.3 Spare parts for repairing and replacing .........................................................................................85
9.4 Reporting your troubles ..............................................................................................................85
10. Datasheet .....................................................................................................................................86
10.1 WindRunner G1U urban type .....................................................................................................86
10.2 WindRunner G1X all terrain type ................................................................................................87
Appendix A. More maintenance instructions ............................................................................................88
A.1 Replace the tire .........................................................................................................................88
A.2 Replace the fender .....................................................................................................................88
A.3 replace the foot mat ...................................................................................................................89
A.4 replace the gear oil ....................................................................................................................90
Appendix B. Deep understanding WindRunner.........................................................................................93
B.1 Battery stamina and battery indication .........................................................................................93
Factors affecting the battery stamina .............................................................................................93
Accuracy of battery indication .......................................................................................................94
B.2 Tire and land form .....................................................................................................................95
B.3 About intelligent Speed limit .......................................................................................................96
Page 10

WindRunner™ self-balancing electric vehicle user’s manual
10
B.4 Hot back-up safety mechanism ....................................................................................................97
B.5 G1X and G1U upgrading mode ....................................................................................................98
B.6 Brake lights ..............................................................................................................................99
Appendix C. Outline and dimensions .................................................................................................... 100
C.1 urban model G1U .................................................................................................................... 100
C.2 all terrain model G1X ............................................................................................................... 101
Contact us ........................................................................................................................................ 102
Page 11

WindRunner™ self-balancing electric vehicle user’s manual
11
1. Introduction of WindRunner™
1.1 How do a WindRunner work?
The WindRunner™ is a dual-wheel self-balanceable electrically operated vehicle, a revolutionary
ride-instead-of-walk and recreational tool. The driver may operate the movement of
WindRunner by standing on it, and shifting his/her body. The WindRunner itself may
automatically keep balance and the driver does not have to worry about the risk of falling.
With the built-in electronic gyro, the on-board high speed CPU may calculate in 200 times/s
whether the mainframe of WindRunner is balanced forward and backward or not. If not, the CPU
may control the motor on both left and right sides to rotate rapidly, and keep the WindRunner
balanced. The self-balancing function, allows the driver to stand on the WindRunner with his
body inclined forward. The mainframe may automatically enable its wheels to move forward,
and the WindRunner will move forward; and vice versa. Simply turn the handle left and right.
Because the balance of WindRunner ™ completely depends on the good functioning of a high
speed CPU, precision gyro, and motor, if any one of them has troubles, the WindRunner may
lose balance. The WindRunner ™ has a hot back-up dual-redundant control system which
ensures that all key circuit systems shall be doubled. Therefore, if any one of the key modules
fails to work, the backup may be put into operation so as to maximize the safe riding.
Page 12
WindRunner™ self-balancing electric vehicle user’s manual
12
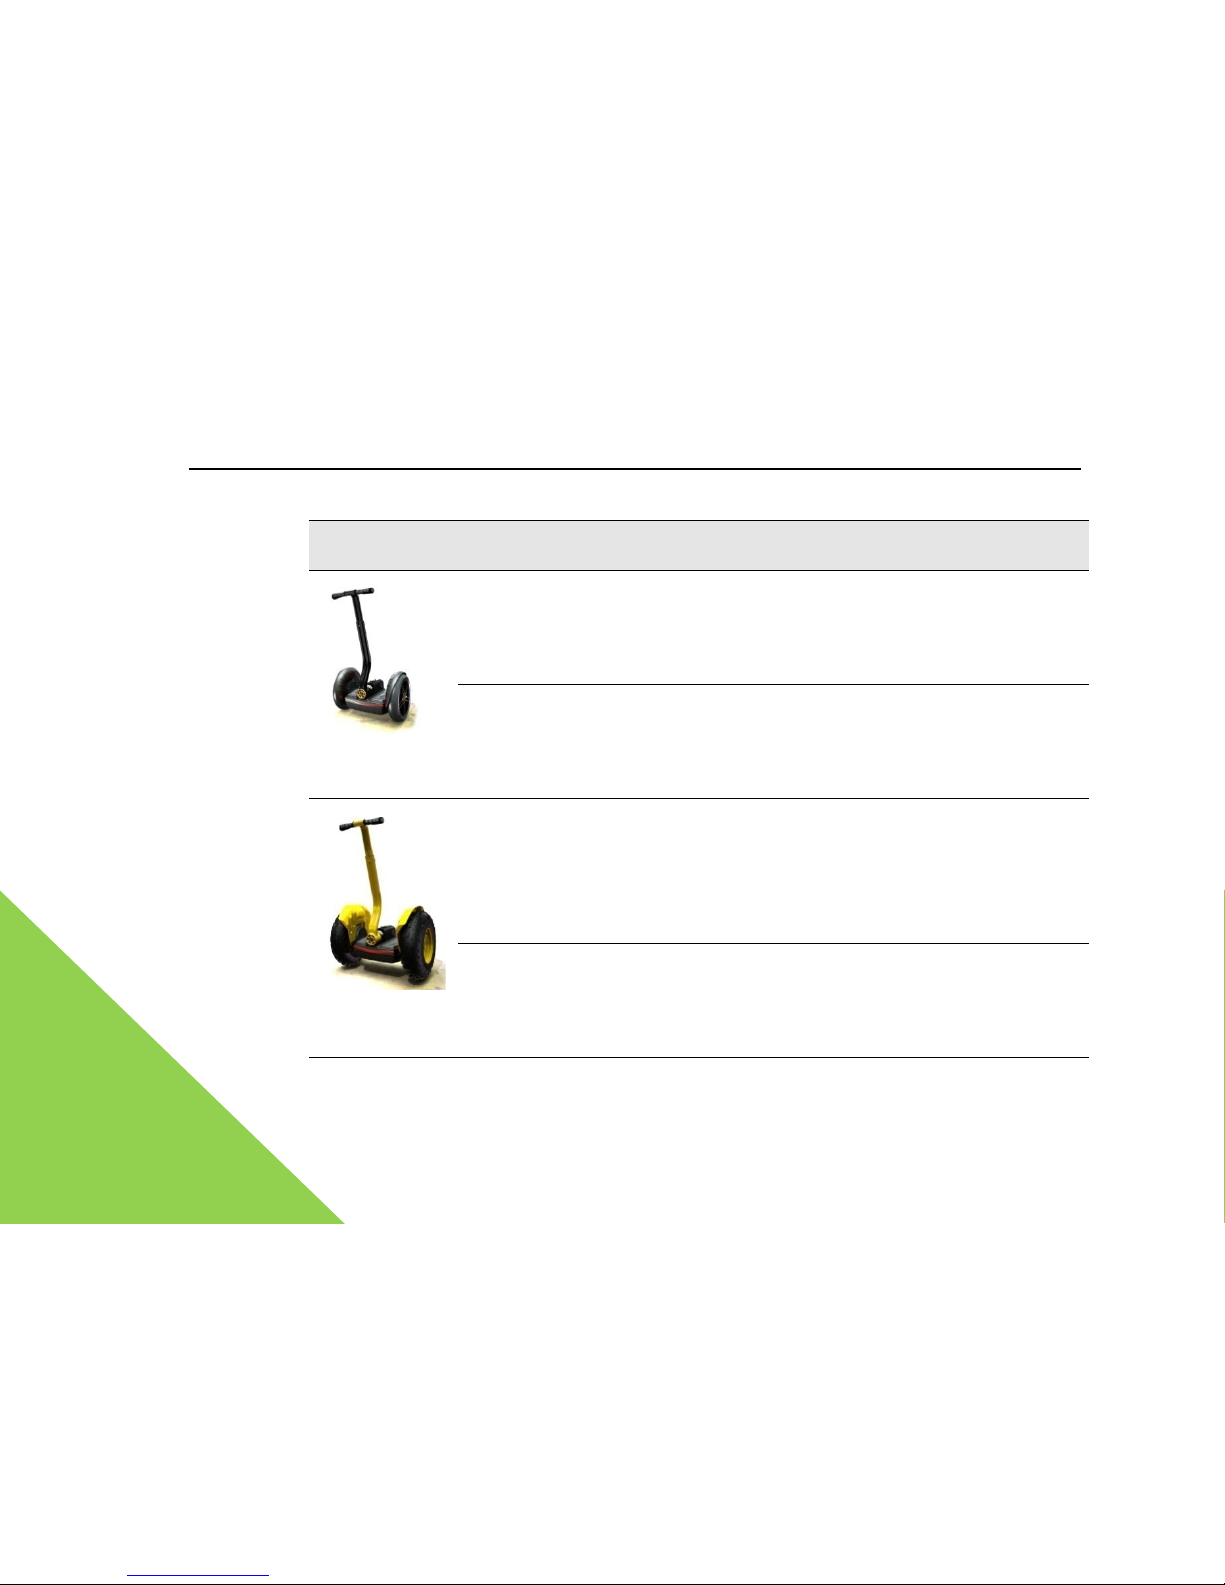
1.2 Model of WindRunner G1 series
Appearance Type Features
G1U urban standard
model
Easy removal of steering handle, and suitable for
storing into the luggage compartment of most of
family-owned cars.
G1UR urban
for-rent model
G1U-based, higher capacity of battery stamina.
Equipped with external quick charger, and optional
RFID billing system.
G1X all terrain
standard model
Low-pressure large-size all-terrain tire, shock
absorbance, and suitable for rugged and uneven
path. With stamina slightly lower than that of G1U
urban type.
G1XR all terrain
for-rent model
G1X-based, high capacity battery, and long
stamina. Equipped with external quick charger, and
optional RFID billing system.
*the WindRunner may also be upgraded. See www.WindRunner.cn for details.
Page 13
WindRunner™ self-balancing electric vehicle user’s manual
13
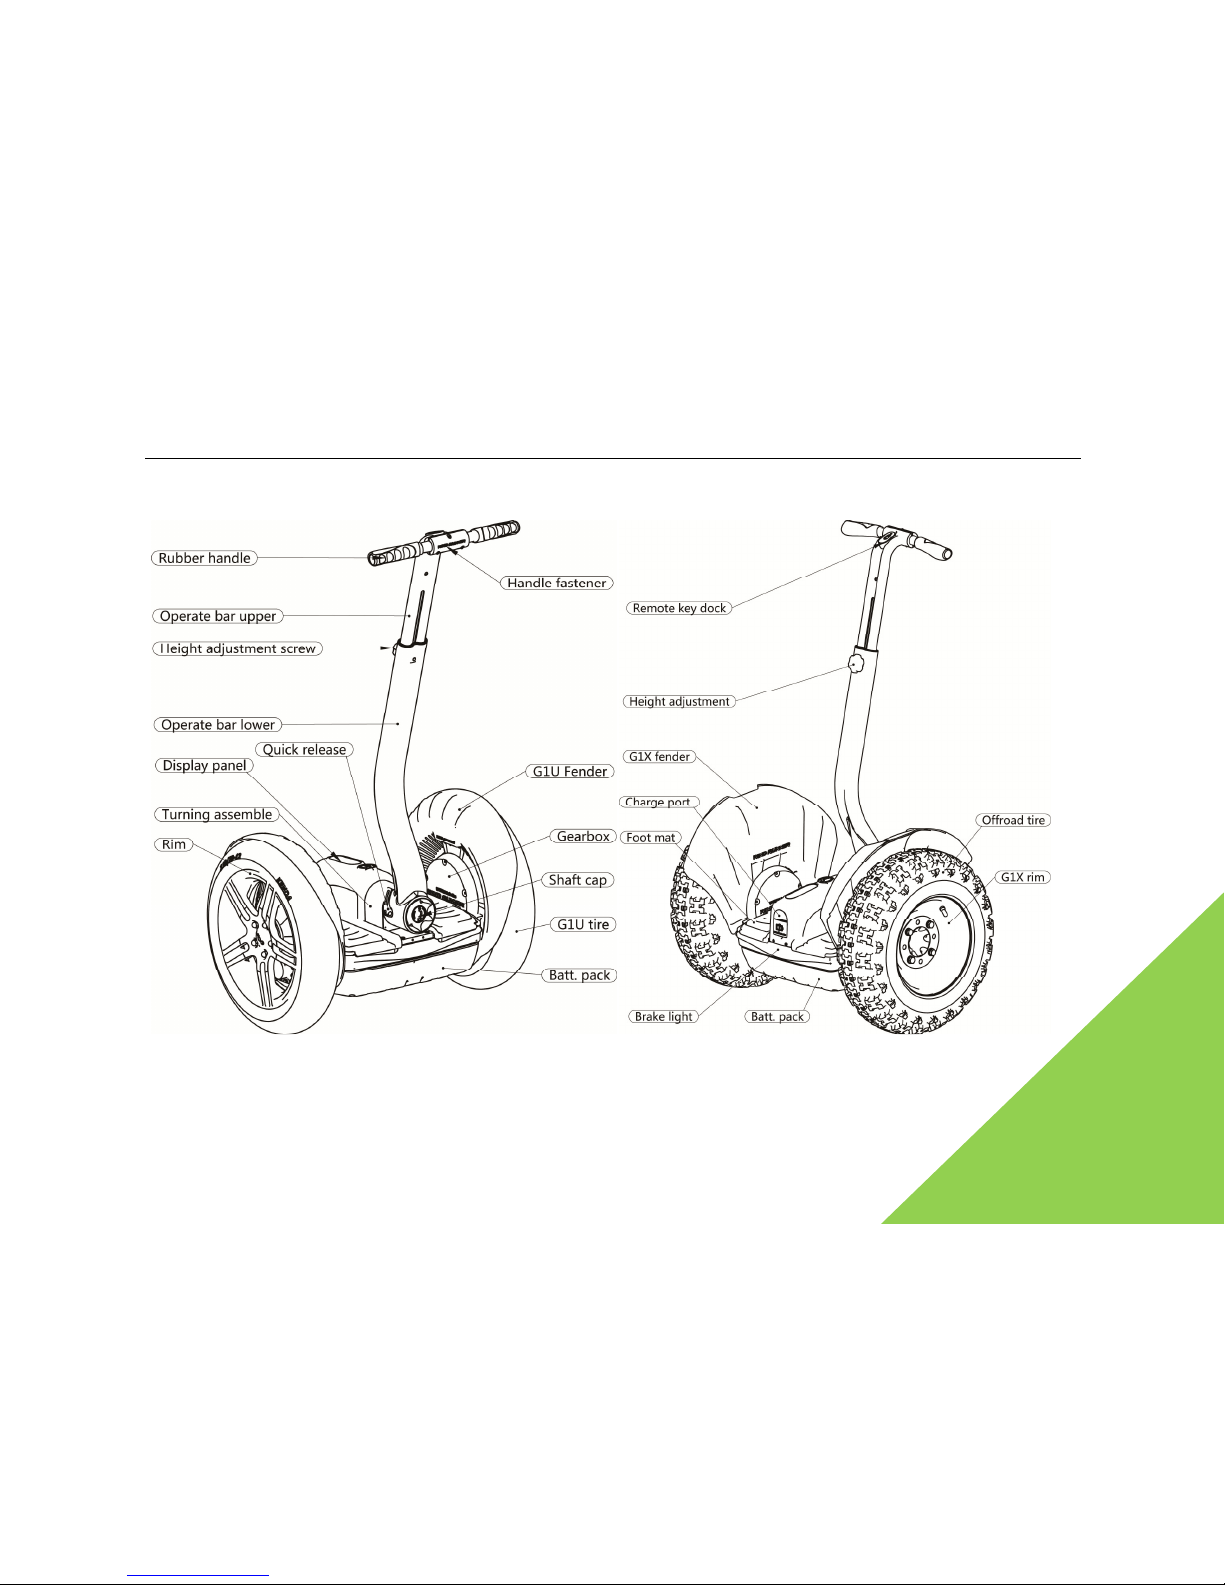
1.3 Illustration of G1U/G1X
Page 14
WindRunner™ self-balancing electric vehicle
14
2. Install a new WindRunner
2.1 Check the package content
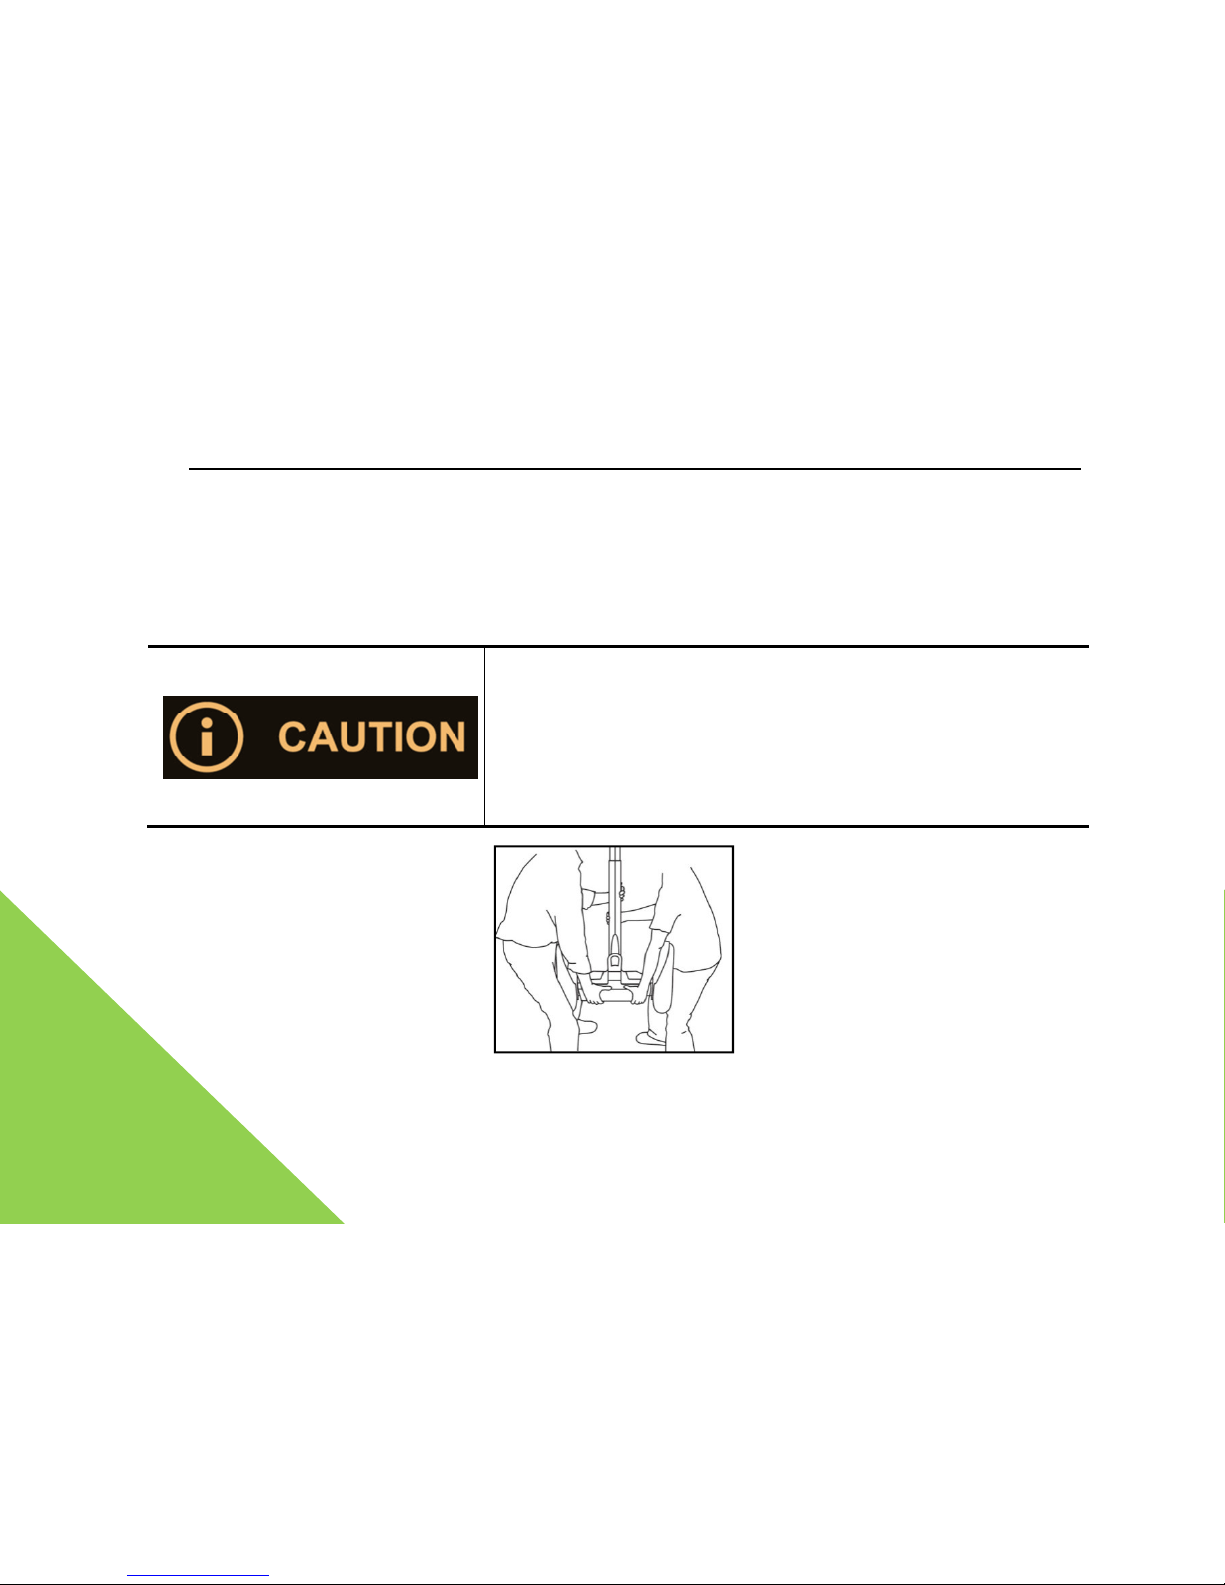
Once unpacked, carefully take out the handle and put it aside. Then,
take out the
The mainframe is relatively heavy;
carefully take it out with the
help of another person.
Take care when picking up
hub with your hands. Do
not directly pick up the
Otherwise, the fender may be damaged
, and
squeezed and harmed.
user’s manual
mainframe.
the wheel
fender.
fingers may be
Page 15

WindRunner™ self-balancing electric vehicle user’s manual
15
Immediately check whether all things in the package are just the same as shown in table below.
If not, please do not hesitate to contact our sales representative.
Chassis (including tire, operating bar quick release) 1 set Care to distinguish the all terrain type and
urban type
battery pack 2 sets including one charging cable
Lower and upper segment of operating bar, handle,
decorative cap
1 set
Intelligent remote key 2 pcs Two general-purpose intelligent remote
keys. One operating and one standby
Battery of intelligent remote key 2 pcs Backup battery for intelligent remote key
Dismantling tools and working gloves 1 set socket screw wrench, 1 set, working gloves,
1 pair
instruction manual and safety riding instruction DVD,
warranty card
1 set
Page 16
WindRunner™ self-balancing electric vehicle user’s manual
16
2.2 Check the S/N
All warranty terms are located on the warranty card and are guaranteed in three aspects: repair,
spare parts, and contact method. All shall be signed by your seller upon the entry-into-effect
date of warranty, contact method of the seller and stamp. Moreover, the last page of the
warranty card should have been attached with the label of serial number.
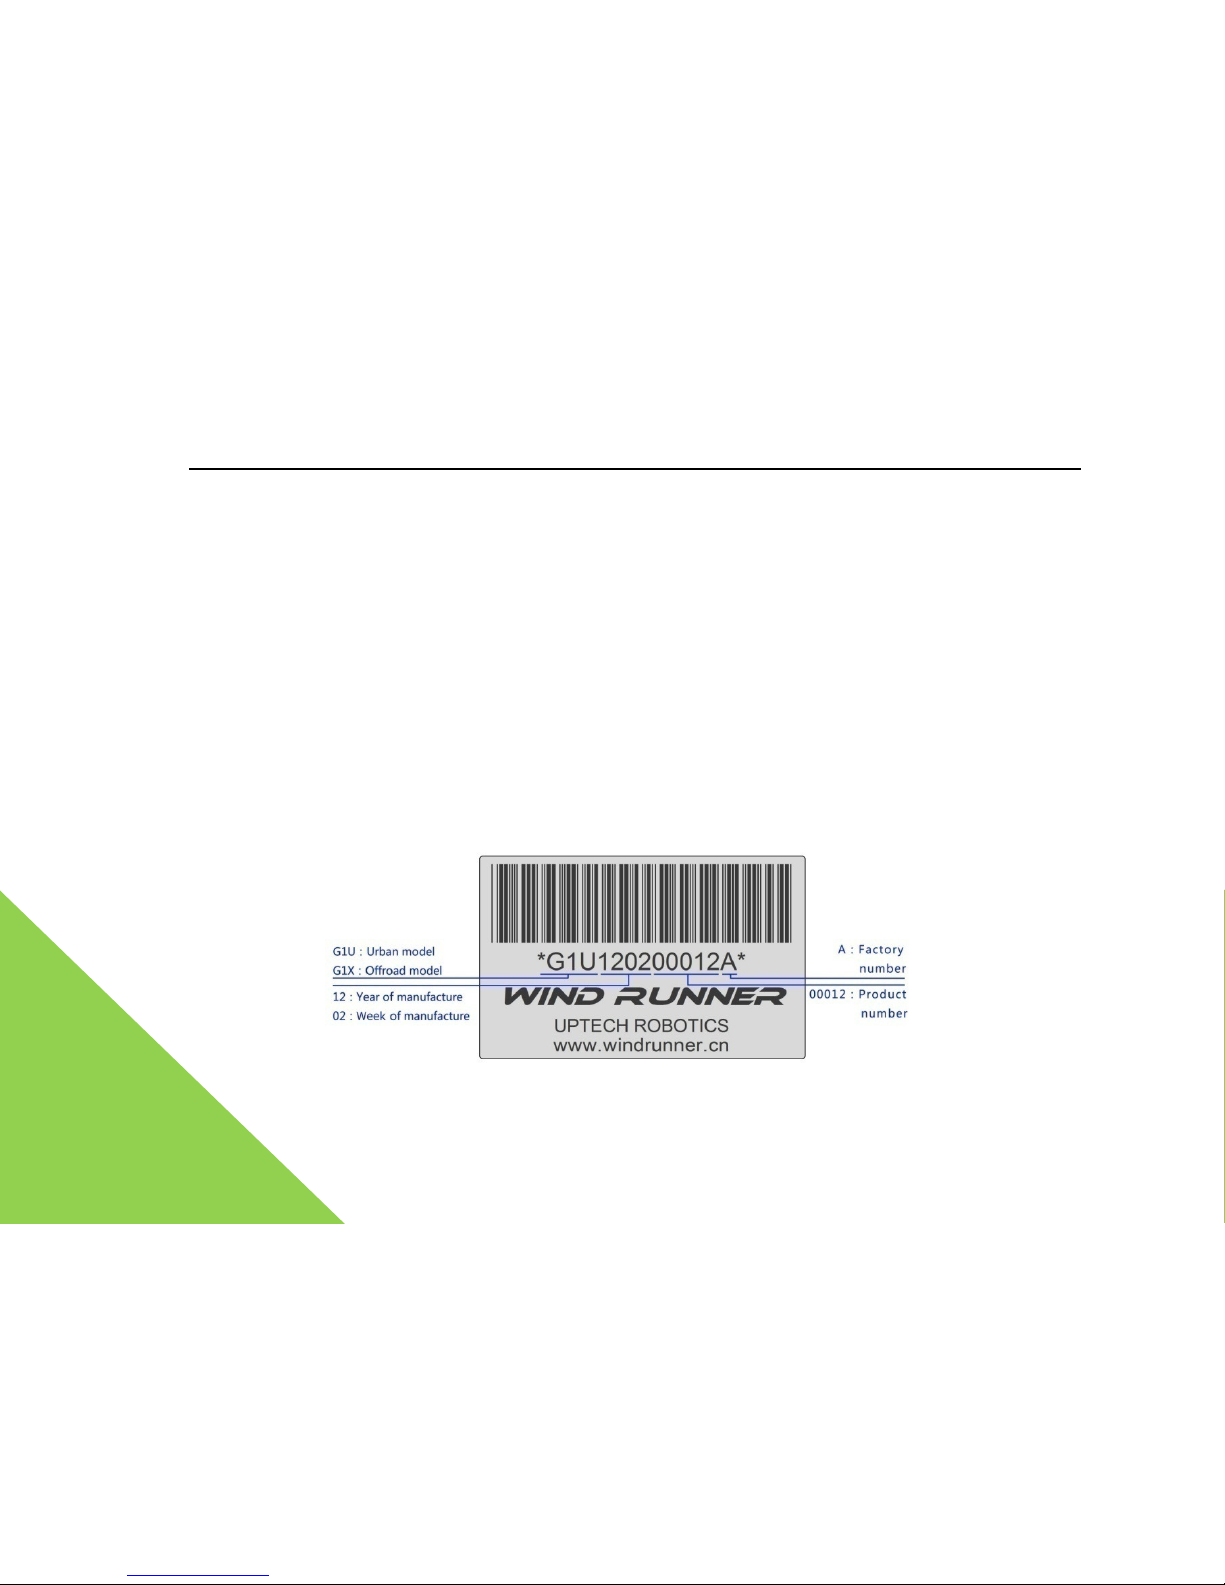
The serial number is the combination of 12-bit character and number. You may find the serial
number located on the positions below:
Attached at the last page of warranty card.
Attached at the place under the right foot mat.
Outside of packing.
meanings of serial number label and code
Page 17
WindRunner™ self-balancing
electric vehicle user’s manual
Each WindRunner
has a unique serial number
and
warranty card are the only mark for
maintenance and repair, and after-
sale service
consistency of serial numbers at three positions mentioned
above. If unconformities are found, it
means that
from an OEM
. If there is a problem, please don’t hesitate to
contact our sales representatives.
Please login the official website of WindRunner www.windrunner.cn,
click the
technical support” link located at the lower right part of screen,
and click the “user registration”
link in a new page. Register your warranty card as required;
you may enjoy the free on
consultation and on-line after-sale service.
2.3 Assembly
After you determined that all component parts are complete and intact,
WindRunner according to the following steps.
17
. The serial number
enjoying the free
. Please verify the
it may not be
“repair and
-line
assemble a new
Page 18

WindRunner™ self-balancing electric vehicle
18
Before handling, installing any
component parts
any cleaning and maintenance,
remember to power off the
WindRunner and cut off the
charging cable
2.3.1 Tools required and preparations
Before assembling a new WindRunner,
please take out a set of accompanied socket
wrenches from the packaging. All these tools must be kept for future
maintenance
transportation.
You should wear the working gloves to protect your hands from dirt
and
2.3.2 Assemble the operating bar
user’s manual
or making
.
screw
and
scratches.
Page 19
WindRunner™ self-balancing electric vehicle user’s manual
19
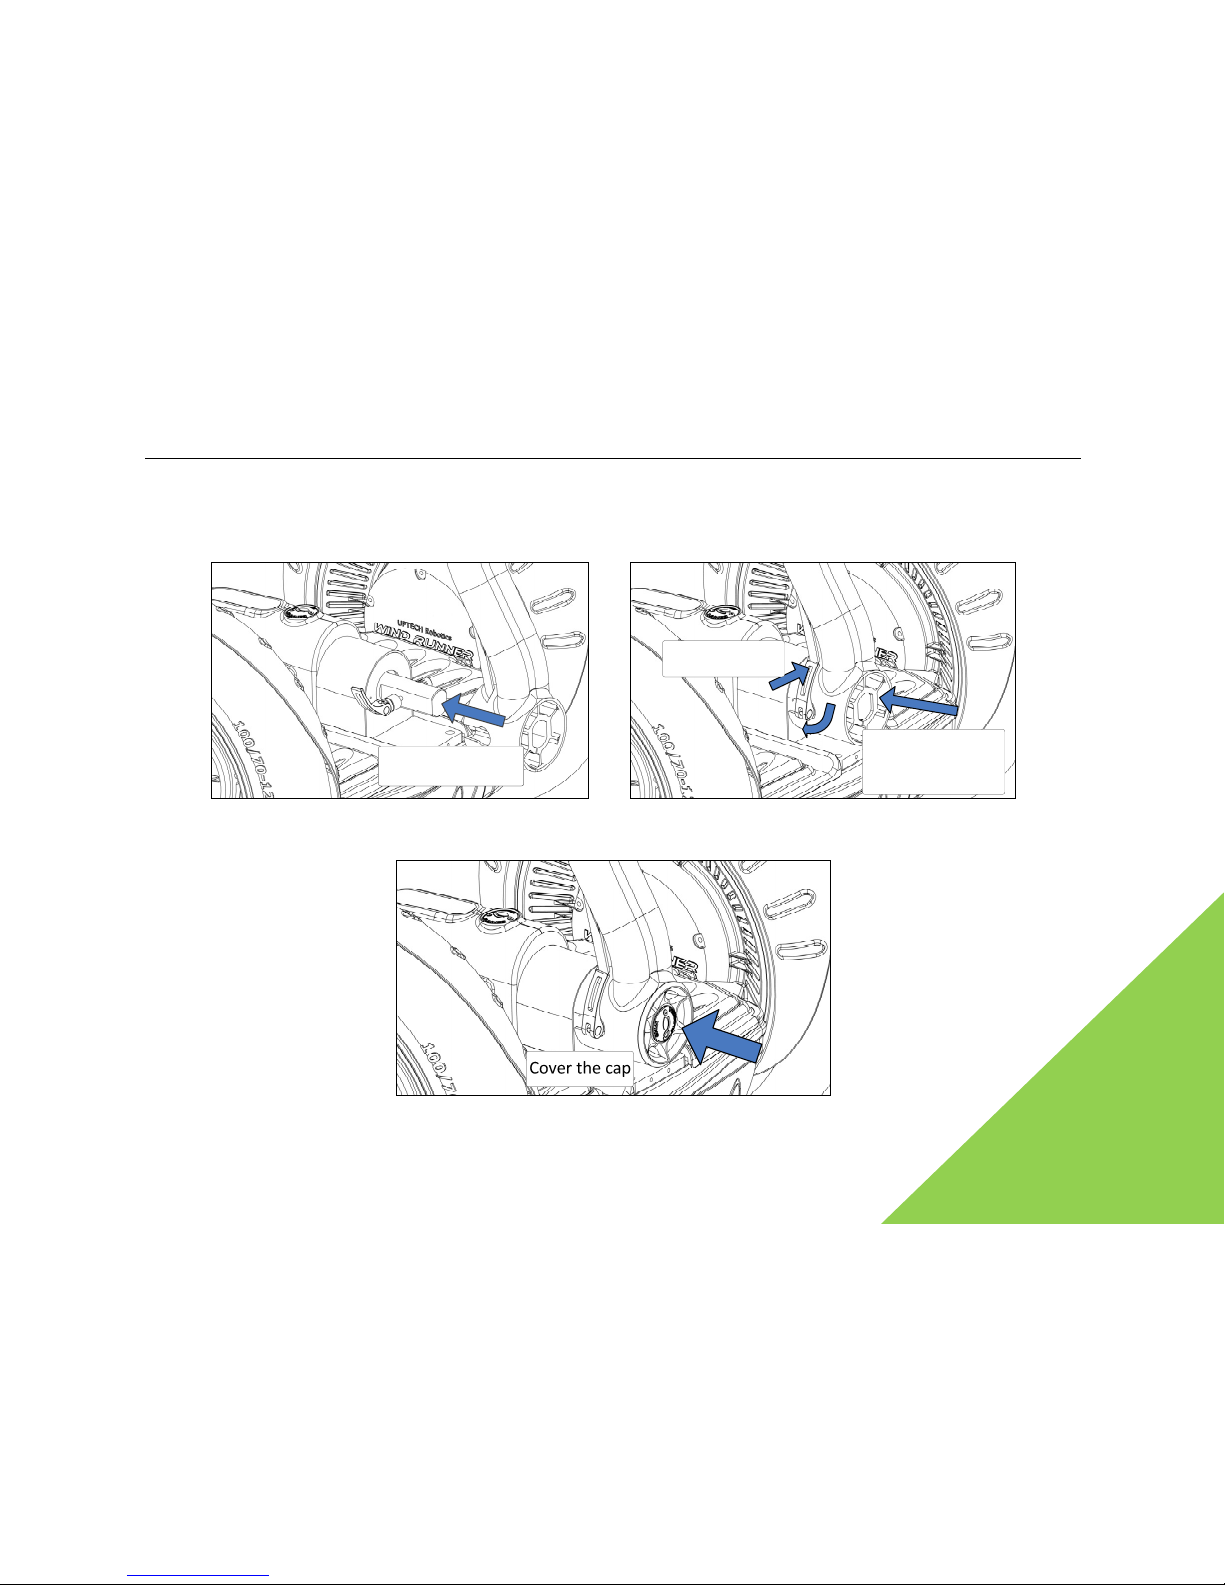
Assemble the handle onto the upper segment of operating bar, and then fit the upper segment
of operating bar with its lower segment together
Insert the operating bar
to the steering shaft
1. Hold the nuts
inside, revolve the
quick release handle
CW
2.fasten the quick
release handle
Insert the operating bar into the steering shaft Hold-down the quick-release handle
Page 20
WindRunner™ self-balancing electric vehicle
20
When assembling or removing the
operating bar
handle, you should first
remove the decorative cap of
then tighten the quick-release handle, turn
it until the last turn is at
its final place. Then hold-down the handle
upward
handle shall be unable to hold down. I
f too loose, the han
disengaged, fall off, and lead to a hazard.
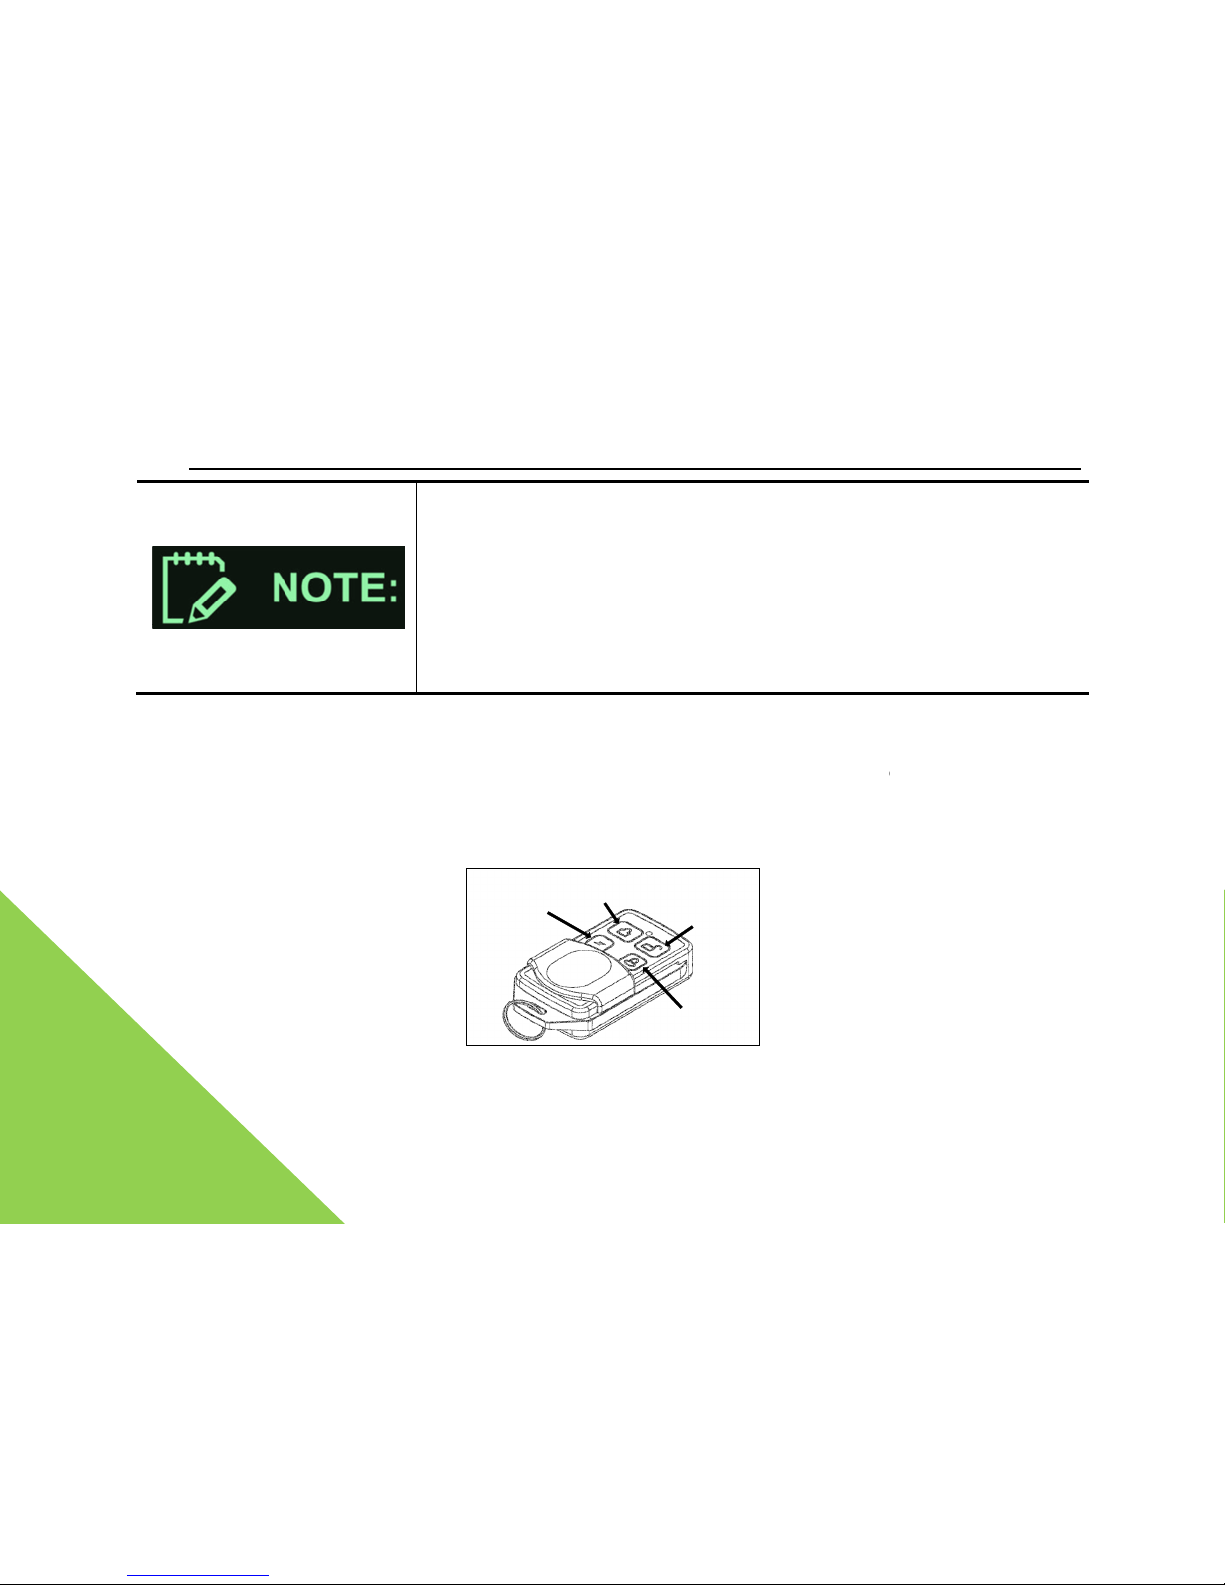
2.4 Intelligent remote keys
Each WindRunner has been equipped with two identical
intelligent remote key
operating, and the other is for standby and precautions against loss or
damage
for the appearance of intelligent remote keys and functions of buttons.
On/Off/
Unlock
Lock
mode
Batt.
indicator
Operation
mode
intelligent remote key contour and functions
user’s manual
with quick-release
operating bar,
. If too tight, the
dle may be
s. One is for
. See figure below
Page 21
WindRunner™ self-balancing electric vehicle user’s manual
21
2.4.1 Function list
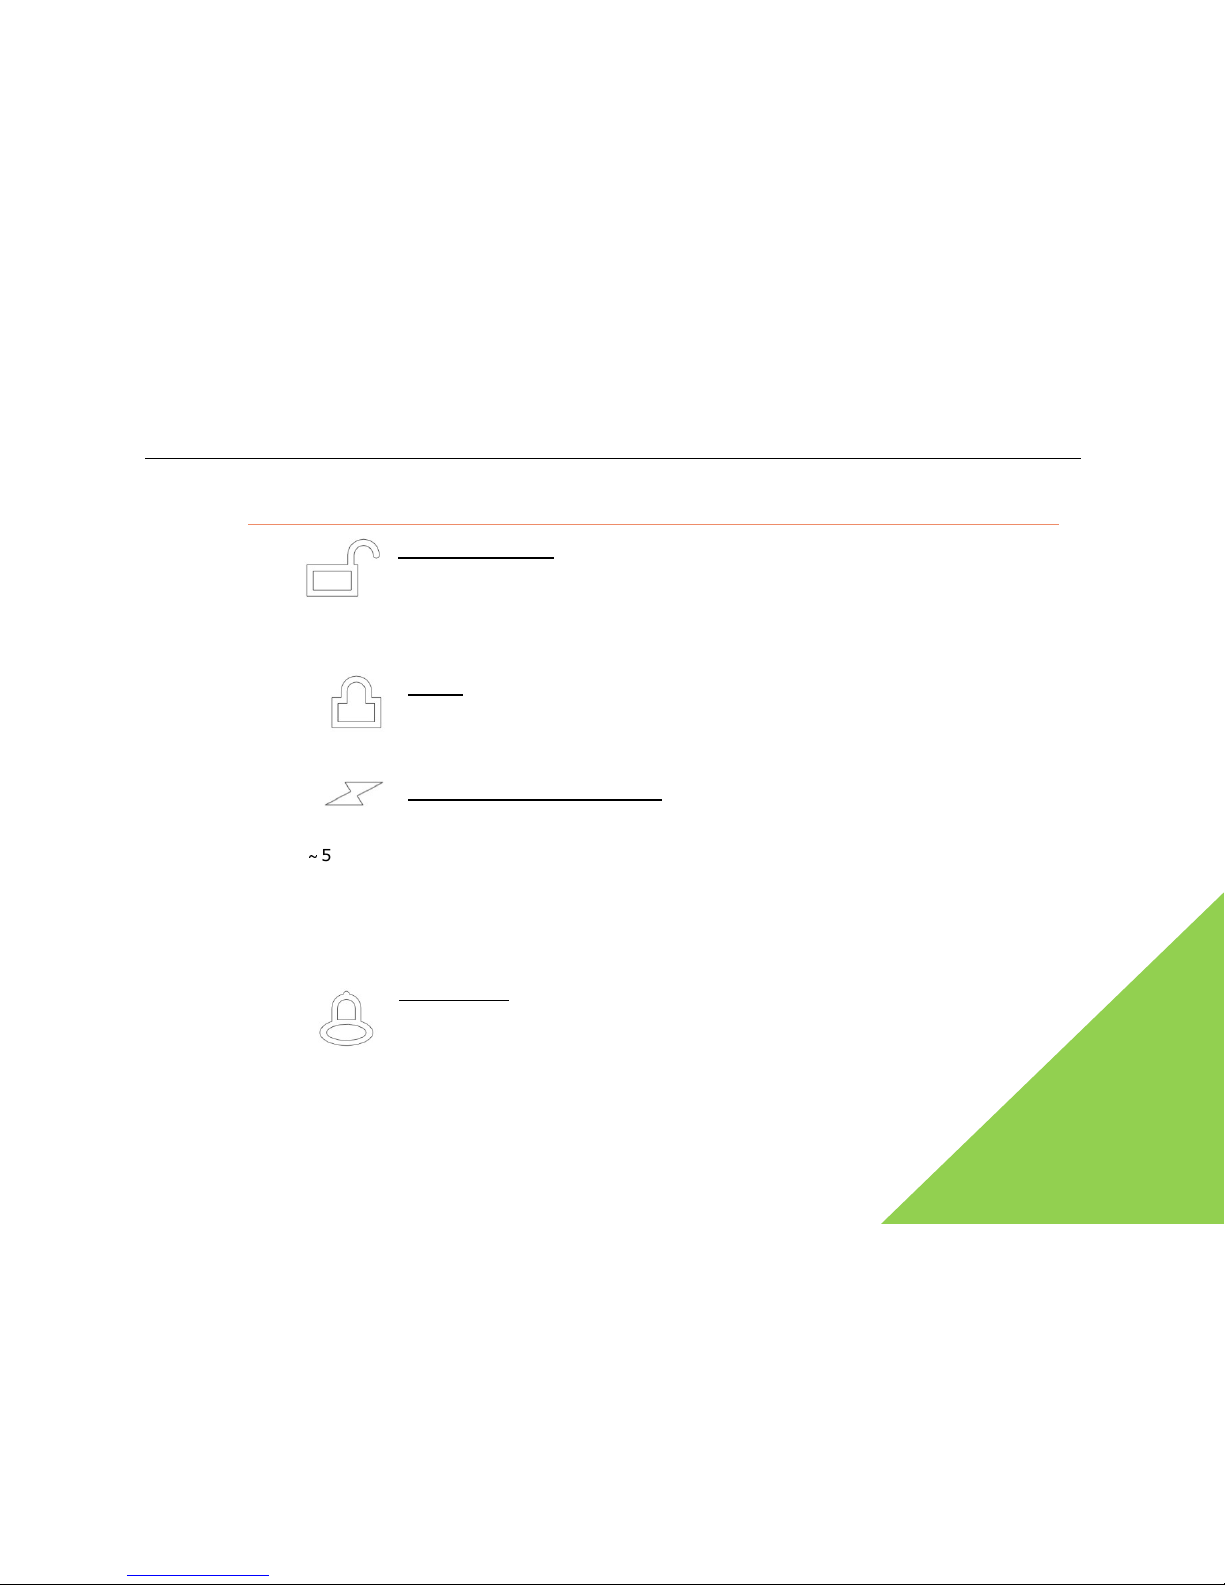
ON/OFF/Unlock: For starting or turning-off the WindRunner. To start it you press
it once. Once you start the WindRunner, if no driver is standing on it, press it once
to turn-off (for safety reasons, if the WindRunner has been started and the driver is standing on
it, it should be not powered off). Under the lock mode, press this button to unlock.
Lock:
if powered on, press this button to start the lock mode. Under lock mode,
any movement or inclining in the mainframe may trigger an alarm; wheels locked
up, cause vibrations and trigger the alarm.
Battery capacity indication: press and hold this button on the display panel to
show the current battery capacity of the WindRunner. There are total five LEDs,
1~5 blue LEDs respectively mean 5 divisions of battery capacity, if 5 blue LEDs lit up means that
the battery capacity is full, 1 red LED means about 20% of batter capacity is left. If you press
and hold this button and only 1 red LED flicker, it means that the battery capacity has been
approximately used up.
Speed limit: the WindRunner has three riding modes: beginner mode, Speed limit
mode and normal mode. The maximum speed and reaction sensitivity under three
operating modes are quite different. If powered on, press this button to toggle the
three modes. Under the beginner mode, a red LED located on the display panel shall glow
Page 22
WindRunner™ self-balancing electric vehicle
22
steadily; under Speed limit mode, the LED will be blue
and glow steadily
the LED will not light up.
2.5 Test riding
Now you have installed the WindRunner properly,
and primarily understand
remote keys. Please take the following steps before test riding:
1) Stand beside or behind the WindRunner. Keep the foot mat
at a basic level position
handle with one hand,
and press the “ON/OFF” of intelligent remote key for 1s with the other
hand and the WindRunner shall start. 5 LEDs on the
central display panel shall come on in
sequence, meanwhile, accompanied with vibration and buzz
similar to that of starting the engine
of a car. After the buzz disappears, the WindRunner self-test
will be complete
basically leveled then tap any one foot mat lightly with your foot.
You may hear a
and then the wheels of WindRunner begin to move, and enter into the
power assistant mode
At the moment of startup, keep the WindRunner
upright
mat basically leveled with the operating bar
Otherwise the intelligent self-
test logic may determine that the
WindRunner
is unsuitable for starting and unable to start
for details.
user’s manual
; under normal mode,
the intelligent
. Hold the
. Keep the foot mat
very short buzz,
.
, and the foot
at middle position.
. Refer to 5.4
Page 23

WindRunner™ self-balancing electric vehicle user’s manual
23
2) Under power assistant mode, you may slowly push the operating bar forward or backward,
the WindRunner shall accompany a forward or backward movement. Turn the operating bar
right or left lightly, the WindRunner shall also turn along the direction of your turning of
operating bar.
3) Next, please press the “lock” of intelligent remote key once until you hear a sound or “tick.”
One red LED on display panel shall come on. Just then you may push the operating bar forward
and backward. The WindRunner shall shake, and give an alarm sound. At this moment if you
want to draw the WindRunner, you will experience difficulty. Simply press “ON/OFF” to unlock.
4) Press and hold the battery capacity indication” of intelligent remote key and the
corresponding LED on display panel shall come on. Once the key is released, the corresponding
LED light will turn off. The battery indication of a new WindRunner is approximately 2
~
5 blue
LEDs (that is, 40%~100% battery capacity).
5) Press “Speed limit” and the red LED on display panel comes on. Once this button is pressed,
the color of the LED will change to blue. Press this button once again and the LED will no longer
be blue.
6) Hold the “ON/OFF” button on the intelligent remote key for about 1s, and the WindRunner will
turn off. It will be accompanied by a buzz, and a light shake just similar to that of stopping an
engine of a car.
Page 24
WindRunner™ self-balancing electric vehicle
24
7) Once all the above mentioned steps are fulfilled, the WindRunner
has
Please continue to read chapter 3~4 of this manual, then follow
Chapter V
on and do a test ride!
At the moment of the test ride
, please don’t
on! Incorrect transportation or
storage
WindRunner not function properly.
Getting
before the test has finished is unsafe.
The testing speed should be slower.
During the
forbidden to release the handle.
During the test ride, if
you find any abnormalities
a regular “tick-tick” alarm buzz, or a
red
display panel, it
usually means that the p
good condition.
Please refer to chapter 9 of
contact your seller for repair.
user’s manual
passed the basic test.
step by step to get
be eager to get
may cause the new
on and riding are
test, it’s
, especially
flicker on the LED
roduct is not in
this manual or
Page 25

WindRunner™ self-balancing electric vehicle user’s manual
25
3. Operating modes
The WindRunner has been provided with different operating modes; good understanding and
using may be helpful for your better riding.
3.1Standby mode
The standby mode means that the WindRunner has been started, but doesn’t have any
movement, or balancing ability. The WindRunner shall be in standby mode under the following
situations:
After powered on, the WindRunner shall be in standby mode. If no any other operations
happen within 10 minutes, the WindRunner will automatically powered off.
If the WindRunner is tilted too high under power assistant mode (overexert etc), speed is too
high (beyond 6km/h), handle released and free sliding speed too high, the WindRunner shall
determine that it is unmanned and this can lead to potential hazards. Firstly, it shall give a
vibration, audio alarm, automatically cut off the power output, and enter the standby mode.
Just then, if the operating bar is not held, the WindRunner shall lose its balance.
If the inclined angle of the WindRunner under balance mode is too high (overexert etc at the
moment of acceleration and deceleration), overload (e.g., riding on a sharp slope), internal
Page 26

WindRunner™ self-balancing electric vehicle user’s manual
26
circuit overheated or battery capacity fully used up etc, the WindRunner shall firstly give a
vibration, and then buzz alarm 4~5s. If the driver has not gotten off or reduced his/her
speed and load within 4
~
5s, the WindRunner will enter standby mode and the rider may fall
off.
3.2 Power assistant mode
The power assistant mode means that the WindRunner has been started, and the driver has not
gotten-on, but the movement by tracting the operating bar. Under the power assistant mode,
the WindRunner shall output its power about 30% and move slowly. This operating mode is
suitable for handling or shifting the WindRunner, See 5.11 for details. The WindRunner shall be
in the power assistant mode under the following situations:
After powered on, and foot mat basically leveled, tap any one foot
mat lightly with your foot. You may hear a very short buzz, and then
the wheels of WindRunner will begin to move and enter the power
assistant mode.
After riding, take your foot off the foot mat. You may hear a very
short buzz, and then the WindRunner will change from balance mode
to power assistant mode.
Page 27
WindRunner™ self-balancing
electric vehicle user’s manual
If required to enter the
power assistant mode
on, only tap the foot mat
once lightly with your foot
do not push on the foot mat
always with heavy thing
This may enable the WindRunner
wrongly
got on and thus, the WindRunner
will enter
which may be very possible to cause a
loss of control, and
eventually lead to serious damage or hurt.
3.3 Balance mode
Once you stand on the WindRunner, the WindRunner
will begin working, and enter balance
mode. Balance mode is convenient for operating and riding
on different road conditions
balance mode consists of beginner mode, Speed limit mode and
normal
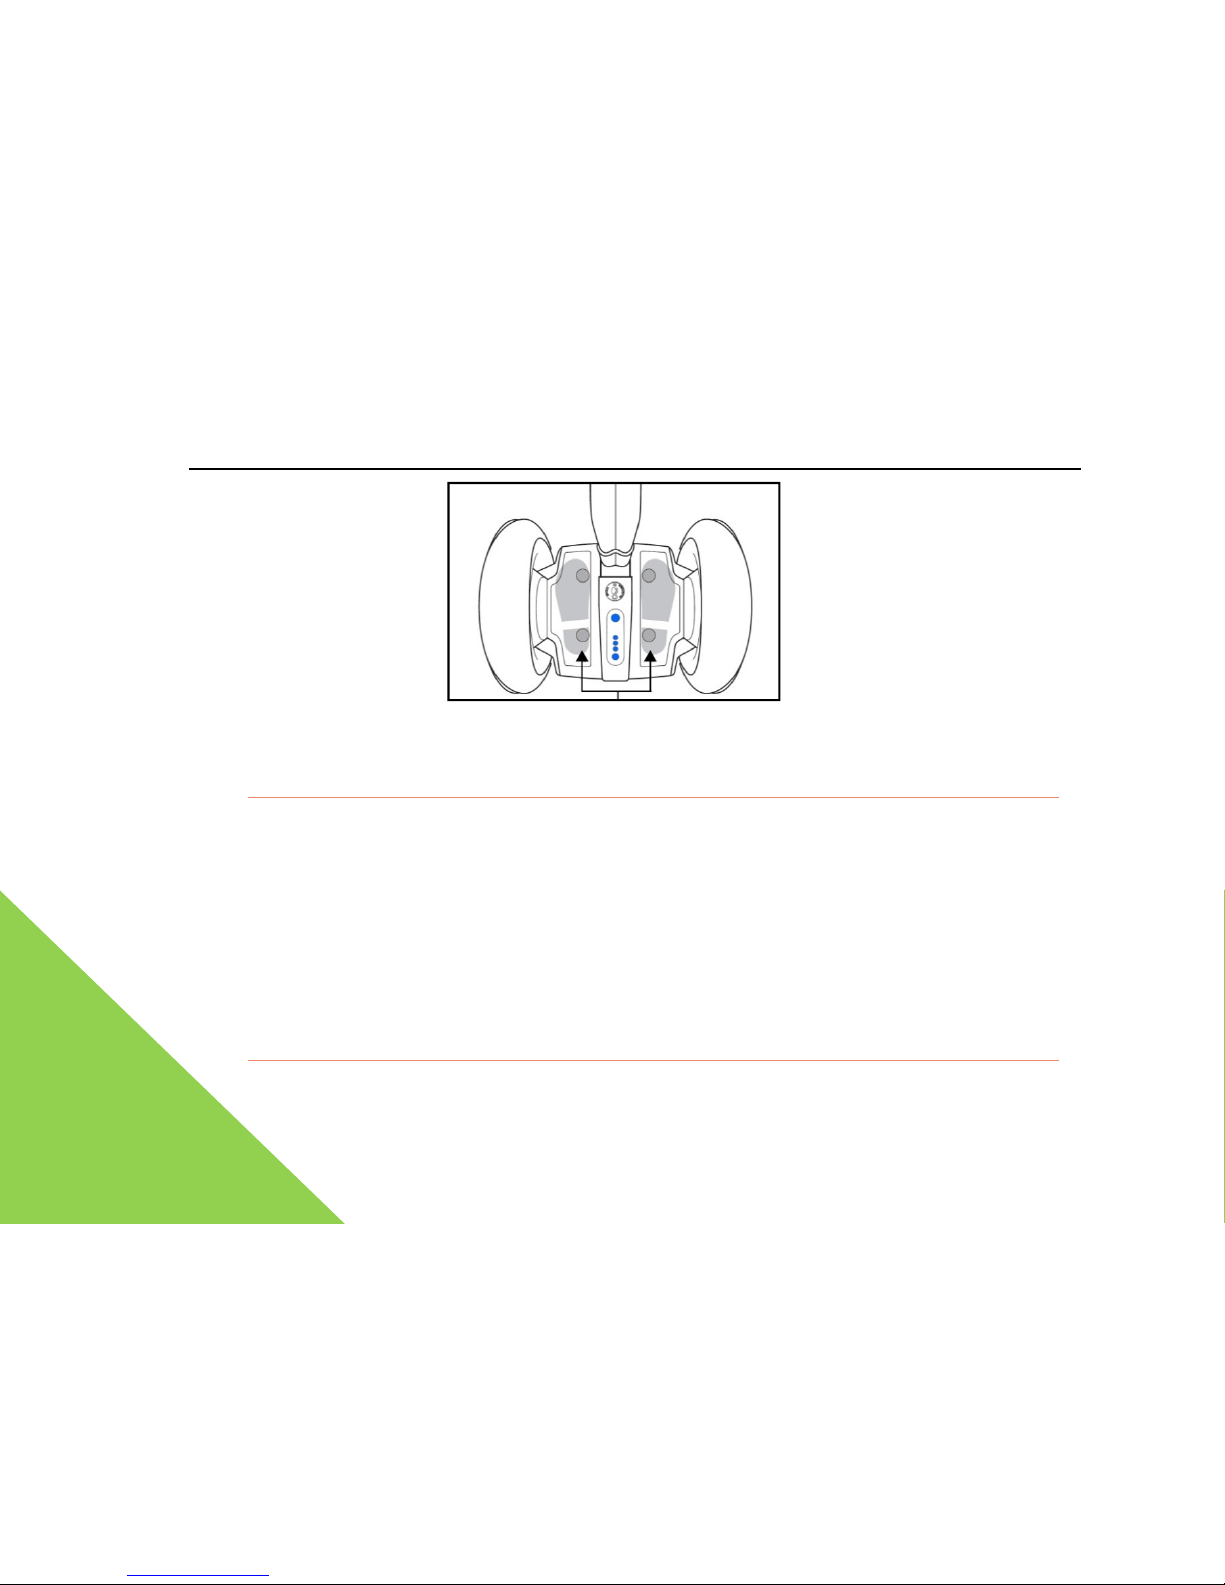
The WindRunner has four foot-on mat sensors to detect whether
the driver
sensors have the same function, once the WindRunner
sensors that anyone is on, it will detect
that the WindRunner is manned. It may enter balance mode.
For all four
both sides, even if the driver rose one foot during riding,
it may give no influences to the test.
27
under powered
. If not on,
or foot.
deem that you have
balance mode,
loss of control, and
. The
mode.
has got on. All four
sensors arranged on
Page 28
WindRunner™ self-balancing electric vehicle user’s manual
28
4 foot-on sensor location
3.2.1 Beginner mode- 5km/h max
The beginner mode is one of the balance modes, especially suitable for a new or unskillful rider.
Press the intelligent remote key “Speed limit”, and when you hear a very short buzz or “tick”,
and the red LED at the lowest part of display panel comes on, it means that the beginner mode
is entered. Under this mode, the maximum speed of WindRunner is limited to 5~7 km/h and
operating response will be very slow. This mode is suitable for the new riders to learn and
master riding skills.
3.2.2 Speed limit mode- 10km/h max
Page 29

WindRunner™ self-balancing electric vehicle user’s manual
29
The Speed limit mode is one of the balance modes, suitable for the driver operating under
complicated road conditions (for example, too much pedestrian or uneven surface of path).
While in beginner mode, press the “Speed limit” button on the intelligent remote key. You may
hear a very short buzz or “tick”, and the red LED at the lowest part of display panel will change
into blue and glow steadily. This means that the Speed limit mode is entered. Under this
operating mode, the maximum speed of WindRunner is between beginner mode and balance
mode for complicated road conditions.
3.2.3 Normal mode- 20km/h max
The normal mode is another balance mode, suitable for experienced drivers on good road
conditions (e.g., no pedestrian and even path). This mode may be applicable for riding
WindRunner. Under the Speed limit mode, press the “Speed limit” button on the intelligent
remote key. You may hear a very short buzz or “tick”, and the blue LED at the lowest part of
display panel will cut off. This means that the normal mode is entered. Under this normal mode,
the WindRunner has the maximum speed, and highest sensitivity. Press the “Speed limit” of
intelligent remote key to toggle between beginner mode, Speed limit mode and normal mode.
Page 30
WindRunner™ self-balancing electric vehicle
30
The built-in intelligent system of
WindRunner
ensure the driver’s safety. However, it
can
problems associated with long overload,
overheat
capacity, wheel skidding, etc. U
nder balance
WindRunner may begin to shake and
alarm
the intelligent safety alarm), if
the driver
within a few seconds, it may be changed to
cut off the power output.
Just then if the
WindRunner, the driv
er may be seriously injured or
3.4 Lock mode
The lock mode is a security function of WindRunner under the
power on
short parking to protect it against traction by others. Under the
power on
the intelligent remote key to enter the lock mode.
After locked up, press
All above mentioned working modes shall
be furthe
next chapters. The driver
may progressively find out the features of
all working modes during the riding
test and make a good using
user’s manual
shall try to
not ensure to solve
overheat
ing, battery
mode, the
(which is called
pays no attention,
standby mode and
driver is still on the
fall.
state for temporary
state, press “lock” on
“ON/OFF” to unlock.
r detailed in the
.
Page 31
WindRunner™ self-balancing electric vehicle user’s manual
31
4. Use the intelligent remote keys
4.1 ON/OFF
This function is suitable for the WindRunner unmanned. Press the “ON/OFF” on the intelligent
remote key for 1s to turn on/off the WindRunner. Under the OFF state, press and hold the
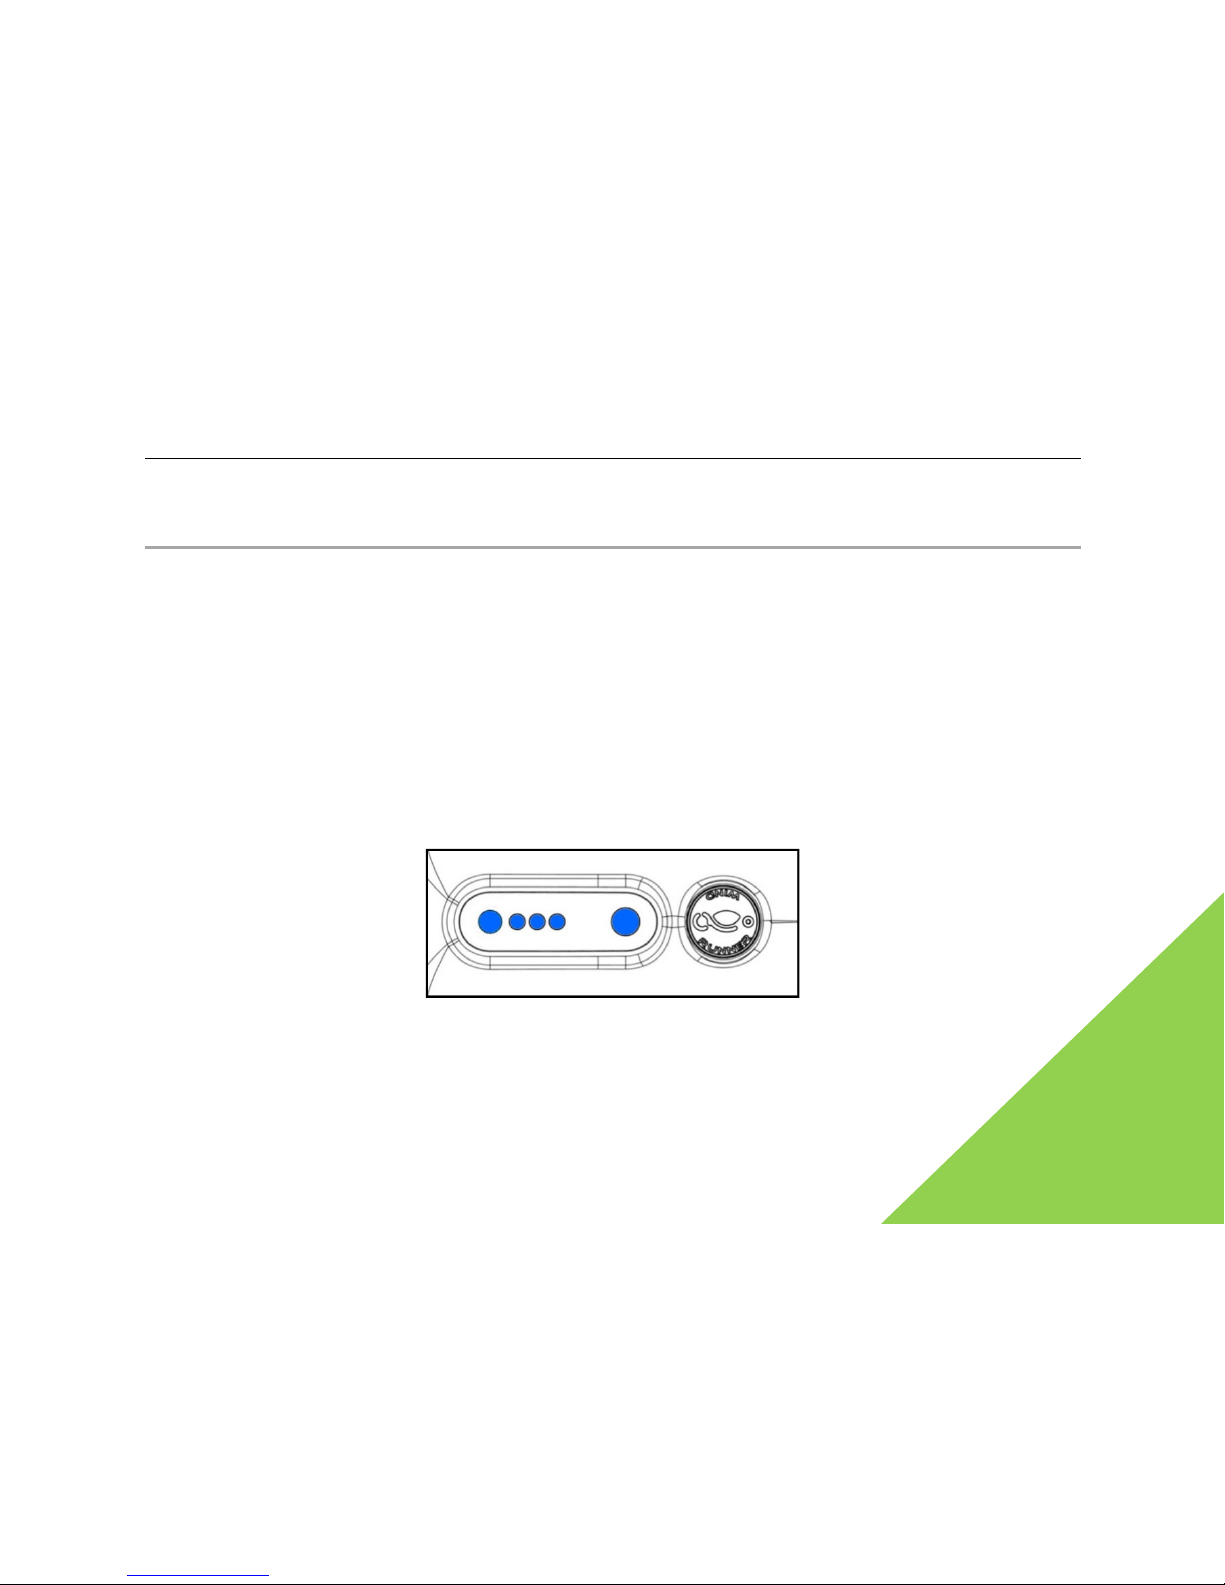
ON/OFF for 1s to start the WindRunner, 5 blue LEDs on the display panel shall come on followed
by a shake and buzz at the moment the WindRunner is powered on. Under the power on state,
press the “ON/OFF” button for 1s. Once the WindRunner is turned off, all LEDs on the display
panel will also turn off. After powered on for more than 10 minutes, the WindRunner will be enter
idle (standby mode), and then the system shall be automatically powered off.
At the moment of powered on, five blue LEDs on the display panel shall be lit up one by one
4.2 mode switch
Page 32
WindRunner™ self-balancing electric vehicle
32
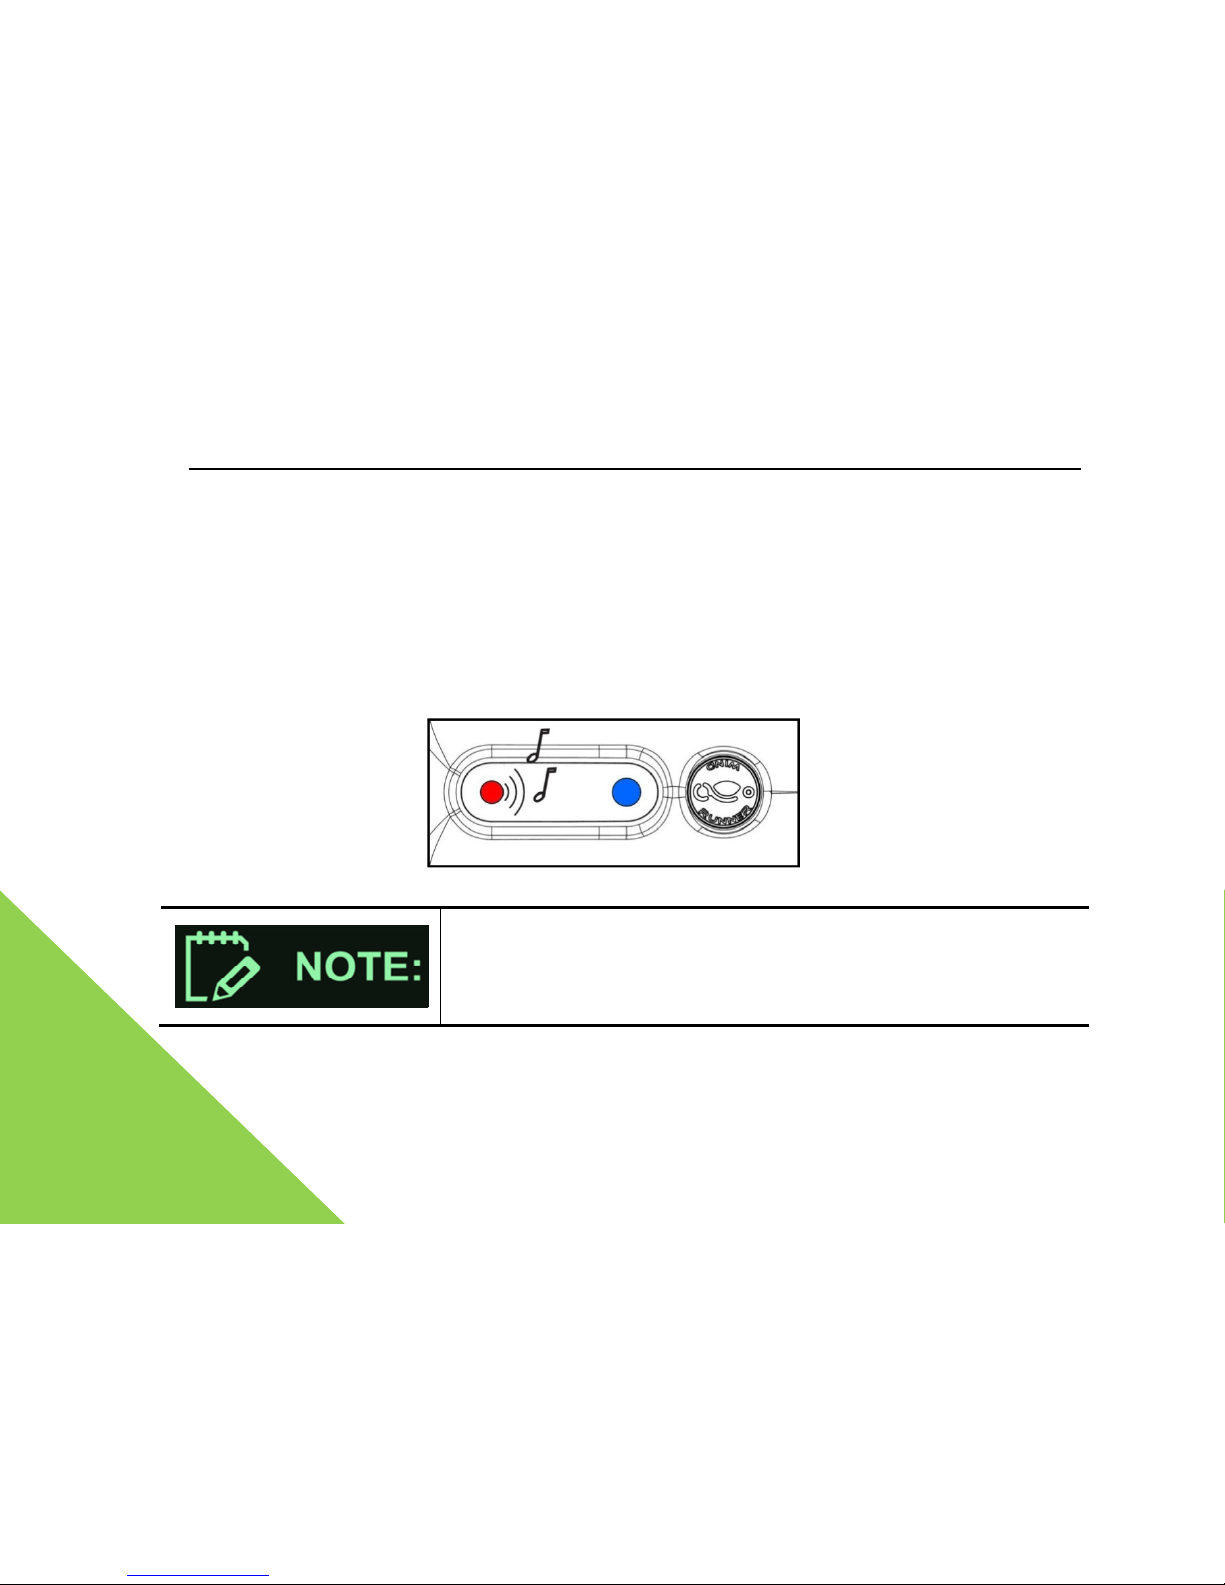
After the WindRunner starts, the system will be in standby mode. A
t this moment
“Speed limit” of intelligent remote key. The LED at the lowest part of
display panel
and glow steadily, accompanied by a buzz. At this moment if
the driver
speed of WindRunner shall be not more than 5km/h (gentler
operating than that in
so its response should be more sluggish). This mode is suitable for the
new
After its speed is beyond 5m/h, the WindRunner shall be faced upward,
backward to forcibly decelerate.
Display panel under Speed limit mode
Both beginner mode and Speed limit mode
shall be saved, even if
powered off. A
fter next startup, it may automatically enter the
working mode before the last power off.
user’s manual
, press the
shall be red
gets on, the maximum
normal mode
or unskillful riders.
pushing the driver
Page 33
WindRunner™ self-balancing electric vehicle user’s manual
33
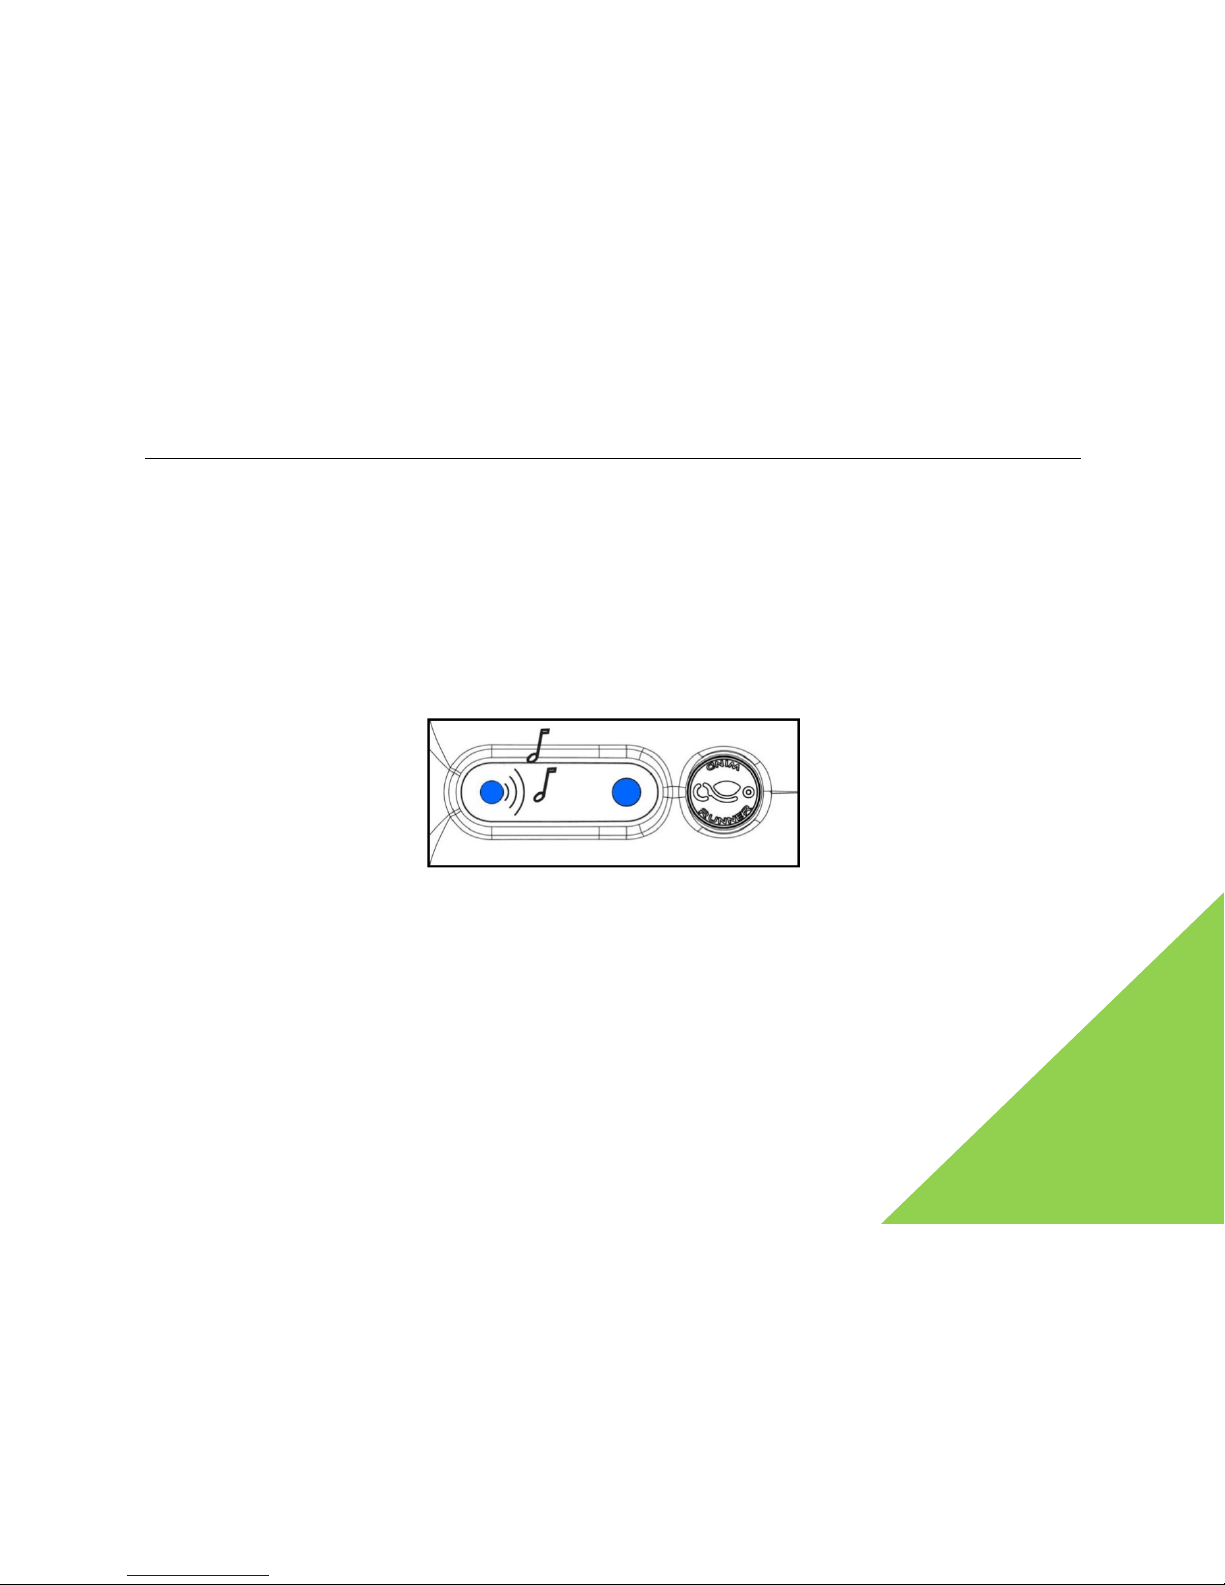
Under beginner mode, press the “Speed limit” of intelligent remote key to change into Speed
limit mode (the last LED on display panel shall be blue and glowing steadily. You will also hear
an accompanying warning buzz). At this moment, if the rider stands on the WindRunner, the
system shall work under Speed limit mode. Under this mode, the maximum design speed of
WindRunner is limited to 10km/h, suitable for complicated road conditions (for example,
pedestrian too much or uneven surface of road). After its speed is beyond 10km/h, the
WindRunner shall be faced upward, pushing the driver backward to forcibly decelerate.
Display panel under Speed limit mode
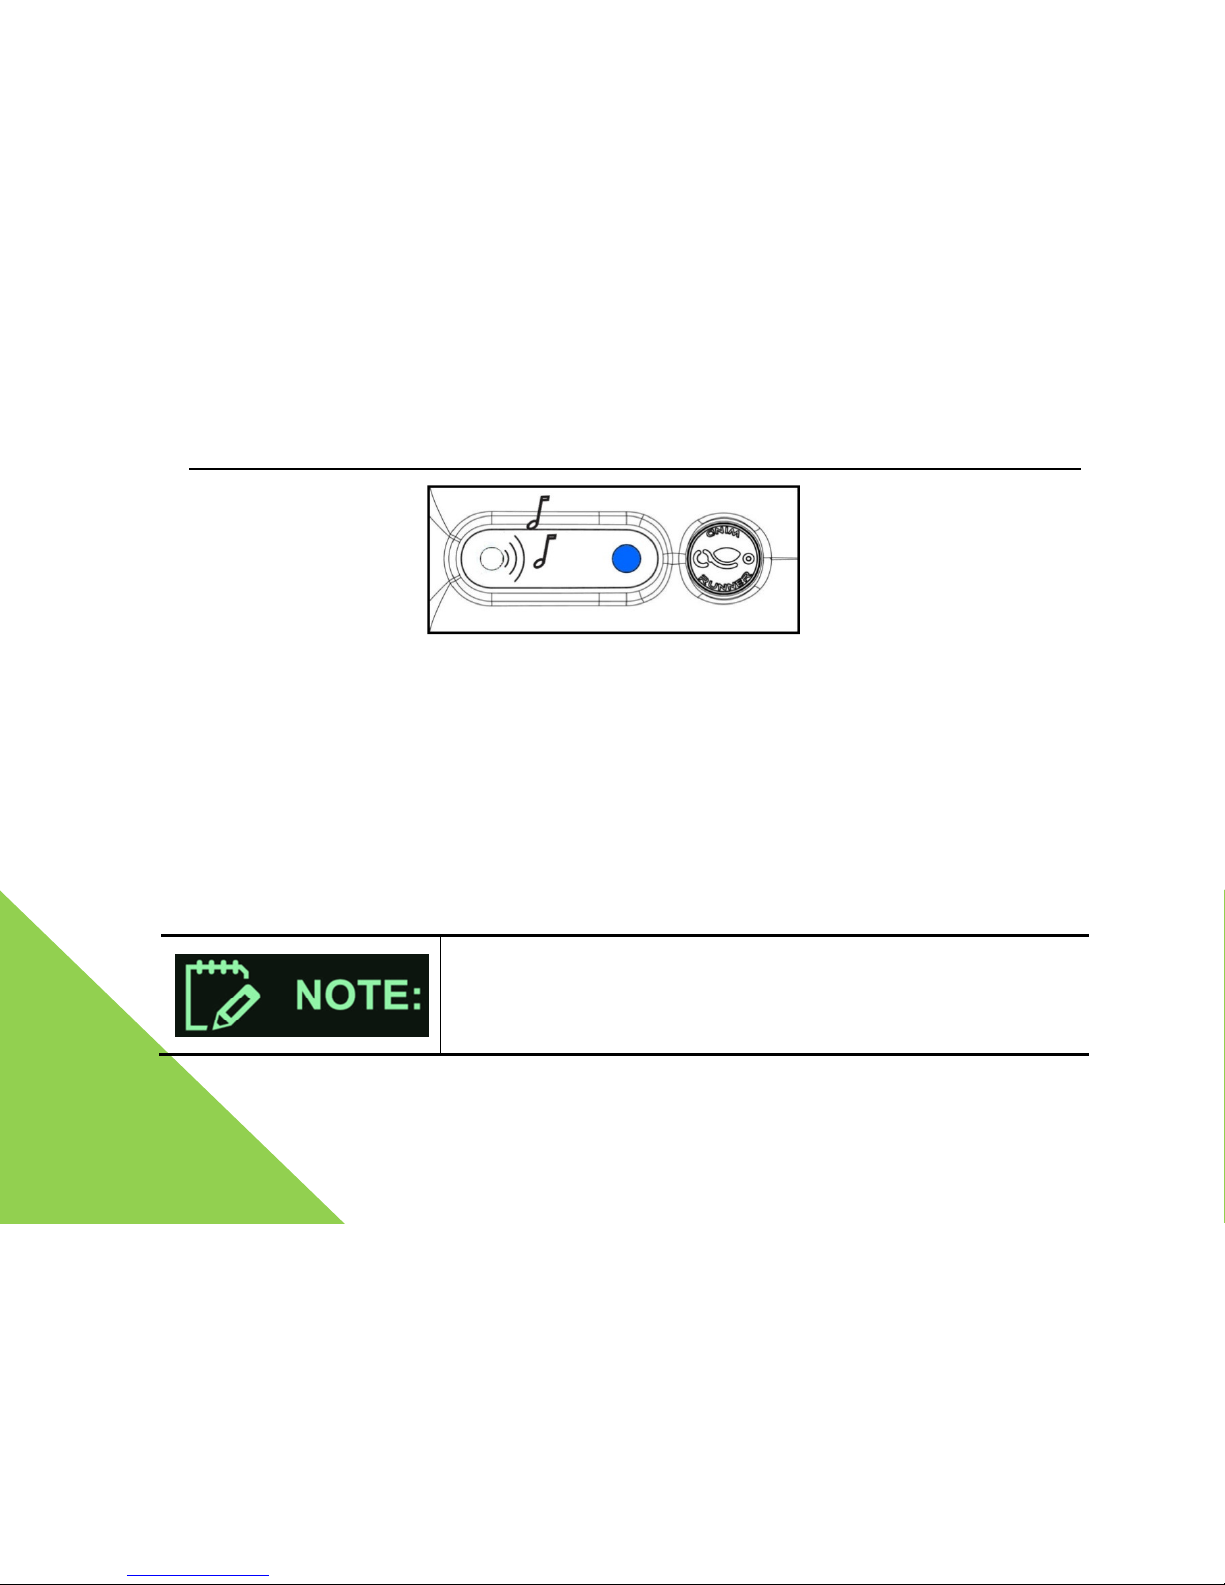
Under Speed limit mode, press the “Speed limit” of intelligent remote key to change to normal
mode. Just then if you stand onto the WindRunner, the system shall work under normal mode.
The maximum design speed of WindRunner will be restricted to 20km/h for easy operation. This
mode is suitable for skillful drivers and good road conditions (e.g., no pedestrian and road
surface flat and even). After its speed is beyond 20km/h, the WindRunner shall change its
posture, and push the driver backward to forcibly restrict the speed.
Page 34
WindRunner™ self-balancing electric vehicle
34
Display panel under normal mode
4.3 Lock mode
This mode is effective only after the WindRunner is started and under
standby,
assistant mode (note: for safety reasons,
it is unable to enter the lock mode under
mode). Under standby mode or power assistant mode, press “lock”
on the
to activate the lock mode. If touched or handled by external force, its
posture
the whole mainframe of WindRunner shall strongly shake, give the alarm
up, and will be difficult to tract.
If the WindRunner is under this working mode
for more than
if the battery capacity is approximately used up
powered off automatically.
user’s manual
or power
balance
intelligent remote key
will change, and
buzz, the tires will lock
12h or
, the system shall be
Page 35
WindRunner™ self-balancing electric vehicle user’s manual
35
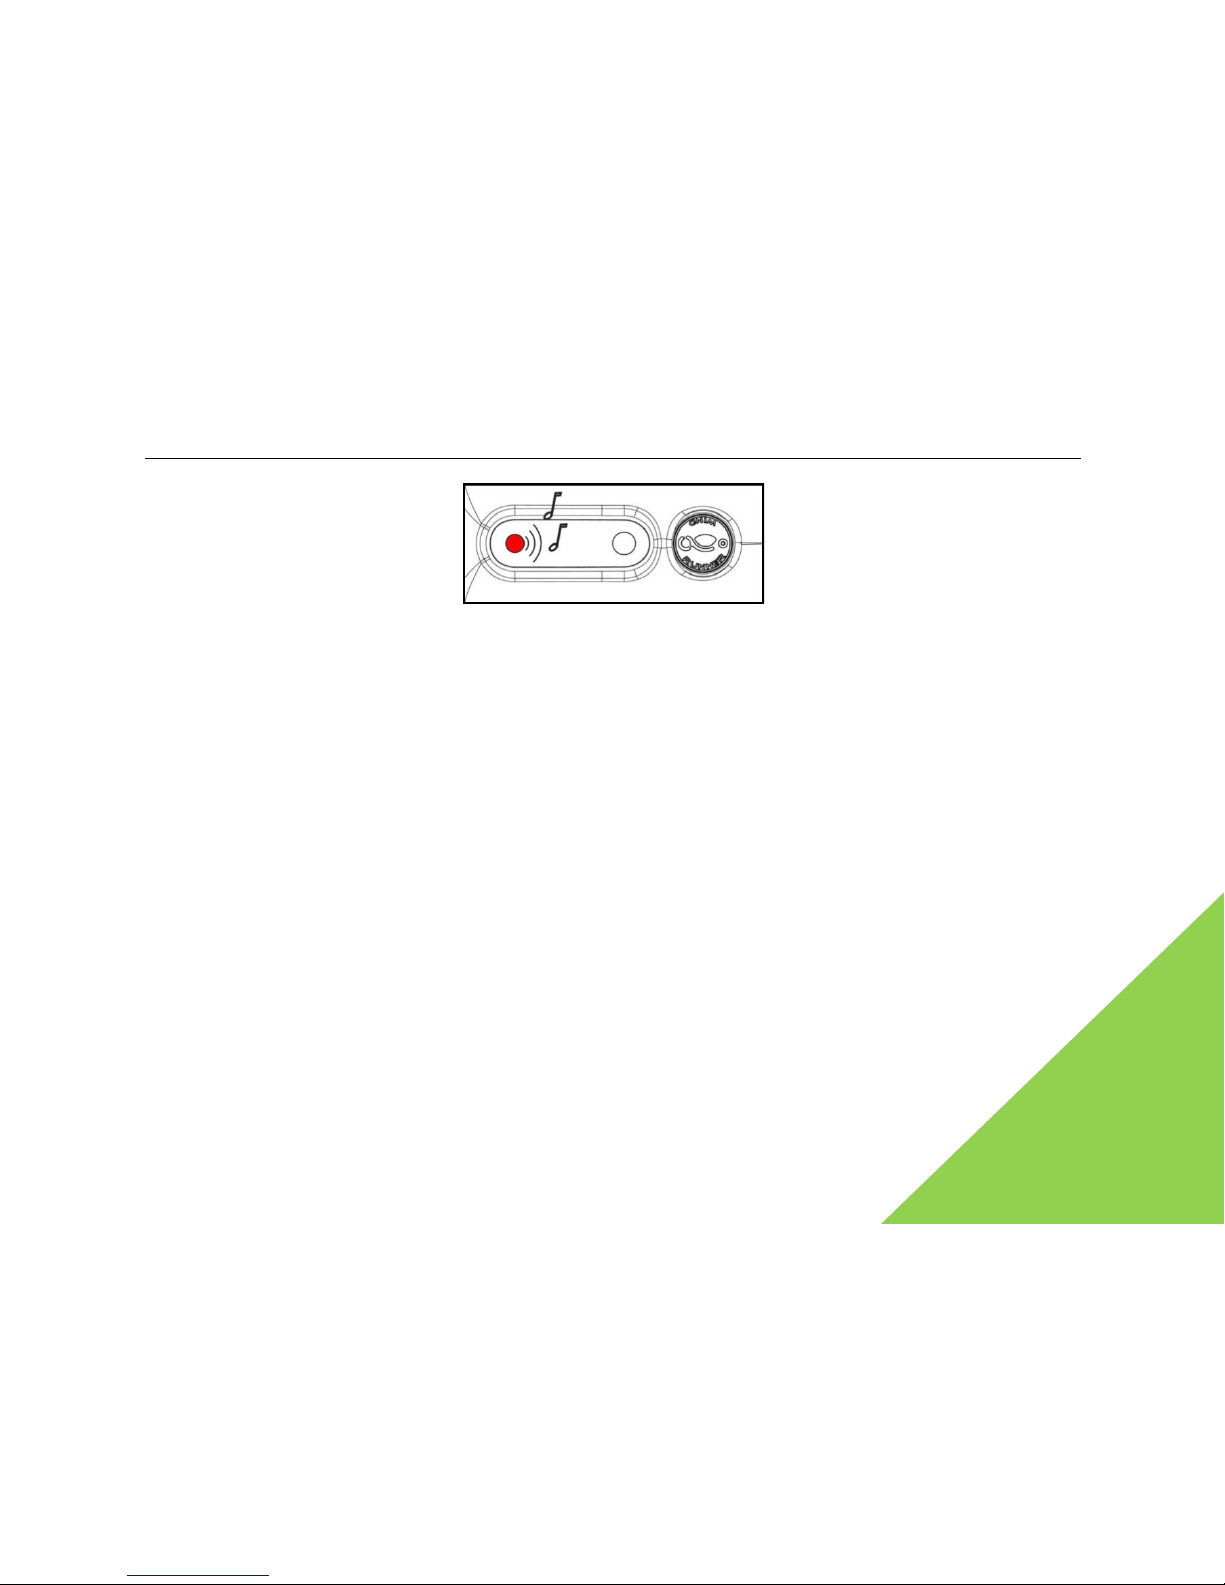
Press the lock key, and the red LED on the display panel will light up. All other LED lights will turn
off. This will be accompanied by a very short sound or “tick”, which indicates that the
WindRunner has entered lock mode
4.4 Battery indication
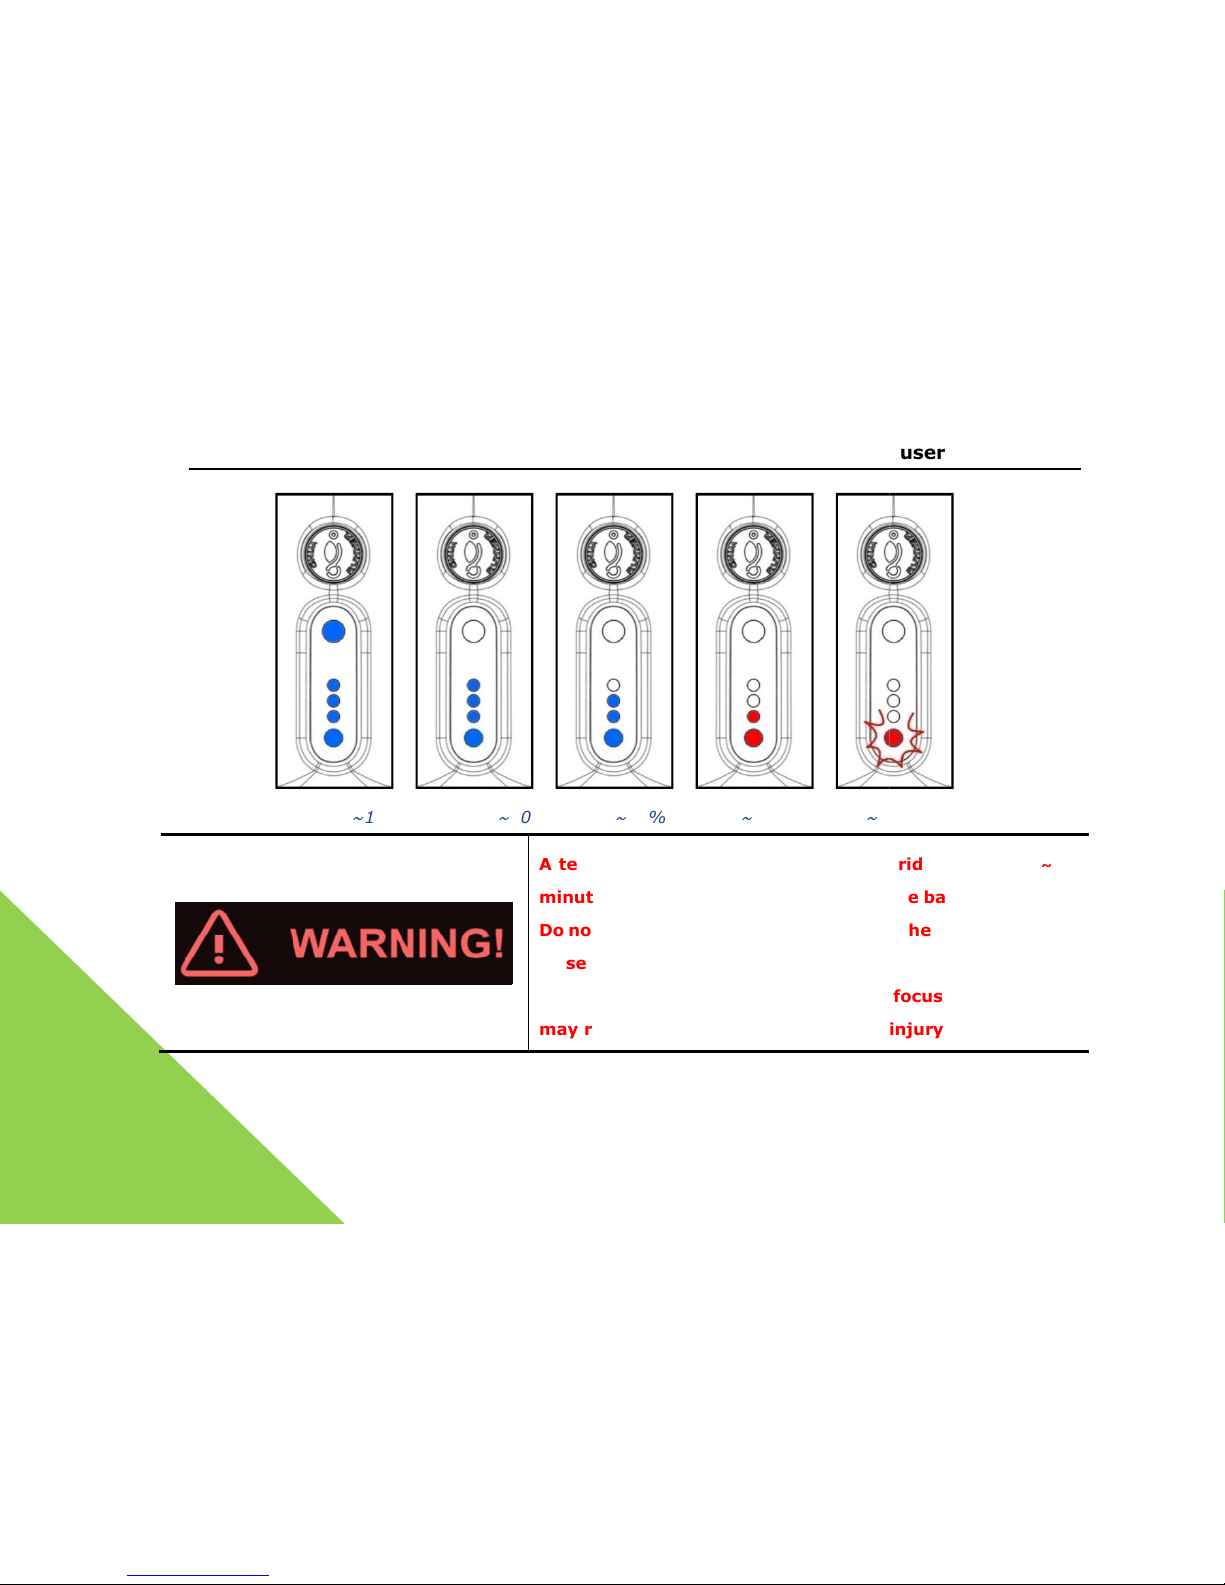
Once powered on, press and hold “battery indication”, and the LED on the display panel shall
indicate the battery capacity and most of the LEDs will light up. Release the “battery indication”
and the LED on the display panel will not indicate the capacity of battery.
When the battery capacity is reduced to a specified value, the WindRunner shall gradually
reduce the maximum riding Speed limit with the reduction of battery capacity. When the battery
capacity is less than 20%, the system shall automatically restrict its speed to 10km/h and below.
Meanwhile, the battery LED will flicker red. If the battery capacity is lowered continuously, it
shall trigger the intelligent safety alarm. Then, the WindRunner mainframe shall vibrate, and
foot mat automatically inclined backward, which will give notice to the driver to get off and
charge as soon as possible.
Page 36
WindRunner™ self-balancing electric vehicle
36
80%~100% 60%~80% 40~60% 20~40% 10
~
20%
After a long-distance ride, please
stop riding
minutes to have a short rest, to ch
eck the battery
Do not check while riding! While rid
ing,
close attention to the road conditions
.
the battery capacity and is not wholly focused
may result in a crash, and or,
serious injury
user’s manual
every 20~30
capacity.
the driver must pay
If the driver checks
on riding, it
.
Page 37
WindRunner™ self-balancing electric vehicle user’s manual
37
4.5 Replace the battery of the key
The intelligent remote key uses 23A battery, 12V, with the normal service life of about 1 year.
If there is no considerable obstacle between you and the WindRunner, the intelligent remote key
will usually realize the normal ON/OFF within a range of 5m. If you find the effective distance for
power-on greatly shortened (for example: powered on only when the distance from the
intelligent remote controller to display panel is less than 50cm) or one of your usually used
intelligent remote key is unable to power on, it means that the battery of this intelligent remote
key has been used up. Please replace the battery as soon as possible.
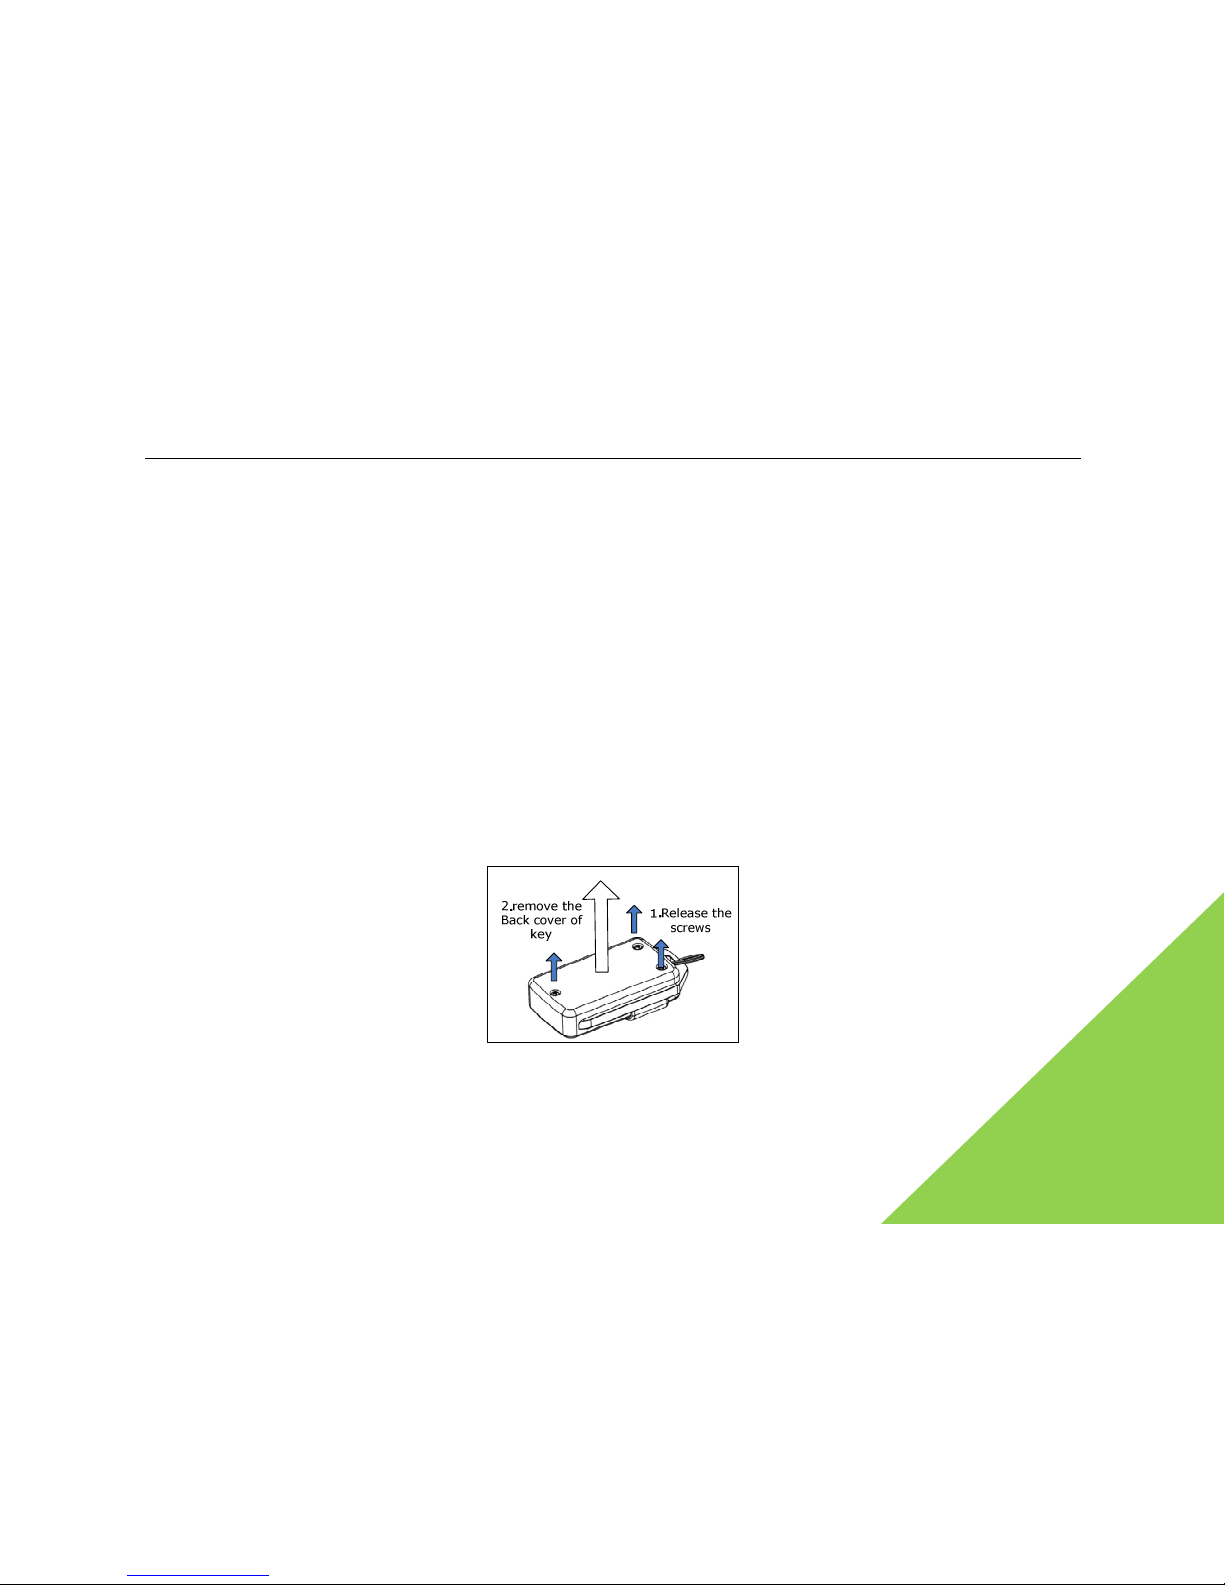
Replacing the battery requires a Phillips screwdriver to unscrew three screws on the back of
remote key. Correctly place the new battery according to the polarity marks inside. Remove the
housing of intelligent remote controller as figure below.
Replace the battery of intelligent remote key
Page 38
WindRunner™ self-balancing electric vehicle user’s manual
38
5. How to ride
5.1 Before ride
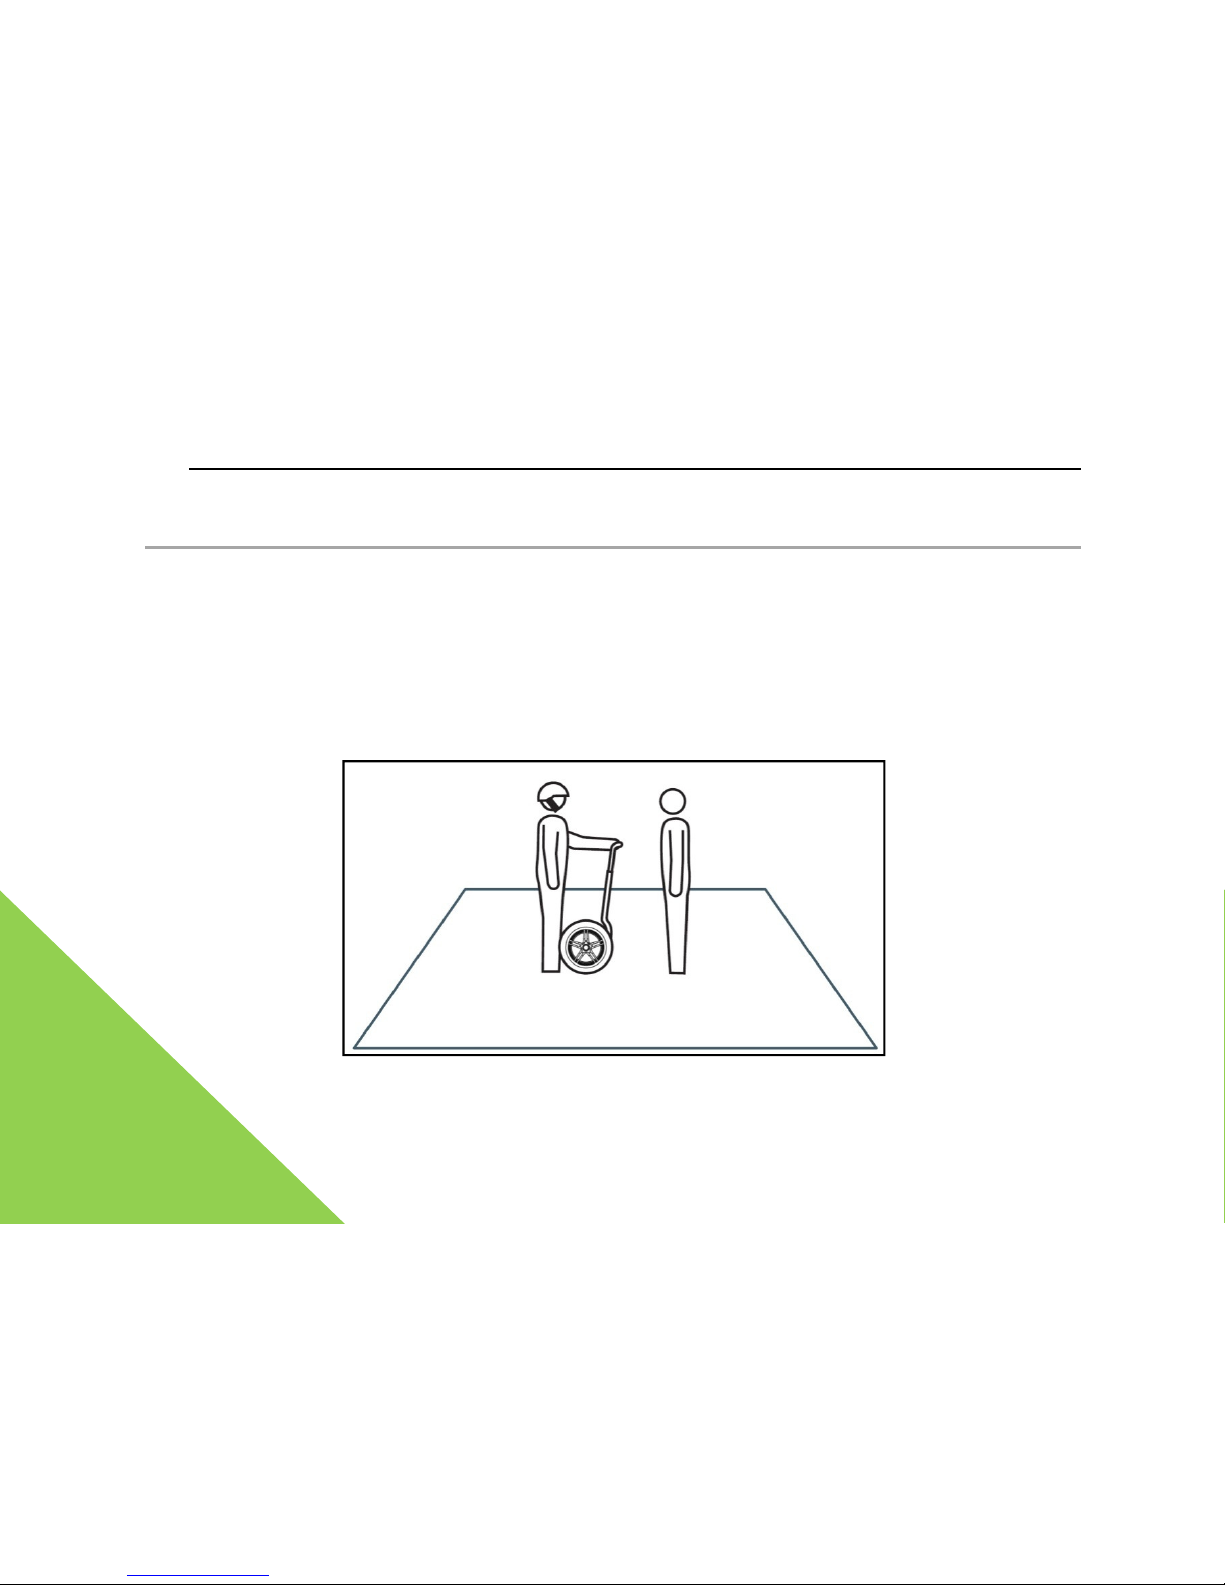
A suitable riding site should be provided for the first ride. This location can be indoors or
outside, but it should at least be 4×4m(16m2), flat, and even. Unlike the wet and slippery
conditions of the road, the site should be smooth. No barrier, no motor-driven vehicles,
bicycles, pets, children, or other things should distract your attention.
Page 39
WindRunner™ self-balancing
electric vehicle user’s manual
To understanding the warnings associated with the WindRunner, y
ou ma
instructor (coach), to help read this manual, and view the safety
video. This will help you
when riding the WindRunner.
Wear the safety helmet and harness to protect yourself
against injuries.
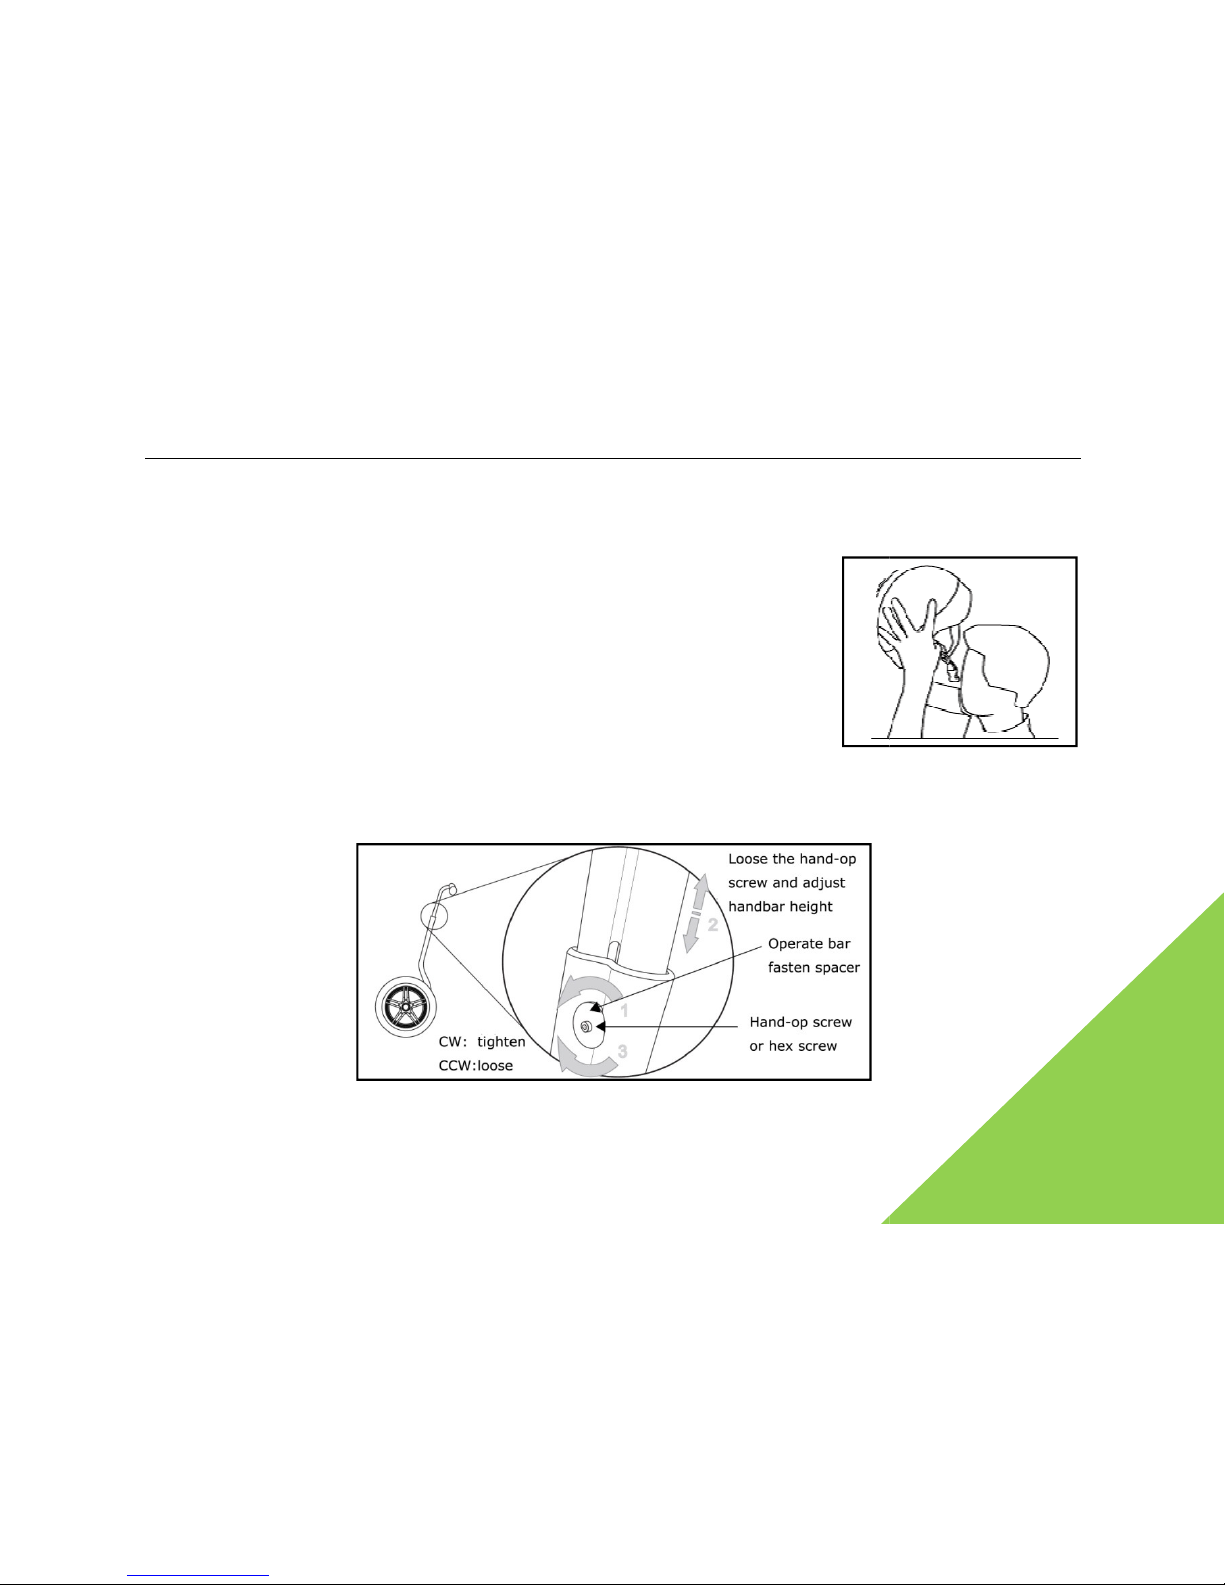
Move the WindRunner to the center of a site.
Adjust the operating bar to your comfortable height. See
figure below for the method of adjusting the operating bar.
Some types may replace the screw with large-size box spanner,
and then
directly with hands. No tools will be required.
39
y require an
you may adjust
Page 40
WindRunner™ self-balancing electric vehicle
40
Learn and correctly use all functions of intelligent remote key.
5.2 Starting the WindRunner
Press “ON/OFF” on the intelligent remote key to start the
WindRunner
buzz once the WindRunner is powered on, several LED lights may
come on
large blue LED at the highest part of display panel shall
glow steadily. Once this happens. t
WindRunner has successfully powered on.
At the moment the WindRunner is
of
keep the WindRunner foot mat
basically
When you first touch the
WindRunner
new rider may need only 2~3
minutes for training
the following steps
effectively ensure your
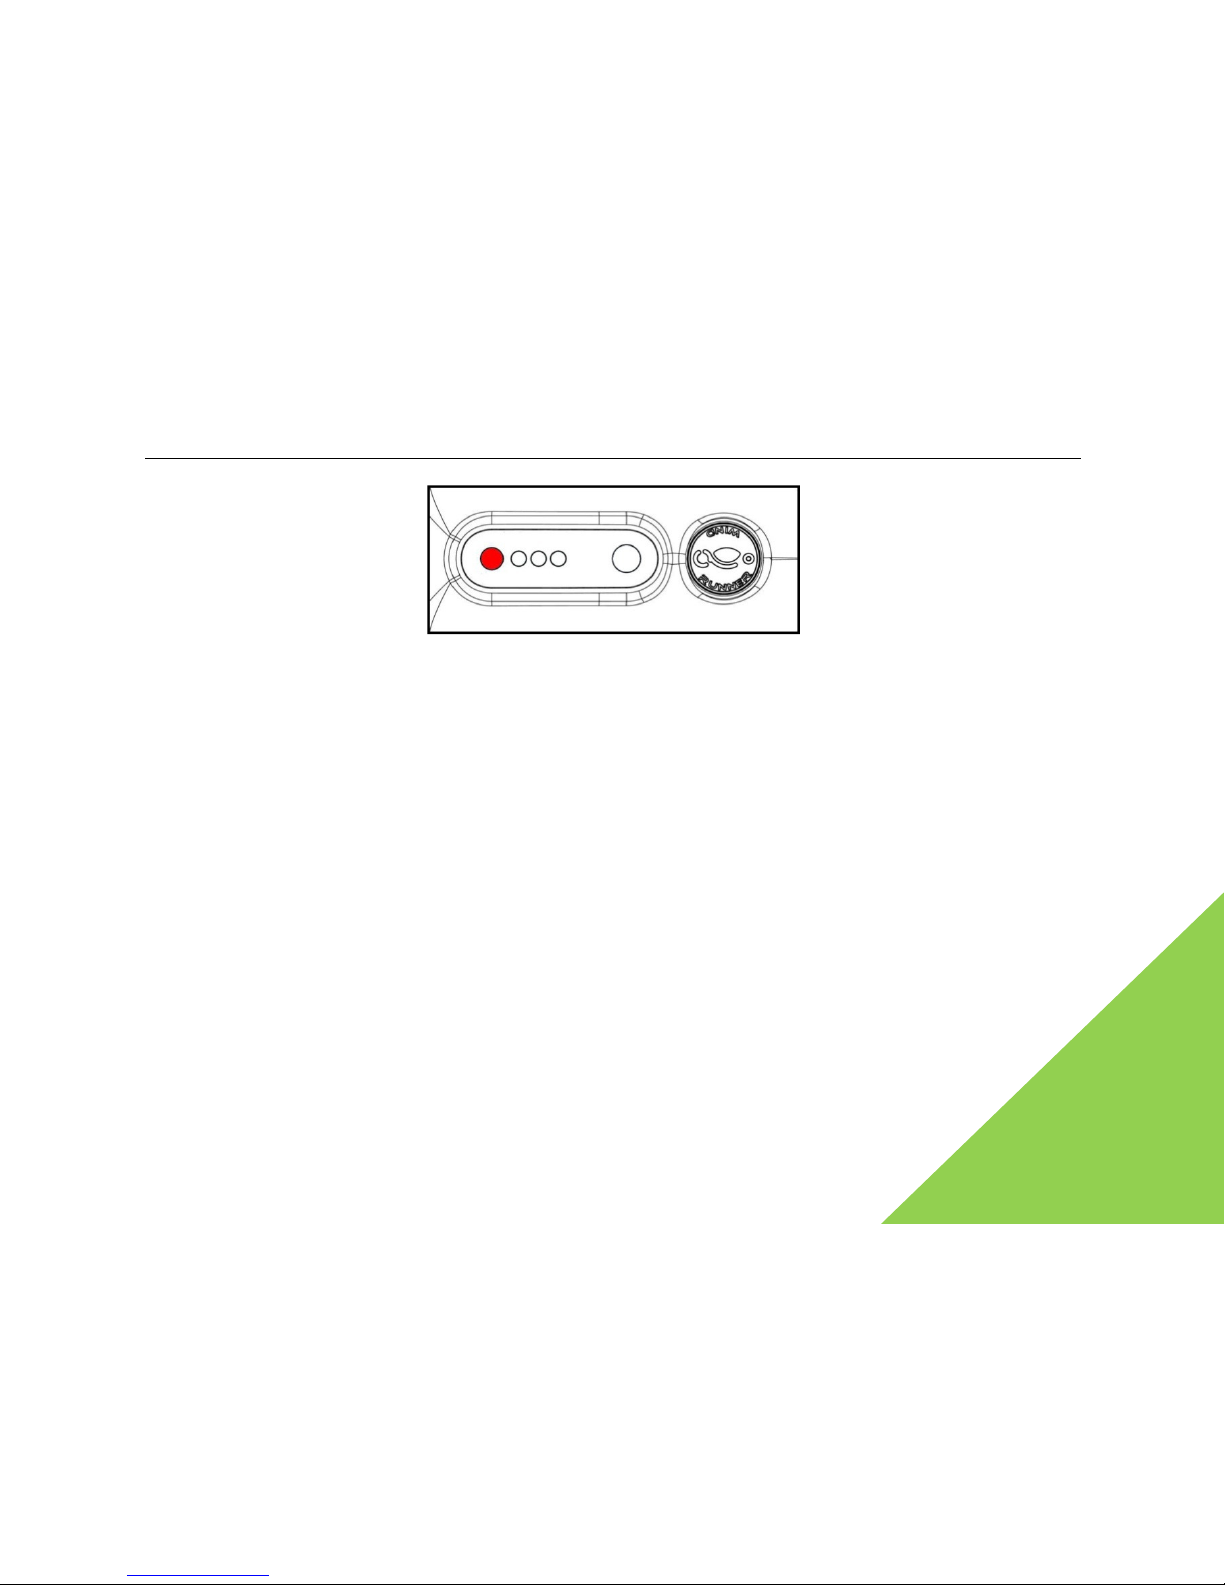
5.3 Verify the startup of beginner mode
Once the WindRunner is started, press the “Speed limit” button on
the
After you hear a beep sound, the red LED on display panel will turn
on
user’s manual
, you may hear the
in turn, and the
he
powered-on, please
leveled.
, wait to get on! A
. Obey
safety.
intelligent remote key.
as the figure shown.
Page 41
WindRunner™ self-balancing electric vehicle user’s manual
41
Under beginner mode, the last LED on the display panel will steadily glow red
5.4 Prior to get on
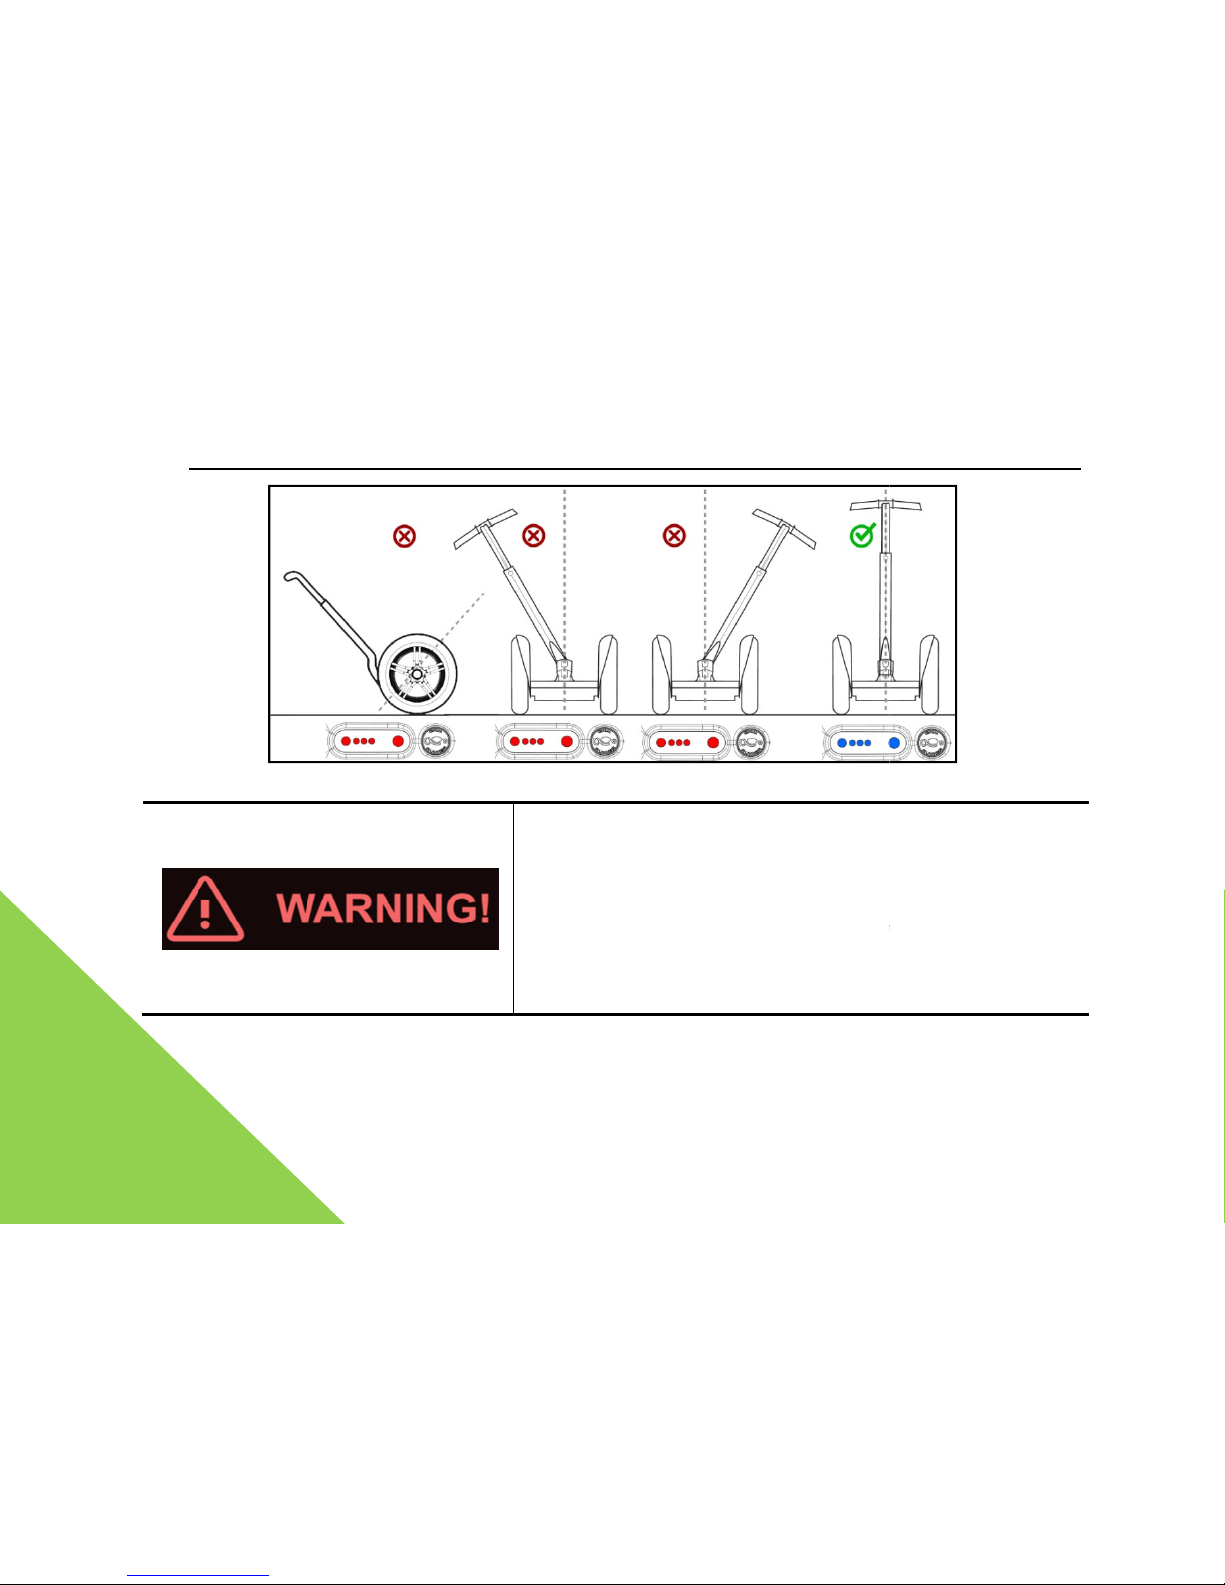
Stand just behind the WindRunner and hold the handle with either both, or a single hand.
Please align the operating bar (basically no force suffered), and adjust the handle until the
foot mat of WindRunner is basically leveled. At this moment, five blue LED’s shall be shown
on the display panel. This means that the WindRunner is in the correct ready posture. At this
point, the driver may get on. If the operating bar is greatly inclined toward one side, or the
foot mat of WindRunner is not leveled, then five red LED’s shall be shown on display panel
which means that the WindRunner is in the incorrect ready posture. Please get on only after
the WindRunner has aligned its posture.
Page 42
WindRunner™ self-balancing electric vehicle
42
Incorrect postures and correct posture at starting
If the WindRunner
is in an incorrect posture
gets on, it may be unable to enter the
balanc
mainframe may suddenly shake. A
ll these may lead to
potential hazard
s, and cause the rider to
WindRunner has not passed the
posture
rush to get on.
user’s manual
, when the driver
e mode, and the
fall. If not the
test, don’t be in a
Page 43

WindRunner™ self-balancing electric vehicle user’s manual
43
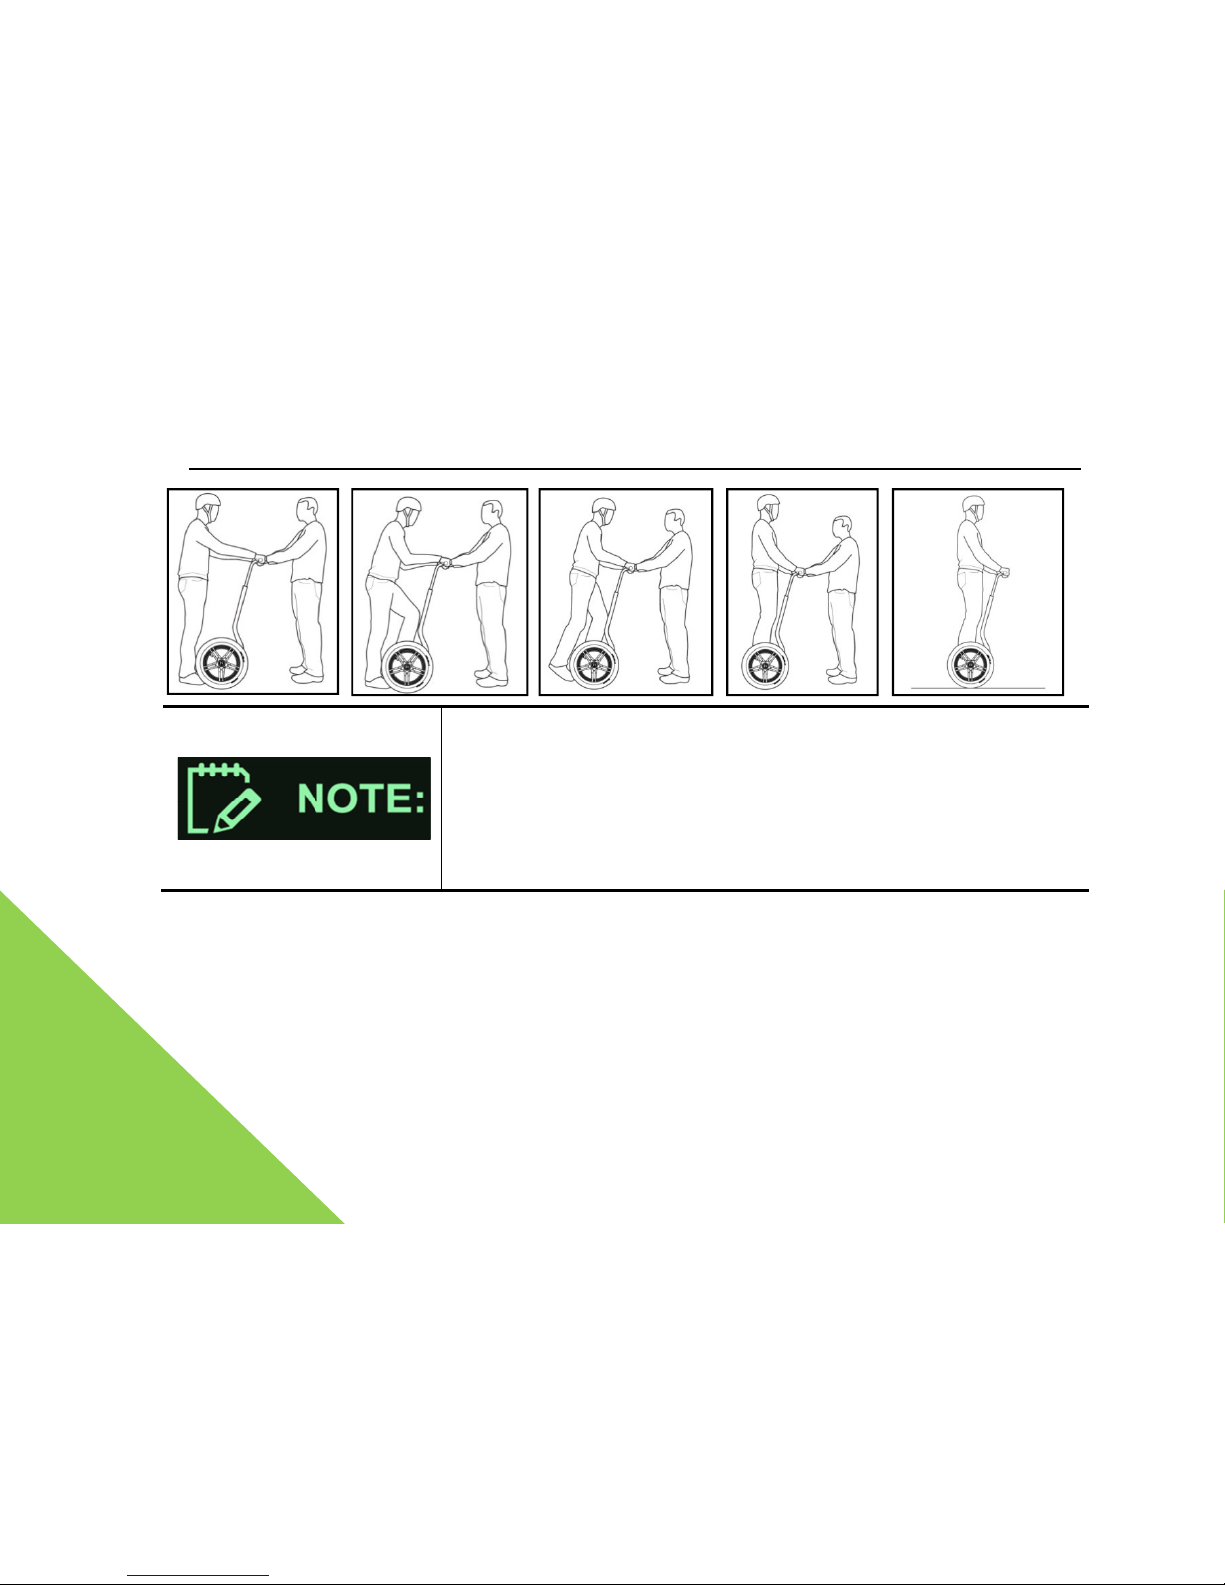
5.5 Get on
1. To help ease the nervousness of first time riders, your instructor may stand face to face with
you in front of your WindRunner to help you overcome the swaying due to your first ride.
2. Be sure to hold the handle with both hands. When standing on the WindRunner, keep your
eyes straight, rather than looking down.
3. Put one foot on the foot mat.
4. Stand center of gravity, and slowly shift your body onto the foot mat and raise the other foot.
5. At this moment, try to avoid the transverse moving of the operating bar. Raise the other foot
slowly from the ground surface and place it on the foot mat. Keep in mind that you are
standing on the flat surface of the ground. You should believe in the balancing ability of the
WindRunner. Be calm, relax, and look straight ahead. The sequence of get-on posture is
shown in the figure below.
Page 44
WindRunner™ self-balancing electric vehicle
44
If you remain relaxed, it will be easier to learn
how to
S
ome people may sway involuntarily during their first ride on the
WindRunner. Please
keep your muscles relax, remain balanced
request your instructor to help you hold the
handle
you will adapt to riding the WindRunner
and you will no longer sway
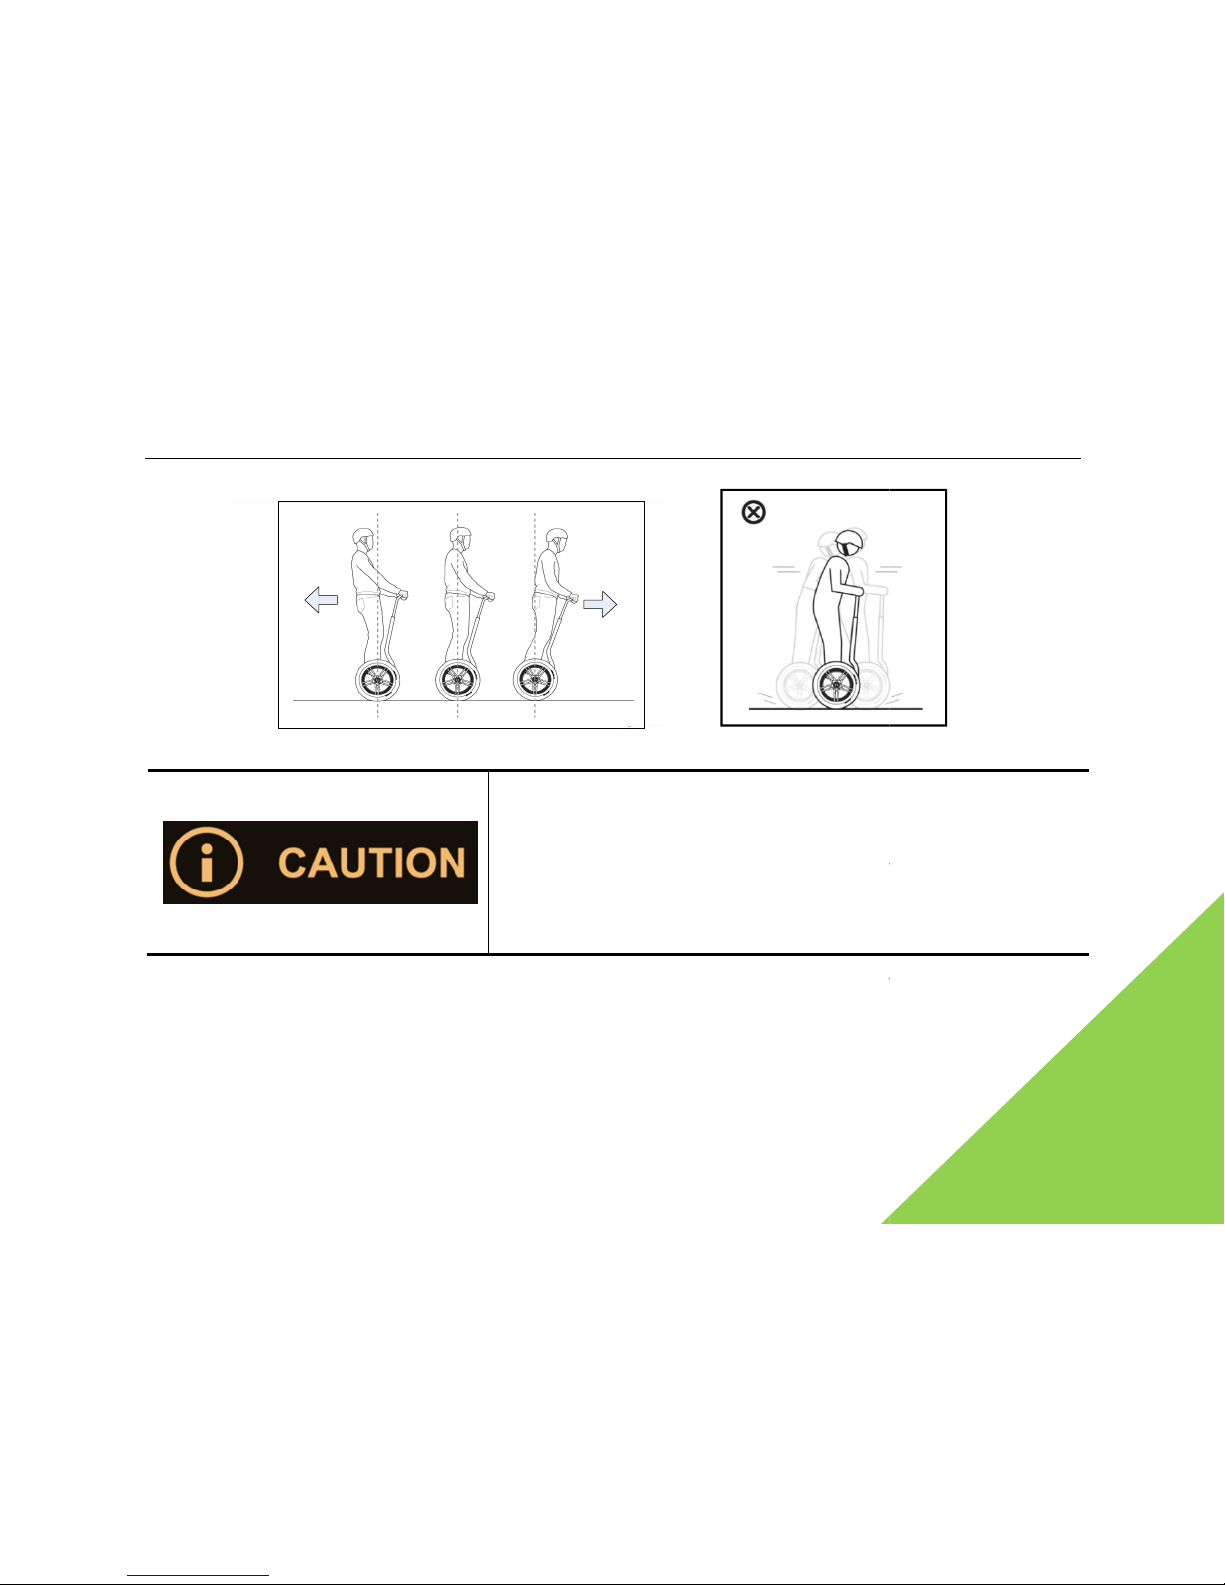
5.6 Move forward and backward
1. Slowly lean forward, and feel the advancement of the WindRunner.
Then lean back
deceleration, and stop. Control its speed.
Repeat several times to ensure control of the
movement of the WindRunner
, and also, the placement of your body at the center of gravity.
user’s manual
ride the bike.
, and
. After a while,
.
, feel the
Page 45
WindRunner™ self-balancing
electric vehicle user’s manual
go backward balancing go forward
avoid any swaying
For a new rider,
make sure you remain relaxed, and ride the
WindRunner gently.
The more relax you remain
swaying you will experience.
Avoid swaying
shift of your body as the center of gravity
. This will help you to
avoid sudden skidding, or falling.
2. Turn your head around to look, and let your body slowly lean
backward to reverse the
WindRunner. Then reset. You may feel the deceleration and stop of
the
several times. Avoid collisions, and you will avoid falling.
45
, the less
or any sudden
WindRunner. Repeat
Page 46
WindRunner™ self-balancing electric vehicle
46
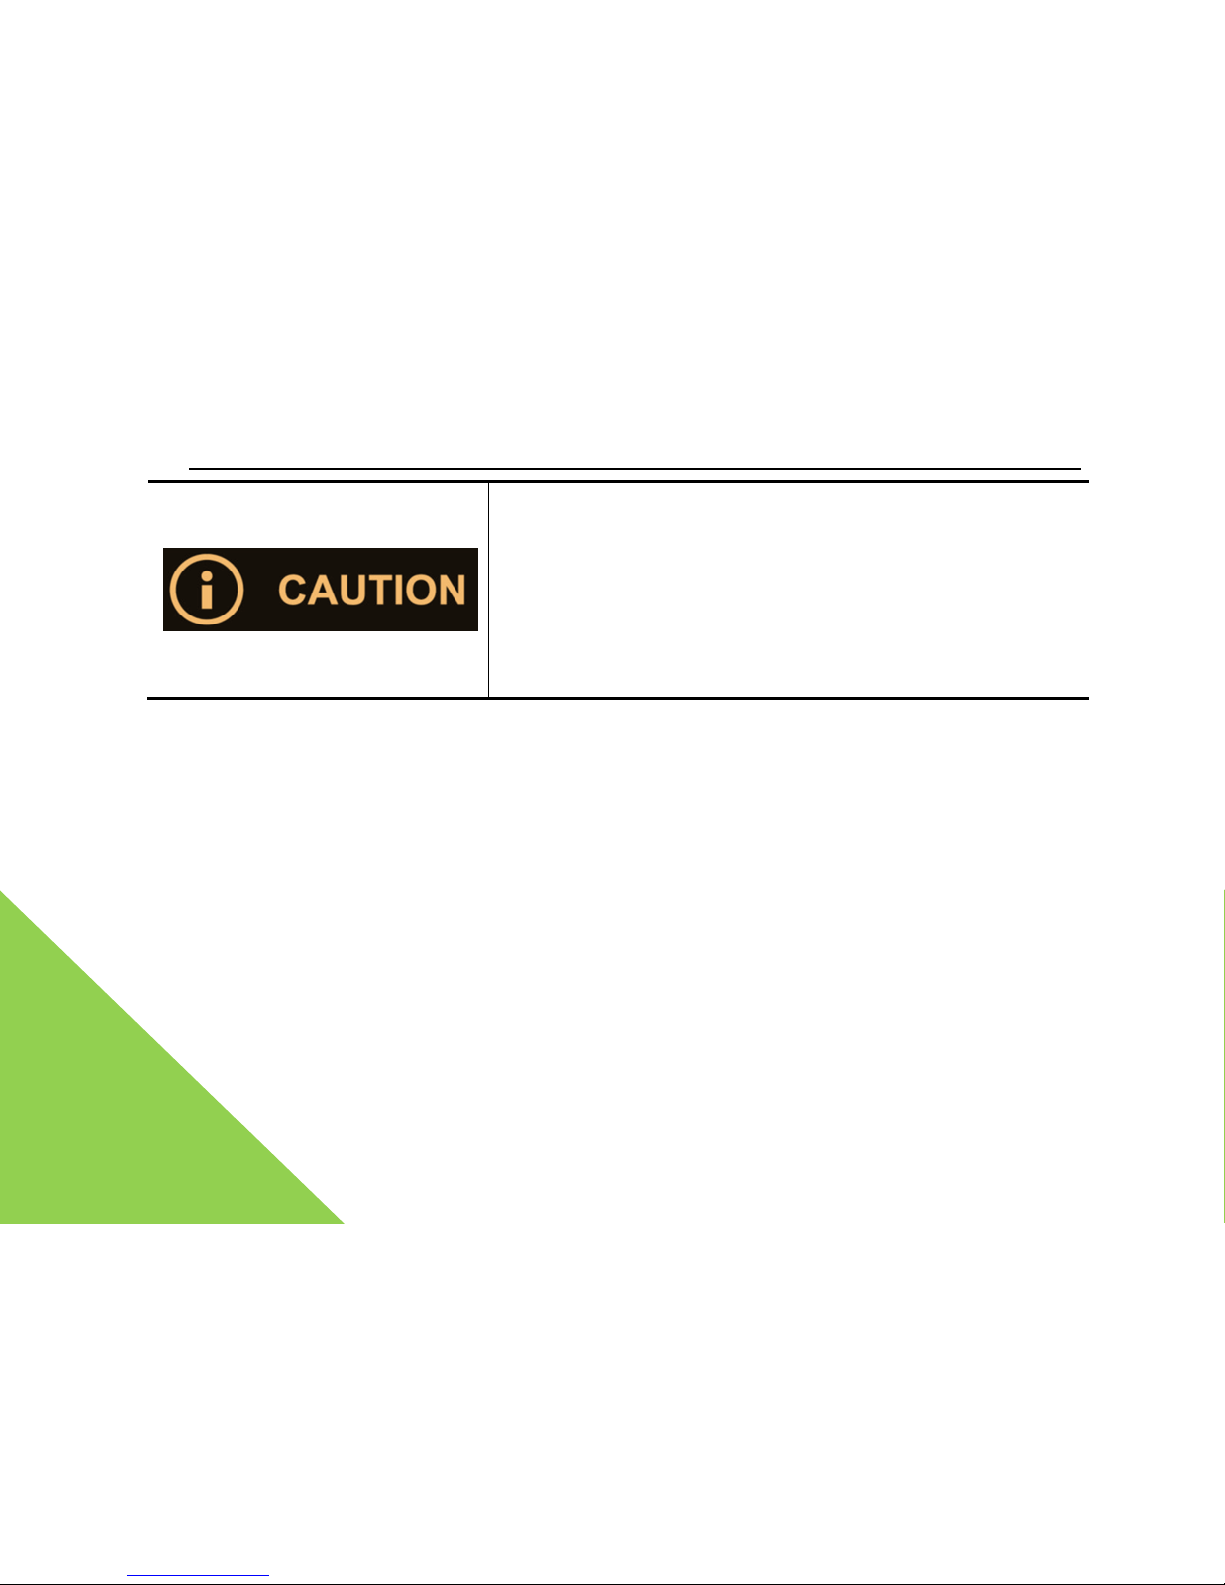
Reverse riding is not a normal riding
substitution
for advancing, unless the rider has to move
backwards to reverse. Otherwise,
please
You may reverse by turn
back, then ride forward
speed is too high, the WindRunner will
shake
alarm.
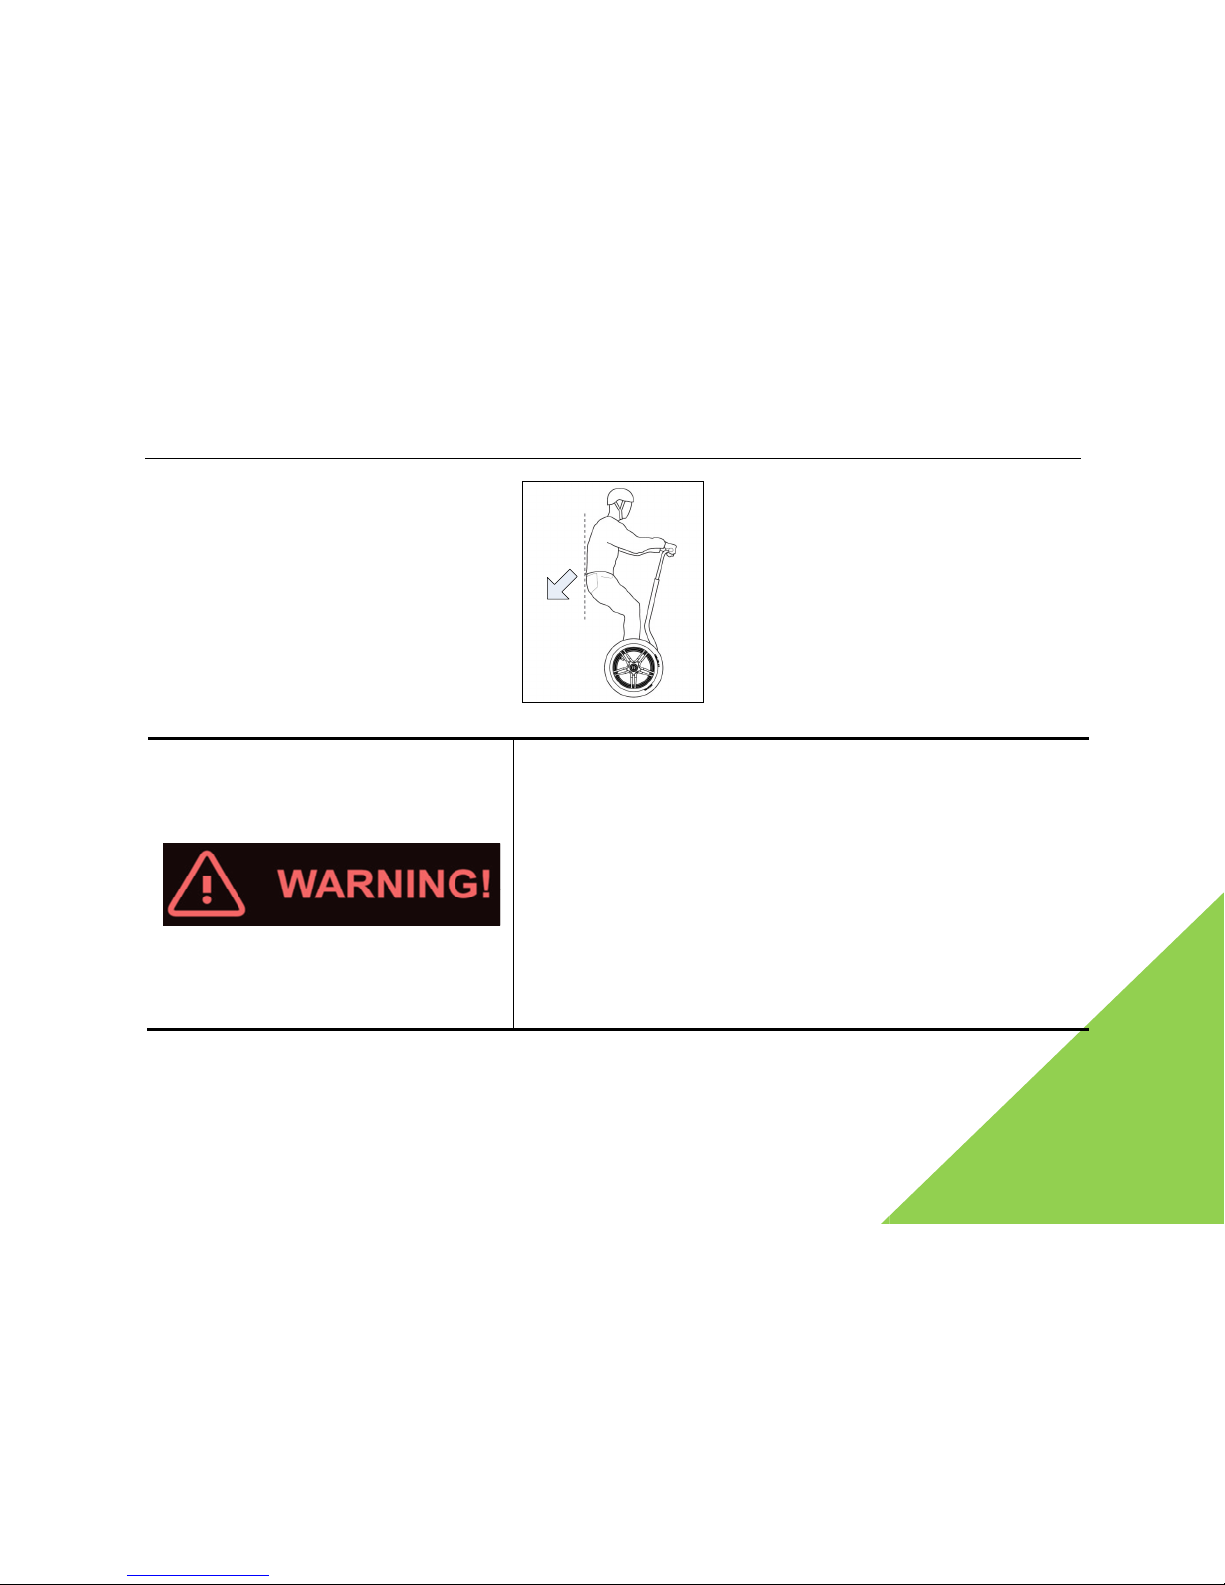
5.7 Decelerate and stop
Shift the center of gravity of the driver’s weight opposite of
the direction of moving to decelerate
and stop the WindRunner. Follow the methods as followed:
1. When you go forward, gently shift your buttocks back (
as if you are ready for seating
backward) to decelerate and stop the WindRunner.
2. After you’ve completely stopped,
uniformly distribute your body’s weight onto the center of
the foot mat to stabilize. At this moment, if
you continue to incline backward
WindRunner shall move backward.
3. Specify a point to practice stopping the WindRunner and
keeping stability
user’s manual
mode. There is no
not reverse riding.
. If the reverse
and give the buzz
, then the
.
Page 47
WindRunner™ self-balancing
electric vehicle user’s manual
Typical decelerating and stopping action
Try to decelerate and stop gently and
progressively
to reduce sharp stops.
Move back the weight of driver’s body
gently from the moving direction to slowly stop the
WindRunner.
During deceleration and stopping, try to avoid
slippery roads b
ecause a sharp stop on it may cause the
WindRunner
and tires to skid and thus, the
get injured!
47
. Also, try
wet and
driver may fall or
Page 48
WindRunner™ self-balancing electric vehicle
48
5.8 Make a turn
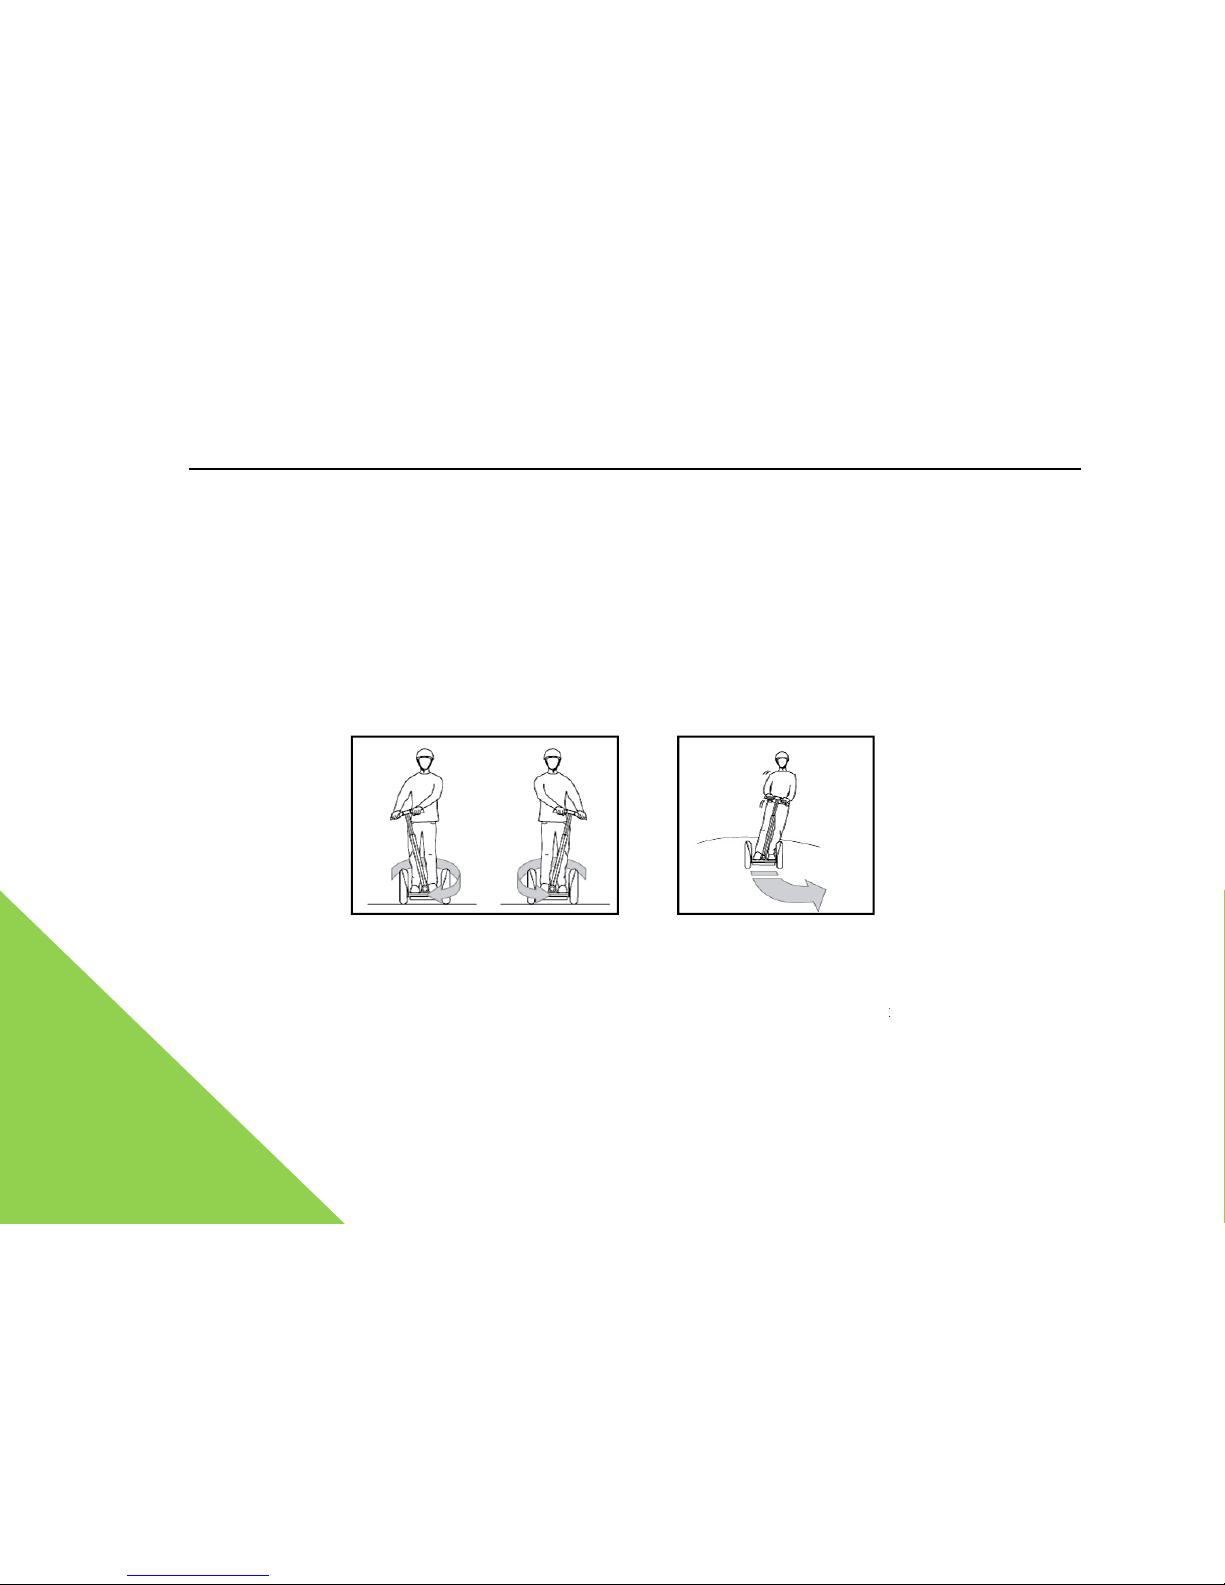
The WindRunner shall turn according to the motion of your handle.
Inclining your
right may cause the WindRunner
to turn to the corresponding directions
1. Firstly do exercises of turning at any safe site for riding.
Slowly incline your
direction you want to move, and the WindRunner shall turn at
site until the angle you
required is achieved. Then, return the handle back to its
normal position
and right to master this skill.
Turn right at site turn left at site make a turn in moving
2. Make a turn in moving. After you have become familiarized with the
go forward, go backward
and turn at site, try to advance slowly and make a turn.
Keep your knees slightly bent
incline to the direction you want to make a turn. T
he angle shall be consistent with that of
operating bar. Repeat until you master this skill.
user’s manual
handle left or
.
handle to the
. Repeat to turn left
, and
the
Page 49
WindRunner™ self-balancing
electric vehicle user’s manual
No matter at site or moving,
making a sharp turn is very
dangerous. It can
easily cause you to lose
So, please decelerate, and ride
slowly
making a turn.
5.9 Get off
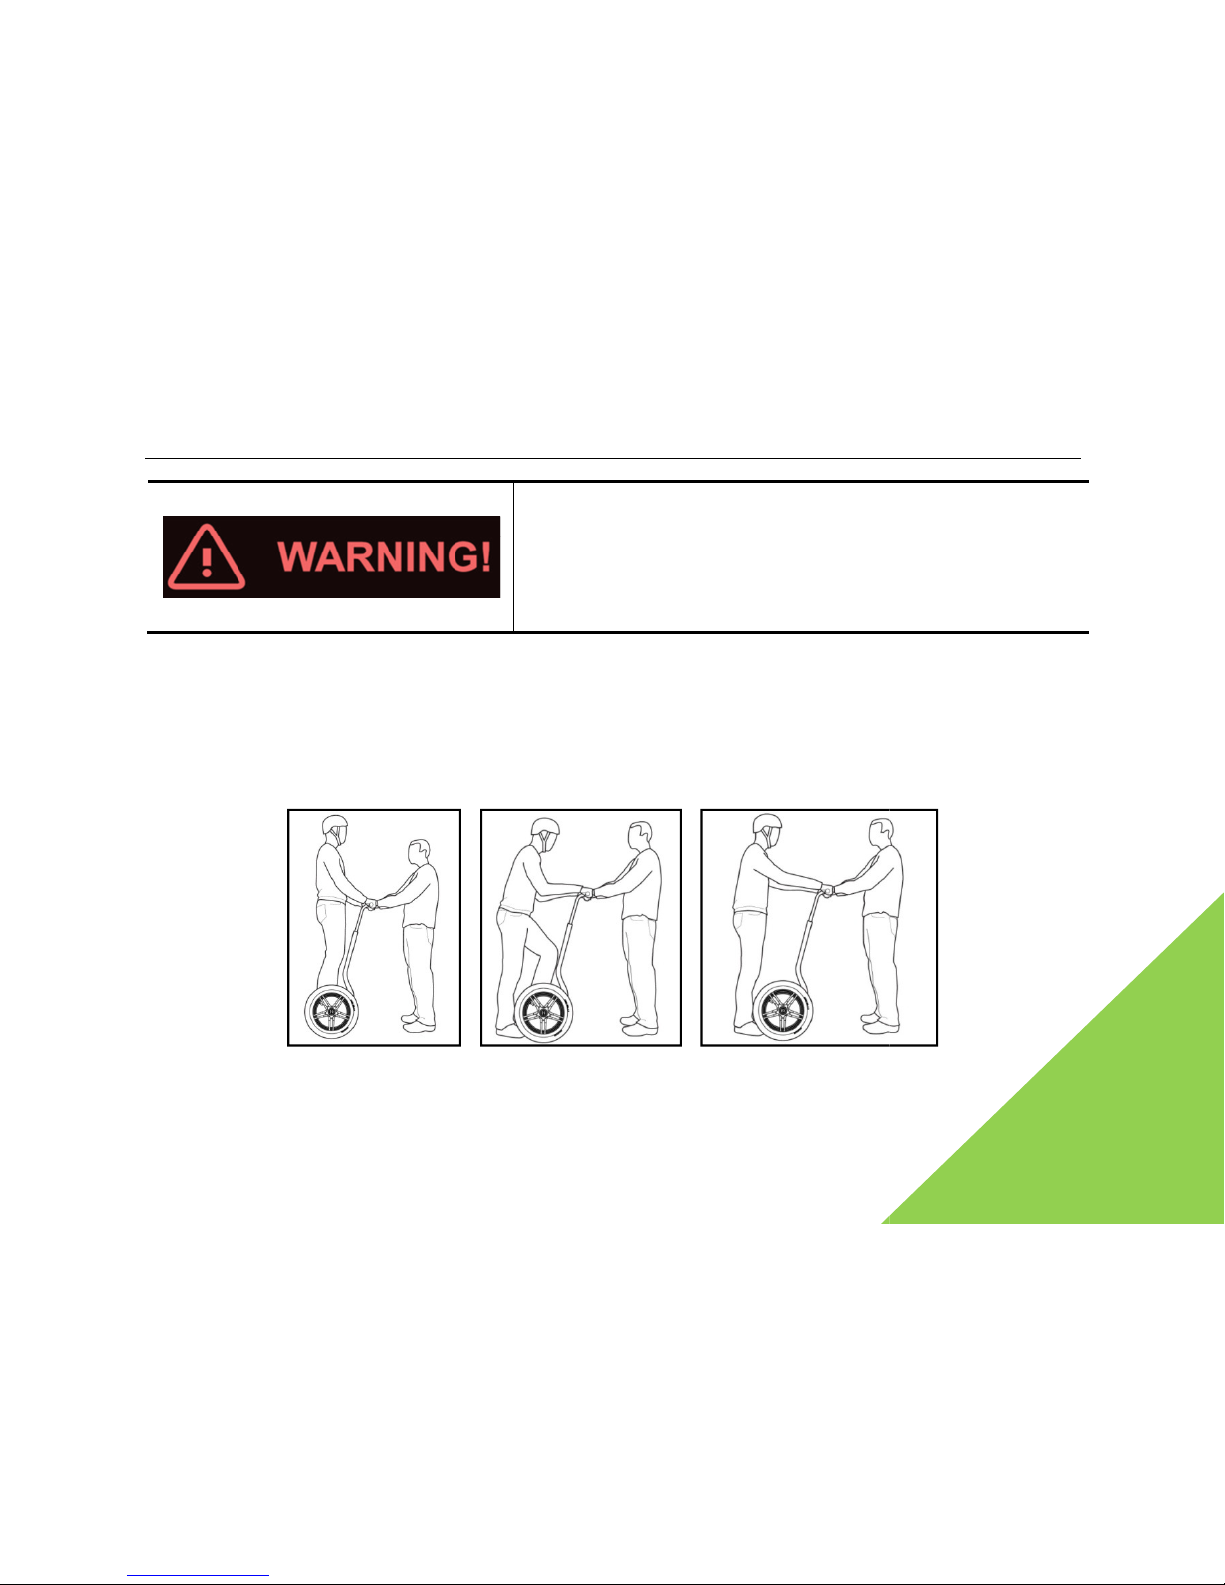
When you want to get off from the WindRunner for the first time, please
request
to help you by holding the handle of WindRunner
. Make sure your body is steady and the center
of gravity. Then without swaying, carefully get off.
49
balance and fall.
at the moment of
request
your instructor
Page 50
WindRunner™ self-balancing electric vehicle
50
Please request your instructor for a help one foot a time. After you ge
t off
bar steady. The detailed getting-off methods are as followed:
1. Firmly hold the operating bar with both hands,
get off one foot a time from the
avoid shifting backward or left/right.
2. After you have completely gotten off, the WindRunner
should be powered off. The
WindRunner may advance forward, so both hands should remain on
death or injury.
Be calm when getting off the
WindRunner
nervousness may cause you to turn the handle. Turning
handle while nervous may cause a
sudden
the rider may become frightened.
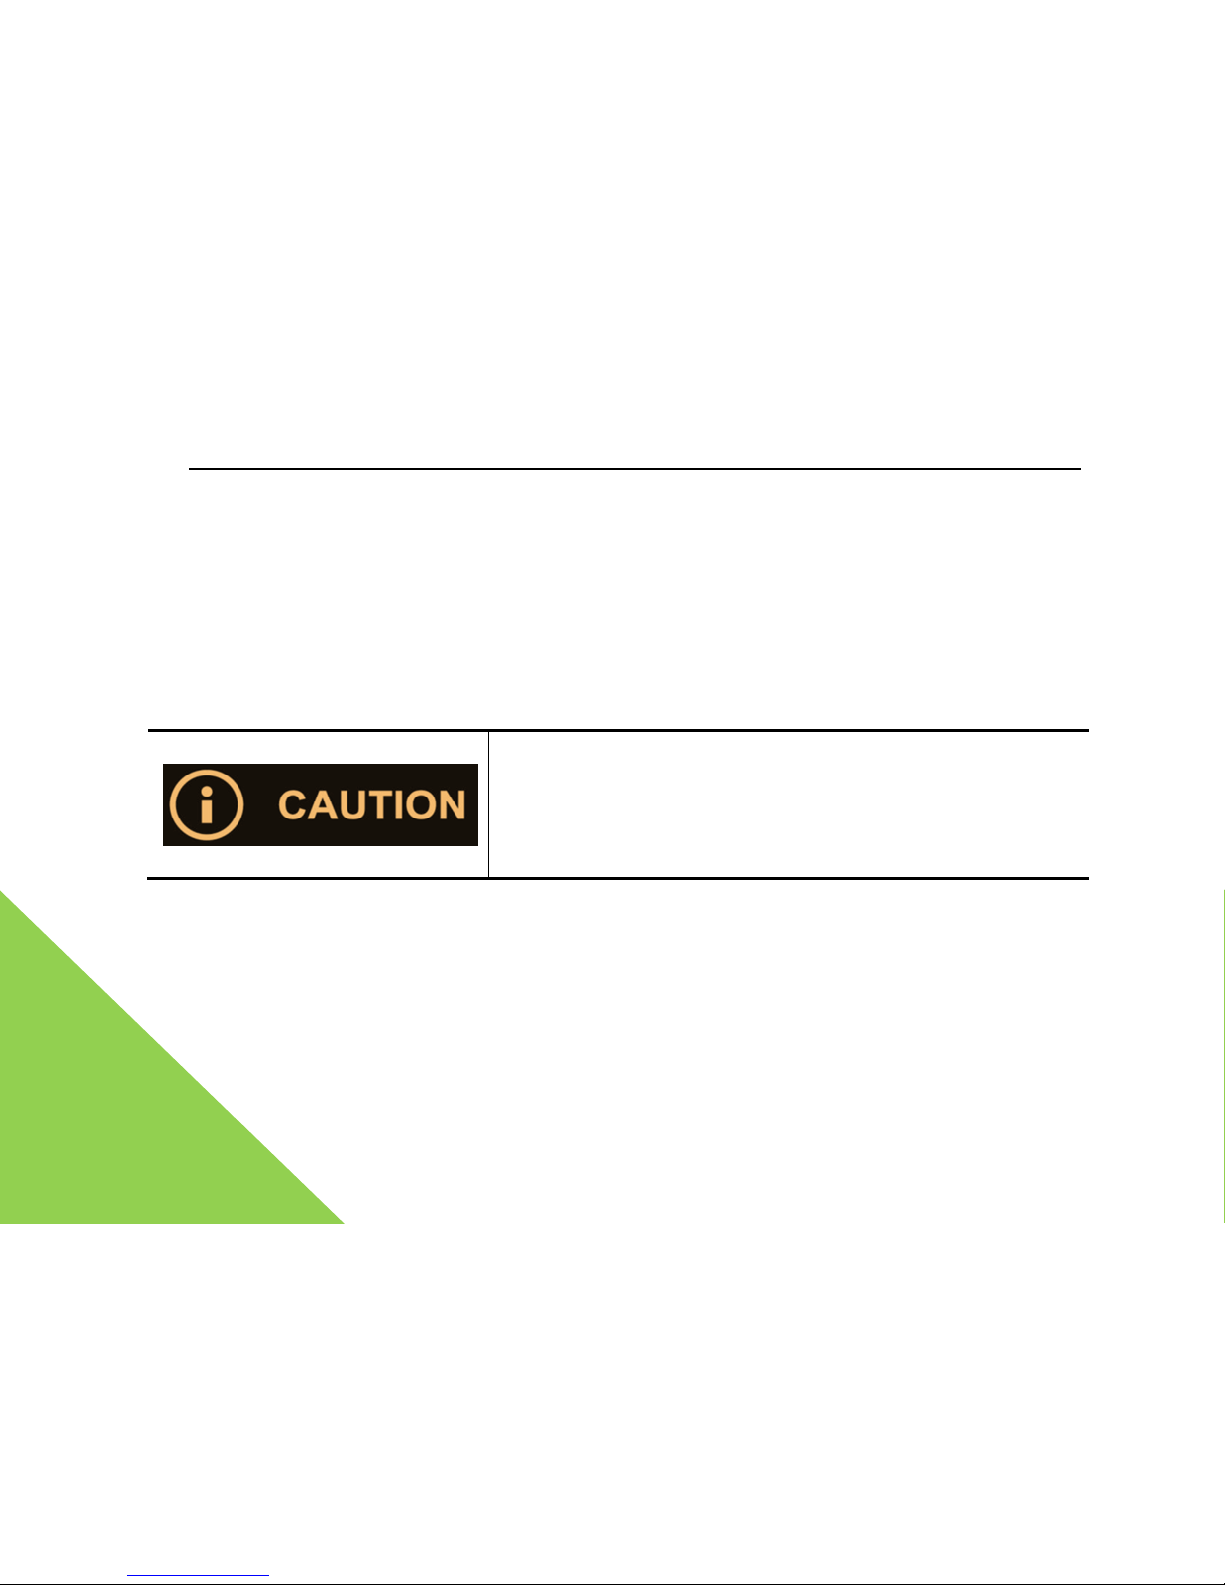
5.10 Use the power assistant mode
Once you take your second foot off, the WindRunner shall change from
balance
assistant mode (or under standby mode, tap the foot mat lightly once,
and a sound of
may be heard. Then, the power assistant mode will be entered). A
t this moment
WindRunner will go forward, backward,
or make a turn according to your shift of
always maintain gentle and low power. If you come across a road barrier
,
user’s manual
, hold the operating
foot mat, and
the handle to avoid
. Reason being,
the
turn and as a result,
mode to power
a “tick”
, the
the handle. But
a flight of step, unsafe
Page 51
WindRunner™ self-balancing
electric vehicle user’s manual
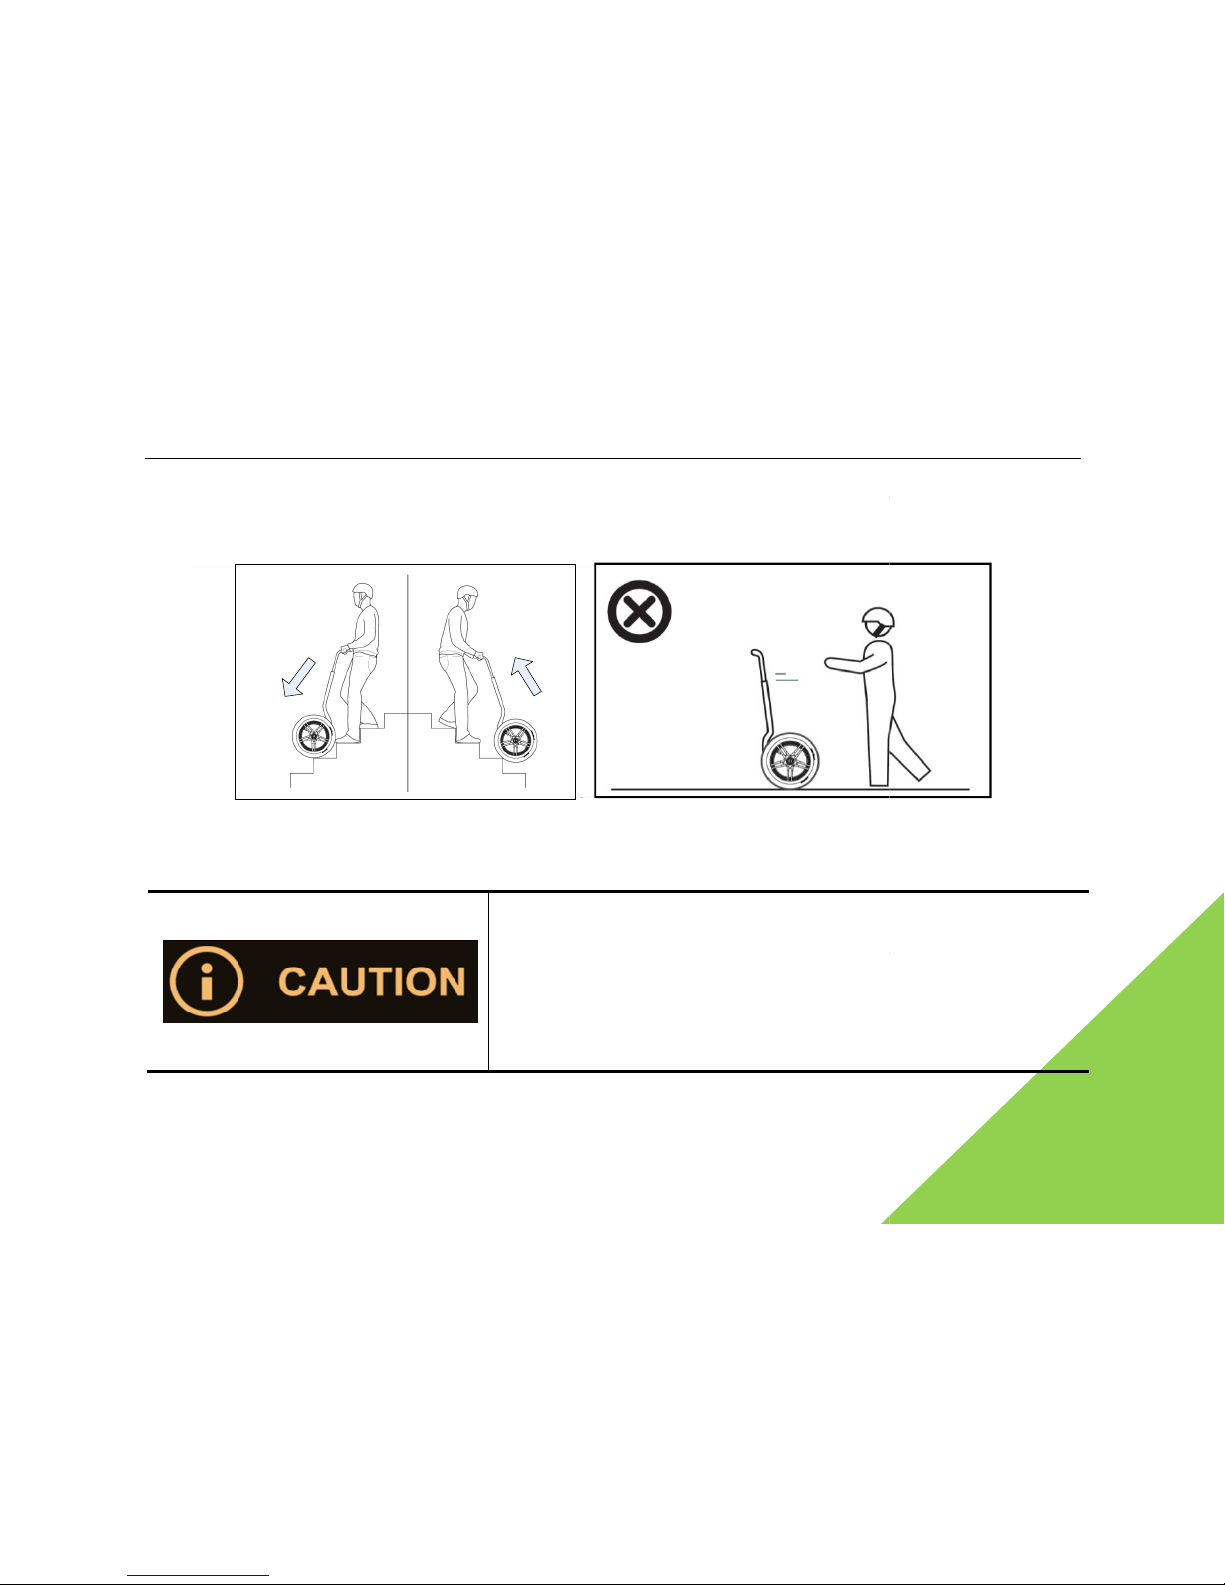
or adverse land form etc, please use the power assistant mode to pass
or
route.
When you ride up and down a flight of steps under
power assistant mode
forbidden to release the handle under power assistant mode
When in power assistant mode, please
grasp the handle to
control the movement of WindRunner.
It's
release the handle under
power assistant mode
WindRunner may give an alarm
sound and shake, then change
to standby mode which may cause damage in a crash.
51
or
go by a roundabout
, you are strictly
strictly forbidden to
. If you do, the
Page 52

WindRunner™ self-balancing electric vehicle user’s manual
52
5.11 Use the lock mode
After you have gotten off the WindRunner, press the “lock” button on the intelligent remote key.
The WindRunner shall enter the lock mode (see 4.3 lock modes for details) so as to ensure
security when you leave the WindRunner temporarily. Once the lock mode has started, if its
posture is changed or touched, the whole mainframe of the WindRunner shall shake strongly,
and give a very short and continuous alarm buzz; under the lock mode, the WindRunner motor
shall be locked up, and the tires will be unable to rotate. This will make it very difficult to tract
the WindRunner.
The lock mode is usually used for security guarantee when you leave the WindRunner
temporarily. The best method for ensuring the safety of WindRunner is parking indoor. The
WindRunner may be put into an elevator, easily pass the obstacle-free ramp etc. When you
temporarily put the WindRunner at a public area and leave, please try to ensure that you may
hear the sound of the alarm and the vehicle is within the view of your sight. Then after you get
off, start the lock mode.
If you park the WindRunner at an unsafe place or out of your view of sight for long period, you
better lock up the hub. The locks for bikes or motorcycles are also applicable.
Page 53
WindRunner™ self-balancing
electric vehicle user’s manual
At any time, when you park the
WindRunner
mind to take along the i
ntelligent remote key
not lose the intelligent remote key
, place it
WindRunner to avoid any loss.
53
, please keep in
. To ensure you do
together with the
Page 54
WindRunner™ self-balancing electric vehicle
54
6. Safe riding
instructions
This part is very important,
please
understand and strictly obey.
Our company will not take any
responsibility for loss in property and personal injury caused
by violation of safety riding
instructions.
The WindRunner is a sports and entertainment tool, so it
also accompanies the safety risks
similar to all those sports and entertainment activities. Ride
strictly in accordance with
riding instructions.“ This may maximize the safety of you and other
persons
WindRunner has serious irreversible troubles; this will
ensure no serious injury to you
However, you should understand; once you ride the WindRunner
on a road
if you completely obey the safe riding instructions, you shall also be
faced with risks from
people or means of transportation. So while riding, maintaining an
appropriate
and reasonable distance from other people and
means of transportation are very important
6.1 You must strictly obey
Understand and obey the local laws and regulations, and only ride
at
user’s manual
read carefully,
the ”safe
; even if the
.
or public place, even
other
level of vigilance,
.
appropriate places.
Page 55

WindRunner™ self-balancing electric vehicle user’s manual
55
Before riding, wear a safety helmet and harness for knees, elbows, and wrists. All the above
are necessary for the effective protection of the driver.
Check the charging conditions. Avoid long-distance riding when the battery capacity is less
than 60%.
Check the basic conditions of WindRunner and make sure all exposed component parts are
not falling, damaged, and are free of slackness. While riding, make sure you don’t hear any
noise or a continuous alarm.
Before riding, ensure that you are in good conditions and clear-headed. Do not drink or take
sedative medicines within 6h’s of operating the WindRunner.
6.2 Strictly forbidden
It is forbidden to ride in area forbidden by relative country/local laws and related authorities.
It is forbidden to ride at risky places such as deep cave/ crack, steep slope >15°, and
accumulated water >6cm deep etc.
Page 56
WindRunner™ self-balancing electric vehicle user’s manual
56
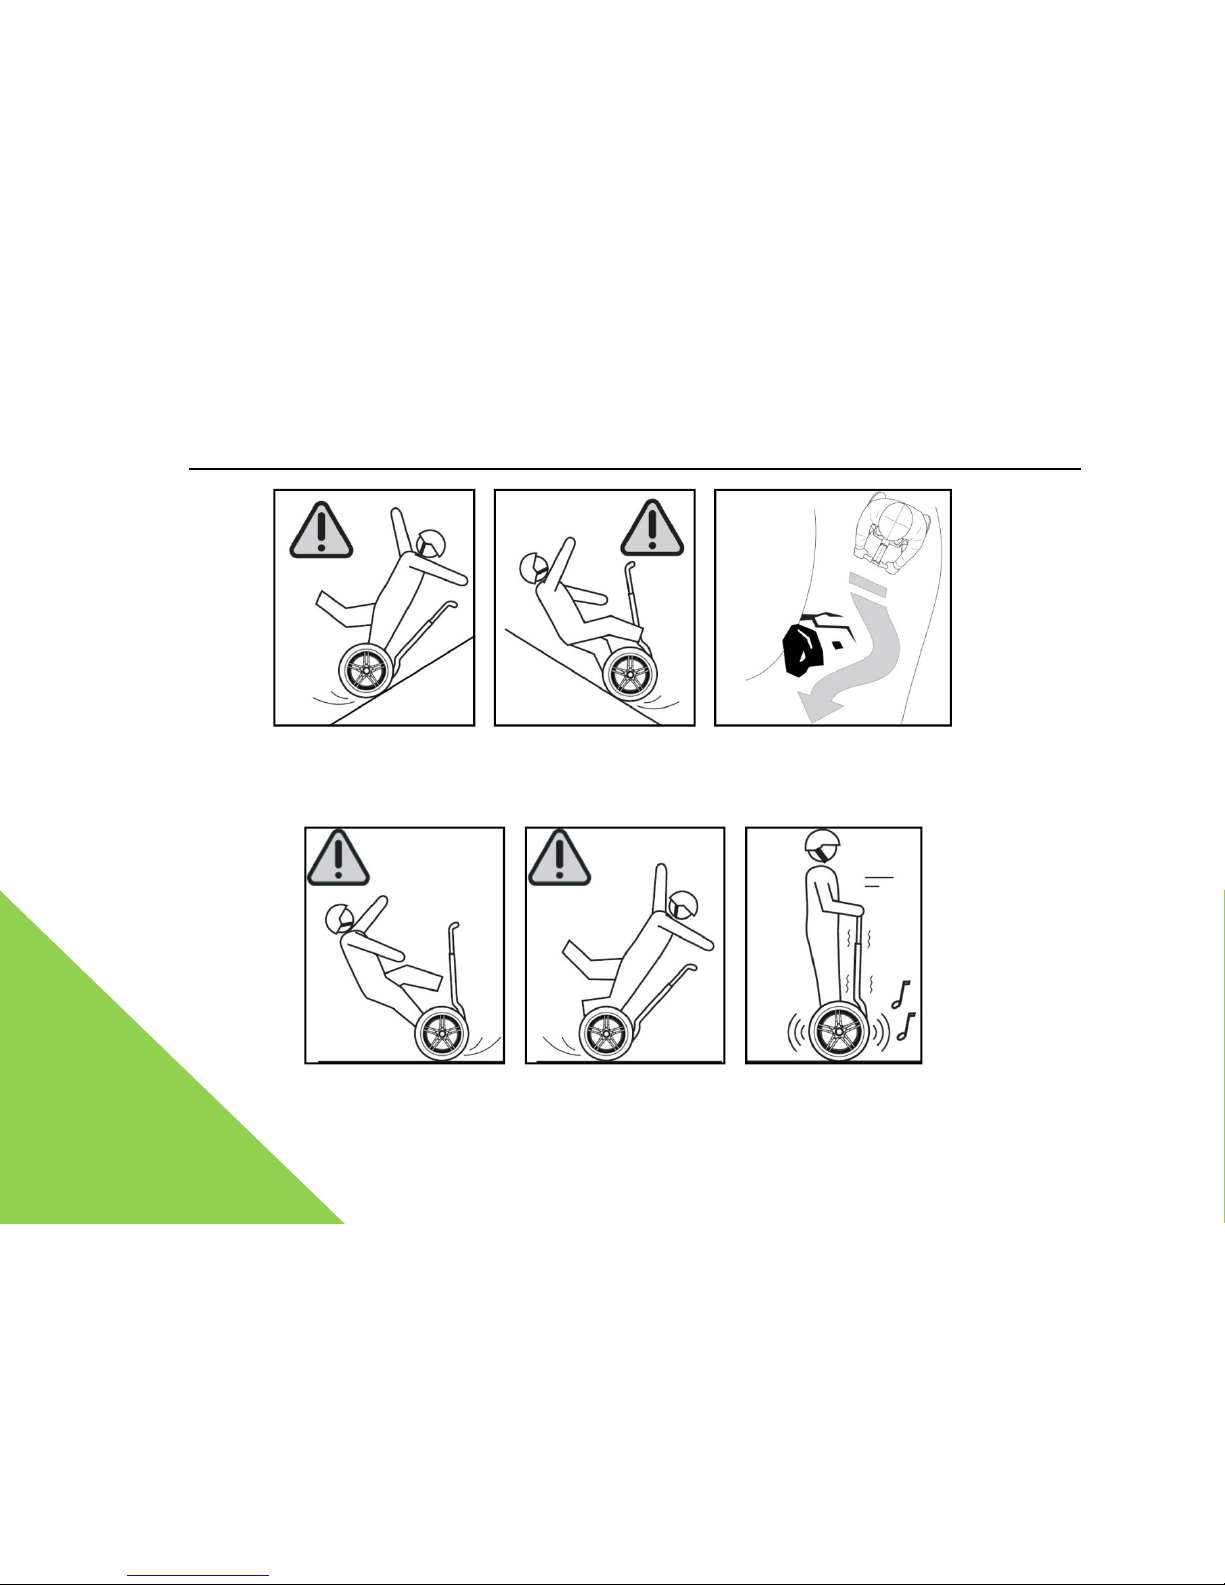
It is forbidden to ride in bad weather and road conditions such as heavy/freezing rain, snow,
accumulated water, wet and slippery surfaces, etc.
Page 57
WindRunner™ self-balancing electric vehicle user’s manual
57
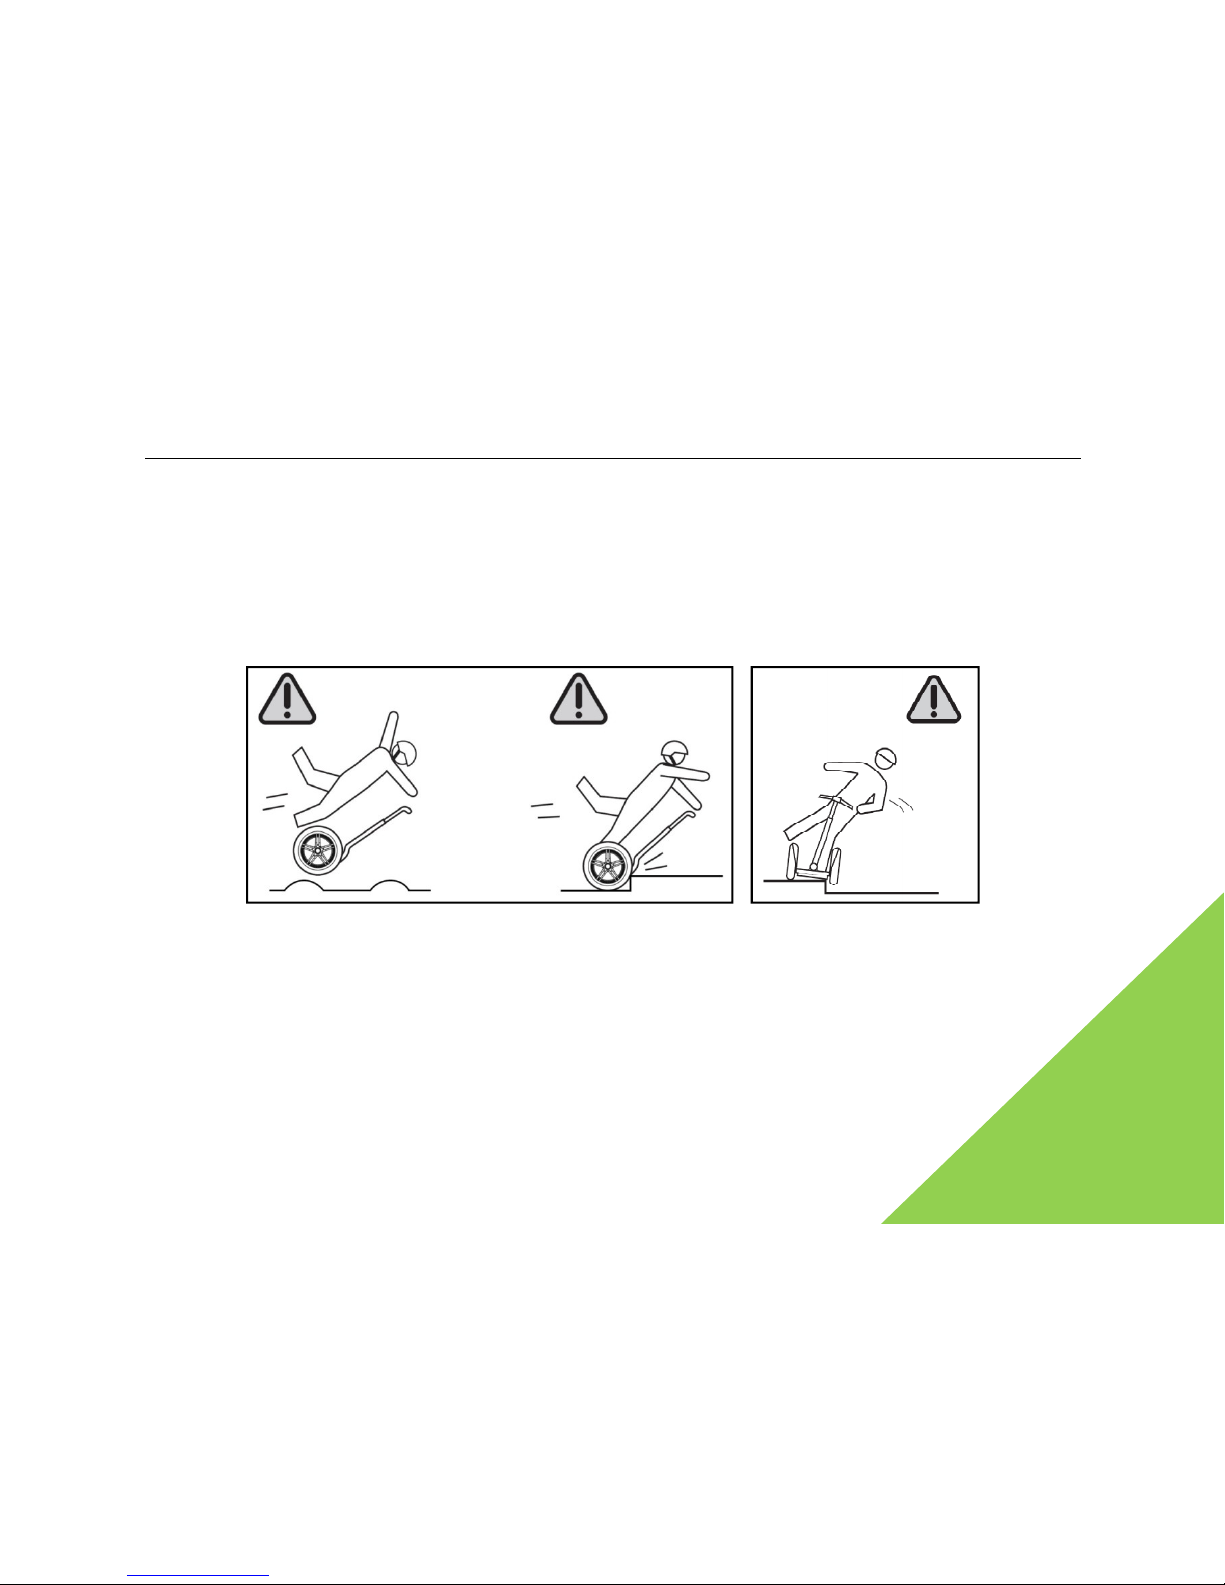
It is forbidden to reverse in high speed, and also, to make a turn while reversing in high
speed.
It is forbidden to ride the WindRunner up and down a flight of steps, and it is also forbidden
to raise the WindRunner high into the air (such as crossing a ridge in high speed). It is also
forbidden to transversely cut or ride across a flight of steps.
It is forbidden to ride in a motor vehicle lane. In some countries and regions, the non-motor
vehicle lane is also forbidden to ride this type of vehicle Please refer to the local laws and
regulations.
While riding, it is strictly forbidden to remove both hands from the operating bar.
It is forbidden to allow a child less than 14-year-old to ride the WindRunner.
Page 58

WindRunner™ self-balancing electric vehicle user’s manual
58
It is forbidden to make a phone call or check the capacity of battery, etc while riding.
It is forbidden for two or more people to stand or ride on the WindRunner.
It is forbidden for a pregnant woman, excessively drunk, mental patient, person with heart
disease, or a disabled person to ride the WindRunner.
It is forbidden to ride in unsafe conditions such as places endangered by fire or explosion,
flammable gas, steam, liquid, dust and fiber, etc.
It is forbidden to violate other requirements of this manual, especially those items strictly
forbidden such as ”warning“ and ”caution“.
6.3 Driving manners/safe riding
While riding the WindRunner, please study and obey the local laws and regulations on
transportation. Please ride carefully to avoid any collisions.
To ensure a controllable situation, please ride at a safe speed for both the driver
himself/herself and others. Be ready to stop any accidents arise.
Have a high regard for pedestrians’ right for road using. Avoid any shocks to pedestrians,
especially children. When passing by from the back of a pedestrian, give a warning to
pedestrian, and decelerate. Try to pass from the left side. If face-to-face with pedestrian,
pass from the right side and slow down.
Page 59

WindRunner™ self-balancing electric vehicle user’s manual
59
If the pedestrians are crowded, slow down and pass with the speed just the same as that of
the pedestrians. If there is enough safe space for passing, you may pass, try to avoid passing
through the crowd of pedestrians.
When riding together with another driver on a WindRunner, keep an appropriate safe
spacing; avoid any hazards and obstacles, unless there is enough space for the safe passing
of pedestrians. Otherwise, it is forbidden to ride side by side.
Do not stop and stay at a place which will cause the WindRunner to impede on the passing
of pedestrians.
Do not ride at place without enough light. If necessary, please slow down and keep vigilance,
it is better to use an external running light to ensure the lighting.
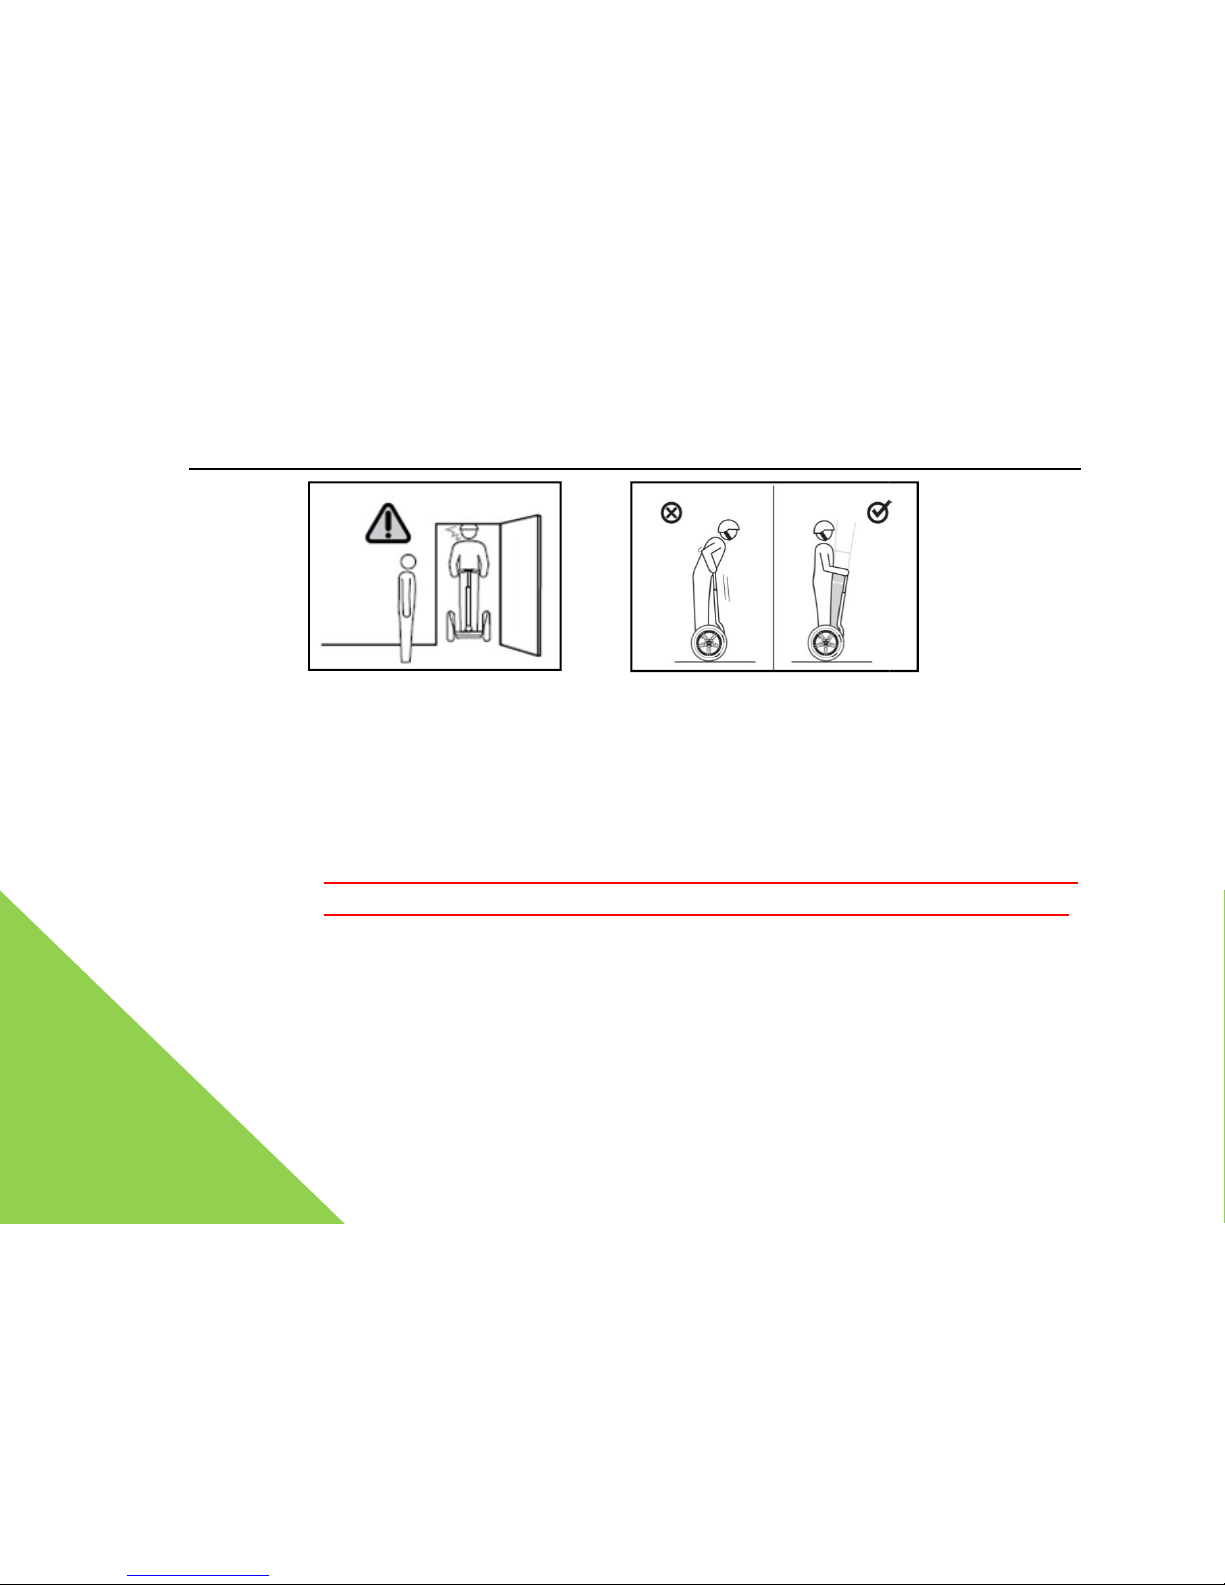
When you ride the WindRunner, you should be 24~30cm higher than your body size, when
passing the door frame or closing the door entrance, tree branches, various labels,
nameplate or other obstacles above, please keep a sharp vigilance and avoid any injuries.
Page 60
WindRunner™ self-balancing electric vehicle
60
Care to the space above your head please ride
with the correct posture
While riding, relax, and keep both your knees and
elbows bent lightly
keep your body in a relaxed posture.
Please do not reverse unless
you are certain to avoid any obstacles. If your path is clear,
you may slowly reverse a few steps.
When riding,
keep in mind that your body shall be kept at least one fist away from
operating bar and handle. Do not lean your body on the
operating bar
That's very dangerous and may cause crush & injury.
6.4 Active protection instruction
Please carefully read this manual and watch the video in D
VD about
instructions. Understand and master these instructions.
user’s manual
. Raise your head, and
or handle:
safety riding
Page 61

WindRunner™ self-balancing electric vehicle user’s manual
61
Do not lend your WindRunner to others unless he/she has carefully read this manual, and
seen the DVD about safety riding instructions.
Please wear the safety helmet and tie the ribbon on the helmet. No matter when you ride
the WindRunner, please wear the qualified safety helmet. The driver may wear the gloves,
eyeshade, shin-guard, and kneepad, etc according to the riding situations and his/her
previous riding experience.
If you feel unwell or unable to obey all notices or warnings in this manual, please not ride;
and not ride under the effect of alcohol or drugs.
When you hear a continuous alarm, see Speed limits, or are at a low battery level, please get
off and charge your batter as soon as possible to ensure high safety.
When carrying something, please use the front storage container, lateral container, or
backpack as recommended. Do not put any other things onto the foot mat. The total carrying
capacity of the handle is no more than 5kg; otherwise, the balancing ability of the
WindRunner will be adversely affected.
Before handling and moving the WindRunner, please confirm that the WindRunner had been
powered off, and handled by both people together. To avoid any damages to the fender, do
not lift the WindRunner by the fender. Be careful not seize your fingers between tire and
fender.
Page 62

WindRunner™ self-balancing electric vehicle user’s manual
62
Prior to riding the WindRunner, please carefully check the WindRunner. If you find any loose
points or damages, please do not ride until the troubles have been resolved.
Periodically maintain your WindRunner according to chapter 7, and 8 and appendix 1.
6.5 Intelligent safe alarm/protection
Under the following situations, the WindRunner shall automatically slow down by automatically
limiting its maximum speed to a safe level:
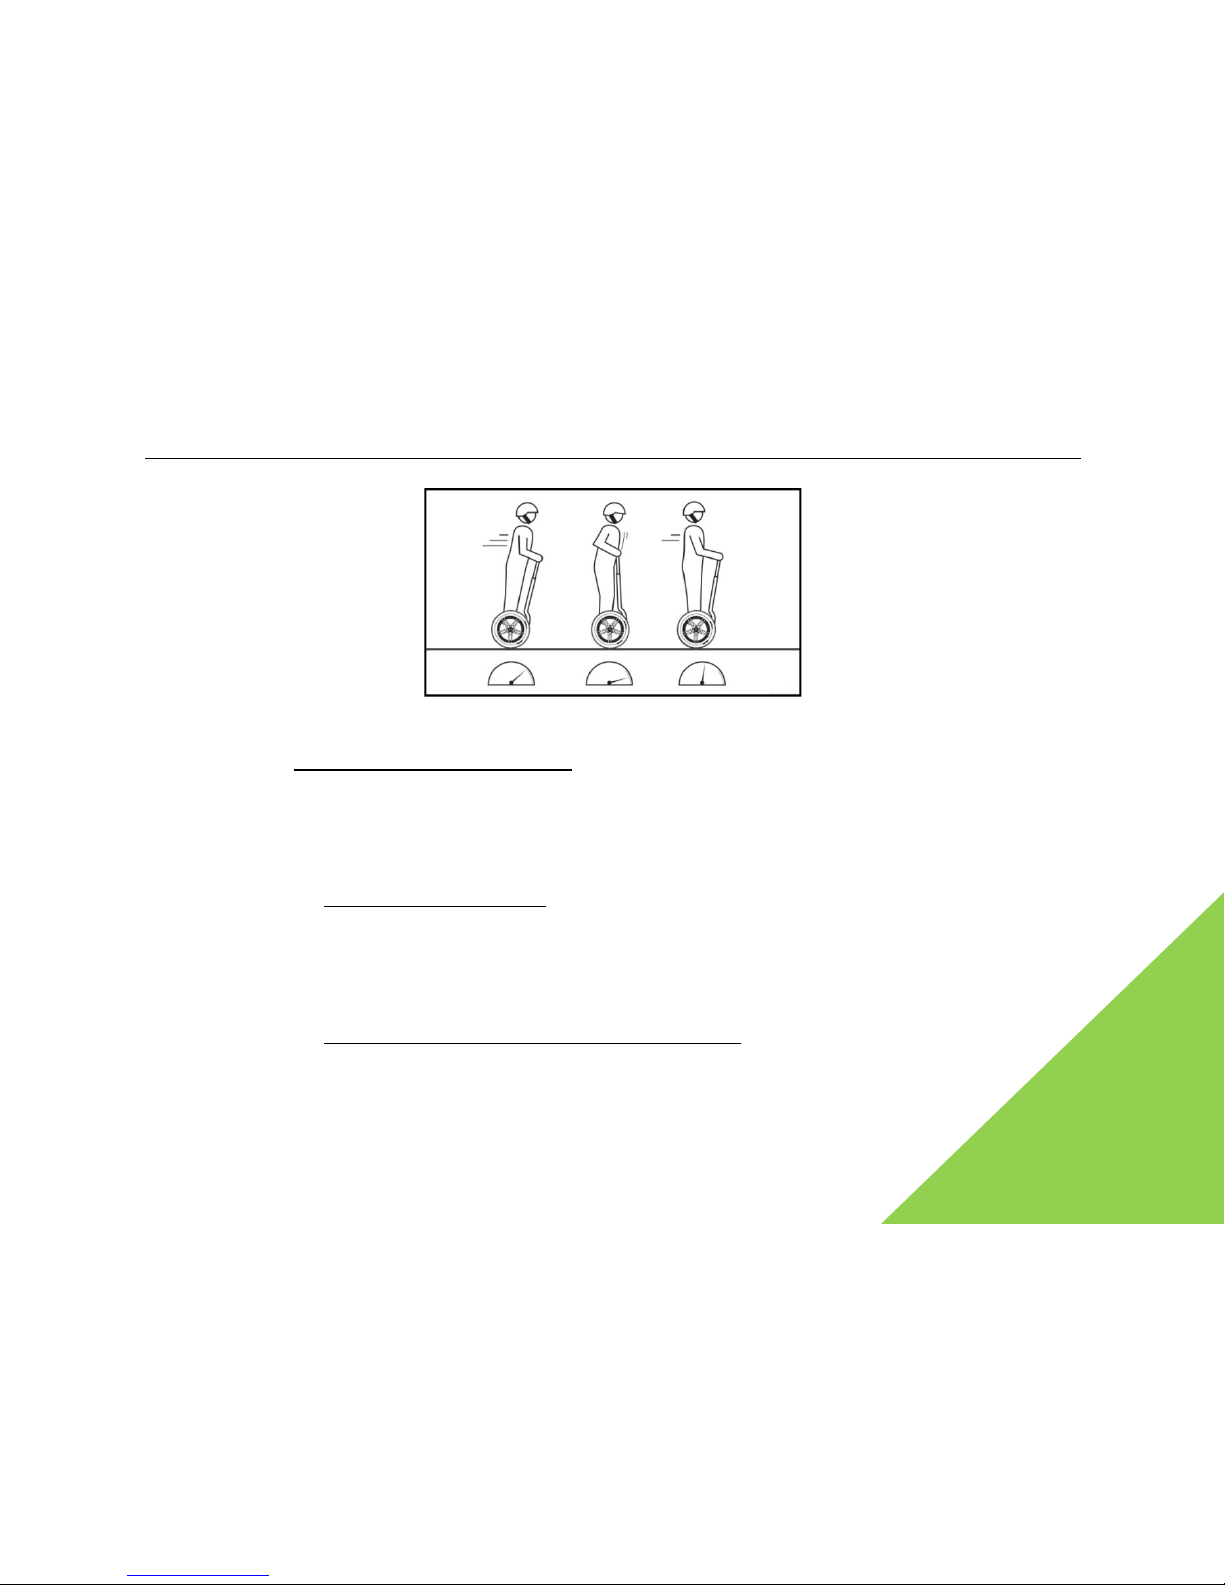
Advance speed too high. If you ride the WindRunner too fast (beginner mode, 5km/h,
Speed limit mode,10km/h, normal mode, 20km/h), the WindRunner handle shall generate a
force to push the driver backwards to limit its speed. During this moment, your body will
have been tilted too high, and your speed too fast. The Speed limit mechanism of the
WindRunner will be triggered and during this moment, please adjust your body’s tilting
degree to keep a spacing about one fist between your body and operating bar;
Low battery capacity. When the voltage of battery is reduced to 40% and below, its
maximum speed under normal mode shall be gradually reduced. That is, begin to restrict its
speed if its speed is still less than 20Km/h. Typically, if the battery capacity is only about
30%, then its maximum speed is about 15km/h.
Page 63
WindRunner™ self-balancing electric vehicle user’s manual
63
auto Speed limit
Intelligent safety alarm(ISA): under the following situations, the WindRunner shall
automatically restrict its speed to about 5km/h, and continuously shake, give an alarm buzz to
the user, and all LEDs will be red and flicker quickly. This mechanism is called the intelligent
safety alarm:
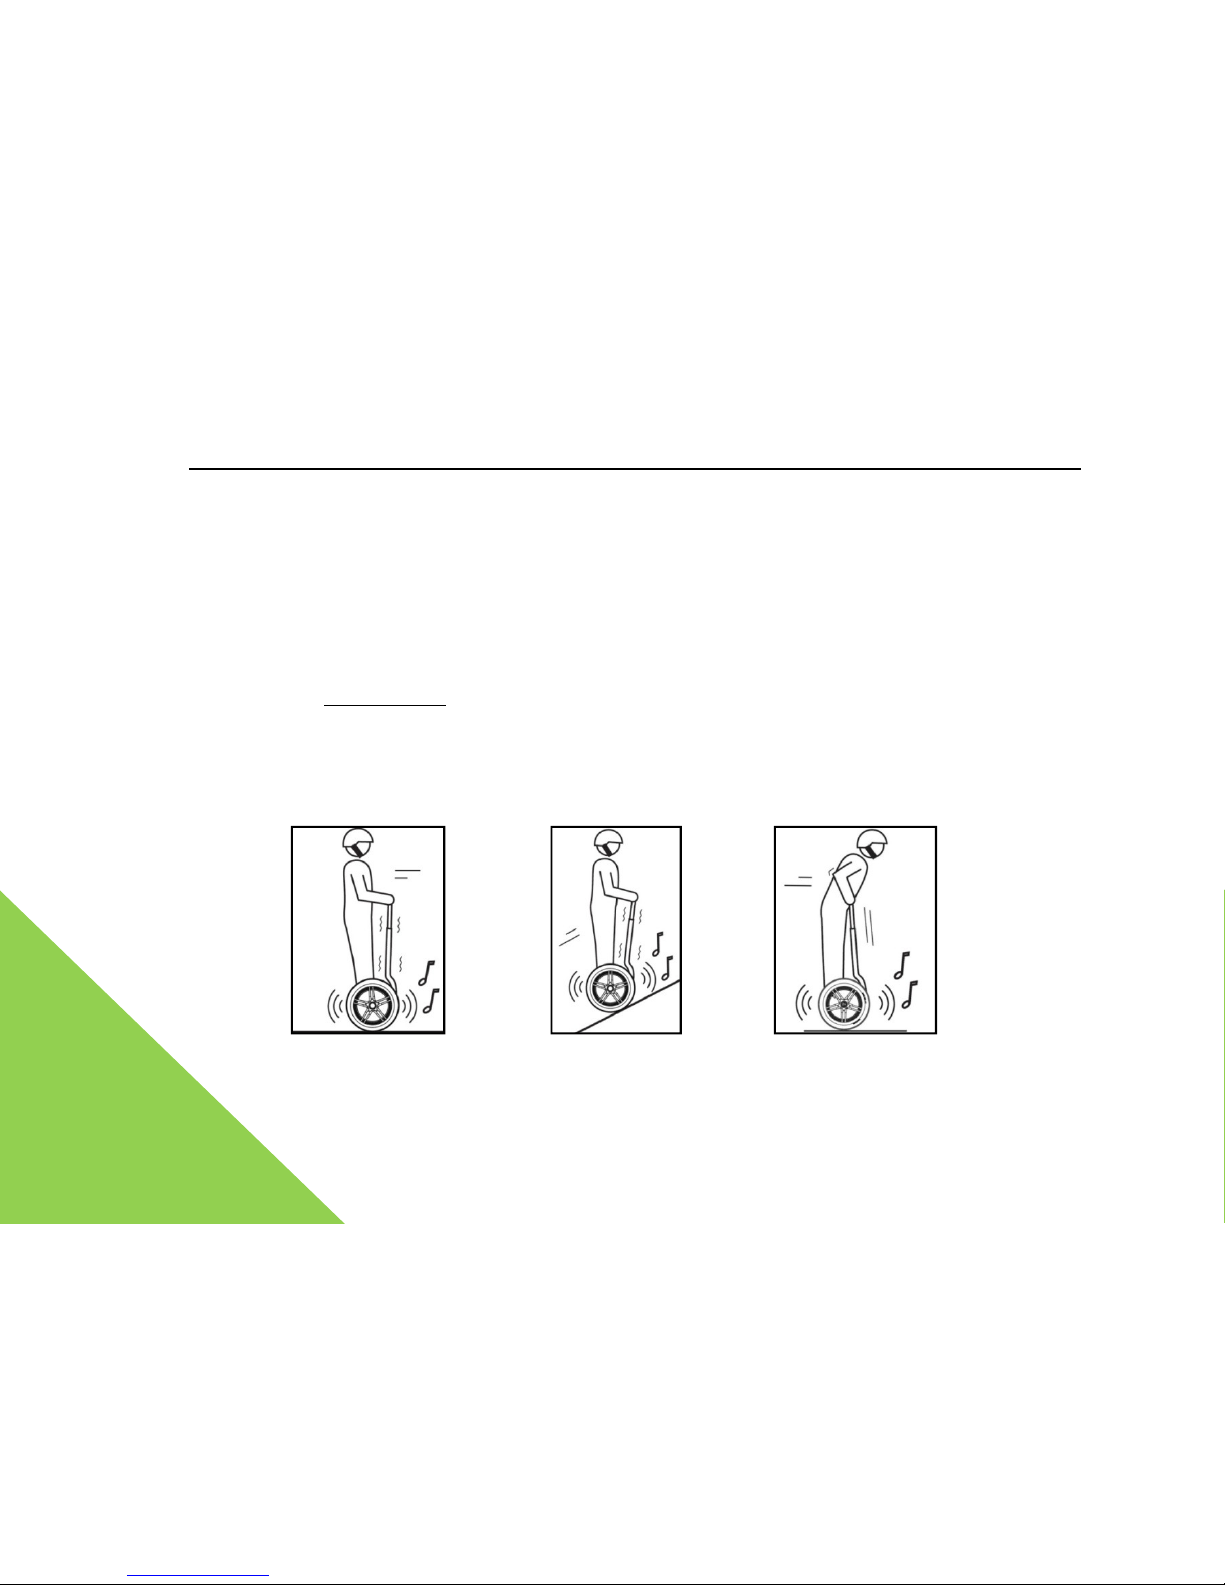
Reverse speed too high. When you ride the WindRunner and reverse too fast (reverse
beyond 5km/h), the intelligent safety alarm will be triggered. Riding in reverse too fast is
dangerous. Please stop immediately, and change to advance mode after you have made a
turn.
Overload or stay on a ramp for a long period. When the load is beyond the designed
safety value of the WindRunner for any specified period (which usually happens during
Page 64
WindRunner™ self-balancing electric vehicle user’s manual
64
situations such as steep slopes, deep pits, the weight of driver’s body is too high, or has
stayed on a ramp for a long period and has caused the WindRunner to overloaded etc), the
intelligent safety alarm may be triggered, just then the foot mat shall tilt backward
considerably, and warn the driver to get off. At this moment, the driver shall get off and hold
the handle to move into power assistant mode. Otherwise, the WindRunner will enter into
standby mode after 5s, and the driver may be fall off if he/she still stands on it.
Low battery.
When the battery capacity is too low (usually lower than 10% the battery
capacity), the intelligent safety alarm shall be triggered. At this moment, immediately get off,
and charge it as soon as possible. If the driver continues to move, the foot mat of the
WindRunner shall be faced up, which may push the driver to get off.
Reverse speed too high, riding on a steep slope or staying on a ramp too long, battery capacity too low
Page 65
WindRunner™ self-balancing electric vehicle user’s manual
65
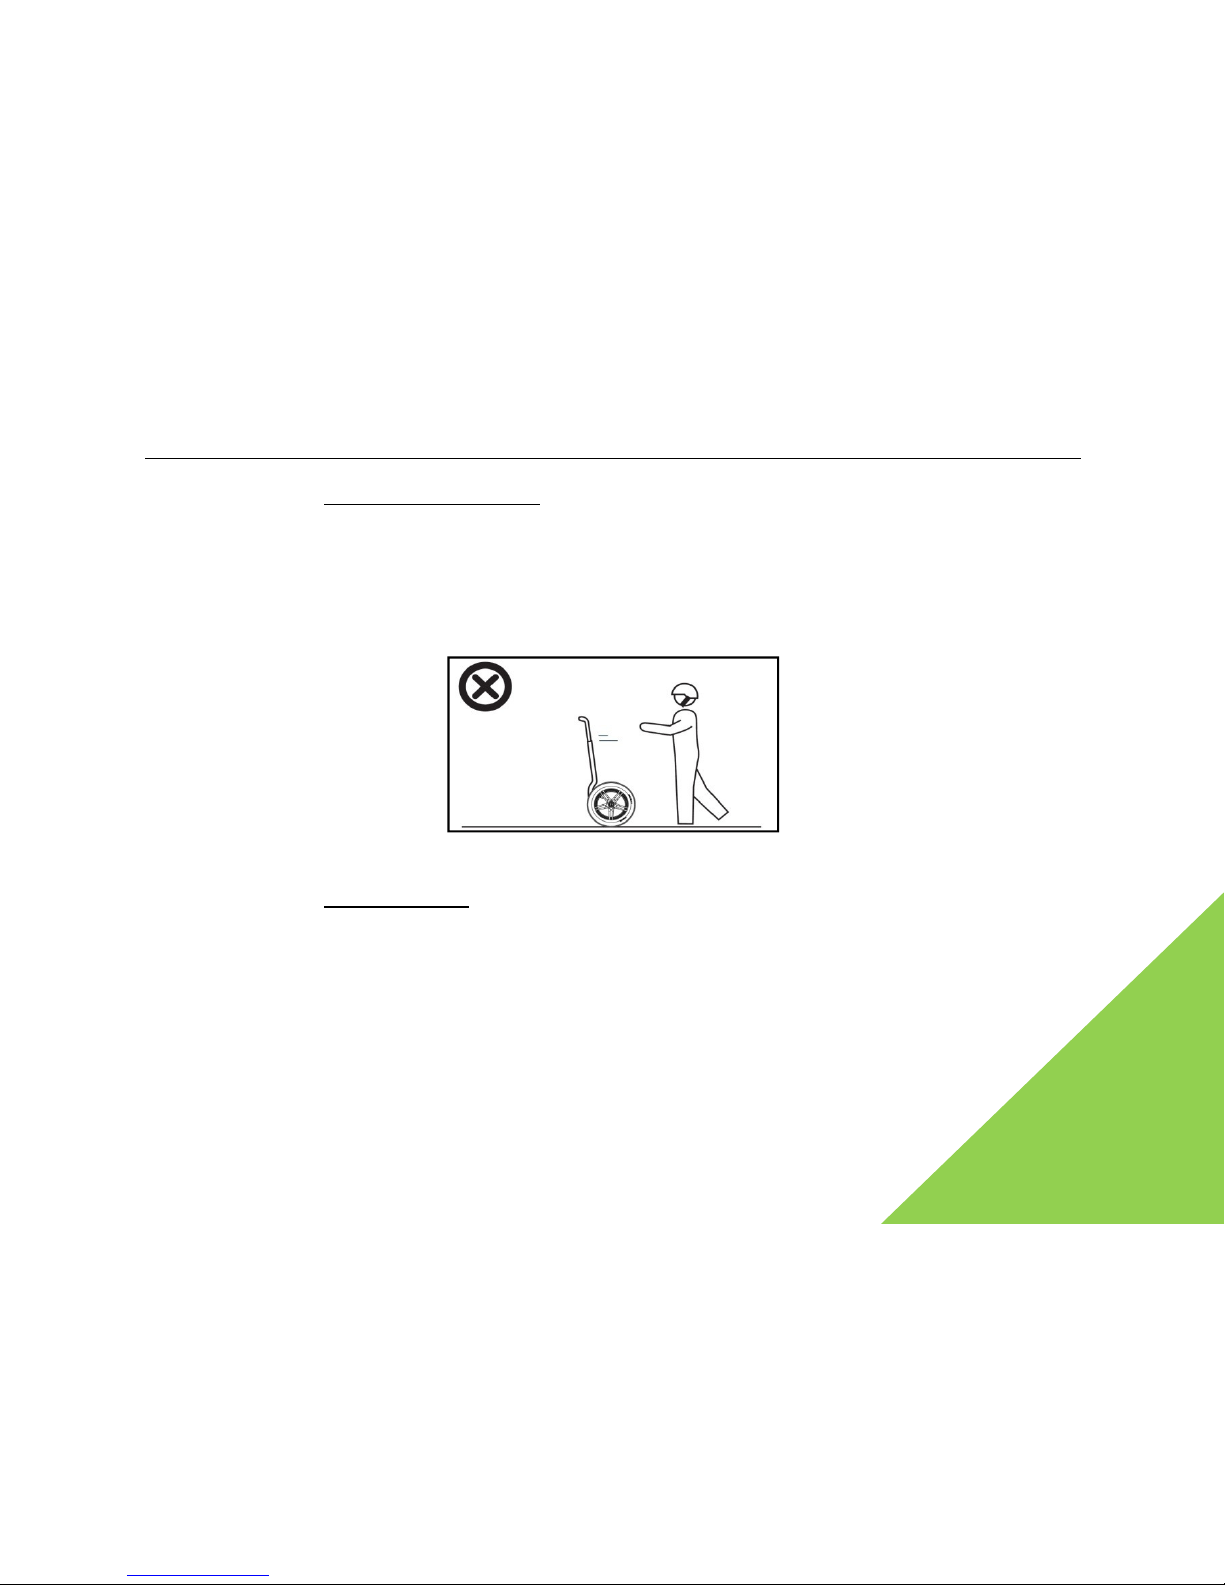
Power assistant mode. Under power assistant mode, if the driver is not holding firmly to
the handle, the WindRunner itself shall advance a section of distance, and then trigger the
intelligent safety alarm. After alarmed, if its speed is not reduced, it shall enter the standby
mode after a few seconds. It is forbidden to let the WindRunner itself move under power
assistant mode. Ensure that the operating bar of the WindRunner is under your control.
It is strictly forbidden to release the handle under power assistant mode
Internal faults. When the WindRunner detects an Internal fault (for example, one battery
power failure, and one set of balancing unit failed), it shall immediately trigger the intelligent
safety alarm. If just ride the WindRunner, immediately get off, and do not hesitate to contact
the authorized after-sale service agent to repair. If the intelligent safety alarm is activated
once powered on, it may be caused by insufficient battery voltage. Please charge it. Once
charged, if it still gives an alarm, please consult the chapter IX to solve the troubles, or
contact the factory for repair.
Page 66
WindRunner™ self-balancing electric vehicle user’s manual
66
7. Charging and battery maintenance
7.1 Introduction of battery
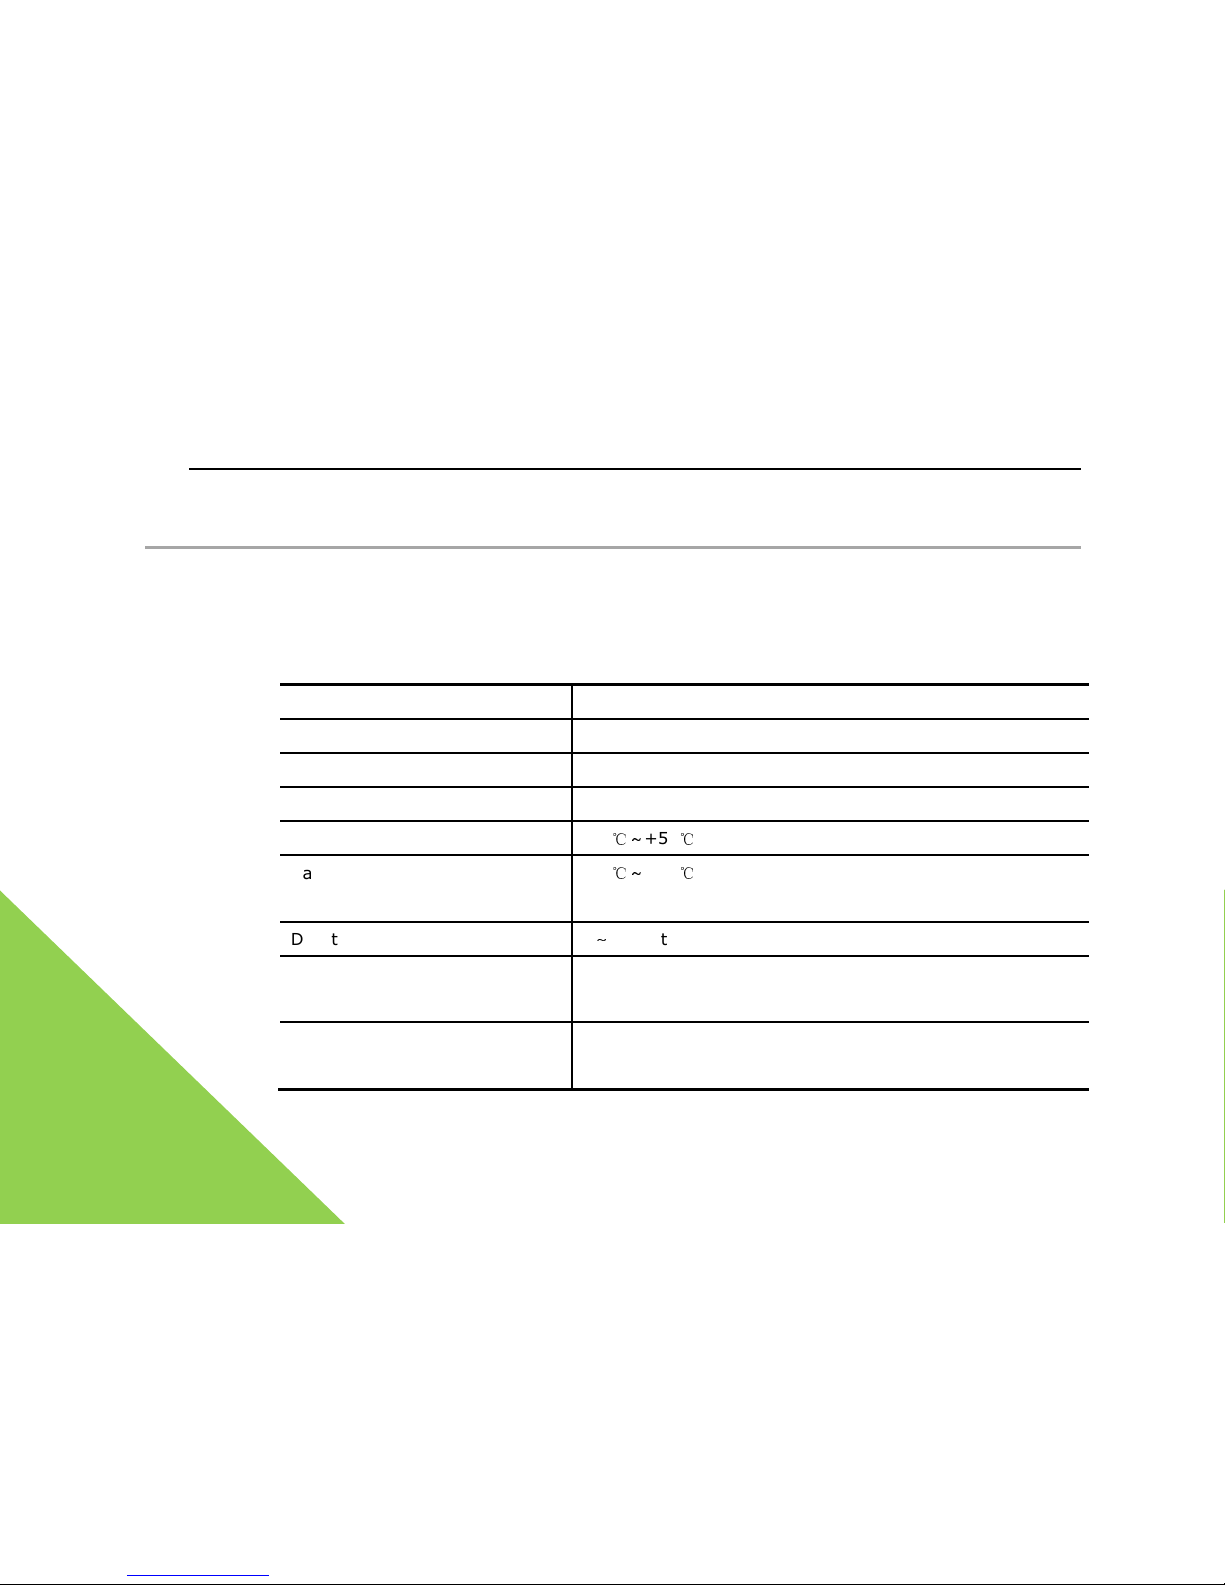
Both sets of lithium batteries for WindRunner are mutually on standby. They are located at a
place under the chassis. The basic data of battery pack are shown in table below.
Type of battery Lithium Ferrous Phosphate battery pack
Rated capacity/each 76.8VDC/5.6Ah,430Wh
Applicable model of WindRunner G1U,G1X,
Weight/each 5.1 Kg
Range of storage temperature
-20
℃
~
+50℃
Range of working/charging
temperature
-15
℃
~
+45℃
Duration for fully charged
2~4h, with the built-in charger
Typical cycle life >1000 times for charging and discharging, converted into
riding mileage about 30000km
Safety No fire and no explosion if put into flame, short-circuit or
pierced. Built-in protection circuit.
Page 67
WindRunner™ self-balancing electric vehicle user’s manual
67
7.2 Charging
After received a new WindRunner, and the first test is complete, please charge the battery of
WindRunner as soon as possible. The charging shall be done at a dry, static-free place. The
precautions for charging are as followings:
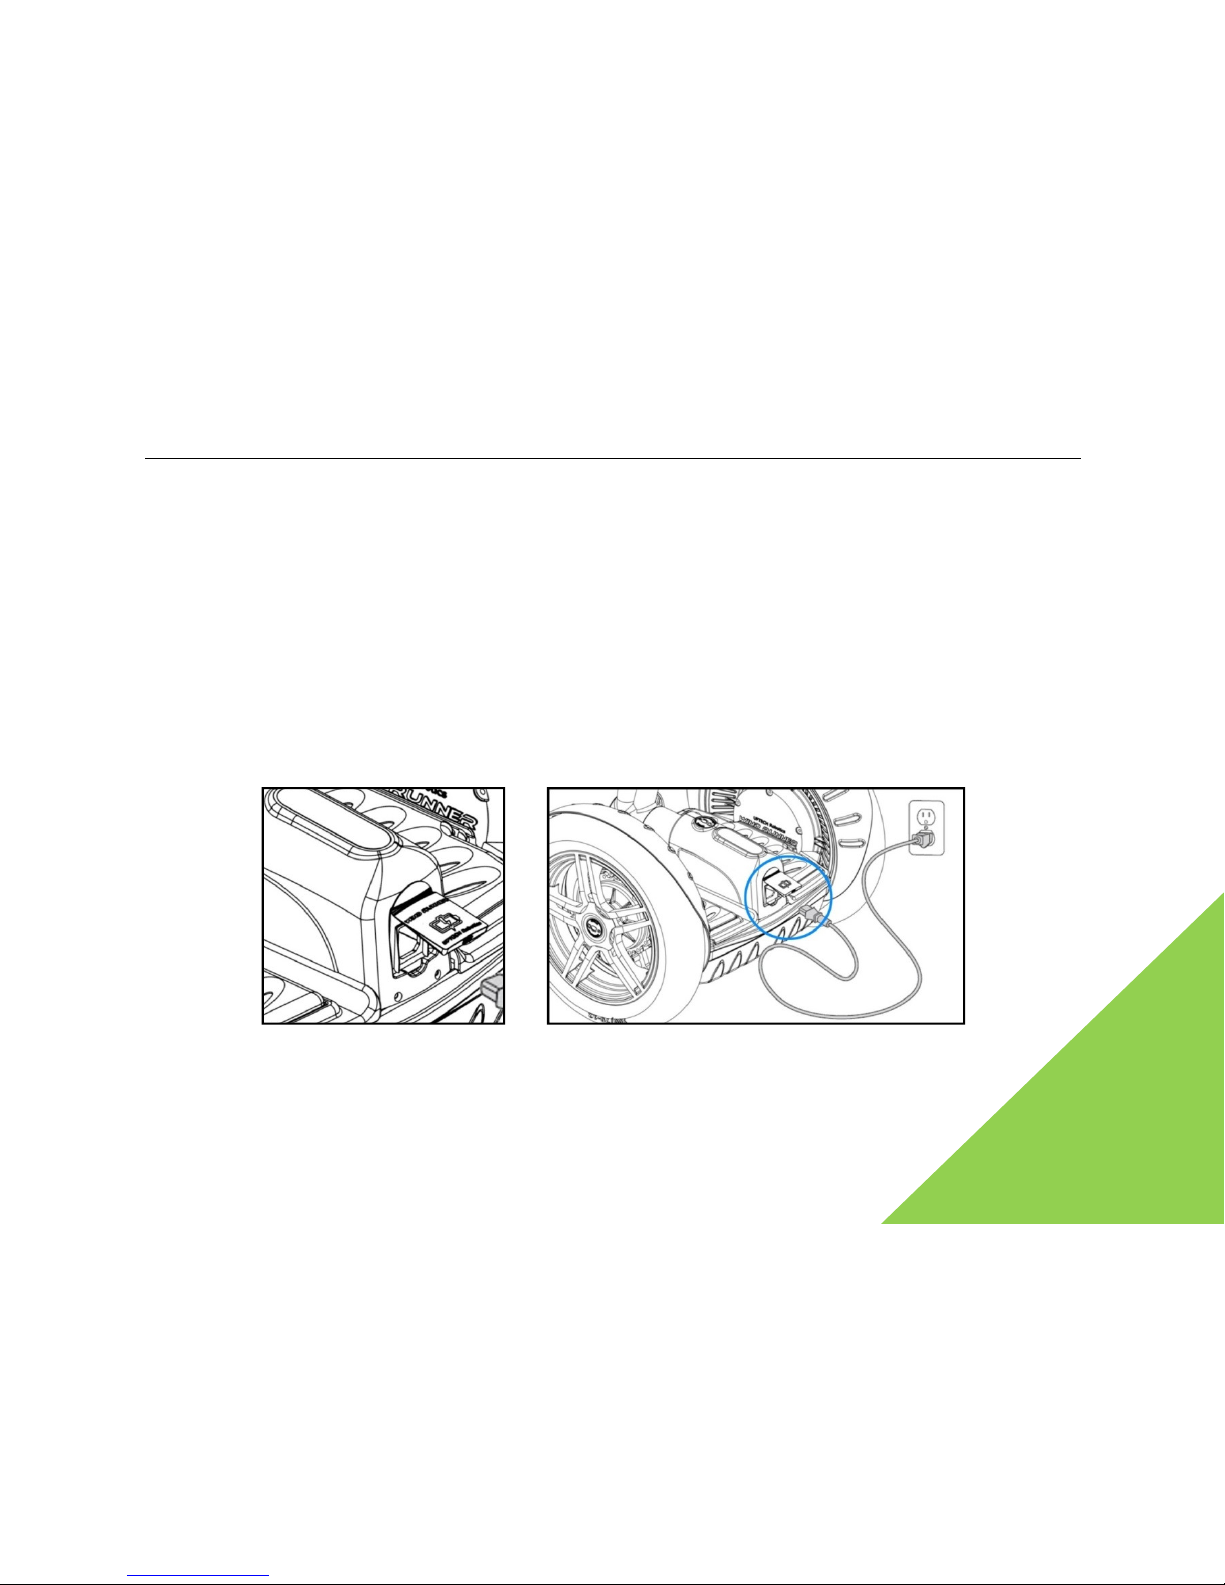
1. Open the rubber cap on the charging outlet.
2. Make sure the charging outlet is dry.
3. Insert one end of charging cable into the earthling AC socket (100V~240V,50Hz or 60Hz).
And the other end of charging cable shall be inserted into the charging outlet of WindRunner.
Open the rubber cap on the charging outlet insert the charging cable
Page 68
WindRunner™ self-balancing electric vehicle
68
The upper part of rubber cap
of charging outlet is fixed
open it from its lower part
Please do not plug in charge wire
if the
exposed to moisture or visibly damaged
!
suffer from electric shock,
and may experience serious injury
or even death.
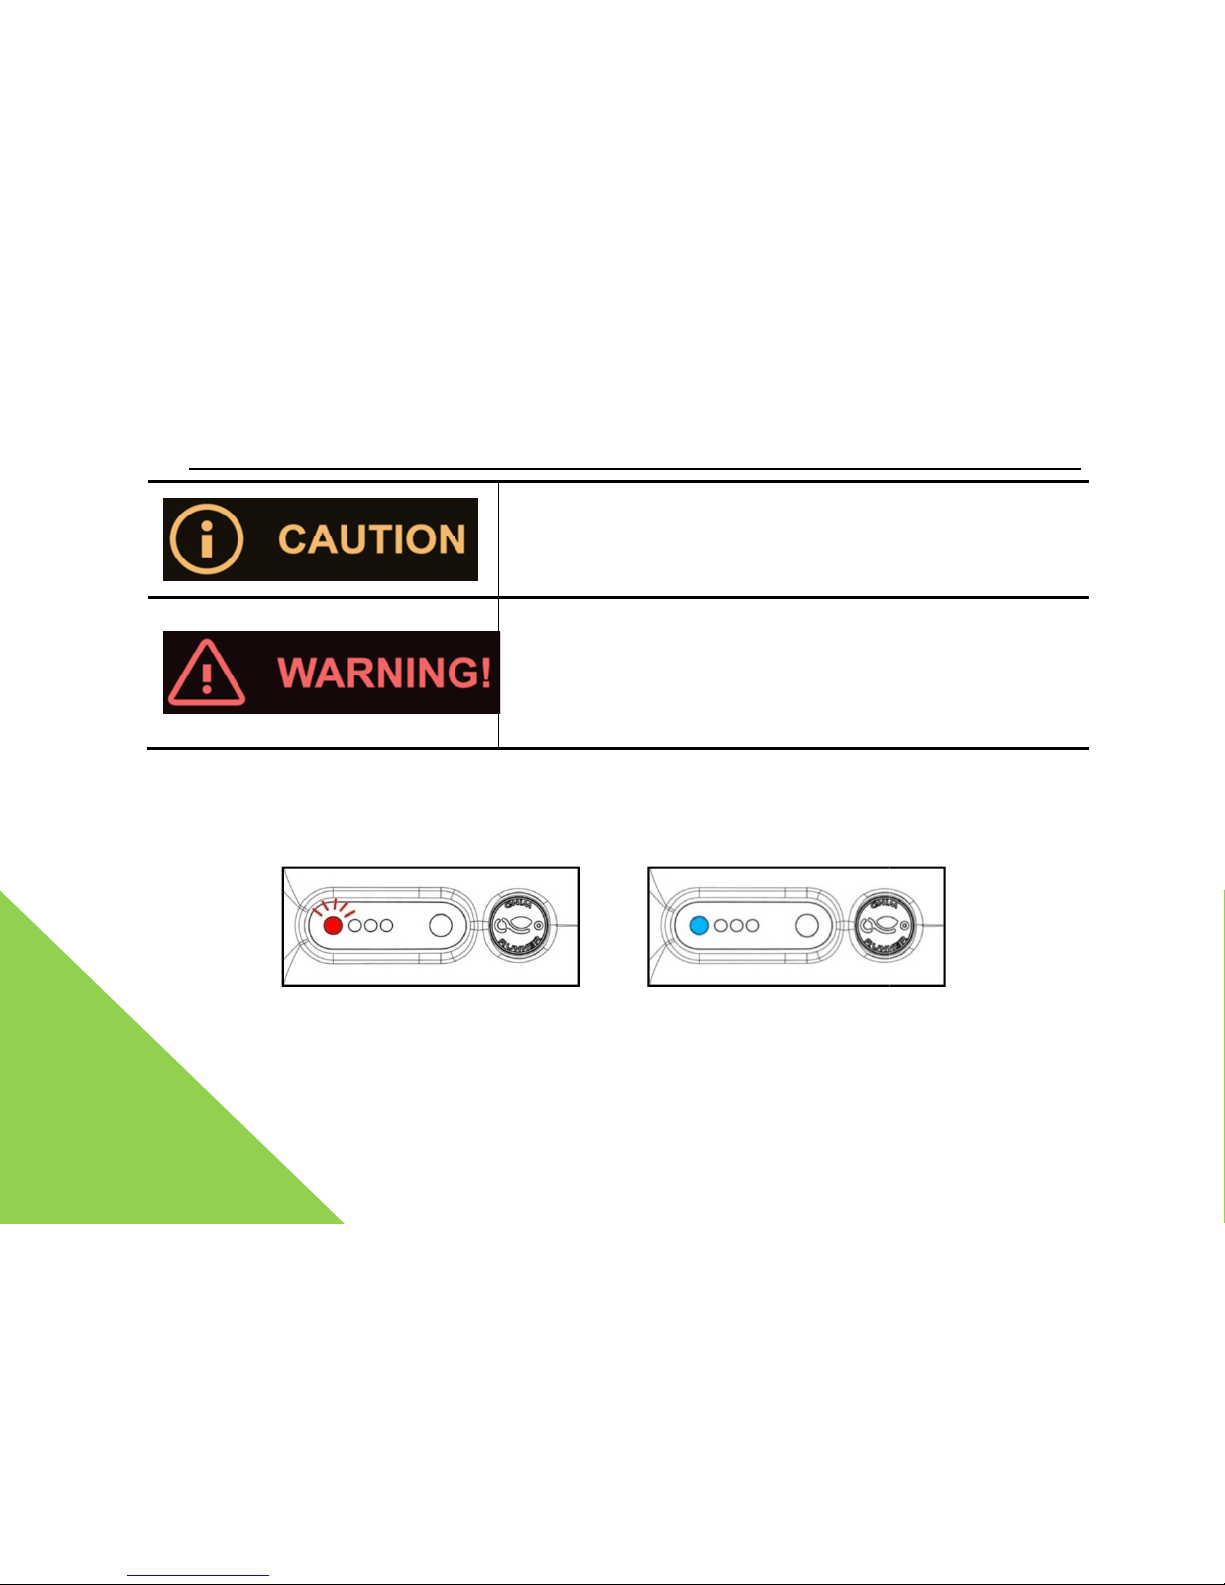
1. The LEDs at the lowest part of display panel comes on in red,
and regularly
means that the charging is in process. At the moment of charging
, you may hear the light
noise of fan in the WindRunner
In charging: red LED flicker charging completed: blue LED
glow steadily
2. The blue LEDs on display panel glow steadily,
which means that the
Once the charging is complete, you may pull out the charging
cable, and seal the
user’s manual
so
charging port is
Otherwise you may
flickers, which
charging is complete.
charging
Page 69
WindRunner™ self-balancing
electric vehicle user’s manual
outlet cap tightly. Otherwise the moisture in rainy days or
damp weather may enter inside
the WindRunner and cause damages to the inside precision circuits.
The built-in charger of WindRunner has the auto
You may charge the WindRunner at any time.
No damages to battery
for long charging period.
7.3 battery maintenance
The battery pack is the source of energy for WindRunner,
and also one of
system components that can easily be damaged. The battery pack
has high value
important for safe running. So
this part shall describe the basic knowledge for
maintenance.
For identical battery packs, whether their maintenance is
correct or not
reliability are quite different. A well –maintained battery pack
may last for more than
charge cycles and still keep 80% of its capacity; but a poorly-maint
ained
last for 100 charge cycles and then approximately rejected.
Please try to obey all the key points for battery maintenance
below to prolong the service life
of the battery pack to
save the cost and reduce the environment impact of rejected
Do not directly give up the rejected battery pack. As a way to avoid
environment
69
protection function.
the WindRunner
, and is very
battery
, their life cycle and
2000
battery pack may only
battery pack.
al pollution,
Page 70
WindRunner™ self-balancing electric vehicle user’s manual
70
please contact the agent and distributor authorized by UPTECH or UPTECH, we provide battery
recovery service.
7.3.1 Assembly / disassembly the battery pack
1. Cut off the power supply of WindRunner, unplug the charging cable, turn over and put aside,
place a cushion or soft cloth on the ground surface to avoid scratching of the hub.
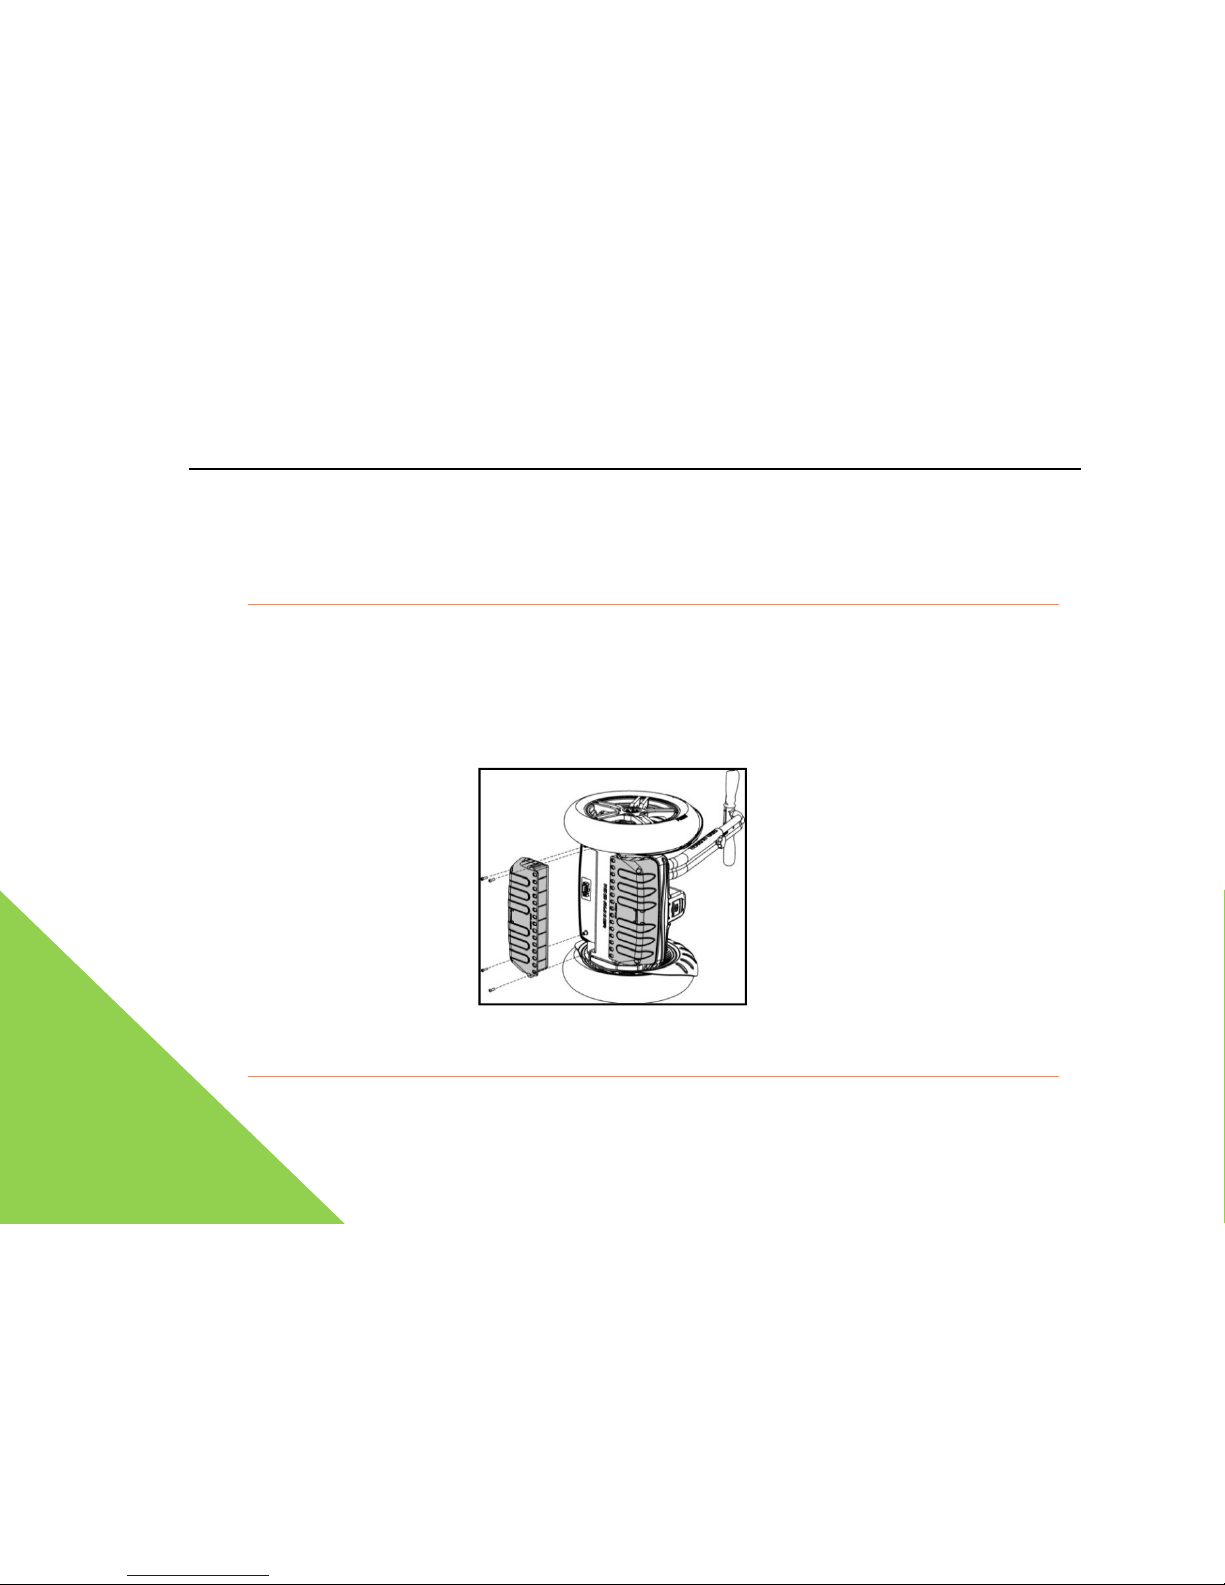
2. Unscrew the four fastening bolts shown as figure below with an internal hex wrench, then
take out the battery pack.
7.3.2 Improve the cycle life of the battery pack
Page 71

WindRunner™ self-balancing electric vehicle user’s manual
71
Lithium battery packs may emit gases when working, so the battery pack can’t be
completely sealed. Avoid dropping into a water pit, and do not immerse the battery pack in
water. If you have to pass a water pit, please be sure to:
Make sure the maximum depth of water pit is not more than 6cm;
Try to speed down and slowly pass to avoid splashing of water.
After you have passed the water pit, try to leach and dry by inclining the WindRunner
forward and backward respectively for about 10s.
Avoid using WindRunner under -10
℃
or above 40℃. Do not put the battery pack directly
under the sunlight.
Please store the WindRunner at a dry and place to keep the battery dry and clean.
If the WindRunner is not used for long period (beyond 1 month), please fully charge the
battery, dismantle it and put it in a cool and dry place.
Even if powered off, the WindRunner is also slowly consuming the electricity. If not
used for more than 1 month, the battery may be over-discharged and this may
seriously reduce the service life of the battery.
Do not directly store the battery after its power used up. Because this may cause
over-discharging, and give adverse effect to the service life of the battery.
Page 72

WindRunner™ self-balancing electric vehicle user’s manual
72
For individually stored batteries, please charge it at least every 3 months.
All lithium batteries have a slow self-discharge. If not charged for long period, it may
also cause the battery to over-discharge.
If the battery capacity is very low, please do not ride any further, and charge immediately.
If the WindRunner gives the low-voltage alarm, shakes, or shows a Speed limit, it
means that the power has been approximately used up. At this moment, it may still
work for about 3-5km, or 8-10km under power assistant mode. If you continue to ride
for long period, it is unsafe, and may possibly cause the battery to over-discharge.
Which, may reduce the cycle life of the battery.
Only the built-in battery charger of WindRunner or OEM charger from UPTECH may be
applicable. Do not use any other chargers. Otherwise the service life of battery may be
reduced, or battery damaged.
If a battery has been out of normal work and after test by UPTECH have found that its life
cycle has been expired, we strongly recommend that you replace the battery or repair. A
new battery together with a battery that may be expired may greatly reduce the service life
of the new one and the riding performances of WindRunner——for safety reasons, the
performances of WindRunner depend on the worst one of all the batteries.
Page 73
WindRunner™ self-balancing
electric vehicle user’s manual
If the shell of battery pack is cracked, leaked, seriously heated or
you smell an
smell, immediately stop using of WindRunner, remove the battery
immediately
the UPTECH authorized agent and distributor for solving. If the
battery
wear the disposal plastic gloves to protect your skin against injury.
If you do not obey the battery
using instructions hereof
cycle, safety, stamina
, and battery endurance may lead to a
loss on the qualification for a battery
warranty
7.4 Transport and recycle of the battery pack
Chinese laws and regulations
only allow the aviation enterprise to transport the lithium ion
battery pack not exceed 160Wh capacity, so
the aviation is not applicable for transporting the
battery pack of a WindRunner. So, you must transport
the battery pack
firstly consult the transport company. For other countries and regions
similar
regulations, please contact the local carrier companies for details.
8.
Routine maintenance
73
abnormal
, and contact
leaked, you must
, the life
.
by truck or train, and
with restrictive
Page 74
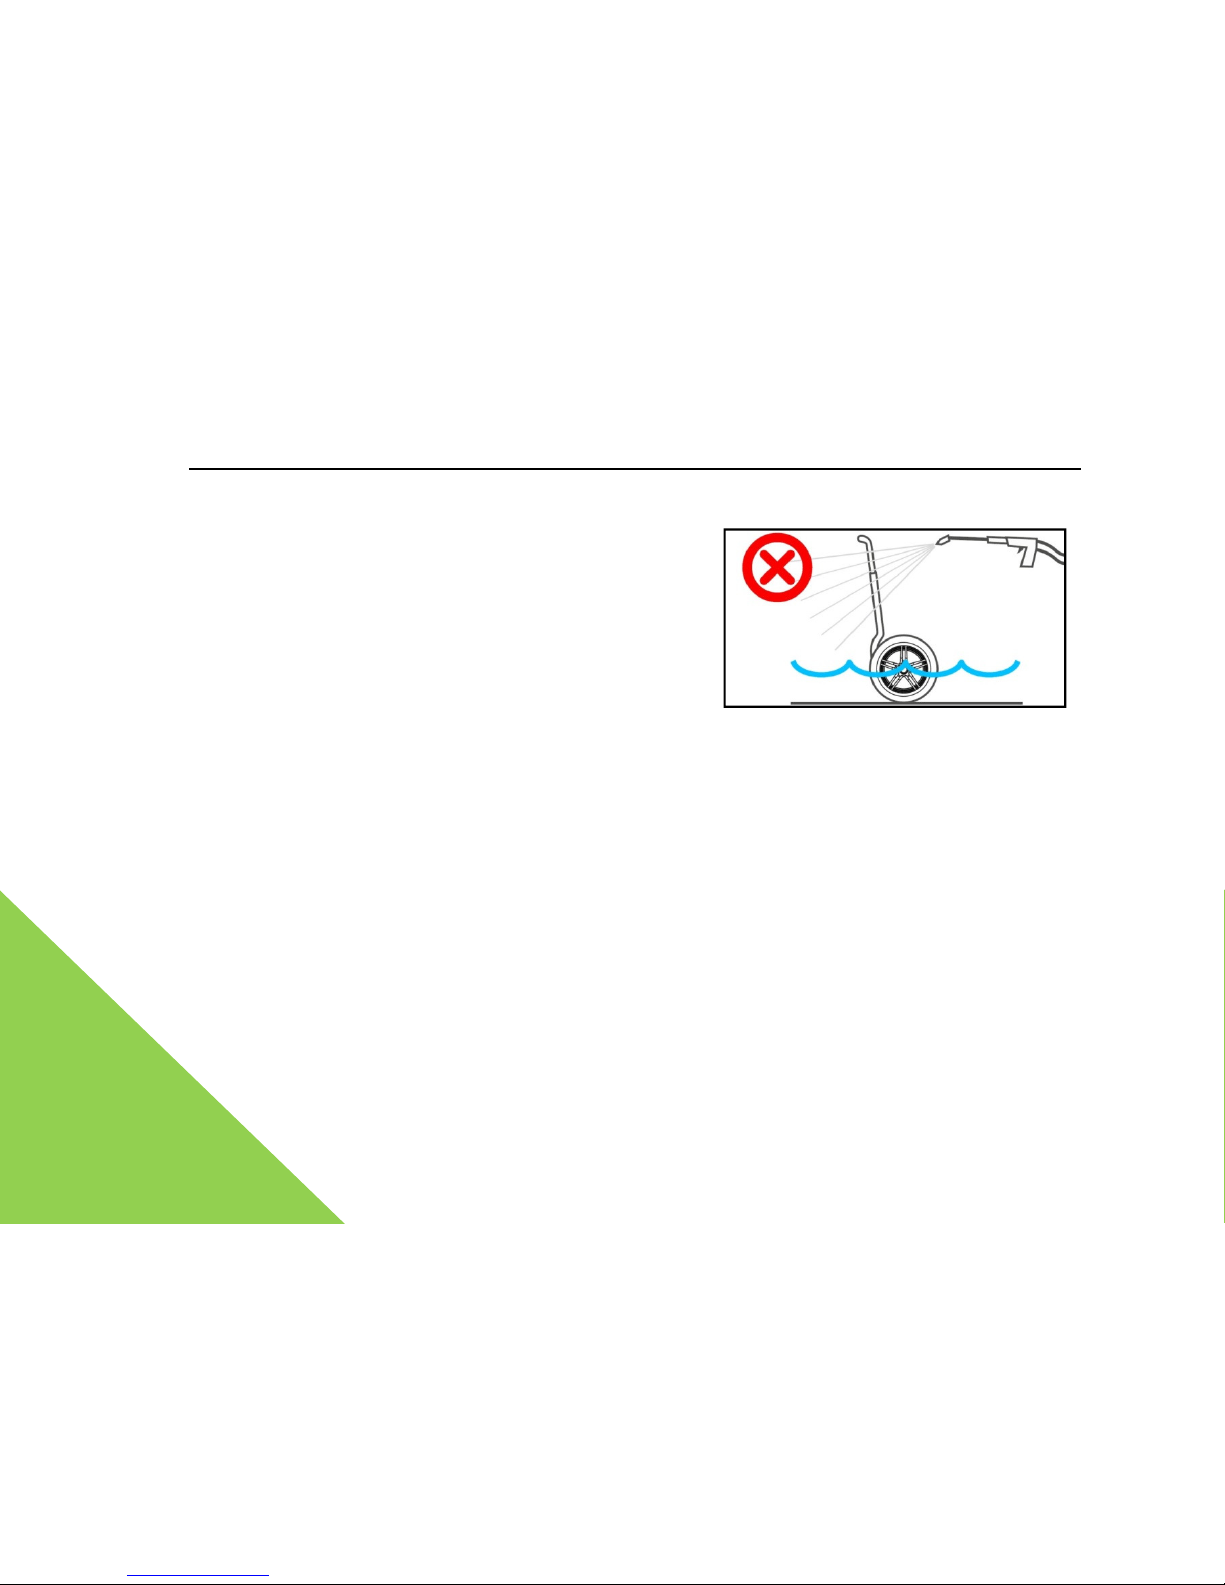
WindRunner™ self-balancing electric vehicle user’s manual
74
8.1 Keep cleanness
Please clean your WindRunner immediately
after use. Periodically clean to keep the
optimum performances of the WindRunner.
During cleaning, you may wipe the mainframe
of WindRunner with a soft cloth soaked in
clean water.
It is forbidden to use alcohol, gasoline, kerosene, acetone or other corrosive chemical
solvents to clean the WindRunner. All the above may cause surface damage, internal part
failure, and warranty qualification loss.
Wash the tire and fender with a household shower or water pipe, but avoid direct spraying to
the mainframe. After washed, leach and dry as soon as possible, store the WindRunner in a
well-ventilated place to dry. This will protect some steel component parts against rust.
Remove the foot mat and wash it with clean water.
Page 75
WindRunner™ self-balancing
electric vehicle user’s manual
When cleaning the WindRunner,
WindRunner is powered-off,
and c
withdrawn and tightly fastened to
the rubber cap
you may suffer an electric shock or
serious
It is strictly forbidden to direct
ly spray
WindRunner with a
water hose and head
car. Do not wholly soak the
WindRunner
cause serious damage due to
the
accumulated inside it.
8.2 Check whether the screw is loose or not
Periodically check the assemblies such as hub, operating bar,
battery pack
of display panel etc. Shake lightly to observe whether the assembly
is shaking or loose
please check the corresponding screw
s, and retighten with the accompanied tools
8.2 Check the inflation pressure of tire
In general, the pressure of the tire of the WindRunner G1U urban type
is kept at
the maximum up to 30PSI; and that of all terrain type G1X
shall be kept at
75
ensure that the
harging cable is
! Otherwise
troubles.
and wash the
used for washing
in water. This may
moisture or water
, fender, and housing
; if loose,
.
10~20PSI, and
4~8PSI, the
Page 76
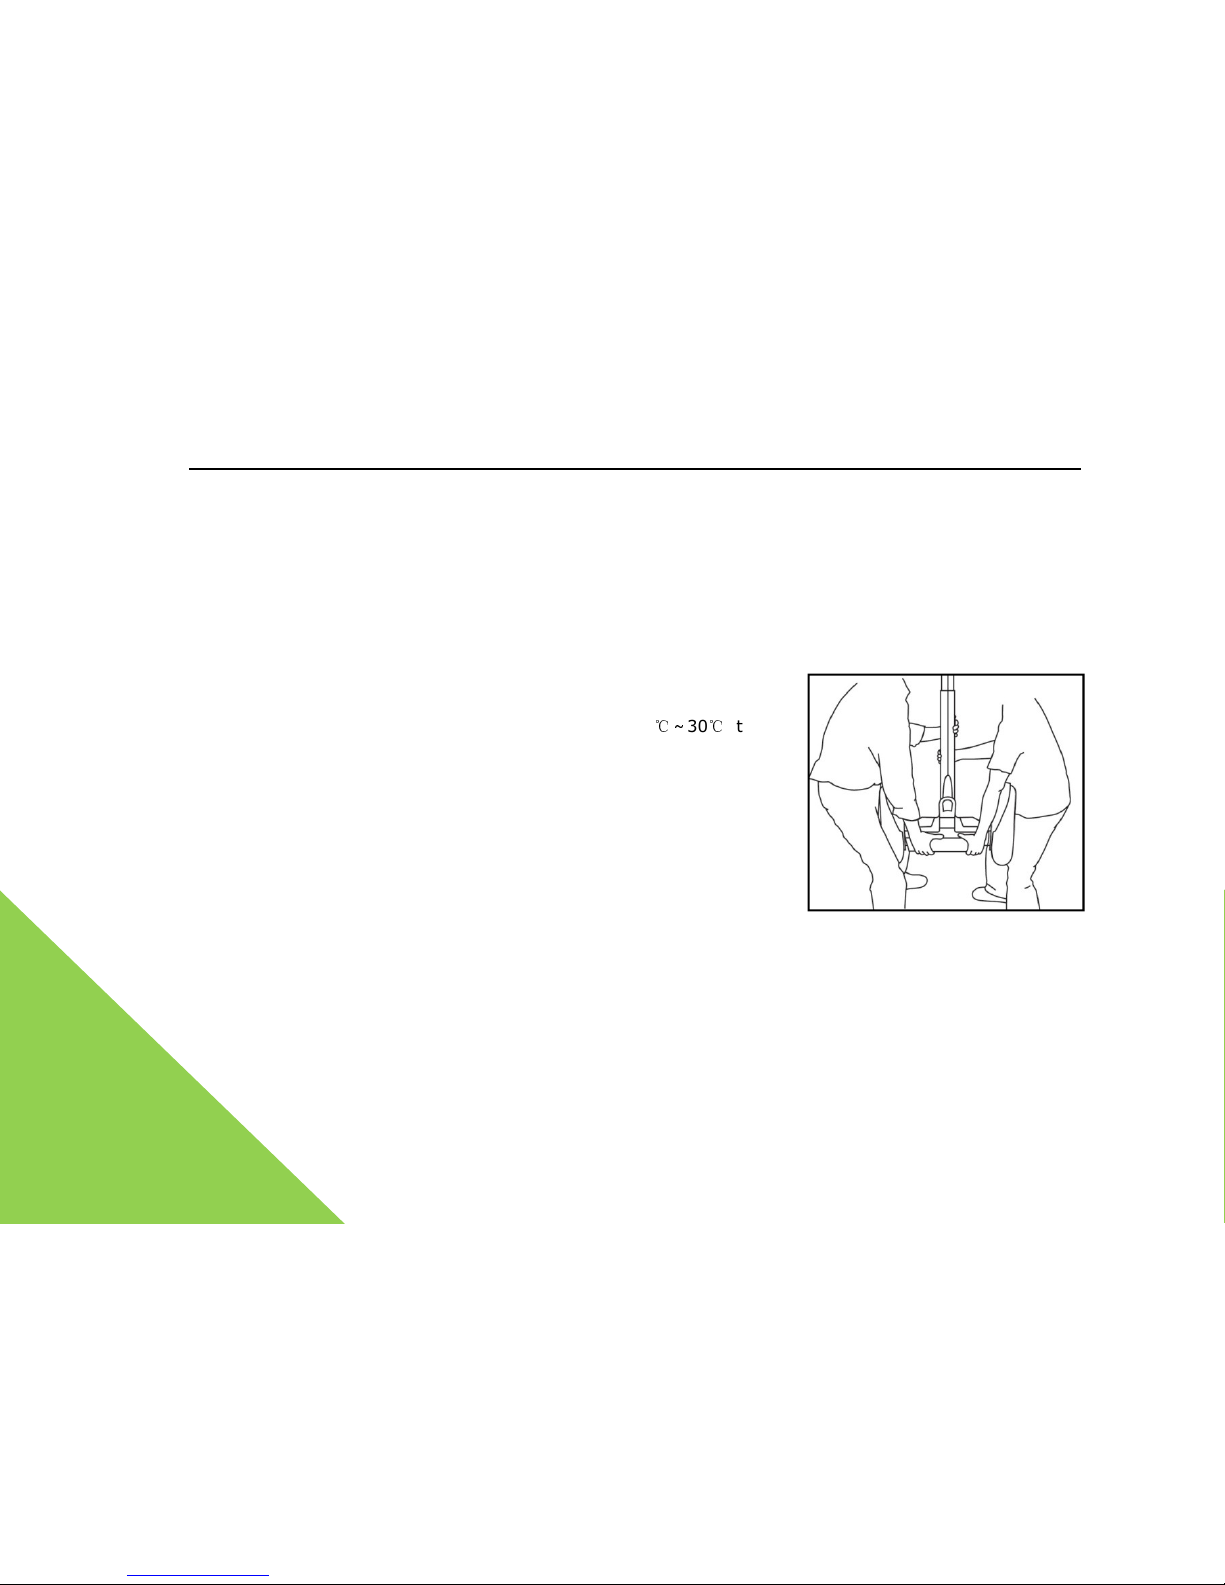
WindRunner™ self-balancing electric vehicle user’s manual
76
maximum up to 12PSI. Higher pressure of the tire may reduce its friction resistance, thus
increase the battery stamina. Lower inflation pressure of the tire may reduce the battery
stamina—but relatively comfortable on the rugged and uneven road. The pressure of a tire too
high or too low may speed up the wearing of the tire.
8.3 Storage
Please store indoor, dry and normal temperature.
Try to control the storage temperature at 0
℃
~30℃
, the
room temperature storage is favorable for prolonging the
service life of battery and other component parts.
8.4 handling
Please handle the WindRunner appropriately, and obey the
steps as followed:
Ensure the WindRunner is not connected to the charging cable, and is powered off.
If you want to put the WindRunner into a narrow and small space (such as the luggage
compartment of car etc), please firstly loosen the quick-release handle of WindRunner
operating bar, remove the whole operating bar, and respectively handle the mainframe and
operating bar.
Page 77
WindRunner™ self-balancing
electric vehicle user’s manual
The mainframe is relatively heavy. If it is difficult for one person to
handl
the help of another person.
Please keep hands in the correct position when handling the
battery pack
At the moment of handling, please
grasp
not the fender, otherwise the fender
may be damaged
possibly injure your hands.
8.5 Repair
Apart from retightening the screw, replacing the tire, fender, and
battery
parts of the WindRunner can be repaired by the users themselves. If
you find
problems, please contact us, or our authorized service agents.
Apart from service engineers
authorized by
else is permit to disassemble the
WindRunner
the warranty terms shall be invalid. A
ny
and or troubles
, shall not be the responsibility of
77
e, please request
or hub.
the hub with hands,
, and
; no other component
any unsolvable
UPTECH, no one
; otherwise
personal damages,
UPTECH.
Page 78

WindRunner™ self-balancing electric vehicle user’s manual
78
9. Troubles and alarms
9.1 FAQs and troubleshooting
1, Unable to power on:
Please verify whether the battery of intelligent remote key has sufficient capacity, or retest
the power after the battery is replaced. If powered on only when the intelligent remote key
is quite close to mainframe, it means that the battery of the intelligent remote key has been
approximately used up and you are now required to replace the battery. (consult 4.5 of this
manual)
If the battery of the intelligent remote key has enough battery capacity but is still unable to
power on, then it may be caused by the power of the WindRunner battery being fully used up.
It may also refer to an internal circuit failure. Please retest only after the WindRunner is fully
charged. If still unable to power on after it has been fully charged (refer to 7.2 of this
manual), please contact the local agent/distributor for repair.
During normal riding, if the WindRunner is unable to power on after automatically being
powered off, or if there is a high resistance felt during traction of WindRunner, then it is
probably caused by internal motor riding circuit failure. To prevent short-circuiting of the
Page 79

WindRunner™ self-balancing electric vehicle user’s manual
79
battery, the user should remove both batteries as soon as possible. Do not hesitate to
contact the factory for repair.
2, After powered on, alarm or red LED continuously flickered:
If able to power on, but you hear the alarm only after powered on, this means that the
WindRunner has not passed the power on self-test power on self-test. The detailed trouble
information is related to LED state, so please consult the 9.2 alarm information code list to
verify the problem and solving method. For troubles you are unable to solve by yourself,
please contact the local agent/distributor for repair.
3, Once powered on normally, and after the driver gets on; if there is no
turning of the handle, the WindRunner itself shall rotate or face-up and
down while making a turn at site:
This situation is usually caused by a great change of ambient temperature. You can
compensate for the change in temperature by taking special steps with the WindRunner
intelligent remote key. The detailed steps are as followed:
First power on. After powered on, press the “lock” button on the intelligent remote
key. The WindRunner will enter lock mode. Then press the battery capacity display
button four times. At this moment, the blue LEDs on the display panel shall come on
in turn from lower to upper. A LED shall come on each time you press this button.
Page 80

WindRunner™ self-balancing electric vehicle user’s manual
80
Once all four LEDs come on, the WindRunner will automatically enter into the
temperature compensation calculating progress. This calculating progress will last for
about 3s. During this process, please ensure that the WindRunner is in absolute rest
condition.
After 3s, all blue LEDs will cut off. Then the temperature compensation will end. You
may now continue with the normal riding.
If there is still a problem after the temperature compensation has ended, please
repeat the compensation steps mentioned above.
4, During normal riding, sudden alarms, Speed limits, and accompanying
acute shaking:
The intelligent safety alarm system may be activated, or the internal safety system test may
have found hardware trouble (including one of the hot back-up systems failed). This is
usually caused by too high temperature, a heavy load, unsafe riding methods, or hardware
failure detected while riding the WindRunner. Please consult 9.2 trouble code lists for details
of troubles. If unable to solve by yourself, please contact the local agent/distributor for
repair.
9.2 List of alarm information codes
Page 81
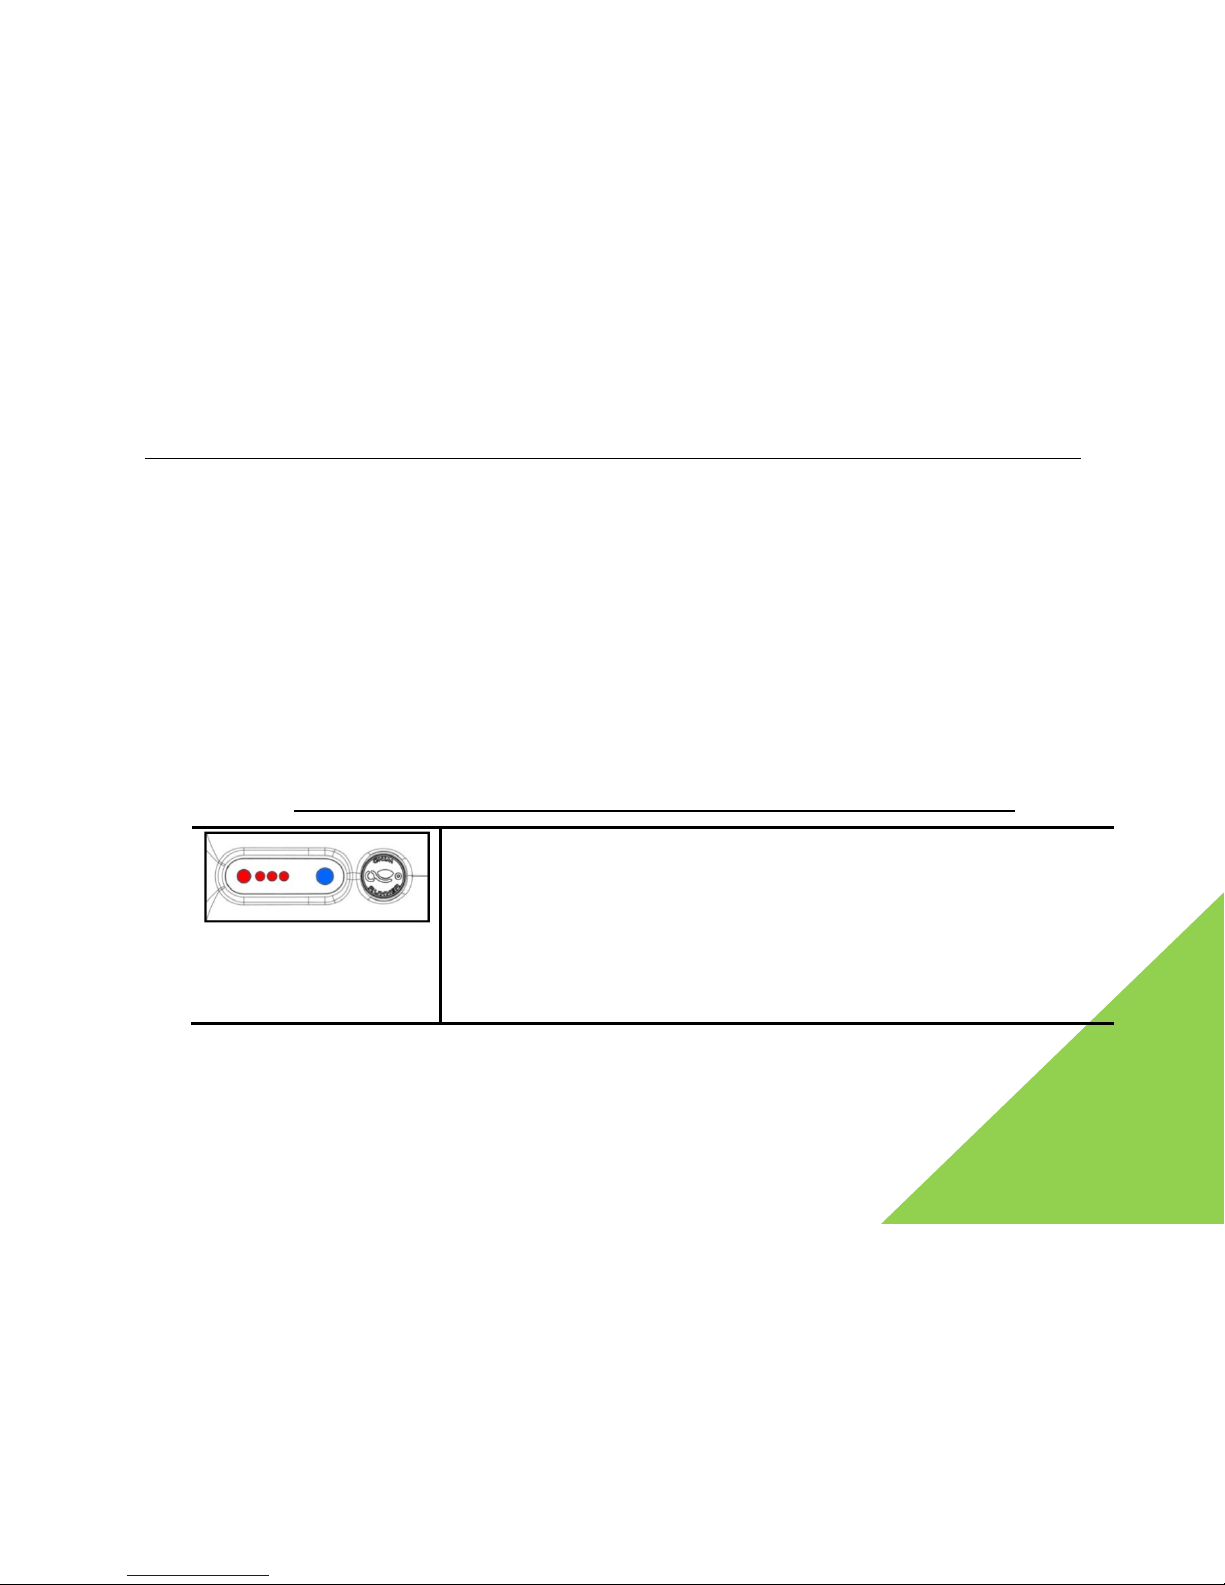
WindRunner™ self-balancing electric vehicle user’s manual
81
If any troubles arise (or intelligent safety alarm is activated), the lamps on WindRunner shall
continuously flicker. This will be accompanied with alarm sound, and an acute shake in the
mainframe. While riding, if any troubles arise or intelligent safety alarm is activated, the
WindRunner will forcibly decelerate, and you will experience an acute shake in the mainframe.
Warn the driver to get off. If it is an irreversible trouble, the WindRunner shall power off
automatically if alarm goes off for 20s.
Preliminarily determine the causes of trouble or alarm according to the flicker of LED at the
moment of alarming for solving the troubles. The followings are the common alarm, trouble and
corresponding LED conditions.
intelligent safety alarm (note: LED close to LOGO is blue and flicker):
red, red, red, red, blue,
flicker
An intelligent safety alarm. it is self-recoverable after troubles are solved.
A hint of battery capacity seriously insufficient.
You should charge the battery as soon as possible. If the trouble still exists
after charged, it may be caused by battery trouble. Please contact the
factory for repair.
Page 82
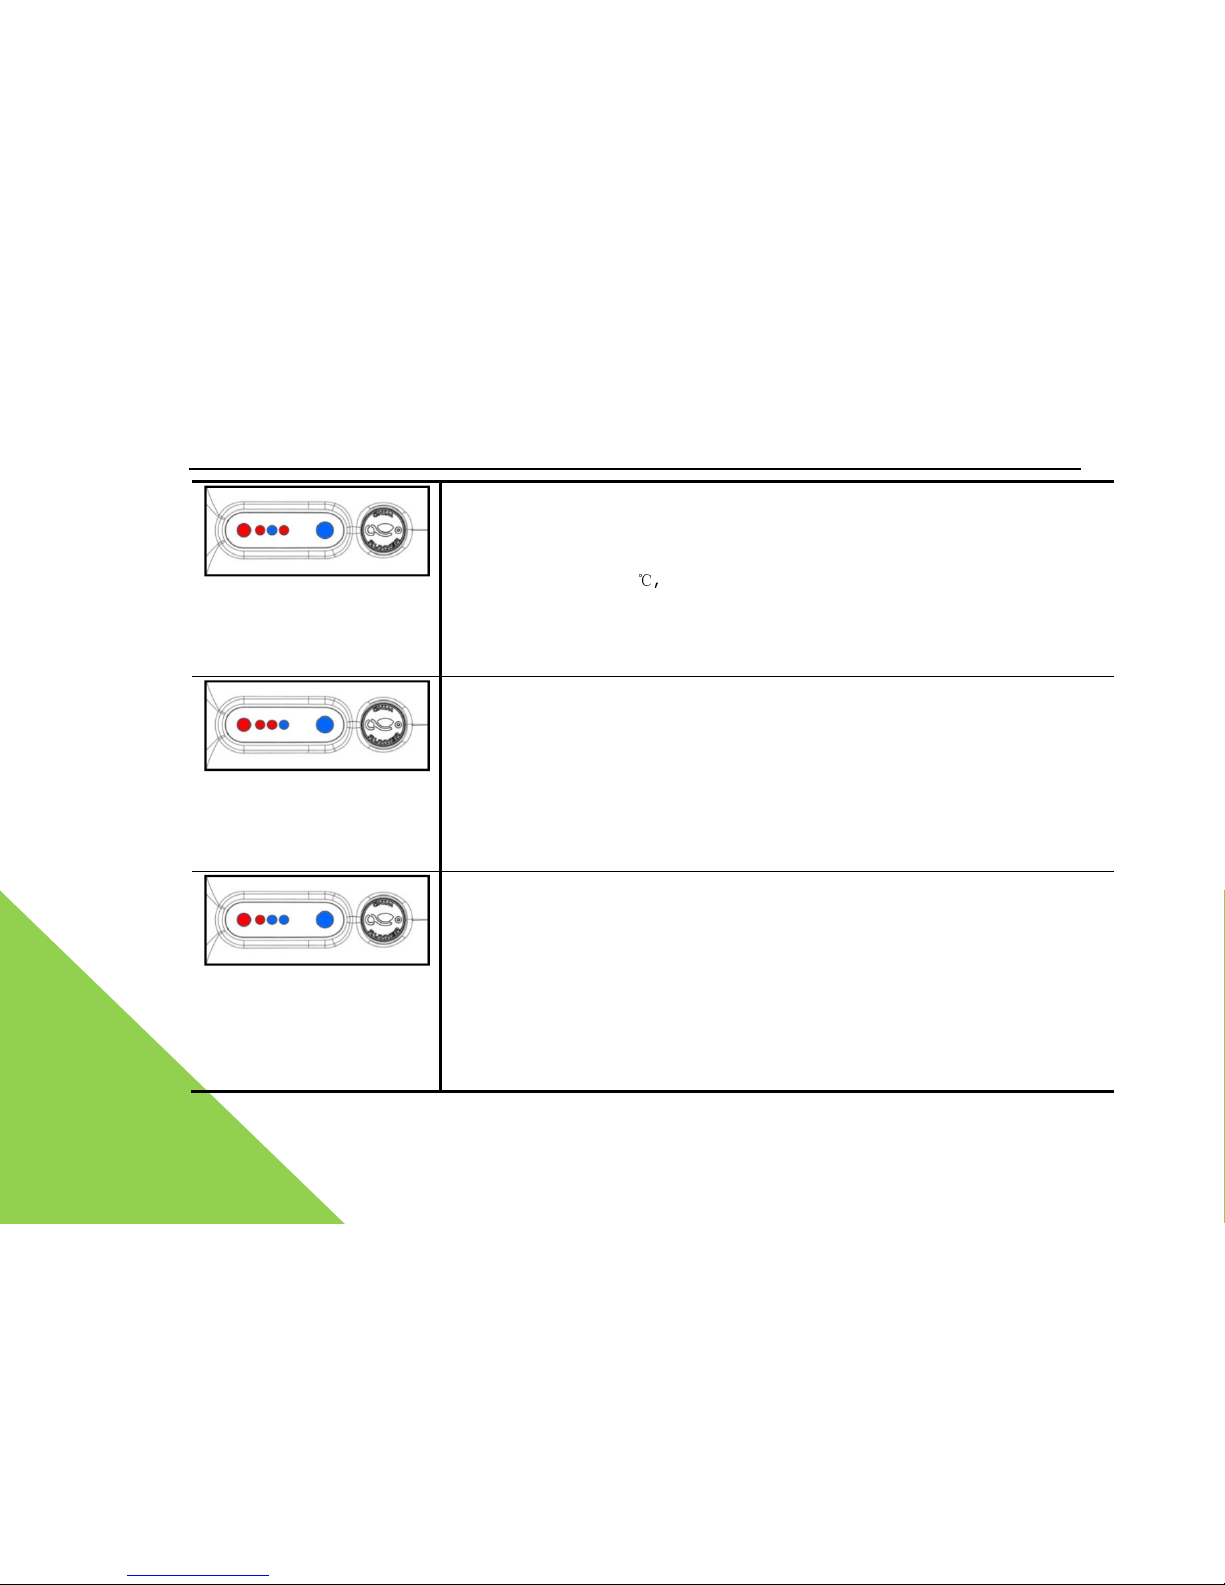
WindRunner™ self-balancing electric vehicle user’s manual
82
red, red, blue, red, blue,
flicker
An intelligent safety alarm. it is self-recoverable after troubles are solved.
A hint of internal temperature too high. Usually arises at air
temperature >30
℃
, continuous running or direct exposure under sunlight.
Cut off the machine and put in a cool place. Continue riding only after the
temperature of machine has reduced to a safe range.
red, red, red, blue, blue,
flicker
An intelligent safety alarm. it is self-recoverable after troubles are solved.
A alarm of overload. Usually caused by several reasons: wheels blocked,
rest on slope for long period, the rider weight too high, etc.
The driver shall decelerate immediately, get off and wait. Continue riding
only after troubles have been solved.
red, red, blue, blue, blue,
flicker
An intelligent safety alarm. it is self-recoverable after troubles have been
solved.
A hint that mainframe inclined angle too high during riding. This alarm is
usually triggered by an unbalanced mainframe, a fallen/under tire skid, or
a very acute acceleration and deceleration.
Once this alarm arises, the WindRunner shall automatically enter the
Page 83
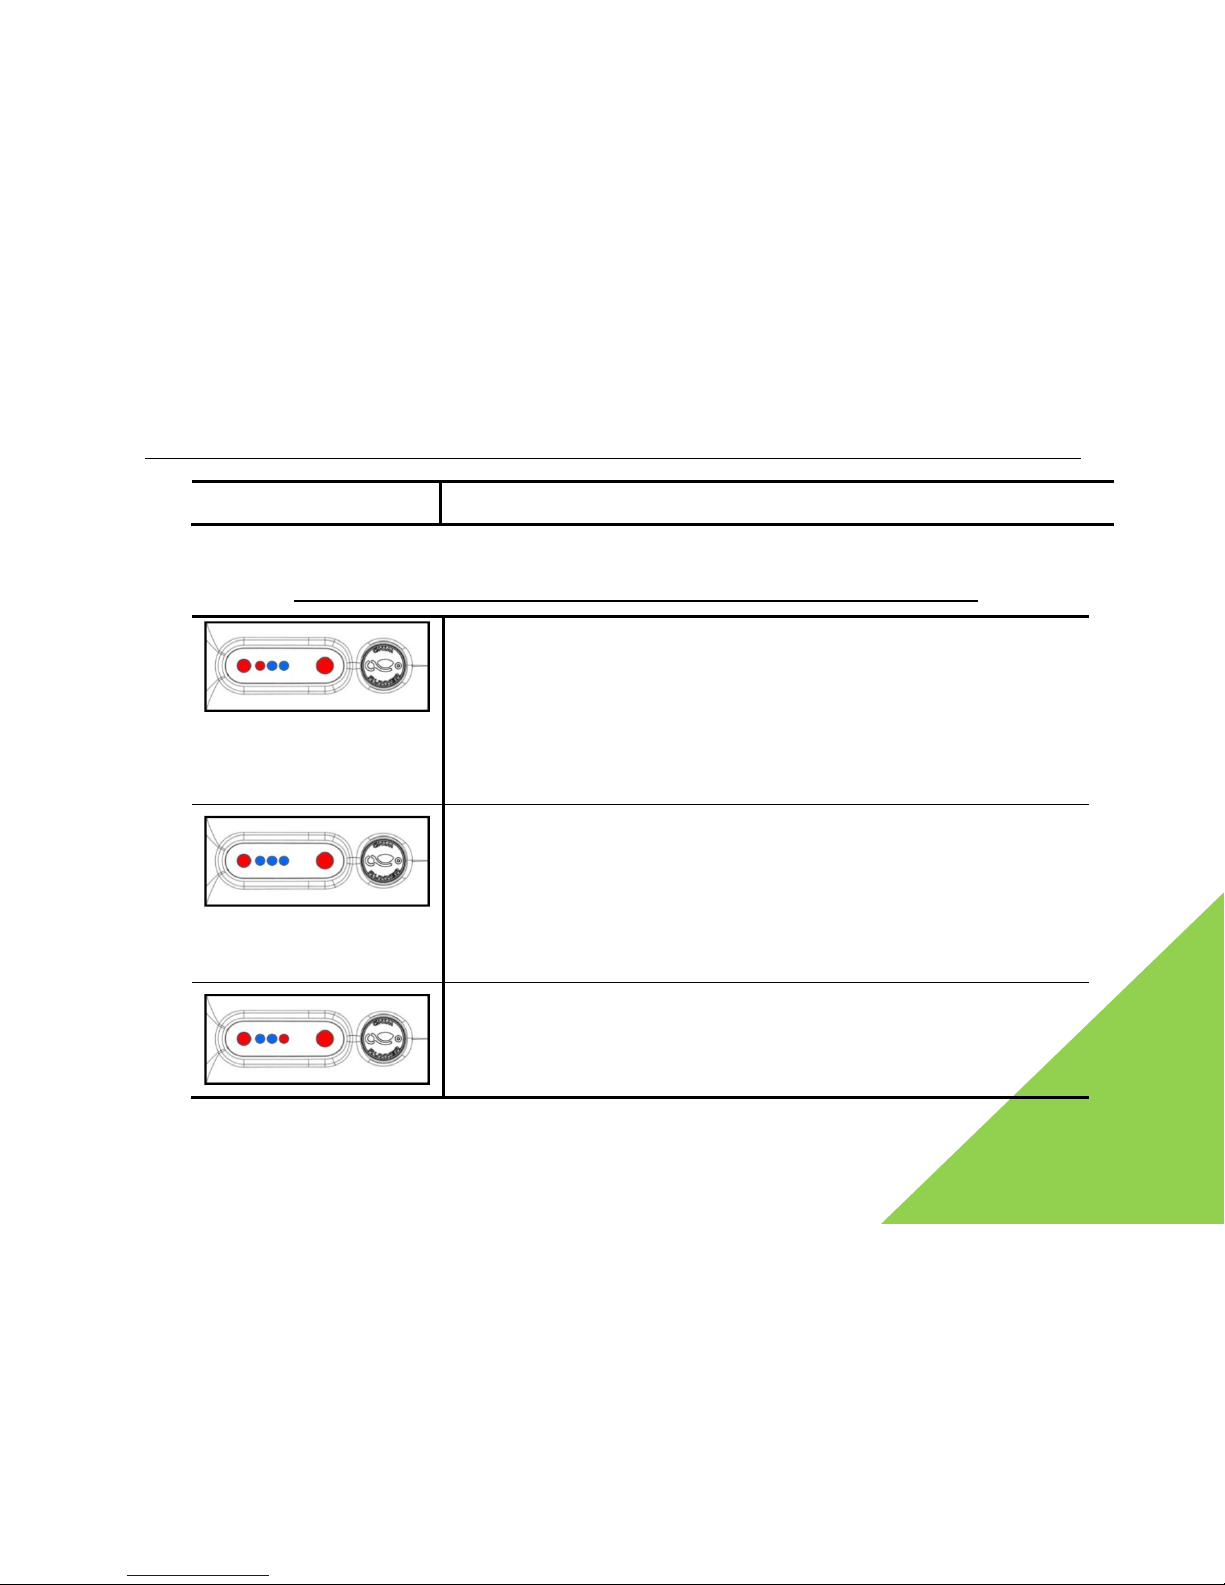
WindRunner™ self-balancing electric vehicle user’s manual
83
standby mode after alarmed for 5s. It will recover once powered on again.
Internal fault alarm (note: LED close to LOGO is red and flickers):
red, red, blue, blue, red,
flicker
An Internal fault alarm. it is usually non-self-recoverable and may
require maintenance.
A hint at wrong internal communication, usually caused by loose
internal cable, or trouble of component parts. Please do not continue
riding. Contact the factory for inspection..
red, blue, blue, blue, red,
flicker
An Internal fault alarm.
May hint at a built-in charger malfunction, incorrect output, or circuit
failure in battery interface. Please contact the factory for inspection.
An Internal fault alarm.
A hint at motor riding circuit failure. Usually accompanied with a
single-side wheel lock up or both wheels simultaneously locking up,
Page 84
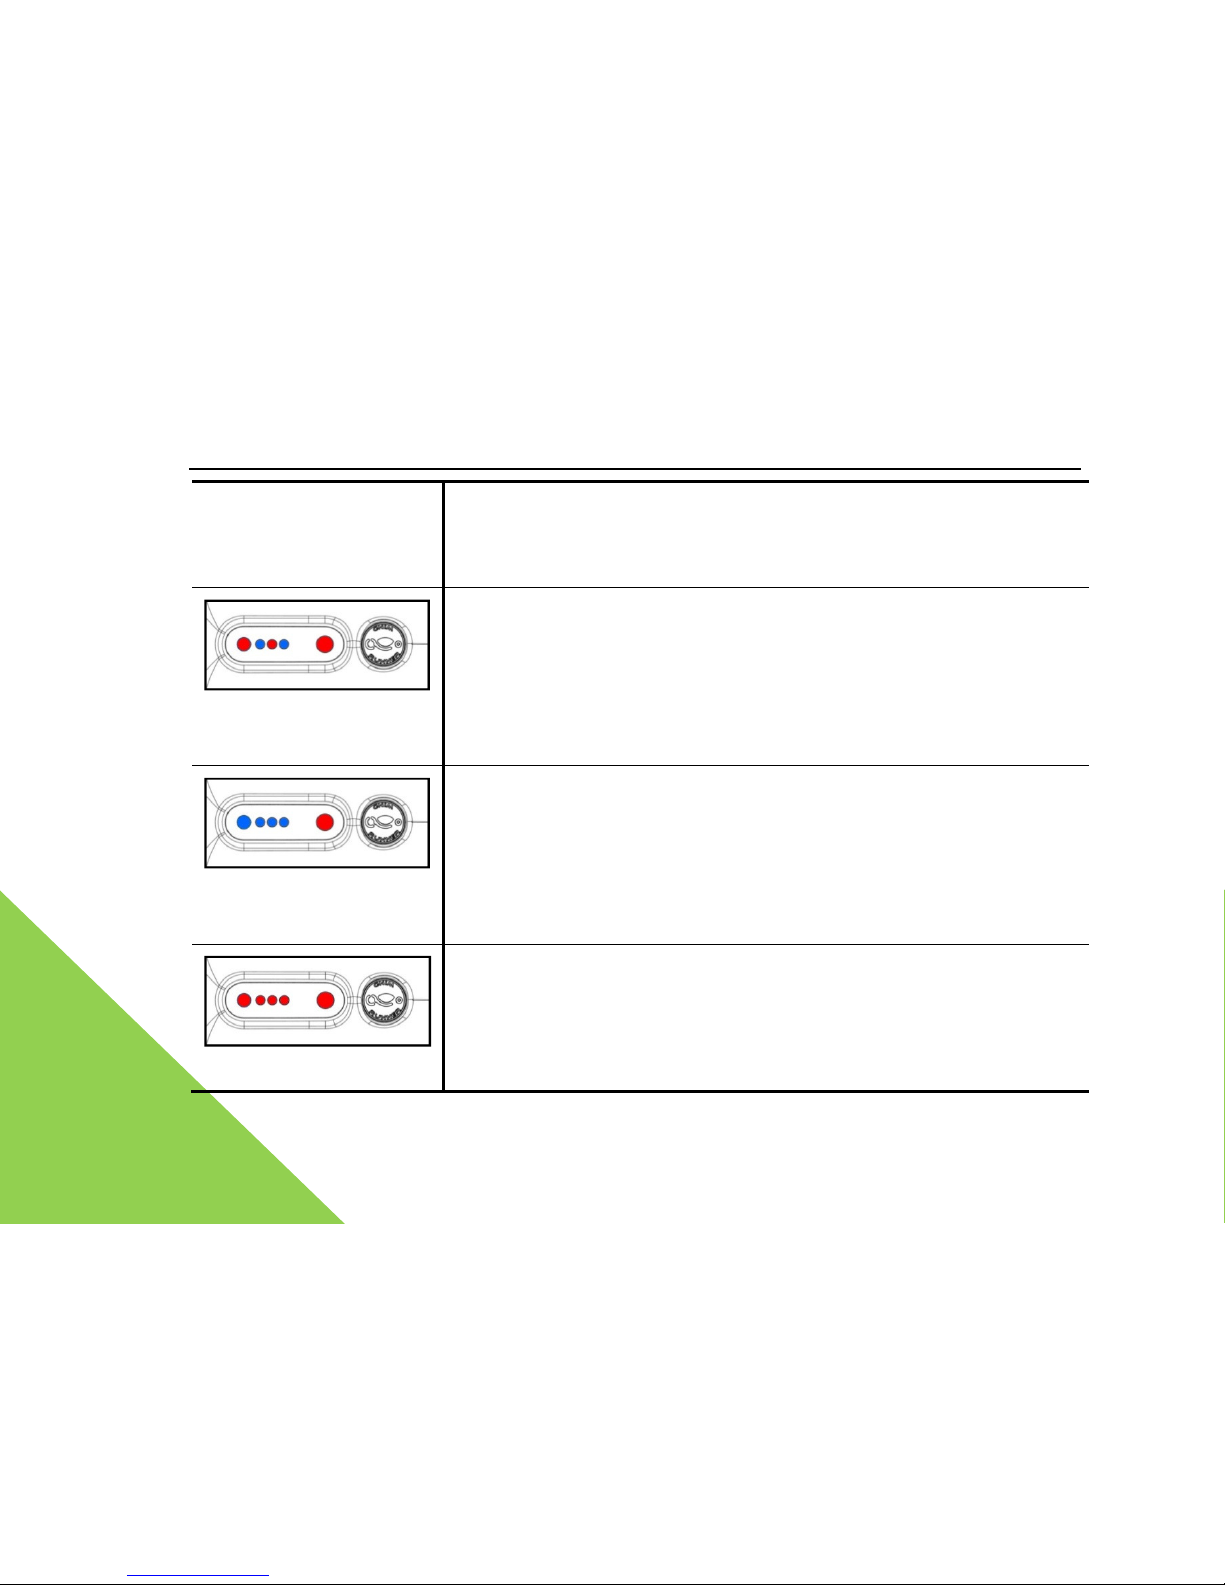
WindRunner™ self-balancing electric vehicle user’s manual
84
red, blue, blue, red, red,
flicker
etc. If the wheel locks up, the user shall remove both batteries and
then tract to prevent further damages. Please contact the factory for
inspection.
red, blue, red, blue, red,
flicker
An Internal fault alarm.
A hint at failure in one of both motor sensor sets. Immediately stop
riding, and please contact the factory for inspection..
blue, blue, blue, blue, red,
flicker
An Internal fault alarm.
A hint that one of both hot back-up posture detection units failed. Do
not continue riding. Please contact the factory for inspection..
all 5 LEDs are red, flicker
An Internal fault alarm.
A hint at other hardware error or unspecified trouble. Do not continue
riding. Please contact the factory for inspection..
Page 85

WindRunner™ self-balancing electric vehicle user’s manual
85
9.3 Spare parts for repairing and replacing
Please do not hesitate to contact your seller to learn how to maintain or replace the component
parts. To contact a local authorized agent /distributor, login to
www.windrunner.cn/en
(the
official website of WindRunner). If no authorized local agent/distributor responds to your inquiry,
please turn this manual to the last page and contact UPTECH to learn how to repair or replace
the component parts.
9.4 Reporting your troubles
Although the WindRunner products have passed many strict tests in factory, it is still inevitable
that some defects, unknown and new troubles, may arise. If you find any troubles not specified
in Chapter IX, please do not hesitate to contact UPTECH. We shall try our best to solve your
problems. Thanks for helping us to continuously improve our product quality.
Page 86

WindRunner™ self-balancing electric vehicle user’s manual
86
10. Datasheet
10.1 WindRunner G1U urban type
N.W. / load capacity
49kg, carrying capacity 20~120kg
Dimensions L×W: 46cm×65cm, and height of operating bar adjustable.
Maximum speed 20km/h( normal mode),10km/h( Speed limit mode),5km/h( beginner mode)
Batt. stamina
Typical 20~40km
Charging time 2-4h
Remote key intelligent remote key, ON/OFF/lock/ Speed limit /battery capacity display
Traffic ability
Cement road, asphalt road, other basically-leveled road surface. With slope not less
than 15°
Waterproof ability Waterproof depth not more than 5cm, no water immersed into the chassis.
Color Black matte lacquered /bright yellow car paint
Optional parts
Luggage support and luggage compartment at both sides, LED running headlight,
handle frame, removable seat, parking frame, portable charger
Page 87
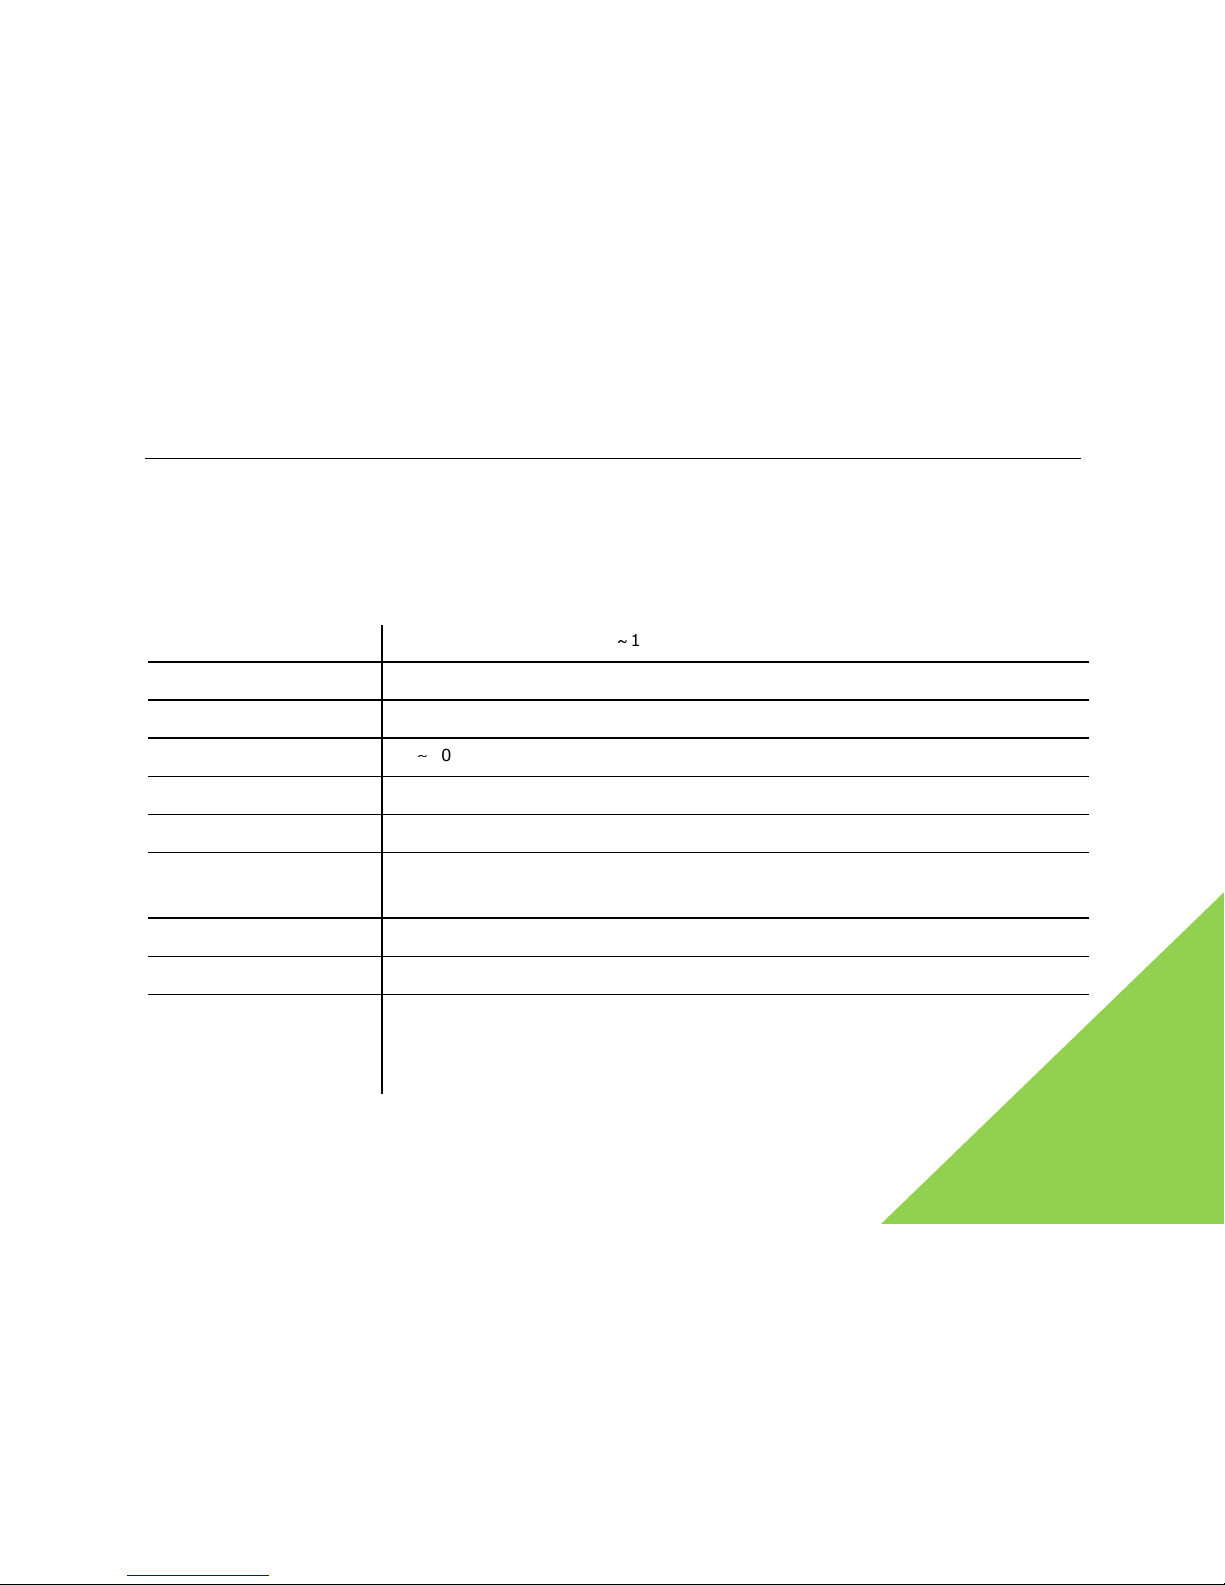
WindRunner™ self-balancing electric vehicle user’s manual
87
10.2 WindRunner G1X all terrain type
A large size and low pressure all terrain tire is suitable for various land forms. It also has a high
adaptability for rugged and uneven land forms, and low shock. The operating bar may be easily
removed, and put into most of SUV luggage compartment.
N.W./load capacity
55kg, carrying capacity 20~110kg
Dimensions
L×W:52cm×81cm, height of operating bar adjustable.
Maximum speed
20km/h( normal mode),10km/h( Speed limit mode),5km/h( beginner mode)
Batt. stamina
15~30km
Charging time
2-4h
Remote key
intelligent remote key, ON/OFF/lock/ Speed limit /battery capacity display
Trafficability
Various road surfaces, grass land, earthy land, rubble land and sand land. With
slope not less than 15°
Waterproof ability
Waterproof depth not more than 5cm, no water immersed into the chassis.
Color
Black matte lacquered /bright yellow car paint
Optional parts
Luggage support and luggage compartment at both sides, parking safety lock, LED
running headlight, handle frame, removable seat, parking frame, portable charger,
and standby battery.
Page 88
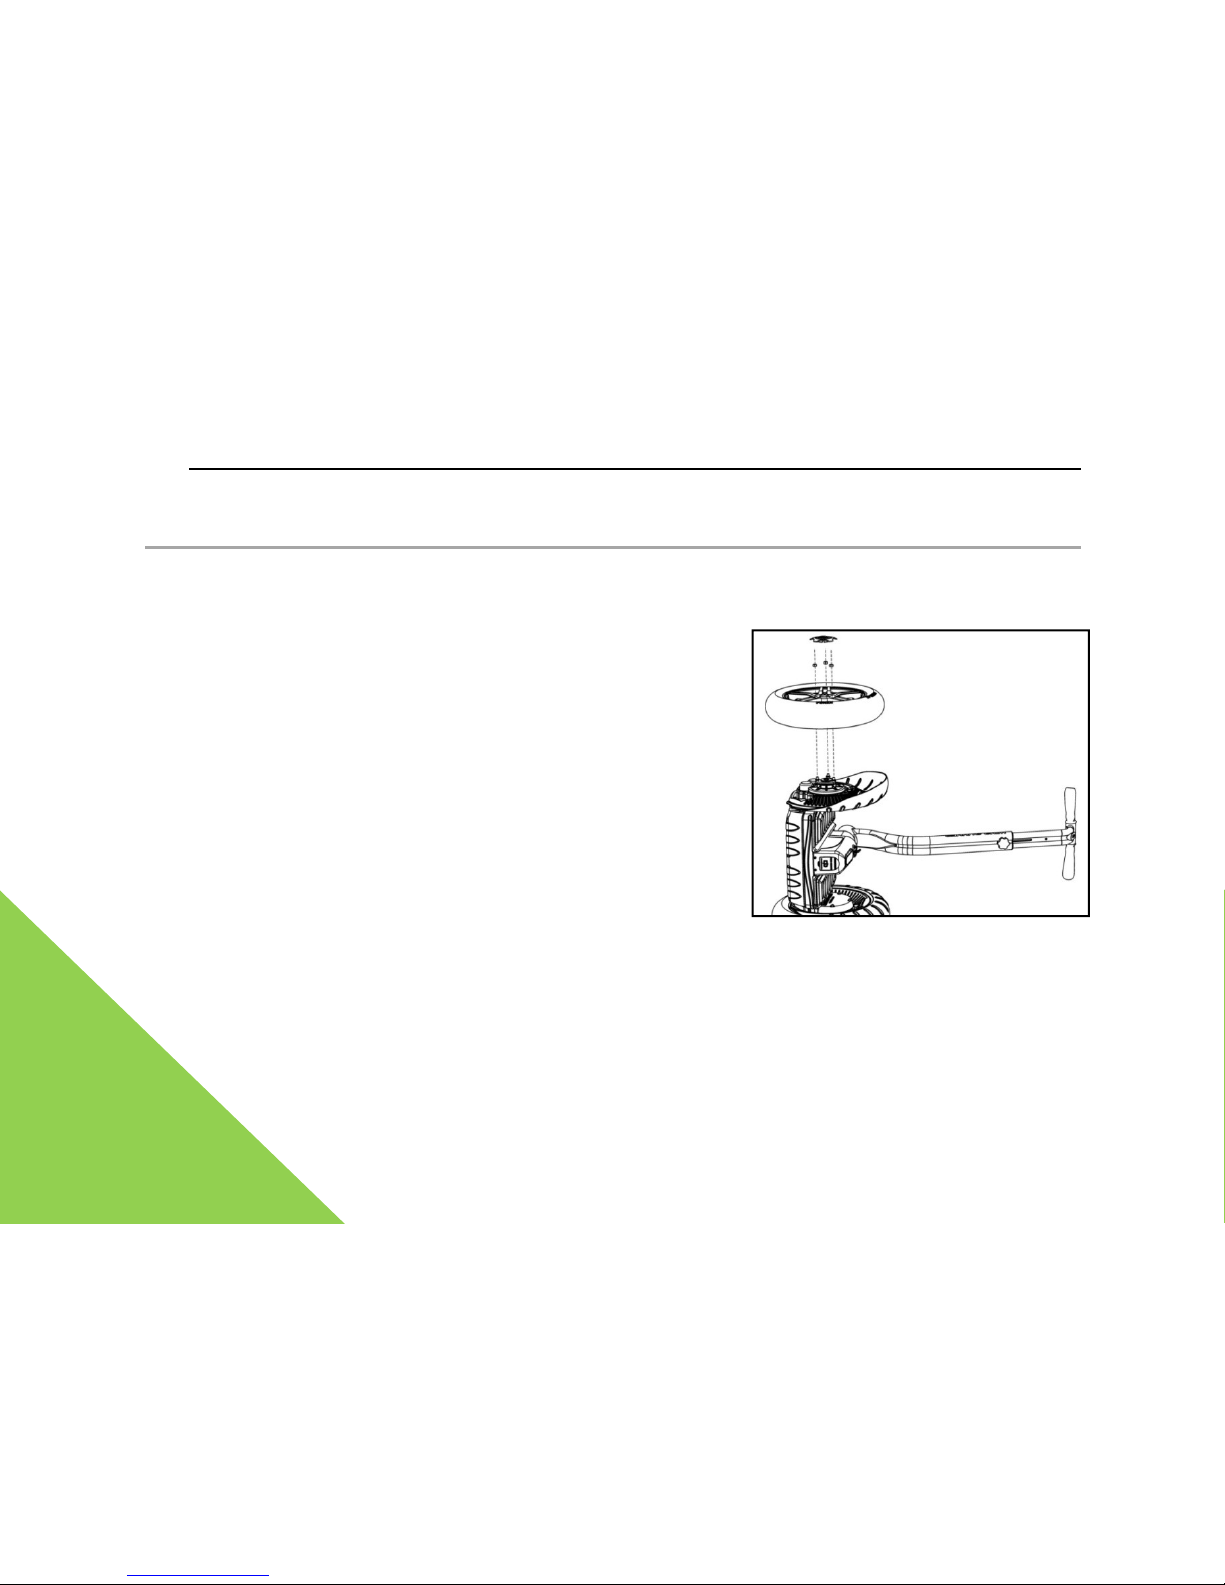
WindRunner™ self-balancing electric vehicle user’s manual
88
Appendix A. More maintenance instructions
A.1 Replace the tire
Replace the tire after worn to a specified extent. The
user may purchase the special-purpose tire and then
replace by his or herself. You can also replace the tire
at an UPTECH authorized agent/distributor. For G1U
urban type, if the tire pattern is worn up to a furrow
less than 2mm deep, or scratched or failed, renew as
soon as possible to ensure high safety. For G1X all
terrain type, if the salient discontinuous pattern at
the apex of tread is worn and invisible, or the tire is
swelt, scratched, or defects are found, renew it.
For replacing the tire, only pull out the decorative cap of hub, and remove the three lock nuts
with sleeve. Then, take out the tire. The right figure is an illustration for replacing tire. (take G1U
urban type as an example. It is similar to the replacement of an all terrain type tire.)
A.2 Replace the fender
Page 89
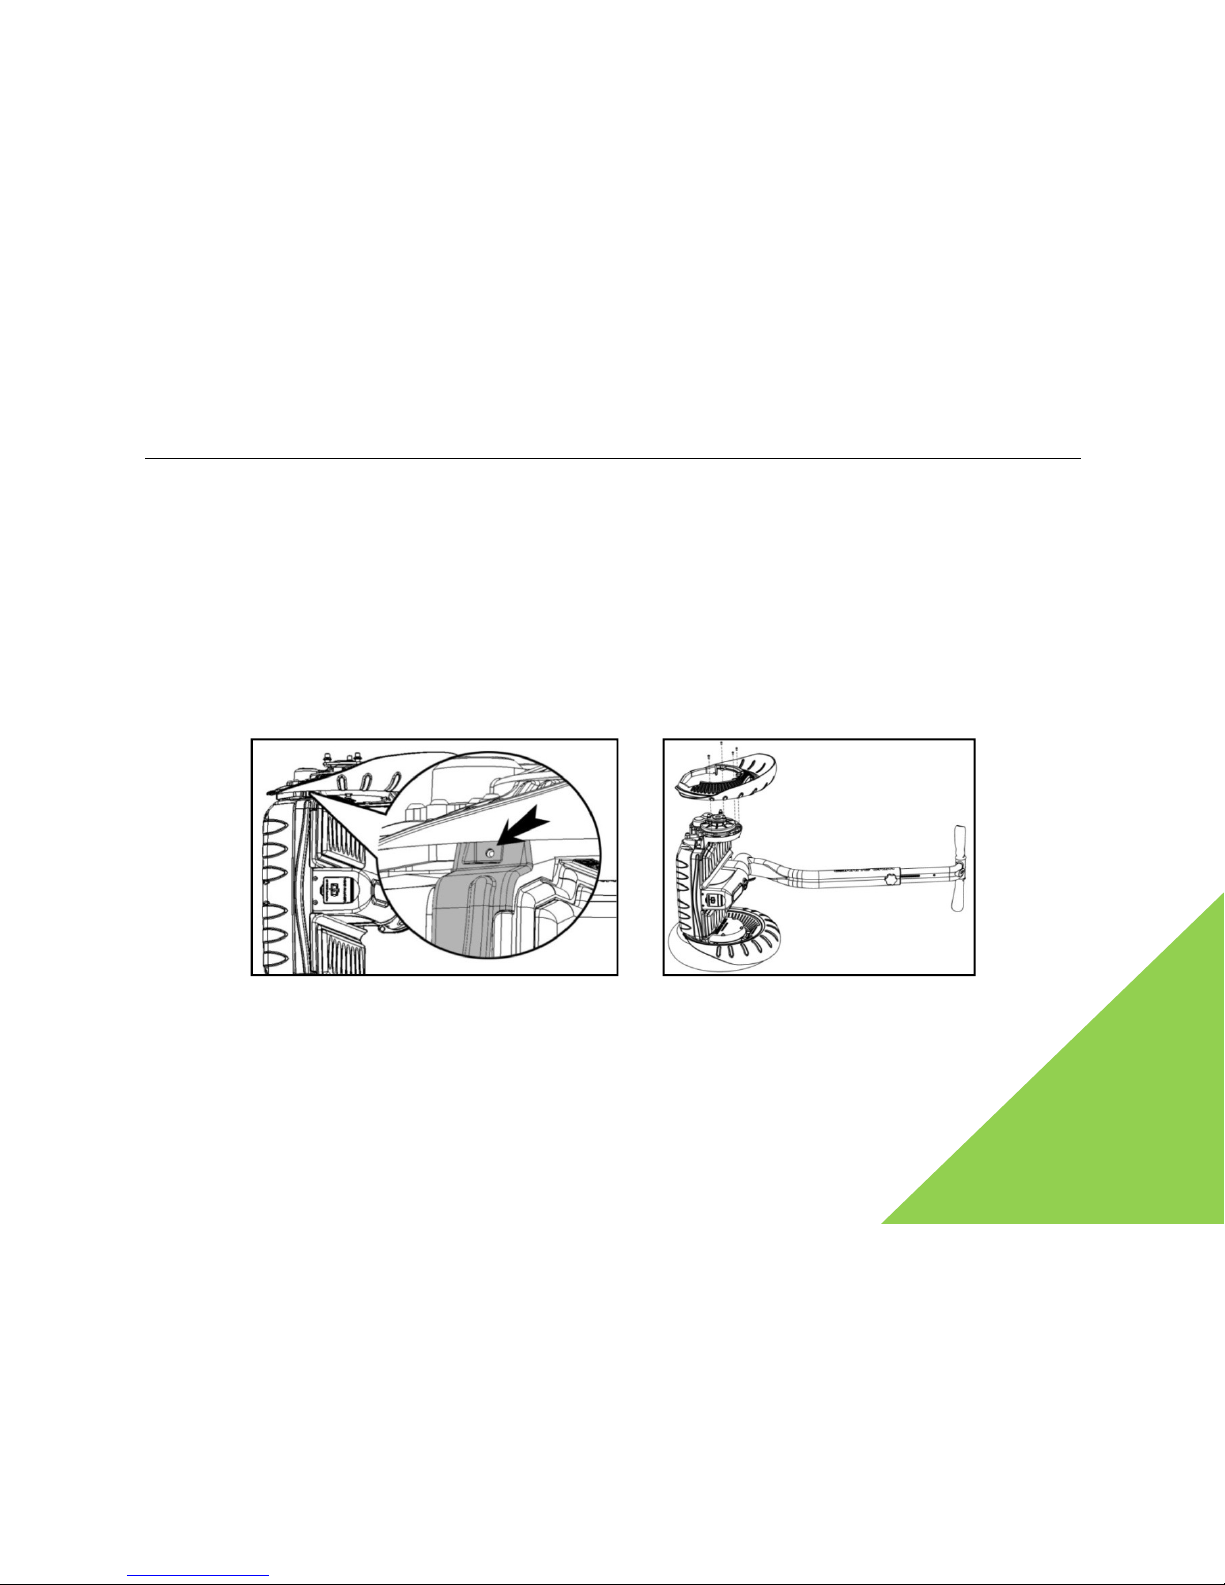
WindRunner™ self-balancing electric vehicle user’s manual
89
If the fender is damaged, the user may replace it on his or her own. You can also replace it at an
UPTECH authorized agent and distributor. The figure below shows an illustration for replacing
the fender.
1. First turn the mainframe sideway. Then, after the tires are removed, hold down the front and
rear decorative strips. Unscrew the two screws of fender but do not remove.
2. Unscrew the four screws for fixing the fender and place on the gearbox. Then raise the
fender.
Loosen the screws that hold-down the decorative strips and fender. Remove the fender screws, then remove the
fender
A.3 replace the foot mat
Page 90
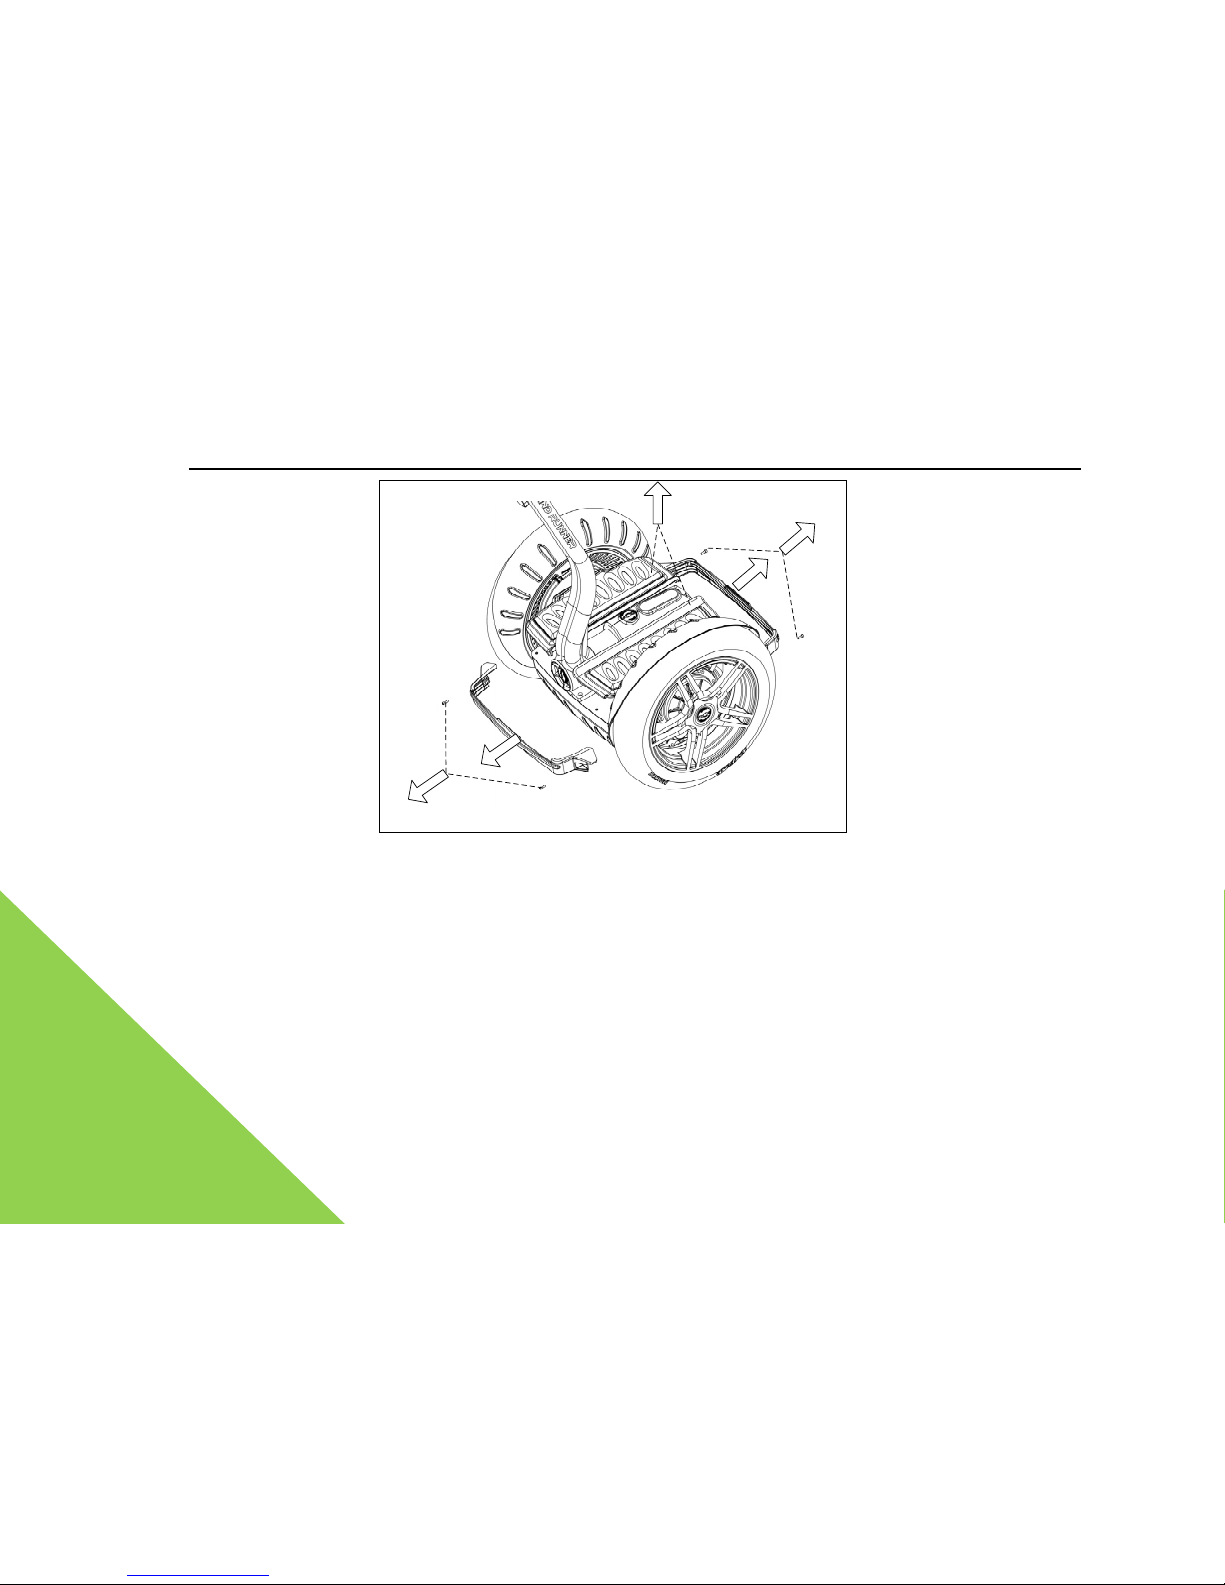
WindRunner™ self-balancing electric vehicle user’s manual
90
1. release 2x screw
2. release the
decoration strip
3. release the foot mat
Prior to replacing the foot mat, loosen or remove the front and rear decorative strips
A.4 replace the gear oil
Page 91
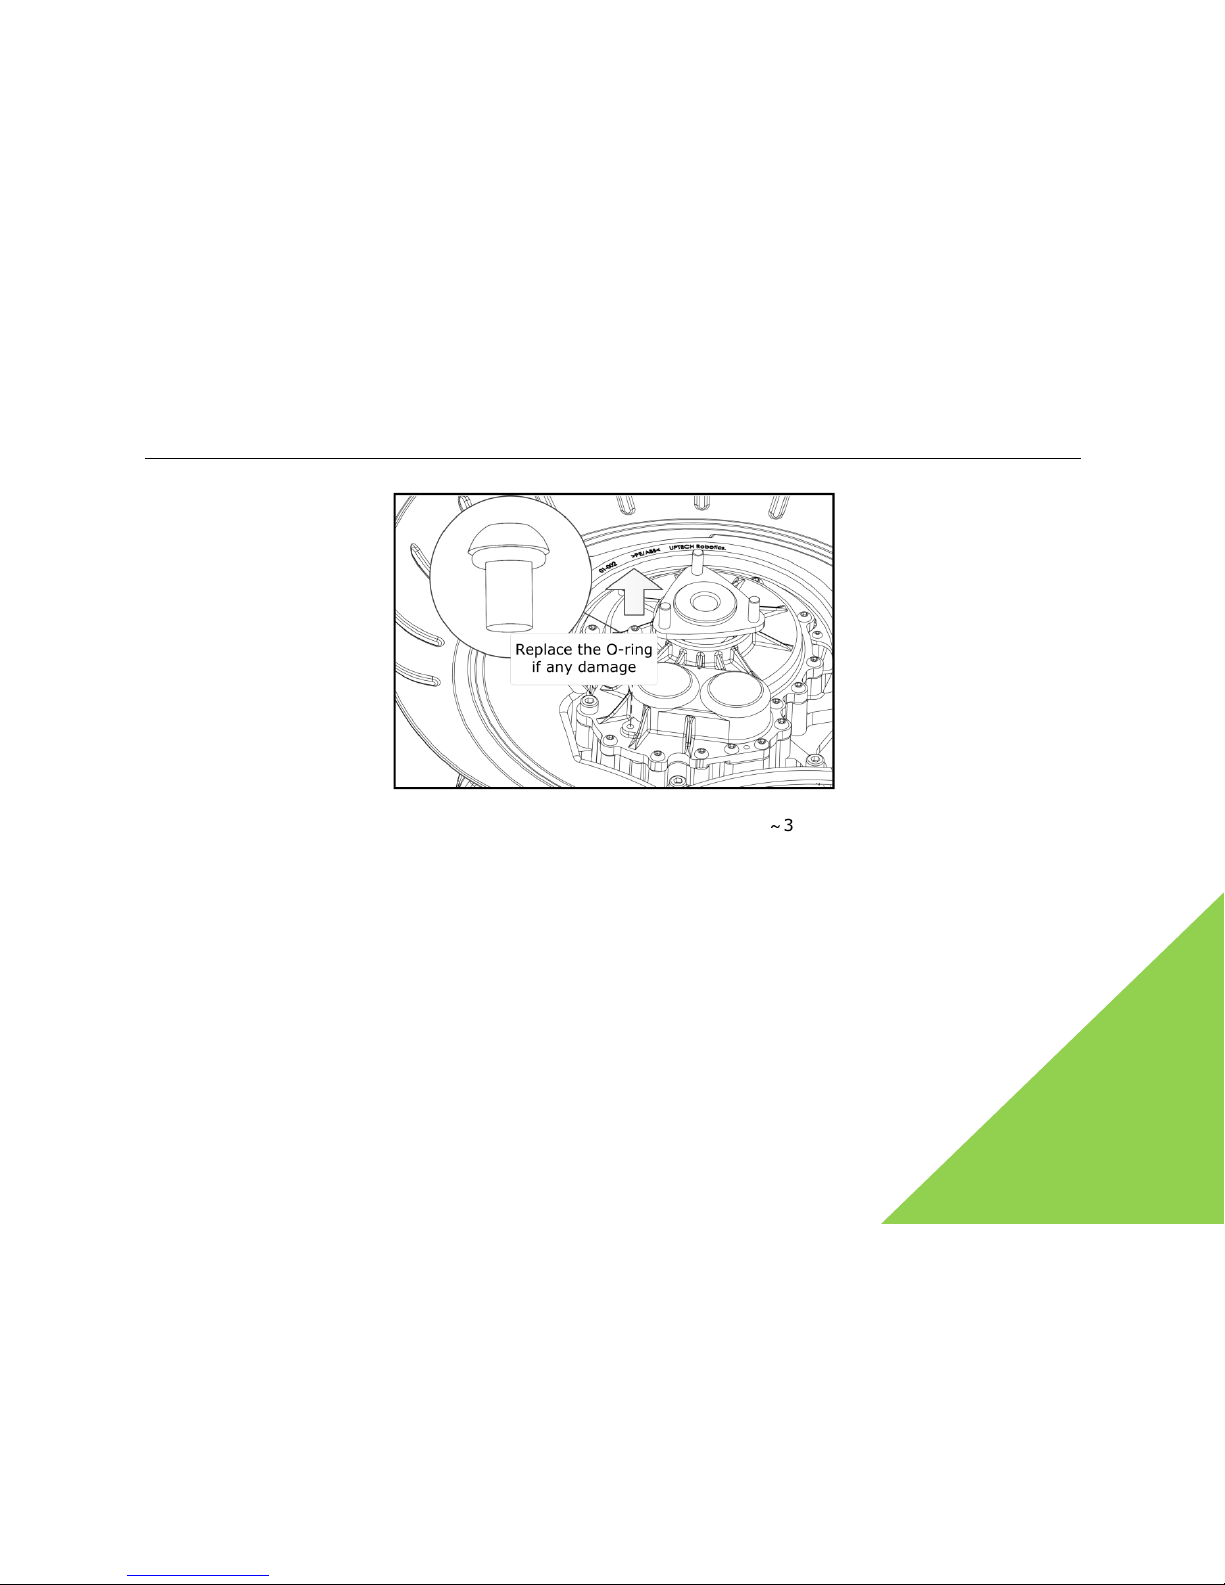
WindRunner™ self-balancing electric vehicle user’s manual
91
About every 5000km of the WindRunner run (charged 200~300 times), replace the gear oil. The
steps are as followed:
1. Dismantle the tire.
2. Vertically place the mainframe of the WindRunner to pump out the gear oil.
3. Remove the oil hole sealing bolt as shown in the figure. Care to keep the O-rings of screws.
4. 4. Use a clean injector with a tube or needle >Ф1mm to insert into the bottom of oil hole.
Slowly suck up the gear oil. Repeat this step until no gear oil is left.
5. Refill the new gear oil 100ml (the OEM transmission oil for motorcycle or car is applicable).
Page 92
WindRunner™ self-balancing electric vehicle
92
6. Check whether the O-ring is in good conditions or not. Put the O-
ring onto the oil hole sealing
bolt, and tighten it.
Apart from the battery pack, tire, fender
,
and operating bar, all other
parts of mainframe can’t be
maintained or repaired by the user.
It is s
to loosen or remove the chassis
cover plate
other parts without authorization. O
therwise
poor waterproof performances
, serious damage,
accidents!
user’s manual
foot mat, gear oil
trictly forbidden
screws or any
, it may cause
or
Page 93
WindRunner™ self-balancing electric vehicle user’s manual
93
Appendix B. Deep understanding WindRunner
B.1 Battery stamina and battery indication
Factors affecting the battery stamina
For the same set of batteries under different service conditions, after charged, its stamina may
be quite different. The followings are some factors affecting the stamina:
Try to ride under uniform speed (12~18km/h) to prolong the stamina of the battery once
charged. Frequently accelerate and decelerate. Low-speed riding and maximum speed riding
may shorten the stamina of the battery once charged.
Riding at 10
℃
~30℃
may get the maximum stamina for the chemical properties of the
lithium battery. Riding under low temperature or high temperature may decrease the
optimum stamina.
The nominal mileage of the WindRunner battery is determined under the carrying capacity of
70kg (including the driver and luggage). The higher the weight of the driver, the lower the
stamina of battery. On the contrary, the lower the weight of the driver, the longer the
stamina of the battery.
Page 94

WindRunner™ self-balancing electric vehicle user’s manual
94
An uphill slope may quickly shorten the stamina of a battery, but a downhill slope may
prolong the stamina of a battery. Under extreme conditions, a gentle slope of a continuous
several kilometers may charge quite a great amount of the battery capacity.
Rugged and uneven road surface may shorten the stamina of a battery, but a flat and
smooth road surface may prolong the stamina of a battery.
Check the tire pressure of the WindRunner. Usually the tire of the WindRunner G1U urban
type is 10
~
20PSI, and that of all terrain type G1X 4~8PSI. The higher the tire pressure, the
lower the friction resistance. Thus prolong the stamina of battery, lower the tire pressure,
and lessen the stamina of battery—but it may be comfortable on a rugged and uneven path.
Accuracy of battery indication
The WindRunner has five LEDs for indicating the battery capacity. Though, these are a rough
means for indicating the capacity of the battery.
Because the power required for riding the WindRunner varies greatly (for example, only
about 300W required for uniform motion on flat and smooth road surface, but accelerate on
a steep slope may require 2000W), it is difficult to have an accurate indication of the battery
capacity. The user shall try to avoid acute acceleration with battery capacity less than 40%
or moving on a complicated land form. Try to avoid moving uphill for long periods at a time.
Page 95

WindRunner™ self-balancing electric vehicle user’s manual
95
The properties of a battery may vary gradually with frequent use. So the battery indication
may be inaccurate after a period of time. To ensure high safety, the battery capacity of
WindRunner has a redundant safety margin. When the battery indication has only one
division, the WindRunner begins its Speed limit and shake alarm. The battery is actually
10%
~
30% left. For safety reasons, also keep an eye out for battery discharge. If you do all
of these things, the life cycle of the battery may be prolonged.
B.2 Tire and land form
The tire pattern and land form have an adaptability and compatibility relationship. Moreover,
the performances of the tire used for suitable or unsuitable land forms vary greatly.
The tire of the WindRunner G1U urban type is suitable for common urban road conditions
such as asphalt road, cement road, glazed tile and brick road, rigid leveled earthy roads, etc.
Under these service conditions, G1U urban type may award the best riding experiences, and
optimum tire adherence effect, and optimum battery stamina. But the all terrain type is
lower efficiency on urban road, so the battery stamina is relatively lower, and the tire may be
worn more rapidly.
The pattern of tire for the WindRunner G1U all terrain type is applicable for grassland, earthy
slope, forest land, and muddy/rugged mountainous road. On these road situations, G1X all
terrain type may reach its optimum shock-absorbing effect, and optimum tire adherence
Page 96

WindRunner™ self-balancing electric vehicle user’s manual
96
effect. Although G1U urban type may be also rode on some rugged and uneven road with
difficulty, its tires will have poor adherence, lower safety and shock-absorbing effect than
that of all terrain type tire. So more caution should be considered when riding.
B.3 About intelligent Speed limit
The WindRunner has adopted the battery capacity based intelligent Speed limit algorithm.
According to different battery conditions (cycle times/ battery ageing, residual battery
capacity), the internal processor of the WindRunner may automatically determine the
maximum Speed limit value.
In good conditions, if the battery capacity is >60%, the WindRunner may continuously ride
under balance mode- normal mode in a speed slightly higher than 20km/h.
In good conditions, if the battery capacity is <60%, the maximum Speed limit of the
WindRunner may be reduced gradually with the reducing of battery capacity.
If the capacity of any one of both batteries is <10%, the WindRunner shall give a low-voltage
alarm buzz, mainframe shake, and the foot mat will face-up greatly to warn the driver to get
off and charge as soon as possible. Under these situations, it is unsafe to continue riding.
Page 97

WindRunner™ self-balancing electric vehicle user’s manual
97
If the ambient temperature is detected to be to low(<-10 ) or too high (>40 ) at the
℃ ℃
moment the WindRunner is powered on, the intelligent Speed limit of the WindRunner shall
also function. Just then, even if the battery capacity is full, the maximum speed may be
unable to reach. To ensure high safety, the detailed Speed limit depends on the
WindRunner’s internal intelligent Speed limit algorithm.
B.4 Hot back-up safety mechanism
Several key components of the WindRunner have the hot back-up safety mechanism to
maximize the guarantee of the driver’s safety.
Hot back-up battery pack: both battery packs are used together, one for operating, and one
for standby. If one battery pack fails, powers off, or disengaged, it may not cause accidents.
Reason being, the WindRunner may immediately detect the exceptions of the battery pack,
and decelerate immediately. The shaking mainframe will give the alarm buzz and warn the
driver to get off.
Hot back-up posture sensor unit: the posture sensor unit is the core of the WindRunner. If
the posture sensor unit fails and does not work while riding, a serious accident may be
possibly happen. To ensure safety, two sets of individual posture sensor units are provided.
Through a unique control algorithm, if any one sets out of function, the system may avoid
Page 98

WindRunner™ self-balancing electric vehicle user’s manual
98
serious accidents such as over turn, etc. The WindRunner will immediately decelerate. The
mainframe will shake give an alarm buzz, and warn the driver to get off.
Hot back-up power subsystem: the WindRunner has a great amount of built-in
micro-electronic devices, which require the converter for power supply. The micro-electronic
chip (IC) has very low failure rate. However, if partial power fails, the system will power off.
Then all the hot back-up design shall lose its significance. So two sets of power supplies were
provided. Any one set may be sufficient for support of the whole system individually. If one
set of the power supply system fails, the system may immediately detect trouble, and
immediately decelerate. The mainframe will shake, give an alarm buzz, and warn the driver
to get off.
It should be noted that the hot back-up technology can’t give the guarantee of 100% safety.
For example, both gearbox and tire are unable to provide the hot back-up. The hot back-up
design may only try to improve the safety of the WindRunner. This is neither a guarantee for
free troubles such as tire burst, nor a guarantee for skidding of tire. Strictly obey chapter VI
“Safe riding instruction” for a better guarantee of safety protection.
B.5 G1X and G1U upgrading mode
The WindRunner G1U urban type may be upgraded into G1X all terrain type by replacing the
tire and fender assembly by updating the control program firmware. The G1X all terrain type
Page 99

WindRunner™ self-balancing electric vehicle user’s manual
99
may also be upgraded into G1U urban type. In the future, the UPTECH shall provide the
upgrading service through the authorized agent/distributor step by step. Please do not
hesitate to contact UPTECH.
B.6 Brake lights
All WindRunner’s are equipped with standard LED brake lights. Under dark conditions, the
red and eye-catching brake lights may greatly reduce the possibility of rear-end collision.
The brake lights are unable to be controlled by the user. Only by the built-in intelligent
algorithm. The brake lights shall come on at the moment of decelerating or downhill journey.
The driver may ignore when the brake lights come on.
Page 100
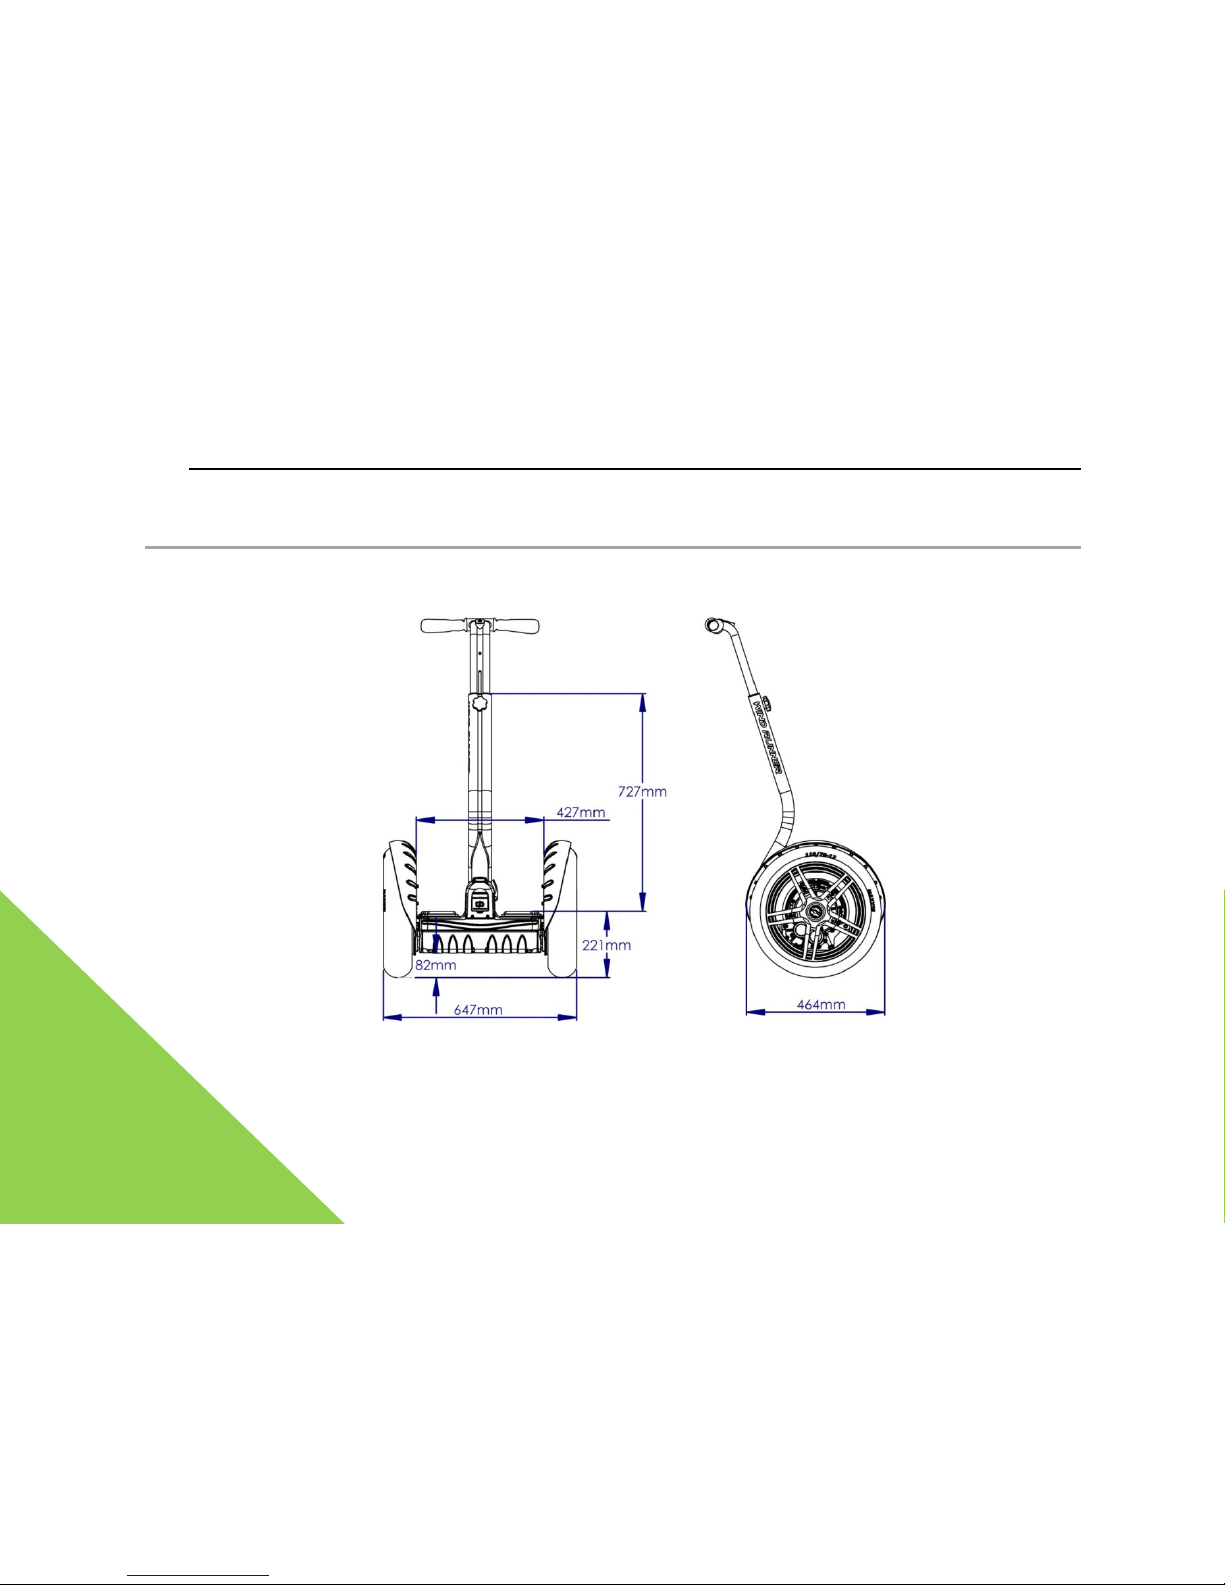
WindRunner™ self-balancing electric vehicle user’s manual
10
Appendix C. Outline and dimensions
C.1 urban model G1U
 Loading...