

Page 1
Model #7650 Instruction Manual
Patent Pending
Page 2
2
IMPORTANT SAFEGUARDS
Read all instructions before use and keep for future
reference.
Use shaver and accessory chargers only for their •
intended purpose and according to these instructions.
Store in a clean, dry place.•
Use at temperatures between 30°F and 120°F.•
CAUTION
Not intended for use on small children or animals. •
Use very close supervision when operating or storing
around children.
Always return protective cover back on the shaver •
heads when not in use.
Shaver is designed for facial hair only. Use on head •
and other body parts is not advised.
Shaver is intended for dry shaving only. To avoid •
damage to shaver, do not use with creams or lotions.
Use only attachments that are included with this •
shaver.
Unplug chargers and turn off the shaver before •
cleaning any part of this shaver.
Follow cleaning and blade and foil replacement •
instructions carefully. Blades are sharp. Use caution
when handling.
Some skin types are sensitive to rotary shavers. •
Discontinue use if skin becomes irritated after
prolonged use.
DANGER
To avoid serious injury, regularly inspect blades •
and foils for damage and proper installation. Do not
operate shaver if blades or foils are loose in their
housing, damaged, or very dull.
To avoid the risk of electric shock and personnel •
injury, do not use in the tub or shower; or allow to
fall into the sink. Do not store where it may come in
contact with water.
Discontinue use if shaver or chargers show any sign •
of electrical malfunction.
SAVE THESE INSTRUCTIONS
Page 3
3
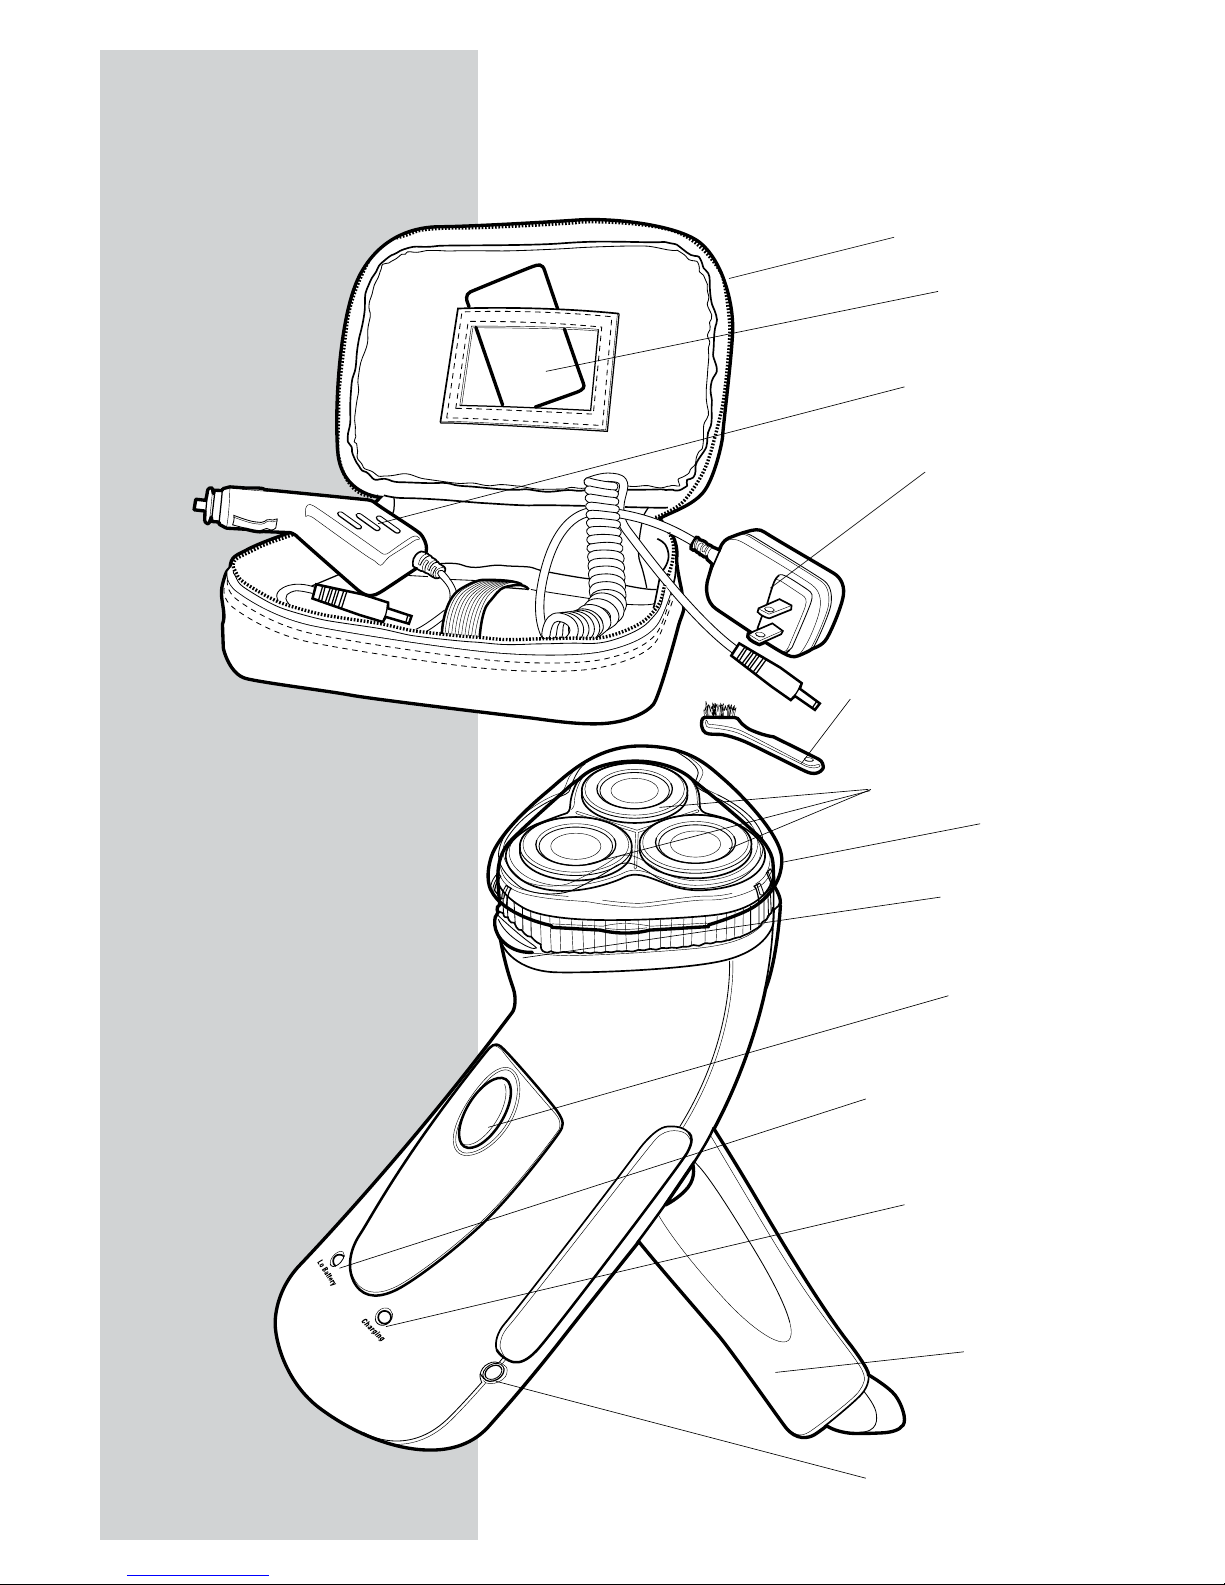
CLEANING BRUSH
SHAVER HEADS
CAP
ASSEMBLY
RELEASE
BUTTON
ON/OFF
POWER
BUTTON
LOW BATTERY
INDICATOR (RED)
CHARGING
INDICATOR
(YELLOW)
DYNAMO
HAND
CRANK
DC INPUT PORT
AC/DC CHARGING
ADAPTER
12V DC CHARGING
ADAPTER
TRAVEL BAG
MIRROR
PARTS IDENTIFICATION
Page 4

4
CHARGING
The shaver may be charged by three methods: •
dynamo hand crank, 120V AC/DC wall charger, and
12V DC vehicle charger.
Dynamo charging is perfect for shaving when •
auxiliary power is not available. The shaver may also
be operated directly from either of the two auxiliary
chargers.
The auxiliary chargers may be used to completely •
recharge the battery.
The internal rechargeable lithium ion batteries never •
need to be replaced.
Indicator Lights
A red low battery indicator LED will illuminate when •
the unit needs to be recharged.
A yellow charge indicator LED will illuminate when •
the unit is receiving power from any of the three
methods of charging (dynamo or auxiliary chargers).
The indicator light will gradually turn off as the
battery level reaches full capacity. Note: leaving the
auxiliary chargers connected to shaver after a full
charge is achieved will not damage the shaver.
Dynamo Hand Crank Charging
1. Make sure the unit is off before charging.
2. Open the hand crank and wind in either direction at
approximately 130 revolutions per minute.
3. The yellow charge indicator light will illuminate while
charging.
4. Charging and operating time:
1 minute of winding will equate to approximately 2 •
minutes shave time.
When the low battery indicator is illuminated, using •
the dynamo hand crank to charge the shaver will
produce a limited number of shaves. At that point
it will effectively provide four 2-minute shaves until
it will need to be fully charged using the auxiliary
chargers.
120V AC/DC Power Charging
Make sure the unit off before charging.1.
Connect the male end of the 120V AC/DC charger 2.
into the DC input port of shaver and then insert the
electrical plug into an electrical wall socket.
The yellow charge indicator light will illuminate while 3.
charging and will go off when fully charged.
Charging and operating time:4.
Time to achieve full charge = 6 – 8 hours•
Run time from a full battery until the low battery •
indicator illuminates = 45 – 50 minutes
Quick Charge for 1-2 hours = 10 – 15 minutes•
Page 5

5
12V DC Power Charging
1. Make sure the unit off before charging.
2. Connect the male end of the 12V DC charger into the
DC input port of shaver and then insert the plug into a
12V power receptacle or cigarette lighter.
3. A green charging indicator light will illuminate on
the 12V charger to verify proper connection and
operation.
4. The yellow charge indicator light will illuminate on
the shaver while charging and will go off when fully
charged.
5. Charging and operating time:
Time to achieve full charge = 6 – 8 hours•
Run time from a full battery until the low battery •
indicator illuminates = 45 – 50 minutes
Quick Charge for 1-2 hours = 10 – 15 minutes•
BEFORE USING FOR THE FIRST TIME, WE
RECOMMEND FULLY CHARGING USING EITHER THE
120V OR 12V CHARGER.
SHAVING INSTRUCTIONS
When using a new shaver, an adjustment period should
be expected to allow your skin to get used to the new
shaver and allow you to develop an effective shaving
style.
Before shaving:
1. Make sure the shaving blades and foils are installed
correctly (see To Reinstall Blades & Foils in the
cleaning section below). Never operate shaver with
loose or broken blades or foils.
2. Always use a clean, dry shaver.
3. For best results, use on a freshly washed and dried
face.
To Shave:
1. Remove the protective cover from the shaver heads.
2. Turn on the shaver by pressing the On/Off button
once.
3. Hold the shaver so that all three heads touch the face.
Using it at an angle so that only one head touches the
skin may cause irritation to the skin and excessive
wear to one head.
4. Apply gentle pressure and use short, circular motions
as you move the shaver across your face. Pressing
too hard flattens the skin and whiskers, which is
ineffective and prematurely wears out the blades.
5. Clean the blade and foil assembly after every shave
(see cleaning section).
Page 6
6
CLEANING
For optimal performance of your shaver it is important to
clean the blade and foil assembly after each use.
Caution: Turn off the shaver and disconnect from any
power supply before cleaning or changing the blades
and foils. Never place any portion of the shaver
or auxiliary chargers in water or other liquids for
cleaning as the unit could be damaged.
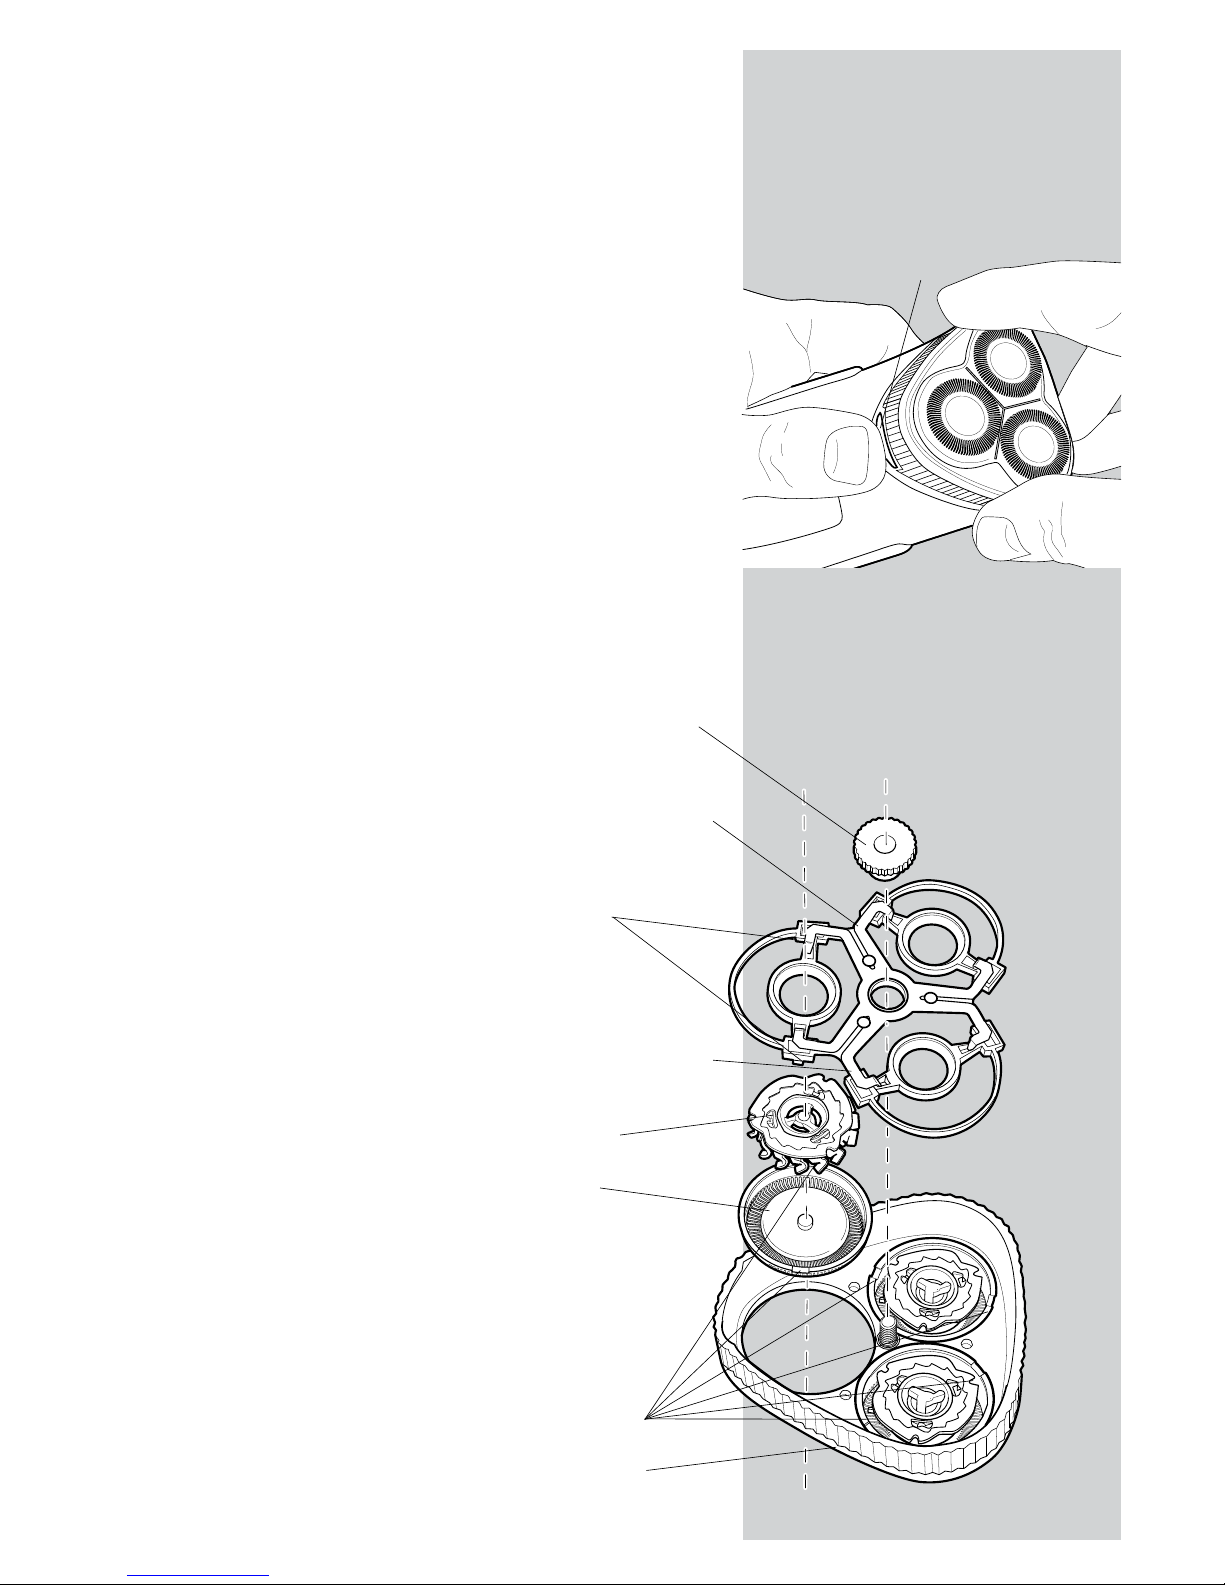
1. Press the assembly release button and carefully
remove the blade and foil assembly from the shaver
body. (see figure 1)
2. To Clean the Hair Chamber: Using the provided
cleaning brush, carefully sweep away any hair
collected inside the internal chamber and around the
blade shafts. A damp cloth may be used to wipe away
any remaining hair particles. Wipe with a dry cloth.
3. To Clean the Blade and Foil Assembly: (see figure 2)
Place the blade and foil assembly on flat a.
surface and carefully remove the retaining ring
by unscrewing the center screw in a counter
clockwise direction until it is completely
removed.
Carefully remove one b.
blade and foil at a time for
cleaning taking care not to
lose any parts. Please note
that each blade and foil
is a matched set and care
must be taken to assure
they are not interchanged.
This would cause poor
performance, uneven wear,
and shorten life of the
blades and foils.
Carefully brush the blade c.
and foil with the provided
cleaning brush to remove
hair particles and rinse
with water and let dry.
Handle carefully. Excessive
pressure on the blades and
foils could cause damage.
Place the blade and foil d.
back into the blade and foil
assembly before moving on
to the next blade.
Before reassembling, sweep e.
away hair particles from the
retaining ring and center
screw.
CENTER SCREW
FOIL
RETAINING RING
TABS
CHROME SPRING
BLADE
ASSEMBLY
RELEASE
BUTTON
NOTCHES
HOUSING
FIGURE 2
FIGURE 1
Page 7
7
FIGURE 3
FIGURE 4
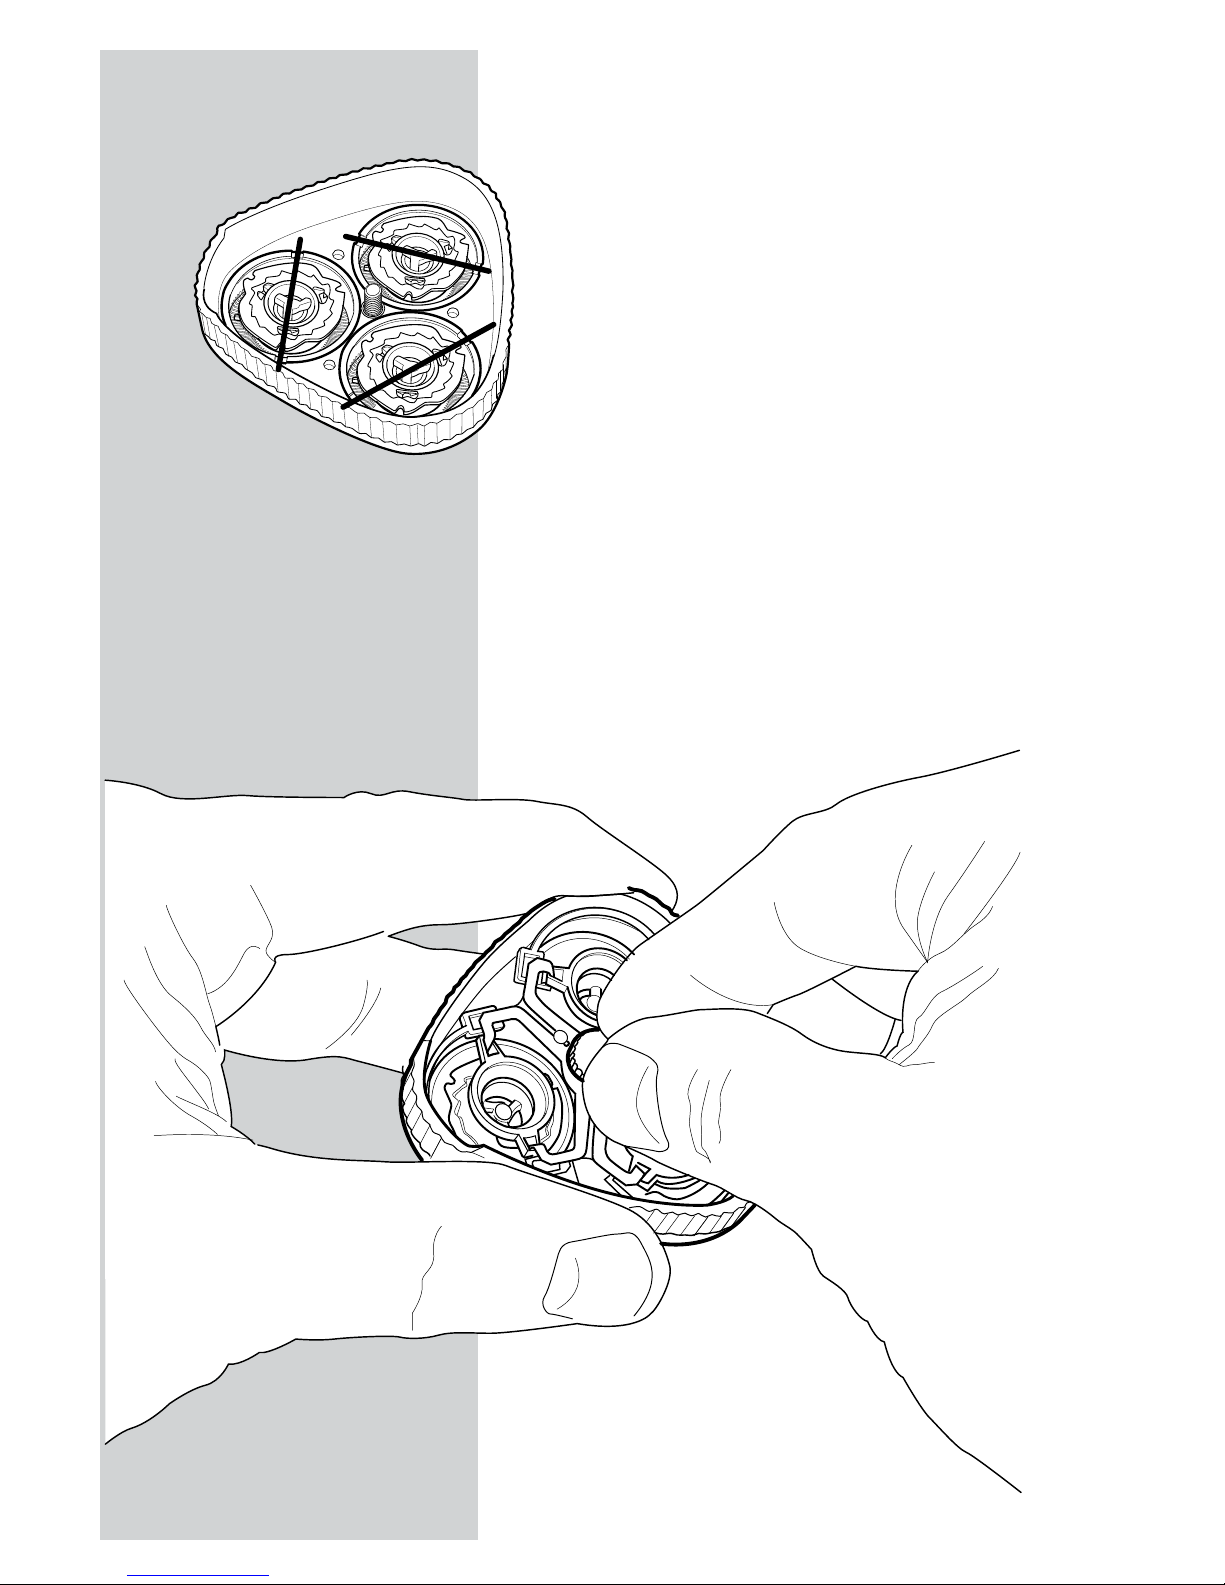
1. To Reinstall Blades & Foils: (see figure 2)
If instructions were followed above, then each a.
blade in back inside of it’s matching foil and is
sitting inside of the blade and foil assembly.
Rotate each foil so that the notches in foil are b.
properly aligned to receive the retaining ring
tabs. (see figure 3)
Place the retaining ring on top of the blades c.
and foils with the chrome springs facing up. It
is important that the notch in the foil is aligned
with the tab on the retaining ring.
Tighten the center screw clockwise until d.
secure without over-tightening (figure 4). After
assembling, check to make sure the blades and
foils are installed correctly. The foils should
not spin in the housing. If they do, remove the
center screw and retaining ring to adjust the foil
as needed.
Place the blade and foil assembly back on e.
shaver body. You should hear a click as it locks
into place. Turn the shaver on and check for
proper operation before storing. Always place
the protective cover back on the shaver heads
when not in use to protect it from dust and
damage.
Page 8
REPLACING BLADES AND FOILS
With normal use, the shaver blades and foils should be replaced every 12 months to
ensure a clean, close shave. You will know when it is time to replace your blades and foils
when whiskers are pulled instead of cut or skin irritation develops. Use only Wind ‘N Go®
Freedom™ Shaver replacement Part No. 7655.
Replacement parts may be purchased from your retailer or ordered from Athena Brands.
Go to www.athenabrands.com or call our Customer Service Department toll-free at
800-272-8603.
Follow the instructions provided with the replacement blades and foils to ensure proper
installation.
MAINTENANCE AND REPAIR
Under normal conditions and with proper care your shaver should not need any additional
maintenance other than replacing the blades and foils.
If the shaver or the auxiliary chargers fail to operate properly, take everything back to the
place of purchase or contact Athena Brands at 1-800-272-8603. See product warranty for
complete information.
SPECIFICATIONS
Internal Rechargeable Battery LIR123A 3.6V-600mA
DC Input Power DC 5V-800mA
120V AC/DC Power Adapter UL Approved
Input: 100V-240V AC, 50-60 Hz, 0.15A
Output: DC 5.0 V - 0.8 (800mA) positive polarity
12V DC Vehicle Power Adapter Input: 12V - 24V DC
Output: DC 5.0V - 0.8 (800mA) positive polarity
Fuse: Replace with glass fuse #F2AL250V,
2 Amp glass fuse, ¼” x 1¼” size (available
at automotive and electronic stores)
Weight 0.5 lbs.
Dimensions 6”L X 2”W x 2.16”H
Replacement Blades & Foils Part No. 7655
ATHENA BRANDS is a division of Aervoe Industries, Inc.
Gardnerville, NV 89410
1-800-272-8603 • www.athenabrands.com • [email protected]
7650 Inst. CS-5/12//08
 Loading...