

Wind n Go 7300 Operating Instructions
Wind ‘N Go™ UltraLight #7300
IMPORTANT SAFEGUARDS
• Read all instructions before operating
• Do not look directly at the light; may cause injury
• Do not use in flammable or explosive environments
• Do not operate at temperatures above 120°F
• Avoid placing siren near the ears when using the siren
• To reduce the risk of electric shock, do not submerge the unit or its accessories in any liquid. Unit is water
resistant but not waterproof.
• Turn off all lights and radio features before charging
• For maximum battery efficiency, never completely deplete stored power
• Store in a clean dry place when not in use
• Administer close supervision when using around children
Note: This equipment has been tested and found to comply with the limits for a Class B digital device, pursuant to Part 15 of the
FCC Rules. These limits are designed to provide reasonable protection against harmful interference in a residential installation.
This equipment generates, uses, and can radiate radio frequency energy and, if not installed and used in accordance with the
instructions, may cause harmful interference to radio communications. However, there is no guarantee that interference will not
occur in a particular installation. If this equipment does cause harmful interference to radio or television reception, which can be
determined by turning the equipment off and on, the user is encouraged to try to correct the interference by one of more of the
following measures:
• Reorient or relocate the receiving antenna
• Increase the separation between the equipment and receiver
• Connect the equipment into an outlet on a circuit different from that to which the receiver is connected
• Consult the dealer or an experienced radio/TV technician for help
Operation is subject to the following two conditions: (1) this device may not cause harmful interference, and (2) this device must
accept any interference received, including interference that may cause undesired operation.
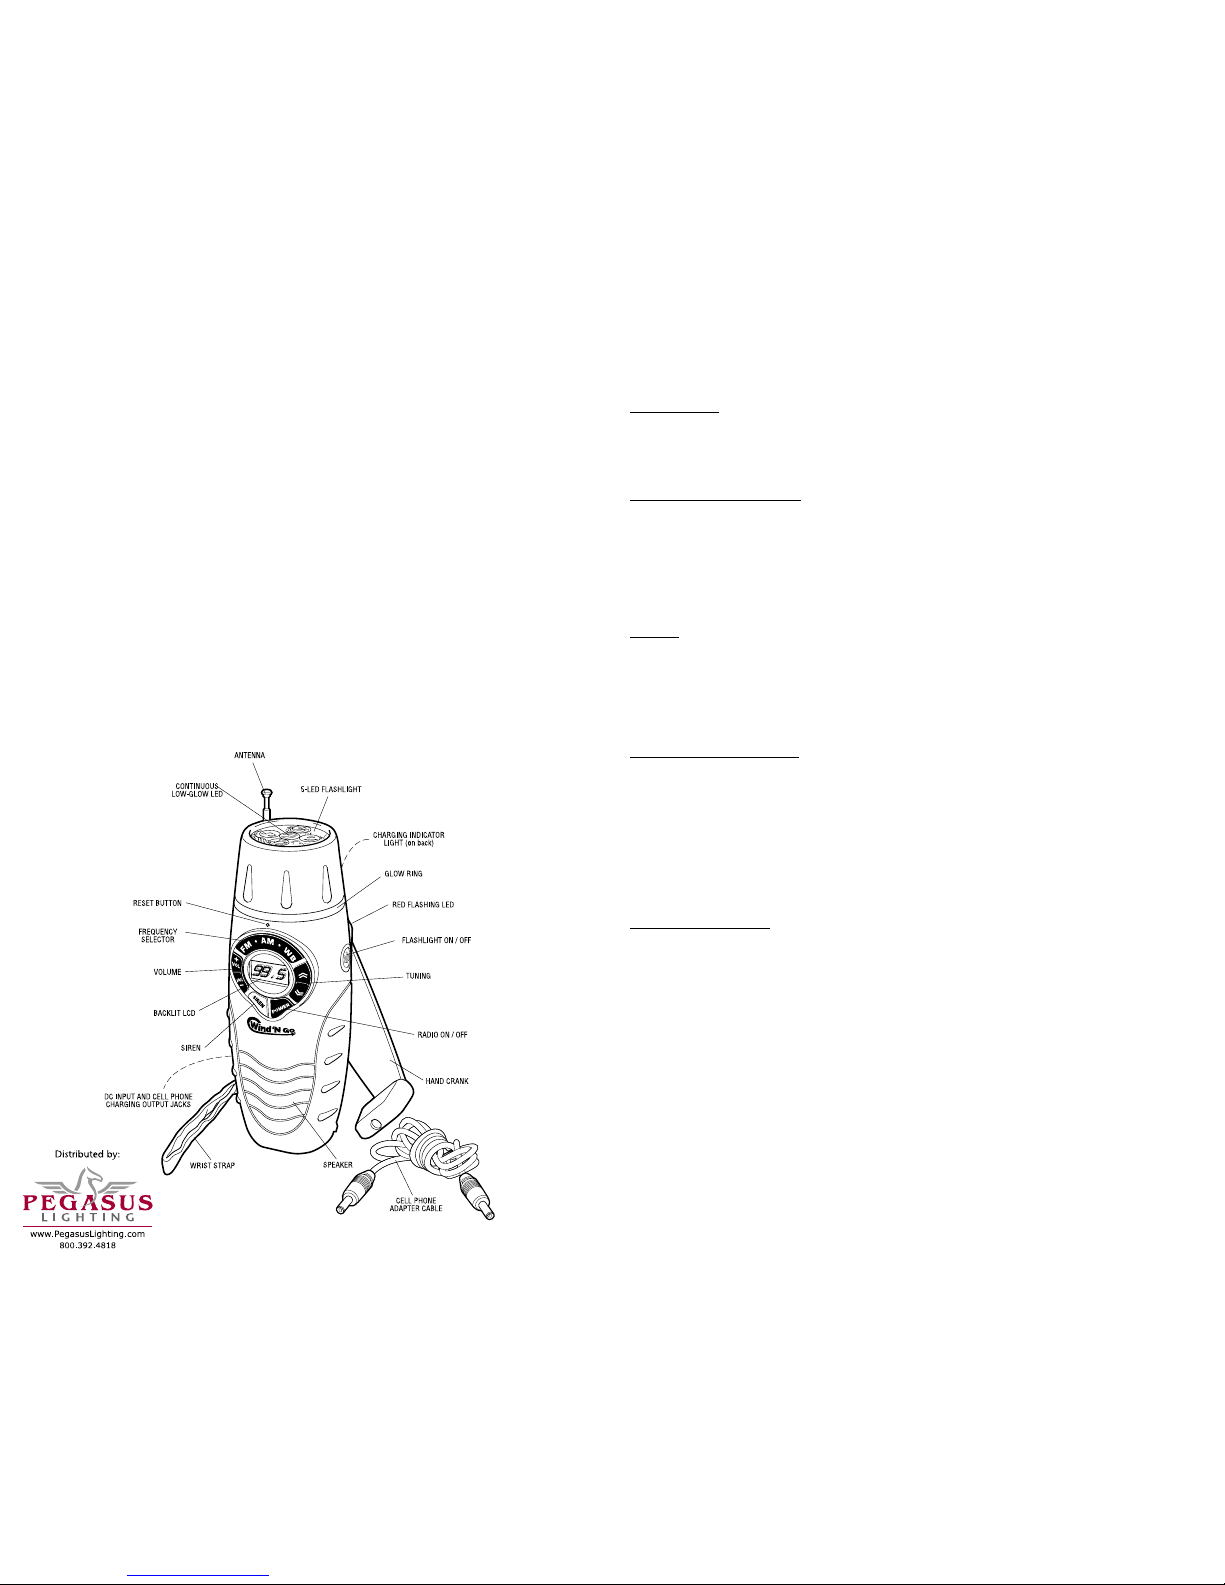
PARTS IDENTIFICATION
CHARGING THE BATTERY
Before charging turn off all light and radio features.
Dynamo Charging:
1.
Open the HAND CRANK and rotate clockwise at approximately 120 cycles/minute for a minimum of one minute.
A green CHARGING INDICATOR LIGHT will appear above the hand crank.
Longer wind-up times will yield a longer
power duration.
2. Close the HAND CRANK.
AC Charging (adapter not included):
1. Please refer to the specifications section on the back for compatible AC power adapter information.
2. Plug the DC output plug from the AC/DC adapter into the DC INPUT JACK of the unit and then plug the 120V AC
adapter into an electrical socket. The green CHARGING INDICATOR LIGHT will appear above the hand crank.
3. Allow 3 hours to achieve a full charge in the internal rechargeable battery. The green CHARGING INDICATOR
LIGHT will change to red when charging is complete. To avoid damage to the battery and circuit, disconnect
the adapter after charging.
OPERATION
Flashlight:
1. Press the FLASHLIGHT ON/OFF button on the side
• 1 time for 5-LEDs
• 2 times for 1-LED
• 3 times for off
2. When the flashlight is off you will still see a very low glow from the center LED. This is so you are able to
find the unit in the dark. It does not consume much energy.
AM/FM/NOAA Weather Band Radio:
1. Extend the ANTENNA to obtain the best reception.
3. Press the POWER button on the front to turn on and off.
2. Select either the AM, FM or Weather band using the FREQUENCY SELECTOR button. The radio station
and radio band will appear on the backlit LCD SCREEN.
3. Adjust the volume by pressing the VOL+/VOL- buttons.
4. Tune to the desired station using the
<< >>
tuning buttons. Cycle through the frequency by pressing
the up or down buttons repeatedly. Or scan the frequency for the next audible station by pressing and
holding the up or down button for a few seconds then releasing. Repeat to hear the next audible station.
NOAA weatherband information is listed on the back page.
Siren and Flashing Red Light:
Press the SIREN button on the front. The high-volume emergency siren will sound and the red LED on the
back will blink.
CELL PHONE CHARGING
NOTE: If the flashlight batter y is full or partially full, the stored power will immediately drain into your cell
phone when connected to your cell phone.
1. Plug the CELL PHONE ADAPTER CORD into the CELL PHONE OUTPUT JACK identified by the cell phone icon
on the protective rubber input cover.
2. Plug the other end into your cell phone. A universal Nokia
®
adapter is provided. Adapter tips for other model
phones plug directly into the Nokia adapter. Additional tips are available at electronic and mobile phone
stores (not included).
3. Charging options:
• Dynamo Charging: Follow the instructions under Dynamo Charging above.
• AC/DC Charging: Follow the instructions under AC Charging above.
TROUBLESHOOTING
In the event the LCD DISPLAY becomes faint or inoperable, the unit may need to be reset. To do so, press the
reset button with a small pointed object. Power off the unit and restart. For all other questions consult the
manufacturer.
OPERATING INSTRUCTIONS
TECHNICAL INFORMATION
SPECIFICATIONS
INTERNAL RECHARGEABLE BATTERY Ni-MH 4x 2/3 AA 600mA 4.8V
AC CHARGER (not included) AC 120V, DC output = 6V DC 300 mA
Positive polarity. Available at electronics stores.
DC CELL PHONE CHARGING OUTPUT 6V DC 300 mA load current
CELL PHONE ADAPTER One Nokia cell phone adapter is included that
works with most Nokia models. It also serves
as a universal connector to attach to other cell
phone adapters available through electronic and
mobile phone stores (not included).
LED Lights Up to 100,000 hours
SIREN Approximately 90 decibel
WEIGHT 12 oz.
DIMENSIONS 3.5” L x 2 38” W x 6.94” H
POWER DURATION
FLASHLIGHT RADIO CELL PHONE SIREN/FLASHER
After winding for
1 minute
90 minutes 1-LED
60 minutes 5-LEDs
45 minutes 7-10 minutes
talk time
30 minutes
Using an AC
charger to fully
charge (approx. 3
hours)
20 hours 1-LED
5 hours 5-LEDs
5 hours 1-2 hours typical.
Rate depends on
cell phone type.
4 hours
Continuous
Low-Glow LED
30 days from 1-3 minute wind-up
RADIO BANDS
AM 525 - 1710 Khz
FM 87.5 - 108 Mhz
NOAA-Weather Band Stations. Log onto www.nws.noaa.gov for the frequency
transmitted in your area.
162.40 Mhz
162.47 Mhz
162.55 Mhz
162.42 Mhz
162.50 Mhz
162.45 Mhz
162.52 Mhz
ATHENA BRANDS, INC.
Gardnerville, NV 89410 • 1-800-272-8603
www.athenabrands.com • mailbox@athenabrands.com
7300inst; cs3/07
UltraLight
 Loading...