

Page 1
1
Installation and Operating
Instructions
Induction Hob IF6601
Please read these instructions carefully before attempting to install or use this
appliance.
It is advisable to keep these instructions in a safe place for future r
eference.
Page 2

2
In
troduct
ion
Thankyou for choosingthis appliance
.
It has been
designed to give years of trouble-free use
provided
it is installed and maintained
correctly.
Please read these instructions carefully before installing
or
using your appliance. It is advisable to keep your purchase and
installation receipts with these instructions in a safe place
for
future reference. Included is some important safety information
in addition to guidelines and recommendations that will
enable
you to take full advantage of all the functions available
.
This quality appliance has been tested and certified to meet all
applicable electrical and safety
standards.
This appliance must be installed and connected in
accordance with current regulations.
After unpacking the appliance ensure that there is no visible
damage. If the appliance has been damaged during transit, do
not use it, contact your retailer immediately
.
Page 3
3
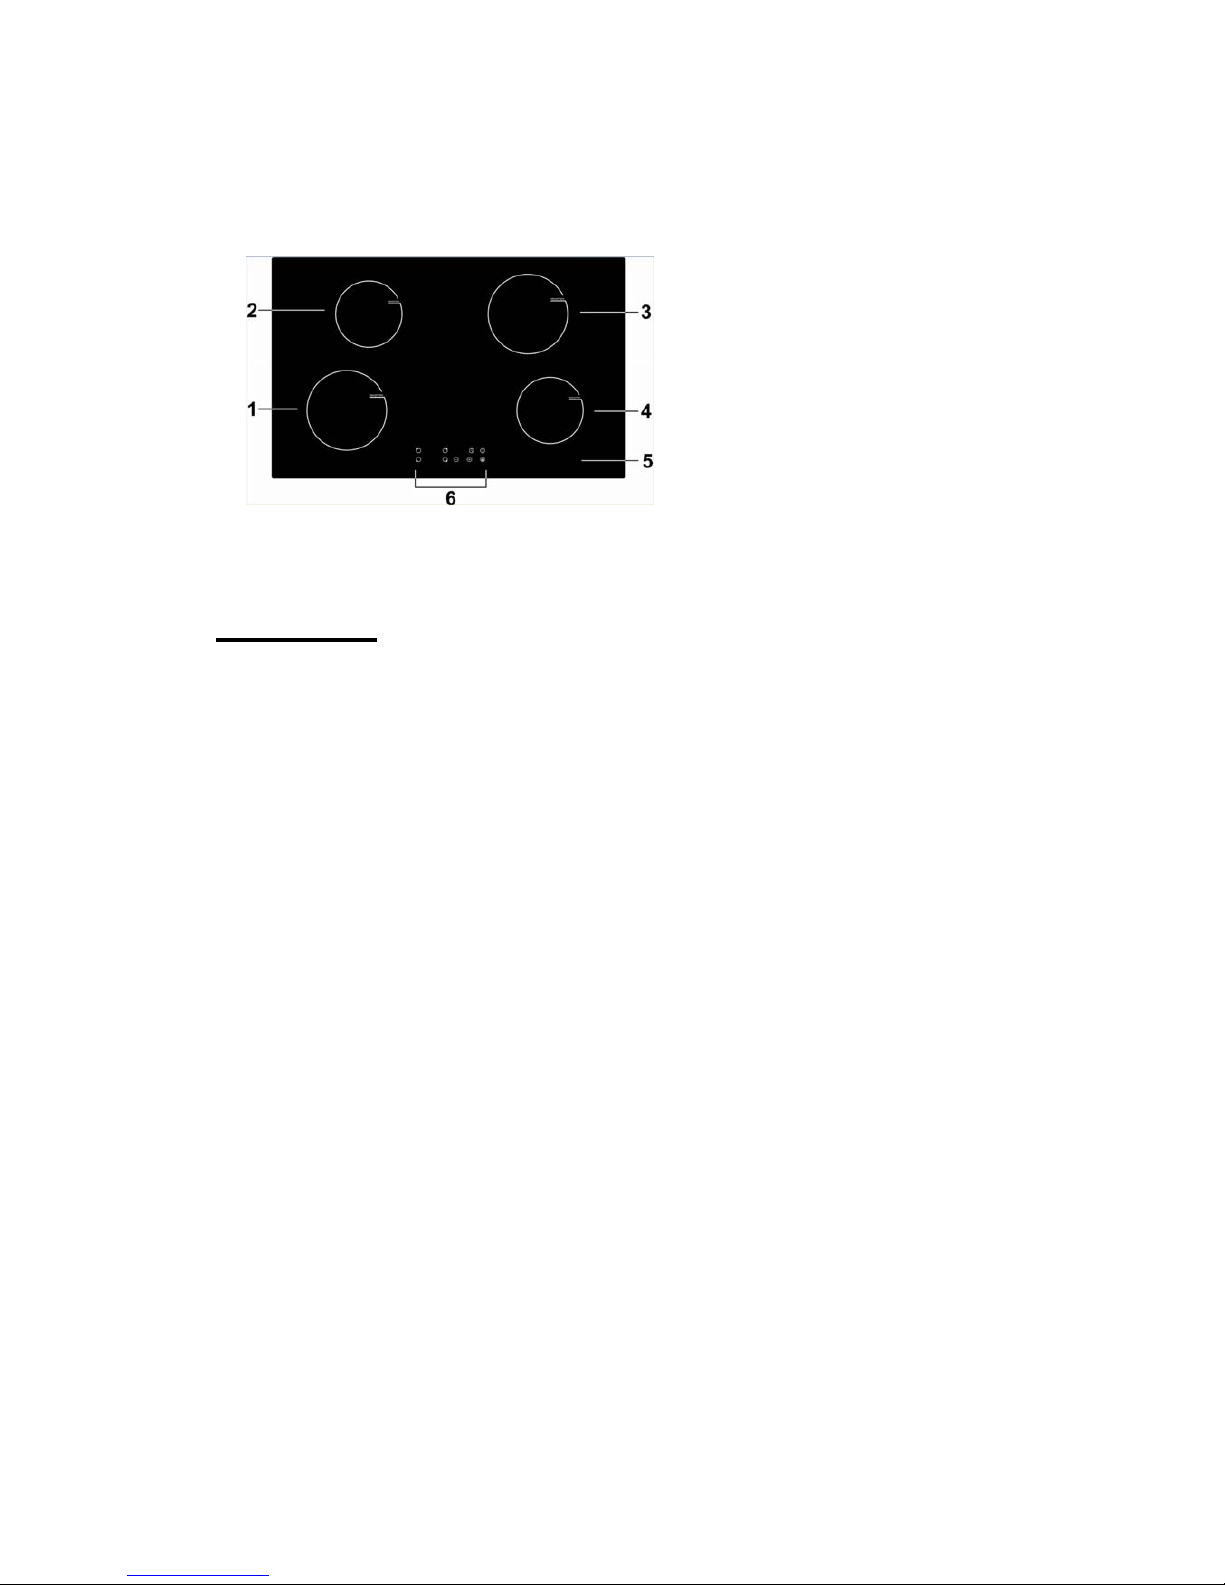
Description Of The Appliance
1. 2000W Cook Zone
2. 1300W Cook Zone
3. 2000W Cook Zone
4. 1300W Cook Zone
5. Glass plate
6. Control panel
CONTENTS:
Section 1. Installation
Section 2. Safety Advice
Section 3. Operating the Appliance
Section 4. Maintenance
Page 4
4
Section 1. Installation
- Remove all packaging, protective film and securing tape
from the appliance.
- Position the appliance in a dry atmosphere.
- The following dimensions are provided as a guide for
installation – your installer will carry out the
installation in accordance with the current
regulations.
- Your installer will connect the power cable in accordance
with the current regulations.
To install this appliance, please proceed as follows:
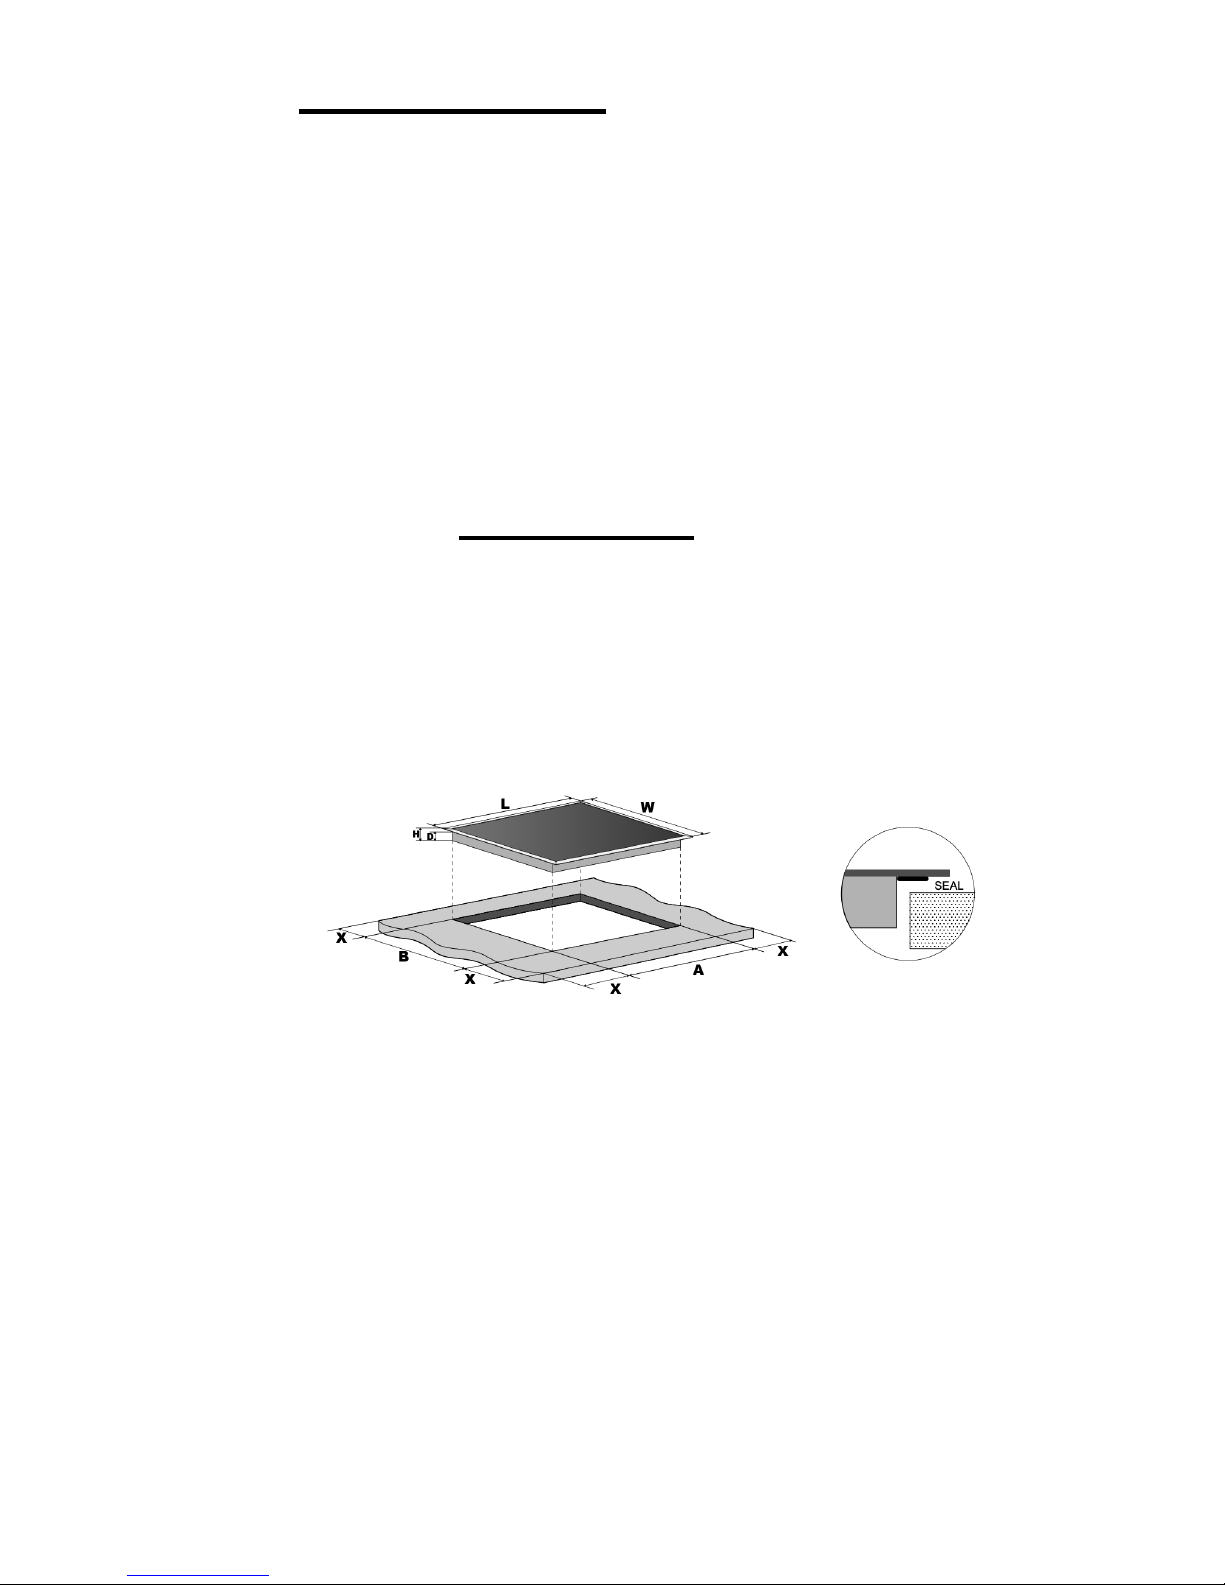
1.1. Work-Surface Cut-Out
- Cut out the work-top as shown in the drawing below,
ensuring that the actual sizes used are as per the chart
below.
- For installation and use, a minimum of 5cm
must be maintained around the cut-out.
- The work surface must have a thickness of at least 30mm.
- The work surface must be heat resistant.
Page 5
5
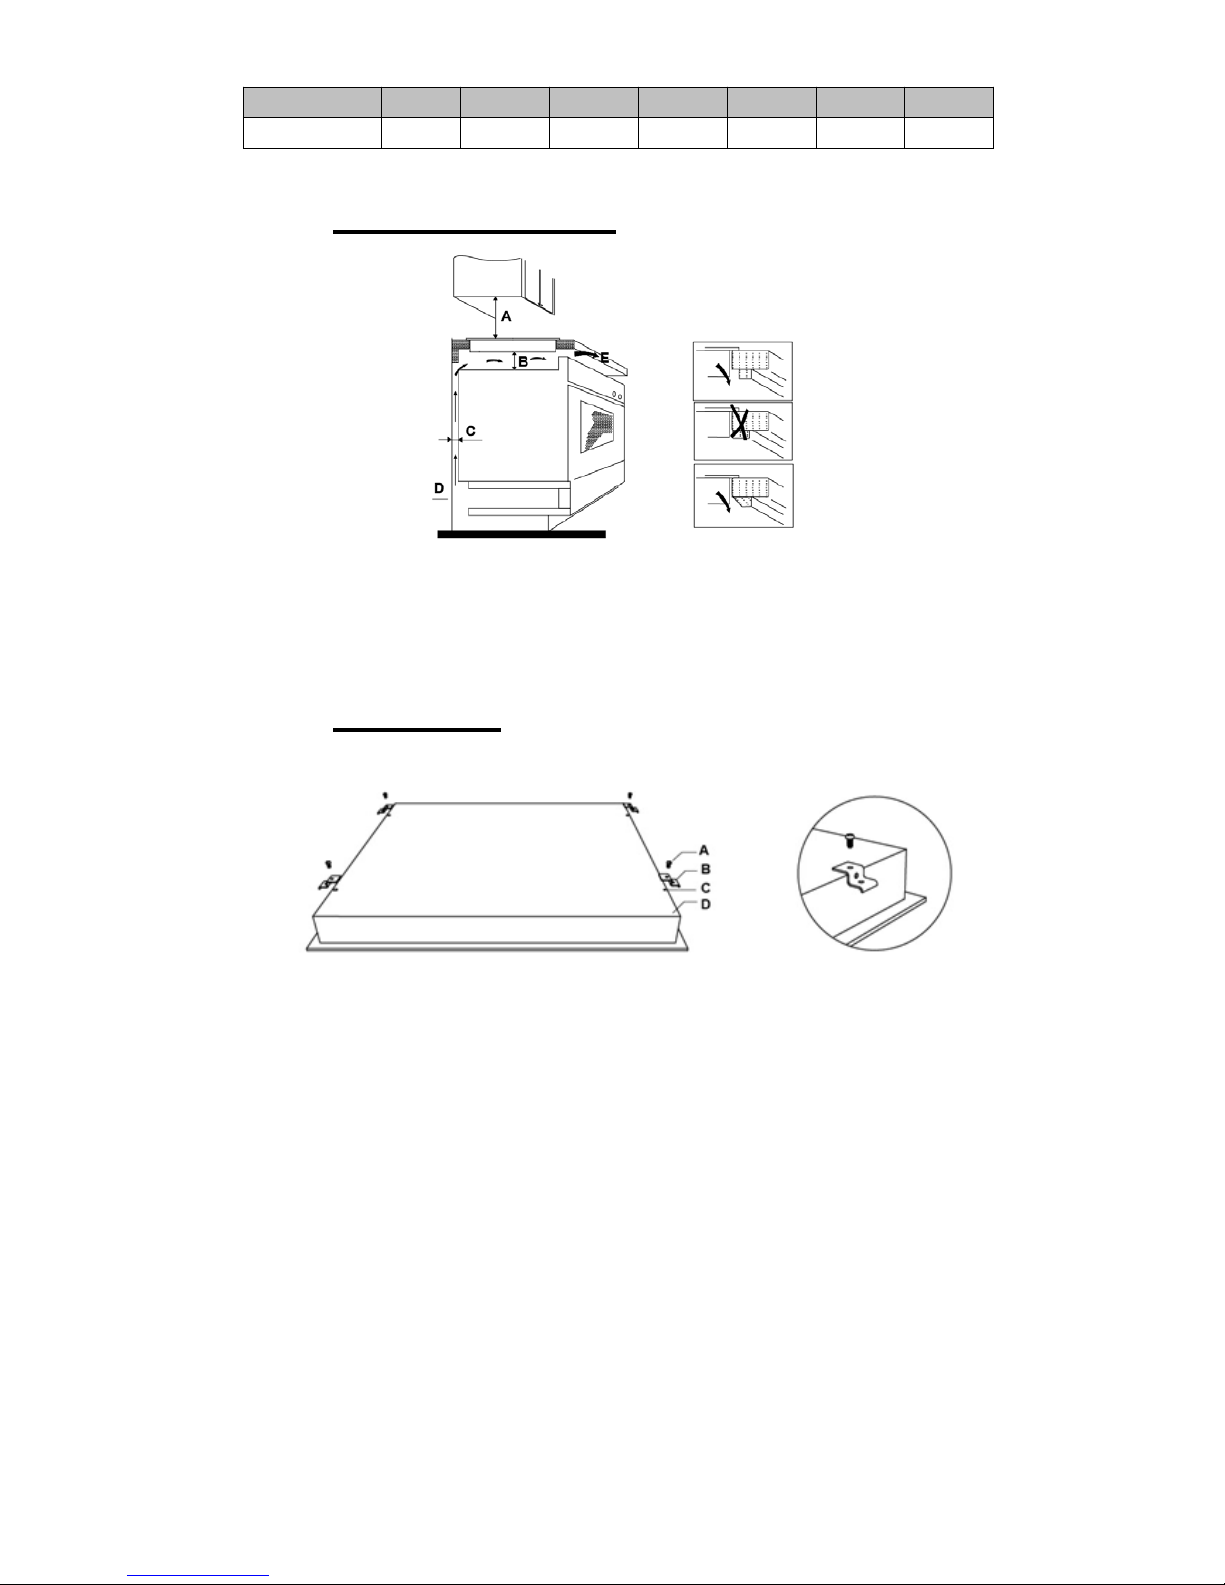
1.2. Space to Rear or Side Wall
A = 760mm B = 50mm (min) C = 20mm (min)
D = Air Gap/Intake E = Air Exit (5mm)
1.3. FixingBrackets
- Fix the brackets as shown below:
a) Screw b) Bracket c) Screw Hole d) Base of hotplate
Model L(mm) W(mm) H(mm) D(mm) A(mm) B(mm) X(mm)
IF6601 500 800 62 58 750 460 50mini
Page 6
6
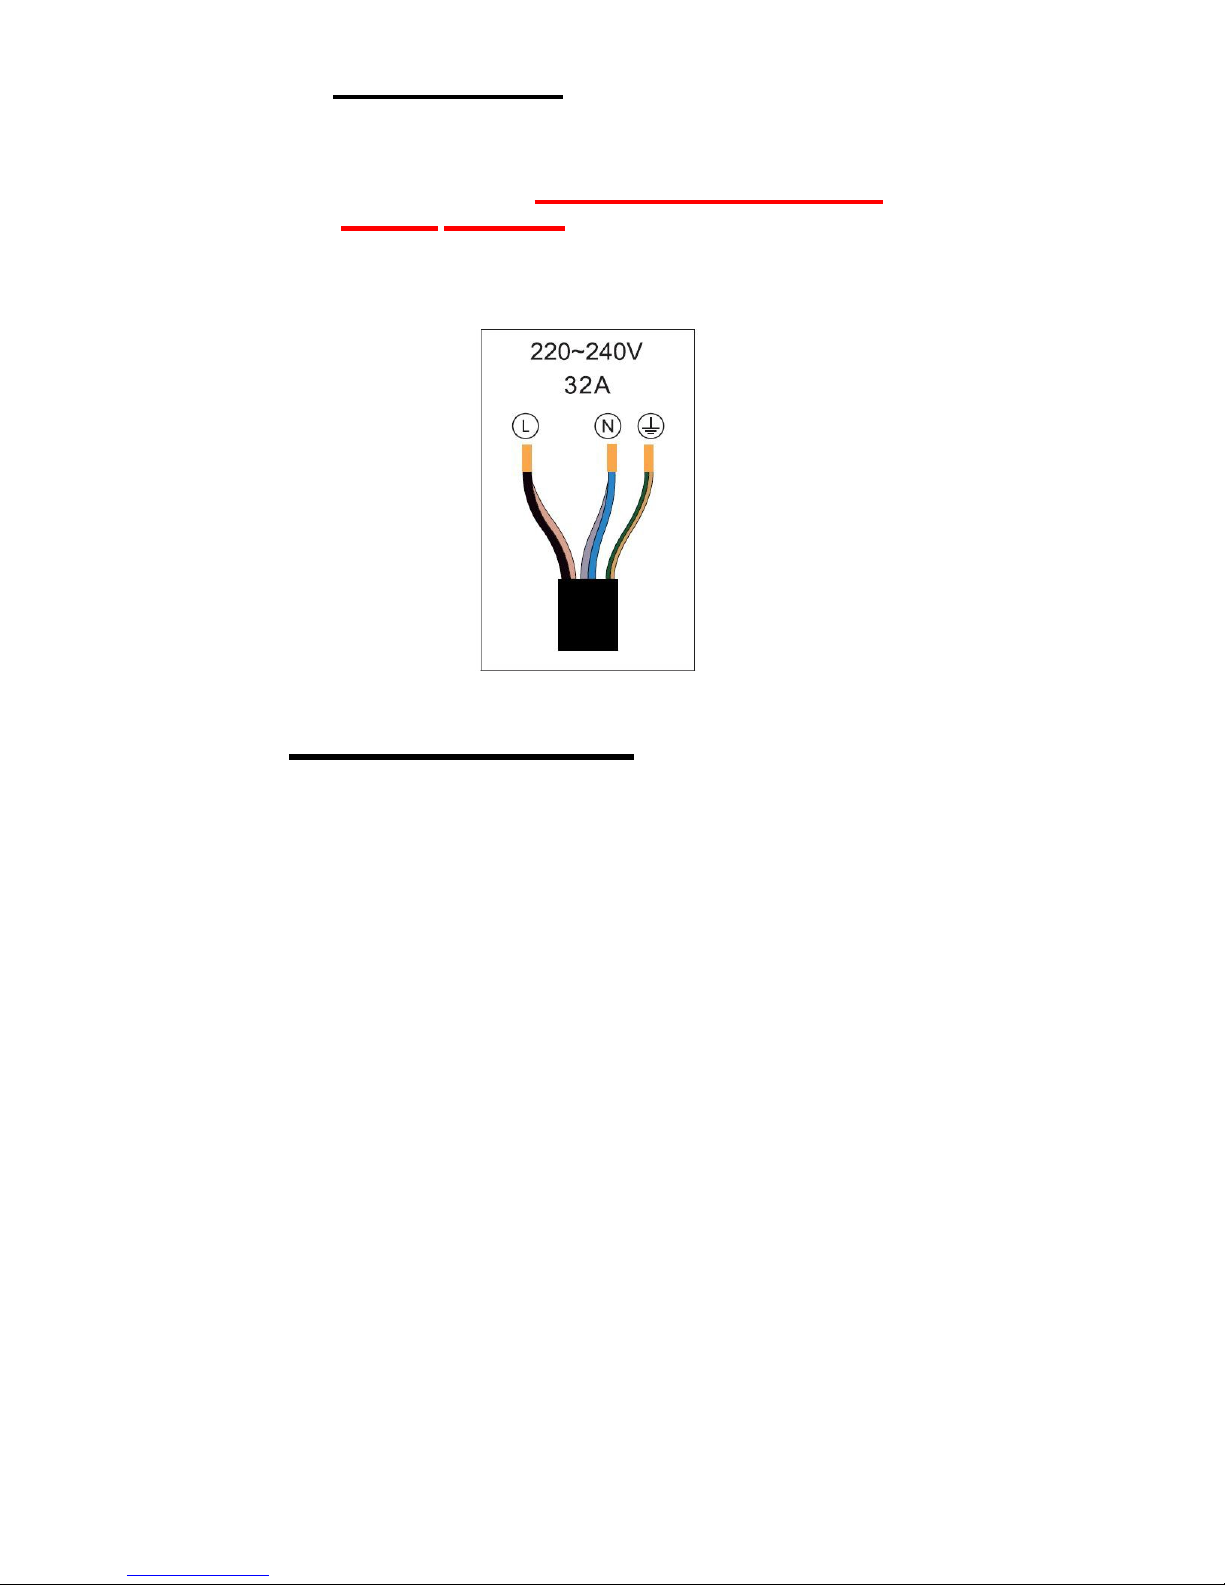
1.4. Electrical Connection
These appliances have a total Power Rating of 7000W and
must be ‘hard wired’ into a suitable fused spur adjacent to the
appliance housing. The product must be installed by a
Qualified Electrician.
Please note that a switchable spur should be accessible
above the work surface in order that the power can be turned
off.
Section 2. Safety Advice
- Please read this booklet thoroughly before installing
and switching on the appliance. The manufacturer
accepts no responsibility for incorrect installation and
usage.
- This appliance is guaranteed for Domestic Use Only.
This appliance shall not be used by children aged from 8
years and above and persons with reduced physical,
sensory or mental capabilities, or lack of experience and
knowledge, unless they have been given supervision or
instruction on how to use the appliance in a safe way and
understand the
Page 7

7
hazards involved. Children shall not play with the appliance.
Cleaning and user maintenance shall not be made by
children without supervision.
- This appliance must only be used for cooking/heating foods
and liquids. Do not use it for any other purpose.
- It is important that you use only metal pans specifically
designed and/or approved for use on Induction or
Ceramic Hobs. Never allow melamine or plastic
containers to come in contact with the heat zones.
- If using an adaptor, this must be used in accordance with
the manufacturers instructions and ensure that the
electrical
circuit is not overloaded as this could cause overheating.
- Do not twist or bend the cables, and keep them away from
hot surfaces. Following installation make sure that the
power
cable is not trapped underneath the appliance.
- Keep the appliance surfaces clean. Failure to do this
could lead to the appliance malfunctioning.
-
The surface of this appliance will get extremely hot during
use.
The surface of this appliance will remain hot after it has
been turned off. Do not touch or clean the heating zone
until it has completely cooled down.
- If the power supply cord is damaged, it must be replaced
by the manufacturer, it’s service agent or similarly
qualified persons in order to avoid a hazard.
Important Message for Cardiac Pacemaker Implant Patients!
THE INDUCTION HOB GENERATES MAGNETIC FIELDS IN ITS IMMEDIATE SURROUNDINGS. Your
pacemaker must be designed in compliance with the corresponding regulations in order for no
interference to be caused between it and the hotplate. Consult the pacemaker manufacturer or your
doctor to determine whether it complies with the regulations in force or whether any incompatibilities exist.
Section 3. Operating the Appliance
3.1. Cookware Suitable for Induction Hob
Page 8
8
Induction hobs are made from smooth, ceramic glass, the heat
comes from a magnetic induction coil which heats the cookware
but not the cooking surface. The heat from the cookware is
transferred to the food.
Pans suitable for induction hob use must be made from
magnetisable metal such as cast iron or steel. Pure aluminium,
copper or glass pans will not work with this type of hob unless the
base is bonded with a magnetic metal.
Check that pans are attracted to a magnet - this ensures that
they are suitable for use with an induction hob.
It is important that you use only metal pans specifically designed
and/or approved for use on Induction Hobs. Never allow melamine
or plastic containers to come in contact with the heat zones.
3.2. Cookware Suitable for Ceramic Hob
Ceramic hobs do not pick pot. You can use any kind of pot or
pan.
Make sure that the base of your pan is smooth, sits flat against
the glass, and is the same size as the cooking zone.
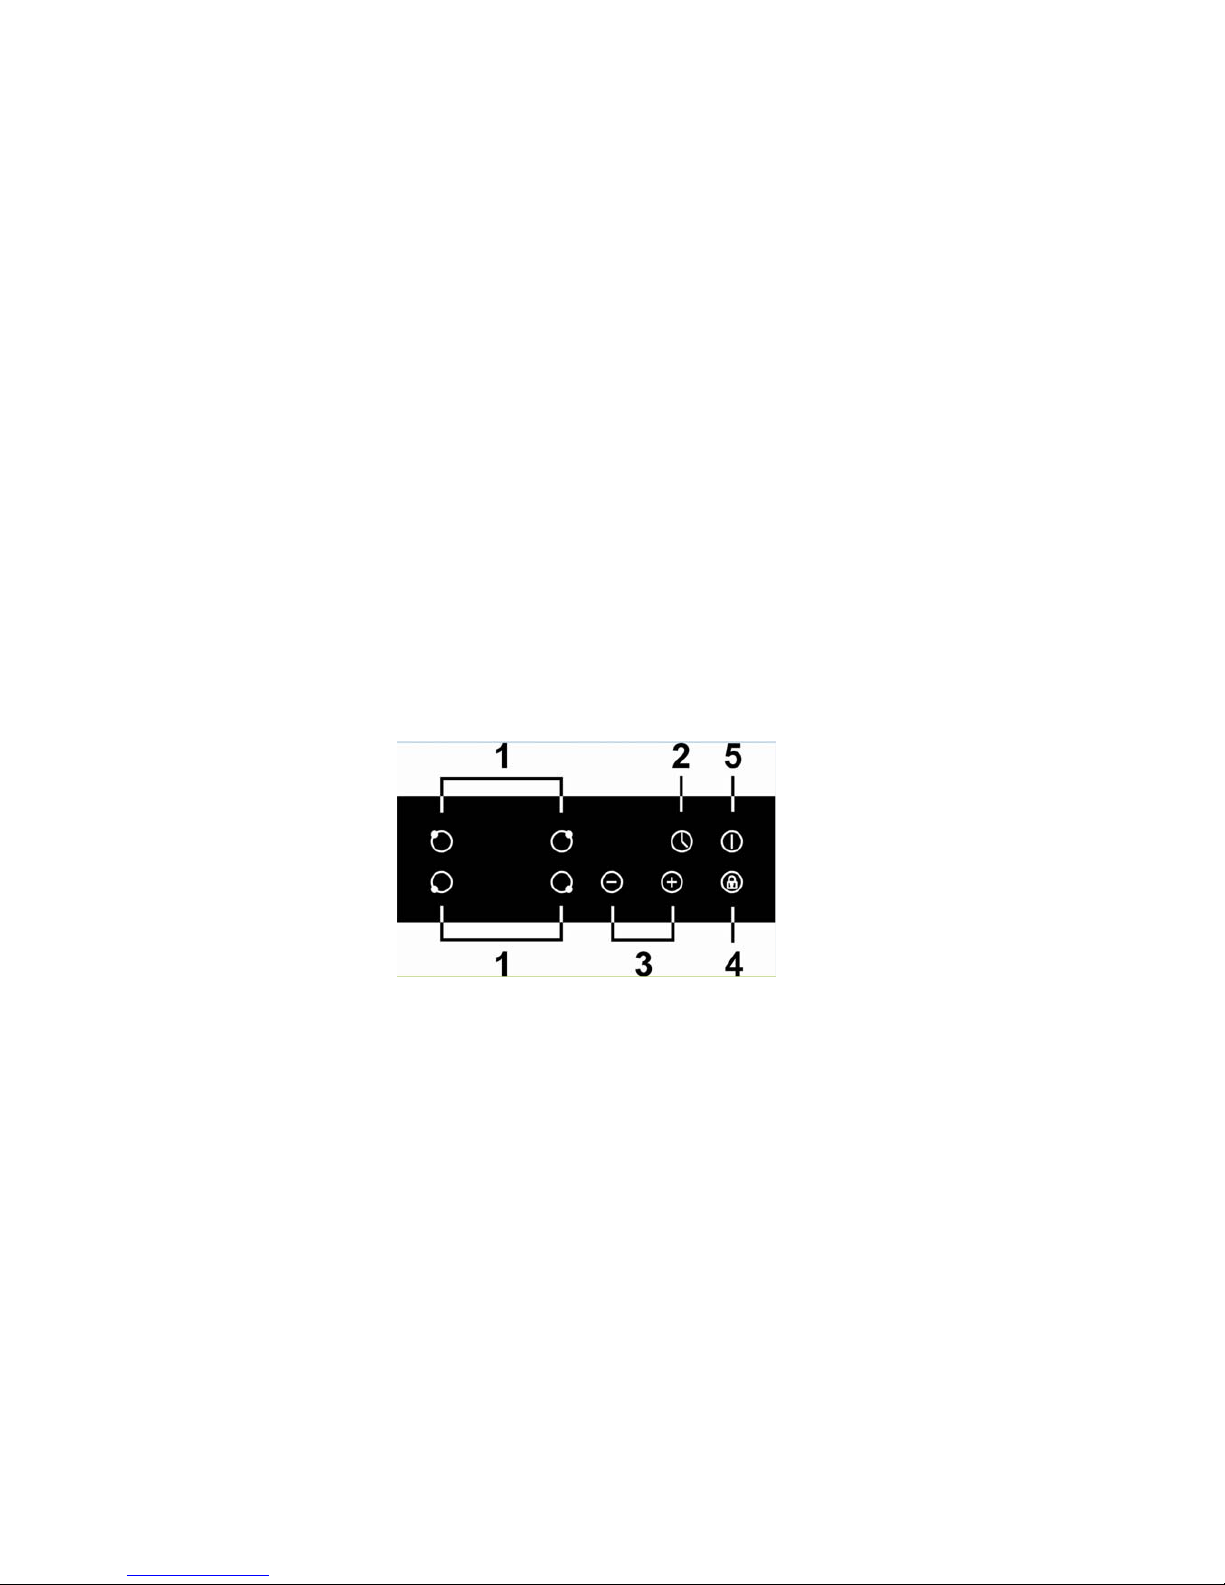
3.3. Control Panel
1. Heating zone selection controls
2. Timer control
Page 9

9
3. Power / Timer regulating key
4. Key/Lock control
5. ON/OFF control
3.4. Power, Cooking & Timer Functions
3.4.1. On-Off
To turn the appliance on or off, press and hold the Power On/Off
control (5) until you hear a ‘beep’. When the appliance powers
up, the heat zone indicators will display.
3.4.2 Setting the Zone Temperature
Press the required zone (1) and then use the ‘+’ or ‘-’ (3) to
increase or decrease the power for the required zone.
Power settings range from ‘0’ lowest to ‘9’ highest setting.
Press the heat zone control off when you have finished and
then turn the appliance off by pressing the Power Control (5).
3.4.3. Timer (1 to 99 Minutes)
You can use the Timer to operate one of the heat zones for a time
period of between 1 and 99 minutes:
- Press the heat zone button that you want to operate the timer
on (1) and select the heat setting level.
- Press the Timer Control (2).
- Select the required time between 1 and 99 minutes by using
the ‘+’ or ‘-’ controls (3).
- Now the heat zone will operate for the selected time and
automatically turn off at the end of the period. An audible
signal will also be heard at the end of the time period.
- If you need to cancel prior to the end of the set time, simply
press the heat zone control and then the Timer Control.
Page 10

10
3.4.6. Child Lock
To activate the Child Lock, press and hold the Child Lock control
(4) until ‘Lo’ is displayed. The lock will now be set and the
appliance will not operate. To unlock the Child Lock, simply press
and hold the Child Lock control again until the display is removed.
3.4.7. Hot Surface Warning Indicator
Please note, a hot surface indicator (H) will show when one or
more of the heat zones has been used – it will go out when the
zone is completely cool.
Page 11

11
Section 4. Maintenance
Before any maintenance or cleaning work is carried out,
DISCONNECT the appliance from the ELECTRICITY supply and
ensure that the appliance is completely cool.
4.1. Cleaning the Hob Surface
Clean spillages from the hob surface as soon as possible after use.
Always ensure that the surface has cooled down before cleaning.
Use a soft cloth or kitchen paper to clean the surface. If the spillage
has dried on the surface you may need to use a specialist vitroceramic glass cleaner, available from all good supermarkets.
Do not use other abrasive cleaners and/or wire wool etc as this may
scratch the surface of the hob.
4.2. What to do if something goes wrong
There is no power to the appliance:
- Check there is not a power cut
- Check there is power to the electric socket/appliance
- Has the set time elapsed? – see section 3.3.3.
After cooking the letter ‘H’ is displayed:
- This is the hot surface indicator – it will remain on until the
appropriate heat zone has completely cooled down.
4.3 What to do if Induction hob goes wrong
After switching off, the appliance sounds like it is still running:
Page 12

12
- This is the cooling fan – it will remain on until the appliance
has completely cooled down.
The display indicates E5:
- This indicates high temperature. Allow the hob to cool down
then start again
The hob makes a ‘clicking’ noise during use:
- This is quite normal – it is the sound of the induction coils
during operation.
Forall other errorcodes, switch off and callyourserviceprovider.
Page 13
13
Important Note:
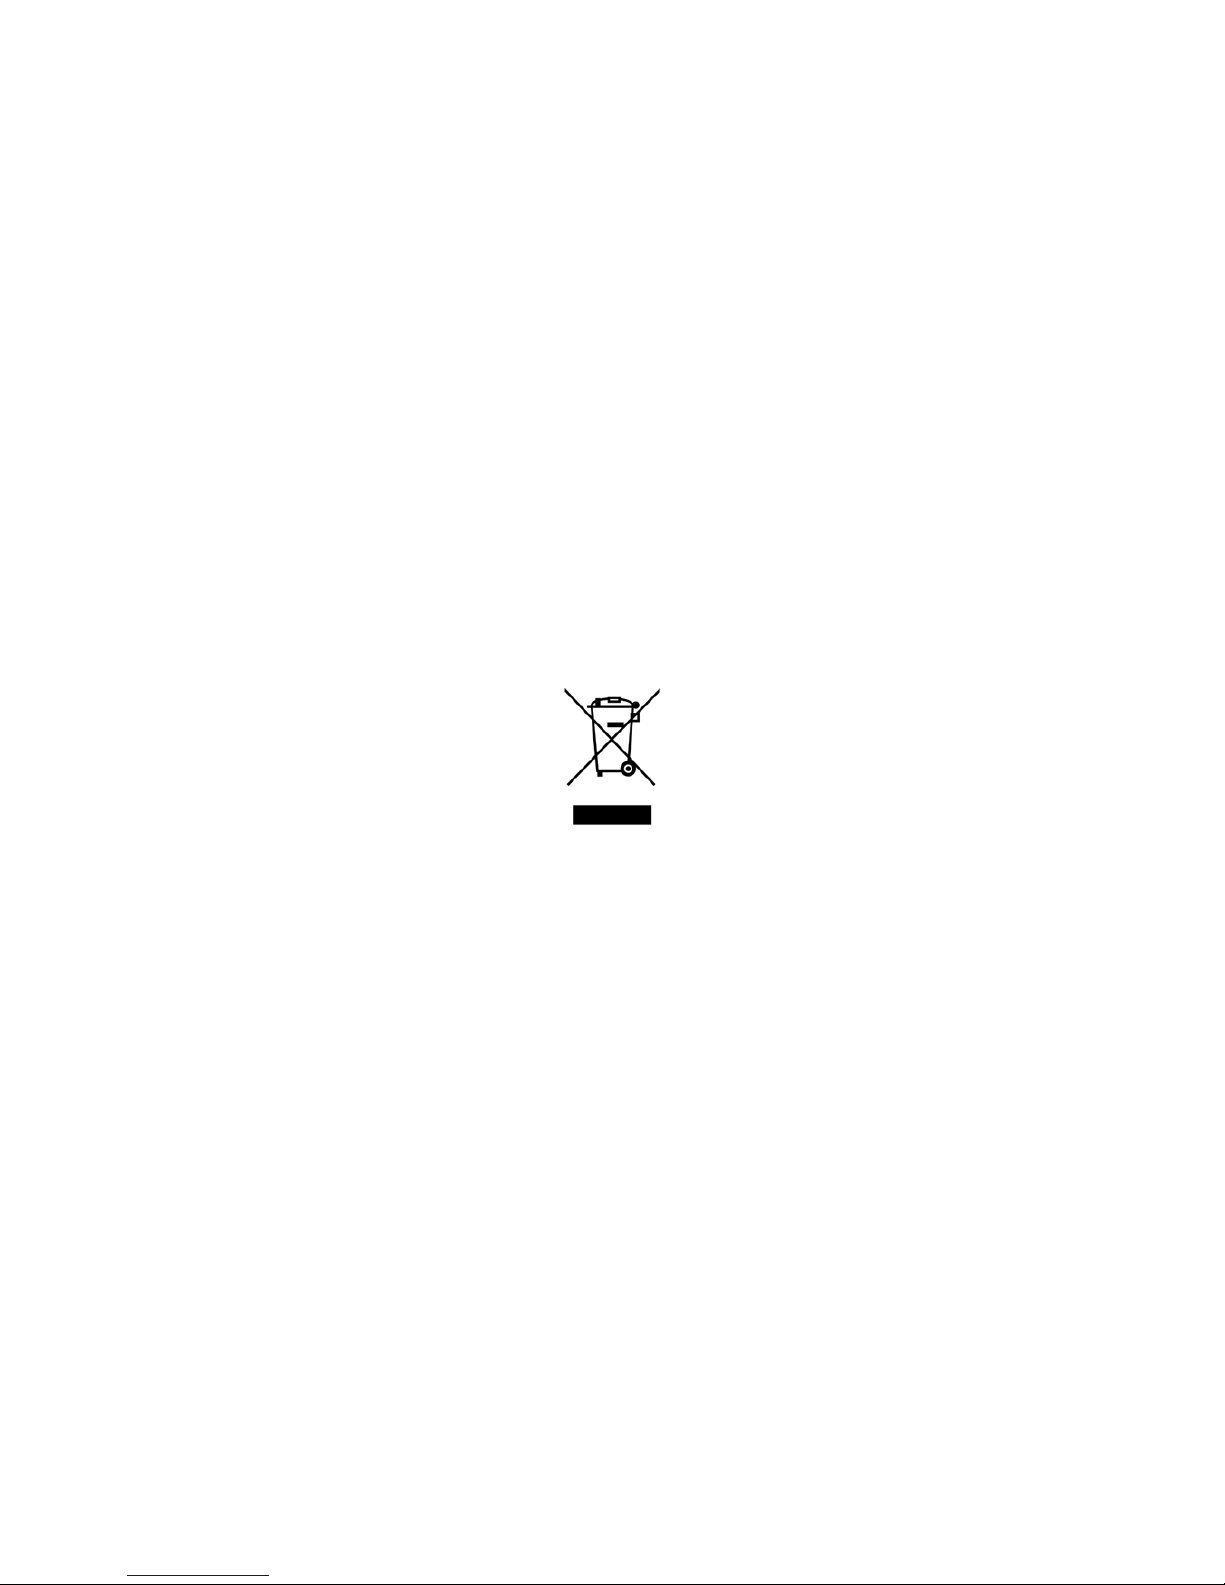
This appliance is marked according to the European directive
2002/96/EC on Waste Electrical and Electronic Equipment
(WEEE). By ensuring this product is disposed of correctly, you
will help prevent potential negative consequences for the
environment and human health, which could otherwise be
caused by inappropriate waste handling of this product.
The symbol on the product, or on the documents
accompanying the product, the Crossed Out Wheelie Bin,
indicates that this appliance may not be treated as household
waste. Instead it shall be handed over to the applicable
collection point for the recycling of electrical and electronic
equipment.
Disposal must be carried out in accordance with local
environmental
regulations for waste disposal. For more detailed information
about treatment, recovery and recycling of this product, please
contact your local authority, your household waste disposal service
or the retailer where you purchased the product.
 Loading...