

Page 1

USER’S MANUAL
AF02
SAFETY INSTRUCTIONS
PRODUCT SPECIFICATION & CONTAINS
INSTALLATION
CONTROLS
WARRANTY
COMPANY INFO.
www.windamp.com
Page 2

SAFETY INSTRUCTIONS
READ ALL INSTRUCTIONS BEFORE USING THIS FAN.
TO REDUCE THE RISK OF FIRE, ELECTRIC SHOCK, OR INJURY:
WARNING
* Do not Turn the Head on your own.
- To use the fan, follow the descriptions in this manual. Never carry out any maintenance
other than described in this manual.
- This fan is not intended for use by young children or lack of experience and knowledge,
unless they have been given supervision or instruction by a responsible person
concerning use of the appliance to ensure that they can use the appliance safely.
- The fan is suitable for dry location only. Do not use it in outdoor or in wet area.
- The fan must be assembled securely before operating.
- Turn off all controls before unplugging.
- Unplug from outlet when not in use for extended period.
- Clean the outer part of the fan regularly with dry cloth.
- Do not use any cleaning agents, lubricants or any other chemicals for cleaning.
- Do not carry the base part of the fan. Always carry the square head part with both hands.
- Do not place or use the fan near the furnaces, fireplace or other sources of heat.
- Do not route cord under furniture or appliances. Arrange cord away from traffic area and
where it will not be tripped over.
- Do use common sense when using this fan and/or any electrical appliances.
- Do not cover the cord with throw rugs or similar coverings.
- Do not put anything into air inlet.
- Do not use the fan or handle the plug with wet hands.
- Do not unplug by pulling on cord.
- Do not use other adaptors without authorization.
- Do not hang or mount fan on a wall or ceiling.
- Do not dismantle or modify the fan.
- Do not sit on the fan or put heavy items on the fan.
1) ambient operating temperature: 40 °C
2) This appliance can be used by children aged from 8 years and above and persons with
reduced physical, sensory or mental capabilities or lack of experience and knowledge if they
have been given supervision or instruction concerning use of the appliance in a safe way and
understand the hazards involved. Children shall not play with the appliance. Cleaning and user
maintenance shall not be made by children without supervision.
3) the appliance is only to be used with the power supply unit provided with the appliance.
4) it must only be supplied at safety extra low voltage corresponding to the marking on the appliance.
02
Page 3
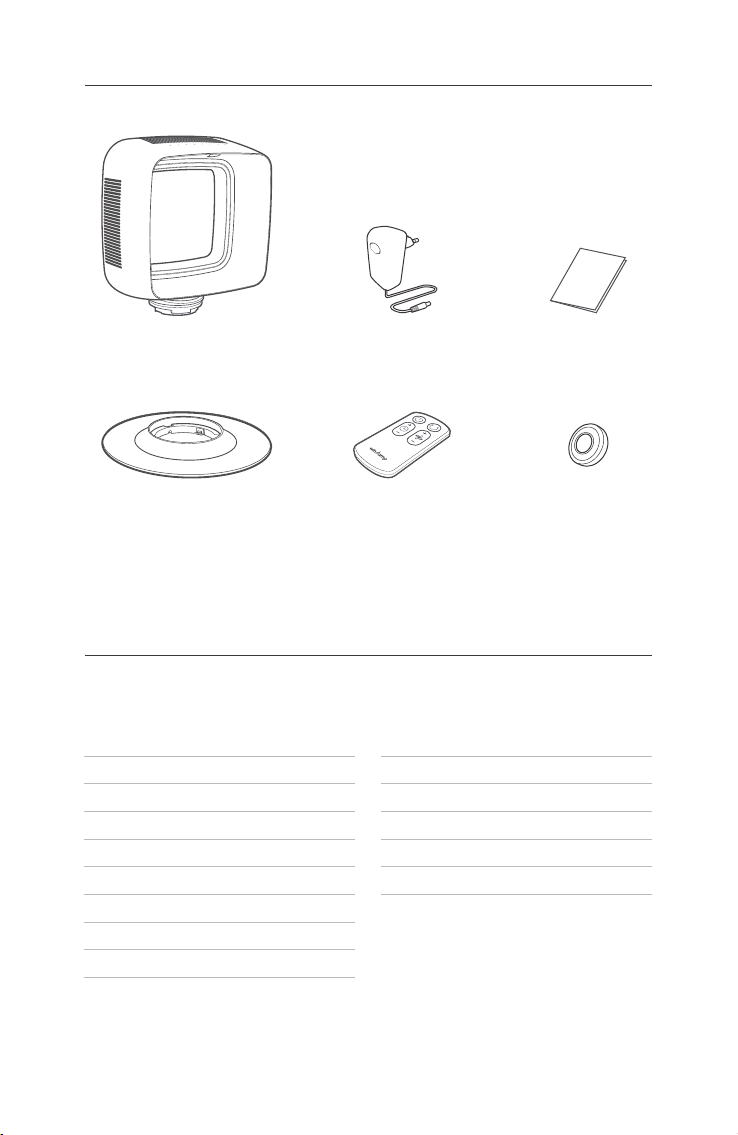
PACKAGE CONTAINS
Fan (Head)
Fan (Base) Remote control
Adaptor
PRODUCT SPECIFICATION
Fan Remote Control
Size (WxDxH)
Timer
Wind Volume
Input Power
Weight
High Speed
Rated Voltage
Tilt(Manual)
Oscillation
367x308.5x419(mm)
1hr ‒ 8hrs
Lv.1 ‒ Lv.8
22W
4.0kg
5.8m/sec
100-240V, 50/60Hz
30°
70°
High glossy ABSMaterial
Size (WxDxH)
Power
Oscillation
Timer
Wind Volume
Material
Battery CR2025
Adaptor
AC 100~240V(Free Volt), 50/60Hz
->DC 12V 2.0A 24W, SMPS
User’s Manual
Battery
(CR2025)
41.4x82.5x8.5(mm)
ON/OFF
ON/OFF
UP/DOWN
UP/DOWN
High glossy ABS
03
Page 4
INSTALLATION
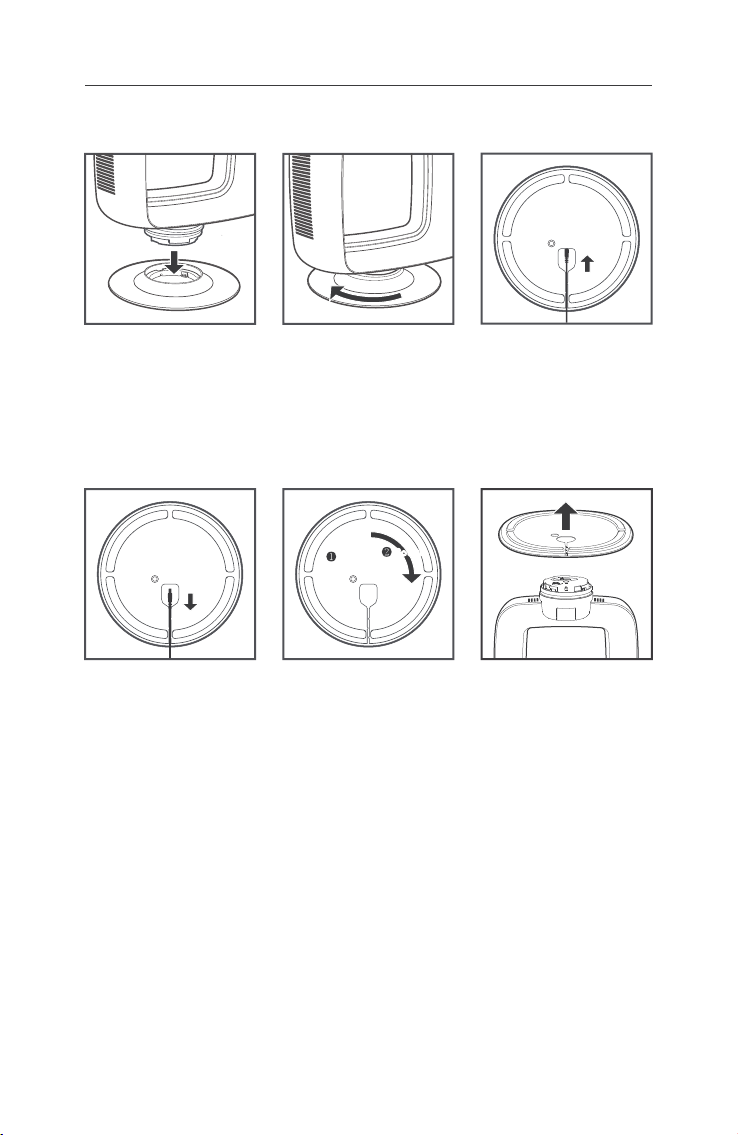
Assembly & Adaptor Connection
Assemble the head and the
base, aligning the arrows.
Disassembly
Unplug the power cord
from the standard outlet
on the bottom of the base.
Once aligned, push
downward and rotate the
base counterclockwise
until you hear a click
sound.
RotateRotate
Push
Button
Press the button and rotate
the base clockwise.
Plug the power cord into
the standard outlet located
on the bottom of the base.
Separate the head and the
base.
04
Page 5
CONTROLS
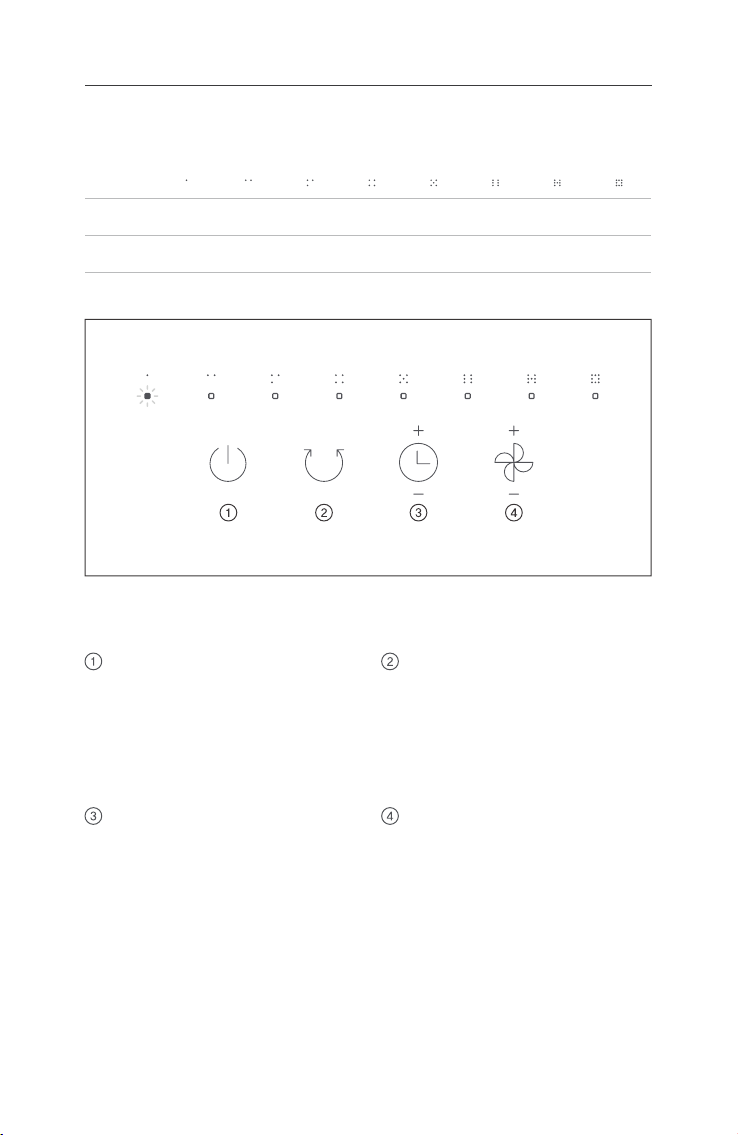
LED Indicator
Timer 4hrs3hrs 5hrs 6hrs 7hrs2hrs1hr 8hrs
Wind Lv. 4Lv. 3 Lv. 5 Lv. 6 Lv. 7Lv. 2Lv. 1 Lv. 8
Sound FaMi Sol La TiReDo Do
Note: When touching buttons except Power button, LED indicates current setting for 3 seconds.
Power Button
Touch the button to turn on/off the fan,
When operating, 1st LED is always on.
(It also indicates 1st Level of Wind
Volume and Timer at the same time)
Timer Button
Touch the button to adjust the time
from 1 hr to 8 hrs.
NOTE:
Touch + button to set timer for 1 hr, then the 1st
LED will blink. To cancel the setting, touch +
once from 8 hrs setting, or - once from 1 hr
setting. Then it makes ‘beep’ sound.
Oscillation Button
Touch the button to turn on/off the
oscillating function.
Wind Volume Button
Touch the button to control the wind
volume upto Lv. 8.
NOTE:
When setting 1st level, the fan makes “Do”
sound, but there is no change on LED indicator.
Also it memorizes past wind volume setting
when turning on again.
05
Page 6
CONTROLS
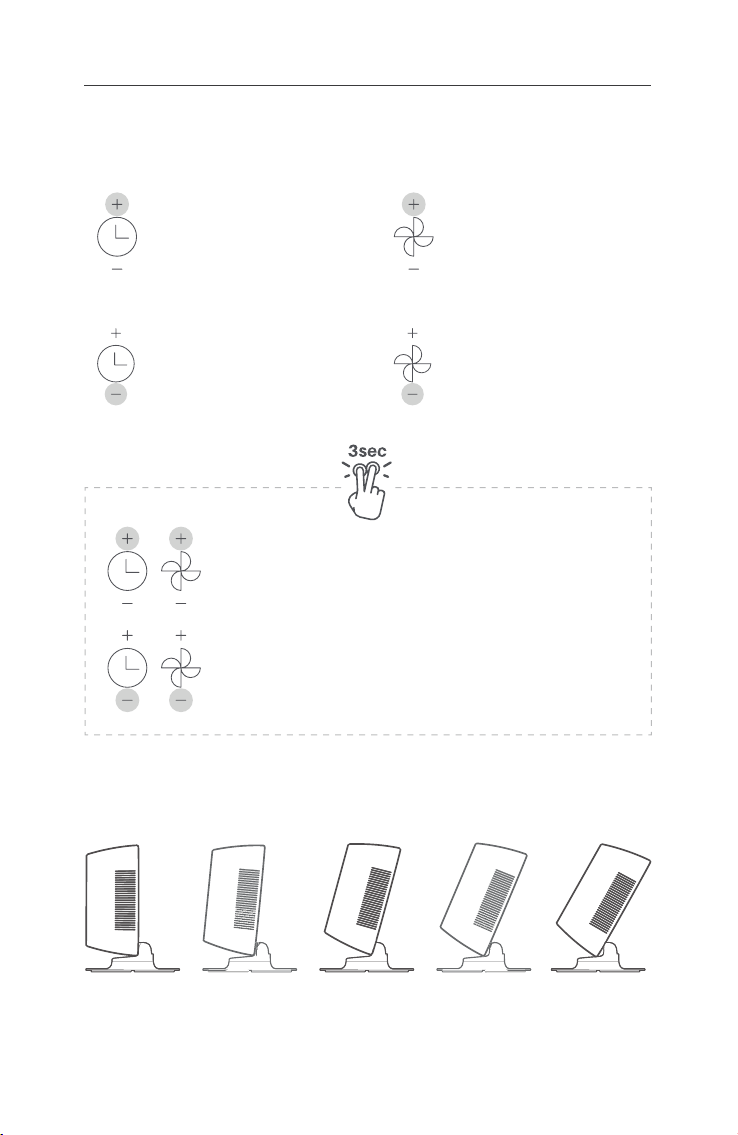
How to use
Button
+
-
Touch the “+” button (top of the
clock button) to extend 1 hour.
Button
Touch the “-“ button (bottom of the
clock button) to reduce 1 hour.
Mute
Touch these two "+" buttons (on the top of the clock and fan buttons)
and hold for at least 3 seconds.
Lock
Touch these two "-" buttons (underneath of the clock and fan
buttons) and hold for at least 3 seconds.
Touch the “+” button (top of fan
button) to increase the wind
volume.
Touch the “-” button (bottom of the
fan button) to decrease the wind
volume.
TILT
0°
The head of the fan can be manually adjusted from 0° to 30°.
15° 30°
06
Page 7
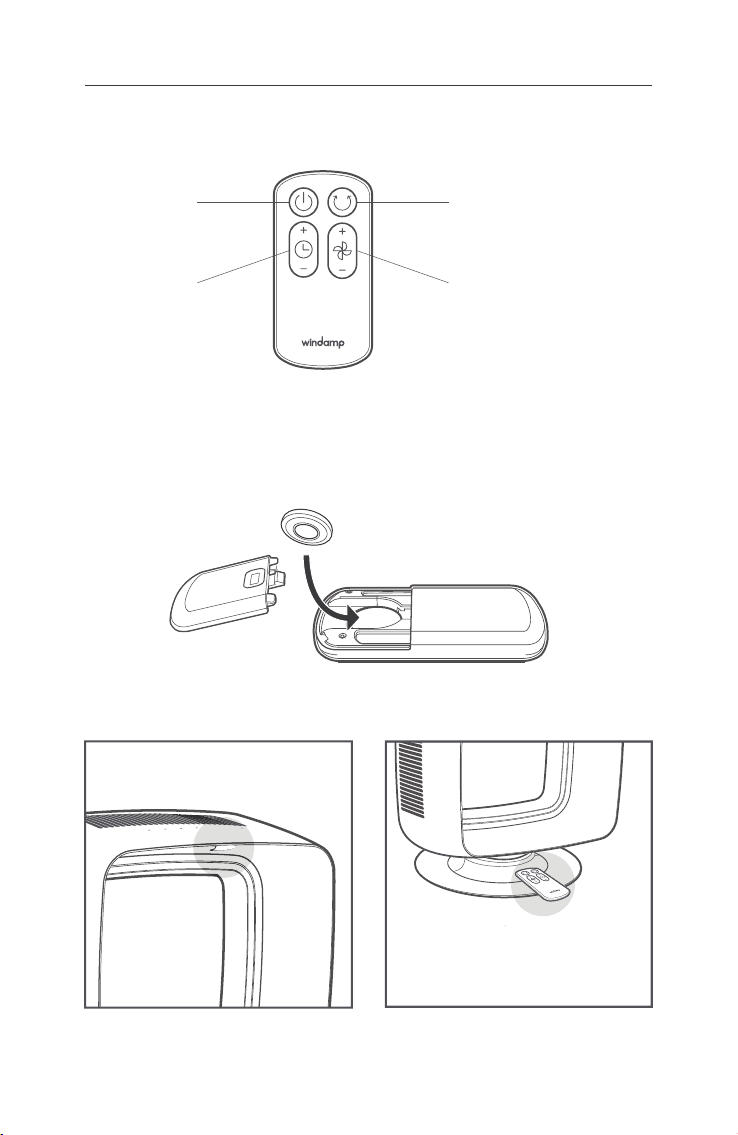
CONTROLS
Remote Control Instructions
Power
Turns on/off the fan
Timer
Adjusts the time
Oscillation
Turns on/off the oscillation
Wind Volume
Controls the wind volume
Remote Control Battery
Remove the battery cover by sliding downward, and insert the battery (CR2025) into
the remote control in direction of arrow.
Place Magnetic Remote ControlRemote Control Operation
Use the remote control facing to IR receiver
of head part.
Attach remote control to marked top of
base part with the top facing up.
07
Page 8

WARRANTY
2 Years Limited Warranty
This warranty is valid only with original purchase receipt.
The warranty starts to be effective for a period of ‘2 years’ from the original
purchase date. Please keep your proof of purchase (receipt).
This warranty provides, at no extra cost to you, all labors and parts necessary
to ensure your product is in proper operating condition during the warranty
period. All replaced products will become the property of Windamp co., Ltd.
The replacement will not extend the warranty period.
WARRANTY DOES COVER
For 2 years of purchase, this warranty covers the defect from material,
workmanship or function. If any defect, mentioned above, is discovered
within the warranty period, Windamp will replace the product with no cost,
but shipping cost will be charged to customers.
Repair not covered by the warranty or after the warranty period will require
a fee to cover the cost of material, labors, handling and shipping.
The parts or the products which are replaced will become the property of
Windamp.
WARRANTY DOES NOT COVER
The warranty does not cover careless operation or handling of the fan
without following the instruction of this manual. The warranty does not
cover the damage of dismantle or modify the fan without authorization. The
warranty does not cover the fan purchased outside of the country. Failure
caused by force majeure or any circumstances out of Windamp’s control,
weather, electrical outages or power surges.
08
Page 9

COMPANY INFO.
US CN
Windamp Co., Ltd.
#403, Seongsu IT Center,37,Seongsui-ro 22-gil
Seongdong-gu, Seoul, Korea
Zip code 133-832
JP KR
WINDAMP ㈱ウィンドエンプ(製造)
Seongsu IT center 403, 37,
Seongsui-ro 22-gil Seongdong-gu
Seoul, Republic of Korea
SMART BS株式会社(販賣)
〒146-0082 東京都大田区池上1-6-9
T 03 6677 0530
www.smartbs.co.jp
(株)WINDAMP
首尔市城东区(圣水二街?)
Seongsui-ro 22路37
圣水IT中心403号
㈜ 윈드앰프
서울시�성동구�성수이로 22길 37
성수IT 센터 403호
T +82 70 8898 9100
F +82 2 497 8804
E Info.windamp@ gmail.com
www.windamp.com
09
 Loading...