

Wincor Nixdorf Beetle/XL-I User Manual
BEETLE /XL-II
Modular POS System
User Guide
Edi ti on April 2005

Co py right© Win cor Nix dorf In ter na tio nal GmbH, 2005
The re pro duc ti on, trans mis si on or use of this do cu ment or its con tents is not
per mit ted wit hout ex press aut ho ri ty.
Of fen ders will be li ab le for da ma ges.
All rights, in clu ding rights crea ted by pa tent grant or re gi stra ti on of a uti li ty mo del or
de sign, are re ser ved.
De li very sub ject to avai la bi li ty; tech ni cal mo di fi ca tions pos si ble.
Li nux™ is a re gis te red tra de mark of Li nus Tor valds
Pen ti um™ is a re gis te red tra de mark of the In tel Cor po ra ti on
MS-DOS™, Wind ows 95™, Wind ows 98™, Wind ows NT™, Wind ows CE™,
Wind ows2000™and Wind ows XP™ are re gis te red tra de marks of the Mi cro soft
Cor po ra ti on

Contents
Ma nu fac tu rers Cer ti fi ca ti on................................................1
Tes ted Sa fe ty..............................................................................................1
FCC-Class A De cla ra ti on............................................................................1
Im por tant No tes ..........................................................................................2
Note on the la ser ........................................................................................3
In tro duc ti on..........................................................................4
About this Ma nu al .......................................................................................4
Care of the BEET LE /XL-II..........................................................................5
Re cy cling the BEET LE /XL-II ......................................................................6
War ran ty .....................................................................................................7
BEET LE /XL-II ......................................................................8
Over view.....................................................................................................8
BEET LE /XL-II Pe ri phe rals....................................................................9
BEET LE /XL-II in a Net work ................................................................10
Be fo re swit ching on the Sys tem ................................................................11
Un pa cking and che cking the Sys tem ..................................................11
Set ting up the De vi ce ..........................................................................11
Cab ling of the BEET LE /XL-II ..............................................................11
Con nec ting to the Mains Po wer Supp ly...............................................12
Dis con nec ting Ca bles..........................................................................12
Moun ting an Ex haust Air Hood............................................................13
In stal la ti on of the BEET LE /XL-II ..............................................................15
Ver ti cal Moun ting.................................................................................15
Ho ri zon tal ly Moun ting .........................................................................15
BEET LE with Ex haust Air Hood ..........................................................16
Moun ting the Ca ble Co ver...................................................................17
Ba sic Set tings .....................................................................................17
Ad ju sting the Loud spea ker..................................................................18
Light Emit ting Di ode (LED)..................................................................18
Con nec ting Pe ri phe rals.............................................................................18
Key bo ard (KYBD)................................................................................19
Scan ners and Sca les (COM1 - COM4*)..............................................19
Cus to mer Dis play (COM2* or COM4*) ................................................20
Cas hier Dis play (COM3*) ....................................................................20
Mo ni tor ...............................................................................................21
TFT - LCD Dis play ..............................................................................21
Con nec ting Stan dard PC Pe ri phe rals (COM1)....................................21
Net work ...............................................................................................22

Mo du lar Prin ters..................................................................................22
Cash Dra wer (1,2) ...............................................................................23
BEET LE /XL-II - the Com po nents .....................................24
Over view...................................................................................................24
Flop py Disk Dri ve ......................................................................................26
Ge ne ral ...............................................................................................26
Re mo ving a Disk .................................................................................27
CD-ROM Dri ve..........................................................................................27
Ge ne ral ...............................................................................................27
Ope ra ting the Dri ve .............................................................................28
No tes...................................................................................................29
Po wer Sypp ly Unit.....................................................................................29
Bat te ry ......................................................................................................30
Chan ging the Bat te ry...........................................................................31
Con fi gu ra ti on Va riants ......................................................33
Sub mo du les for the CPU ..........................................................................33
LAN Con trol ler 10/100 MBit.................................................................33
CRT- or TFT-Adap ter ..........................................................................33
In stal ling a Sub mo du le .......................................................................33
Chan ge of the CD-ROM Dri ve ..................................................................35
Chan ge of the Hard Disk Dri ve .................................................................36
In stal ling an Ex pan si on Card ....................................................................37
Re tail Soft wa re...................................................................39
Win cor Nix dorf Sto re So lu tions .................................................................39
Plat forms and Pro ducts.............................................................................40
Mi cro soft .............................................................................................40
Li nux....................................................................................................41
Tech no lo gy Eva lua ti on ........................................................................41
Star ting up the Sys tem .....................................................42
Start and Ru nup Be ha vi our.......................................................................42
Ap pen dix ............................................................................44
Tech ni cal Data for the BEET LE /XL-II.......................................................44
Rear Pa nels of the BEET LE /XL-II ............................................................45
Glos sa ry....................................................................................................46
Ab bre via tions ............................................................................................48
Manufacturers Certification
The device complies with the requirements of the EEC
directive 89/336/EEC with regard to ‘Electromagnetic
compatibility" and 73/23/EEC “Low Voltage Directive”.
Therefore, you will find the CE mark on the device or packaging.
Tested Safety
The POS sys tem has been pro vi ded with the sym bol for
“Tes ted Sa fe ty”.
In ad di ti on, the BEET LE has re cei ved the UL sym bol and cUL
sym bol.
FCC-Class A Declaration
This equipment has been tested and found to comply with the limits for a
Class A digital device, pursuant to part 15 of the FCC Rules. These limits
are designed to provide reasonable protection against harmful interfe rence
when the equipment is operated in a commercial environment. This
equipment generates, uses, and can radiate radio frequency energy and, if
not installed and used in accordance with the instruction manual, may cause
harmful interference to radio communications.
Operation of this equipment in a residential area is likely to cause harmful
interference in which case the user will be required to correct the
interfe rence at his own expense.
Le présent appareil numérique ne génère pas de bruits radioélectriques
dépassant les limites applicable aux appareils numériques de la “Class A”
prescrites dans le Règlement sur le brouillage radioélectrique édicté par le
ministère des Communications du Canada.
1
TESTED SAFETY
geprüftegeprüfte
SicherheitSicherheit

Important Notes
The modular POS system BEETLE /XL-II conforms to the current safety
standards for data processing equipment.
n
If this device is taken from a cold environment into the operating room,
moisture condensation may form. The device must be absolutely dry
before being put into service; an acclimatization period of at least two
hours must therefore be observed.
n
This device is equipped with a safety-tested power cable and may be
connected only to a prescribed grounded-contact power socket.
n
When setting up the device, ensure that the power socket on the device
and the grounded-contact power socket are easily accessible.
n
To disconnect the device from the supply voltage completely, switch off
the device and disconnect the power plug.
n
Ensure that no foreign objects (e.g. office clips) find their way into the
device, as this may lead to electric shocks or short-circuits.
n
Never plug in or unplug data communication lines during thunderstorms.
n
Protect devices from vibrations, dust, moisture and heat.
n
Always dispose of used parts, such as batteries, in an environmentally
safe manner.
The lithium battery must be disposed of in accordance with local regulations
for special waste. The lithium battery must be replaced by authorized
personnel only. Incorrect replacement may lead to the danger of explosion.
n
In emergencies (e.g. damaged housing or damaged power cable,
penetration by liquids or foreign bodies), the device must be switched off
immediately, the power plug disconnected and the Customer Service of
Wincor Nixdorf or your dealer must be notified.
n
The device may only be repaired by authorized qualified personnel.
Unauthorized opening of the device and inexpertly carried-out repairs may
not only seriously jeopardize the safety of the user, but also cancel all
warranty and liability agreements.
IMPORTANT NOTES
2

n
Your BEETLE POS system is the result of modern technical innovation.
So please see for according structural and technical surroundings to
guarantee a faultless and efficient work of your BEETLE.
n
Therefore, you should connect your BEETLE or other IT-devices only to
power supply systems with separately guided protective earth conductor
(PE). This kind of electricity system is known as TN-S network. Do not
use PEN conductors!
n
Please also observe the recommendations of the norm DIN VDE 0100,
Part 540, Appendix C2 as well as EN50174-2, §5.4.3. Thus you can help
to avoid possible malfunctions.
Note on the laser
lf your device is equipped with a CD ROM drive, the following condition
applies:
The CD ROM drive contains a light-emitting diode (LED), classified
according to IEC 825-1:1993:LASER CLASS 1; it must not be opened.
3
NOTE ON THE LASER

Introduction
The BEETLE /XL-II is the compact, powerful and economical basis for your
POS system.
The BEETLE conforms to the PC/AT industry standard. Powerful
processors ensure a quick processing of all operations.
You can connect a variety of different peripheral devices to your BEETLE
and even the choice of the software is not limited to a certain product.
Optionally, the BEETLE /XL-II can be equipped with a floppy disk drive,
a CD-ROM drive or a DVD drive, a hard disk or a compact flash.
This provides you with a considerable degree of flexibility when arranging
the configuration of your POS system.
The BEETLE can also be connected to a network once an appropriate
network card has been installed.
Whatever configuration you need: Wincor Nixdorf offers the right solution.
So, whenever you want to expand your BEETLE /XL-II, please contact your
Wincor Nixdorf branch office or your dealer.
About this Manual
This documentation is intended to help you work with the POS system and
to serve as a reference work. The detailed table of contents helps you find
the desired information quickly and easily.
The first section describes
n
ever ything you need to do be fo re swit ching on the POS sys tem and
how to con nect pe ri phe rals to the BEETLE /XL-II.
The second section contains
n
a brief over view of the com po nents of your BEET LE POS sys tem. Here,
you will also find a de tai led des crip ti on of re cur ring ac tions, for ex am ple,
how to use the disks.
The third selection describes
n
the possible configuration variants of your BEETLE /XL-II.
About this Manual
4

The fourth section provides
n
a general overview of the Wincor Nixdorf Retail Software.
Section five
n
explains the start and runup behaviour of the BEETLE /XL-II.
The Appendix
n
con tains the most im por tant tech ni cal data, a glos sa ry and a list of
ab bre via tions.
Notes in the manual are marked by this symbol.
This symbol is used for warnings.
The type and scope of application programs depend on the customer’s own
selection; therefore software will not be discussed further in this manual.
Separate manuals are included in the scope of the connectable peripherals.
For this reason, a more detailed description of these devices will not be
provided here. For more information, see the relevant manuals.
Care of the BEETLE /XL-II
Clean your BEETLE /XL-II at regular intervals with a suitable plastic-surface
cleaner. Make sure that the power plug is disconnected, connector cables
are unplugged and that no liquid finds its way into the device.
5
CARE OF THE BEETLE /XL-II

Recycling the BEETLE /XL-II
En vi ron men tal pro tec ti on does not be gin when the time
has come to dis po se of the BEET LE; it be gins with the
ma nu fac tu rer. This pro duct was de sig ned ac cor ding to
our in ter nal norm “En vi ron men tal cons ci ous pro duct
de sign and de ve lop ment”.
The modular BEETLE /XL-II POS System is manufactured without the use
of CFCs and CCHS and is produced mainly from reusable components and
materials.
The processed plastics can, for the most part, be recycled. Even the
precious metals can be recovered, thus saving energy and costly raw
materials.
Please do not stick labels onto plastic case parts. This would help us to
re-use components and material.
You can protect our environment by only switching on your equipment when
it is actually needed. If possible, even avoid the stand-by-mode as this
wastes energy, too. Also switch your equipment off when you take a longer
break or finish your work.
At this time, there are still some parts that are not reusable. Wincor Nlxdorf
guarantees the environmentally safe disposal of these parts in a Recycling
Center, which is certified pursuant to ISO 9001.
So don’t simply throw your BEETLE POS system on the scrap heap when it
has served its time, but take advantage of the environmentally smart,
up-to-date recycling methods!
Plea se con tact your com pe tent branch or the Re cy cling Cen ter Pa der born
(for Eu ro pe an coun tries) for in for ma ti on on how to re turn and re-use de vi ces
and dis po sa ble ma ter ials un der the following mail address:
Email: info@win cor-nix dorf.com
We look for ward to your mail.
RECYCLING THE BEETLE /XL-II
6

Warranty
Win cor Nix dorf gua ran tees ge ne ral ly a war ran ty en ga ge ment for 12 months
be gin ning with the date of de li very. This war ran ty en ga ge ment co vers all
tho se da ma ges which oc cur de spi te a nor mal use of the pro duct.
Da ma ges be cau se of
n
im pro per or in suf fi cient main ten an ce,
n
im pro per use of the pro duct or un aut ho ri zed mo di fi ca tions of the pro duct,
n
ina de qua te lo ca ti on or sur roun dings
will not be co ver ed by the war ran ty.
For furt her in for ma ti on of the sti pu la ti on look at your con tract.
All parts of the pro duct which are sub ject to wear and tear are not in clu ded
in the war ran ty en ga ge ment.
Plea se or der spa re parts at the Win cor Nix dorf cus to mer ser vi ce.
7
WARRANTY

BEETLE /XL-II
Overview
You can connect a variety of peripherals to your modular POS system
BEETLE /XL-II and thus implement a wide range of expansion stages. You
can connect a two or four-line alphanumeric customer display and a four line
cashier display. Alternatively you can connect flat screens, such as BA69
(VGA/4), BA70 (b/w) or BA71, BA72 and BA73, use various types of
scanners such as distance, touch or stationary scanners, use scales and
scanner scales (please take into account the official certification
regulations), connect various printers, use POS keyboards with or without a
swipecard reader, use different types of cash drawers, connect a monitor,
install the POS workplace SNIkey, integrate the BEETLE /XL-II in a network
after installing a LAN board and upgrade the BEETLE /XL-II, since it can
accommodate onboard extension card, such as VGA/TFT/LAN.
This means that the BEETLE /XL-II can meet your requirements at all times,
without having to exchange the complete system for a new one, thus saving
you time and money.
The following illustrations show you how your modular POS system can
grow - from a scanner to integration into a network.
OVERVIEW
8
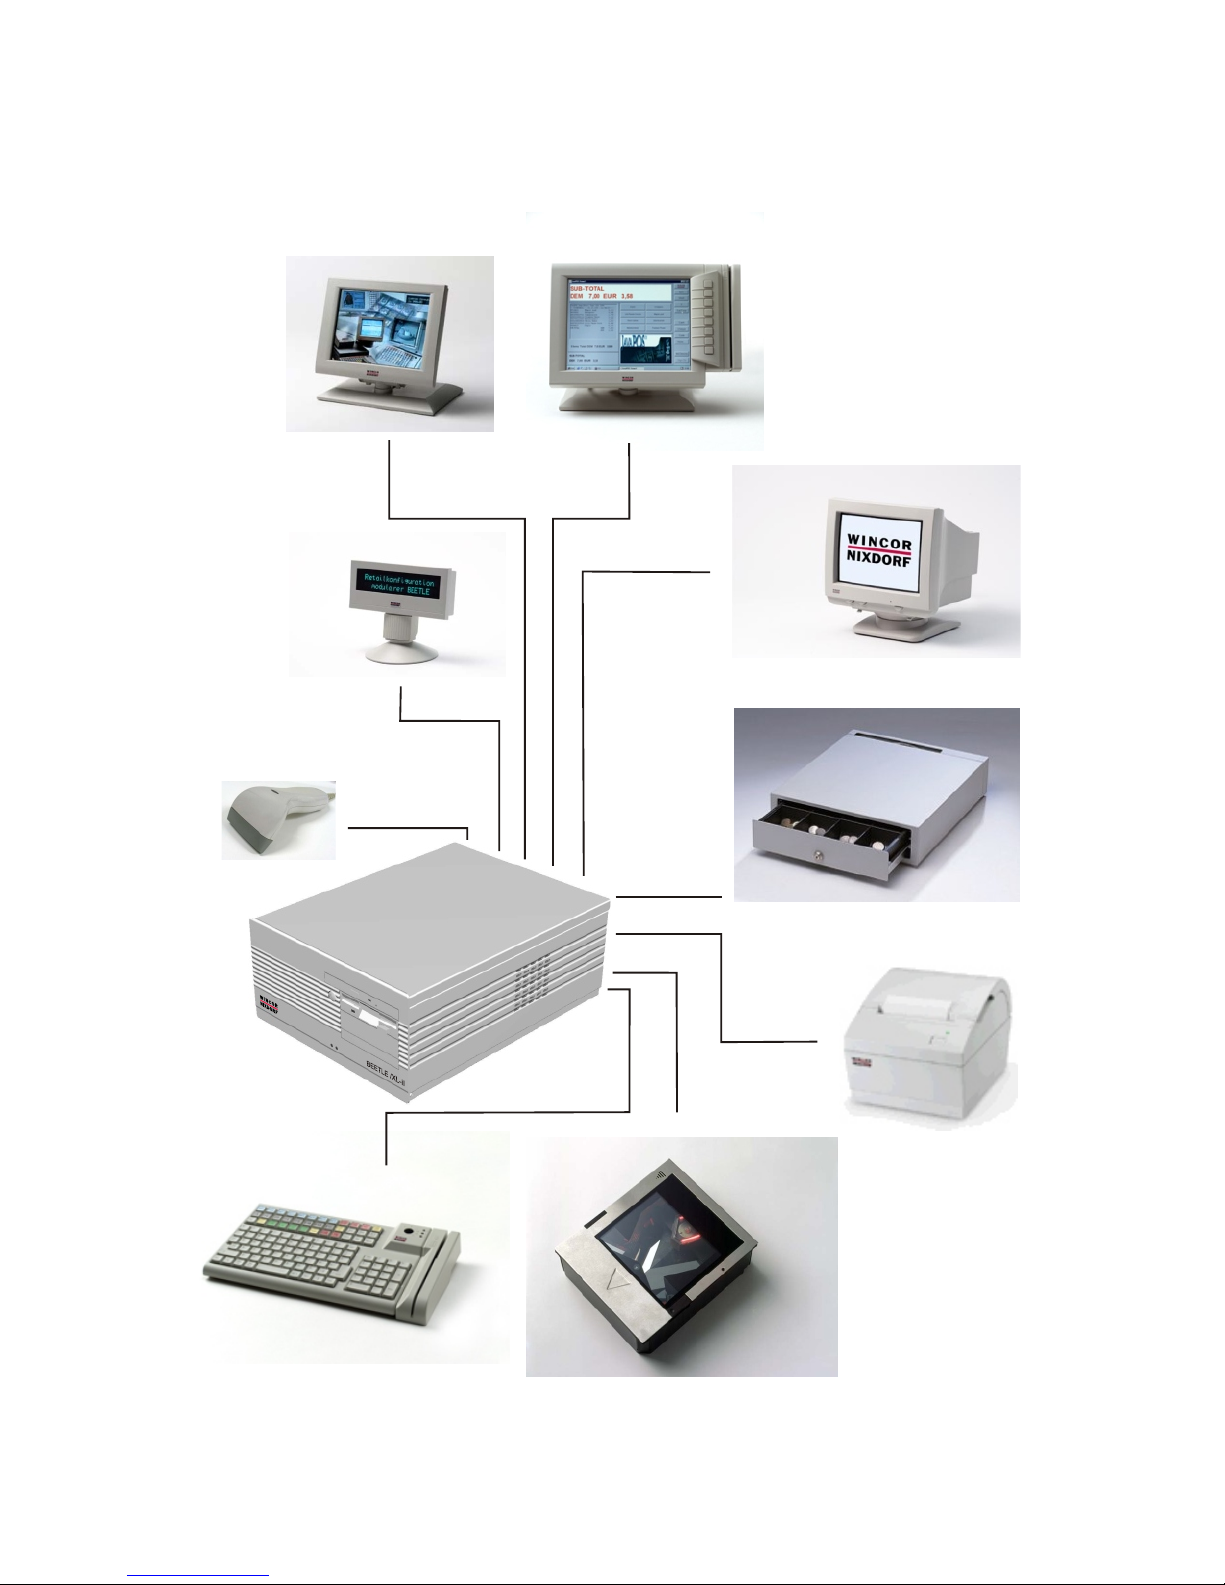
BEET LE /XL-II Pe ri phe rals
9
OVERVIEW
BA63
BA72
SNIkey
EL44
MO34
KA18
TH210
EL30
TA58

BEET LE /XL-II in a Net work
OVERVIEW
10
Ethernet 10/100 Base T
Server

Before switching on the System
Un pac king and chec king the System
Unpack the parts and check to see whether the delivery matches the
information on the delivery note.
The carton contains the basic unit and a country-specific accessories kit.
Some ordered composition may be installed.
If damage has occurred during shipping or if the package contents do not
match the delivery note, promptly inform your Wincor Nixdorf sales outlet.
Trans port the de vi ce only in its ori gi nal pa cka ging (to pro tect it against
im pact and shock).
Set ting up the De vi ce
Set up the BEETLE /XL-II POS system where it will not be exposed to
extreme environmental conditions. Protect the device from vibrations, dust,
moisture, heat and strong magnetic fields.
Make sure that the side ven ti la ti on slots on the BEETLE /XL-II POS sys tem
are not ob struc ted in or der to en su re that the de vi ce has suf fi cient
ven ti la ti on (left side 30 mm, right side 100 mm by horizontal mounting).
Cab ling of the BEET LE /XL-II
Follow the steps below in the order given when installing devices:
n
The cable cover must be removed, if present.
n
Plug one end of the power cable into the socket of the BEETLE /XL-II.
n
Plug in and secure the data cable.
n
Plug the other end of the power cable into the main power supply.
Al ways make sure that the sys tem is swit ched off when you do cab ling
works.
11
BEFORE SWITCHING ON THE SYSTEM
Con nec ting to the Mains Po wer Supp ly
All devices belonging to the modular BEETLE /XL-II system that have a
separate power cable must be connected to the same electric circuit.
n
Make sure that all data cables on the system unit and peripherals are
connected correctly.
n
Plug the power cables belonging to the BEETLE and the peripherals into
the grounded-contact power sockets.
n
You can now switch on the BEETLE /XL-II by means of the switch on the
power supply at the rear side. Push the ON button at the front of the box.
Dis con nec ting Ca bles
Never unplug a cable by pulling on the cable itself; always take hold of the
actual plug. Follow the procedure below when disconnecting cables:
n
Turn off all power and equipment switches.
n
Remove the cable cover.
n
Unplug all data communication cables from the sockets of the data
networks.
n
Unplug all power plugs from the grounded-contact power sockets.
n
Unplug all cables from the devices.
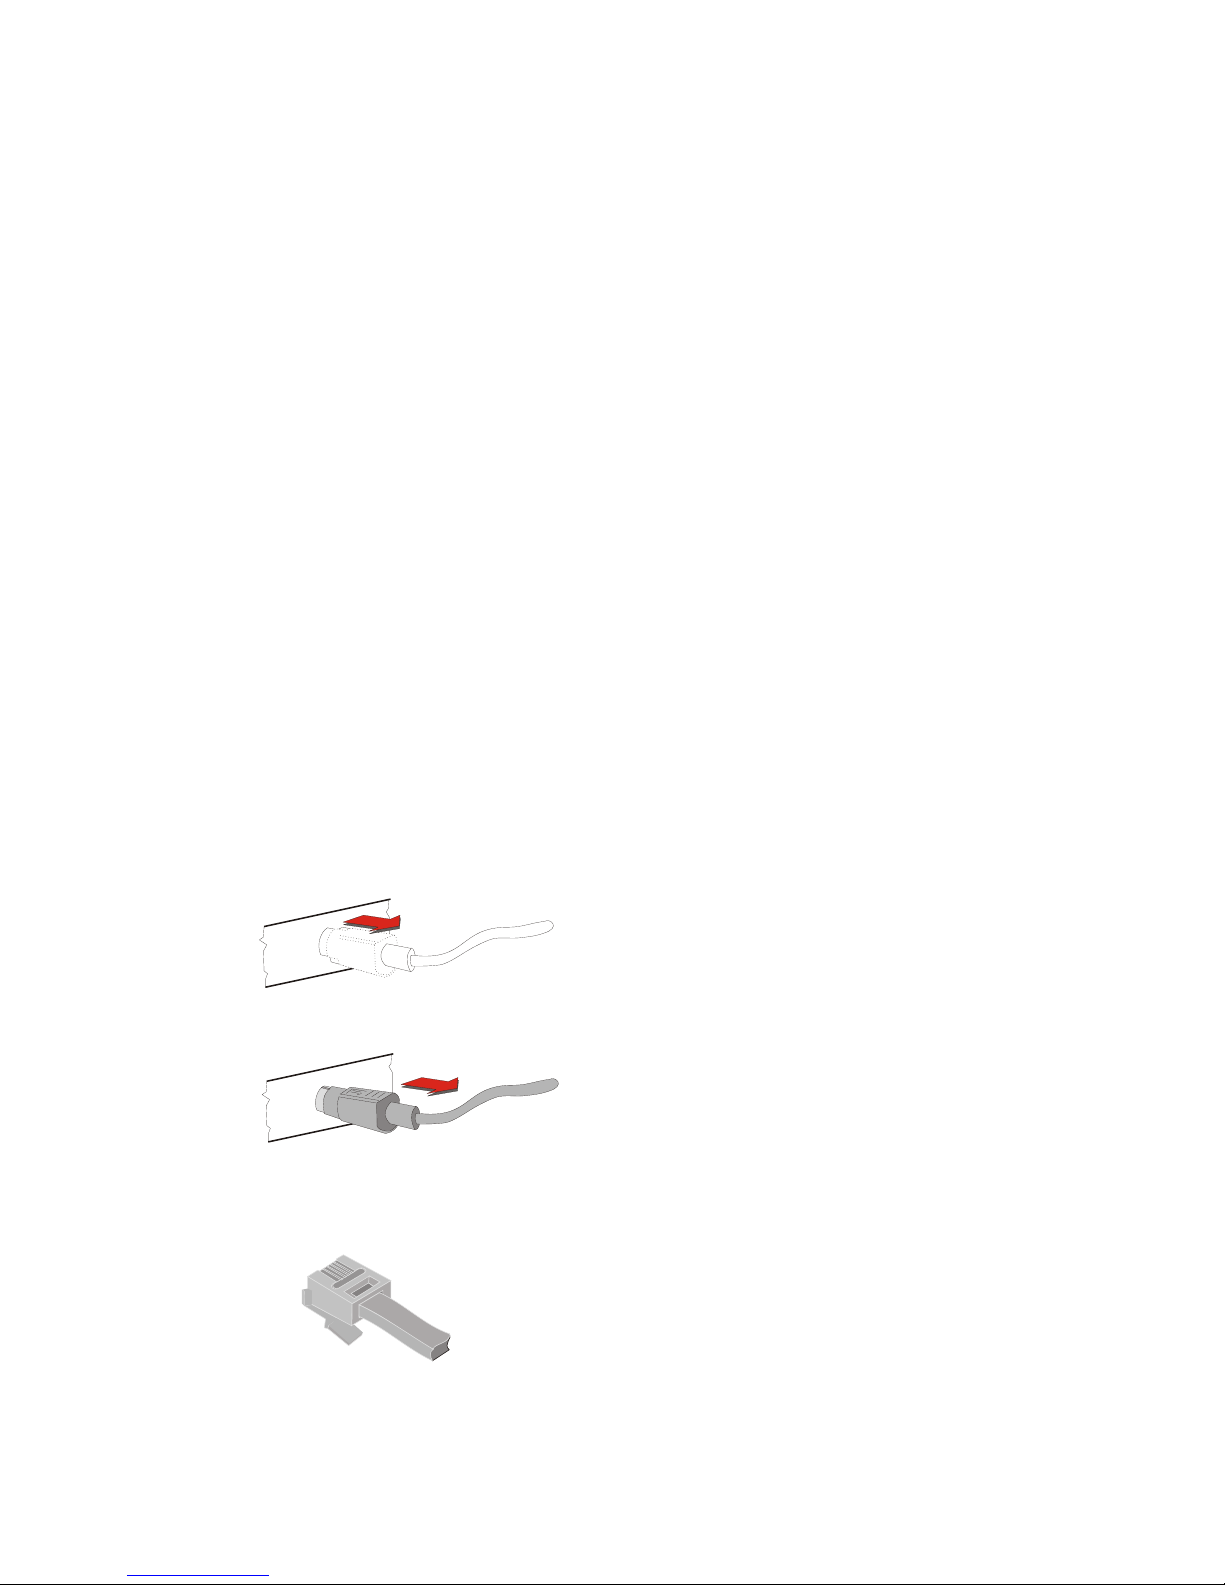
With MINI-DIN plugs, the plug remains inserted
until released.
Pull the plastic covering from the connecting
socket with your thumb. The lock is released.
The metal of the plug is visible.
RJ12 plugs lock in when you insert them. To
release them push the latch under the plug to
the top.
BEFORE SWITCHING ON THE SYSTEM
12
 Loading...