

Wincor Nixdorf BEETLE /moPOS Getting Started

BEETLE /moPOS
Mobile POS Solution
End User’s Guide Software - Getting Started (December 2015)

We would like to know
your opinion on this publication.
Please send us a copy of this page
if you have any constructive criticism on:
- the contents
- the layout
- the product.
We would like to thank you in advance
for your comments.
With kind regards,
Wincor Nixdorf International GmbH
R&D, SAT36
Wohlrabedamm 31
D-13629 Berlin
E-Mail: retail.documentation@wincor-nixdorf.com
_________________________________________________________________________________________________________________
Your opinion
BEETLE/ moPOS, moPOS End User’s Guide Software Getting Started, Order No.: 01750280021A

All product names mentioned in this document are registered trademarks.
Copyright ©Wincor Nixdorf International GmbH, 2015
The reproduction, transmission or use of this document or its contents is not permitted
without express authority.Offenders will be liable for damages.
All rights, including rights created by patent grant or registration of a utility model or design, are reserved.
Delivery subject to availability; technical modifications possible

Contents
1 Important Notes .................................................................................................................. 1
1.1 LCD Displays .................................................................................................................. 2
2 General ................................................................................................................................ 3
2.1 Abbreviations ................................................................................................................ 3
2.2 Trademarks ................................................................................................................... 3
2.3 Summary ....................................................................................................................... 4
3 Introduction and Architecture: What is BEETLE /moPOS? .................................................. 5
4 Getting Started .................................................................................................................... 6
4.1 Overview Steps for configuring the several devices ..................................................... 7
4.2 Tablet: Perform the 1st setup (Windows related part) ................................................. 8
4.3 WiFI router: Configuring ............................................................................................... 9
4.4 Tablet: Installation and configuring moPOS SW layer on the tablet .......................... 10
4.4.1 Installation of the Unified POS Adapter ............................................................... 10
4.4.2 Installing the Java Virtual Machine ...................................................................... 11
4.4.3 Installation of the demo package ......................................................................... 11
4.4.4 Configuration the demo package ......................................................................... 13
4.5 Configuring POS Device HUB ...................................................................................... 17
4.5.1 Login WebGUI....................................................................................................... 18
4.5.2 Start Up Screen of WebGUI .................................................................................. 18
4.5.3 Configure network settings .................................................................................. 19
4.5.4 Setup peripheral devices ...................................................................................... 19
4.5.5 Enabling Admin Server on ONE POS Device HUB ................................................. 20
4.5.6 Configuring the Admin Server .............................................................................. 21
5 JavaPOS Demo Application: Getting Started ..................................................................... 25
5.1 Demo Application settings for experts ....................................................................... 25
5.2 POS devices to be used with Demo1 .......................................................................... 26
5.3 Remote usage with POS Device HUB .......................................................................... 26
5.3.1 Unified POS Device Manager Connection handler configuration ........................ 26
5.3.2 AdminServer Connection handler configuration ................................................. 27
5.3.3 Dummy Admin Server implementation ............................................................... 27
5.4 The difference in using the moPOS Admin Server and a dummy Admin Server ........ 28

5.5 POSPrinter settings ..................................................................................................... 29
5.6 Operating the Demo1 application .............................................................................. 29
5.6.1 Retrieving the list of POS Device HUBs ................................................................ 29
5.6.2 Connecting to the first configured POS Device HUB by approaching an NFC tag 31
5.6.3 Available operations panels ................................................................................. 31
5.6.4 End of transaction processing .............................................................................. 34
5.6.5 Concurrent application access to the POS Device HUB ....................................... 34
5.6.6 Reconnecting to the POS Device HUB .................................................................. 35
5.6.7 Disconnection detection ...................................................................................... 35
6 Programmers Guide for Application Providers ................................................................. 36
7 LED Service Menu during BOOT and operational LED States ............................................ 37
7.1 LED Service Menu of POS Device HUB ........................................................................ 38
7.1.1 Service Menu: Main menu ................................................................................... 38
7.1.2 Service Menu: Sub Menu 1 - Change Parameter ................................................. 39
7.1.3 Meaning of Service Menu selection items ........................................................... 39
7.2 Operational LED States ............................................................................................... 42
8 Update of POS Device HUB firmware and other files ....................................................... 43
8.1 Firmware Update from a Windows based host via network ...................................... 43
8.2 Firmware Update from a Linux based host ................................................................ 45
8.3 Firmware Update via USB stick ................................................................................... 46
9 Recommendations for configuration of WiFi routers ....................................................... 48
10 Using the WebGUI interface of the POS Device HUB .................................................... 49
10.1 Login......................................................................................................................... 49
10.2 Start up screen ......................................................................................................... 50
10.3 Network settings ..................................................................................................... 51
10.4 System passwords ................................................................................................... 53
10.5 Peripheral – settings ................................................................................................ 54
10.6 Peripheral – testing ................................................................................................. 55
10.7 Boot behaviour ........................................................................................................ 56
10.8 Plugins ...................................................................................................................... 58
10.9 Security settings....................................................................................................... 59
10.9.1 Settings for peripherals using ........................................................................... 59
10.9.2 Docking unit ...................................................................................................... 59
10.9.3 Security settings network ports ........................................................................ 60

10.10 Miscellaneous settings ............................................................................................ 61
10.11 BEETLE /moPOS Admin server ................................................................................. 63
10.12 Factory settings ....................................................................................................... 64
10.13 Production ............................................................................................................... 64
10.14 Logoff ....................................................................................................................... 65
11 Diagnostics via WebGUI ................................................................................................. 66
11.1 System diagnostics .................................................................................................. 66
11.2 Service report .......................................................................................................... 66
11.3 Peripheral diagnostics ............................................................................................. 67
11.4 Logfiles ..................................................................................................................... 68
11.5 Download diagnostics files ...................................................................................... 69
11.6 Licences documents and software .......................................................................... 70
12 Plugin usage on POS device HUB ................................................................................... 71
13 Future enhancements for HTML5 based POS application ............................................. 72
14 Appendix......................................................................................................................... 73
14.1 Certifications ............................................................................................................ 73
14.2 Tested safety............................................................................................................ 73
14.3 FCC-Class A declaration ........................................................................................... 73
14.4 Warranty .................................................................................................................. 73
14.5 Unpacking and checking the System ....................................................................... 74
14.6 ESD (Electrostatic Sensitive Devices) ....................................................................... 74

Important Notes
BEETLE /moPOS "Getting Started" 1
1 Important Notes
The following safety instructions should be read carefully and strictly observed when
handling technical appliances and before doing any work on the device. Further safety,
installation, operating and maintenance instructions can be found in the manuals available on
the internet:
http://www.wincornixdorf.com/internet/site_EN/EN/Support/Downloads/downloads_node.html
Should you have any questions, please contact your dealer or our service department.
Devices supplied by Wincor Nixdorf International GmbH (WN) comply with the respective
safety regulations for data-processing devices and information technology devices, including
electrical office equipment for use within an office or store environment.
Always
consult the installation and operating instructions before doing any work
with an appliance. These manuals are available on the internet (see above).
If an appliance is brought into the service area from a colder environment,
condensation may occur. The appliance must be absolutely dry before activation. This
requires an acclimatization time of at least two hours.
Observe warning and information labels on the device.
Appliances that are equipped with safety tested power cables must be plugged into a
grounded socket.
Always lay the supply leads and cables in such a way that they cannot be stepped on
or tripped over.
Make sure that there is always free access to the grounded sockets used or to the
electrical circuit-breakers of the house installation.
Check that the set nominal voltage of the appliance corresponds to the local mains
voltage.
In order to completely separate the appliance from the mains voltage, switch off the
appliance and disconnect it from the mains.
Ensure that no foreign objects (e.g. paper clips) or liquids enter the housing of the
appliance. This may result in electric shock or short circuit.
Always keep the ventilation slots free of obstruction to ensure adequate air
circulation and avoid overheating.
Data cables must not be plugged in or unplugged during electrical storms.
Always hold the plug when removing the power cable or other cables. Never pull the
cable itself. Have damaged power cables replaced immediately.
Only use accessories and extension components that have been approved by Wincor
Nixdorf. Nonobservance can result in damage to the device or violations of
regulations concerning safety, radio interference and ergonomical requirements.
Protect the appliance from vibrations, dust, moisture and heat.

Important Notes
2 BEETLE /moPOS "Getting Started"
Transport the appliance only in its original packaging (to protect it against knocks and
bumps).
In case of an emergency (e.g. damaged controls or power cables, liquids or foreign
objects in the device) take the following steps:
Deactivate the device immediately by:
- Disconnecting the plug connector of the power supply cable from the grounded
socket in the building installation.
- Inform the customer service responsible for you.
Properly dispose of worn out parts that may be environmentally hazardous (e.g.
batteries).
If a lithium battery is supplied with the appliance, ensure that the battery is replaced
with an equivalent type. Otherwise there is danger of explosion! Lithium batteries may
only be replaced with identical types or other types recommended by the
manufacturer. Batteries must be disposed of according to local regulations on the
disposal of special waste.
Appliances may only be repaired by authorized technicians. Unauthorized opening
of the housing or inexpert repairs can result not only in considerable personal danger,
but will also invalidate your warranty and liability protection.
1.1 LCD Displays
If the display element is damaged and the liquid crystal solution leaks out onto your hands
or clothing, please wash your hands or clothing immediately under running water for at
least 15 minutes, using soap or alcohol. If the liquid comes into contact with your eyes, consult
a medical doctor immediately.
Before opening the device, make sure, that the device is disconnected from the main power
supply. Only authorized personnel is permitted to open the device.

General
BEETLE /moPOS "Getting Started" 3
2 General
2.1 Abbreviations
Aka
Also known as
BR
Business Requirement
FIFO
First-in, first-out
FW Firmware
HW Hardware
JavaPOS Java for Retail POS
JDK Java Development Kit
LAN
Local area network: wired network infra structure
LSB
Linux Standard Base
OPOS
Ole for Retail POS
OS Operating system
PDH POS Device HUB
POS Point of Service
SSID SSID stands for Service Set Identifier ; this is the name of a wireless
network to be entered when connecting from mobile devices to a router
SW Software
UPOS Unified POS
Programming Interface for POS applications to access peripheral devices
WEP Wired Equivalent Privacy
a type of weak encryption used for WiFi communication
WiFi Wireless local area network
aka WiFi
WPA
Wi-Fi Protected Access
2.2 Trademarks
Microsoft® Internet Explorer®, Windows ® Microsoft Windows are either registered trademarks or trademarks of Microsoft Corporation in the United States and/or other countries.
IOS is a trademark or registered trademark of Cisco in the U.S. and other countries and is
used under license.
Android is a trademark of Google Inc.
Mozilla® Firefox® is a trademark or registered trademark of the Mozilla Foundation, USA.
Google™ Chrome is a trademark of Google Inc, USA.
Safari® is a registered trademark of Apple Inc. in the United States and in other countries.
BEETLE™ is a registered trademark of Wincor Nixdorf GmbH.
Java is a registered trademark of Oracle and/or its affiliates.

General
4 BEETLE /moPOS "Getting Started"
2.3 Summary
This End User’s Guide “Getting Started” describes the first steps when getting a
BEETLE /moPOS to run.
Chapter 4 contains just a reference to an additional external document giving a short overview of the BEETLE /moPOS concept and product.
Chapter 5 describes the necessary SW installations on tablet and configurations for POS Device HUB when setting up the participating devices of the BEETLE /moPOS environment to
make the configuration run.
Chapter 6 describes the additional installation and configuration of an additional Java Demo
POS application for showing a sample POS transaction.
Chapter 7 contains just a reference to an additional external document describing the Programming API for accessing the POS Device HUB and Admin Server.
Chapter 8 describes the LED states and the so-called LED service menu which can be entered
at system boot for adjusting some basic settings of the POS Device HUB.
Chapter 9 describes how to download a firmware to the POS Device HUB.
Chapter 10 describes some recommendations when using a market-usual WiFi (aka WIFI)
router in the BEETLE /moPOS configuration.
Chapter 11 and 12 describe the remote admin WebGUI interface of the POS Device HUB for
configuring and for diagnostics.
Chapter 13 gives a short overview about upcoming plugin feature of the BEETLE /moPOS.
Chapter 14 gives a short overview about upcoming HTML5/javascript based interface for
using the POS Device HUB from HTML5 based applications running on Windows Android or
iOS tablets.

Introduction and Architecture: What is BEETLE /moPOS?
BEETLE /moPOS "Getting Started" 5
3 Introduction and Architecture: What is BEETLE /moPOS?
The Chapter “4 Introduction and Architecture: What is BEETLE /moPOS?” is provided as a
separate document.
Getting Started
6 BEETLE /moPOS "Getting Started"
4 Getting Started
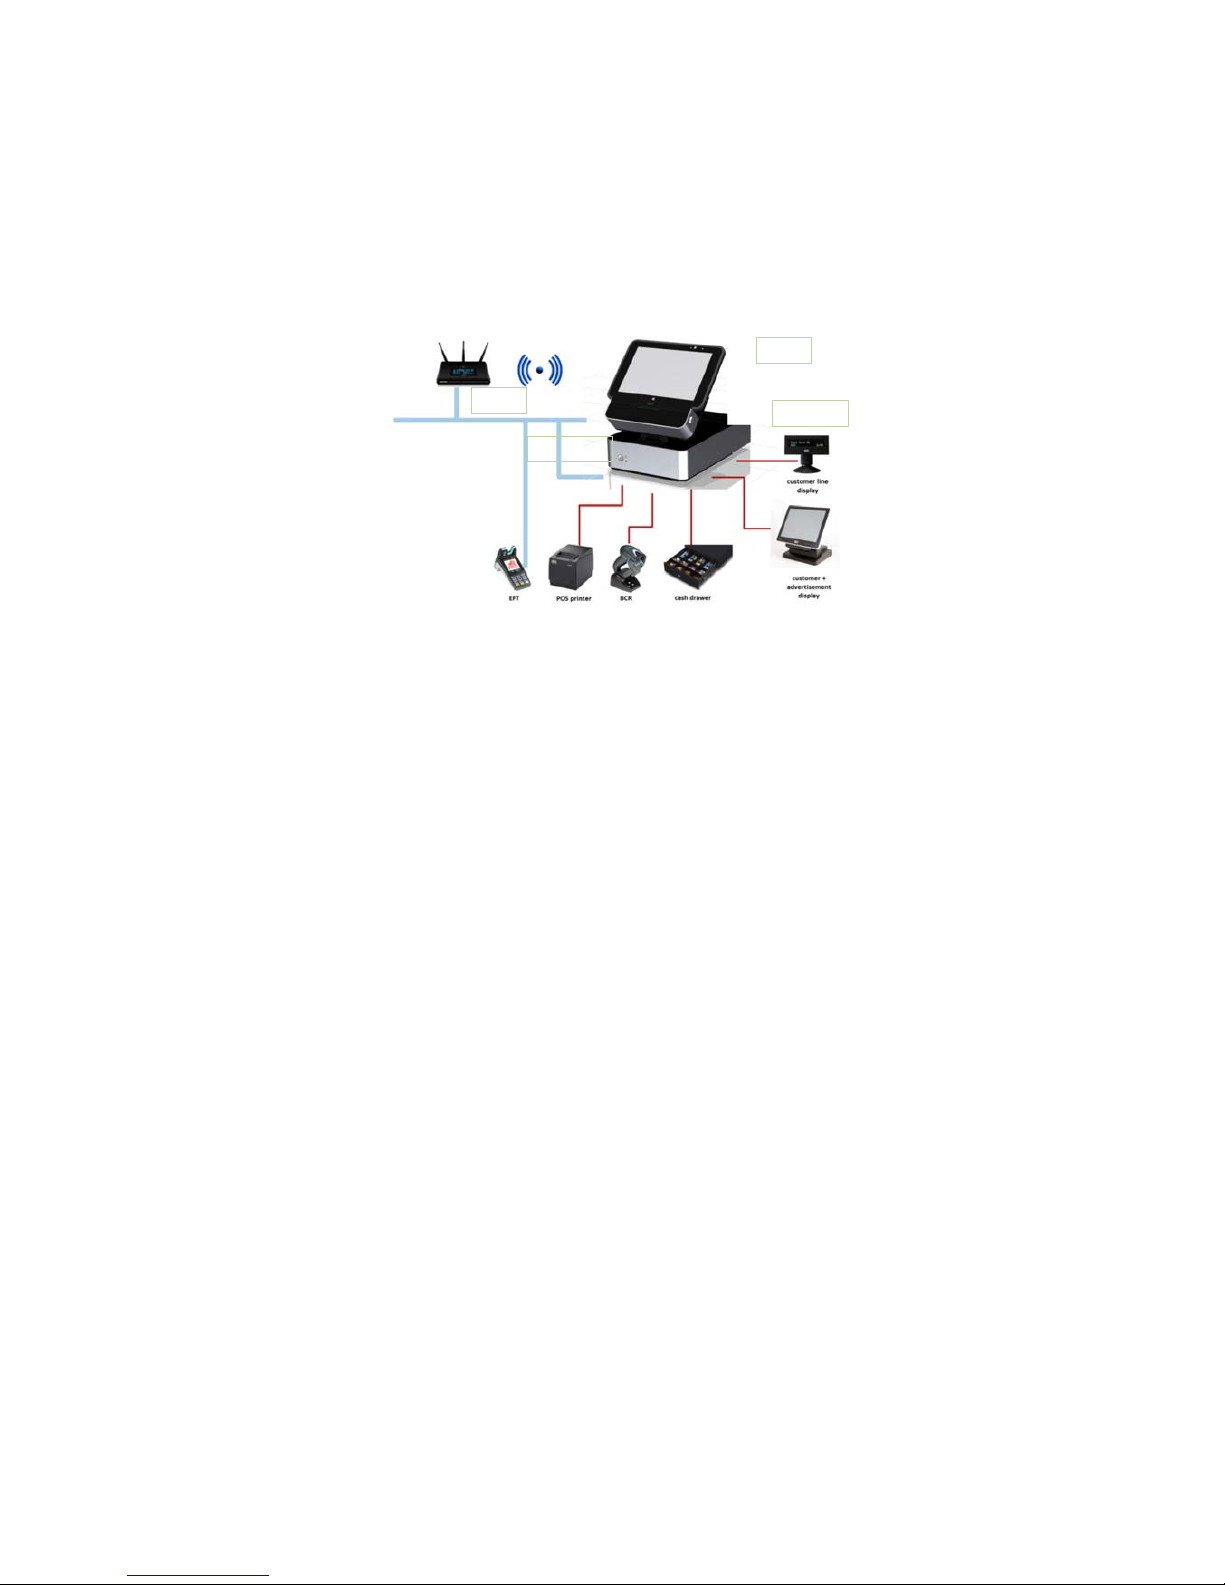
This chapter describes how to setup a complete set of devices for performing mobile
applications of the BEETLE /moPOS.
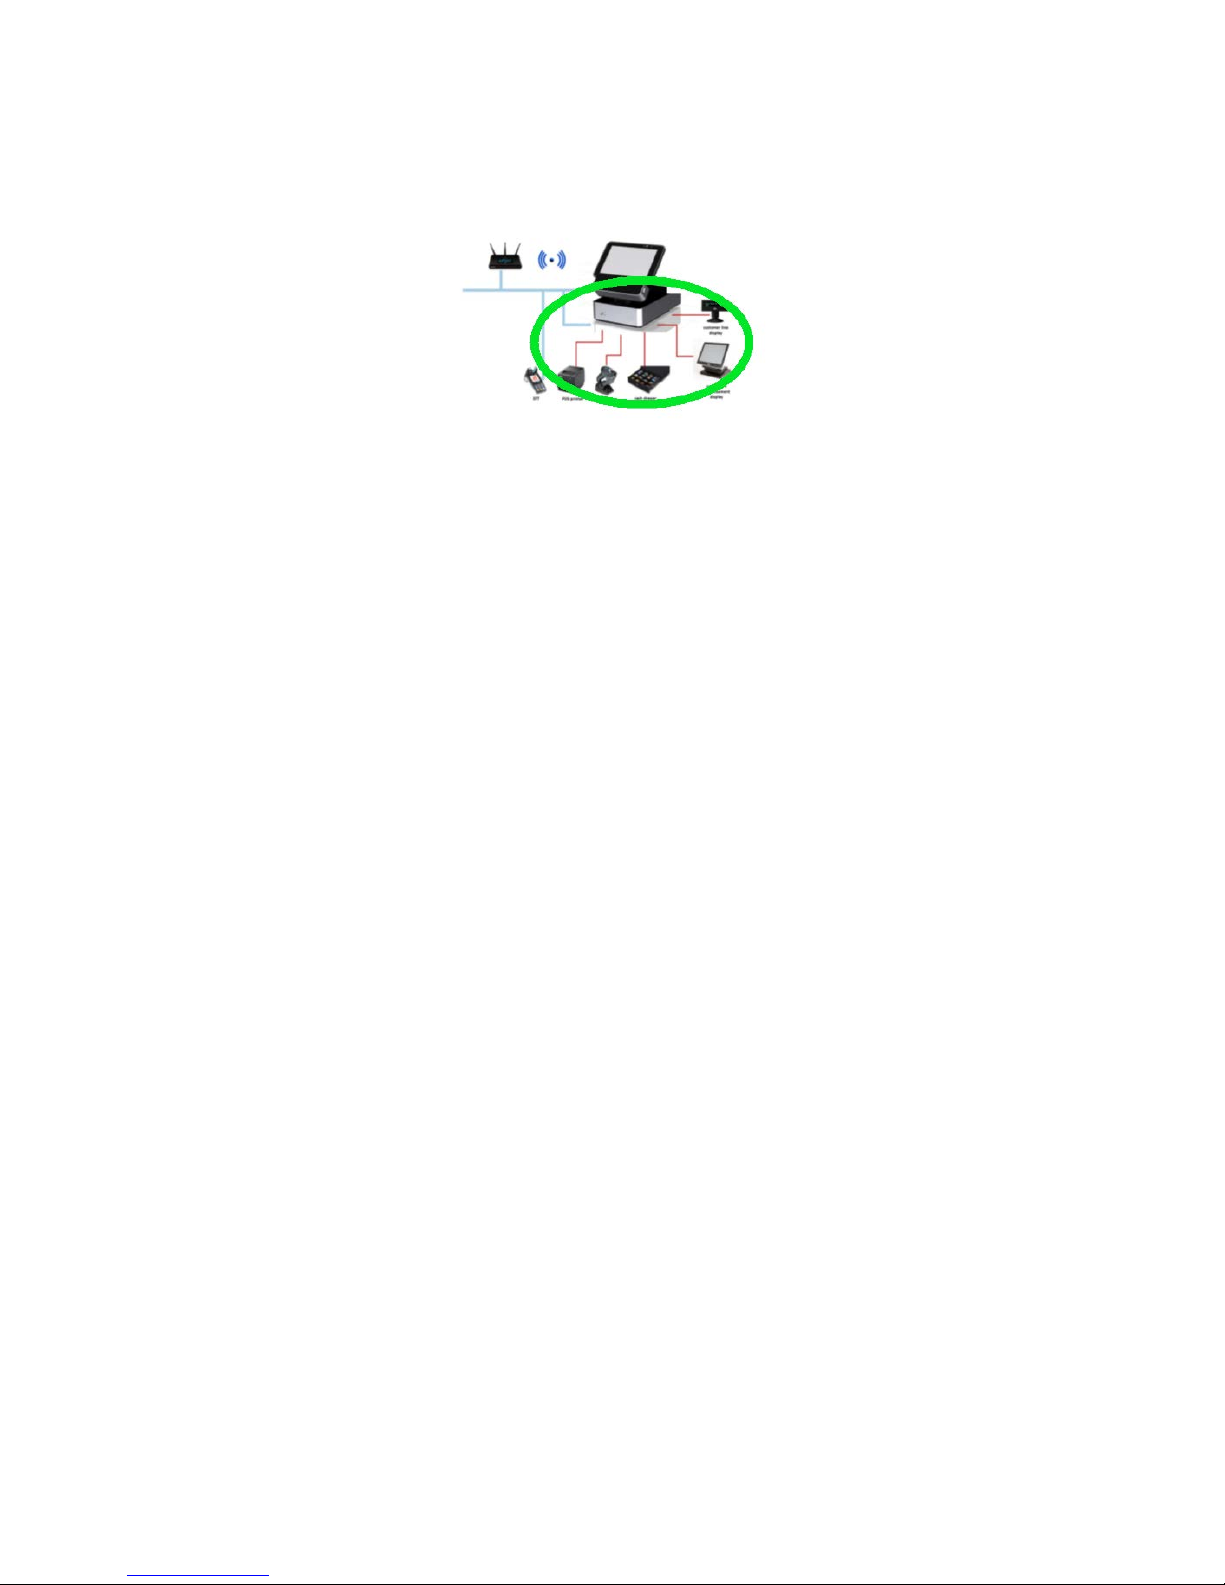
For a complete environment you will need at least the following moPOS components:
1. The mobile tablet:
the mobile tablet is a Windows 8.1 based mobile computer for
a. displaying the graphical user interface of a mobile POS application
b. accepting input via the touch based surface of the tablet
c. accessing the peripheral devices via the WiFi connection
2. the POS Device HUB with Docking Unit
allows
a. connecting several peripheral devices such as one pos printer, one line display
and/or a graphical display, one or two scanners and a cash drawer
b. docking and undocking the mobile tablet
c. charging of battery of a docked tablet
d. getting the unique tablet id for authorization in case the tablet is docked.
e. accessing of peripheral devices for registered tablets.
Registration at one central Admin Server software activated on one POS Device HUB.
f. using optionally a so-called iButton for authorization of device access when
tablet shall also be allowed to devices if undocked
g. showing the current state of docking unit with a LED with different colors
3. POS peripheral devices
with possibly
a. A USB or RS232 pos printer for printing tickets
b. A USB or RS232 line display or a graphical display for displaying items
c. A USB or RS232 bar code scanner for scanning items
d. A cash drawer for handling cash money connected at the printer or at the POS
device HUB itself
e. An EFT device connected via LAN cable (not supported in the demo software).
4. WiFi router
the WiFi router performs the network connection between devices connected via a
LAN cable and the mobile tablets connected wireless through the router.
The router needs to be configured in a proper way
see chapter “4.3 WiFI router: Configuring” in this document.
router
tablet
docking unit
POS Device HUB

Getting Started
BEETLE /moPOS "Getting Started" 7
Each of the four components needs to be configured properly.
4.1 Overview Steps for configuring the several devices
For configuring the several participating devices in the BEETLE /moPOS concept you need to
perform the following step:
1. Perform the 1
st
setup of the tablet (Windows related part)
2. Configure the WiFi router
3. Installing and configuring the moPOS SW layer on the tablet
4. Configuring the POS Device Hub

Getting Started
8 BEETLE /moPOS "Getting Started"
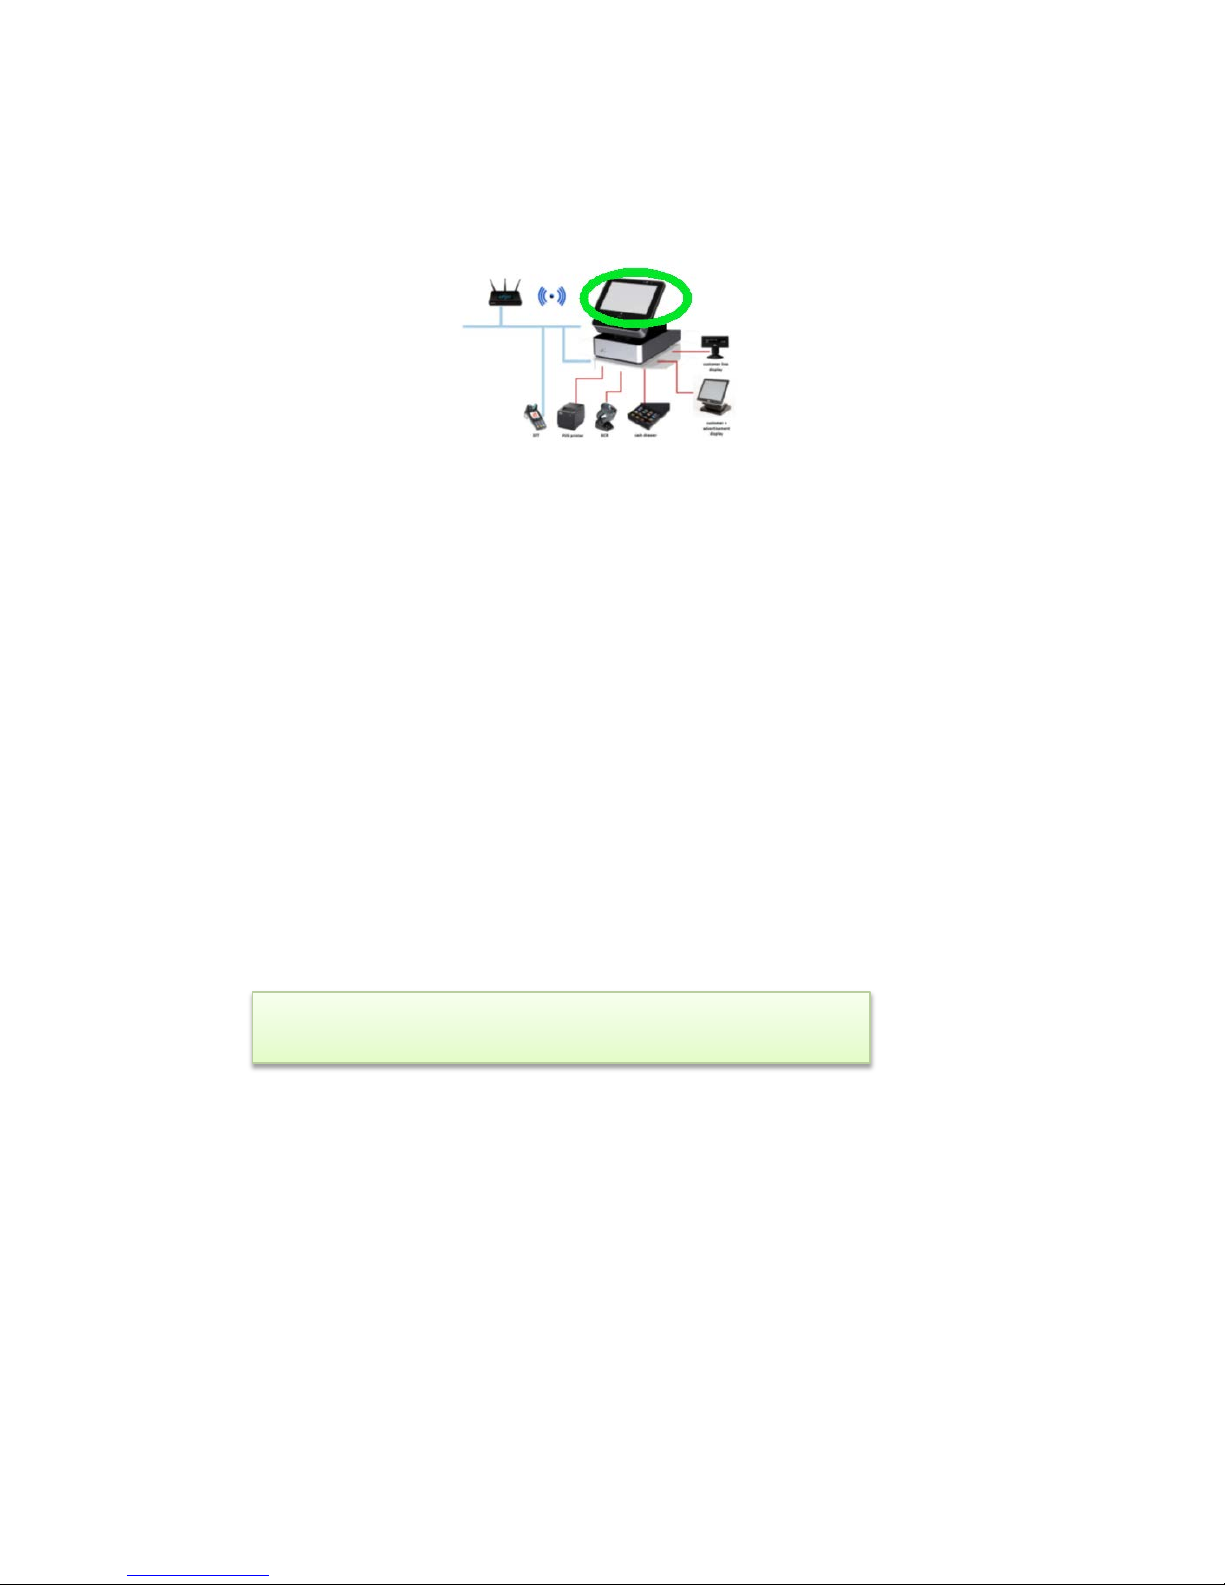
4.2 Tablet: Perform the 1
st
setup (Windows related part)
The first time you turn on your Windows 8.1 tablet you will realize a slight difference compared to an “old” PC with e.g. Windows 7 (or previous versions).
To begin the setup process, just go through the first-time setup process.
1. Choose your
- Country or region
- Language, keyboard layout and time zone?
click [Next] button
- Enter the product key XXXXX-XXXXX-XXXXX-XXXXX-XXXXX ?
click [Next] button
2. License terms: Agree the license terms by
clicking [I accept] button
3. Personalize: Enter the Computer name and set the color scheme of Windows
click [Next] button
4. Get online: Pick a WiFi network and go online to finish setting up your PC? click the
appropriate [network] or [Skip] button to pick a network later on.
5. Settings: Express settings: We recommend to select the express settings. You can
customize these settings now or later. ? click [Use express settings] button
6. Your account: Type in your user name. The user name is mandatory. If you want to
protect the user with a password, you can type in your password. The password is
optional ? click on [Finish] to finalize the set-up. Now, the tablet will be restarted.
7. Done!
Getting Started
BEETLE /moPOS "Getting Started" 9
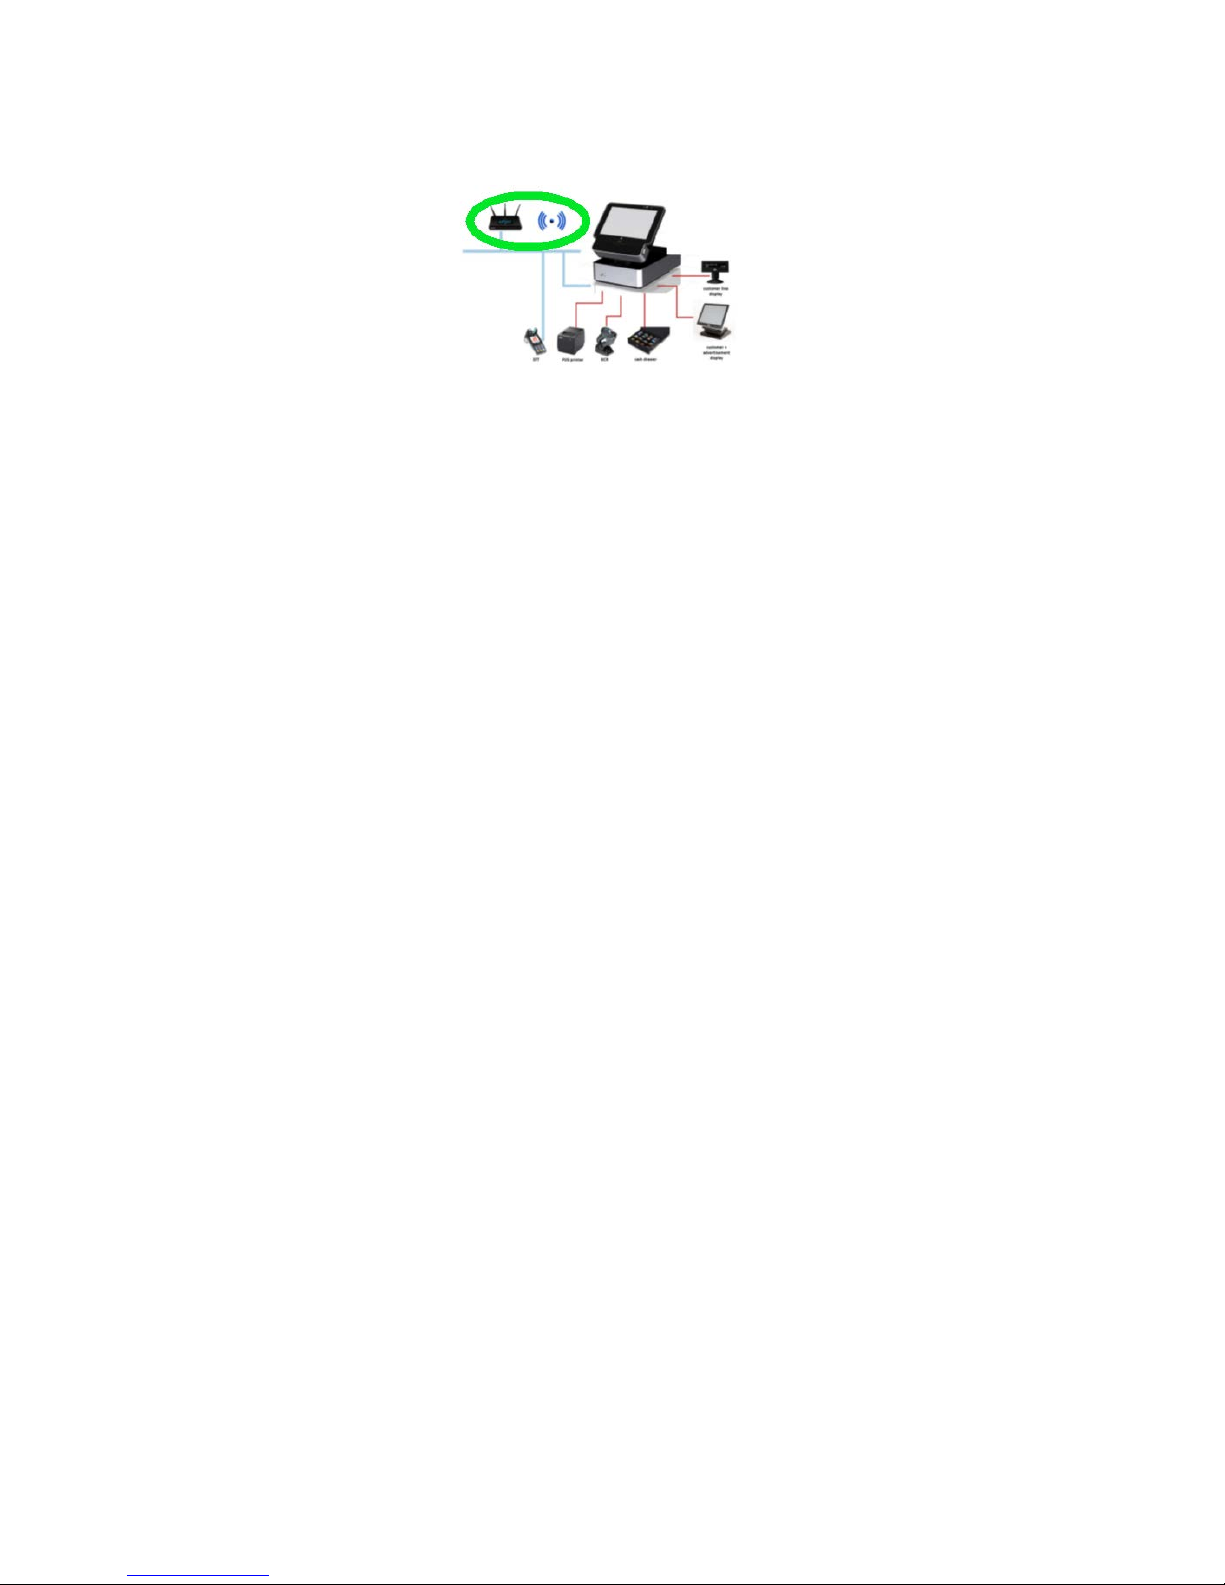
4.3 WiFI router: Configuring
The WiFi router is not a Wincor Nixdorf product. Therefore, a typical WiFi router can be used
as long as it meets the requirements for usage with the mobile tablet:
• The WiFi router shall use a strong encryption such as WPA/WPA2 with at least AES.
Make sure a password with sufficient length is used for the WiFi connectivity.
• Configure the WiFi router to use DHCP for assigning TCP/IP addresses to the tablet(s)
and the POS device HUB(s). Make sure that in the router a hard binding of TCP/IP
addresses to the MAC address of devices is enabled. That is, the device will get always the same IP address by the router during startup of network communication.
• In a first step allow routing of all ports between WiFi and LAN devices.
Two ways of how to configure are possible:
• In case the router has already a WiFi SSID preconfigured by factory settings:
connect it with your tablet to the WLAN of the router and perform the router configuration via tablet GUI in a browser such as IE or Firefox.
• Otherwise:
connect a separate PC or notebook via LAN cable to the router and perform the router configuration via PC resp. notebook GUI in a browser such as IE or Firefox.
More detailed recommendations and consideration can be found in chapter 9 " Recommendations for configuration of WiFi routers", page 48.
Getting Started
10 BEETLE /moPOS "Getting Started"
4.4 Tablet: Installation and configuring moPOS SW layer on the
tablet
This chapter describes how to install the tablet with the BEETLE /moPOS SW layer.
For installation of the interface SW on the tablet you need to install several installation
packages. Please note all packages have to be installed as User Administrator.
4.4.1 Installation of the Unified POS Adapter
The Unified POS Adapter contains the SW library for the JavaPOS application to
• access the peripherals via Unified POS API
• access the AdminServer
The file containing the single installer is named as MOPOS-UnifiedPOS-Adapter-X.Y-Z.zip
where X is the major version, Y the minor version and Z the build version of the
BEETLE /moPOS Tablet SW.
For the FW release 1.0 the file name is: WNmoPOSUnifiedPOSAdapter-1.0-0-0-setup.zip.
The ZIP file contains the installer WNmoPOSUnifiedPOSAdapter-1.0-0-0-setup.exe.
You may install it silently by calling it with:
Per default the installation is done as follows:
• The package will be installed to
C:\Program Files\WincorNixdorf\mopos.
• in the directory
C:\Program Files \javapos
additional JavaPOS-related files are located which are not vendor-specific.
Applications shall include the file
C:\Program Files \javapos\setjavaposvars.bat
to get appropriate CLASSPATH and PATH settings for the JavaVM environment. The
file will be setup correctly by the installer to include all jpos.xml files and JAR files in
the CLASSPATH.
Note:
WNmoPOSUnifiedPOSAdapter-1.0-0-0-setup -setup.exe /SILENT

Getting Started
BEETLE /moPOS "Getting Started" 11
• You may choose to install interactively and modify some settings by calling the in-
staller without option /SILENT
• In case you want to install the UnifiedPOS adapter to another directory you may
specify another directory with the calling option /DIR=. Example:
WNmoPOSUnifiedPOSAdapter-1.0-0-0-setup.exe /SILENT
/DIR=
C:\Retail\Software\javapos
4.4.2 Installing the Java Virtual Machine
Usually for accessing the Unified POS interface in its implementation of JavaPOS you need to
install a JavaVM from Oracle. Depending on your application you may download a Java
Runtime package with a version higher or equal to version 1.7. Downloads are available from
http://www.oracle.com/technetwork/java/javase/overview/index.html
You may install the UDM default runtime engine when just using the JavaPOS demo package
for showing the functionality of BEETLE /moPOS.
Please note: the UDM default runtime engine can only be used for the JavaPOS demo and
the sample application but not for 3rd party applications.
For silent installation of the UDM default runtime package just call:
4.4.3 Installation of the demo package
Therefore there is another package which contains a small demonstration POS application
handling the different devices as connected at the BEETLE /moPOS POS Device HUB.
For installation of the demo package just call:
The demo package needs to be configured in a proper way for connection to the POS Device
Hub. During installation you will be queried to enter the IP address of the BEETLE /moPOS
where the Admin Server is running. For a complete description on how to configure the
Demo1 application please look into chapter
“5 JavaPOS Demo Application: Getting Started, page 25”.
In the next chapter it is described how to configure the demo application when using the
BEETLE /moPOS Admin Server.
WN_Ref_UDM_Default_Runtime_Engine-1.1-3-setup.exe /SILENT
WNmoPOS-JavaPOSDemo-0.9-53-3-setup.exe
Getting Started
12 BEETLE /moPOS "Getting Started"
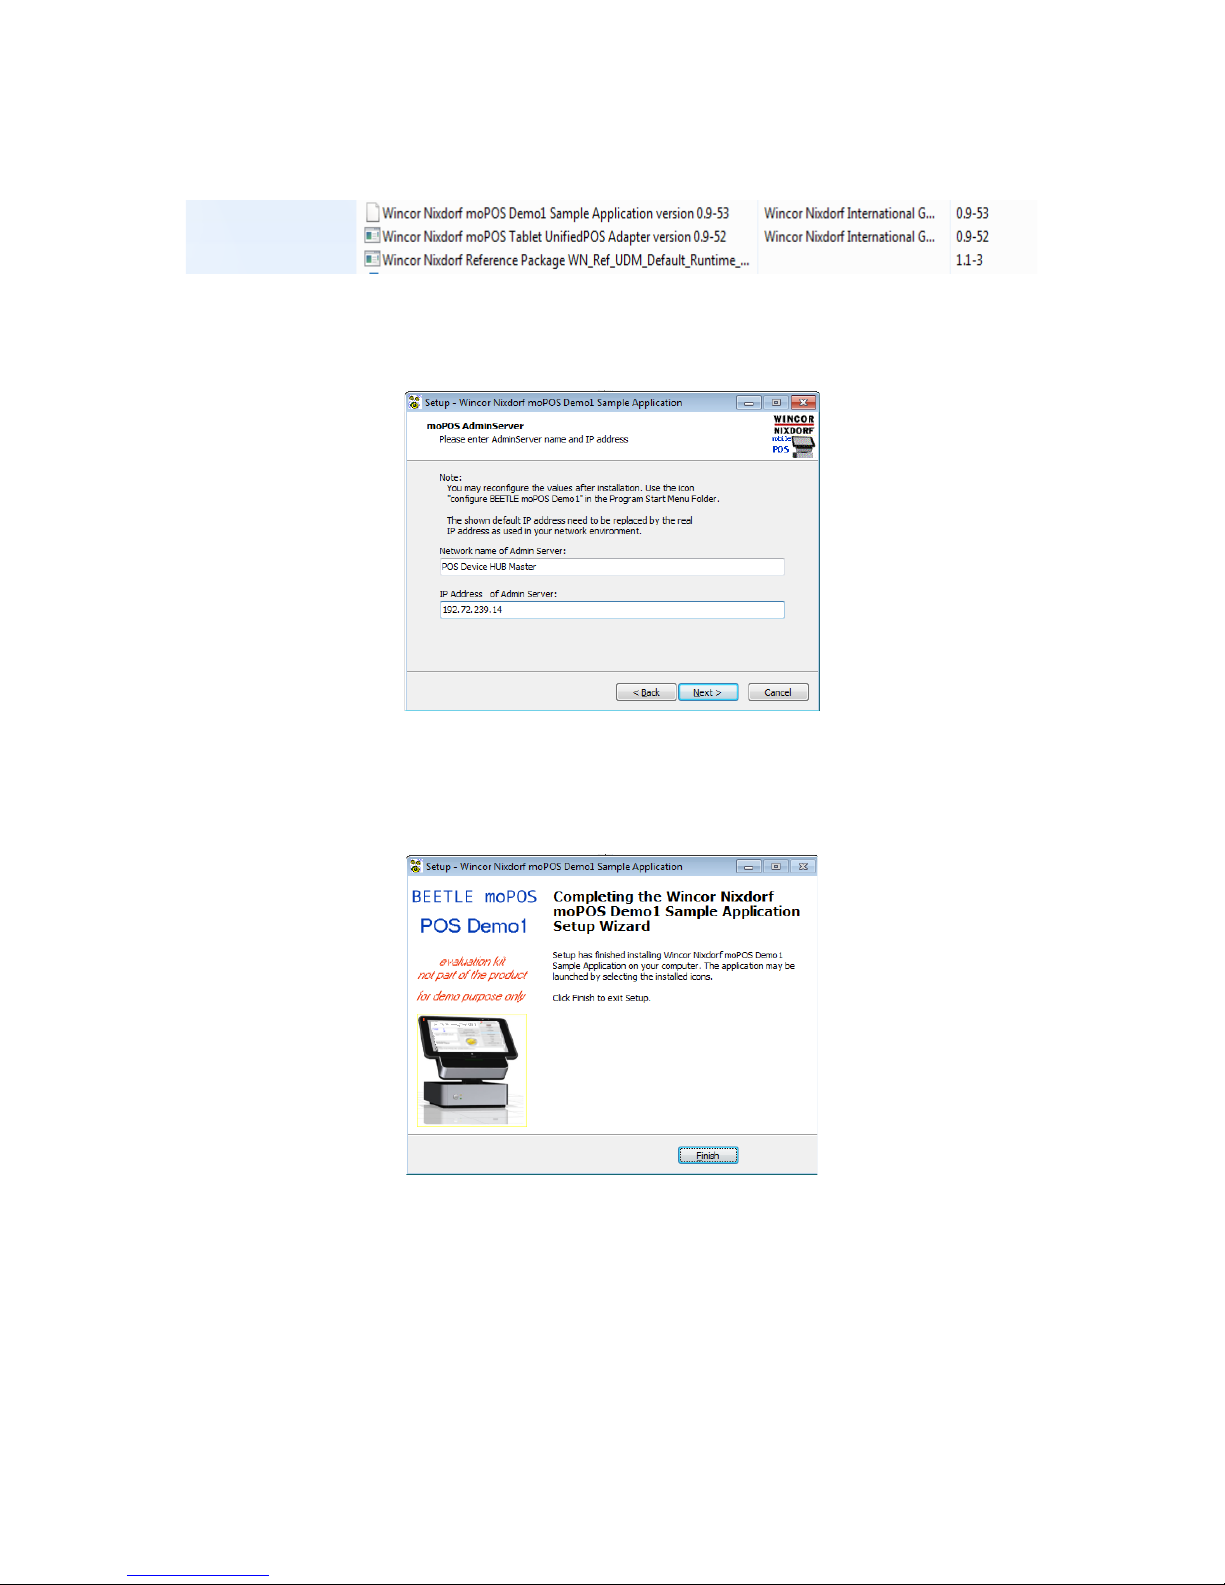
After installation of all packages you should see in the System Control Panel under "All Con-
trol Items" and "Programs and Features" the following packages:
During installation you have to enter the IP address of the moPOS Admin Server. A dialogue
appears and allows you to enter the name and the IP address of the Admin Server.
You may enter the values for the Admin Server here during installation or later by calling the
Demo1 configuration tool. When installation has been finished the following window is
shown:
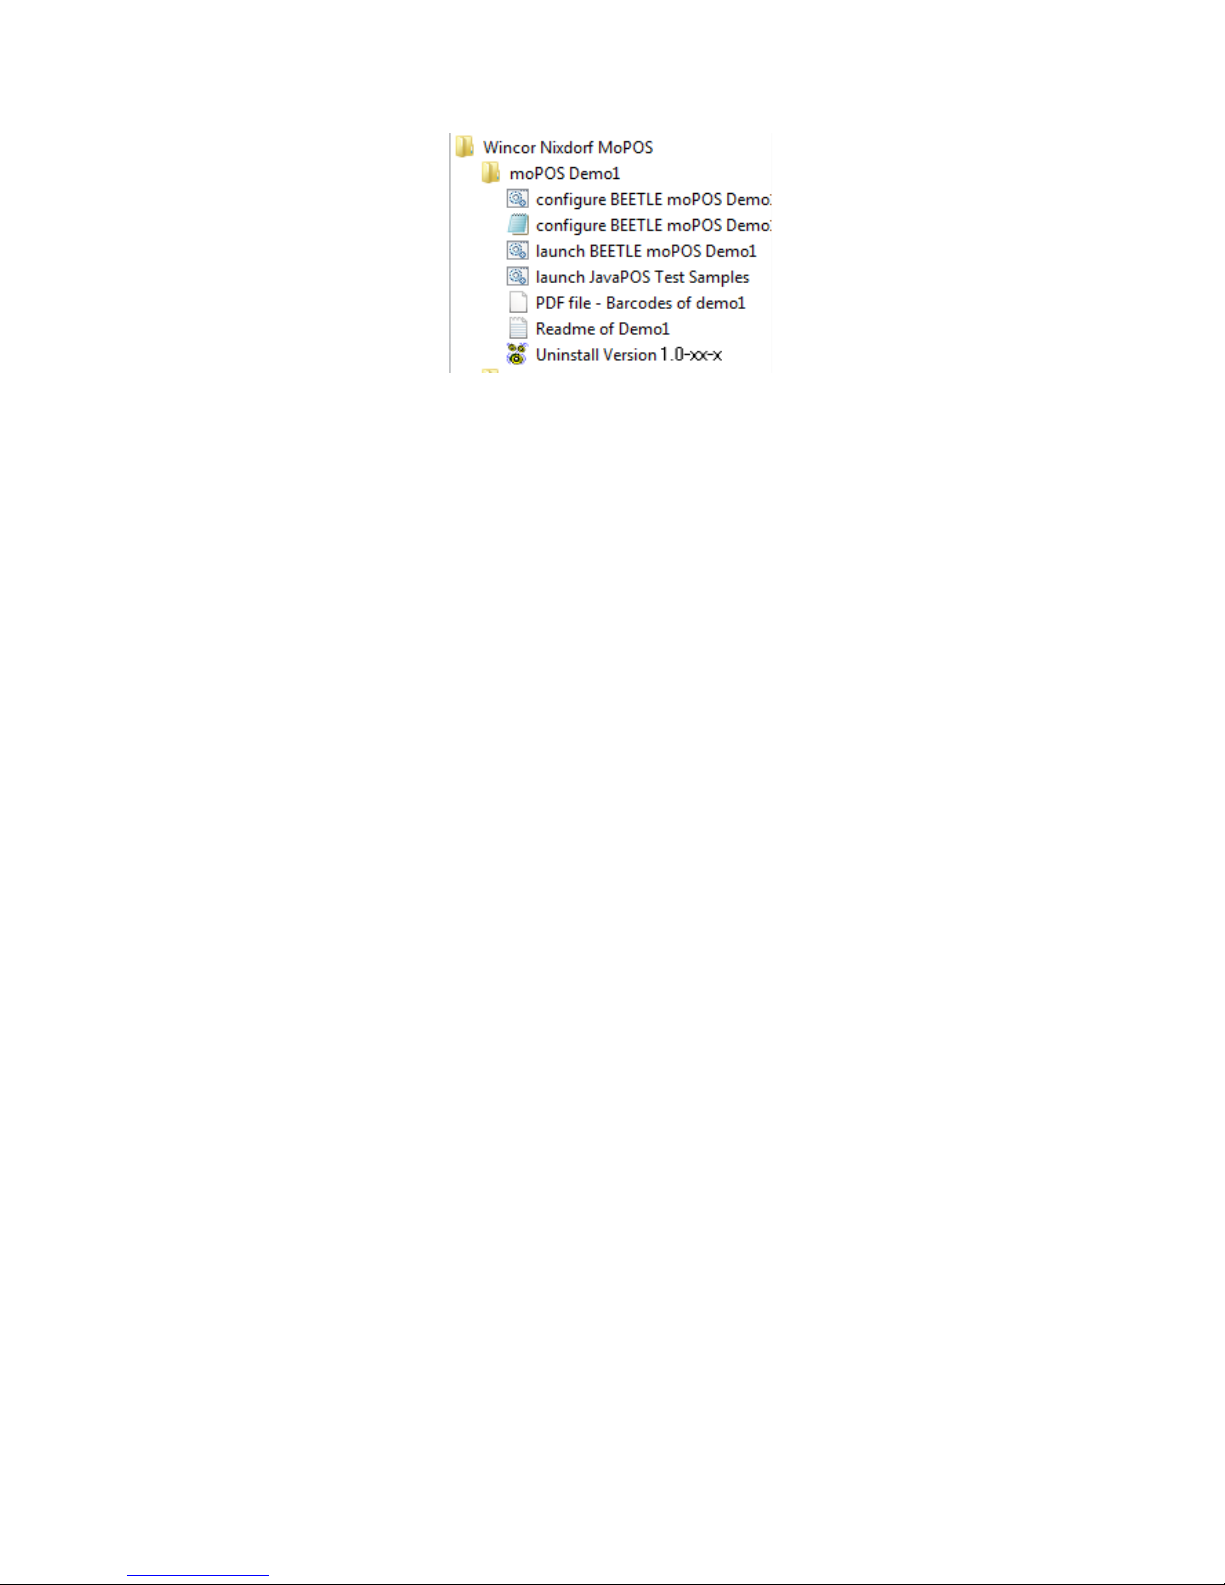
After installation in the Program Start Menu Folder you find a sub directory the following
Icons can be found:
Getting Started
BEETLE /moPOS "Getting Started" 13
4.4.4 Configuration the demo package
There are two ways of configuring the demo:
• Editing with text editor the property file
C:\Retail\Software\Demos\demo1\wn\properties\demo1.properties.
• Or using the configuration tool by selecting the icon "configure BEETLE /moPOS
Demo1"
The configuration tool allows it much easier to adjust the settings.
4.4.4.1 Configuration with a text editor
There is a property file for the demo1 software containing all settings for the demo program.
You may use the standard windows text editor notepad, just call:
notepad C:\Retail\Software\Demos\demo1\wn\properties\demo1.properties
or use the icon in the Windows program start menu folder
Wincor Nixdorf moPOS \
moPOS Demo1 \
configure BEETLE /moPOS Demo1 with Text Editor
Search for the lines starting with “AdminServerConnectionHandler.activate=”, “AdminServer-
ConnectionHandler.useDummy=” and “AdminServerConnectionHandler.server=” modify the
lines and adjust the line with the “AdminServerConnectionHandler.server=” field entry contains the IP address of your POS Device HUB which has the running Admin server. As port
use the number 8025.
Getting Started
14 BEETLE /moPOS "Getting Started"
To start the demo there is a start icon in the Windows program start menu folder under
Wincor Nixdorf moPOS \
moPOS Demo1 \
launch BEETLE /moPOS Demo1
4.4.4.2 Configuration tool
The configuration tool is a GUI-based tool which allows configuring the demo1.properties file
in a more comfortable way. To start the configuration tool you may choose the icon in the
Windows program start menu folder
Wincor Nixdorf moPOS \
moPOS Demo1 \
configure BEETLE /moPOS Demo1
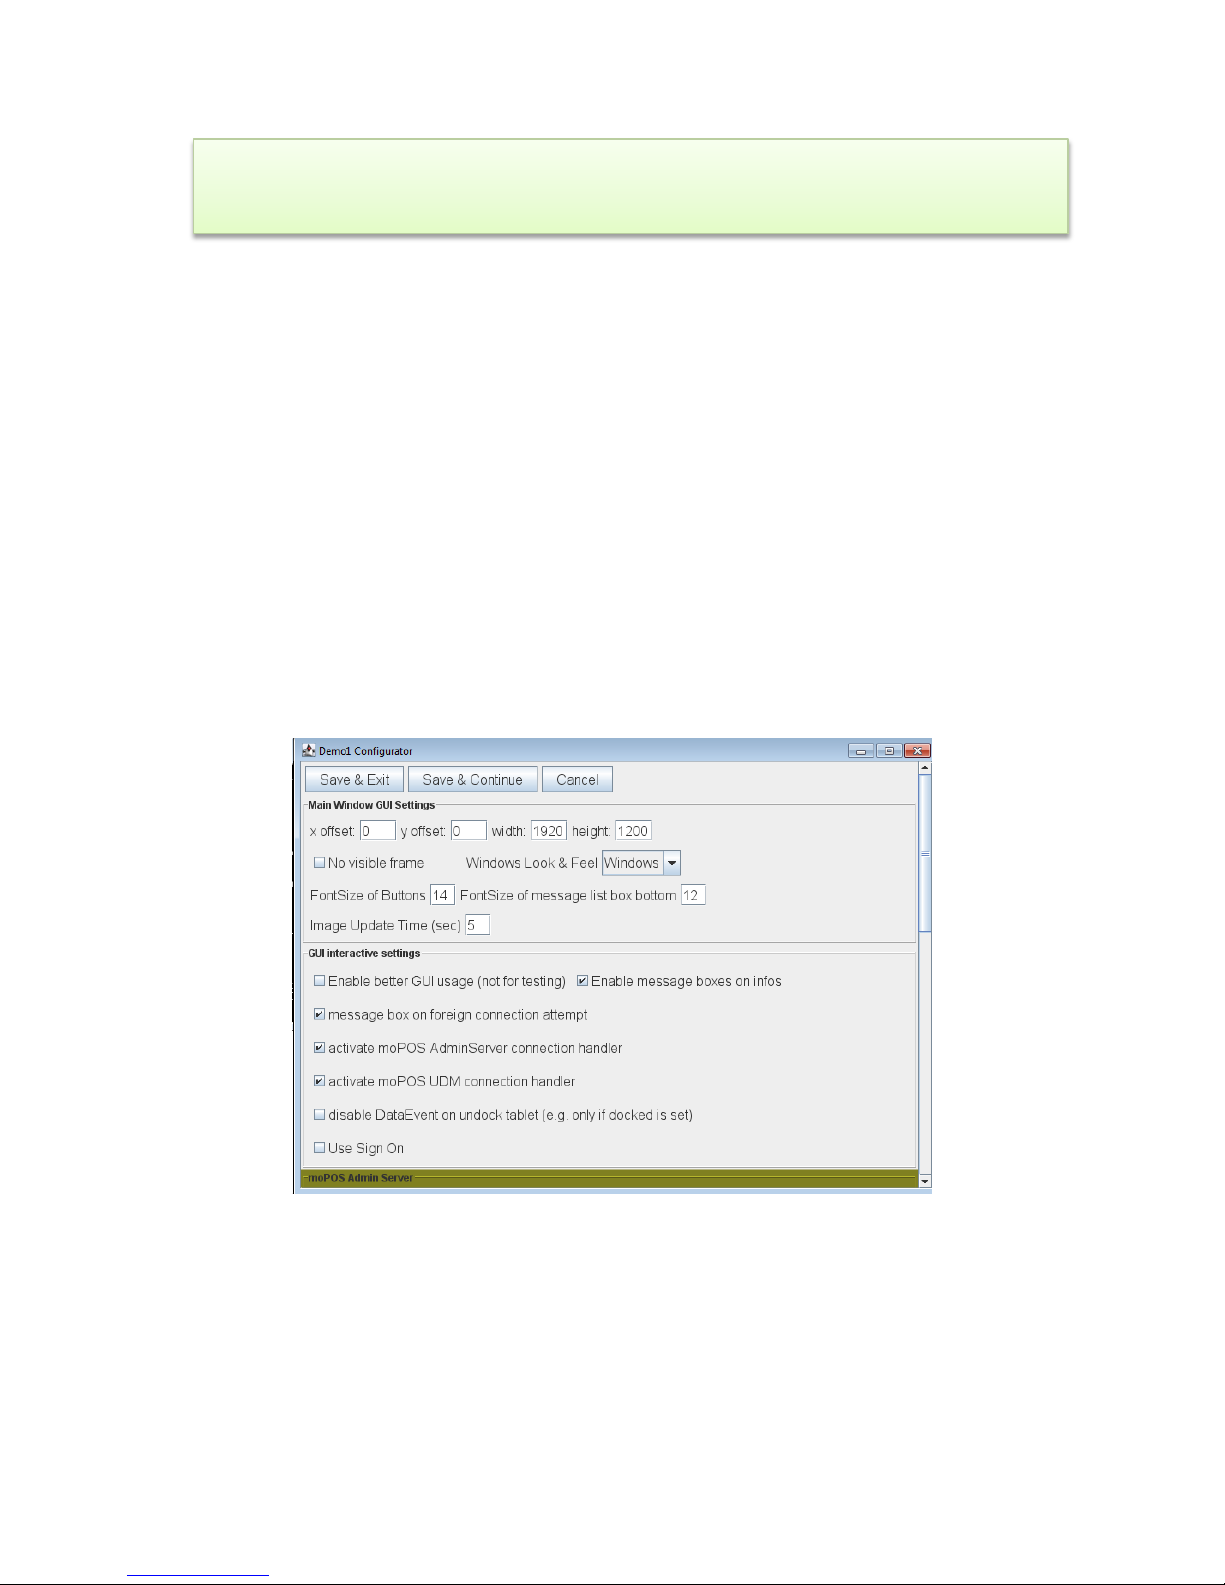
After calling the GUI of the configuration tool appears:
There are several settings that allow to configure the behavior of the demo program. The
most important will be described here. When using the configuration tool usually describing
texts will be shown as tool tip. Configuration parameters:
• x offset, y offset, width, height :
defines the position of the upper left corner of the demo1 main window
• no visible frame:
if set the main window will be shown without a frame
• Windows Look & Feel:
this ComboBox allows to define the so-called appearance of the main window
AdminServerConnectionHandler.activate=yes
AdminServerConnectionHandler.useDummy=no
AdminServerConnectionHandler.server=POS Device Hub 1@<ipadress>:<port>

Getting Started
BEETLE /moPOS "Getting Started" 15
• FontSize of Buttons:
defines the height of the font as used in buttons of the demo program. This may be
increased for better reading the text when using on the tablet
• FontSize of message list box bottom:
defines the height of the font as used in the message list box of the demo program.
This may be increased for better reading the text when using on the tablet
• Image Update:
In case showing images has been selected in the demo1.properties this setting define
the time how long an image shall be shown
• Enable better GUI using:
if set, some buttons will be disabled during operating dependent on current internal
states. This helps to avoid wrong input in the demo program.
• Enable message boxes on information:
if set, information will be shown as message boxes which need to be accepted with
an OK button. If not set the message is only shown in the message list box at the bottom of the demo program.
• message box on foreign connection attempts:
if set and if the tablet is connected to a POS Device HUB and if another tablet tries to
connect to the same POS Device HUB a message box appears and allows the user to
decide if the connection shall be allowed or not.
if not set, no message box appears and foreign connections are always disallowed.
• activate moPOS AdminServer connection handler: should always be set
• activate moPOS UDM connection handler: should always be set
• disable DataEvent on undock tablet:
if set, in case a tablet will be undocked at the POS Device HUB the demo will set
DataEventEnabled of all participating Unified POS Devices which follow the Data
Input Model to false. That is, those devices will not send further input to the demo.
if not set, in case a tablet will be undocked at the POS Device HUB. The demo does
not change the DataEventEnabled property of such Uified POS devices.
• Use Sign On: should always be unset

Getting Started
16 BEETLE /moPOS "Getting Started"
• Use Admin Server:
If set, the BEETLE /moPOS Admin Server is used by the demo to handle the several
POS Device HUB. Then also the name and the valid IP address have to be entered.
If not set, the BEETLE /moPOS Admin Server is not used. All names and IP addresses
of participating POS Device HUBs have to be named in the lists. The demo then
allows supporting up to 5 POS Device HUB.
• UDM connection timeout:
This timeout specifies when connecting ( claiming) the tablet to a POS Device HUB,
how long the Unified POS Adapter Software should wait at most for an answer of the
POS Device HUB before aborting the connection attempt.
• POSPrinter, Scanner1, Scanner2, LineDisplay, CashDrawer:
Depending on the peripheral set connected at the POS Device HUBs these switches
need to be set.
Getting Started
BEETLE /moPOS "Getting Started" 17
4.5 Configuring POS Device HUB
This chapter describes how to configure the POS Device HUB.
By default, when the POS Device HUB is switched on in the booting phase
• It tries to get a valid TCP/IP address via DHCP via the LAN connection.
• It outputs the currently assigned IP address to a connected RS232 or USB line display
BA63/66.
• Please note: Booting the very first time it may take up to five minutes due to some
extended initialization procedures.
You may use this IP address to connect with a usual browser such as Firefox or Google
Chrome to the Remote Administration WebGUI of the POS Device HUB.
Note: the default behavior of obtaining the IP address can also be changed in the so-called
service menu which is described in chapter “7.1 LED Service Menu of POS Device HUB , page 38”
below.
When starting the remote WebGUI just enter:
https://<ip address of POS device HUB>
to get a connection to the desired POS Device HUB. Please note that you need to use the
HTTPS protocol. During the first access to the POS Device HUB you need usually to confirm
the exchange of a certificate as sent by the POS Device HUB via HTTPS protocol.
Getting Started
18 BEETLE /moPOS "Getting Started"
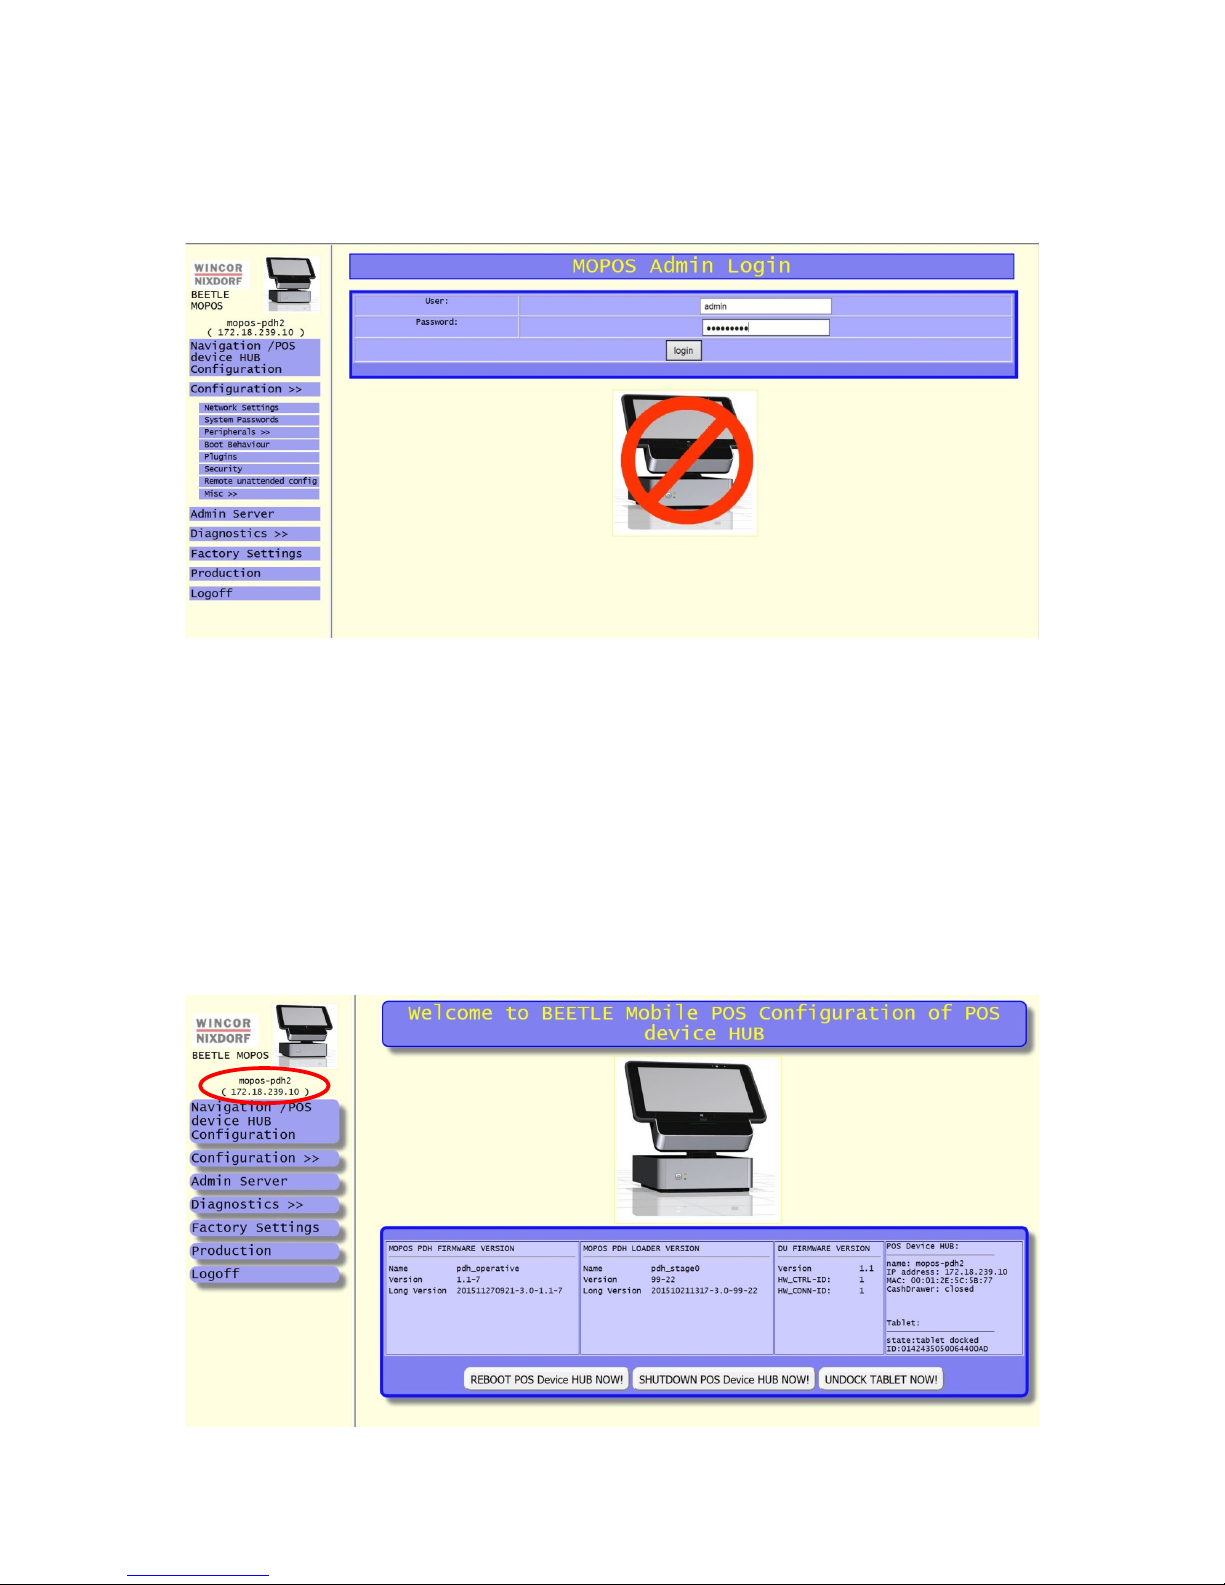
4.5.1 Login WebGUI
After connection to the POS Device HUB you will obtain first the login dialog:
To login at the WebGUI you have to enter the user and the password. The default user is
“admin” and the default password is “mopos1234”.
Important Note:
• It is strongly recommended to change the default passwords when using the POS
Device HUB in an operational environment.
4.5.2 Start Up Screen of WebGUI
After that you come to the main page of the remote WebGUI:
Getting Started
BEETLE /moPOS "Getting Started" 19
You need to go through some dialogs to modify the settings to appropriate values. You need
to do this for all POS Device HUB’s you have in use. Mainly you have to set up the following
items:
4.5.3 Configure network settings
It is recommended to use DHCP for assigning the IP address to the POS Device HUB. In the
dialog “Network settings” you only need to set the “network host name” and the “network
domain name”.
Important note:
• Make sure that the network host name is unique in your network and is not used also
on another POS Device HUB. This is essential for working with the BEETLE /moPOS.
Additionally make sure that the “network domain name” is the same for all POS Device HUB’s as used in the network environment.
After changing the network settings rebooting the POS Device HUB is necessary.
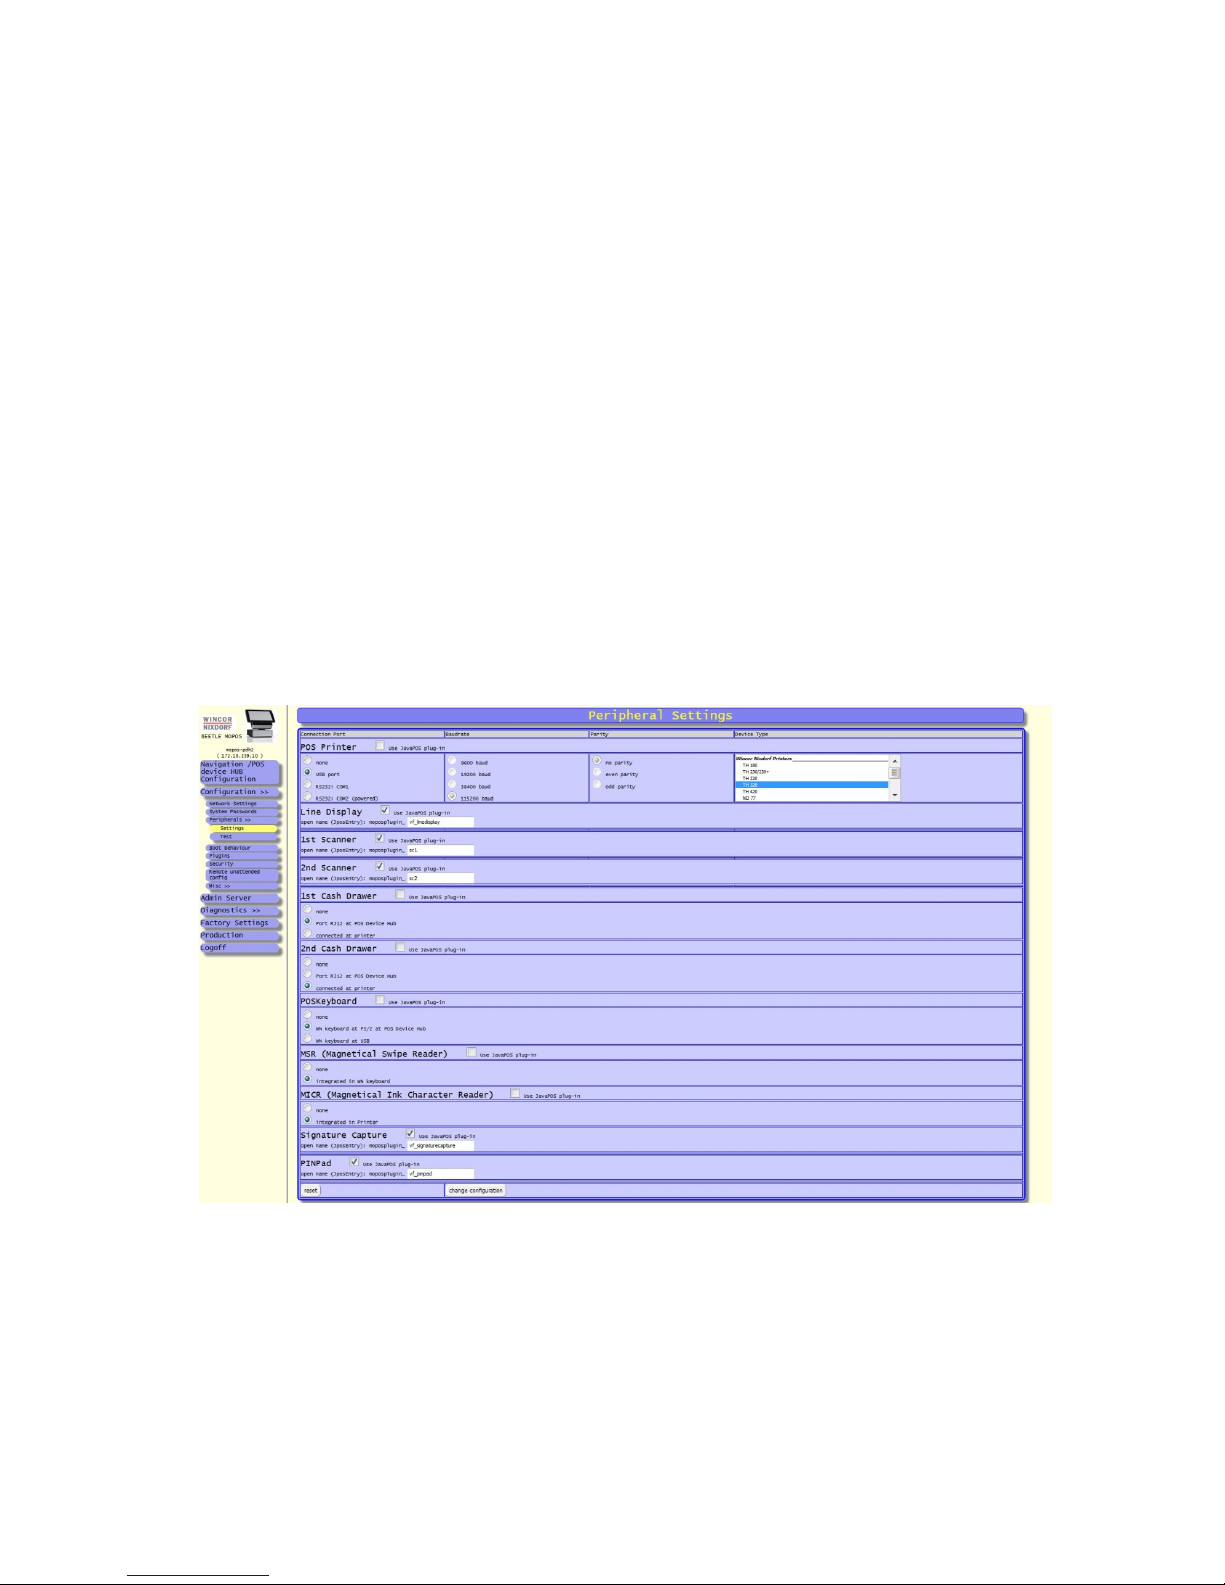
4.5.4 Setup peripheral devices
1. Setup the peripherals:
Peripherals such as printer, scanner, line display and cash drawer will be configured on
each POS device by going into the sub dialog “Peripheral Settings”.
Please setup the
o the connection type such as USB or RS232
o in case RS232 has been selected additionally the baud rate and the parity of the
RS232 connection
o type of device
for each peripheral device. You may configure one POS printer, line display and cash
drawer and two scanner devices (usually used when having both, a table top and a hand
held scanner)
 Loading...