

Wincor Nixdorf BEETLE /iPOS plus Advanced User Manual

BEETLE /iPOS plus Advanced
All-in-one POS System
User Manual

We would like to know your opinion on this publication.
Please send us a copy of this page if you have any constructive criticism.
We would like to thank you in advance for your comments.
With kind regards,
Wincor Nixdorf International GmbH
Technical Documentation R&D SAT22
Wohlrabedamm 31
D-13629 Berlin
E-Mail: retail.documentation@wincor-nixdorf.com
Order No.: 01750259126C
Your opinion:

BEETLE /iPOS plus Advanced
All-in-one POS System
User Manual
Edition June 2014

All brand and product names mentioned in this document are trademarks of their
respective owners.
Copyright © Wincor Nixdorf International GmbH, 2013
The reproduction, transmission or use of this document or its contents is not permitted without
express authority.
Offenders will be liable for damages.
All rights, including rights created by patent grant or registration of a utility model or
design, are reserved.
Delivery subject to availability; technical modifications possible.

Contents
Manufacturer´s Certification .......................................................... 1
FCC-Class A Declaration .................................................................. 1
BSMI (EMC for Taiwan) ................................................................... 1
Energy Efficiency ............................................................................ 2
Important Notes ............................................................................. 3
Safety Notes ................................................................................... 4
Introduction ................................................................................... 6
About This Manual ......................................................................... 6
Care of the BEETLE /iPOS plus Advanced ......................................... 7
Recycling the BEETLE /iPOS plus Advanced ...................................... 7
Warranty ........................................................................................ 8
Unpacking And Checking the Delivery Unit ...................................... 8
Basic settings ................................................................................. 9
Components ................................................................................... 9
Processors Type ......................................................................... 9
RAM ........................................................................................... 9
Hard Disk Options....................................................................... 9
Display ....................................................................................... 9
Replacing the Lithium Battery ....................................................... 10
Setting Up the Device ................................................................... 12
Ergonomic Terminal Workplace .................................................... 12
Overview ..................................................................................... 14
Front View with Stand .................................................................. 14
Back View with Stand.................................................................... 15
AC Power Adapter ........................................................................ 16
Front Panel ................................................................................... 17
Projective Capacitive Touch Screen .............................................. 18
General Information ..................................................................... 18
Instructions for Using the Touch Screen ........................................ 18
Cleaning Instructions .................................................................... 19
Resistive Touch Screen ................................................................. 20

General Information ..................................................................... 20
Construction of the Resistive Touch Screen ................................... 20
Instructions for Using the Touch Screen ........................................ 21
Cleaning Instructions .................................................................... 21
Planning the installation .............................................................. 22
Dimensions ................................................................................... 22
Desktop version ............................................................................ 22
Wall mount version....................................................................... 23
Required operation space ............................................................. 23
Installation site requirements ....................................................... 24
Desktop version ........................................................................ 24
Wall mount version .................................................................. 24
lnstalling to a stand ...................................................................... 25
Preparing the stand ...................................................................... 25
Preparing the display .................................................................... 25
Installing the stand ....................................................................... 27
Connector panel ........................................................................... 30
Connecting cables ........................................................................ 31
Disconnecting cables..................................................................... 32
Storage Media .............................................................................. 34
Replacement of the Hard Disk Drive .............................................. 34
Second Hard Disk Drive ................................................................. 37
Installing the second hard disk drive ......................................... 37
Replacement of the RAM .............................................................. 41
lnstalling to a wall ........................................................................ 43
Things you need ............................................................................ 43
Preparation................................................................................... 45
Connecting the display ............................................................. 45
Mounting height ....................................................................... 46
Mounting location .................................................................... 46
Installation.................................................................................... 47
Fix wall mount back plate to the wall ........................................ 47
Fix wall mount front plate to the system ................................... 48
Secure the system to the wall ................................................... 48
Peripherals ................................................................................... 50
Magnetic Swipe Card Reader (Option) ........................................... 50
How To Operate ....................................................................... 50

Cleaning Instructions ................................................................ 51
Waiter Lock (Option) .................................................................... 51
Installing peripherals .................................................................... 52
Starting Up the System ................................................................ 55
Error reporting ............................................................................. 57
Technical Data.............................................................................. 58
AC Power Adapter ........................................................................ 59
Projected Capacitive Touch Screen ............................................... 59
Resistive Touch Screen ................................................................. 59
MSR Module ................................................................................. 60
Waiter Lock (iButton) Module ....................................................... 60
iPOS plus I/O Hub ......................................................................... 61
Appendix...................................................................................... 62
Approved Printers List .................................................................. 62
Abbreviations............................................................................... 63


BEETLE /iPOS plus Advanced User Manual 1
Manufacturer´s Certification
The device complies with the requirements of the
EEC directive 2004/108/EC with regard to ‘Electromagnetic compatibility" and 2006/95/EC “Low
Voltage Directive” and RoHS directive 2011/65/EU.
Therefore, you will find the CE mark on the device or packaging.
In addition, the BEETLE /iPOS plus Advanced has received the UL symbol and cUL symbol.
FCC-Class A Declaration
This equipment has been tested and found to comply with the limits for a
Class A digital device, pursuant to part 15 of the FCC Rules. These limits are
designed to provide reasonable protection against harmful interference
when the equipment is operated in a commercial environment. This
equipment generates, uses, and can radiate radio frequency energy and, if
not installed and used in accordance with the instruction manual, may
cause harmful interference to radio communications. Operation of this
equipment in a residential area is likely to cause harmful interference in
which case the user will be required to correct the interference at his own
expense. Modifications not authorized by the manufacturer may void users
authority to operate this device.
This class A digital apparatus complies with Canadian ICES-003.
Cet appareil numerique de la classe A est conforme à la norme NMB-003
du Canada.
BSMI (EMC for Taiwan)
The device complies with the requirements of the BSMI
(Bureau of Standards, Metrology and Inspection,
Ministry of Economic Affairs) directive CNS13438 with
regard to “Electromagnetic compatibility” with the limits
for a Class B product.

2 BEETLE /iPOS plus Advanced User Manual
Energy Efficiency
iPOS plus Advanced is tested in an accredited test lab and can meet the Eligibility Criteria for Integrated Desktop laid down in ENERGY STAR version 6.0
for Computers. On a request basis, an application can be made to Energy
Star for listing.
BEETLE /iPOS plus Advanced User Manual 3
Important Notes
The Wincor Nixdorf International GmbH is not responsible for any radio
and television malfunctions which emerge from unauthorized changes in
the device. Make sure that only cables and devices may be connected
which are admitted by Wincor Nixdorf. The user is responsible for any
malfunctions that emerge from the actions mentioned before.
The device may only be repaired by authorized qualified personnel. Unauthorized opening of the device and
inexpertly carried-out repairs may not only seriously
jeopardize the safety of the user, but also cancel all
warranty and liability agreements.
Expansion cards with electrostatically sensitive devices
(ESD) may be marked with this sticker.
When opening the device or handling modules fitted with ESD, please observe the following instructions, which pertain to all electrostatic sensitive
devices (ESDs):
Always use the antistatic kit.
Statically discharge yourself, for example by touching an earthed ob-
ject (such as a heat radiator) before beginning to work with ESDlabeled components.
Likewise, all equipment and tools used in working with such compo-
nents must be free of static charge.
Pull the mains plug before inserting or removing such components.
Only handle such components by their edges.
Never touch any terminal pins of the strip conductors on such compo-
nents.

4 BEETLE /iPOS plus Advanced User Manual
Safety Notes
The BEETLE /iPOS plus Advanced conforms to the current safety standards
for data processing equipment.
If this device is taken from a cold environment into the operating
room, moisture condensation may form. The device must be
absolutely dry before being put into service; an acclimatization
period of at least two hours must therefore be observed.
This device is equipped with a safety-tested power cable and may be
connected only to a prescribed grounded-contact power socket.
When setting up the device, ensure that the power socket on the
device and the grounded-contact power socket are easily accessible.
Whenever work of any kind is done on the device, as well as when
data cables are plugged and/or unplugged, the device must be completely disconnected from the line voltage. To do so, turn the device
off and unplug the power cord.
To disconnect the device from the supply voltage completely, switch
off the device and disconnect the power plug of the system.
Never plug in or unplug data communication lines during thunder-
storms.
Protect devices from vibrations, dust, moisture and heat.
Always dispose of used parts, such as batteries, in an environmentally
safe manner.
In emergencies (e.g. damaged housing or damaged power cable,
penetration by liquids or foreign bodies), the device must be switched
off immediately, the power plug disconnected and the Customer
Service of Wincor Nixdorf or your dealer must be notified.
Your BEETLE system is the result of modern technical innovation. So
please see for according structural and technical surroundings to guar-
antee a faultless and efficient work of your BEETLE. Therefore, you
should connect your BEETLE or other IT-devices only to power supply
systems with separately guided protective earth conductor (PE). This
kind of electricity system is known as TN-S network. Do not use PEN
conductors!

BEETLE /iPOS plus Advanced User Manual 5
Please also observe the recommendations of the norm DIN VDE 0100,
Part 540, Appendix C2 as well as EN50174-2, §5.4.3.Thus you can help
to avoid possible mal functions.
If you replace a storage medium, make sure that you only use the stor-
age medium recommended or approved by Wincor Nixdorf.
You can connect or disconnect USB devices during operation of your
BEETLE, provided that these devices comply with the specifications
according to usb.org. Other peripheral devices (such as PoweredUSB
printer) should be connected to or disconnected from your BEETLE
system only after the BEETLE has been switched off.

6 BEETLE /iPOS plus Advanced User Manual
Introduction
The BEETLE /iPOS plus Advanced 15" comes in two variants, one with the
Projected Capacitive and the other with Resistive touch.
Its key features are the bezel-free design with multi-touch capabilities and
the elegantly designed aluminum back housing coupled with its support
for the high performance i3 and i5 processors as well as the value range of
Celeron/Pentium processors.
About This Manual
This documentation is intended to help you to work with the POS system
and to serve as a reference work. The detailed table of contents help you
find the desired information quickly and easily.
Notes in the manual are marked by this symbol.
This symbol is used for warnings.
The type and scope of application programs depend on the customer’s
own selection; therefore, software will not be discussed further in this
manual.

BEETLE /iPOS plus Advanced User Manual 7
Care of the BEETLE /iPOS plus Advanced
Clean your system’s housing at regular intervals with a dry, lint-free cloth.
If this does not suffice please use a suitable plastic-surface cleaner which
you can order from Wincor Nixdorf International GmbH.
For more information about cleaning read the chapter “Projective Capaci-
tive Touch Screen” and “Resistive Touch Screen”. When cleaning always
make sure that the power plug is disconnected and that no liquid finds its
way into the device.
Recycling the BEETLE /iPOS plus Advanced
Environmental protection does not begin when the time has come to dispose of the BEETLE; it begins with the manufacturer. This product was designed according to our internal norm “Environmental conscious product
design and development”.
The BEETLE /iPOS plus Advanced system is manufactured without the use
of CFC and CHC and is produced mainly from reusable components and
materials.
Please do not stick labels onto plastic case parts. This would help us to reuse components and material.
But there are still some parts that are not reusable. Wincor Nixdorf International GmbH guarantees the environmentally safe disposal of these
parts in a Recycling Center, which is certified pursuant to ISO 9001 and ISO
14001.
You can protect our environment by only switching on your equipment
when it is actually needed. If possible, even avoid the stand-by-mode as
this wastes energy, too. Also switch your equipment off when you take a
longer break or finish your work.
Please contact your competent branch or the Recycling Center Paderborn
(for European countries) for information on how to return and reuse devices and disposable materials under the following mail address.
Email: info@wincor-nixdorf.com or on the internet.

8 BEETLE /iPOS plus Advanced User Manual
Warranty
In general, damages due to
improper or insufficient maintenance,
improper use of the product or unauthorized modifications of the
product,
inadequate location or surroundings
will not be covered by the warranty.
For further information on the stipulation consult your contract.
All parts of the product which are subject to wear and tear are not
included in the warranty engagement. For detailed warranty arrangements
please consult your contract documents.
Please order spare parts at the Wincor Nixdorf customer service.
Unpacking And Checking the Delivery Unit
Unpack the parts and check to see whether the delivery matches the
information on the delivery note. The delivery comprises the respective screen module. Data cables, necessary for operation, can be ordered separately. lf damage has occurred during shipping or if the
package contents do not match the delivery note, immediately inform
your Wincor Nixdorf sales outlet.
Transport the device only in its original packaging (to protect it
against impact and shock).

BEETLE /iPOS plus Advanced User Manual 9
Basic settings
The BEETLE /iPOS plus Advanced is configured to your order. Additional peripheral devices are delivered separately, for example the swipe card reader. The modules must still be mounted to the system.
Components
The BEETLE /iPOS plus configuration can consist of the following
components:
Processors Type
Celeron G1820TE
Intel Pentium G3320TE
Intel Core i3-4330TE
Intel Core i5-4570TE
RAM
2 x DDR3 SODIMM socket
DDR3 SODIMM up to 1600MHz
Maximum size is 16GB
Hard Disk Options
1x 2.5” format-factor docking drive bay for 7mm thick hard disk or SSD
Display
15" Color TFT LED backlight with touch options:
projected Capacitive touch, 2-touch multi-touch, or
5-wire Resistive Touch screen
10 BEETLE /iPOS plus Advanced User Manual
Replacing the Lithium Battery
Incorrect replacement of the Lithium Battery may lead to a risk of explosion.
The end user must replace the lithium battery only by identical batteries or
types recommended by Wincor Nixdorf.
Do not throw Lithium Batteries into the trashcan. It must be disposed of in
accordance with local regulations concerning special waste.
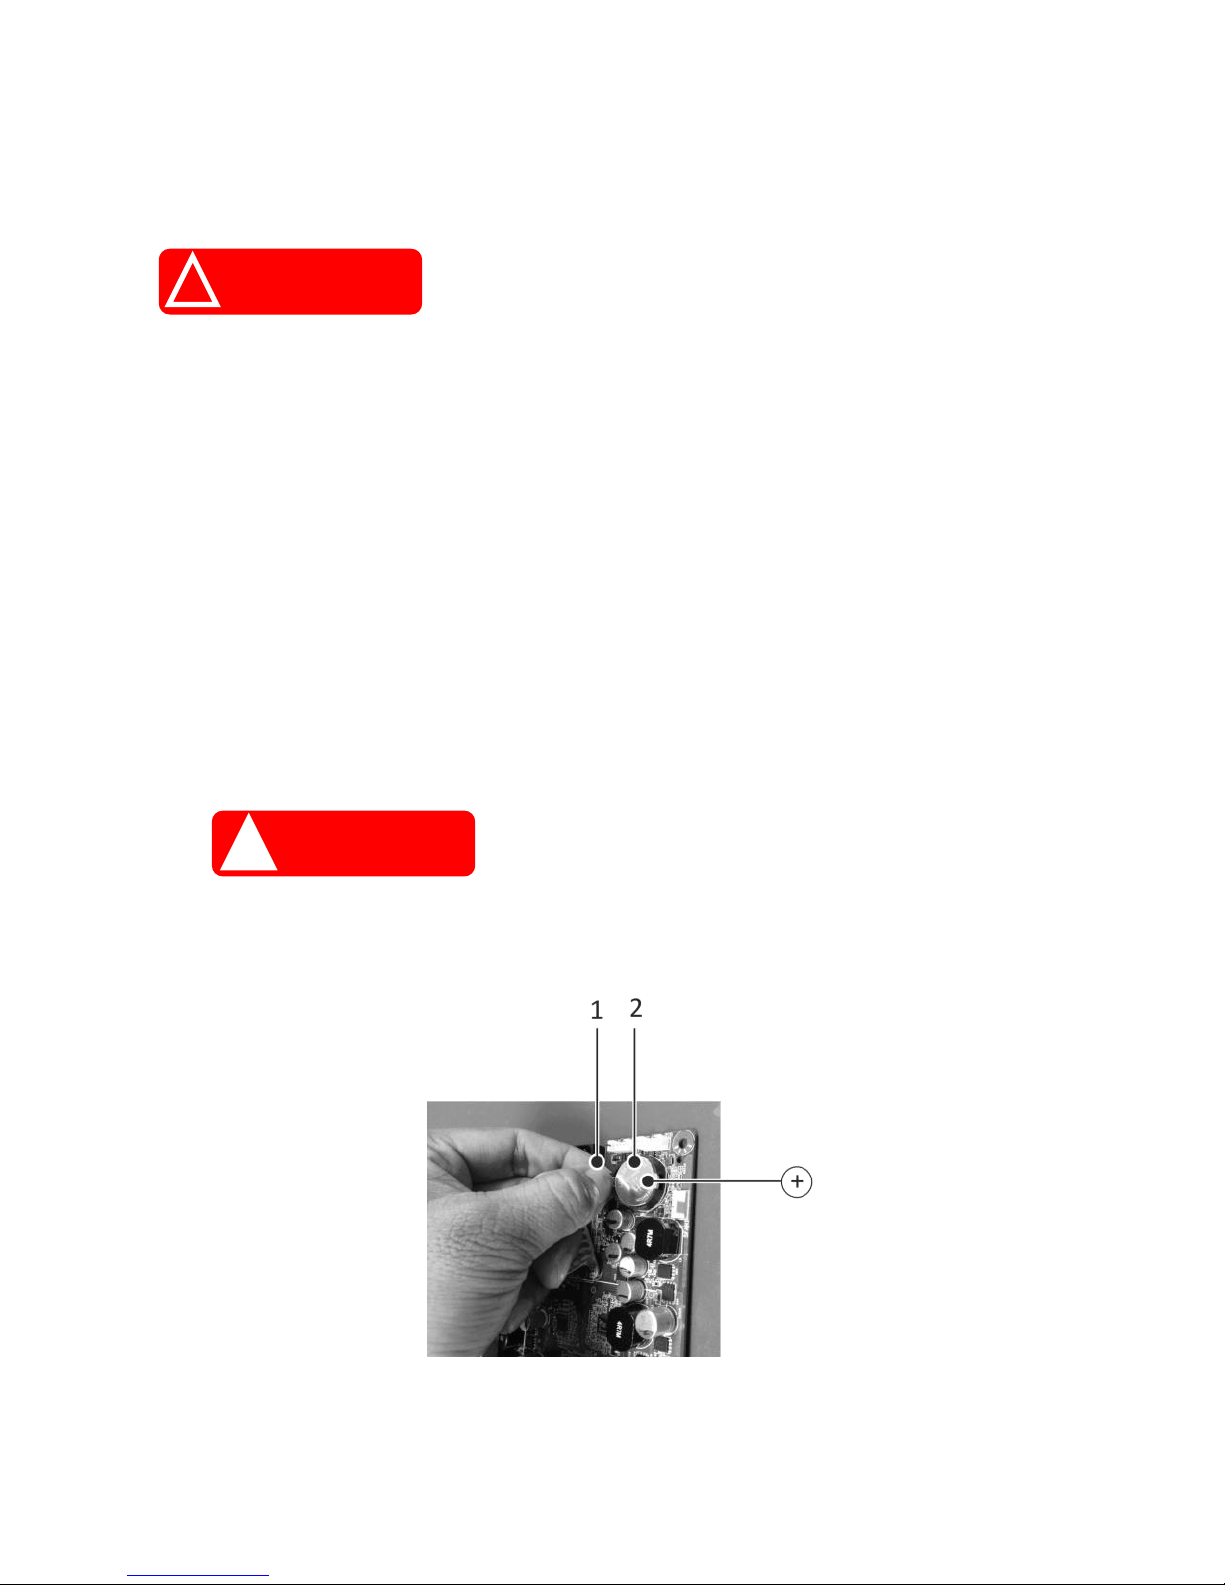
Make sure that you insert the Battery the right way round by the indicated
polarity in the picture below.
Follow the following steps to replace the Lithium battery.
Always make sure that the system is switched off before you replace the
battery.
! CAUTION
! WARNING

BEETLE /iPOS plus Advanced User Manual 11
Push the spring latch (1) and remove the Lithium Battery from its Socket
(2).
Insert and press a new Lithium Battery of same type in the Socket.
Make sure that you insert the battery the right way round, by the indicated
polarity in the picture above.
12 BEETLE /iPOS plus Advanced User Manual
Setting Up the Device
The BEETLE /iPOS plus Advanced was developed for an in-house installation. The device is designed to be mounted on a stand (desktop version) or
on the wall (wall mount version).
Set up the BEETLE /iPOS plus Advanced system where it will not be exposed to extreme environmental conditions. Protect the device from vibrations, dust, moisture, heat and strong magnetic fields.
Ergonomic Terminal Workplace
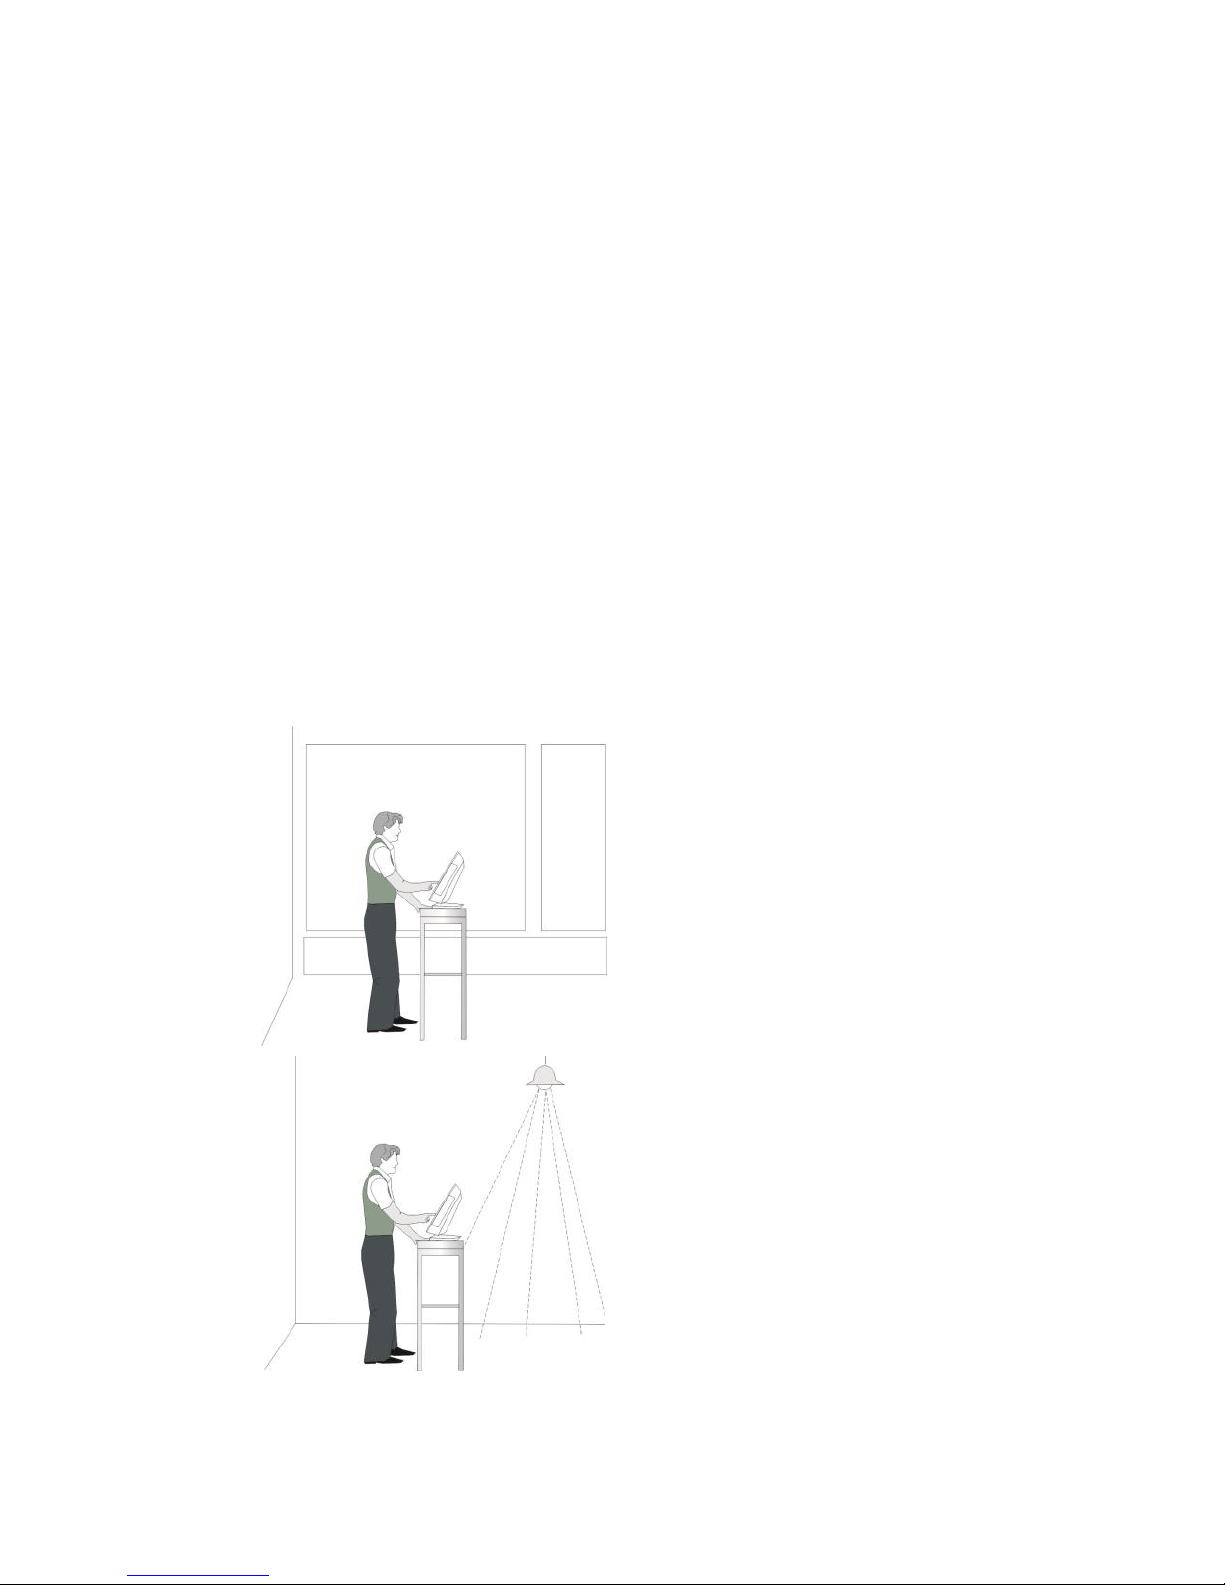
Please observe the following when setting up your terminal workplace:
Avoid direct glaring and
reflective glaring. Use the
screen only in a controlled
luminance surounding.
Install the device with a
viewing direction that is
parallel to the windows.
Avoid reflective glaring
caused by electric light
sources.
BEETLE /iPOS plus Advanced User Manual 13
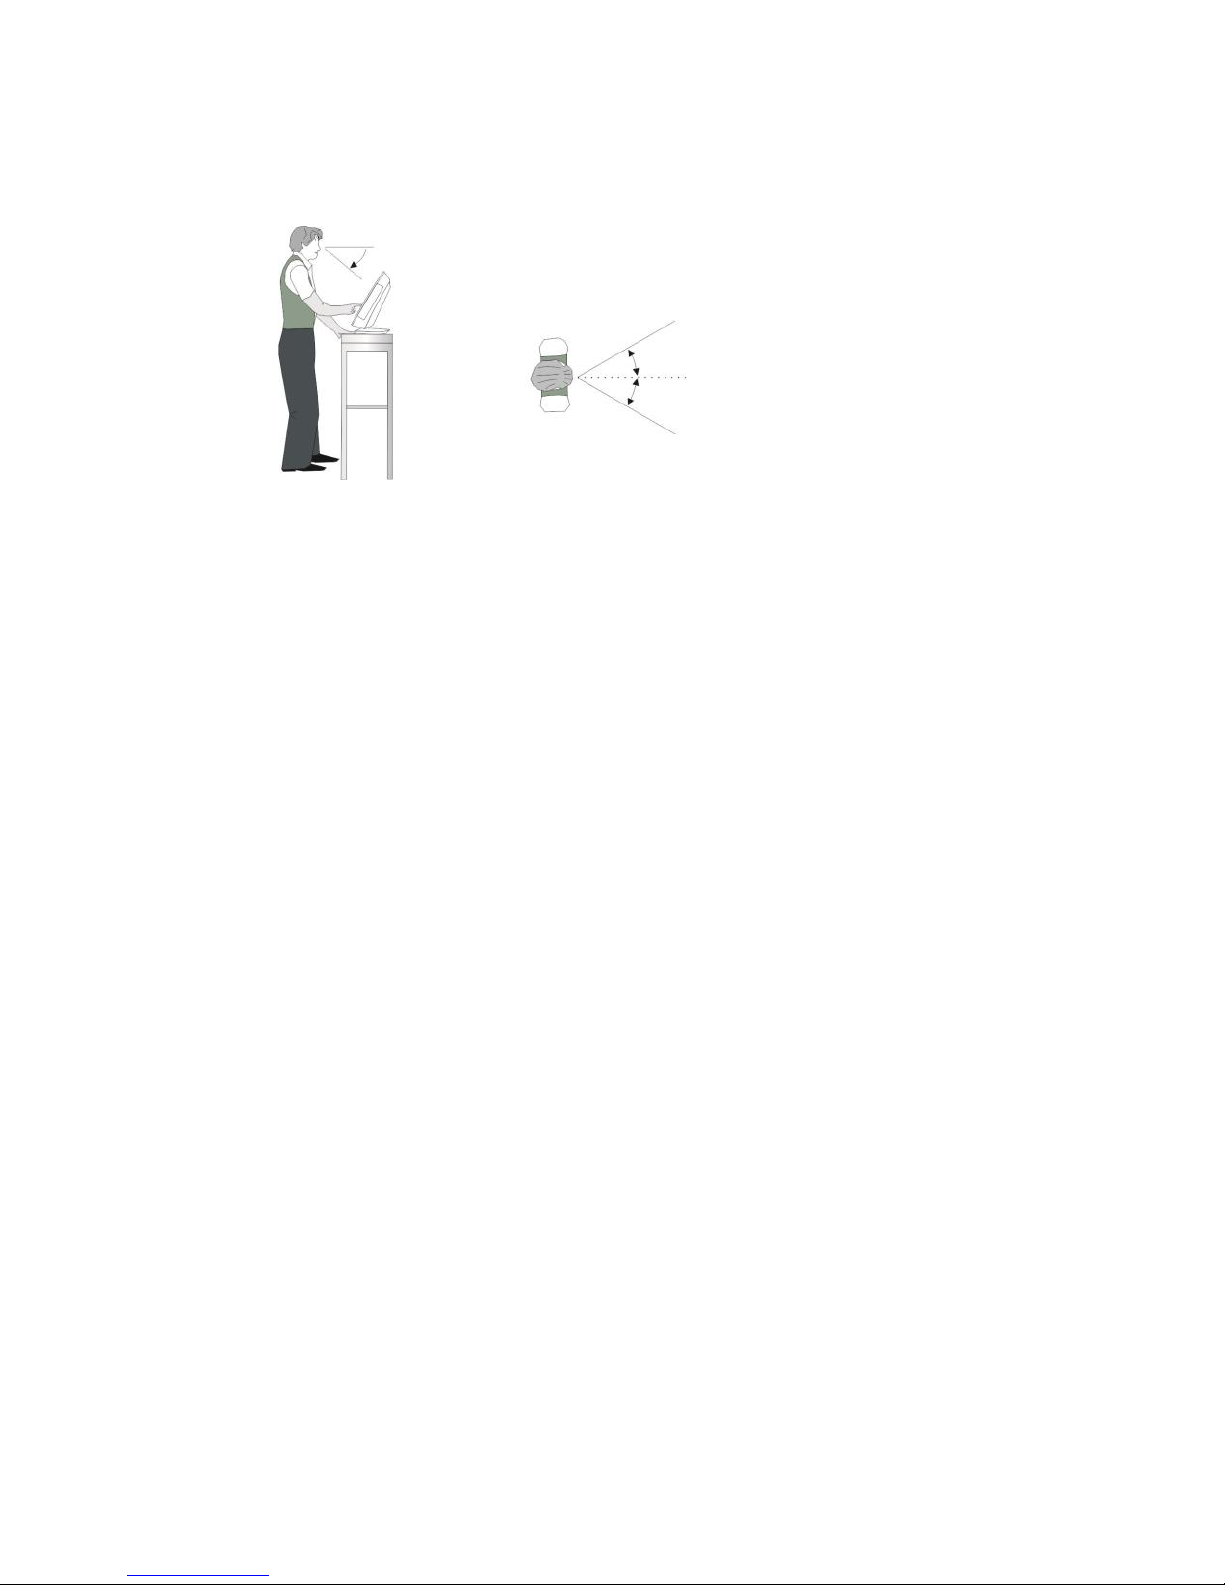
Position the screen within a
preferred and permit ted range
of vision, so that you can look
onto the screen from above.
30°
30°
40°
0°
Permitted range of vision
Preferred range of vision
14 BEETLE /iPOS plus Advanced User Manual
Overview
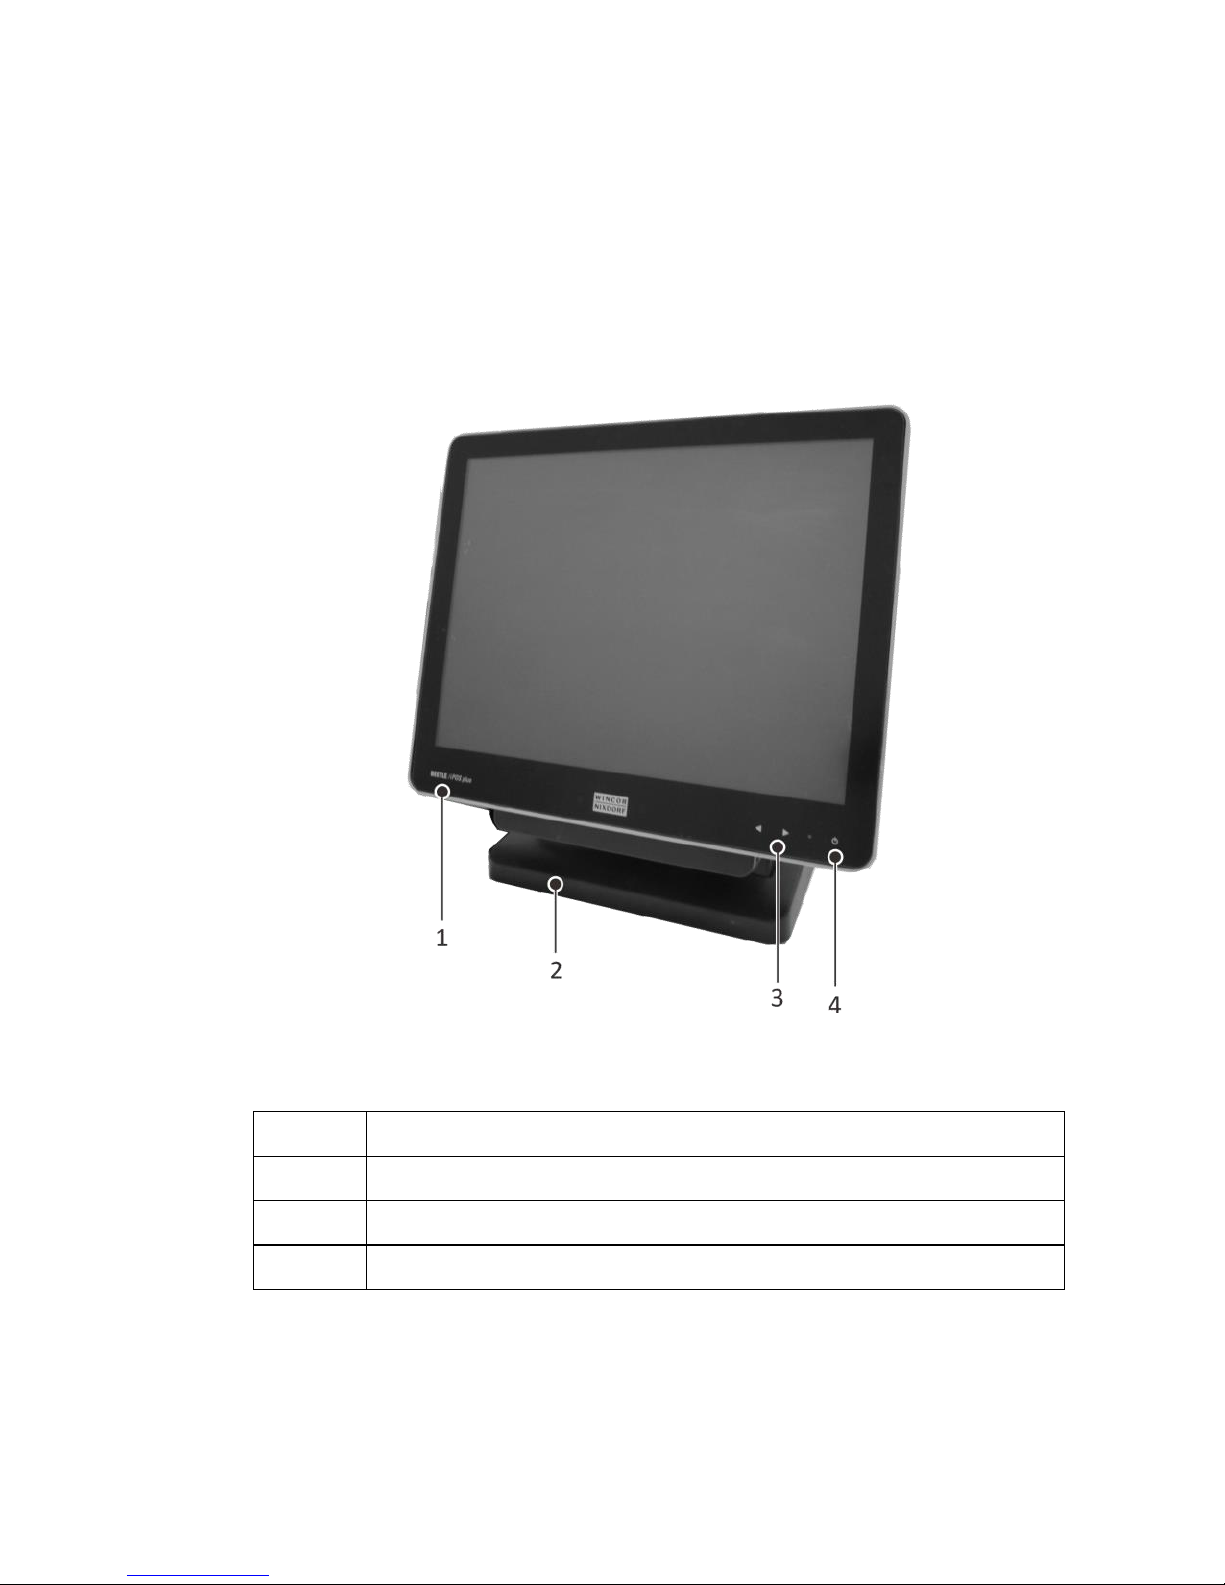
Front View with Stand
1
Display
2
Stand
3
Brightness adjustment, LEDs
4
Power status indicator
 Loading...