

Wincor Nixdorf Beetle/60 User Manual

BEETLE
BEETLE /60
POS System
User Guide

BEETLE /60
POS System
User Guide
Edition May 2000

Copyright © Wincor Nixdorf GmbH & Co. KG, 2000
The reproduction, transmissionoruseof this documentoritscontentsisnotpermitted
without express authority.
Offenders will be liable for damages.
All rights, including rights createdby patent grant or registrationofa utilitymodelordesign,arereserved.
Delivery subject to availability; technical modifications possible.

Contents
Manufacturer’s Certification.....................................................................1
FCC-Class A Declaration..........................................................................1
Tested Safety ............................................................................................2
Important notes..........................................................................................2
Introduction................................................................................................4
About this manual......................................................................................6
Care of the BEETLE..................................................................................7
Recycling the BEETLE POS system.........................................................8
BEETLE /60 POS terminal and system....................................................9
Before switching on the system .............................................................11
Unpacking and verifying the scope of supply......................................11
Setting up the device ...........................................................................11
Cabling of the BEETLE ........................................................................12
Securing the data cable.......................................................................12
Connecting to the mains power supply................................................13
Disconnecting cables...........................................................................14
Basic settings.......................................................................................14
Adjusting the loudspeaker ...................................................................15
Connecting peripherals ...........................................................................15
Keyboard (KYBD) ................................................................................16
Cash drawer (CASHDRW) ..................................................................16
Scanners and scales (COM1, COM2*,COM3*oder COM4*)..........17
Customer display (COM2*, COM3*oder COM4*)............................17
Monitor .................................................................................................18
Connecting standard PC peripherals...................................................18
Network................................................................................................18
Cable cover..........................................................................................19
Cable cover for expansion boards.......................................................20
The BEETLE components.......................................................................21
Overview..................................................................................................21
Cashier display........................................................................................22
The BEETLE printer ................................................................................23

Operation............................................................................................. 23
Inserting spacers................................................................................. 24
Changing the receipt and journal paper.............................................. 25
– Green paper feed button............................................................... 26
Changing the receipt roll ..................................................................... 27
– Remove receipt roll ....................................................................... 27
– Insert receipt roll............................................................................ 29
Changing the journal roll ..................................................................... 31
– Remove journal paper................................................................... 31
– Insert journal roll............................................................................ 33
Changing the ribbon cassette ............................................................. 36
Clearing paper jams ............................................................................ 39
Changing the print head...................................................................... 41
Checking the receipt and journal entries............................................. 43
Receipt and journal feed key............................................................... 43
Document printing...................................................................................44
Cleaning the printing unit..................................................................... 45
– Cleaning the transport axes of the print head............................... 46
The BEETLE card................................................................................... 47
The various card types........................................................................48
– SRAM Card................................................................................... 48
– MASK ROM Card.......................................................................... 49
– OTPROM Card.............................................................................. 49
– FLASH EPROM Card ................................................................... 49
Inserting the BEETLE Card................................................................. 49
Removing the BEETLE card ............................................................... 50
Write protection for SRAM cards......................................................... 50
Changing the battery for SRAM cards ................................................51
Floppy drive ............................................................................................ 53
General................................................................................................ 53
Inserting a diskette .............................................................................. 54
Removing a diskette............................................................................ 54
CPU.........................................................................................................55
General................................................................................................ 55
Interfaces.............................................................................................56
Loudspeaker........................................................................................ 56
Nonvolatile RAM.................................................................................. 56
Dynamic RAM ..................................................................................... 56
Connection options.............................................................................. 57
– Connecting a hard disk ................................................................. 57
– Free AT slots................................................................................. 57
– VGA slot ........................................................................................ 57

– ASYNC controller (VGA slot)........................................................57
– LAN controller ((VGA slot))............................................................58
Connecting to a network..........................................................................58
Power pack and battery...........................................................................58
Changing the battery............................................................................59
Security against power failure..............................................................63
Changing the BEETLE/60 battery...........................................................64
Software....................................................................................................65
Operating system ....................................................................................65
Retail device interface .............................................................................65
Application programs...............................................................................65
Retail message handler...........................................................................66
Retail presentation manager ...................................................................66
Retail transaction manager .....................................................................66
High frequency table ...............................................................................66
Hash file access method.........................................................................66
Starting up the system ............................................................................67
Start and runup behavior.........................................................................67
Output of MS-DOS system error messages........................................70
Power-on selftest (POST)....................................................................71
BIOS Setup..............................................................................................72
Appendix...................................................................................................85
Technical data for the BEETLE/60..........................................................85
CPU.........................................................................................................86
Hard Disk.................................................................................................87
Printer......................................................................................................88
Document paper ..................................................................................88
Receipt / journal paper (single-ply)......................................................89
Printable area (back of receipt/journal)................................................89
Printable area (receipt/journal/document) ...........................................90
Network controller ...................................................................................91
BEETLE in-house controller....................................................................91
Installing an expansion board..................................................................92
What to do if... .........................................................................................96
The configuration label (located under the terminal)...............................97
Error messages.......................................................................................98
MS-DOS critical errors.........................................................................98
POST error messages .........................................................................99
Phoenix BIOS POST and start messages.........................................101

– Additional messages................................................................... 104
Glossary................................................................................................ 105
Abbreviations ........................................................................................ 107
Index....................................................................................................... 109

Manufacturer’s Certification
If there is a CE symbol on the back of the device then:
The device complies with the requirements of the EEC directive
89/336/EEC with regard to “Electromagnetic compatibility”.
FCC-Class A Declaration
This equipment has been tested and found to comply with the limits for a
Class A digital device, pursuant to part 15 of the FCC Rules. These limits
are designed to provide reasonable protection against harmful
interference when the equipment is operated in a commercial environment.
This equipment generates, uses, and can radiate radio frequency energy
and, if not installed and used in accordance with the instruction manual,
may cause harmful interference to radio communications.
Operation of this equipment in a residential area is likely to cause harmful
interference in which case the user will be required to correct the
interference at his own expense.
This digital apparatus does not exceed the “Class A” limits for radio noise
emmissions from digital apparatus as set out in the Radio Interference
Regulations on the Canadian Dept. of Communications.
Le présent appareil numérique pas de bruits radioélectriques dépassant
les limites applicables aux appareils numériques de la “Class A” prescrites
dans le Règlement sur le brouillage radioélectrique édicté par le ministère
des Communications du Canada.
GB - 1
Tested Safety
The BEETLE /60 has been provided with the symbol
for “Tested Safety”.
In addition, the BEETLE has received the cUL
symbol and the UL symbol.
Important notes
Manufacturer’scertification Import antnotes
The BEETLE /60 POS system conforms to the current safety standards
for data processing equipment.
■ Condensation may form if the device is brought into the operating
room from a cold environment. The device must be completely dry
before it is put into operation. Wait at least two hours, therefore, to
enable the device to acclimatize.
■ This device is equipped with a safety-tested power cable and may be
connected only to a grounded-contact power socket.
■ When setting up the device, ensure that the power socket on the
device or the grounded-contact utility power socket is easily
accessible.
■ The supply leads and cables must be laid in such a way as to avoid
anyone stepping on or tripping over them.
■ To disconnect the device from the supply voltage completely, switch
off the device and disconnect the power plug.
■ Take necessary precautions to avoid any objects (such as paper
clips) or liquids coming into contact with the inside of the device in
order to avoid electric shocks or short circuits.
■ In order to ensure that the device is well ventilated and to prevent
overheating, do not obstruct the ventilation slots on your device.
Important notes Manufacturer’s certification
GB - 2

■ Never plug in or unplug data communication lines during
thunderstorms.
■ Protect devices from vibrations, dust, moisture and heat.
■ The device should be transported in its original packing only (in order
to provide the necessary protection against knocks and shocks).
■ In emergencies (e.g. damaged housing or mains cable or if liquids or
foreign bodies have come into contact with the inside of the device),
the device must be switched off immediately, the mains connector
unplugged and the customer service department of Wincor Nixdorf
GmbH & Co. KG (WN) notified.
■ Always dispose of used parts, such as batteries and ribbons, in an
environmentally safe manner.
The device may be repaired by authorized qualified personnel
only. Unauthorized opening of the device and inexpertly
carried-out repairs may not only seriously jeopardize the safety
of the user, but also cancel all warranty and liability agreements.
Manufacturer’s certification Important notes
GB - 3

Introduction
The BEETLE /60 is a powerful, economical, compact POS system that
requires very little space.
The BEETLE POS system conforms to the PC industry standard. This
means that you can add any expansions you wish in order to adapt it to
your growing requirements.
A variety of peripheral devices are also available, such as a scanner for
reading bar codes, a swipecard reader for check, credit and customer
cards, or a monitor.
With the exception of the keyboard and the optionally connectable
devices, all components of the BEETLE POS system are accommodated
in a single housing.
The base plate of the BEETLE POS system houses the CPU’s boards and
plug connector strips, and the power pack. All ports for peripherals and the
power supply are located on the back of the housing.
The integrated printer is characterized by a high print rate. A 9-dot matrix
print head is used for receipt and journal printing. Document printing is
also possible.
The BEETLE POS system has a 4-line, 20-position alphanumeric cashier
display. In addition to the currently posted items, the cashier display also
outputs error messages and operating instructions.
The system supports the operation of the BA63 customer display, which
can display a total of 40 characters on two lines. The customer display is
optionally available.
GB - 4

Introduction
The BEETLE POS system is network-capable; when the appropriate
network board has been installed, the BEETLE also operates in a POS
network.
Due to the integrated battery and with the aid of corresponding software,
programs are terminated correctly in the event of a power failure and your
data is saved.
The BEETLE POS system allows you to use the BEETLE card (memory
card). This storage medium requires very little space, is mechanically
robust and provides a high rate of data security. Some possible
application areas for a BEETLE card would be program loading and data
storage.
The BEETLE POS system is optionally available with a floppy drive as a
supplementary storage medium. Like BEETLE cards, diskettes are
mechanically robust and can be used for program loading and data
storage.
Hard disks of varying storage capacities can also be used in the BEETLE
as a further, optional storage medium. They mainly serve to store large
datasets and to boot the system.
The system software is based on the standard operating system MS-DOS.
The operating system has been expanded in order to take account of
specific retailing requirements.
The POS-specific functions can be programmed by means of the software
interface RDI (Retail Device Interface) developed by Wincor Nixdorf
GmbH & Co. KG.
A series of expansion products are available from WN for developing
application programs which
■ support the object-oriented design of applications, paying special
attention to POS-specific user interfaces (RPM),
■ offer typical functions required by networked POS systems (fail-safe
facility, database functions etc.) in heterogeneous client/server
environments with standardized SQL interfaces (RTM),
■ control data exchange in the form of messages within a local network
(LAN) (RMH),
Introduction
GB - 5

■ feature the standard service functions for POS systems (HSF, HFT).
The BEETLE software is thus both sophisticated and extremely flexible.
We wish you a profitable future with your BEETLE /60.
About this manual
Aboutthis manual
The BEETLE is an easy-to-use POS system. Following a brief
familiarization period, you will already know how to use all its functions.
This manual is intended to help you work with the POS system and to
serve as a reference work. The detailed table of contents and the index
help you find the desired information quickly and easily.
The manual is divided into five main sections.
The first section describes
■ everything you need to do before switching on the POS terminal and
■ how to connect peripherals to the BEETLE.
The second section contains
■ a brief overview of the components of your BEETLE POS system.
Here, you will also find a detailed description of recurring actions
(changing paperrolls, handling the BEETLE card, etc.).
The third section provides
■ information on the software of the BEETLE POS system.
The fourth section explains
■ the procedure for starting up the system. This section is aimed
primarily at staff with technical training.
About this manual Introduction
GB - 6

The Appendix
■ contains the most important technical data, a glossary, a list of
abbreviations and instructions on how to install an expansion board.
Notes in the manual are marked by this symbol.
This symbol is used for cautionary notes.
Apart from the information on the setup program and a brief description of
the most important WN programs, this manual contains no further details
on software as the type and scope of the application programs depend on
the individual requirements of the customer.
Separate manuals are included in the scope of supply of a number of
connectable peripherals. For this reason, a more detailed description of
these devices will not be provided here. For more information, see the
relevant manuals.
Care of the BEETLE
Clean your BEETLE at regular intervals with a suitable surface cleaner.
Suitable products are available via WN Plus.
Make sure that the power plug is disconnected and that no
liquid finds its way into the device.
To maintain your BEETLE in good working order, clean its printer
regularly. You will find information on how to do this in the chapter on the
printer on page GB-45.
Introduction About this manual
GB - 7

Recycling the BEETLE POS system
Environmental protection is
important right from the very
beginning of the manufacturing
process and not just when a POS
system is disposed of.
The BEETLE POS system is
manufactured without CFCs and
CHCs and comprises mostly
reusable components and materials.
Recycling
The materials used are for the most part recyclable. The precious metals
can also be recovered. This saves energy and valuable raw materials.
At this time, there are still some parts that are not reusable. Wincor
Nixdorf GmbH & Co. KG guarantees that these parts will be disposed of in
an environmentally-friendly manner in the WN recycling center which is
certified in accordance with ISO 9001.
So don’t simply throw your BEETLE POS system on the scrap heap when
it has served its time, but take advantage of the environmentally smart,
up-to-date recycling methods!
The operation of your BEETLE POS system also produces consumables
that must be disposed of in an ecologically sound manner. Wincor Nixdorf
GmbH & Co. KG provides a recycling box for used ribbons that you can
set up at your company. The low price you pay for the box also includes
pickup and complete recycling of the ribbons. For more information,
contact the WN branch office responsible for your area.
Our environmental protection section in Paderborn, Germany (Email:
referat.umweltschutz@wincor-nixdorf.com) is always ready to answer any
questions you may have about WN’s environmental protection policies.
Recycling Introduction
GB - 8

BEETLE /60 POS terminal and system
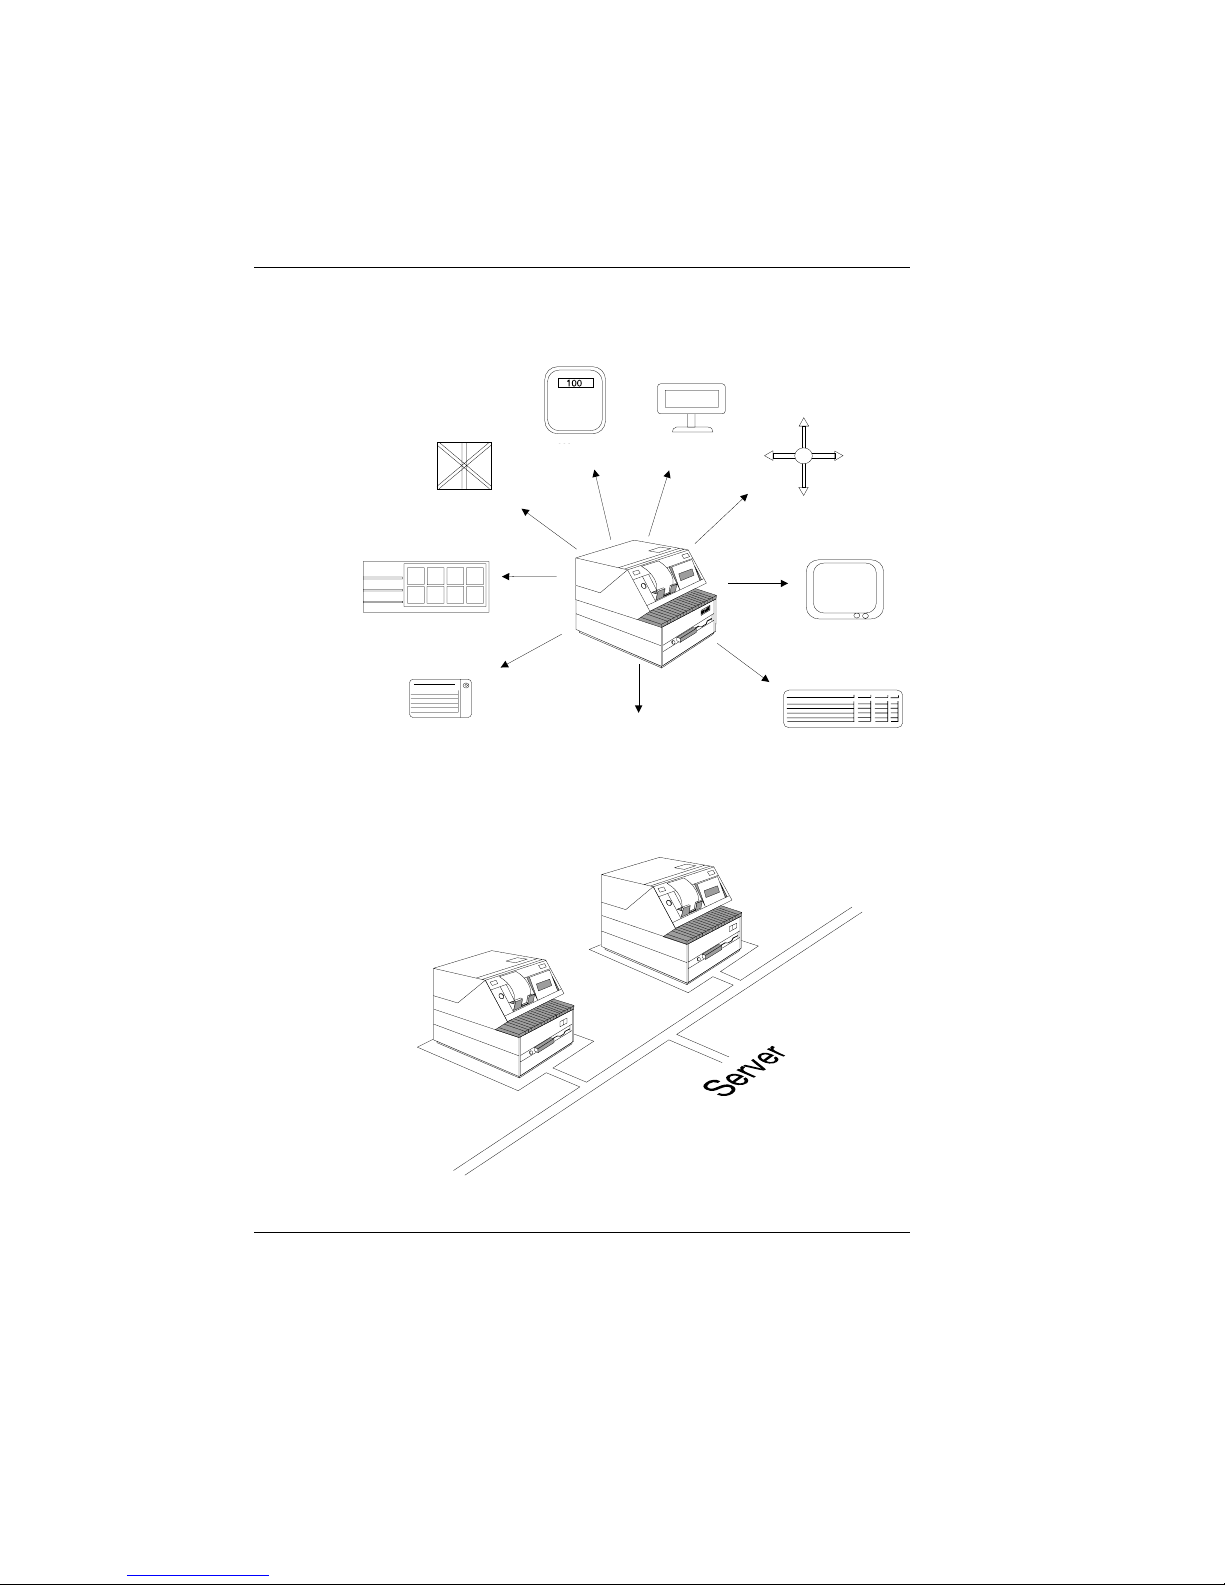
The BEETLE is a growth-oriented POS system. To meet your growing
requirements, a number of optionally connectable peripherals are
available for the BEETLE. Thus, you can also
■ connect one two or four-line alphanumeric customer display and one
four-line cashier display,
■ use different types of scanners such as distance, touch or stationary
scanners,
■ connect scales and scanner scales (observe the relevant official
standards),
■ use POS keyboards with or without a swipecard reader or a PC
keyboard,
■ use different types of cash drawer,
■ connect a monitor,
■ install SNIkey,
■ integrate the BEETLE in a network after installing a LAN board and
■ upgrade the BEETLE, since it can accommodate several expansion
boards.
This means that the BEETLE can meet your requirements at all times,
without your having to exchange the complete system for a new one, thus
saving you time and money.
The illustrations on the next page show you how your BEETLE POS
system can grow - from a scanner to integration in a network.
GB - 9
POSterminal and system
Scales
Displays
Cash drawers
POS keyboard
Standard
peripherals
MF2 keyboard
Monitor
Network
Scanners
POS terminal and system
GB - 10

Before switching on the system
Unpacking and verifying the scope of supply
Scopeof supply
Unpack the parts and check to see whether the delivery matches the
information on the delivery note.
The carton contains the basic unit and a country-specific accessories kit.
The basic unit can also be equipped with a network board, floppy drive,
hard disk or a VGA board, or a combination of these components.
If damage has occurred during shipping or if the package contents do not
match the delivery note, inform your WN branch immediately.
Transport the device only in its original packaging (to protect it
against impact and shock).
Setting up the device
Set up the BEETLE POS system where it will not be exposed to extreme
environmental conditions. Protect the device from vibrations, dust,
moisture, heat and strong magnetic fields.
Make sure that the side ventilation slots on the BEETLE POS system are
not obstructed in order to ensure that the device has sufficient ventilation.
POS terminal and system Scope of supply
GB - 11
Cabling of the BEETLE
Cablingof the BEETLE
Follow the steps below in the order given when installing devices:
■ Make sure that the power switch on the back of the housing is set to
“0".
■ Plug in and secure the data cable.
■ Plug the power cable into the rubber connector of the BEETLE.
■ Plug the power cable into the grounded-contact utility power socket.
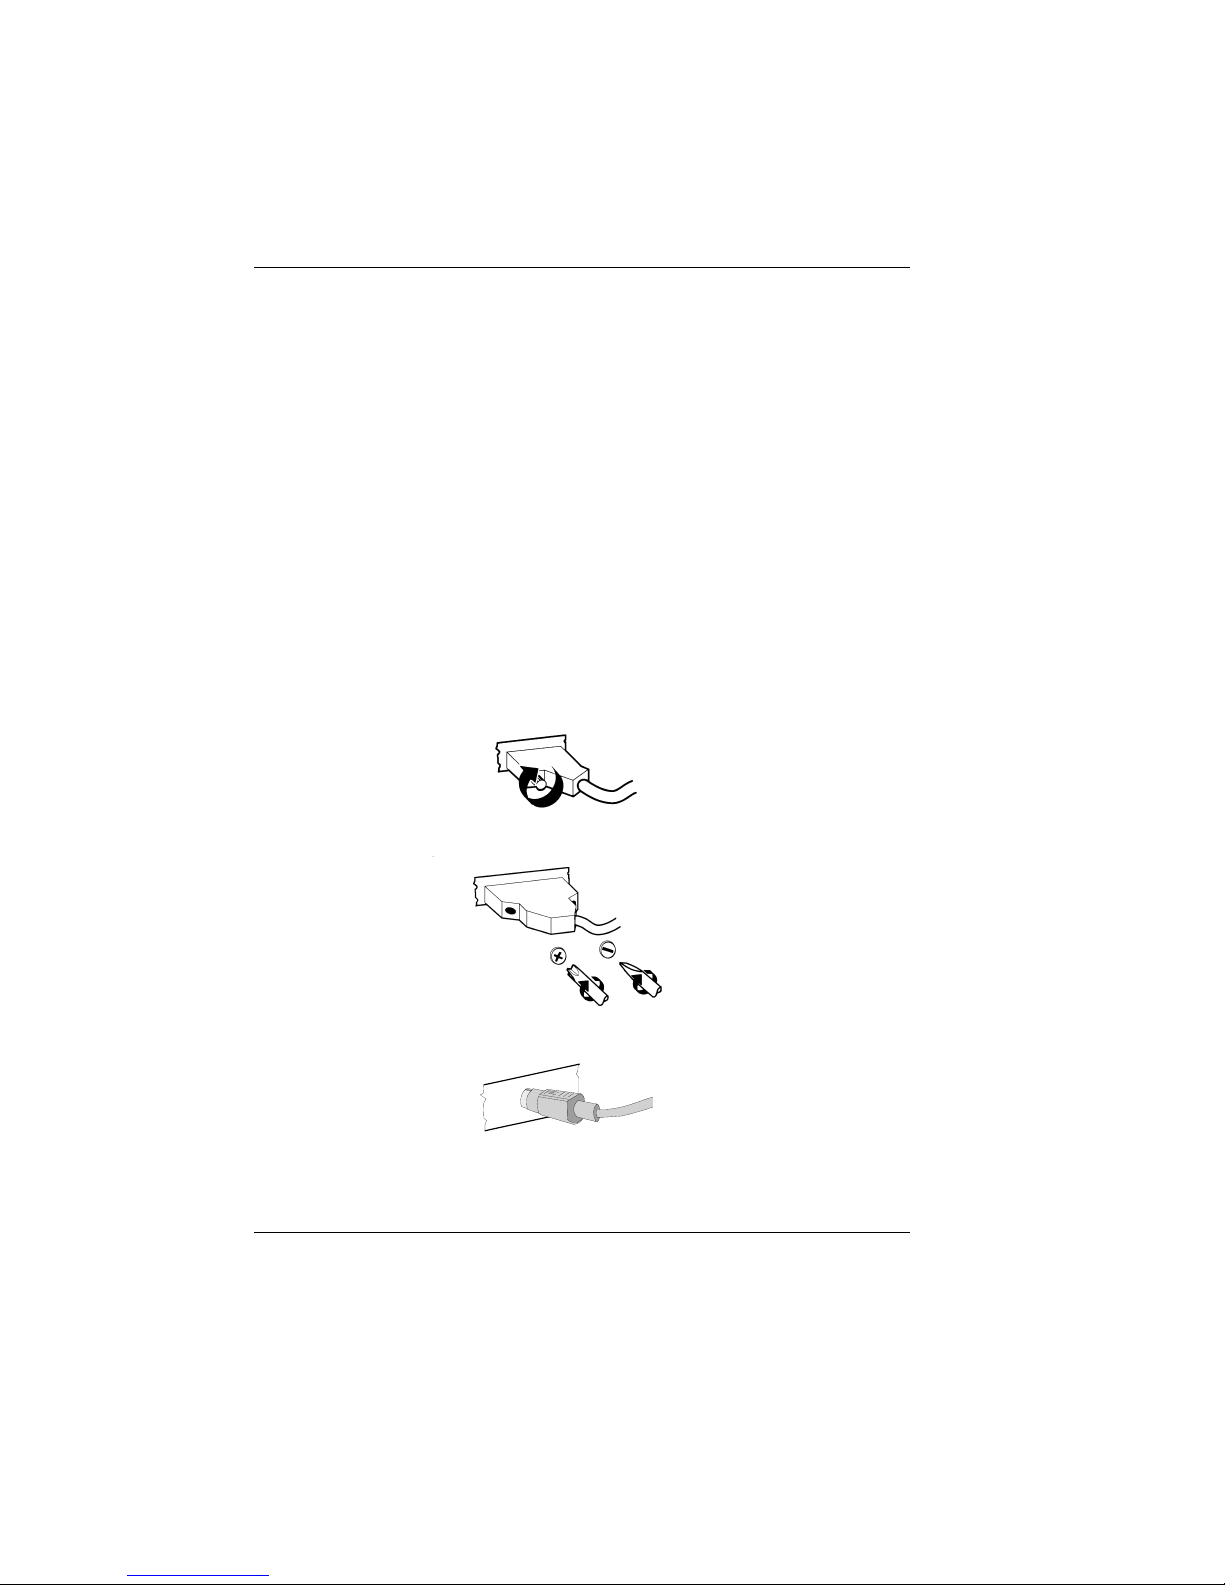
Securing the data cable
Secure interface
connectors with
knurled screws using
your fingers.
Secure interface
connectors with
standard screws
using a screwdriver.
Mini-DIN connectors
are locked when
inserted.
Cabling of the BEETLE POS terminal and system
GB - 12

Connecting to the mains power supply
Connectingto the mains powersupply
All devices belonging to the BEETLE POS system that have a separate
power cable must be connected to the same electric circuit.
■ Ensure that the power switch on the POS terminal housing is
switched off.
■ Make sure that all data cables on the system unit and peripherals are
connected correctly.
■ Plug all power cables belonging to the peripherals and the BEETLE
into the grounded-contact utility power sockets.
The power-supply unit of the BEETLE POS system adapts itself
to the local system voltage so that you do not have to make any
adjustments yourself.
You can now switch
on the power switch
at the rear of the
housing (position I).
The power output of devices connected to the BEETLE system
must not be more than 200 V AC.
Rubber socket
Rubber connector
Power switch
POS terminal and system Connecting to the mains power supply
GB - 13
Disconnecting cables
Disconnectingcables
Never unplug a cable by pulling on the cable itself; always take hold of the
actual plug. Follow the procedure below when disconnecting cables:
■ Turn off all power and equipment switches.
■ Unplug all power plugs from the grounded-contact utility power
sockets.
■ Unplug all data communication cables from the sockets of the data
networks.
■ Unplug all cables from the devices.
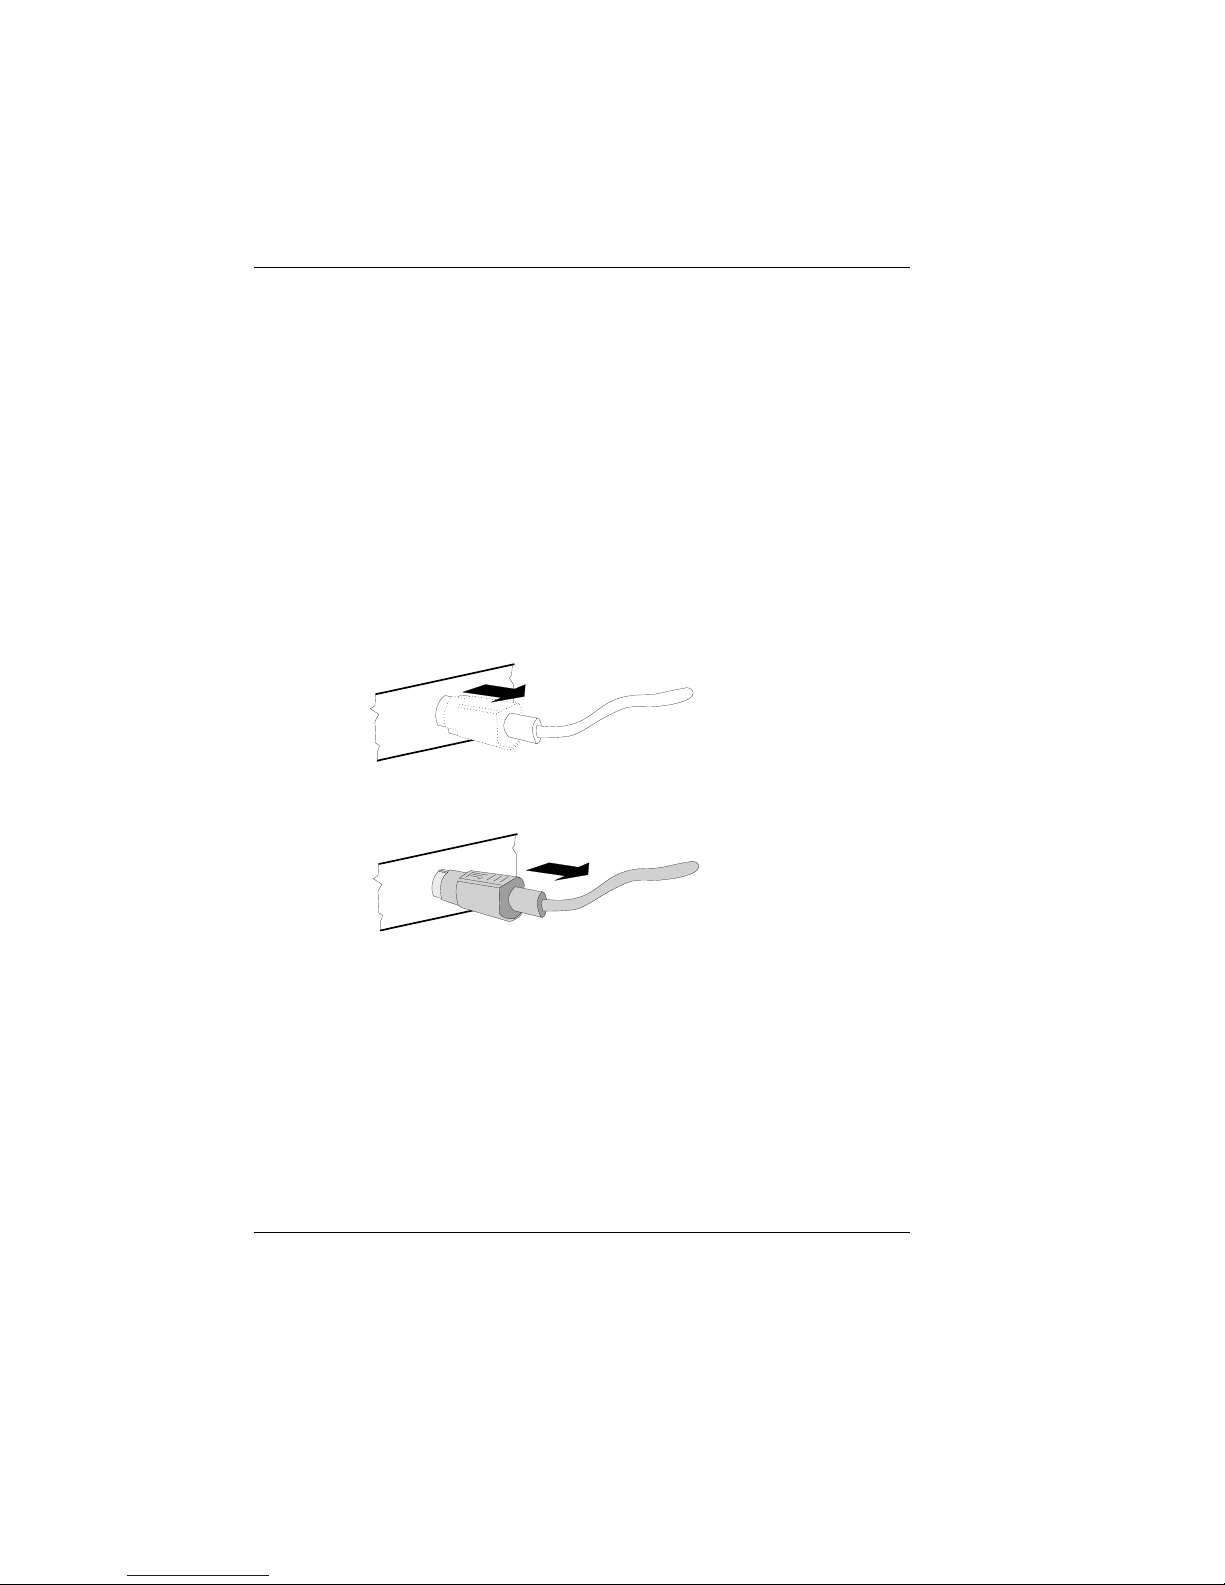
The Mini-DIN
connectors remain
connected until they
are unlocked.
Use your thumb to
move the plastic
casing around the
connector shell away
from the socket. This
unlocks it, and the
metal on the connector becomes
visible.
Now remove the connector from the socket.
Basic settings
Ex works, the BEETLE POS system is configured to your order. Your
configuration must be subsequently adapted to support supplementary
devices such as scanners. For more information, please contact the WN
branch office responsible for your area.
Disconnecting cables POSterminal and system
GB - 14
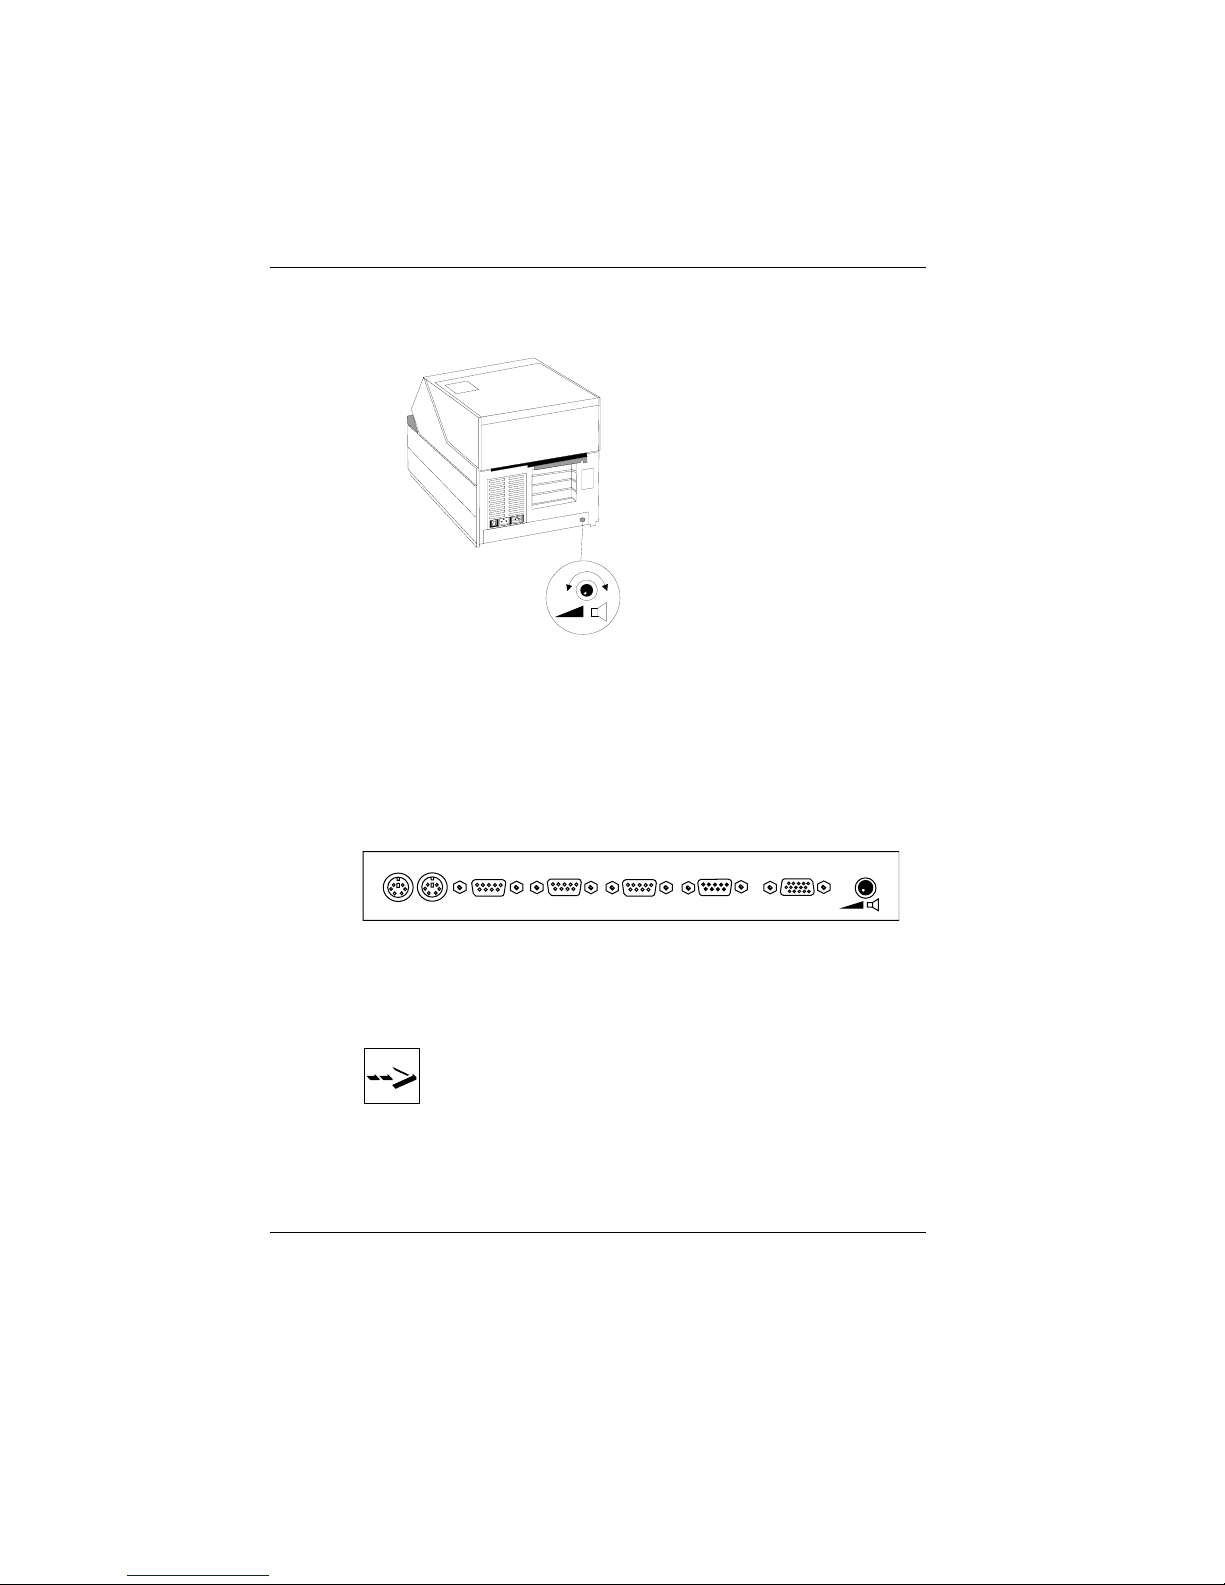
Adjusting the loudspeaker
Adjustingthe loudspeaker
You can set the
volume as desired by
means of the volume
control on the back
of the POS terminal
housing.
Connecting peripherals
Connectingperipherals
Some of the peripherals mentioned here are available as options and are
not part of the basic configuration. A separate manual is provided for each
of the connectable components. For more detailed information, consult the
relevant documentation.
The figure shows the back panel of the BEETLE POS system with the
locations of the connecting sockets and connecting plugs.
You can connect a maximum of seven peripherals. If you wish to connect
a monitor, however, you must also have a video board. You can connect
the system to a network via an expansion board.
The chapter “Installing an expansion board” in the appendix
contains details on installing expansion boards of this type in
the BEETLE.
KYBD
CASHDR COM4 COM3 COM2 COM1
VGA
POS terminal and system Adjusting the loudspeaker
GB - 15
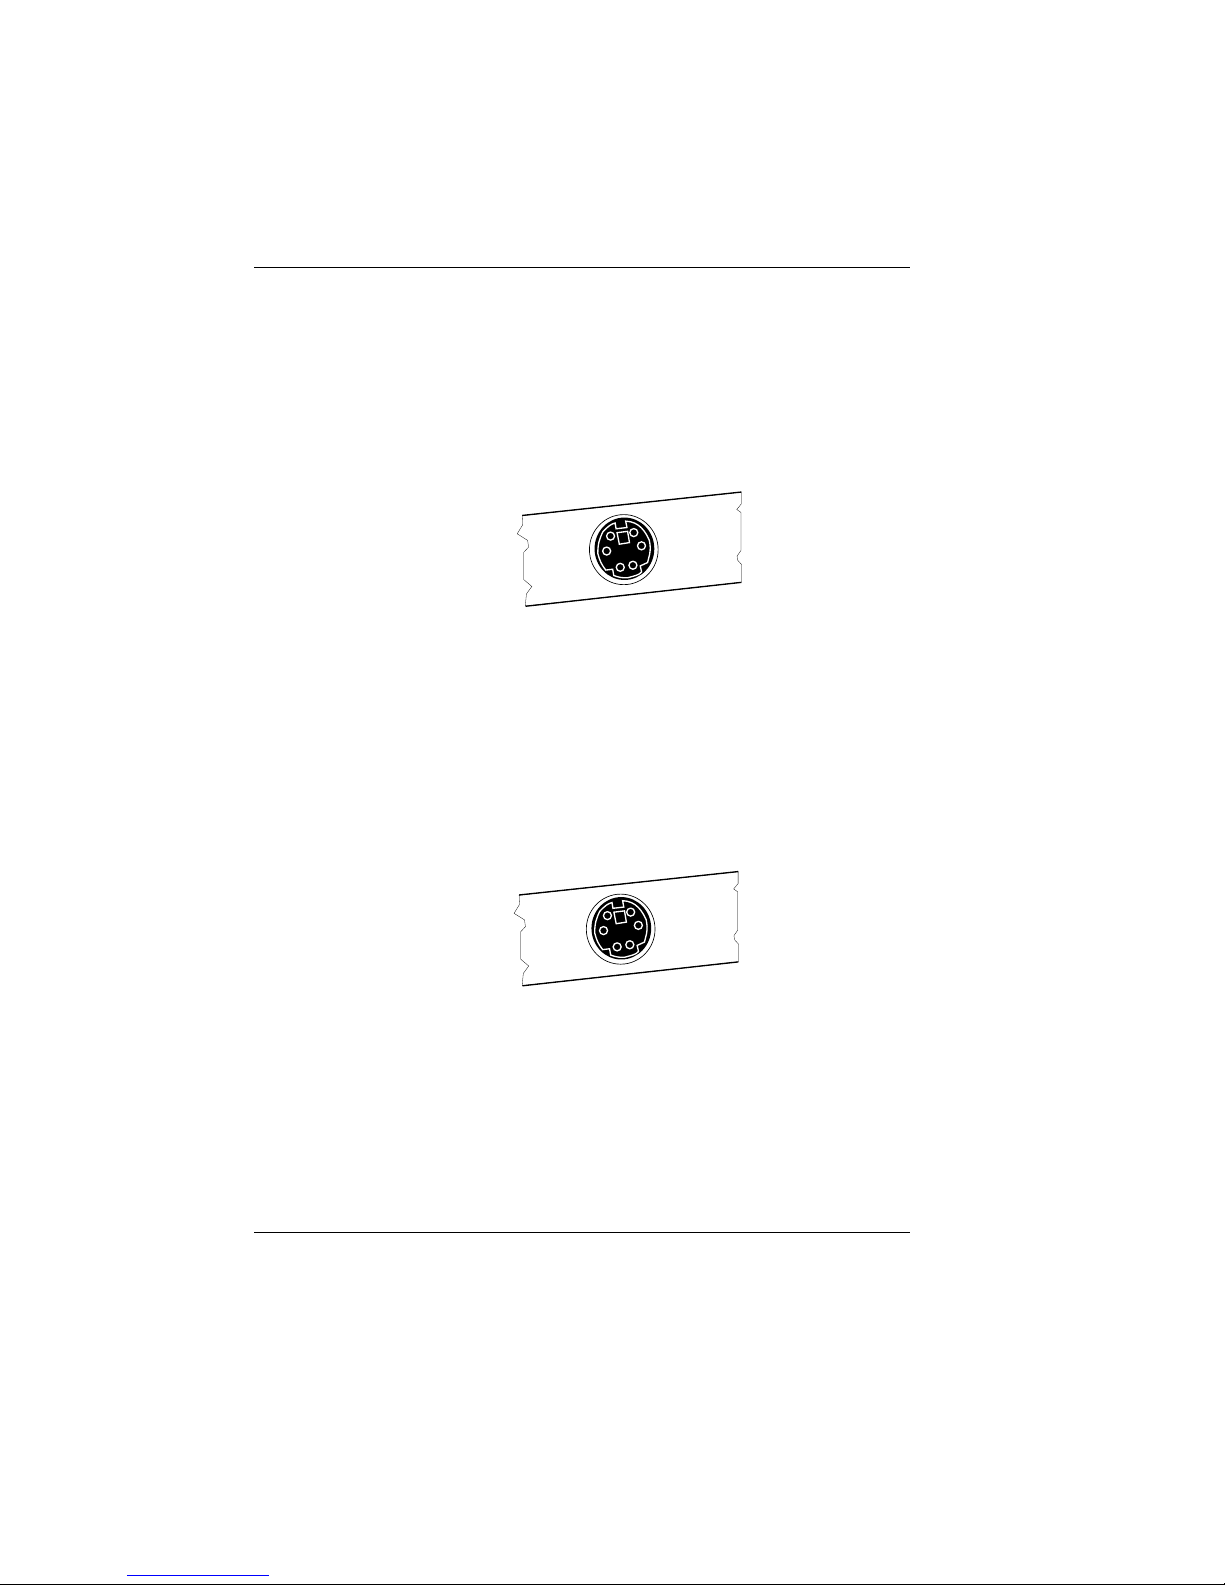
Keyboard (KYBD)
The BEETLE POS system has a 6-pin Mini-DIN jack for connecting a
keyboard. Make sure that the connector is plugged firmly into the socket to
prevent malfunctioning. Power is supplied to the keyboard via this socket.
If you wish to connect a standard PC keyboard, you must use a special
adapter cable, obtainable from the WN office responsible for your area.
When using cables with connector locking mechanisms, take hold of the
cable by the connector when disconnecting it.
Cash drawer (CASHDRW)
The BEETLE POS system has a second 6-pin Mini-DIN jack for
connecting a cash drawer. Make sure that the connector is plugged firmly
into the socket to prevent malfunctioning. Power is supplied to the cash
drawer via this socket.
When using cables with connector locking mechanisms, take hold of the
cable by the connector when disconnecting it.
Connecting peripherals POS terminal and system
GB - 16
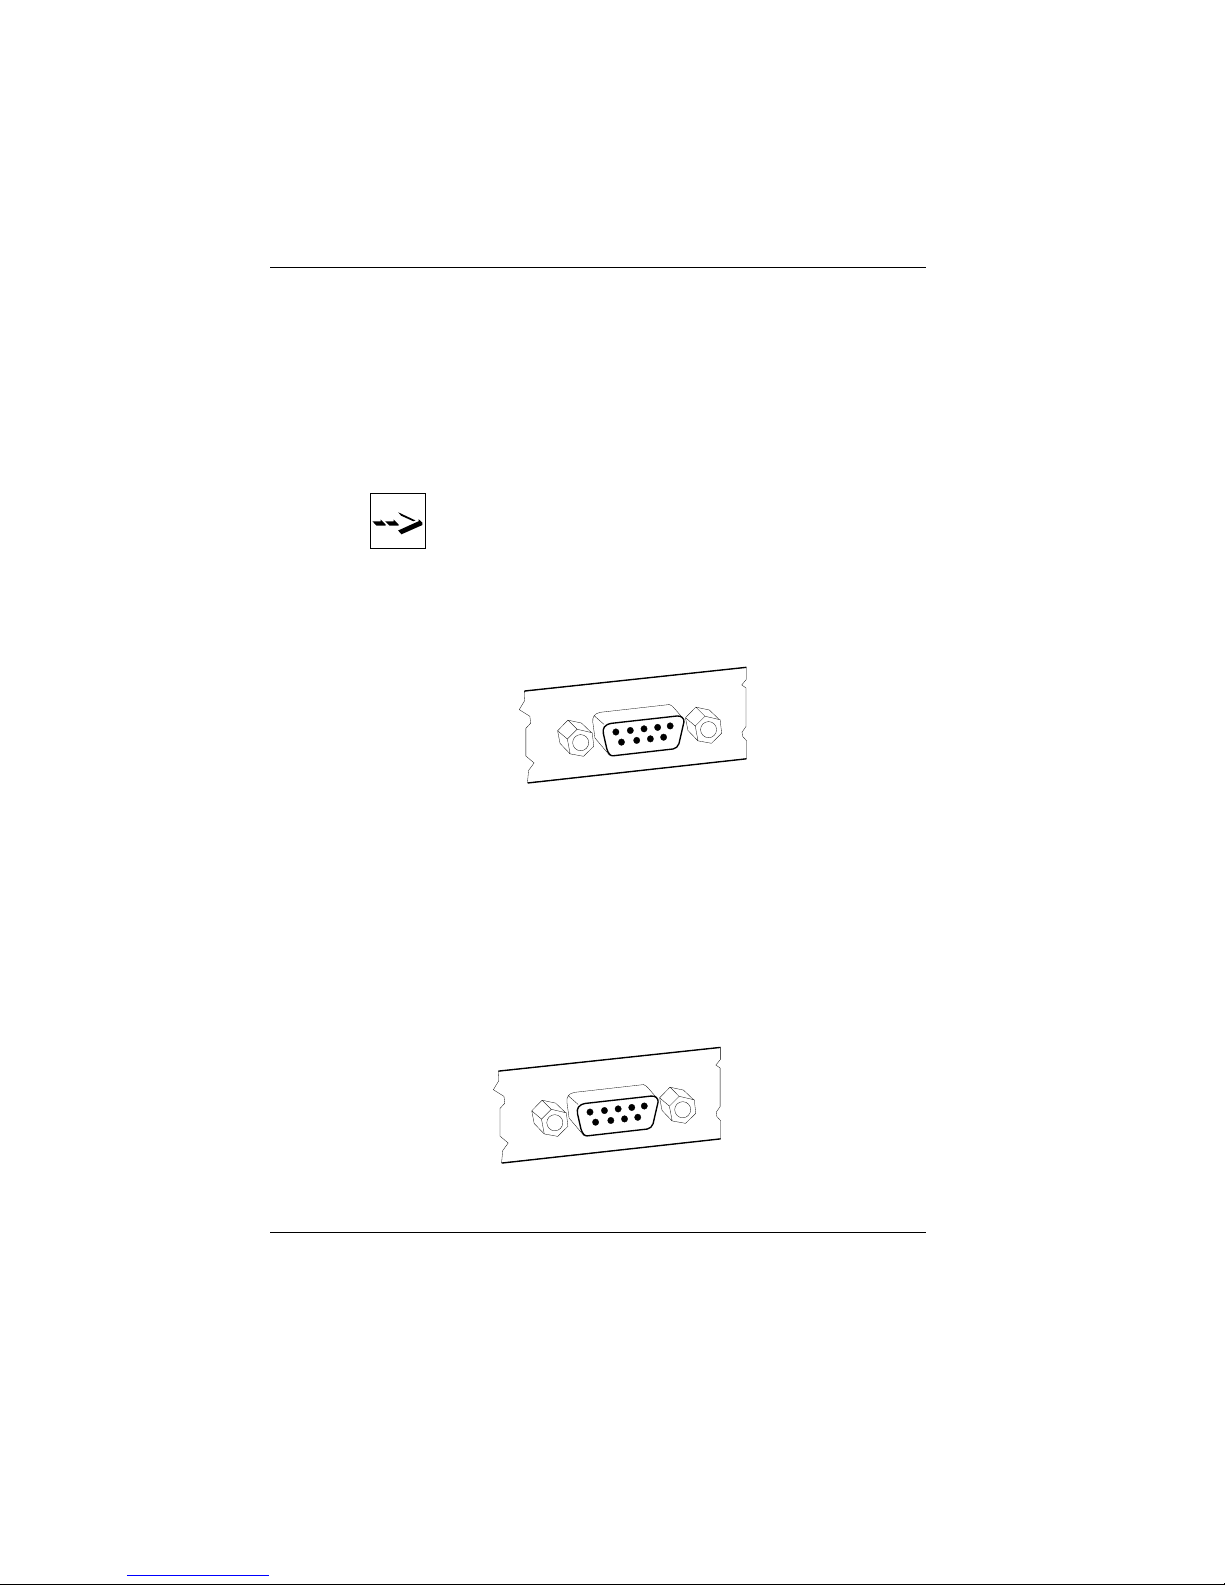
Scanners and scales (COM1, COM2*, COM3*oder COM4*)
Depending on the system configuration, scanners and scales without their
own power-supply units are connected to the serial interface COM2
*
,
COM3*or COM4*(default setting is COM3*). Scales with their own
power supply units must be connected to COM1. COM1 is a 9-pin
connector whereas COM2
*
-COM4*are 9-pole D-sub jacks.
If you connect scales to the BEETLE system which were not
supplied by WN, an appropriate WN licence must be acquired
for the driver software.
Make sure that the scanner connector is plugged securely into the socket
to prevent possible malfunctioning. The power for COM2
*
,COM3*and
COM4*is supplied via these jacks.
Customer display (COM2*, COM3*oder COM4*)
Depending on the system configuration, the displays are connected to the
serial interface COM2*,COM3*or COM4*(default setting: customer
display - COM4*, cashier display - COM3*). The interface connection on
the BEETLE POS system is a 9-pin D-sub jack.
Make sure that the connectors for the displays are plugged firmly into their
sockets to prevent possible malfunctioning. Power is supplied via these
jacks.
POS terminal and system Connecting peripherals
GB - 17

Monitor
If a VGA board or VGA submodule is installed, you can connect a monitor
to the BEETLE POS system via the 15-pin D-sub jack on the VGA board.
Power is supplied to the monitor via the rubber connector on the BEETLE,
located on the back of the housing.
The power output of devices connected to the rubber socket of
the BEETLE system must not be more than 200 V AC.
Connecting standard PC peripherals
You can connect supplementary standard peripherals via the COM1 serial
interface.
Make sure that all supplementary devices have been tested for
RFI suppression pursuant to the legal requirements of your
country.
Network
If a network board or LAN submodule is installed, the system can be
connected to a network (LAN) from the POS terminal back panel. If there
is no LAN port, this location on the back panel is closed by a dummy cover.
Connecting peripherals POS terminal and system
GB - 18
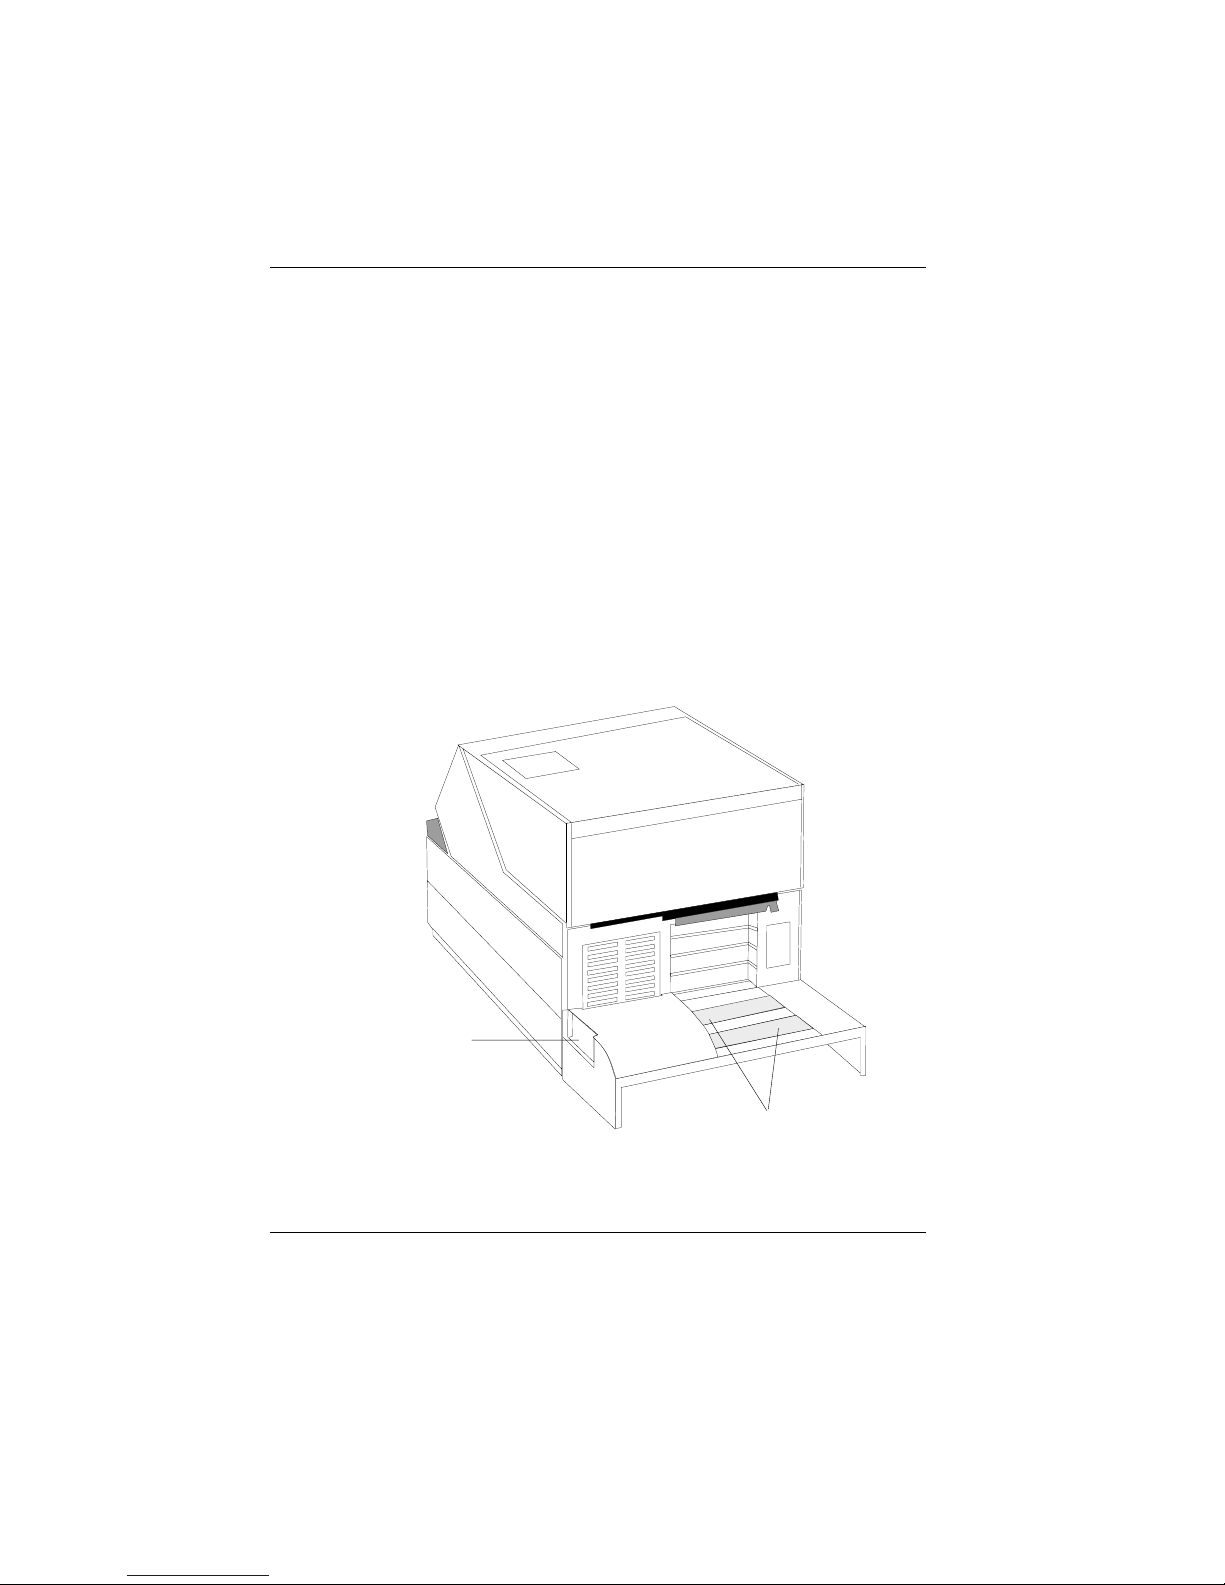
Cable cover
The cable cover is used to prevent the cables from being disconnected
inadvertently. It also tidies up the rear of the BEETLE/60 system.
One of the two prepunched panels on the cable cover must be removed if
an expansion board is installed in the BEETLE. The second panel must
also be removed if two expansion boards are installed.
The cable cover is pushed downwards over the brackets mounted on the
rear panel of the BEETLE. Make sure that the cable cover also locks into
the slot which is located underneath the expansion boards.
The BEETLE can also be switched on and off via the recess on the side if
the cable cover is mounted at the rear.
Recess
Mains ON/OFF
Prepunched
panels
POS terminal and system Connecting peripherals
GB - 19

Cable cover for expansion boards
Fit the second cable cover (see drawing) supplied once all of the
connections have been made. Remove the outer prepunched panel of the
lower cable cover. Then hook the bracket at the bottom of the cable cover
into the panel you have removed from the lower cable cover.
Then push the cable cover upwards, pressing the upper bracket gently
downwards until this locks into the POS housing.
The prepunched panels on the right and left-hand side of the cable cover
can be removed by hand in order to route the cables.
vorgestanzte Blende
Prepunched panel
Connecting peripherals POS terminal and system
GB - 20

The BEETLE components
Overview
The illustration below shows the components of the BEETLE POS system.
Journal window
Cashier display
Rotary knob for
ribbon
Document rest
with integrated
ribbon
Touch-sensitive key,
receipt/journalfeed
BEETLE card
lid
BEETLE card
lock
Paper compartment cover
Release button
- upper POS
housing
Receipt
compartment
Connection strip
(rear panel)
Diskette drive
GB - 21
Cashier display
TheBEETLE components Cashier display
The BEETLE has a 4-line, 20-position, alphanumeric cashier display. The
display field is backlit, making it easy to read any information that is
displayed. In addition, the cashier display can be tilted gradually to prevent
glare. Along with the journal, this display also shows operating instructions
and error messages.
Cashier display The BEETLE components
GB - 22

The BEETLE printer
TheBEETLE printer
The printer used in the BEETLE has a needle head with nine needles that
services the three print stations for receipt, journal and document printing.
The characters are represented in a 9 x 9 or 7 x 9 matrix, depending on
the line spacing selected in your application program.
The BEETLE provides you with the option of controlling receipt and journal
paper feed by means of two touch-sensitive keys on the front panel. A
green paper feed button is located inside the housing for changing the
receipt and journal paper.
For reasons of safety, the printing mechanism and cut-off blade are
disabled whenever the printer cover is opened.
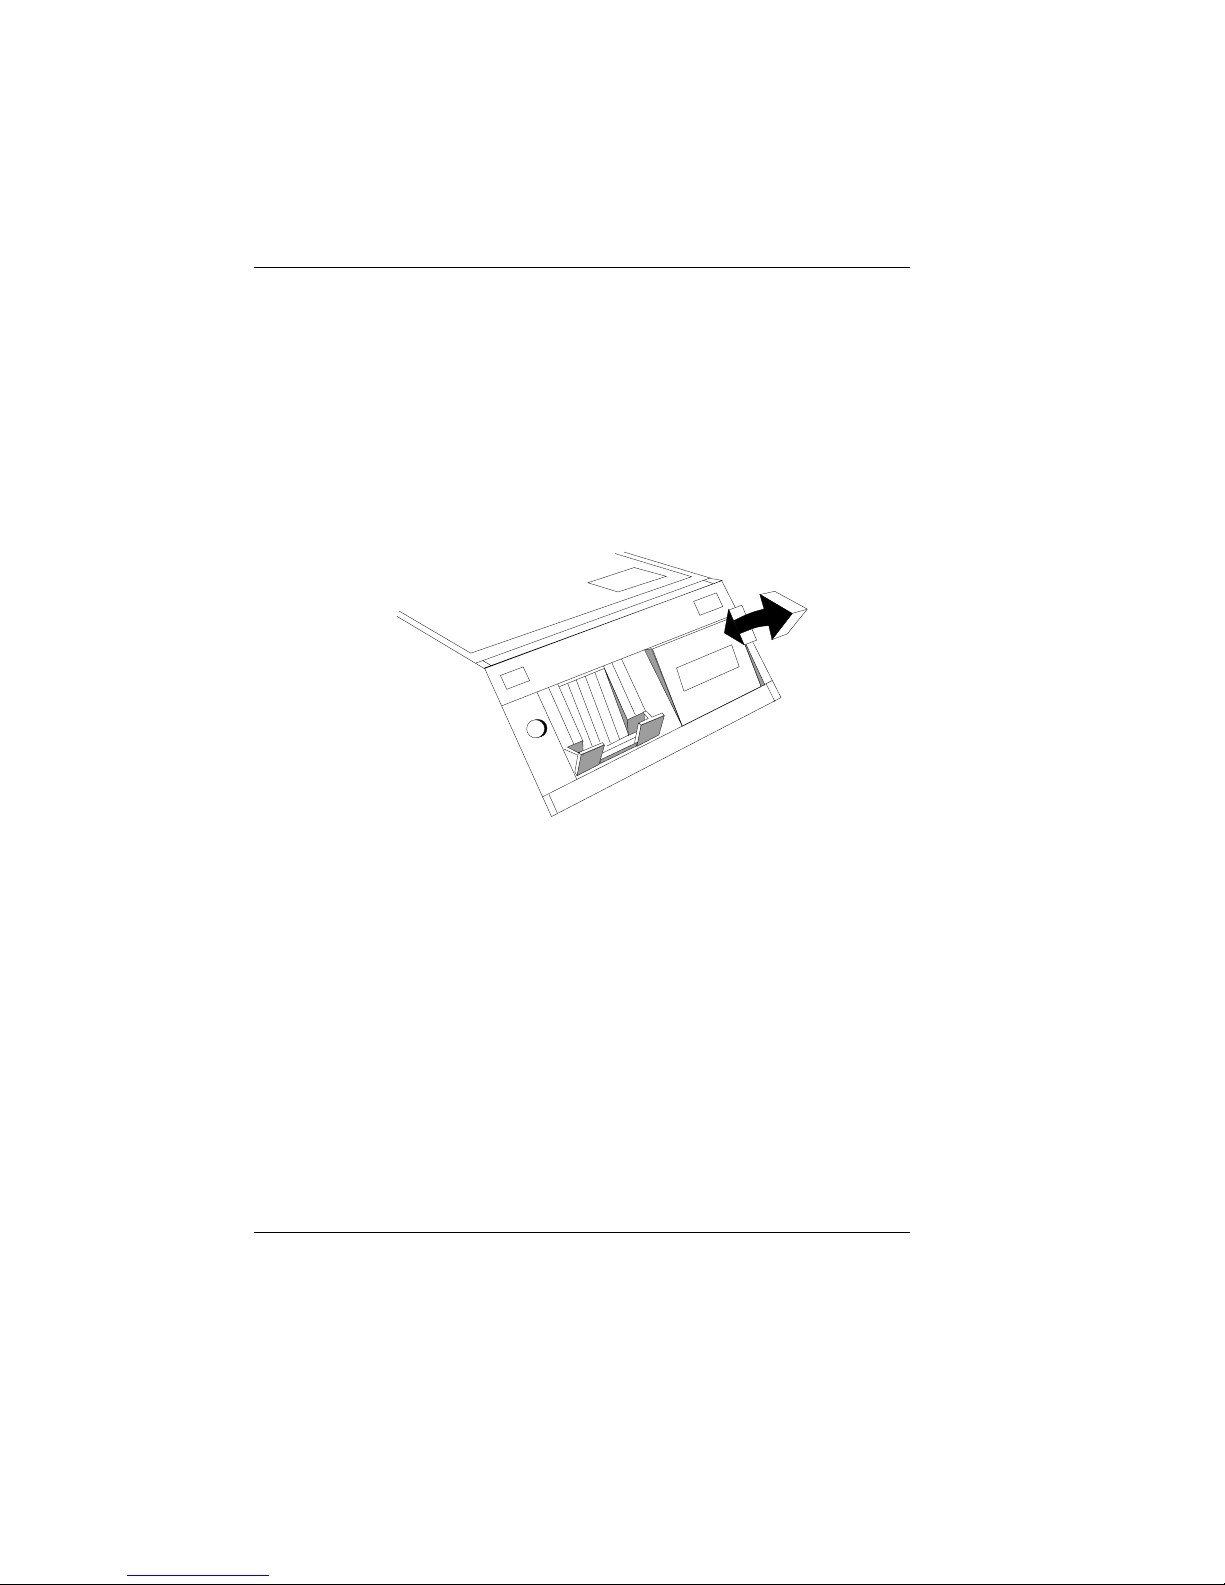
Insertion of the receipt and journal paper is facilitated by a semiautomatic
paper feed.
You can generate an individual, graphics-quality company logo by means
of the pixel printing function. The logo is generated in your application
program and loaded to the printer memory.
The printer is further characterized by a high print rate, low noise level and
ease of operation.
Always dispose of consumables properly (see section on
recycling).
Operation
The ribbon cassette is not installed in the document rest when the printer
is delivered. For more information, read the section “Changing the ribbon
cassette“.
The BEETLE is delivered with receipt and journal paper in the paper
compartments. The paper rolls are covered by cardboard sleeves to
protect them during shipping. Remove these sleeves and insert the paper
as described in subsequent sections. Since the BEETLE POS system
allows different paper widths for the receipt and journal, it may be
necessary to “reduce“ the paper compartments for narrower paper rolls by
means of the spacers provided. This procedure is described in the next
section, ”Inserting spacers“.
The BEETLE components The BEETLE printer
GB - 23
 Loading...