

Wincor Nixdorf BA82 User Manual
BA82
LCD TFT 12.1" (30.7 cm) Flat Panel Display
User Guide

Your opinion:
Wincor Nixdorf International GmbH
Dokumentation RD HWD01
Rohrdamm 7
Haus 16
D-13629 Berlin
E-Mail: retail.documentation@wincor-nixdorf.com
Order No. 01750180277B
We would like to know your opinion on this
publication.
Please send us a copy of this page if you have any constructive
criticism.
We would like to thank you in advance for your comments.
With kind regards.

BA82
Flat Panel Display
User Guide
Edition August 2010

All brand and pro duct na mes men tio ned in this do cu ment are tra de marks of
their re spec ti ve owners.
Co py right© Win cor Nix dorf In ter na tio nal GmbH, 2010
The re pro duc ti on, trans mis si on or use of this do cu ment or its con tents is not
per mit ted wit hout ex press aut ho ri ty.
Of fen ders will be li ab le for da ma ges.
All rights, in clu ding rights crea ted by pa tent grant or re gi stra ti on of a uti li ty
mo del or de sign, are re ser ved.
De li very sub ject to avai la bi li ty; tech ni cal mo di fi ca tions pos si ble.

Contents
In tro duc ti on ........................1
From Point-of-Sale to Point-of-Ser vi ce ..................1
Ad van ta ges at a Glan ce..........................1
About this Ma nu al .............................2
The Flat Pa nel Dis play BA82 ...............3
Ge ne ral ..................................3
Ope ra tor Pa nel Mo du le ..........................3
USB In ter fa ce .............................4
On Screen Dis play (OSD) .......................4
LED ..................................4
On/Off But ton .............................4
Se cu ri ty ..................................5
Pro tec ti on ...............................5
In te gra ted Loud spea kers .................6
Ca pa ci ti ve Touch Screen .................7
Ge ne ral ..................................7
How to Ope ra te ..............................7
Clea ning In struc tions ...........................8
In fra rot Touch Screen ...................9
Ge ne ral ..................................9
How to ope ra te ..............................9
Clea ning In struc tions ..........................10
Swi pe Card Rea der (op tio nal) ..............11
How to Ope ra te .............................11
Clea ning In struc tions ..........................11
Key bo ard (Op ti on) ....................12
Clea ning In struc tions ..........................12
Key Field.................................12
Ex chan ging the Keys ..........................13
In ser ting Key La bels ...........................14

In ser ting Key Caps............................14
Swi pe Card Rea der in a Key bo ard (op tio nal) ..............15
In stal ling and Se cu ring .................16
Un pa cking and Che cking the De li very Unit ...............16
In stal ling the Base ............................16
Tab le Moun ting .............................18
Moun ting the Tube Adap ter .......................19
Con nec ti on Be zel ............................21
Con nec ting the BA82 ..........................21
Moun ting Po si tions............................23
Er go no mic Ter mi nal Work pla ce .....................24
Moun ting Pe ri phe rals ..................25
Key bo ard and Swi pe Card Rea der....................25
Mag ne tic Swi pe Card Rea der ......................32
Moun ting on the right Side ......................33
Moun ting on the left Side .......................39
Drop the Co ver .............................40
On Screen Dis play (OSD) ................41
In put Sour ce ...............................42
Dis play Set ting ..............................43
Co lour Set ting ..............................44
Ima ge Set ting (VGA- Mode) .......................46
Tools Menu ...............................48
Vo lu me Set ting .............................49
EXIT OSD ................................50
Tech ni cal Data ......................51
Di men sions (mm) ............................52
Ca pa ci ti ve Touch Screen ........................53
In fra red Touch Screen ..........................53
Key bo ard ................................53
MSR in si de Key bo ard.........................54
MSR Mo du le ...............................54
Screen Dri ver In stal la ti on/ In stal la ti on Tool ...............55
Cur rent Con sump ti on of the Screen Mo du le ...............55
Pro gram ming the Key bo ard and MSR .........56
In ter fa ces ................................56
Fi les ...................................57

Mo dus ..................................58
Crea ting Tab les .............................58
Soft wa re In ter fa ces ...................59
Key bo ard Codes (Stan dard) .......................59
Manufacturer’s De cla ra ti on and Ap pro val .......60
Ge ne ral Aut ho ri za ti on ..........................60
FCC-Class A De cla ra ti on ........................60
Tes ted Sa fe ty ..............................60
User In for ma ti on .............................61
Sa fe ty In for ma ti on ............................61
In struc tions for Main ten an ce .......................62
War ran ty .................................62
Re cy cling ................................63
Ab bre via ti on In dex ....................64

Introduction
From Point-of-Sale to Point-of-Service
With the BA82 you are using a er go no mi cal and cus to mer-friend ly cashier’s
work pla ce.
The BA82 is connected to the system via a VGA or DVI interface. Power is
supplied via a PoweredUSB interface or an external power supply unit. The
Touch screen as well as the USB Hub are contolled via a USB cable or via
a PoweredUSB cable.
The display can be ap plied in all tra de mar ket seg ments like spe cia list
re tai lers, de part ment sto res, self-ser vi ce sto res, pe trol sta tions or in
restaurants. The re is in deed a great deal of sco pe for implementing the
BA82.
They can be used, for ex am ple, as:
n a point-of-sale ter mi nal
n an or de ring ter mi nal
n an in for ma ti on ter mi nal
n a desk ter mi nal.
The low-ener gy, fli cker free and ra di ati on-free co lour mo ni tor of the BA82 is
an LCD in TFT-tech no lo gy (Thin Film Tran sis tor).
The re fo re, it is well suit ed for mul ti me dia ap pli ca tions as it of fers
bril li ant co lour re pre sen ta ti on, an ex cel lent con trast ra tio and a high
dis play speed.
Ad van ta ges at a Glan ce
n Low foot print
n Au to sca ling of the screen
1
INTRODUCTION

n Fli cker free and free from ra di ati on
n Very good con trast ra tio, ad jus tab le loud ness, sharp ness, width, pha se,
co lour tem pe ra tu re and bright ness via OSD menu
n LCD TFT-Tech no lo gy
n Di gi tal In ter fa ce
n Simp le in stal la ti on via plug and play fea tu re
n Moun ting VESA 75 & 100 stan dard
n In te gra ted loud spea ker
n USB interfaces for ex ter nal devices
About this Manual
This ma nu al in forms you about ever ything you might need to know for the
in stal la ti on (soft wa re and hard wa re), the ope ra ti on and the main ten an ce of
your BA82.
Some parts of this book re qui re fa mi lia ri ty and ex per ien ce in wor king with
ope ra ting sys tems and in stal la ti on and con fi gu ra ti on procedures.
No tes in the ma nu al are mar ked by this sym bol.
This sym bol is used for war nings.
INTRODUCTION
2

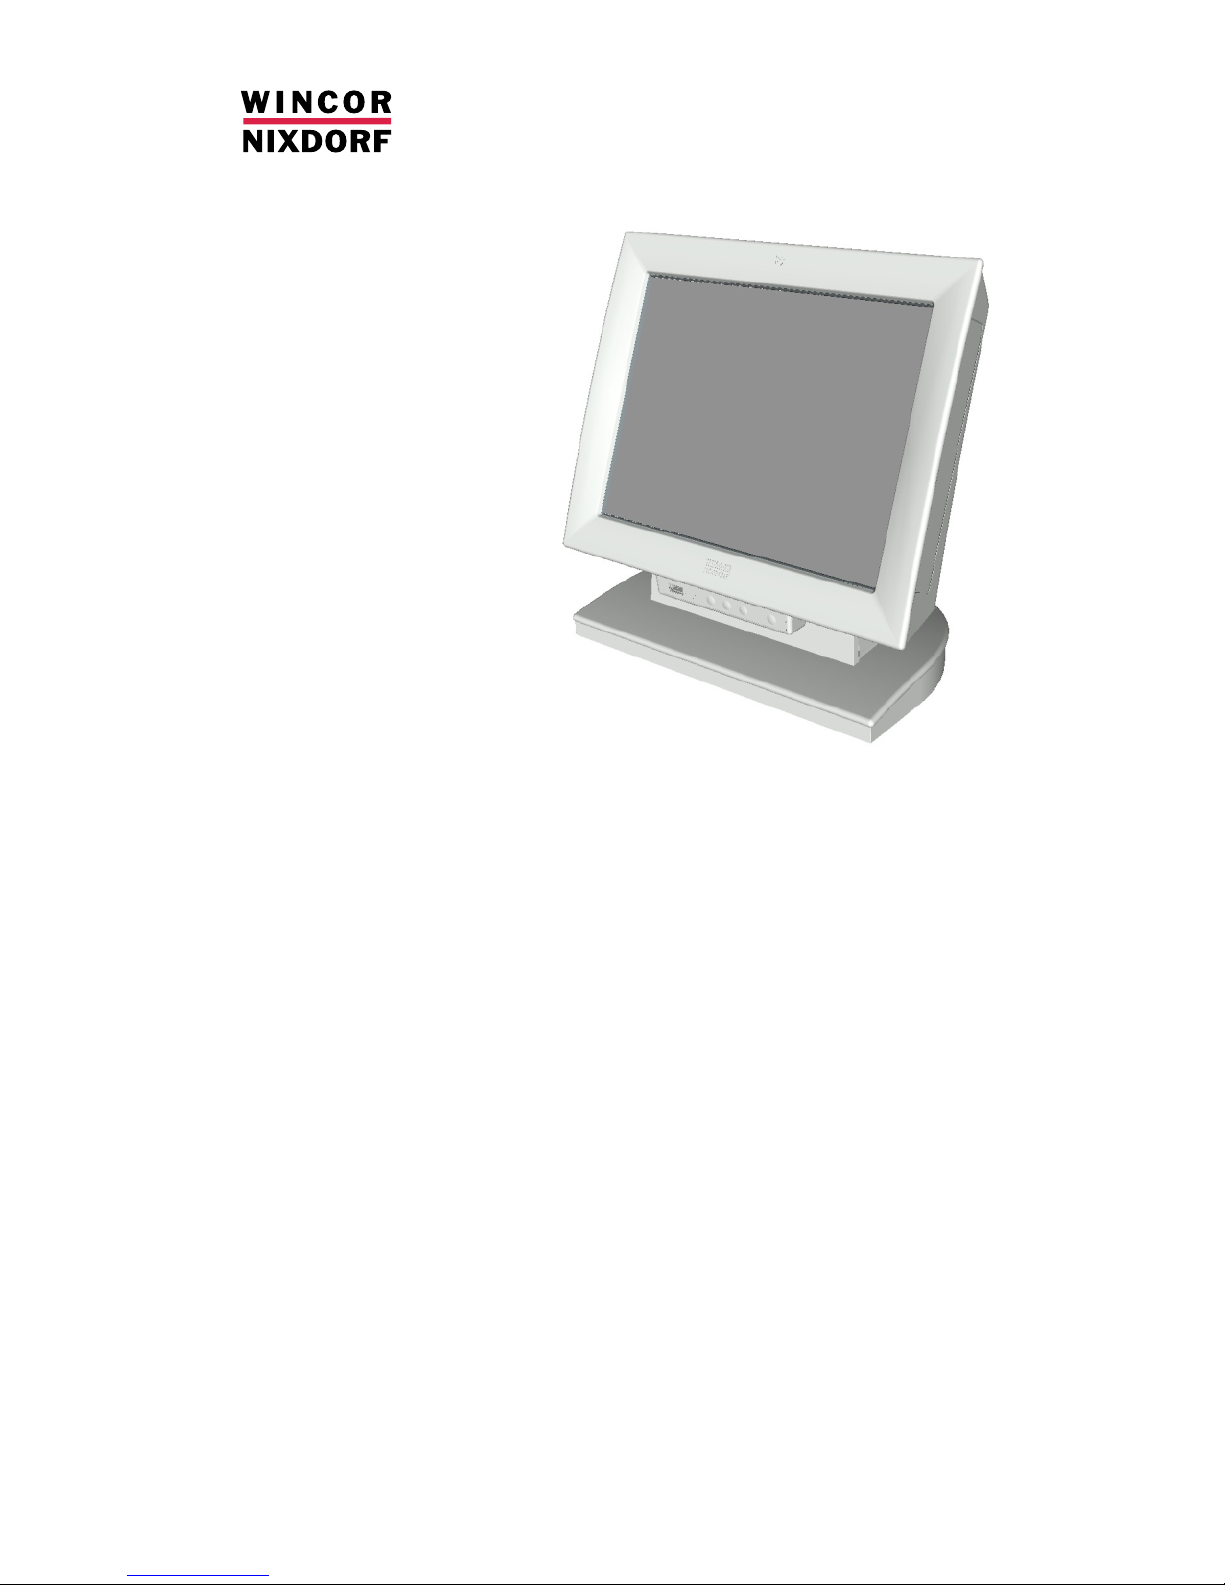
The Flat Panel Display BA82
General
The TFT LCD flat panel display is an SVGA-com pa ti ble 12.1-inch flat panel
display which is ab so lu te ly fli cker free and free from ra di ati on. It is de sig ned
for a re so lu ti on of max. 800 x 600 pi xel. Ap pli ca ti on pro grams should be
used with this resolution!
Operator Panel Module
3
FLAT PANEL DISPLAY BA82
USB interface
Menue
turn in si de
the menue
Sta tus
LED
ON/OFF
button
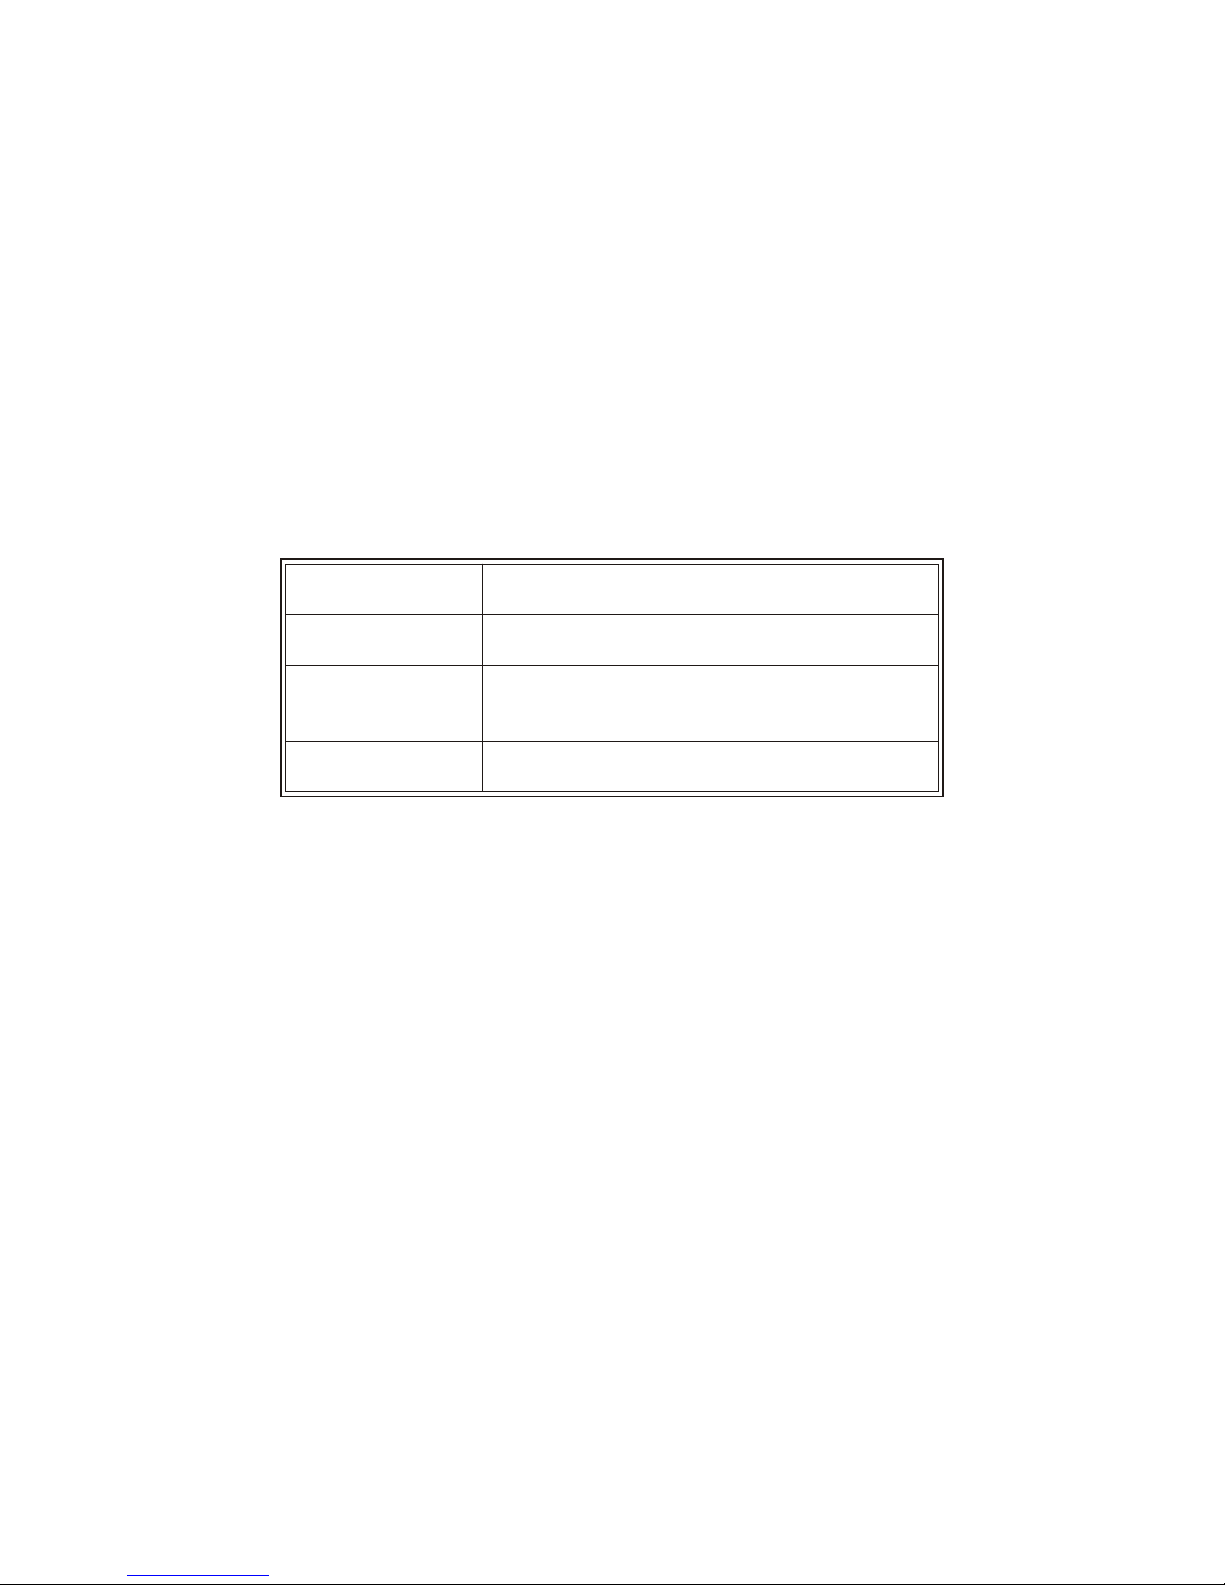
USB Inter fa ce
A ‘Plug and Play’ interface (Type A) for connecting peripherals during
operation, e.g. USB sticks or a keyboard.
On Screen Dis play (OSD)
Menu
Via the menu you can set the loudness, brightness, contrast and colour.
Scrol ling
The arrows serve for scrolling forwards or backwards in the menu items.
LED
Dark Power off
Green Power on
Orange
Power save mode
the LED flashs in the standby mode
Red Out of Range (improper display setting)
On/Off But ton
With this button you can switch the display on or off.
The optional devices supported by the USB HUB are electric powered. Only
the data transfer is separated.
When the BA82 is connected to a BEETLE- system, the button also
switches the system on or off, provided that the system supports the
feature.
With this key you can switch the system into ‘Wake up Mode’ or ‘Sleep
Mode’ provided a Remote function (see page 18) for the BA82 is availabe
(i.e. the cable is connected to a BEETLE system via a remote connector).
4
FLAT PANEL DISPLAY BA82
Se cu ri ty
The operator panel module can be mounted horizontally turned thus to
handicap the access.
Slightly press the module
inwards at the left and
right hand side (1).
Remove the module of
the recesses and carefully
move it off downwards
(2).
Carefully turn the device
through 1800 (3).
Reinsert the module into
the recesses (4). Mind not
to jam the cables.
Pro tec ti on
If you do not need the USB interface in the operator panel and you want to
close the port you can order a small cover in the required colour at Wincor
Nixdorf. To attach this bezel remove the operator panel as described above
and insert the bezel between USB interface and the panel.
5
FLAT PANEL DISPLAY BA82
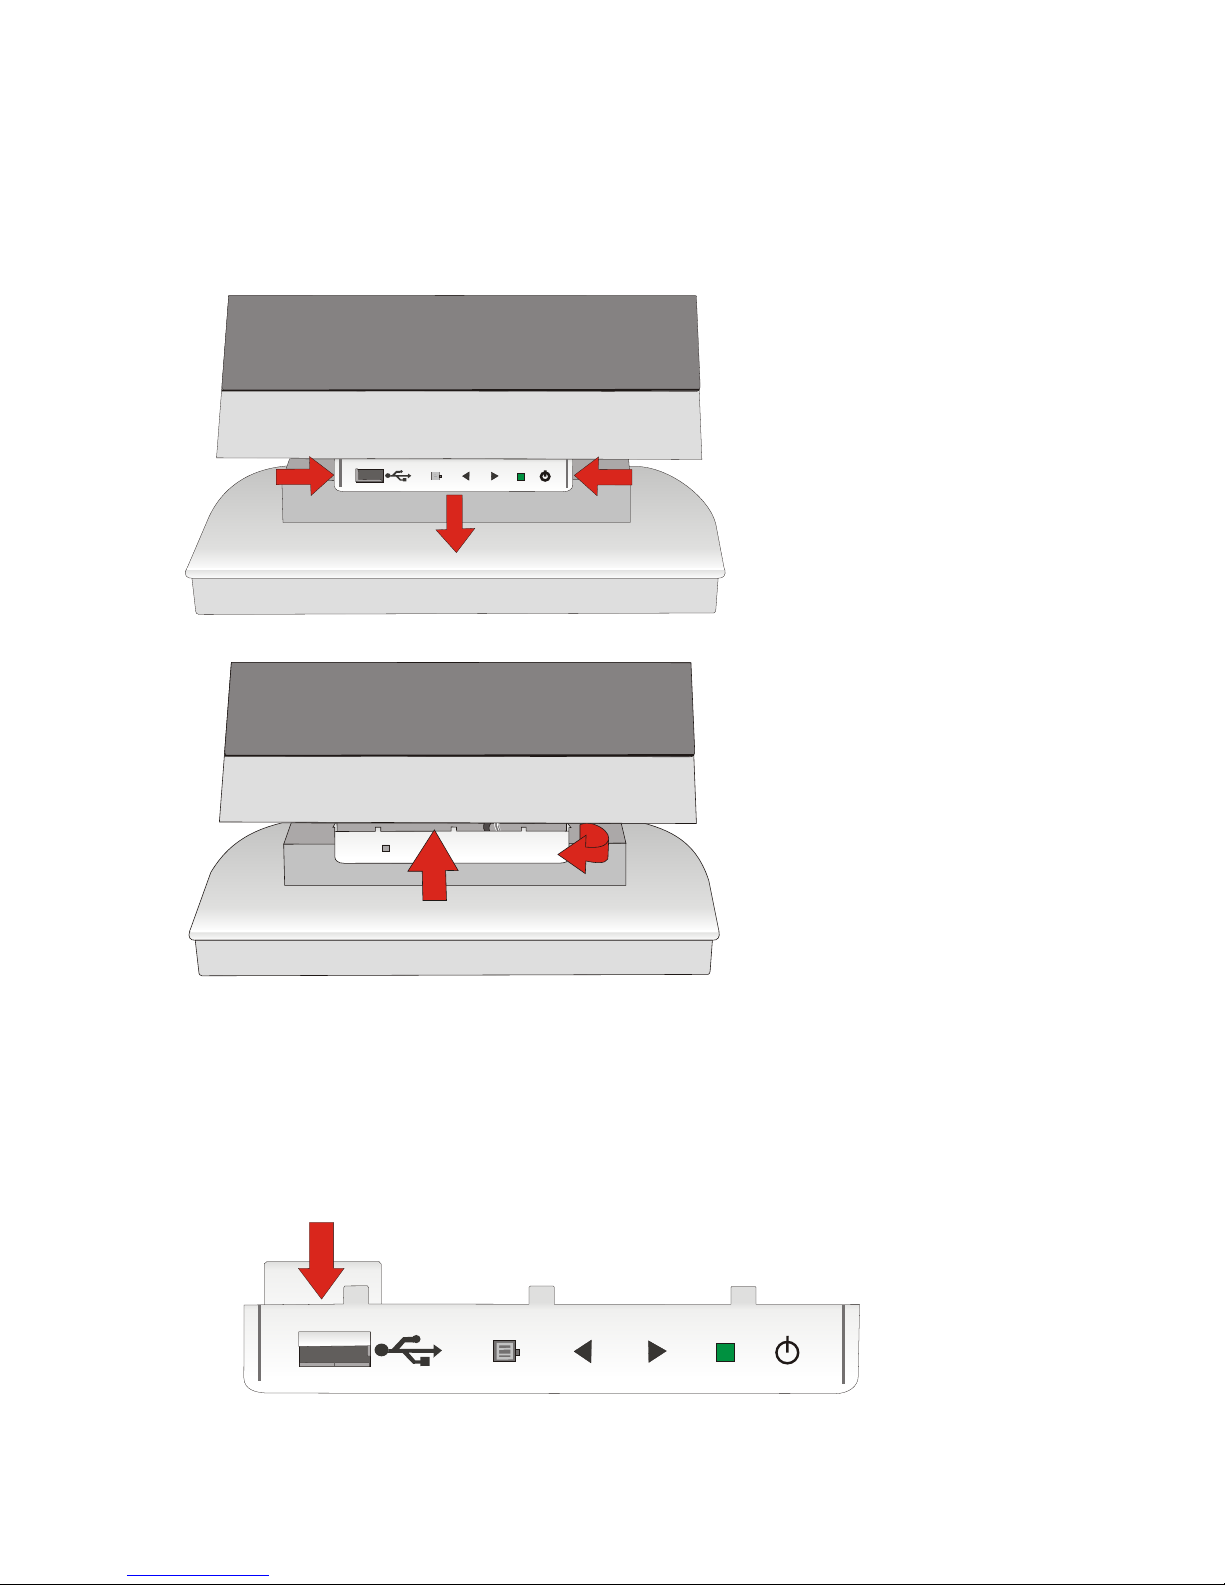
Integrated Loudspeakers
The two integrated loudspeakers are located at the bottom side of the
screen (see arrows).
6
FLAT PANEL DISPLAY BA82

Capacitive Touch Screen
Ge ne ral
The TFT Touch Screen works ac cor ding to the prin ci ple of a chan ge in
ana log ca pa ci tan ce. It has a glass screen with a trans pa rent, thin-film
over lay on the sur fa ce. This is ful ly sea led and pro tec ted by a furt her lay er
of cle ar glass. Elec tro des on the ed ges of the screen pro vi de an uni form
low-vol ta ge field. As soon as you touch the screen with your fin ger the
con tact point is “re cog ni zed” by the chan ge in ca pa ci tan ce.
Be cau se this happens very quic kly, the Touch Screen is op ti mal ly equip ped
for a number of different requirements and applications. The pro gram ming
in ter fa ce of the screen is iden ti cal to the mou se in ter fa ce.
Connecting a BA82 for the first time we approve to calibrate the Touch
Screen. Details depend on the Operating System that you use.
How to Ope ra te
The Touch Screen re sponds to the slightest con tact, the re fo re you do not
have to ap ply pres su re when wor king with the screen. Tou ching the touch
glass has the same ef fect as cli cking the left mou se but ton. You only need
to ap ply a litt le pres su re with the fin ger tip. In this ca pa ci ti ve pro cess only
fin ger tip con tact is re cog ni zed. The touch screen does not re act in any way
if tou ched, for ex am ple, with a pen.
7
CAPACITIVE TOUCH SCREEN
Cle ar glasscover
Con duc ti ve pro duct layer

Clea ning In struc tions
Al ways turn off the sys tem be fo re clea ning.
The glass sur fa ce of your Touch Screen should be clea ned with a mild,
abrasive free, com mer ci al ly avai la ble glass clea ning pro duct. All pH neut ral
ma ter ials (pH 6 to 8) are good for clea ning. Clea ners with pH va lu es 9 to 10
are not re com men ded. Clea ning with wa ter and iso pro pyl al co hol is pos si ble
as well. Do not use sol vents con tai ning ace tic acid. Use a soft, fine-mes hed
cloth to cle an the sur fa ce. Dam pen the cloth slight ly and then cle an the
screen.
A wrong main ten an ce may cau se da ma ges to the screen, which are not
covered by guarantee or warranty.
CAPACITIVE TOUCH SCREEN
8
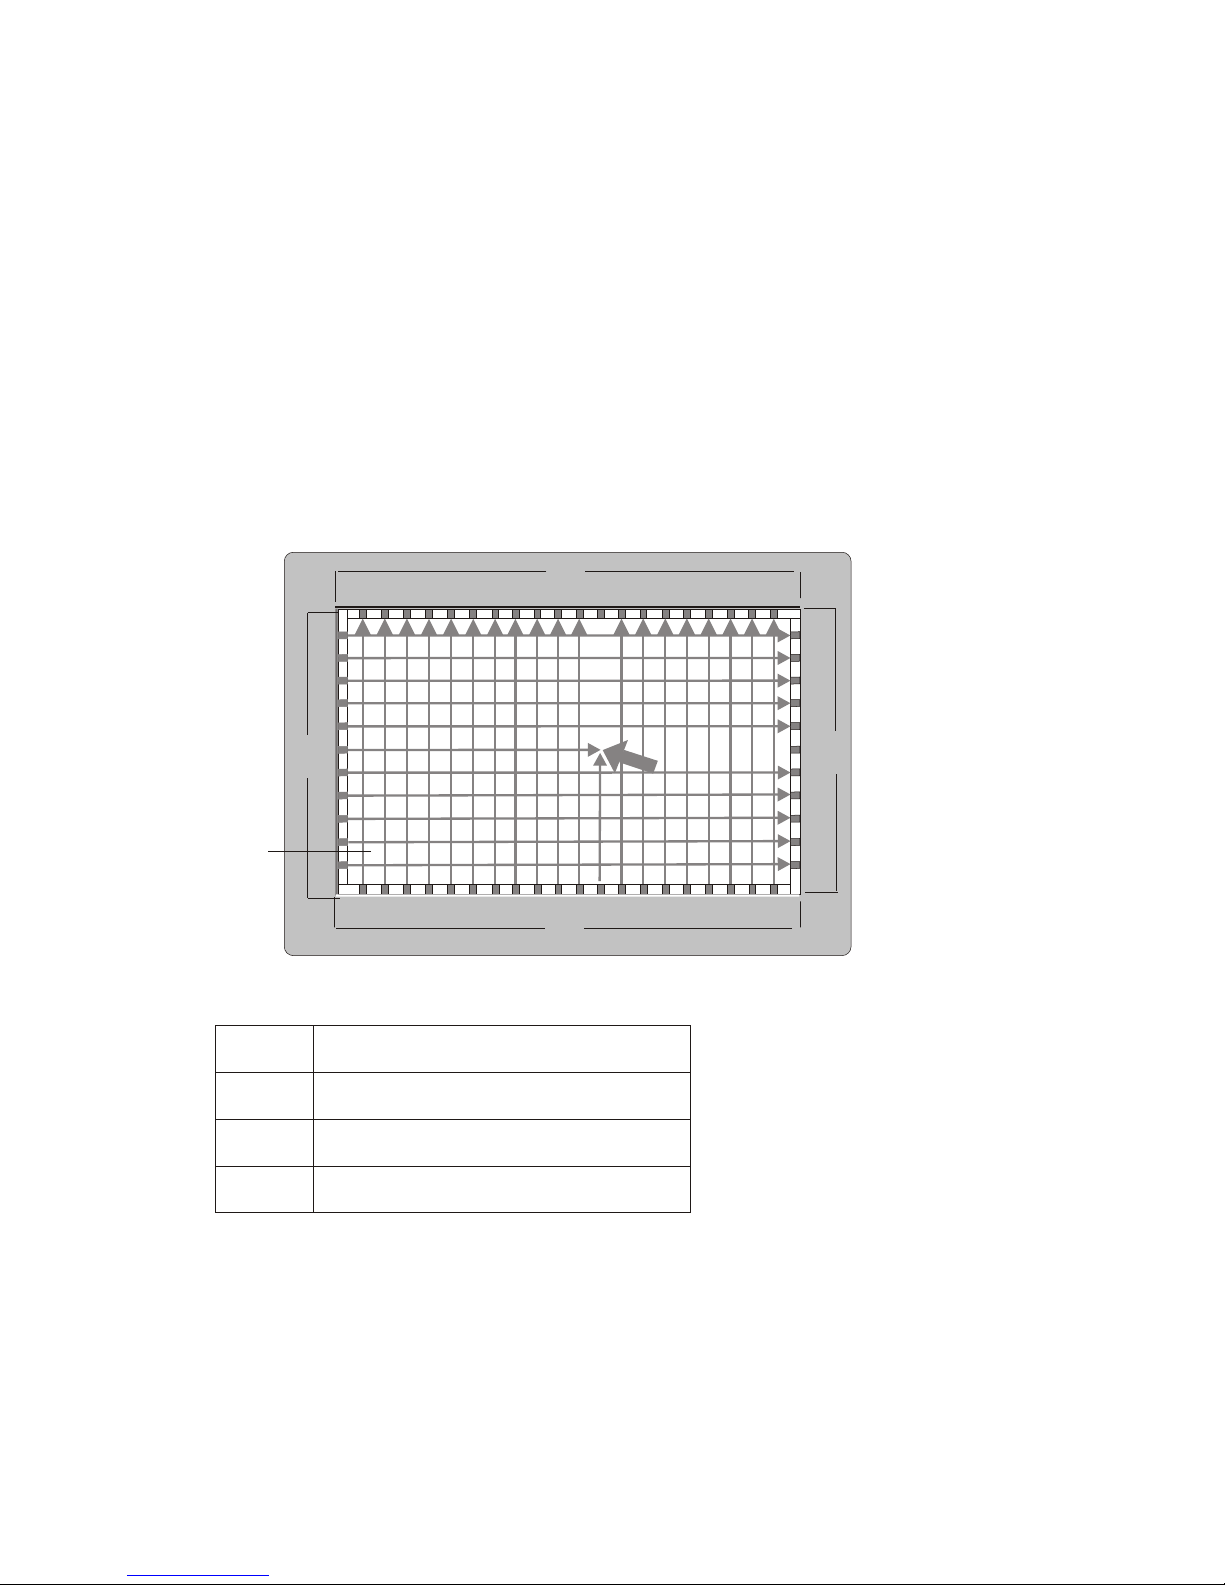
Infrarot Touch Screen
Ge ne ral
The infrared (IR) technology is based on the interruption of a grid of IR light
beams before the surface of a screen. The touch frame contains a row of
infrared light emitting diodes (LEDs) and photo transistors, each mounted
on two opposite sides to create a grid of invisible infrared light.
How to ope ra te
1 Touch Activation
2 Receiver
3 Active Display Area
4 Transmitter
IR light beams are produced and transmitted over the surface of the screen.
The photo sensors accept the beams. When an object (min. 8mm Ø), such
as a finger, enters the hidden grid, it obstructs the beams. One or more
photo sensors detect the absence of light and transmit a signal, that
identifies the x and y coordinates.
9
INFRAROT TOUCH SCREEN

Breaking through the grid has the same ef fect as cli cking the left mou se
but ton. Therefore, touching the glass is not necessary.
To avoid malfunctions: Do not fix labels or stickers on the frame and do not
put pencils or the like on the inner frame.
Clea ning In struc tions
Al ways turn off the sys tem be fo re clea ning.
The glass sur fa ce of your Touch Screen should be clea ned with a mild,
abrasive free, com mer ci al ly avai la ble glass clea ning pro duct. All pH neut ral
ma ter ials (pH 6 to 8) are good for clea ning. Clea ners with pH va lu es 9 to 10
are not re com men ded. Clea ning with wa ter and iso pro pyl al co hol is pos si ble
as well. Do not use sol vents con tai ning ace tic acid. Use a soft, fine-mes hed
cloth to cle an the sur fa ce. Dam pen the cloth slight ly and then cle an the
screen.
A wrong main ten an ce may cau se da ma ges to the screen, which are not
covered by guarantee or warranty.
10
INFRAROT TOUCH SCREEN
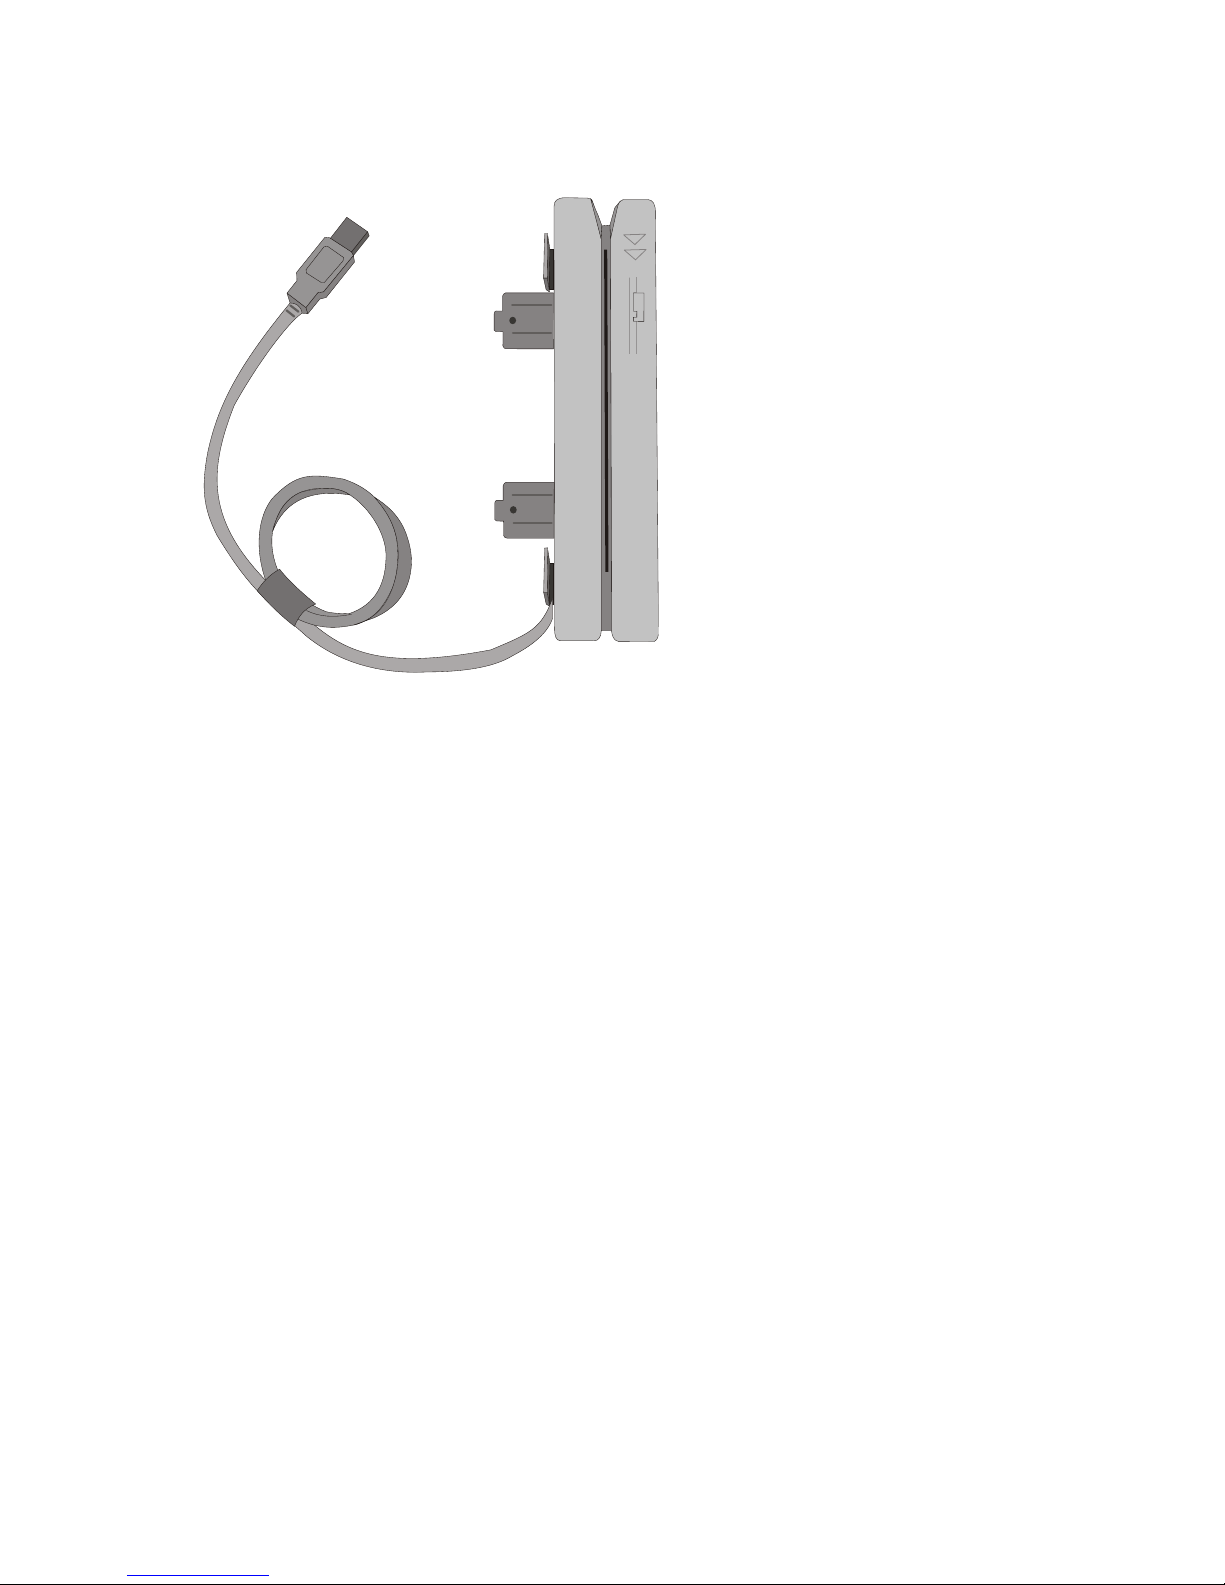
Swipe Card Reader (optional)
The swi pe card
rea der (MSR
Mo du le), that is
avai la ble as an
op ti on, can read
three ISO tracks
si mul ta ne ous ly in a
sing le swi pe.
The MSR mo du le
is fit ted on the
right-hand or
left-hand side of
the key bo ard mo du le or screen mo du le.
How to Ope ra te
Run the swi pe card through the slit of the swi pe card rea der from top to
bot tom in a quick and stea dy mo ve ment. Make sure that the mag ne tic strip
is to the right. When using swi pe cards, the fol lo wing should be ob ser ved:
n Swi pe cards should ne ver be al lo wed to come into con tact with li quids.
n Swi pe cards should not be bent or fol ded in any way.
n Swi pe cards should not be al lo wed to come into clo se con tact with a
mag ne tic field.
Swi pe cards should only be in ser ted in the top of the spe ci al ly de sig ned slit
of the rea ding de vi ce. If the card is in ser ted in anot her pla ce, this could
da ma ge the rea ding head.
Clea ning In struc tions
In or der to gua ran tee good rea ding re sults, the swi pe card rea der should be
clea ned from time to time. This is car ried out by using a spe ci al clea ning
card that can be pur cha sed from Win cor Nix dorf.
11
SWIPE CARD READER (OPTIONAL)
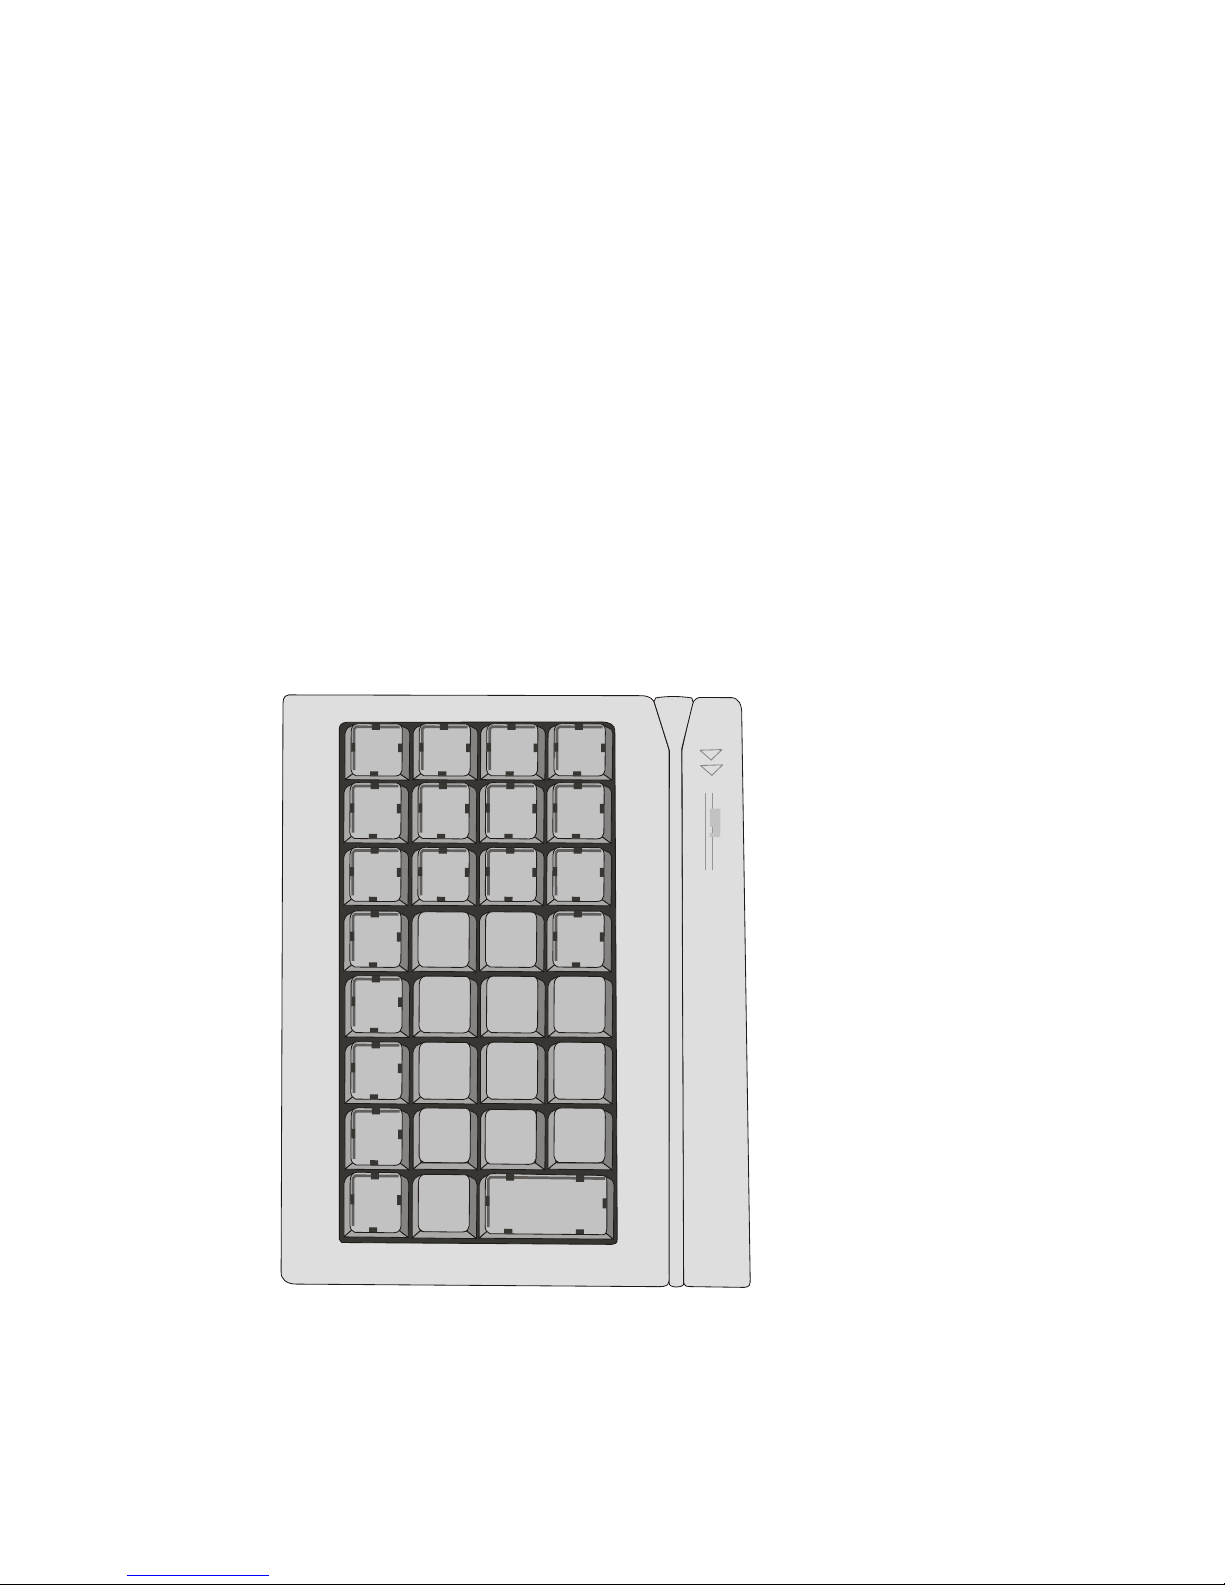
Keyboard (Optio n)
The keyboard is connected directly to the display via a USB interface. It is
fitted to the right-hand side of the screen. The keyboard is available with or
without a swipe card reader.
Clea ning In struc tions
The key bo ard should be clea ned with a ger mi ci de from time to time. Be fo re
clea ning in bet ween the keys on the key bo ard with a brush, loo sen and
re mo ve the key caps using the key re mo ving de vi ce. Do not al low dust to
get in through the open key bo ard me cha nics.
Key Field
The key field com pri ses
max. 32 free ly as sig nable
keys.
12
KEYBOARD (OPTIO N)
0
1
2
3
6
5
4
7
8 9
C
,
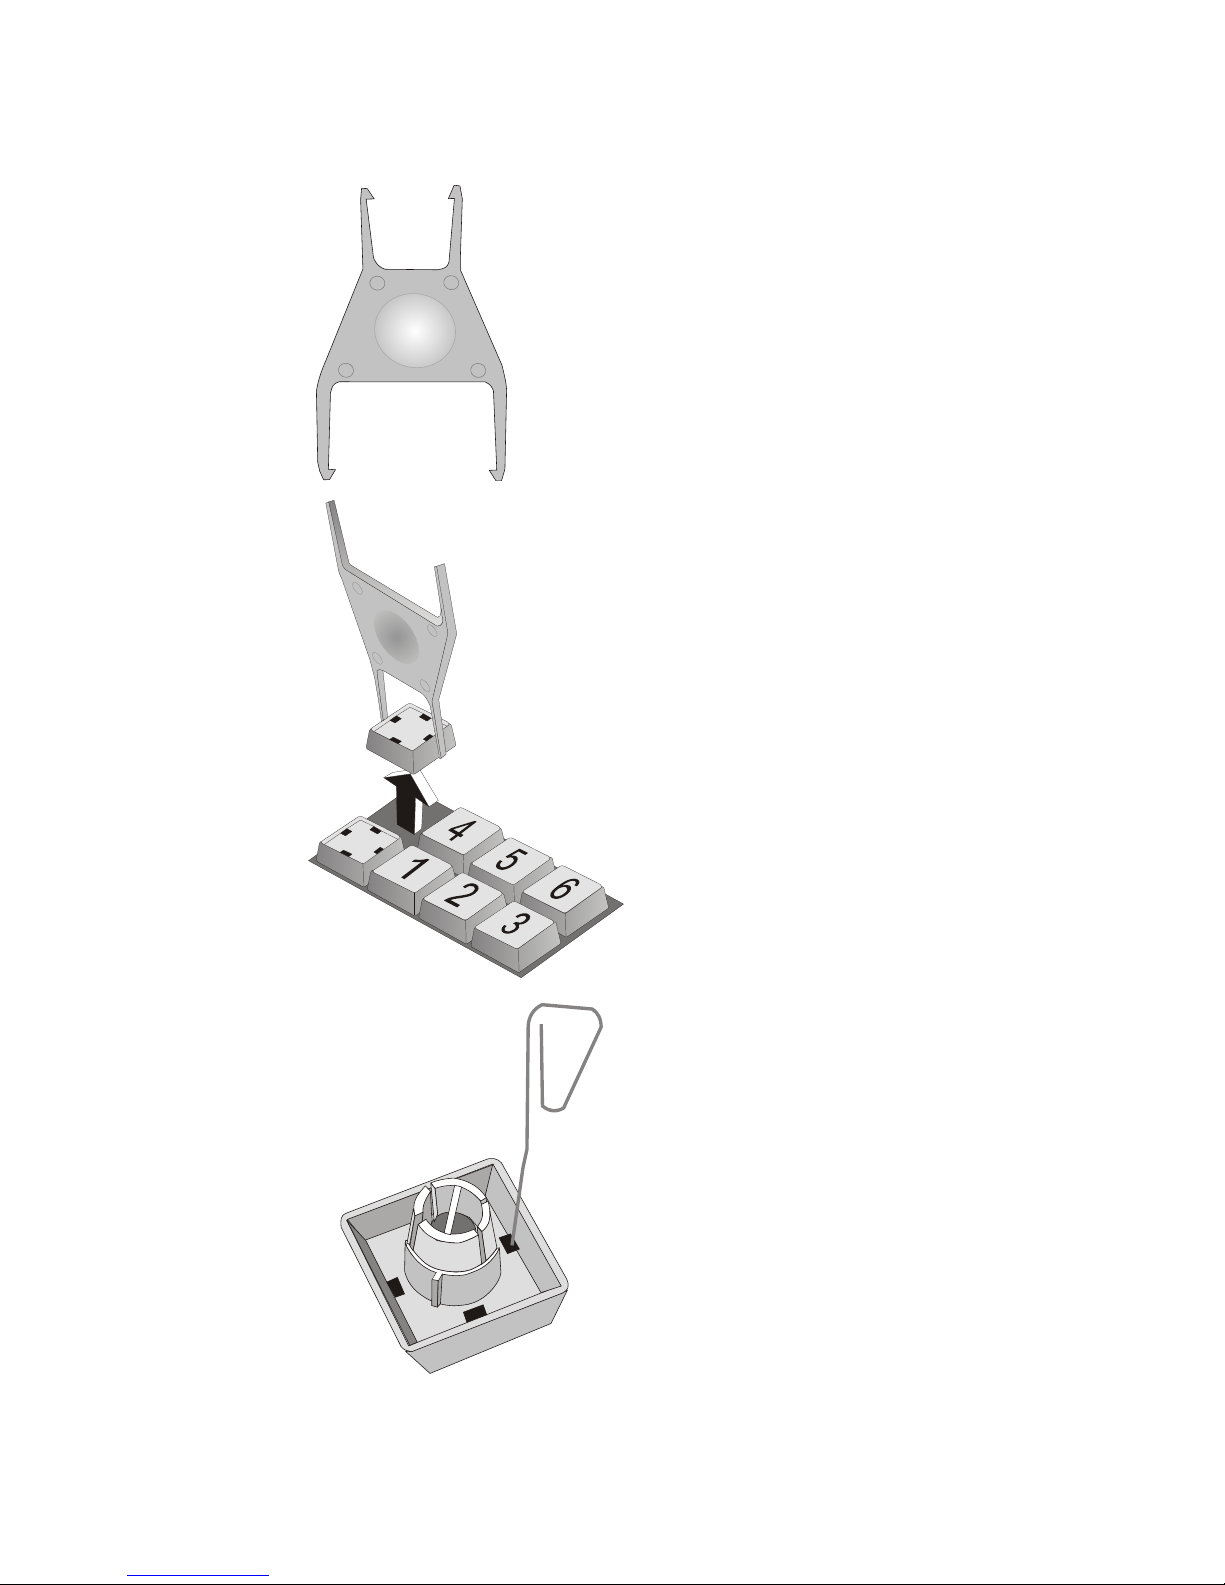
Ex chan ging the Keys
You can re mo ve each of
the key caps using the
key re mo val de vi ce
en clo sed, pul ling the key
up wards.
Pla ce the key re mo val
de vi ce on the se lec ted
key un til you hear a click.
Now re mo ve this key from
the key bo ard by pul ling it
up wards.
If the key that has been
re mo ved is already
labelled you can chan ge
the let te ring as fol lows:
Using a thin ob ject (e.g.
pa per-clip etc.), press
up wards against the
plas tic co ver through the
ope ning on the un der si de
of the key. Plea se re fer to
the next chap ter for
in struc tions on how to
in sert the new la bel.
13
KEYBOARD
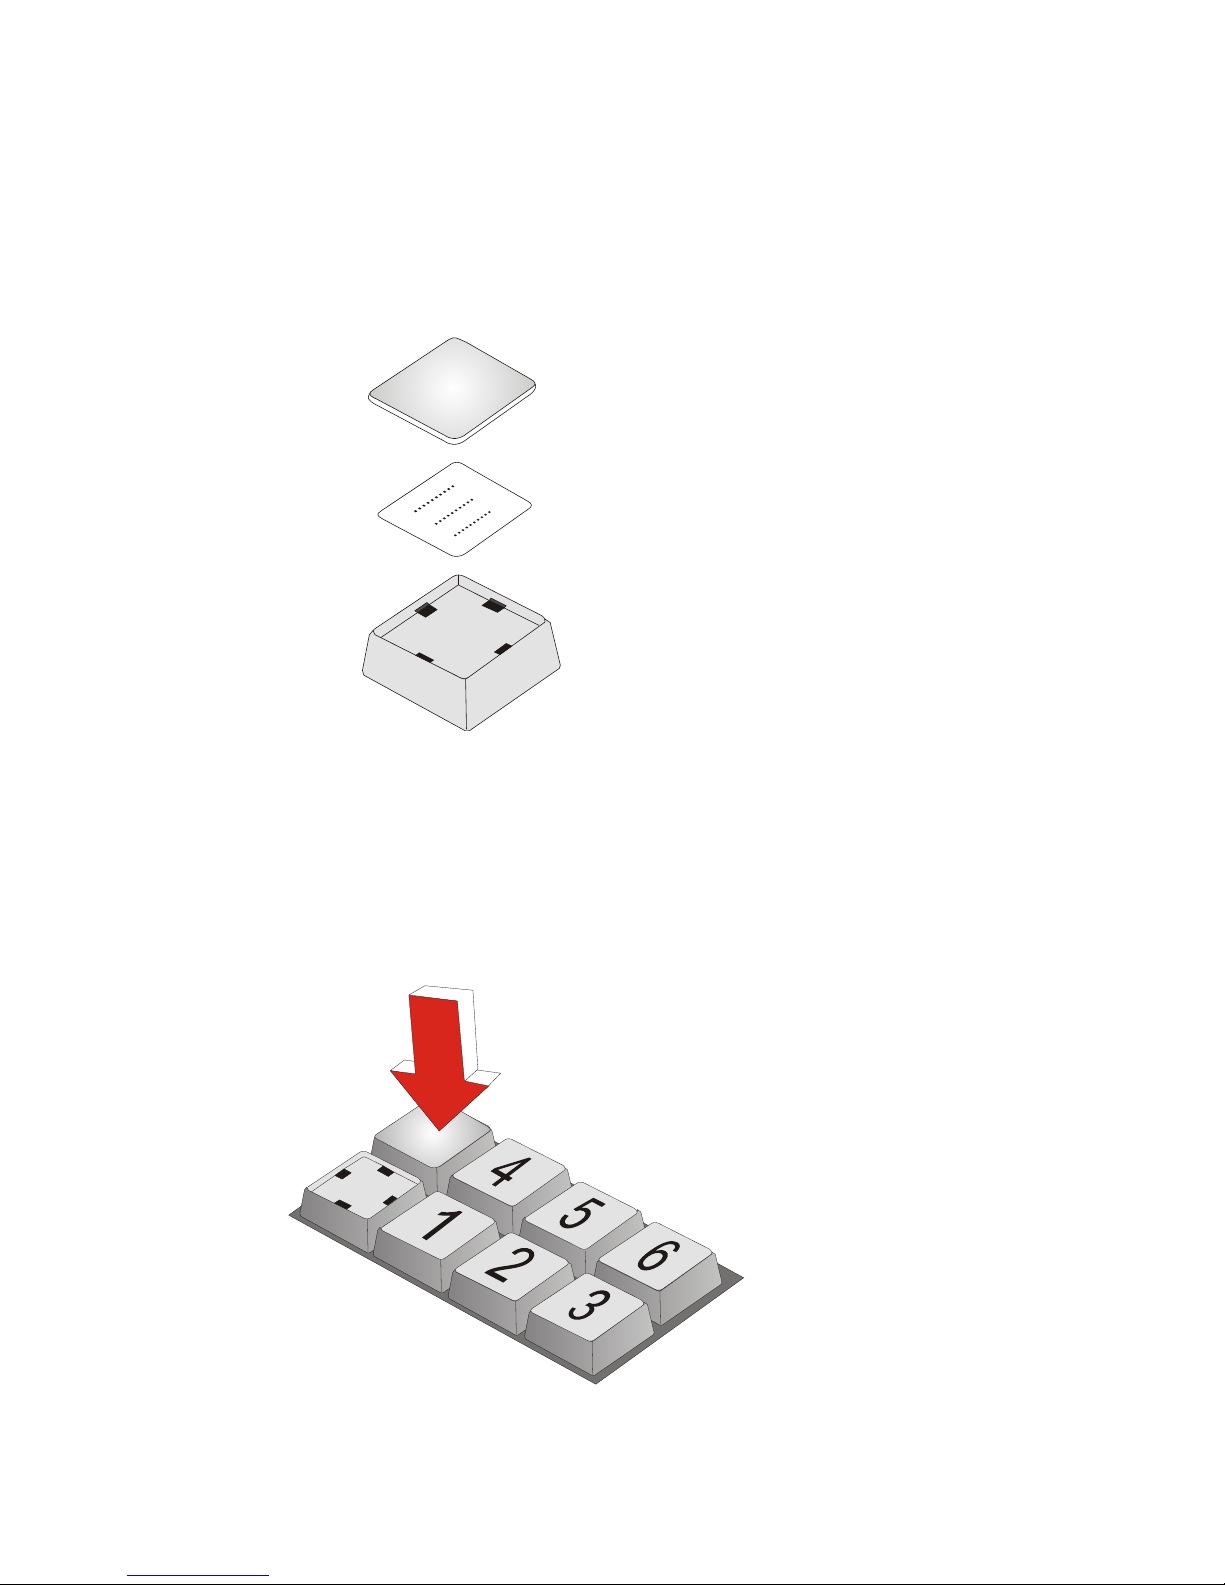
In ser ting Key La bels
Be low, you will find in struc tions on how to in sert the key la bels:
Each key should be la bel led in di vi du al ly. You can use the emp ty la bels
de li ver ed with the sys tem to do so.
Pla ce the la bel on the key
cap.
In sert the key co ver with the mat side up wards un til it clicks into pla ce in the
key cap.
In ser ting Key Caps
In sert the key cap in the
key bo ard and press it
firm ly into pla ce.
KEYBOARD
14
La bel for keys
Key co ver with mat side up
Key cap
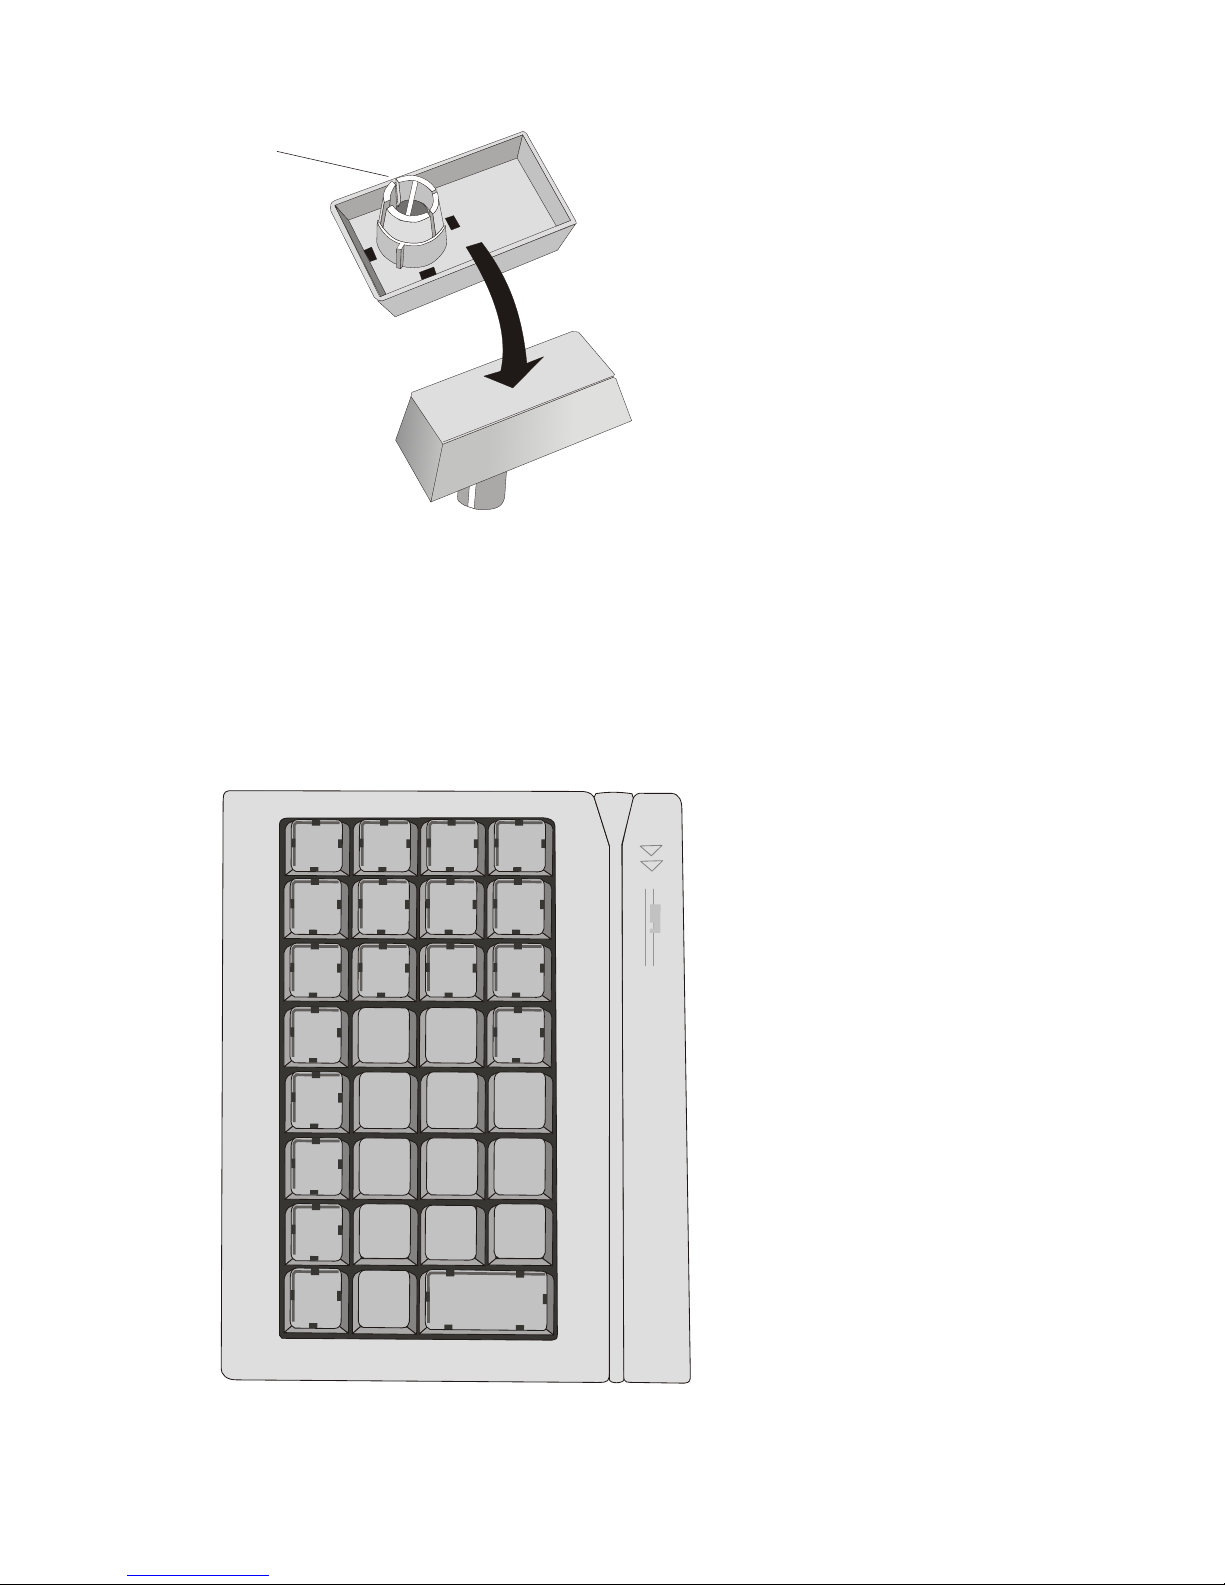
When in ser ting dou ble
keys, plea se en su re that
the actuating cy lin der is
on the left (horizontally
inserted key) resp. on top
(vertically insertion). Mind
to insert quadruple key
caps with the cylinder on
the upper left.
Swipe Card Reader in a Keyboard (optional)
The keyboard is available with or without a Swipe Card Reader.
For technical data see the accordant chapter on page 51. Technical data of
the separate Swipe Card Reader comply with the data of the Swipe Card
Reader integrated in the keyboard.
15
SWIPE CARD READER IN A KEYBOARD (OPTIONAL)
ac tua ting cy lin der
0
1
2
3
6
5
4
7
8 9
C
,
 Loading...