

Wincor Nixdorf BA73A User Manual

BA73A
LCD TFT 15" (38.1 cm) Flat Screen
User Manual

Published by
Wincor Nixdorf GmbH & Co. KG
D-33094 Paderborn
Bestell-Nr./Order No.: 01750038094A
Printed in Singapore

BA73A
LCD TFT 15" Flat Screen
User Manual
Edition May 2001

Copyright © Wincor Nixdorf GmbH & Co, KG, 2001
The reproduction, transmission or use of this document or its contents is not permitted without
express authority.
Offenders will be liable for damages.
All rights, including rights created by patent grant or registration of a utility model or design, are
reserved.
Delivery subject to availability; technical modifications possible.
MS-DOS®,Microsoft®, Windows 3.1®, Windows 95/98®Windows 2000®,WindowsMe®and Windows NT
®
are registered trademarks of Microsoft Corporation, USA.
PanelLink
®
is a registered trademark of Silicon Image Inc., USA
Pentium
®
is a registered trademark of Intel Corp., USA
PCI
®
is a registered trademark of the PCI Special Interest Group (SIG), USA
BEETLE
®
is a registered trademark of the Wincor Nixdorf GmbH & Co. KG
All other trademarks are the property of their respective owners

Contents
Introduction ............................................................................................... 1
From Point-of-Sale to Point-of-Service....................................................... 1
Advantages at a Glance.............................................................................. 2
Unpacking and checking the Delivery Unit ................................................. 3
About this Manual........................................................................................3
BA73A Components ................................................................................. 4
Screen Module ............................................................................................ 4
LCD-Controller -A/BA73A ........................................................................... 5
Capacative Touch Screen (Option) ......................................................... 8
General........................................................................................................ 8
Touch Screen and Sleep Mode..............................................................9
How to Operate.......................................................................................10
Cleaning Instructions .............................................................................. 10
COM Board for Touch Screen ............................................................... 10
I/O-Addresses of COM Interfaces ........................................................11
COM Interface Interrupts...................................................................... 11
Assignment of COM port addresses and interrupts ..............................13
IRQ9, conflict with powerfail interrupt of BEETLE systems ................. 13
IRQ10, conflict with COM3, COM4 of BEETLE systems ..................... 13
IRQ11, most likely conflict SCSI controller or USB..............................13
IRQ12, most likely conflict Mouse Port or PS/2 Mouse ....................... 14
IRQ15, most likely conflict IDE controller .............................................14
Adding COM ports under Windows NT ................................................ 14
Adding COM ports under Windows 9x, Windows Me and Win2000.... 14
Using shared interrupts for COM ports ................................................ 15
Using shared interrupts for COM ports under Windows 95 ................. 17
Using COM ports under Windows 3.x ..................................................17
Using COM ports under MS-DOS........................................................ 17
LCD-TFT Adapter A-Celeron/Pentium III................................................19

Resistive Touch Screen (Option)...........................................................20
General....................................................................................................20
How to Operate .......................................................................................21
Installing and Securing the Screen into Place .....................................23
Adjustable Screen Angle ...........................................................................25
Ergonomic Terminal Workplace ................................................................26
Installation................................................................................................27
Installing the Controller in the BEETLE .....................................................27
Connecting the Speaker Cable ...............................................................29
Connecting the BA73A to the BEETLE /20...............................................30
Connecting the BA73A to the BEETLE /XL-II............................................30
Connecting the BA73A to the PC ..............................................................31
Connecting the BA73A to the BEETLE /M................................................31
The Jumper layout of the Celeron/Pentium III “D2"- board.....................32
Jumper Setting ........................................................................................33
The Jumper layout of the Celeron/Pentium III “D1"- board.....................34
COM2 with Celeron/Pentium III Board (“D1"-CPU) ................................35
LCD Paneltype Settings for BA73A.........................................................35
Connecting the cable...............................................................................36
Installing a LCD-TFT Adapter A ................................................................37
Inserting the Cable.....................................................................................38
Releasing the Cable Connection ..............................................................39
Software Installation................................................................................40
Software Interfaces..................................................................................41
Touch Screen ............................................................................................41
Touch Screen and Sleep Mode...............................................................41
TFT LCD Flat Screen.................................................................................41
Automated Logic Diagram (ALD) and Pin Assignments ....................42
Interface.....................................................................................................43
Inverter (High-Voltage Generator).............................................................43
Touch Screen and Controller.....................................................................43
Pin Assignments........................................................................................44
COM 6 Interface of the LCD-Controller-A/BA73A...................................45
Internal Speaker Connector for Controller and BEETLE-CPU ...............45
COM7 and COM8 Interfaces of the LCD-Controller-A............................45
Internal Connecting Socket...................................................................46
External Connecting Socket..................................................................47

Technical Data ........................................................................................ 48
Touch Screen (optional)............................................................................ 48
TFT/ LCD Screen ...................................................................................... 49
BA73A ....................................................................................................... 50
Current Consumption................................................................................51
LCD-Controller-A/BA73A........................................................................ 51
Screen Module........................................................................................ 51
COM6/7/8 with Power Supply................................................................. 51
Power Consumption.................................................................................. 51
LCD-Controller-A/BA73A .......................................................................... 52
COM Board ............................................................................................... 53
Manufacturer’s Declaration and Approval............................................54
General Authorization ...............................................................................54
FCC-Class A Declaration.......................................................................... 54
Tested Safety ............................................................................................55
User Information........................................................................................55
Safety Instructions.....................................................................................56
Instructions for Maintenance..................................................................... 57
Warranty....................................................................................................57
Recycling...................................................................................................57
Appendix.................................................................................................59
Abbreviation Index..................................................................................... 59
Introduction
From Point-of-Sale to Point-of-Service
“The customer is king”, a motto that seems so simple and yet it demands
a permanently increasing supply of goods and services, both quantitatively
and qualitatively. More customer service and more customer information
have transformed the point-of-sale to a point-of-service, as business transactions are becoming more complex and there are growing demands on
shop assistants and personnel working on the cash till.
By using the BA73A you are provided with a terminal-orientated, ergonomical and customer-friendly cashier’s workplace.
The BA73A is equipped with the PanelLink
TM
technology with the new
highlights: cable distance support up to 5m, flexible All-in-One cable for
Touch Screen, loudspeaker and supply voltage.
Optionally BA73A is equipped with a Touch Screen including a loudspeaker. The BA73A can be applied in all trade market segments like specialist
retailers, department stores, self-service stores, petrol stations or in restaurants. There is indeed a great deal of scope for implementing the BA73A.
They can be used, for example, as:
n
an ordering terminal
n
an information terminal
n
a lottery terminal
n
a point-of-sale terminal
n
a training terminal.
GB - 1
The low-energy, flickerfree and radiation-free colour monitor of the BA73A
is an Active-Matrix-Display in TFT-technology (Thin Film Transistor).
Therefore, it is well suited for multimedia applications as it offers
brilliant colour representation, an excellent contrast ratio and a high
display speed.
The screen can be installed directly on the cashier’s desk. Furthermore, it
can also be set up on the central unit of a modular BEETLE system. Advantages
Advantages at a Glance
r
low footprint
r
ergonomic terminal workplace; adjustable loudness and brightness
r
Power Saving Mode
r
basis for animation and multimedia
r
flickerfree and free from radiation
r
resolution XGA 1024 x 768
r
TFT-Technology, high luminiscence and high brightness
r
very good contrast ratio
r
Touch Version
r
with Magnetic Swipe Card Reader or Chip Card Reader
r
no need for LCD adjustments
r
flexible All-in-One cable for touch function, LCD, PanelLink and
supply voltage
r
cable length for 3m up to 5m (16 foot)
r
Digital Interface
Advantages
GB - 2

Unpacking and checking the Delivery Unit
Unpack the parts and check to see whether the delivery matches the information on the delivery note. The delivery comprises of the respective
screen module. Controllers and data cables, necessary for operation, can
be ordered separately. If damage has occurred during shipping or if the
package contents do not match the delivery note, immediately inform your
Wincor Nixdorf sales outlet.
Transport the device only in its original packaging (to protect it against impact and shock). DeliveryUnit
About this Manual
This manual informs you about everything you might need to know for the
installation (software and hardware), the operation and the maintenance of
your BA73A.
Some parts of this book require familiarity and experience in working with
operating systems and installation and configuration procedures.
Delivery Unit
GB - 3
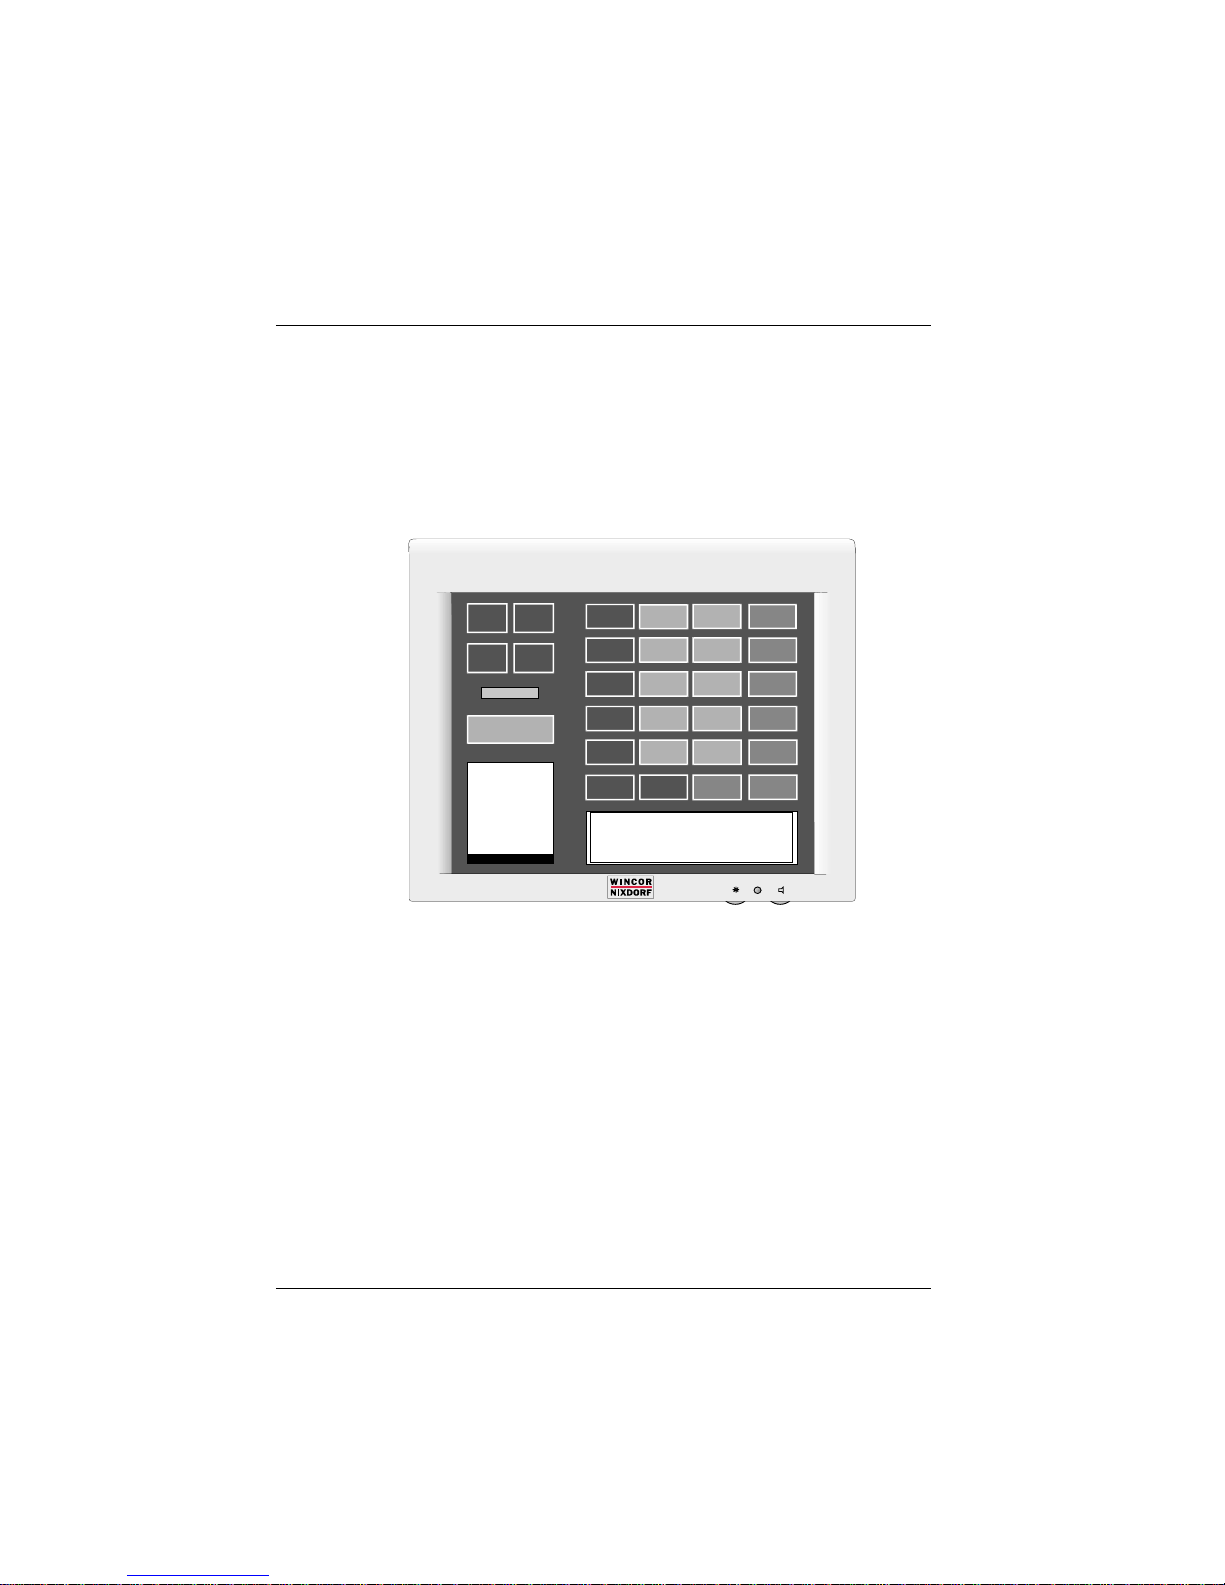
BA73A Components
Screen Module
The screen module represents the main unit of the BA73A. It comprises of
a TFT-LCD colour screen, the TFT-interface and an inverter that generates the voltage for backlighting the screen. As an option the screens are
available with Touch Screen including a loudspeaker. Behind the cover on
the back of the BA73A you connect the cable.
Remove the cable cover by pushing it in
the direction of arrow
(see picture) and then
taking it off upwards.
Back of the screen
The TFT LCD flat screen is an XGA-compatible 15-inch flat screen which
is absolutely flickerfree and free of radiation and has only a low heat emission. It is designed for a resolution of 1024 x 768 pixel. Application programs should be used with this resolution!
However, a resolution of 640 x 480 pixel is possible. In graphics mode this
resolution is used during the start of the BIOS or with MS-DOS etc. It is
also used for instance during installation or when configuration problems
occur (protected mode of Windows). The resolution 640 x 480 pixel is implemented through “stretching”.
GB - 4

“Stretching” is only possible when a separate LCD controller or an adapter
(“PanelLink-Bridge”)isused(“D1" Central Processing Unit with Celeron or
Pentium III Processor). There is no ”stretching" with the “D2" CPU.
If the display element is damaged and the liquid crystal
solution leaks out onto your hands or clothing, please wash
your hands or clothing immediately under running water for
at least 15 minutes, using soap or alcohol.
If the liquid comes into contact with your eyes, consult a
medical doctor immediately.
LCD-Controller -A/BA73A
LCD-Controller-A/BA73A
For the LCD display
r
the LCD-Controller-A/BA73A (PCI) is needed and
for the optional Touch function
r
the COM board (ISA) is needed.
Both boards have to be connected.
The Controller and COM board need one slot with PCI and ISA
interface. Thus, a display controller can be connected with every
BEETLE /M, BEETLE /20, BEETLE /XL-II, and BEETLE /S.
The LCD/TFT adapter A-Celeron can be used instead of the LCD-Controller-A/BA73A.
LCD-Controller-A/BA73A
GB - 5

The LCD-Controller-A/BA73A is a plug-in-controller with a PCI-interface.
There are two connections for
r
a 40-pin MDR connector with integrated COM5 output
r
a 9-pin DSUB female (for COM6)
COM5 and COM6 are only ready for operation when the optional
COM board is used.
The control data and data lines for the TFT LCD display are transmitted to
the 50-pin MDR connector via hardware drivers and filters. The cable,
which is linked up to the screen module, is connected to this MDR connector. The all-in-one cable length is up to 5 m. The COM5 interface signals
(for the Touch Screen) and the loudspeaker signal are also on this connector. A loudspeaker cable connects the beeper of the CPU to the loudspeaker connector of the controller. Please refer to the chapter “Installation” for
further information.
The screen panel next to the MDR connector has a 9-pin DSUB socket
connector, to which the COM6 interface is connected. This is the interface
with the power supply. This socket is always installed, but it will only work
with the Touch Screen version.
Please find a description of the COM board on page 11.
LCD-Controller-A/BA73A
GB - 6
Panel of LCD- Ccontroller-A/BA73A
Board layout (LCD-Controller-A/BA73A)
Jumper Settings of the LCD-Controller-A/BA73A:
B1: OPEN
B2: Closed
B3: Closed
1
1
2
40
5
6
9
COM6 resp.
DSUB Socket (9-pin)
BA73A Connector
incl. COM5, LCDInterface
and Loudspeaker
MDR Connector (40-pin)
Speaker
Connector
1
COM5/
COM6
4
"Touch In"
BIOS
B1
B2
B3
Jumper
LCD-Controller-A/BA73A
GB - 7
Capacative Touch Screen (Option)
General
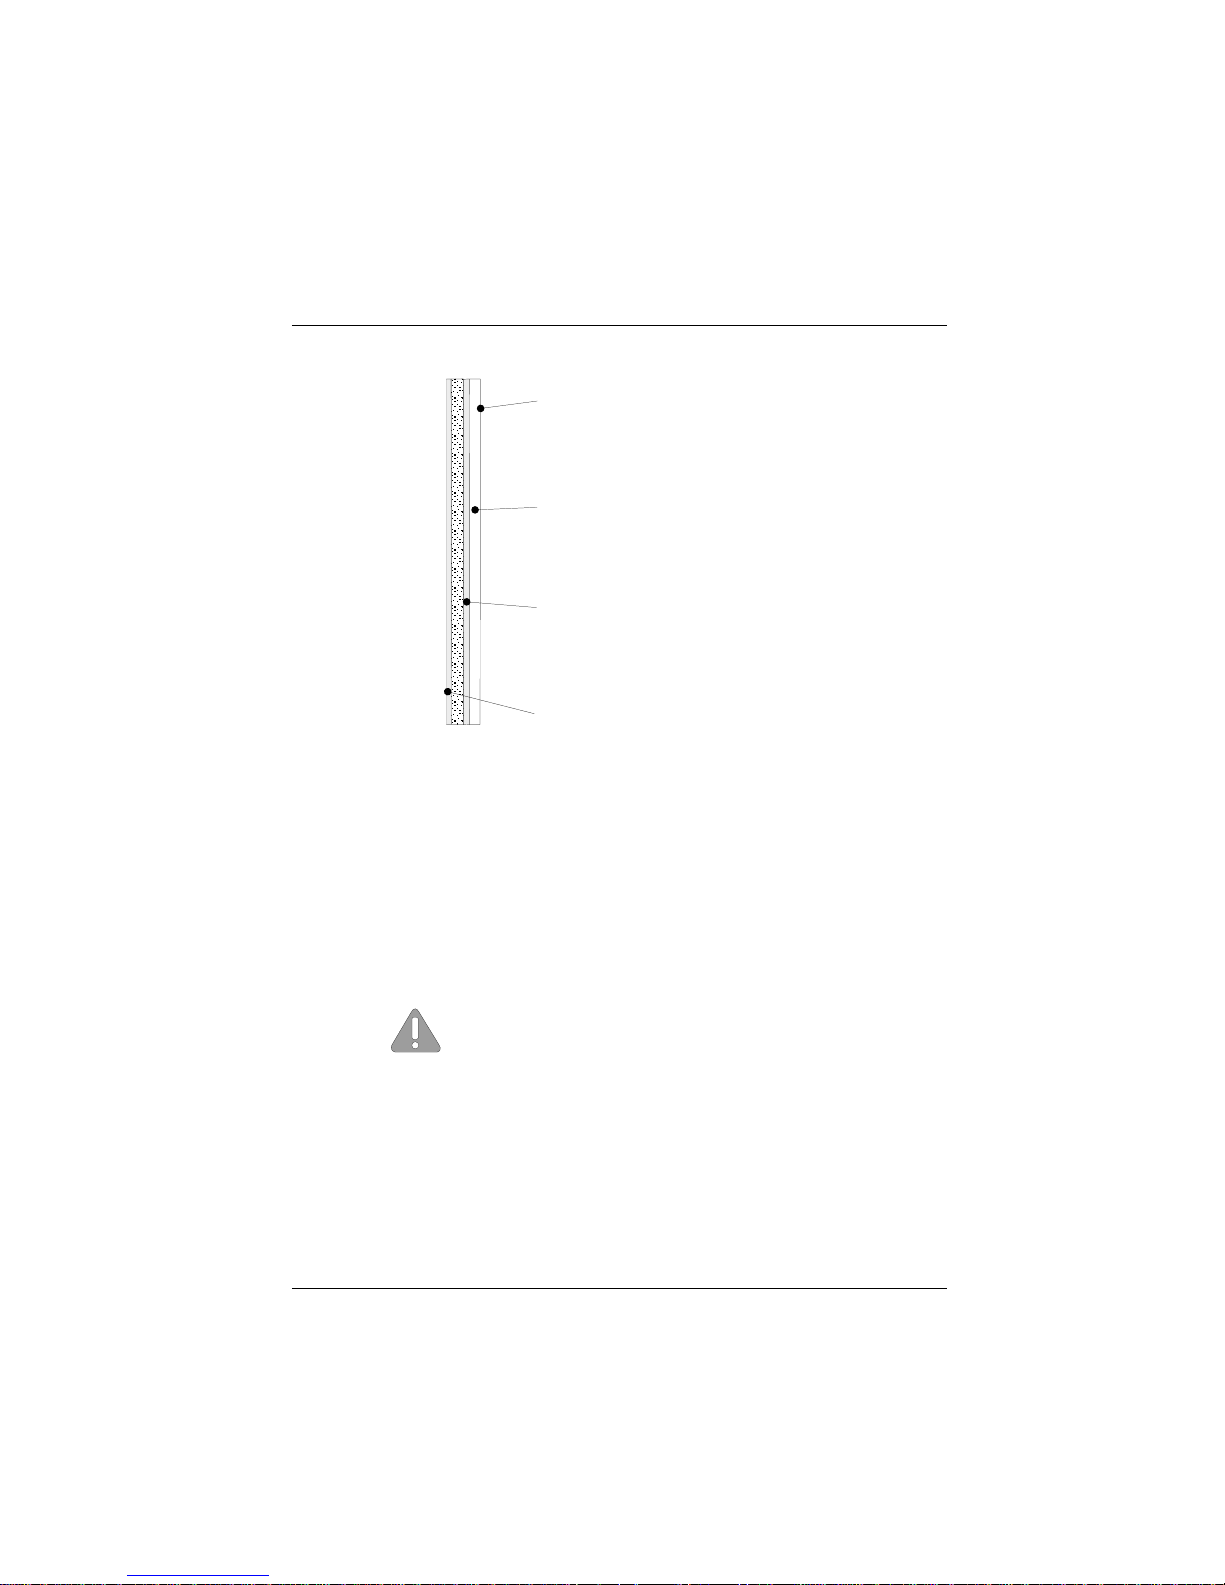
The TFT Touch Screen works according to the principle of a change in
analog capacitance. It has a glass screen with a transparent, thin-film
overlay on the surface. This is fully sealed and protected by a further
layer of clear glass. Electrodes on the edges of the screen provide a
uniform low-voltage field. As soon as you touch the screen with your
finger the contact point is “recognized” by the change in capacitance.
Because this takes place very quickly - 15 milliseconds after being
touched - the Touch Screen is optimally equipped for a number of
different requirements and applications.
GB - 8
The programming interface of the screen is identical to the mouse interface. Touch Screen
Touch Screen and Sleep Mode
Using the Touch Screen with a BEETLE System, an entry via touch during
sleep mode may lead to a faulty input. During sleep mode nothing can be
read from the LCD flat screen. Entries via touching the screen will still be
processed by the system, but without the system “waking up”.
For these reasons it is not recommended to set
the sleep mode. For details please read the manual “POSMotherboard” delivered with your BEETLE System.
Protective Noise Shield
Conductive Coating
ClearTek Glass Overcoat
Anti Reflective Etched Surface and protection
Touch Screen
GB - 9

How to Operate
The Touch Screen responds to the slightest contact, therefore you do not
have to apply much pressure when working with the screen. This does not
only safe time, but is also kind to your joints!
Touching the touch glass has the same effect as clicking the left mouse
button. You only need to apply a little pressure with the fingertip. In this capacitive process only fingertip contact is recognized. The screen does not
react in any way if touched, for example, with a pencil or a glove.
You can adjust the brightness and the loudness with the thumb wheels
located down to the right of the front of the screen.
Cleaning Instructions
Always turn off the system before cleaning. The glass surface of your
Touch Screen should be cleaned with a mild, commercially available glass
cleaning product. All pH neutral materials (pH 6 to 8) are good for cleaning. Cleaners with pH values 9 to 10 are not recommended. Cleaning
with water and isopropyl alcohol is possible as well. Do not use solvents
containing acetic acid. Use a soft, fine-meshed cloth to clean the surface.
Dampen the cloth slightly and then clean the screen.
A wrong maintenance may cause damages to the screen, which are not
covered by guarantee or warranty.
COM Board for Touch Screen
The COM Board is an additional board for the LCD-Controller-A with an
ISA bus interface that has 2 or 4 COM interfaces (COM5, 6, 7, 8). COM5
and COM6 are linked to the BA72 controller via a plug connector. COM5
is a reduced COM interface for RxD and TxD signals and is intended for
the use of the (optional) touch function.
As an option the COM board can be equipped with a COM7 and a COM8
interface. These can alternatively be operated as power-supplied interfaces (COM7* /COM8*) or as powerless interfaces (COM7 / COM8).
Touch Screen
GB - 10
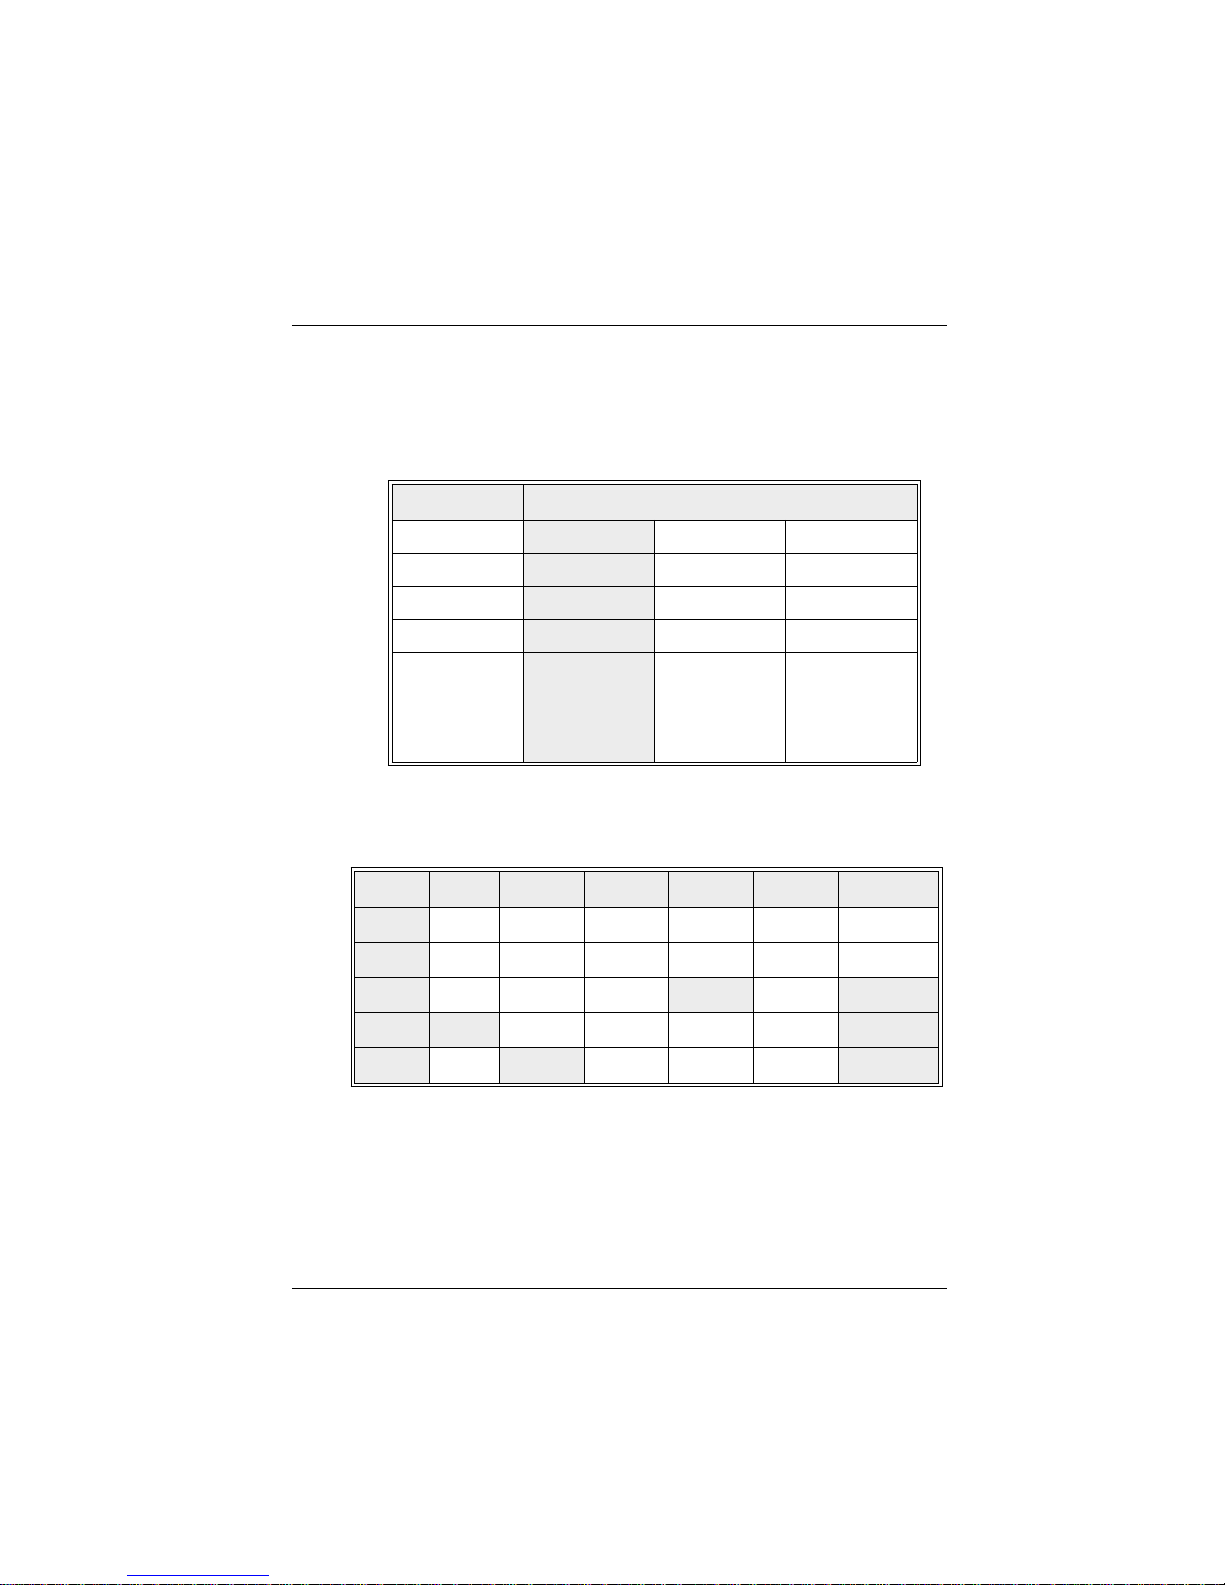
I/O-Addresses of COM Interfaces
COMBoard
The four COM interfaces of the COM board have the following
I/O-addresses. Please refer to the table for the jumper settings.
COM Address (Hex)
5 2E0 - 2E7 330 - 337 320 - 327
6 328 - 32F 338 - 33F 328 - 32F
7 3E0 - 3E7 340 - 347 360 - 367
8 368 - 36 F 348 - 34F 368 - 36F
Jumper
Position
IO1 = open
IO2 = open
IO3 = open
Default
setting
IO1 = closed
IO2 = open
IO3 = open
IO1 = open
IO2 = closed
IO3 = open
COM Interface Interrupts
COM5 COM6 COM7 COM7-8 COM6-8 Interrupt
IRQ9
I9 - - - I11 IR9
IRQ10
I10 - - - I12 IR10
IRQ11
I5 - I4 I8 I13 IR11
IRQ12
I1 - - - I6 IR12
IRQ15
I3 I2 - - I14 IR15
For the default setting the jumper I1, I2, I8, IR11, IR12 and IR15 are active
(closed).
COM Board
GB - 11

The interrupts IRQ9 and IRQ10 are added for PC application only. For a
correct reproduction of the interrupt signals it is necessary that the jumper
IR9 to IR15 are not activated. To activate the interrupt request signal the
corresponding jumper must be closed.
To avoid possible conflicts with already existing plug-in-boards in your
system, deactivate those jumpers on the COM board, that are no longer
needed (opening the jumpers).
COM Board
GB - 12

Assignment of COM port addresses and interrupts (installation details)
Ensure that there is no conflict of hardware port addresses or interrupt
requests (IRQs) used by your system and the COM Board!
Essentially the AT COM Board has been designed to be configurable
for a non-shared IRQ9, IRQ10, IRQ11, IRQ12, or IRQ15 for COM5 and
a shared IRQ9, IRQ10, IRQ11, IRQ12, or IRQ15 for COM6,7,8 and even
COM5. The interrupt requests have to be enabled explicitly by jumpers
on the controller.
To assist you further, some hints to the assignment of interrupts are
given in this chapter. Please note, that only some possible conflicts are
mentioned. There might be more possible!
IRQ9, conflict with powerfail interrupt of BEETLE systems
IRQ9 cannot be used with BEETLE systems, since this is in conflict
with the powerfail interrupt. For other systems, no hint can be given
for a conflict that is likely to occur. So you will have to check your
specific configuration.
IRQ10, conflict with COM3, COM4 of BEETLE systems
IRQ10 cannot be used with BEETLE systems, since this is in conflict with
COM3 and COM4. Factory settings of the BEETLE provide using IRQ10
for COM3 and COM4.
For other systems, no hint can be given for a conflict that is likely to occur.
So you will have to check your specific configuration.
IRQ11, most likely conflict SCSI controller or USB
The Adaptec product line of SCSI controllers uses IRQ11 as default. If this
is your type of controller, please check. Refer to your technical documentation, if a change of the configuration is required.
BEETLE systems factory settings provide to use shared IRQ10 for COM3
and COM4, but COM4 can be configured by jumpers on the motherboard
to use IRQ11 instead.
Some of the latest PCs use IRQ11 for USB (Universal Serial Bus).
COM Board
GB - 13
 Loading...