

Page 1

e-Net
200
Communication System
IP580/IP500 IP Phone
User Guide
06IP58M.CH17.EN7
Page 2

InterPBX, InterServer, VG5000, AP8000, IP580, IP500, InterClient, and are trademarks of DSG Technology Inc.
Windows, Outlook, and Outlook Express are trademarks of Microsoft Inc. Other names used here are trademarks of
their respective owners.
e-Net, e-Net 200 are trademarks of WIN Communications Corporation.
WIN is a registered trademark of WIN Communications Corporation
Copyright © WIN Communications Corporation Technology Inc. All rights reserved.
Page 3

Table of Contents
3
Table of Contents
Chapter 1 Using The IP Phone ...........................................................................................................5
Overview of IP Phone......................................................................................................5
Making Internal Calls{XE “Making Internal Calls”.....................................................7
Making External Calls......................................................................................................8
Answering Calls ...............................................................................................................8
Recent Calls .......................................................................................................................8
Placing a Call on Hold...................................................................................................10
Transferring Calls...........................................................................................................10
Conference Call...............................................................................................................11
Call Waiting.....................................................................................................................11
Accessing Voice Mailbox...............................................................................................11
System Speed Dialing ....................................................................................................12
Personal Speed Dialing..................................................................................................12
Call Pickup ......................................................................................................................12
Call Park ..........................................................................................................................12
Internal Paging................................................................................................................13
External Paging...............................................................................................................13
Member Login/Logout..................................................................................................13
Making Calls to Joint Server Extensions and Local Phone Stations........................14
Chapter 2 Voicemail System.............................................................................................................15
Listening to Messages....................................................................................................15
Sending a Message .........................................................................................................16
Change Personal Options..............................................................................................17
Accessing Voice Mail Remotely ...................................................................................20
Listening to Your Message via E-mail.........................................................................21
Chapter 3 Recording System ............................................................................................................23
Recording Calls...............................................................................................................23
Playing the Recording....................................................................................................23
Chapter 4 InterClient Utility.............................................................................................................25
Login to the Web-based InterClient.............................................................................25
Personal Information .....................................................................................................26
Setting Button Mapping ................................................................................................26
Personal Speed Dialing..................................................................................................29
Answering Option..........................................................................................................30
Mailbox Parameter .........................................................................................................32
Page 4

Table of Contents
4
Notification......................................................................................................................32
Distribution List..............................................................................................................34
Change Password...........................................................................................................35
Phone Book......................................................................................................................35
Review System Speed Dial............................................................................................36
Printing Button Mapping Label....................................................................................36
Chapter 5 Maintenance......................................................................................................................39
Connecting the IP Phone ...............................................................................................39
Adjusting the Supporting Bracket................................................................................39
IP Phone Setup................................................................................................................40
Appendix A: Quick Start Guide.......................................................................................................41
Page 5
Chapter 1 Using The IP Phone
5
Chapter 1
Using The IP Phone
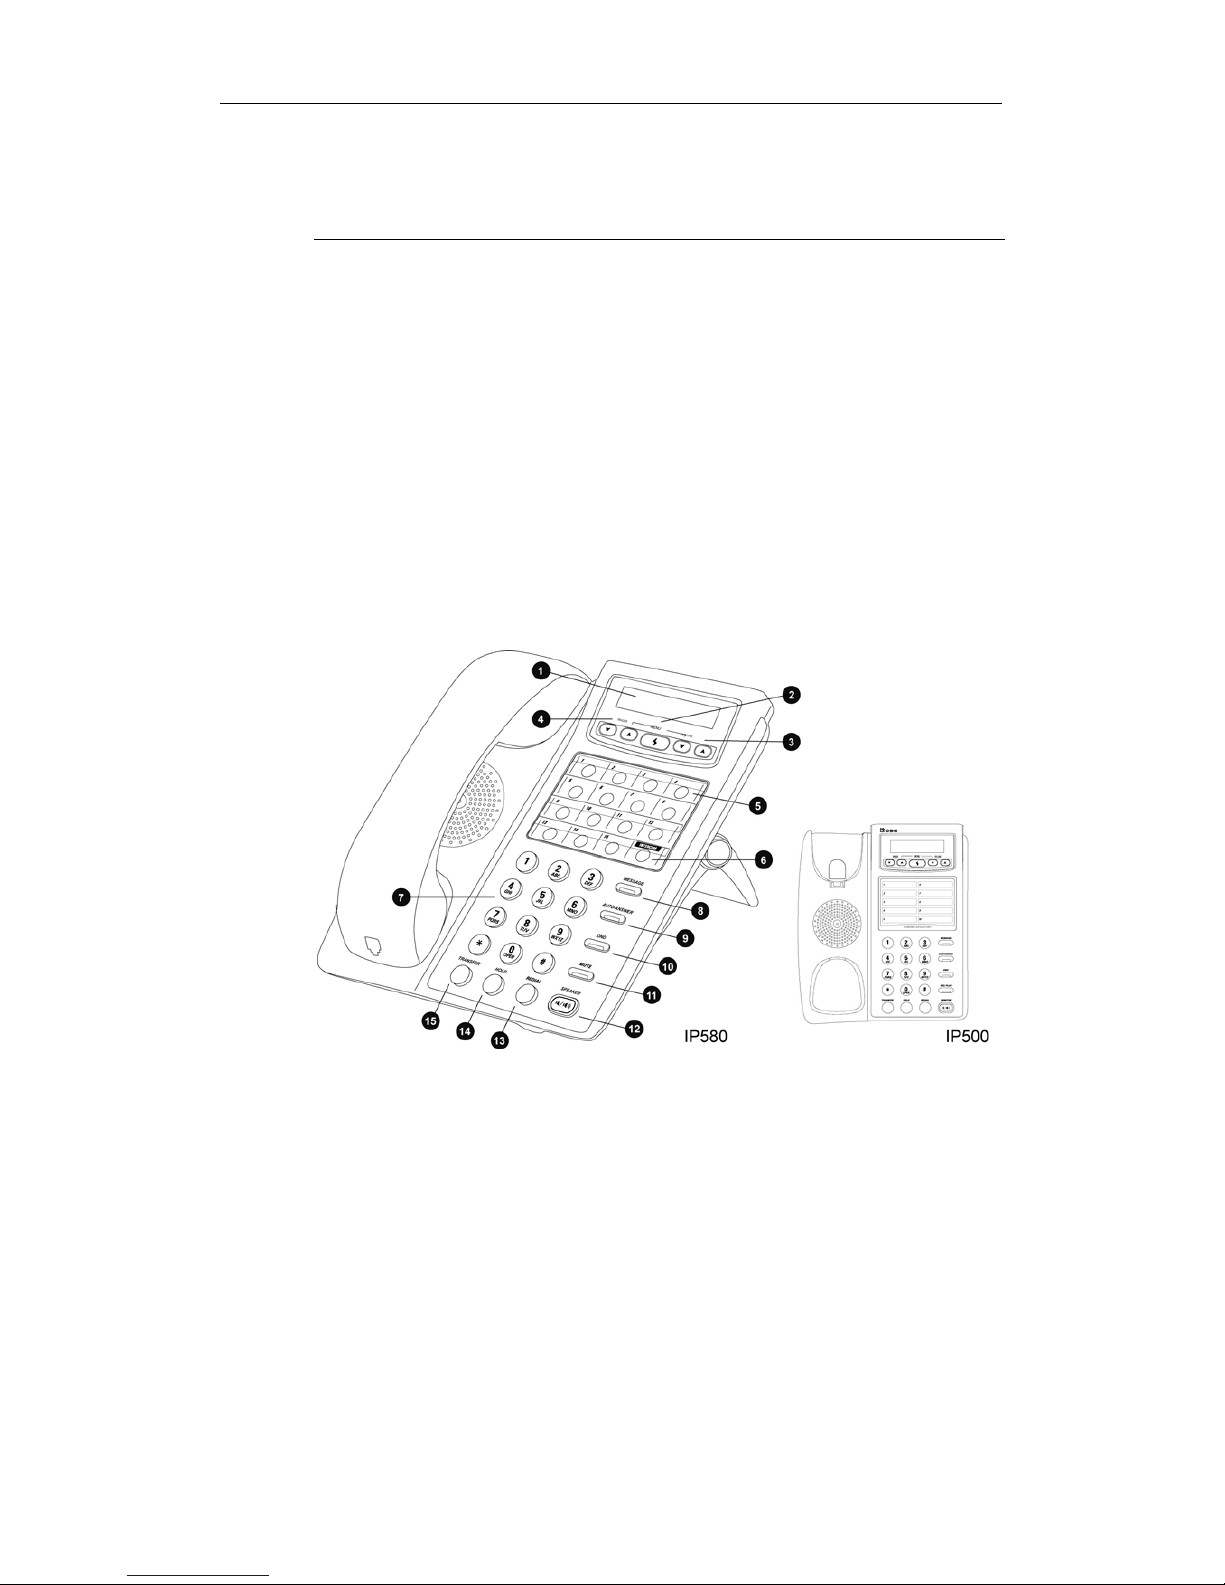
The IP580 is a feature-rich IP phone. Both the IP580 and IP500 provide 9
function keys for commonly used calling features. The IP580 also provides 15
programmable buttons allowing you to customize specific features. The LCD
displays your extension number, name, time, caller ID and call status. On the
bottom of the phone, there are three RJ-45 ports for connecting to LAN, your PC,
and the Attendant Console.
Overview of IP Phone
Page 6
Chapter 1 Using The IP Phone
6
IP580 Phone
LCD Display Displays information such as extension number,
name, current time, call status, caller ID, number of
new messages, number of missed calls and other
settings.
Menu Buttons
y Press and hold to access call history mode,
and then press
or to select missed calls,
received calls, or dialed calls. Press
again to
display the further details of call status.
y Press for 3 seconds to access setup mode. In
setup mode, press
to edit or save settings, or
press
or to scroll through setting items.
Volume Buttons
Increases or decreases the volume of handset,
headset, or speakerphone.
Ringer Buttons
Increases or decreases on-hook ringer volume.
Programmable
Buttons
Can be programmed as CO line, CO group, extension,
extension group or other functions such as
conference, page, park, login or logout.
When defined as CO lines or extensions, the LED
displays different colors to indicate different status:
y No light:The line is available to use.
y Steady green:The line is in use (off-hook or busy).
y Flashing amber:The line is on hold.
y Flashing red:The line is ringing.
The programmable buttons can be configured
through InterClient Button Mapping.
Intercom When the Intercom Button flashes, it indicates an
incoming call from another extension. You can also
directly press the Intercom Button to place internal
calls.
Keypad Same as on traditional phones.
Message Button When the Message Button light is on, it indicates that
you have new messages. Press Message Button to
access Voice Mailbox.
Auto-Answer
Button
When selected, the phone answers calls automatically.
Page 7
Chapter 1 Using The IP Phone
7
DND Button Press DND to activate Do-Not-Disturb function.
Callers will be forwarded to your Ring-No Answer
setting. When the lamp is on, you will receive no calls.
Mute Button During a conversation, press Mute Button to turn off
your microphone. The caller will not hear your voice.
Speakerphone
Button
Be used to receive or make calls without using the
handset.
Redial Button Lift and handset and press the Redial button to redial
the last external number you dialed.
Hold Button Press to hold a call, or press again to retrieve the call.
Transfer Button During a call, press to transfer a call to another
extension. Or press again to retrieve the call.
IP500 Phone
Phone Book Uses as a record of personal phone book.
Conference
Button
Press Conference Button to initiate a conference call
with parties who are on hold.
Rec/Play Button During a call, press Rec/Play Button to record the
call. When on-hook, press Rec/Play Button to play
the recording.
The other buttons of IP500 function the same as on IP580.
Making Internal Calls{XE “Making Internal Calls”
1. Lift the handset or press Speakerphone button.
2. Wait for dial tone and dial the extension number. (Also applies to
off-premises extensions or Joint Server’s extension.)
If the number to be reached is set on Button Mapping, simply press the
corresponding programmable button to call. To edit Button Mapping, please
refer to Chapter 4: InterClient Utility.
If the Administrator enables your Direct Outward Dialing function, which means
when you lift the handset you will get an outgoing line, you may press the
Intercom button for making internal calls.
Page 8

Chapter 1 Using The IP Phone
8
Making External Calls
1. Lift the handset or press Speakerphone button.
2. Wait for the dial tone and dial the CO line access code “0”.
3. Wait for the dial tone and dial the phone number.
You may also press the specific programmable button mapping to CO Lines or
CO Line Groups to get an outside line.
If the Administrator enables your Direct Outward Dialing function, simply lift the
handset and dial the phone number.
Answering Calls
When the phone rings, lift the handset to answer the call.
Caller ID: InterPBX system supports Caller ID. The LCD will display the
extension number and caller’s name when you have internal calls. External caller
ID also displays caller’s phone number when your telecom company enables the
Caller ID service.
Auto-Answer: If you enable the Auto-Answer function, all the calls will be picked
up automatically.
Distinctive Ringing: If the administrator enables the Distinctive Ringing function,
you can distinguish the internal calls from the external calls by different ringing
tones.
Busy/Ring-No-Answer: If you do not answer the call or if your line is busy, the
call will be forwarded to your voice mailbox after a certain timeout. You may also
forward calls to other extensions. You can set your personal Answering Option
(call forwarding) through InterClient. Please refer to Chapter 4: InterClient
Utility/Answering Option for more details. As default, the system will redirect
calls to AA or VMS Server when busy or Ring-No-Answer.
Recent Calls
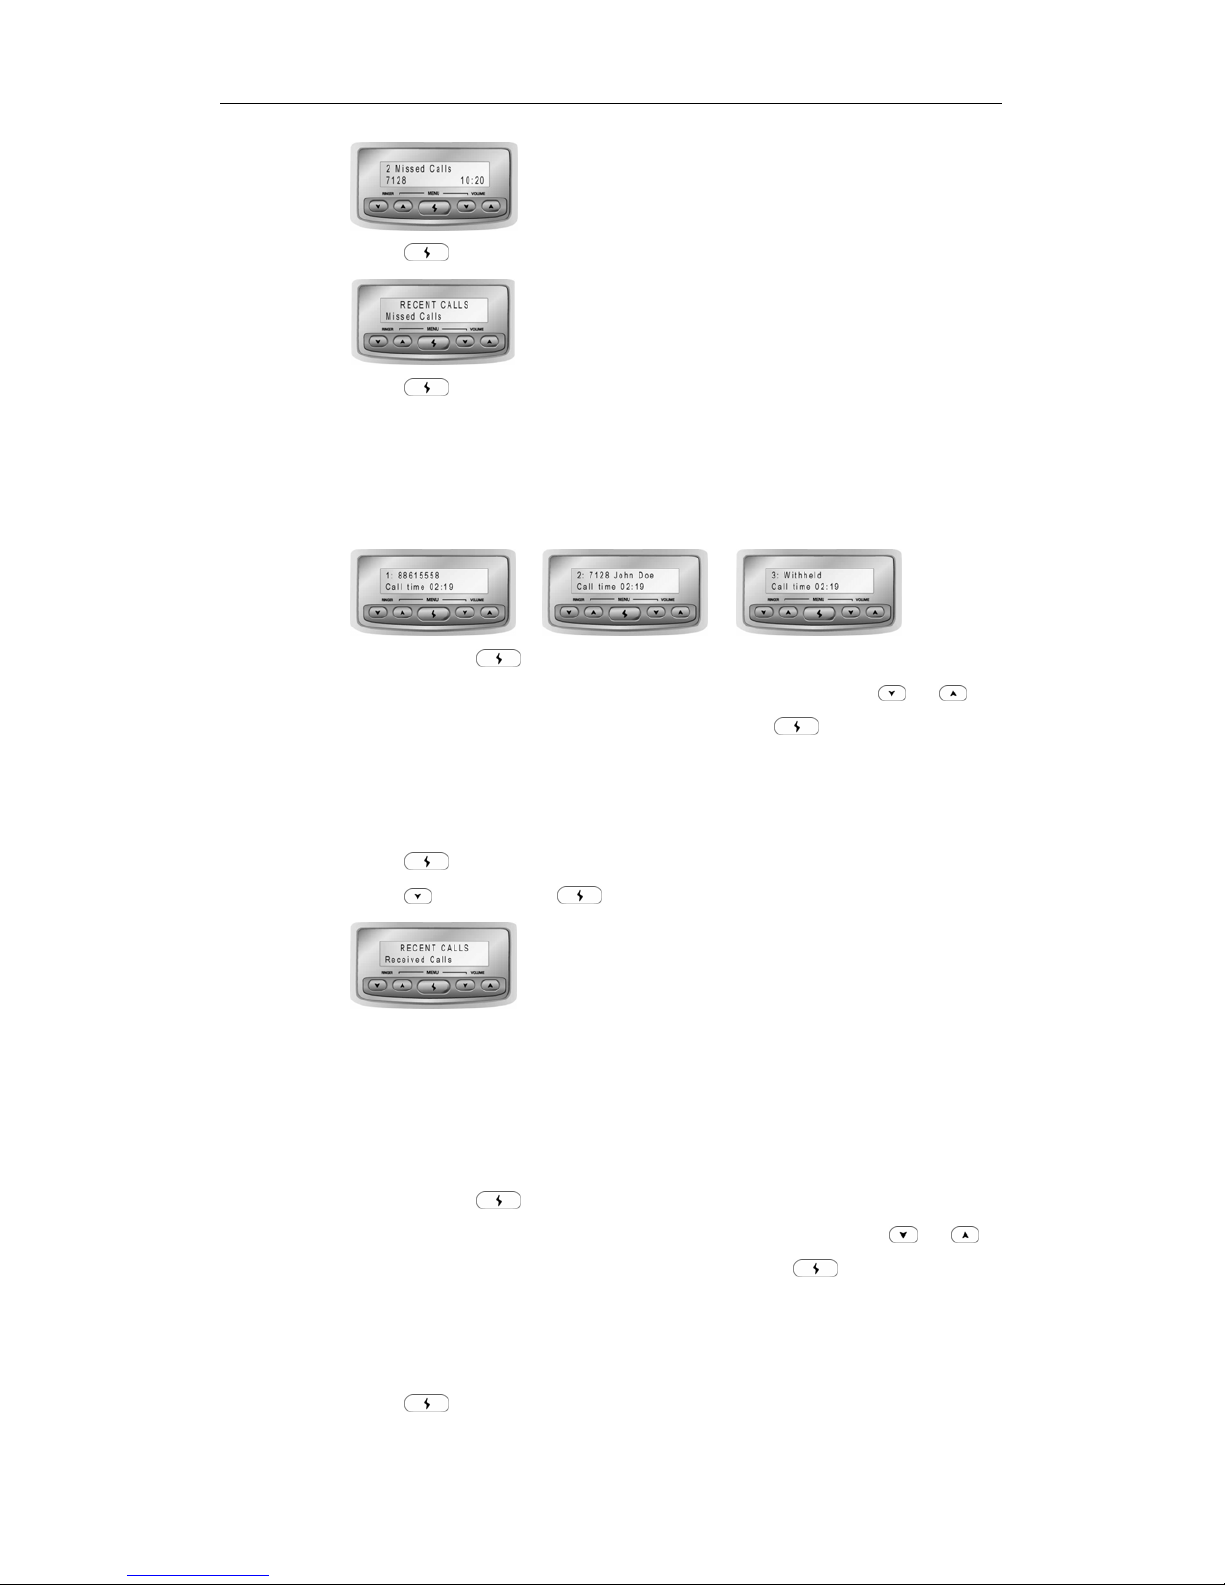
The IP phone provides recent calls records. The LCD can display missed calls,
received calls and dialed numbers. You can press
to check recent calls
records.
Missed Calls
1. When you have missed calls, the LCD will display the message as follows:
Page 9
Chapter 1 Using The IP Phone
9
2. Press
to access to Recent Calls Mode.
3. Press
again to select Missed Calls items. The LCD displays the
extension number and user name of internal calls. If the outside line supports
Caller ID, the LCD will also display the phone number of external calls. If the
caller is unknown, the LCD will display “Withheld.” At the bottom of the
LCD, it shows call time (HH:MM).
4. You can press to directly dial to a missed call number. The Missed
Calls list stores maximum 10 latest missed calls. You can press
or to
select any entries or “Clear All” or “Return”, and press
again to record or
return to the previous menu.
Received Calls
1. Press
to access to Recent Calls Mode.
2. Press
and then press to select Received Calls items.
3. The LCD can display the telephone number of received calls. If the outside
line supports Caller ID, the LCD will also display the phone number of
external calls or the extension number and name of internal calls. If the caller
is unknown, the LCD will display “Withheld.” At the bottom of the LCD, it
shows the call time (HH:MM).
4. You can press
to directly dial to a received call number. The Received
Calls list stores maximum 10 latest received calls. You can press
or
to select any entries or “Clear All” or “Return”, and press
again to record or
return to the previous menu.
Dialed Numbers
1. Press
to access to Recent Calls Mode.
Page 10

Chapter 1 Using The IP Phone
10
2. Press twice and then press to select Dialed Numbers items.
3. The LCD will display the dialed number of external calls or the extension
number and name of internal calls.
4. You can press
to directly dial to a dialed call number. The Dialed Calls
list stores maximum 10 latest dialed calls. You can press
or to select
any entries or “Clear All” or “Return”, and press
again record or return to
the previous menu.
Note: When you are checking the recent calls records, your phone status is busy.
The phones will automatically logoff the Recent Calls Mode if there is no further
action in 30 seconds.
Placing a Call on Hold
During a call, press the Hold button to put the caller on hold.
To retrieve the call you placed on hold, press the Hold button again. If the CO line
or the extension number are set on a programmable button the correspondent
LED will be flashing amber when on hold. You can directly press the flashing
programmable button to retrieve the call.
If there is no any further action after holding the call, the call will be recalled to
your station upon timeout.
You can place up to 5 calls on hold. When more than one calls are on hold, press
#14 and the extension number to retrieve a specific internal call or press #13 and
the CO line extension number to retrieve a specific external call (The
administrator has to turn on the CO line extension number display function).
When the phone rings, the LCD will display the internal or external call number.
Transferring Calls
1. During a call, press the Transfer button.
2. Dial the extension number you want to transfer.
3. When the party answers, announce the call or simply hang up.
If the party is not available, the call will be bounced back to your station.
Page 11

Chapter 1 Using The IP Phone
11
Conference Call
1. During a call, press the Hold button to hold one party.
2. Call another party. Both internal and external phone number are applicable.
To invite more parties, press the Hold button to hold the call and call the next
one. You can place up to 4 people on hold at the same time.
3. After the call is connected, press the Transfer button and #40 to start the
conference.
4. If you still want to invite more parties to join the conference, press the Hold
button to hold the conference. Call the new party. Then press the Transfer
button and #40 to start the conference.
The conference function allows up to 18 parties in different sessions. Only one
party of each session is required to be in the InterPBX System.
Please consult your administrator for your conference authorization.
Note: Off-Premise extensions cannot initiate a conference but can be invited to
join a conference.
Call Waiting
If you enable the Call Waiting function, during a call you will hear a beep
indicating that you have another incoming call. The LCD will also display the
message of an incoming call. However, the caller will hear the normal ringing
tone as usual.
To pick up the incoming call, press the Hold button to hold the current call and
then it will switch to the incoming call. To switch back, press the Hold button
again (For analog phone user, please press the hook flash).
The Call Waiting function only allows one call stays on queue. You can enable this
function through InterClient. Please refer to Chapter 4: InterClient
Utility/Answering Option for more details.
Accessing Voice Mailbox
1. Press the Message button to access to your mailbox.
2. Enter your password and then press #. (The default password is blank; you
don’t have to enter any passwords.)
Page 12

Chapter 1 Using The IP Phone
12
3. Follow the system prompts to play the message or change the settings.
Please refer to Chapter 2: Voice Messaging for more detailed voice mailbox
operation.
System Speed Dialing
If your administrator has set up specific numbers for system speed dialing, you
can use the defined speed dial numbers to call.
1. Lift the handset or press the Speakerphone button.
2. Press #20.
3. Press the system speed dialing number (00-49.) (Please consult your
administrator for the available system speed dialing numbers.)
Personal Speed Dialing
In addition to system speed dialing, you may also use your personal speed
dialing to place calls.
1. Lift the handset or press the Speakerphone button.
2. Press #21.
3. Press the personal speed dialing number (00-49.)
You can edit maximum 50 personal speed dialing numbers. You may edit
personal speed dialing through InterClient. For more details, please refer to
Chapter 4: InterClient Utility/Personal Speed Dialing.
Call Pickup
You can pick up any incoming call or a call for a specific extension.
y To pick up any external incoming call, lift the handset and press #10 when
ringing.
y To pick up a call for a specific extension, lift the handset and then press #11
and the target extension number when ringing.
y To pick up a call for a group, lift the handset and press the specific group
pickup code when ringing. You have to be one of the group members to pick
up the call for the group. Consult your administrator for the group pickup
code.
Call Park
If you would like to transfer a call to a person not in sight but in the office, you
can park the call at a specific parking slot. The parked call can be picked up from
Page 13

Chapter 1 Using The IP Phone
13
any other extension.
1.
During a call, press the Transfer button and #15.
2. Assign a slot number from 0 to 9.
3. Hang up the phone.
4. You can page and inform the assigned slot number to the correspondent
person t pick it up. You can also move to another extension (in a meeting
room or somewhere else) to pick it up.
If the parking slot you want to assign is occupied, you will hear the busy tone. In
the meantime, try to assign another parking slot.
To Retrieve A Parked Call:
1. Lift the handset from any extension.
2. Press #15.
3. Input the assigned slot number to pick up the parked call.
Internal Paging
You can broadcast over the speaker on each extension or extension group.
1. Lift the handset.
2. Press #38 and the specific extension number or extension group number.
3. Broadcast through the handset or microphone.
4. Hang up the phone after broadcasting.
Note: You may not broadcast through a remote extension group, but you can
broadcast through an individual remote extension.
External Paging
You can broadcast over the external amplifier or paging system if connected with
the Voice Gateway.
1. Lift the handset.
2. Press the specific Voice Gateway paging code. (Consult your administrator
for the paging code.)
3. Broadcast over the handset or the speakerphone.
4. Hang up the phone after broadcasting.
Member Login/Logout
If your administrator enables the Member Login/Logout function, you will need
to login to join a specific Extension Group like Customer Service or Sales Dept.
Page 14

Chapter 1 Using The IP Phone
14
You can login to more than one Extension Group at the same time.
To Login:
1. Lift the handset or press the Speakerphone button.
2. Press #35.
3. Press the Extension Group Number to login. (Consult your administrator for
the Extension Group Number.)
To Logout:
1. Lift the handset or press the Speakerphone button.
2. Press #36.
3. Dial the Extension Group Number to logout.
To Check the Status of Login or Logout:
1. Lift the handset or press the Speakerphone button.
2. Press #37.
3. Dial the Extension Group Number.
4. If you hear the dial tone, it means you have already logged in the extension
group. If you hear the busy tone, it means you haven’t logged in the extension
group.
Making Calls to Joint Server Extensions and Local Phone Stations
If your company installed InterServer in more than one location, you can directly
call remote extensions of Joint Server directly as the way you make an internal
call.
1. Lift the handset or press the Speakerphone button.
2. Dial the remote extension number. (Consult your administrator for your call
authorization.)
You can also dial to a general landline phone via remote InterServer.
1. Lift the handset or press the Speakerphone button.
2. Dial the remote FXO extension number or group code. (Consult your
administrator for the remote FXO extension number.)
3. If the password is required, please follow the system prompts to enter the
password. (Consult your administrator for the password.)
4. Dial the phone number after you hear the dial tone. (If you would like to
make a long distance call, please follow local dialing plans.)
Page 15
Chapter 2 Voicemail System
15
Chapter 2
Voicemail System
InterPBX Communication System provides a built-in VMS System. It allows
callers to leave voice messages in your voice mailbox. You can play the voice
messages or forward voice messages to someone else. You may also record your
personal greetings or edit the message transfer function. Besides, the Unified
Messaging function also allows you to listen to the voice messages from your
e-mail.
Listening to Messages
If someone leaves a new message in your voice mailbox, the system will inform you by the
way of your personal message notification settings. The LCD on IP phones will show the
number of new messages and the Message lamp will be on. When you lift the handset or
press the Speakerphone button, you will hear two short dial tones. If your phone is an analog
phone, you will hear two short dial tones to alert you that you have new messages when you
lift the handset.
1. Press Message button to access to the voice mailbox (For analog phone, please
press ##).
2. Enter your voice mailbox password and then press # (The default password is
blank).
3. The system will announce the number of new/old messages you have. Follow
the system prompts and press 1 to play the new messages or press 2 to play
the old messages.
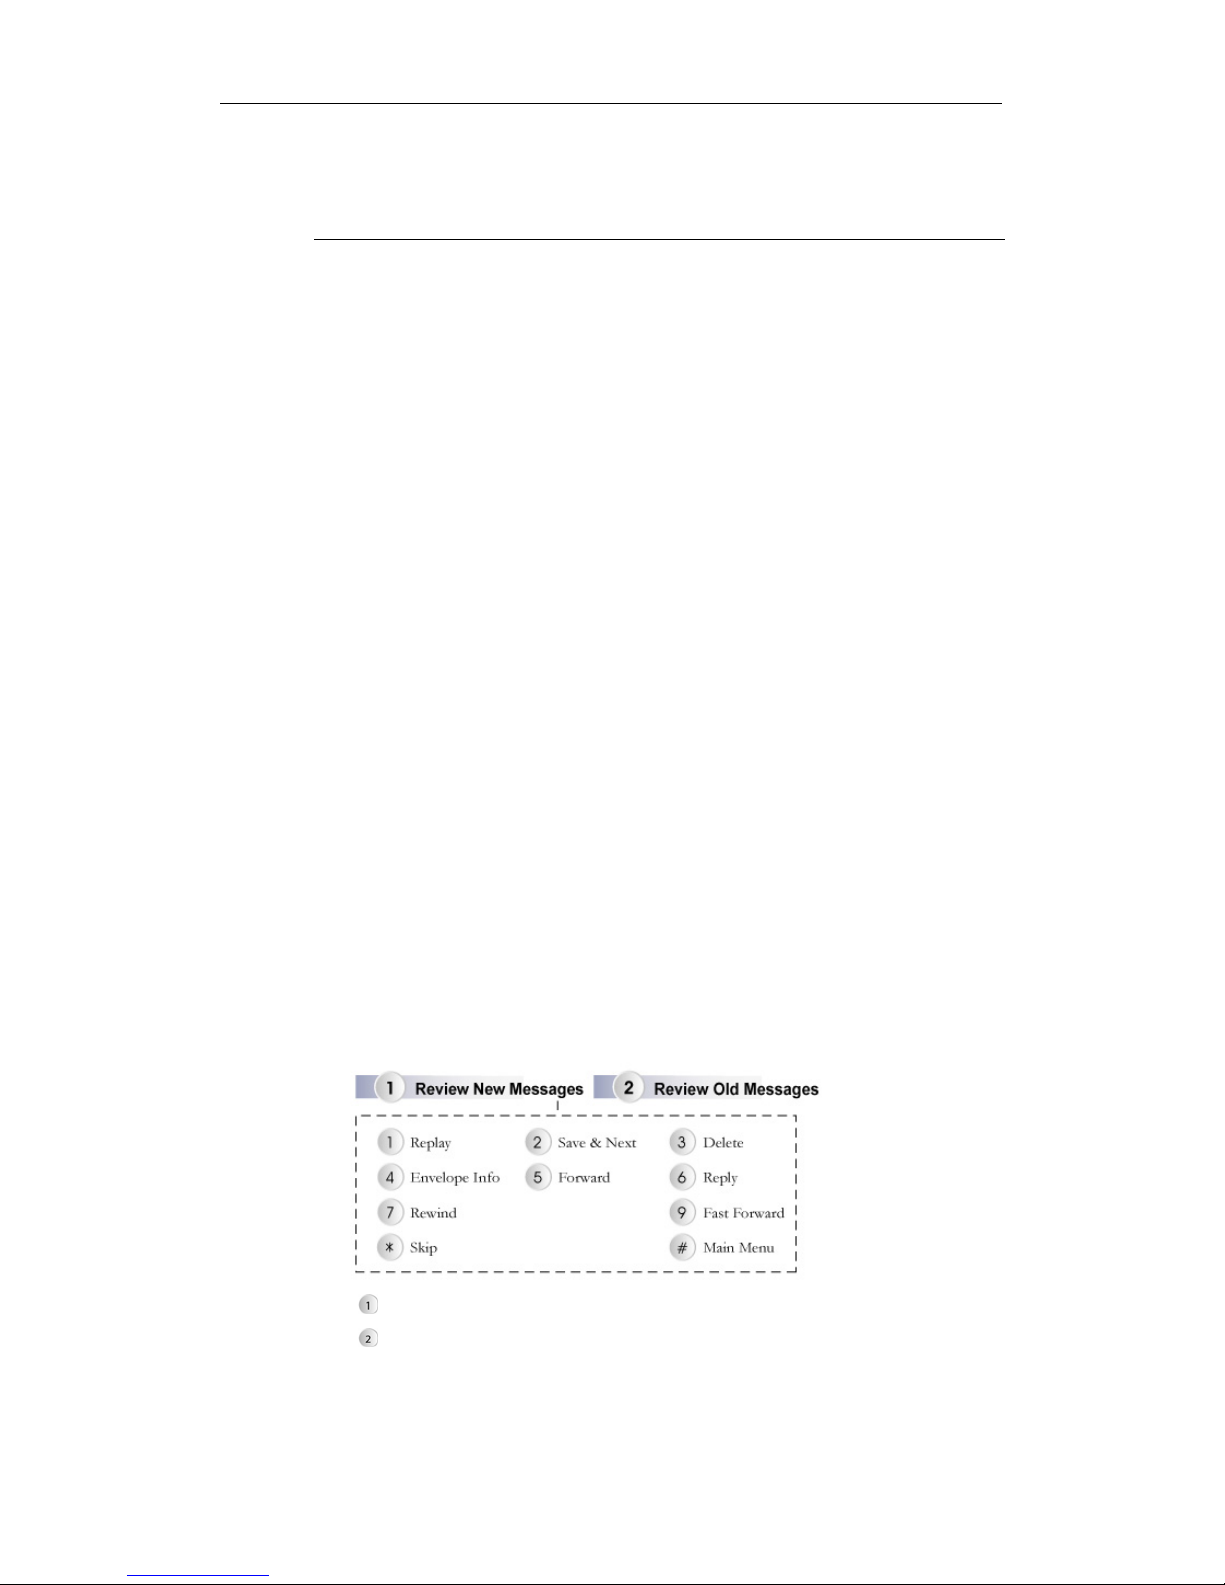
4. When listening to messages, you can use the following options to assist you in
reviewing your messages.
Replay: To play the message from the beginning again.
Save & Next: To save the message as an old message and continue to
play the next new message. If you don’t save the message as an old
message or delete it, the message would still be identified as a new
Page 16

Chapter 2 Voicemail System
16
message.
Delete: To delete the message permanently and continue to play the
next message.
Envelope Info: To show the time when the message was recorded and
to show if it is a personal or urgent message.
Forward: The system allows you to record an annotation and transfer
the message to a mailbox or mailbox group; however, if it is a personal
message, it can’t be forwarded.
Reply: This option will be only available when the message was sent by
another mailbox. When you receive the message, you can record an
annotation and reply to the original message sender. The original
message will be appended to your replied message.
Rewind: When you are listening to a message, press the button to
rewind the message by 1 second and then continue to play the message.
Fast Forward: When you are listening to a message, press the button to
fast forward the message by 1 second and then continue to play the
message.
Skip: Press the button to skip to the next message. If you press the
button after you finish listening to a new message, it will be saved as an
old message.
Main Menu: To stop playing the message and return to the main menu.
Sending a Message
When you access to the voice mailbox, you can record and send a message to a
mailbox or to a distribution list. When the receiver can reply to you directly, you
can press to return to the previous menu or press to exit in the Voice Mail.
1. Press the Message button to access to the mailbox (For analog phone, please
press ##).
2. Enter your password and then press
(The default password is blank).
3. Press 3 to send a message.
4. Follow the system prompts, press 1 to send a message to a mailbox, or press 2
to send a message to a distribution list.
Page 17
Chapter 2 Voicemail System
17
5. Press the receiver’s mailbox number or the distribution list code from 1 to 9.
6. Follow the system prompts to record and send your message.
Please be sure to edit the distribution list members before you send the message
to them. For more details about distribution list, please refer to Chapter 2: Voice
Mail System/Editing Your Voice Mailbox. You can also edit the distribution list
via InterClient. Please refer to Chapter 4: InterClient Utility/Distribution List for
more details.
Change Personal Options
After you access to the voice mailbox, you can edit the settings, as you need. In
the mailbox, you can press * to return to the previous menu or press # to exit.
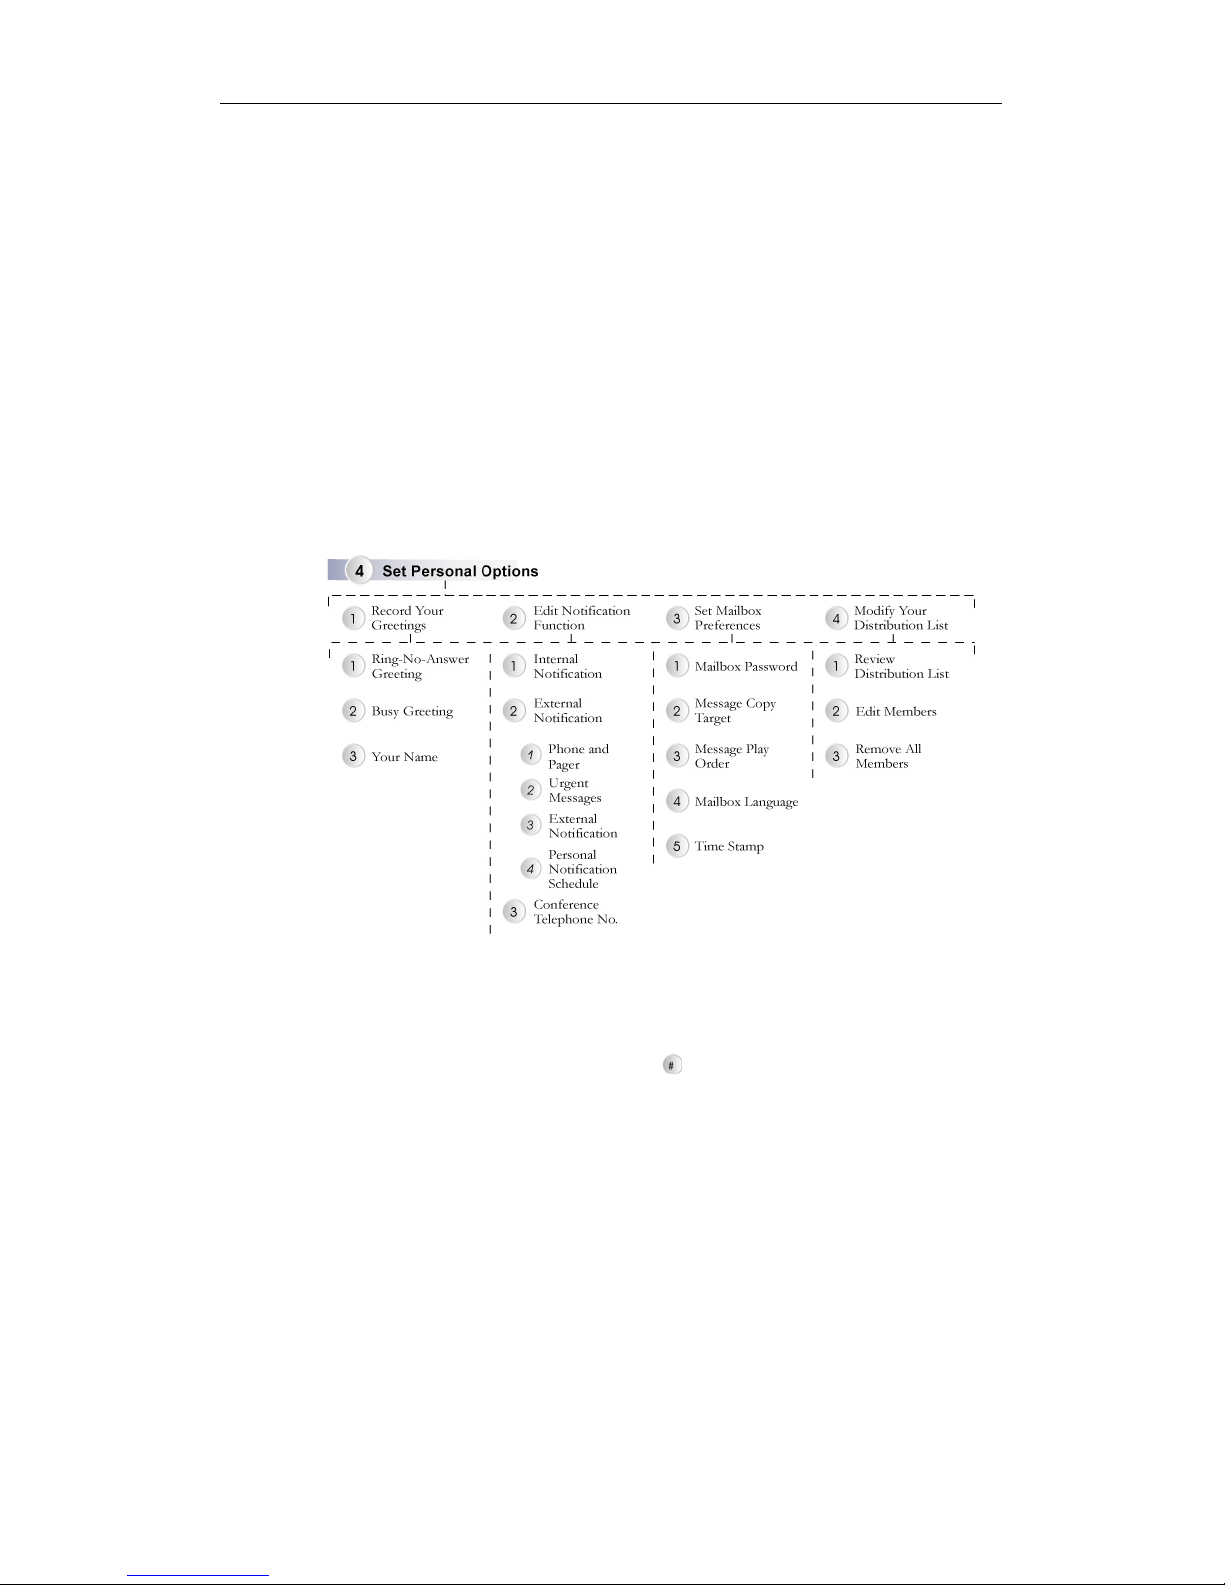
Recording Your Greetings
1. Press the Message button to access to your mailbox (For analog phone, please
press ##).
2. Enter your password and then press
(The default password is blank).
3. Press 4 to set personal options.
4. Press 1 to record your greetings.
5. Select the type of greetings you want to record. The system will play your
recorded greetings to the caller. There are 3 types of mailbox greetings.
y Ring-No-Answer Greeting: Press 1 to record the Ring-No-Answer
Greeting, which will be played when no one answers the phone or the
DND function is enabled.
y Busy Greeting: Press 2 to record the Busy Greeting. This greeting will be
played when the extension is busy.
y Your Name: Press 3 to record your Name. If you enable this function, the
Page 18

Chapter 2 Voicemail System
18
system will play your recording of name announcement before
transferring a call to you.
6. Follow the system prompts to review, save or re-record your greetings. Be
sure to save your greetings after the recording is finished.
If you would like to delete the greetings you recorded, you can select re-record
and stop immediately. The old greetings will be automatically deleted. If no
personal greeting is recorded, the system will play the default greetings.
Editing Notification
You can set various message notifications to inform you of new messages.
1. Press the Message button to access to your mailbox.
2. Enter your password and then press #.
3. Press 4 to set Personal Options.
4. Press 2 to edit “Notification Function”, which includes internal and external
notifications.
y Press 1 to edit Internal Notification: The Internal Notification is
Extension Notification. Please follow the system prompts to enable or
disable the extension notification. When a new message is received, the
system will call your extension to notify you of the new message. This
function allows those people whose phone has no Message button, such
as assistant extension, analog extension or virtual extension) to be
notified of new messages. You can set your extension or other extensions
as notification target via the InterClient.
y Press 2 to edit External Notification:
Press 1 to Set Your Telephone and Paging Notification. Please
follow the system prompts to enter the Notification Entry
Number, and its notification mode (Phone Mode, Pager Mode, or
Close) and the phone number. You can set up to 5 entries. In the
Phone Mode, the phone number can be landlines or cell phone.
To activate the external notification, you have to set at least one
entry of phone number and phone type.
Press 2 to Edit Notify Urgent Message Only Function. If you
enable the “Urgent Notification Only” function, the system will
notify you only when receiving urgent messages.
Press 3 to Select External Notification Schedule. You can assign
the system to notify you of new messages in the office hours or
personal hours.
Page 19

Chapter 2 Voicemail System
19
Press 4 to set Personal Notification Schedule. If you assign the
system to notify you of new messages in personal hours, you can
set your personal schedule here. The personal schedule is in 24
hours format.
y Press 3 to set your Conference Telephone Number: Please enter your
external number. The administrator needs to enable Conference in
Transfer Options Menu to activate this function. When no one answers
the phone or the line is busy, the system prompts will lead the caller to
the Transfer Options. The caller may press the assigned button to
forward the call to the external number you set.
You can edit notification function via the InterClient. Please refer to Chapter 4:
InterClient Utility/Notification for more details.
Note: Sending a notification to phone or pager may be limited by your Class of
Service. Please consult your administrator for your Class of Service.
Setting Mailbox Preferences
1. Press the Message button to access to your mailbox.
2. Enter your voice mailbox password and then press #.
3. Press 4 to set Personal Options.
4. Press 3 to “Set Mailbox Preferences.”
y Press 1 to Change Your Mailbox Password. The system will announce
your current password. Please follow the system prompts to change your
password and then save it (The default password is blank).
y Press 2 to Set the Message Copy Target. This function will copy your
new messages to a target mailbox. Please follow the system prompts to
enter the target mailbox number.
y Press 3 to Select Message Playing Order. You can select the Message
Playing Order between Least Recent play first or Most Recent Play first.
Please follow the system prompts to select the Message Playing Order.
y Press 4 to Select Mailbox Language. You can select the mailbox
language you prefer. After you change the language, the system prompts
will be played in the selected language when you access to your mailbox
again. Please consult your administrator for the available languages.
Page 20

Chapter 2 Voicemail System
20
y Press 5 to Change Time Stamp Control Function. You can allow the
system plays the Time Stamp or not (the time while the message was
recorded) when listening to the message. If you don’t need this function,
you can disable the Time Stamp.
You can also edit the above functions through the InterClient. Please refer to
Chapter 4: InterClient Utility/Mailbox Parameter for more details.
Modifying Your Personal Distribution List
1. Press the Message button to access to your mailbox.
2. Enter your password number and then press #.
3. Press 4 to set Personal Options.
4. Press 4 to modify your Personal Distribution List. You can set maximum 9
groups of distribution lists in your mailbox. Each groups contains up to 15
members. Please follow the system prompts to add or modify the distribution
list.
You can also edit the above functions through the InterClient. Please refer to
Chapter 4: InterClient Utility/Distribution List for more details.
Accessing Voice Mail Remotely
If your administrator sets the remote access function on AA Menu, you can call to
your company’s phone number and follow AA prompts to enter your mailbox
and listen to your new messages.
1. Dial your company’s phone number. The Auto Attendant will pick up your
call.
2. Enter the specific key to access to the mailbox. (Please consult your
administrator for more details about the defined DTMF key).
3. Enter your extension number and password.
4. Follow the system prompts to listen to your message, send a message, or
change your mailbox preferences.
You can also listen to your message from another extension in your office.
1. Dial the access code of AA Menu. (Please consult your administrator for the
access code.)
2. Enter the specific key to access to your mailbox. (Please consult your
administrator for more details about the defined DTMF key).
3. Enter your extension number and password.
Page 21

Chapter 2 Voicemail System
21
4. Follow the system prompts to listen your message, send a message, or
change your mailbox preferences.
This function also allows you to play the message of a virtual extension’s mailbox.
Listening to Your Message via E-mail
InterPBX supports Unified Messaging function that allows you to receive your
voice message via e-mail. When you have new messages, the system will send
you an attachment in wav format by e-mail. You can open the attachment to listen
to the message.
Please be sure if the following settings are properly set in order to make this
function work properly.
1. The administrator has to enable this function and also set the SMTP server
on the System Parameter option.
2. Your e-mail address must be set on the Notification option. Please refer to
Chapter 3: InterClient Utility/Notification for more details.
Page 22

Chapter 2 Voicemail System
22
Page 23

Chapter 3 Recording System
23
Chapter 3
Recording System
The InterPBX system can improve enterprise operation. e-Net Series IP-PBX
contains a built-in recording system offering Store on Demand function. The
system will continue recording the conversation of specific extensions. Users can
save or play the recording anytime during a call, as they need.
Recording Calls
In E-Net IP-PBX System, if your extension is on the “Store-on-Demand” list, the
Recording Server will keep on recording your calls but won’t store them. You
may save the recordings manually upon necessary.
1. Press the Record button during a call, which can save the recording from the
beginning of the call. On IP580 or SoftPhone, please press the specific
programmable button, which needs to be set as Recording function via Button
Mapping. On IP500, please press the REC/PLAY button.
2. After the call hangs up, the recording will be stopped automatically.
If your administrator enables the alerting function, you will hear a beep sound
during recording. It reminds you and the other parties that the call is being
recorded.
Note: Your phone conversation only can be recorded when your extension
number is on the Store on Demand list. When you lift the handset, the
programmable button light of recording will be on. The light will be flashing
during recording. Please consult your administrator for the authorization of
recording.
Note: Analog Phones and Off-Premises Extensions don’t support recording
function.
Playing the Recording
You can play the recording from your phone set directly.
1. Press the Play button to play the recording. On IP580 or SoftPhone, you can
press a specific programmable button that is assigned via Button Mapping to
play the recording. On IP500, please press the REC/PLAY button.
Page 24
Chapter 3 Recording System
24
2. Enter the password and then press #. (The password for the recording system
is same as your mailbox password. The default password is blank.)
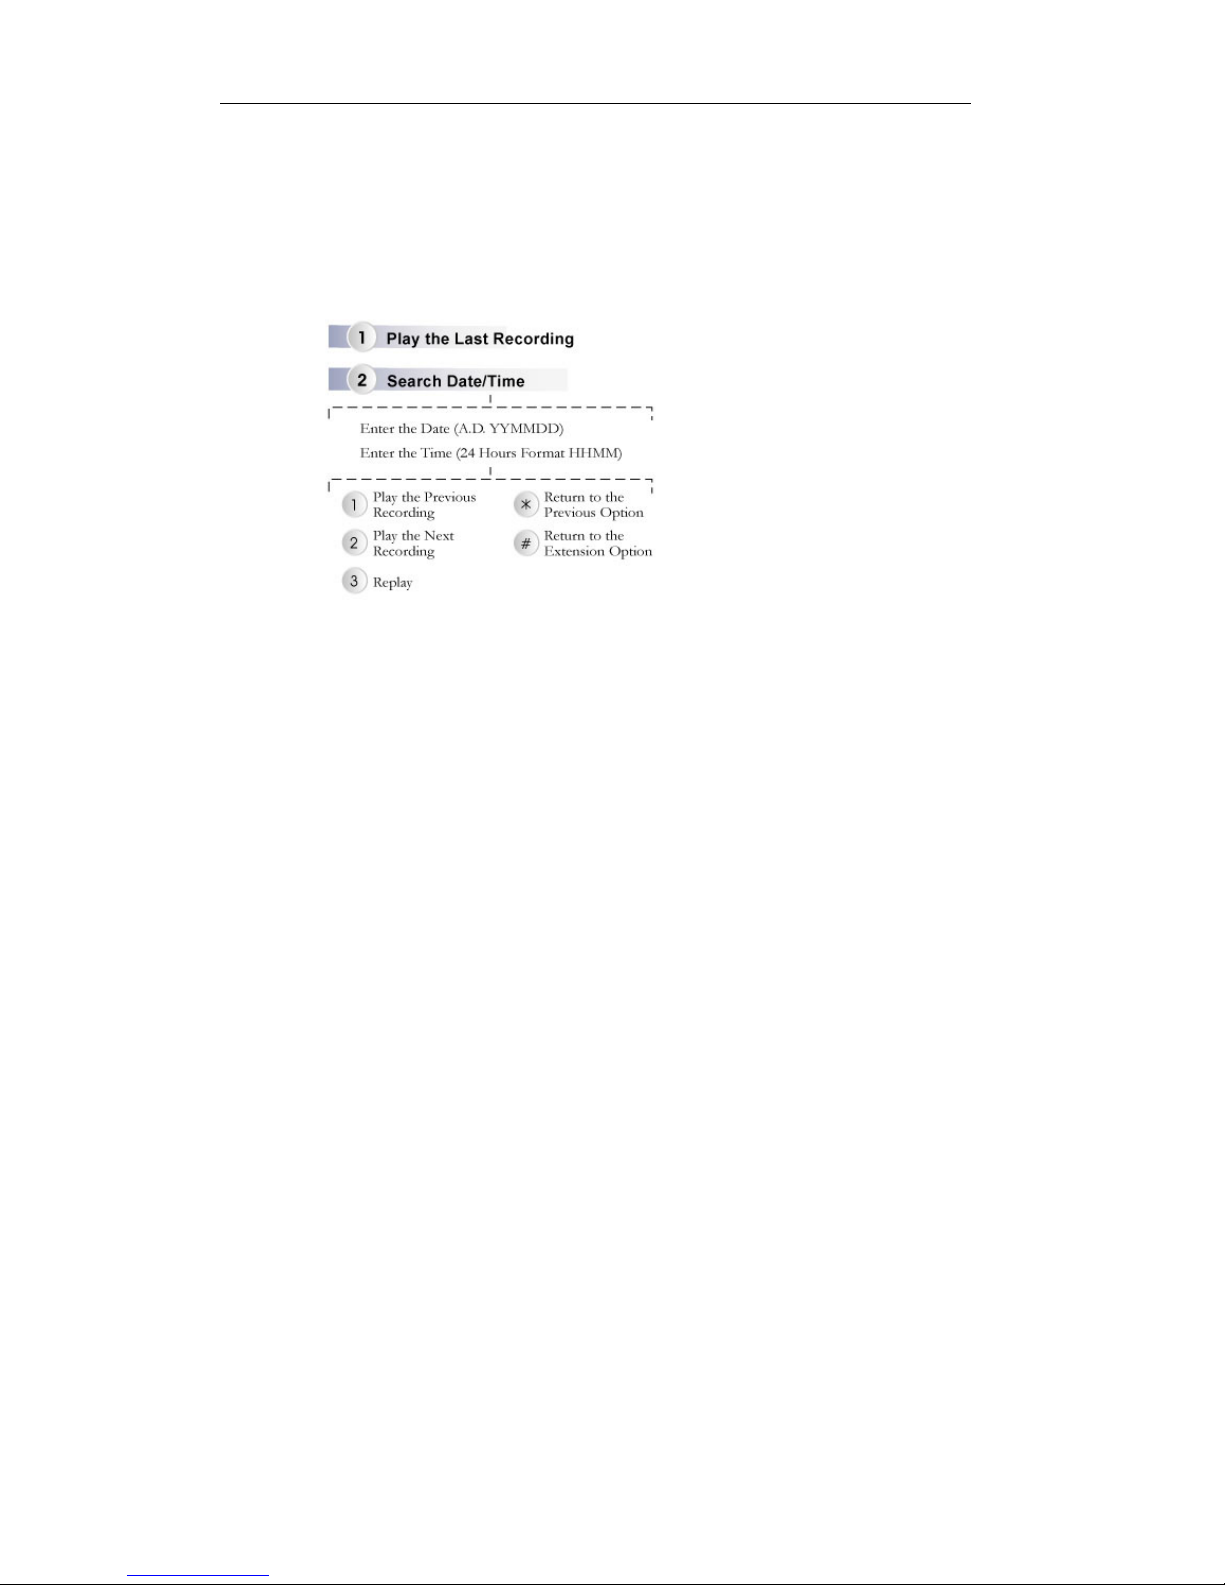
3. Follow the system prompts, press 1 to play the latest recording or press 2 to
check the recording by entering date and time. Please follow the procedure
below to assist you in listening to the recording.
In the recording system, you can press * anytime to return to the previous menu.
When you play the recording, you can press 0 (zero) to skip the time stamp
announcement of the recording.
You are only able to play the latest or previous or next recording for the current
day. When you enter the time of the reached recording, the system will play the
recent recording after the time.
You can play the recording of another extension from your extension. Please press
the Play button and enter the password to access to the system. Then press # and
follow the system prompts to enter the extension number and password to play
the recording.
Page 25

Chapter 4 InterClient-Utility
25
Chapter 4
InterClient Utility
The e-Net 200 system provides Personal Extension Management. This InterClient
utility allows you to edit some features of your personal extension. You can edit
options including Button Mapping, Station Speed Dialing, Answer Option,
Mailbox, Message Notification, Distribution List, Change Password, and so on.
You can login through the administrator website through the User Login feature.
Login to the Web-based InterClient
The InterClient is provided in web-based format. You can login via your web
browser.
1. Open the browser and type your InterServer IP address in the address bar.
(Please consult your administrator for the InterServer IP address.)
e
-
Net
200
System Administration
2. After you connect to the e-Net Administrator Website, please click the User
Login icon.
3. On the pop-up window, key in the following information.
Extension No.: Enter your extension number.
Password: Enter your password to login to the InterClient. The default is
blank if the extension is created by Auto Discovery. On the first login change
your password.
Page 26
Chapter 4 InterClient-Utility
26
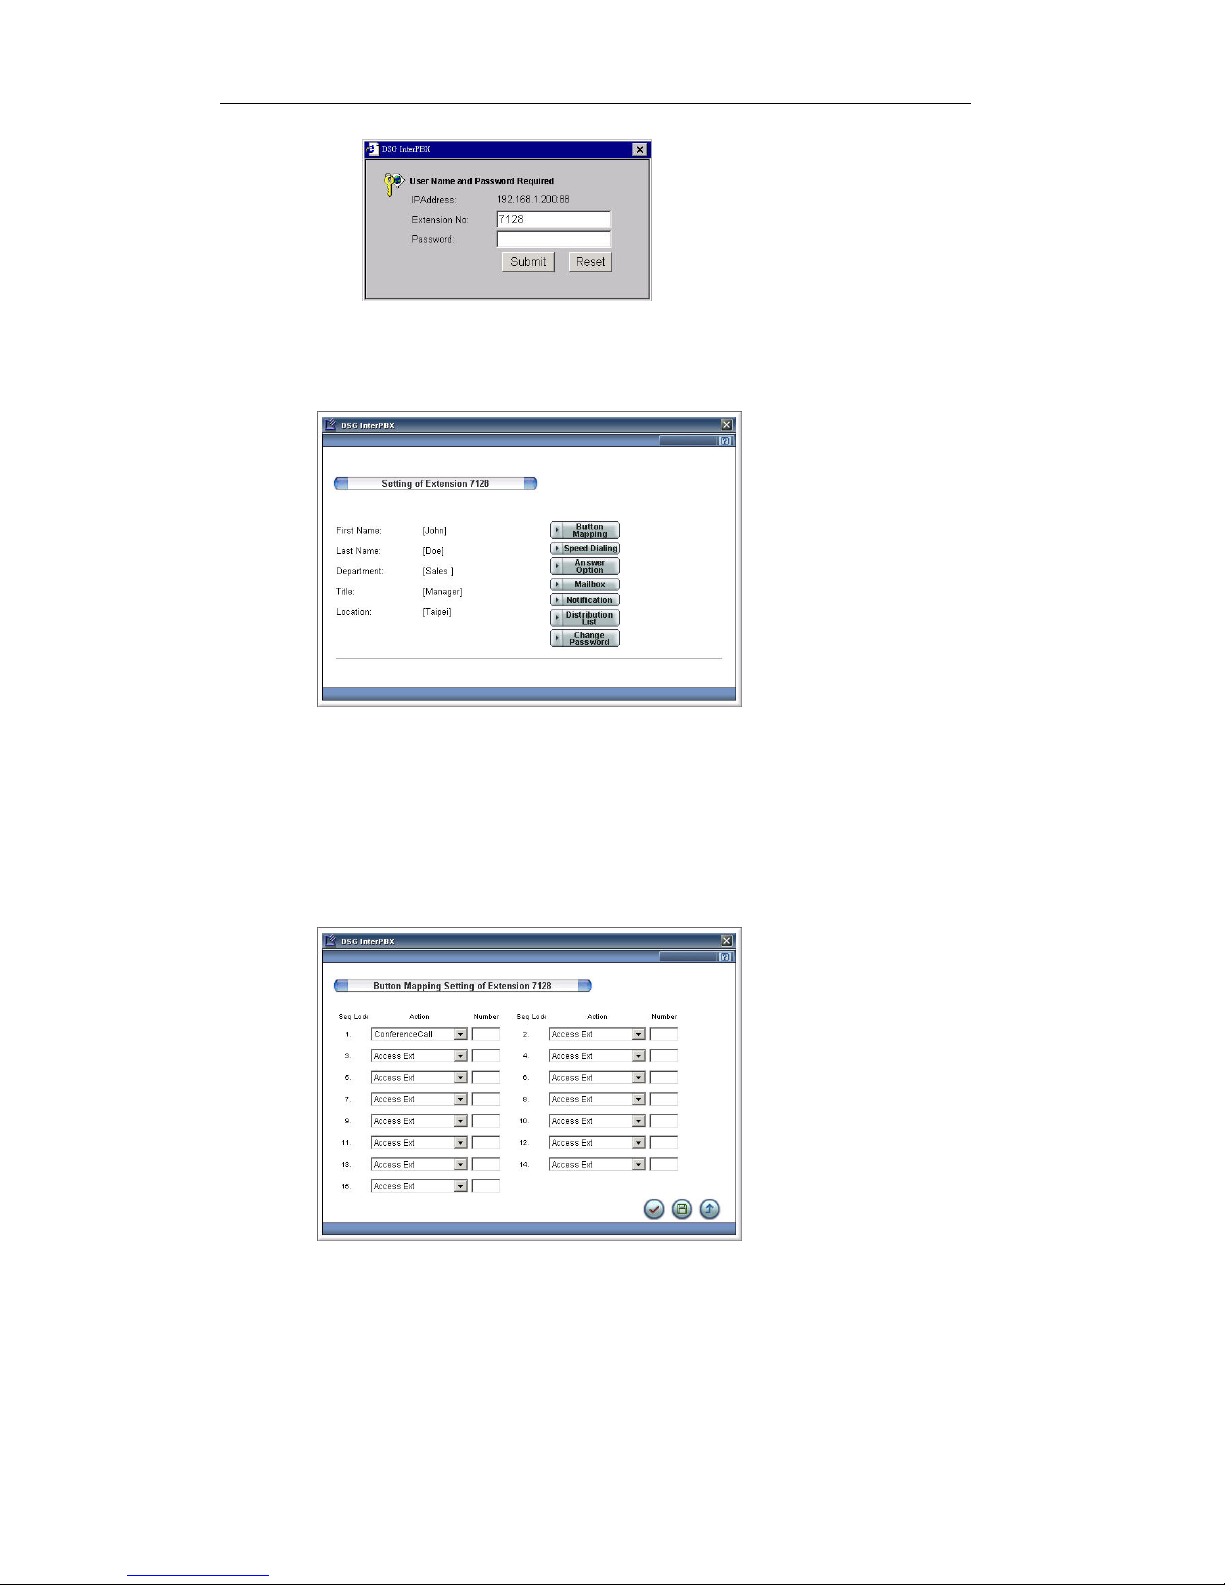
Personal Information
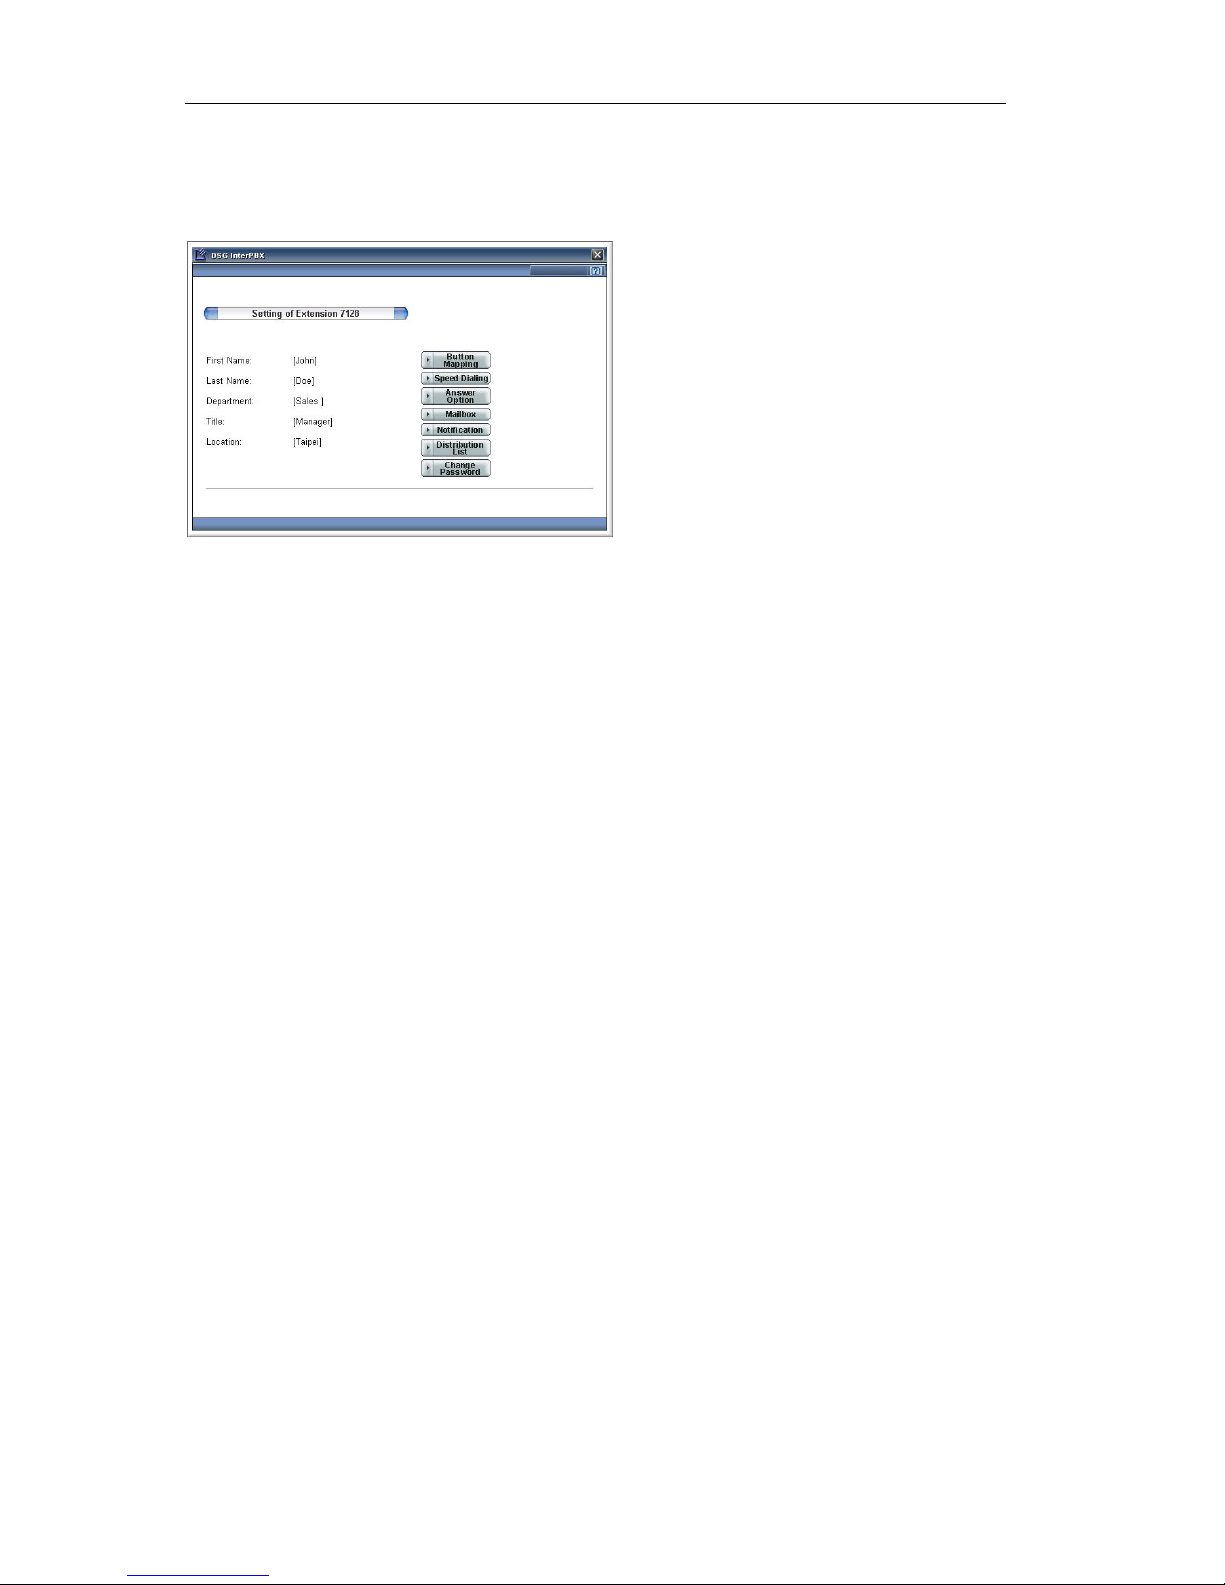
After you login to the InterClient, it will show the Personal Information window.
This page is only for browsing.
Setting Button Mapping
The programmable buttons on IP phones can be assigned as a specific CO line,
extensions, or other common functions such as Conference, Call Park, Page, and
so on. Your system or group administrators may set some or all the buttons. You
can set the unused programmable buttons according to your needs.
1. Select the Button Mapping item.
2. Select an unlocked entry of programmable button. If a programmable button
is already assigned for system-wide or a group, it will display a lock icon. You
can only set the unused programmable buttons. Please refer to the following
table to select an action and input its correspondent number.
Page 27

Chapter 4 InterClient-Utility
27
3. Choose a programmable button you want to edit and select an action from the
action list.
4. Enter the assigned number in the “Number” box. If you keep the “Number”
box empty, you need to enter the preferred number after pressing the
programmable button. For example: If you set a programmable button, as
“Personal Speed Dial” and key in a speed dial number, you can directly reach
the phone number set on the speed dial number by pressing the
programmable button. If the “Number” box is empty, you need to enter a
specific speed dial number after pressing the programmable button.
Page 28

Chapter 4 InterClient-Utility
28
Action Number Function Description
Access Extension Number of an
extension, extension
group, CO line, CO
line group, or an
outside phone
number
Dial to a number or get a
CO line. To set an outside
phone number, please add
the CO line access code,
e.g. 05551234.
Call Pickup CO Line - To answer the least recent
incoming call ringing on
the system.
Call Pickup Directed An extension number To pick up a call for a
specific station.
Call Hold Retrieve
CO
A CO line extension
number
To retrieve an incoming
call that is placed on hold.
Users can directly press
the flashing
programmable button
when properly configured.
Call Hold Retrieve Ext A station’s extension
number
To retrieve an intercom
call on Hold. Press the
flashing programmable
button to retrieve the call
when the extension
number is pre-defined.
Call Park A park slot number
(0 - 9)
To park a call in a specific
slot.
DND Set 1 (DND On)
0 (DND Off)
To enable or disable the
DND (Do Not Disturb)
function.
Auto Line Access - To access a CO line
automatically.
System Speed Dial A system speed dial
number
To dial the telephone
number specified on the
specific system speed dial.
Page 29

Chapter 4 InterClient-Utility
29
Action Number Function Description
Personal Speed Dial A personal speed dial
number
To dial the telephone
number specified on the
specific personal speed
dial.
Transfer to Ext Voice
Mail
An extension number To transfer a call to a
specific extension’s
mailbox.
Retrieve Message - To access to the mailbox
system.
Member Login An extension group
number
To login to become a
member of the extension
group.
Member Logoff An extension group
number
To logout the extension
group.
Ask Member Login An extension group
number
To check your login status
of a specific group. If you
hear a dial tone, it means
you are logged in. If you
hear a busy tone, it means
you are not logged in.
Internal Paging An extension or
extension group
number
To page via a specific
extension or extension
group.
Conference Call - To initiate a conference
with participants you put
on hold.
Store on Demand - To store the active call’s
recording.
Retrieve Record - To play a saved recording.
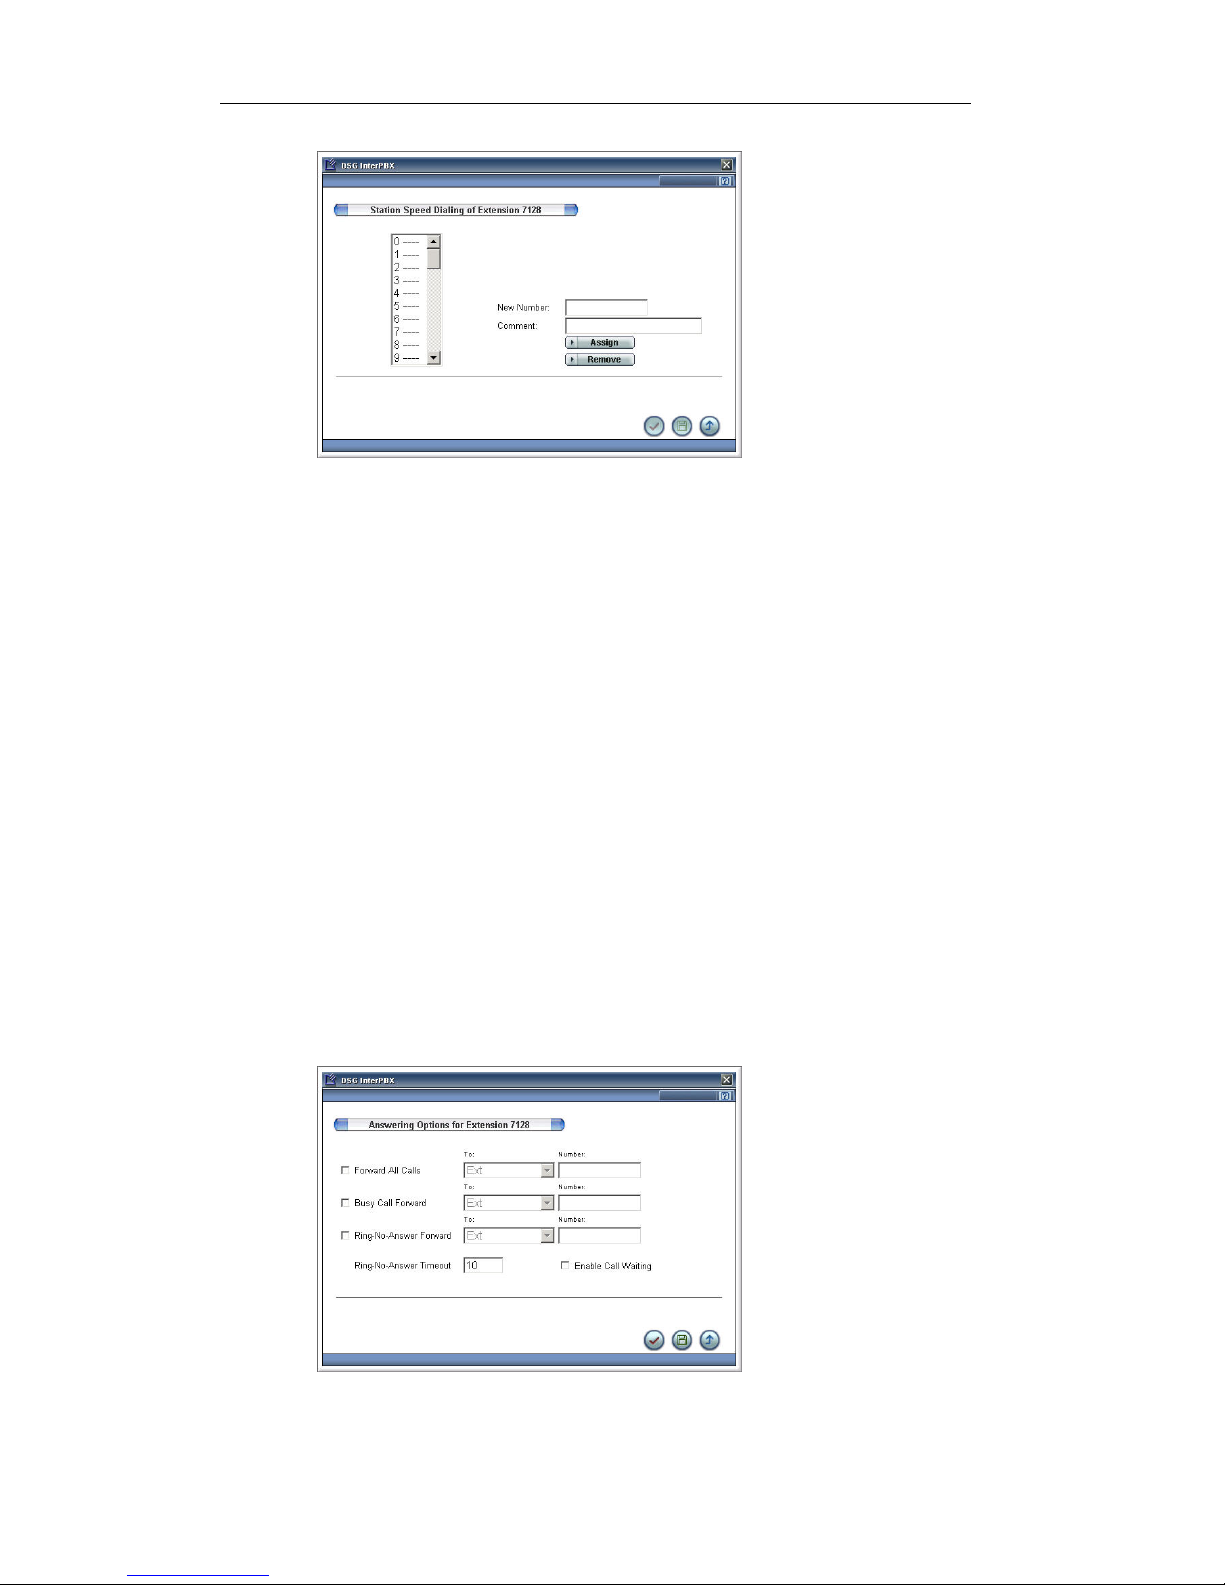
Personal Speed Dialing
In addition to the system-wide speed dialing, you can also edit frequently dialed
phone number at “Station Speed Dialing” for individual usage.
Page 30
Chapter 4 InterClient-Utility
30
1. Select the Speed Dial item.
2. On the “Station Speed Dialing” list, select one speed dial number from 0 to 49.
3. Enter the destination phone number or extension number in the “New
Number” box.
4. Enter the name or the description for this entry on the “Comment” box.
5. Click the Assign button to save.
You can create maximum 50 entries for station speed dialing. If you would like to
set an outside phone number, please remember to add the CO line access code “0”
in the front of the phone number (e.g. 05551234). For long distance calls, please
add the long distance code (e.g. 2125551234). For international calls, please add
the international code and country code (e.g. 00 11 886 2 8861558).
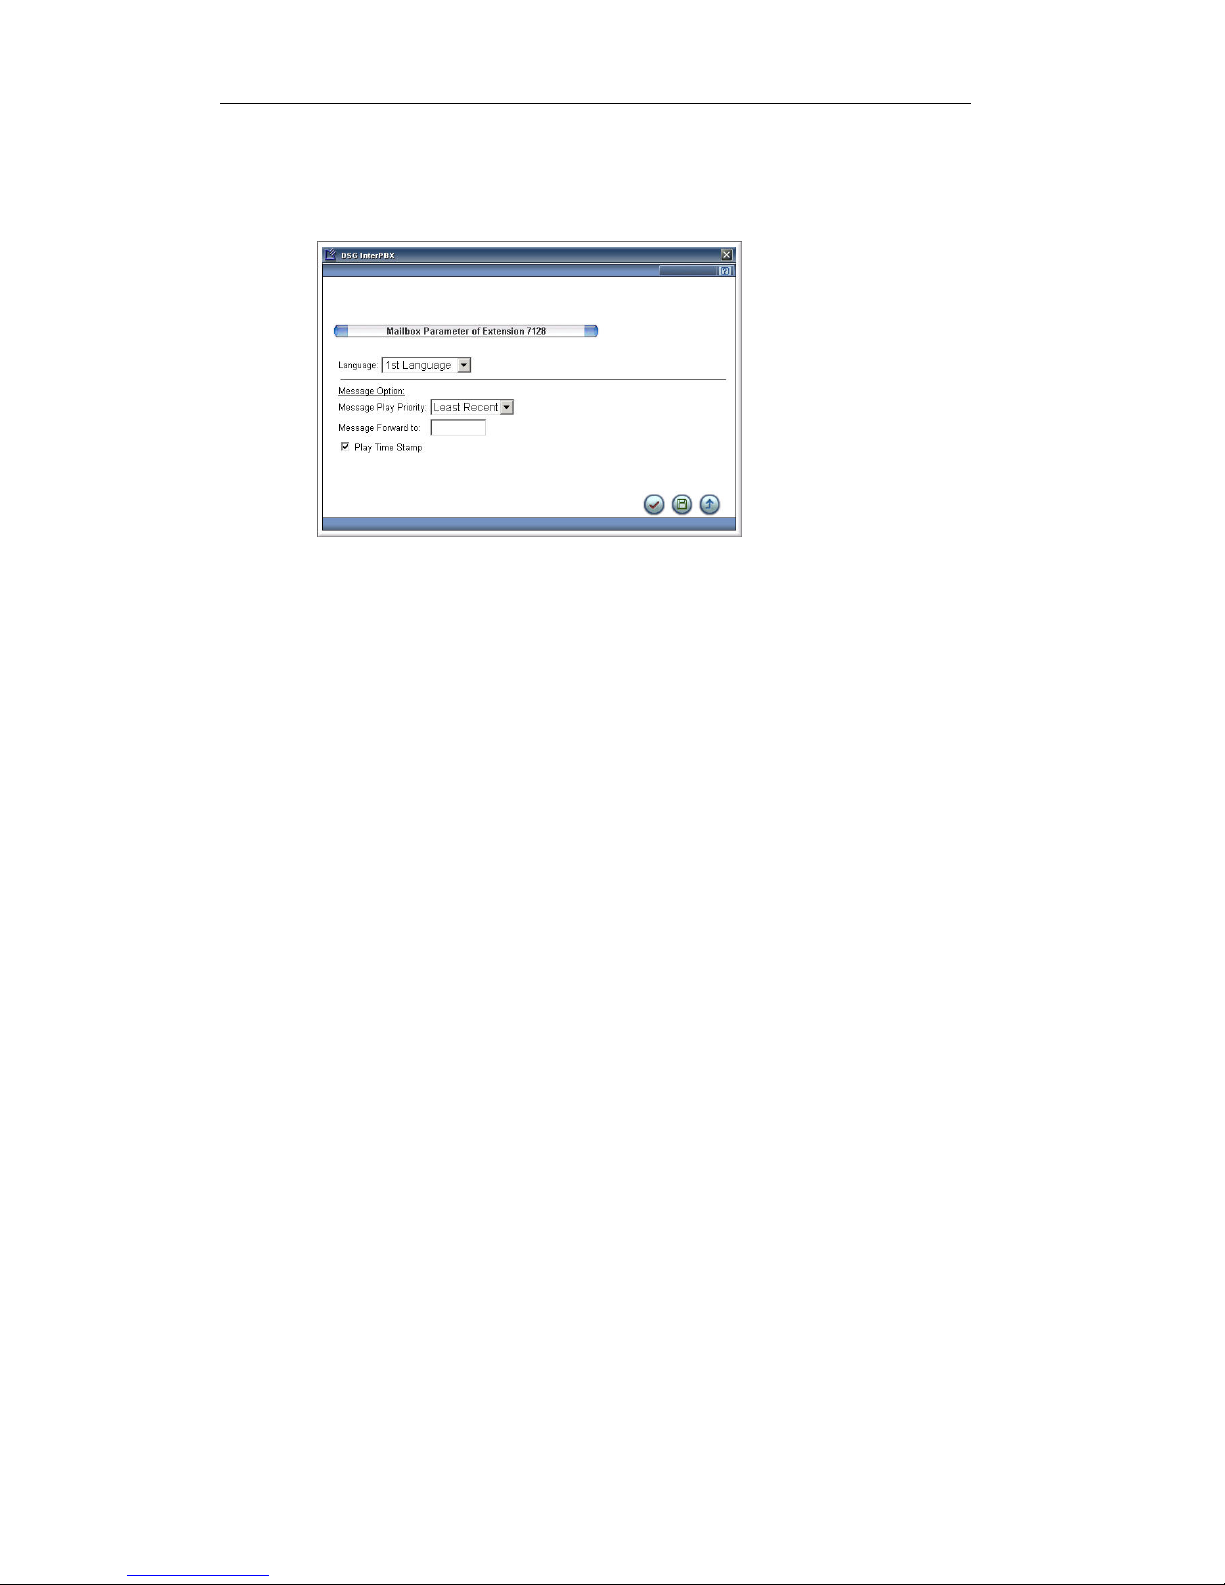
Answering Option
When you are unavailable, the InterPBX Communication System will forward
your incoming calls to your voice mailbox as default. In this section, you can set
personal call forwarding (Answering Option).
Page 31

Chapter 4 InterClient-Utility
31
1. Select the Answering Option item.
2. Check the options you need for All Calls, Busy, and Ring-No-Answer.
3. Select a location from the list in order to answer incoming calls.
y Ext: When selected, calls will be forwarded to another extension. Enter
the target extension number in the “Number” box. If the target extension
is busy as well, the forwarded calls will be sent to the location as defined
by the target extension’s call forward setting.
y Voice Mail: When selected, incoming calls will be sent to your voice
mailbox. Note: Your administrator needs to set a DTMF button in the
Transfer Option” menu to allow callers to leave messages.
y Auto Attendant: When selected, incoming calls will be forwarded to the
voice mail system, but callers cannot leave messages.
y Ring-No-Answer Timeout: When “Ring-No-Answer Forward” is
enabled, you need to set the timeout allowing calls to be forwarded to the
location you assigned. The unit of timeout is in second.
y Call Waiting: You may enable the “Call waiting” function to pick up the
second incoming call during a call. After the Call Waiting is enabled, if
your line is busy, the second incoming caller will hear the normal ringing
tone, and you will hear the “beep” tone indicating that you have a call
waiting. The “Call Waiting” function can allow only one more incoming
call to stay on queue.
If you don’t edit the Answering Option, the system will send incoming calls to the
Transfer Option of VMS Server when busy or Ring-No-Answer, but callers cannot
leave messages. The Transfer Options is set by the administrator.
Conference Telephone Number
You can also set Conference Telephone Number. The Conference Telephone
Number only can be set from the phone. Please access to the voice mailbox, press
4 to change personal option, press 2 to edit notification function, press 3 to set
your conference telephone number, and then enter your conference telephone
number. The administrator needs to enable the Conference item on Transfer
Options in order to activate this function. When you are not available, the system
will guide the caller to Transfer Options. The caller can press a specific button to
redirect to the assigned telephone number. Please refer to Chapter 2: Voice
Mailbox System/Change Personal Options for more details.
Page 32
Chapter 4 InterClient-Utility
32
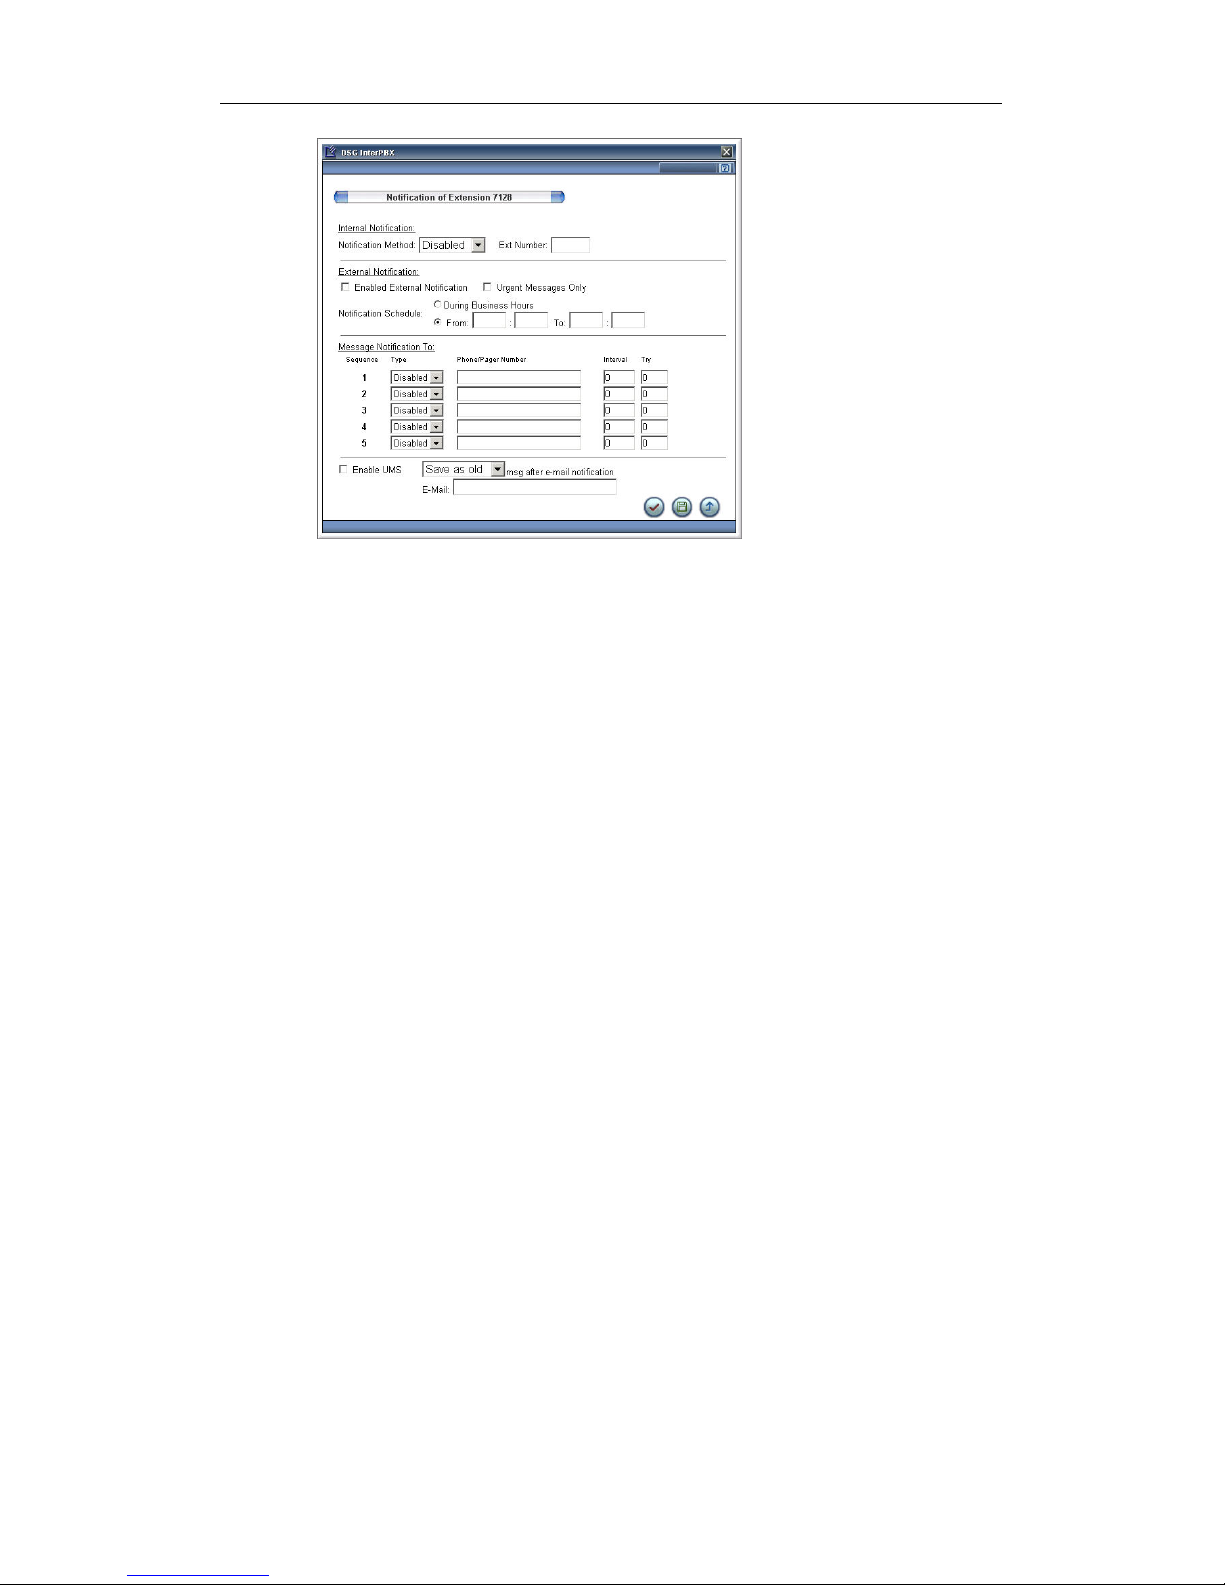
Mailbox Parameter
You can edit the Language, Message Play Priority, and Message Forward to
in ”Mailbox Parameter” item.
1. Click the Mailbox item.
2. Select the system language from the Language list. They system
announcement will be played in the selected language. It provides up to 4
languages. Please consult your administrator for available language options.
3. Select the Message Play Priority. The system will play the Most Recent
message or the Least Recent message according to the Message Play Priority
setting.
4. Set the Message Forward Target. Enter the target extension number in
“Message Forward to” box. This function will forward your new messages to
the target extension’s mailbox you assigned.
5. Play Time Stamp: If you enable the “Play Time Stamp”, the system will play
the time stamp when you play messages.
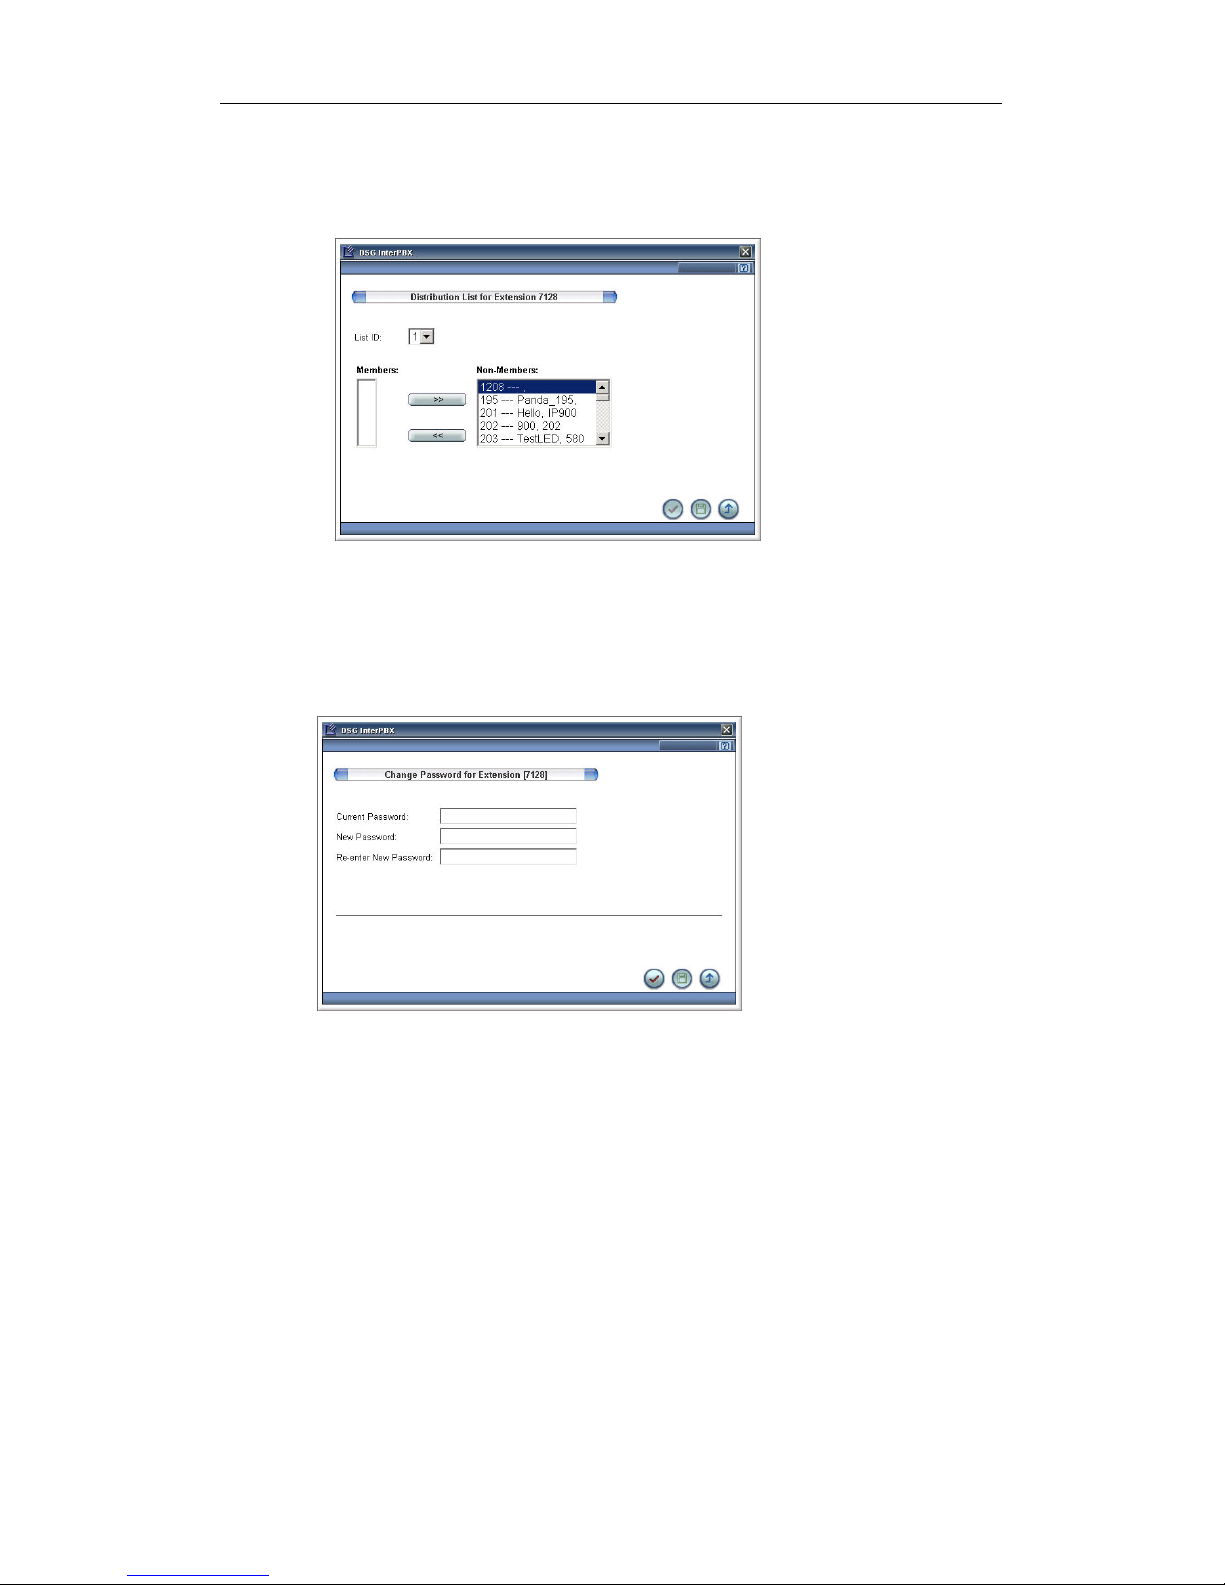
Notification
The Notification allows you to assign several methods to notify you when
receiving new voice messages.
Page 33
Chapter 4 InterClient-Utility
33
Internal Notification
The Internal Notification is Ring Notification. When the extension receives new
messages, the system will notify the receiver by ringing the extension. This
function can be used on different kinds of extensions such as assistant extensions,
analog phones, and virtual extensions.
1. Click the Notification item.
2. Setting the Notification Method: You can disable or enable by selecting
extension from the Notification Method list. If you select Extension, you have
to key in the extension number on the next step.
3. Setting the Notification Target: Input the extension number. The system will
ring the extension number you assigned when receiving new messages. If you
want to enable your station’s notification function, please input your
extension number or leave it at blank.
External Notification
1. Click the “Enabled External Notification” check box to enable the External
Notification function, or click the “Urgent Messages Only” check box to notify
you of urgent messages only. The notification of urgent messages will be
delivered even when you disable the external notification.
2. Set the “Notification Schedule” according to your requirements. The
notifications will be sent during the hours you set.
3. Set the notification sequence from 1 to 5. Select Phone or Pager from the Type
list.
4. Enter the destination’s phone number or pager ID. You don’t need to add the
Page 34

Chapter 4 InterClient-Utility
34
CO line access code “0” here.
5. Enter the interval. The system will notify you of new messages after the
interval time.
6. Enter the number of times allowing system to repeat the notification action.
The system will stop notification in the following situations. (1) The system
reaches the notifications times. (2) The user saves the new message as an old
one or deletes it.
The system will send notification to the destination’s phone/page numbers from
1 to 5. If the number in sequence 1 is busy or unavailable, the system will retry
after the interval time you set. If failed, the system will start from sequence 2 to
repeat until it reaches the “Try Times.”
Note: If the Answer Options of the destination’s phone or extension are set, the
notification will also follow the settings.
Note: Sending a notification via phone or pager may be restricted by your Class of
Service. Please consult your administrator for your Class of Service.
Unified Messaging
If your administrator enables the unified messaging function, you can also
forward the contents of voice mail to your e-mail address. The new voice
messages will be as saved as a WAV file and sent to you via e-mail.
1. Please click the “Enable UMS” check box to enable this function.
2. Select “Keep as new” or “Save as old” after e-mail notification.
3. Enter your e-mail address in the “E-mail” box.
When the “Unified Messaging” is enabled, if you select “Save as old” after e-mail
notification, the internal and external notifications won’t be delivered.
Note: Please consult your administrator if the “Unified Messaging” function is
enabled and the SMTP server is set on the system.
Distribution List
You can record or transfer the voice message to a personal mailbox or a
distribution list. Please edit your distribution list as follows.
1. Click the Distribution List item.
2. Select a List ID from 1 to 9.
Page 35
Chapter 4 InterClient-Utility
35
3. Edit members list by selecting extensions from the Non-Member list.
You can set up to 9 sets of distribution list. Each list can hold up to 15 members.
Change Password
You can change your login password for the InterClient. The default password is
empty. If you forget your password, please ask your administrator to reset for
you.
1. Click the Change Password item.
2. Enter your current password in the “Current Password” box.
3. Enter a new password in the “New Password” box.
4. Enter the new password again in the “Re-enter New Password” box to
confirm.
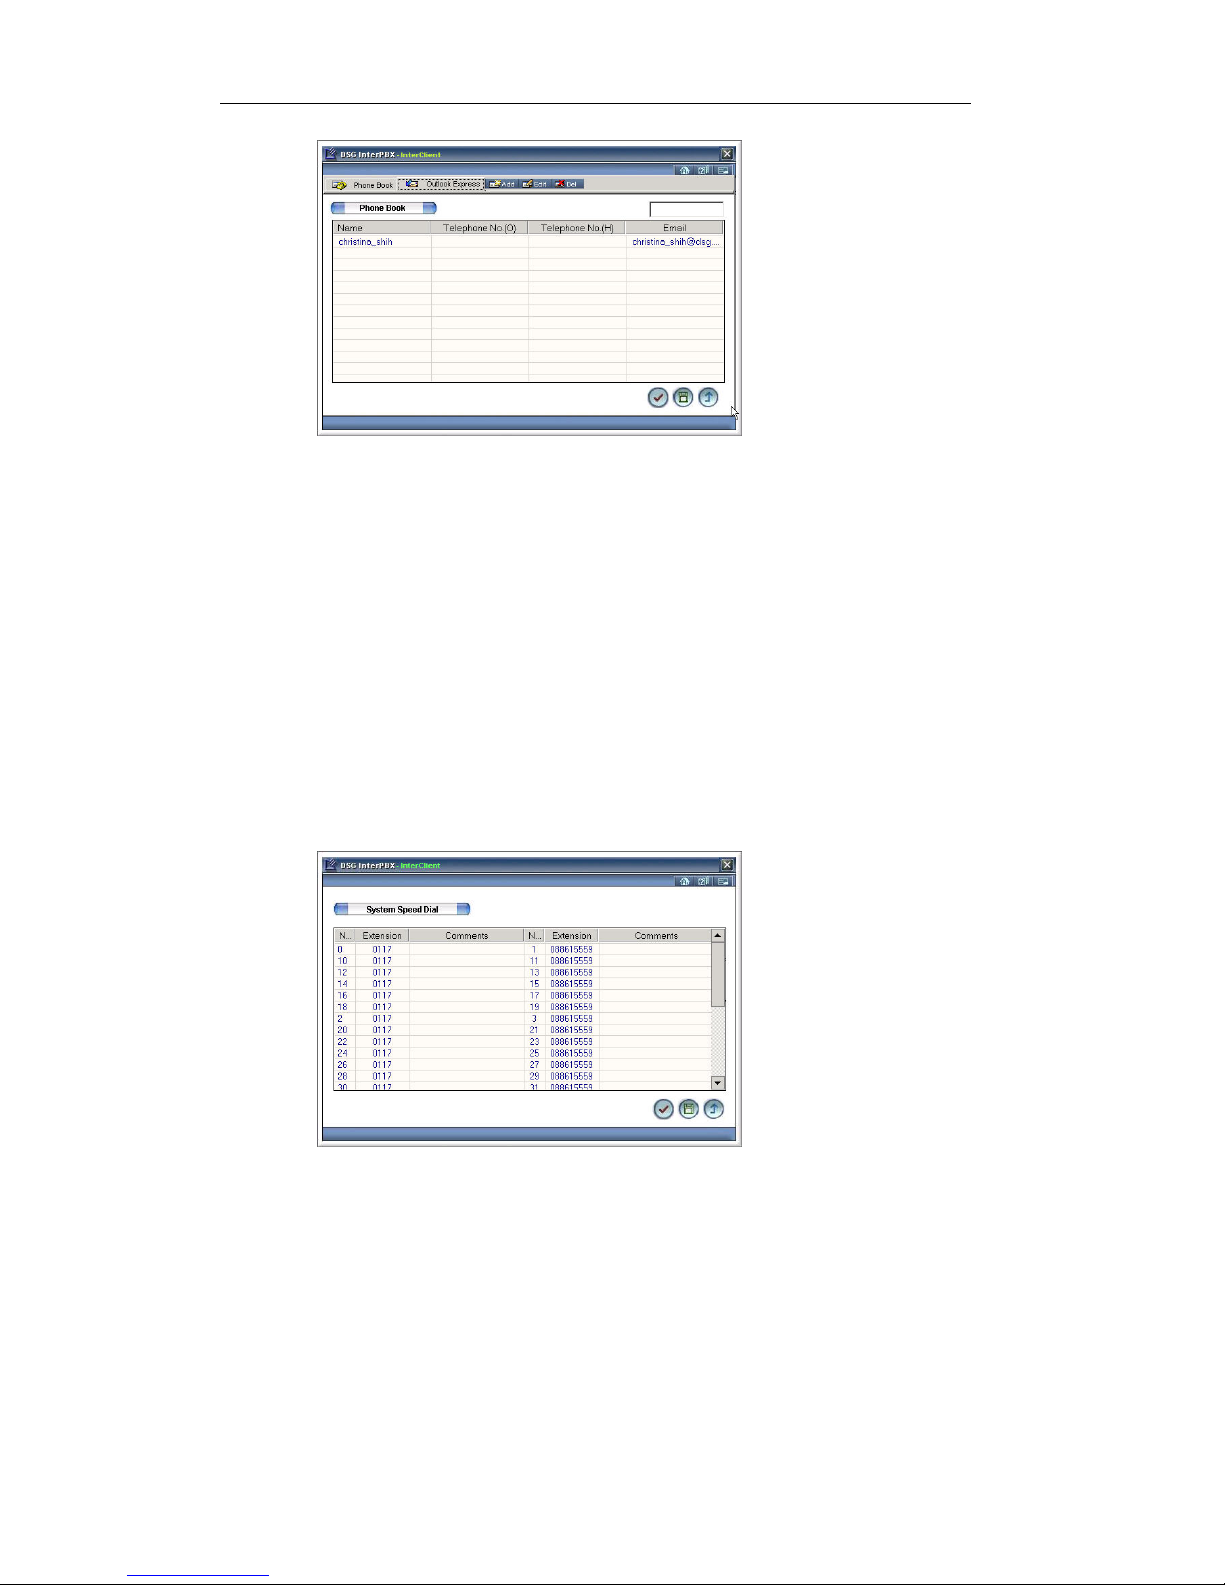
Phone Book
You can edit your personal contact list in Phone Book and import the contact list
from Microsoft Outlook Express automatically. You can review the complete
contact list from the Phone Book. This function is provided on InterClient
software.
Page 36
Chapter 4 InterClient-Utility
36
New Contacts
Click the Add icon in the Phone Book tab to add a new contact. Enter the name,
telephone number and e-mail address. Click “ok” to save.
Edit or Delete the Contacts
Please select a contact and click Edit or Delete to edit or delete the contact.
Review System Speed Dial
If your administrator creates System Speed Dial, you can browse all the system
speed dial numbers here. This function is only provided by InterClient software
version.
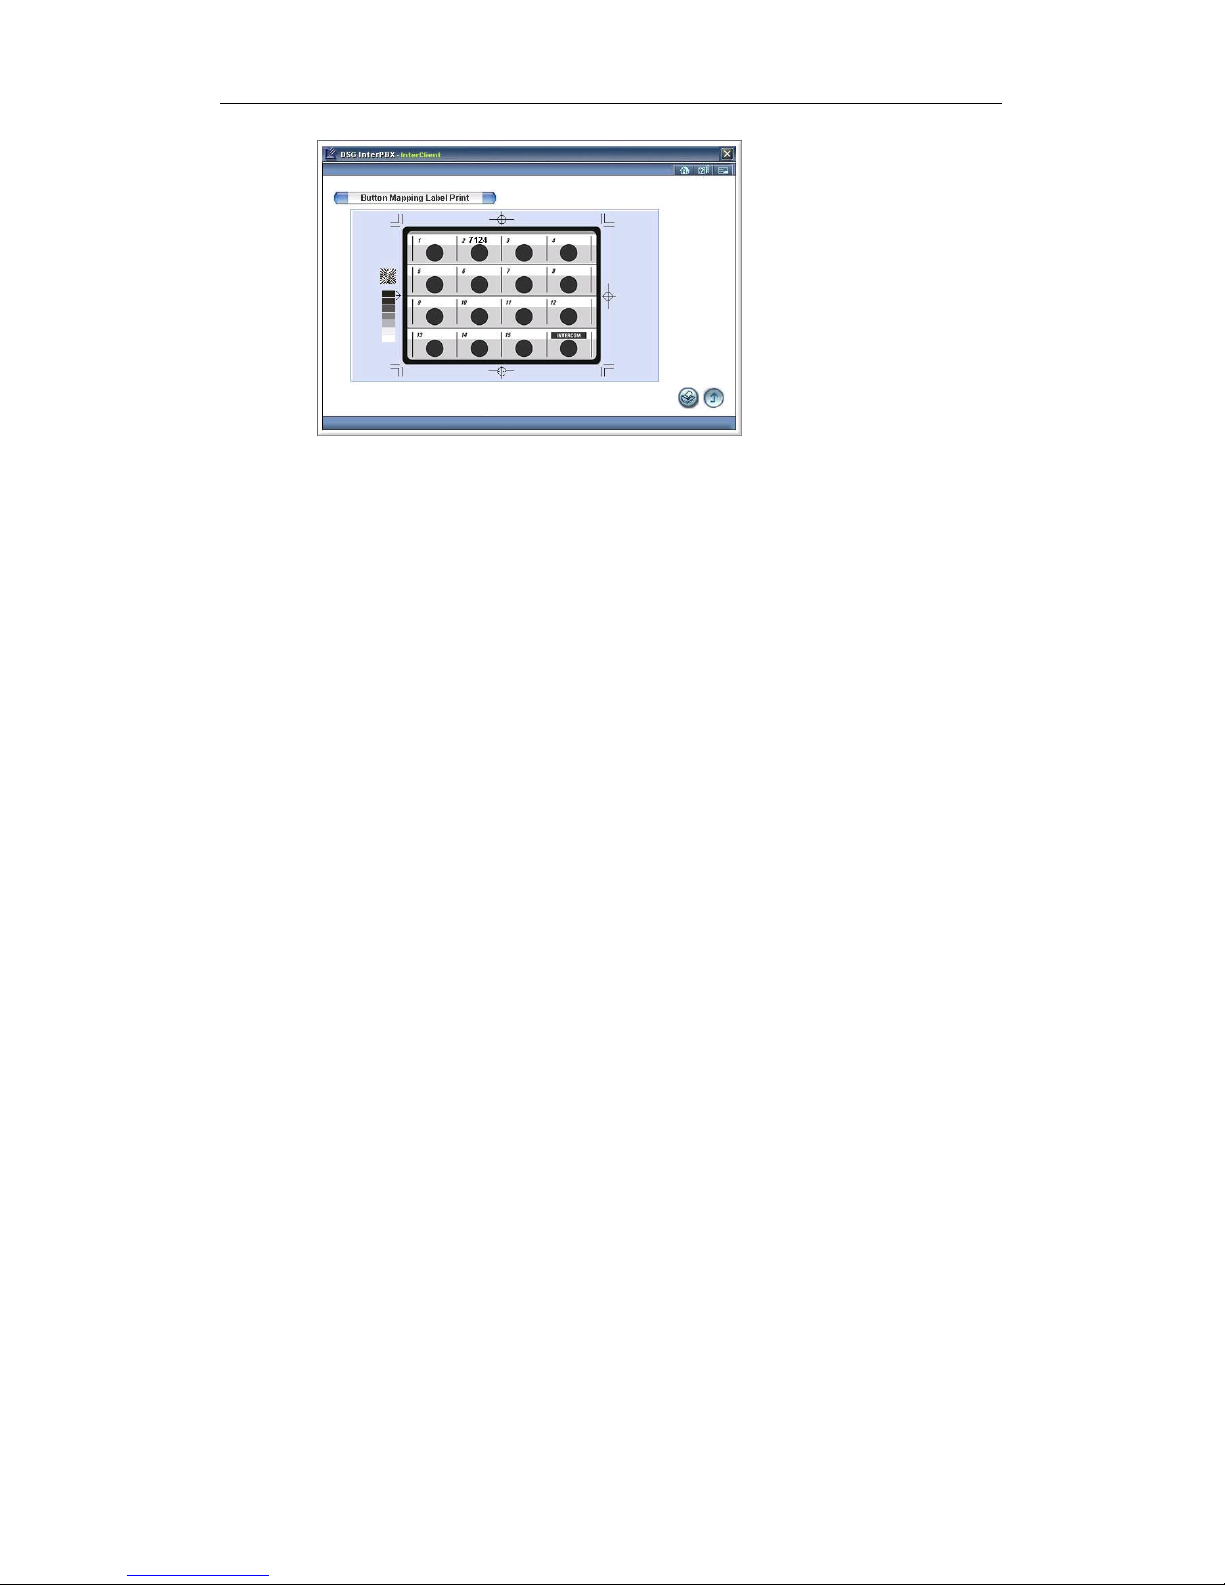
Printing Button Mapping Label
You can print the button-mapping label of your phone station. The label will
display the settings of Button Mapping. You can change the settings in the Button
Mapping window. This function is only offered by InterClient software version.
Page 37
Chapter 4 InterClient-Utility
37
Page 38

Chapter 4 InterClient-Utility
38
Page 39
Chapter 5 Maintenance
39
Chapter 5
Maintenance
You can learn how to connect IP phones, adjust the supporting bracket or edit IP
phones settings in this chapter.
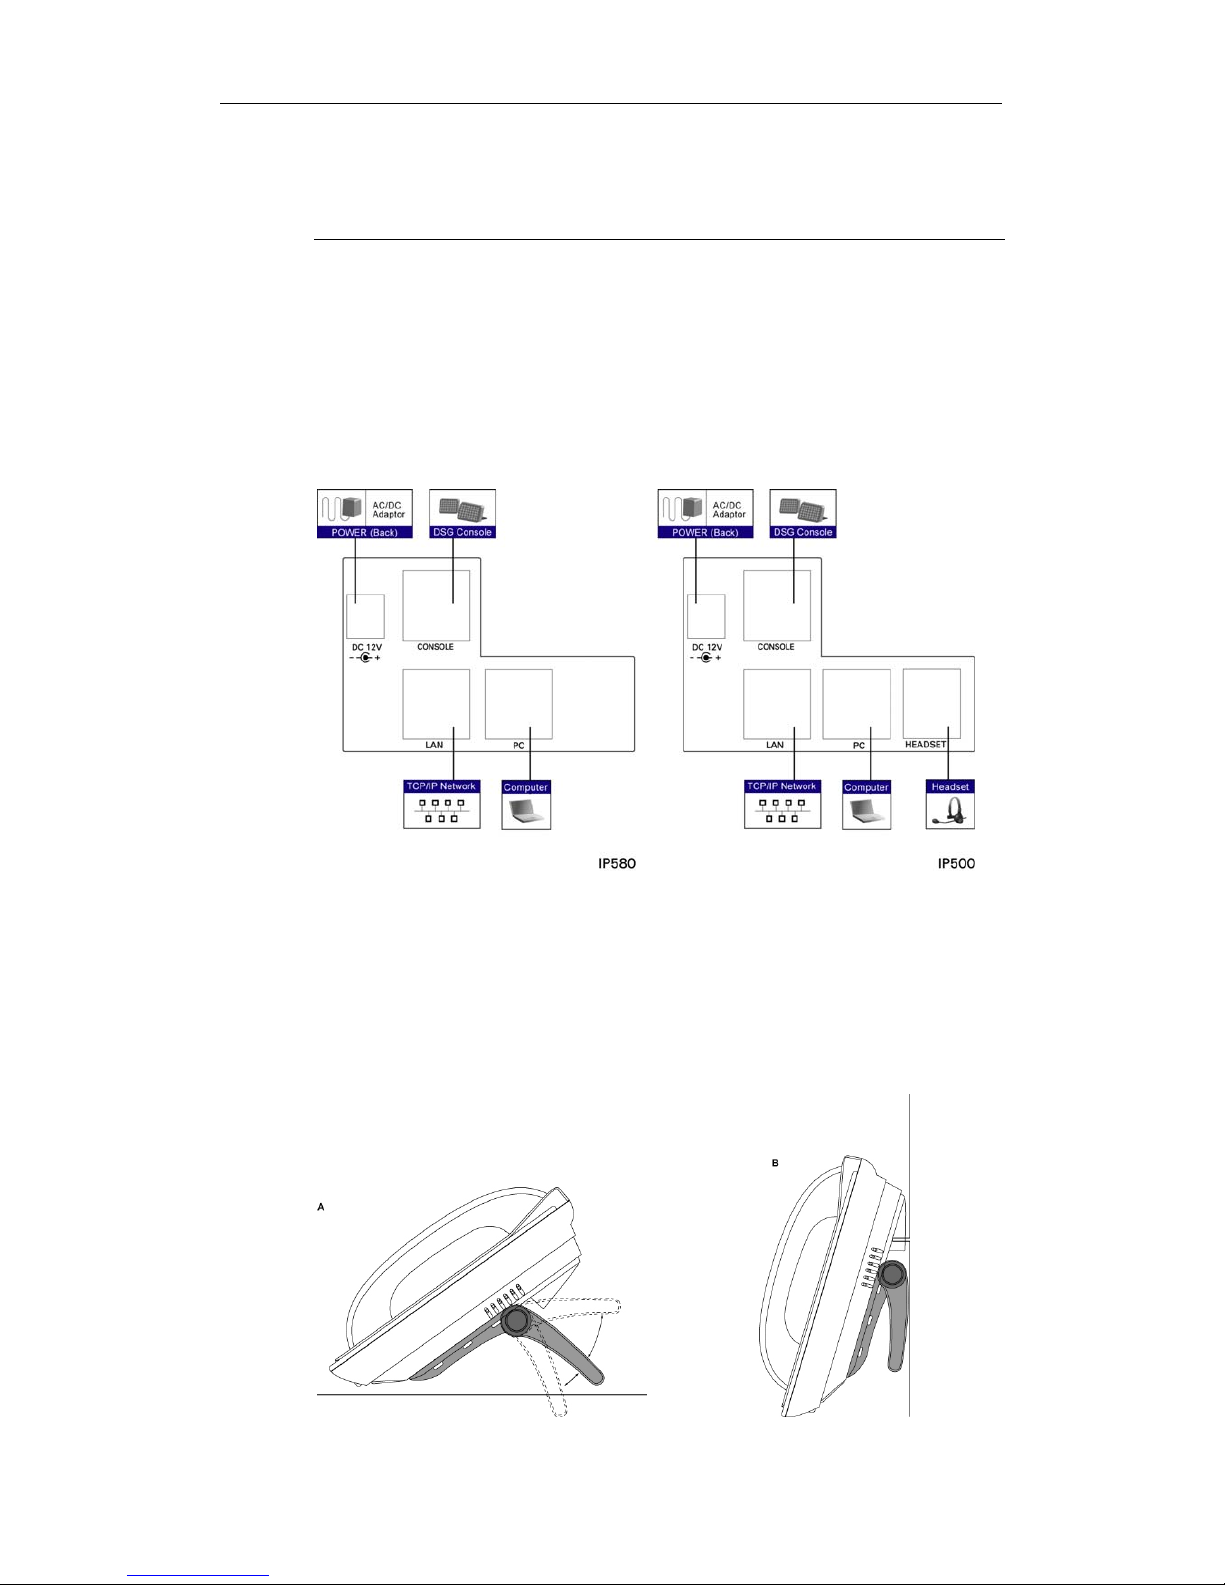
Connecting the IP Phone
There are two RJ45 ports on the rears of IP580 and IP500 for connecting to LAN
and PC. Please refer to the following diagram to connect your phone.
Adjusting the Supporting Bracket
IP580/IP500 phone provides a multi-angle supporting bracket, which can be
adjusted in different angles (diagram A). When adjusting the bracket, press and
hold the joints at two sides, set the height and release the joint. You can also
install your phone on a wall (diagram B). If you want to re-install the bracket,
please refer to diagram C.
Page 40

Chapter 5 Maintenance
40
IP Phone Setup
The Phone Settings of IP580 and IP500 are listed as follows. Please don’t change
the phone settings unless it is required by your Administrators. If you need to
change the settings, please press and hold the
button below the LCD screen
for 3 seconds to enter the setting mode. In the setup mode, you can press
to edit or
save the settings, or press
and to move to the next or the previous item.
y EXT NUMBER: Your extension number.
y IP ADDRESS: The IP address of your phone.
y GATEWAY IP: The gateway IP address of your phone.
y SUBNET MASK: The subnet mask address of your phone.
y DHCP: If your network is under DHCP, you need to enable DHCP.
y PBX SERVER IP: The IP address of your InterServer.
y MAC ADDRESS: The MAC address of your phone. It cannot be changed.
y OFF PREMISES: If your phone is a remote extension, you need to enable this
item.
y IMAGE VERSION: It displays the current software version of your IP phone.
y EXIT SETUP: To exit the setup mode.
Page 41

Appendix A Quick-Start-Guide
41
Appendix A: Quick Start Guide
Function Code List
During a call, if you want to activate a function, please press the Transfer button first and
then enter the function code. For example, if you want to initiate a conference call, please put
all the members on hold. Then press the Transfer button and #40.
Functions Function Code +
Designated Number
Description
Call Pickup CO Line #10 To answer the least recent incoming
call ringing on the system.
Call Pickup Directed #11 + Extension No. To answer a call ringing at another
extension.
Call Pickup Group Extension Group Code To answer a call ringing at another
extension in your call pickup group.
(Please consult administrators for
Extension Group Code.)
Call Hold Hold or #12 (On analog
phone)
To place a call on hold by pressing
Hold or #12. Press the button again
to retrieve the call.
Call Hold Retrieve
CO
#13 + CO Line Extension
No.
To retrieve incoming calls those are
placed on hold. Users can directly
press the flashing programmable
button when properly configured.
Call Hold Retrieve
Ext.
#14 + Extension No. To retrieve extension placed on
Hold. Users can directly Press the
flashing programmable button
when properly configured.
Call Waiting Hold or Hook Flash (On
analog phone)
Users can place the incoming calls
on hold and answer another
incoming call at the same time.
Press “Hold” button again to
retrieve the previous call on Hold.
(Please enable Call Waiting
function.)
Call Park Transfer + #15 + slot
number (0-9)
Place the call on a specific slot and
press #15 + the specific slot number
Page 42

Appendix A Quick-Start-Guide
42
Functions Function Code +
Designated Number
Description
to retrieve the call.
DND Set #17 + 1 (enable DND)
#17 + 0 (disable DND)
Enable or disable DND (analog
phone).
System Speed Dial #20 + Speed Dial Code
(00-49)
Dial the pre-defined No.
Personal Speed Dial #21 + Speed Dial Code
(00-49)
Dial the pre-defined No.
Transfer to Ext Voice
Mail
Transfer + #24 + Extension
Number
Transfer a call to the extension’s
voice mailbox.
Transfer to AA Tree Transfer + #25 + the access
code of the AA menu
Transfer a call to the AA menu.
Retrieve Message Message or ## (On
analog phone)
Access mailbox.
Member Login #35 + Extension Group
Number
Login to be one of the members in
the extension group.
Member Logoff #36 + Extension Group
Number
Logout from the extension group.
Ask Member Login #37 + Extension Group
Number
Check the login status of extension
group. Hearing dial tone means you
are logged-in successfully and busy
tone means not logged-in.
Internal Paging #38 + Extension Number
or Extension Group
Number
Broadcast through an extension or
extension group.
External Paging Broadcast codes for the
Voice Gateway.
Broadcast through an external
device such as Voice Gateway.
Please consult the administrator
for broadcast codes.
Conference Transfer + #40 Start Conference with the callers
placed on Hold.
Store on Demand #41 Save the recording of a call.
Retrieve Record #42 To play the saved recordings.
Page 43
Appendix A Quick-Start-Guide
43
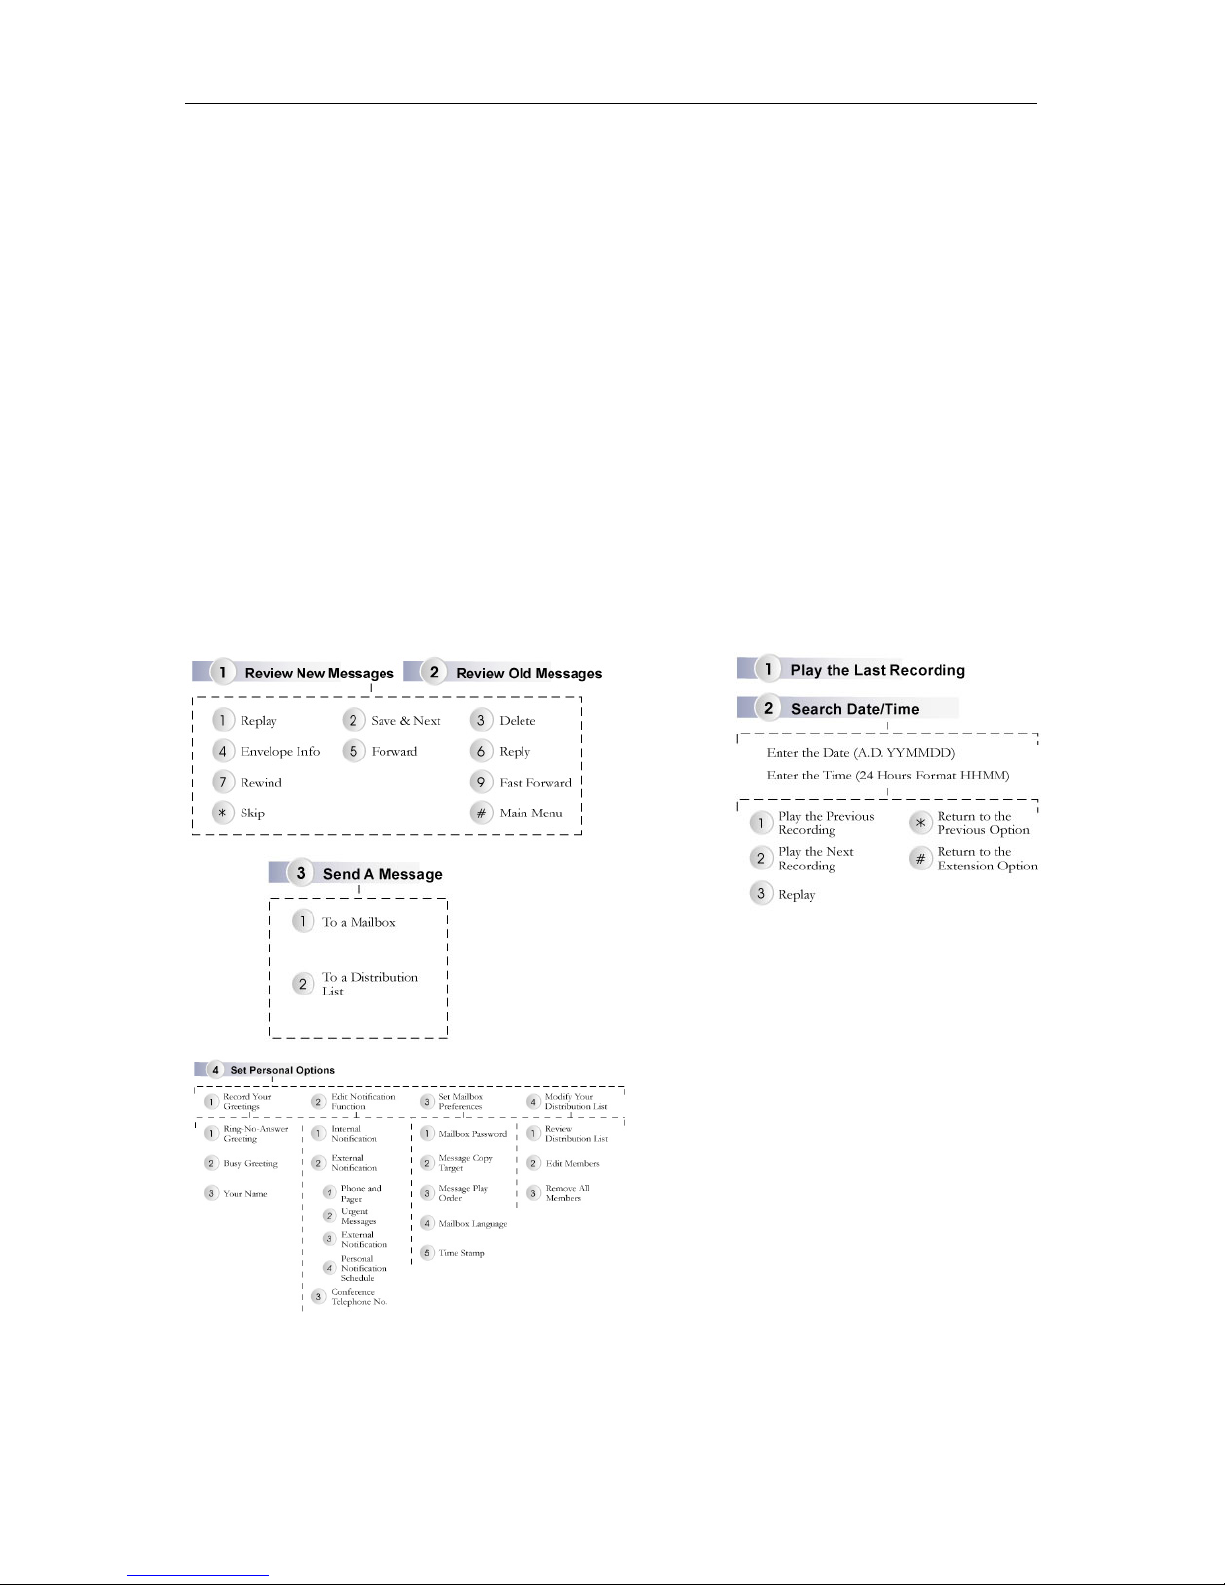
Voice Mailbox System Function
1. Press the Message button to access
mailbox.
2. Enter your password and then press #.
3. The system will announce the numbers of
your messages. Please follow the system
prompts: press 1 to play the new message,
press 2 to play the old messages, press 3 to
send a message, or press 4 to change
personal options. In the mailbox, you can
press * to return to the previous menu or
press # to return to the main menu.
4. When you are listening to the messages,
you can refer to the following diagram.
Play the Recording
1. On IP580 and SoftPhone: Please press the
Play button to play the recordings (You
have to assign a specific programmable
button as the Play function). On IP500:
Please press the REC/PLAY button to play
the recordings.
2. Enter the password and then press #. (The
default password is blank.)
3. Follow the system prompts and press 1 to
play the latest recording or press 2 to
check the recording by date and time. The
following procedure will assist you of
listening to the recording.
InterClient
1. Enter the InterServer IP in the address bar
of the web browser. Once the page is
accessed, click on User Login to access to
InterClient. If the InterClient you use is
software version, please launch the
InterClient program and enter the
InterServer IP address in the “IP” box.
(Please consult the administrators for
InterServer IP address.)
2. Enter your extension number in the
“Extension No.” box.
3. Enter your password.
4. A list of available features such as: Button
Mapping, Speed Dial, Answer Option,
Page 44
Appendix A Quick-Start-Guide
44
Mailbox, Notification, Distribution List
and Change Password will be available for
you to setup.
Page 45

Appendix A Quick-Start-Guide
45
 Loading...