

WIN Communications 32 Line Display, 20 Line Non-Display, 32 Line Non-Display, DSS/BLF Console User Manual
Page 1
®
Digital Multiline Telephone User Guide
Page 2
WIN®Digital Multiline Telephone User Guide
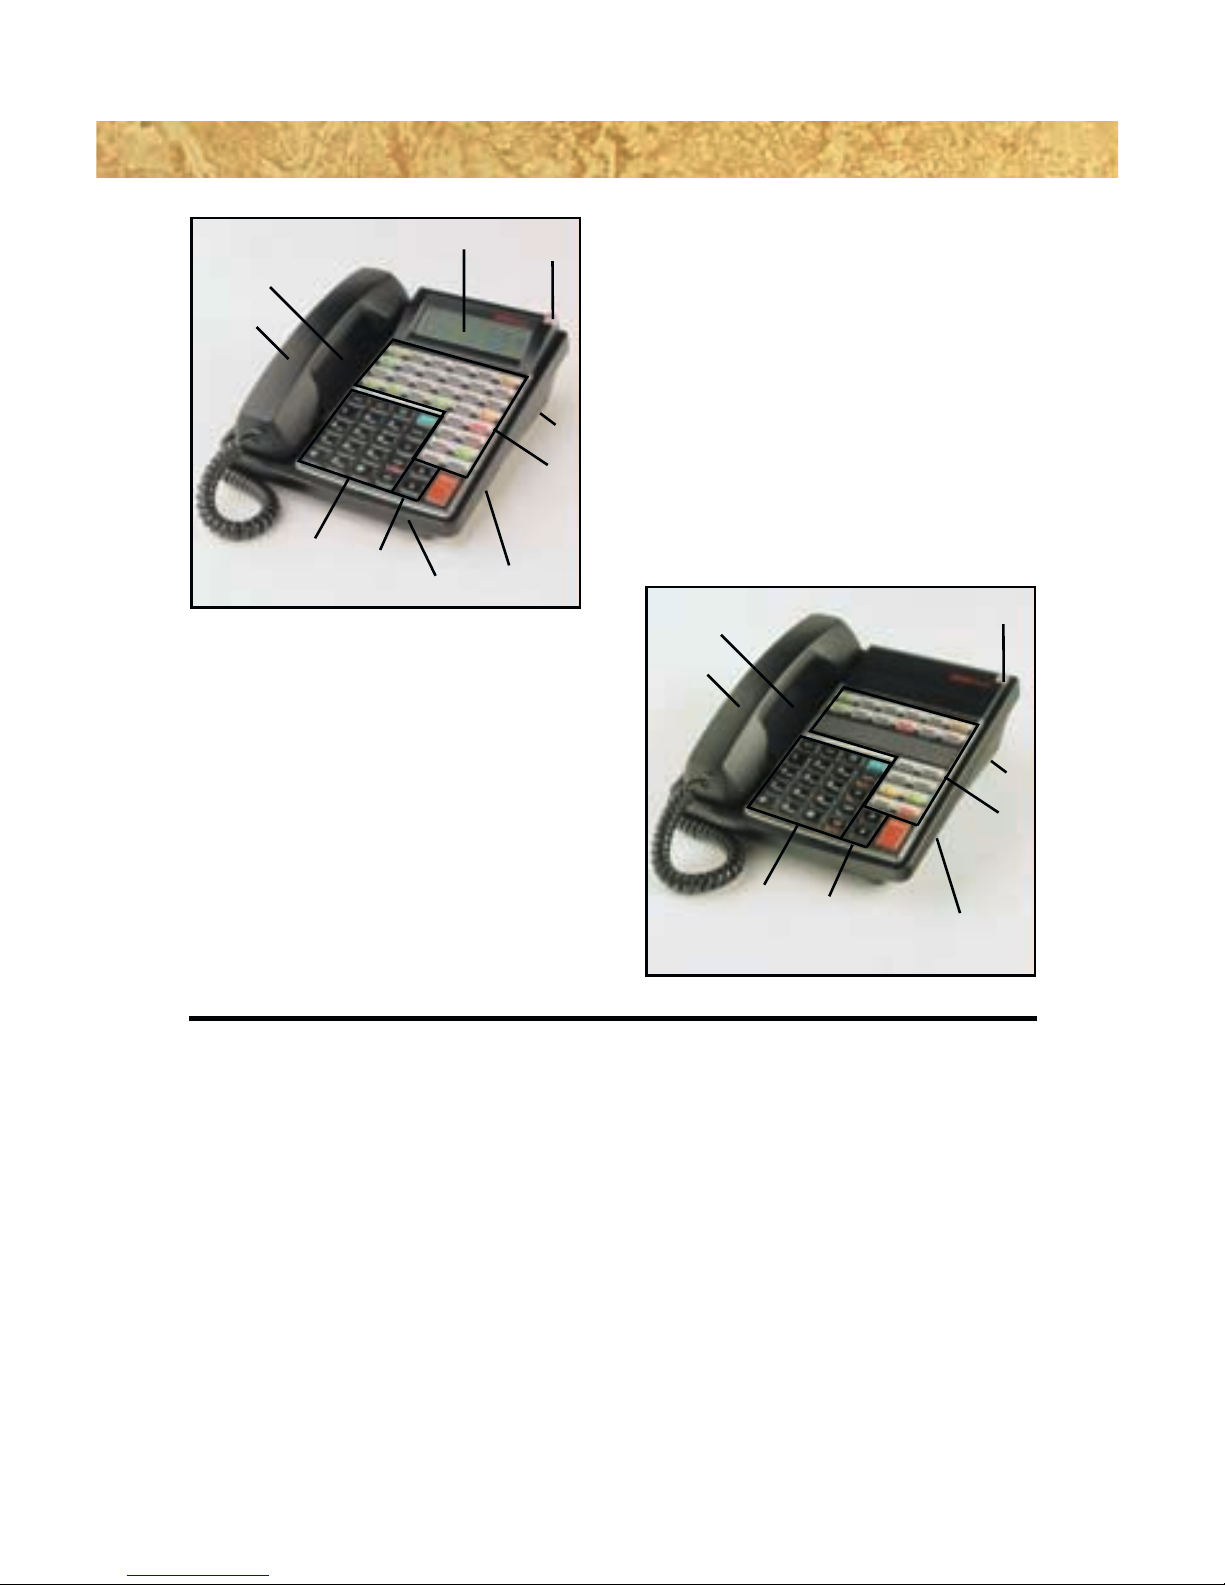
1. Dedicated Feature Buttons - Provide easy access to frequently used fea-
tures some of which include Intercom and Intercom2 access, Hands-Free
activation, Transfer, and Speed Dial/Last Number Redial and Flash.
2. Programmable Feature Buttons - Illuminated in 3 colors, these buttons
provide a visual indication of active features and line status. Button programming can be performed by system administrator or by station user.
3. Fold Out Legs - Allow station user to change the angle of the telephone by
extending or retracting and locking them in place under the telephone.
4. Status Indicator - Provides a visual status indication for message waiting,
incoming calls and headset mode operation using two color illumination
and a steady/flashing sequence.
5. Speaker - Provides audible ringing and on-hook voice announce operation
for telephone calls, paging and station background music.
32 Line Display
The 32 Line Display Telephone offers
maximum use of digital telephone
features including 32 tri-colored programmable feature buttons, a fullduplex speaker phone and a high
resolution 3 line display.
20 Line Non-Display
The 20 Line Non-Display Telephone
provides sophisticated digital telephone features such as tri-colored
programmable feature buttons and
voice announce on an easy-to-use
instrument.
1
7
9
8
2
3
4
10
5
6
1
7
8
2
3
4
5
6
Page 3

32 Line Non-Display
The 32 Line Non-Display Telephone
features 32 tri-colored programmable buttons and a full-duplex speaker phone providing users with optimal use of digital telephone
features.
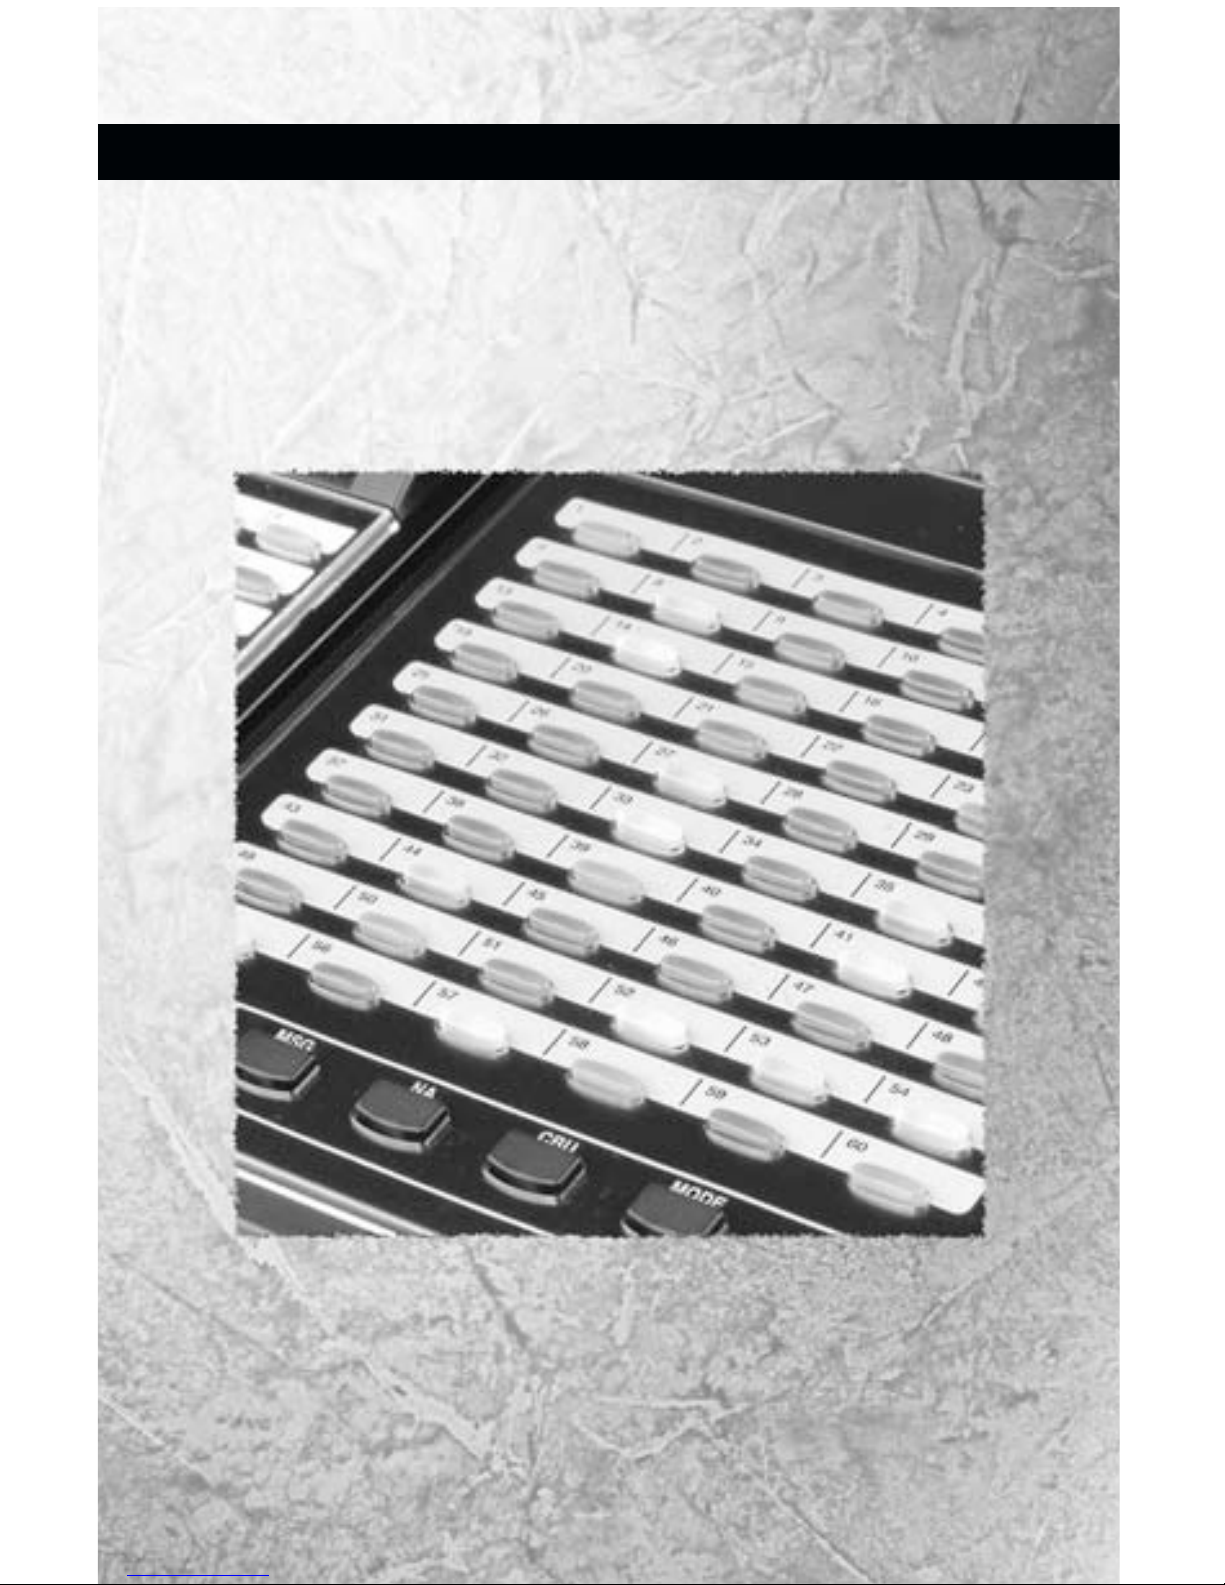
DSS/BLF Console
The DSS/BLF Console mates to any
of the digital telephone station sets
expanding the button capacity to
accommodate more line appear-
ances, direct station appearances
and/or auto dial buttons.
6. Handset - Users have the option of using the hearing-aid compatible
handset for privacy while on a call or using the hands-free option if available on the telephone.
7. Multifunction Level Controls - Allows the user to individually set the vol-
ume levels for ringing, hands-free speakerphone and handset operation
as well as providing the contrast adjustment for the display telephones.
8. Slide Tray - Swivels out to provide a location to place important tele-
phone information or hard to remember numbers.
9. Microphone - Allows the user to respond to calls completely hands-free.
10.High Resolution Display - The display provides the highest degree of tele-
phone/user interaction by displaying information such as dialed numbers, Caller I.D., call duration, feature activation and text messaging.
1
7
9
8
2
3
4
5
6
1
2
3
Page 4

CONTENTS
DIGITAL MULTILINE TELEPHONE 3
Answering Calls 4
Internal Calls 4
External Calls 4
Off-Hook Voice Call (Call Waiting) 5
Page Answer 5
Automatic Answer 5
Caller ID 5
Placing Calls 6
Internal Calls 6
External Calls 6
Last Number Redial 6
Automatic Redial 6
Speed Dial 7
Dial-by-Name 7
One-Touch Dial 7
Busy Queue 7
Call in Progress Features 8
Holding Calls 8
Transferring Calls 8
Conferencing Calls 9
Privacy Release 9
Parking Calls 9
Call Forwarding 10
Call Pickup 11
Account Code Registry 12
Text Messaging 12
Paging 12
Do Not Disturb 13
Executive Override 13
Service Observe 13
Barge-In 13
Voice Mail Record 13
Station Preferences 14
Background Music 14
Headset Mode 14
Distinctive Ring Mode 14
Prime (ICM) Line Preference 14
Dynamic (Outside) Line Preference 14
Ringing Line Preference 15
Ring Mode for Internal Calls 15
Off-Hook Ring 15
Hold Mode Priority 15
Spare Button Programming 16
Station Speed Dial 16
System Preferences 18
Area Background Music 18
Calendar Setting 18
Time Setting 18
System Speed Dial 18
DSS/BLF CONSOLE 19
Answering Calls 20
Placing Calls 20
Transferring Calls 20
Message Waiting 20
Call Backup 21
Night Answer 21
Programming Feature Buttons 21
REFERENCE NUMBERS 22
AGENT FEATURES 23
Disclaimer:
Certain state and federal laws regulate the monitoring of calls without the knowledge of parties involved. Prior to
performing any method of call monitoring, any such regulations should be identified and compiled with. WIN
Communications Corporation, Inc., disclaims any liability arising out of failure to comply with such regulations.
Page 5
DIGITAL MULTILINE TELEPHONE
Page 6

4
INTERNAL CALLS
Voice Announce
Receive voice call
– Ensure MUTE button is off
– Reply hands-free
– Lift handset for privacy
With Ringing Line Preference Feature
Receive ringing indication on station
– Lift handset OR – Press HF button for hands-free
– Converse
– Replace handset to disconnect OR – Press HF button to disconnect
Without Ringing Line Preference Feature
Receive ringing indication
– Lift handset
– Press ICM button
– Converse
– Press HF button for hands-free
– Replace handset to disconnect OR – Press HF button to disconnect
EXTERNAL CALLS
With Ringing Line Preference Feature
Receive ringing indication
– Lift handset OR – Press HF button for hands-free
– Converse
– Replace handset to disconnect OR – Press HF button to disconnect
Without Ringing Line Preference Feature
Receive ringing indication
– Lift handset
– Press flashing button
– Converse
– Press HF button for hands-free
– Replace handset to disconnect OR – Press HF button to disconnect
ANSWERING CALLS
Page 7

5
OFF-HOOK VOICE CALL (CALL WAITING)
With call in progress
– Receive caller announcement (outside caller will not hear announcement)
– Press ICM button (outside call will be placed on Hold)
– Converse
– Press flashing button to reconnect to original call
PAGE ANSWER
Receive overhead page
– Lift handset
– Press ICM button
– Dial # followed by
– 68 for Internal Page
– 69 for External Page
– Converse
AUTOMATIC ANSWER (HEADSET MODE)*
From Idle State
– Press RELEASE button
– Tone will be heard prior to first call
– Call will be automatically connected
– Converse
From Busy State
– Press RELEASE button to disconnect current call
– Tone will be heard prior to next call
– Call will be automatically connected
– Converse
*Note: This feature must be programmed by installer
CALLER ID
View or Callback Numbers from abandoned calls
– Press CID Button to display stored calling in number
– Press # to display name associated with number
– Press # to display time and date of call
– Press * to reverse one step
– Press available line key to dial number – OR –
– Press FLA to delete
– Press CID Button to continue to next message
Page 8

PLACING CALLS
6
INTERNAL CALLS
With Prime Line Preference Feature
– Lift handset OR – Press HF button for hands-free
– Dial station number
– Voice announce after tone OR – Press additional digit to force ring
Without Prime Line Preference Feature
– Lift handset OR – Press HF for hands-free
– Press ICM button OR – Press Direct Station Selection key
– Dial station number
– Voice announce after tone OR – Press additional digit to force ring
EXTERNAL CALLS
With Dynamic Line Preference Feature
– Lift handset OR – Press HF for hands-free
– Dial telephone number
– Converse
Without Dynamic Line Preference Feature
– Lift handset OR – Press HF for hands-free
– Press an outgoing Line button OR – Press ICM + 9
– Dial telephone number
– Converse
– Replace handset to disconnect OR – Press HF to disconnect
Forced Account Code Dialing
– Lift handset OR – Press HF for hands-free
– Press ACCOUNT button OR – Press FEAT and 1
– Dial account code
– Press #
– Hear confirmation tone
– Press an outgoing Line button OR – Press ICM + 9
– Dial telephone number
– Converse
– Replace handset to disconnect OR – Press HF to disconnect
LAST NUMBER REDIAL
– Press pre-programmed LNR key
– Press # or * to scroll through last 5 numbers dialed
– Lift handset OR – Press HF key
– Press an outgoing Line button OR – Press ICM + 9
– Wait for system to complete dialing
– Converse
– Lift handset for privacy
– Replace handset to disconnect OR – Press HF to disconnect
AUTOMATIC REDIAL
Set
With telephone call in progress . . .
– Receive busy or no answer
– Press AUTOMATIC REDIAL button (LED will light)
Page 9

7
– Replace handset or press HF button to disconnect
– Station set will automatically call the telephone number until feature expires
– Pick up handset and press AUTOMATIC REDIAL button when connected
Cancel
– Press AUTOMATIC REDIAL button again (LED will extinguish)
SPEED DIAL
– Press available Line button OR – Press ICM + 9
– Press SPD/LNR button
– Dial speed dial code
– Converse
– Lift handset for privacy
DIAL-BY-NAME
– Press SPD/LNR button
– Press FEAT button
– Dial access code 1 for System Speed numbers
2 for Station Speed numbers
– Dial appropriate 2-digit character code (See Chart on inside of back cover)
– Press FEAT button
– First will display
– Use # or * to scroll through numbers
– Press ICM or outgoing line button
– Converse
ONE-TOUCH DIAL
– Press available Line button OR – Press ICM + 9
– Press programmed dial button
– Converse
– Lift handset for privacy
BUSY QUEUE
Set
Receive busy signal while calling an internal station or accessing a telephone line
– Press CALL BACK button OR – Dial #1
– Replace handset OR – Press HF to disconnect
– Wait for ringing indication
Once Station or Line is available
Receive ringing indication
– Press flashing button to connect
– Wait for called station to answer OR – Dial telephone if placing a call
– Converse
– Lift handset for privacy
– Replace handset OR – Press HF to disconnect
Cancel
– Press CALL BACK button OR – Press ICM + #1
Page 10

CALL IN PROGRESS FEATURES
8
HOLDING CALLS
System Hold
With call in progress
– Press HOLD button
Exclusive Hold
With call in progress
– Press HOLD button twice
– Listen for confirmation tone
Retrieve Held Call
– Press flashing button
– Converse
TRANSFERRING CALLS
Screened Transfer
With call in progress
– Press TRF button OR – Press DSS/BLF key for station
– Dial station number
– Announce call
– Replace handset to release OR – Press TRF button to retrieve caller
Unscreened Transfer
With call in progress
– Press TRF button OR – Press DSS/BLF key for station
– Dial station number
– Replace handset to release OR – Press TRF button to retrieve caller
Transfer Via Page
With call in progress
– Press TRF button
– Dial # + 6 OR – Press Page button
– Dial page zone (00-32)
– Announce call over page
– Wait for page answer
– Replace handset to release OR – Press TRF button to retrieve caller
Trunk-to-Trunk Transfer (Transfer to Outside Line)
With call in progress
– Press TRF button
– Press available Line button OR – Press ICM + 9
– Dial telephone number
– Announce call
– Replace handset to release OR – Press TRF button to retrieve caller
Page 11

9
CONFERENCING CALLS
Initiating a new conference call
With call in progress
– Press TRF button
– Dial station number OR – Press an outgoing line
– Dial telephone number
– Wait for other party to answer
– Announce the conference
– Press CONFERENCE button
– Converse
Adding more parties
– Press CONFERENCE button
– Dial station number OR – Press an outgoing line
– Dial telephone number
– Wait for other party to answer
– Announce the conference
– Press CONFERENCE button
– Converse
– Perform for each new party
Releasing an individual party from conference
– Press FEAT + FEAT
– Dial desired station to release OR – Press desired line to release
– Talk to party if desired
– Replace handset in cradle OR – Press HF button if hands free
– Answer conference recall
– Converse
PRIVACY RELEASE
With call in progress
– Press PRIVACY RELEASE button to allow others to join call
– Other users may join conversation by pressing their Privacy Release button
PARKING CALLS
Call Park
Set
With call in progress
– Press PARK button
– Replace handset
Retrieve
From any station
– Lift handset
– Press PARK button + station number if retrieving call from another station
– Converse
Page 12

10
Group Park
Set
With call in progress
– Press GROUP PARK button
– Dial park orbit
– Replace handset
Retrieve
From any station in group
– Lift handset
– Press GROUP PARK button
– Dial park orbit
– Converse
Direct Group Park
Set
With call in progress
–Press desired DIRECT GROUP PARK button
–Replace handset
Retrieve
From any station in group
–Lift handset
–Press DIRECT GROUP PARK button
–Converse
CALL FORWARDING
Direct Forwarding
Set
–Press FORWARD button OR –Press ICM + # + 9
–Dial 1 for Direct Forwarding
–Dial 0 for Day forward or 1 for Night forward
–Dial station number
–Listen for confirmation tone
–FORWARD button will illuminate
Cancel
–Press FORWARD button OR –Press ICM + # + 9
–Dial 0
–Dial 0 to cancel Day or 1 to cancel Night
–Listen for confirmation tone
Page 13

11
Follow-me Forwarding
Set
From station set where calls are to be forwarded to
–Press FORWARD button OR –Press ICM + #9
–Dial 2
–Dial 0 for Day forward or 1 for Night forward
–Dial station number
–Listen for confirmation tone
Cancel
–Press FORWARD button OR –Press ICM + #9
–Dial 0
–Dial 0 to cancel Day or 1 to cancel Night
–Listen for confirmation tone
External Forwarding
Set
– Press ICM + # + 9
– Dial 3
– Dial telephone number
– Dial #9
– Listen for confirmation tone
Cancel
– Press ICM + # + 9
– Dial 3
– Dial 0 to cancel
– Dial #9
– Listen for confirmation tone
CALL PICKUP
Direct
Upon hearing ringing indication
– Lift handset
– Press DIRECT PICKUP button OR – Press ICM + *3
– Dial extension number of ringing station
– Converse
Group
Upon hearing ringing indication
– Lift handset
– Press GROUP PICKUP button OR – Press ICM + *9
– Converse
Exclusive Hold
– Lift handset
– Press DIRECT PICKUP button OR – Press ICM + *3
– Dial extension number of ringing station
– Converse
Page 14

12
Hold Recall
– Lift handset
– Press DIRECT PICKUP button OR – Press ICM + *3
– Dial extension number of ringing station
– Converse
ACCOUNT CODE REGISTRY
With call in progress
– Press ACCOUNT button OR – Press FEAT + FLA
– Dial account code (max. 10 digits)
– Press ACCOUNT button OR – Press FEAT
– Listen for confirmation tone
– Continue conversation
* Outside caller does not hear dialed digits
TEXT MESSAGING
Station-to-Station Message
Edit
– Press FEAT button
– Press MESSAGE WAITING button
– Find desired message (Press # or * to scroll through messages)
– Use number pad to fill in time/date information
– Press FEAT button to register
Send
– Press FEAT button
– Press ICM button
– Dial station number
– Listen for confirmation tone
Review
Message Waiting button will be illuminated
– Press MESSAGE WAITING button
– Message will appear in the display
– Press * or # to scroll through messages
– Press ICM button to call back or FLA button to delete
PAGING
Page
– Lift handset
– Press PAGE button OR – Press ICM + # + 6
– Dial page zone (00-32)
– Make page announcement
– Replace handset to disconnect
Page 15

13
Answer
Receive page
– Lift handset
– Press ICM button
– Dial # followed by
– 68 for Internal Page
– 69 for External Page
– Converse
DO NOT DISTURB
Message (Users dialing your station while in DO NOT DISTURB will see this message
in their display)
– Press FEAT button
– Press DO NOT DISTURB button
– Find desired message (Press # or * to scroll through messages)
– Use number pad to fill in time/date information
– Press FEAT button to register
Set
– Press DO NOT DISTURB button
– Listen for confirmation tone
– Button will illuminate
Cancel
– Press DO NOT DISTURB button
– Listen for confirmation tone
– Button extinguish
EXECUTIVE OVERRIDE
Receive station busy indication
– Press OVERRIDE button
– Announce (Whisper quiet off-hook voice announce)
SERVICE OBSERVE
– Lift handset
– Press (SERVICE OBSERVE) button
– Dial desired station number
– Replace handset to disconnect
BARGE-IN
– Lift handset
– Press desired line button
– Replace handset to disconnect
VOICE MAIL RECORD
With call in progress
– Press VOICE MAIL RECORD button
– Listen for confirmation tone
– Continue with conversation
Page 16

STATION PREFERENCES
14
BACKGROUND MUSIC
Set
– Press FEAT button
– Dial 21 to set
– Listen for confirmation tone
– Use the Multifunction Level Control buttons to adjust the volume
Cancel
– Press FEAT button
– Dial 20 to set
– Listen for confirmation tone
HEADSET MODE
Set
– Program a RELEASE button on the telephone (see quick reference card)
– Press ICM button
– Dial *01
– Listen for confirmation tone
Cancel
– Press ICM button
– Dial **01
– Listen for confirmation tone
– Remove RELEASE button if desired
DISTINCTIVE RING MODE
– Press ICM button
– Dial *5
– Dial tone number (1-4)
– Listen for confirmation tone
PRIME (ICM) LINE PREFERENCE
Set
– Press ICM button
– Dial *07
– Listen for confirmation tone
Cancel
– Press ICM button
– Dial **07
– Listen for confirmation tone
DYNAMIC (OUTSIDE) LINE PREFERENCE
Set
– Press FEAT button
– Press Line button
– Listen for confirmation tone
– Repeat for each Line as required
Page 17

15
Cancel
– Press FEAT button
– Press Line button
– Listen for confirmation tone
– Repeat for each Line as required
RINGING LINE PREFERENCE
Set
– Press ICM button
– Dial *06
– Listen for confirmation tone
Cancel
– Press ICM button
– Dial **06
– Listen for confirmation tone
RING MODE FOR INTERNAL CALLS
Ring
– Press ICM button
– Dial *03
– Listen for confirmation tone
Voice Announce
– Press ICM button
– Dial **03
– Listen for confirmation tone
OFF-HOOK RING
Set
– Press ICM button
– Dial **02
– Listen for confirmation tone
Cancel
– Press ICM button
– Dial *02
– Listen for confirmation tone
HOLD MODE PRIORITY
System
– Press ICM button
– Dial *08
– Listen for confirmation tone
Exclusive
– Press ICM button
– Dial **08
– Listen for confirmation tone
Page 18

16
SPARE BUTTON PROGRAMMING
One-Touch Dial
– Press SPD/LNR
– Press available Programmable Feature Button
– Dial 9 OR – Press an outgoing line
– Dial telephone number
– Press SPD/LNR
– To enter 10 character name use # pad to input dial codes for each character OR
– Press SPD/LNR
– Listen for confirmation tone
Auto Dial Buttons
– Press SPD/LNR
– Press available Programmable Feature Button
– Dial station number
– Press SPD/LNR
– To enter 10 character name use # pad to input dial codes for each character OR
– Press SPD/LNR
– Listen for confirmation tone
DSS/BLF Buttons
– Press SPD/LNR
– Press available Programmable Feature Button
– Press ICM + station number
– Press SPD/LNR
– To enter 10 character name use # pad to input dial codes for each character OR
– Press SPD/LNR
– Listen for confirmation tone
Feature Buttons
– Press SPD/LNR
– Press available Programmable Feature Button
– Dial feature code (See chart on page 17 for a detailed list of codes)
– Press SPD/LNR + SPD/LNR
– Listen for confirmation tone
Clear Button Programming
– Press SPD/LNR
– Press desired Programmable Feature Button
– Dial 0000 to clear
– Press SPD/LNR + SPD/LNR
– Listen for confirmation tone
STATION SPEED DIAL
– Press SPD/LNR button
– Dial speed dial code (9000-9499 440CT/128CT) OR (2000-2099 48CT/96CT)
– Dial telephone number OR – Dial 0000 to clear
– Press SPD/LNR
– Use number pad to input dial codes for each character (see note for characters)
– Press HOLD to advance to next character
– Press SPD/LNR when finished
Page 19

FEATURE CODE CHART
Feature Button Code
Account Code ACCT #504
Auto Redial ARD #520
Busy Queue CBK #505
Buzzer Tone BUZZER #518 + station number
Call Forward FWD #510
Caller ID CID #530
Call Park PRK #517
Group Park GRP #522
Direct Group Park DRP #521
Conference CNF #509
Do Not Disturb DND #506
Do Not Disturb + PIN DND+ #529
Do Not Disturb All DNDA #532
Do Not Disturb All + PIN DNDA+ #533
Direct Call Pickup DPK #511
Group Call Pickup GPK #512
Executive Override OVRD #508
External Paging EPAGE #620
Internal Paging IPAGE #6 + zone number (00-32)
Hunt Group Do Not Disturb HDND #525
Hunt Do Not Disturb + HDND+ #525 + 8 for Unavailable Status
9 for Wrap up Status
Hunt Do Not Disturb All HDNDA #534
Hunt Do Not Disturb All + HDND+ #534 + 8 for Unavailable Status
9 for Wrap up Status
Hook HOK #528
Handset Mute HSM #524
Last Number Redial LNR #514
Message Waiting MSG #515
Privacy Release PRV #507
Service Observation SVO #523
Release Key RLS #519
Voice Mail Record RSVO #526
17
Page 20

SYSTEM PREFERENCES
18
AREA BACKGROUND MUSIC
Set
– Press ICM button
– Dial #2
– Dial MOH channel (00-03)
– Listen for confirmation tone
Cancel
– Press ICM button
– Dial ##2
– Dial MOH channel (00-03)
– Listen for confirmation tone
CALENDAR SETTING
– Press FEAT button
– Dial 31
– Press 1 for Sunday
2 for Monday
3 for Tuesday, etc.
– Dial 2-digit month
– Dial 2-digit day
– Dial 4-digit year
– Press FEAT button
– Listen for confirmation tone
TIME SETTING
– Press FEAT button
– Dial 32
– Dial 4-digit time (0830 or 1045 for example)
– Dial * for AM or # for PM
– Press FEAT button
– Listen for confirmation tone
SYSTEM SPEED DIAL
– Press SPD/LNR button
– Dial speed dial code (0000-4999 440CT/128CT) OR (0000-0999 48CT/96CT)
– Dial telephone number OR – Dial 0000 to clear
– Press SPD/LNR
– Use number pad to input dial codes for each character (see note for characters)
– Press HOLD to advance to next character
– Press SPD/LNR when finished
Page 21
DSS/BLF CONSOLE
Page 22

20
TRANSFERRING CALLS
With call in progress
– Press TRF button
– Dial station number OR – Press DSS/BLF key for station
– Announce call
– Replace handset to release OR – Press TRF button to retrieve caller
MESSAGE WAITING
Set
– Press MSG button
– Call station number OR – Press DSS/BLF button
– Listen for confirmation tone
Cancel
– Press MSG button
– Call station number OR – Press DSS/BLF button
– Listen for confirmation tone
Page 23

21
CALL BACKUP
Flexible Station Assignments
– Press MODE button
– Press CBU button
– Dial first station number OR – Dial 0000 to clear
– Dial #
– Repeat previous 2 steps for additional assignments
– Press HF to exit programming
Set
– Press CBU button
– Button will illuminate
Cancel
– Press CBU button
– Button will extinguish
NIGHT ANSWER
Set
– Press NA button
– Button will illuminate
Cancel
– Press NA button
– Button will extinguish
PROGRAMMING FEATURE BUTTONS
– Press MODE button
– Press the desired Programmable Feature Button
– Press ICM button
– Dial the station number
– Press the MODE button
Page 24
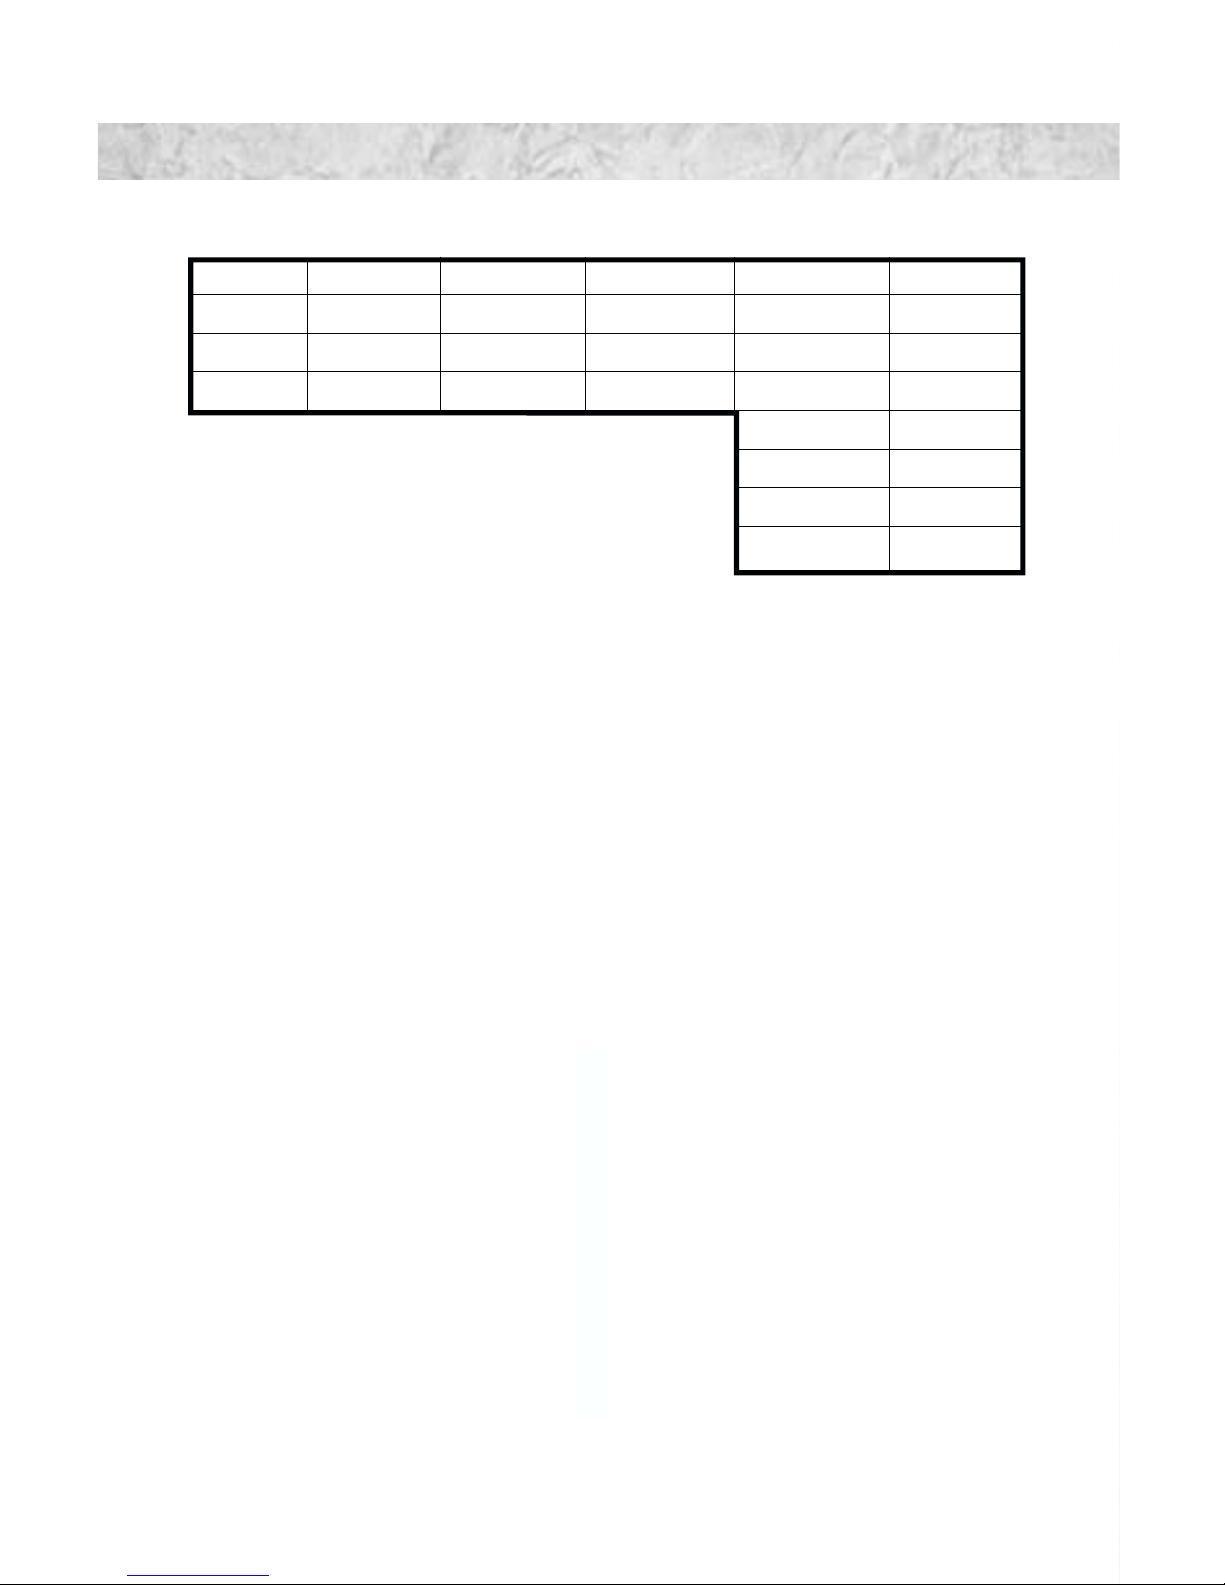
Programmable Feature Button Assignments
12 3 4 5 6
78 9 10 11 12
13 14 15 16 17 18
19 20 21 22 23 24
25 26
27 28
29 30
31 32
REFERENCE NUMBERS
Voice Mail Access
Call Voice Mail from . . .
Inside __________________________________________________________
Outside ________________________________________________________
Enter System Access Code ________________________________________
Enter User ID____________________________________________________
Enter Password __________________________________________________
Important Numbers
1.______________________________________________________________
2.______________________________________________________________
3.______________________________________________________________
4.______________________________________________________________
5.______________________________________________________________
6.______________________________________________________________
7.______________________________________________________________
8.______________________________________________________________
9.______________________________________________________________
10. ____________________________________________________________
22
Page 25

AGENT FEATURES
Log On/Log Off
– Press designated LOGON/LOGOFF button to Logon
– Dial 4-digit PIN if required
– Listen for confirmation tone (Button will extinguish)
– Press button again to Logoff
– Listen for confirmation tone (Button will illuminate)
Unavailable/Available
– Press designated UNAVAILABLE button to restrict calls
– Listen for confirmation tone (Button will illuminate)
– Press button again when ready to receive calls
– Listen for confirmation tone (Button will extinguish)
Wrap Up/Available
– Press designated WRAPUP button to restrict calls
– Listen for confirmation tone (Button will illuminate)
– Press button again when ready to receive calls
– Listen for confirmation tone (Button will extinguish)
Help Request
Request for help
With call in progress
– Press HELP button
– Listen for confirmation tone (Button will illuminate)
Respond to help
Receive message indication
– Press MESSAGE WAITING button
– Use * or # to scroll through messages
– Press ICM button to call back or FLA button to delete
23
Page 26

NOTES
Page 27
Alphanumeric Character Table
Char Dial Code
1 1
2 2
3 3
4 4
5 5
6 6
7 7
8 8
9 9
Space 00
A 01
B 02
C 03
D 04
E 05
F 06
G 07
H 08
I 09
J 10
K 11
L 12
M 13
N 14
O 15
P 16
Q 17
R 18
S 19
T 20
Char Dial Code
U 21
V 22
W 23
X 24
Y 25
Z 26
Space 27
-28
.29
+ 30
% 31
& 32
= 33
$ 34
? 35
! 36
' 37
, 38
" 39
/ 40
( 41
) 42
< 43
* 44
;45
:46
Space 47
Space 48
Space 49
Page 28

PROGRAMMABLE FEATURE BUTTONS AT A GLANCE
One Touch Auto-Dial
Press SPD/LNR button / Press available Programmable Feature Button / Press
outgoing line button OR Dial 9 / Dial desired telephone number / Press
SPD/LNR / To enter 10 character name use number pad to input dial codes
for EACH CHARACTER – OR – skip / Press SPD/LNR / Listen for confirmation tone
Direct Station Selection / Busy Lamp Field (DSS/BLF)
Press SPD/LNR button / Press available Programmable Feature Button / Press
ICM button / Dial desired station number / Press SPD/LNR + SPD/LNR
Feature Activation
Press SPD/LNR button / Press available Programmable Feature Button / Dial
desired feature code from chart below / Press SPD/LNR + SPD/LNR
FEATURE BUTTON CODE
Account Code ACCT #504
Auto Redial ARD #520
Busy Queue CBK #505
Buzzer Tone BUZZER #518 + station number
Call Forward FWD #510
Caller ID CID #530
Call Park PRK #517
Group Park GRP #522
Direct Group Park DRP #521
Conference CNF #509
Do Not Disturb DND #506
Do Not Disturb + PIN DND+ #529
Do Not Disturb All DNDA #532
Do Not Disturb All + PIN DNDA+ #533
Direct Call Pickup DPK #511
Group Call Pickup GPK #512
Executive Override OVRD #508
External Paging EPAGE #620
Internal Paging IPAGE #6 + zone number (00-32)
Hunt Group Do Not Disturb HDND #525
Hunt Do Not Disturb + HDND+ #525 + 8 for Unavailable Status
9 for Wrap up Status
Hunt Do Not Disturb All HDNDA #534
Hunt Do Not Disturb All + HDND+ #534 + 8 for Unavailable Status
9 for Wrap up Status
Hook HOK #528
Handset Mute HSM #524
Last Number Redial LNR #514
Message Waiting MSG #515
Privacy Release PRV #507
Service Observation SVO #523
Release Key RLS #519
Voice Mail Record RSVO #526
Page 29

DIGITAL MULTILINE TELEPHONE QUICK REFERENCE GUIDE
Answering Calls
Internal (ICM) Press ICM / Lift handset for privacy
External (Line) Press flashing button / Lift handset for privacy
Off-hook Voice Call Press ICM to respond
Placing Calls
Internal (ICM) Press ICM / Dial station / Lift handset for privacy
Page Press ICM / Dial #6 / Dial two digit area code
External (Line) Press line button / Dial telephone number / Lift
handset for privacy
External (ICM) Press ICM / Dial 9 / Dial telephone number / Lift
handset for privacy
Last Number Redial Press SPD/LNR / # or * to scroll / Press line
button to dial
Speed Dial Press SPD/LNR / Dial speed dial number / Press
line button
Call-in-Progress
Transfer Press TRF / Dial station number / Hang up
Holding Calls Press Hold
Exclusive Hold Press Hold twice
Conference Press TRF / Make new call / Repeat for each new
call / Press CNF when all calls are connected
Station Preferences
Background Music (Set) Press FEAT / Dial 21
(Cancel) Press FEAT / Dial 20
Station One-Touch Dial Press SPD/LNR / Press available button / Press
ICM / Dial station number / Press SPD/LNR
Prime Line Preference Press ICM / Dial *07
Dynamic Line Preference Press FEAT / Press Line button / Repeat for each
line as necessary
Ringing Line Preference Press ICM / Dial *06
Ring Mode (Internal) (Ring) Press ICM / Dial *03
(Voice) Press ICM / Dial **03
Ring Tone Press ICM / Dial *5 / Select tone 1-4
Ring Volume While call is ringing press adjustment key
Speaker Volume While on call press adjustment key
Display Brightness While telephone is idle press adjustment key
®
6755 Jimmy Carter Blvd. Norcross, Georgia 30071
770 447 9555 Fax 770 449 3799
www.win-phone.com
Page 30

®
6755 Jimmy Carter Blvd. Norcross, Georgia 30071
770 447 9555 Fax 770 449 3799
©1999 WIN®Communications Corp. The material contained herein is subject to
change without prior notice at the sole discretion of WIN
®
Communications Corp.
 Loading...