

WINCODE LP423N, LP433N User Manual
LP423N / LP433N USER MANUAL
User Manual:LP4 series
Issue Date:2018/08/31
Version 4.1

LP4 USER MANUAL
- 1 -
Declaration
The content of this manual is subject to change without prior notice and cannot be
altered without written permission obtained from Wincode Technology Co., Ltd
(hereinafter referred to as “Wincode”). No part of this manual may be reproduced or
transmitted in any form by any means. This manual includes the installation instruction
and detailed description of possible questions in the operation. Wincode has reserved
the right to improve product including technology, components, software and
hardware.
Copyright
The Copyright of this manual is belonged to Wincode
Ver4.0, 08. 2018.
Printed in Taiwan
Trademark
Our registered trademark:
Compliances
CE Class B
FCC Part 15, Class B
CCC, CB, BIS, KC
Comply with RoHS regulation

LP4 USER MANUAL
- 2 -
Safety Instructions
Please read the following instructions carefully.
1. Install printer on the flat and stable place. To avoid printer exposed in the
high temperature or high humidity or polluted place.
2. Do not disassemble the printer and adapter under any circumstances.
3. Please check the voltage before printer is connected with power outlet; If
printer is deemed to idle for a long time, please pull out the power cord to
avoid voltage instability to cause printer damage.
4. If printer gets water or conductive material, please shut off the power
immediately to ensure the safety of personnel and equipment.
5. To avoid printer to start printing while there is no label paper installed;
otherwise the print head and platen roller would be damaged.
6. The print head is a thermal part, please do not touch it or its peripherals
during printing or after printing.
7. Shut down the printer when connecting or disconnecting interfaces to avoid
any damage happened.
8. Please choose designated adapter model of Wincode to connect printer
accordingly.

LP4 USER MANUAL
- 3 -
Contents
Declaration .......................................................................................................... - 1 -
Safety Instructions ............................................................................................... - 2 -
Contents .............................................................................................................. - 3 -
1. Product Introduction .................................................................................... - 5 -
1.1 Unpacking and checking ......................................................................... - 6 -
1.2 Appearance ............................................................................................ - 7 -
2. Setup ........................................................................................................... - 9 -
2.1 Setting up the printer ............................................................................. - 9 -
2.2 Ribbon Loading..................................................................................... - 10 -
2.3 Label Loading ....................................................................................... - 16 -
2.4 Real Time Clock Battery Installation ...................................................... - 19 -
2.5 Cutter Installation (Optional) ................................................................ - 20 -
2.5.1Label Installation ......................................................................... - 22 -
2.6 Peeler Installation (Optional) ................................................................ - 23 -
2.6.1Label Installation ......................................................................... - 26 -
3. Driver installation ....................................................................................... - 27 -
3.1 Printer Installation ................................................................................ - 28 -
3.2 Install driver with “Add a Printer” in Microsoft ...................................... - 32 -
3.2.1 Printer Installation ...................................................................... - 33 -
3.3 Printing Setup (Driver Setup) ................................................................ - 40 -
3.3.1 Page Setup ................................................................................. - 40 -
3.3.2 Media Settings ........................................................................... - 41 -
3.3.3 Sensor Calibration ............................................................... - 43 -
3.3.4 Options ...................................................................................... - 44 -
3.3.5 Image Processing ....................................................................... - 47 -
3.3.6 Tools .......................................................................................... - 48 -
3.3.7 About ........................................................................................ - 49 -
4. WinLabel tool suite .................................................................................... - 50 -
4.1 Software Introduction ........................................................................... - 50 -
4.2 Software Installation ............................................................................. - 51 -
4.3 WINLABEL Label Editing Software ......................................................... - 52 -
4.4 Update settings and update check ........................................................ - 53 -
4.5 Firmware update Tool ........................................................................... - 54 -
5. Printer Utility ............................................................................................. - 55 -
5.1 Printing Summary ................................................................................. - 57 -
5.2 Settings ................................................................................................ - 58 -

LP4 USER MANUAL
- 4 -
5.3 File Management.................................................................................. - 61 -
5.4 Send Command .................................................................................... - 62 -
6. LED indicators and button explanation ........................................................ - 63 -
7. Maintenance .............................................................................................. - 66 -
8. Appendix – LP4N series specification .......................................................... - 67 -

LP4 USER MANUAL
- 5 -
1. Product Introduction
Thank you for purchasing Wincode’s LP4N series label printer, this desktop label
printer with reasonable price has reliable quality to provide user highly-efficient
printing performance. The LP4 series printer not only can print label in text or graphic
formats, but owns basic function and convenient operation interface.
In addition, LP4N series label printer with elegant bright black enclosure has cover
open buffer design to avoid hand clamped in operation; The maximum 5” outside
diameter label loading space; Dual ribbon loading design enables user to use 100m or
300m ribbon; It is also equipped 32 bit processor with highly efficient relevant
configurations to make printing action smoothly and clearly so it can be applied in the
different fields such as retailing, health care, manufacturing, logistics, warehousing
and so on.
The bundled label design program as “WinLabel” provides completed label design
tools and barcode resource for user to design ideal label format; Free database
function can be connected with Excel, Access, Text file…etc. and get required
information in the specified position of label. Standalone function can support
advanced models LP4A series to produce standalone format label.
LP4 USER MANUAL
- 6 -
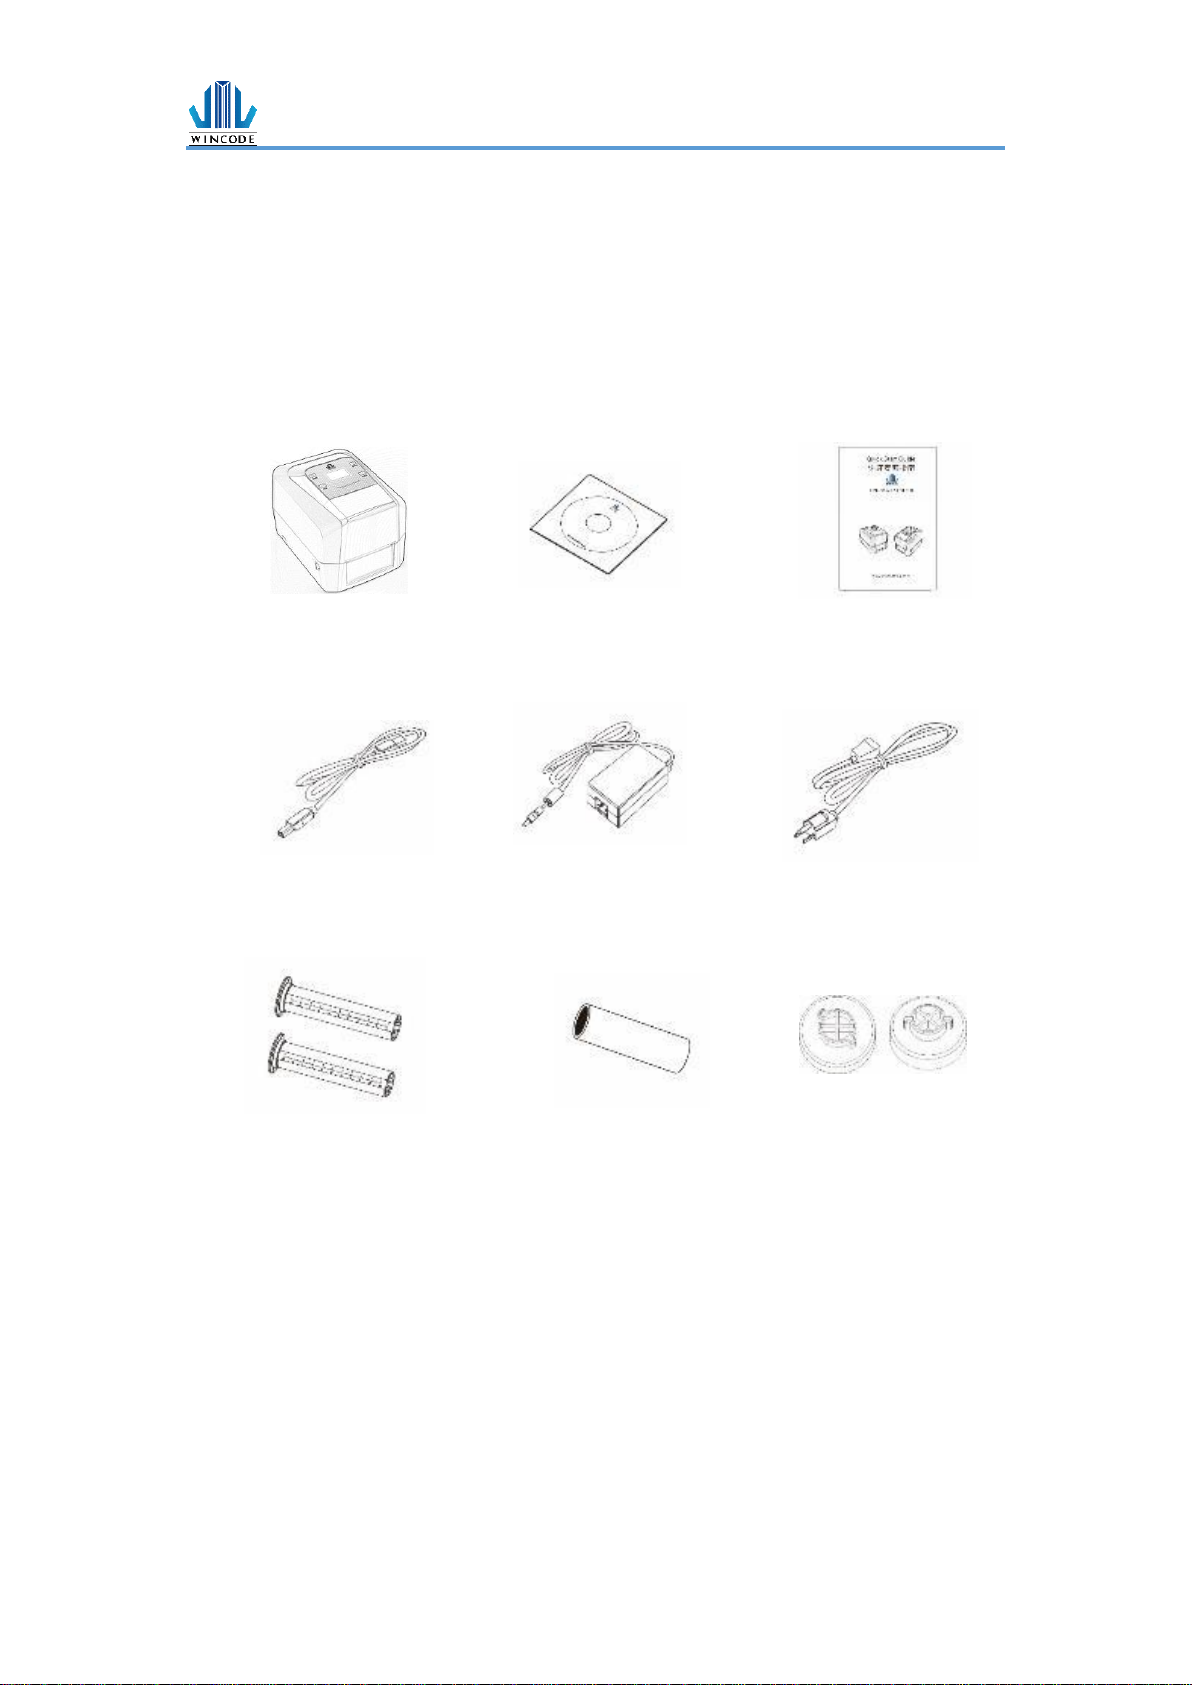
1.1 Unpacking and checking
Unpacking the package, and refer to the below packing list to check whether any part
is damaged or missing in transit. If this incident has been happened, please contact
with local dealer or distributor for further assistance.
Label Printer CD Disc (Optional) Quick Installation Guide
USB Cable Adapter Power Cord
Ribbon Supply Spindle Empty Paper Core (1” core) 0.5”ribbon cap
Ribbon Take-up Spindle
LP4 USER MANUAL
- 7 -
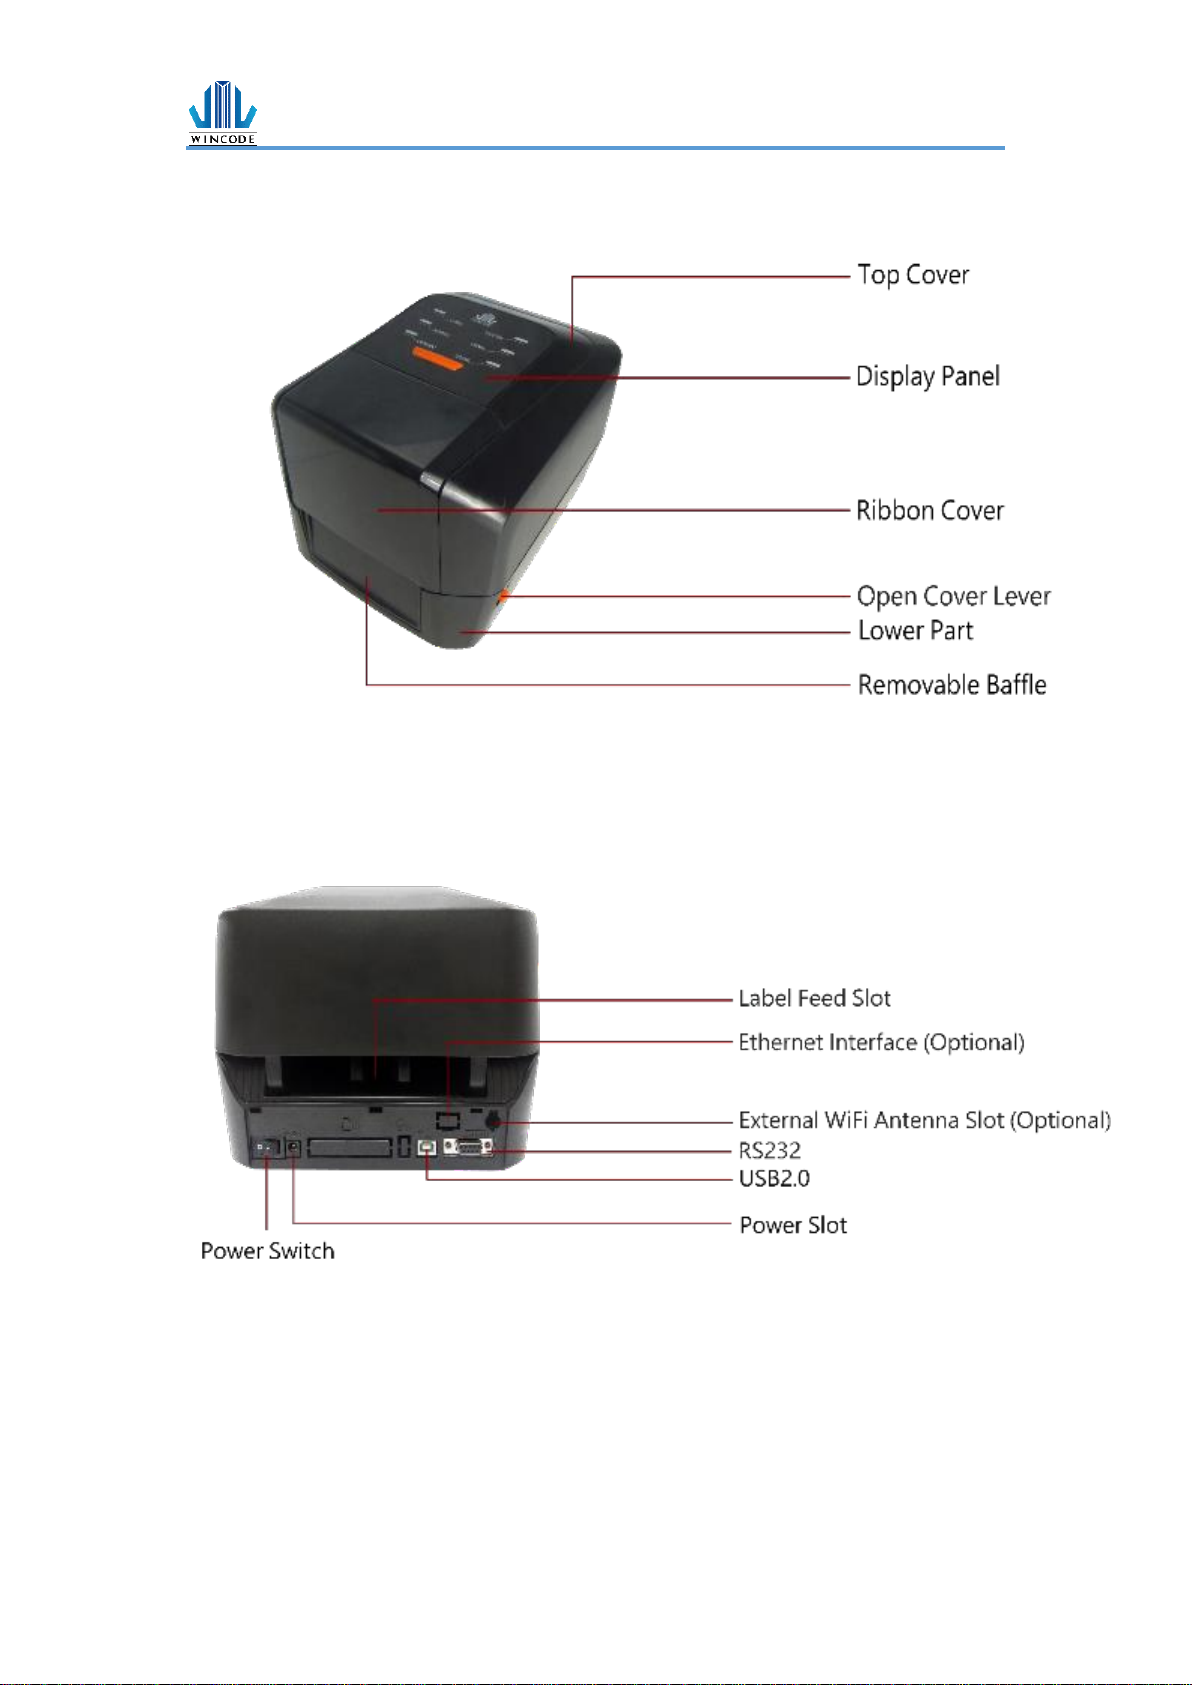
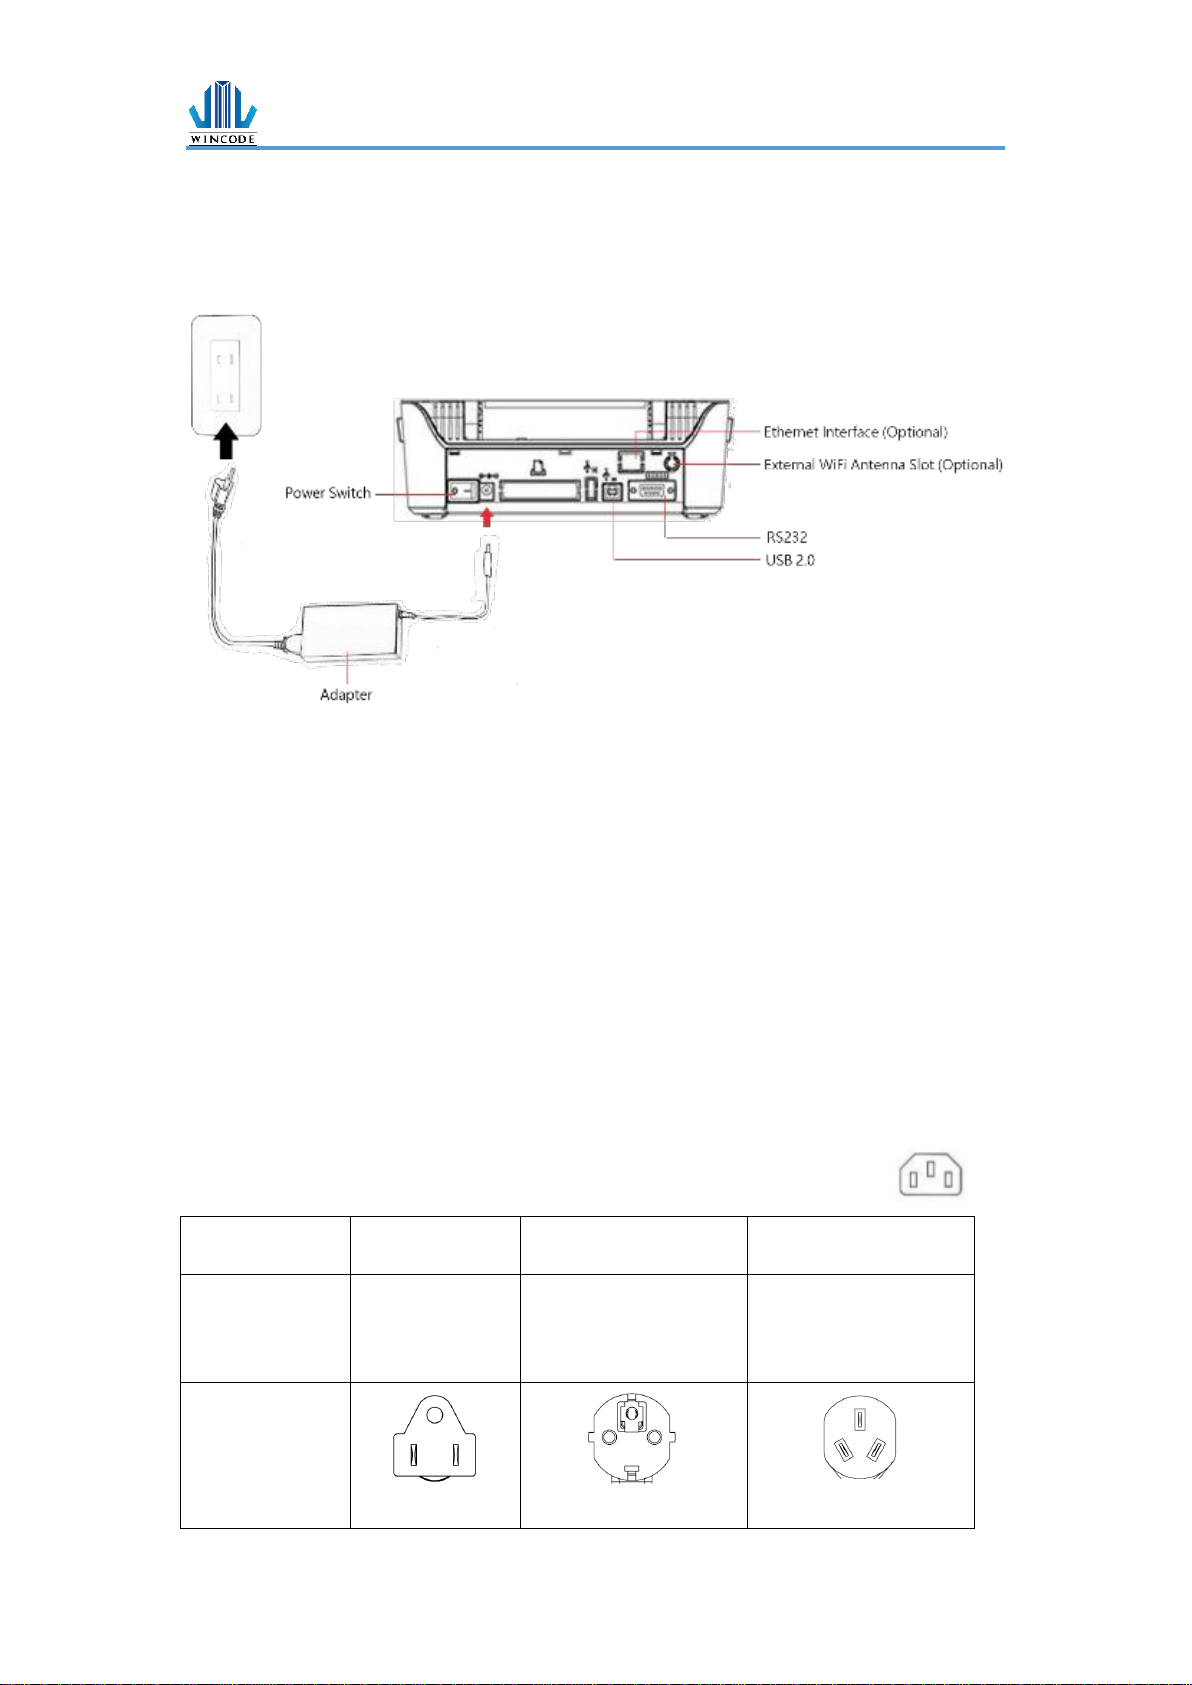
1.2 Appearance
(Figure 1: Front View)
(Figure 2: Rear View)
LP4 USER MANUAL
- 8 -
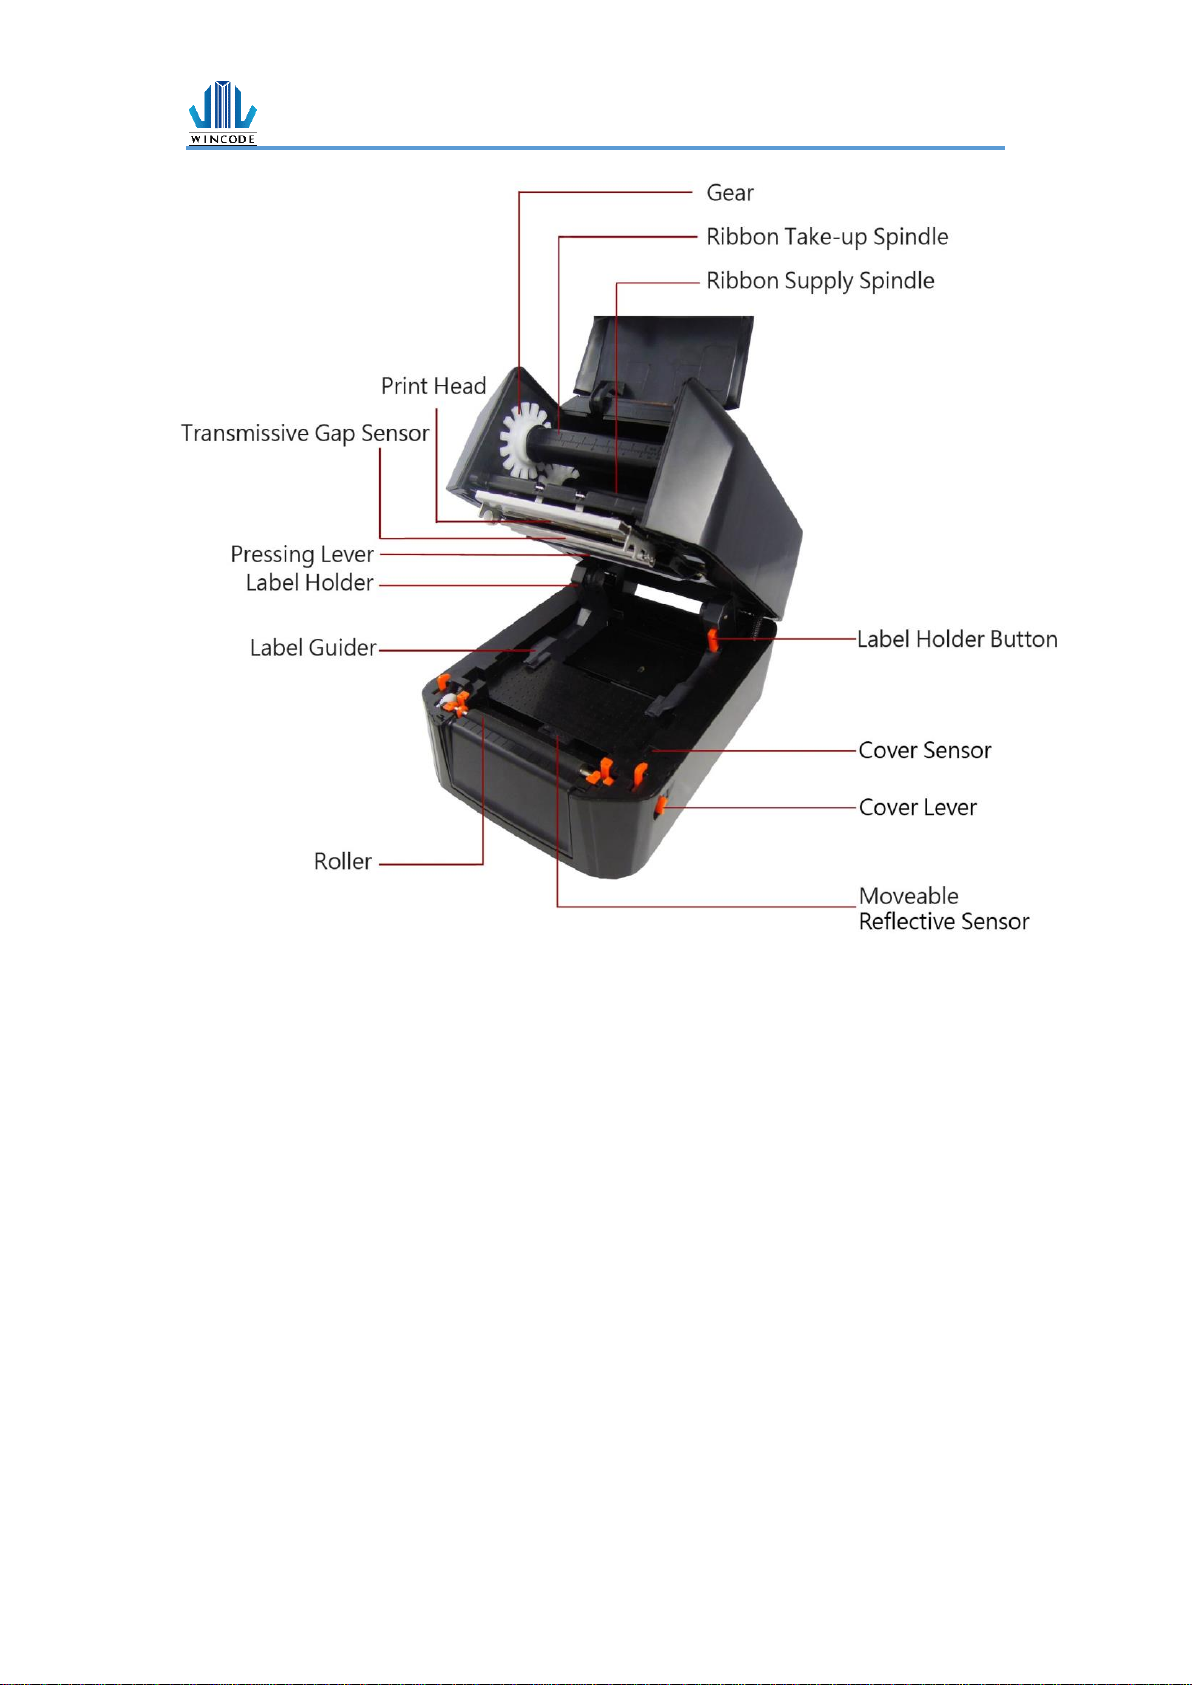
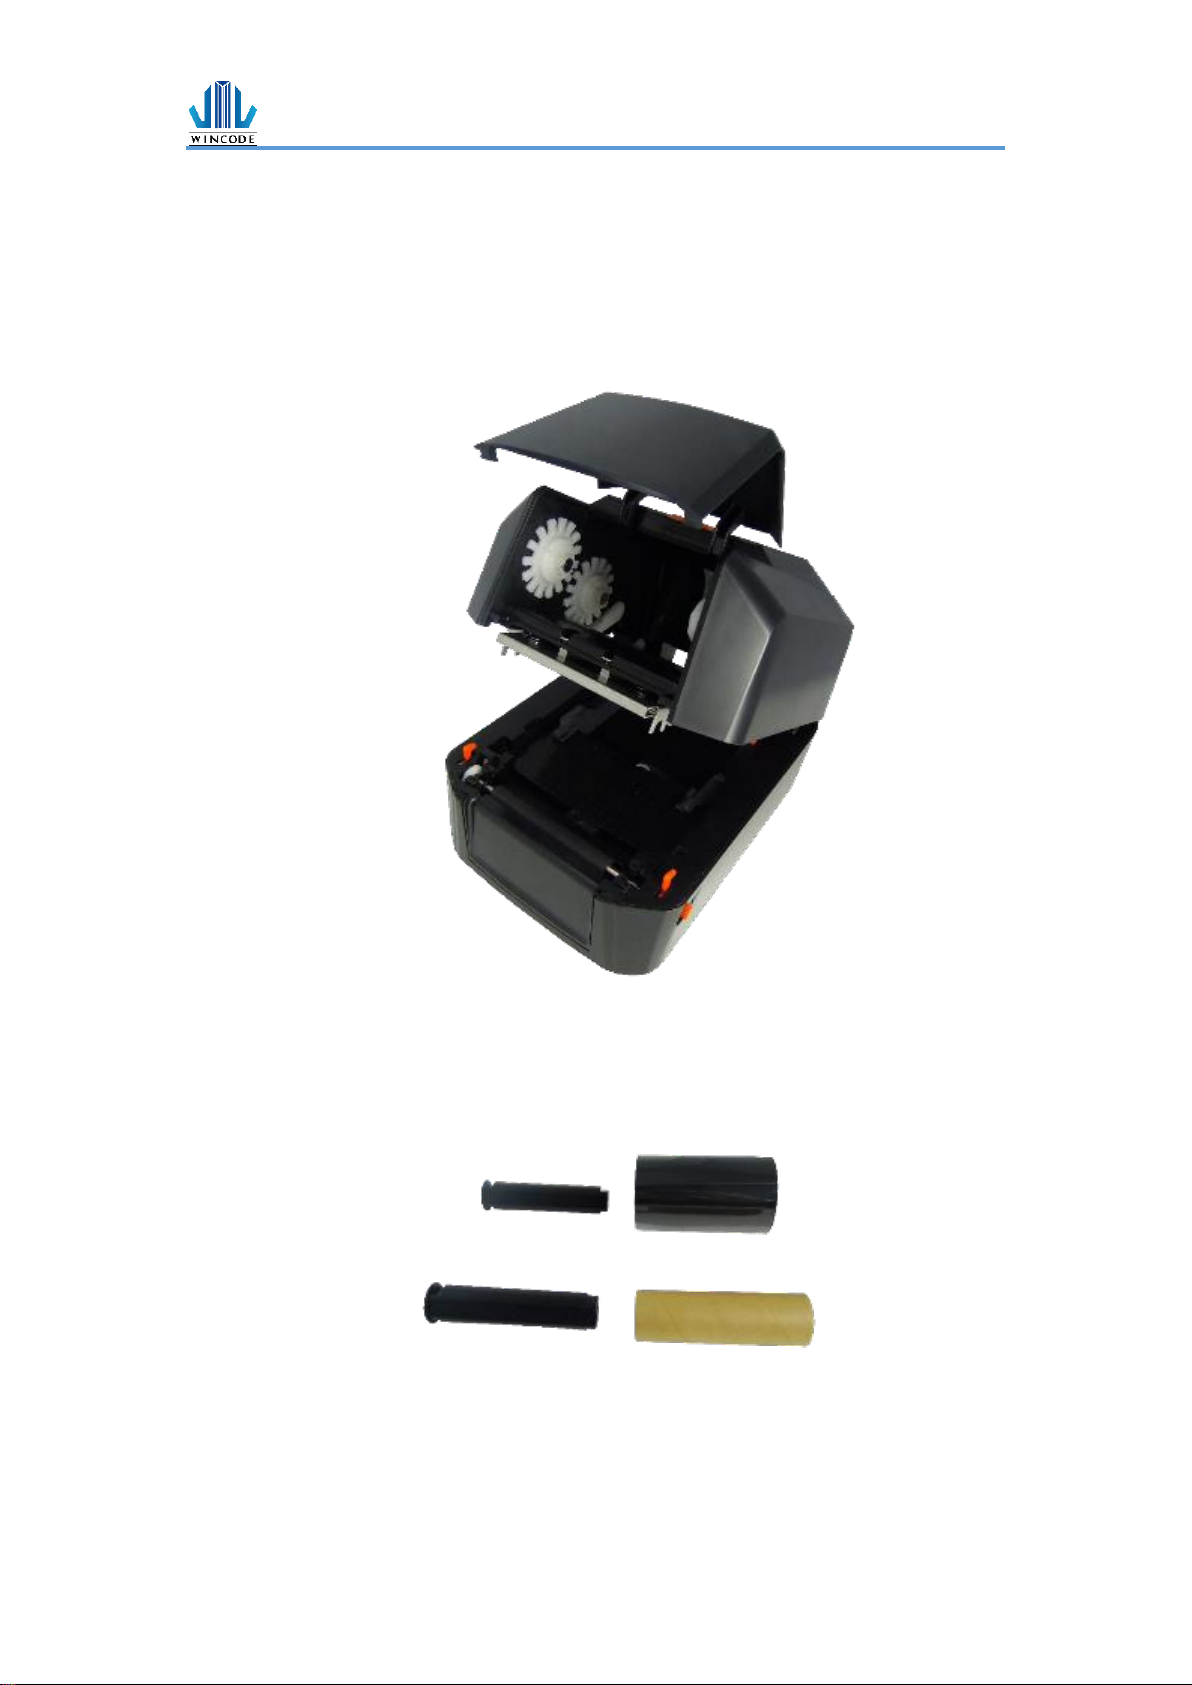
(Figure 3: Inside View)
LP4 USER MANUAL
- 9 -
2. Setup
2.1 Setting up the printer
1.) Place the printer on the flat surface.
2.) Make sure the power switch is OFF.
3.) Choose corresponding cable (RS232 or USB 2.0) to connect printer with computer.
4.) Plug the DC power cord into the power slot and plug the AC power cord into a
socket on the wall.
Note: Power Cord instruction
⚫ To use 100-125 Voltage, please choose minimum rating power cord. (125V, 10A)
⚫ To use 200-240 Voltage, please choose minimum rating power cord. (250V, 10-
16A)
⚫ Please select the power cord length less than 2 meter.
⚫ Power cord is connected with adapter and have to plug in the jack
as ICE-320-C13 as right figure.
Country/ Area
North
America/Taiwan
Europe
China
Power cord
Voltage and
Electricity Spec.
125V, 10A
SVT 18AWG
250V,10A
H05VV-F
250V,10A
RVV H05VV-F
Plug (Refers to the
local plug standard)
125V, 10A
250V, 16A
250V, 10A
LP4 USER MANUAL
- 10 -
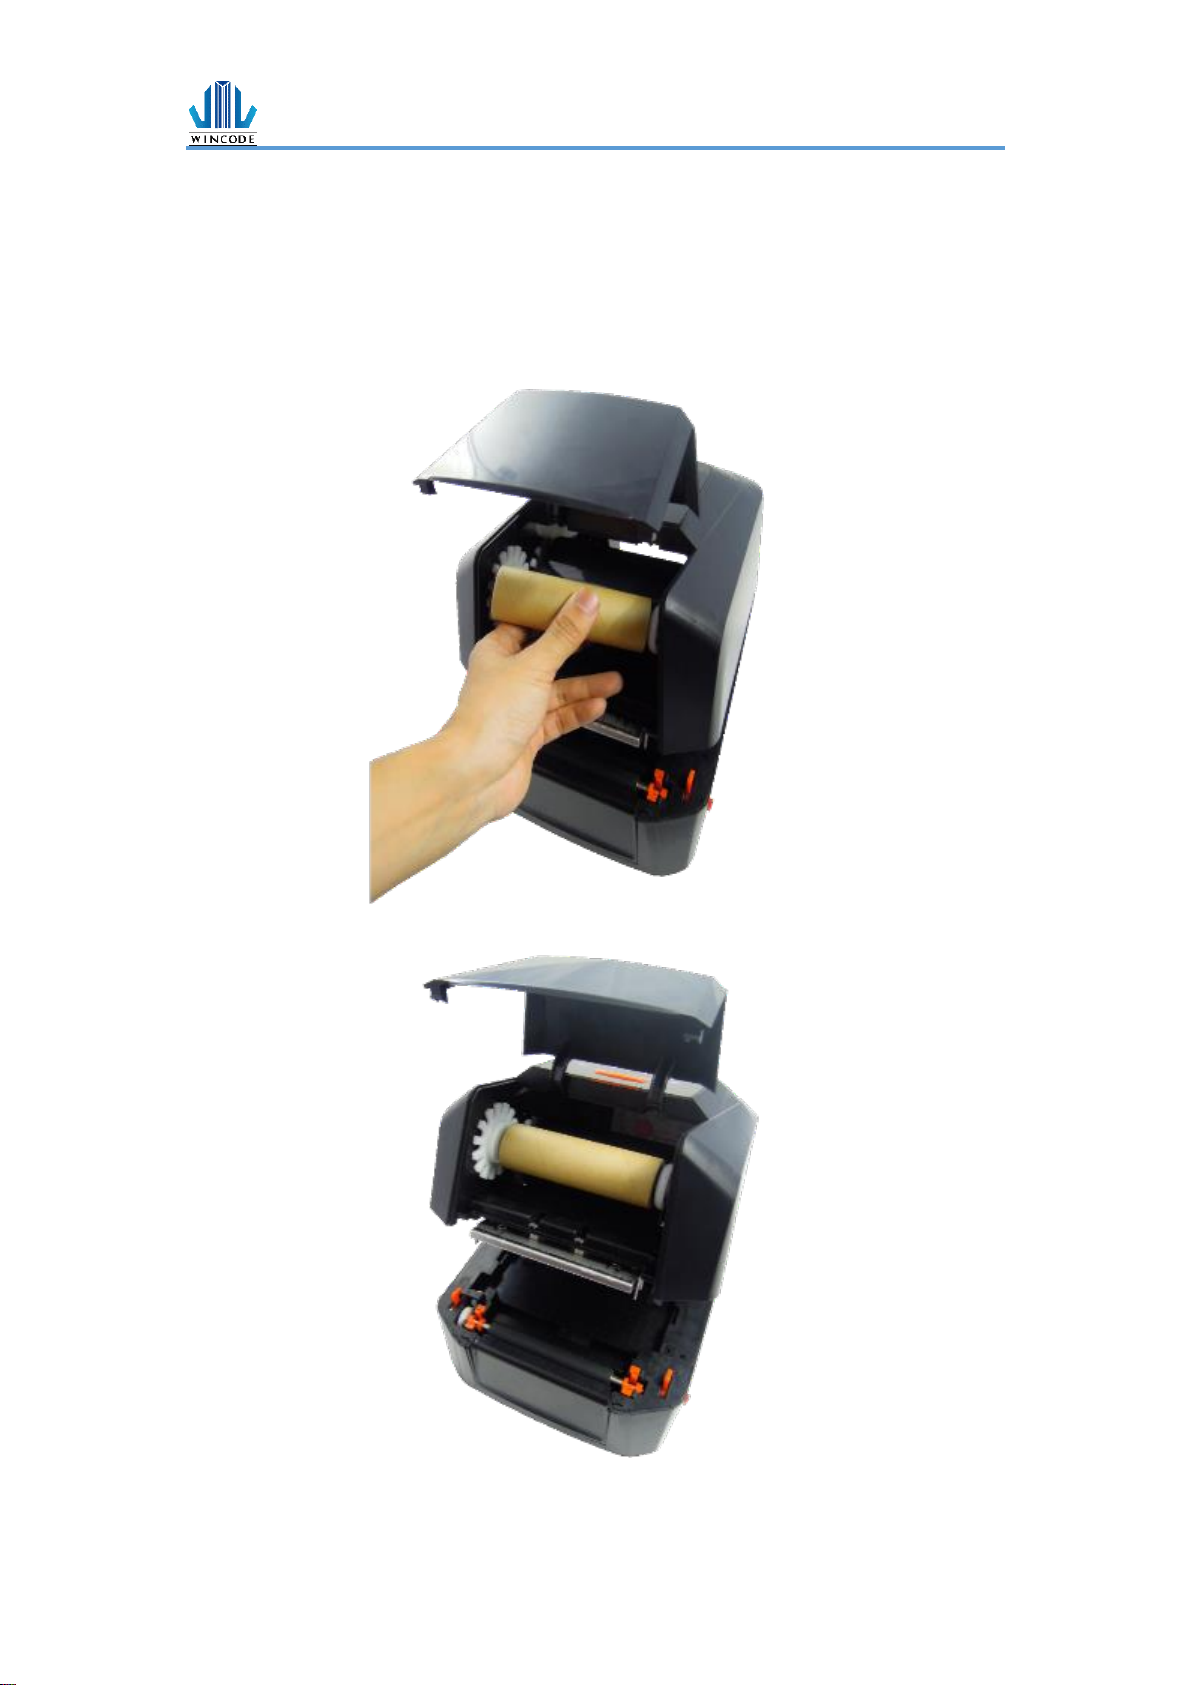
2.2 Ribbon Loading
1) 1” core (300m length ribbon)
Open the ribbon cover and top cover; Install an empty paper core onto the
ribbon take-up spindle; Install a ribbon onto the ribbon supply spindle.
LP4 USER MANUAL
- 11 -
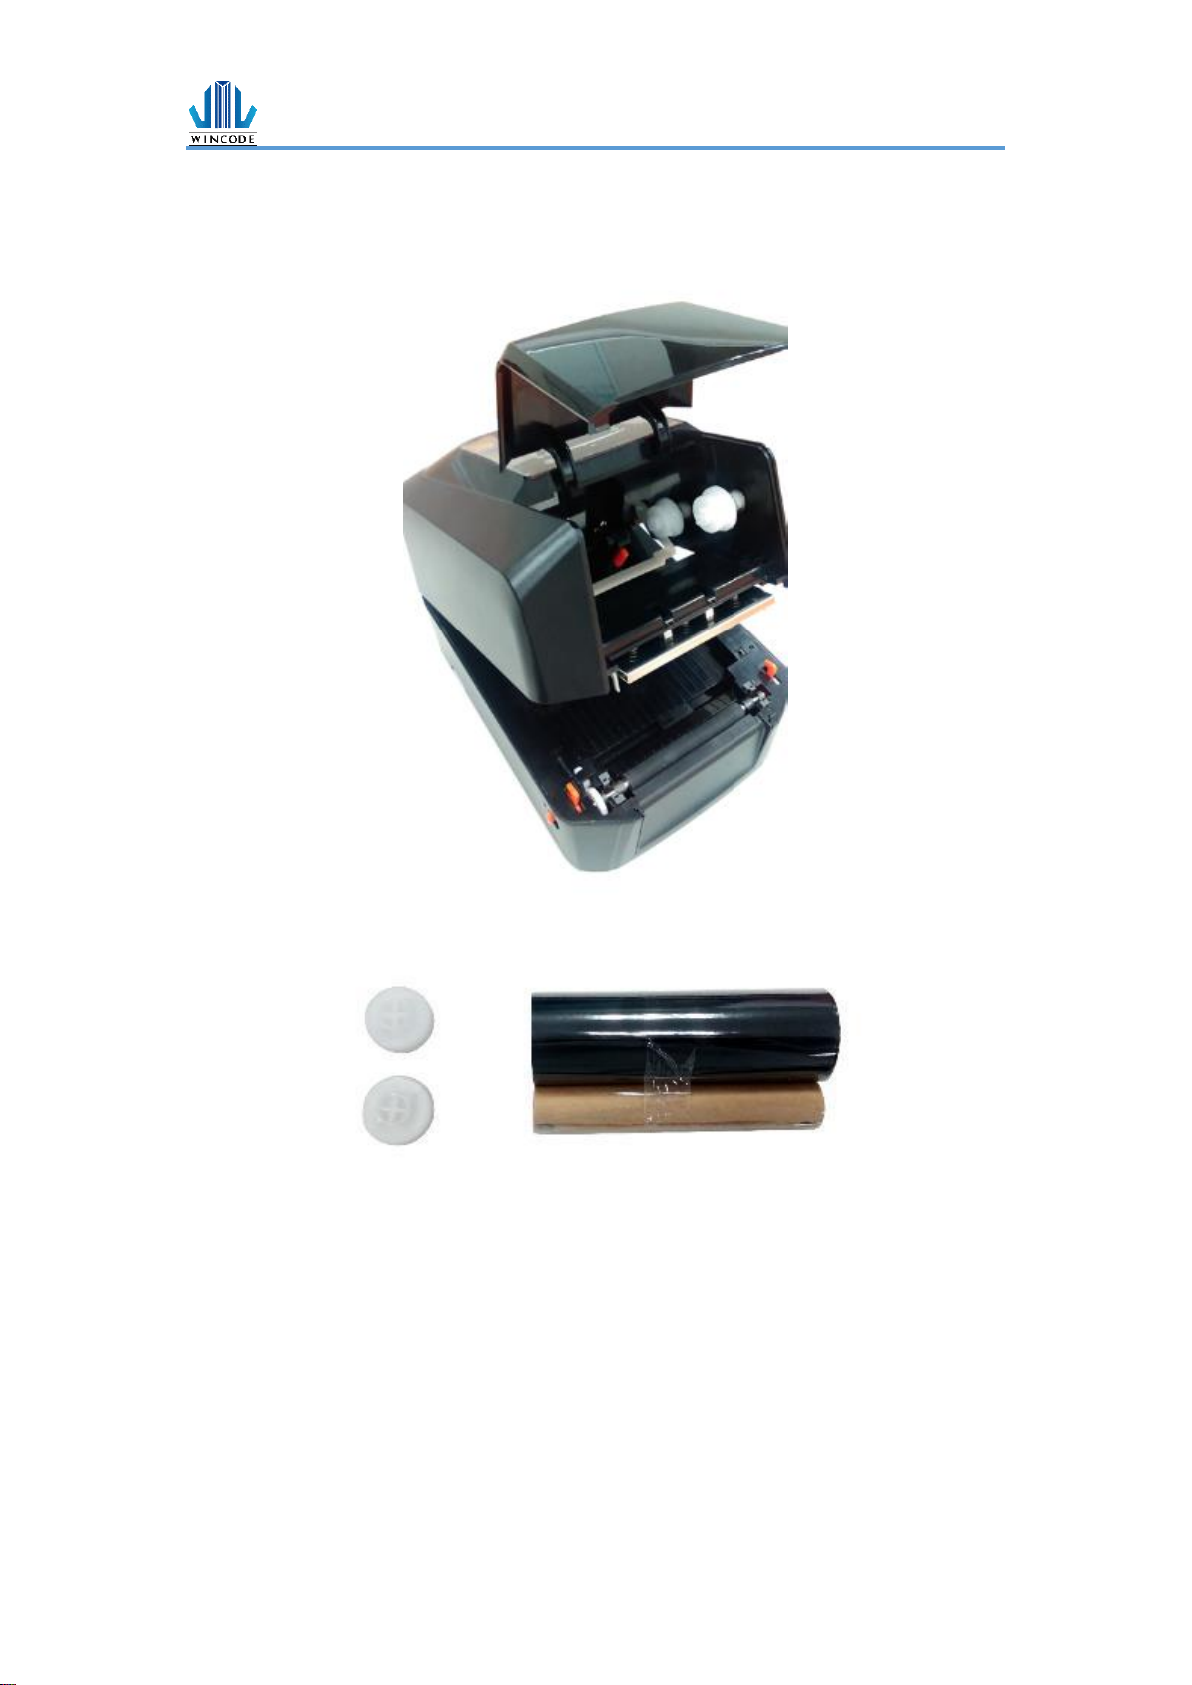
0.5” core (100m length ribbon)
Open the ribbon cover and top cover; install the two 0.5" ribbon caps on the
right white holders.
LP4 USER MANUAL
- 12 -
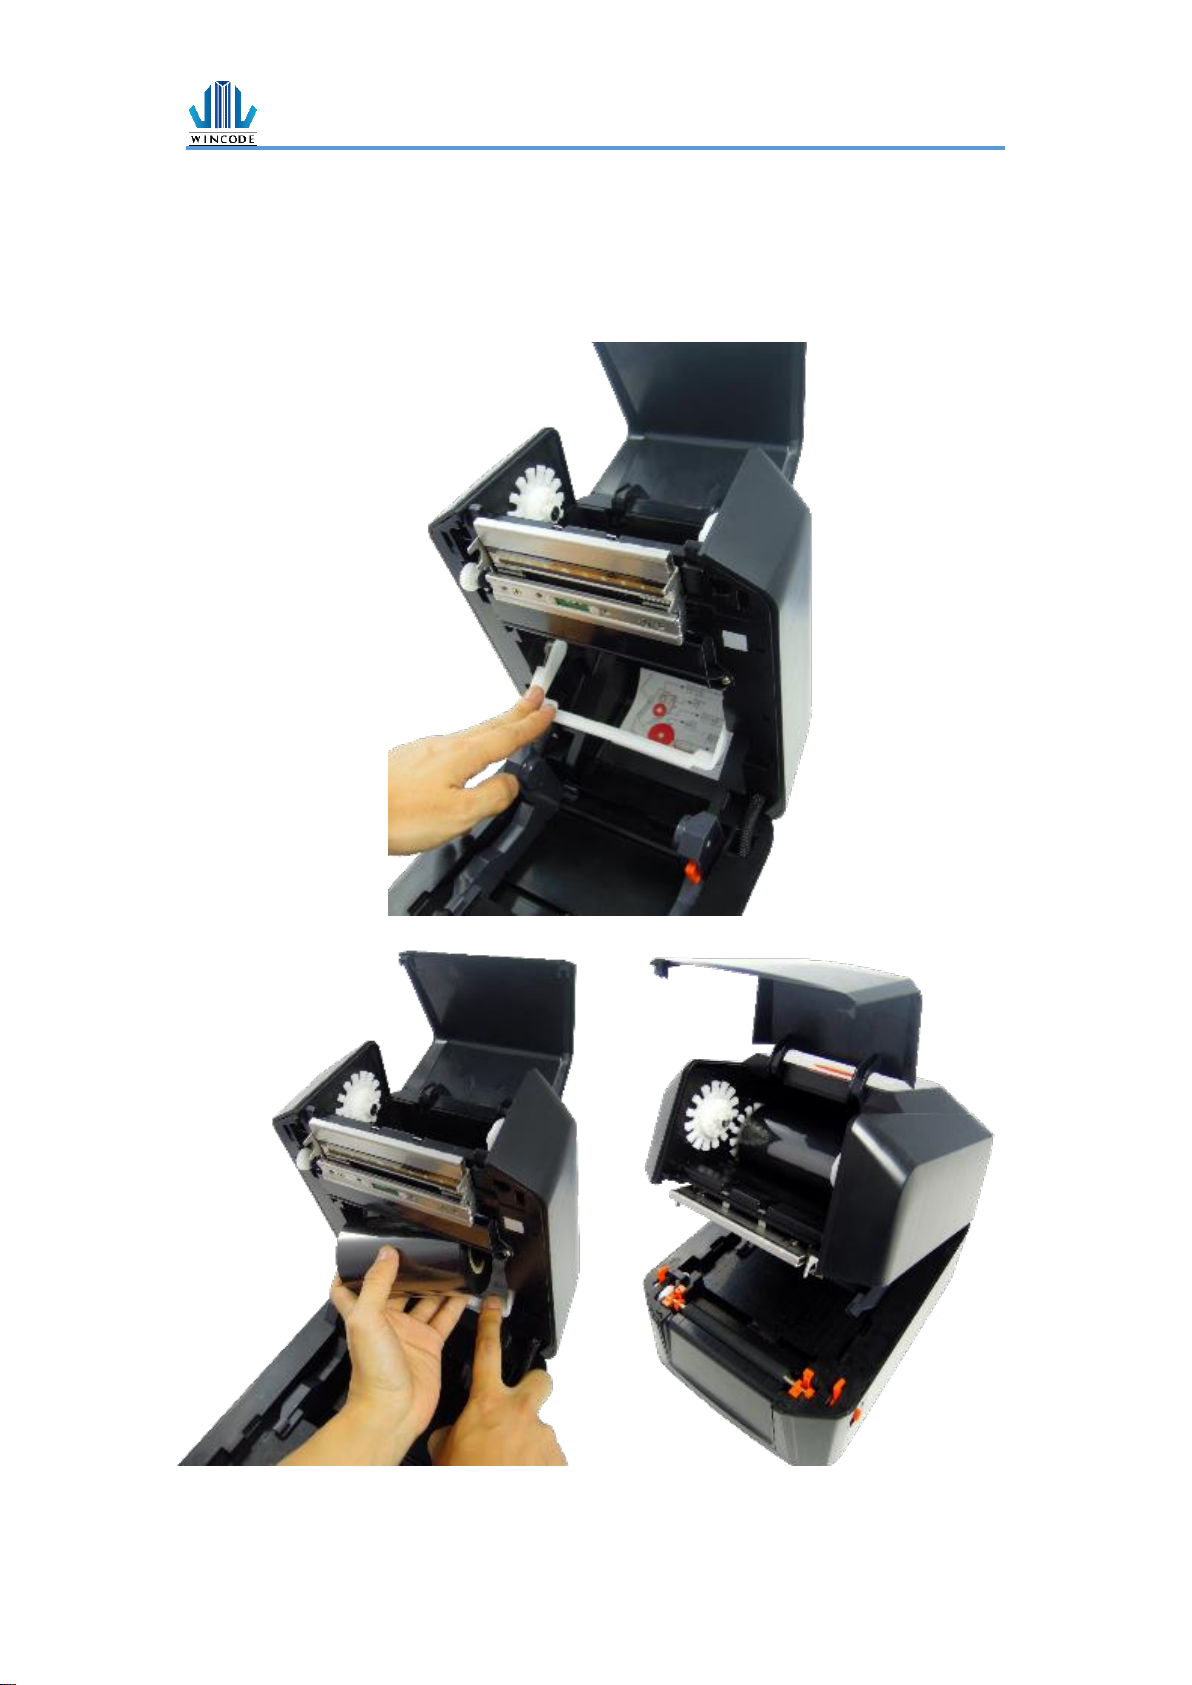
2) Pull back the pressing lever, then load the right side of ribbon first into the
ribbon supply mechanism.
The left side of ribbon supply spindle needs to be connected with bulge part
of left supply mechanism completely (Turn the gear until the bulge part in the
notch of spindle).
LP4 USER MANUAL
- 13 -
3) Load the right side of paper core first into the ribbon take-up mechanism.
The left side of ribbon take-up spindle needs to be connected with bulge part of
take-up mechanism completely. (Turn the gear until the bulge part in the notch
of spindle).
LP4 USER MANUAL
- 14 -
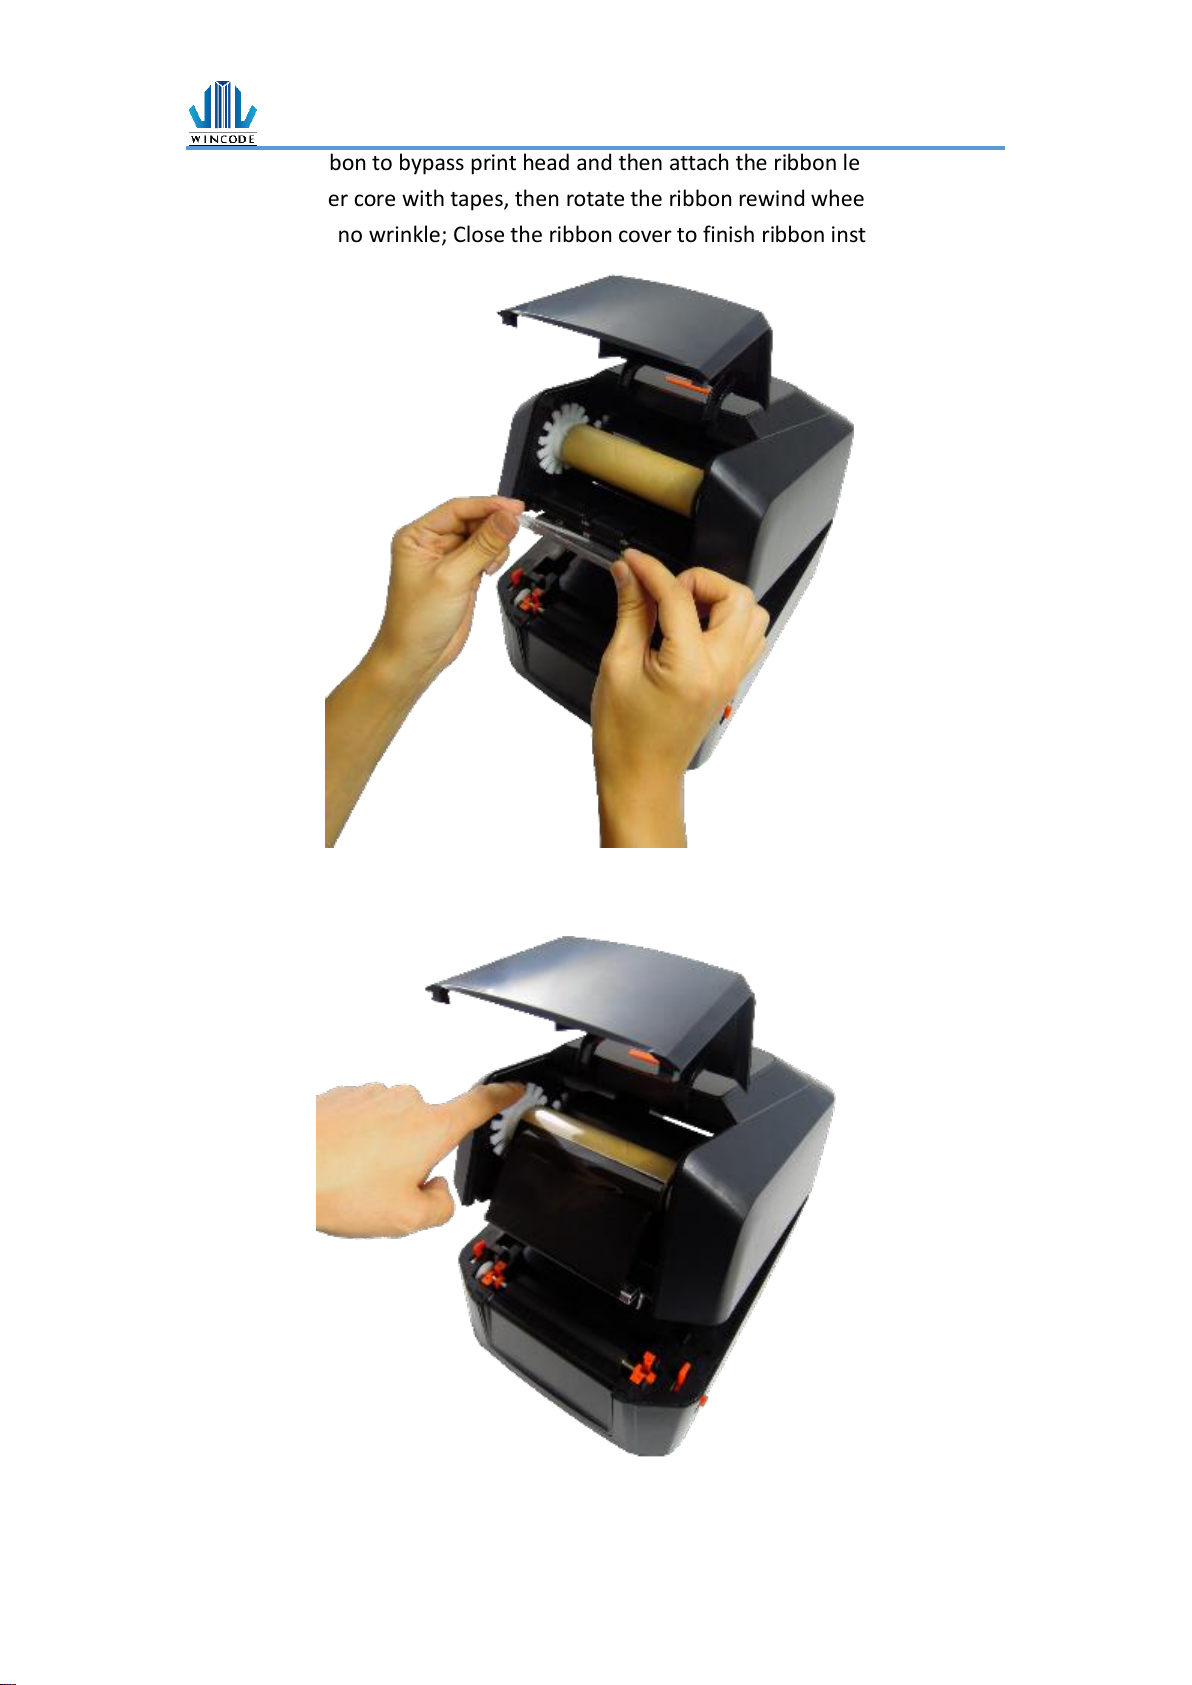
4) Pull the ribbon to bypass print head and then attach the ribbon leader on the
empty paper core with tapes, then rotate the ribbon rewind wheel until ribbon
surface has no wrinkle; Close the ribbon cover to finish ribbon installation.
LP4 USER MANUAL
- 15 -
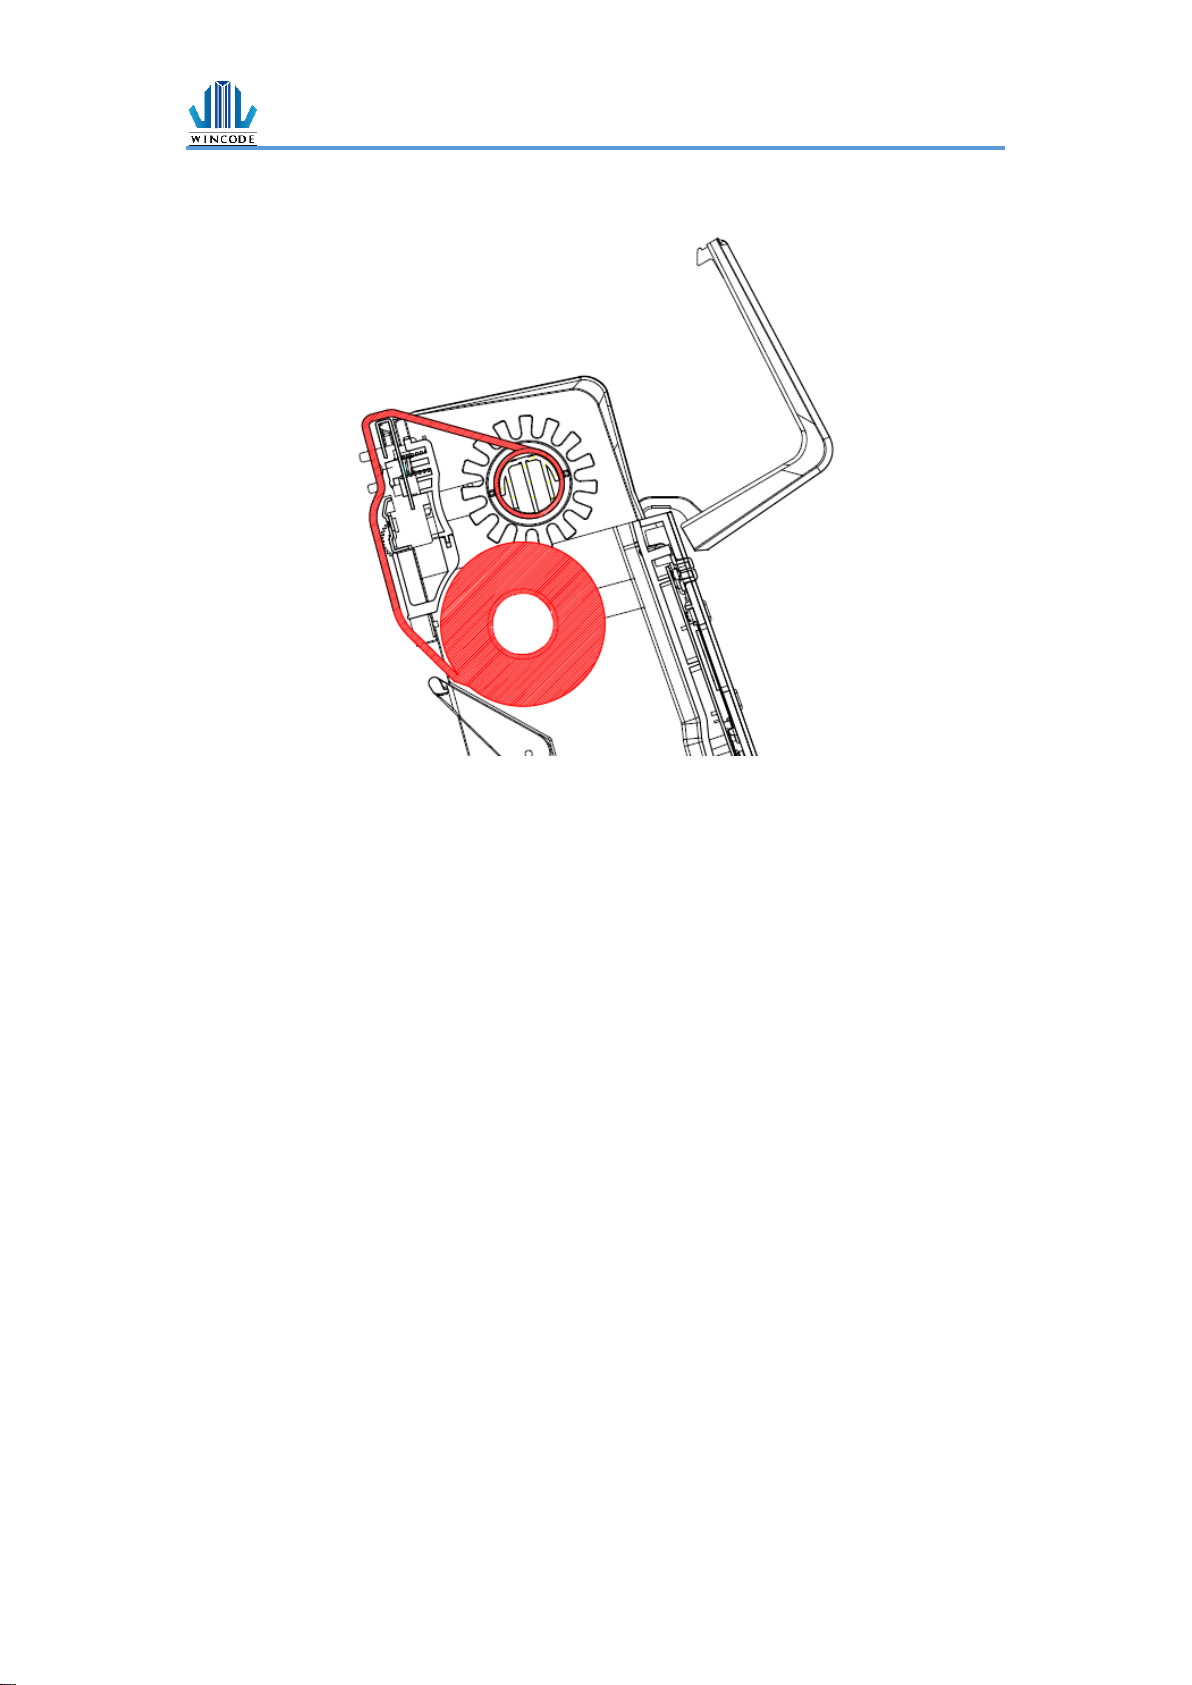
6. Ribbon Installation Path
LP4 USER MANUAL
- 16 -
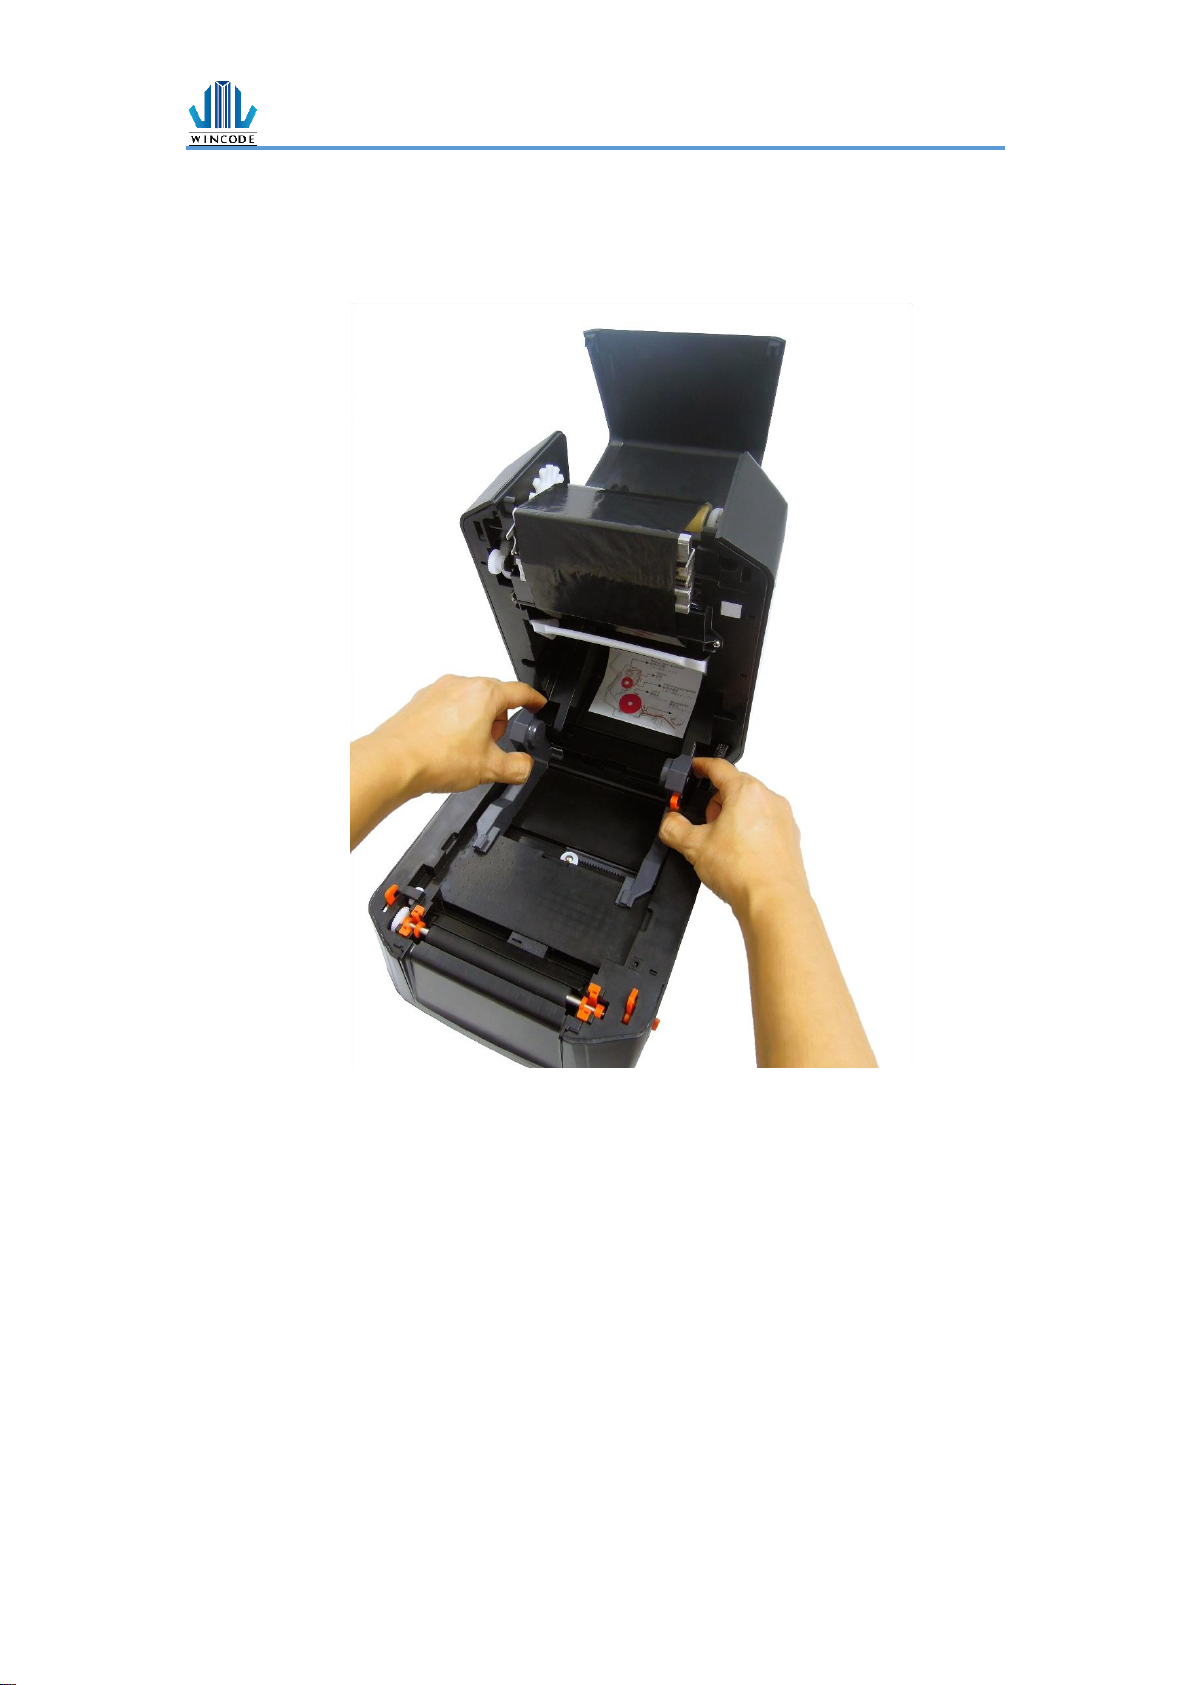
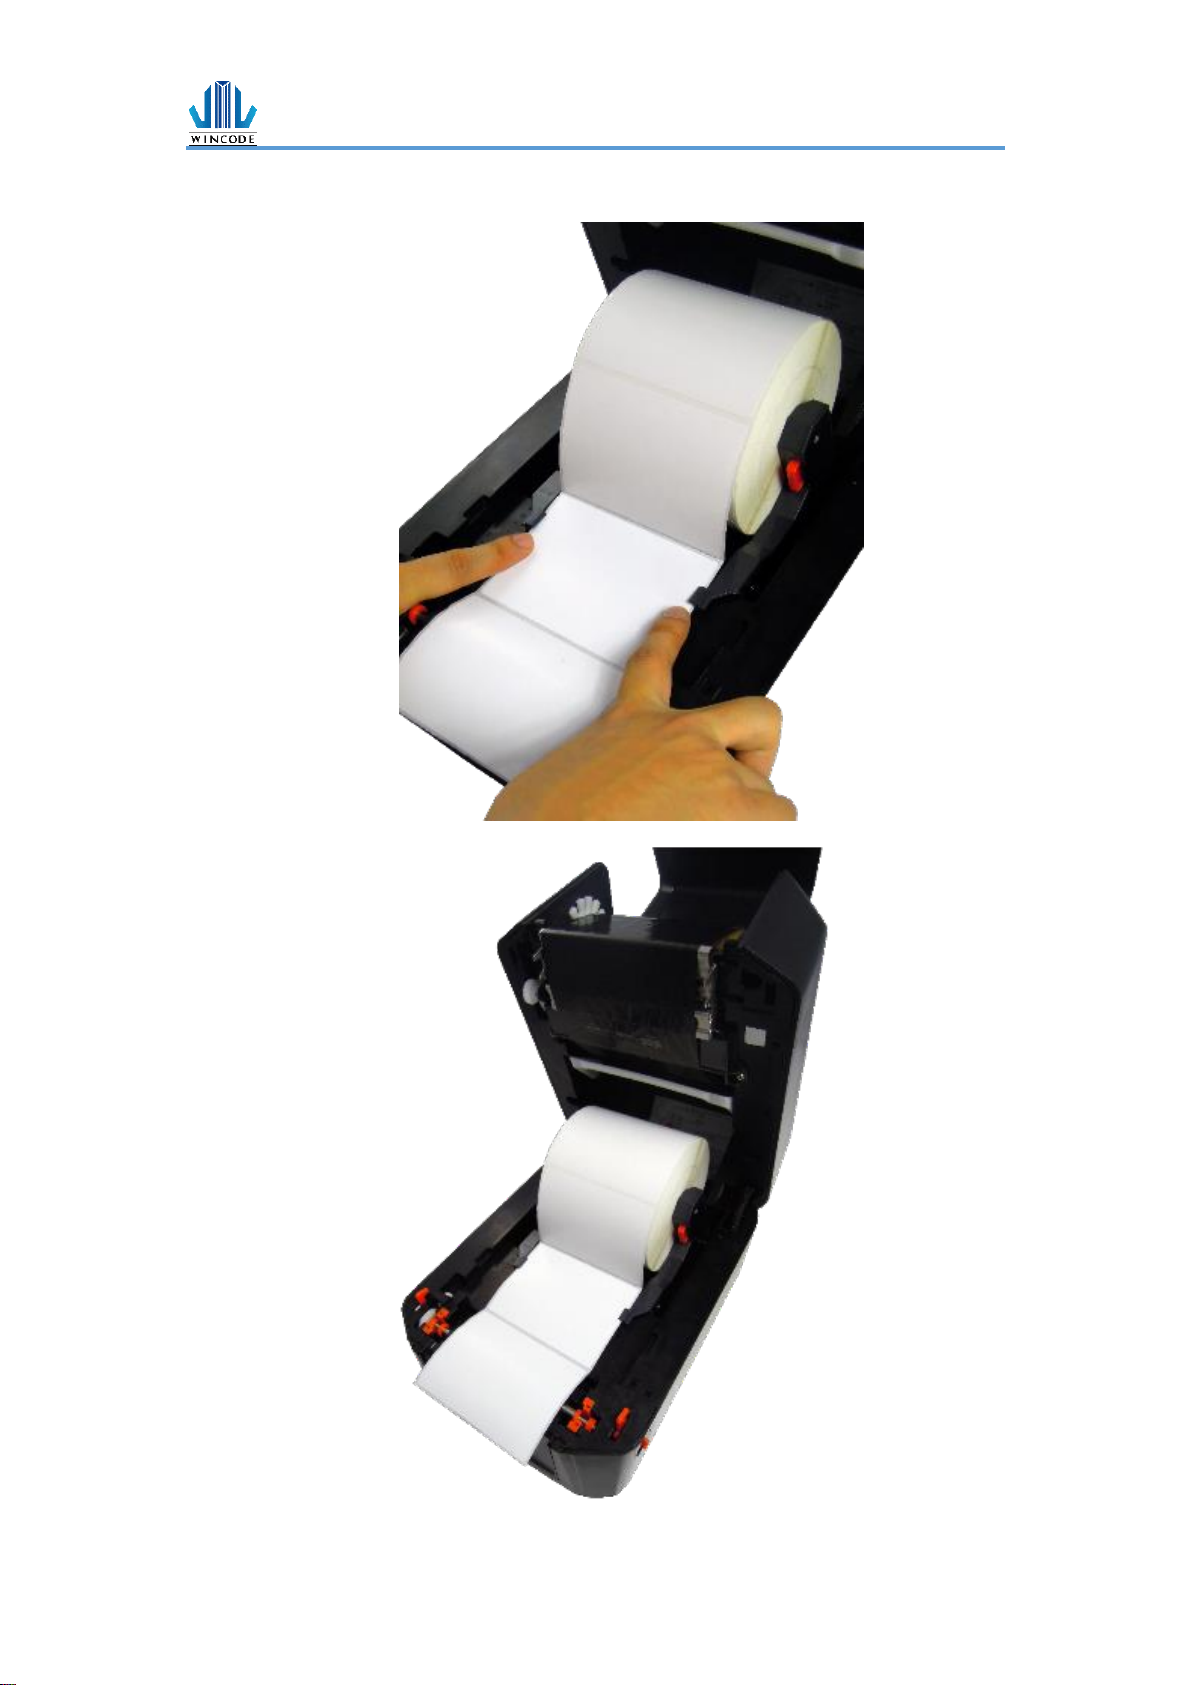
2.3 Label Loading
1) Hold on each side of label holder, press the orange buttons and then arrange
the width, and place a label roll between the holders.
LP4 USER MANUAL
- 17 -
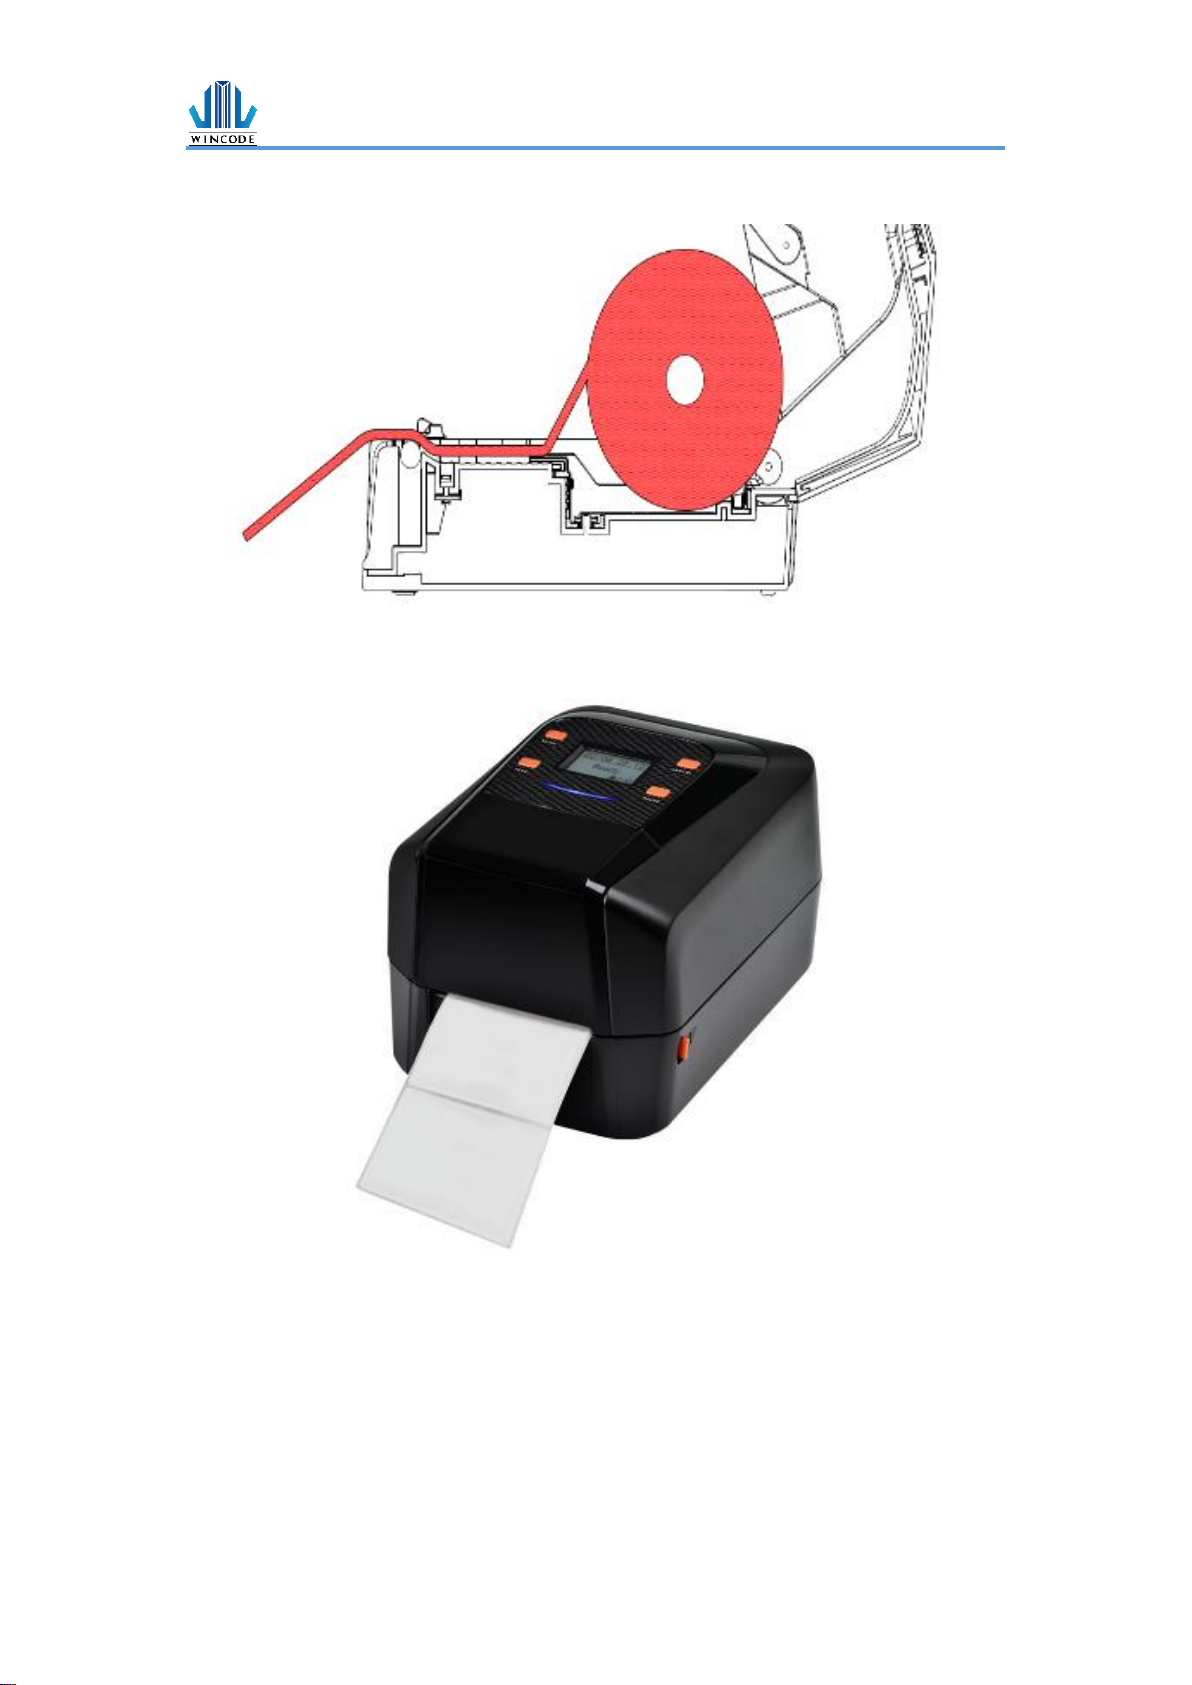
2) Pull the label paper through the rubber roller and push the both sides of label
under the label guides. Close the top cover to finish label installation.
LP4 USER MANUAL
- 18 -
3) Label installation path
LP4 USER MANUAL
- 19 -
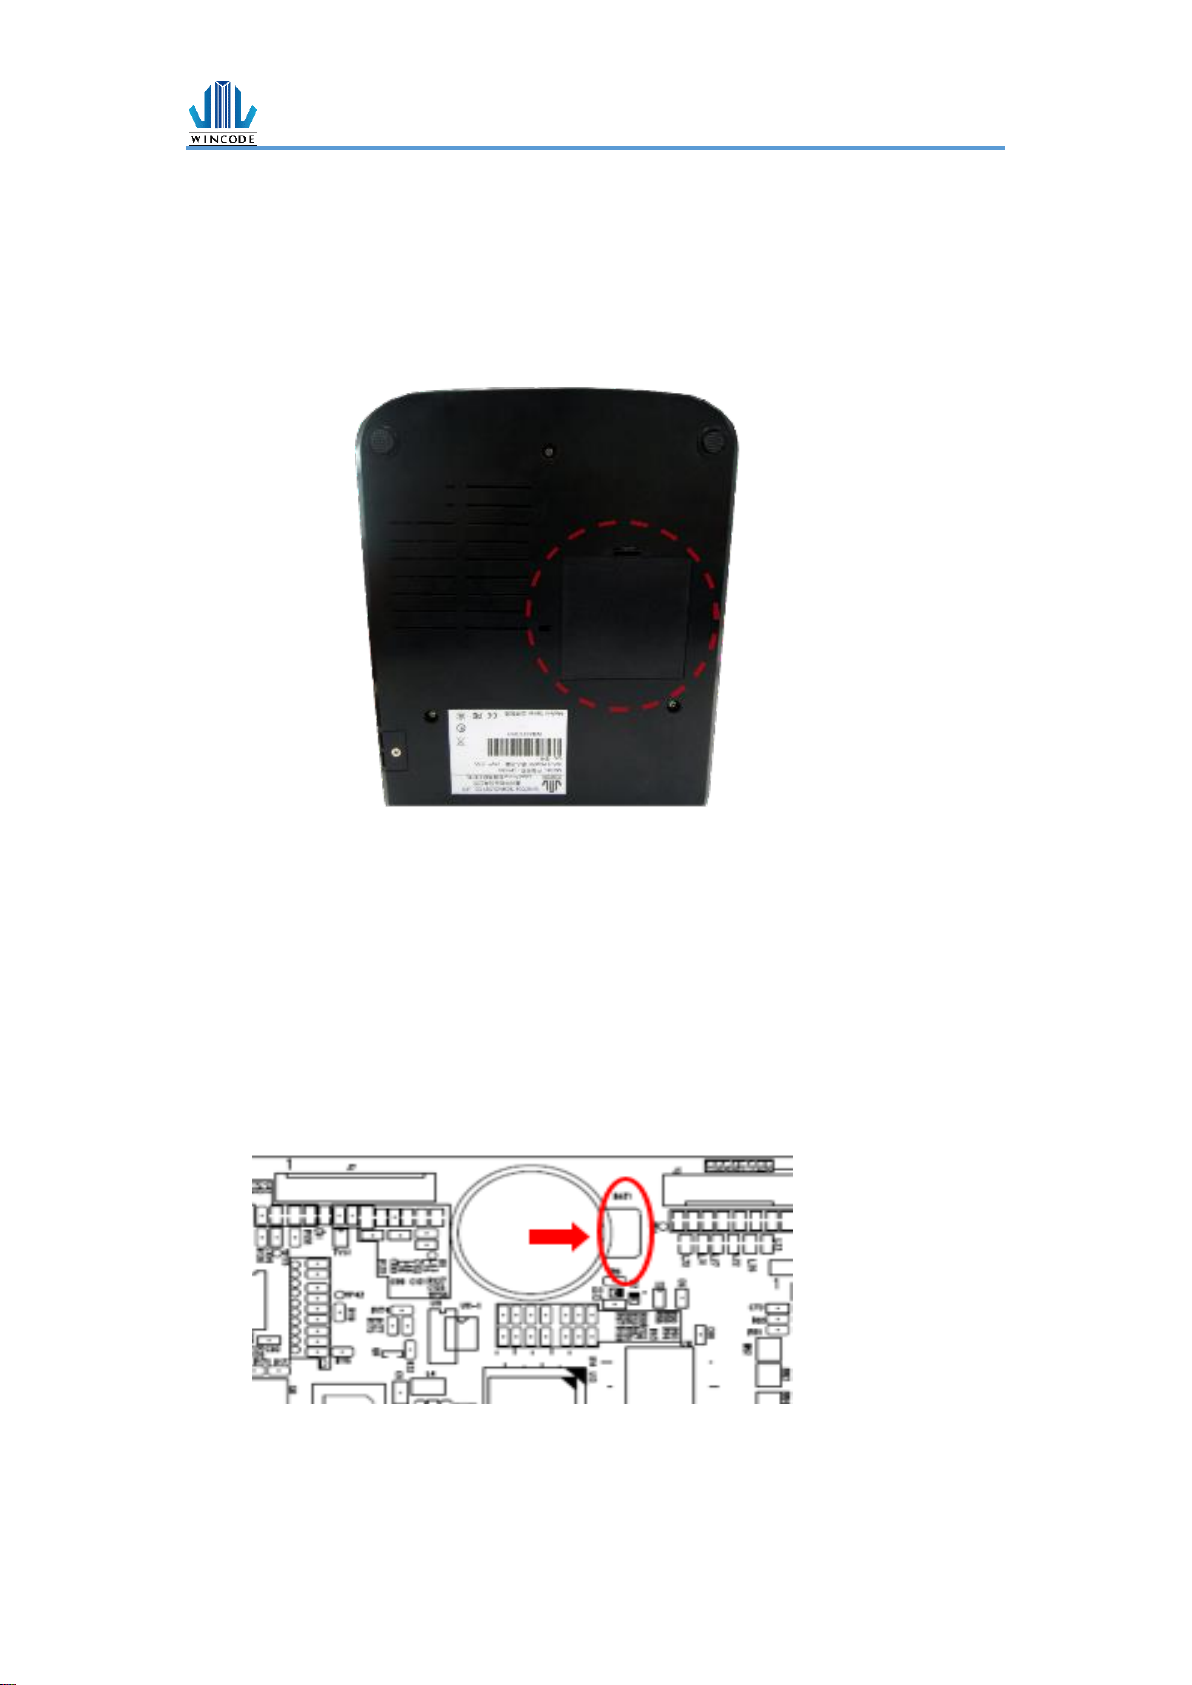
2.4 Real Time Clock Battery Installation
2.4.1 Get started (Battery is excluded in the LP4N model)
1) Turn off the power, and then remove the power cord and relevant connected
cable.
2) Open the chassis cover at the bottom, there is a battery with insulation sheet.
3) Pull out the insulation shim.
2.4.2 Replace the battery
1) Turn off the power and disconnect all the cables attached.
2) Loose the three screws at the bottom, and then open the lower part cover to
see the motherboard.
3) Press the button beside the battery as below figure.
4) The battery would be left from the mount.
5) Place a new battery and then press until it is fixed in the installation mount.
*Notice: the battery model CR2032 is recommended.
LP4 USER MANUAL
- 20 -
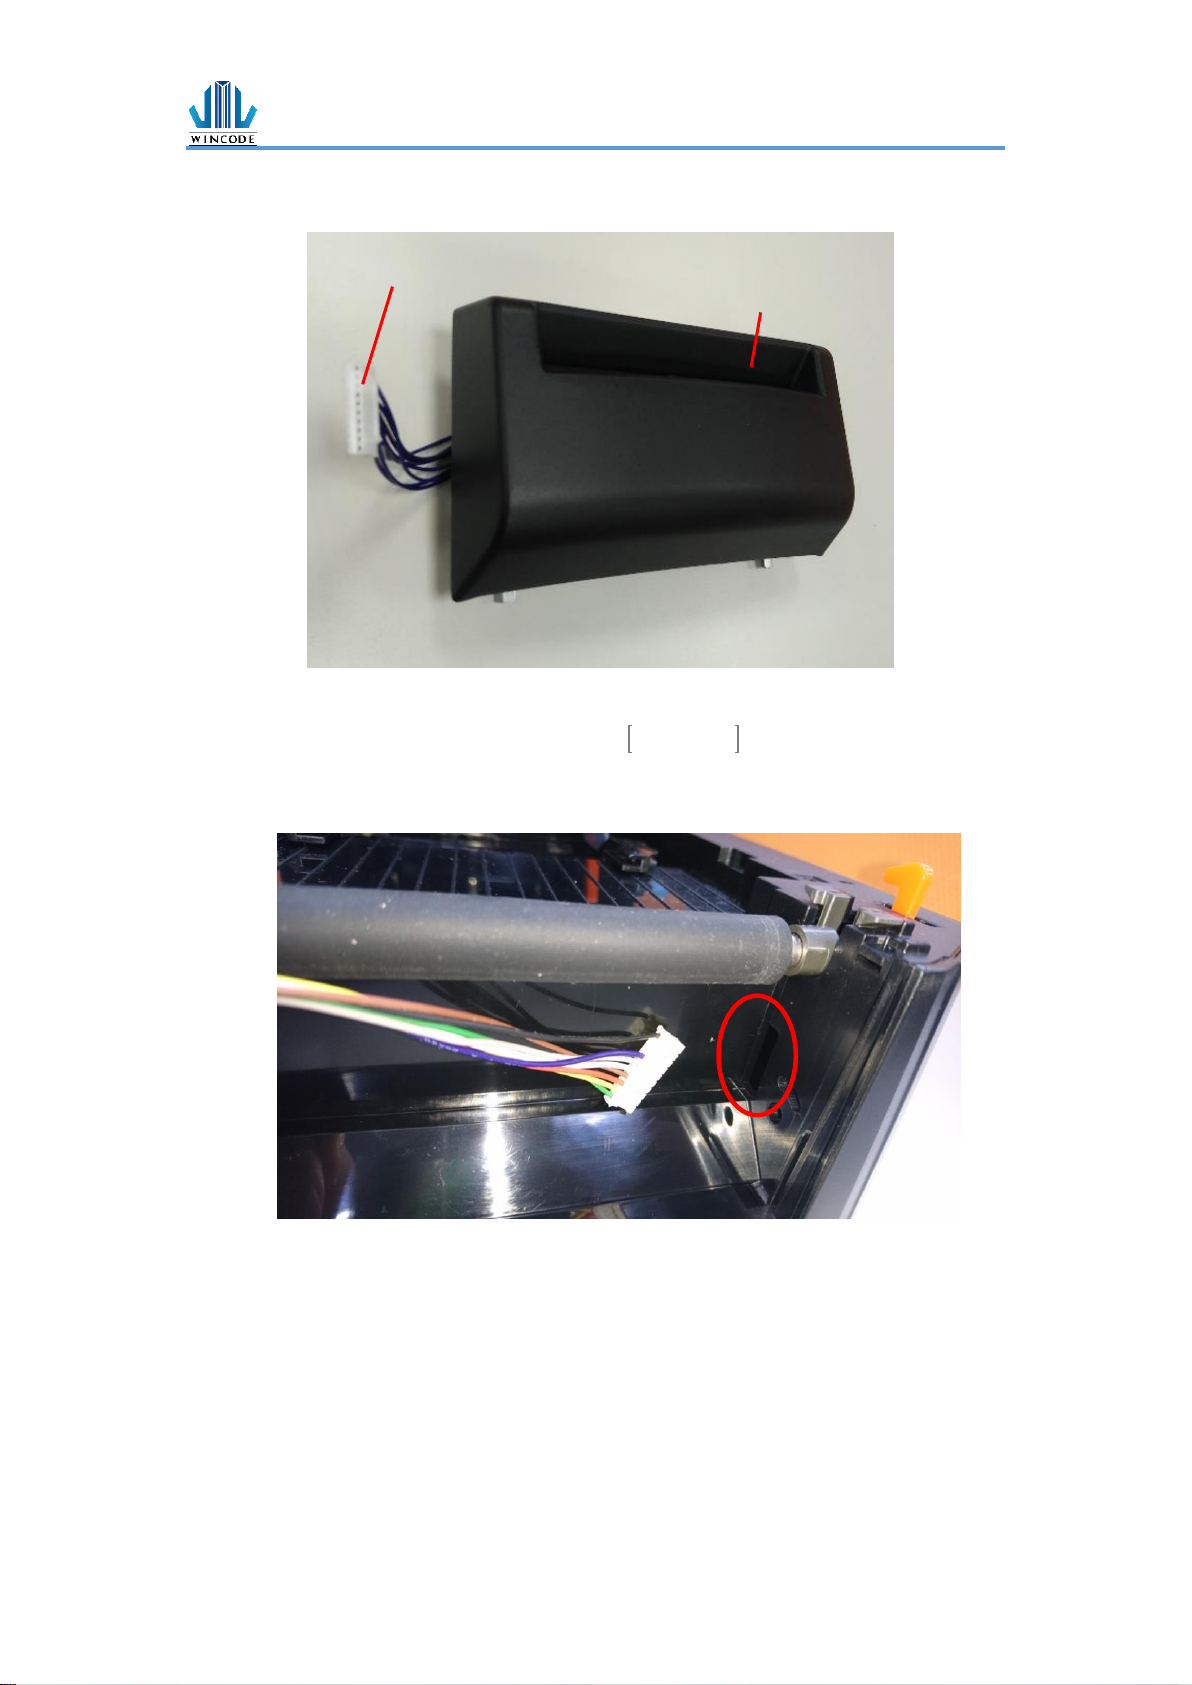
2.5 Cutter Installation (Optional)
1) Turn off the power and disconnect all the cables attached.
2) Open the upper cover and take down the front baffle.
3) Make the connected cable go through the hole of right side of lower part.
Paper out hole
The cable connector
 Loading...