

Page 1
Page 1 of 8
9681 & S400 Weight Capacity = 400 lbs. (181 kg.)
PLEASE READ AND FAMILIARIZE YOURSELF WITH ALL INSTRUCTIONS BEFORE USING THIS PRODUCT.
before attempting to use this product; otherwise injury may occur.
Winco assumes no responsibility for damage or injury caused by improper assembly,
IMPORTANT
FIG 1
9681-S400
Transfer Recliner
If you have trouble understanding these instructions contact your dealer or Winco customer support, (800) 237-3377
1. READ AND FOLLOW ALL DIRECTIONS.
2. NEVER USE the recliner ARMS, BACKREST or LEGREST as a seat; INJURY MAY OCCUR.
3. NEVER STAND on fold-out footrest – footrest is not a step; Tipping of chair could result and INJURY MAY OCCUR.
4. NEVER transport user with recliner arms in a “down” position; INJURY MAY OCCUR.
5. DO NOT put hands, feet or clothing into any openings when changing positions on recliner. Attendant MUST
confirm that users hands and feet are safe while changing recliner positions or INJURY MAY RESULT.
6. STAY CLEAR of the recline mechanisms.
7. Periodically, recheck tightness of all nuts, bolts and screws.
8. LOCK CASTERS at all times, except when transporting recliner.
9. USE SEAT BELT when transporting user.
10. DO NOT use recliner for Transporting in or with ANY type of vehicle or trailer. Winco recliners have not been
tested or approved for use by an occupant in any type of vehicle or trailer.
11. Immediately remove from service; Any recliner with broken recline mechanisms, torn upholstery, or other
mechanical or visible damage.
12. USE ONLY WINCO AUTHORIZED REPLACEMENT PARTS.
13. NEVER EXCEED the recommended weight capacity of 400 lbs. (181 kg).
14. SAVE THESE INSTRUCTIONS for future reference and training.
installation, use, or maintenance of these products.
CUSTOMER INSTRUCTIONS
(No assembly required)
Operating Instructi ons:
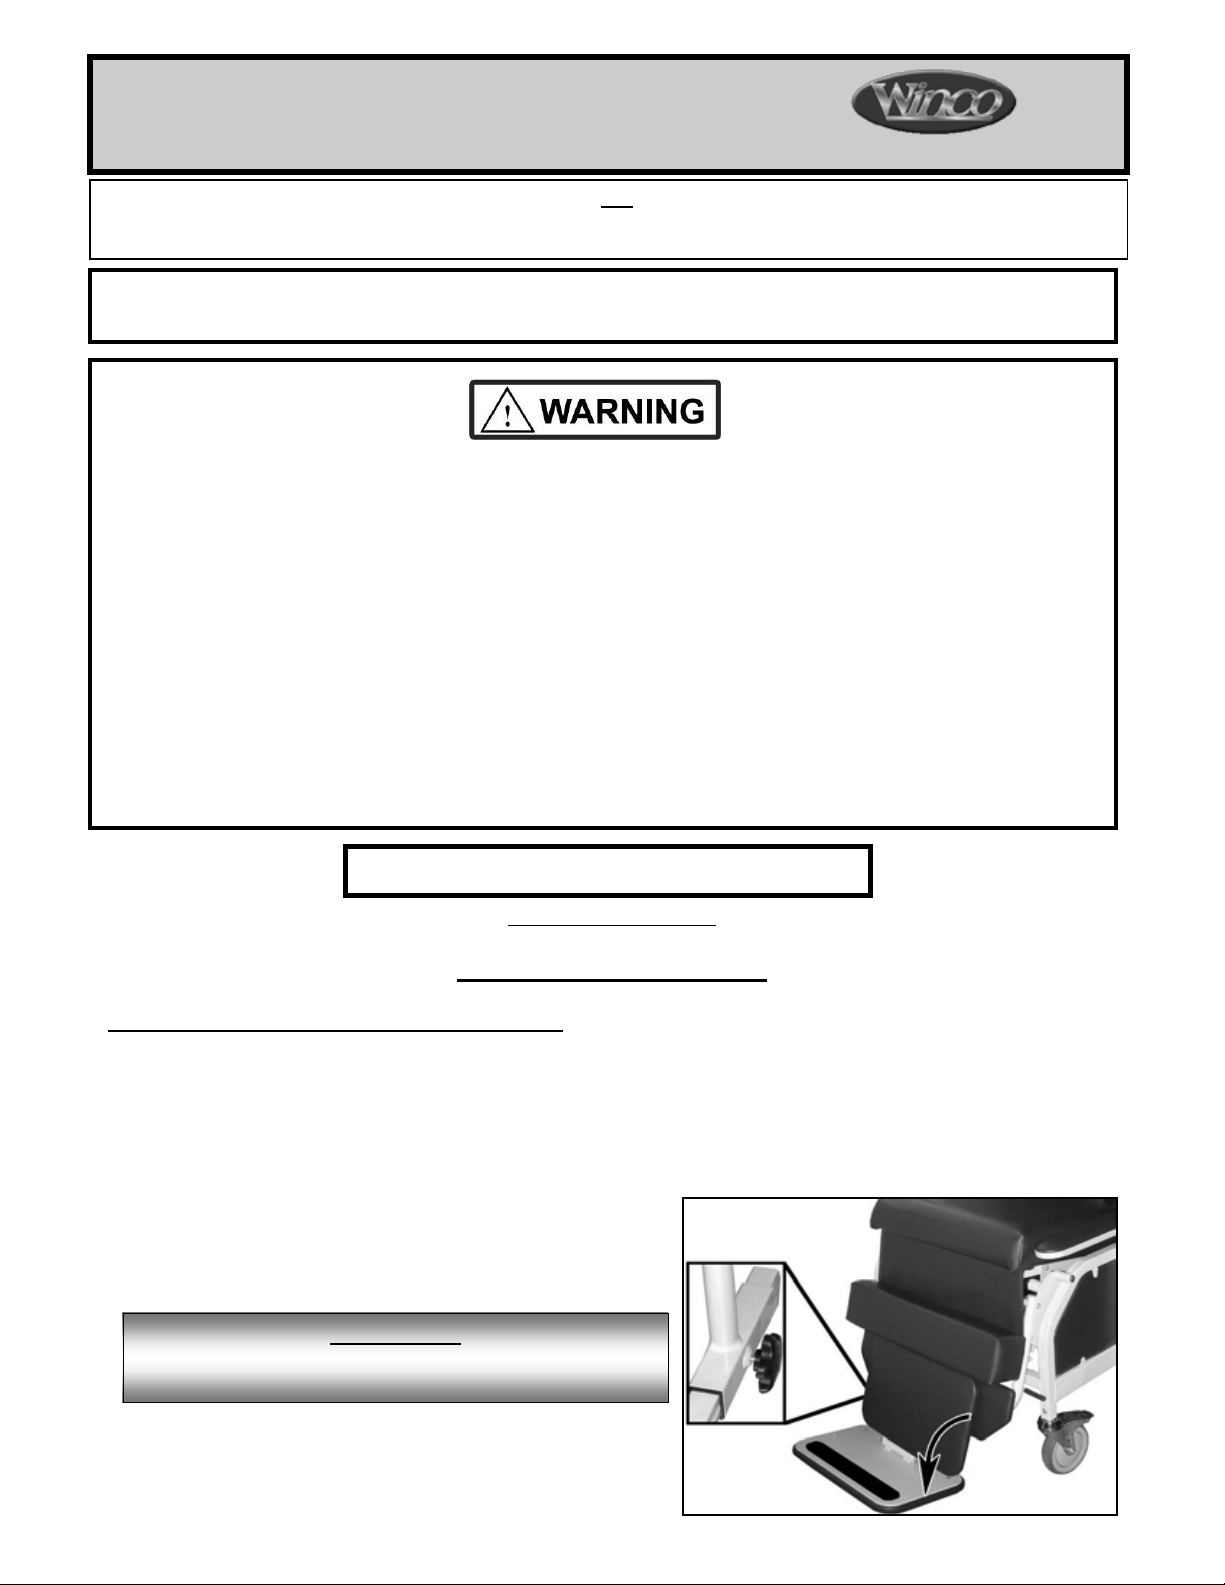
• FIG. 1: Footrest Plate Use & Adjustment
Access the footrest plate by pivoting the footrest pad down.
Adjustment: Locate the footrest adjustment knob just behind the footrest and turn
006195 Revision GG Date 06-28-13 JWC
Once desired height of footrest is found, turn the knob the opposite way to tighten.
to loosen footrest
DO NOT overtighten knob
DO NOT stand on footrest
Page 2
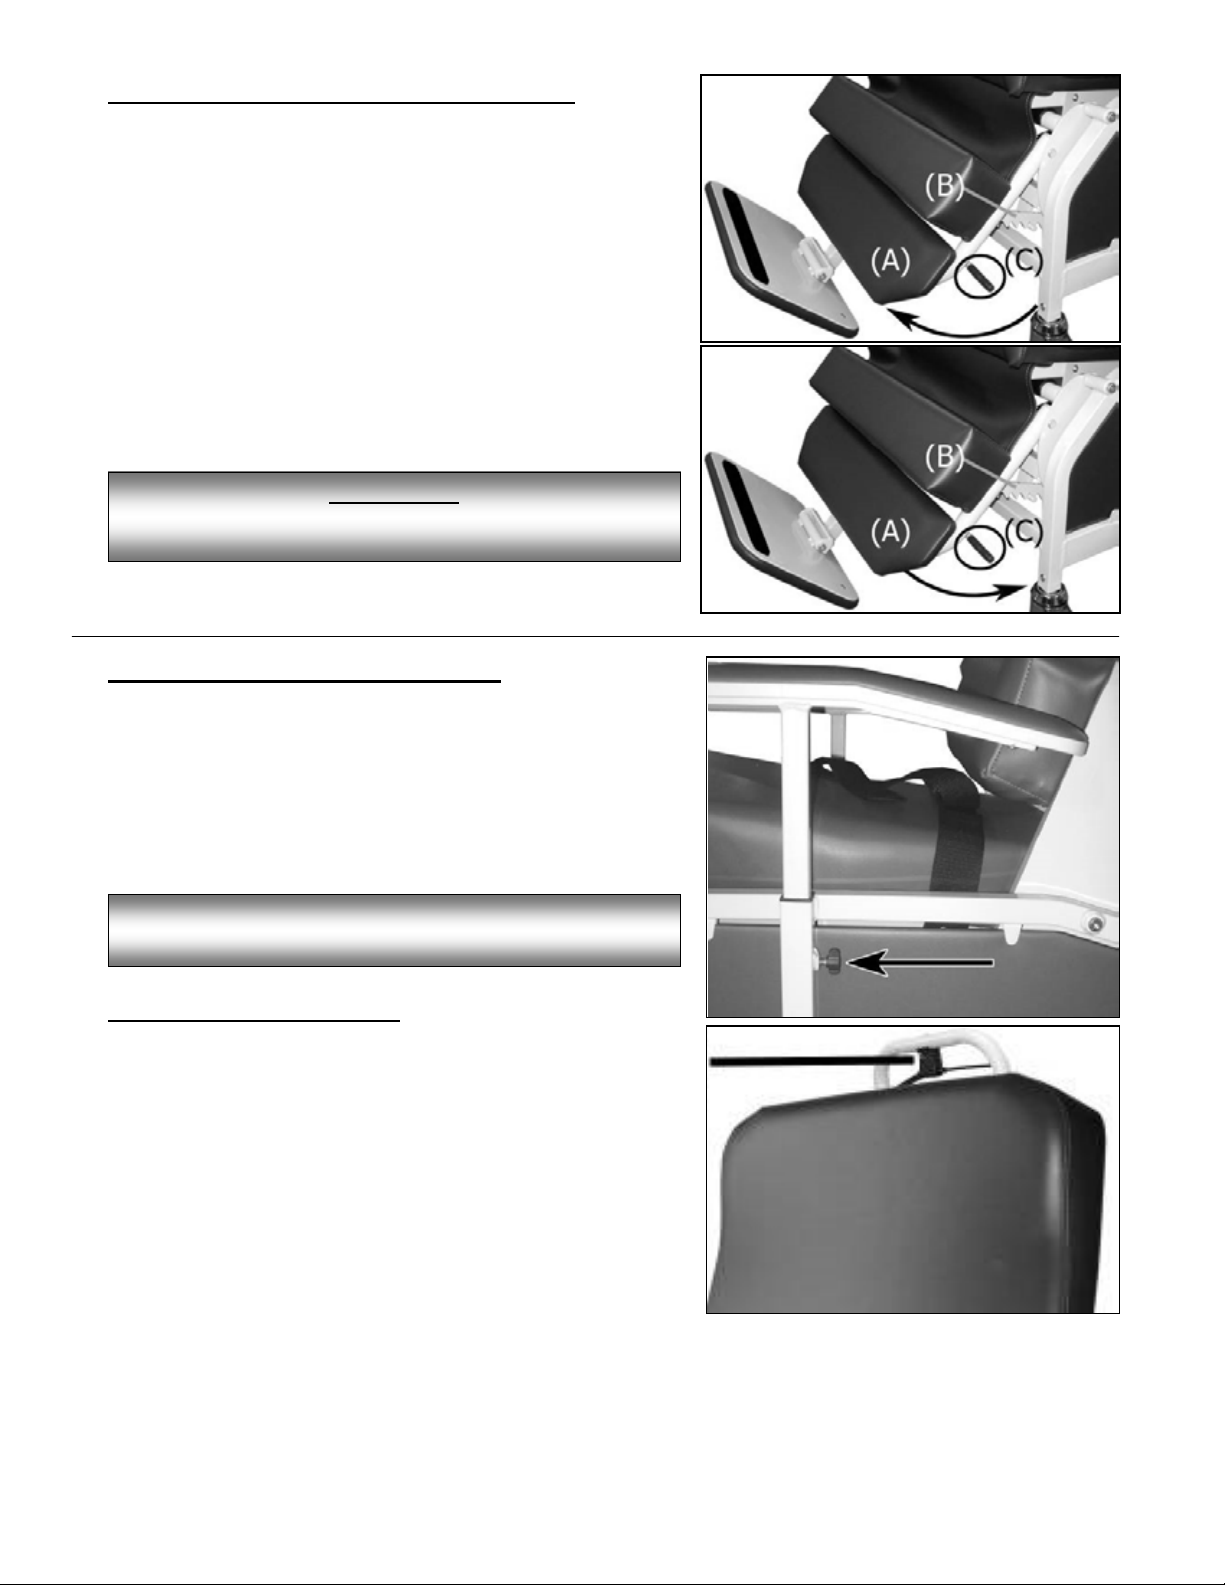
FIG 2A
FIG 2B
BE SURE BOTH ARMRESTS HAVE BEEN FULLY
FIG 3
IMPORTANT
FIG 3
FIG 4
• FIG. 2A-2B: Legrest-Footrest Adjustment
To ELEVATE the leg/foot rest:
●Pull up just behind the legrest pad. (A)
●The ratchet bar (B) will automatically lock into
place.
To RETURN the leg/foot rest to the proper seated
position:
●Slightly lift the legrest pad. (A)
●Push down on the ratchet bar handle (C) and
lower leg/footrest to the desired position.
Lower the legrest COMPLETELY before lowering back
to flat transfer position
• FIG. 3: Armrest Height Adjustment
To LOOSEN or TIGHTEN armrest:
●Hold the armrest stable with one hand
●Turn the armrest knob clockwise or counter
clockwise with the other hand to loosen and
tighten.
TIGHTENED PRIOR TO PATIENT ENTRY/EXIT.
• FIG. 4: Back Adjustment:
• Squeeze control lever and raise or lower back of recliner.
• Release control lever when desired back position is
achieved.
• Recliner back will stay in desired position when control
lever is released.
006195 Revision GG Date 06-28-13 JWC
Page 2 of 8
Page 3

• FIG. 5: Transfer of Patient
Stay clear of the recline mechanism. Periodically recheck tightness of all screws and bolts.
BE SURE BOTH ARMRESTS HAVE BEEN FULLY TIGHTENED
FIG 5
(1) Lower the adjustable arm that is adjacent to
the transfer surface.
(SEE FIG 3 on preivious page)
● Position the Transfer Recliner as close as
possible to the surface patient is to be
transferred to/from.
(2) Engage all 4 - Total Lock Casters. This
locks both the swivel mechanism and wheel.
(3) Make sure the fold-out Footrest is folded up.
(4) Keep opposite arm raised to prevent patient
from sliding off Transfer Recliner during
transfer.
(5) If a 180 degree (flat) transfer is desired,
squeeze the Release Lever on top of Back
Frame and lower Back of recliner to flat
transfer position.
When the Release Lever is released, the
Transfer Recliner b ac k will stay in desired
position.
● Transfer patient to/from the Transfer Recliner according to your
facilities’ recommended safety guidelines.
● Check for proper patient positioning, then raise Transfer Recliner Arm securely in place. (FIG. 3)
● Adjust the Back, Footrest and Seat Belt for optimal patient comfort, safety and support as needed.
PRIOR TO PATIENT ENTRY/EXIT.
Page 3 of 8
006195 Revision GG Date 06-28-13 JWC
Page 4

GENERAL MAINTANENCE:
FIG. 6
CAUTION:
The Transfer Recliner is completely assembled and ready for use, however, to extend the life of your Transfer
Recliner, and to insure proper operation, lubricate all pivot points with a silicone lubricant at least twice a year.
• FIG. 6: Adjusting Gas Spring:
If the back of your Transfer Recliner does not recline
when you squeeze the Control Lever; you may need to
make an adjustment to the operator (located on the end
of the gas spring).
NOTE: Tension o r “ease of movement” of gas
spring is factory set and CANNOT be changed.
1. To adjust, remove cable (A) from operator (B) - (if
not connected - STOP: reconnect and try Control
Lever again).
2. Loosen the 11/16” hex nut (C) on top of the
Operator.
3. Remove clevis pin and bowtie cotter pin (D).
DO NOT squeeze operator (B) during this procedure.
• If back of recliner does not go into the “flat” or full
recline position, rotate the Operator (E) clockwise
one (1) full revolution.
• If back of recliner will not stay in upright position,
rotate the Operator (E) counter-clockwise one (1) full revolution.
4. Tighten the hex nut (C) on gas spring, replace release cable (A) into operator (B) and check lever action.
5. Repeat these steps as needed until proper “back release action” is achieved.
GENERAL CARE & CLEANING
Remove hair & body oils; Your recliner should be cleaned with mild soap & water solution and a damp
cloth on a regular basis (especially where skin & hair make contact with upholstery).
Avoid harsh detergents or chemicals that could damage the upholstery or finish of your recliner. If the recliner is
disenfected, the chair MUST be wiped off with ONLY clean water on a damp cloth.
Note: Disinfectants alone, will not provide adequate "grease or oil cutting" properties to remove hair & skin oils.
Over time, the appearance and feel of your upholstery may diminish if not cleaned properly.
Please refer to the PERMABLOK instruction tag that is attached to your Care Cliner for complete care and
cleaning instructions.
Retain information on tag for future use.
FOR FURTHER CLEANING INFORMATION VISIT:
http://www.wincomfg.com/permablok-info-and-cleaning-instructions
Page 4 of 8
006195 Revision GG Date 06-28-13 JWC
Page 5

Page 5 of 8
Visit our website www.wincomfg.com/product-documents/parts-lists for a complete parts list catalog of your chair
or call Customer Service @ 1-800-237-3377 to request it by mail.
006195 Revision GG Date 06-28-13 JWC
Page 6

Other Quality Winco Medical Furnishings You May Be Interested In:
Page 6 of 8
Visit us online at www.wincomfg.com
006195 Revision GG Date 06-28-13 JWC
Page 7

Page 7 of 8
006195 Revision GG Date 06-28-13 JWC
Page 8

Page 8 of 8
Design, appearance, parts, & construction are subject to change without noti ce
006195 Revision GG Date 06-28-13 JWC
 Loading...