

Page 1
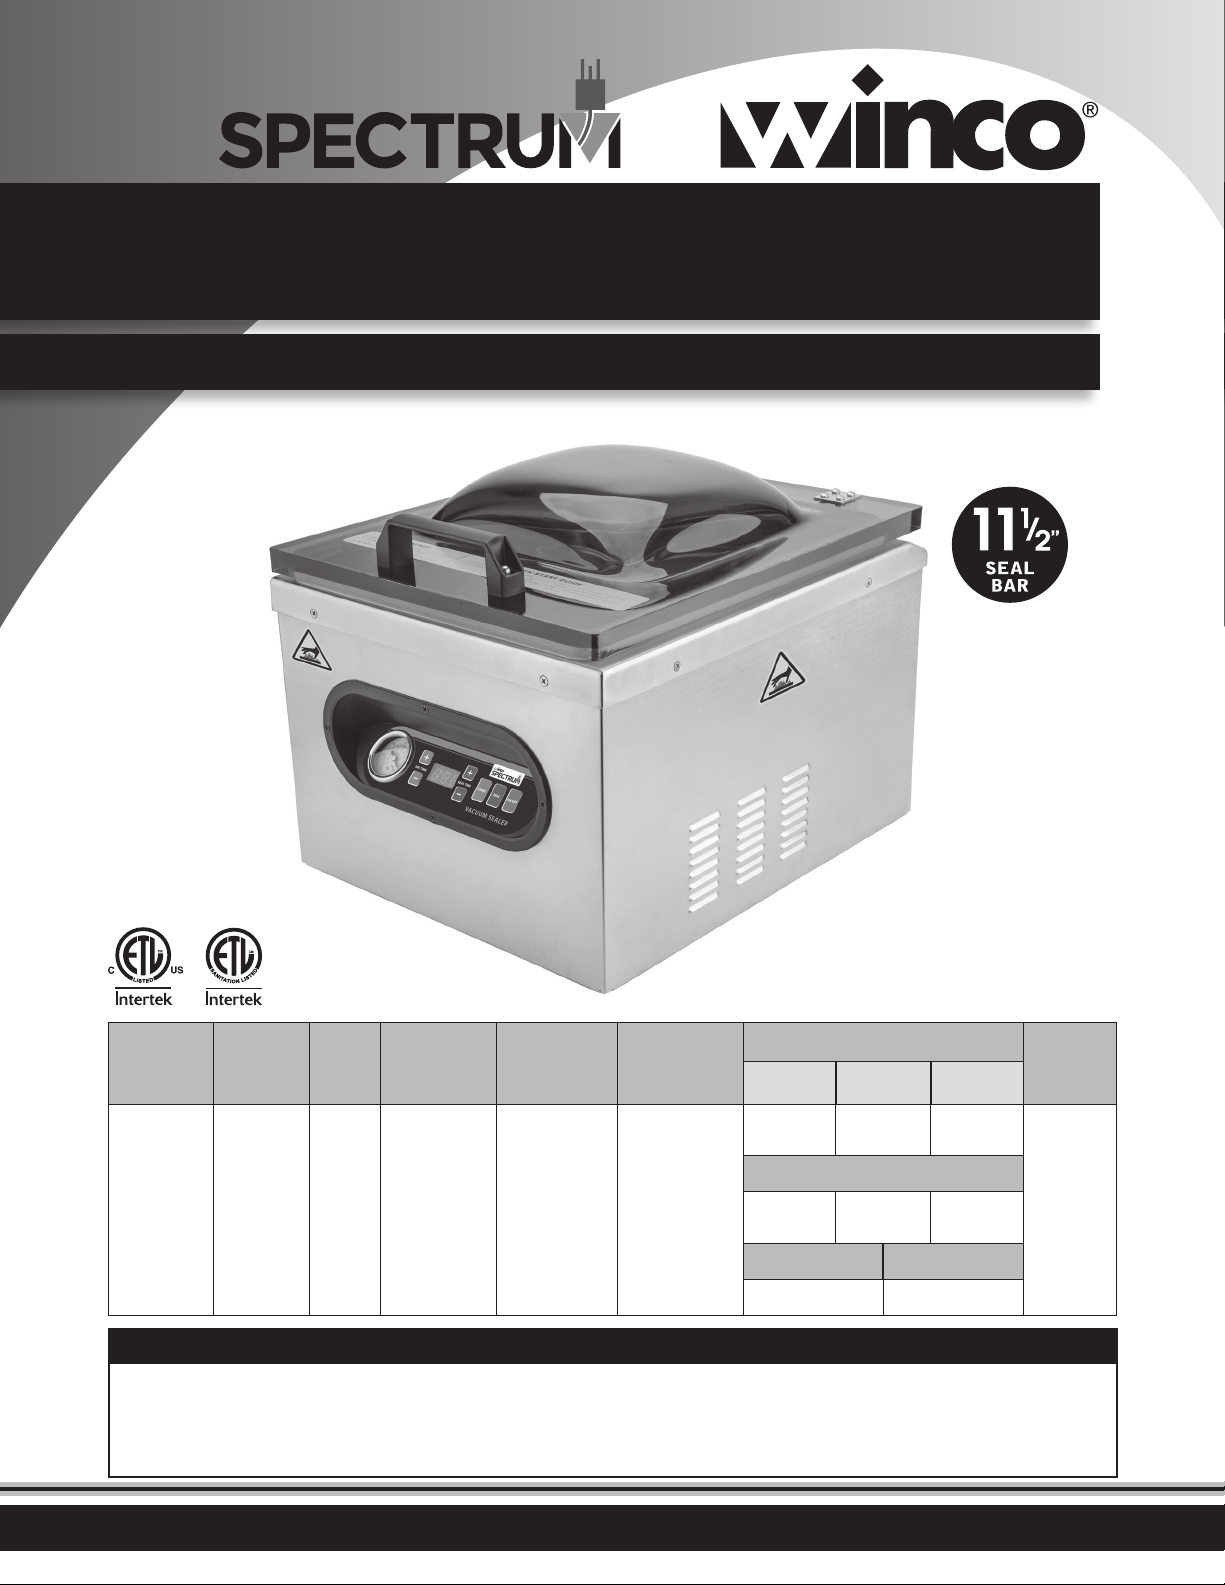
ELECTRIC COUNTERTOP
CHAMBER VACUUM PACKAGING MACHINE
Installation and Operating Instruction Manual
EVPM-12
Model Voltage Power Amperage Plug Ty pe
EV PM-1 2
110-120V ~
60Hz
630W 5.25 A NEMA 5-15P Dry
Vacuum
Pump
Overall Dimensions
Length Dept h Heig ht
14-1/8"
(359mm)
Chamber Dimensions
12"
(300mm)
Seal Bar Seal Wire
11-1/2" (295mm) 0.14" (3. 5mm)
16 -7/ 8"
(429mm)
13 -7/8"
(350 mm)
13 -1/2"
(345mm)
4-5/16"
(110 mm)
Product
Weight
53.8 lbs
24.4kgs
BEFORE OPERATING ANY EQUIPMENT, READ AND FAMILIARIZE YOURSELF WITH THESE USE AND SAFETY INSTRUCTIONS
Congratulations on your purchase of this SPECTRUM commercial Vacuum Sealer. When used as intended, and with
proper care and maintenance, you are sure to experience years of reliable operation from this equipment. To ensure
best results, it is important that you read and follow the instructions in this manual carefully. It is important to
keep these instructions in a safe place for future reference.
Form No. EVPM-12 Manual - 070219
Page 2

Electric Countertop Vacuum Sealer
Important For Future Reference
Please complete this information and retain this manual for the life of the equipment. For
Warranty Service and/or parts, this information is required.
Model Number Serial Number Date Purchased
WARNING: IMPROPER INSTALLATION, ADJUSTMENT,
ALTERATION, SERVICE OR MAINTENANCE CAN CAUSE
! !
PROPERTY DAMAGE, INJURY, OR DEATH. READ THE
INSTALLATION, OPERATION, AND MAINTENANCE
INSTRUCTIONS THOROUGHLY BEFORE INSTALLING
OR SERVICING THIS EQUIPMENT.
CAUTION: THESE MODELS ARE DESIGNED, BUILT, AND
SOLD FOR COMMERCIAL USE ONLY. IF THESE MODELS
! !
ARE POSITIONED SO THE GENERAL PUBLIC CAN USE
THE EQUIPMENT, MAKE SURE THAT CAUTION SIGNS,
WARNINGS, AND OPERATING INSTRUCTIONS ARE
CLEARLY POSTED NEAR EACH UNIT SO THAT ANYONE
USING THE EQUIPMENT WILL USE IT CORRECTLY AND
NOT INJURE THEMSELVES OR HARM THE EQUIPMENT.
WARNING: A FACTORY AUTHORIZED SERVICE
PROVIDER SHOULD HANDLE ALL MAINTENANCE
! !
AND REPAIR. BEFORE DOING ANY MAINTENANCE
OR REPAIR, FOLLOW SERVICE SET UP ARRANGEMENT
ON PAGE 11.
AVERTISSEMENT: TOUTE INSTALLATION, RÉGLAGE,
MODIFICATION, RÉPARATION OU ENTRETIEN
INCORRECT PEUT OCCASIONNER DES DOMMAGES
MATÉRIELS, DES BLESSURES GRAVES OU LA MORT.
LIRE LES INTRUCTIONS D'INSTALLATION, D'UTILISATION ET
D'ENTRETIEN ATTENTIVEMENT AVANT D'INSTALLER OU DE
RÉPARER CET APPAREIL.
ATTENTION: CES MODÈLES SONT CONÇUS, FABRIQUÉS,
ET VENDUS POUR UN USAGE COMMERCIAL SEULEMENT.
SI CES MODÈLES SONT PLACÉS POUR QUE LE GRAND
PUBLIC PUISSE LES UTILISER, ASSUREZ-VOUS QUE LES CONSIGNES
D’ATTENTION, D'AVERTISSEMENT, ET LES INSTRUCTIONS
D'UTILISATION SOIENT CLAIREMENT AFFICHÉES PRÈS DE
CHAQUE UNITÉ DE SORTE QUE N'IMPORTE QUEL UTILISATEUR DE
L'APPAREIL L'EMPLOIE CORRECTEMENT ET NE SE BLESSE PAS OU
N'ENDOMMAGE PAS L'APPAREIL.
AVERTISSEMENT: UN TECHNICIEN AUTORISÉ PAR
L'USINE DEVRA EFFECTUER TOUT L'ENTRETIEN ET LES
RÉPARATIONS. AVANT DE FAIRE TOUT ENTRETIEN OU
RÉPARATION, VEUILLEZ CONTACTER WINCO.
Introduction
Congratulations on the purchase of your SPECTRUM™ Commercial
Vacuum Sealer. Please take time to carefully read through this manual
to ensure the machine is operated and maintained properly, to ensure
the best possible performance from the product for many years.
SPECTRUM will not accept liability for the following if:
• The instructions in this manual have not been followed correctly.
• Non-authorized personnel have tampered with the machine.
• Non-original spare parts are used.
• The machine has not been handled and cleaned correctly.
• There is any use damage to the unit.
2
Immediately Inspect for Shipping Damage
All containers should be examined for damage before and during
unloading. The freight carrier has assumed responsibility for its safe
transit and delivery. If equipment is received damaged, either apparent
or concealed, a claim must be made with the delivering carrier.
A. Apparent damage or loss must be noted on the freight bill
at the time of delivery. It must then be signed by the carrier
representative (Driver). If this is not done, the carrier may refuse
the claim. The carrier can supply the necessary forms.
B. If concealed damage or loss is not apparent until after equipment
is uncrated, a request for inspection must be made to the carrier
within 15 days. The carrier should arrange an inspection. Be certain
to keep all contents and packaging material.
Page 3

Electric Countertop Vacuum Sealer
Table of Contents
Specications .............................................................................. 1
Warnings ..................................................................................... 2
Introduction ................................................................................ 2
Packaging .................................................................................... 3
Installation .................................................................................. 4
Food Safety ................................................................................. 5
Operation .................................................................................... 6
Cleaning, Care & Maintenance ................................................. 7
Safety ........................................................................................... 7
Troubleshooting ......................................................................... 8
Service & Repair .......................................................................... 8
Exploded View ........................................................................... 9
Parts List ....................................................................................... 9
Limited Warranty ..................................................................... 10
Package Contents
All units come with an Operating Instruction Manual and the following:
• SPECTRUM™ Commercial Vacuum Sealer
SPECTRUM prides itself on quality and service, ensuring that at the
time of packing, all products are supplied fully functional and free
of damage. Should you nd any damage as a result of freight, please
contact your SPECTRUM dealer immediately.
Installation and start-up must be performed by a qualified installer who has thoroughly read, understands and follows these instructions.
Please keep this manual in a safe place for future use!
Unpacking the Equipment
DISPOSE OF ALL PACKAGING MATERIALS IN AN
ENVIRONMENTALLY RESPONSIBLE MANNER.
1. Remove all packing materials and tape, as well as any protective
plastic and cardboard, from the unit.
2. Clean any glue residue left over from the plastic or tape.
3. Place the unit in the desired position and height.
NOTE
Please remember that this manual and the warning labels do not replace the need to be alert, to properly train and
supervise operators, and to use common sense when using this equipment.
3
Page 4
Installation
These instructions should be followed at all times. Failure to follow
these instructions could result in injury to yourself and others.
TO REDUCE RISK OF INJURY OR DAMAGE TO THE UNIT:
1. Read this manual thoroughly before installation and operation.
DO NOT proceed with installation and operation if you have any
questions or do not understand anything in this manual. Contact
your representative or the manufacturer rst.
WARNING AVERTISSEMENT
Fire Hazard.
Correct installation precautions,
procedures and regulations
must be fo llowed. Operati on
and safe ty training is ne cessary
for all use rs of this equipme nt.
The equip ment must be
install ed by qualied per sonnel
only. Correc t installatio n
precautions, procedures and
regulati ons must be followe d
in order to re duce the risk of
re. Hood an d re suppression
system s must be maintaine d
per manufacturer's guidelines.
Only quali ed and trained
person nel are to use this
equipment.
2. Remove the SPECTRUM™ Commercial Vacuum Sealer from the
packaging. Be certain that all protective plastics and residues are
thoroughly cleaned from its surface.
3. Place your Vacuum Sealer on a rm level surface.
Local standards and regulations should be consulted in order to
abide by standards set in relation to positioning, spacing, and
ventilation. SPECTRUM recommends that you allow no less than 4”
for a ventilation gap around the perimeter of this unit. Common
sense should be used when choosing position and operation of this
product.
CAUTION
Do not position or operate near combustible materials/ammable
objects.
Ne pas placer ni faire fonctionner l'appareil près de
matériels combustibles ou d'objets inflammables.
Risque d'incendie
La surcha ue des vapeurs d' huile ou de
l'huile peut s'enammer et provoquer
un incendi e. Surveillez la temp érature,
la qualité et l e niveau d’huile. Uti lisez et
entrete nez le système d'élimi nation des
vapeurs d'huile.
Faire chau er l'huile avec préca ution. Si
l'huile fu me, réduire le feu. Ne p as laisser
l'appareil s ans surveillance. S i le feu se
produit , éteindre l'apparei l, couvrir jusqu'à
refroi dissement. Ne pas m ettre l'eau dans
l'huile chau de ou enammée. Ne fa ites pas
fonct ionner avec de l'huile s ous la barre
d'huile. L’huile sal e a un point d'éclair
plus bas. R emplacer l'huile sur un e base
régulière. Maintenir le niveau d'huile
correct. Utiliser un système d'évacuation
de la vapeur d' huile (capot) pour réd uire
l'accumulation de graisse et d'huile sur les
surfa ces de paroi ou de plaf ond.
ATTENTION
WARNING AVERTISSEMENT
Electrical Shock Hazard
Keep water an d other liquids
from entering the inside of the
unit. Liquid inside the unit could
cause an el ectrical sho ck.
Do not spray w ater or cleaning
products. Liquid could contact
the electrical components
and cause a s hort circuit o r an
elect rical shock. Do n ot use unit
if power cor d is damaged or has
been modied.
4. Proper connections and power supply are essential for ecient
performance. Supply the appropriate power and connect to source;
your Vacuum Sealer is now ready to turn on and operate. (For
power supply please see technical specication on page 1).
Fournir l'alimentation secteur appropriée et brancher l’appareil
à la source d'alimentation ; votre Machine Scellant Sous Vide
est maintenant prête à être allumée et à fonctionner. (Pour
l’alimentation, veuillez voir la che technique, page 1).
5. The units are wired to be used with a standard 110V/AC receptacle
and may be plugged into any convenient outlet.
6. The installation of the unit must conform to the NATIONAL
ELECTRIC CODE, ALL LOCAL ELECTRIC CODES AND ORDINANCES, AND
ALL THE LOCAL ELECTRICAL COMPANY RULES AND REGULATIONS.
Additionally, we recommend a 4" spacing surrounding the unit in
order to provide adequate ventilation.
Proper Grounding · Mise à la terre correcte
This machine is p rovided with a three-pronged
grounding plug. The outlet to wh ich this plug
is connected must be prop erly grounded. If the
receptacle is not the proper grounding ty pe, contact an
electr ician. DO NOT, under any circumstance s, cut
or remove the thir d ground prong from the power cord
or use any adapter plug.
Cette machine est équip ée d'une che à trois broches.
La prise sur laquelle cette che es t branchée doit être
correctement mise à la terre. Si la prise n'est pas le type d e
mise à la terre, contactez avec un électrici en. NE PAS, en
aucun cas couper ou enlever la troisièm e broche de terre à
partir du cordon d'alimentation ou utiliser un adaptateur.
Risque de choc électrique
Conser ver l'eau et d'autres liqui des
de pénétr er à l'intérieur de l'app areil.
Liquide à l'intérieur de l'appareil pourrait
provoquer un choc électrique.
Ne pas pulvé riser de l'eau ou des pro duits
de nettoyage. Le liquide pourrait contacter
avec les comp osants élec triques et caus er
un court- circuit ou un cho c électrique.
Ne pas util iser l'appareil si le cor don
d'alimentation est endommagé.
ou a été modi é.
USE A GROUNDED OUTLE T
DO NOT ADD AN ADAPTO R
TO THE PLUG
UTILISER UNE PRISE AVEC M ISE
À LA TERRE NE PAS AJO UTER UN
ADAPTATEUR SUR LA FICHE
4
Page 5
Food Safety
FOOD SAFETY PRECAUTIONS
The Vacuum Sealer will help keep food fresher up to 5 times longer than under normal circumstances. However, there
are certain basic guidelines that should always be followed in order to package foods safe to eat. Neglecting these basic
guidelines can result in food spoilage, and in some cases, illness or death.
To preserve foods safely, it is important to maintain low temperatures. You can significantly reduce the growth of
microorganisms at temperatures of 40°F (4ºC) or below. Freezing at 2°F (-17ºC) does not kill microorganisms, but stops
them from growing. For long-term storage, always freeze perishable foods that have been vacuum packed.
• Only vacuum seal fresh foods. Please keep in mind that not all foods benet from vacuum packaging. Do not use old or rancid foods. An already
bad product does not improve with vacuum sealing.
• Fresh foods (Meats, vegetables, cheeses, etc.) should be refrigerated at 34˚F or below or frozen after vacuum sealing.
• Never vacuum package garlic or fungi like mushrooms. A dangerous chemical reaction takes place when air is removed, causing these foods to
be dangerous if ingested.
• The foods susceptible to botulinum should be refrigerated for a short term and frozen for long-term storage. Consume immediately after
heating.
• Vegetables need to be blanched before vacuum packaging. This process stops the enzyme action, which leads to loss of avor, color and texture.
• Cruciferous vegetables (broccoli, sprouts, cabbage, cauliower, kale, turnips) naturally emit gases during storage. Therefore, after blanching,
they must be stored in the freezer only.
• Vacuum packaging is not a substitute for canning, refrigeration, or freezing. Any perishable food that requires refrigeration must still be
refrigerated or frozen after vacuum packaging.
Vacuum sealing removes a high percentage of air. This slows the growth of most living microorganisms, which degrade
food, such as aerobic bacteria and molds. However, some forms of bacteria such as clostridium botulinum (responsible for
botulism) are anaerobic and grow in the absence of oxygen.
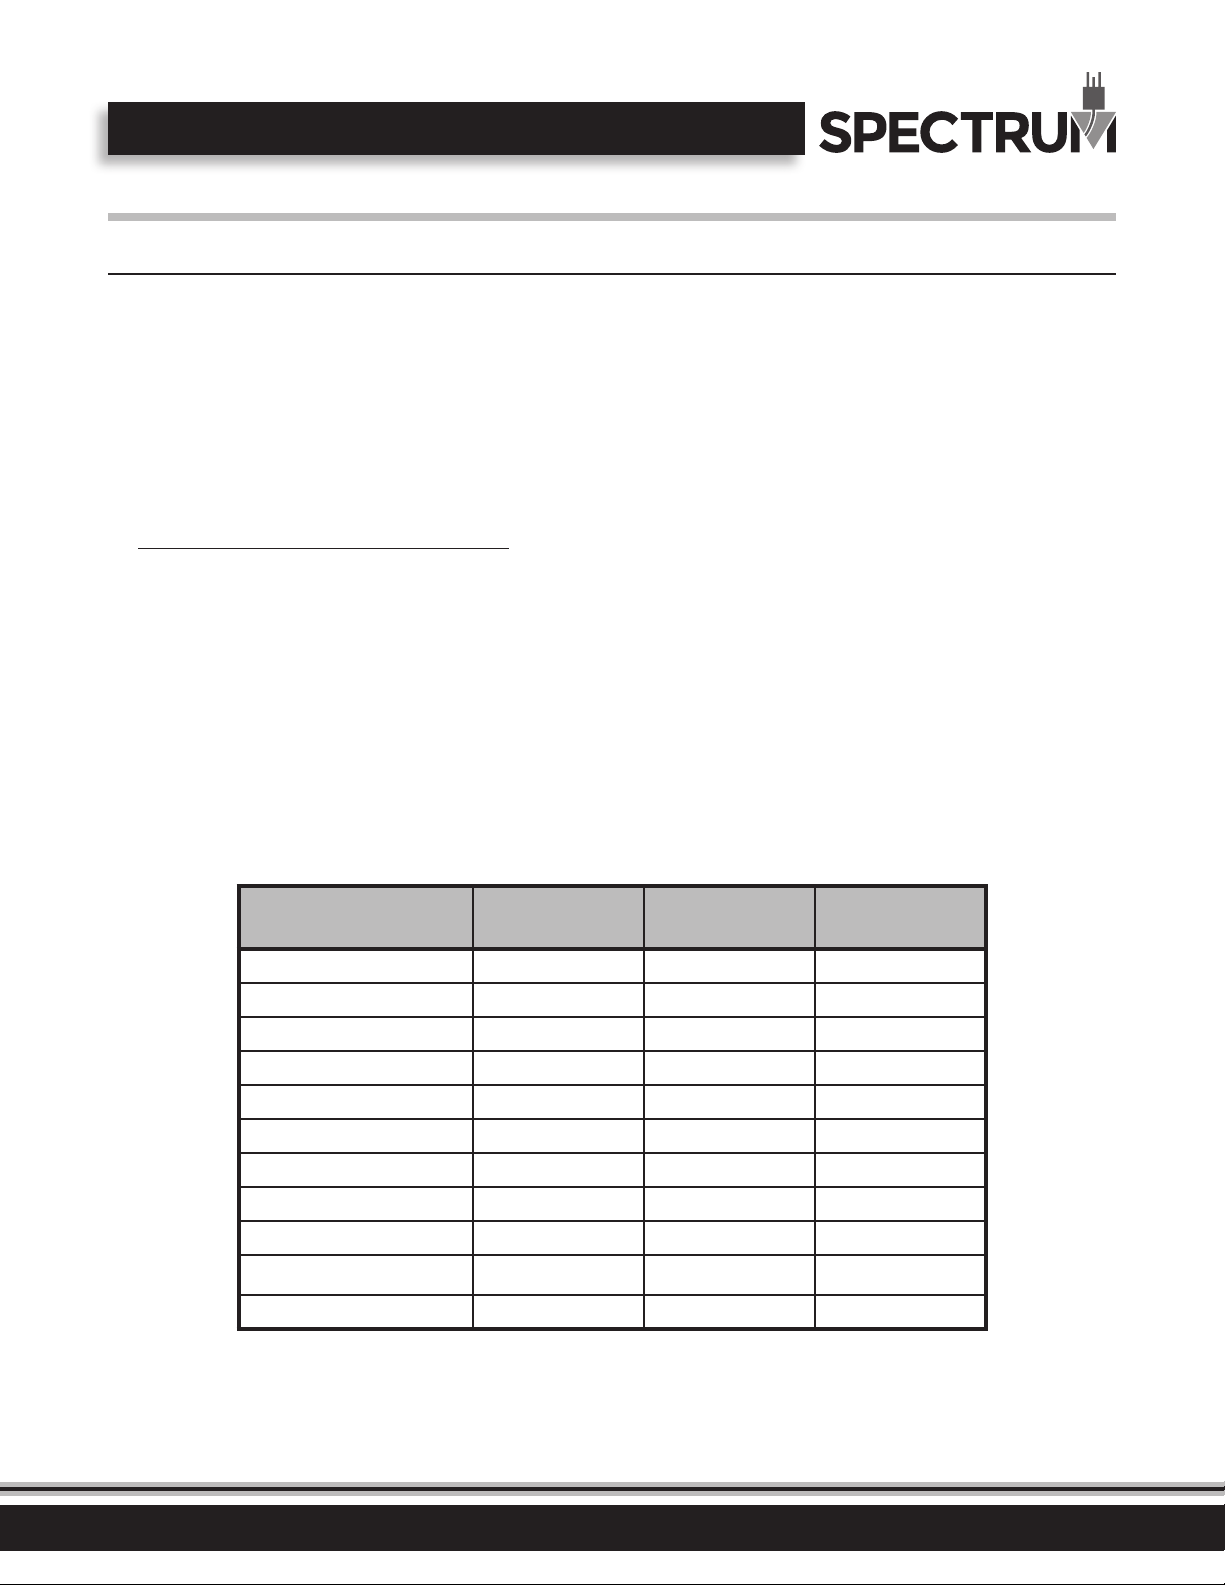
FOOD VACUUM FREEZER
STORAGE
VACUUM FRIDGE
STORAGE
TYPICAL STORAGE
Fresh Beef & Veal 1-3 years 1 month 1-2 weeks
Ground Meat 1 year 1 month 1-2 week s
Fresh Pork 2-3 years 2-4 weeks 1 week
Fresh Fish 2 years 2 weeks 3-4 days
Fresh Poultry 2-3 years 2-4 weeks 1 week
Smoked Meats 3 years 6-12 weeks 2-4 weeks
Fresh Produce, Blanched 2-3 years 2-4 weeks 1-2 weeks
Fresh Fruits 2-3 years 2 weeks 3-4 days
Hard Cheeses 6 months 6-12 weeks 2-4 days
Sliced Deli Meats not recommended 6-12 weeks 1-2 we eks
Fresh Pasta 6 months 2-3 weeks 1 week
5
Page 6
Operation
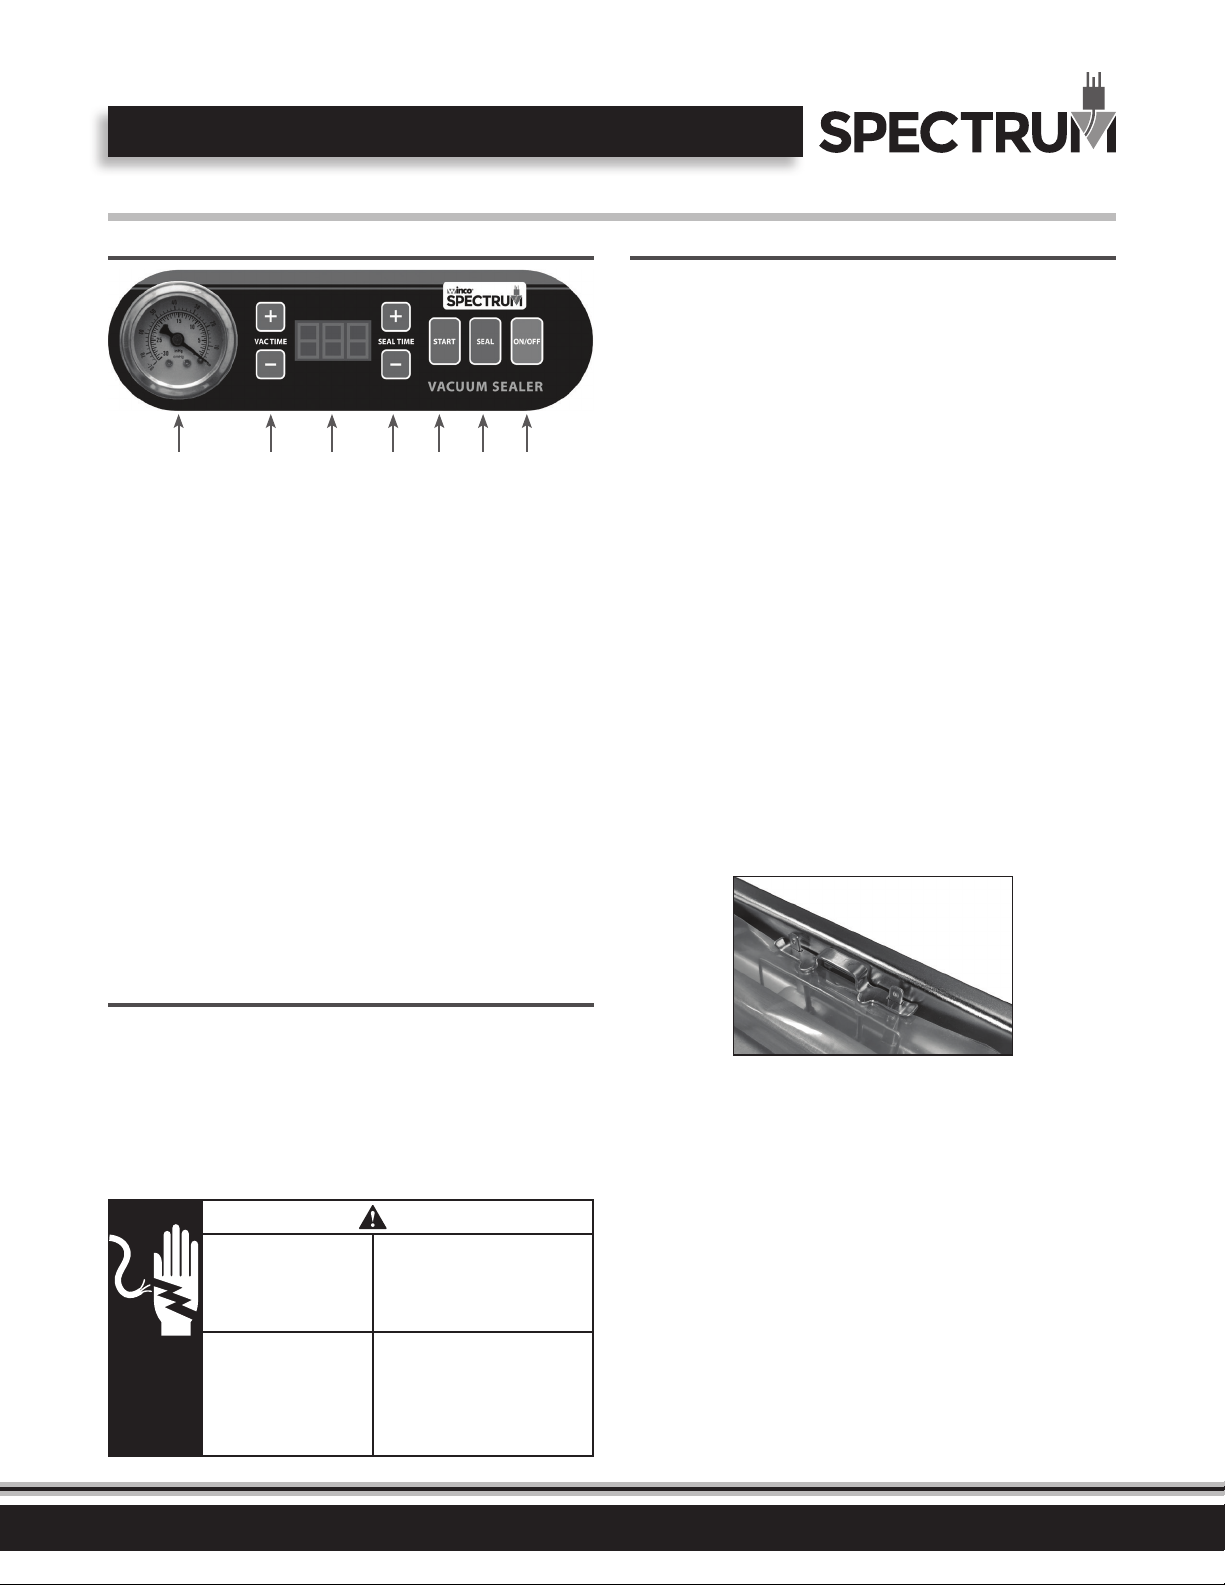
Understanding the control panel Operating the vacuum sealer
1. Plug the machine into grounded electrical outlet. The LED Display
(C) on the control panel will read “OFF”.
2. Open the vacuum lid and press “ON/OFF” button (G).
When the vacuum lid is open, LED display (C) will show “ON”.
When the vacuum lid is closed, LED (C) display will show “CLO”.
3. With the LED Display (C) showing "ON." Adjust the Vacuum Time
A B C D E F G
A. Vacuum Gauge
Shows the vacuum level inside the vacuum chamber
B. Vacuum Time Adjustment Buttons
C. LED Display
Shows the vacuum or seal time.
D. Seal Time Adjustment Buttons
E. "Start" Button
If machine does does not start automatically after closing the
lid, press “Start” button.
F. "Seal" Button
Press “Seal” button to stop vacuum cycle and instantly seal
the bag to prevent crushing delicate items.
G. "On/O" Button
After using the machine, press the "O" button before
unplugging the machine.
During the working processes, press the "On/O" button to
stop any process.
(B) and Seal Time (D) by pressing the “+” or “-“buttons to desired
times. For the initial test, set the vacuum time to 30 seconds.
Adjust vacuum time accordingly to achieve the vacuum required.
Depending on the pouch size and the amount of product in the
package, the vacuum time can vary from 5-60 seconds.
For the initial test, set the seal time to 5 seconds.
Adjust the time accordingly to achieve a perfect seal, the seal time
can vary from 3-9 seconds.
4. Place the vacuum bag with food into the vacuum chamber.
Keep pouches that contain liquids or wet product below the height
of the seal bar.
Lay the pouch at in the chamber with the opening of the pouch
across the seal bar.
Open the clamp in front of the seal bar, clamp the underside of the
vacuum bag mouth, and then lock the clamp.
NOTE: The entire pouch, including the opening must remain
inside the chamber.
Preparing food for the vacuum sealer
1. Vegetables must be blanched before being packaged. Place in
boiling water or microwave until heated through but still crunchy.
2. Select the proper size vacuum pouch for your food. Allow a
minimum of 1” to 2” of extra space at the top of the pouch to
ensure a quality air-tight seal.
3. Place the food into the pouch.
WARNING AVERTISSEMENT
Electrical Shock Hazard
Keep water an d other liquids
from entering the inside of the
unit. Liquid inside the unit could
cause an el ectrical sho ck.
Do not spray w ater or cleaning
products. Liquid could contact
the electrical components
and cause a s hort circuit o r an
elect rical shock. Do n ot use unit
if power cor d is damaged or has
been modied.
6
Risque de choc électrique
Conser ver l'eau et d'autres liqui des
de pénétr er à l'intérieur de l'app areil.
Liquide à l'intérieur de l'appareil pourrait
provoquer un choc électrique.
Ne pas pulvé riser de l'eau ou des pro duits
de nettoyage. Le liquide pourrait contacter
avec les comp osants élec triques et caus er
un court- circuit ou un cho c électrique.
Ne pas util iser l'appareil si le cor don
d'alimentation est endommagé.
ou a été modi é.
5. Close the vacuum lid. The machine will start automatically.
The number on LED display will count down from preset value.
6. When the vacuum is nished, the machine will seal automatically.
The number on LED display will count down from preset value.
7. Inspect the pouch.
Check the quality of the vacuum by looking at the tightness of
the pouch and the product. If you notice air pockets increase the
vacuum time by 5 seconds, and try again.
The vacuum time could take up to 60 seconds depending on the
pouch size and the volume of the product being packaged.
Check the quality of the pouch seal. A positive seal will look “clear”
upon inspection. If the seal is “spotty or incomplete” increase the
sealing time by 1. If the seal is “white or milky” decrease the seal
time by 1.
Page 7
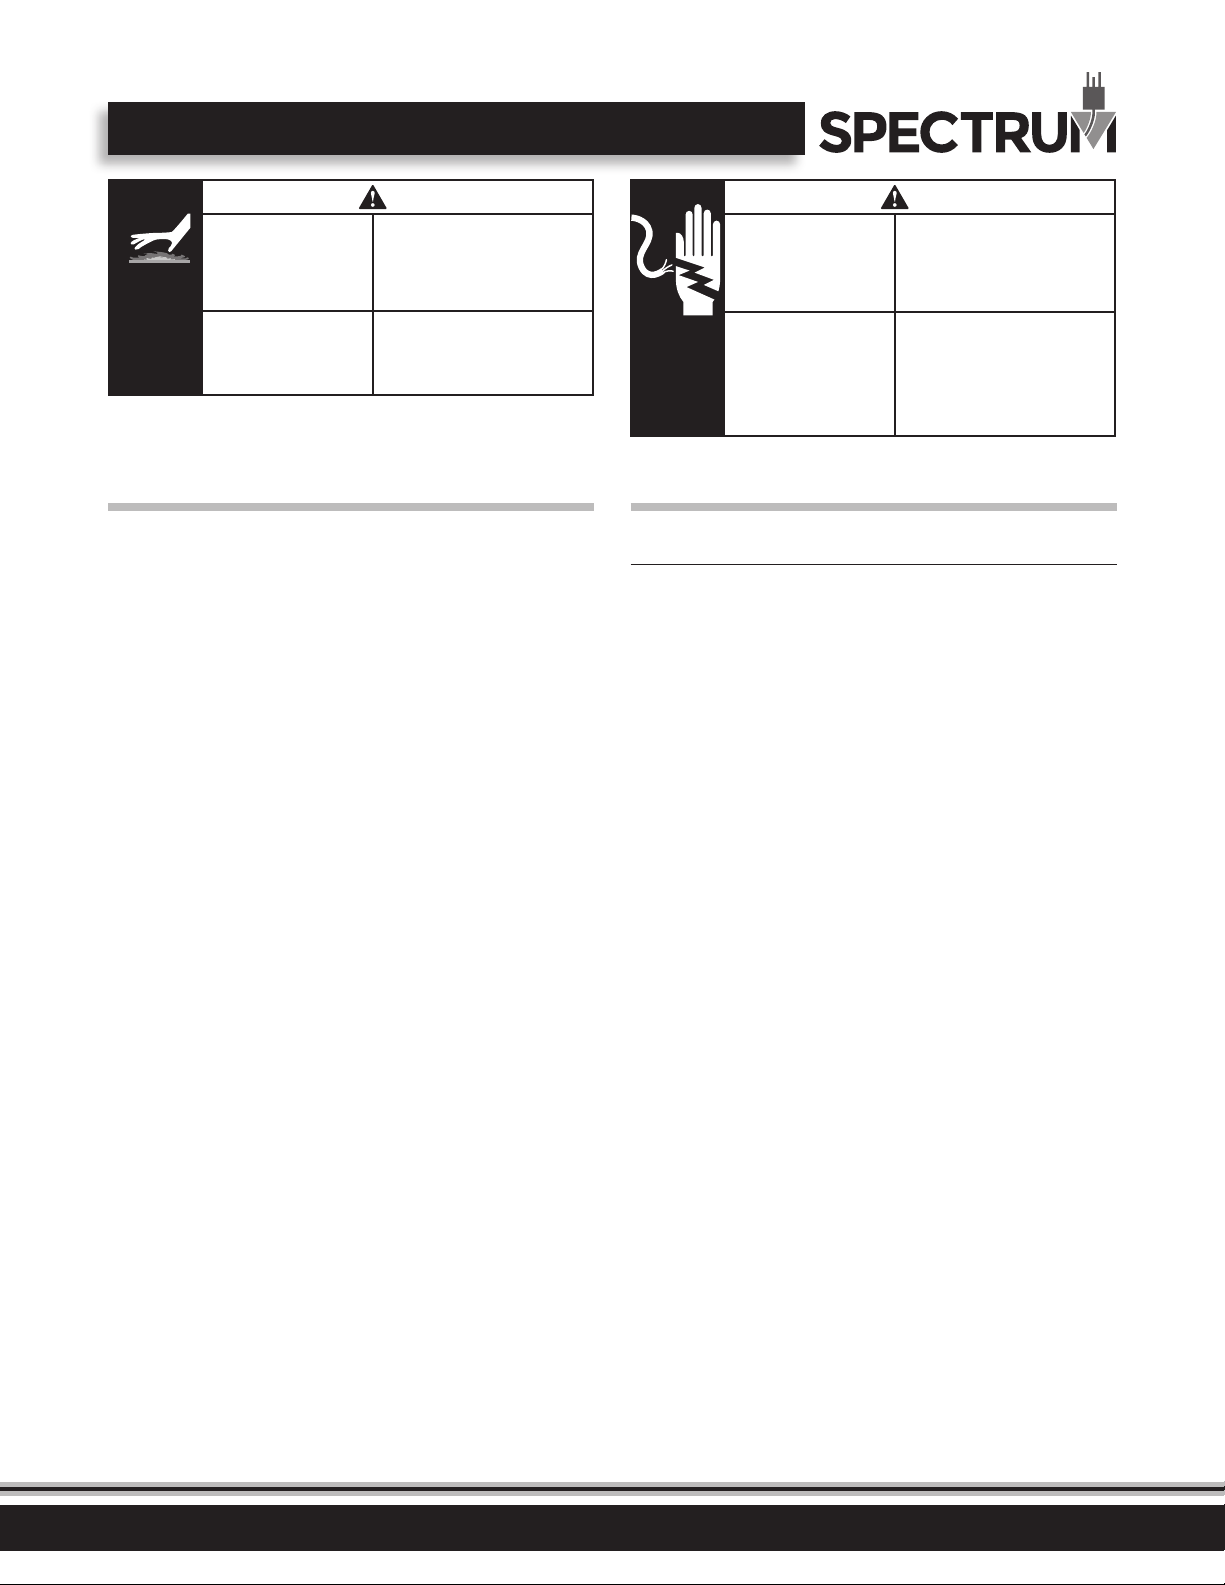
HOT
WARNING
Burn Hazard.
When in operation, the surface
of the Vacuum S ealer will
be hot.
Please take e xtreme cau tion.
USE CAUTION WHEN
TOUCHING THE UNIT.
AVERTISSEMENT
Risque de brûlure.
Ne touche z pas les surface s chaudes ou
chaué es liquide tout app areil chaue ou
en fonctionnement.
Ne touchez pas le liquide c haud
ou les sur faces de chauage
lorsque l’appareil chaue ou en
fonctionnement.
WARNING AVERTISSEMENT
Electrical Shock Hazard
Keep water an d other liquids
from entering the inside of the
unit. Liquid inside the unit could
cause an el ectrical sho ck.
Do not spray w ater or cleaning
products. Liquid could contact
the electrical components
and cause a s hort circuit o r an
elect rical shock. Do n ot use unit
if power cor d is damaged or has
been modied.
Risque de choc électrique
Conser ver l'eau et d'autres liqui des
de pénétr er à l'intérieur de l'app areil.
Liquide à l'intérieur de l'appareil pourrait
provoquer un choc électrique.
Ne pas pulvé riser de l'eau ou des pro duits
de nettoyage. Le liquide pourrait contacter
avec les comp osants élec triques et caus er
un court- circuit ou un cho c électrique.
Ne pas util iser l'appareil si le cor don
d'alimentation est endommagé.
ou a été modi é.
Cleaning, Care & Maintenance
To maintain the appearance and increase the service life,
clean your unit daily. The SPECTRUM™ Vacuum Sealer
should be cleaned after each day’s operation; however,
the unit may require more frequent cleaning, depending
on the volume of production.
1. Switch power o, disconnect from the outlet, and let the Vacuum
Sealer cool down before cleaning.
2. The Vacuum Sealer can be cleaned with a damp cloth using hot,
soapy water.
3. Do not immerse completely in water or use hose to clean.
4. Warm soapy water is recommended for cleaning; prolonged use of
cleaning agents may cause damage to stainless steel.
Safety
SAFETY PRECAUTIONS
Before installing and operating this equipment be sure
everyone involved in its operation are fully trained and
aware of all precautions. Accidents and problems can
result from a failure to follow fundamental rules and
precautions.
• A WINCO® Approved Recommended Qualied Service Technician
should carry out repairs if necessary. Do not remove any
components or service panels on this product.
• Before cleaning, switch o power and disconnect power cord from
the outlet.
• Do not immerse unit in water or use hose to clean.
Ne jamais immerger l'appareil dans l'eau ni utilisez un jet
d'eau pour le nettoyer.
• If the power cord is damaged, it must be replaced by a WINCO®
Approved Recommended Qualied Service Technician in order to
avoid a hazard.
7
Page 8
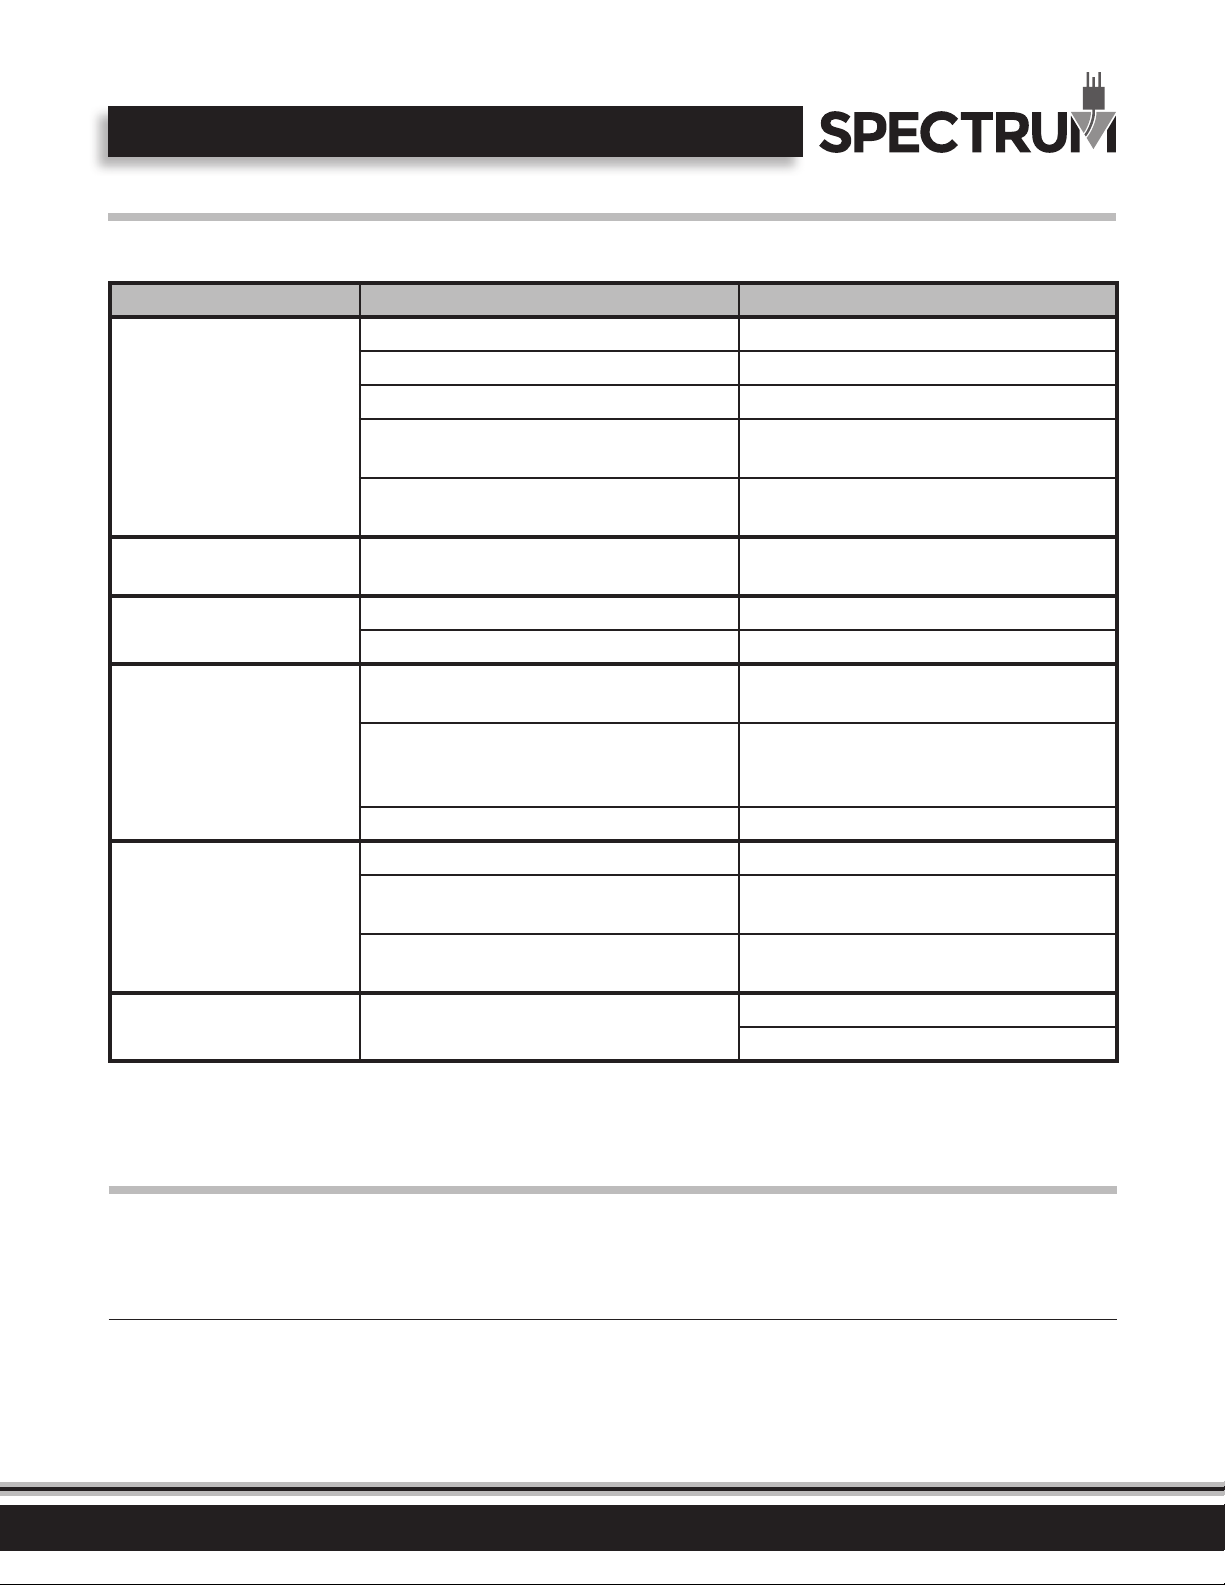
Troubleshooting
If your SPECTRUM™ Vacuum Sealer does not operate, please check the following before placing a service call:
ISSUE MIGHT BE CAUSE BY RECOMMENDED SOLUTION
Lack of power Check main power supply
Power switch has not been turned on Check that unit is correctly plugged in and turned on
The unit is not working and the
display is not on
The unit is working but the
display is not on
Display is on but the unit is not
sealing
Vacuum pouch loses vacuum after
being sealed
Pouch is not sealing properly
E01 appears on the display screen
Wrong operating procedure Refer to operating instructions
Plug and lead are damaged
Internal wiring fault
Faulty control board
Faulty sealing bar Replace faulty sealing wire or sealing bar
Seal time may not be long enough Increase seal time and try again
Sharp items puncturing small holes in pouch.
Some fruits and vegetables can release gases if not
properly blanched or frozen before packaging.
Sealing bar Check sealing bar and try again
Seal time may not be long enough Increase seal time and try again
Moisture, food particles or debris are present in the
seal area
Pouch is not properly placed along the seal bar.
Micro switch is not closed when the machine enters
the heat seal mode.
Replace damaged power cable - Replacement must
be done by an authorized service provider
Replace faulty wiring - Replacement must be done
by an authorized service provider
Replace faulty control board - Replacement must be
done by an authorized service provider
Cover sharp edges with paper towel and vacuum in
a new pouch.
Open pouch. If you think food spoilage has begun,
discard food. If food spoilage has not yet begun,
consume immediately. If in doubt, discard food.
Wipe the inside of the pouch clean and try again.
Make sure the entire pouch is over the seal bar and
there are no wrinkles in pouch material.
Check lid is closed and try again
Check micro switch connection
Service and Repair
THIS EQUIPMENT MUST ONLY BE SERVICED BY AN AUTHORIZED AGENT.
NOTE
Parts protected by the manufacturer or its agent are not to be adjusted by the installer unless the installer is an authorized service agent.
If you have any questions or problems DO NOT send unit to WINCO® without rst contacting our customer service department.
See "Limited Warranty" section on page 10 for details.
8
Page 9
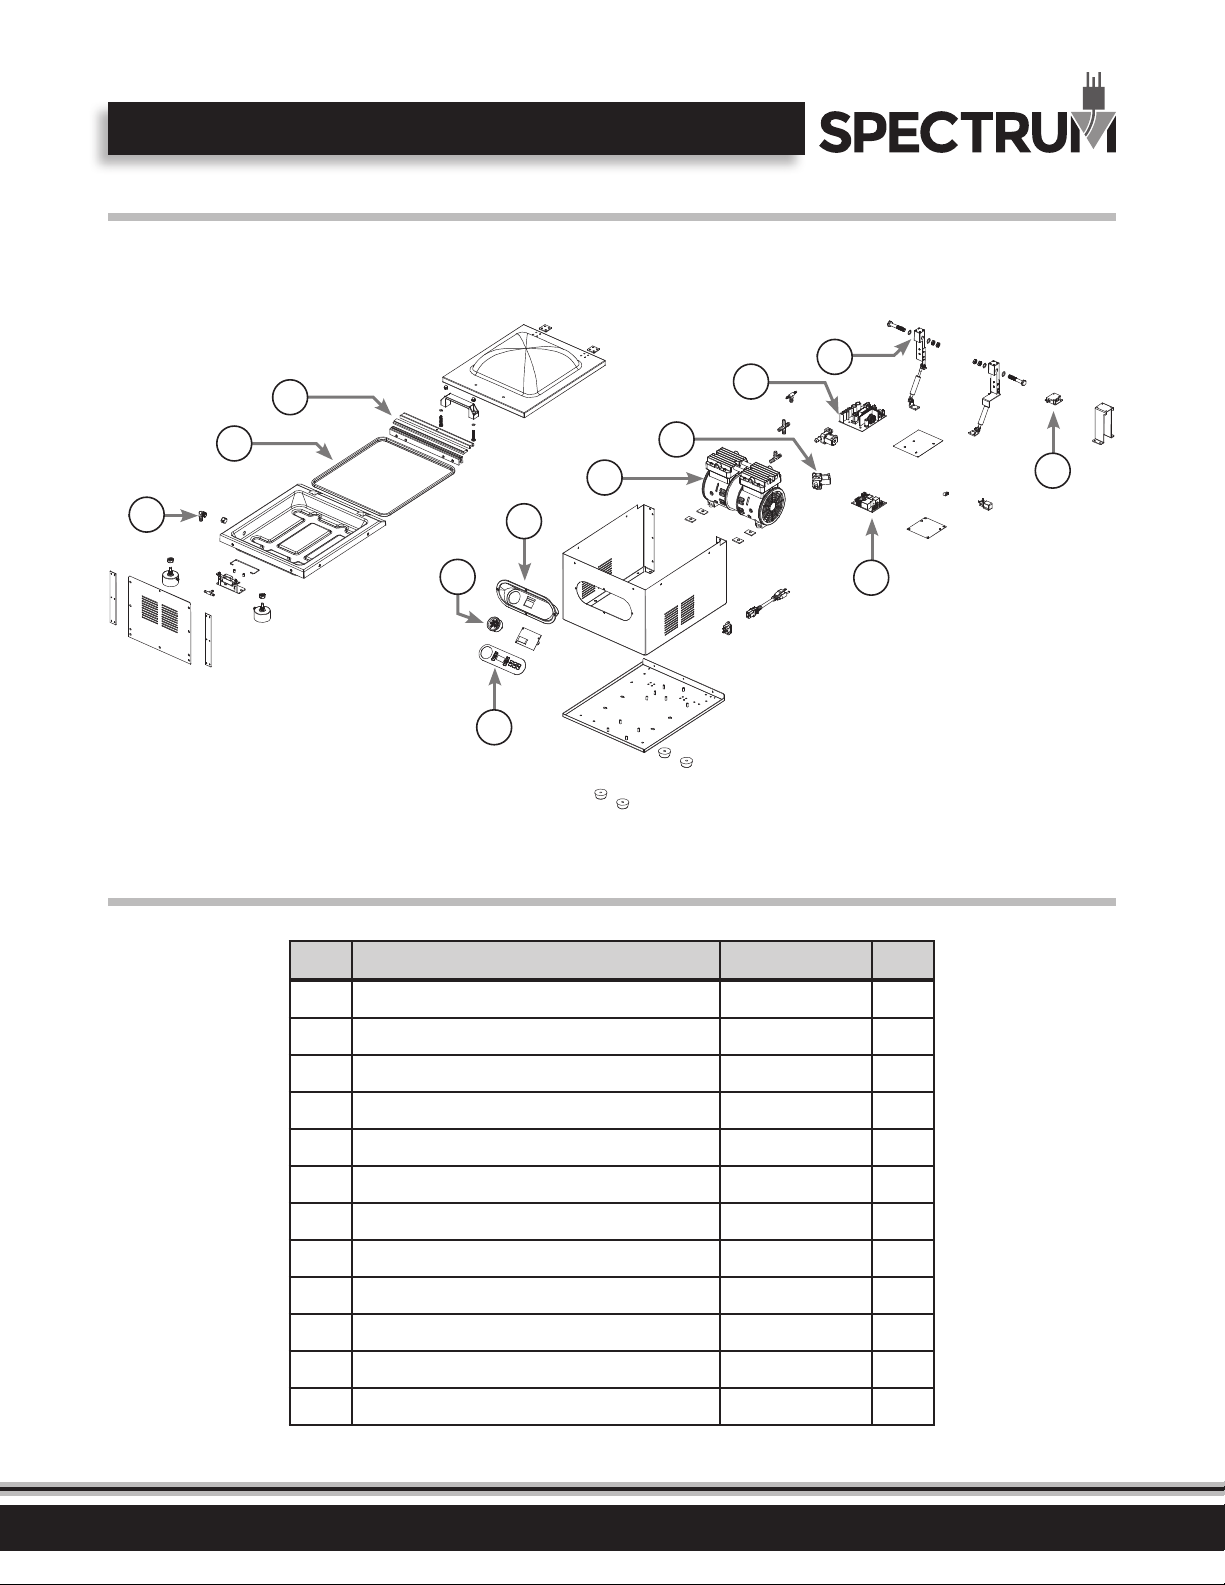
Exploded View
MODEL: EVPM-12
4
1
5
2
3
Parts List
MODEL: EVPM-12
6
7
8
9
10
11
# Description Part # QTY
1 Seal bar assembly EVPM-P1 1
12
2 Sealing ring EVPM-P2 1
3 Water inlet valve EVPM-P5 1
4 Up-down piston assembly EVPM-P3 2
5 Power board EVPM-P4 1
6 Small solenoid valve EVPM-P11 2
7 Vacuum pump EVPM-P6 1
8 Control board EVPM-P9 1
9 Vacuum gauge EVPM-P7 1
10 Membrane switch EVPM-P8 1
11 Main board EVPM-P10 1
12 Microswitch assembly EVPM-P12 1
Please contact factory for special order parts not listed.
9
Page 10

Limited Warranty
WINCO® warrants to the original purchaser of new equipment that said equipment, when installed in accordance with our instructions within North
America and subjected to normal use, is free from defects in material or workmanship for a period of 1 year. The labor warranty is one year from
original installation or 18 months from actual factory shipment date, whichever date occurs rst.
THIS WARRANTY IS IN LIEU OF ALL OTHER WARRANTIES, WHETHER EXPRESSED OR IMPLIED. WINCO EXPRESSLY DISCLAIMS ANY
IMPLIED WARRANTY OF MERCHANTABILITY OR EXPRESSED OR IMPLIED WARRANTY OF FITNESS FOR A PARTICULAR PURPOSE.
WINCO’S OBLIGATION AND LIABILITY UNDER THIS WARRANTY IS EXPRESSLY LIMITED TO REPAIRING AND REPLACING EQUIPMENT
THAT PROVES TO BE DEFECTIVE IN MATERIAL OR WORKMANSHIP WITHIN THE APPLICABLE WARRANTY PERIOD.
IN NO EVENT SHALL WINCO BE LIABLE FOR INCIDENTAL OR CONSEQUENTIAL DAMAGES TO BUYER OR ANY THIRD PARTY, INCLUDING,
WITHOUT LIMITATION, LOSS OF PROPERTY, PERSONAL INJURY, LOSS OF BUSINESS OR PROFITS OR OTHER ECONOMIC LOSSES, OR
STATUTORY OR EXEMPLARY DAMAGES, WHETHER IN NEGLIGENCE, WARRANTY, STRICT LIABILITY, OR OTHERWISE.
This warranty is given only to the rst purchaser from a retail dealer. No warranty is given to subsequent transferees.
Warranty does not cover product failures caused by: failure to maintain, neglect, abuse, damage due to excess water, re, normal wear, improper set
up and use. Periodic maintenance is not covered.
This warranty is not in force until such time as a properly completed and digitally signed Installation/Warranty Registration has been received by
WINCO within 30 days from the date of installation.
WARRANTY SERVICE
To initiate warranty service contact: [email protected]
or call: 973-295-3899
DO NOT send unit to WINCO® without rst contacting our customer service department.
REGISTER ONLINE AT:
http://support.wincous.com
Proof of purchase is required to extend warranty more than 1 year from date of shipment from the factory.
10
Page 11

Limited Warranty
THE FOREGOING WARRANTY PROVISIONS ARE A COMPLETE AND EXCLUSIVE STATEMENT BETWEEN THE BUYER AND SELLER. WINCO®
NEITHER ASSUMES NOR AUTHORIZES ANY PERSONS TO ASSUME FOR IT ANY OTHER OBLIGATION OR LIABILITY IN CONNECTION WITH
SAID EQUIPMENT.
Examples of items not covered under warranty, but not limited to just these items:
1. Natural disasters (ie: earthquakes, tornadoes, hurricanes, etc.), re, water damage, burglary, accident, theft.
2. Freight damage.
3. Improper installation or alteration of equipment.
4. Use of generic or after-market parts.
5. Repairs made by anyone other than a WINCO® designated service provider.
6. Lubrication.
7. Expendable wear parts, adjustable feet, blown fuses, lamps, etc.
8. Cleaning of equipment.
9. Misuse or abuse.
Please keep this manual in a safe place for future use!
11
Page 12
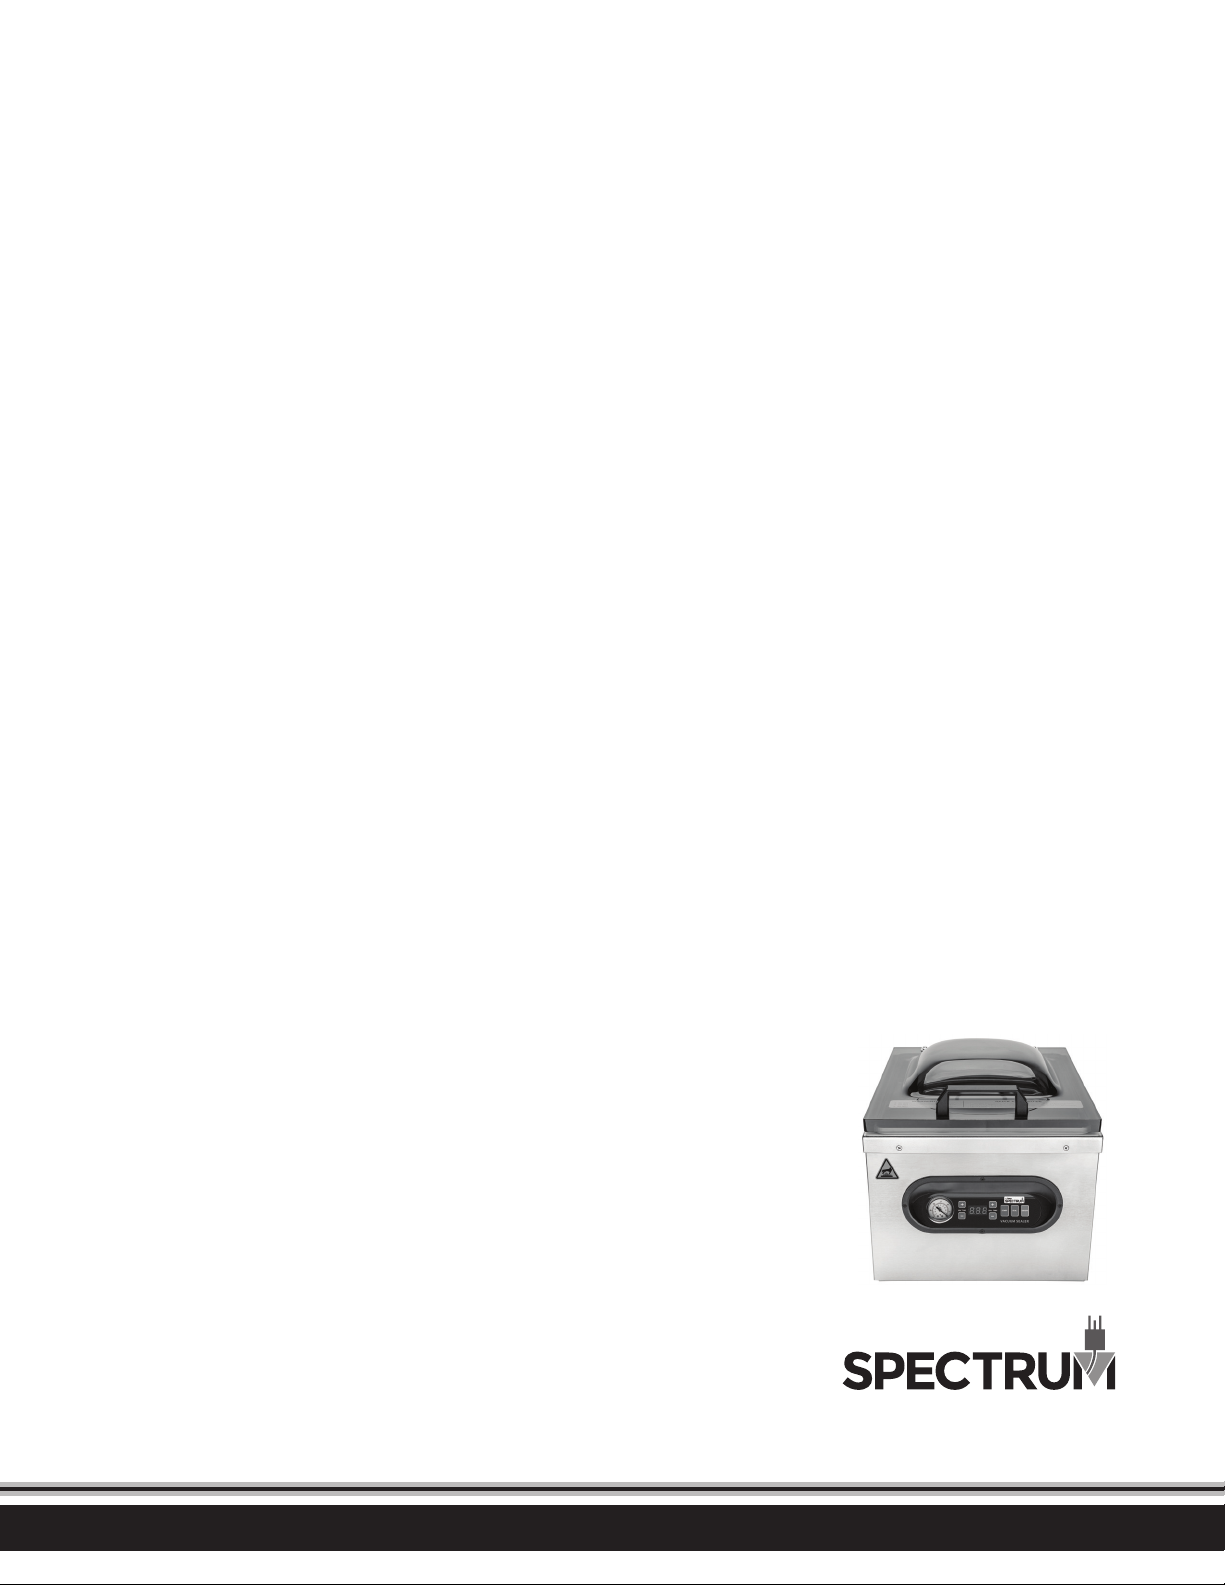
Mod el: EVPM -12
www.wincous.com
 Loading...