

Page 1
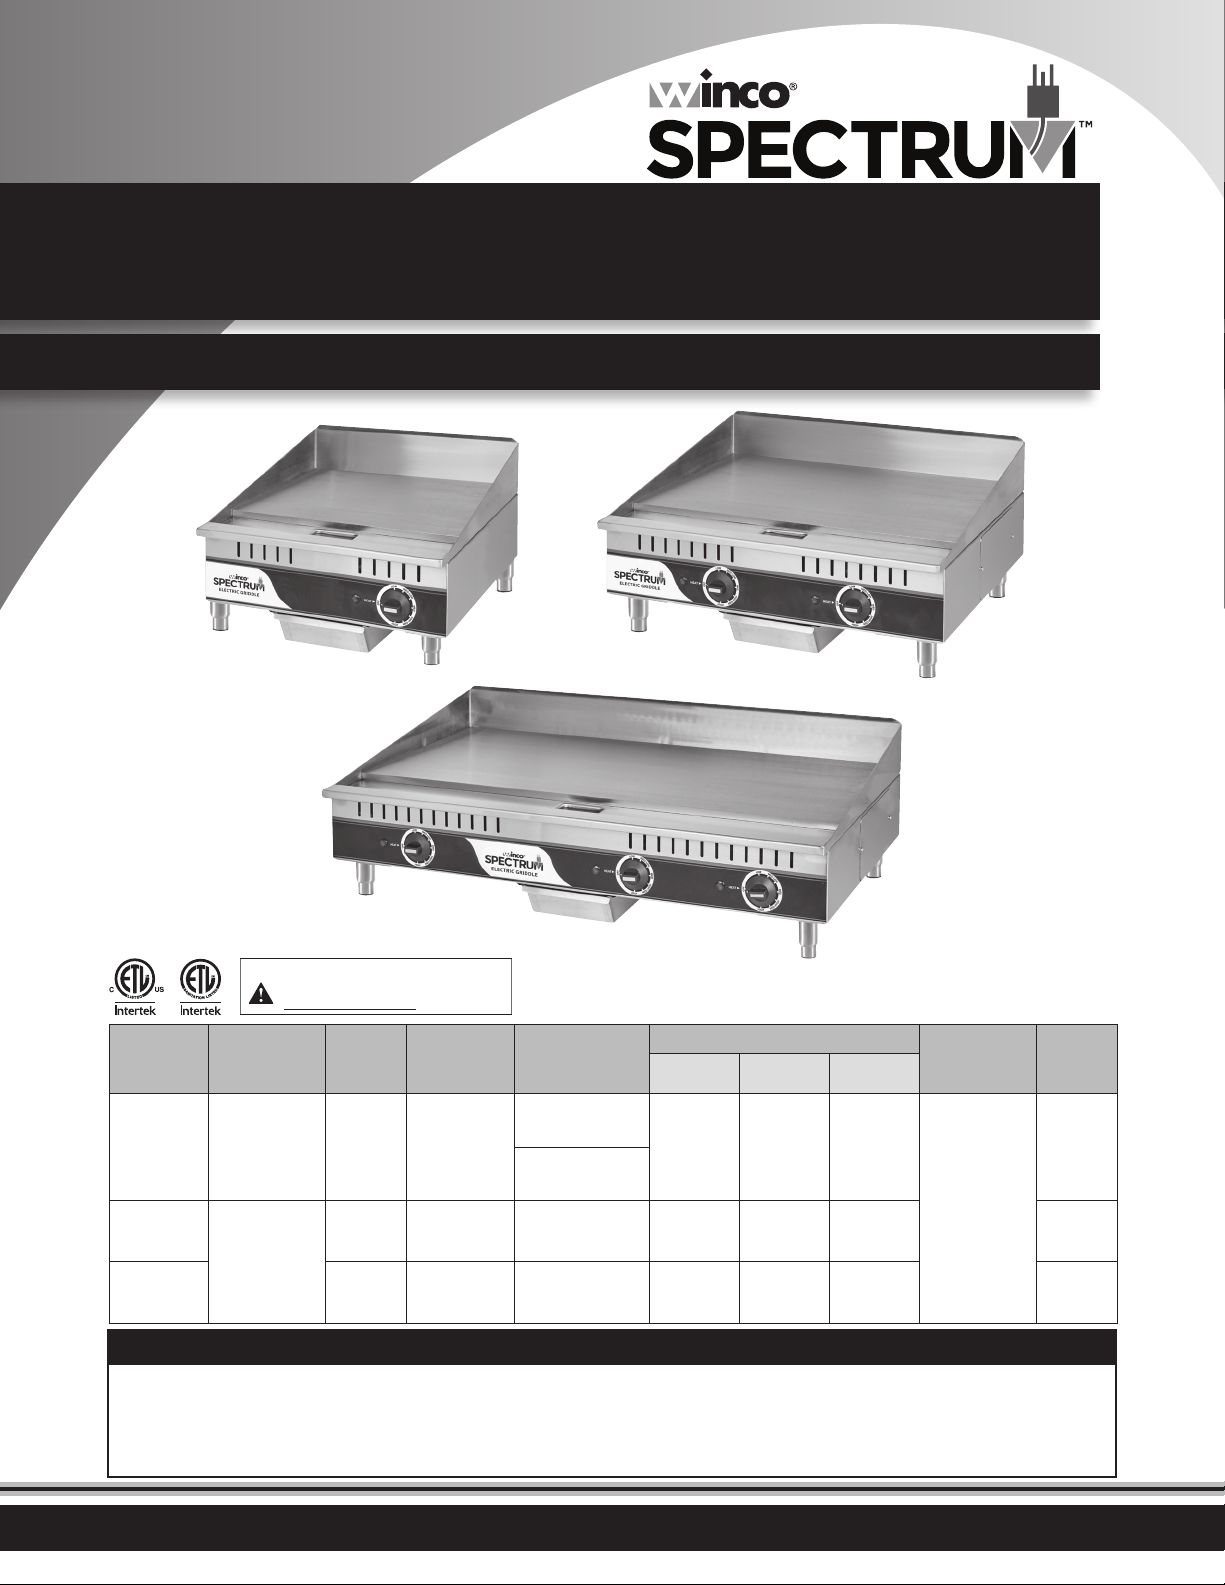
ELECTRIC COUNTERTOP
GRIDDLES
Installation and Operating Instruction Manual
EGD-24MEGD-16M
EGD-36M
For California Customers
WARNING: Cancer and Re produc ve Harm -
www.P65Warnings.ca.gov
Model Voltage Power
EGD-16M
EGD-24M
EGD-36M
120V
~50/60 Hz
208/ 240V
~50/60 Hz
1750W 14.6A
4200/
5600W
6300/
8400W
Amperage
see pg9 for
3-phase
20.2/23.4A
1-phase
30.29/35A
1-phase
Plug Type
NEMA
5-15P
NEMA
5-20P (Canada)
NEMA
L6-30P
Field-wired by
others
Overall Dimensions
Length Depth Height
16"
(406mm)
24"
(609mm)
36"
(914mm)
19-1/8"
(486mm)
21-3/4"
(551mm)
21-3/4"
(551mm)
12 -7/8"
(327mm)
12 -7/8"
(327mm)
12 -7/8"
(327mm)
Temp Rang e Weight
53 lbs
(24 kgs)
150°F - 480°F
(65°C - 250°C)
116.8 lbs
(53 kgs)
159.6 lbs
(72.4 kgs)
BEFORE OPERATING ANY EQUIPMENT, READ AND FAMILIARIZE YOURSELF WITH THESE USE AND SAFETY INSTRUCTIONS
Congratulations on your purchase of this SPECTRUM commercial equipment. When used as intended, and with
proper care and maintenance, you are sure to experience years of reliable operation from this equipment. To ensure
best results, it is important that you read and follow the instructions in this manual carefully. It is important to
keep these instructions in a safe place for future reference.
Form No. EGD-Series Manual - 0820
Page 2
Electric Countertop Griddles
Important For Future Reference
Please complete this information and retain this manual for the life of the equipment. For
Warranty Service and/or parts, this information is required.
Model Number Serial Number Date Purchased
WARNING: For your safety, do not store or use gasoline
or other ammable vapors or liquids in the vicinity of
! !
this or any other appliances. Keep the area free and
clear of combustibles. (See ANSI Z83. 14B, 1991).
WARNING: Improper installation, adjustment,
alteration, service or maintenance can cause property
! !
damage, injury, or death. Read the installation
operating and maintenance instructions thoroughly
before installing, or servicing this equipment.
WARNING: Instructions must be posted in a prominent
location. All safety precautions must be taken in the
! !
event the user smells gas. Safety information can be
obtained from your local gas supplier.
CAUTION: These models are designed, built, and sold for
commercial use only. If these models are positioned so
! !
the general public can use the equipment, make sure
that cautions, warnings, and operating instructions
are clearly posted near each unit so that anyone using
the equipment will use it correctly and not injure
themselves or harm the equipment.
AVERTISSEMENT: Pour votre sécurité, ne pas stocker ni
utiliser d'essence ou d'autres vapeurs ou liquides
inammables à proximité de cet appareil ou d'autres
appareils. Garder la zone libre de combustible.
(Voir la norme ANSI Z83. 14B, 1991).
AVERTISSEMENT: Une installation, un réglage, une
modication, un entretien ou peut causer des dommages
matériels, des blessures ou la mort. Lisez les
instructions d' exploitation et de maintenance d'installation
avant d'installer, ou sauvegarder cet équipement.
AVERTISSEMENT: Les instructions doit être achées dans
un endroit bien en vue. Toutes les mesures de sécurité
doit être prises en cas d'odeur de gaz. Les consignes
de sécurité peut être obtenue auprès de votre fournisseur
de gaz local.
ATTENTION: Ces modèles sont conçus, fabriqués et vendus
pour un usage commercial seulement. Si ces modèles
sont positionnés de sorte que le grand public peut
utiliser l'équipement, assurez-vous que mises en garde, les
avertissements et les instructions sont clairement achés unité
de sorte que toute personne utilisant l'équipement va l'utiliser
correctement et de ne pas nuire à injurethemselves
ou l'équipement.
WARNING: A factory authorized agent should handle
all maintenance and repair. Before doing any
! !
maintenance or repair, contact your authorized service
representative.
2
AVERTISSEMENT: Un agent autorisé de l'usine doit traiter
tout l'entretien et la réparation. Avant de faire tout
entretien ou réparation, contactez votre représentant
de service autorisé.
Page 3

Table of Contents
Specications .............................................................................. 1
Warnings ..................................................................................... 2
Introduction ................................................................................ 3
Packaging .................................................................................... 4
Installation .................................................................................. 5
Operation .................................................................................... 6
Cleaning, Care & Maintenance ................................................. 7
Exploded View & Parts List ....................................................... 8
Electrical Diagram ...................................................................... 9
Troubleshooting ........................................................................11
Electric Countertop Griddles
Service & Repair .........................................................................11
Limited Warranty ..................................................................... 12
Introduction
Congratulations on the purchase of your SPECTRUM™ equipment.
Please take time to carefully read through this manual for proper
operation and maintenance to ensure the best possible performance
from the product for many years.
SPECTRUM will not accept liability for the following if:
• The instructions in this manual have not been followed correctly.
• Non-authorized personnel have tampered with the equipment.
• Non-original spare parts are used.
• The equipment has not been handled and cleaned correctly.
• There is any use damage to the unit.
LOCATION OF DATA PLATE
The data plate is located on the rear or side panel.
IMMEDIATELY INSPECT FOR SHIPPING DAMAGE
All containers should be examined for damage before and during
unloading. The freight carrier has assumed responsibility for its safe
transit and delivery. If equipment is received damaged, either apparent
or concealed, a claim must be made with the delivering carrier.
A. Apparent damage or loss must be noted on the freight bill
at the time of delivery. It must then be signed by the carrier
representative (Driver). If this is not done, the carrier may refuse
the claim. The carrier can supply the necessary forms.
B. If concealed damage or loss is not apparent until after equipment
is uncrated, a request for inspection must be made to the carrier
within 15 days. The carrier should arrange an inspection. Be certain
to keep all contents and packaging material.
Installation should be performed by a qualied installer who
thoroughly read, understands and follows these instructions.
If you have questions concerning the installation, operation,
maintenance or service of this product, please contact WINCO®.
Please keep this manual in a safe place for future use!
3
Page 4
Safety Precautions
DANGER: This symbol warns of imminent hazard which
will result in serious injury or death.
! !
WARNING: This symbol refers to a potential hazard
or unsafe practice, which could result in serious injury
! !
or death.
CAUTION: This symbol refers to a potential hazard
or unsafe practice, which could result in minor or
! !
moderate injury or product or property damage.
NOTICE: This symbol refers to information that needs
special attention or must be fully understood even
! !
though not dangerous.
NOTICE: This product is intended for commercial use
only. Not for household use.
! !
NOTICE: Local codes regarding installation vary greatly
from one area to another. The National Fire Protection
! !
Association, Inc., states in its NFPA 96 latest edition
that local codes are “Authority Having Jurisdiction”
when it comes to requirement for installation of
equipment. Therefore, installation should comply with
all local codes.
Risque: Ce symbole avertit du danger imminent qui peut
entraîner des blessures graves ou la mort.
AVERTISSEMENT: Ce symbole indique un danger potentiel
ou une pratique dangereuse, qui peut entraîner des
blessures graves ou la mort.
ATTENTION: Ce symbole indique un danger potentiel ou une
pratique dangereuse, qui peut entraîner des blessures
mineures ou modérées ou des dommages matériels.
AVIS: Ce symbole renvoie à des informations qui nécessite
une attention particulière ou doit être pleinement
compris, même si pas dangereux.
AVIS: Ce produit est destiné à un usage commercial.
Pas pour usage domestique.
AVIS: Les codes locaux concernant l'installation varient
grandement d'une région à l'autre. La National Fire
Protection Association, Inc., déclare dans sa dernière
édition que NFPA 96 codes locaux sont “Autorité Compétente”
lors de l'exigence pour l'installation d'équipements.
Par conséquent, l'installation doit être conforme à tous les
codes locaux.
Package Contents
All units come with Installation & Operating Instructions Manual
and the following:
• (1) Griddle Unit
• (1) Catch Tray
• (4) Adjustable Legs
SPECTRUM prides itself on quality and service, ensuring that at the
time of packing, all products are supplied fully functional and free
of damage. Should you nd any damage as a result of freight, please
contact your SPECTRUM dealer immediately.
Installation and start-up must be performed by a qualied installer who
has thoroughly read, understands and follows these instructions.
Unpacking the Equipment
DISPOSE OF ALL PACKAGING MATERIALS IN AN
ENVIRONMENTALLY RESPONSIBLE MANNER.
1. Remove all packing materials and tape, as well as any protective
plastic and cardboard, from the unit.
2. Clean any glue residue left over from the plastic or tape.
3. Place the unit in the desired position and height.
SAVE THE ORIGINAL BOX AND PACKAGING FOR USE IN
PACKAGING AND SHIPPING THE EQUIPMENT IF SERVICES
ARENEEDED.
NOTE
Please remember that t his manual and the warning labels do not replac e the need to be alert, to properly trai n and supervise
operators, and to use common sense when using this equipment.
4
Page 5
Installation
These instructions should be followed at all times. Failure to follow
these instructions could result in injury to yourself and others.
TO REDUCE RISK OF INJURY OR DAMAGE TO THE UNIT:
1. Read this manual thoroughly before installation and operation.
DO NOT proceed with installation and operation if you have any
questions or do not understand anything in this manual. Contact
your representative or the manufacturer rst.
WARNING AVERTISSEMENT
Fire Hazard.
Correct installation precautions,
procedures and regulations
must be fo llowed. Operati on
and safe ty training is ne cessary
for all use rs of this equipme nt.
The equip ment must be
install ed by qualied per sonnel
only. Correc t installatio n
precautions, procedures and
regulati ons must be followe d
in order to re duce the risk of
re. Hood an d re suppression
system s must be maintaine d
per manufacturer's guidelines.
Only quali ed and trained
person nel are to use this
equipment.
Risque d'incendie
La surcha ue des vapeurs d' huile ou de
l'huile peut s'enammer et provoquer
un incendi e. Surveillez la temp érature,
la qualité et l e niveau d’huile. Uti lisez et
entrete nez le système d'élimi nation des
vapeurs d'huile.
Faire chau er l'huile avec préca ution. Si
l'huile fu me, réduire le feu. Ne p as laisser
l'appareil s ans surveillance. S i le feu se
produit , éteindre l'apparei l, couvrir jusqu'à
refroi dissement. Ne pas m ettre l'eau dans
l'huile chau de ou enammée. Ne fa ites pas
fonct ionner avec de l'huile s ous la barre
d'huile. L’huile sal e a un point d'éclair
plus bas. R emplacer l'huile sur un e base
régulière. Maintenir le niveau d'huile
correct. Utiliser un système d'évacuation
de la vapeur d' huile (capot) pour réd uire
l'accumulation de graisse et d'huile sur les
surfa ces de paroi ou de plaf ond.
NOTE
IF CERTIFIED RECEPTACLE IS REQUIRED, IT MUST BE INSTALLED BY
A QUALIFIED ELECTRICIAN WHO IS FAMILIAR WITH ELECTRICAL
PROCEDURES AND CODES. DO NOT ATTEMPT TO WIRE THIS
GRIDDLE YOURSELF.
2. Remove the SPECTRUM Electric Griddle from the packaging. Be
certain that all protective plastics and residues are thoroughly
cleaned from its surface.
3. Place the SPECTRUM Electric Griddle on a rm level surface. Local
standards and regulations should be consulted in order to abide by
standards set in relation to positioning, spacing and ventilation.
4. Proper connections and power supply are necessary for
satisfactory performance.
5. The external wiring must be in conduit or an approved type of
exible cable suitable for operation at temperature indicated at
the conduit hole, and in a proper size to carry the load.
6. The supply circuit must be correctly fused and equipped with a
means of disconnecting, as required by the local electrical code.
For griddle with plugs and leads set, simply provide a suitable
power point and connect.
WARNING AVERTISSEMENT
Burn Hazard.
When in operation, the
appliance w ill be hot.
HOT
Please take e xtreme cau tion.
USE CAUTION WHEN
TOUCHING THE UNIT.
Leg Installation:
The Griddle must not be operated without the legs attached.
Install by screwing each leg post into each corner of unit frame. Level
unit by turning lower foot clockwise or counter clockwise as required.
Leveling:
Turn the feet at the bottom of the legs (after legs are installed on unit)
up or down to level the Griddle in the nal installed location.
Assembly:
Slide the catch tray into the runners below the heating elements and
place into the rack. Once in position, the catch tray will catch crumbs,
grease or drippings from food product.
Seasoning the Griddle:
Heat to low temperature (300° - 350°F / 150° - 180°C) and pour a small
amount of cooking oil onto the griddle plate (about one ounce { 30cc }
per square foot of surface). Spread the oil over the entire griddle surface
with a cloth to create a thin lm. Wipe o any excess oil with a cloth.
Repeat this procedure 2 to 3 times until the griddle has a slick, mirror-like
surface. See "Operation" section for further step-by-step instructions.
Combustible clearances:
6" sides (152 mm) 6" rear (152 mm) 4" oor (102 mm)
Noncombustible clearances:
0" sides (0 mm) 6" rear (152 mm) 4" oor (102 mm)
THIS EQUIPMENT GETS EXTREMELY HOT!
DO NOT POSITION AND/OR OPERATE NEAR COMBUSTIBLE
MATERIALS/FLAMMABLE OBJECTS.
Do not obstruct the ow of combustion and ventilation air, under the
unit by the legs or behind the unit by the ue.
Ne pas obstruer le ux de combustion et de ventilation, sous l'unité par les jambes ou
derrière l'appareil par la cheminée.
Risque de brûlure.
Ne touche z pas les surface s chaudes ou
chaué es liquid tout appar eil chaue ou
en fonctionnement.
Ne touchez pas le liquide c haud
ou les sur faces de chauage
lorsque l’appareil chaue ou en
fonctionnement.
5
Page 6
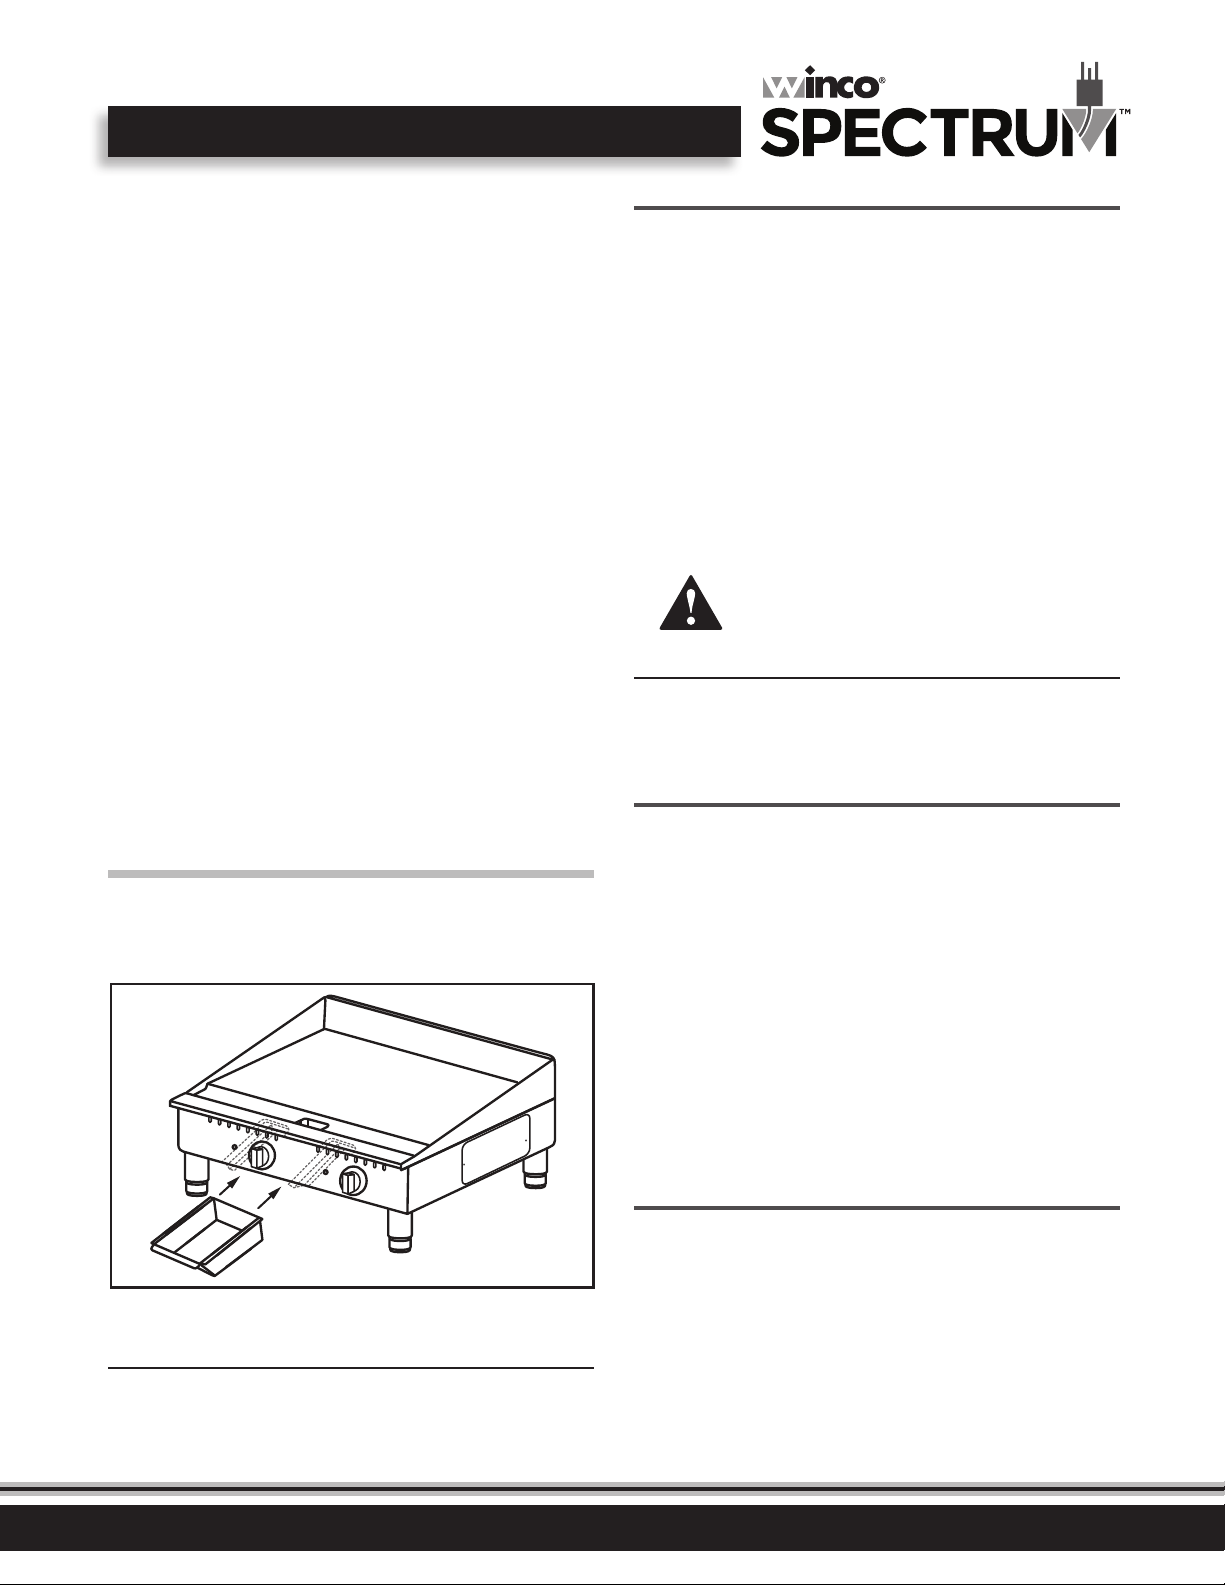
Adequate clearance for air openings into the combustion chamber is
required. Do not place objects between the bottom of the unit and the
counter top.
Un dégagement adéquat pour des ouvertures d'air dans la chambre de combustion
est nécessaire. Ne pas placer d'objets entre le bas de l'appareil et le comptoir.
There must be adequate clearance for removal of the front panel. All
major parts except the burners are removable through the front if the
gas line is disconnected.
Il doit y avoir un espace susant pour le retrait de la face avant. Toutes les parties
principales à l'exception des brûleurs sont amovibles à travers l'avant si la conduite
de gaz est coupée.
TO AVOID SERIOUS PERSONAL INJURY:
• ALWAYS install equipment in an area with adequate light and space.
• ONLY operate on a solid, level, nonskid surface that is
nonammable and away from sinks and water hazards.
• NEVER bypass, alter or modify this equipment in any way from
its original condition. Doing so can create hazards and will
void warranty.
• NEVER operate the griddle without all warnings attached to it.
Season the surface
1. Clean the griddle surface thoroughly. Once clean, it must be
seasoned to prevent food from sticking. Follow the steps below for
the correct heating method to season the griddle before use and
after scouring.
2. Switch to ON and adjust the thermostat dial knob to 350°F.
3. Use a clean cloth (not a spatula), to spread a thick lm of cooking
oil or fat over the griddle cooking surface. Film must remain on hot
griddle for 30 minutes.
4. Remove the excess fat and wipe clean.
5. Apply another lm of cooking oil over hot cooking surface for
another 30 minutes.
6. Remove the excess fat, wipe clean - the griddle surface is ready.
CAUTION
GRIDDLE SURFACE WILL BE HOT
PLAQUE SURFACE SERA CHAUD
NOTE
EVEN WITH CAREFUL SEASONING, FOOD CAN STICK TO
THE GRIDDLE COOKING SURFACE UNTIL GRIDDLE PLATE IS
“BROKEN IN”.
Operation
Before operating the griddle, it must be checked to see that it
is sitting level. Adjust the feet to level the griddle. Be sure the
catch tray has been assembled correctly (see image below).
Rack
Catch Tray
NOTE
Upon first use, griddle can produce a burning metal smell.
This is normal. The smell will decrease with use.
Temperature Control
Your griddle should be turned on prior to usage to allow the cooking
surface to warm up; 5-7 minutes is sucient.
To get ecient use from this unit, it is recommended that for
intermittent use that the thermostat be turned down when not
cooking. This will assist in reducing power consumption and also allow
for quicker heat response when needed.
It is recommended that the cooking surface is lightly greased before
each use.
The temperature is thermostatically controlled.
The set point of each thermostat is marked on the front panel with
"TEMP " in the 9 o’clock position. Griddle is equipped with one
thermostat per various cooking surface segments.
Cooking
Switch griddle to ON and adjust the thermostat dial knob to the
desired temperature. After a short pre-heating period, the thermostat
will automatically maintain the selected temperature. When the set
temperature is reached, the signal light will go OFF.
A temperature setting of between 375ºF and 430ºF will be sucient
for general cooking. This may vary for particular food types, individual
needs, or experience.
Simply place the food products on the grilling surface and cook to
manufacturer's specications.
6
Page 7
Cleaning, Care & Maintenance
To maintain the appearance and increase the service life,
clean your unit daily. The Electric Griddle should be cleaned
after each day’s operation - the unit may require more
frequent cleaning depending on the volume of production.
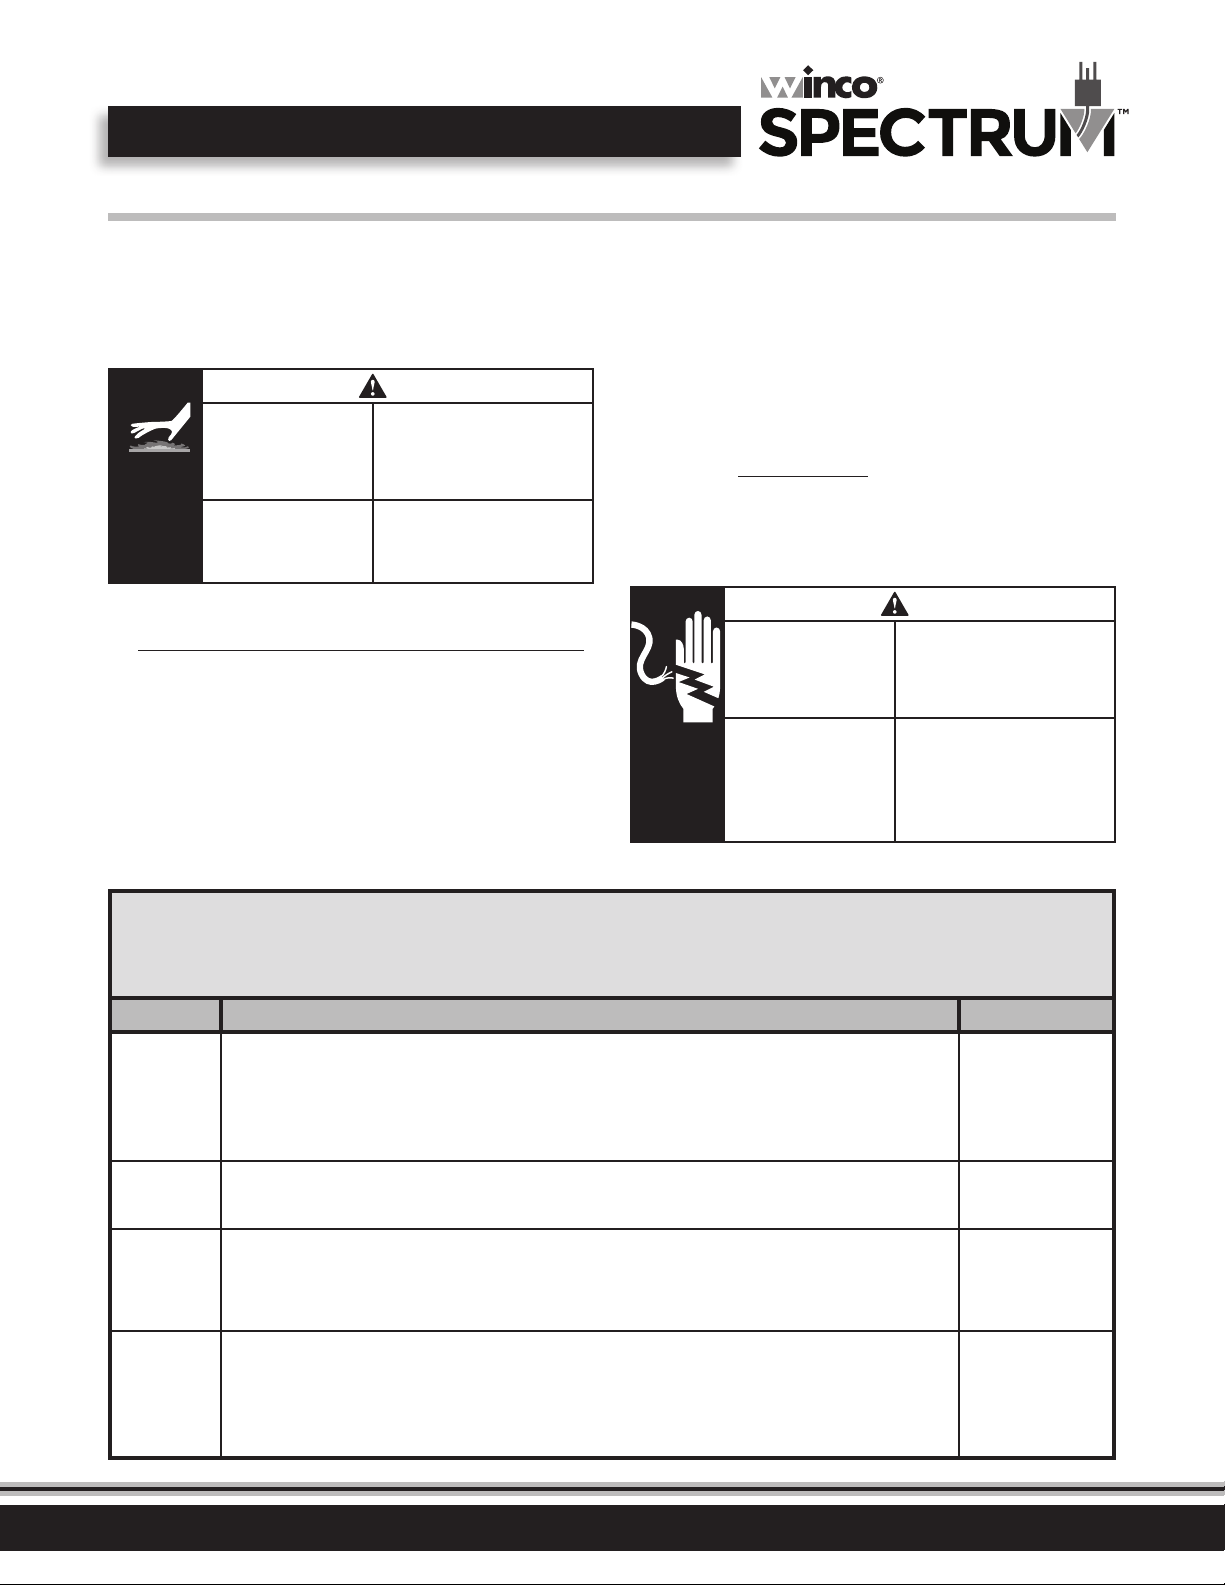
AVERTISSEMENT
Risque de brûlure.
Ne touche z pas les surface s chaudes ou
chaué es liquid tout appar eil chaue ou
en fonctionnement.
Ne touchez pas le liquide c haud
ou les sur faces de chauage
lorsque l’appareil chaue ou en
fonctionnement.
HOT
WARNING
Burn Hazard.
When in operation, the
appliance w ill be hot.
Please take e xtreme cau tion.
USE CAUTION WHEN
TOUCHING THE UNIT.
1. Switch power o and disconnect from the outlet before cleaning.
2. Allow the Electric Griddle to cool down after use before dismantling
for cleaning; the unit will still be too hot to handle immediately
after use. Regular cleaning will result in easier cleaning, as the build
up will be less. Correct preparation of the cooking surface when rst
used will assist in keeping the plates clean.
3. For best results clean the plate while still warm using warm soapy
water. A nylon cleaning cloth may be used. It is recommended that
you avoid scrapers made of steel wool, as they will damage the
plate. Do not use cold water on warm plates, as buckling eect
may occur.
4. When scrubbing the plates, do not clean too thoroughly; if you do,
you must prepare the cooking surface again before use.
5. Remove catch tray from unit and discard waste; clean with hot
soapy water.
6. The remainder of the Electric Griddle can be cleaned with a damp
cloth using warm, soapy water. Prolonged use of cleaning agents
may cause damage to stainless steel.
7. Do not immerse completely in water or use hose to clean. Ne pas
immerger l'appareil dans l'eau ni utilisez un jet d'eau pour le nettoyer.
WARNING
Electrical Shock Hazard
Keep water an d other liquids
from entering the inside of the
unit. Liquid inside the unit could
cause an el ectrical sho ck.
Do not spray w ater or cleaning
products. Liquid could contact
the electrical components
and cause a s hort circuit o r an
elect rical shock. Do n ot use unit
if power cor d is damaged or has
been modied.
AVERTISSEMENT
Risque de choc électrique
Conser ver l'eau et d'autres liqui des
de pénétr er à l'intérieur de l'app areil.
Liquide à l'intérieur de l'appareil pourrait
provoquer un choc électrique.
Ne pas pulvé riser de l'eau ou des pro duits
de nettoyage. Le liquide pourrait contacter
avec les comp osants élec triques et caus er
un court- circuit ou un cho c électrique.
Ne pas util iser l'appareil si le cor don
d'alimentation est endommagé.
ou a été modi é.
RECOMMENDED CLEANING
A little eort goes a long way to keeping the griddle attractive and performing at top eciency. If grease accumulates, it will build up and
carbonize into a hard substance that is Extremely dicult to remove. Prevent this condition and follow the following cleaning steps:
PART REQUIRED ACTION FREQUENCY
Scraping Scrape the griddle with a scraper / exible spatula to remove excess fat & food. A catch tray is provided for
After each use
the scrapings. If there is an accumulation of burned fat and food, griddle must be thoroughly scoured and
re-seasoned. While the griddle is warm, use pumice or griddle stone to remove excess fat and food. Do not
use steel wool because of the danger of steel slivers getting into the food.
Body Use a clean cloth and a non-abrasive cleanser to clean the stainless steel griddle body.
Daily
Wipe the polished areas with a soft cloth.
Controls Griddle must be turned OFF when not in use.
Daily
Switch griddle to OFF and disconnect power supply to griddle.
Use a clean cloth to wipe down switches and thermostat dial knobs.
Catch tray Once griddle has cooled, remove catch tray from griddle and discard the waste, debris and crumbs.
CAUTION: If catch tray is permitted to ll too high, the excess grease will run out of the overow hole at the
Per use,
or at least daily
front of catch tray.
Remove the catch tray by pulling it forward. USE CAUTION WHEN FILLED WITH HOT GREASE!
7
Page 8
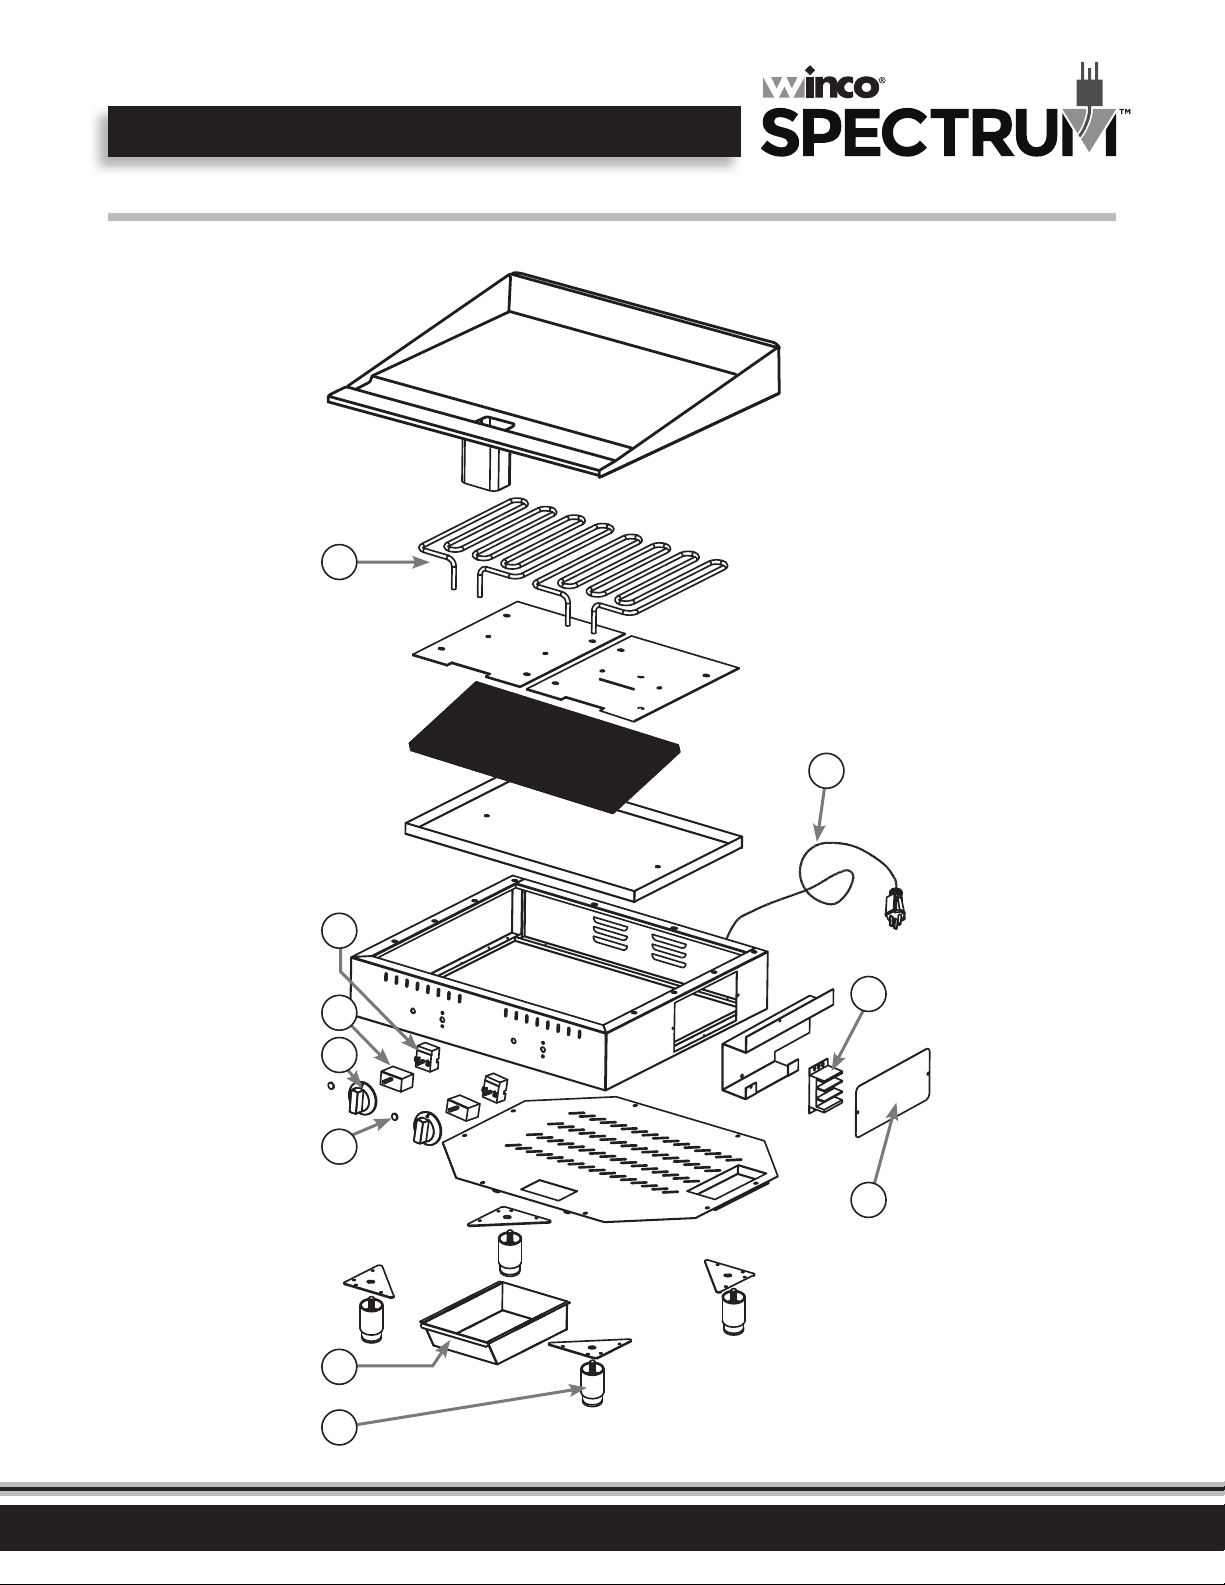
Exploded View
7
8
6
5
4
3
2
1
9
10
8
Page 9
Parts List
NOTE:
1) FOR SUPPLY CONNECTIONS USE COPPER WIRE ONLY,
SUITABLE FOR AT LEAST 194°F (90°C). USE WIRE GAUGE
SHOWN OR LARGER
2) ALL INTERNAL WIRING IS #14 GA
EGD-16M EGD-24M EGD-36M
No. Description Part # Part # Part#
1 Foot EGD-MP1 EGD-MP1 EGD-MP1
2 Drip Tray EGD-MP3 EGD-MP3 EGD-MP3
3 Indicator light EGD-MP5 EGD-MP5 EGD-MP5
4 Dial EGD-MP6 EGD-MP6 EGD-MP6
5 Switch N/A EGD-MP7 EGD-MP7
6 Thermostat EGD-MP8 EGD-MP8 EGD-MP8
7 Heating Element EGD-MP12 EGD-MP13 EGD-MP13
8 Plug & Lead EGD-MP15-1 EGD-MP15-2
9 Terminal Block EGD-MP16 EGD-MP17 EGD-MP17
10 Connection Box Cover N/A EGD-MP18 EGD-MP18
Optional Power Cord with 5-20P Plug EGD-MP19 N/A N/A
Please contact factory for special order parts not listed.
N/A
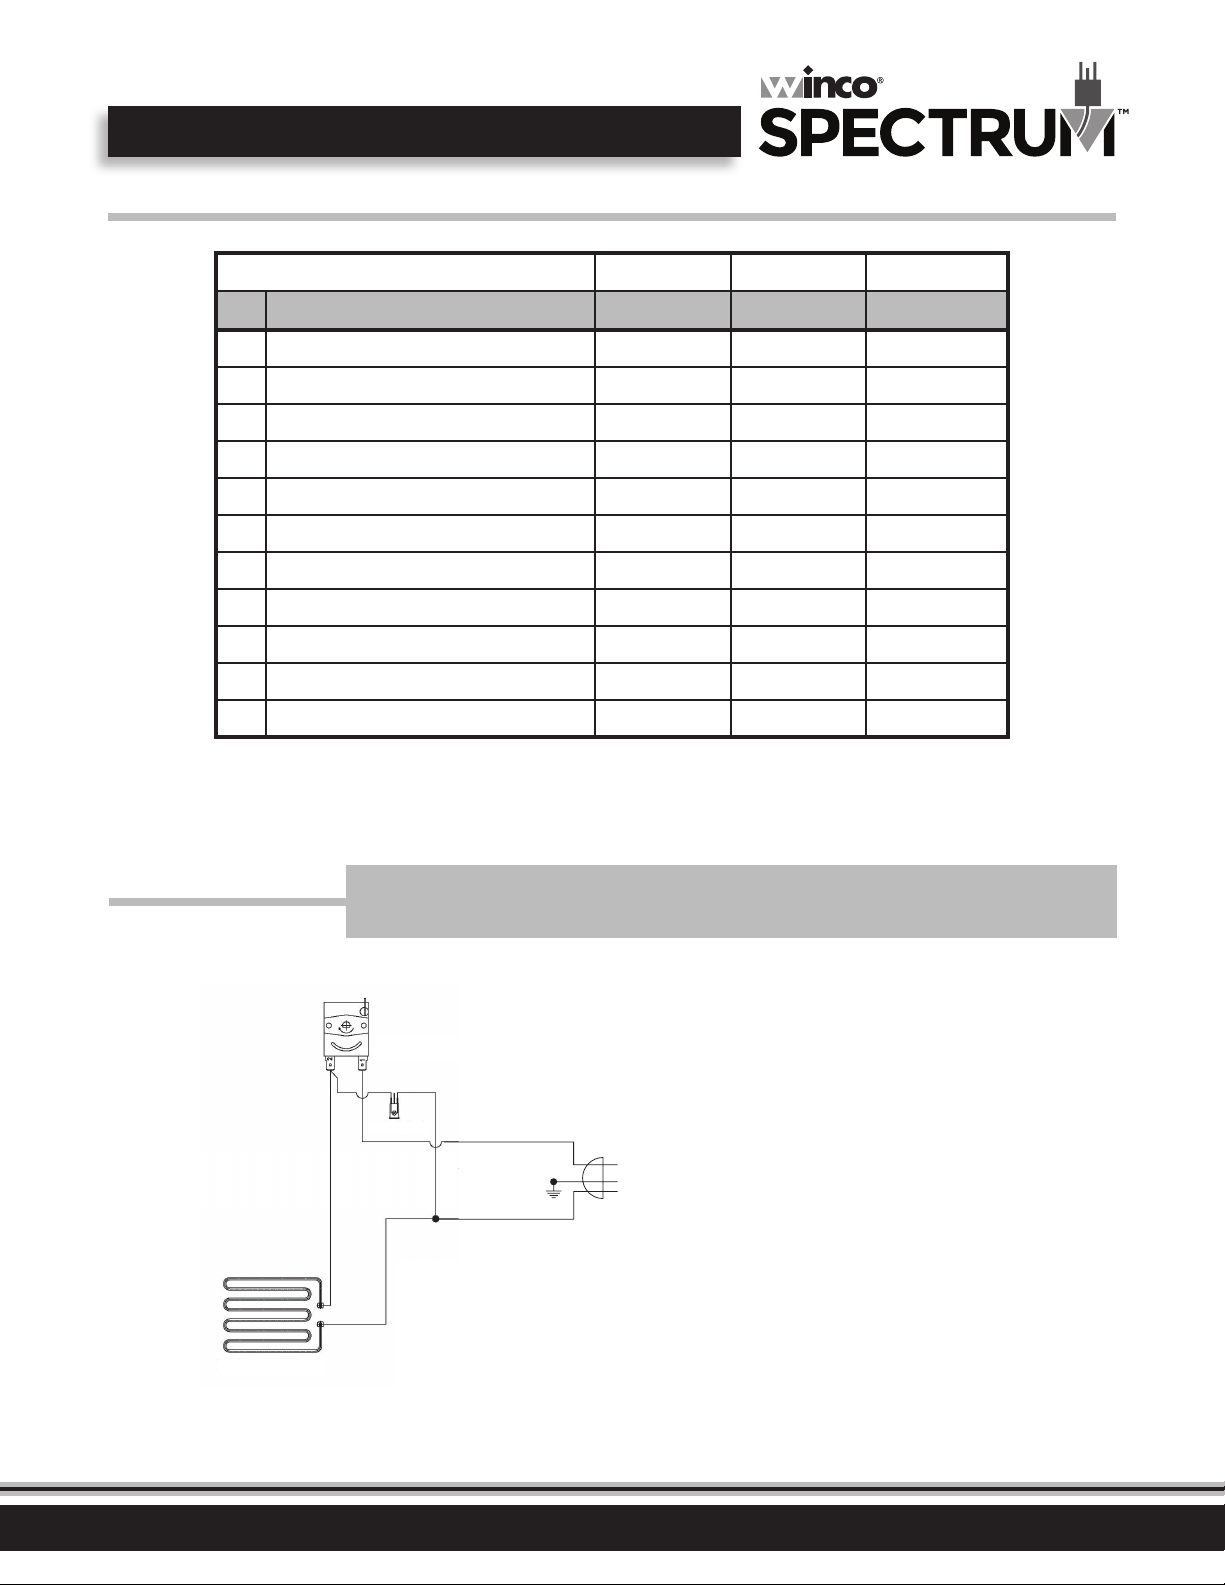
Electrical Diagrams
EGD -16M
HEATING ELEMENTS 1
The circuit d iagrams are provided to assist qualied tec hnicians. Only SPECTRUM agent s or Recommended Qualied Technicians should
carry o ut repairs if needed. (Refer to page 11 for service arrangements)
DO NOT remove any components or service panels on this product.
THERMOSTAT 1
PILOT LIGHT 1
120V AC
GND
L
N
9
Page 10
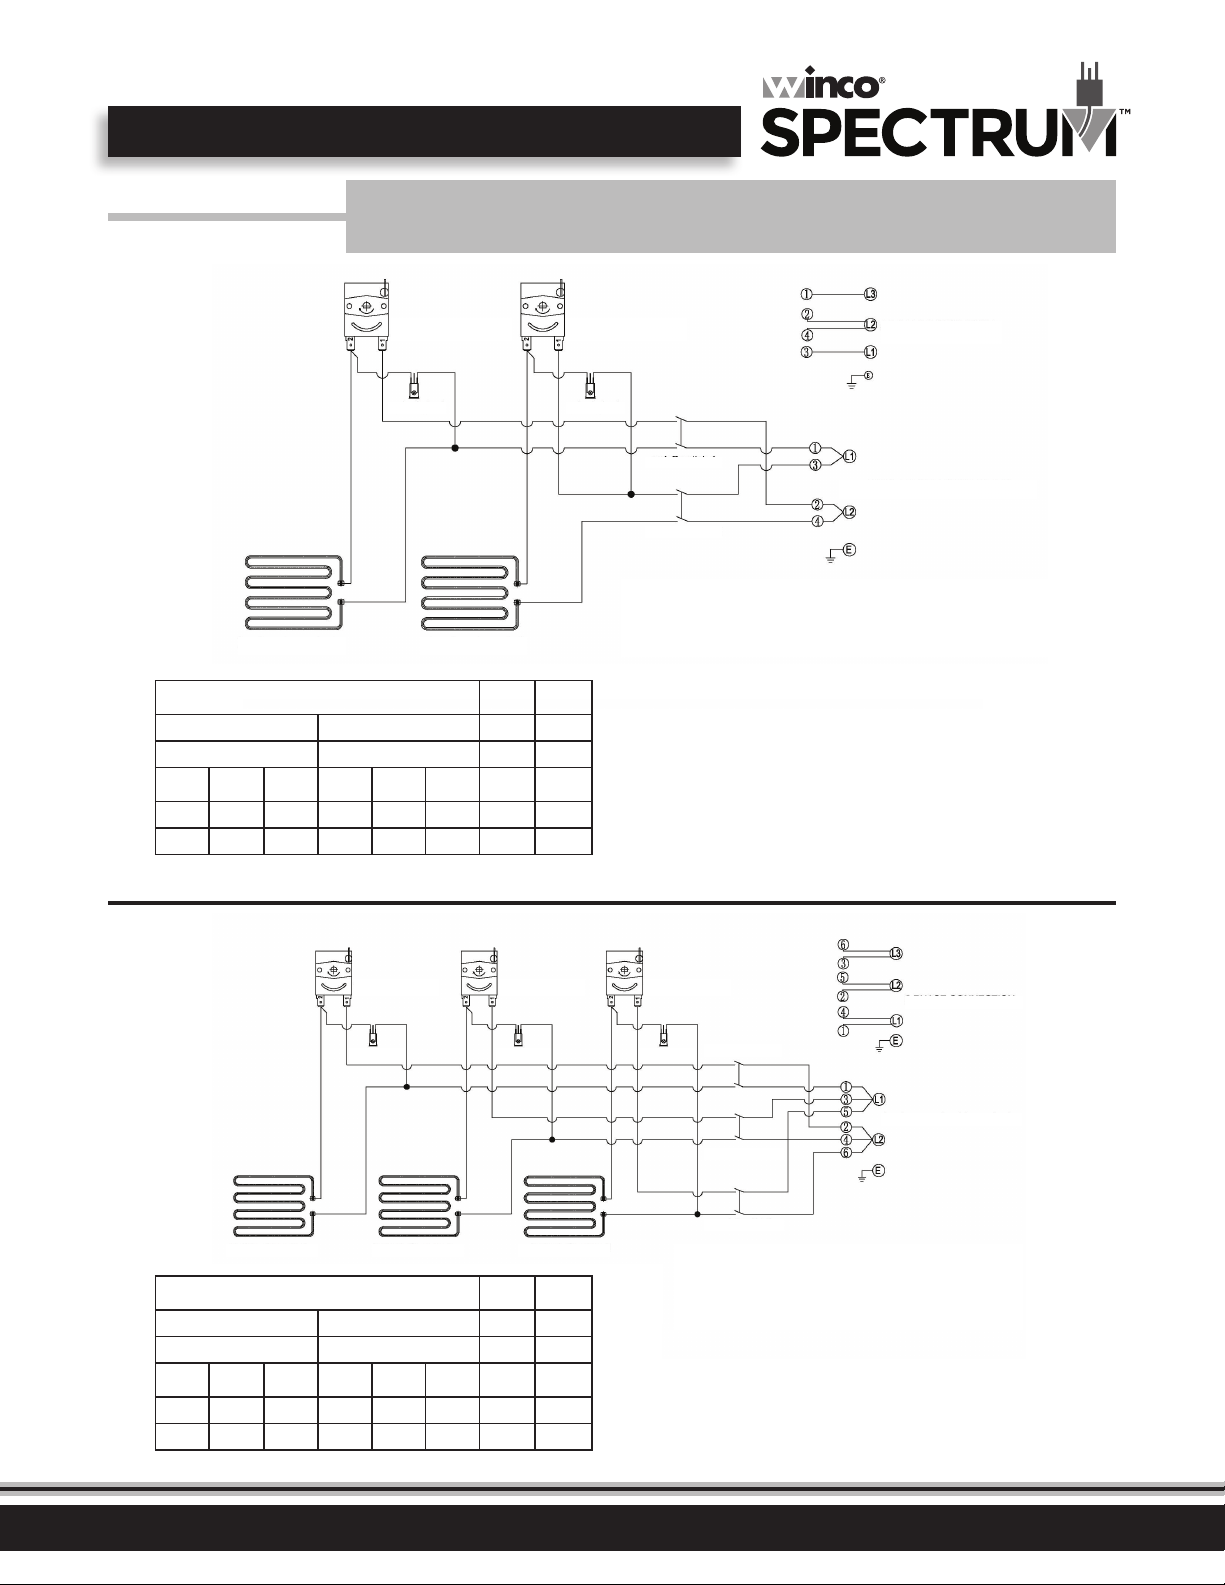
NOTE:
1) FOR SUPPLY CONNECTIONS USE COPPER WIRE ONLY,
SUITABLE FOR AT LEAST 194°F (90°C). USE WIRE GAUGE
SHOWN OR LARGER
2) ALL INTERNAL WIRING IS #14 GA
SINGLE PHASE CONNECTION
3 PHASE CONNECTION
THERMOSTAT 2THERMOSTAT 1
PILOT LIGHT 1 PILOT LIGHT 2
ON/OFF SWITCH 1
ON/OFF SWITCH 1
3 PHASE CONNECTION
SINGLE PHASE CONNECTION
ON/OFF SWITCH 2
ON/OFF SWITCH 3
ON/OFF SWITCH 2
HEATING ELEMENTS 1 HEATING ELEMENTS 2
THERMOSTAT 2 THERMOSTAT 3THERMOSTAT 1
PILOT LIGHT 2 PILOT LIGHT 3PILOT LIGHT 1
HEATING ELEMENTS 1 HEATING ELEMENTS 2 HEATING ELEMENTS 3
NOTE:
1) FOR SUPPLY CONNECTIONS USE COPPER WIRE ONLY,
SUITABLE FOR AT LEAST 194°F (90°C). USE WIRE GAUGE
SHOWN OR LARGER
2) ALL INTERNAL WIRING IS #14 GA
Electrical Diagrams
EGD-24M
HEATING ELEMENTS 1 HEATING ELEMENTS 2
The circuit d iagrams are provided to assist qualied tec hnicians. Only SPECTRUM agent s or Recommended Qualied Technicians should
carry o ut repairs if needed. (Refer to page 11 for service arrangements)
DO NOT remove any components or service panels on this product.
THERMOSTAT 2THERMOSTAT 1
PILOT LIGHT 1 PILOT LIGHT 2
ON/OFF SWITCH 1
ON/OFF SWITCH 2
NOTE:
1) FOR SUPPLY CONNECTIONS USE COPPER WIRE ONLY,
SUITABLE FOR AT LEAST 194°F (90°C). USE WIRE GAUGE
SHOWN OR LARGER
2) ALL INTERNAL WIRING IS #14 GA
3 PHASE CONNECTION
SINGLE PHASE CONNECTION
NOMINAL AM PS PER LINE
208V ~ 3-PHA SE 240V ~ 3-PH ASE 208V 240V
420 0 WAT TS 56 00 W ATT S 1-PH 1-PH
L1 L2 L3 L1 L2 L3
11. 6 11 .6 11. 6 15. 5 15.5 15. 5 20.2 23.4
AWG #10 AWG #10 AWG #10 AWG #10 AWG # 10 AWG #10 AWG #8 AWG #6
EGD-36M
NOMINAL AM PS PER LINE
208V ~ 3-PHA SE 240V ~ 3-PH ASE 208V 240V
63 00 WAT TS 8400 WATTS 1-PH 1-PH
L1 L2 L3 L1 L2 L3
17. 49 17. 49 17. 49 20.21 20. 21 20. 21 30. 29 35
AWG #10 AWG #10 AWG #10 AWG #10 AWG #10 AWG #10 AW G #8 AWG # 6
10
Page 11
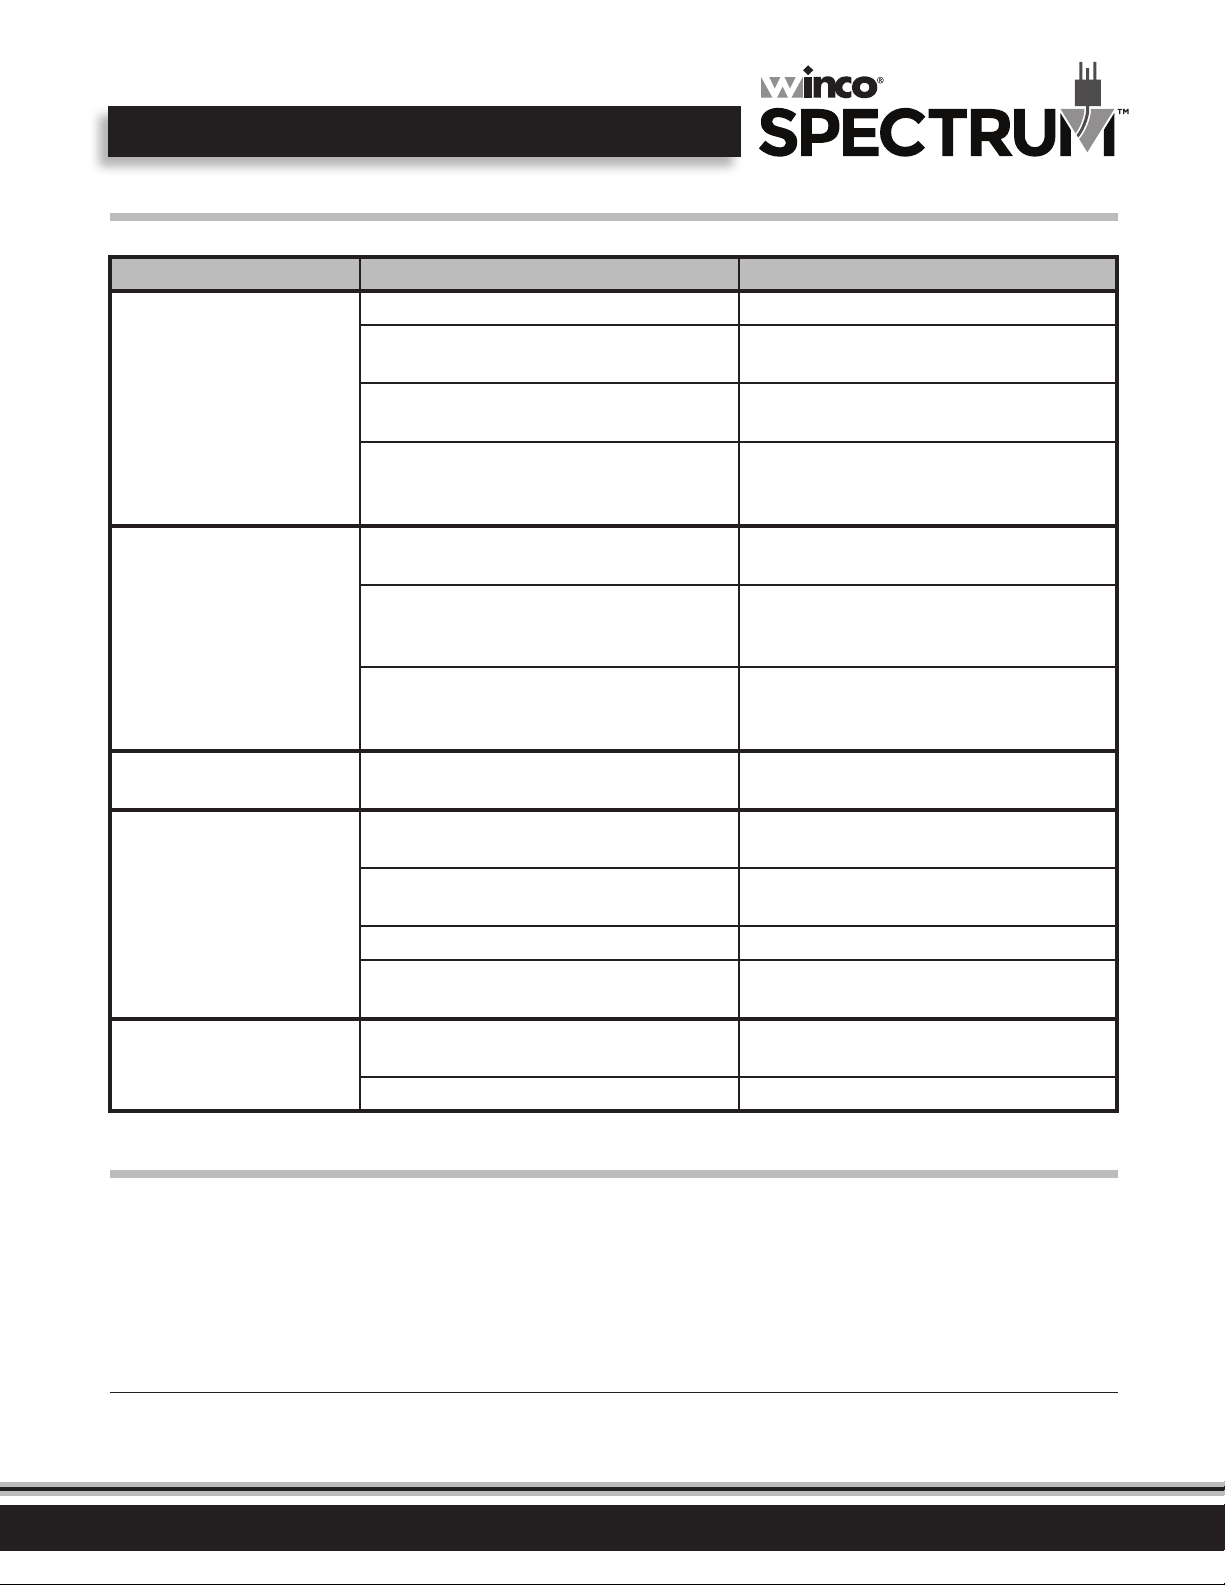
Troubleshooting
If your SPECTRUM Electric Griddle does not operate, please check the following before placing a service call:
ISSUE MIGHT BE CAUSED BY RECOMMENDED SOLUTION
Power supply Check power source
Power switch has not been turned on Check that the unit is correctly plugged in and
turned on
The unit is not working
The indicator light is on, but
griddle is not heating up
The indicator light is NOT on, but
the griddle IS heating up
Cooking Surface is heating up
slowly
Food Sticking
Plug/cord, set or external wiring is damaged Remove and replace power cord - Replacement
must be done by an authorized service provider.
Internal wiring fault Inspect that all connections are terminated and
secure - Replacement must be done by an
authorized service provider
Faulty heating elements Remove & replace - Replacement must be done by
an authorized service provider.
Operation of thermostat
All thermostats are not turned on
Faulty thermostat Check thermostat connections. Remove and replace
Faulty indicator light Remove and replace - Replacement must be done
Carbon build up Make sure that the plates are kept clean and free
Thermostat setting Make sure thermostat is set correctly, & dial is not
Insucient power Check incoming power for correct voltage.
Faulty heating elements Remove & replace - Replacement must be done by
Carbon build up Make sure that the plates are kept clean and free
Not seasoned Season grill, see Operating Instructions, page 5
Make sure thermostat is set correctly and make sure
dial is not spinning on the thermostat, giving the
wrong reading
if found faulty - Replacement must be done by an
authorized service provider.
by an authorized service provider.
from carbon build up/debris
spinning on thermostat giving the wrong reading.
an authorized service provider.
from carbon build up/debris
Service and Repair
THIS EQUIPMENT MUST ONLY BE SERVICED BY AN AUTHORIZED AGENT.
There are no user serviceable parts within this appliance. To avoid serious injury or damage, do not remove any componenets or service panels
onthe product, never attempt to repair the unit, or replace a damaged power cord yourself. A WINCO Approved Qualied Service Technician should
carry out repairs if they're necessary.
DO NOT send unit to WINCO without rst contacting our customer service department. See "Limited Warranty" section on page 10 for details.
NOTE
Parts protected by the manufacturer or its agent are not to be adjusted by the installer unless the installer is an authorized service agent.
If you have any questions or problems DO NOT send unit to WINCO® without rst contacting our customer service department.
See "Limited Warranty" section on page 11 for details.
11
Page 12

Limited Warranty
WINCO® warrants to the original purchaser of new equipment that said
equipment, when installed in accordance with our instructions within
North America and subjected to normal use, is free from defects in
material or workmanship for a period of 1 year. The labor warranty is
one year from original installation or 18 months from actual factory
shipment date, whichever date occurs rst.
THIS WARRANTY IS IN LIEU OF ALL OTHER WARRANTIES,
WHETHER EXPRESSED OR IMPLIED. WINCO EXPRESSLY
DISCLAIMS ANY IMPLIED WARRANTY OF MERCHANTABILITY
OR EXPRESSED OR IMPLIED WARRANTY OF FITNESS FOR A
PARTICULAR PURPOSE.
WINCO’S OBLIGATION AND LIABILITY UNDER THIS WARRANTY
IS EXPRESSLY LIMITED TO REPAIRING AND REPLACING
EQUIPMENT THAT PROVES TO BE DEFECTIVE IN MATERIAL OR
WORKMANSHIP WITHIN THE APPLICABLE WARRANTY PERIOD.
IN NO EVENT SHALL WINCO BE LIABLE FOR INCIDENTAL OR
CONSEQUENTIAL DAMAGES TO BUYER OR ANY THIRD PARTY,
INCLUDING, WITHOUT LIMITATION, LOSS OF PROPERTY,
PERSONAL INJURY, LOSS OF BUSINESS OR PROFITS OR OTHER
ECONOMIC LOSSES, OR STATUTORY OR EXEMPLARY DAMAGES,
WHETHER IN NEGLIGENCE, WARRANTY, STRICT LIABILITY, OR
OTHERWISE.
This warranty is given only to the rst purchaser from a retail dealer.
No warranty is given to subsequent transferees.
Warranty does not cover product failures caused by: failure to maintain,
neglect, abuse, damage due to excess water, re, normal wear,
improper set up and use. Periodic maintenance is not covered.
This warranty is not in force until such time as a properly completed
and digitally signed Installation/Warranty Registration has been
received by WINCO within 30 days from the date of installation.
WARRANTY SERVICE
To initiate warranty service contact: [email protected]
or call: 973-295-3899
DO NOT send unit to WINCO® without rst contacting our customer
service department.
Please provide or have the following information available:
• Model & Serial Number
• Date of Purchase
• Purchase Dealer
• Operator / Installation Contact Information
• Business Name & Business Address
• Contact Name & Contact Telephone Number
REGISTER ONLINE AT: http://www.wincous.com
Proof of purchase is required to extend warranty more than 1 year from
date of shipment from the factory.
THE FOREGOING WARRANTY PROVISIONS ARE A COMPLETE
AND EXCLUSIVE STATEMENT BETWEEN THE BUYER AND SELLER.
WINCO® NEITHER ASSUMES NOR AUTHORIZES ANY PERSONS
TO ASSUME FOR IT ANY OTHER OBLIGATION OR LIABILITY IN
CONNECTION WITH SAID EQUIPMENT.
Examples of items not covered under warranty, but not limited to just
these items:
1. Natural disasters (ie: earthquakes, tornadoes, hurricanes, etc.), re,
water damage, burglary, accident, theft.
2. Freight damage.
3. Improper installation or alteration of equipment.
4. Use of generic or after-market parts.
5. Repairs made by anyone other than a WINCO® designated service
provider.
6. Lubrication.
7. Expendable wear parts, adjustable feet, blown fuses, lamps, etc.
8. Cleaning of equipment.
9. Misuse or abuse.
Warranty voided if:
1. Product is altered by user
2. Serial number plate is removed
3. Product is installed in a prison or any correctional facility.
12
Please keep this manual in a safe place for future use!
Models: EGD-16M, EGD-24M, EGD-36M
www.wincous.com
 Loading...