

Page 1
13. Screen is not recommended for outdoor use.
Screen Model: 373-374
PLEASE READ AND FAMILIARIZE YOURSELF WITH ALL INSTRUCTIONS
otherwise injury may occur.
Winco assumes no responsibility for damage or injury caused by
improper assembly, installation, use, or maintenance of these products.
Flat Panel Aluminum Folding Screen
If you have trouble understanding these instructions contact your dealer or
Winco customer support, (800) 237-3377 before attempting to use this product;
1. READ AND FOLLOW ALL DIRECTIONS.
2. SAVE THESE INSTRUCTIONS for future reference and training.
3. NEVER place screen on a cart, table, stand or other object; Screen
could fall and INJURY MAY OCCUR.
4. NEVER place screen near open flame or over a radiator or heat
register.
5. NEVER place screen in front of a door or exit sign; During
emergency, screen could hinder evacuation.
6. NEVER stand or ride on screen legs; INJURY MAY OCCUR.
7. DO NOT allow children to play with screen; Screen could fall and
INJURY MAY OCCUR.
8. DO NOT attach object to screen frame; Screen can tip over and
INJURY MAY OCCUR.
9. SUFFOCATION DANGER to children if vinyl is not attached to
screen. VINYL SCREEN IS NOT A TOY.
10. Screen should ALWAYS be positioned on level surface.
11. Remove from service, any screen with broken or missing parts, torn
vinyl, or other visible damage.
12. Screen is not intended for use in wet environments.
PLEASE DO NOT DISCARD THIS MANUAL! KEEP FOR FUTURE REFERENCE AND TRAINING
BEFORE USING THIS PRODUCT.
Page 2
Assembly Instructions
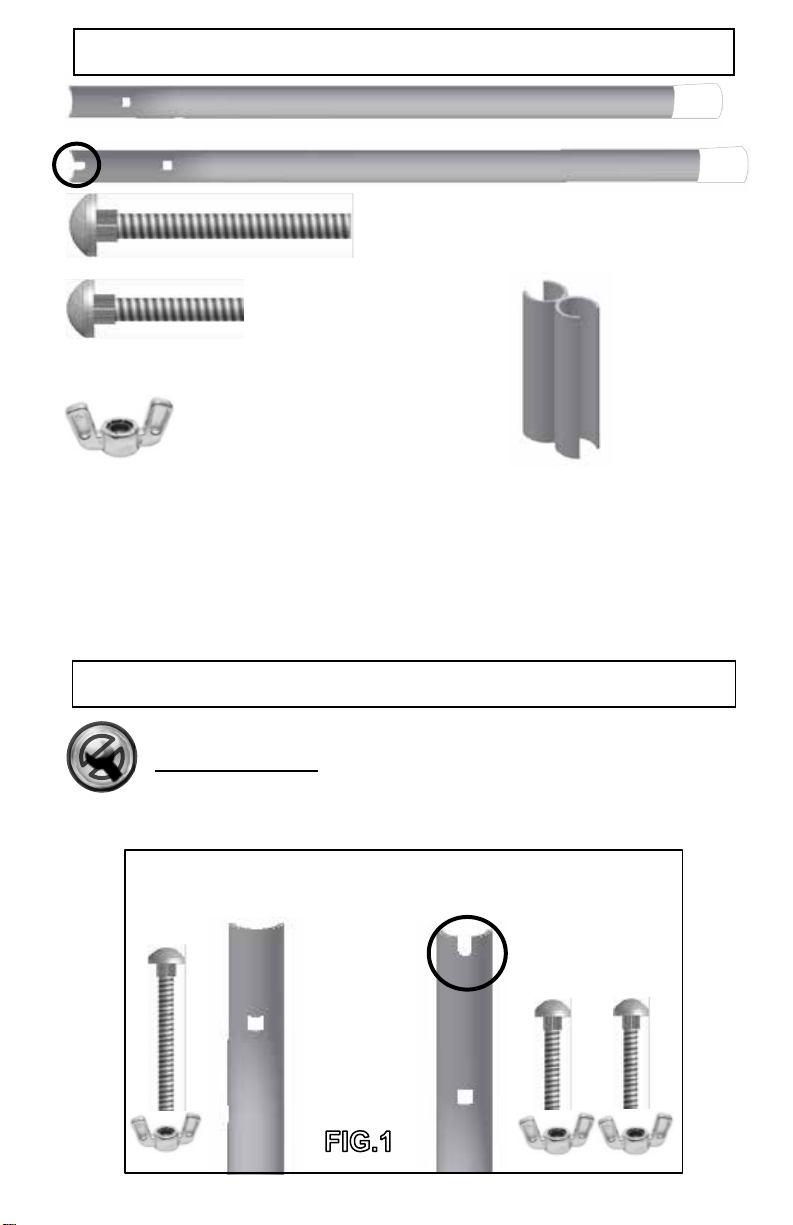
Hardware Included
[A] Leg x 4 ea.
[B] Leg x 2 ea. (model 373) x 4 ea. (model 374)
2” Carriage Bolt x 2
1¼” Carriage Bolt x 2
Nylon Lock Wing-nut x 4
(Actual size)
(Actual size)
Plastic Screen Hinge x 2
B-LEG
A-LEG
x 4 (model 374)
(model 373)
x 6 (model 374)
(model 373)
No Tools Necessary
1. Identify the legs and their hardware to attach. (FIG.1)
(EXTRA for future screen attachment)
(Notched)
Page 3
A
B
A
B
A
B
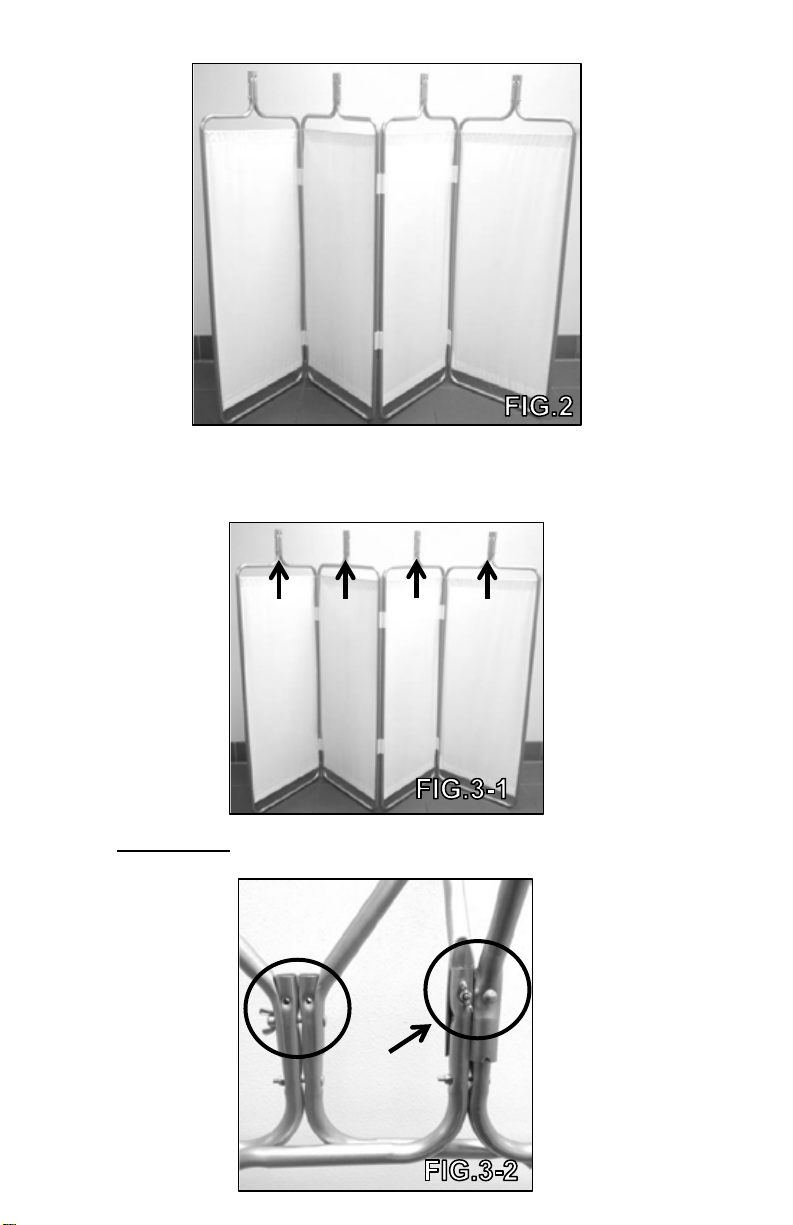
2. Stand the screen upside down. (FIG.2)
3. You will be installing the legs in the following order:
Model 373: A-Leg, B-Leg, A-Leg (FIG.3-1)
Model 374: A-Leg, B-L eg, A-Leg, B-Leg (FIG.3-1)
IMPORTANT: Notice that the A-legs are installed, positioned differently than
the B-legs (FIG.3-2)
LEG
-LEGS
LEG
LEG
-LEGS
LEG
Page 4

B-LEG
Carriage
Bolt
4. Starting with either end of the screen panel install a pair of
A-LEGS using (1) 2” CARRIAGE BOLT and (1) NYLON-LOCK
WING-NUT. (FIG.4-1 & 4-2)
5. Next, on the adjacent panel, install a pair of B-LEGS (notched) using
(2) 1¼” CARRIAGE BOLTS and (2) NYLON-LOCK WING-NUTS.
(FIG.5-1, 5-2)
NOTE: CARRIAGE BOLT must go through the square hole of
the B-Leg 1st. (FIG.5-3)
Page 5

6. Next, on the adjacent panel, install a pair of A-LEGS using (1) 2”
Operating Instructions
NOTE: (2) Extra hinges are provided to attach future screen panels.
CARRIAGE BOLT and (1) NYLON-LOCK WING-NUT. (FIG.4-1, 4-2)
7. For model 374 ONLY:
On the adjacent panel, install another pair of B-LEGS using (2) 1¼”
CARRIAGE BOLTS and (2) NYLON-LOCK WING-NUTS. (FIG.5-1,
5-2, 5-3)
8. Stand Screen right-side up.
Assembly Completed
If your screen should “wobble” or rock from side to side after assembly, press
down on the top of the screen panels so that ALL screen panel legs are
resting on the ground. (FIG.6)
Page 6

G A P
To eliminate gaps between screen panels (FIG.7-1), rotate the screen hinge
towards you. (FIG.7-2)
To attach 2 screen panels together, line up a panel with the PLASTIC
SCREEN HINGE (FIG.8-1) and squeeze until the panel pops
into place. (FIG.8-2)
Page 7

Other Quality Winco Medical Furnishings You May Be Interested In:
Visit us online at www.wincomfg.com
Page 8

006333 REV.-- DATE 06-05-13 JWC
Design, appearance, parts, & construction are subject to change without notice
 Loading...