

Page 1

- 1 -
Wine Cabinet WINCAVE
User Manual
INDEX
OPERATING INSTRUCTIONS, 2
INSTALLATION, 2
CABINET DESCRIPTION, 2
Technical specifications
CONNECTION AND TEMPERATURE SETTINGS, 3
Your temperature
Smart Handle MONO T°
Smart Handle AMPHORA
How to adjust your temperature
EQUIPMENT, 4/5
Storage and sliding shelves
Installation of shelves
Capacity of each cabinet
CONTROL AND MAINTENANCE, 6
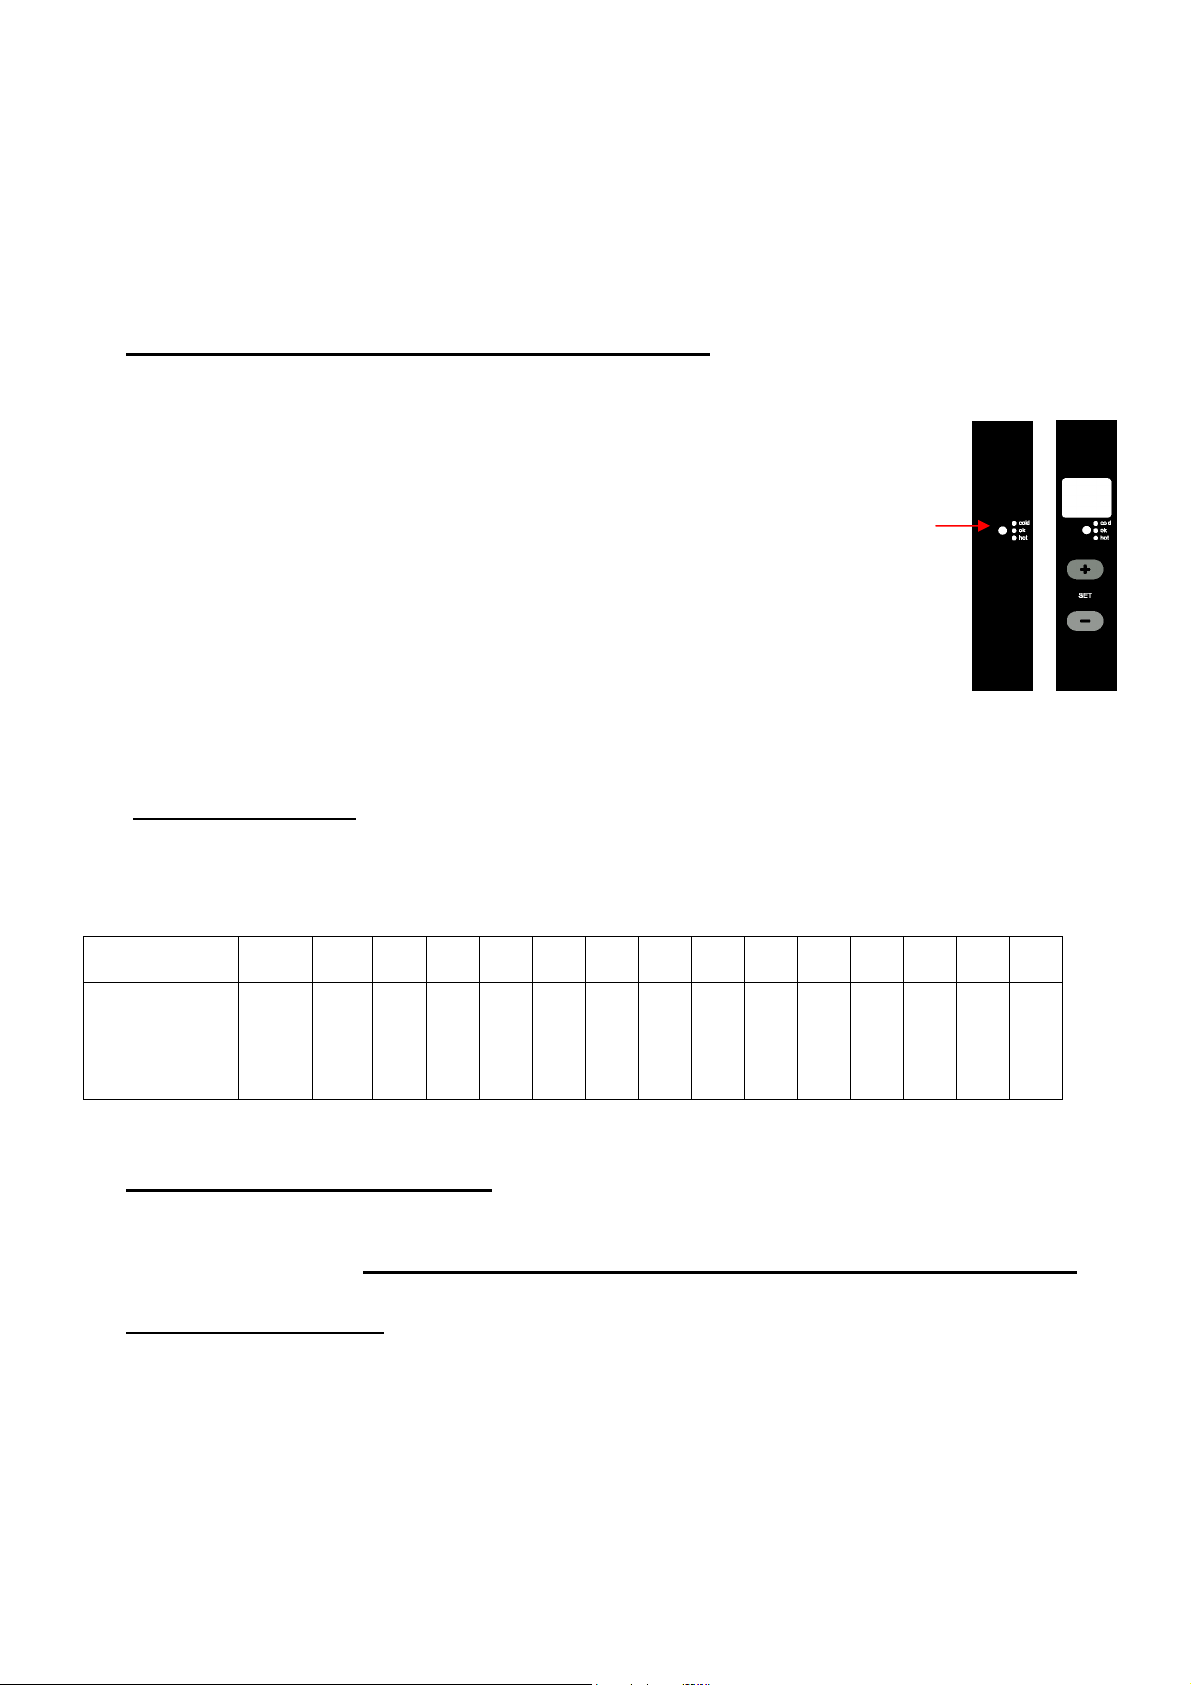
Temperature Alarm, the < led security plus >
Carbon Filter
Cleaning your Wincave cabinet
PROBLEM SOLVING, 7
INSTALLATION OF THE SMART HANDLE, 8
25, Rue DELAMBRE 75014 PARIS
Tel/Fax :01 42 79 83 34
www.wincave.com
TEST
Page 2
- 2 -
1
4
5
6
Operating Conditions
Before installing your cabinet read these instructions carefully.
OPERATING CONDITIONS
The WINCAVE cabinet you recently purchased is a maturation cabinet. It is therefore fitted with both cold
and warm circuits. The ideal temperature is 12°C/14°C.
When the temperature inside the cabinet is above the set temperature, the COLD circuit is activated. When
it falls below the set temperature, the WARM circuit automatically starts heating up.
You therefore obtain the programmed temperature.
THE AMBIENT TEMPERATURE RANGE IS FROM 5 to 35°C
INSTALLATION
The WINCAVE cabinet should not be positioned next to a significant warm source or in a very humid
environment. Make sure that your cabinet is properly levelled. A surrounding air circulation is
recommended, to optimise efficiency.
You need to adjust the front feet to ensure that your cabinet is properly levelled.
The nominal power should be 220V – 50Hv (voltage between 198/242V). You need to have an efficient
earth (15 amp).
CABINET DESCRIPTION
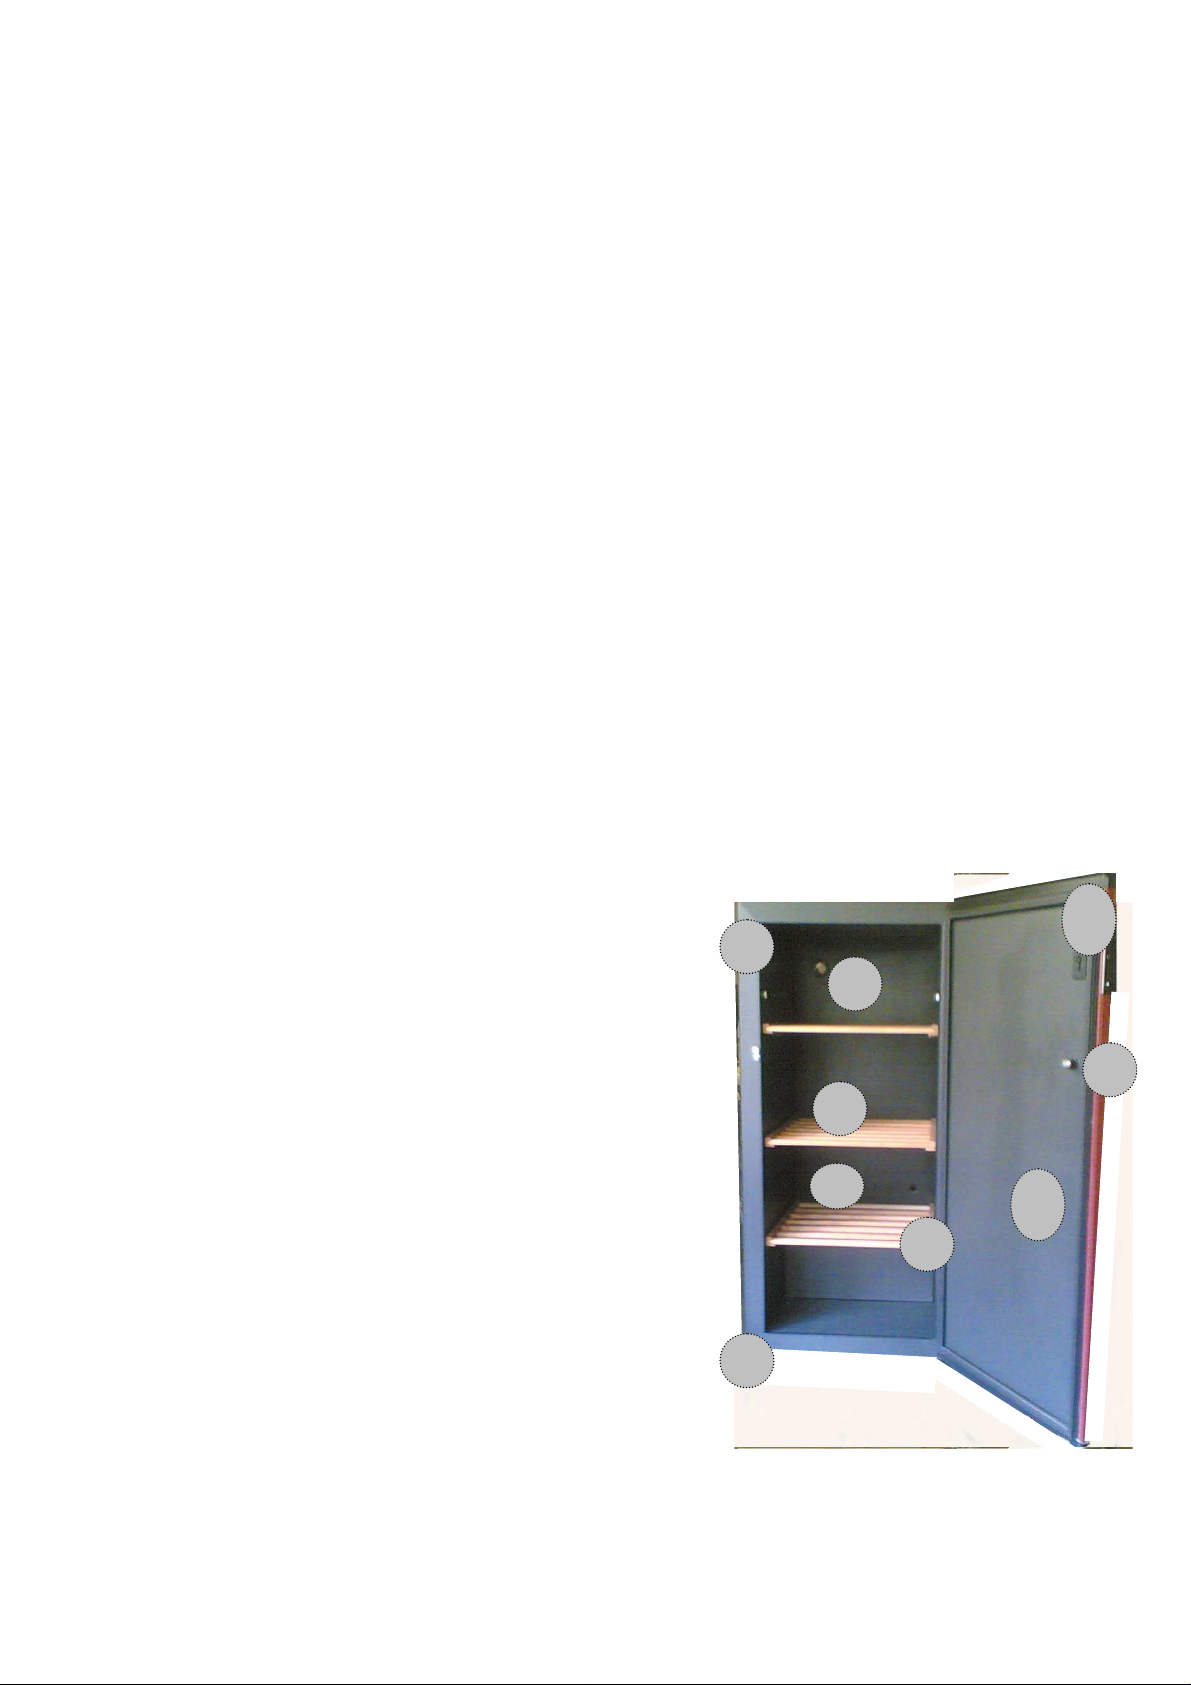
1. Internal and external cabinet walls of steel.
Walls are 60 mm thick insulated with polyurethane foam without CFC to a density of 45g/l.
2. Sensor.
3. Magnetic door joint.
4. Shelves (sliding and storage).
5. Transportation wheels (rear) and adjustable feet (front).
6. Rust-proof security lock.
7. Heater (automatic winter function).
8. Upper and lower aeration.
8
3
8
2
Page 3
- 3 -
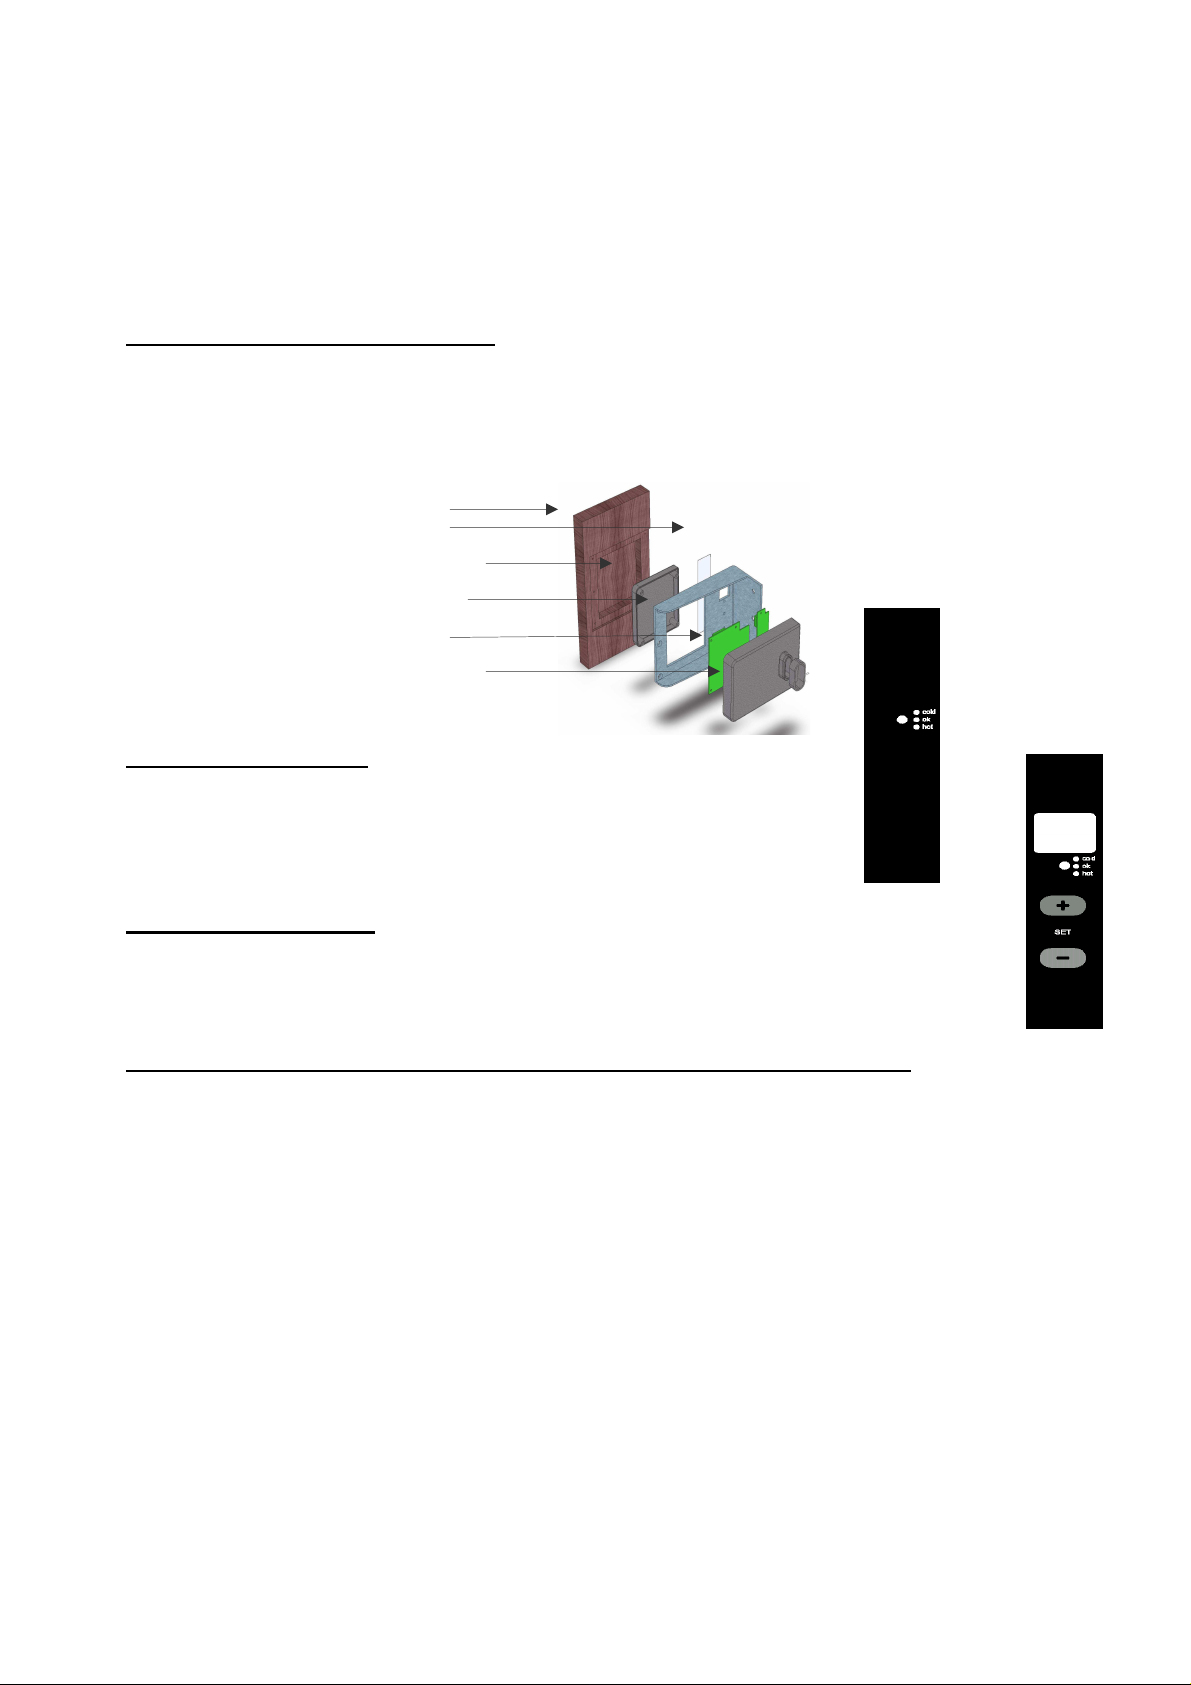
PCB box
Connecting and temperature setting
WARNING: YOU MUST WAIT 48 hours after unpacking and positioning your cabinet before switching
on. After plugging in, load your cabinet step by step.
THE BOTTLES MUST NOT BE IN CONTACT WITH THE BACK OF THE CABINET to maintain air
circulation around the bottles.
YOUR CELLAR TEMPERATURE
Depending on your WINCAVE model, your cabinet is fitted with the smart handle, equipped with one of
the following two electronic regulations (French patent no. 9106156).
Smart Handle Mono T° with the <LED security + >
The ideal temperature for wine storage is between 12°C and 14°C.
The temperature is pre-set and needs no adjustment.
YOU HAVE NOTHING TO DO.
Smart Handle Amphora with display and the <LED security +>
The temperature is adjustable by using the external display.
You can select between 10°C and 16°C.
HOW TO ADJUST THE TEMPERATURE RANGE, AMPHORA MODEL.
When the cabinet is first plugged in, the temperature is pre-set at a fixed 14°C. The display indicates for 3
seconds the set temperature. Then it displays the current internal temperature. Pressing on the < plus >
or < minus > keys will display the set temperature level. After releasing the keys the current interior
temperature is displayed again. Pressing the < plus > or < minus > keys at the same time for 3 seconds will
enable you to reach the programming mode.
For the first 3 seconds the display shows a flashing “P”.
After 3 seconds, the display shows the set temperature (flashing). You can adjust the value by pressing the
< plus > or < minus > keys.
After 3 seconds, without pressing any key, the temperature is automatically registered and the current
interior temperature is shown again.
In case of power failure, the set temperature is stored in the programme’s memory and will be used as soon
as power is re-established.
Wood Handle
Sticker
Cover for PCB box
Aluminium carter
PCB (Regulato)r
Page 4
- 4 -
A
B
Adjustments:
Internal equipement
LOCK
Your cabinet is equipped with a security lock. To open it, it is necessary to push the key, in order to
disengage the security and to be able to rotate the key to the right or the left.
SLIDING AND STORAGE SHELVES
WINCAVE offers 2 options to store your wine bottles.
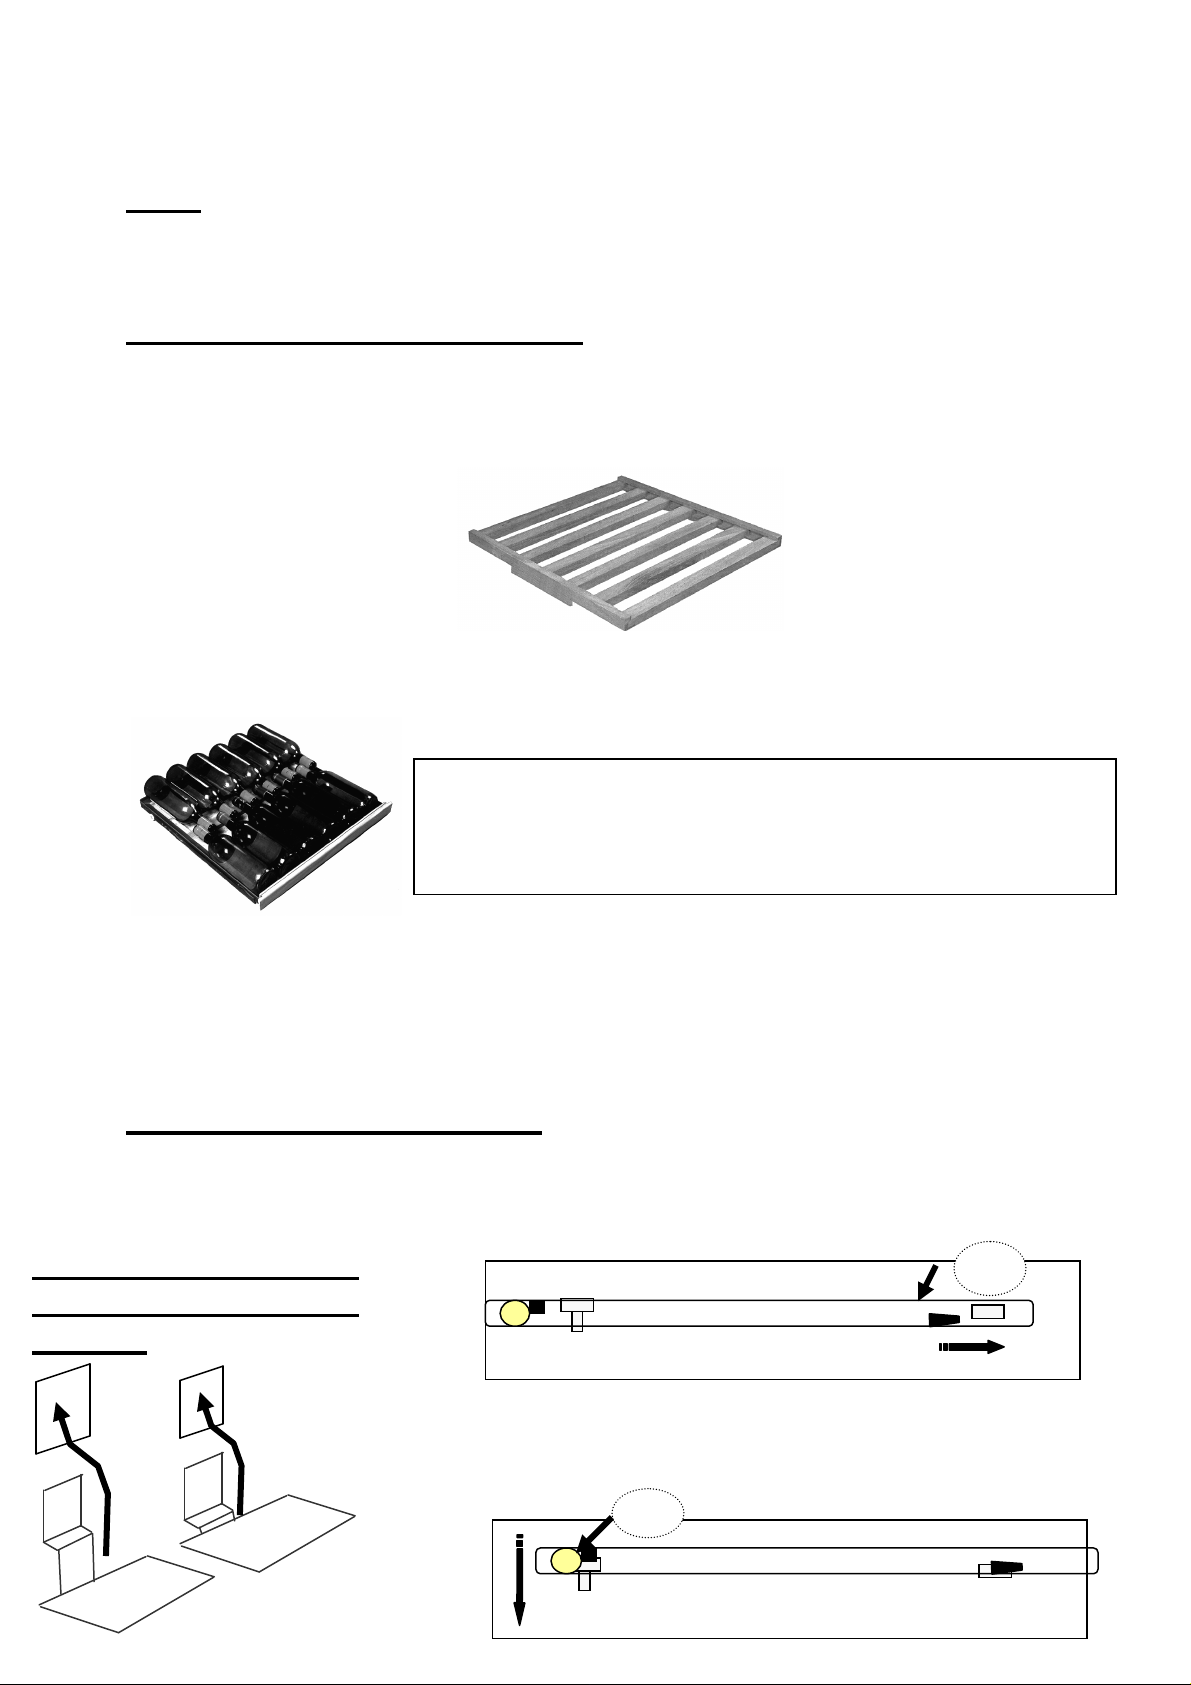
A storage shelf for 48 bottles maximum
Ref: C/S4s su
A sliding shelf for a layer of 12 bottles
Ref: C/coul su
Ref : C/coul su
This shelf allows you to store your bottles with their labels facing upwards. When you slide the shelf
towards you, you can identify them without moving them. A wooden label carrier helps identification.
Each shelf is positioned on 4 metal supports which fit into the side of the cabinet. You can therefore
progressively add more sliding shelves to your cabinet.
Installation of shelve
Installation of the metal
supports for the storage
shelves :
Back
Front
the male screws, fitted under the sliding shelf, allow
you to adjust the shelf width to avoid it moving out of the supports
positioned on the walls.
Insert the rear pin into the stamped hole on the cabinet wall
Insert the font pin into the stamped hole on the cabinet wall and push it
down
Page 5
- 5 -
CV 246 Btlles CV 210 Btles
CV 162 Btles CV 150 Btles
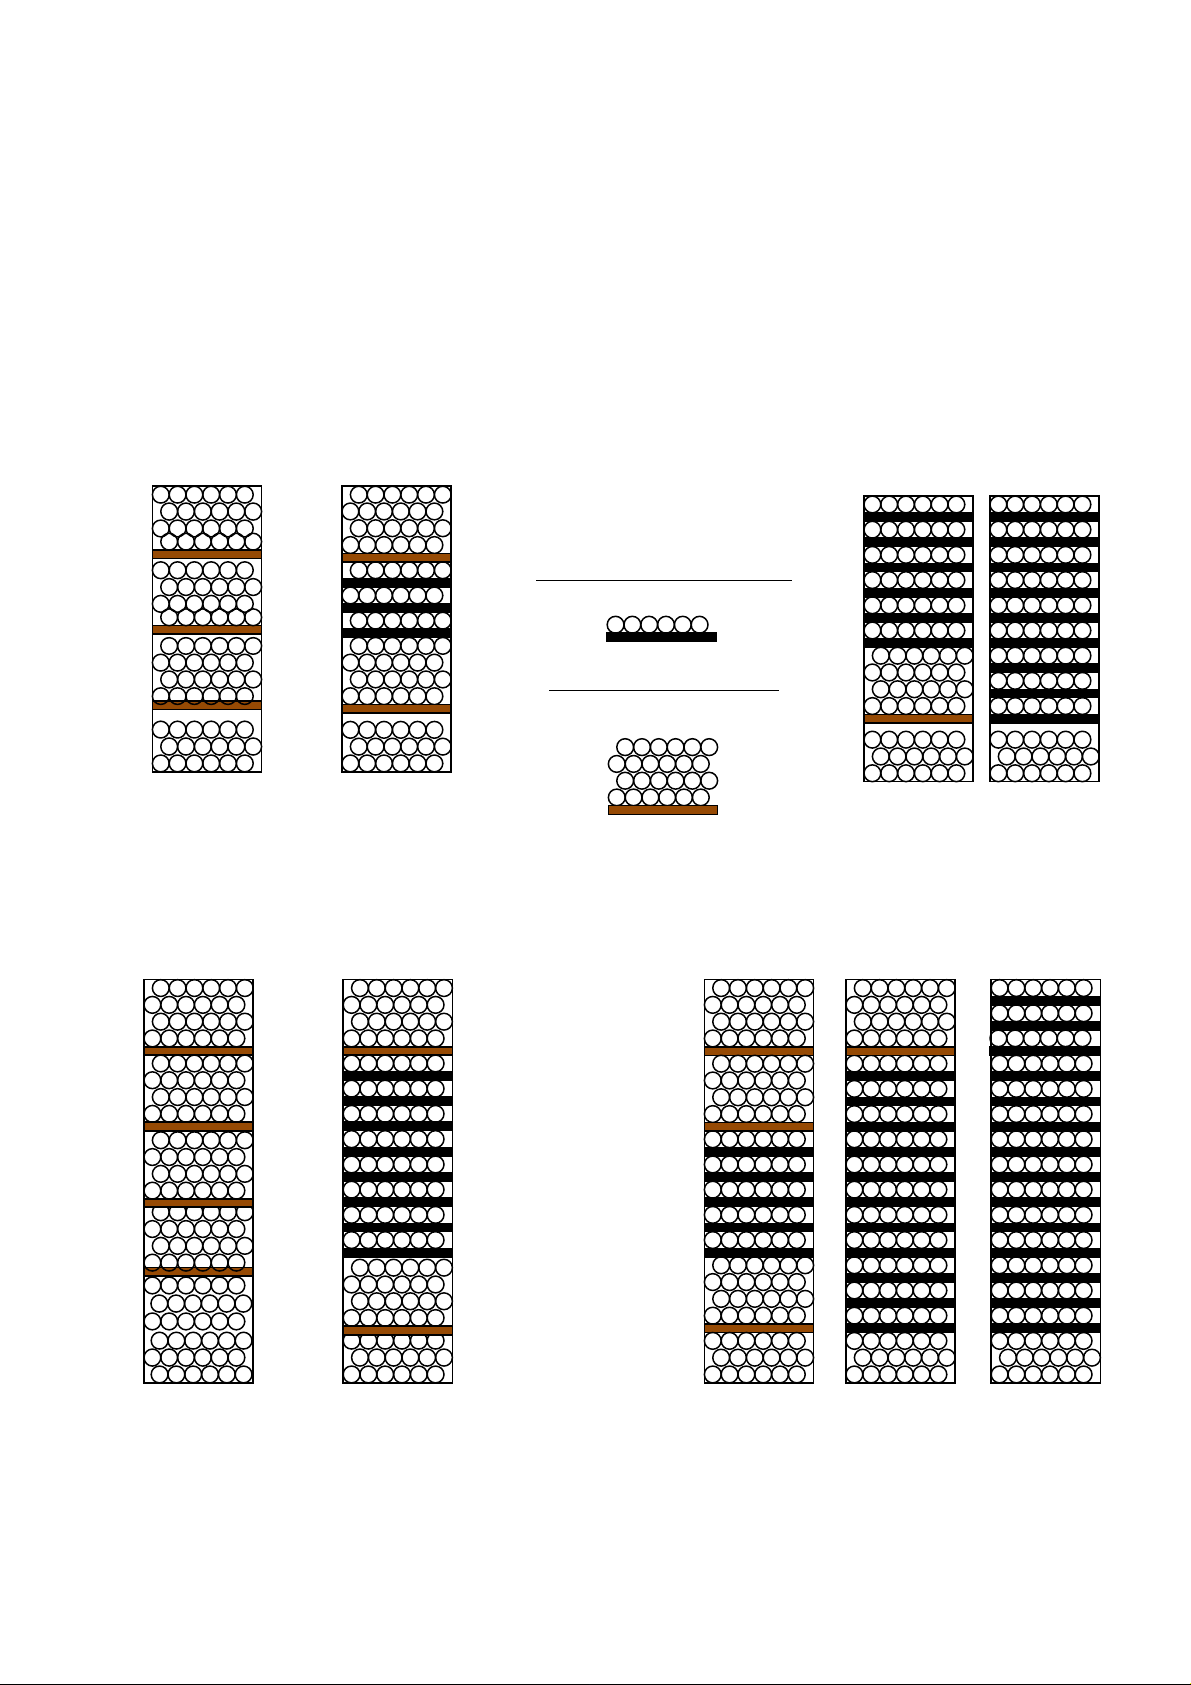
Your model : Possible capacity:
Your model : Possible capacity:
CAPACITY OF YOUR CABINET
MEASURED IN BORDEAUX BOTTLES
138 Btles 126 Btles
Your cabinet is equipped
with the following accessories:
Sliding shelves C/coul su.
12 bordeaux’s bottles maxi
Fixes Shelves CS/4s su
48 bordeaux’s bottles maxi
222 Btles 198 Btles 186 Btles
Page 6
- 6 -
changed
changed changed
changed
Control and maintenance
THE <LED SECURITY + >, TEMPERATURE ALARM
3 colour LED indication::
If temperature is more than 4°C lower than set temperature
If temperature is no more than 4°C higher or lower than set temperature
If temperature is more than 4°C higher than set temperature
WARNING: A certain time is necessary to obtain the required temperature after plugging in the cabinet or
after opening the door
CARBON FILTER
An active carbon filter is located in the upper part of your cabinet. This filter allows a good air circulation
and prevents external odours to penetrate into your cabinet.
You need to replace this filter every year, sometimes twice a year if your room is very humid..
2007 0 0 0 0 0 0 0 0 0 0 0 0 0 0
Blue LED
Green LED
Red LED
Filter
Filter
Filter Filter
on
on :
:
onon
::
CLEANING YOUR WINCAVE
Twice a year, clean the condenser (metallic grating at the back of the cabinet).
The wooden parts, the top and bottom of the door, and the general parts of the cabinet must be cleaned with
a soft cloth and water. Never use chemical or solvent produce or abrasive cleaning materials.
IMPORTANT NOTE:
Wood handles are made of solid oak.
The handle is hand made, polished and lacquered by craftsmen. Each handle is, therefore, unique and
never exactly the same as another.
Page 7
- 7 -
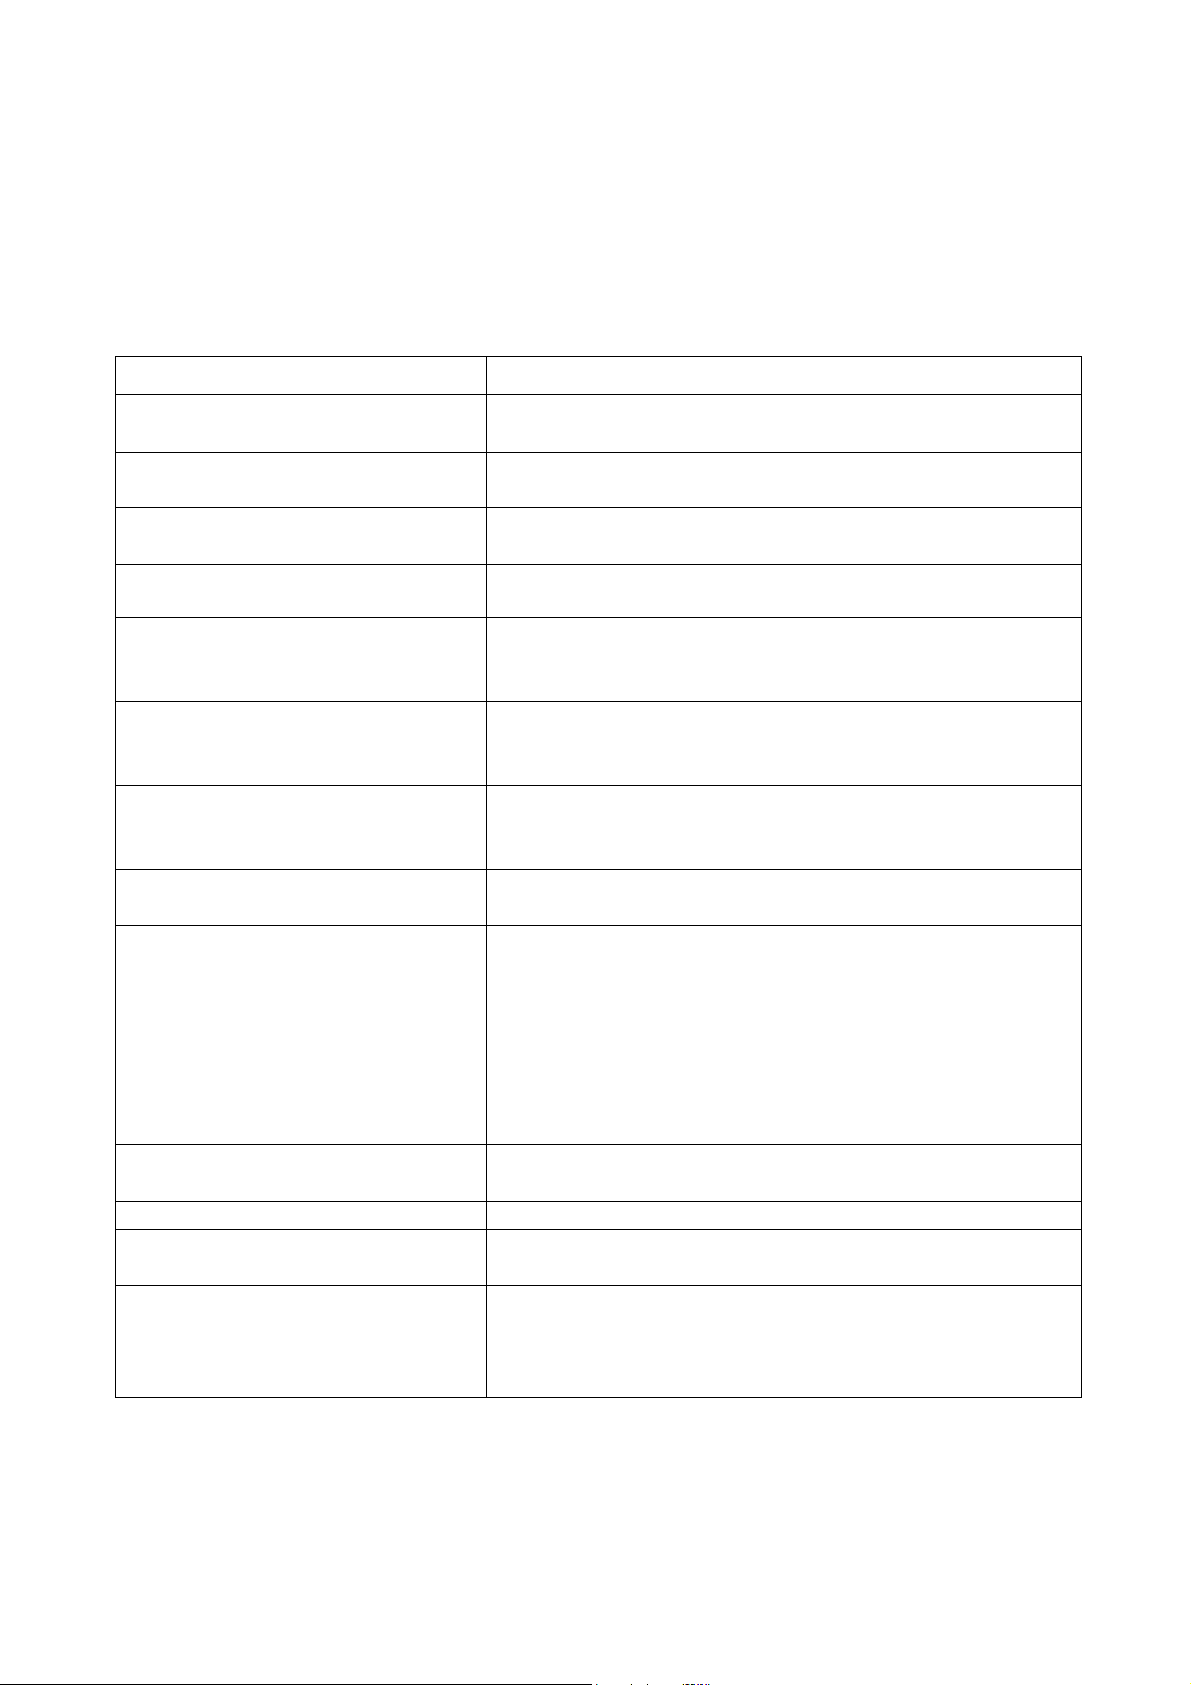
Malfunctionning
Your problem and its answer are perhaps in the following list:
Problem Solution
There is a vibration when the
compressor is working
No indication after plugging in. Check plug, fuse and socket
Cabinet is not level on the floor. Use the adjustable feet at
the front of the cabinet.
Screen shows a blinking < - > (
Amphora )
Blinking LED ( model, Mono T° )
The ambient T° is > 16°C and/or
the interior T° is > 16°C
The ambient T°C is < 10°C and the
interior T°C is < 10°C
The interior T° is < 10°C and the
compressor works continuously.
There is frost on the inside back
wall
A lot of ice has collected on the
back wall
Cabinet is working, but T° is not as
selected.
Shelves do not slide correctly Check that the shelf rail is properly adjusted.
The fixed shelves are not straight
Water is dripping from the front of
the cabinet.
Problem with the sensor. Switch off the cabinet and contact
your after sales service.
Problem with the sensor .Deplug the cabinet and contact your
after sale service
Check the set temperature, (Amphora) Switch off and then
on again. If the compressor does not work, switch off and
contact your after sales service.
Check the set temperature, (Amphora) Switch off and then
on again. If the heater does not work, switch off the cabinet
and contact your after sales service.
Check the set temperature, (Amphora) Switch off and then
on again. If the compressor does not stop working, switch
off and contact your after sales service.
This is a normal physical phenomenon which will appear
after opening the door.
Check that the door is well closed.
Check the set temperature, (Amphora)
If the interior temperature is the correct one, check that the
bottles are not touching the rear of the cabinet,(on fixed
shelves)
If the temperature is lower that the set temperature, be sure
that the compressor is not working all the time. (see above)
Check that the plug used is not dependant on a
commutator.
The wood is very dry and needs the natural humidity of the
cabinet to return to it’s original straight form.
The cabinet is not correctly positioned on the floor. Use the
adjustable feet to create a very slight slope to the rear.
Check that there is nothing obstructing the evacuation hole,
on the compressor step.
Page 8
- 8 -
A
B
C
D
E
G
H
G
G
D
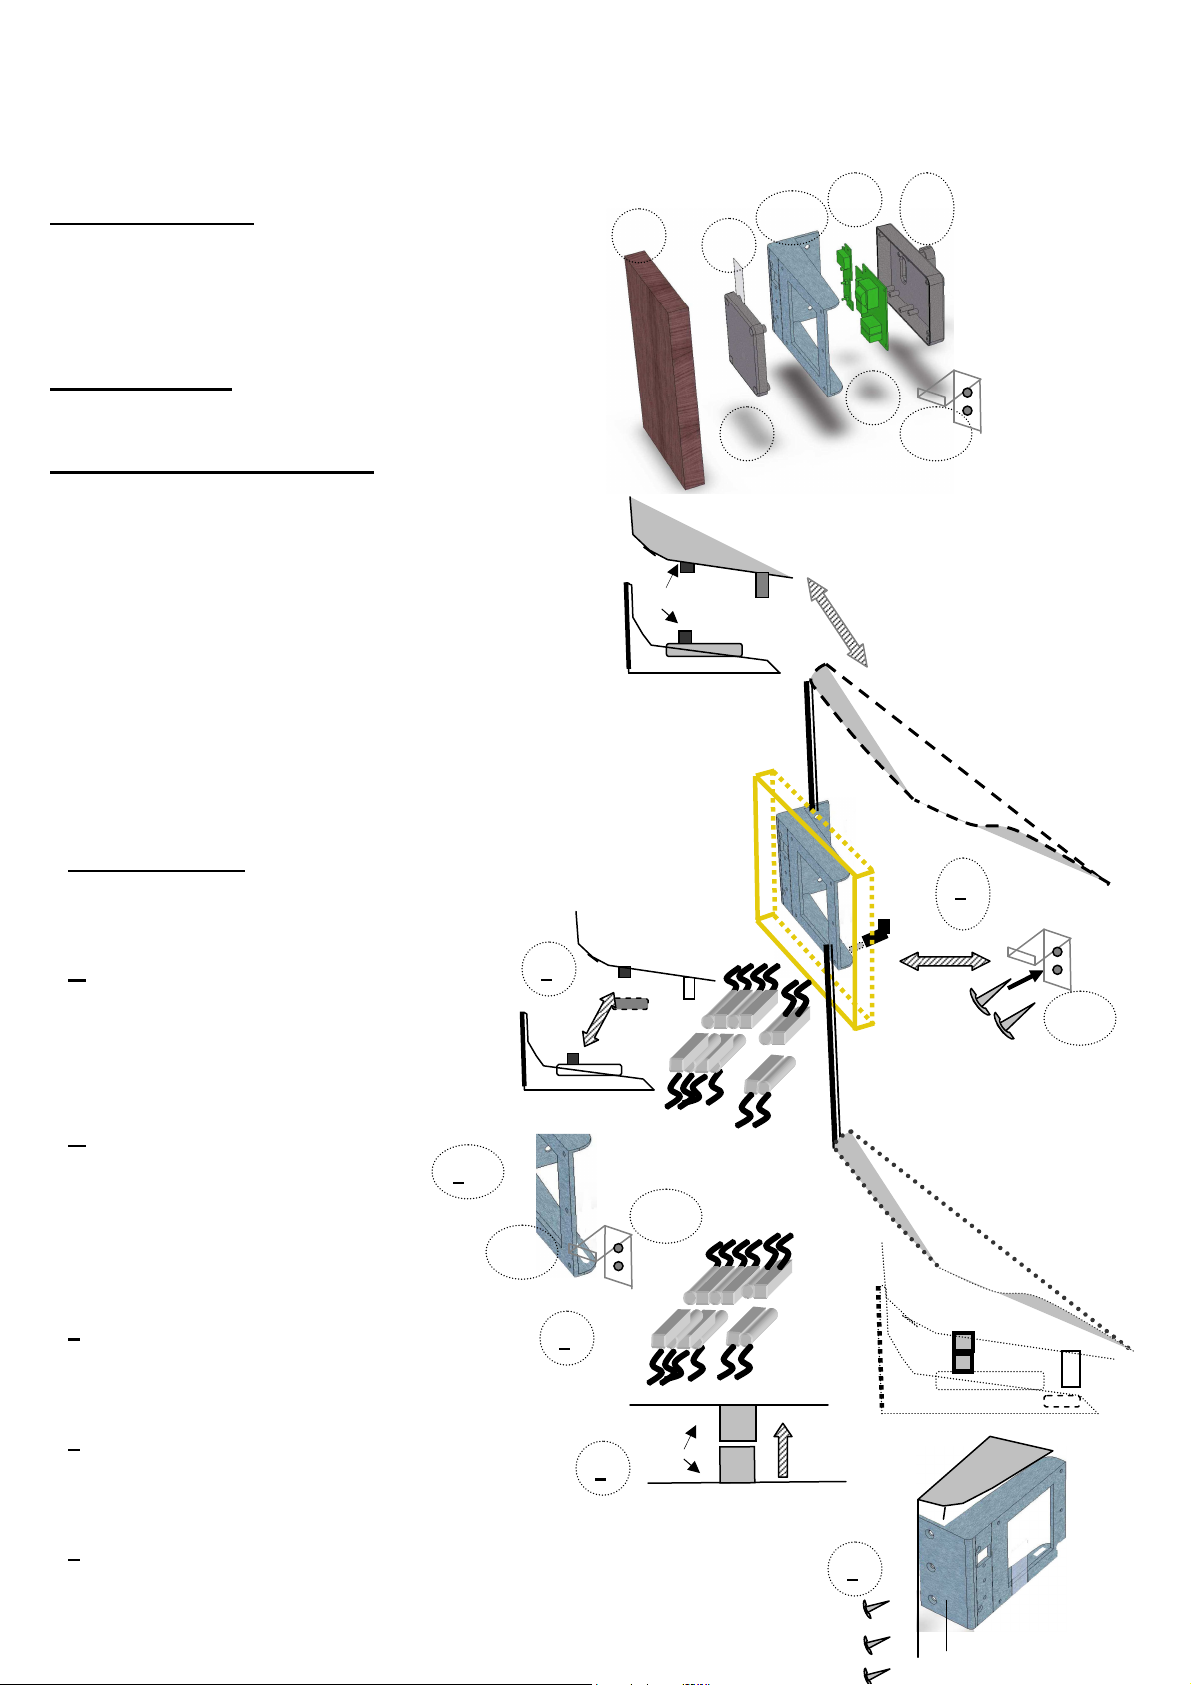
INSTALLATION OF THE SMART HANDLE
Description of parts
1 Control panel stand
2 Screw for fixing the control panel. (pre-screwed on the door )
3 Screws for fixing on the smart handle
1 Smart handle MONO T° or AMPHORA
Neccessary tools :
1 Phillips screwdriver
Description of the smart handle
A Wood handle
B Plastic cover
C Electrical unit
D Housing for electrical unit
E Temperature regulator
F Cover for electrical unit
G Control panel stand
H Reception hole for the electrical unit
I Channel for door and handle
I
F
G
Porte
F
INSTALATION:
1 Screwing the electrical unit bracket on the door
2 Extract the electrical connectors from
the door and from the handle
3 Place the electrical unit on it’s stand.
4 Connect together the electrical connections
5 Introduce the electrical connection into the
door channel and join the two parts together.
Using the 3 screws fit the door handle.
6
1
2
3
4
I
5
6
 Loading...