

Page 1
WINBOT
Руководство по эксплуатации для
моделей 7 серии
Live Smar t. Enjoy Life.
www. ecovacs.com
Page 2
Краткая инструкция пользователя
Важные инструкции для облегчения знакомства с прибором.
Пр еду пре жде ние :
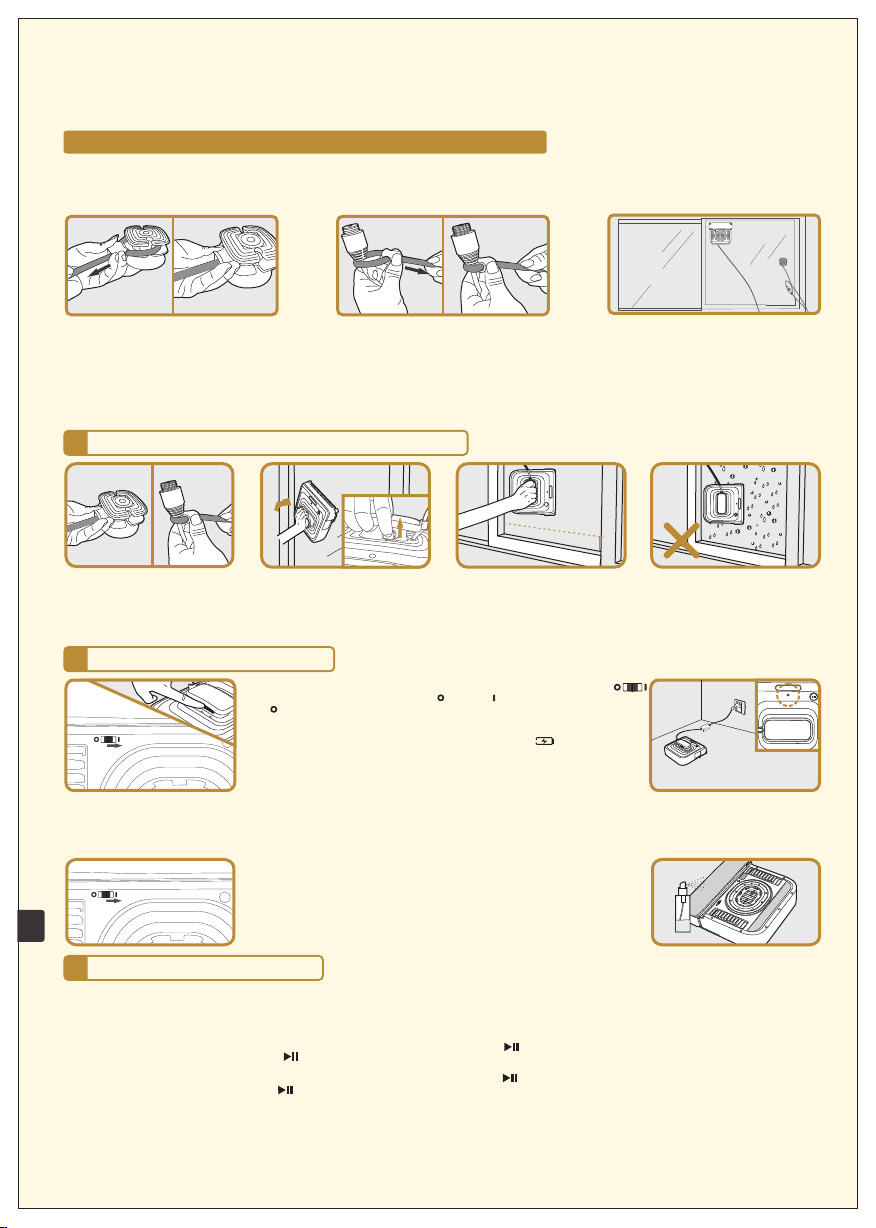
Есл и WINBOT и споль зуется д ля мыть я окон, р асполо женных в ысоко н ад уров нем земл и, прим енени е страх овочно го держ ателя и п редохр аните льног о троса я вляетс я
ОБЯЗ АТЕЛЬН ЫМ.
WINB OT долж ен эксп луатир овать ся в стро гом соот ветств ии с инст рукци ями, изл оженн ыми в руко водст ве. ECOVA CS не нес ет ответс твенн ости за п оврежд ения, в ызван ные
нен адлежа щим исп ользов анием п рибор а.
1. Убе дитесь в т ом, что д лина шн ура элек тропи тания д остато чно вели ка и позв оляет WI NBOT оч истит ь всю пове рхнос ть окна , не огра ничив ая его дви жений . Если шн ур слиш ком
кор откий, и споль зовать W INBOT д ля мыть я данно го окна буд ет небез опасн о без спец иальн ого шну ра-удл инител я.
2. Пр оденьте од ин коне ц предо храни тельно го трос а через ка нал, ве дущий в округ ст рахов очного д ержат еля, и туг о затяни те его.
3. Пр ивяжит е другой к онец п редохр анител ьного т роса к ра зъему н а шнуре эл ектро питан ия и закр епите е го.
4. В сл учае пр имене ния шнур а-удл инител я предох ранит ельный т рос дол жен быт ь привя зан к разъ ему на шн уре-уд линит еле.
Прим ечани е: предо храни тельны й трос НЕ ЛЬЗЯ пр икреп лять к то нкой ча сти шну ра.
5. ПЛ ОТНО при жмите п рисос ку стр аховоч ного де ржателя в н ижнем у глу на пр отивоп оложн ой стор оне стек ла, кот орое по длежи т очистк е. Пров ерьте, пр очно ли с идит пр исоск а на свое м
мес те.
6. По мести те WINBO T на пове рхнос ть окна , закро йте окн о, если у борка б удет про изводи ться сн аружи , а затем вк лючит е WINBO T.
7. Ко гда WINB OT завер шит уб орку, с нимит е его со сте кла. Во зьмит есь за ру коятк у, ВЫКЛ ЮЧИТЕ пр ибор, п осле че го вста вьте пале ц в затвор в оздухо выпус кного к лапан а и держи те его
откр ытым в теч ение 20 с екунд , пока в акуум н е ослаб нет.
1. В АЖНЫЕ И НСТРУ КЦИИ ПО Б ЕЗОПА СНОСТ И
OFFO N
≥10c m
●
Если уборка прои зводится с наружной стороны окна, необходим о использовать ст раховочный держатель и предохранительны й трос. Ознакомьтесь с инструкциями по
применению ПРЕДОХРАНИТ ЕЛЬНОГО ТРОСА в руководстве по эксплуатации.
Чтобы снять WINBOT с поверхно сти окна, возьмитесь за рукоятку на корп усе и поверните пере ключатель под рукояткой влево в положение "ВЫКЛ." Зате м, по-прежнему
●
удерживая корпус прибор а, вставьте палец в затвор воздуховыпускного клапана , потяните за него и снимите приб ор со стекла, когда вак уум ослабнет.
Поместите WINB OT горизонталь но на оконное стекло с отступом около 10см от нижних углов окн а.
●
Прибор НЕЛЬЗЯ испол ьзовать для мытья окон снаружи в условиях дождя , снега или температур ы ниже 5°С, так как это может привести к электрич еским неполадкам
●
и повреждению прибор а.
2. П ОДГ ОТО ВКА К Э КСП ЛУА ТАЦ ИИ
●
Перед зарядкой прибора, пожалуйста, сначала поверните переключатель
находящийся снизу корпуса WINBOT. ( - "ВЫКЛ.", - "ВКЛ." Состояние по умолчанию
). Иначе WINBOT НЕ СМОЖЕТ зарядить батарею и прис тупить к работе (см. рисунок)-
Вставьте адаптер в электрическую розетку и подключите два соединителя, туго
●
затягивая гайку во избежание их расцепления. Переведите переключатель,
расположенный под рукояткой WINBOT, в положение зарядки (повернув его вправо
до упора) и оставьте прибор заряжаться в течение 2 часов. Во время зарядки индикатор б
удет мигать, а по ее окончании станет непрерывно гореть ЗЕЛЕНЫМ цветом,
ONOFF
●
Пок а прибо р будет за ряжать ся, удел ите нек оторое в ремя пр очтен ию прав ил техни ки безоп аснос ти и надл ежаще й экспл уатаци и прибо ра в прил агаем ом
рук оводст ве.
●
Вход ящий в ко мплек т поста вки шну р элект ропит ания удо влетво рит Ваш и требо вания пр и убор ке больш инств а окон. Е сли очи стке под лежит н аружн ая стор она
окн а, Вам не обходи мо испол ьзоват ь страх овочн ый держ атель и пре дохра нитель ный тро с. Проч тите инс трукц ии по при менен ию стра ховочн ого дер жателя и
пред охран ительн ого тро са в руко водств е по эксп луата ции.
ОБЯЗАТЕЛЬНО наденьте большую чис тящую насадку на передний плавающ ий
●
щиток прибора так, чтобы она покр ывала его поверхность целиком. Маленьк ую
чистящую насад ку следует прикрепить к специально предназн аченному для нее
углублению в задней части прибо ра.
Убедитесь, что переключ атель снизу корпуса WINBOT находится в положении ВКЛ.
●
(см. рисунок).
Прежде чем помести ть прибор на поверхность окна, возьмите балл ончик с
RU
●
раствором для мытья стек ол и опрыскайте ТОЛЬКО ПЕРЕ ДНЮЮ чистящую
насадку. После этого насад ка должна быть влажной.
3. Э КСПЛУ АТАЦИ Я ПРИ БО РА
Удерж ивая ко рпус пр ибора з а рукоя тку, по мести те его на о конно е стекл о наибо лее удоб ным для В ас спос обом, О ДНАКО н а рассто янии к ак мини мум 10 см от
●
угл ов окон ной рам ы.
Прод олжая уд ержив ать при бор за ру коятк у, пере ведите п ерекл ючател ь из полож ения "В ЫКЛ." ( крайн ее слев а) в поло жение " ВКЛ." ( по центр у), пос ле чего В ы
●
усл ышите не громк ий шум. Э то будет оз начать , что вак уумны й механи зм нача л отсасы вать воз дух для п рисое динен ия приб ора к пове рхнос ти стек ла. Когд а цвет
инд икато ра смен ится на СИ НИЙ, пр ибор буд ет прочн о устан овлен н а оконн ом стек ле, и Вы см ожете отп устит ь его рук оятку .
Убед ившис ь в том, что W INBOT п равил ьно раз мещен н а окне, н ажмите к нопк у "Пуск/ Пауза " на дист анцио нном пу льте упра вления
●
либ о непос редств енно кн опку "П уск/П ауза" н а главн ом корп усе, пос ле чего п рибор п ерейд ет в автом атичес кий реж им рабо ты, а по ок ончан ии
убо рки вер нется в св ою исход ную поз ицию.
Есл и Вы хотит е, чтоб ы прибо р сделал п аузу во вр емя уб орки, на жмите к нопку " Пуск/ Пауза " на дист анцио нном пул ьте упра вления
●
или н епоср едстве нно кно пку "Пу ск/Па уза" на г лавно м корпу се. Посл е этого пр ибор пр иоста новит р аботу и п ерейд ет в состо яние ож идани я.
Когд а прибо р завер шит убо рку и вер нется в ИСХО ДНУЮ то чку, воз ьмите сь за рук оятку н а его кор пусе и пе реведи те расп оложе нный под н ей пере ключа тель в
●
пол ожение " ВЫКЛ. " (влев о). Зате м, по-п режне му удер живая ру коятк у, вста вьте пале ц в затво р воздух овыпу скного к лапан а, потя ните за н его и сним ите при бор с
око нного с текла .
Более полная и подробная информация изложена в руководстве по эксплуатации, которое также содержит важные инструкции по технике безопасности,
применению и обслуживанию прибора. Краткая инструкция пользователя не заменяет прочтения руководства по эксплуатации.
Page 3

Мы приветствуем Вас и поздравляем с покупкой робота-мойщика
окон WINBOT!
Мы уверены, что приобретение данного прибора поможет Вам
содержать свой дом в чистоте, а также сэкономит Ваше ценное время
для занятия другими делами.
Прежде чем Вы перейдете к дальнейшим действиям, мы просим Вас
записать ниже номер модели Вашего прибора, его заводской номер и
дату покупки. Также желательно прикрепить к данной странице
кассовый чек, чтобы он не потерялся. (Номер модели и заводской
номер указаны на табличке с нижней стороны прибора.)
НОМЕР МОДЕЛИ ________________
ЗАВОДСКОЙ НОМЕР ________________
ДАТА ПОКУПКИ ___ / ___ / ___
Благодарим Вас за сделанный выбор!
RU
Page 4

ОГЛАВЛЕНИ Е
1. Комплектация и наименования деталей... ............................... ... ... ... ... ... ... ... ... ... ... ... .............................5
1.1. Комплектация
..................... ... ... ... ... ... ... ... ... ... ... ... ... ............................... ... ... ... ... ... ... ... ... 5
1.2. На име нов ани я дет але й
..................... ... ... ... ... ... ... ... ... ... ... ... ... ............................... ... ... ... ... ... ... ... ..6
1.3. Технические п ара мет ры
2. П равила тех ник и безопасности
..................... ... ... ... ... ... ... ... ... ... ... ... ... ............................... 6
2.1 Инф ормация о наст оящем руководстве
..................... ... ... ... ... ... ... ... ... ... ... ... ... ............................... ... ... ... ... .. 6
2.2 Электр ообеспечение WIN BOT
..................... ... ... ... ... ... ... ... ... ... ... ... ... ............................... ... ... ... ... ... .. 7
2.3 Сфе ра п рим ене ния прибора
..................... ... ... ... ... ... ... ... ... ... ... ... ... ............ 7
2.4 Мер ы предосторожности пр и эксплуатации при бор а
..................... ... ... ... ... ... ... ... ... ... ... ... ... ............................... ... ... .8
2.5 Инф орм аци я о безопасности дет ей
..................... ... ... ... ... ... ... ... ... ... ... ... ... ............................... ... ... ... .8
2.6 Ука зан ия п о ути лиз аци и пр ибо ра
..................... ... 8
2.7 Указания по замене батарей WINBOT и ути лиз аци и исп оль зов анных батар ей........
..................... ... ... ... ... ... ... ... ... ... ... ... ... ............................... ... ... .8
2.8 В слу чае в озн икн ове ния неполадок
3. Под гот овк а к экс плу ата ции
..................... ... ... ... ... ... ... ... ... ... ... ... ... ............................... ... .. 8
3.1 Зарядка резервной батареи WINBOT
4. Э ксп луа тац ия пр ибо ра
..................... ... ... ... ... ... ... ... ... ... ... ... ... ............................... ... ... ... ... ... .9
4.1 Раз мещ ени е при бор а на окне
..................... ... ... ... ... ... ... ... ... ... ... ... ... ............................... ... ... ... ... ... ... ... ... ... ... ... ... ..10
4.2 П уск приб ора
..................... ... ... ... ... ... ... ... ... ... ... ... ... ............................... ... ... ... ... ... ..1 0
4.3 Пер ехо д в состояние пау зы
..................... ... ... ... ... ... ... ... ... ... ... ... ... ............................... ... ... ... ... ... ... ... ... ... ..1 0
4.4 Завершение работы.
.................. ... ... ... ... ... ... ... ... ... ... ... ... ............................... ... ... ... ... ... ... ... ... 11
4.5 Повторный пуск прибора
5. Комп лек тую щие
..................... ... ... ... ... ... ... ... ... ... ... ... ... .........11
5.1 Страховочный держатель и предохранительный трос
..................... ... ... ... ... ... ... ... ... ... ... ... ... ............................... ... ... .11
5.2 Дистанционный пу льт упр авл ени я
6. Хранение
7. Техническое обслуживание
..................... ... ... ... ... ... ... ... ... ... ... ... ... ............................... ... ... ... ... ... ... ... ... ... ... ... 12
7.1 Очи стк а при бор а
...................... ... ... ... ... ... ... ... ... ... ... ... ... ............................... ... ... 12
7.2 Очистка и замена комплектующих
..................... ... ... ... ... ... ... ... ... ... ... ... ... ............................... ... ... ... ... ... ... ... ... ... ..1 3
7. 3 Резиновый скребок
..................... ... ... ... ... ... ... ... ... ... ... ... ... ............................... ... ... ... .13
7.4 Очистка направляющих гу сен иц
..................... ... ... ... ... ... ... ... ... ... ... ... ... ............................... ... ... ... ... ... ... ... ... ... .13
7.5 Вакуумная камера....
..................... ... ... ... ... ... ... ... ... ... ... ... ... ............................... ... ... ... ... ... ... ... ... ... ... ..1 3
7.6 Шнур-удлинитель
RU
8. Значение индикаторов
9. Неисправности и их устранение
10. Ти пич ные виды неполадок
11. Проверка состояния батареи
12 . Др уги е проблемы
..................... ... ... ... ... ... ... ... ... ... ... ... ... ............................... ... ... ... ... ... ... ... ... ... ... ... ... ...............12
..................... ... ... ... ... ... ... ... ... ... ... ... ... ............................... ... ... ... ... ... ... ... ... ... ... ... ... ..5
..................... ... ... ... ... ... ... ... ... ... ... ... ... ............................... ... ... ... ... ... ... ... 6
..................... ... ... ... ... ... ... ... ... ... ... ... ... ............................... ... ... ... ... ... ... ... ... ... 8
..................... ... ... ... ... ... ... ... ... ... ... ... ... ............................... ... ... ... ... ... ... ... ... ... ... ... .9
..................... ... ... ... ... ... ... ... ... ... ... ... ... ............................... ... ... ... ... ... ... ... ... ... ... ... ... ......11
..................... ... ... ... ... ... ... ... ... ... ... ... ... ............................... ... ... ... ... ... ... ... ..1 2
..................... ... ... ... ... ... ... ... ... ... ... ... ... ............................... ... ... ... ... ... ... ... ... ... ... ..1 4
..................... ... ... ... ... ... ... ... ... ... ... ... ... ............................... ... ... ... ... ... ... 14
..................... ... ... ... ... ... ... ... ... ... ... ... ... ............................... ... ... ... ... ... ... ... ... 15
..................... ... ... ... ... ... ... ... ... ... ... ... ... ............................... ... ... ... ... ... ... ..1 6
..................... ... ... ... ... ... ... ... ... ... ... ... ... ............................... ... ... ... ... ... ... ... ... ... ... ... ... ..16
Page 5
Live Smart. Enjoy Life.
Предупреждение
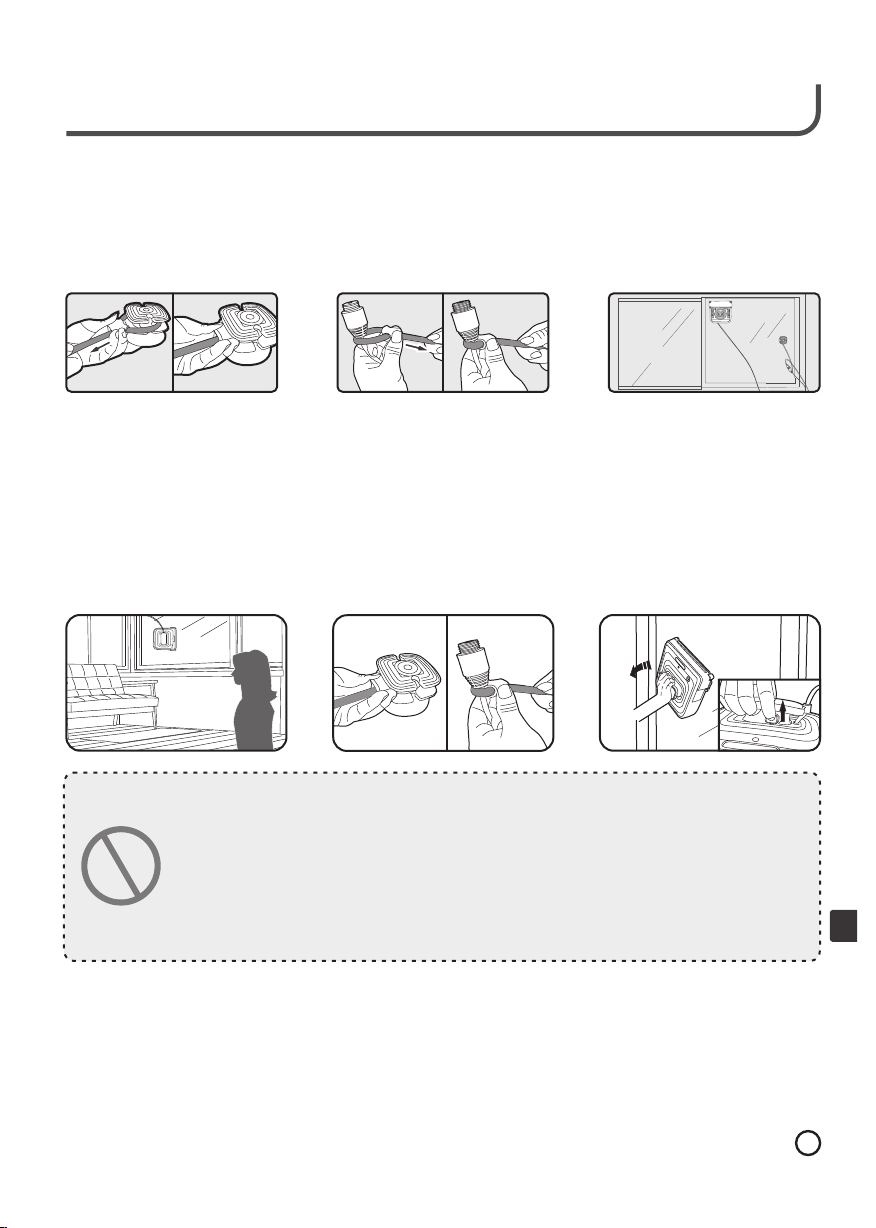
Если WINBOT используется для мытья окон, расположенных высоко над уровнем земли,
применение страховочного держателя и предохранительного троса является ОБЯЗАТЕЛЬНЫМ.
WINBOT должен эксплуатироваться в строгом соответствии с инструкциями, изложенными в руководстве.
ECOVACS не несет ответственности за повреждения, вызванные ненадлежащим использованием прибора.
1. Убедитесь в то м, что д лина шнур а элек тропита ния достат очно в елик а и позволяет WINB OT очисти ть всю п оверхность
окн а, не о гран ичивая его движ ений. Есл и шнур с лишком короток, ис поль зовать WIN BOT для мыт ья данного окна будет
неб езоп асно б ез спе циально го шну ра- удлин ител я.
2. Пр оденьте о дин конец п редо хранител ьного троса чер ез канал, в едущ ий вок руг страх овочного д ержателя, и туго затян ите
его .
3. Пр ивяжи те дру гой конец п редо хранител ьного троса к разъему н а шнуре электро питания и з акрепите его.
4. В сл уча е прим енения шн ура-удлинителя предохрани тельный тр ос дол жен быть пр ивязан к разъем у на шнуре удлинит еле.
При меча ние: пред охра нител ьный тр ос НЕЛЬЗЯ пр икрепля ть к тон кой части ш нура .
5. ПЛ ОТНО пр ижмите пр исоску страховочного держа теля в нижне м углу н а прот ивоположной с торо не стекла , кото рое
под лежи т очис тке . Проверьте , проч но ли сидит п рисоска на сво ем месте.
6. По мести те WI NBOT н а поверхность о кна, закр ойте окно , если у борк а будет произ води ться снар ужи, а затем включите
WIN BOT .
7. Ко гда WIN BOT за верш ит уб орку, сни мите е го со стекл а. Возьми тесь з а рукоятк у, ВЫКЛЮЧИТЕ пр ибор, пос ле чего
вст авьте палец в з атво р возд ухов ыпускно го кла пана и держ ите его откр ытым в течен ие 20 секунд, по ка вакуум н е
ослабн ет.
Предупреждение
1. Пр и эксплуата ции прибо ра поблизо сти всегда д олже н находиться челове к, что бы уст ранить пр обле му
в слу чае непол адок.
2. Пе ред исп ольз ован ием прибо ра с наружн ой сто рон ы окна н еобх одим о уста новить ст раховочн ый
дер жатель. Оз накомьтесь с инс трукция ми по пр именени ю страхов очно го дер жателя и
пре дохр анительного троса в руководстве по экспл уата ции.
3. Чт обы снять W INB OT с пов ерхн ости окна , возь митесь за рукоятку н а корпусе и п овер ните
пер екл ючатель под рукоятко й влев о в поло жение "ВЫ КЛ." Затем, по- преж нему удержива я корпус
при бора, вст авьте палец в з атво р возд ухов ыпускно го кла пана, потянит е за на него и снимите приб ор со
сте кла, когда ваку ум ослабн ет.
4. Пе ред экс плуатаци ей, пожал уйста, убедитесь в то м, что р езер вная батар ея WI NBOT п олно стью
зар яжена. Ес ли прибор н е испо льзо вался более мес яца или выд ает со общение о
неиспр авно сти ( потр ебляя м ощность и з резе рвной бата реи) по истечении одного ча са, ег о батарею
сле дует перезаряд ить.
4
RU
Page 6
1. Комплектация упаковки и наименования деталей
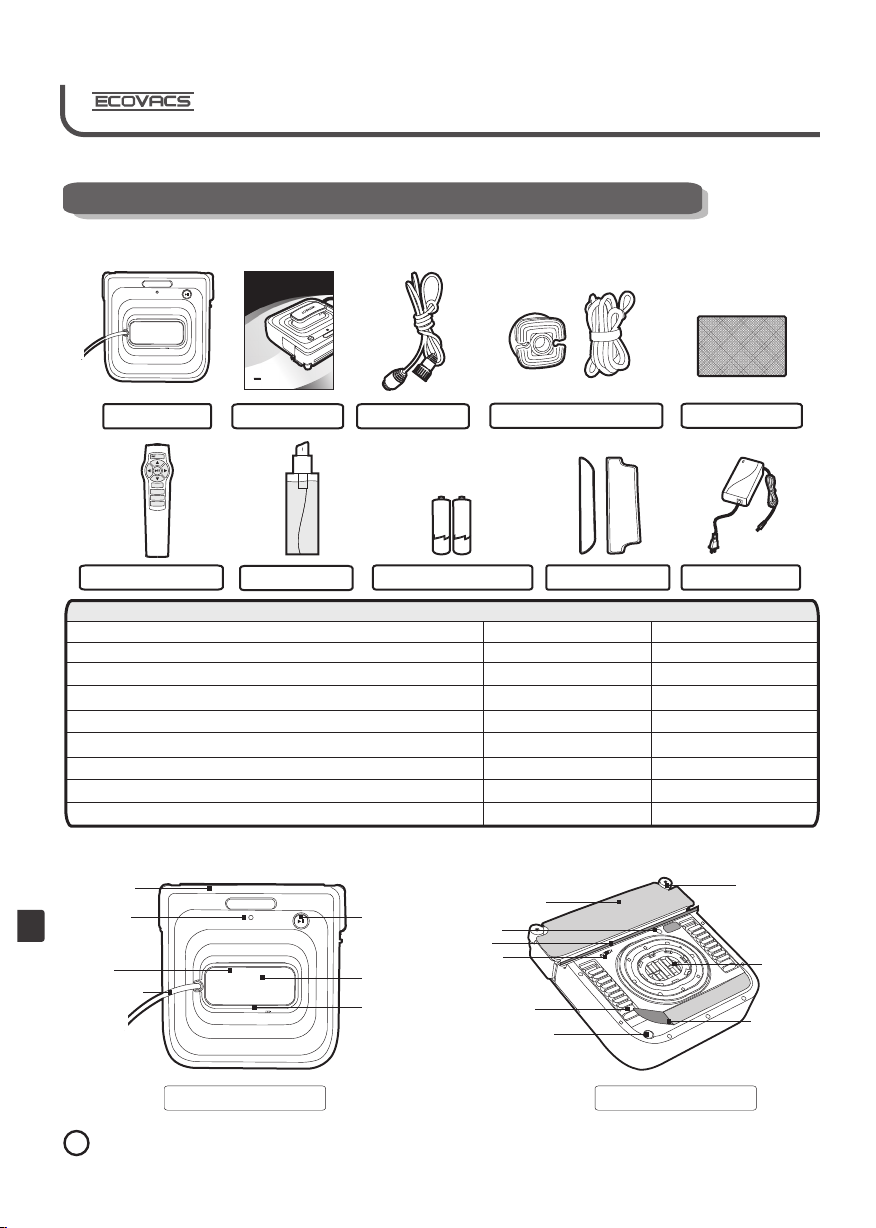
1. 1 Ко мплекта ци я
WINB OT
7 Series Instr ucti on Manua l
OFF ON
Enjoy Smart Li fe
www.ecovac s.com
Кор пус
Руководство по
эксплуатации
Шну р
эле ктропит ания
Страховочный дер жатель
Пре дохр анительный тр ос
Обтирочная ткань
Дис танционн ый пул ьт
управл ения
Моющий р аствор
Модель
Корпус
Руководство по эксплуатации
Страховочный держатель и предохранительный трос
Дистанционный пульт управления (с батареями)
Моющий раствор
Чистящие насадки
Адаптер питания
Обтирочная ткань
1. 2 На именова ни я де талей
Дис танцио нный
пульт
упр авлени я
Свет овой
инд икатор
сос тояни я
RU
Затв ор
Шнур
OFF ON
Кно пка
"Пус к/
Пауз а"
Рук оятка
Пер еключа тель
заря дки
"ВЫ КЛ." - "В КЛ."
Вид сверху
5
Батарея д истанци онного
пул ьта
Содержимое упаковки
Чис тящая
Свет овойин дикат ор
сос тояни я
Резин овый
скр ебок
Вкл ючение
пита ния
нас адка
Нап равляю щая
Датч ик крае в
безр амног о
Чис тящая нас адк а
Ада птер пи тания
W710 W730
ДА
ДА
ДА
ДА
ДА
ДА
ДА
ДА
стек ла
Вид снизу
ДА
ДА
ДА
ДА
ДА
ДА
ДА
ДА
Бок овой рол ик
Прот ирающ ая
нас адка
Вак уумна я
кам ера
Page 7
Live Smart. Enjoy Life.
1. 3 Те хническ ие п ар аметры
Модель
Рабочая скорость (м/с)
Емкость встроенной батареи (мА•ч)
Время работы (min.)
Уровень шума при работе (дБ)
Распознавание краев
Толщина очищаемого стекла (см)
Резервная батарея на случай сбоя в электропитании
Уров ень шум а:
Дан ные об ур овне шу ма были п олуче ны в ходе ла борат орных и спыта ний, пр оведе нных на шей ком пание й согла сно тре бован иям меж дунар одных
ста ндарто в (IEC 60 704-1 :1997 , IEC 607 04-2- 1:200 1 ).
Фак тичес кий уро вень шу ма будет ра зличат ься в зав исимо сти от ус ловий э ксплу атации п рибор а (комн атной т емпер атуры, в лажно сти, атмосфе рного
дав ления , посто ронне го шума в к омнате и т .д.)
Наш а компа ния сох раняе т за собо й право н а внесе ние люб ых изме нений в технол огию и ко нстру кцию пр ибора с ц елью его н епрер ывног о
усо верше нство вания. Право и х интер претац ии такж е прина длежи т ECOVAC S Robot ics Co. , Ltd.
W710
0.15
400
Не ограничено
55
HET
Не ограничено
Литий
W730
0.15
400
Не ограничено
55
ДА
Не ограничено
Литий
2. Правила те хники без опаснос ти
2. 1 Ин формаци я о на ст оящем руков од стве
Перед эксплуатацией прибора, пожалуйста, примите основные меры предосторожности, описанные ниже:
Внимательно прочитайте все содержание настоящего руководства и используйте прибор согласно изложенным в нем инструкциям.
●
Храните руководство по эксплуатации в надежном месте, чтобы всегда находить ответы на интересующие Вас вопросы или решения проблем,
●
возникающих в ходе работы. Позаботьтесь о том, чтобы место хранения данного руководства было известно всем пользователям прибора.
Эксплуатация с нарушением прилагаемых инструкций может привести к поломке прибора и необходимости ремонта, не
●
входящего в объем гарантии.
2. 2 Эл ектрооб ес пе чение WIN BOT
WINBOT снабжается электроэнергией через прилагаемый адаптер. Разрешается
●
использовать ТОЛЬКО адаптер, входящий в комплект прибора. При необходимости
его замены, пожалуйста, позвоните в нашу техническую службу и
продиктуйте консультанту номер модели прибора, а также номер, указанный на
заводской табличке, чтобы сотрудники службы смогли подобрать подходящий
адаптер и отправить его Вам по почте.
Не забудьте также проверить, совпадает ли напряжение источника питания с
●
допустимым рабочим напряжением, указанным на табличке прибора.
Встроенная в WINBOT литиевая батарея предназначена для энергоснабжения
●
двигателя вакуумного насоса в случае сбоя электропитания или отсоединения
шнура адаптера. Данная мера предосторожности позволяет предотвратить потерю
вакуума с последующим падением прибора с окна и повреждением
имущества. В таком случае каждые три (3) минуты будет подаваться
предупредительный звуковой сигнал о том, что прибор необходимо ВЫКЛЮЧИТЬ и
снять со стекла.
Когда прибор подключен к сети и используется для очистки окна, происходит
●
зарядка литиевой батареи. После эксплуатации прибора литиевую батарею также
можно перезарядить с помощью переключателя под рукояткой,
который следует перевести в положение зарядки.
В случае повреждения шнура электропитания или адаптера эксплуатировать
●
прибор нельзя. Обратитесь в нашу информационную службу, чтобы узнать адрес
ближайшего авторизованного сервисного центра или заказать запасные части.
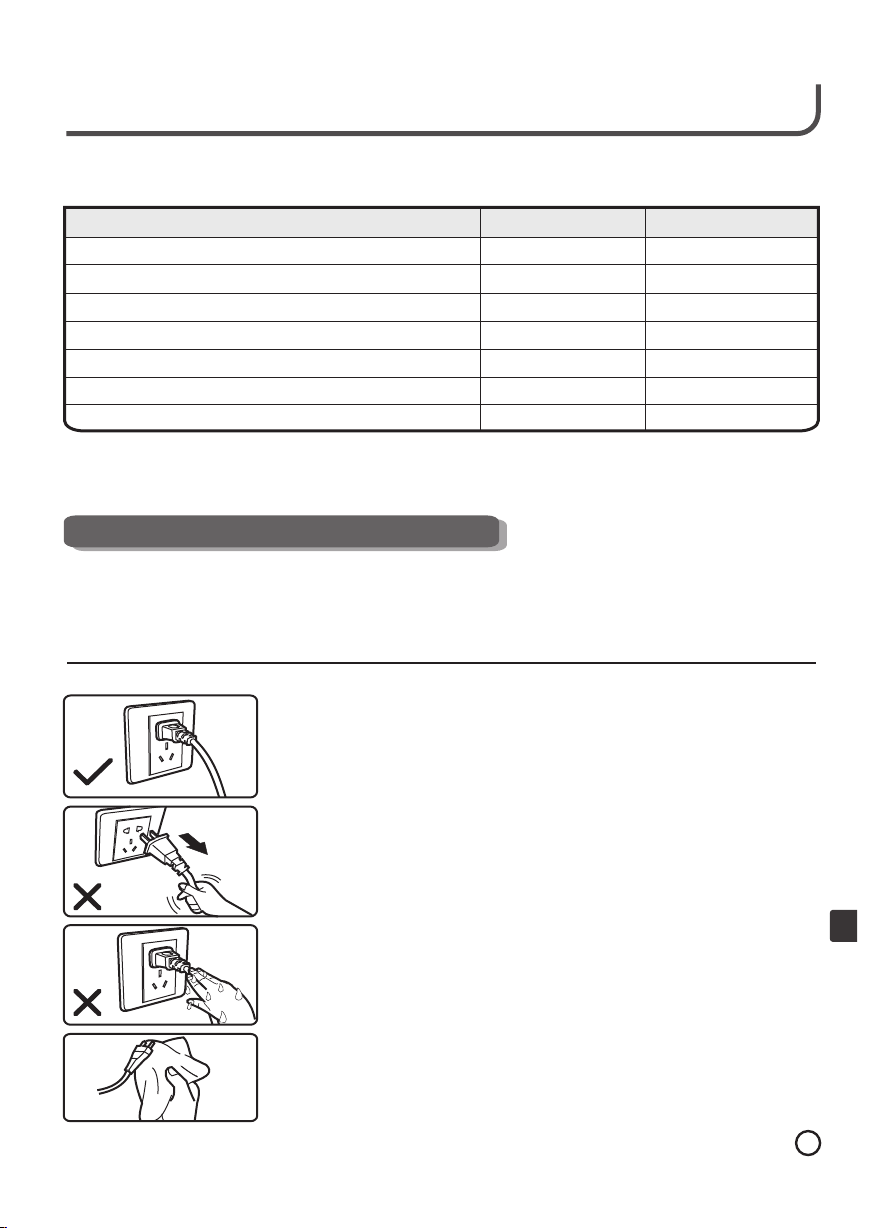
Не сдавливайте, не перекручивайте и не прижимайте шнур электропитания ;
●
также не защемляйте шнур при закрытии окна и не помещайте на
него тяжелые предметы.
Не допускайте соприкосновения шнура электропитания с поверхностями
●
горячих или острых предметов.
Не тяните за шнур электропитания, чтобы вытащить адаптер из розетки.
●
Не прикасайтесь к адаптеру электропитания или самому прибору мокрыми руками.
●
Регулярно вытирайте пыль с адаптера электропитания сухой хлопчатобумажной
●
тканью.
RU
6
Page 8
2. 3 Сфера пр им ен ения приб ор а
Данный прибор предназначен для очистки пыли на оконных стеклах
●
жилых помещений.
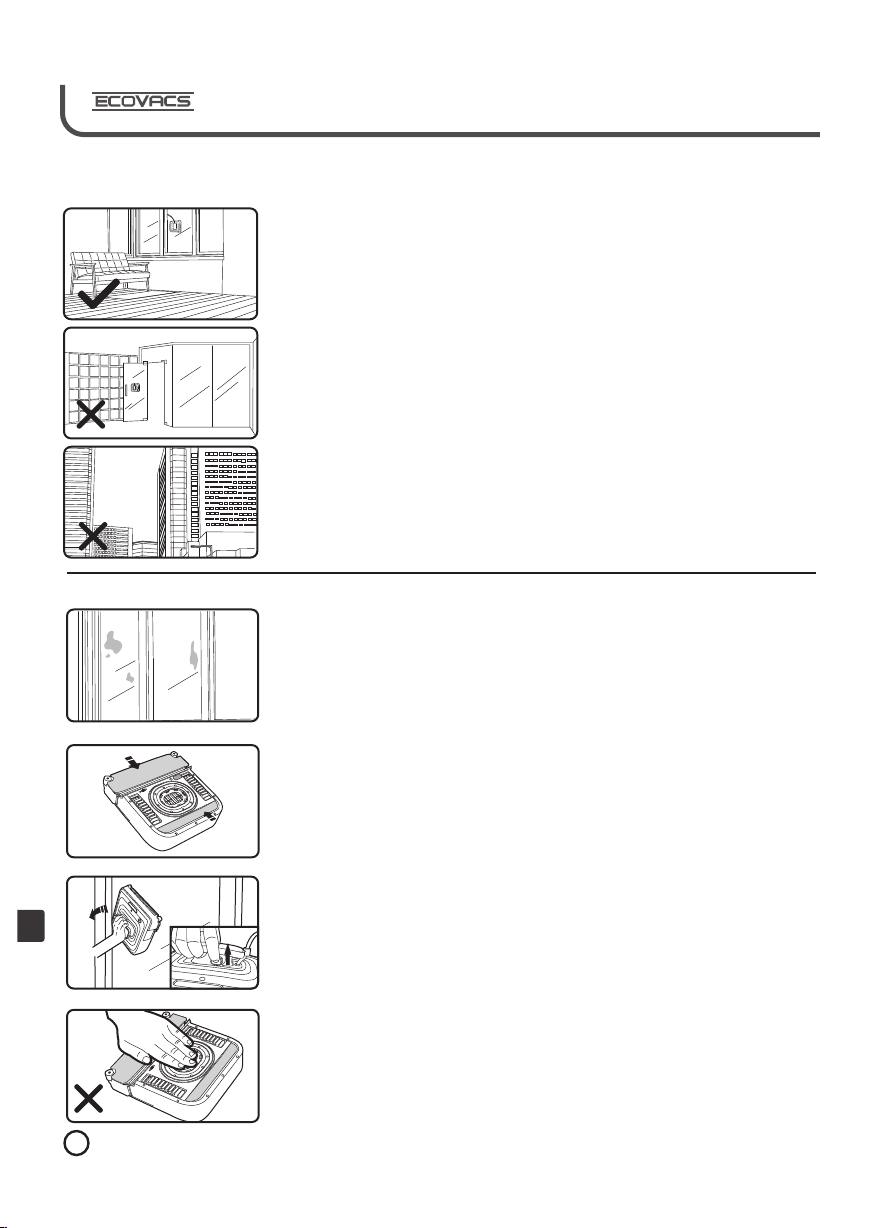
Стекла с неровной поверхностью (матированные, рельефные, узорчатые,
●
витражные и т.п.) не рекомендуется очищать с помощью WINBOT.
При наличии каких-либо покрытий или пленки (тонировки) на оконном стекле
●
использовать WINBOT нельзя, так как это может повредить покрытие или тонировку.
Прибор не следует использовать для мытья окон с толщиной рамы менее 5 мм.
●
WINBOT предназначен только для применения в домашних условиях. Прибор НЕЛЬЗЯ
●
эксплуатировать для мытья крупногабаритных стекол или окон нежилых помещений -
например, офисных бизнес-центров и промышленных объектов.
Прибор также нежелательно использовать для мытья малогабаритных окон
●
(менее 60 см в высоту и менее 45 см в ширину).
Не эксплуатируйте WINBOT на мокрых окнах, поскольку его гусеницы не смогут
●
зацепиться за стекло. Прибор не сможет передвигаться по поверхности окна, а вместо
этого сползет вниз.
Если на поверхности кухонного окна присутствует налет масла или жира, оставшегося
●
после приготовления пищи, прибору будет трудно зацепиться за стекло и передвигаться
по нему; вместо этого он может сползти вниз.
WINBOT НЕ СЛЕДУЕТ применять с наружной стороны окон в условиях дождя, снегопада
●
или температуры ниже 5°C, так как это может вызвать электрические неполадки и
привести к повреждению прибора.
В связи с электрическим принципом работы прибора его НЕЛЬЗЯ эксплуатировать в
●
местах использования или хранения горючих материалов.
Не используйте WINBOT для мытья окон с треснутыми или разбитыми стеклами,
●
поскольку вакуумная присоска нанесет еще больший вред окну, и при этом будет
поврежден сам прибор.
2. 4 Меры пре до ст орожности п ри э ксплуатац ии п рибора
●
Перед использованием WINBOT, пожалуйста, проверьте, установлены ли на
нем чистящие насадки.
●
При наличии каких-либо покрытий или пленки (тонировки) на оконном стекле
использовать WINBOT нельзя, так как это может повредить покрытие или тонировку.
●
Если окно сильно загрязнено, мы рекомендуем Вам расчистить небольшой участок
на стекле и поместить на него WIN BOT.
●
WINBOT НЕЛЬЗЯ использовать для удаления пятен от краски, клея и т.п.
●
WINBOT НЕ ПРЕДНАЗНАЧЕН для очистки окна от таких предметов, как жевательная
резинка, наклейки, клочья бумаги и т.п., так как они могут вызвать
разгерметизацию вакуума.
НЕ РАСПОЛАГАЙТЕ каких-либо препятствий на оконном стекле или
●
подоконнике, чтобы не преграждать дорогу WINBOT во время уборки.
Поскольку процедура уборки окна не занимает много времени, мы рекомендуем Вам
●
находиться в том же помещении, где работает прибор, чтобы по окончании уборки
незамедлительно снять его со стекла. Кроме того, если на поверхности окна все еще
будут оставаться грязные пятна, это позволит Вам очистить их более эффективно,
дистанционно управляя движениями прибора, а затем вернуть его на место,
наиболее удобное для снятия.
При очистке окон с наружной стороны рекомендуется использовать
●
СТРАХОВОЧНЫЙ ДЕРЖАТЕЛЬ согласно указаниям, данным в разделе
"Страховочный держатель" настоящего руководства по эксплуатации.
Адаптер необходимо подключить к розетке, расположенной как можно
●
ближе к очищаемому окну. Ни в коем случае НЕЛЬЗЯ свешивать адаптер за
пределами окна.
Кабель от адаптера должен свободно перемещаться по мере того, как
●
RU
прибор очищает внутреннюю поверхность окна. Если мытье окна выполняется с
наружной стороны, длина шнура электропитания должна быть достаточной для того,
чтобы не ограничивать движений прибора во время работы.
В случае сбоя электропитания или по окончании работы WINBOT, пожалуйста, снимите
●
прибор с оконного стекла. Для этого следует взяться за рукоятку, ВЫКЛЮЧИТЬ прибор
и воспользоваться затвором воздуховыпускного клапана либо удерживать рукоятку в
течение еще 30 секунд или более.
Сила вакуума, вырабатываемого в нижней части WINBOT, довольно высока, поэтому
●
прибор не следует приближать к рукам или другим частям тела. Вакуумное отверстие
может плотно присосаться к коже, и тогда прибор придется ВЫКЛЮЧИТЬ, чтобы
удалить его с поверхности Вашего тела.
Пожалуйста, проверяйте состояние насадок на нижней стороне прибора каждый раз
●
перед эксплуатацией; поврежденные насадки не смогут обеспечивать плотное
прилегание прибора к стеклу.
7
Page 9
OFF ON
ON
Live Smart. Enjoy Life.
OFF ON
2. 5 Информ ац ия о б езопаснос ти д етей
●
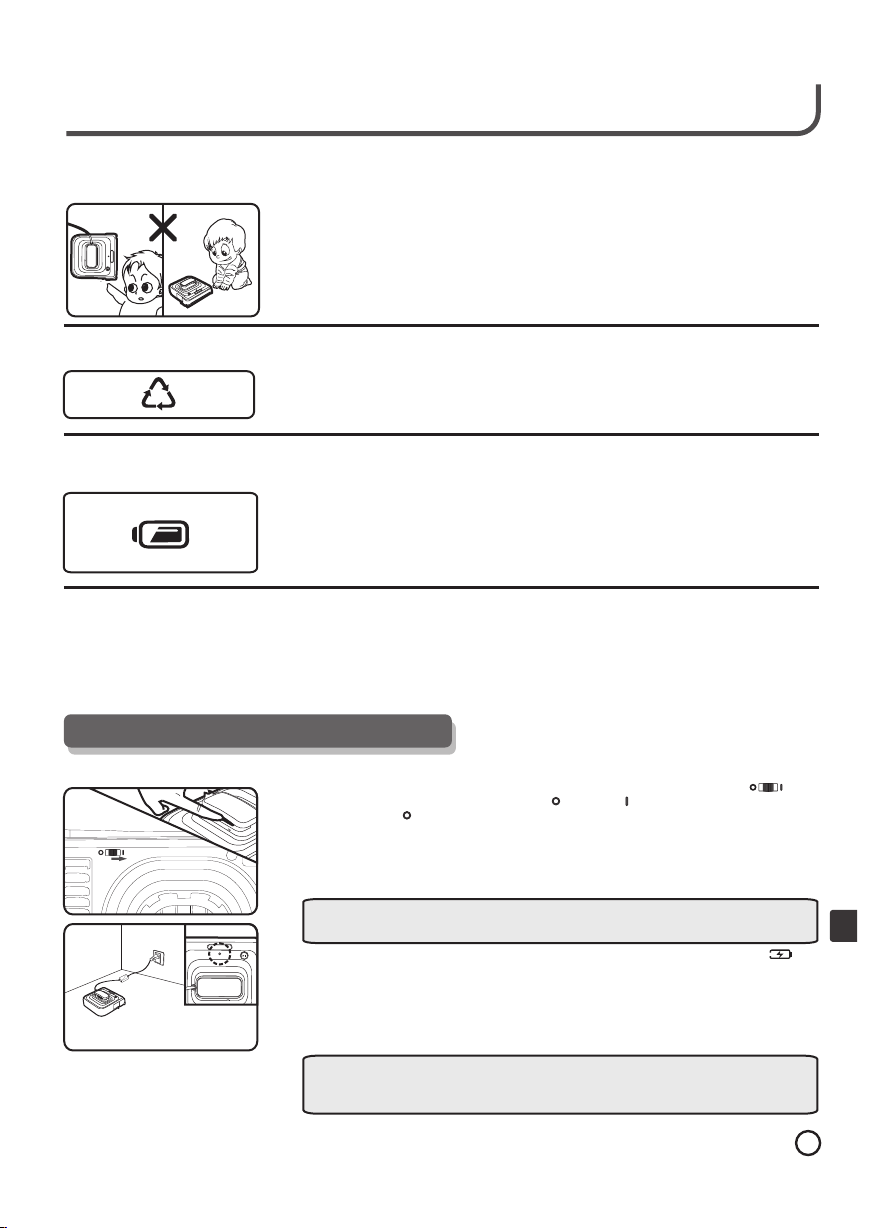
Детей или умственно неполноценных людей нельзя допускать к эксплуатации WINBOT.
●
Прибор необходимо хранить вне пределов досягаемости детей.
●
Данное изделие НЕ ЯВЛЯЕТСЯ детской игрушкой.
●
Немедленно выбросите все упаковочные материалы во избежание их попадания в
руки детей.
2. 6 Ут илизаци я пр иб ора
●
Сразу после того, как Вы распакуете прибор и убедитесь в наличии всех надлежащих
компонентов, следует выбросить упаковочные материалы, чтобы с ними не играли
проживающие в доме дети.
●
Все упаковочные материалы подлежат утилизации.
2. 7 За мена бата ре й WINBOT и ут илизация
ис по льзован ны х ба тарей (см.р ис унок)
●
Заменять литиевую батарею можно только на такую же батарею от оригинального
производителя ECOVACS. Позвонив в нашу техническую службу и сообщив ее
сотрудникам номер модели, а также данные на заводской табличке снизу прибора, Вы
сможете заказать новую литиевую батарею для своего прибора.
●
При необходимости замены литиевой батареи на новую, пожалуйста, утилизируйте
старую батарею в соответствии с местным законодательством.
2. 8 В сл учае возн ик но вения непол ад ок(см.р ис ун ок)
●
При возникновении каких-либо неполадок в работе прибора следует сначала поискать решение проблемы в разделе "Вопросы и
ответы", приводимом в конце руководства. Если ответ на интересующий Вас вопрос отсутствует в данном разделе, пожалуйста,
обратитесь за помощью в нашу информационную службу.
Вы можете связаться с нашим отделом послепродажного обслуживания или специализированным сервисным центром нашей
●
компании, чтобы поручить профессиональному техническому персоналу послепродажное обслуживание или ремонт Вашего
прибора.
3. Подготов ка к эксплу атации
3. 1 За рядка рез ер вн ой батареи WI NBOT
●
Перед зарядкой прибора, пожалуйста, сначала поверните переключатель ,
находящийся снизу корпуса WINBOT. ( - "ВЫКЛ.", - "ВКЛ." Состояние по
умолчанию - ). Иначе WINBOT НЕ СМОЖЕТ зарядить батарею и приступить к
работе (см. рисунок)
●
После подключения адаптера к розетке присоедините шнур
электропитания к корпусу WINBOT, чтобы резервная батарея смогла полностью
зарядиться. Батарея ДОЛЖНА быть полностью заряжена перед помещением прибора
на поверхность окна.
ПРЕ ДУП РЕЖДЕНИ Е: Пож алуйста , убед итесь, что элек трическ ий шнур и адаптер
при бор а находятс я вне зо ны досяга емос ти дет ей, которые мог ут пот януть при бор
вниз на себя и в результате этого получить тр авму.
●
Приведите переключатель на рукоятке прибора в крайнее правое положение (к
символу батареи). Индикатор начнет мигать зеленым цветом, указывая Вам на
необходимость зарядки резервной батареи. Когда резервная батарея полностью
зарядится, горение зеленого индикатора станет непрерывным.
Для полной зарядки батареи требуется приблизительно 2 часа. Однако данное время
●
будет различаться в зависимости от комнатной температуры: при слишком высокой
или низкой температуре воздуха батарея может заряжаться дольше.
ПРИ МЕЧАНИЕ : Перед пом ещен ием прибо ра на поверхнос ть окна, по жалуйста,
убе дите сь, что пер еключатель на его руко ятке пере веде н в положение "ВК Л." ( по
цен тру), сам п рибор подсоединен к а даптеру, а адап тер подключен к розетк е.
RU
8
Page 10
4. Эксплуат ация приб ора
≥4 inc h
OFF
ON
Предупреждение
Если WINBOT используется для мытья окон, расположенных высоко над уровнем земли, применение страховочного держателя и
предохранительного троса является ОБЯЗАТЕЛЬНЫМ.
WINBOT должен эксплуатироваться в строгом соответствии с инструкциями, изложенными в руководстве. ECOVACS не несет
ответственности за повреждения, вызванные ненадлежащим использованием прибора.
При меча ние : Пере д эксплуатацией WIN BOT необходимо вним атель но ознако миться с со держани ем раздела " Прав ила
техники б езоп асности ". Люб ое примен ение приб ора с наруш ением инс трук ций насто ящег о руко водс тва может пр ивести
к пов реждени ю прибора и ли пол учению тр авмы пользоват елем.
4. 1 Ра змещени е пр иб ора на окне
●
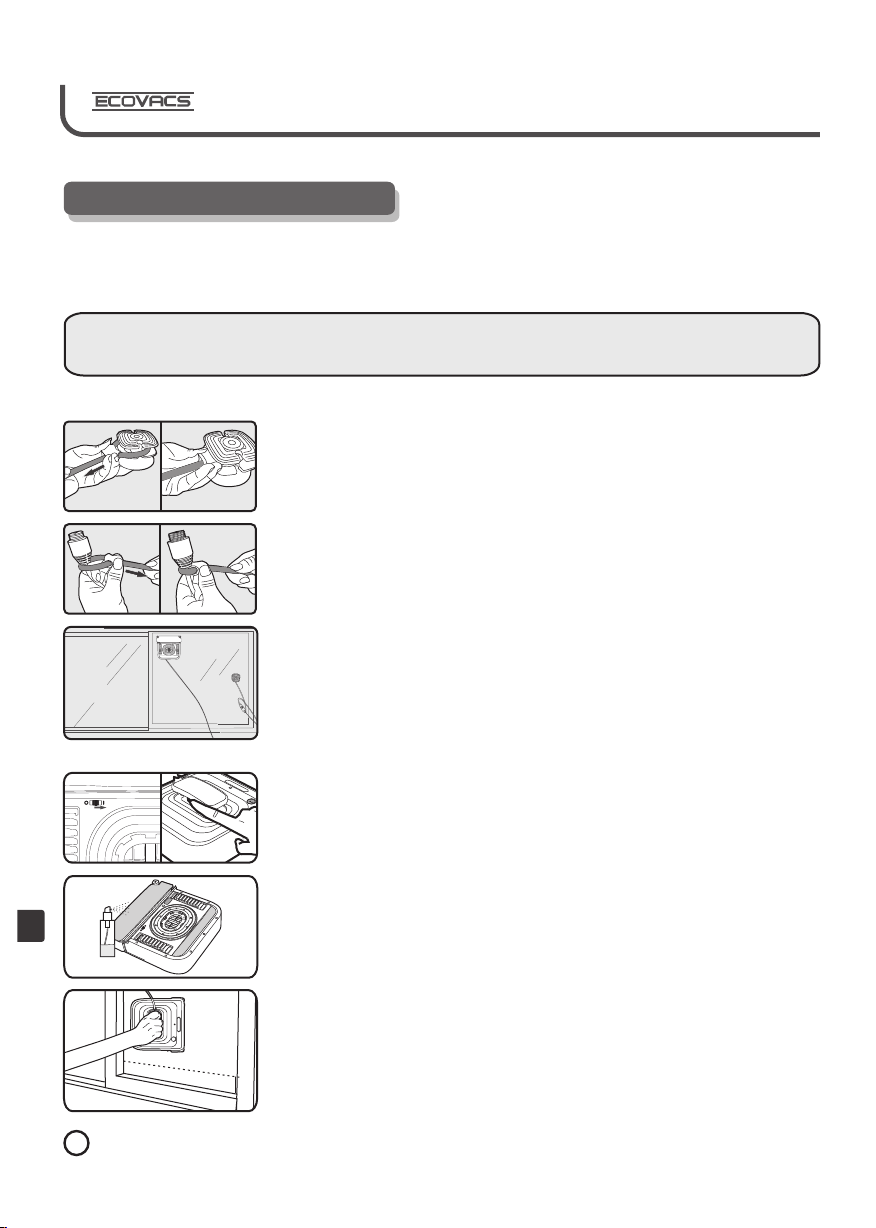
Убедитесь в том, что длина шнура электропитания достаточно велика и позволяет
WINBOT очистить всю поверхность окна, не ограничивая его движений. Если шнур
слишком короток, использовать WINBOT для мытья данного окна будет небезопасно
без специального шнура-удлинителя.
Проденьте один конец предохранительного троса через канал, ведущий вокруг
●
страховочного держателя, и туго затяните его.
Привяжите другой конец предохранительного троса к разъему на шнуре
●
электропитания и закрепите узел.
●
В случае применения шнура-удлинителя предохранительный трос должен быть
привязан к разъему на шнуре-удлинителе.
●
Примечание: предохранительный трос НЕЛЬЗЯ прикреплять к тонкой части шнура.
●
ПЛОТНО прижмите присоску страховочного держателя в нижнем углу на
противоположной стороне стекла, которое подлежит очистке. Проверьте, прочно ли
сидит присоска на своем месте.
Поместите WINBOT на поверхность окна, закройте окно, если очистка будет
●
производиться снаружи, а затем включите WINBOT.
Убедитесь, что кнопка снизу корпуса WINBOT находится в положении ВКЛ. (см. рисунок)
●
Вставьте адаптер в настенную розетку и нажмите кнопку электропитания, чтобы
●
запустить WINBOT.
Слегка опрыскайте переднюю чистящую насадку прилагаемым раствором для мытья
●
окон. После нескольких раз эксплуатации прибора Вы научитесь правильно увлажнять
переднюю насадку перед очисткой окна. Если насадка будет слишком мокрой, это
может затруднить равномерное перемещение прибора по стеклу на направляющих
гусеницах. НЕ НАНОСИТЕ раствор на заднюю насадку прибора, поскольку она
предназначена для вытирания следов, оставляемых гусеницами.
Разместив прибор на оконном стекле в горизонтальном положении на расстоянии
RU
9
●
около 10 см от нижних углов окна, приведите переключатель в позицию "ВКЛ." и не
отпускайте прибор, прежде чем его корпус не будет надежно прикреплен к стеклу, о
чем Вам сообщит мигание индикатора СИНИМ цветом. После этого можно убрать
руку с прибора. Если свет индикатора НЕ ЗАГОРАЕТСЯ, это означает, что сила
вакуума недостаточно велика. Пожалуйста, проверьте состояние вакуумной камеры
или замените ее на новую. Когда индикатор мигает КРАСНЫМ цветом, необходимо
отрегулировать высоту расположения прибора и снова пустить его в ход.
Прикрепив страховочный держатель к внутренней поверхности стекла, закройте окно,
●
стараясь не повредить внешнюю оболочку шнура электропитания. Убедитесь в том,
что длина шнура электропитания между страховочным держателем и WINBOT
достаточно велика для того, чтобы очистить всю поверхность окна, не ограничивая
движений прибора.
Page 11
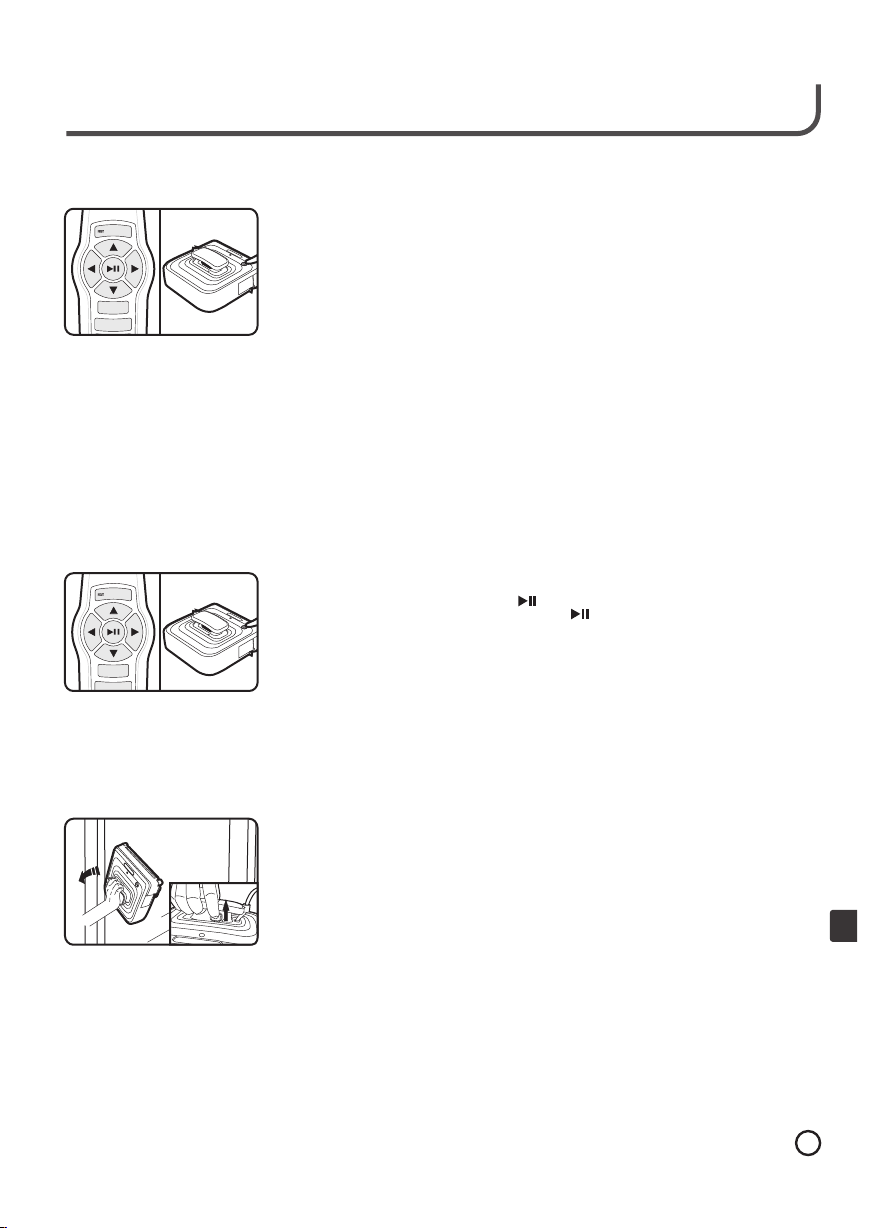
4. 2 Пу ск прибор а
OF
F
ON
OFF
O
N
● Пос ле того, ка к WIN BOT буд ет при креплен с нару жи окна, нажмите к нопку пус к
на корпусе при бора или кн опк у "Пус к/Пауза " на дис танцион ном пульте
упр авления . Приб ор автомат ически пр ист упит к очистке ок на в авт омат ическом
реж име и вернет ся в исходную позицию ( т.е. прим ерно туда, откуд а начинал ) по
оконча нии работы.
ПРИ МЕЧАНИЕ :
● Настоящий пр ибор предназн ачен д ля очи стки пыли н а окнах жил ых
пом ещений. W INB OT НЕЛ ЬЗЯ ис поль зова ть для удале ния пятен от крас ки, клея
и т.п . Кроме того, при бор НЕ ПОДХОДИТ дл я очис тки окна от таких п редм етов,
как жевательн ая резинк а, наклейки, к лочь я бума ги и т. п., та к как они мог ут
выз вать р азге рмет изацию вакуум а.
●
Сте кла с н еров ной п овер хностью ( мати рова нные, рельефн ые, узорчатые,
вит раж ные и т. п.) не рекомен дуется очищать с помощ ью WINBOT .
●
Когд а WINB OT зак ончит очистку первого окна, пр оверьте, не слиш ком ли
заг рязнены е го чис тящие нас адки; при н еобходимости з амените и х на новые.
●
При бор Н ЕЛЬЗ Я использо вать д ля мытья ок он снаруж и в условия х дождя,
сне га или температ уры ни же 5°С, так как это мож ет при вест и к элек трически м
неп оладкам и п оврежде нию прибо ра.
●
Есл и WIN BOT пр екращает работу и инд икатор начина ет мигать КРАС НЫМ
цветом, Вам сле дует немедленн о вмешаться: возьми тесь з а рукоятк у прибора
и ВЫК ЛЮЧИ ТЕ его п ереключ атель . Зате м переклю чател ь можно пер евес ти
обр атно в положени е "ВКЛ." и на жать к нопку "Пу ск/Пауза", чт обы во зобн овить
про цесс очистки.
4. 3 Пе реход в состо ян ие паузы
●
Есл и Вы хот ите, ч тобы приб ор сделал паузу во в ремя уборки,
наж мите кноп ку "Пуск/ Пауз а" на диста нционно м пульте упра влен ия или
неп осредст венн о кнопку "П уск/Пау за" на г лавном ко рпус е.
При бор остан овит работу и будет ожид ать Ва ших дальн ейших ком анд.
●
Когд а прибор находится в реж име паузы, Вы мож ете переме щать е го по
пов ерхност и окна при по мощи соответст вующ их кнопок с о стрелками на
дис танцион ном пульте уп равл ения. Дан ная фу нкция быв ает полезна в тех
сит уация х, ко гда на окне пр исутствует труд ноочища емое пятн о, и Вам
нео бходимо пе ремести ть прибор о брат но на грязн ый уча сток, ч тобы о чистить
его е ще раз . Если В ы жела ете вернут ься в автоматически й режим и продолжить
уборку о кна, нажм ите кнопк у паузы на ди стан ционном п ульте.
Есл и WIN BOT до лже н непр еры вно эк спл уати ров атьс я в теч ение д лит ельн ого
●
вре мен и, каж дый ч ас сле дуе т дела ть пе реры в на 10 м инут – э то по звол ит
про дли ть сро к слу жбы, у луч шить р або чие ха рак тери сти ки, а та кже и збеж ать
пер егр еван ия пр ибор а.
4. 4 За вершени е ра бо ты
●
Зав ершив очистку окна , WINB OT возвра щается обр атно к т ому месту , с которого
нач инал работу. Ес ли Вы сч итаете мес то остановки пр ибора неудобн ым для
его с нятия с окн а, вос поль зуйтесь с оотв етствующими кн опк ами со стрелками
на ди станцио нном пульте у правления, чтобы на править п рибор в дру гое
мес то , отк уда Вы сможете б ез труд а дотянут ься до е го рук оятки.
Удер жива я прибор за р укоятку , переведите его пере ключ атель в положени е
●
"ВЫ КЛ. " (кра йнее слев а), после ч его вс тавьте пале ц в затв ор
воздуховыпу скного клапан а. Когда Вы поднимете затвор п альцем, вакуу м
нач нет выходить из вн утренне го контур а. Через несколько секун д прибор
мож но будет снять с поверхн ости стек ла.
Есл и Вы НЕ НАЖИМ АЕТЕ кноп ку выпуск а воздуха, рукоят ку пр ибора
●
нео бходимо удержи вать в течение при мерно 45- 60 секунд . НЕ ПЫТАЙТЕСЬ
исп ользоват ь рукоятк у в качеств е рычага для снят ия прибор а с окна,
пос кольку это может нане сти ему вред.
По ок ончании уб орки, когда при бор будет удален с ок на, необходимо
●
вып олнить на длеж ащие проц едуры по обс луживан ию для его под готовки к
хра нен ию. ПЕ РЕД хране нием приб ора, не извлекая ада птер и з розетки,
при веди те его п ереключ атель в п олож ение заря дки и заряжайте батарею,
пок а зелен ый индика тор не п ерестан ет мига ть.
При х ран ении п ере ключ атель приб ора до лжен всегд а находить ся в пол ожении
●
"ВЫ КЛ. "
Live Smart. Enjoy Life.
RU
10
Page 12
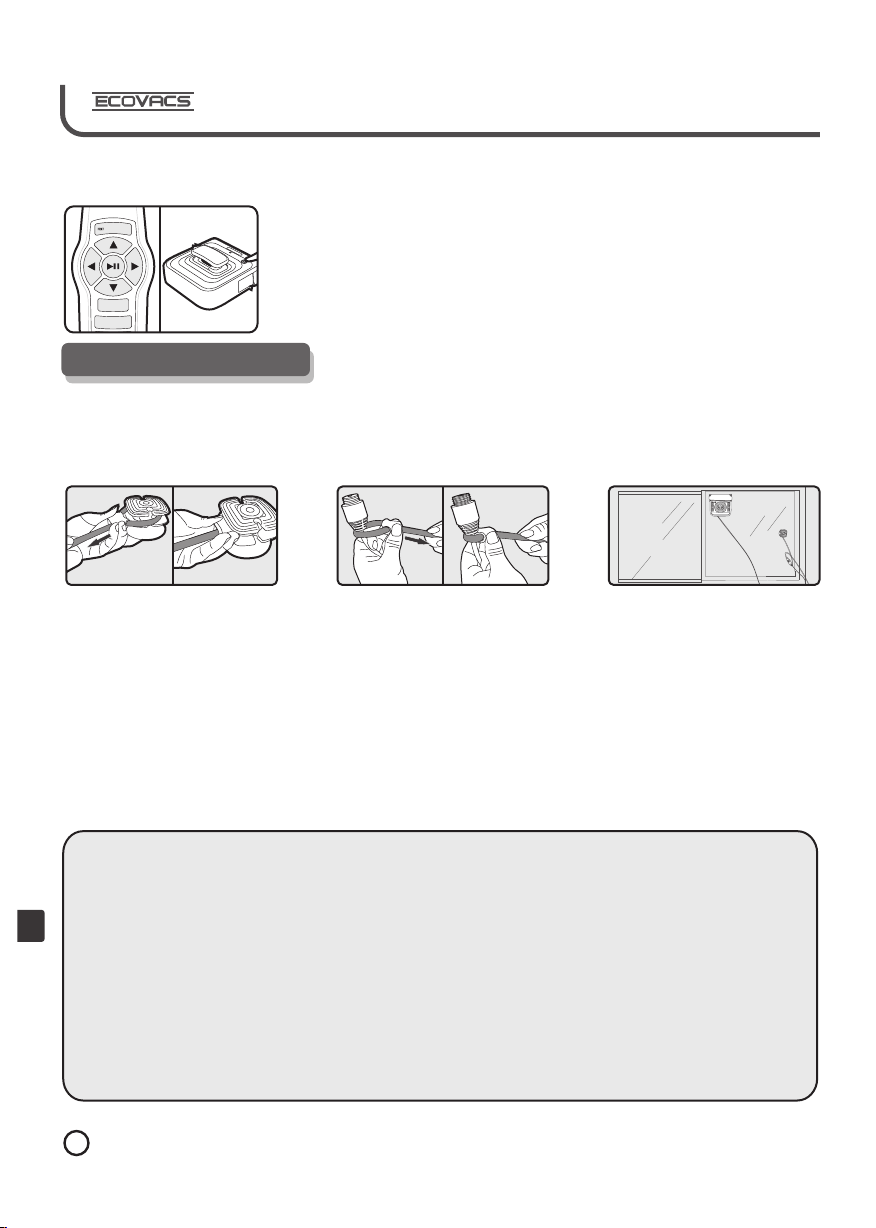
4. 5 По вторный п ус к пр ибора
OFF
ON
Когда прибор во время уборки зацикливается на определенном участке
или внез апн о пре кра щает работу, и здавая звуковой а варийный сигнал
одн овр еме нно с к рас ным м иганием индикатора, Вам необходи мо
взяться за ру коя тку прибора и перевес ти его переключатель в
пол оже ние " ВЫК Л." П осл е этого сно ва ВКЛЮЧИ ТЕ пр ибо р и наж мите
кнопку "Пуск/Пауз а" на е го корпусе, чтобы прод олжить процесс уборки.
5. Комплектующие
5. 1 Ст раховоч ны й де ржатель
Предупреждение
Если WINBOT используется для мытья окон, расположенных высоко над уровнем земли, применение страховочного
держателя и предохранительного троса является ОБЯЗАТЕЛЬНЫМ.
WINBOT должен эксплуатироваться в строгом соответствии с инструкциями, изложенными в руководстве. ECOVACS не
несет ответственности за повреждения, вызванные ненадлежащим использованием прибора.
Убедитесь в том , что дл ина шнура элект ропитан ия достаточно велика и п озволяет W INBO T очис тить всю по верх ность
●
окн а, не о гран ичивая его движ ений. Есл и шнур с лишком корото к, исполь зовать WIN BOT для мыт ья данного окна будет
неб езопасно б ез спе циально го шну ра- удлин ител я.
Про деньте один к онец предохра нительно го тро са через ка нал, ведущий вокруг с траховоч ного д ержателя , и туго
●
зат яните его.
При вяжите другой к онец предохра нительно го тро са к раз ъему на шну ре эле ктропит ания и закр епит е его.
●
В слу чае п риме нения шну ра- удлинител я пред охранительный тро с долж ен быть при вязан к разъ ему н а шнур е-
●
удлинит еле.
При меча ние: пред охра нительн ый трос НЕЛ ЬЗЯ прикре плять к тонкой ча сти шнура.
ПЛО ТНО прижм ите присо ску с траховоч ного д ержателя в н ижнем углу на противо поло жной стороне ст екла, которое
●
под лежи т очис тке . Проверьте , проч но ли сидит п рисоска на сво ем месте.
Пом естите WI NBO T на пов ерхн ость окна , закройт е окно , если уборка буд ет про изводиться сн аружи, а затем вк лючи те
●
WIN BOT .
Когд а WINB OT заверши т убо рку, сним ите его со стекла . Возьмитесь за р укоятку , ВЫКЛЮЧИТЕ при бор, посл е чего
●
вст авьте палец в з атво р возд ухов ыпускно го кла пана и
5. 2 Ди станцио нн ый п ульт упра вл ен ия
Пер ед эксп луатацие й дистанц ионного пульта уп равл ения, пож алуйста, убедитес ь в правиль ной ус тановке батарей.
В пул ьте управле ния ис пользуют ся две б атар еи тип а ААА.
●
При у становк е батарей не обходимо с леди ть за те м, чтобы на правление положительного и отрицательн ого
●
пол юсов батар еи соответ ство вало обоз наче ниям в отсеке пульта.
Когд а мощность батареи осл абнет, зам ените обе батаре и; никогда не исп ольз уйте н овую батар ею в соч етан ии
●
со старой.
Есл и дистанц ионн ый пульт управления не будет ис поль зоваться в т ечение дли тель ного в ремени, п ожал уйста,
●
изв леките из него батареи в о избе жание пов режд ения пульта .
RU
Не оставл яйте дистанци онный пульт упра влен ия под с олнечным и лучами ил и вблизи источни ка тепла,
●
пос кольку это может нане сти ем у вред.
В слу чае п опад ания жидк ости на дистанци онный пульт упра влен ия из не го сле дует немедленн о вынуть бат ареи,
●
а затем осн оват ельно стря хнуть все о статки вла ги. Вс тавл ять батаре и обратно разре шается только по сле
выс ушивани я пульта в течен ие 24 часов. Зате м пронаблюдайте за движен иями приб ора на окне , управляя им
дис танцион но с близкого расстояния, ч тобы проверит ь исправн ость работы пул ьта. Если дис танц ионный пульт
раб отает НЕИС ПРАВНО, пр ибор н ельз я экс плуатиро вать д о тех по р, пока пул ьт не будет з аменен.
В слу чае , если п ри замене б атарей в бата рейный отсек по падет пост оронний п редм ет, его необходимо
●
нем едленно и звлечь. На личи е посторо ннего пред мета в батарейно м отсеке мож ет при вест и к кор отко му
зам ыка нию ба таре й и поломке д иста нци онно го пул ьта упр авле ния.
● Пож алуйста , соблюдай те мес тные экол огическ ие нормы пр и утилиза ции батаре й.
дер жите его откр ытым в т ечен ие 20 се кунд, пока вак уум не осла бнет .
11
Page 13
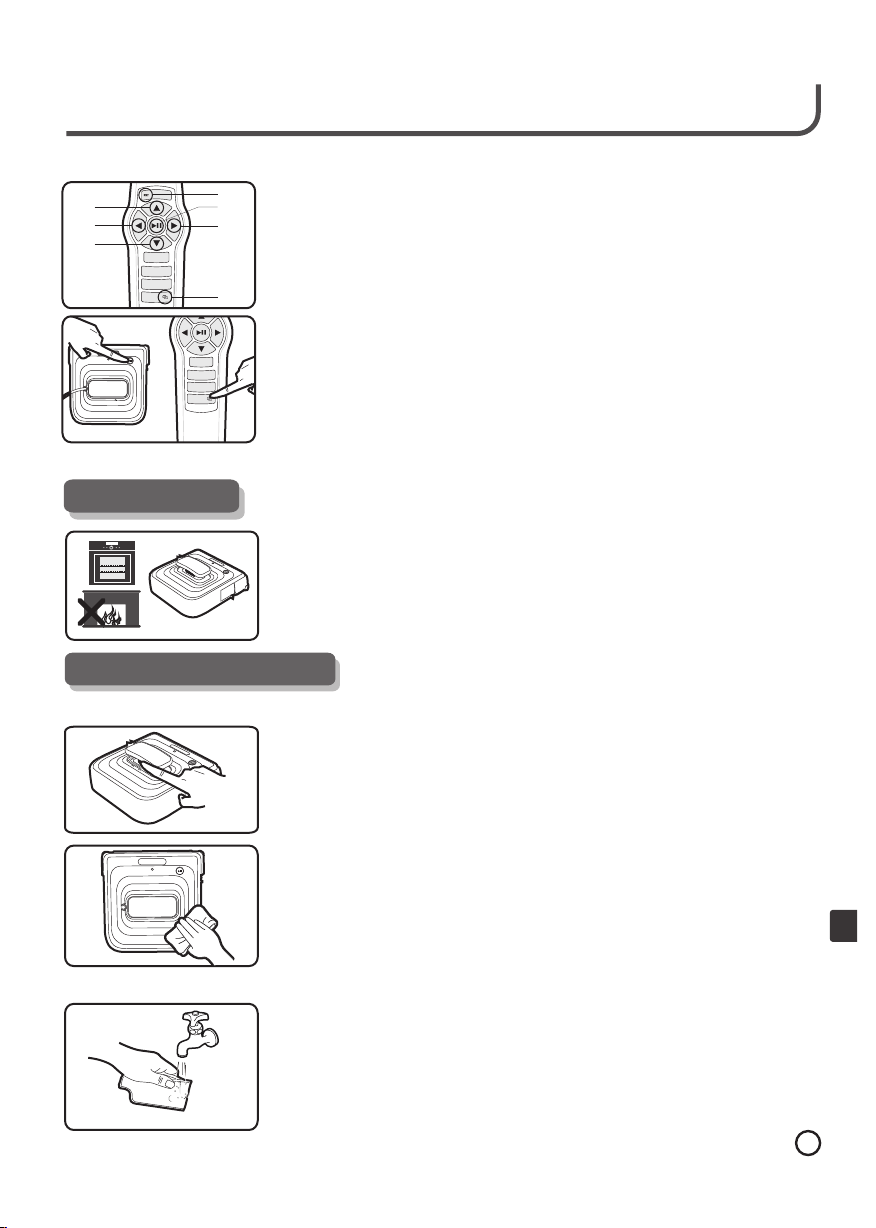
Дис танцион ный пульт упр авле ния обладает ряд ом функци й, с кот орыми Вам
1
4
5
6
OFF ON
2
3
7
сле дует ознак омиться в о время работы пр ибор а на ок не под В ашим присмотр ом.
Чит ая нижепр ивед енные инс трук ции и управляя пр ибором ди станцио нно, В ы
увидите, нас колько ле гко управлять д вижения ми прибор а нажатием кноп ок на
пул ьте.
(1)Кно пка " СБРОС" – есл и прибор НЕ РА БОТАЕТ ни в одном из н ижеуказ анных
реж имов, кно пку СБРОС м ожно и спол ьзовать для повторного запуск а прибора
и вос становления е го зав одск их уст ановок по умолча нию.
(2)Кно пка " Пуск / П ауза " – начи нает и ли остана влив ает работу п рибора
(
дви гать ся прибор , причем ст релк а "ВВЕРХ" оз нача ет дви жение при бора впер ед.
7 Кно пка си нхро низа ции – да нная к нопк а отвечае т за син хрон изац ию WIN BOT с
пул ьтом д истанци онно го упр авле ния.
При меча ние : Пуль т дист анци онно го упр авле ния уж е синхрон изир ован с W INBO T
при п оста вке пр ибо ра с фабрики . Если В ам нео бход имо за мени ть пул ьт
дис танц ион ного у прав лени я, пож алуй ста, в оспольз уйте сь дан ной кн опко й для ег о
синхронизации
Про цедура синхронизации:
Под ключ ите WINBO T к сети и перев едит е пере ключ ател ь приб ора в по ложе ние
ЗАР ЯДКИ . Удержив айте к нопк у синх рони заци и на пул ьте ди станцио нног о упра влен ия.
Зат ем наж мите кноп ку «Пус к/Па уза» на к орпу се при бора и д ожди тесь , пока W INBO T
не из даст з вуко вой сигна л (око ло 3 сек унд) . Данн ый сиг нал бу дет оз нача ть,
что с инхр онизаци я WINB OT зав ерше на.
Пул ьт дис танцион ного у прав лени я рабо тает н аибо лее оптим альн о в ради усе 2 м от
при бора . Максима льно д опус тимо е расс тоян ие меж ду пульто м и WINB OT
сос тавл яет 12 м.
6. Хранение
●
тем пер атуры во избежа ние поврежде ния его полимерных и
эле ктр онных деталей.
●
поскол ьку с лучайно пролитая жидк ост ь может попасть вовн утрь
прибор а и вывести его из строя.
●
приведенные в соответству ющем разделе руководства по экспл уата ции .
7. Уход за приб ором
Live Smart. Enjoy Life.
3) (4 ) (5) (6) С трелки – каждая из с трел ок ук азыв ает на правление, в которо м будет
WIN BOT.
с
Прибор н еобходимо хра нит ь вдали от ис точн ико в выс око й
Не следует хранить приб ор по близости сосудов с жидкостью,
Соблюда йте правила технич еск ого обслу живания прибора ,
7. 1 Оч истка при бо ра
Прежде всего прибор необходимо ВЫКЛЮЧИТЬ и отсоединить его
адаптер от сети питани я.
Для очис тки п риб ора Н ЕЛЬЗЯ применять лету чие ж идк ости
( , . .)
растворители бензин и т п либо моющие сред ства с содержанием
кислотных или ароматизирующих доба вок посколь ку они отрицательно
воздействуют на полимерный материал
,
.
7. 2 Оч истка и зам ен а ко мплекту ющ их
После каждой уб орк и или в с луч ае, если насадка сильно загря зни тся
еще до окончания уборки, чистящую насадку прибора следует
сполоснуть чистой тепл ой водой. Будьте осторожны при нанесении на
насадку моющих средств, так к ак они могут остав ить н а ее по верхности
нежелательную мыльную пленку и тем самым затрудн ить п роцесс
мытья окон. После тщательного выс уши вания (к ак пр ави ло, в течение
24 часов), насадку можно снова устана вливать н а при бор.
RU
12
Page 14
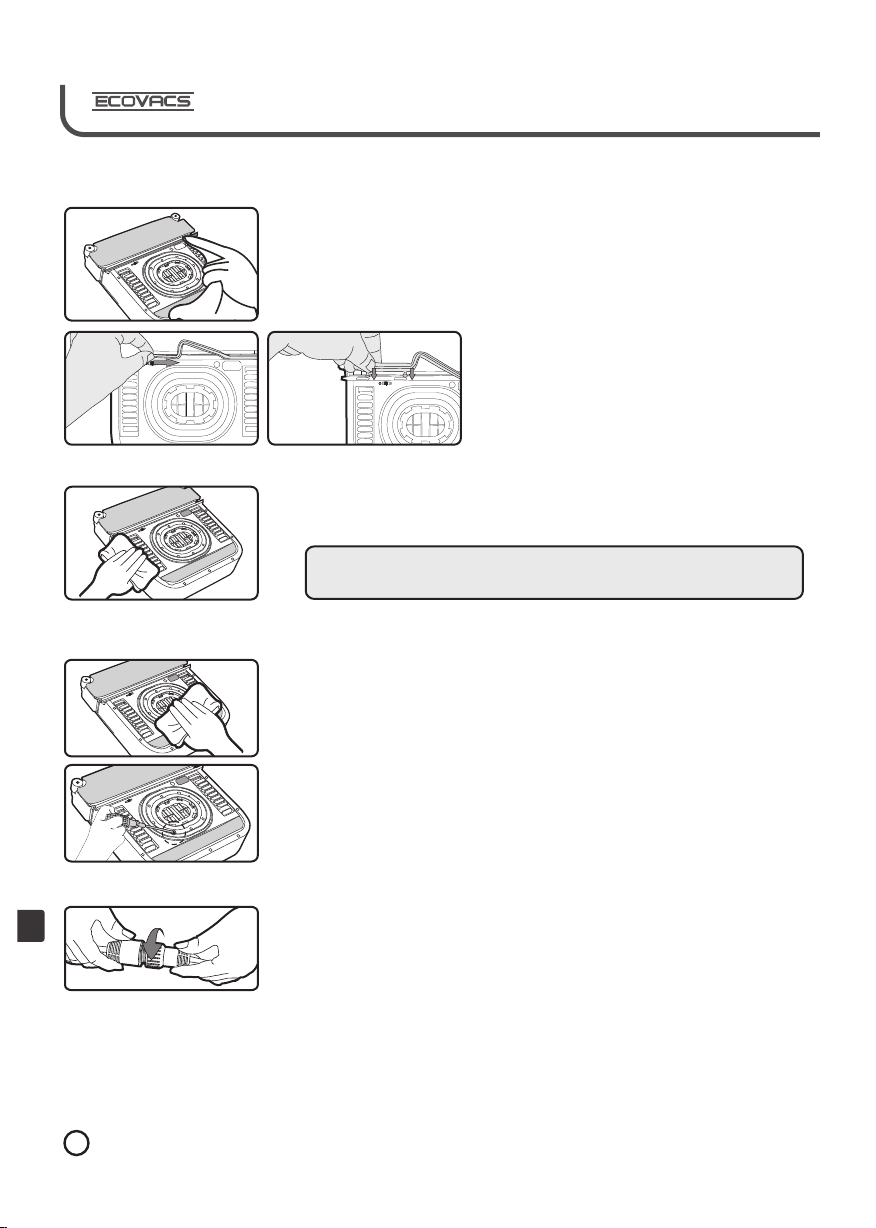
7. 3 Ре зиновый с кр еб ок
Уход за скр ебком
Пос ле каждой эк сплуатаци и прибора с леду ет акк урат но вытирать резинов ый
скр ебок влажной тр япкой для удале ния с его пове рхности о стат ков грязи . Если
тря пка будет сл ишком мок рой, вода может пр оникнут ь в корпус пр ибора и выз вать
пов режде ние внутр енних дета лей. Чтоб ы зак азать запа сной скре бок, посет ите наш
вебсайт и ли позвоните в на шу тех ническу ю слу жбу.
7. 4 Оч истка нап ра вл яющих гусен иц
Каж дый раз п осле эксп луат ации необх одим о осматривать гусен ицы на предмет
скопле ний грязи. Пром отать гусе ницы по всей их дли не можно с по мощью кно пок
пер еднего и задн его хода на ди стан ционном п ульте управлени я. Очищай те любые
заг рязнени я мягкой вл ажно й тка нью.
ПРИМЕЧАНИЕ: Грязные гусеницы могут неблагоприятно влиять на
работу прибора, затрудняя его перемещение по стеклу.
7. 5 Ва куумная к ам ер а
Уход за вакуумной камерой
Вак уумна я кам ера, игра ющая важн ую рол ь в работоспосо бности
при бор а, рас положен а снизу его корпуса. Ка ждый раз по сле мы тья окон следует
осматривать к амеру на предмет разрывов ил и порезов. Любо й мусор,
при липший к ее п оверхно сти, н еобх одим о осто рожно удалить .
Замена ваку умной камеры
1. От вин тите в акуумну ю камеру с по мощью отвертки.
2. За менит е ее на новую.
Замена резинового скребка
1. Пе редви ньте скребо к с обеих кра йних п озиций
к цен тру, а затем с нимите его.
2. За менит е старый ск ребо к на новый, в кладыва я
его в в ыемку и при тягивая е го торцы к кра йним
поз ициям.
7. 6 Шн ур-удли ни те ль
RU
13
Шну р-уд линитель п рименяется для увеличен ия рабочего радиуса W INBO T.
Есл и Вам предстоит очист ка ос обо крупн огабарит ного о кна, без его п омощи
нельзя буд ет обо йтись. На и ллюстра ции ниже по казано, к ак след ует использовать
шнур-уд линитель ( см. рисун ок) :
Page 15
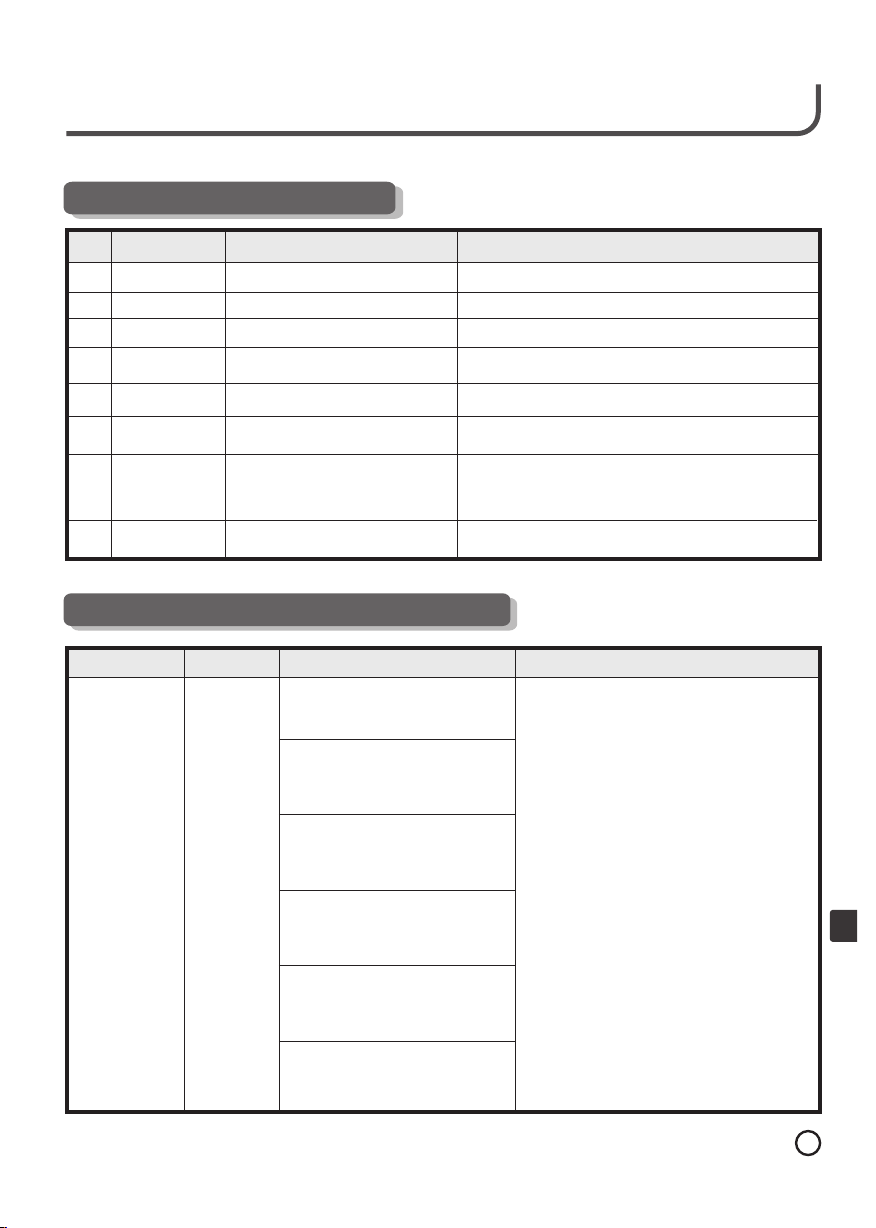
8. Значение и ндикато ров
Live Smart. Enjoy Life.
Зву ковой
№
Изд ает звуков ой
1
сиг нал
Отс утствует
2
Отс утствует
3
Отс утствует
4
Отс утствует
5
Изд ает звуков ой
6
сиг нал
Изд ает двойно й
7
сиг нал
Изд ает двойно й
8
сиг нал
сигнал
Не го рит
Инд икатор ми гает ЗЕЛЕН ЫМ цветом
Инд икатор горит ЗЕ ЛЕНЫМ цвет ом
Инд икатор ми гает СИНИМ ц ветом
Инд икатор горит ЗЕ ЛЕНЫМ цветом
Инд икатор ми гает СИНИМ ц ветом
Инд икатор ми гает КРАСНЫМ цвето м
Инд икатор горит КРАСНЫМ ц ветом
Световой
индикатор
WIN BOT подкл ючен к электрос ети.
Резе рвная бата рея заряжается .
Резе рвная бата рея полностью з аряж ена.
WIN BOT был раз мещен на ок не и усп ешно
при кре пилс я к стеклу.
WIN BOT в ыпол няет проце сс уборки о кна.
WIN BOT закончил у борку окн а и готов к снят ию
со стекл а.
Воз можно, WI NBOT нужд ается в пере становк е или
сбр осе прогр аммы. Пож алуйста, озна комьтесь с
сод ержание м разд ела «Си гнализа ция и ре шение
неполадок».
WIN BOT ст олкнулся с пр облемой, для решения которо й
Вам н еобхо дима к онсультаци я наше го сервисн ого цен тра.
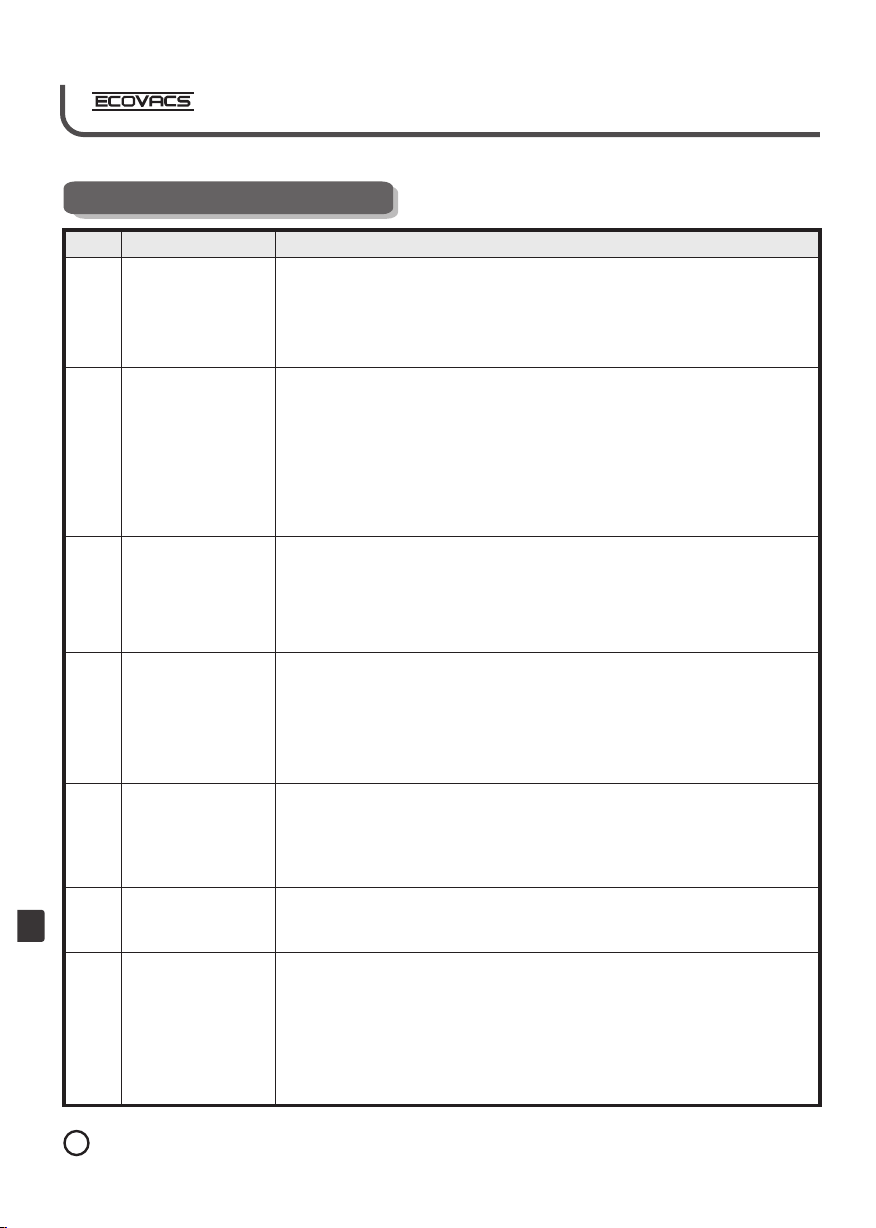
9. Неисправ ности и их ус транени е
Аварийный
сигнал
Гудки
Индикатор Причина Реше ния
1. WI NBO T был ВК ЛЮЧЕ Н без
под соед инения к сети.
2. В пр оцесс е убо рки ок на WI NBOT
был о тсоединен от источника
пит ания.
Индикатор
мигает
КРАСНЫМ
цветом
3. Утечка ваку ума в камер е.
4. Бампе р приб ора натолк нулся на
оконну ю раму и прип одня лся.
5. Размеры окна слишком малы
для очис тки с п омо щью
WINBOT.
6. Оконная рама слишком
тонкая.
Значен ие
1. Подкл ючит е прибор к ада птеру пит ания и
вст авь те его в р озе тку.
2. Вс тав ьте ад апт ер пит ани я обра тно в р озет ку.
3. Сними те WIN BOT с о кна и пе рев едит е
его п ере ключ ате ль пит ани я в поло жен ие
ВЫК Л. (к райн ее сл ева) . Пер евер нит е
прибор , осмо три те кам еру н а пред мет
заг ряз нени й, на липш их на е е пове рхн ости .
Ост оро жно оч ист ите по вер хнос ть ка меры
мягкой в лажн ой тр япко й, чт обы ве рну ть ей
гла дко сть. П ров ерьт е, не п рису тст вует л и на
сте кле т верд ый му сор, з атр удня ющи й
работу к амеры.
4. Испол ьзуя пуль т дист анц ионн ого
упр авл ения , отв едит е WIN BOT от о кон ной
рамы наж атием кно пок со с тре лкам и.
5. Миним альн ые га бари ты ок на, ко тор ое
WIN BOT м ожет о чис тить в а вто мати чес ком
режиме – 6 1 см в выс оту и 4 8 см в шир ину .
6. То лщина о кон ной ра мы до лжна
превыш ать 5 мм .
Есл и проблема после это го не исчеза ет,
пож алуйста , обратит есь в ав тори зова нный
сервисный це нтр.
RU
14
Page 16
10. Типичны е неполад ки
№
1
2
3
4
5
6
RU
7
Проблемы
WIN BOT не
при липает
к окн у
Апп арат
ост анавливается и
выд ает зв уковой
ава рийный си гнал,
тогд а как и ндикато р
нач инает мигать
КРАСНЫМ цв етом.
WIN BOT оставляет
пол осы на стек ле во
время уб орки
Во время р абот ы
при бор а возн икает
гро мкий шу м
Снижен ие
эфф ект ивности
уборки
Направляющ ие
гус еницы ско льзя т по
пов ерхност и стек ла
Дис танцион ный
пул ьт упра влен ия
не работа ет
Реш ени я
a. Если Вы пер евод ите пе реключатель в положе ние " ВКЛ. ", а индикатор не з агораетс я
СИН ИМ цветом, п роверьте, подсоединен ли W INB OT к ада птеру, и подключен ли
ада птер к наст енной розетке; либо
b. WIN BOT не м ожет прикр епиться к о кон ному стек лу из-за его неро вной пове рхно сти;
либ о
c. Поверхность н асадок сн изу корпу са покрыта гряз ью и нуждается в очистк е; либо
При о смотре на садок на их п овер хности об нару живаю тся ра зрывы или п ризнаки
изн оса, что ук азыва ет на не обход имость их з амены.
a. Если WINB OT натол кнулся на оконную ра му, пе редви ньте его в другом направлении с
помощью ди станционн ого пульта, а затем н ажмите кноп ку "ПУСК" на ко рпусе
прибора ил и кнопку "СБРОС" на пульте, чтобы возобнови ть процесс очистки ; либо
b. Если WI NBOT достиг края оконного стекл а, возь митесь за рукоятку прибо ра и уведите
его от кр ая окна, а затем н ажмите кнопку "ПУСК" на ко рпусе прибо ра или кн опку
"СБРОС" на пульте, что бы возо бновить про цесс очистки; либо
с. На пути WIN BOT вст ретил ся налипший Т ВЕРДЫЙ м усор , котор ый вызвал потерю
вакуума во внешне м конт уре, и пр ибор не может самосто ятель но сдвинуть ся с
места, не рискуя разгерм етизи роват ься и упа сть с окна; Вы можете пер едвин уть
прибор с помощью ди станционного пул ьта управления, а затем н ажать кнопку
"ПУСК" на ко рпусе или кнопку "СБРОС" на пульте, чт обы продолжи ть начатый
процесс уб орки.
a. Передняя чист ящая наса дка п рибора сл ишком заг рязн ена и т ребует замены на
чис тую влажн ую насадк у;либо
b. Передняя наса дка н едос таточно увлажн ена и не впит ывает в себя грязь
надлежащим о бразом; либо
c. Резиновы й скребок покры т налипше й грязью и ну ждается в очистк е; либо
d. В гусениц ах прибор а скопила сь гря зь и/ или ча стицы мус ора, кото рые необходимо
удалить ; либо
e. Задня я наса дка п рибора за грязнен а и требует замены н а чистую.
a. Осмотрите пер едню ю и заднюю на садки на пр едмет заст рявш его мусор а, кот орый
мож ет создавать шум при уборке о кна; либо
b. Проверьте , не прилип ли ли к поверхнос ти насадк и частицы м усора, которые также
мог ут создавать шум при дв ижении пр ибора по ок ну; либо
c. Осмотрите гусениц ы прибора и о чист ите их от любого налипш его мусор а; либо
d. Проверьте , свободно ли пер емещаетс я вверх и в низ щиток передней чи стящей
насадк и.
e. Ес ли шум посл е этого не исчезнет , позвоните в наш с ервисны й цент р и обратитесь к
консультанту за более под робн ыми разъясн ениями.
a. Вык лючи те электропитание п рибора, с нимите чи стящ ую насадку и о чист ите ее от
гря зи.
b. Удали те вес ь мус ор и прочие загрязнен ия из ведущих кол ес при бора.
c. Проверьте , сох раня ет ли ги бко сть ус тановочн ый щиток чи стящей на садк и, и не
при липли ли к не му по стор онние предметы.
d. Ес ли после вы полн ения выше описанн ых действ ий проблем а по- преж нему
при сутствует, пож алуйста , обратите сь в наш отдел после прод ажного обслуж ивания.
a. Передняя чист ящая наса дка ч резм ерно увлажнен а и оставляет воду на стек ле;
b. Направляющи е гусениц ы слишком з агря знены и нуждаются в очистк е; либо
c. Гусен ицы прибо ра под верглись силь ному изно су, и Вам следует позвонить в н аш
сер вис ный це нтр для получен ия тех ническо й кон сультации.
a.
Пул ьт дистанци онного уп равл ения работает оп тимальн ым образом, нах одяс ь в
радиусе 2 м от WIN BOT; л ибо
Про верьте состо яние батар ей. Ес ли батареи у стан овлены пр авил ьно, а пульт
b.
дис танцион ного у правления не ра бота ет, сл едует з аменить батареи; ли бо
Пул ьт дистанци онного уп равл ения необх одим о синхрон изировать с при бором.
c.
Инс трукции п о синхрон изации пр ивед ены в пу нкт е 5.2; л ибо
Сле дите з а пред упредительными си гналами и ли поведен ием индик атора . Если
d.
WIN BOT издал з вуко вой сигна л в виде г удка по при чине отсоединения от сети или
утраты ва куума, он у же не будет реаг ировать на команды п ульта ди станцио нного
упр авления . Восстановит е подачу пит ания либо снова п рикрепи те при бор к
пов ерхност и стек ла.
либ о
15
Page 17

Live Smart. Enjoy Life.
11. Проверка состоян ия батаре и
Под соед инив WINB OT к адапте ру и вст авив а даптер в ро зетку пита ния, переведите пере ключ атель на рук оятке при бора в
кра йнее пр авое положе ние ( симв ол бата реи). Если инди катор мигает зеленым ц ветом, бата рея все еще нужда ется в
зар ядке. Ост авьте W INBOT в так ом пол ожении до тех пор, пока инди катор не начнет непре рывно гореть зеленым .
Это будет означать, что батар ея пол ностью за ряжена, и м ожно п риступать к эксплу атац ии при бора.
12. Вопросы и ответы
Существуют ли к акие-ли бо указан ия для
1.
пол ьзовател я при эксплуата ции прибо ра
на бо льшой выс оте?
1)
Пер ед эксп луат ацие й WIN BOT не з абудьте
пре дохр анить его от паде ния с по мощью
фик сируе мого н а стекле ст раховочн ого
дер жателя ,, который обес печи вает
безопас ность раб оты пр ибора. О чистка
одн ого ок на занима ет сов сем не мно го
времен и, поэ тому мы рек омендуе м
пол ьзов ателю п рисматр ивать за раб отой
при бор а, что бы воврем я распознать любую
неиспр авно сть и приня ть необход имые меры
для е е устране ния. Во вр емя экспл уата ции
WIN BOT шнур электропи тани я долж ен
находит ься в свободном п олож ении, что бы не
огр аничивать д вижений п рибора по в сей
пов ерхност и очищ аемого окна, а та кже во
изб ежан ие воз можного от соедине ния от с ети
и обе сточ иван ия приб ора.
Мож ет ли WI NBO T упас ть во вр емя уборк и?
2.
WIN BOT сконструиров ан таким образо м,
что бы свести возмо жнос ть потери вакуу ма к
мин имуму. В случа е сбоя сетев ого
эле ктропит ания запа с энергии в р езервной
бата рее будет достаточным для поддер жания
работы ва куумног о двиг ателя д о тех по р, пока
Вы не п римете срочные меры д ля
раз решения с итуации . Из сообра жений
безопас ности в ком плект при бор а входит
стр аховочный д ержатель, кото рый кр епитс я к
внутре нней поверхно сти окна и уде рживает
при бор снару жи, предохран яя его о т паде ния
и облегча я его сн ятие со сте кла.
. Мож ет ли WI NBO T работать б ез
3
чел овеч еско го при смот ра?
WIN BOT р азра бота н для оч истки око н без
физ ического присутс твия ч еловека . Тем не
мен ее, мы ре ком ендуем Вам оста вать ся в той
же комнате, где в ыпол няется мыт ье окна,
пос кольку в бо льшинст ве слу чаев данн ый
про цесс пр оисходит очень быст ро. По
оконча нии уборк и Вам будет необходимо
сня ть пр ибор с о кон ного с текла, очисти ть его
от за гряз нений и подготов ить к у борке
сле дующего ок на.
. Мож но ли использовать пр ибор для
4
3)
2)
очи стки окон или сте клянных д верей с
различной толщин ой стекла ?
Толщина стекла сама п о себе н е созд ает
пре пятст вий для раб оты пр ибора. Тем н е
мен ее, сущ ествуют оп ределенн ые виды
неровн ого стекла, а име нно: матированное ,
вит раж ное, у зорч атое с текло и т.п ., которые
мог ут привес ти к разгерметиз ации ваку ума в
при бор е и его па дению с окн а.
. Поч ему пр ибор и здает "гудкообразный "
5
ава рийный си гнал, и его индик атор
нач инает мигать кр асным, если он только
что б ыл зап ущен в эксп луат ацию?
Пож алуйста , поищите решен ие проблем ы в
разделе руков одст ва "Типичн ые неполадки" ,
где приводится более подр обна я
инф орм ация .
. WIN BOT НЕ МОЖЕ Т приступить к р абот е, и
6
све т инди катора НЕ ГОРИТ , хотя п рибо р
находит ся на оконном сте кле?
Под обное поведен ие при бора означает, что
сил а вакуума н едос таточно вел ика .
Пож алуйста , проверьте с остояни е вакуумной
камеры и н аправляющих г усениц. Если на н их
скопил ось слишк ом много грязи ил и пыли, это
будет отри цател ьно вл иять на сил у вакуума и
работос пос обность W INBOT. В связи с этим
рекоме ндуется очищать камеру и гусени цы
при бор а при на личии на ни х как их- либо
заг рязнени й.
. Поч ему WI NBOT не начинает работу после
7
нажати я кнопки "П УСК" на главном корпусе?
1) WI NBOT НЕ МОЖЕТ при ступить к очист ке
окн а, если е го адаптер не подключ ен к
роз етке п итан ия. Имея в ра споряже нии
только заряд резервной батареи, он с полз ает
вниз по стеклу . В таком слу чае следует
вст авить ада птер п рибора в бли жайшую
настенную ро зетк у и возобнов ить подачу
пит ания. 2) WI NBO T НЕ НАЧИНАЕТ р абот у,
есл и был непра вильно ра змещен на
пов ерхност и окна. О том, как следует
пра вильн о устан аливать пр ибор на оконно м
сте кле, расс каз ано в разделе "Размещение
при бор а на окн е".
RU
16
Page 18

8. ,
9.
10.
RU
. С посо бен ли WINB OT пол ностью очисти ть
11
Что п роизойдет если WI NBO T натол кнется
на ок онную раму?
При н ормальны х усло виях рабо ты прибор
автомат ичес ки изме нит напра вление
дви жен ия, об ойдет препятс твие и продолжит
уборку .
Поч ему пр ибор о чищает не всю
пов ерхность окна и ли стекля нной двер и?
1) Во зможно, п еред няя чистя щая насад ка
заг рязнила сь после мы тья окна и по этом у
ост авля ет следы на ст екле. Ост ановите
при бор и замен ите грязн ую нас адк у на
чис тую . 2) К задней н асадке пр ибора могли
при липнуть ч астицы гр язи или мус ора,
пач каю щие по верхнос ть сте кла. Грязн ую
зад нюю н асад ку сл едует з аменить н а чистую.
3) Пр оверьте сост ояние нап равл яющих
гус ениц. В них т акже могу т заст ревать
пос торонни е пред меты , кото рые оставляют
на стекл е след ы, не оч ищаемые з адней
насадк ой. Регулярно о смат ривайте г усен ицы
при бор а и в случ ае загряз нения выт ирайте их
вла жной тряпкой. 4 ) При очист ке окон
необходимо ис поль зова ть при лагаемы й
мою щий рас твор. С ухая наса дка сможет
только вытереть пыль, но Н Е ОЧИСТИТ
сте кло от гряз и. 5) WI NBO T не пре дназ наче н
для удале ния с о стек ла следов к раски,
жир ных пят ен, остатков бумаги и ли клея.
Под обные заг рязн ения Вам пр идется
отч ищат ь вруч ную - так ж е, ка к Вы дел али это
раньше .
Когда при бор испыт ывае т затр удне ния
при р аботе - нап риме р, остана влив аетс я
на оп редел енном уча стке и ли в углах
окн а - что мне следует д елать?
При о чистке ок онных и две рных стек ол
WIN BOT может сталкиваться с ра злич ными
труднос тями. В подобны х ситуаци ях он
пыт ается найт и решение с амостоя тельно;
есл и ему это не уда ется , треб уется В аша
пом ощь. Преж де всего следует нажат ь кнопку
"СБРОС", чтобы при бор снова верну лся в
реж им работы и продолжил у борку окн а.
угл ы окон ного стек ла?
WIN BOT запро граммир ован н а очис тку о кон с
мак симально в озмо жной эффе ктивнос тью.
Одн ако при нек отор ых обстоятельствах ему
быв ает тр удно уд алить всю г рязь ,
скопив шуюся в углах окн а. По оконч ании
уборки В ы можете вос поль зоваться
дис танцион ным пультом у правления, чт обы
направ ить пр ибор на те уч астки сте кла,
кот орые нужд аютс я в особо тщательной
очи стке. Мы ув ерены, что это поможет
решить В ашу пр обле му.
Если при э кспл уата ции прибо ра
воз ника ют ситуац ии, для кото рых в
настоящем рук овод стве н е предлаг аетс я
под ходя щего р ешения, м ы прос им Вас
обр атиться в н аш отд ел пос лепродажног о
обс луживания, где техн ичес кий
кон сультант сможет напрямую
про ана лизи ровать Ва шу кон кретную
про блему или во прос . Кроме того , Вы
можете позвон ить в на ш сервисн ый центр.
17
Page 19
WINBOT
7 Series Instruction Manual
Live Smar t. Enjoy Life.
www. ecovacs.com
Page 20
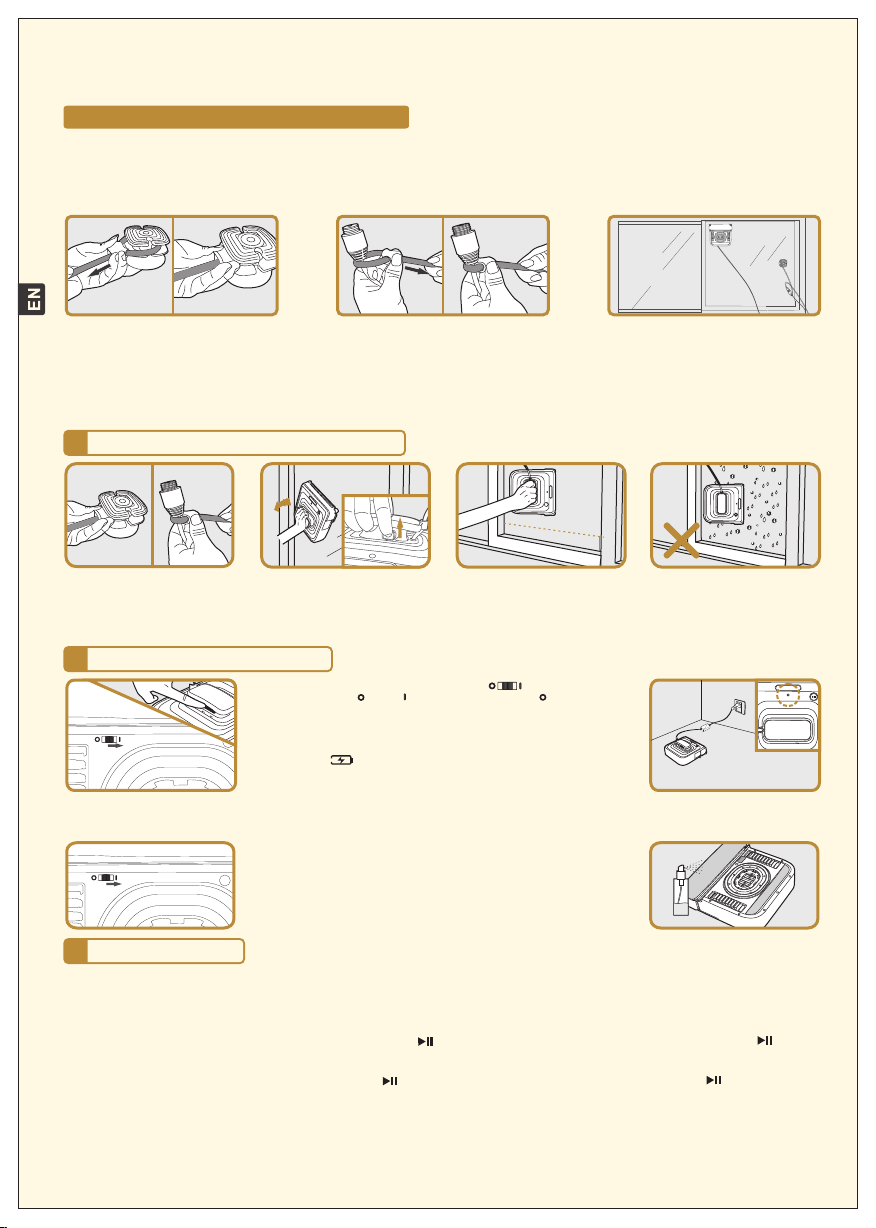
Quick U ser Guide
ONOFF
OFFO N
≥10c m
(4' ')
Important notes to help you get a quick start.
WINBOT is NOT intended to replace heavy duty or first time cleaning, this must be done manually as you have done in the past. WINBOT is intended for maintenance
cleaning on standard windows.
Warning
If WINBOT is used to clean a window above ground level, the Safety Pod MUST be used.
WINBOT must be used in strict accordance with the directions in the Instruction Manual. ECOVACS can not be held liable or responsible
for any damages or injuries caused due to improper use.
1. Make sure that there is enough power cord for the WINBOT to clean the entire window without restricting its movement. If there is not enough cord, it is not safe to use the
WINBOT on that particular window until a WINBOT Extension Cord is attached.
2. Loop one end of the Safety Rope around the Safety Pod's channel and pull it tight.
3. Loop the other end of the Safety Rope to the power connector on the power cord and tighten.
4. If an Extension Cord is attached, the Safety Rope must be tied to the power connector on the Extension Cord.
Note: Do NOT attach the Safety Rope to the thin part of the cord.
5. Press the Safety Pod suction cup FIRMLY in the lower corner on the opposite side of the glass you are cleaning. Make sure the Safety Pod suction cup is securely in place.
6. Place WINBOT on the window, close the window if cleaning the outside of the window, and start WINBOT.
7. After WINBOT is done cleaning remove it from the window. Grasp the handle, switch the unit OFF, insert finger into Air Release Trigger and pull up on it for 20 seconds until
suction has diminished.
1. I MPORTA NT SA FE TY IN ST RUC TIONS
1. Should you be cleaning the outside of the window, you must use the Safety Pod. Read the instructions on Safety Rope use in your Instruction Manual.
2. When removing the WINBOT, grasp the handle of the unit and move the switch under the handle to the left - OFF position, and while still grasping the unit,
insert finger into the Air Release trigger and Pulling up on it, remove the unit from the window when the suction has diminished.
3. Place the WINBOT horizontally on the window and about 10cm (4'') from the lower corners of the window.
4. The unit may NOT be used outside while raining, snowing or colder than 5℃ (40℉) as it will damage the product and could cause electrical problems.
2. P REPARATION B EFORE U SE
Before charg ing, please firstly turn on the button at the bottom of
●
the WINBOT. (“ ” OFF “ ” ON. The default state is “ ”) Otherwise ,
WINBOT can NOT be charged or worki ng.
Plug the adapte r into your elect rical receptacl e and assemb le the two
●
connect ors, tightening the nut so the connect or will not pull apart. Place
the WINBOT’s swi tch button, located under the han dle, in the Charging
Positio n “ ” (far to the right) and charge for 2 hours. The indica tor
light flash es GREEN and will go to a steady GREE N when the charging is
●
While the unit is chargi ng, take time to read the Instructio n Manual for Safe ty Notes and proper use of the unit.
●
For most of your windows, th e cord supplied will meet your demand s. Should you be cleaning the outsid e of the window, you must use the Safety
Pod. Read the instru ctions on Safety Pod use in your Instruct ion Manual.
3. U SE OF PRODUC T
Grasping the unit by the handle, place the unit on the window which is most convenient to you, BUT making sure it is at least 10cm (4'') up and in from
●
the corner of the window frame.
While still having a hold on the handle, move the switch from the OFF position (far left) to the ON position (Center) and you will hear a slight noise.
●
This is the vacuum motor creating suction to hold the unit to the window. When the indicator light turns BLUE, the unit has attached itself to the
window and you can now let go of the handle.
After ensuring the WINBOT is correctl y placed on the glass, press “ ” button of the Remote Control momentarily or directly press the “ ” button
●
on th e Main Unit , th en th e pr oduct will use automatic cleaning mode for cleaning the window and when finished cleaning will re turn to the start
position.
If you want the product to pause during the cleaning, press “ ” button on the Remote Control momentaril y or directly press “ ” bu tton on the
●
Main Unit, then the pr oduct will pa use working and go on stan dby.
When the unit is done cleaning and has returned to the START position , grasp the handle of the unit and move the switch under the handle to the OFF
●
position - left, and while still grasping the unit, insert finger into the Air Release trigger and Pullin g up on it, remove the unit from the window.
For more complete and detailed information, please refer to Instruction Manual, which provides important safety, use and maintenance information.
Do NOT replace reading the Instruction Manual with review of the Quick User Guide.
complete .
●
You MUST place the large cleaning pad on the front floating plate, making
sure to cover the whole plate. The smaller cleaning pad to be attached to
the rear of the unit in the space provided.
●
Make sure the button on the bottom of the WINBOT is turned ON.
●
Just prior to placing the unit onto the window, take the glass cleaning
solution bottle and spray ONLY the FRONT pad. The pad should just be
damp.
Page 21

Welcome and congratulations on your purchase of a WINBOT
We trust the purchase of your new product will help you to keep your home
clean and provide you more quality time to do other things.
Before you go any further, we ask you to record your model number, serial
number and date of purchase below. We also suggest you attach your
Receipt to this page for safe keeping. Model and Serial numbers are
located on the label on the bottom of the Robot.)
MODEL # ________________
SERIAL # ________________
DATE OF PURCHASE ___ / ___ / ___
(
Page 22

TAB LE OF CONTE NTS
1. Package Co nte nts & Par t Nam e .. . .. .. . .. .. . .. .. ... .. ... .. ... .. ... .. ... .. .. . .. .. . .. .. . .. .. . .. .. . .. .. . .. .. . .. .. ... .. ... .. ... 5
1 . 1 P a c k a g e C o n t e n t s
. . . . . . . . . . . . . . . . . . . . . . . . . . . . . . . . . . . . . . . . . . . . . . . . . . . . . . . . . . . . . . . . . . . . . . . . . . . . . . . . . . . . . . . . . . . . . . . . . . . . . 5
1.2 Part Na me .. .. ... .. ... .. ... .. .. . .. .. . .. .. . .. .. . .. .. . .. .. . .. .. . .. .. ... .. ... .. ... .. ... .. ... .. .. . .. .. . .. .. . .. .. . .. .. . .. .. . .. 5
1.3 Technical Pa ram ete rs . .. ... .. ... .. ... .. ... .. ... .. ... .. .. . .. .. . .. .. . .. .. . .. .. . .. .. . .. .. . .. .. ... .. ... .. ... .. ... .. ... .. .. 6
2. Saf ety Ins tru cti ons .. .. . .. .. . .. .. . .. .. . .. .. . .. .. . .. .. . .. .. ... .. ... .. ... .. ... .. ... .. ... .. .. . .. .. . .. .. . .. .. . .. .. . .. .. . .. .. ... .. ... 6
2.1 Ab out thi s In str uct ion Manual .. .. ... .. ... .. .. . .. .. . .. .. . .. .. . .. .. . .. .. . .. .. . .. .. ... .. ... .. ... .. ... .. ... .. .. . .. .. . .. .6
2.2 WIN BOT Po wer ... .. ... .. ... .. ... .. ... .. ... . ... .. ... .. ... .. ... .. .. . .. .. . .. .. . .. .. . .. .. . .. .. . .. .. . .. .. ... .. ... .. ... .. ... .6
2.3 Product Ap pli cat ion R ang e .. .. . .. .. ... .. ... .. ... .. ... .. ... .. ... .. .. . .. .. . .. .. . .. .. . .. .. . .. .. . .. .. . .. .. ... .. ... .. ... .. 7
2 . 4 P r o d u c t P r e c a u t i o n a r y I t e m s
. . . . . . . . . . . . . . . . . . . . . . . . . . . . . . . . . . . . . . . . . . . . . . . . . . . . . . . . . . . . . . . . . . . . . . . . . . . . . . . . . . . . . . . 7
2.5 Abo ut Ch ild ren S afe ty . .. ... .. ... .. ... .. ... .. ... .. .. . .. .. . .. .. . .. .. . .. .. . .. .. . .. .. . .. .. ... .. ... .. ... .. ... .. ... .. ... .. .. 8
2.6 About Disposal of Th e Pr odu ct. . .. .. . .. .. . .. .. . .. .. ... .. ... .. ... .. ... .. ... .. .. . .. .. . .. .. . .. .. . .. .. . .. .. . .. .. . .. .. ... 8
2.7 Abo ut Re pla cem ent o f Battery of W INB OT and Dis pos al of U sed B att eri es. . .. .. . .. .. . .. .. ... .. ... .. ... .. 8
2.8 C ase s of Pro duc t Problems.. . .. .. . .. .. . .. .. ... .. ... .. ... .. ... .. ... .. ... .. .. . .. .. . .. .. . .. .. . .. .. . .. .. . .. .. . .. .. ... .. .8
3. Preparation B efo re U se . ... .. ... .. ... .. ... .. .. . .. .. . .. .. . .. .. . .. .. . .. .. . .. .. . .. .. ... .. ... .. ... .. ... .. ... .. .. . .. .. . .. .. . .. .. . .8
3.1 Charge WIN BOT ’s Ba ck- up B att ery . . .. .. . .. .. . .. .. . .. .. . .. .. ... .. ... .. ... .. ... .. ... .. ... .. .. . .. .. . .. .. . .. .. . .. .. . 8
4. Us e of Product. .. ... .. ... .. ... .. ... .. ... .. ... .. .. . .. .. . .. .. . .. .. . .. .. . .. .. . .. .. . .. .. ... .. ... .. ... .. ... .. ... .. .. . .. .. . .. .. . .. .. . .9
4 . 1 P l a c e m e n t o f P r o d u c t
. . . . . . . . . . . . . . . . . . . . . . . . . . . . . . . . . . . . . . . . . . . . . . . . . . . . . . . . . . . . . . . . . . . . . . . . . . . . . . . . . . . . . . . . . . . . . . . . . 9
4.2 Product Start .. ... .. .. . .. .. . .. .. . .. .. . .. .. . .. .. . .. .. . .. .. ... .. ... .. ... .. ... .. ... .. ... .. .. . .. .. . .. .. . .. .. . .. .. . .. .. . .. .. 10
4.3 Product Pa use .. . .. .. . .. .. . .. .. . .. .. . .. .. ... .. ... .. ... .. ... .. ... .. .. . .. .. . .. .. . .. .. . .. .. . .. .. . .. .. . .. .. ... .. ... .. ... .. 10
4.4 Pro duc t Sto p .. . .. .. . .. .. ... .. ... .. ... .. ... .. ... .. ... .. .. . .. .. . .. .. . .. .. . .. .. . .. .. . .. .. . .. .. ... .. ... .. ... .. ... .. ... .. .. . 10
4.5 P rod uct Res tar t . .. . .. .. ... .. ... .. ... .. ... .. ... .. ... .. .. . .. .. . .. .. . .. .. . .. .. . .. .. . .. .. . .. .. ... .. ... .. ... .. ... .. ... .. .. . 11
5. A cce sso rie s . . .. .. ... .. ... .. ... .. ... .. ... .. ... .. .. . .. .. . .. .. . .. .. . .. .. . .. .. . .. .. . .. .. ... .. ... .. ... .. ... .. ... .. .. . .. .. . .. .. . .. .. 11
5.1 Saf ety Pod . .. ... .. .. . .. .. . .. .. . .. .. . .. .. . .. .. . .. .. . .. .. ... .. ... .. ... .. ... .. ... .. ... .. .. . .. .. . .. .. . .. .. . .. .. . .. .. . .. .. ..11
5.2 R emo te C ont rol .. . .. .. . .. .. . .. .. . .. .. . .. .. . .. .. ... .. ... .. ... .. ... .. ... .. ... .. .. . .. .. . .. .. . .. .. . .. .. . .. .. . .. .. . .. .. ... .11
6. D ay- to- day S tor age . . .. .. . .. .. ... .. ... .. ... .. ... .. ... .. ... .. .. . .. .. . .. .. . .. .. . .. .. . .. .. . .. .. . .. .. ... .. ... .. ... .. ... .. ... .. .. . 12
7. Ma int ena nce.. .. . .. .. . .. .. ... .. ... .. ... .. ... .. ... .. .. . .. .. . .. .. . .. .. . .. .. . .. .. . .. .. . .. .. ... .. ... .. ... .. ... .. ... .. ... .. .. . .. .. . .12
7 . 1 C l e a n i n g t h e U n i t
. . . . . . . . . . . . . . . . . . . . . . . . . . . . . . . . . . . . . . . . . . . . . . . . . . . . . . . . . . . . . . . . . . . . . . . . . . . . . . . . . . . . . . . . . . . . . . . . . . . . . 1 2
7 . 2 C l e a n i n g a n d R e p l a c i n g C l e a n i n g
C l o t h . . . . . . . . . . . . . . . . . . . . . . . . . . . . . . . . . . . . . . . . . . . . . . . . . . . . . . . . . . . . . . . . . . . . . . . . . 1 2
7.3 Squeegee.. . .. .. . .. .. . .. .. . .. .. . .. .. ... .. ... .. ... .. ... .. ... .. ... .. .. . .. .. . .. .. . .. .. . .. .. . .. .. . .. .. . .. .. ... .. ... .. ... .. ..13
7 . 4 C l e a n i n g D r i v i n g
T r e ads . . . . . . . . . . . . . . . . . . . . . . . . . . . . . . . . . . . . . . . . . . . . . . . . . . . . . . . . . . . . . . . . . . . . . . . . . . . . . . . . . . . . . . . . . . . . . 1 3
7. 5
Cu pul e. . .
7.6 E xte nsi on Cord.. . .. .. . .. .. . .. .. . .. .. . .. .. ... .. ... .. ... .. ... .. ... .. ... .. .. . .. .. . .. .. . .. .. . .. .. . .. .. . .. .. ... .. ... .. ... .. 13
8 . M e a n i n g o f I n d i c a t o r s
. . . . . . . . . . . . . . . . . . . . . . . . . . . . . . . . . . . . . . . . . . . . . . . . . . . . . . . . . . . . . . . . . . . . . . . . . . . . . . . . . . . . . . . . . . . . . . . . . . . . . . . 1 4
9. Ala rm & S olu tio ns . .. . .. .. . .. .. . .. .. . .. .. . .. .. . .. .. ... .. ... .. ... .. ... .. ... .. ... .. .. . .. .. . .. .. . .. .. . .. .. . .. .. . .. .. ... .. ... .. ... 14
. ... . . ... . . . .. . . . .. . . . .. . . . .. . . . ... . . ... . . ... . . . .. . . . .. . . . .. . . . ... . . ... . . ... . . . .. . . . .. . . . .. . . . .. . . . ... 13
Page 23
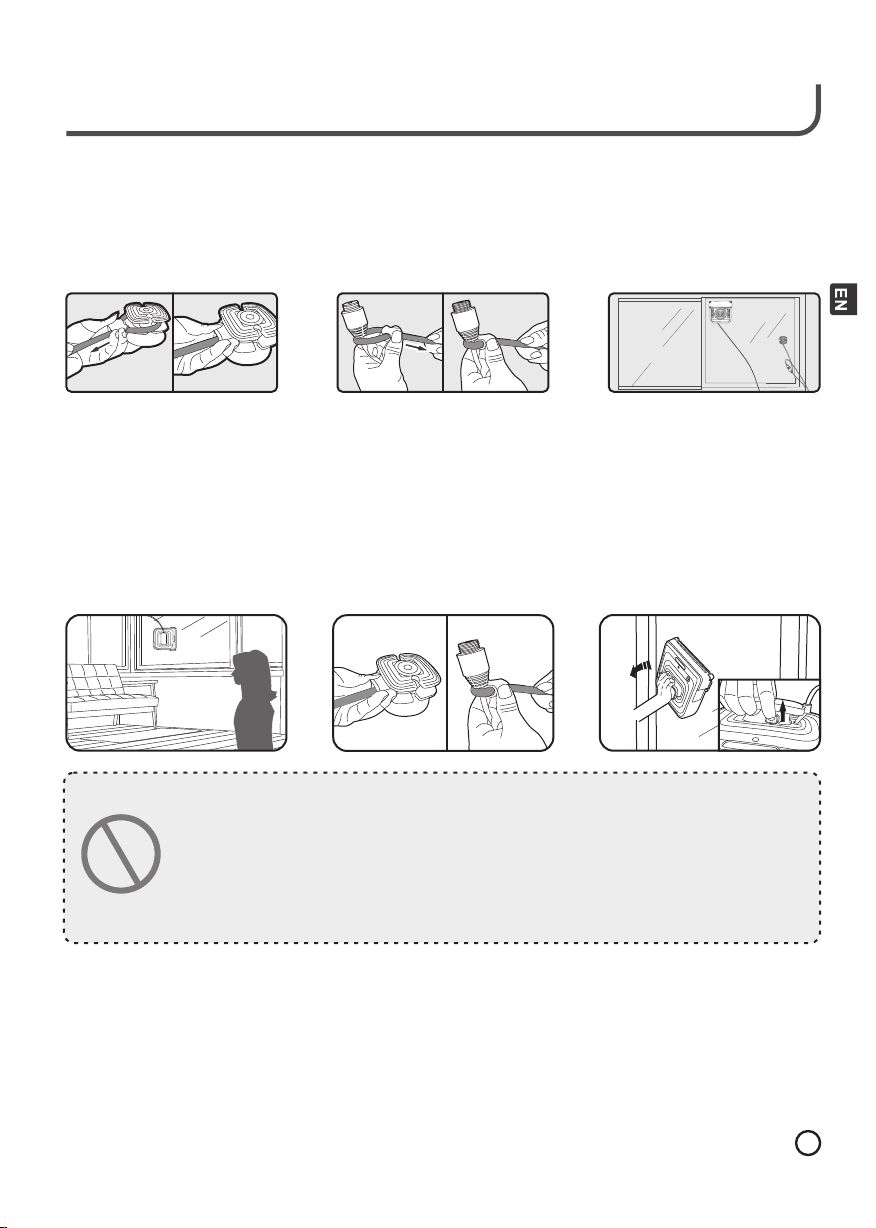
Live Smart. Enjoy Life.
Warning
If WINBOT is used to clean a window above ground level, the Safety Pod MUST be used.
WINBOT must be used in strict accordance with the directions in the Instruction Manual. ECOVACS can not be held
liable or responsible for any damages or injuries caused due to improper use.
1. Make sure that there is enough power cord for the WINBOT to clean the entire window without restricting its movement.
If there is not enough cord, it is not safe to use the WINBOT on that particular window until a WINBOT Extension Cord is
attached.
2. Loop one end of the Safety Rope around the Safety Pod's channel and pull it tight.
3. Loop the other end of the Safety Rope to the power connector on the power cord and tighten.
4. If an Extension Cord is attached, the Safety Rope must be tied to the power connector on the Extension Cord.
Note: Do NOT attach the Safety Rope to the thin part of the cord.
5. Press the Safety Pod suction cup FIRMLY in the lower corner on the opposite side of the glass you are cleaning. Make
sure the Safety Pod suction cup is securely in place.
6. Place WINBOT on the window, close the window if cleaning the outside of the window, and start WINBOT.
7. After WINBOT is done cleaning remove it from the window. Grasp the handle, switch the unit OFF, insert finger into Air
Release Trigger and pull up on it for 20 seconds until suction has diminished.
Warning
1. When using the product, a person should be in the vicinity to assist should there be a
problem.
2. Before using the product on the outside of the window, you must use the Safety Pod. Read the
instructions on Safety Pod use in your Instruction Manual.
3. When removing the WINBOT, grasp the handle of the unit and move the switch under the
handle to the left - OFF position, and while still grasping the unit, insert finger into the Air
Release trigger and Pulling up on it, remove the unit from the window when the suction
has diminished.
4. Please make sure the WINBOT’s back-up battery is fully charged before use. If you have not used
the product for over a month or the product alarms (which consumes the back-up battery’s
4
Page 24
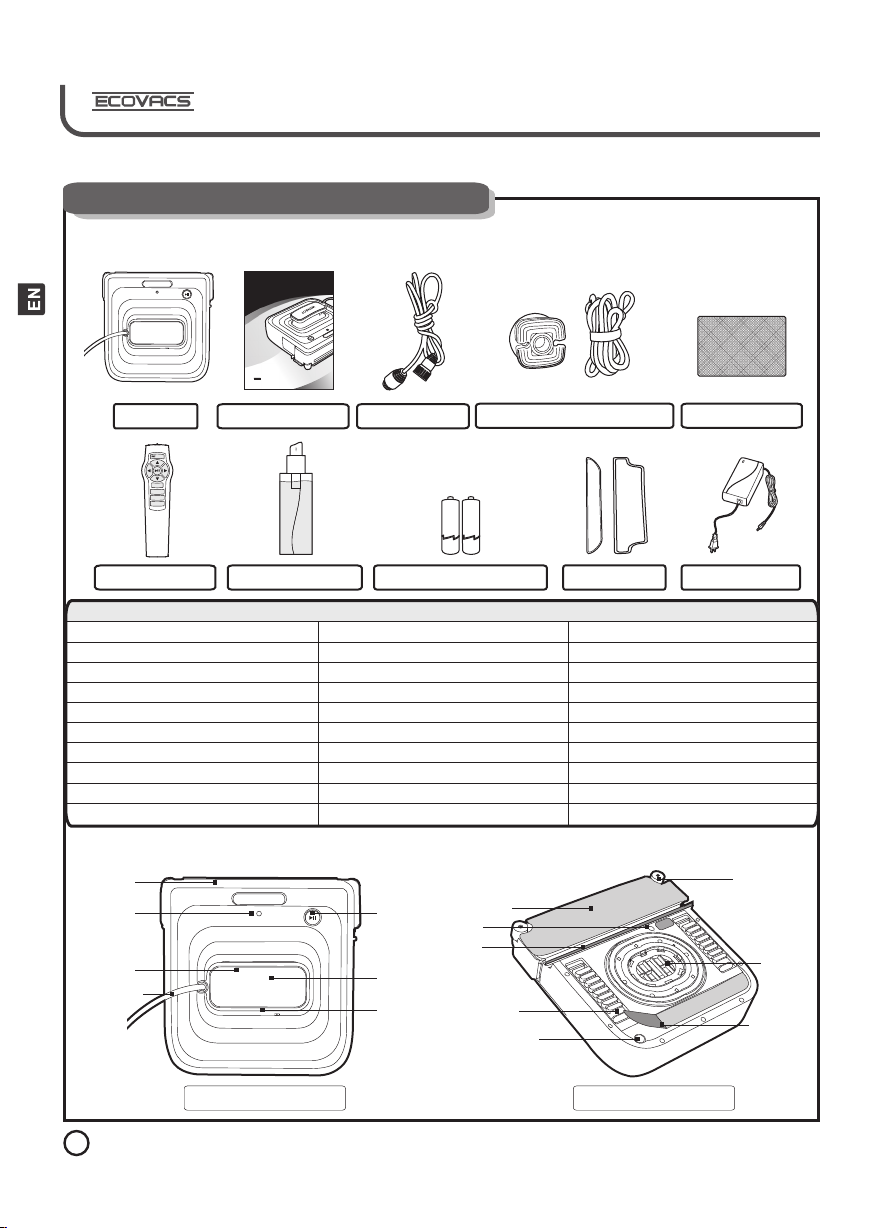
1. Packa ge Cont ents & Part Name
1. 1 Packa ge C on te nts
WINB OT
7 Series Instr ucti on Manua l
OFF ON
Enjoy Smart Li fe
www.ecovac s.com
Main Unit
Remote Control
Instruction Manual
Cleaning Solution Re mot e Con tro l Bat ter y Cleaning Pad
Model
Main Unit
Instruction Manual
Extension Cord
Safety Pod & Safety Rope
Remote Control (with batteries)
Cleaning Solution
Cleaning Pads
Power Adapter
Finishing Cloth
1. 2 Part N am e
Bum per
Sta tus Lig ht
Ind icato r
Air R eleas e
Trig ger
Safety
Protection Cord
OFF ON
Extension Cord
Safety Pod and Safety Rope
Packed Contents
W710 W730
YES
YES
YES
YES
YES
YES
YES
YES YES
YES YES
Sta rt / Paus e
But ton
Han dle
OFF - O N Cha rging B utton
Cle aning P ad
Sta tus Lig ht
Ind icato r
Squ eegee
Dri ving Tre ad
Fra meles s Senso r
Finishing Cloth
Power Adapter
YES
YES
YES
YES
YES
YES
YES
Sid e Rolle r
Cup ule
Wip ing Pad
Front
Bottom
5
Page 25
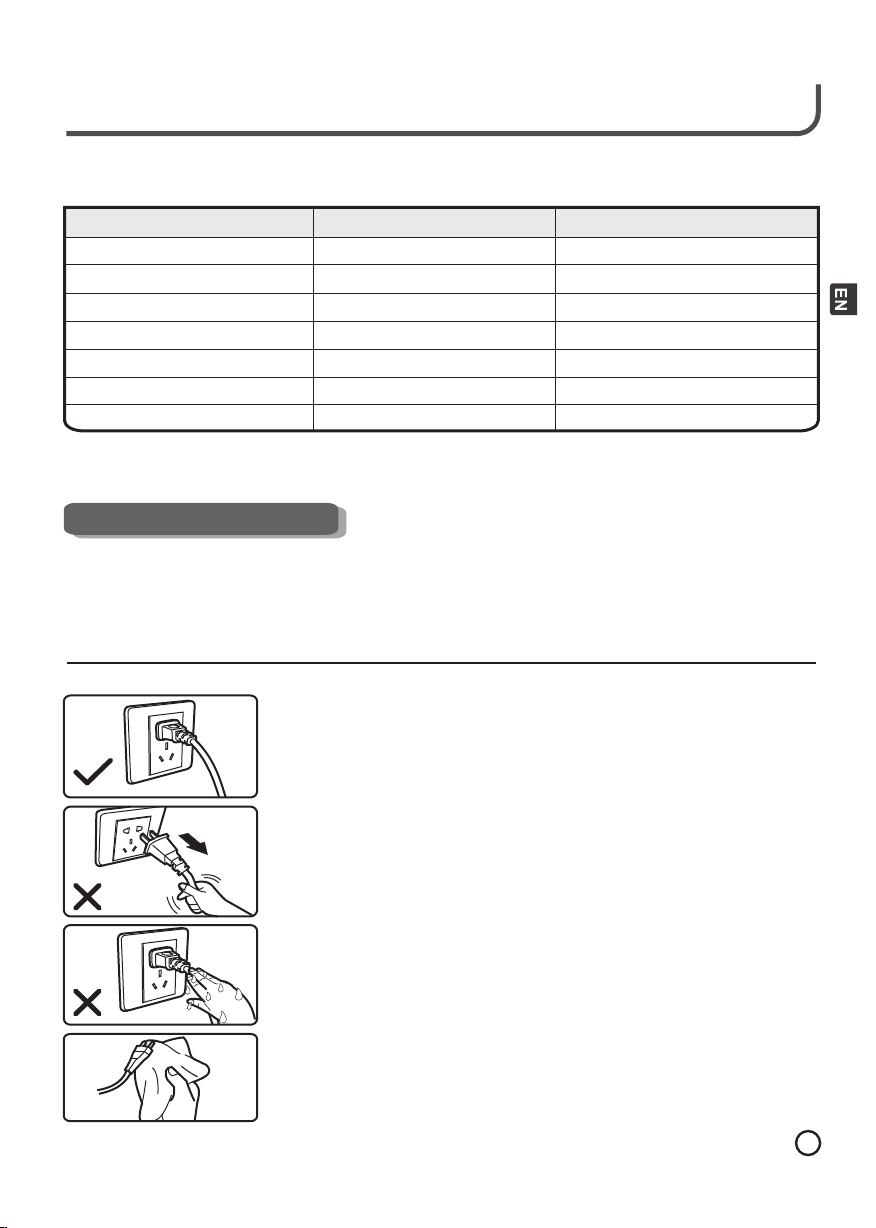
Live Smart. Enjoy Life.
1. 3 Technical Pa ra meters
Model
Wor kin g spe ed (m /s)
Built-in battery capacity (mAh)
Wor kin g tim e (mi n)
Wor kin g noi se (d B)
Frameless identification
Cleanable glass thickness
Back up battery for loss of electric
Abo ut nois e:
The d ata is fr om Labo rator y testi ng at our C ompan y based o n noise t est in ac corda nce wit h IEC 607 04-1: 1997, I EC 6070 4-2-1 :2001 I ntern ation al Sta ndard .
The a ctual h eard no ise is di ffere nt acco rding t o diffe rent us e envir onmen t (room t emper atur e, humi dity, at mosph eric pr essur e, orig inal in door no ise, et c.).
Our c ompan y reser ves the r ight to m ake any t echno logy an d desig n chang es to thi s produ ct due to t he need s of cont inuou s impro vemen t of the pr oduc t. The
rig ht of int erpre tatio n belon gs to ECO VACS Rob otics C o., Ltd .
W710
0.15m/s (6ft/s) 0.1 5m/ s (6f t/s )
400
Unlimited
55
NO
Unlimited
Lithium
W730
400
Unlimited
55
YES
Unlimited
Lithium
2. Safety Instr uct ions
2. 1 Ab out this In st ruct io n Manual
Before use of the product, please follow the basic safety precautions as follows:
● Please carefully read all contents of this Instruction Manual and use the product in accordance with its
instructions.
● Place the Instruction Manual in a safe place to refer to questions on operation or possible solution to problems you
might encounter. Make sure all people who will use this product know where the Instruction Manual is kept.
● Operation of the unit inconsistent with the enclosed instructions could possibly damage the product and require
2. 2 WI NBOT Power
● Your WINBOT is powered through the adapter provided. You MUST only use
the power adapter that is sold with the unit. Should a replacement become
necessary, please call our service number and have your model number and
the number on the PC label ready to give to the person so the correct adapter
will be purchased and sent to you.
● Please check and confirm the marked power supply voltage to ensure the
product is used under the condition of indicated voltage.
● The lithium battery in the WINBOT is used to power the Pump motor
should your electric fail or the adapter cord become unplugged. This is a
Safety precaution so the unit will not loose suction and fall from the window and
cause damage. A warning will sound every 3 minutes until you turn the unit
OFF and remove from the window.
● While the unit is plugged in and being used to clean the window, the lithium
battery will be charging. You may also charge the lithium battery when
done using by placing the slide switch under the handle to the Charge
position.
● If the either power cord or power plug is found to be damaged, do not use
the product. Call our service number to find the nearest Authorized Service
Center or to order replacement parts.
● Do not excessively distort, twist or squeeze the power cord, nor nip the power
cord when the window is closed or place heavy objects on the power
cord.
● Do not let the power cord contact with the surfaces of hot objects or sharp
objects.
,
6
Page 26
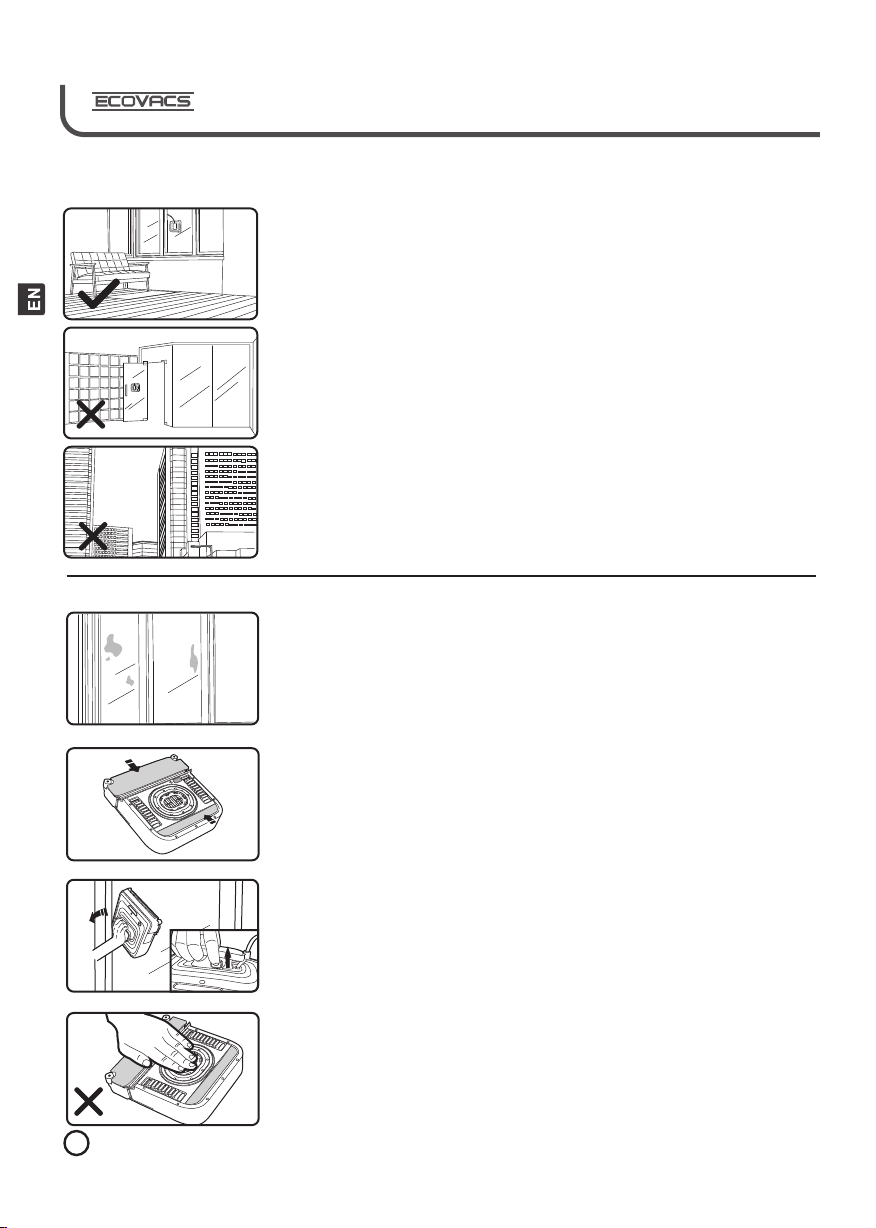
2. 3 Product Applic ation Range
● This product is intended for cleaning dust on common home windows.
● A glass with uneven surface, such as frosted, textured , patterned or leaded
is not suitable to be cleaned by the WINBOT.
If there are any coatings or films (tints) on windows or glass, do not use
●
WINBOT as it may damage the coating or tint.
● This product can not be used on windows whose frame thickness is
less than 5mm (0.2'').
● WINBOT is in tended for home use on ly. It can NOT be used on huge
windows or in complex places, for example, the windows of commercial office
buildings and industrial sites.
● Product not designed for use on small windows (less than 60cm (24'') high
and less than 45cm (18'' ) wide).
● The product will not work on wet windows as the tread will not be able to
grasp the window and move the unit, instead it will slide down the window.
● Should the kitchen window have a film of oil or grease from cooking, the unit
may not be able to grasp the window and move the unit, instead it will slide
down the window.
● The unit may NOT be used outside while raining, snowing or colder than 5℃
(40℉) as it will damage the product and could cause electrical problems.
● Because of the electrical nature of the product, the product may NOT be used
in areas where flammable material is used or stored.
● The product may not be used to clean cracked or broken windows as the
suction will do further damage to the window and would also damage the
product.
2. 4 Product Precau ti onar y It em s
● Please check that cleaning pads are installed on WINBOT before cleaning.
● If the window is too dirty, we suggest cleaning a small area to place the
WINBOT on the window.
● WINBOT can NOT be used to clean stains such as painting, glue, etc.
● WINBOT can NOT be used to clean items such as chewing gum, label,
papers, etc which may cause suction failure.
● Do NOT place any obstacles on the window or the window sill which
would obstruct WINBOT's cleaning path.
● Since the cleaning of the window does not take a long period of time, it is
recommended you be in the same room the unit is cleaning the window so
when the unit is done, you can attend to the removal of the unit from the
window. This will also allow you, should there still be a dirty spot, to use the
Remote to guide the unit to clean the spot and then return the unit to a
convenient spot for removal from the window.
● We recommend that you use the SAFETY ROPE for cleaning the outside of
windows as described in the Safety Rope section of this Instruction Manual.
● The adapter should be plugged into a receptacle as close to the window as
possible. The adapter MUST never be allowed to hang outside the window.
● The Supply Wire from the adapter must be free to move as the unit cleans the
inside of the window. Should the unit be cleaning the outside of the window,
enough supply cord must be on the outside of the window so as not to restrict
movement of the unit.
● When electrical connection fails or WINBOT finishes cleaning, please remove
it from the window. Grasping the handle, turn the unit OFF and use the Air
Release Button or hold onto the handle for 30 seconds or more.
● Because the vacuum generated on the bottom of the unit is rather strong, do
not place close to body or hand as it will suck the skin into the orifice and unit
would have to be turned OFF to remove the unit from the body part.
● Please check the cupule on the bottom of the unit before each use to make
sure they are not damaged and would prevent goo d suction to the window.
● Please check that cleaning pad s are installed on WINBOT bef ore
7
Page 27
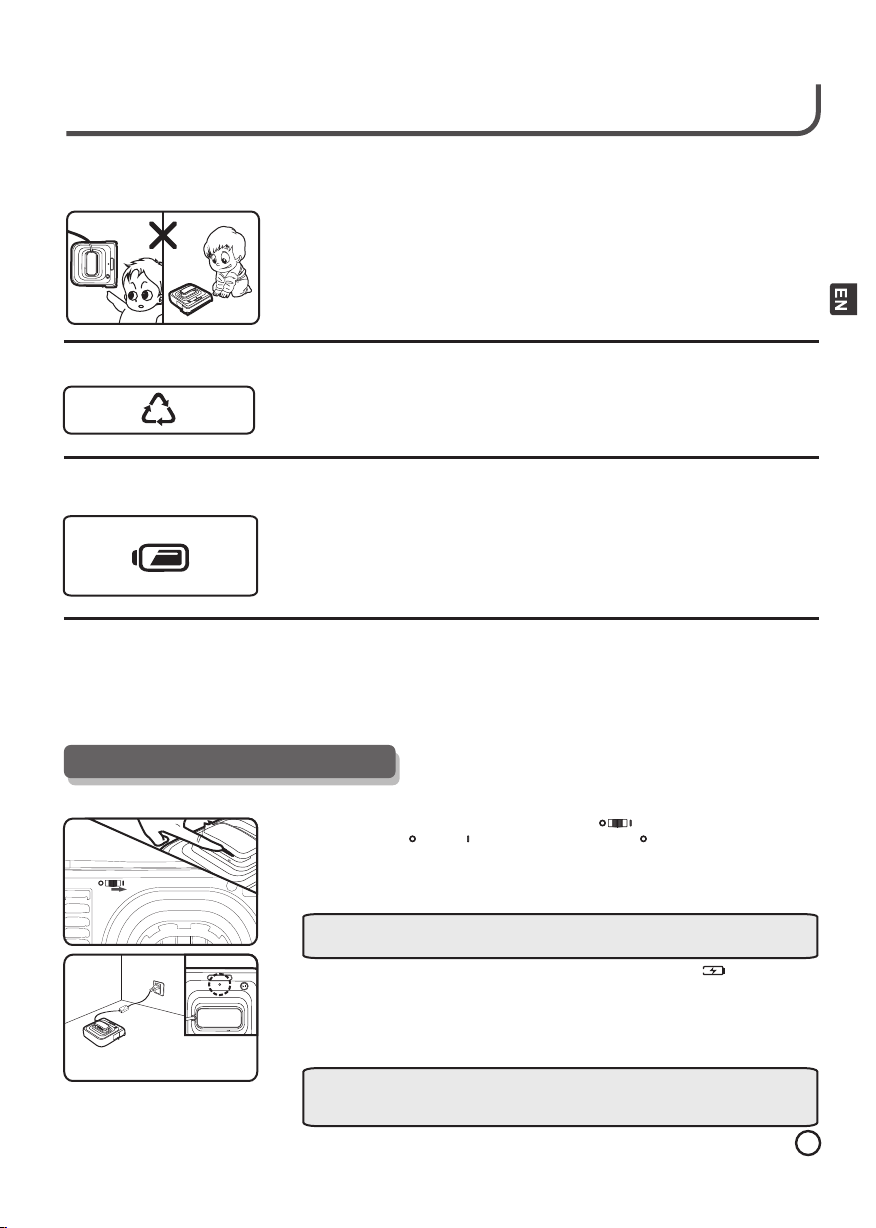
OFF ON
Live Smart. Enjoy Life.
OFF ON
ON
2. 5 About Ch il dr en S afety
● The product cannot be used by children or mentally challenged people.
● The product should be stored out of the reach of children.
● The product is NOT a toy for children to play with.
● Keep all packing material out of the reach of children and dispose of immediately.
2. 6 Pr od uct Disposa l
● As soon as the unit is unpacked and you have verified that all components
have been accounted for, you should dispose of the packaging material right
away to keep the children from playing with it.
● Please recycle all packing material.
2. 7 Replace me nt of WINBOT’s Bat tery
an d Di sposal of Us ed Batt er ie s
● Replace the Lithium battery with only genuine ECOVACS replacement battery.
By calling our service number and with the Model number and the numbers
from the UPC label on the bottom of the unit, you can order a replacement
Lithium battery.
● Should the Lithium battery need replaced, dispose of the old battery in
accordance with your local laws.
2. 8 Ca ses of Product Pr ob le ms
● Should there be a problem with your unit , please consult the questions and answers at the end of the Instruction
Manual. Should you not find the necessa ry help in the Question and Answer section, please call our service
number for further technical assistance.
● Please contact our after- sales service department or the professiona l maintenance agency developed by our
company so that the professional maintenance person nel can provide after-sales service and maintenance.
3. Prepar ation Befor e Use
3. 1 Ch ar gi ng WINBOT ’s Ba ckup Batt er y
● Before charging, please firstly turn on the button at the bottom of the
WINBOT. (“ ” OFF “ ” ON. The default state is “ ”) Otherwise, WINBOT can
NOT be charged or working.
● After plugging the adapter into your receptacle connect the supply cord to
the WINBOT so the Back Up battery can be fully charged. The Battery
WARNING: Please make sure that the cord of the unit and adapter are not within
reach of a child so that they can pull the unit down upon themselves and cause
● Move the switch on the handle to the furthest right position “ ”. The
Indicator Light will flash Green indicating that the Back Up battery needs to be
charged. When the Back Up battery is fully charged, the Indicator Light will
light a continuous Green.
● Charging time for the battery is approximately 2 hours. This time will vary
depending on the temperature of the room, a cooler or warmer room may take
longer to charge the battery.
NOTE: While the unit is cleaning the window,make sure the Switch on the
Handle is in the ON (center position) and the unit is connected to the
adapter and the adapter is plugged into your receptacle.
8
Page 28
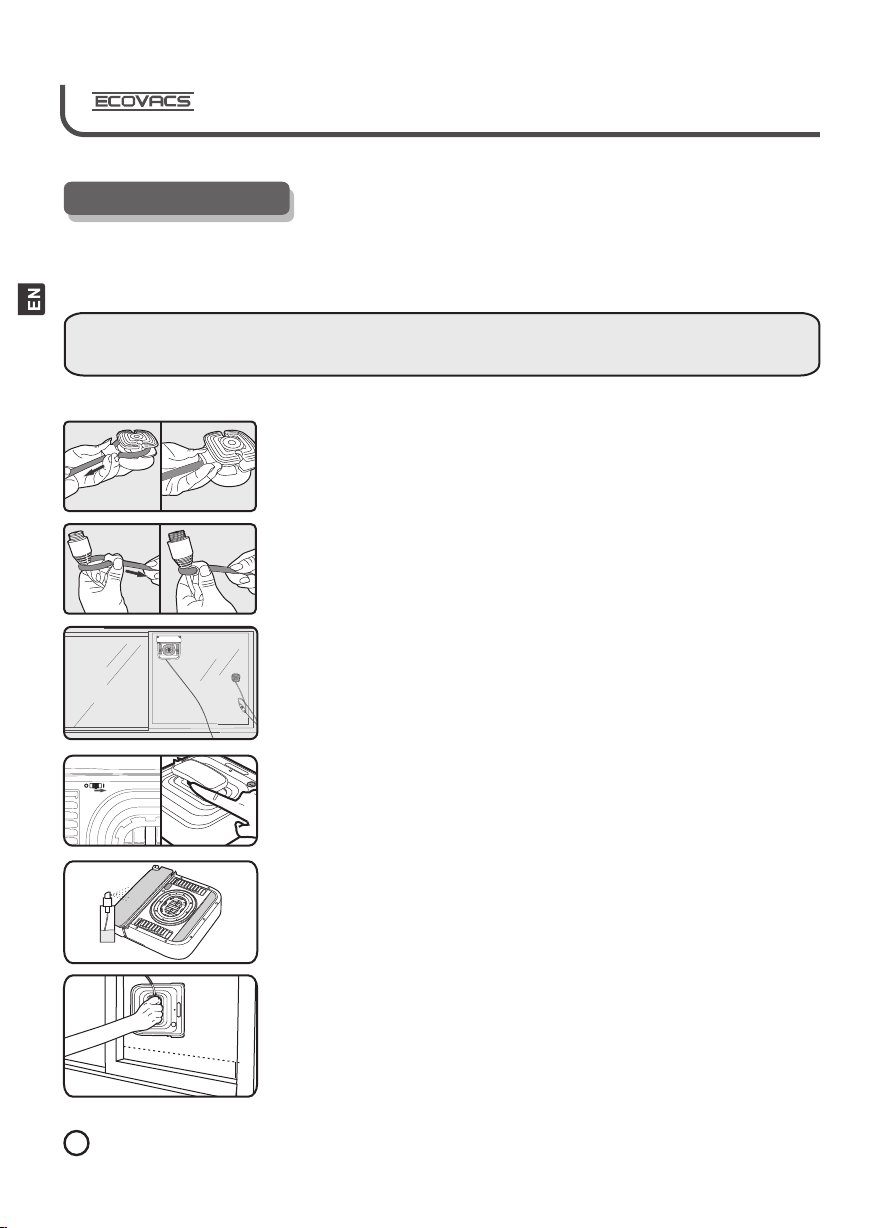
4. Use of pr oduct
≥10c m(4 )''
OFF
ON
Warning
If WINBOT is used to clean a window above ground level, the Safety Pod MUST be used.
WINBOT must be used in strict accordance with the directions in the Instruction Manual. ECOVACS can not be held
liable or responsible for any damages or injuries caused due to improper use.
Note: Before operation of the unit, you must carefully read the con tent of “Safety Introductions” before using the
product. Any operation inconsistent with the contents of Instruction Manua l may cause damage to the
product or caus e personal injury.
4. 1 Pl acement o f W INBOT
● Make sure that there is enough power cord for the WINBOT to clean the
entire window without restricting its movement. If there is not enough cord,
it is not safe to use the WINBOT on that particular window until a WINBOT
Extens ion Cord is attached.
● Loop one end of the Safety Rope around the Safety Pod's channel and pull
it tight.
● Loop the other end of the Safety Rope to the power connector on the power
cord and tighten.
● If an Extension Cord is attached, the Safety Rope must be tied to the power
connec tor on the Extension Cord.
Note: Do NOT attach the Safety Rope to the thin part of the cord.
● Press the Safet y Pod suction cup FIRMLY in the lower corne r on the
opposi te side of the glass you are cleaning. Make sure the Safety Pod
suctio n cup is securely in place.
● Place WINBOT o n the window, close the window if cleaning the outside of
the window, a nd start WINBOT.
● Make sure the button on the bottom of the WINBOT is turned ON.
● Plugging the Adapter into your receptacle and push the power button to start
WINBOT.
● Spray the front Pad with the provided Window Cleaning Solution lightly. After
having cleaned your windows a number of times, you will begin to know how
damp the Pad should be to clean your windows. If you get the Pad too Wet, it
may not allow the treads to properly drive the unit on the window. Do NOT
spray the back pad as this Pad is for wiping the window after the treads.
● With the unit placed horizontally on the window and about 10cm (4'') from the
corner s of the lower window, move the switch to the ON positi on and only let
go once the unit has securely atta ched itself to the window being indicated by
the Indicator Light flashing BLUE in colo r. At this point, you should remove
your hand from the unit.When Indicator Light do NOT ligh t, it means the
suctio n power in too small. Please check or replace the cupule. When
Indica tor Light flashes red, please adjust the height of place ment and restart
the product.
● With the Safety Rope attached to the inside of the window, close the window
withou t damaging the outer skin of the Supply Cord. Make sure there is
enough cord between the Safety Rope and the WINBOT for the unit to cle an
the entire window without restricting its movement.
9
Page 29
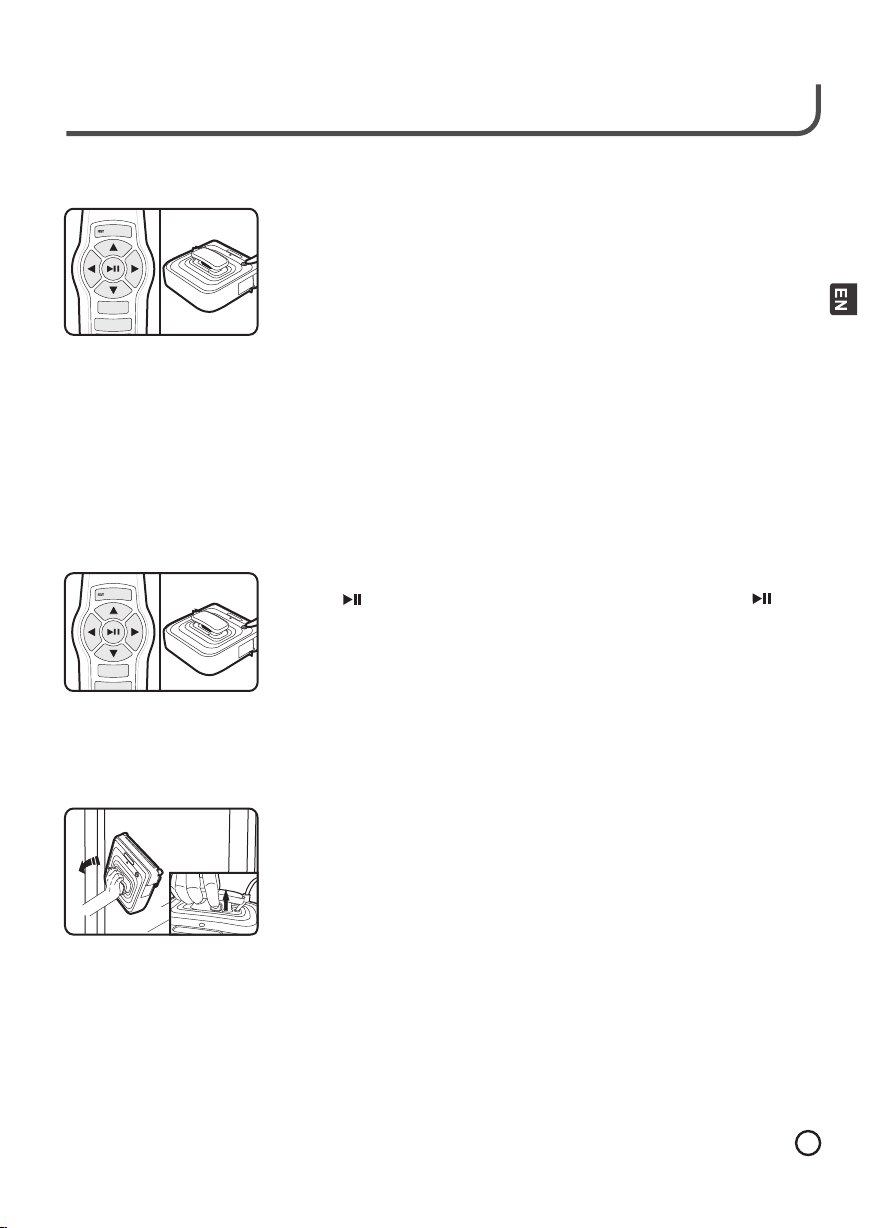
4. 2 Pr od uct Star t
OF
F
ON
OFF
O
N
4. 3 Pr od uct Pau se
4. 4 Pr od uct Stop
Live Smart. Enjoy Life.
● Onc e the unit is atta ched to the o uts ide of the wi ndo w, press the S tart
Button o n the unit or t he St art/Pau se bu tton on the R emo te. Th e
produc t wil l use its aut omatic clean ing mode to clea n the windo w and
return t o the start posi tion after hav ing cleaned th e window.
NOTE:
● Thi s pro duct is int end ed for clea nin g dust on com mon home wi ndo ws.
WINBOT can NOT be used to cle an stains such a s pain tin g, glue,
etc. WIN BOT ca n NOT be used t o remove it ems s uch as chew ing
gum, lab el, papers, et c which may caus e suction fail ure.
● Gla ss wi th uneven s urf ace, such a s frosted, tex tured, patte rne d or
leaded i s not suitable t o be cleane d by th e WINBOT.
● Aft er WI NBOT has finished cl eaning on e win dow, if the cleaning
pads are t oo dirty, please r eplace th em wi th a cle an set.
● The u nit may NOT be used outs ide w hile rain ing , snowing o r col der than
5℃ (40℉) a s it will dam age t he produc t and could caus e electrical
proble ms.
● Sho uld t he unit sto p working and th e Indicator Li ght blink RED, y ou
need to re spond by gr asp ing the han dle o f the unit an d turn the sw itc h
OFF. You m ay then tur n the s witch bac k ON and press the P ause/Start
button t o start the clea ning process .
● If yo u want to Pau se th e product d uri ng the clea nin g process , pre ss the
“ ” but ton on the Re mot e Control mome ntarily or pre ss the “ ”
button o n the unit. T he produc t wil l pause and w ait for fur the r
instru cti ons.
● Whi le th e unit is in th e Pause Mod e, yo u may use the R emote to mo ve
the unit a round the wind ow by press ing t he approp ria te direction al
arrow. This is ha ndy f or your use w hen a spot on t he window is difficult
to clean , because you ca n maneuver the u nit back to t he spot and clea n
again. W hen you want to re turn the un it to the Auto M ode to cont inu e
cleani ng, press the pa use butto n on the Remo te.
● If us ing WINBOT for a long pe rio d of time con tin uously, give yourse lf
and WINB OT a 10 mi nut es break fo r eve ry hour of us e, this wil l ext end
the life a nd performan ce of robot and av oid overh eat ing.
● Aft er th e product h as finished cl ean ing the win dow, it will r etu rn to the
place wh ere you had star ted the cle ani ng. If you fi nd th e stoppin g pla ce
is not con venient for yo u to grasp to r emo ve the unit , use the Rem ote b y
pressi ng th e appropr iat e directi ona l arrow unt il th e unit is whe re you can
grasp th e handle more co nveniently.
● Hol din g the handl e of the unit, mov e the switc h to the OFF position,
to th e far left, and place fi nge r in the Air Release slo t and lifti ng
with you r finger, yo u will rele ase the vac uum from th e inn er
circle . In a few seco nds, the un it will be fr ee from the w indow.
● If yo u do NOT use th e Ai r Release b utt on, you nee d to hold the h and le
for abou t 45 to 60 seco nds . Do NOT try to use the h andle as
levera ge to pry the u nit from th e window as y ou could da mage
the prod uct.
● Aft er re moving th e uni t from the wi ndow, do the r equ ired main ten ance
on th e pro duct in pre paration for storage. B EFORE sto rin g, while
the unit i s plugged i nto your re ceptacle, mo ve the swit ch to the
Charge p osition and al low the bat tery to cha rge until t he Green
light qu its Flash ing .
● Alw ays S tore the un it with the swit ch in the OFF p osi tion.
10
Page 30
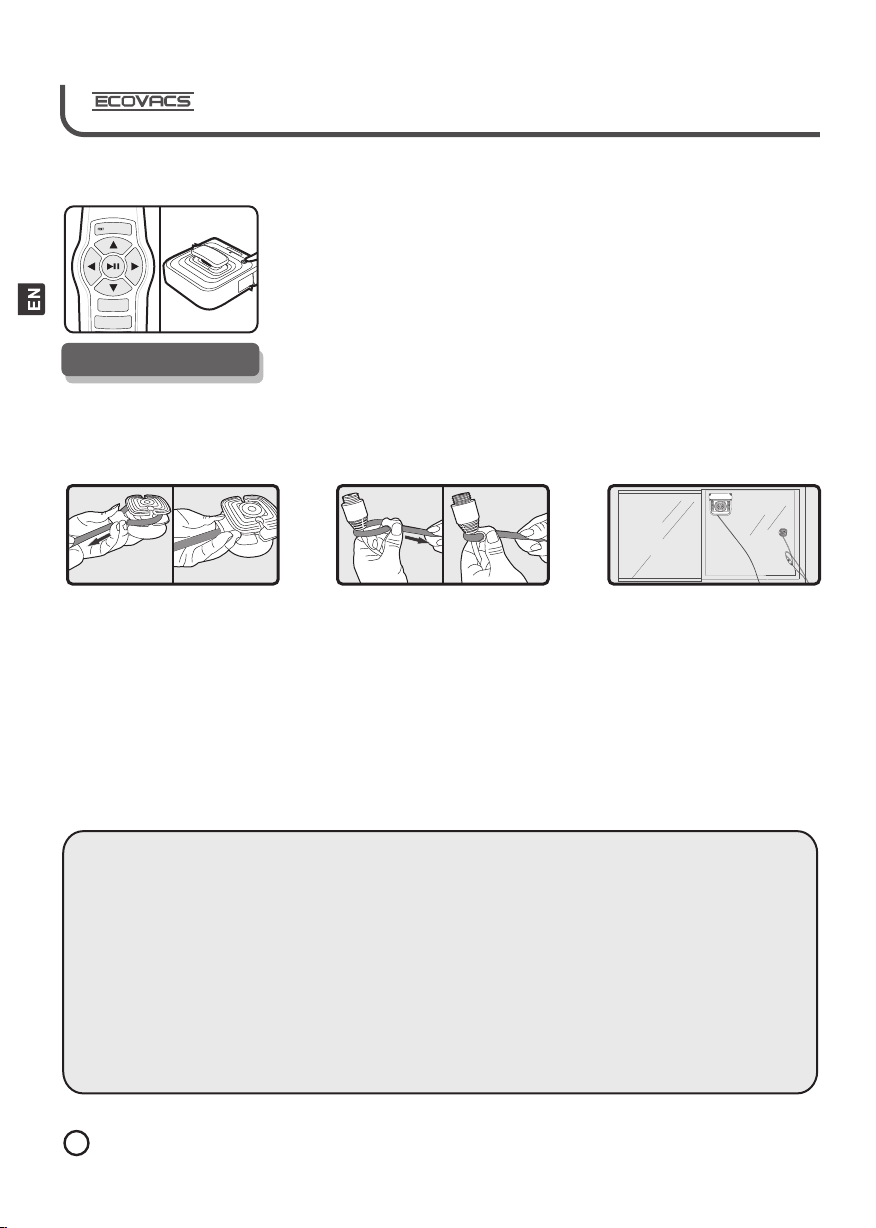
4. 5 Pr od uct Res ta rt
OFF
ON
When the product cycles a place repeatedly during the operation, or stops
working, sending a warning prompt and the red indicator light flashing,
grasp the unit by the handle and turn the switch to the OFF position. The n,
turn the unit back ON and press the Pause/Start button on the unit
to continue the cleaning process.
5. Accessories
5. 1 Sa fety Po d
Warning
If WINBOT is used to clean a window above ground level, the Safety Pod MUST be used.
WINBOT must be used in strict accordance with the directions in the Instruction Manual. ECOVACS can not be held
liable or responsible for any damages or injuries caused due to improper use.
1. Make sure that there is enough power cord for the WINBOT to clean the entire window without restricting its movement.
If there is not enough cord, it is not safe to use the WINBOT on that particular window until a WINBOT Extension Cord is
attached.
2. Loop one end of the Safety Rope around the Safety Pod's channel and pull it tight.
3. Loop the other end of the Safety Rope to the power connector on the power cord and tighten.
4. If an Extension Cord is attached, the Safety Rope must be tied to the power connector on the Extension Cord.
Note: Do NOT attach the Safety Rope to the thin part of the cord.
5. Press the Safety Pod suction cup FIRMLY in the lower corner on the opposite side of the glass you are cleaning. Make
sure the Safety Pod suction cup is securely in place.
6. Place WINBOT on the window, close the window if cleaning the outside of the window, and start WINBOT.
7. After WINBOT is done cleaning remove it from the window. Grasp the handle, switch the unit OFF, insert finger into Air
Release Trigger and pull up on it for 20 seconds until suction has diminished.
5. 2 Remot e Co nt ro l
Before use of the remote control, please confirm whether the battery has been installed correctly.
● The remote control uses two AAA batteries.
● During installation of the battery, be sure to pay attention to the direction of the positive and negative poles of the
battery and the diagram in the Remote Control casing.
● If the battery power is low, replace both batteries; never use a new battery with an old battery.
● If the remote control is not used for a long time, please remove the batteries so they will not damage the Remote
Control.
● Do not place the remote control in the Sun or next to a heat source as this can damage the Remote Control.
● Should liquid be spilled on the Remote Control, remove the batteries immediately and shake till as much of
the liquid is out of the Remote Control. Allow to dry for 24 hours before replacing the batteries. Try to
use the Remote with the unit on the window while the unit is within easy reach to see that it works. If the
Remote does NOT work, do not use the unit until the Remote has been replaced.
● While replacing the battery, should a foreign object be dropped into the battery area, please remove immediately.
IF the object is left in the battery area, possible shorting of the batteries could happen and render the Remote
Control useless.
● Please follow the local environmental regulations for the disposal of the discarded batteries.
11
Page 31
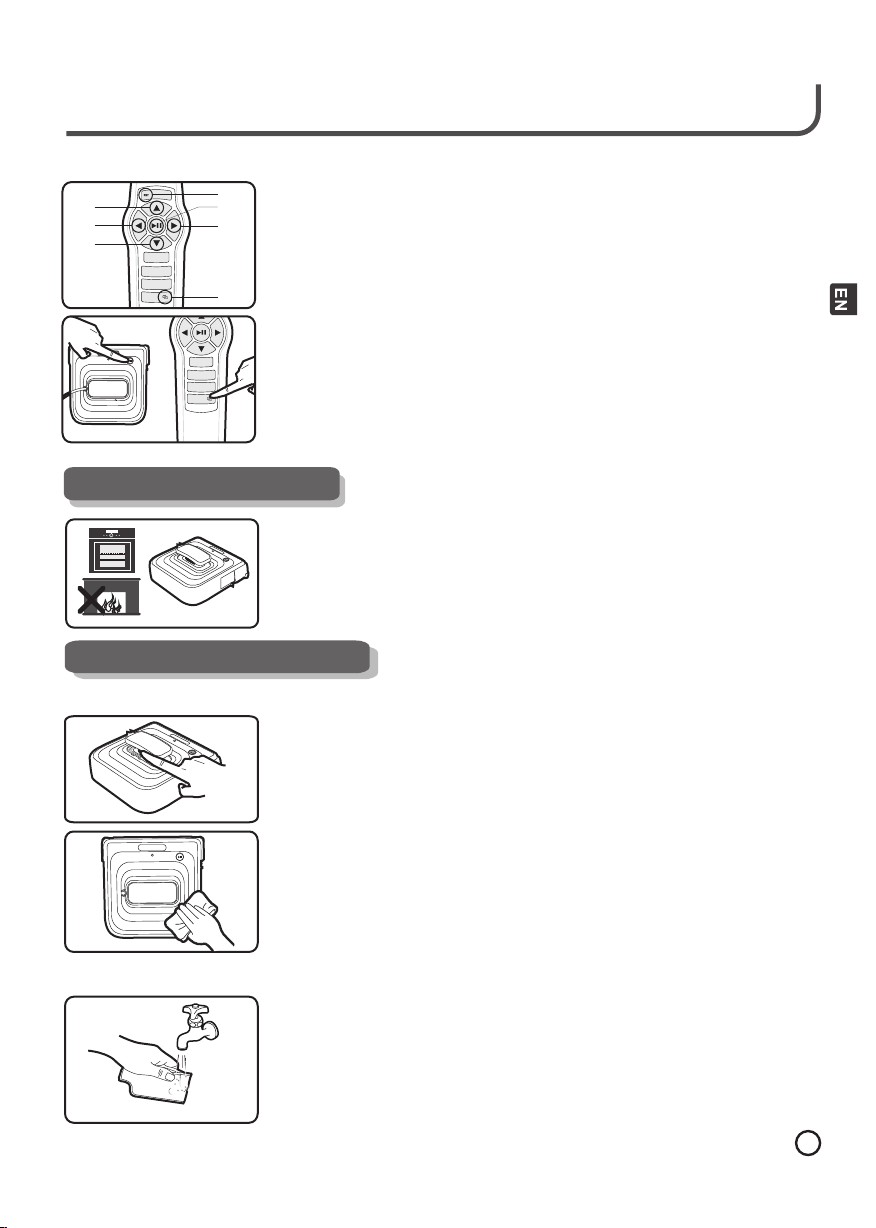
Live Smart. Enjoy Life.
OFF ON
1
4
5
6
2
3
7
The Remote Control has a series of functions to become familiar with. The
Remote Control is very easy to use.
1. RESET button - Sh ould the WINBOT stop working in any way, the RESET butt on
can be pressed to restart the product and/ or restore it to the facto ry default s.
2. Start / Pause button - St arts and/or Stops th e product.
3.4.5.6 Arrows - When pressed each arrow indi cates the direction the unit will
move, re member ing that the UP arrow corresponds t o the fron t of the WINBOT.
7. Pairing button - This button pairs the Re mote Control with WINBOT.
Notice - Th e Remote Control is already paired with WINBOT when it arrives from
the factory. If you need to replace the Remote Control, please use the Pairing
button to pair the Remote Control with WINBOT.
Pairing method:
Plug WINBOT in and place WINBOT's switch to the CHARGE position. Hold the Pairing
button on the Remote Control unit. Then press the Start/Pause button on WINBOT
until WINBOT beeps (about 3 seconds). Pairing action is complete when WINBOT beeps.
The Remote Co ntrol will work best when wi thin 2m (6.5' ) of the un it. Maximum
distance between Remote Control and Winnbot is 12m (39.4').
6. Day-to-d ay Stor age
● Sto rag e of the unit m ust be away f rom h igh tempe rat ures as the p lastic
● Do no t store the unit c lose to liq uid s where the l iqu id might be s pilled
● Pay a tte ntion to th e maintenanc e req uiremen ts of t he unit as sp elled out
7. Produc t Mainten ance
7. 1 Cl eaning th e Un it
The Unit must be in the OFF positi on and unplu gged from the electrical
source.
and elec tro nic compo nen ts can be affected.
onto the u nit and get i nsi de and dama ge th e unit.
in that se ction of th e Ins tructio n Man ual.
The Unit may NOT be cleaned with any volati le liquid s uch as solvent, gas,
etc. o r a detergent containing acidic or pine sole additives as they will
negativel y affect th e plasti c.
7. 2 Cl eaning an d Replacing C le aning Cloth
After each clean ing or should the Pad get really dirty be fore finishing the
cleaning of the window, the Pad can be rinsed in clea r warm water. Be careful
of detergent you might use to wash the pad as you do not want to leave a
soapy film on the pad that will n ot allow the Pad to properly clean the
window. Afte r thoroug hly dried (generally dry for 24 hou rs), re-install the pad
on the unit.
12
Page 32
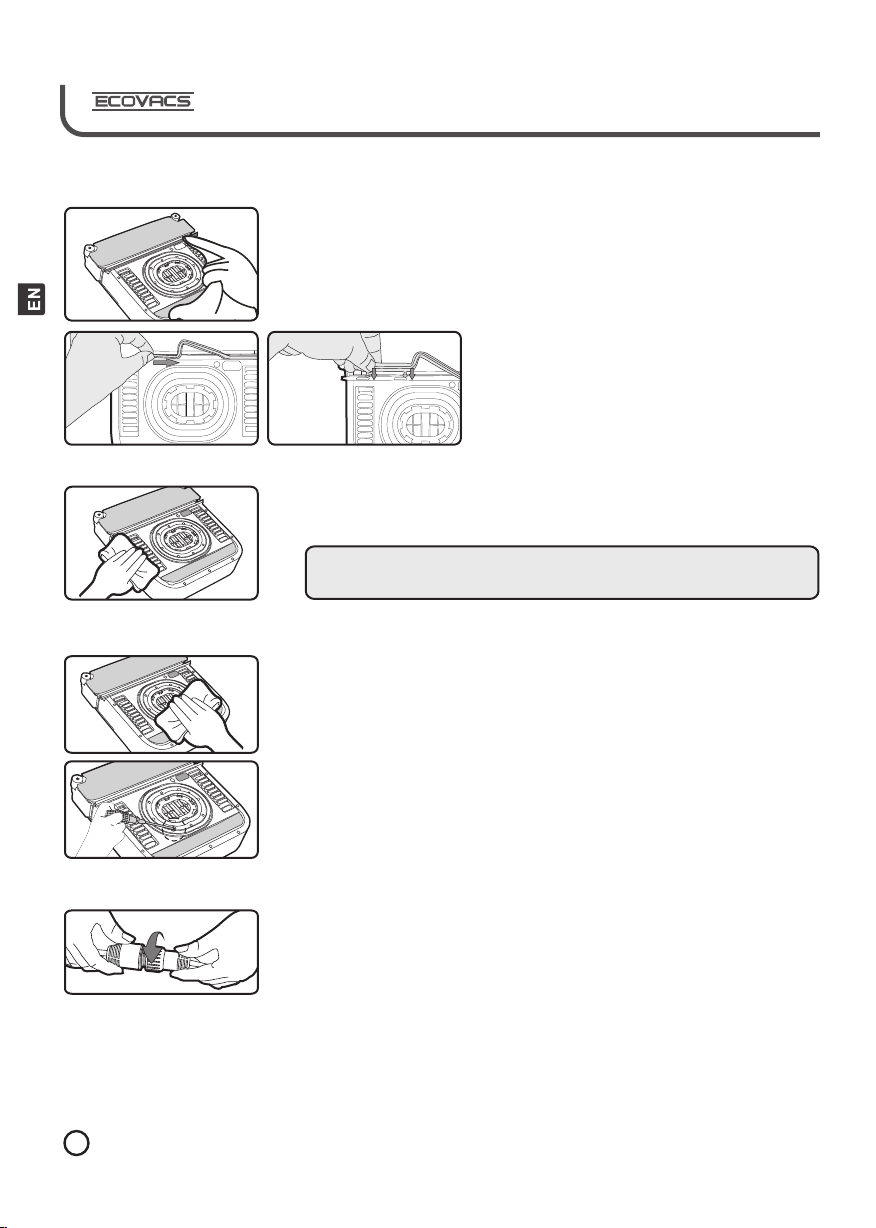
7. 3 Sq ueeg ee
Squeegee maintenance
After each use, gently wipe the Squeegee with a damp cloth to remove residue
from its surface. A wet cloth will allow water to get inside the unit and cause
damage to the internal components. A replacement squeegee may be
purchased by going to our Web Site or calling our service number.
7. 4 Cl eaning Dr iv in g Tre ad s
After each use inspect the Treads for possible accumulation of dirt. The total
tread can be inspected by using the remote and pressing the Forward or
Reverse arrow. Clean any dirt with a soft damp pad.
7. 5 Cu pule
Cupule maintenance
The Cupule assembly is a basic part of the units function and is located on the
bottom of the unit. After each use, you need to inspect the cupule's surface to
make sure it is not torn or cut. Any debris that is stuck to the surface must be
carefully removed.
Cupule replacement
1. Take the cupule off with a screw driver.
2. Replace it with a new one.
Squeegee replacement
1. Push the Squeegee to the center from each end
of the Squeegee, then take it off.
2. Replace it with a new one: put the new one into
the groove and pull the end of the Squeegee to
each side.
NOTE: Dirty treads can negatively affect the function of the treads
driving the unit on the window.
7. 6 Ex tension C or d
13
Extension Cord is used to extend Winbot's working range. If your window is
too large, this will be a perfect choose. For the use of Extension Cord, please see
Page 33
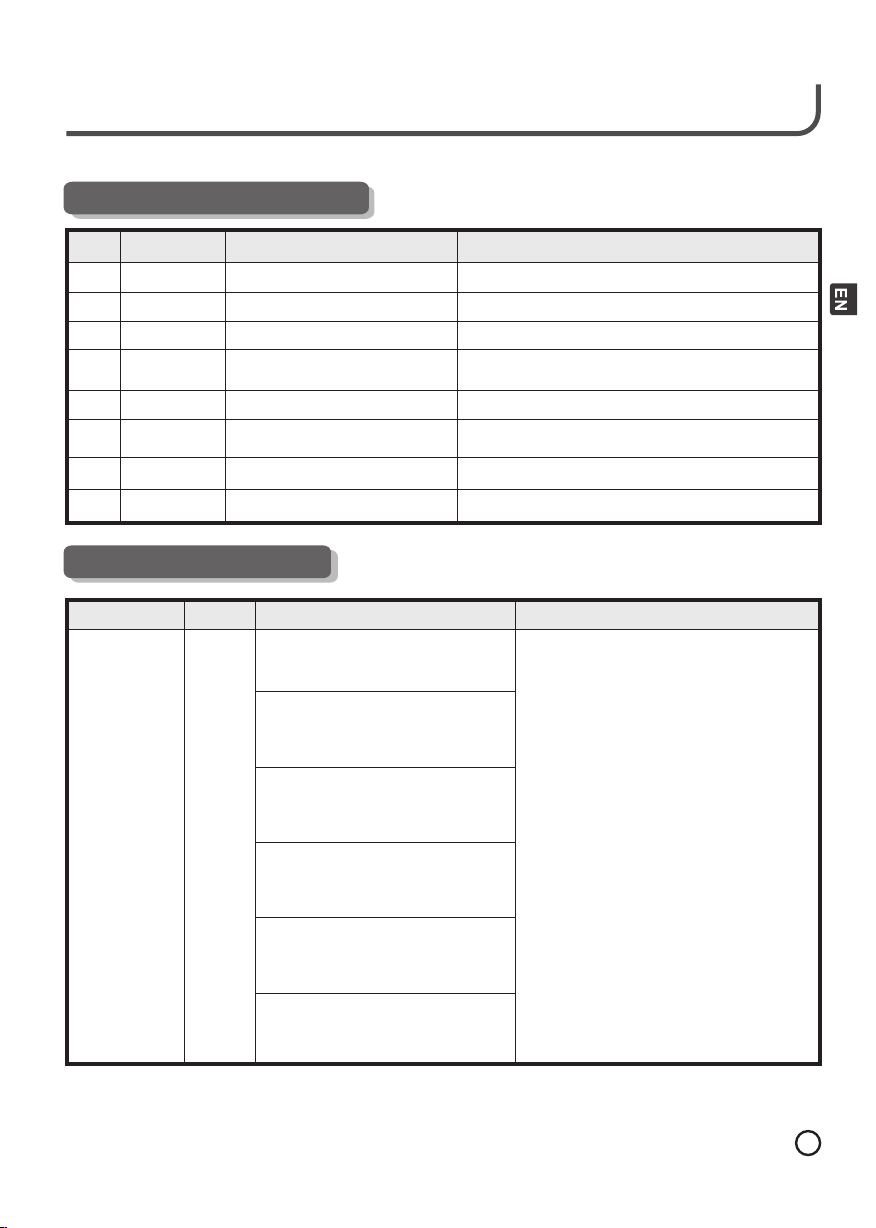
8. Meaning of Indicator s
Live Smart. Enjoy Life.
NO.
1
2
3
4
5
6
7
8
Sound
Emits *d ing do ng
*Tone
None
None
None
None
Emits Soung
Emits double
Tone
Emits double
Tone
Indicator Light
None
Indicator Light Flashes Green
Indicator Light steady Green
Indicator Light Flashes Blue
Indicator Light steady Blue
Indicator Light Flashes Blue
Indicator Light Flashes Red
Indicator Lights steady Red
WINBOT has been connected to power.
Back up battery is charging
Back up Battery is Fully Charged
WINBOT has fi rst b een p lac ed on w ind ow an d has
successfully suctioned itself to the glass
WINBOT is in th e pro ces s of cl ean ing t he wi ndo w
WINBOT has fi nis hed c lea nin g the w ind ow an d is
WINBOT may ne ed to b e mov ed or r ese t. Pl eas e
refer to Alarm and Solutions Section.
WINBOT has a pr obl em an d req uir es ou r
Meaning
ready to be removed.
Service Center.
9. Alar m & Solut ions
Alarm Sound Light Causes Solutions
Toot, toot
Red
indicator
light
flashes
1. Tu rni ng WI NBO T ON wh en no t
plugged into receptacle.
2. While cleaning the window,
WINBOT beco mes d isc onn ect ed
from the Power Source.
3. Vac uum i s lea kin g at th e cup ule .
4. Bumper is pressed against the
window frame and raised;
5. Window is too small for WINBOT
to clean.
1.Connect unit to the Power Adapter and
plug into the receptacle.
2.Plug the Power Adapter back into the
receptacle.
3.Remove WINBOT fro m the w ind ow an d
turn the power switch OFF (far left).
Tur n the u nit o ver , ins pec t the C upu le
for dirt stuck on the Cupule's surface.
Gently clean the surface with a soft
damp cloth to make it smooth again.
Check the window to make sure there
is no hard debris that would affe ct th e
Cupule.
4.Use the Remote Control to move the
WINBOT away f rom t he wi ndo w fra me by
pushing Arrow buttons.
5.The smallest window WINBOT can
automatically clean is 60cm (24'') high
by 45cm (18'') wide.
6.The window frame thickness must be
over 5mm (0.2'').
6. Th e win dow f ram e is to o thi n.
If problem persists, please contact our
Service Center.
14
Page 34
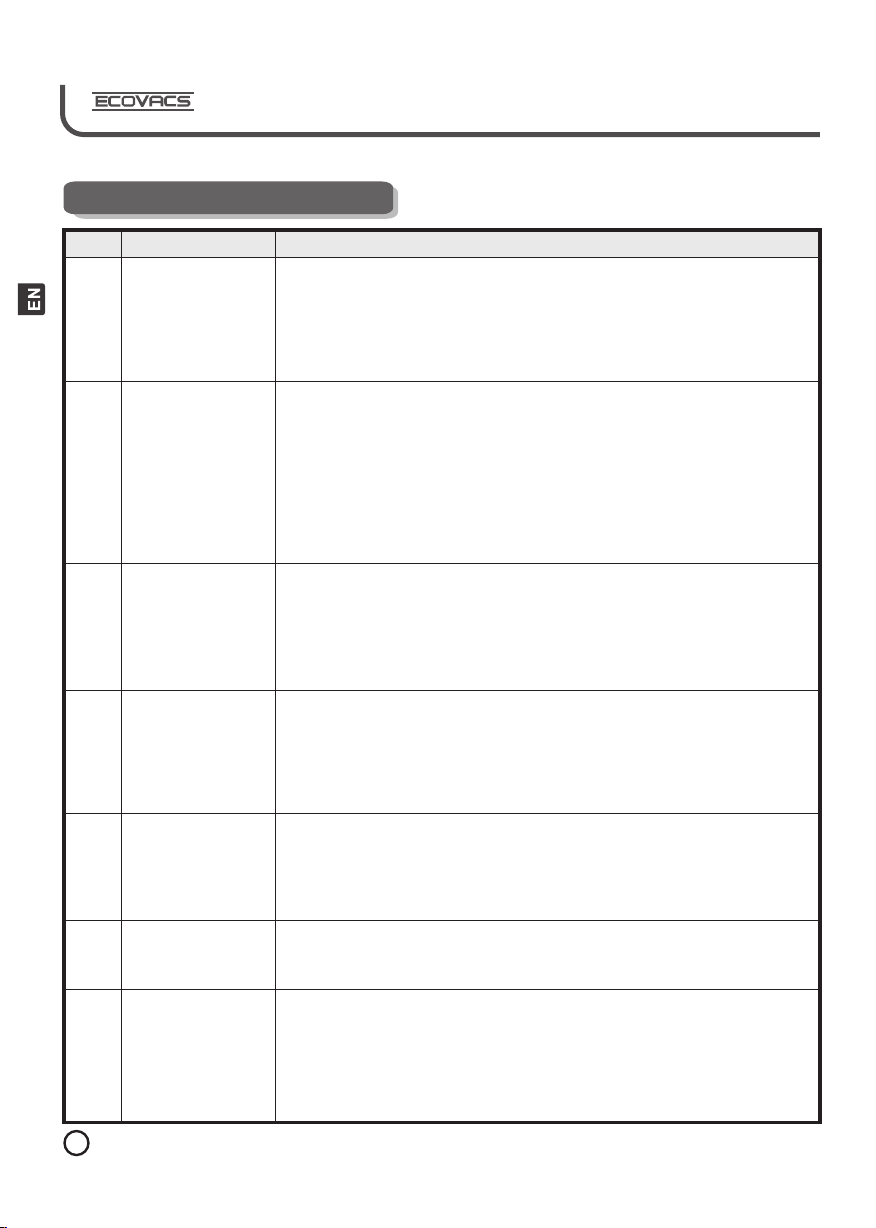
10. Common Ma lfuncti ons
NO.
WINBOT fail s to st ick
1
to window
Machine stops and
sounds an alarm
2
and the Indicator
Light flashes RED
WINBOT leav es
streaks on the
3
window while
cleaning
Lower cleaning
4
ability
Problem Solutions
a. when you turn the switch ON, the Indicator Light does not light BLUE,
check that WINBOT is co nne cte d to th e Adap ter a nd th e Ada pte r is
plugged into the receptacle, or
b. The window surface is not smooth and WINBOT is not a ble t o suc tio n to
the window, or
c. The cupule’s surface on the bottom is dirty and needs to be cleaned, or
d. Upon inspecting the cupule’s surface there is a tear or is worn and needs
a. Should WINBOT be aga ins t the f ram e, mo ve it a way f rom t he fr ame b y
use of the Remote and then press the STAR T button on the unit or RESET
on the Remote to start the cleaning process, or
b. Should WINBOT be on th e edg e of th e gla ss, g ras p the u nit a nd mo ve it
away form the edge of the window and then press the STAR T button on
the unit of reset BUTTO N on th e Rem ote t o sta rt th e cle ani ng pr oce ss, o r
c. WINBOT has e nco unt ere d HAR D deb ris o n the w ind ow th at ha s cau sed a
loss of suction in the outer ring and is not capable of maneuvering itself
away from the spot without possibility of losing suction and dropping
from the window; you may use the Remote to maneuver the unit away
and then press the START button on the unit or the RESET bu tto n on th e
a. WINBOT's front cleaning pad is too dirty to clean the dirt from the
window, needs to be replaced with a clean moist pad, or
b. The front pad is not moist enough and is not properly absorbing the dirt in
to the pad, or
c. The squeegee is dirty and needs to be cleaned of dirt residue, or
d. The treads are dirty and / or have accumulated debris that needs to be
cleaned off , or
a. Check the front and rear pads to see if there is debris in the pads that is
creating the noise on the window, or
b. Check the gasket that debris is not attached to the surface and creates a
noise when rubbing against the window, or
c. Check the treads to see that debris has not stuck itself on the
tread, or
d. Check that the front pad plate is free to move up and down.
15
There is loud noise
5
when the product
works.
Driving treads slip
6
on the window
Remote control
7
does not work
a. Tu rn off the power switch of the product, remove the cleaning cloth and
clean.
b. Clean the dirt and other unclean matters on the driving wheel.
c. Check whether the cover plate of the cleaning cloth is flexible, and
whether it is stuck by foreign object.
d. If the fault remains after cleaning in accordance with the above steps,
a. The front pad is too wet and leaves water on the window, or
b. The treads are too dirty and must be cleaned, or
c. The treads are heavily worn and you need to call our Service Center and
talk to a Tech nic ian .
a. Remote control works best when used within 2m (6.5') of WINBOT, or
b. Check Batteries. If batteries are installed properly and the Remote
Control is not functioning, replace the batteries, or
c. Remote Control may need to be Paired with WINBOT. For Pairing
instructions,please see section 5.2, or
d. Check Alarm or Indicator Light. If WINBOT has sounded a toot toot warning
because it has lost power or suction, it can not be maneuvered with the
Remote Control. Reconnect power or reattach WINBOT to Window.
Page 35

Live Smart. Enjoy Life.
11. Check of Batte r y Status
With WINBOT conn ect ed to t he Ada pte r and p lug ged i nto y our r ece pta cle , mov e the s wit ch on t he Ha ndl e to th e
extreme right position (Battery symbol). If the Indicator Light flashes Green, the Battery needs to charge.
Leave WINBOT in this position until the Indicator Light will turn a steady Green, indicating the
12. Questio ns and Answer s
Are there any notes for the Consumer window and attend to its cleaning and
1.
during the use of the product above preparation for the next window.
the ground level?
1) During use of the product, be sure to thicknesses of glass in the window or
fix and protect the product with Safety door?
Pod, to improve the safety performance
of the product. 2) The ti me fo r cle ani ng
each window is very short; therefore,
we recommend the Consumer to be
aware of its function to timely discover
any abnormal function of the product and
take necessary corrective actions. 3)
During use of the product, please keep
the power cord free from restrictions so
that it will NOT ham per t he un it fr om
cleaning the entire surface of the window
or possibly cause the unit to become
unplugged and lose power.
Will WINBOT fall duri ng cl ean ing ?
2.
WINBOT is des ign ed to k eep f rom
encountering situations where it would
lose suction. Should the power from the
receptacle fail, the built-in battery has
enough stored energy to keep the
vacuum motor running until you can
quickly attend to the WINBOT. For
safety, we hav e inc lud ed a Sa fet y Pod
that will suction to the inside of the
window and keep the unit on the outside
of the window from falling very far and
to make for easy retrieval.
Can WINBOT work without someone
.
3
watching?
WINBOT is des ign ed to c lea n the w ind ow
without a person' s physical assis tance.
We do r eco mme nd th at yo u be wi thi n the
same room where WINBOT is cl ean ing
the windows because in most cases the
window will be cleaned within a very short
time. When it has finished, you will be
needed to remove the WINBOT fro m the
.
Can the product be used on various
4
The thickness of the glass does not
cause problems in its operation.
However, various types of uneven glass,
such as: frosted, stained, patterned,
etc. will cause the unit to loose
suction and fall from the window.
.
Why does the product send out “toot”
5
alarm and the Indicator Light flash
red when you have just started to use
the product?
Please refer to the Common Failures
section of the Manual where it will be
covered in more detail.
.
WINBOT can NOT work and the
6
Indicator Light do NOT flash when
WINBOT is on the window ?
If this happens, it means the suction
power is too small. Please check
WINBOT' s cupule a nd dr ivi ng tr ead s. If
there is too much dirt or dust on them, the
suction power will be affe cte d and c aus e
WINBOT stop w ork ing . The ref ore , it is
recommended to clean the cupule and
driving treads when they gets dirty.
Why does the product fail to work
.
7
when the START b utt on is p res sed o n
WINBOT?
1) WINBOT will NOT clea n the w ind ow if
it is not plugged into a receptacle. Its
battery power will send the unit to the
bottom of the window. Should this
happen, plug the adapter into a nearby
receptacle for its power. 2) WINBOT
can NOT work if it is not correctly
16
Page 36
What if WINBOT encounters frame red, l ett ing y ou kn ow th ere i s a pro ble m
8.
obstructions? that requires your attention.
.
When the product gets into trouble,
Under normal circumstances, WINBOT
will automatically maneuver around the
obstruction and continue its cleaning.
Why does the product fail to
9.
completely clean the door or window
glass?
1) The front pad could be dirty from
cleaning the glass and as a result is
leaving a residue on the glass. Stop and
replace the pad with a clean pad. 2) The
rear pad may be dirty or contain some
debris that is leaving marks on the glass.
You sh oul d rep lac e the r ear p ad wi th a
clean pad. 3) Check that the treads are
clean. They may also contain some
matter that will leave marks on the glass
that the rear pad can not wipe off. T he
treads should be checked often for
cleanliness and wiped with a damp cloth.
4) Th e pro vid ed cl ean ing solu tio n sho uld
be used when cleaning the glass. A dr y
cloth will only wipe dust and NOT clea n
the glass. 5) WINBOT ca nno t cle an
paint, stains, paper, or glue from the
window. You will h ave to continue
removing these residues by hand as you
have done previously.
.
How to completely clean the door or
10
window glass?
WINBOT cann ot cl ean p ain t, st ain s,
paper, or glue from the window. You will
have to continue removing these
residues by hand as you have done
previously.
.
How to store the product when not in
11
use?
The product must be cleaned and with the
switch in the OFF position. It needs to be
stored in a dry place away from heat and
strong sun light which can have a
detrimental affec t on th e uni t.
.
When the product cleans the outside
12
of the window and the alarm goes off, I
may not be able to hear the alarm.
WINBOT has a fe atu re th at wi ll vi sua lly
let you know if a problem occurs while
also sounding its alarm. The In dic ato r
light on the bottom of the unit will flash
13
such as stopping in a place on the
window or in the corners, what do I
do?
The product may get into trouble when
cleaning the door and window glass. In
such cases, it will try to get out of
trouble; if it fails, your assistance will
be needed. First, press RESET button
to restart the product and the product
should start cleaning again.
Can WINBOT completely clean the
.
14
corners of the window glass?
WINBOT is pro gra mme d to cl ean t he
windows as good and eff ici ent ly as
possible. Ther e may b e som e
circumstances that corners may not be
totally cleaned. With the Remote, you
can take control of WINBOT when i t has
finished cleaning the window and
drive it to those spots that need to
be attended to. We f eel t hat t his w ill
satisfactorily resolve your problem.
Should you still encounter some
situations that have not been properly
addressed to your satisfaction, we ask
that you contact our Service
Department where a Tec hni cia n can
properly address your specific
problem or question. Or call our
service number.
17
Page 37

Live Smart. Enjoy Life.
WIN BOT7S -010I M2012 R08
 Loading...