

Page 1

XP Manual
Preface_________________________________________________2
Chapter One: THE GUIDED TOUR__________________________5
Chapter TWO: ON THE ROAD--Battery Use XP________________23
Chapter THREE: SETTING UP BASE CAMP__________________37
Chapter FOUR: GREAT COMMUNICATIONS_________________44
Chapter FIVE: UPGRADES_________________________________49
Chapter SIX: CONFIGURING YOUR SYSTEM________________55
APPENDIX A: TROUBLESHOOTING & MAINTENANCE______64
APPENDIX B: SPECIFICATIONS___________________________81
Page 2

XP USER'S MANUAL
This manual is copyrighted with all rights reserved. No part of this manual may be copied
without the written consent of the manufacturer.
This publication may include technical inaccuracies or typographical errors. The manufacturers
reserve the right to make improvements or changes to the product described herein at any time.
Any changes will be incorporated into new editions of this publication.
© 1994
Version 1.1
Products mentioned in this manual are mentioned for identification purposes only. Product
names appearing in this manual may be trademarks or registered trademarks of their respective
owners.
WinBook and WinBookXP are registered trademarks of Micro Electronics Inc.
WinBook Computer Corporation is a subsidiary of Micro Electronics Inc.
MS-DOS and Windows are trademarks of Microsoft.
Page 3

FEDERAL COMMUNICATIONS COMMISSION (FCC) STATEMENT XP
This equipment has been tested and found to comply with the limits for a class B digital device,
pursuant to Part 15 of the FCC Rules. Their limits are designed to provide reasonable protection
against harmful interference when the equipment is operated in a residential installation. This
equipment generates, uses, and can radiate radio frequency energy, and if not installed and used
in accordance with the instruction manual, may cause harmful interference to radio
communications. However, there is no guarantee that interference will not occur in a particular
installation. If this equipment does cause harmful interference to radio or television reception,
which can be determined by turning the equipment off and on, the user is encouraged to try to
correct the interference by one or more of the following measures:
Reorient or relocate the receiving antenna.
Increase the separation between the equipment and receiver.
Connect the equipment into an outlet on a circuit different from that to which the receiver is
connected.
Consult the dealer or an experienced radio TV technician for help.
Notice:
1. ) Any changes or modifications not expressly approved by the party responsible for
compliance could void the user’s authority to operate the equipment.
2. ) Shielded interface cables and AC power cord, if any, must be used in order to comply
with the emission limits.
Page 4

MANUAL CONVENTIONS
This manual uses the following conventions:
When we refer to key commands, the name of the key is enclosed in single quotes, e.g. ‘Esc’.
If a key command is incorporated into a sentence, where the name of the key has previously been
mentioned (in single quotes, to separate it from non-technical text) we will forgo the quotes.
When you must use several keys to activate a command, the keys have a plus sign between them,
e.g. ‘Ctrl’ + ‘Alt’ + ‘S’.
Command lines you must type in will be enclosed in quotation marks, don’t type the quotes
when you type the command.
Comments in the gray sidebars serve to draw your attention to special procedures, warning, or a
additional information. Especially important information is indicated by this icon:
Page 5

CHAPTER ONE: THE GUIDED TOUR
[WinBook XP]
This chapter contains everything you need to get started using your WinBookXP. Take a look at
it before you go racing for the power switch and we’ll save you a little time. We’ll go over what
you’ll pull out of the box, what everything is, and how to connect things so you can be up and
running in no time. You can use your WinBookxp right out of the box after you do just a few
things, so, here we go.
Unpacking
When you open your WinBookXP shipping carton you’ll find several items – including this
manual, which of course you looked at before you did anything else, right? The rest of the
goodies are all carefully packed to protect them during shipping – and reshipping – so go easy on
the packing materials in the box and don’t throw anything away. You’ll need the whole setup
later should you ever need to ship your computer for upgrades, service, or anything else. Take
everything out to make sure that what should have come with the compute is there. There’s a
quick visual guide on the next pages, for you to refer to . In addition to the computer and its AC
Adapter and power cords, there should be software packages with manuals and disks. Once
you’re sure everything’s there, go ahead and take a look at the computer. If anything is missing,
contact the number listed on the "Read-Me-First"sheet, which is packed with the WinBookXP.
This sheet has the information you'll need to contact Customer Service for your version of the
WinBookXP.
What’s in the WinBookXP Box?
When you unpack your computer you should find the following things:
• WinBookXP notebook computer
(battery installed).
• AC Adapter
• Power Cord
• PS/2 Port Duplex Adapter
• This Manual
• PCMCIA Reference Manual
• Utility Floppy Disks
• Additional Floppy Disks and manuals for sound card and fax modem options, if installed
Page 6
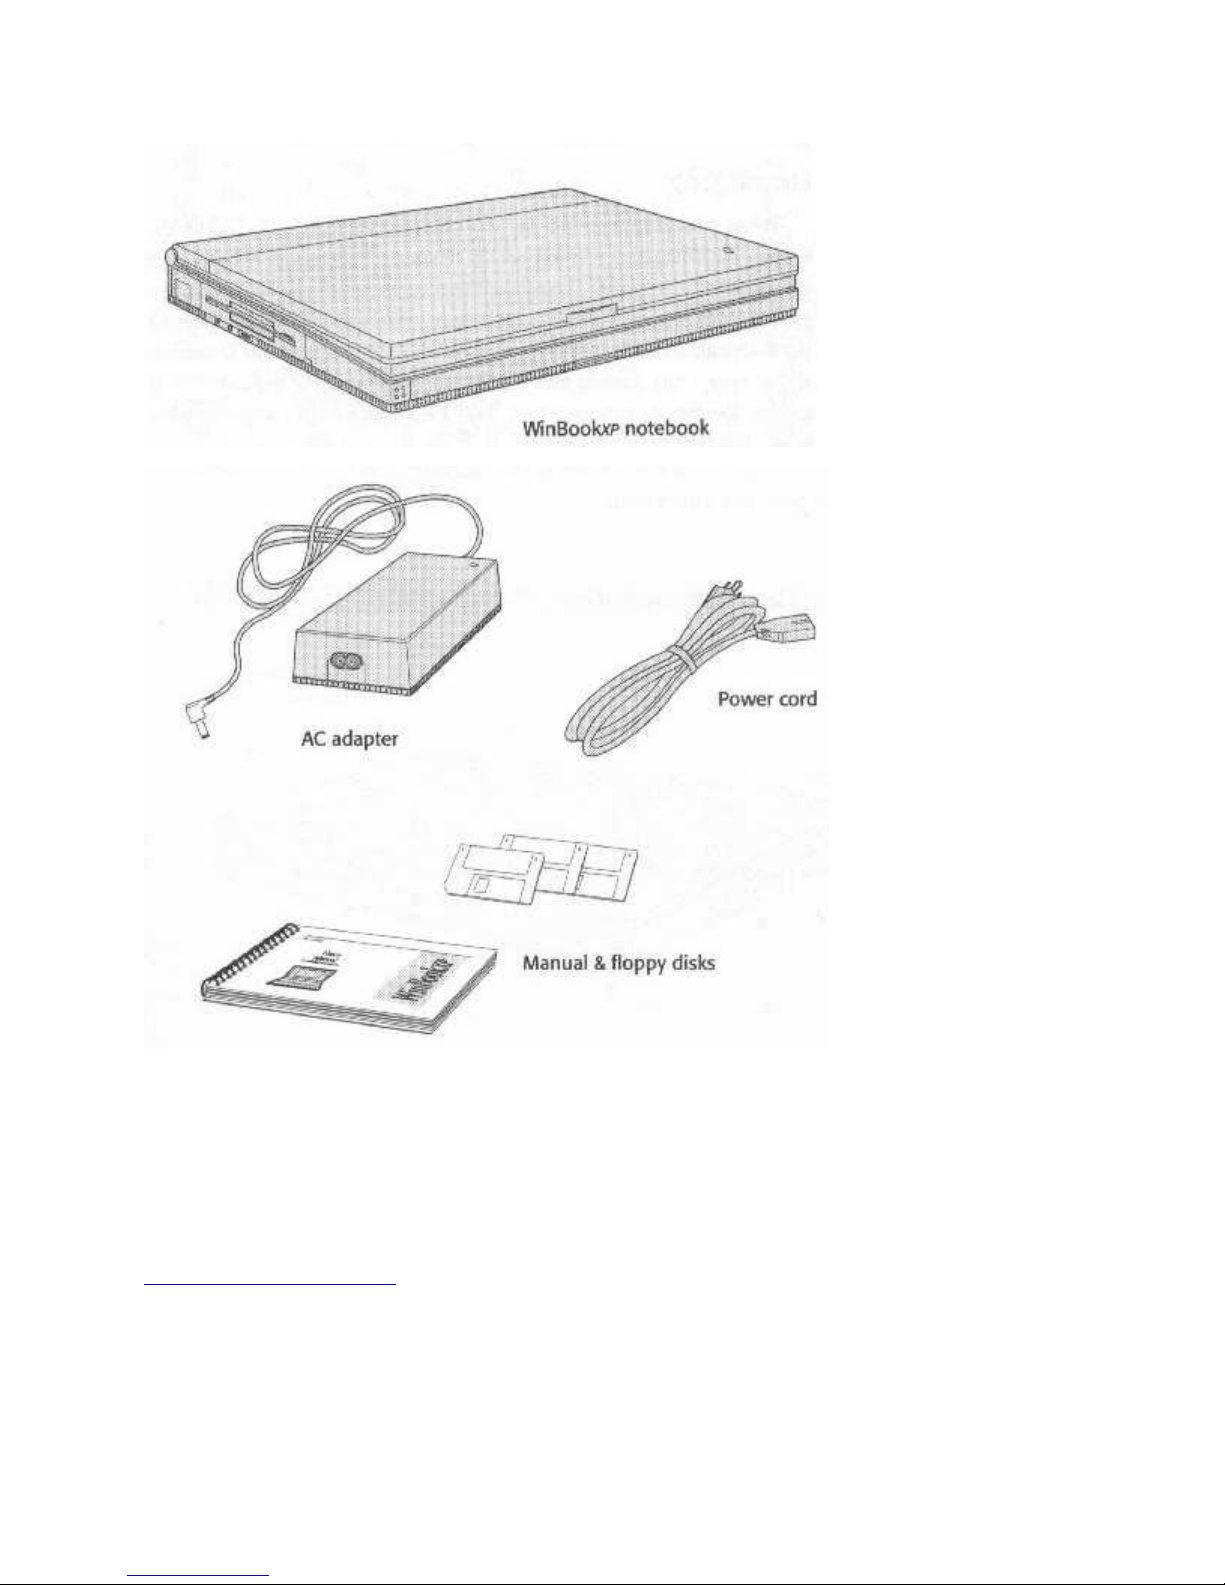
Fig. 1: The Basic WinBookXP Package
Anything Missing or Damaged?
Contact the number listed on the “Read-Me-First” instructions packed with your WinBookXP.
Important: Don’t plug the notebook in yet! See pages about preparing the battery first.
A Walk Around the Block
Page 7
A Walk Around The Block
[WinBook XP]
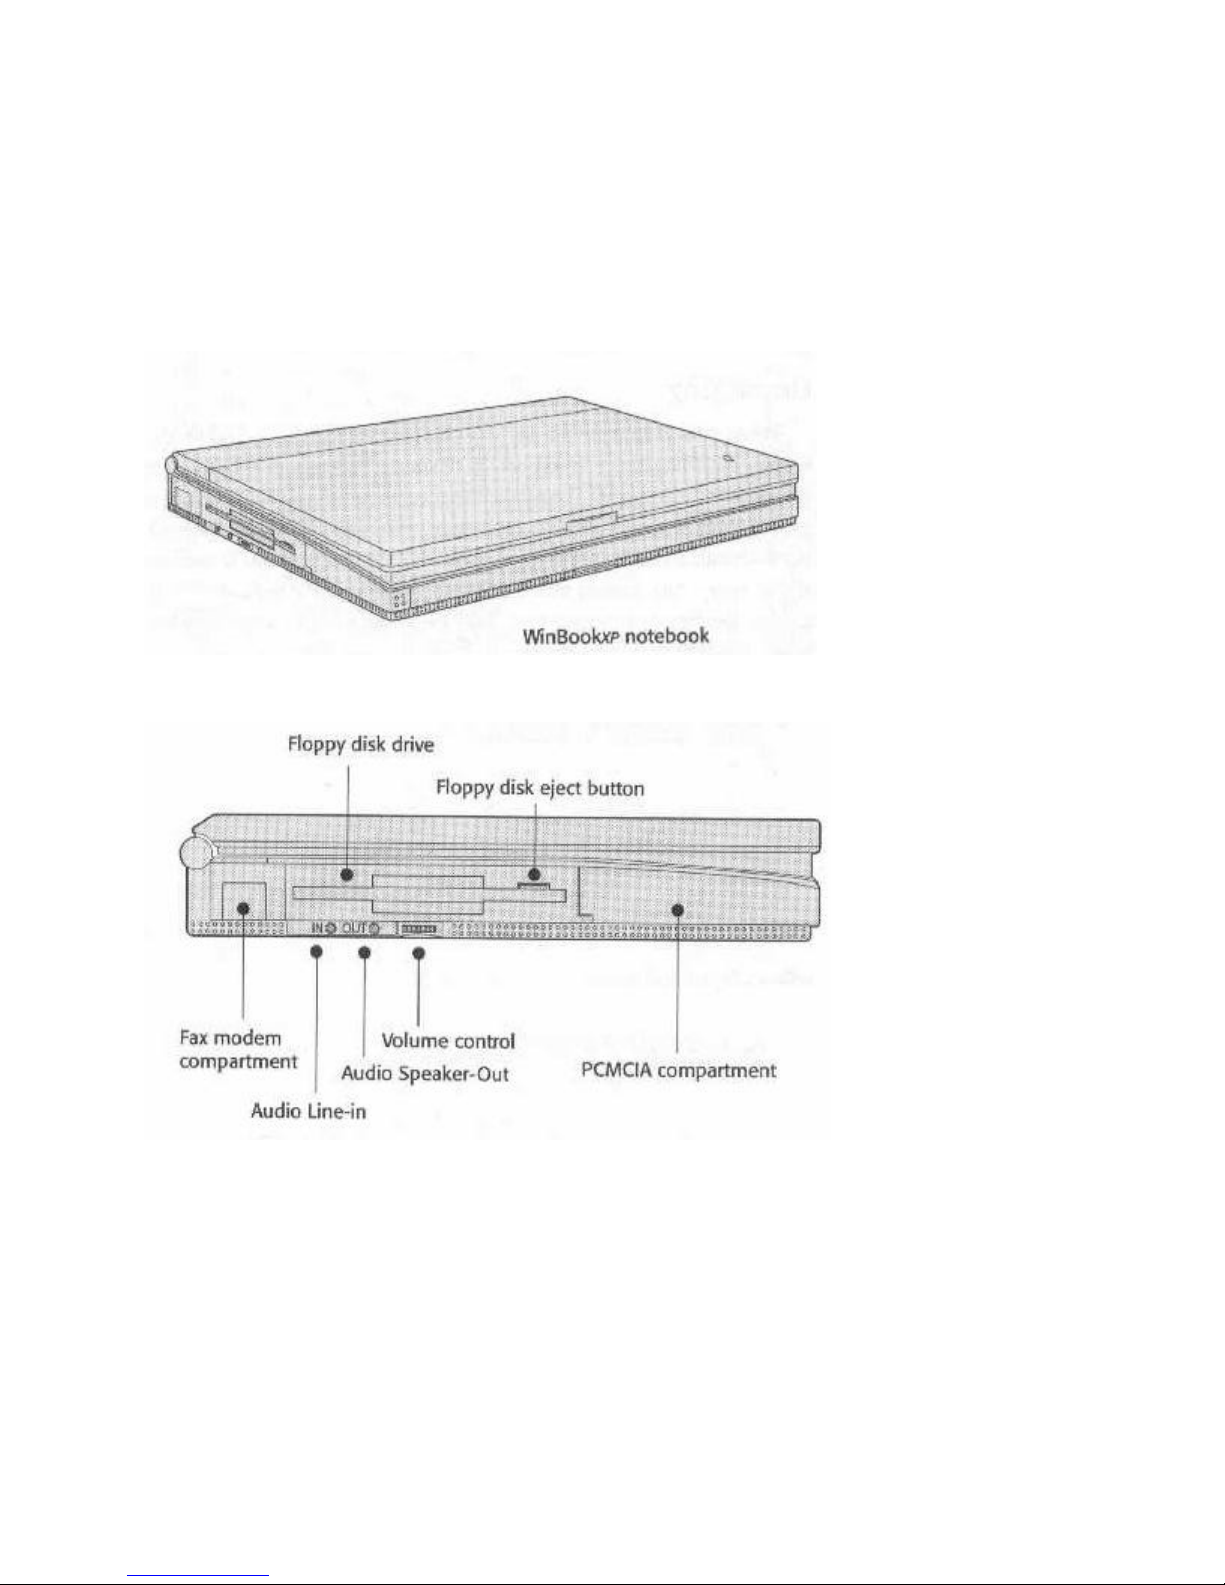
Now that you’ve got everything unpacked, let’s take a quick look at where things are on the
exterior of the computer. The following illustrations point out what’s what.
Fig. 2: Front-Left View
Fig. 3: Left View Close Up
Left Side Controls & Ports
The floppy disk drive has an eject button. The button pops out when you put a disk in the drive.
Push it in to eject the disk. When the drive is active, the activity icon on the LCD status panel
flashes.
The audio connectors and volume control work with the optional audio card. A small panel that
slides out from the bottom covers the fax modem port.f
Page 8
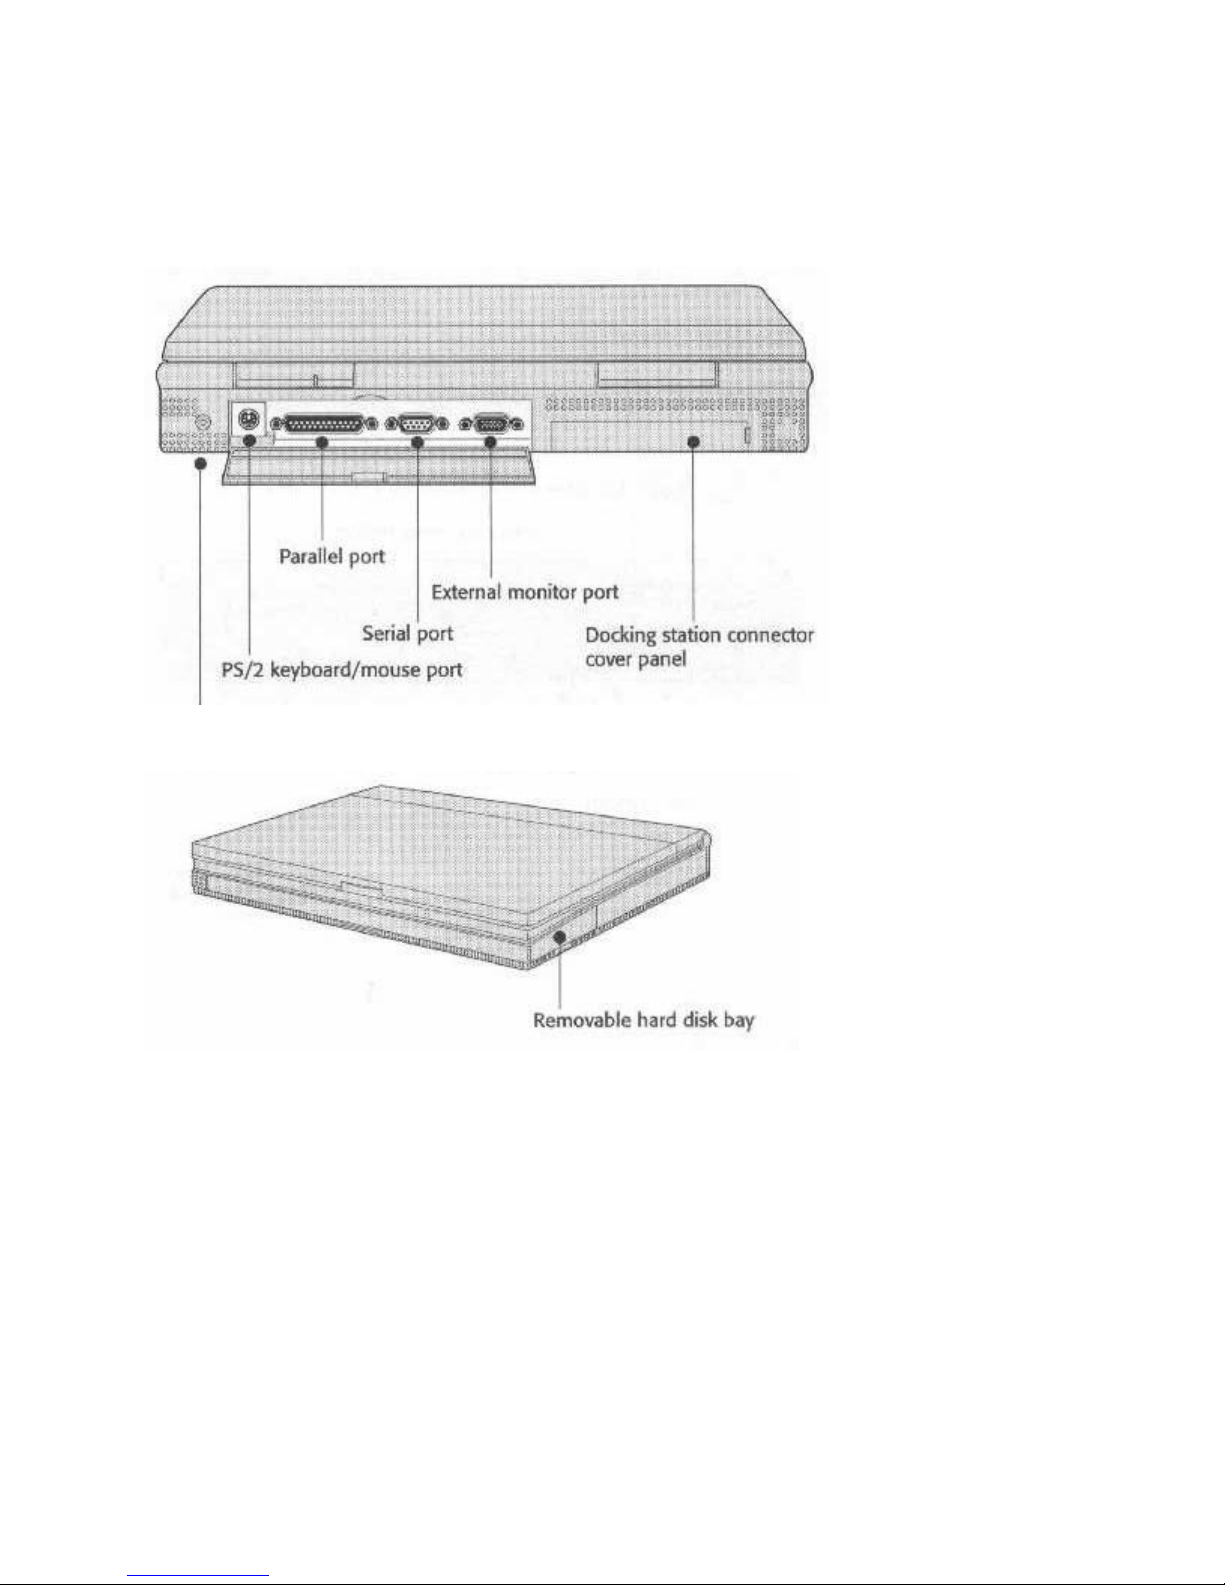
Port Covers
A hinged access panel that drops down covers the rear ports. The Docking Station connector has
a removable cover that pulls off.
Fig. 4: Rear View
Fig. 5: Right Side View
Page 9
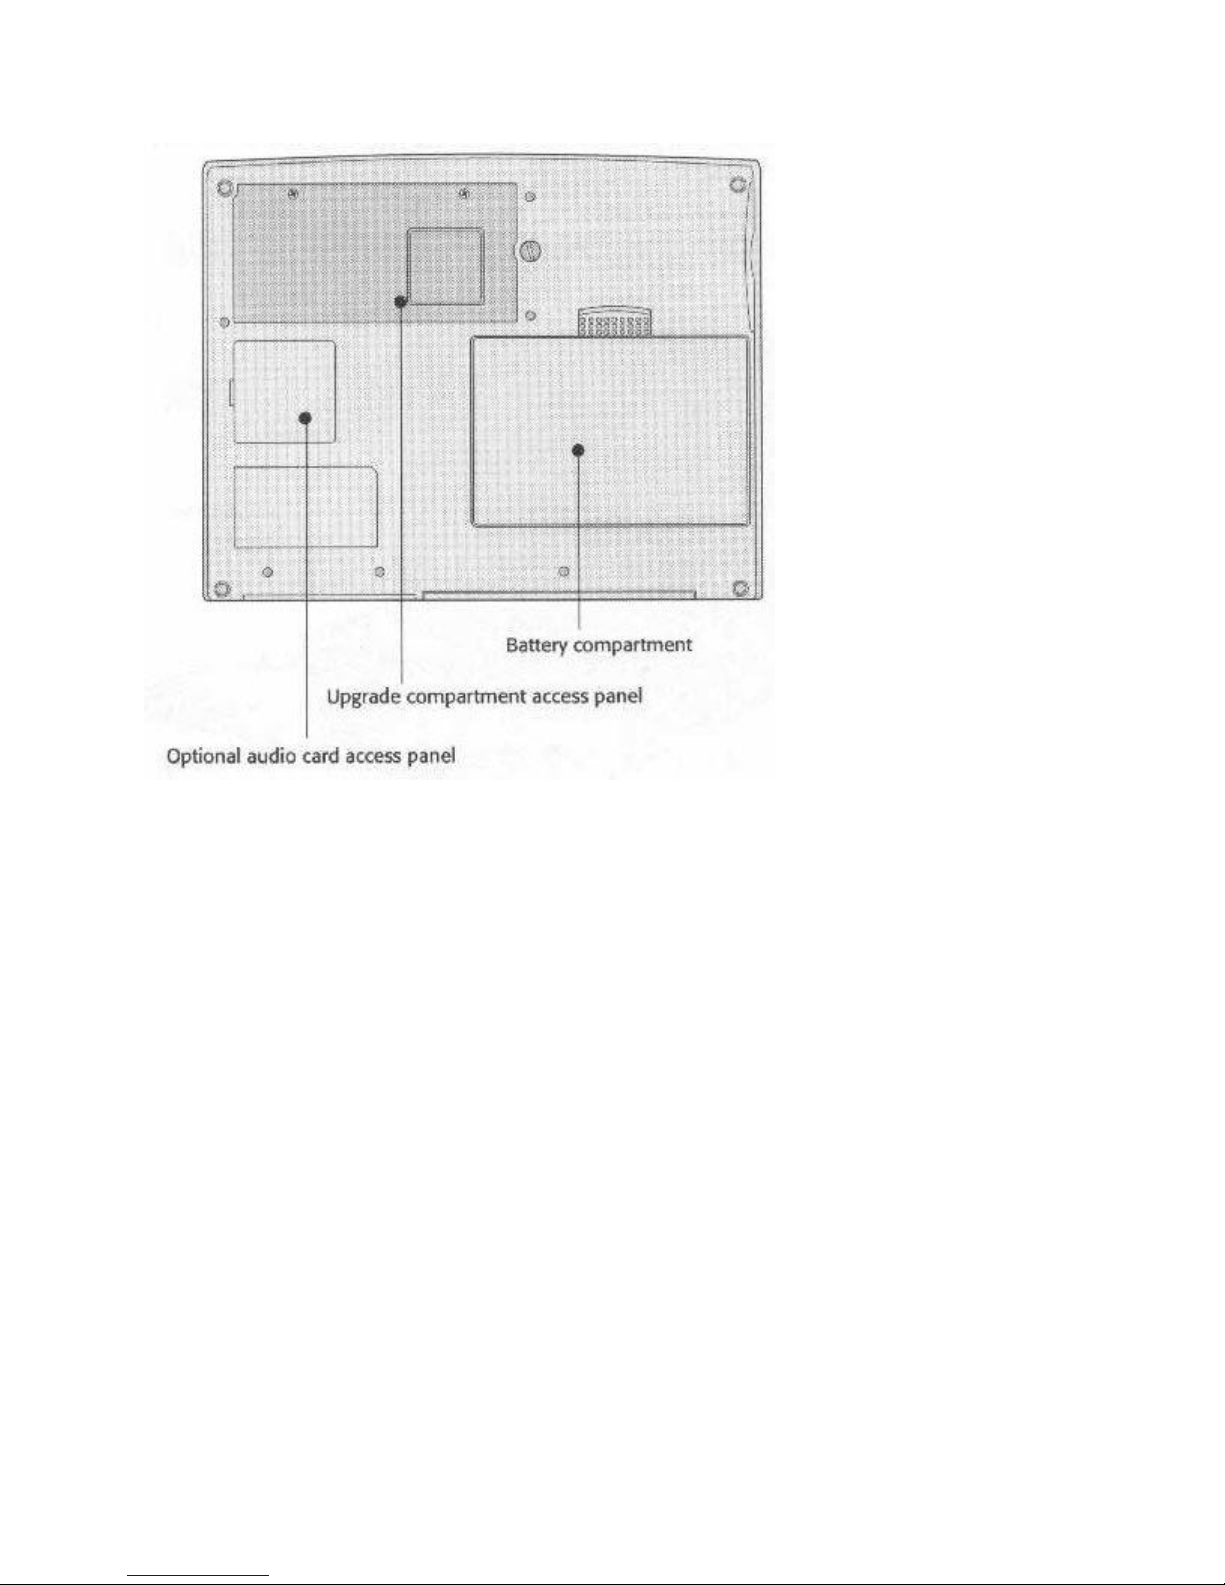
Fig. 6: Underside View
Underside Compartments
The battery, audio card, and memory compartments are on the underside of the computer.
For more information, see Chapter 4 regarding the audio card and Chapter 5 about memory and
hard disk upgrades.
Note
The battery pack has a shipping insert you have to remove before you use the computer:
1. Push the latch slide away from the battery to release it
2. Remove the battery
3. Pull out the insert
4. Replace the battery
The WinBookXP opens like most other notebook computers; there’s a hinge at the back edge
and a latch at the front. Push in on the latch release bar at the front and raise the top half. The
following illustrations show where things are.
Page 10
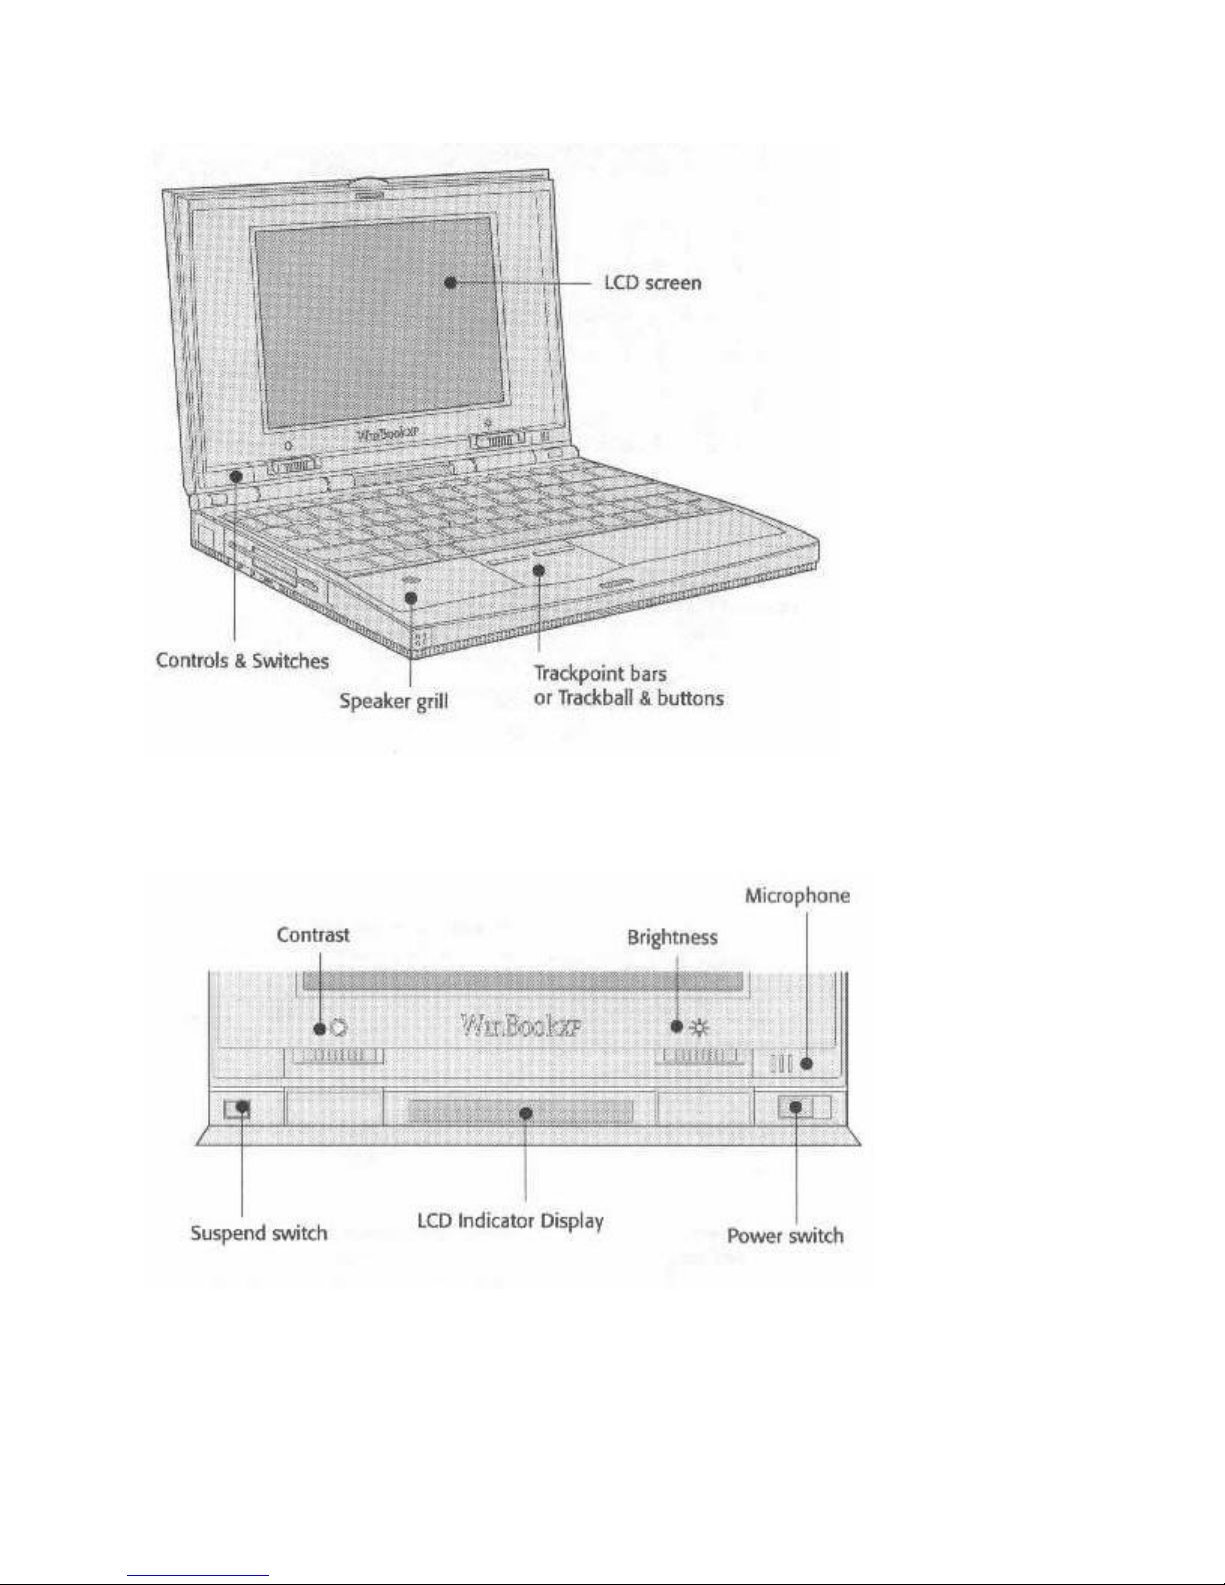
Fig. 7: Open View
The Trackball Model
Fig. 8: Hardware Controls and Indicators
Switch & Control Operation
All the controls and switches except audio volume are at the cover hinge. The power switch and
Page 11

contrast & brightness controls slide left/right. The suspend switch is a push button.
Fig. 9: LCD Indicator Panel Icons
The LCD Indicator Panel
The LCD indicator panel displays system status information. There are twelve icons, which are
explained on the next. The icons display, flash or change appearance to indicate the current
status of the part of the system they represent.f
LCD Indicator Panel Icon Functions
Power On
Indicates the computer is turned on, using either AC or battery.
AC Adapter connected
Indicates the computer is connected to an AC power source.
Suspend state activated
Indicates the computer is in Suspend-to-Ram mode.
Power Management
Indicates power management is enabled on the Power Management Setup page of the Setup
program.
Battery Gauge
Four bars and the cap show the charge level. With AC Adapter connected, it indicates charge
progress. Running on battery power, it indicates the remaining charge.
Floppy Disk Drive active
Flashes when the floppy drive is in being accessed.
Hard Disk Drive active
Flashes when the hard drive is in being accessed.
PCMCIA Indicator
Arrows show PCMCIA slots in use. Arrows indicate upper and lower slots. Only the bottom
arrow displays for Type 3 cards.
Page 12
Num Lock
Indicates the embedded numeric keypad is turned on. Press the ‘Num Lock’ key once to turn it
off.
Caps Lock
Indicates that caps lock is active. Press the ‘Caps Lock’ key once to turn it off.
Scroll Lock
Indicates that scroll lock is turned on. Press Fn and the insert/ScrLk key to turn it off.
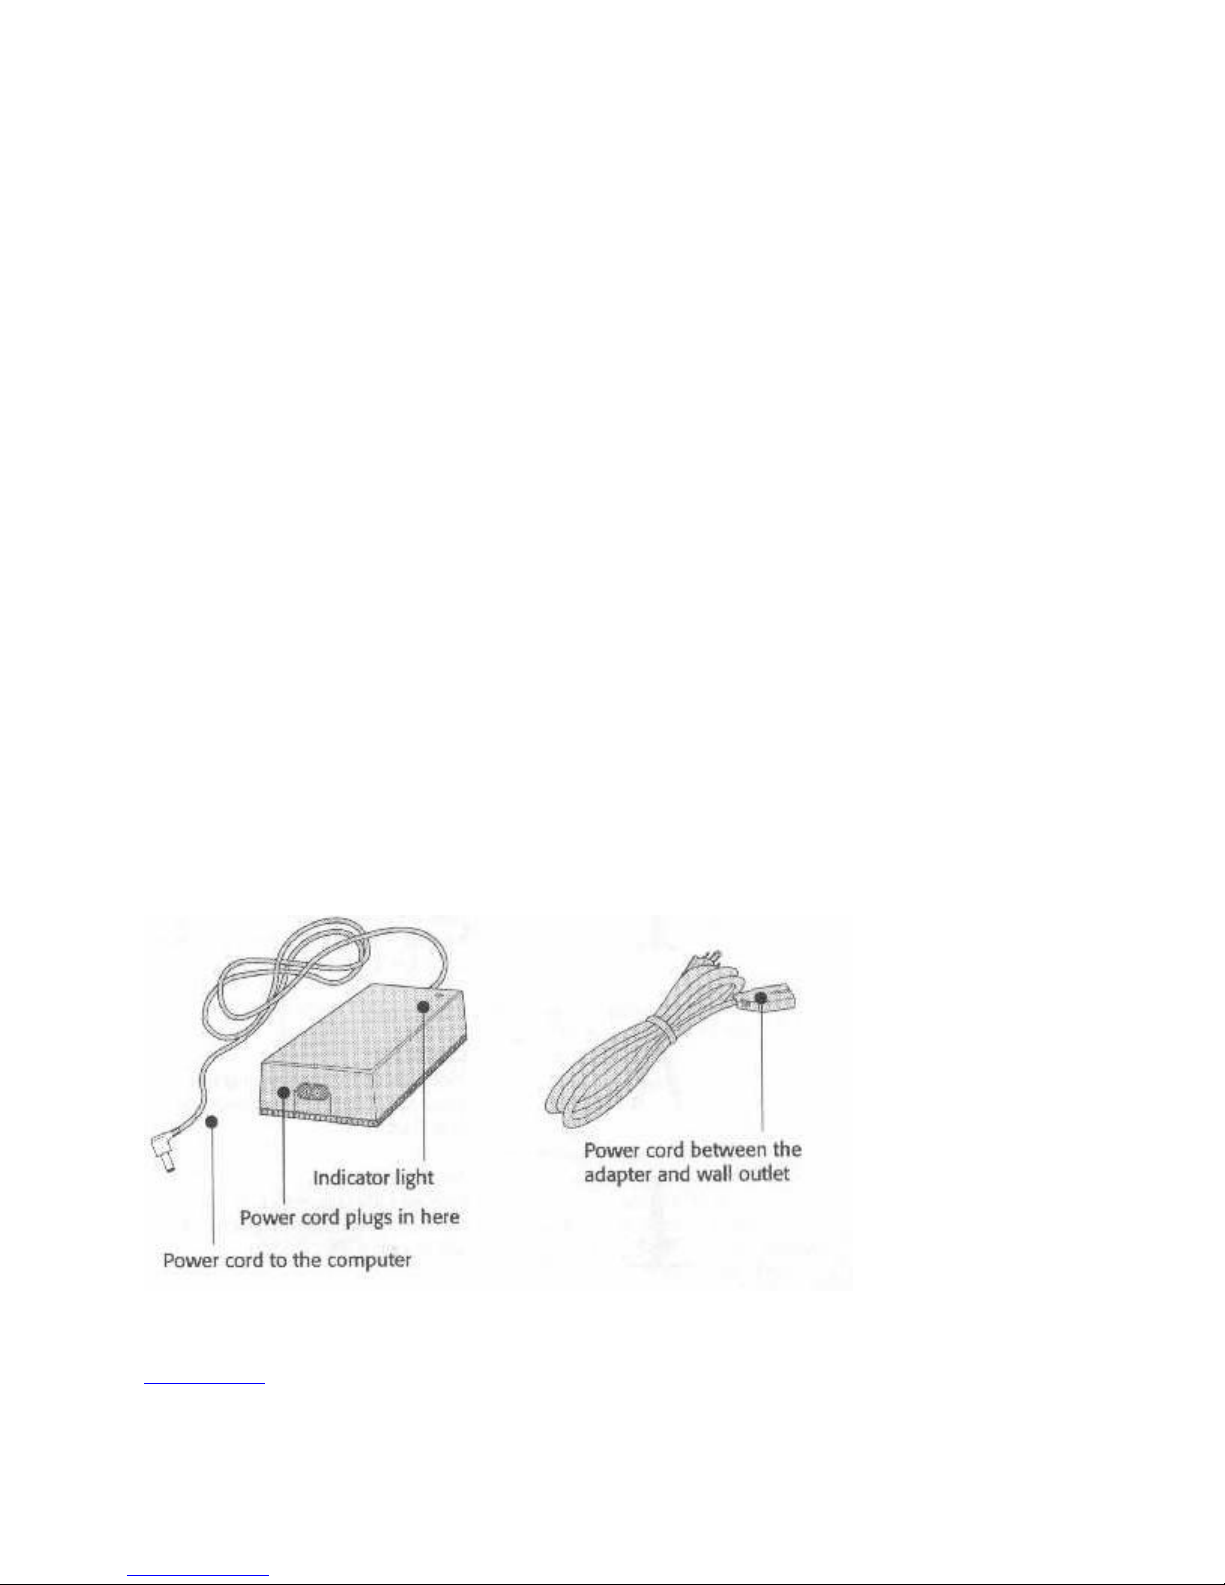
The AC Adapter
The AC adapter converts the alternating electrical current from your wall outlet to the direct
current the computer uses. There is a cord permanently attached to the adapter, with a connector
jack that plugs into the computer. A power cord comes with the adapter. One end is designed to
plug into the adapter; the other is a standard plug for your wall outlet or power strip. We
recommend using a surge protector. The AC adapter is not designed to protect the computer from
power spike and surges. Use a surge protector to protect against power fluctuations.
You can use the AC adapter with any AC source from 90 to 260 Volts and 50 to 60 Hz. It is an
auto-switching adapter; with the proper plug adapters you can use it anywhere that the electricity
falls within these electrical specifications.
The AC Adapter Components
The adapter power light should come on when you connect the adapter to an AC power source. If
the light doesn’t come on, there’s either a problem with the adapter or the power outlet.
Fig. 10: Adapter and Power Cord
Ready to Go
Page 13

READY TO GO
Now you’re ready to start using the computer. This section covers how to charge the battery, use
the computer controls, including keyboard commands, and the software configuration.
First Step – Charge The Battery
When you get your system, the removable battery pack is already installed in the computer. To
protect the battery and the computer during shipping, a protective insert blacks the connection
between the battery and the contacts in the battery compartment. You must remove the insert
before you use the computer. Also, we strongly recommend that you charge the battery before
you use the computer the first time. Although the battery is conditioned at the factory, NickelMetal Hydride (NiMH) batteries perform best if you fully charge them before you use them. We
recommend the following procedure:
1. Turn the computer over so you can see the battery compartment.
2. Remove the battery pack by pressing the release latch away from the pack so that it pops
up and you can pull it out.
3. Remove the insert and replace the battery.
4. Connect the AC adapter to the computer; plug the power cord into the adapter first, and
then into an electrical outlet.
5. Charge the battery for two and a half hours with the computer off or in suspend mode,
five hours with the computer on, or, in either case, until the top cover status light stops
blinking.
You can charge the battery while you are using the computer on AC power, but it will take much
longer, and you must make sure to fully charge the battery the first time. The easiest way to do it
is just to charge the battery first before you use the computer.
The Top Cover Status Light
The status light on the top cover is an LED that indicates battery charging and system suspend
status when the notebook is closed. The color of the light changes to indicate what is happening:
Flashing red – Battery charging
Solid red – Battery fully charged
Solid green – System suspended to RAM
Flashing amber – System suspended, Battery charging
Solid amber – System suspended, Battery fully charged
Hit The Switch
Page 14

Turn on the computer by sliding the power switch to the right. Some icons on the indicator panel
will light or flash as the system powers up.
What You'll See
When the system starts up, some text will appear on the screen while the computer tests itself
and processes the config.sys and autoexec.bat files. Windows will then load automatically.
If There's A Problem
It’s not likely, but in the event that you encounter a problem when you turn the computer on, the
solution will probably be relatively simple. There are a few suggestions here of what to look for.
If these aren’t enough, refer to the Troubleshooting section in Appendix A to see if you can work
out what the problem is. If you can’t solve the problem alone, contact the umber listed in the
“Read-Me-First” sheet that came with the system.
When you turn the computer on, it does three things. It checks itself (the Power-On Self Test),
loads DOS with its Config.sys and Autoexec.bat configuration files, and then loads Windows.
If the computer doesn’t complete the process and successfully load Windows, or you get error
messages, try turning the computer off then on again to see if the problem clears up. Also, check
to make sure the screen contrast and brightness controls are adjusted so you can see the screen
clearly. If you’re using the AC adapter, make sure the connections in the chain from the
electrical outlet to the computer are secure. If you’re using battery power, make sure the battery
is charged.
Pointing Devices
Page 15

POINTING DEVICES - TRACKBALL OR
TRACKPOINT
A mouse is the pointing device most people are familiar with. Alternate devices perform the
same function. The WinBookXP comes with one of two pointing device options.
Depending on which model you have, there’ll be either be a trackball and buttons installed in the
center of the palm rest, or there’ll bee a TrackPoint pointing stick in the center of the keyboard
and two buttons mounted in the center of the palm rest. They both function as Microsoft Mousecompatible pointing devices and can be configured by double clicking on the Mouse icon (the
rodent kind) in the Windows Control Panel.
When you get your WinBookXp, it will also be set up to run a DOS mouse driver. This means
you can use the pointing device with DOS programs that support a mouse, including the DOS 6.2
utilities that have mouse support.
Trackball Use
You control the built-in trackball by rolling the ball around to direct the mouse cursor on the
screen. Use the two buttons below the Trackball like you use left and right mouse buttons.
Using the TrackPoint
To use the TrackPoint control stick place your index fingertip on the stick and direct the mouse
cursor by gently pressing the stick in the direction you want the cursor to go. It doesn’t require
much force. The two bars in the center of the palm rest below the keyboard are equivalent to the
left and right mouse buttons.
The TrackPoint has a replaceable rubber cover. You get spares with the computer so you can
replace the cover if it wears out, or if you want to use a black cover instead of the standard red
one.
The Keyboard
Page 16
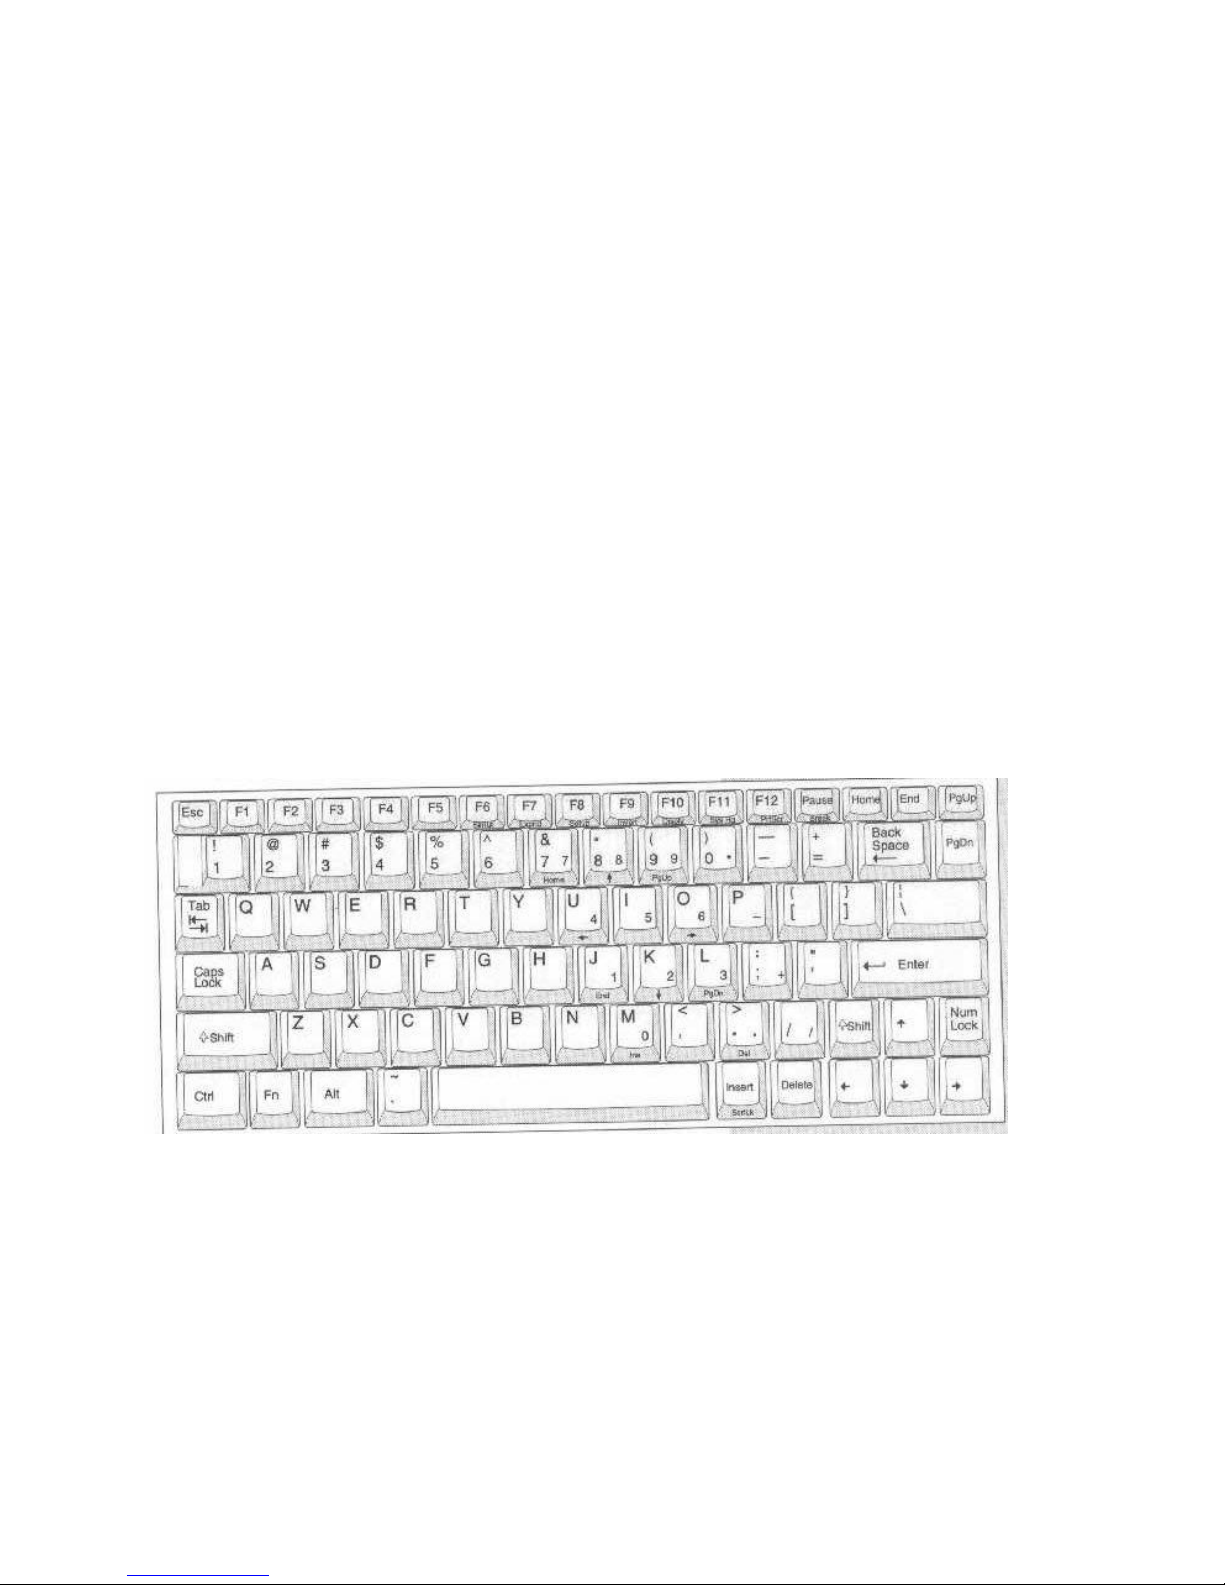
THE KEYBOARD
The keyboard has all the standard computer typing and control keys. It also has a numeric
keypad and some other key functions “embedded.” The standard letter, number and symbol keys
are printed in white on the key-tops. The computer control and cursor keys are printed in yellow.
The embedded keys are printed in gray or teal.
The embedded numeric keypad characters are printed in gray on the lower right-hand corner and
the front of the keys used. They reproduce the functions of the numeric keypad on an IBM 101type keyboard, which has a dedicated keypad. To use the embedded keypad, turn on Number
Lock by pressing the ‘Num Lock’ key once. With Num Lock on, the numeric keys are active. If
you hold down either Shift key as well, the keypad cursor control functions, printed in gray on
the front of the keys, are activated. The Num Lock function is disabled in the default system
Setup program configuration.
There are also some additional Fn-key activated functions printed in Teal on the front of some
keys. These include screen controls and a key to call up the power management setup screen.
The keyboard layout is the same for both the trackball and Track Point models, with the
exception that the TrackPoint control button sticks up out of the keyboard between the G and H
keys. The following figures show the keyboard layout and which keys are used by the embedded
keypad. There is more information on specific key functions in Appendix B.
Figure 11: Full Keyboard
Page 17
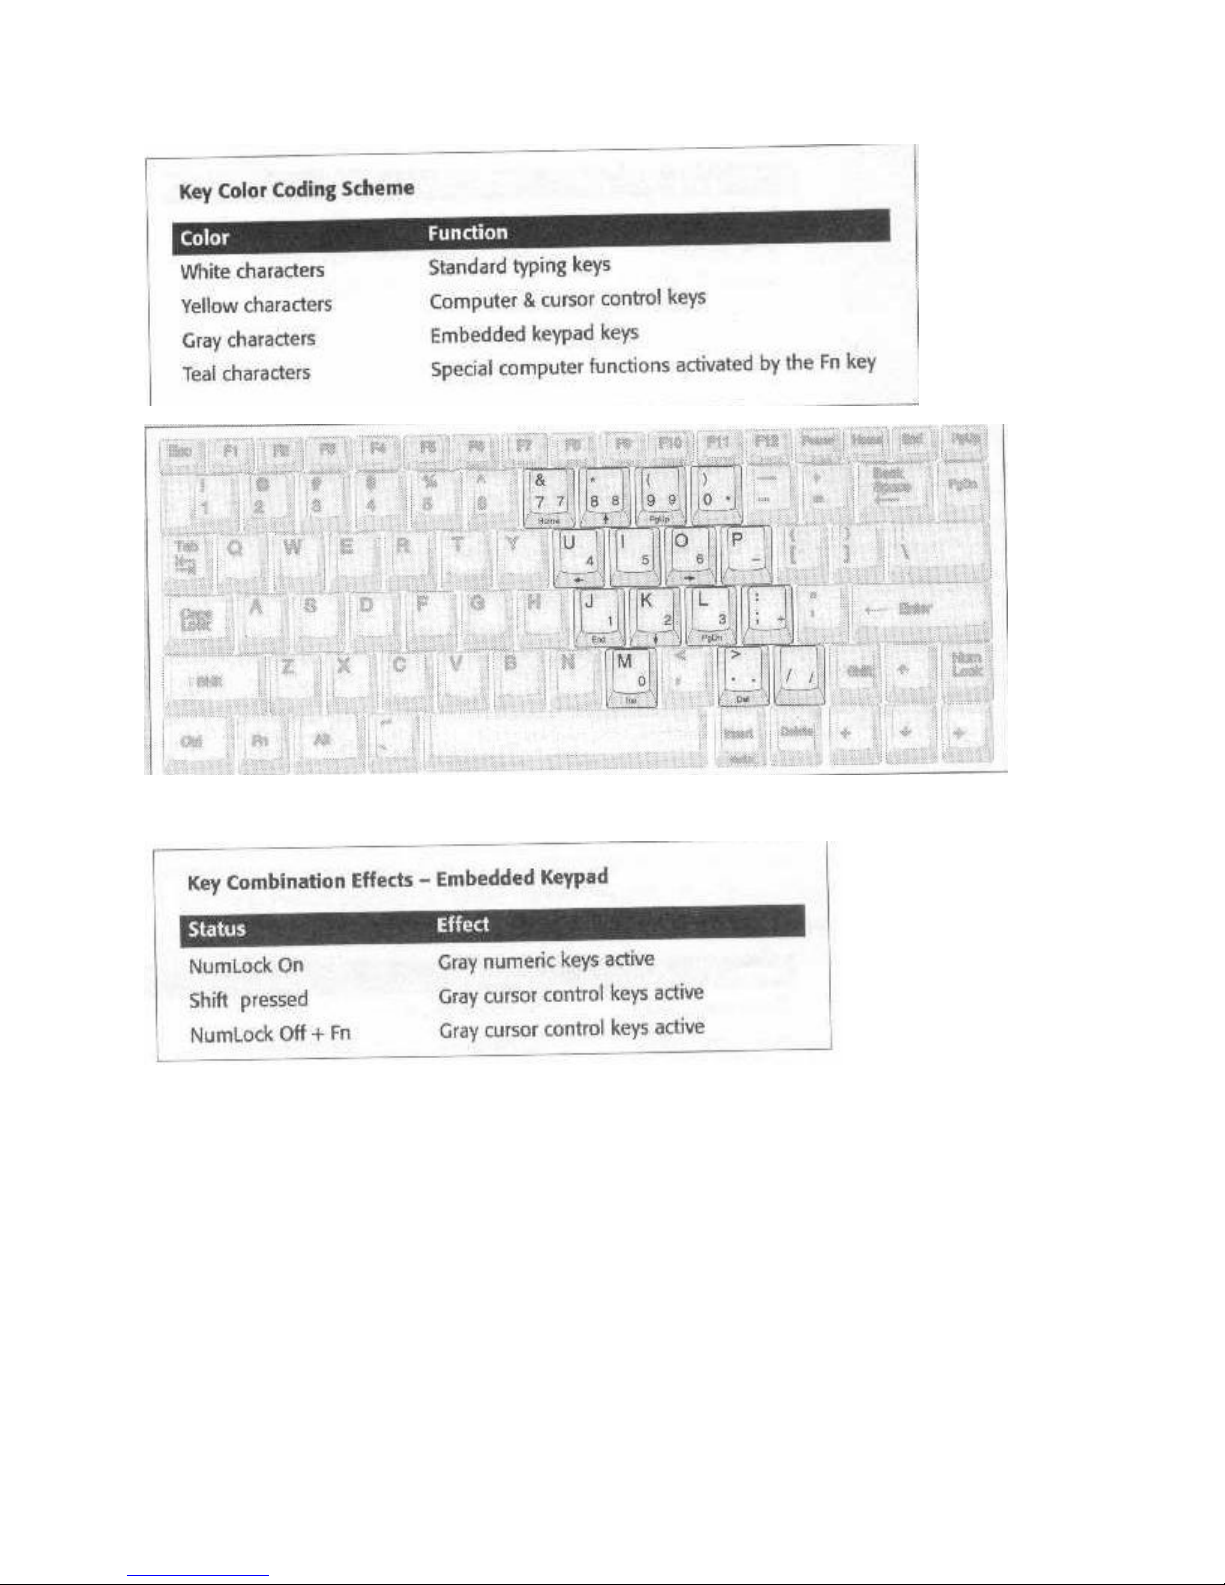
Fig. 12: Embedded Keyboard
Page 18
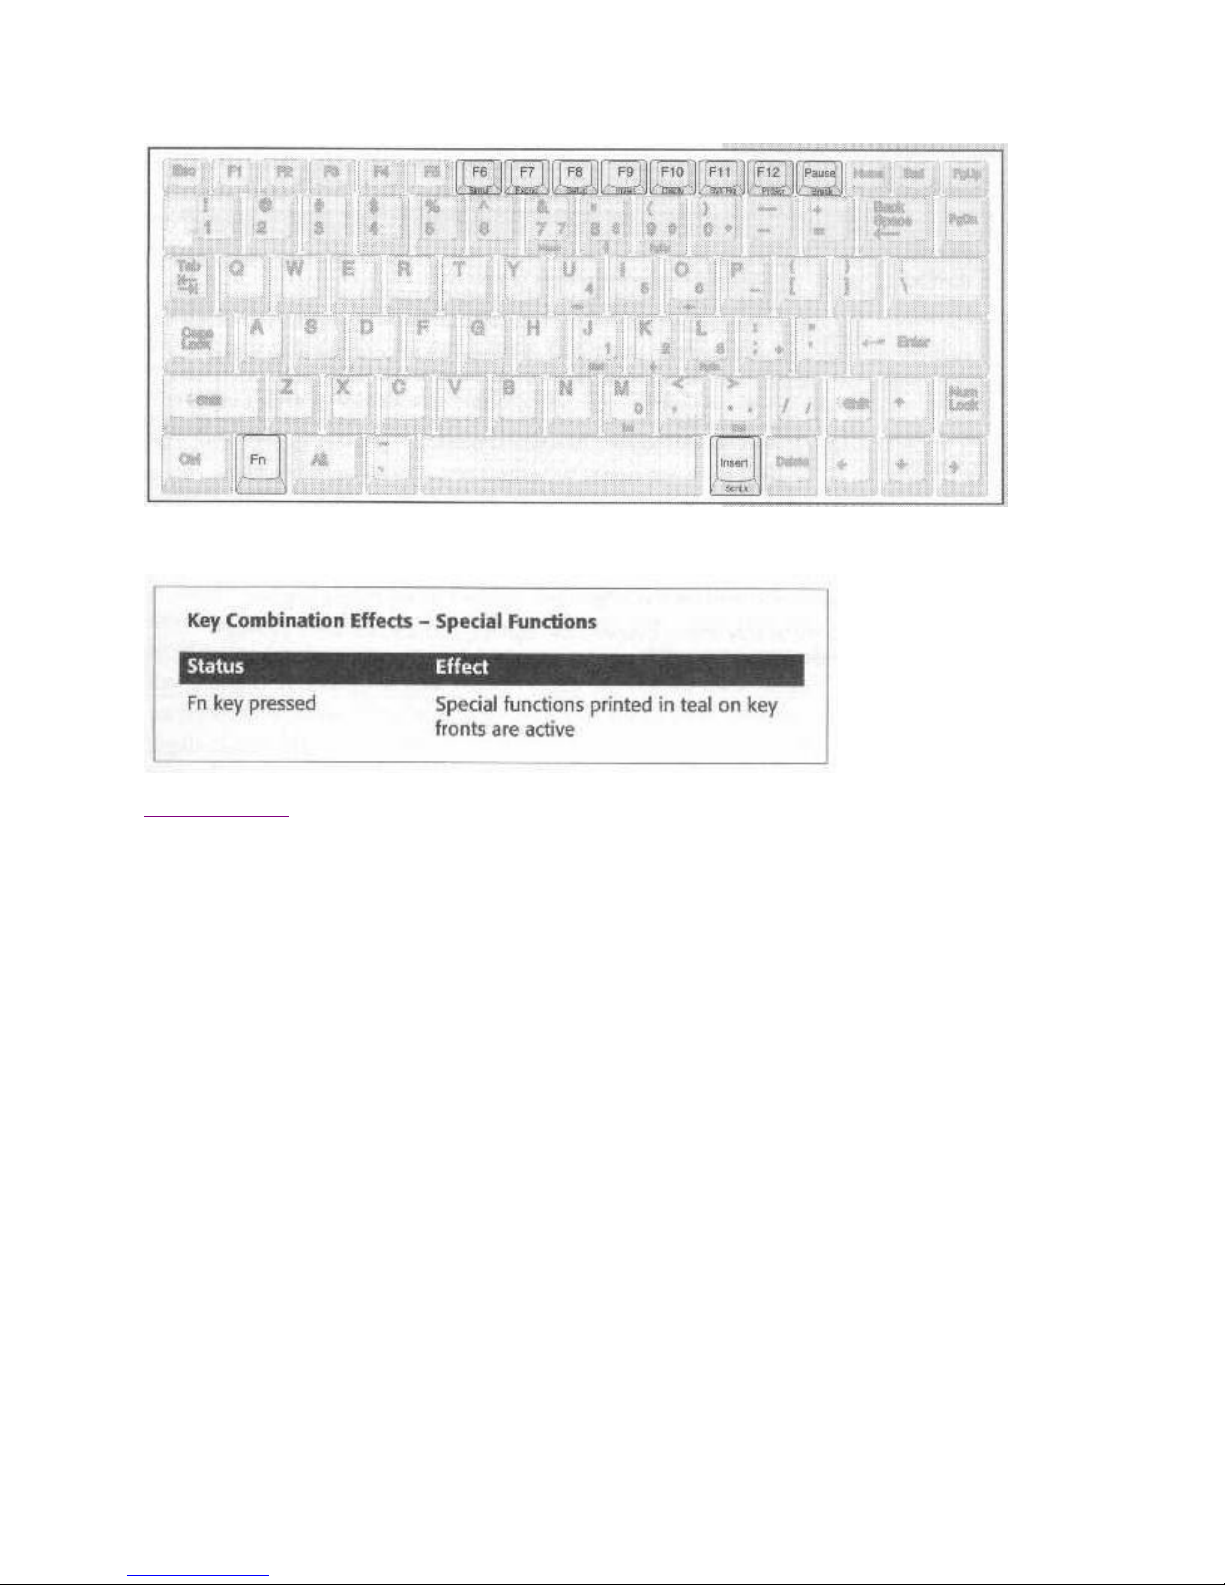
Fig. 13: Fn-activated functions
So Now What?
Page 19

SO NOW WHAT?
Now you’re up and running and you can start using your computer. Let’s briefly go over the
software that came with your system. If you purchased your WinBookXP with pre-loaded system
software, the hard disk has already been set up and all the software installed. If you purchased a
model without pre-loaded system software, refer to the “Read-Me-First” setup and initialization
guide for further instructions.
The Software You Get
Page 20

The Software You Get
[WinBook XP]
Most WinBookXPs come with pre-loaded software, including MS-DOS and Windows,
configured so that you can start using them right away. You don't have to do anything unless you
need to change the configuration, so you can install whatever application software you plan to
use right away. We recommend backing up the hard disk first, so that if the software installation
gets corrupted, you can restore the WinBook XP configuration. You do get the floppy disks for
all the software installed on the hard disk, so you could reinstall from master disk copies.
Backing up, however, is preferable to doing a generic installation from the software floppies
because you don’t have to then re-configure the system.
MS-DOS and Windows both come with a back-up utility, so you can use either one to backup
your hard disk onto floppy disks. Both programs are in your DOS directory. The DOS version is
called “msbackup.exe” and the Windows version is “mwbackup.exe”. You can run the DOS
version from the DOS command line by typing the name of the program and pressing the ‘Enter’
key. Run the Windows version from the “Run&ldots;” command in the File menu of the
Program Manager or by clicking twice on the MSBACKUP icon in the Applications group. Both
programs have Help files that explain how to use them.
WinBookXP Software (Pre-loaded systems only)
• Microsoft MS-DOS
• Microsoft Windows
• Logitech mouse drivers
• Western Digital display drivers for DOS and Windows
• PCMCIA software (card and socket services support PCMCIA 2.01 specifications)
• Phoenix PHDisk utility
There are Windows display drivers specific to the computer’s video display circuitry already
installed in the Windows System sub-directory and there are also display drivers for various
DOS programs installed in sub-directories on the hard disk. Video display drivers are explained
in more detail in Chapter 6.
To use the PCMCIA card feature, you must set up the basic software required to use PCMCIA
cards in general, as well as any software specific to the type of card you plan to use. We have
provided sample config.sys and autoexec.bat files that you can use or copy from to set up the
PCMCIA feature. There is some explanation of this in Chapter 4, and you should refer to the
PCMCIA Card Reference Guide that comes with the computer.
If you purchase either the audio card or fax modem option, their software and manuals are
packed with them. If you specified either of these options when you got your computer, the
hardware will already be in- stalled and the software installed on the hard disk drive. If you got
Page 21

them separately, you will need to install everything yourself. Refer to the manuals that come
with them for instructions on how to install the hardware and software. The audio card comes
with Windows sound drivers and utility software. The fax modem comes with WinFax Lite.
There is more information about these options in Chapter 4.
Installing More Software
Page 22
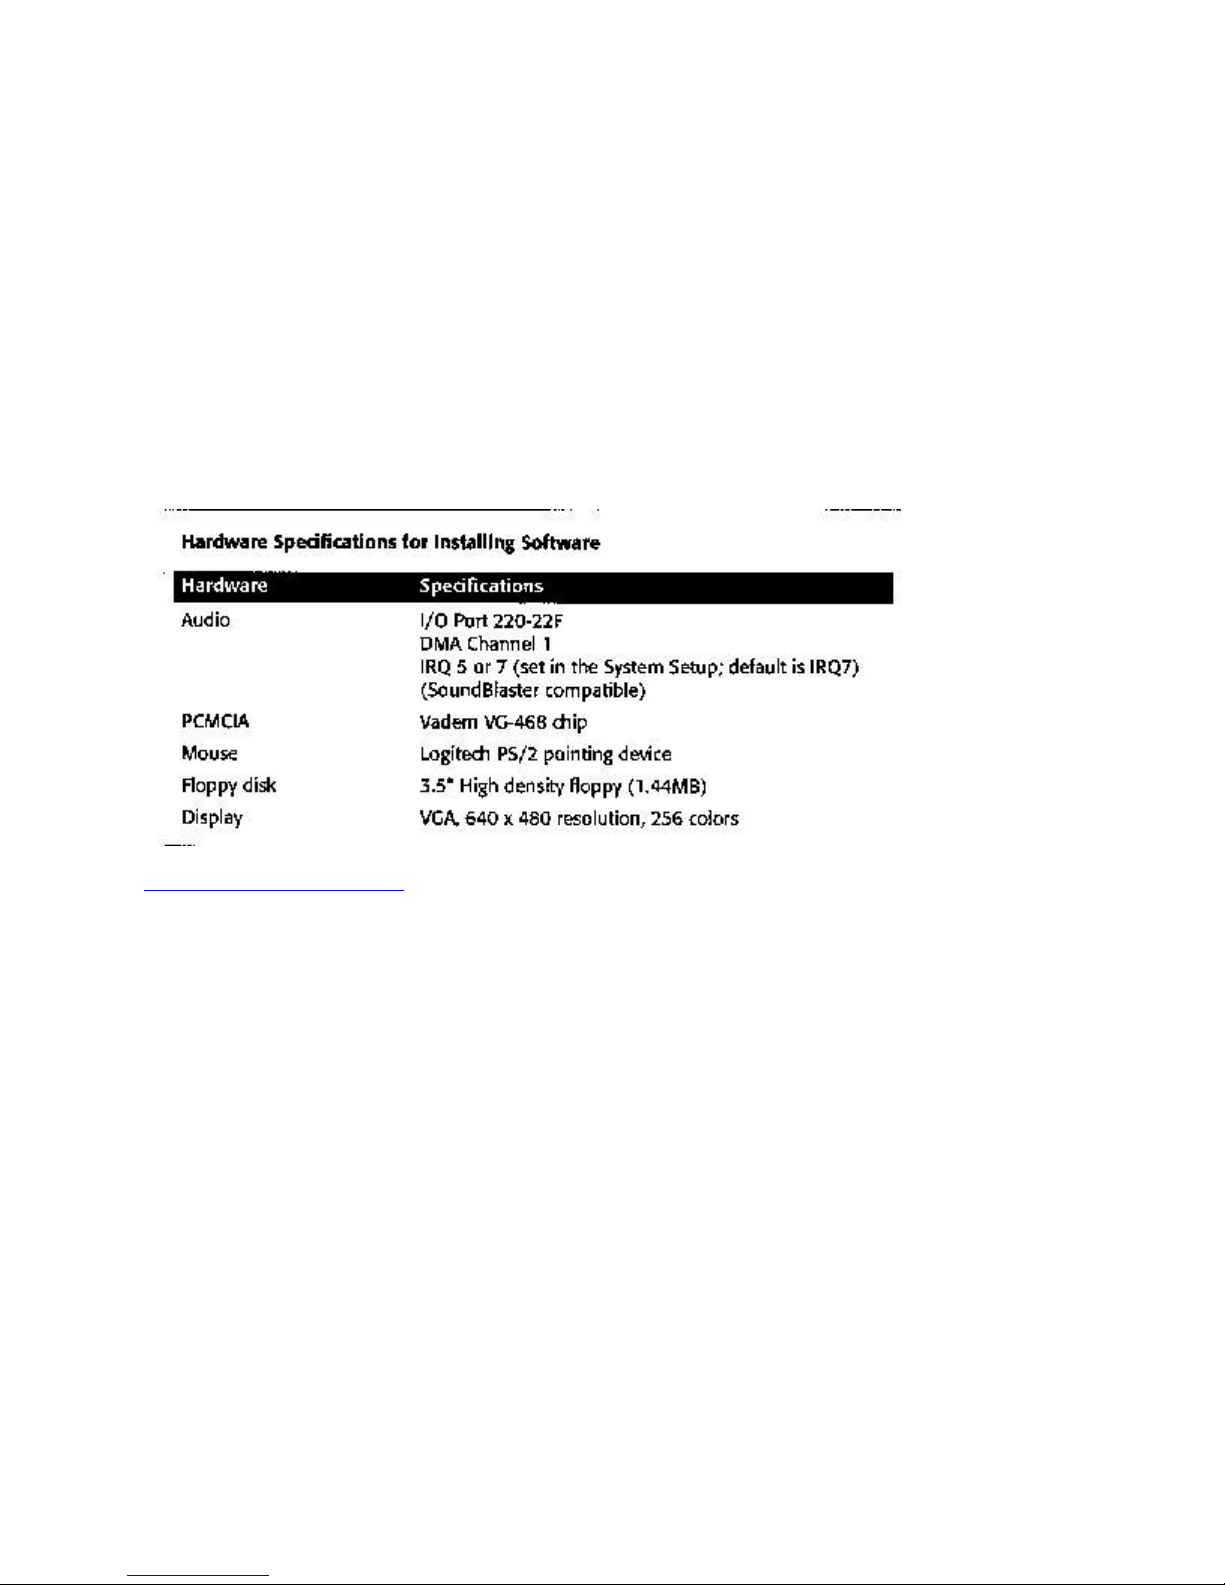
Installing More Software
[WinBook XP]
To install applications or utility software, follow the instructions that come with the software.
Most Windows programs install from within Windows. Install DOS programs from the DOS
command line. Many programs have “Install” or “Setup” utility programs that explain in detail
how to install the program and often allow you to customize the installation according to your
preferences, or by selecting which parts to install.
Some Windows and DOS programs request information about your system hardware during the
installation process. Refer to the specifications below for information you’re likely to need.
Chapter Two: On the Road
Page 23

Chapter Two: ON THE ROAD
This section covers running your computer on battery power, using the power management
features and some general precautions you should take when using your computer on the road.
BATTERY OPERATION
The battery pack inserts in the underside of the computer, and is already installed when you get
it. The pack is a set of batteries encased in a plastic shell, the bottom of which forms part of the
bottom of the computer. This section explains how to charge and exchange the battery, and
contains information on operating the computer on battery power.
Charging the Battery
You must charge the battery completely the first time you use it. This is explained in Chapter
One, so please go back and refer to the explanation if you missed it. Before you start, don’t
forget to remove the protective insert in the battery compartment by pulling it out. The battery
takes two and a half-hours to charge with the computer turned off, and stops charging
automatically when it is full. The battery gauge should show full when you first turn on the
computer after having charged the battery.
Normally, you should try to charge the battery when you aren’t using the computer. When you
use the computer with the AC adapter, the battery charges automatically. You can charge it while
the computer is turned on, but it can take as much as five hours to charge completely. The charge
icon will display in the LCD status bar while the battery is charging. After the battery is fully
charged and the charge icon goes out, the charger still provides a small amount of current to the
battery, so that as you use the computer, the battery stays fully charged.
Warning, Do not charge the battery while the computer is in its carrying case. Charging the
battery builds up a significant amount of heat, which can damage the computer if there is no way
for the heat to dissipate.
Changing the Battery
If you buy an extra battery, you can replace the installed one when it runs out, and recharge it
later. To remove the battery pack, turn off the computer and unplug the AC adapter. Turn the
computer over and slide the retaining latch away from the battery pack. The battery will pop up
and you can pull it out. Put the replacement battery in the way the original came out. Make sure
the latch secures the battery in place so it won’t fall out when you turn the computer right side
up.
If you are using a replacement battery for the first time, make sure you charge it fully, just as you
did the original battery when you first got the computer. You can refer to Chapter One for a
reminder of the details.
Battery Life
A feature of NiMH batteries is that they tend to self-discharge, which is why you must charge the
Page 24

battery when you get the computer. In addition, they have a limited “cycle life” of about 500
charges. It is therefore quite possible you will need to replace the original battery at some point.
The Battery Gauge
When you run the computer on battery power, the battery gauge displays the amount of charge
left. It’s best to recharge the battery when the gauge reaches the last bar.
If you charge the battery while the computer is turned on, the battery gauge will display charge
progress. When the entire icon is visible, the battery is fully charged.
Battery Operation - What You Can Expect
The amount of time you can operate the computer on battery power will vary considerably
depending on your work habits, your software, and your use of the power management features.
The WinBookXP has a power management scheme that, if used effectively, will greatly increase
the amount of operating time you can expect from one charge.
In general, any program that makes extensive use of the disk drives will use more power. Even
Windows can be a power-drain if you use too many programs at the same time, so it is better to
only run programs you are actively using.
Another influential factor is the hardware configuration of the model you purchased. Power
consumption will depend on which LCD screen and CPU you have, and whether you have the
optional audio card and fax modem installed. A monochrome screen uses the least power, while
color screens use substantially more. Likewise, the faster your CPU, the more power it will use
at full speed. Adding either fax or audio options also adds to the overall load.
From all of this you can see that it’s something of a problem to arrive at a useful figure for how
long one battery charge will last, but we’ll do it anyway. If you’re an average user, you’ll
probably have the power management default settings active, be using the hard disk 50% of the
time, and be using the display 80% of the time. These figures are typical for word processing
work.
Battery Charge Temperature Limits
Temperature affects battery cycle life, self-discharge rate, operating and charge time. Below
10°C, the colder the battery, the longer it will take to charge, and the lower its charge capacity
will be. The operating period for one charge is also greatly reduced in cold temperatures. Above
35°C, the battery will not charge fully at all. Using the battery in extreme temperatures will
reduce its cycle life by as much as 50%. For the most efficient operation and longest life, you
should try to use battery power at temperatures between 20°C and 30°C.
If that is the case, you can probably expect one charge to give you four to five hours of battery
life for a monochrome model, three to four and a half hours for dual-scan color, and two to three
and a half for an active matrix color (TFT) screen. From this you can see, by the way, that the
LCD types is the most influential factor. Note that if you use a lot of power, the average time a
battery charge may be lower than the figures listed. If you are careful to conserve power, you can
expect one charge to last longer.
Page 25
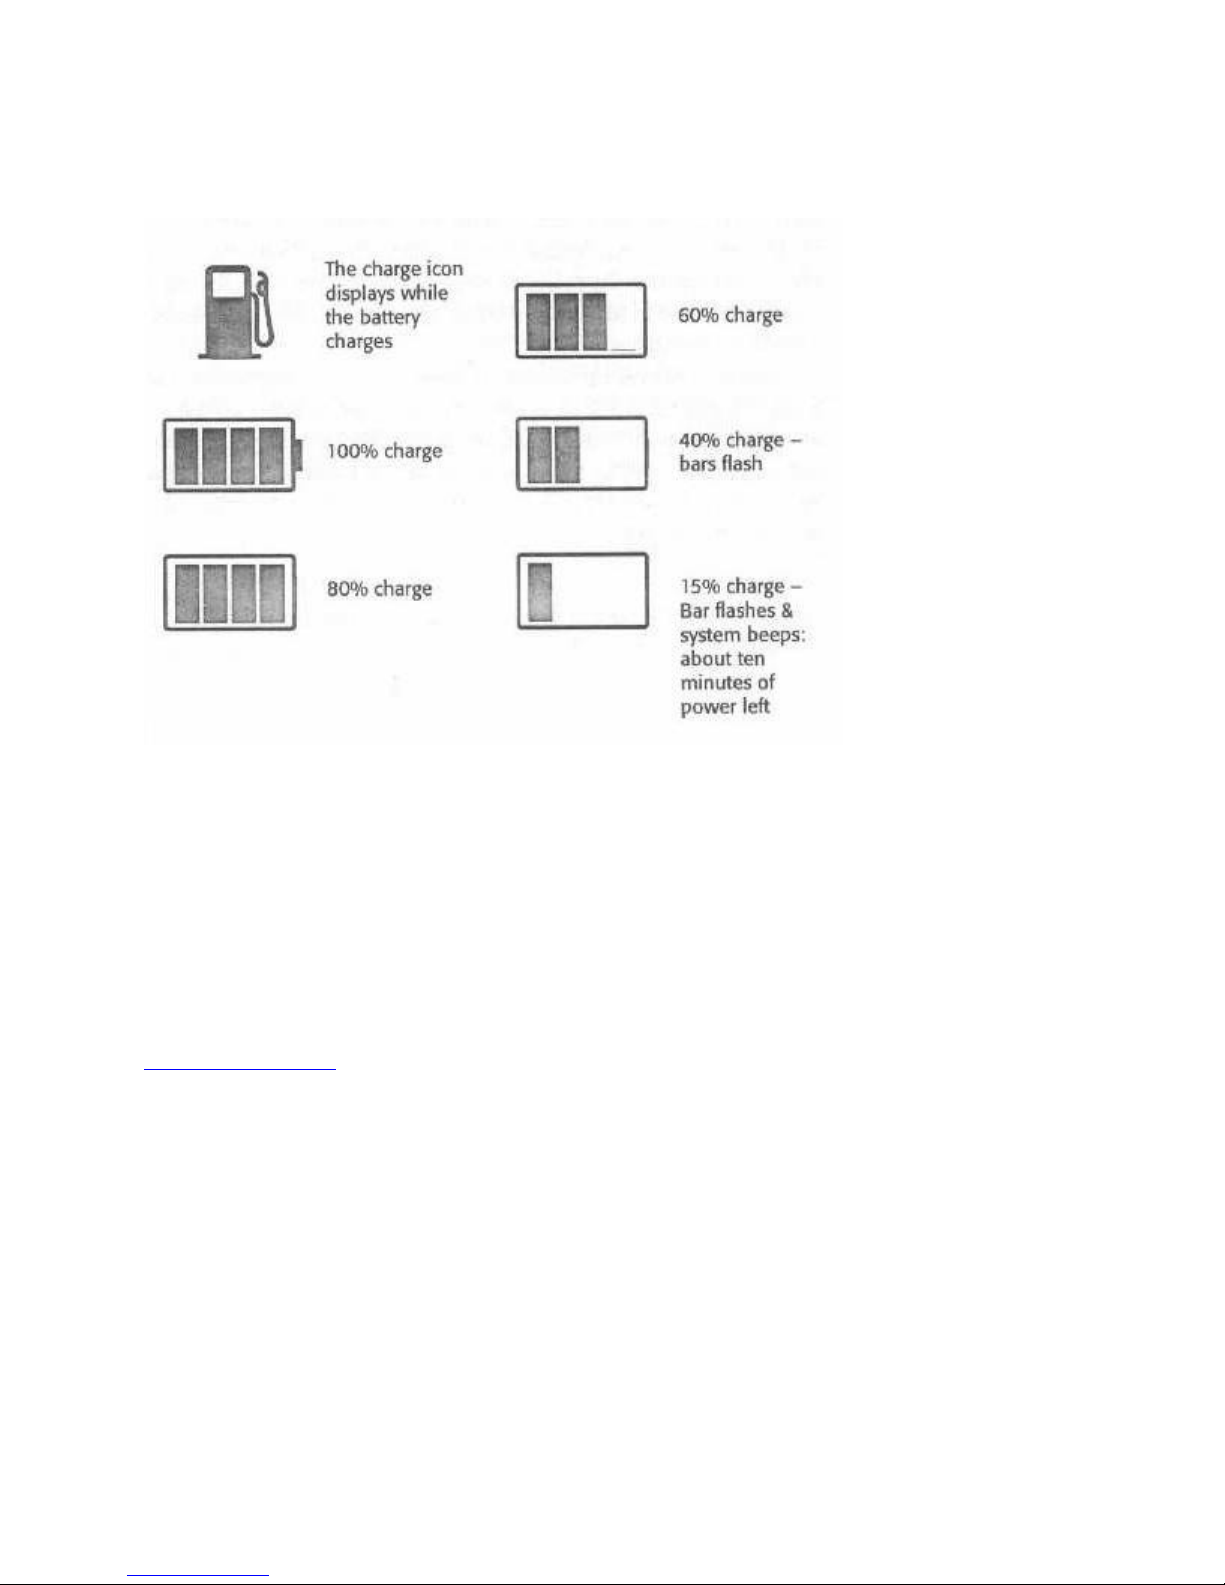
The battery gauge in the LCD status panel indicates approximately how much charge is left in
the battery.
Figure 14: Battery Gauge Display
The Battery Gauge Display
The Battery Gauge gives as precise an estimate as possible of the current state of your battery.
The estimate is based on an average user scenario, which includes assumptions about your use
habits and that you will use Power Management. If you use your WinBook substantially
differently from these assumptions the gauge will behave differently than represented here.
Remember, the purpose of the gauge is to protect you from losing power at a critical moment. Its
best to err on the side of caution and always charge or change the battery well before it runs out.
Power Management
Page 26

POWER MANAGEMENT
Power management can be divided into two categories, the part the computer manages and the
part you take care of. First we’ll take a look at how the computer’s end of it works, then talk a
little about your end.
Hint
You can tell at a glance if Power Management is turned on because the faucet icon on the LCD
indicator panel displays.
Setting Up Power Management
The WinBookXP uses power management software permanently stored in the computer to
conserve power in a variety of ways. You use Page 2, Power Management Setup, of the system
Setup program to set up the power management features. We’ll explain how to use Page 2 in this
section. For information on how to use the other two Setup pages, refer to Chapter Six.
The basic idea behind power management is to reduce the time the system’s most powerconsuming devices operate at full power. This is accomplished in several ways. The hard disk
drive, the LCD display panel and its backlight, and the microprocessor (CPU) consume the most
power of any component in the computer. The floppy disk drive also uses a lot of power, but
since it isn’t generally in constant use, and you have more control over it, we won’t consider it
here. The innards of the computer use power in a variety of ways, too.
The power management scheme automatically reduces power consumption of major components
when they are not actively in use. This means, for instance, that the CPU will slow down or
suspend processing temporarily, or the hard disk drive will stop spinning for a while. They then
return to full activity when needed.
Power-Hungry Devices:
In order of the amount of power they consume when active:
1. ) Display
2. ) Hard Drive
3. ) Floppy Drive
4. ) CPU
5. ) PCMCIA Cards (if installed)
Accessing Power Management
Page 27

Accessing Power Management Setup
[WinBook XP]
You can call up the Power Management screen in two ways. In DOS, you can run System Setup
by holding down the ‘CTRL’ and ‘ALT’ keys and typing ‘S’. This brings up Page 1, Standard
Setup. Then press the ‘PgDn’ key to switch from Page 1 to Page 2, Power Management Setup.
You can access the Power Management Setup screen (only) at any time under DOS or Windows.
When you use the “Setup” ‘Fn’ + ‘F8’ command, the Power Management Setup screen will
appear. You can use this command to tailor your power management setting on the fly without
having to exit to DOS to run the system Setup program, and without having to re-boot the
computer.
When you’re finished, you can exit Power Management Setup and return to where you left off by
pressing the ‘Esc’ and then the ‘F4’ key. In this situation, the system will Resume, rather than
reboot, as it would if you were running s System Setup session.
There are sixteen items in the Power Management screen. We’ll explain them here in order, then
talk about how to configure the options to produce either more power saving or faster
performance. For average users, the WinBook default power management settings should
provide a good trade-off between snappy performance and long battery life.
The power management scheme allows you to configure each feature independently. You can set
the interval of time after which a feature will activate for many of the items. The following chart
lists the items on the Power Management screen. We’ve shown a chart here rather than the
screen, because the chart allows us to show you all the options for each field, rather than just
one. There are instructions at the bottom of the Setup screen explaining how to navigate within
the program.
Power Management Settings
Page 28

Chart of Power Settings [WinBook XP]
Loading Default Settings
If you accessed Power Management Setup only, by using the ‘Fn’ + ‘F8’ key command, when
you press ‘F5’, it will load only the defaults for Power Management. If, however, you accessed
the entire Setup program using the ‘CTRL’ + ‘ALT’ + ‘S’ command, then ‘F5’ will load the
system defaults for all the Setup program pages.
Power Management
This line is the master switch for all the power management features. You have to enable power
management here for any of the features to work. There are two options for this feature.
“Always” enables power management while you’re using either battery or AC power. “Battery
only” means power management will only be active if you’re running the computer on battery
power.
If you enable power management, you can load default setting for all items by pressing the ‘Esc’
and then the ‘F5’ key.
Note: If you accessed Power Management Setup only, by using the ‘Fn’ + ‘F8’ key command,
when you press ‘F5’, it will load only the defaults for Power Management. If, however, you
accessed the entire Setup program using the ‘CTRL’ + ‘ALT ‘ + ‘S’ command, then ‘F5’will
load the system defaults for all the Setup program pages.
CPU Doze Timeout
This is an automatic timeout. With this feature enabled, the CPU will automatically switch
speeds so lower power-demand speeds after 30ms of system inactivity. In practice, this means
the CPU is conserving power a large part of the time you are using the computer, since the
interval is short enough for the CPU to enter this mode even between keystrokes.
Sleep Timeout
This sets the interval of time after which the system will enter “Sleep” mode. The default setting
is “02 minute”. You can change the interval in one-minute increments. You can also disable this
feature.
Sleep mode shuts the CPU down to its minimum power consumption state, where it consumes
almost no power. The CPU will resume full speed operation as soon as any system activity takes
place.
Suspend Timeout
This sets the interval of time after which the system will enter Suspend mode. The default setting
is “Disabled”. You can change the interval in one-minute increments. You can also disable this
feature.
The Suspend feature has two modes, Suspend to RAM and Suspend to Disk. They are explained
in the next item. If you have activated the suspend timeout option and selected Suspend-to-RAM,
Page 29

the system will automatically suspend to RAM after the timeout period. If, however, you have
selected Suspend-to-Disk, the system will automatically suspend to disk after the timeout period.
Suspend Data To
This assigns which method is used when the system enters the Suspend mode. The default setting
is “RAM”. The alternate settings are “DISK” and “Disabled”. The system will not suspend
automatically if the Suspend Timeout field is set to “Disabled”. You can use the Suspend button
to put the system into the selected suspend mode at any time.
The Suspend feature saves the current system state using the method selected. It does this under
both Windows and DOS. You can then “Resume” to the exact state the system was in when it
was suspended, and continue working.
The two Suspend methods are sufficiently different that you can almost think of them as two
different features.
For Example
So you’re finishing up that presentation to the big client in O’Hare airport, and they’ve called
final boarding. You hit the suspend button, put the WinBook back in its carrying case, and rush
to the plane. An hour later, after a fine airline meal, you take your WinBook out of its carrying
case and press resume. Voila; no wait, no boot, you’re right where you were back in the boarding
area, with power to spare.
Suspend-To-RAM is quick and simple and allows almost instant Suspend/Resume. It does,
however, continue to consume power, although significantly less than the Doze or Sleep modes.
You can use it to minimize power consumption when you take even a short break from activity
using the computer. If you get in the habit of suspending the system whenever possible, you will
greatly extend the usable length of one battery charge. This feature also works with the automatic
Modem Ring and Alarm Resume features described later in this section.
Suspend-To-Disk is a bit more complicated and not as fast as Suspend-to-RAM, since the
system information must be written to the hard drive. The advantage is that you can save the
system state for an unlimited period, without using any battery power. The system state and your
data are stored in a dedicated hard disk partition, separate from the main partition used by the
rest of the computer. Setting up this feature requires using a utility program, PHDisk, which
comes with your computer. We’ve detailed its use in a section in Appendix B.
Once you’ve set up the special partition, and enabled Suspend-to-Disk in the Power Management
Setup, the rest is easy. When you want to suspend, simply press the suspend switch and the
system will save the system state to disk. Note that this takes time – how long is determined by
the amount of RAM memory you have in your WinBook. After the data is stored on disk, the
computer will automatically turn itself off. You can restart later either by pressing the Suspend
button or by pushing the On/Off switch to OFF, and then ON. You can also leave the computer
turned off until the next time you use it, when it will start from the suspended state rather than
the usual start-up.
Very Important
Page 30

When you suspend the system to disk the power switch is still in the ON position even though
the computer has turned itself off. You can restart the system by pushing the Suspend button
again, or by pushing the On/Off switch to the OFF position, and then back ON. You can also just
turn the computer power switch off. When you use the computer later on, turn it on the way you
normally would and the system will resume from the suspended state.f
Hard Disk Timeout
This sets the interval of hard disk inactivity after which the hard disk drive motor will turn off.
The default setting is “02 minutes”. You can change the interval in one-minute increments. You
can also disable this feature.
The hard disk timeout will save power, but it reduces performance because it delays access after
the hard disk has powered down. When disk access is required, the drive motor has to restart, so
there is a delay of about ten seconds before the disk is available again.
Display Timeout
This sets the interval of system inactivity after which the LCD screen will turn off. The default
setting is “02 minutes”. You can change the interval in one-minute increments. You can also
disable this feature.
Unlike the hard disk timeout, where you must wait for the drive to ‘spin up’, the LCD will come
back on instantly when there is any system activity. Refer also to the Auto Dim feature described
below.
FDD Timeout
This sets the interval of floppy disk inactivity after which the floppy disk controller shuts down.
The default setting is “02 minutes”. You can change the interval in one-minute increments. You
can also disable this feature.
This feature, used in concert with the other features similar to it, helps maximize overall power
conservation. There is no noticeable performance disadvantage when you enable the floppy
timeout option.
Modem Timeout
Fax modems – whether built-in, or on a PCMCIA card – use a lot of power, even when they’re
not in use. For the internal fax modem, we have provided an inactivity timeout that significantly
reduces power-consumption when it powers down the modem. The modem will automatically
restart when your communications software accesses it, so you should use this feature. If you’re
like most people, you’ll use the fax modem infrequently, so you can increase battery life by
leaving the default setting at “60 seconds”. You can change the interval in ten-second
increments. You can disable this feature, but you will barely notice any effect on modem
performance with the option enabled.
You should note that some communications software written in the days before power
management or portable computers were available cannot tolerate timeouts like this. If you have
software with this problem, don’t use this feature while you’re running the software. Also, if you
Page 31

use your modem for file transfers – for example, downloading files from a BBS – try disabling
this feature if you experience communication problems. If the problem clears up, leave the
timeout disabled.
Audio Timeout
This sets the interval of inactivity after which the optional audio card will enter low-power mode.
The default setting is “02 minutes”. You can change the interval in one-minute increments. You
can also disable this feature.
Normally you will want to use this, but you could possibly experience audio problems with some
games and multimedia programs under both Windows and DOS. If you have an audio problem
while using a program, try disabling this feature. If the problem clears up, leave this disabled
while you’re using that program.
Auto Dim
The default setting for this is “Enabled”. When enabled, and the computer is operating on battery
power, at maximum brightness the backlight will be 30% dimmer than its actual maximum
intensity. This has the same effect as reducing the screen brightness using the manual control,
but it does it automatically, and to a fixed degree. The backlight will automatically operate at full
intensity while using AC power with the Auto Dim feature enabled.
CPU Clock Throttle
Clock throttle is a special hardware feature, which automatically stops the CPU clock at routine
intervals regardless of system activity; although, it decreases the CPU clock at routine intervals
regardless of system activity. Even though it decreases the CPU performance by about 10%, it
results in a 10 % power saving. If you want the highest performance possible, disable this
feature. If you want to extend battery charge-life, enable it.
Brightness & Power Saving
If you like to have a bright screen even when you use battery power, disable the Auto Dim
feature. But remember the LCD backlight accounts for about 30% of the system’s power
consumption. You can realize substantial conservation by using this feature, or by manually
adjusting the screen brightness to the lowest level you find acceptable.
Battery Low Suspend
The default setting for this is “Enabled”. When enabled, the system will automatically suspend
when the battery has about ten minutes of usable operating time left. The system will suspend
using the method you have specified in the “Suspend Data to” field. Don’t use this feature.
The purpose of this option is to ensure that you don’t lose work by giving you time to connect
the AC adapter while the system is in a minimum power consumption mode. The idea is that
once in suspend mode (to RAM, that is) the remaining time before the battery fails is
significantly extended, giving you time to decide what you want to do. If you want to, you can
reactivate the system from Suspend-to-RAM by pressing the Suspend button. You will still have
enough time to immediately save your work, quit, and turn off the computer.
Page 32

If you have set the computer to suspend to the hard disk, you won’t be able to return to the active
system state without first completely suspending to disk and then restoring. In this case, you
should definitely connect the AC adapter before you reactivate the system. Restoring the active
system state is very disk-intensive and could use up the battery before the system fully restores.
A better approach is to keep your eye on the battery gauge, and recharge or place the battery
before time gets critical. If you don’t want to use this feature, leave it disabled.
Modem Ring Resume
When you enable this, the system will automatically ‘wake up’ (Resume) from Suspend-to-RAM
if the fax modem detects an incoming call on the telephone line connected to it. The default
setting for this is “Disabled”.
Alarm Resume
This works like an alarm clock. When enabled, the system will automatically ‘wake up’
(Resume) from Suspend-to-RAM at a time you set in the “Alarm Time” field that follows it. The
default setting for this is “Disabled”.
Alarm Time
This is where you set the alarm for the “Alarm Resume” feature. The time format is 24-hour or
“military” time. The alarm will activate and wake up the system at the next point the system
clock reaches the time you set. This will either be during the same day, or on the next day if the
time you set has already passed on the day you set the alarm.
For example, if at the end of the day you want to set your computer to wake up at 8 AM the next
morning, you would enable “Alarm Resume” and then set the Alarm Time to 08:00. As you can
see, you can also use this feature with the AC adapter connected.
To set the time, select either the hour or minute field and use the plus or minus keys to scroll to
the setting you want.
BE A CONSERVATIONIST
At your end, there are many things you can do to extend the usable period of one battery charge.
First of all, try to use AC power whenever possible. It may be tempting not to bother, but a little
extra effort will leave you with a full battery when you really need it. Otherwise, you should use
the power management software. Set it up to match your work habits and preferences. If your
habits and preferences don’t contribute to conserving power, you can consider adopting habits
that do.
For example, many people use a ‘screen saver’ nowadays. These are fine for a desktop computer
(where they are intended to prevent wear on the desktop monitor) or for when you are using the
AC adapter to power the computer, but a screen saver still requires that the LCD screen operate
at full power. A better solution for battery operation is to use the setting that turns the LCD off
when you don’t use the computer for more than two minutes – or whatever length of time you
set.
Page 33

You should also try to minimize the amount of time you use the floppy disk drive. It consumes a
lot of power, and generally speaking, you can probably wait until you have access to AC power
before using it.
Care and Handling
Page 34

MENU ITEM DEFAULT OPTIONS
Power
Management
CPU Doze
Always Battery only
Disabled
Enabled Disabled
Timeout
Sleep Timeout 02 Minutes (increments of 1
minute) Disabled
Suspend
Timeout
Disabled (increments of 1
minute) Enabled
Suspend DatatoRam Disk Disabled
Hard Disk
Timeout
Display
Timeout
Floppy Disk
Timeout
02 Minutes (increments of 1
minute) Disabled
02 Minutes (increments of 1
minute) Disabled
02 Minutes (increments of 1
minute) Disabled
Modem
Timeout
60 seconds (increments of 10
sec.) Disabled
Audio Timeout 02 Minutes (increments of 1
minute) Disabled
Auto Dim Enabled Disabled
CPU Clock
Enabled Disabled
Throttle
Battery Low
Disabled Enabled
Suspend
Modem Ring
Disabled Enabled
Resume
Back to Power Management Text
Page 35

CARE & HANDLING
[WinBook XP]
Obviously, one of the main points of having a notebook computer is so you can easily carry it
around with you. But because it is so easy and convenient to transport, it’s easy to forget that any
computer is a somewhat delicate piece of electronic equipment and requires some care handling
and usage.
CAUTIONARY NOTES
Rough Handling
While your WinBookXP is sturdily constructed, it wasn’t designed to travel around by itself.
Micro Center offers a range of carrying case options to suit your lifestyle. It is a good idea to
always transport your WinBook in a case. If you don’t use one of Micro Center’s cases, make
sure to put the computer in a safe transport container – which might or might not be your
briefcase, depending on its design and contents. If you like a bigger case with more storage
space, Micro Center offers products that cover a full range of designs and features.
The most important thing to remember is, DON’T DROP IT! Sounds silly and obvious to say
don’t it? Nonetheless, many people still tend to treat their notebook computer as if it could take a
lot more punishment than one should reasonably expect. This simple precaution will save you
and everyone else a lot of headaches.
A corollary to this is Don’t Check It As Luggage. Always carry-on your computer when you fly.
We can tell you right now, it quite likely will not come out fine if you put it in that hard shell
suitcase. And certainly never check the computer in its carrying case. Commercial baggage
handling equipment, and often bag handlers, are not gentle on luggage, so protect your
investment.
Don’t Check It!
Never check your WinBookXP as luggage, either by itself or packed inside other luggage. It is
very likely it will get damaged or possibly even destroyed if you do this.
X-Rays, Metal Detectors and Grief
One of the most common hazards facing your travelling notebook is modern-day security
equipment. While the staff at airports and elsewhere will usually assure you that their X-ray
equipment is safe for your computer, it is difficult to be absolutely sure, especially outside the
USA. The safest bet is not to put your computer through X-ray inspections and to ask for a hand
inspection. Be prepared for the security staff to ask you to turn the computer on to prove that it
works and isn’t hiding something. You may not always be able to do this, and many, or even
most, X-ray machines are probably safe. You’ll have to make your own appraisal of the risk on a
case-by-case basis.
Metal detectors project a powerful magnetic field that can wipe credit and other magnetic cards,
and can damage the information on your hard disk (they won’t hurt the hardware) as well as any
Page 36

PCMCIA disk drive devices you might have installed in your computer. While you would not
normally carry your computer through one in an airport, you might encounter them elsewhere.
Never carry or pass your computer through a metal detector. Pass it around the outside of the
detector.
Some Common Sense Precautions
Here are a few additional precautions you should take to ensure the long life of your computer.
Many computer problems can be traced to sources outside the computer rather than to
component malfunction. If you are careful to avoid the things most likely to cause trouble, you
are much less likely to experience problems with your WinBook.
Liquids – Computers don’t like them. They don’t get thirsty, so don’t give them anything to
drink. If you’re like many people who like to work with a beverage around, keep it to yourself
and well away from your notebook. It’s pretty simple really: if you spill liquid in your computer
while it’s turned on, you will quite probably either damage it beyond repair or cost yourself a
bundle. It’s your call.
Temperature - Computers, like you, like to be cool. Don’t use yours in high heat and humidity
if you can avoid it. And especially do not put your computer someplace where it will be
subjected to extreme heat while it’s turned off – the seat or shelf of a car in the sun, for example.
You know what happens to dogs when you do that.
Dirt – Computers, particularly notebook computers, are fastidious. They don’t like to get dirty
(they don’t like baths either so don’t get ideas). Don’t let dirt or dust build up, or you’re asking
for at best fitful performance, and more likely, outright malfunction. There are a number of
places that well allow dirt and dust and who-knows-what into the computer. The trackball
assembly, keyboard, microphone orifice, floppy disk drive, PCMCIA compartment, and audio
jacks are all particularly susceptible to contamination. Try to keep the computer in the case (or at
least closed) when you aren’t using it, and keep your workspace clean.
Electricity – It’s fickle. It runs through a lot of things in your computer, including things you
probably don’t know about, so avoid temptation. Except for PCMCIA cards and the AC adapter
while the computer is in Suspend mode, don’t connect or disconnect anything while the
computer is turned on. You may get away with it once in a while, but unless Russian Roulette is
your favorite parlor game, err on the side of caution and you won’t have to pay for it.
Also, you should always plug the AC adapter into a protected outlet strip rather than directly into
an electrical outlet.
Setting Up Base Camp
Page 37
CHAPTER THREE: SETTING UP BASE CAMP
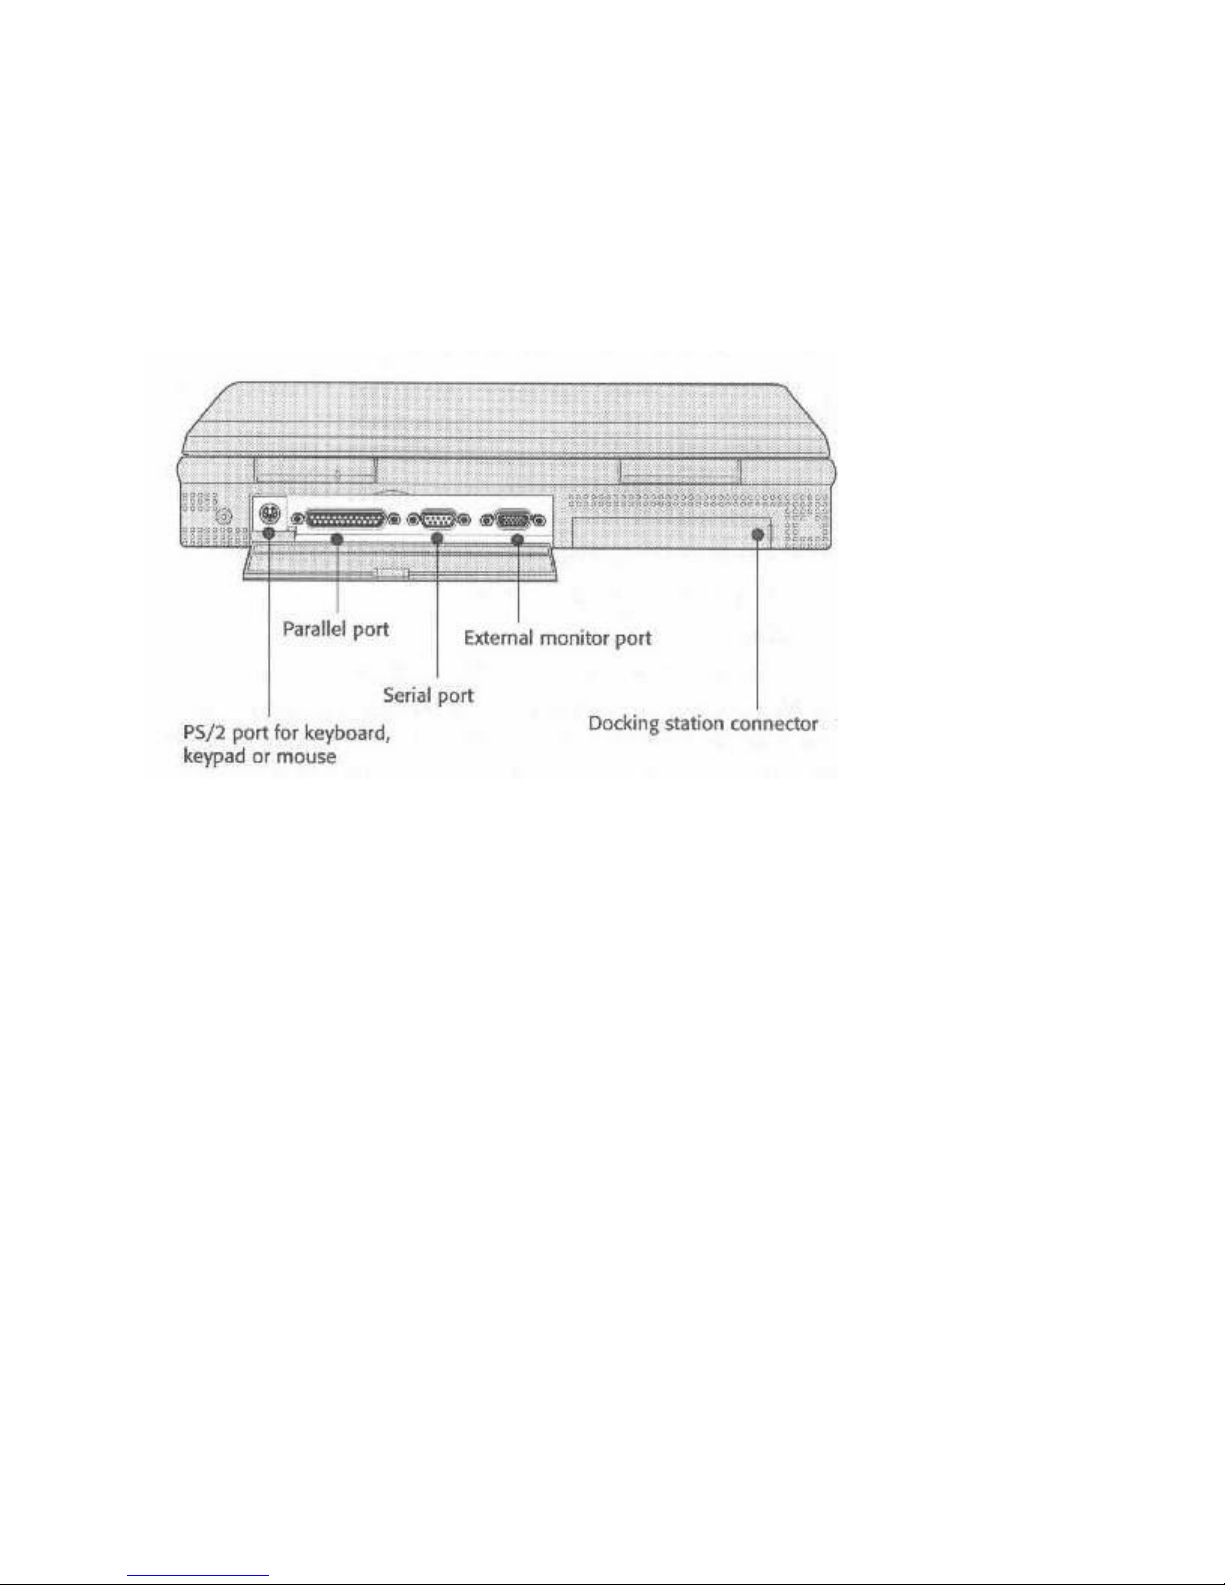
When you use your WinBook XP at a base location, you’re likely to want to connect various
peripherals to the computer. This section covers how to do it. The connection ports are shown
again below for your reference.
Figure 15: Peripheral Connection Ports
Using A PS/2-type Mouse
You must use the adapter described in this chapter if you want to connect a PS/2-type mouse to
the PS/2 port.f
CONNECTING COMMON PERIPHERALS
When you use your WinBook at an office or at home you may want to take advantage of the
option to use desktop peripherals. Doing this has two advantages. You may find that a desktop
keyboard and monitor are more comfortable for extended use for some kinds of work. In
addition, using these whenever you can, along with the AC adapter, will prolong the life of the
less easily replaced components built into your WinBook.
Connecting Peripherals – The Basic Procedure
To connect any peripheral device to your computer, you should always follow this basic
procedure:
1. Make sure everything is turned off, and better yet, unplugged.
2. Set up the peripheral according to the instructions in the manual that comes with it.
3. Connect the device to the computer with an appropriate cable.
Page 38

4. Plug in the device and the computer.
5. Turn everything on.
6. Configure the device or other software if required.
Remember, never connect or disconnect anything other than a PCMCIA card from your
computer if anything is turned on. Turn the power to both the computer and the peripheral device
off before you connect them.
Connecting A Printer
You will most likely use at least a printer with your notebook. You may even have purchased a
portable model to take along with the computer. Whatever kind of printer you have, it is almost
certainly going to connect to the parallel port. You’ll need a standard parallel cable to connect
the printer, unless your printer comes with a special cable connector for the end that plugs into
the printer. Connect the end of the cable that matches the parallel port on the computer and
secure the cable to the computer by tightening the thumbwheels attached to the cable connector.
The standard configuration for the parallel port on the WinBookXP is LPT1 at address 378.
Refer to section six for more details.
To use a printer, you must configure a software printer driver in Windows. You can view a list of
drivers that come with Windows by clicking on the “Add>>” button in the Printers section of the
Windows Control Panel. The WinBookXP comes with a generic printer driver installed as the
default printer driver on the LPT1 port. This should allow you to at least print text for test
purposes on most printers. To test the connection, plug the printer into the LPT1 port, test print
some text from a text editor like DOS Edit or Windows Write. Once you’ve confirmed that your
printer works with the WinBook, you will want to install the specific printer driver that matches
your printer, so you can print both text and graphics.
If You Install A New Printer
You must have the Windows disks with you to install a printer driver, because the printer drivers
are not pre-loaded on the hard disk. Once you’ve installed the printer driver(s), you won’t need
to carry the disks with you to switch between various printers. If you want, you can delete the
generic text printer driver that comes installed on a system with pre-loaded software.f
If you want to install a driver for another printer, the basic procedure is as follows:
1. Open the Windows Control Panel.
2. Open the Printers section of the Control Panel.
3. Click on the Add>> button.
4. See if the printer you want to use is listed in the list of printers that appears.
5. If your printer is there, select its name and click on the Install button.
6. Follow the instructions for inserting the appropriate Windows printer driver disk and
Page 39

install the driver.
7. Select the name of your printer when it appears in the “Installed Printers” box and click
on the Set As Default Printer button just below the box to assign it as the default printer.
The name of your printer should appear in the “Default Printer” box at the top of the
window.
After you install the new driver, you may want to re-configure the printer using the Connect and
Setup buttons. Click the Help button or refer to the Windows manual if you
need information on how to do this. Once you’ve completed this, you are ready to use the printer
to print in both text and graphics modes.
Connecting A Monitor
The on-board video supports a broad range of CRT monitors. You can connect a standard,
multifrequency desktop monitor to the external monitor port on the computer. It is a standard 15pin VGA port. Though the LCD maximum resolution is 640 x 480 x 256 colors, on an external
monitor CRT, it can produce resolutions up to 1024 x 768 x 256 colors. In practice, this means
you should be able to use any VGA or Super VGA monitor from 14’ to 21’ inches with the
WinBookXP, as long as it can support these resolutions. Any standard multifrequency SVGA
monitor can do this.
To connect an external monitor do as follows:
1. Turn off the computer.
2. Plug the monitor cable into the VGA port.
3. Plug the monitor power cord into a power source.
4. Turn on both the monitor and the computer, and run the system Setup and Preferences.
You can switch active display modes under DOS or Windows, by using one of two hot-key
commands.
If you want to set the screen image to display on just one screen, use the ‘Fn’ + ‘F10’ key
command to select between the LCD and the external monitor. The command toggles the
selection between the two.
Typing ‘Fn’ + ‘F6’ simultaneously turns the Simulscan function on or off. Simulscan displays an
image on both the LCD and the external monitor. There is some display limitations in this mode.
See the “Video Drivers & Utilities” section at the end of Chapter Six for more information.
Hi-Color Video Drivers
There are also drivers you can use on an external monitor that display more than 256 colors. You
can use the Windows video utilities described in Chapter Six to select drivers that will display
32,000 or 64,000 colors.f
An external monitor will work in standard resolution (640 x 480 x 16 color VGA mode) with
Page 40
DOS without using a video driver, but you must have a video driver for Windows installed in
order for Windows to run.
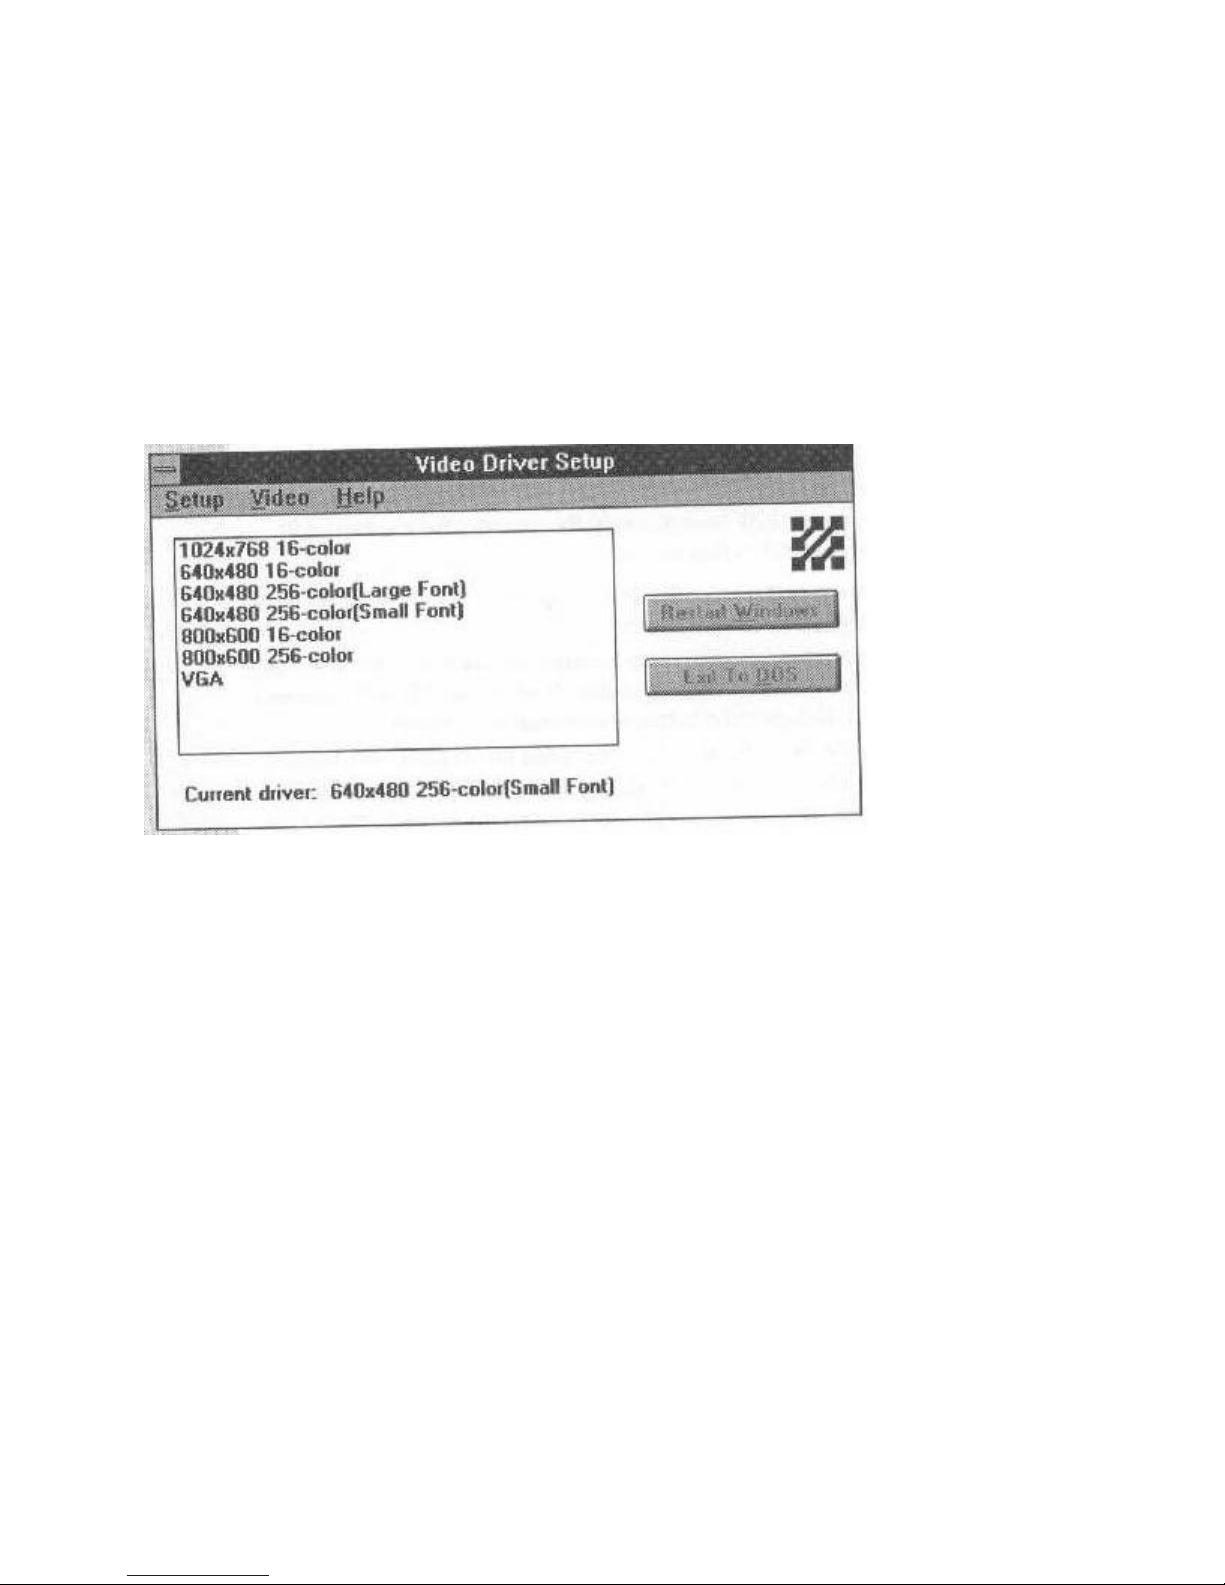
You can use the preinstalled Windows video driver with an external monitor. Refer to the “Video
Drivers & Utilities” section at the end of Chapter Six for more information about video drivers
and installing them in your system. The installed video driver supports the colors and resolutions
shown below. The default Windows driver
for the WinBook is the Western Digital 640 x 480 x 256 color mode with the Small Front option.
Figure 16: Windows Video Drivers
Connecting An External Keyboard
You can connect a full-size keyboard to the PS/2 mini-DIN port. Just plug it in and it will work.
If your desktop keyboard uses the larger type of connector, get a DIN to mini-DIN PS/2 adapter
for the mini-DIN port.
You can also plug an external keyboard and mouse into the PS/2 port at the same time by using
the PS/2 port duplex adapter explained in the mouse section below.
Connecting a PS/2 Keypad
Embedded keypads on notebook computers provide a modified keypad, which although fully
functional, is not identical to the IBM 101-keyboard layout because the keys rows are on a slant.
For this reason, several suppliers make a special PS/2 keypad you can use with your notebook.
These keypads are ideal for people who must to numeric data entry, as they reproduce the
familiar layout of the IBM 101 keyboard. You can use this kind of keypad with the WinBookXP
by connecting it to the PS/2 mini-DIN port, as you would an external keyboard. You can use a
keypad with or without the duplex adapter.
Connecting A Mouse
You can use either a Serial or PS/2-type Microsoft-compatible mouse with your WinBookXP.
Page 41

Both will work under Windows or DOS, but, since the computer has a built-in pointing device,
you must change system settings if you want to use a serial mouse. The WinBook is shipped with
a Logitech mouse driver which loads automatically when you turn the computer on. This
happens because there is a line in the Autoexec.bat file telling DOS to load the driver. The driver
works with most PS/2 or serial mice, but you may want to substitute the Logitech driver that
came with your mouse. Mouse software normally comes with an install disk that edits the
Autoexec.bat file for you and puts in the commands needed.
Serial Mouse
We have provided a simple way to allow you to use a serial mouse without having to edit the
Autoexec.bat file. Call up the system Setup program using the ‘CTR’ + ‘ALT’ + ‘S’ key
command and select Page 3, the Advance Setup screen. Select “PS/2 Pointing Dev”, and set it to
“Disabled”. Save the configuration and the system will automatically reboot and find the serial
mouse.
PS/2 Mouse
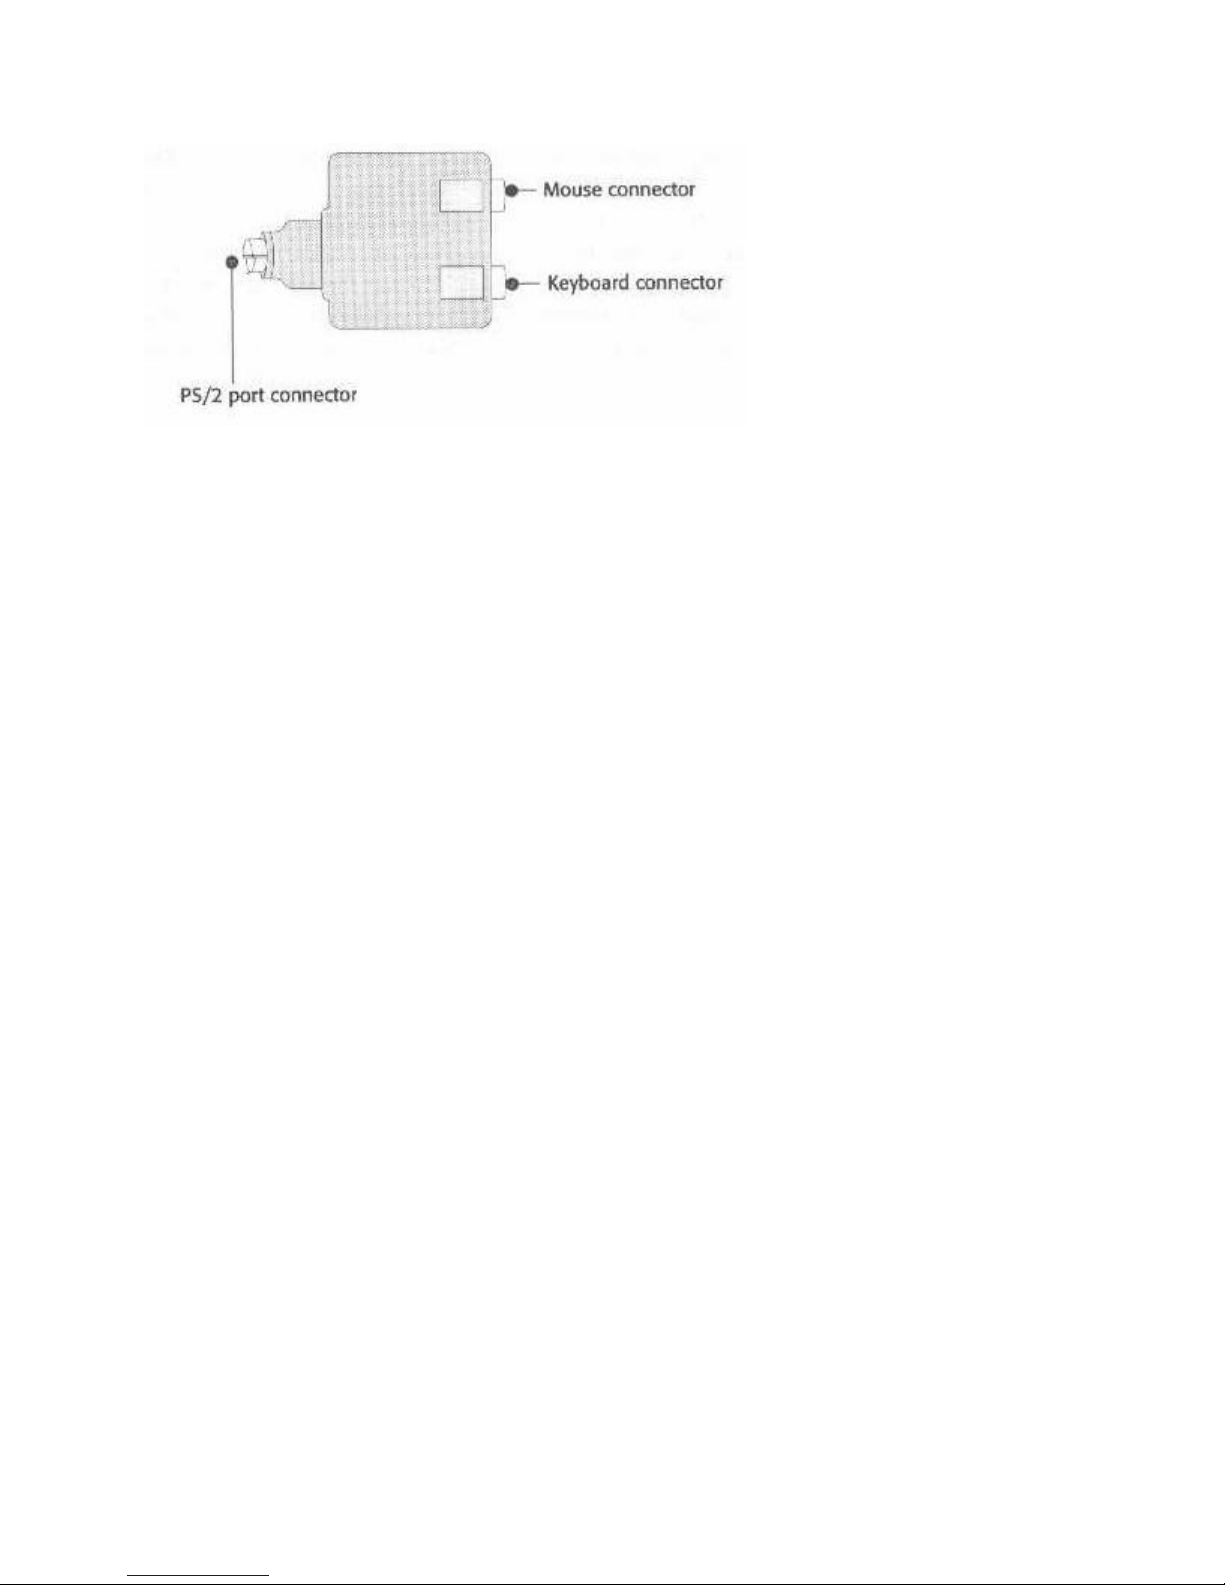
To use a PS/2 mouse, you must use the PS/2 adapter included with your system. Plug the adapter
into the PS/2 port, then plug the PS/2 mouse into the bottom jack. When your are using a PS/2
mouse, the WinBookXP will detect an external PS/2 mouse is plugged in and switch to it
automatically when you turn on the computer. Since you cannot use two pointing devices at the
same time in DOS or Windows, the WinBookXP automatically disables the internal pointing
device whenever it detects the external PS/2 mouse is plugged in.
Using the PS/2 Adapter With A Mouse
Do not plug a PS/2 mouse directly into the PS/2 keyboard port. You must use the duplex adapter
supplied with the computer to connect the mouse to the port. The adapter has two PS/2 jacks on
one end and a PS/2 plug on the other. The lower jack is for the mouse, the upper is for an
extended PS/2 keyboard. To connect the mouse, do as follow:
1. Turn off the computer.
2. Plug the mouse cable into the low jack.
3. Plug the adapter into the PS/2 port on the computer.
Never connect or disconnect the mouse or the keyboard while the computer is turned on.
When you connect a PS/2 mouse to the computer, the built-in pointing device will automatically
be disabled.
Figure 17: PS/2 Port Duplex Adapter
Page 42
THE OPTIONAL DOCKING STATION
The optional docking station gives you a number of expansion capabilities. There is space for
one half-height 5 ¼” device in the front. It is also possible to install four ISA expansion cards in
the docking station. The back panel has two power ports, one parallel port, one serial port, and
one external monitor port. There are also connectors for a PS/2-type keyboard and mouse, as
well as audio jacks for the optional sound card.
The manual that comes with the docking station explains how to dock and undock the notebook.
You will also find information about how to use the hardware together to good effect in that
manual.
CONNECTING SOUND EQUIPMENT
The WinBookXP includes Line In and Speaker Out mini phone jacks on the left-hand side of the
case. You can connect any external audio source that uses a standard mini phone plug to the
computer’s Line in port. However, you cannot plug a non-amplified external microphone into the
Line In port, as the mic must meet the minimum input amplitude requirements. Some
microphones on the market have a high output level, and can be plugged into the Line In input.
You can plug either self-amplified speakers, non-amplified speakers or headphones into the
Speaker Out jack.
The system automatically configures itself for stereo/mono configuration depending on the audio
option board installed. When you use the internal speaker, both channels will play through that
speaker. External speakers or headphones will receive either stereo or mono input, depending on
the option you have installed. The internal microphone records in mono only – even if you have
a stereo audio board installed.
Be Careful With Headphones
You should always be careful about excess volume when using headphones. Adjust the Volume
control for the Speaker Out jack to a lower volume before you plug headphones into it.
Otherwise, as with personal audio devices, you risk hurting your ears and damaging your
hearing.
Connecting Other Hardware
To connect any other devices that use a standard port, follow the directions that come with the
Page 43

device on how to connect it to your computer. This notebook comes equipped with a number of
ports, some of which have additional capabilities. The parallel port supports both EPP and ECP
transfer modes, which significantly increase parallel port transfer speeds. The WinBookXP also
uses the high performance 16550 serial ports, which give superior performance, especially within
Windows.
CHAPTER FOUR: GREAT COMMUNICATIONS
Page 44
CHAPTER FOUR: GREAT
COMMUNICATIONS
This section briefly describes two major WinBookXP options you may have gotten with the
computer, or may decide to get later on. These are the Fax Modem and the Audio Card. A third
section covers PCMCIA basics. All three cards have their own documentation, so our goal here
is to give you an overview.
THE FAX MODEM
The fax modem option includes the internal fax modem hardware and software to go with it. The
fax modem hardware is dual function. It is a 4.4K bps fax with voice capability and also a 14.4K
bps data modem. The software includes WinFax Lite, a program that lets you send and receive
faxes. Because the WinFax driver installs like a printer driver, the fax capability is available, by
selecting the WinFax driver as the active or default printer, to any Windows application that can
print.
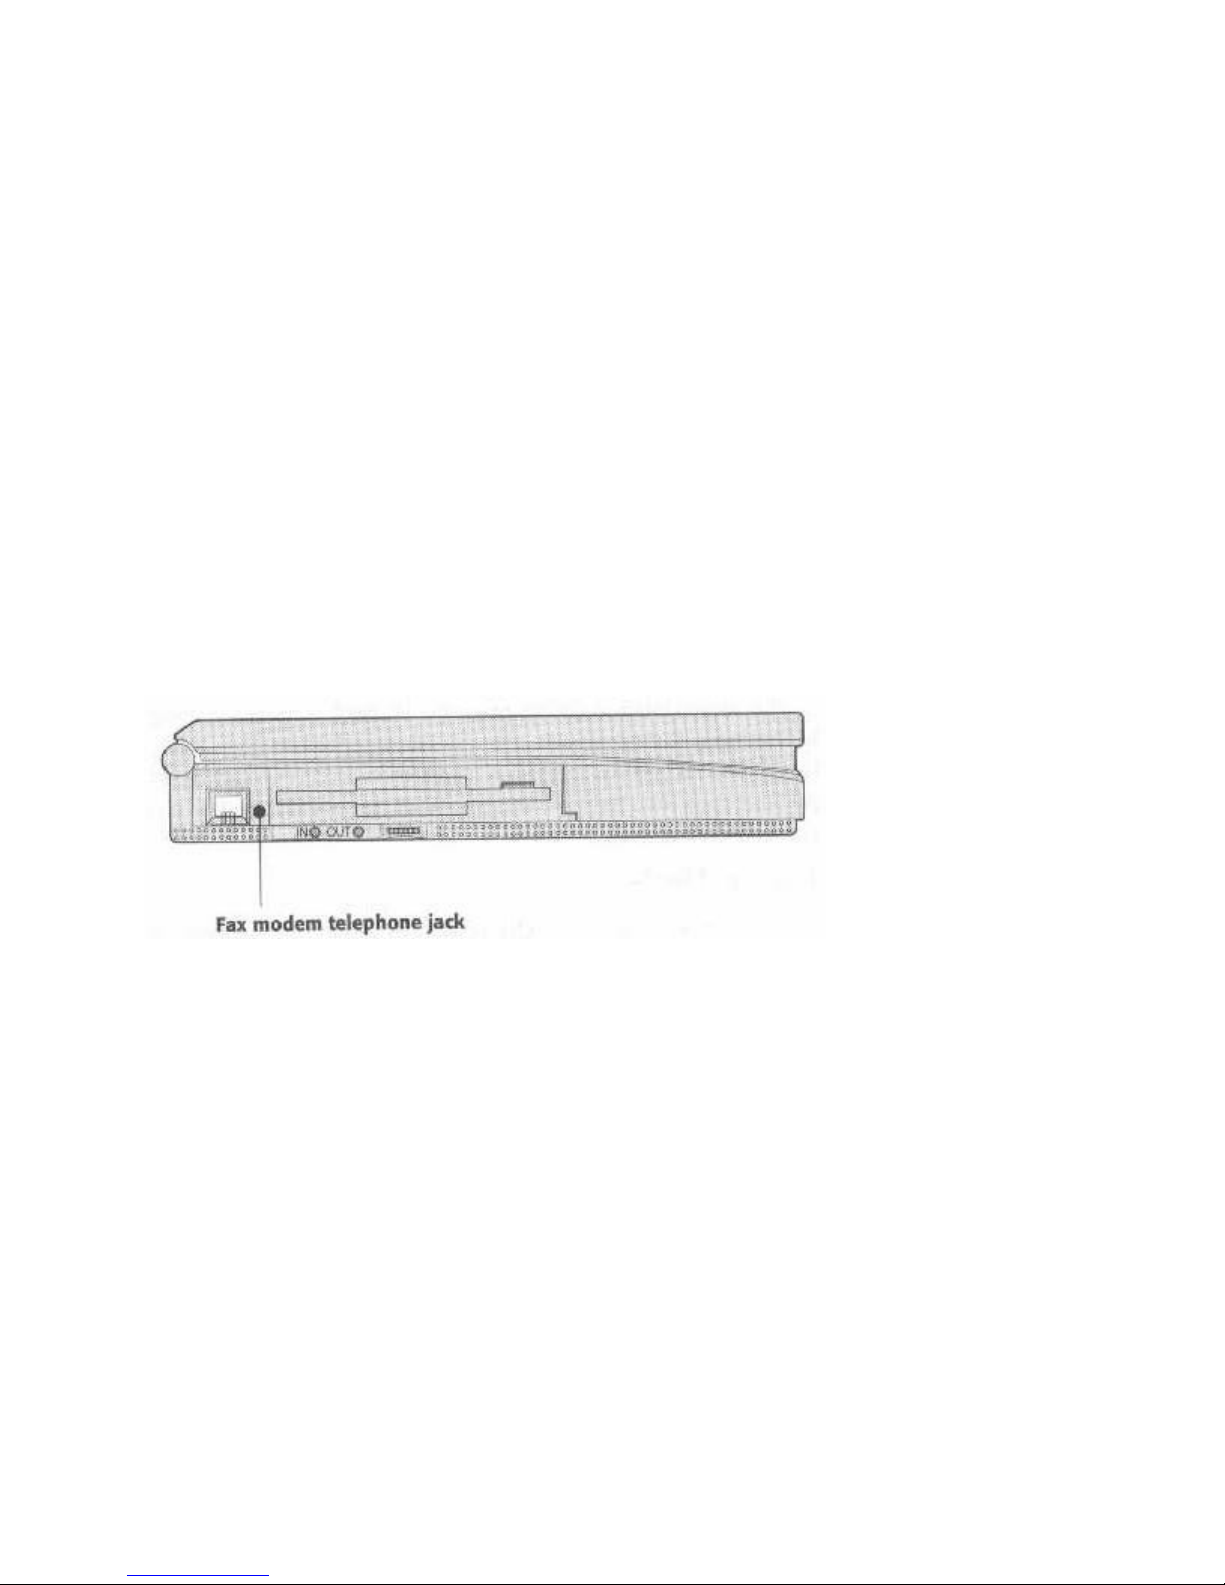
Figure 18: Fax Modem Telephone Jack
All the software that comes with the fax modem comes with its own documentation that explains
how to install and use it. We install the software for you when you order the fax modem with
your WinBookXP, so if the fax modem is already installed in your system, you’ll find the
software for it installed and configured on your hard disk.
THE AUDIO CARD
The audio card option includes the audio card hardware and software to go with it. There are two
versions of the audio card: a 12-bit monophonic card and a 16-bit stereo card. The computer
automatically configures its built-in audio hardware for stereo or mono depending on which card
is installed. The internal speaker plays both stereo channels together, producing a mono output.
External speakers or headphones will receive stereo signals. The mono version produces mono
output both internally and externally. The built-in microphone records in mono only.
The audio software includes the ESS Windows sound programs and drivers. Under DOS, the
audio card is Business Audio and Sound Blaster™ compatible, so you can run DOS-based games
and multimedia programs.
The audio card installs in a small compartment on the underside of the computer. If you buy the
Page 45
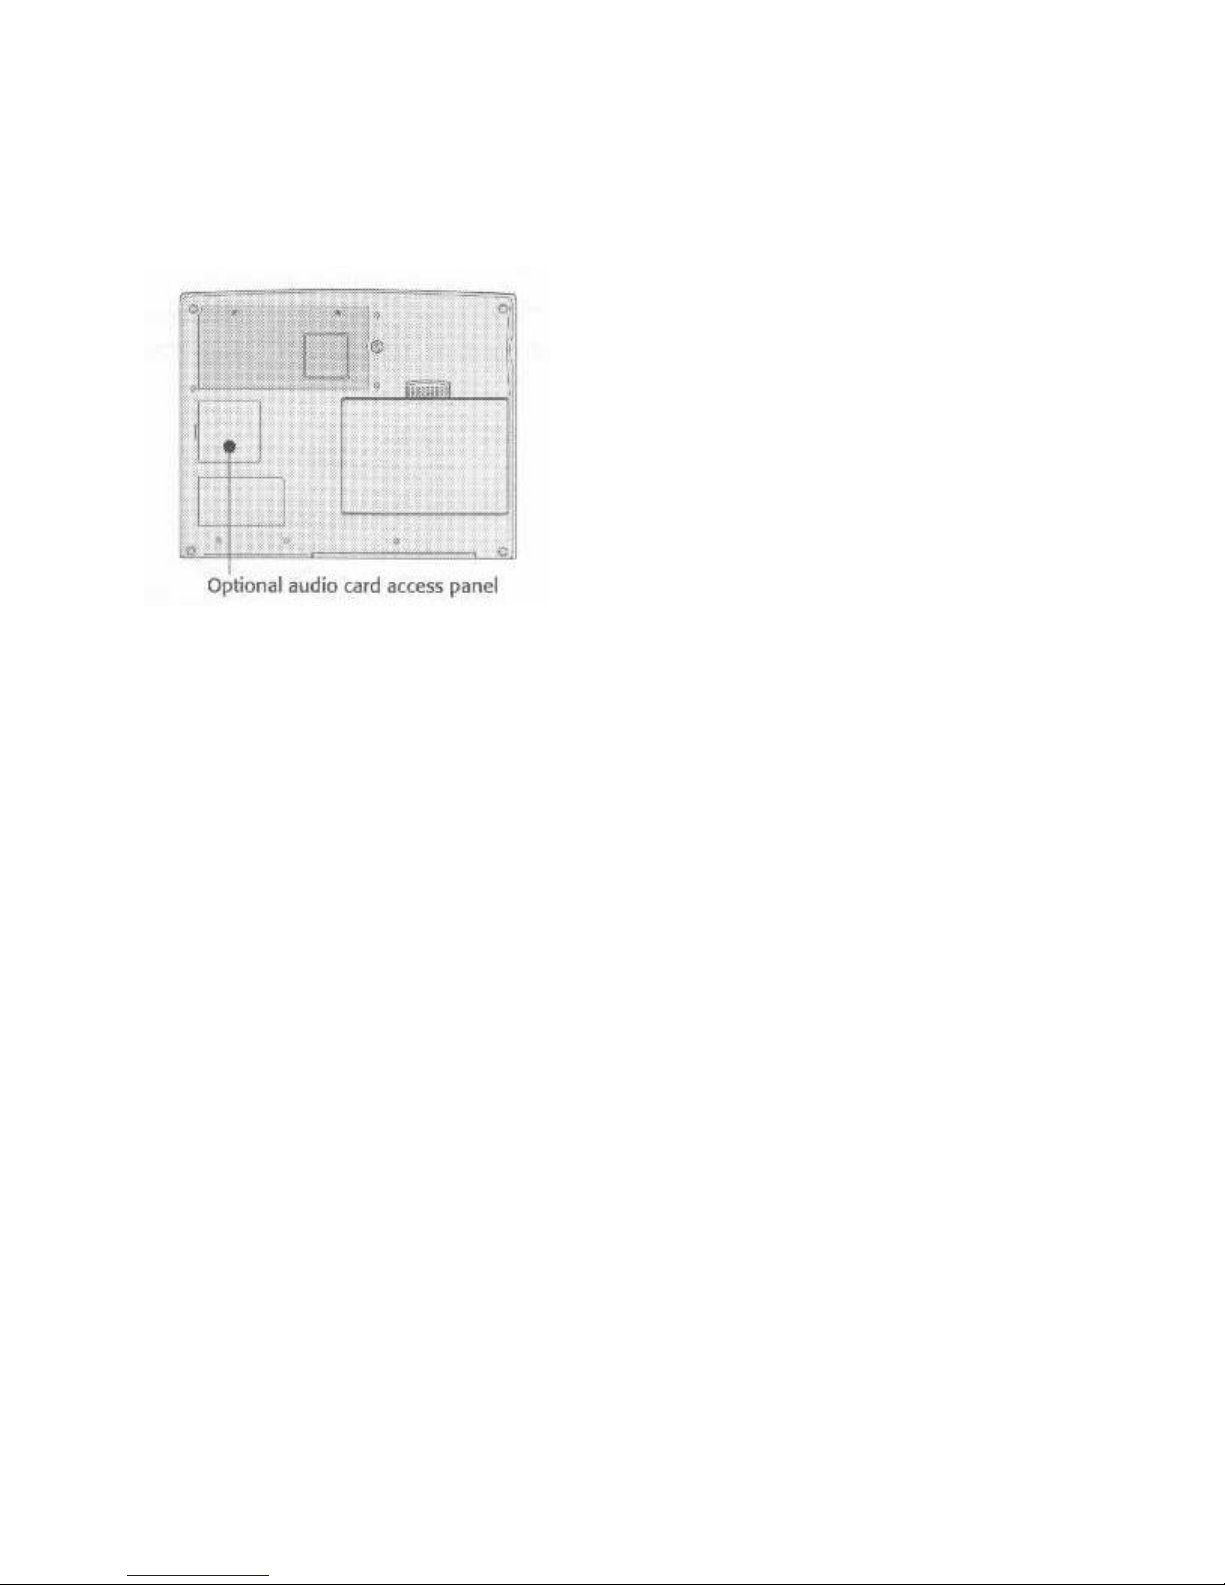
audio card later, you can easily install it yourself using the instructions that come with the
hardware.
Figure 19: Audio Upgrade Compartment Access
Audio cards can enhance:
• Presentations
• Game audio
• CD-ROM soundtracks
• System sounds
All the software that comes with the audio card comes with its own documentation that explains
how to install and use it. We install the software for you when you order toe audio card with your
WinBook, so if the card is already installed in your system, you’ll find the software for it
installed and configured on your hard disk.
Audio System Setup Options
The Setup program allows you to enable or disable the internal audio function and select which
IRQ line the audio card will use. The BIOS will default to the IRQ7 setting. In some instances,
this may cause a conflict with other hardware. If you have problems getting the audio card to
work correctly, you may need to set the audio board to use IRQ5. You can set the IRQ on Page
3, Advanced Setup, of the Setup program.
Using DOS Games
Although no special software or drivers are required to run DOS games and multimedia software
on your computer, programs like this will normally have setup options when you install them.
Then you’re installing them, you should select the “SoundBlaster™” option. Most newer
software will automatically configure itself so you won’t need to worry about port setting, etc.
Older software may ask for setup parameters at installation. For these programs, select
“SoundBlaster™” with port settings at 220, IRQ set to 7, and DMA channel set to 1.
Page 46
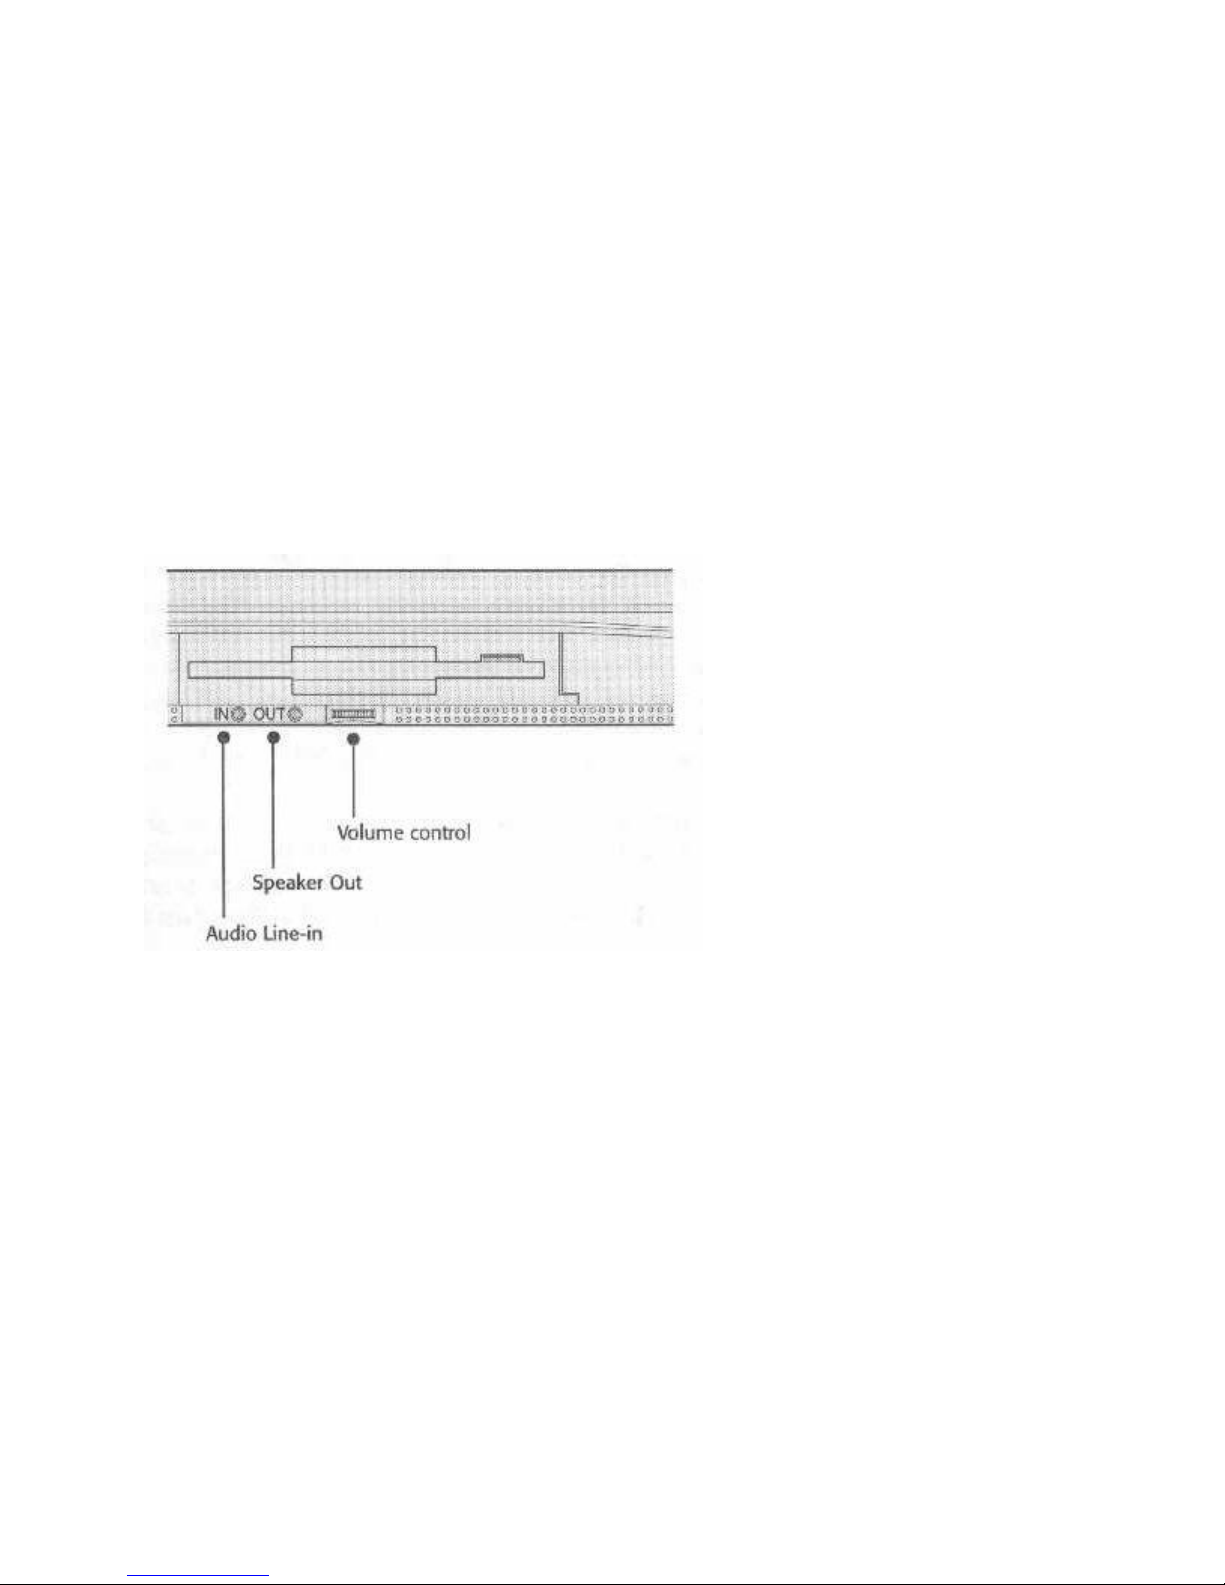
Connecting Audio Equipment
The audio components built into the WinBookXP function when the audio card is installed.
There are Line In and Speaker Out mini phone jacks and a volume control dial on the left-hand
side of the computer below the floppy disk drive. You can plug any external audio source that
uses a standard mini phone plug into the Line In jack. You cannot, however, plug a nonamplified external microphone into the Line In jack.
You can connect the Speaker Out jack to either self-amplified speakers, non-amplified speakers,
or headphones. To avoid hurting your ears, be sure to first set the audio volume to minimum
when you plug in headphones, and then adjust the volume to a comfortable level. The internal
amplifier can produce volumes, which can damage your ears, so use care when adjusting the
volume.
Figure 20: Audio Jacks & Volume Control
PCMCIA CARDS
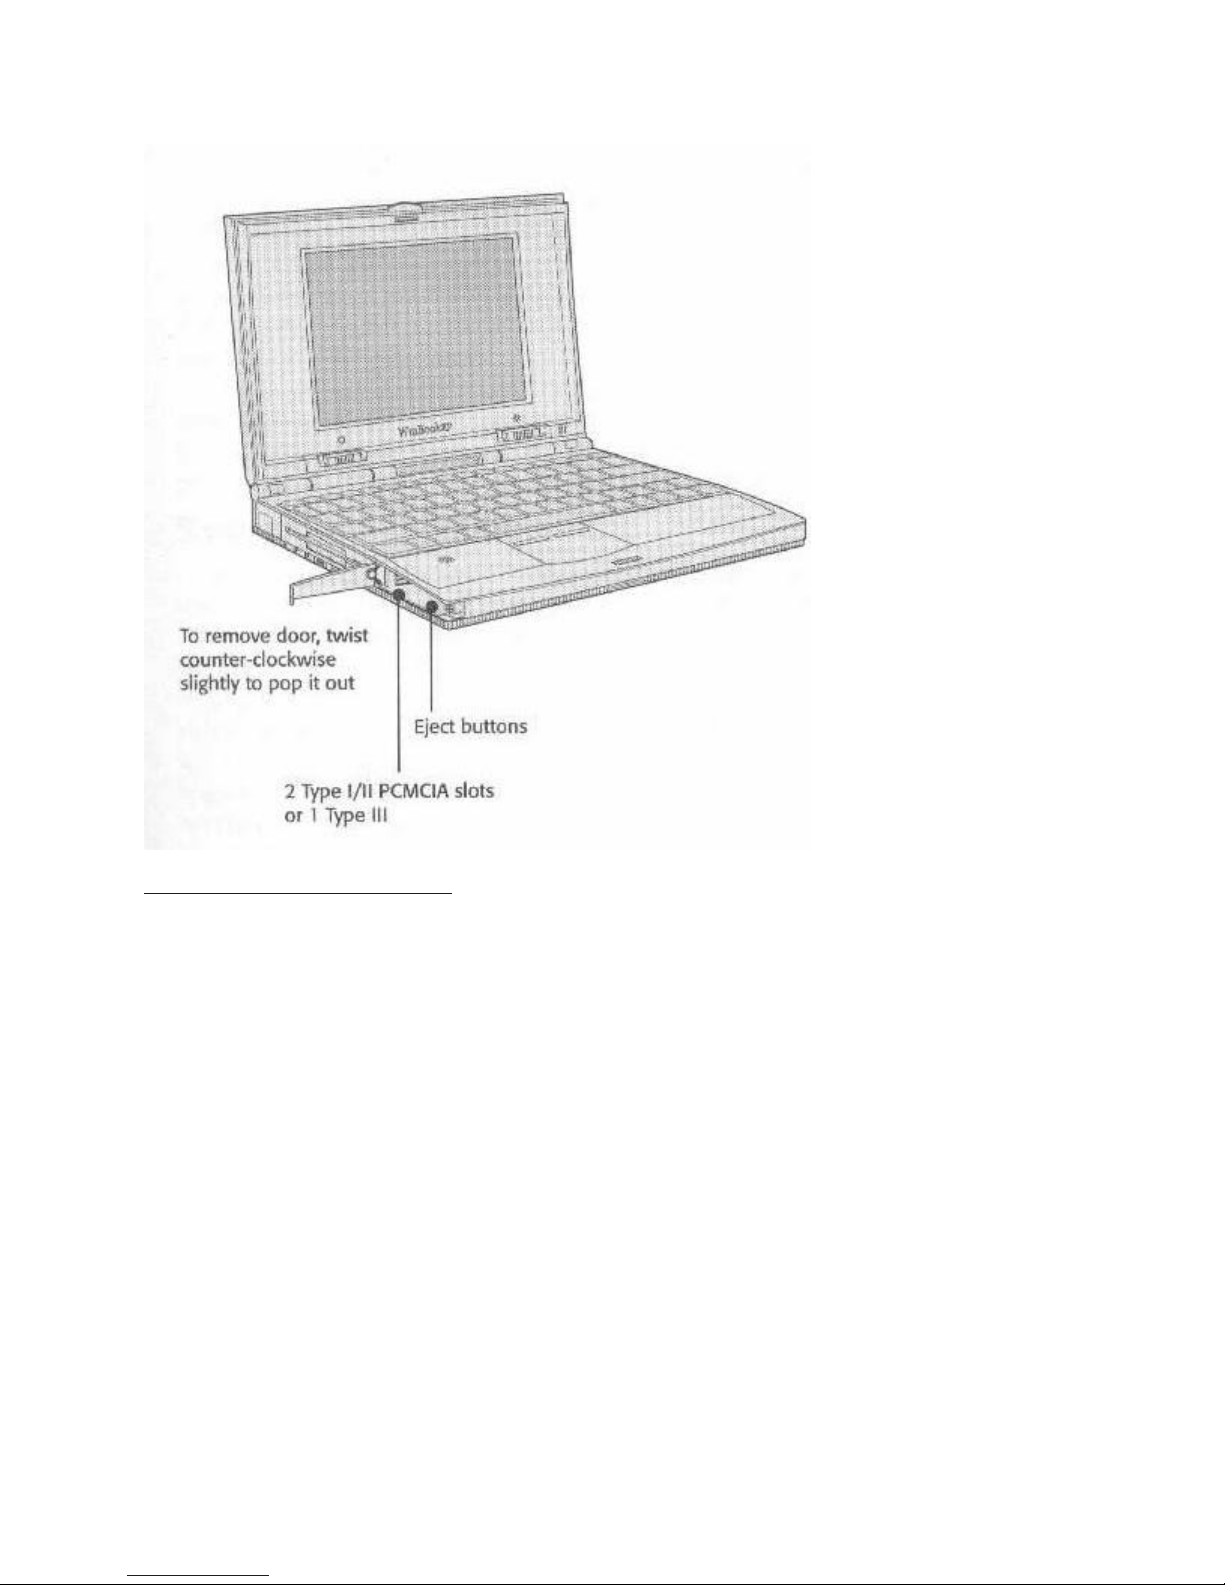
The WinBookXP can use most PCMCIA cards. There are two Type II PCMCIA slots, into
which you can also insert one Type III card, at the left front corner of the computer. They are in a
compartment covered by an access door. The door swings open by gently pressing on the front,
left corner of the computer and pushing the door to the side and back.
PCMCIA cards slide into the slots from the side. When you insert a card in a slot, an eject
button, which is at the front side of the compartment opening, will pop out. To eject a card, press
the button in again and the card will come out enough for you to pull it out of the slot. A Type III
card is twice the height of a Type II cards, so it occupies both slots. However, you can only insert
it in the bottom slot, so the bottom eject button will pop out. You can use both Type I and Type
II cards individually in the slots. Cards insert face up.
The PCMCIA compartment door is removable to allow for oversized cards, or cards with special
connectors needing extra room outside the computer. The door hinge is a flexible pressure fitting
with nubs at the top and bottom that fit into corresponding receptacles in the housing. To remove
Page 47

the door, open it all the way, until you feel some resistance, then twist the door slightly to the
right to pop it out. To reinstall the door, insert the hinge end at the same angle you removed it
and pop it into place. The nubs must snap into their receptacles, and you may need to squeeze the
pressure fitting slightly to retract a nub in order to get the door to snap into place.
All PCMCIA cards require at least some configuration software that must be added to the
Config.sys file. The PCMCIA Card Reference Manual that comes with the computer explains in
detail how to set up your WinBookXP to use PCMCIA cards, so that ‘s all we’ll say about them
here.
PCMCIA Options:
• Ethernet & Token Ring LAN cards
• High speed modem cards
• Wireless modems
• SRAM memory cards
• FLASH memory cards
• Type III ATA hard disks
• Silicon disk cards
• SCSI cards
• Multimedia cardsf
Figure 21: PCMCIA Compartment
Page 48
CHAPTER FIVE: UPGRADES
Page 49

CHAPTER FIVE: UPGRADES
HARDWARE UPGRADES
In Chapter Four we described two options you can either buy when you get your WinBook or
install yourself, namely audio and fax modem cards. This chapter covers the upgrades you can
get for your WinBookXP. These options are also available when you buy the computer, so you
may already have some. If you didn’t opt for any of them at the outset or you want to upgrade
further, contact the number listed on the “Read-Me-First” sheet that came with your system.
You can add more memory, a faster CPU and/or external cache memory to improve try your
WinBookXP’s performance. You can also get an additional hard disk drive to either supplement
or replace the one you got with the computer. First, we’ll look at the upgrades you can install
yourself.
SYSTEM MEMORY
You can upgrade your system DRAM memory from the base memory configuration of either 4
or 8MB (megabytes) to a total of 8MB, 16MB, or 32MB. Upgrading system memory lets you
run more programs at one time and in many situations will speed up the system.
There are two ways you can upgrade the memory in your system: install it yourself, or have it
installed for you through a customer service upgrade. If you are familiar with installing memory
SIMs in a computer, upgrading the WinBook memory follow the same procedure and you’ll
have no problem with the installation. If you are unfamiliar with this process or don’t feel
confident about doing the upgrade yourself, please contact the telephone number on the “ReadMe-First” sheet, which came with your computer.
Static Electricity Warning
All components you handle are sensitive to static electric discharge. In order to protect the
components from damage (and you from shock) please take the following precautions before
handling the open computer or any components:
1. Wear a grounding wrist-strap. This strap is widely available in computer stores. It has an
alligator clip you must attach to something metal, and a strap that fits snugly around your
wrist.
2. Use an anti-static pad. All computer components come in their own anti-static bags, but
there are also foam pads, which give you a larger anti-static work area.
Once you’ve taken these precautions, you can proceed.f
Installing Memory Upgrades
To install a memory upgrade module yourself, follow the procedure below. Don’t forget to take
static electricity precautions.
1. Turn off the computer and disconnect all cables.
Page 50

2. Turn the computer upside down.
3. Remove the two Phillips screws that secure the metal CPU/Memory compartment cover
panel and remove the cover panel.
4. Gently, push down on the two release tabs that secure the memory board in the socket.
5. The memory board will spring up to a 45° angle, remove it by holding it by the edges and
gently pulling it out of the socket.
6. Insert the new memory board into the socket at a 45° angle. The memory board is
designed to insert only in the correct orientation. If it won’t go into the socket, turn it
over and try again.
7. Push the board firmly into the socket, then press down until the spring latches hold the
board securely in place.
8. Replace the cover panel and secure it with the screws.
9. Turn on the computer. The system will automatically detect the additional memory and
prompt you to press ‘F2’ to run the Setup program. When the program comes up, just
press ‘Esc’ and then ‘F4’ and the new memory configuration will be recorded.
The system will automatically reconfigure itself for the additional memory. If you check in the
Setup program, you should see that the extended memory total listed on Page 1 has increased.
Memory & Suspend-to-Disk
If you use the Suspend-to-Disk feature, whenever you add memory, you must increase the size of
the dedicated disk partition to be the same size as your new system memory total. Please refer to
Appendix B for instructions on using the PHDisk utility to change the disk partition.f
Figure 22: Installing a Memory Upgrade
Page 51
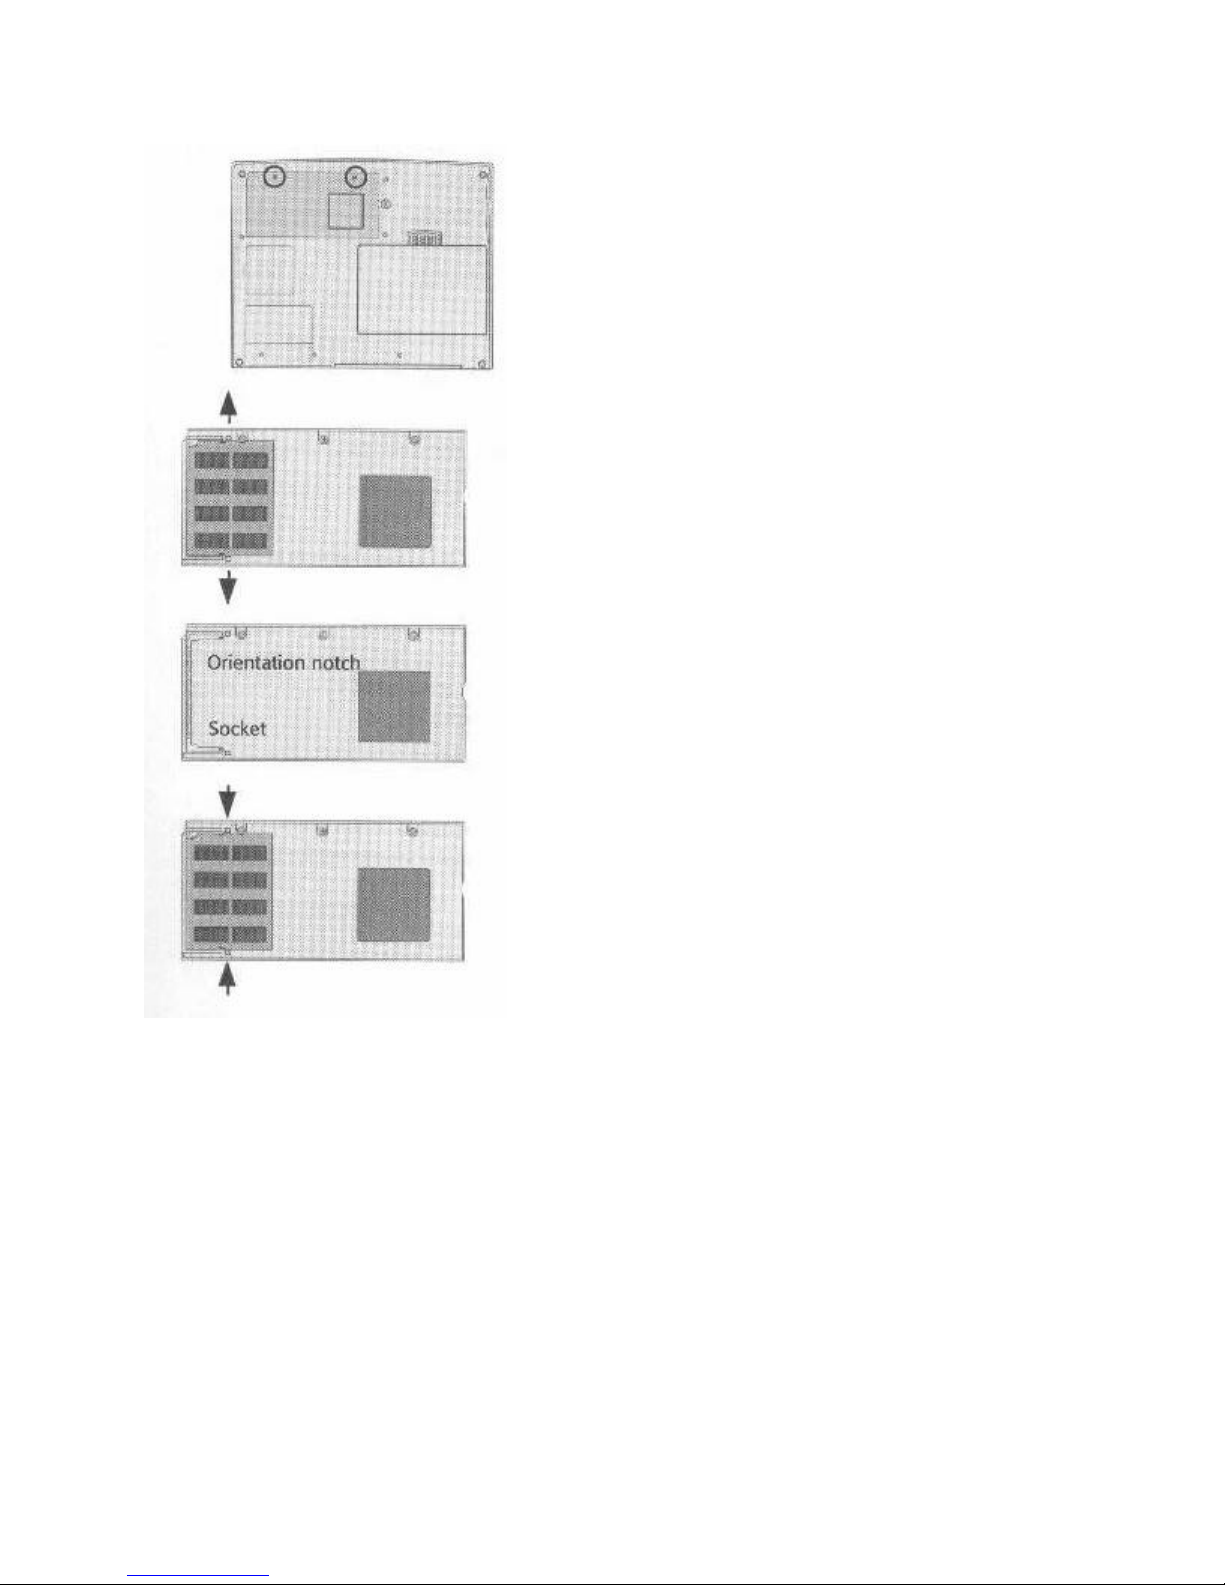
Take Static Electricity Precautions!
Everything in the upgrade compartment can be damaged by static electric discharge.
Make sure to take precautions against it.
REPLACING THE HARD DISK DRIVE
If you decide you need more storage space, you can get a hard disk drive with more storage
capacity. The options include 340MB and 520MB drives, among others. If you decide you want
to upgrade, call the number listed on the “Read-Me-First” document for the latest options. The
upgrades come installed in replacement mounting frames that fit in the computer’s hard disk
compartment.
You can install a hard disk upgrade yourself in a few steps.
Page 52

1. Turn off the computer and disconnect all cables.
2. Turn the computer upside down.
3. Remove the large retaining screw that secures the hard disk housing inside the computer.
4. Turn the computer right side up.
5. Pull the hard disk out of the compartment and put it on an anti-static surface.
6. Remove the new hard disk/mounting frame assembly from its packaging and slide the
assembly into the hard disk compartment. Press the assembly into the compartment so
that you can feel its connector insert in the compartment socket.
7. Turn the computer over and replace the retaining screw to secure the new drive in the
compartment.
The system BIOS will detect the new hard disk when you next turn the computer on and will
automatically configure the system for it.
Figure 23: installing an Alternate Hard Disk Drive
Page 53
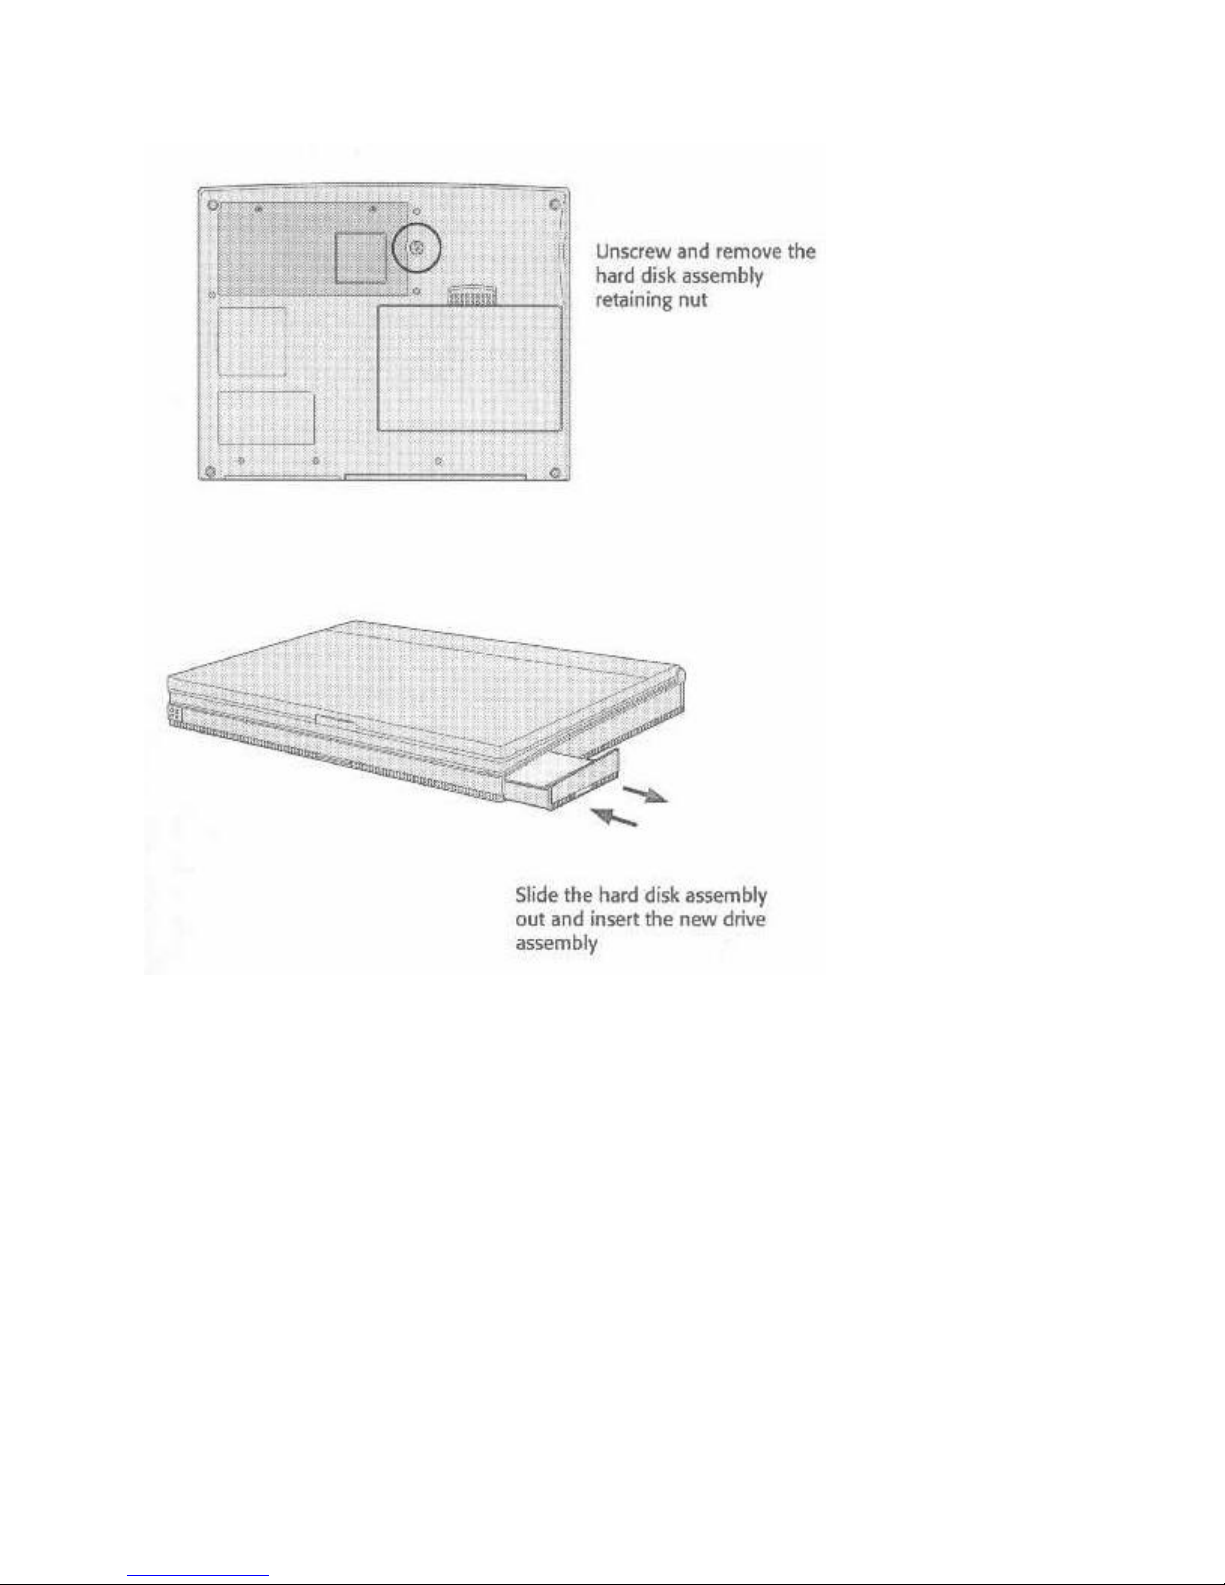
Static & Storage
When you remove a hard disk assembly from the compartment the components on the exposed
hard disk drive are also susceptible to damage from static electric discharge. Take normal antistatic precautions to prevent this. Put the assembly you remove in an anti-static bag or storage
bag. Do not leave it unprotected when you store or transport it.
CPU UPGRADES
Upgrading the computer’s CPU is the most effective thing you can do to increase your
WinBook’s speed and power. We must install this upgrade for you. If you want to upgrade your
CPU, contact the number listed on the “Read-Me-First” document, which came with your
WinBookXP. CPU options are listed in the specification section of Appendix B.
The range of CPU options is designed to meet your computing needs and budget. The higher the
speed of the CPU, the faster the system performance will be, but this will also affect battery life.
For CPU-intensive applications, the Intel DX4™-75, or Intel DX4™-100 are best.
Page 54

Page 55

CHAPTER SIX: CONFIGURING YOUR
SYSTEM
This chapter explains how to use the system Setup program and the special Video Display
drivers that come with your WinBookXP.
THE SETUP PROGRAM
You need to understand how to use the system Setup program even if you dot your WinBookXP
ready-to-roll when it came out of the ox. The program isn’t difficult and you don’t have to be a
computer whiz to use it.
The Setup program creates a configuration record that gets stored in the computer hardware.
Every time you turn on the computer the system refers to this record. If the entries are incorrect,
your computer may not function properly.
As we’ve already seen in Chapter Two, to access all three pages of the program you have to run
it from the DOS prompt. If you’re already in Windows, exit Windows before you run Setup. To
run Setup hold down the ‘Ctrl” and ‘Alt’ keys and press the ‘S’ key. The Setup program will
come on screen. The program has three ‘pages’.
Page 1: Standard Setup
Page 2: Power Management Setup
Page 3: Advanced Setup
Page 1 displays first. You can switch to the next page by pressing the ‘PgDn’ key. To return to
previous page, press the ‘PgUp’ key. Use the keyboard arrow keys to move between items on the
page. The field for the currently selected item will be highlighted. You can select the field option
you want by using the plus and minus keys to change the displayed entry to another option.
In summary:
Change Pages – Page Down (PgDn) & (PgUp) keys
Highlight Item – Arrow Keys
Select Option – Plus & Minus keys
The ‘Esc’ (Escape) key brings up a menu with a list of F-key commands, the commands
displayed are:
Esc Goes back to Setup
F4 Saves any changes you’ve made, exits Setup and reboots the computer
F5 Loads default setting for all pages, including a set of power management settings
Page 56

F6 Exits Setup without saving any changes
PAGE 1: STANDARD SETUP
Page 1 configures the basic system hardware. Most of the entries are defined by the hardware in
the computer. The entries must be the same as the hardware present. The chart on the next page
shows the items listed on the screen in the order they appear, with the default setting and the
options for each item.
Page 1: Standard Setup
MENU ITEM DEFAULT OPTION
System Time 00:00:00AM(PM)
System Date MM/DD/YY
Diskette A 3.5”, 1.44MB Not installed
Diskette B Not installed 3.5’, 2.88MB 3.5”, 1.44MB 3.5”,720K
1. 25”, 1.2MB 5.25”,360K
Hard Disk 1 Auto-detect Not installed User defined
Base Memory 640KB
Extended Mem. 3072KB
CPU Speed Fast Slow
Quick Boot Enabled Disabled
Boot Drive Order C:, A: A:, C:
Password Disabled
Boot Display Auto-detect Simulscan
Note: System Time is shown in 12-hour format, with hours, minutes, and seconds displayed.
System Date is shown with months, days, and years designated by either one or two-digit
numbers
Extended Memory will vary depending on how much system memory your computer has.
System Time & System Date
You can set the correct date and time in the “System Time” and “System Date” fields if the
current system clock setting is incorrect.
Diskette A & B
Page 57

Leave “Diskette A:” set to “3.5”, 1.44” setting. Set “Diskette B:” to “Not Installed” unless you
have the optional docking station and it has a floppy disk drive in it, in which case set “Diskette
B:” to the correct type.
Hard Disk 1
Hard Disk 1 will be set to Auto Detect. Don’t change the setting.
Hard Disk Auto Detection
You should never need to change this setting, since the system software determines the hard disk
settings automatically at power-up. This is a particularly useful feature if you are using more
than one type of hard disk in your system. You can mix and match hard disk drives without
concern for their individual specifications and the BIOS will automatically reconfigure the
system for the drive installed. For instance, if you share a system with another user, you can each
have your own hard disk, and swap them in and out without having to reconfigure the system.
Base Memory & Extended Memory
These are automatically detected by the system.
CPU Speed
The default setting for “CPU Speed” is “Fast”. You can set it to “Slow” to reduce power
consumption at the expense of system performance.
Quick Boot
This setting eliminates the memory test when the system is first powered up, and the memory
test can take quite some time to run. Since the MS-DOS 6.2 “Himem” driver now performs a
memory test before it runs, it is no longer necessary for the BIOS to run a similar test.
Boot Drive Order
“Boot Drive Order” is set to “C:, A:” which causes the system to go to the hard disk first to load
the operating system. If you want it to check the floppy disk drive first, so the computer will boot
from it if a system floppy is in the drive, switch this to the “A:, C:” setting.
Password
The Password feature allows you to password protect access to your WinBook. When you set a
password in this field, the computer will not complete the boot process without the password,
effectively preventing unauthorized access.
To use this feature, highlight the “Password” field and follow the instructions that pop up to
guide you through the process of creating and saving a password.
If you reach the point where you are supposed to type in your password and you decide you want
to stop, type any key, press ‘Enter’ and then press ‘Enter’ again without typing ANYTHING
when it asks you to confirm the new password. This will send you back to the beginning.
Page 58

You must use the F4 command to exit Setup and save the new password setting, or it will not
work even if you set a password.
You can change or remove the password by highlighting the “Password” field, typing in the
existing password at the prompt, and following the instructions.
Boot Display
The “Boot Display” field defines which display the system will use when you turn the computer
on. There are two options:
Auto-Detect – The default. If no CRT is connected, the system will use the LCD display. If a
monitor is connected to the VGA port, the system will default to Simulscan mode.
Simulscan – Setup option 1. Both LCD and CRT display (slows response a little). If no external
monitor is connected, the LCD will still display the screen image.
PAGE 2: POWER MANAGEMENT SETUP – CONTROL CENTRAL
Page 2 of the Setup program is for the power management features. You can disable all the
features together, enable power management and adjust the features individually, or load a
default set by loading all the BIOS defaults with the F5 command. There is a full explanation of
how to use the power management features in Chapter Two.
The options table is listed here again for your convenience.
Page 2: Power Management Setup
MENU ITEMS DEFAULT OPTIONS
Power Management Always Battery only Disabled
CPU Doze Timeout Enabled Disabled
Sleep Timeout 02 Minutes (Increments of 1 minute) Disabled
Suspend Timeout Disabled (Increments of 1 minute) Enabled
Suspend Data to RAM Disk Disabled
Hard Disk Timeout 02 Minutes (Increments of 1 minute) Disabled
Display Timeout 02 Minutes (Increments of 1 minute) Disabled
Floppy Disk Timeout 02 Minutes (Increments of 1 minute) Disabled
Modem Timeout 60 Seconds (Increments of 10 seconds) Disabled
Audio Timeout 02 Minutes (Increments of 1 minute) Disabled
Auto Dim Enabled Disabled
CPU Clock Throttle Enabled Disabled
Page 59

Battery Low Suspend Disabled Enabled
Modem Ring Resume Disabled Enabled
Alarm Resume Disabled Enabled
Alarm Time 00:00
PAGE 3: ADVANCED SETUP
The Advanced Setup section of the Setup program is for additional hardware configuration
settings. These include settings for some of the optional hardware.
Page 3: Advanced Setup
MENU ITEM DEFAULT OPTIONS
Internal Audio Enabled Disabled
Audio IRQ IRQ7 IRQ5 Off
External Cache Disabled Enabled
COM Port 3F8h 2F8h 3E8h 2E8h Disabled
Internal Modem 2F8h 3F8h 2E8h 3E8h Disabled
LPT 378h 278h Disabled
PS/2 Pointing Device Enabled Disabled
HDD Block Mode Disabled Enabled
Note: Disabling the PS/2 pointing device disables both the internal and the external PS/2 devices.
Internal Audio & Audio IRQ
If you have either of the optional audio cards, you must set “Internal Audio” to “Enabled.”
You can use the default IRQ setting of IRQ 7 for the audio card, or you can select IRQ 5 instead.
IQ selection is explained in detail in “Audio System Setup Options” in Chapter Four.
Com Port, Internal Modem, & LPT
These settings for these entries are the standard address assignments used for these ports in IBMcompatible PCs. The Internal Modem Port, which normally functions as COM 2, is reserved for
the fax modem even if you don’t have it installed. Do not change the addresses unless you have a
specific reason why you need to , and you know what you are doing. Normally, there should be
no need to change the.
PS/2 Pointing Device
This enables the built-in pointing device (either the trackball or the TrackPoint)
Page 60

And mouse support for the external PS/2 port. The default setting is “Enabled”. If you disable
this setting none of them will work.
HDD Block mode
The default setting for these two is “Disabled”.
VIDEO DRIVERS & UTILITIES
The WinBookXP uses video display drivers to support several screen resolutions and numbers of
colors. A Windows video driver set for the optimum setting of 640x480x256-colors is already
installed when you get the computer. The advantage of using this driver over the standard
Windows VGA driver is that this one takes advantage of the WinBookXP’s video display
circuitry to speed up graphic display. It also offers more colors than the stock 640x480x16-color
VGA driver that comes with Windows.
Alternate drivers for Windows are on the hard disk, if you have a system with pre-loaded
software, as well as on video driver floppy disks that come with the computer. You can use the
same driver you use for the LCD screen for an external monitor, or you can change to another
one. The Windows drivers support several resolutions and number of colors displayed, including
two HiColor modes at 640 x 480 that display approximately 32,000 and 64,000 colors.
There are also high-resolution display drivers for a number of DOS programs. There are
installation instructions for them in the “Readme” text files that come with the drivers.
The DOS drivers are included on the floppy disks, which come with your WinBook, and, if you
have a system with pre-loaded software, are on your hard disk. They are in the \DRIVERS\WD
directory, and include drivers for such popular DOS programs a AutoCad, WordPerfect, and
Word for DOS> The drivers for these applications are located in separate directories for each
application within the \DRIVERS\WD directory. If you are not using any of these DOS-based
applications, you can delete the drivers from your hard disk. If you need them later, you can
install the drivers from the floppy disks.
Windows Video Utilities
In addition to the Windows video drivers, you get two Windows utilities that allow you to
change drivers from within Windows and to adjust some display features.
The utilities, Western Digital Video Driver Setup and Video Changer, are from Western Digital
Corporation, the maker of the WinBookXP’s video controller and driver software. Both are in
the “Main” Windows program group.
Western Digital Video Driver Setup
The main purpose of Video Driver Setup is to install Western Digital video drivers. When you
run the utility, the list in the box shows the currently installed options. The default WinBookXP
256-color driver supports resolutions of 640 x 480, 800 x 600 and 1024 x 768 at 256 colors.
Remember, however, that you can only see the higher resolutions on an external monitor. Using
Video Driver Setup is reasonably straightforward and since the drivers you’re likely to want are
already installed, you may not need to use this utility. The “Help” feature explains in detail how
Page 61
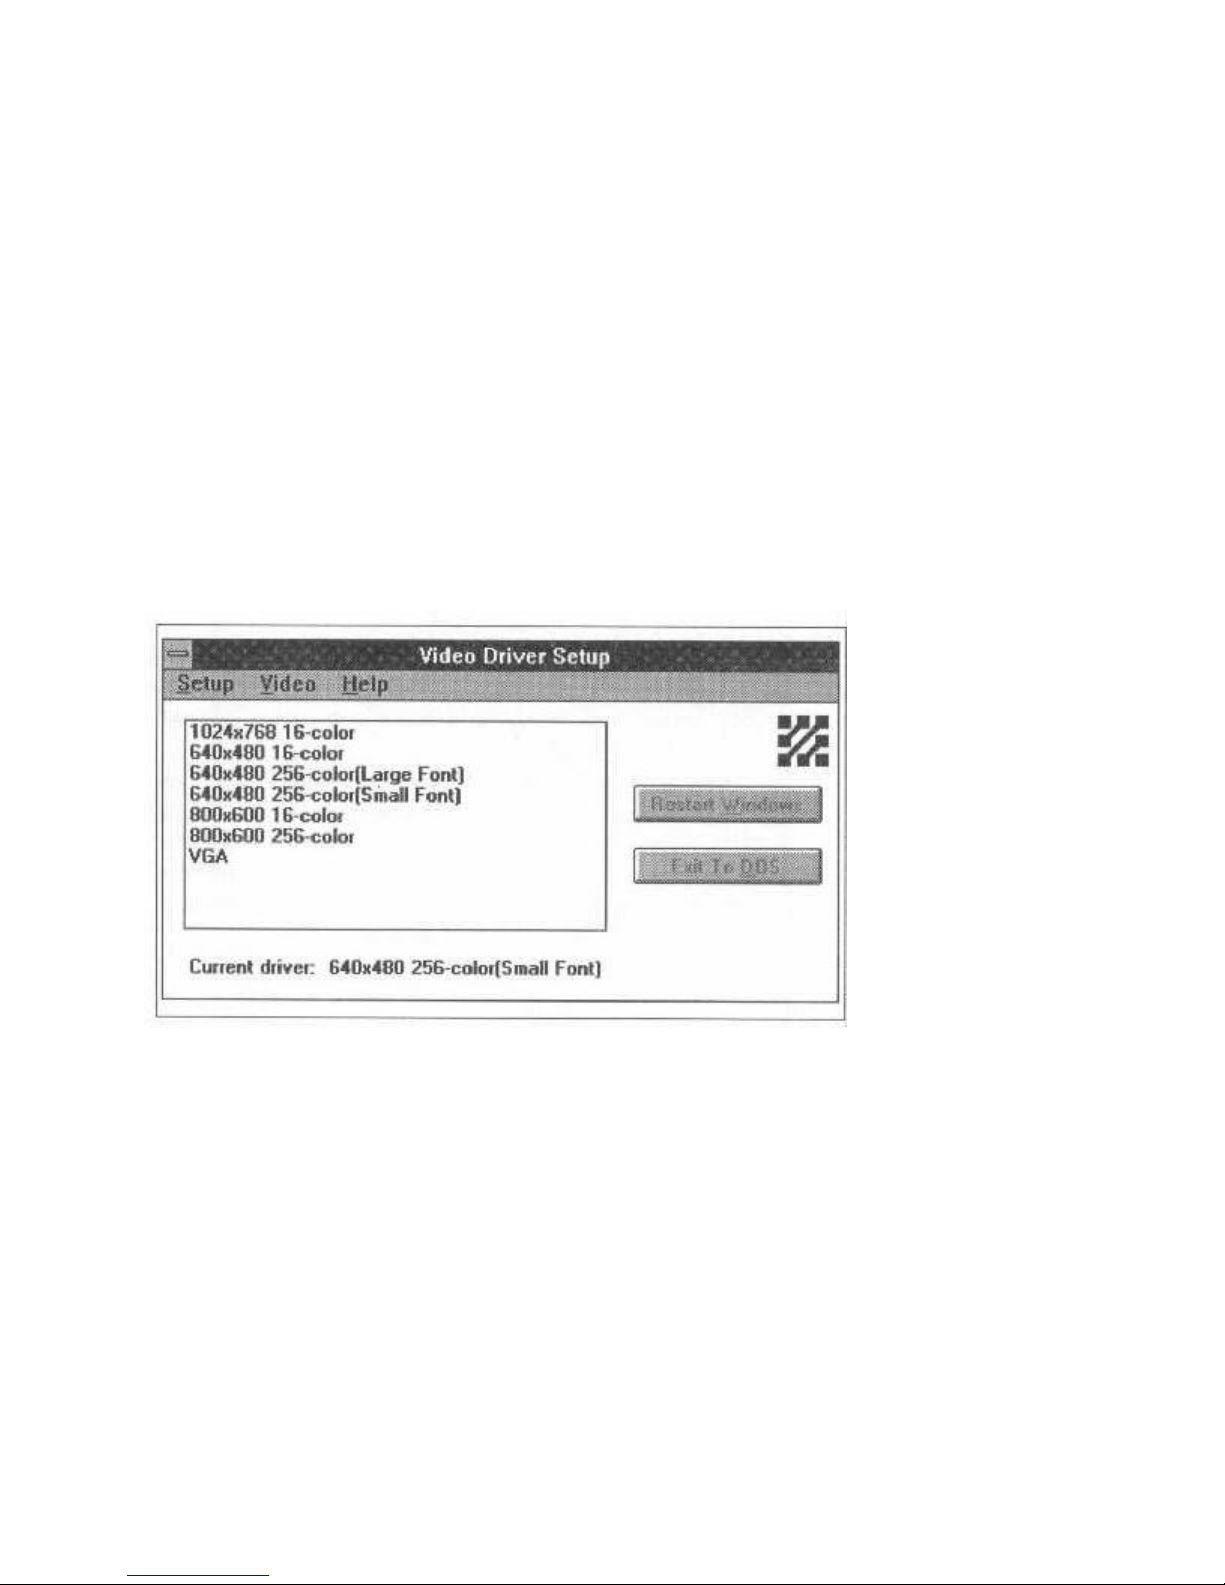
to use it if you do. You can also acc4ess the Video Changer utility by using the “Change Video’
command in the Video menu. You must restart Windows in order for any changes you make to
take effect.
The “Small Font” and “Large Font” notations refer to the basic display font that Windows uses
in the Program Manager, Windows utilities and application programs. The “Small Font” is the
‘standard’ size for a given resolution. Generally speaking, to get closest to a WYSIWYG (What
You See Is What You Get) display, 14- and 15 –inch monitors should use the 640 x 480
resolution, while 16- or 17-inch monitors should use 800 x 600. The 1024 x 768 resolution are
for 19- or 20-inch monitors.
Sometimes, however, you might like to display a higher resolution on a smaller monitor so that
you get more displayed in the same screen dimensions. In this case, you might want to use the
“Large Fonts” option so that menus etc. are easier to see on the smaller –looking image that
results from this arrangement.
Figure 24: WD Video Driver Setup
WD Video Driver Setup Program
This program allows you to conveniently change the current display drivers to meet your needs.
The maximum LCD resolution is 640x480x256 colors, but if you’re using a CRT, you can select
from resolutions up to 1024x768x256 colors. The program will automatically restart Windows
when you select a new display driver.
Video Changer
You should use the Video Changer utility to change between currently installed resolutions and
numbers of colors. You can also change between the Small and Large Font options. The Figure
on the next page shows the Video Changer window.
To make changes, you click on the item you want to change and then select an option from the
items presented. Not all items on the screen are usable for the LCD screen. The ‘32K or 64K
Page 62
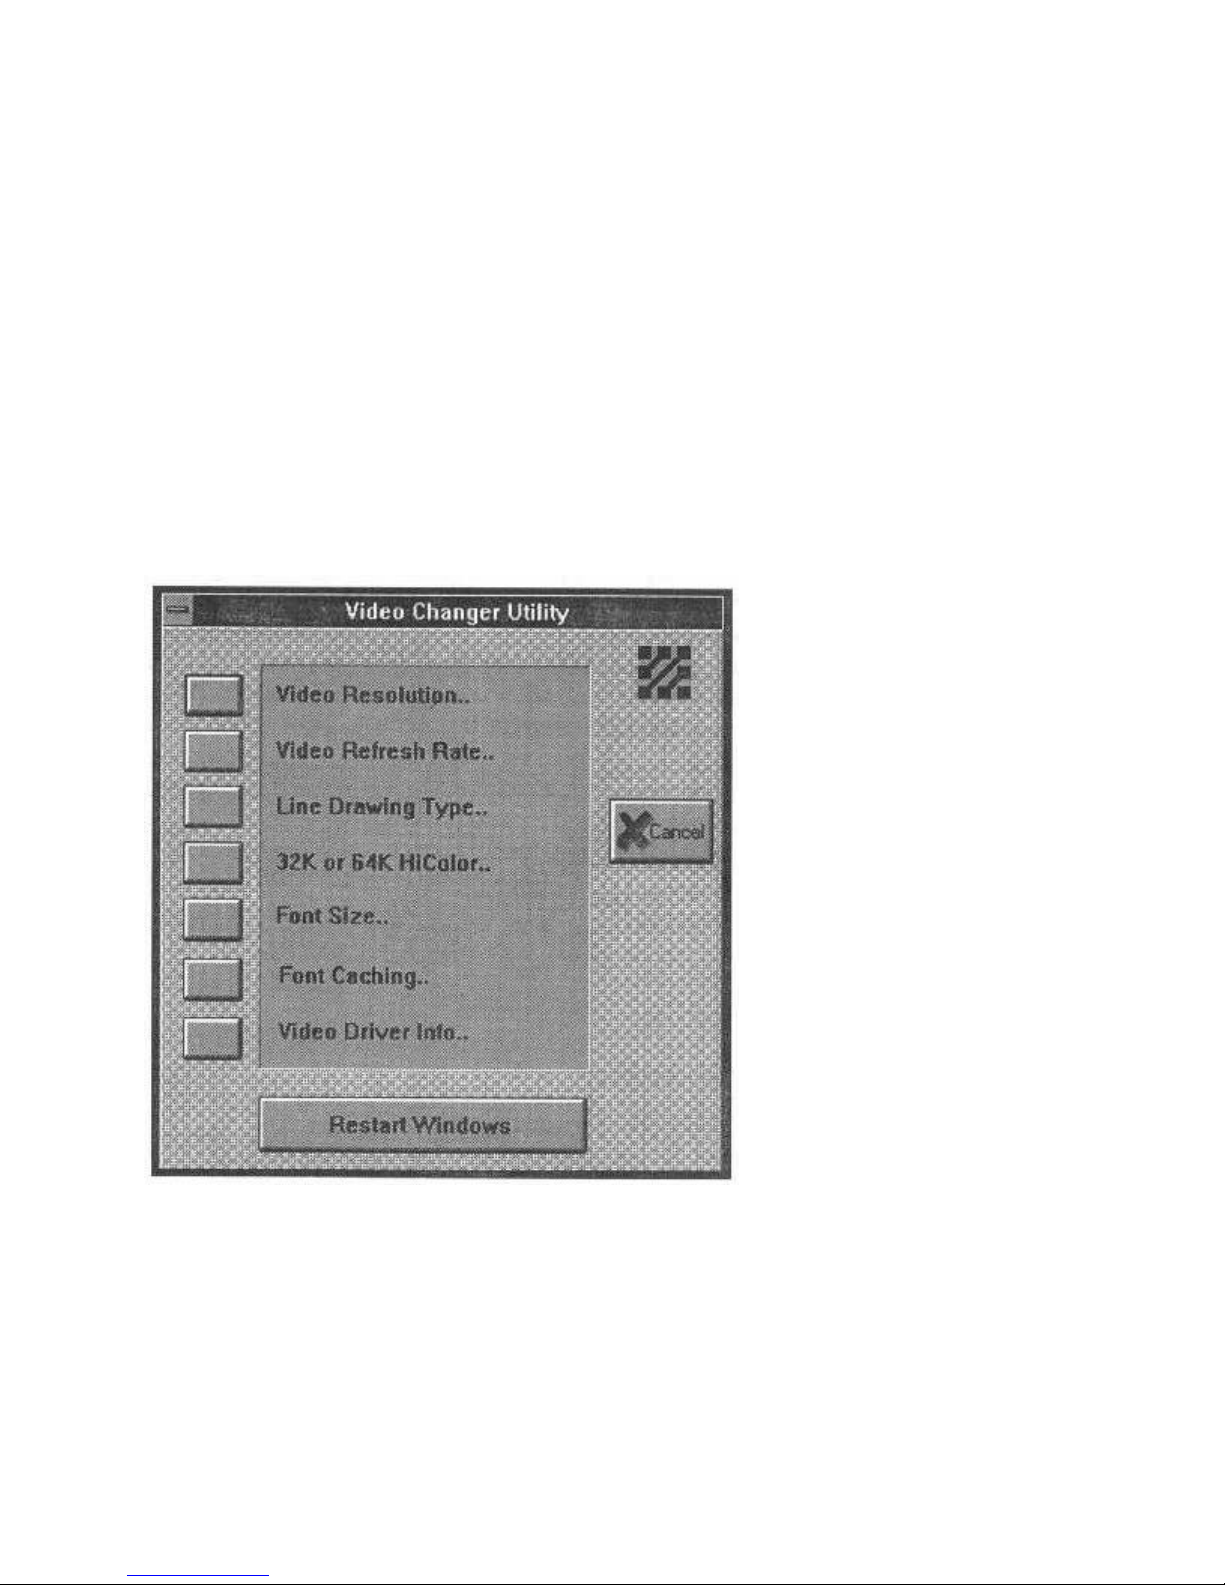
HiColor’ modes require that the display be set for an external monitor only before they will
work.
Windows Display Driver Special Characteristics
The video display drivers have some special characteristics that result from the WinBookXP’s
added capability of using either its own LCD screen or an external monitor, or both at the same
time.
The LCD panel in color WinBookXP models, as is standard for this type of screen, can display a
maximum resolution of 640 x 480 and a maximum of 256 colors. This means it can not display
all the resolutions and modes the video controller and drivers can produce. The result of this is
that at some resolutions, you can display both the LCD’s maximum resolution on the LCD panel,
and a higher resolution on an external monitor.
Figure 25: WD Video Changer
WD Video Changer Program
This program allows you to control some features of the display controller individually. We’ve
optimized the settings for the LCD display at the factory. If you’re using the WinBook with an
external monitor, you may want to experiment with the Video Refresh rate and HiColor settings
to see which combination is best for you r application.f
At 800 x 600 and 1024 x 768 resolutions, in either 16- or 256-color modes, both the LCD and an
external monitor will display 640 x 480 resolution in LCD and Simulscan modes. In CRT-only
Page 63

mode, however, the actual resolution setting will display. Both the Simulscan and Display
Fn/function key commands will work in this situation. This allows you to set up the following
arrangement:
1. In the system Setup program on Page1, Standard Setup, make sure the Boot Display line
is set to “Auto-detect”. This is the default setting so it should already be set for this unless
you changed it.
2. Reboot and set the Windows driver to the high resolution and 16- or 256-color mode you
want using the Video Changer utility.
• When you use the computer with no external monitor connected, the auto-detection
feature will set the video display to run in LCD-only mode at a resolution of 640 x 480.
• When you connect an external monitor, the system will operate in CRT-only mode and
the monitor will display the higher resolution.
Display Driver Limitations
There are two limitations to how you can use the video display drivers. The first is that you can
not use the high-resolution drivers in Simulscan mode. You have to use the method described
above to switch between standard resolution o the LCD panel and higher resolutions.
The second limitation concerns the HiColor modes. The HiColor modes will only work on an
external monitor and when you use them the display switching Fn/Function key commands F6
and F10 do not work. Moreover, if you try to run Windows using a HiColor mode in Simulscan
or LCD mode, Windows will not run and will produce an error message saying that the driver
does not support that configuration. If you have this problem, shut down, connect an external
monitor, run Windows again and use the Video Changer utility to switch to 16- or 256-color
mode. You can then return to LCD-only operation.
APPENDIX A: TROUBLESHOOTING MAINTENANCE
Page 64

APPENDIX A: TROUBLESHOOTING &
MAINTENANCE
This Appendix is designed to help you solve problems you may encounter while using the
WinBookXP. If you have a problem that’s not listed here, please telephone the number listed on
the “Read-Me-First” document that came with your computer.
SOLVING PROBLEMS YOURSELF
Following is a list of some commonly experienced problems, and their possible solutions. If
nothing you do helps the situation, call the Service Center listed on the “Read-Me-First” sheet
that came with the WinBook.
Error Messages During “Boot” Process
Problem: BIOS setup or configuration error, type ‘F1’ to continue.
Action: - Enter setup program (press ‘CTRL’ + ‘ALT’ + ‘S’) and
use default setup configuration.
- If a new option has been added, be sure to run the Setup
program.
- Unplug any external keyboards and/or pointing devices
and retry.
- If you are using a docking station, unplug WinBookXP
from dock and retry.
Problem: Invalid CMOS error message, type ‘F1’ to continue.
Action: - Enter setup program (press ‘CTRL’ + ‘ALT’ + ‘S’)
and use default setup configuration.
Problem: System reports an error message on screen that is not related to any setup
problems.
Action: - If you are using a docking station, unplug WinBookXP from dock and retry.
- Write down error message and call the Service Center listed on the “Read-Me-First” sheet that
came with the WinBook.
Problem: System prompts for password at boot time.
Action: - Boot password has been enabled, type in password to continue.
Page 65

- If you have lost the password, call the Service Center listed on the “Read-Me-First” sheet that
came with the WinBook.
Problem: Message indicates missing operating system.
Action: - Hard drive type is not selected correctly:
A.) Enter setup program (press “CTRL’ + ‘ALT” + “S’);
B.) Select IDE drive C: to be “Auto-detect”.
- Hard drive needs to be re-initialized, check with the service center first.
- Try booting from a floppy disk with an operating system installed on it.
- Re-install the operating system.
- If problem persists, call the Serve Center listed on the “Read-Me-First” sheet that came with
the WinBook.
Problem: Computer cannot locate startup device.
Action: - Enter setup (press ‘CTRL’ + ‘ALT’ + ‘S’) and make sure the boot
devices are active.
A. Drive A: (floppy drive) should be set for 1.44MB, 3.5”;
B. Drive C: should be set for “Auto-detect”;
C. Your drive “boot sequence” should be set to “C:, A:”.
Problem: System stops partway through boot process, after single beep is heard.
Active: - Corrupt CONFIG.SYS or AUTOEXEC.BAT files:
A. Turn the computer off and then on;
B. Press ‘F5’ key to bypass these files at boot time;
C. If system boots, write AOTOEXEC and CONFIG settings down, then re-install backups of
these files and try again;
D. If problem persists, call the Service Center listed on the “Read-Me-First” sheet that came with
the WinBook. If you are using a docking station, detach WinBookXP from the dock and retry.
Problem: Computer does not come on when the power switch is pressed.
Action: - Be sure the AC adapter connectors are fully plugged into the wall outlet, the computer,
and the AC adapter.
Plug in and run the unit from the AC adapter. When done, turn off the computer and leave it
connected to the AC adapter for two hours, to fully charge the battery.
Page 66

- Make sure the wall outlet is not defective, by plugging something else
- (e.g., a lamp) into the outlet to check it.
Internal or External Display-Related Problems:
Problem: There is a blank display, no beeps were heard, and the LCD indicator is blank.
Action: - If you are running on AC power, make sure the adapter is plugged in and the green
power indicator is lit.
- If you are running on battery power, make sure a charged battery is installed in your system.
- If you are using a docking station, unplug your WinBookXP from the dock and retry.
Problem: There is a blank display, no beeps were heard, and the LCD indicator panel is
active.
Action: - Make sure the WinBookXP power switch is turned on.
- If using battery power, make sure battery is charged.
- If using AC power, see that AC power indicator is on.
- Unplug all external connections except for the AC power and try again.
- If you are using a docking station, unplug WinBookXP from dock and retry.
Problem: The power switch is on, but there is a blank display, no beeps, and the LCD
indicator panel is active.
Action: - System is in suspend, check to see if the suspend icon is displayed on the indicator
panel.
- Press suspend switch to reactivate.
- If you are using a docking station, unplug WinBookXP from dock and retry.
- External display may be selected. Press ‘Fn’ + ‘F6’ to set display to Simulscan mode.
Problem: The display is blank and a single beep was hear.
Action: - Check to make sure brightness and contrast controls are at it’s midpoint settings.
- Check that the active display option has been set to LCD or Simulscan:
A. Press the ‘Fn’ + ‘F10’ keys simultaneously to change the active display type setting;
B. Press ‘CTRL’ + ‘ALT’ + ‘S’ to enter setup screen to select display type.
C. Press ‘Fn’ + ‘F6’ to force display to Simulscan mode.
Page 67

Problem: There is a blank screen and a series of beeps, or a long continuous beep.
Action: - If an option has just been installed remove the newly installed option:
A. Check to be sure memory expansion card is correctly installed:
B. Check to be sure audio card is correctly installed:
C. Check to be sure modem is correctly installed.
- If you are using a docking station, unplug WinBookXP from dock and try again.
- If failure persists, call the Service Center listed on the “Read-Me-First” sheet that came with
the WinBook.
Problem: Display is on, but system will not display any messages (blank screen).
Action: - If an option has just been installed, remove newly installed option:
A. Check to be sure memory expansion card is correctly installed;
B. Check to be sure audio card is correctly installed;
C. Check to be sure modem is correctly installed.
- If you are using a docking station, unplug WinBookXP from dock and try again.
- If failure persists, call the Service Center listed on the “Read-Me-First” sheet that came with
the WinBook.
Problem: The screen is not readable.
Action: - If an option has just bee installed, remove newly installed option:
A. Check to be sure memory expansion card is correctly installed;
B. Check to be sure audio card is correctly installed;
C. Check to be sure modem is correctly installed.
- If failure persists, call the Service Center listed on the “Read-Me-First” sheet that came with
the WinBook.
Problem: Incorrect image is on display.
Action: - Be sure operating system is installed correctly.
- Boot system from DOS “Boot” diskette to see if problem goes away.
- If a new hard drive has been installed, remove it and insert old one.
- When using LCD display, be sure S/W has correct driver (VGA) installed.
Page 68

- If failure persists, call the Service Center listed on the “Read-Me-First” sheet that came with
the WinBook.
Problem: Display has vertical or horizontal stripes on it when it is powered up.
Action: - Call the Service Center listed on the “Read-Me-First” sheet that came with the
WinBook.
Problem: Display has small, colored dots, which are always present
Action: - If you a TFT panel, a small number of colored dots is a acceptable.
- If you have a TFT panel with more than seven of these dots, call the Service Center listed on
the “Read-Me-First” sheet that came with the WinBook
- If you have a dual scan color or monochrome system, call the Service Center listed on the
“Read-Me-First” sheet that came with the WinBook.
Problem: Display brightness is poor.
Action: - Adjust contrast and brightness for optimum viewing. Relocate system away from direct
light sources or high ambient light.
- If running on battery power, go into setup and deselect “Auto-Dim” function.
- If brightness control is set at maximum, backlight may need replacing.
- If contrast must be set at maximum while operating at room temperature, call the Service
Center listed on the “Read-Me-First” sheet that came with the WinBook.
Problem: Cannot get external display to work.
Action: - External CRT will not activate.
A. Press ‘CTRL’ + ‘ALT’ + ‘S” to select Auto or Simulscan display mode;
B. Press ‘Fn’ + ‘F10’ to switch active display;
C. Make sure you plugged in the CRT monitor before you powered up the WinBook.
D. Press ‘Fn’ + ‘F6’ to force display to Simulscan mode.
Problem: External display is not working in the high-resolution mode.
Action: - High-resolution drivers are not activated:
A. In Windows, use WD display Utility to select resolution/mode;
B. In DOS, install WD drivers in the \DRIVERS\WD directory.
Keyboard or Pointing Device Problems
Page 69

Problem: Internal keyboard keys are not working or are only working intermittently.
Action: - If an external keyboard is plugged in, remove it.
- If problem persists, call the Service Center listed on the “Read-Me-First” sheet that came with
the WinBook.
Problem: External keyboard is not working.
Action: - Keyboard is defective.
- Duplex adapter is defective, contact the Service Center.
- If other PS/2 device is plugged in, disconnect it.
- Keyboard is incompatible with PS/2 specifications.
- WinBookXP is defective, call the Service Center listed on the "Read-Me-First" sheet that came
with the WinBook for instructions.
Problem: External PS/2 pointing device is not working.
Action: - Setup program has disabled PS/2 pointing device:
A. Press ‘CTRL’ + ‘ALT’ + ‘S” to enter setup;
B. Select Advanced Setup screen (screen3);
C. Enable PS/2 pointing device.
- Check if any external PS/2 devices are plugged into the duplex adapter.
- Check if the external PS/2 device is defective, by unplugging it and retrying.
- If the system is plugged into the docking station, unplug and retry.
Problem: Internal-pointing device is too sensitive, or not sensitive enough.
Action: - Invoke Windows Control panel and select mouse icon;
A. Readjust tracking and sensitivity as appropriate.
Problem: Cursor disappears when moved rapidly.
Action: - Move pointing device more slowly.
- Open Windows Control panel and select mouse icon:
A. Readjust tracking and sensitivity as appropriate;
B. Enable large cursor, mouse trails or mouse locator.
Problem: Internal trackball operation is intermittent.
Page 70

Action: - Trackball may be dirty. Clean trackball according to instructions at end of this chapter.
- If problem persists, call the Service Center listed on the “Read-Me-First” sheet that came with
the WinBook for further instructions.
Communication Port Problems
Problem: External serial port is not working.
Action: - Port is not enabled:
A. Press ‘CTRL’ + ‘ALT’ + ‘S’ to enter Setup;
B. Select Advanced Setup screen (Page 3);
C. Enable External COM port for 3F8 (COM1 default).
- Incorrect cable, purchase correct cable.
Problem: Internal modem not functional.
Action: - Port is not enabled:
A. Press ‘CTRL’ + ‘ALT’ ‘S’ to enter Setup;
B. Select Advanced setup screen (Page 3);
C. Enable Internal modem port for 2F8 (COM2 default);
D. Make sure your communications software is set to use COM2.
- Refer to Modem Installation Guide for more details.
Printer Port Problems
Problem: External parallel port or printer is not working.
Action: - Port is not enabled:
A. Press ‘CTRL’ + ‘ALT’ + ‘S’ to enter setup;
B. Select Advanced Setup screen (screen 3);
C. Enable LPT port for 378 (LPT1 default.
- Incorrect cable, purchase correct cable.
- Correct printer driver not installed, install correct driver in Printers section of Windows Control
Panel.
Page 71

- Make sure correct printer port is selected in Windows (LPT1).
Problem: Printer doesn’t print correct characters.
Action: - Incorrect cable, purchase correct cable.
- Correct printer driver not installed, run Printers section of Windows Control Panel or
application setup.
PCMCIA Problems
Problem: No system beep when the PCMCIA card is installed.
Action: - PCMCIA drivers not installed:
A. Back up your current CONFIG.SYS file;
B. Copy CONFIG.PCM to CONFIG.SYS;
C. Reboot your system;
D. Plug PCMCIA card in slot A or B, and check LCD status panel;
E. Some cards need software referred to as a Client Driver, or card ‘enabler’. LAN and SCSI
controller cards are examples of this. Refer to installation instructions, which came with your
PCMCIA cards.
Problem: System issues a single beep when card is installed.
Action: - The PCMCIA card is not being recognized:
A. Select correct boot option at startup for your card;
B. Refer to PCMCIA reference guide for further details.
Miscellaneous Problems
Problem: Disk drive is not working correctly.
Action: - Setup configuration is incorrect
A. Press ‘CTRL’ + ‘ALT’ + ‘S’ to enter Setup;
B. Make sure Floppy drive A: with the 1.44MB, 3.5” specs is enabled.
- Be sure diskette is formatted for a DOS computer.
- Be sure diskette is installed correctly.
Page 72

- If docking station is attached, remove computer from it and retry.
Problem: Diskette will not eject when eject button is pressed.
Action: - Label may have become detached and is obstructing diskette exit:
A. Check for condition by looking inside slot;
B. Call the Service Center listed on the “Read-Me-First” packing sheet that came with the
WinBook for further instructions.
Problem: Cannot boot from floppy disk.
Action: - Boot sequence is set to boot from C: first.
A. Type ‘CTRL’ + ‘ALT’ + ‘S’ to enter setup;
B. Set boot sequence to “A:, C:”.
- Floppy does not have the correct operating system loaded on it.
- Floppy is defective.
Audio Problems
Problem: Internal audio is not functioning, or is malfunctioning.
Action: - The audio volume is turned all the way off.
- Headphones or external speakers are plugged in, but are not turned on.
- Internal audio is not enabled; enable it on Setup Page 3.
- Internal audio IRQ is not enabled; use Setup Page 3 to set this to IRQ7 (default) or IRQ5.
- Internal audio power management is interfering (disable it).
- Audio board is not installed correctly, refer to Audio Installation Guide.
- Application software or drivers are not configured correctly:
A. Select SoundBlaster option (or ESS 488 if available);
B. Select I/O port 220h;
C. Select DMA channel as 1;
D. Select either IRQ7 or IRQ5 (depending on how you have set this up on Setup Page 3).
- If docking station is installed, remove it and retry.
- If a PCMCIA Multimedia card is installed, remove it and retry.
Page 73

- Audio board is defective, call the Service Center listed on the “Read-Me-First” sheet that came
with your WinBook.
Problem: WinBookXP is interfering with radio or TV reception.
Action: - Unplug external cables and verify that they are at fault.
- Use only shielded cables and be sure they are attached properly.
- Reposition WinBookXP away from these devices.
- If problem persists, call the Service Center listed on the “Read-Me-First” sheet that came with
the WinBook.
Power Management Problems
Problem: System won’t operate from the battery.
Action: - Battery not charged correctly, plug in AC adapter and turn system off to allow the
battery to fully charge. Full charge should take about two hours.
- Battery is not correctly inserted, or the contacts are broken. You can check by removing battery
from compartment and examining the contacts in the computer to see if they are broken or bent.
- Battery pack is defective, call the service number listed on your “Read-Me-First” sheet for
details on ordering a replacement battery.
Problem: Battery life is too short.
Action: - Battery is not charged correctly, plug in AC adapter and turn system off to allow the
battery to fully charge which should take about two hours. The battery is sensitive to extreme
temperatures and should only be charged between 20°C and 30°C for best operation. Also, there
is a safety mechanism in the WinBookXP that stops the charging process when the temperature
exceeds 40°C, regardless of whether the battery is fully charged or not.
- Power management is not turned on. Using the ‘Fn’ + ‘F8’ key combination, enter the Power
Management setup screen and enable power management.
- Device power-down options are disabled. Load defaults in the Power
Management setup screen.
- POWER.EXE program is not loaded in CONFIG.SYS file. You can test this by typing “Power”
and pressing ‘Enter’ at the DOS prompt. If the program is loaded in your CONFIG.SYS file, you
will get a list detailing system status or it will tell you power management is not installed. You
must have the following line somewhere in your CONFIG.SYS file:
“DEVICEHIGH=C:\DOS\POWER.EXE ADV:MAX”.
Note that the WinBookXP is shipped with a CONFIG.SYS with this line already inserted. A
Page 74

backup copy of this file is also included in the C:DOS directory, in case you have accidentally
deleted the original one.
- Battery pack is defective, call the service number listed on your “Read-Me-First” sheet for
details on ordering a replacement battery.
Problem: System won’t suspend to disk.
Action: - Suspend to disk is not enabled in the power management setup. Using the ‘Fn’ + ‘F8’
key combination, enter the Power Management setup screen and change the selection for
“Suspend to” from Suspend-to-RAM to select Suspend-to-DISK.
- There is no partition for suspending to disk, or the partition is too small to suspend to disk. Use
the PHDisk utility (in the C:\DRIVERS\PHOENIX directory on the hard drive) to check for the
presence of a disk partition. If you don’t find one, refer to page B-18 for information about
setting up a Suspend –to-Disk partition.
Problem: Resume from disk error message.
Action: - The most common cause of this error comes from using more than one hard disk with
the WinBook. If you suspend to disk, you must always power the system back up with the disk
that was in the WinBook when it was put Suspend mode.
- The suspend-to-disk partition has somehow become corrupted. You can use the
PHDISK/REFORMAT command to reformat the partition.
- There is a bad sector on the hard disk, causing you to lose information when you enter suspend
mode. Try using the PHDISK/REFORMAT command to reformat the partition. PHDISK will
automatically map out bad sectors if they are found.
Problem: Battery charge LED never stops flashing.
Action: - Ambient temperature is too hot for the battery to completely charge.
- Battery is not correctly inserted, or the contacts are broken. You can check by removing battery
from compartment and examining the contacts in the computer, to see if they are broken or bent.
- Battery pack is defective, call the service number listed on your “Read-Me-First” sheet for
details on ordering a replacement battery.
- The battery charge circuit inside the WinBook is defective. Call the service number listed on
your “Read-Me-First” sheet for further instructions.
Problem: Battery fuel gauge indicator icon is inaccurate.
Action: - The battery fuel gauge is a rough approximation of the actual battery capacity and is
highly dependent on the amount of energy you are using. As with an automobile, the heavier you
are on the accelerator, the fewer miles you can travel before you hit Empty. Likewise, the more
you use the WinBook’s power-hungry devices (hard disk, floppy disk, or display) the less time
you’ll have on the gauge. Note that we have set the fuel gauge to reflect an average user profile,
with power management set to the default settings. If you have power management disabled, the
Page 75

battery gauge will perform differently.
- The battery pack is nearing the end of its usable life, and cannot sustain a full charge. The
usable life of a NiMH battery is approximately 500 cycles (depending on operating, charging,
and storage temperatures). You can order a spare battery by contacting the service number listed
on your “Read-Me-First” sheet for details on ordering a replacement battery.
- The battery gauge circuit inside the WinBook is defective. Call the service number listed on
your “Read-Me-First” sheet for further instructions.
ERROR MESSAGE HANDLING
Power-on self-tests are the system tests and component initialization processes performed by the
computer’s AT-compatible ROM BIOS. The self-tests first initialize, and then test the central
hardware. The central hardware must function properly before further system tests can be run. In
general, a failure in a test of the system board or its components halts the test and causes a beep.
Each time the system boots, the BIOS performs diagnostic testing of the various system
components. During a standard implementation, if the BIOS detects an error, one of the
following events occurs:
A message is displayed informing the user where the error occurred. Following the message, the
prompt “Press F1 to continue,” or “Press F2 to enter setup,” is displayed. The system pauses
until the user presses F1 or F2.
The following section lists the messages that may appear while booting up the WinBookXP.
Where applicable, possible solutions are included.
Message: Gate A20 failure
Description: System gate A20 cannot run.
Action: - Contact the Service Center listed on the “Read-Me-First” sheet that
came with the WinBook.
Message: Memory failure at read expecting ****
Description: System memory read failure at****bank, where****is a memory address.
Action: - Contact the Service Center listed on the “Read-Me-First” sheet that came with the
WinBook to replace the memory card.
Message: No timer tick interrupt
Description: System controller failure.
Action: - Contact the Service Center listed on the “Read-Me-First” sheet that came with the
WinBook.
Message: Shutdown failure
Page 76

Description: System controller failure.
Action: - Contact the Service Center listed on the “Read-Me-First” sheet that came with the
WinBook.
Message: Timer 2 failure
Description: System controller failure.
Action: - Contact the Service Center listed on the “Read-Me-First” sheet that came with the
WinBook.
Message: Keyboard controller clock line or data line failure
Description: The keyboard failed the self-test command.
Action: - Unplug external keyboard, if installed.
- Contact the Service Center listed on the “Read-Me-First” sheet that came with the WinBook.
Message: Keyboard controller stuck key failure
Description: Press ‘F1’ to continue.
Action: - Check to see if a key has actually become stuck.
- Refrain from pressing keys during boot process.
- Unplug any other PS/2 devices connected to the computer.
- Contact the Service Center listed on the “Read-Me-First” sheet that came with the WinBook.
Message: Diskette drive failure
Description: The floppy controller failed to respond to the reset command.
Action: - Check system Setup by pressing ‘CTRL’ + ‘ALT’ + ‘S’.
- Turn off the system and check relevant connections.
- If the problem persists, you may need to replace the floppy drive, or contact the Service Center
listed on the “Read-Me-First” sheet that came with the WinBook.
Message: Pointing device failure
Description: The pointing device does not respond during the power-on self-test.
Action: - If external PS/2 device is plugged in, unplug it.
- If external PS/2 pointing device is plugged in, it must use duplex adapter.
- Try re-installing the pointing device.
Page 77

- If the problem persists, you may need to change your pointing device, or contact the Service
Center listed on the “Read-Me-First” sheet that came with the WinBook.
Message: Fixed disk configuration error
Description: The drive parameters stored in the CMOS setup do not match the hard disk
detected in your system.
Action: - Press ‘F2’ to enter CMOS setup, and make sure the hard disk parameter is set to Auto-
detect.
Message: Fixed disk controller failure
Description: The hard disk controller failed to respond to the reset command.
Action: - First, check the drive parameters, then turn off the power to check all appropriate
connections. Make sure the hard drive is installed, and check to make sure the locking screw is
secure.
- If the problem persists, you may need to replace the hard disk controller; contact the Service
Center listed on the “Read-Me-First” sheet that came with the WinBook.
Message: Real-time clock failure
Description: CMOS RAM lost power and needs to be reinitialized.
Action: - Re-enter configuration settings in the Setup program.
- If the problem persists, contact the Service Center listed on the “Read-Me-First” sheet that
came with the WinBook.
Message: System halted
Description: Password is incorrect.
Action: - Restart your computer and enter the correct password. If you can’t remember the
correct password, contact the Service Center listed on the “Read-Me-First” sheet that came with
the WinBook. Be sure to have the serial number and registered owner’s name to insure correct
identification before you call the Service Center.
CARE & MAINTENANCE
There are a few things you can do to help insure that your WinBook provides you with troublefree service for an extended period. The computer is designed so that most of the vital
components are protected from external contamination. The main things you should do are to
keep the exterior of the computer clean and free from accumulated dust and dirt, and protect it
from electrical and physical shock hazards. We’ve already talked about electrical and physical
precautions elsewhere, so this section focuses on how to minimize contamination and how to
deal with dirt related problems.
No Vacuum Cleaner Inside
Page 78

You can use a computer vacuum cleaner to vacuum the outside of the computer, but make sure
the computer is turned off. Never vacuum any part of the interior including the upgrade
compartments. A vacuum generates static electricity at the nozzle tip that can damage interior
components.
Cleaning the Computer
It’s good ideal to keep your computer clean. If it gets dirty, you should use a clean, lint-free, nonabrasive cloth to wipe it. You can use a damp cloth - just make sure that it isn’t so wet that any
liquid can get into the computer. Be particularly careful not to scratch the LCD screen.
They’re several places on the WinBookXP where dust & dirt can get inside the computer. You
should do what you can to prevent this. Here’s a list of the sensitive areas and what you can do:
• Rear Ports
If dust and dirt get in the rear ports and affect the contact pins or receptacles, you may
experience problems when you connect devices to the ports. To prevent this, keep the
port cover door closed when you aren’t using the ports. If you have cables connected to
some, but not all of the ports, try to keep the area behind the computer clean. Always
keep the Docking Station connector covered when not in use.
• Fax Modem Port
The internal fax modem compartment is covered by a two-piece cover if you don’t have
the fax modem, leave the cover in place. If you have the fax modem, the telephone
connector jack replaces the compartment cover.
• Audio Jacks & Volume Control
The audio jacks and volume control thumbwheel have no cover, and since they are close
to the base of the computer are more easily contaminated. Be especially careful not to let
them get clogged up.
• Floppy Disk Drive
The hinged panel that covers the drive opening will keep out most dust and dirt as long as
it its completely closed. The thing you need to be more careful of is the floppy disks
themselves. It won’t matter if the panel keeps dust out if you put dirty disks in the drive.
• PCMCIA Card Compartment
Always keep the compartment door shut when you aren’t using any cards. If you have a
card installed in only one slot, be careful not to let the compartment get contaminated.
• The Keyboard
Try to keep the keyboard as clean as possible. Don’t eat or drink over it and remove any
dust or dirt that builds up, especially between the keys.
Page 79

• The Trackball
The trackball is susceptible to contamination inside its housing, just like a mouse is. You
will need to clean the housing occasionally. When the ball starts moving less easily and
your control of the cursor becomes less precise, you know it is time to clean it. The next
section explains how to do it.
Cleaning the Trackball
Cleaning the trackball is actually a two-part operation. You have to clean both the
trackball and the housing it sits in. Follow this procedure to do it:
1. Remove the trackball-retaining ring.
There is a small hole in the ring at the 12 o’clock position. Stick the tip of a straightened
paper clip in the hole, press down slightly and rotate the ring counter-clockwise until the hole
is at the 11 o’clock position. The ring will pop up a little and you can take it off.
2. Remove and clean the trackball.
With your hand covering the housing, remove the ball by turning the computer over so the
ball falls out into your hand. Use a clean, lint-free cloth to wipe the ball clean, then put it
aside on the cloth.
3. Clean the housing
There are several bearings and rollers built into the side of the trackball housing. Gently use a
computer-cleaning swab moistened with isopropyl alcohol to clean the bearings and the inner
surface of the housing. Don’t overdo it. Use as little pressure as will get the job done. You
can use more than one swab if necessary.
4. Replace the trackball and retaining ring.
Drop the ball back into the housing and replace the retaining ring so that the hole in the ring
is at the 11 o’clock position. Insert the tip of the paper clip in the hole, press down slightly
and rotate the ring clockwise to the 12 o’clock position.
When you’re finished, turn on the computer and test the trackball to make sure it’s working
properly.
Figure 26: Cleaning the Trackball
Page 80
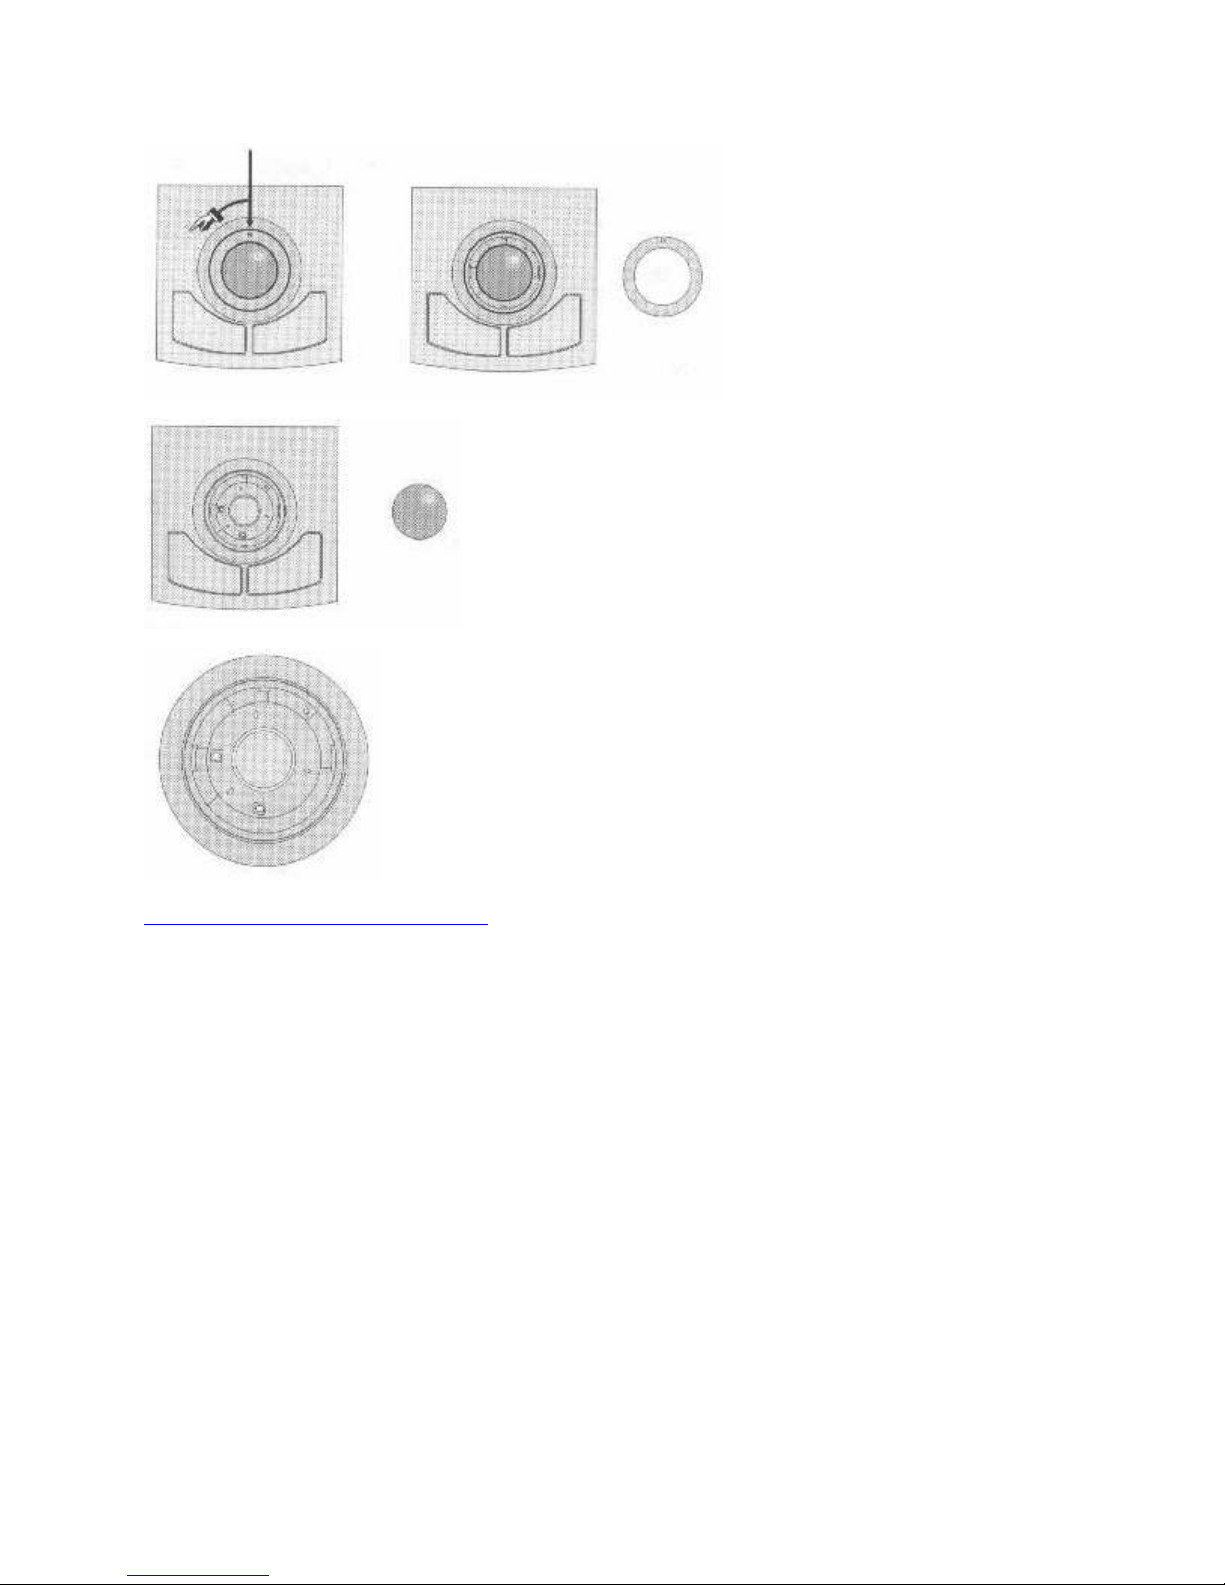
APPENDIX B: SPECIFICATIONS
Page 81

APPENDIX B: SPECIFICATIONS
This appendix list hardware and environmental specifications for the WinBookXP. It also
contains additional system-use information.
HARDWARE SPECIFICATIONS
Dimensions
Width Depth Height
Mono 292mm (11.68”) 220mm (8.66”) 43.5mm (1.71”)
Color STN 292mm (11.68”) 220mm (8.66”) 48.5mm (1.91”)
Color TFT 292mm (11.68”) 220mm (8.66”) 48.5mm (1.91”)
AC adapter 36mm 60mm 20mm
Weight
Pounds Kilograms
Mono 5.4 2.45
Color STN 5.9 2.68
Color TFT 6.2 2.82
AC adapter & Power Cord 0.8 0.367
CPU
Intel 486SX/25 Intel 486SX/33
Intel 486SX2/50 Intel 486DX/33
Intel 486DX2/50 Intel 486DX4/75™
Intel 486DX4/100™
Cyrix Cy486DX/33 Cyrix Cy486DX2/50
System Memory
4MB, 8MB, 16MB, 32MB
Video Controller
Western Digital 90C24 controller wit graphics acceleration
VESA local bus interface
Page 82

1MB Video RAM
CRT output resolutions up to 1024x768x256 colors
HiColor modes at 640x480 and 800x600 resolutions
ROM BIOS
Phoenix Notebook Miser BIOS, 128KB Flash ROM
Battery
Removable pack consisting of ten 2500ma/h NiMH cells
Total capacity of 30 W/h
Battery Capacity
Raw Average Use
Mono, DX4/75 3:30 4:00
TFT, DX4/75 2:15 3:00
Color STN, DX4/75 2:30 3:45
Note:
Raw = all power management disabled; power.exe at off setting; running the PC Magazine 8.0
Battery Rundown test
Average = default power management enabled; power.exe at max setting; running test
applications which have 50% display utilization and 20% disk utilization
Display Type
9.4” STN Color 10.3” STN Color 9.4”TFT Color
Response Time 300 ms 300 ms 35 ms
Pixel Pitch 0.25 x 0.3 mm 0.33 x 0.318 mm 0.3 x 0.3 mm
Contrast Ratio 18 20 50
Brightness 80 cd/m2 80 cd/m2 60 cd/m2
9.4” Mono LCD
Response Time 270 ms
Pixel Pitch 0.3 x 0.3 mm
Page 83

Contrast Ratio 18
Brightness 60 cd/m^
Hard Drive
12.5mm, 15mm, 17mm, or 19mm IDE
120MB, 260MB, 340MB, and 520MB
Optional fast transfer and block mode support
Floppy Drive
Internal 3.5” high density drive (1.44MB)
PCMCIA
Card types supported:
2 Type I
2 Type II
1 Type III
PCMCIA 2.01 complaint
AC Adapter
90-264 V, 47-63 Hz, two-wire AC input cable
Output: 30W (1.5A max.)
LED indicator: Power on
Pointing Device
Either 19mm Trackball or
TrackPoint pointing stick
Audio
Optional internal monophonic or stereophonic audio modules;
Business Audio and SoundBlaster™ compatible.
FAX Modem
Composite 14.4K bps Send/Receive Fax, 14.4K bps data modem, including voice capability
Ports
I/O Port Assignments:
Page 84

Device Address
Fixed Disk 1F0-1F8
Audio 220-22F
Parallel Printer Port 2 278-27F
Serial Port 2 2F8-2FF
Device Address
Parallel Printer Port 1 378-37F
Display Adapter 3A0-3E5
Floppy Controller 3F0-3F7
Serial Port 1 3F8-3FF
DMA Channel Assignment
Channel No. Function
1. Reserved
2. Opt. Audio Bd.
3. Floppy Disk
4. ECP Support
5. (Cascade)
6. Available
7. Available
8. Available
IRQ Assignments:
Interrupt Function
IRQ0 System Timer
IRQ1 Keyboard
IRQ2 (Cascade)
IRQ3 COM2, COM4
IRQ4 COM1, COM3
Page 85

IRQ5 Parallel Printer Port 2 (Optional Audio)
IRQ6 Floppy Disk
IRQ7 Parallel Printer Port 1 (Optional Audio)
IRQ8 Clock/Calendar
IRQ9 Cascaded to INT 0AH (IRQ2)
IRQ10 Available
IRQ11 Available
IRQ12 Trackball
IRQ13 Coprocessor
IRQ14 Fixed Disk Controller
IRQ15 Available
Port Descriptions
Parallel: EPP, ECP support
Serial: Dual 16550 UARTS
PS/2: Keyboard/Mouse combination port
VGA: supports up to 1024x768x256 color
Audio Line In: Microphone
Speaker Line out: Self- or Non-amplified speakers, or Headphones
Microphone: Built-in
High quality internal speaker with volume control
Docking Station connector
Keyboard
82-key Lexmark keyboard, 3mm travel, 19mm pitch
ENVIRONMENTAL SPECIFICATIONS
Temperature
Operating: 5-35° C (41-95°F)
Non-operating: -15 - 55° C (5-131°F)
Page 86

Gradient: not to exceed 20° C/h (35.66°F/h)
Humidity
Operating: 30%-90% (non-condensing)
Non-operating: 5%-95% (non-condensing)
Altitude
Operating: 0-10,000 ft. (0-3280m)
Non-operating -200- 30,000 ft. (-65.6-9840m)
Shock
Operating: 9G, 11ms
Non-operating: 50G, 11ms
Vibration
Operating: 10-27Hz, 0.01”
Non-operating: 5-62Hz, 0.02”
Noise
35dB max at 1 meter
THE KEYBOARD
This section explains the keyboard in more detail. Use the chart on the next page as a quick
reference for the meanings of the color-coded characters printed on the keys.
Figure 27: WinBookXP Keyboard
Page 87
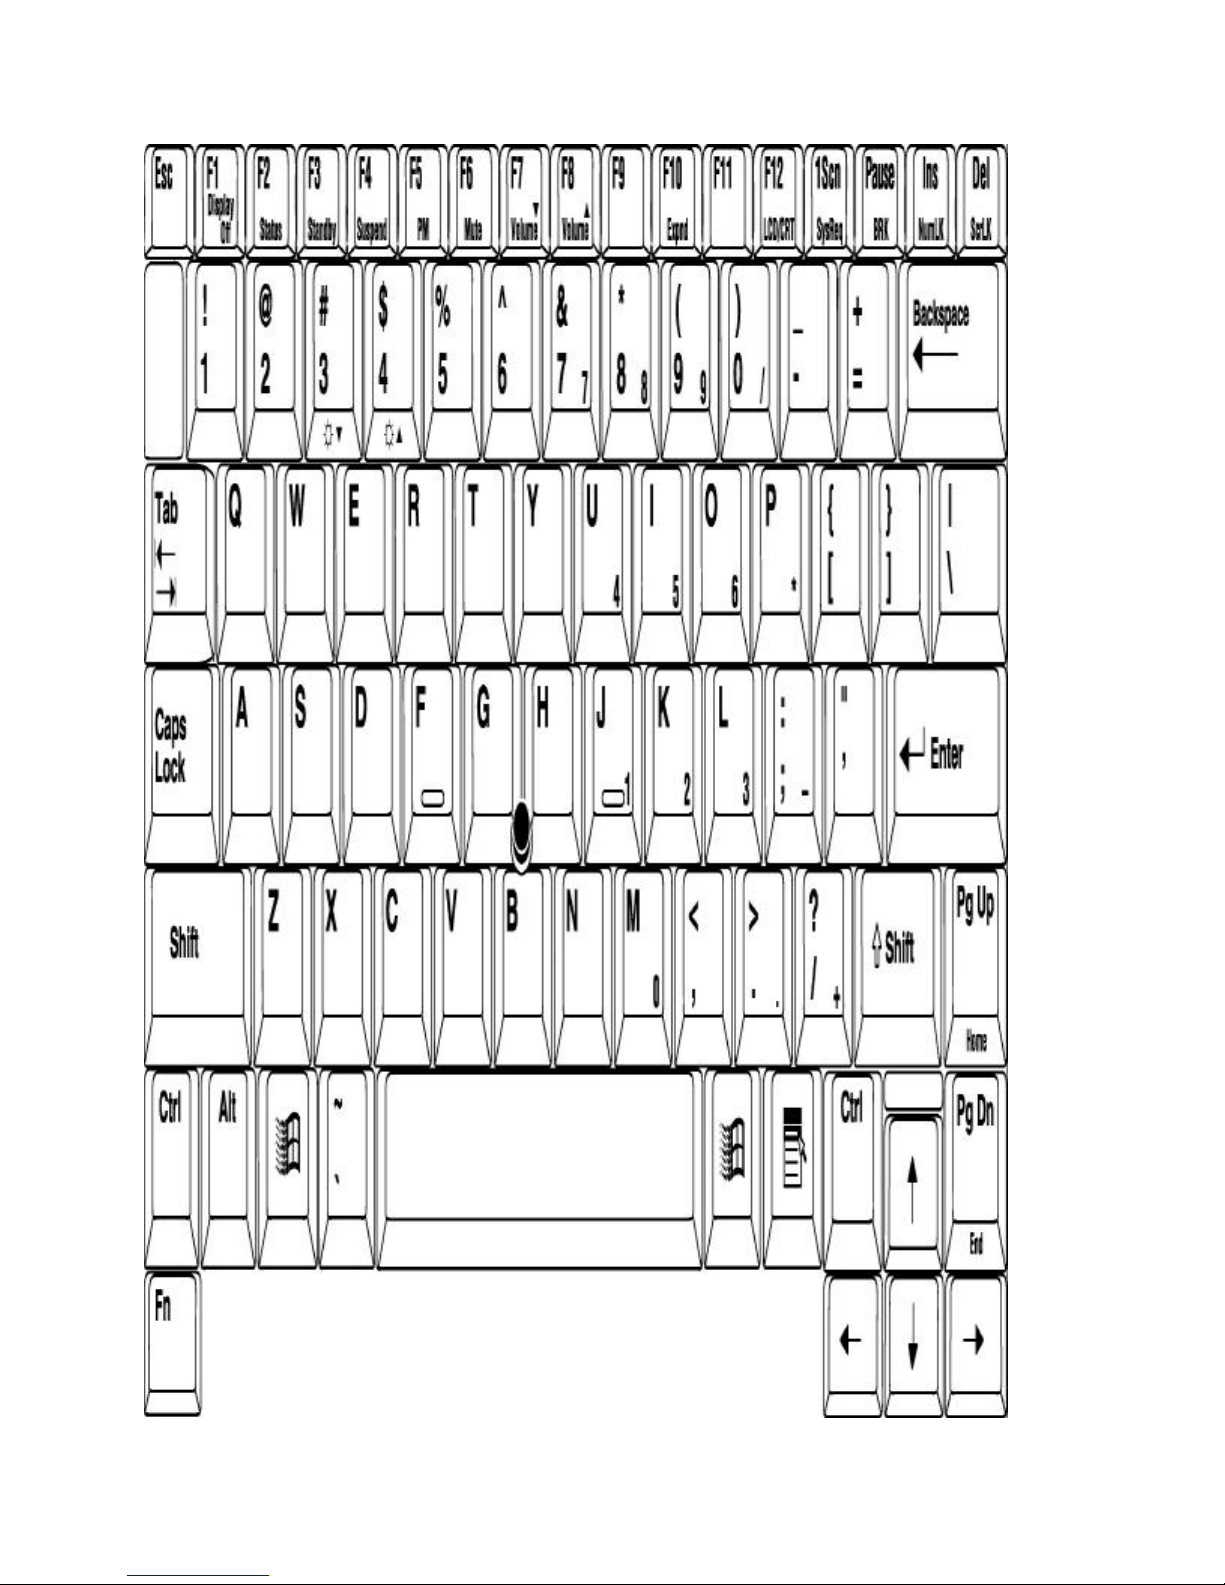
Page 88
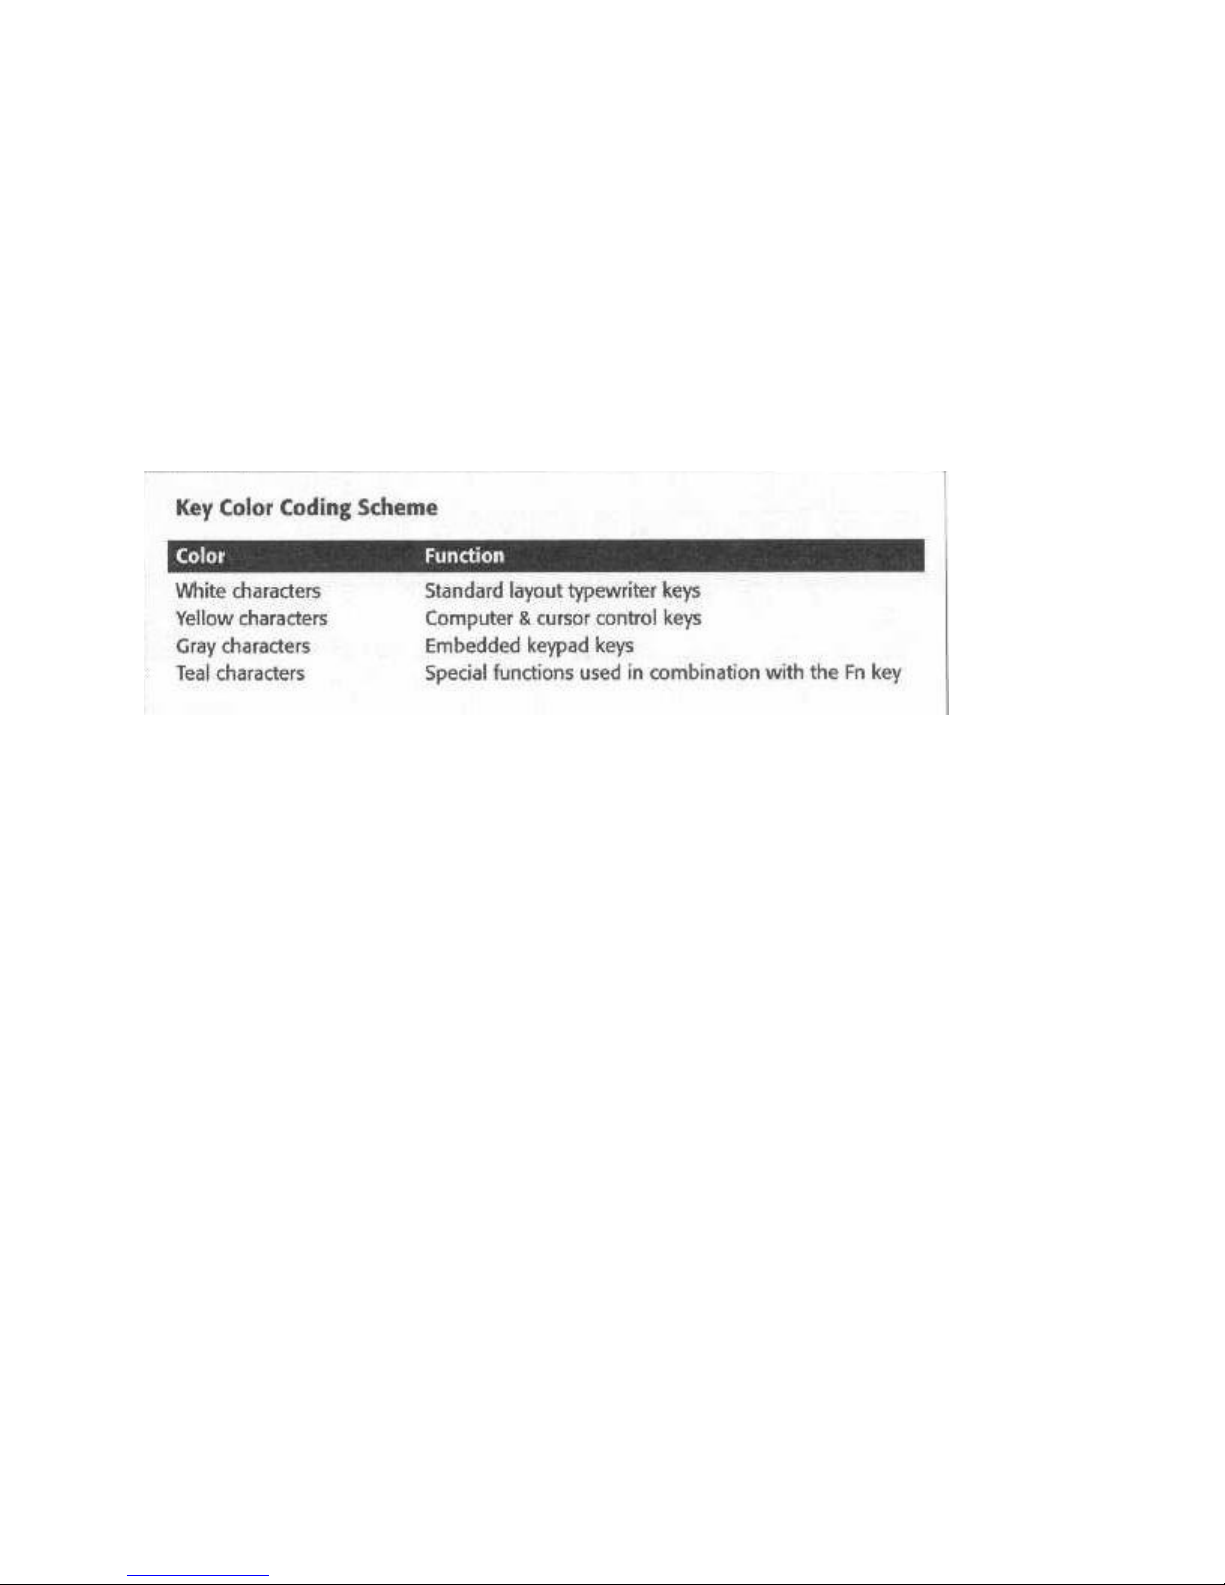
THE TYPEWRITER KEYS
The typewriter keys are arranged in a standard typewriter layout. The Caps Lock key
corresponds to the Shift Lock key on a typewriter, with one important exception. The Caps Lock
key only affects letter keys. In order to use the symbols above the number keys and the
alternative punctuation marks, you must still press the Shift key.
Note that when the Caps Lock key is engaged, the Caps Lock status indicator icon comes on.
Pressing the Shift key and typing a letter at this time will result in a lower case, rather than an
upper case letter.
Key Color Coding Scheme
THE FUNCTION KEYS
There are 12 dedicated function keys located across the top edge of the keyboard. They are
labeled F1 to F12. These keys are used in many different ways, depending on the operating
system and software in use. They are also programmable. See your operating system and
software user’s manuals for detailed information.
THE CONTROL KEYS
There are a number of non-typing keys that issue commands or enable functions as listed below.
Escape
Command: ‘Esc’
Many applications use this key to cancel a command or exit the application. Refer to your
application manual for details.
Simulscan
Command: ‘Fn’ + ‘F6’
Overrides the current BIOS setup selection governing whether both the LCD and CRT screens
are active at the same time. Changes are temporary, and revert to BIOS setup settings when the
system is rebooted. Command is active under DOS and Windows.
Expand
Page 89

Command: ‘Fn’ + ‘F7’
This command will force the image to fill the entire LCD screen, and is only used in DOS
applications. The changes are saved so the system will remember the setting when rebooted. It’s
only active under DOS or in DOS applications.
Setup (Power Management screen only)
Command: ‘Fn’ + ‘F8’
This command calls up the power management Setup Utility page (page 2). When you finish
your modifications and exit, the system is restored. Note that while the system is in power
management Setup, your DOS or Windows application’s state is also saved. When you leave
Power Management Setup, you automatically resume your application. The key is active no
matter which application or operating system you are using.
Invert – Normal/Reverse Video (monochrome only)
Command: ‘Fn’ + ‘F9’
This command toggles the display between Normal and Reverse modes in text mode. In most
cases you will probably want to leave it on Normal. Command is active under DOS and
Windows.
Display – Active Display
Command: ‘Fn’ + ‘F10’
This command sets the active display. The options are the LCD or a CRT monitor. Command is
active under DOS and Windows.
ScrLk
Command: ‘Fn’ + ‘Insert’
Some applications use this function to control cursor movement.
SysRq
Command: ‘Fn’ + ‘F11’
This key may be used in conjunction with other keys for other specific functions within an
application program. Consult your software user’s manuals for information.
Print Screen
Command: ‘Fn’ + ‘F12’
Pressing this key will print a text rendition of whatever is on the screen at the time.
Pause
Page 90

Command: ‘Pause’
This key temporarily halts a program or command –in-progress under DOS.
Break
Command: ‘Fn’ + ‘Ctrl’ + ‘Pause’
This will cause some DOS operating programs to terminate.
Num Lock
Command: ‘NumLock’
This key activates the embedded numeric keypad.
The Break Command
You must also press the ‘Ctrl’ key to activate Break.
CURSOR CONTROL KEYS
Arrow Keys
These cursor control keys move the cursor in the direction indicated. They are also available as
Fn key combinations:
‘Fn’ + ‘8’ – up
‘Fn’ + ‘U’ – left
‘Fn’ + ‘O’ – right
‘Fn’ + ‘K’ – down
Page Keys
Home, End, PgUp (Page Up) & PgDn (Page Down)
They are also available as Fn key combinations:
‘Fn’ + ‘7’ – Home
‘Fn’ + ‘J’ – End
‘Fn’ + ‘9’ – PgUp
‘Fn’ + ‘L’ – PgDn
The Page Up and Down keys move the cursor a page, or sometimes a screen, at a time. The
Home and End keys move the cursor to either the beginning or end of the file or line you’re
working on.
Page 91

Insert
Command: ‘Ins’ or ‘Fn’ + ‘M’
The Ins key is used in editing and word processing programs. It inserts material into a text
passage so that it overwrites text to the right of the insertion point. Some software packages
under Windows assign other functions to this key.
Delete
Command: ‘Del’ or ‘Fn’ + ‘>’
The Del key deletes text or graphics in a wide variety of software programs.
Embedded Numeric Keypad
Command: ‘NumLock’
This turns on the embedded keypad, which replicates the functions of the numeric keypad on an
extended keyboard. The assignment for each function is printed on the lower right of the key.
The cursor control functions are printed on the front faces of the keys.
SUSPEND-TO-DISK – USING THE PHDISK UTILITY
The PHDisk utility creates a dedicated partition on your hard disk drive that the Suspend-ToDisk feature uses to store the system state when you suspend the system to disk. There is a copy
of PHDISK.EXE on your hard drive in the \DRIVERS\PHOENIX directory. Do not run
PHDISK.EXE on a pre-loaded hard disk drive before you back it up, or you will end up erasing
the whole drive! As noted earlier, all pre-loaded drives come with a Suspend-To-Disk partition
large enough for a system with up to 8MB of memory. If you install more than 8MB in your
system you must increase the size of the dedicated partition. In doing this, you eliminate the old
partition and erase the entire hard disk. Therefore, before you use the program, you must back up
the entire hard disk drive. After you create a new partition you can restore your system
configuration from the backup.
You can back up your hard disk either by copying your data to floppy disks, to another computer
on a network, or to a stand-alone desktop PC. We recommend using Microsoft’s backup program
that comes with DOS.
Here’s a sample of the procedure for using PHDisk:
1. Back up the hard disk
Back up all your files onto the media of your choice. You start the backup program by typing
“MSBACKUP” at the DOS prompt and pressing ‘Enter’. From there on, just follow the
programs on-screen instructions. You can read about how to use the program in the DOS User’s
Manual, too.
2. Make a PHDisk bootable floppy disk
After each of the following commands, press the “Enter” key.
Page 92

Make a bootable floppy disk by typing:
FORMAT A:/u/s
Copy the files you will need onto the floppy as follow:
CD\DOS
COPY FDISK.EXE A:\
COPY FORMAT.COM A:\
COPY MSB*.* A:\
COPY DEFAULT.* A:\
COPY C:\DRIVERS\PHOENIX\PHDISK.EXE A:\
3. Set the boot drive order
Run the system Setup program and on Page 1Standard Setup, select the “Boot Drive Order” to be
“A: C:” so that the system will boot from the floppy disk drive.
Press ‘Esc’ and the ‘Alt’ + ‘F4’ to save the new configuration.
4. Reboot from drive A:
Hold down the ‘Ctrl’ and ‘Alt’ keys and type ‘Del; to reboot the computer and boot from the
floppy disk in Drive A:.
5.Run PHDisk, delete old Suspend-To-Disk partition if necessary
Type “PHDISK” at the A: command line. PHDisk will run and a list of options will appear. If
your hard disk does not already have a disk partition for Suspend-To-Disk, go on to step 7. If
your system has a Suspend-To-Disk partition, delete it by typing “PHDISK/DELETE” and
pressing ‘Enter’.
6. Create a new Suspend-To-Disk partition
Type the command for your system memory total:
4MB: “PHDISK/CREATE 5552/VRAM 1024”
8MB: “PHDISK/CREATE 9576/VRAM 1024”
16MB: “PHDISK/CREATE 17648/VRAM 1024”
32MB: “PHDISK/CREATE 34280/VRAM 1024”
Press ‘Enter’. It will take the system a while to complete the task. When complete, you will be
back at the A: DOS prompt. For pre-loaded systems, use the 4MB command if your system has
4MB of memory and you want to make more disk space available by reducing the pre-loaded
drive’s default 8MB-partition size.
Page 93

7. Use FDisk to partition the rest of the hard disk
Reboot the computer as before. The system will reboot to the A: prompt.
Type “FDISK” and ‘Enter’ to run the standard FDISK disk-partitioning program. Select “1” to
create a new partition and then press ‘Enter’ in response to the series of questions that pop up on
screen. When FDISK is complete, it will automatically reboot the computer from the floppy
drive.
8. Format drive C:
Type “FORMAT C:/s/u” and press ‘Enter’
9. Copy the floppy files back to a hard disk DOS directory
Type “MD C:\DOS” and press ‘Enter’.
Type “COPY *.* C:\DOS” and press ‘Enter’.
Remove the floppy disk after there is no more drive activity and reboot your computer. You
should see the C: prompt.
10. Configure the system for Suspend-To-Disk
Run the system Setup program by pressing ‘Ctrl’ + ‘ALT’ + ‘S’.
Change the “Boot Drive Order” line back to “C: A:”.
Press ‘PgDn’ to go to Screen 2.
Select the “Suspend to” line and press the “+” (plus & equal sign)
Key until “Suspend-to-Disk” appears.
Press ‘Esc’ and ‘F4’ to save and exit. The system will reboot.
Selecting Suspend-to-Disk
You cannot select Suspend-to-Disk in the Setup program unless there is a Suspend-to-Disk partition on the hard disk and the
partition is large enough to support the current memory configuration – the BIOS automatically detects if the Suspend-to-Disk
partition exists and if it is big enough. If there is no partition or it is too small the BIOS will not allow you to select the Suspendto-Disk option.
11. Test the new Suspend-To-Disk partition
After the system has powered up, press the suspend button, and the system will now suspend to
disk. Push the button again to return to normal.
If the test is successful (it should be), go to the next step. If there is a problem, try repeating steps
5 through 11.
12. Restore your hard disk backup
Page 94

Type “CD\DOS” and press ‘Enter’.
Type “MSBACKUP” and press ‘Enter’.
Follow the program instructions to restore the hard disk from your backup.
To make sure that you are not using any power at all after you have suspended to disk, be sure to
turn the computer OFF.
 Loading...