

Page 1

FCC Statement. . . . . . . . . . . . . . . . . . . . . . . . . . . . . . . . 5
Conventions of this Manual . . . . . . . . . . . . . . . . . . . . . . 6
Chapter 1: Getting Started . . . . . . . . . . . . . . . . . . . . . . . 11
Hardware — Inventory. . . . . . . . . . . . . . . . . . . . . . . . . . . . . . . . . . . 13
The WinBook Notebook — The Front; The Right Side;
The Rear; The Left Side; The Bottom; Inside the Notebook. . . . . . . 14
Power On . . . . . . . . . . . . . . . . . . . . . . . . . . . . . . . . . . . . . . . . . . . . 21
The Keyboard — Keyboard System Controls . . . . . . . . . . . . . . . . . . . 22
Mouse Buttons & Pointing Devices — Touchpad . . . . . . . . . . . . . . 24
LCD Display. . . . . . . . . . . . . . . . . . . . . . . . . . . . . . . . . . . . . . . . . . . 25
Battery & Power Saving — Battery Icon . . . . . . . . . . . . . . . . . . . . . 26
Power Management. . . . . . . . . . . . . . . . . . . . . . . . . . . . . . . . . . . . 27
Audio/Sound — Built-in Speakers; Built-in Microphone . . . . . . . . . . . 27
CD-ROM Drive/DVD Drive . . . . . . . . . . . . . . . . . . . . . . . . . . . . . . . 28
CD-R/CD-RW Drive . . . . . . . . . . . . . . . . . . . . . . . . . . . . . . . . . . . . . 30
Software — Preloaded Software; Adding Software . . . . . . . . . . . . . . 31
Chapter 2: Windows Help and Support . . . . . . . . . . . . . . 33
Using the Help and Support Center. . . . . . . . . . . . . . . . . . . . . . . . 35
WinBook Users’ Manual and the Help and Support Center . . . . . 37
System Restore. . . . . . . . . . . . . . . . . . . . . . . . . . . . . . . . . . . . . . . . 38
Why Use the Help and Support Center . . . . . . . . . . . . . . . . . . . . . 38
Chapter 3: Basic Computing . . . . . . . . . . . . . . . . . . . . . 41
RAM . . . . . . . . . . . . . . . . . . . . . . . . . . . . . . . . . . . . . . . . . . . . . . . . 42
Hard Drives. . . . . . . . . . . . . . . . . . . . . . . . . . . . . . . . . . . . . . . . . . . 43
1
Table
of
Contents
Table of Contents
X Series Manual Ver. 2 9/01
X series manual w/no OS 9/5/01 2:19 PM Page 1
Page 2

Table
of
Contents
The Device Manager. . . . . . . . . . . . . . . . . . . . . . . . . . . . . . . . . . . . 43
Communications . . . . . . . . . . . . . . . . . . . . . . . . . . . . . . . . . . . . . . 44
Faxing . . . . . . . . . . . . . . . . . . . . . . . . . . . . . . . . . . . . . . . . . . . . . . 44
Modem Communications . . . . . . . . . . . . . . . . . . . . . . . . . . . . . . . . 44
Internet and the World Wide Web . . . . . . . . . . . . . . . . . . . . . . . . 46
Your Version of Windows . . . . . . . . . . . . . . . . . . . . . . . . . . . . . . . 47
Chapter 4: Mobile Computing . . . . . . . . . . . . . . . . . . . . 49
Battery Operation — Charging; Changing . . . . . . . . . . . . . . . . . . . . 50
Power Management — WinBook Notebook
Low Power Measures; Standby and Hiberate Modes . . . . . . . . . . . 53
Infrared (IR) Port. . . . . . . . . . . . . . . . . . . . . . . . . . . . . . . . . . . . . . . 55
Safety & Operation . . . . . . . . . . . . . . . . . . . . . . . . . . . . . . . . . . . . 56
Travel — Travel Tips . . . . . . . . . . . . . . . . . . . . . . . . . . . . . . . . . . . . 58
Chapter 5: Desktop Operation . . . . . . . . . . . . . . . . . . . . 61
Audio — Audio Software; Controlling the Sound Levels;
Playing an Audio CD; Playing Sound Files; Sound
Recording; External Speakers & Microphone . . . . . . . . . . . . . . . . . 62
Connecting Peripherals — Printer; Other Parallel
Devices; External Monitor; External Keyboard;
External Pointing Device; Serial Devices. . . . . . . . . . . . . . . . . . . . . 64
USB Ports . . . . . . . . . . . . . . . . . . . . . . . . . . . . . . . . . . . . . . . . . . . . 66
USB Floppy Disk Drive . . . . . . . . . . . . . . . . . . . . . . . . . . . . . . . . . . 68
Scanners and Digital Cameras . . . . . . . . . . . . . . . . . . . . . . . . . . . . 68
LAN Port — Sharing . . . . . . . . . . . . . . . . . . . . . . . . . . . . . . . . . . . . 68
Optional Port Replicator. . . . . . . . . . . . . . . . . . . . . . . . . . . . . . . . . 69
Chapter 6: PC Cards (PCMCIA) . . . . . . . . . . . . . . . . . . . . 71
2
Series
User’s Manual
X series manual w/no OS 9/5/01 2:19 PM Page 2
Page 3

PC Cards — To Use the PC Card; PC Card Tips. . . . . . . . . . . . . . . . . . 72
PCMCIA Network Connections . . . . . . . . . . . . . . . . . . . . . . . . . . . 75
PCMCIA SCSI Interface . . . . . . . . . . . . . . . . . . . . . . . . . . . . . . . . . . 76
PCMCIA Modem . . . . . . . . . . . . . . . . . . . . . . . . . . . . . . . . . . . . . . . 76
Chapter 7: Video Settings . . . . . . . . . . . . . . . . . . . . . . . 77
Video Settings . . . . . . . . . . . . . . . . . . . . . . . . . . . . . . . . . . . . . . . . 78
External VGA Port . . . . . . . . . . . . . . . . . . . . . . . . . . . . . . . . . . . . . 79
TV-Out Port. . . . . . . . . . . . . . . . . . . . . . . . . . . . . . . . . . . . . . . . . . . 80
Multiple Monitor Support . . . . . . . . . . . . . . . . . . . . . . . . . . . . . . . 81
DVD . . . . . . . . . . . . . . . . . . . . . . . . . . . . . . . . . . . . . . . . . . . . . . . . 81
Chapter 8: Configuring & Maintaining Your System. . . . . 83
Setup Program . . . . . . . . . . . . . . . . . . . . . . . . . . . . . . . . . . . . . . . . 84
Main Menu — Primary Master Submenu;
Secondary Master Submenu . . . . . . . . . . . . . . . . . . . . . . . . . . . . 84
Advanced Menu — Advanced Chipset Control Submenu;
I/O Device Configuration Submenu . . . . . . . . . . . . . . . . . . . . . . . 89
Security Menu . . . . . . . . . . . . . . . . . . . . . . . . . . . . . . . . . . . . . . . . 93
Boot Menu . . . . . . . . . . . . . . . . . . . . . . . . . . . . . . . . . . . . . . . . . . . 96
Exit Menu . . . . . . . . . . . . . . . . . . . . . . . . . . . . . . . . . . . . . . . . . . . . 97
Security — Viruses; Passwords/System Security;
The Password Protection Available to You Includes . . . . . . . . . . . . 99
Encryption . . . . . . . . . . . . . . . . . . . . . . . . . . . . . . . . . . . . . . . . . . 101
Internet Connections . . . . . . . . . . . . . . . . . . . . . . . . . . . . . . . . . . 101
Physical Security . . . . . . . . . . . . . . . . . . . . . . . . . . . . . . . . . . . . . . 102
System Maintenance — Backup; Archiving . . . . . . . . . . . . . . . . . . 102
Software Updates. . . . . . . . . . . . . . . . . . . . . . . . . . . . . . . . . . . . . 103
3
Table
of
Contents
Table of Contents
X series manual w/no OS 9/5/01 2:19 PM Page 3
Page 4

Cleaning . . . . . . . . . . . . . . . . . . . . . . . . . . . . . . . . . . . . . . . . . . . . 104
Operating Environment . . . . . . . . . . . . . . . . . . . . . . . . . . . . . . . . 105
Chapter 9: Troubleshooting . . . . . . . . . . . . . . . . . . . . . 109
Booting Up . . . . . . . . . . . . . . . . . . . . . . . . . . . . . . . . . . . . . . . . . . 110
CD-ROM/DVD . . . . . . . . . . . . . . . . . . . . . . . . . . . . . . . . . . . . . . . . 113
Drives . . . . . . . . . . . . . . . . . . . . . . . . . . . . . . . . . . . . . . . . . . . . . . 113
Keyboard . . . . . . . . . . . . . . . . . . . . . . . . . . . . . . . . . . . . . . . . . . . 116
Miscellaneous . . . . . . . . . . . . . . . . . . . . . . . . . . . . . . . . . . . . . . . . 117
PCMCIA . . . . . . . . . . . . . . . . . . . . . . . . . . . . . . . . . . . . . . . . . . . . . 118
Pointing Devices . . . . . . . . . . . . . . . . . . . . . . . . . . . . . . . . . . . . . . 119
Ports . . . . . . . . . . . . . . . . . . . . . . . . . . . . . . . . . . . . . . . . . . . . . . . 120
USB (Universal Serial Bus) . . . . . . . . . . . . . . . . . . . . . . . . . . . . . . 120
Video . . . . . . . . . . . . . . . . . . . . . . . . . . . . . . . . . . . . . . . . . . . . . . 121
S-Video Out . . . . . . . . . . . . . . . . . . . . . . . . . . . . . . . . . . . . . . . . . 122
Windows. . . . . . . . . . . . . . . . . . . . . . . . . . . . . . . . . . . . . . . . . . . . 122
CD-R . . . . . . . . . . . . . . . . . . . . . . . . . . . . . . . . . . . . . . . . . . . . . . . 123
CD-RW. . . . . . . . . . . . . . . . . . . . . . . . . . . . . . . . . . . . . . . . . . . . . . 124
Index . . . . . . . . . . . . . . . . . . . . . . . . . . . . . . . . . . . . 125
4
Table
of
Contents
Series
User’s Manual
X series manual w/no OS 9/5/01 2:19 PM Page 4
Page 5

Federal Communications Commission (FCC) Statement
This equipment has been tested and found to comply with the limits for a class B digital device,
pursuant to Part 15 of the FCC Rules. Their limits are designed to provide reasonable protection
against harmful interference when the equipment is operated in a residential installation.
This equipment generates, uses, and can radiate radio frequency energy, and if not installed
and used in accordance with the instruction manual, may cause harmful interference to radio
communications. However, there is no guarantee that interference will not occur in a particular
installation. If this equipment does cause harmful interference to radio or television reception,
which can be determined by turning the equipment off and on, the user is encouraged to try
to correct the interference by one or more of the following measures:
• Reorient or relocate receiving antenna.
• Increase the separation between equipment and receiver.
• Connect the equipment into an outlet on a circuit different from that to which the
receiver is connected.
• Consult the dealer or an experienced radio/TV technician for help.
Notice 1:
Any changes or modifications not expressly approved by the party responsible for compliance
could void the user’s authority to operate the equipment.
Notice 2:
Shielded interface cables and AC power, if any, must be used in order to comply with
emission limits.
5
Preface
X series manual w/no OS 9/5/01 2:19 PM Page 5
Page 6
Conventions of This Manual
Using this manual will help you get the most from your WinBook
®
notebook computer. Keep the manual and the “Read Me First” brochure
with your WinBook notebook to refer to when you want information
and help. If you are an experienced user of computers and/or Microsoft’s
Windows
®
operating systems, you might find it useful to read Chapter
One on the features specific to your WinBook notebook and then take
advantage of the HTML-based help located in the Help and Support
center in Windows. The hypertext links will enable you to move more
quickly to the information you require. If you are a less experienced
user, you should read through the manual carefully before using your
system. Whether or not you are an experienced user, you should consult
Chapter 9 (Troubleshooting) if you encounter any problems with your
WinBook notebook. You will find answers there to many common
problems or errors.
Before proceeding, you should be aware of some of the conventions
of usage in this manual:
• Specific keyboard keys to be typed are indicated in square
brackets: [Tab].
• Combinations of keys are indicated with a plus sign between the keys:
[Shift]+[Tab]. For a combination of keys, you should depress the keys
simultaneously. You might also find it easier to hold down the control
keys ([Alt] or [Shift] or [Ctrl]) of the combination and then press the
final key of the combination.
6
Series
User’s Manual
This manual is for all
versions of the WinBook
X series of computers.
Some of the options mentioned inside may not be available
for your model.
Every attempt has
been made to keep this
manual current, but there
might be changes between
the writing of this manual and
your purchase of the WinBook
notebook.
X series manual w/no OS 9/5/01 2:19 PM Page 6
Page 7
In order to get the optimal usage out of your WinBook notebook,
you should remember the following:
• Read through all the instructions for your WinBook notebook,
including this manual and the “Read Me First” brochure that
came with your computer.
• Keep the area free of static electricity and magnetic fields.
These can damage the computer and/or diskettes.
7
Preface
This identifies information
that you might find particularly helpful in using your
computer or this manual.
The pencil symbol indicates
that you should take
note of the accompanying
information.
This warning cautions
you against actions which
might be destructive to
your data or might disrupt proper
system operation.
The exclamation symbol
identifies information
which is important for
you to read to avoid damage
to the computer, loss of data,
or personal injury.
Windows has a built in application for supplying feature rich help and
support content called the “Help and Support Center”. Through the use
of the Help and Support Center, you may find more detailed information
about your machine and its operating system as well as tips and problem resolutions. This symbol will help you to directly find the information you are looking
for by supplying the keywords that should be searched for within the Help and
Support Center. For specific information on how to use the Help and Support
Center, refer to the “Windows Help and Support” chapter in this manual.
X series manual w/no OS 9/5/01 2:19 PM Page 7
Page 8

• Be sure to discharge static electricity from your body before
touching the computer or keyboard.
• Use the same caution you would with any electronic equipment.
Keep food, drinks, smoke and ashes away from your computer.
Store the computer in an area that is not exposed to direct sunlight
or heating ducts. Keep the computer away from sources of excessive
moisture. Damage to the computer caused by immersion is not
covered by the warranty.
• When cleaning the computer or its components, apply the proper
cleaning solutions or sprays only to the cloth, not to the computer
or its components.
• If there is ever a need to disconnect internal components other
than those mentioned in the instructions that came with your system,
please have this done by a qualified service technician.
• You should never attempt to physically repair a CD-ROM, CD-R/RW
or DVD drive or diskette drive yourself.
• Do not attempt to repair or open a battery yourself. The battery should
not be exposed to extreme heat, as explosion can result. Proper battery
disposal is required. Do not
dispose of a battery in regular waste.
• Do not block the cooling fans on the sides or bottom of your unit.
8
Series
User’s Manual
X series manual w/no OS 9/5/01 2:19 PM Page 8
Page 9

The information in this document and the associated WinBook notebook Help file is subject
to change without notice and should not be construed as a commitment by the manufacturer.
The manufacturer assumes no responsibility for any errors or omissions that might appear
in this document or the associated WinBook notebook Help file.
The software described in this document is furnished under a license and may be used and
copied only in accordance with the terms of such license. No responsibility is assumed for
the use or reliability of software or equipment that is not supplied by the manufacturer or
its affiliated companies.
Restricted Rights: Use, duplication, or disclosure by the U.S. Government is subject to restrictions
as set forth in subparagraph (c) (1) (ii) of the Rights in Technical Data and Computer Software
clause at DFARS 252.227-7013.
Acknowledgements:
WinBook® is a registered trademark of Micro Electronics, Inc. MS-DOS, Internet Explorer,
Windows® Me and Windows 2000 are registered trademarks of Microsoft Corporation.
Zip® is a registered trademark of Iomega Corporation. Active Desktop is a registered trademark
of Intel Corporation. All other trademarks and registered trademarks are property of their
respective corporations.
Copyright Notice:
Duplication or reproduction of this manual in any form without prior permission from
Micro Electronics, Inc. represents an infringement of copyright.
©2001 Micro Electronics, Inc.
Manual Version 2.1
Release Date: September 2001
9
Preface
X series manual w/no OS 9/5/01 2:19 PM Page 9
Page 10

10
X series manual w/no OS 9/5/01 2:19 PM Page 10
Page 11

Chapter 1:
Getting Started
11
Chapter 1: Getting Started
X series manual w/no OS 9/5/01 2:19 PM Page 11
Page 12
Your WinBook notebook is designed for those who need the full power
of a desktop PC in a thin, light and easily portable package. You can take
the power of your computer almost anywhere you go. The battery power
of your computer allows you to use the computer even where there are no
electrical outlets. You can add optional elements to your system (Floppy
Disk Drive, Port Replicator) that connect to your USB port and expand
its use as a desktop system. You can also use the PCMCIA port and the
optional LAN to connect to devices and computers, expanding the usability
of your system.
Continuous use of a keyboard may cause repetitive stress injuries
or discomfort, including carpal tunnel syndrome, tendonitis
and tenosynovitis. You should seek medical advice if you feel
any aching, numbing or tingling in your arms, wrists or hands.
Suggestions for maximizing comfort in using a keyboard include:
• Take frequent breaks from typing
• Maintain a straight wrist position
• Avoid resting on your wrists while typing
• Use a light touch on keys
• Ensure that your chair, work surface, monitor and keyboard
are in the correct positions to keep your back and neck
straight, your shoulders relaxed and your elbows at your sides.
Consult your doctor or other health professional for medical
advice on how to reduce your risk of injury or discomfort from
continuous keyboard use.
WARNING
12
Series
User’s Manual
X series manual w/no OS 9/5/01 2:19 PM Page 12
Page 13
Hardware
Inventory
When you unpack your WinBook notebook, check all the items you
ordered are present and in good condition. Check the inventory checklist
that came in the WinBook notebook box to be sure that all the components
and optional components you ordered are included. If anything is missing
or damaged, contact Customer Service immediately (the Customer Service
number can be found on the “Read Me First” brochure that was enclosed
in your box). Checklist follows:
• WinBook notebook, with built-in CD-ROM, DVD, CD-RW
or Combo (CD-RW and DVD) Drive
• Primary Battery (stored separately in the box)
• AC Power Adapter
• Power Cord
• This Manual
• WinBook notebook Restore/Utility CD
• Phone cord (in units with a built-in modem)
• Any other optional components ordered
Note: The WinBook notebook uses proprietary accessories that are
designed specifically for your WinBook computer (such as a port
replicator) and you should only use those items that have been approved
for your computer. Contact WinBook for information about obtaining
approved accessories and upgrades. If you use items that are not approved
for use with this computer, you might cause the computer to malfunction
or to emit electromagnetic radiation in excess of local regulations. This
does not apply to non-proprietary accessories such as PC cards, USB
devices, printers, etc.
13
Chapter 1: Getting Started
The primary battery
for your WinBook
notebook is shipped
in the accessory box. You
will need to install the battery
before use. See Chapter 4 for
instructions, if needed.
X series manual w/no OS 9/5/01 2:19 PM Page 13
Page 14
The WinBook Notebook
Before you begin using your WinBook notebook, you should take a
moment to familiarize yourself with the various ports, bays, connectors,
and indicators that make up your system.
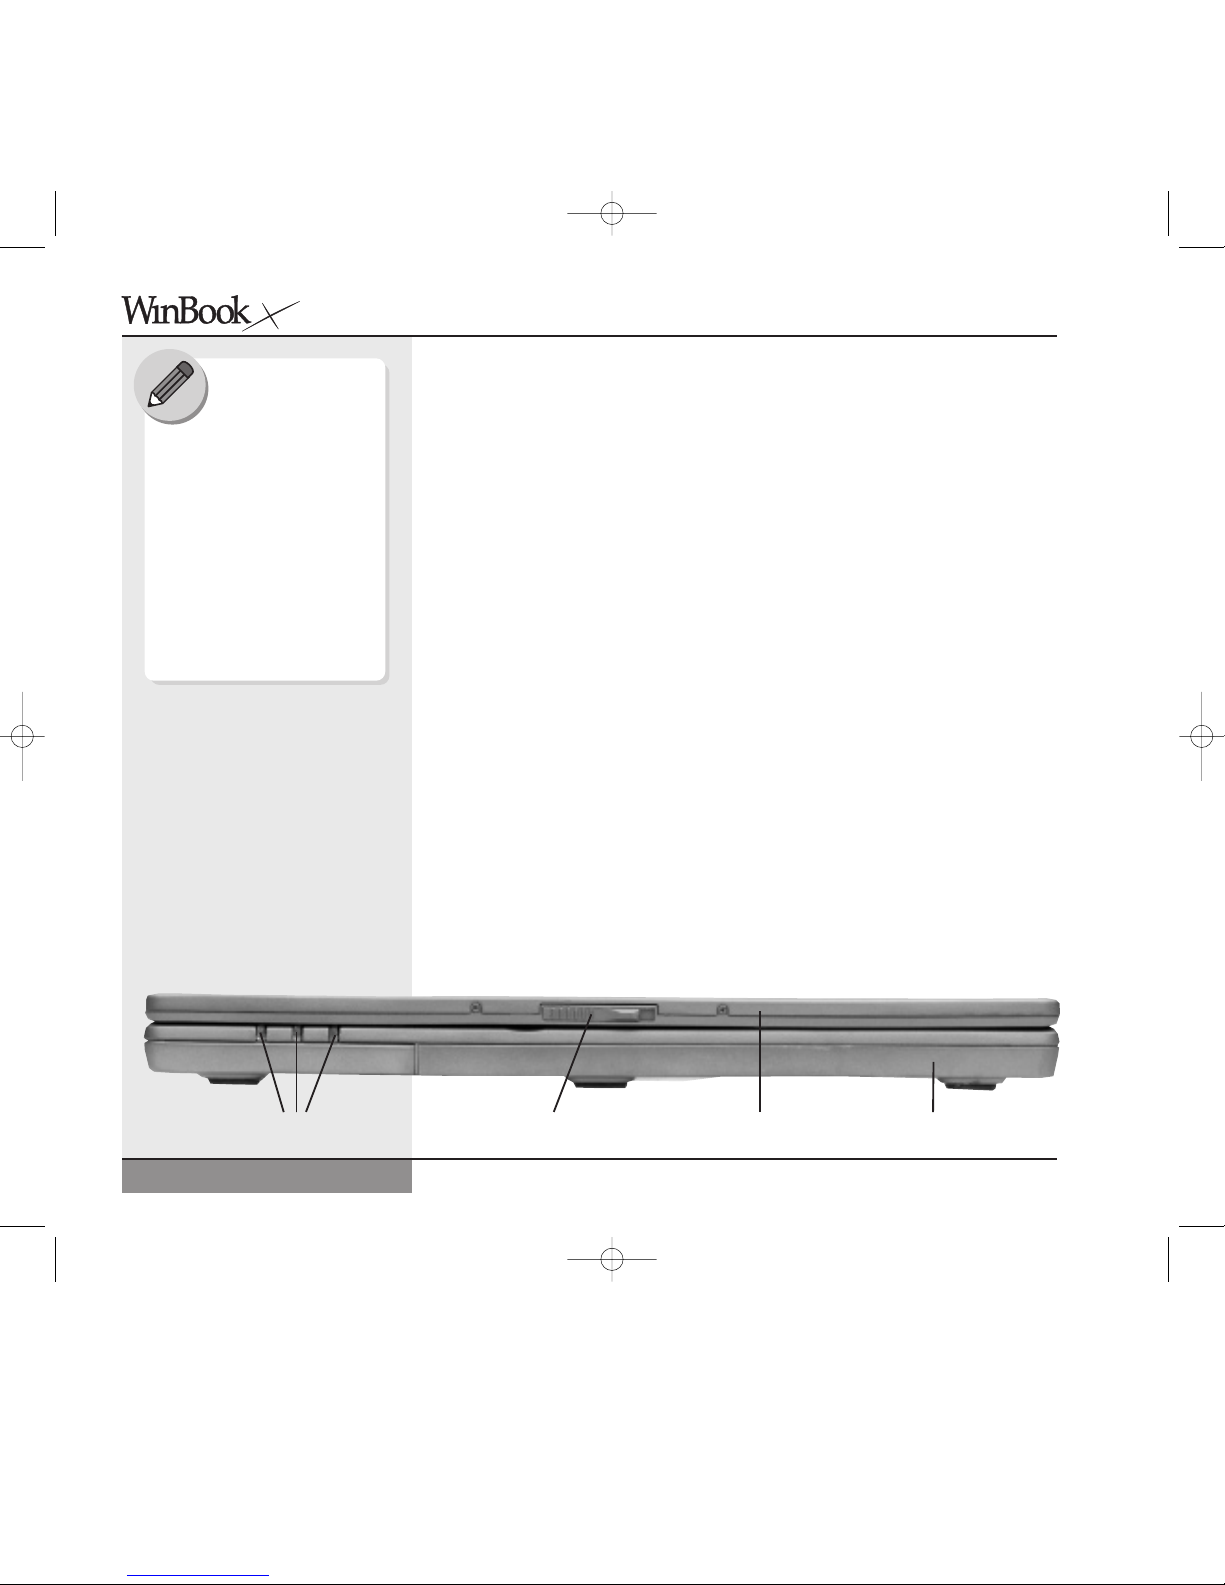
The Front (Figure 1.1)
The Display Panel Release allows you to open the display panel and
reveal the LCD screen and the keyboard.
The Display Panel opens to reveal the LCD screen and keyboard of
the WinBook notebook. To open the display panel: slide the release latch
on the front of the system and gently lift the display panel to a vertical
position.
Power LED Indicators provide a means for checking the battery status
of your system. There are three LED indicators on the front edge of the
system that display the following information (left to right):
• Power On: This indicator will be lit green when the notebook
is powered on.
• Suspend mode: This indicator will be lit green when the notebook
is in suspend mode.
• Battery Charge: This indicator will be lit orange when the battery
is charging. It will be lit green when the battery is fully charged.
Series
User’s Manual
Figure 1.1: Front View of the Closed WinBook Notebook
Display Panel
Battery
Display Panel Release
LED Indicators
14
Save the inner box
and all inserts and inner
packaging. If you later
need to ship or store the
system, you will find these handy
to have. All software is preloaded
onto the hard drive of your
WinBook notebook. You can
store any included disks and
CDs in a safe place. Copies of
the Windows installation files
are also stored on your hard
disk, so that you will not need
the CD to add Windows features
or drivers to your system.
X series manual w/no OS 9/5/01 2:19 PM Page 14
Page 15
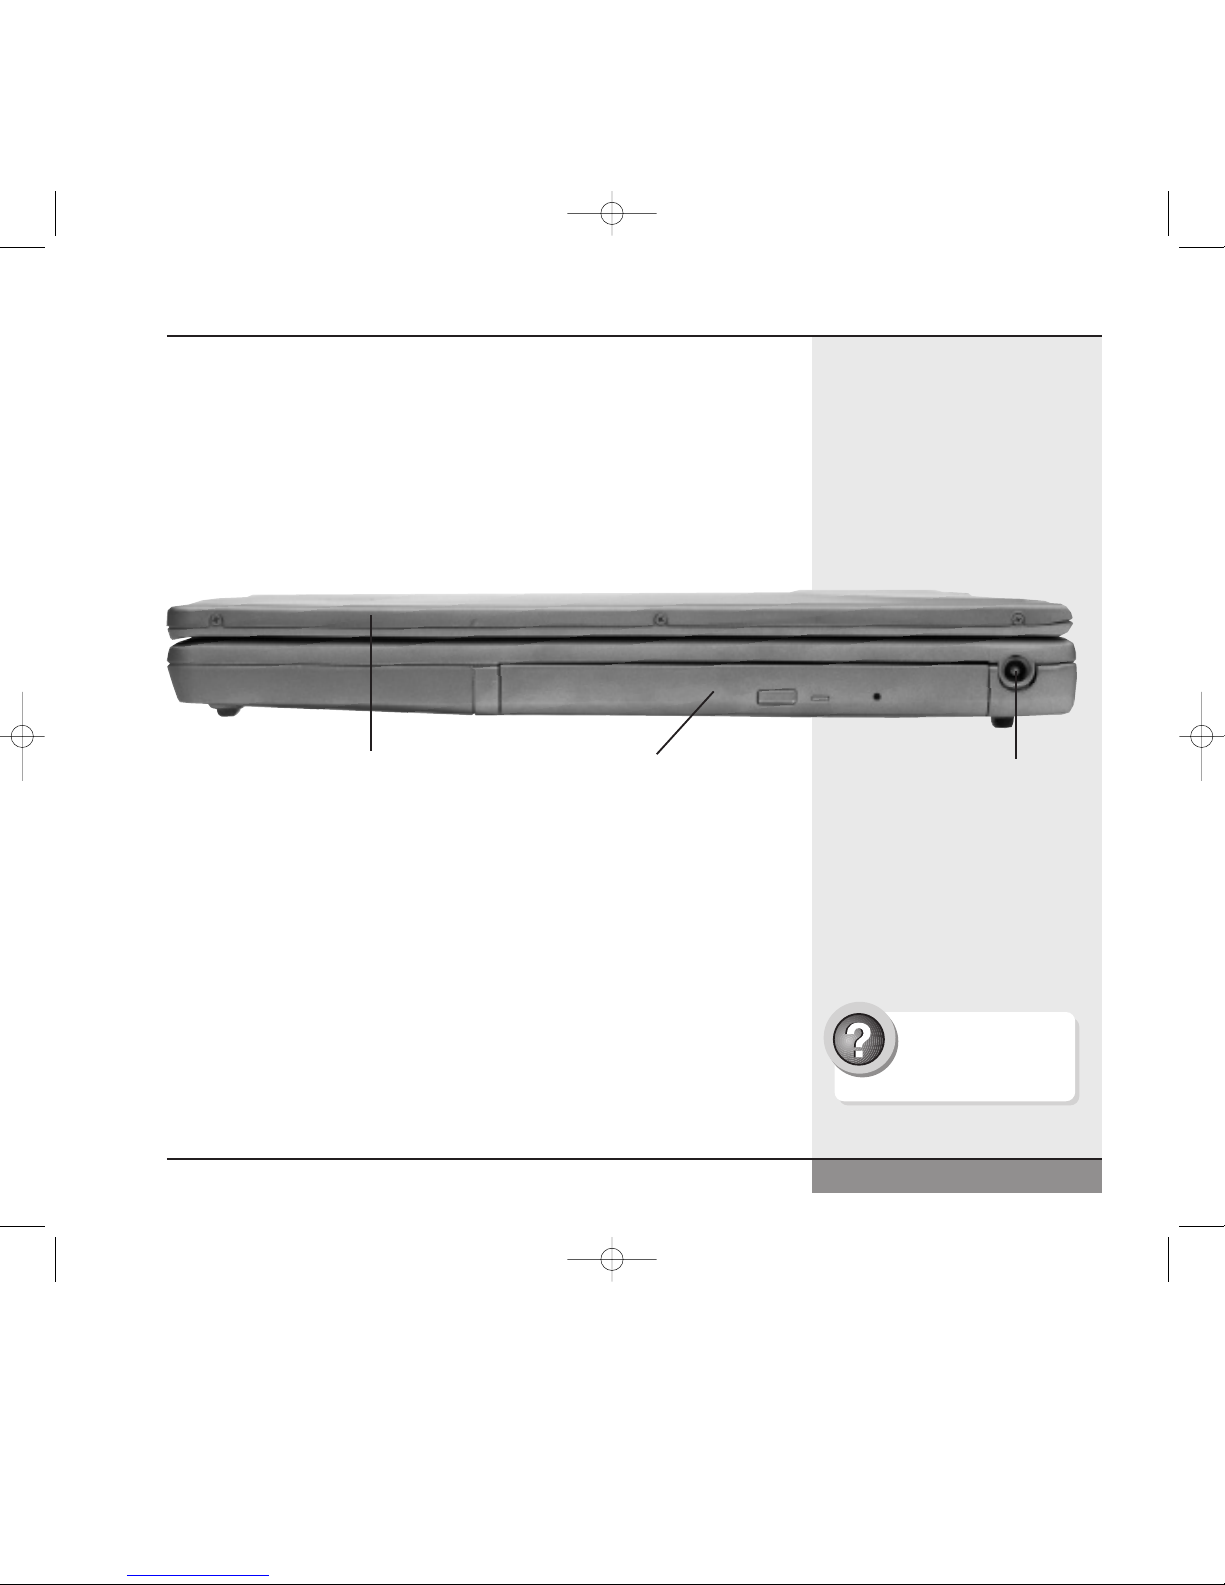
The Right Side (Figure 1.2)
The CD-ROM/DVD-ROM Drive is built into the system. To open the
drive, turn on the system and press the release button. The door will slide
open.
The AC Connector should only be used with the proper AC adapter
supplied by WinBook.
The Rear (Figure 1.3)
The S-Video Port allows you to connect your WinBook to a television
display.
The Parallel Port provides a connection for a parallel printer or other
parallel port device.
The 9-pin Serial Port provides a connection for serial devices, including
a serial external mouse. The serial port is designated as COM1.
The External VGA Port allows you to connect any standard computer
monitor to your system. You can display output simultaneously on both
the LCD and the external monitor or toggle between the two screens.
Refer to the Help and Support Center within windows for directions
on how to adjust your display settings.
Chapter 1: Getting Started
15
Figure 1.2: Right Side View of the WinBook Notebook
CD-ROM/DVD-ROM Drive
Display Panel
AC Connector
Search Help and Support
Center using keywords:
display settings
X series manual w/no OS 9/5/01 2:19 PM Page 15
Page 16
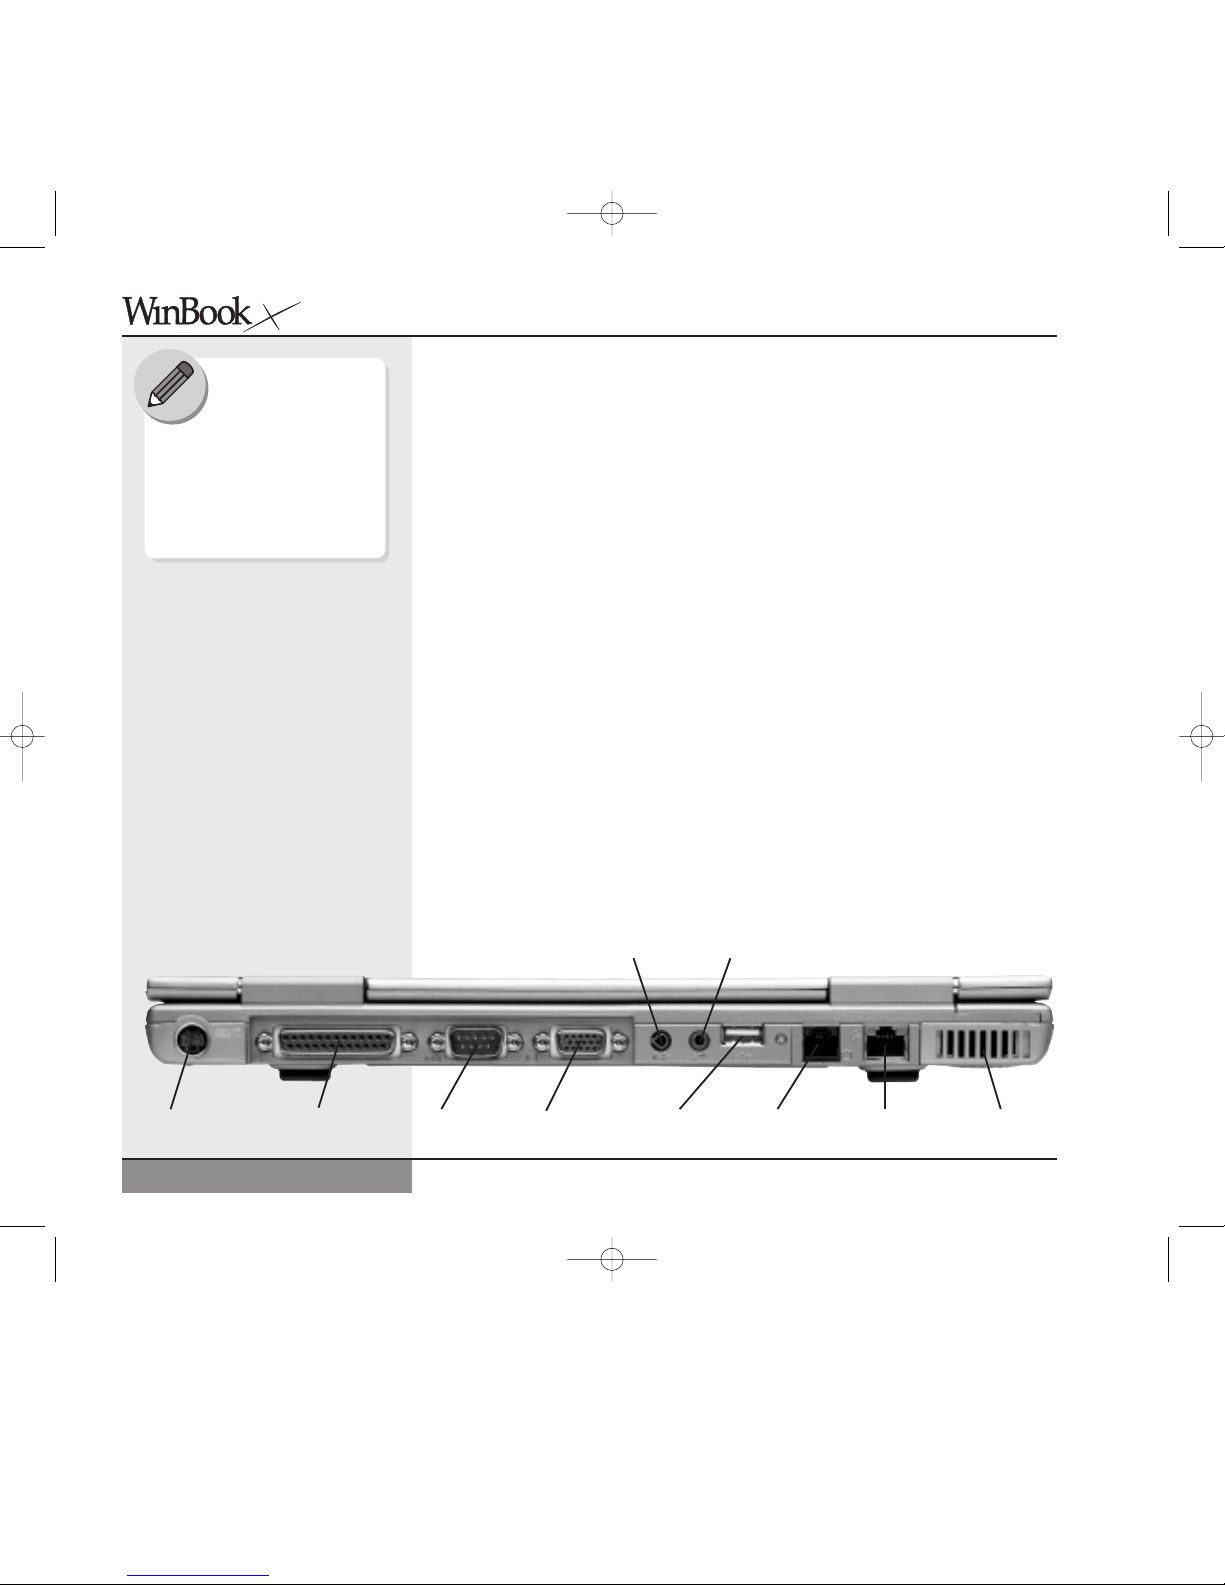
The Audio Line Out Jack allows you to direct audio output to a stereo
headphone, powered external speakers or an earphone set. You will need
to use a 1/8” phono plug for this connection. If your speakers or earphones
have a different plug, you will need to obtain an adapter from your local
retailer. Use of a headphone or external speakers will disable the integrated
speakers.
The Microphone Jack allows you to receive monophonic input from
an external microphone. Use of an external microphone will disable the
built-in microphone. It is recommended that you purchase an external
microphone for applications such as speech recognition that require
precise input quality.
The USB (Universal Serial Bus) Port of your WinBook notebook allows
you to add a wide variety of devices to your machine. The USB port can
allow you to connect up to 127 devices at very high data transfer rates
of up to 12 Mbps (Megabits per second). (Note: There is a second USB
port on the left side of the system.)
The Modem Port is an internal 56K voice/fax/data modem. You will
connect your computer to your phone line through this port. This jack
does not provide a pass-through option for connecting a phone to the
same line. You can obtain adapters that will allow you to connect a phone
to the same line as your WinBook notebook.
Series
User’s Manual
Figure 1.3: Rear View
of the WinBook Notebook
Parallel Port Serial Port VGA Port USB Port Modem Port LAN Port
Cooling Fan
Microphone Jack Port
Audio Line Out Jack
S-Video Port
16
Although you can
connect up to 127
devices through the USB
port, not all USB devices have
a pass-through to permit a chain
of connected devices. You might
need to obtain a USB hub to
permit you to connect multiple
devices into a single port.
X series manual w/no OS 9/5/01 2:19 PM Page 16
Page 17
The optional LAN Port provides a standard RJ-45 connection for
integration with an existing network or a high-speed (DSL or cable)
connection via a network cable.
The Cooling Fan Vent admits air into your WinBook notebook and
keeps the interior within proper operating temperatures. Do not block this
vent when the WinBook notebook is in use. Do not operate your WinBook
notebook inside a tight-fitting cover or case that blocks the cooling vent.
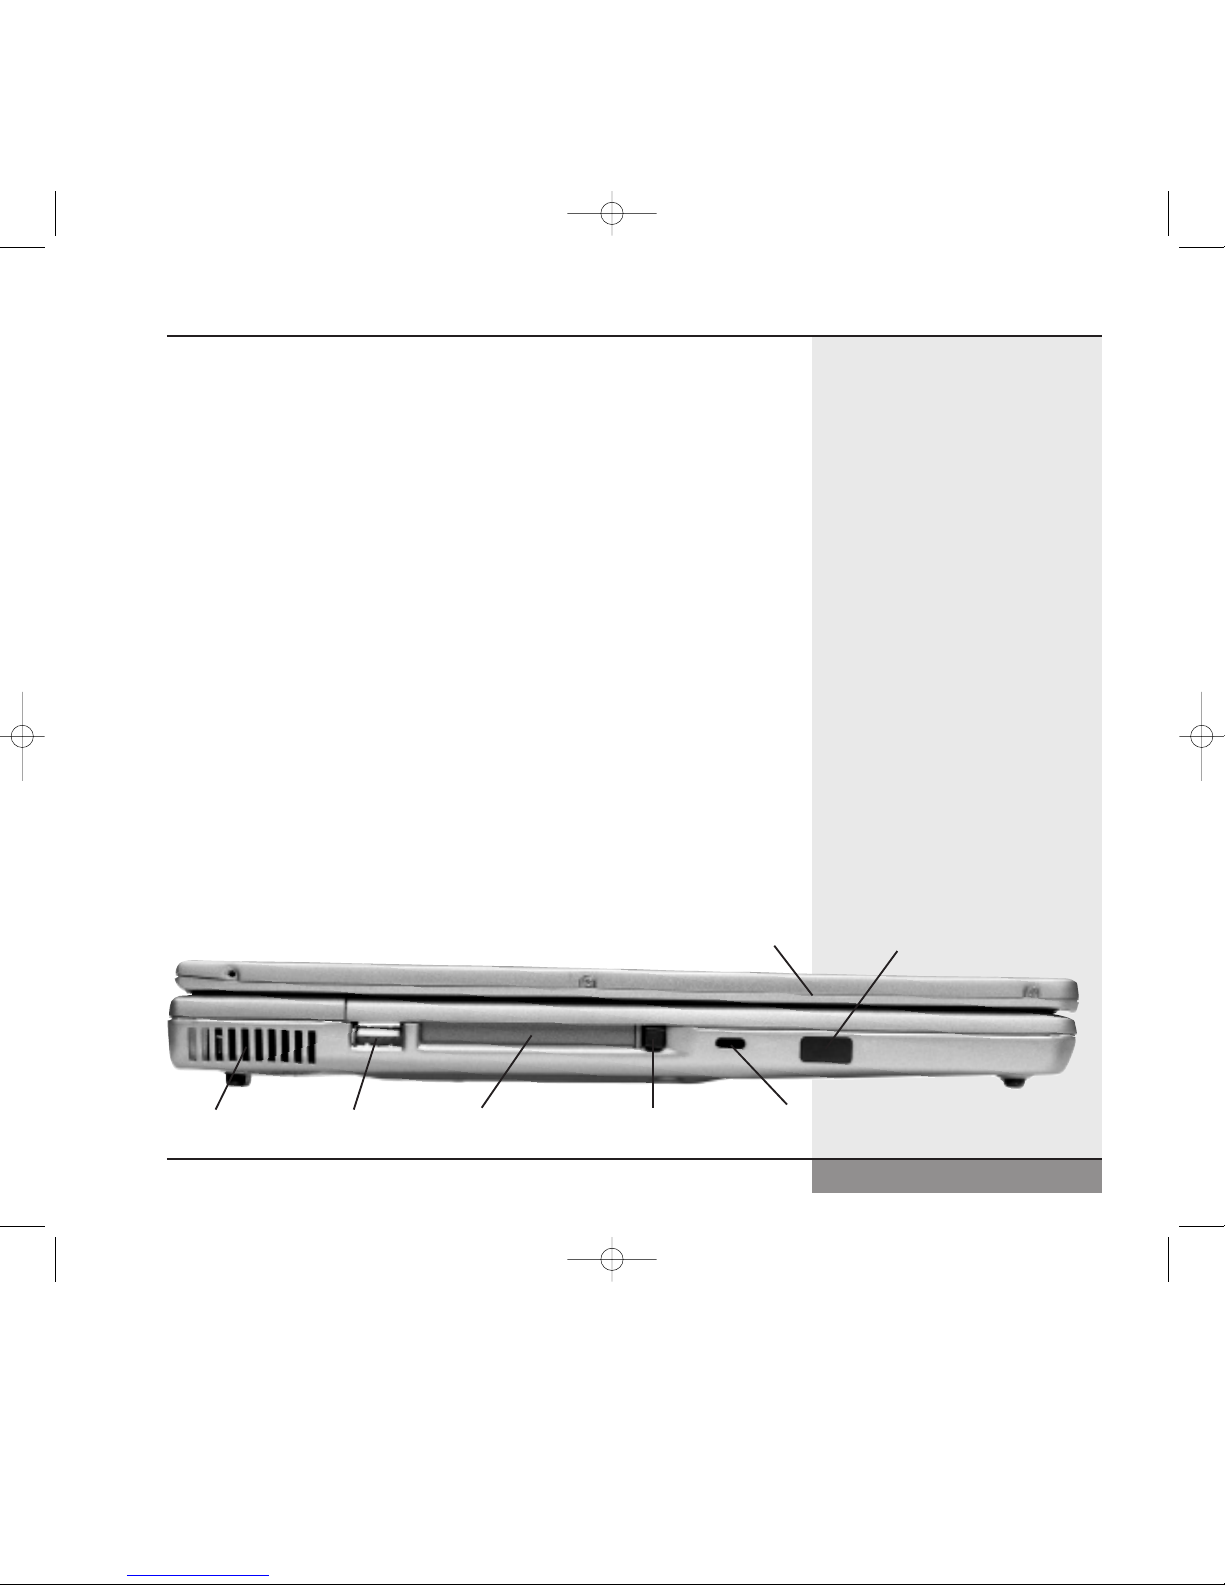
The Left Side (Figure 1.4)
The Cooling Fan Vent admits air into your WinBook notebook and keeps
the interior within proper operating temperatures. Do not block this vent
when the WinBook notebook is in use. Do not operate your WinBook
notebook inside a tight-fitting cover or case that blocks the cooling vent.
The USB (Universal Serial Bus) Port of your WinBook notebook allows
you to add a wide variety of devices to your machine. The USB port can
allow you to connect up to 127 devices at very high data transfer rates of
up to 12 Mbps (Megabits per second). Note: There is a second USB port
on the rear of the system.
The Kensington Lock Slot allows you to connect a special computer lock
to secure your system. You can purchase a lock at most computer retailers.
This lock is referred to as a Kensington lock.
Chapter 1: Getting Started
Figure 1.4: Left Side View of the WinBook Notebook
USB Port
PCMCIA Slot
Display Panel
IR Port
Kensington Lock Slot
Cooling Fan
PCMCIA Eject Button
17
X series manual w/no OS 9/5/01 2:19 PM Page 17
Page 18
The IR (infrared) Port allows you to connect to another system or device
using IR technology. You must place the port within one or two feet of the
other IR port for proper communication.
The PCMCIA (PC Card) Slot allows you to connect Type I or II cards
to your system. Your WinBook notebook will accept one Type I or Type
II card. For more information about PCMCIA cards, see Chapter 5. The
eject button allows you to remove the PC Card from your system.
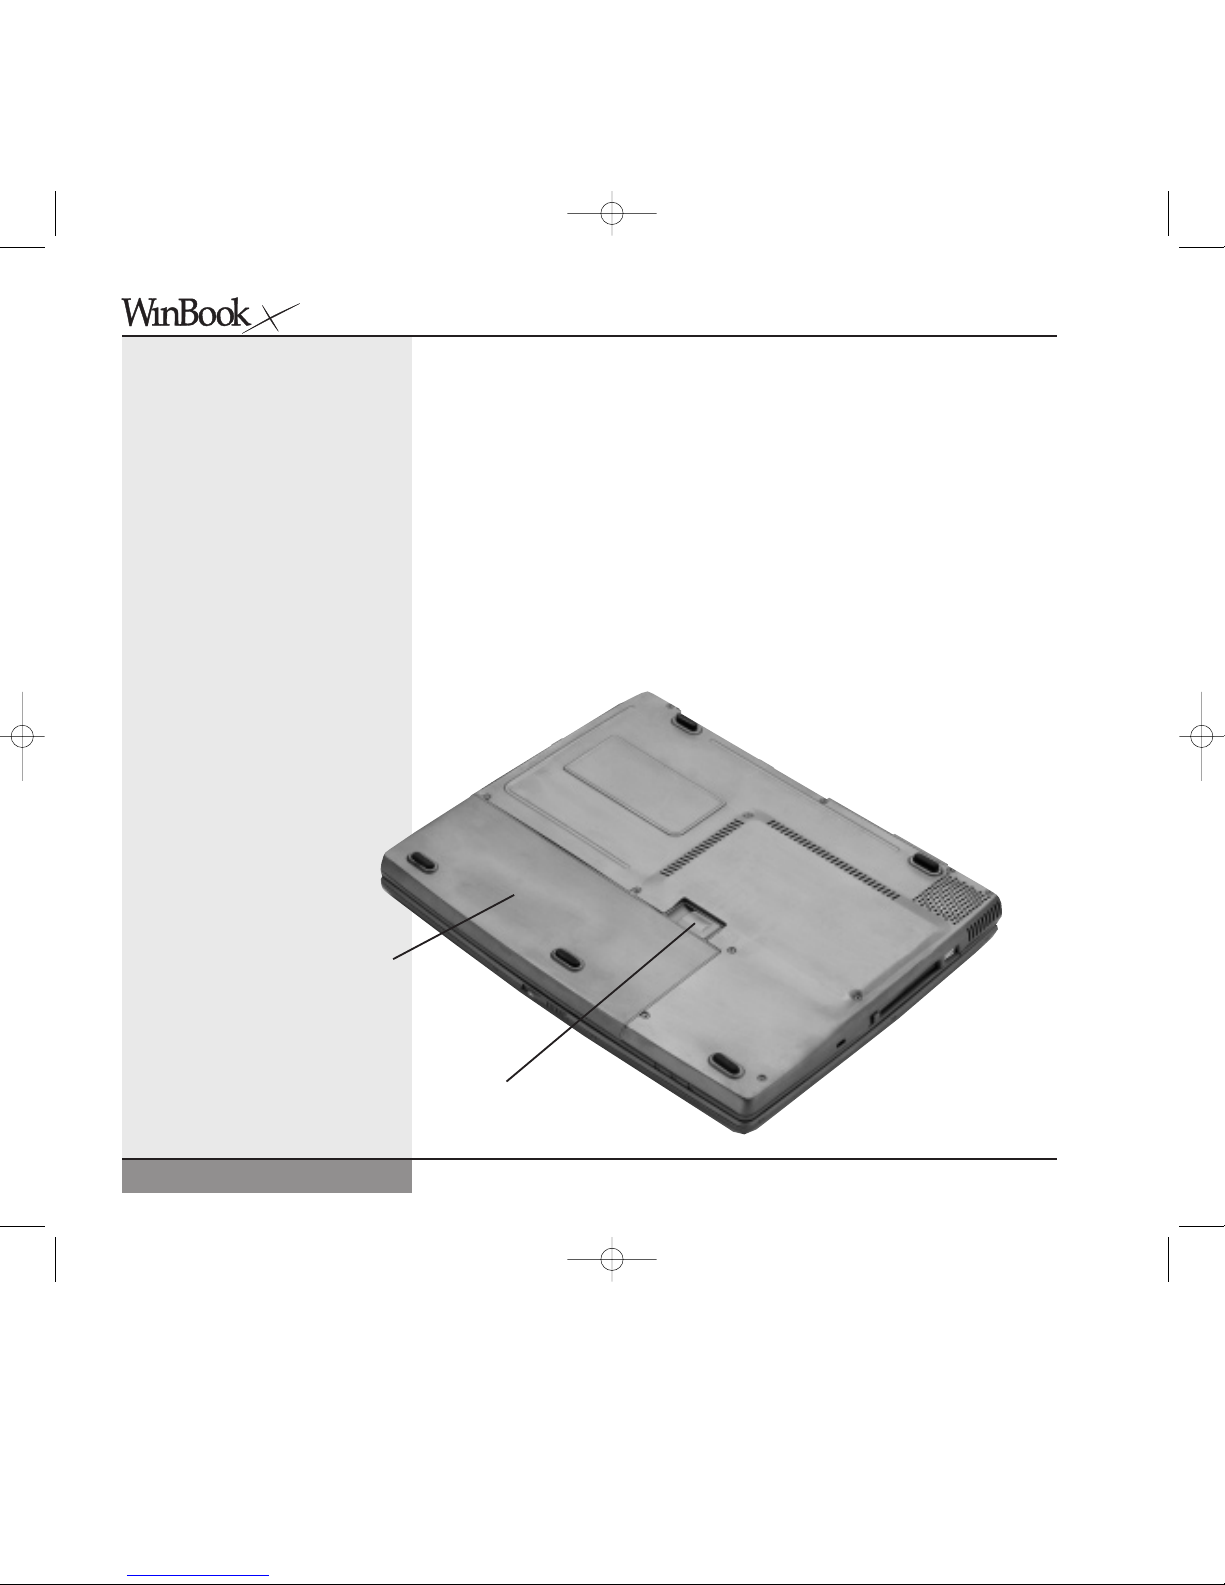
The Bottom (Figure 1.5)
The Battery Bay stores the primary Lithium-Ion (Li-Ion) battery
pack. The battery pack is stored separately in the shipping box
and must be installed for battery operation and battery recharging.
Series
User’s Manual
Battery
Compartment
Figure 1.5: Bottom View
of the WinBook Notebook
Battery
Compartment
Release Leaver
18
X series manual w/no OS 9/5/01 2:19 PM Page 18
Page 19
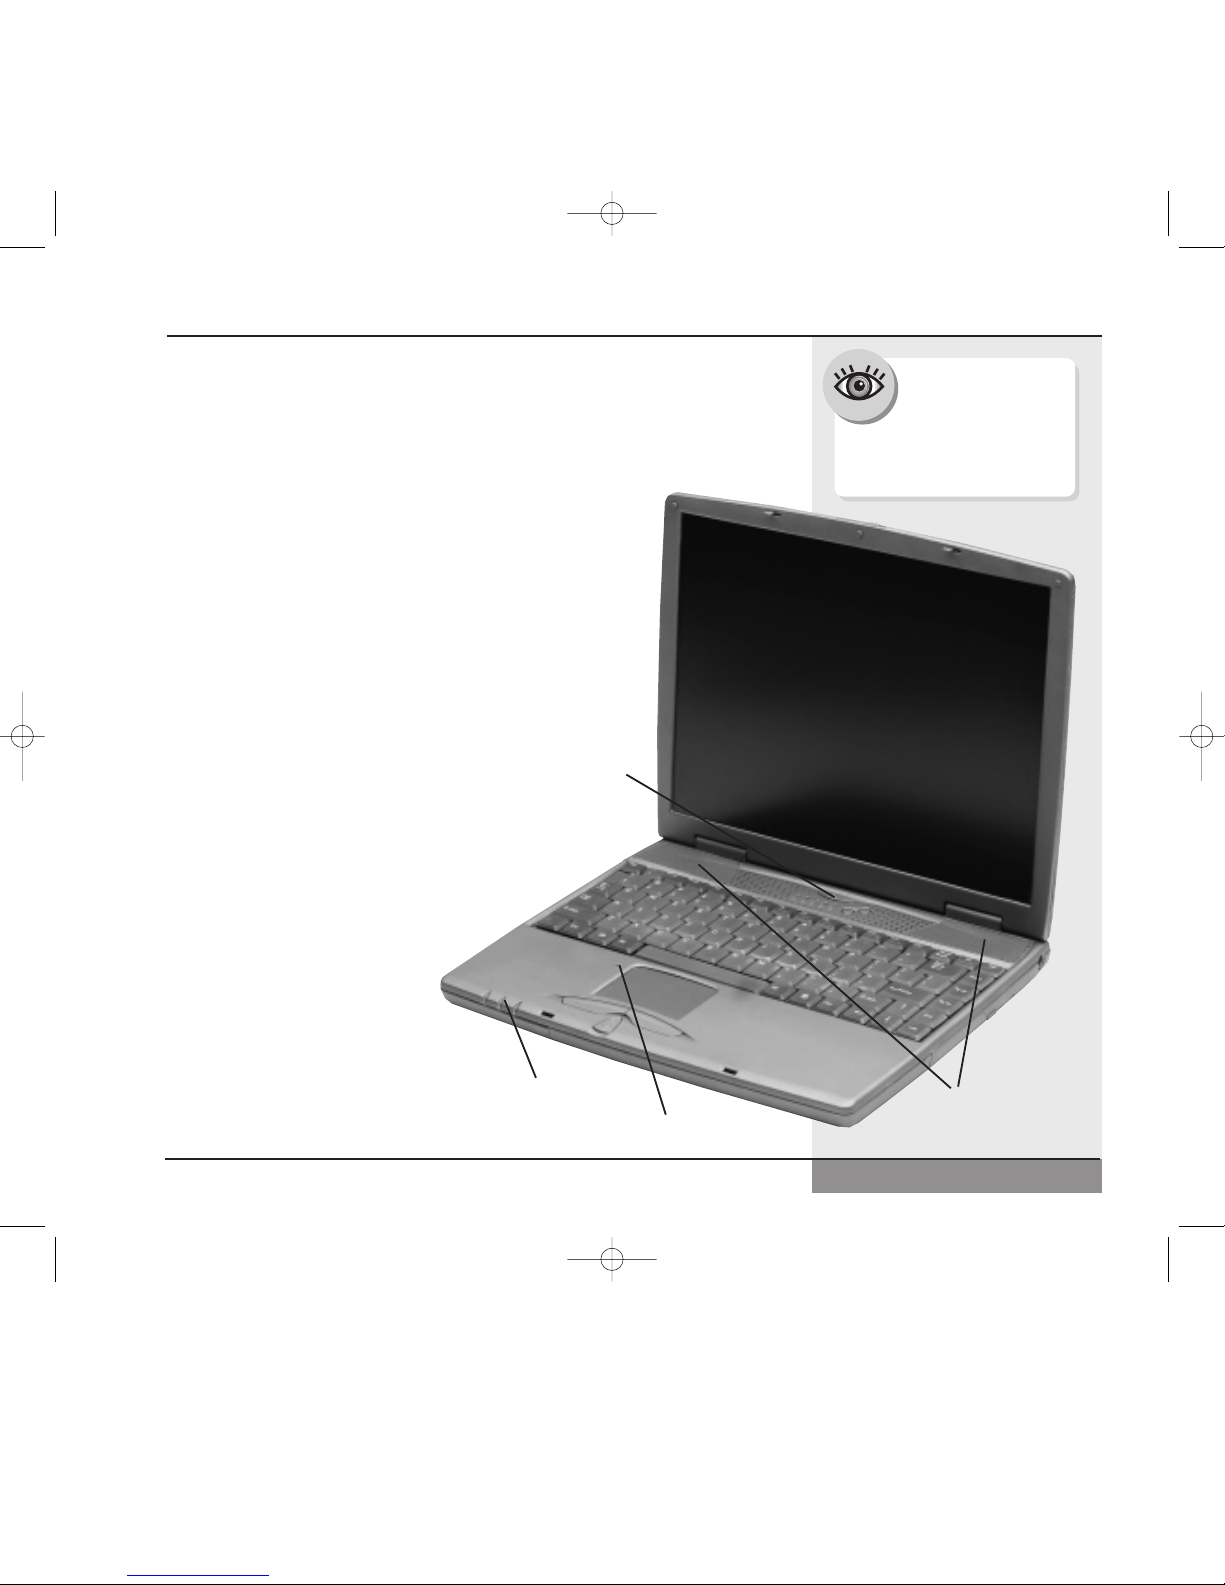
Inside the Notebook (Figure 1.6)
Your WinBook notebook comes equipped with
two high-quality Integrated Stereo Speakers.
These are located on the left and right edges
of the system just above the keyboard.
Status LED Indicator Panel from left to right
(Figure 1.7).
The Hard Drive Access LED: A green light
indicates that the computer is reading from
the hard drive.
The CD-ROM Drive Access LED: A green
light indicates that the computer is reading
from the CD-ROM or DVD drive.
Num Lock: A green light indicates that
the Num Lock function has been activated.
The embedded number pad will be enabled.
Caps Lock: A green light indicates that
the CapsLock function has been activated.
Scroll Lock: A green light
indicates that the Scroll Lock function has been activated.
In certain programs, this
will prevent the screen
from scrolling.
The Power Button for your
system is located just above
the keyboard and the LED
indicators.
Chapter 1: Getting Started
Figure 1.6: Inside
the Notebook
Power
Button
Power & Battery
Charging LEDs
Integrated
Stereo Speakers
Microphone
19
The sharpness of the
screen will vary with
your viewing angle.
Try moving the display panel
slightly forwards or back to find
the optimal contrast.
X series manual w/no OS 9/5/01 2:19 PM Page 19
Page 20
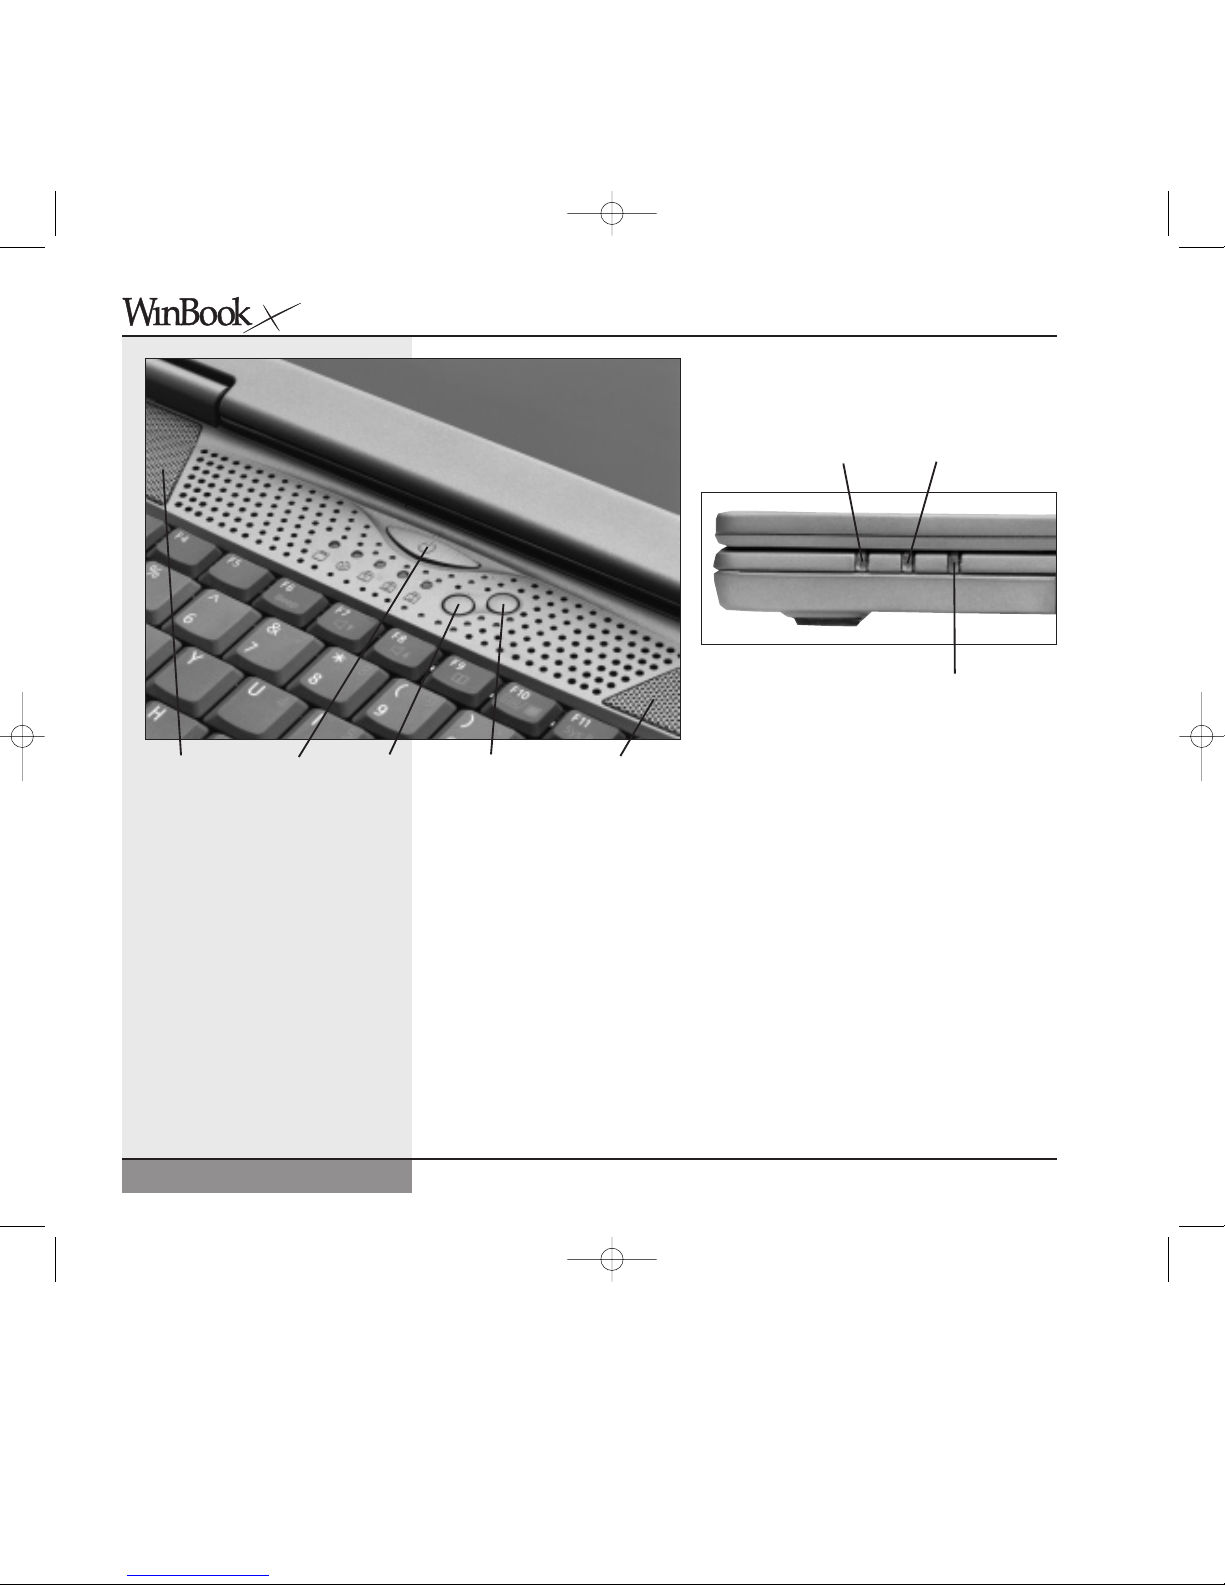
The E-mail Button will launch Microsoft Outlook Express or your
default mail program when pressed.
The Internet Button will launch Microsoft Internet Explorer or your
default browser when pressed.
The Integrated Microphone located to the left of the touchpad allows
for voice recording.
The Touchpad of your system provides an internal pointing device
to control the mouse cursor of your system.
Series
User’s Manual
20
E-mail
button
Internet
button
Power LED
Hibernate LED
Battery LED
Speakers
Power
Button
Figure 1.7: System Status LEDs
Speakers
X series manual w/no OS 9/5/01 2:19 PM Page 20
Page 21
The Mouse Buttons located just below the touchpad provide left and
right mouse buttons for your touchpad. See the section below on pointing
devices for more information.
The Scroll Button located just below the mouse buttons allows you
to scroll through programs that support the scrolling function. See the
section below on pointing devices for more information.
Power On
Before starting your system, you should remove the battery from the
box and install it in your system. Carefully turn the unit upside down.
Place the front edge of the battery into the grooves at the front edge
of the system. Gently angle the battery into place and push down on
the battery until you hear it “click” into position.
The first time you use your WinBook notebook, use your AC power
adapter. This will allow your battery to fully charge. It is recommended
that you fully charge and discharge your battery 3 times. This will help
calibrate the electronics that monitor and maintain the battery charge.
After those three full discharges, you can partially discharge or charge
your system as your use demands, although you should allow a full
discharge/recharge periodically to help optimize battery life. See Chapter
3 for more information on conditioning and maintaining your battery
efficiency.
Connect your AC Adapter to your system. Connect the power cord to
the adapter and connect the cord to a wall outlet or power strip. Slide
the display panel release latches forward and gently lift the display
panel until it is fully vertical. Press the power button on your computer
to initiate a boot of the system.
Chapter 1: Getting Started
Every effort has been
made to make certain
that your WinBook
notebook system will function
properly. If you experience a
problem when you turn on the
computer, refer to Chapter 9.
If you cannot find the answer
there or are unsure how to
proceed, contact Technical
Support (at the number indicated
on the “Read Me First” brochure
that came with your system).
If you ever need to
reinstall your Windows
Operating system and
are prompted for a User
Key, you can find your User
Key number on a sticker on
the bottom of your unit. Please
do not remove the Certificate of
Authenticity sticker (Product Key
xxxxx-xxxxx-xxxxx-xxxxxxxxxx) that
is attached to the bottom of your
WinBook X1, as another number
cannot be issued. We can NOT
provide a replacement! It is
advisable to copy the product
key to another location in case
the sticker comes loose or is lost.
21
X series manual w/no OS 9/5/01 2:19 PM Page 21
Page 22
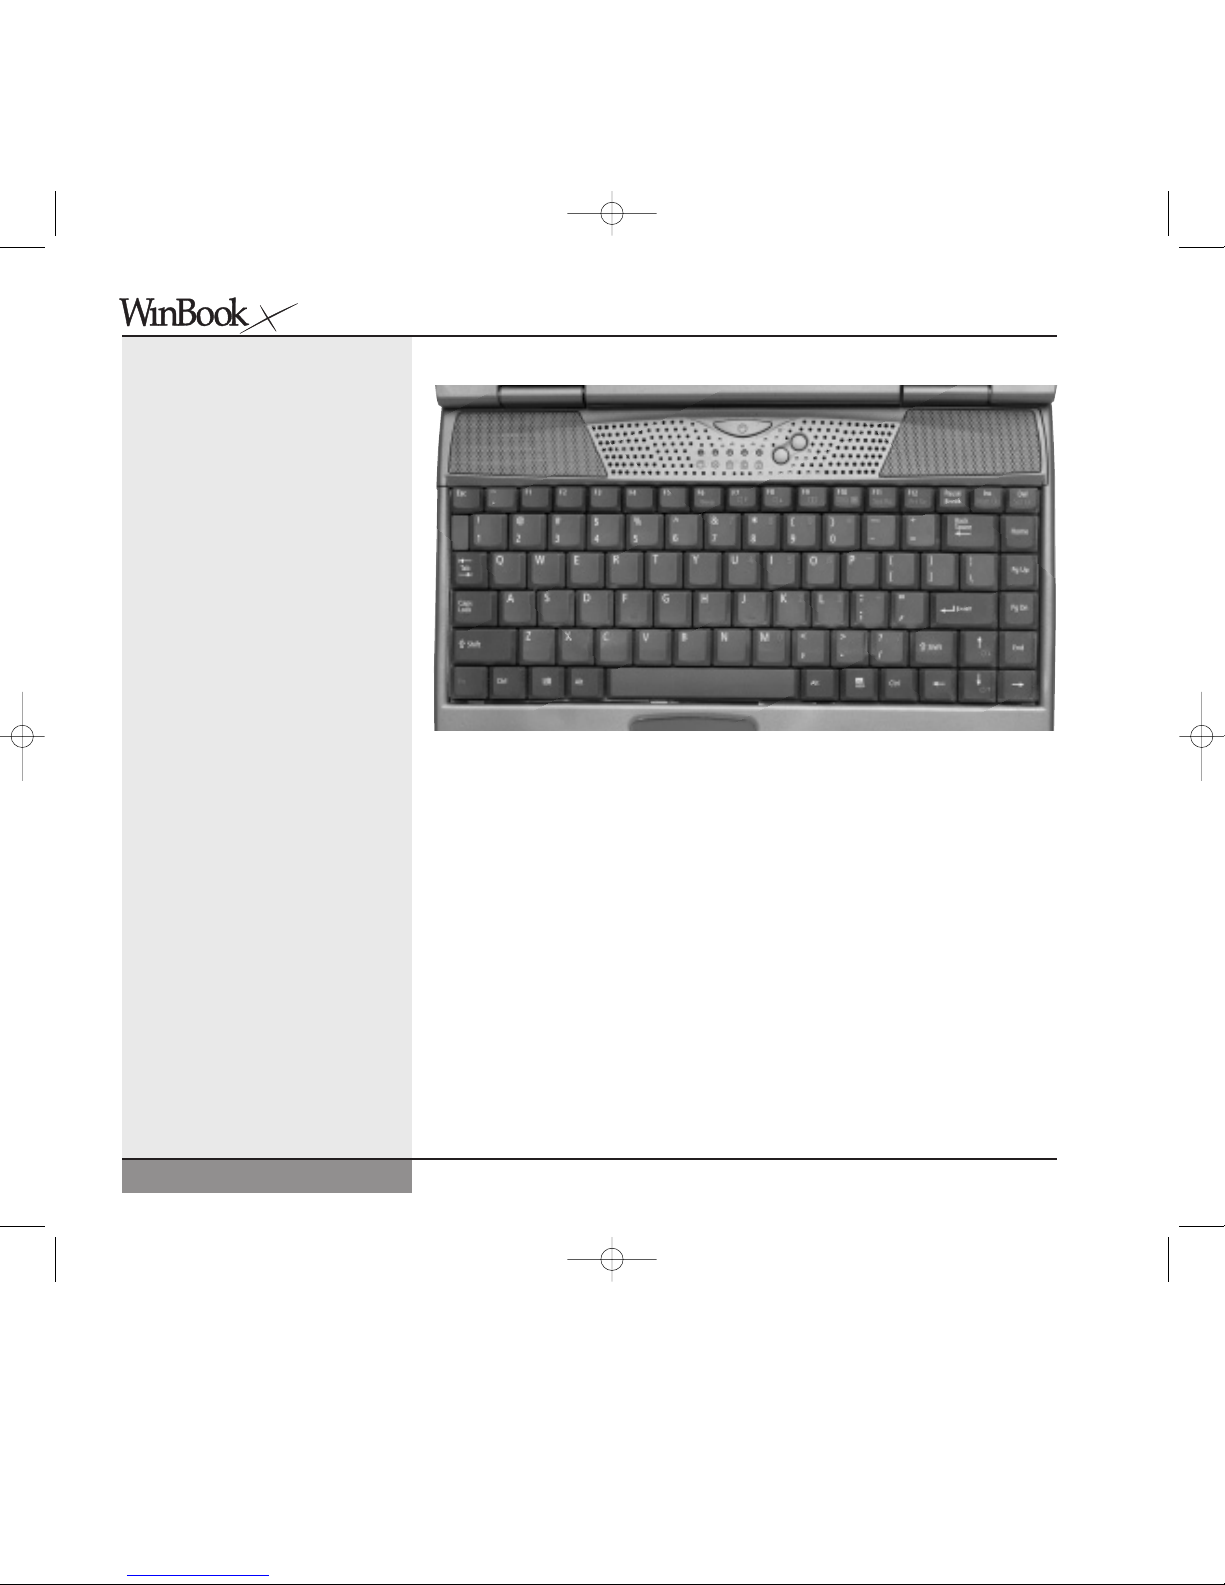
The Keyboard (Figure 1.8)
Your main interface with your computer will be your keyboard. If you are
unfamiliar with the standard PC keyboard, some of its keys are explained
in this section. The keyboard has all the standard computer typing keys
and some control keys. If you are not familiar with the computer control
keys, the major ones are discussed below.
The [Alt] and [Ctrl] keys, like the [Shift] key alter the function of the
traditional typing keys and the function keys. Depending on the software
you are using, the actual function of the [Alt] and [Ctrl] keys will vary.
They might also be used in combination with each other and/ or with
the [Shift] key to provide further possible combinations of functions
with the typing keys. For example, the [Alt]+[Ctrl]+[Del] combination
is used to close down an application in Windows that has “hung” or can
be used to provide a warm reboot of the computer system.
22
Series
User’s Manual
Figure 1.8: The X Series Keyboard
X series manual w/no OS 9/5/01 2:19 PM Page 22
Page 23
The function keys (F1-F12) serve different purposes and carry out different
tasks depending on the application you have running. They are often used
in combination with control keys. You should check the documentation for
your application, especially sections on keyboard shortcuts, for information
about what the keys do in that application.
The cursor (arrow) keys (which are all located in the lower right corner
of your keyboard) and the [Pg Up], [Pg Dn], [Home] and [End] keys
(which are located along the right edge of the keyboard) allow you to
move the active cursor of the computer to various locations on the screen
or within the document. The [Ins] and [Del] keys at the upper right of
the keyboard allow you to insert and delete characters.
Your computer also has an embedded numeric keypad. This numeric
keypad is printed in blue on the keyboard. If the Num Lock key is
engaged, the pad will allow you to type numbers as you would on
a 10-keypad. If the NumLock is not engaged, the keys perform their
normal alphanumeric function.
Your keyboard also has two Windows keys: a Start key (which bears
the Windows logo), which allows you to pull up the Start menu, and
a Menu Key, which calls up pop-up menus just like the right mouse
button (in programs that support such menus).
Keyboard System Controls
In addition to its function as a normal keyboard, your keyboard also
contains controls for various aspects of your WinBook notebook, including
the intensity of the LCD screen. These controls appear in blue on the keys
and are activated by pressing the [Fn] key (the key in the lower left corner
of the keyboard-to the left of the [Ctrl] key) in conjunction with the key
for the specific control function (or by holding the [Fn] key while pressing
the key for the specific control function).
23
Chapter 1: Getting Started
Once you are experienced with Windows,
you will find that you
can change the look and
configuration of the desktop
from the defaults provided for
you. Please refer to the Windows
Help and Support Center for
more information.
Search Help and Support
Center using keywords:
desktop settings
X series manual w/no OS 9/5/01 2:19 PM Page 23
Page 24

KEYS FUNCTION(S)
[Fn]+[F6] Mutes system audio.
[Fn]+[F7] Decreases system audio.
[Fn]+[F8] Increases system audio.
[Fn]+[F9] Expands the display to full screen in programs that
use a 640x480 mode.
[Fn]+[F10] If an external monitor is present, pressing this hot key
combination toggles the display between the built-in
LCD screen, the external monitor and simultaneous
display on both screens.
Note: The function key combination [FN]+[F10] is not valid when
running Microsoft Windows operating systems.
Mouse Buttons & Pointing Devices
Your WinBook notebook comes with a built-in touchpad and can support
an external mouse via the USB ports. If you use an external USB mouse,
you can use it simultaneously with the touchpad.
Touchpad
The touchpad is a rectangular electronic panel located just below your
keyboard. You can use the static-sensitive panel of the touchpad as a
pointing device. Place your finger gently on the surface of the touchpad
and slide it to move the cursor. You can use the buttons below the touchpad
as left and right mouse buttons. You can also tap lightly on the touchpad,
which the system will recognize as a left mouse click. You can click and
drag an item with the touchpad by pointing at the item, tapping to select
it and then, while holding your finger on the pad, sliding your finger
in the direction of the movement desired.
24
Series
User’s Manual
X series manual w/no OS 9/5/01 2:19 PM Page 24
Page 25
No matter which pointing device you use, it can be adjusted to
accommodate your personal preferences. Refer to the Help and Support
Center within Windows for directions on how to adjust the settings
of your pointing device.
In addition to the left and right mouse buttons located just beneath
the touchpad, there is a scroll button just beneath those mouse buttons.
If your program supports a scrolling button, you can click the button
up or down to scroll through the information in the program.
LCD Display
Your WinBook notebook comes with a back-lit LCD display panel.
The intensity of the panel will vary slightly with your angle to the screen.
You can adjust the angle of the panel to provide optimal clarity. You can
also make minor adjustments in screen brightness and contrast by using
the hot-key combinations built into your WinBook notebook—[Fn]+[ ]
and [Fn]+[ ]—to adjust brightness.
Depending on the screen that was built into your WinBook notebook,
your display will support a resolution of 1024 x 768 pixels or greater.
If you use the Windows Display Properties window to change down
to a resolution lower than the standard resolution of your screen, you
might also notice a slight loss of clarity when using a resolution below
the default resolution for your LCD display. Notice that when you
put your computer into the DOS mode, which uses the VGA resolution
(640 x 480) as a default, the display will be stretched to fit the full
screen (if your 640 x 480 display does not fill the entire screen, you
can use the [Fn]+[F9] hot-key combination to expand the display.)
When you are displaying the video on the built-in screen, you cannot
choose a higher resolution than the standard resolution. However, you
can use a higher resolution when you output the notebook’s video to an
external monitor that supports high resolutions. You can quickly adjust
the resolution and number of color settings through Windows Display
25
Chapter 1: Getting Started
➔
➔
Search Help and Support
Center using keywords:
pointing device
X series manual w/no OS 9/5/01 2:19 PM Page 25
Page 26
Properties window. Refer to the Help and Support Center within Windows
for directions on how to adjust the settings of your display.
Battery & Power Saving
When the AC Adapter is connected to your WinBook notebook, your
battery will charge whether the computer is on, off, or in the power saving
mode. It will, however, charge much faster if the computer is off or in the
Hibernate mode. When your battery charge level gets low, you will receive
several warnings.
• When the charge starts to get low, a red “X” will appear over
the battery icon on the taskbar.
• When about 10-15 minutes of battery power remains, you will receive
warnings: the system will beep periodically to warn you that you have
entered this low-charge.
• When about 5-10 minutes of battery power remains, the beeping
will accelerate. You should save your work and shut off the computer
(or enter the hibernate mode) or connect to AC power.
• Windows will provide warnings at the battery levels you select
in the Power Properties. Refer to the Help and Support Center
within Windows for more information.
If your battery drains completely without being placed into the hibernate
mode, you might lose information which has not been saved. It is a good
idea when using battery power to place the unit in the hibernate mode if
you think you will be leaving the unit for any substantial length of time.
To check your battery charge level:
Series
User’s Manual
26
Search Help and Support
Center using keywords:
display settings
Search Help and Support
Center using keywords:
power settings
X series manual w/no OS 9/5/01 2:19 PM Page 26
Page 27
Battery Icon
The battery icon provides a rough indicator of the battery charge level by
starting out all blue (full charge) and becoming grayer as the charge level
drops. You can also hold the cursor over the icon to get a pop-up reading
of battery charge level.
Power Management
Your WinBook notebook should run for over two hours on a single,
fully charged battery and longer if power management is employed.
The key to obtaining optimal battery life for your system is effective
power management. You can set your system to the optimal power
management level for your usage by using the power management
features in Windows. Refer to the Help and Support Center within
Windows for more information. You should familiarize yourself with
the various power management features designed into your system so
that you can configure your system for your needs. Keep in mind that
power management takes advantage of the times when you stop using
resources. If you work continuously and use resources extensively,
power management will not be able to take effect and extend battery life.
Audio/Sound
Built-in Speakers
Your WinBook notebook comes with built-in audio hardware that plays
sounds through the speakers built into the cabinet of your system (above
the keyboard at the right and left sides of the system). You can adjust
the hardware volume using the hot keys (see the section on the keyboard
above). You can also adjust the software controls of the audio through
Windows. Refer to the Help and Support Center within Windows for
more information.
27
Chapter 1: Getting Started
If you will be using
your system primarily
in a desktop setting,
you should consider setting
the power management to
less aggressive settings. The
aggressive settings are more
appropriate for mobile usage.
You can switch the settings as
the specific situation demands
by making adjustments in the
power management features
of Windows.
Search Help and Support
Center using keywords:
power management
Search Help and Support
Center using keywords:
audio properties
Connecting external
speakers to your
WinBook notebook
disables the built-in
speakers.
X series manual w/no OS 9/5/01 2:19 PM Page 27
Page 28
Built-in Microphone
The microphone built into the case of your WinBook notebook
provides you with an integrated source for adding sound to your
applications or for using the speech functions of your applications.
You will need applications capable of using such sound input to make
use of the microphone. The audio software that is included with your
WinBook notebook provides one such application. Refer to the Help
and Support Center within Windows for directions on how to enable
the built-in microphone.
CD-ROM Drive/DVD Drive
The CD-ROM or DVD drive provides you with a means of having
access to programs or data that take up a lot of disk space, without
having to sacrifice a large section of your hard drive for that purpose.
The CD-ROM drive uses data CDs that are capable of holding hundreds
of megabytes of data (DVD disks can hold several gigabytes of information). The high-speed access rate of your CD-ROM enables it to search
that data and retrieve the specific data that you want very quickly. Data
CDs are ROM (Read Only Memory) disks and cannot be written to with
your CD-ROM drive. Their high capacity and fast speed makes them very
useful for programs such as encyclopedias and other reference works that
require a lot of space and a fast search mechanism, and to which you do
not need to add data. Your CD drive can also be used to play audio CDs
through the audio hardware built into your WinBook notebook. Your
CD-ROM will also be able to read from photo CDs.
You can load a CD-ROM/DVD into the drive as described below:
1. Press the Load/Eject button.
2. The disc tray opens.
28
Series
User’s Manual
Connecting an external
microphone to your
WinBook notebook
disables the internal microphone. Your system will ship
with the microphone deselected,
which helps reduce feedback
when the microphone is not
being used by an application.
Dirt in the CD tray
can affect performance.
Be sure to keep the tray
clean.
Search Help and Support
Center using keywords:
microphone
X series manual w/no OS 9/5/01 2:19 PM Page 28
Page 29
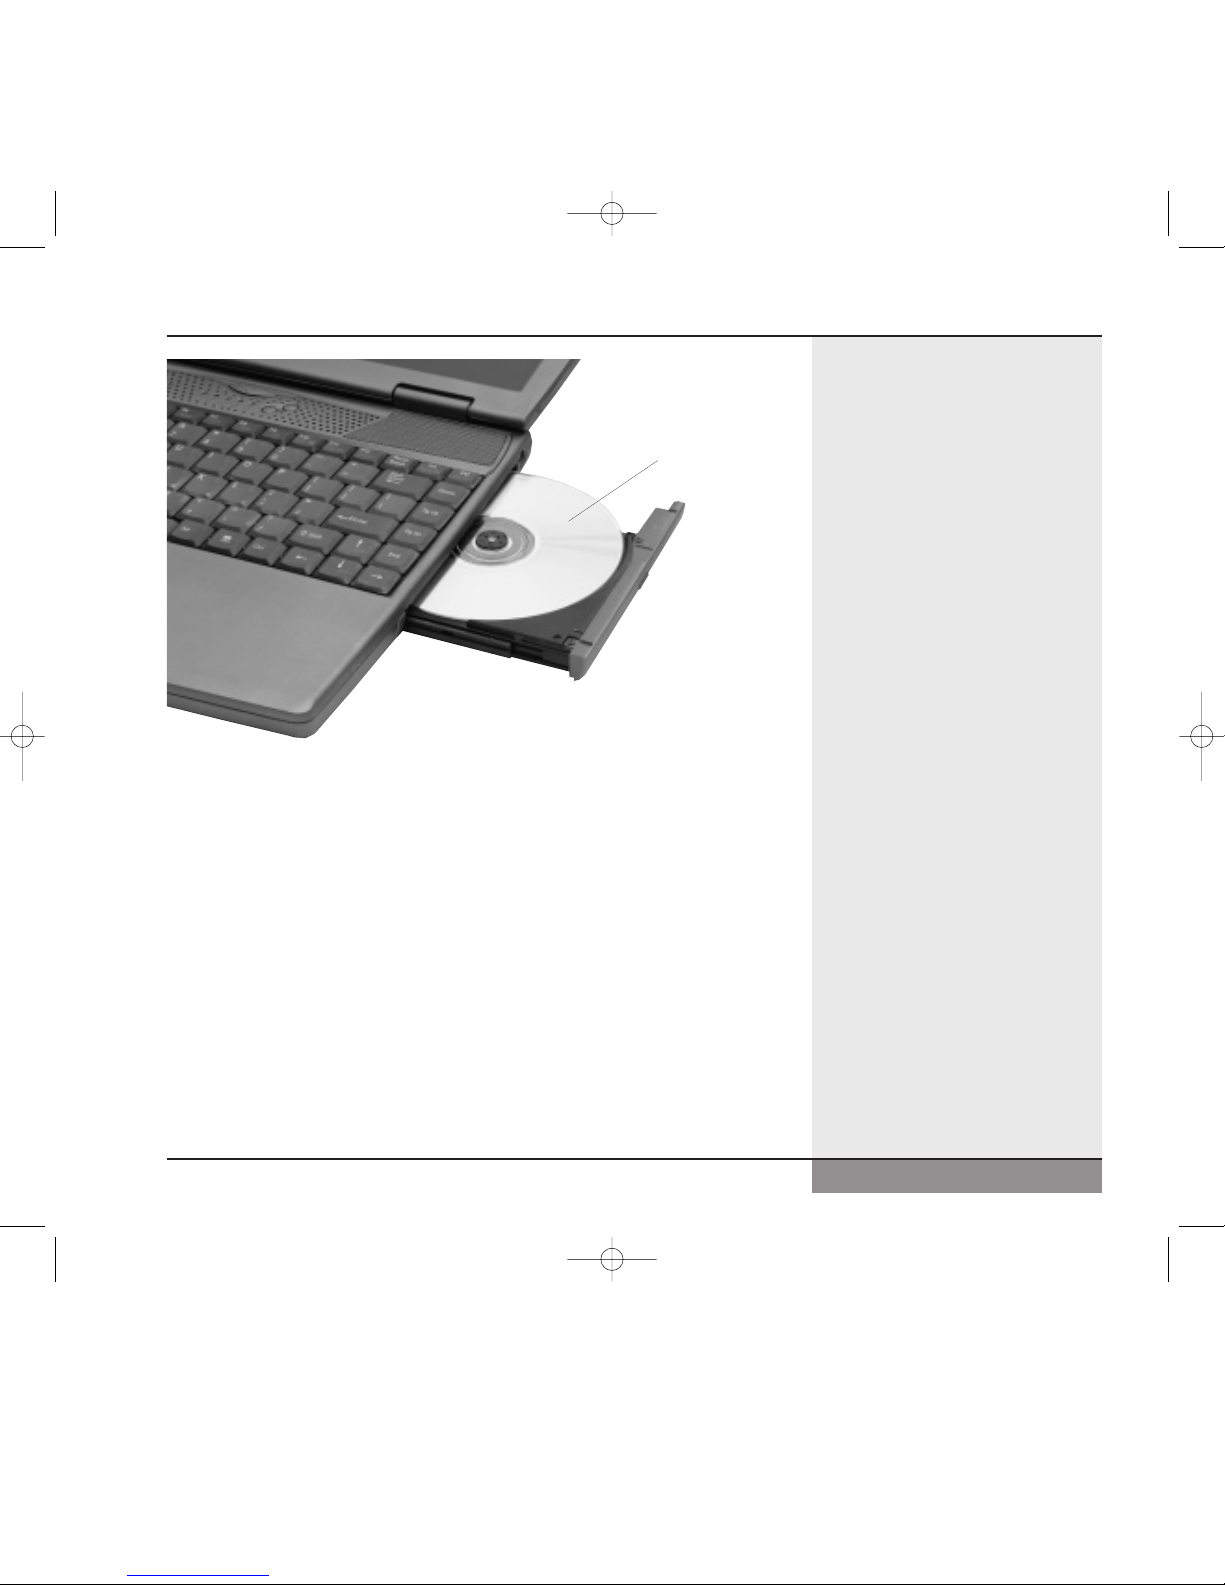
3. Wait until the tray stops. If the tray does not open far enough to
insert the CD, gently ease the tray out until you have enough clearance
to insert the CD.
4. Carefully place the CD (audio or data), with the label side up,
on the disc tray. (Figure 1.9)
5. Be sure to carefully center the CD and press it into place on the
loading tray. Since your WinBook notebook is meant to be portable,
the CD is secured onto the tray rather than simply resting in a recess.
6. Close the tray. Be certain that it is closed completely.
In general, your software will control the CD-ROM directly. Data CDs
are accessed via the software. Consult your software instructions for the
operations of a data CD. Windows compatible CD-ROMs will usually
have an autoplay feature that starts the program when the CD is detected.
29
Chapter 1: Getting Started
Figure 1.9: Loading
a CD into the drawer
Label-side up
X series manual w/no OS 9/5/01 2:19 PM Page 29
Page 30
When the CD-ROM is to be used as an audio CD player, you can still
use software to control the playing and volume of the CD. Refer to the
Help and Support Center within Windows for directions on how to adjust
the volume of CD audio.
If you need to open the CD drawer when the power is not on, you can
use the emergency release, which is the small hole located on the front
of the drive to the right of the release button. Use a paper clip to press
on the release inside the hole. The tray can then be pulled gently forward
until the disc can be retrieved. Slide the tray back into place until you feel
it click. This method is designed to be used occasionally for an emergency
retrieval of a disk and should not be used as a regular method of removing
disks. Your drive will last longer if you remove the disk using the normal
unloading method.
If your WinBook notebook has a DVD drive, you will be able to use this
drive to play DVD video disks. See Chapter 7 for more information about
DVD use.
CD-R/CD-RW Drive
If your unit came with the Combo CD-RW/DVD drive, you will have
the ability to write to CD-R and CD-RW disks. The physical operation
of this drive is the same as for a CD-ROM or DVD drive (as explained
in the previous section).
CD-R disks can be written to once, although you can continue to add
information to the disk until it is full. Once you have written data (or
audio) to the disk, that disk can be formatted for reading in most standard
CD-ROM drives or audio CD-players.
Note: some older drives will not be able to read from these disks.
You can write to CD-R disks and use them to distribute your data
to other users. CD-R drives come in two capacities:
1. 650MB (data)/74 minute (CD audio)
30
Series
User’s Manual
Search Help and Support
Center using keywords:
audio CD
Search Help and Support
Center using keywords:
winbook combo
X series manual w/no OS 9/5/01 2:19 PM Page 30
Page 31
2. 700MB (data)/80 minute (CD audio)
CD-RW disks can be erased and reused many times. CD-RW disks
can be read only by CD-RW drives or by specially designed “multiread”
CD-ROM players, so these disks are primarily intended as a high-capacity
storage device rather than as a means of distributing data.
For more detailed information about this drive, check the Help and Support
Center in Windows.
Software
Preloaded Software
Your WinBook notebook comes preloaded with Windows as its operating
system. There is also the necessary software to use the various hardware
of the laptop in Windows. For instructions on using Windows, refer to
the Help and Support Center within Windows. In addition to the software
that you run and see, there is some preloaded software that runs in the
background. Specific drivers (files that allow pieces of hardware to communicate effectively with the computer and operating system) have been
preloaded for the various hardware units that have been packaged with
your system (e.g. sound card, CD-ROM drive). These drivers are also
important in allowing you to alter certain aspects of your system, such
as the resolution of your video image.
Adding Software
If you purchased some other software, or if you already own software
that you will be installing on your new WinBook notebook system, or
if you buy software at a later date, you will need to know how to install
that software on the WinBook notebook system. Follow the instructions
provided by the software manufacturer. Most current software on CDROM will start automatically once the CD is inserted and recognized
by your WinBook notebook.
31
Chapter 1: Getting Started
If you have to reinstall
Windows at some point,
you will lose some of
these drivers. To regain normal functioning of your WinBook
notebook in such a case, use the
Restore CD that came with your
system.
Select Windows
Basics from the
help topic menu.
Search Help and Support
Center using keywords:
uninstall software
Windows software
comes with uninstall
functions built-in. If
you ever want to remove a
Windows program, do not delete
it. Use the Add/Remove feature
to remove it. Refer to the Help
and Support Center within
Windows for directions on how
to uninstall software.
X series manual w/no OS 9/5/01 2:19 PM Page 31
Page 32

32
X series manual w/no OS 9/5/01 2:19 PM Page 32
Page 33

Chapter 2:
Windows Help
and Support
Chapter 2: Windows Help and Support
33
X series manual w/no OS 9/5/01 2:19 PM Page 33
Page 34

The Help and Support Center is your one stop shop for anything and
everything that relates to Windows and your WinBook. Through this
resource, you can find answers on a multitude of subjects such as basic
windows operations, detailed problem resolutions, and specifications of
your WinBook computer. Also found within this resource are applications
that you can run to help maintain and troubleshoot your WinBook such
as system restore, remote assistance, and system configuration utility.
For further information on any item in this chapter, just type the keyword
in the Search box of the Help and Support Center.
When connected to the internet, the Help and Support Center becomes
an even greater tool by expanding its capabilities in the following ways:
• Through the Remote Assistance feature, a WinBook technical support
representative could connect to your computer with your permission,
then see your files, control your mouse and keyboard, and chat online
with you to discuss your problem.
• Through Windows Update, your computer can always be up to date
with the latest patches and drivers from Microsoft. When connecting
to Windows Update, your computer will be scanned, and the appropriate
updates will be displayed for your unique installation of the operating
system.
• Through the Get Support feature, you can access various sources
of help and support information via newsgroups and manufacturer
websites.
No matter what your question or problem may be, the Help and
Support Center should be your first step towards finding the answer.
34
Series
User’s Manual
X series manual w/no OS 9/5/01 2:19 PM Page 34
Page 35
Using the Help and Support Center
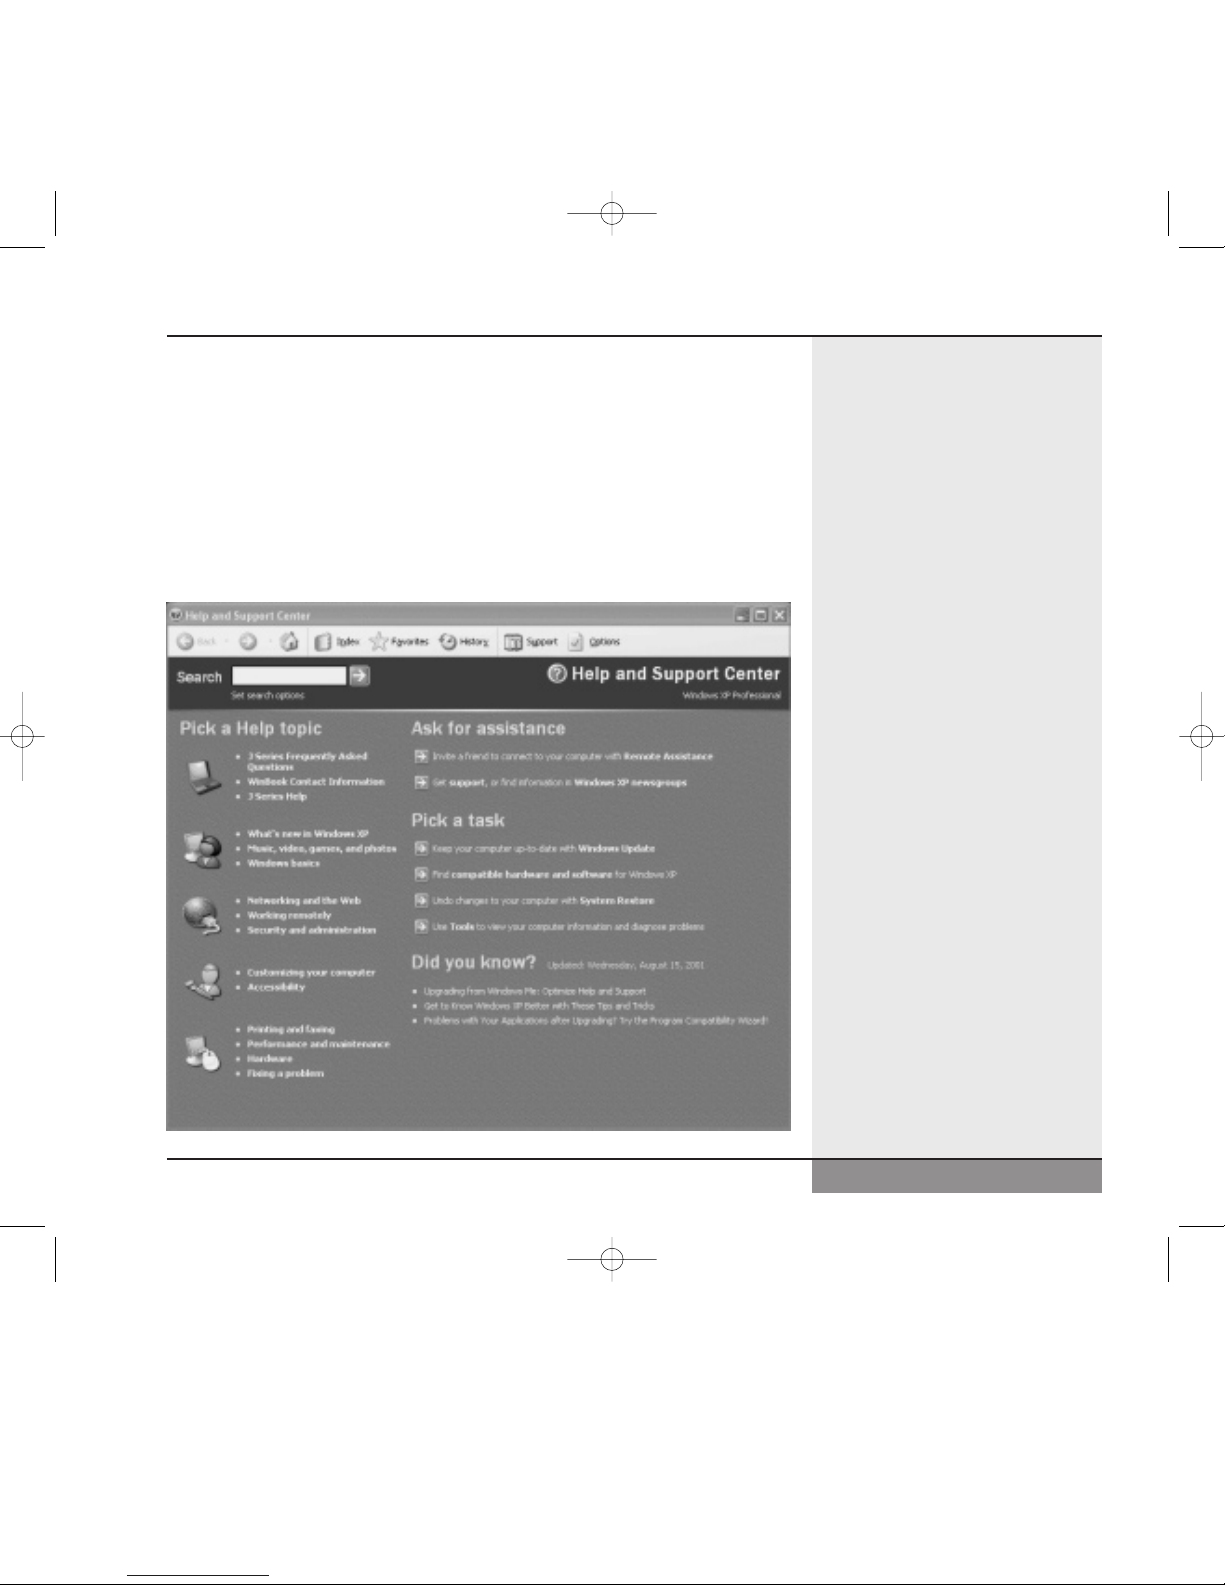
Obtaining access to the Help and Support Center is just a key press or
mouse click away. From the Windows desktop, press the [F1] key in order
to bring up the Help and Support Center. Alternatively you can click once
on the Start Menu and then select Help and Support. Once activated,
the Help and Support Center window will open up as depicted below.
(Figure 2.1)
Chapter 2: Windows Help and Support
35
Figure 2.1: Help and Support Center Window
X series manual w/no OS 9/5/01 2:19 PM Page 35
Page 36
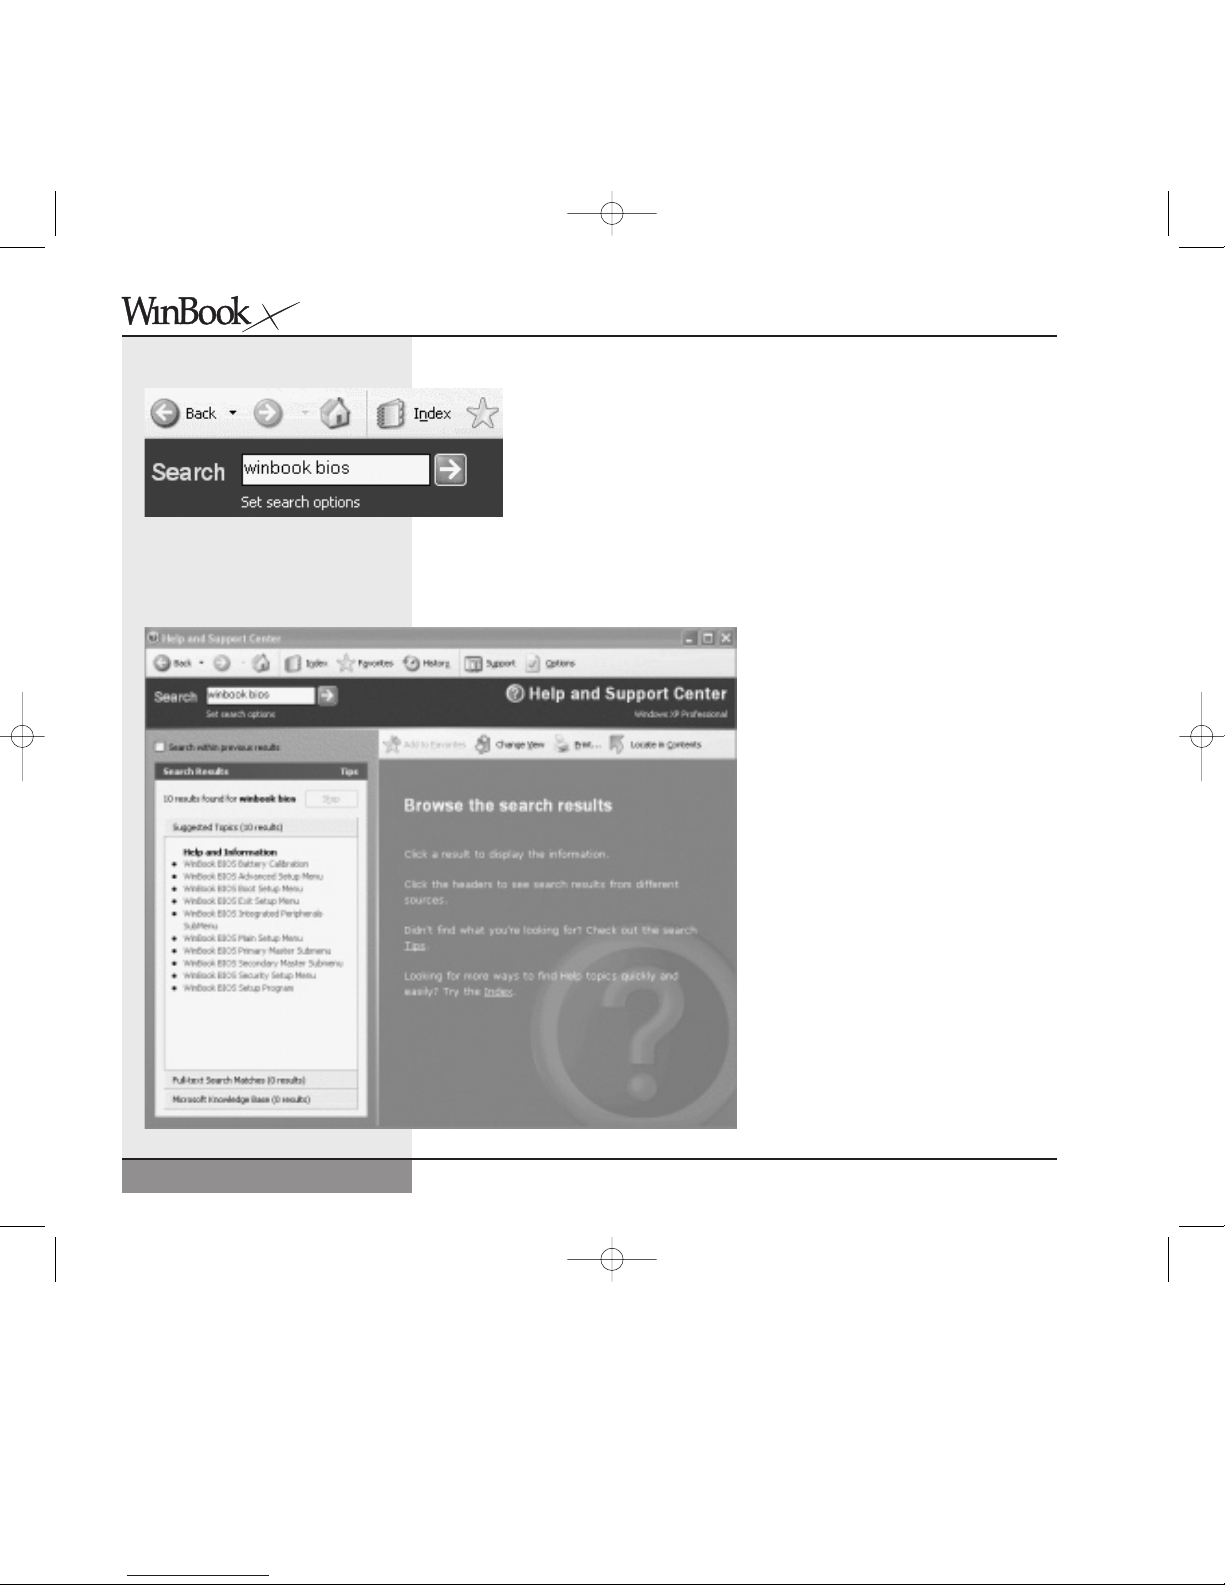
It is through this home page that you will find easy access
to the many resources the Help and Support Center has to
offer. Just click on the hypertext link of the topic that coincides
with the question that you have. If you find that you are unable
to bring up a resource for a particular question by clicking
through the topic links, the Help and Support Center allows
you to search its entire database through a comprehensive
search utility. Click once on the blank search box in the upper
left corner of the window and type in a keyword or keywords
that the search engine will scan for. (Figure 2.2)
After a quick scan, the Help and
Support Center will display any
resources that match the keywords
searched for. (Figure 2.3)
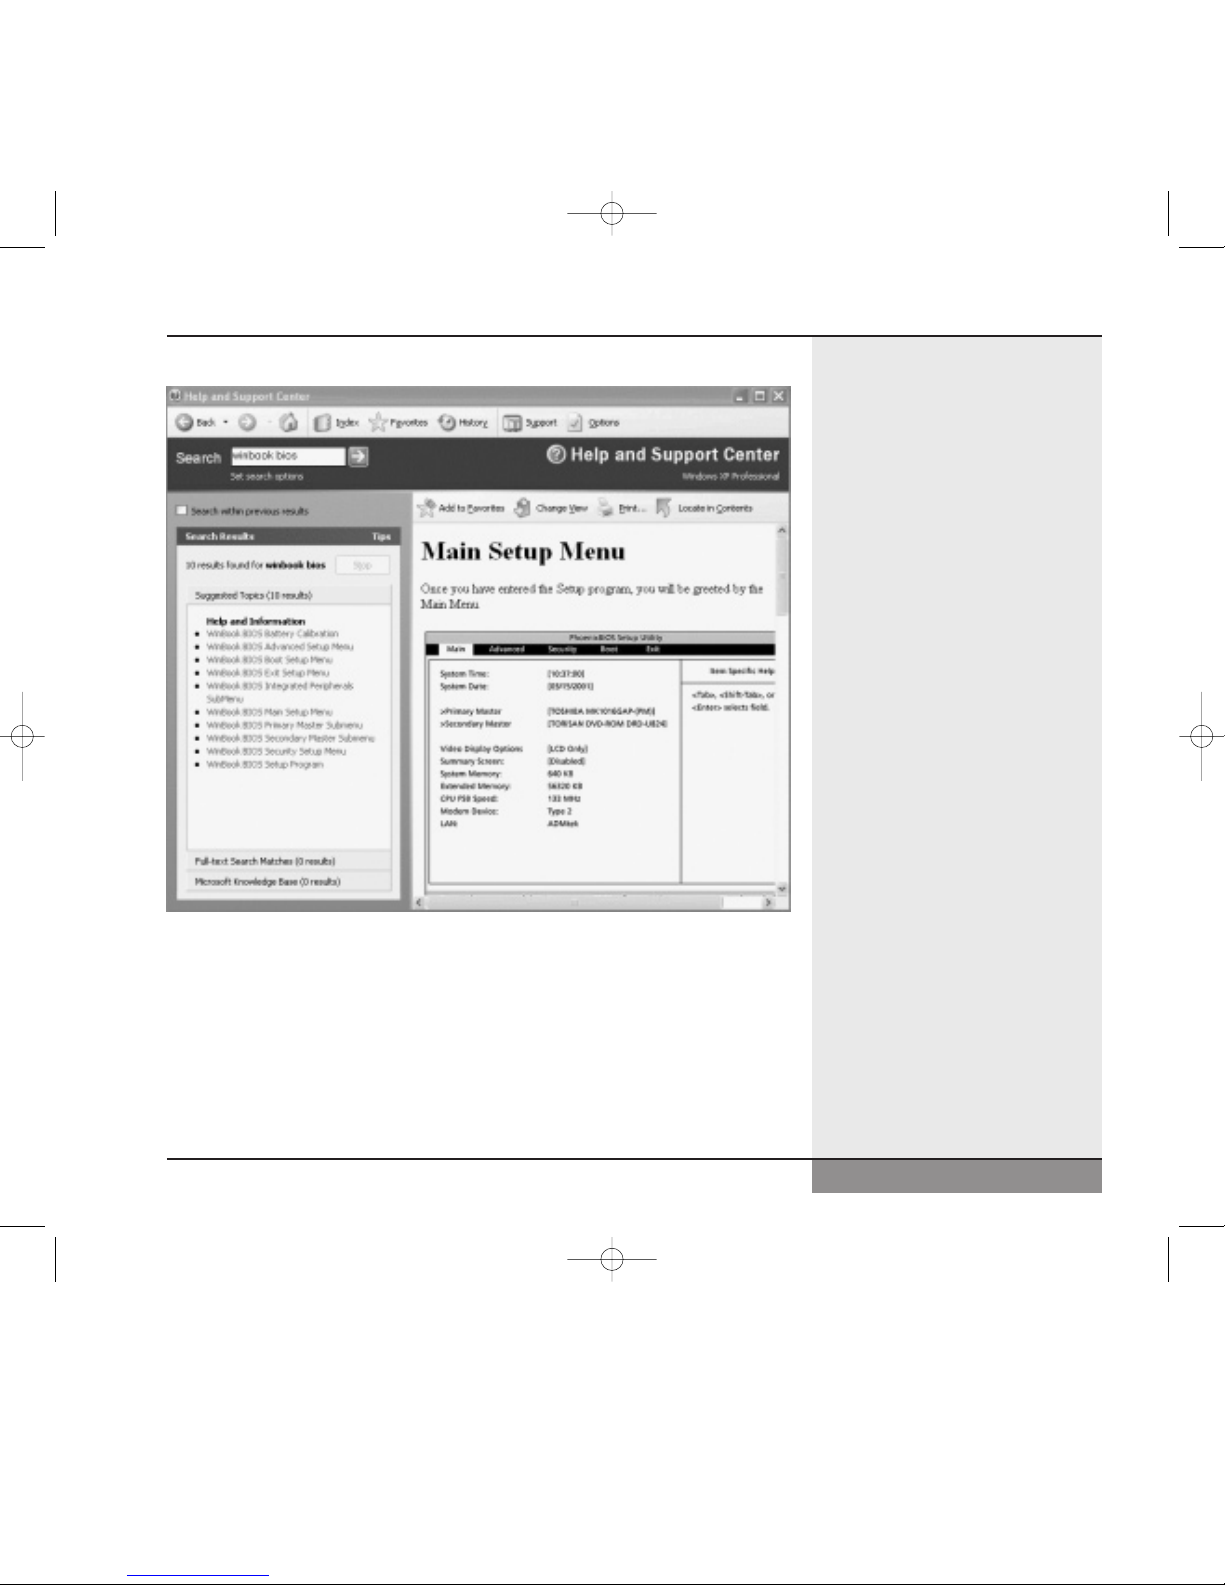
Click on one of the hypertext links
of the Suggested Topics in order
to display the information that
you are looking for. (Figure 2.4)
Note: The resources supplied
by the Help and Support Center
focus only on your WinBook
computer as well as the operating
system installed. The Help and
Support Center does not provide
resources for any 3rd party programs or hardware that you may
have installed. Refer to the manufacturer of your user installed
hardware or software for help
on their products.
36
Series
User’s Manual
Figure 2.2: Help and Support Center Search Box
Figure 2.3: Help and Support Center Search Results
X series manual w/no OS 9/5/01 2:20 PM Page 36
Page 37
WinBook Users’ Manual and the Help
and Support Center
This manual was written to complement the Help and Support Center.
While the manual doesn’t directly answer many of the questions or
concepts explained in each chapter, the manual does refer the reader
to the Help and Support Center along with the exact keywords needed
in order to bring up the correct resource. Here is an example of the
Help and Support icon found within this manual. (Figure 2.5)
Chapter 2: Windows Help and Support
37
Figure 2.4: Help and Support Center Main Setup Menu
X series manual w/no OS 9/5/01 2:20 PM Page 37
Page 38
Icons like this can be found throughout the entire manual as a sidebar
item pertaining to a question or concept being explained on that page.
System Restore
One of the powerful utilities within the Help and Support Center is
the System Restore utility. With this utility, you can recover from fatal
errors that are the direct result of failed hardware or software installations.
Your operating system automatically sets restore points whenever you
install a new piece of software or add a new hardware device. If you
find yourself in a situation in which your computer is malfunctioning
after you have recently installed something, running System Restore
from the Help and Support Center will allow you to revert back to a
point before the installation occurred, thus protecting your valuable
data and the integrity of your system.
Why Use the Help and Support Center?
• Most likely the answer to your question can already be answered
within the Help and Support Center.
• The Help and Support Center gives you the user, the power to solve
your own problem or answer your own question without having to rely
on the traditional methods of support. (i.e. technical support phone call,
surfing the internet for answers)
38
Series
User’s Manual
Figure 2.5: Help and Support Center Icon
Search Help and Support
Center using keywords:
WinBook BIOS
X series manual w/no OS 9/5/01 2:20 PM Page 38
Page 39

Note: WinBook Technical Support is still an alternative resource for
your questions. Refer to the Read Me First document that came with
your WinBook for the toll free telephone support number.
• The Help and Support Center is a dynamic resource from WinBook.
The Help and Support Center will be periodically updated by WinBook
in order to give you the latest information about your WinBook
computer. Download updated Help and Support files for your WinBook
at www.winbookcorp.com.
Chapter 2: Windows Help and Support
39
X series manual w/no OS 9/5/01 2:20 PM Page 39
Page 40

40
X series manual w/no OS 9/5/01 2:20 PM Page 40
Page 41

Chapter 3:
Basic Computing
41
Chapter 3: Basic Computing
X series manual w/no OS 9/5/01 2:20 PM Page 41
Page 42

The WinBook notebook is designed to be run straight out of the box,
so, if you are an experienced computer user, you should be ready to go.
You can find additional information about specific features of your system
in the chapters that follow as well as the Help and Support Center feature
found within Windows.
RAM
RAM (Random Access Memory), also sometimes referred to as system
memory, is the active memory of your computer, where it holds programs
and data that are currently in use. The more RAM your computer has, the
more space it has to run programs. Your WinBook notebook came with a
certain amount of RAM, but that is not the limits of the memory used by
Windows. Windows will set up a swap file on your hard drive to provide
additional “virtual memory”. When the programs you are running need
more than the memory available in RAM on your computer, Windows
will “swap” some programs from RAM to that hard drive. When those
bits of memory are needed, Windows will swap them back into RAM
(and, if necessary, swap other bits of memory to the hard drive). Even
with the fast data bus and fast hard drive in your WinBook notebook,
the reading and writing to the disk is slower than having the data available
in RAM. Some programs will require a large amount of RAM to run.
As a result, the number of programs that you can run simultaneously
will vary with the type of applications in use.
When you place your WinBook notebook in the Standby mode, it
will use a small amount of battery power to keep the RAM active
while shutting down the other elements of your system. When you
resume using the system, your active sessions in RAM will be available
just as you left them.
42
Series
User’s Manual
X series manual w/no OS 9/5/01 2:20 PM Page 42
Page 43
Hard Drives
The hard drive is the fixed disk, which provides the primary storage
medium for your data. Most of your programs and data will be stored
on the hard drive. The capacity of your hard drive will probably be several
gigabytes (1 gigabyte (GB) = 1024 MB or approximately 1 billion bytes).
The programs you run and the data you create will be stored on this hard
drive and take up some of that available space. Programs tend to take
up a large amount of disk space (some may take up over 100 megabytes,
with software suites taking up considerably more), while the files that
you create will generally take up much less (stored in plain text, a 1,000
page manuscript will fit in less than 1 megabyte).
Your hard drive is usually the C: drive in your system. There are a
number of system tools that will allow you to keep track of disk usage
and keep your hard drive running efficiently.
The Windows Help and Support Center contains more detailed
explanations of maintenance of your hard drive and file system.
The Device Manager
While the Setup program (see Chapter 8) tells your computer what
equipment it is running, the Windows Device Manager tells the operating
system what equipment it is running. It is a good idea to learn about
the various components of your system and how they operate. You might
find that there are capabilities of your system that you had not anticipated.
You might also need to know what hardware is in your machine and to
what standards it conforms in order to know how well your system will
work with some new software you want to install. You might want to add
some additional equipment to your system and will need to know if its settings will conflict with those in your WinBook notebook. Device Manager
is the place where you can learn this information about your system. If
you want to know more information about these pieces of the computer,
you can click on the particular device in the Device Manager and then
43
Chapter 3: Basic Computing
If your computer is
connected to a network,
you will also have access
to hard drives on other computers (if they are set up to share
data). See the networking documentation in Windows to see
how to access such drives.
Search Help and Support
Center using keywords:
hard disk
Be sure to read the
Windows manual
carefully before altering
any settings in Device
Manager.
For detailed information
about using Windows,
you can check the
WinBook information in the
Help and Support center. To
access the Help and Support
Center, press the [F1] key while
the cursor is on the Windows
desktop or click on the Windows
Start Menu and select “Help and
Support.
X series manual w/no OS 9/5/01 2:20 PM Page 43
Page 44
click on Properties. If there is a problem with the device, you will get
some basic information here on the source of the problem. If there is
a conflict between two (or more) devices, you will also be told which
devices are trying to use the same IRQ or resource. Refer to the Help
and Support Center within Windows for details on the device manager.
Communications
Some WinBook notebook models come with a fax/modem (built-in
or a PCMCIA card) that allows you to take advantage of the fax and
communications abilities of your system. The fax/modem is capable
of running in two modes: as a fax and as a modem (which can be
connected to other computers via their modems).
Faxing
Your modem can allow the computer to send and receive faxes if
you obtain fax software. Any Windows application which has a print
command can be used to generate faxes. You can combine text and images
from different programs into a single fax transmission. To send a fax
from within a Windows program, you need only select the fax as your
printer for that document. Then print the document just as you would
to your printer. Your fax can also be used to receive faxes, which can be
sent directly to your printer to produce a hard copy of the fax transmission.
Software logs will enable you to track all of the faxes that you have sent
or received.
Modem Communications
You can use the modem to connect to other computers with a modem,
or to log into networks that allow modem access. Your modem can be
set to emulate a terminal for logging into remote systems. It can also
be used with login protocols to connect to certain providers and online
services. Your modem can be set to allow your computer to function
44
Series
User’s Manual
You must disengage
Call Waiting when using
the fax/modem. The click
from the Call Waiting can
interrupt or cancel transmissions
by the fax modem. Contact your
local phone company for information about how to disable Call
Waiting.
Search Help and Support
Center using keywords:
device manager
X series manual w/no OS 9/5/01 2:20 PM Page 44
Page 45

as its own mini-BBS (bulletin board system), enabling callers to login
to your computer and exchange information.
The speed of your modem (e.g. 56K) represents the speed at which
the modem is capable of transmitting information. The FCC restricts
the actual transmission to slightly slower speeds. Your modem may be
capable of faster speeds of transmission from modem to computer. This
does not affect the rate of communication between modems, but, if both
modems are capable of such compression, a connection can have a higher
effective speed if the sending system compresses the data as it is sent
from the sending computer to the sending modem and if the receiving
system decompresses the data as it is sent from the receiving modem
to the receiving computer. Thus, it is possible to “connect” at higher
speeds. You should always try to connect at the highest rate of connection
available to you. The modems will negotiate the connection and establish
the actual rate of transmission of information (the key is the compatibility
of the modems – the standards in this industry are fairly well-established
and thus compatibility is pretty much the norm).
To connect to anything with your modem, you will usually need to sign
on with some provider (unless you have log-in rights with some network
already - e.g. at work) or dial-in to another computer already set to receive
such connections. Online service providers will allow you to connect to
an extensive computer environment. You can use such providers to send
and receive e-mail (electronic mail), chat with other computer users, look
up information in their databases, participate in electronic discussions with
multiple parties, and even download software. The major service providers
usually charge a monthly fee for connection time. Some services they provide may entail an additional charge. Since such electronic connections
are an important resource for computer users, Windows comes with its
own software for making such connections, as well as with software from
some of the major service providers (in the Online Services folder). You
can also use your modem in conjunction with financial software to perform
your banking and pay your bills electronically. Such software can also be
45
Chapter 3: Basic Computing
X series manual w/no OS 9/5/01 2:20 PM Page 45
Page 46
used to track investments by logging into providers who transmit market
data. In addition, you can use commercial tax preparation programs to
send your tax forms to the IRS electronically. Your state and local tax
offices might also offer such services.
Keep in mind that your modem is a phone, but unlike other phones, it is
very sensitive to noise. While you might be able to listen through static
and line noise and make out what your caller is saying, modems, which
communicate in high-speed tones, are more finicky. If you find that your
modem has many disconnect problems, you might see if you can reduce
the line noise in your phone lines (sometimes the noise is in the lines from
your telephone service provider and there is little that you can do). Also,
if someone picks up a phone connected to the line and then hangs it back
up, this might be interpreted by your communications software to be a
disconnect signal.
Internet and the World Wide Web
If your WinBook notebook came with a modem, or if you have a
network connection, you can use your computer to connect to the
Internet and World Wide Web. Windows is designed to help provide
quick access to the Internet, so you will want to familiarize yourself
with the Internet functions of Windows. To enter the Internet, you will
need to log your computer into a network connected to other networks
as part of the Internet.
If your area is wired for a high-speed Internet connection such as DSL
or cable, you will be able to use that connection with your WinBook
X Series notebook. Such connections use their own “modem” provided
by the carrier rather than your built-in or PCMCIA modem. You will
be able to connect that modem to your computer through the LAN port
(see Chapter 5), if you have one, or through a network PCMCIA card
(see Chapter 6). Your carrier will be able to provide you with details.
46
Series
User’s Manual
Microsoft Windows
has many integrated
features that will enrich
your Internet use. To learn
about these features, you can
check the Help and Support
Center in Windows by pressing
[F1] at the Windows desktop
or clicking on the Windows Start
Menu and selecting “Help and
Support”.
X series manual w/no OS 9/5/01 2:20 PM Page 46
Page 47
If you have a modem or high-speed connection, you can arrange service
with a provider. Some providers just provide access to the Internet. Major
commercial providers have their own content and also have connections
to the Internet. You might also have access to the Internet by dialing into
a network at home or school. Some communities have local “freenets”
which can be used to provide a connection to the Internet. If you have a
direct connection to a network line, you will find this connection to be a
much faster way to access the Internet than via modem. Once connected
to the Internet, you can use this connection to send e-mail, download and
upload files, and connect to a variety of information and entertainment
sources.
You will need a web browser, such as the Internet Explorer program
that is included with Windows, to be able to access information on the
World Wide Web. The browser program includes the necessary software
to handle most of the program, text, graphics, sound and video files of
the web. In some cases, you might need additional software for certain
files, but this software should be available as a download from the web.
Internet connections are a useful way to exchange information and acquire
updates of programs, including updated drivers or files for your WinBook
notebook. Once you have become familiar with your WinBook notebook,
you can find more extensive information about the World Wide Web
in the Help and Support center of Windows.
Your Version of Windows
If you are unfamiliar with Windows, you should familiarize yourself
with the operating system by running the introductory tour that is offered
when you first start up your system. If you have shut off that screen,
you can find the tour in the Help and Support Center of Windows.
47
Chapter 3: Basic Computing
Your WinBook notebook
is designed for efficient
Internet use. You can
launch Microsoft Outlook
Express or your default e-mail
program at any time by pressing
the e-mail button located above
the top left of your keyboard
(the button on the left with the
envelope icon). You can launch
Microsoft Internet Explorer or
your default browser at any time
by pressing the Internet button
located just to the right of the
e-mail button.
X series manual w/no OS 9/5/01 2:20 PM Page 47
Page 48
The Help and Support center in Windows features links to Windowsrelated sites. Manufacturers’ sites will also be linked there. The automatic
update feature will check for new sites and integrate their links into your
Help and Support center.
Many system files in Windows are protected by the system. This
will help keep your system functioning smoothly. If software attempts
to change or replace those files, Windows will protect or restore them.
If this causes a problem with your software, contact the program
manufacturer.
Windows protects certain system functions by hiding certain utilities
in the Control Panel. If you want full functioning of the Control Panel,
you will need to unhide those utilities. See the Help and Support center
for information.
Windows allows you to choose among several options for desktop
appearance and functioning. See the Help and Support Center in Windows
for more information.
48
Series
User’s Manual
Search Help and Support
Center using keywords:
desktop settings
Search Help and Support
Center using keywords:
control panel overview
X series manual w/no OS 9/5/01 2:20 PM Page 48
Page 49

Chapter 4:
Mobile Computing
49
Chapter 4: Mobile Computing
X series manual w/no OS 9/5/01 2:20 PM Page 49
Page 50

Battery Operation
Charging
Your WinBook notebook comes equipped with a durable, lightweight,
rechargeable Lithium-Ion (Li-Ion) battery that can power your system for
over two hours when fully charged (longer if power management is used).
The actual duration of a charge will vary with how you use the computer
and with how much you take advantage of the power management features
of the system. In addition, you can obtain an additional battery that can
be swapped into the battery bay of your WinBook notebook to provide
even greater battery capacity.
The battery charges whenever the AC Adapter is connected to your
system. The battery will charge whether the system is off, in the Hibernate
mode, or operating. The fastest recharge occurs when the system is off
or in hibernate mode. It takes about 3 hours to fully recharge the primary
battery when the system is powered down or in hibernate mode, longer
if you are using the system (about 4 hours or more). If the system temperature exceeds a safe level while the battery is charging, the system will
stop the charging process in order to protect the battery. Once the battery
temperature falls back within the safe range, the battery charging process
will resume.
Each time you charge and partially discharge the battery, it stores
slightly less power. After about twenty cycles, it might only store about
80% of its potential charge. Similarly, if you do not use the battery for
a few days, it will slowly self-discharge, and when it is recharged, it
will hold less than 100% of the potential charge. To correct battery charge
problems, you should calibrate the battery frequently to help keep the
battery in good condition. This operation carried out every few weeks
will maintain the battery efficiency.
50
Series
User’s Manual
X series manual w/no OS 9/5/01 2:20 PM Page 50
Page 51
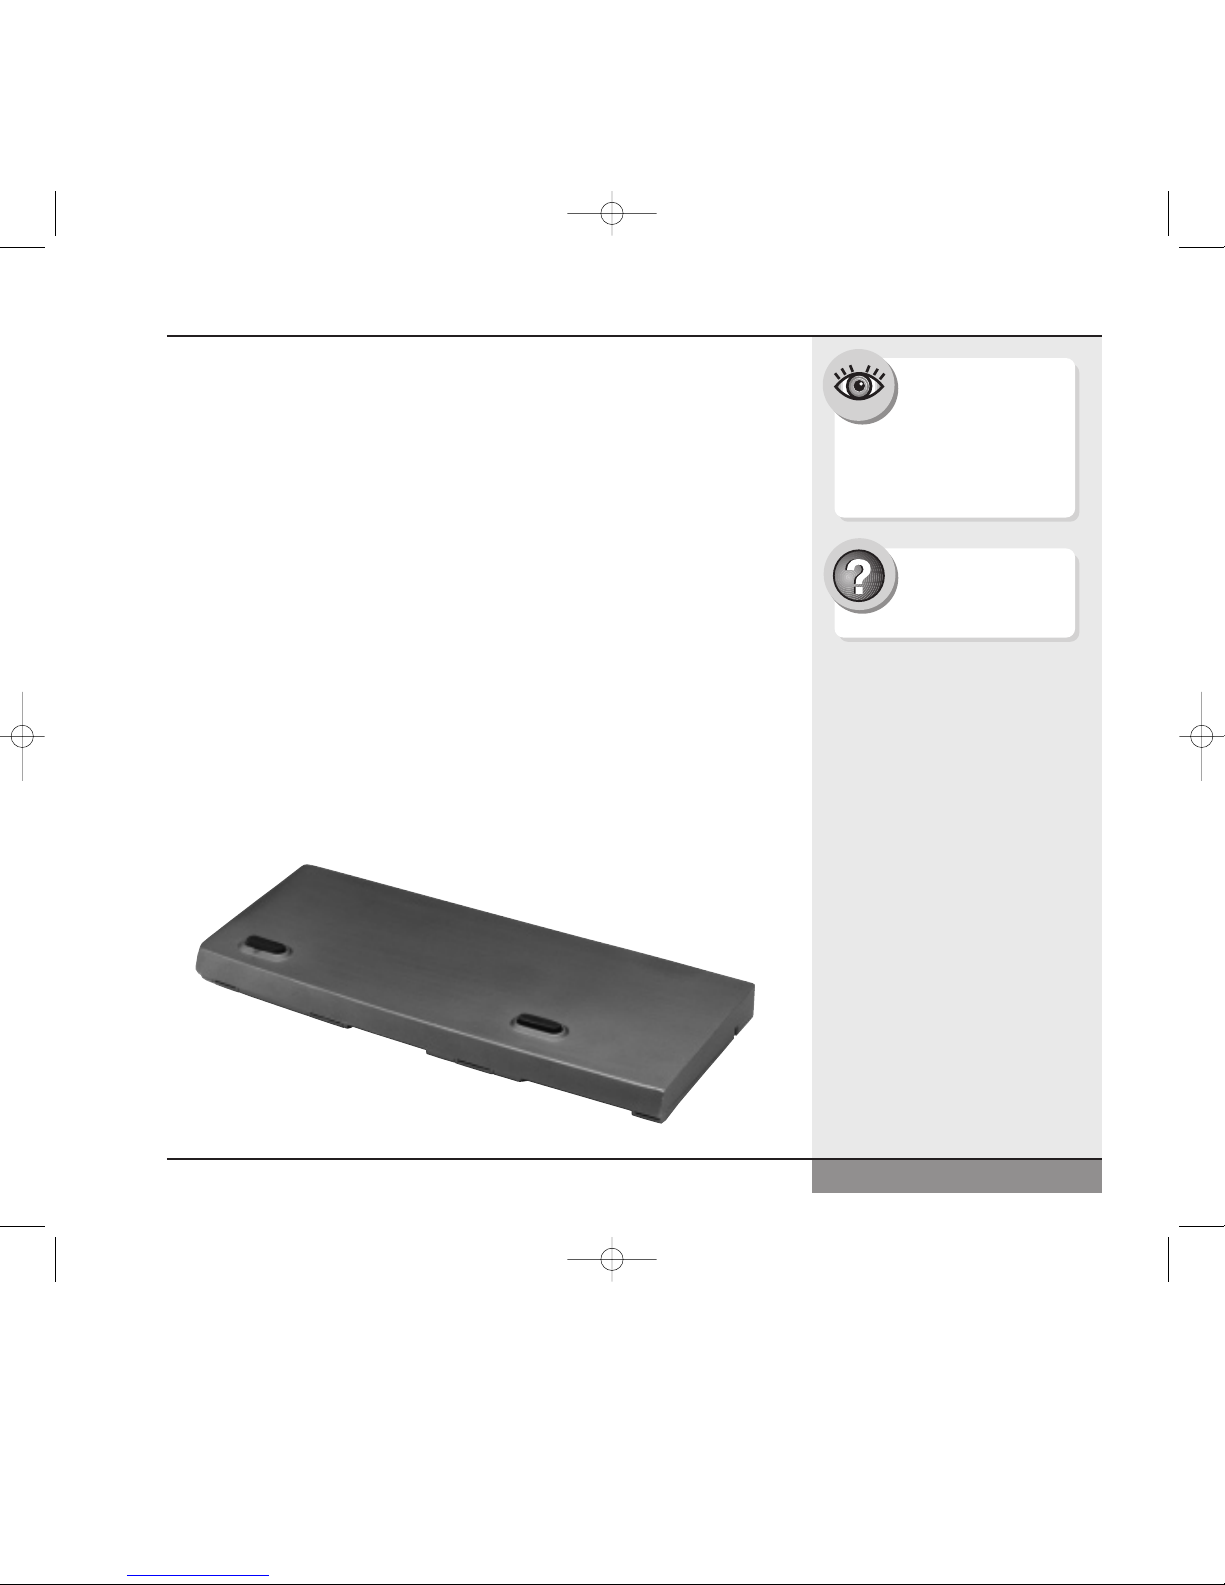
Over time, as the battery is charged and discharged, it gradually stores
less charge. Li-Ion cells generally last for 500 or more cycles before they
begin to deteriorate. You should replace your battery when you notice
that it begins to store significantly less charge.
If you replace the battery with a new one, you might first need to initialize
the battery so that the battery gauge in your WinBook notebook will be
able to accurately measure the battery charge level. Check the WinBook
section of the Windows Help and Support center for information about
replacing a battery in your system.
Changing
You can purchase a second battery for your WinBook notebook.
This second battery can be installed in the battery bay. (Figure 4.1)
1. Shut down the unit or place it in the hibernate mode. Disconnect
the AC Adapter. Close the LCD panel and turn the unit upside down.
The front of the unit should be toward you.
2. Lift the release latch to release the battery from the bay. The battery
will now be angled slightly out of the bay.
Figure 4.1: WinBook
Notebook Battery
51
Chapter 4: Mobile Computing
You can connect and
disconnect the power
cord while working with-
out disrupting the functioning
of the system, as long as your
battery is in place and has at
least some charge remaining.
Search Help and Support
Center using keywords:
winbook battery
X series manual w/no OS 9/5/01 2:20 PM Page 51
Page 52
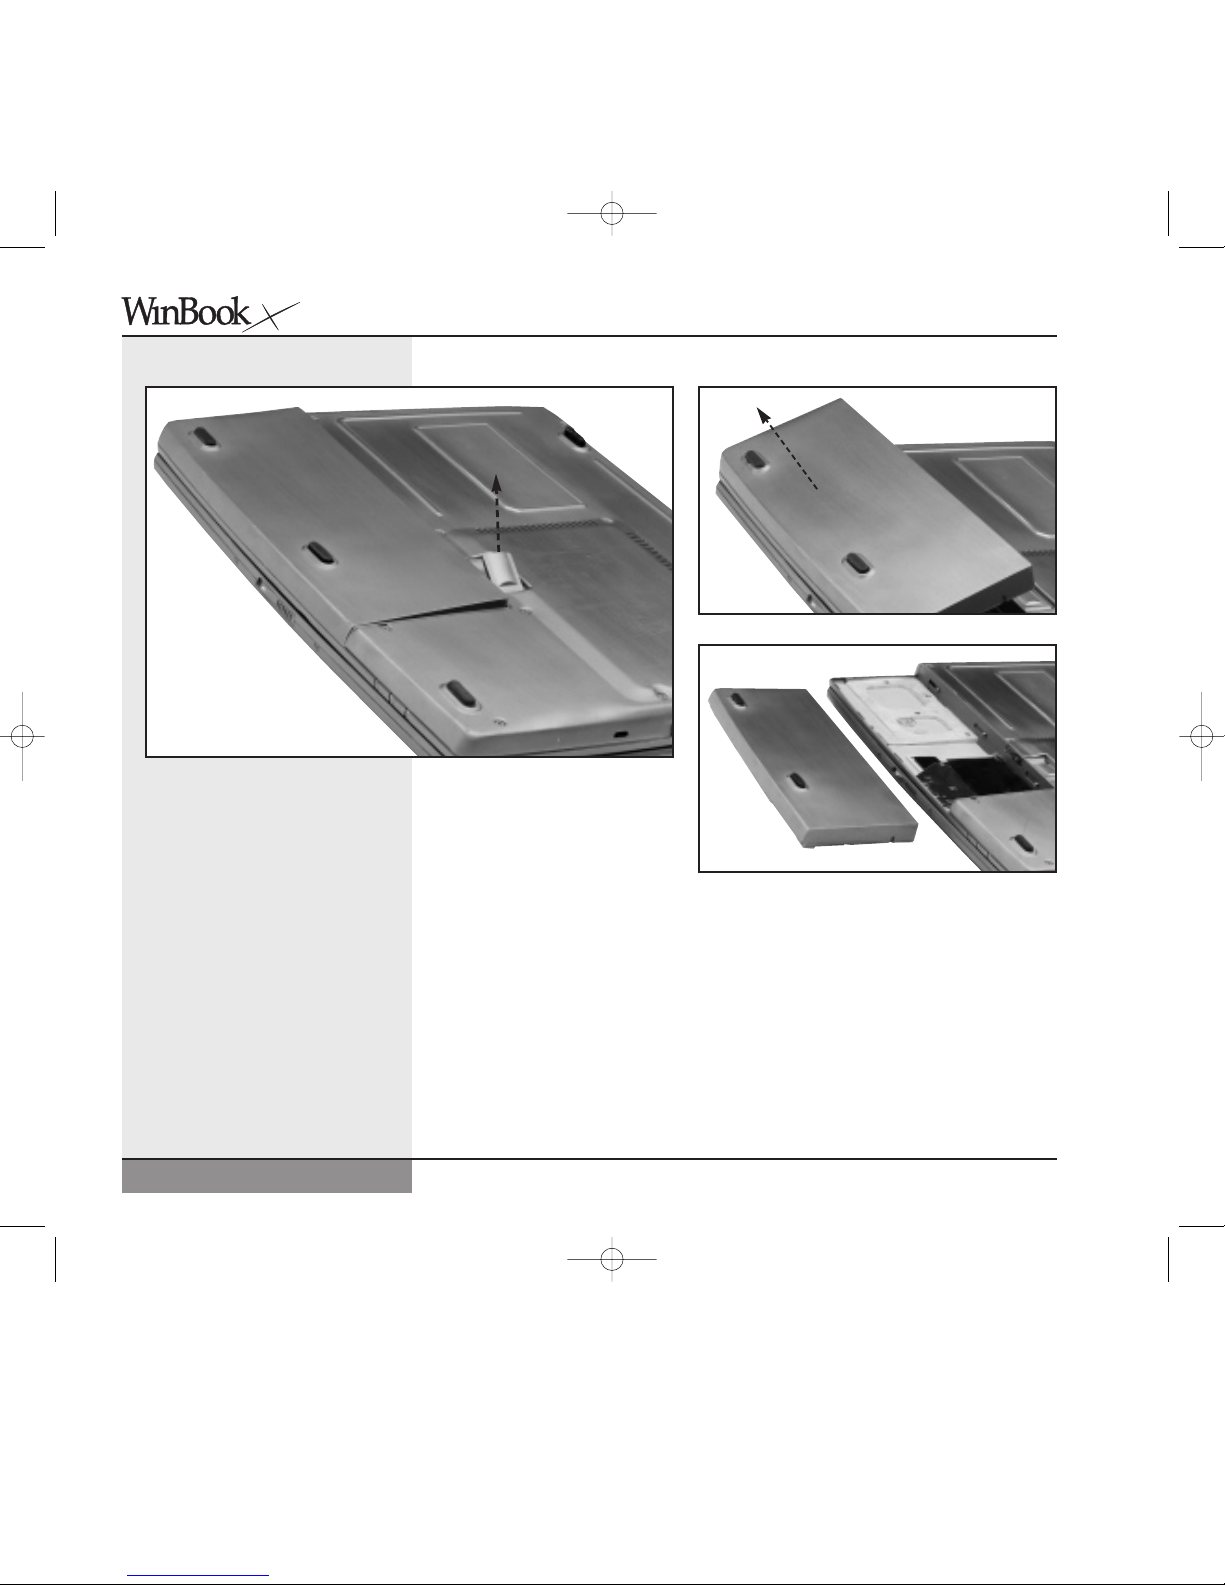
3. Angle the battery up from the bay and gently slide it out.
(Figure 4.2)
4. Angle the new battery into the bay. The front edge of the battery
should slide into the grooves in the system case.
5. Gently lower the battery into the bay and push it until it “clicks”
securely in the bay. Reconnect the AC Adapter.
52
Series
User’s Manual
Figure 4.2: Changing the Battery
Above: Pull up on the tab and the battery will pop-up.
Top right: Lift the battery out.
Right: Remove the battery.
X series manual w/no OS 9/5/01 2:20 PM Page 52
Page 53
When you install a new battery, you will need to calibrate the battery.
Install the new battery and connect the AC adapter. Let the battery charge
fully. Then, turn on the power and press [F2] when prompted to enter the
Setup program. Use the right arrow to move to the Exit Menu. At the
bottom of this menu you will see “Battery Calibration.” Use the down
arrow to scroll down to it and hit [Enter] to run the battery calibration.
Follow the instructions provided by the battery calibration utility.
Power Management
In order to make the most of the mobile computing capabilities of your
WinBook notebook, you will need to be aware of how to manage the
power consumption of your system. Aggressive power conservation
can provide extended computer usage. Sometimes aggressive conservation
will not be needed, or you might prefer not to engage it. You should
set the default to match your most common needs. If you use the system
primarily as a mobile system with long-term battery needs, you can use
an aggressive setting. If your battery usage is usually limited, then you
might prefer a more moderate setting.
Your WinBook notebook is ACPI (Advanced Configuration and Power
Interface) compliant and can take advantage of Windows’s built-in power
management features. Windows is designed to help manage power on
portable computers and you will find its features useful in conserving
battery life. ACPI also allows certain applications to exert control over
power management.
Taking advantage of power management features can have a significant
effect on the battery use you can get on a single charge. A fully charged
battery should provide you over two hours of system use, but aggressive
power management can extend that time.
There are some measures that you can take as a user to help optimize
battery use in your WinBook notebook. If you are running one or more
PCMCIA cards, using the system audio and making frequent calls to the
53
Chapter 4: Mobile Computing
Search Help and Support
Center using keywords:
winbook battery
Search Help and Support
Center using keywords:
power management
For detailed explanations
of Power Management
in Windows, please refer
to the Help and Support
Center within Windows.
X series manual w/no OS 9/5/01 2:20 PM Page 53
Page 54

CD-ROM or hard drive, you will find that battery power will be consumed
much more quickly than with standard system use.
You can send your WinBook notebook into Stand-by or Hibernate by
hitting the power button (if you have set the button for this function)
or by hitting Start/Turn Off Computer and selecting the Standby mode
from the menu.
WinBook Notebook Low Power Measures
When you are running on battery power, your WinBook notebook
tracks battery charge. When battery power gets low, the unit will provide
warnings and eventually take action to help preserve data. Power level
warnings in Windows will be activated according to the settings you have
established. In the default setting, a red “X” will appear over the battery
when approximately 15% of battery power remains. When the battery
level reaches 10%, you will receive a warning to save your work. When
the battery level reaches 3%, the unit will move to the Hibernate mode.
When the WinBook notebook estimates that there are about 10-15 minutes
of power remaining (the actual time will vary with usage), the unit will
start to give periodic beeps to remind you to save your work.
When approximately 5-10 minutes of battery power remain, the beeps
will accelerate.
When you receive the low power warnings, you should shut down your
system, hibernate your system or connect to a power source. If you respond
immediately after receiving the warnings, you should have sufficient
power to shut down completely, including saving large files. Do not
attempt to restart your system until you have connected to the AC adapter
or changed or charged your battery.
Windows allows you to activate the Hibernate function in Power
Management. If you do so, when the system reaches a critical power
level, it will enter a Standby or Hibernate mode (depending on your
settings). Enabling this function will permit you to preserve data in
54
Series
User’s Manual
X series manual w/no OS 9/5/01 2:20 PM Page 54
Page 55
RAM from being lost when the battery is about to use the last of its
power. You should familiarize yourself with those settings in Windows
to help prevent data loss.
Standby and Hibernate Modes
While both Standby mode and Hibernate mode permit power savings,
each serves a different purpose. The Standby mode uses a trickle of
battery power to keep the RAM active. This option provides you with
a faster resume. Hibernate provides more substantial power savings, as
well as providing the safe mode for switching batteries. Since the system
is powered-down it takes longer to resume operation. This Suspend to
Disk option will allow you to suspend for a longer time, since it does not
require battery power to hold the session in RAM. Resuming from RAM
is much quicker than resuming from disk. The WinBook notebook can
remain in the hibernate mode for up to a week on a fully charged battery.
You should consider these factors when deciding which mode to use.
The Hibernate mode, since it does not consume any power, can also be
a useful way to save you time in getting started on your work. If you like
to work with a number of programs open on a regular basis, you can use
the hibernate mode to save the active session with those programs already
opened. Rather than wait for the system to shut down each program and
then manually reloading each program the next time you are ready to work,
you can suspend and be ready to work once the session has been resumed.
Keep in mind, it is still a good idea to shut down and restart your system
over a few uses, just to refresh the system or to allow your virus software
to perform a complete scan of your system, if you have enabled such an
option.
Infrared (IR) Port
The Infrared (IR) port on the rear of your WinBook notebook provides a
powerful tool for connecting to other computers, networks, and peripherals
55
Chapter 4: Mobile Computing
If your WinBook
notebook is unable
to Hibernate, which
suspends to disk, (for example
if your Save-to-File file is too small
or damaged), it will suspend to
RAM (Standby). When the unit
is suspended to RAM, there will
be a slow trickle of power and
the battery could drain completely
and data could be lost. When
the unit is in Standby, the power
management system cannot
gauge battery charge levels. Since
the Standby mode uses a trickle
of battery power to maintain the
information in RAM, the battery
will slowly discharge in this mode.
As a result, it is possible, if the
unit remains in Standby until the
battery is completely discharged,
for the information in RAM to be
lost. If you will be suspending the
system for a long period, you
should use the Hibernate method.
X series manual w/no OS 9/5/01 2:20 PM Page 55
Page 56

via a high-speed wireless connection. This port is sometimes referred
to as a serial infrared port, but it is also capable of functioning as a second
parallel port for printing. This port allows you to send information between
machines without having to attach cables or transfer information to a floppy disk or other removable disk. With the high speed of data transmission
(up to 115,200 bits per second) and the ease of connection of the IR port,
it is a quick and easy connection to establish.
To use your IR port, place the two IR ports within two feet of each other
(optimal distance is usually between six inches and two feet) and either
directly in line or at an angle of less than 30 degrees (less than 15 degrees
is usually optimal). If there is another infrared device in proximity, your
WinBook notebook will detect its presence and complete the connection.
If the other device is not detected, try adjusting the angle and distance
between the device and your WinBook notebook.
Safety & Operation
The WinBook notebook does not have a handle or a rough surface for a
sure grip, so use a carrying case when traveling. At times, you may want
to put both the case and the WinBook notebook within a larger briefcase
to conceal the system and reduce the risk of theft. Do not use this product
in an unstable location. Serious damage could result if the system should
fall. When using the AC adapter, be certain that the cord is not placed
where someone might trip over it (since this might cause your computer
to fall.) Avoid rough handling of your WinBook notebook. Jolts to the
system can damage components or result in data loss. Transport your
WinBook notebook in a case or bag that provides adequate cushioning
and a secure position. Never check your WinBook notebook in as luggage
when you are traveling. Even the toughest carrying case won’t protect it
from such rough handling. Although it is tempting to pack your WinBook
notebook in your luggage, it is apt to result in a broken system. The best
solution is to carry the WinBook notebook with you. Avoid high and low
temperatures. While you travel in the summer, do not leave your WinBook
56
Series
User’s Manual
X series manual w/no OS 9/5/01 2:20 PM Page 56
Page 57

notebook in a car trunk on a hot day. Trunk temperatures can reach 140°
F, beyond the safe range for the WinBook notebook. Do not leave the
unit sitting in direct sunlight in your car on a hot day. The heat can cause
system damage. Also be careful when shipping or storing your WinBook
notebook so that it is not exposed to high or low temperatures. The
batteries will not operate as well under extremes of temperature. They
are specified to work from 41° to 95° F (5° to 35° C). Running your
WinBook notebook in temperatures below 41° F or above 95° F will
reduce the battery life. If a battery module is left in the sun and gets quite
hot, it is apt to fail to charge. This is due to a safety switch in the battery
module that is aimed at preventing over-heating due to over-charging.
Once the battery cools down, you will be able to charge it. In extremely
cold weather, you may find that it takes longer for the battery to charge
or that it does not fully charge.
Slots and openings in the system are for ventilation purposes. Do not
obstruct or cover these openings or the system could overheat. Do not
place the system in close proximity to a source of heat or a source of dust.
Protect your modem. Be aware that phone systems can be either analog or
digital. Your modem is designed to work on an analog phone system. Most
residential telephones are analog. Digital phone systems typically involve
building–or company–specific PBX (Private Branch eXchange) systems.
Some PBX systems can use voltages that will damage an analog modem.
Before you hook up your modem in a hotel or at a new company, check
with the facilities manager. To find an analog line, you might look for
a fax machine. Your WinBook X Series notebook has built-in circuitry
protection for the modem in your system. This circuitry will help protect
your system from electrical damage, but it is still recommended that you
locate an analog line where possible. Note that there are products available
that will support analog modems on digital PBXs.
If an extension cord is used with this product, ensure that the total ampere
ratings of all the devices sharing the extension cord do not exceed the rating of the extension cord, nor the rating of the wall outlet. As with the AC
57
Chapter 4: Mobile Computing
X series manual w/no OS 9/5/01 2:20 PM Page 57
Page 58

Adapter, be certain that the cord is placed so that no one will trip over
it (since this might cause the computer to fall).
The WinBook notebook can be used safely in a moving car. Power
adapters that will connect between the WinBook notebook and a cigarette
lighter socket are available. For information, contact Sales at the number
listed on the “Read Me First” brochure that came with your system.
Contact technical support if:
a) The power cord appears damaged or frayed
b) Liquid has been spilled on the product
c) The product does not operate normally
d) The product has been dropped or the cabinet impeached
e) The product shows a distinct change in performance
Travel
Travel Tips
• It is a good idea to load common printer drivers onto your WinBook
notebook (such as HP Laser Jet and DeskJet drivers). This will allow
you to print from many printers at your destination, even if you do
not carry your own printer with you.
• Take along a bootable CD or floppy disk (if you also take along
your optional USB Floppy Disk Drive), just in case there is damage
to your hard drive.
• Travel can present considerable risks of system shock or theft.
Complete a full system backup before traveling.
• Be familiar with your Setup settings, or print a copy of them,
in case there is damage to those settings while you travel.
58
Series
User’s Manual
X series manual w/no OS 9/5/01 2:20 PM Page 58
Page 59

• If you will be traveling to another country, check with your travel
agent to determine whether or not you will need special adapters
to use the electrical outlets and telephone connections.
• If you do a lot of traveling, you might find it useful to purchase
an acoustic coupler for your modem (which hooks to the handset
instead of directly to a phone jack), to allow connection even where
compatible phone jacks cannot be found. However, most public
phones are now being upgraded to accept modem/fax connection
from portable computers.
• Hand your WinBook notebook to an airport attendant rather than
setting it on the conveyor for security checks. This will help reduce
the possibility of theft.
Note: X-rays will not damage your system.
• Password protect your system (with at least one level of password)
to help preserve your data.
• Consider purchasing a lock for your WinBook notebook. The WinBook
notebook comes with a slot for connecting a lock located on the left side
of your system case.
• Brand or physically mark your computer to make for easy identification.
• If you will be using an Internet provider or other on-line service,
call ahead to find out local access numbers for your destination(s).
• In case your destination does not have outlets near convenient
work spaces, you might want to pack a short extension cord.
Remember to pack:
• Your WinBook notebook
• Your WinBook notebook Restore CD (which contains the drivers
for your system)
59
Chapter 4: Mobile Computing
X series manual w/no OS 9/5/01 2:20 PM Page 59
Page 60

• Your AC adapter/power cord
• Any international converters for your adapter
• Any international converters for your modem
• Network cable, if you will be connecting directly to a network
• Printer and/or printer cable
• PCMCIA cards and any detachable connections for those cards
• Spare battery packs (if any)
• Bootable floppy or CD
• A spare floppy or two for easy file exchange (if you are using
the optional USB Floppy Disk Drive)
• Manuals for any critical software (printed or CD), including
Windows
Remember to:
• Charge your battery
• Change your power management settings to more aggressive
settings, if appropriate
• Transfer the working files you will need
• Change your security settings (passwords and Floppy Disk
Controller access) if you will be traveling in an insecure environment.
60
Series
User’s Manual
X series manual w/no OS 9/5/01 2:20 PM Page 60
Page 61

Chapter 5:
Desktop Operation
61
Chapter 5: Desktop Operation
X series manual w/no OS 9/5/01 2:20 PM Page 61
Page 62
While your WinBook notebook is capable of providing you with efficient
and productive mobile computing, it has the speed and capacity to serve
as a desktop system. Even if you have an existing desktop system, you
will find it useful on occasion to be able to connect your WinBook notebook as if it were a desktop system. This chapter discusses those functions
of your WinBook notebook that are typical of desktop systems.
Audio
Audio Software
Your WinBook notebook comes equipped with an integrated sound
system capable of providing you with quality audio sound through
the built-in speakers or through external speakers connected via the
jack on the rear of the system.
Controlling the Sound Levels
In addition to the hot keys on your keyboard, there are software controls
that you can use to set your audio volume. Refer to the Help and Support
Center within Windows for directions on how to adjust your audio volume.
Playing an Audio CD
You can play audio CDs through the sound system. Place the audio
CD in the drive (see Chapter 1 for instructions on inserting a disk).
The Media Player in Windows will recognize the audio CD and launch
the program to control the playback of the CD.
The Windows Media Player is designed to take advantage of Internet
music databases. When you load the CD, you will be asked if you would
like to check an Internet Database for information about the CD (artist,
title, tracks). It will automatically check its database for your CD. You
can modify the information once it has been downloaded. See the Help
and Support Center for more information.
62
Series
User’s Manual
You can mute system
audio instantly by
pressing the [Fn]+[ F6]
hot key combination. To
restore audio, press the combination a second time.
Search Help and Support
Center using keywords:
volume
X series manual w/no OS 9/5/01 2:20 PM Page 62
Page 63
Playing Sound Files
In addition to playing music from audio CDs, your WinBook notebook
can play audio files stored in MIDI, WAVE or MP3 file formats, as well
as sound stored in audio form and used in programs and games. With the
proper software, you can also use the sound system to play audio files via
the World Wide Web, including live audio broadcasts. Check the Help and
Support Center in Windows for information on the functions of the Media
Player.
Sound Recording
You can obtain applications that will allow you to use your system
microphone to record sounds and store them as files on your system.
You can also use the Sound Recorder program built into Windows
for this purpose. This program can also be used to modify the sound
files with certain audio effects. Check the Help and Support Center
for information on using the various elements of this program. For
sound files that require excellent sound quality, you should consider
buying an external microphone designed for high-quality voice recording
(which can be connected to your WinBook notebook through the
microphone jack on the back of the system).
Wave files that you have recorded can be added to documents that
support OLE. Sounds embedded in a document will be played via the
Windows software when double-clicked in the document. Check your
software documentation to determine if your software will support
embedded sounds.
External Speakers & Microphone
The sound system is capable of providing high quality sound to
external speakers and receiving and processing sounds from an external
microphone or external sound source. To connect external speakers,
follow the instructions provided with your speakers. When the speakers
63
Chapter 5: Desktop Operation
Search Help and Support
Center using keywords:
media player
Search Help and Support
Center using keywords:
sound recorder
The Media Player can
be used to play sound
files, play audio CDs,
and run video clips or streaming video from the Internet.
For information on playing video
on your system, see the Windows
Help and Support Center
documentation.
X series manual w/no OS 9/5/01 2:20 PM Page 63
Page 64
are connected, the built-in speakers of your WinBook notebook will
automatically be disabled. An external microphone will disable the
built-in microphone.
Connecting Peripherals
Your WinBook notebook has ports (serial, parallel, USB), a slot (PCMCIA)
and jacks (AC power, microphone and audio out) that allow you to connect
peripheral devices to your computer.
Printer
Whether you purchase a portable computer or a desktop model, you
will probably connect the printer to the computer via the parallel cable.
You might also connect to a printer via a network connection, a serial
connection or a USB connection. Whatever the nature of the connection,
you will need to set up the necessary drivers for the printer. You can vary
the port connection (or network setup) at the step where it is requested.
If you will be connecting the device to a parallel or serial port, you should
shut down the system before connecting the printer (you do not need
to shut down to connect a USB printer). If your printer is Plug and Play
compliant, your system will detect the new hardware on boot and begin
the process of setting up the printer. Refer to the Help and Support Center
within Windows for directions on how to set up a printer.
Other Parallel Devices
Your parallel port can also be used with other parallel port devices
(e.g. a tape backup unit). In addition to a bi-directional mode, your
parallel port is capable of supporting enhanced ECP and EPP transfer
modes. ECP transfer mode provides significant performance increases
for transfer to parallel devices (such as printers). EPP transfer mode
provides increased performance for 2-way transfers such as those used
to link another computer to your WinBook notebook system for file
64
Series
User’s Manual
If you connect to your
printer via a network,
contact your network
administrator for details on
the printer and the specific setup
for your network connection.
You might need to have the
driver disk that came with your
printer available for the installation of the printer drivers.
If your printer came with
an installation disk, it
might have drivers on it
(this will often be the case if
the printer came into production
after the most recent release of
Windows). You should check your
printer manual for information
on using the installation disk. You
can click on the Have Disk button
if you have an installation disk.
Search Help and Support
Center using keywords:
install printer
X series manual w/no OS 9/5/01 2:20 PM Page 64
Page 65
transfer. You might need to check the documentation of your device
to determine the modes supported. If you need to change the transfer
mode for your printer, you can do so in the BIOS Setup program
(see Chapter 8). Be sure to shut down your system before connecting
the device to your system to prevent damage to your system and the
parallel device.
External Monitor
You can connect an external monitor to your WinBook notebook through
the VGA port on the rear of the system. You can direct the output to the
LCD, the external monitor or both via the display properties.
External Keyboard
Your WinBook notebook comes equipped with two USB ports, which
can be used to connect an external keyboard to your system. The WinBook
notebook should automatically detect the external keyboard and activate
it. USB keyboards can be plugged or unplugged during operation. The
external keyboard will not disable the built-in keyboard, so you will be
able to use both devices simultaneously. You can use the two keyboards
in combination, since the computer will not distinguish between the input
from each keyboard.
External Pointing Device
You can connect a USB mouse to your WinBook notebook.
If your mouse is Windows compliant, the WinBook notebook should
detect new hardware and take you through the process of installing
the hardware. If Windows does not recognize your mouse, you will
need to manually install the device into Windows. Refer to the Help
and Support Center for directions on how to install devices. You can
have Windows search for the mouse, or, if you know the correct settings,
you can set up the mouse manually. If Windows does not have drivers
65
Chapter 5: Desktop Operation
You do not need to
have a printer physically
present to install the
Windows drivers for it. If
you will be using another printer
or might be transferring information to another site (such as work
or home) where you will be using
another printer, you can set up
Windows for those printers (so
that files you are working on can
be set up for that printer). If the
printer is one you will be connecting to your computer, you will
want to set up the proper port
connections for this printer. If the
printer is one you will be using
elsewhere, you can set up the
printer on the location “File.”
X series manual w/no OS 9/5/01 2:20 PM Page 65
Page 66
for your mouse, you can use a standard driver, or use a disk provided
by the mouse manufacturer.
A USB mouse can be connected or disconnected during operation and
the WinBook notebook will automatically adjust to the presence or absence
of the mouse. The presence of a USB mouse will not affect the use of the
internal touchpad.
Serial Devices
The Communications Ports on your WinBook notebook allow you to
connect external devices such as a mouse, a modem, a printer, a scanner or
another computer to the WinBook notebook. The Serial Communications
Port on your WinBook notebook is COM1. Devices connected after the
WinBook notebook is powered up may not work reliably. Connect devices
to the Communications Ports while the computer is turned off. This not
only helps to protect the WinBook notebook from damage, but turning
on the WinBook notebook after connecting an external device to the port
allows the computer to prepare itself and the device to operate together.
USB Ports
While the parallel and serial ports of your WinBook notebook provide
you with connections for many current external devices, your WinBook
notebook also comes equipped with two USB (Universal Serial Bus) ports,
which allows you to take advantage of a high-speed connection to newer
devices. AUSB port can allow you to connect up to 127 devices through
a single port, at very high data transfer rates of up to 12 Mbps (Mega-bits
per second). Devices can be connected through a USB hub (a USB external
device that provides power and connection for other USB devices) or connected one to the other in a chain. Your WinBook notebook will automatically check the USB ports to determine what devices are attached. If they
are new to your system, the Plug and Play interface will detect and identify
the new equipment. The constant communication between the USB ports
66
Series
User’s Manual
Search Help and Support
Center using keywords:
install device
X series manual w/no OS 9/5/01 2:20 PM Page 66
Page 67
and your devices allows you to connect and disconnect devices without
shutting down your system. You can connect a USB device by plugging
the USB cable into the USB port (one is on the rear of your WinBook notebook and the other is on the left side of the unit). Since the USB devices
can be chained together, you can plug USB devices into each other or
into a hub that connects to the USB port of your WinBook notebook.
Note: not all USB devices provide a pass-through port for other devices.
You might need a USB hub to allow several devices to be connected to
the USB port of your system. The system should automatically detect the
new device and make it available for use. If the device is not immediately
recognized, check the documentation for the device. If the device is new
to your system, you might be asked to set up the device before use (for
example, a new printer will need to be set up to run under Windows).
The USB ports not only provide a connection between your WinBook
notebook and external devices, they are also capable of providing electrical
current to run those devices. If you make considerable use of your WinBook
notebook under battery power, you should consider how USB devices
might drain your battery or slow battery charging (when the AC Adapter
is in use). If you have a USB device (such as a printer) that has its own
electrical power source, you should consider using this device as a hub
for your other devices. You can also obtain a powered USB hub from your
local retailer. These devices can draw power through the hub device, leaving
your WinBook notebook free to conserve or recharge battery power. If you
have a mobile USB device and want to make use of the WinBook notebook
as the power source for the device, consider using an aggressive power
management setting to help maximize battery life.
67
Chapter 5: Desktop Operation
If your USB-compatible
device comes with a
manufacturer’s installation disk, follow the manufacturer’s instructions. Although
Windows includes USB support,
individual devices might need
specific drivers for optimal
operation. Since a USB device
is capable of very high speeds,
and since it does not use up the
access to an available port (as
a serial or parallel device does),
you should consider available
USB peripherals for your system.
X series manual w/no OS 9/5/01 2:20 PM Page 67
Page 68
USB Floppy Disk Drive
Your WinBook X Series notebook can be used with an optional USB
Floppy Disk Drive unit. You can connect the drive to either USB port
on your system. Once it is connected, the drive will function like a
normal floppy disk drive.
Scanners and Digital Cameras
Windows is designed for easy image acquisition and handling. No
matter what kind of connection the device uses (USB, Serial, Parallel),
you can take advantage of these functions in Windows. You will be able
to establish connections to the devices’ controls that can allow for smooth
handling of images. For example, you can stream images from your
camera into a slideshow-like format. See the Help and Support center
in Windows for detailed information.
LAN Port
Your unit may include the optional LAN (Local Area Network) port.
If so, you will be able to use this port to connect to a network or a highspeed (e.g. DSL or cable) Internet connection.
Windows is designed to allow for easy networking setup for a home
network. If you have a network to which you want to connect, you can
use a standard network cable with a RJ-45 jack to connect your WinBook
X Series notebook to that network. Your system should already be set up
with the appropriate software for the network, but you might need to make
adjustments based on the needs of your individual network configuration.
Please see your Network Administrator for specific networking questions.
For general network questions, refer to the Help and Support Center in
Windows.
68
Series
User’s Manual
Search Help and Support
Center using keywords:
scanner camera
Search Help and Support
Center using keywords:
network
WinBook Technical
Support does not
provide support for
networking functions (other
than hardware problems). Please
see your Network Administrator
for all networking questions.
X series manual w/no OS 9/5/01 2:20 PM Page 68
Page 69
Sharing
If you want to make files on your WinBook X Series notebook available
to another computer, or if you want to allow another system to print to
a printer attached to your WinBook X Series notebook, you will need
to set up your system for sharing. Refer to the Help and Support Center
for details on how to set up sharing.
Optional Port Replicator
You can “hot dock” your WinBook notebook into an optional USB
port replicator. You will not need to shut down or suspend your computer
to connect it to the port replicator. If you have peripherals attached to
your port replicator that have never been recognized by your system,
you might be asked about the installation of new hardware. If you do
not receive a window identifying the new hardware, that hardware might
not be functional until you configure your system to recognize it. Refer
to the Help and Support Center within Windows for details on how to
set up new hardware. To connect your WinBook notebook to the port
replicator, plug the port replicator into the USB port on the rear of your
system. Using the port replicator will allow you to make a single connection between your WinBook notebook and the port replicator and start
right into your work, without having to make the connections to your
keyboard, printer, etc. each time.
The I/O (input/output) controller of the port replicator takes control of
the I/O for the computer and directs input to the system as if the devices
were connected to the native ports of the WinBook notebook.
69
Chapter 5: Desktop Operation
Search Help and Support
Center using keywords:
sharing
Search Help and Support
Center using keywords:
install device
Search Help and Support
Center using keywords:
winbook port replica
tor
You can find more
information about your
port replicator in the
Windows Help and
Support Center.
The first time you use
a peripheral on your
system, you should be
able to plug it directly into
your port replicator. If the computer does not recognize the new
hardware, you can try plugging
it directly into the native port
on the WinBook notebook.
X series manual w/no OS 9/5/01 2:20 PM Page 69
Page 70

70
X series manual w/no OS 9/5/01 2:20 PM Page 70
Page 71

Chapter 6:
PC Cards (PCMCIA)
71
Chapter 6: PC Cards (PCMCIA)
X series manual w/no OS 9/5/01 2:20 PM Page 71
Page 72
PC Cards
PC Cards (or PCMCIA Cards) can be used to extend the capabilities
of your system by providing a connection for adding a modem (or an
additional modem, such as a cellular modem), a network connection,
a SCSI interface, or other functions. PCMCIA cards provide a compact
source of such extended capabilities and a common interface with
your WinBook notebook. They can provide a very powerful source
for expanding your system. Your WinBook notebook comes equipped
with a ACPI-compliant PCMCIAslot (on the left side of the unit),
which is able to use cards that conform to the PCMCIA standard.
The slot of your WinBook notebook is equipped for CardBus support
and can use PC cards. Your WinBook notebook can accept Type I or
Type II cards.
If your card is not configured for power management, which usually
requires a driver (the software coding that communicates between the
card and the machine) specific to the card, this can drain your battery.
The PCMCIA port is ACPI-compliant and will manage the power use
by the card whenever possible.
The preloaded drivers will work with most cards designated as
Windows-compatible.
If you find that your card does not work with the preloaded drivers,
use the driver disk that came with your card or contact the card
manufacturer to determine how to get your card to work with the
WinBook notebook. If the driver for your actual card is not found
in Windows database of drivers and you choose a generic driver,
you should consider taking the card out of the slot when it is not
in use to avoid draining the battery.
Most cards with some external connection will allow you to remove
or recess the connection for travel. Remember to take any removable
connections with you when you travel if you intend to use the card.
72
Series
User’s Manual
Search Help and Support
Center using keywords:
add hardware
X series manual w/no OS 9/5/01 2:20 PM Page 72
Page 73
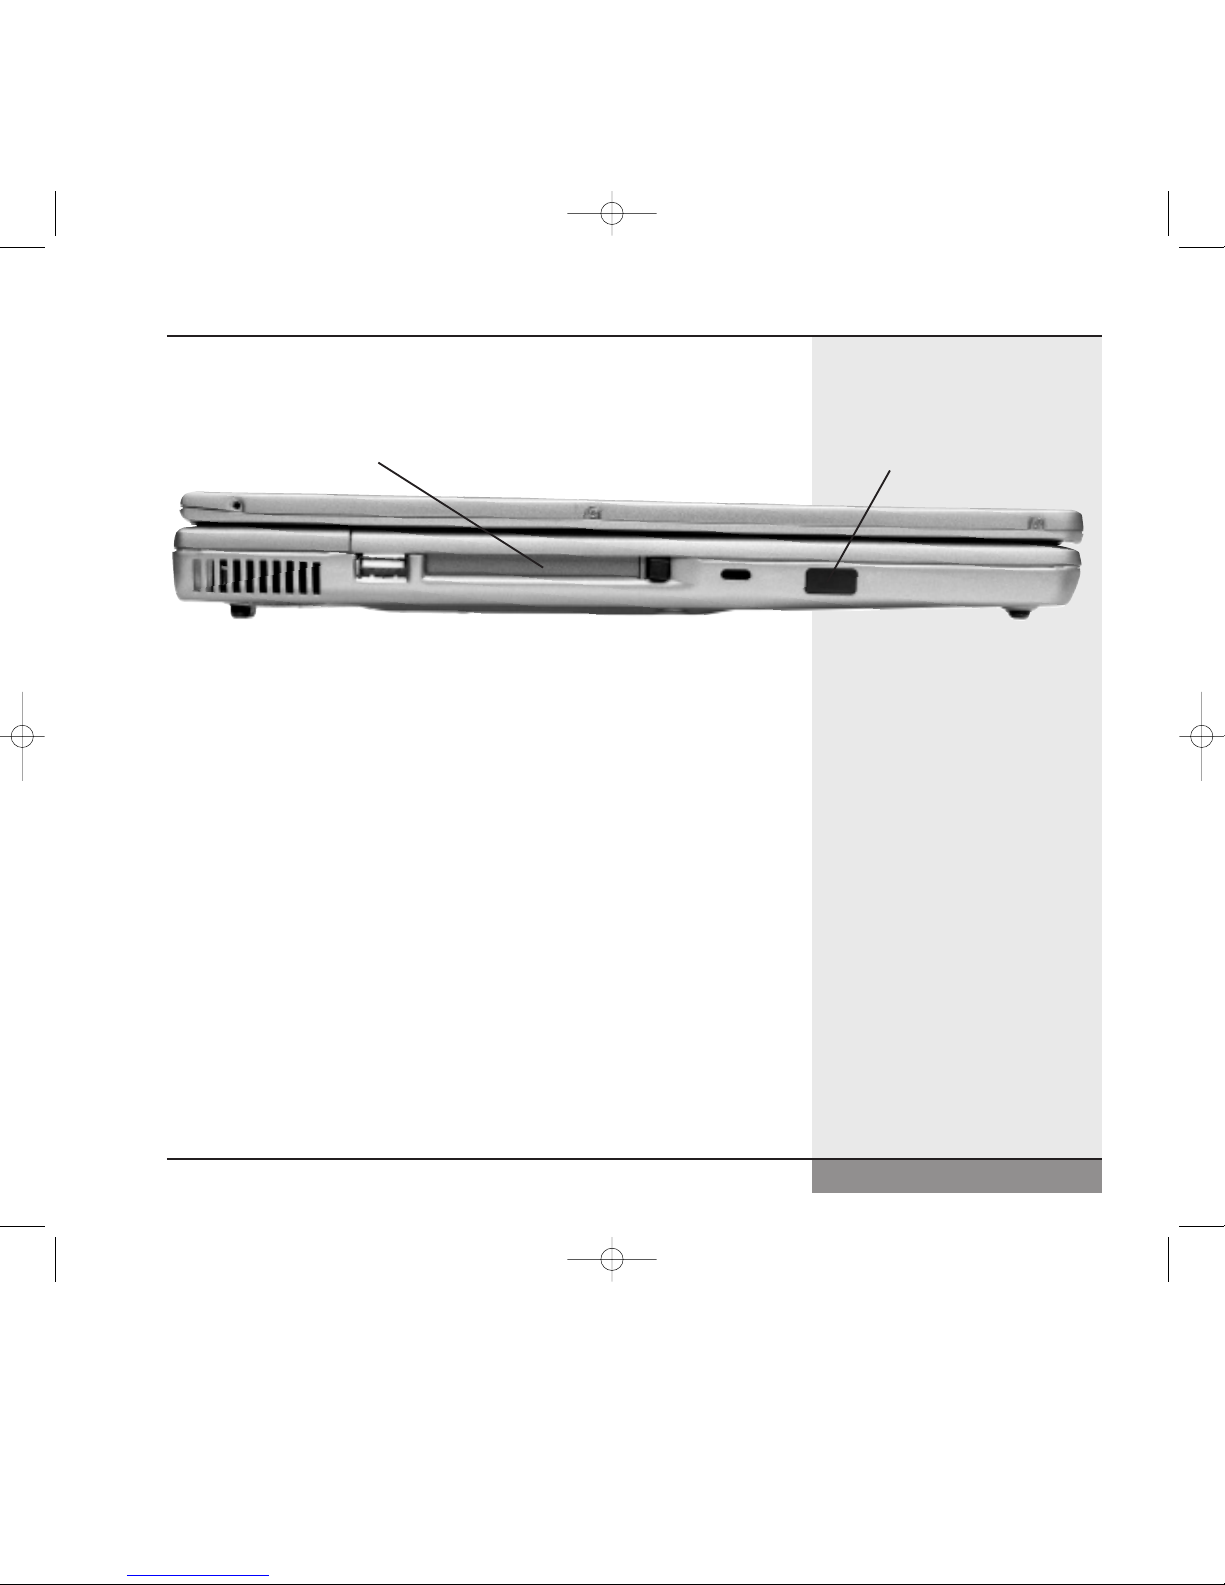
For more information on how to install PCMCIA cards, refer to the Help
and Support Center within Windows.
To Use the PC Card:
1. Insert the card into the slot. (Figure 6.1)
2. Push to make sure it is properly seated. When you insert your PCMCIA
card, Windows should recognize the card.
3. If the card is new to your system, Windows will attempt to recognize
it and load the necessary drivers. You might be asked to indicate the
source of the drivers. Windows has drivers for many PCMCIAcards,
but you should check the documentation for your card to determine
whether the manufacturer has provided more current drivers.
4. If Windows does not recognize the card, you will be prompted to
complete the installation of the necessary drivers. You can find the
driver for your card, use a standard driver for the hardware or, if you
have a disk from your manufacturer, you can load the drivers provided.
Follow the instructions provided by the installation wizard. If you use
a standard driver and one not specific for your card, the card should
work, but certain features, such as power management, might not
be active.
73
Chapter 6: PC Cards (PCMCIA)
Figure 6.1: PCMCIA Slots
IR Port
X series manual w/no OS 9/5/01 2:20 PM Page 73
Page 74
5. If the card has any external connections, secure them to the card
and the necessary external device.
6. When you are finished using the card, you should properly disable
the card. There are two ways to do this:
a) Left click once on the Safely Remove Hardware icon on the
taskbar. This will bring up a pop-up menu that will list the PCMCIA
card installed. Click on the device to be removed and you should
receive a message telling you when it is safe to remove the card.
b) Right click on the Safely Remove Hardware icon on the taskbar.
This will bring up the Safely Remove Hardware window. The PCMCIA
card to be removed will be listed in the hardware devices list. Select
the device to be removed and then click stop. You will be asked to
confirm your choice. Click OK and you should receive a message
telling you when it is safe to remove the card.
This procedure will protect your system and also help prevent data loss
that might occur if you attempt to remove a card that is still actively linked
to a network or modem connection.
7. You can now eject the card. Press the eject button in and the card
will pop out. Now press the button firmly in until the card ejects.
The button should remain in; if it pops back out, you can push it
in until it clicks into place.
PC Card Tips
You can “hotswap” PC cards while your computer is on, but you should
properly shut down the card before removing it.
And keep in mind the following:
• Do not remove a network card while your system is connected to the
network. This could cause loss of data for you or for other users and
could disrupt network functioning.
74
Series
User’s Manual
Search Help and Support
Center using keywords:
add hardware
If you are unfamiliar
with adding new
hardware to your
WinBook computer, refer
to the Help and Support Center
within Windows.
Although most current
PC cards are Plug and
Play, you should always
refer to the manufacturer’s
documentation for your card.
Some manufacturers might have
optimal ways for using their card.
X series manual w/no OS 9/5/01 2:20 PM Page 74
Page 75
• In many cases, your network card has to be present when you boot
the system to be recognized by the network (since Windows identifies
itself to the network as it boots). Unless you are an experienced user
and know how to connect to your network manually, you should reboot
your system if you want to install your network card.
• Do not remove a fax/modem card while the card is transferring data
to or from your computer.
• If you remove a fax/modem card, remember to shut off any automated
functions that use that card (such as fax receive-monitoring).
• Be aware if you have other software (such as e-mail) that accesses
a network card or fax/modem card and change the software settings
if needed.
• Do not remove a storage card (such as a hard disk or ATAcard) or
a card connected to a storage device (such as a SCSI card connected
to an external drive) while the computer is accessing that card.
• If your card is a storage card or connects to a storage device, it might
need to be present when you boot the system in order to be assigned
its proper drive letter. Check the documentation for your card and/or
device for further information.
• Some PC cards may require additional system resources. You might
have to disable the serial port or another device to free resources
for the card (Refer to the Help and Support Center within Windows for
information about hardware resources). Check the card documentation
for more information.
PCMCIA Network Connections
If your WinBook X Series computer did not come with a LAN connection,
you can purchase a PCMCIA Network Interface Card.
75
Chapter 6: PC Cards (PCMCIA)
Search Help and Support
Center using keywords:
device manager
Search Help and Support
Center using keywords:
add hardware
X series manual w/no OS 9/5/01 2:20 PM Page 75
Page 76
If you purchase a network PCMCIA card, you will first need to have
your WinBook notebook recognize the card and load the necessary
drivers. Refer to the Help and Support Center within Windows for more
information. Once your network card has been recognized and Windows
has installed the necessary networking files, you might be required to
restart your system to allow the new networking environment to function.
PCMCIA SCSI Interface
In order to use devices that require a SCSI interface, you will need
to install a SCSI interface card in the PCMCIA slot in your WinBook
notebook. Once your card has been recognized and the proper drivers
loaded, you will be able to connect SCSI devices to your WinBook
notebook.
You can check the documentation for your SCSI controller or your
SCSI devices to determine what other steps might be required for
proper operation.
PCMCIA Modem
Even if your unit came with a built-in modem, you might purchase
a PCMCIA modem (e.g. one that connects to a cellular phone). Follow
the steps above for installing and configuring your card. Once the correct
driver has been installed and the modem is ready for use, you might be
asked to fill in the settings for using this modem (if you have not set up
a modem on this system before).
Fill in the information requested to assure proper operation of your
PCMCIA modem. Refer to the Help and Support Center within Windows
for more information about using a fax/modem with this system.
76
Series
User’s Manual
Search Help and Support
Center using keywords:
install modem
X series manual w/no OS 9/5/01 2:20 PM Page 76
Page 77

Chapter 7:
Video Settings
77
Chapter 7: Video Settings
X series manual w/no OS 9/5/01 2:20 PM Page 77
Page 78
Video Settings
Your WinBook notebook provides you with a wide range of video controls
and options. You should take a little time to familiarize yourself with these
aspects of your machine.
Your WinBook notebook allows you to adjust the brightness of the
LCD screen by using hot-key combinations: [Fn]+[ ] to increase screen
brightness and [Fn]+[ ] to decrease screen brightness. You will need to
hold this combination for several seconds to see any effect. These keys
will not set the screen completely bright or dark; they will provide small
adjustments to account for room lighting. Your WinBook notebook will
support a number of resolutions. Resolution is a measure of the number
of pixels (a pixel is a single dot of color on the screen). Depending on
the unit you purchased, your display will support a resolution of 1024
x 768 or greater with 16 million colors. Notice that when you put your
computer into the DOS mode, which uses the VGA resolution (640 x 480)
as a default, the display will be stretched to fit the full screen. Your unit
also has a hot-key combination that allows you manually to expand or
decrease the size of the display for programs set to the 640 x 480 mode;
press [Fn]+[F9] to toggle the size of the display.
If you lower the resolution of your LCD, you may find that the desktop
area might be slightly pixilated. The highest resolution of your LCD screen
will provide the sharpest image. This should not be the case for an external
monitor. When you are displaying the video on the built-in screen, you
cannot choose a higher resolution than the standard resolution. However,
you can use a higher resolution when you output the notebook’s video to
an external monitor that supports high resolutions. When using an external
monitor, the WinBook notebook will readily support the resolution settings
of your monitor.
78
Series
User’s Manual
➔
➔
It may be necessary
to install the proper
monitor driver for your
external monitor in order
for your WinBook to support
all of the modes the monitor
it is capable of displaying.
X series manual w/no OS 9/5/01 2:20 PM Page 78
Page 79
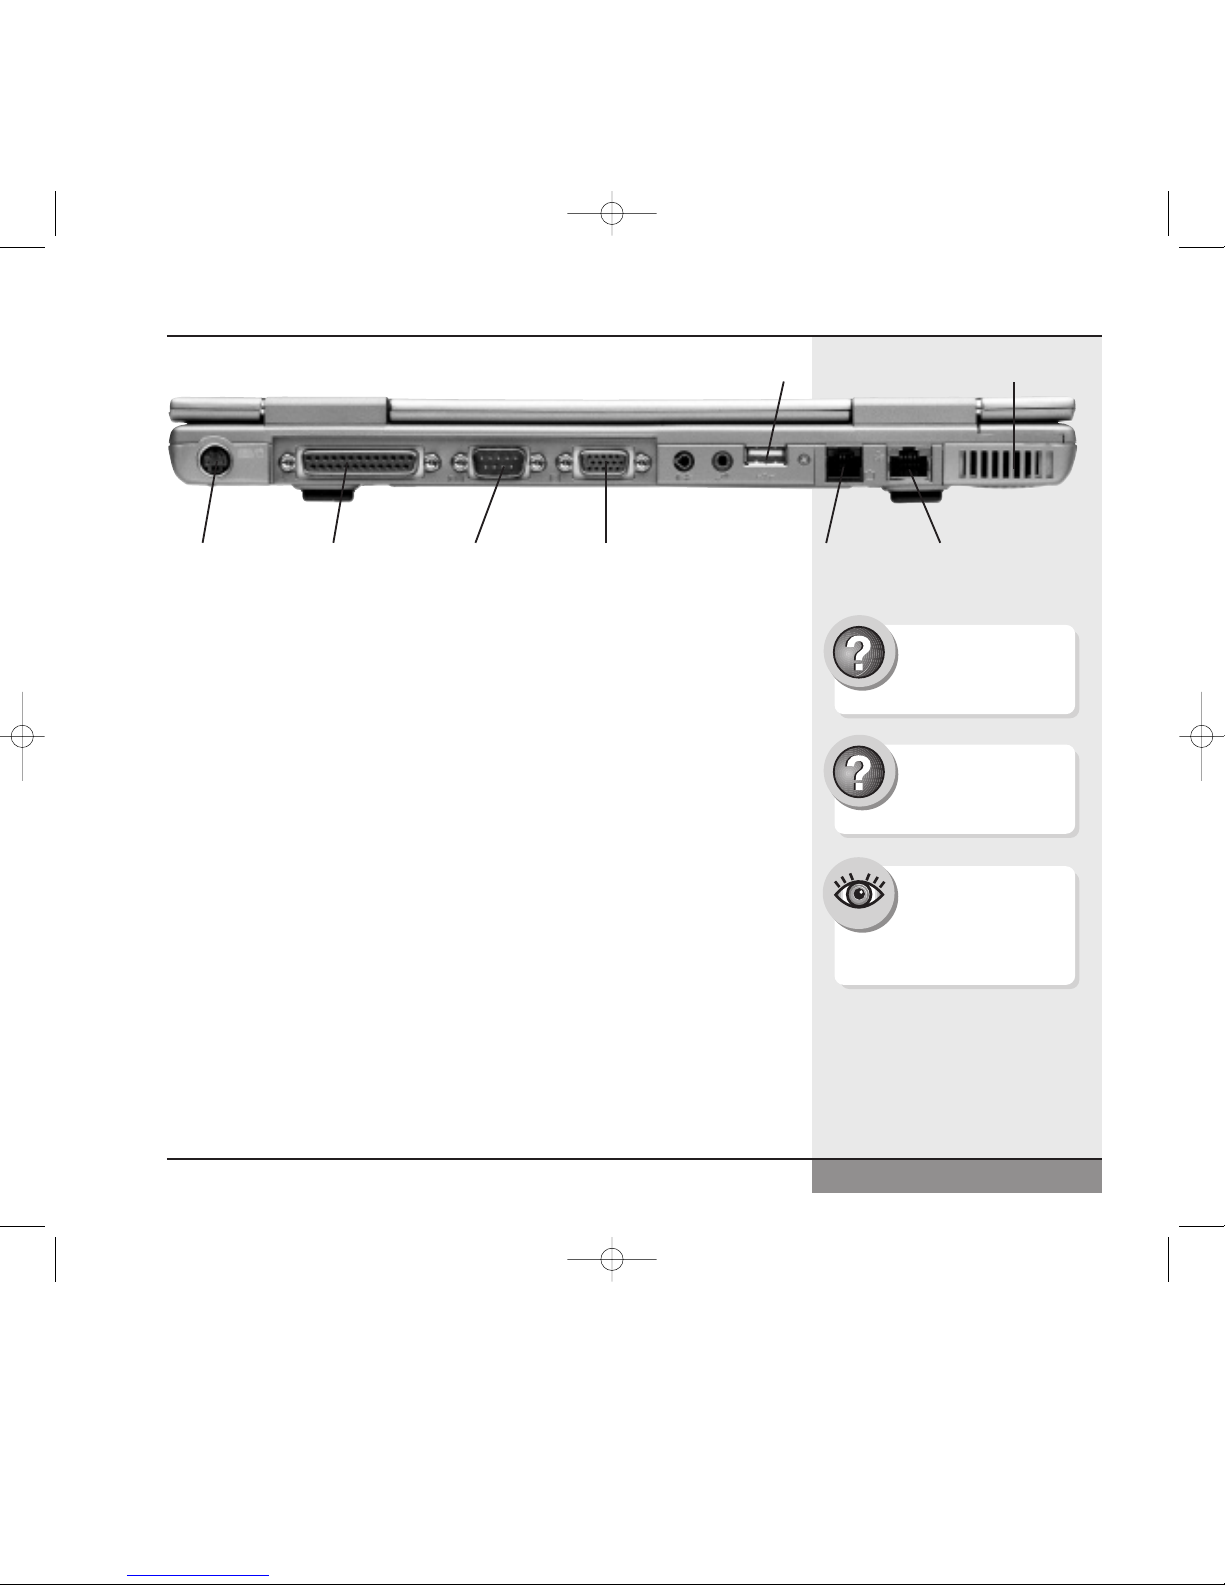
External VGA Port
Your WinBook notebook has an external VGA port for directing video
out-put to an external monitor. (Figure 7.1) You can connect an external
VGA or SVGA monitor to your WinBook notebook through the VGA
port on the rear of the system. You can direct output to the LCD, the
external monitor or both through the display properties. Refer to the Help
and Support Center for further information on the options available in the
display properties. Your external monitor might require that you change
the video driver from the default driver for the LCD screen. Check the
Help and Support Center for specific instructions regarding video drivers.
A higher resolution on your external monitor might also mean a slower
refresh rate, the speed at which a monitor sends a new image to the screen.
A cathode ray tube (CRT) sends an image vertically down a screen one
line at a time. The whole screen is thus refreshed at a certain interval (as
the CRT cycles down the screen and then returns to the top). This speed is
usually measured in Hz (cycles per second), which is a unit of frequency.
A refresh rate of 60 Hz will produce a slightly perceptible flicker of the
screen that can cause eyestrain. Arate of 72 Hz or faster will usually produce a comfortable image. Your monitor may refresh at different frequencies depending on the resolution. Check your monitor specifications for he
refresh rate; this may help prevent eyestrain. If you do need to use another
Chapter 7: Video Settings
Parallel Port Serial Port VGA Port Modem Port LAN PortS-Video Port
79
Figure 7.1: Location of ports on the rear of the WinBook notebook
Cooling FanUSB Slot
Directing the video
output to both the
LCD and the video
monitor will slightly slow
the video response time.
Search Help and Support
Center using keywords:
display settings
Search Help and Support
Center using keywords:
video driver
X series manual w/no OS 9/5/01 2:20 PM Page 79
Page 80
driver with your external monitor, you might need to reset the driver for
the LCD to achieve optimal display quality on the LCD. Windows will
usually provide you with a chance to review the changes and cancel them.
It will also usually instruct you if you need to restart the system.
Be sure to shut down your system before connecting the device to your
system to prevent damage to your system and the external monitor.
TV-Out
Your WinBook notebook comes equipped with a S-Video jack that
allows you to direct the screen output of your system to a television screen
that has an S-Video input. You will need to purchase A/V cables that are
capable of fitting your jacks. If you want video and audio, you will want
to purchase separate cables for audio and video transmission. If you want
to enable the television output for your WinBook notebook, follow the
directions below.
1. Turn off the computer. Locate the S-Video jack in the rear panel
connector compartment. Locate the stereo speaker/headphone jack
on the back of the computer.
2. Connect one end of video cable into the S-Video jack. Connect
the other end of the cable to the video input jack of the TV receiver.
3. If you will need audio, you will need a “Y” cable with an “RCA
mini” stereo jack (it looks like the jack on a set of headphones) on
one end and a right and left RCA jack on the other. Connect one end
of the audio cable to the speaker/headphone jack on the back of your
WinBook notebook. Connect the audio cable to the right and left
channel audio input jacks.
Note: If your television does not have stereo sound, you can obtain
a cable with a single jack for both signals.
4. Start up your computer. Your system will automatically detect
the presence of a device on this port.
80
Series
User’s Manual
Not all programs
support the use of
more than one monitor.
If you attempt to use a program with the Multiple Monitor
function enabled and the program will not work, shut off the
Multiple Monitor function and
try running the program again.
X series manual w/no OS 9/5/01 2:20 PM Page 80
Page 81
5. After your computer has started and Windows has loaded, you can
output your display to the TV by clicking on the “settings” tab of the
display properties. Refer to the Help and Support Center in Windows
for details on changing your display settings.
Multiple Monitor Support
If you are using Windows your WinBook notebook supports Multiple
Monitor functionality, which allows you to expand the size of your desktop
with the use of an external monitor. You can easily drag or stretch items
across the two monitors. This can allow you to have two programs side
by side, each occupying a “full screen” or can allow you to stretch out
a document or spreadsheet or image. Even though the monitors might be
side-by-side for you, you do not have to think in those terms: the Multiple
Monitor mode allows you to treat the monitors as if they were in any physical arrangement. You can set them to stretch vertically, allowing you to let
a long document run “down” onto the second screen. One monitor serves
as the primary display (you can set which it is by following the directions
below). Most programs and dialog boxes will open in the primary display,
but you can drag them to the secondary monitor. To enable the Multiple
Monitor function, you will need to connect an external monitor to the
External VGA Port on the back of your WinBook notebook.
It is recommended that you reboot after connecting the monitor as this
allows the WinBook notebook to properly recognize the presence of the
external monitor.
DVD
If your WinBook notebook came equipped with a DVD-ROM drive,
you will be able to use this drive to run software on DVD or to watch
movies stored in DVD format. Your WinBook notebook comes equipped
with software MPEG-2 support that will play video at 24 frames per
second. MPEG-2 compresses video signals for quicker transmission.
81
Chapter 7: Video Settings
In order to play a DVD
on your LCD screen, you
should have the screen
set to the default resolution
for your unit and 16-bit color
(64K colors). If you use another
setting, your DVD playback might
lose clarity or the software might
be unable to function.
Search Help and Support
Center using keywords:
display settings
Search Help and Support
Center using keywords:
multiple monitor
X series manual w/no OS 9/5/01 2:20 PM Page 81
Page 82
This compression standard is adequate for smooth DVD video playback.
If you require even more precise video playback, you can look into a
hardware MPEG-2 decoder on a PCMCIA card.
Movies on DVD provide menus and additional information about the
movie. The software DVD player will provide access to these additional
features of the DVD. Insert the DVD disk into your drive and close
the drive door. The computer will identify the disk as a DVD-ROM
and launch the DVD player software.
Check the Help and Support Center withing Windows for more specific
information about using the DVD software in your system.
82
Series
User’s Manual
Since DVD activity will
not reset power manage-
ment timers, you should
disable power management
when using the DVD drive as a
video play-back system. You might
find it useful to create a power
scheme for DVD use. Refer to the
Help and Support Center within
Windows for information about
power management.
Your DVD software does
not come pre-installed
on your notebook. Before
you can playback DVD movies,
you must install the accompanying
DVD installation CD located in the
accessories box.
Search Help and Support
Center using keywords:
power scheme
Search Help and Support
Center using keywords:
DVD options
X series manual w/no OS 9/5/01 2:20 PM Page 82
Page 83

Chapter 8:
Configuring &
Maintaining
Your System
Chapter 8: Configuring & Maintaining Your System
83
X series manual w/no OS 9/5/01 2:20 PM Page 83
Page 84

Setup Program
The Setup program writes information about the equipment, security
and power management of your computer directly into ROM (Read-Only
Memory) in the computer’s hardware (it is stored in the computer’s BIOS
chip). When you turn on your computer, it first looks at this information
to see what the physical devices the system has available for its use.
Access to the Setup menu is during the boot process. When you first
start the computer, you will be able to enter the Setup mode (by pressing
the [F2] key). If your system begins with the BIOS logo (this is the
default boot option), you should press the [F2] key when you see the
logo. If you wish to enter after the computer has booted, you will need
to exit Windows (or whatever operating system you are running). You
can restart the computer by selecting Turn Off Computer in the Start
menu, then selecting the Restart option. When the computer starts to
reboot, press the [F2] key to enter the program.
Main Menu
Once you have entered the Setup program, you will be greeted by the
Main Menu. (Figure 8.1) This menu allows you to make changes to the
basic setup of your system (e.g. time or default display). You will notice
that at the bottom of the window are the commands for navigating the
Setup program. These commands are the same for all menus in the Setup
program.
[F1] Brings up the Help information for the Setup Program
[Esc] Takes you to the Exit menu
Up arrow Moves up one item in the menu
Down arrow Moves down one item in the menu
Left arrow Moves one menu to the left
84
Series
User’s Manual
X series manual w/no OS 9/5/01 2:20 PM Page 84
Page 85
Right arrow Moves one menu to the right
[+]/[-] Allow you to cycle down [-] or up [+] through the values
for that item
[Enter] Opens the Submenu for the item or executes the command
[F9] Restores the default values for the Setup program
[F10] Saves and Exits the Setup Program
Chapter 8: Configuring & Maintaining Your System
85
Figure 8.1: The Main Menu
Check the Help and
Support Center within
Windows for the most
current BIOS information for
your system. You can also obtain
updated BIOS software from the
WinBook technical support site:
http://www.winbookcorp.com/
Search Help and Support
Center using keywords:
WinBook BIOS
PhoenixBIOS Setup Utility
F1 Help
ESC Exit
Select Item
Select Menu
-/+ Change Values
Enter Select Sub-Menu
F9 Setup Defaults
F10 Save and Exit
<Tab>, <Shift-Tab>, or
<Enter> selects field.
System Time: [15:26:05]
System Date: [10/01/2001]
Primary Master [TOSHIBAMK1016GAP-(PM)]
Secondary Master [MATSHITA CR-177-SM)]
System Memory: 640 KB
Extended Memory: 12976 KB
Main Advanced Security Boot Exit
Item Specific Help
X series manual w/no OS 9/5/01 2:20 PM Page 85
Page 86

System Time: This item allows you to adjust the time of your computer ’s
internal clock. Use the [-] or [+] keys to change the values of the fields.
You can use the [Tab] or [Shift]+[Tab] keys to move among the hour,
minute and second fields. Use the [-] or [+] keys to change the values
of the fields.
System Date: This item allows you to adjust the date of your computer’s
internal clock. You can use the [Tab] or [Shift]+[Tab] keys to move among
the month, date and year fields. Use the [-] or [+] keys to change the
values of the fields.
Primary Master: This item displays information about the drive on
the primary IDE master, which should be your hard disk drive. Scroll
down to this item and hit [Enter] to enter the Primary Master Submenu.
Secondary Master: This item displays information about the drive
on the secondary IDE master, which should be your CD-ROM or
DVD-ROM drive. Scroll down to this item and hit [Enter] to enter
the Secondary Master Submenu.
System Memory: This field shows the conventional memory available.
This is a display-only item and cannot be altered.
Extended Memory: This field shows the extended memory available.
This is a display-only item and cannot be altered. If you add this number,
the number in system memory above and 384KB of upper memory
reserved for certain computer functions, you should have the total RAM
of your system. If these numbers do not add up to the total RAM in your
system, contact Technical Support.
86
Series
User’s Manual
You do not need to
enter the Setup program
to adjust the time and
date of your computer. You
can adjust these from within
Windows by double-clicking
on the clock on your taskbar
and adjusting the information
in the Date/Time Properties window. Windows will also adjust
your system time automatically
to account for Daylight Savings
Time if you choose that option.
X series manual w/no OS 9/5/01 2:20 PM Page 86
Page 87
Primary Master Submenu (Figure 8.2)
This menu displays the settings for the hard disk drive.
Chapter 8: Configuring & Maintaining Your System
87
Figure 8.2: The Master Submenu
PhoenixBIOS Setup Utility
F1 Help
ESC Exit
Select Item
Select Menu
-/+ Change Values
Enter Select Sub-Menu
F9 Setup Defaults
F10 Save and Exit
Items on this menu
cannot be modified by
the user. These values
are automatically
determined by the BIOS.
Type: [Auto]
LBA Format
Total Sectors: 19640880
Maximum Capacity: 10056MB
Multi-Sector Transfers: [16 Sectors]
LBA Mode Control: [Enabled]
32 Bit I/O: [Disabled]
Transfer Mode: [Fast PIO 4]
Ultra DMA Mode: [Mode 4]
Main
Item Specific HelpPrimary Master [TOSHIBA MK1016AP-(PM)]
X series manual w/no OS 9/5/01 2:20 PM Page 87
Page 88
Secondary Master Submenu (Figure 8.3)
This menu displays the settings for the secondary IDE drive (the CD-ROM
or DVD-ROM drive).
88
Series
User’s Manual
Figure 8.3: The Secondary Master Submenu
PhoenixBIOS Setup Utility
F1 Help
ESC Exit
Select Item
Select Menu
-/+ Change Values
Enter Select Sub-Menu
F9 Setup Defaults
F10 Save and Exit
Items on this menu
cannot be modified by
the user. These values
are automatically
determined by the BIOS.
Type: [Auto]
Multi-Sector Transfers: [Disabled]
LBA Mode Control: [Disabled]
32 Bit I/O: [Disabled]
Transfer Mode: [Fast PIO 4]
Ultra DMA Mode: [Mode 2]
Main
Item Specific HelpSecondary Master [MATSHITA CR-177-(SM)]
X series manual w/no OS 9/5/01 2:20 PM Page 88
Page 89
Advanced Menu (Figure 8.4)
Advanced Chipset Control: This item allows you to enter the Advanced
Chipset Control submenu. Scroll down to this item and hit [Enter] to enter
the submenu.
I/O Device Configuration: This item allows you to enter the I/O Device
Configuration submenu. Scroll down to this item and hit [Enter] to enter
the submenu.
Chapter 8: Configuring & Maintaining Your System
89
Figure 8.4: The Advanced Menu
PhoenixBIOS Setup Utility
F1 Help
ESC Exit
Select Item
Select Menu
-/+ Change Values
Enter Select Sub-Menu
F9 Setup Defaults
F10 Save and Exit
Setup Warning
Setting items on this menu to incorrect values
may cause your system to malfunction.
Advanced Chipset Control
I/O Device Configuration
Installed O/S:
Reset Configuration Data: [No]
Large Disk Access Mode: [DOS]
Quiet Boot: [Enabled]
Main Advanced Security Boot Exit
Item Specific Help
X series manual w/no OS 9/5/01 2:20 PM Page 89
Page 90

Installed O/S: This item allows you to set the operating system for
your unit. If you are using Microsoft Windows, this item should be
left at the default setting (which is for Windows operating systems).
If you install another operating system, you can change this setting
and it will release Windows controls of many functions (such as power
management).
Reset Configuration Data: This setting allows you to clear the extended
system configuration data. You should contact Technical Support before
using this item.
Large Disk Access Mode:This allows you to set the mode for large disk
access (your hard disk drive is considered a large disk) for your system.
If you are using a Windows-based operating system, you should use the
DOS setting. If you are using another operating system, select “Other” for
this item. This will enable the operating system to control the disk access
as needed.
Quiet Boot: If you enable this option, you will see a logo screen rather
than boot information; this setting allows for a faster boot. If you disable
this setting, you will see the comprehensive boot information during the
boot process.
Advanced Chipset Control Submenu (Figure 8.5)
Shared Video Memory: This item allows you to set the amount of system
memory that is dedicated to VGA display memory. You can adjust this
amount of display memory to fit your needs (keep in mind that increasing
the VGA memory share will reduce system memory available for program
operation). The values available are: 4MB, 8MB, 16MB, 32MB and 64MB.
90
Series
User’s Manual
X series manual w/no OS 9/5/01 2:20 PM Page 90
Page 91
USB Legacy Support: Windows will have the drivers for USB devices.
To use a USB keyboard or mouse with another operating system, you
should Enable USB legacy support for your system.
Auto Dim: This item allows the laptop to conserve energy when running
on battery power by dimming the LCD.
Chapter 8: Configuring & Maintaining Your System
91
Figure 8.5: The Advanced Chipset Control Submenu
PhoenixBIOS Setup Utility
F1 Help
ESC Exit
Select Item
Select Menu
-/+ Change Values
Enter Select Sub-Menu
F9 Setup Defaults
F10 Save and Exit
Switch TV Mode
Television Display Mode [NTSC]
Shared Video Memory [8MB]
USB Legacy Support [Enabled]
Advanced
Item Specific Help
Advanced Chipset Control
X series manual w/no OS 9/5/01 2:20 PM Page 91
Page 92
I/O Device Configuration Submenu (Figure 8.6)
Serial Port: This item allows you to enable or disable the serial port.
When enabled, this port should be set to “Auto” (which will automatically
set the address on system start-up). Be aware of conflicts that might arise
if you add devices that require a COM port (such as a modem). If conflicts
arise, you can disable the serial port (and enable it again when you need
to use it) by setting it to “Disabled.”
Parallel Port: This item allows you to enable or disable the parallel port.
When enabled, this port should be set to “Auto” (which will automatically
set the address on system start-up). If you choose the Auto option, you
92
Series
User’s Manual
Figure 8.6: The I/O Device Configuration Submenu
PhoenixBIOS Setup Utility
F1 Help
ESC Exit
Select Item
Select Menu
-/+ Change Values
Enter Select Sub-Menu
F9 Setup Defaults
F10 Save and Exit
Configure serial port A
using options:
[Disabled]
No configuration
[Auto]
BIOS or OS chooses
configuration
Serial port A: [Auto]
Parallel port: [Auto]
Mode: [FIR]
Parellel Port: [Auto]
Mode: [ECP]
Advanced
Item Specific Help
I/O DeviceConfiguration
X series manual w/no OS 9/5/01 2:20 PM Page 92
Page 93

will have the option of setting the Parallel Port mode. If conflicts arise,
you can disable the parallel port (and enable it again when you need to
use it) by setting it to “Disabled.”
Parallel Port Mode: This item allows you to set the communication
mode of the Parallel Port. There are four options:
Output Only: This setting assumes that the communication is primarily
from the computer to a peripheral (such as a printer). This setting is not
intended for a parallel connection between your WinBook notebook and
another computer for file transfers.
Bi-Directional: This setting allows two-way transfers between your
computer and the parallel device.
ECP: This is an enhanced bi-directional transfer mode. A bi-directional
mode is required for file transfers between computers via a parallel
connection.
EPP: This is an enhanced bi-directional transfer mode. A bi-directional
mode is required for file transfers between computers via a parallel
connection.
Security Menu (Figure 8.7)
WARNING: Write down your password and store it in a safe place.
If you lose your password, you will be unable to use your computer.
There is no way to clear or change a forgotten password. You will
have to send the computer back to the service department to have
the password reset.
Supervisor Password Is: This item displays the current status of the
Supervisor Password: Set or Clear.
User Password Is: This item displays the current status of the User
Password: Set or Clear.
Chapter 8: Configuring & Maintaining Your System
93
X series manual w/no OS 9/5/01 2:20 PM Page 93
Page 94
Set Supervisor Password: This item allows you to set or clear the
super-visor password. If the supervisor password has been enabled,
you will need to log in as the supervisor to clear or change the password.
Press [Enter] to set or clear the password.
• To set the password, enter a password in the space provided.
Press [Enter]. Type the same password again (to provide verification
of the password) in the second line and press [Enter]. The password
will now be set.
• To clear the password you will need to first enter the existing password
in the first line and press [Enter]. Then press [Enter] twice to leave the
other two lines blank.
94
Series
User’s Manual
Figure 8.7: The Security Menu
If you choose to enable
the password, be sure
to write down the pass-
word and store it in a safe
place. If you ever forget this
password, you will be unable
to use the system or change
the BIOS settings. You will need
to return the unit to WinBook
to restore full functioning to the
system in this event.
PhoenixBIOS Setup Utility
F1 Help
ESC Exit
Select Item
Select Menu
-/+ Change Values
Enter Select Sub-Menu
F9 Setup Defaults
F10 Save and Exit
Supervisor Password
controls access to the
setup utility.
Supervisor Password Is: Clear
User Password Is: Clear
Set Supervisor Password [Enter]
Set User Password [Enter]
Diskette access: [Supervisor]
Fixed disk boot sector: [Normal]
Password on boot: [Disabled]
Main Advanced Security Boot Exit
Item Specific Help
X series manual w/no OS 9/5/01 2:20 PM Page 94
Page 95

Set User Password: This item allows you to set or clear the user
password. Press [Enter] to set or clear the password.
• To set the password, enter a password in the space provided. Type
the same password again (to provide verification of the password)
in the second line and press [Enter]. The password will now be set.
• To clear the password you will need to first enter the existing
password in the first line and press [ Enter]. Then press [Enter]
twice to leave the other two lines blank.
Note: This option will not be available to you until a supervisor
password has been set.
Diskette Access:This item determines the level of access to the floppy
disk drive. This allows you to protect your computer from unauthorized
users who could boot from a floppy disk and then copy files from your
hard drive. If the boot password is enabled, a password will be required
to use the floppy disk drive. You can set this to Supervisor (the supervisor
password is required to use the disk drive) or User (either password can
be used). The default setting is “Supervisor.”
Fixed Disk Boot Sector: This item allows you to write protect your hard
disk to protect against viruses. When the Normal option is selected, you
have standard read and write access to the hard disk. When the write protect is enabled, you will be able to read from the boot sector of the hard
drive, but not write to it. This is an aggressive level of protection against
boot sector viruses. If you have reason to suspect that you are using the
computer in an environment where such risk is high, you should consider
using this option. The default setting is “Normal.”
Password on boot: This item allows you to enable or disable the password on boot option. If it is enabled, a password will be required to boot
the computer. Either the supervisor password or the user password can be
used. The default option is “Disabled.” Note: If the user password is used,
you will not have access to all BIOS settings. Only the supervisor has full
access to the BIOS settings.
Chapter 8: Configuring & Maintaining Your System
95
X series manual w/no OS 9/5/01 2:20 PM Page 95
Page 96
Boot Menu (Figure 8.8)
This menu allows you to set the order in which devices are checked
for an operating system at boot. The WinBook notebook will check
the devices in the order selected and load the operating system from
the first device with one installed. The items with a [+]/[-] beside them
are expandable categories. Hit [Enter] to expand or collapse the category.
[Ctrl]+[Enter] expands all the categories. [Shift]+[1] enables or disables
a device. Adisabled device will not be checked during the boot process.
To move a device up or down in the boot order, use the [+] or [-] key.
This is true of categories or devices within a category. If you will be
96
Series
User’s Manual
Figure 8.8: The Boot Menu
PhoenixBIOS Setup Utility
F1 Help
ESC Exit
Select Item
Select Menu
-/+ Change Values
Enter Select Sub-Menu
F9 Setup Defaults
F10 Save and Exit
Keys used to view or
configure devices:
<Enter> expands or
collapses devices with
a + or –
<Ctrl+Enter> expands
all
<Shift + 1> enables or
disables a device.
<+> and <-> moves the
device up or down.
<N> May move removable
device between Hard
Disk or Removable Disk
<d> Remove a device
that is not installed.
Removable Devices
+Hard Drive
ATAPI CD/DVD-ROM Drive
Main Advanced Security Boot Exit
Item Specific Help
X series manual w/no OS 9/5/01 2:20 PM Page 96
Page 97
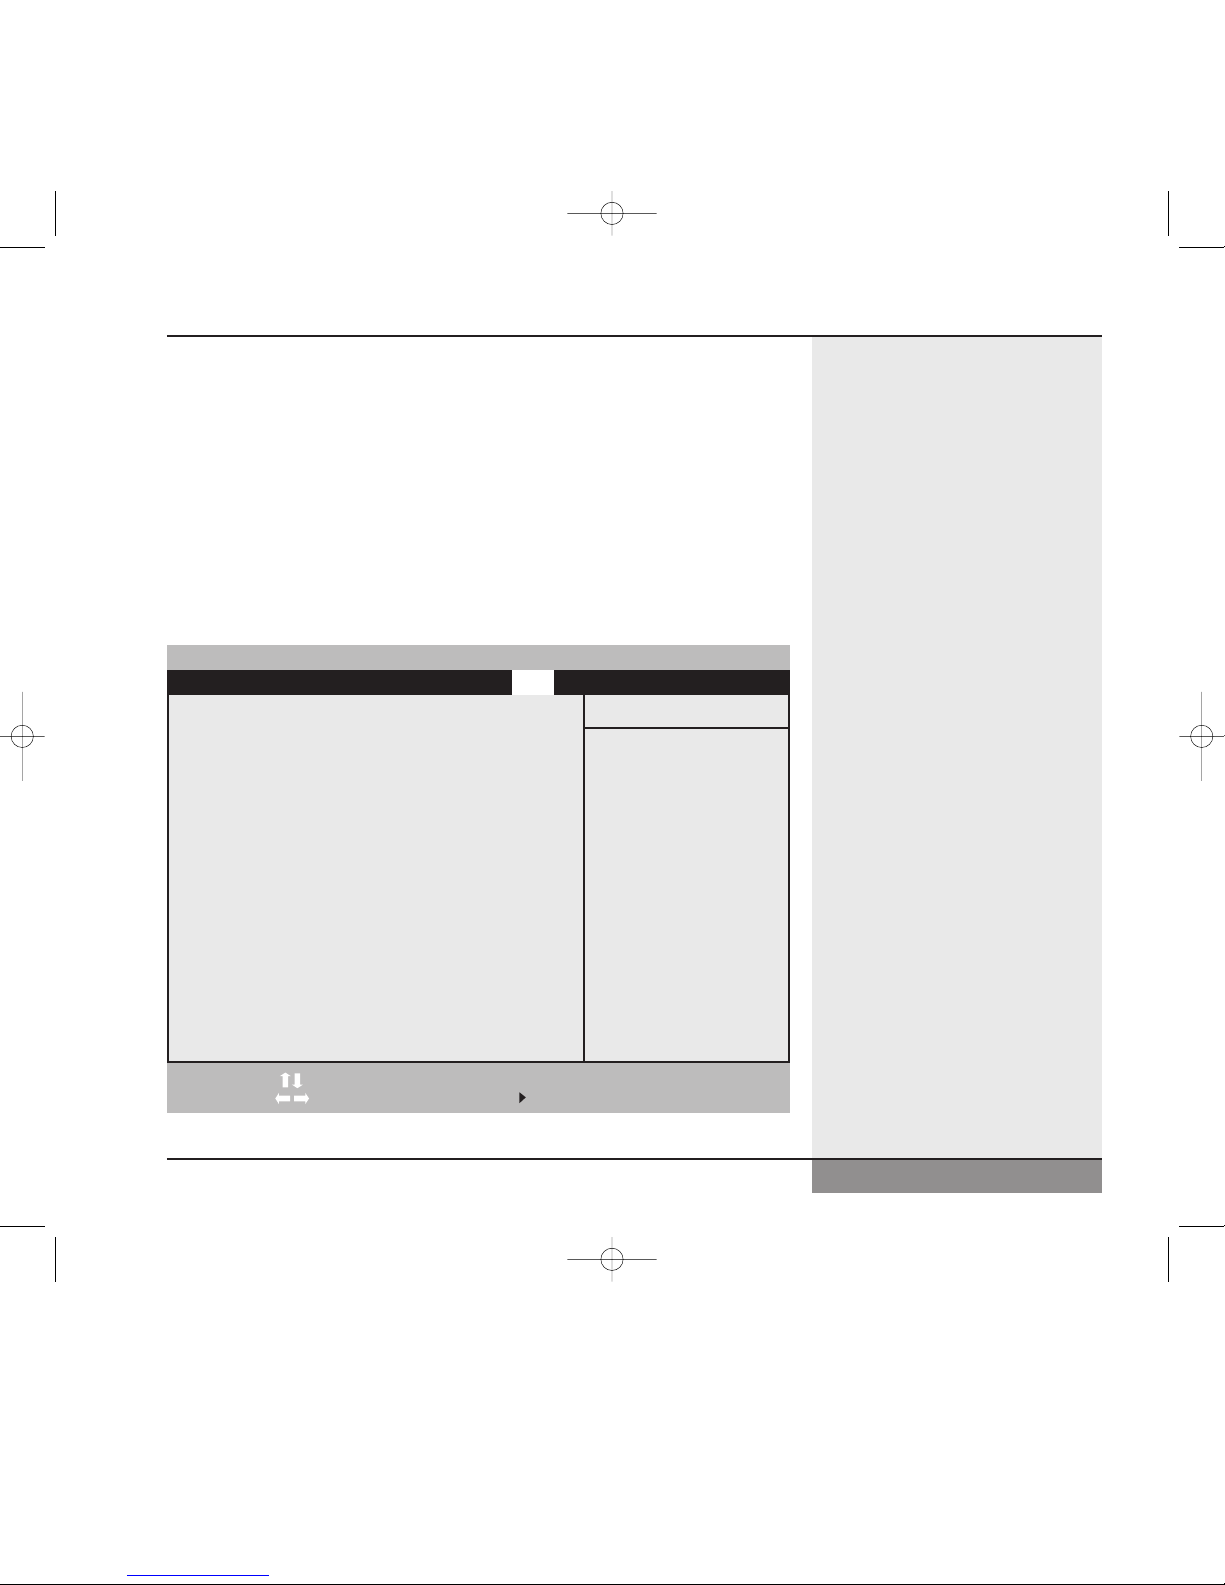
booting from a floppy or CD-ROM/R/RW drive, you should set these
devices to be checked prior to the Hard Drive category.
If you have a bootable add-in card, you should set this card to be checked
prior to the internal hard drive within the Hard Drive category.
Exit Menu (Figure 8.9)
Once you have made the necessary changes to your Setup program,
you can use this menu to exit.
Chapter 8: Configuring & Maintaining Your System
97
Figure 8.9: The Exit Menu
PhoenixBIOS Setup Utility
F1 Help
ESC Exit
Select Item
Select Menu
-/+ Change Values
Enter Select Sub-Menu
F9 Setup Defaults
F10 Save and Exit
Exit System Setup and
save your changes to
CMOS.
Exit Saving Changes
Exit Discarding Changes
Load Setup Defaults
Discard Changes
Save Changes
Battery Calibration
Main Advanced Security Boot Exit
Item Specific Help
X series manual w/no OS 9/5/01 2:20 PM Page 97
Page 98

Exit Saving Changes: This item will save all the changes that you made
during this session and exit the Setup program. Your system will then
reboot with the new settings. If you notice any problems with the operation
of your system, you will need to re-enter the Setup program and correct
settings that might be causing the problems.
Exit Discarding Changes: This item will abandon all changes that you
have made to the Setup program in this session and exit the Setup program.
Load Setup Defaults: Restores all the values to the default settings that
were in place when you received your WinBook notebook. You can now
save these changes and exit or return to the other menus to make additional
changes.
Discard Changes: Restores all values to the settings that were in place
before you entered the Setup program. You can now save these changes
and exit or return to the other menus to make additional changes.
Save Changes: This item allows you save the changes without exiting
the Setup Program. All changes made will be saved, but you can continue
to make changes in the other menus before exiting.
Battery Calibration: This item allows you to start a special program
designed to optimize battery performance. It must be performed when
installing a new battery. The battery will be fully discharged. Then the
computer will automatically be turned off. This process might take as long
as two hours. You will then have to fully charge your battery. Performing
this routine on a regular basis will help your battery retain its optimal
charge level. Note: the system fan will turn on during calibration to keep
the system cooled and help optimize calibration.
When you activate this utility, you will be asked if you want to perform
the calibration. Type “Y” to begin the calibration. You will then be asked
to disconnect the AC power so that the battery can be drained. Type “Y”
again to proceed with the calibration. Once the battery has drained and
the computer has shut down, you can reconnect the AC power and start
up your system.
98
Series
User’s Manual
X series manual w/no OS 9/5/01 2:20 PM Page 98
Page 99
Security
Viruses
It is possible that your computer might become infected by a virus, a
program that was designed to move into a computer’s system and cause
damage. Many viruses act by altering the boot record of your disk, thus
rendering it unusable. Some viruses are relatively harmless. Many are
very destructive and can cause serious data loss. If you never exchange
disks with anyone else, only buy software from major companies and
do not exchange information via modem or a network, your risk of being
infected is relatively minimal (although not nonexistent).
Unfortunately, that is a very limiting way to use a computer. You should
regularly check your computer for viruses (not all viruses act immediately,
some are set to engage when a function is performed or when a specific
date and time arrives). There are programs designed for checking for
viruses on your system and eliminating those viruses if found. If you
have been making regular backups of your data, you should be able to
survive infection by a virus with minimal damage. If you use your modem
to upload and download files regularly, you should be sure that you are
checking the files for viruses. Many antivirus programs will check files
as they are received by the modem, this can include checking information
as it is accessed from the World Wide Web.
If your system is infected with a virus, you will usually need to boot
from a bootable floppy disk (if you have the optional USB Floppy Drive)
or CD-ROM, CD-R or CD-RW that you are sure is free of infection. You
should consider carrying a write-protected boot disk with your computer,
to allow for a clean boot wherever you might be using your system.
Chapter 8: Configuring & Maintaining Your System
99
New viruses come along
frequently. You should
update your virus soft-
ware regularly (most virus
software manufacturers have
an update service) to keep your
system secure from new viruses.
X series manual w/no OS 9/5/01 2:20 PM Page 99
Page 100
Passwords/System Security
There are a number of opportunities that you will have to use passwords
to protect your system or your data. Keep in mind that a good password
should be easy to remember, but should not be a word or number that
could easily be guessed or that might be easily discovered in your other
possessions. Agood password should also be as long as possible (within
the limits of your password utility) and should contain a combination of
numbers and letters (and non-alphanumeric characters-such as punctuation
marks-where permissible).
The Password Protection Available to You Includes:
BIOS Password Protection: You can set this password to restrict access
to your hard drive at bootup or at entry into the BIOS Setup program.
his aggressive form of password protection can be used to limit access
to your system and files. If this password is enabled at boot, it will restrict
the computer from booting unless your password is provided. It will not,
however, protect your data if the drive is removed and placed into another
machine. See above for information about setting this password.
Windows Passwords: Windows comes equipped with an array of security
features that allow an administrator (or the user designated as one) to
limit access by specific users.
WARNING: If you forget or lose your Windows password, you will
have to reformat your hard drive and restore Windows from your
Restore CD. This can result in loss of data. Be sure to store your
password in a safe place and keep a backup version of your data files.
Screen Saver Password: If you use a screen saver in Windows, you can
set the system to require a password to resume normal functioning. This
can be used to protect your current session from a casual observer, but it
does not provide any substantial security.
100
Series
User’s Manual
If you are in an insecure
environment, you might
consider disconnecting
your USB Floppy Disk Drive
(if you have one) to help protect
your system from viruses.
The System File
Protection in Windows
will help prevent the
overwriting of critical
Windows files, but this is not an
effective protection from viruses.
You should obtain virus software
as additional protection for your
system.
X series manual w/no OS 9/5/01 2:20 PM Page 100
 Loading...