

Page 1

WinBook FX Manual
FX Chapter 1: Getting Started ___________________ 3
FX Chapter 2: System Tour _____________________10
FX Chapter 3: Mobile Computing _________________27
FX Chapter 4: Communicating ___________________34
FX Chapter 5: Expanding Your System ____________46
FX Chapter 6: Upgrading Your FX ________________53
FX Chapter 7: Maintaining Your FX _______________56
FX Chapter 8: Security __________________________60
FX Chapter 9: The Setup Program _________________64
FX Chapter 10: Solving Problems _________________87
FX Appendix A: Specifications ___________________115
FX Appendix B: Setup Program Summary __________119
This manual is copyrighted with all rights reserved. No part of this manual may be copied
without the written consent of Micro Electronics, Inc.
©1996 Micro Electronics, Inc. Version 1.1
This publication may include technical inaccuracies or typographical errors. The manufacturers
reserve the right to make improvements or changes to the product described herein at any time.
Micro Electronics makes no commitment to update or keep current the information contained in
this document.
MICRO ELECTRONICS MAKES NO WARRANTY OF ANY KIND WITH RESPECT TO
THIS MATERIAL, INCLUDING BUT NOT LIMITED TO, THE IMPLIED WARRANTIES
OF MERCHANTABILITY OR FITNESS FOR A PARTICULAR PURPOSE. MICRO
ELECTRONICS ASSUMES NO RESPONSIBILITY FOR ANY ERRORS THAT MAY
APPEAR IN THIS DOCUMENT, AND SHALL NOT BE RESPONSIBLE FOR DAMAGES,
INCLUDING, WITHOUT LIMITATION, CONSEQUENTIAL DAMAGES RESULTING
FROM RELIANCE ON INFORMATION IN THIS DOCUMENT.
Page 2

Products mentioned in this manual are mentioned for identification purposes only. Product
names appearing in this manual may be trademarks or registered trademarks of their respective
owners. WinBook Computer Corporation is a subsidiary of Micro Electronics Inc. WinBook and
WinBook FX are registered trademarks of Micro Electronics, Inc. MS-DOS and Windows 95 are
trademarks of Microsoft.
FEDERAL COMMUNICATIONS COMMISSION (FCC) STATEMENT
This equipment has been tested and found to comply with the limits for a class B digital device,
pursuant to Part 15 of the FCC Rules. Their limits are designed to provide reasonable protection
against harmful interference when the equipment is operated in a residential installation. This
equipment generates, uses, and can radiate radio frequency energy, and if not installed and used
in accordance with the instruction manual, may cause harmful interference to radio
communications. However, there is no guarantee that interference will not occur in a particular
installation. If this equipment does cause harmful interference to radio or television reception,
which can be determined by turning the equipment off and on, the user is encouraged to try to
correct the interference by one or more of the following measures:
· Reorient or relocate the receiving antenna.
· Increase the separation between the equipment and receiver.
· Connect the equipment into an outlet on a circuit different from that to which the receiver is
connected.
· Consult the dealer or an experienced radio TV technician for help.
Notice:
1.) Any changes or modifications not expressly approved by the party responsible for compliance
could void the user's authority to operate the equipment.
2.) Shielded interface cables and AC power cord, if any, must be used in order to comply with
the emission limits.
Page 3

CHAPTER 1: GETTING STARTED
Welcome to Mobile Computing
Congratulations on your purchase of the WinBook FX computer! This notebook PC features the
most advance innovations in portable computing technology. It is reliable, convenient, and easy
to use.
While providing all the functionality of a desktop PC, the WinBook FX’s compact size and
portability allow you to use your computer almost anywhere you go. You can work where there
is no electrical outlet or during a power failure. You can use your WinBook FX in your car our
outdoors. You can take notes while you are at a meeting or class.
This section of the User’s Manual will help you get started with your WinBook FX. It guides you
through unpacking to using the WinBook FX for the first time.
Check the Inventory
When you unpack your WinBook FX, check that the items included are in good condition.
Check the contents against the enclosed packing slip. If anything is missing or damaged, please
contact Customer Service immediately. See the "Read-Me-First" card for telephone numbers for
our service departments.
NOTE: Save the inner box and the plastic inserts that your WinBook FX was shipped in. These
may be handy later if you ship or store your system.[FX 1-2]
NOTE: The figure below does not show the Floppy Disk Drive or CD-ROM modules. To
inventory the entire contents, check the inventory checklist that came in the WinBook FX box.
Page 4
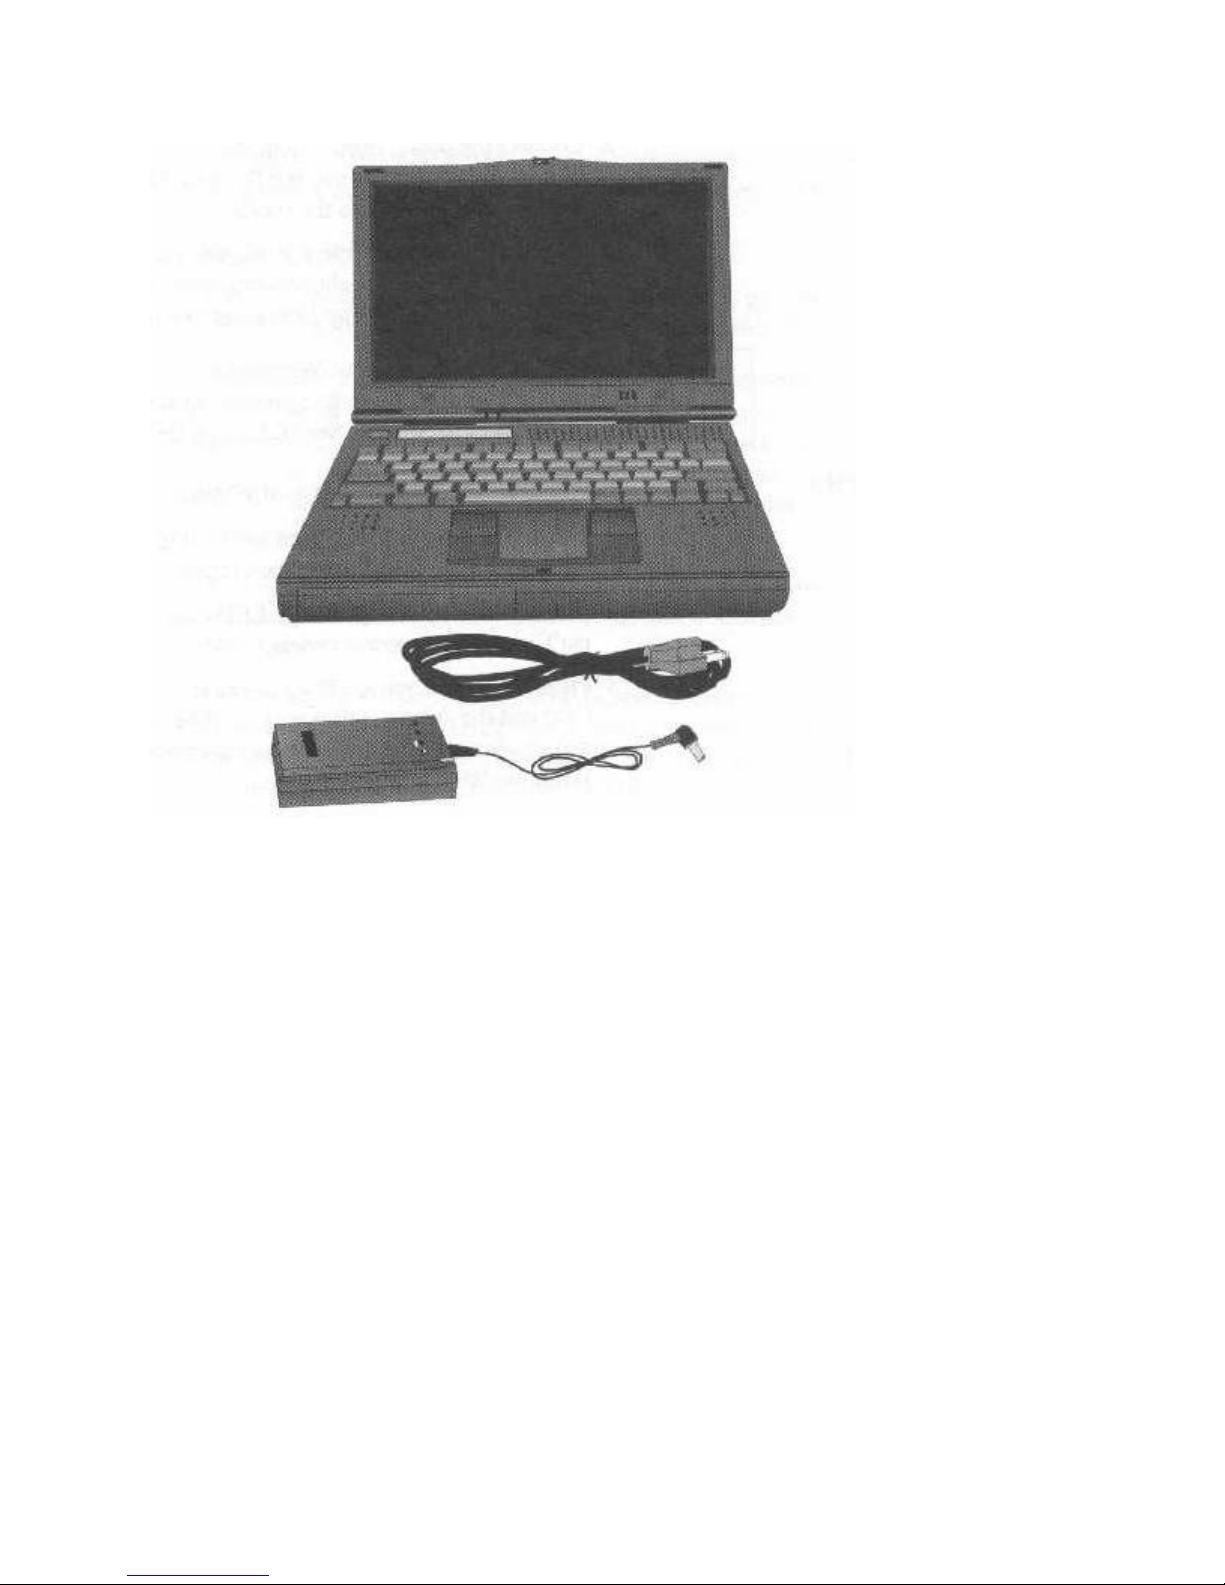
WinBook FX
Hardware Inventory
WinBook FX
Primary Battery (installed)
CD-ROM Drive (installed)
Floppy Drive (uninstalled)
AC Power Adapter
Power Cord [FX 1-3]
Plugging in your WinBook FX
Refer to the front and side views of the WinBook FX in Chapter 2, System Tour.
Plugging in the WinBook FX
Connect the power cable extending from the AC adapter to the power jack on the left side of
the WinBook FX. Make sure that the connector sheath locks firmly into the socket.
Plug the power cable into the adapter and then into a wall socket. The rightmost LED (light
emitting diode) on the left side of your WinBook FX will light up indicating that the battery
is being charged.
NOTE: The battery in your WinBook FX will have lost some charge since it left the factory, so
Page 5

let it charge up when you use your WinBook FX for the first time. See "Charging the Battery" in
this chapter.
Starting Up
Starting up the WinBook FX and Windows 95
Locate the display panel latch on the WinBook FX and slide it to the right. Gently lift the
display panel open.
Check that the Battery Charge LED (the one on the right) is on. If it isn’t, check your power
connections.
Press the power button. The Power-On LED (the one on the left) will light and the system
will power-up. The WinBook FX will now boot and display self-test and sign-on information
on the display. Wait for Windows 95 to start.
As Windows 95 starts up for the first time, the system will ask for your name, company, and
the product identification number. Your Windows 95 product ID number is on the front
cover of the Windows 95 manual that came with your system.[FX 1-4]
Windows 95 will continue the setup routine and ask you about your location, accessories, etc.
Adjusting Display Brightness
Adjusting the Display Brightness
To increase display brightness, press 2 keys together: <Fn> + <4>
To decrease display brightness, press 2 keys together <Fn> + <3>
Using the Pointing Device
Using the Pointing Device:
The WinBook FX comes with a standard TrackPoint pointing device. A TouchPad pointing
device is available as a factory-installed option.
TrackPoint
The TrackPoint consists of a pressure sensitive knob set in the middle of the keyboard. By
pressing this knob, you send directional information to the pointing device driver. The system
translates this into movement of the screen cursor. There are 2 switches on the palm rest beneath
the space bar. These are equivalent to the left and right buttons on a standard mouse.
NOTE: Left-handers, you can change the button orientation if you wish. See the "Additional
Pointing Devices" section in Chapter 5, Expanding Your System.
TouchPad
The TouchPad (a factory-installed option) senses finger movement across it and sends directional
information to the system. You can use the TouchPad with the buttons, or you can tap on the
Page 6

TouchPad for the same effect as the left mouse button.[FX 1-5]
TouchPad Click and Drag
The following figure shows how you can select and move an item (click and drag) with the
TouchPad. Simply use your finger on the Touch Pad to point the cursor at an item on the screen.
Select the item by tapping the TouchPad. Then move the item on the screen by moving your
finger across the TouchPad.
TouchPad Software Driver
Although the TouchPad will work fine with the Windows 95 standard PS/2 mouse driver, you
may want to use the enhanced driver included in the WinBook FX with Touch Pad option
installed. This drier allows you to more accurately control the special actions of the TouchPad
such as the tap and the double-taps. If the driver is already installed, you will see a TouchPad
icon instead of the mouse icon in the Windows 95 Control Panel screen. If you see the mouse
icon, you may want to install the Touch Pad driver from the floppy disks that came with the
system. [FX 1-6]
Installing the TouchPad Software Driver
Insert the Floppy Drive into the Media Bay and power-up your WinBook FX. Once in
Windows 95, insert the TouchPad driver diskette into the drive. Select Start, Settings, and
then Control Panel. Next, select the Add New Hardware icon.
Click on the Next button, and then select the No button, followed by the Next button.
On the next screen, double click on the Mouse icon, then click on the Have Disk button.
Click on the OK button, then the Next button, and Windows 95 will begin installing the
TouchPad driver. Click on the Finish tab to complete the installation.
You must reboot your system to enable the new driver.
Checking Your Preloaded Software
Once you have Windows 95 up, you may want to check out some of the applications that were
shipped with your WinBook FX.
WARNING: Although a lot of floppy disks full of software came with your WinBook FX, most
of this software is already installed for you. DO NOT install software until you see what is
already on your system.
To start your applications, select Start then Programs. A Windows 95 applications list will
appear. Following is information about some of the software already installed on your system.
CardWorks
This is a SystemSoft application that is really a set of tools for managing and accessing PCMCIA
cards in the Windows 95 environment. This appears as a folder under Start, Programs. In this
folder, you will find an application called CardWizard, as well as a Help file and a ReadMe file.
Page 7

[FX 1-7]
Power Panel
This is a Phoenix Windows application, which allows you to control and customize the power
setting in your WinBook FX. This appears as the Power Panel folder in Start, Programs. In
this folder, you will find an application called Power Panel as well as Help and ReadMe files.
Arcade Player
This is an application from Mediamatics Corporation that allows you to playback MPEG files on
your WinBook FX. These files can be from a CD-ROM, the Internet, or any other sources of
standard MPEG-1 files.
Also provided by this application is the capability of playing CDV disks (Compact Disc Video)
using the CD-ROM inside your WinBook FX. This will appear as the Mediametrics Software
MPEG folder in the Start, Programs section. In this folder you will find an application called
Arcade Media Player, as well as a How to Use Media Player file and an MPEG ReadMe file.
Audio Applications
This suite of Windows 95 audio tools by Creative Technologies provides a complete set of
utilities for creating, editing and managing all types of sound within our WinBook FX. This will
appear in the Audio Applications folder in the Start, Programs section. In the folder will be a
suite of applications including: Audio Rack, CD Player, MIDI Player, Mixer Control, Wave
Player and Wave Editor. In addition, there is a ReadMe file with details about these audio
applications. For more information, refer to the Audio User’s Guide that came with your system.
TranXit
This software, created by Puma Technologies, allows you to use the IR (infrared) capabilities of
the WinBook FX to communicate with similarly equipped notebooks, desktop systems, and
printers. [FX 1-8]It provides both a communication suite as well as a printer redirector. Besides
IR, Puma TranXit also supports connections over the parallel port or serial port. This appears as
the TranXit2 folder in the Start, Programs section. In the folder will be an application called
TranXit as well as an extensive Help program called TranXit Help. In addition there is a ReadMe
file containing notes on this specific release, plus some utilities for upgrading and registering the
software.
_
Battery
Page 8

Charging the Battery
The battery in your WinBook FX will probably have lost charge since it left the factory. We
recommend that you leave it plugged into the AC power adapter for at least 2 hours before
relying on the battery.
To charge the battery, connect the AC adapter cord to the power jack on the left side of the
WinBook FX. Then connect the power cable first to the AC adapter, and then into an electrical
outlet. If power is reaching the adapter, the adapter’s green LED will be illuminated.
The batteries will charge whether the system is on, off, or in a power savings mode: however,
they will charge faster with the system off. It takes about 4 hours to fully charge the primary
battery with the system off. The WinBook FX should run for at least 2 hours on a fully charged
primary battery. Refer to "Monitoring Battery Charge" and the Battery Warnings table in
Chapter 3 for indicators of low battery charge.
Checking the Battery Charge Level
The Popup Status window is the most precise method. By pressing 2 function keys
<Fn> + <F2> simultaneously, you will bring up the window. This window will
present the charge level on both primary (BAT1) and secondary (BAT2) battery
modules as a percentage of power remaining.[FX 1-9]
The Battery Charge LED will go off as the battery reaches full charge.
Charge Level LED on the battery module will all go on. To illuminate the charge
LEDs on the battery pack, push the little black button on the pack. The button works
whether the battery is installed in the computer or not, so you can always check the
pack (or extra packs) easily.
The Battery Charge icon in the LCD Status window (battery gauge) indicates full
charge.
Turning Off the WinBook FX
Before turning off (powering down) your WinBook FX, select Start in the Windows 95, then
Shutdown.
WARNING: Don’t turn off or boot the WinBook FX while in Windows 95. Doing so can
cause total loss of data on your hard drive.
If your WinBook FX encounters software problems and needs a power-on reset, it may be
necessary to hold the power button down for a couple of seconds before the system responds by
powering down.
_
Adding New Software
Adding new software to the WinBook FX is simple. Place the software installation floppy disk or
CD-ROM into the corresponding drive module in the Media Bay. Select Start, then Run in
Windows 95. Indicate the drive. The floppy is drive A: and the CD-ROM is drive D:. Enter
Page 9
setup. For further information, check the instructions that came with your new software.
WARNING: Although a lot of software floppy disks came with your WinBook FX, most of this
software is already installed for you. DO NOT install more software until you see what is already
on your system.[FX 1-10]
Swapping the CD-ROM and Floppy Drives
The WinBook FX will arrive with the CD-ROM Drive installed in the Media Bay. To use floppy
disks, you must remove the CD-ROM Drive and install the Floppy Disk Drive module. You can
swap modules under the following conditions: The WinBook FX is OFF, not charging the
battery, and unplugged, or is OFF and charging the battery.
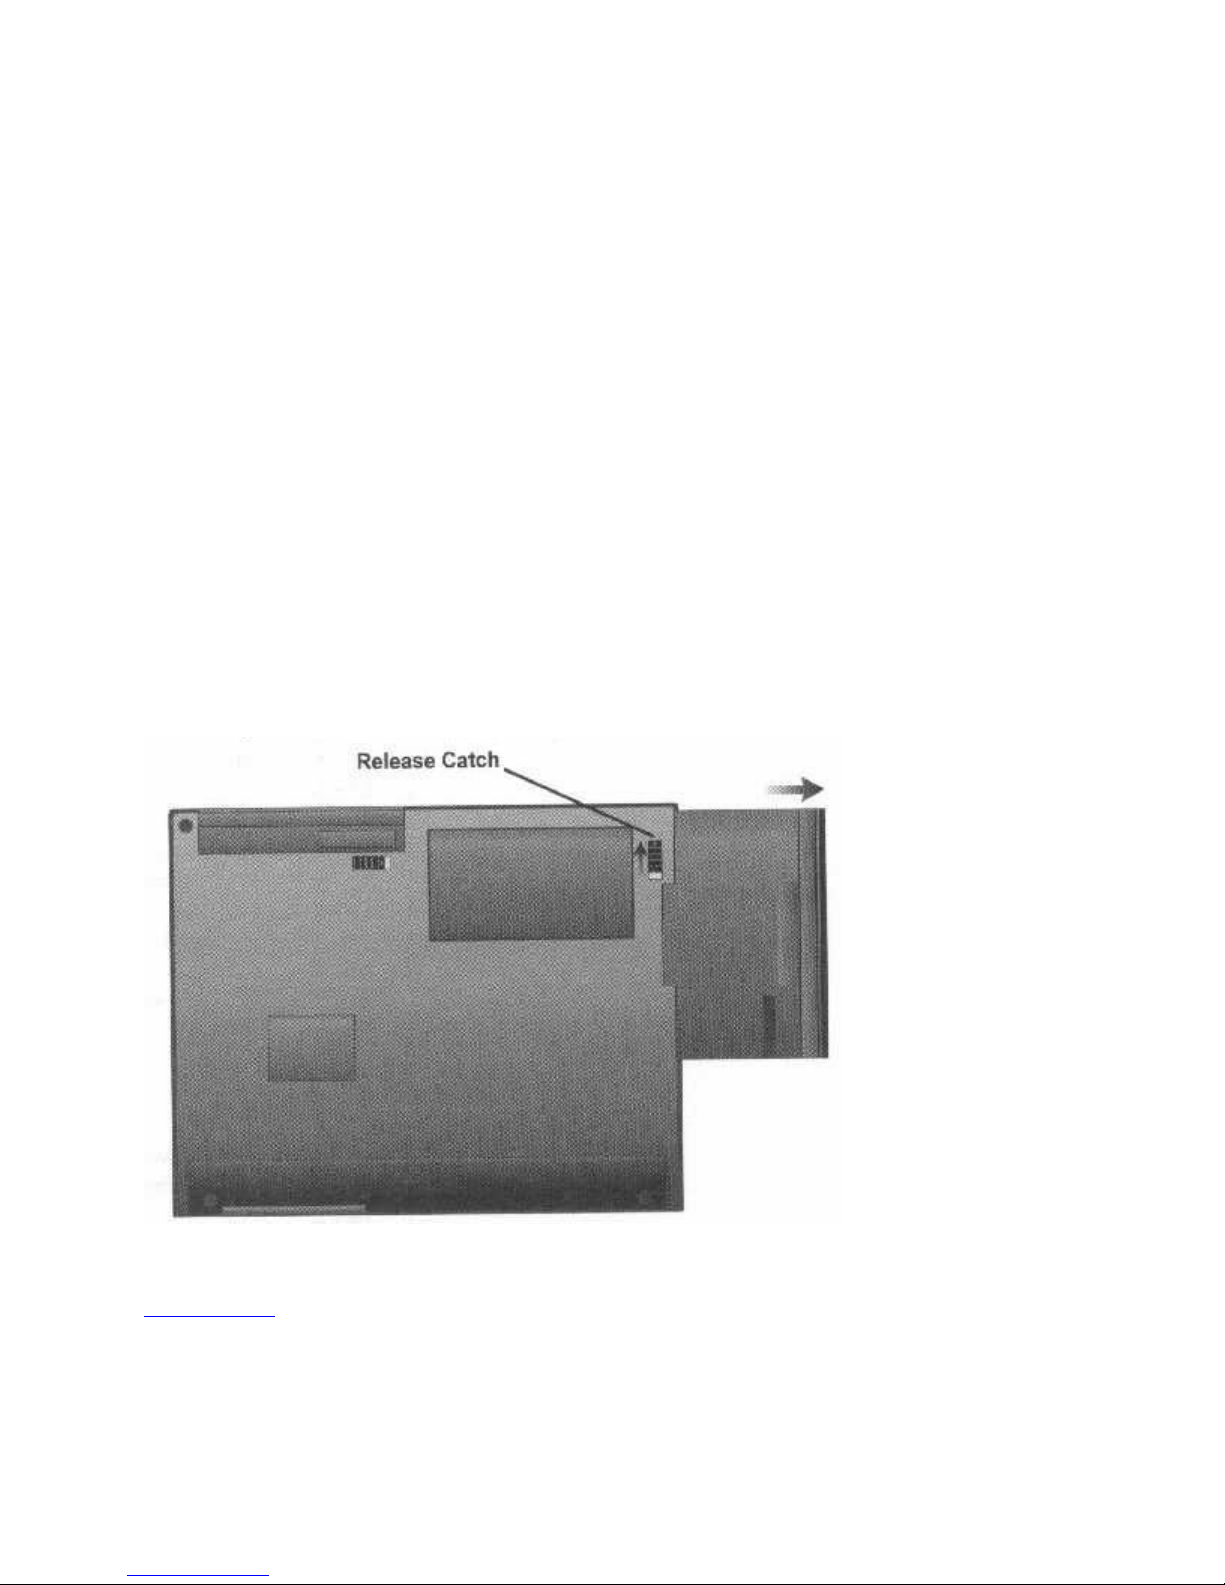
Swapping Modules in the Media Bay
Make sure the power is OFF.
Place the WinBook FX on a flat surface, top down.
Locate the Media Bay release catch. Slide the release catch as shown in the illustration, and
pull the module out of the bay.
Align the replacement module and slide it in gently until the release catch snaps into place.
Be sure to push the module all the way in so it is securely seated and flush with the edge of
the computer.
[FX 1-11]
FX Chapter 2
Page 10
CHAPTER 2: SYSTEM TOUR
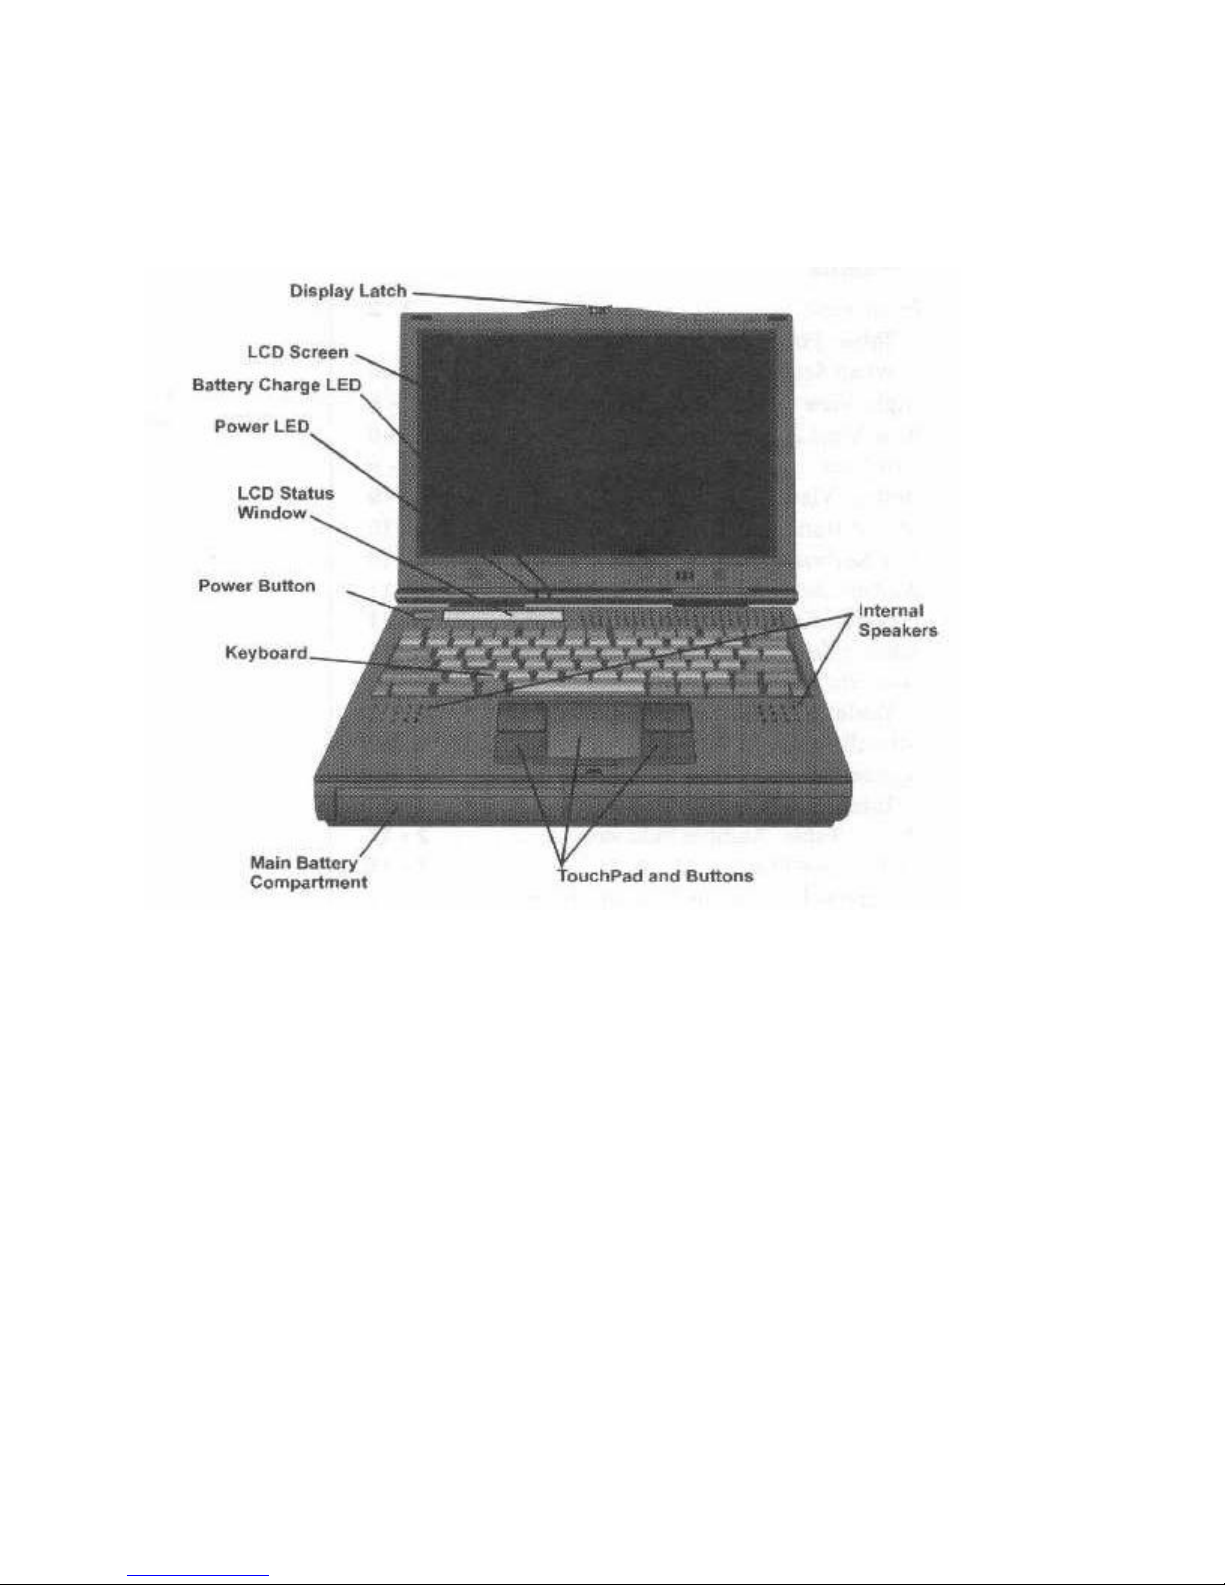
WinBook FX Front View
Display
Panel Latch
Holds the display panel in the down locked position.
LCD Screen
Presents information wit a standard resolution of 800 X 600. Note that the video interface
supports 1024 X 768 X 256 colors on an external monitor.
Battery Charge LED
Indicates the charging status of the WinBook FX.[FX 2-2]
This LED (Light Emitting Diode) shines when the battery is charging and goes out when the
battery is fully charged. When the battery is low, this LED will flash. (See the Battery Warnings
table in Chapter 3).
Power LED
Indicates when the WinBook FX is on, and flashes when the system is in Suspend mode. See
Chapter 3, Mobile Computing, for information on the Suspend mode.
Page 11
LCD Status Window
Displays icons that show the status of the battery, AC power, hard disk drive, floppy disk drive,
the <Caps Lock> key, the <Scroll Lock> key, and the <Num Lock> key. Refer to the LCD
Status Display section later in this chapter.
Power Button
Allows you to power-on the WinBook FX. To power the system off, press this button again.
NOTE: Under certain circumstances, the system may just stop when running a program and will
no longer respond to the keyboard or pointing device. If you press the power button to turn off
the system, it may not go off. Just press the button down again and hold it down for 2 seconds.
The system will turn off and you can reboot it.
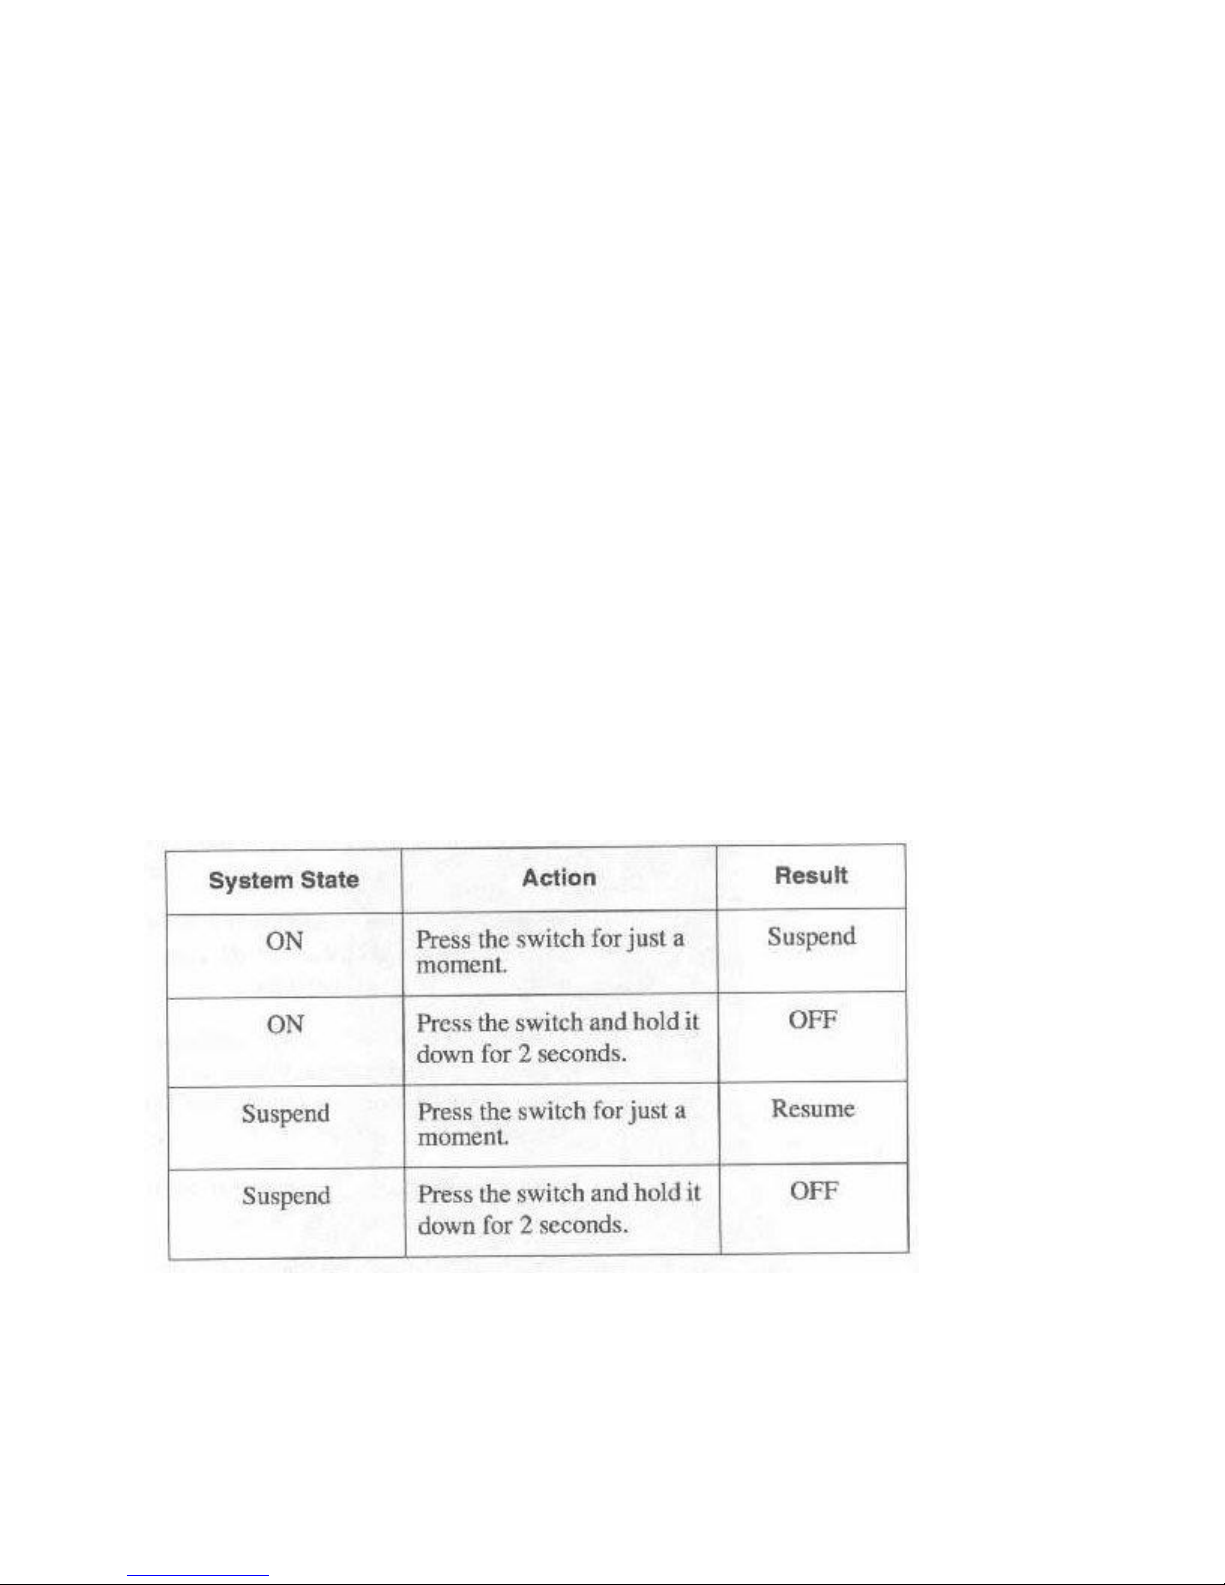
You can also use this switch to put your WinBook FX in Suspend to RAM mode. To do this you
must first make a setting on the Power Savings menu of the Setup Program. See Chapter 9,
Using the Setup Program, for details. When the power button is set to support Suspend, it
functions as described in the table on the next page.[FX 2-3]
Power Button Function When Set for Suspend
See Chapter 9, Using the Setup Program, under the Power Savings menu for information on
setting the power button for Suspend.
Keyboard
Page 12
Allows standard QWERTY – Style input.
Main Battery
The battery module that is seated in a bay accessible at the front of the WinBook FX chassis.
TouchPad and Buttons
Allow pointing input to the WinBook FX. The 2 buttons correspond to the 2 buttons on a mouse.
The TouchPad is used in the illustrations in this manual.
Internal Speakers
These are internal stereo speakers.
[FX 2-4]
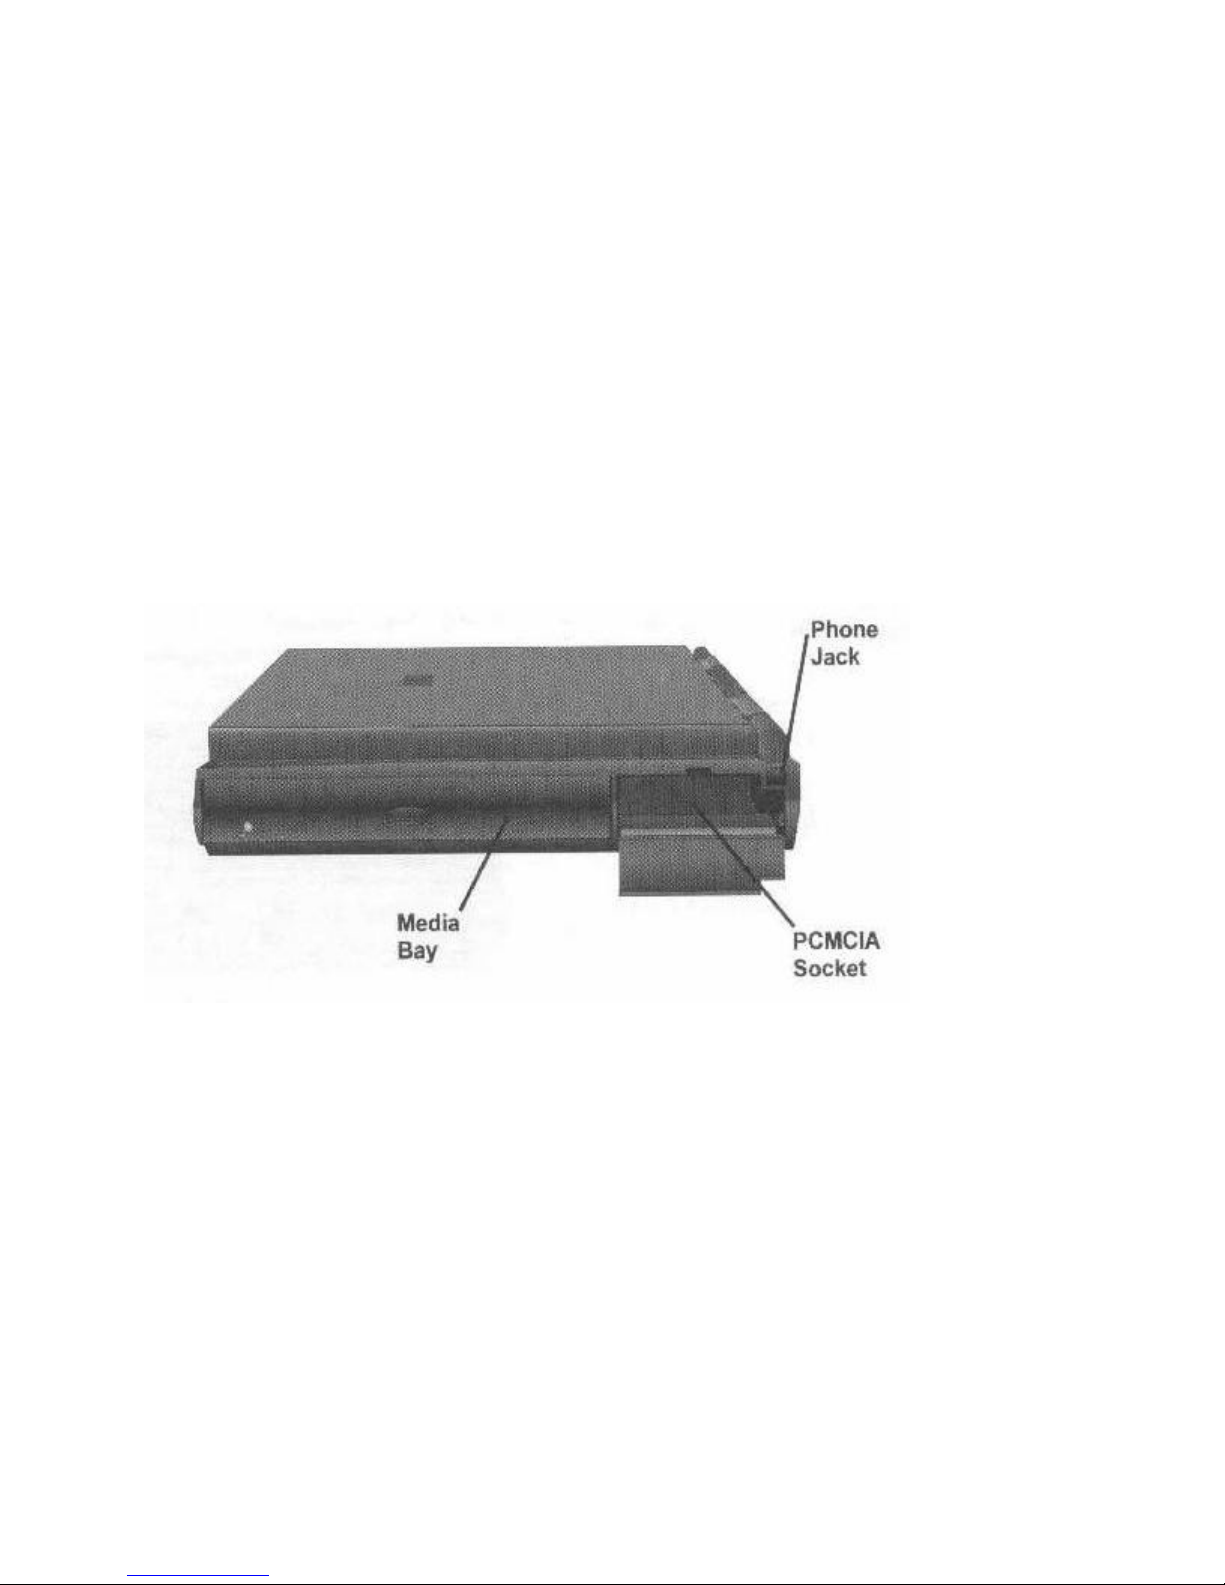
The WinBook FX Right View
Media Bay
Holds the CD-ROM drive when the system is shipped. You can remove the CD-ROM drive and
replace it with other modules: Floppy Disk Drive module, Secondary Battery module, and PCI
module.
For information on swapping modules in the Media Bay, See Chapter 1, Getting Started. For
information on secondary battery modules, see Chapter 3 on Mobile Computing. For information
on PCI modules for the WinBook FX, call Sales at the number on the "Read-Me-First" card.
PCMCIA Socket
Pulling the door down accesses this area. The upper slot is socket 1 and the lower slot is socket
2. For information on using the PCMCIA socket, see Chapter 6, Upgrading Your WinBook FX.
Phone Jack
Page 13
Connects a phone line to the internal modem. Refer to Chapter 4, Communicating, for
information on phone jacks and adapters.
[FX 2-5]
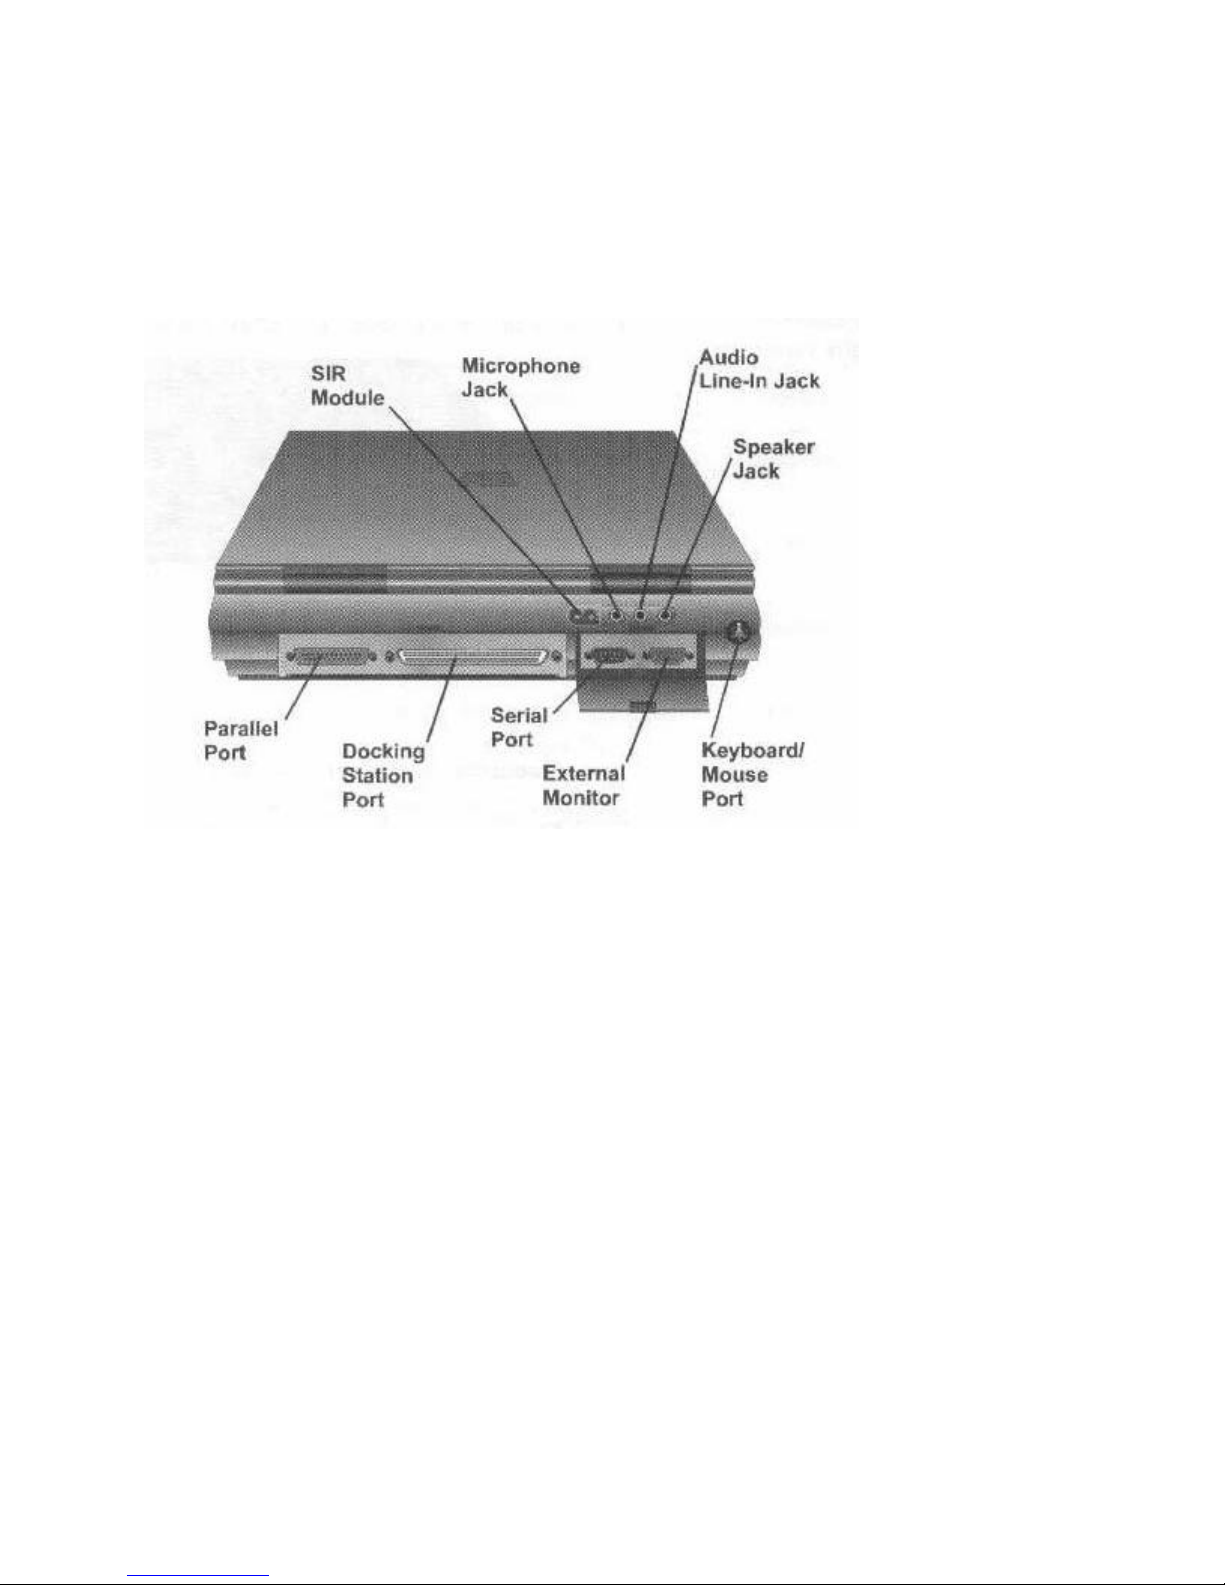
WinBook FX Rear View
SIR Module
Serial Infrared module allows wireless, serial communication between the WinBook FX and
other devices such as printers and computers. See Chapter 3, Communicating, for more
information on this interface.
External Microphone Jack
Allows connection of a microphone to the WinBook FX. See Chapter 5, Expanding Your System,
for more information.
Audio Line-In Jack
This connects the WinBook FX to external audio sources such as a tape player. See Chapter 5,
Expanding Your System, for more information.[FX 2-6]
External Speaker Jack
This connects external audio speakers. Chapter 5, Expanding Your System, provides more
information.
Parallel Port
Page 14
This connects the WinBook FX to printers and other standard parallel port devices. See Chapter
5, Expanding Your System, for more information.
Docking Station Port
This allows the WinBook FX to be connected to mini or full sized docking stations.
Serial Port
Interfaces RS-232 serial devices such as mouse, serial printer, and graphics tablet to the
WinBook FX. See Chapter 5, Expanding Your System, for more information.
Video Port
Connects an external monitor (CRT) to the WinBook FX. See Chapter 5, Expanding Your
System, for more information.
Keyboard & PS/2 Mouse Port
Automatically detects whether a standard PS/2 keyboard or external pointing device has been
connected. See Chapter 5, Expanding Your System, for more information.[FX 2-7]
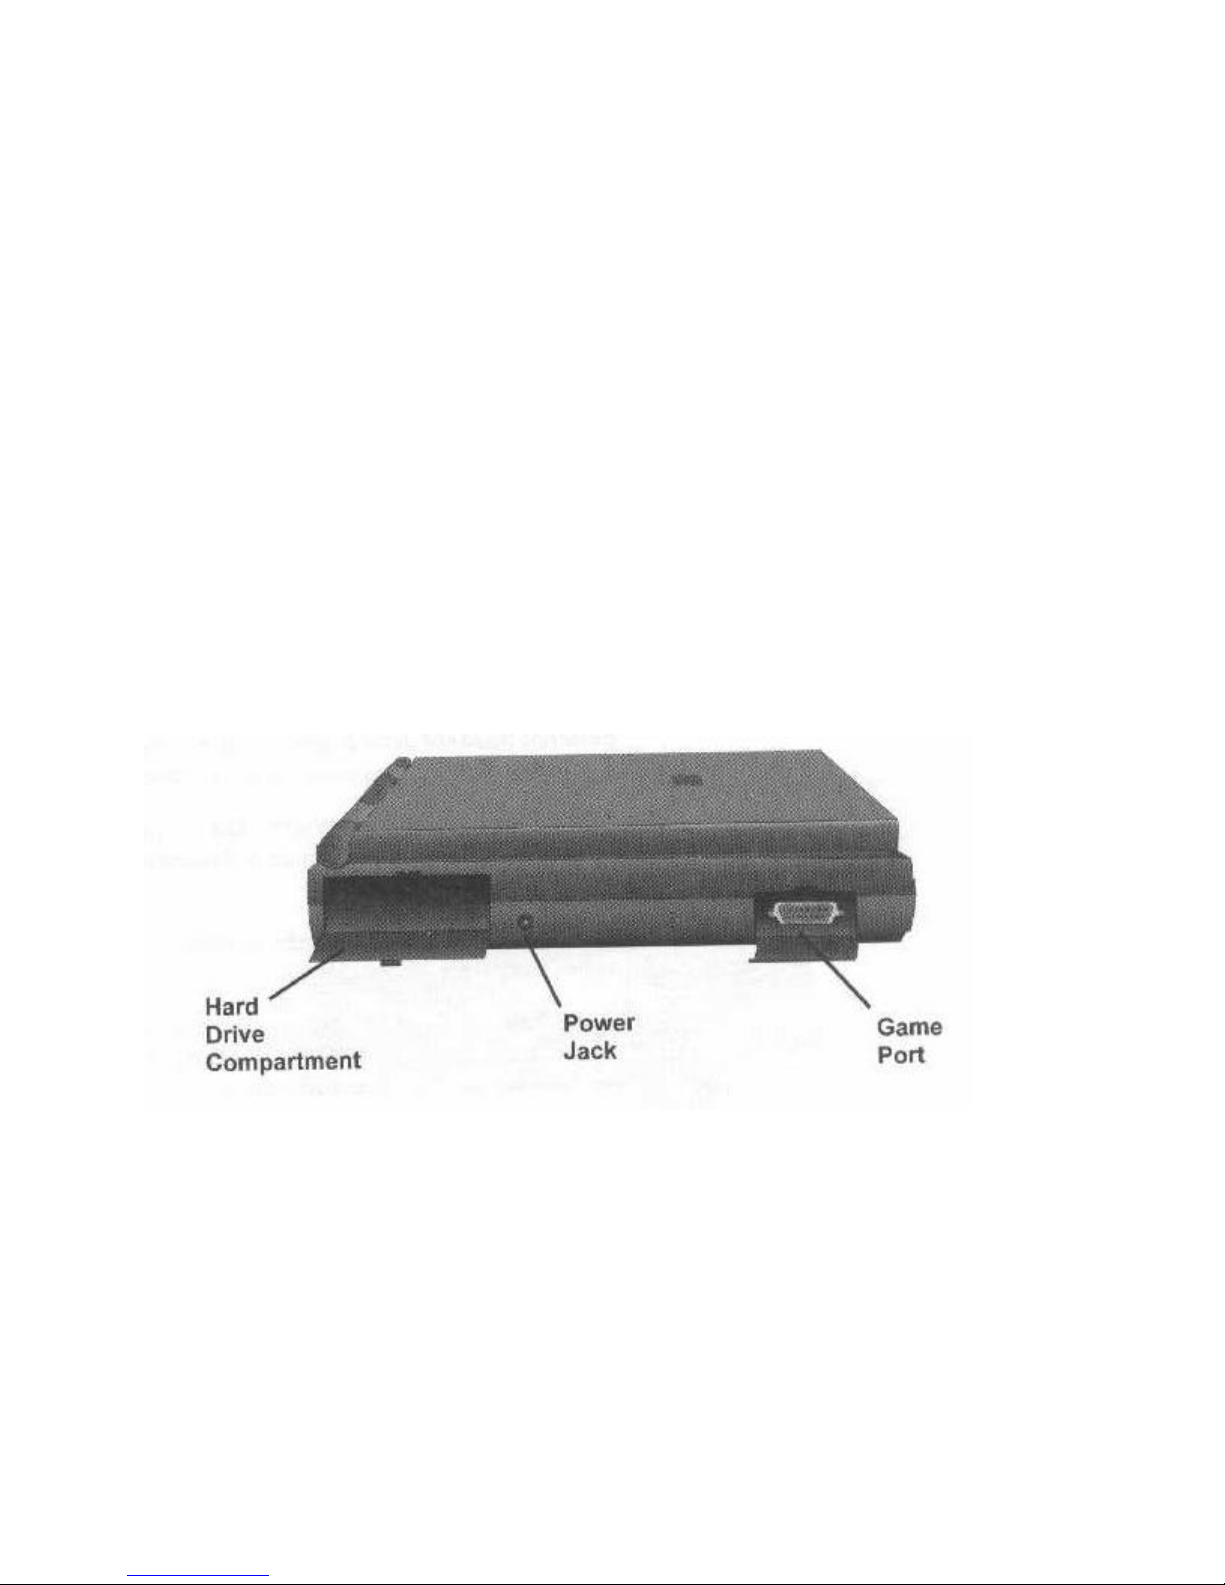
WinBook FX Left View
Hard Drive Compartment
Allows access to the hard disk drive. For information on hard disk drive upgrades, see Chapter 6,
Upgrading Your WinBook FX.
Power Jack
Connects power from the AC power adapter to the WinBook FX. For information on alternative
power sources, see Chapter 3, Mobile Computing.
Game Port
Page 15
Interfaces the WinBook FX to joysticks or other game pointing devices.[FX 2-8]
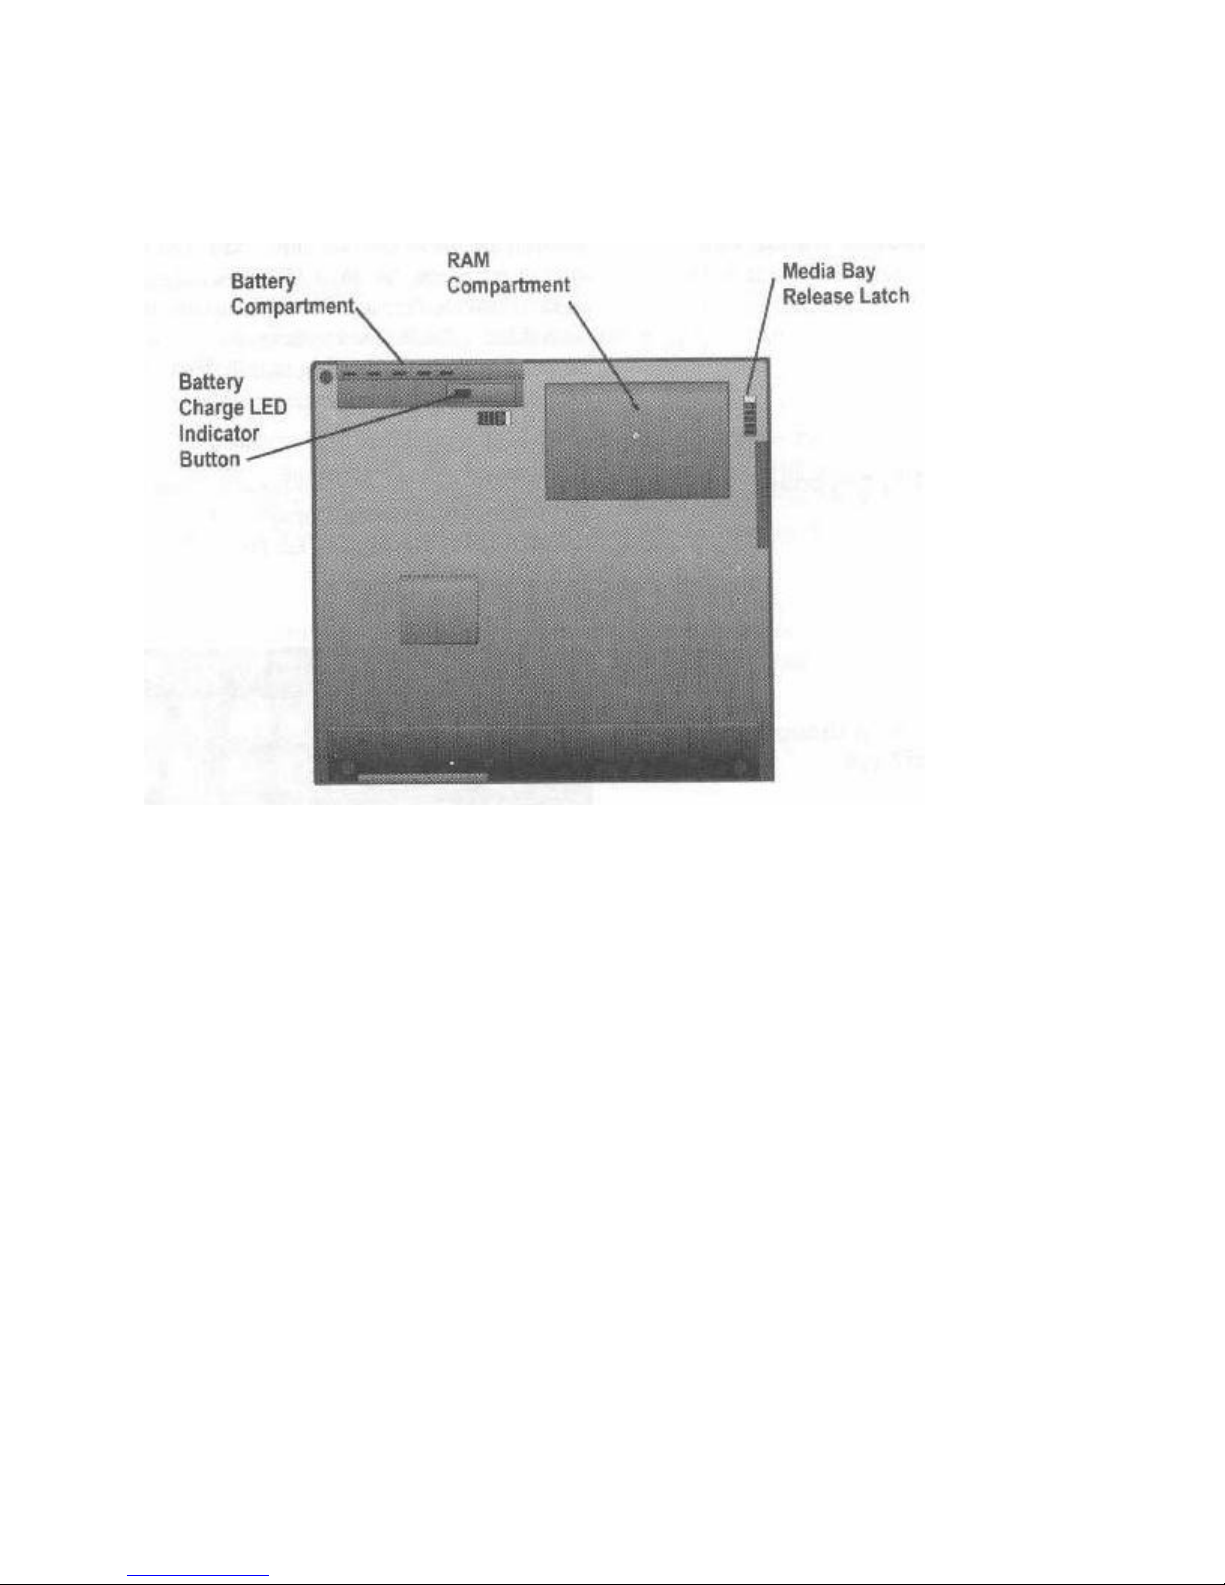
WinBook FX Bottom View
Battery Compartment
Holds the primary battery cartridge in place. When inserting the battery cartridge, make sure the
release latch clicks shut. For information on batteries, see Chapter 3, Mobile Computing.
RAM Compartment
Houses the WinBook FX’s RAM modules. See Chapter 6, Upgrading Your WinBook FX, for
information on RAM upgrades.
Media Bay Release Latch
Holds the module in the bay in place. When inserting a module, make sure this latch clicks
shut.[FX 2-9]
Mouse Buttons
The left and right buttons mounted in the palm rest are just like those on a standard mouse. In
application programs, the left button is usually used to make selection. The function of the right
button varies widely with different software applications. Some applications allow you to assign
functions to the right button. Refer to your application’s User’s Manual for specific information
on pointing device function buttons.
Page 16
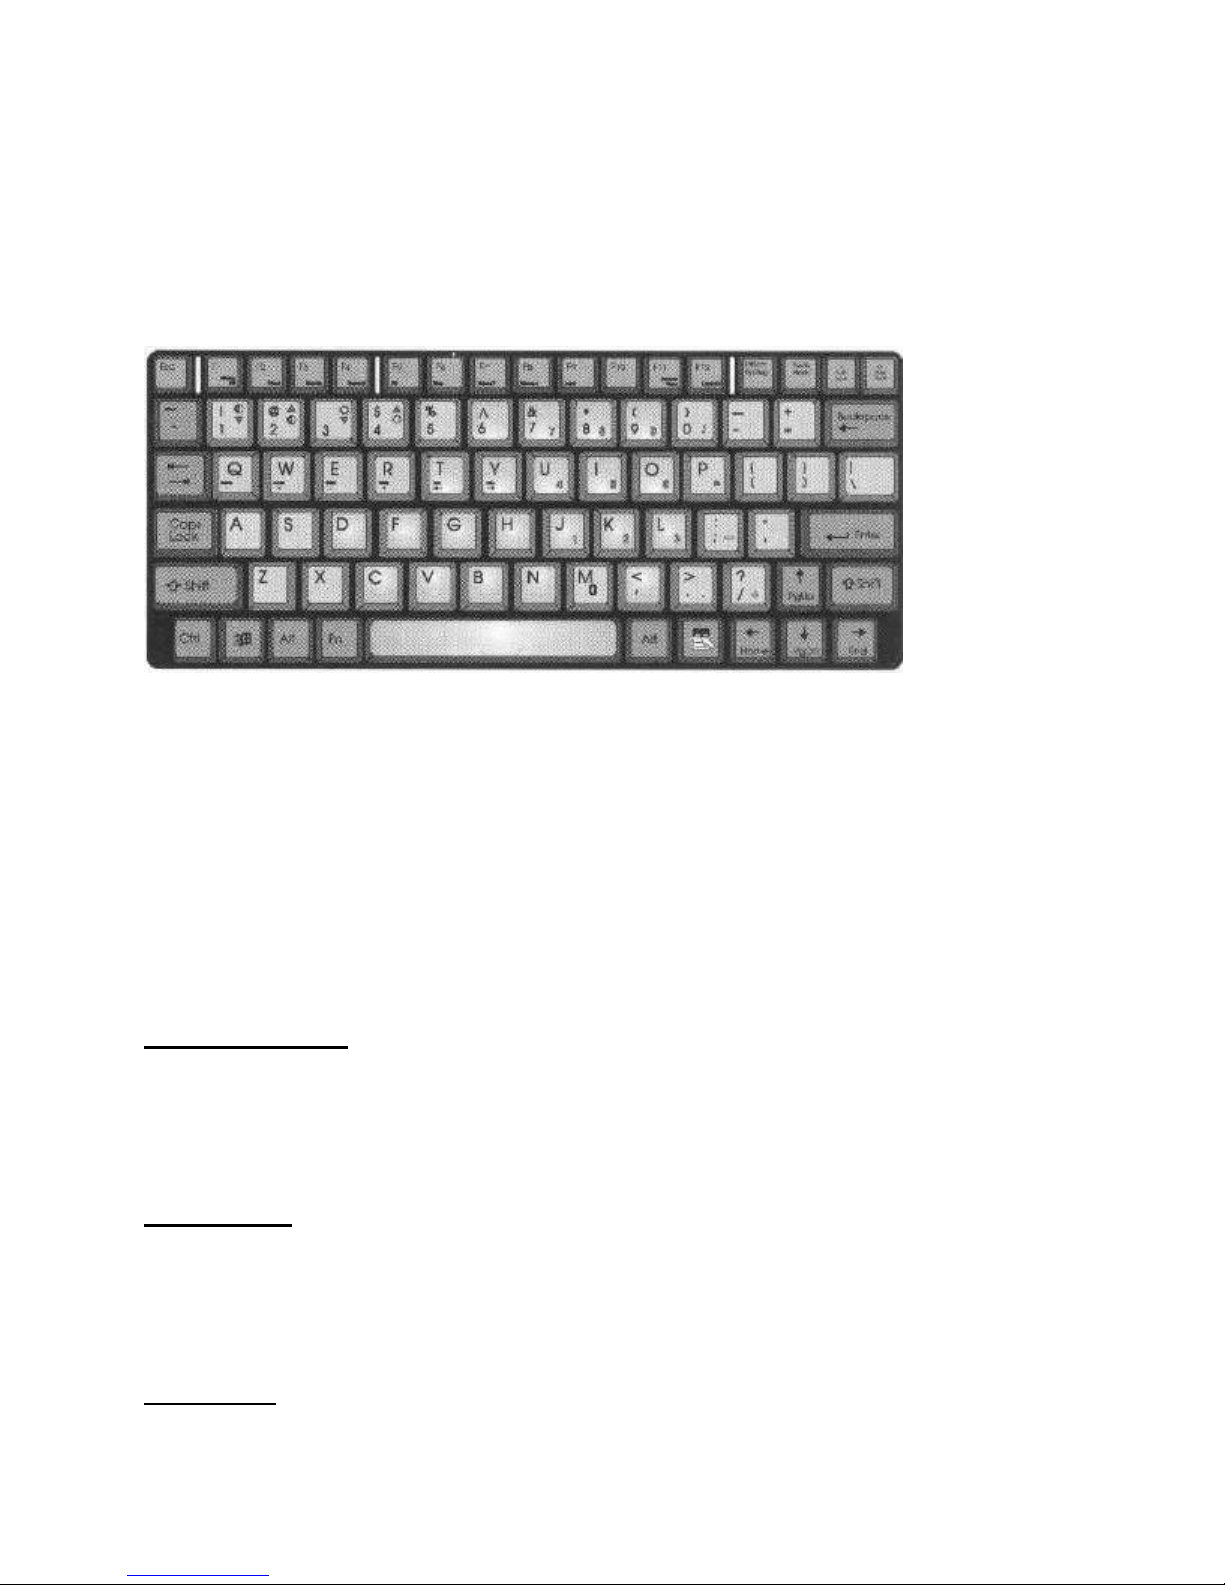
The Keyboard
The WinBook FX comes equipped with an 81 key, low profile keyboard that features an
embedded numeric keypad and a full array of special function keys. The built-in keyboard
provides all the functions of a full size 1010key keyboard.
Keyboard Layout
The keyboard consists of five main groups of keys: alphanumeric keys, function keys, editing
keys, embedded numeric keypad, and miscellaneous keys.[FX 2-10]
Main Groups of Keys
Alphanumeric
Function
Editing
Embedded numeric keypad
Miscellaneous
Alphanumeric Keys
Like the keys of a standard typewriter, alphanumeric keys consist of alphabetic keys (A-Z) and
numeric keys (0-9), as well as other keys with printable symbols found on most typewriters. The
alphanumeric keys are arranged in basically the same manner as typewriter keys (QWERTY
keyboard).
Function Keys
The function keys are the smaller keys in the top row of the keyboard labeled F1 through F12.
The functions they perform vary with respect to the operating system and software in use. Refer
to the appropriate software User’s Guide for more detailed information on function key
differences.
Editing Keys
Page 17
Insert
Delete
Cursor
Page
The functions of editing keys vary according to the software in use. Refer to the appropriate
software User’s Guide for definitions of the following editing keys.
Insert Key: Text editors and word processor programs generally use this key for inserting
text and other data into a passage of text.
Delete Keys: This key is used by most programs to delete data.
Cursor Keys: These 4 keys (also called direction keys) are located at the lower right hand
corner of the keyboard and are marked by 4 arrows pointing in 4 directions. In some
programs, the arrows indicated the direction the cursor moves when the keys are pressed.
Page keys: Hold down the <Fn> key when using the page keys. Word processor programs
commonly use these keys to move the cursor the width and length of an entire page.
[FX 2-11]
Numeric Keypad
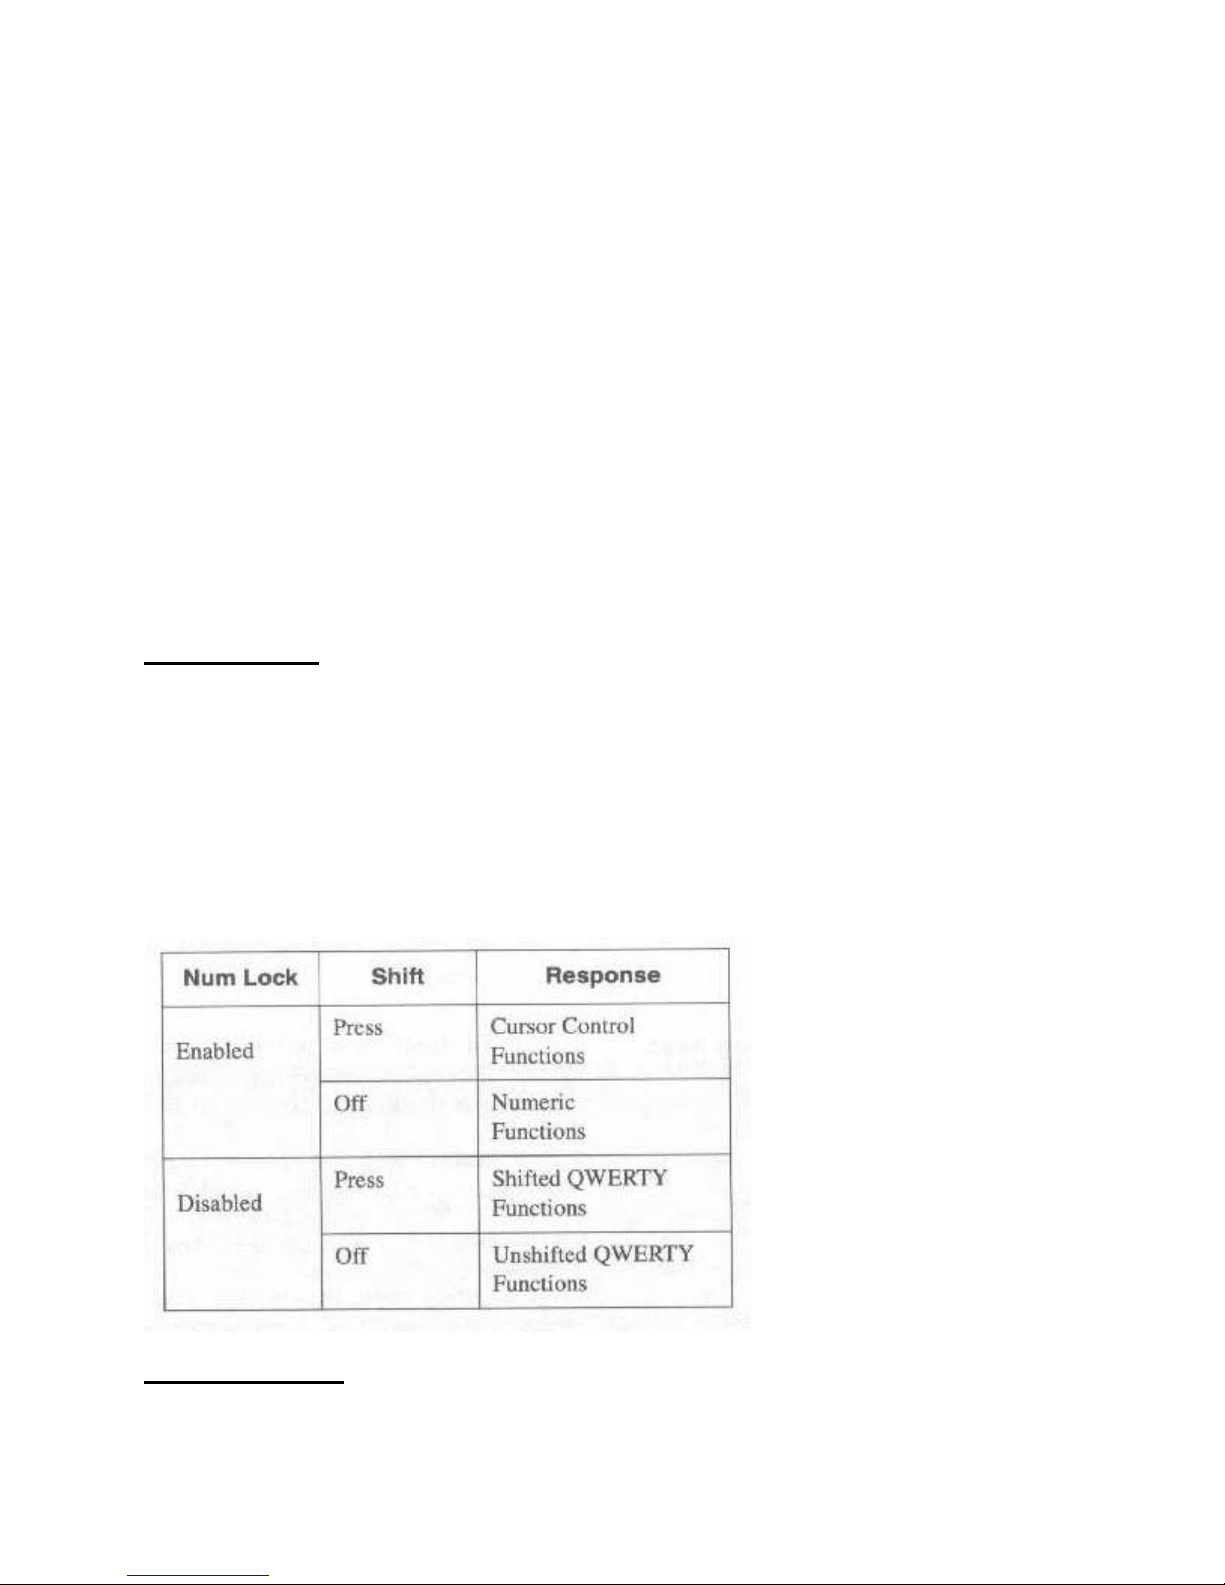
The embedded numeric keypad consists of a set of 15 keys that make number intensive input
more convenient. These keys have both numeric and cursor movement functions. Numeric
assignments are found on the lower right of each key.
The functions of the keypad vary according to the <Num Lock> and <Shift> key combinations.
To activate the keypad, refer to the following table for various key combinations and their
results.
Numeric Keypad Combinations
Miscellaneous Keys
Most of the keys covered in this section have software specific functions. For more detailed
Page 18

information on these keys, refer to appropriate software manuals.
Escape key: Although this key is software specific, it generally functions as an all – purpose
"stop" key.[FX 2-12]
Tab key: In most text mode applications, this key functions like the Tab key on a standard
typewriter.
Shift key: When pressed with an alphanumeric key, the <shift> key generates either upper case
letters or the symbols at the top of the key. Note: There are 2 <shift> keys on the keyboard.
Caps Lock key: This key corresponds to the Shift Lock key on a typewriter, but it only affects
letter keys-that is, number keys and function keys are not affected. To generate the symbols and
punctuation marks above the number keys, the <Shift> key must be pressed. Pressing <Caps
Lock> engages or disengages the keyboard’s Caps Lock setting.
Using the <Shift> while striking a letter key with <Caps Lock> engaged would generate a low
case letter instead of an upper case letter.
Control and Alternate keys: These keys are software specific and are usually used in
conjunction with other keys.
Num Lock key: When <Num Lock> is enabled, this key activates the numeric function of the
keypad.
Print Screen key: Refer to the User’s Guides of the operating system and software you are
using for details on how to use this key. In most programs, whatever is displayed on the screen is
printed when this key is pressed.
Scroll Lock key: This is a software specific key. Refer to the appropriate software manual for a
description of Scroll Lock. The <Scroll Lock> key affects cursor movement and text scrolling in
some applications.[FX 2-13]
Pause/Break key: Press this key to halt the scrolling of information being displayed on the
screen.
Backspace key: Pressing this key deletes text and symbols from right to left.
Enter or Return key: This key is used by most operating systems to enter commands typed at
the command line prompt. It also functions like a typewriter carriage return when used with word
processing programs and other applications.
Space Bar: The space bar functions like a typewriter space bar when used with operating
systems, word processing programs, and other applications.
Left Windows key: This key will bring up the Start menu when pressed in Windows 95.
Right Windows key: The function of this key will vary depending on applications. Usually it
will bring up a program menu option. Microsoft refers to this key as the program key.[FX 2-14]
Special Function Keys
Page 19
Display Controls
Power Controls
Audio Controls
Miscellaneous Controls
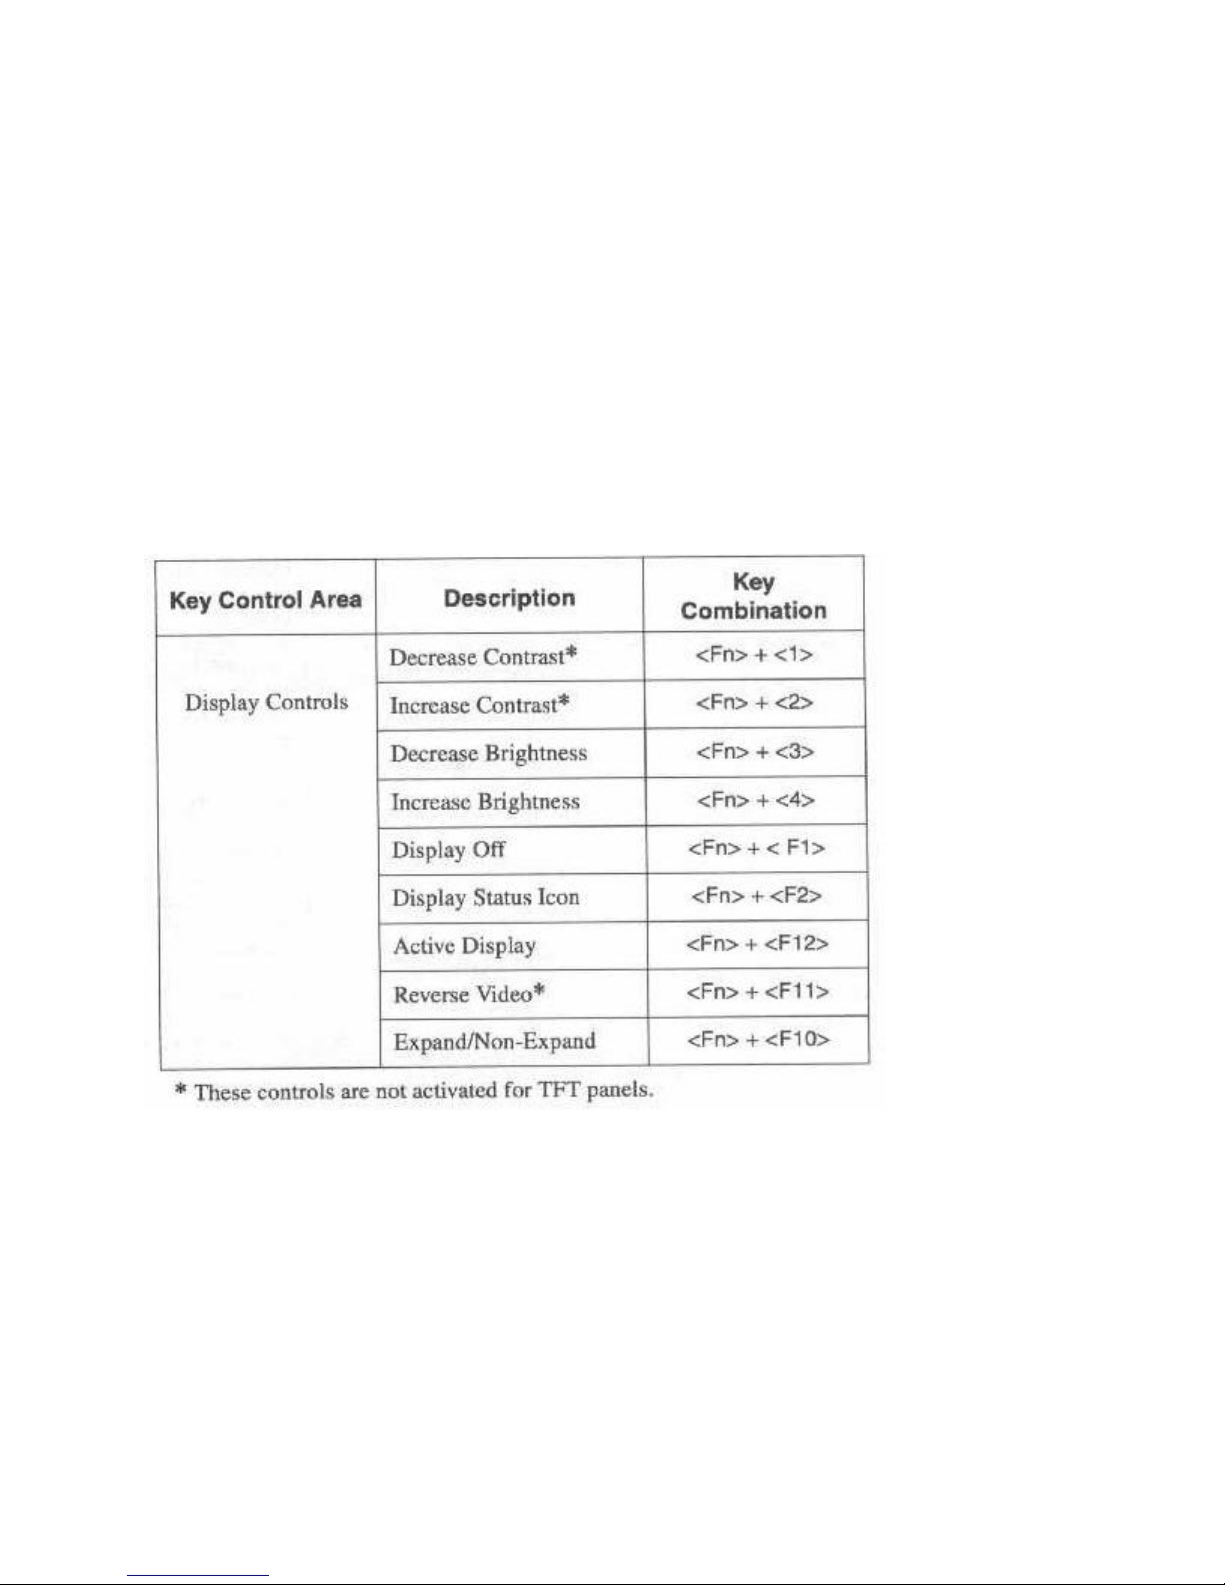
The WinBook FX offers convenient keyboard controls. Some of these are permanent because
turning the WinBook FX on an off does not affect them. Others are temporary and must be reset
when the WinBook FX is powered back on. Special function keys fall into 4 categories: Display
Controls, Power Controls, Audio Controls, and Miscellaneous Controls.
Expand Mode supports users of games and other applications operating under MS-DOS by
expanding the 640 x 480 display to cover the entire 800 x 600 screen. You can toggle the expand
mode on and off with the key combination shown in the table below.
Keyboard Controls
These Controls are not activated for TFT panels.[FX 2-15]
NOTE: Keys in combination must be pressed simultaneously.
Page 20
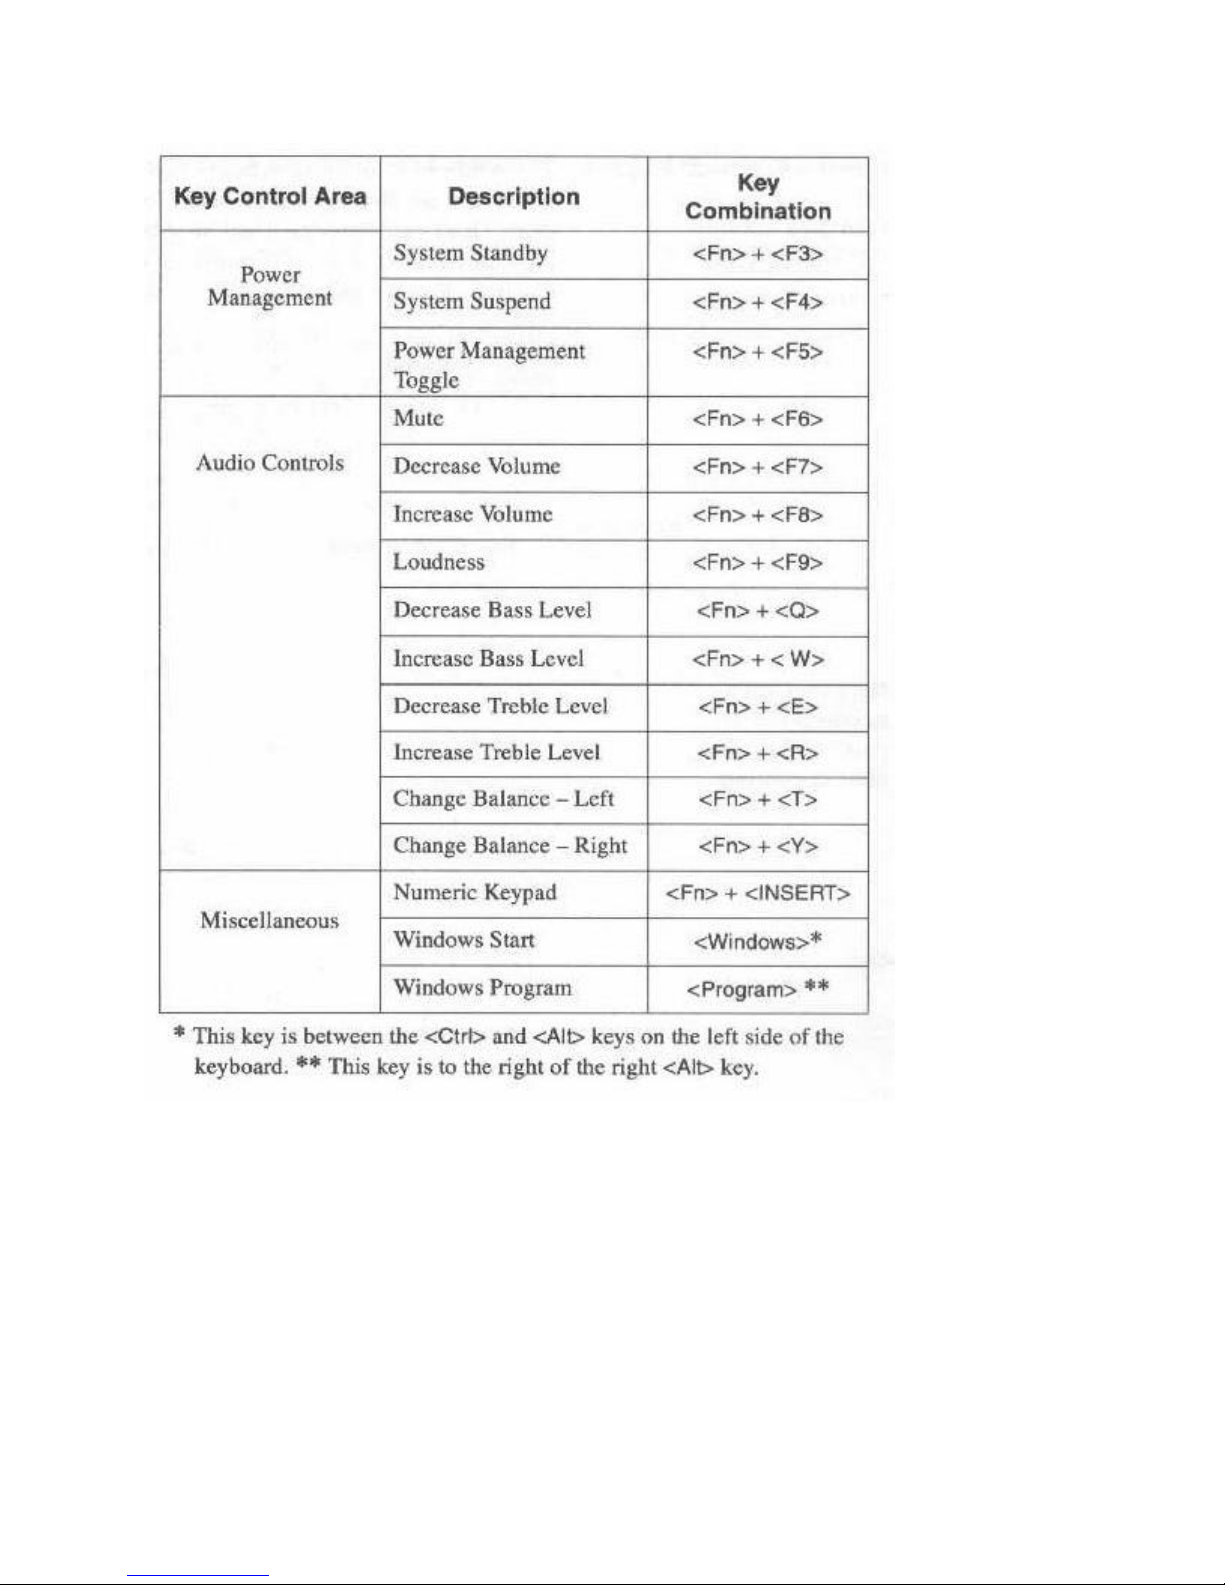
* This key is between the <Ctrl> and <Alt> keys on the left side of the keyboard. ** This key is
to the right of the right <Alt> key. [FX 2-16]
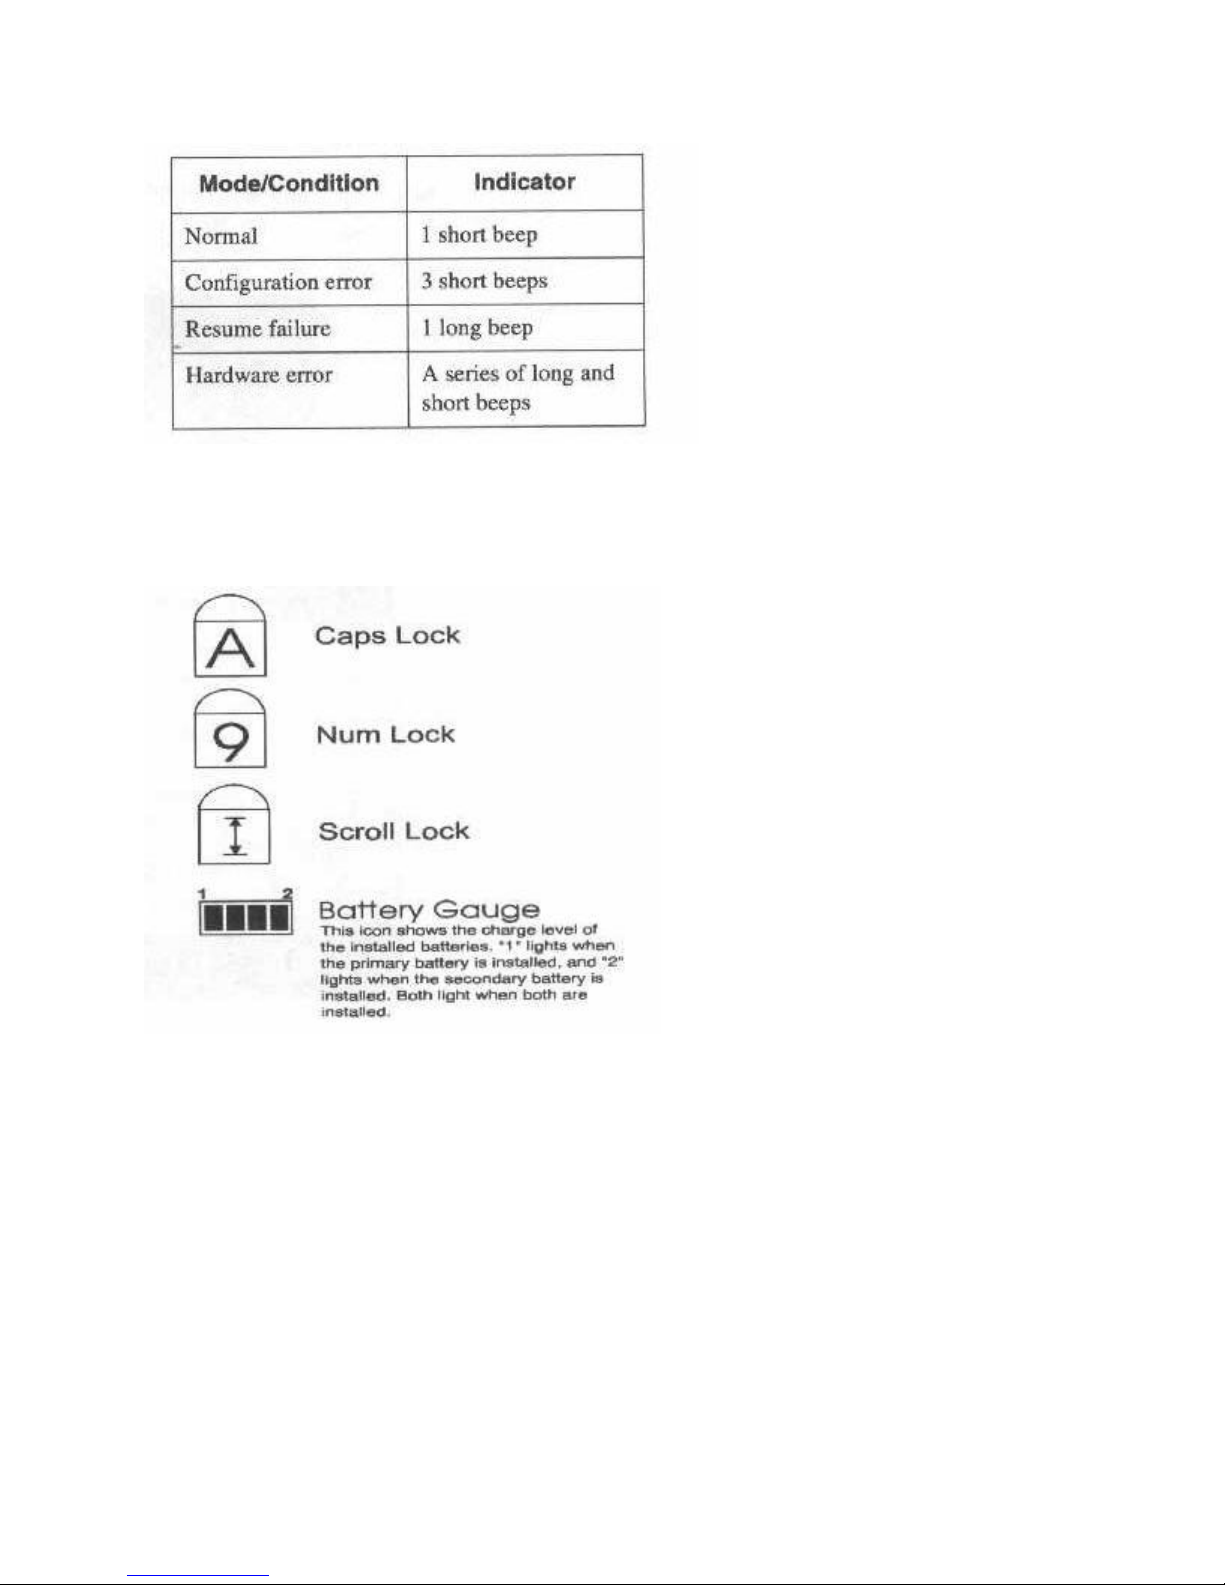
Beeps
When you power-on your WinBook FX, you may hear a series of beeps (audible indicators) from
the speakers indicating there is a problem. These are summarized in the table below.
Audible Indicators
Page 21
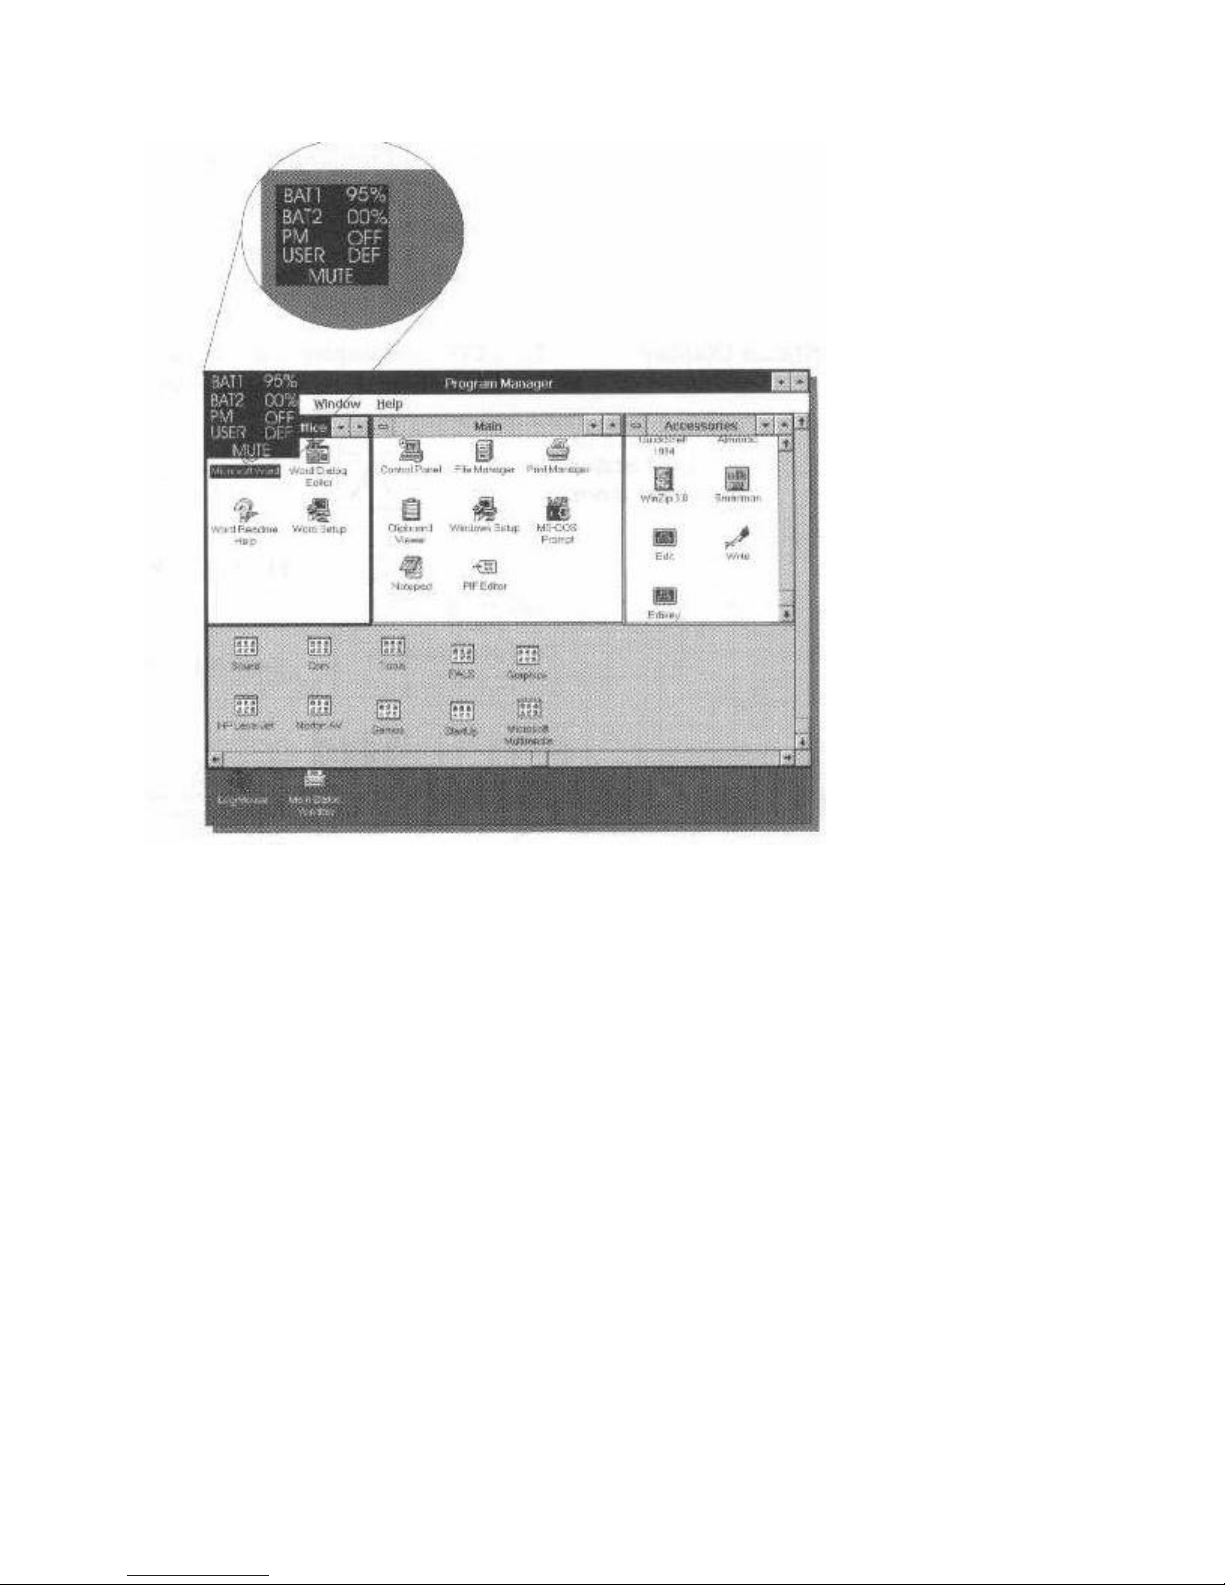
LCD Status Display
The LCD status display to the left and above the keyboard presents icons summarizing current
system status.
[FX 2-7]
Popup Status Window
The WinBook FX’s Popup Status window allows you to monitor the battery charge for main and
secondary batteries, and the status of power management. The Popup Status window will also
show whether the Mute function (<Fn> + <F6>) is enabled.
The Popup Status window is keyboard activated by pressing the <Fn> + <F2> keys at the same
time.
Page 22
[FX 2-18]
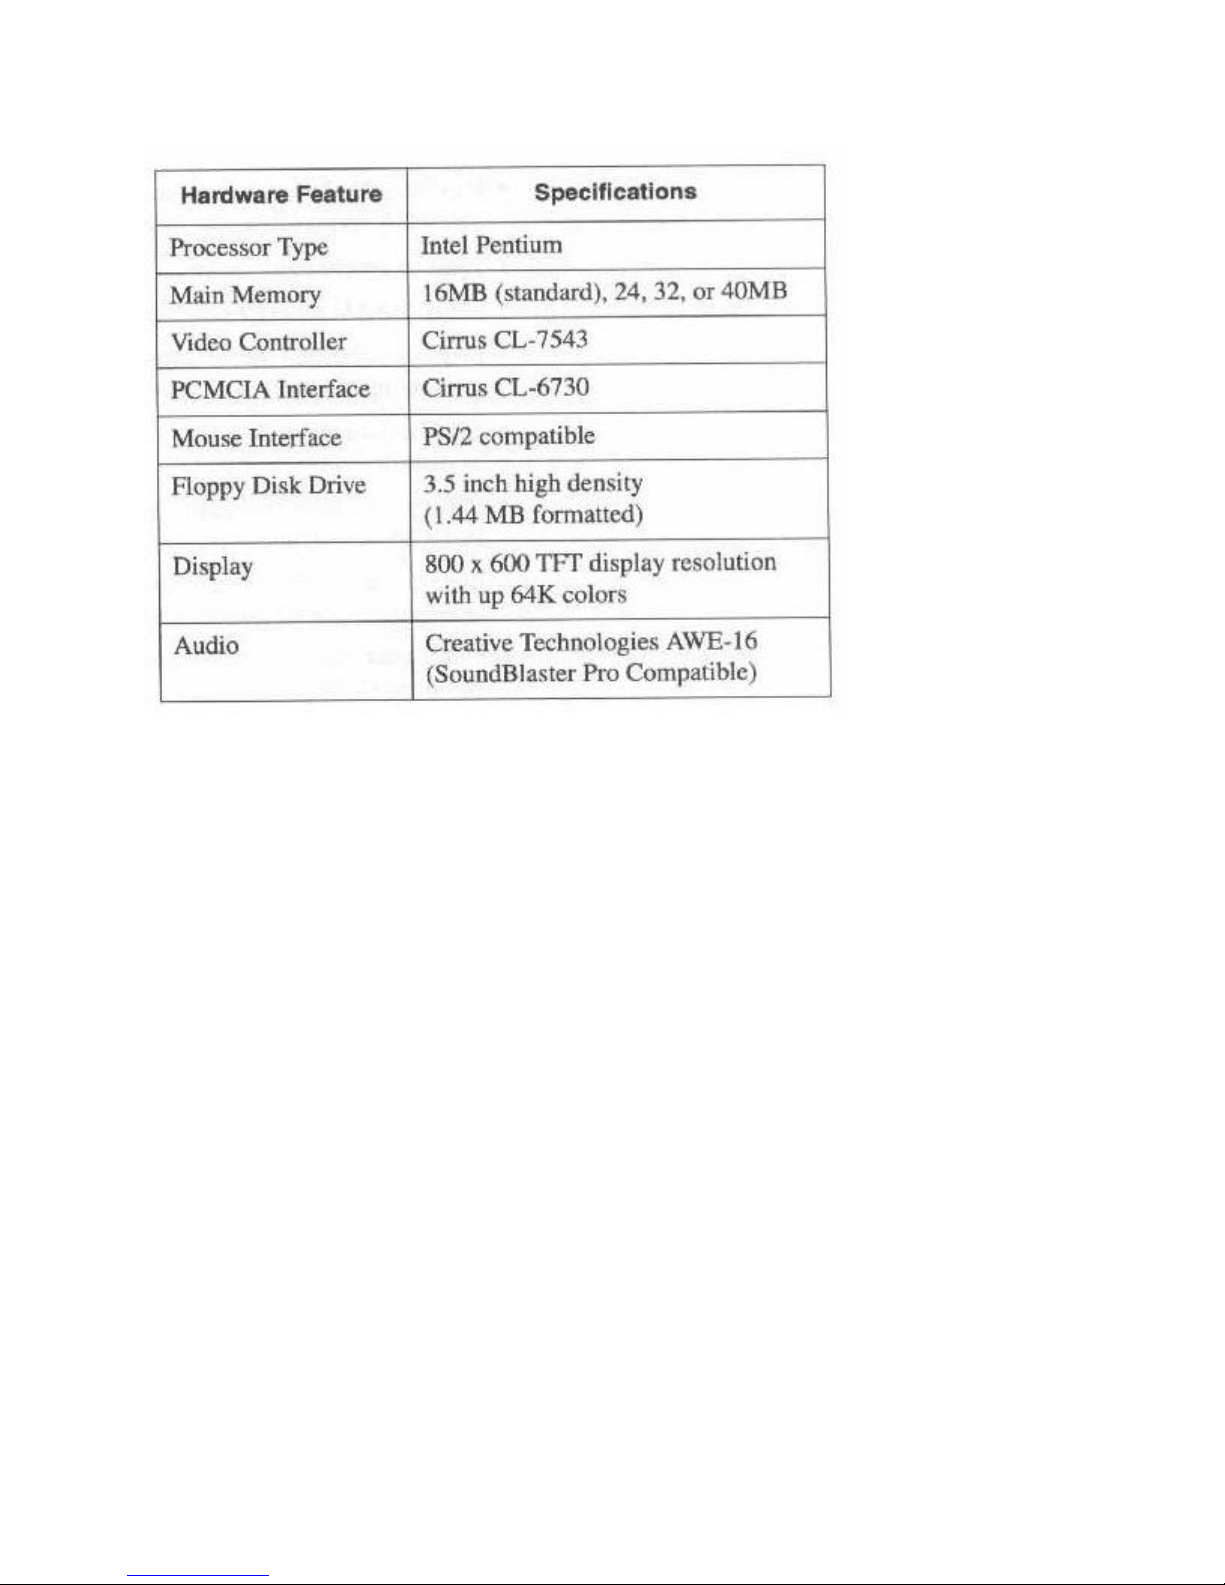
Hardware Specifications for Installing Software
Some programs will request information about your system. Refer to the table below for
information you’re likely to need.
Page 23
[FX 2-19]
Hardware Features
The WinBook FX is designed to provide you with a portable computer that is compact,
convenient, and powerful. The WinBook FX’s state-of-the-art features include:
Fast Intel Pentium processor at 100, 120, or 133MHz.
An SPGA socket allows for future CPU upgrades.
256K of synchronous cache.
16MB DRAM memory standard.
Memory expansion modules for upgrading system memory up to 40MB.
256KB Flash BIOS ROM that can be easily upgraded by diskette.
Built-in expansion slots accepting industry standard PCMCIA Type II and III
cards.
Full-feature 81 key compact keyboard with Windows 95 keys.
Removable IDE hard drive module featuring an enhanced IDE interface.
Intel Mobile Triton chipset.
High performance PCI bus interface for video, hard disk, and PCMCIA.
PCI docking port connector.[FX 2-20]
A Media Bay that provides a space for one of the following modules:
CD-ROM module (included, installed at the factory)
Floppy Disk module (included, not installed)
Page 24

Second Battery module (contact Sales to purchase)
PCI module (contact Sales to purchase)
TFT LCD display with standard resolution of 800 x 600 with up to 64K colors.
Two options LCD display sizes: 11.3" or 12.1".
Cirrus VGA graphics controller: Super VGA, high-speed 32-bit PCI local bus,
simultaneous display, Windows (GUI) acceleration, and 1MB video memory.
Supports up to 2 optional removable battery cartridges (NiMH or Lithium).
28,800 bps Data/Fax Modem module.
Supports external VGA monitor, external keyboard, and external PS/2 pointing
device.
Enhanced compatible bi-directional parallel port (ECP).
One 16550A compatible first in, first out (FIFO) serial port.
One 15-pin D connector game port.
Audio system including two built-in stereo speakers, one speaker-out port, one
mic-in port, one line-in port, one internal microphone.[FX 2-21]
16-Bit PC Audio compatible with Roland MPU 401 UART and multimedia PC
level 2 specifications. Compatible with Ad Lib and Creative Labs Sound Blaster
16.
IRDA compliant Serial Infrared (SIR) Port supports transfer speeds up to
115Kbps.
Software Features
Intelligent Power Management features built into the BIOS Setup Program supporting
doze, peripheral power-down, system standby, memory suspend, and suspend to disk
modes.
Support for Intel/Microsoft Advanced Power Management (APM 1.1) standard.
Available device drivers provide support for MS-DOS and Windows operating
systems.
Hot key Power Management setup displays a Popup Status window of current settings
and battery levels.
Plug and Play support for Window 95 PnP.
Sound Control for volume, treble, bass, balance, and loudness.
Bundled device drivers include: VGA, PCMCIA, pointing device, audio infrared, and
suspend to disk utilities.
ROM Setup Program for setting the system configuration.
Security setup for protecting data.[FX 2-22]
Accessories
Carrying cases (contact Sales for information).
Second battery pack that can be exchanged with the Floppy Disk Drive module
(NiMH or Lithium).
Memory upgrade modules available in two sizes: 8MB and 16MB modules.
Car adapter to plug the WinBook FX into a car cigarette lighter.
Page 25

PCI mini-docking station.
PCI full-feature docking station.
I/O port replicator
PCMCIA cards including modems, Lan cards, SCSI cards.
Functions Summary
Your WinBook FX performs the following functions using programs built into the Windows 95
operating system, or with software applications you can purchase from various vendors.
Included with Windows 95 Operating System
Word Processor
Paperless fax machine
Telephone speed dialer
CD Player
Draw Diagrams
Calculator
Connect to and update your desktop computer
Connect to Bulletin Board Services[FX 2-23]
Additional Application Programs for Windows 95 (fees may apply)
Database
Spreadsheet
Desktop publishing
E-mail services
Internet connection
Dictionary
Thesaurus
Encyclopedia
Road maps and atlas
Hardware Options
Ethernet PCMCIA LAN card
SCSI PCMCIA Adapter card
V.34 Modem
The WinBook FX’s large hard disk drive and memory capacity will support new software
applications, as they become available. You can also install additional hardware to enhance the
operation of your WinBook FX. Refer to Chapter 6, Upgrading Your WinBook FX.
[FX 2-24]
Page 26

FX Chapter 3
Page 27

CHAPTER 3: MOBILE COMPUTING
Road Hazards
Avoid Rough Handling
Never check your WinBook FX in as luggage when you are traveling. Even the toughest carrying
case won’t protect it from rough handling. Although it is tempting to pack your WinBook FX in
your luggage, it is apt to result in a broken system. The best solution is to carry the WinBook FX
with you.
Avoid High and Low Temperatures
While you travel in the summer, do not leave your WinBook FX in a car trunk on a hot day.
Trunk temperatures can reach 140ºF, beyond the safe range for the WinBook FX. Also be careful
when shipping or storing your WinBook FX so that it is not exposed to high or low temperatures
which can damage electronic components. The safe operating range for the WinBook FX is 50º
to 95ºF (10º to 35ºC). Chapter 7, Maintaining Your WinBook FX, and Appendix A provide more
information about environmental considerations.
Protect Your Modem
Be aware that phone systems can be either analog or digital. Your modem is only sure to work
on an analog phone system. Most residential telephones are analog.
Digital phone systems typically involve building or company-specific PBX (Private Branch
Exchange) systems. Some PBX systems can use voltages that will damage the analog modem in
the WinBook FX. Before you hook up your modem in a hotel or at a new company, check with
the facilities manager. To find an analog line, you might look for a fax machine.
NOTE: There are products available that will support analog modems on digital PBXs.[FX 3-2]
Ground Travel
The WinBook FX does not have a handle or a rough surface for a sure grip, so use a carrying
case when traveling with your WinBook FX. At times, you may want to put both the case and the
WinBook FX within a larger briefcase to conceal the system to prevent theft.
WARNING: If there is a sudden mechanical shock to the WinBook FX while the hard drive is
in operation, you may damage the head disk assembly within the drive. Therefore, be particularly
careful to backup your work while operating in a mobile environment. If the WinBook FX does
get dropped or jolted, refer to the "Maintaining Your System" section of the Windows 95 Manual
for information on using ScanDisk to check that your hard drive is OK.
WARNING: If you are using a power adapter in a car, be sure to disconnect the power cable
from the WinBook FX before starting up the car. There are often high voltage surges in car
electrical systems as the engine starts.[FX 3-3]
Air Travel
Page 28

Never pack your WinBook FX in your luggage or check it in as luggage at the airport. It is best
to carry the WinBook FX with you to prevent damage to the system.
WARNING: DO NOT take your WinBook FX through airport metal detectors.
Airport security clearance areas often have large doorways that detect metal when you pass
through them. If your are asked to pass through this type of doorway, do not carry your
WinBook FX with you. Ask the security guard to check it in a different way. Metal detectors can
be a threat to your data.
Pay attention to instruction from flight crews on operating electronic devices on the airplane.
You may be asked to not operate the system while the airplane is taking off from and
approaching airports.
Foreign Travel
The WinBook FX power adapter is compatible with electrical outlet voltage ranging from 100
VAC to 240 VAC (volts, alternating current) and is compatible with 50 or 60 Hz power.
Some foreign countries use a different type of electrical outlet. You can contact the Consulate
Office for the country to which you are traveling, your travel agent, or a local electrical supply
store for information about foreign power input cables. Appliance power adapters are frequently
sold at airports and hotels in foreign countries.[FX 3-4]
Battery
Battery Types
There are 2 types of additional batteries that you can purchase for your WinBook FX.
Lithium batteries are lighter and have greater capacity, but are more expensive than NiMH
batteries.
Nickel Metal Hydride batteries are heavier and have less capacity, but are less expensive than
Lithium ion batteries.
Extra Batteries
For extended mobile use, extra primary and secondary battery modules can be very useful.
Contact our Sales Department to purchase additional batteries.
DANGER: To prevent injury or burns, do not allow metal objects to contact or short circuit the
battery terminals.
Monitoring Battery Charge
The WinBook FX offers a number of ways to monitor the battery charge level. The Popup Status
window is the most accurate.
To bring up the Popup Status window, press the <Fn> + <F2> keys at the same time. This
Page 29
window will present the charge level on both the primary (BAT1) and the secondary (BAT2)
battery modules as a percentage. For example, 95% means that the battery has expended only 5%
of its charge.
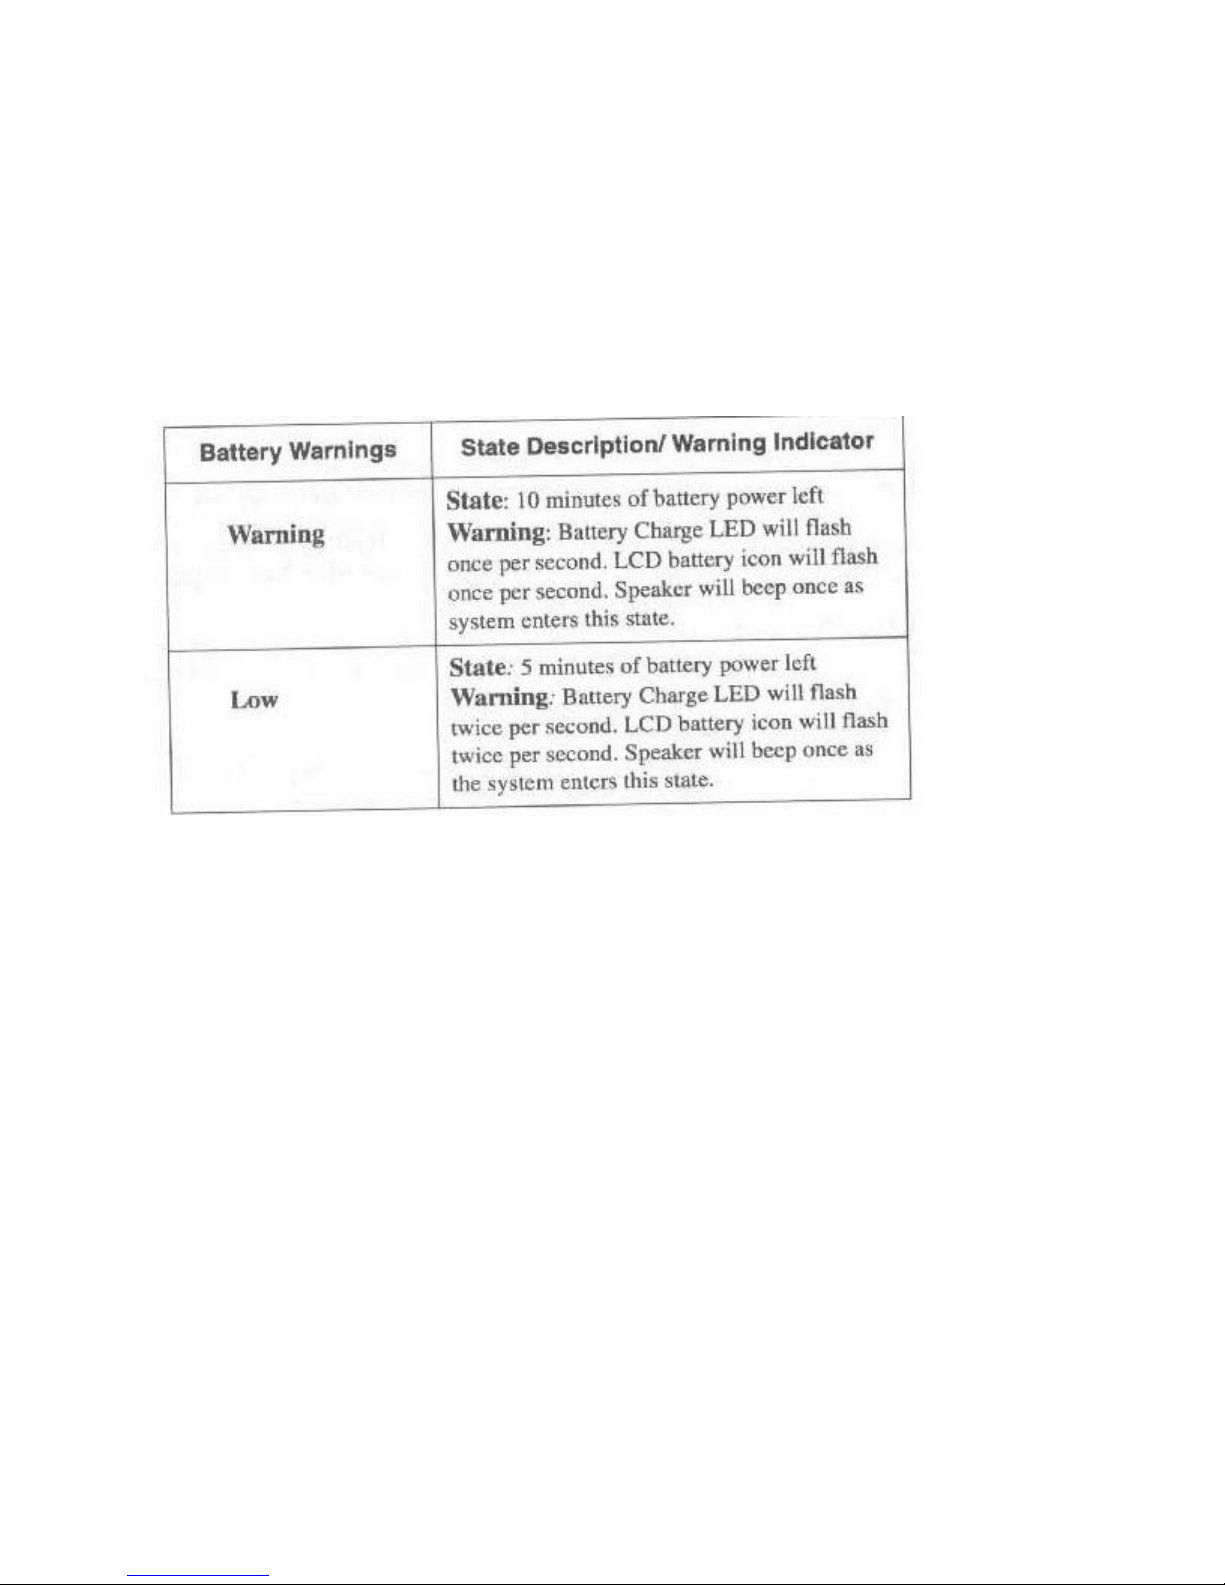
The table on the next page summarizes battery charge LED and LCD battery icon warning
indicators of low battery power.[FX 3-5]
Battery Warnings
Battery Warnings are summarized in the following table:
Changing the Primary Battery
WARNING: Never remove the battery when the system is ON. This may damage your
WinBook FX. Make sure the system is OF or in Suspend mode.
Turn the WinBook FX OFF or put it in Suspend mode.
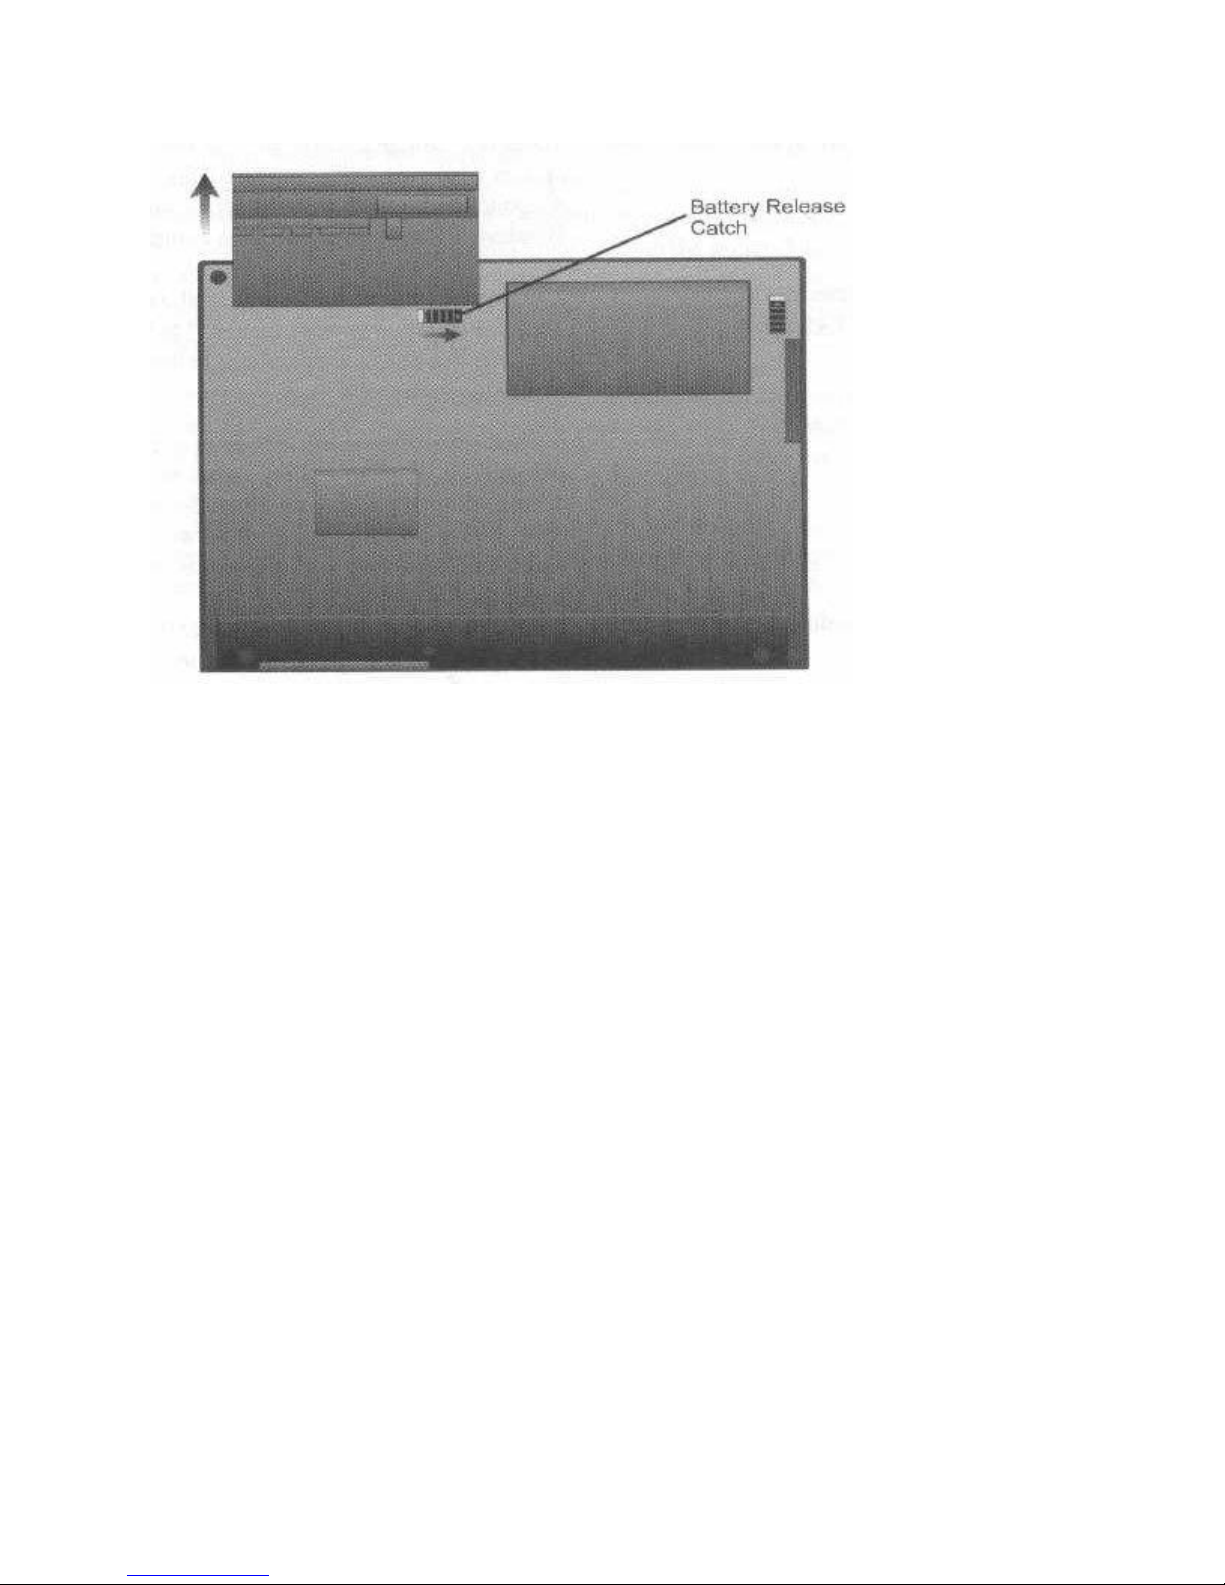
Place the WinBook FX on a flat surface with the underside facing up.
Locate the battery release catch.
Slide the release catch to the right, then pull the battery out of the battery compartment.
Align the fresh battery module, then slide it in. Make sure that the release catch is in place
and that the edge of the battery is flush with the front of your WinBook FX.[FX 3-6]
Page 30
Changing the Secondary Battery
To remove and replace a secondary battery from the Media Bay, turn off the WinBook FX or put
it in Suspend mode. Never remove the battery when the system is on. Then follow the
instructions for changing Media Bay modules presented in Chapter 1, Getting Started.
Getting the Most from the Batteries
You can maintain your battery’s charge capacity by periodically letting it fully discharge, and
then fully recharging it. It is recommended that you do a full discharge/full charge cycle
("cycling" the battery) once every 32 times that you plug the WinBook FX into an AC power
source to recharge the battery. (See "Cycling the Battery" under Fast fixes in Chapter 10 for
more details.)[FX 3-7]
Hot Swapping Batteries
There is a "bridge battery" in your WinBook FX that will support the system while you swap
batteries. This allows you to put the system in Suspend mode and to swap batteries without
having to shut down Windows 95 and power down the computer.
Temperature and Batteries
The batteries will not operate as well under extremes of temperature. They are specified to work
from 41º to 95ºF (5º to 35º C). Running your WinBook FX in temperatures below 41ºF or above
95ºF will reduce the battery life.
If a battery module is left n the sun and gets quite hot, it is apt to fail to charge. This is due to a
safety switch in the battery module that is aimed at preventing over-charging. Once the battery
Page 31

cools down, you will be able to charge it. In extremely cold weather, you may find that it takes
longer for the battery to charge or that it does not fully charge.
Recycling Batteries
Battery disposal poses an environmental hazard. When a battery module no longer holds enough
charge for practical use, send it back to us. Call Customer Service at the phone number listed on
the "ReadMe-First" card for details. They will provide a Return Materials Authorization (RMA)
number and a location to ship your old battery to.[FX 3-8]
POWER
Power Management
For information on the Setup Program, refer to Chapter 9. Appendix B provides summaries of
Setup Program settings.
To support mobile use for longer periods of time, you will want to consider the advanced Power
Management features that are built into your WinBook FX. Although the power management
settings can be selected by using the <Fn> + <F5> keys and monitored in the Popup Status
window, the settings will not be permanent. This means that each time you turn on your system,
you will have to manually change the Power Management settings from the default settings.
A better approach is to go into the Setup Program Power Management screen and select the
settings that match your work style. For information on the Setup Program, refer to Chapter 9,
Using the Setup Program.
Using the Power Button
The function of the Power Button can be changed for use as a Suspend Button instead. (See the
description of the Power Button in Chapter 2, System Tour, for details.) This setting requires you
to go to the Power Management menu in the Setup Program. Refer to Chapter 9.
Power Savings Settings
To set configurations for power conservation, the WinBook FX Setup Program allows you to
choose from 4 options to customize your power savings settings. The options are:
Maximum Battery Life
Maximum Performance
Media
Customize
This choice can be made on the Power Management menu in the Setup Program. Your WinBook
FX comes from the factory defaulting to Maximum Battery Life when Power Management is
enabled.[FX 3-9]
Power Savings Settings
Setting Timeouts
Page 32

If you choose the Customize option for Power Savings, you can set the timeouts for Standby,
video, and the hard disk. Timeout means that a subsystem or device that hasn’t been accessed
within a specific time period will be turned off to conserve power. For example, during standby
and video timeouts, the system will turn off the display and power down the CPU and other
inactive power hungry devices. We have provided timeout settings for the most power hungry
devices: CPU, video display, and hard drive. Turning these off when not in use is the best way to
extend battery life.
Auto Dim
In addition, the display backlight consumes a good deal of power when it is on. We have
provided a feature called Auto Dim which will automatically dim the backlight when you are
running on the battery. You can disable this feature in the Setup Program, but remember that the
backlight consumes a lot of power.
Standby Mode
When Standby Timeout is enabled in the Setup Program, the WinBook FX will automatically
enter Standby mode when the specified timeout period elapses. It can go into Standby from
either full-power mode, or with a device such as the hard disk drive that is already timed-out and
powered-down.
You can manually put the WinBook FX in Standby mode by pressing the <Fn> + <F3> keys at
the same time.
Any activity, such as pressing a key, will return the system from Standby to full-power
mode.[FX 3-10]
The WinBook FX does the following as it goes into Standby mode:
Stops the clock to the CPU
Turns off the display screen
Spins down the hard disk drive
Powers down I/O controllers including PCMCIA cards
Puts the SVGA controller in Standby mode
Suspend Mode
You can put the WinBook FX into Suspend mode manually by pressing the <Fn> + <F4> keys at
the same time. When you enable Suspend on the Power Management menu of the Setup
Program, the system will enter Suspend after the specified timeout elapses. You can swap the
second battery in and out of the system while the WinBook FX is is-n Suspend mode.
Suspend to RAM
In Suspend to RAM mode, the system turns off display screen, hard disk drive, and all peripheral
systems, but the current contents of the main and video memories remain. This mode consumes
more power than Suspend to Disk, but it can be entered into
More quickly, and can resume in response to a modem ring or alarm.
Page 33

Suspend to Disk
In Suspend to Disk mode, the WinBook FX copies the contents of the main and video memories
to disk, and virtually turns itself off. This mode saves the most power, but it is slower to suspend
and resume.
NOTE: If you partition or reformat your hard disk drive, you must create a dedicated disk
partition using the Phoenix PHDISK utility that came on the WinBook FX Support Disk. We
ship the system with a Suspend [FX 3-11] to Disk partition already installed, so unless you are
adding memory yourself, you should not have to use this utility. The PHDISK Utility will
automatically determine the size of the partition required for your system and then create it. Be
sure to backup your system before using this utility.
[FX 3-12]
FX Chapter 4
Page 34

CHAPTER 4: COMMUNICATING
USING THE MODEM
Your WinBook FX’s modem allows you to communicate with other people and services around
the world using your telephone line. The modem supplied with your WinBook FX is a 28.8K bps
data and 14.4 K bps fax modem. For a list of protocols, see the documentation that came with
your modem.
Definitions
Off-line: The system is not connected to an external information source.
On-line: The system is connected to an external information source.
NOTE: Windows Help (also referred to as on-line help) and documentation is available in the
system regardless of connections.
This chapter describes some of the major uses for the modem. You can enable other uses for the
modem with software you can obtain from your local software dealer. In the last part of this
chapter, we mention other modems you might acquire to support wireless communications, and
we discuss ways to use the Serial Infrared Communication Port.
With the software that came with your WinBook FX, you can use the following features:
Speed dialer
Update or exchange files with another computer
Send and receive E-mail messages
Send and receive Fax messages
Use popular on-line Services
Communicate over the Internet
Browse the World Wide Web
Contact and use Bulletin Board Services
Phone Jack
When you use the modem to communicate, you must plug your modem into a phone line. The
modem uses a standard RJ11 phone jack just like a regular telephone, so it’s easy to connect to
your telephone line.[FX 4-2]
WARNING:
Be aware that phone systems can be either analog or digital. Most residential telephone lines are
analog. Your modem is only sure to work on an analog phone system.
Digital phone systems typically involve building or company-specific PBX (Private Branch
eXchange) systems. Some PBX systems can use voltages that will damage the analog modem
in the WinBook FX. Before you hook up your modem in a hotel or at a new office, check with
Page 35
the telephone system manager. To find an analog line, you might look for a fax machine.
NOTE: There are products available that will support analog modems on digital PBX’s.
CHECKING THE MODEM
The WinBook FX comes in two configurations:
With an internal 28.8 modem (28,800 bps)
Without an internal modem
If your system does not include an internal modem, you can purchase a 28.8 PCMCIA modem to
use instead.
If you have purchased the WinBook FX with an internal modem, it will be automatically set up
for use in Windows 95. If you have elected to use a PCMCIA modem, you will have to set up
Windows 95 to work with this card. This section covers the general steps required to enable the
modem. Always consult the documentation that ships with your PC Card modem for specific
instructions.[FX 4-3]
To check to see if your modem is working or installed correctly, go to the Control Panel. Go to
Start, then Settings, and then Control Panel. Select the entry for modems by double clicking
on it.
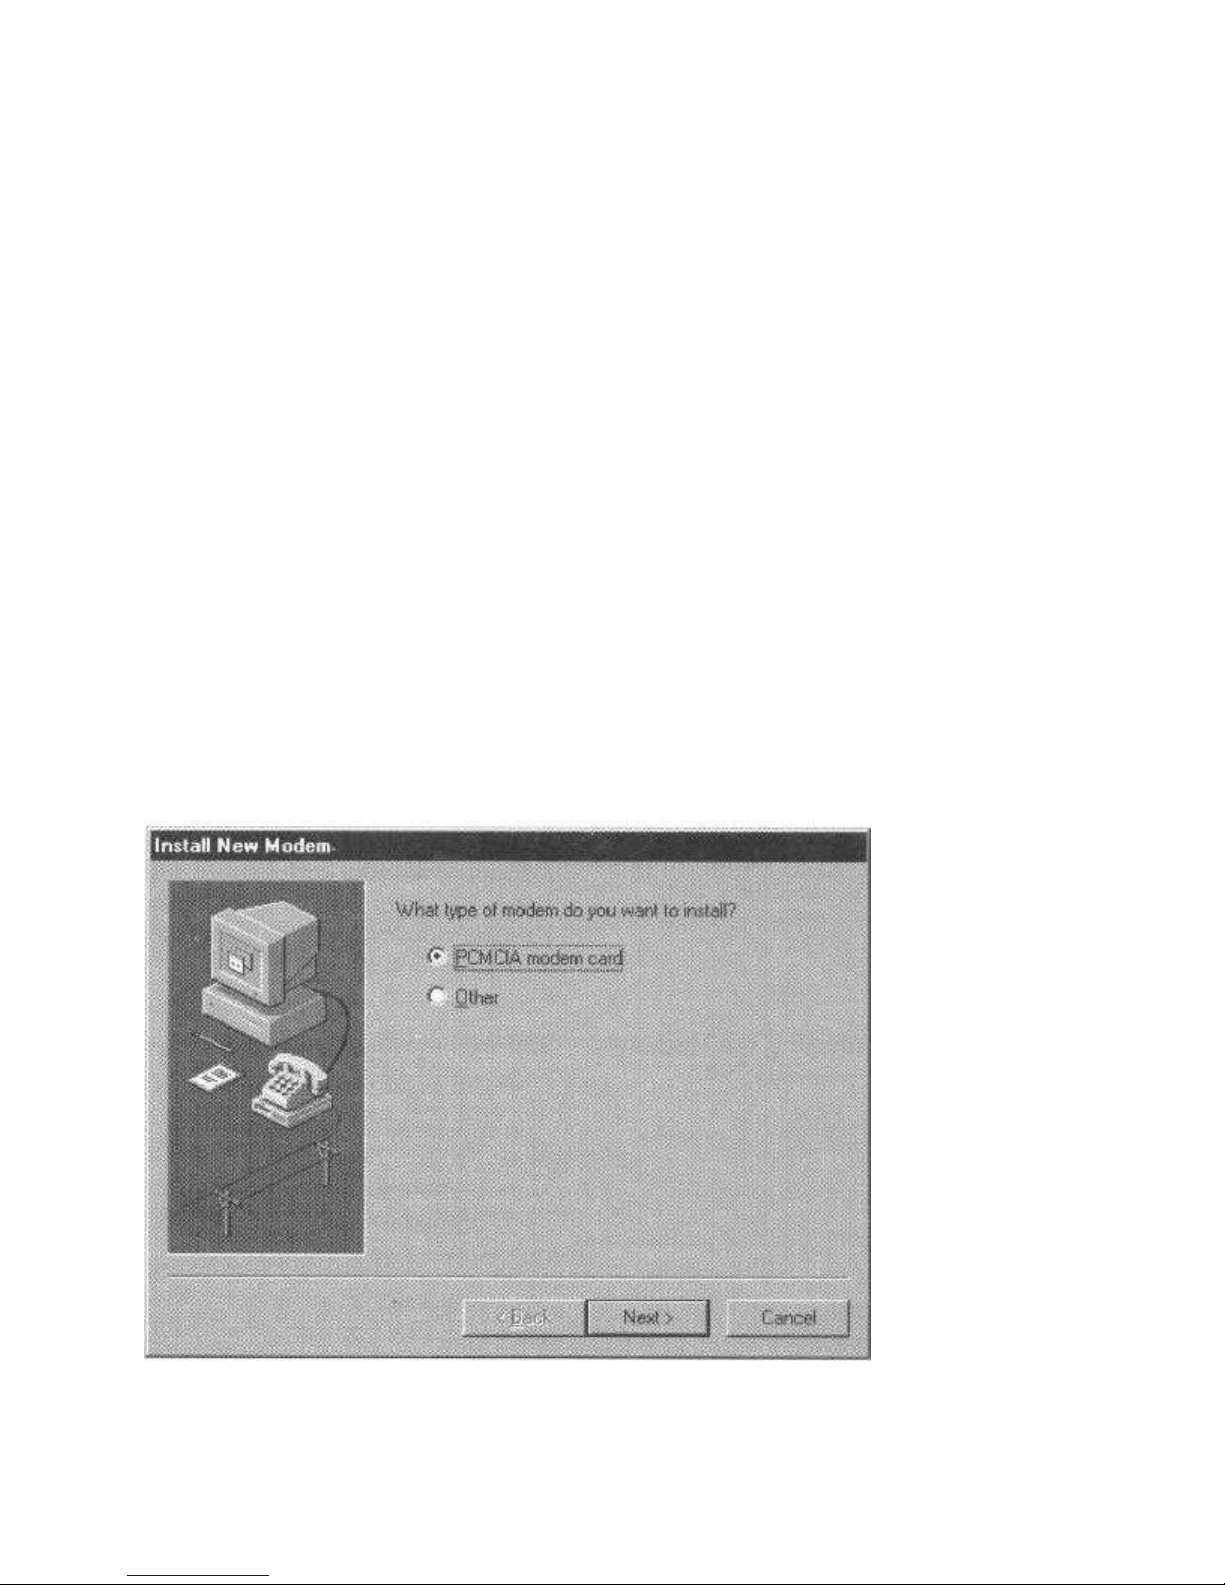
If you don’t see any modem installed, you will need to install one yourself by using the ADD
button. You will see a dialog box like the one below.
Proceed with the on-screen instructions to install and test your modem.[FX 4-4]
Page 36
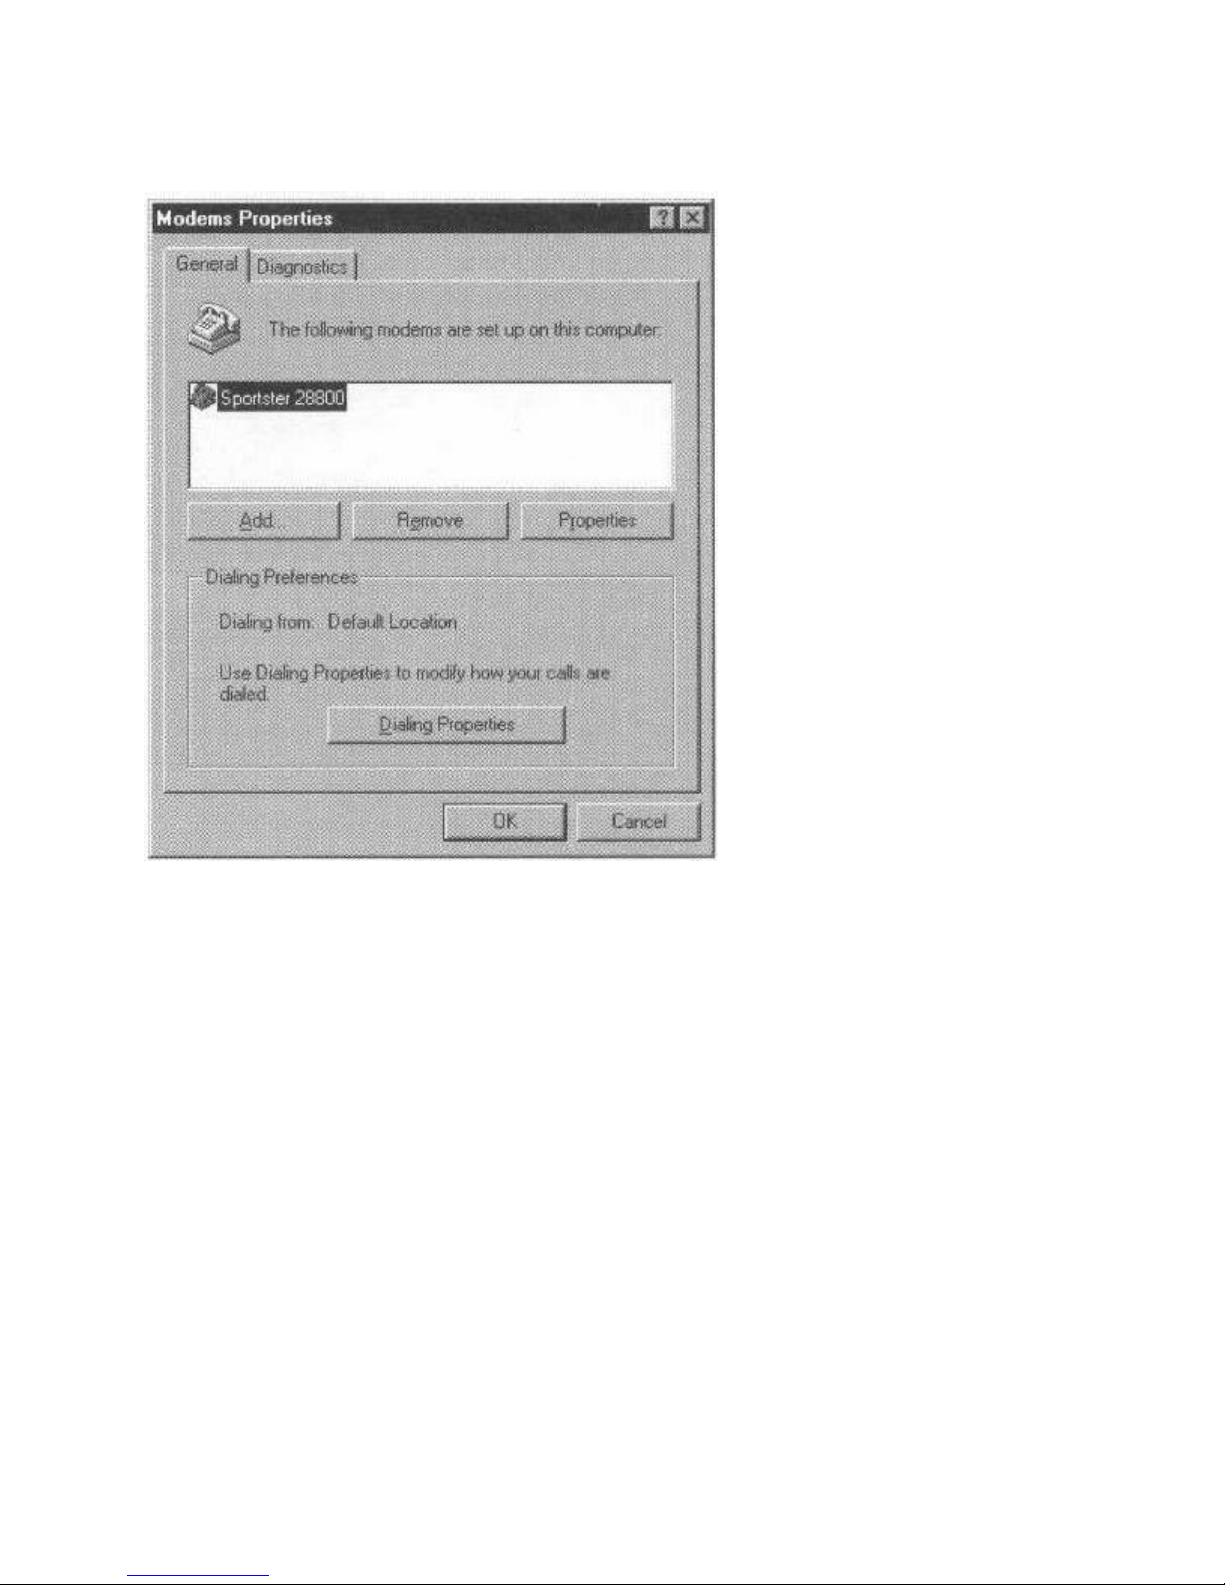
If your modem software drivers are already installed, you will see a screen like the one below.
Once your modem is installed, click on Properties to see how it is set up. A screen like the one
here will appear.[FX 4-5]
Page 37
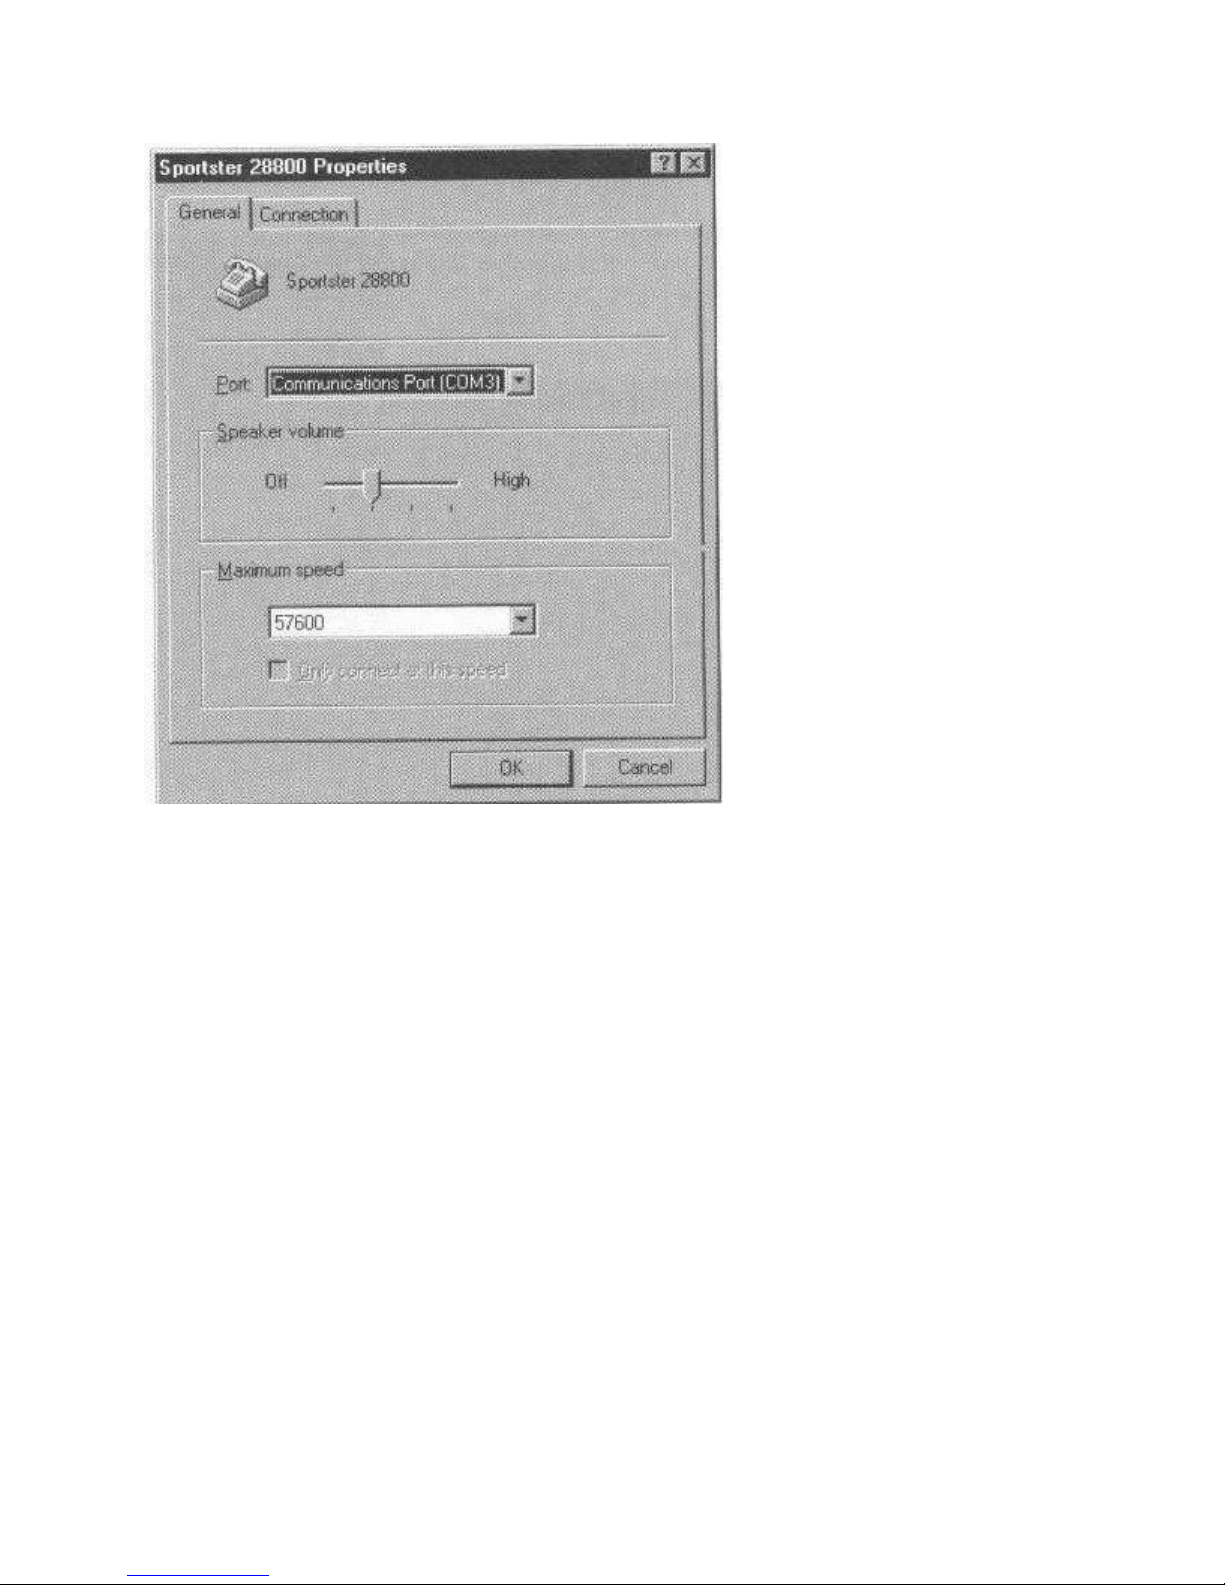
From this screen you will be able to change the modem configurations for speaker volume (when
dialing out), communication speeds, protocols and the COM port assignment. You should not
have to change nay of these settings to get you modem to work. For a detailed description of
these specific settings, consult your modem manual or Windows 95 User’s Guide.[FX 4-6]
When you are finished checking your modem configurations, click on the OK button to return to
the main modem Setup screen (shown as the Modem Properties). Once in the Setup screen, you
need to do one more thing to configure your modem for your working environment. Click on the
Dialing Properties button and the following screen will appear.
Page 38
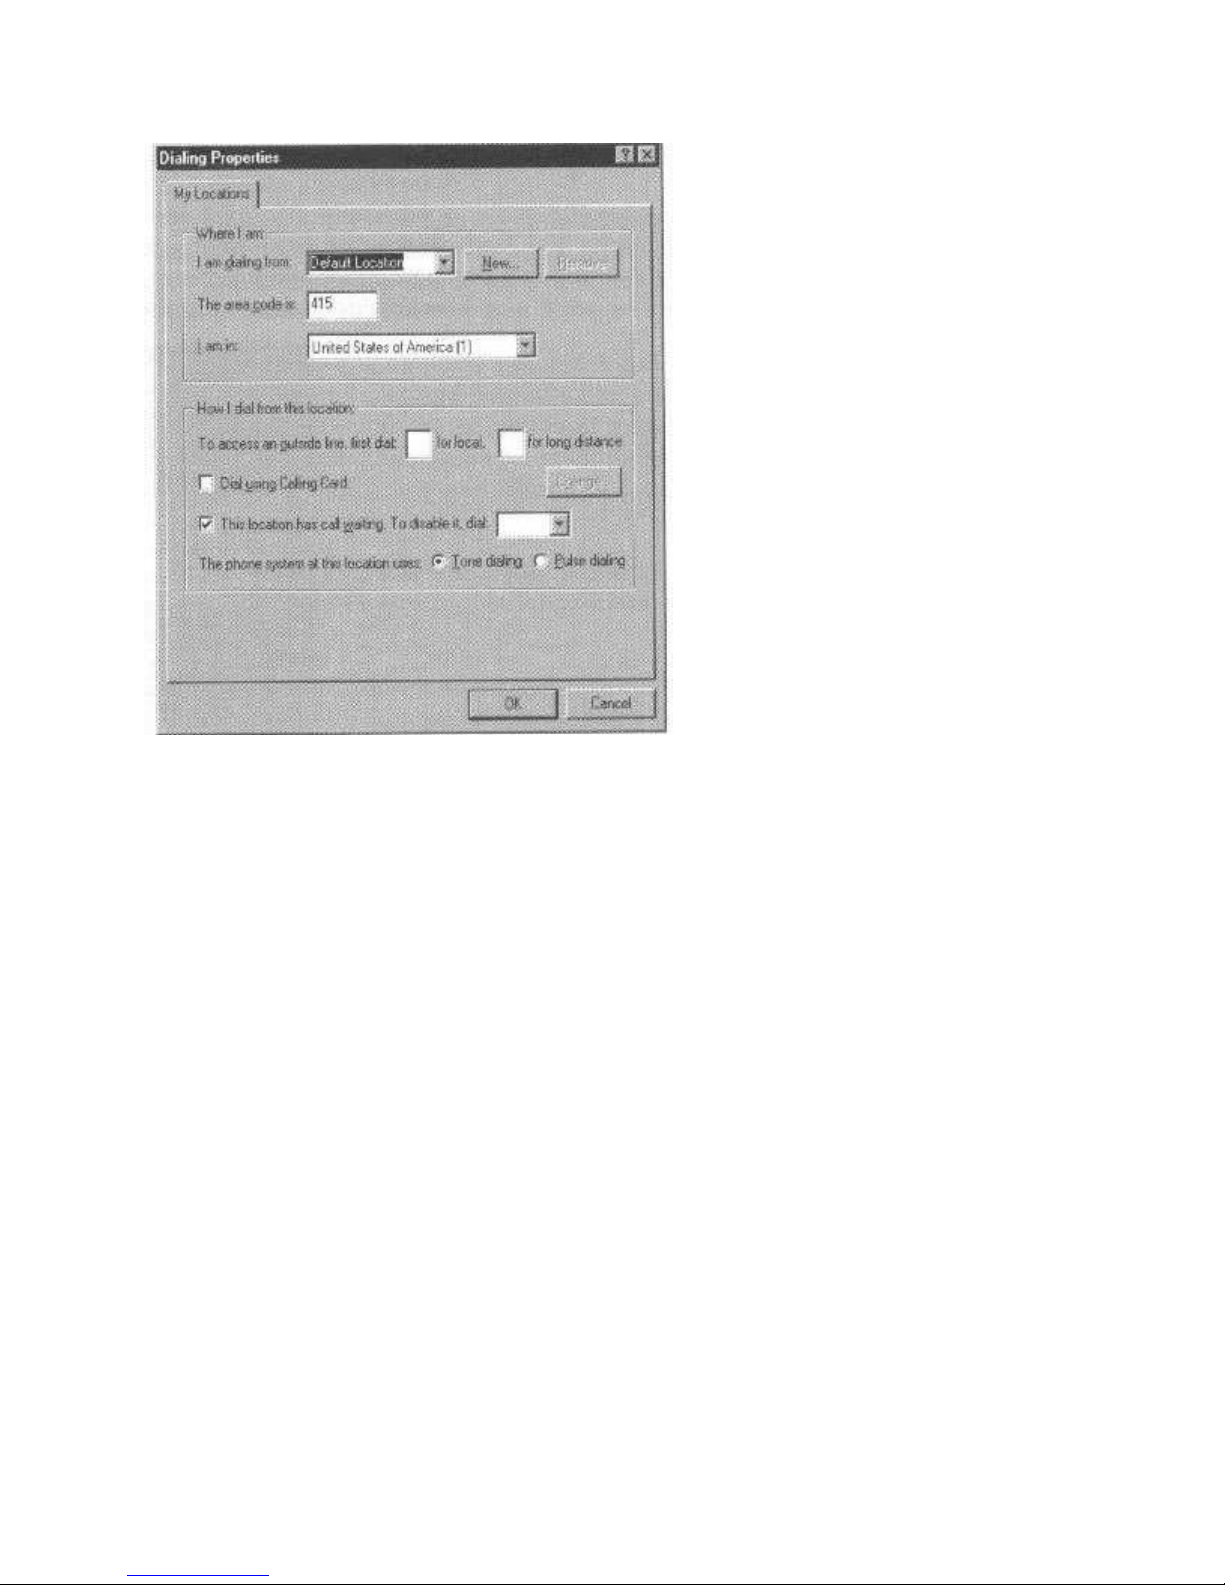
At this point you should fill in the information regarding your local environment and then click
on the OK button to complete the final installation.[FX 4-7]
ADDING WINDOWS 95 PROGRAMS
Throughout this section we will be referring to the communications applications included with
Windows 95. If you don’t see these applications in the Programs listing, or have accidentally
removed them from your system, you will need to install them before you can use them.
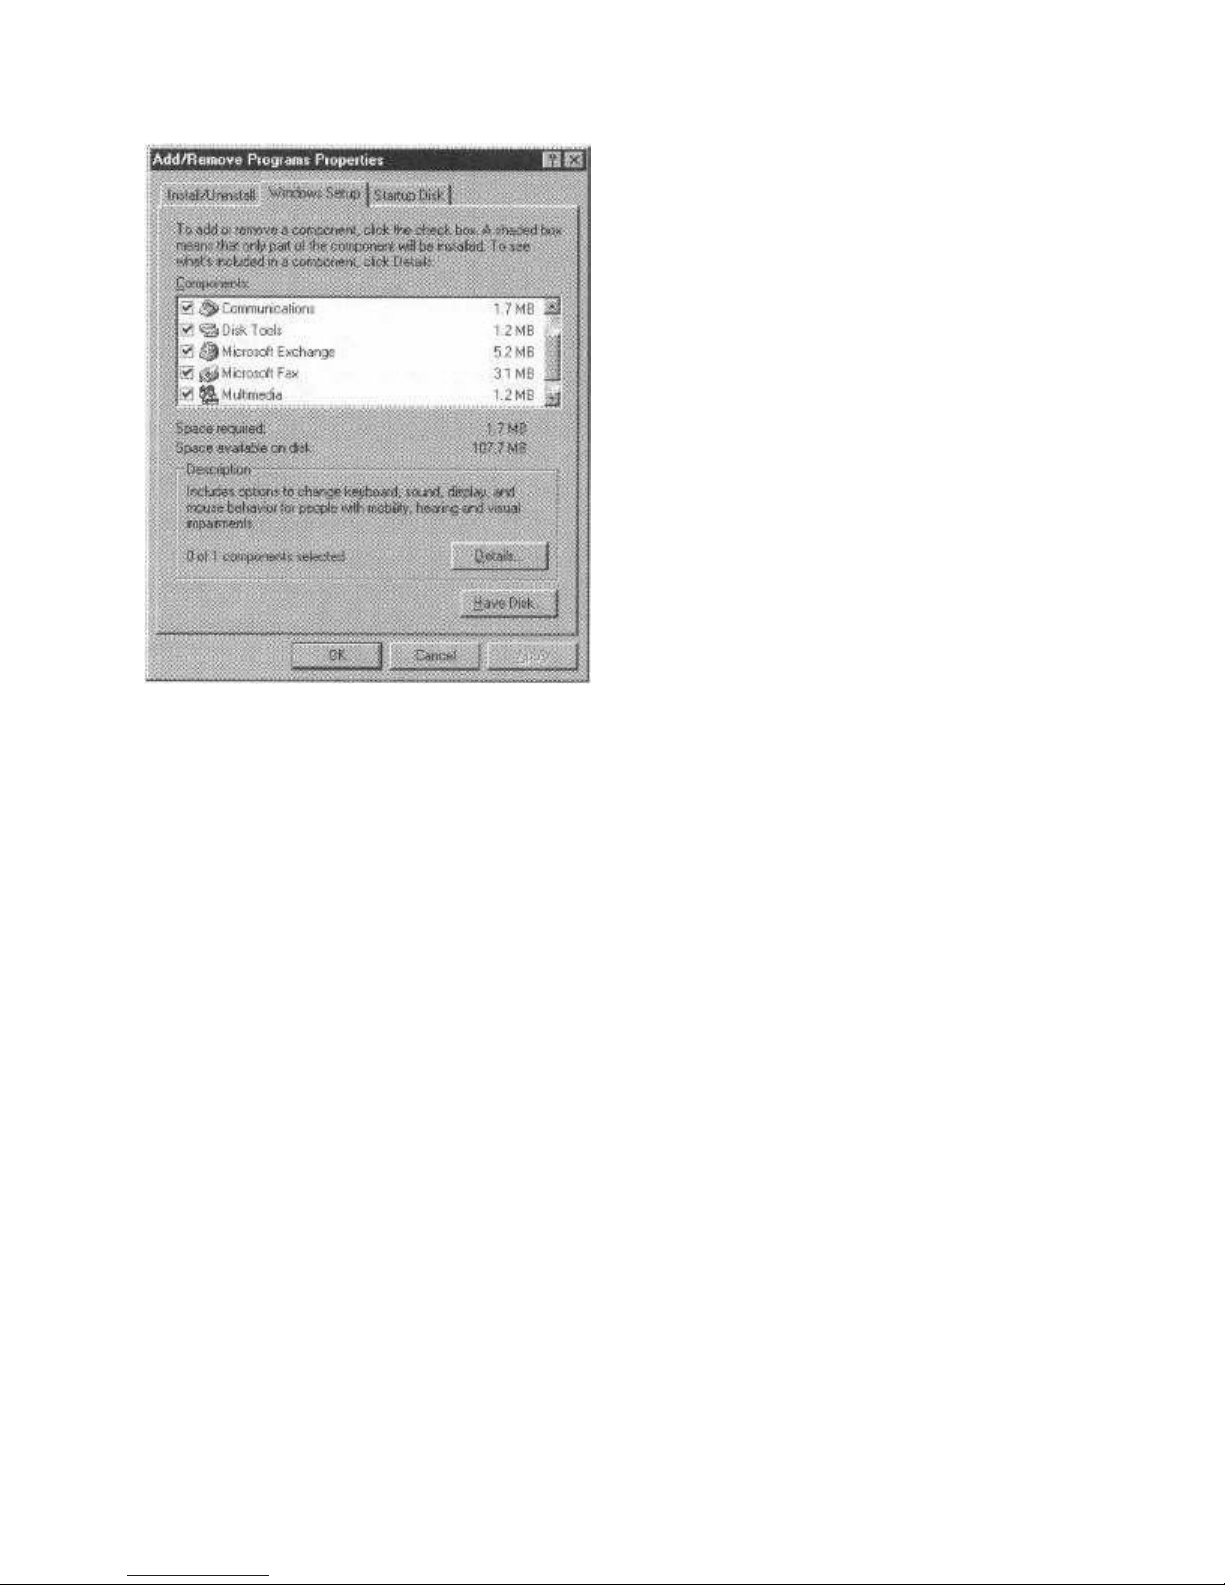
To add an application, first select Start, then Settings, and then the Control Panel. Select the
icon marked Add/Remove Program. Now select the tab marked Windows Setup to select the
applications you want to install, and you will see the screen below. When this screen appears,
select the applications you want. If your system doesn’t show a check next to Microsoft
Exchange, Fax, and Communication tools, click on the boxes to select them. Click the OK
button. Windows 95 will automatically install these applications.
Page 39
ACTIVATING WINDOWS 95 PROGRAMS
In the upcoming sections, we will instruct you to choose the Start button to activate programs
within Windows 95. There are two ways to display the Windows 95 Start menu:
Press the left <Windows> key between the <Ctrl> and <Alt> keys on the left side of
the keyboard, or
Use your mouse pointer to select the Start button on the left side of the Task Bar at
the bottom of the Windows 95 desktop.
USING THE PHONE DIALER
You can use Phone Dialer to place calls from your WinBook FX with the internal modem or the
PCMCIA modem. This speed dialing feature is useful when you can’t remember phone numbers,
or when you want to dial a phone number quickly. You can store up to 8 phone numbers.
You can initiate calls with your WinBook FX modem using the Phone Dialer application then
pick up the phone when you hear a person answer your call. Before you do this though, you
must connect both your phone and the WinBook FX modem to the same phone jack. See
"Getting Faxes You Weren’t Expecting" that follows for details about connecting a multi-jack
adapter.
To find Phone Dialer, activate the Start menu (see "Activating Windows 95 Programs" above).
Choose Programs, then Accessories, and Phone Dialer.
If Phone Dialer does not display in the Accessories menu, activate Windows Help by activating
Page 40

the Start menu. Choose Help, then choose the Index tab. Type installing in the field then use
the down arrow to move down the selections until you see Windows Components. Choose
Windows Components and follow the steps. Refer to "Adding Windows 95 Programs" on the
previous page.[FX 4-9]
UPDATING FILES FROM A REMOTE COMPUTER
Using Briefcase in Windows 95, you can update files on your main computer when you’ve
worked on copies of these files away from y our office or home on your WinBook FX. Or you
can update files on your WinBook FX from files on your main computer.
When using Briefcase, move files from shared folders on the main computer to the Briefcase
icon on your WinBook FX.
To update files, you must first connect your WinBook FX to the main computer. You can do this
by using the WinBook FX’s modem, a cable from your serial port to the main
computer’s serial port, or if your main computer uses a Serial Infrared (SIR) port, you can use
the SIR port to connect with the main computer (see "Using the Serial Infrared Port" in this
chapter). IF you don’t want to use serial ports for connecting the WinBook FX to the main
computer, Briefcase allows you to update your files using a floppy disk.
If Briefcase is not shown on the desktop, activate Windows Help by activating the Start menu
(see "Activating Windows 95 Programs" in this chapter). Choose Help, then chose the Index
tab. Type installing in the field then use the down arrow to move down the selections until you
see Windows Components. Choose Windows Components and follow the steps.
MICROSOFT EXCHANGE
Microsoft Exchange in Windows 95 provides a mailbox that you can use to send and receive email (electronic mail), faxes, and messages from on-line services.
To activate Microsoft Exchange, choose the Inbox icon on your desktop. If Inbox is not shown
on the desktop, activate Windows Help by [FX 4-10] activating the Start menu (see "Activating
Windows 95 Programs" in this chapter). Choose Help, then choose the Index tab. Type
installing in the field then use the down arrow to move down the selections until you see
Windows components. Choose Windows Components and follow the steps.
If you will be using the communications applications such as fax, phone dialer, or e-mail
frequently, you may want to automatically start Exchange each time you start up Windows 95 to
save you from having to manually start up Exchange when you want to use these applications.
To setup Windows 95 so Exchange will run each time you bring up Windows 95, take the
following steps:
Click the Start button, then point to Settings
Click on the Task Bar, and click the Start Menu Programs tab.
Click Add, then click Browse.
Locate Exchange program by choosing My Computer, Program Files, Microsoft
Exchange and Exchng32. Then double click on it.
Page 41

Click Next, and then double-click the StartUp folder.
Type the name that you want to see on the StartUp menu, and then click Finish. If
Windows prompts you to choose an icon, click on one, and then click Finish. The
next time you start Windows 95, Exchange will automatically start.
SENDING AND RECEIVING FAXES
Use Microsoft Exchange to view, edit, send, or reply to fax messages. To start Microsoft
Exchange for sending or receiving fax messages, choose the Inbox icon on the Windows 95
desktop. The Inbox window [FX 4-11] appears, allowing you to view incoming and outgoing
messages. Choose the Inbox folder to see messages you have received.
NOTE: Be sure to check that the modem software for Windows 95 is correctly installed before
using Microsoft Exchange. Refer to "Checking the Modem" at the beginning of this chapter.
MICROSOFT FAX
Microsoft Fax is a program within Microsoft Exchange, which you can use to send and receive
faxes if you’re using Windows 95. You can compose new messages, and you can send and
receive documents composed in other programs. Almost anything you can print from a Windows
95 program can be sent as a fax message.
To use this feature, you need to select the Microsoft Fax printer to print your document. In the
program that you used to create a document, spreadsheet, or drawing, choose the Print dialog
box from the program. Change the printer selection from your normal printer to Microsoft Fax.
When you have make this selection and you are ready to print, choose the OK button on the
screen to start the print job. Microsoft Fax will step you through tasks to choose the recipient and
send the document as a fax message.
If you need help using Microsoft Fax, choose the Help menu in Microsoft Exchange, then
choose Microsoft Fax.
If Microsoft Fax is not on your computer, activate Windows Help by activating the Start menu
(see "Activating Windows 95 Programs" in this chapter). Choose Help, then choose the Index
tab. Type installing in the field, and then use the down arrow to move down the selections until
you see Windows Components. Choose Windows Components and follow the steps.[FX 4-12]
GETTING FAXES YOU WEREN’T EXPECTING
If you don’t have a separate phone line for your WinBook FX, there may be times when you
answer an incoming phone call and hear tones indicating a fax machine is trying to send you a
message. Normally you would hang up the phone, connect the WinBook FX to the phone line,
and then wait for the remote fax machine to call again.
By adding a multi-jack telephone adapter, you can avoid have to wait for the remote fax machine
to call a second time. The WinBook FX’s telephone line connection does not have a multi-jack
adapter, so you must install one to receive unexpected fax messages. You can purchase an
adapter from retailers who sell telephone accessories.
To use a multi-jack adapter with an internal modem, plug the adapter into the WinBook FX’s
Page 42
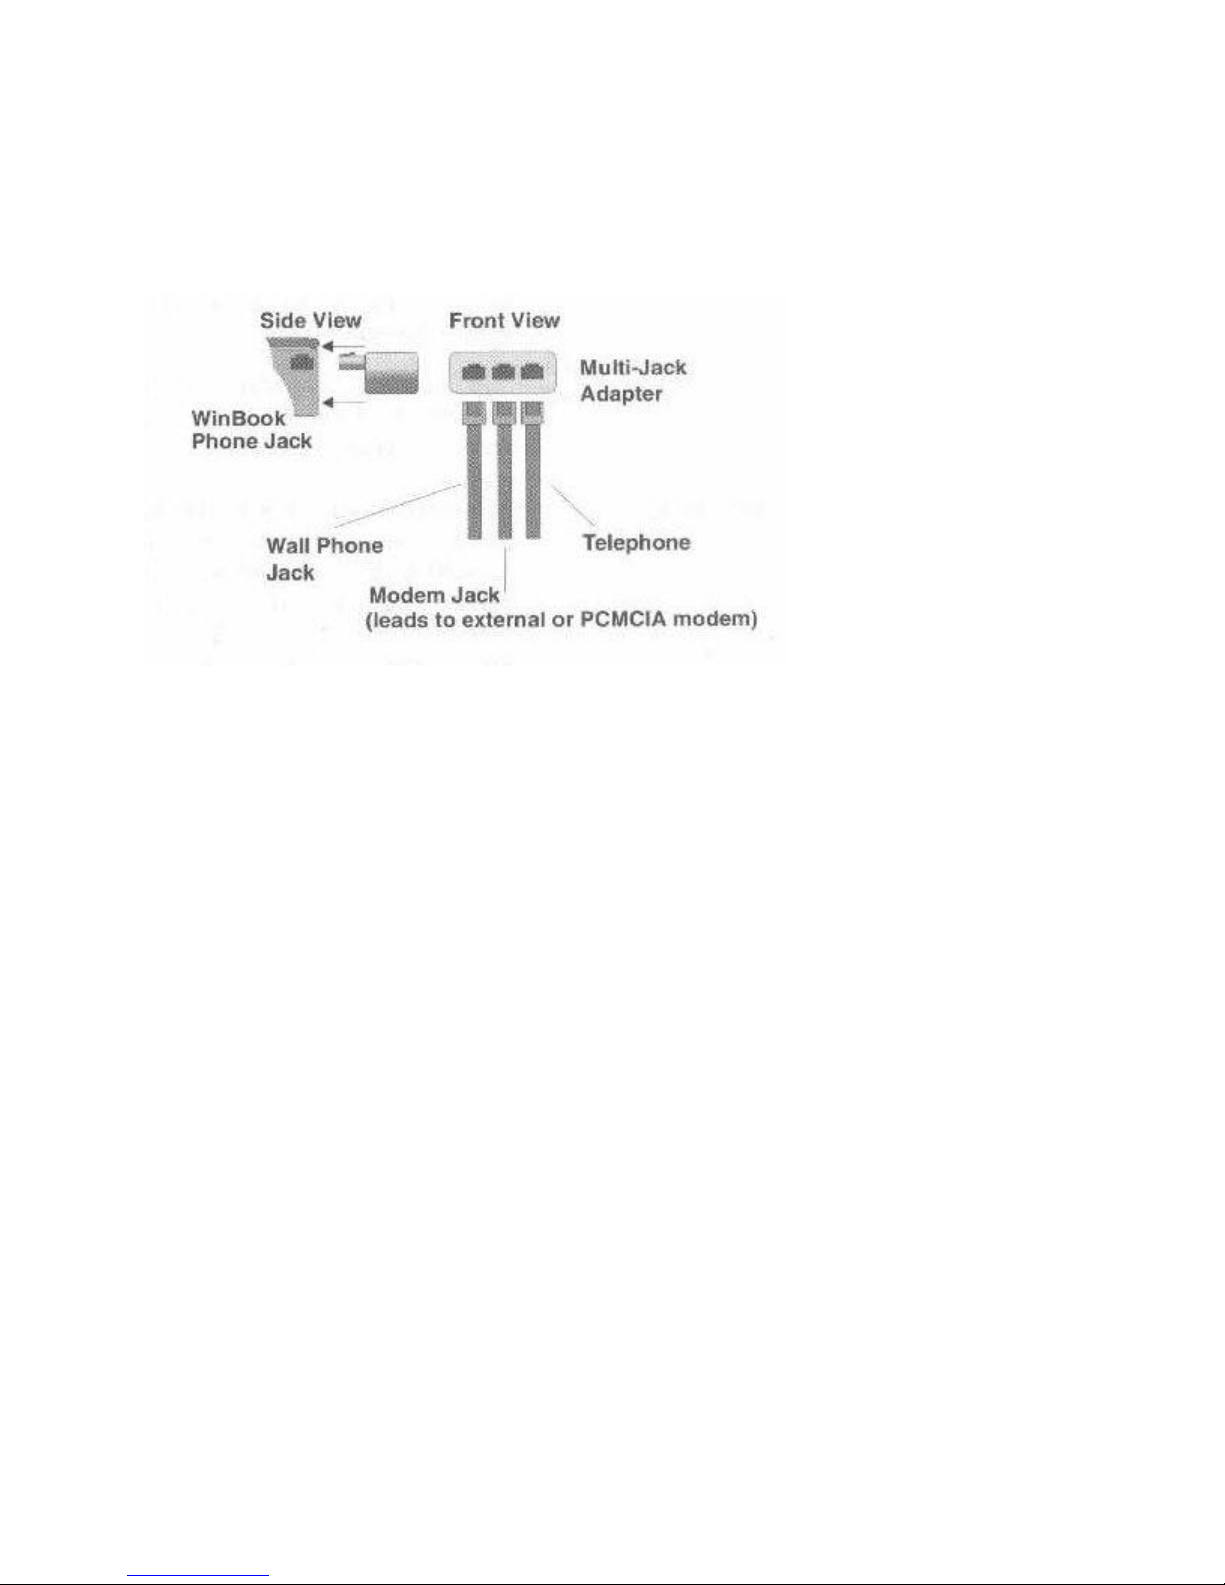
internal telephone line jack. The adapter has 3 jacks, allowing you to connect the incoming
phone line to one, and your telephone to the other; if you are using a PCMCIA or external
modem instead of an internal modem, use the third jack to connect to that modem.
Multi-Jack Adapter
[FX 4-13]
After connecting the multi-jack adapter, if you answer an incoming call and hear the tones
associated with an incoming fax message, choose the Phone icon in the Status section of the
Task Bar.
Choosing the Phone icon causes the Microsoft Fax Status window to appear on your desktop.
Choose the Answer Now button in the Microsoft Fax Status window to cause the WinBook FX
to connect to the phone line and receive the fax.
NOTE: The Phone icon will appear in the Windows 95 Task Bar only when Microsoft Exchange
is enabled. If you use Exchange a lot, you may want to set up Windows 95 so Exchange is
activated automatically when you boot (see the "Microsoft Exchange" section earlier in this
chapter). Or you can click on Inbox each time you boot Windows 95.
ON-LINE SERVICES
Using your modem to connect to an on-line service allows you to communicate with other users
around the globe. You can use on-line information centers-bulletin boards-for information,
entertainment, and shopping. You can also get answers to technical questions, download
software programs, and have access to the Internet.
You can access many on-line services with your WinBook FX. Most on-line services charge a
monthly fee for using their service. Contact the service provider to determine the cost of the
service before connecting.
MICROSOFT NETWORK
Microsoft Network is an on-line service that is available when using Windows 95. To start using
Page 43

Microsoft Network click on the Microsoft Network icon on your desktop, and follow the onscreen instructions to begin the application. If you don’t see the Microsoft Network icon on your
desktop or if you accidentally removed the application, see "Adding Windows 95 Programs"
earlier in this chapter.[FX 4-14]
INTERNET ACCESS
The Internet is a world-wide network that you can access to send e-mail, obtain information on
specific topics, and exchange computer files. You can access the Internet using most on-line
services. By choosing the service’s Internet Browser, you can go to Web Sites, chat with others
who share your interests, and connect with people products, and services around the world.
The Windows 95 Plus software package by Microsoft, available at most software retail stores,
provides a program called the Internet Explorer to access the Internet and World Wide Web.
SENDING AND RECEIVING E-MAIL
Definitions
Off-line: The system is not connected to an external information source.
On-line: The system is connected to an external information source.
You can send or receive e-mail using the Microsoft Network. If you use a different Internet
access provider, you can configure Microsoft Exchange for Internet e-mail by starting the
Internet Setup Wizard.
NOTE: Be sure to check that the modem software for Window 95 is correctly installed before
using Microsoft Exchange. Refer to "Checking the Modem" at the beginning of this chapter.
To run the Internet Setup Wizard, activate the Start menu (see "Activating Windows 95
Programs" in this chapter). Choose Programs, then Accessories. Choose Internet Tools, then
choose Internal Setup Wizard.
You do not need to be connected to your e-mail service to compose a message. You can compose
and save outgoing messages while you are off-line and not paying for service, then send the
messages when connected to your e-mail service. You can also compose e-mail messages while
you are on-line.
Other people can send you e-mail when you are off –line. When you connect [FX 4-15] to your
e-mail service, you can read your messages while on-line, or you can download your messages
and read them later when you are off-line.
If you need assistance sending or receiving e-mail:
Activate Windows Help by activating the Start menu (see "Activating Windows 95 Programs"
in this chapter). Choose Help, then choose the Index tab. Type e-mail. Choose the Display
button to see more information. For more help, see "adding Windows 95 Programs" in this
chapter.
USING HYPERTERMINAL
Page 44

NOTE: Windows Help (also referred to as on-line help) and documentation is available in the
system regardless of its connections.
HyperTerminal is a feature of Windows 95 that you can use to communicate with a bulletin
board, an on-line service, or other computers.
To find HyperTerminal, activate the Start menu (see "Activating Windows 95 Programs" in this
chapter). Choose Programs, then choose Accessories.
If HyperTerminal is not on your computer, activate Windows Help by activating the Start menu
(See "Activating Windows 95 Programs" in this chapter). Choose Help, then choose the Index
tab. Type installing in the field, and then use the down arrow to move down the selections until
you see Windows Components. Choose Windows Components and follow the steps.
To create a new HyperTerminal Connection, choose HyperTrm from the HyperTerminal
window. Dialog boxes walk you through the steps that are required to create the new connection.
If you save the connection, it will be added to the HyperTerminal window for easy connection at
a later time. [FX 4-16]
To use a HyperTerminal connection that you previously created, simply choose the Icon that
represents the location that you want to connect to. The WinBook FX will dial and connect. A
terminal window will appear that allows you to interact with the location to which you are
connected.
COMMUNICATING WITH BULLETIN BOARDS
You can use your WinBook FX to communicate with on-line information centers known as
bulletin boards. Bulletin boards offer services such as e-mail, chat, and information. Some
Bulletin Board Services (BBS) allow you to download documents, programs, and other
information.
You can use HyperTerminal to dial, connect, and communicate with Bulletin Board Services.
See "Using HyperTerminal" above for more information.
If you think you may need a software driver that was not included with your WinBook FX when
you received it, contact Technical Support at the number listed on the "Read-Me-First" card.
They may recommend that you download a software driver from a bulletin board. They will give
you details on file names, procedures, etc.
EXCHANGING FILES WITH OTHER COMPUTERS
Your WinBook FX allows you to exchange files with other computers. You can use Briefcase to
do this. See "Updating Files from a Remote Computer" in this chapter for more information.
You can also use HyperTerminal to dial, connect, and communicate with other computers. See
"Using HyperTerminal" in this chapter for more information.[FX 4-17]
USING WIRELESS SERVICE
Page 45

A very handy feature for people on the road is the capability of hooking a cellular phone to the
WinBook FX. There are several vendors who offer PCMCIA cards that interface to cellular
phones. Normally these cards work with specific models of cellular phones, so be sure to check
with your cellular phone manufacturer to see if your phone supports these features. Or check
with your PC Card manufacturer to see if it supports your phone.
Once you have the PC card hooked up with your cellular phone and your WinBook FX, you can
send and receive faxes, access e-mail or surf the Internet without having to find a phone jack.
USING THE SERIAL INFRARED PORT
The Serial Infrared port uses infrared light to communicate with compatible external devices
such as other computers or printers. The Serial Infrared port operates similar to a TV remote
control, but the data moves at a greater speed. This method of communication offers a
convenient wireless connection to compatible devices.
To use the port, you must have an unobstructed visual pathway between the WinBook FX’s
Serial Infrared transceiver and the external device’s Serial Infrared transceiver. The WinBook
FX and the external device can be up to 1 meter apart with a 15º angle.
To use the Serial Infrared port, you may need to enable the port. To enable the port, go to the
Setup Program. See Chapter 9, Using the Setup Program, for more information.
NOTE: The WinBook FX comes with Puma TranXit software to support the infrared interface.
TranXit will allow you to print wirelessly to a printer with an IR port such as the HP LaserJet
5M, or send and receive files from another system with TranXit. Refer to the TranXit manual
that [FX 4-18] came with your system or the TranXit on-line documentation.
To get to the TransXit on-line help, press the left <Windows> key, and select Programs, then
TranXit, and then select the TranXit Help icon. This will bring up the on-line manual.
Once you are familiar with the TranXit capabilities, you can start the application by clicking on
Start, then Programs, then TranXit2, then TranXit, and then follow on-screen instructions.
[FX 4-19]
FX Chapter 5
Page 46

CHAPTER 5: EXPANDING YOUR SYSTEM
ACCESSORIES
Your WinBook FX is compatible with common computer accessories: monitors, keyboards,
mouse pointer, and printers. You can connect accessories directly to the WinBook FX or to a
docking station that allows a quick and convenient connection to all accessories at once.
WARNING: Turn off power to accessories before you connect them to your WinBook FX
to ensure that its interfaces are not damaged.
EXTERNAL KEYBOARD
To make typing more convenient, you can use a full-size external IBM PS/2 or compatible
keyboard with your WinBook FX. The external keyboard must be compatible with the PS/2 jack
on the back of the WinBook FX. The PS/2 jack is the small round socket located on the right side
of the back of WinBook FX.
If your keyboard’s cable connector doesn’t fit the WinBook FX’s PS/2 connector, you may be
ale to use an interface connector to make them compatible. You can purchase an AT-PS/2
adapter from most suppliers of computer hardware.
Connecting an External Keyboard
Make sure your WinBook FX is powered OFF before starting.
Locate the mini-Din connector located at the right side of the WinBook FX. For location,
refer to the rear view of the WinBook FX in Chapter 2, System Tour.
Carefully line up the pins of the keyboard jack and connect it to the mini-Din connector.
Note that e some keyboards have an AT-style keyboard connector. If your keyboard has this
type of connector, use an AT-to-PS/2 keyboard adapter.
Once the external keyboard is connected, turn on the WinBook FX [FX 5-2] power. Both the
embedded keyboard and the external keyboard should function. You can use both keyboards
at the same time, but you can’t use combination keys such as <C> on one keyboard an
<CTRL> on the other.
EXTERNAL MONITOR
You can easily hook up an external monitor to your WinBook FX. The WinBook FX’s external
monitor interface supports SVGA monitors.
You may need to change the monitor driver for the best monitor image. Refer to your monitor’s
User’s Guide for the specifications of your external monitor.
Connecting an External Monitor
Turn off power to the video monitor to ensure that the WinBook FX’s interfaces are not
damaged.
Connect the monitor’s 15-pin make analog connector to the video port located behind the
right-hand door in the back of the WinBook FX.
Page 47

After plugging the monitor cable into the video port, tighten the connector screws to secure
the connector to the WinBook FX.
Make sure the monitor is plugged into a suitable power source, then turn it on.
Press <Fn> + <F12> to switch between the WinBook FX’s display and your external monitor.
Note that you have a choice of 3 active display settings: LCD only, both LCD & CRT monitor,
and CRT monitor only. <Fn> + <F12> will toggle through these 3 settings.[FX 5-3]
PRINTER
If you want to print your work on paper, you’ll need to use a printer. You can connect a printer
directly to LPT1 on your WinBook FX. To connect a printer to the WinBook FX, you need a
parallel cable. Some printers use cables with a special connector that plugs into the printer, but
the end that plugs into your WinBook FX must be a standard parallel connector.
WARNING: Make sure the printer is turned OFF before connecting it to the WinBook FX
to ensure that its interfaces are not damaged.
Connecting the Printer
Open the large I/O door on the back of the WinBook FX. This is the I/O door located on the
left side as you face the back of the WinBook FX. Refer to the rear view in Chapter 2, System
Tour.
LPT1, the parallel printer port, is located on the left side of the large bay. Plug the printer
cable connector into the parallel port, and then screw it into place to secure the connection.
You must have a software driver installed for your particular printer for printing with the
WinBook FX. There are a number of printer drivers included with Windows 95. You can use one
of them, or you can supply your own driver.
Installing the Printer Software Driver
To display the Start menu, press the left <Windows> key, or choose the Start button on the
Windows 95 Task Bar.
Choose Settings, then Printers.
Choose Add Printer, then Next.
Choose the Manufacturer Name of your printer.[FX 5-4]
Choose the Printer Model that you are using.
If Windows 95 does not list your printer, you need the software driver disk that came with
your printer. If you have the disk, choose Have Disk, and follow the appropriate steps to
install your printer driver.
When you have completed installing the driver, Windows 95 allows you to print a test page t
verify proper operation.
ADDITIONAL POINTING DEVICES
You can attach another pointing device such as a mouse, graphics tablet, or virtual reality input
device to either the PS/2 port or the serial port. Refer to your pointing device User’s Manual for
Page 48

information about which port to choose.
More than one device can cause a conflict. Although the WinBook FX supports 2 pointing
devices, it is recommended that you only use one pointing device at a time to avoid device
conflicts.
Pointing devices typically have a right and left button. In application programs, the left button is
usually used to make selections. The function of the right button varies widely with different
software. Some applications allow you to assign functions to the right button. Refer to your
application User’s Manual for specific information on pointing device button functions.
NOTE: You can switch the "left- and right-handedness" of the buttons on your pointing device.
You can do this in the Windows 95 Control Panel mouse setting. Simply click and the driver will
reverse the operations.[FX 5-5]
Installing the Pointing Device Software Driver
You may have to install a new pointing device driver if your pointing device is not presently
supported by Windows 95. Check the User’s Manual that came with your pointing device. Use
the procedure described in "Installing the TouchPad Software Driver" in Chapter 1, Getting
Started.
TouchPad Software Driver
If you have purchased a WinBook FX with a TouchPad installed, you can either use the standard
Windows 95 PS/2 mouse driver or an enhanced TouchPad driver. The enhanced driver allows
you to more accurately control the special actions of the TouchPad such as the tap and doubletaps. If the driver is already installed, you will see a TouchPad icon instead of the mouse icon in
the Control Panel screen. If you see the mouse icon, you may want to install the TouchPad driver
from the floppy disks that came with the system. See "Installing the TouchPad Software Driver"
in Chapter 1, Getting Started.
Adding a Mouse
You can connect either a serial or PS/2 Microsoft compatible mouse to your WinBook FX. If
you connect an external PS/2 mouse before you turn on your WinBook FX, the WinBook FX
will automatically sense the mouse and enable it.
If you use a serial mouse, connect the mouse to the serial port located behind the small I/O door
on the backside of the WinBook FX. The small I/O door is located on the right side of the
WinBook FX as you face the backside. The serial port is the left connector inside of the small
bay.[FX 5-6]
If Windows 95 does not recognize your serial mouse, you will need to use Windows 95 to "Add
New Hardware."
Follow these steps to use the Add New Hardware feature:
Attach the mouse to the serial port.
To display the Start menu, press the left Windows 95 key, or choose the Start button on the
Page 49

Windows 95 Task Bar.
Choose Settings, then Control Panel.
Choose Add New Hardware, then Next.
Windows 95 will search for your serial mouse and add a driver to operate it.
MULTIMEDIA SOUND SYSTEM
The WinBook FX’s built-in audio capabilities allow you to take advantage of a wide range of
educational and entertainment multimedia software without the additional costs of add-on cards
and peripheral hardware. The multimedia sound system features a sophisticated on-board FM
sound generator that produces realistic music and human voice sounds in 16-bit stereo.
The multimedia sound system includes the following features:
Audio tone and balance controls that are unique to the WinBook FX allow you to get
the optimum quality sound
Sound Blaster 16, Ad Lib, and MS Windows Sound System compatibility
Music Synthesizer, Roland MPU401 UART mode compatible[FX 5-7]
An FM sound generator capable of simultaneous playing of 18 melody sounds and 4
rhythm sounds via software control
Sine wave speech synthesis for creating realistic human speech effects with 8
selectable waveforms
16-bit Analog to Digital and Digital to Analog converter
Five 44.1 kHz sampling rates, 16-bit digitized audio playback
Dynamic filtering reduces noise and distortion rate
Five-channel MPC compatible mixer, 32-step volume control
Built-in microphone for convenient recording
Integrated power amplifier for analog output and volume control
Sound compression at rates of 2:1, 3:1, and 4:1 allows you to save disk space
These applications are compatible with Sound Blaster and the Microsoft Windows Sound
System. With these programs you can record, store, compress, edit, and playback a variety of
sounds and music.
Windows 95 Audio Applications
To access the audio applications, press the left <Windows> key. Choose Programs, then Audio
Applications. You will see 6 audio applications listed:
Audio Rack
CD Player
MIDI Player
Mixer Control
Wave Player
Wave Editor
For a thorough description of installing, setting up, and using these audio applications, refer to
Page 50
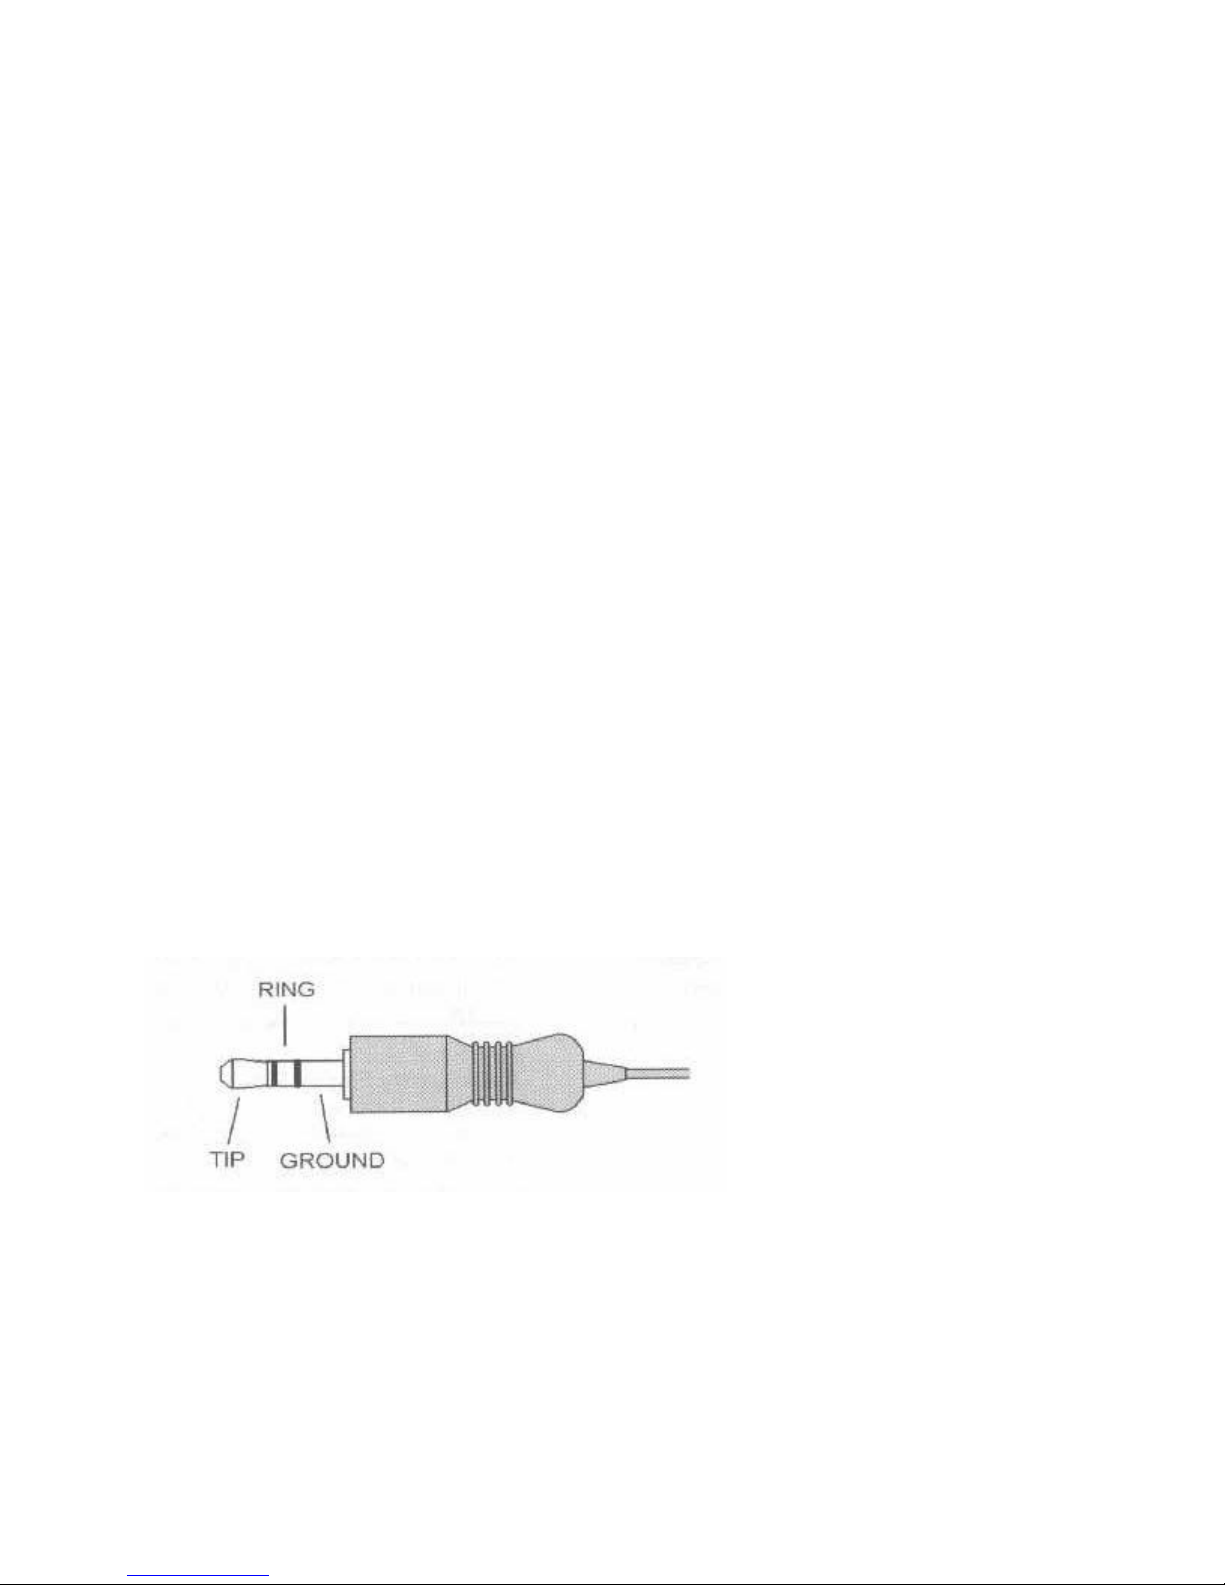
the Audio Manual that came with your system.[FX 5-8] Also in the Audio Applications folder
will be a file called ReadMe which will have the latest release notes for these applications, along
with specific tips on using the audio system with MS-DOS modes.
Audio Utility Floppy Disks
The audio applications floppy disks included with your system contain the applications listed
above. As shipped, your WinBook FX will have these audio applications already installed. If you
have deleted these from your system and need to reinstall them, insert Disk 1 of the Audio
Applications disks into the Floppy Drive. Then click on Start, then Run, and then type A:Setup
into the dialog box. The program will automatically install and will ask you to insert the second
floppy when needed.
Audio Connectors
There is a stereo Line-In input and an External Microphone input (you can also use the internal
condenser microphone). You can connect an external audio source such as a
stereo tape deck or CD player to the Line-In jack. In addition to the WinBook FX’s built-in
speakers, you can connect external stereo speakers or headphones to the External Speaker jack.
Refer to Chapter 2, System Tour, for connector locations.
NOTE: Most external microphones provided for Creative Labs or Microsoft sound cads and coil
moving type microphones are compatible with the WinBook FX. If you are using a condenser
type microphone, check the connector to make sure the tip and ring short internally. Refer to the
illustration on the next page. Contact the microphone manufacturer for further information.[FX
5-9]
Microphone Plug
EXTERNAL SPEAKERS
You can listen to music or other audio material using the built-in speakers in your WinBook FX.
You can also connect external speakers to your WinBook FX.
DANGER: To avoid damage to the speakers or to your hearing, turn the volume down before
you plug in the speakers (see "Controlling the Volume Level of External Speakers").
Page 51

Connecting External Audio Speakers
Connect your external speakers to the external speaker jack on the backside of the WinBook FX.
As you view the backside of the WinBook FX, the external speaker jack is the right-most hole
above the right I/O door. Refer to the WinBook FX rear view in Chapter 2, System Tour.[FX 5-
10]
Controlling the Volume Level of External Speakers
To control the volume level of the external speakers, you can use function keys on the keyboard
or volume controls in Windows 95 and other audio programs. Wen you press the volume control
keys, a Popup Status window appears in the upper left side of the screen. The Popup Status
window shows you the current volume level with a graphic display.
When using function keys to control the volume: Press <Fn> + <F7 repeatedly to lower the
volume. Press <Fn> + <F8> repeatedly to raise the volume. If you need to silence the audio
source, press <Fn> + <F6>. Enable sounds by pressing <Fn> + <F6> again. (See the "Special
Function Keys" section of Chapter 2, System Tour, for additional audio keyboard controls.)
SERIAL PORT DEVICES
The WinBook FX includes a standard RS-232 compatible port for serial communications. You
can connect serial devices such as a mouse pointer, serial printer, plotter, modem, or a graphics
tablet to the serial port. The serial port is located at the back of the WinBook FX. Refer to the
rear view of the WinBook FX in Chapter 2, System Tour. Note that the WinBook FX’s serial ort
uses a DB-9 type connector. Many serial devices are equipped with a DB-25 type connector. To
plug a DB-25 connector into the WinBook FX’s DB-9 connector, you need a serial 25-to-9
adapter. Your local computer store should have one.
PARALLEL PORT DEVICES
Aside from a printer, there are many computer accessories that will connect to the WinBook FX
through the parallel port. The parallel port is located at the back of the WinBook FX. Refer to the
rear view of the WinBook FX in Chapter 2, System Tour. [FX 5-11]
PARALLEL PORT OPERATIONS MODE
The WinBook FX supports 3 parallel port operation modes: Output Only, Bi-directional
(default), and Enhanced Capabilities (ECP). The Setup Program allows you to select which mode
of operation you want. See Chapter 9, Setup Program, for details on configuring the parallel port
communication mode.
Output Only
Output Only Mode: When operating in Output Only mode, the parallel port allows data output
only. The Output Only mode is sometimes referred to as PC Compatible mode since this is the
mode supported in the original PC design. If you are having a problem with your parallel port, or
are using a peripheral that was designed years ago, you should change to this setting since it
Page 52

should work in all cases.
Bi-Directional
Bi-Directional Mode: In Bi-directional mode, the parallel port allows both data input and output.
The Bi-directional mode is the most common setting since most modern devices will work in this
mode, and it provides better performance than the Output Only mode. Use Bi-directional mode
for normal devices like printers.
Enhanced Capabilities
Enhanced Capabilities Mode: The parallel port operates in the Enhanced Capabilities Port (ECP)
mode if an Enhanced device driver is loaded. This mode is only supported with ECP aware
peripherals, so when the parallel port is configured as an Enhanced Capabilities Port, your
application must be ECP aware. Use Enhanced Capabilities mode for devices such as a LAN
adapter or a Tape Backup device.
[FX 5-12]
FX Chapter 6
Page 53

CHAPTER 6: UPGRADING YOUR WINBOOK FX
You can add to your WinBook FX’s capabilities with hardware upgrades. Some possible
upgrades are listed below.
FASTER CPUs
As you are undoubtedly aware, the latest and greatest CPU of today will seem antiquated in a
few years. To help you protect your investment, the WinBook FX uses a socket for the CPU.
This allows you to upgrade to faster processors, as they become available.
WARNING: Upgrading the CPU is NOT something you should try on your own. Contact Sales
at the number listed on the "Read-Me-First" card that came with your computer. Ask about
available CPU upgrades and how to send your WinBook FX to our Support Center for CUP
installation.
LARGER HARD DISK DRIVES
As the WinBook FX is introduced, you may purchase it with hard disk drives ranging in capacity
from 820MB to 2.2GB. Later, you may want to consider upgrading to a higher capacity drive.
The WinBook FX features a removable hard disk drive to support this process. Although you can
do this yourself, we recommend you call Sales for information on the latest drives available.
Contact Sales at the number listed on you "Read-Me-First" card.
WARNING: If you do choose to upgrade your drive, be sure to back it up before removing it.
You can then restore the backup to your upgrade hard drive.[FX 6-2]
ADDITIONAL MEMORY MODULES
Additional memory modules can increase your WinBook FX’s main memory from 16MB to
24MB, 32MB, or 40MB. You can get a kit that will give you precise instructions on how to
remove the memory module compartment cover and insert additional memory modules.
Contact Sales at the number listed on your "Read-Me-First" card and ask for information on
memory upgrades.
WARNING: The WinBook FX requires custom-sized SIMMs (Single-In-Line-MemoryModules). If you want to increase your WinBook FX’s memory, contact Sales at the number on
your "Read-Me-First" card to find the right SIMM for your system.
The table below summarizes the possible memory module configurations.
Page 54
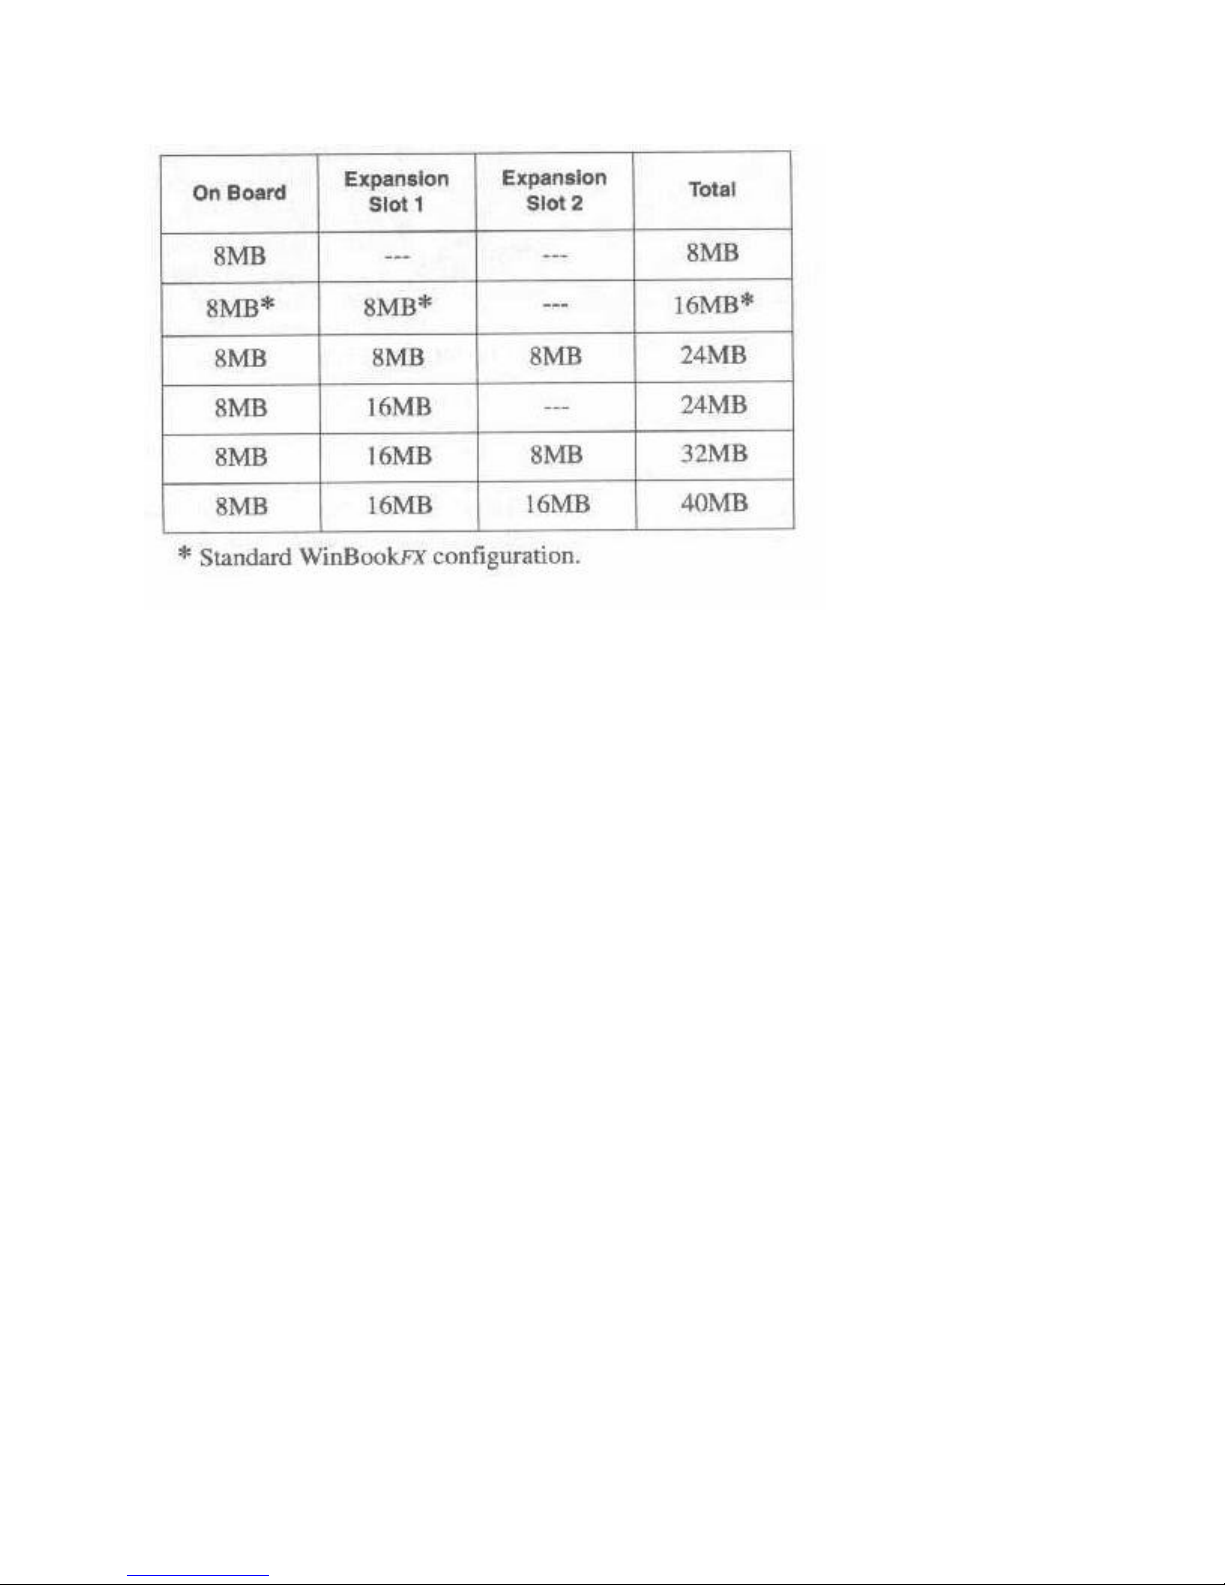
*Standard WinBook FX configuration.
FIRMWARE UPDATES
Your WinBook FX includes software written into Read Only Memory chips or ROM. When
software resides in chips, it is called firmware. The basic firmware for the PC is called the ROM
BIOS for the Basic Input/Output System. Part of this firmware is the Setup Program described in
Chapter 9, Using the Setup Program.
From time to time, we will update the WinBook FX system BIOS (firmware) for enhancements
or bug fixes. These firmware upgrades can be downloaded from the WinBook BBS via an
upgrade floppy disk. These are then used to reprogram your Flash ROM BIOS. With the help of
Technical Support, you will be able to erase the current firmware and replace it with the updated
version.
PCMCIA CARDS
PCMCIA cards are credit card sized electronic modules that can provide your WinBook FX with
added functionality. They include memory cards, modems, network adapters and more. Contact
Sales at the number listed on your "Read-Me-First" card for information on PCMCIA product
offerings. If you want to buy a PCMCIA product from another source, you may want to check
with Technical Support about which PC Cards are certain to be compatible with the WinBook
FX and Windows 95.
PCMCIA cards are classified as Type I, II, and III. The WinBook FX has 2 PCMCIA sockets
that will support the following configurations:
2 Type I cards
1 Type I and 1 Type II card
2 Type II cards
1 Type I or II card, with 1 Type III card
Page 55
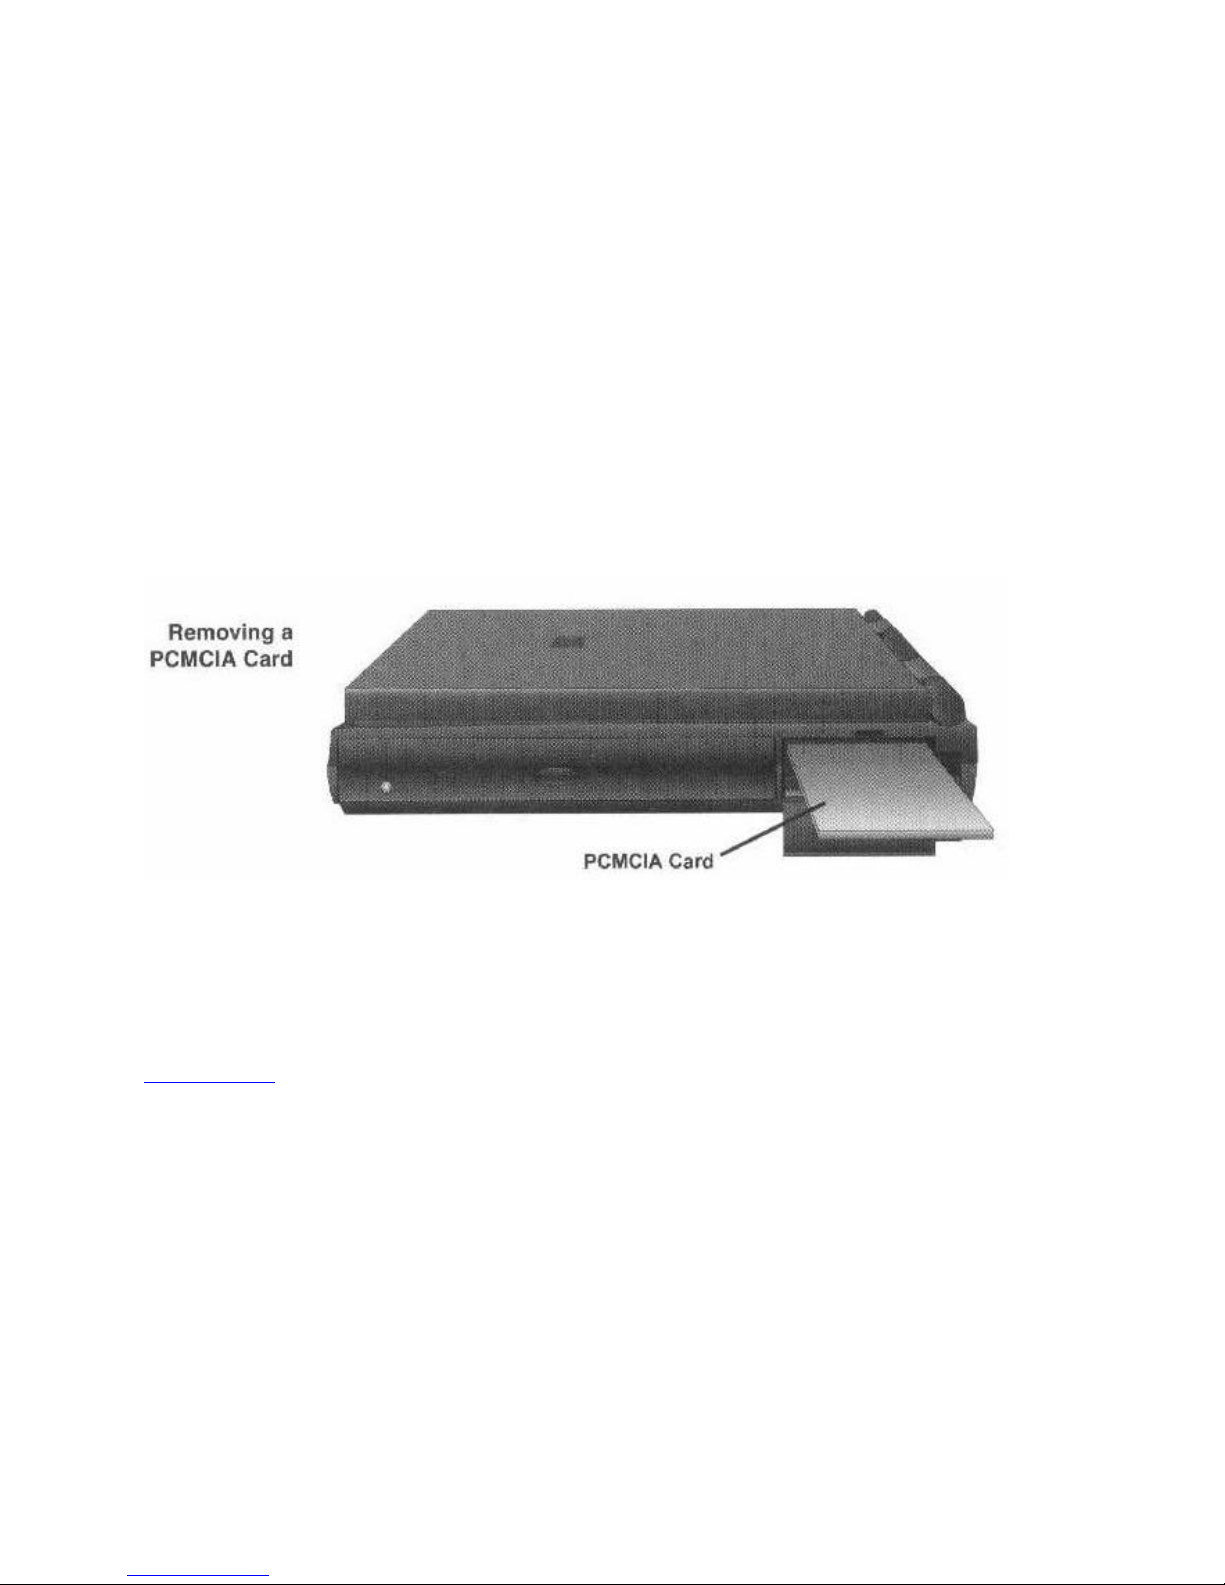
The PCMCIA compatible card sockets are located on the right side of the WinBook FX. Refer to
the right view illustration in Chapter 2, System Tour.[FX 6-4]
Inserting a PCMCIA Compatible Card
Drop the panel door to access the PCMCIA sockets.
Hold the PCMCIA compatible card with the arrow side up and the connector side toward the
socket.
Insert the card into the appropriate socket. The top socket is socket 1; the bottom socket is
socket 2. When the card is fully seated, the black eject button located on the right side of the
socket will pop out.
Note: There are 2 eject buttons, 1 per socket.
To remove a PCMCIA card, press the eject button, and the WinBook FX will eject the PCMCIA
card from the socket.
NOTE: You can leave your PCMCIA cards in the WinBook FX for safe storage; however, this
will be an extra drain on your battery. Many PCMCIA cards draw quite a bit of power when
plugged in. There are cards that automatically power down when they are idle. Check with your
PC card vendor to see if their products support power conservation features. If not, you may
want to remove the cards when not in use.[FX 6-5]
FX Chapter 7
Page 56

CHAPTER 7: MAINTAINING YOUR WINBOOK FX
ABOUT THIS CHAPTER
This chapter presents information about procedures that will help avoid problems and extend the
life of you r WinBook FX. It is divided into 2 sections:
Environment Considerations: Ways the WinBook FX might affect the environment, and
the main ways the environment can hurt your WinBook FX
Maintenance Procedures: Preventive maintenance procedures you should use on a regular
basis
ENVIRONMENTAL CONSIDERATIONS
Temperature
Temperature effects on batteries
Humidity
Altitude
Electromagnetic interference
Battery disposal
Dust accumulation
Temperature
High and low temperatures can damage electronic components. Avoid using your WinBook FX
in temperatures below 50ºF (10ºC) or above 95ºF (35ºC). Note that these temperatures are not
the extreme. Caution should be taken when using the WinBook FX outside an air-conditioned
environment; components in a computer operating in sunshine through a window in a non-airconditioned building can reach high temperatures.
WARNING: Be careful when storing or shipping your WinBook FX so that it is not exposed to
temperatures below -4ºF (-20ºC) or above 140ºF (60ºC). Remember that car trunks and other
storage areas can reach temperature extremes.[FX 7-2]
Temperature Effects on Batteries
The batteries are specified to work from 41º to 95ºF (5º to 35ºC). Running your WinBook FX in
temperatures below 41ºF or above 95ºF will reduce the battery life.
The batteries are designed so that if the temperature is too high, the charging circuit is cut off and
the batteries will not charge. A safety switch in the battery causes this module that is aimed at
prevention over-charging. So if you leave a battery in the sun on the dashboard of your car, don’t
be surprised if it doesn’t charge when inserted into
the WinBook FX. Once the battery cools down, you will be able to charge it. At the other
extreme, if the batteries get too cold, it will take up to twice as long to charge them or they may
not fully charge.
Humidity
Page 57

Avoid using your WinBook FX in weather where the relative humidity is above 85%. If you see
condensation appearing on other warmed-up equipment, don’t turn on your WinBook FX. The
big risk from humidity is condensation that shorts out electrical connections. In microelectronics,
it doesn’t take much moisture to do this.
Altitude
Changes in air pressure can pose problems for the Micro-mechanical adjustments made in disk
drives. Pressurized environments in airplanes at 20,000 feet are not a problem, but if you are
using your WinBook FX in the mountains at high altitudes, you might, over the long run,
experience lower disk drive reliability.[FX 7-3]
Electromagnetic Interference
In certain places such as airplanes, you may be asked to turn off your WinBook FX to avoid any
possibility of interference with communications equipment. Normally, your WinBook FX should
not create interference problems for household or office electronics equipment. However,
connecting your WinBook FX to other computer devices might create interference with a nearby
TV or radio. You can avoid this by getting cables and connectors that are properly shielded. You
can obtain these from your computer dealer.
Battery Disposal
Your WinBook FX batteries must be recycled or disposed of properly. Currently, regulations
governing battery disposal vary in different jurisdictions. To avoid any environmental problems,
send your old batteries to us. Call Customer Service to obtain a Return Materials Authorization
(RMA) number and a location to ship your old batteries to.
DANGER: To avoid shocks or burns, do not allow metal objects to contact or short circuit the
battery terminals.
Dust Accumulation
Air is circulated through the WinBook FX to keep its components cool. Fine dust carried by the
air can accumulate inside the WinBook FX and interfere with air-cooling. This dust coating heats
up components and can also absorb moisture from the air which contributes to corrosion or
rusting of components. If the environment where you use or store your WinBook FX is relatively
dusty, vacuum the vents as described in the "Maintenance Procedures" section of this chapter.
[FX 7-4]
MAINTENANCE PROCEDURES
Clean the display
Clean the keyboard, pointing devices, connectors
Vacuum the vents
Take care of cables, cords, connectors
Power-cycle the batteries
Use virus detection utilities regularly
Run Windows 95 Defragmenter and ScanDisk utilities
Page 58

DANGER: Be sure your WinBook FX is powered down and unplugged before performing
any of the following maintenance procedures.
Clean the Display
Be sure the WinBook FX is powered down and unplugged. Us a clean soft cloth and ant-static
cleaning spray. Always spray the soft cloth, no the display itself. Gently wipe the damp cloth
over the display to remove dust and dirt.
Clean the Keyboard, Pointing Device, and Connectors
Over time, you will notice that the keys become dusty around the edges. There may be times
when dust, dirt, or crumbs fall between the keys.
WARNING: Do not turn the WinBook FX upside down and shake it to remove dust and dirt.
Shaking the WinBook FX can cause damage to the hard disk drive.
Be sure the WinBook FX is powered down and unplugged. Use a handheld vacuum cleaner or
canned air to remove dust and debris from the keyboard and communication ports.
Clean grease build-up on the keys with a damp clothe or cotton swab.
WARNING: Never spray liquid cleaners directly onto the keys or pointing devices. Moisture
under the keys can damage your WinBook FX. Always spray cleaners onto a clean cloth or
cotton swab, and then clean the keys and pointing devices.[FX 7-5]
Vacuum the Vents
Be sure the WinBook FX is powered down and unplugged. Use a handheld vacuum cleaner and
hold it next to the ventilation slots on the WinBook FX enclosure.
Take Care of Cables, Cords, and Connectors
When connecting cables and cords to your WinBook FX, never route them across areas where
people may trip. Avoid routing cables under your desk where your feet can get tangled. Locate
your WinBook FX close to power outlets and other connected accessories to eliminate tension on
cables and cords that can cause them to wear.
Power-Cycle the Batteries
After some use, the electronics in the battery module that monitors the battery level must be
recalibrated. If it is not, a popup message indicating "battery gauge unsure" will appear. To avoid
this, recalibrate the battery modules after every 32 charge/discharge cycles, or about once a
month. To recalibrate the battery modules, fully discharge and recharge the battery ("cycling" the
battery). If you frequently run the battery all the way down during normal use, you don’t have to
do this procedure. Battery cycling is described more fully in the "Fast Fixes" section of Chapter
10.
Use Virus Detection Utilities
Viruses are a serious threat to you r WinBook FX’s data and software. Be sure to run a virus
Page 59

detection and cleaning program regularly if you exchange files with other systems or networks.
See the "Viruses" section in Chapter 8, Security.[FX 7-6]
Run Windows 95 Defragmenter and ScanDisk Utilities
To keep your hard disk drive running efficiently, use the Windows 95 Defragmenter and
ScanDisk utilities regularly.
To find more information about Windows Disk tools, follow these steps:
Click the Start button in Windows 95.
Choose Help.
Choose the Index tab.
Type in disk tools.
Then choose the Display button to get more information.
[FX 7-7]
FX Chapter 8
Page 60

CHAPTER 8: SECURITY
BASIC AWARENESS
This chapter covers steps you can take to secure your WinBook FX and its data.
INSURANCE COVERAGE
Check with your insurance agent to see if your household coverage will extend to cover your
WinBook FX against theft or damage. Owners of portable systems are surprised to learn just how
expensive the display is to replace. A replacement display can cost nearly $2,000.
PROTECTION AGAINST THEFT
The best way to protect your WinBook FX from theft is to disguise it in a carrying case or bag. If
the bag looks like one that should hold a notebook computer, it may become a thief’s target. The
bag or case that you choose should have adequate padding to help prevent damage in the event
that you drop it. It should also be comfortable to carry so that you are less likely to lay the bag
down.
WARNING: Never leave your WinBook FX unattended while traveling, in restaurants, at
conferences, or other public places.[FX 8-2]
SECURITY CONNECTOR
Consider using a mechanical security lock. There are many public situation where using
something like a bicycle lock to secure your WinBook FX is appropriate, even if it may look
clumsy. A built-in Security Connector allows you to lock the WinBook FX to a fixed object.
The Security Connector is located on the left side of the WinBook FX between the Power Input
Connector and the Game Port. This connector will work with the Kensington lock security
system, which consists of a lock and a steel cable that loops around an immovable object. The
Kensington lock is available through many computer dealers.
WINBOOK FX PASSWORDS
You can restrict access to your WinBook FX with passwords that are built into the WinBook FX,
as well as with passwords that are supported by Windows 95.
The firmware that supports the Setup Program in your WinBook FX allows you to set two
passwords: the Supervisor Password and the User Password. Refer to Chapter 9, Using the Setup
Program.
Supervisor Password
When the Supervisor Password is enabled in the Security menu of the Setup Program (See
Chapter 9, Using the Setup Program), it will block access to the Setup Program menus. Once
you enter the Supervisor Password, you can access all of the Setup Program menus.
Page 61

If the Password on boot item is enabled in the Security menu, then you will be required to enter
the Supervisor Password before your WinBook FX boots. You can also use the Supervisor
Password to limit access to the Floppy Disk Drive by setting Diskette access in the Security
menu to Supervisor.[FX 8-3]
NOTE: Setting Diskette access in the setup program can prevent unauthorized booting of the
system in a way that could bypass your Windows 95 password.
User Password
If the Supervisor Password is enabled, a User Password may also be enabled. This password can
be used to allow someone access to all of the Setup menus, but it does not allow them complete
access to the settings in the Security menu. Specifically, if you have the User Password, you’ll be
able to change the User Password) Set User Password entry), and change the Password on Boot
entry. However, you will not be able to disable the Supervisor or User Passwords.
You can also set Diskette access in the Security menu of the Setup Program to User in order to
allow diskette access without complete control over the Setup Program menus.
WINDOWS 95 PASSWORDS
Microsoft Windows 95 offers a number of password features that help protect your privacy. We
briefly describe some of them below.
For more information, on the Windows 95 desktop choose the Start button on the Task Bar to
see the Startup menu. Choose Help, then choose the Index tab in the Help Window. Type
passwords into the field, and then press the Display button on the bottom of the Help window to
learn more about passwords in Windows 95.
Startup Password
Windows 95 offers an optional password that occurs when Windows 95 starts. If you use this
Startup Password, you must type it in each time you start Windows 95.[FX 8-4]
If the WinBook FX powers down as a result of a low battery or power failure, when the power is
restored, Windows 95 will pause and wait for a password before completing the startup.
NOTE: Some programs that are scheduled to run automatically will run even if you don’t enter
the Startup Password. Other programs skip duties until the next scheduled time if the password is
entered.
User Password
If Windows 95 is setup for User Passwords, the WinBook FX will not fully start Windows 95
until a user presents a password. User Passwords allow you to configure Windows 95 to allow
and disallow use of programs or files depending on the User Password. This is useful when
several users share a WinBook FX, but do not wish to share applications or files.
HARD DISK ENCRYPTION
If someone removes your WinBook FX’s hard disk drive, they can install it into another
Page 62

computer to read or copy its contents. Even if you use Window 95 or the WinBook FX’s Setup
Program to enter passwords, your hard disk drive is not protected. There are applications
available that allow you to encrypt the hard disk and avoid possible theft of personal or
proprietary information. See your local computer software dealer about hard disk drive
encryption utilities.
COMMUNICATIONS ENCRYPTION
Messages and files that you send over public facilities can be intercepted. You, and whoever
you’re exchanging information with, can acquire encryption utilities that will encode this
information. Encryption programs are available as shareware and from computer software
dealers. The different products offer a range of security levels from simple passwords that
determined hackers can break, to sophisticated encryption that even national intelligence
organizations cannot decipher.[FX 8-5]
VIRUSES
Computer viruses can "infect" files and programs on your WinBook FX. Viruses are a serious
problem in the computer world. These unwanted programs will automatically spread themselves
from one system to another, and can cause a number of problems such as:
New display messages to appear as the system boots, indicating problems loading drivers and
other software.
Large amounts of disk space to be used.
Scrambling of information on your hard disk drive.
Files to be erased.
Unusual display problems.
Whenever you transfer files from one system to another – by floppy disks, by downloading from
an on-line service, by a local network – you are risking exposure to viruses.
Virus detection and removal software packages are available at most computer store. Be sure you
get one for Windows 95. You may want to consider one that will automatically run every time
you boot your WinBook FX.
WARNING: It is important to scan for viruses on a regular basis. Also, be sure to check for
updates to your virus detection and removal software package every few months.[FX 8-6]
One way to protect your hard disk drive from virus damage is to enter Security menu in the
Setup Program, and set the Fixed Disk Boot Sector field to Write Protect. Refer to Chapter 9,
Using the Setup Program.
If you don’t use a virus checker that runs automatically each time you boot, consider using the
Virus check reminder that is built into you WinBook FX. Go to the Security menu of the Setup
Program. (Refer to Chapter 9, Using the Setup Program.) Select the Virus check reminder item,
and use the <+> and <-> keys to set the frequency with which the reminder message will appear.
Consider Weekly or Monthly settings depending on how often you transfer files from other
systems to your WinBook FX. The reminder message will appear whenever you boot your
WinBook FX.
Page 63

Typically, virus detect packages will guide you through building a backup boot floppy disk to be
used if you suspect that the hard disk is infected.
NOTE: The WinBook FX is typically set up to look for a boot floppy disk before it starts to boot
from the hard disk drive. This setting supports use of a backup boot floppy disk. To check this
setting, go to the Main menu of the Setup Program as shown in Chapter 9, Using the Setup
Program. Check that the Boot Option item is set to [A: then C:].
BACKUP YOUR HARD DISK
Hard disk drives do die. Sometimes data recovery specialists can rescue files and sometime they
can’t. While hard disk drives are getting more reliable, the possibility of failures is still there,
especially for mobile users who may drop the unit while it is in operation. Consequently, you
should make a habit of regularly backing up the information on your [FX 8-7] hard disk. Refer to
Windows 95 documentation, or to on-line Help for instructions.
Consider using the System backup reminder that is built into your WinBook FX. Go to the
Security menu of the Setup Program. (Refer to Chapter 9, Using the Setup Program.) Select the
System backup reminder item, and use the <+> and <-> keys to set the frequency with which
the reminder message will appear. Consider Weekly or Monthly depending on how much you
use your WinBook FX and how often you travel with it. The reminder message will appear
whenever you boot your WinBook FX.
WARNING: If your WinBook FX does take a heavy mechanical shock while in operation, be
sure to use the Window 95 ScanDisk utility to check for damage. If ScanDisk reports loss of
data, call Technical Support at the number listed on the "Read-Me-First" card that came with
your WinBook FX.
[FX 8-8]
FX Chapter 9
Page 64

CHAPTER 9: USING THE SETUP PROGRAM
INTRODUCTION
The Setup Program is part of your WinBook FX’s ROM BIOS (Read-Only-Memory Basic
Input/Output System). The ROM BIOS, or BIOS as it is usually called, is neither hardware nor
software-it’s firmware. This is software that is stored in chips that the CPU reads when it starts
up. The BIOS firmware creates a standard environment for different operating systems like
Windows 95 and DOS.
The Setup Program allows you to modify settings in the BIOS and configure your WinBook FX
for things such as:
Hard drives, floppy disk drives, and CD-ROM drives
Video display options
Password protection
Power management features
The WinBook FX stores these settings in a non-volatile battery backed-up part of memory called
NVRAM (Non-Volatile Random Access Memory) or battery backed-up CMOS (Complimentary
Metal Oxide Silicon) RAM. This means that even if you lose all power to your WinBook FX,
these settings (which include the current time and date) will not be lost.
The settings made in the Setup Program intimately affect how the WinBook FX performs. If you
are considering changing your system’s configuration, it is important to first to try to understand
all the Setup’s options, and second, to make settings appropriate for the way you use your
WinBook FX.[FX 9-2]
We programmed a standard configuration in the Setup Program. You may not need to change the
standard program, but we recommend that you read this chapter just in case you need to make
any changes in the future.
The next section discusses how to move around in the Setup Program, and how to specify and
save your new settings, followed by a brief discussion of the optional settings with the
submenus.
USING THE SETUP PROGRAM
We designed the menu-driven Setup Program to make it easy to use. You can scroll through the
various menus and make your selections among the displayed options.
When turning on the WinBook FX for the first time, you may get a message prompting you to
run the Setup Program. A warning message may appear on the screen that the hardware
configuration is changed or that the Power-On Self Test (POST) fails. The screen message will
inform you of any errors or invalid settings and prompt you to run the Setup Program to correct
the problem.
Even if the computer does not prompt you with a message instructing you to use the Setup
Program, at some time in the future you may want to change the configuration of your computer.
Page 65

For example, you may want to connect a peripheral or make changes to the power management
settings. It will then be necessary to reconfigure your system using the Setup Program so that the
WinBook FX can recognize these changes.[FX 9-3]
WHEN TO USE THE SETUP PROGRAM
You should run the Setup Program under the following conditions. Note that these are only a few
examples and this is not a complete list.
You have set up the computer for the first time and you get a message stating that you
should run the BIOS Setup Program.
You added or removed memory (RAM).
You want to redefine the communication ports to prevent any conflicts
You want to make changes to the Power Management configuration.
You want to change the password or make other changes to the security setup.
ACCESSING THE SETUP PROGRAM
To access the Setup Program: Press the <F2> key after the WinBook FX is through its POST
(Power-On Self Test). You’ll know POST is over after you see the memory test information on
the screen.[FX 9-4]
The top of the Setup screen will display the Menu Bar as shown here.
The Menu Bar
Setup Program options are summarized in Appendix B.
Main:Use this menu to make changes to the basic system configuration.
Advanced:Use this menu to enable and make changes to the advanced features available on your
system.
Security:Use this menu to set passwords for both a User and a Supervisor, and to enable backup
and virus check reminders.
Power: Use this menu to configure and enable power management savings features.
Exit:Use this menu to exit the current menu or specify how to exit the Setup Program.
To access the Menu Bar items, you can use the arrow keys to highlight the desired item, then
press <Enter>.
The Legend Bar
The Legend Bar is located at the bottom of the Setup screen. The keys in the Legend Bar allow
you to navigate through the various Setup menus.
The table that follows lists the keys found in the Legend Bar with their corresponding alternates
Page 66
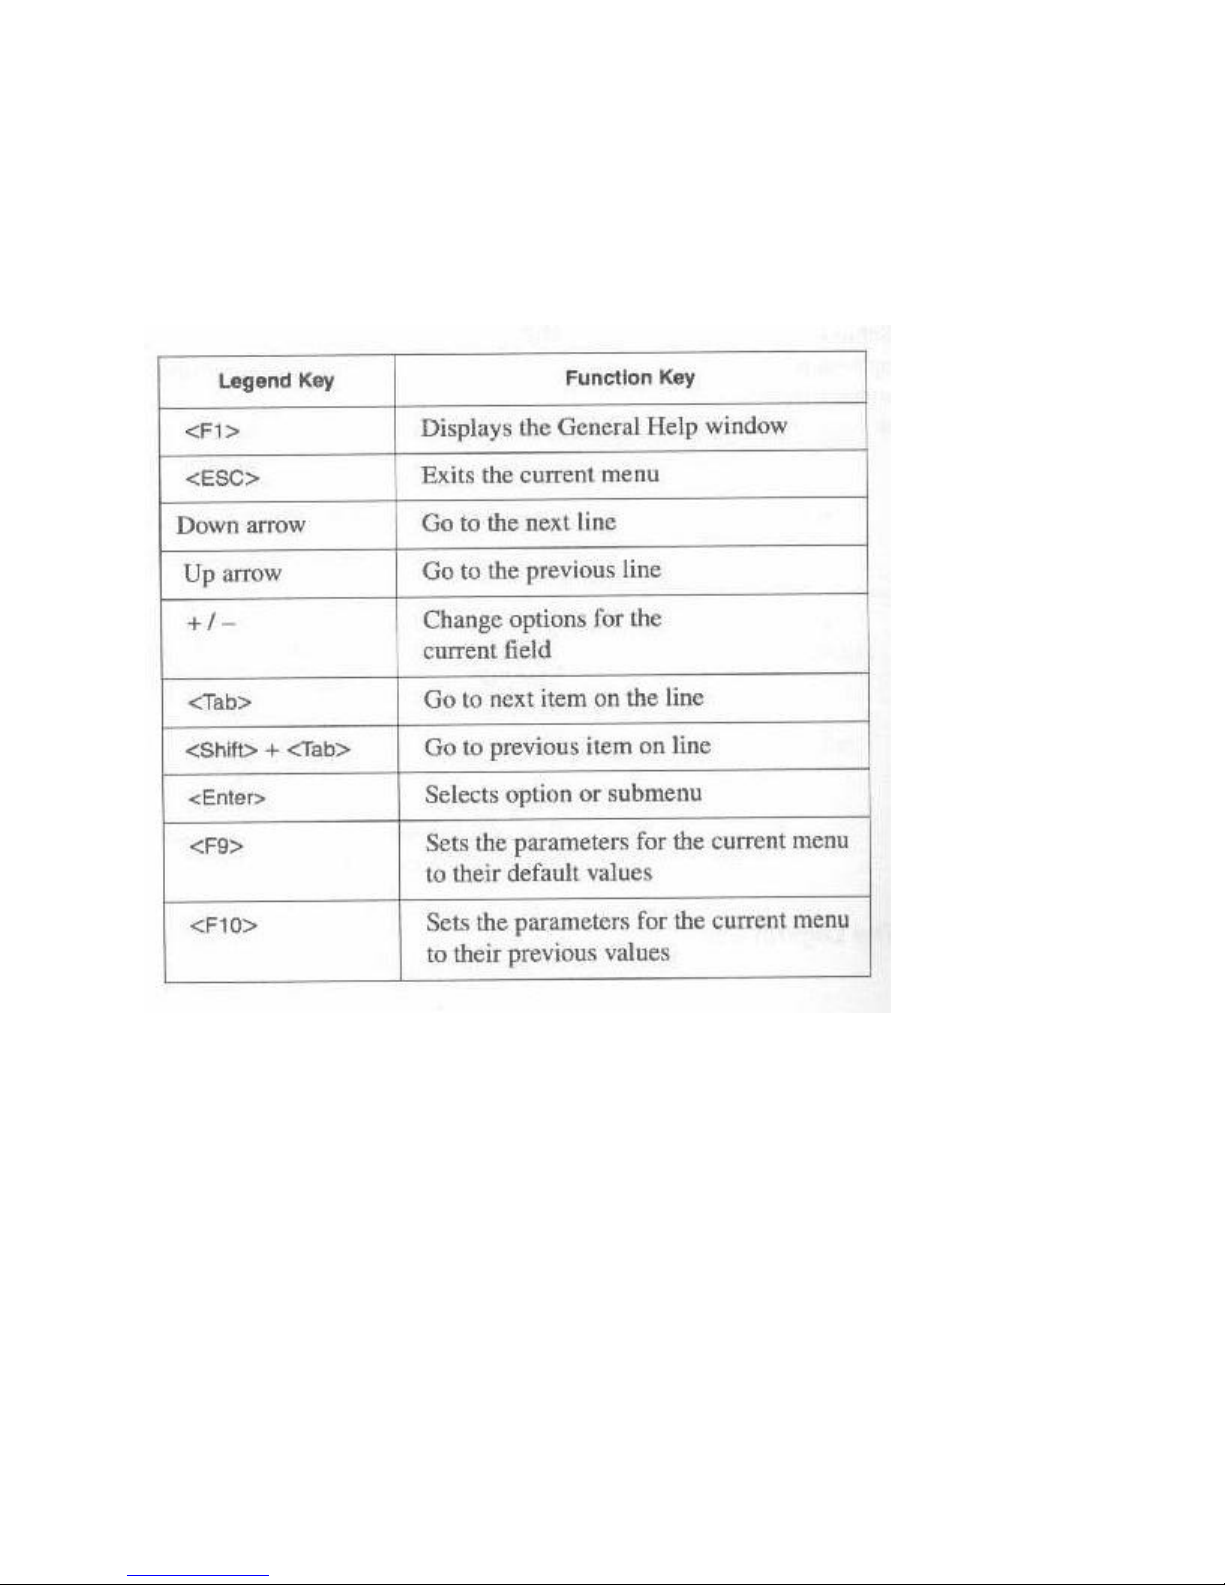
and functions.[FX 9-5]
F1 Help &σηψ; ↓ Select Item -/+ Change Values F9 Setup Defaults
Esc Exit Select Menu Enter Select Sub Menu F10 Previous Values
Setup Program Keys
[FX 9-6]
LAUNCHING SUBMENUS
Note that a pointer symbol appears to the left of certain fields. This pointer indicates that you can
launch submenus from this field. A submenu contains additional options for a field parameter.
To call up a submenu: Move the cursor to highlight the field and press the <Enter> key. The
Submenu immediately appears. Use the legend keys to enter values and move from field to field
within a submenu just as you would within a menu.
Take some time to familiarize yourself with each of the legend keys and its corresponding
functions. Practice navigating through the various menus and submenus. Be careful that you
don’t accidentally make unwanted changes to the current configuration.
ITEM SPECIFIC HELP
Page 67

While moving around through the Setup Programs, note that explanations appear in the Item
Specific Help window located to the right of each menu. This window displays the Help text for
the field that you highlighted.
GENERAL HELP
In addition to the Item Specific Help window, the Setup Program also provides a General Help
screen. This screen can be called up from any menu by simply pressing <F1>, or the <Alt> +
<H> key combination. The General Help screen lists the legend keys with their corresponding
alternates and functions.
When a scroll bar appears to the right of a Help window, this indicates that the screen has
information to display that does not fit in the window. Use the <PgUp> and <PgDn> keys or the
up and down arrow keys to scroll through the entire Help document. Press <Home> to display
the first page, or press <End> to go to the last page. To exit the Help window, press the <Enter>
or the <Esc> key.[FX 9-7]
THE MAIN MENU
MAIN MENU FIELDS
System Time
System Date
Diskette A
Diskette B
IDE Adapters
Display Devices Selection
Memory Cache
Boot Sequence
System Memory
Extended Memory
When you enter into the Setup Program, the display shows the following screen:
Page 68
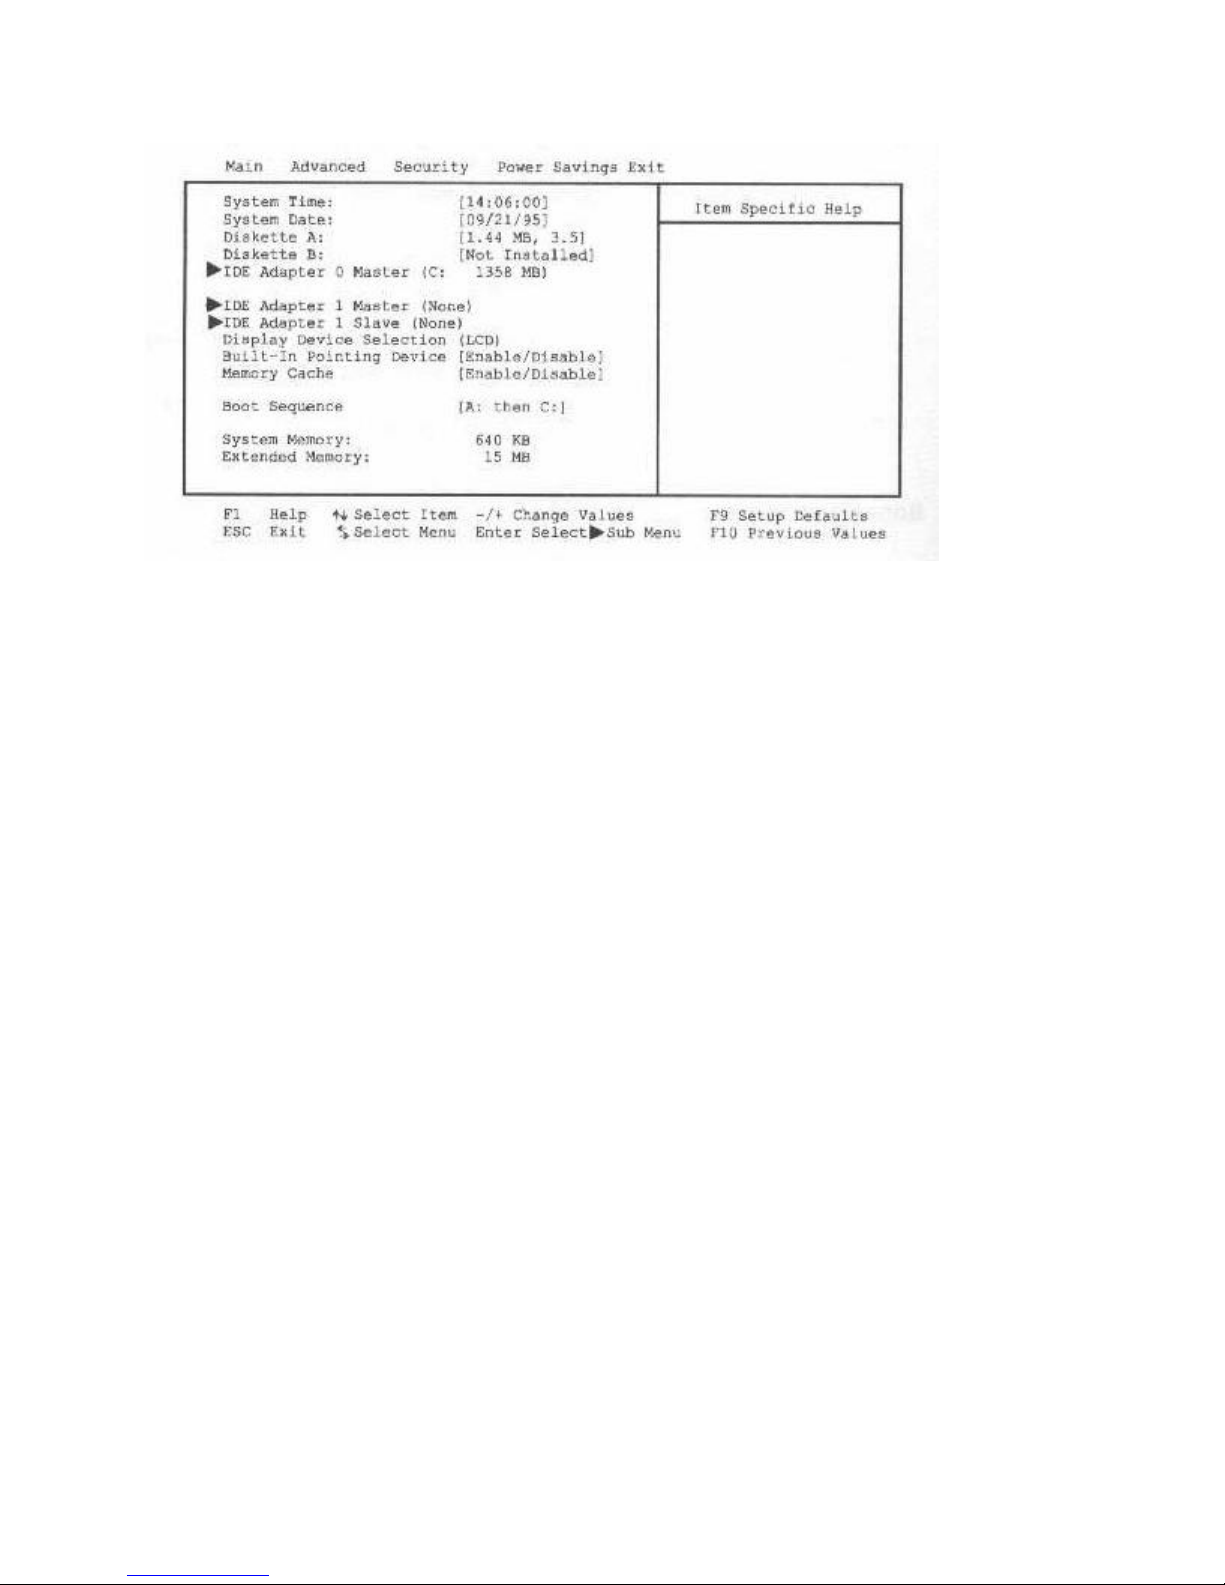
This is the Main menu of the Setup Program. You can make changes to the WinBook FX’s
system configuration from this menu.
Main Menu Fields: Each of the fields in the Main menu is discussed below:
System Time
Sets your system to the time that you specify (usually the current time). The format is hour,
minute, and second. Insert the appropriate information. Us e the <tab> key to move between the
hour, minute, and second fields.
System Date
Sets your system to the date that you specify (usually the current date). The format is month,
date, and year. Type in the appropriate information. Use the <tab> key to move between the
month, day, and year fields. [FX 9-8]
Diskette A
Indicates the drive type installed as Floppy Drive A. Defaults to 3.5 inch, 1.44MB drive.
Diskette B
Indicates the drive type installed as Floppy Drive B. Defaults to "Not Installed".
IDE Adapters
IDE Adapters: Note that the Main menu contains 3 IDE Adapter fields. Each of these fields
calls up a submenu.
Your WinBook FX has the capability of supporting 4 different IDE devices. The internal hard
drive is normally set to the Primary Master (0) drive. The internal CD-ROM drive, if installed, is
always a slave to the internal hard drive. So if the internal hard drive has been set to the Primary
Master, the internal CD-ROM must be the Primary Slave. At the factory, we set the internal hard
Page 69
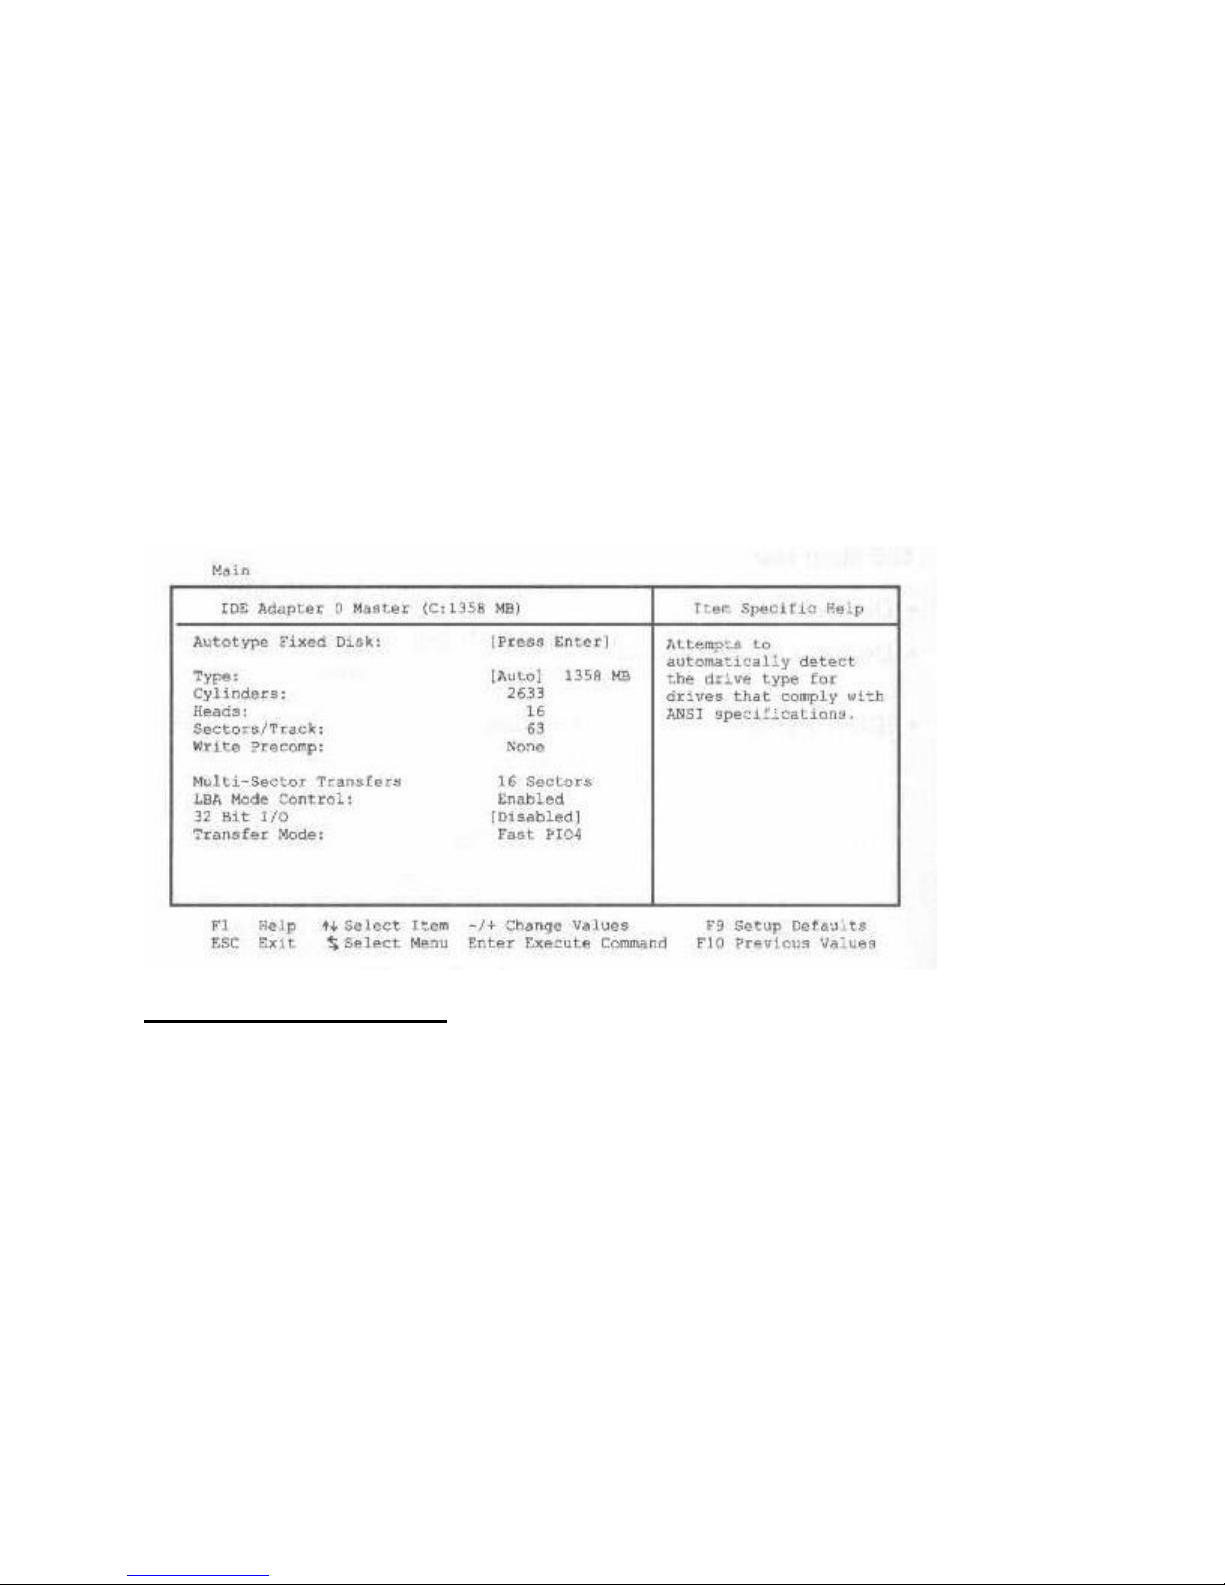
drive as primary master and default since this is the only way, which allows you to boot from a
hard drive.
Since you cannot configure the internal CD-ROM device separately from the internal hard drive
device, we do not provide a configuration field for this.
Each of the other 2 submenus configures the IDE Adapter 1 Master and Slave devices. Although
these are never installed in the WinBook FX, they may be installed in the docking station at
some point, so we will give you the configuration option to support this.
WARNING: Incorrect settings can cause your system to malfunction. Before attempting to
configure a hard disk drive, make sure you have the configuration information supplied by the
manufacturer of your hard drive.[FX 9-9]
IDE Adapter Submenu
IDE Adapter Submenu Fields:
Autotype Fixed Disk
This field automatically configures an IDE type drive. Pressing <Enter> causes the system to
attempt to automatically detect the drive type. If successful, the program fills in the correct value
for the remaining fields in this submenu.
NOTE: Always use the Autotype Fixed Disk feature. This feature automatically enters the
correct settings for your hard disk drive. Since this feature sets all of the parameters, there is no
need to change any parameters on this screen. Since all drives shipped with the WinBook FX
support the Auto IDE detection system, we recommend that you always use the Auto selection.
Type
If you know the correct drive type for your hard disk drive, enter the number (1-39 in this field.
Entering your drive type causes the program to fill in the correct values for the remaining fields
Page 70

in this submenu with the correct values for the predefined disk type.[FX 9-10]
To configure a drive that is not one of the 39 standard drive types, specify User. Manually enter
the number of cylinders, heads sectors per track and write precomp for your drive. Refer to your
drive’s documentation or look on the drive if you need to obtain this information.
NOTE: Autotype identifies your hard drive type. If you do not have the documentation that
came with your hard disk, try to use the Autotype Fixed Disk option as described on the previous
page.
If you have no drive installed or if you are removing a drive and not replacing it, select None.
Cylinders
This field configures the drive’s number of cylinders. Refer to your drive’s documentation, or
look on the drive to determine the correct value to enter for the field. To make changes into this
field, you must set the Type field to User.
Heads
This field configures the drive’s number of read/write heads. Refer to your drive’s
documentation, or look on the drive to determine the correct value to enter for this field. To
make changes to this field, you must set the Type field to User.
Sectors/Track
This field configures the drive’s number of sectors per track. Refer to your drive’s
documentation, or look on the drive to determine the correct value to enter for this field. To
make changes to this field, you must set the Type field to User.
Write Precomp
Refer to your drive’s documentation, or look on the drive to determine the correct value to enter
for this field. To make changes to this field, you must set the Type field to User.[FX 9-11]
Multi-Sector Transfers
This option automatically sets the number of sectors per block to the highest number supported
by the drive. You can also configure this field manually.
To make change s to this field, you must set the Type field to User. Configuration options are
shown below. The default value for this field is 16 Sectors.
Disabled
2 Sectors
4 Sectors
8 Sectors
16 Sectors
LBA (Logical Block Access) Mode
Page 71

When enable, this option uses 28-bit addressing of the hard drive without regard for cylinders,
heads, and sectors. Note that Logical Block Access may decrease the access speed of the hard
disk.
To make changes to this field, you must set the Type field to User. Configuration options are
shown below. The default value for this field is Enabled.
Disabled
Enabled
32-Bit I/O
When you enable this option, it increases the speed of communication between the CPU and
IDE. Configuration options are shown below. The default value for this field is Disabled.
Disabled
Enabled
[FX 9-12]
Transfer Mode
This field allows you to select the method for transferring data between the hard disk and system
memory. If the system has successfully detected the drive automatically, you will not need to
adjust the field.
To make changes to this field, you must set the Type field to User. Configuration options are
shown below. The default value for this field is Fast PIO4.
Standard
Fast PIO1
Fast PIO2
Fast PIO3
Fast PIO4
Leaving the IDE Adapter Menu
After using the legend keys to make your selections for the IDE Adapter submenu, press the
<Esc> key to exit back to the Main menu. When the Main menu appears, you will notice that the
drive letter and the drive size appear in the IDE adapter field for the hard drive you just
configured. Follow the above instructions to configure the other hard drives in your system. Use
a separate submenu for each drive.
THE MAIN MENU CONTINUED
Display Device Selection
You can use this Main menu field to choose which display device you want to use.
Configuration options are shown below. The default value for this field is LCD. (See note on
next page regarding the LCD & CRT option.)
Page 72

LCD
CRT
LCD & CRT
[FX 9-13]
NOTE: When you put the system in LCD & CRT mode, sometimes referred to as the Simulscan
mode, the display performance will slow slightly since the system has to update both screens at
the same time. There for, for maximum performance, use one display or the other unless you
really need to use both displays at the same time.
Memory Cache
This option allows you to enable an external memory cache. A memory cache improves system
performance by keeping frequently used computer instructions in memory with a faster access
time than DRAM.
To enable the WinBook FX’s memory cache, specify Enabled for this setting. The default value
for this field is Enabled.
The only time you might want to disable the cache is under the following conditions:
Operating the WinBook FX at high speed with cache enabled causes problems
(instability and incompatibility with other operating systems, etc.).
A program’s documentation specifies that you must disable the computer’s memory
cache.
Note that a memory cache is different from a disk cache. A disk cache is used to speed up access
to the disk drives; whereas, a memory cache is used to speed up accesses to DRAM.[FX 9-14]
Boot Sequence
This field allows you to set the booting sequence of the WinBook FX. You can choose one of the
3 settings below. The default value for this field is A: then C:.
A: then C:
When "A: then C:" is specified, the system will attempt to boot from drive A: first. If
drive A: is empty or a non-system floppy disk is present in the floppy drive, the
system will boot from the C: drive.
C: then A:
When "C: then A:" is specified, the system will attempt to boot from the C: drive
first.
C: only
When "C: only" is specified, the system will attempt to boot from the C: drive only.
CD-ROM
Page 73
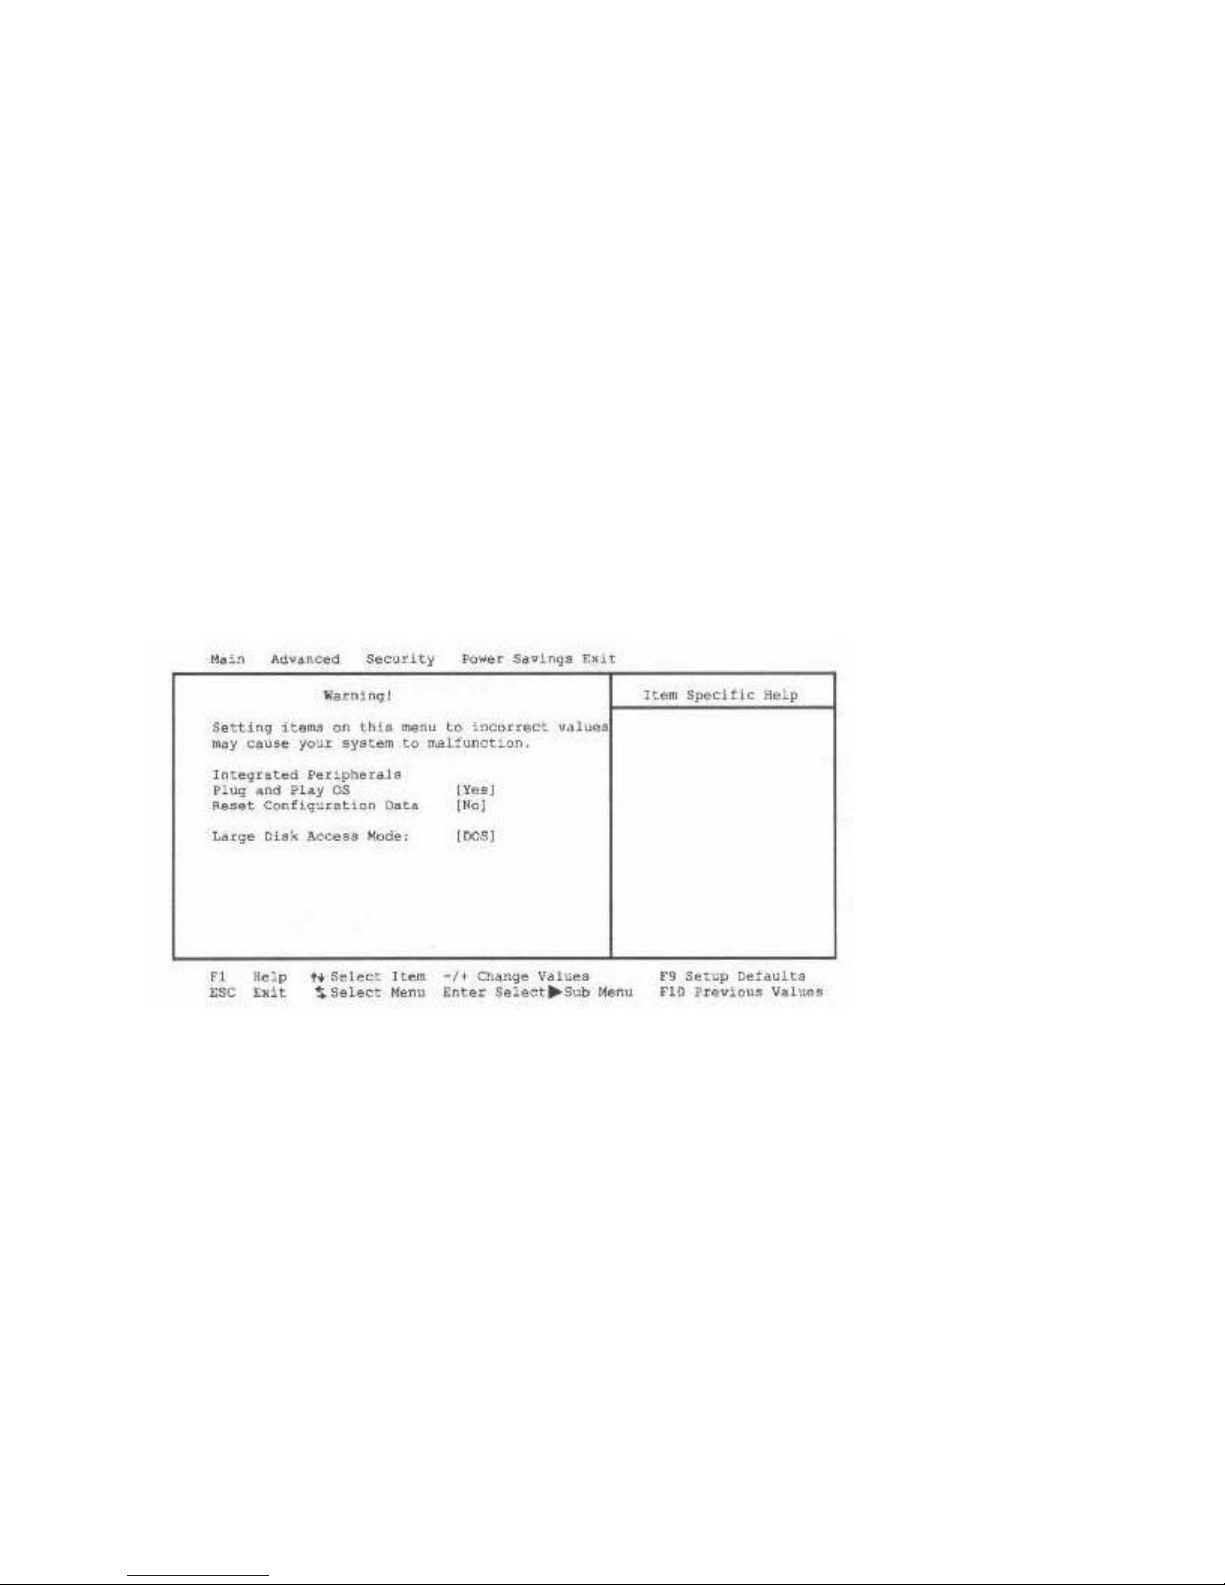
When "CD-ROM" is specified, the system will boot from a CD-ROM, providing that
the CD-ROM has been set up to include a system boot partition.
System Memory
This field displays the amount of conventional memory detected by the system during boot-up.
You do not need to make changes to this field. This is a display-only field.
Extended Memory
This field displays the amount of extended memory detected by the system during boot-up. You
do not need to make changes to this field. This is a display-only field.[FX 9-15]
THE ADVANCED MENU
Selecting Advanced from the Menu Bar displays the Advanced menu. The Advanced menu
contains 4 fields as shown below.
FIELDS
Integrated Peripherals
Plug and Play OS
Reset Configuration Data
Large Disk Access
Integrated Peripherals
Pressing the <Enter> Key when the Integrated Peripherals field is highlighted calls up the
following submenu.
ADVANCED MENU
Page 74
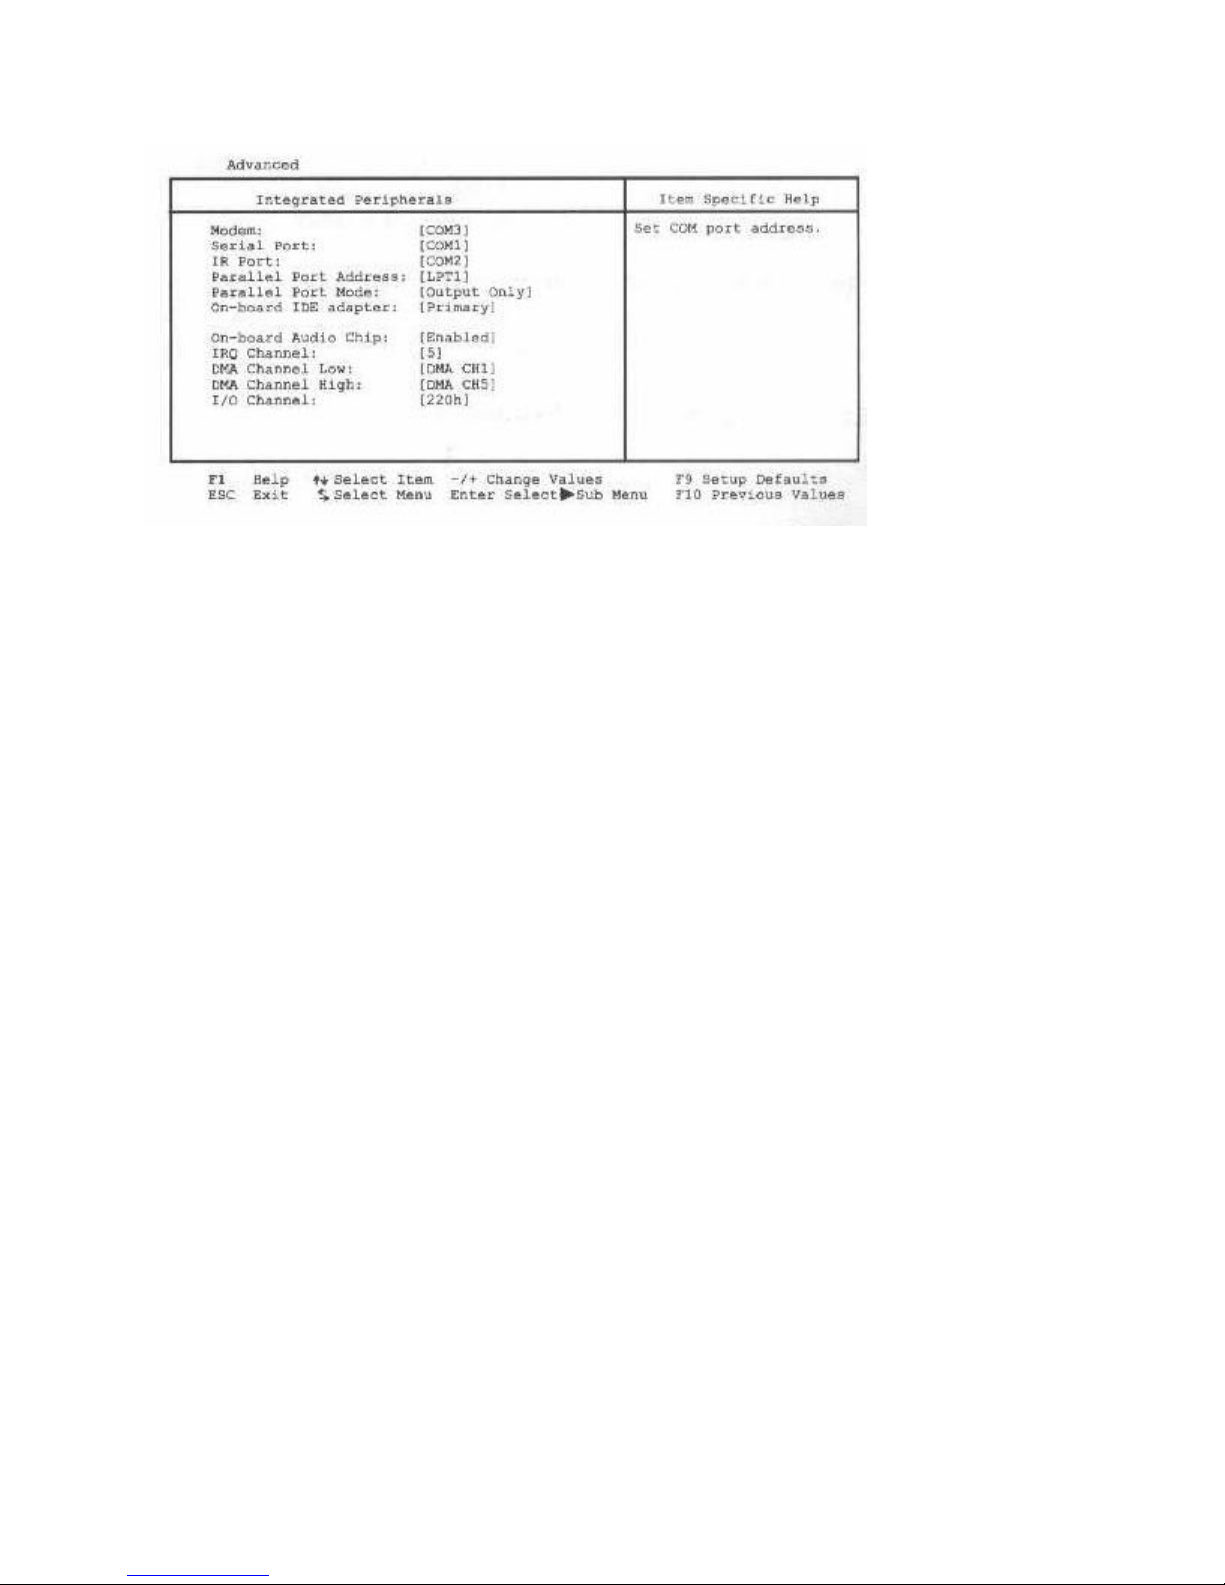
[FX 9-16]
Integrated Peripherals submenus:
The Integrated Peripherals submenu allows you to configure the WinBook FX’s parallel and
serial ports. Each field on this submenu is covered below.
Modem
This field allows you to set the WinBook FX’s modem for a particularly COM port. The
available options are listed below. The default for this field is COM3.
COM1
COM2
COM3
COM4
Serial Port
This field allows you to assign a COM port to the Serial Port. The available options are listed
below. The default for this field is COM1.
COM1
COM2
COM3
COM4
Infrared Port
This field allows you to assign a COM port to the Infrared Port. The available options are listed
below. The default for this field is COM2.
COM1
COM2
COM3
Page 75

COM4
[FX 9-17]
Parallel Port Address
This field allows you to assign an LPT Port to the Parallel Port. The available options are listed
below. The default for this field is LPT1.
LPT1
LPT2
LPT3
Disabled
Parallel Port Mode
This field sets the mode of the Parallel Port. The available options are listed below. The default
for this field is Output Only.
Output Only
Bi-directional
ECP
On-Board IDE Adapter
This field sets the IDE status for the on-board IDE adapter. The available options are listed
below. The default for this field is Primary.
Primary
Secondary
Disabled
On-Board IDE Audio Chip
This field allows you to enable or disable the on-board audio chip. The available options are
listed below. The default for this field is Enabled.
Enabled
Disabled
[FX 9-18]
IRQ Channel
This field allows you to set the interrupt channel for the on-board audio chip. The available
options are listed below. The default for this field is 5.
5
7
9
10
Page 76

DMA Channel Low
This filed sets the High DMA channel for the on-board audio chip. The default for this field is
DMA CH5.
[220h]
[240h]
[260h]
[280h]
[FX 9-19]
Advanced Menu Fields Continued
Plug and Play OS
This field allows the WinBook FX’s operating system to identify hardware when it is installed.
When the operating system identifies the newly installed device, it make s changes to the
WinBook FX’s Setup and selects appropriate drivers for that device. The default value for this
field is Yes. If you are using Windows 95, you should set this field to Yes. For all other
operating systems, set this field to No.
Reset Configuration Data
This field allows you to clear the system configuration data. The default for this field is No.
No
Yes
WARNING: Resetting the configuration data will clear all the preset configurations for the
WinBook FX. This could cause your system to malfunction. DO NOT USE THIS FEATURE
unless instructed to do so by Technical Support.
Large Disk Access Mode
If you are using a hard disk with a capacity larger than 528MB, you can indicated the drive’s
cylinder, head, and sector arrangement to the operating system you are using.
Set this field to DOS if you are using MS-DOS, Windows, or OS/2. Select Other if you are
using a different operating system. DO NOT change this field after you have formatted and
partitioned the hard disk drive. The default for this field is DOS.
DOS
Other
[FX 9-20]
THE SECURITY MENU
Page 77
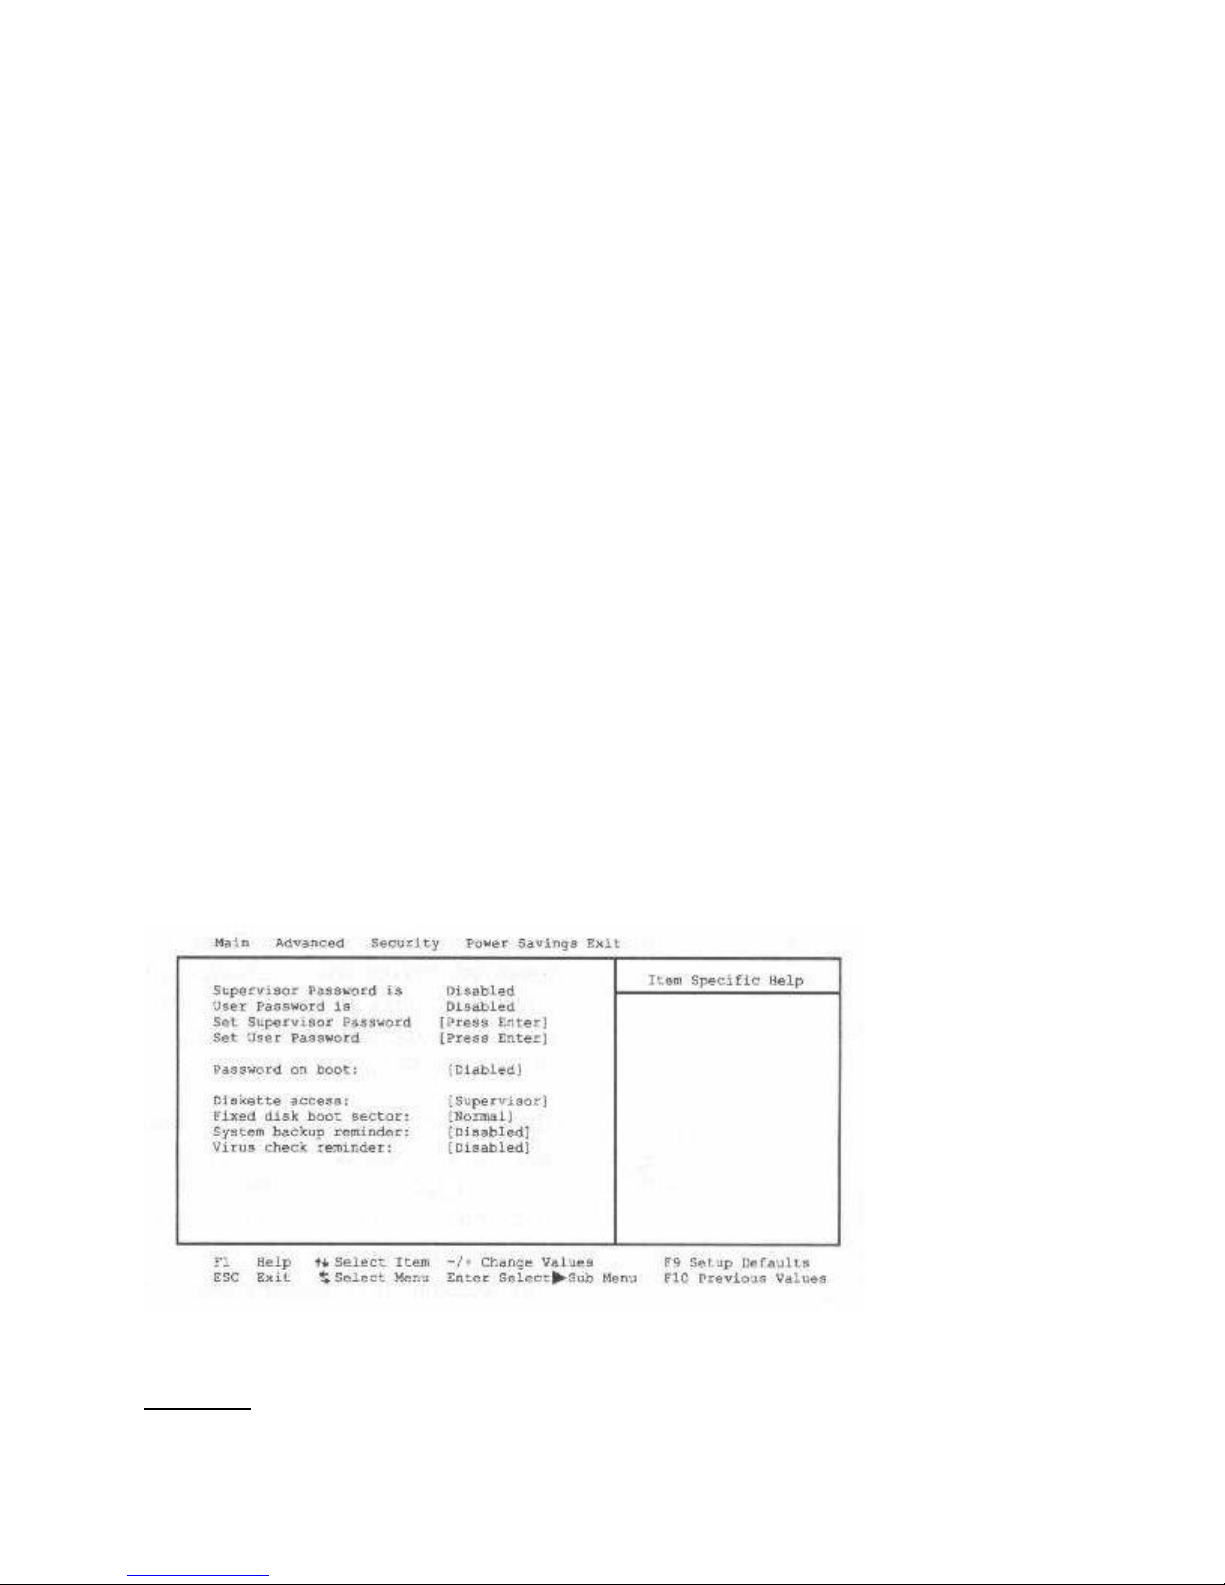
The WinBook FX’s advanced system of security allows you to set 2 different passwords to
prevent unauthorized access to system resources, data, and the Setup Program. From this menu
you can also enable a boot password, diskette access password, a system backup reminder and a
virus check reminder. Further, you can assign a separate password to restrict access to the Setup
Program. This section covers each parameter of the Setup Security menu.
WARNING: Write down your password. If you lose your password, you will be locked out.
There is no way to clear or retrieve passwords once they are saved. If you lose your password,
you must send the WinBook FX in for service in order to unlock the password.
Passwords interrupt automatic boot-up procedures. If you use your WinBook FX in a way that
requires 24-hour operation-for instance, if you dedicate the system as a 24-hour fax machineadding passwords for boot-up or for users will interrupt an automated boot-up that would
normally lead to fax software being enabled. If the system should reboot or reset, the WinBook
FX would not automatically return to the desired application.[FX 9-21]
SECURITY MENU FIELDS
Supervisor Password
User Password
Set Supervisor Password
Set User Password
Password on Boot
Diskette Access
Fixed Disk Boot Sector
System Backup Reminder
Virus Checker Reminder
Selecting Security from the Menu Bar displays the following menu.
Each field of the security menu is described below.
Passwords
Page 78

The Setup Program allows you to specify 2 separate passwords, a Supervisor password and a
User password.
Passwords are not case sensitive so you can enter a password using either upper or lower case
letters.
Supervisor Password
When enabled, the Supervisor password is required for entering the Setup Program. This is a
display-only field.
User Password
When enabled, the User password restricts access o the Setup Program. This is the display-only
field.[FX 9-22]
Set Supervisor Password
This field allows you to set the Supervisor password. To set the Supervisor password, highlight
the field and press the <Enter> key. The following dialog box appears:
Set Supervisor Password
Enter new Password: [ ]
Re-enter new [ ]
Password :
Type the password and press the <Enter> key. You can type up to 7 alphanumeric characters.
The system ignores symbols and other keys.
To confirm the password, type the password again and press the <Enter> key. The Supervisor
password is now set. This password allows full access to the Setup Program menus.
WARNING: Write down your password. If you lose your password, you will be locked out.
There is no way to clear or retrieve passwords once they are saved. If you lose your password,
you must send the WinBook FX to us for service in order to unlock the password.
Set User Password
This field allows you to set the User password. To set the User password, follow the same
procedures as those for setting the Supervisor password. The User password allows restricted
access to the Setup Program. This password also requires that the Supervisor password be set
prior to resetting the User password.
Password on Boot
Page 79

When this option is enabled, the system will require a password before boot-up. This option
requires prior setting of the Supervisor password. The options for this field are listed below. [FX
9-23]The default value for this field is Disabled.
Disabled
Enabled
NOTE: This field entry affects booting. If "Password on Boot" is disabled and the Supervisor
password is enabled, the Setup Program assumes the User is booting.
Diskette Access
The diskette access field allows you to restrict the use of the Floppy Disk Drive. The default
value for this field is Supervisor.
Supervisor
User
When set to Supervisor, the use of floppy drive is restricted to the Supervisor. This option
requires setting the Supervisor password.
When set to User, both the User and the Supervisor have access to floppy drives.
If the field is set to Supervisor, and the User password is enabled, the user must enter the
Supervisor password in order to boot from the floppy disk drive.
NOTE: Why use a diskette access password? You can set up a computer with programs such as
Disk Lock, which encrypt the data on your hard disk so that others cannot access it. However, it
is possible to get around this encryption if someone boots from floppy disks and copies files
from your hard disk to the floppy disk. Also, the most common way to pick up a computer virus
is through a contaminated floppy disk. A password protecting floppy disk access is a good way
to protect your system.[FX 9-24]
Fixed Disk Boot Sector
This field allows you to write-protect the hard disk boot sector to help prevent viruses. The
options for this field are listed below. The default value for this field is Normal.
Normal
Write-protect
WARNING: Write-protecting the boot sector can protect your system from "boot sector viruses"
which are the most common type of viruses. Boot sector viruses are commonly passed by sharing
floppy disks with a contaminated system. As soon as you access the disk, the virus will copy
itself to the boot sector of your hard disk. From then on, each time you boot your system, the
virus will be activated.
Boot sector viruses have a wide range of negative affects on your system, from displaying an
annoying message at boot time to totally corrupting your data and files so they are no long
readable. Note that this type of virus can be passed through files downloaded from BBS, World
Page 80
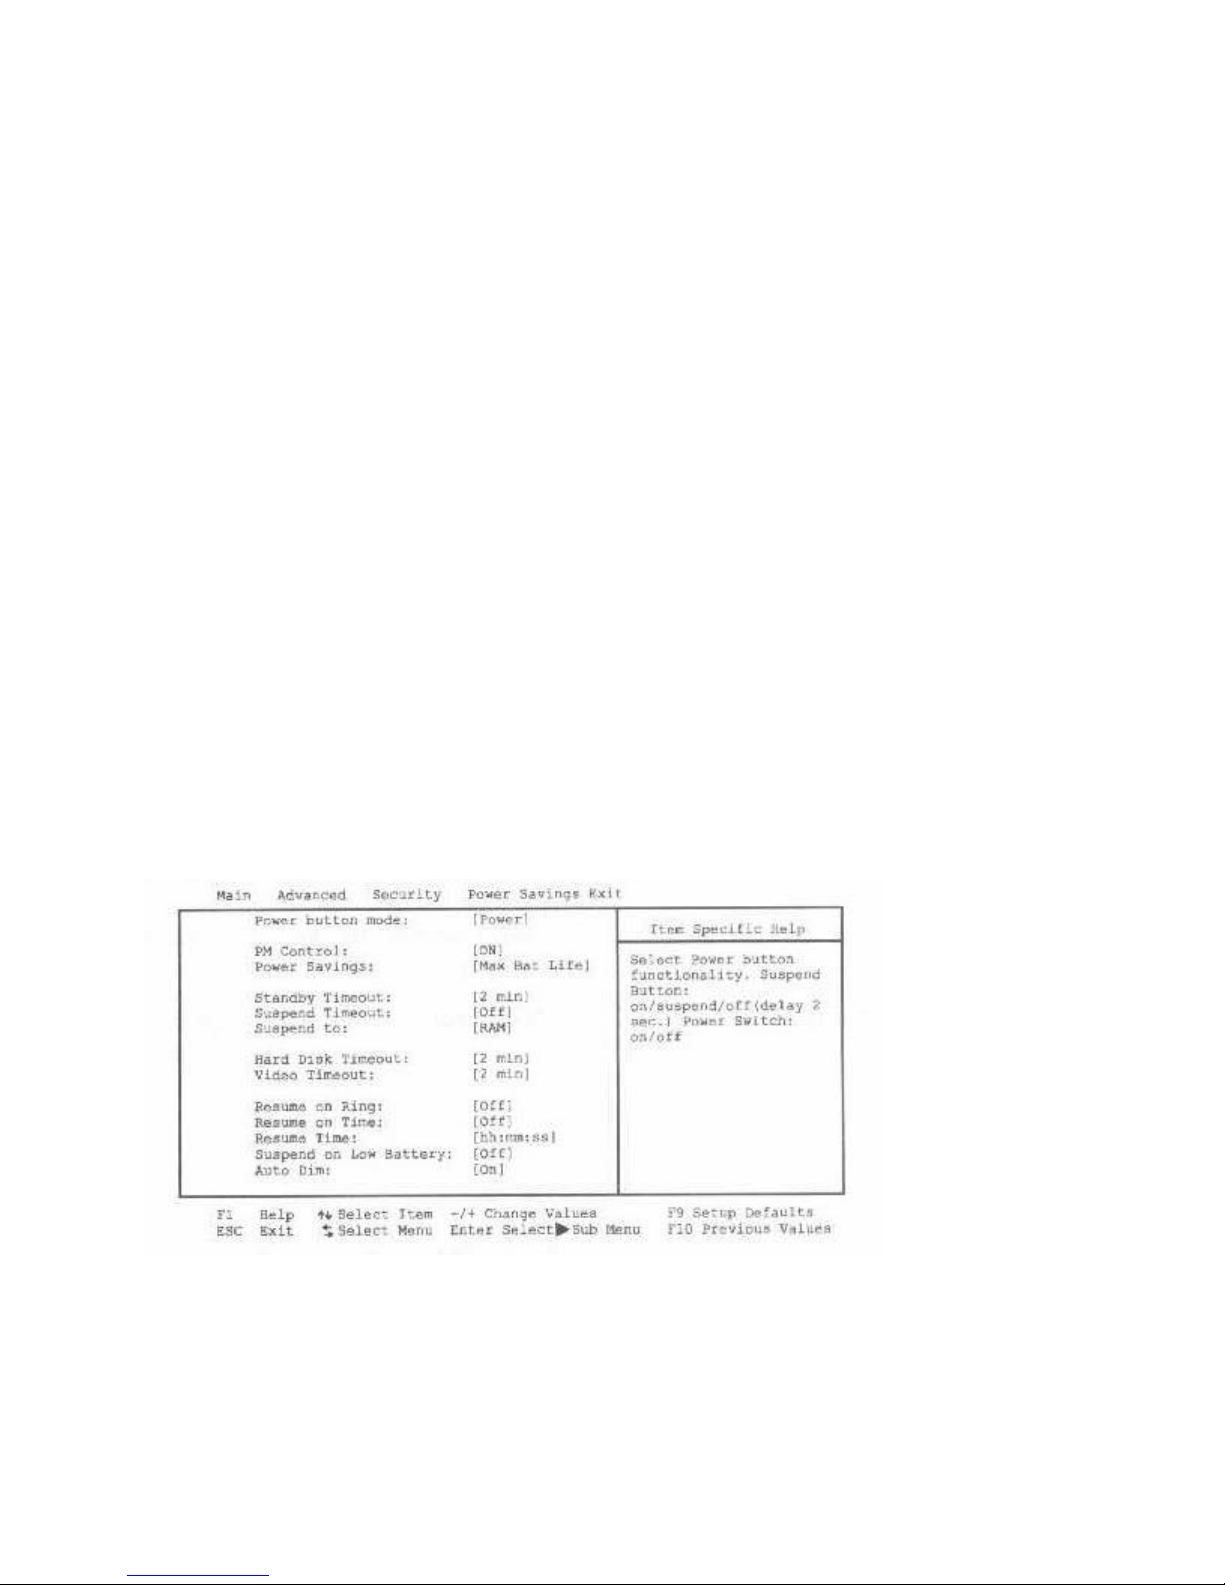
Wide Web, and the Internet.
System Backup Reminder
This field allows you to enable a system backup reminder. When enabled, a message is displayed
during boot-up asking if you have backed up the system. The options for this field are below.
The default value for this field is Disabled.
Disabled
Daily
Weekly
Monthly
[FX 9-25]
If you specify Daily, the computer displays the message on the first boot of the day. If you
specify Weekly, the system displays the message on the first boot after Sunday. When you
specify Monthly, the system displays the message on the first boot of the month. The message
will return each time you boot until you respond with "Y".[FX 9-26]
POWER SAVINGS MENU
The Power Savings menu of the Setup Program allows you to enable and adjust to the WinBook
FX’s sophisticated power saving features. Enabling these features will extend the life of the
battery pack between charges.
To make changes to power management settings, select Power Savings from the Menu Bar. The
following menu will appear.
POWER SAVINGS MENU FIELDS
Power Button Mode
PM Control
Power Savings
Page 81

Power Button Mode
This field allows you to choose what function the power button will have. The options are listed
below. The default is Power Switch.
Power Switch
Suspend Button
If you choose Power Switch, then the power button will have only ON and OFF modes. In Power
Switch mode, you press the switch once to [FX 9-27] turn on the system, and then again to turn
off the system. If the system hangs, that is, does not respond to the keyboard, you may have to
press the switch down for 2 seconds or longer to turn off the system.
If you choose Suspend Button, then the power button will have OFF, SUSPEND, and ON modes
with a 1.5 second delay between modes. In Suspend Button mode, if the system is OFF, a press
of the switch will turn the system ON. If the system is ON and you press the switch, the system
will be put into Suspend mode. To go directly from ON to OFF, simply hold down the button for
more than 2 seconds. The advantage of this mode is that it gives you a quick way to enter
Suspend mode.
PM Control
This field allows you to select when Power Savings is enabled. The options for this field are
listed below. The default value is ON.
OFF
DC
ON
If you choose OFF, the computer disables power management. If ON is selected, then power
management is enabled at all times. If you select DC, the computer enables power management
only when the computer is using battery power. This setting has the advantage of providing
maximum performance while the WinBook FX is powered by AC power, while giving good
battery life when disconnected from AC power.[FX 9-28]
Power Savings
This field allows you to set power management features with predefined values. The available
option for this field is listed below. The default value is Maximum Battery Life.
Maximum Battery Life
Maximum Performance
Media
Customize
Maximum Battery Life
When you specify this field as Maximum Battery Life, the system sets the remaining fields on
this menu to predefined values that ensure maximum power savings. However, you may see
some difference in performance.
Page 82

Maximum Performance
When you specify Maximum Performance, the computer sets the remaining fields on this menu
to predefined values that ensure the best system performance. Using this selection will reduce
your battery life between battery charging sessions.
Media
When you specify Media, the computer sets the remaining fields so they are optimized for
multimedia applications such as CD-ROM video and audio playback or multimedia
presentations. This selection will reduce your battery life between battery charging sessions.
Customize
The Customize setting allows you to make your own custom selections from the following fields:
Standby Timeout
This field allows you to specify how much time of inactivity must elapse before the system
automatically activates the Standby mode. In Standby mode the computer turns off all inactive
devices, and the system enters a low power CPU state. [FX 9-29] The default value for this field
is 2 min. When Power Savings is set to Customize, you can select:
OFF
10 min.
2-30 min.
Suspend Timeout
This field determines how much system idle must pass before the system enters Suspend mode.
When you specify OFF, the system will not automatically suspend when there is a
period of inactivity. However, you can still manually Suspend with the Windows Suspend icon
by pressing the <Fn> + <F4> keys. The default value for this field is off. When Power Savings is
set to Customize, you can select:
OFF
10 min.
2-30 min.
Suspend To
This field allows you to specify the type of Suspend the system enters when you press the
Suspend/Resume button. There are actually 2 levels of Suspend: Suspend to Ram and Suspend
to Disk. The default is RAM.
RAM
Disk
Page 83

Suspend to RAM
This mode saves power by turning off the power of the CPU and DMA clocks, turning off the
video, and turning off all controllable peripheral devices. As a method of power conservation,
Suspend to RAM operates faster than Suspend to Disk. Using this method also allows the
WinBook [FX 9-30] FX to resume operation if the modem detects an incoming phone call or if a
scheduled alarm takes place. You can also use this mode if you need to swap the battery while
using your WinBook FX.
Although the WinBook FX draws more power when it suspends to Ram, a fully charged battery
should be able to support the WinBook FX for a few days in the Suspend to RAM mode.
Suspend to Disk
This mode provides the greatest power saving capabilities by essentially turning off the system.
In this mode, the system turns off all logic except for the system wake-up circuitry and battery
charger. During this Suspend mode, the computer saves the DRAM and video memory to the
hard disk, and restores the values from their memory when the system resumes.
As a method of power conservation, Suspend to Disk operates more slowly than Suspend to
RAM. Using this method does not allow the WinBook FX to resume operation if the modem
detects an incoming phone call or if a scheduled alarm takes place. The WinBook FX draws less
power than if it had suspended to memory, so a fully charged battery should be able to support
the WinBook FX for up to a month in the Suspend to Disk mode.
Hard Disk Timeout
This field allows you to specify the period of inactivity the WinBook FX requires before the hard
disk turns off and enters the standby state. This method of power conservation allows you to
operate the WinBook FX for longer periods of time between battery charge sessions. If you enter
a lesser value in this field, the hard disk shuts down sooner when it is idle, so it consumes less
power. [FX 9-31] The default value for this field is 2 min. When Power Savings is set to
Customize, you can select:
OFF
6 min.
2-14 min.
Video Timeout
This field allows you to specify the period of inactivity required before the screen enters the
standby (off) state. This method of power conservation allows you to operate the WinBook FX
for longer periods of time between battery charges. If you enter a lesser value in this field, the
display shuts down sooner when it is idle, so it consumes less power.
This setting also conserves the amount of time that the display’s backlight is illuminated.
Shutting down the display when you are not using it can add years to its lifetime. The default
value for this field is 2 min. When Power Savings is set to Customize, you can select:
Page 84

OFF
ON
NOTE: If you set your system to Suspend to RAM, the system will be able to resume when the
modem detects the phone ringing. If you set your system to Suspend to Disk, you will not be able
to resume when the phone rings.
Resume On Time
This field allows the option to specify a time for the system to resume. The possible options are
below. The default value for this field is OFF.
OFF
ON
NOTE: If you set your system to Suspend to RAM, the system will be [FX 9-32] able to resume
when the alarm time occurs. If you set your system to Suspend to Disk, you will not be able to
resume when the alarm time occurs.
Resume Time
This option allows you to set a Specific time for the system to resume. Enter the time in hours,
minutes, and seconds.
NOTE: The alarm time allows only hh:min:sec fields and does not specify a date or month. This
means that when you set the alarm time, your system will resume automatically at the preset time
every day until you disable this function. This can be handy if you want your system to wake up
at the same time every day before you begin your work.
Suspend on Low Battery
When selected, this option causes the system to go into Suspend when it detects that there is less
than 10% of a full charge left in the battery. The default for this field is OFF.
Auto Dim
When selected, this option causes the display to dim whenever it is working off the battery. The
default for this field is ON.[FX 9-33]
THE EXIT MENU
Once you have made all of your selections from the various menus in the Setup Program, you
should save your changes and exit the Setup Program. Select Exit from the Menu Bar to display
the following menu.
Page 85
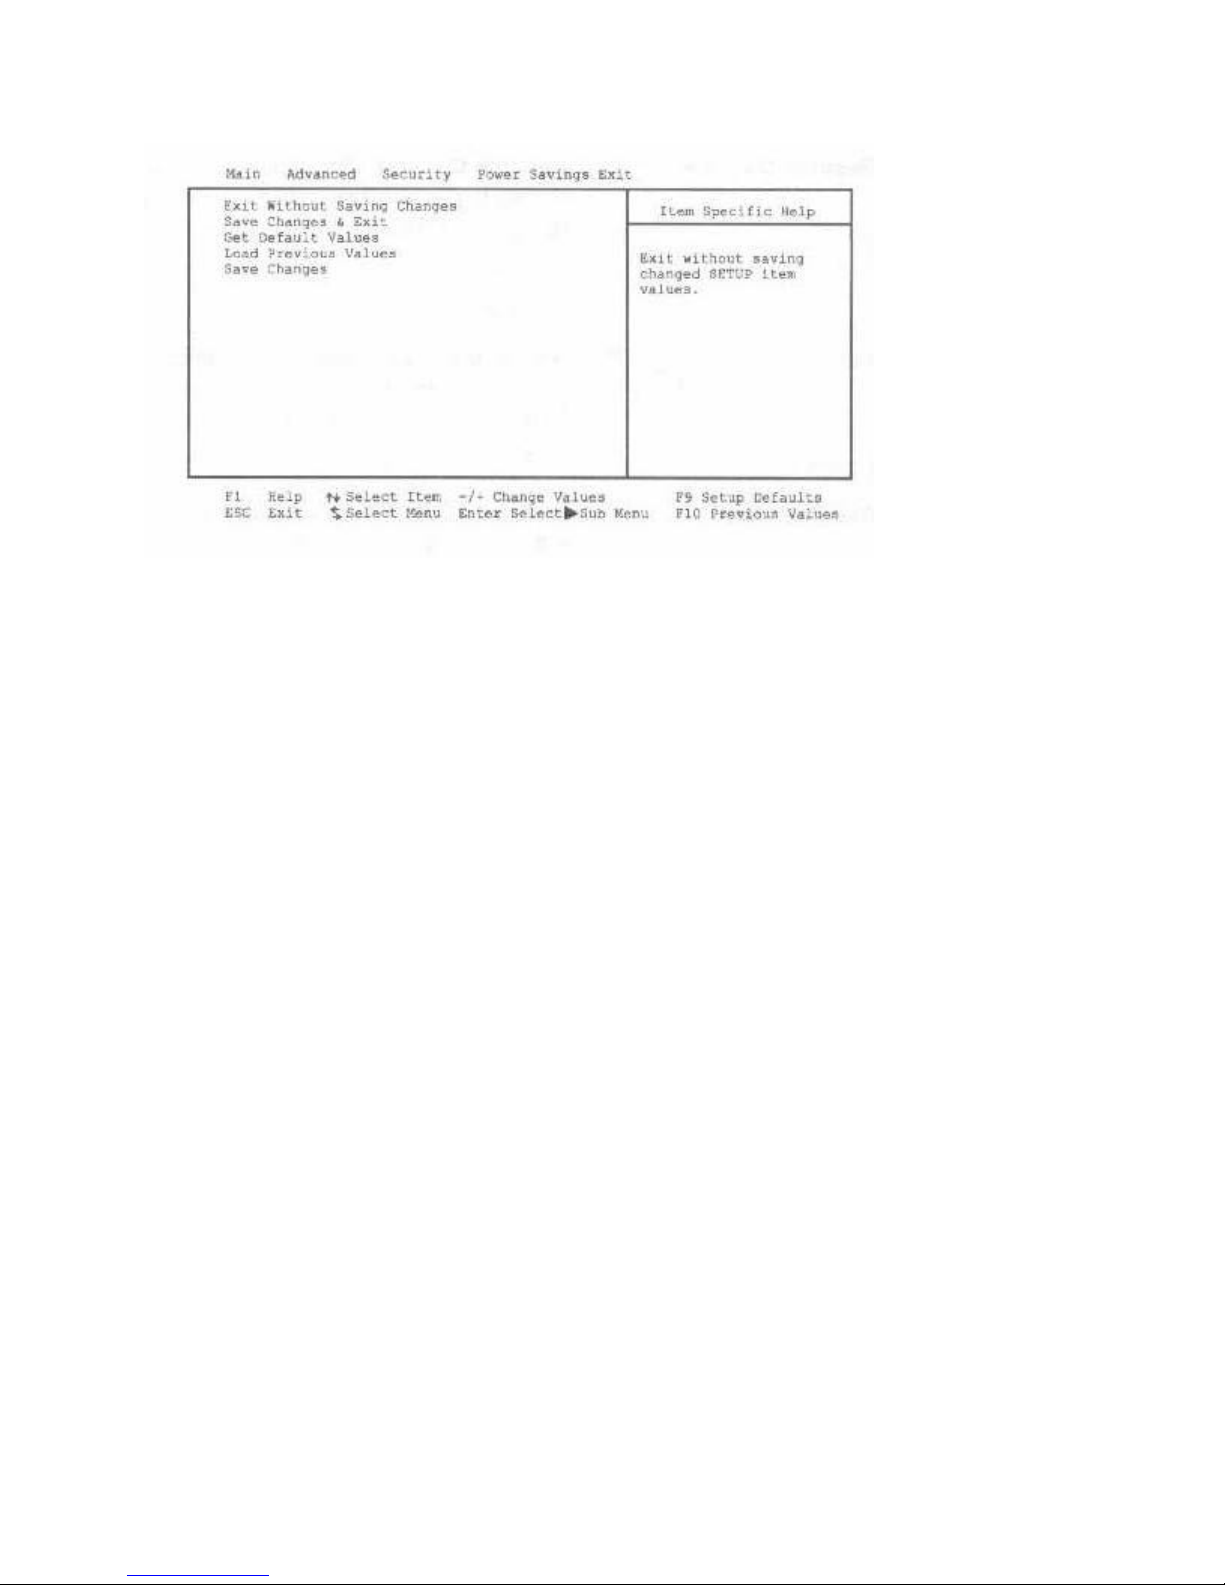
Pressing the <Esc> key does not exit this menu. You must select one of the options from
this menu or a Menu Bar item to exit.
EXIT MENU FIELDS
Exit Without Saving Changes
Save Changes and Exit
Get Default Values
Load Previous Values
Save Changes
Exit Without Saving Changes
Only use this option from the Exit menu if you do not want to save the changes you have made
in the Setup Program. When the dialog box appears, choose NO to leave the Setup Program
without saving your configurations to non-volatile RAM.[FX 9-34]
Save Changes and Exit
Once you are finished making your selections, choose this option from the Exit menu to ensure
the values you selected are saved to Non-volatile RAM. The computer must save changes you
make to the Setup Program to Non-volatile RAM in order to make them operative. Non-volatile
RAM differs from standard RAM memory in that it is sustained by an on-board battery and stays
on even when the WinBook FX is turned off.
The next time you boot-up the WinBook FX, the BIOS loads the values saved in non-volatile
memory. If these values cause the system boot to fail, reboot and press <F2> to enter the Setup
Program. Once in Setup, you can try to change the values that cause the system boot to fail. If the
problem persists, load the default values as described below.
If you attempt to exit the Setup Program without saving your changes, the program will prompt
you with a message asking if you want to save your changes before exiting.
Page 86

Get Default Values
This option allows you to load the default values for each of the parameters on the Setup menus.
When the dialog box appears, you can now select Save Values and Exit or make other changes
before saving the values to Non-volatile RAM.
Load Previous Values
This option allows you to discard the selections you just make and restore the values you
previously saved. After selecting this option, the computer updates all selections.
Save Changes
This option saves your selections without exiting the Setup Program. You can return to other
menus and make changes. After selecting this option, the computer saves all selections.
[FX 9-35]
FX Chapter 10
Page 87

CHAPTER 10: SOLVING PROBLEMS
BEFORE YOU CALL TECHNICAL SUPPORT
Take the following steps before calling Technical Support. You will find the phone number for
Technical Support on the "Read-Me-First" card that came with the system.
If you are not the original registered owner, make sure you have the original registered
owner’s name on hand.
This is an effort on our part to discourage theft and resale of our product.
Look at the nameplate on the bottom of your WinBook FX and copy down the serial
number.
List any changes you have recently made to your system including hardware upgrades
and additions of software.
Refer to the Start, Programs listing under Windows 95.
Prepare a brief description of the problem you are encountering.
FREQUENTLY ASKED QUESTIONS
OPTIMAL BATTERY LIFE
How do I configure my WinBook FX for optimal battery life?
Battery life will vary from user to user depending on how the WinBook FX is used.
Configuration of the power management features within the Setup Program of your WinBook
FX can help to increase your battery life. Power management settings can be accessed and
configured by pressing the <Fn> + <F5> keys together.
The settings for the LCD display, the floppy disk drive, and the hard disk drive are key to
extending battery life. Setting them to long – say 10 minutes-will not provide much advantage,
but setting them too low can unnecessarily interrupt your work. A setting of 2 or 3 minutes may
best [FX 10-5] suit your needs. Feel free to experiment with different settings until a desired
configuration is achieved.
You can also add a second battery to your WinBook FX for more battery operating time. If you
install the additional battery, you will install it into the Media Bay where your CD-ROM for
floppy disk drive is usually installed. If you use the second battery, you will not be able to use
the bay for these devices.
BACKING UP DATA
What files should I backup and how do I accomplish this?
The most important files to keep multiple copies of are your own personal files. Maintaining a
current backup can prove to be a lifesaver should your hard drive ever experience problems. The
easiest way to backup is to save all of your important files in a separate directory (named
Page 88

BACKUP for example). The next step would be to copy this directory onto one or more floppy
disks on a regular basis.
To learn more about backing up your files with Windows 95, follow these steps: Choose the
Start button, then choose Help. Choose the Index tab and type backup agent. Choose the
Display button for more information.
There are a number of other backup software packages available. Contact your local software
retailer for more information about Backup Utility software.
MODEM SETUP
Which modem do I select in setting up my communications software?
Upon receiving your WinBook FX, you may need to configure your modem for use by Windows
95. Follow these steps:
Select My Computer, Control Panel, and Modem.[FX 10-6]
Windows 95 will ask whether you are using a PCMCIA modem or not. If you have an
internal modem, select Other. If you have a PCMCIA modem, select PCMCIA modem.
Internal Modem
If you selected Other in step 2, you will see another screen about auto detecting. Click on
Next. Windows 95 will then look for the internal modem and should find it on COM3. Click
on Next when prompted then click on Finish.
Windows 95 will then present you with a screen requesting the driver disk. Put the Modem
Driver disk into the floppy drive and click on OK. On the next screen, also click on OK. On
the next screen, again click on OK, and the driver will be loaded from the floppy diskette.
Windows 95 will now prompt you to enter your area code if you have not already done this.
Enter your phone dialing information now.
Click on Finish and the modem will now be installed.
PCMCIA Modem
As above.
As above.
If you selected PCMCIA modem in step 2, you will be asked to insert the PCMCIA
modem. Insert the card now.
If Windows 95 recognizes the PCMCIA modem card, it will automatically load the driver
and present you with a summary screen. Click on Finish to complete the installation.
If Windows 95 doesn’t recognize the PCMCIA modem card, it will ask you to provide a
driver disk. Insert the Windows 95 Modem Driver diskette that came with your modem into
the floppy drive and click OK. On the next two screens, also click on OK. On the next
screen, click OK and the driver will now install.
Windows 95 will now prompt you to enter your area code if you have not already done this.
Enter your phone dialing information now.
Page 89

Click on Finish and the modem will now be installed.[FX 10-7]
MOUSE SETUP
How do I set up an external mouse?
Using the shipping software configuration, both PS/2 and serial mouse pointer would be plug
and play, meaning they work automatically. Simply turn the computer off, attach the external
mouse, then turn the computer back on.
However, should you install software included with a serial port mouse, you will need to disable
the Built-in Pointing Device option located on the Main menu of the Setup Program. Press <F2>
while booting your computer. Once the Built-in Pointing Device option is disabled, save the
changes, turn the computer off, connect the external mouse, then turn the computer back on.
WINDOWS 95
What are some of the more common issues concerning installing and using Windows 95?
Reinstalling Windows 95: There are certain ramifications you should be aware of if you delete
Windows 95 and reinstall it.
You will need to reinstall ALL Windows 95 related programs because the information
contained in the Windows 95 initialization files, some necessary DLL files, etc. Will no
longer be there.
You must reinstall the utility disks that came with the WinBook FX.
Interlinking (or Laplinking) from another computer: This is NOT a good idea because
copying Windows 95 and its related directories and files overwrites utilities, drivers, etc. that are
necessary for the WinBook FX to run properly.
DANGER: Don’t turn off or boot the WinBook FX while in Windows. Doing so can cause
file corruption, lost clusters, cross-linked files, and can actually wipe out the File Allocation
Tables, resulting in a total loss of data on your hard disk.[FX 10-8]
VOLUME CONTROL AND SOUND SYSTEM
When I start my WinBook FX, I hear a very loud beep or no sound at all. How can I turn
the volume up or down to correct this?
The WinBook FX uses hot keys to control the volume. To turn the volume up, press <Fn> +
<F8>. To turn it down, press <Fn> + <F7>.
As shipped, your WinBook FX has been set up to support the internal sound system. In most
instances no additional configuration is required. If your sound system is not working properly,
try the following procedures.
Check that the volume settings for the audio system are correct. The audio controls setting
should be set so that when you double-click on the speaker icon at the right side of the Windows
95 Task Bar, you will see all options for audio volume control. The default installation from
Creative Labs is with the PC Speaker and Microphone settings all the way down. Double-click
Page 90
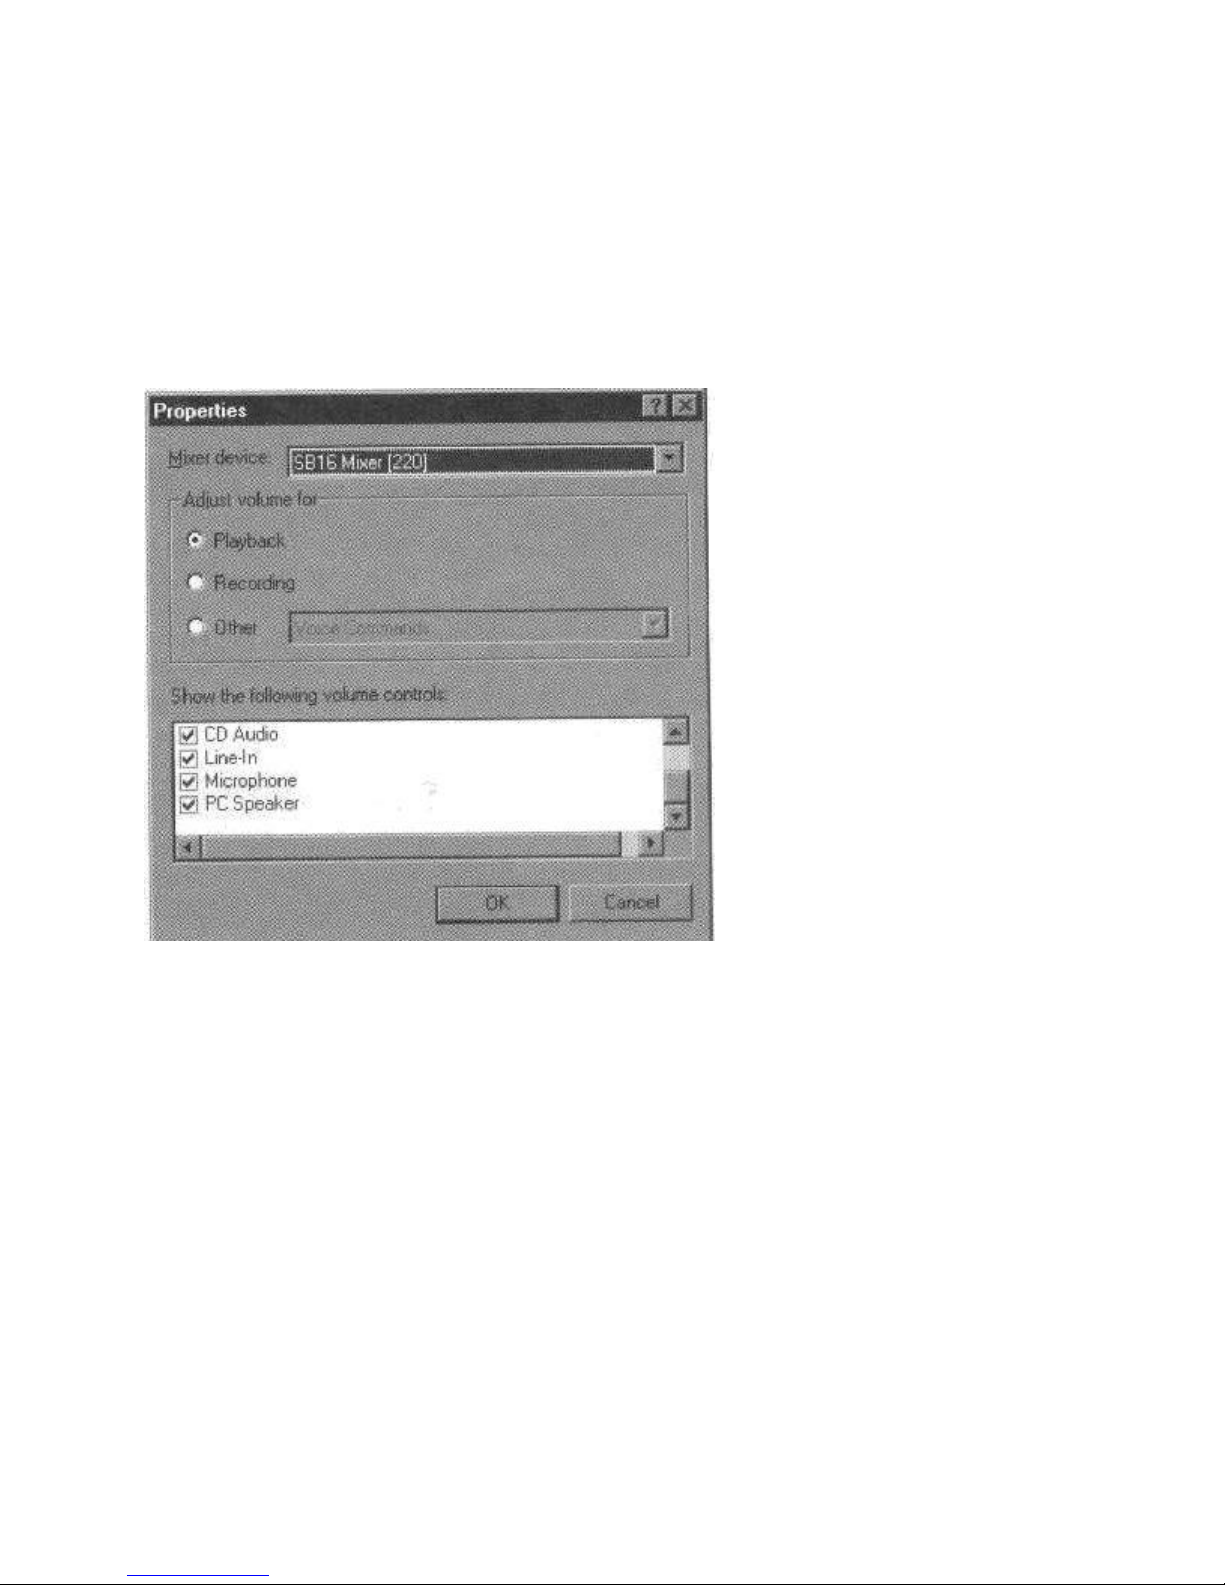
on the speaker icon in the Task Bar and the following screen will appear.
[FX 10-9]
Now click on the Options selection and select Properties. The following screen will appear.
Make sure that there is a check mark next to the Microphone and PC Speaker selections as
shown.
Once you have done this, each time you double click on the Speaker icon in the Task Bar, you
will see the screen on the preceding page. Be sure to set your Microphone and PC Speaker
Volume settings to midrange.[FX 10-10]
Another reason why you might not get audio output is that Windows 95 may not be properly
configured. Follow the steps below:
Point to the My Computer icon.
Click the right mouse button and choose Properties.
Move down the device list, select the + sign next to Sound, video and game controllers.
You should see both the Sound Card and Joystick drivers displayed. If there is a problem, a
yellow or red symbol will display to the left of the driver name. If this is the case, choose the
Properties button at the bottom of the box.
Select the Driver tab, then the Change Driver button.
Select the Show compatible driver’s button.
Choose the driver Creative Labs Sound Blaster 16 or AWE-32 driver, and then select the
OK button.
Page 91

If the sound system still doesn’t seem to be enabled, follow these steps:
Go to My Computer, Control Panel, select the System icon, then choose the Device
Manager tab.
In Device Manager, double click on the Sound, video and game controllers option.
Double click on the Creative Labs option which takes you to the Audio Drive Properties
screen.
Once in the Properties screen, select the Resources tab, and ensure the Windows 95 has
selected the following:
Input/output Range: 0220-022f
Input/output Range: 0380-038b
Interrupt: 05
Direct Memory Access: 01
Direct Memory Access: 05 [FX 10-11]
Once these are verified or changed if necessary, select OK to save changes, then Restart
Windows 95 when prompted.
Enter the Setup Program (see Chapter 9, Using the Setup Program).
In the Advanced menu, verify the Plug and Play OS is set to Yes.
Go into the Integrated Peripherals menu and check that you have not changed the audio
port settings from the default values:
On-board Audio Chip: [Enabled]
IRQ Channel: [5]
DMA Channel Low: [DMA CH1]
DMA Channel High: [DMA CH5]
I/O Channel: [220h]
If you continue to have problems with the audio system, one last thing to check before you call
Technical Support is the AUTOEXEC.BAT file. You must have the correct parameters loaded
into your program in order for your system audio to work correctly. The configuration we whip
has this loaded correctly, but installing additional software may have altered this. If you use an
editor to open up the AUTOEXEC.BAT file, you should find these values:
SET SOUND=C:\PROGRA˜1\CREATIVE\AUDIOAPP
SET BLASTER=A220 I5 D1 H5 P330 T6
SET MIDI=SYNTH:1 MAP:E
You may try the audio again, after changing AUTOEXEC.BAT and resetting the system.
Page 92
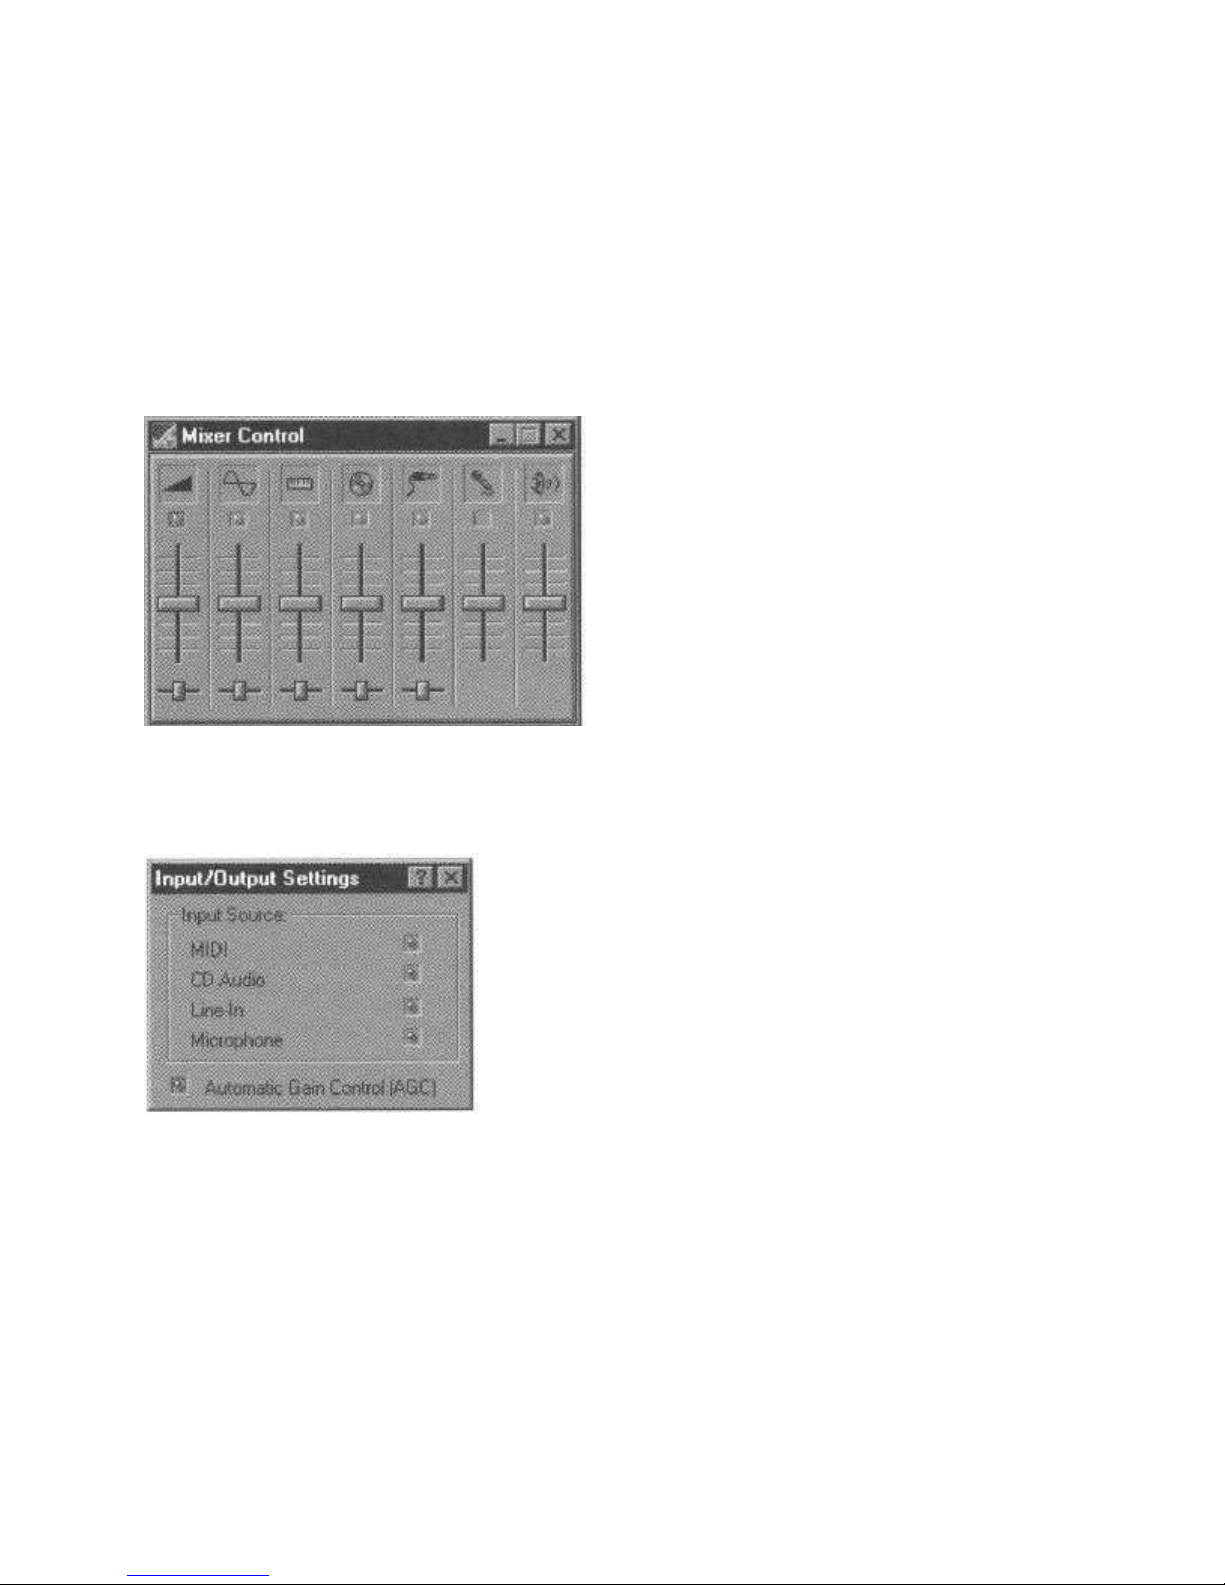
Audio or Microphone Input
I can get audio output from my system, but it doesn’t seem to accept audio or microphone
input?
Go through the following screens to make sure you have the audio input set up correctly.[FX 1012]
The mixer control panel shown below appears when you select Start, Audio Applications and
Mixer.
When you click on the upper left corner of the mixer control panel shown above, you get the
dialog box shown below that allows you to select Input/Output settings. Click on the AGC
control to enable the microphone AGC circuit.
[FX 10-13]
Now double-click on the speaker icon in the Task Bar and you will bring up the Volume Control
panel shown below.
Page 93
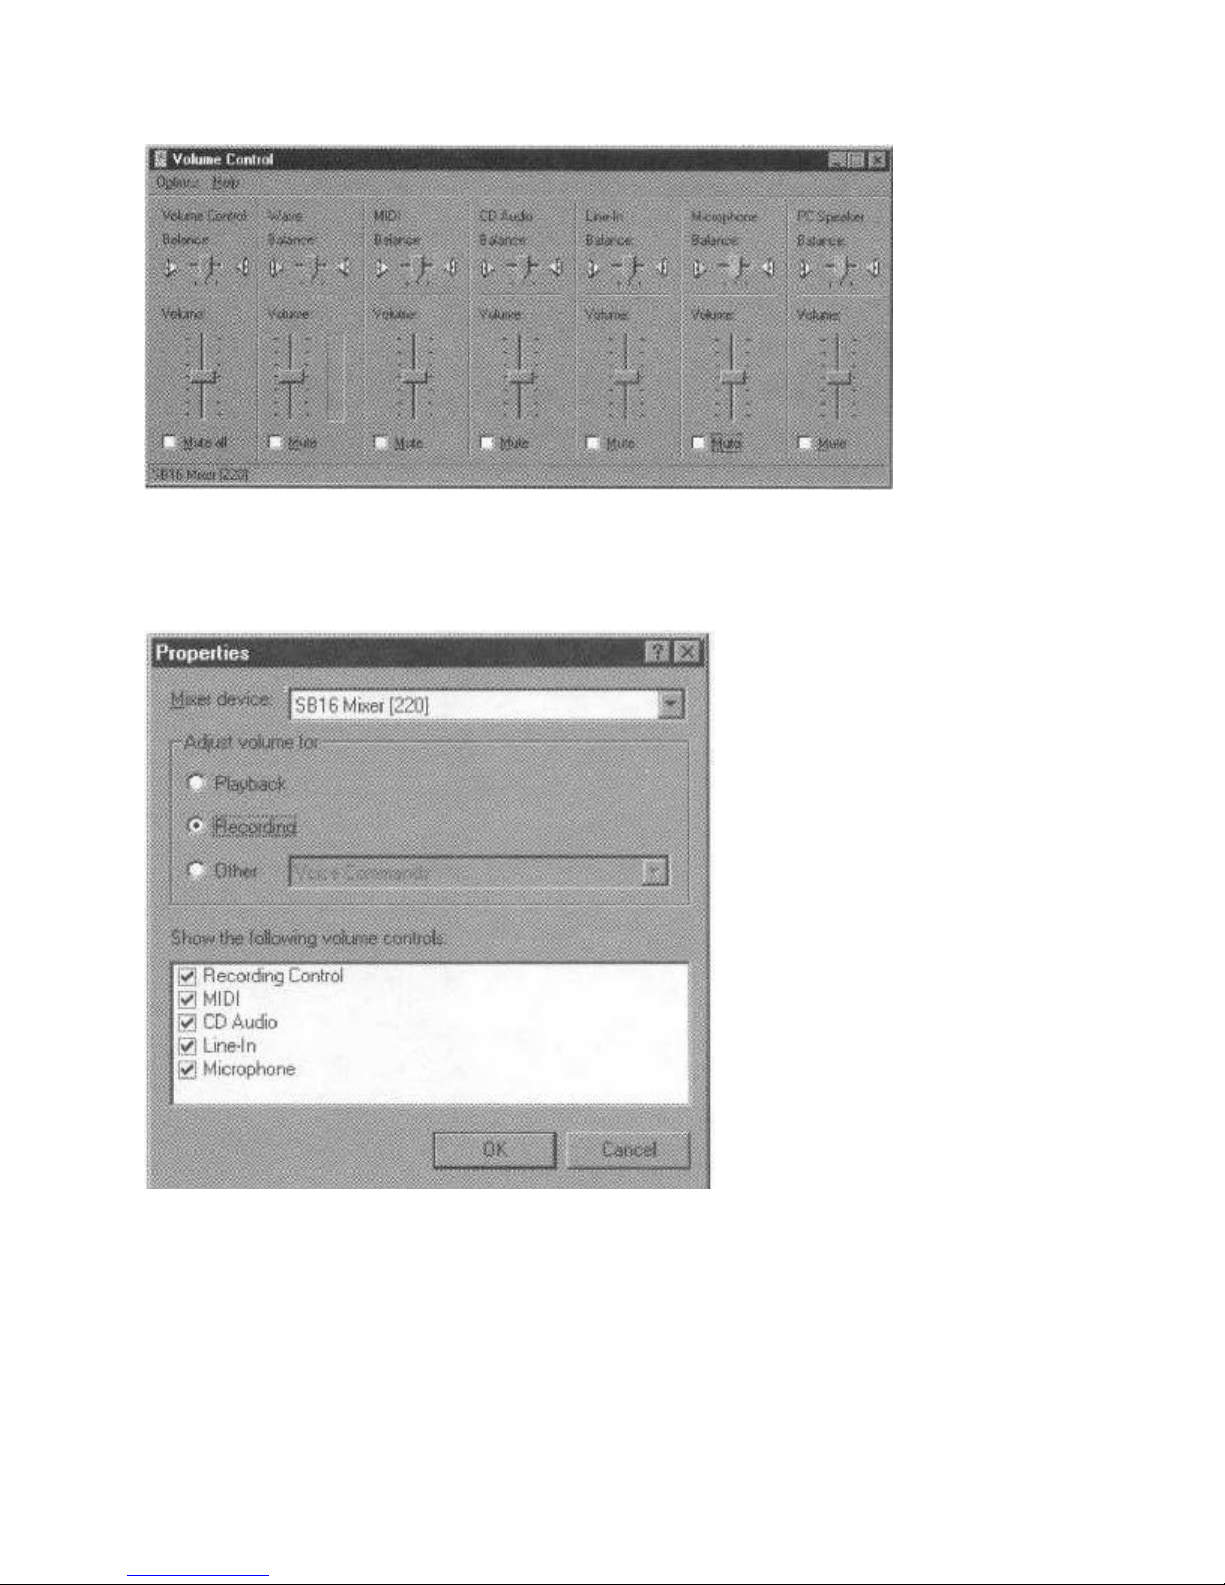
Click on the Options menu on the Volume Control panel above and the following screen will
appear.
[FX 10-14]
The screen shown above lets you select which volume control that appears when you double
click on Volume Control in the Task Bar. If you select Playback (normal), then the play back
volume control appears. If you click on Recording, then the recording volume appears. Put a
check mark in all the fields you want to use as a source for recording. In this case, be sure to
check Microphone. After you close this window, whenever you click on Volume Control, you
will see the following screen.[FX 10-15]
Page 94
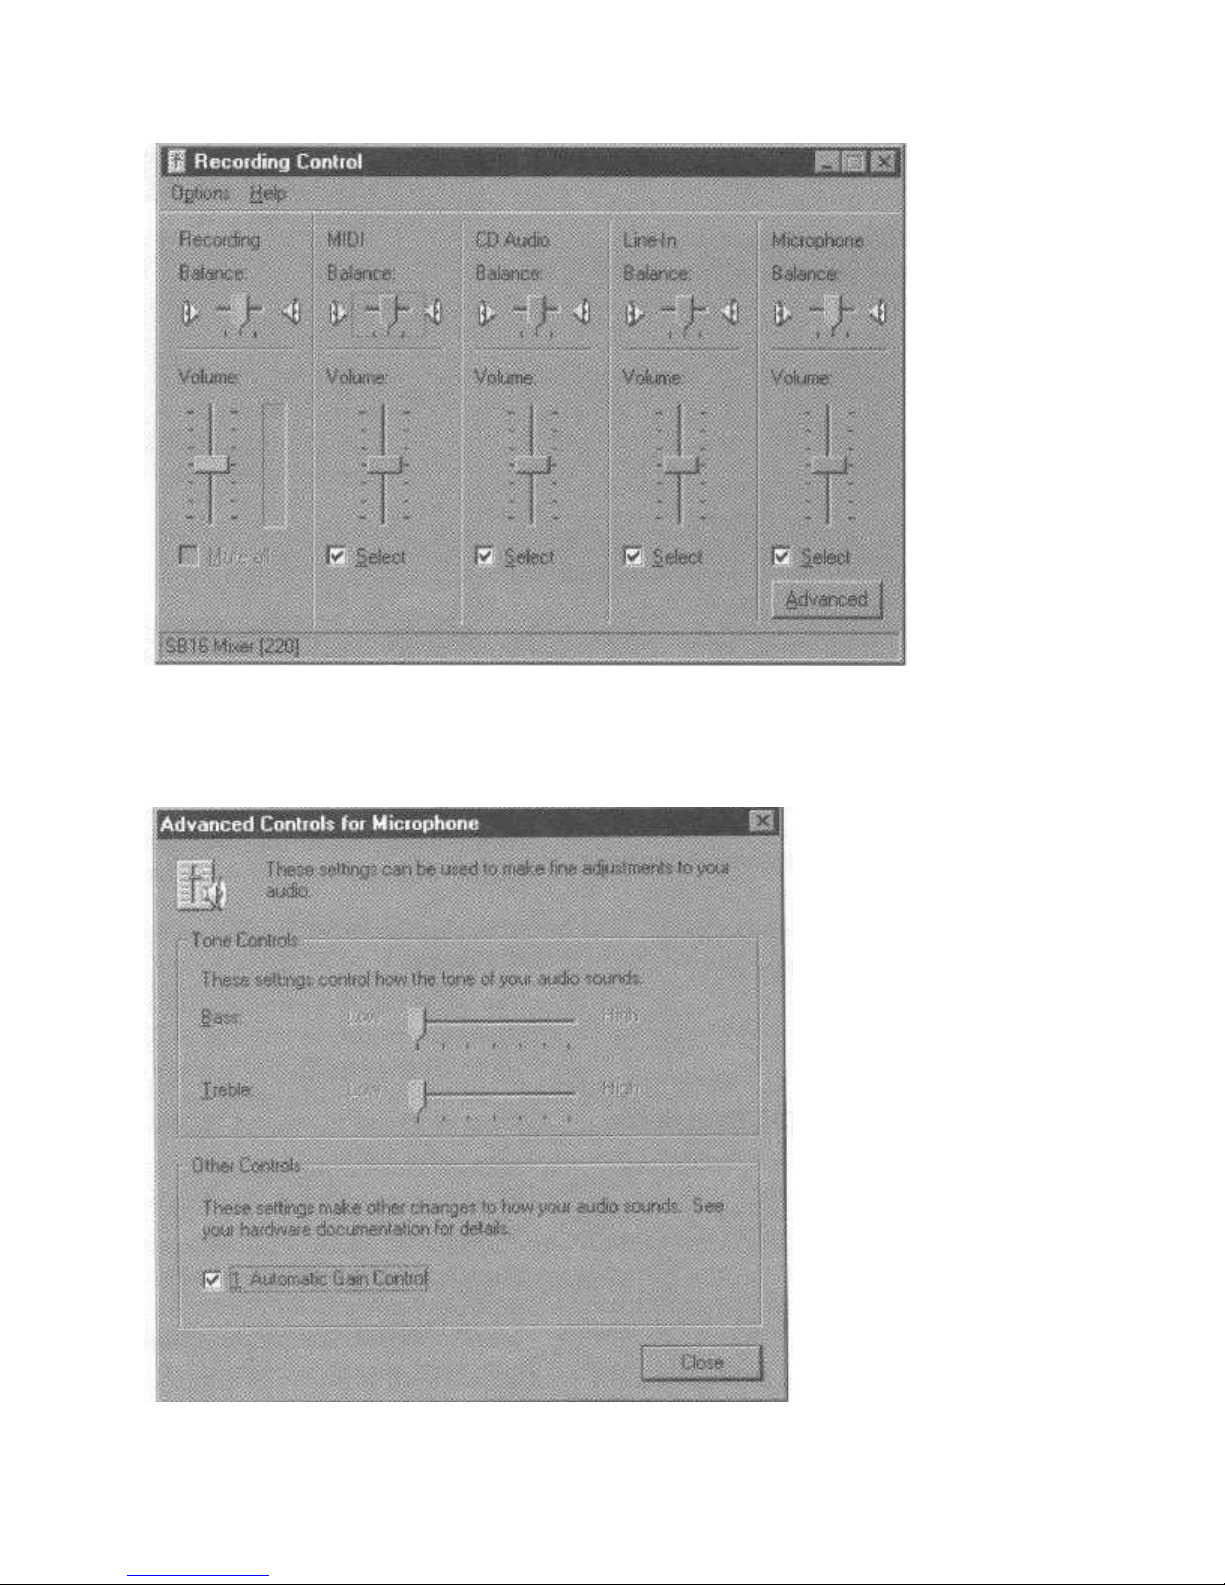
To complete microphone setup, click on the Advanced button in the screen shown above to bring
up the following screen.
[FX 10-16]
Page 95

Make sure there is a check mark next to the Automatic Gain Control box. You’re now done.[FX
10-17]
MICROPHONE FEEDBACK
Why do I get a screeching noise when I try to record into my notebook?
This is the typical microphone feedback problem. Turn down the audio and microphone volume.
DISPLAY CONTROL HOTKEYS
Why don’t the contrast and reverse video control hotkeys effect the display?
The active matrix screen has an "Auto Contrast" feature, so this control serves no function on
this type of display. The reverse video key doesn’t apply to color LCD displays; it works only
with monochrome LCDs.
PCMCIA CARD SETUP
What do I need to setup a PCMCIA card?
Most PCMCIA cards will use the 32-bit drivers included with Windows 95. Upon card insertion,
the cards will be detected and automatically set up for use.
The WinBook FX uses a Cirrus 6730 PCMCIA controller chip, which is a superset of the Intel
365SL chip, making it fully compatible with the Intel PCIC Controller. Some PCMCIA cards
may need additional software to be properly configured.
We have provided CardWorks software with your WinBook FX and Windows 95. Go
to Start, then Run. Type in C:\CARDWORK\SETUP, and follow on-screen
instructions when prompted. Even through CardWorks includes on-line help; you
may want to refer to the WinBook FX PCMCIA User’s Guide for more details.
With DOS 6.22 and Windows 3.11, boot from the WinBook FX Support Disk.
Contact Technical Support for further directions.[FX 10-18]
FAST FIXES
Check Power Inputs
Restart or Boot
Properly Install Accessories
Disconnect External Devices
Check Setup Program Settings
Scan For Viruses
Common problems can often be simply solved. Fast Fixes provide steps to try before you
proceed to the more specific solutions listed after each problem in the later subsections. We will
refer you back to this section when these procedures apply.
CHECK POWER INPUTS
AC Adapter Connection
Page 96

Proper connection to an AC power source is essential for charging the WinBook FX’s battery
modules. The AC adapter requires three connections:
Connect the AC Adapter cord to the connector socket on the side of the WinBook FX.
Connect the adapter’s supply cord into the adapter.
Connect the adapter’s supply cord to an electrical outlet. If power is reaching the
adapter, the adapter’s green LED will be illuminated.
Battery
You must charge the battery for the WinBook FX to operate on battery power. It takes about 4
hours to fully charge the primary battery with the system off. The WinBook FX should run for at
least 2 hours on a fully charged primary battery.
Occasionally it is important to allow the battery to fully discharge before completely recharging
it. A complete discharge and recharge is called "cycling" the battery. Not only will this cause
your WinBook FX to operate longer on battery power, but it will also extend the battery’s total
life.
You should perform a battery cycle once every 32 times that you plug the WinBook FX into an
AC power source to recharge the battery. The WinBook FX will display a message in the Popup
window when it is time to do this. The message will be: BAT 1 (or BAT 2) GAUGE UNSURE!
Follow the steps below to cycle the battery.[FX 10-19]
Cycling the Battery
Fully charge the battery for at least 4 hours with the system off.
Turn off all Power Management by using the Setup Program (see Chapter 9, Using the Setup
Program) or by pressing the <Fn> + <F5> keys at the same time.
Disconnect the AC adapter.
Discharge the battery by keeping the WinBook FX on until the battery is totally discharged.
To speed this up, you may want to run your favorite game program in "demo" mode to use
more power.
After the system automatically powers off from the low battery charge, fully charge the
battery. The battery indictor in the Popup window is now recalibrated and its indication
should be reliable.
RESTART OR BOOT
Probably, the most common way to solve simple problems with the WinBook FX is to restart it.
Though restarting the WinBook FX can correct problems with operation, you will lose any
changes that you make to your files since the last time you saved your work. It’s a good idea to
save your work at frequent intervals in case you have to restart unexpectedly.
WANING: If you restart your WinBook FX without saving active files or work that you have
recently done, you may lose the data that is stored in system memory. It is advisable to save any
work and close all files before you attempt to restart your computer as described below.
Page 97

There are 4 ways to restart your WinBook FX:
If you are using Windows 95, when you have a problem with an application that is not
responding, a dialog box will appear. From [FX 10-20] the list of applications displayed,
select the application that is not responding, then click on End Task. This will fix the
problem in most cases. You can then restart the problematic application without having to
turn off your WinBook FX.
If you are in Windows 95 and cannot end the task as described above, press the left Windows
key on your keyboard, then select Shutdown, then Restart the Computer. Follow any
instructions that may appear on your screen.
If you are using Windows 95 and the methods above do not work, or you are in MS-DOS
only mode, another way to restart your system is to press <Ctrl> + <Alt> + <Del> all at the
same time.
Use this method when the first 3 fail. Press the ON-OFF switch and hold it down for
approximately 2 seconds. Then you can power the system back on by pressing the ON-OFF
switch again.
Restarting with the WinBook FX Support Disk: The WinBook FX Support Disk allows you
to restart the WinBook FX without using your current operating system or hard disk drive. Call
Technical Support for instructions on using the WinBook FX Support Disk. Be sure the Floppy
Disk Drive module is installed in the Media Bay before you call Technical Support.
PROPERLY INSTALL ACCESSORIES
If you just installed the CD-ROM drive, Floppy Disk Drive module, or Secondary Battery into
the Media Bay, make sure that the exposed edge of the drive is even with the edge of the
WinBook FX. If drives are not installed properly, your WinBook FX may not operate properly.
If you have recently installed additional memory, check to be sure that the memory expansion
card is correctly installed. See Chapter 6, Upgrading Your WinBook FX for more
information.[FX 10-21]
DISCONNECT EXTERNAL DEVICES
Sometimes installing external devices can conflict with internal devices that came with your
WinBook FX. This can be especially true when you add an external pointing device like a mouse
pointer.
If you have installed external devices and the WinBook FX fails to operate properly shortly after
the installation, unscrew and unplug the external devices. It is best to start with devices that were
last installed prior to the trouble. After removing the devices, restart the WinBook FX as
described in "Restart or Boot" in this chapter.
Try to operate the WinBook FX after restarting. If it operates satisfactorily, you may need to
make changes in the Setup Program settings to operate the new external device. See Chapter 9,
Using the Setup Program for more information about configuring the WinBook FX. Also see
"Check the Setup Program Settings" that follows.
CHECK SETUP PROGRAM SETTINGS
Page 98

The Setup Program menus allow you to change settings that enable or disable features on your
WinBook FX. Incorrect settings in these menus can cause the WinBook FX to operate in an
unusual way or fail to operate at all.
Default Setting: The best way to determine if there is a problem with the WinBook FX is to use
default settings. This will cause the computer to operate as it did when you first received it.
NOTE: Setting the Setup Program fields to their default configuration may cause external
accessories to stop working or to work incorrectly.
Getting Into the Setup Program: Reboot the WinBook FX by pressing <Ctrl> + <Alt> +
<Del> all at the same time. When the Screen becomes active, press <F2> to enter the Setup
Program.[FX 10-22]
Leaving the Setup Program: After making changes to items within the menus, press <Enter> to
select the new changes. To leave the Setup Program, press <ESC>. Use the arrow keys to move
into the Exit menu, then choose Save Changes and Exit. Your WinBook FX will leave the
menu and restart.
SCAN FOR VIRUSES
Viruses can cause damage to your system and data. You can obtain anti-virus software from your
local software dealer. For more detailed information, see "Viruses" in Chapter 8, Security.[FX
10-23]
BOOT PROCESS
BEEP AFTER STARTUP SCREEN STOPS
After I turn on my WinBook FX or after I reboot it, I hear a beep, then the screen stops
before it finishes booting.
The operating system needs correct information in the AUTOEXEC.BAT and CONFIG.SYS
files to boot properly.
Turn the computer off and then on.
Press the <F8> key to bypass these files at boot time.
If the system boots, use an editor or viewer to inspect the files.
Write AUTOEXEC and CONFIG settings down, and then reinstall backups of
these files and try again.
If you are using a port replicator, mini-dock, or docking station, undock the WinBook
FX and retry.
WINDOWS 95 WON’T LOAD
Page 99

My WinBook FX won’t load Windows 95.
If your WinBook FX fails to successfully load Windows 95 after it boots, do not try to
reinstall Windows 95.
Locate your WinBook FX Support Disk. Be sure the Floppy Disk Drive module is
installed in the Media Bay. Then call Technical Support at the number listed on the
WinBook FX "Read-Me-First" card for instructions on using the WinBook FX
Support Disk.
MISSING OPERATING SYSTEM ERROR MESSAGE
My WinBook FX displays a message indicating a missing operating system.
Use the Setup Program menus to select hard disk drive type:
Enter the Setup Program (see "Check the Setup Program Settings" under Fast Fixes).
On the Main menu, highlight IDE Adapter-Master, and [FX 10-24] then select
<Enter>. The screen displays the IDE Adapter 0 Master screen. Check that the Type
field is set to Auto.
Move the highlight to Autotype Fixed Disk: and select <Enter>. Follow any
additional instructions on the screen.
Leave the Setup Program menus (see "Check the Setup Program Settings" under Fast
Fixes).
You may have loaded a virus onto your WinBook FX’s hard disk drive (see
"Viruses" in Chapter 8, Security.
If the problem persists, locate your WinBook FX Support Disk. Be sure the Floppy
Disk Drive module is installed in the Media Bay. Then call Technical Support at the
number listed on the WinBook FX "Read-Me-First" card for instructions on using the
WinBook FX Support Disk.
SETUP/CONFIGURATION ERROR MESSAGE
When I turn on my WinBook FX, the screen displays "BIOS setup or configuration
error, type ‘F1’ to continue."
Look for changes that you recently made to your WinBook FX. Unplug any external
keyboards and/or pointing devices and retry (see "Disconnect External Devices" under Fast
Fixes).
If you are using a port replicator, mini-dock, or docking station, undock the WinBook FX
and retry.
If you have installed new internal or external accessories, be sure to run the Setup Program.
Use the default setup configuration. [FX 10-25]
INVALID CMOS ERROR MESSAGE
Page 100

When I turn on my WinBook FX, the screen displays "invalid CMOS error message,
type ‘F1’ to continue."
Go back to default settings in the Setup Program (see "Check the Setup Program Settings"
under Fast Fixes).
PASSWORD PROMPT
My WinBook FX screen prompts me to enter a password at bot time.
Enter your password. If you can’t remember your password and have not stored it
somewhere, you must send your WinBook FX in for service to clear the password. Please
contact Customer Service at the number listed on the WinBook FX "Read-Me-First" card to
arrange for an RMA (return materials authorization) number.
WON’T START PROGRAMS OR READ DISKS
My WinBook FX won’t start any programs or read any disks after I turn on the power.
Check the Setup Program. To check the special entries that help your WinBook FX to start
up, enter the Setup Program menus (see "Check the Setup Program Settings" under Fast
Fixes), and make sure the boot devices are active:
In the Main menu, set Diskette A: for [1.44MB, 3.5]. Note that if your Floppy Drive
module is not installed, you will be unable to choose this option
Move the highlight to Boot Sequence and choose [C: then A:] Note that in general
you’re safer with this setting as [A: then C:] because it always gives you the option
of booting from the support disk in A: first. This could be critical if you run into virus
problems.[FX 10-26]
Make sure that drive C: is set up properly (see boot process problem 3 for more
information).
ERROR NOT RELATED TO SETUP
My WinBook FX displays an error message on the screen that is not related to any
setup problems.
If you are using a port replicator, mini-dock, or docking station, undock the WinBook FX
and retry.
If the problem persists, write down the error message and call Technical Support for
assistance. The phone number is listed on the "Read –Me-First" card that came with your
system.
POWER
WINBOOK FX WON’T TURN ON
 Loading...