

Page 1
User’s
Manual
FusionPC manual 6/6 8/21/03 1:26 PM Page 1
All manuals and user guides at all-guides.com
all-guides.com
Page 2

FusionPC manual 6/6 8/21/03 1:26 PM Page 2
All manuals and user guides at all-guides.com
Page 3
Regulations Information
Class B Regulations
USA — Federal Communications Commission Radio Frequency
Interference Statement
Note:
This equipment has been tested and found to comply with the limits for a
Class B digital device pursuant to Part 15 of the FCC Rules. These limits
are designed to provide reasonable protection against harmful interference
in a residential installation. This equipment generates, uses and can radiate
radio frequency energy and, if not installed and used in accordance with
the instructions, may cause harmful interference to radio communications.
How-ever, there is no guarantee that interference will not occur in a particular
installation. If this equipment does cause harmful interference to radio or
television reception, which can be determined by turning the equipment off
and on, the user is encouraged to try to correct the interference by one or
more of the following measures:
• Reorient or relocate the receiving antenna.
• Increase the separation between the equipment and receiver.
• Connect the equipment into an outlet on a circuit different from that
to which the receiver is connected.
• Consult the dealer or an experienced radio/TV technician for help.
Any changes or modifications not expressly approved by the manufacturer
could void the user’s authority to operate the equipment.
Canada — Canadian Department of Communications
Radio Interference Regulations Class B Compliance Notice
This digital apparatus does not exceed the Class B limits for radio noise
emissions from digital apparatus set out in the Radio Interference Regulations
of the Canadian Department of Communications.
FusionPC manual 6/6 8/21/03 1:26 PM Page 3
All manuals and user guides at all-guides.com
Page 4
Le présent appareil numérique n’émet pas de bruits radioélectriques dépassant
les limites applicables aux appareils numériques de la classe B prescrites dans
le Règlement sur le brouillage radioélectrique édicté par le ministère des
Communications du Canada.
About the Modem
Caution
1. Never install telephone wiring during a lightning storm.
2. Never install telephone jacks in wet locations unless the jack is specifically
designed for wet locations.
3. Never touch uninsulated telephone wires or terminals unless the telephone
line has been disconnected at the network interface.
4. Use caution when installing or modifying telephone lines.
5. Avoid using the telephone function (other than a cordless type) during an
electrical storm. There may be a remote risk of electric shock from lightning.
6. Do not use the telephone function to report a gas leak in the vicinity of the
leak.
7. Do not use this product near water, for example near a bath tub, wash bowl,
kitchen sink or laundry tub, in a wet basement or near a swimming pool.
Trademarks
All brand and product names are trademarks or registered trademarks of their
respective companies.
Note
The information in this manual is subject to change without notice.
FusionPC manual 6/6 8/21/03 1:26 PM Page 4
All manuals and user guides at all-guides.com
Page 5
Table of Contents
Preface v
Chapter 1
Getting Started 1
Unpacking 2
Taking a Look at the System 3
Front Components 3
Right-Side Components 5
Left-Side Components 6
Rear Components 7
Setting up the System for Use 8
Selecting a Site 8
Making Connections 8
Installing the Remote Control Batteries 13
Using the FusionPC 14
AV Mode and PC Mode 14
Powering On and Off 16
Powering On to AV Mode 16
Powering On to PC Mode 16
Powering Off 17
Adjusting the Display 17
Where to Go from Here 18
Chapter 2
Computing Basics 19
Controlling the Computer Power 20
Starting the Computer 20
Turning Off the Computer 20
Power Options 20
Hibernation 21
Using the Keyboard 22
i
FusionPC manual 6/6 8/21/03 1:26 PM Page 5
All manuals and user guides at all-guides.com
Page 6
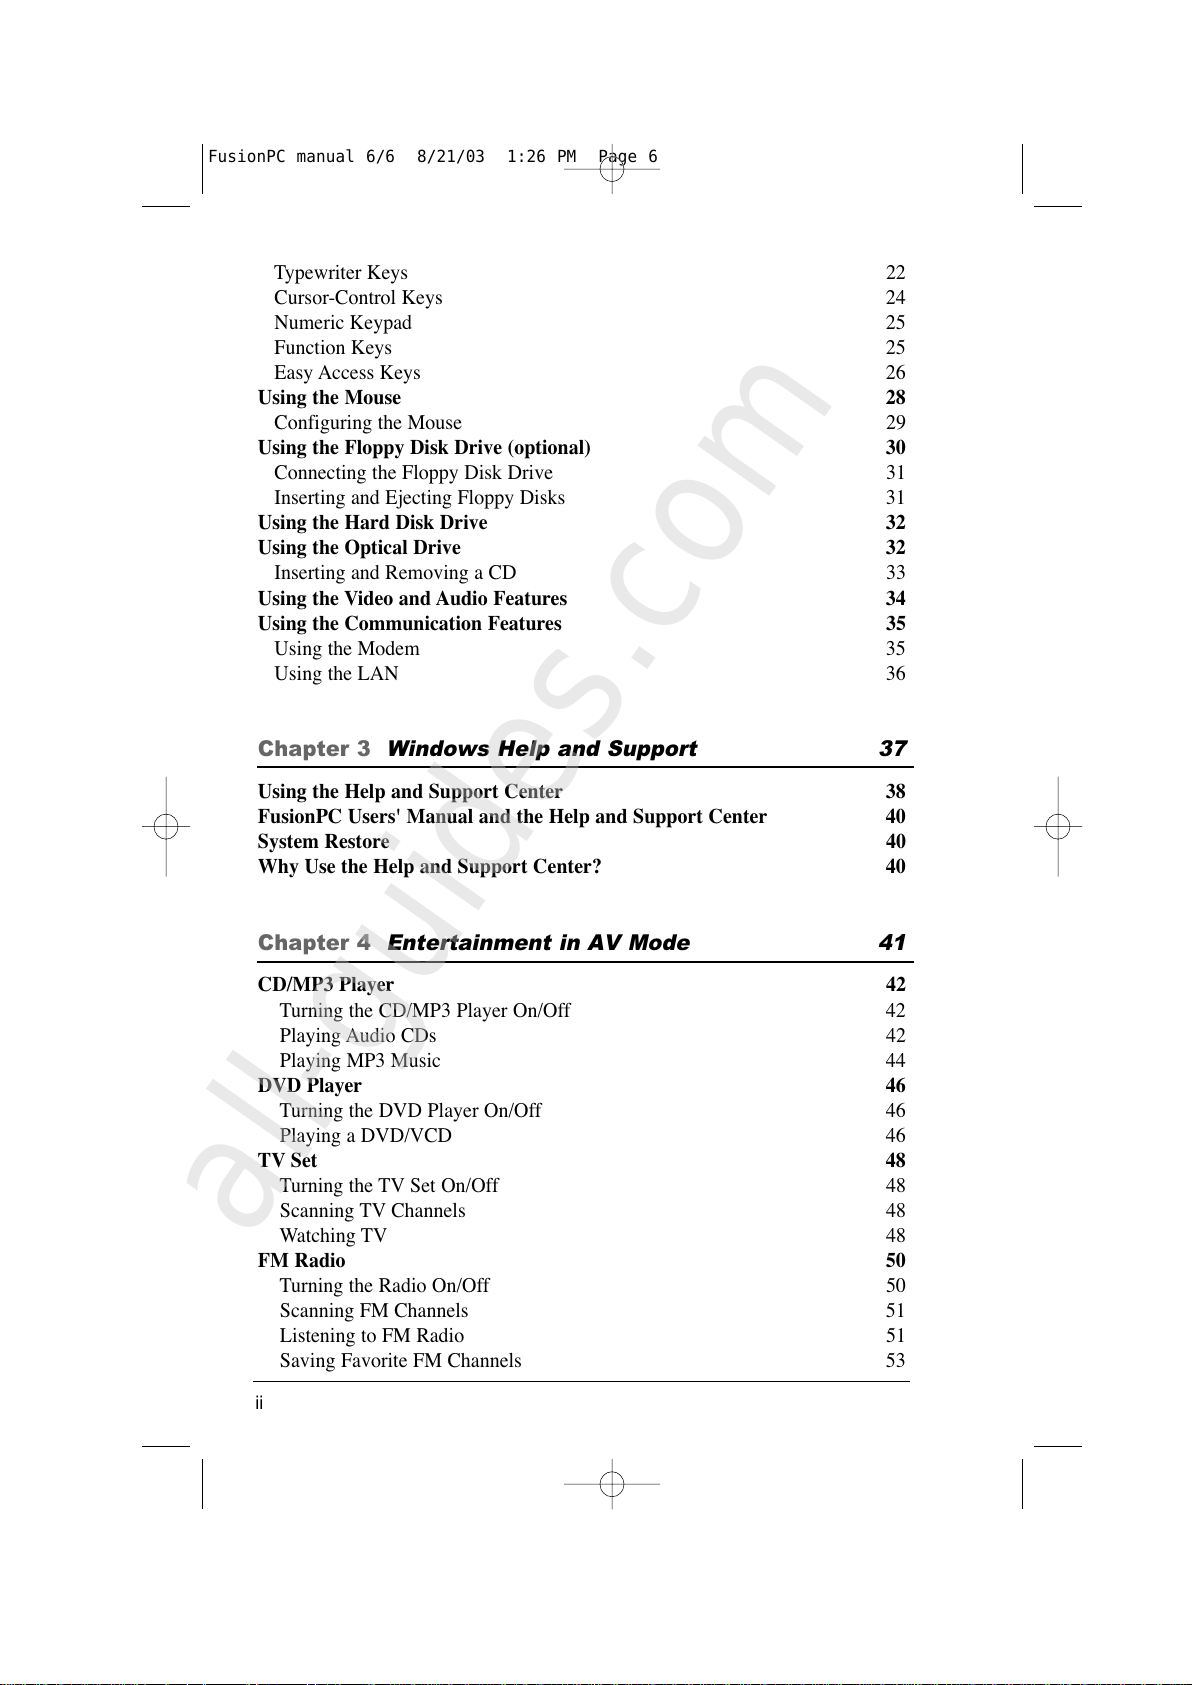
Typewriter Keys 22
Cursor-Control Keys 24
Numeric Keypad 25
Function Keys 25
Easy Access Keys 26
Using the Mouse 28
Configuring the Mouse 29
Using the Floppy Disk Drive (optional) 30
Connecting the Floppy Disk Drive 31
Inserting and Ejecting Floppy Disks 31
Using the Hard Disk Drive 32
Using the Optical Drive 32
Inserting and Removing a CD 33
Using the Video and Audio Features 34
Using the Communication Features 35
Using the Modem 35
Using the LAN 36
Chapter 3
Windows Help and Support 37
Using the Help and Support Center 38
FusionPC Users' Manual and the Help and Support Center 40
System Restore 40
Why Use the Help and Support Center? 40
Chapter 4
Entertainment in AV Mode 41
CD/MP3 Player 42
Turning the CD/MP3 Player On/Off 42
Playing Audio CDs 42
Playing MP3 Music 44
DVD Player 46
Turning the DVD Player On/Off 46
Playing a DVD/VCD 46
TV Set 48
Turning the TV Set On/Off 48
Scanning TV Channels 48
Watching TV 48
FM Radio 50
Turning the Radio On/Off 50
Scanning FM Channels 51
Listening to FM Radio 51
Saving Favorite FM Channels 53
ii
FusionPC manual 6/6 8/21/03 1:26 PM Page 6
All manuals and user guides at all-guides.com
all-guides.com
Page 7
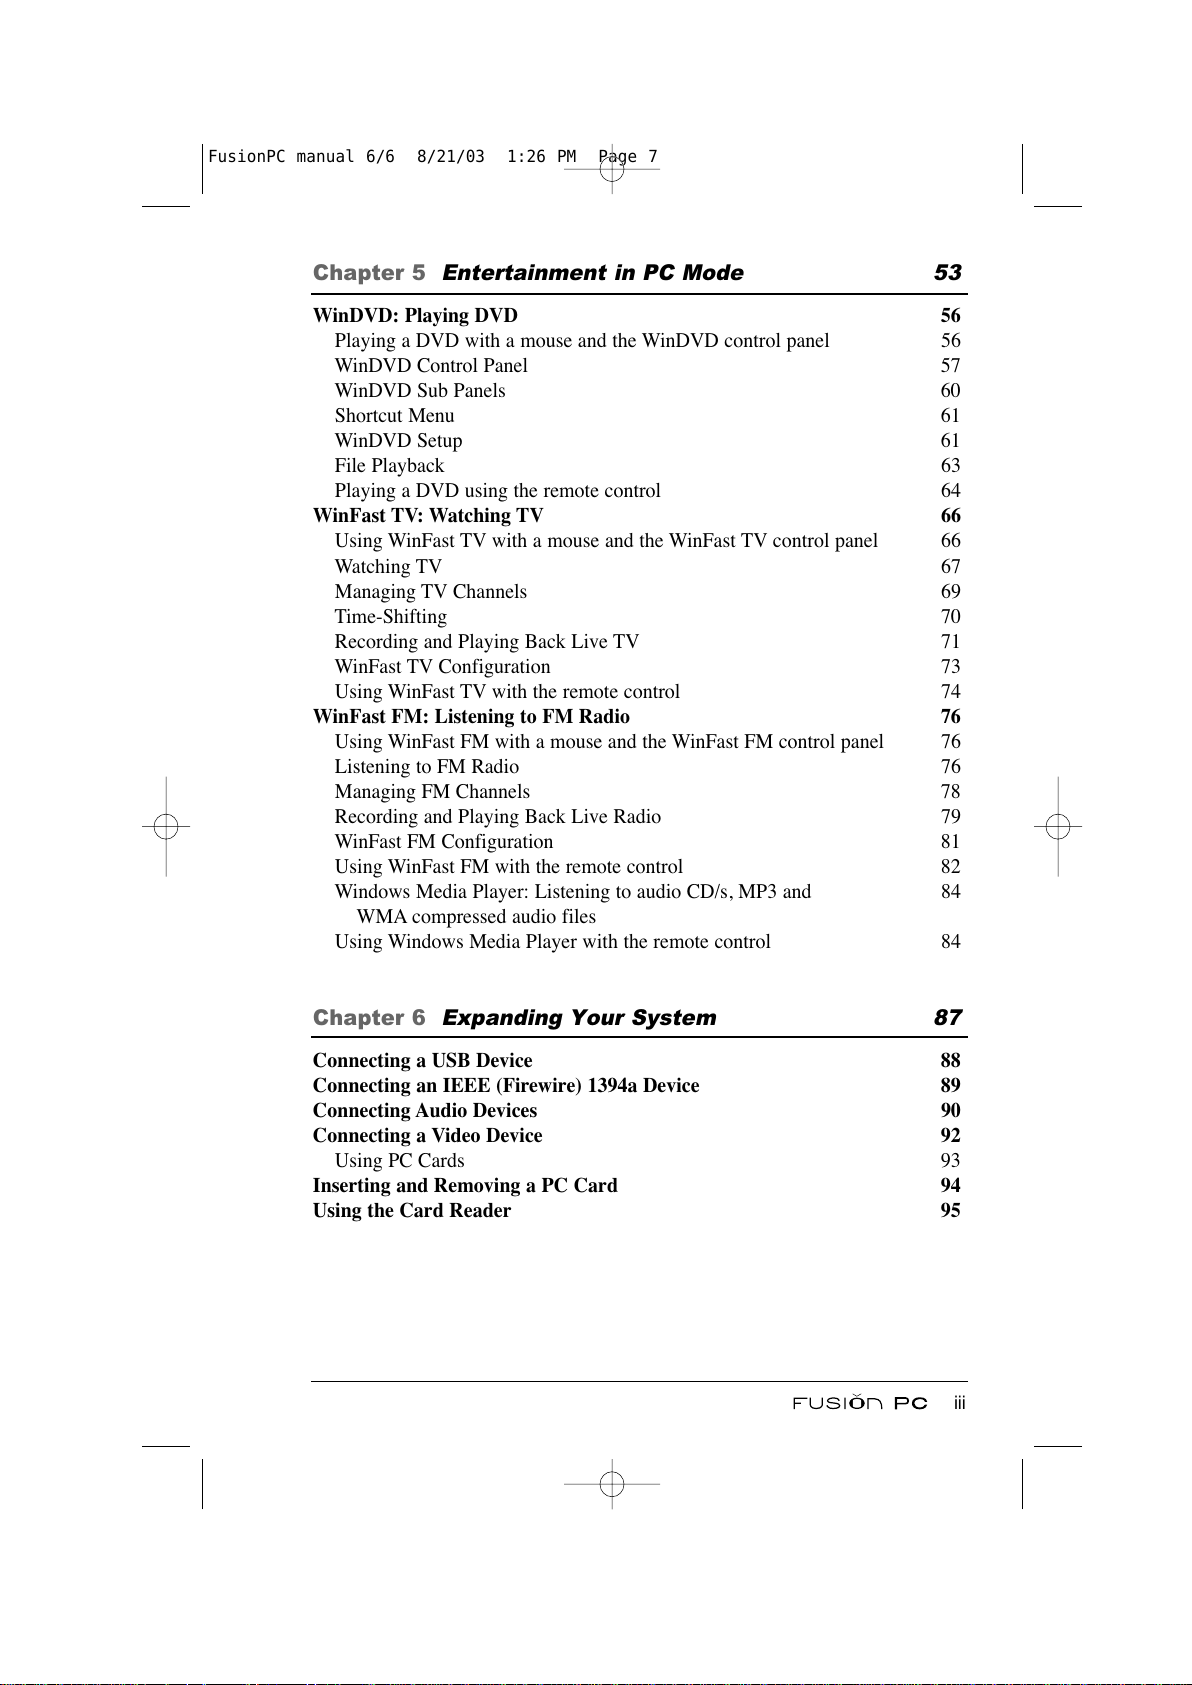
Chapter 5
Entertainment in PC Mode 53
WinDVD: Playing DVD 56
Playing a DVD with a mouse and the WinDVD control panel 56
WinDVD Control Panel 57
WinDVD Sub Panels 60
Shortcut Menu 61
WinDVD Setup 61
File Playback 63
Playing a DVD using the remote control 64
WinFast TV: Watching TV 66
Using WinFast TV with a mouse and the WinFast TV control panel 66
Watching TV 67
Managing TV Channels 69
Time-Shifting 70
Recording and Playing Back Live TV 71
WinFast TV Configuration 73
Using WinFast TV with the remote control 74
WinFast FM: Listening to FM Radio 76
Using WinFast FM with a mouse and the WinFast FM control panel 76
Listening to FM Radio 76
Managing FM Channels 78
Recording and Playing Back Live Radio 79
WinFast FM Configuration 81
Using WinFast FM with the remote control 82
Windows Media Player: Listening to audio CD/s, MP3 and 84
WMA compressed audio files
Using Windows Media Player with the remote control 84
Chapter 6
Expanding Your System 87
Connecting a USB Device 88
Connecting an IEEE (Firewire) 1394a Device 89
Connecting Audio Devices 90
Connecting a Video Device 92
Using PC Cards 93
Inserting and Removing a PC Card 94
Using the Card Reader 95
iii
FusionPC manual 6/6 8/21/03 1:26 PM Page 7
All manuals and user guides at all-guides.com
Page 8
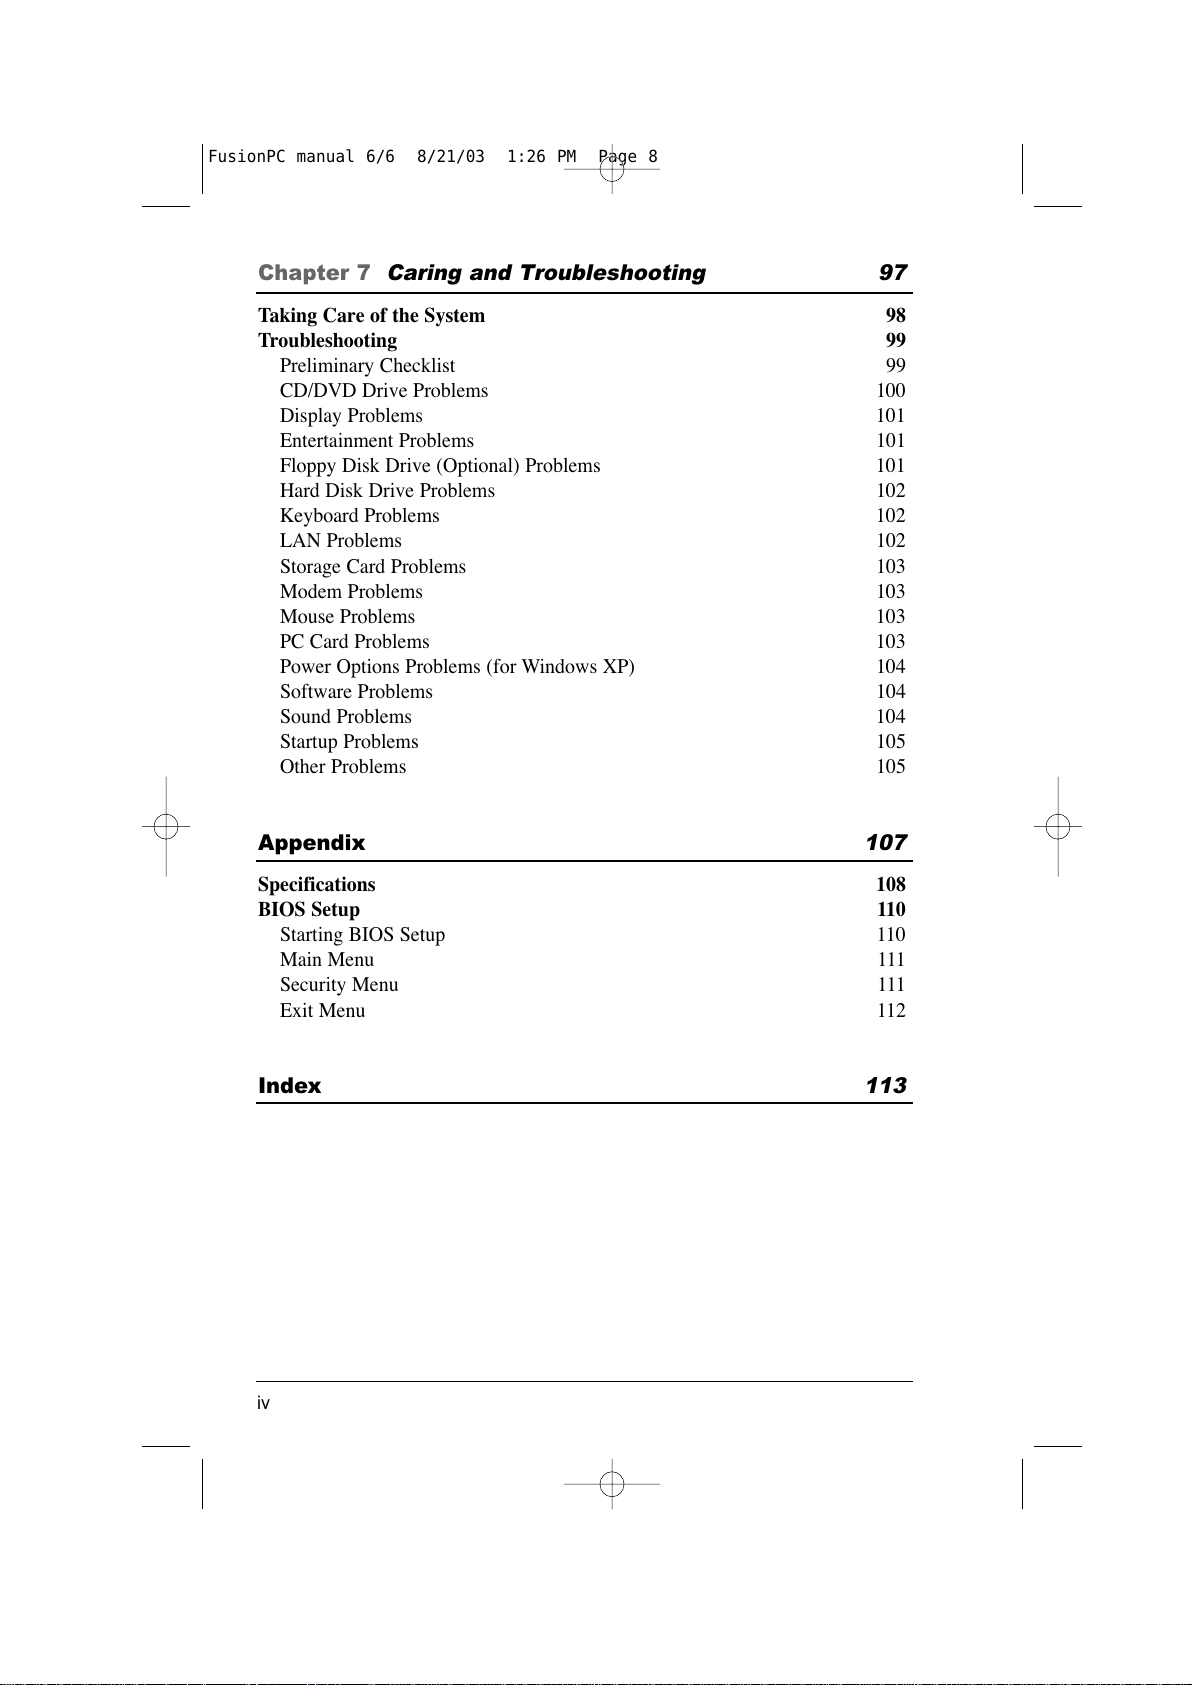
Chapter 7
Caring and Troubleshooting 97
Taking Care of the System 98
Troubleshooting 99
Preliminary Checklist 99
CD/DVD Drive Problems 100
Display Problems 101
Entertainment Problems 101
Floppy Disk Drive (Optional) Problems 101
Hard Disk Drive Problems 102
Keyboard Problems 102
LAN Problems 102
Storage Card Problems 103
Modem Problems 103
Mouse Problems 103
PC Card Problems 103
Power Options Problems (for Windows XP) 104
Software Problems 104
Sound Problems 104
Startup Problems 105
Other Problems 105
Appendix
107
Specifications 108
BIOS Setup 110
Starting BIOS Setup 110
Main Menu 111
Security Menu 111
Exit Menu 112
Index
113
iv
FusionPC manual 6/6 8/21/03 1:26 PM Page 8
All manuals and user guides at all-guides.com
Page 9
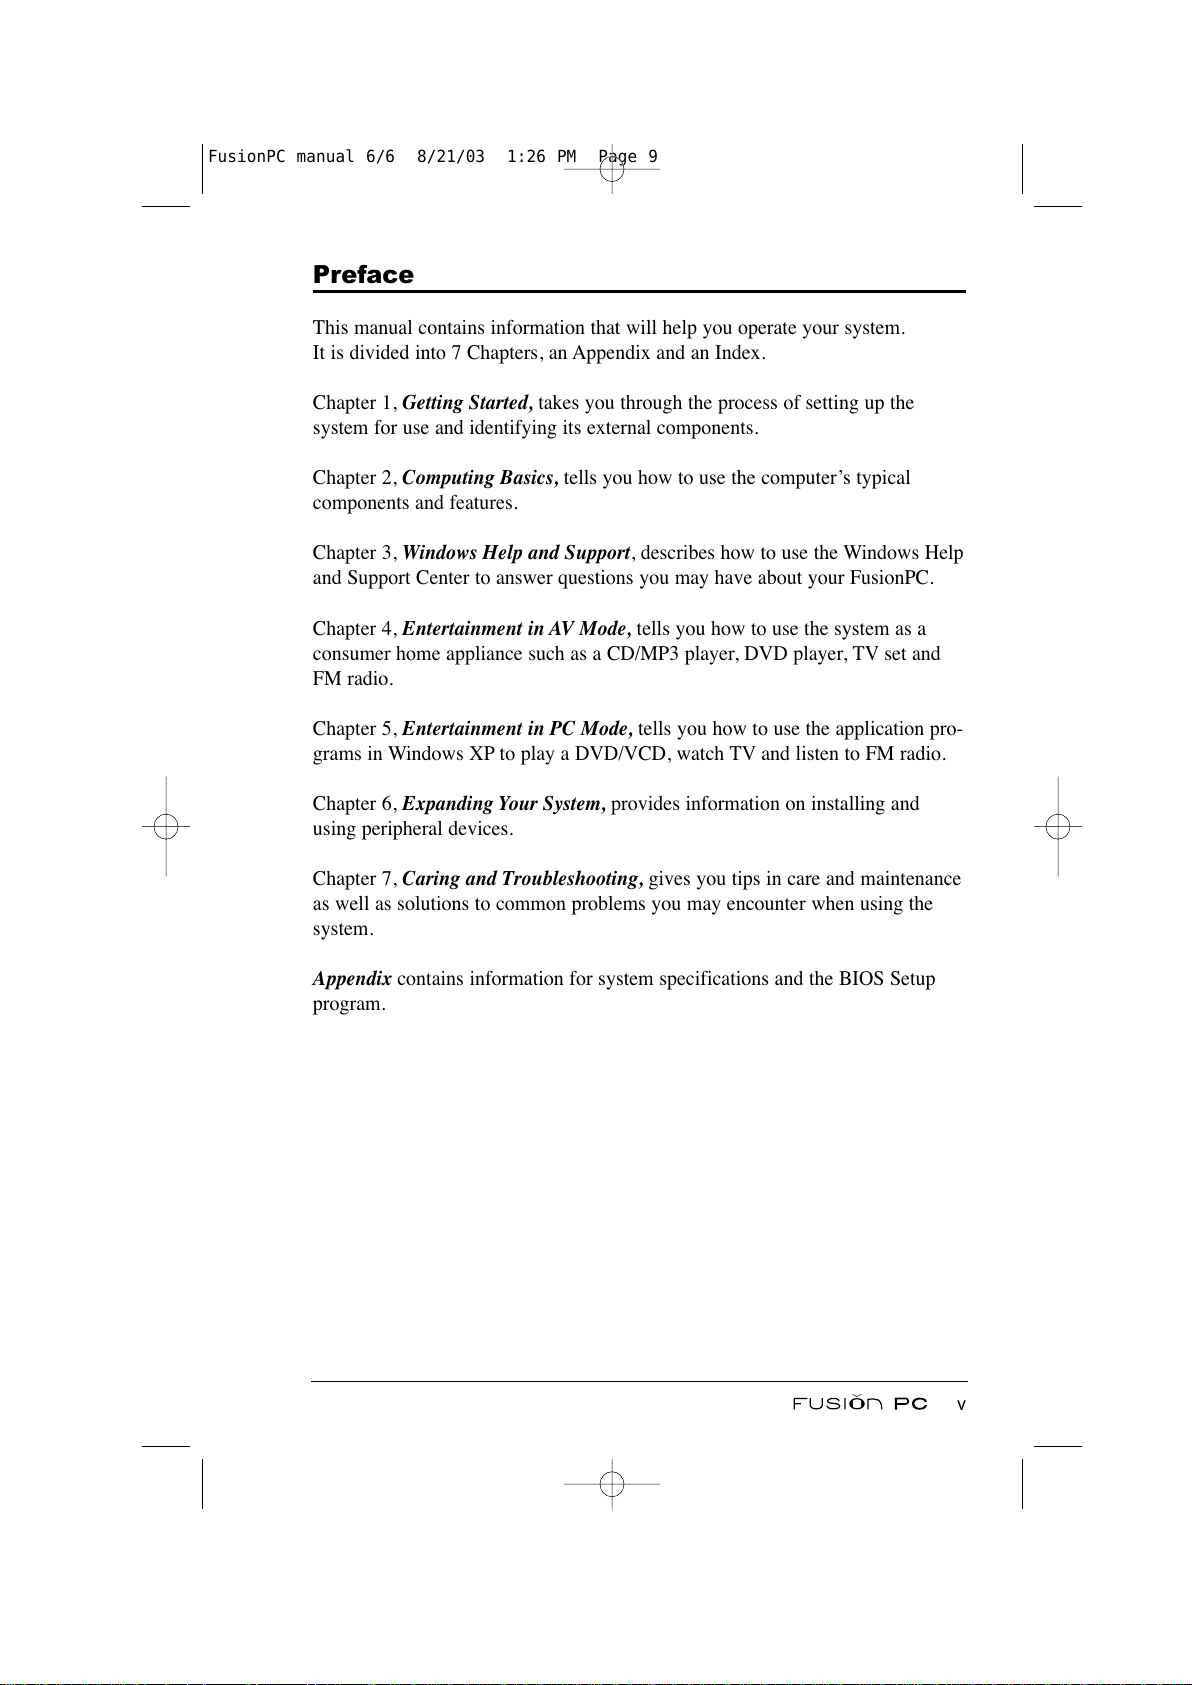
Preface
This manual contains information that will help you operate your system.
It is divided into 7 Chapters, an Appendix and an Index.
Chapter 1, Getting Started, takes you through the process of setting up the
system for use and identifying its external components.
Chapter 2, Computing Basics, tells you how to use the computer’s typical
components and features.
Chapter 3, Windows Help and Support, describes how to use the Windows Help
and Support Center to answer questions you may have about your FusionPC.
Chapter 4, Entertainment in AV Mode, tells you how to use the system as a
consumer home appliance such as a CD/MP3 player, DVD player, TV set and
FM radio.
Chapter 5, Entertainment in PC Mode, tells you how to use the application pro-
grams in Windows XP to play a DVD/VCD, watch TV and listen to FM radio.
Chapter 6, Expanding Your System, provides information on installing and
using peripheral devices.
Chapter 7, Caring and Troubleshooting, gives you tips in care and maintenance
as well as solutions to common problems you may encounter when using the
system.
Appendix contains information for system specifications and the BIOS Setup
program.
v
FusionPC manual 6/6 8/21/03 1:26 PM Page 9
All manuals and user guides at all-guides.com
Page 10
Notational Conventions
Throughout this manual, the following conventions are used to distinguish
elements of text.
Note: identifies additional information that requires special attention.
Caution: identifies important information which, if not followed, may result in loss
of data or damage to the system.
Keyboard keys and remote control buttons are shown in a bold typeset. For
example:
Press Enter to complete.
When keys are joined by a plus sign (+), press the first key, and, while keeping
the first key down, press the remaining keys, finally release all the keys. When
necessary, keys are also shown with graphics.
A title, command, setup item or button that you can see on the screen is shown
in boldface. If several menu commands must be selected in sequence, they will
be separated with a greater-than sign (>). For example:
Select Start > Settings > Control Panel > Power Options, select Home/Office
Desk and then click the
OK button.
vi
FusionPC manual 6/6 8/21/03 1:26 PM Page 10
All manuals and user guides at all-guides.com
Page 11
Chapter 1
Getting Started
Congratulations on purchasing a FusionPC — a next-generation multimedia
computer that incorporates a large LCD (Liquid Crystal Display), wireless
mouse , wireless keyboard and a stereo speaker set into one compact package
design. In addition to typical computer capabilities, it offers complete home
entertainment features such as CD/MP3 player, DVD player, FM radio and
TV. Also provided is a remote control for your convenience. Whether you are
working or relaxing, the FusionPC is here to satisfy your needs.
This chapter introduces the external components of your system and then tells
you step by step how to get your system up and running. Finally, it navigates
you to the information you may need after your system is ready for use.
1
FusionPC manual 6/6 8/21/03 1:26 PM Page 1
All manuals and user guides at all-guides.com
all-guides.com
Page 12
Unpacking
Note: Depending on the model you purchased, the appearance of your computer
and its accessories may not be exactly the same as those shown in this manual.
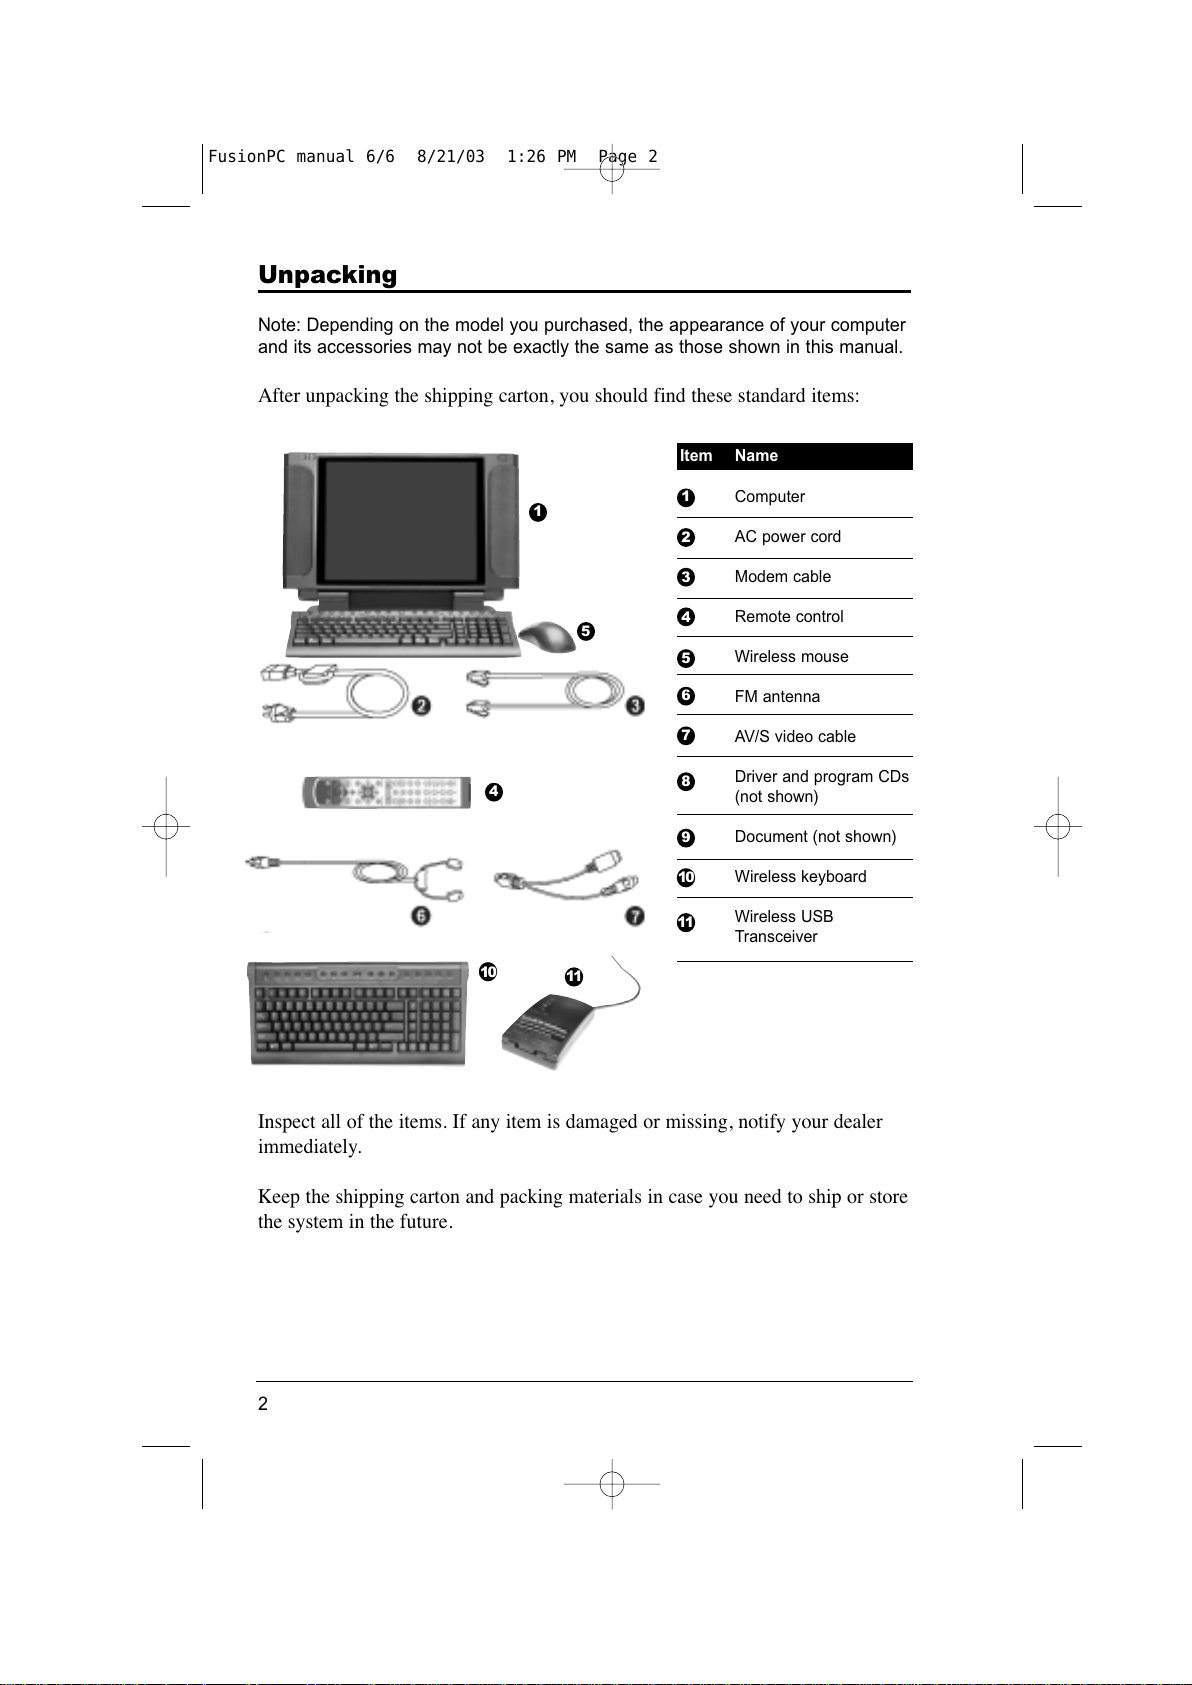
After unpacking the shipping carton, you should find these standard items:
Inspect all of the items. If any item is damaged or missing, notify your dealer
immediately.
Keep the shipping carton and packing materials in case you need to ship or store
the system in the future.
Item Name
Computer
AC power cord
Modem cable
Remote control
Wireless mouse
FM antenna
AV/S video cable
Driver and program CDs
(not shown)
Document (not shown)
Wireless keyboard
Wireless USB
Transceiver
11
1
2
3
4
5
6
7
8
9
2
1
5
4
10
10
11
FusionPC manual 6/6 8/21/03 1:26 PM Page 2
All manuals and user guides at all-guides.com
Page 13
Taking a Look at the System
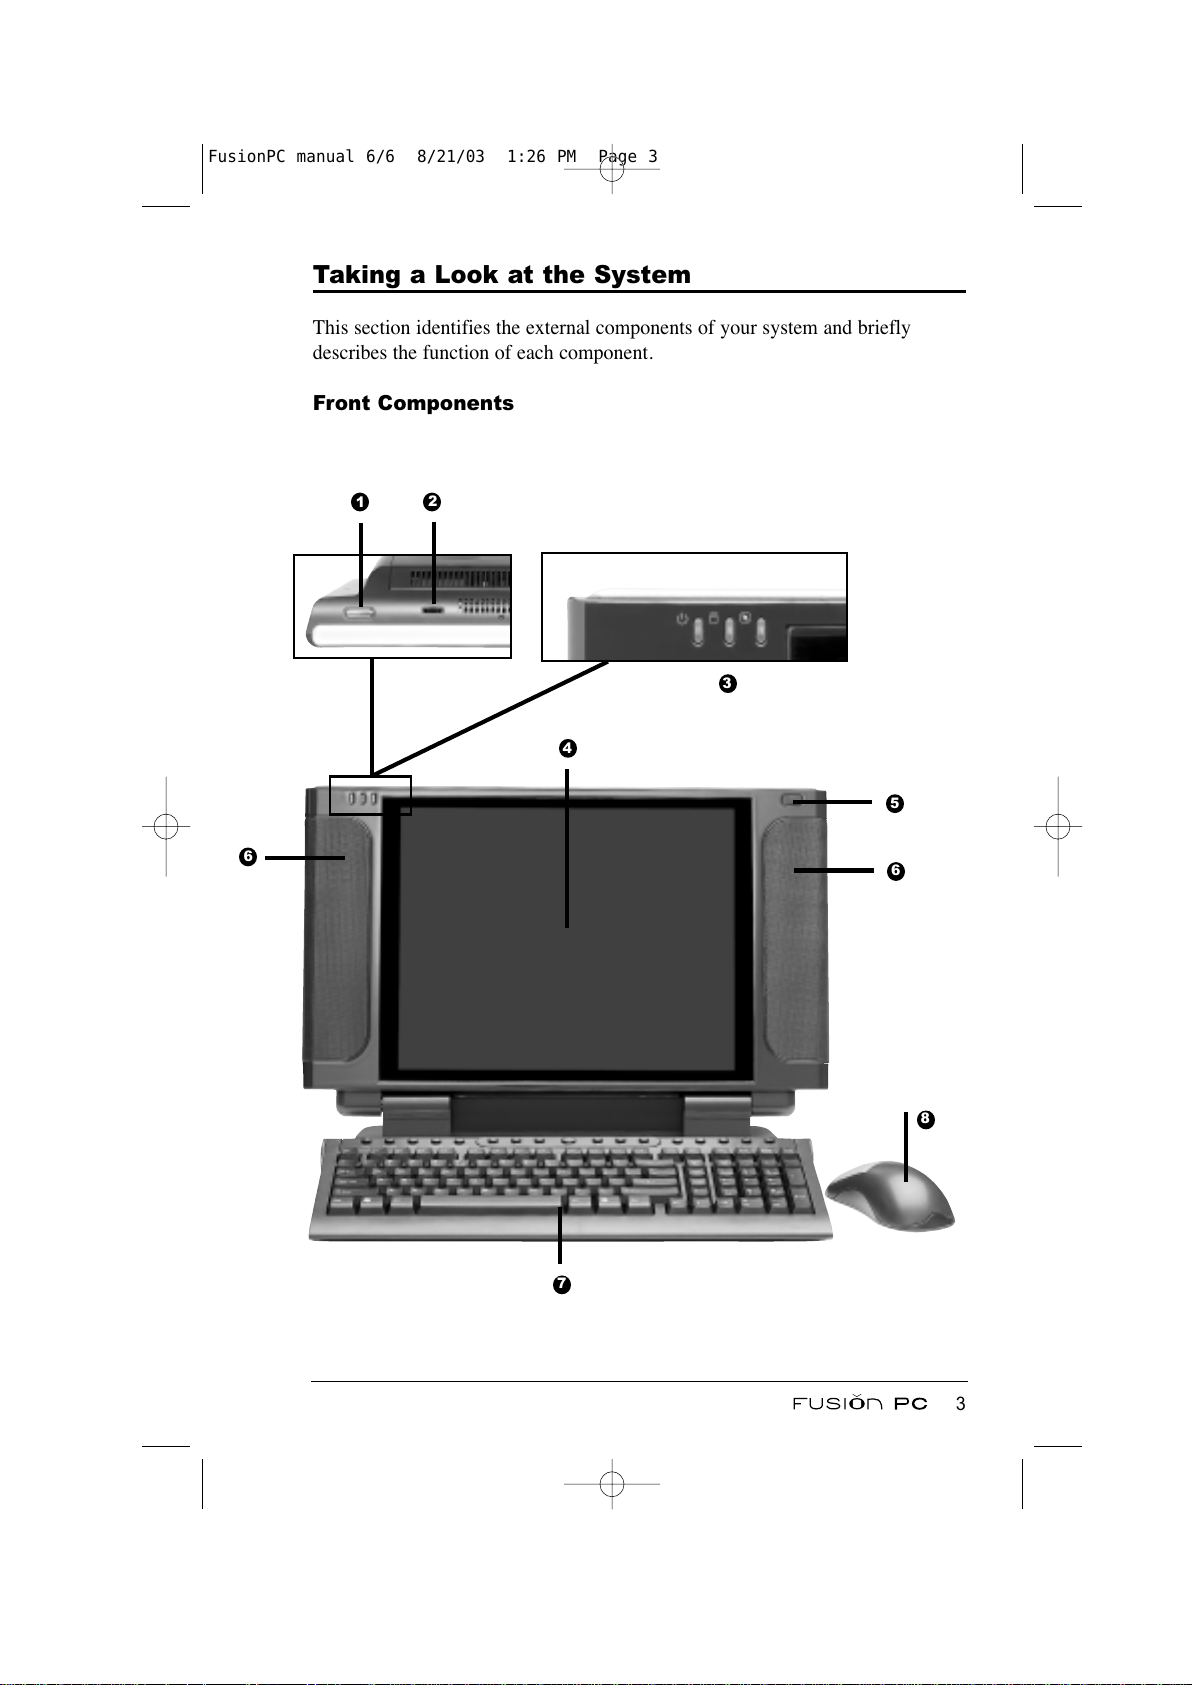
This section identifies the external components of your system and briefly
describes the function of each component.
Front Components
3
1
3
2
4
5
6
6
7
8
FusionPC manual 6/6 8/21/03 1:26 PM Page 3
All manuals and user guides at all-guides.com
Page 14
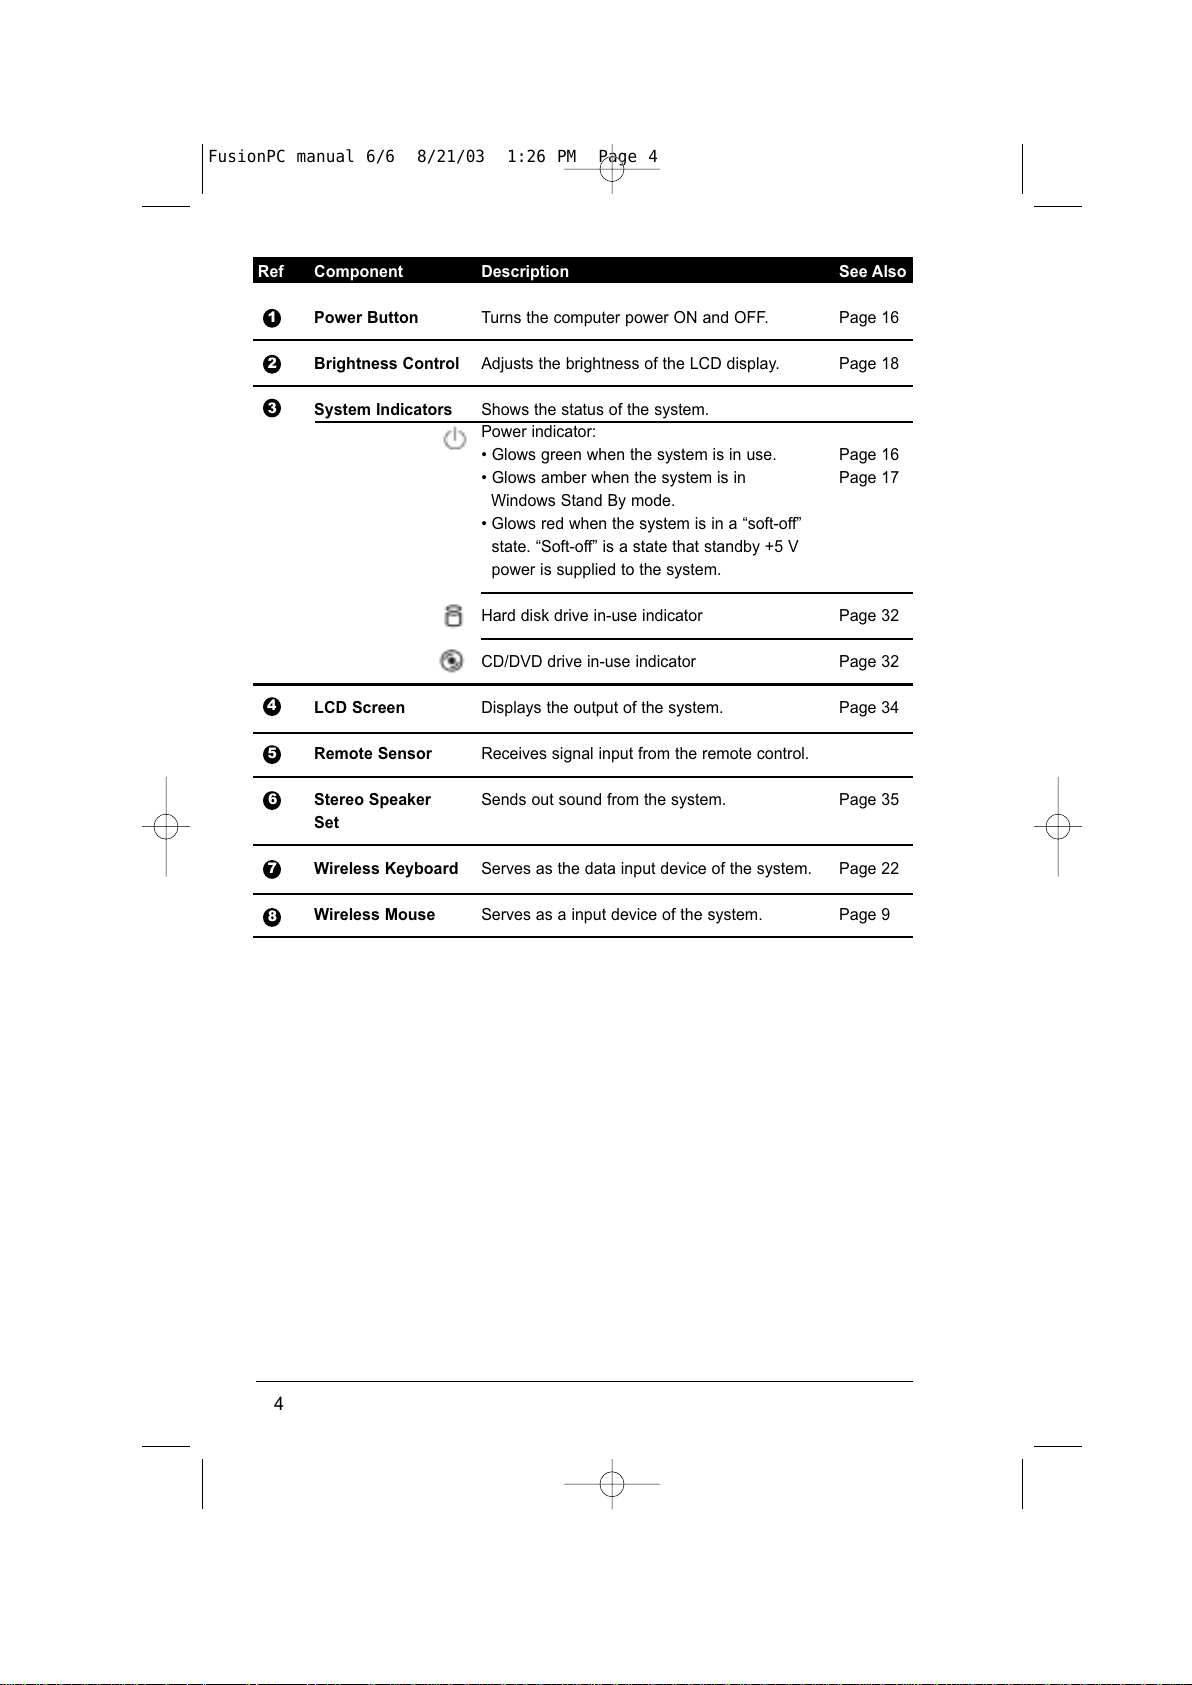
Ref Component Description See Also
Power Button Turns the computer power ON and OFF. Page 16
Brightness Control Adjusts the brightness of the LCD display. Page 18
System Indicators Shows the status of the system.
Power indicator:
• Glows green when the system is in use. Page 16
• Glows amber when the system is in Page 17
Windows Stand By mode.
• Glows red when the system is in a “soft-off”
state. “Soft-off” is a state that standby +5 V
power is supplied to the system.
Hard disk drive in-use indicator Page 32
CD/DVD drive in-use indicator Page 32
LCD Screen Displays the output of the system. Page 34
Remote Sensor Receives signal input from the remote control.
Stereo Speaker Sends out sound from the system. Page 35
Set
Wireless Keyboard Serves as the data input device of the system. Page 22
Wireless Mouse Serves as a input device of the system. Page 9
1
2
3
4
5
6
7
4
8
FusionPC manual 6/6 8/21/03 1:26 PM Page 4
All manuals and user guides at all-guides.com
Page 15
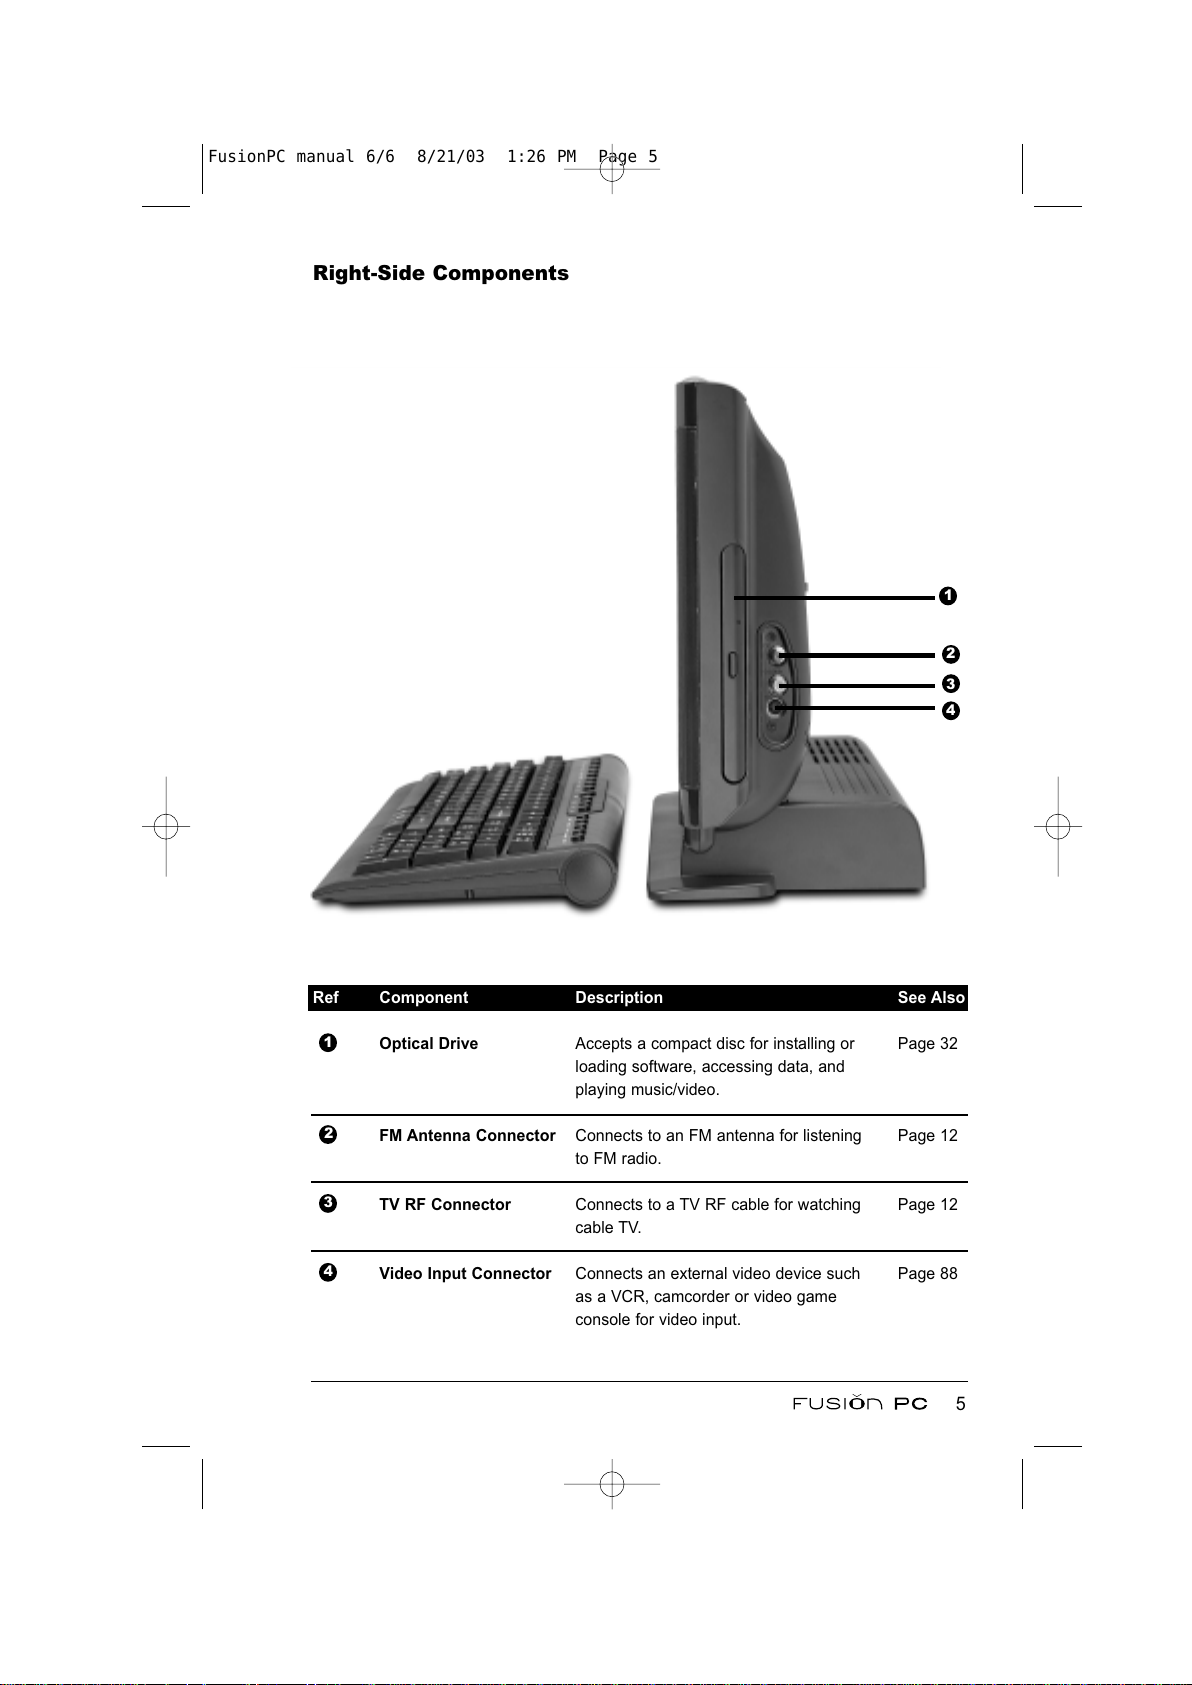
Right-Side Components
Ref Component Description See Also
Optical Drive Accepts a compact disc for installing or Page 32
loading software, accessing data, and
playing music/video.
FM Antenna Connector Connects to an FM antenna for listening Page 12
to FM radio.
TV RF Connector Connects to a TV RF cable for watching Page 12
cable TV.
Video Input Connector Connects an external video device such Page 88
as a VCR, camcorder or video game
console for video input.
1
2
3
4
5
1
3
2
4
FusionPC manual 6/6 8/21/03 1:26 PM Page 5
All manuals and user guides at all-guides.com
Page 16
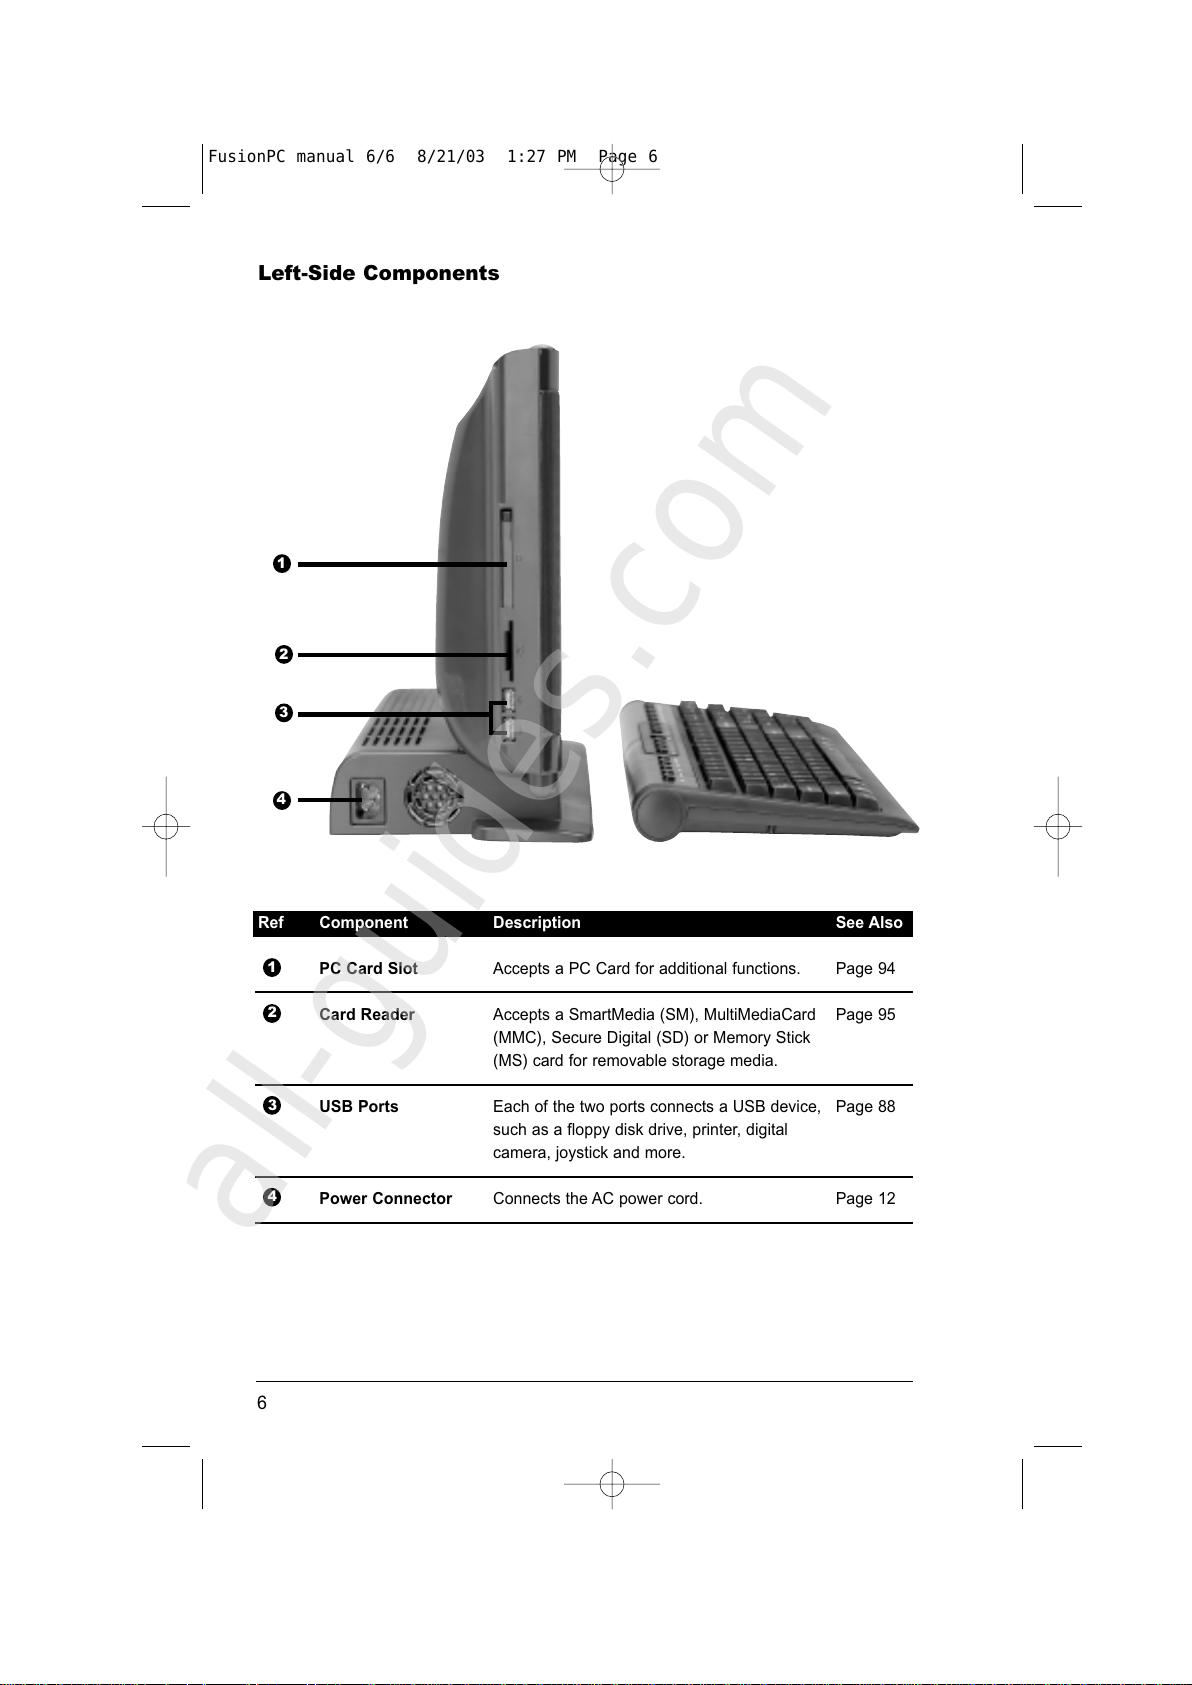
Left-Side Components
Ref Component Description See Also
PC Card Slot Accepts a PC Card for additional functions. Page 94
Card Reader Accepts a SmartMedia (SM), MultiMediaCard Page 95
(MMC), Secure Digital (SD) or Memory Stick
(MS) card for removable storage media.
USB Ports Each of the two ports connects a USB device, Page 88
such as a floppy disk drive, printer, digital
camera, joystick and more.
Power Connector Connects the AC power cord. Page 12
1
2
3
4
6
1
3
2
4
FusionPC manual 6/6 8/21/03 1:27 PM Page 6
All manuals and user guides at all-guides.com
all-guides.com
Page 17
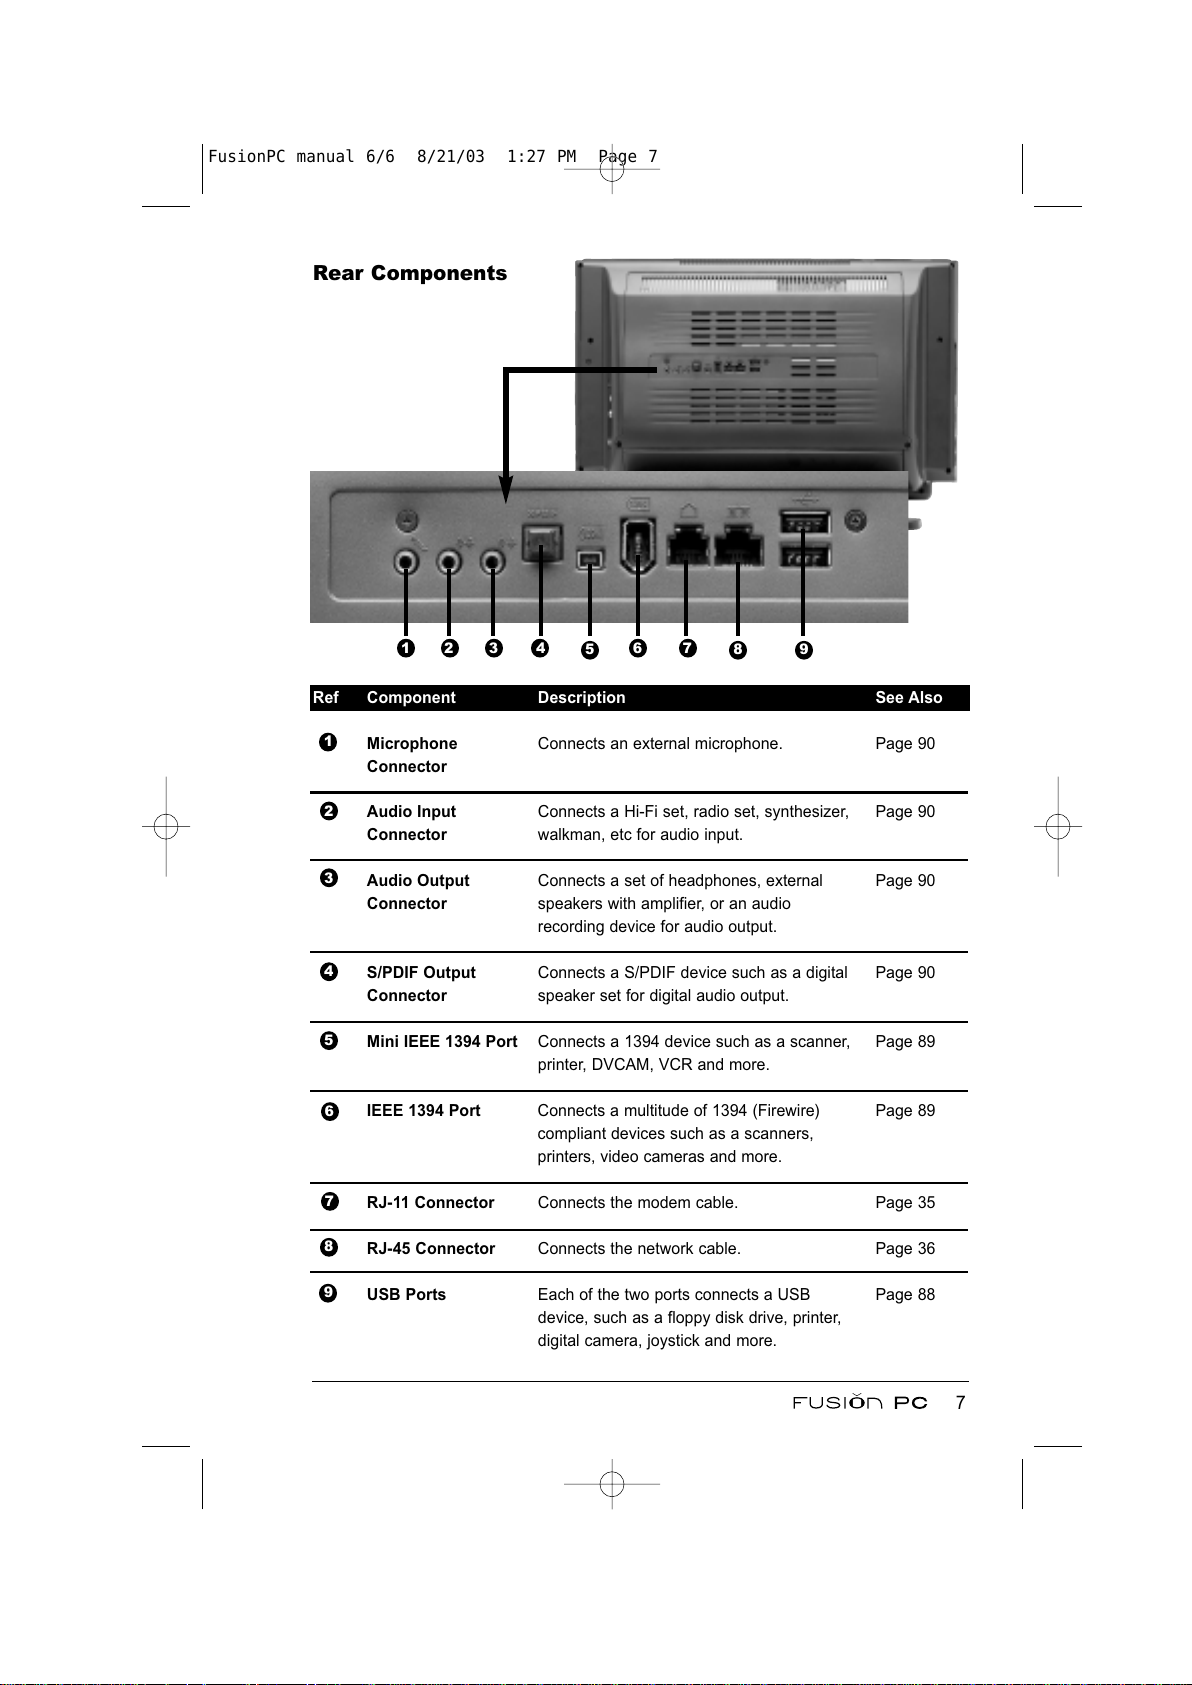
Rear Components
Ref Component Description See Also
Microphone Connects an external microphone. Page 90
Connector
Audio Input Connects a Hi-Fi set, radio set, synthesizer, Page 90
Connector walkman, etc for audio input.
Audio Output Connects a set of headphones, external Page 90
Connector speakers with amplifier, or an audio
recording device for audio output.
S/PDIF Output Connects a S/PDIF device such as a digital Page 90
Connector speaker set for digital audio output.
Mini IEEE 1394 Port Connects a 1394 device such as a scanner, Page 89
printer, DVCAM, VCR and more.
IEEE 1394 Port Connects a multitude of 1394 (Firewire) Page 89
compliant devices such as a scanners,
printers, video cameras and more.
RJ-11 Connector Connects the modem cable. Page 35
RJ-45 Connector Connects the network cable. Page 36
USB Ports Each of the two ports connects a USB Page 88
device, such as a floppy disk drive, printer,
digital camera, joystick and more.
1
2
3
4
5
6
8
9
7
7
132
4
5
6 7
8
9
FusionPC manual 6/6 8/21/03 1:27 PM Page 7
All manuals and user guides at all-guides.com
Page 18
Setting up the System for Use
Selecting a Site
Select a site that has:
• a sturdy and level surface
• space for ventilation
• a grounded three-pronged electrical outlet nearby
• available modem or network cable connection (for connecting to Internet)
• available TV RF cable connection (for watching TV)
Caution: Slots or openings on the system are for ventilation. Do not block
or cover the ventilation openings.
Making Connections
The wireless keyboard and mouse communicate with the FusionPC through a
RF (radio frequency) transceiver that is plugged into one of the available USB
ports. Each wireless component must be operated on its own frequency in order
to avoid RF interference (component failure due to competing signals on the
same channel). The transceiver supplied with the FusionPC supports two distinct
channels that are user selectable via switches located on front of the transceiver.
The factory defaults for FusionPC wireless input devices are set to channel 1 for
the keyboard and channel 2 for the mouse.
Note: The keyboard and mouse must be operated on separate channels to
ensure proper functionality. If both devices are set to the same channel you may
experience abnormal device behavior.
8
FusionPC manual 6/6 8/21/03 1:27 PM Page 8
All manuals and user guides at all-guides.com
Page 19
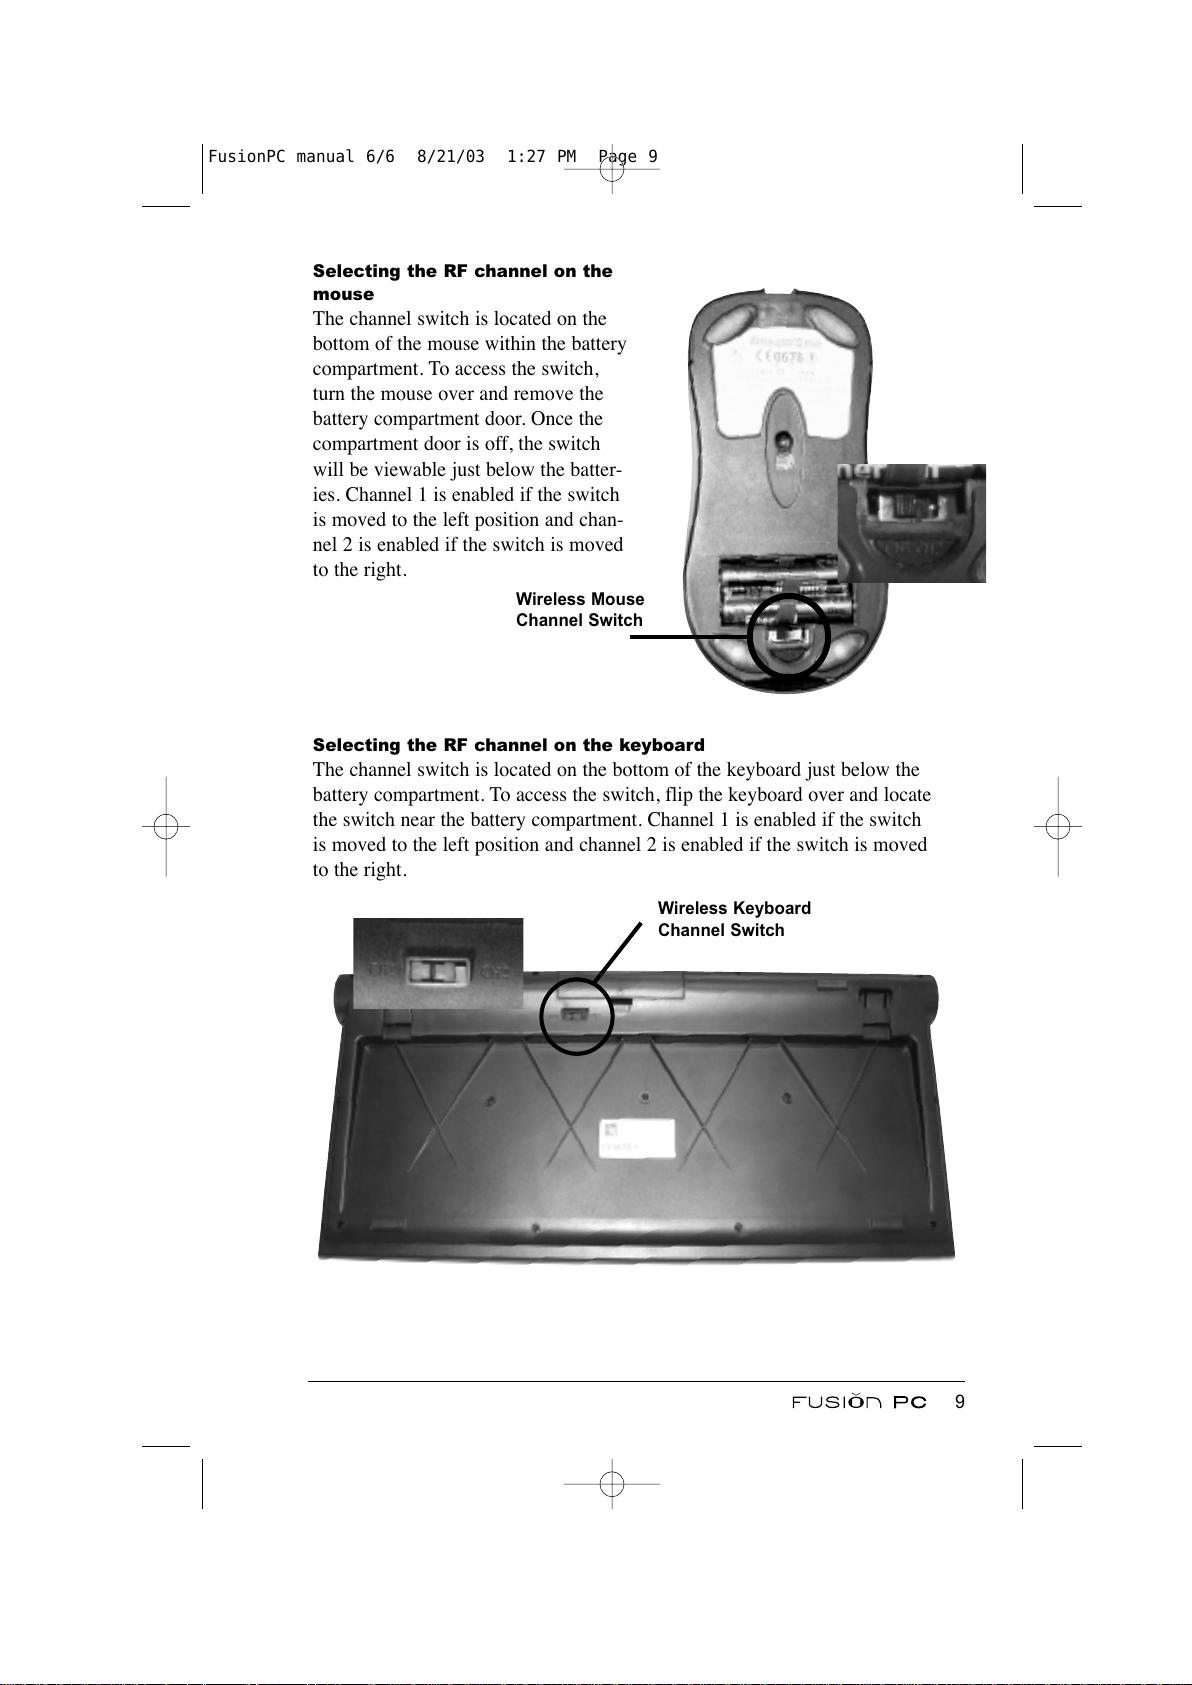
Selecting the RF channel on the
mouse
The channel switch is located on the
bottom of the mouse within the battery
compartment. To access the switch,
turn the mouse over and remove the
battery compartment door. Once the
compartment door is off, the switch
will be viewable just below the batter-
ies. Channel 1 is enabled if the switch
is moved to the left position and chan-
nel 2 is enabled if the switch is moved
to the right.
Selecting the RF channel on the keyboard
The channel switch is located on the bottom of the keyboard just below the
battery compartment. To access the switch, flip the keyboard over and locate
the switch near the battery compartment. Channel 1 is enabled if the switch
is moved to the left position and channel 2 is enabled if the switch is moved
to the right.
9
Wireless Mouse
Channel Switch
Wireless Keyboard
Channel Switch
FusionPC manual 6/6 8/21/03 1:27 PM Page 9
All manuals and user guides at all-guides.com
Page 20
Troubleshooting FusionPC wireless input devices
If you find that one or both of the wireless devices are not operating correctly
then try the following actions:
• Ensure that the wireless device channel setting matches the transceiver setting.
• Replace (keyboard) or recharge (mouse) the batteries to ensure sufficient
charge to the device.
• Make sure that each device is on its own channel.
• Use the ID Connect button on the transceiver to "lock down" communication
between the device and the transceiver.
Note: The ID Connect feature allows for multiple connections of FusionPC wire-
less devices within the same channel. For example; two FusionPC computers
within a 10 foot radius of each other, set up in the factory default positions. (i.e.
both keyboards on channel 1 and both mice on channel 2)
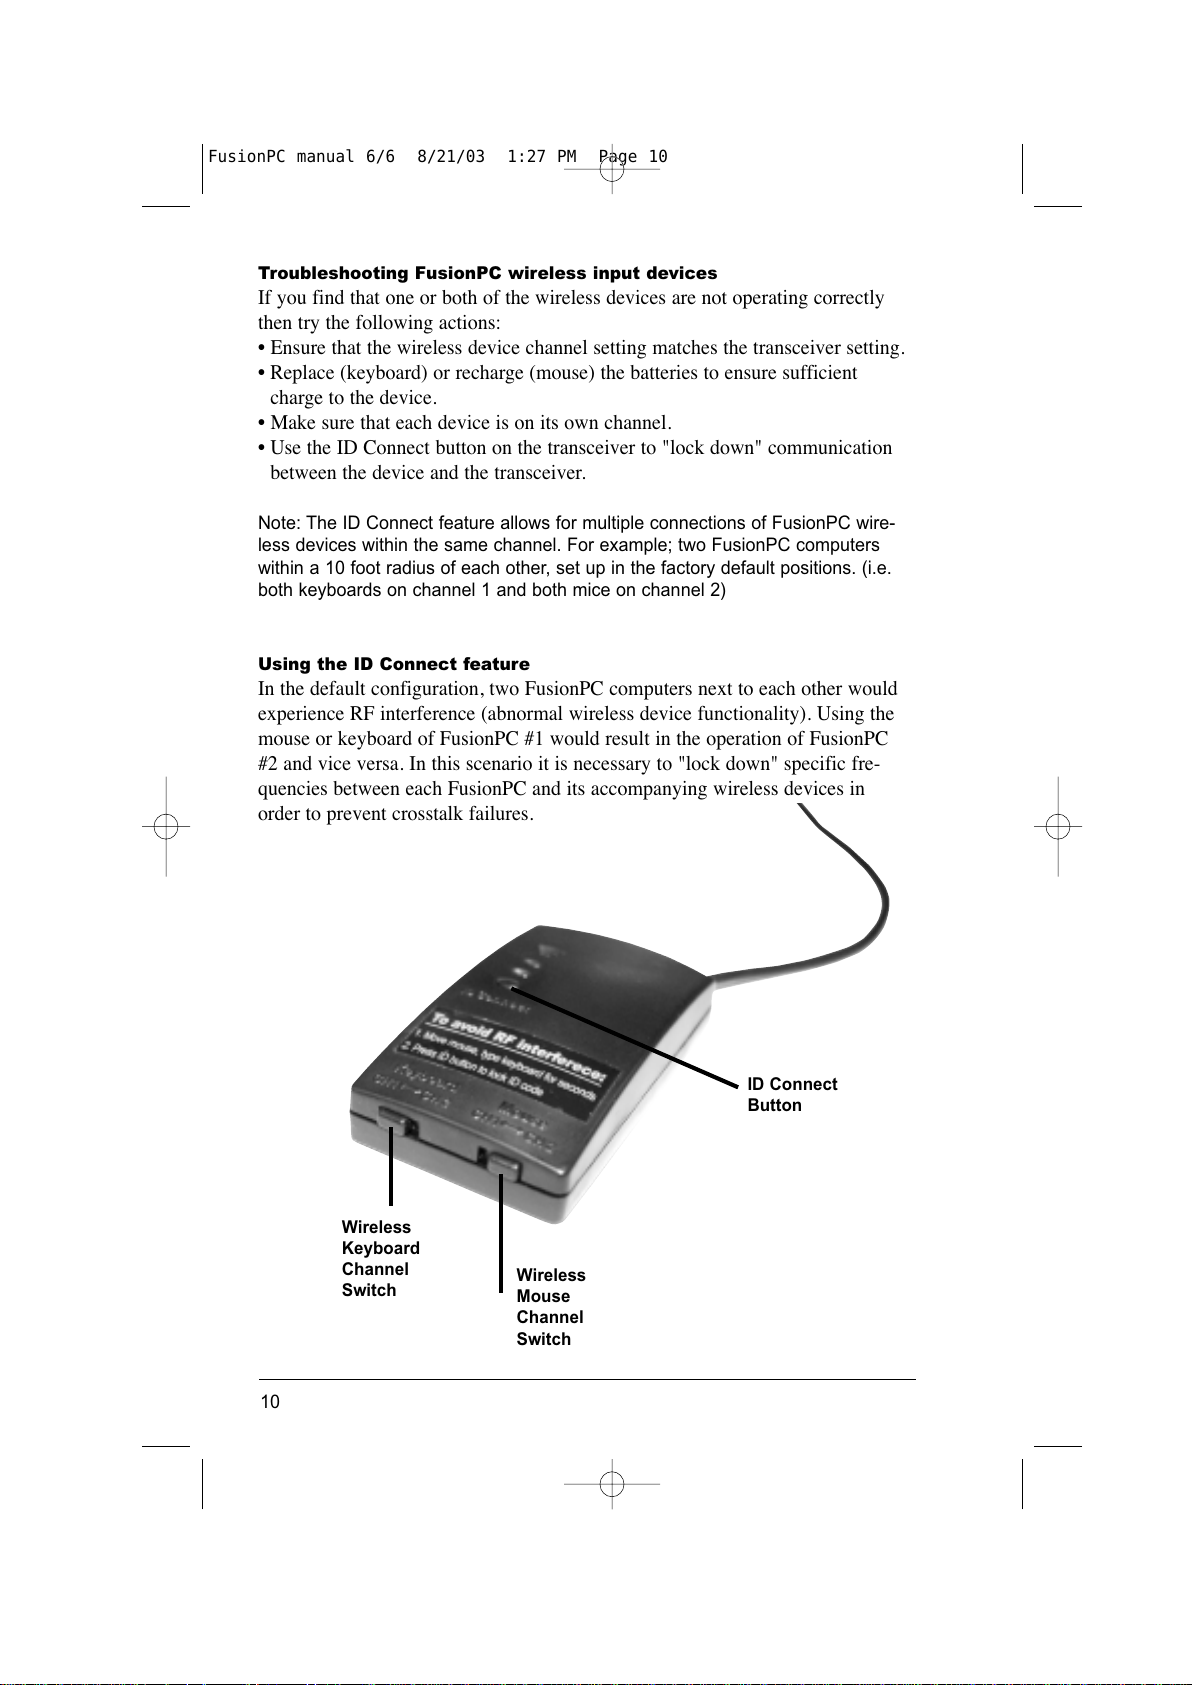
Using the ID Connect feature
In the default configuration, two FusionPC computers next to each other would
experience RF interference (abnormal wireless device functionality). Using the
mouse or keyboard of FusionPC #1 would result in the operation of FusionPC
#2 and vice versa. In this scenario it is necessary to "lock down" specific fre-
quencies between each FusionPC and its accompanying wireless devices in
order to prevent crosstalk failures.
Wireless
Keyboard
Channel
Switch
Wireless
Mouse
Channel
Switch
ID Connect
Button
10
FusionPC manual 6/6 8/21/03 1:27 PM Page 10
All manuals and user guides at all-guides.com
Page 21
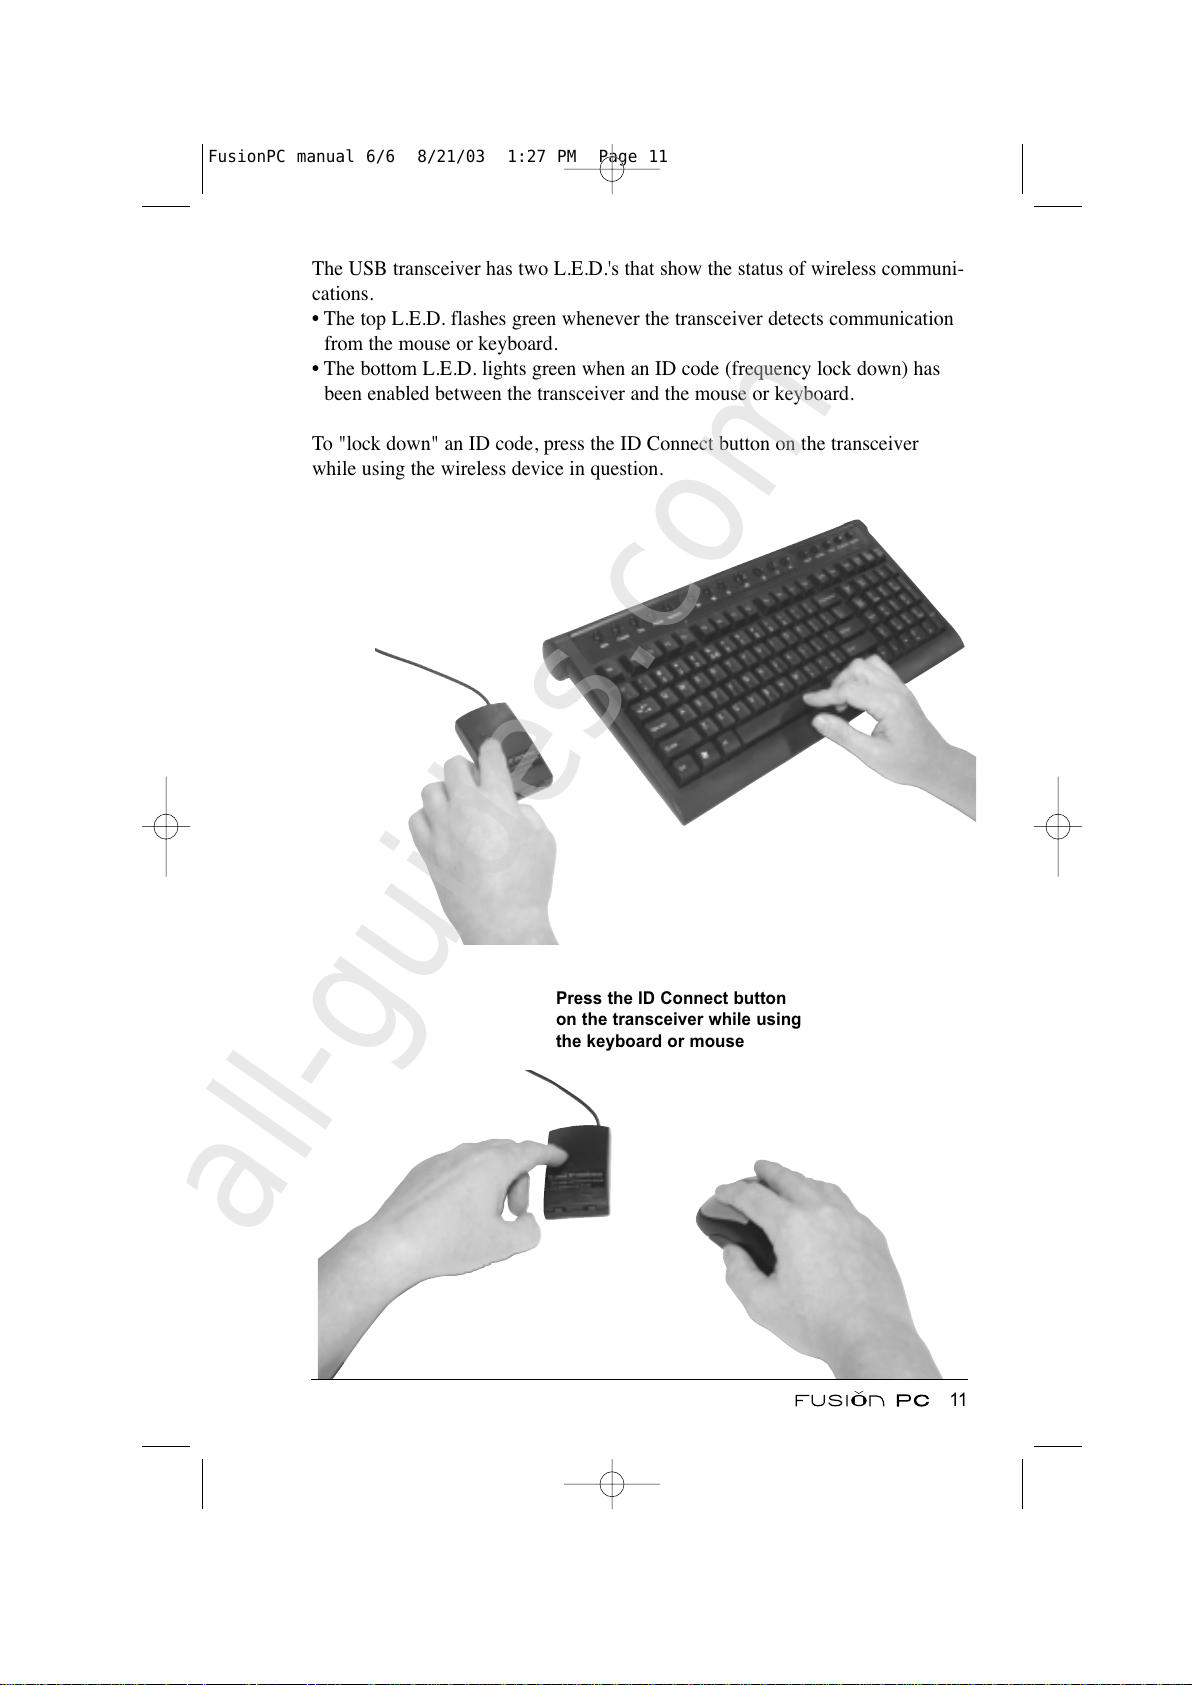
The USB transceiver has two L.E.D.'s that show the status of wireless communi-
cations.
• The top L.E.D. flashes green whenever the transceiver detects communication
from the mouse or keyboard.
• The bottom L.E.D. lights green when an ID code (frequency lock down) has
been enabled between the transceiver and the mouse or keyboard.
To "lock down" an ID code, press the ID Connect button on the transceiver
while using the wireless device in question.
Press the ID Connect button
on the transceiver while using
the keyboard or mouse
11
FusionPC manual 6/6 8/21/03 1:27 PM Page 11
All manuals and user guides at all-guides.com
all-guides.com
Page 22
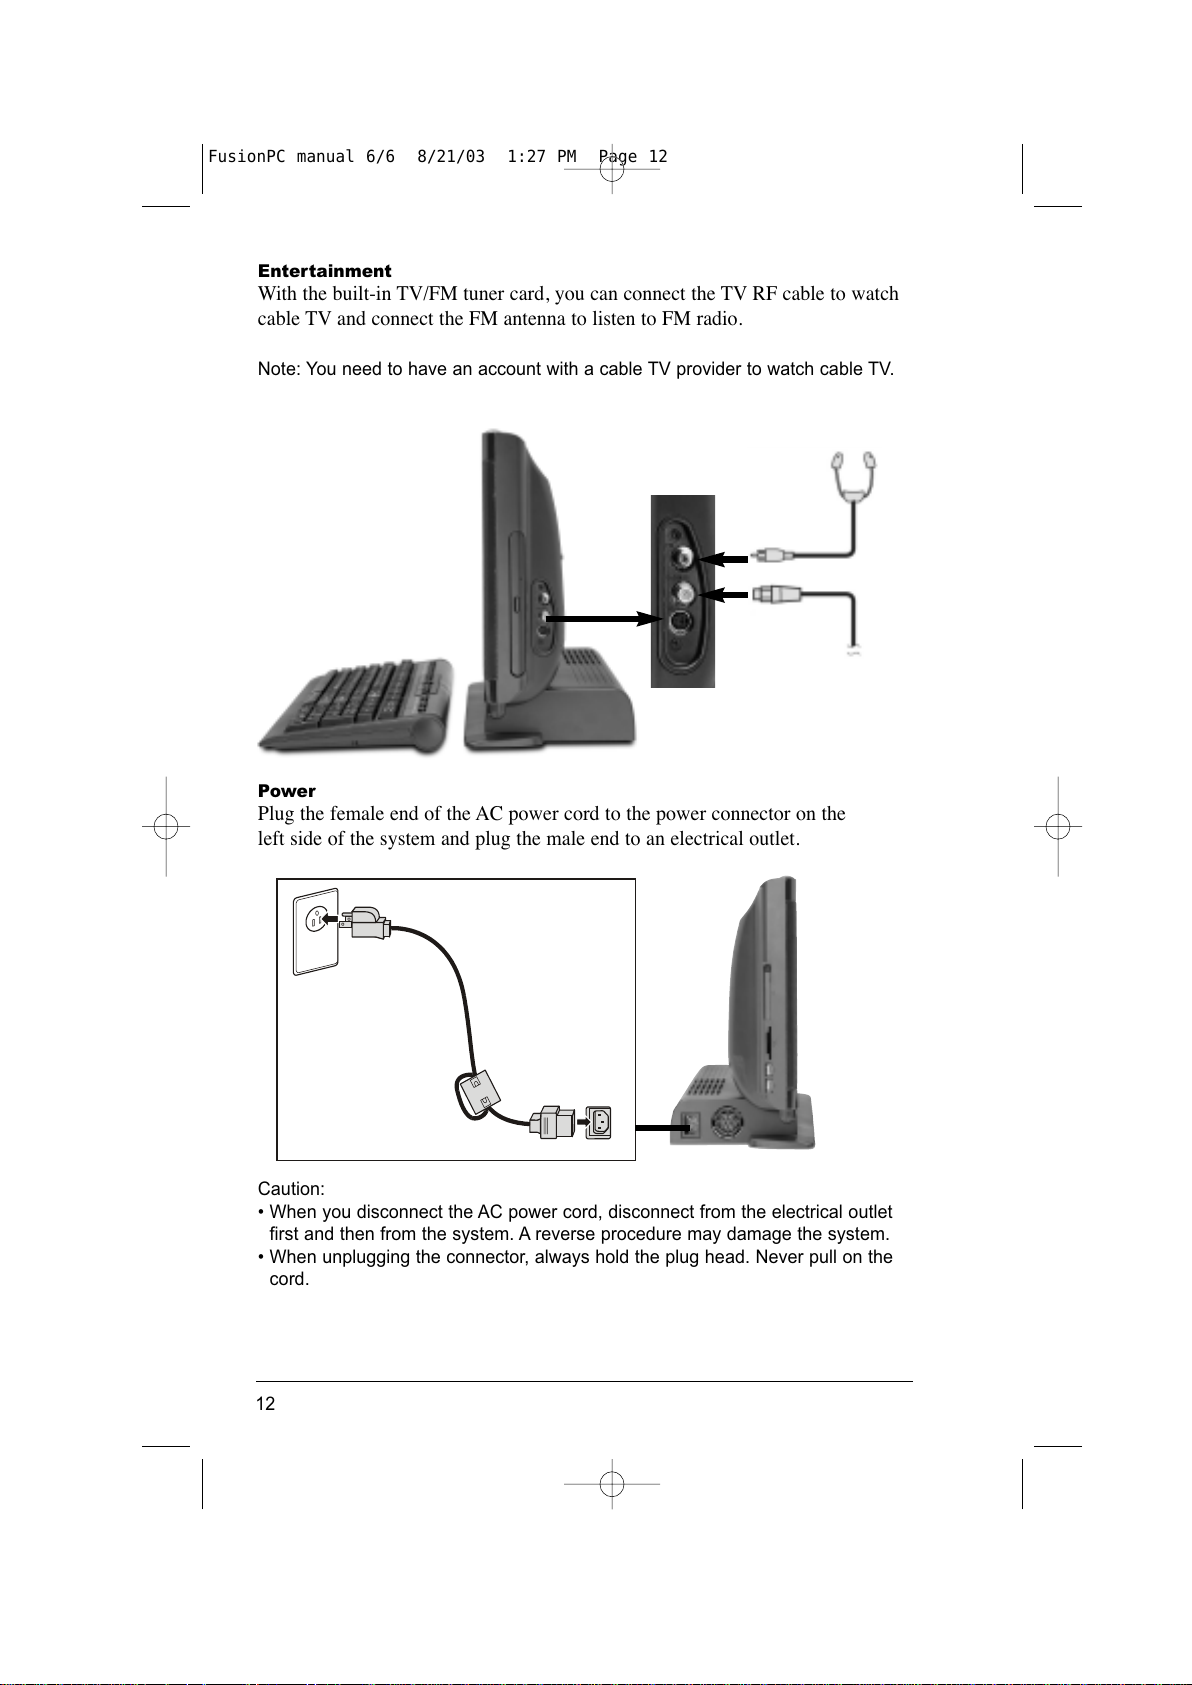
Entertainment
With the built-in TV/FM tuner card, you can connect the TV RF cable to watch
cable TV and connect the FM antenna to listen to FM radio.
Note: You need to have an account with a cable TV provider to watch cable TV.
Power
Plug the female end of the AC power cord to the power connector on the
left side of the system and plug the male end to an electrical outlet.
Caution:
• When you disconnect the AC power cord, disconnect from the electrical outlet
first and then from the system. A reverse procedure may damage the system.
• When unplugging the connector, always hold the plug head. Never pull on the
cord.
12
FusionPC manual 6/6 8/21/03 1:27 PM Page 12
All manuals and user guides at all-guides.com
Page 23
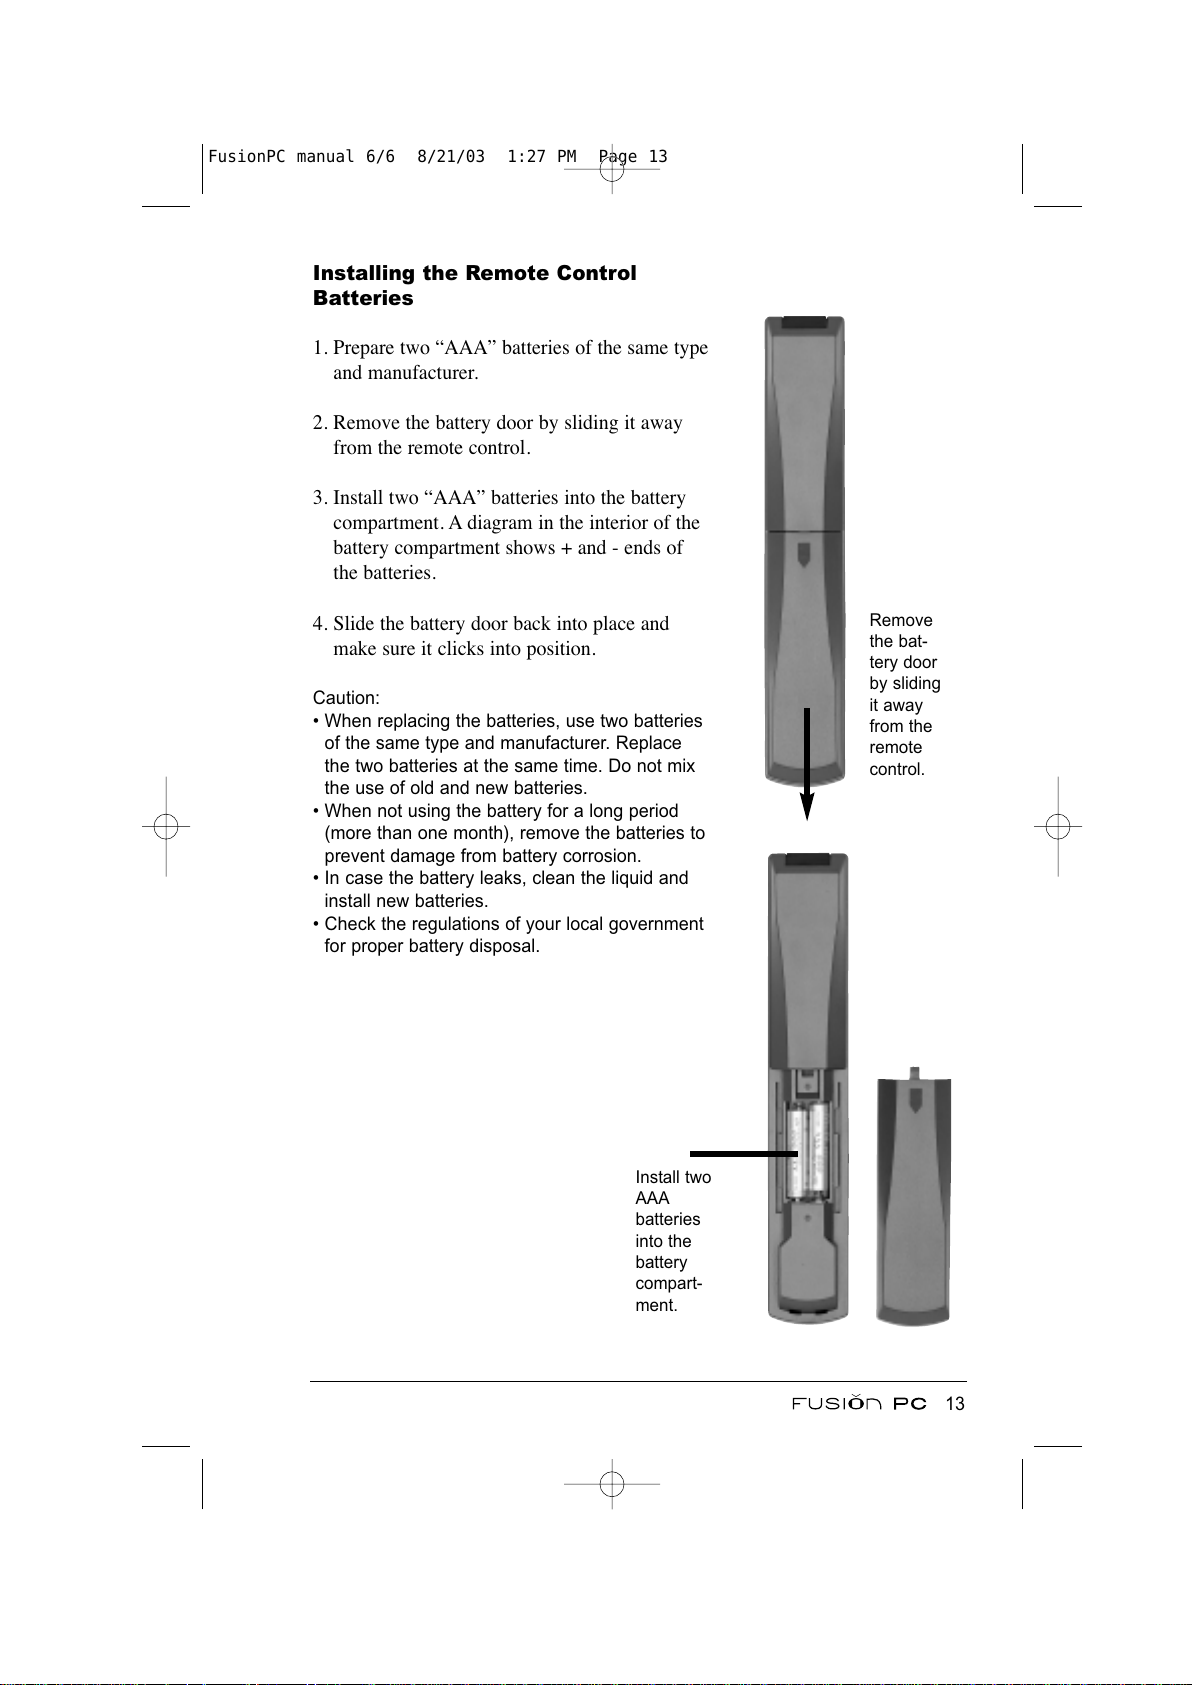
Installing the Remote Control
Batteries
1. Prepare two “AAA” batteries of the same type
and manufacturer.
2. Remove the battery door by sliding it away
from the remote control.
3. Install two “AAA” batteries into the battery
compartment. A diagram in the interior of the
battery compartment shows + and - ends of
the batteries.
4. Slide the battery door back into place and
make sure it clicks into position.
Caution:
• When replacing the batteries, use two batteries
of the same type and manufacturer. Replace
the two batteries at the same time. Do not mix
the use of old and new batteries.
• When not using the battery for a long period
(more than one month), remove the batteries to
prevent damage from battery corrosion.
• In case the battery leaks, clean the liquid and
install new batteries.
• Check the regulations of your local government
for proper battery disposal.
13
Remove
the bat-
tery door
by sliding
it away
from the
remote
control.
Install two
AAA
batteries
into the
battery
compart-
ment.
FusionPC manual 6/6 8/21/03 1:27 PM Page 13
All manuals and user guides at all-guides.com
Page 24
Using the FusionPC
After making all the connections, you can begin to use the system. This section
helps you get started.
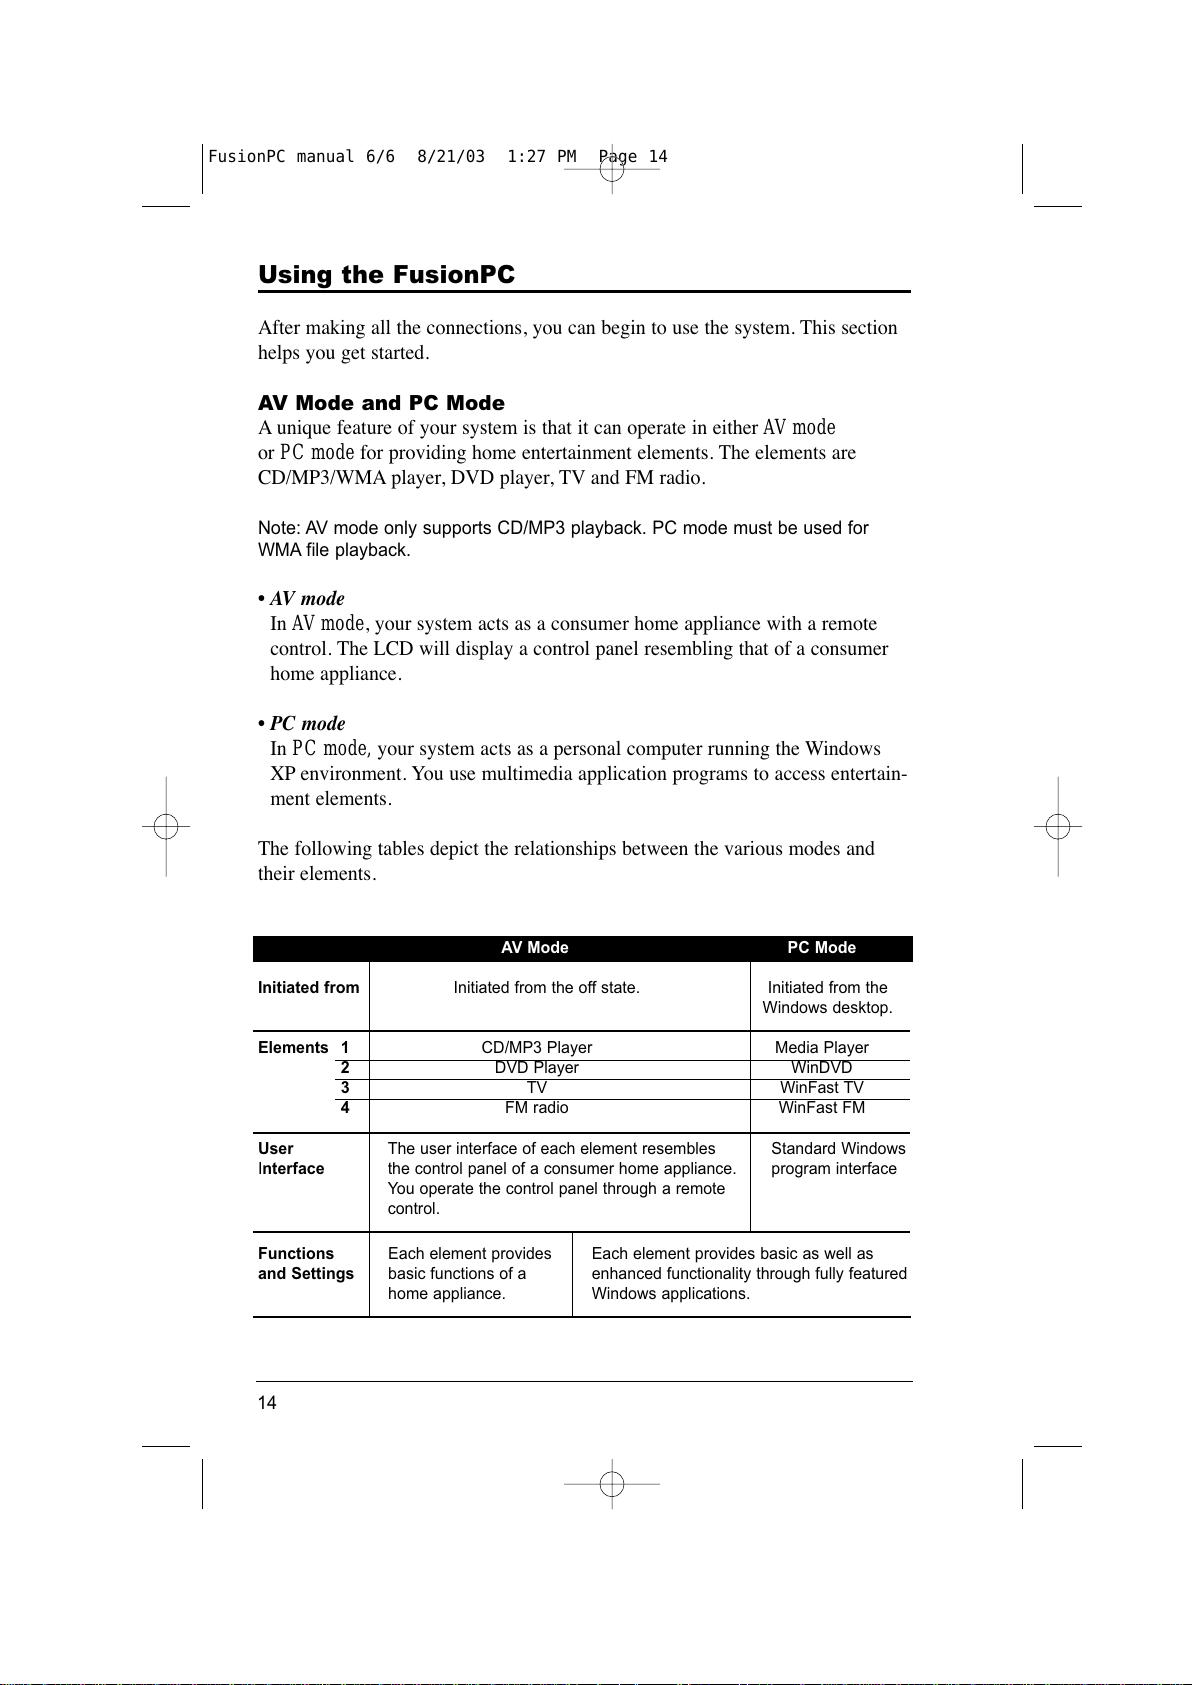
AV Mode and PC Mode
A unique feature of your system is that it can operate in either AV mode
or PC mode for providing home entertainment elements. The elements are
CD/MP3/WMA player, DVD player, TV and FM radio.
Note: AV mode only supports CD/MP3 playback. PC mode must be used for
WMA file playback.
• AV mode
In AV mode, your system acts as a consumer home appliance with a remote
control. The LCD will display a control panel resembling that of a consumer
home appliance.
• PC mode
In PC mode, your system acts as a personal computer running the Windows
XP environment. You use multimedia application programs to access entertain-
ment elements.
The following tables depict the relationships between the various modes and
their elements.
AV Mode PC Mode
Initiated from Initiated from the off state. Initiated from the
Windows desktop.
Elements 1 CD/MP3 Player Media Player
2 DVD Player WinDVD
3 TV WinFast TV
4 FM radio WinFast FM
User The user interface of each element resembles Standard Windows
Interface the control panel of a consumer home appliance. program interface
You operate the control panel through a remote
control.
Functions Each element provides Each element provides basic as well as
and Settings basic functions of a enhanced functionality through fully featured
home appliance. Windows applications.
14
FusionPC manual 6/6 8/21/03 1:27 PM Page 14
All manuals and user guides at all-guides.com
Page 25
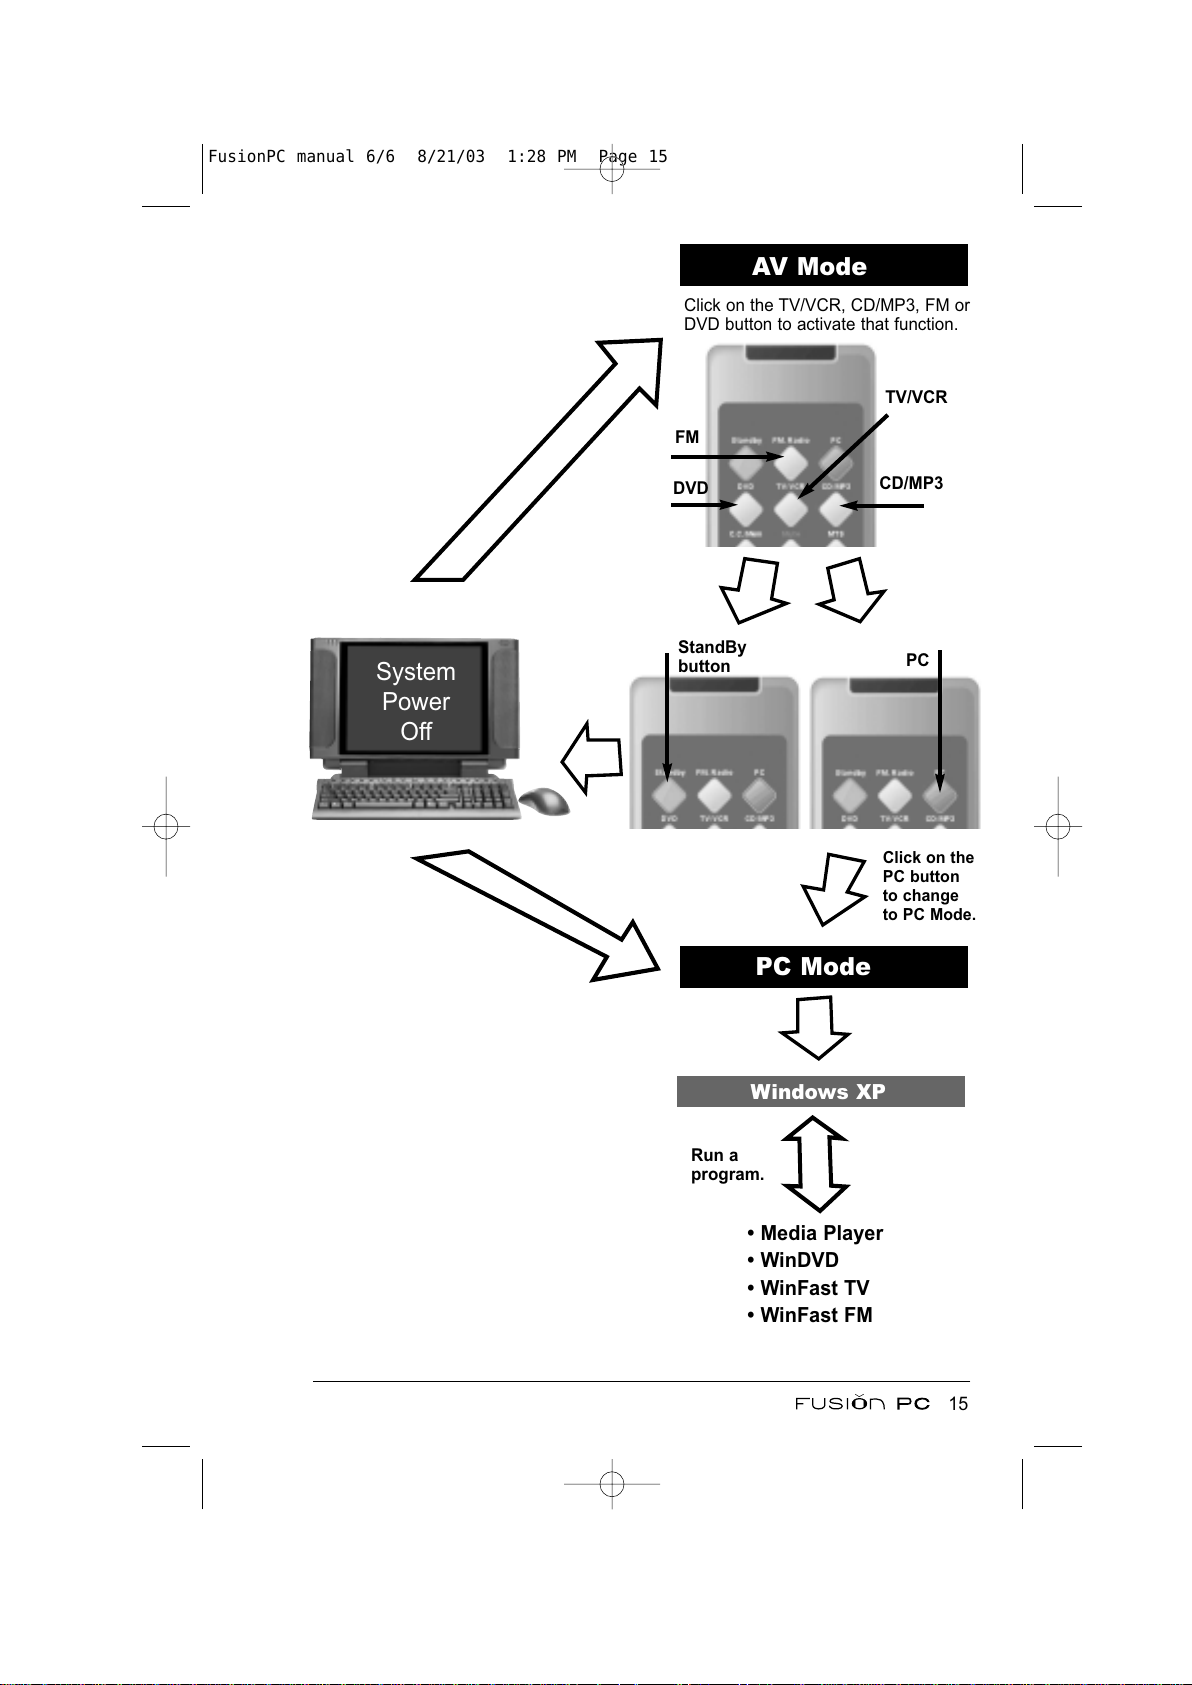
15
FM
DVD
CD/MP3
TV/VCR
AV Mode
PC Mode
PC
Windows XP
System
Power
Off
StandBy
button
Click on the TV/VCR, CD/MP3, FM or
DVD button to activate that function.
Click on the
PC button
to change
to PC Mode.
Run a
program.
• Media Player
• WinDVD
• WinFast TV
• WinFast FM
FusionPC manual 6/6 8/21/03 1:28 PM Page 15
All manuals and user guides at all-guides.com
Page 26
Powering On and Off
Powering On to
AV Mode
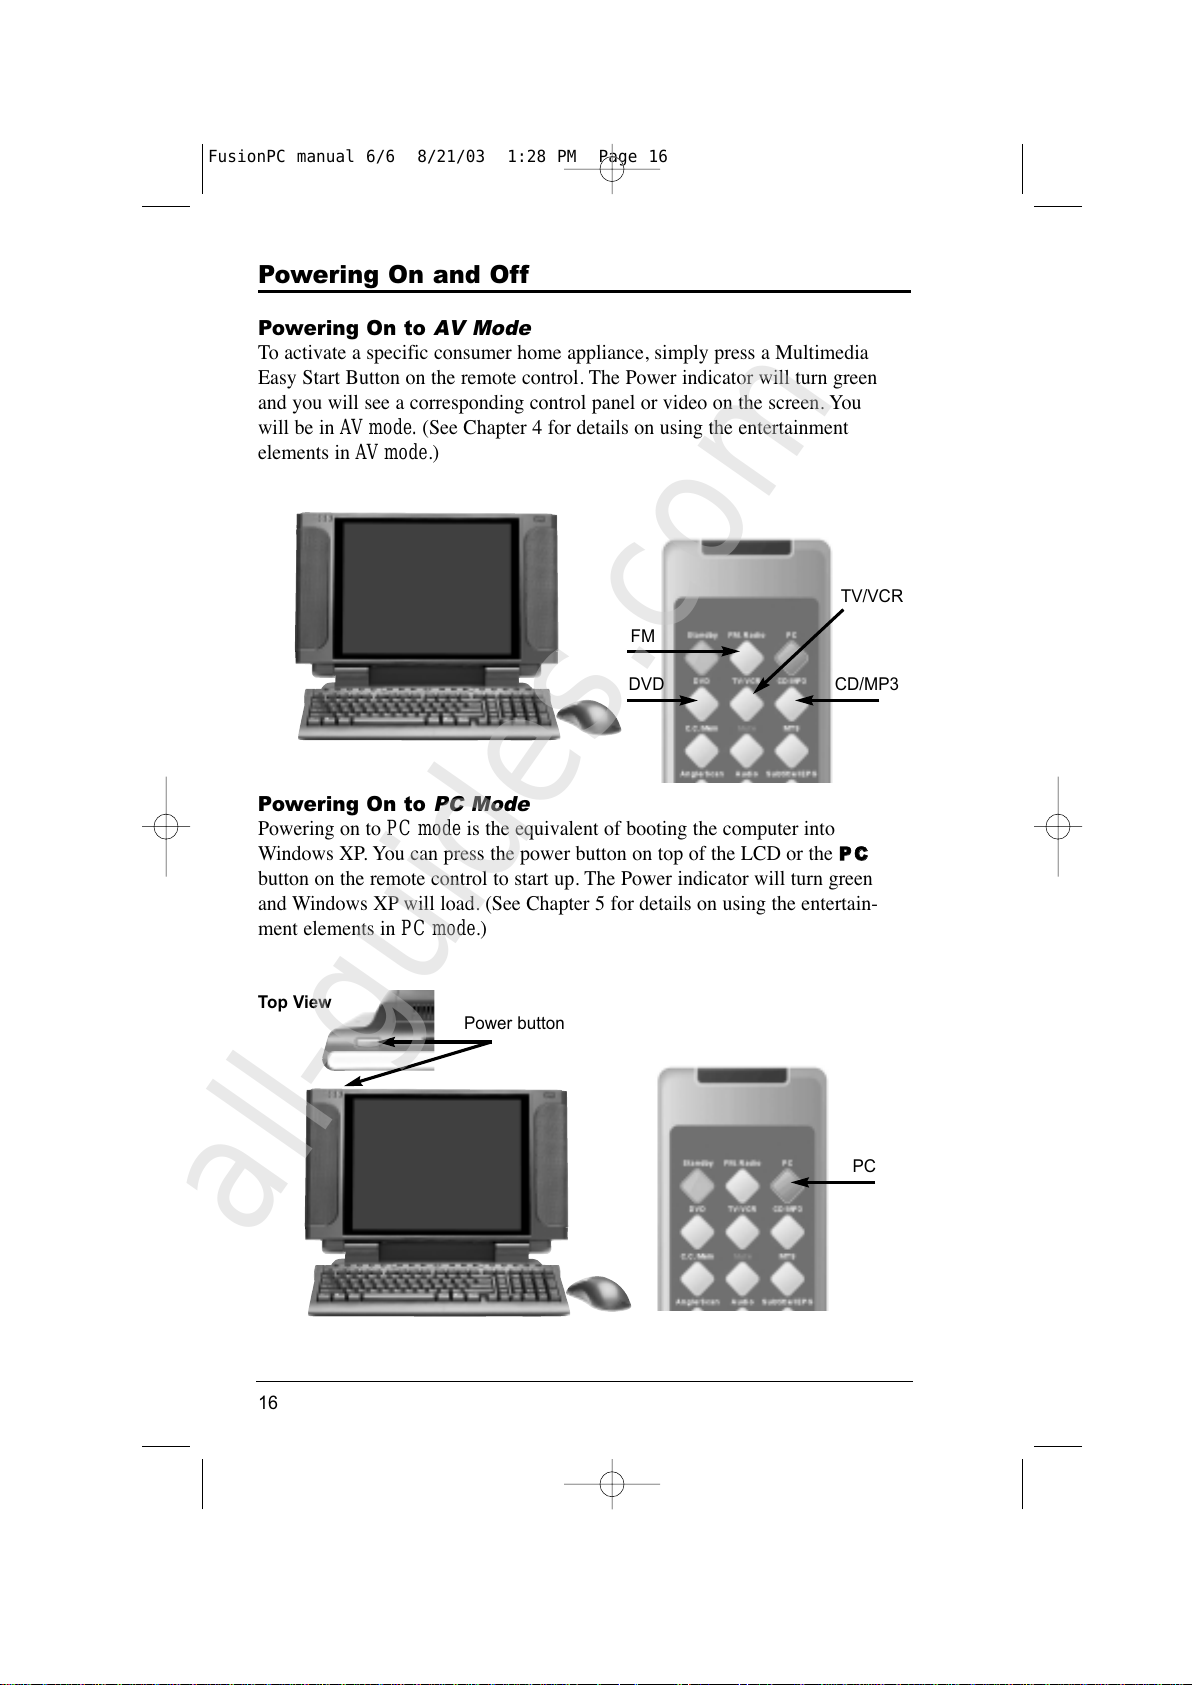
To activate a specific consumer home appliance, simply press a Multimedia
Easy Start Button on the remote control. The Power indicator will turn green
and you will see a corresponding control panel or video on the screen. You
will be in AV mode. (See Chapter 4 for details on using the entertainment
elements in AV mode.)
Powering On to
PC Mode
Powering on to PC mode is the equivalent of booting the computer into
Windows XP. You can press the power button on top of the LCD or the
PP CC
button on the remote control to start up. The Power indicator will turn green
and Windows XP will load. (See Chapter 5 for details on using the entertain-
ment elements in PC mode.)
16
FM
DVD
CD/MP3
TV/VCR
PC
Power button
Top View
FusionPC manual 6/6 8/21/03 1:28 PM Page 16
All manuals and user guides at all-guides.com
all-guides.com
Page 27
Powering Off
Ways of powering off the system are different depending on the current mode:
• If in PC mode (Windows XP):
Click Start at the lower left corner of Windows XP tool bar and click Turn
Off Computer. From the popup dialog box, click Turn Off. You can also
press the power button to turn off. (See “Controlling the Computer Power”
in Chapter 2 for more information.)
• If in AV mode:
Press the
Stand By button or the power button.
When you power off the system, the Power indicator will turn from green
to red, indicating that the system is off.
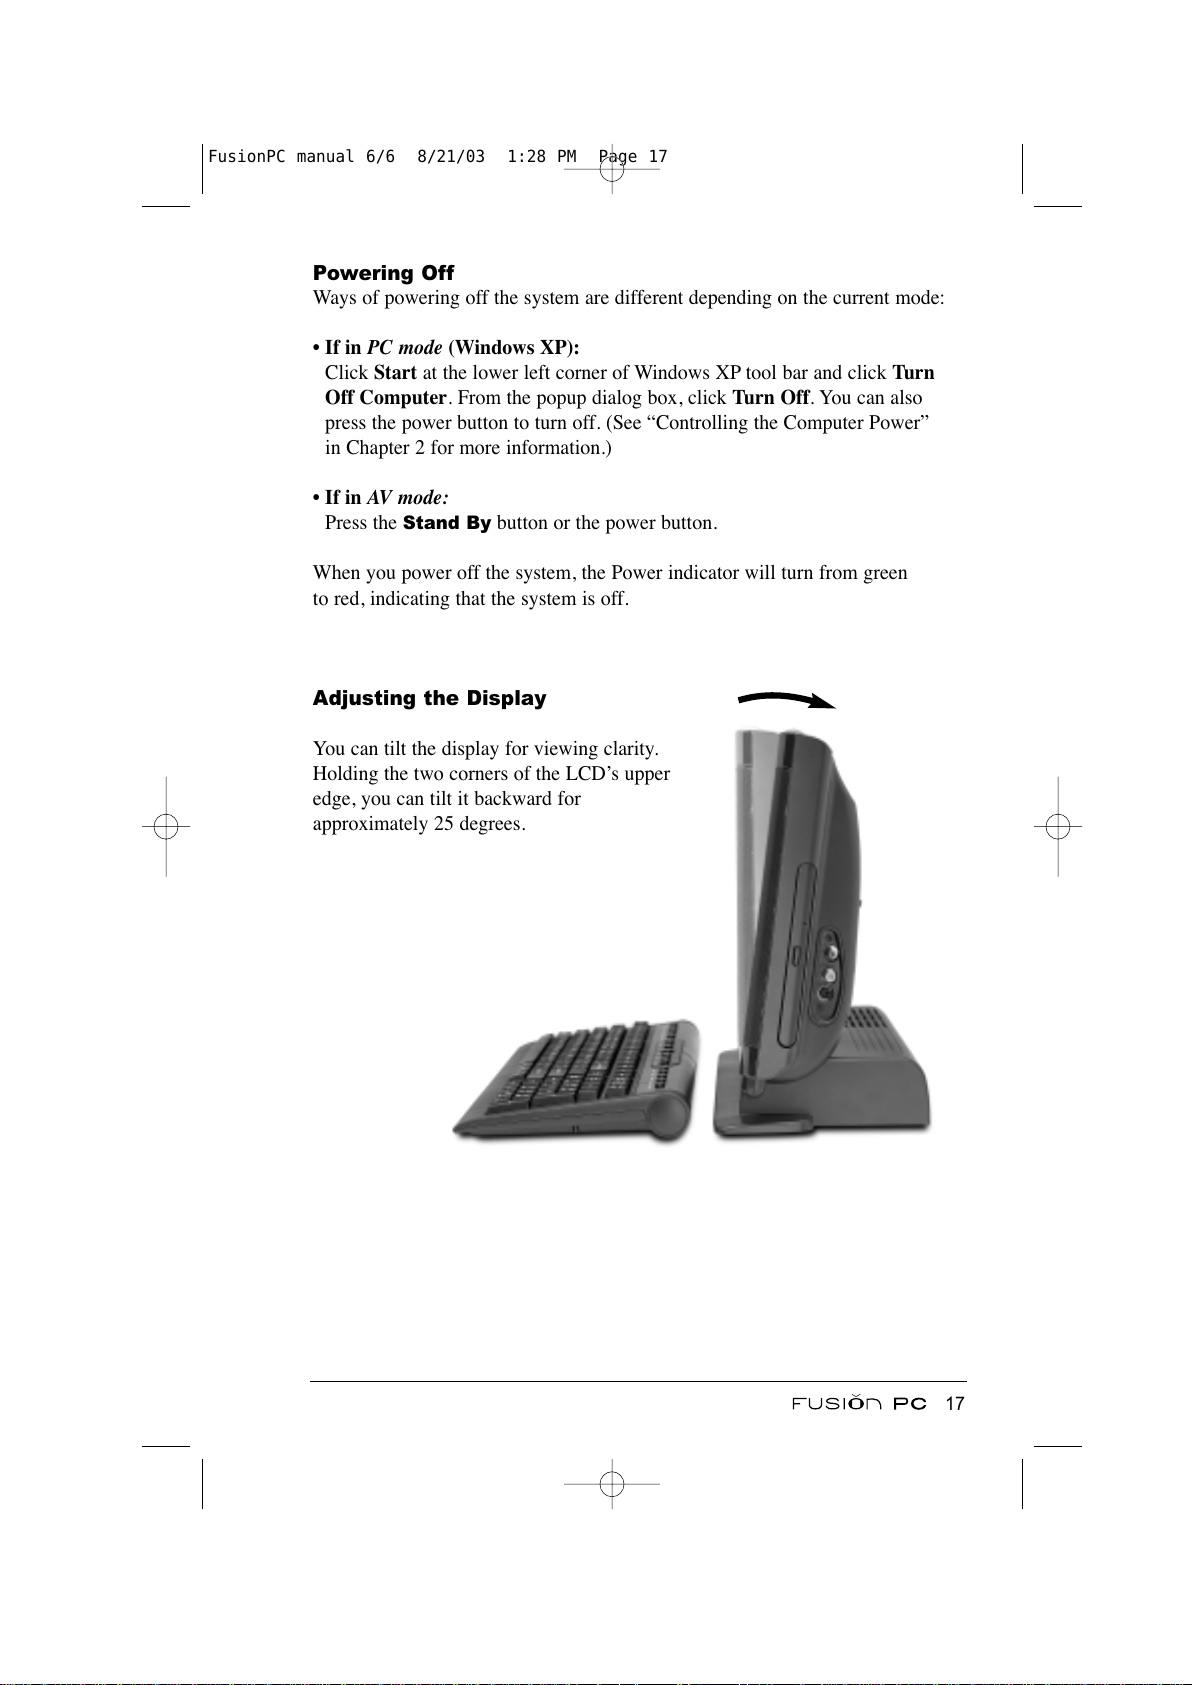
Adjusting the Display
You can tilt the display for viewing clarity.
Holding the two corners of the LCD’s upper
edge, you can tilt it backward for
approximately 25 degrees.
17
FusionPC manual 6/6 8/21/03 1:28 PM Page 17
All manuals and user guides at all-guides.com
Page 28
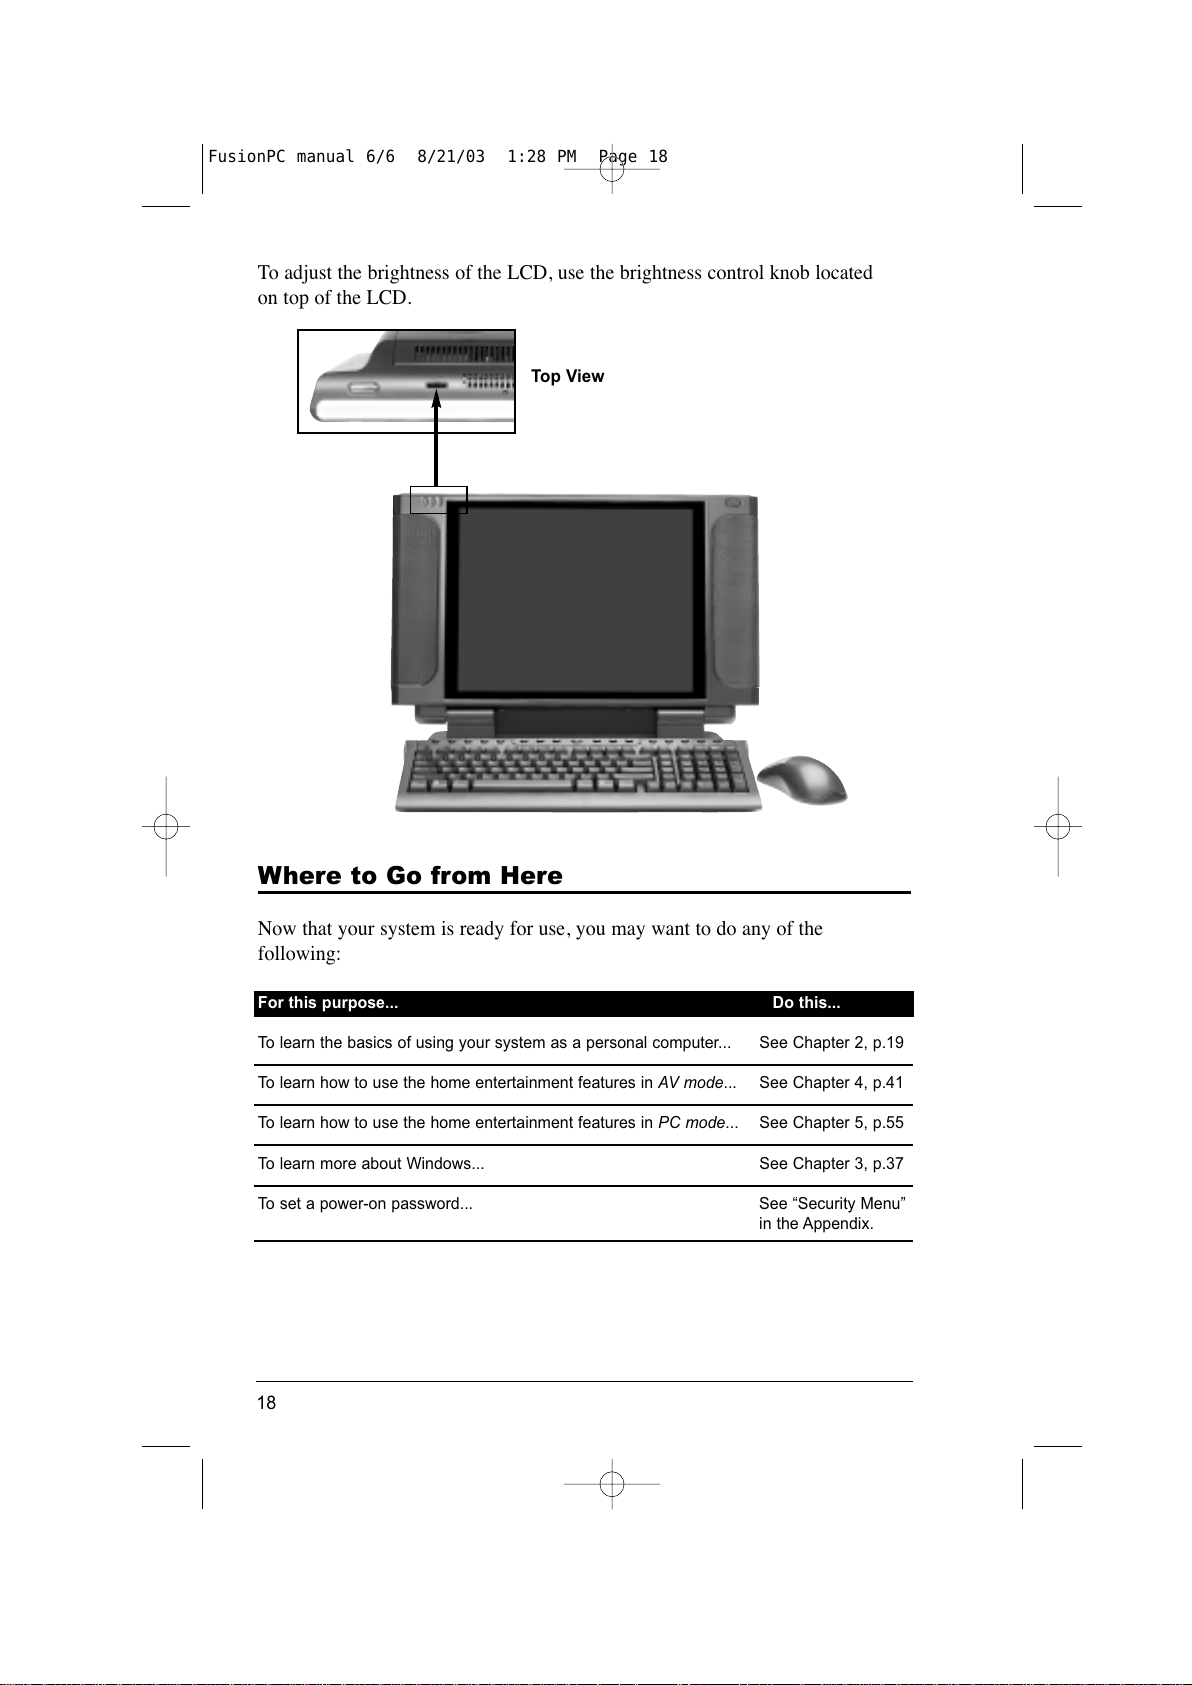
To adjust the brightness of the LCD, use the brightness control knob located
on top of the LCD.
Where to Go from Here
Now that your system is ready for use, you may want to do any of the
following:
For this purpose... Do this...
To learn the basics of using your system as a personal computer... See Chapter 2, p.19
To learn how to use the home entertainment features in AV mode... See Chapter 4, p.41
To learn how to use the home entertainment features in PC mode... See Chapter 5, p.55
To learn more about Windows... See Chapter 3, p.37
To set a power-on password... See “Security Menu”
in the Appendix.
18
Top View
FusionPC manual 6/6 8/21/03 1:28 PM Page 18
All manuals and user guides at all-guides.com
Page 29
Chapter 2
Computing Basics
This chapter provides information on using your system as a personal computer.
If you are new to computers, reading this chapter will help you to learn the
basics of operating a computer.
Described in this chapter are the operating basics of these components:
• Keyboard
• Mouse
• Floppy disk drive
• Hard disk drive
• CD/DVD drive
And these features:
• Power saving features
• Video and audio features
• Communication features
19
FusionPC manual 6/6 8/21/03 1:28 PM Page 19
All manuals and user guides at all-guides.com
Page 30
Controlling the Computer Power
Starting the Computer
Note:
• Starting (or “booting”) the computer is the process of loading the operating
system (OS) from a storage device such as a hard disk.
• An operating system is the platform for all your software application programs
to run on. The most widely used operating system today is Microsoft Windows.
Your computer is designed to use Windows XP as the operating system.
To start the computer, press the power button on top of the LCD. You can also
press the
PC button on the remote control.
The Power indicator will turn green and Windows XP will start up.
Turning Off the Computer
To turn off the computer, click Start > Turn Off Computer > Turn Off. Yo u
can also press the power button to turn off the computer.
Note: If the system is locked up because of hardware or software problems,
press and hold the power button on top of the computer for 4 or more seconds
to turn off the computer.
When you turn off the computer, the Power indicator will turn from green
to red meaning that the system is off.
Power Options
Windows XP allows your system to enter Stand By and Hibernation modes.
You can configure power settings by clicking Start > Settings > Control Panel
> Power Options.
Stand By
Stand By mode in Windows XP is useful for saving power during short
absences away from the computer. The operating system and any open applica-
tions are stored in RAM while the remaining parts of the computer are powered
down. Resuming from Stand By is a quick process as the operating system and
applications are already in memory.
You can set up a timer so that the computer will automatically enter Stand By
mode when it has been idle for a specified time period. You can also manually
initiate Stand By using one of the following methods:
20
FusionPC manual 6/6 8/21/03 1:28 PM Page 20
All manuals and user guides at all-guides.com
Page 31
• Press the Stand By button on the keyboard or remote control.
• Click Start > Turn Off Computer > Stand By.
• You can also use the power button if you have assigned the Stand By function
to the power button from within the Power Options control panel applet.
When Windows XP Stand By is initiated, the screen will display a “Preparing
to stand by” message as the various subsystems are turned off and the system
enters a power saving state. The Power indicator will light amber.
To end Stand By mode and resume operation, press the power button,
PC
button or Stand By button.
Hibernation
Caution: To use the hibernation feature, hibernation must be enabled in the
Hibernate tab of the Power Options control panel applet.
When you use the hibernation feature, you do not have to close applications
or exit from the operating system when you are finished using the computer.
Hibernation allows the computer to store the contents of memory to a file on
the hard disk and then power off the computer. When you next turn on your
computer, the file contents are read back into memory and you return to exactly
where you left off; all without having to “load” the operating system or the
applications.
You can manually initiate Hibernation using one of the following methods:
• Click Start and Turn Off Computer. When the “Turn off the computer’
dialog box appears, press the
Shift key to change Stand By to Hibernation
and then select Hibernation.
• You can also use the power button if you have assigned the Hibernation func-
tion to the power button from within the Power Options control panel applet.
When Windows XP Hibernation is initiated, the screen will display a “Preparing
to hibernate” message as the contents of memory are copied to disk and the sys-
tem turns off. The Power indicator will light red.
To resume from hibernation, press the power button or the PC button on the
remote control.
21
FusionPC manual 6/6 8/21/03 1:28 PM Page 21
All manuals and user guides at all-guides.com
all-guides.com
Page 32
Using the Keyboard
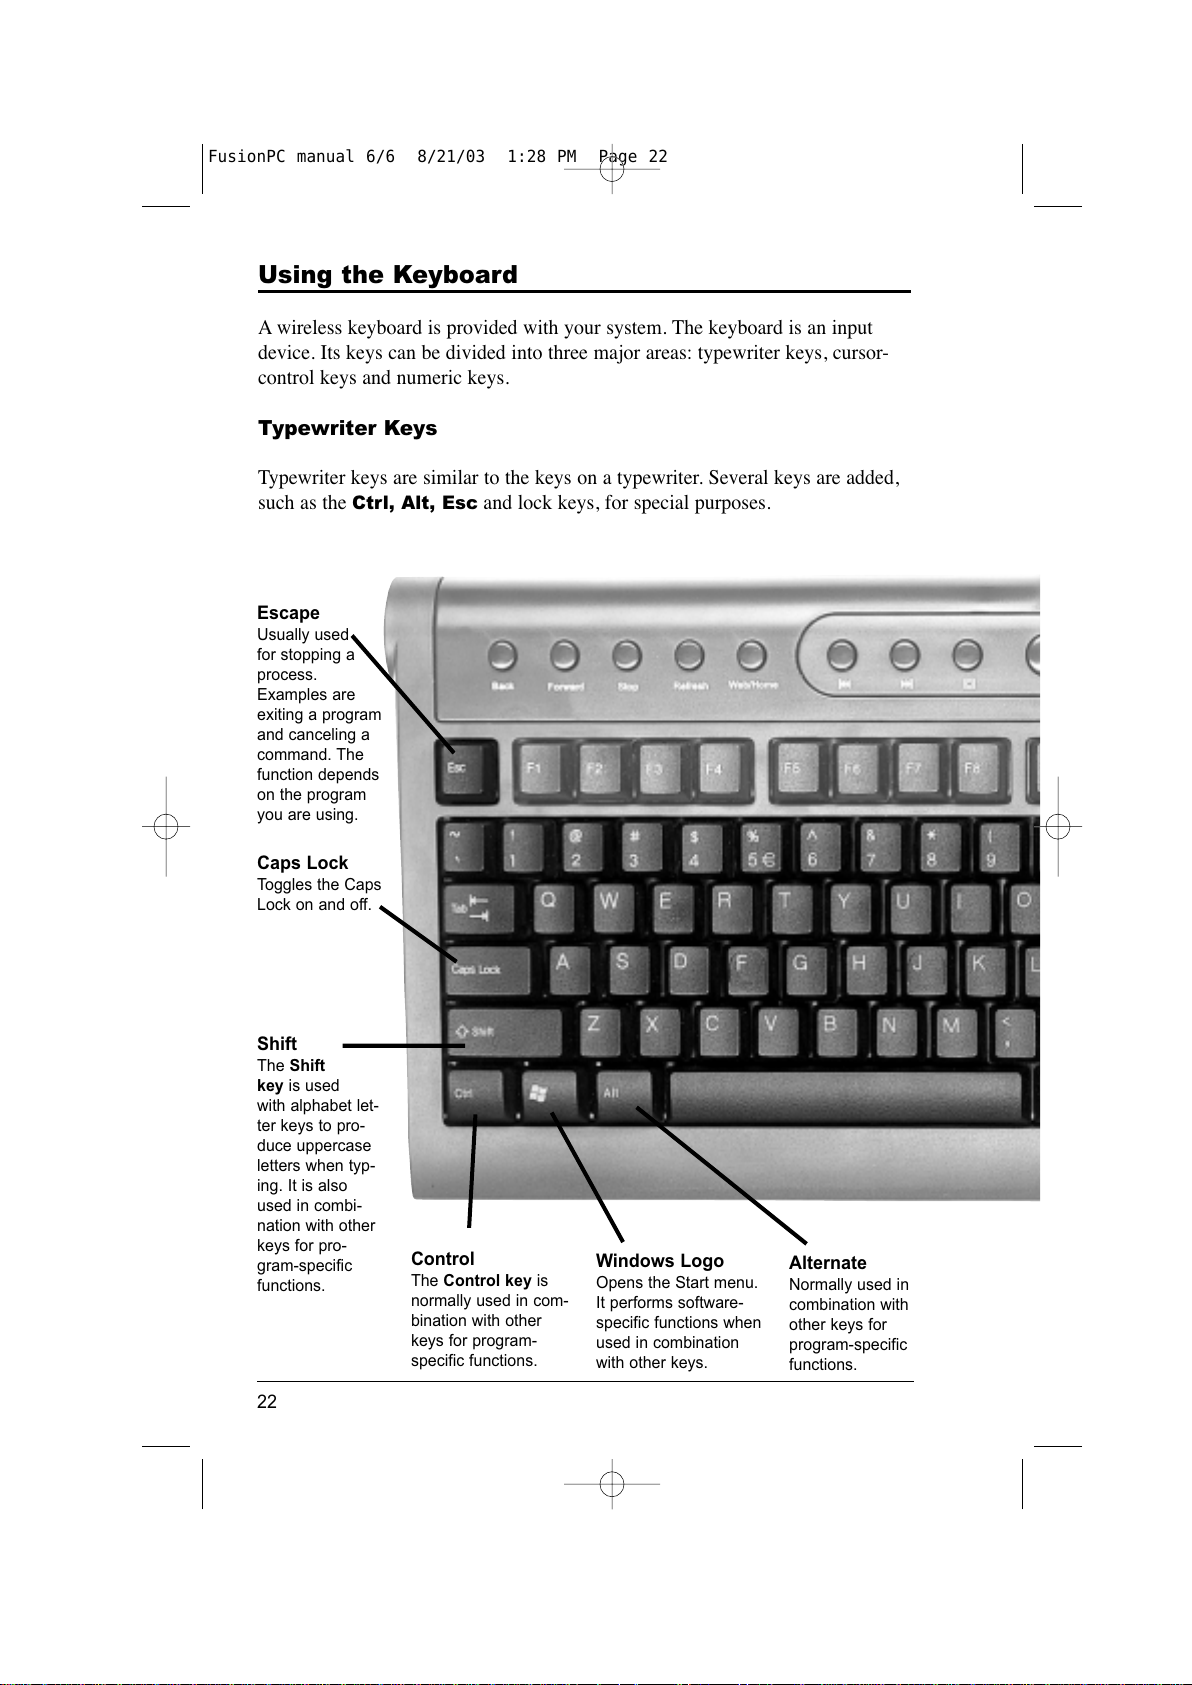
A wireless keyboard is provided with your system. The keyboard is an input
device. Its keys can be divided into three major areas: typewriter keys, cursor-
control keys and numeric keys.
Typewriter Keys
Typewriter keys are similar to the keys on a typewriter. Several keys are added,
such as the
Ctrl, Alt, Esc and lock keys, for special purposes.
22
Control
The Control key is
normally used in com-
bination with other
keys for program-
specific functions.
Alternate
Normally used in
combination with
other keys for
program-specific
functions.
Escape
Usually used
for stopping a
process.
Examples are
exiting a program
and canceling a
command. The
function depends
on the program
you are using.
Shift
The Shift
key is used
with alphabet let-
ter keys to pro-
duce uppercase
letters when typ-
ing. It is also
used in combi-
nation with other
keys for pro-
gram-specific
functions.
Caps Lock
Toggles the Caps
Lock on and off.
Windows Logo
Opens the Start menu.
It performs software-
specific functions when
used in combination
with other keys.
FusionPC manual 6/6 8/21/03 1:28 PM Page 22
All manuals and user guides at all-guides.com
Page 33
23
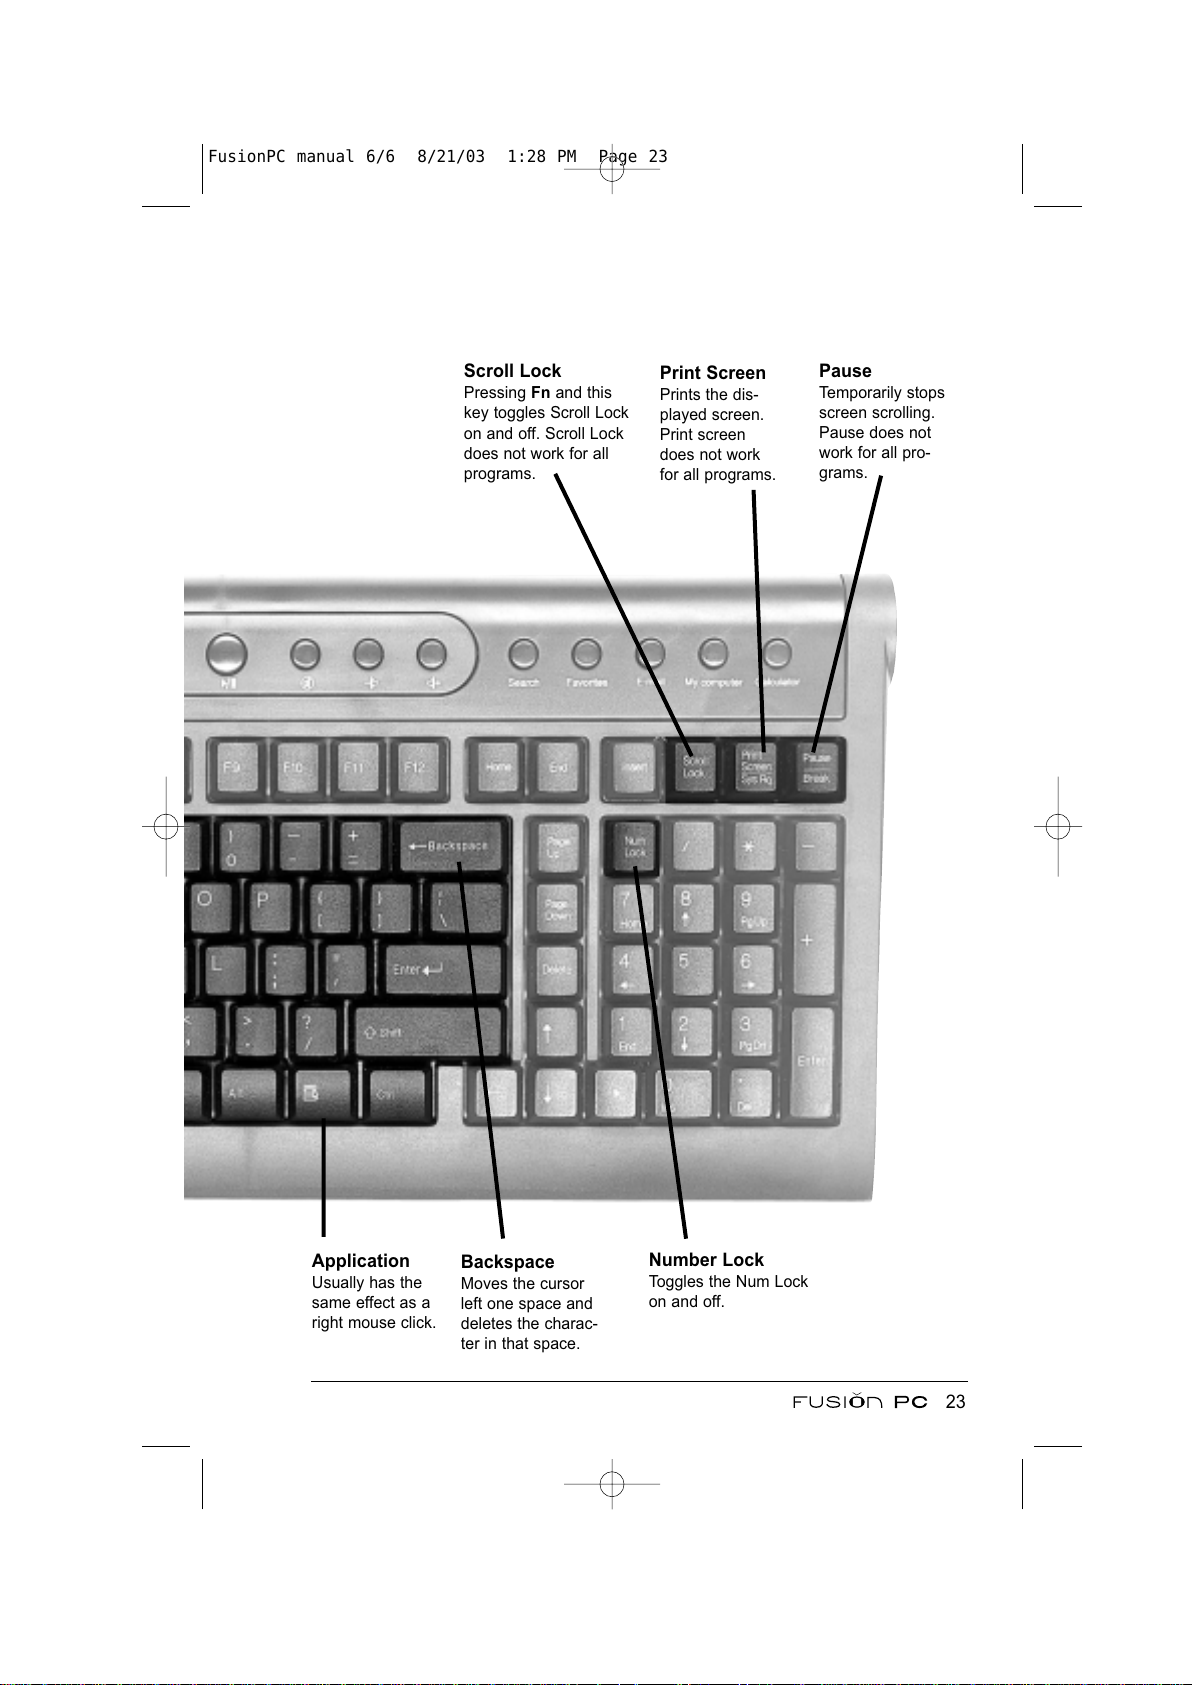
Backspace
Moves the cursor
left one space and
deletes the charac-
ter in that space.
Scroll Lock
Pressing Fn and this
key toggles Scroll Lock
on and off. Scroll Lock
does not work for all
programs.
Pause
Temporarily stops
screen scrolling.
Pause does not
work for all pro-
grams.
Print Screen
Prints the dis-
played screen.
Print screen
does not work
for all programs.
Application
Usually has the
same effect as a
right mouse click.
Number Lock
Toggles the Num Lock
on and off.
FusionPC manual 6/6 8/21/03 1:28 PM Page 23
All manuals and user guides at all-guides.com
Page 34
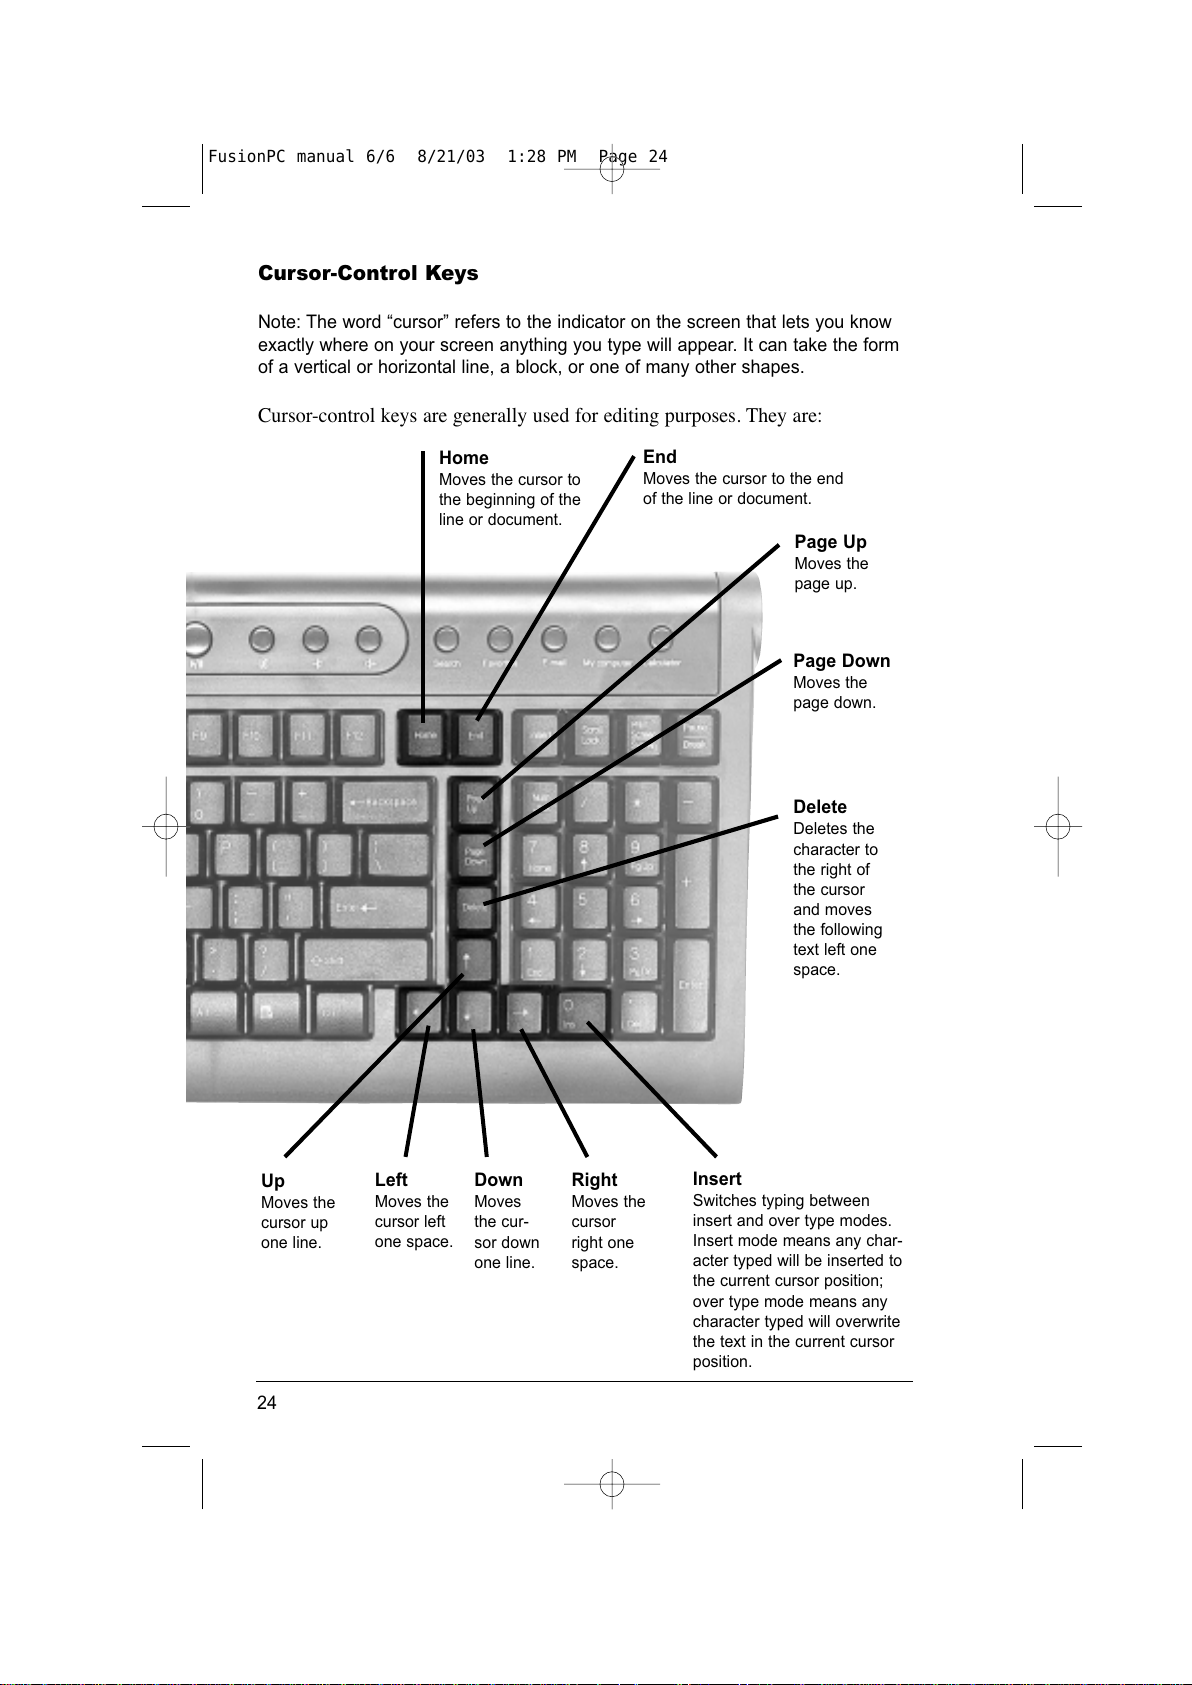
Cursor-Control Keys
Note: The word “cursor” refers to the indicator on the screen that lets you know
exactly where on your screen anything you type will appear. It can take the form
of a vertical or horizontal line, a block, or one of many other shapes.
Cursor-control keys are generally used for editing purposes. They are:
24
Left
Moves the
cursor left
one space.
Right
Moves the
cursor
right one
space.
Up
Moves the
cursor up
one line.
Down
Moves
the cur-
sor down
one line.
Page Up
Moves the
page up.
Page Down
Moves the
page down.
Home
Moves the cursor to
the beginning of the
line or document.
End
Moves the cursor to the end
of the line or document.
Insert
Switches typing between
insert and over type modes.
Insert mode means any char-
acter typed will be inserted to
the current cursor position;
over type mode means any
character typed will overwrite
the text in the current cursor
position.
Delete
Deletes the
character to
the right of
the cursor
and moves
the following
text left one
space.
FusionPC manual 6/6 8/21/03 1:28 PM Page 24
All manuals and user guides at all-guides.com
Page 35
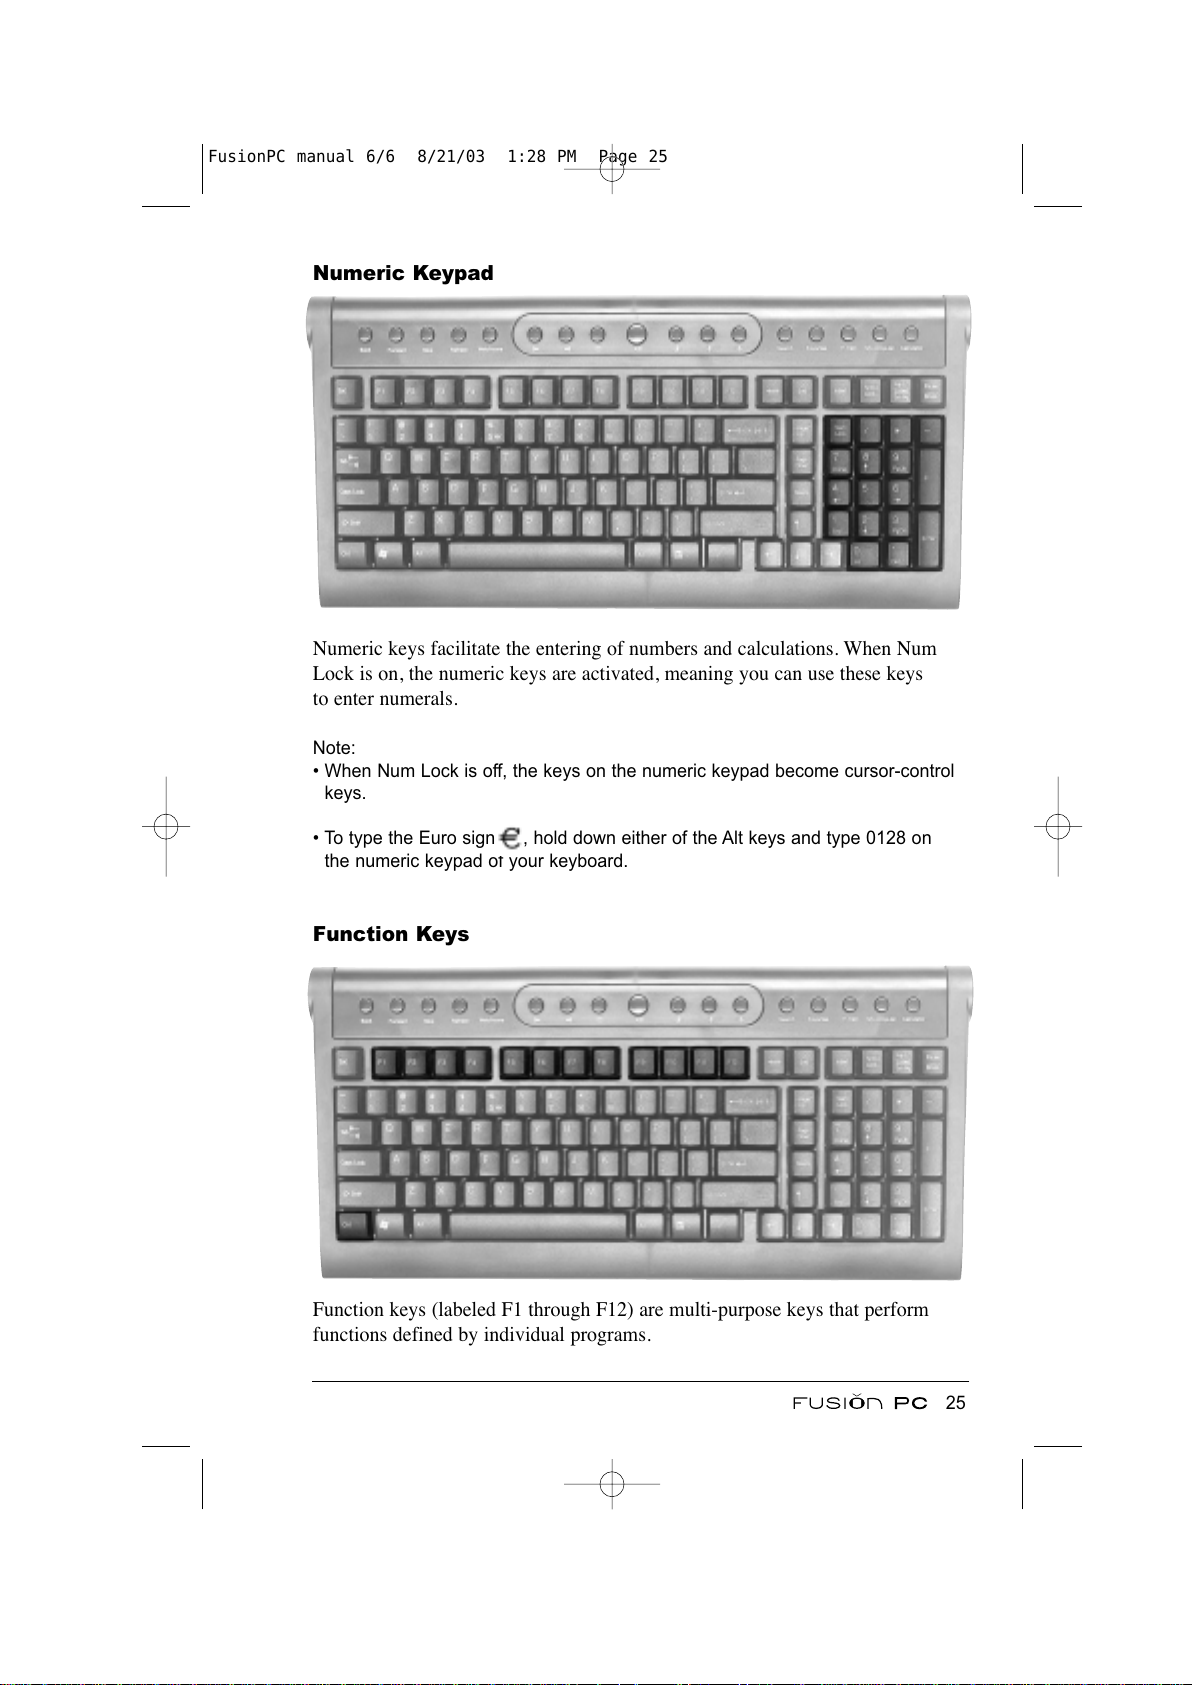
Numeric Keypad
Numeric keys facilitate the entering of numbers and calculations. When Num
Lock is on, the numeric keys are activated, meaning you can use these keys
to enter numerals.
Note:
• When Num Lock is off, the keys on the numeric keypad become cursor-control
keys.
• To type the Euro sign , hold down either of the Alt keys and type 0128 on
the numeric keypad of your keyboard.
Function Keys
Function keys (labeled F1 through F12) are multi-purpose keys that perform
functions defined by individual programs.
25
FusionPC manual 6/6 8/21/03 1:28 PM Page 25
All manuals and user guides at all-guides.com
Page 36
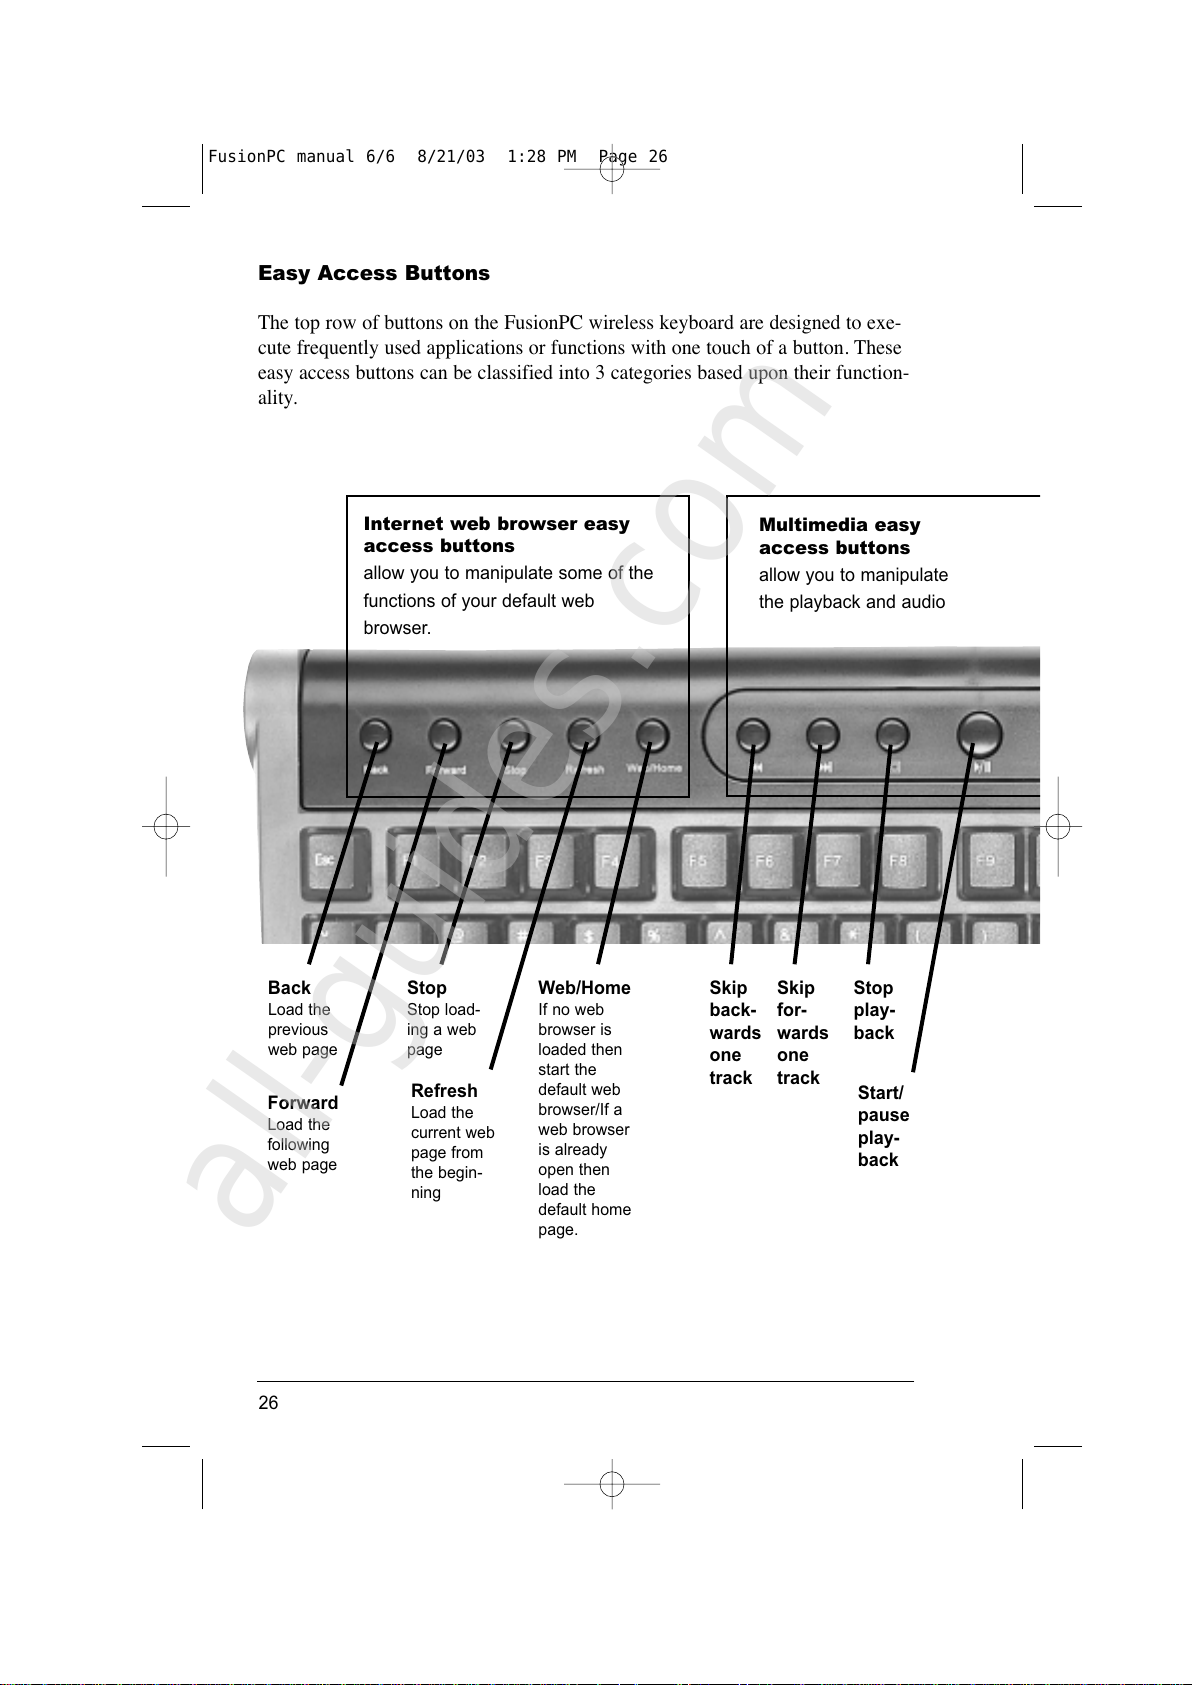
Easy Access Buttons
The top row of buttons on the FusionPC wireless keyboard are designed to exe-
cute frequently used applications or functions with one touch of a button. These
easy access buttons can be classified into 3 categories based upon their function-
ality.
26
Internet web browser easy
access buttons
allow you to manipulate some of the
functions of your default web
browser.
Back
Load the
previous
web page
Forward
Load the
following
web page
Stop
Stop load-
ing a web
page
Refresh
Load the
current web
page from
the begin-
ning
Web/Home
If no web
browser is
loaded then
start the
default web
browser/If a
web browser
is already
open then
load the
default home
page.
Multimedia easy
access buttons
allow you to manipulate
the playback and audio
Skip
back-
wards
one
track
Skip
for-
wards
one
track
Stop
play-
back
Start/
pause
play-
back
FusionPC manual 6/6 8/21/03 1:28 PM Page 26
All manuals and user guides at all-guides.com
all-guides.com
Page 37
27
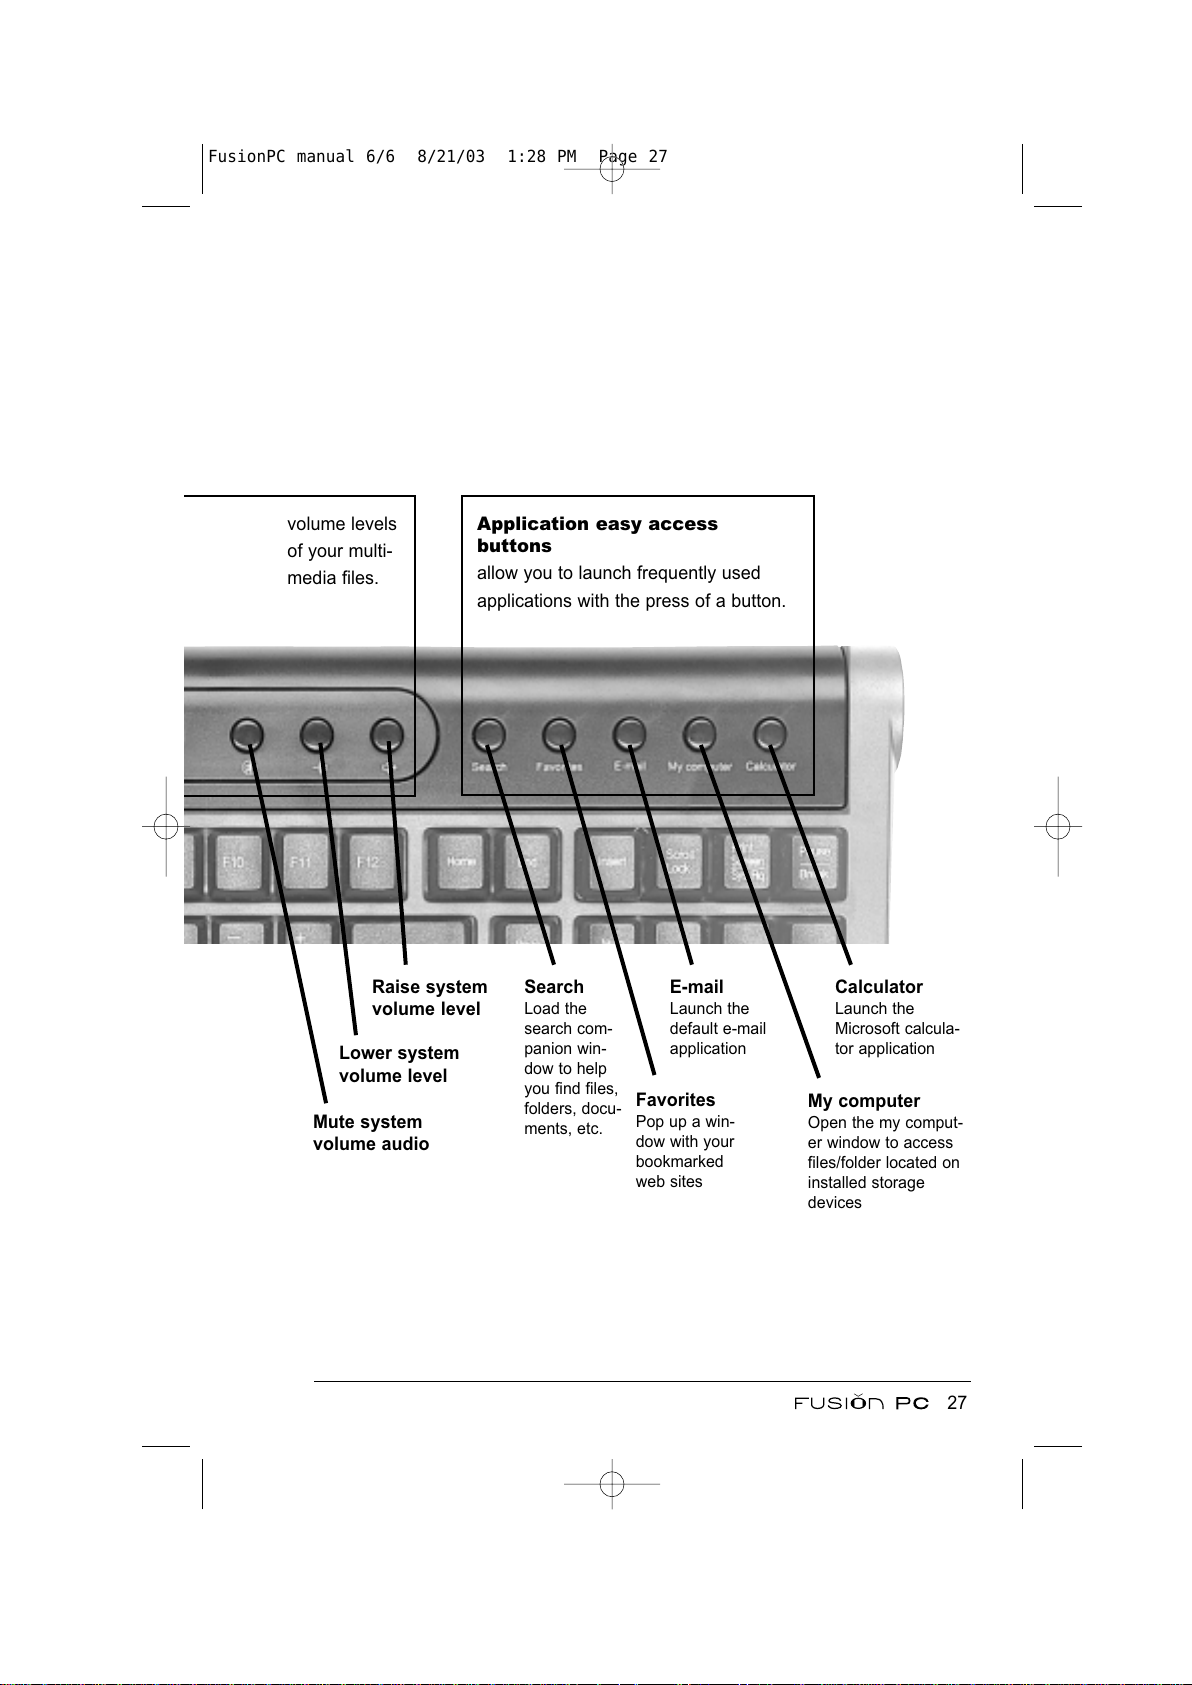
Application easy access
buttons
allow you to launch frequently used
applications with the press of a button.
volume levels
of your multi-
media files.
Search
Load the
search com-
panion win-
dow to help
you find files,
folders, docu-
ments, etc.
Favorites
Pop up a win-
dow with your
bookmarked
web sites
E-mail
Launch the
default e-mail
application
My computer
Open the my comput-
er window to access
files/folder located on
installed storage
devices
Calculator
Launch the
Microsoft calcula-
tor application
Mute system
volume audio
Lower system
volume level
Raise system
volume level
FusionPC manual 6/6 8/21/03 1:28 PM Page 27
All manuals and user guides at all-guides.com
Page 38
Using the Mouse
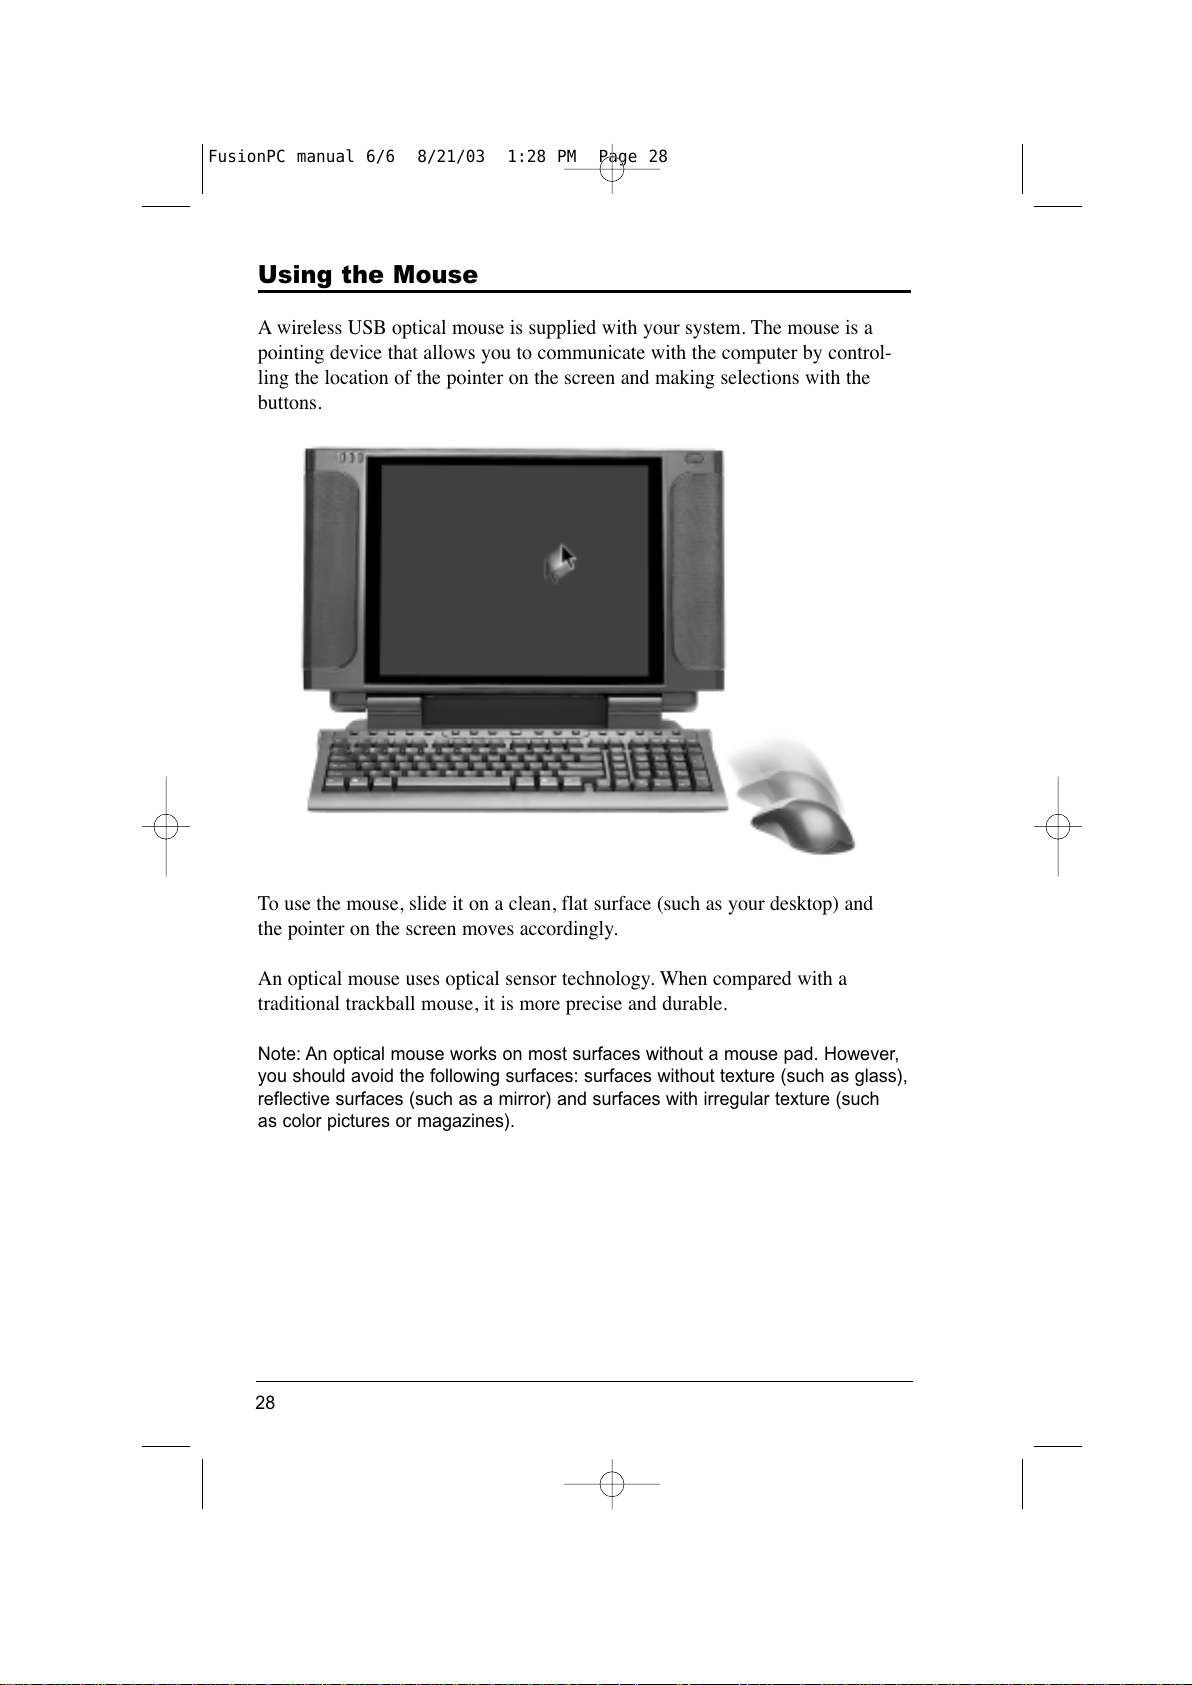
A wireless USB optical mouse is supplied with your system. The mouse is a
pointing device that allows you to communicate with the computer by control-
ling the location of the pointer on the screen and making selections with the
buttons.
To use the mouse, slide it on a clean, flat surface (such as your desktop) and
the pointer on the screen moves accordingly.
An optical mouse uses optical sensor technology. When compared with a
traditional trackball mouse, it is more precise and durable.
Note: An optical mouse works on most surfaces without a mouse pad. However,
you should avoid the following surfaces: surfaces without texture (such as glass),
reflective surfaces (such as a mirror) and surfaces with irregular texture (such
as color pictures or magazines).
28
FusionPC manual 6/6 8/21/03 1:28 PM Page 28
All manuals and user guides at all-guides.com
Page 39
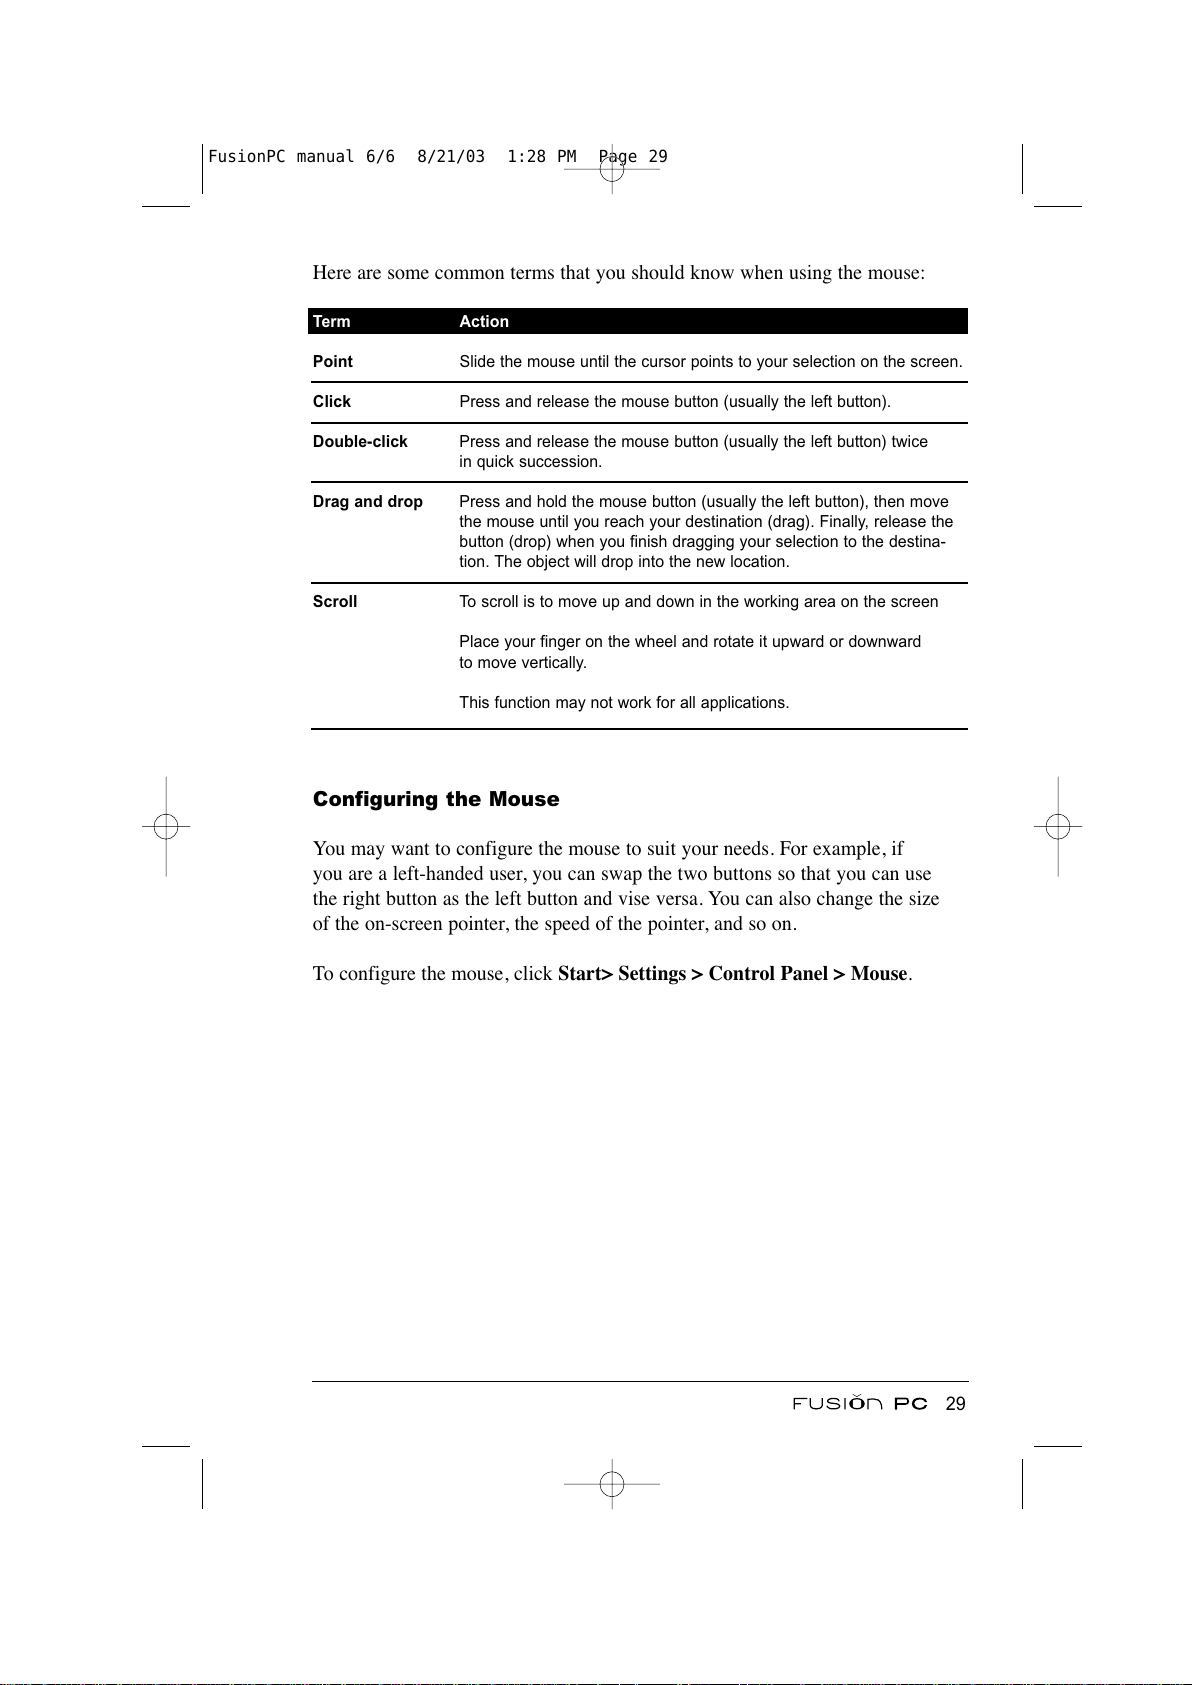
Here are some common terms that you should know when using the mouse:
Term Action
Point Slide the mouse until the cursor points to your selection on the screen.
Click Press and release the mouse button (usually the left button).
Double-click Press and release the mouse button (usually the left button) twice
in quick succession.
Drag and drop Press and hold the mouse button (usually the left button), then move
the mouse until you reach your destination (drag). Finally, release the
button (drop) when you finish dragging your selection to the destina-
tion. The object will drop into the new location.
Scroll To scroll is to move up and down in the working area on the screen
Place your finger on the wheel and rotate it upward or downward
to move vertically.
This function may not work for all applications.
Configuring the Mouse
You may want to configure the mouse to suit your needs. For example, if
you are a left-handed user, you can swap the two buttons so that you can use
the right button as the left button and vise versa. You can also change the size
of the on-screen pointer, the speed of the pointer, and so on.
To configure the mouse, click Start> Settings > Control Panel > Mouse.
29
FusionPC manual 6/6 8/21/03 1:28 PM Page 29
All manuals and user guides at all-guides.com
Page 40
Using the Floppy Disk Drive (optional)
Caution:
• Do not use the floppy disk drive in an upside-down position.
• Do not put objects on top of the floppy disk drive.
A floppy disk drive allows you to install new programs into your computer,
or to store information on a removable floppy disk so that you can transfer
information from one computer to another.
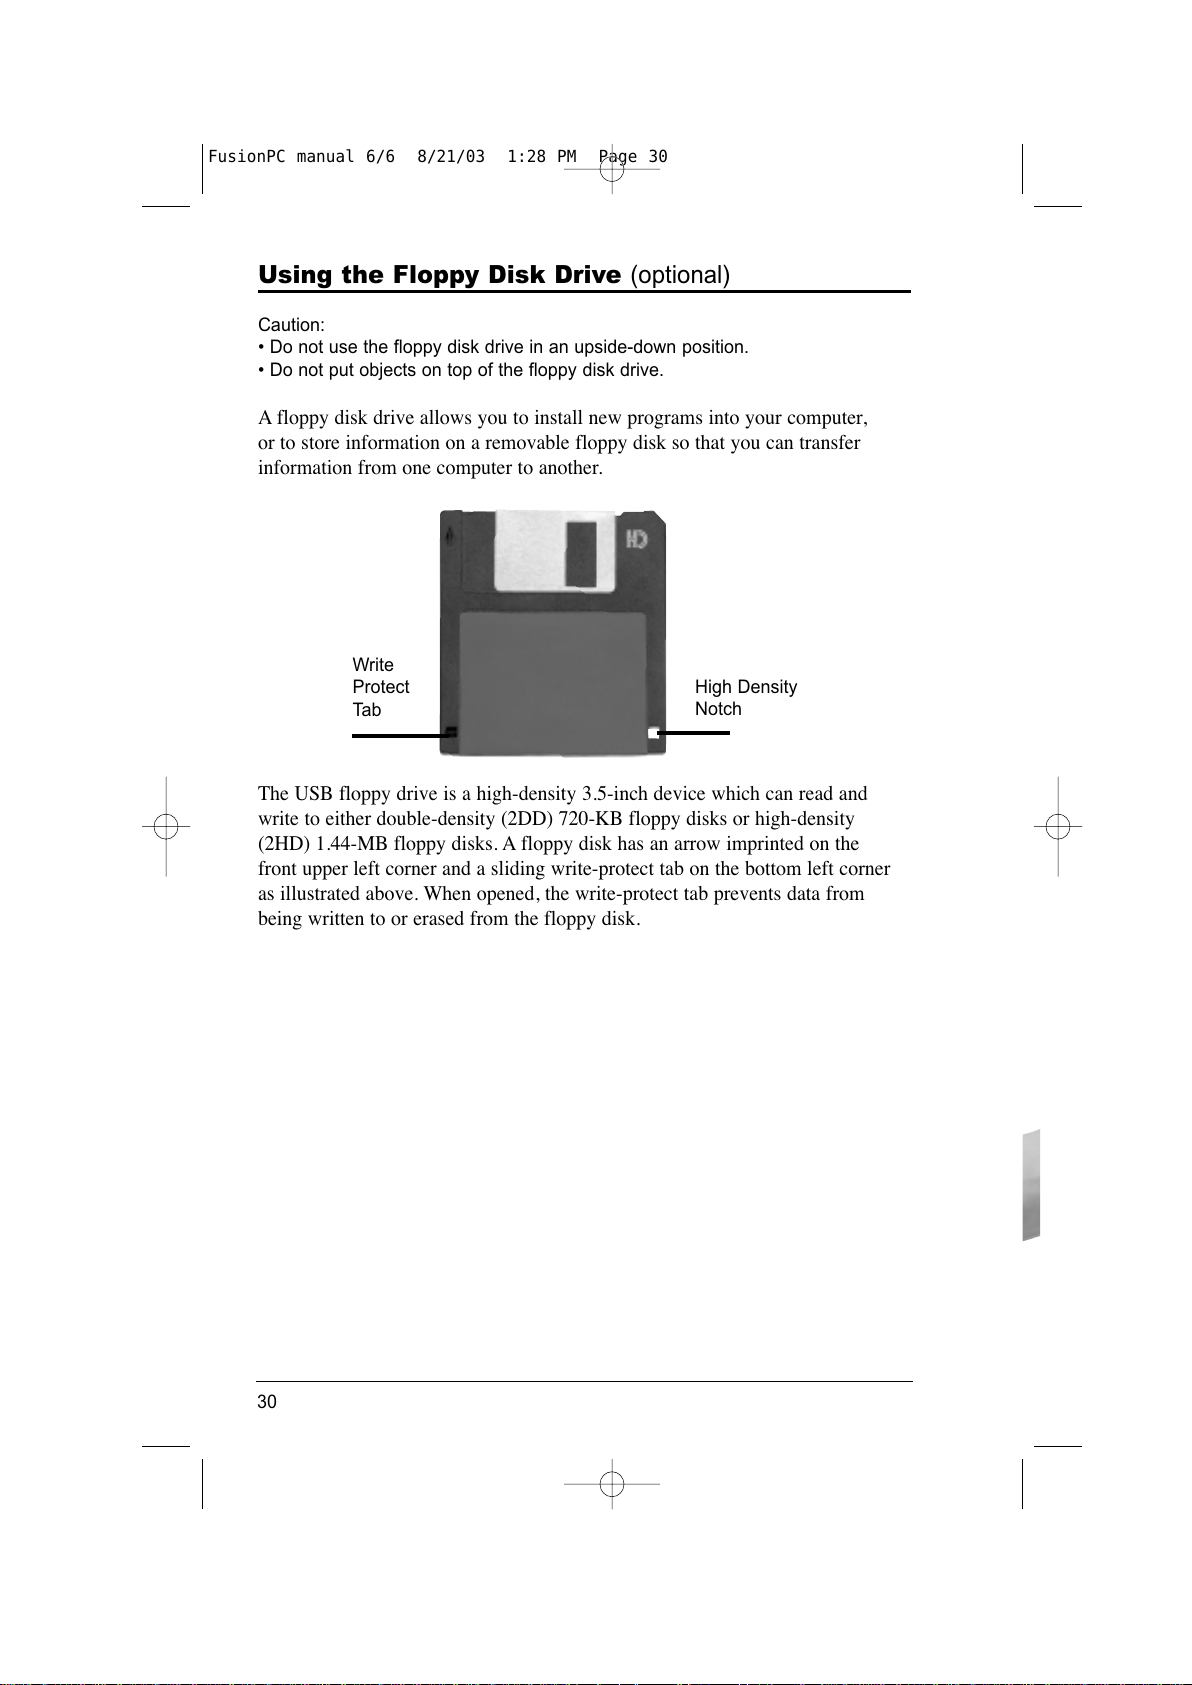
The USB floppy drive is a high-density 3.5-inch device which can read and
write to either double-density (2DD) 720-KB floppy disks or high-density
(2HD) 1.44-MB floppy disks. A floppy disk has an arrow imprinted on the
front upper left corner and a sliding write-protect tab on the bottom left corner
as illustrated above. When opened, the write-protect tab prevents data from
being written to or erased from the floppy disk.
30
High Density
Notch
Write
Protect
Ta b
FusionPC manual 6/6 8/21/03 1:28 PM Page 30
All manuals and user guides at all-guides.com
Page 41
Connecting the Floppy Disk Drive
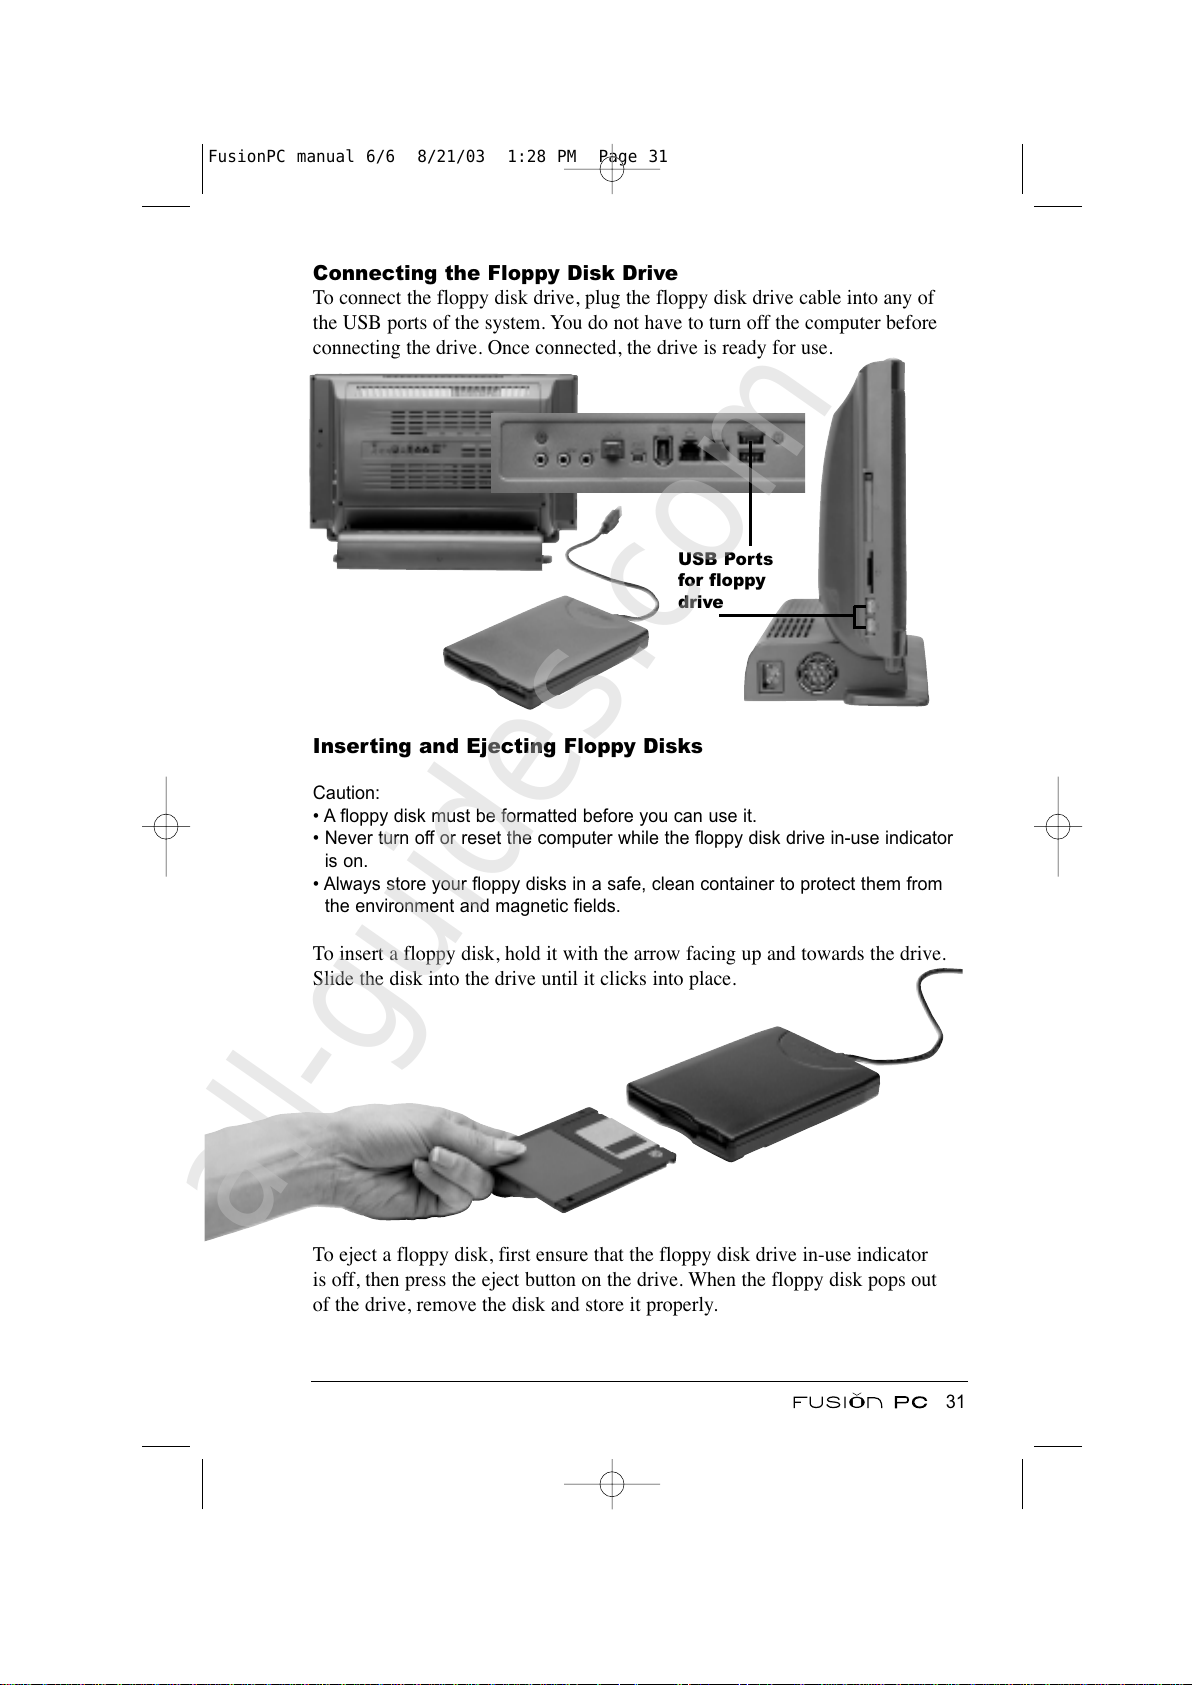
To connect the floppy disk drive, plug the floppy disk drive cable into any of
the USB ports of the system. You do not have to turn off the computer before
connecting the drive. Once connected, the drive is ready for use.
Inserting and Ejecting Floppy Disks
Caution:
• A floppy disk must be formatted before you can use it.
• Never turn off or reset the computer while the floppy disk drive in-use indicator
is on.
• Always store your floppy disks in a safe, clean container to protect them from
the environment and magnetic fields.
To insert a floppy disk, hold it with the arrow facing up and towards the drive.
Slide the disk into the drive until it clicks into place.
To eject a floppy disk, first ensure that the floppy disk drive in-use indicator
is off, then press the eject button on the drive. When the floppy disk pops out
of the drive, remove the disk and store it properly.
31
USB Ports
for floppy
drive
FusionPC manual 6/6 8/21/03 1:28 PM Page 31
All manuals and user guides at all-guides.com
all-guides.com
Page 42
Using the Hard Disk Drive
Your system comes with a hard disk drive configured as drive letter C:.
A hard disk drive is a storage device with non-removable, rotating, magnetic
storage platters inside it. It is where your operating system and application
software programs are stored.
Your hard disk drive is a 3.5-inch IDE (Integrated Drive Electronics) hard disk
drive. This type of drive embodies the latest in fast, reliable mass storage by
integrating all the control circuitry necessary for operation directly onto the
drive itself. This allows the drive manufacturer to optimize drive performance.
Caution:
• Make regular backups of your data files from your hard disk drive to floppy
disks or other storage media. This can prevent losing data because of a
computer virus or an accident.
• Never try to remove or install the hard disk drive while the system is powered
on. Doing so can result in loss of data, and can damage the system and the
hard disk drive’s sensitive circuitry.
• Never turn off or reset the computer while the hard disk drive in-use indicator
is on.
Using the Optical Drive
Your system comes with a optical drive, usually configured as drive letter D:.
An optical drive is an ideal medium to use for distributing multimedia because
of the huge amount of data that a disc can store.
Depending on the model, your drive is one of the following:
• CD-ROM drive can read CD-ROMs, audio CDs, video CDs, CD-R, and
CD-RW discs.
• CD-RW drive can not only read the above discs but also write to CD-R
and CD-RW discs.
• DVD-ROM drive can read DVD (Digital Versatile Disc) in addition to the
above discs.
• Combo drive can work both as a DVD-ROM drive and CD-RW drive.
• DVD-R/DVD-RW drive can work as all of the drives listed above as well
as having the ability to write data that conforms to DVD standards.
32
FusionPC manual 6/6 8/21/03 1:28 PM Page 32
All manuals and user guides at all-guides.com
Page 43
Caution:
• When inserting a CD, do not use force.
• Make sure that the CD is correctly inserted into the tray.
• Do not leave the CD tray open. Also, avoid touching the lens in the tray with
your hand. If the lens becomes dirty, the CD-ROM may malfunction.
• Do not wipe the lens using materials with a rough surface (such as paper
towel). Instead, use a cotton swab and an approved cleaning solution to gently
wipe the lens.
FDA regulations require the following statement for all laser-based devices:
“Caution, Use of controls or adjustments or performance of procedures other
than those specified herein may result in hazardous radiation exposure.”
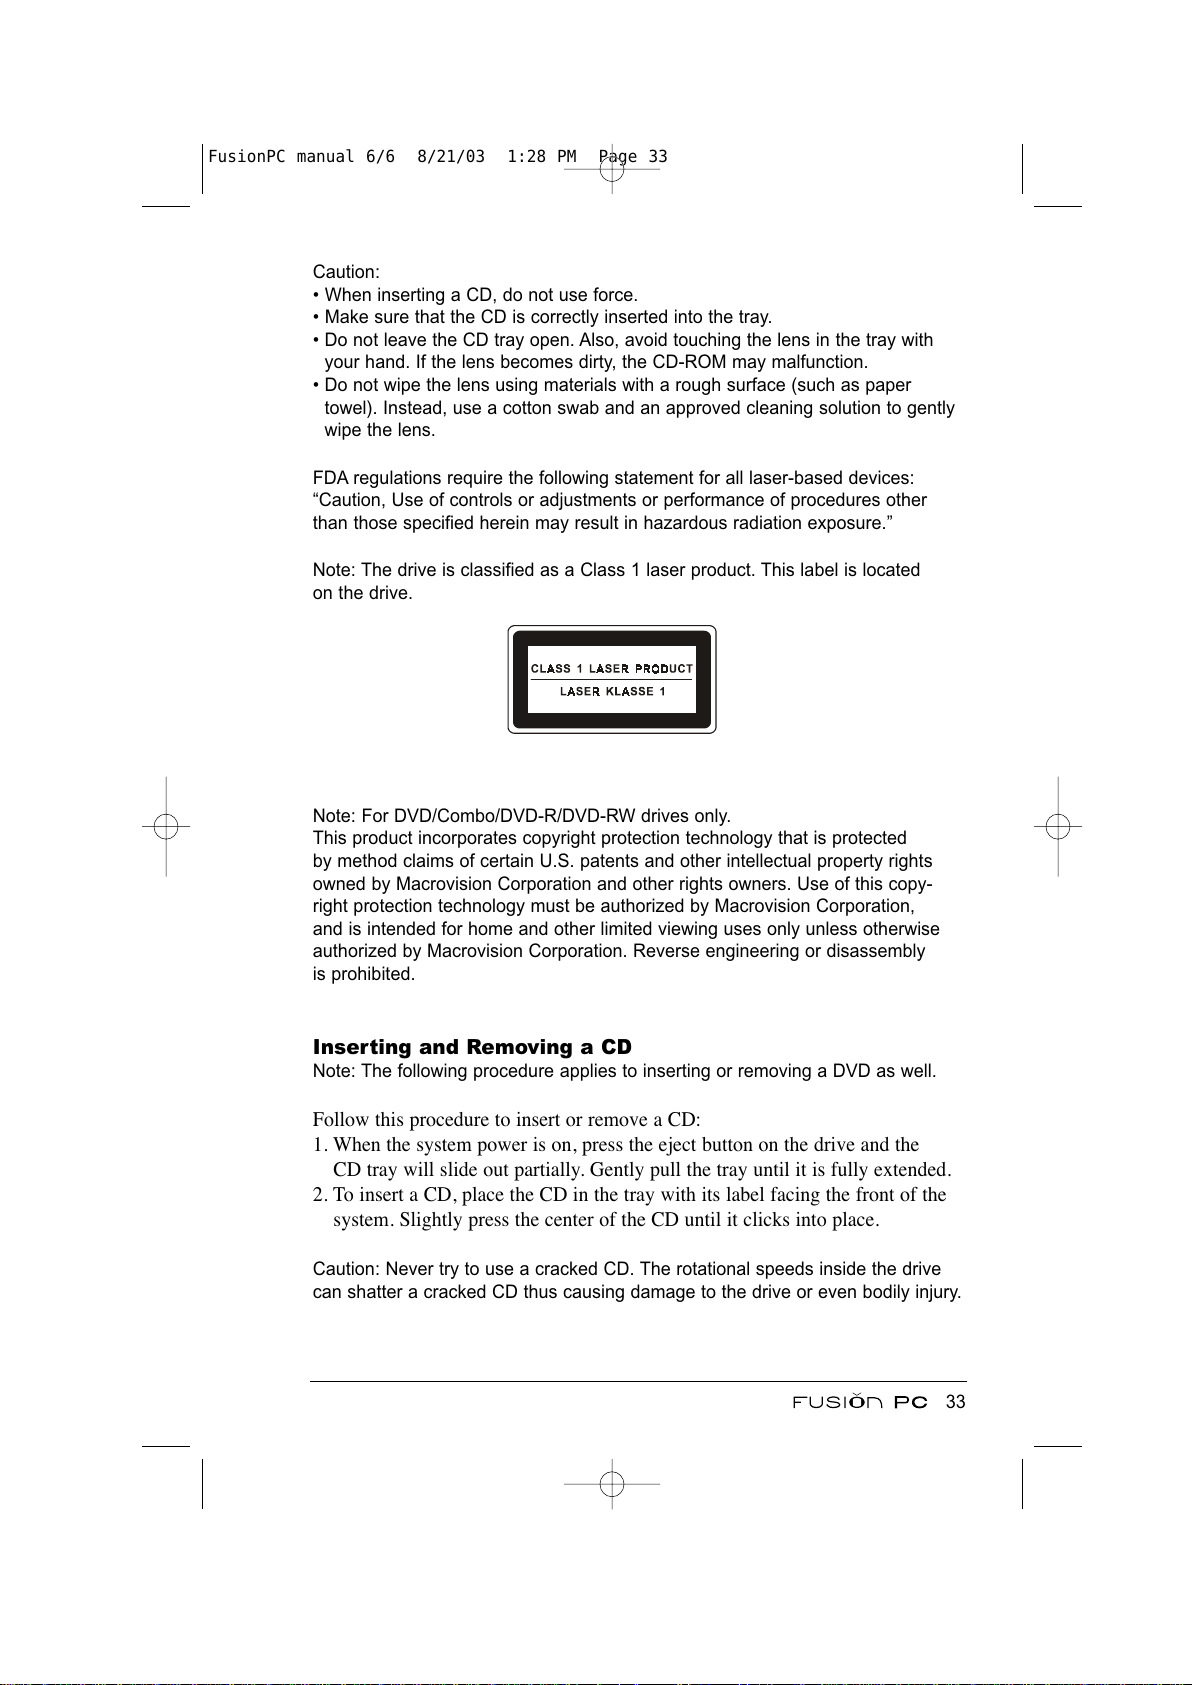
Note: The drive is classified as a Class 1 laser product. This label is located
on the drive.
Note: For DVD/Combo/DVD-R/DVD-RW drives only.
This product incorporates copyright protection technology that is protected
by method claims of certain U.S. patents and other intellectual property rights
owned by Macrovision Corporation and other rights owners. Use of this copy-
right protection technology must be authorized by Macrovision Corporation,
and is intended for home and other limited viewing uses only unless otherwise
authorized by Macrovision Corporation. Reverse engineering or disassembly
is prohibited.
Inserting and Removing a CD
Note: The following procedure applies to inserting or removing a DVD as well.
Follow this procedure to insert or remove a CD:
1. When the system power is on, press the eject button on the drive and the
CD tray will slide out partially. Gently pull the tray until it is fully extended.
2. To insert a CD, place the CD in the tray with its label facing the front of the
system. Slightly press the center of the CD until it clicks into place.
Caution: Never try to use a cracked CD. The rotational speeds inside the drive
can shatter a cracked CD thus causing damage to the drive or even bodily injury.
33
FusionPC manual 6/6 8/21/03 1:28 PM Page 33
All manuals and user guides at all-guides.com
Page 44
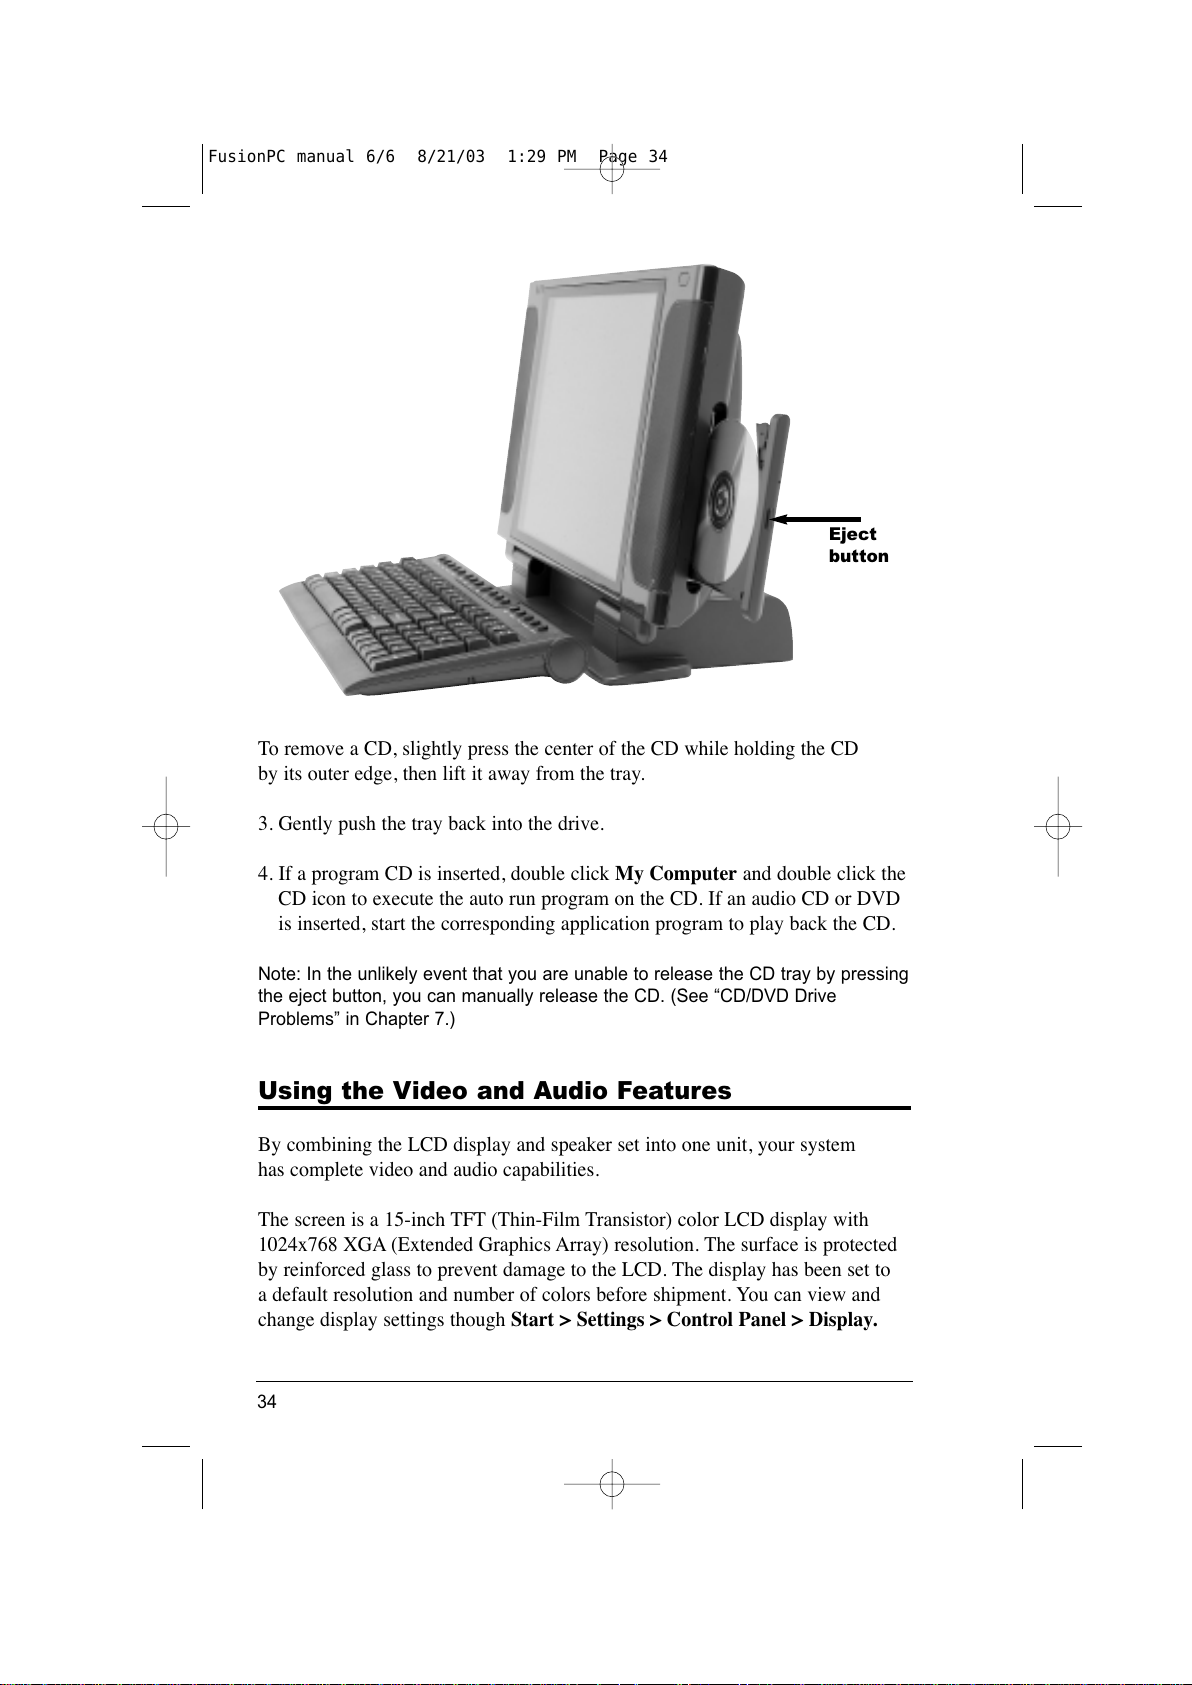
To remove a CD, slightly press the center of the CD while holding the CD
by its outer edge, then lift it away from the tray.
3. Gently push the tray back into the drive.
4. If a program CD is inserted, double click My Computer and double click the
CD icon to execute the auto run program on the CD. If an audio CD or DVD
is inserted, start the corresponding application program to play back the CD.
Note: In the unlikely event that you are unable to release the CD tray by pressing
the eject button, you can manually release the CD. (See “CD/DVD Drive
Problems” in Chapter 7.)
Using the Video and Audio Features
By combining the LCD display and speaker set into one unit, your system
has complete video and audio capabilities.
The screen is a 15-inch TFT (Thin-Film Transistor) color LCD display with
1024x768 XGA (Extended Graphics Array) resolution. The surface is protected
by reinforced glass to prevent damage to the LCD. The display has been set to
a default resolution and number of colors before shipment. You can view and
change display settings though Start > Settings > Control Panel > Display.
34
Eject
button
FusionPC manual 6/6 8/21/03 1:29 PM Page 34
All manuals and user guides at all-guides.com
Page 45
The speakers are located on the right and left side of the LCD display. The
volume level is adjustable via Windows XP through Start > Settings > Control
Panel > Sound and Audio Device > Advanced.
In addition to the built-in speaker set, your system provides three audio
connectors for audio input and output. (See “Connecting Audio Devices”
in Chapter 6 for more information.)
Using the Communication Features
Using the Modem
Note:
You need to establish an account
with an ISP (Internet Service Provider).
The internal 56k fax/data modem
allows you to use the ordinary
telephone line to communicate
with others by fax, email or connect
to Internet.
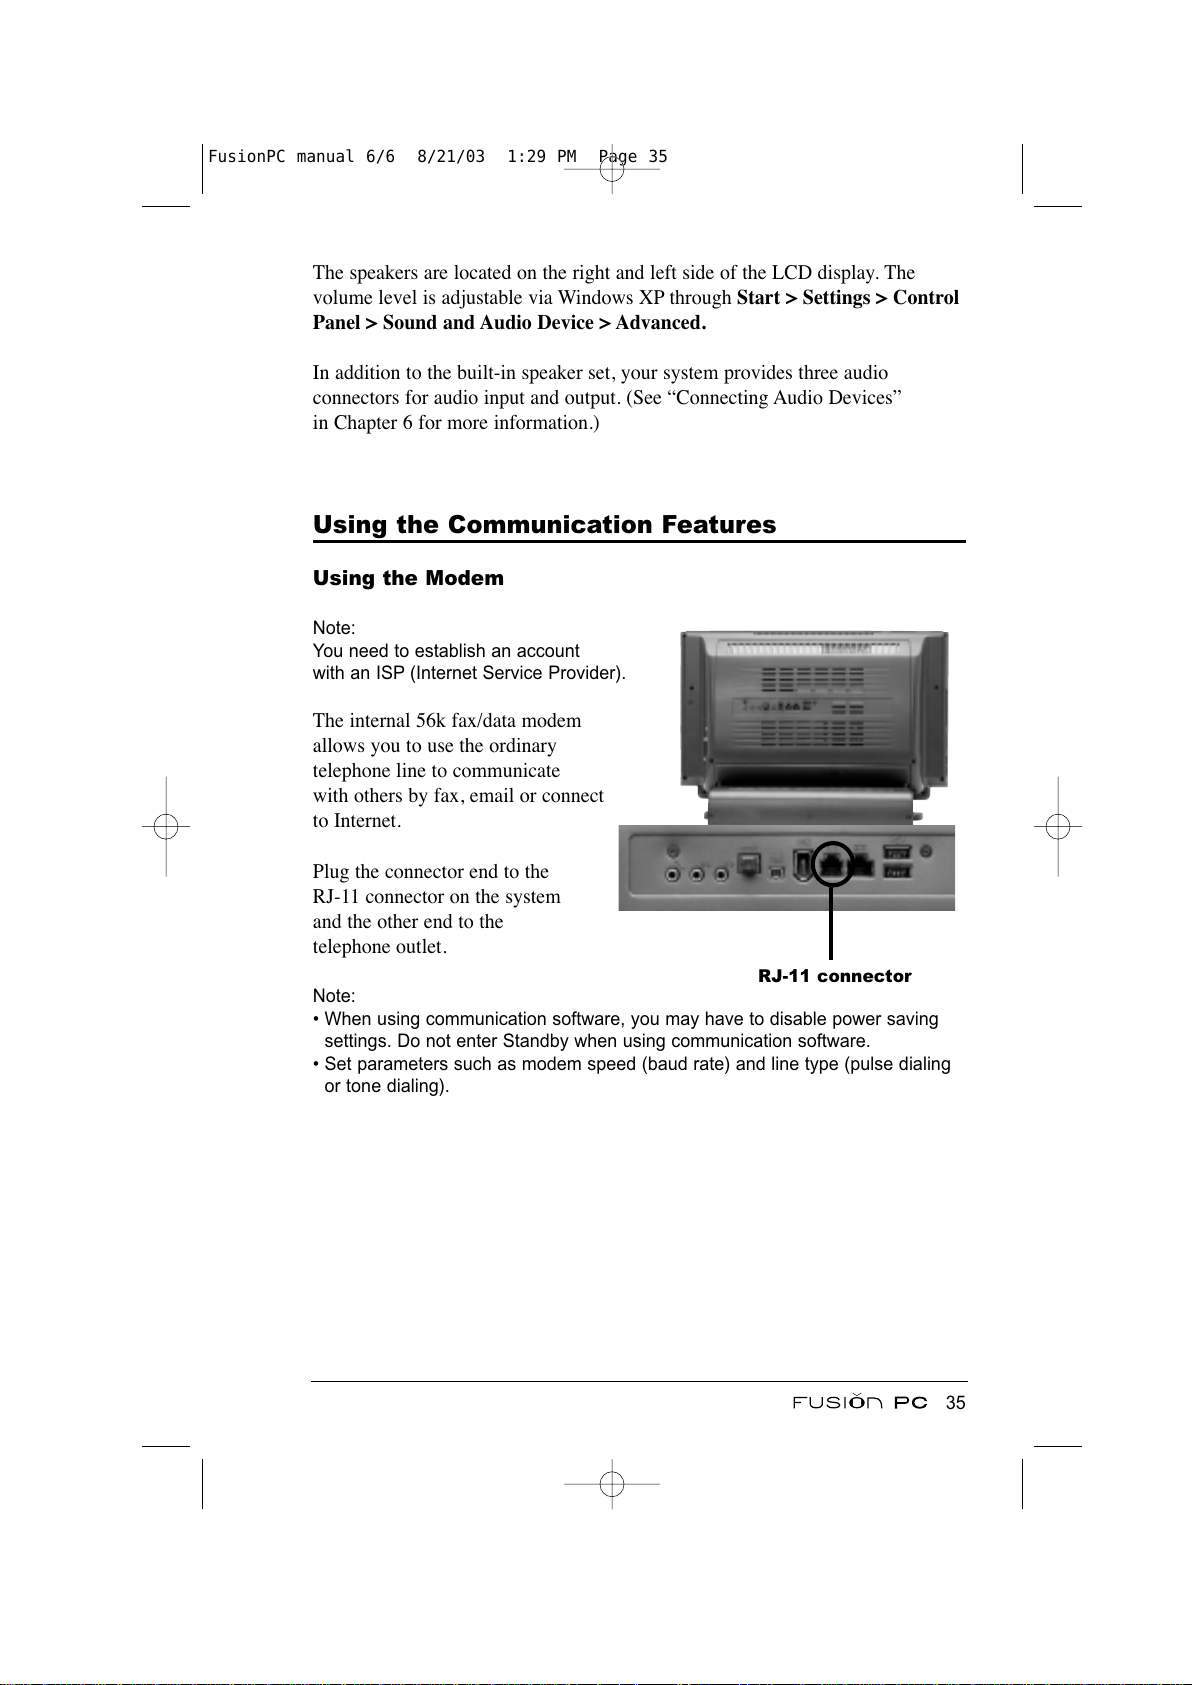
Plug the connector end to the
RJ-11 connector on the system
and the other end to the
telephone outlet.
Note:
• When using communication software, you may have to disable power saving
settings. Do not enter Standby when using communication software.
• Set parameters such as modem speed (baud rate) and line type (pulse dialing
or tone dialing).
35
RJ-11 connector
FusionPC manual 6/6 8/21/03 1:29 PM Page 35
All manuals and user guides at all-guides.com
Page 46
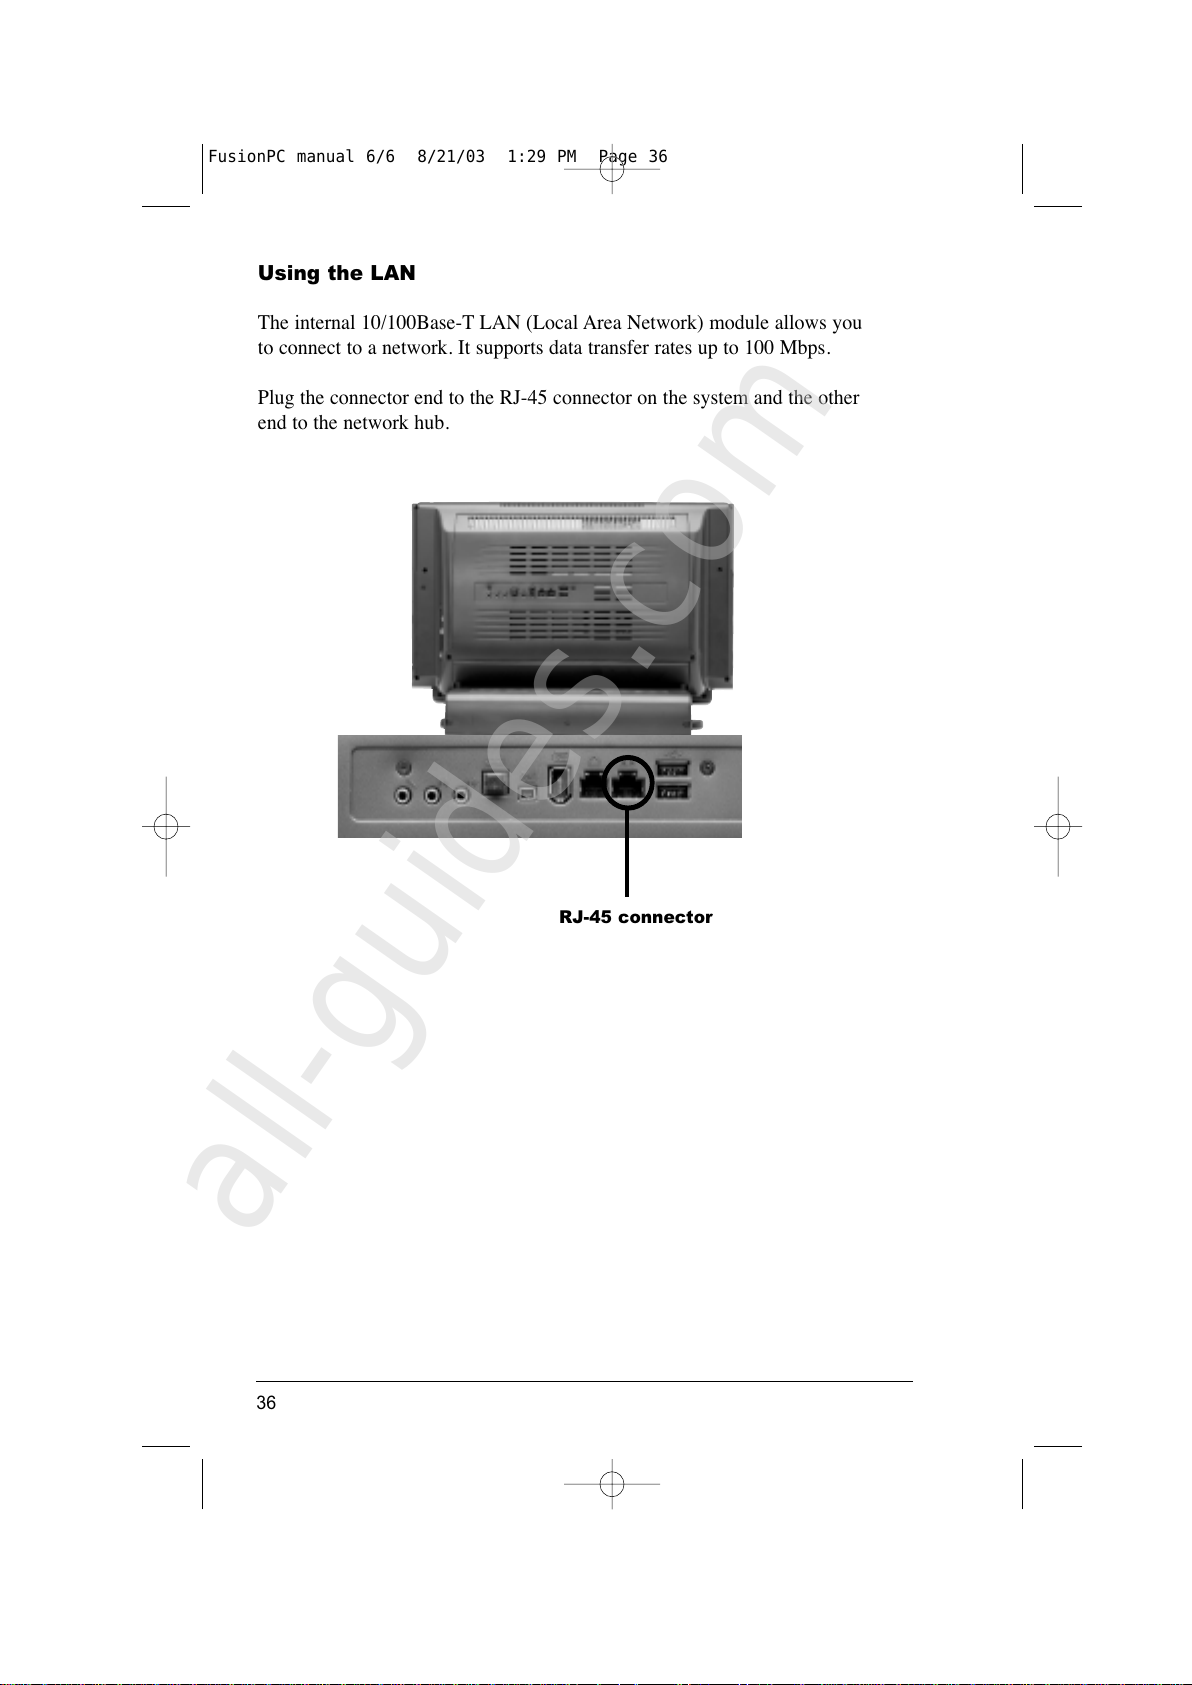
Using the LAN
The internal 10/100Base-T LAN (Local Area Network) module allows you
to connect to a network. It supports data transfer rates up to 100 Mbps.
Plug the connector end to the RJ-45 connector on the system and the other
end to the network hub.
36
RJ-45 connector
FusionPC manual 6/6 8/21/03 1:29 PM Page 36
All manuals and user guides at all-guides.com
all-guides.com
Page 47
Chapter 3
Windows Help and
Support
The Help and Support Center is your one stop shop for anything and everything
that relates to Windows and your FusionPC. Through this resource, you can find
answers on a multitude of subjects such as basic windows operations, detailed
problem resolutions, and specifications of your FusionPC. Also found within
this resource are applications that you can run to help maintain and troubleshoot
your FusionPC such as system restore, remote assistance, and system configura-
tion utility. For further information on any item in this chapter, just type the
keyword in the Search box of the Help and Support Center.
37
FusionPC manual 6/6 8/21/03 1:29 PM Page 37
All manuals and user guides at all-guides.com
Page 48
When connected to the internet, the Help and Support Center becomes an even
greater tool by expanding its capabilities in the following ways:
• Through the Remote Assistance feature, a 3rd party application technical
support representative could connect to your computer with your permission,
then see your files, control your mouse and keyboard, and chat online with
you to discuss your problem.
• Through Windows Update, your computer can always be up to date with
the latest patches and drivers from Microsoft. When connecting to Windows
Update, your computer will be scanned, and the appropriate updates will
be displayed for your unique installation of the operating system.
• Through the Get Support feature, you can access various sources of help
and support information via newsgroups and manufacturer websites.
No matter what your question or problem may be, the Help and Support Center
should be your first step towards finding the answer.
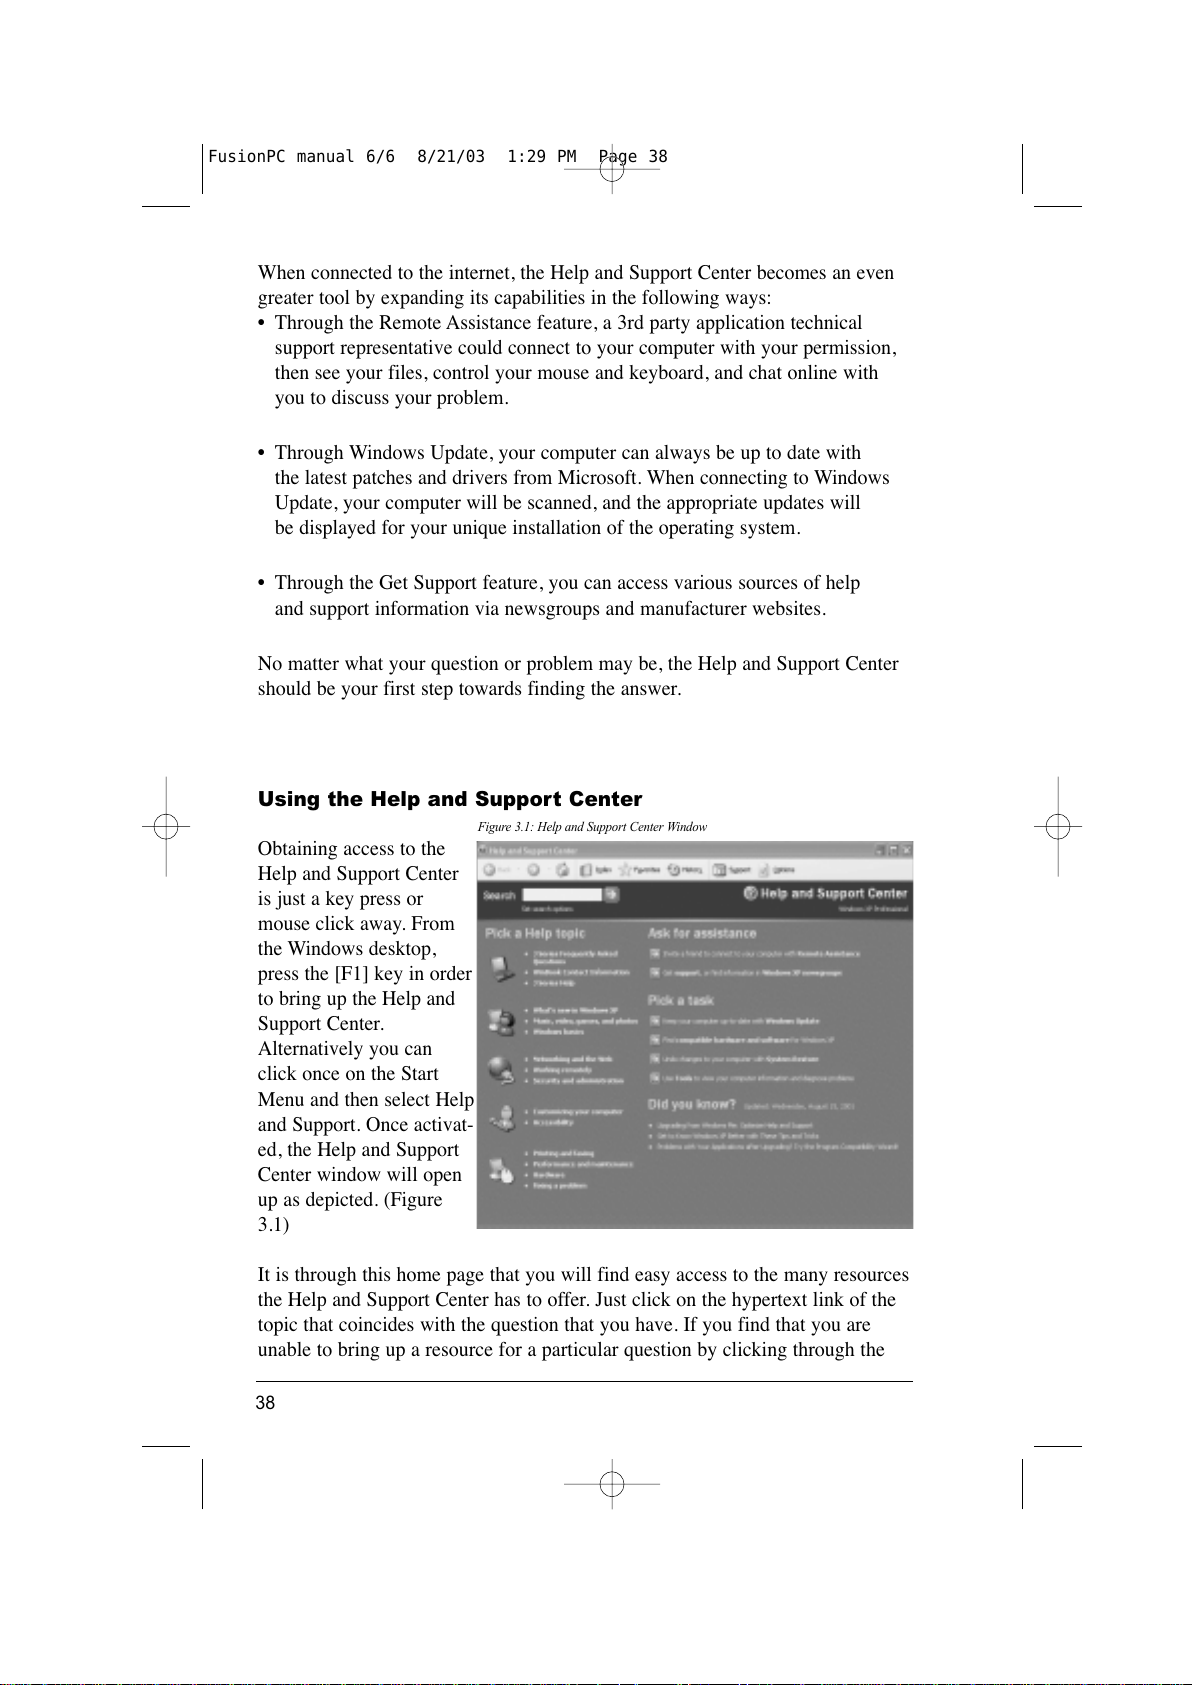
Using the Help and Support Center
Obtaining access to the
Help and Support Center
is just a key press or
mouse click away. From
the Windows desktop,
press the [F1] key in order
to bring up the Help and
Support Center.
Alternatively you can
click once on the Start
Menu and then select Help
and Support. Once activat-
ed, the Help and Support
Center window will open
up as depicted. (Figure
3.1)
It is through this home page that you will find easy access to the many resources
the Help and Support Center has to offer. Just click on the hypertext link of the
topic that coincides with the question that you have. If you find that you are
unable to bring up a resource for a particular question by clicking through the
Figure 3.1: Help and Support Center Window
38
FusionPC manual 6/6 8/21/03 1:29 PM Page 38
All manuals and user guides at all-guides.com
Page 49
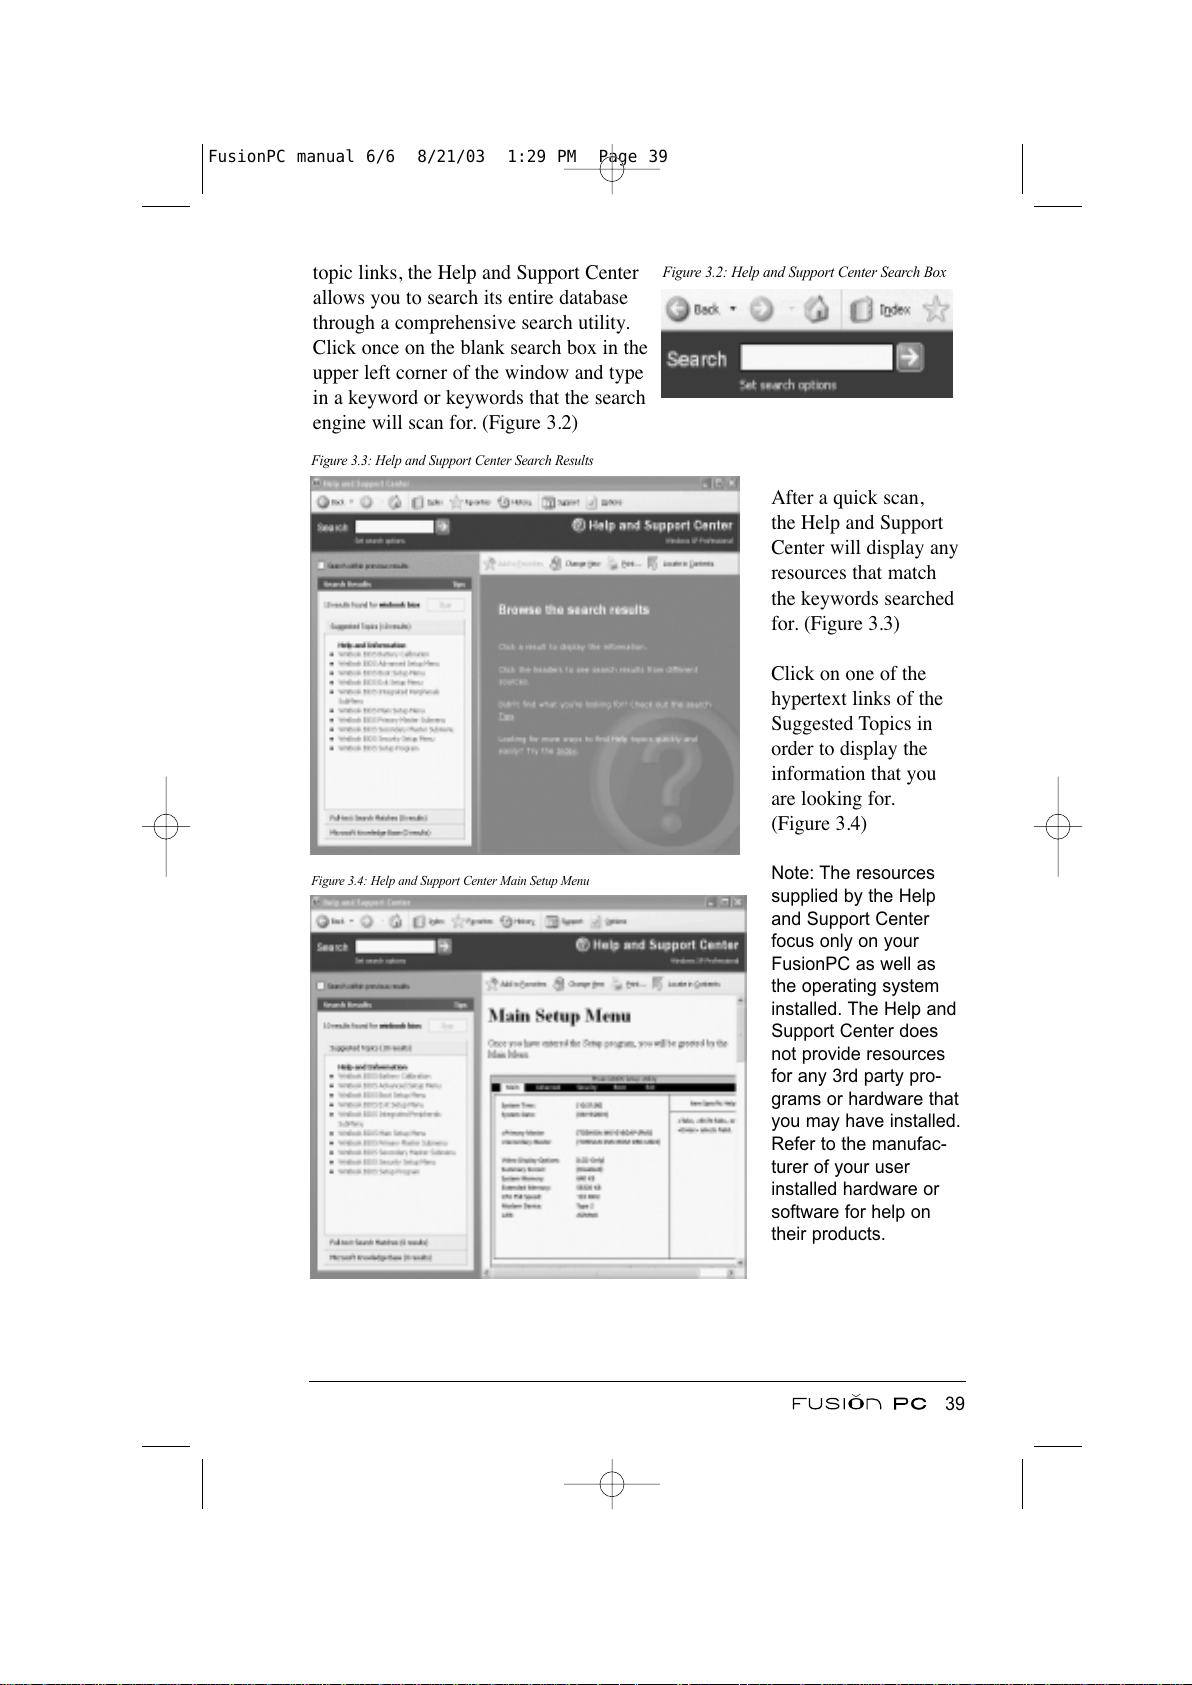
topic links, the Help and Support Center
allows you to search its entire database
through a comprehensive search utility.
Click once on the blank search box in the
upper left corner of the window and type
in a keyword or keywords that the search
engine will scan for. (Figure 3.2)
After a quick scan,
the Help and Support
Center will display any
resources that match
the keywords searched
for. (Figure 3.3)
Click on one of the
hypertext links of the
Suggested Topics in
order to display the
information that you
are looking for.
(Figure 3.4)
Note: The resources
supplied by the Help
and Support Center
focus only on your
FusionPC as well as
the operating system
installed. The Help and
Support Center does
not provide resources
for any 3rd party pro-
grams or hardware that
you may have installed.
Refer to the manufac-
turer of your user
installed hardware or
software for help on
their products.
Figure 3.2: Help and Support Center Search Box
Figure 3.3: Help and Support Center Search Results
Figure 3.4: Help and Support Center Main Setup Menu
39
FusionPC manual 6/6 8/21/03 1:29 PM Page 39
All manuals and user guides at all-guides.com
Page 50
FusionPC Users’ Manual and the Help and Support Center
This manual was written to complement the Help and Support Center. While the
manual doesn’t directly answer many of the questions or concepts explained in
each chapter, the manual does refer the reader to the Help and Support Center in
order to bring up the correct resource.
System Restore
One of the powerful utilities within the Help and Support Center is the System
Restore utility. With this utility, you can recover from fatal errors that are the
direct result of failed hardware or software installations. Your operating system
automatically sets restore points whenever you install a new piece of software
or add a new hardware device. If you find yourself in a situation in which your
computer is malfunctioning after you have recently installed something, running
System Restore from the Help and Support Center will allow you to revert back
to a point before the installation occurred, thus protecting your valuable data
and the integrity of your system.
Why Use the Help and Support Center?
• Most likely the answer to your question can already be answered within the
Help and Support Center.
• The Help and Support Center gives you the user, the power to solve your own
problem or answer your own question without having to rely on the traditional
methods of support. (i.e. technical support phone call, surfing the internet for
answers)
40
FusionPC manual 6/6 8/21/03 1:29 PM Page 40
All manuals and user guides at all-guides.com
Page 51
Chapter 4
Entertainment in AV Mode
In AV mode, your system functions as a consumer home appliance. By simply
using the remote control, the FusionPC can be used just like standalone devices.
This chapter tells you how to use your system as the following appliances:
• CD/MP3 player
• DVD player
• TV set
• FM radio
41
FusionPC manual 6/6 8/21/03 1:29 PM Page 41
All manuals and user guides at all-guides.com
all-guides.com
Page 52
CD/MP3 Player
Turning the CD/MP3 Player On/Off
To use your system as a consumer CD/MP3 player, press the
CD/MP3 button
on the remote control. If your system is in an off state when you press the but-
ton, you will be in AV mode.
When you have finished using the player, you can switch directly to another
mode or element. If you want to directly turn the system off, press the
Stand
By
button or power button.
Playing Audio CDs
Follow this procedure to play an audio CD:
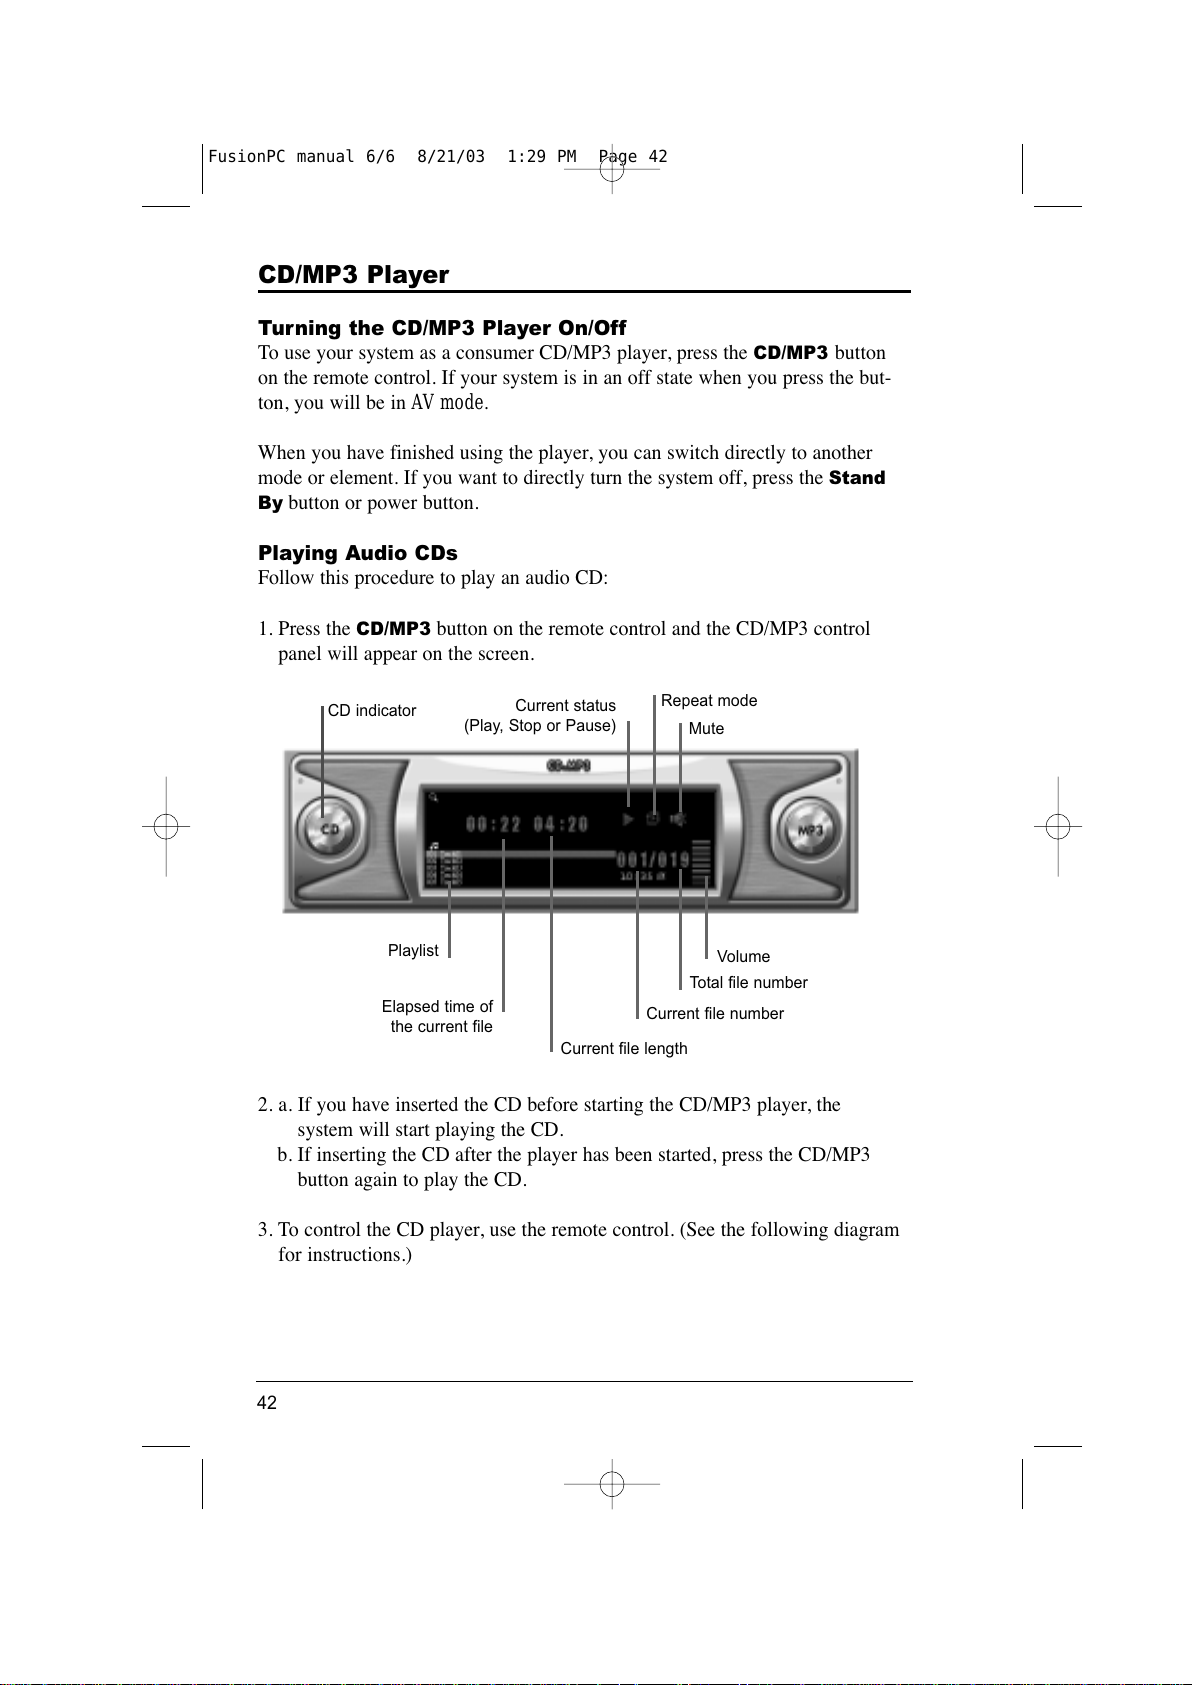
1. Press the
CD/MP3 button on the remote control and the CD/MP3 control
panel will appear on the screen.
2. a. If you have inserted the CD before starting the CD/MP3 player, the
system will start playing the CD.
b. If inserting the CD after the player has been started, press the CD/MP3
button again to play the CD.
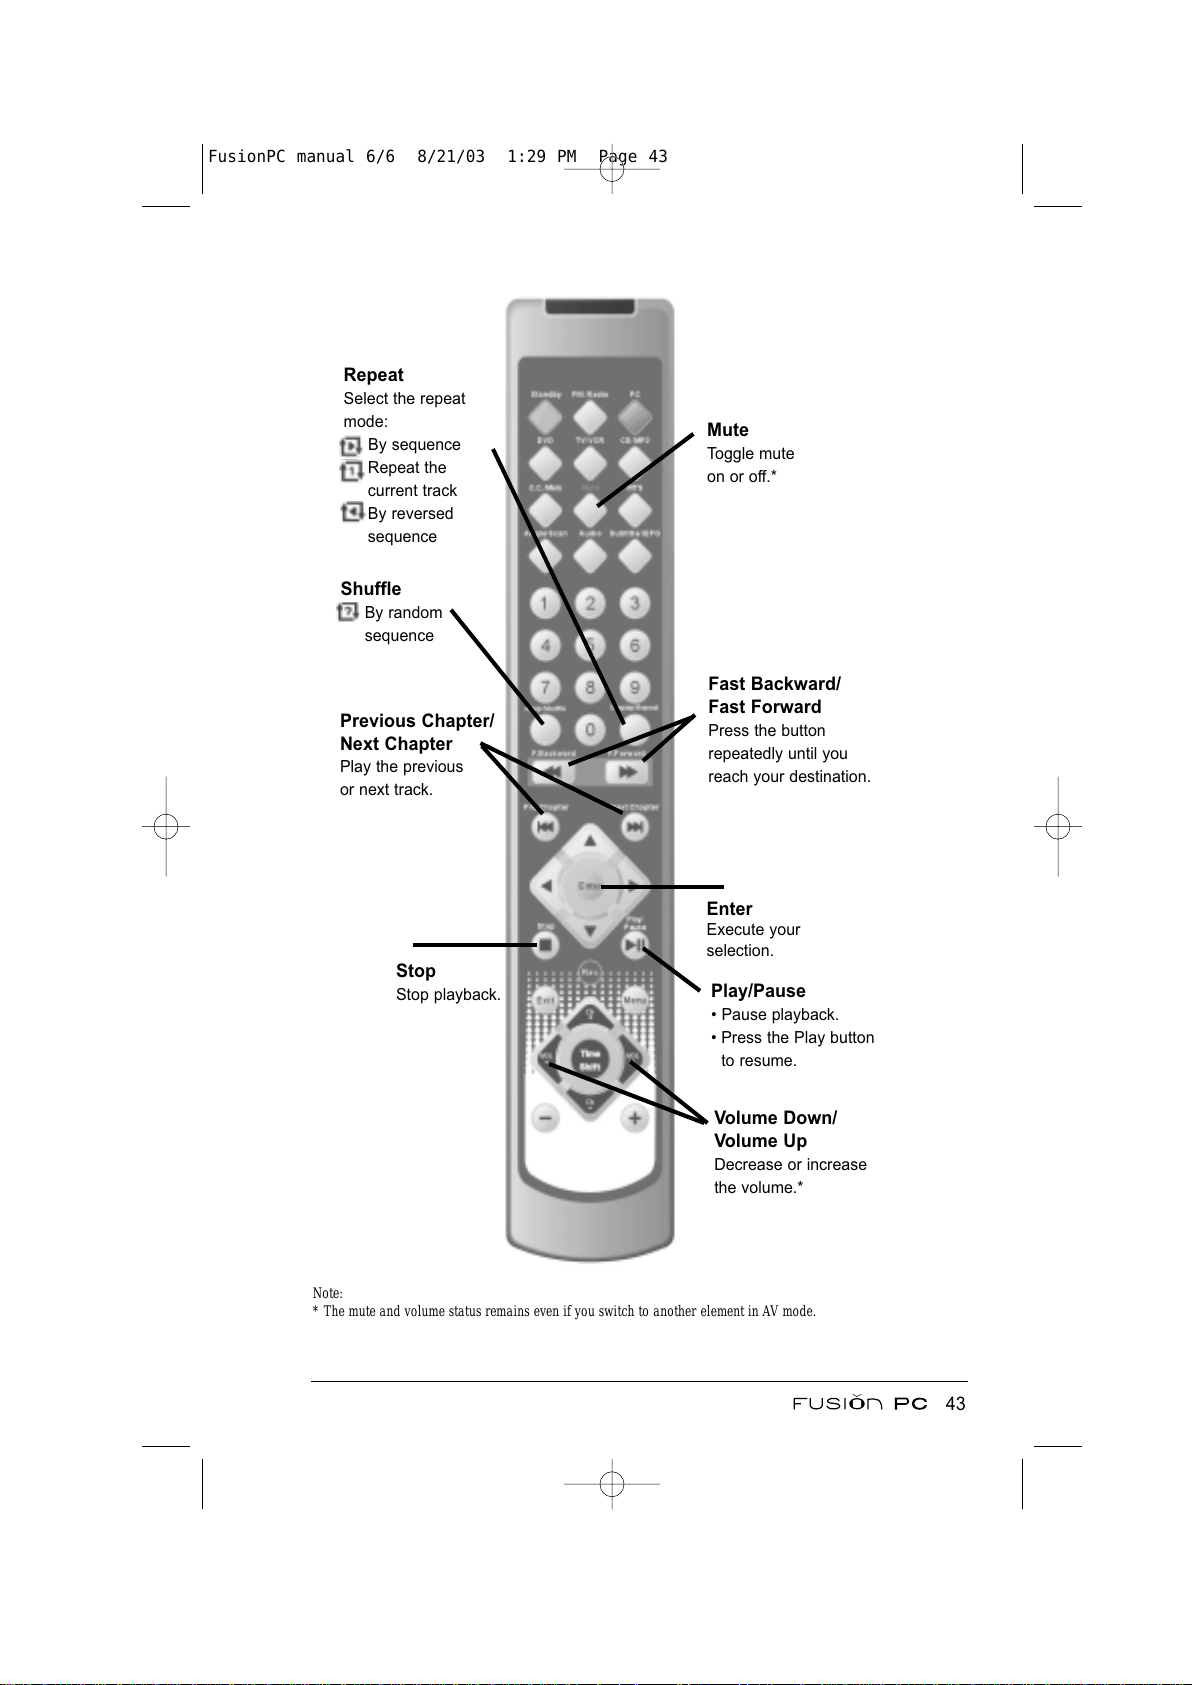
3. To control the CD player, use the remote control. (See the following diagram
for instructions.)
Playlist
Elapsed time of
the current file
Current file length
Current file number
Total file number
Volume
CD indicator
Mute
Repeat mode
Current status
(Play, Stop or Pause)
42
FusionPC manual 6/6 8/21/03 1:29 PM Page 42
All manuals and user guides at all-guides.com
Page 53
Note:
* The mute and volume status remains even if you switch to another element in AV mode.
43
Enter
Execute your
selection.
Stop
Stop playback.
Play/Pause
• Pause playback.
• Press the Play button
to resume.
Fast Backward/
Fast Forward
Press the button
repeatedly until you
reach your destination.
Previous Chapter/
Next Chapter
Play the previous
or next track.
Repeat
Select the repeat
mode:
By sequence
Repeat the
current track
By reversed
sequence
Shuffle
By random
sequence
Mute
Toggle mute
on or off.*
Volume Down/
Volume Up
Decrease or increase
the volume.*
FusionPC manual 6/6 8/21/03 1:29 PM Page 43
All manuals and user guides at all-guides.com
Page 54
4. If you want to play another CD, press the Stop button to stop the current
CD > remove the current CD > Insert the next CD and press the
Play
button.
Note: A CD can’t be ejected during playback in AV mode.
Playing MP3 Music
The MP3 player can play MP3 files on a CD or in the c:\mp3 folder (directory)
on your hard disk drive.
Follow this procedure to play MP3 files:
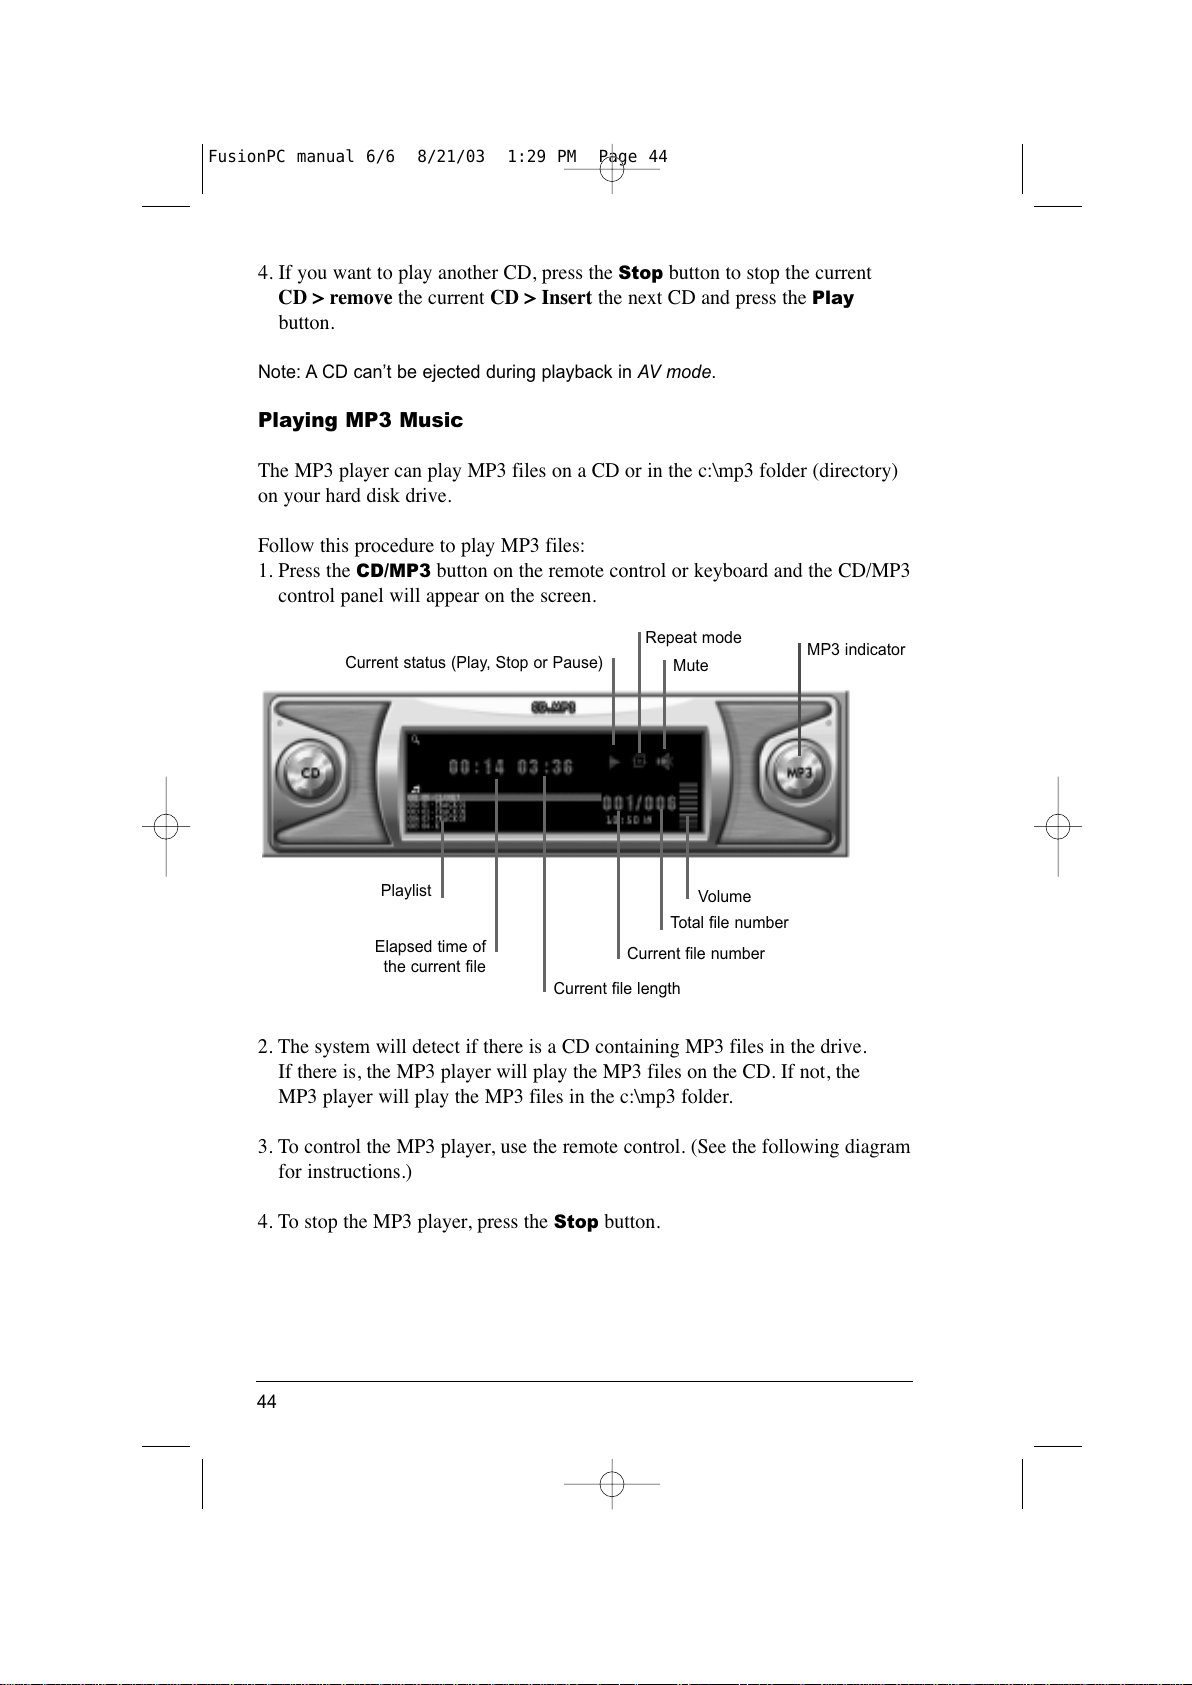
1. Press the CD/MP3 button on the remote control or keyboard and the CD/MP3
control panel will appear on the screen.
2. The system will detect if there is a CD containing MP3 files in the drive.
If there is, the MP3 player will play the MP3 files on the CD. If not, the
MP3 player will play the MP3 files in the c:\mp3 folder.
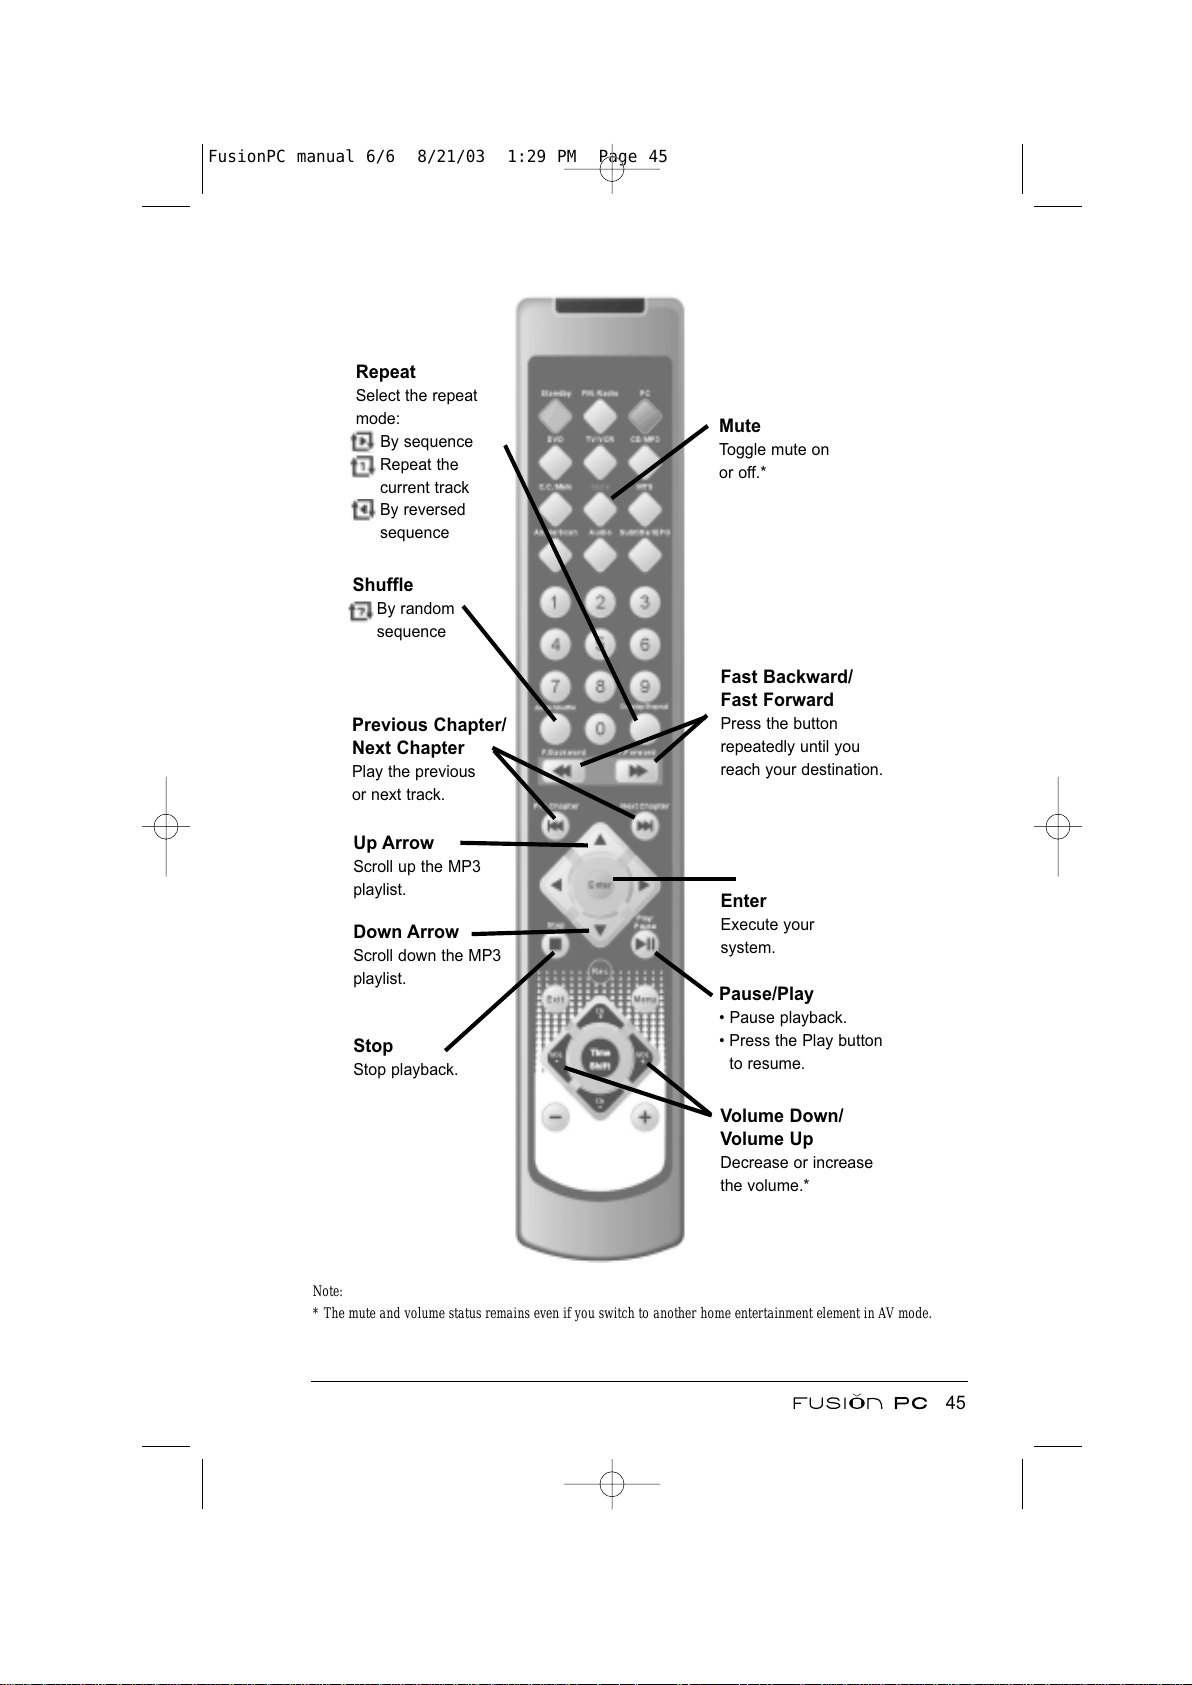
3. To control the MP3 player, use the remote control. (See the following diagram
for instructions.)
4. To stop the MP3 player, press the
Stop button.
Playlist
Elapsed time of
the current file
Current file length
Current file number
Total file number
Volume
MP3 indicator
Mute
Repeat mode
Current status (Play, Stop or Pause)
44
FusionPC manual 6/6 8/21/03 1:29 PM Page 44
All manuals and user guides at all-guides.com
Page 55
Note:
* The mute and volume status remains even if you switch to another home entertainment element in AV mode.
45
Enter
Execute your
system.
Stop
Stop playback.
Pause/Play
• Pause playback.
• Press the Play button
to resume.
Fast Backward/
Fast Forward
Press the button
repeatedly until you
reach your destination.
Previous Chapter/
Next Chapter
Play the previous
or next track.
Repeat
Select the repeat
mode:
By sequence
Repeat the
current track
By reversed
sequence
Shuffle
By random
sequence
Mute
Toggle mute on
or off.*
Volume Down/
Volume Up
Decrease or increase
the volume.*
Up Arrow
Scroll up the MP3
playlist.
Down Arrow
Scroll down the MP3
playlist.
FusionPC manual 6/6 8/21/03 1:29 PM Page 45
All manuals and user guides at all-guides.com
Page 56
DVD Player
If your system comes with a DVD, DVD-R/DVD-RW or Combo drive, you
can use the DVD player to play back DVD movies.
Turning the DVD Player On/Off
To use your system as a consumer DVD player, press the
DVD/VCD button
on the remote control. If your system is in an off state when you press the but-
ton, you will be in AV mode.
When you have finished using the player, you can switch directly to another
element. If you want to directly turn the system off, press the
Stand By button
or power button.
Playing a DVD/VCD
Note: Most DVD’s have regional settings. When you play a disc from a different
region, you will be asked if you want to change the region setting in PC mode.
However, you won’t be able to play the disc in AV mode unless you change the
region setting in PC mode. (See “WinDVD Setup” in Chapter 5 for information
on region settings.)
1. Press the DVD button on the remote control.
2. a. If you have inserted the DVD before starting the DVD player, the system
will start playing the DVD.
b. If inserting the DVD after the player has started, press the
Play button
again on the remote control to start playing.
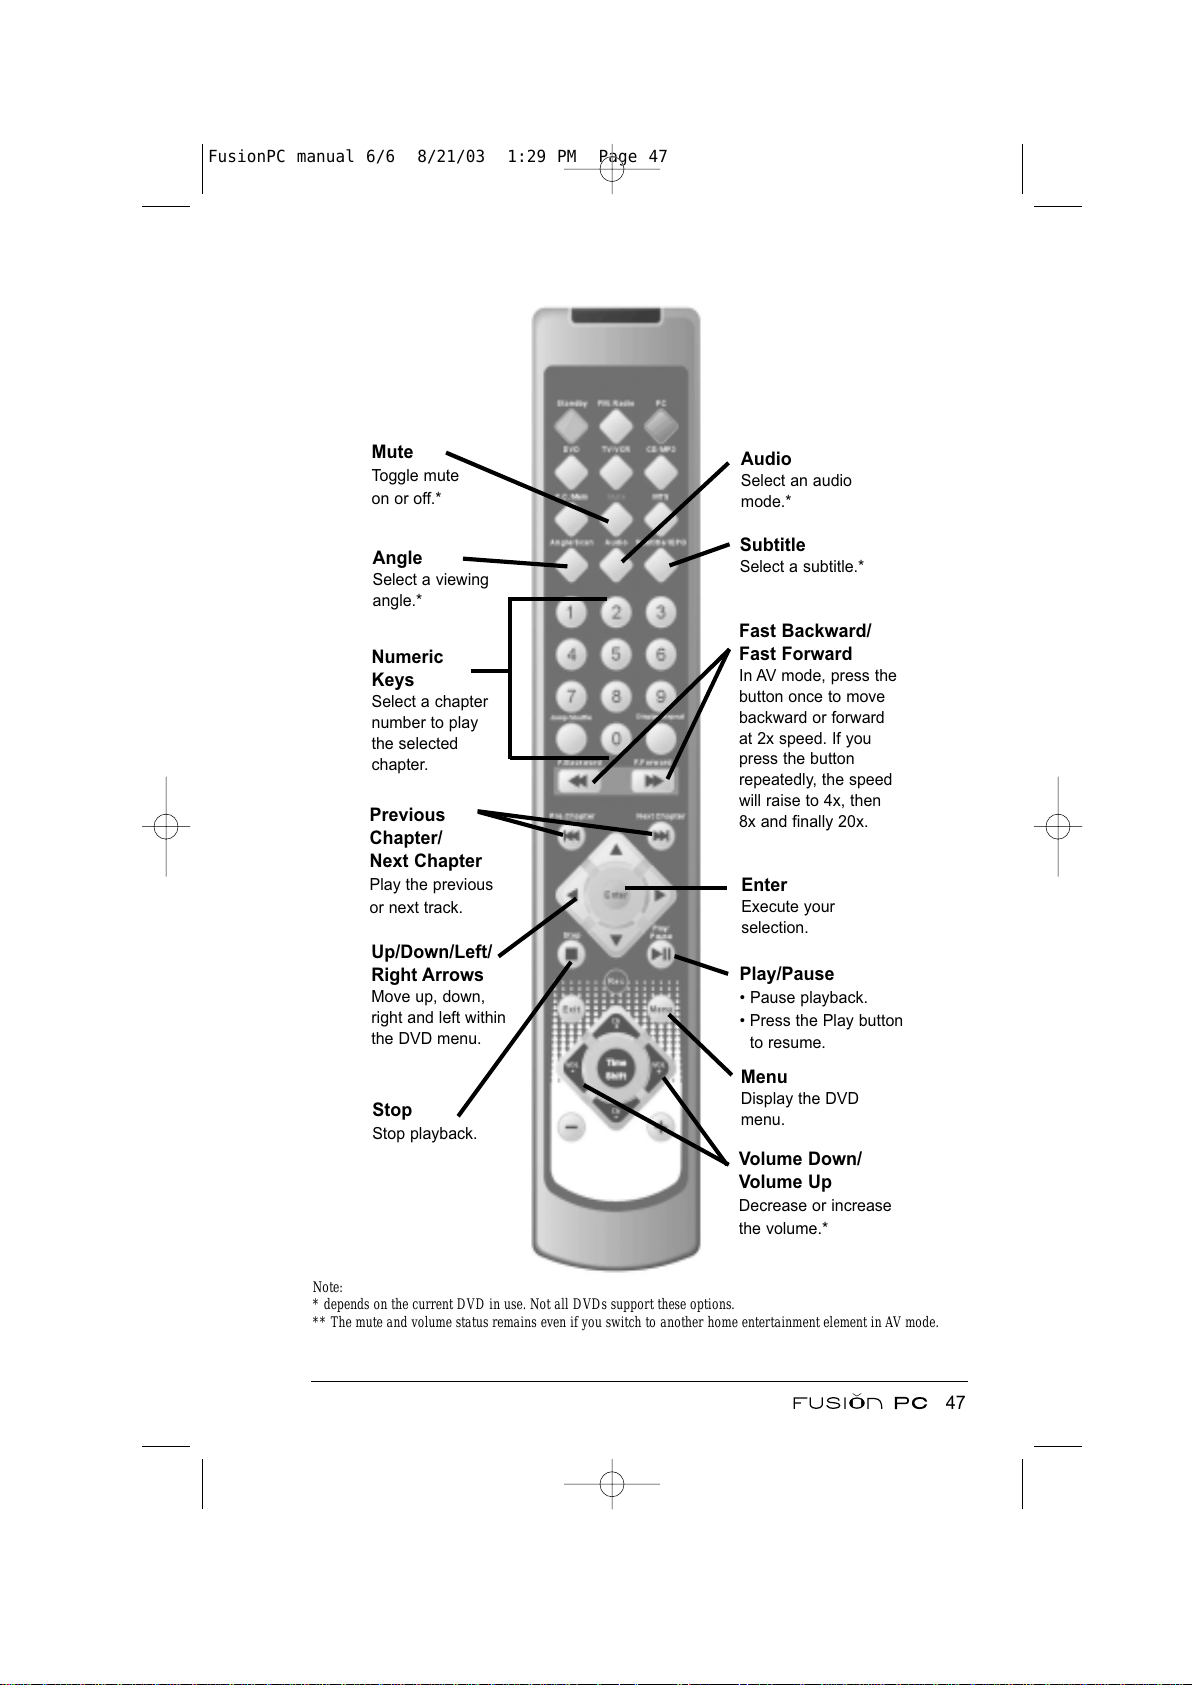
3. To control the DVD player, use the remote control. (See the following
diagram for instructions.)
46
FusionPC manual 6/6 8/21/03 1:29 PM Page 46
All manuals and user guides at all-guides.com
all-guides.com
Page 57
Note:
* depends on the current DVD in use. Not all DVDs support these options.
** The mute and volume status remains even if you switch to another home entertainment element in AV mode.
47
Enter
Execute your
selection.
Stop
Stop playback.
Play/Pause
• Pause playback.
• Press the Play button
to resume.
Fast Backward/
Fast Forward
In AV mode, press the
button once to move
backward or forward
at 2x speed. If you
press the button
repeatedly, the speed
will raise to 4x, then
8x and finally 20x.
Previous
Chapter/
Next Chapter
Play the previous
or next track.
Angle
Select a viewing
angle.*
Mute
Toggle mute
on or off.*
Volume Down/
Volume Up
Decrease or increase
the volume.*
Menu
Display the DVD
menu.
Up/Down/Left/
Right Arrows
Move up, down,
right and left within
the DVD menu.
Numeric
Keys
Select a chapter
number to play
the selected
chapter.
Audio
Select an audio
mode.*
Subtitle
Select a subtitle.*
FusionPC manual 6/6 8/21/03 1:29 PM Page 47
All manuals and user guides at all-guides.com
Page 58
TV Set
With the built-in TV tuner, you can use your system to watch TV or play back
video from an external source.
Note: To watch cable TV, you need to have an account with a cable TV provider.
Turning the TV Set On/Off
To use your system as a TV set, press the
TV/VCR button on the remote
control. If your system is off when you press the button, you will start in
AV mode.
When you have finished using the player, you can switch directly to another
element. If you want to directly turn the system off, press the
Stand By button
on the remote control or the power button on the top side of the unit.
Scanning TV Channels
You must scan all available channels before you can watch TV.
When you use TV in AV mode for the very first time, the channels
will be automatically scanned. After that, you can use the remote control
to switch to a channel for watching.
Watching TV
1. Press the
TV/VCR button on the remote control. Live TV will be shown
on the screen.
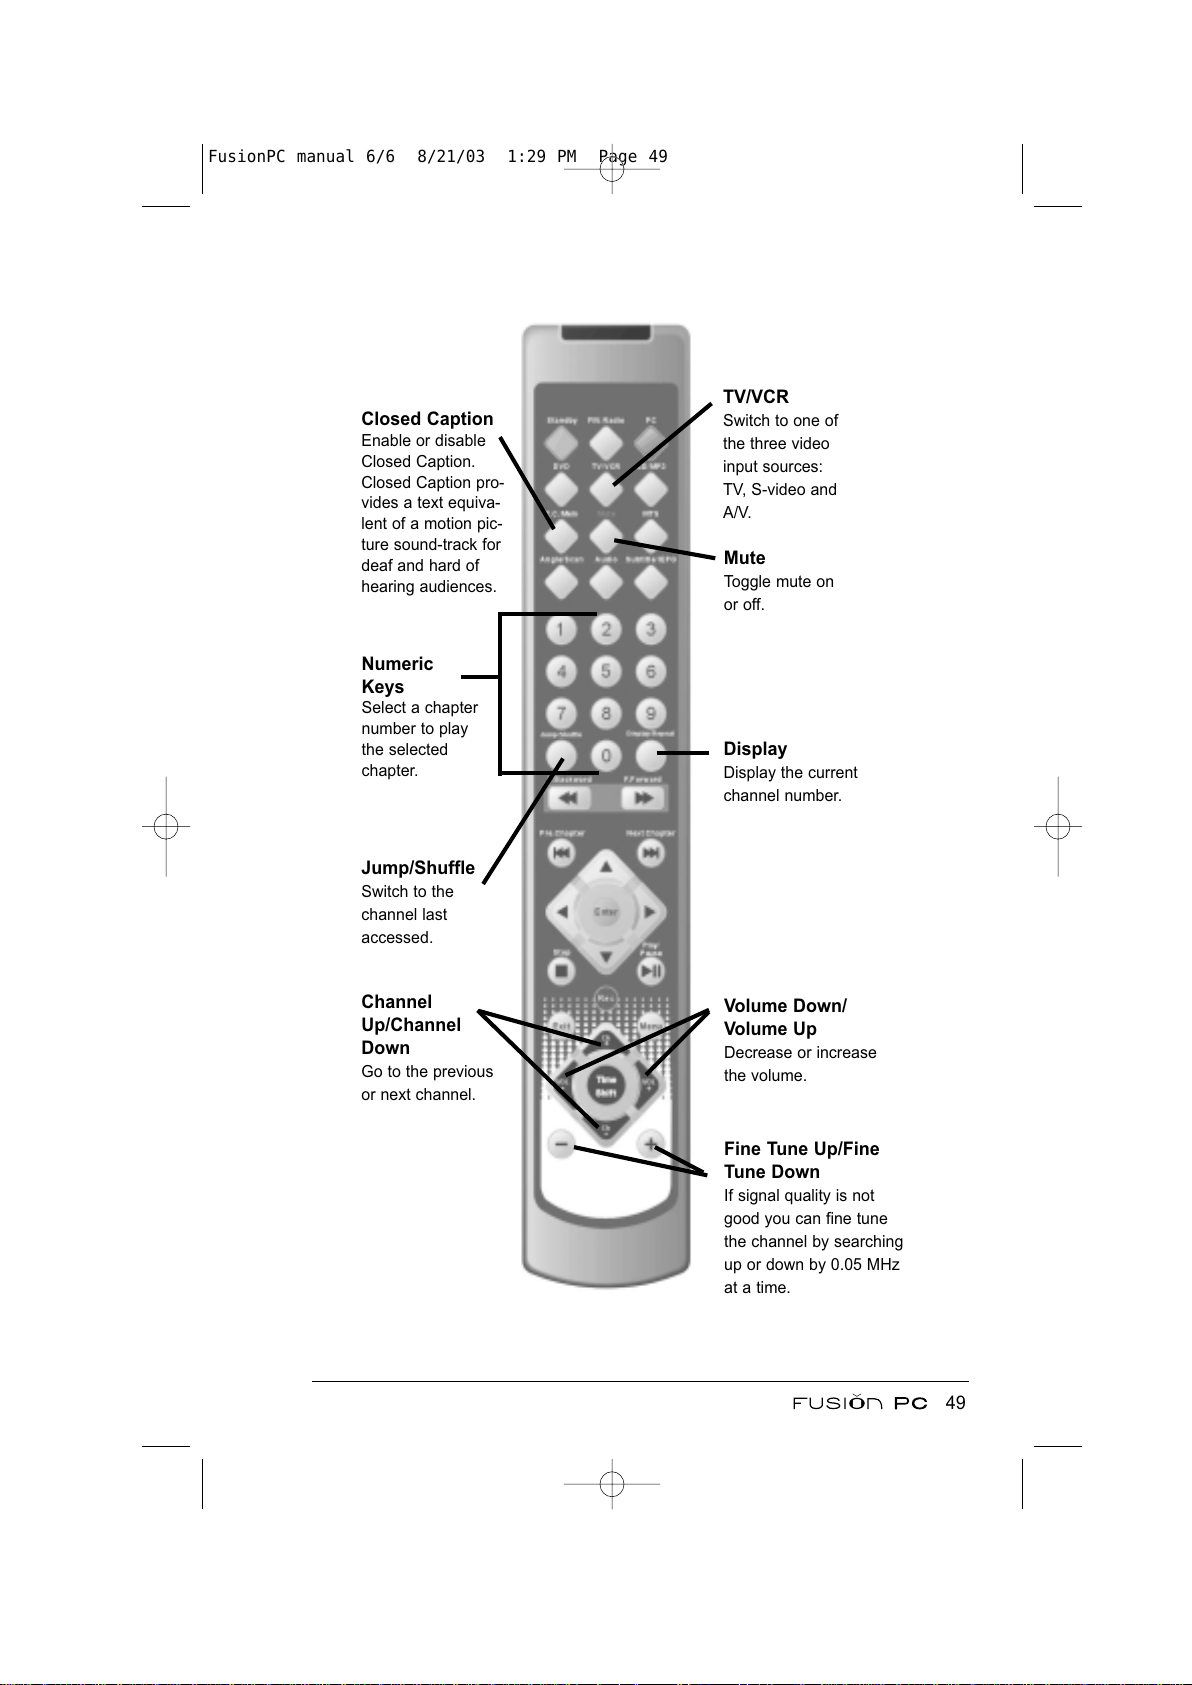
2. To control the TV set, use the remote control. (See the following diagram
for instructions.)
48
FusionPC manual 6/6 8/21/03 1:29 PM Page 48
All manuals and user guides at all-guides.com
Page 59
49
Jump/Shuffle
Switch to the
channel last
accessed.
Fine Tune Up/Fine
Tune Down
If signal quality is not
good you can fine tune
the channel by searching
up or down by 0.05 MHz
at a time.
Mute
Toggle mute on
or off.
Volume Down/
Volume Up
Decrease or increase
the volume.
TV/VCR
Switch to one of
the three video
input sources:
TV, S-video and
A/V.
Numeric
Keys
Select a chapter
number to play
the selected
chapter.
Channel
Up/Channel
Down
Go to the previous
or next channel.
Display
Display the current
channel number.
Closed Caption
Enable or disable
Closed Caption.
Closed Caption pro-
vides a text equiva-
lent of a motion pic-
ture sound-track for
deaf and hard of
hearing audiences.
FusionPC manual 6/6 8/21/03 1:29 PM Page 49
All manuals and user guides at all-guides.com
Page 60
FM Radio
With the built-in FM tuner, you can use your system to listen to FM radio.
Note: You must connect the FM antenna before you can listen to FM radio.
If signal quality is not good, try relocating the antenna.
Turning the Radio On/Off
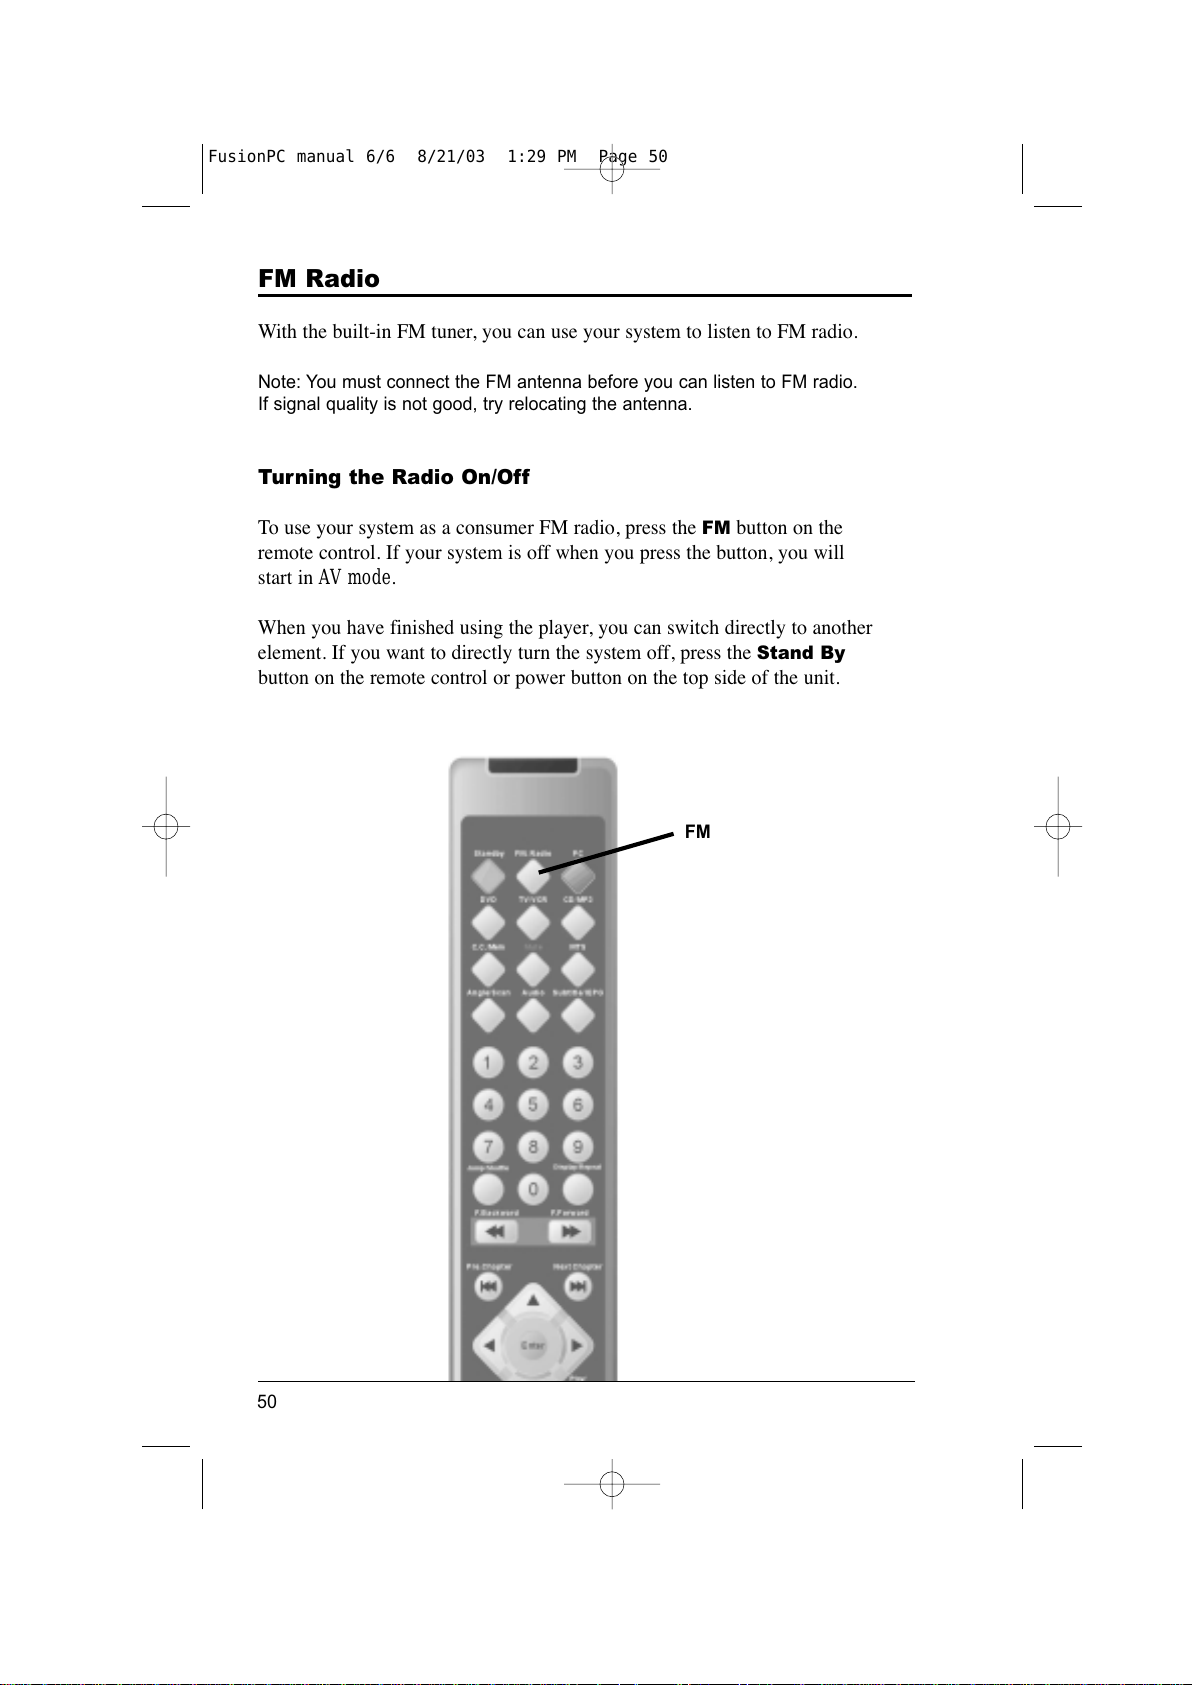
To use your system as a consumer FM radio, press the
FM button on the
remote control. If your system is off when you press the button, you will
start in AV mode.
When you have finished using the player, you can switch directly to another
element. If you want to directly turn the system off, press the
Stand By
button on the remote control or power button on the top side of the unit.
50
FM
FusionPC manual 6/6 8/21/03 1:29 PM Page 50
All manuals and user guides at all-guides.com
Page 61
Scanning FM Channels
When the system scans the first channel, it will stop and give you the chance
to set the channel as a favorite channel. (See “Saving Favorite FM Channels”
later in this section.) Press the
Scan button to keep on scanning until the lock
icon lights up on the screen indicating the end of the scanning.
Listening to FM Radio
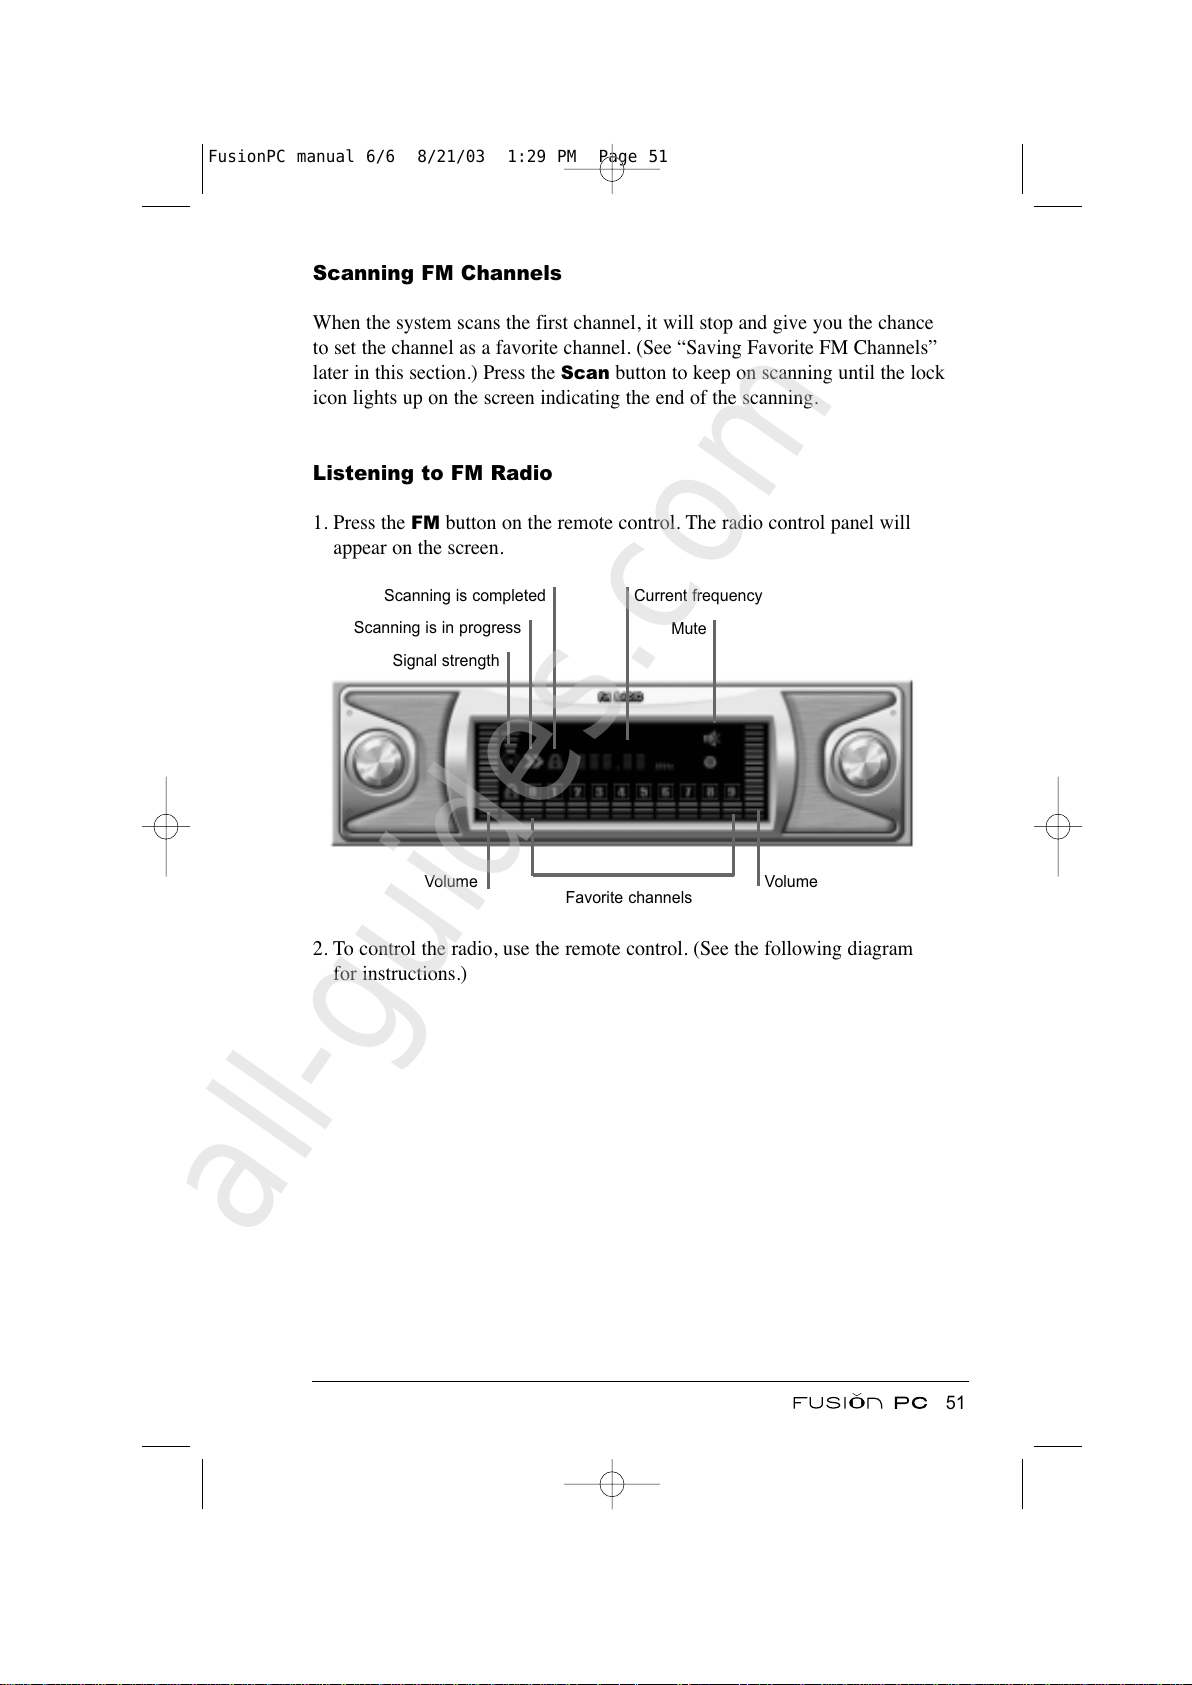
1. Press the
FM button on the remote control. The radio control panel will
appear on the screen.
2. To control the radio, use the remote control. (See the following diagram
for instructions.)
51
Volume
Favorite channels
Signal strength
Mute
Current frequency
Volume
Scanning is in progress
Scanning is completed
FusionPC manual 6/6 8/21/03 1:29 PM Page 51
All manuals and user guides at all-guides.com
all-guides.com
Page 62
Note:
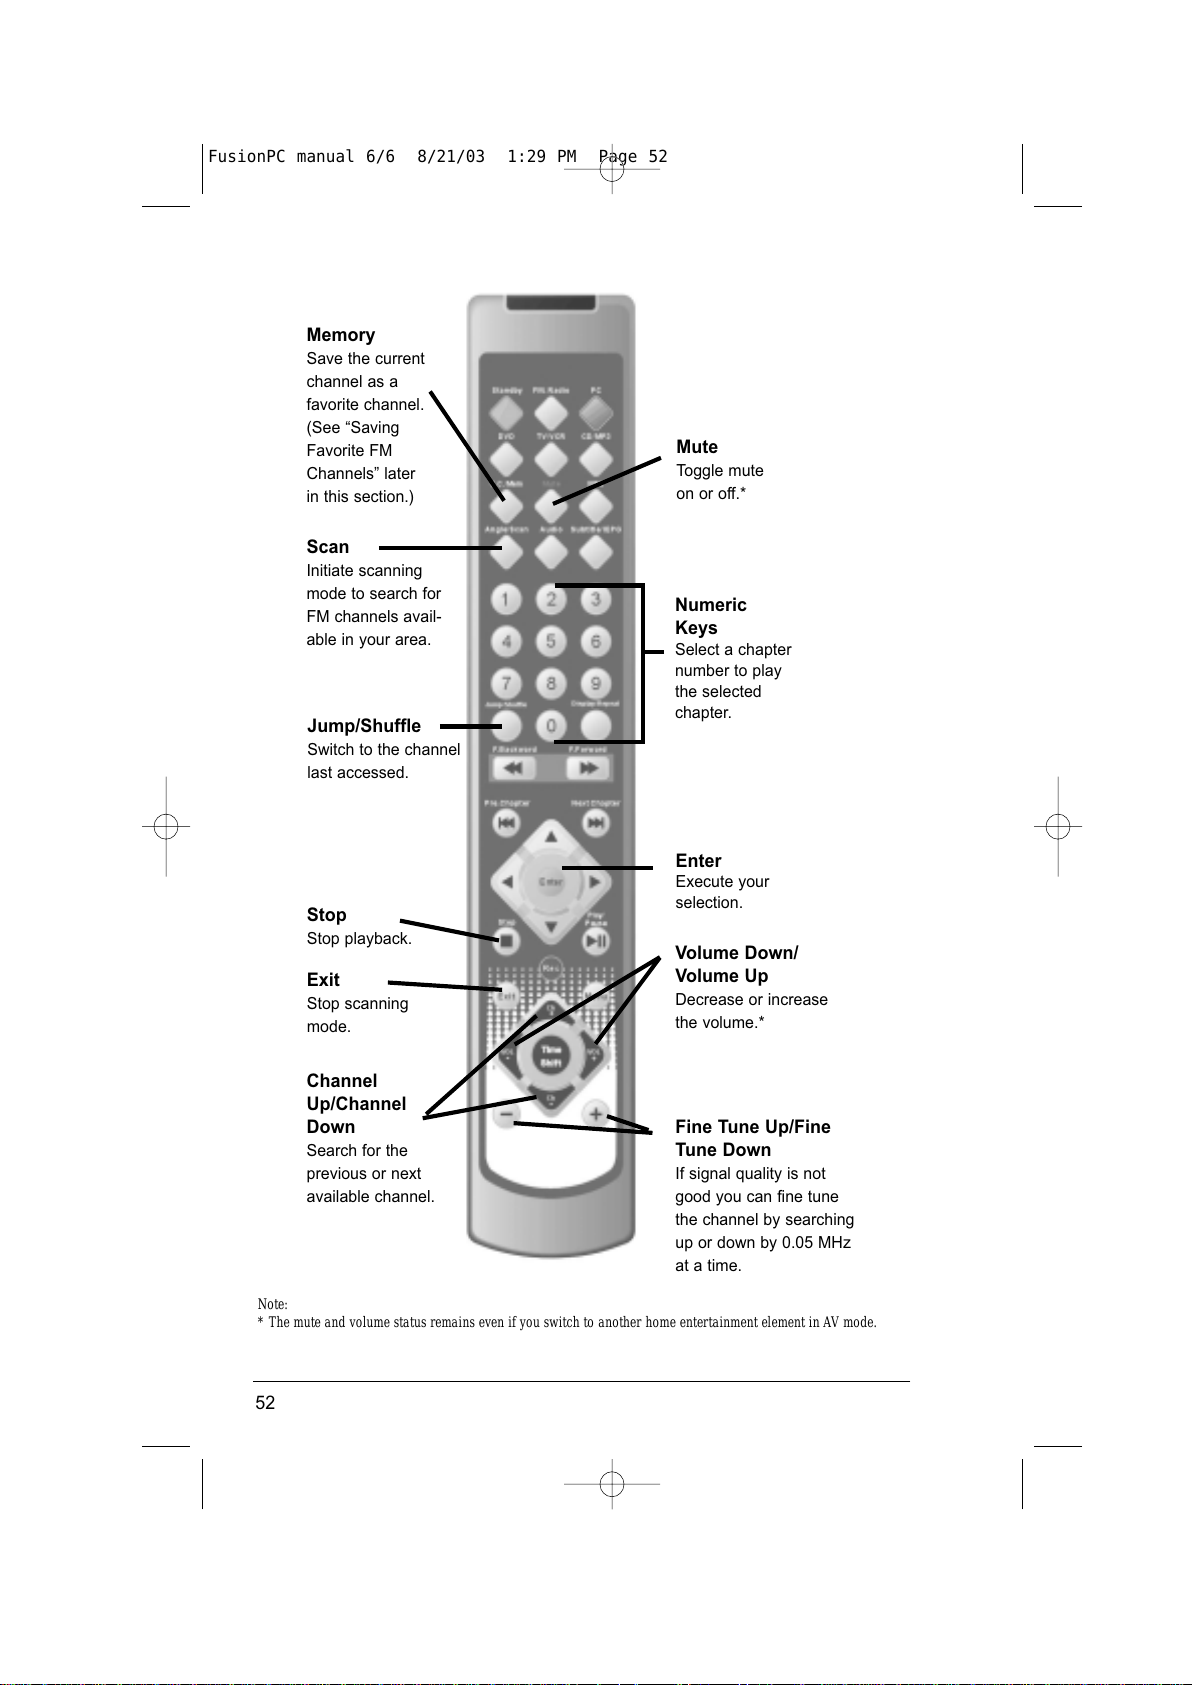
* The mute and volume status remains even if you switch to another home entertainment element in AV mode.
52
Enter
Execute your
selection.
Stop
Stop playback.
Jump/Shuffle
Switch to the channel
last accessed.
Mute
Toggle mute
on or off.*
Volume Down/
Volume Up
Decrease or increase
the volume.*
Numeric
Keys
Select a chapter
number to play
the selected
chapter.
Memory
Save the current
channel as a
favorite channel.
(See “Saving
Favorite FM
Channels” later
in this section.)
Fine Tune Up/Fine
Tune Down
If signal quality is not
good you can fine tune
the channel by searching
up or down by 0.05 MHz
at a time.
Channel
Up/Channel
Down
Search for the
previous or next
available channel.
Exit
Stop scanning
mode.
Scan
Initiate scanning
mode to search for
FM channels avail-
able in your area.
FusionPC manual 6/6 8/21/03 1:29 PM Page 52
All manuals and user guides at all-guides.com
Page 63
Saving Favorite FM Channels
You can easily create your own favorite channel list and then access the
channels by pressing a number button on the remote control. Up to 10 favorite
channels are allowed.
Note:
Favorite channels in AV mode work independently of favorite channels saved
in PC mode.
There are two ways to save the favorite channels.
Saving Favorite Channels by Scanning
1. Press the Scan button to initiate scanning mode.
2. Upon the first channel scanned, an available number on the control panel
will light up (number 1 lights up for first time use). If you wish to use another
number, press the
Mem button as many times as required to select the desired
number. If you do not want this channel as a favorite channel, press the Scan
button to continue scanning for a new channel.
3. Once you have decided on the number to use for the station, press the Enter
button on the remote to save the setting.
4. To end scanning mode, press the
Exit button.
Saving Favorite Channels by Searching
1. Press the Ch+ or Ch- button to search for the channel you wish to save.
2. To save the selected channel, press the
Mem button and an available number
on the control panel will light up (number 1 lights up for first time use). If
you wish to use another number, press the Mem button as many times as
required to select the desired number.
3. Press the
Enter button to save the setting.
4. To continue with other favorite channels, repeat steps 1 to 3.
53
FusionPC manual 6/6 8/21/03 1:29 PM Page 53
All manuals and user guides at all-guides.com
Page 64

54
FusionPC manual 6/6 8/21/03 1:29 PM Page 54
All manuals and user guides at all-guides.com
Page 65
Chapter 5
Entertainment in PC Mode
In PC mode your system functions as a standard computer with built-in multi-
media capabilities. Entertainment features are accessed through application pro-
grams from within Windows XP and are manipulated through mouse or remote
control commands. Your system provides the following multimedia programs:
• WinDVD for playing DVD’s
• WinFast TV for watching TV
• WinFast FM for listening to FM radio
• Microsoft Windows Media Player for listening to Audio CD's, MP3
and WMA files.
This chapter shows you how to use either the mouse or remote control
to operate each entertainment application within PC mode.
55
FusionPC manual 6/6 8/21/03 1:29 PM Page 55
All manuals and user guides at all-guides.com
Page 66
WinDVD: Playing DVD
WinDVD is a simple-to-use software DVD player combining all the features
of a standard consumer DVD player with some very advanced functionality
only possible with a software DVD player, such as time stretching, zooming,
panning, bookmarking and capturing screen images.
This section explains the functionality that WinDVD has to offer and provides
basic operating instructions. For advanced operations, refer to the WinDVD
online help file for detailed information.
Playing a DVD with a mouse and the WinDVD control panel
You can use WinDVD to play a DVD or an audio CD.
1. Click Start > All Programs > InterVideo WinDVD > InterVideo WinDVD
to start the program.
2. a. If the DVD has been inserted before you start the program, playback
will start.
b. If inserting the DVD after the player has started, press the
Play
button at the left side of the Control Panel.
3. WinDVD will check the type of the disc and play accordingly.
4. By default, a DVD title is shown in full screen. You can double click on
the screen to change playback to a window mode. To control playback, use
the WinDVD Control Panel or shortcut (right click) menu.
56
FusionPC manual 6/6 8/21/03 1:29 PM Page 56
All manuals and user guides at all-guides.com
all-guides.com
Page 67
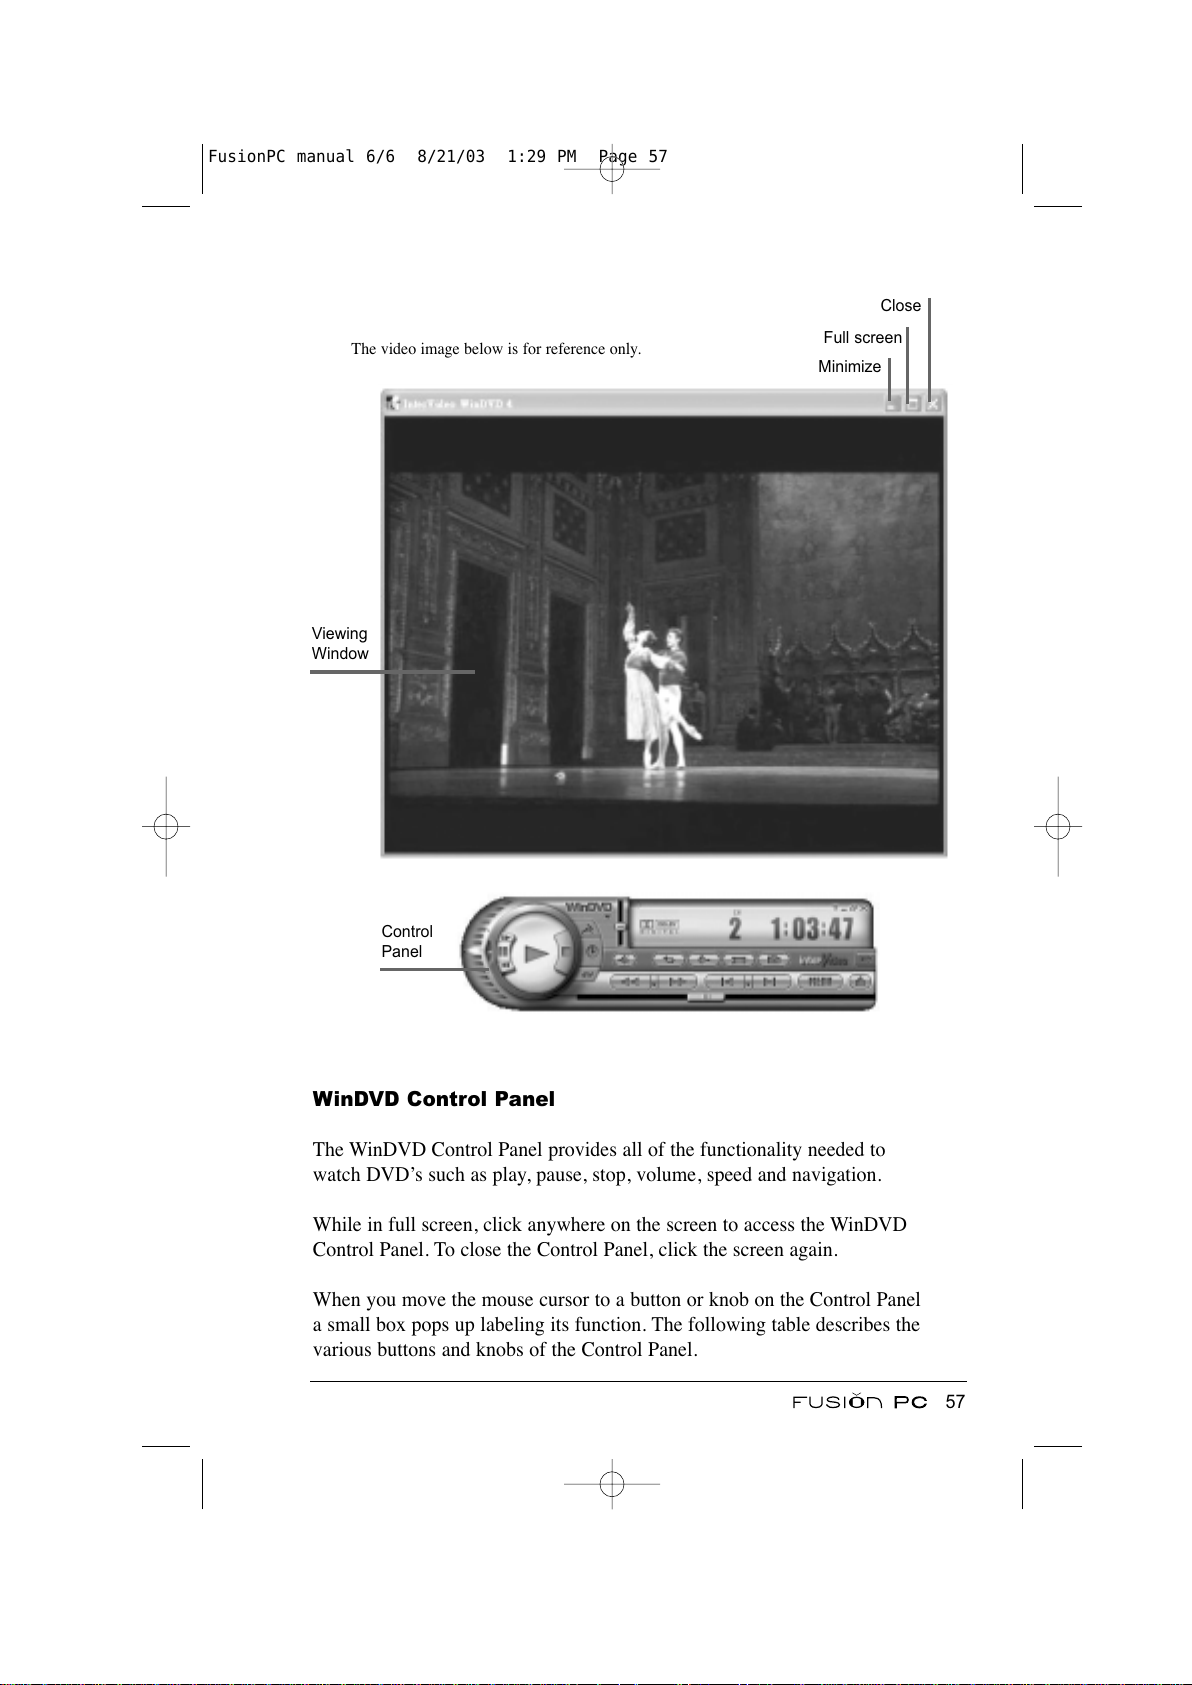
The video image below is for reference only.
WinDVD Control Panel
The WinDVD Control Panel provides all of the functionality needed to
watch DVD’s such as play, pause, stop, volume, speed and navigation.
While in full screen, click anywhere on the screen to access the WinDVD
Control Panel. To close the Control Panel, click the screen again.
When you move the mouse cursor to a button or knob on the Control Panel
a small box pops up labeling its function. The following table describes the
various buttons and knobs of the Control Panel.
57
Minimize
Full screen
Close
Viewing
Window
Control
Panel
FusionPC manual 6/6 8/21/03 1:29 PM Page 57
All manuals and user guides at all-guides.com
Page 68
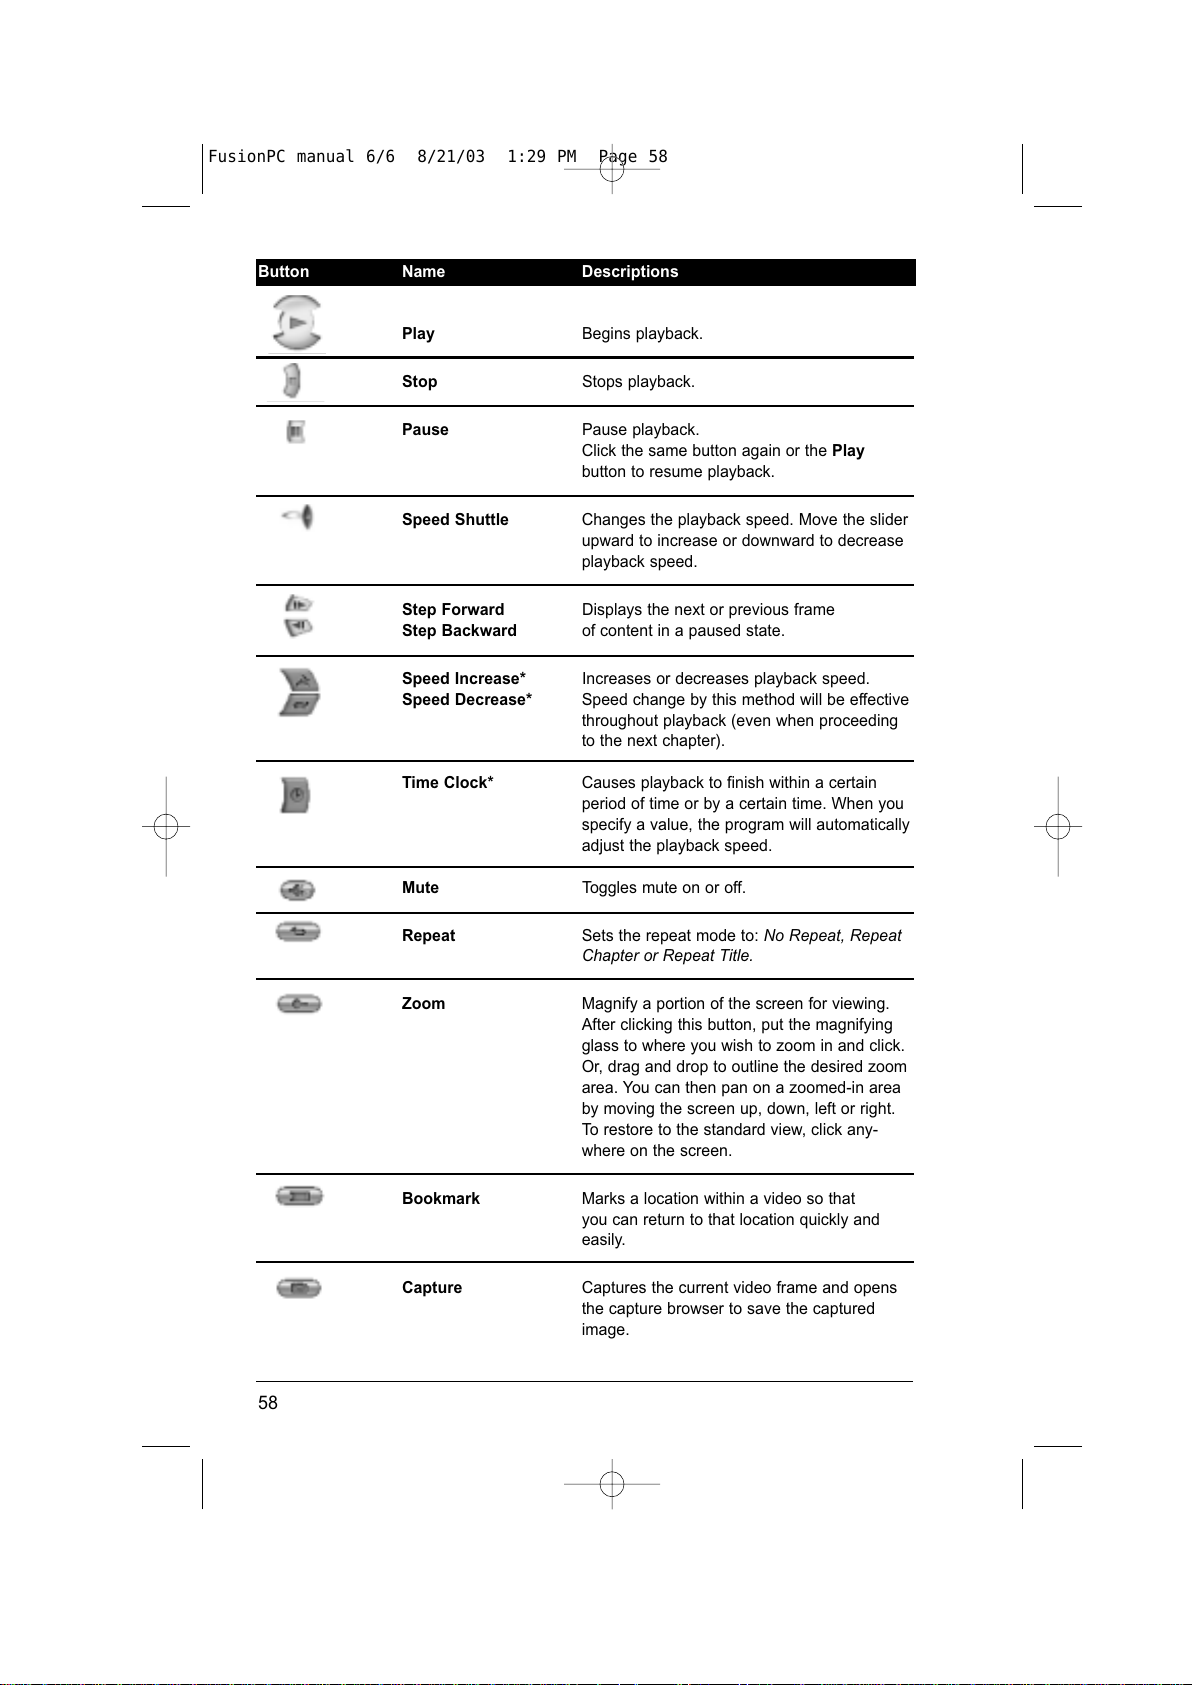
Button Name Descriptions
Play Begins playback.
Stop Stops playback.
Pause Pause playback.
Click the same button again or the Play
button to resume playback.
Speed Shuttle Changes the playback speed. Move the slider
upward to increase or downward to decrease
playback speed.
Step Forward Displays the next or previous frame
Step Backward of content in a paused state.
Speed Increase* Increases or decreases playback speed.
Speed Decrease* Speed change by this method will be effective
throughout playback (even when proceeding
to the next chapter).
Time Clock* Causes playback to finish within a certain
period of time or by a certain time. When you
specify a value, the program will automatically
adjust the playback speed.
Mute Toggles mute on or off.
Repeat Sets the repeat mode to: No Repeat, Repeat
Chapter or Repeat Title.
Zoom Magnify a portion of the screen for viewing.
After clicking this button, put the magnifying
glass to where you wish to zoom in and click.
Or, drag and drop to outline the desired zoom
area. You can then pan on a zoomed-in area
by moving the screen up, down, left or right.
To restore to the standard view, click any-
where on the screen.
Bookmark Marks a location within a video so that
you can return to that location quickly and
easily.
Capture Captures the current video frame and opens
the capture browser to save the captured
image.
58
FusionPC manual 6/6 8/21/03 1:29 PM Page 58
All manuals and user guides at all-guides.com
Page 69
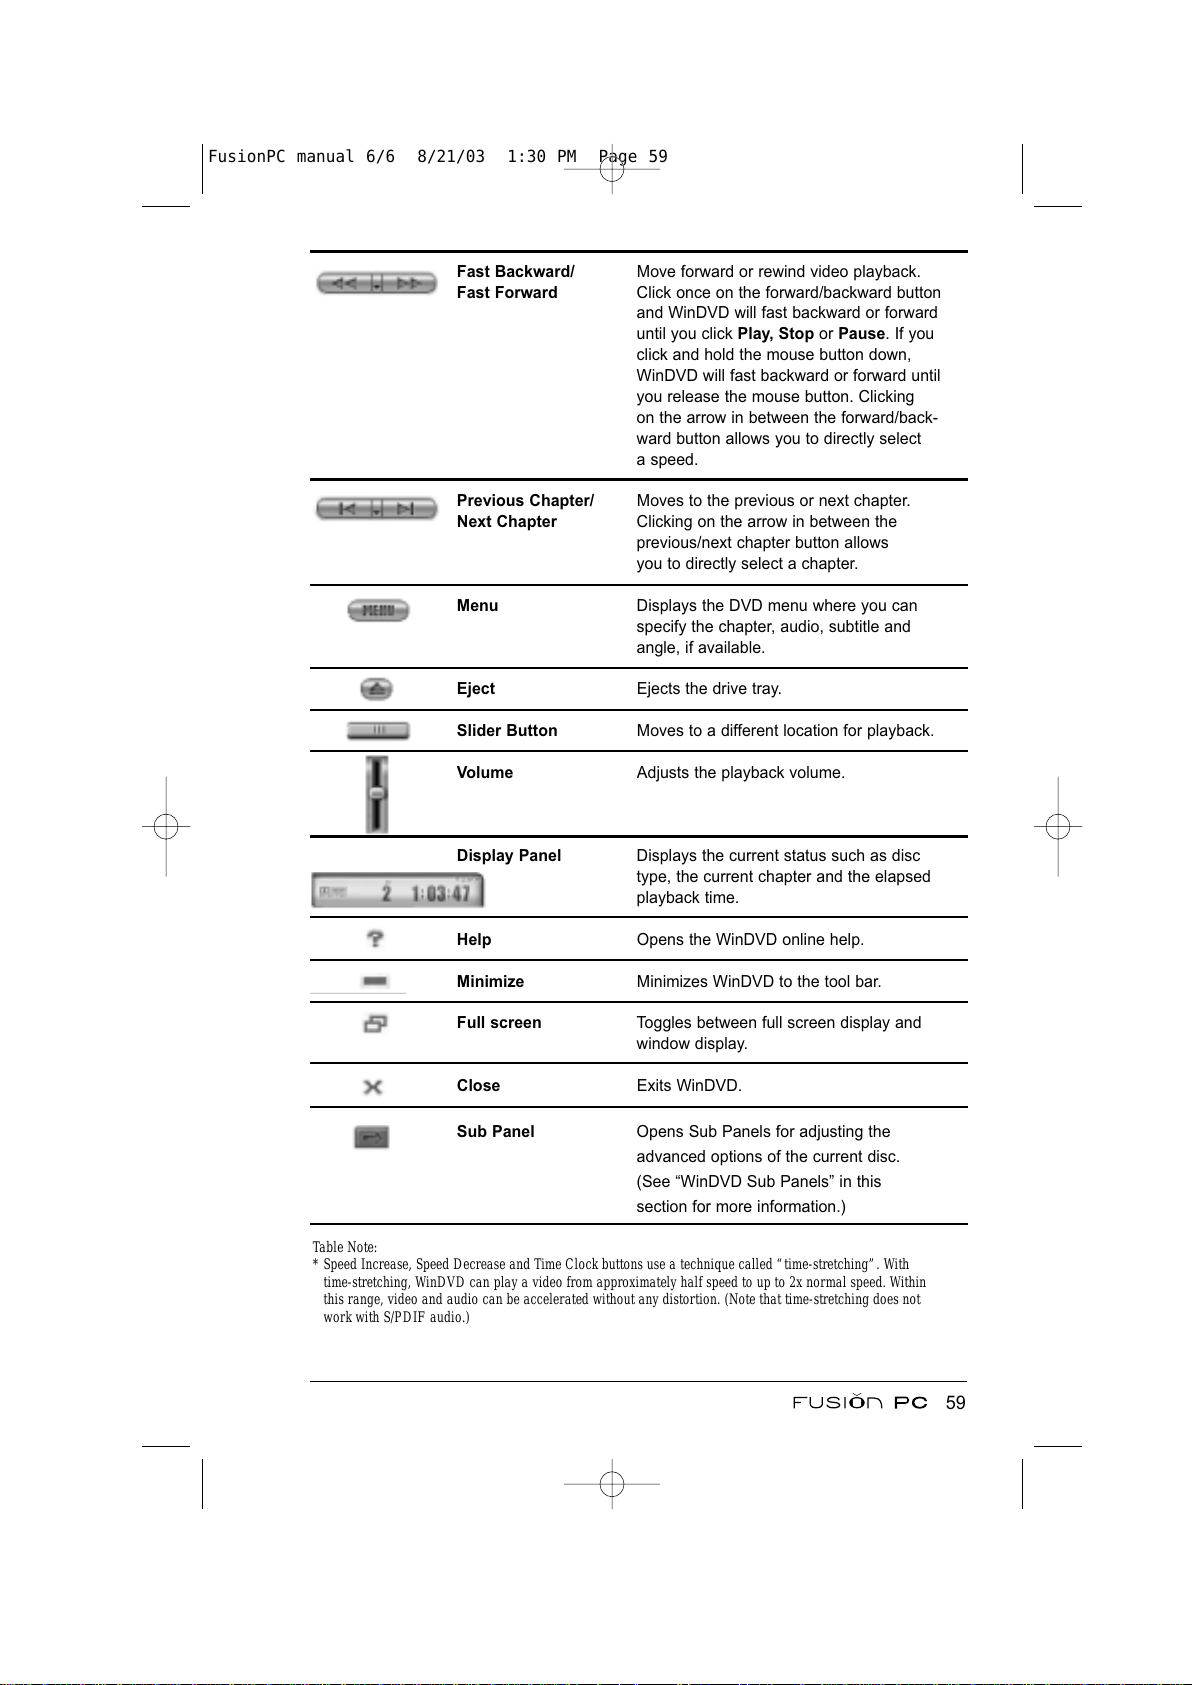
Fast Backward/ Move forward or rewind video playback.
Fast Forward Click once on the forward/backward button
and WinDVD will fast backward or forward
until you click Play, Stop or Pause. If you
click and hold the mouse button down,
WinDVD will fast backward or forward until
you release the mouse button. Clicking
on the arrow in between the forward/back-
ward button allows you to directly select
a speed.
Previous Chapter/ Moves to the previous or next chapter.
Next Chapter Clicking on the arrow in between the
previous/next chapter button allows
you to directly select a chapter.
Menu Displays the DVD menu where you can
specify the chapter, audio, subtitle and
angle, if available.
Eject Ejects the drive tray.
Slider Button Moves to a different location for playback.
Volume Adjusts the playback volume.
Display Panel Displays the current status such as disc
type, the current chapter and the elapsed
playback time.
Help Opens the WinDVD online help.
Minimize Minimizes WinDVD to the tool bar.
Full screen Toggles between full screen display and
window display.
Close Exits WinDVD.
Sub Panel Opens Sub Panels for adjusting the
advanced options of the current disc.
(See “WinDVD Sub Panels” in this
section for more information.)
Table Note:
* Speed Increase, Speed Decrease and Time Clock buttons use a technique called “time-stretching”. With
time-stretching, WinDVD can play a video from approximately half speed to up to 2x normal speed. Within
this range, video and audio can be accelerated without any distortion. (Note that time-stretching does not
work with S/PDIF audio.)
59
FusionPC manual 6/6 8/21/03 1:30 PM Page 59
All manuals and user guides at all-guides.com
Page 70
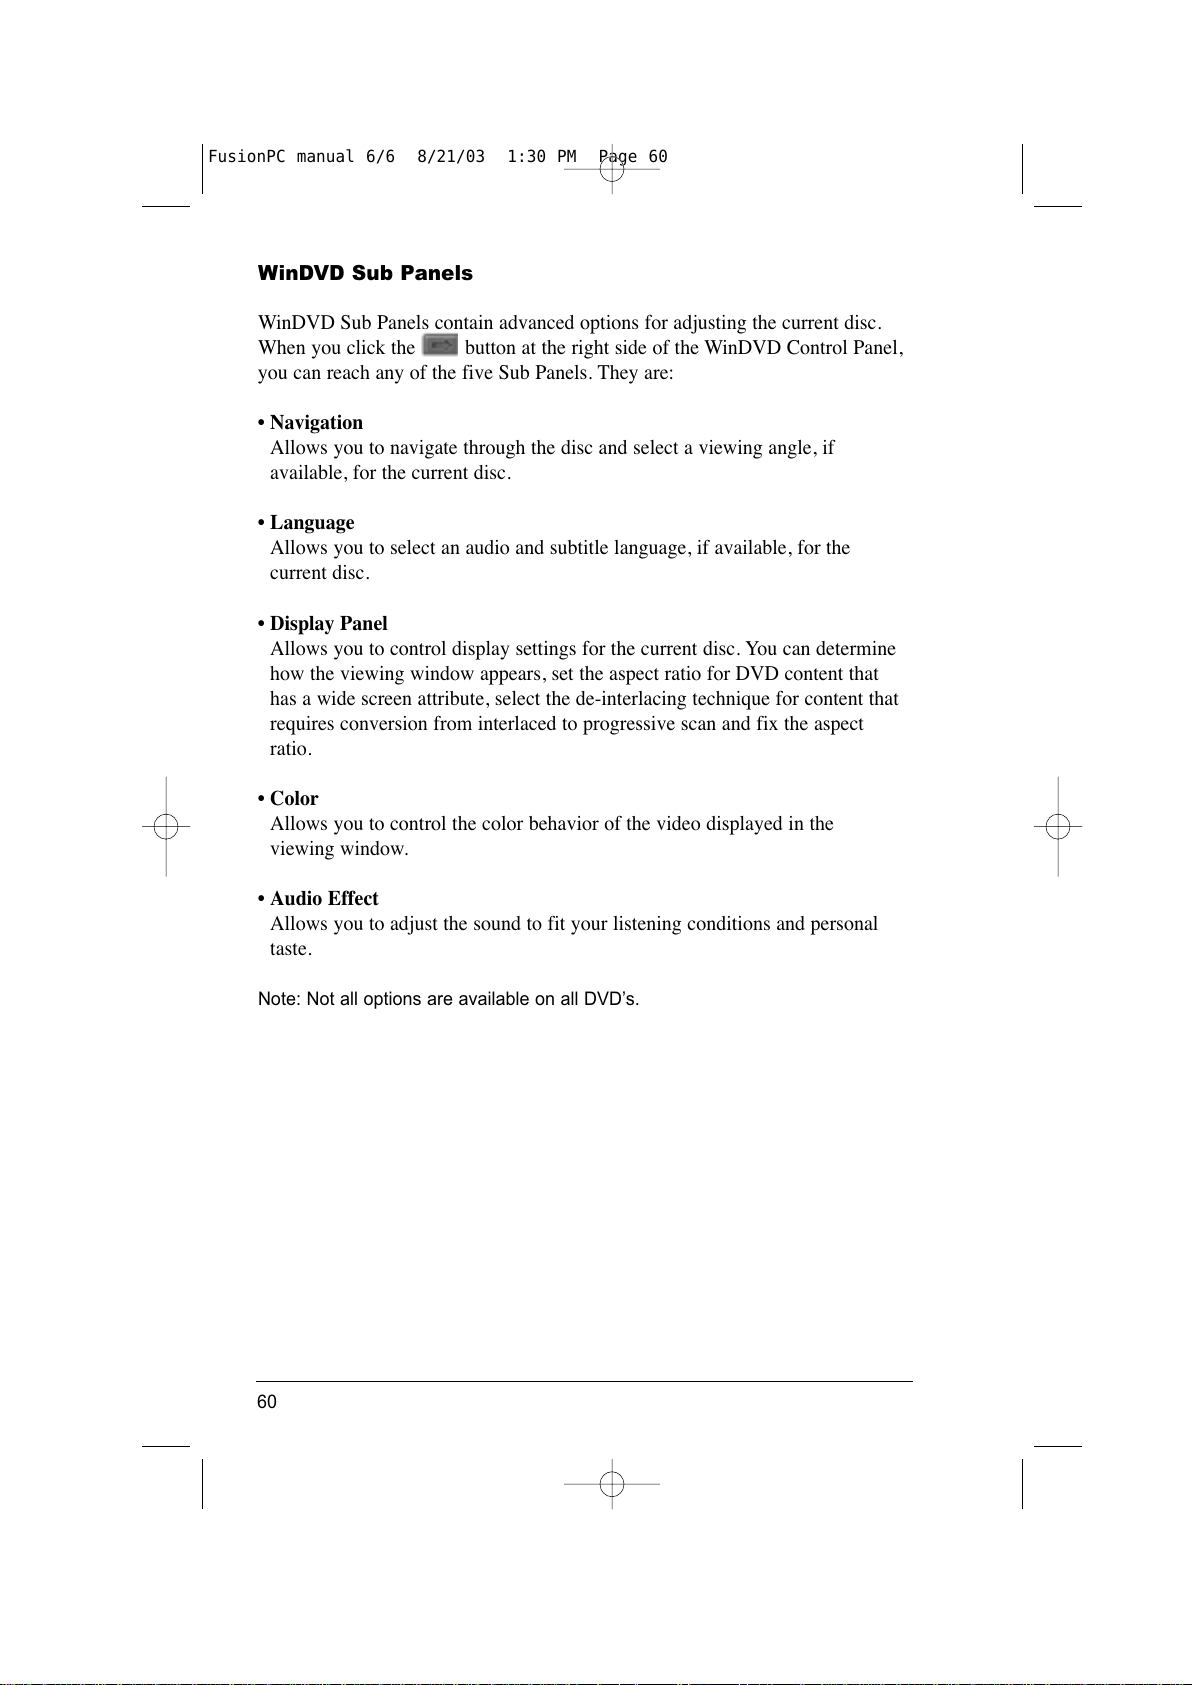
WinDVD Sub Panels
WinDVD Sub Panels contain advanced options for adjusting the current disc.
When you click the button at the right side of the WinDVD Control Panel,
you can reach any of the five Sub Panels. They are:
• Navigation
Allows you to navigate through the disc and select a viewing angle, if
available, for the current disc.
• Language
Allows you to select an audio and subtitle language, if available, for the
current disc.
• Display Panel
Allows you to control display settings for the current disc. You can determine
how the viewing window appears, set the aspect ratio for DVD content that
has a wide screen attribute, select the de-interlacing technique for content that
requires conversion from interlaced to progressive scan and fix the aspect
ratio.
• Color
Allows you to control the color behavior of the video displayed in the
viewing window.
• Audio Effect
Allows you to adjust the sound to fit your listening conditions and personal
taste.
Note: Not all options are available on all DVD’s.
60
FusionPC manual 6/6 8/21/03 1:30 PM Page 60
All manuals and user guides at all-guides.com
Page 71
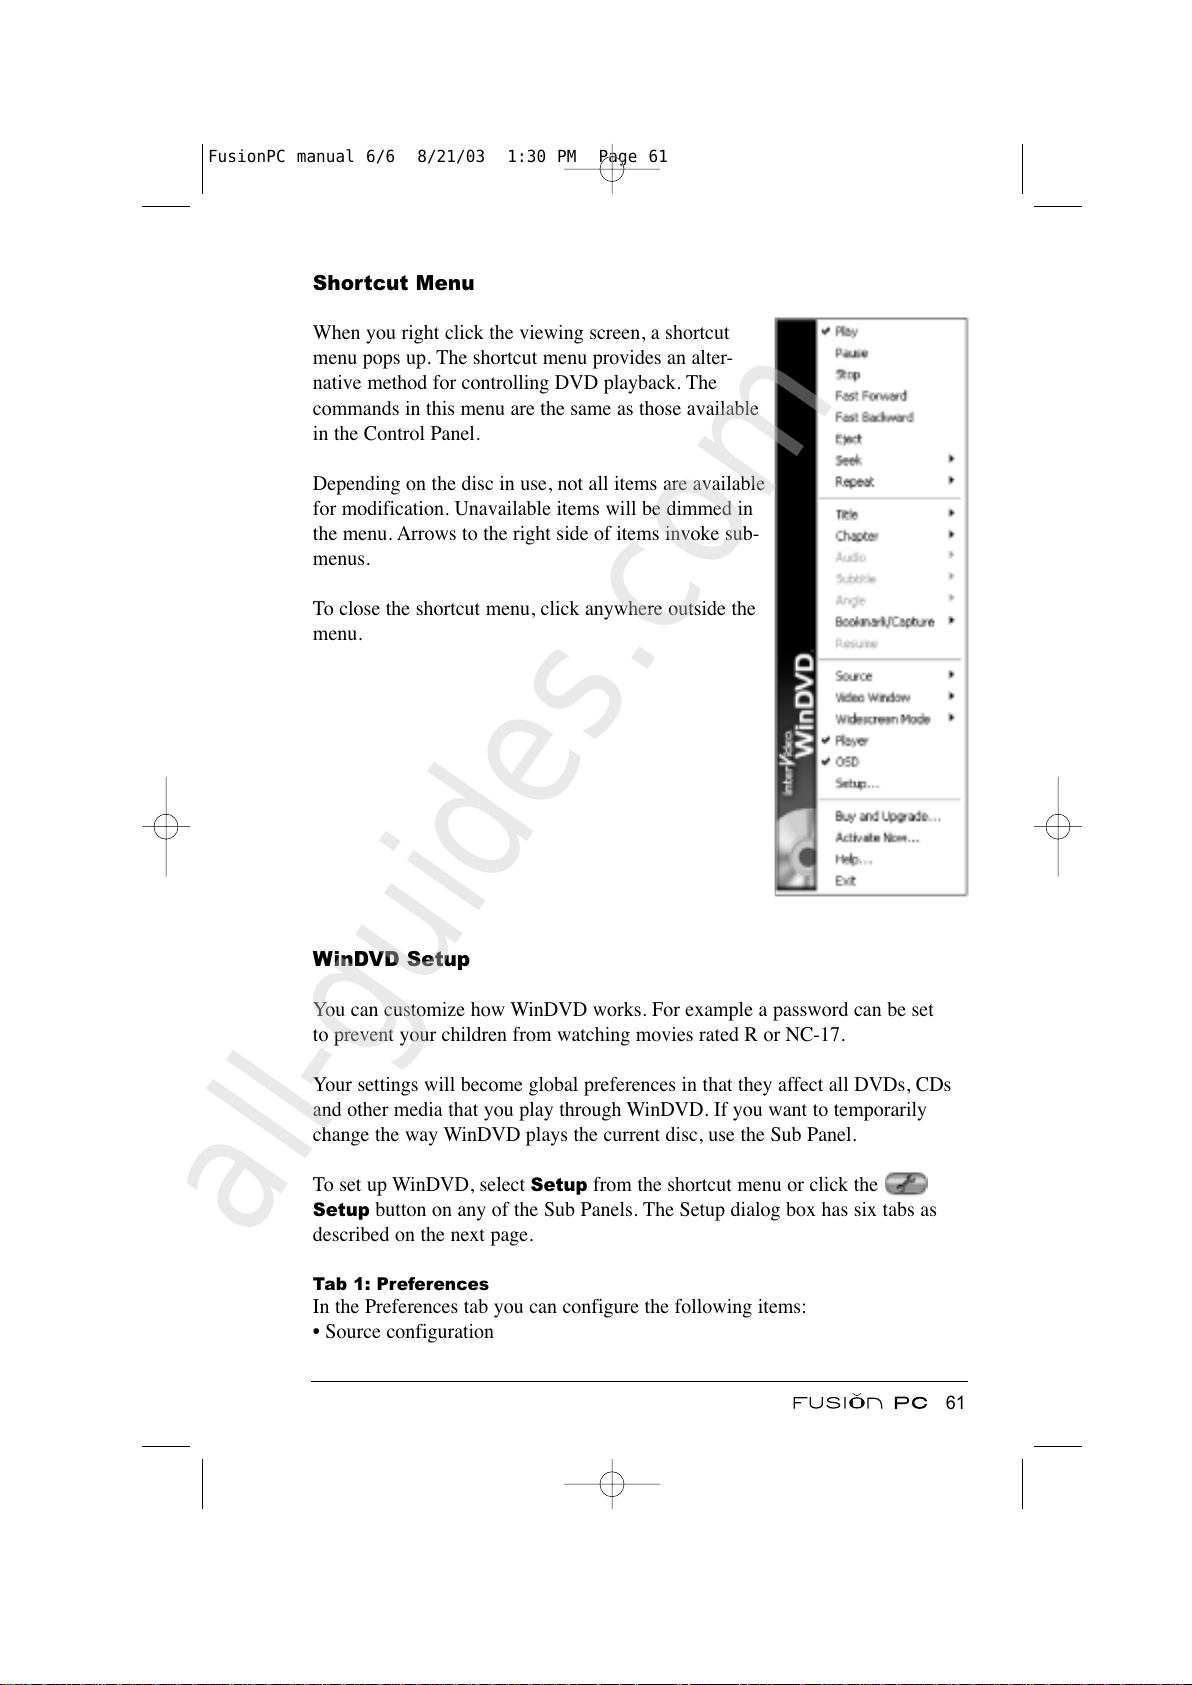
Shortcut Menu
When you right click the viewing screen, a shortcut
menu pops up. The shortcut menu provides an alter-
native method for controlling DVD playback. The
commands in this menu are the same as those available
in the Control Panel.
Depending on the disc in use, not all items are available
for modification. Unavailable items will be dimmed in
the menu. Arrows to the right side of items invoke sub-
menus.
To close the shortcut menu, click anywhere outside the
menu.
WinDVD Setup
You can customize how WinDVD works. For example a password can be set
to prevent your children from watching movies rated R or NC-17.
Your settings will become global preferences in that they affect all DVDs, CDs
and other media that you play through WinDVD. If you want to temporarily
change the way WinDVD plays the current disc, use the Sub Panel.
To set up WinDVD, select
Setup from the shortcut menu or click the
Setup button on any of the Sub Panels. The Setup dialog box has six tabs as
described on the next page.
Tab 1: Preferences
In the Preferences tab you can configure the following items:
• Source configuration
61
FusionPC manual 6/6 8/21/03 1:30 PM Page 61
All manuals and user guides at all-guides.com
all-guides.com
Page 72
• DVD default configuration (audio language, subtitle language and subtitle/CC
style)
• Parental playback control
Tab 2: Control
In the Control tab, you can determine the behavior of the Control Panel such as:
• The Control Panel visibility
• Bookmark/capture configuration
• Timing configuration
Tab 3: Audio
The Audio tab lets you set audio preferences such as output, speaker configura-
tion and sub woofer control. The options available depend mainly on your hard-
ware. If you need to change the audio settings during playback of a disc, use the
Sub Panel.
Tab 4: Video
The video tab allows you to configure the video hardware and TV output
settings.
Tab 5: Region
To determine the region a DVD disc is designed for, look in the middle of the
disc for a small standardized globe icon indicating the region number. If a disc
plays in more than one region, it will have more than one number on the globe.
If a disc does not have any regional coding, the disc should have a globe with
ALL instead of a number or no globe icon at all.
There are six regions:
1. USA, Canada
2. West Europe, Japan, South Africa
3. South East Asia
4. Australia, Spanish America
5. Russia, East Europe, Africa
6. China
The FusionPC DVD drive will allow you to change your designated region a
total of five (5) times before the region setting becomes permanent. Before you
select your last regional change you will be given a special warning. Once you
have made the final choice for regional settings you will not be able to play
DVD discs from any other region.
The first time that you play a regionalized DVD, the region will be automatical-
ly set to match the region of the disc. If you later try to play a disc from a differ-
ent region, WinDVD will ask you if you want to change the region setting. Click
62
FusionPC manual 6/6 8/21/03 1:30 PM Page 62
All manuals and user guides at all-guides.com
Page 73
OK to change to the new region. Normally, you cannot change the region
while a disk is playing.
Caution: There is no way to reset this value, so be careful.
Tab 6: Information
The Information tab provides hardware-related information for your reference.
The information can be helpful when you want to set up your own preferences.
File Playback
WinDVD can play video and audio files thus allowing you to take advantage
of WinDVD features while watching video or listening to audio.
The file formats supported are:
• Video File Types
ASF, ASX, AVI, MPG, MPEG, M2V,VOB, DAT
• Audio File Types
AC3, DAT, M2A, M2P, MP2, MPG, MPEG, MP3, M3U
Files can be viewed via playlist or drag and dropping the file in question onto
the WinDVD screen.
Drag and Drop
WinDVD lets you drag your favorite files from your desktop onto the WinDVD
Control Panel. Simply drag the icon for one or more audio or video files onto
the WinDVD icon or Control Panel. WinDVD automatically begins playing the
file(s).
Using Playlists
A playlist is a custom list of media files to play and the order in which to play
them. WinDVD allows you to create lists that mix different types of media. Any
file type supported by WinDVD can be added to a playlist, including entire
discs. You can save playlists and load them again for replay at any time.
To create a playlist:
1. Select the New Playlist command from the Source menu on the Navigation
Sub Panel.
63
FusionPC manual 6/6 8/21/03 1:30 PM Page 63
All manuals and user guides at all-guides.com
Page 74
2. In the lower left of the Playlist window, select File to allow file selection
or Disc to allow playback of entire discs.
3. Use the browser to highlight files or discs you want to include in the playlist.
Click Add.
4. Once you have added all of your selections, you can save the list or simply
play it by clicking OK.
5. To save the playlist, click Save Playlist and give it a name.
Once you have created and saved a playlist, you can load it into WinDVD for
playback. To play a playlist:
1. Select the Playlist command from the Source menu on the Navigation
Sub Panel.
2. Click Load Playlist to load a saved playlist.
3. Select the playlist to load and click Open.
4. Click OK and WinDVD plays the files in the order they appear in the
playlist.
Playing a DVD using the remote control
The remote control gives you the freedom to control DVD playback up to
20 feet away from your FusionPC.
Note: DVD playback must be initiated by pressing the DVD button on the
remote control in order for WinDVD to accept remote commands.
The remote control provides limited functionality from within the WinDVD
application. Advanced DVD features can only be accessed through the WinDVD
control panel. However, any options set by the user via the WinDVD control
panel remain in effect when operating WinDVD by remote control.
1. Press the DVD button on the remote control to load WinDVD.
2. If a DVD is already in the drive when the application is started it will begin
to play automatically. If inserting a DVD after the application has started,
press the Play/Enter button on the remote to continue with playback.
3. Use the remote control to interact with the player as needed. The following
diagram shows the various remote control buttons supported by WinDVD:
64
FusionPC manual 6/6 8/21/03 1:30 PM Page 64
All manuals and user guides at all-guides.com
Page 75
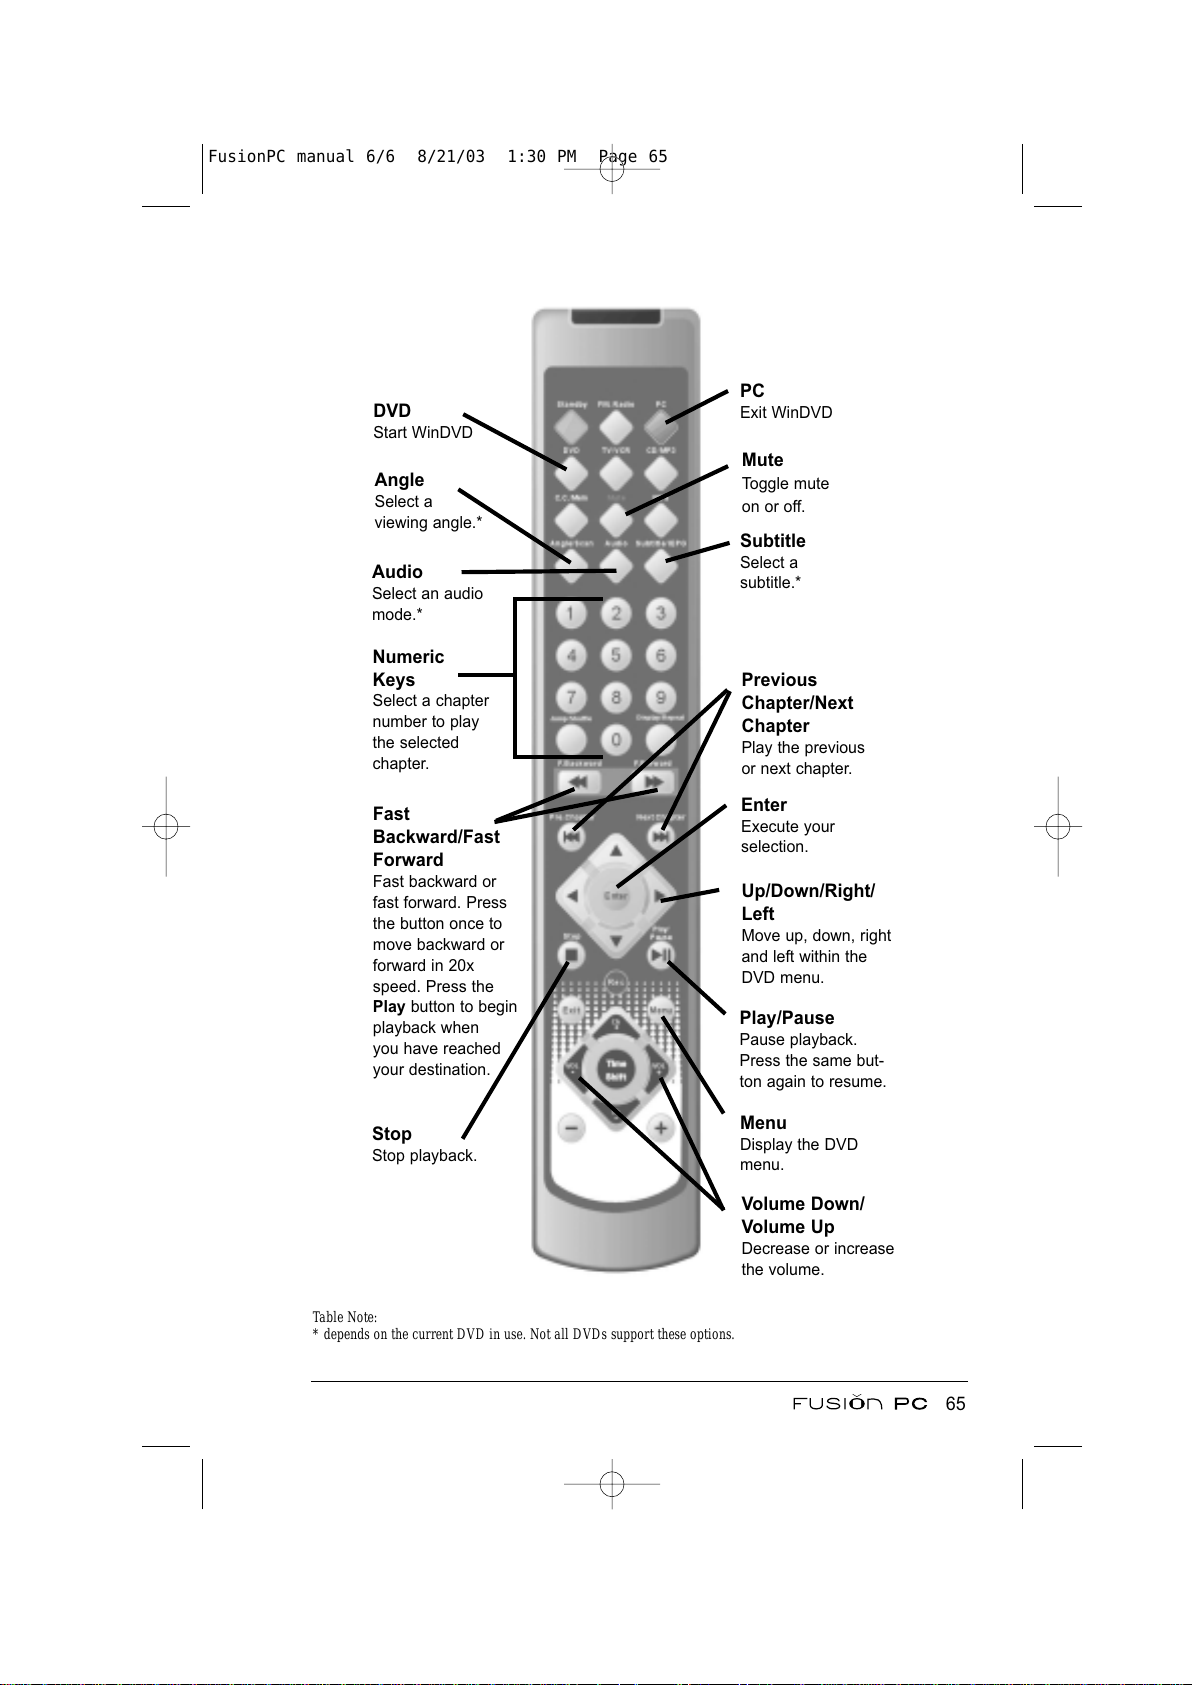
Table Note:
* depends on the current DVD in use. Not all DVDs support these options.
65
Enter
Execute your
selection.
Mute
Toggle mute
on or off.
Volume Down/
Volume Up
Decrease or increase
the volume.
Numeric
Keys
Select a chapter
number to play
the selected
chapter.
Fast
Backward/Fast
Forward
Fast backward or
fast forward. Press
the button once to
move backward or
forward in 20x
speed. Press the
Play button to begin
playback when
you have reached
your destination.
Play/Pause
Pause playback.
Press the same but-
ton again to resume.
PC
Exit WinDVD
DVD
Start WinDVD
Angle
Select a
viewing angle.*
Audio
Select an audio
mode.*
Subtitle
Select a
subtitle.*
Up/Down/Right/
Left
Move up, down, right
and left within the
DVD menu.
Stop
Stop playback.
Menu
Display the DVD
menu.
Previous
Chapter/Next
Chapter
Play the previous
or next chapter.
FusionPC manual 6/6 8/21/03 1:30 PM Page 65
All manuals and user guides at all-guides.com
Page 76
WinFast TV: Watching TV
Note: To watch cable TV, you need to have an account with a cable TV provider
and connect the cable to your system.
WinFast TV is a powerful and easy-to-use application that provides feature-
rich video entertainment. WinFast TV allows you to view and record live TV
or video and play back recorded TV or video in a PIP (picture-in-picture) style
as well as control all available functions.
This section explains the functionality that WinFast TV has to offer and provides
basic operating instructions. For advanced operations, refer to the WinFast
online help file for detailed information.
Using WinFast TV with a mouse and the WinFast TV
control panel
Click Start > All Programs > WinFast Entertainment Center > WinFast TV
to start the program.
Scanning TV Channels
When you use WinFast TV for the very first time, you must scan the available
TV channels in your area before you can watch TV. On the WinFast TV Control
Panel, click the Configuration button > Tuner Setup button >
Scan channels button. WinFast TV will start scanning and display channel
numbers on the channel list.
66
FusionPC manual 6/6 8/21/03 1:30 PM Page 66
All manuals and user guides at all-guides.com
all-guides.com
Page 77
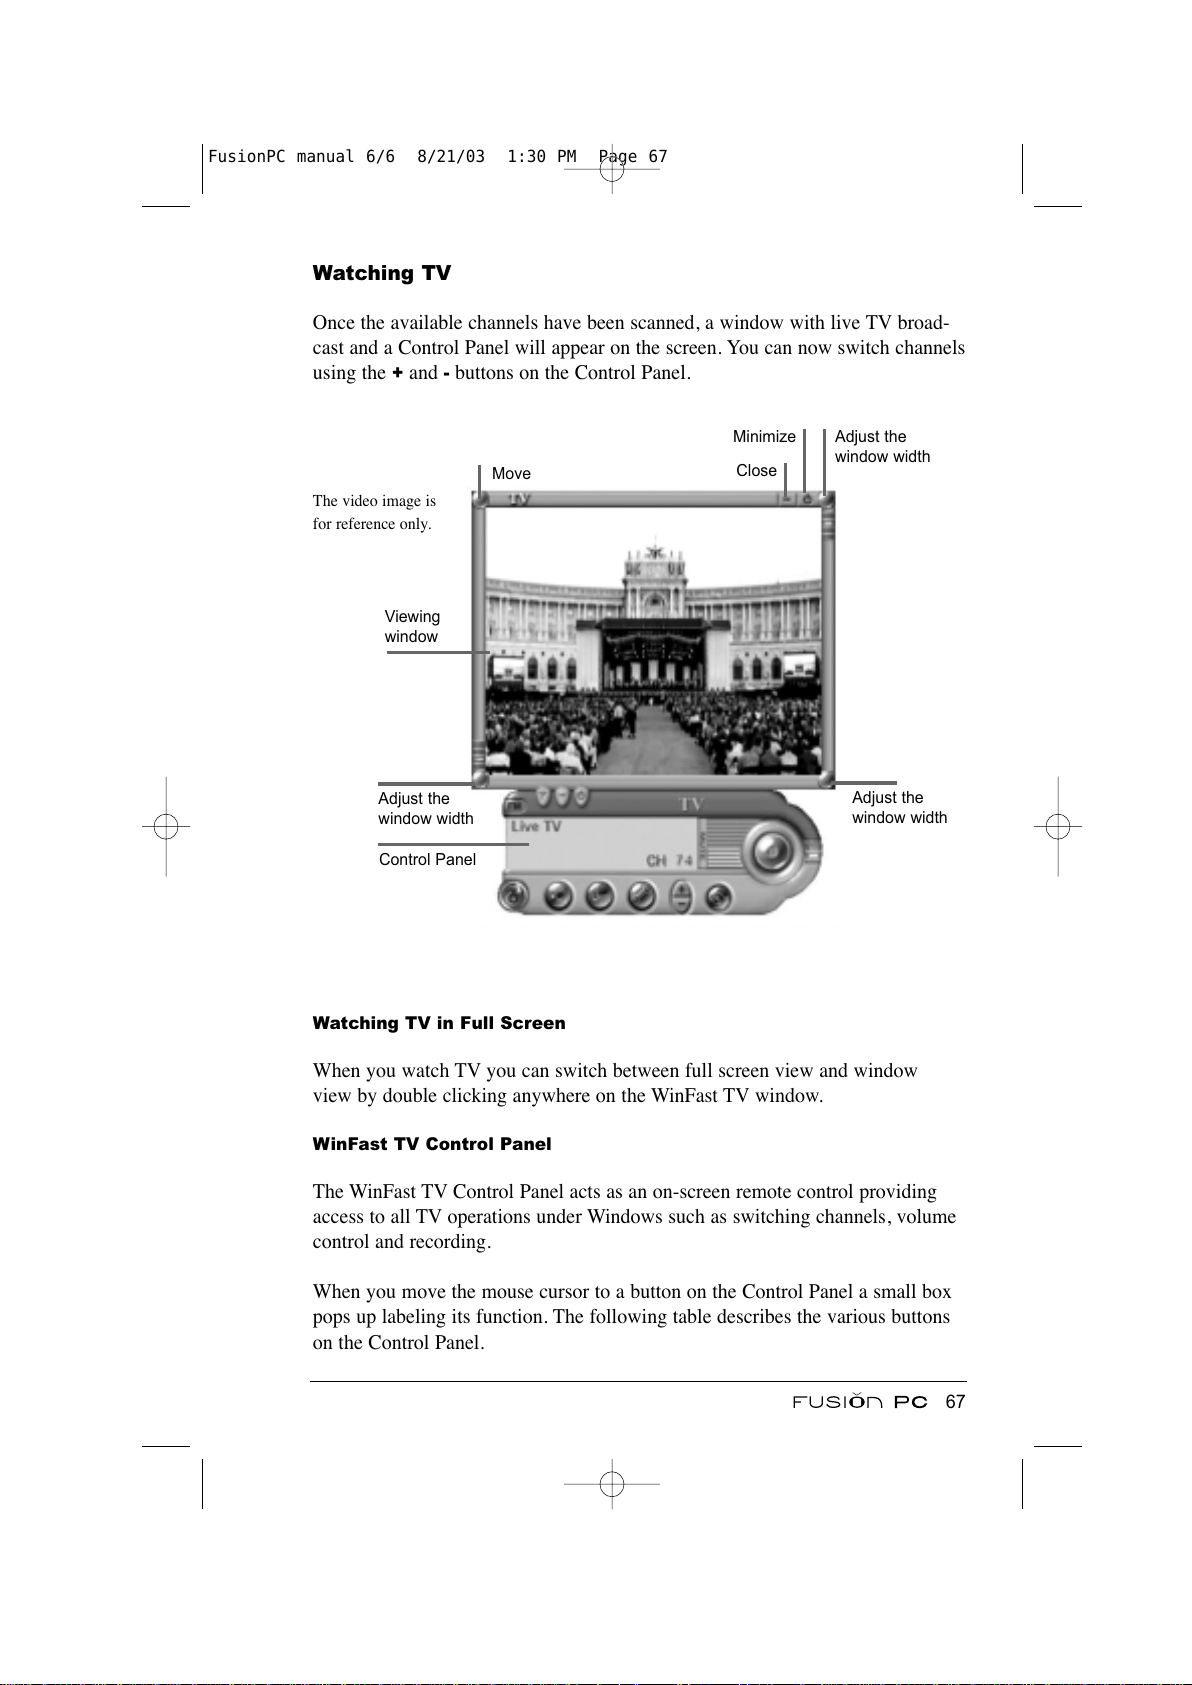
Watching TV
Once the available channels have been scanned, a window with live TV broad-
cast and a Control Panel will appear on the screen. You can now switch channels
using the
+ and - buttons on the Control Panel.
The video image is
for reference only.
Watching TV in Full Screen
When you watch TV you can switch between full screen view and window
view by double clicking anywhere on the WinFast TV window.
WinFast TV Control Panel
The WinFast TV Control Panel acts as an on-screen remote control providing
access to all TV operations under Windows such as switching channels, volume
control and recording.
When you move the mouse cursor to a button on the Control Panel a small box
pops up labeling its function. The following table describes the various buttons
on the Control Panel.
67
Minimize
Adjust the
window width
Close
Adjust the
window width
Move
Viewing
window
Adjust the
window width
Control Panel
FusionPC manual 6/6 8/21/03 1:30 PM Page 67
All manuals and user guides at all-guides.com
Page 78
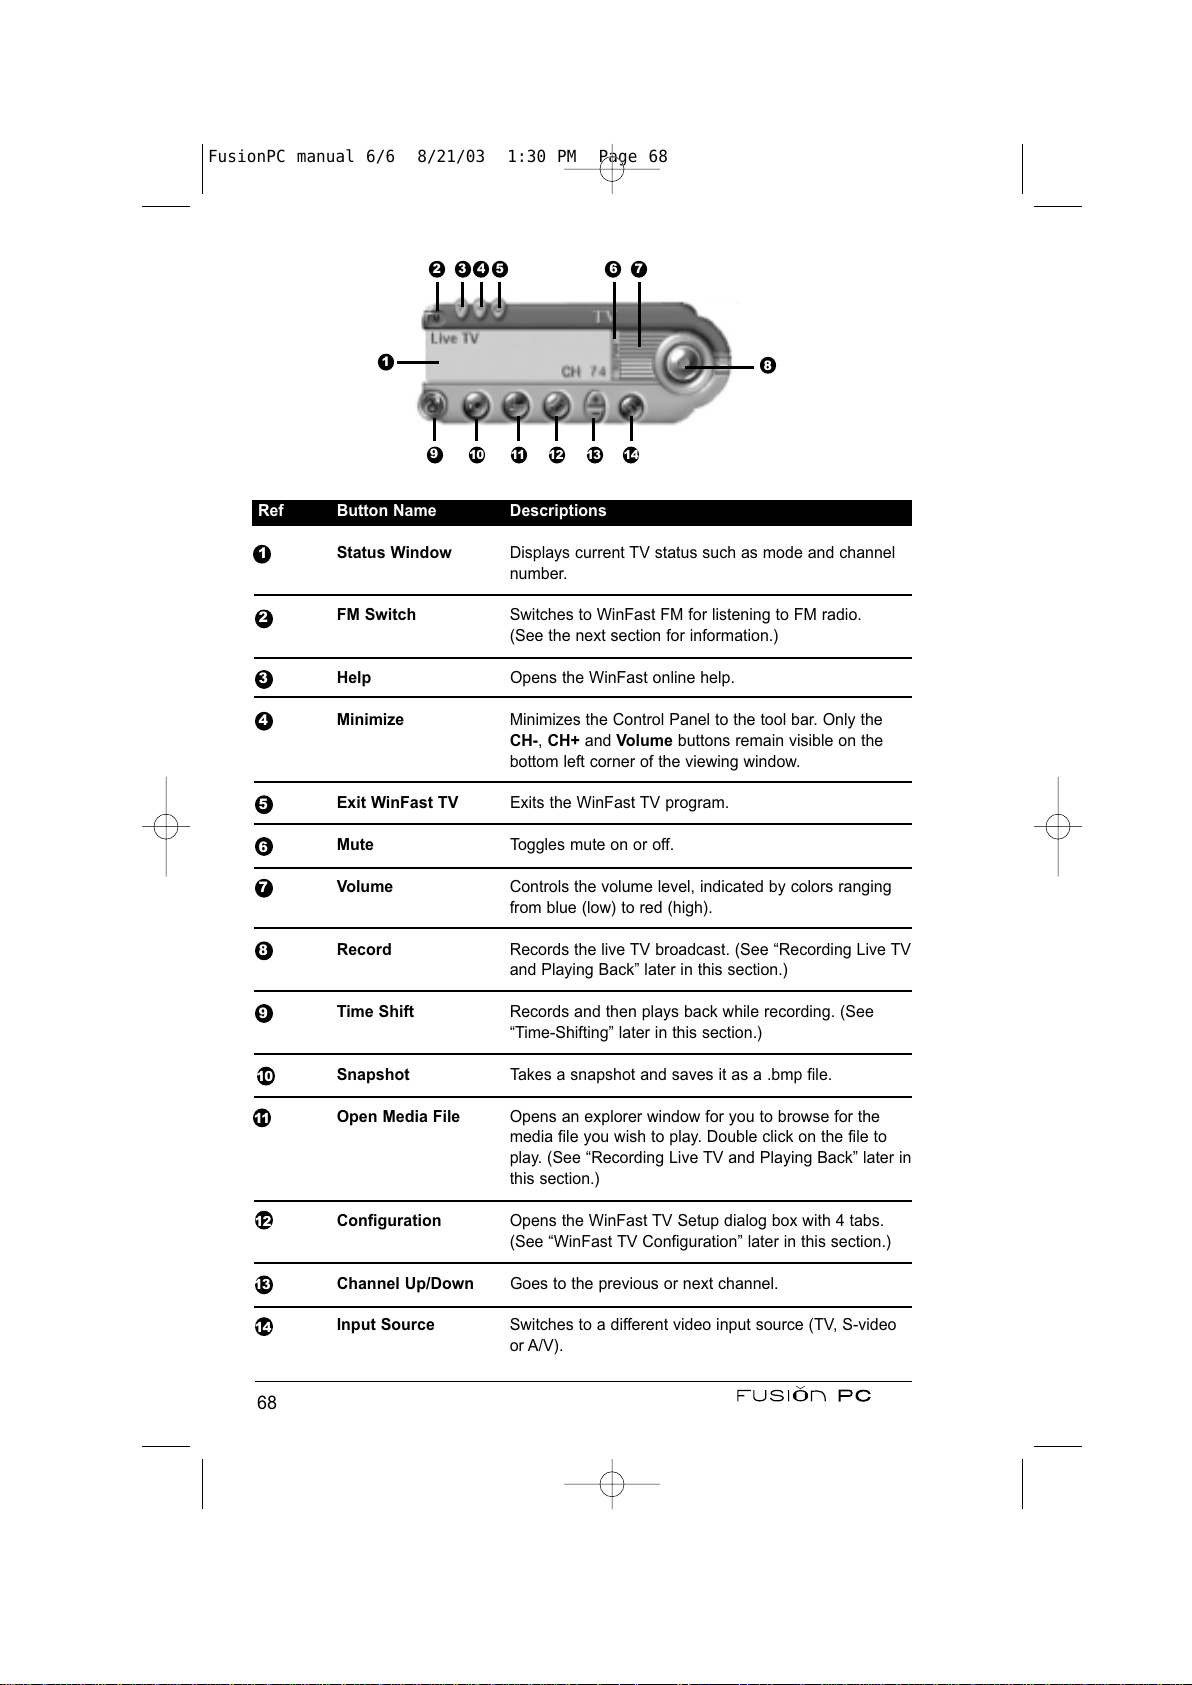
1
2 3 4
5
6
8
9
7
10 11 12
13
14
1
2
3
4
5
6
7
8
9
10
11
12
13
14
Ref Button Name Descriptions
Status Window Displays current TV status such as mode and channel
number.
FM Switch Switches to WinFast FM for listening to FM radio.
(See the next section for information.)
Help Opens the WinFast online help.
Minimize Minimizes the Control Panel to the tool bar. Only the
CH-, CH+ and Volume buttons remain visible on the
bottom left corner of the viewing window.
Exit WinFast TV Exits the WinFast TV program.
Mute Toggles mute on or off.
Volume Controls the volume level, indicated by colors ranging
from blue (low) to red (high).
Record Records the live TV broadcast. (See “Recording Live TV
and Playing Back” later in this section.)
Time Shift Records and then plays back while recording. (See
“Time-Shifting” later in this section.)
Snapshot Takes a snapshot and saves it as a .bmp file.
Open Media File Opens an explorer window for you to browse for the
media file you wish to play. Double click on the file to
play. (See “Recording Live TV and Playing Back” later in
this section.)
Configuration Opens the WinFast TV Setup dialog box with 4 tabs.
(See “WinFast TV Configuration” later in this section.)
Channel Up/Down Goes to the previous or next channel.
Input Source Switches to a different video input source (TV, S-video
or A/V).
68
FusionPC manual 6/6 8/21/03 1:30 PM Page 68
All manuals and user guides at all-guides.com
Page 79
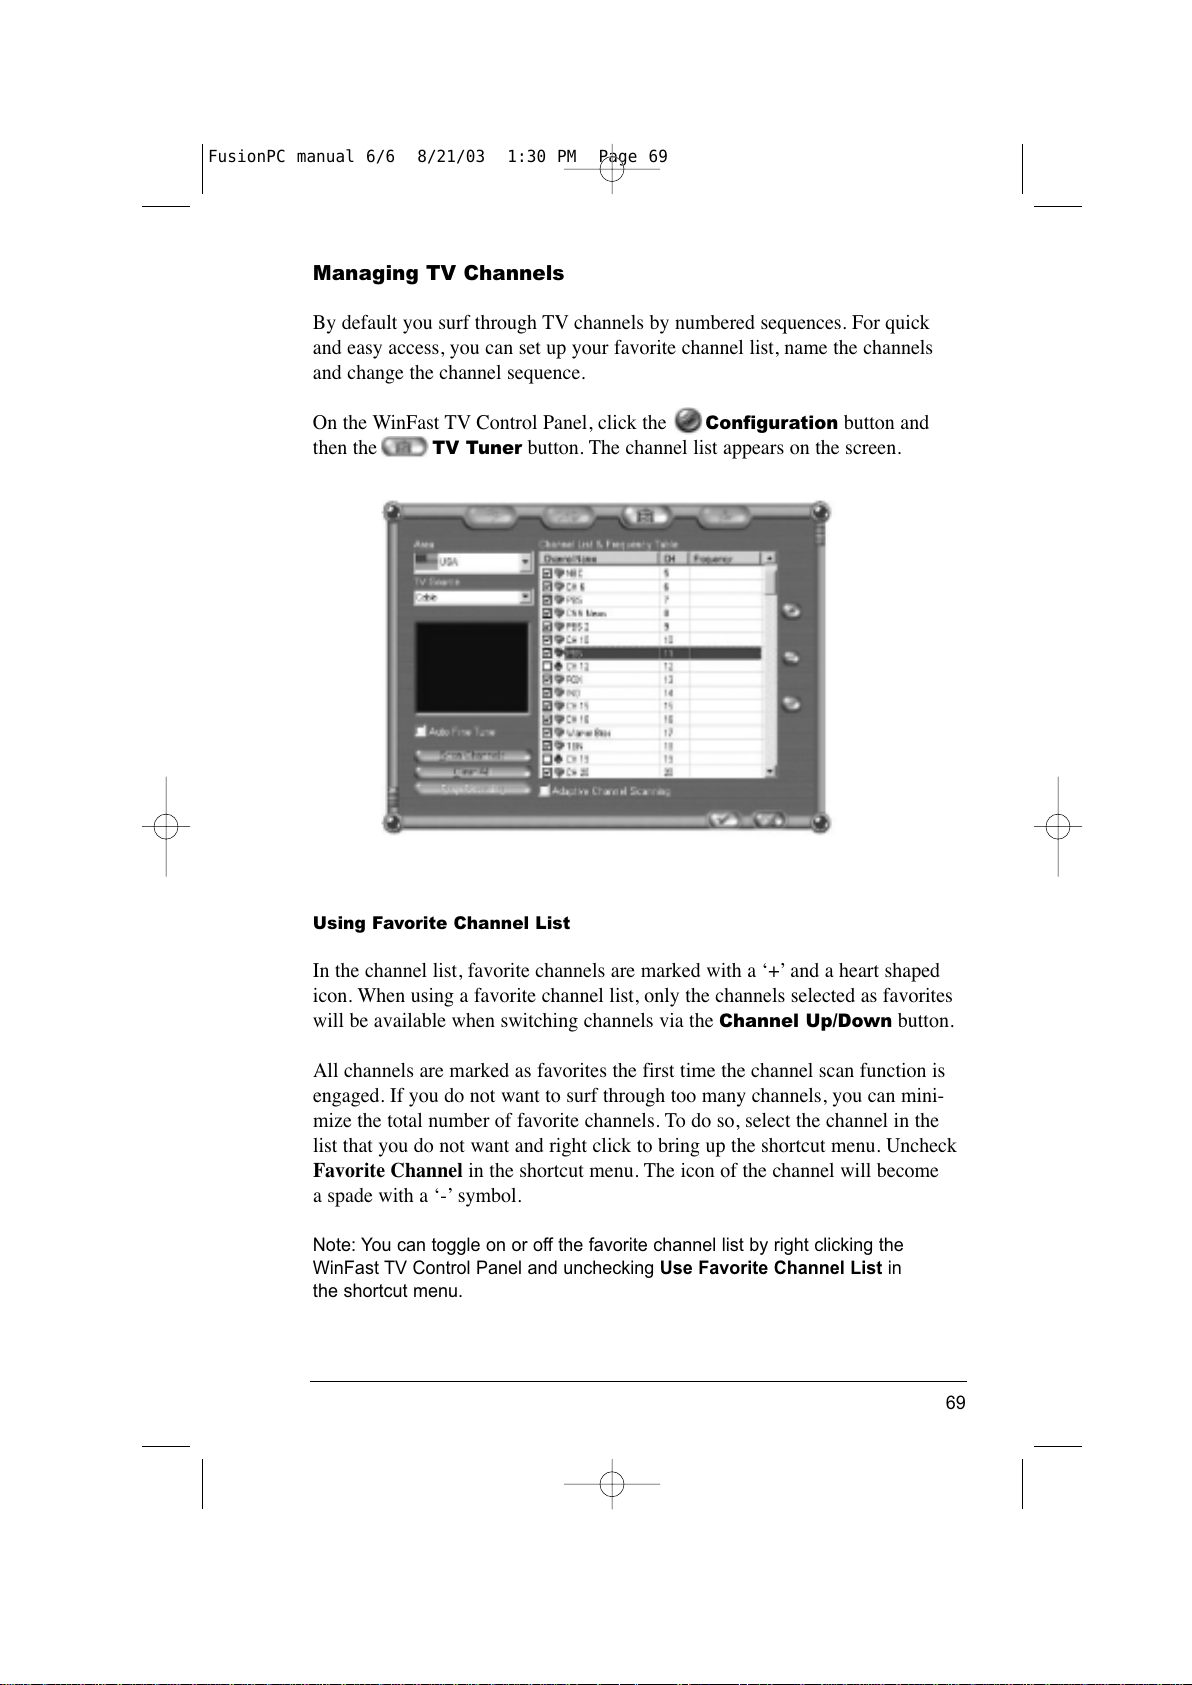
Managing TV Channels
By default you surf through TV channels by numbered sequences. For quick
and easy access, you can set up your favorite channel list, name the channels
and change the channel sequence.
On the WinFast TV Control Panel, click the
Configuration button and
then the TV Tuner button. The channel list appears on the screen.
Using Favorite Channel List
In the channel list, favorite channels are marked with a ‘+’ and a heart shaped
icon. When using a favorite channel list, only the channels selected as favorites
will be available when switching channels via the
Channel Up/Down button.
All channels are marked as favorites the first time the channel scan function is
engaged. If you do not want to surf through too many channels, you can mini-
mize the total number of favorite channels. To do so, select the channel in the
list that you do not want and right click to bring up the shortcut menu. Uncheck
Favorite Channel in the shortcut menu. The icon of the channel will become
a spade with a ‘-’ symbol.
Note: You can toggle on or off the favorite channel list by right clicking the
WinFast TV Control Panel and unchecking Use Favorite Channel List in
the shortcut menu.
69
FusionPC manual 6/6 8/21/03 1:30 PM Page 69
All manuals and user guides at all-guides.com
Page 80
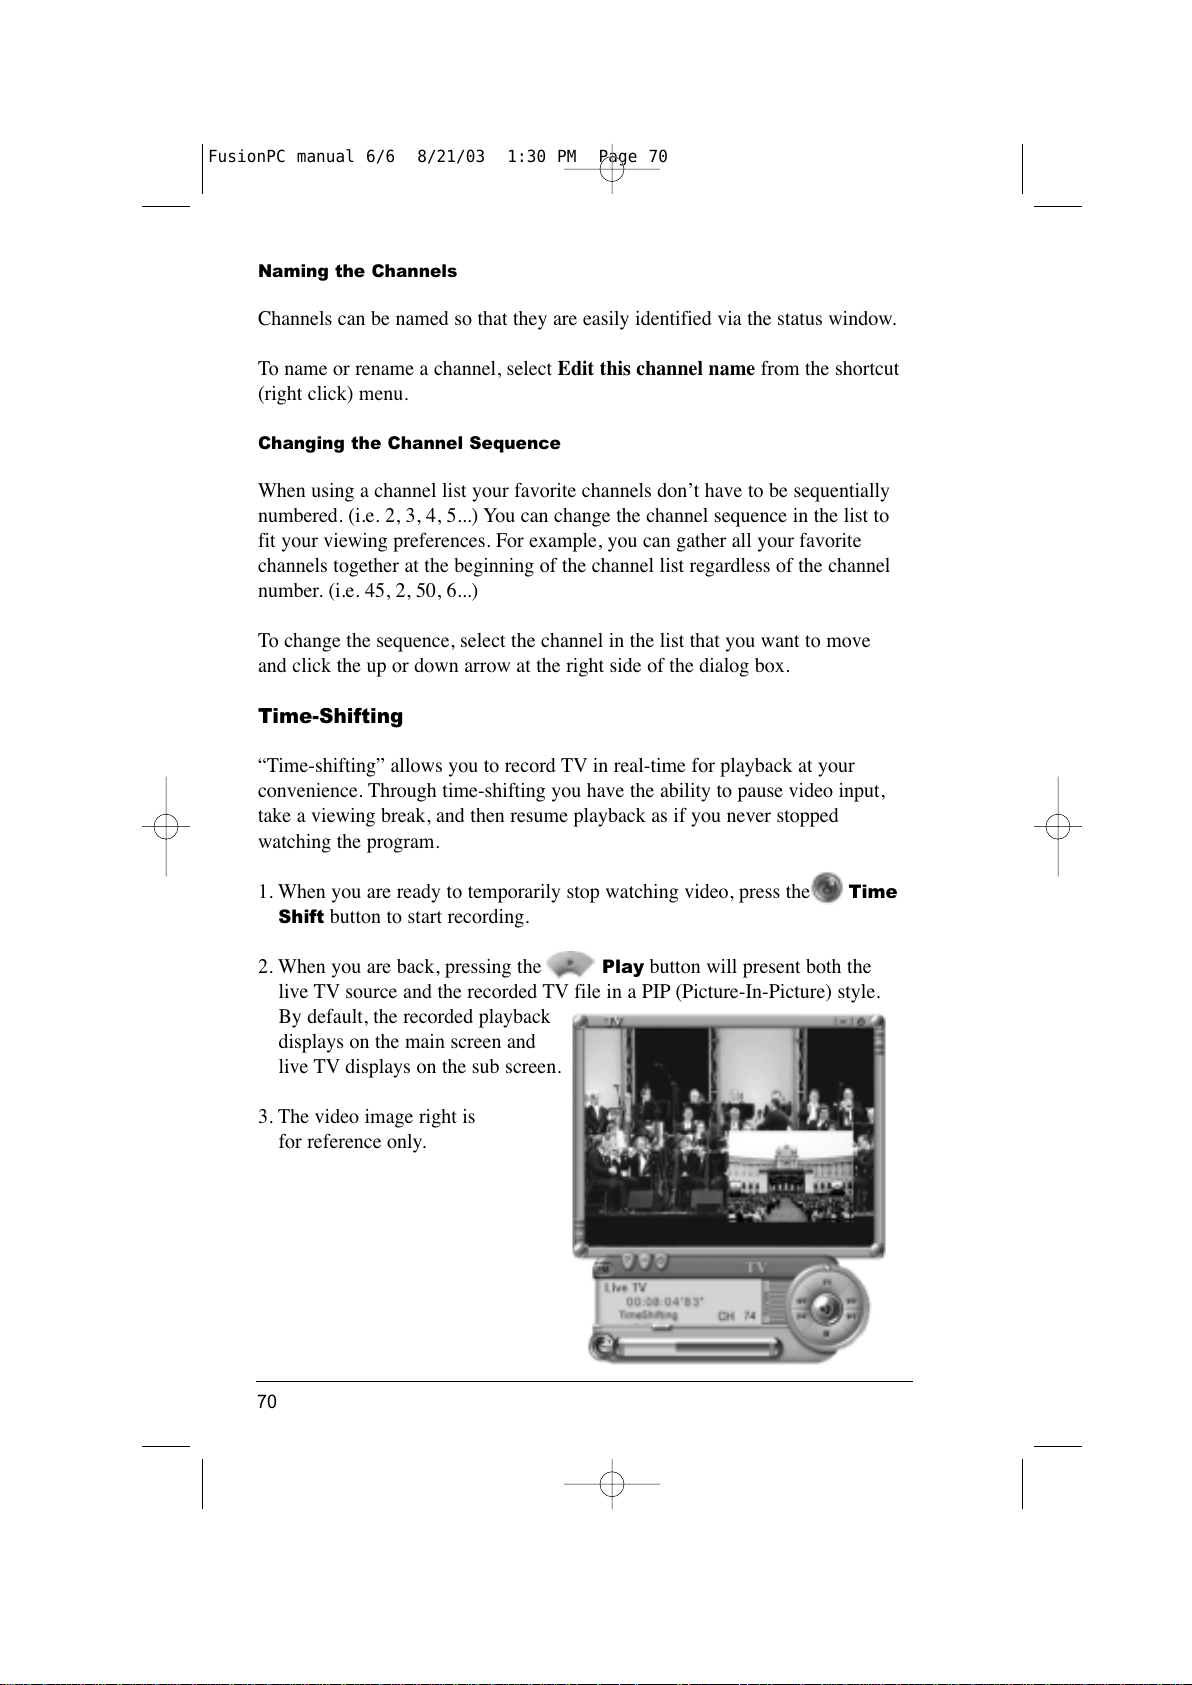
Naming the Channels
Channels can be named so that they are easily identified via the status window.
To name or rename a channel, select Edit this channel name from the shortcut
(right click) menu.
Changing the Channel Sequence
When using a channel list your favorite channels don’t have to be sequentially
numbered. (i.e. 2, 3, 4, 5...) You can change the channel sequence in the list to
fit your viewing preferences. For example, you can gather all your favorite
channels together at the beginning of the channel list regardless of the channel
number. (i.e. 45, 2, 50, 6...)
To change the sequence, select the channel in the list that you want to move
and click the up or down arrow at the right side of the dialog box.
Time-Shifting
“Time-shifting” allows you to record TV in real-time for playback at your
convenience. Through time-shifting you have the ability to pause video input,
take a viewing break, and then resume playback as if you never stopped
watching the program.
1. When you are ready to temporarily stop watching video, press the
Time
Shift
button to start recording.
2. When you are back, pressing the
Play button will present both the
live TV source and the recorded TV file in a PIP (Picture-In-Picture) style.
By default, the recorded playback
displays on the main screen and
live TV displays on the sub screen.
3. The video image right is
for reference only.
70
FusionPC manual 6/6 8/21/03 1:30 PM Page 70
All manuals and user guides at all-guides.com
Page 81
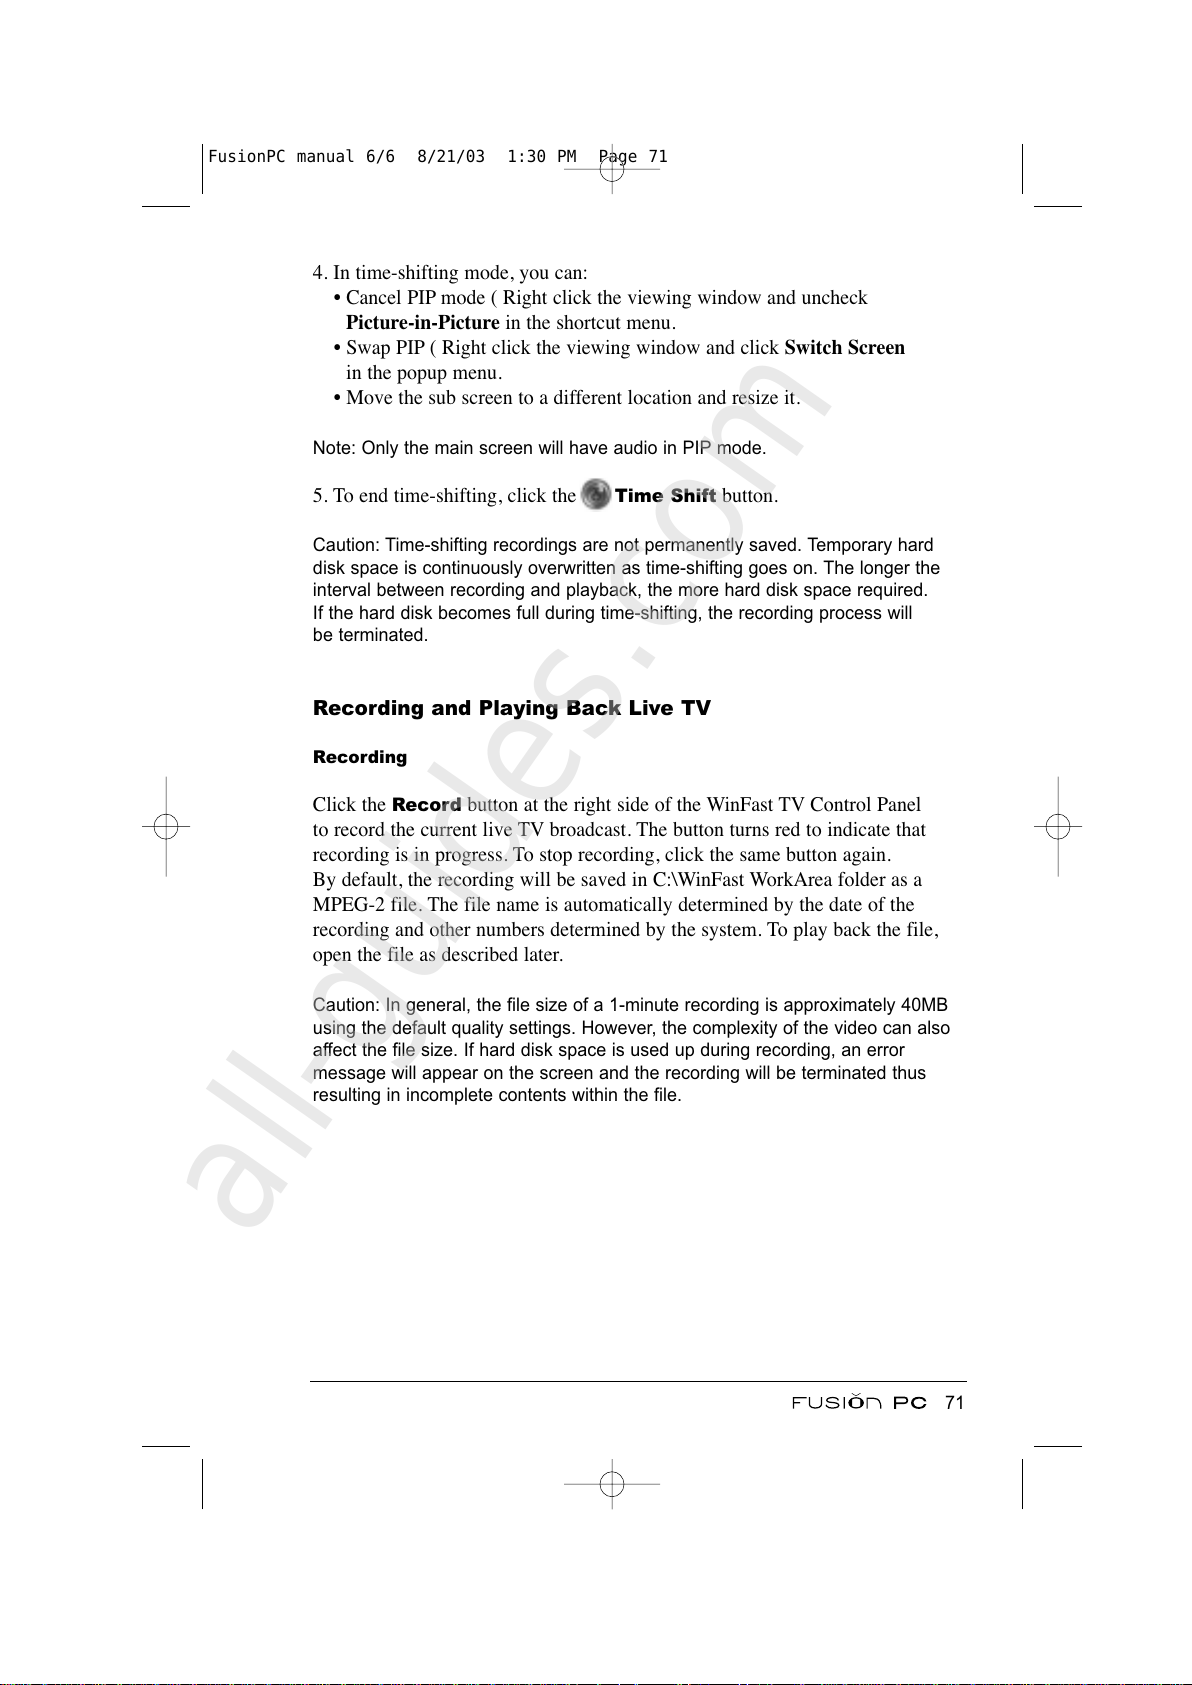
4. In time-shifting mode, you can:
• Cancel PIP mode ( Right click the viewing window and uncheck
Picture-in-Picture in the shortcut menu.
• Swap PIP ( Right click the viewing window and click Switch Screen
in the popup menu.
• Move the sub screen to a different location and resize it.
Note: Only the main screen will have audio in PIP mode.
5. To end time-shifting, click the Time Shift button.
Caution: Time-shifting recordings are not permanently saved. Temporary hard
disk space is continuously overwritten as time-shifting goes on. The longer the
interval between recording and playback, the more hard disk space required.
If the hard disk becomes full during time-shifting, the recording process will
be terminated.
Recording and Playing Back Live TV
Recording
Click the Record button at the right side of the WinFast TV Control Panel
to record the current live TV broadcast. The button turns red to indicate that
recording is in progress. To stop recording, click the same button again.
By default, the recording will be saved in C:\WinFast WorkArea folder as a
MPEG-2 file. The file name is automatically determined by the date of the
recording and other numbers determined by the system. To play back the file,
open the file as described later.
Caution: In general, the file size of a 1-minute recording is approximately 40MB
using the default quality settings. However, the complexity of the video can also
affect the file size. If hard disk space is used up during recording, an error
message will appear on the screen and the recording will be terminated thus
resulting in incomplete contents within the file.
71
FusionPC manual 6/6 8/21/03 1:30 PM Page 71
All manuals and user guides at all-guides.com
all-guides.com
Page 82
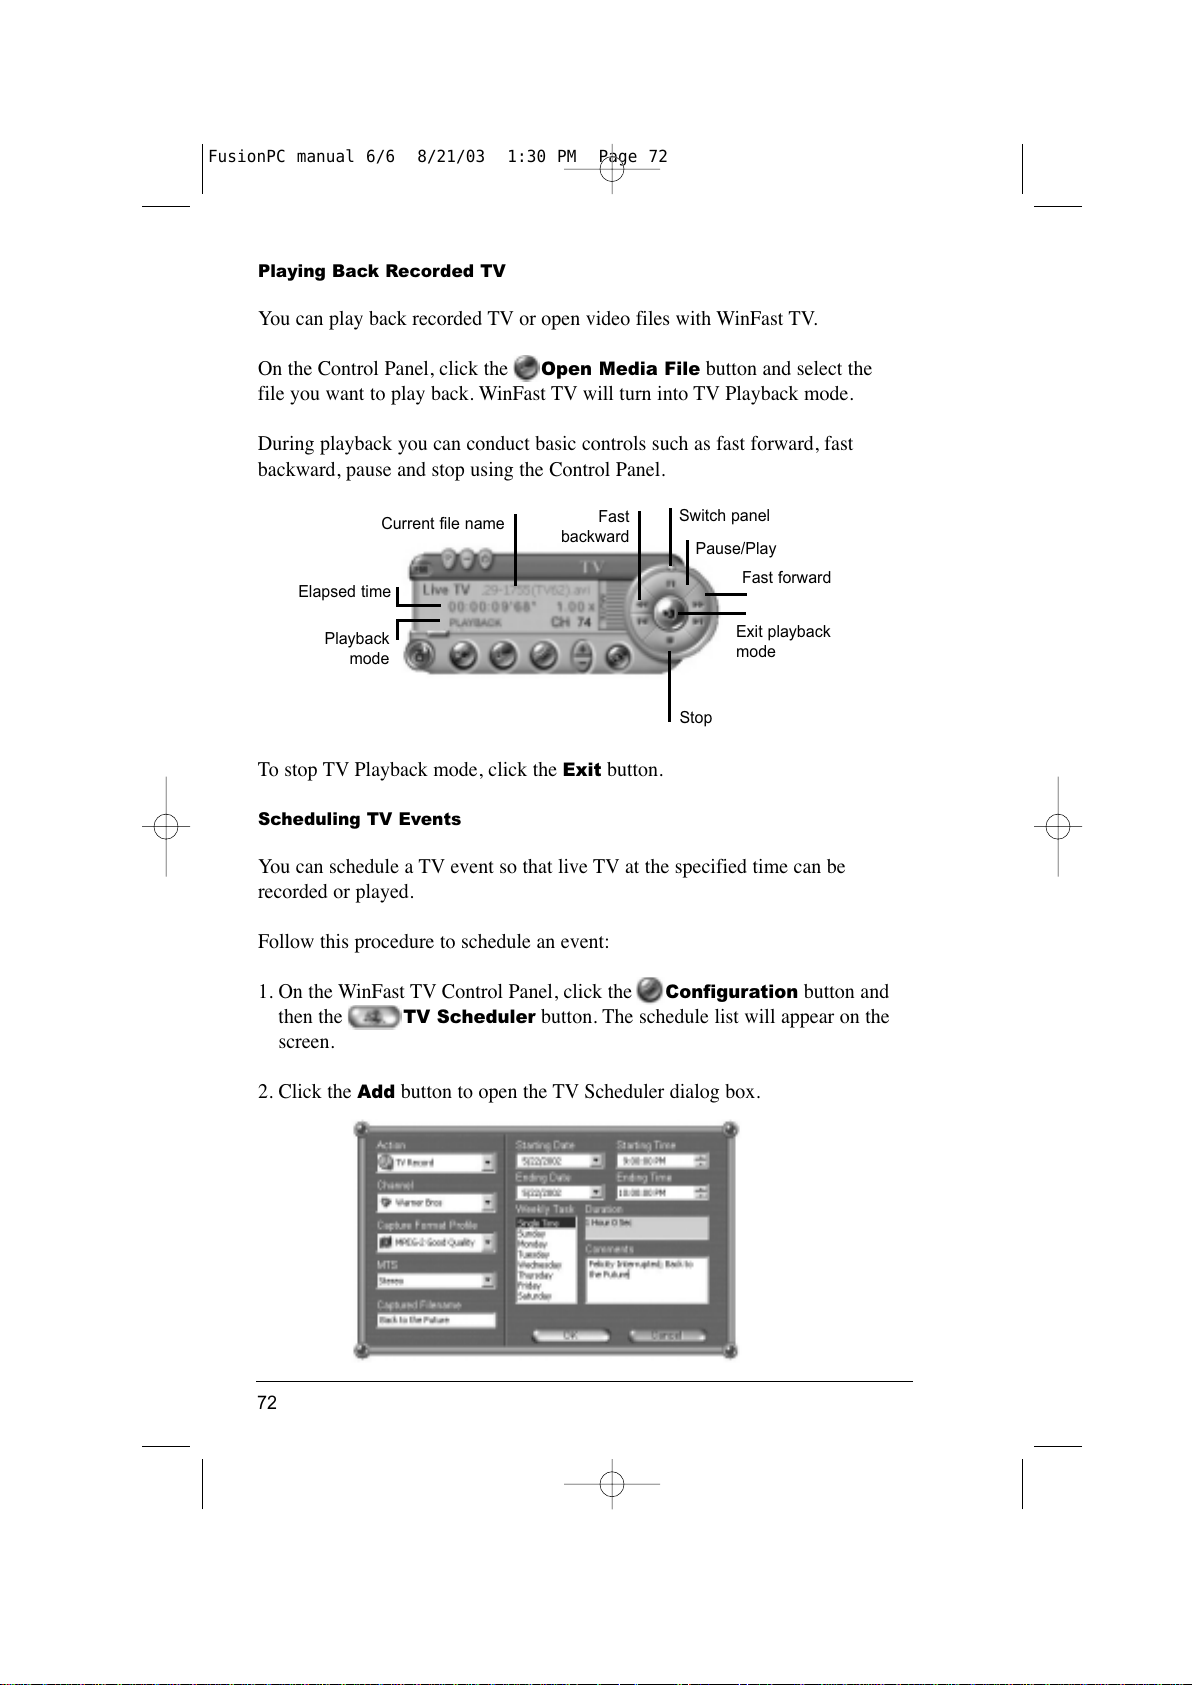
Playing Back Recorded TV
You can play back recorded TV or open video files with WinFast TV.
On the Control Panel, click the Open Media File button and select the
file you want to play back. WinFast TV will turn into TV Playback mode.
During playback you can conduct basic controls such as fast forward, fast
backward, pause and stop using the Control Panel.
To stop TV Playback mode, click the
Exit button.
Scheduling TV Events
You can schedule a TV event so that live TV at the specified time can be
recorded or played.
Follow this procedure to schedule an event:
1. On the WinFast TV Control Panel, click the
Configuration button and
then the TV Scheduler button. The schedule list will appear on the
screen.
2. Click the
Add button to open the TV Scheduler dialog box.
72
Elapsed time
Playback
mode
Current file name
Stop
Exit playback
mode
Fast forward
Pause/Play
Switch panel
Fast
backward
FusionPC manual 6/6 8/21/03 1:30 PM Page 72
All manuals and user guides at all-guides.com
Page 83
3. Enter the information for these fields:
Action — Select either TV Record or TV Show.
Channel — Select the desired channel from the pull down list.
Captured Filename — Enter a file name. If not entered, the filename
will be determined by the program.
Starting/Ending Date — Enter the date of the TV show.
Starting/Ending Time — Enter the time of the TV show.
4. Enter other information as necessary.
5. Click the
OK button to confirm and return to the previous screen.
6. The event will appear in the list. Click the ✓ button to save.
Caution: Make sure that the system is in PC mode with power saving disabled
before the scheduled event starts. A scheduled event cannot occur if the system
is off or in Windows XP Stand By mode.
7. The WinFast TV program will automatically run at the specified time and
date to perform the action as requested.
WinFast TV Configuration
The configuration sub panel is where the majority of program option settings are
located, such as device properties, quality settings, tuner settings and scheduler.
Click the
Configuration button on the WinFast TV Control Panel to
access the configuration dialog box where the following 4 tabs appear.
Device Setup
You can select from 10 format profiles built into the program. If necessary,
you can create your own format profile. In this tab you can also set Time Limits
or Size Limits for recording.
Quality Setup
This tab lets you set the brightness, contrast, hue, saturation and color scheme
of the viewing window.
Tuner Setup
This tab lets you scan and configure the TV channels. (See “Managing TV
Channels” earlier in this section.)
73
FusionPC manual 6/6 8/21/03 1:30 PM Page 73
All manuals and user guides at all-guides.com
Page 84
Scheduler
This tab lets you schedule a recording or playback event. (See “Scheduling
TV Events” earlier in this section.)
Using WinFast TV with the remote control
The remote control gives you the freedom to control TV recording and playback
up to 20 feet away from your FusionPC.
Note: TV recording/playback must be initiated by pressing the TV/VCR button
on the remote control in order for WinFast TV to accept remote commands.
The remote control provides limited functionality from within the WinFast TV
application. Advanced TV features can only be accessed through the WinFast
TV control panel. However, any options set by the user via the WinFast TV
control panel remain in effect when operating the TV by remote control.
1. Press the TV/VCR button on the remote control to load WinFast TV.
2. A window with live TV broadcast and a Control Panel will appear on the
screen.
3. Use the remote control to interact with the player as needed. The following
diagram shows the various remote control buttons supported by WinFast TV:
74
FusionPC manual 6/6 8/21/03 1:30 PM Page 74
All manuals and user guides at all-guides.com
Page 85
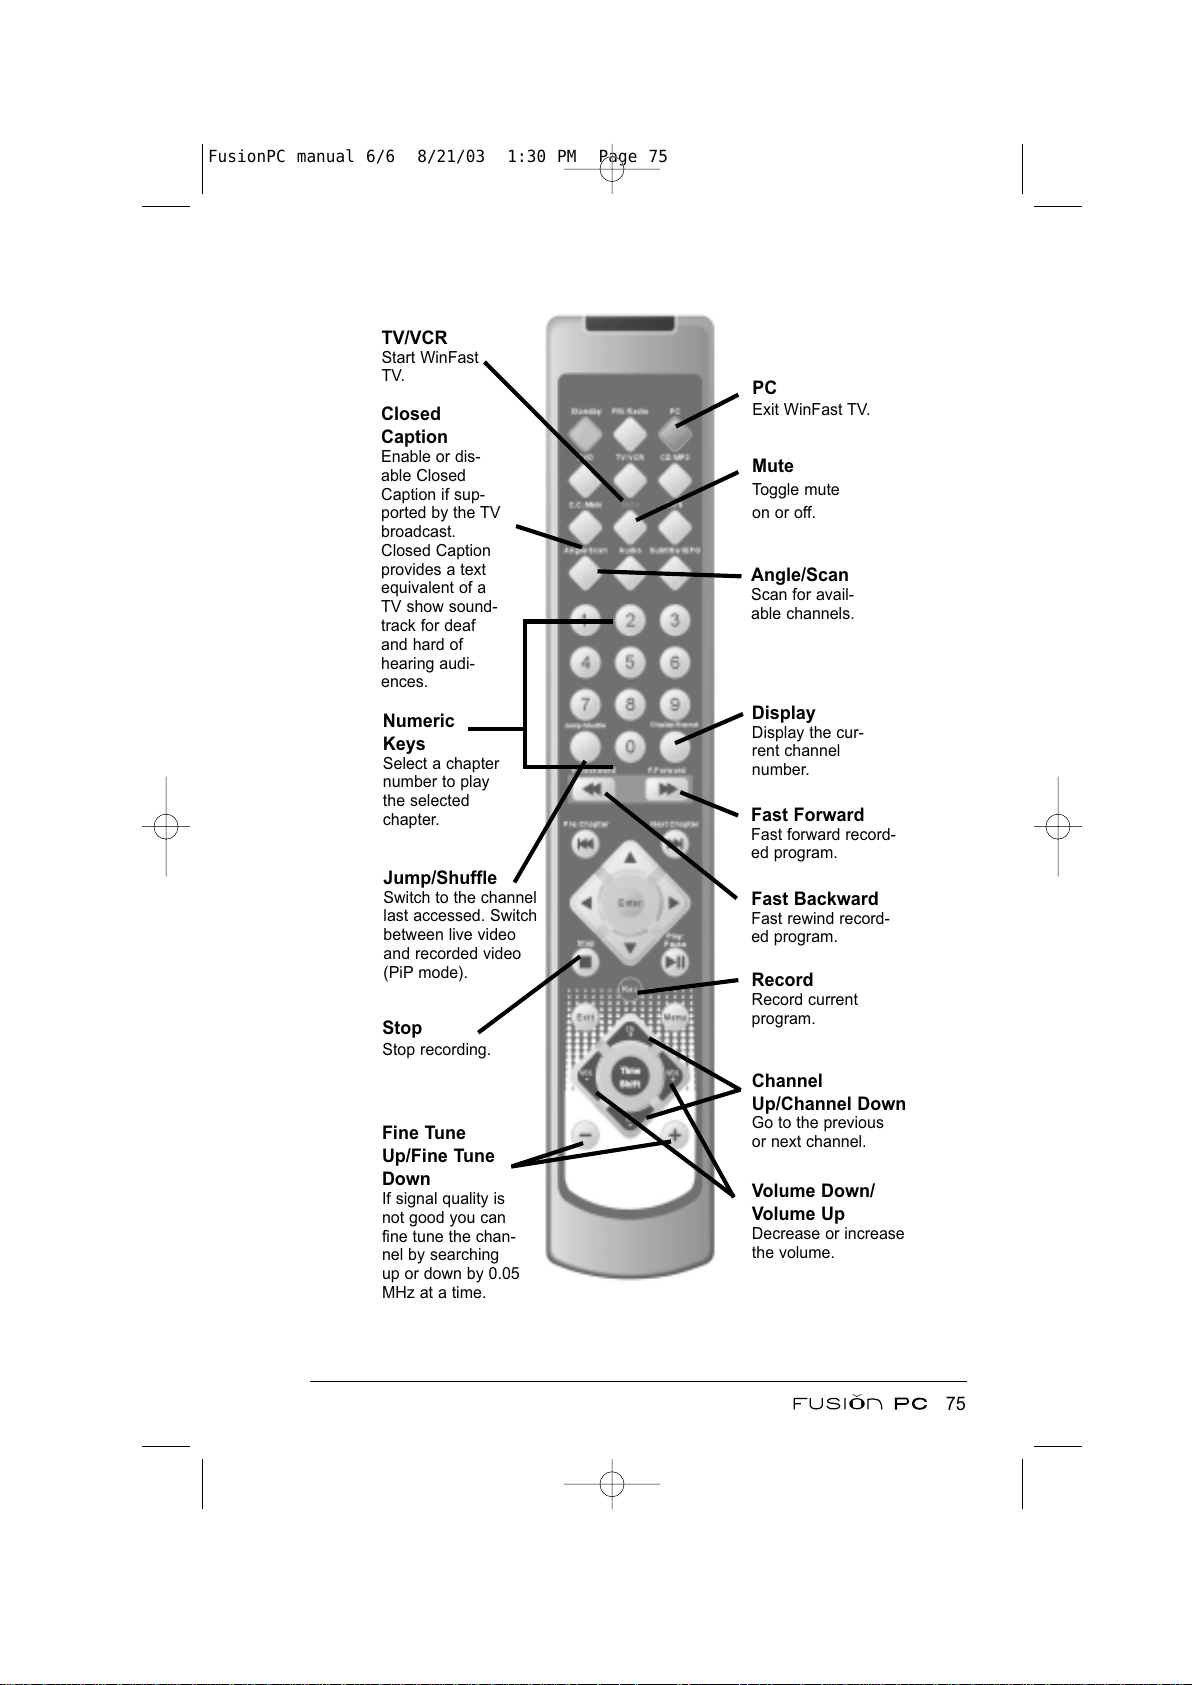
75
Jump/Shuffle
Switch to the channel
last accessed. Switch
between live video
and recorded video
(PiP mode).
Mute
Toggle mute
on or off.
Volume Down/
Volume Up
Decrease or increase
the volume.
Numeric
Keys
Select a chapter
number to play
the selected
chapter.
Fast Backward
Fast rewind record-
ed program.
PC
Exit WinFast TV.
TV/VCR
Start WinFast
TV.
Angle/Scan
Scan for avail-
able channels.
Record
Record current
program.
Display
Display the cur-
rent channel
number.
Stop
Stop recording.
Channel
Up/Channel Down
Go to the previous
or next channel.
Closed
Caption
Enable or dis-
able Closed
Caption if sup-
ported by the TV
broadcast.
Closed Caption
provides a text
equivalent of a
TV show sound-
track for deaf
and hard of
hearing audi-
ences.
Fast Forward
Fast forward record-
ed program.
Fine Tune
Up/Fine Tune
Down
If signal quality is
not good you can
fine tune the chan-
nel by searching
up or down by 0.05
MHz at a time.
FusionPC manual 6/6 8/21/03 1:30 PM Page 75
All manuals and user guides at all-guides.com
Page 86
WinFast FM: Listening to FM Radio
Caution: You must connect the FM antenna before you can listen to FM radio.
If signal quality is not good, try relocating the antenna.
This section explains the functionality that WinFast FM has to offer and pro-
vides basic operating instructions. For advanced operations, refer to the WinFast
FM online help file for detailed information.
Using WinFast FM with a mouse and the WinFast FM
control panel
Click Start > All Programs > WinFast Entertainment Center > WinFast
FM to start the program.
Scanning FM Channels
When you use WinFast FM for the very first time, you must scan the available
FM channels in your area before you can listen to FM radio. On the WinFast
FM Control Panel, click the Configuration button > Tuner Setup
button > Scan button. WinFast FM will start scanning and display channel
numbers on the channel list.
Note: If the scanning sensitivity is set too high, noise may be mistaken for a radio
station. If the sensitivity is set too low, the scanning process may skip over valid
stations. If you are having problems acquiring stations in scanning mode, adjust
the sensitivity level from within the WinFast FM control panel.
Listening to FM Radio
Once the available stations have been scanned, the WinFast FM Control Panel
will appear on the screen. You can click the Control Panel buttons to select a
channel for listening to.
Note: You can schedule a radio event in advance to make WinFast FM automati-
cally broadcast the show at the scheduled time. (See “Scheduling Radio Events”
later in this section.)
76
FusionPC manual 6/6 8/21/03 1:30 PM Page 76
All manuals and user guides at all-guides.com
all-guides.com
Page 87
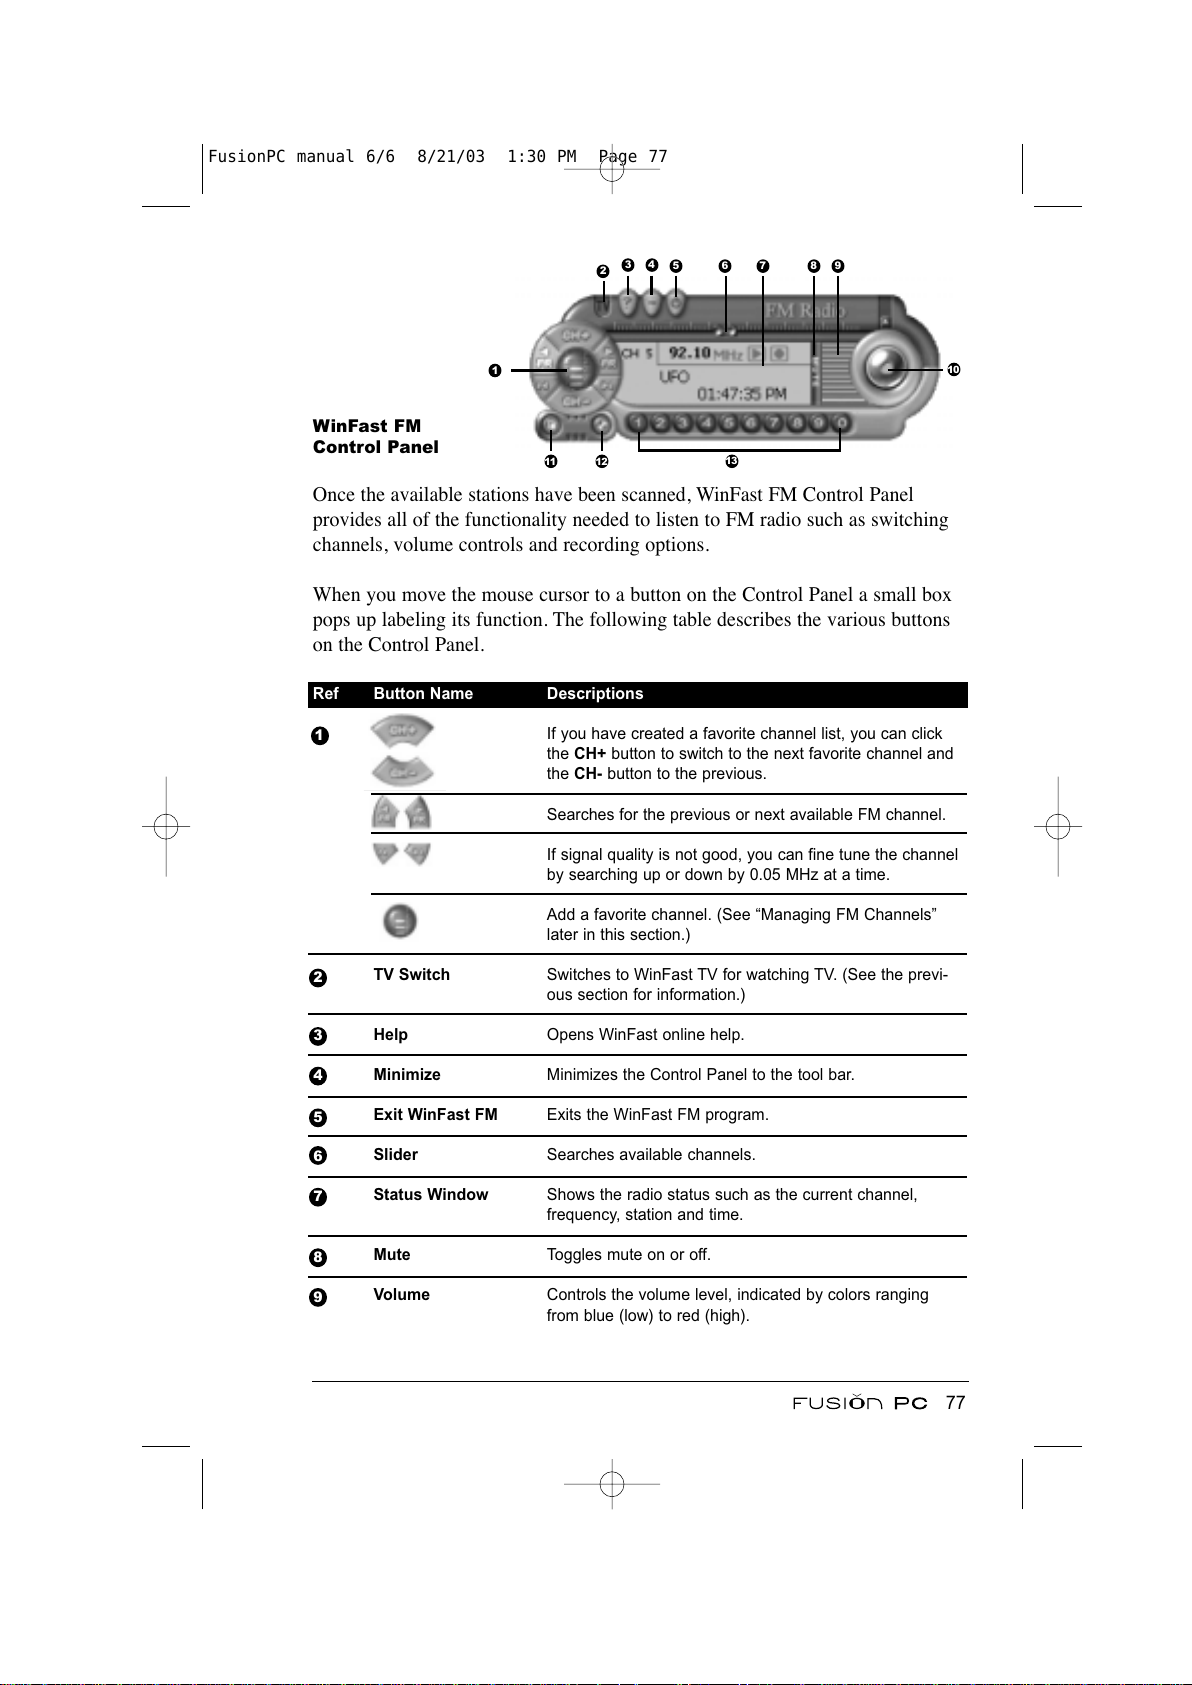
1
2
3
4
5
6
7
8
9
WinFast FM
Control Panel
Once the available stations have been scanned, WinFast FM Control Panel
provides all of the functionality needed to listen to FM radio such as switching
channels, volume controls and recording options.
When you move the mouse cursor to a button on the Control Panel a small box
pops up labeling its function. The following table describes the various buttons
on the Control Panel.
Ref Button Name Descriptions
If you have created a favorite channel list, you can click
the CH+ button to switch to the next favorite channel and
the CH- button to the previous.
Searches for the previous or next available FM channel.
If signal quality is not good, you can fine tune the channel
by searching up or down by 0.05 MHz at a time.
Add a favorite channel. (See “Managing FM Channels”
later in this section.)
TV Switch Switches to WinFast TV for watching TV. (See the previ-
ous section for information.)
Help Opens WinFast online help.
Minimize Minimizes the Control Panel to the tool bar.
Exit WinFast FM Exits the WinFast FM program.
Slider Searches available channels.
Status Window Shows the radio status such as the current channel,
frequency, station and time.
Mute Toggles mute on or off.
Volume Controls the volume level, indicated by colors ranging
from blue (low) to red (high).
77
1
2
3 4
5
6 7
10
11 12
13
8
9
FusionPC manual 6/6 8/21/03 1:30 PM Page 77
All manuals and user guides at all-guides.com
Page 88
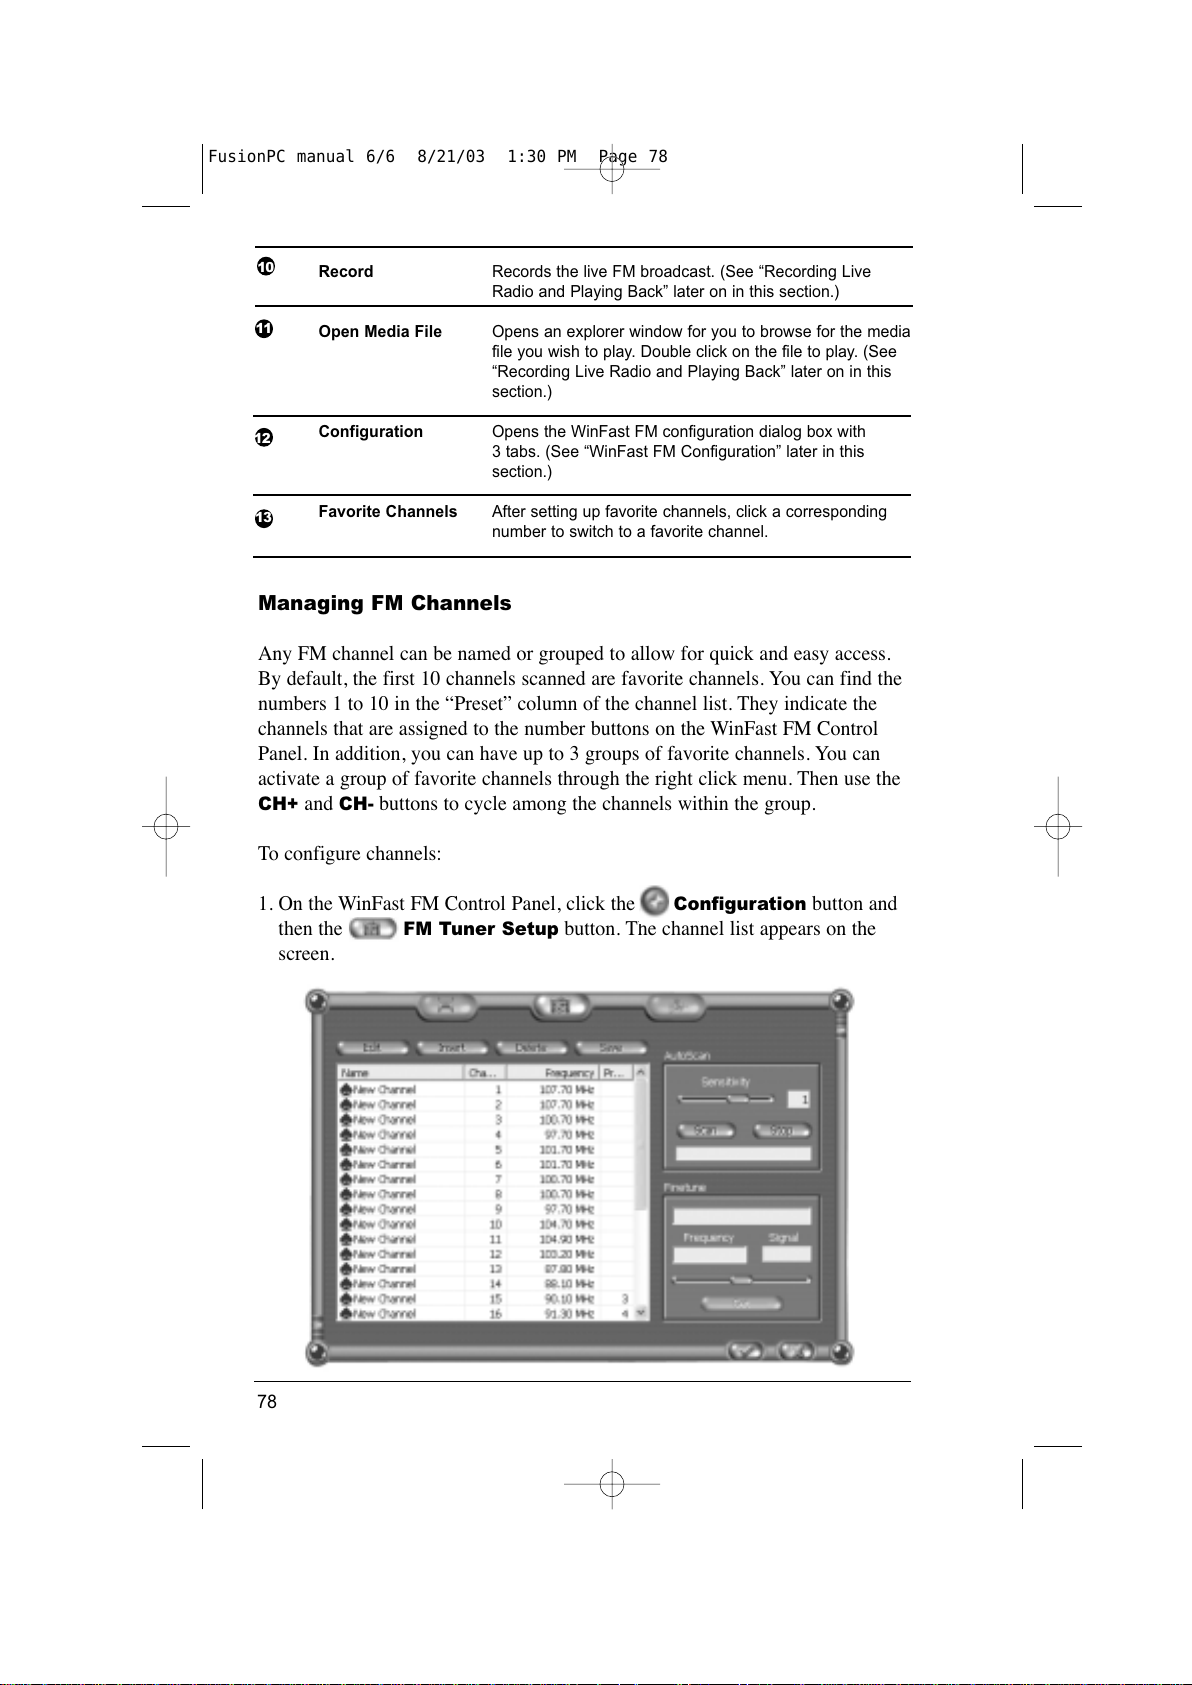
Record Records the live FM broadcast. (See “Recording Live
Radio and Playing Back” later on in this section.)
Open Media File Opens an explorer window for you to browse for the media
file you wish to play. Double click on the file to play. (See
“Recording Live Radio and Playing Back” later on in this
section.)
Configuration Opens the WinFast FM configuration dialog box with
3 tabs. (See “WinFast FM Configuration” later in this
section.)
Favorite Channels After setting up favorite channels, click a corresponding
number to switch to a favorite channel.
Managing FM Channels
Any FM channel can be named or grouped to allow for quick and easy access.
By default, the first 10 channels scanned are favorite channels. You can find the
numbers 1 to 10 in the “Preset” column of the channel list. They indicate the
channels that are assigned to the number buttons on the WinFast FM Control
Panel. In addition, you can have up to 3 groups of favorite channels. You can
activate a group of favorite channels through the right click menu. Then use the
CH+ and CH- buttons to cycle among the channels within the group.
To configure channels:
1. On the WinFast FM Control Panel, click the
Configuration button and
then the FM Tuner Setup button. The channel list appears on the
screen.
78
10
11
12
13
FusionPC manual 6/6 8/21/03 1:30 PM Page 78
All manuals and user guides at all-guides.com
Page 89
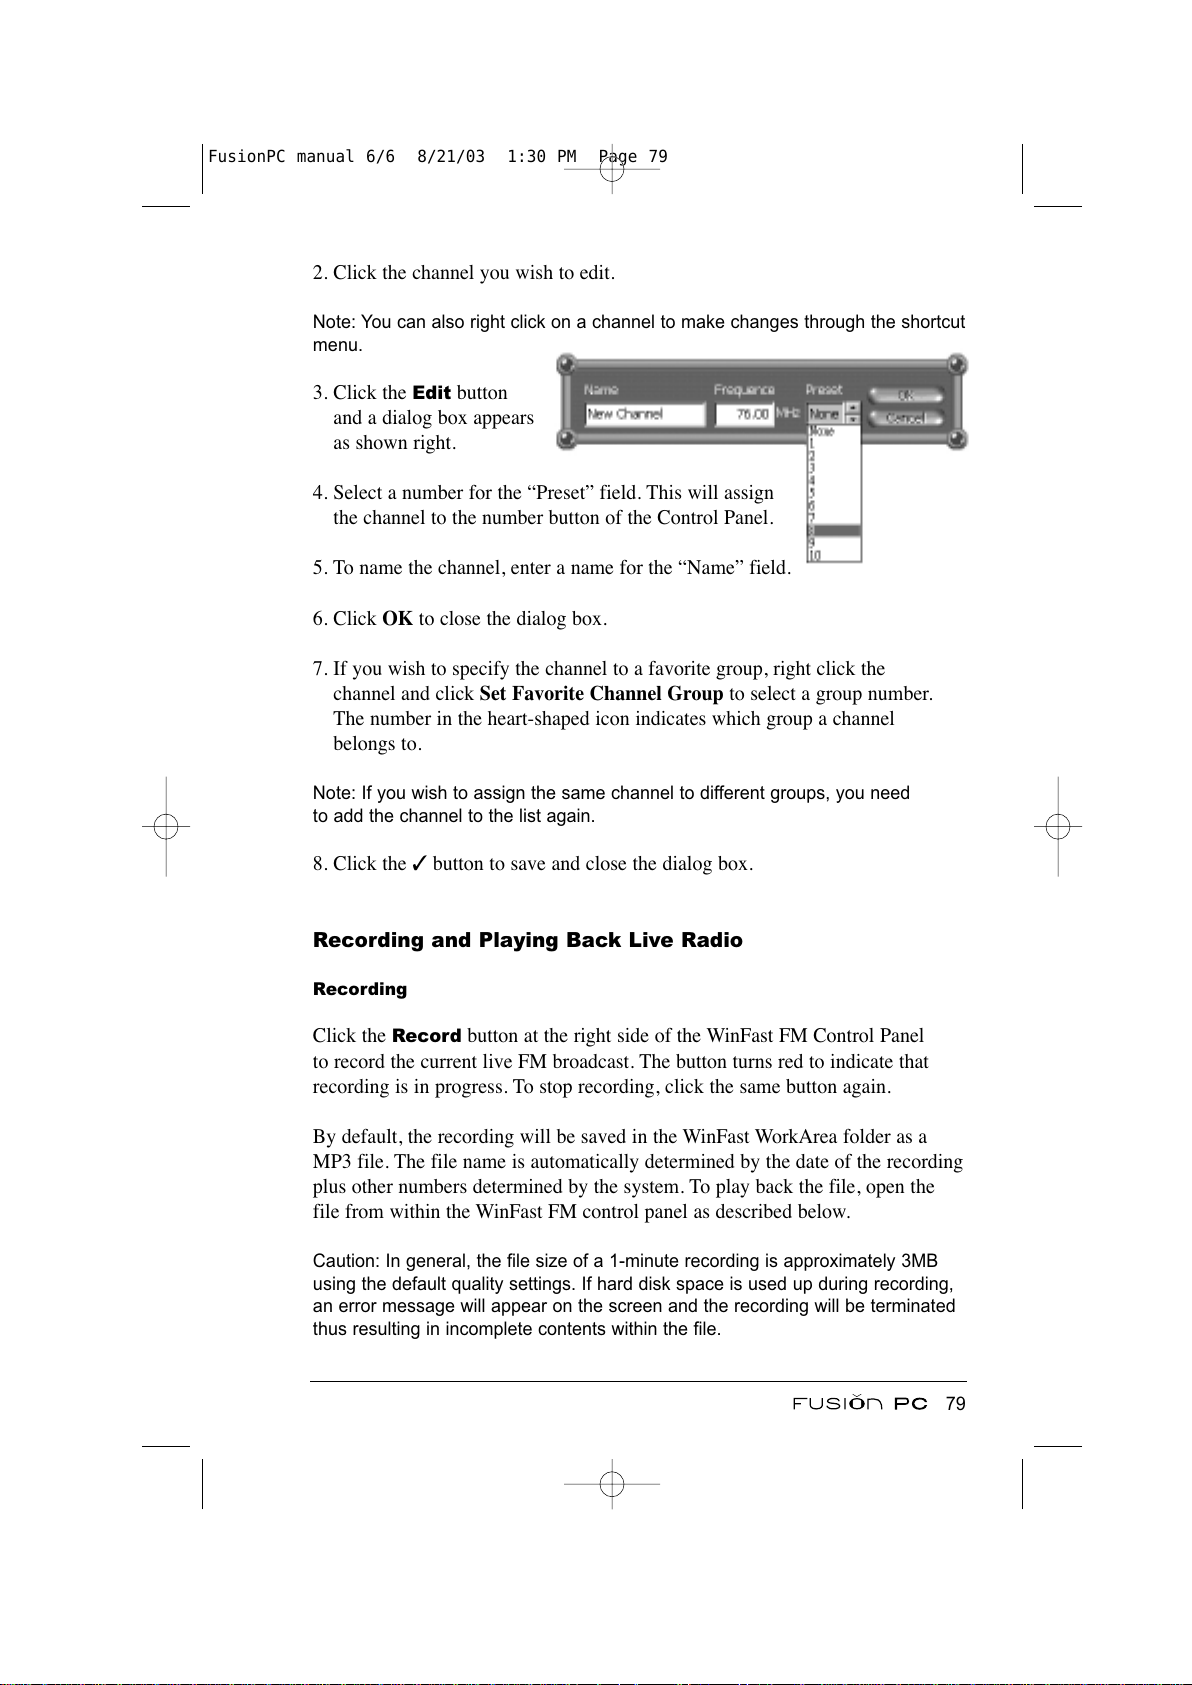
2. Click the channel you wish to edit.
Note: You can also right click on a channel to make changes through the shortcut
menu.
3. Click the Edit button
and a dialog box appears
as shown right.
4. Select a number for the “Preset” field. This will assign
the channel to the number button of the Control Panel.
5. To name the channel, enter a name for the “Name” field.
6. Click OK to close the dialog box.
7. If you wish to specify the channel to a favorite group, right click the
channel and click Set Favorite Channel Group to select a group number.
The number in the heart-shaped icon indicates which group a channel
belongs to.
Note: If you wish to assign the same channel to different groups, you need
to add the channel to the list again.
8. Click the ✓ button to save and close the dialog box.
Recording and Playing Back Live Radio
Recording
Click the Record button at the right side of the WinFast FM Control Panel
to record the current live FM broadcast. The button turns red to indicate that
recording is in progress. To stop recording, click the same button again.
By default, the recording will be saved in the WinFast WorkArea folder as a
MP3 file. The file name is automatically determined by the date of the recording
plus other numbers determined by the system. To play back the file, open the
file from within the WinFast FM control panel as described below.
Caution: In general, the file size of a 1-minute recording is approximately 3MB
using the default quality settings. If hard disk space is used up during recording,
an error message will appear on the screen and the recording will be terminated
thus resulting in incomplete contents within the file.
79
FusionPC manual 6/6 8/21/03 1:30 PM Page 79
All manuals and user guides at all-guides.com
Page 90
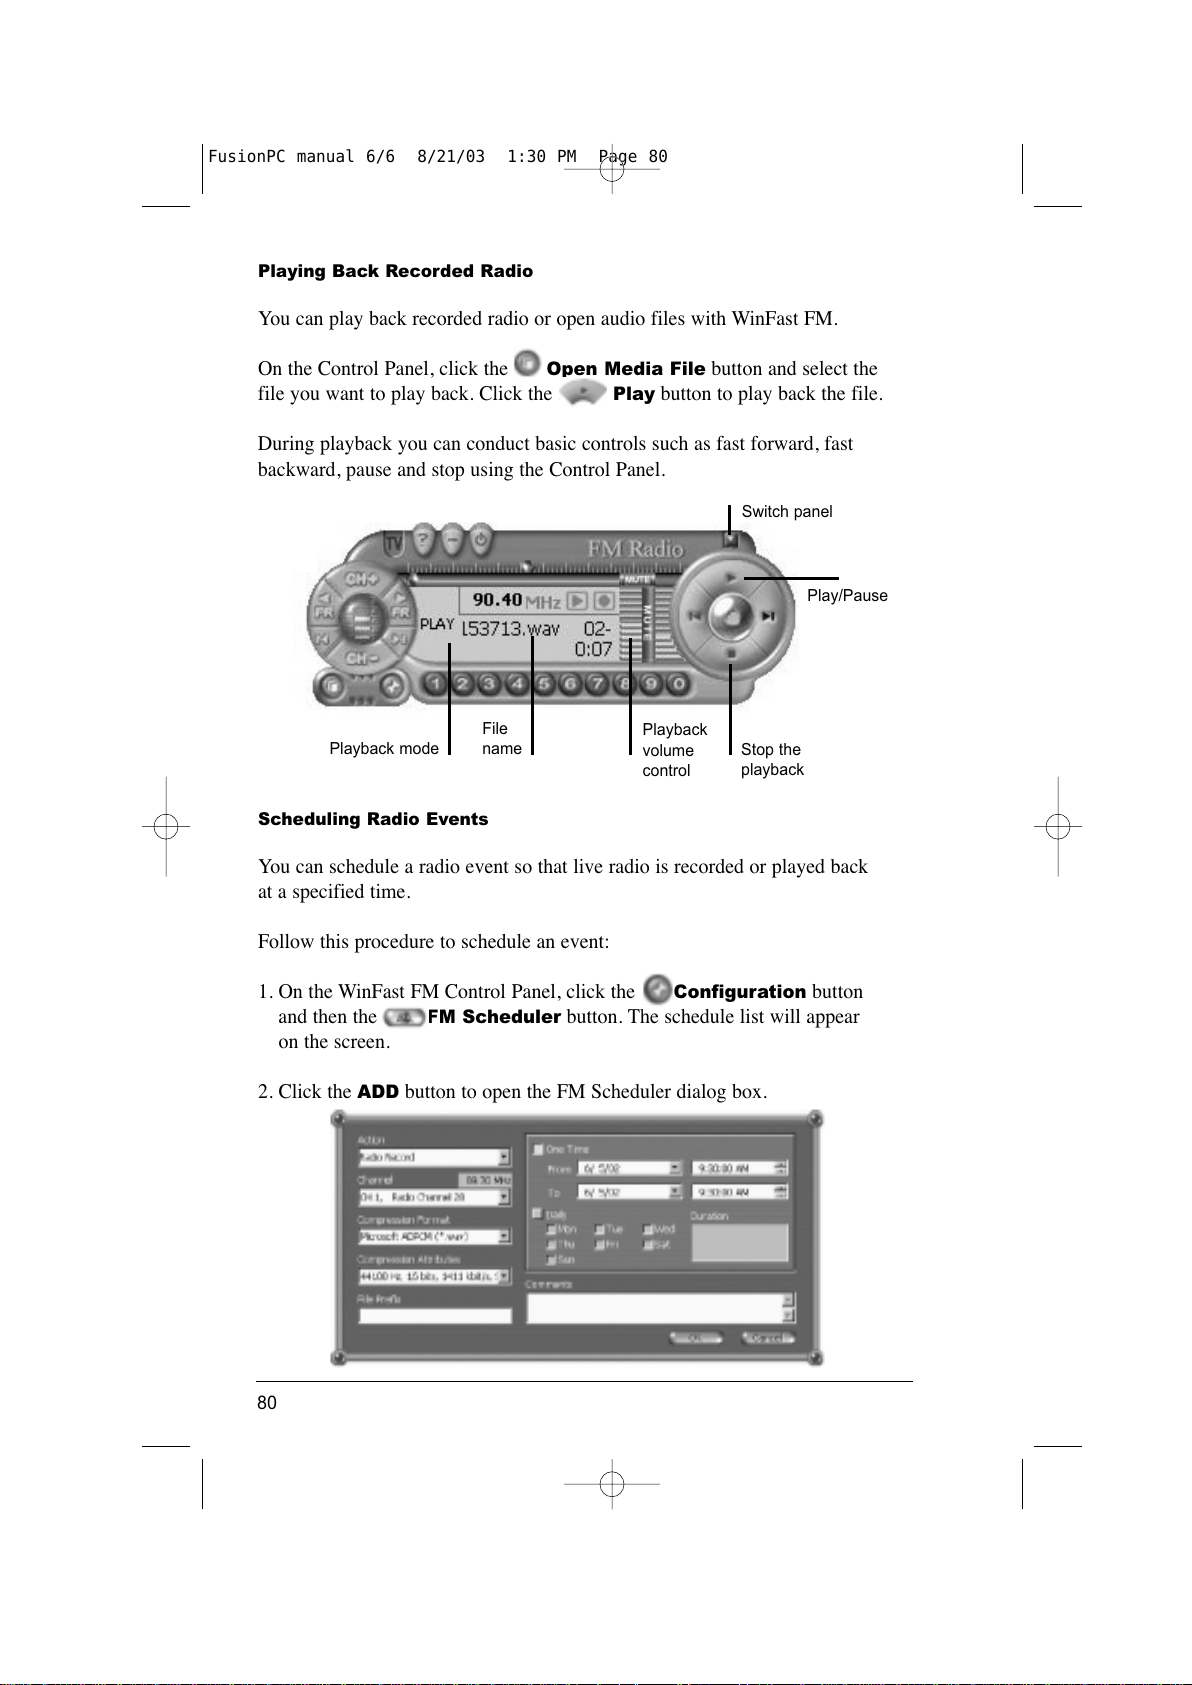
Playing Back Recorded Radio
You can play back recorded radio or open audio files with WinFast FM.
On the Control Panel, click the Open Media File button and select the
file you want to play back. Click the
Play button to play back the file.
During playback you can conduct basic controls such as fast forward, fast
backward, pause and stop using the Control Panel.
Scheduling Radio Events
You can schedule a radio event so that live radio is recorded or played back
at a specified time.
Follow this procedure to schedule an event:
1. On the WinFast FM Control Panel, click the
Configuration button
and then the FM Scheduler button. The schedule list will appear
on the screen.
2. Click the
ADD button to open the FM Scheduler dialog box.
80
Playback mode
Stop the
playback
Playback
volume
control
File
name
Play/Pause
Switch panel
FusionPC manual 6/6 8/21/03 1:30 PM Page 80
All manuals and user guides at all-guides.com
Page 91
3. Enter the information for these fields:
Action — Select either Radio Record or Radio Show.
Channel — Select the desired channel from the pull down list.
File Prefix — Enter a file name. If not entered, the filename will be
determined by the program.
From/To — Enter the starting time/date and the ending time/date
of the radio show.
Daily — Check this field for a daily event. Check a week day
for a weekly event.
4. Enter other information as necessary.
5. Click the OK button to confirm and return to the previous screen.
6. The event will appear in the list. Click the ✓ button to save.
Caution: Make sure that the system is in PC mode with power saving disabled
before the scheduled event starts. A scheduled event cannot occur if the system
is off or in Windows XP Stand By mode.
7. The WinFast FM program will automatically run at the specified time and
date to perform the action as requested.
WinFast FM Configuration
The configuration sub panel is where the majority of program option settings
are located such as device properties, tuner setup and scheduler.
Click the
Configuration button on the WinFast FM Control Panel to
access the configuration dialog box where the following 3 tabs appear.
Device Setup
In this tab you can specify the file prefix for recorded files as well as the default
directory files are saved to.
Tuner Setup
This tab lets you scan and configure the FM channels. (See “Managing FM
Channels” earlier in this section.)
Scheduler
This tab lets you schedule a Radio Record or Radio Show. (See “Scheduling
Radio Events” earlier in this section.)
81
FusionPC manual 6/6 8/21/03 1:30 PM Page 81
All manuals and user guides at all-guides.com
all-guides.com
Page 92
Using WinFast FM with the remote control
The remote control gives you the freedom to control FM recording and playback
up to 20 feet away from your FusionPC.
Note: FM recording/playback must be initiated by pressing the FM button on the
remote control in order for WinFast FM to accept remote commands.
The remote control provides limited functionality from within the WinFast FM
application. Advanced FM radio features can only be accessed through the
WinFast FM control panel. However, any options set by the user via the
WinFast FM control panel remain in effect when operating the FM radio by
remote control.
1. Press the FM button on the remote control to load WinFast FM.
2. The FM broadcast Control Panel window will appear on the screen.
3. Use the remote control to interact with the player as needed. The following
diagram shows the various remote control buttons supported by WinFast FM:
82
FusionPC manual 6/6 8/21/03 1:30 PM Page 82
All manuals and user guides at all-guides.com
Page 93
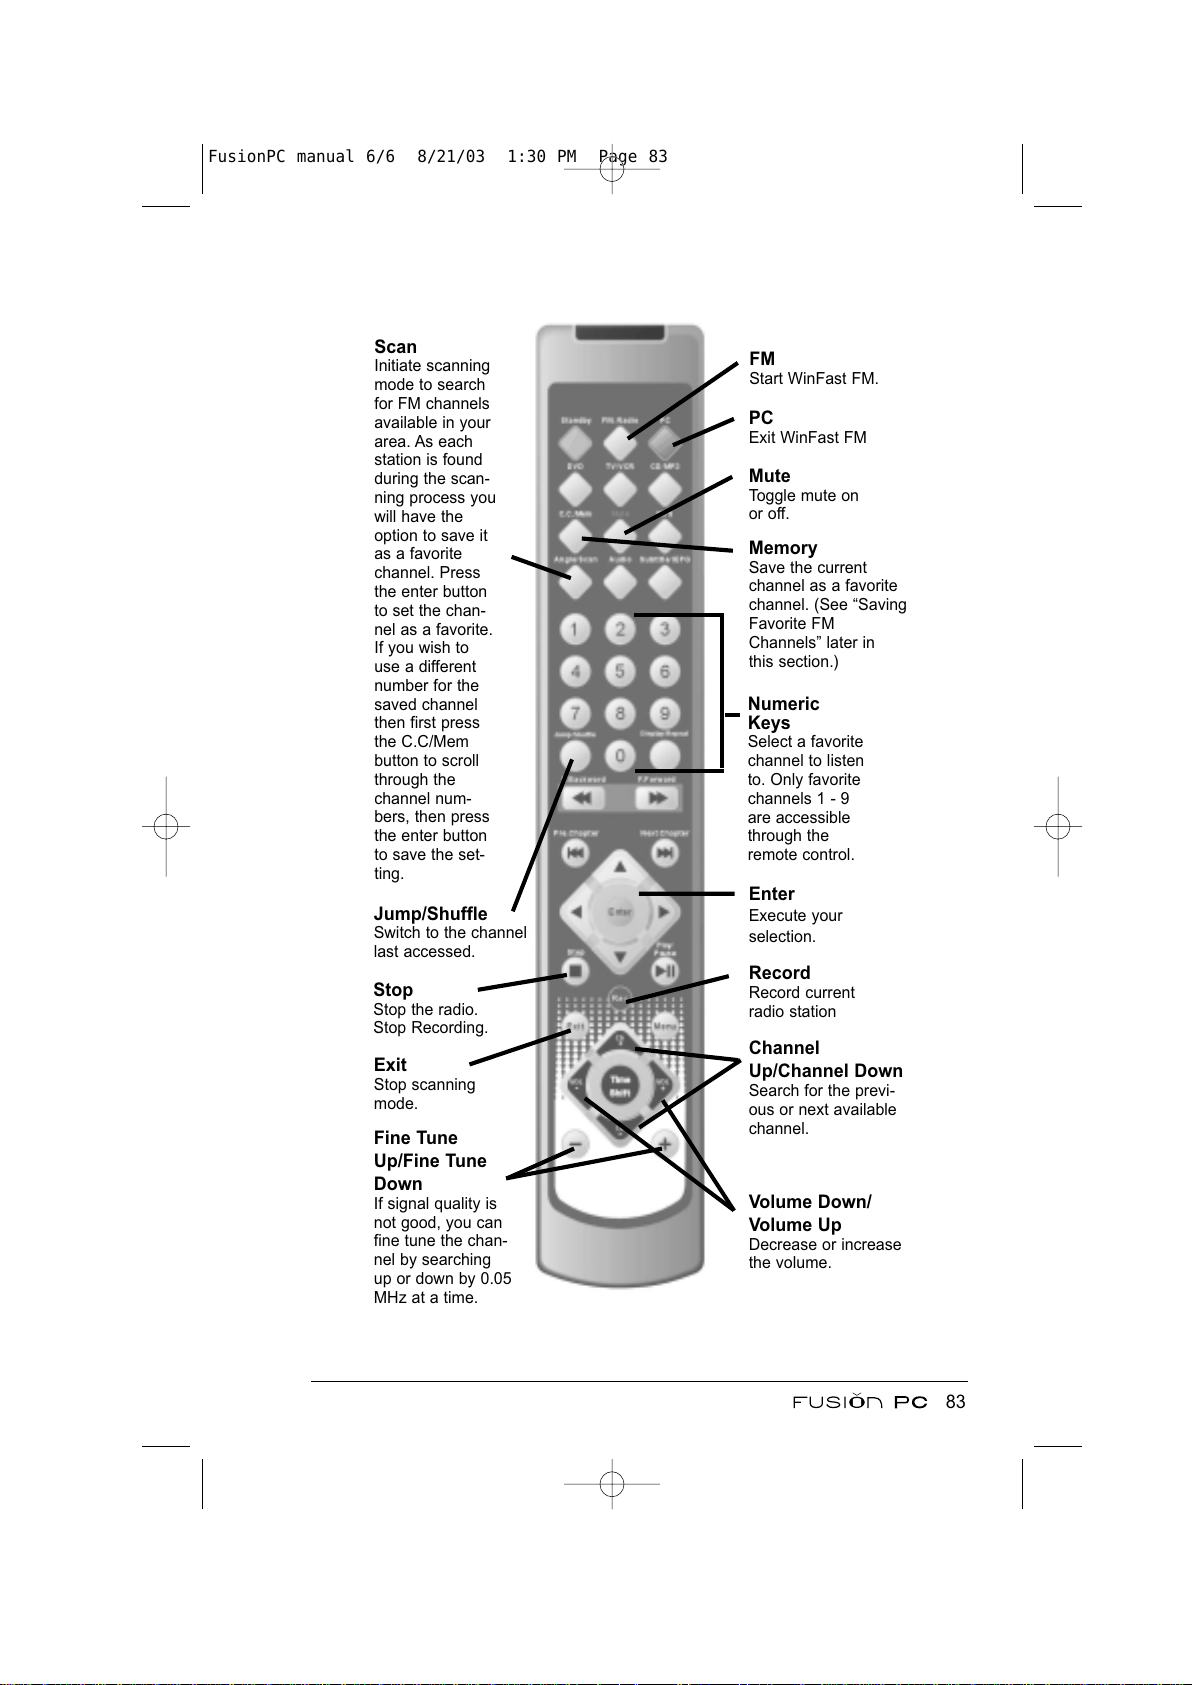
83
Jump/Shuffle
Switch to the channel
last accessed.
Mute
Toggle mute on
or off.
Volume Down/
Volume Up
Decrease or increase
the volume.
Numeric
Keys
Select a favorite
channel to listen
to. Only favorite
channels 1 - 9
are accessible
through the
remote control.
Scan
Initiate scanning
mode to search
for FM channels
available in your
area. As each
station is found
during the scan-
ning process you
will have the
option to save it
as a favorite
channel. Press
the enter button
to set the chan-
nel as a favorite.
If you wish to
use a different
number for the
saved channel
then first press
the C.C/Mem
button to scroll
through the
channel num-
bers, then press
the enter button
to save the set-
ting.
Stop
Stop the radio.
Stop Recording.
Memory
Save the current
channel as a favorite
channel. (See “Saving
Favorite FM
Channels” later in
this section.)
Record
Record current
radio station
Exit
Stop scanning
mode.
Channel
Up/Channel Down
Search for the previ-
ous or next available
channel.
Fine Tune
Up/Fine Tune
Down
If signal quality is
not good, you can
fine tune the chan-
nel by searching
up or down by 0.05
MHz at a time.
Enter
Execute your
selection.
FM
Start WinFast FM.
PC
Exit WinFast FM
FusionPC manual 6/6 8/21/03 1:30 PM Page 83
All manuals and user guides at all-guides.com
Page 94
Windows Media Player: Listening to audio CD's, MP3
and WMA compressed audio files
Media player is a powerful and easy-to-use application that provides feature
rich audio entertainment. As a standalone application media player allows you
to listen to audio content in virtually any format available. When connected
to the internet, media player expands its capabilities by offering internet radio
station playback as well as up to date information about your music.
This section explains the functionality that Windows Media Player has to offer
and provides basic operating instructions. For advanced operations, refer to the
Windows Media Player online help file for detailed information.
Using Windows Media Player with the remote control
The remote control gives you the freedom to control Windows Media Player
up to 20 feet away from your FusionPC.
Note: Windows Media Player must be initiated by pressing the CD/MP3 button
on the remote control in order for Media Player to accept remote commands.
The remote control provides limited functionality from within the Windows
Media Player application. Advanced media player features can only be accessed
through the media player control panel. Any options set by the user via the
media player control panel remain in effect when operating the media player
by remote control.
1. Insert an Audio CD, a CD with MP3/WMA files or copy MP3/WMA files
to the directory C:\MP3.
2. Press the CD/MP3 button on the remote control to load Windows Media
Player. By default, media player will first search the optical drive, then the
digital media directory C:\MP3. If no media is present, a dialogue box will
appear prompting the user to insert/copy media to one of the search destina-
tions.
3. The Windows Media Player control panel window will appear on the screen.
If an audio CD is found it will begin to play automatically. If MP3/WMA
files are found, they will be automatically queued into the playlist.
Note: MP3/WMA files can only be queued via the remote control if they are
located in the root directory of the CD. MP3/WMA files within directories on
a CD can only be selected by using the mouse.
4. Use the remote control to interact with the player as needed. The following
diagram shows the various remote control buttons supported by Windows
Media Player:
84
FusionPC manual 6/6 8/21/03 1:30 PM Page 84
All manuals and user guides at all-guides.com
Page 95
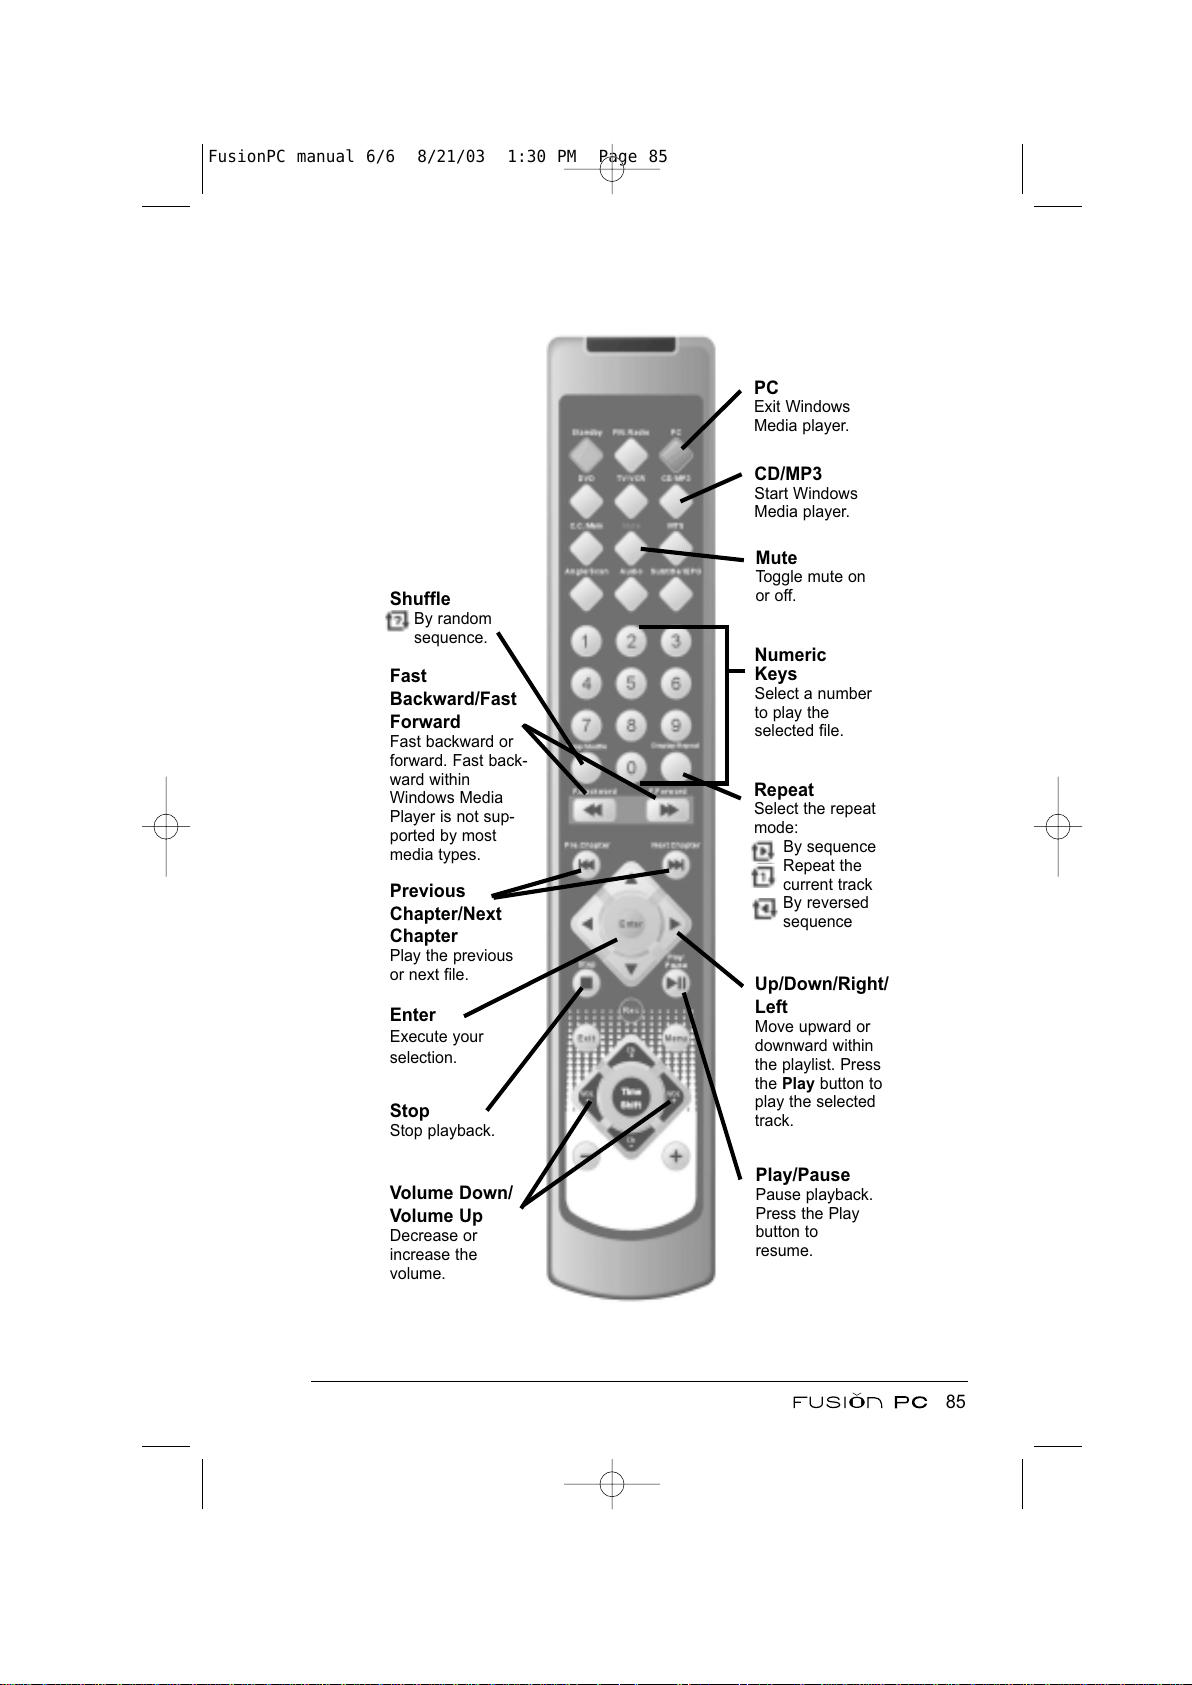
85
Shuffle
By random
sequence.
Mute
Toggle mute on
or off.
Volume Down/
Volume Up
Decrease or
increase the
volume.
Numeric
Keys
Select a number
to play the
selected file.
Stop
Stop playback.
Play/Pause
Pause playback.
Press the Play
button to
resume.
Enter
Execute your
selection.
Previous
Chapter/Next
Chapter
Play the previous
or next file.
Fast
Backward/Fast
Forward
Fast backward or
forward. Fast back-
ward within
Windows Media
Player is not sup-
ported by most
media types.
Repeat
Select the repeat
mode:
By sequence
Repeat the
current track
By reversed
sequence
CD/MP3
Start Windows
Media player.
PC
Exit Windows
Media player.
Up/Down/Right/
Left
Move upward or
downward within
the playlist. Press
the Play button to
play the selected
track.
FusionPC manual 6/6 8/21/03 1:30 PM Page 85
All manuals and user guides at all-guides.com
Page 96

To Press Button Name
86
FusionPC manual 6/6 8/21/03 1:30 PM Page 86
All manuals and user guides at all-guides.com
all-guides.com
Page 97
Chapter 6
Expanding Your System
You can expand the capabilities of your system by connecting external peripher-
al devices. When using a device, be sure to read the instructions accompanying
the device along with the relevant section in this chapter.
This chapter gives guidelines on installing and using these devices:
• USB
• IEEE 1394a
• Audio
• Video
• PC Card
• SmartMedia/MultiMediaCard/Secure Digital/Memory Stick cards
87
FusionPC manual 6/6 8/21/03 1:30 PM Page 87
All manuals and user guides at all-guides.com
Page 98
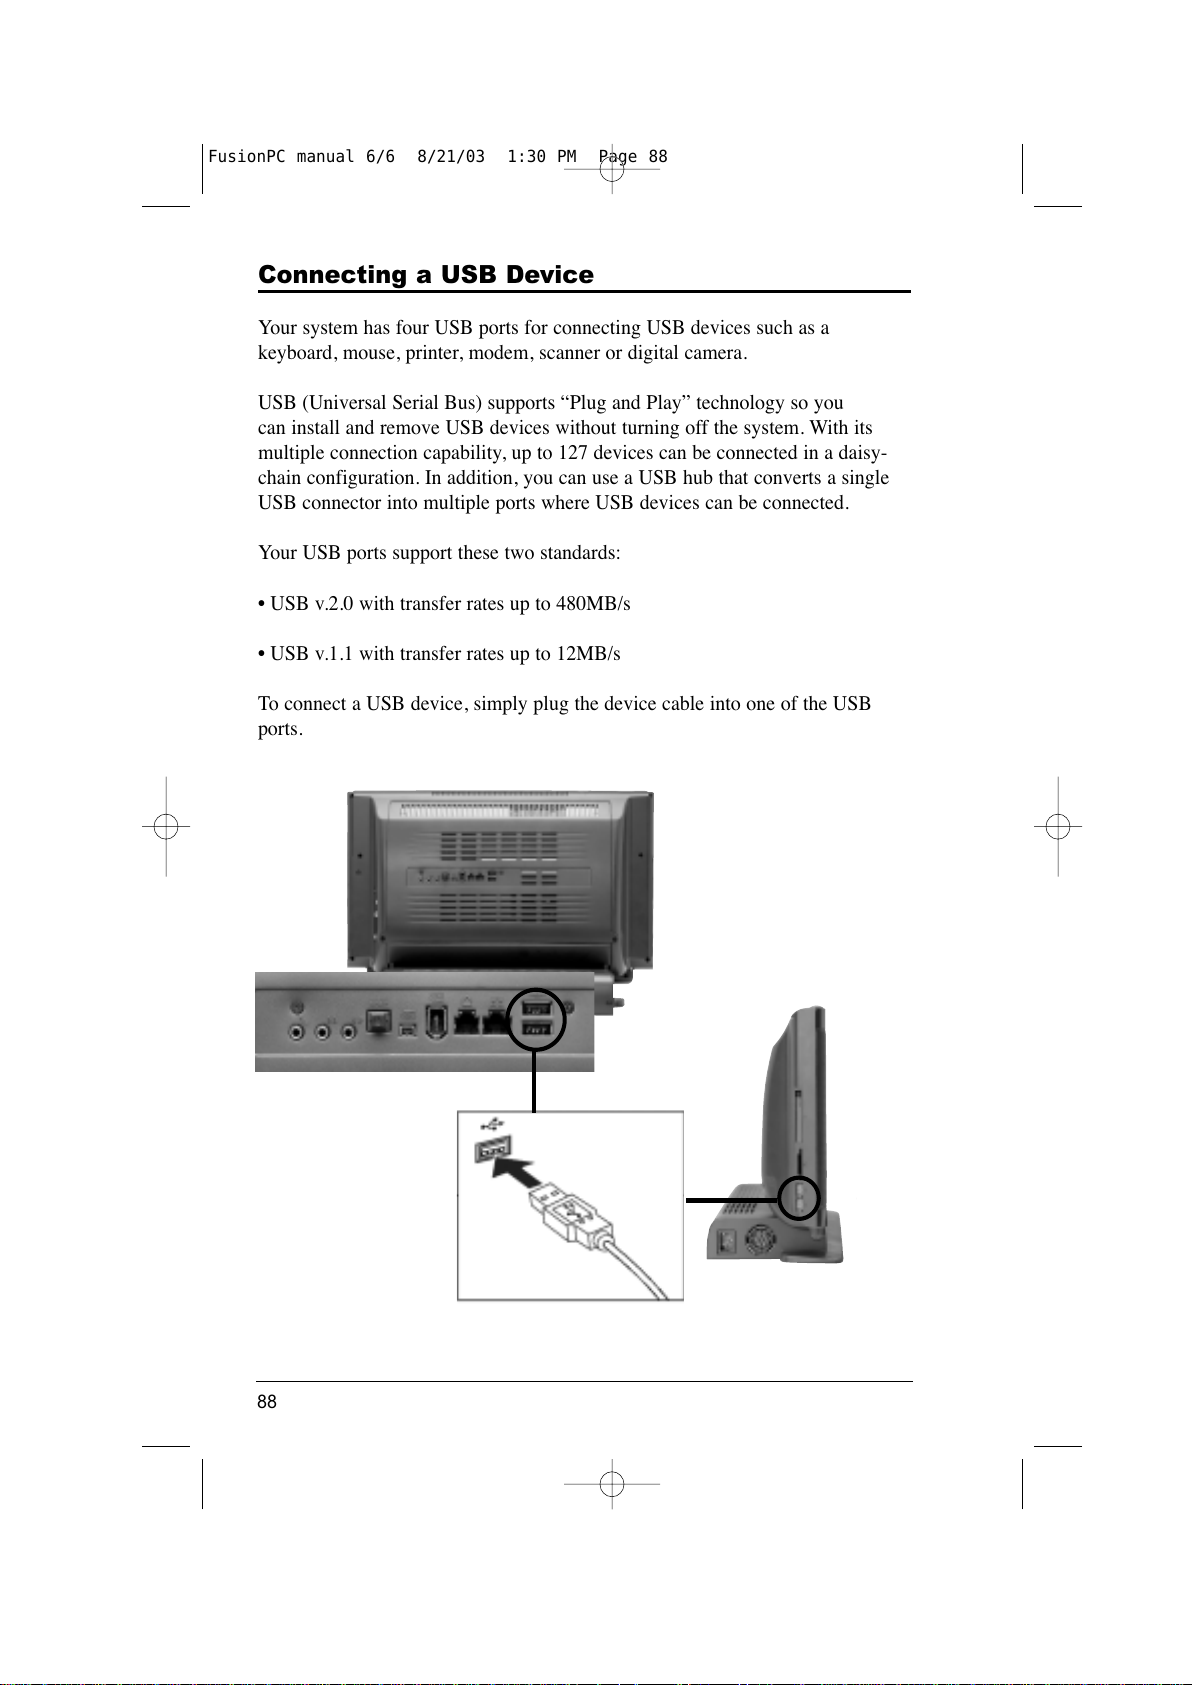
Connecting a USB Device
Your system has four USB ports for connecting USB devices such as a
keyboard, mouse, printer, modem, scanner or digital camera.
USB (Universal Serial Bus) supports “Plug and Play” technology so you
can install and remove USB devices without turning off the system. With its
multiple connection capability, up to 127 devices can be connected in a daisy-
chain configuration. In addition, you can use a USB hub that converts a single
USB connector into multiple ports where USB devices can be connected.
Your USB ports support these two standards:
• USB v.2.0 with transfer rates up to 480MB/s
• USB v.1.1 with transfer rates up to 12MB/s
To connect a USB device, simply plug the device cable into one of the USB
ports.
88
FusionPC manual 6/6 8/21/03 1:30 PM Page 88
All manuals and user guides at all-guides.com
Page 99
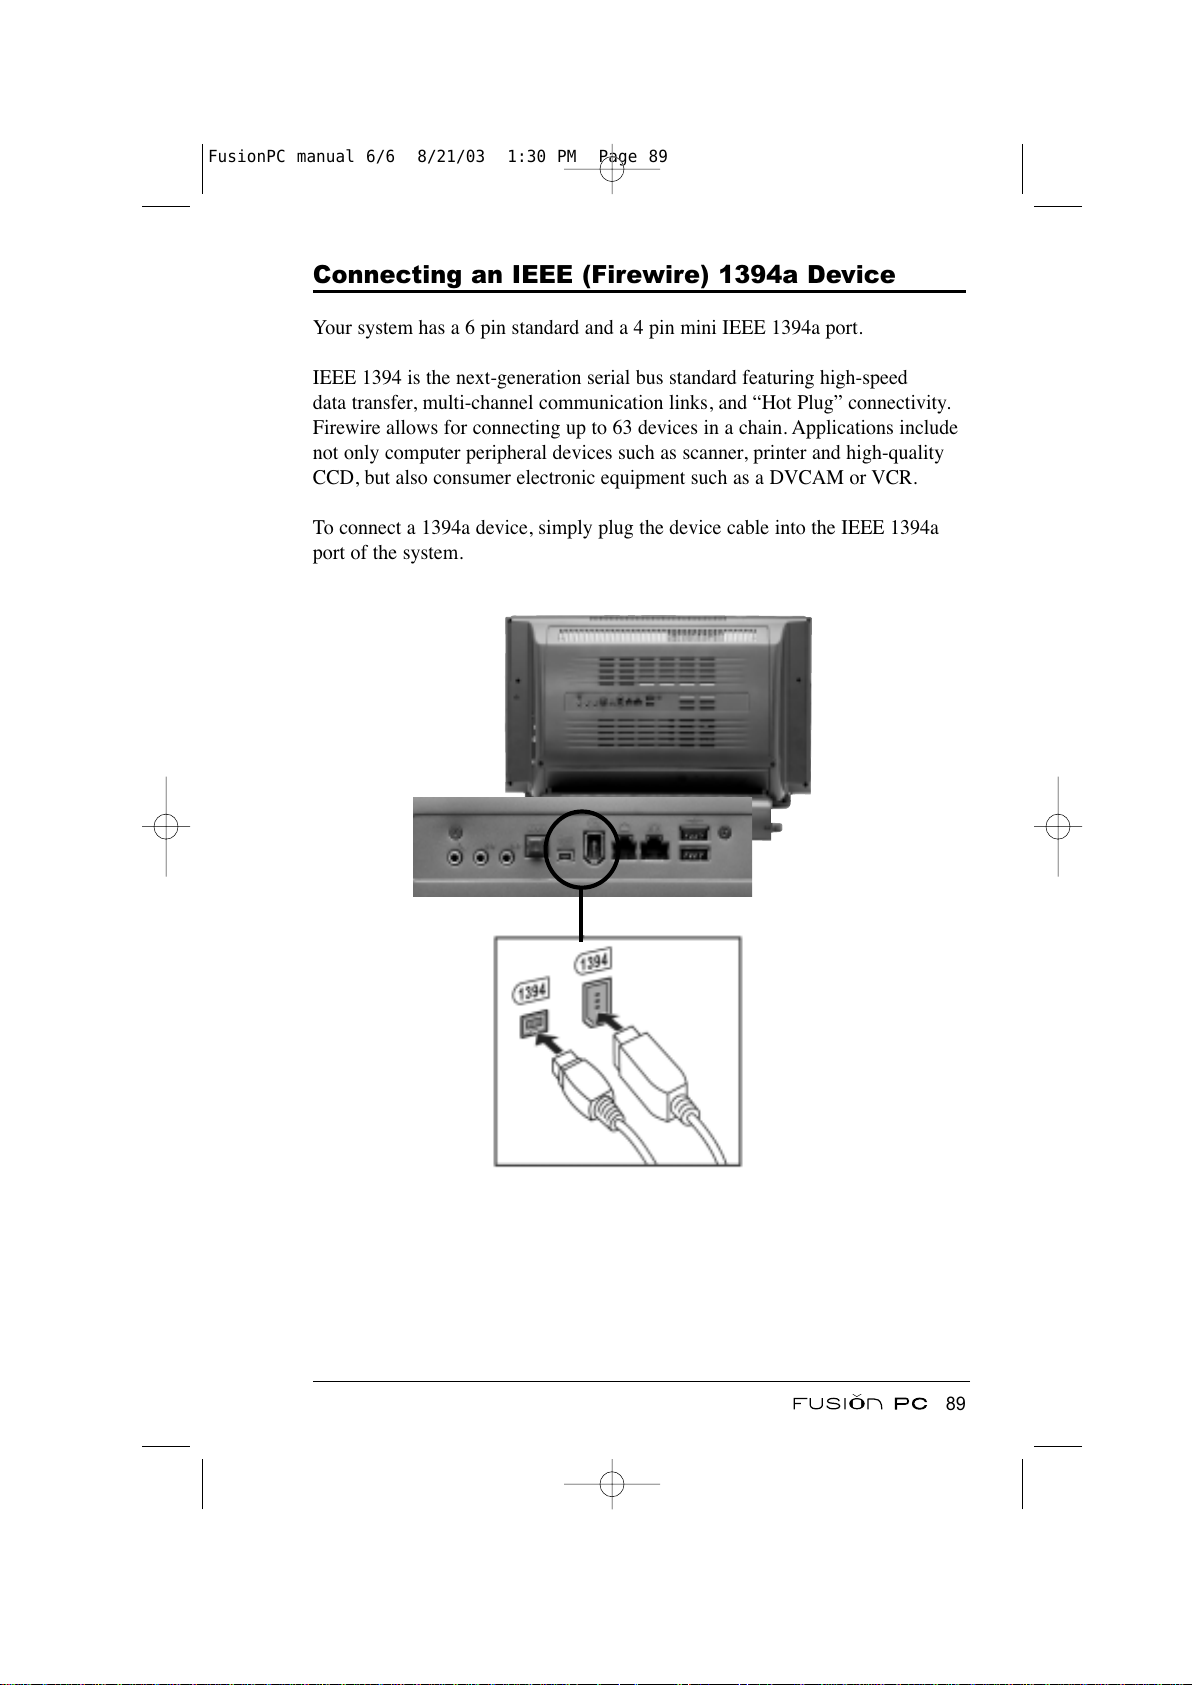
Connecting an IEEE (Firewire) 1394a Device
Your system has a 6 pin standard and a 4 pin mini IEEE 1394a port.
IEEE 1394 is the next-generation serial bus standard featuring high-speed
data transfer, multi-channel communication links, and “Hot Plug” connectivity.
Firewire allows for connecting up to 63 devices in a chain. Applications include
not only computer peripheral devices such as scanner, printer and high-quality
CCD, but also consumer electronic equipment such as a DVCAM or VCR.
To connect a 1394a device, simply plug the device cable into the IEEE 1394a
port of the system.
89
FusionPC manual 6/6 8/21/03 1:30 PM Page 89
All manuals and user guides at all-guides.com
Page 100
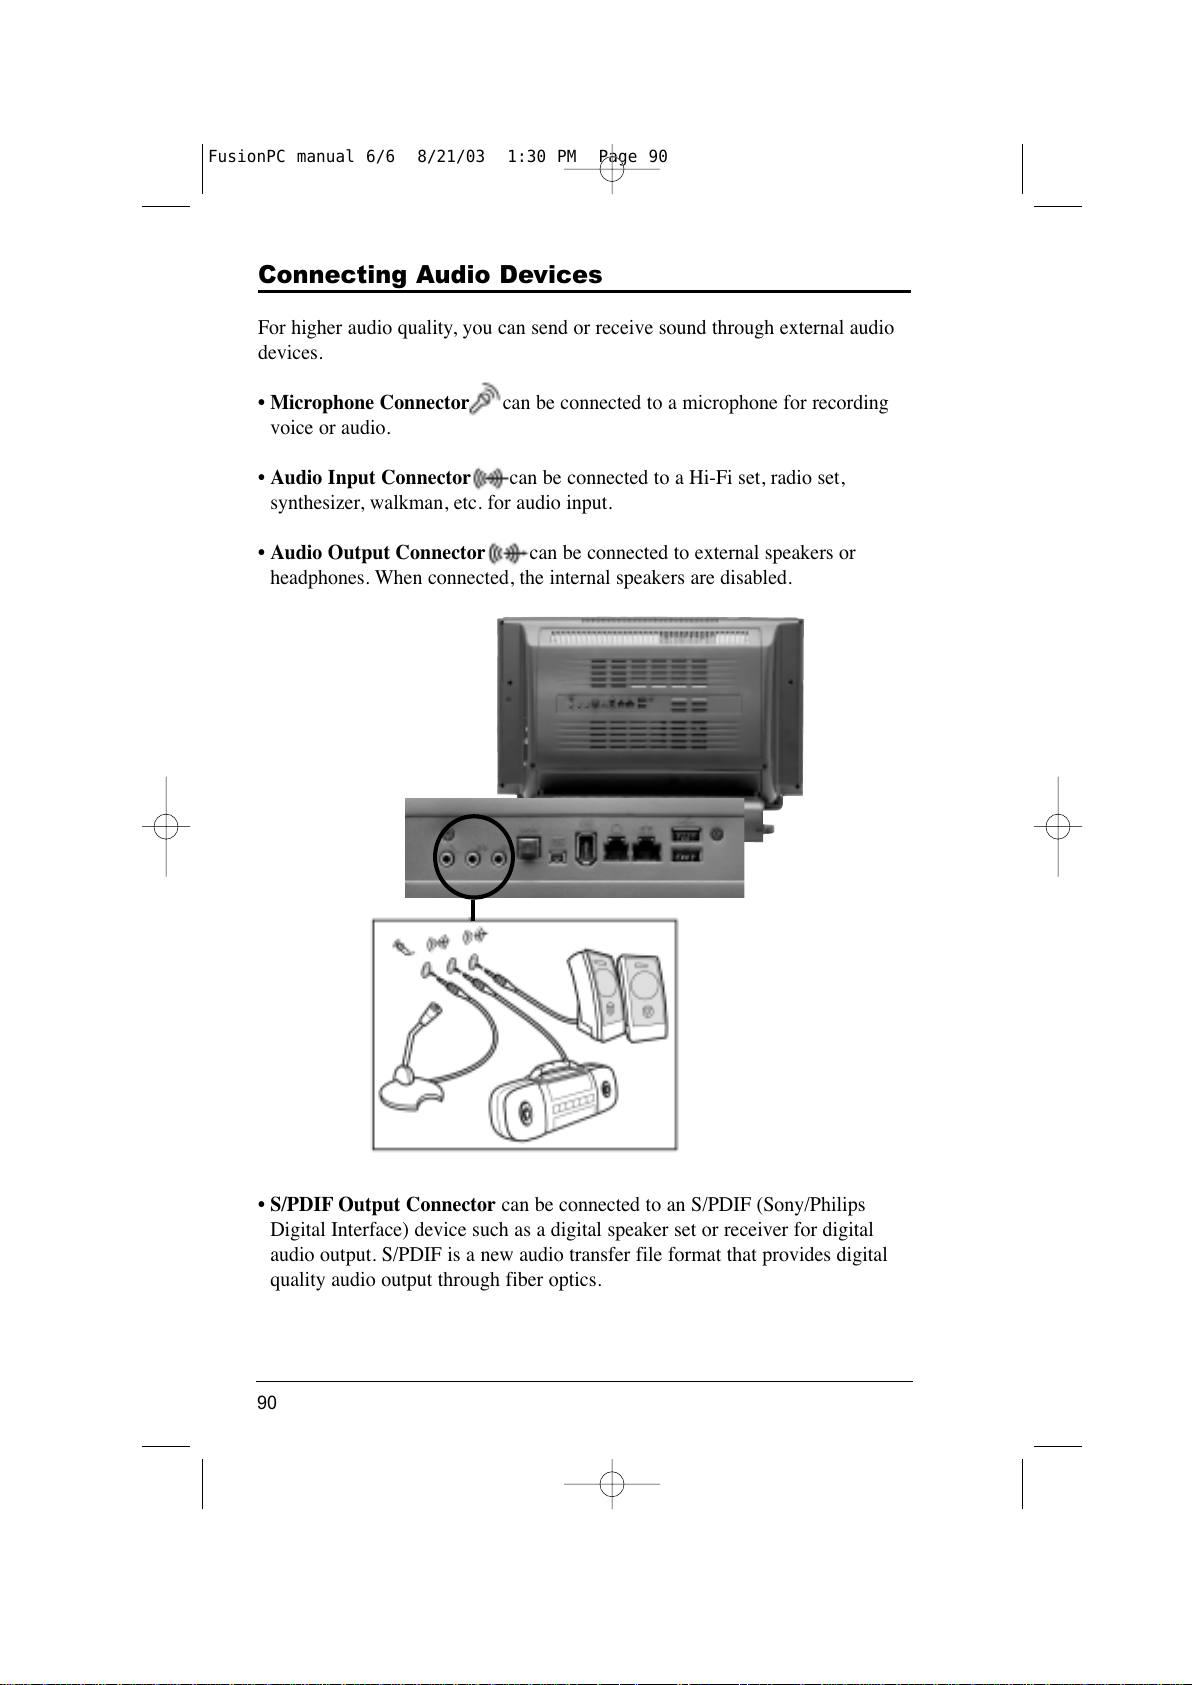
Connecting Audio Devices
For higher audio quality, you can send or receive sound through external audio
devices.
• Microphone Connector can be connected to a microphone for recording
voice or audio.
• Audio Input Connector can be connected to a Hi-Fi set, radio set,
synthesizer, walkman, etc. for audio input.
• Audio Output Connector can be connected to external speakers or
headphones. When connected, the internal speakers are disabled.
• S/PDIF Output Connector can be connected to an S/PDIF (Sony/Philips
Digital Interface) device such as a digital speaker set or receiver for digital
audio output. S/PDIF is a new audio transfer file format that provides digital
quality audio output through fiber optics.
90
FusionPC manual 6/6 8/21/03 1:30 PM Page 90
All manuals and user guides at all-guides.com
 Loading...