

Page 1

SX-DX Manual file:///C|/test/SX-DX Manual.htm
SX-DX Manual
Chapter 1: System Overview____________________3
The Central Processing Unit _______________4
Key Components________________________ 5
Unpacking and Component Checklist________7
Software Requirements ___________________8
Chapter 2: Basic Operation _____________________9
User Controls __________________________12
LED Indicators _________________________14
Chapter 3: Data Storage Devices ________________16
Floppy Disk Drives and Diskettes ___________17
IC Cards _______________________________19
Hard Disk Drives _________________________20
Chapter 4: Using the Keyboard ___________________21
The Typewriter Keys ______________________22
Hot Keys _______________________________27
Common Key Combinations ________________28
Chapter 5: Basic MS-DOS Usage ________________30
Loading DOS ___________________________31
General DOS Usage ______________________33
Common DOS Commands ________________35_
A Word of Advice on DOS ________________40
Notes on Running Windows _______________41
Chapter 6: Connecting Peripherals _______________42
1 of 2 3/2/99 12:16 PM
Page 2

SX-DX Manual file:///C|/test/SX-DX Manual.htm
The External Keyboard Port-PS/2 Mouse______43
The External CRT Monitor Port _____________44
The Serial Port ___________________________45
The Parallel Port _________________________47
Connecting the Optional Docking Station ______48
Other Available Options ____________________49
Chapter 7: Power Options _______________________50
Using the Battery _________________________51
Charging the Battery _______________________52
Chapter 8: BIOS Setup Program ___________________54
Standard Settings __________________________56
Preferences Menu __________________________60
VGA Menu _______________________________62
Memory Menu _____________________________64
Power Management _________________________65
Chapter 9: Troubleshooting ________________________69
Basic Precautions ___________________________70
Cleaning the 486 SX/DX-WinBook _____________71
Problem Solving _____________________________73
Appendix A ______________________________________77
2 of 2 3/2/99 12:16 PM
Page 3

CHAPTER 1: SYSTEM OVERVIEW SX/DX file:///C|/test/HtmlHelp/TechhelpCHAPTER_1_SYSTEM_OVERVIEW_SXDX.html
CHAPTER 1: SYSTEM OVERVIEW SX/DX
Your 486SX/DX-Winbook notebook Personal Computer (PC) represents the leading edge of present day
PC technology. Despite its amazing compactness, the 486SX/DX-Winbook incorporates all the functions
and features of full sized desktop PCs. This amazing reduction in size and weight was accomplished by
taking full advantage of the latest advances in VLSI (Very Large Scale Integration) technology. As a
result, the 486SX/DX-Winbook is extremely light and more reliable due to the reduction in the number of
on-board components. The 486SX/DX-Winbook is IBM AT and MS-DOS compatible and can run most
software designed for use on IBM AT systems in an MS-DOS environment including Windows and
Windows applications.
The four models in the 486SX/DX-Winbook series and their distinguishing features are listed below:
486SX-WinBook Mono (486Sx CPU, monochrome LCD display)
486SX-WinBook Color (486SX CPU, color LCD display)
486DX-WinBook Mono (486Dx CPU, monochrome LCD display)
486DX-WinBook Color (486DX CPU, color LCD display)
All instructions and specifications in this manual refer to all four models unless otherwise specified,
and all models in the series are referred to collectively as the 486SX/DX-Winbook.
1 of 1 3/2/99 12:20 PM
Page 4

The Central Processing Unit SX/DX file:///C|/test/HtmlHelp/TechhelpThe_Central_Processing_Unit_SXDX.html
The Central Processing Unit SX/DX
The Central Processing Unit (CPU) is the heart of any computer system, coordinating the flow of data
and controlling the hardware in a system. The key features of the various CPU’s used in the
486SX/DX-WinBook series are outlined here for your reference, though note that [SX/DX 1-1] the CPU
type does not affect the operating procedures which are identical for all models.
The 80486SX CPU
Both the monochrome and color versions of the 486SX-WinBook use the Intel 80486SX CPU which
includes a built-in 8 Kbyte cache to increase the speed of data access. The CPU uses a 32-bit internal and
external data bus (path), offering the speed of 32 bit processing while still remaining fully compatible with
the 16-bit AT standard. Note that the 80486SX CPU does not include a math coprocessor and no
external math coprocessor solution is provided.
The 80486DX CPU
Both the color and monochrome versions of the 486DX-Winbook use the Intel 80486DX CPU. This
CPU also has a built-in 8 Kbyte cache, and also includes an integrated 80487-math coprocessor. This
provides more processing power for arithmetic intensive applications such as some graphics and data base
programs.
Generally speaking, with the exception of the integrated math coprocessor in the 80486DX CPU, all
features and functions of the 80486SX and 80486DX CPU’s are identical. Note that both CPU’s are
downwardly compatible with the 80386, 80286 (AT) and 8086 (XT) CPU’s and support all applications
designed to run on those CPU’s.
CPU Processing Speed
In addition to offering 486SX and 486DX versions, all versions come with varying CPU processing
speeds. A choice of 25MHz and 33MHz CPU’s is available for all models. In general, the higher the
processing speed of the CPU, the quicker an application will run, so a 33MHz system will execute
applications quicker than a 25MHz system. The actual difference in speed between applications, however,
depends on several factors in addition to the CPU speed, such as the amount of system memory and/or
disk access, etc., so the extent to which systems appear quicker/slower depends on the software being
run.[SX/DX 1-2]
1 of 1 3/2/99 12:21 PM
Page 5

KEY COMPONENTS SX/DX file:///C|/test/HtmlHelp/TechhelpKEY_COMPONENTS_SXDX.html
KEY COMPONENTS SX/DX
This manual contains full instructions for using all the functions of the 486SX/DX-WinBook. Some items
in the 486SX/DX-WinBook may vary, such as the hard disk drive type, but all basic functions will be the
same. In this section, a brief introduction to the various components in the system are given to give you
an overall understanding of the key parts and the names that will be used in this manual to describe them.
The Main System Unit
By the main system unit we refer to the bottom half of the whole system, i.e. the complete unit excluding
the LCD display and the keyboard. Contained within the main system unit are the power supply, the
mainboard, the storage devices including hard and floppy disk drives and an IC card unit (see below), the
battery and all connectors.
Mainboard
The mainboard is contained within the main system unit and is not visible to the user. The mainboard
contains the following key components:
25MHz or 33MHz Intel 80486DX or 80486SX CPU
4MB (megabytes) of main memory (RAM) expandable to 8MB, 16MB or 32MB
PICO 82C268A core logic chipset
SystemSoft BIOS with SETUP program and power management
Storage Devices
One 3.5” 1.44 megabyte floppy disk drive.
One 120MB 2.5” IDE (AT bus) non-removable hard disk drive
One PCMCIA type 1/Type 2 IC card unit
Interface Ports
One external serial (RS-232) port [SX/DX 1-3]
One external parallel (printer) port
One external keyboard port
One external analog VGA monitor port
One docking system expansion port
The Keyboard
1 of 2 3/2/99 12:21 PM
Page 6

KEY COMPONENTS SX/DX file:///C|/test/HtmlHelp/TechhelpKEY_COMPONENTS_SXDX.html
84 (USA) or 85 (European) key IBM AT compatible keyboard.
Integrated two-button trackball
Integrated cursor keys and numeric keypad.
LED indicators for Num Lock, Caps Lock and Scroll Lock
The LCD Display SX/DX
All models in the 486SX/DX-WinBook series are available with a choice of monochrome and color LCD
displays. The color versions come with a built-in color VGA compatible LCD (Liquid Crystal Display)
with a resolution of 640 pixels (dots) by 480 pixels.
The monochrome versions come with a built-in monochrome VGA compatible LCD also with a
resolution of 640 pixels (dots) by 480 pixels.
These displays take the place of the monitor in conventional desktop computer systems. Both the
monochrome and color LCD displays are fully compatible with the IBM VGA standard, which means that
you will be able to run most software in VGA mode which provides the highest resolution. VGA mode
also allows you to run software that was designed for VGA and monochrome displays.
2 of 2 3/2/99 12:21 PM
Page 7

UNPACKING AND COMPONENT CHECKLIST SX/DX file:///C|/test/HtmlHelp/TechhelpUNPACKING_AND_COMPONENT_00000220.html
UNPACKING AND COMPONENT CHECKLIST SX/DX
Your 486SX/DX-WinBook comes in a single carton. When you open this carton for the first tie, check
that all the items listed below are present:
1.One 486SX/DX-WinBook computer.
2.One AC adapter and charger.[SX/DX 1-4]
3.One AC power cable.
4.One battery pack.
5.3.5” VGA Driver/Utility & PCMCIA program diskettes.
6.One dual keyboard cable adapter.
7.486SX/DX-WinBook User’s Manual
If any of the above items are not present, please contact the WinBook support center immediately.
1 of 1 3/2/99 12:22 PM
Page 8

SOFTWARE REQUIREMENTS SX/DX file:///C|/test/HtmlHelp/TechhelpSOFTWARE_REQUIREMENTS_SXDX.html
SOFTWARE REQUIREMENTS SX/DX
Please note that the 486SX/DX-WinBook comes with the MS-DOS operating system and Microsoft
Windows Ver. 3.1 pre-loaded on the hard disk drive. Other configurations may also include certain other
software packages. The 486SX/DX-WinBook is compatible with the IBM PC/AT standard and can run
most software designed for that standard. Note that all configurations include driver and utility diskettes
that are specifically for use with the 486SX/DX-WinBook.
Operating System
A (Disk) Operating System, abbreviated as DOS or OS, is necessary to be able to use your computer.
This software control the basic manipulation of data between the components of the computer and no
other software can be run without it. MS-DOS, OS/2 and UNIX are examples of common operating
systems and you must load one of these operating systems before you do anything else. Your system
comes with S-DOS 6 pre-loaded on the hard disk drive.
Microsoft Windows is a graphical user interface (GUI) which takes over many of the functions of the
operating system and is loaded on top of MS-Dos. Your system comes with Windows 3.1 pre-loaded on
the hard disk drive.
Applications Software
Applications software refers to software that performs some task, such as a word processor or a
spreadsheet. What applications software you should buy depends entirely on what you wish to
do.[SX/DX 1-5]
Most software comes in different versions according to the operating environment that it is to be used on;
for example software might come in a DOS version, an OS/2 version and a Windows version. You must
use the correct version according to the operating system that you have loaded. Note that although
Windows is loaded on top of DOS, only Windows versions software are optimized to run in the Windows
environment.
Most software is readily available in computer stores or by mail order and you should consult with your
local dealer for advice on what software to buy.[SX/DX 1-6]
1 of 1 3/2/99 12:23 PM
Page 9
CHAPTER 2: BASIC OPERATION SX/DX file:///C|/test/HtmlHelp/TechhelpCHAPTER_2__BASIC_OPERATION_SXDX.html
CHAPTER 2: BASIC OPERATION SX/DX
SETTING UP YOUR SYSTEM
Because the 486SX/DX-WinBook comes as an integrated unit complete with MS-DOS 6 and Windows
preloaded, the setup procedures are quite simple, and even if you are new to computers, by following the
instructions given here, you will soon be up and running. You must run the 486SX/DX-WinBook from
the AC power adapter when you use your system for the first time.
Connecting the Power Adapter
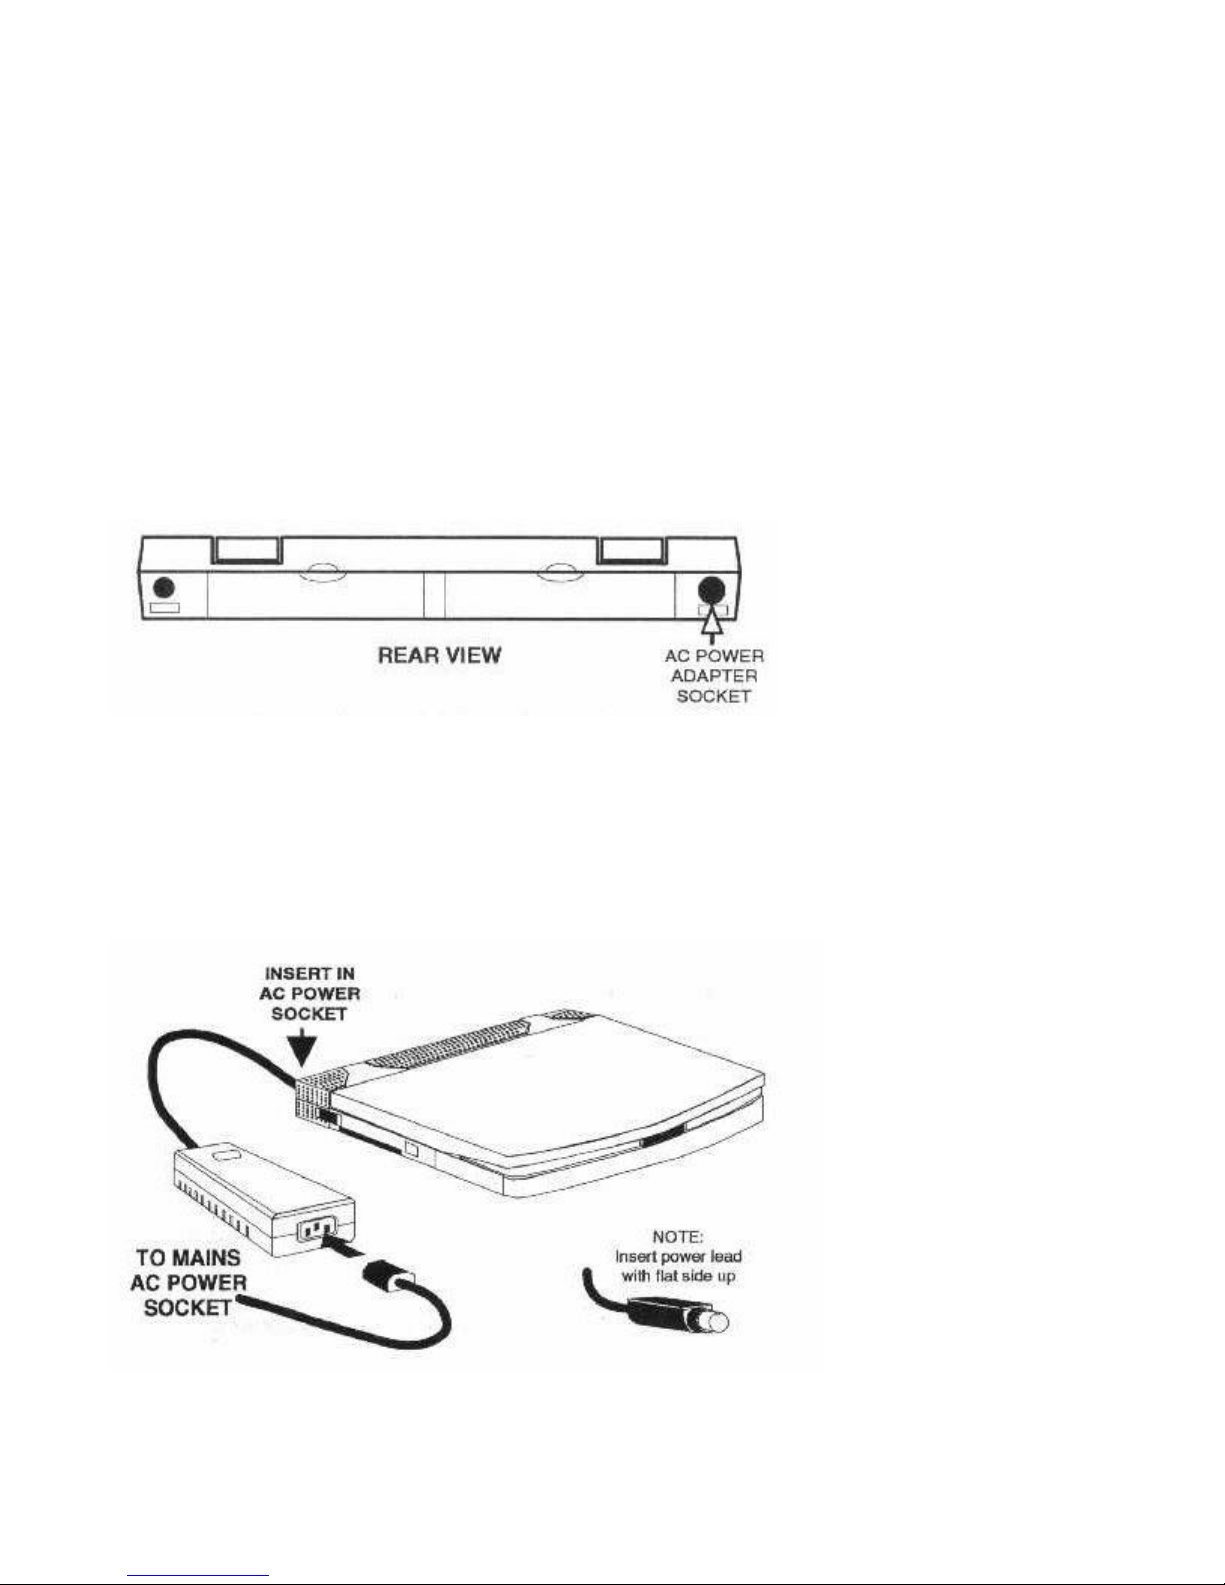
Turn the 486SX/DX-WinBook so you are looking at the rear of the system. Locate the power socket
according to the diagram below.
Figure 2-1 Locating the Power Adapter Socket
Plug the cable attached to the power adapter into this power socket. Plug the power cable into the socket
on the power adapter, and plug the other end of the power cable into an AC power outlet of any voltage
from 90V to 260V. It is not necessary to select any particular voltage as the power adapter has an
auto-select feature.[SX/DX 2-1]
Figure 2-2 System with Power Adapter Connected
1 of 3 3/2/99 12:24 PM
Page 10
CHAPTER 2: BASIC OPERATION SX/DX file:///C|/test/HtmlHelp/TechhelpCHAPTER_2__BASIC_OPERATION_SXDX.html
Opening the LCD Screen
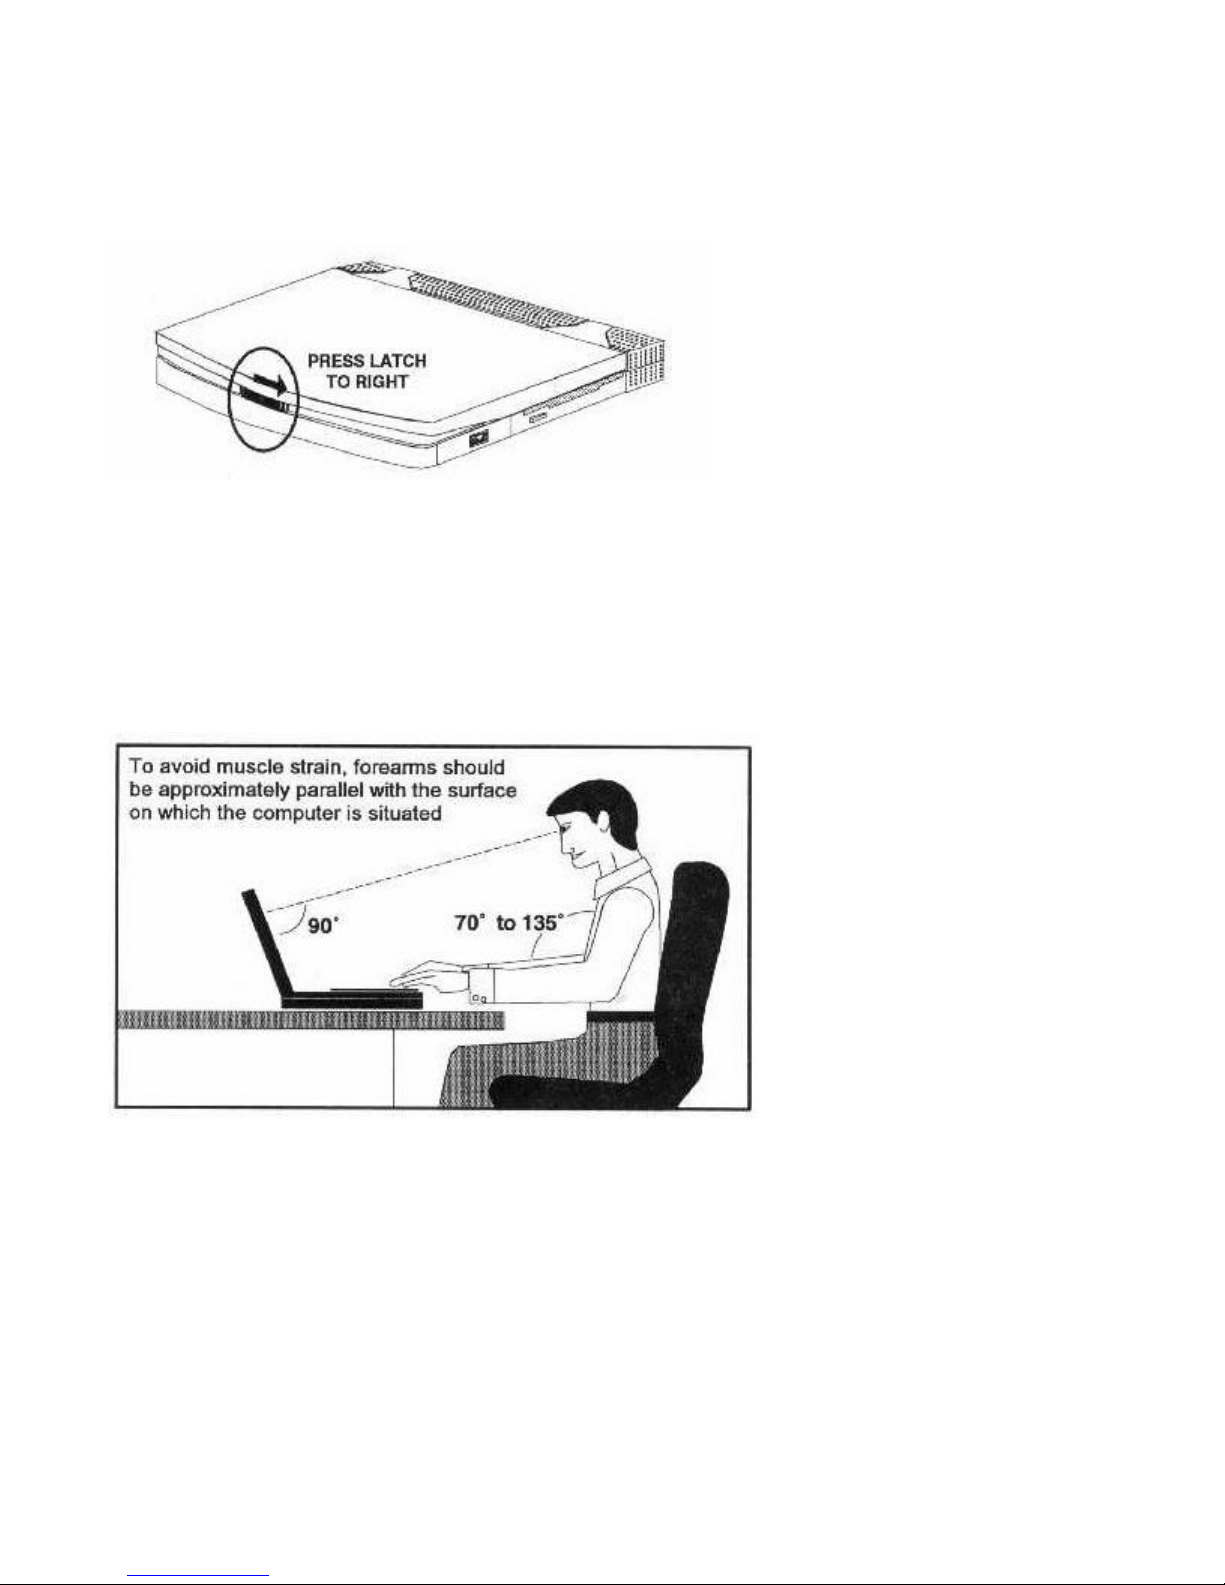
Having connected the power adapter, turn the system so you are looking at the front. Slide the latch on
the front of the system to the right, as illustrated below.
Figure 2-3 Opening the LCD Screen
Raise the LCD screen until it is in the vertical position. You may thin push the LCD screen slightly
further back or forward according to your preference. The special hinge of the LCD allows you to
position the [SX/DX 2-2] screen at any angle and it will stay fixed at that angle. Usually to obtain the
clearest image the LCD screen should be positioned so you can look directly into it at 90 degrees, as
shown in the illustration below.
Figure 2-4 Ideal Seating Position for Max. Comfort
2 of 3 3/2/99 12:24 PM
Page 11
CHAPTER 2: BASIC OPERATION SX/DX file:///C|/test/HtmlHelp/TechhelpCHAPTER_2__BASIC_OPERATION_SXDX.html
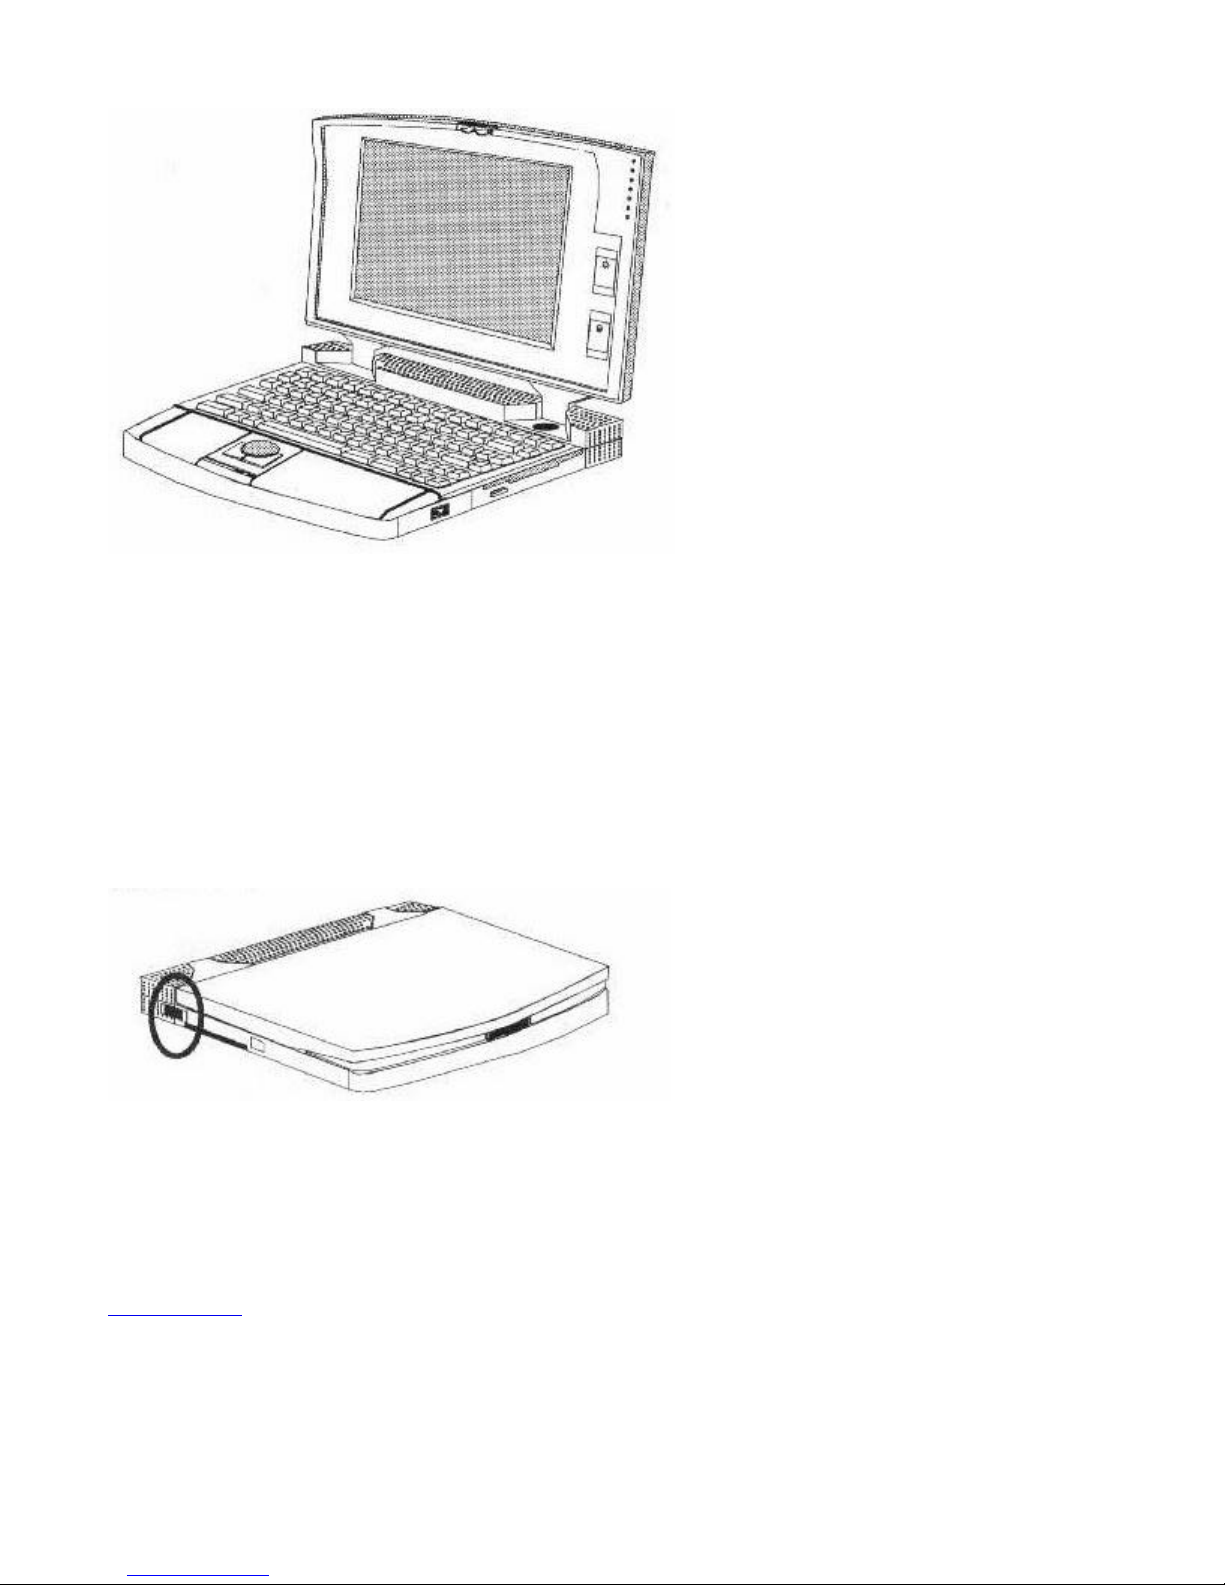
Fig. 2-5 WinBook-Color/Mono Set Up and Ready Use
[SX/DX 2-3]
Turning the Power On
Locate the Power ON/OFF switch at the rear of the left side of the 486SX/DX-WinBook, as shown in
the illustration below.
Fig. 2-6 Locating the Power ON/OFF Switch
Press the switch and the Power ON LED indictor on the top of your 486SX/DX-WinBook will
illuminate. The backlight of the LCD screen will also come on and the system will then start to boot up.
And that is all it takes to get started with your 486SX/DX-WinBook!
3 of 3 3/2/99 12:24 PM
Page 12
USER CONTROLS SX/DX file:///C|/test/HtmlHelp/TechhelpUSER_CONTROLS_SXDX.html
USER CONTROLS SX/DX
In order to get the most out of your 486SX/DX-WinBook it is essential that you have a good
understanding of the controls and indictors on the system. In this section, a detailed explanation of all the
controls on your 486SX/DX-WinBook is given and we recommend that you read the whole section
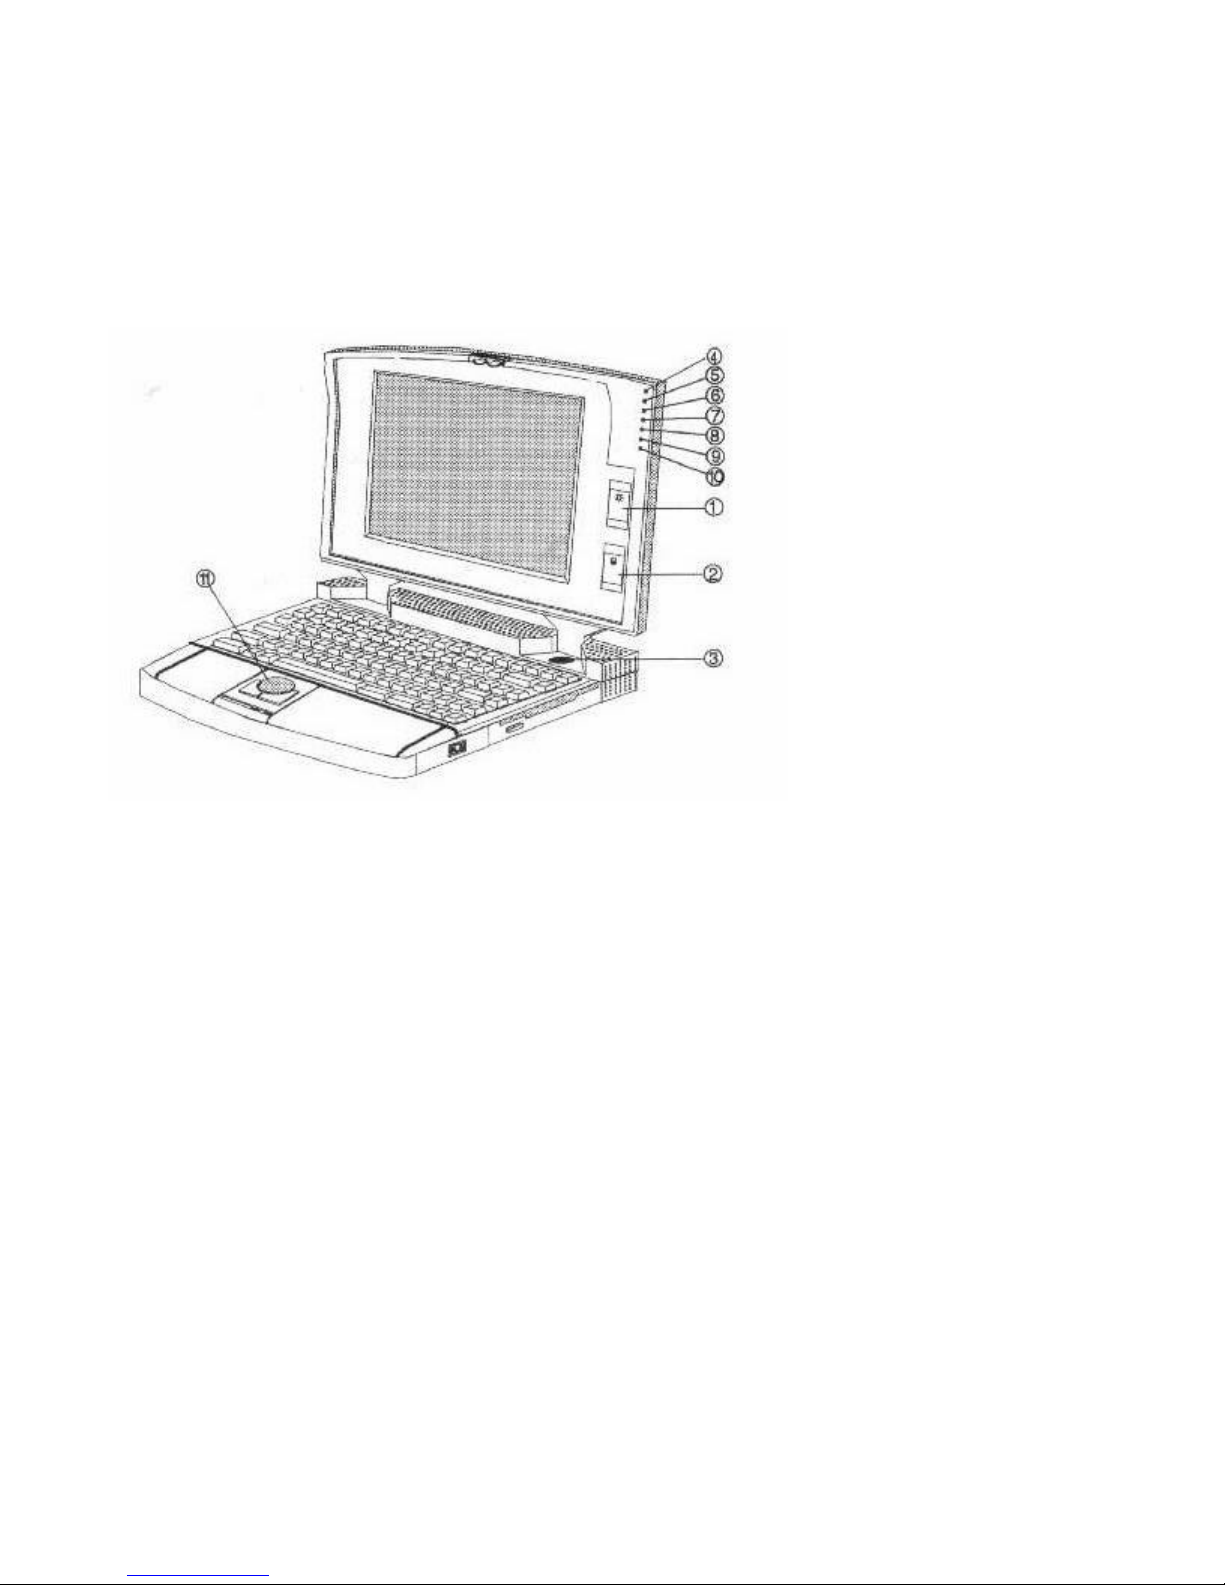
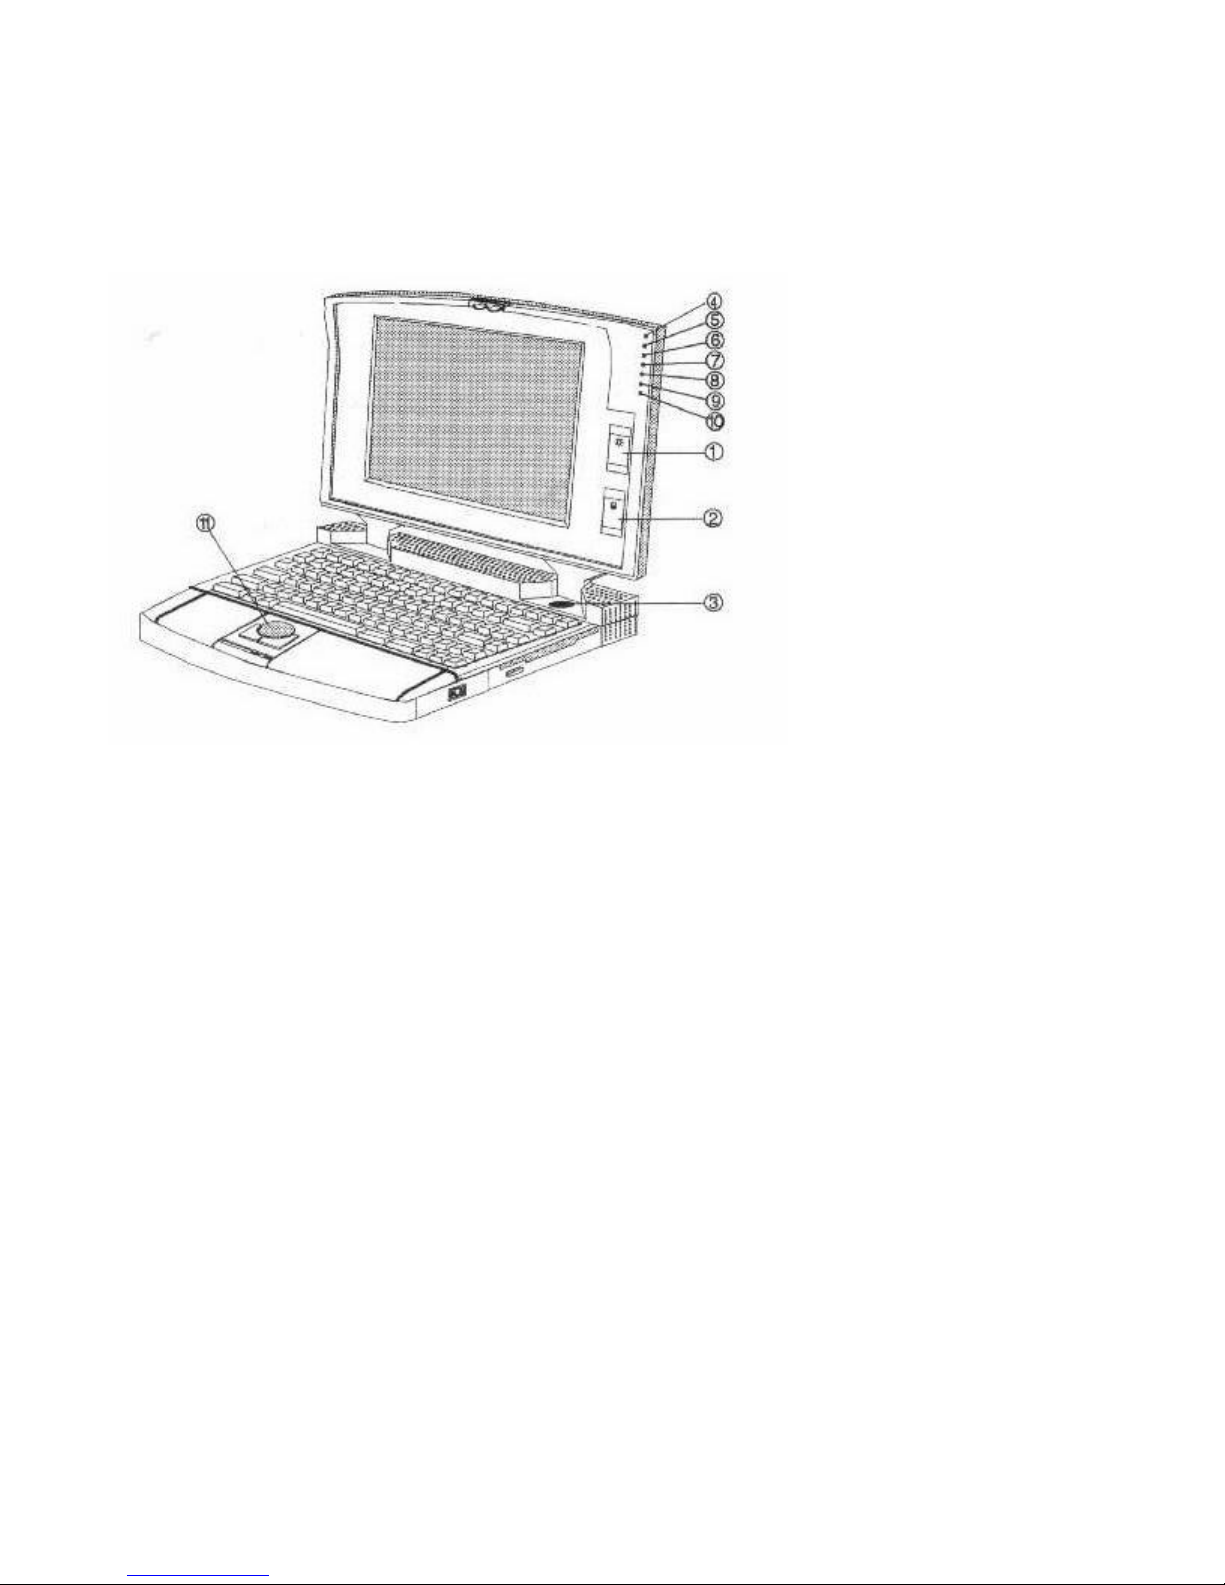
through before you start using your system. Please refer to the illustration on the following page for a key
to the location of the user controls and LED indicators.
Fig. 2-7 Key to User Controls and LED Indicators
1 – LCD Brightness Control
The LCD brightness control can be used to increase/decrease the brightness of the display. Slide the
control up to increase brightness, down to decrease brightness. The setting of the brightness control will
depend on the current lighting conditions and is important for obtaining the clearest possible image.
If nothing appears on the LCD screen when you turn on your computer, it may be because the brightness
control is set at minimum brightness and you should always check the setting of this control first.
2 – The LCD Contrast Control
The Contrast control acts in exactly the same way as the contrast switch on a conventional monitor. By
adjusting the contrast control you can adjust the comparative brightness between normal text and
highlighted text. You can adjust the contrast switch during use to achieve the optimum setting according
to each individual software.
3 – The Suspend Switch
The suspend switch is situated on the top panel beneath the right hinge of the LCD display.
The Suspend switch is a power saving device that is useful when running your system from batteries.
1 of 2 3/2/99 12:24 PM
Page 13

USER CONTROLS SX/DX file:///C|/test/HtmlHelp/TechhelpUSER_CONTROLS_SXDX.html
When you press the Suspend switch, the display will become blank and to all intents and purposes your
486SX/DX-WinBook will appear to have been turned off. In this state your system is using a minimum of
power. When in suspend mode, the Suspend LED on the LCD screen will illuminate.
To resume, simply press the Suspend switch again and the display will be returned exactly as it was
before. The Suspend switch allows you to save power without having to turn your 486SX/DX-WinBook
off and then on again, and is extremely useful when you wish to take a short break from what you are
doing.
2 of 2 3/2/99 12:24 PM
Page 14
THE LED INDICATORS SX/DX file:///C|/test/HtmlHelp/TechhelpTHE_LED_INDICATORS_SXDX.html
THE LED INDICATORS SX/DX
On the right side of the LCD screen is a row of seven LED indicators that indicate the status of certain
functions. These are detailed below.
(From figure 2.7)
4 – Power LED
The power LED will be illuminated when your system is turned on, and will remain illuminated until you
turn the power off. Note that the power LED is also visible on the top of the LCD panel so that when the
LCD is in the closed position you can still see whether the power to the computer is turned on or not,
Note that the Power LED also functions as a battery low indicator. When the battery power is low the
Power LED will flash.
5 – FDD LED
The FDD (Floppy Disk Drive) LED will illuminate whenever data is being read from or written to the
floppy disk drive installed in your system. As long as the floppy disk drive is not being accessed the FDD
LED will remain unlit.[SX/DX 2-6]
6 – HDD LED
The HDD (Hard Disk Drive) LED will illuminate whenever data is being read from or written to the hard
disk drive installed in the system. As long as the hard disk drive is not being accessed the HDD LED will
remain unlit.
7 – Suspend LED
1 of 2 3/2/99 12:25 PM
Page 15

THE LED INDICATORS SX/DX file:///C|/test/HtmlHelp/TechhelpTHE_LED_INDICATORS_SXDX.html
The SUSPEND LED will illuminate when the system has entered into Suspend mode by pressing the
Suspend switch on the computer. Suspend mode is a power saving mode which can be entered to save
battery power during usage.
8 – Num Lock LED
The NUM LOCK LED refers to the NUM LOCK key on the 486SX/DX-WinBook’s keyboard. On a
conventional keyboard, this LED is usually situated on the keyboard itself. When illuminated, the NUM
LOCK LED indicates that the NUM LOCK key has been pressed, in which case the numerical keypad
will be in numeric mode. The NUM LED will go off when the NUM LOCK key is pressed a second time.
Please refer to the keyboard chapter in this manual for details of the NUM LOCK key.
9 – Scroll Lock LED
The SCROLL LOCK LED refers to the Scroll Lock key on the 486SX/DX-WinBook’s keyboard. When
illuminated, this indicates that the Scroll Lock key has been pressed. The SCROLL LOCK LED will go
out when the Scroll Lock key is pressed a second time. Please refer to Chapter 4 for details of the Scroll
Lock key.
10 – Caps Lock LED
The Caps Lock LED refers to the Caps Lock key on the 486SX/DX-WinBook’s keyboard. On a
conventional keyboard, this LED is usually situated on the keyboard itself. When illuminated, the Caps
Lock LED indicates that the Caps Lock key has been pressed, in which case all letter keys will be typed
in upper case (capital). The Caps Lock LED will go off when the Caps Lock key is pressed a second
time. Please [SX/DX 2-7] refer to the keyboard chapter in this manual for details of the Caps Lock key.
11. Built-in Trackball
The built-in trackball can be used to control cursor movement on the screen in much the same way as a
mouse. The tow buttons act as the left and right mouse buttons. The function of the two buttons will
depend on the software being used, though in general, the left button is used to execute a command or
select an item and the right button is used to cancel or quit a function.
IMPORTANT NOTE
After a period of use, dust and small particles may enter the trackball unit resulting in uneven
movement. Please refer to Chapter 9 for instructions on cleaning the trackball.[SX/DX 2-8]
2 of 2 3/2/99 12:25 PM
Page 16

CHAPTER 3: DATA STORAGE DEVICES SX/DX file:///C|/test/HtmlHelp/TechhelpCHAPTER_3__DATA_STORAGE_DEVICES_.html
CHAPTER 3: DATA STORAGE DEVICES SX/DX
INTRODUCTION
The data storage devices included on your 486SX./DX-WinBook consist of a 1.44 Megabyte (M) 3.5”
floppy disk drive; one hard disk drive (optional); one Type 1/Type 2 IC card slot. It is via the disk drives
and IC card slot that you can load different programs to run on your computer, and store the data that
you create.
In this chapter we give a brief introduction to the use of floppy disk drives and diskettes, hard disks and
IC cards for those of you who are new to computing. If you are an experienced computer user you will
probably already be familiar with this information, and may skip this chapter. If you are a new user, then
we recommend that you read this chapter to get an overall understanding of the basic use of disk drives
and diskettes.
1 of 1 3/2/99 12:26 PM
Page 17
FLOPPY DISK DRIVES AND DISKETTES SX/DX file:///C|/test/HtmlHelp/TechhelpFLOPPY_DISK_DRIVES_AND_DISKETTES.html
FLOPPY DISK DRIVES AND DISKETTES SX/DX
Floppy disk drives are so called because they use flexible diskettes that can be inserted and taken out as
required. They can be broadly divided into two types – 5.25” and 3.5”. This measurement refers to the
size of the diskette that is used with each type, though your 486SX/DX-WinBook uses only the smaller
3.5” drive. This does not impose any limitation on the software you can use, since all popular software
packages are available in both 5.25” and 3.5” packages.[SX/DX 3-1]
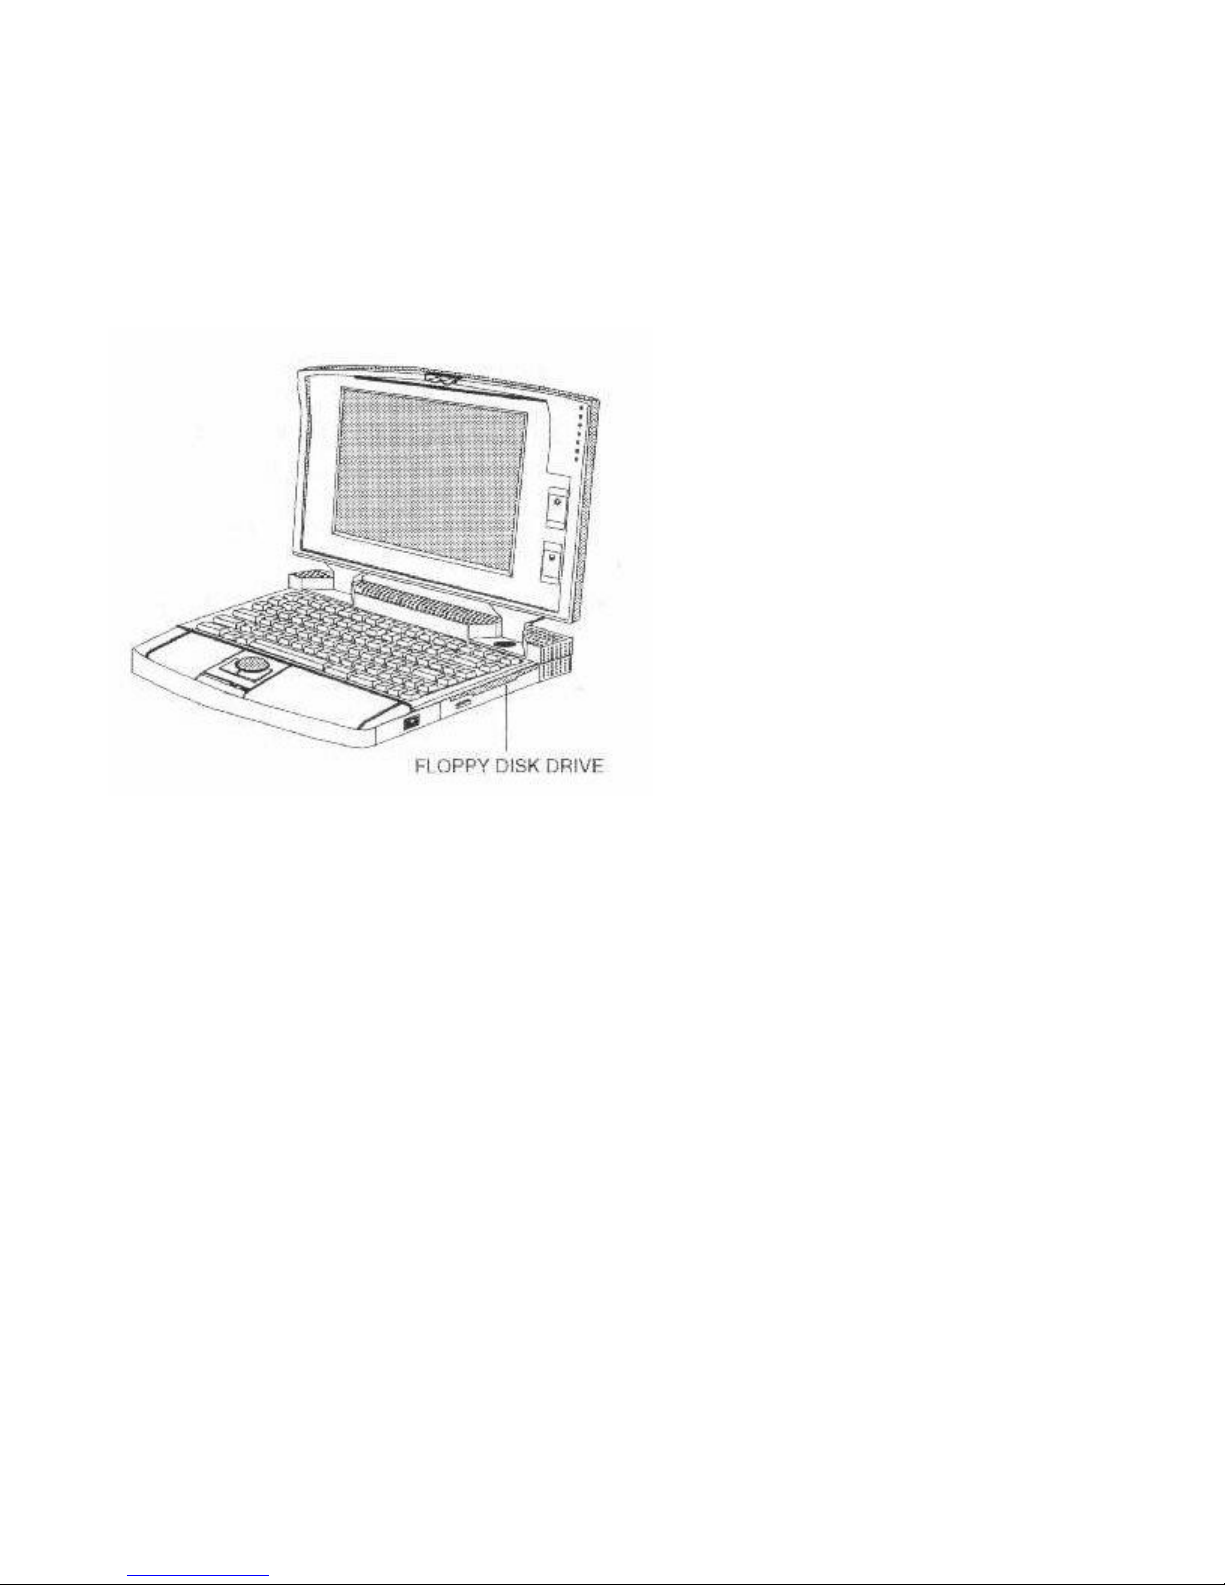
Fig. 3-1 Locating the Floppy Disk Drive
3.5" Disk Drives and Diskettes
3.5” floppy disk drives are smaller and have a larger capacity than 5.25 disk drives. 3.5” disk drives come
in two capacities – 720Kbytes and 1.44M. The floppy disk drive installed in your 486SX/DX-Winbook is
a 1.44M drive. In order to be able to take advantage of the full 1.44M capacity, high –density diskettes
must be used. Such diskettes are marked 2HD. The WinBook may also use 720K floppy disks which are
normally labeled DD.
Functionally, 3.5” drives operate in exactly the same way as 5.25” disk drives, though the diskettes used
are different in many respects.
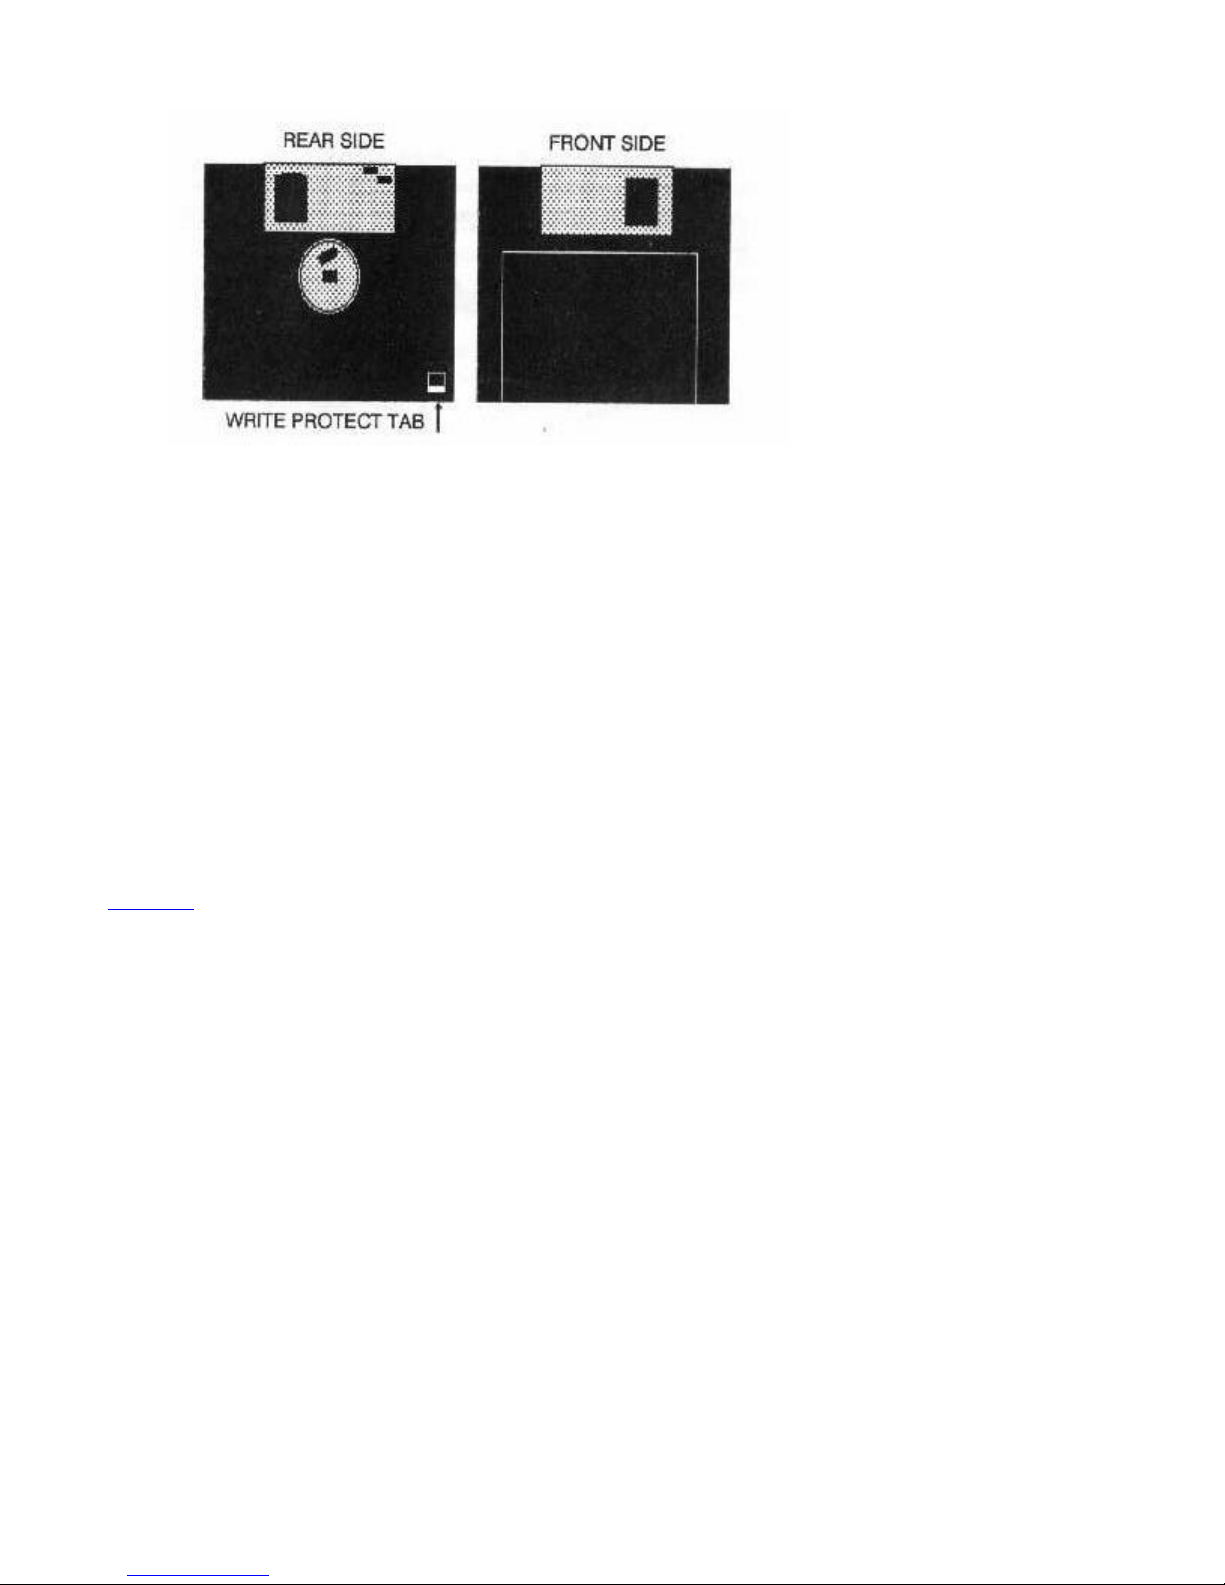
3.5” floppy diskettes come in a hard plastic case and are therefore far less susceptible to damage. The
magnetic surface of the diskette is not exposed, being covered by a sliding metal cover that is
automatically opened when inserted into the disk drive. Rather than having a notch which must be
covered by a sticker to make them read only, they come with a tab which can be set as read only or
read/write.[SX/DX 3-2]
1 of 2 3/2/99 12:27 PM
Page 18
FLOPPY DISK DRIVES AND DISKETTES SX/DX file:///C|/test/HtmlHelp/TechhelpFLOPPY_DISK_DRIVES_AND_DISKETTES.html
Fig. 3-2 3.5” Diskette
Formatting Diskettes SX/DX
When you purchase diskettes they are usually unformatted, and cannot be used until they have been
formatted. Some companies also offer pre-formatted diskettes, though if you purchase such diskettes,
you must make sure that they are IBM formatted diskettes.
An unformatted diskette can be compared to a record before the groove has been engraved on it. All
diskettes must first be formatted before they can be used to store data. If you insert an unformatted
diskette into a floppy disk drive you will get an error message when you try to write to the diskette.
Formatting diskettes is a simple process and is achieved with the MS-DOS FORMAT command. For
basic instructions on how to use this command, please refer to page 5-10 in this manual or type HELP
FORMAT at the DOS prompt or refer to the DOS user’s manual.
2 of 2 3/2/99 12:27 PM
Page 19
IC CARDS SX/DX file:///C|/test/HtmlHelp/TechhelpIC_CARDS_SXDX.html
IC CARDS SX/DX
IC cards are the latest advances in storage media, supporting storage of large amounts of data on a credit
card sized unit. IC cards come as both Flash memory cards and SRAM cards, both of which can be used
with your 486SX/DX-WinBook. IC cards are further divided into Type 1 and Type 2 categories and both
are supported by the IC card [SX/DX 3-3] interface installed in your 486SX/DX-WinBook which is a
68-pin type fully compatible with the PCMCIA standard. Some Type 2 IC cards are actually a
combination of hardware and software, a fax/modem IC card for example, which includes the fax modem
hardware and the software to drive it.
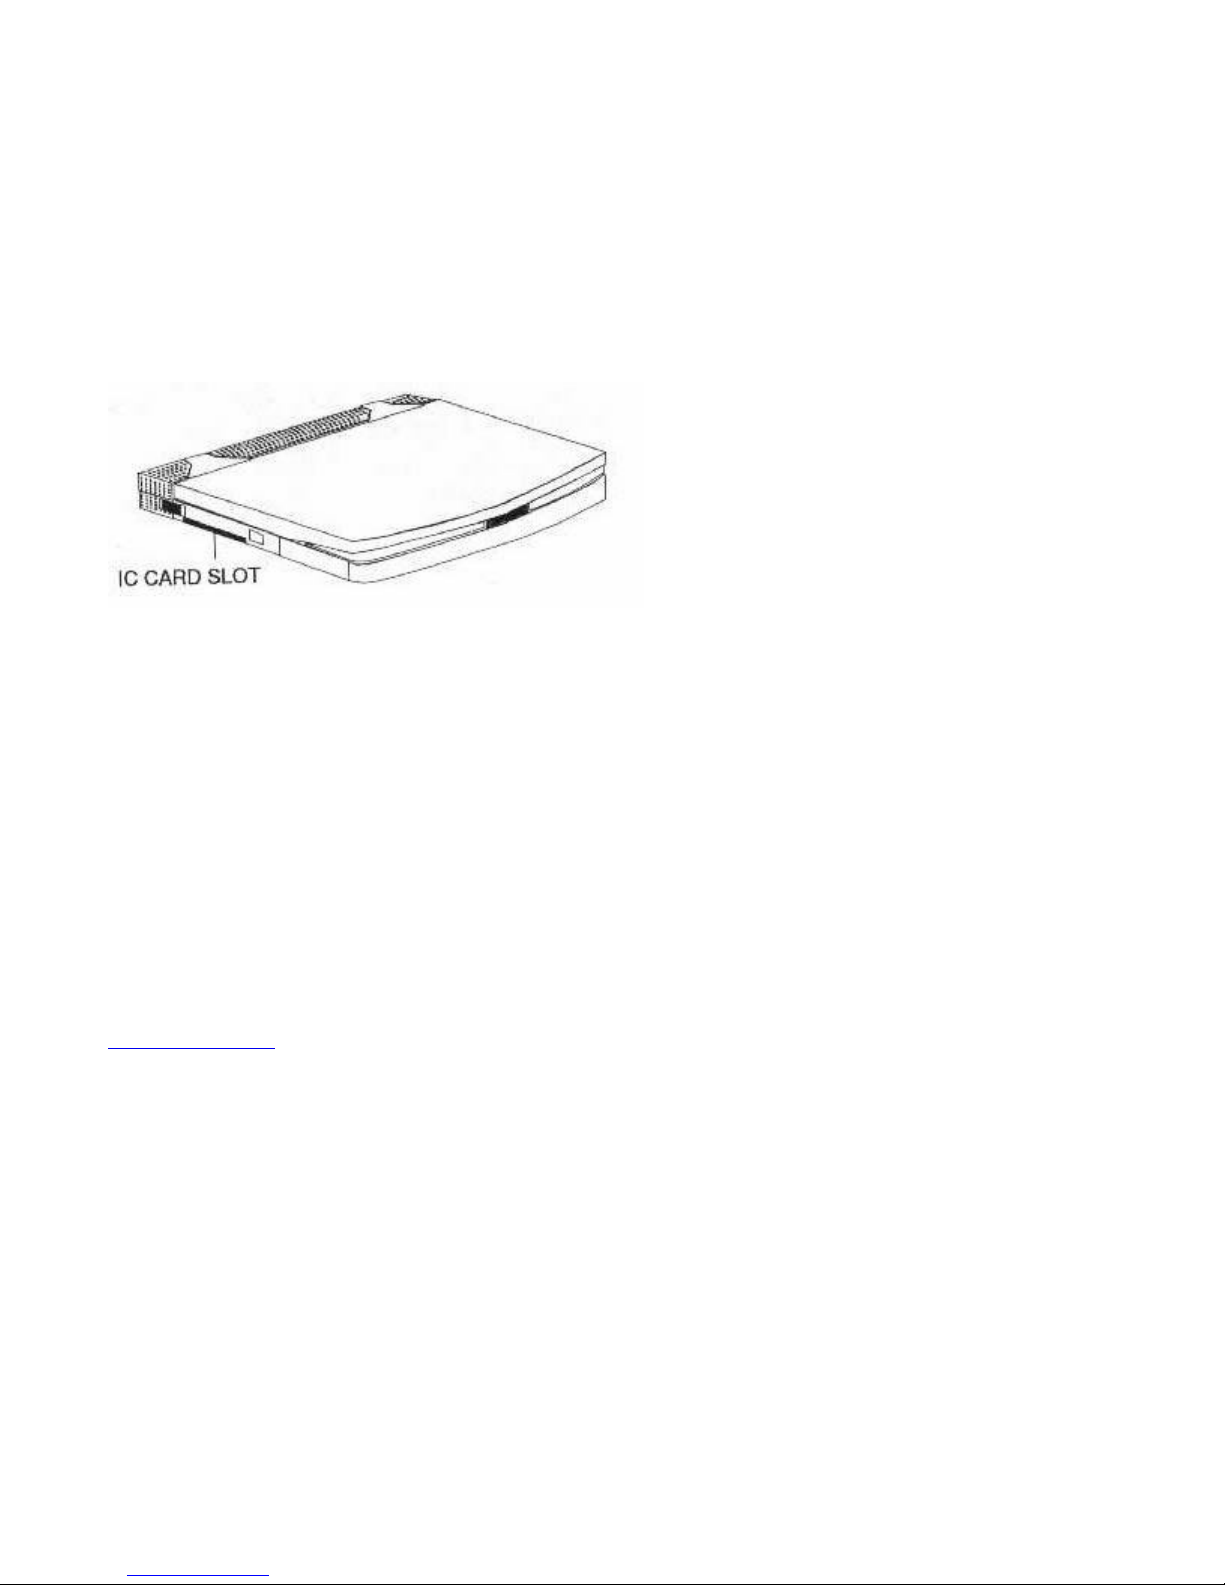
Fig. 3-3 Locating the IC Card Slot
IC cards should be inserted directly into the IC card slot that is situated next to the power switch on the
left side of the 486SX/DX-WinBook. When inserted into the unit when the power is on, you will hear
two beeps. Two beeps will also be heard when the card is removed.
Please note that certain software drivers need to be loaded before IC cards can be used, or they will not
be recognized by the system. IC cards also need to be formatted before they can be used to store data,
though the procedure for doing this differs from that used for floppy diskettes. WinBook systems are
shipped with PCMCIA software enabled to provide full support for SRAM memory cards. If you wish to
use Flash memory cards with your WinBook, please refer to the additional documentation included with
your system for an introduction to PCMCIA. Please consult your dealer for more information on the
PCMCIA options available.
1 of 1 3/2/99 12:27 PM
Page 20

HARD DISK DRIVES SX/DX file:///C|/test/HtmlHelp/TechhelpHARD_DISK_DRIVES_SXDX.html
HARD DISK DRIVES SX/DX
Hard disk drives are also commonly known as fixed disk drives and Winchester disk drives. In this
manual we shall refer to them always as hard disk drives. The main difference between hard disk drives
and floppy disk drives is that the disks in hard disk drives are not removable. Thus, hard disk drives have
no need for diskettes since the disks are built into the unit.
Hard disk drives have a much greater storage capacity than floppy disk drives, and data can be accessed
much faster. They are also much more convenient because it is not necessary to keep changing diskettes
to load different programs.
Because of their greater storage capacity, you can copy all your commonly used programs from the
various floppy diskettes onto your hard disk drive. Then, whenever you want to use a program, you
simply call up that program from the hard disk. You can also make hard disk drives “bootable”, which
means that you can load MS-DOS directly from the hard disk and do not need to insert your MS-DOS
diskette into a floppy disk drive every time you turn on your computer. The hard disk drive options with
the 486SX./DX-WinBook include a 2.5” AT bus version with capacities ranging from 120MB to 340MB.
Various options for higher capacity hard disk drives are also available.
Taking Care of Hard Disk Drives
Since the disks in a hard disk drive are unmovable there is no risk of damage as with floppy diskettes. The
drives themselves, however, are highly sensitive units. The hard disk drive installed in your
486SX/DX-WinBook is specially designed to be shock resistant since you will inevitably be moving your
system around. The drive also features autopark capability, which means that the sensitive magnetic heads
are automatically locked in position when power is turned off, greatly reducing the chance of damage.
Despite this, every care should be taken to avoid subjecting your 486SX/DX-WinBook to heavy shocks
or blows that may result in the hard disk drive being damaged. Hard disk drives are sealed units and are
not user serviceable. If used in the normal way the hard disk drive in your 486SX/DX-WinBook should
give many years of trouble free life.
Preparing Hard Disk Drives
Hard disk drives have to be formatted in the same way as diskettes before you can save data on them,
though hard disk drives must under go low level formatting followed by high level formatting. The drive
in your 486SX/DX-WinBook has already been formatted with MS-DOS 6 and has Windows 3.1
pre-loaded, so DO NOT REFORMAT YOUR HARD DISK OR YOU WILL ERASE ALL THE
PRE-LOADED DATA.
1 of 1 3/2/99 12:28 PM
Page 21
CHAPTER 4: USING THE KEYBOARD file:///C|/test/HtmlHelp/TechhelpCHAPTER_4__USING_THE_KEYBOARD.html
CHAPTER 4: USING THE KEYBOARD
In order to get the most out of your computer, it is essential that you have a good understanding of your
keyboard. Correct keyboard usage can save you a lot of time when typing data into your computer, and
will make all your computing tasks more enjoyable.
The Keyboard on your 486SX/DX-WinBook is compatible with a conventional PC keyboard, and
contains all the same functions. The layout, however, is slightly different. If you are familiar with a
conventional PC keyboard, you will soon get used to the 486SX/DX-WinBook keyboard. Read through
this chapter carefully to make sure you are well acquainted with the special function keys and key
combinations.
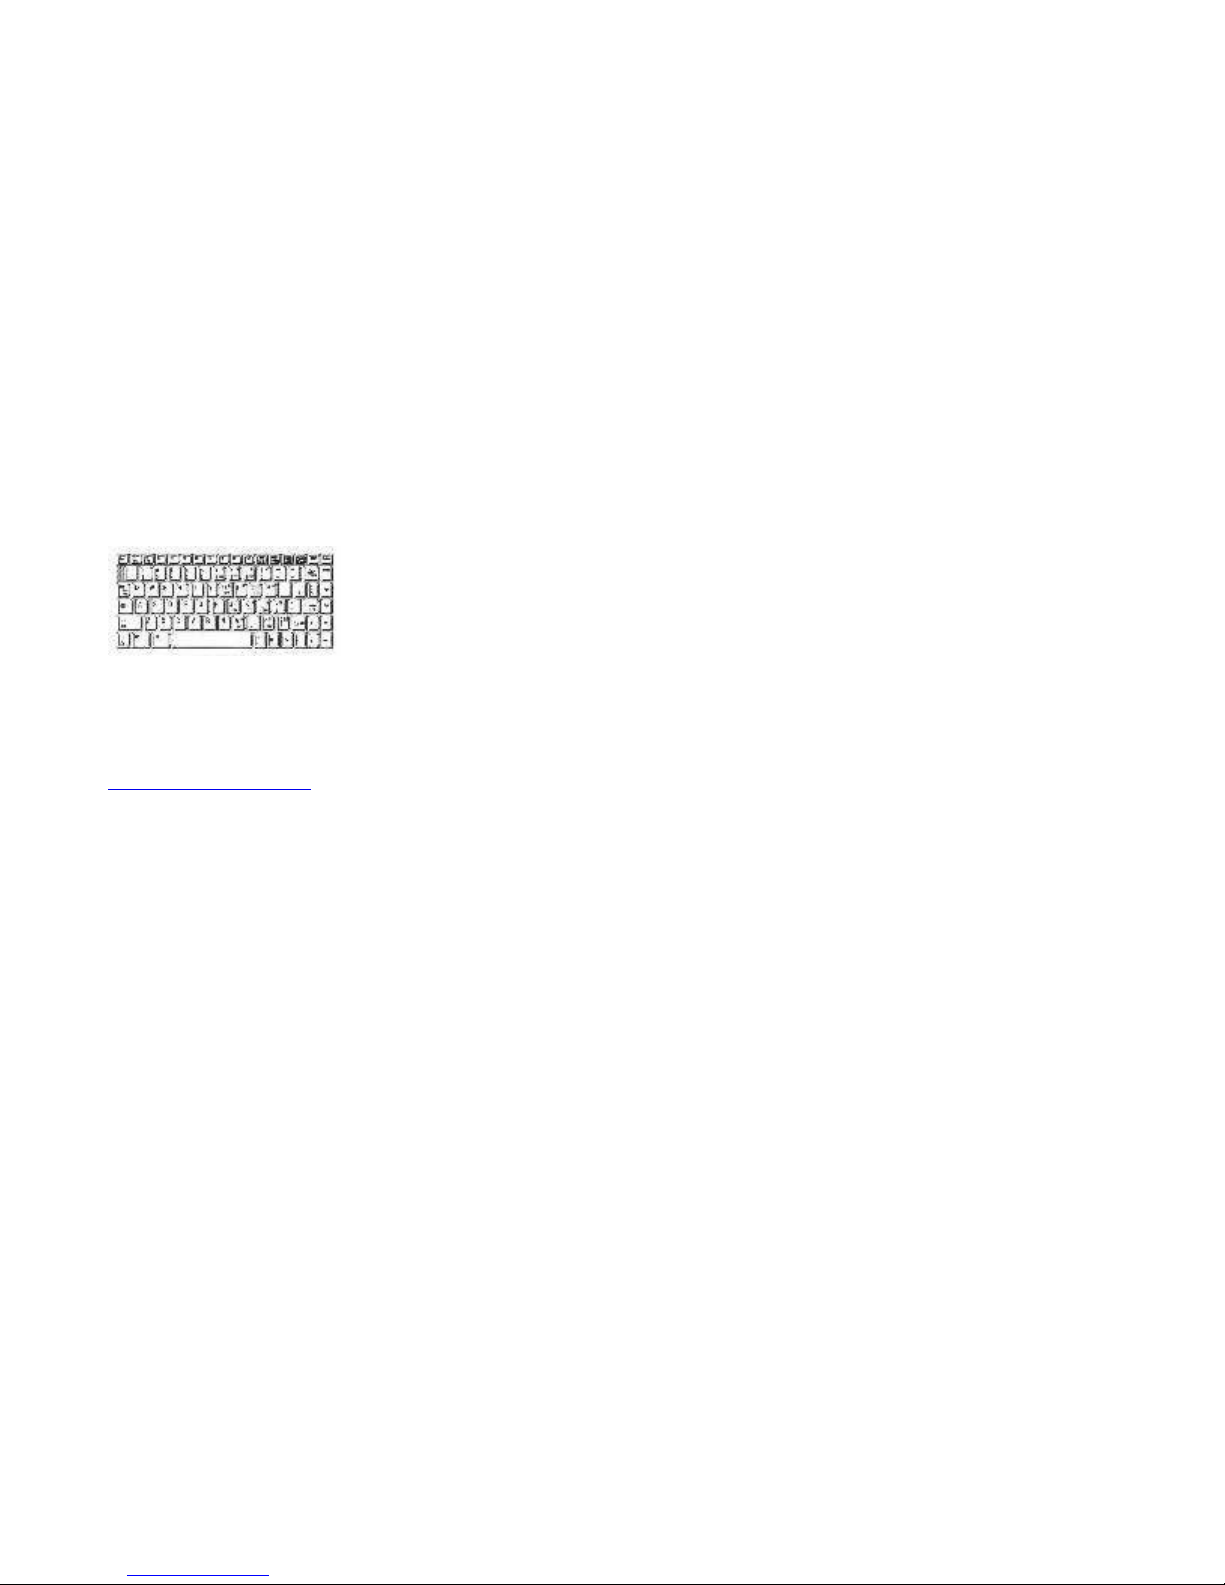
The illustration below shows the layout of the 486SX/DX-WinBook keyboard.
Fig. 4-1 Keyboard Layout
[SX/DX 4-1]
1 of 1 3/2/99 12:29 PM
Page 22

THE TYPEWRITER KEYS SX/DX file:///C|/test/HtmlHelp/TechhelpTHE_TYPEWRITER_KEYS_SXDX.html
THE TYPEWRITER KEYS SX/DX
The typewriter keys make up the main block of keys on your keyboard, and it is these keys that you will
use the most. As is obvious from the name, these keys are basically the same as found on a standard
typewriter, with a few extras especially for computer use. The layout of the alphanumeric part of the
keyboard (i.e. the part with the letters and numbers on it) is the same as a standard QWERTY Typewriter
keyboard, and these are light colored. There are also darker colored keys, some of which have the same
functions as typewriter keys (e.g. the Tab key and the Caps Lock key), some of which are not found on a
typewriter, and some of which function both as typewriter keys and computer function keys. These will
be explained individually later in this section.
If you are used to using a standard typewriter you will have no difficulty getting used to your computer
keyboard. However, there are some important differences between using a typewriter and a computer
keyboard.
All the keys are “typematic” which means that they repeat as long as you hold them down. Many
modern electric typewriters are also typematic, but manual typewriters are not.
The space bar appears to work the same as on a typewriter, but there is an important difference.
When you press the space bar you will see a space on your screen, just as when you press a
typewriter space bar there is a space on the page. But a computer recognizes a space as a
character, and treats it accordingly. Thus, especially in programming or when entering commands,
the presence or absence of a space can make a lot of difference.
The lower case L (l) and the number on (1) are not interchangeable as they are on a typewriter.
The upper case O (O) and the zero (0) are not interchangeable as they are on a typewriter.
The darker colored keys to the right and left of the alphanumeric keys are detailed individually
below.[SX/DX 4-2]
The Shift Keys
The two shift keys, one on the left and one on the right, function exactly as typewriter shift keys.
When you press either one of the shift keys and hold it down, any letters you type will be in upper
case. As soon as you release the shift key, the letters will again be in lower case. Note that in
MS-DOS and many other programs the Shift key can be used in combination with other keys for
some special functions. Please see the section on Special Key Combinations in this chapter.
The Caps Lock Key
The Caps Lock key is a toggle key, which means that when pressed it stays engaged until pressed
a second time. The Caps Lock LED indicator on the front panel of the LCD display will illuminate
when the Caps Lock key is engaged. The Caps Lock key is somewhat different from that on a
typewriter. It only affects the alpha characters (the letters from A to Z). Punctuation and symbols
must be typed with the Shift key held down even when Caps Lock is engaged.
The Tab Key
1 of 5 3/2/99 12:29 PM
Page 23

THE TYPEWRITER KEYS SX/DX file:///C|/test/HtmlHelp/TechhelpTHE_TYPEWRITER_KEYS_SXDX.html
The Tab key functions in the same way as on a typewriter, advancing the cursor to the next tab
position. Pressing the Tab key in conjunction with the Shift key will tab to the left.
The Backspace Key
In MS-DOS and in most software, the Backspace key moves the cursor one space to the left,
simultaneously deleting the character to the left of the cursor. The function of the backspace key
may be different in some software.
The Delete Key
In MS-DOS and in most software, the Delete key is used to delete the character at the current
cursor position. The function of the Delete key may vary according to the software being
used.[SX/DX 4-3]
The Enter Key
When typing in data, the
Enter key
functions in the same way as the carriage return key on a
typewriter. It advances the cursor one line and returns the cursor to the left hand side of the screen.
In MS-DOS and most other software packages the Enter key must be pressed to execute a
command.
The Control (Ctrl) Key
The Ctrl key is always used in combination with one or more other keys to perform some special
function. Its use will vary from program to program. Please also see the section on Special Key
Combinations in this chapter.
The Alternate (Alt) Key
The Alt key is always used in combination within or more other keys to perform some special
function. Its use will vary from program to program. Please also see the section on Special Key
Combinations in this chapter.
The Escape (Esc) Key
The use of the Esc key will vary depending on the program you are using. In MS-DOS, and in
many other software packages, the Esc key is used to cancel a command or exit from a program.
THE FUNCTION KEYS
Fig. 4-2 The Function Keys
2 of 5 3/2/99 12:29 PM
Page 24

THE TYPEWRITER KEYS SX/DX file:///C|/test/HtmlHelp/TechhelpTHE_TYPEWRITER_KEYS_SXDX.html
The Function keys are labeled F1 to F10 with F1 and F2 keys doubling as F11 and F12. What the
function keys do will depend entirely on what software you are using. Each software package may
[SX/DX 4-4] or may not allocate a certain function to some or all of the function keys. In this case
you will have to consult the manual of that particular software to find out what the function of each
key is.
To use the F1 key as F11, press and hold down the Fn (Function) key and then press the F1 (F11)
key. Similarly, to access F12, press and hold the Fn key and press the F2 (F12) key.
In MS-DOS the F1 function key can be used to retype the last command issued one letter at a
time. The F3 function key can be used to retype the last command issued with a single keystroke.
THE CURSOR CONTROLS KEYS
Fig. 4-3 The Cursor Control Keys
The next group of keys is mainly used to control the movement of the cursor about the screen. The
Cursor Up, Cursor Down, Cursor Left and Cursor Right are used by most software packages
to move the cursor one space in the relevant direction. The
PgUp
and
PgDn
keys are usually used
to scroll through data up or down one page (or screen) at a time, though their use may vary with
different software. The Home and End keys are usually used to go to the beginning and [SX/DX
4-5] end of a line, screen or document depending on the software. Please refer to your software
applications manuals for the precise functions of these keys.
In MS-DOS the Cursor Left key acts the same as the Backspace key, deleting the characters to
the left of the cursor. The Cursor Right key functions the same as the F1 key, retyping the
previous command one letter at a time.
SPECIAL FUNCTION KEYS
The Insert Key
3 of 5 3/2/99 12:29 PM
Page 25

THE TYPEWRITER KEYS SX/DX file:///C|/test/HtmlHelp/TechhelpTHE_TYPEWRITER_KEYS_SXDX.html
The Insert key is a toggle key and in MS-DOS and many other software packages, is used to
alternate between Insert and Overwrite modes. In Insert mode characters are placed in front of
existing text; in Overwrite mode characters type replace the original text. Many software packages
assign other special functions to the Insert key, details of which will appear in the relevant manual.
The Delete Key
In MS-DOS and many other software packages the Delete key is used to delete the character at
the present cursor position.
The Prt Sc (Print Screen)/SysRq Key
When in DOS and most programs running in text mode, the Prt Sc key can be pressed to obtain a
hard copy printout of the present screen display. The Sys Rq key is rarely used but may be
assigned some special function in some software. Note that the PrtScn/SysRq key has no action
when in Windows.
The Scroll Lock Key
The Scroll Lock key is a toggle key. When engaged, the Scroll Lock LED indicator to the right of
the LCD display will be illuminated. This key has no function in MS-DOS and its function, if any,
will depend on the individual software package. This key has no function in Windows. [SX/DX
4-6]
The Pause/Break Key
This key can be pressed to pause execution of some programs and may have other uses in some
software.
THE NUMERIC KEYPAD
The final group of keys on your keyboard is the Numeric Keypad. On a conventional keyboard, the
numeric keypad is usually a separate block of keys. On the 486SX/DX-WinBook these keys have
been integrated into the main typewriter keys.
4 of 5 3/2/99 12:29 PM
Page 26

THE TYPEWRITER KEYS SX/DX file:///C|/test/HtmlHelp/TechhelpTHE_TYPEWRITER_KEYS_SXDX.html
Fig. 4-4 The Integrated Numeric Keypad
NUM LOCK plus the Numeric Keypad
The keys in this group have two functions depending on whether the Num Lock Key is toggled On
or OFF, and whether the Fn key has been pressed.
When Num Lock is toggled on (the Num Lock LED in the control panel will illuminate), the M, J,
K, L, U, I, O, 7/&, 8/*, and 9/( keys will function as 0, 1, 2, 3, 4, 5, 6, 7, 8, 9 respectively. Thus,
with the NUM LOCK toggled ON, if you press the “k” key a 2 will appear on your screen just as if
you pressed the five key in the typewriter keys. In addition, the ./> key becomes “.” (decimal
point); the //? key becomes “/” [SX/DX 4-7] (division sign); the ;/: key becomes “+”; the P key
becomes “-” (minus); and the 0/) key becomes “*” (multiplication sign). With Num Lock on the
numeric keypad is especially convenient for users who frequently need to use the keypad as a
calculator function.
Fn plus the Numeric Keypad
If you press these keys with the Fn key depressed then a different function is accessed. If you press
and hold the Fn key the ./>, M, J, K, L, U, O, 7/&, 8/* and 9/( keys become Del, Ins, End, Cursor
Down, PgDn, Cursor Left, Cursor Right, Home, Cursor Up and PgUp keys respectively. The
functions accessible by pressing the function key are printed on the relevant keys enclosed in a box,
and duplicate the functions of the cursor keys described earlier.
5 of 5 3/2/99 12:29 PM
Page 27

HOT KEYS SX/DX file:///C|/test/HtmlHelp/TechhelpHOT_KEYS_SXDX.html
HOT KEYS SX/DX
Hot keys are special key combinations used to access the setup and power management programs and
adjust the display characteristics. Note that these hot keys will only work under DOS and will have no
effect under Windows.
<Ctrl> <Alt> S
This hot key is used to access the BIOS Setup program. Please refer to Chapter 8 for details of how to
use the setup program. Note that when you exit the setup program the system will always reboot.
<Ctrl> <Alt> P
This hot key is used to access the power management program. This program is used to maximize power
efficiency, which is particularly important when running from the battery. Please refer to Chapter 8 for
details of the features available in the power management program. Note that the system will NOT reboot
when you exit from the power management program and any changes made will be immediately
implemented. [SX/DX 4-8]
<Ctrl> <Alt> F8 (Monochrome Models Only)
Toggles the display of screen images between normal contrast mode and automap contrast mode. In
automap contrast mode, your computer optimizes the contrast automatically for certain applications
software that runs in text mode.
<Ctrl> <Alt> F9 (Monochrome Models Only)
Toggles the display of screen text between normal video mode (black text on white background) and
reverse video mode (white text on black background).
<Ctrl> <Alt> F10
If you connect an external CRT VGA monitor, press and hold down the <Ctrl> and <Alt> keys and press
the f10 function key to toggle between Auto, LCD, CRT and SimulSCAN display modes. Note that for
the WinBook-Color, only two modes are available, CRT and LCD.
For the WinBook-Mono, in Auto mode, if an external CRT is connected, the display will automatically
switch to the CRT monitor; in LCD mode, the display will appear only on the LCD; in CRT mode, the
display will appear only on the CRT; in SimulSCAN mode, the display will appear on both displays at the
same time. Note that color display models do not support SimulSCAN and only toggle between LCD and
CRT displays.
1 of 1 3/2/99 12:30 PM
Page 28

COMMON KEY COMBINATIONS SX/DX file:///C|/test/HtmlHelp/TechhelpCOMMON_KEY_COMBINATIONS_SXDX.html
COMMON KEY COMBINATIONS SX/DX
As we have already mentioned, in addition to their individual functions, some keys can be used in
combination with other keys to provide special functions. And, as in the case of the Alt and Ctrl keys,
some keys only function when pressed in combination with other keys. Before reading about some of the
more common key combinations, however, please remember one thing. As you start to use various
software packages you will quickly learn that each software has its own rules for the keyboard. Although
many of the keys, especially the typewriter keys and cursor movement keys, have these same functions in
most different software packages, some keys, especially the function keys F1 to F12, will often have
completely different functions. For [SX/DX 4-9] example, one software may use the F5 function key to
delete a block of text, and another software might use the F5 function key to insert a block of text.
The special key combinations that we explain here are those that are commonly used by MS-DOS, your
computer’s operating system software. Since MS-DOS loads every time you turn on your computer
before loading the particular applications software you wish to use, the better you know MS-DOS the
easier your computing operations will be. Also, some of these key combinations will take effect even
when you are using other applications software.
<Ctrl> <Alt> <Del> - The Warm Boot
To “boot up” your computer means to turn on your computer and load the operating system. When you
first turn on your computer each session by turning on your computer’s power switch, this is known as a
cold boot. Sometimes when you are using your computer, it will “hang”, which means that the display
will freeze and nothing you type on the keyboard seems to have any effect. This is a fairly uncommon
occurrence and is not a cause for panic. It can be due to any number of reasons such as a “bug” or defect
in the software package you are using. If this happens, you can turn off your computer for a few seconds
using the power switch. Then when you turn your computer on again, everything should be back to
normal.
This is rather inconvenient, however, and a far quicker way is by using the “warm boot”. All you have to
do is press and hold the <Ctrl>, <Alt> and <Del> keys and your computer will reboot without you
having to turn your computer on and off again.
Your computer will reboot whenever you press the <Ctrl> <Alt> <Del> keys no matter what software
you are using. In Windows, pressing <Ctrl> <Alt> <Del> will cause a message to pop up on the screen
with instructions on how to proceed. Because your system will reboot, make sure you only use it when
necessary as it erases the current contents of RAM. If you are editing a document and have not saved it
to floppy or hard disk, pressing <Ctrl> <Alt> <Del> will erase the document from memory and you will
have to start again. [SX/DX 4-10]
<Ctrl> S or <Ctrl> <Pause> - Pause Scrolling
Sometimes when you display data on your screen it will scroll off the screen faster than you can read it.
To pause the scrolling of data, you need to press <Ctrl> S or <Ctrl> <Pause>. When you are ready to
resume scrolling press <Ctrl> S or <Ctrl> <Pause> again.
<Ctrl> C – Interrupt a Command
This command is used to terminate a command already executed. When the command has been
1 of 2 3/2/99 12:31 PM
Page 29

COMMON KEY COMBINATIONS SX/DX file:///C|/test/HtmlHelp/TechhelpCOMMON_KEY_COMBINATIONS_SXDX.html
terminated you will be returned to the DOS prompt.
You will frequently use the special key combinations detailed above as you get accustomed to using
MS-DOS and other programs. Please note that we have only explained a few of the most commonly used
key combinations here, and for further details you should refer to your MS-DOS user’s manual. [SX/DX
4-11]
2 of 2 3/2/99 12:31 PM
Page 30

CHAPTER 5. BASIC MS-DOS USAGE file:///C|/test/HtmlHelp/TechhelpCHAPTER_5_BASIC_MSDOS_USAGE.html
CHAPTER 5. BASIC MS-DOS USAGE
Introduction
If you are a newcomer to computing you may be a total loss as to how to start using your computer. This
section is especially for you. Here we explain what MS-DOS is, how it interacts with your computer, and
why you need it no matter what software you intend to use. We also explain how to use the basic
MS-DOS commands that are essential for managing the information stored on your hard disk and
diskettes.
Your MS-DOS software comes with a complete user’s manual with comprehensive instructions on how
to use the program and it is this manual you will have to read to really understand all about MS-DOS. If
you are new to computing, we strongly recommend that you take some time to read the first few chapters
of the MS-DOS manual to gain a basic knowledge of PC usage. However, the information we provide
here should be enough to get you started, and once you are started, you will quickly find out that
computing really is as easy as everyone says it is.
WHAT IS MS-DOS? SX/DX
MS-DOS stands for Microsoft Disk Operating System. Microsoft is the name of the company that
produces the program and Disk Operating System (DOS) is a somewhat abbreviated description of what
the program does. For the rest of this manual we shall refer to it simply as DOS since there are operating
systems available from other companies besides Microsoft. DOS is also known as the system software or
the operating system. What you call it is not important but what is important is this – You can do nothing
with your computer before you have loaded DOS. No matter what software you want to use, be it
[SX/DX 5-1] WordStar, Lotus 1-2-3, Dbase III, a computer game, or even something that you have
written yourself, you will not be able to load that software before you have loaded DOS.
The essential part of the DOS program acts as a bridge between your hardware and your software. It
communicates with the hardware and controls the flow of information to and from your keyboard, disk
drive and monitor. It also provides you with the tools for manipulating the data stored on your computer,
allowing you to copy and delete files, see what files you have stored, rename files etc. etc. In short, no
matter whether you like it or not, you are going to have to get used to using DOS. DOS includes many
commands you may never use depending on what you intend to use your computer for, but you will use
some commands every time you turn on your computer.
1 of 1 3/2/99 12:32 PM
Page 31

LOADING DOS SX/DX file:///C|/test/HtmlHelp/TechhelpLOADING_DOS_SXDX.html
LOADING DOS SX/DX
There are basically two ways to load DOS – the first is to load it from a floppy diskette, the second is to
load it from a hard disk. Loading DOS from a hard disk is automatic whenever you power on the
computer. To load DOS from a diskette you simply place the DOS system diskette in your floppy disk
drive and turn on your computer. Note that
we say the DOS system diskette. Earlier versions of DOS came on a single diskette, but the latest
versions such as 5 and 6 consist of several diskettes. The reason for this is that more commands and
features have been added, making it impossible to store everything on a single diskette.
When you load DOS from a floppy, the system files will be read from the diskette and the following will
appear on your Screen:
Current date is Mon. 5-28-90
Enter new date (mm-dd-yy)
Details of how to set the date are given in the DOS user’s manual, and for the moment we will skip this
procedure.
To skip this step press < Enter> and the following will appear:
Current time is 18:12:51.26
Enter new time:
[SX/DX 5-2]
Press < Enter> again and the DOS prompt will appear on your screen, as below:
A>
The DOS prompt tells you that DOS has been loaded and that your computer is now ready to accept
your commands. The DOS prompt also tells you what disk drive is currently being addressed. Above we
have shown the DOS prompt as A>, but it could also be B> or C>. Each letter refers to the disk drives
installed in your system. The letter A always refers to the first floppy disk drive. The letter B refers to the
second floppy disk drive. If you only have one floppy disk drive installed both A & B refers to this disk
drive. Letters C and above refer to the hard disk drives installed. To change from the A drive to the C
drive, you must type the following:
A>C:<Enter>
C>
Note that the letter of the DOS prompt will change according to which disk drive you have selected,
though when you boot from the hard disk the C> prompt will always appear. The DOS prompt may be
changed with the DOS command PROMPT. Full
1 of 2 3/2/99 12:32 PM
Page 32

LOADING DOS SX/DX file:///C|/test/HtmlHelp/TechhelpLOADING_DOS_SXDX.html
details of this command are contained in the DOS user’s manual. At this stage, the important point is to
understand how the letter of the DOS prompt indicates the disk drive currently being addressed.
2 of 2 3/2/99 12:32 PM
Page 33

GENERAL DOS USAGE SX/DX file:///C|/test/HtmlHelp/TechhelpGENERAL_DOS_USAGE_SXDX.html
GENERAL DOS USAGE SX/DX
As we have explained, DOS controls the flow of information between the various components of your
PC. It also provides you with the tools to organize the information on your disk drives and even check
whether they are working properly. The core of DOS is a file called COMMAND.COM. This file
contains the basic DOS instructions and is loaded into your system’s memory every time you turn on your
computer. When we talk about “booting” your computer, this means [SX/DX 5-3] to turn on your
computer and load the COMMAND.COM. When the DOS prompt appears, this tells you that the
COMMAND.COM file has been loaded and that you can start your computing operations.
Internal Commands
Internal commands are those that are automatically loaded into your PC’s memory every time you boot
your computer. Because they are loaded into memory, they are always available for use even if you have
removed the DOS diskette from your floppy disk drive. These commands are the most frequently used,
and include CLS, COPY, DELETE, DIR, TYPE and VER, all of which are explained later in this
chapter. There are many other internal commands, details of which are given in your DOS user’s manual.
External Commands
External commands are used less frequently, and must be loaded from a disk drive. These commands will
only be loaded into memory when you type the command name, assuming your DOS diskette is inserted
in the disk drive currently displayed in the DOS prompt. For example, if you loaded DOS from your a
drive, then to load a program from the DOS diskette, you simply type the name of the command after the
A> prompt. If the prompt is shown as C> (i.e. the C drive, the hard disk drive, is currently being
addressed) and you type the name of a DOS command while the DOS diskette is in the A drive, you will
see an error message since your PC will not be able to find DOS in the C drive. In this case you would
first have to type A: to change back to the A drive. Later in this chapter the CHKDSK and FORMAT
commands both external commands, are introduced. Full details of all the external commands are to be
found in the DOS user’s manual.[SX/DX 5-4]
Basic Rules
We list here some basic rules for DOS usage, which apply in all cases:
Commands can be typed in either uppercase or lowercase letters, or even combinations of both.
To execute a command the < Enter> key must be pressed after the command has been typed at the
DOS prompt.
To change the disk drive currently being addressed type in the letter of that disk drive followed by
a colon (:).
In order to execute an external DOS command, the relevant command must be present on the disk
drive currently being addressed, as indicated by the DOS prompt.
To correct typing errors when typing in command use the < Backspace> or cursor left keys to
delete the incorrect characters.
1 of 2 3/2/99 12:33 PM
Page 34

GENERAL DOS USAGE SX/DX file:///C|/test/HtmlHelp/TechhelpGENERAL_DOS_USAGE_SXDX.html
Loading Other Programs from DOS
When you have booted your computer you will most likely want to load some other program, such as
windows, a word processor or database program. By way of a simple example we will load Windows
which is contained on the hard disk. You have booted DOS from the C drive, so the C> prompt is shown.
Then simply type the name of the command to run the Windows program, as shown below:
C>WIN<ENTER>
Windows will then be loaded from the C drive and you can begin using this program.
What command you have to issue to load a certain program will, of course, depend on which program
you are using, and the relevant manual will tell you what it is. The important thing is that you understand
the basic principle. Once DOS is loaded you can load any other program you wish because the internal
part of DOS has been stored in your computer’s memory. [SX/DX 5-5]
2 of 2 3/2/99 12:33 PM
Page 35

COMMON DOS COMMANDS SX/DX file:///C|/test/HtmlHelp/TechhelpCOMMON_DOS_COMMANDS_SXDX.html
COMMON DOS COMMANDS SX/DX
To give you more confidence before you start the daunting task of pursuing your DOS user’s manual, we
outline here some of the more common and most basic DOS commands. The operative word here is
“outline”. For full details of all the possible functions with these commands you will have to refer to your
DOS user’s manual or type
HELP (command name)
at the DOS prompt. The commands are divided
into internal and external commands, starting with the former.
Dir – The Directory Command
The DIR command is probably the most common DOS command and you will use it almost every time
you turn on your computer. The DIR command gives you a directory, that is a list, of all the files stored
on a diskette or disk. For example, suppose you have a diskette and you want to know what files are
stored on that diskette, then, to find out, insert the diskette in your floppy disk drive and type DIR, as
below:
A>DIR<Enter>
A list of file names will appear on your screen. Alongside each file name is the size of the file (in bytes)
and the date and time at which that file was last modified.
Beneath the list of files you will also be told how many files are on the diskette and how many free bytes
remain on the diskette or disk. The DIR command can be used for floppy diskettes or hard disk drives.
The DIR command can also be used to find information on one particular file. Suppose you have a file
called LETTER>TXT on your C: drive and you want to see the date on which the file was last modified,
you could type:
A>DIR C:LETTER>TXT<ENTER>
Notice how the C: used to tell DOS to look on the C: drive is placed after the DIR command and before
the file name. In response to such a command you would get a display similar to that shown: [SX/DX
5-6]
Volume in drive C has no label
Directory of C:\
LETTER TXT 2340 5-01-90 4.53p
1 File(s) 320000 bytes free
This tells you that the file LETTER.TXT consists of 2,340 bytes and was last edited at 04.53pm on the
1st of May 1990. You are also told that there are a total of 320,000 free bytes on the hard drive.
If the list of files is very long, the text will continue scrolling off the top of your screen making it
impossible to see the first files in the directory. To pause the scrolling, you need to press < Ctrl> S or <
Ctrl> < Pause>. To restart the scrolling press either of these key combinations again. The DIR command
has various parameters to display the list of files in different formats and you should refer to the DOS
1 of 5 3/2/99 12:34 PM
Page 36

COMMON DOS COMMANDS SX/DX file:///C|/test/HtmlHelp/TechhelpCOMMON_DOS_COMMANDS_SXDX.html
manual for details.
CLS – Clear Screen
To clear the screen so that it is blank except for the DOS prompt, type:
C>CLS<ENTER>
The screen will be cleared, with only the DOS prompt remaining in the top left hand corner.
DEL – Delete a File
The DEL command is used to delete a particular file, or a number of files from a diskette or hard disk.
Suppose you have a file LETTER>TXT on the diskette and you no longer
wish to keep this file. By deleting it you will create more space on the diskette for other files. To delete
the file type:
C>DEL LETTER.TXT<Enter>
[SX/DX 5-7]
C>
If you now use the DIR command to view a directory of files on the A: drive you will see that the
LETTER.TXT is no longer there.
If the file had been in the A: drive, you could have executed it as follows:
C>DEL A:LETTER.TXT<Enter>
C>
Obviously care should be taken when using the DEL command to ensure that you do not accidentally
delete a file you wished to keep.
COPY – Copy a File
COPY is another command you will often use. As its name suggests it is used to copy files from one disk
or diskette to another. For example, suppose you have a file called ADDRESS.TXT on a diskette in drive
A:, and you now want to copy this file to your hard disk. To do this you would type:
A>COPY A:ADDRESS.TXT C:<Enter>
1 Files(s) copied
This tells DOS to copy the file ADDRESS.TXT on the A: drive, onto the C: drive.
It is also possible to copy a file under a different name. Supposing you wish to copy the file
2 of 5 3/2/99 12:34 PM
Page 37

COMMON DOS COMMANDS SX/DX file:///C|/test/HtmlHelp/TechhelpCOMMON_DOS_COMMANDS_SXDX.html
ADDRESS.TXT to the C: drive and you want to change the name to OLDADDR.TXT. In this case you
would type:
A>Copy A:ADDRESS.TXT C:OLDADDR.TXT<Enter>
1File(s) copied
The COPY command is one of DOS’s most useful tools and you should consult your DOS user’s manual
for full details.
VER – DOS Version Number
As we have mentioned, DOS has gone through various changes since its first release, each upgrade
having a different version number. In order to find out the version of DOS you are using, type the VER
command as below:
A>VER<Enter>
MS-DOS Version 6.00
As you can see the version number of the DOS being used will be displayed. The version number
displayed will obviously depend on which version you are using. It is sometimes necessary to know the
version number because some programs will only run with certain versions of DOS. For instance, you
may have a program which [SX/DX 5-8] requires that you have version 5.00 or above to run. If your
VER command tells you the version you are using is 3.10, then that program may not run. The instance
of this is very small and 99% of programs will run under any version of DOS above 3.00.
The VER command has no other use than to find out the version of DOS you are using.
TYPE – Type a File to the Screen
The TYPE command is used to view the contents of a file on your screen. It can only be used to view
text files, not program files. Text files are the files that you have created with your word processor or
other program. Not all text files can be viewed with the TYPE command, however. Some programs, such
as WordStar, store their files in a special format and if you try to use the TYPE command to view them,
you will get unintelligible garbage on your screen. For such files you will have to use the program that
was used to create them to view them.
To use the TYPE command to view the contents of a file TAXFILE.TXT on your C: drive you would
type:
A>TYPE C:TAXFILE.TXT<Enter>
The contents of this file will then scroll continuously onto your screen, and you may use the < Ctrl> S
command to pause the scrolling. Note that text displayed with the TYPE command is not displayed in any
particular format, and may appear very differently from how you saved it. This is because the TYPE
command ignores all formatting commands entered in the program that was used to create the file, and
simply displays the text. You cannot edit files with TYPE command that can only be used to view the file
contents. [SX/DX 5-9]
3 of 5 3/2/99 12:34 PM
Page 38

COMMON DOS COMMANDS SX/DX file:///C|/test/HtmlHelp/TechhelpCOMMON_DOS_COMMANDS_SXDX.html
External Commands
FORMAT – The Disk(ette) Formatting Command
As we noted in Chapter 3. about the Diskettes and Disk Drives, all diskettes and hard disk drives must be
formatted before you can use them. We shall only introduce the formatting of diskettes here, and if you
require information on the formatting of hard disk drives then you should refer to your DOS user’s
manual since this is a complicated process.
When you purchase diskettes, they are normally unformatted. Before you can store data on a diskette,
DOS needs to divide the diskette up into sections and prepare it for receiving data. The technical details
are not important. What is important is that no matter what kind of disk drive or diskette you are using,
the diskette must be formatted before anything can be done with it.
To use FORMAT, type the following command:
C>FORMAT A:<Enter>
Insert new diskette for drive A:
And strike ENTER when ready
Make sure that the blank diskette is correctly inserted in drive A: and press < Enter>. The FORMAT
command will count through the heads and cylinders on your screen and when the procedure is finished,
the following will be displayed:
Format Complete
1457664 bytes total disk space
1457664 bytes available on disk
Format another (Y/N)?
If you wish to format another diskette remove the diskette just formatted, replace it with a new diskette
and press “Y”. If you do not wish to format another diskette, press “N”. In the example above, a
1.44Mbyte diskette was formatted. To format a 720Kbyte diskette it will require a special format
command “FORMAT A: /F:720” and the total disk space displayed will be 655,360. [SX/DX 5-10]
CHKDSK – The Check Disk Command
The CHKDSK command is a diagnostic command, and it can be used to check the condition of a floppy
diskette or hard disk. The command will give information on the diskette or disk being checked and will
also give you information on the memory of your computer. Again, the CHKDSK command is an
external command, so the DOS diskette must be in the current drive.
To check a diskette in drive A:, type the following command:
4 of 5 3/2/99 12:34 PM
Page 39

COMMON DOS COMMANDS SX/DX file:///C|/test/HtmlHelp/TechhelpCOMMON_DOS_COMMANDS_SXDX.html
C>CHKDSK A:
1457664 bytes total disk space
0 bytes in 1 hidden files
1337344 bytes in 69 user files
118272 bytes available on disk
655360 bytes total memory
566192 bytes free
The example above shows the information given by the CHKDSK command. It tells you that the disk
being checked is a 1.44Mbyte diskette; that there is 1 hidden file with 0 bytes (a hidden file is one that
will not show up using the DIR command); that there are 69 files on the diskette taking up a total of
1337344 bytes; and that there are 118272 bytes available on the diskette. It also tells you that your PC
has a total of 655,360 bytes of memory, and that currently 566,192 of those bytes are free.
The CHKDSK command can also be used to check the contents of a hard disk drive in a similar way. The
CHKDSK command does not only look for information, however, but also detects if there are any errors
among the files on the disk or diskette being checked. If there are, it will tell you so, and you can use the
CHKDSK command to try and save any damaged files. For details of this, please refer to your DOS
user’s manual or type HELP CHKDSK at the DOS prompt. [SX/DX 5-11]
5 of 5 3/2/99 12:34 PM
Page 40

A WORD OF ADVICE ON DOS SX/DX file:///C|/test/HtmlHelp/TechhelpA_WORD_OF_ADVICE_ON_DOS_SXDX.html
A WORD OF ADVICE ON DOS SX/DX
In this chapter we have barely skimmed the surface of DOS and the many commands available. The
commands introduced here will soon become second nature to you as you use them every day. Many of
the DOS commands not covered here offer other important functions that you will come to need as you
become more acquainted with your PC, and as your requirements increase.
DOS is not a very user-friendly operating system and the average user will never use many of the
commands provided. Indeed, many of these commands will be fairly unintelligible to people unfamiliar
with programming or computer science. The more you know about DOS, the more you will get out of
your computer. We suggest you gradually learn the various DOS commands (by referring to your DOS
manual) as you come across them, rather than attempting to learn everything about DOS in a short period
of time.
1 of 1 3/2/99 12:35 PM
Page 41

NOTES ON RUNNING WINDOWS SX/DX file:///C|/test/HtmlHelp/TechhelpNOTES_ON_RUNNING_WINDOWS_SXDX.html
NOTES ON RUNNING WINDOWS SX/DX
Windows is a Graphical User Interface (GUI) that runs on top of DOS. Your system comes with
Windows 3.1 already loaded on the hard disk and correctly setup to allow you to commence using the
program immediately. To start Windows, type the following command at the DOS prompt:
C>WIN
Windows will then be loaded. Note that the built-in trackball is the default pointing device when you first
run Windows. If you wish to use a mouse connected to the external serial port (refer to page 6-4 for
details of how to connect a mouse) rather than the built-in trackball, you must configure the mouse as
COM1. You may also connect a PS/2 mouse directly to the external keyboard port.
Extended VGA Drivers with an External CRT Monitor SX/DX
Note that if you connect an external CRT monitor you may wish to load one of the extended resolution
display drivers for a higher resolution display than the standard 640 x 480 VGA display. The [SX/DX
5-12] extended resolution display drivers have already been copied to the hard disk and you should use
the Windows Setup program or the Setup icon in the Control Panel to load a different display driver. The
display drivers provided are listed as CHIPS 655XX ——, and you can scroll through the list to select
the required option. Which option you can use will depend on the specification of your monitor. [SX/DX
5-13]
1 of 1 3/2/99 12:35 PM
Page 42

CHAPTER 6: CONNECTING PERIPHERALS SX/DX file:///C|/test/HtmlHelp/TechhelpCHAPTER_6__CONNECTING_PERIPHERAL.html
CHAPTER 6: CONNECTING PERIPHERALS SX/DX
Your 486SX/DX-WinBook computer includes a number of ports to allow the connection of external
peripherals. Although your notebook computer is a completely self contained unit which does not require
the addition of any other device to function, you may at some time or other find it convenient to connect
certain devices to your notebook. The 486SX/DX-WinBook supports the connection of a wide range of
commonly used devices just as is possible with a conventional desktop PC. Devices include serial and
parallel printers; a mouse or scanner, or any other device that requires a serial port; an external floppy
disk drive; an external keyboard; an external monitor etc. Each of the on-board ports is detailed
separately on the following pages. Please refer to Appendix A for details of the pin connections of each
port.
1 of 1 3/2/99 12:36 PM
Page 43
THE EXTERNAL KEYBOARD PORT - PS/2 MOUSE SX/DX file:///C|/test/HtmlHelp/TechhelpTHE_EXTERNAL_KEYBOARD_PO00000250.html
THE EXTERNAL KEYBOARD PORT - PS/2 MOUSE SX/DX
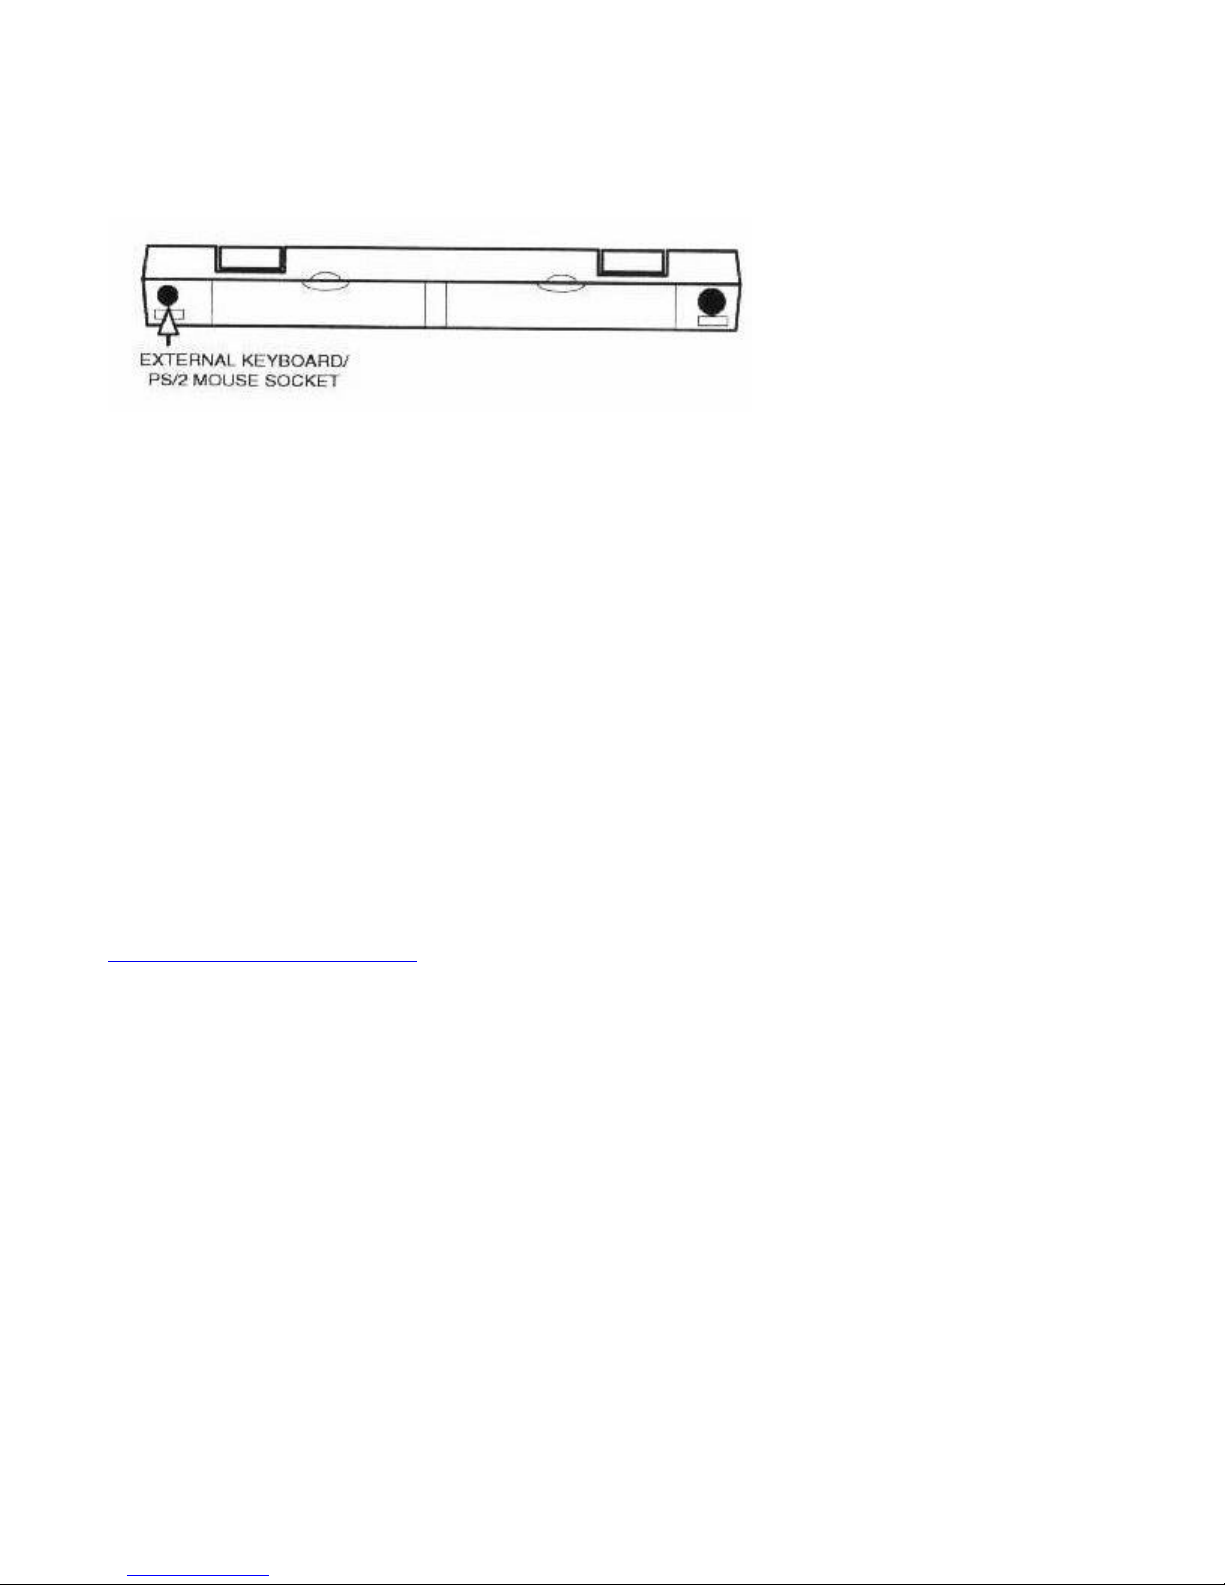
The external keyboard port is situated on the left side of the rear panel of the 486SX/DX-WinBook.
Fig. 6-1 Locating the External Keyboard Port
[SX/DX 6-1]
Please note that the external keyboard socket is smaller than the connector found on standard desktop
computer keyboards. In order to be able to connect an external keyboard you will need to use the adapter
provided with the unit.
To connect an external keyboard, first turn your 486SX/DX-WinBook off. Then, plug the external
keyboard into the external keyboard socket. Now turn your 486SX/DX-WinBook on again. When an
external keyboard is connected, you may use either the internal keyboard or external keyboard to input
data as both will be activated.
The external keyboard port doubles as a PS/2 mouse port and you may connect a PS/2 mouse directly to
this port. Please note that the PS/2 keyboard/mouse port can only use one device at a time, either a
mouse or a keyboard, not both. Also, note that if you wish to plug a PS/2 keyboard in the external
keyboard socket, you must use a special adapter and cannot connect directly to the WinBook.
1 of 1 3/2/99 12:36 PM
Page 44
THE EXTERNAL CRT MONITOR PORT SX/DX file:///C|/test/HtmlHelp/TechhelpTHE_EXTERNAL_CRT_MONITOR_PORT_SX.html
THE EXTERNAL CRT MONITOR PORT SX/DX
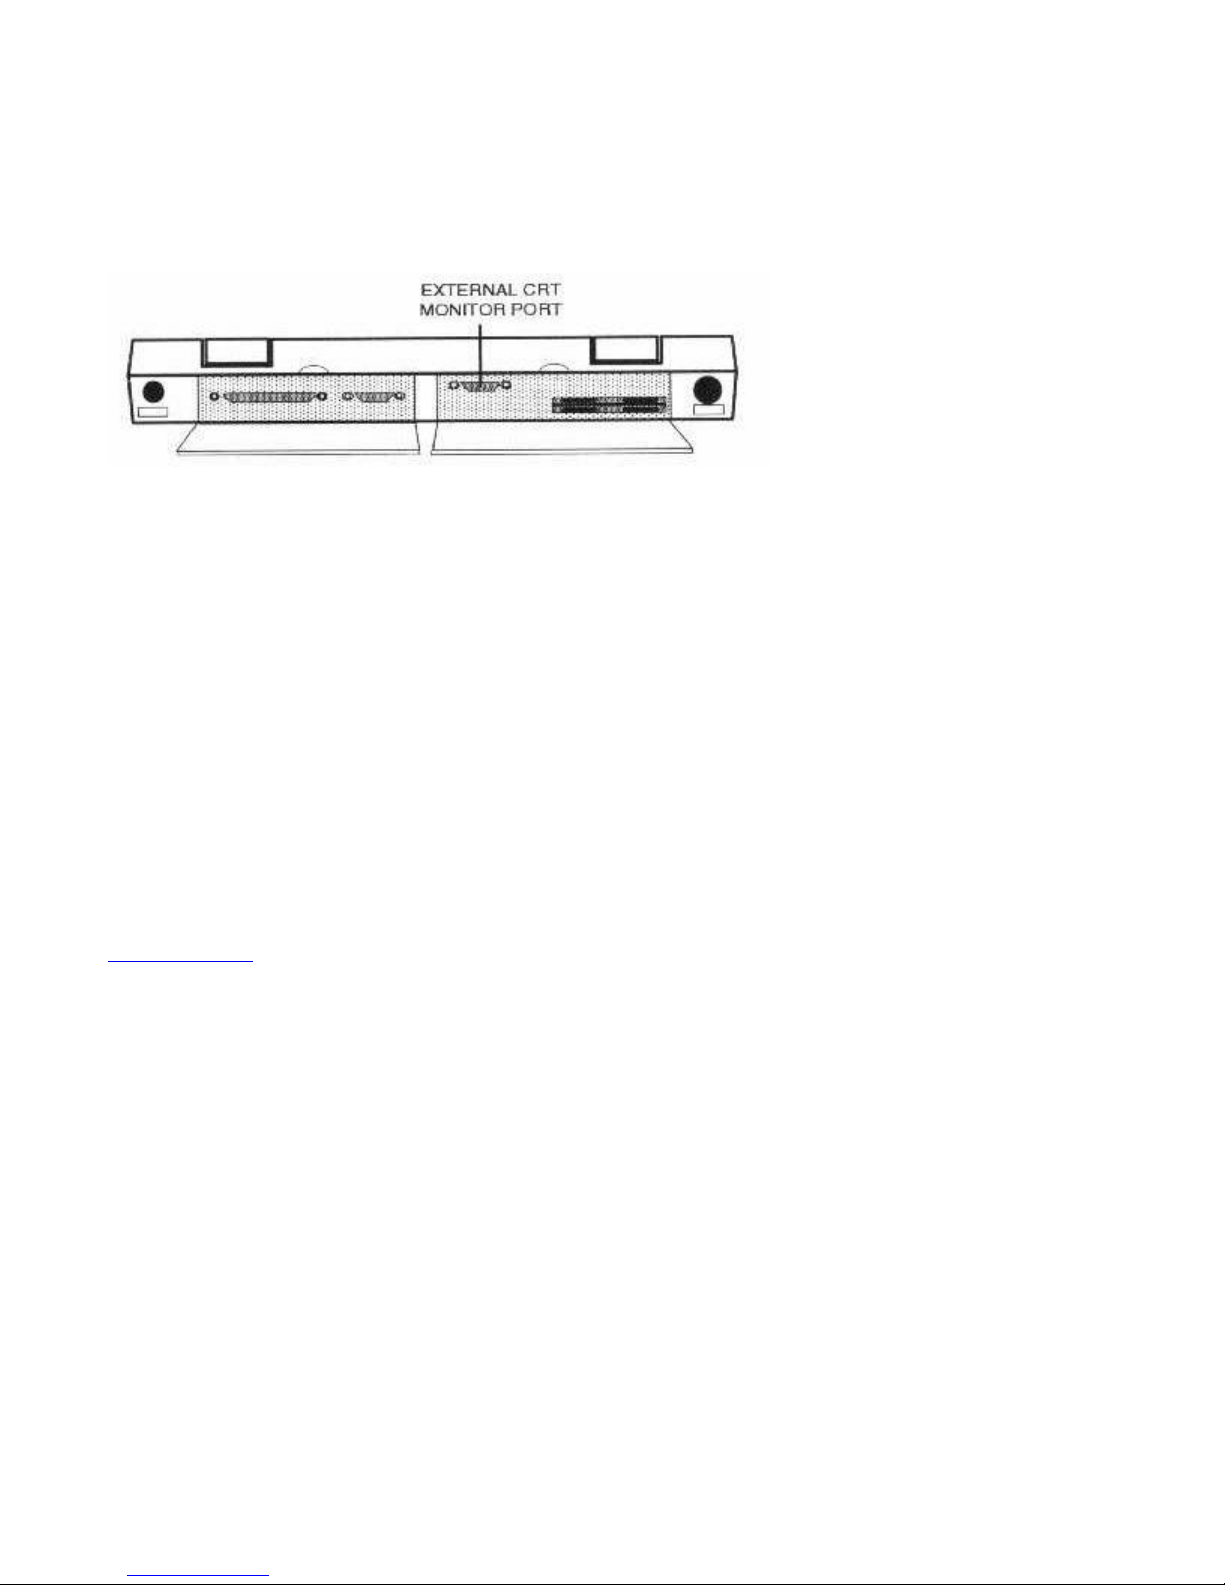
The external CRT (Cathode Ray Tube) monitor port is located behind the right-hand cover on the rear of
the 486SX/DX-WinBook as shown in the illustration below. To gain access to the external monitor
connector, simply pull the cover open.
Fig. 6-2 Locating the External CRT Monitor Port
The External CRT monitor port supports the connection of any analog VGA compatible monitor. You
cannot connect a digital monitor such as a conventional monochrome, CGA or EGA monitor, to this
port. The IBM VGA standard is an analog signal, and only an analog monitor will work with the
486SX/DX-WinBook. If you have a multi-frequency [SX/DX 6-2] monitor this probably supports both
digital and analog modes. If you wish to connect such a monitor to the 486SX/DX-WinBook you must
configure the monitor in analog mode.
To connect an external monitor, first turn your 486SX/DX-WinBook off. Connect the 15-pin
D-connector cable from the monitor to the external monitor port, and secure the connector in place by
tightening the two screws. Now turn your system on again and turn the power to the monitor on.
With an external monitor connected, you may toggle the display between the external CRT, the LCD and
both at the same time by pressing the < Ctrl> < Alt> F10 key combination.
1 of 1 3/2/99 12:37 PM
Page 45
THE SERIAL PORT SX/DX file:///C|/test/HtmlHelp/TechhelpTHE_SERIAL_PORT_SXDX.html
THE SERIAL PORT SX/DX
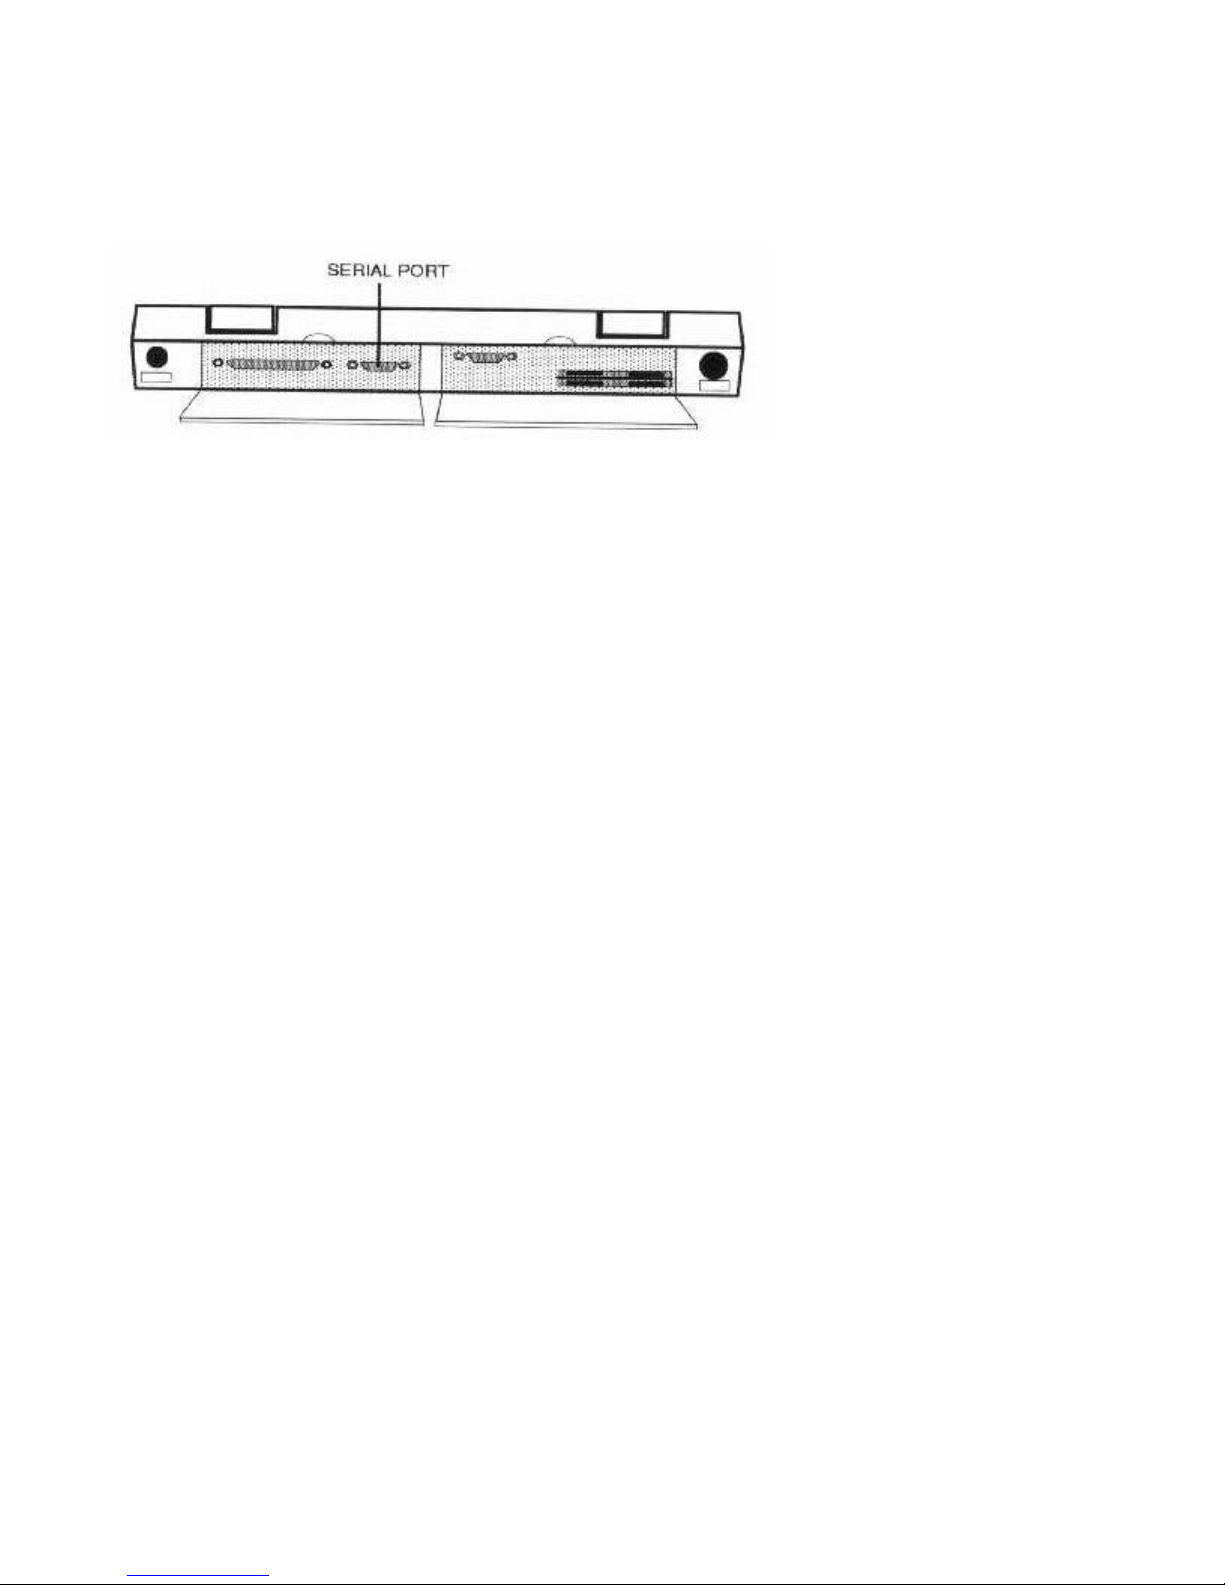
The serial port is located behind the left-hand cover on the rear. To gain access to the serial port, open
the hinged cover.
Fig. 6-3 Locating the Serial Port
Serial ports are often called RS-232(C) ports, which refers to the industry standard for this kind of
interface. Because the serial interface is an industry standard there is a wide range of devices that can be
connected to the serial port. Basically, any device that is listed as a serial device and requires an RS-232
interface can be connected to your 486SX/DX-WinBook. Examples of such devices include a mouse, an
external modem and a serial printer. [SX/DX 6-3]
COM 1 and COM 2
The serial port on your 486SX/DX-WinBook is configured as COM1. The COM2 serial port is used by
the built-in trackball. When you connect a device to your 486SX/DX-WinBook, you will have some
software to configure and run the device. In your software, you must configure the device as being
connected to the COM1 serial port. For example, if you connect a mouse to the serial port, you must
ensure that you use your mouse software to configure the mouse as being connected to COM1.
How to Connect a Mouse
By way of an example, we describe here the simple procedure for connecting a mouse, which is probably
the most commonly used serial device, to your 486SX/DX-WinBook. The procedure for connecting any
kind of serial device will be similar. An increasing number of software packages supports the use of a
mouse, and a mouse can make the operation of such software extremely quick and easy. The most
commonly used mice are serial devices and as such can be directly connected to your
486SX/DX-WinBook. Another kind of mouse is the bus mouse that usually requires a special interface
card. You cannot connect this type of mouse to the serial ports, so make sure the mouse you wish to use
is a serial mouse.
NOTE
The external serial port is COM1, the optional Fax/Modem is COM3. When using a serial mouse
on COM1 there will be a conflict wen using the Fax/Modem on COM3. If it is desired to use both
a mouse and modem together, the best solution is to use the internal trackball or a PS/2 mouse
instead of a serial mouse.
[SX/DX 6-4]
1 of 2 3/2/99 12:37 PM
Page 46

THE SERIAL PORT SX/DX file:///C|/test/HtmlHelp/TechhelpTHE_SERIAL_PORT_SXDX.html
The serial connector on the 486SX/DX-WinBook is a 9-pin male D-connector. A male connector is a
connector containing the pins, (a female connector is a connector with pin holes into which the pins on
the male connector must be inserted.) D-connector refers to the shape of the connector that has one long
side and one short side.
Now look at the connector attached to your mouse. If the connector is a 9-pin female D-connector you
may plug this directly onto one of the serial port connectors on your 486SX/DX-WinBook. Secure the
mouse connector in place by means of the screws on either side, which should be screwed into the
receptacles on the serial port connectors.
If your mouse is fitted with 25 –pin connector you must buy a 25-pin to 9-pin adapter. Such adapters are
available at any good computer store. If you need to purchase such an adapter, make sure that the 9-pin
connector on the adapter is female.
Having obtained an adapter, plug this onto the connector on your mouse and secure with the attached
screws/fasteners, and then connect the adapter to one of the serial ports on your 486SX/DX-WinBook
and similarly secure it in place. Your mouse is now connected and ready for use. Please note, however,
that a mouse requires a software driver that must be installed before you will be able to use it. The mouse
should include a software diskette containing such a driver, so please refer to the manual provided with
your mouse for details of how to install the software driver n the 486SX/DX-WinBook.
The installation procedure for the 486SX/DX-WinBook will be the same as for any other PC.
2 of 2 3/2/99 12:37 PM
Page 47
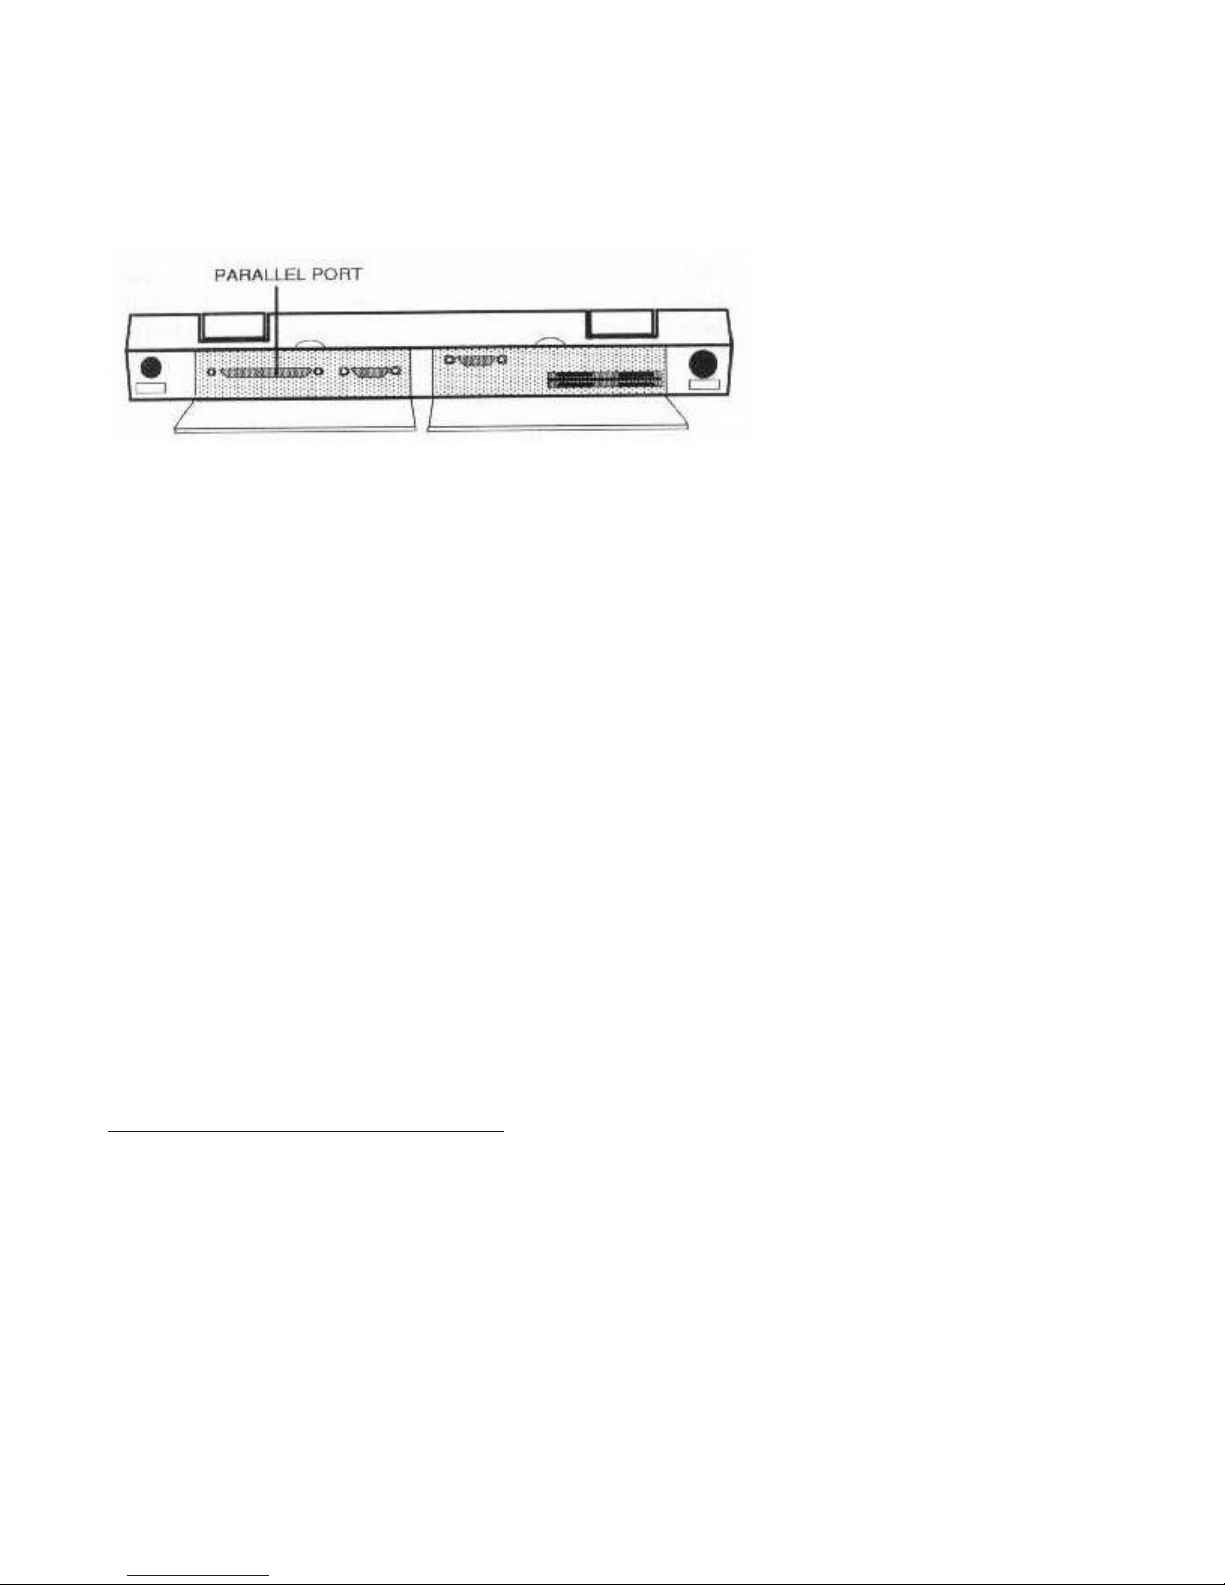
THE PARALLEL PORT SX/DX file:///C|/test/HtmlHelp/TechhelpTHE_PARALLEL_PORT_SXDX.html
THE PARALLEL PORT SX/DX
The parallel port is located behind the left-hand cover on the rear of your 486SX/DX-WinBook. To gain
access to the parallel port, open the hinged cover.[SX/DX 6-5]
Fig. 6-4 Locating the Parallel Port
Parallel ports are often referred to as Centronics or Printer ports, since a printer is the device most
commonly connected to the parallel port. Again, this is an industry standard, so any device that requires a
parallel interface can be connected to the parallel port. In addition to printers, common parallel devices
include plotters and digitizers.
Connecting a Printer
If you wish to connect a printer to your 486SX/DX-WinBook first make sure the printer is a parallel
printer and not a serial printer. The vast majorities of PC printers are parallel devices and can therefore be
connected to the parallel port on your 486SX/DX-WinBook. Provided with the printer should be a
printer cable. Connect the matching connector on this cable to your printer and secure it in place with the
screws or fasteners on the cable connector. Plug the other end of the cable onto the parallel connector on
your 486SX/DX-WinBook and secure it in place. And that is all it takes!
Most printers do not require any software drivers and you should be able to access the printer
immediately without any further setup procedure. An easy way to test whether the printer is on line is to
turn on your 486SX/DX-WinBook and turn on the printer, and then, when your 486SX/DX-WinBook
has booted up, press the Prt Sc (Print Screen) key. This should cause the contents of the screen display to
be printed out. For details of your particular printer’s operation, please refer to the printer manual.
[SX/DX 6-6]
1 of 1 3/2/99 12:42 PM
Page 48
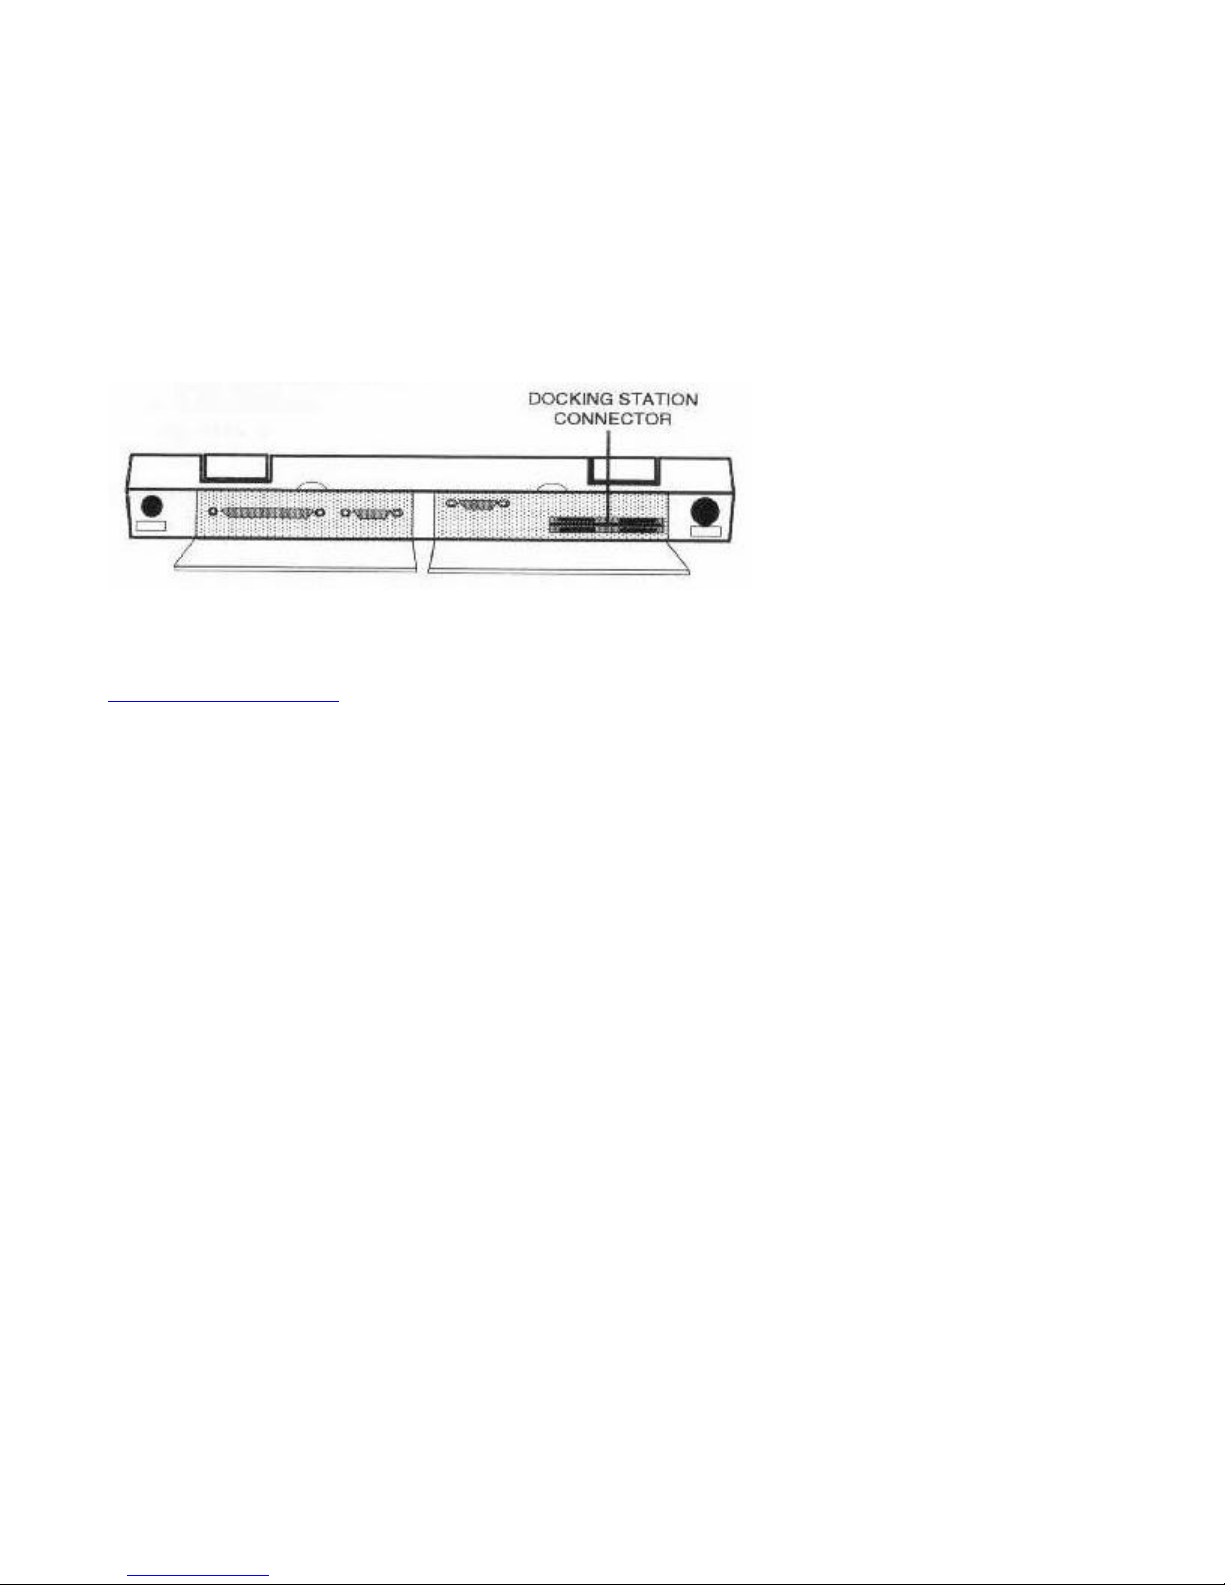
CONNECTING THE OPTIONAL DOCKING STATION SX/DX file:///C|/test/HtmlHelp/TechhelpCONNECTING_THE_OPTIONAL_DOCKING_.html
CONNECTING THE OPTIONAL DOCKING STATION SX/DX
An external docking station is available as an option for your 486SX/DX-WinBook. The docking station
includes its own power supply and has space for interface cards just as in a conventional PC. The docking
station will also allow the use of additional disk drives.
The connector for the external docking station is situated behind the right-hand cover on the rear panel.
The whole notebook should be “plugged in” to the docking station via this connector. For full details,
please refer to the instructions included with the docking station.
Fig. 6-5 Locating the Docking Station Connector
1 of 1 3/2/99 12:43 PM
Page 49

OTHER AVAILABLE OPTIONS SX/DX file:///C|/test/HtmlHelp/TechhelpOTHER_AVAILABLE_OPTIONS_SXDX.html
OTHER AVAILABLE OPTIONS SX/DX
Note that the following options are also available for the 486SX/DX-WinBook, but these options are
NOT ones the user can install, they must be installed by an authorized dealer. For further information,
please call your dealer.
Memory Options
The standard 486SX/DX-WinBook comes with 4MB of memory on a custom memory module. Memory
expansion modules supporting 8MB, 16MB and 32MB are also available. Increasing the memory will
greatly enhance the performance of programs that use large amounts of memory, such as Windows.
[SX/DX 6-7]
Optional Fax/Modem
An optional Fax/Modem can be installed in the unit, providing a 2400 Hayes compatible modem and G3
compatible fax with send/receive capabilities.[SX/DX 6-8]
1 of 1 3/2/99 12:44 PM
Page 50

CHAPTER 7: POWER OPTIONS SX/DX file:///C|/test/HtmlHelp/TechhelpCHAPTER_7__POWER_OPTIONS_SXDX.html
CHAPTER 7: POWER OPTIONS SX/DX
The 486SX/DX-WinBook features the ability to run on AC power or the rechargeable internal battery for
maximum convenience when at home or in the office or out and about with no access to a power supply.
To maximize the efficiency of battery usage the 486SX/DX-WinBook also comes with a number of
power conservation features, some of which can be tailored to your particular requirements.
USING THE AC ADAPTER/CHARGER SX/DX
When you have access to AC power you should normally use the AC adapter provided with your
486SX/DX-WinBook in order to save the battery for use when power is not available. The supplied AC
adapter can be plugged into any power source from 90 volts to 240 volts since it is auto-adjustable.
When you turn on your system, as long as the AC power adapter is connected, power will be derived
from this power supply and the battery will remain unused.
If the main power is accidentally cut off, or the cable is unplugged either from the 486SX/DX-WinBook
or from the AC power outlet, the system will automatically switch to battery use with no break in
operation. Thus, the on-board battery provides an Uninterruptible Power Supply (U.P.S.) function during
AC power operations.[SX/DX 7-1]
1 of 1 3/2/99 12:45 PM
Page 51
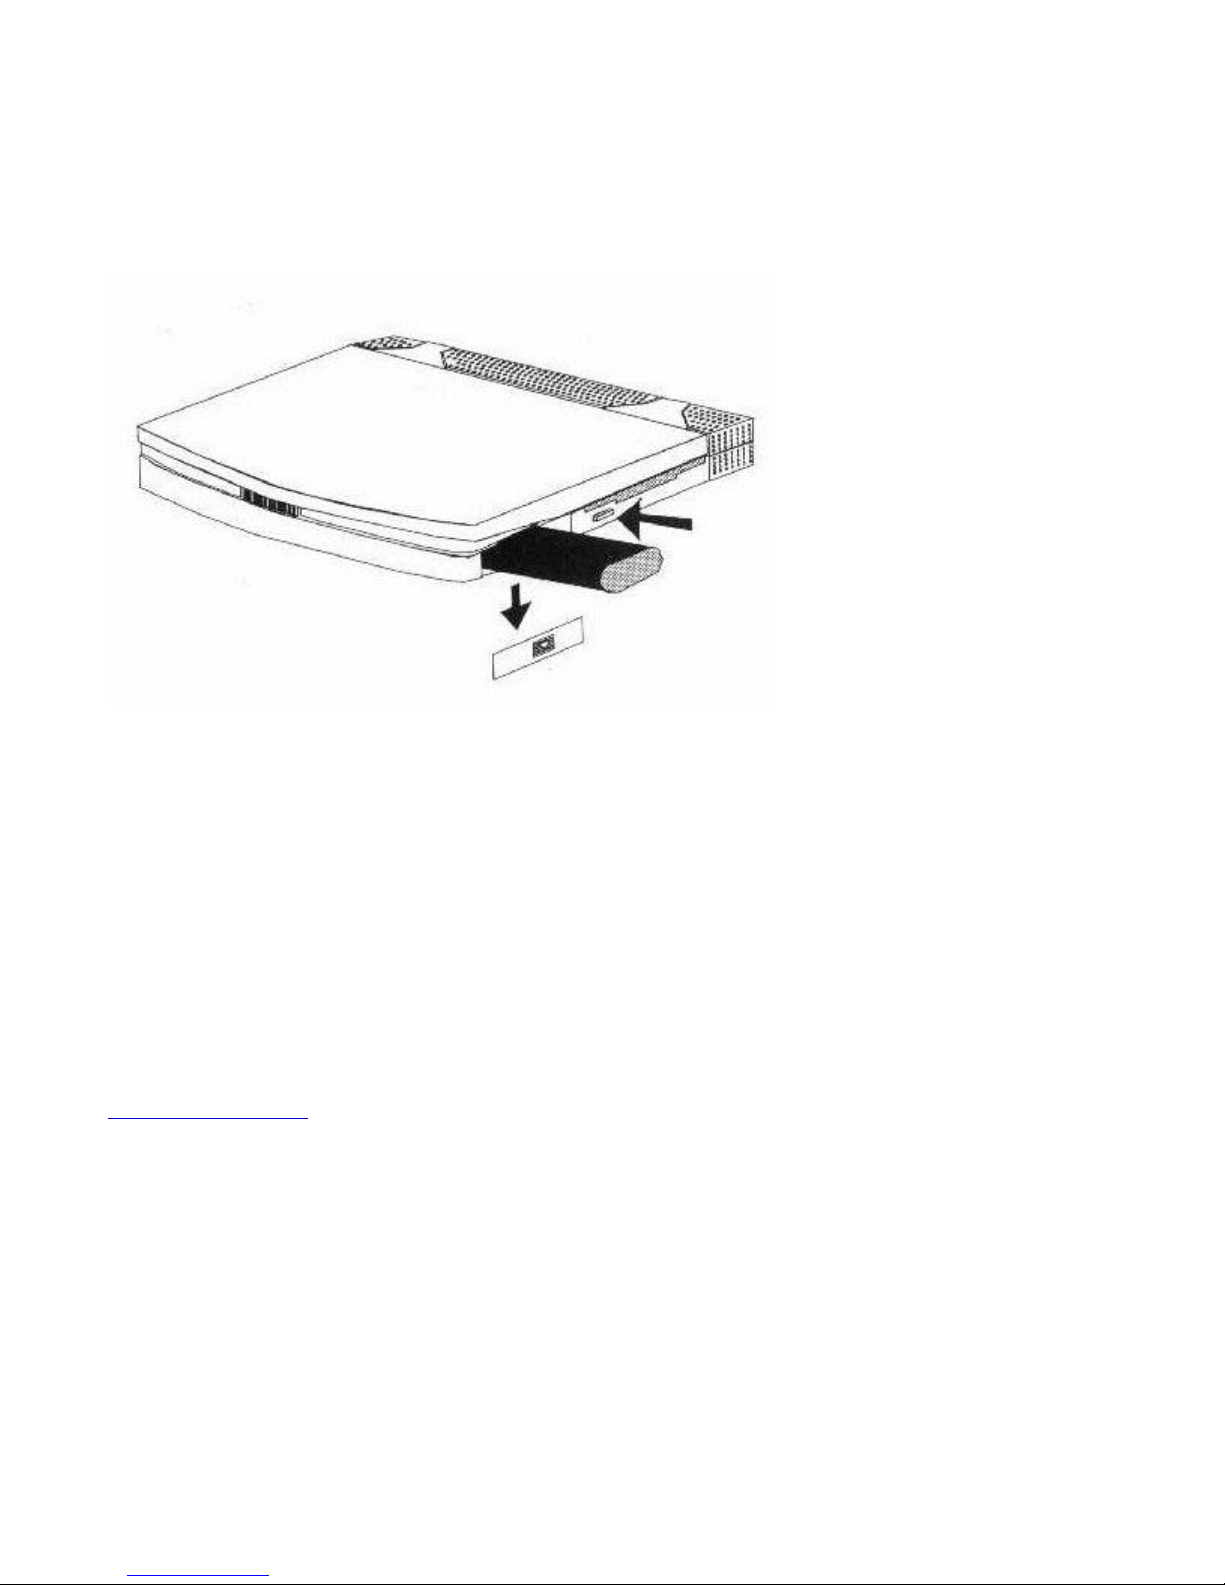
USING THE BATTERY SX/DX file:///C|/test/HtmlHelp/TechhelpUSING_THE_BATTERY_SXDX.html
USING THE BATTERY SX/DX
The 486SX/DX-WinBook can also be run off the battery supplied, so you can use your system even
when no AC power is available. The battery is inserted into the battery cavity in the
486SX/DX-WinBook that is accessed by removing the battery cover.
Fig. 7-1 Inserting the Battery
To remove the cover, simply press firmly on the cover with your thumb and slide it downwards. When
the battery is installed the battery cover should always be replaced.
The battery will provide at least two hours of usage before it will need to be recharged. If you run the
POWER>EXE program, more than two hours of usage will be possible. Please refer to page 7-4 for
details.
If you turn on your 486SX/DX-WinBook when the power adapter is NOT connected, the system will
automatically use the battery. As soon as you connect the power adapter, the system will automatically
use the power adapter.[SX/DX 7-2]
1 of 1 3/2/99 12:45 PM
Page 52

CHARGING THE BATTERY SX/DX file:///C|/test/HtmlHelp/TechhelpCHARGING_THE_BATTERY_SXDX.html
CHARGING THE BATTERY SX/DX
The AC power adapter provided with your system is actually a combined power supply/battery charger.
The battery used is a Nickel-Metal-Hydride type and you should only use the supplied charger to
recharge this battery. The procedure for charging the battery is detailed below:
1. Turn off the power to the computer and insert the battery in the battery compartment. NOTE:
Make sure you insert the battery in the direction of the arrow on the battery.
2. Plug the power adapter in the computer and turn the power on. The power LED on the power
adapter will illuminate.
3. As long as the battery is inserted and the power adapter is connected, the charge LED on the
power adapter will illuminate, indicating that the battery is being charged. Due to the advanced
design of the charger circuit, the battery in the 486SX/DX-WinBook will fully charge in 1 to 1.5
hours no matter whether you are using the computer or not.
4. When the battery is fully charged, the Charge LED on the power adapter will flash.
5. The charger will automatically enter “trickle charge” mode to ensure the battery is kept fully
charged. To obtain the best performance and prolong battery life, you should continue to charge
the battery for a further 30 minutes after the full charge indicator has flashed.
6. When the battery is fully discharged the temperature of the battery will be higher than normal.
Please wait approximately ten minutes before recharging the battery. [SX/DX 7-3]
7. If you do not intend to use your computer for a period of time, you should fully discharge the
battery and remove the battery from the computer. DO NOT RECHARGE THE BATTERY
BEFORE REMOVING IT FROM THE COMPUTER.
8. Note that to get maximum battery usage, you should recharge the battery before you use it.
SAFETY NOTES
Recharge in a place 50ºF (10ºC) to 95ºF (35ºC).
Do not short-circuit battery.
Do not put into fire.
Saving Battery Power with POWER.EXE
Included with all MS-DOS/IBM DOS version 6 is a program called POWER.EXE, which can be loaded
to maximize power usage. As shipped, the WinBook is configured to use this software automatically. We
recommend you use this default configuration, especially if you frequently use your 486SX/DX-WinBook
on battery power.
When at the command prompt, the user can type:
1 of 2 3/2/99 12:50 PM
Page 53

CHARGING THE BATTERY SX/DX file:///C|/test/HtmlHelp/TechhelpCHARGING_THE_BATTERY_SXDX.html
C>POWER
And the system will print the power management status. For more information on the program, see the
user’s manual or type HELP POWER at the DOS prompt. [SX/DX 7-4]
2 of 2 3/2/99 12:50 PM
Page 54
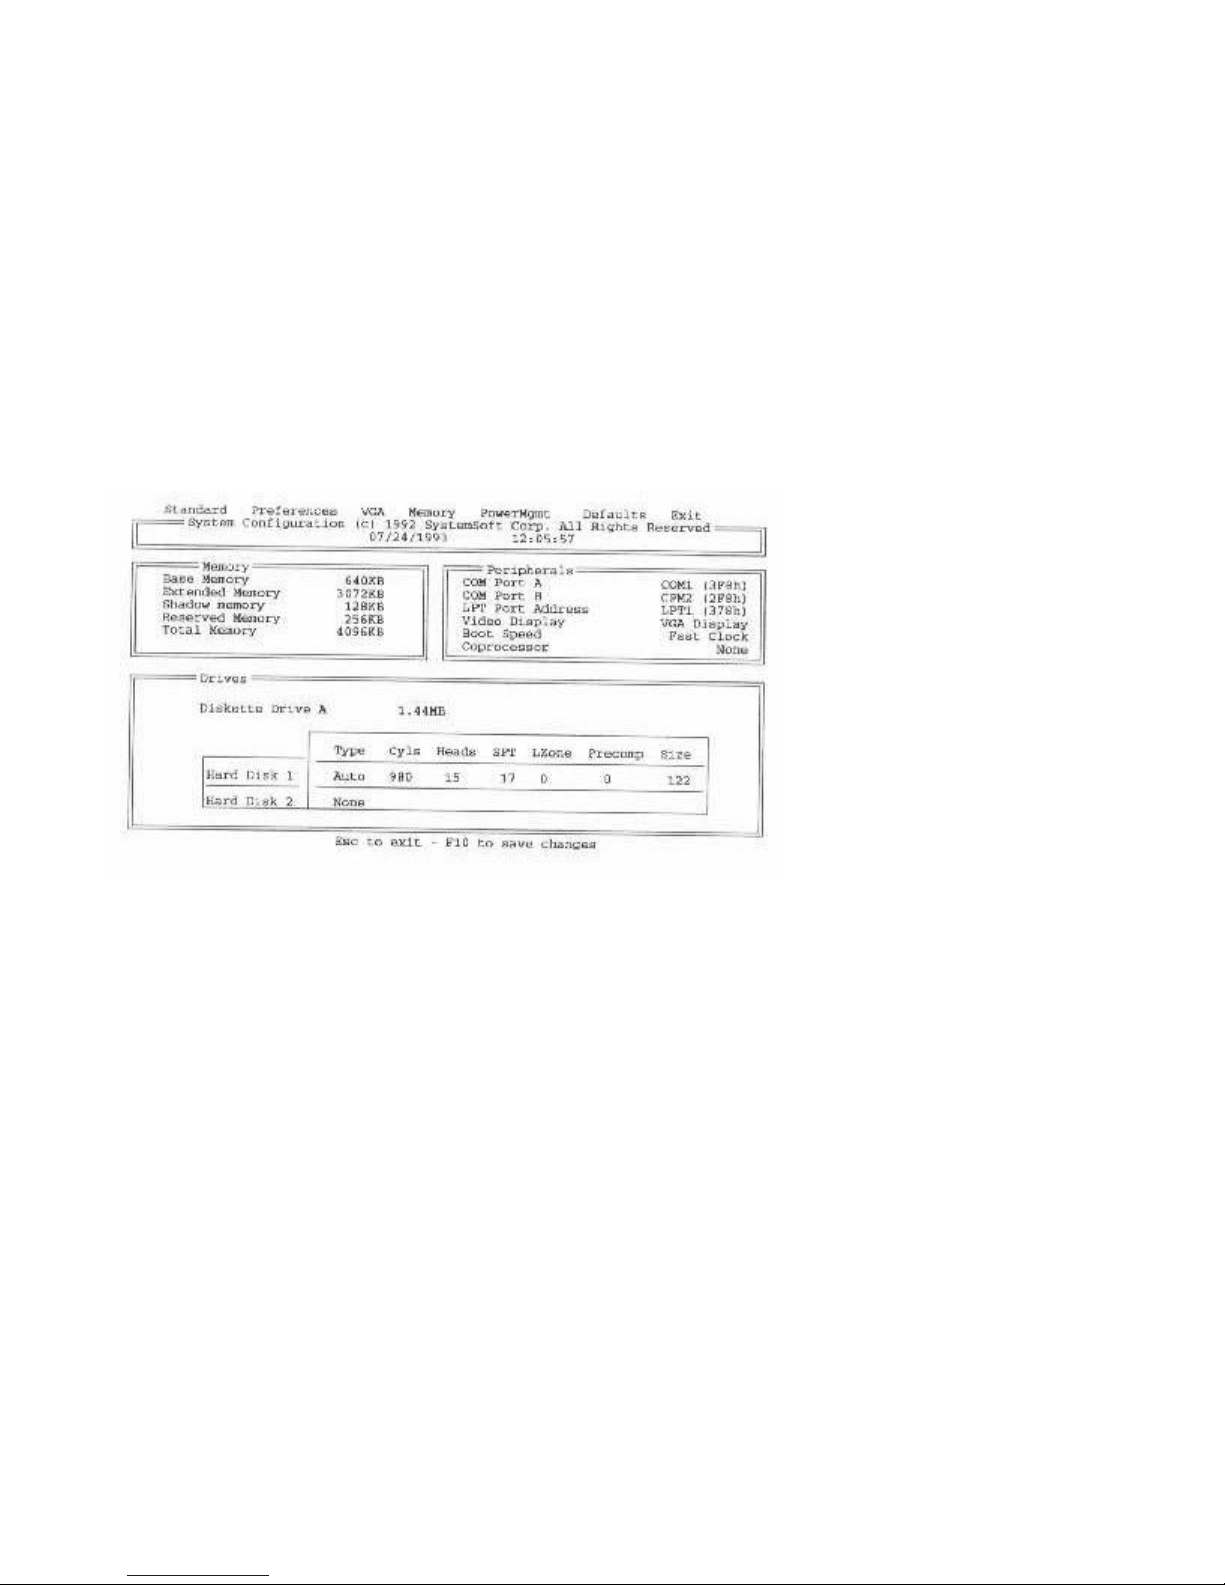
CHAPTER 8: BIOS SETUP PROGRAM SX/DX file:///C|/test/HtmlHelp/TechhelpCHAPTER_8__BIOS_SETUP_PROGRAM_SX.html
CHAPTER 8: BIOS SETUP PROGRAM SX/DX
One of the components on the mainboard inside your 486SX/DX-WinBook is the BIOS (Basic Input
Output System). This consists of firmware (software burned into hardware) which handles basic routines.
The BIOS also includes a SETUP program to allow you to configure the computer and set certain power
management features. In this chapter we explain how to use the setup program and power management
features to get the best performance from your 486SX/DX-WinBook.
ACCESSING THE BIOS SETUP PROGRAM
To access the BIOS setup program, turn on your computer and press < Ctrl> < Alt> S. The main menu
of the setup program will appear on your screen as shown below.
Fig. 8-1 The BIOS Setup Program Main Screen
[SX/DX 8-1]
Use the cursor left/right keys to move between the menu names at the top of the display. The available
menus and their overall functions are:
Standard
Allows you to set the time and date in the system clock and make basic hardware configuration settings,
including setting the disk drive types, serial and parallel port addresses etc.
Preferences
Allows you to set up some basic preferences, such as boot speed, keyboard typematic rate and delay and
boot password.
VGA
Allows you to set the display mode with a choice of LCD only, external CRT only or both together.
1 of 2 3/2/99 12:50 PM
Page 55

CHAPTER 8: BIOS SETUP PROGRAM SX/DX file:///C|/test/HtmlHelp/TechhelpCHAPTER_8__BIOS_SETUP_PROGRAM_SX.html
Memory
Allows you disable/enable Shadow RAM and cache memory.
Power Management
Allows you to set up the power management features to ensure maximum power saving when running off
the battery.
Defaults
Allows you to restore default settings.
Exit
Allows you to save your settings and exit the BIOS setup program. [SX/DX 8-2]
2 of 2 3/2/99 12:50 PM
Page 56
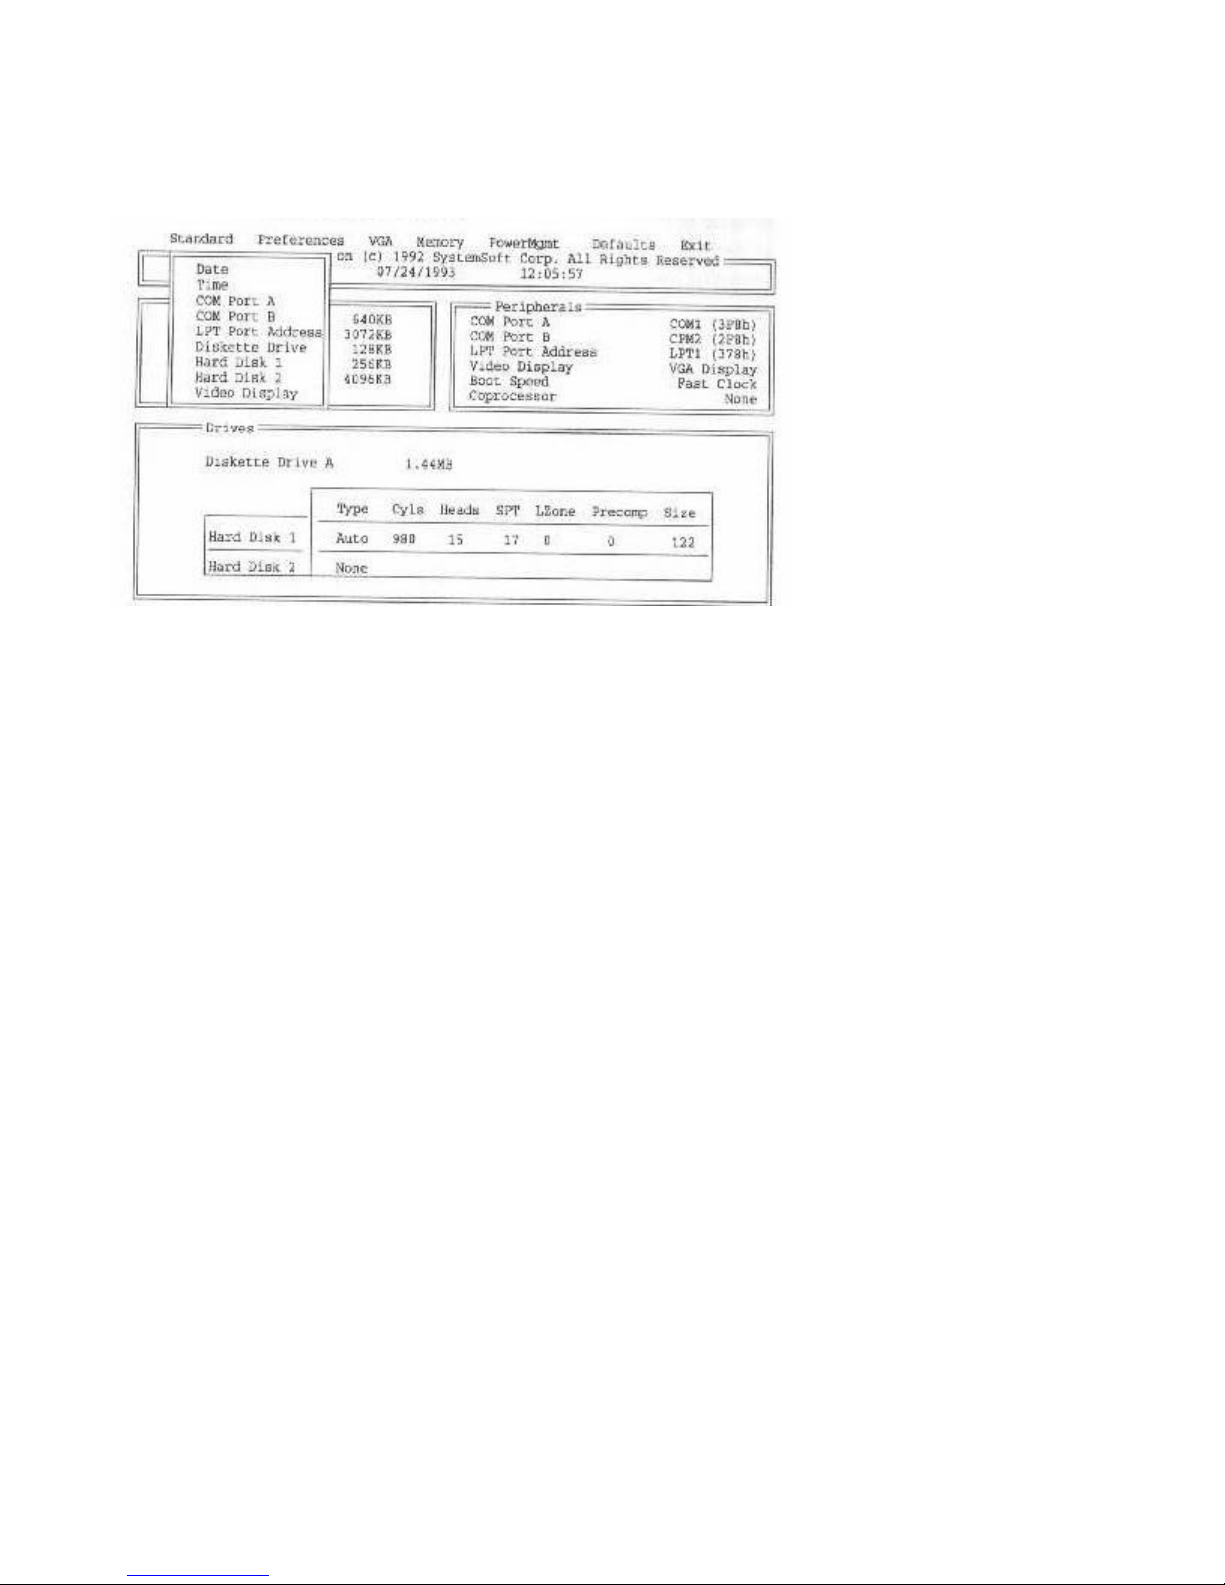
STANDARD SETTINGS SX/DX file:///C|/test/HtmlHelp/TechhelpSTANDARD_SETTINGS_SXDX.html
STANDARD SETTINGS SX/DX
First highlight the Standard menu and press < Enter>. The following menu will appear on your screen:
Fig. 8-2 The Standard Settings Menu
Date/Time
First highlight the Date and Time items and enter the correct date and time that will then be used by the
system clock.
COM Port A/COM Port B
These items allow you to configure the COM (serial) ports on your 486SX/DX-WinBook. You may set
the COM port as COM1/COM3 or COM2/COM4.
COM Port A refers to the external serial port on your 486SX/DX-WinBook. You may configure this port
as COM1 or COM3 with a choice of two I/O ports for each setting. Note that settings are available for
COM Port B but we recommend leaving it on COM2 as the installed software has been pre-configured
using these default settings. An example screen is shown on the following page. [SX/DX 9-3]
1 of 4 3/2/99 12:51 PM
Page 57
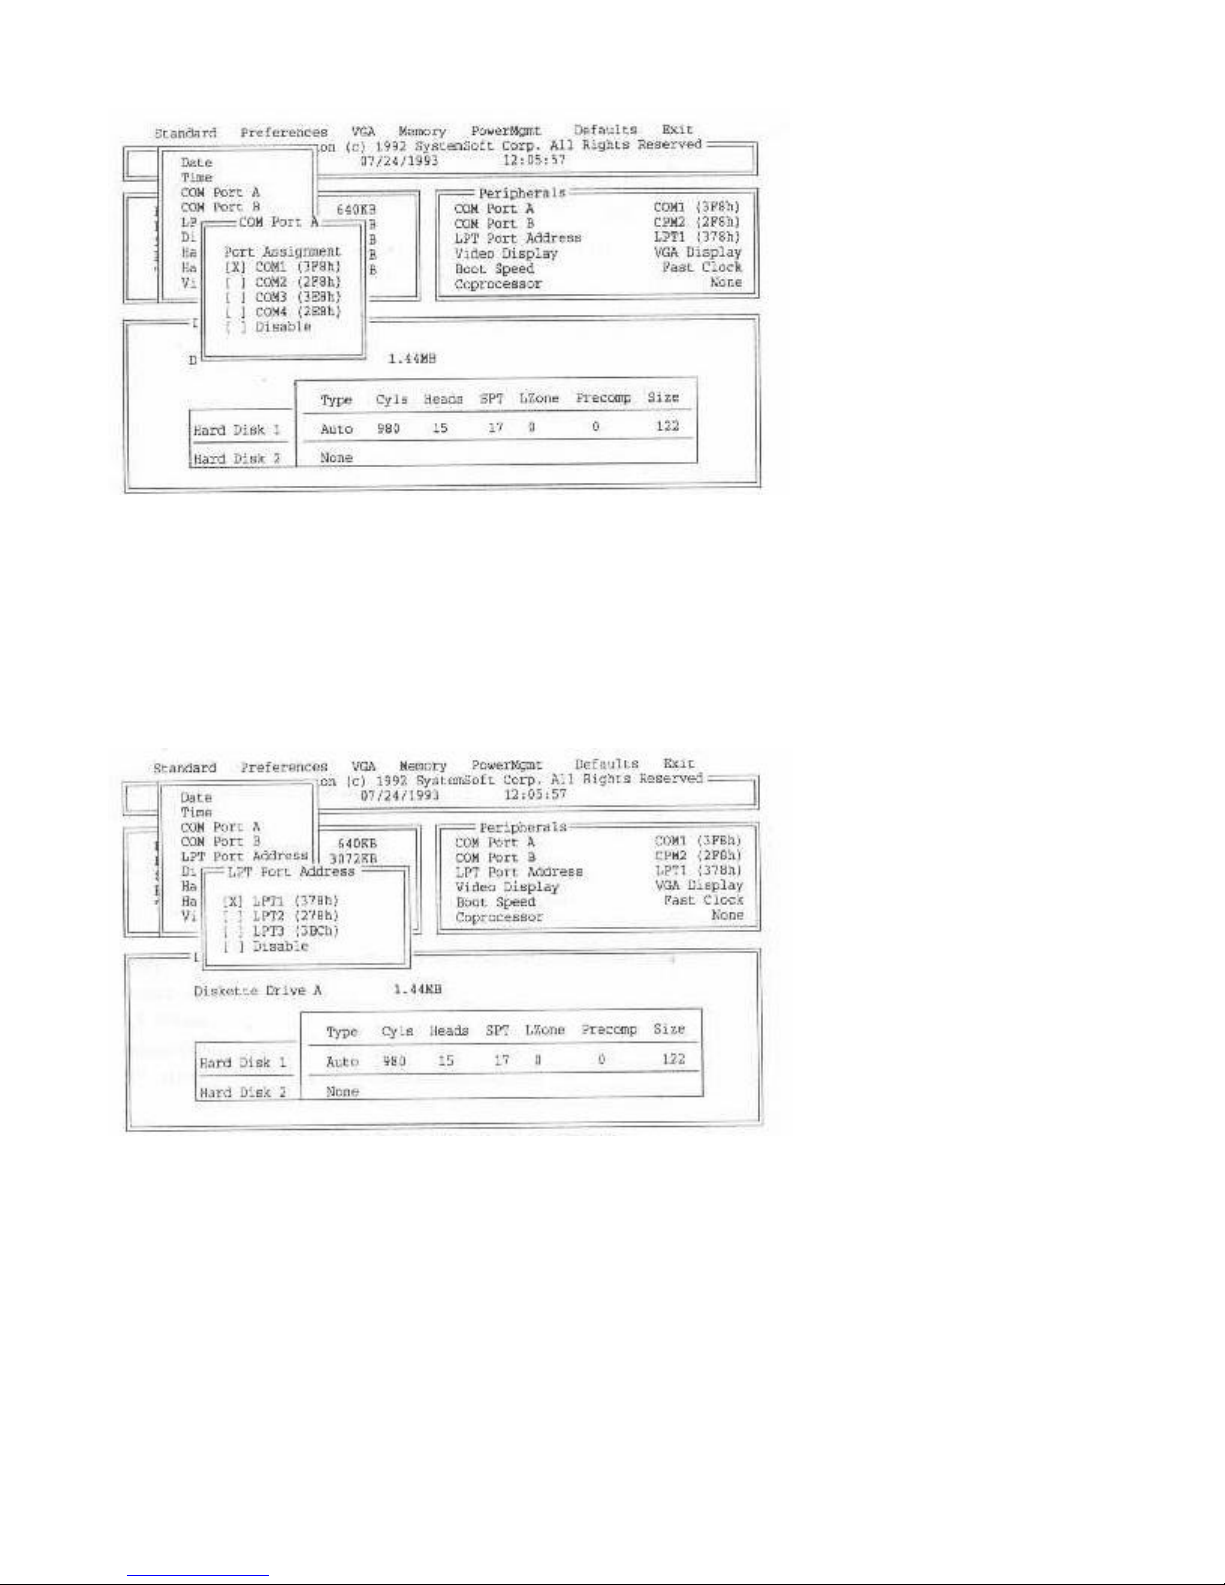
STANDARD SETTINGS SX/DX file:///C|/test/HtmlHelp/TechhelpSTANDARD_SETTINGS_SXDX.html
Fig. 8-3 Setting the COM A (1) Serial Port
LPT Port Address
In a similar way you can set the printer port with the LPT Port Address item, which allows you to
configure the printer port as LPT1, LPT2, and LPT3 or disabled. The default setting will be applicable
for most operations. Refer to the example screen below.
Fig. 8-4 Setting the LPT Port Address
[SX/DX 8-4]
Diskette Drive
Use the Diskette Drive item to define the floppy disk drive type. By default the 486SX/DX-WinBook is
set for a 1.44MB A: drive and no B: drive. You will only need to adjust this setting if you add an external
floppy drive via the expansion dock. You should then use this item to define the floppy B: drive type. The
default settings are shown below.
2 of 4 3/2/99 12:51 PM
Page 58
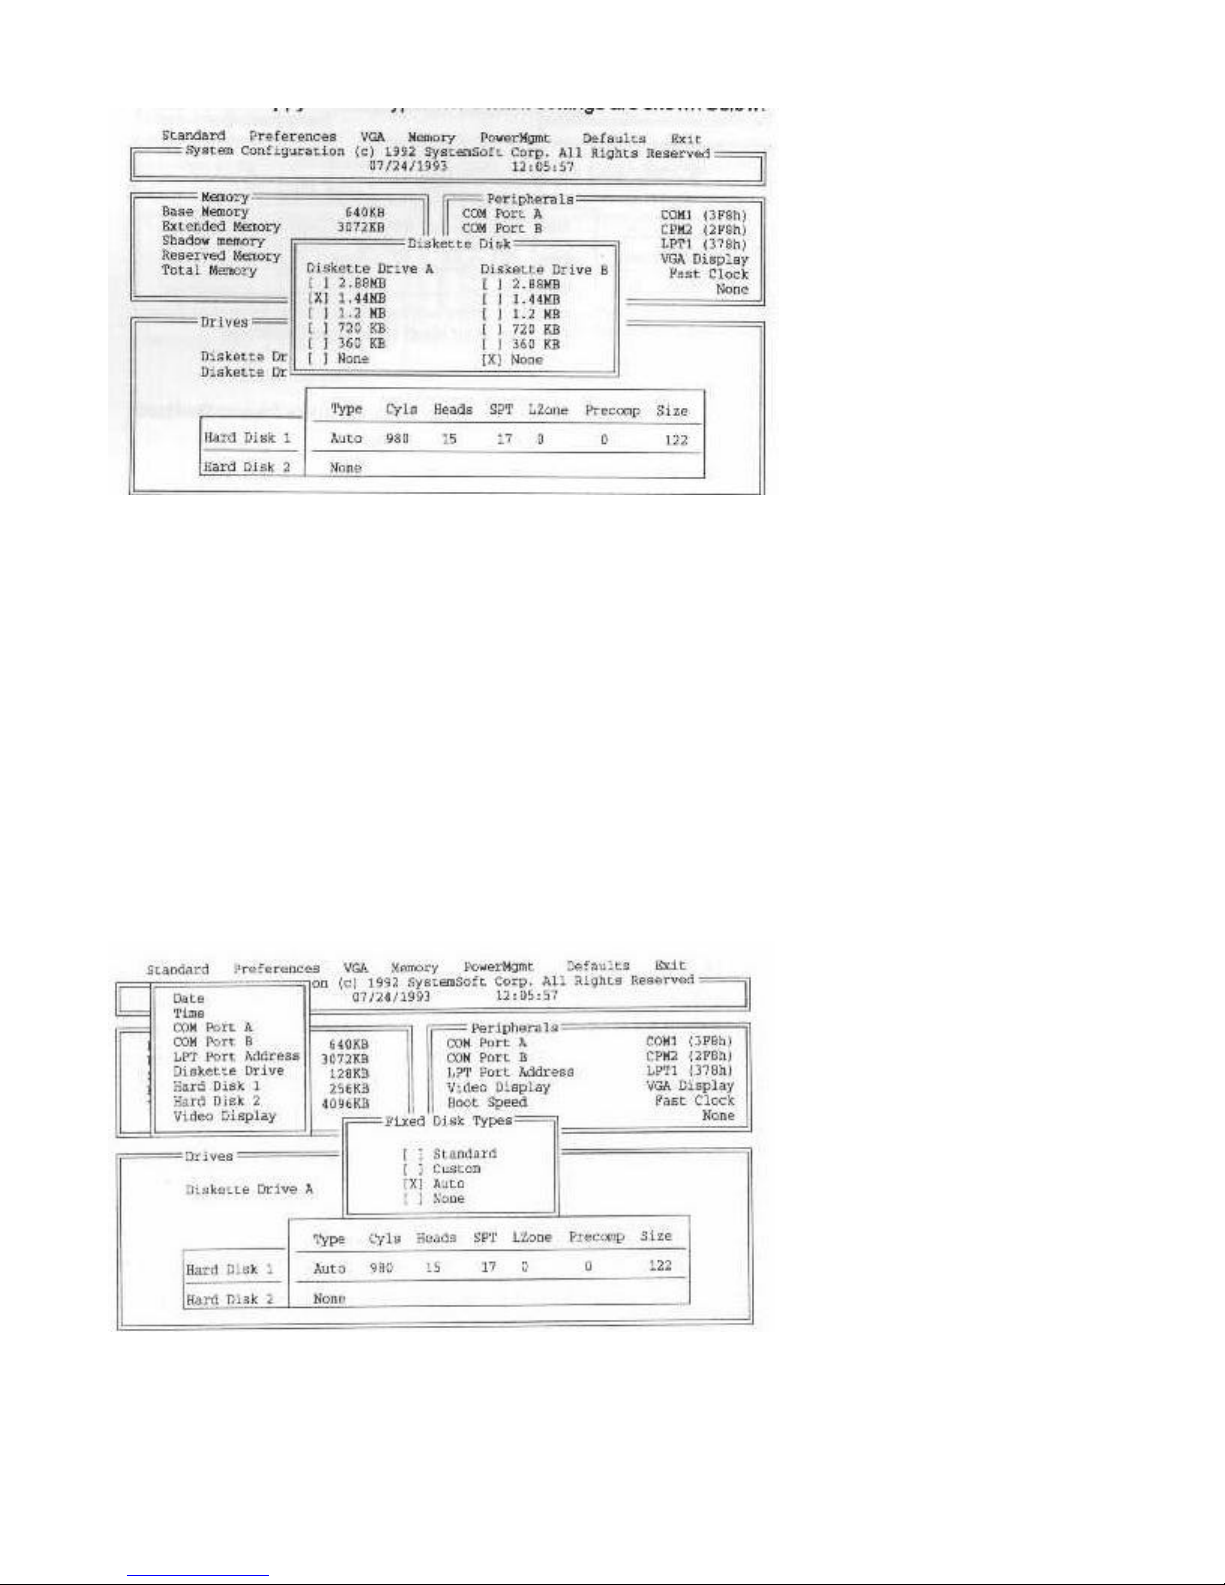
STANDARD SETTINGS SX/DX file:///C|/test/HtmlHelp/TechhelpSTANDARD_SETTINGS_SXDX.html
Fig. 8-5 The Default Floppy Disk Drive Settings
Hard Disk 1
The Hard Disk 1 item will be automatically preset according to the disk drive type installed.
Normally you will select Auto and the BIOS will automatically detect which drive type is connected. This
is the default setting and will be applicable for most drive types.
Select Standard for a standard fixed disk type, and enter the relevant type number. The number of
cylinders, heads, etc. will be displayed according to the hard disk drive type selected.
Select Custom if your hard disk drive is a non-standard type. You may then manually enter the number
of Cylinders, Heads, etc. as appropriate for the hard disk installed.[SX/DX 8-5]
Fig. 8-6 Selecting Auto Hard Disk Type Detection
Hard Disk 2
3 of 4 3/2/99 12:51 PM
Page 59
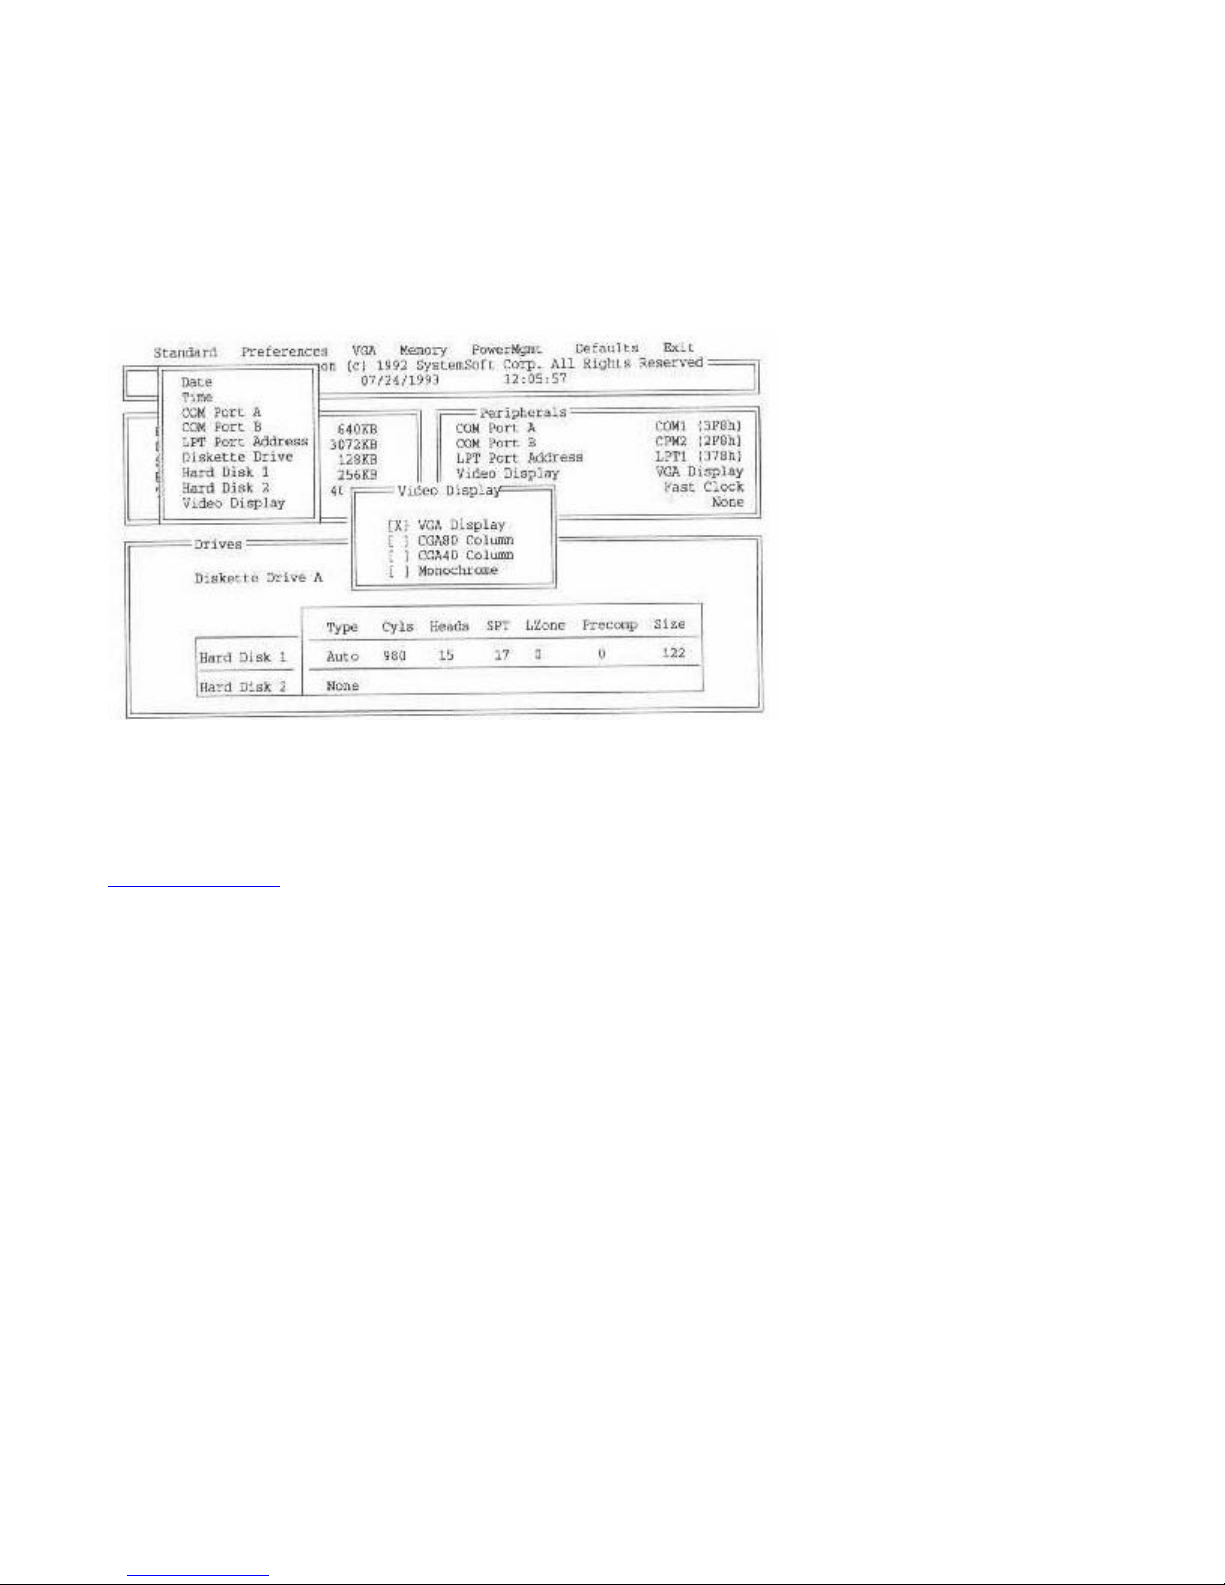
STANDARD SETTINGS SX/DX file:///C|/test/HtmlHelp/TechhelpSTANDARD_SETTINGS_SXDX.html
The 486SX/DX-WinBook only supports one hard disk drive so the Hard Disk 2 item should always be
set as None.
Video Display
The Video Display item should be set as VGA Display to take full advantage of the
486SX/DX-WinBook’s VGA compatible LCD display.
Fig. 8-7 Selecting the VGA Video Display
[SX/DX 8-6]
4 of 4 3/2/99 12:51 PM
Page 60
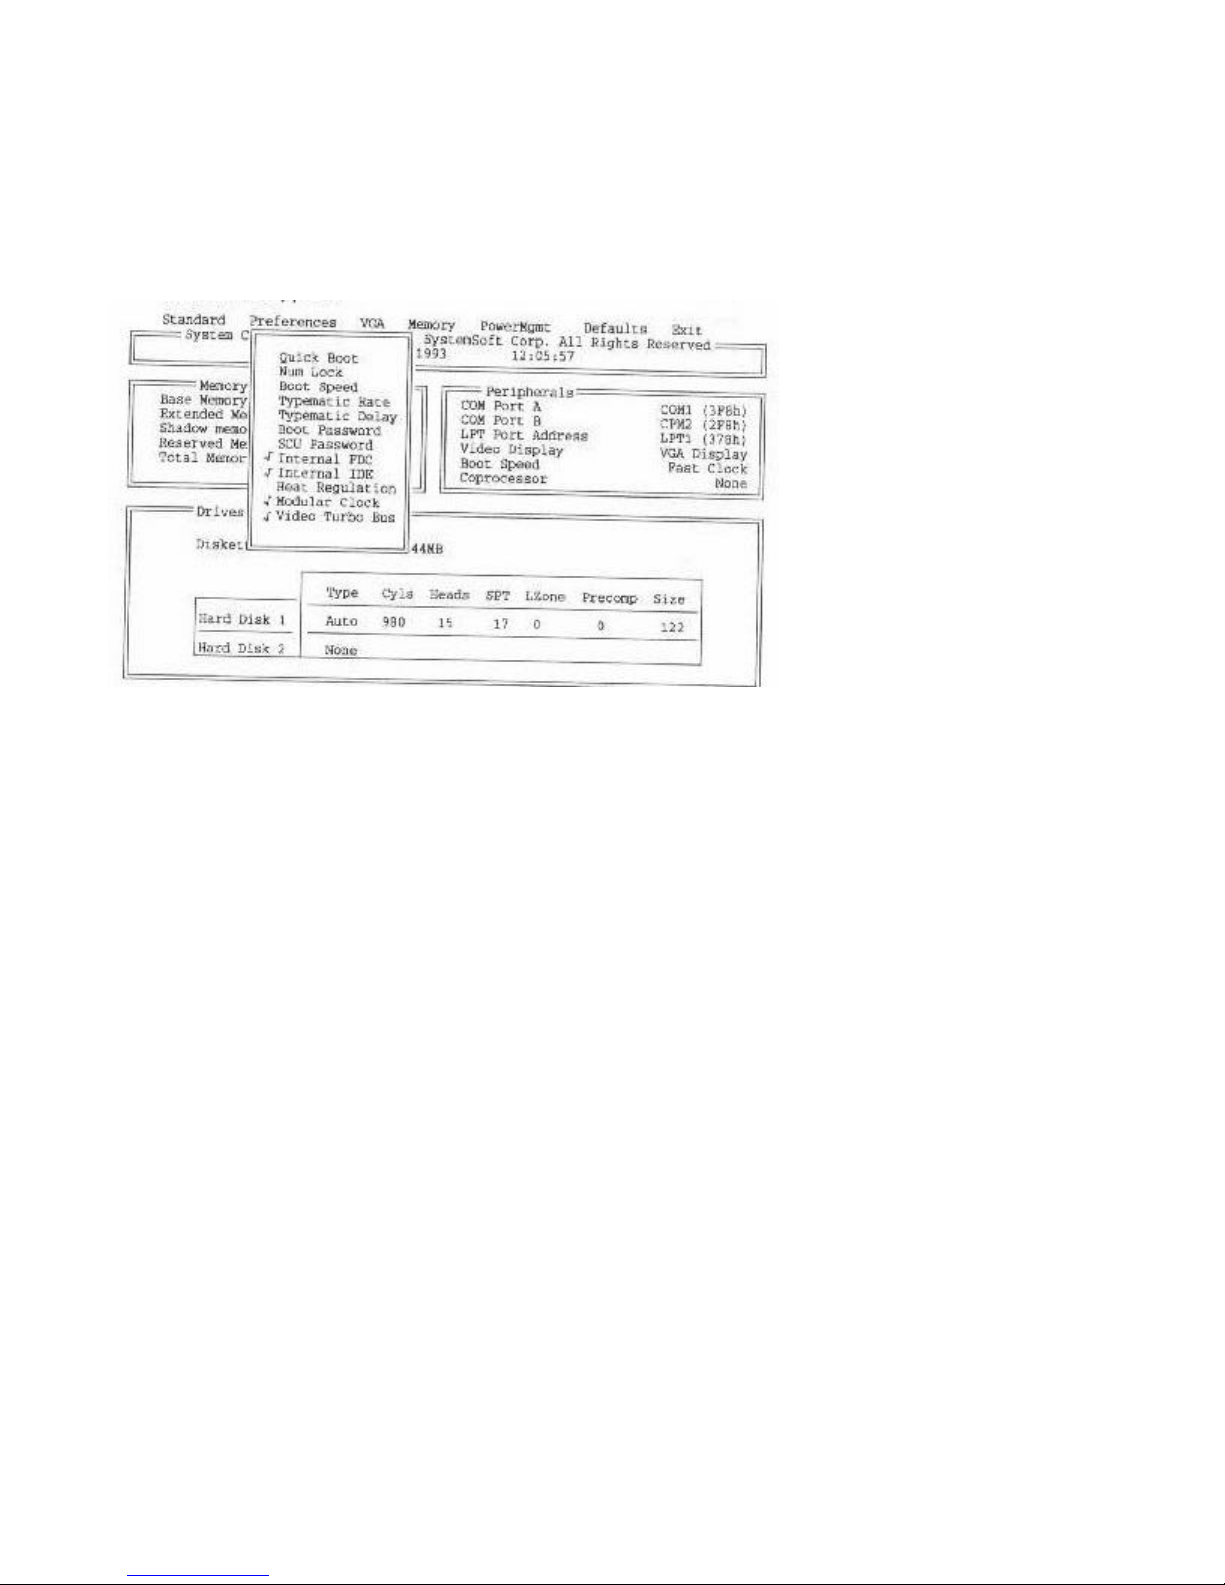
PREFERENCE MENU SX/DX file:///C|/test/HtmlHelp/TechhelpPREFERENCE_MENU_SXDX.html
PREFERENCE MENU SX/DX
The items in the Preferences menu allow you to make certain basic setting according to your particular
requirements. When an item is enabled, a check mark will appear alongside the item. To disable a selected
item, highlight that item and press < Enter> and the check mark will disappear.
Fig. 8-8 The Preferences Menu
The functions of each item are outlined below.
Quick Boot
Enable this item to make the computer boot up quicker each time you turn the power on.
Num Lock
Enable this item to set the NUM Lock Key ON at boot up. In this way, the numeric keypad will be
enabled at boot up. This is particularly useful when using an external keyboard.
Boot Speed
Use this item to set the computer in fast or normal speed at boot up. Select Fast Clock in the sub-menu
for maximum performance. [SX/DX 8-7]
Typematic Rate
This item allows you to determine the speed at which characters will be repeated when a key is held
down. This is measured in CPS (Characters Per Second). The usual setting is 10CPS.
Typematic Delay
This item allows you to determine the delay after which each character will be repeated, measured in
milliseconds (ms). The options are 250ms, 500ms, 750ms and 1000ms, with 500ms being the usual
1 of 2 3/2/99 12:51 PM
Page 61

PREFERENCE MENU SX/DX file:///C|/test/HtmlHelp/TechhelpPREFERENCE_MENU_SXDX.html
setting.
Boot Password
Select this item if you wish the computer to require you to enter a password each time you boot up. Enter
any password between 4 and 8 characters.
SCU Password
Enable this item if you wish the computer to require you to enter a password to enter the setup program.
Internal FDC
This refers to the internal floppy disk drive. A check mark should appear next to this item indicating that
the system does include an internal floppy disk drive.
Internal IDE
This refers to the internal hard disk drive. A check mark should appear next to this item indicating that
the system does include an internal hard disk drive.
Heat Regulation
The system does not support this feature, so no check mark should appear next to this item.
Modular Clock
This refers to a hardware feature in the WinBook that automatically stops clocks to sections of the
computer, which are not in use. In computer systems, stopping clocks to unused devices dramatically
reduces the power consumption of these devices and prolongs battery life. A check mark should appear
next to this item.[SX/DX 8-8]
Video Turbo Bus
This refers to a special design feature that increases the speed of video output. Your system does support
this feature, so a check mark should appear next to this item.
2 of 2 3/2/99 12:51 PM
Page 62
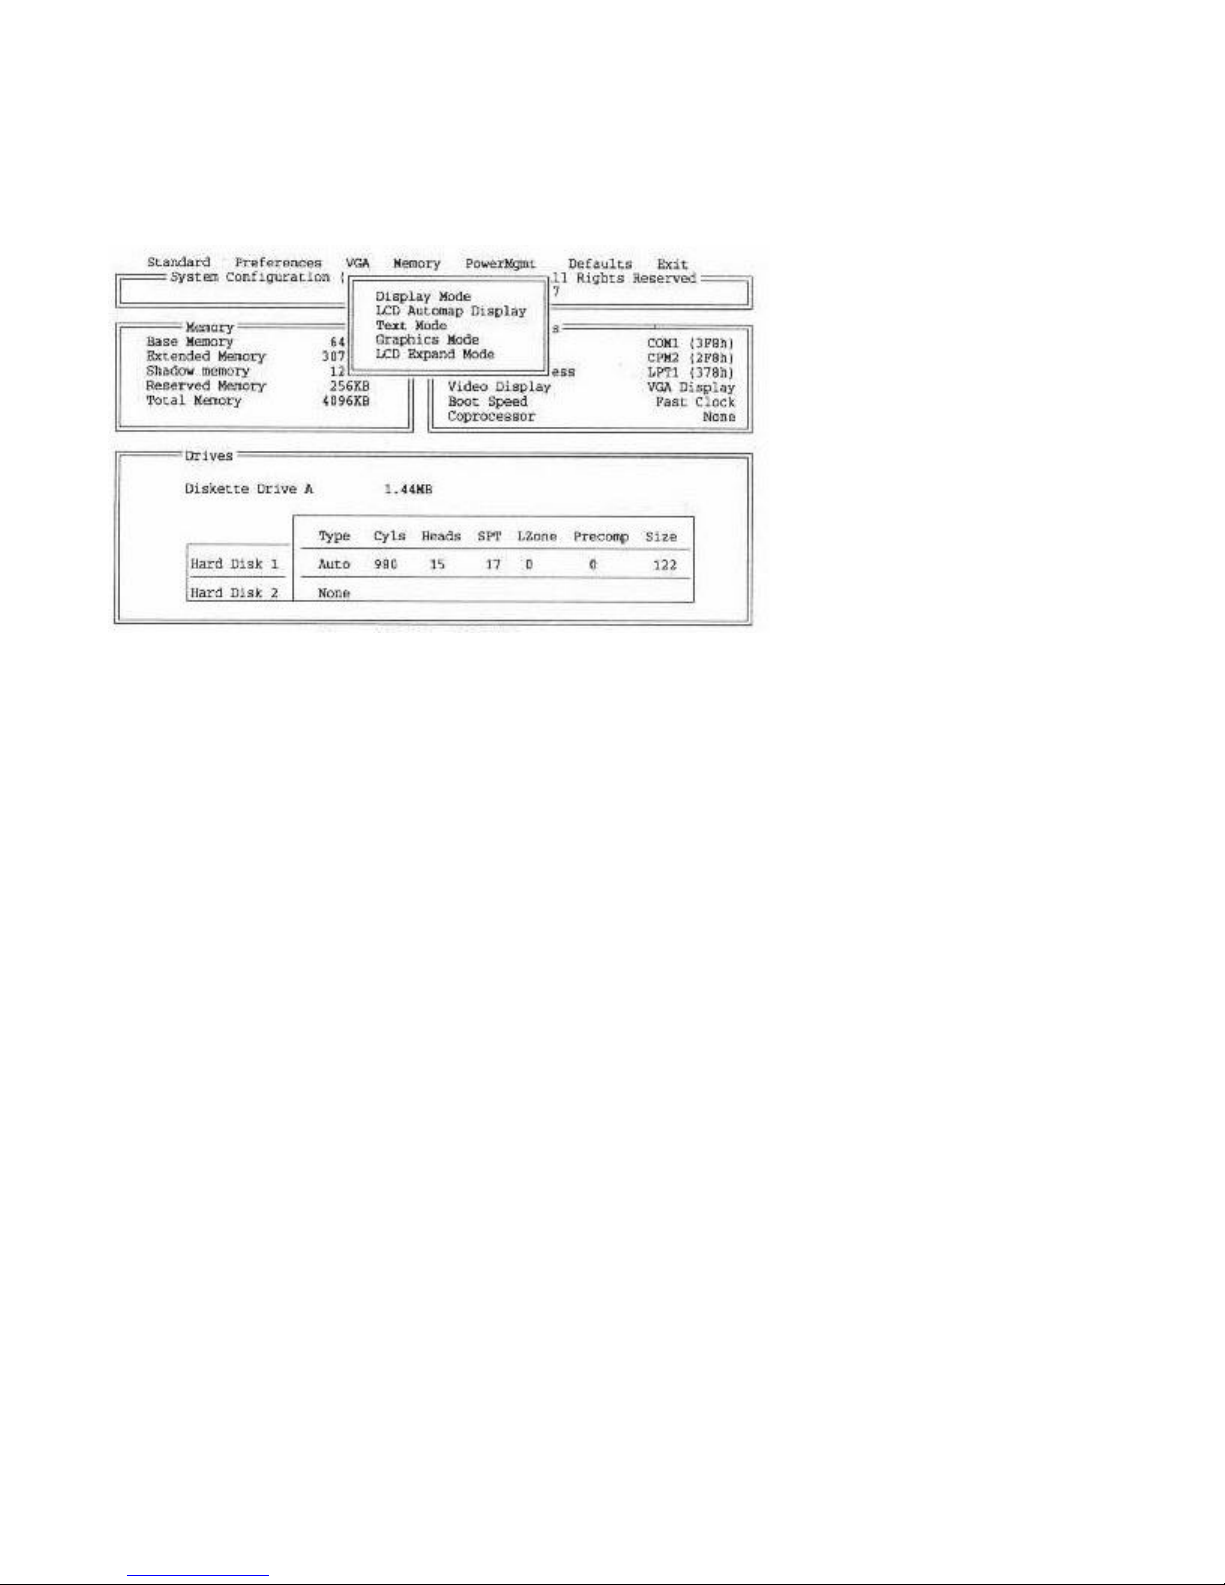
VGA MENU SX/DX file:///C|/test/HtmlHelp/TechhelpVGA_MENU_SXDX.html
VGA MENU SX/DX
The items in this menu are used to control the LCD display. The VGA menu is shown below. Each
option is detailed below.
Fig. 8-9 The VGA Menu
Display Mode
Select Both if you wish to be able to view the LCD and an external monitor at the same time (this option
is available for monochrome models only).
Select LCD to view the LCD only.
Select CRT to view an external monitor only.
LCD Automap Display (Monochrome Models Only)
This item can be Enabled/Disabled. For best results, you should normally enable this item. This item is
provided to improve the display of certain programs on the LCD screen. [SX/DX 8-9]
Text Mode (Monochrome Models Only)
Select either Normal or Reverse for text mode. In Normal mode, programs running in text mode will be
displayed with dark characters on a light background. In Reverse mode, the display will consist of light
characters on a dark background.
Graphics Mode (Monochrome Models Only)
Select either Normal or Reverse for graphics mode. In Normal mode, programs running in graphics
mode will be displayed with dark characters on a light background. In Reverse mode, the display will
consist of light characters on a dark background.
LCD Expand Mode
1 of 2 3/2/99 12:52 PM
Page 63

VGA MENU SX/DX file:///C|/test/HtmlHelp/TechhelpVGA_MENU_SXDX.html
This item should be enabled to display full screens in text mode and DOS. Some DOS programs may not
work correctly in this mode and may be displayed incorrectly. For these programs, either disable this
mode in setup or use < Ctrl> < Alt> F8 to temporarily change this.
2 of 2 3/2/99 12:52 PM
Page 64
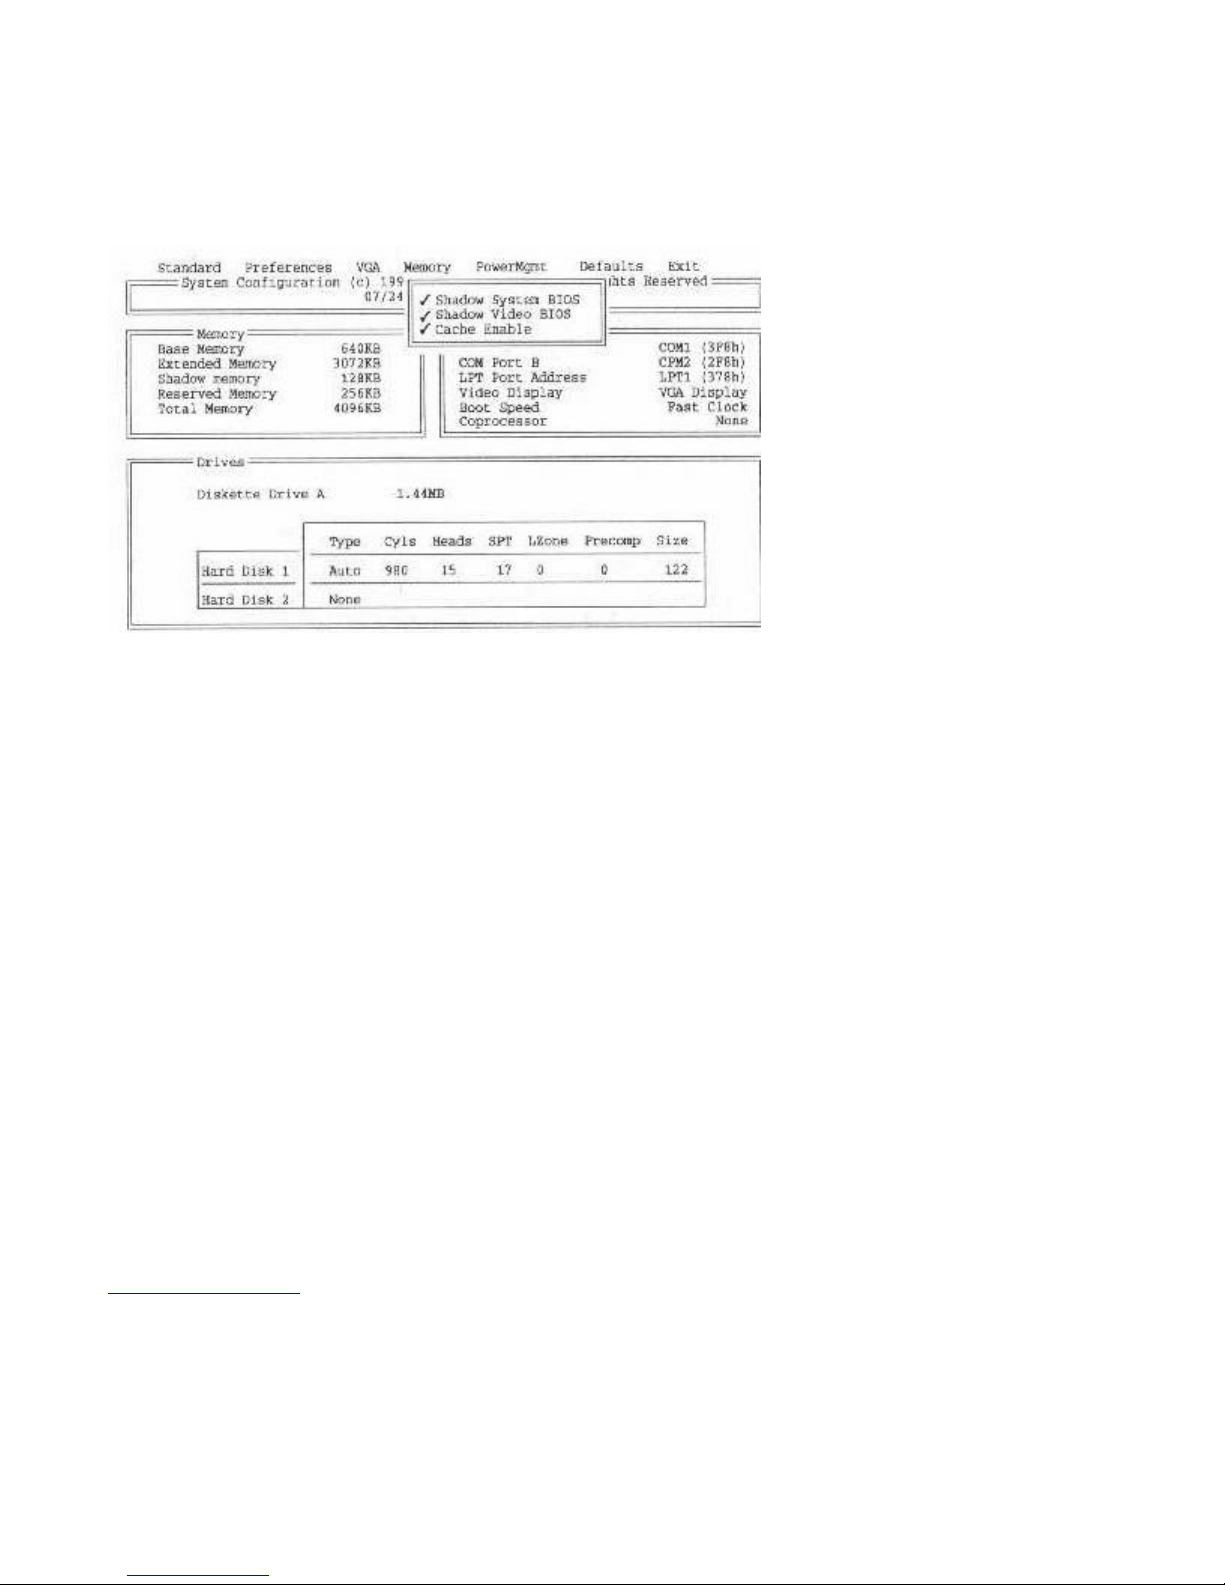
MEMORY MENU SX/DX file:///C|/test/HtmlHelp/TechhelpMEMORY_MENU_SXDX.html
MEMORY MENU SX/DX
Select the Memory menu item and the Memory menu will appear as shown below. This menu allows you
to enable shadow RAM and the cache, as detailed below.
Fig. 8-10 The Memory Menu
[SX/DX 8-10]
Shadow System BIOS
Shadowing is a function whereby the contents of the BIOS are copied into memory at boot up. This
upgrades performance for programs using extensive BIOS calls as the BIOS data can be accessed quicker
from memory than from the ROM chips. You should enable this item as indicated by the check mark
alongside the item.
Shadow Video BIOS
Use this item to shadow the video BIOS, which will enhance overall performance. We recommend that
this item is enabled.
Cache Enable
Cache memory is high-speed memory inside the 486 chip which is used to store frequently used data
which can than be accessed much quicker that when retrieved from the main memory each time. Enabling
the cache will provide a considerable increase in speed.
1 of 1 3/2/99 12:53 PM
Page 65
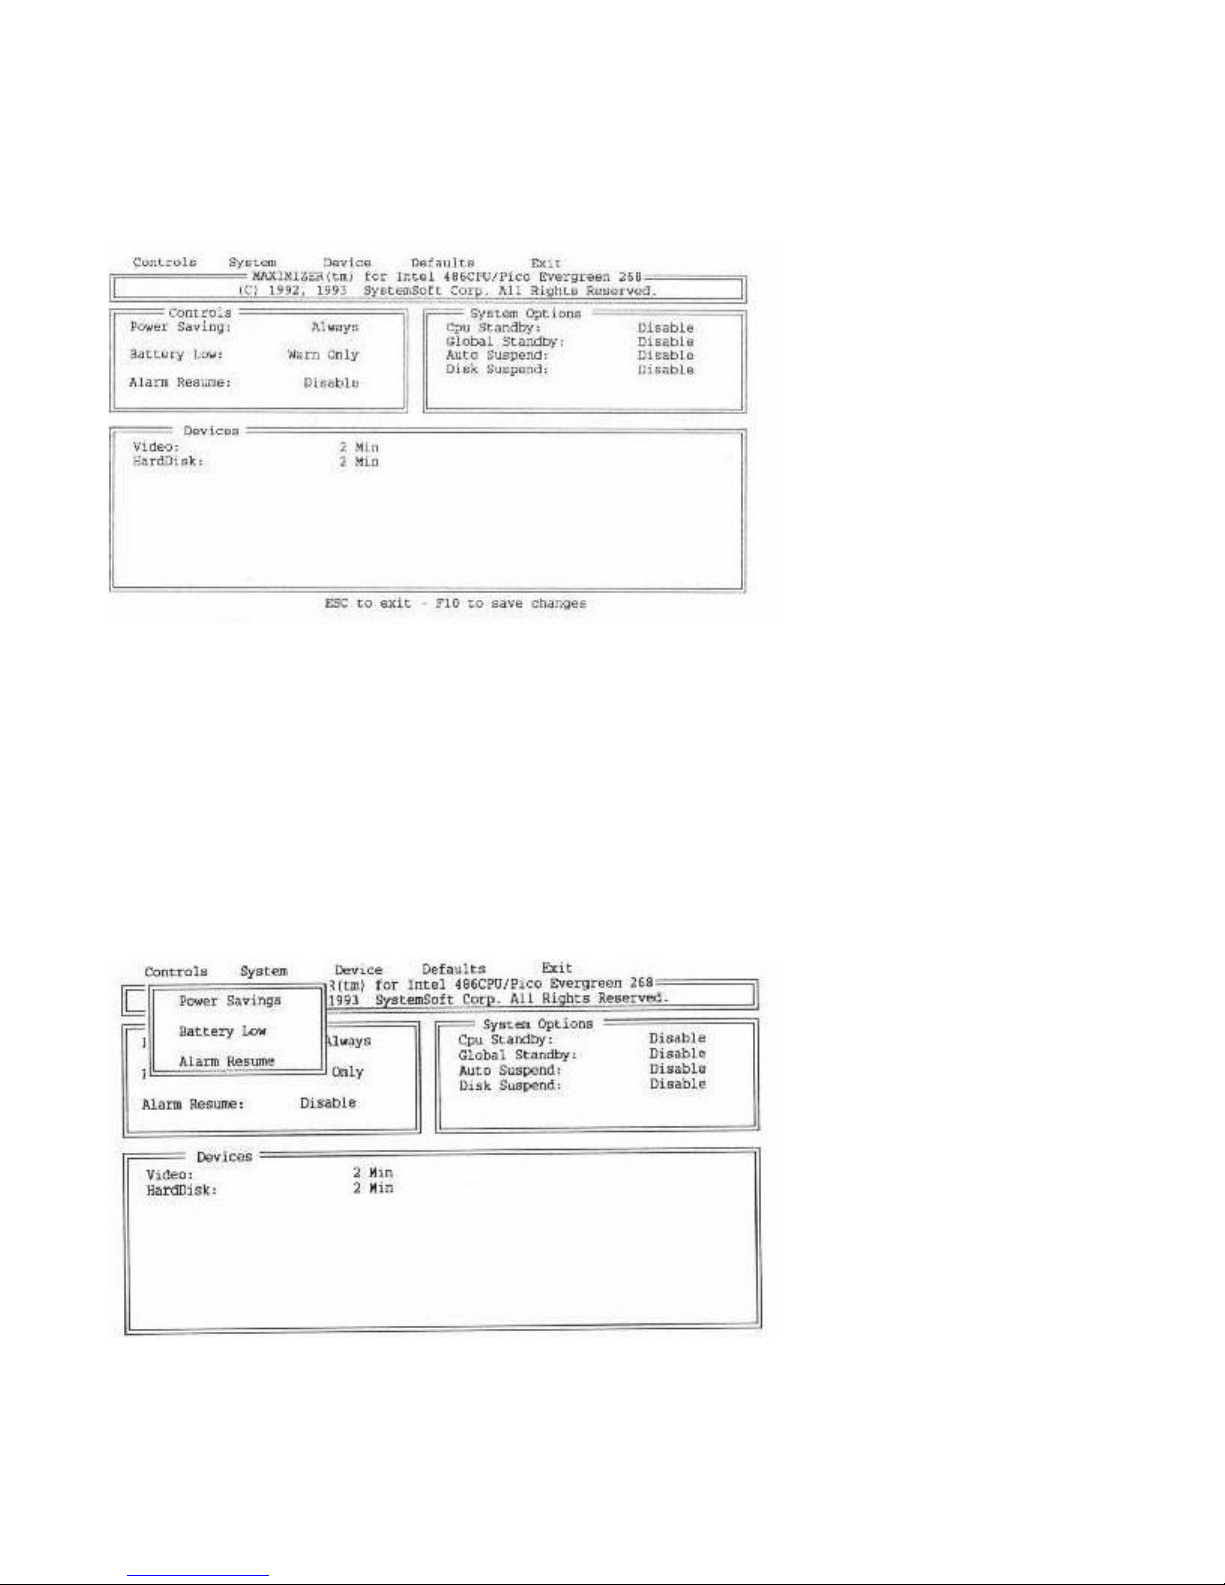
POWER MANAGEMENT SX/DX file:///C|/test/HtmlHelp/TechhelpPOWER_MANAGEMENT_SXDX.html
POWER MANAGEMENT SX/DX
The Power Management menu allows you to take advantage of the advanced power saving features
designed into your 486SX/DX-WinBook computer. Select this item and the following display will appear.
Fig. 8-11 The Power Management Screen
[SX/DX 8-11]
The screen is divided into three areas,
Controls, System Options,
and
Devices
to adjust the settings displayed in the Controls window as detailed below.
Control Menu
Select the Control Menu and make the necessary settings as explained below.
. Select the controls menu
Fig. 8-12 The Power Management Control Menu
Power Savings
1 of 4 3/2/99 12:53 PM
Page 66
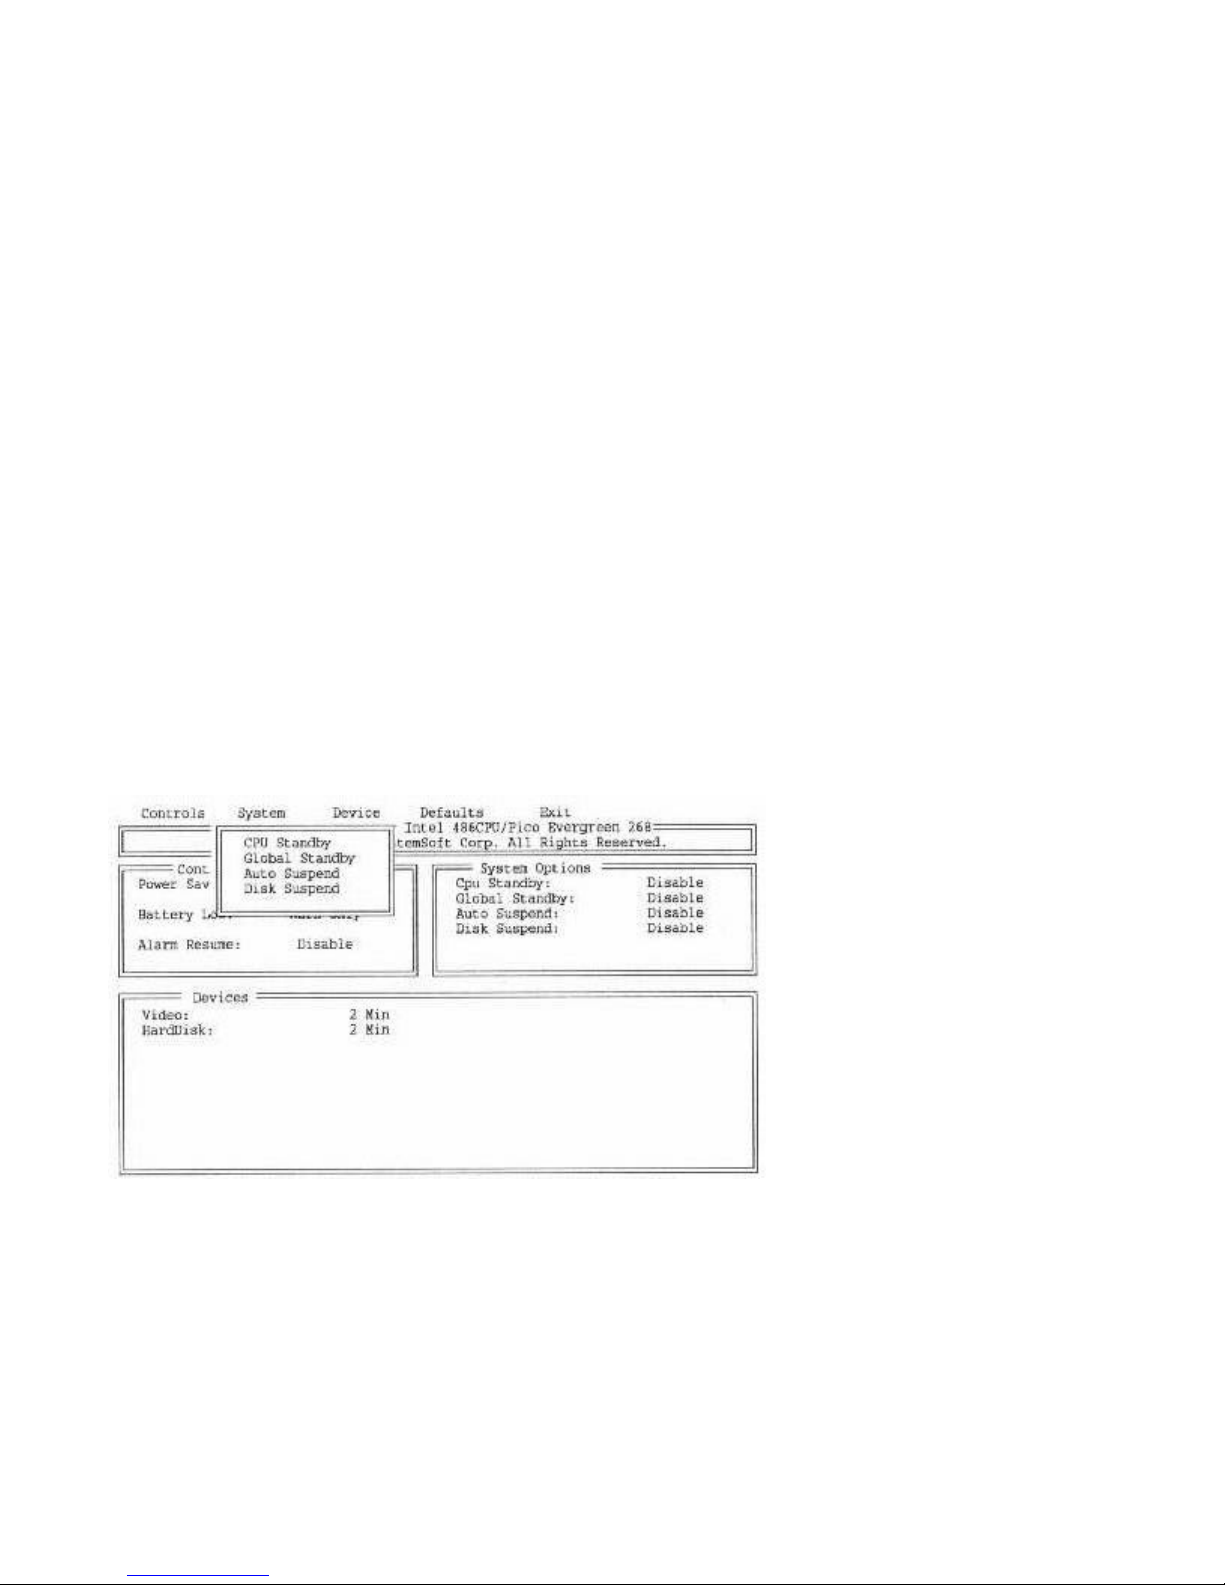
POWER MANAGEMENT SX/DX file:///C|/test/HtmlHelp/TechhelpPOWER_MANAGEMENT_SXDX.html
Select Power Savings in the Control Menu. Select Always to have the power saving functions enabled at
all times, including when running off AC power.
Select Battery to enable the power saving functions only when running an alarm off the battery.
Select Disable to turn off the power saving options.
Battery Low
You may set this item to force the system to automatically enter Suspend mode when the battery power
becomes low, or to only issue an audible warning beep when battery power is low but not automatically
enter Suspend mode. [SX/DX 8-12]
Alarm Resume
This item can be used to set an alarm time that will cause the system to issue an audible alarm at the time
set. If you enable the alarm, you will then be required to enter the time at which you wish the alarm to be
issued. Enabling this item will cause the system to automatically resume in case the system is in Suspend
mode at the alarm time set.
System Menu Settings
Select the System menu item and the following display will appear. Each item is explained in detail below.
Fig. 8-13 The Power Management System Menu
CPU Standby
Use this item to set the CPU in power saving Standby mode after a specified period of inactivity. For
example, if you select 4 seconds, if the CPU is idle for 4 seconds, it will automatically enter standby
mode. Setting a lower time value will increase the power savings.
Global Standby
2 of 4 3/2/99 12:53 PM
Page 67
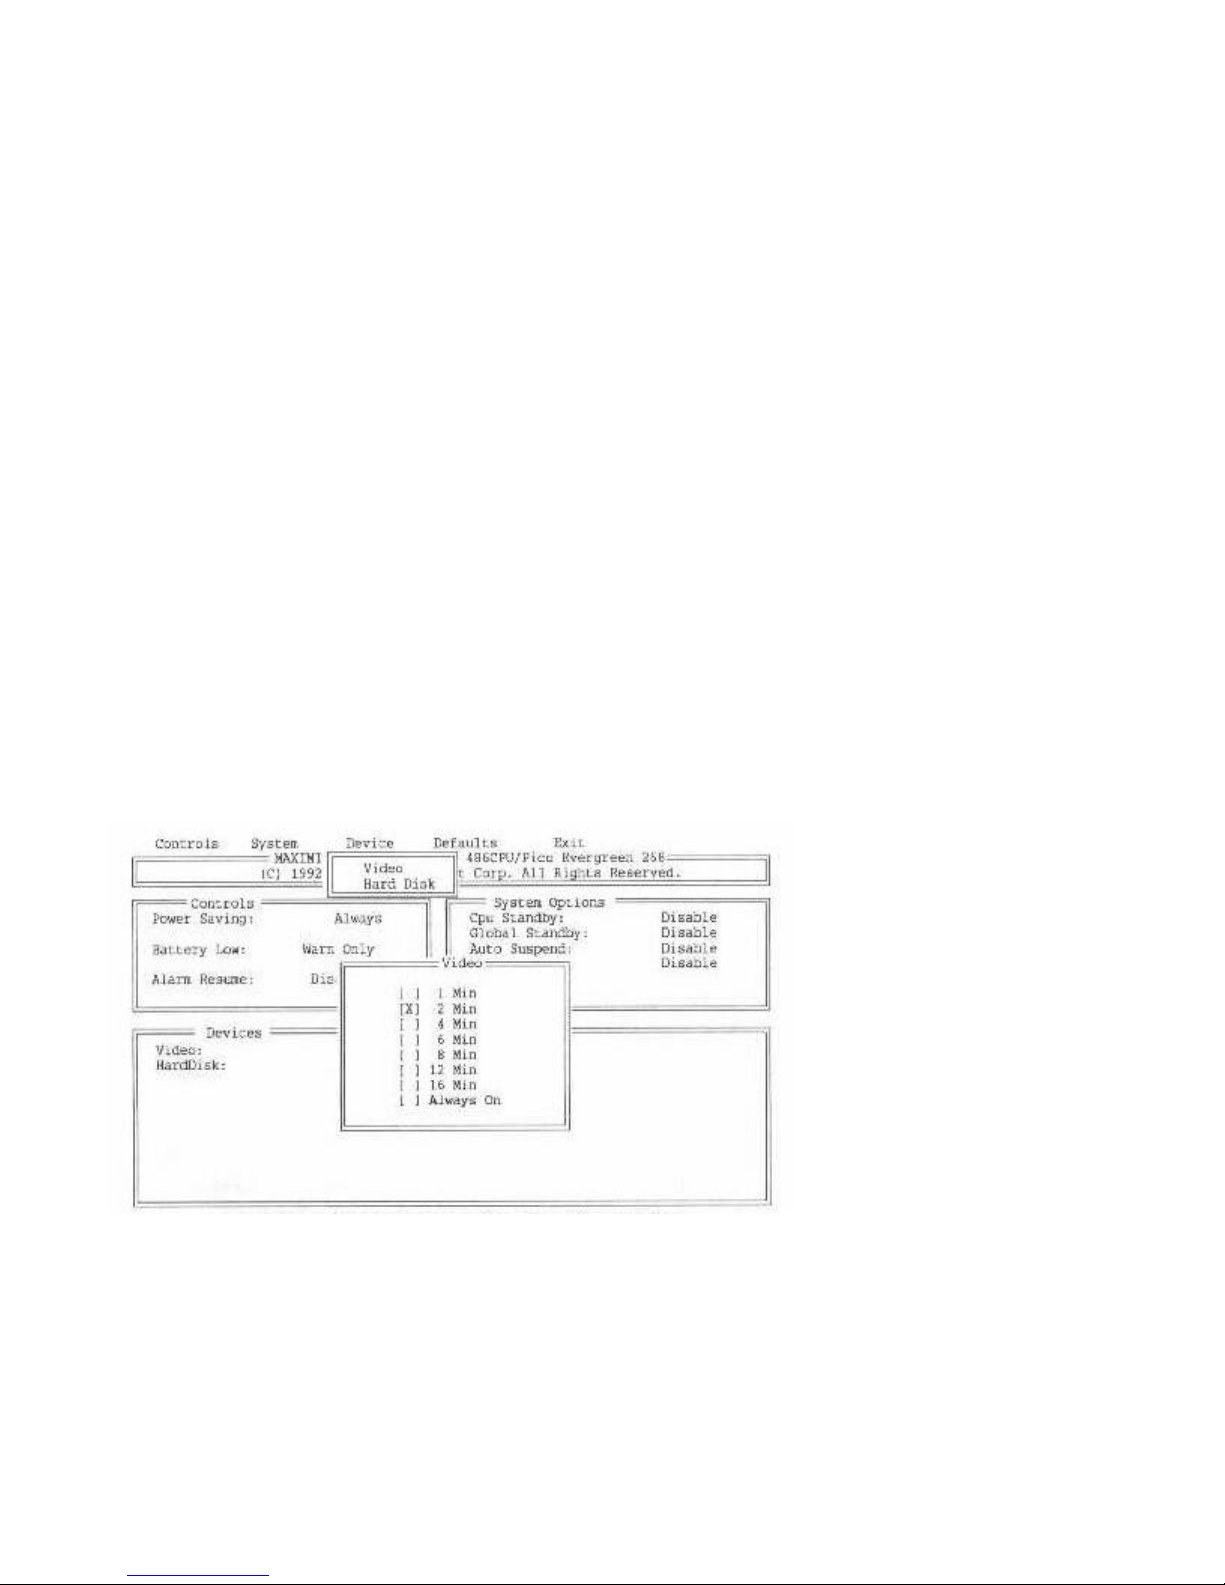
POWER MANAGEMENT SX/DX file:///C|/test/HtmlHelp/TechhelpPOWER_MANAGEMENT_SXDX.html
This item is similar to CPU Standby, except that it applies to all the sub-systems in the computer. Set the
time of non-activity after which the computer will enter Global Standby mode. For example, if you select
2 minutes, if you do not input any data with the keyboard of mouse for two minutes, the computer will
enter Global Standby mode. [SX/DX 8-13]
Auto-Suspend
Similarly you may set this item to define the period of inactivity after which the computer will
automatically enter suspend mode. Note that you may manually set the computer in suspend mode at any
time by pressing the Suspend button whether this item is enabled or not.
Disk Suspend
This setting allows the system to enter zero voltage suspend mode at which point the memory contents
are saved to disk and the system is turned completely off. This mode is convenient for long term storage
and conserves battery life. When the system is turned back on, the memory contents are restored from
disk automatically and the user is back where he left off. Although this process takes longer than normal
suspend/resume it optimizes battery conservation. Use this feature when the system is to be left in
suspend mode overnight to achieve maximum battery conservation.
Device Menu
The Device Menu has two items, Video and Hard Disk which allow you to separately define power
saving settings for the LCD display and hard disk drive.
Fig. 8-14 The Power Management Device Menu
[SX/DX 8-14]
Video
Using this item you may define the period of inactivity after which the LCD display will automatically
shut down. For example, select 2 minutes, if you wish the LCD to shut down if no input has been made
3 of 4 3/2/99 12:53 PM
Page 68

POWER MANAGEMENT SX/DX file:///C|/test/HtmlHelp/TechhelpPOWER_MANAGEMENT_SXDX.html
for two minutes.
Hard Disk
Similarly, you may define the period of inactivity after which the hard disk drive will shut down.
The (Power Management) Defaults Menu
You may use the Defaults menu to reset all power management settings to the default settings. If you use
this option, you should check all settings to ensure they are correct for your system.
Exit (Power Management)
Use this item to exit from the Power Management screen and return to the main BIOS setup screen. You
have the choice of saving any settings you have made, or canceling them.
When you exit from the Power Management program you will be returned to the main setup screen. Or,
if you entered the power management program using the < Ctrl> < Alt> P hot key from DOS, you will be
returned to DOS.
Note:
The < Ctrl> < Alt> P hot key is not available from Windows.
DEFAULTS MENU
Use this menu to recall all default BIOS settings. You should then check all settings to ensure they are
correct for your system.
EXIT MENU
When you have completed making all your desired settings, select this item. You will be prompted as to
whether you wish to save the settings you have just made, or to abandon these changes. Assuming you
are satisfied with the settings you have made, press < Enter> [SX/DX 8-15] and the settings will be saved
into the CMOS memory in your 486SX/DX-WinBook. These settings will be used each time you turn on
your computer and you will not need to use the setup program again unless you make some changes in
your configuration. [SX/DX 8-16]
4 of 4 3/2/99 12:53 PM
Page 69

CHAPTER 9: TROUBLE-SHOOTING SX/DX file:///C|/test/HtmlHelp/TechhelpCHAPTER_9_TROUBLESHOOTING_SXDX.html
CHAPTER 9: TROUBLESHOOTING SX/DX
Your 486SX/DX-WinBook computer was designed to be transported around and provide trouble free
service for a long time. Nevertheless, certain basic precautions should be taken to ensure that the system
remains in good working order. In this chapter, we make some recommendations as to how to achieve
the most reliable performance for the longest possible time, and how to solve some of the problems that
you may encounter.
1 of 1 3/2/99 12:54 PM
Page 70

BASIC PRECAUTIONS SX/DX file:///C|/test/HtmlHelp/TechhelpBASIC_PRECAUTIONS_SXDX.html
BASIC PRECAUTIONS SX/DX
The 486SX/DX-WinBook is built and designed to be a rugged notebook computer. However, we suggest
that when transporting the notebook, pack it into a briefcase or a notebook carrying case. In this way, the
plastic shell will be less liable to become scratched or damaged during transportation. In addition, please
note the following points:
Do not subject the 486SX/DX-WinBook to excessive shocks or severe vibration. The hard disk
drive installed in the system was designed to be shock resistant, but within reason.
Do not place heavy objects on top of the 486SX/DX-WinBook.
Do not place the 486SX/DX-WinBook near to any heat source or subject it to extreme
temperature changes.
The recommended operating environment for the WinBook is 50º F to 95º F (10º C to 35º C).
[SX/DX 9-1]
1 of 1 3/2/99 12:55 PM
Page 71

CLEANING THE 486SX/DX-WINBOOK SX/DX file:///C|/test/HtmlHelp/TechhelpCLEANING_THE_486SXDXWINBOOK_SXDX.html
CLEANING THE 486SX/DX-WINBOOK SX/DX
You may use a slightly damp cloth to clean the plastic shell of the system. Take great care that no liquid
enters between any of the seams of the shell or into any of the connectors.
Glass cleaner may be used to clean the LCD screen. Do not spray cleaner onto the screen, however, but
rather dampen a soft, clean cloth and gently rub the screen. Do not let any liquid run between the LCD
and the surrounding frame.
WinBook Trackball Cleaning Instructions
With all trackball type devices, there is a routine maintenance involved. This maintenance involves
cleaning both the outer and inner working components.
The problem lies with the trackball surface being exposed and constantly touched by fingertips.
Everyone’s skin contains oils that stick to the surface of the trackball making it a “dirt magnet”, pulling
dust and grime down into the trackball rollers.
To clean the inner components, the user will have to remove the retainment ring and the ball to gain
access to the inside of the assembly. To do this, follow the instructions below:
1. Insert a paper clip, safety pin or other small printed object into one of the two holes located on the
retainment ring which surrounds the ball (NOT the rectangular holes below the trackball
assembly!). Refer to the illustration 9-1.
2. Turn the retainment ring counter-clockwise. Once the holes move from the 12/6 o’clock positions
to the 9/3 o’clock positions, the retainment ring should pop up allowing the user to remove the ring
and ball.
3. Once the ring and ball are removed, the user should notice two tiny rollers, one at 3 o’clock and
the other at 6 o’clock, within the “pit” where the trackball is held.
4. To clean the assembly, take a foam Q-tip and some rubbing alcohol to each of the rollers. [SX/DX
9-2]
5. After thoroughly cleaning the rollers, take a soft, lint-free cloth and hot water and wipe the ball and
the “pit” clean.
6. Having followed the steps outlined above, the trackball assembly should be reassembled this is
done by replacing the ball and the retainment ring. Turn the retainment ring clockwise to tighten.
1 of 2 3/2/99 12:56 PM
Page 72
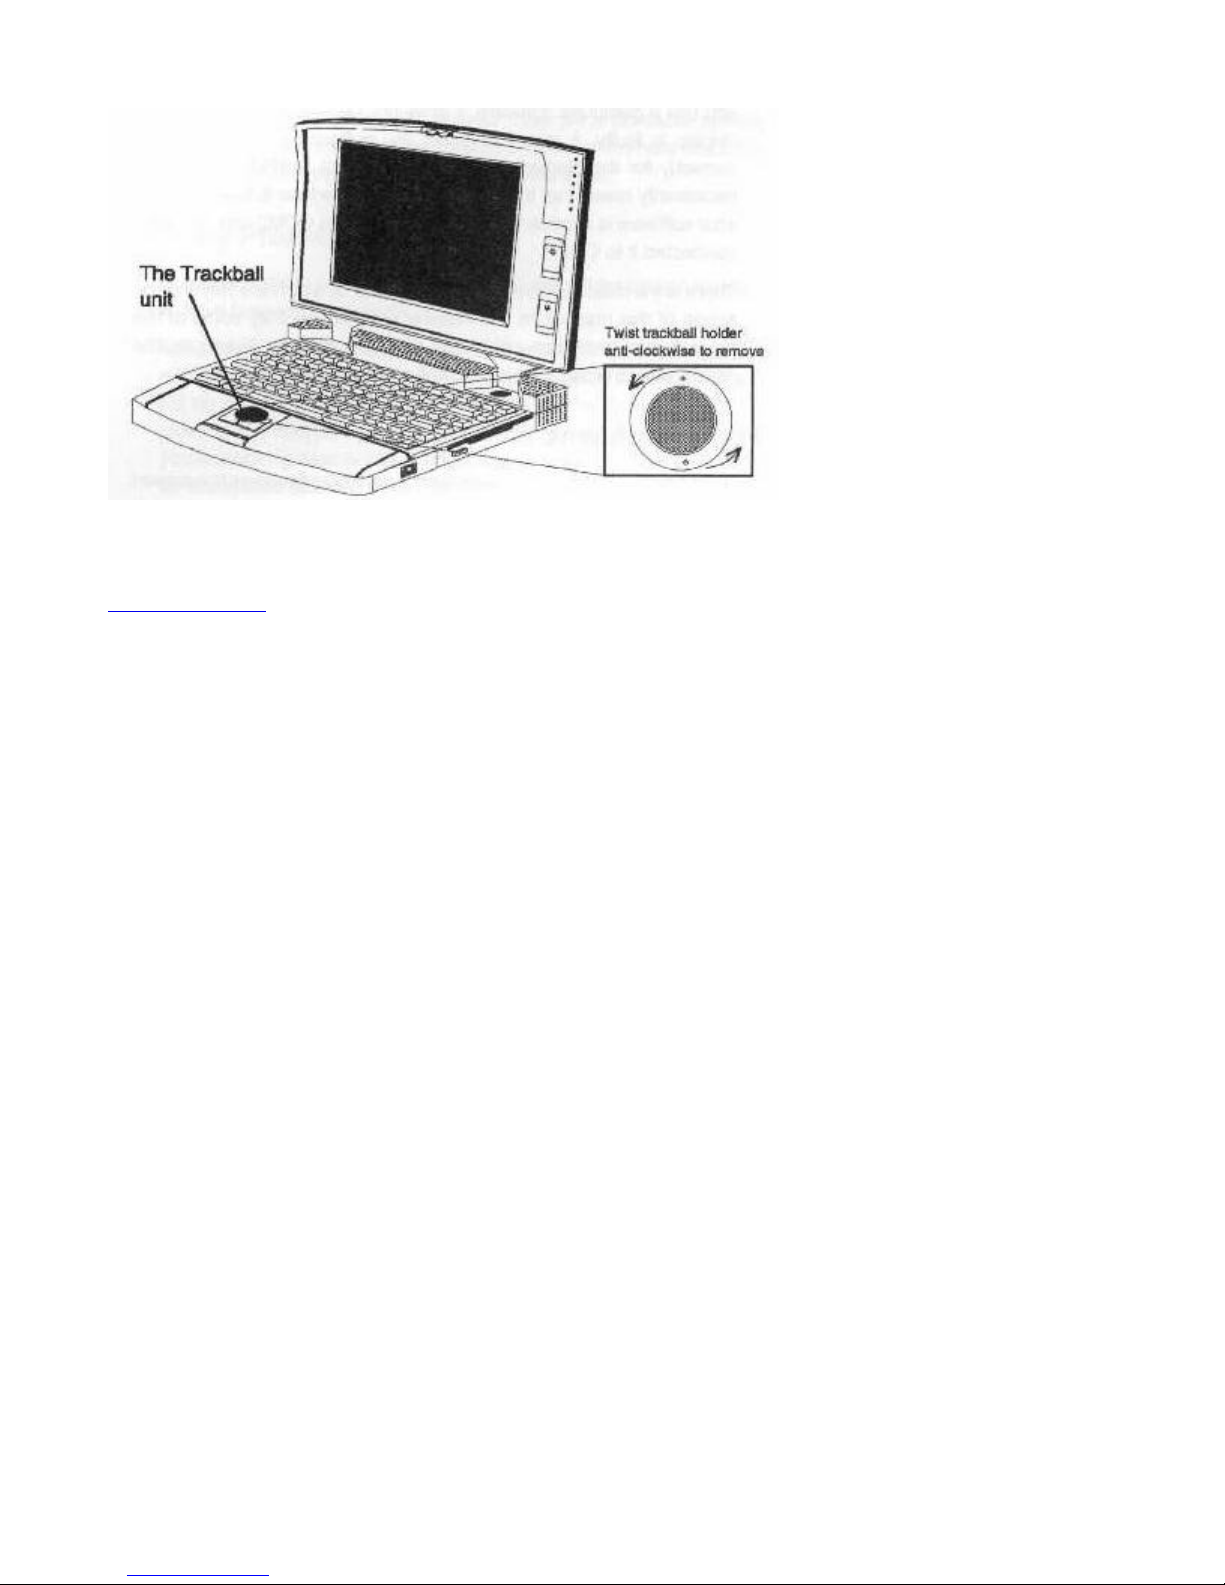
CLEANING THE 486SX/DX-WINBOOK SX/DX file:///C|/test/HtmlHelp/TechhelpCLEANING_THE_486SXDXWINBOOK_SXDX.html
Figure 9-1 Cleaning the Trackball
2 of 2 3/2/99 12:56 PM
Page 73

PROBLEM SOLVING SX/DX file:///C|/test/HtmlHelp/TechhelpPROBLEM_SOLVING_SXDX.html
PROBLEM SOLVING SX/DX
The 486SX/DX-WinBook was designed and manufactured according to very stringent quality standards.
As such, with careful use, there is no reason why it should malfunction. The field of personal computing;
however, includes such a diversity of software and hardware combinations that problems will inevitably
arise. It is important that you understand how to differentiate between problems caused by hardware
malfunction and those that arise out of an incorrect setting or software configuration.
The ability to accurately pinpoint the source of problems will only come with experience, but always
adopt a methodical approach to trying to solve problems. If nothing appears on your LCD display when
[SX/DX 9-3] you use a particular software, it does not necessarily mean
that the display is faulty, it may mean that the software is not configured correctly for the display. If your
mouse is not working it does not necessarily mean that the mouse or serial interface is faulty. Maybe your
software is expecting to find the mouse on COM2 and you have connected it to COM1.
There are a million different scenarios most of which are beyond the scope of this manual. In this chapter
we mention only some of the more basic hardware problems that are directly linked to the
486SX/DX-WinBook, and how to solve these problems.
POWER PROBLEMS
I can boot up the computer but cannot run my software as the screen freezes.
This may occur infrequently when running the 486SX/DX-WinBook from the battery and when the
battery is very low. Connect the AC adapter and recharge the battery. Remember that you can still use
the WinBook while the battery is charging.
Nothing happens when I turn on the power switch.
If running from the power adapter, check that the adapter is correctly plugged into both the AC outlet
and the 486SX/DX-WinBook, and that there is power in the power outlet. The power LED on the power
adapter should be on. When running on the battery, check that the battery is correctly installed. Check
also that the battery is not totally discharged. If it is, recharge it by connecting the power adapter to the
system.
BOOT UP PROBLEMS
The power is reaching my 486SX/DX-WinBook but the system “hangs” before it is booted up.
Boot up problems are usually caused by an incorrect configuration or statement in the CONFIG.SYS file
(see your DOS user’s manual). To test whether this is the case, try booting up from a floppy diskette
[SX/DX 9-4] inserted in the A: drive (this diskette must be a bootable system diskette). If this works, edit
the CONFIG.SYS file on the hard disk drive and then try booting from the hard disk drive again.
DISPLAY PROBLEMS
I can see nothing on the LCD display even though my system appears to have booted up correctly.
1 of 4 3/2/99 12:56 PM
Page 74

PROBLEM SOLVING SX/DX file:///C|/test/HtmlHelp/TechhelpPROBLEM_SOLVING_SXDX.html
Adjust the LCD Brightness and Contrast settings. For maximum illumination, the top most slide control
on the display should be at the full up position. The bottom slide control on the display should be close to
the midpoint position. Adjust the position of the screen so you are looking directly into it at right angles.
Select a different location for the system shielded from bright light shining directly into the LCD display.
You should also check to be sure the BIOS has been configured for LCD in the Setup utility. To quickly
check whether the WinBook has been configured for the external monitor only, press < Ctrl> < Alt> F10
that will toggle from external monitor to internal display. If this was the problem then you must set the
BIOS correctly by pressing < Ctrl> < Alt> S at the DOS prompt and select system defaults option.
I connected an external monitor but the display still only appears on the LCD.
Check the setting in the VGA menu in the BIOS setup program. The Display Mode option must be set
as Both or CRT (support only in monochrome systems) in order to be able to view an external CRT
monitor.
I connected an external monitor but nothing appears on the external monitor even though the BIOS
SETUP setting is correct.
Have you plugged in the power lead from the monitor? Check that the monitor is an analog VGA
compatible model. Digital monitors such as standard monochrome, CGA or EGA models will not work
with the external video outlet on the 486SX/DX-WinBook.[SX/DX 9-5]
PERIPHERAL CONNECTION PROBLEMS
I have connected a mouse to the serial port but it will not work.
Have you checked the configuration in your software. Is the mouse supposed to be on COM1 or COM2?
Are you using a serial mouse. Have you loaded a mouse driver?
I configured my mouse as being on COM2 and it will not work.
The built-in trackball uses COM2. The external serial port must be configured as COM1.
BIOS SETTINGS
I have made modifications in the BIOS setup program and now my system is no longer working
correctly.
Reboot the system and type < Ctrl> < Alt> S when text first appears on the screen. In the setup menu,
select the DEFAULT option to restore the factory-preset configuration that is guaranteed to work.
The system performance seems slower than normal. Why is this?
This can be caused by certain BIOS settings from the Power Management option. Type < Ctrl> < Alt> P
at the DOS prompt and select Defaults to restore the factory preset configuration which has been
optimized for battery life, or select the Disable function in the Power Management options screen which
turns power management off completely, assuring maximum CPU performance.
2 of 4 3/2/99 12:56 PM
Page 75

PROBLEM SOLVING SX/DX file:///C|/test/HtmlHelp/TechhelpPROBLEM_SOLVING_SXDX.html
System battery life is less than expected how can I improve this?
First, try using the BIOS setup defaults in the Power Management setup screen. To access this, type <
Ctrl> < Alt> P at the DOS prompt and select options to the factory default setting. You should then save
these settings and return to DOS. At the DOS prompt, type POWER. This program will tell you if the
advanced power management functions have been turned on. The normal response will be:[SX/DX 9-6]
Power Management Status
--------------------------------
Setting=ADV:MAX
CPU: idle 80% of time.
If this command indicates that the Power Management driver is not loaded, you should check to see if
this file was loaded in the CONFIG.SYS file on the hard disk. Your WinBook is shipped with this
function enabled to prolong battery life. For more information, type HELP POWER at the DOS prompt.
COMMUNICATION PROBLEMS
My internal fax/modem is not working correctly, how can I correct this?
Be sure your software is correctly set up using COM3 as the modem device. Most software packages
come pre-configured to use COM1 or COM2. The WinBook uses COM2 for the internal trackball and
COM3 for the fax/modem interface. You must set your communications software package appropriately.
Note that all applications which ship with the WinBook (e.g. the Windows Terminal program) come
pre-configured with the modem at COM3.
TRACKBALL PROBLEMS
Why is the trackball cursor movement no longer smooth and feels as if it is not tracking correctly?
The trackball may become dirty due to hand oils or other contaminants. It is recommended that routine
cleaning be done on this. Please refer to section 9 for details of the cleaning procedure.
Note also that in Windows there is also a facility to change the mouse speed and visibility that allows you
to tailor the trackball performance to your tastes. The utility is located in the Main menu folder and is
titled Control Panel, double click on the Control Panel icon and then double click on the Mouse icon.
You can then use the slide controls to change the sensitivity of the trackball and switches.[SX/DX 9-7]
LCD panels, due to their slower response times, sometimes present a problem locating the cursor. The
Windows Control Panel for mouse utility provides a useful option that can help reduce this problem.
Many notebook users also prefer to turn on the Mouse Trails option (simply click on the box labeled
Trails in the Mouse setup window) since it helps keep track of the cursor particularly when moving
rapidly across the screen.
USING PCMCIA CARDS
3 of 4 3/2/99 12:56 PM
Page 76

PROBLEM SOLVING SX/DX file:///C|/test/HtmlHelp/TechhelpPROBLEM_SOLVING_SXDX.html
What do I need to do to get the PCMCIA slot to work?
Please refer to the additional documentation on using PCMCIA cards with your WinBook. [SX/DX 9-8]
4 of 4 3/2/99 12:56 PM
Page 77

APPENDIX A: CONNECTOR PINOUTS SX/DX file:///C|/test/HtmlHelp/TechhelpAPPENDIX_A_CONNECTOR_PINOUTS_SXD.html
APPENDIX A: CONNECTOR PINOUTS SX/DX
For your reference, we list here the pin signals of the external connectors on the 486SX/DX-WinBook
user’s manual. It is not necessary to use this information to connect peripherals, as all connectors
conform to the industry standards.
EXTERNAL VGA MONITOR CONNECTOR
Pin No. Signal
1. Red Signal
2. Green Signal
3. Blue Signal
4. NC
5. Ground
6. Ground
7. Ground
8. Ground
9. NC
10. Ground
11. NC
12. NC
13. Horizontal Sync.
14. Vertical Sync.
15. NC
EXTERNAL SERIAL PORT CONNECTOR
Pin No. Signal
1. Carrier Detect
2. Receive Data
3. Transmit Data
1 of 3 3/2/99 12:57 PM
Page 78

APPENDIX A: CONNECTOR PINOUTS SX/DX file:///C|/test/HtmlHelp/TechhelpAPPENDIX_A_CONNECTOR_PINOUTS_SXD.html
4. Data Terminal Ready
5. Signal Ground
6. Data Set Ready
7. Request to Send
8. Clear to Send
9. Ring Indicator
EXTERNAL PARALLEL PORT CONNECTOR
Pin No. Signal
1 Strobe
2-9 Data 0-7
10 Ack-
11 Busy
12 PE
13 SLCT
14 Auto Feed
15 Error-
16 Init-
17 SLCTIN-
18-25 Ground
EXTERNAL KEYBOARD CONNECTOR
Pin No. Signal
1. PS/2 Data
2. Keyboard Data
3. Ground
2 of 3 3/2/99 12:57 PM
Page 79
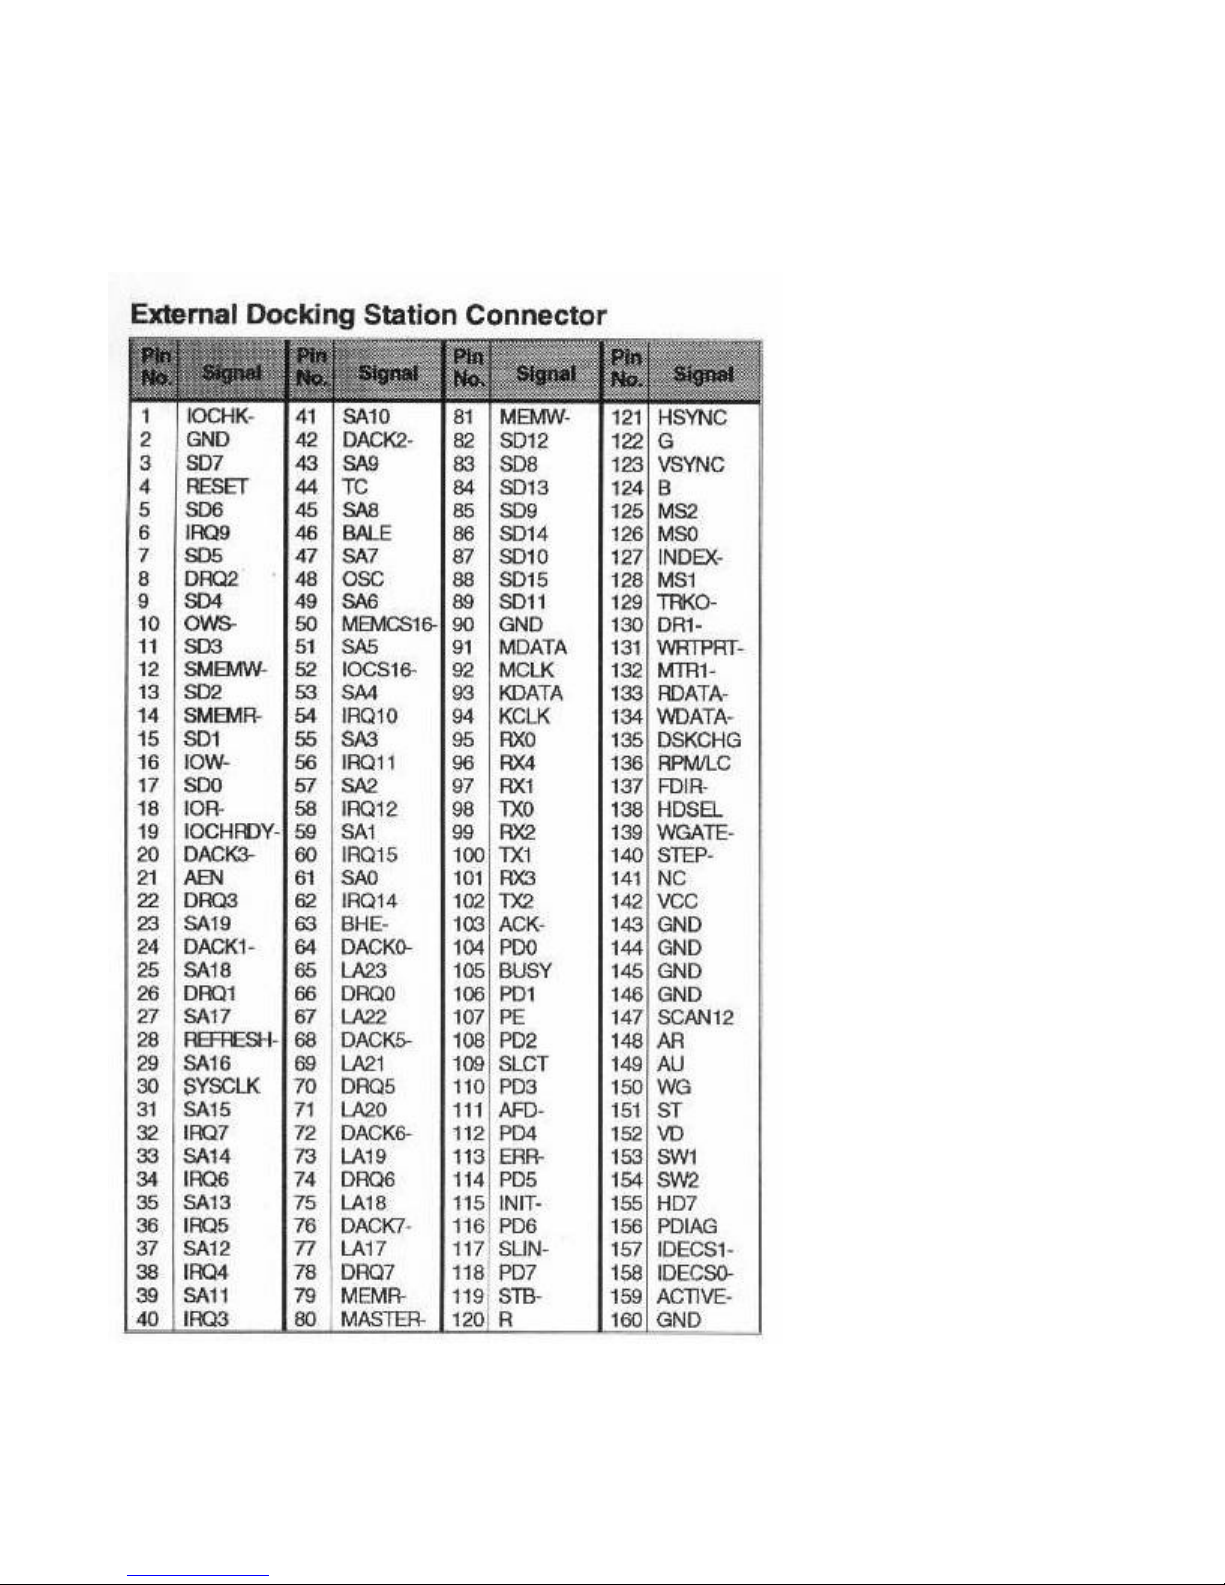
APPENDIX A: CONNECTOR PINOUTS SX/DX file:///C|/test/HtmlHelp/TechhelpAPPENDIX_A_CONNECTOR_PINOUTS_SXD.html
4. + 5V
5. PS/2 Clock
6. Keyboard Clock
3 of 3 3/2/99 12:57 PM
 Loading...