

Page 1
TFT 15" LCD 2K700
. USER MANUAL
Page 2

CONTENTS
General Information………………………………………1
Features……………………………………………………2
FCC Information………………………………………...2
Caution to The User………………………………….2
General Safety Precautions…………………………..3
Installation
Package Contents…………………………………….4
Control Description
……………………………………..4
Connection with External Equipment…………………6
Adjust the round desk…………………………………..7
Operation
On Screen Display Menu & Function Table…………8
Power Management System…………………………..10
Preset Timing Modes……………………………………l 0
Technical Information
Specifications…………………………………….............11
Trouble shooting……………………………………........12
Page 3

General Information
Thank you for purchasing out 15” Flat screen TFT LCD Monitor. It is a high
performance, 15 inch analog signal input, color TFT LCD (Liquid Crystal Display)
monitor. The LCD employs the latest state-of-the-art flat panel display technology
providing a wider viewing angle, higher contrast ratio and greater color accuracy.
Compatible with IBM and compatible systems, this monitor is designed to operate under
a multitude of hardware platforms and video standards VGA to 1024 x 768 noninterlaced. Its multiscan function automatically adjusts the monitor to the scanning
frequency of your video card. Its non-interlaced and higher refreshing rate offers flickerfree image, which reduces eye - strain and fatigue so that you can work in front of the
screen longer.
The OSD (on screen display) control system which adopt the digital controls greatly
enhances and expands your ability to control your display through adjusting the screen
settings. The adjustable desk allows you to adjust the monitor to your preferred angle of
vision. This outside adapter for led monitor also supports universal power supply,
allowing you to use the monitor anywhere in the world.
Page 1
Page 4

1. Features
I5-inch TFT LCD with anti-glare treatment
1024 x 768 Optimal Resolution
High contrast for a sharp, crisp image
Wide viewing angle
On-Screen Display (OSD) user controls
Standard 15 Pin D-Sub VGA input
Universal power supply for outside adapter
Super-thin on desk design
Built-in stereo speakers with volume control
Standard Video input( optional)
TV port( optional)
2. FCC Compliance Statement
This equipment has been tested and found to comply with the limits for a Class B digital
device, pursuant to Part 15 of FCC Rules. These limits are designed to provide
reasonable protection against radio frequency interference in a residential installation.
This equipment generates, uses, and can radiate radio frequency energy. If not installed
and used in accordance with the instructions, it may cause interference to radio
communications. However, there is no guarantee that interference will not occur in
particular installation. If this equipment does cause interference to radio or television
reception (this can be determined by turning the equipment off and on), the user is
encouraged to try to correct the interference by one or more of the following measures:
Reorient or relocate the receiving antenna.
Increase the separation between the equipment and receiver.
Connect the equipment into an outlet on a circuit different from which the
receiver is connected to.
Consult the dealer or an experienced radio/television technician for help.
3. Caution To The User
To assure continued FCC compliance, please use grounded power supply cord and the
provided shielded video interface cable with bonded ferrite
Page 2
Page 5

cores. If a BNC cable is going to be used, use only a shielded BNC (5) cable. Also, The
Federal Communications Commission warns the user that any unauthorized changes or
modifications to the unit if not expressly approved by the party responsible for
compliance could void the user's authority of operating the equipment.
4. General Safety Precautions
The equipment should be installed near the wall socket, which should always be easily
accessible. If any faults occur with the equipment, disconnect the power supply cord from
the unit first.
(1) Environment
Place the monitor on a flat and level surface.
Place the monitor in a well-ventilated area.
Keep the monitor away from:
Rain or water
Excessive heat, cold or humidity
Areas exposed to direct sunlight
Dusty surroundings
Equipment that generates strong magnetic fields
(2) Precautions
Sit at least 18" from the TFT LCD Monitor.
Do not apply pressure to the screen. The LCD screen is delicate.
Do not touch the screen directly with fingers, which may damage the screen, and oil
from skin is difficult to clean.
Do not place heavy objects on the power cord, video audio cables, or on the LCD.
Never remove the rear cover. The display unit contains high-voltage parts. You may
suffer from electric shock if you touch these parts.
Always handle your LCD with care when moving it.
(3) Cleaning the TFT LCD Monitor:
Gently wipe the screen with a clean camel hair lens brush, or a soft, clean, lint-free
cloth. This removes dust and other particles which may scratch the screen.
Do not apply excessive pressure to the screen surface because this may damage the
LCD.
Do not pour or spray any liquid to the screen or case of the LCD monitor.
Page 3
Page 6
Installation
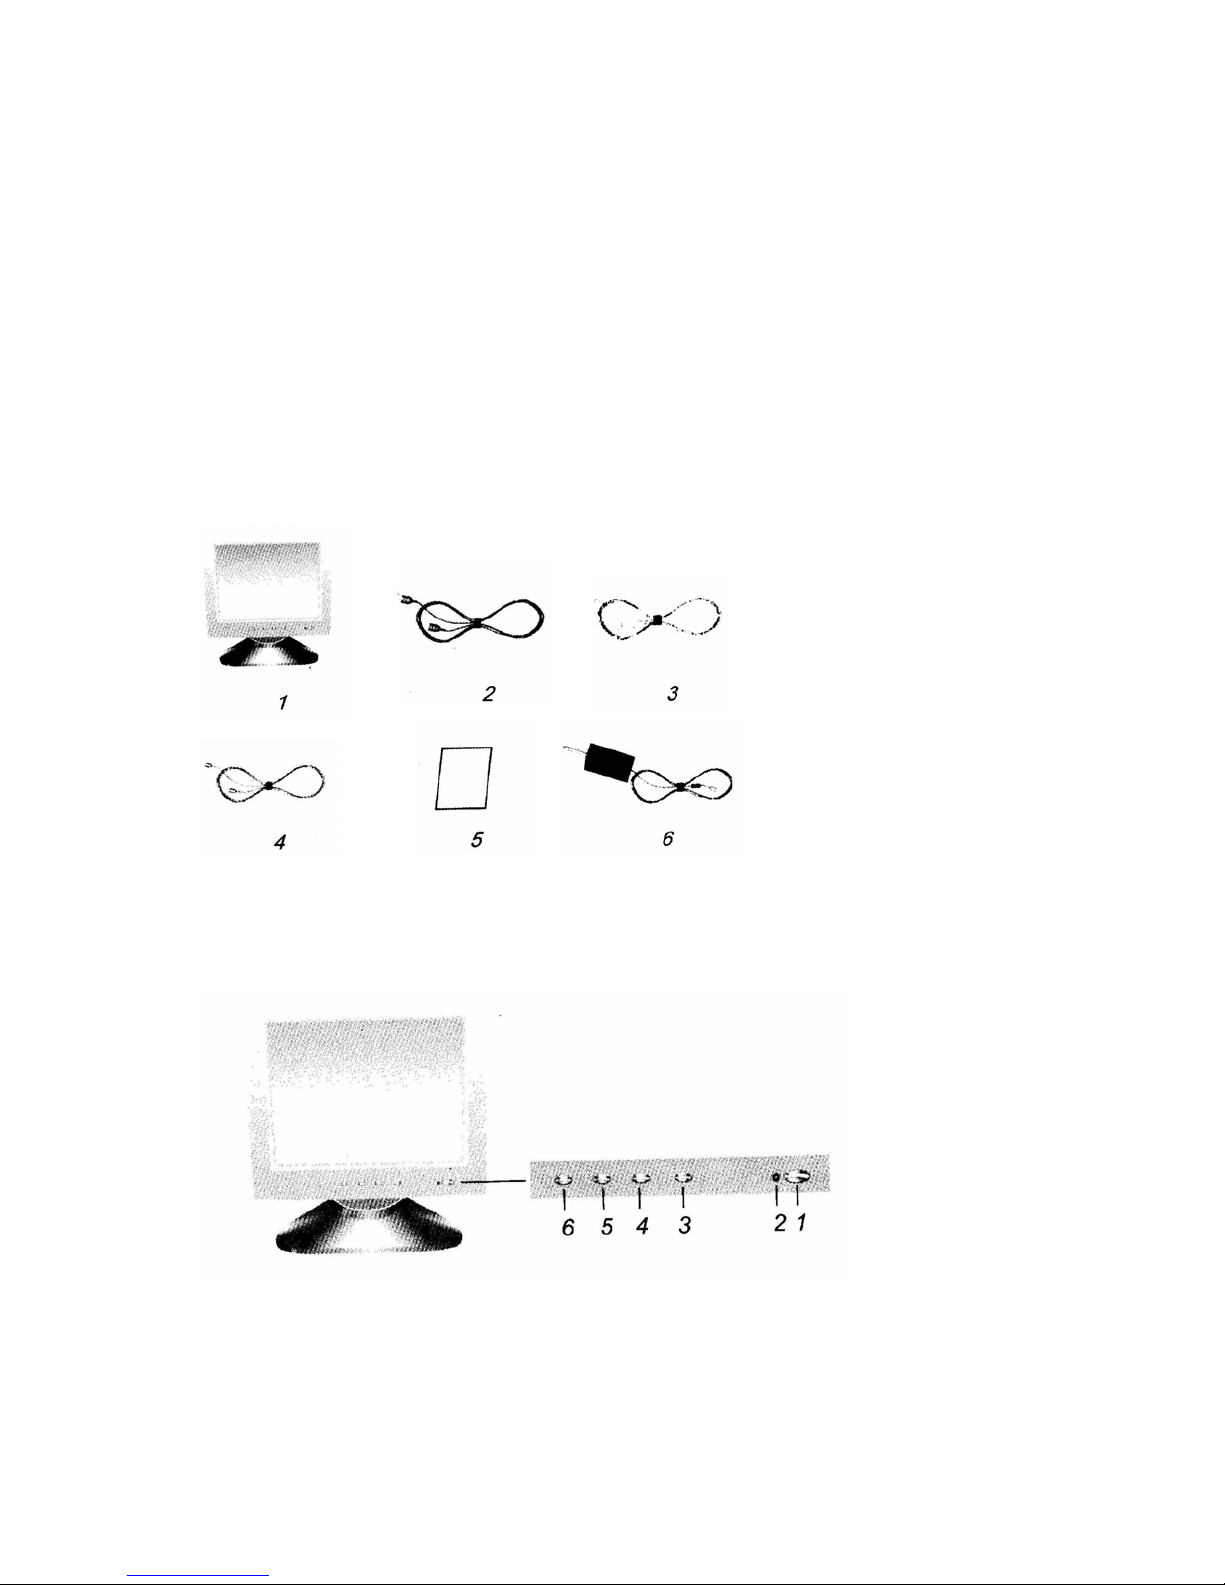
1. Package Contents
Your package includes the following:
(1) 15" TFT LCD Monitor (2) Power Cord
(3) VGA Cable (4) Audio Cable
(5) User's manual (6) AC/DC Adapter
Video Cable(optional) S-Video Cable
Audio Cable(optional) Remote controller
2. Control Description
Front View
Page 4
Page 7
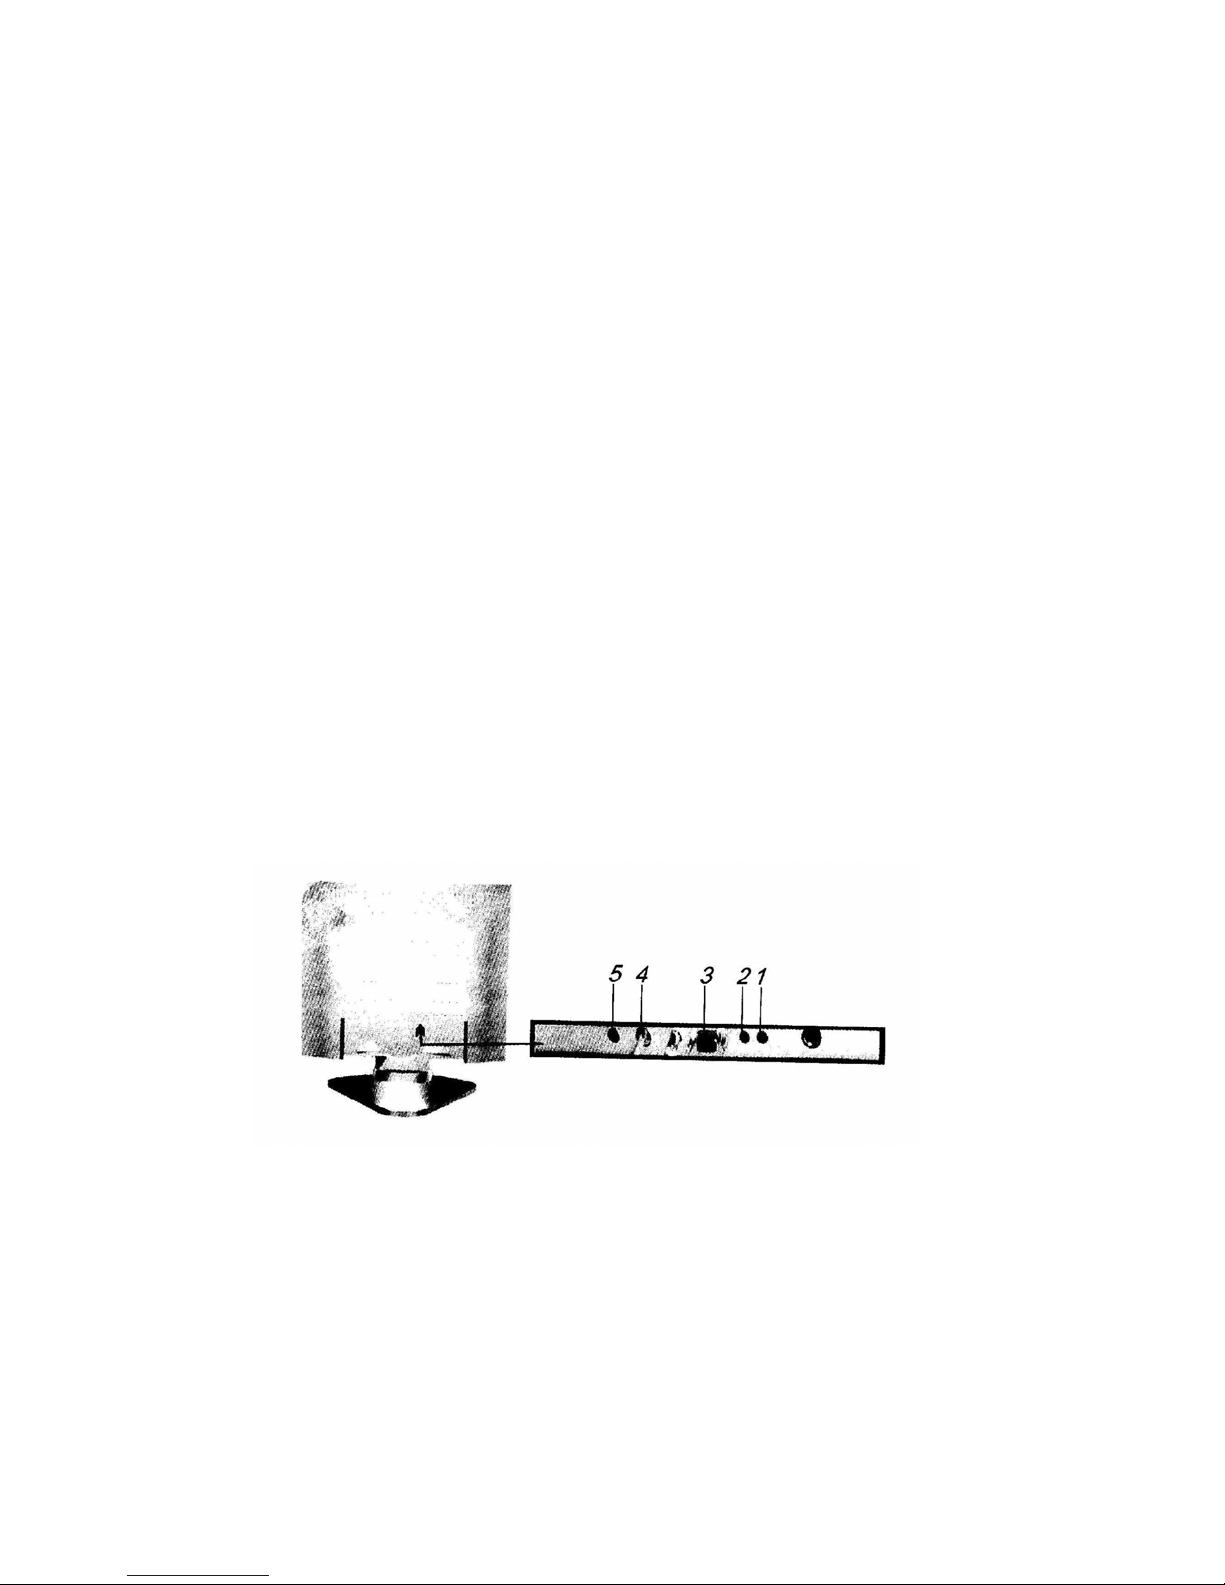
1. Power Switch
Pressing this button to turn the display system on or off
2. Power LED
This indictor illuminates when the power is turned on. It is also used to indicate each
stage of monitor by changing its color (see the later for more information)
3. Exit
Press this button to exit or return to OSD main menu.
4. Menu/Down
When the OSD (On-Screen Display) menu is on the screen and one of the
OSD control options is selected, press this key can decrease the value.
5. Menu/Up
When the OSD (On-Screen Display) menu is on the screen and one of the
OSD control options is selected, press this key can increase the value.
6. Menu
Press this button to activate the main menu and pressing it continuously can select the
OSD options in turn.
Rear View
Page 5
Page 8

(1) PC Audio In
This input is for connecting the audio cable from the audio-out connection on computer.
(2) Audio In (optional)
This input is for connecting the audio cable from the audio-out connection on VCD or D
VD.
(3) VGA Signal Connector
This input is for connecting the 15-pin D-sub VGA signal cable from computer.
(4)Knob
This knob can turn on/off built-in speaker and can adjust volume.
(5) Power Connector
This input is for connecting the power cable from the A C/DC adapter through DC 12 V
cable.
Video In (optional)
This input is for connecting the Video cable from the Video-out connection on DVD
or VCD.
S-video In
Connect the Video equipment with S- Video into this input by S-video cable.
TV system port(optional)
Using coaxial-cable with 75 ohm to obtain radio signal or TV cable signal.
If there is any technical change, we will not inform.
3. Connection with External Equipment
Note: Please be sure the AC power to your computer is turned off before connecting or
disconnecting any display peripherals. Failure to do so may cause serious personal
injury as well as permanent damage to your computer equipment.
Connect 15-pin D-sub interface cable to the computer via the video connector on the
video card, and fix it firmly with the screws provided on the plug. Plug in one end of the
audio cable to the back of the Pc. Connect the A C plug of Adapter into A C outlet.
Connectors for the signal cables and audio are located on the back of the monitor. Plug
the DC12V output of Adapter into DC12V socket. Please refer to the connector
configuration.
Page 6
Page 9
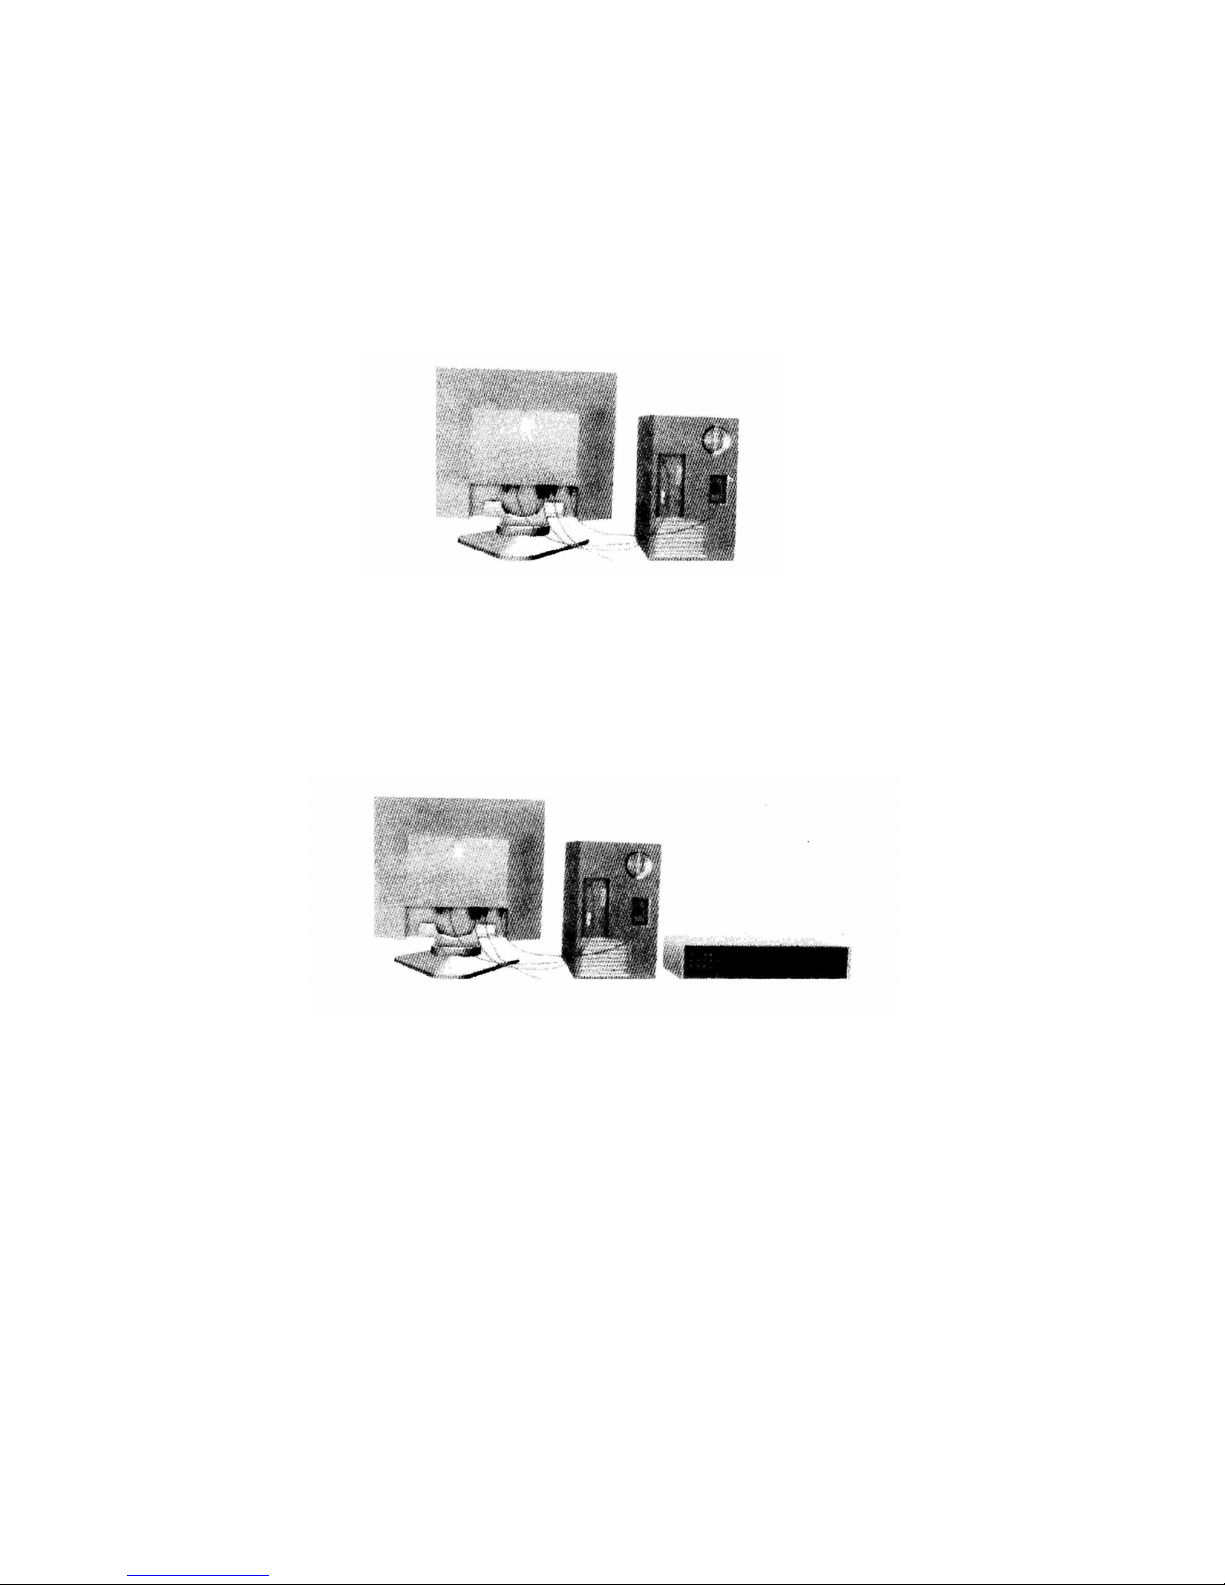
(Optional) Connect one end of Video Cable to LCD Monitor and other end to the DVD;
Connect one end of Audio Cable to LCD Monitor and other end to the DVD; Connect the
AC plug of Adapter into AC outlet. Plug the DC12V output of Adapter into DC12V
socket. Please refer to the connector configuration.
4. Adjust the round desk
Adjust the panel the by adjusting the round desk for our maximum viewing comfort.
Page 7
Page 10
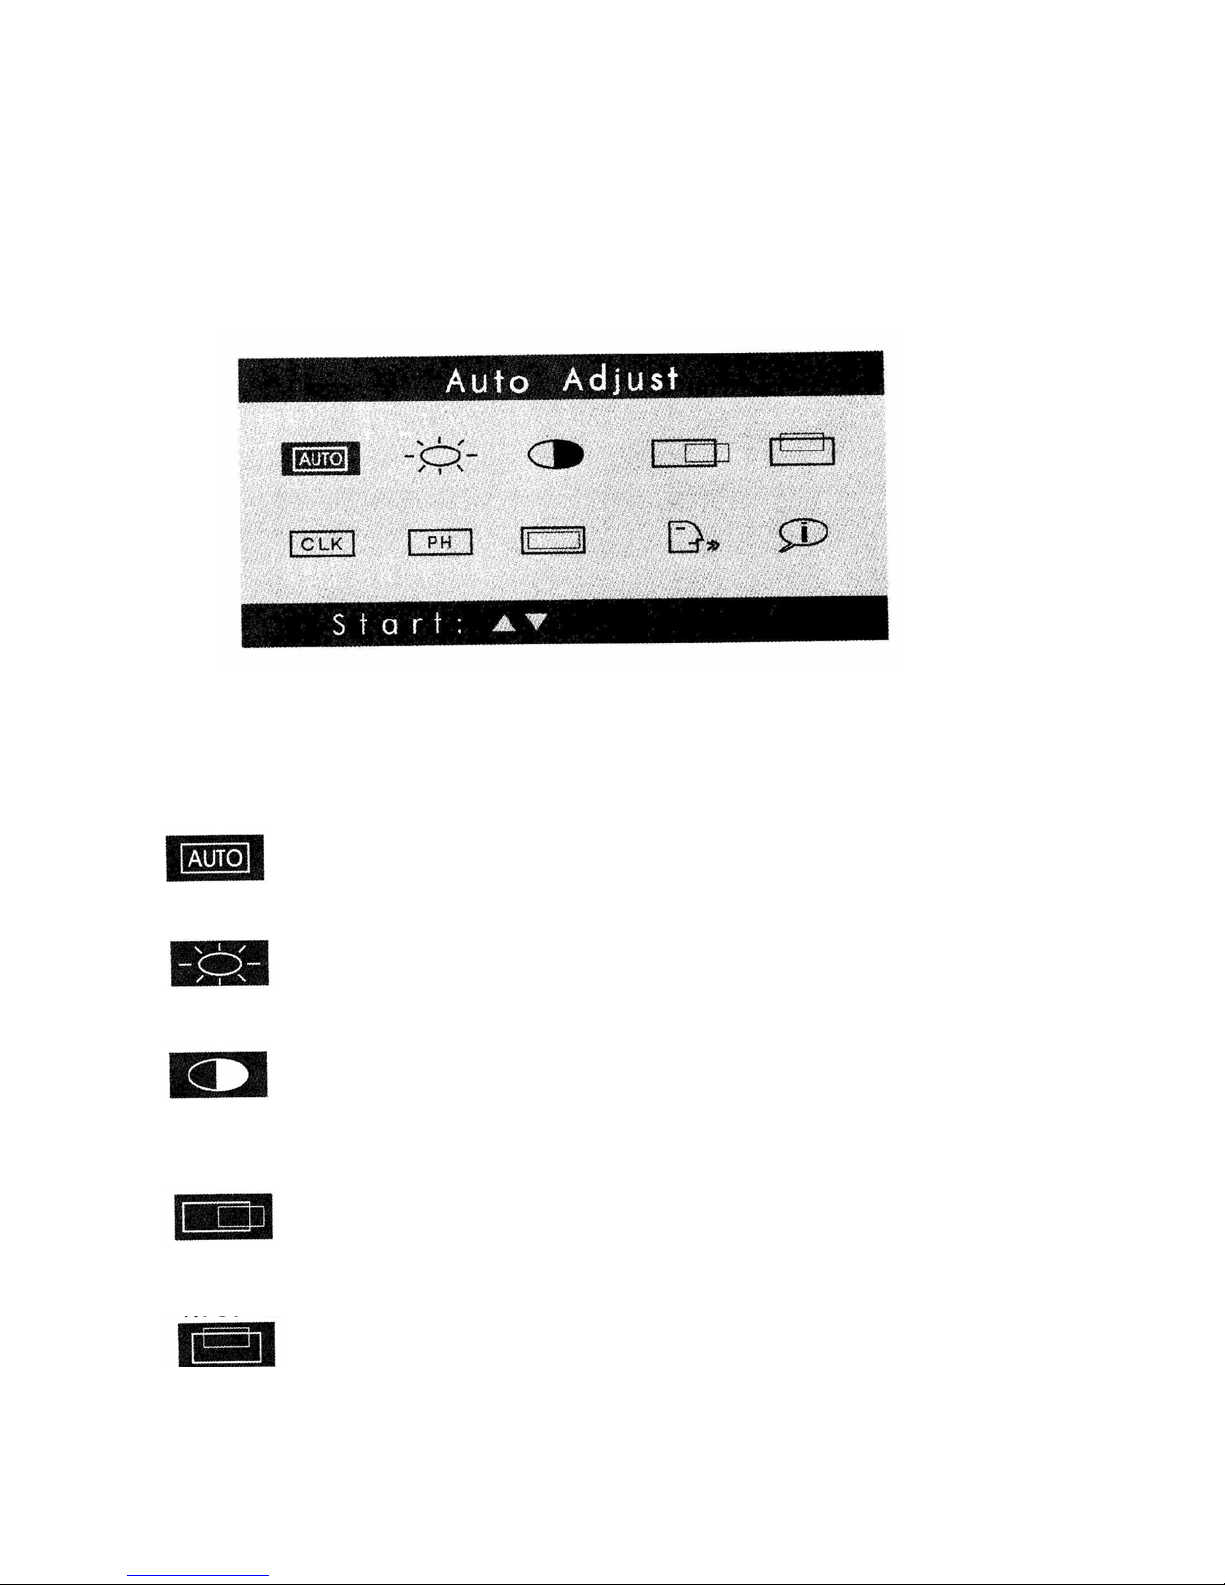
Operation
1. On Screen Display MENU & Function Table
Pressing the MENU button activates the main menu. See the following:
pressing it continuously can select the OSC options in turn.
Menu Descriptions
Auto Adjust
Automatically adjust Image Position, Horizontal Size or Fine setting Press UP
or DOWN button to adjust the settings antonatically.
Brightness
Controls the brightness of the LCD
Use UP or DOWN button to increase or decrease the setting.
Contrast
Controls the contrast of the LCD
Use UP or DOWN button to increase or decrease the setting.
IMAGE
H.POSITION
Controls the horizontal image position within the display of the
LCD Use the UP or DOWN button to move the image right or left
IMAGE
V. POSITION .
Controls the vertical image position within the display of the LCD Use The UP or
DOWN button to move the image up or down
Page 8
Page 11
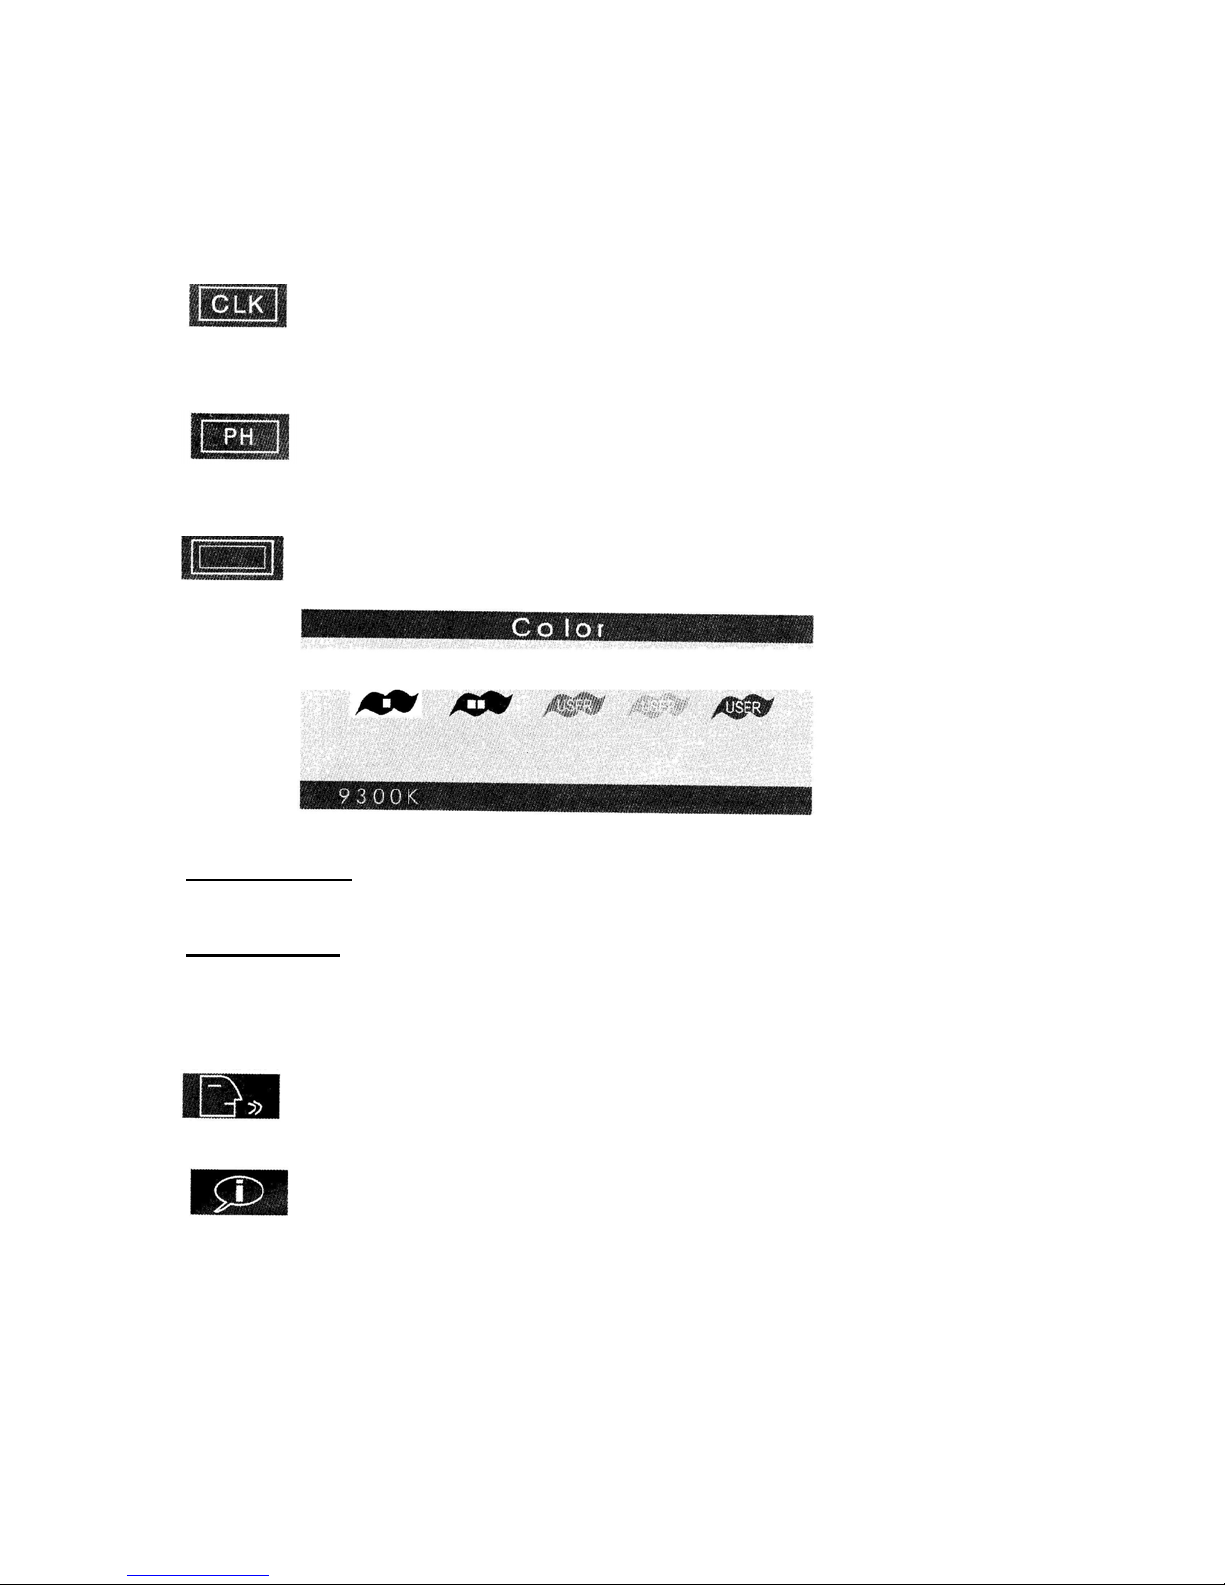
COARSE(Coarse Tuning)
Improves focus, clarity and image stability by changing the horizontal image size
Use + or -button to increase or decrease the setting.
CLOCK PHASE(Fine Tuning)
Improves focus, clarity and image stability. Use UP or DOWN button to increase
or decrease the setting
COLOR
Press the UP or DOWN button to enter into the following submenu
Press the MENU button to select the item you wish to change
Color temperature
Provides two preset color adjustment:9300K and 6500K Select the preset by using MENU button
and press EXIT button
RGB Adjustment
Increases or decreases Red, Green or blue color selected Use UP or DOWN button to increase or
decrease the setting To exits to the OSD main menu, press the EXIT button
LANGUAGE
Provides Five languages for OSD menu such as : English, Italiano, Espaol,
Francais,
INFORMATION
Show the horizontal and vertical frequency.
Page 9
Page 12
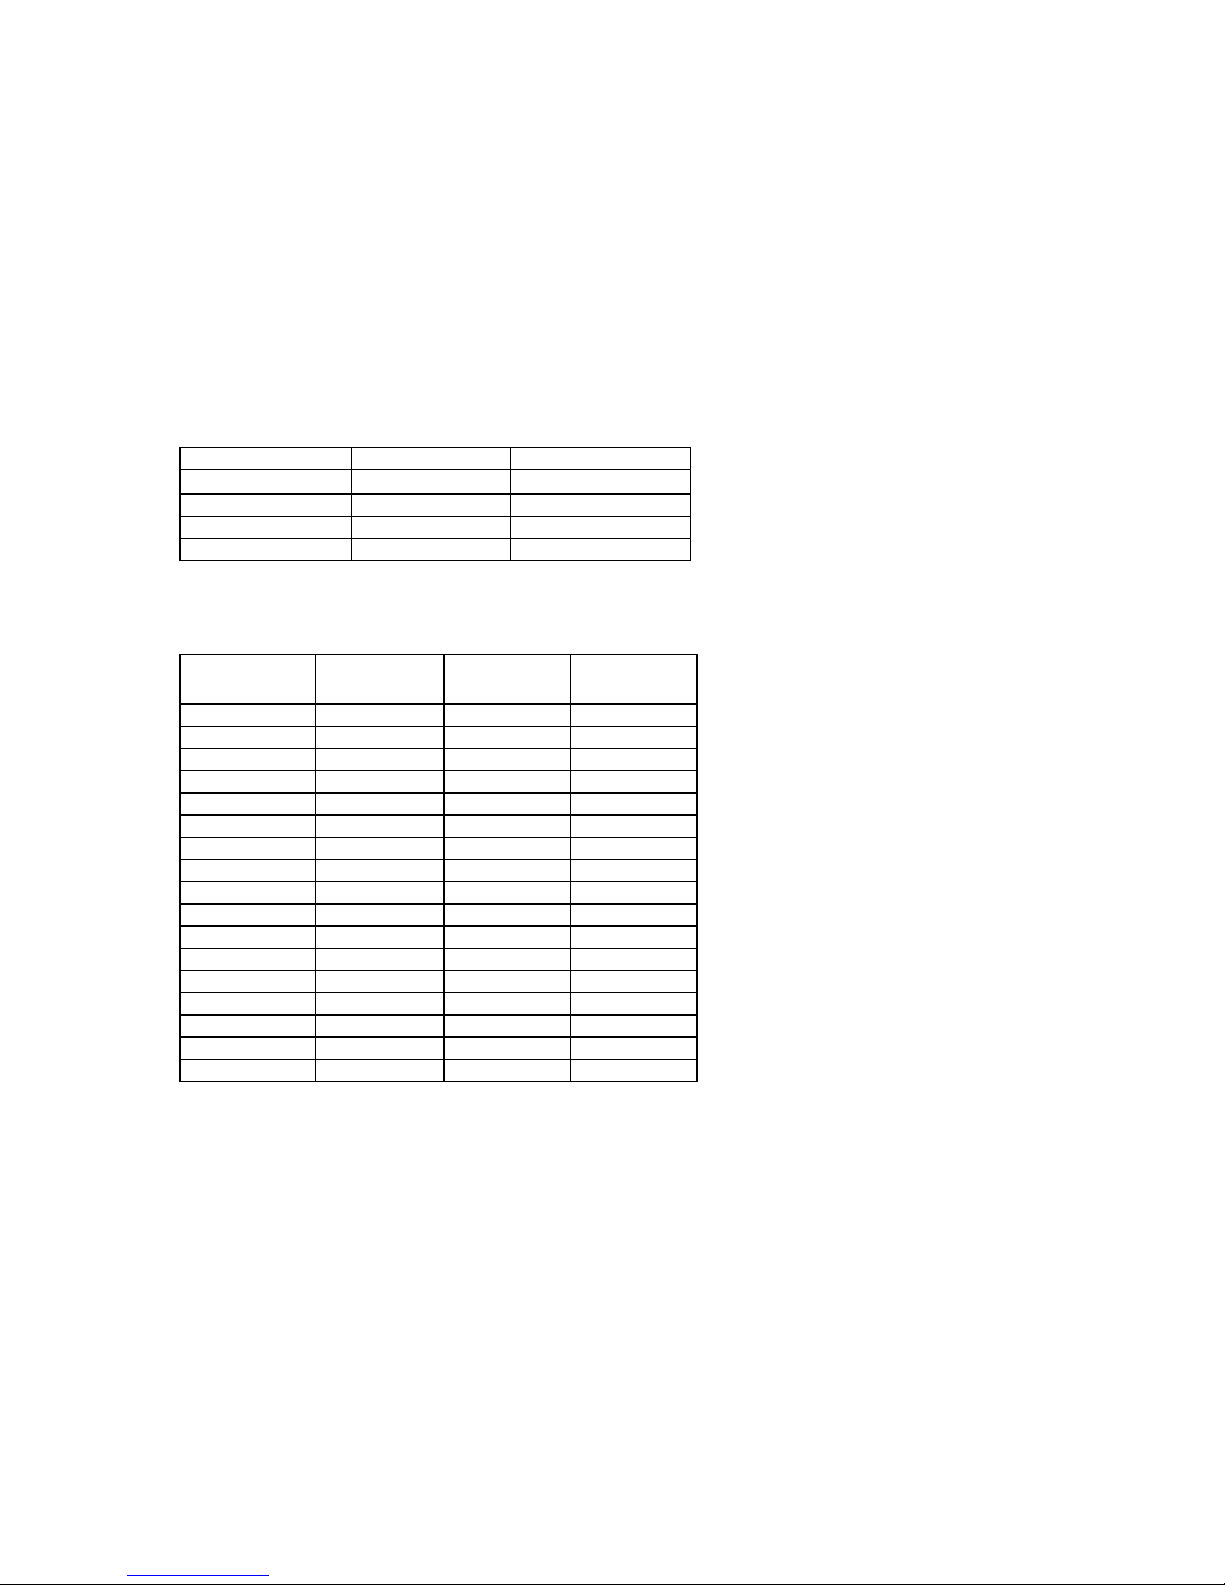
2. Power Management System
Power Mode LED Color Power Consumption
On Green
. <20W
Standby Red flash <3W
Suspend Red flash <3W
Active Off No indication <3W
3. Preset Timing Modes
Please use VESA 1024x768 for the best performance.
Mode Resolution. H.Frequency v.Frequency
(Khz) (Hz)
1 640x350 31.849 70
2 640x350 37.861 85
3 640x350 37.861 65
4 720x400 31.469 70
5 720x400 37.927 85
6 640x400 24.83 56
7 640x480 31.469 60
8 640x480 37.861 72
9 640x480 37.500 75
10 640x480 43.269 85
11 800x600 37.876 60
12 800x60fJ 46.077 72
13 800x600 46.875 75
14 800x600 53.674 85
15 1024x768 48.363 60
16 1024x768 56.476 70
17 1024x768 60.023 75
Page 10
Page 13

Technical Information
1. Specifications:
Panel Type 15-inch TFT Active Matrix LCD,
Display Size (h x v) 304.128 x 228.096mm
Pixel Pitch (h xv) 0.297 x 0.297mm
Optimum Resolution XGA 1024 x 768
Response Time <=35ms
Contrast Ratio 350:1
Brightness 250cd/m2
Color depth 262,144
Viewing Angle r/l :60°/60° /70°/7d
(Contrast Ratio>=5) u/d:35°/6d /55°/60°
Input Signal Analog RGB, 0.7Vpp/75Q
Separate TTL level
HFreq.:31 60KHz v.Freq.:56 75Hz
Power Supply Input DC 12V/1.5A
Adapter Input AC 100V-240/47-63Hz,
Adapter Output DC 12V/2A
Power Consumption On:<20W; Stand/Suspend:<3W
Audio Peak Value 1 W x 2 stereo speakers
Operating Temperature 5°C to 40°C
Operating Humidity 20% to 90% RH
Storage Temperature -20 C to 60 C
Storage Humidity 5% to 90% RH
Dimensions (w x h x d) 390mm x 420mm x 240mm
Net Weight 5.1Kg
Item number 2K700
Type INV-X(L)15BA
TV Function (optional) TV Mode: PAL/NTSC/SECAM
TV Channel: VHF/UHF
TV Channel Tune
Electronic Tune
Remote Control
Page 11
Page 14

2. Trouble shooting
(1) Power on but no screen image
Make sure video cable supplied with monitor is tightly secured to video output port
on the back of computer, or A V peripheral.
Adjust the brightness and contrast.
(2) Wrong or abnormal colors
If any color (red, green, or blue) is missing, check video cable to make sure it is
securely connected. Loose pins in the cable connector can cause a bad connection.
Connect monitor to another computer.
Turn monitor OFF, wait one minute, then turn ON again. Do this only once.
(3) The letters and icons look soft on the edges when change to resolutions other than the
native/optimum resolution of the panel.
LCD monitor has a native (physical) resolution which pixels are produced by cells
in fixed positions. When a resolution different from the native resolution is chosen,
the LCD monitor uses various interpolation methods to achieve the pseudo
resolution. To achieve the optimum viewing quality, choose the native resolution of
the panel, 1024 x-768, is recommended.
(4)Entire screen image scrolls (rolls) vertically
Make sure DSUB input signals are within monitor's specified frequency range.
Try Adapter with another power socket or change another adapter.
Try monitor with graphics card, or computer system.
Connect video cable securely.
(5) The image doesn’t look sharp and there are shimmering vertical lines.
Not enough power supplied. Connect Adapter to another different outlet. If using
surge protector, reduce number of devices plugged in.
Verify refreshing rate (vertical frequency) is 70Hz or lower.
Make sure graphics card in your computer can use non-interlaced mode at desired
frequencies. To enable your graphics card to
Page 12
Page 15

support higher refresh rates, try selecting fewer colors or running lower resolutions.
Need to perform the AUTOTUNE function in the OSD.
If the AUTOTUNE doesn't reduce such screen artifacts satisfactorily, you may need
to adjust the tuning functions manually. First, adjust the CLOCK. Then adjust the
PHASE.
Remove any devices from area around monitor that emits magnetic fields such as
radios, surge protectors, unshielded speakers, fluorescent lights, A C power
converters, desk fans, etc
Page 13
 Loading...