

Page 1

Table of contents
Safety1. . . . . . . . . . . . . . . . . . . . . . . . . . . . . . . . . . . . . . . . . . . . . . . . . . . . . . . . . . . . . . . . . . . . . 2
Regulatory Information1.1. . . . . . . . . . . . . . . . . . . . . . . . . . . . . . . . . . . . . . . . . . . . . . . . . . .2
Environmental care1.2. . . . . . . . . . . . . . . . . . . . . . . . . . . . . . . . . . . . . . . . . . . . . . . . . . . . . .3
Battery replacement1.3. . . . . . . . . . . . . . . . . . . . . . . . . . . . . . . . . . . . . . . . . . . . . . . . . . . . . .3
Operating the unit2. . . . . . . . . . . . . . . . . . . . . . . . . . . . . . . . . . . . . . . . . . . . . . . . . . . . . . . . . . . . 4
Connect the AC power2.1. . . . . . . . . . . . . . . . . . . . . . . . . . . . . . . . . . . . . . . . . . . . . . . . . . . .4
Your Digital Photo Frame3. . . . . . . . . . . . . . . . . . . . . . . . . . . . . . . . . . . . . . . . . . . . . . . . . . . . . . 5
DPF overview3.1. . . . . . . . . . . . . . . . . . . . . . . . . . . . . . . . . . . . . . . . . . . . . . . . . . . . . . . . . .5
Front view3.2. . . . . . . . . . . . . . . . . . . . . . . . . . . . . . . . . . . . . . . . . . . . . . . . . . . . . . . . . . . . .6
Back View3.3. . . . . . . . . . . . . . . . . . . . . . . . . . . . . . . . . . . . . . . . . . . . . . . . . . . . . . . . . . . . .6
Side View3.4. . . . . . . . . . . . . . . . . . . . . . . . . . . . . . . . . . . . . . . . . . . . . . . . . . . . . . . . . . . . . .6
Top View3.5. . . . . . . . . . . . . . . . . . . . . . . . . . . . . . . . . . . . . . . . . . . . . . . . . . . . . . . . . . . . . .7
Remote control view3.6. . . . . . . . . . . . . . . . . . . . . . . . . . . . . . . . . . . . . . . . . . . . . . . . . . . . . 8
Use the menus4. . . . . . . . . . . . . . . . . . . . . . . . . . . . . . . . . . . . . . . . . . . . . . . . . . . . . . . . . . . . . . 9
Access the Main menu4.1. . . . . . . . . . . . . . . . . . . . . . . . . . . . . . . . . . . . . . . . . . . . . . . . . . .9
Access the Slideshow menu4.2. . . . . . . . . . . . . . . . . . . . . . . . . . . . . . . . . . . . . . . . . . . . . . .9
Access the Source menu4.3. . . . . . . . . . . . . . . . . . . . . . . . . . . . . . . . . . . . . . . . . . . . . . . . .10
Access the File Management menu4.4. . . . . . . . . . . . . . . . . . . . . . . . . . . . . . . . . . . . . . . .10
Access the Setup Menu4.5. . . . . . . . . . . . . . . . . . . . . . . . . . . . . . . . . . . . . . . . . . . . . . . . . .11
Specifications5. . . . . . . . . . . . . . . . . . . . . . . . . . . . . . . . . . . . . . . . . . . . . . . . . . . . . . . . . . . . . . 1 4
Page 2
EN-2
Safety1.
Before operating this unit (digital photo frame),
please carefully read and follow the instructions
below.
Safety Notes
The display surface is sensitive and •
pressing the screen should be avoided.
The Device is not waterproof. Don’t spill •
any liquid on the device.
Don’t place or use the device under •
extreme temperatures, strong static
electricity or excessive vibration.
Only use the supplied power DC adapter. •
Using any other adapter may cause the
damages.
1.1 Regulatory Information
FCC Compliance
This device complies with Part 15 of the •
FCC Rules. Operation is subject to the
following two conditions: (1) this device may
not cause harmful interference, and (2) this
device must accept any interference received,
including interference that may cause
undesired operation.
NOTE: This equipment has been tested •
and found to comply with the limits for
a Class B digital device, pursuant to Part
15 of the FCC Rules. These limits are
designed to provide reasonable protection
against harmful interference in a residential
installation. This equipment generates, uses
and can radiate radio frequency energy
and, if not installed and used in accordance
with the instructions, may cause harmful
interference to radio communications.
However, there is no guarantee that
interference will not occur in a particular
installation. If this equipment does cause
harmful interference to radio or television
reception, which can be determined by
turning the equipment off and on, the
user is encouraged to try to correct the
interference by one or more of the following
measures:
Reorient or relocate the receiving antenna.•
Increase the separation between the •
equipment and receiver.
Connect the equipment to an outlet on •
a circuit different from that to which the
receiver is connected.
Consult the dealer or an experienced radio/•
TV technician for help.
WARNING:
Any unauthorized modification to this
equipment could result in the revocation of the
authorization to operate the equipment and void
the product warranty.
CE
The shipped version of this device complies with
the requirements of the EEC directives 73/23/
EEC "Low voltage directive".
UL/CUL
CONFORMS TO ANSI/UL STD. 60950-1
CERTIFIED TO CAN/CSA STD. C22.2 No.
60950-1
Page 3
EN-3
ENGLISH
WEEE
Information for users applicable in European
Union countries
The symbol on the product or its packaging
signifies that this product has to be disposed
separately from ordinary household wastes at
its end of life. Please be aware that it is your
responsibility to dispose of electronic equipment
at recycling centers so as to help conserve our
natural resources. Each country in the European
Union should have its collection centers for
electrical and electronic equipment recycling.
For information about your recycling drop off
area, please contact your local related electrical
and electronic equipment waste management
authority or the retailer where you purchased
your product.
Hg
Information for users applicable in United States
of America
LAMP(S) inside this product contain mercury
and must be recycled or disposed of according
to local, state or federal laws. For more
information, contact the electronic industries
alliance at www.eiae.org for lamp specific disposal
information check www.lamprecycle.org
1.2 Environmental care
Recycling your packaging
The packaging of this product is intended to
be recycled. Contact your local authorities for
information on how to recycle the packaging.
Disposing your used product
Your product is manufactured with high-quality
materials and components that can be recycled
and reused. When you see the crossed-out
wheel bin symbol attached to a product, it
means the product is covered by the European
Directive 2002/96/EC:
Do not dispose of your used product with
household waste. Ask your dealer for information
on how to safely dispose of the product.
Uncontrolled waste disposal harms both the
environment and human health.
Disposing used batteries
The supplied batteries do not contain mercury
or cadmium. Discard supplied and all other used
batteries according to your local regulations.
Battery replacement1.3
CAUTION: There is a danger of explosion
if the battery is incorrectly replaced. Replace
only with the same or equivalent battery type
recommended by the manufacturer. Discard
used batteries according to the manufacturer's
instructions. Do not expose the battery to
excessive heat such as sunshine, fire, etc.
Page 4
EN-4
Operating the unit2.
Checking the package contents
Open the package carefully to make sure you
have the following items.
1. Digital photo frame
2. User Manual
3. Foot stand
4. USB cable
5. Quick Start Guide
6. AC power adapter
7. Remote controller (Battery)
8. Warranty card
9. Removable bezel.
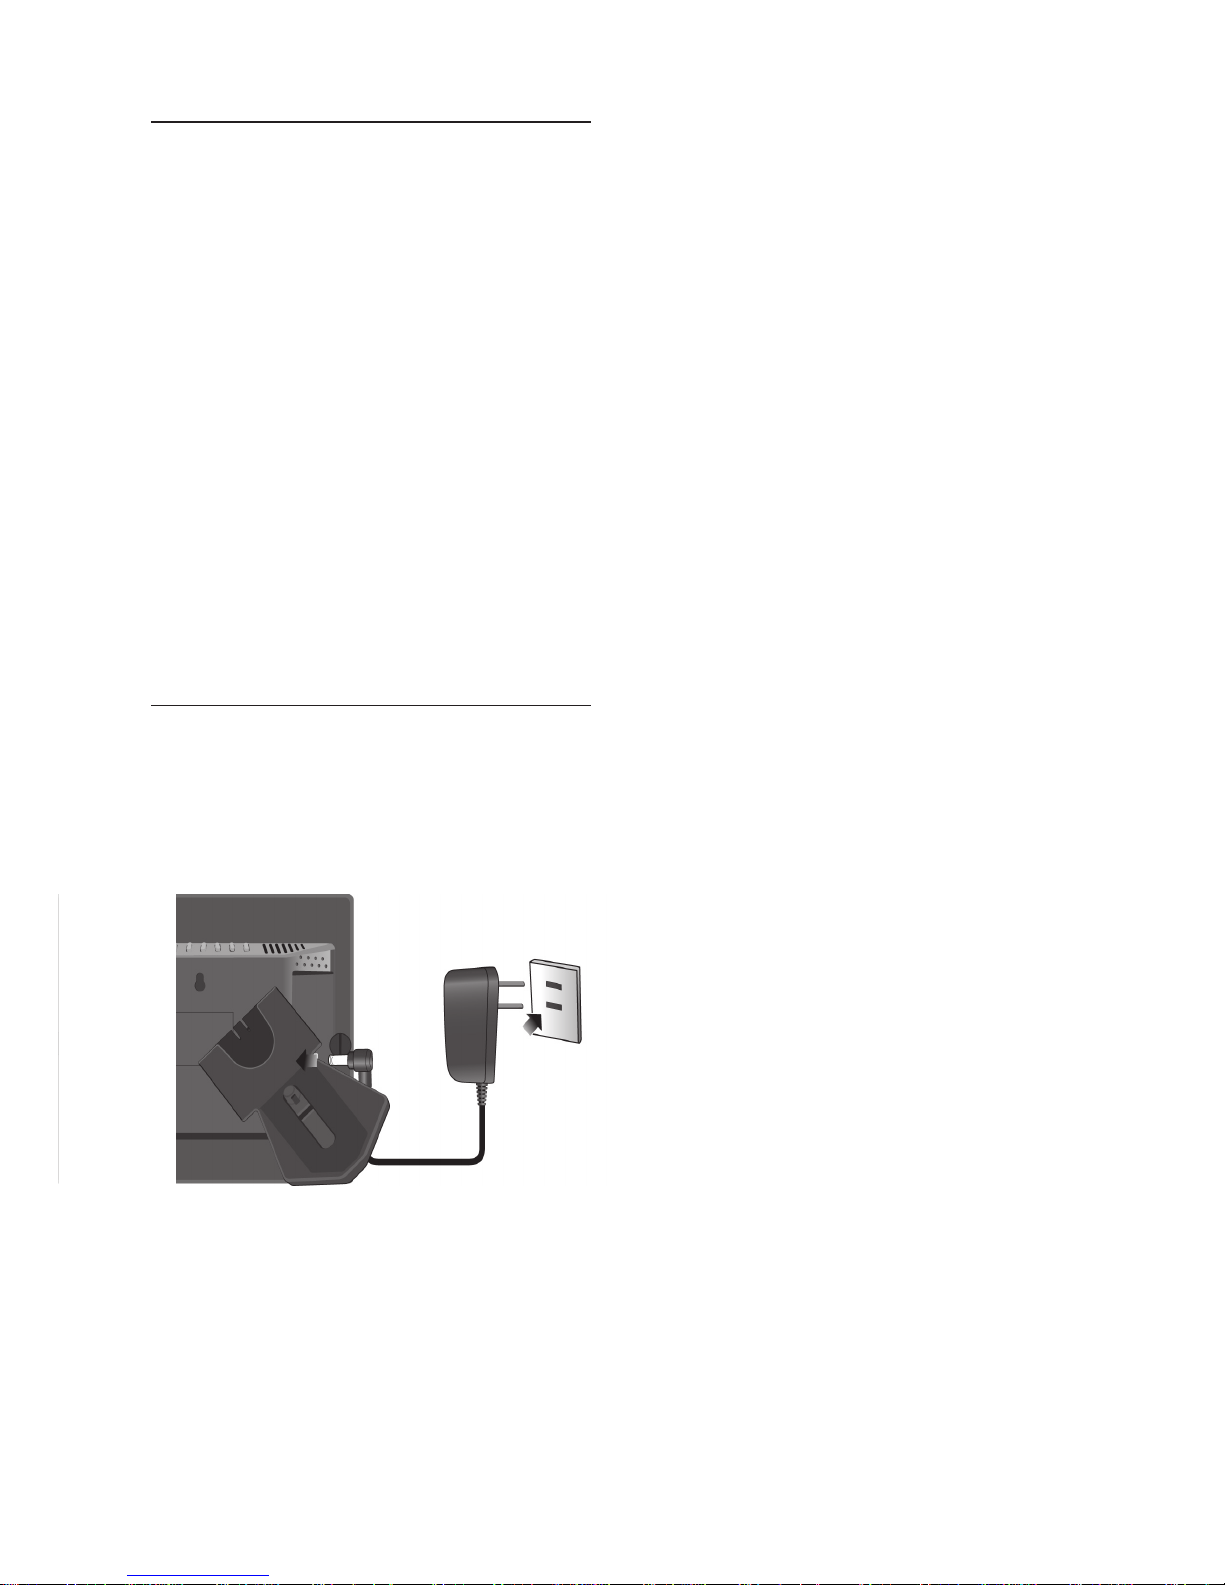
2.1 Connect the AC power
Attach the foot stand to the lock slot on •
the back of the unit.
Plug the other end into an AC power •
outlet.
Page 5
EN-5
Your Digital Photo Frame3.
This section gives you an overview of the
commonly used controls and functions.
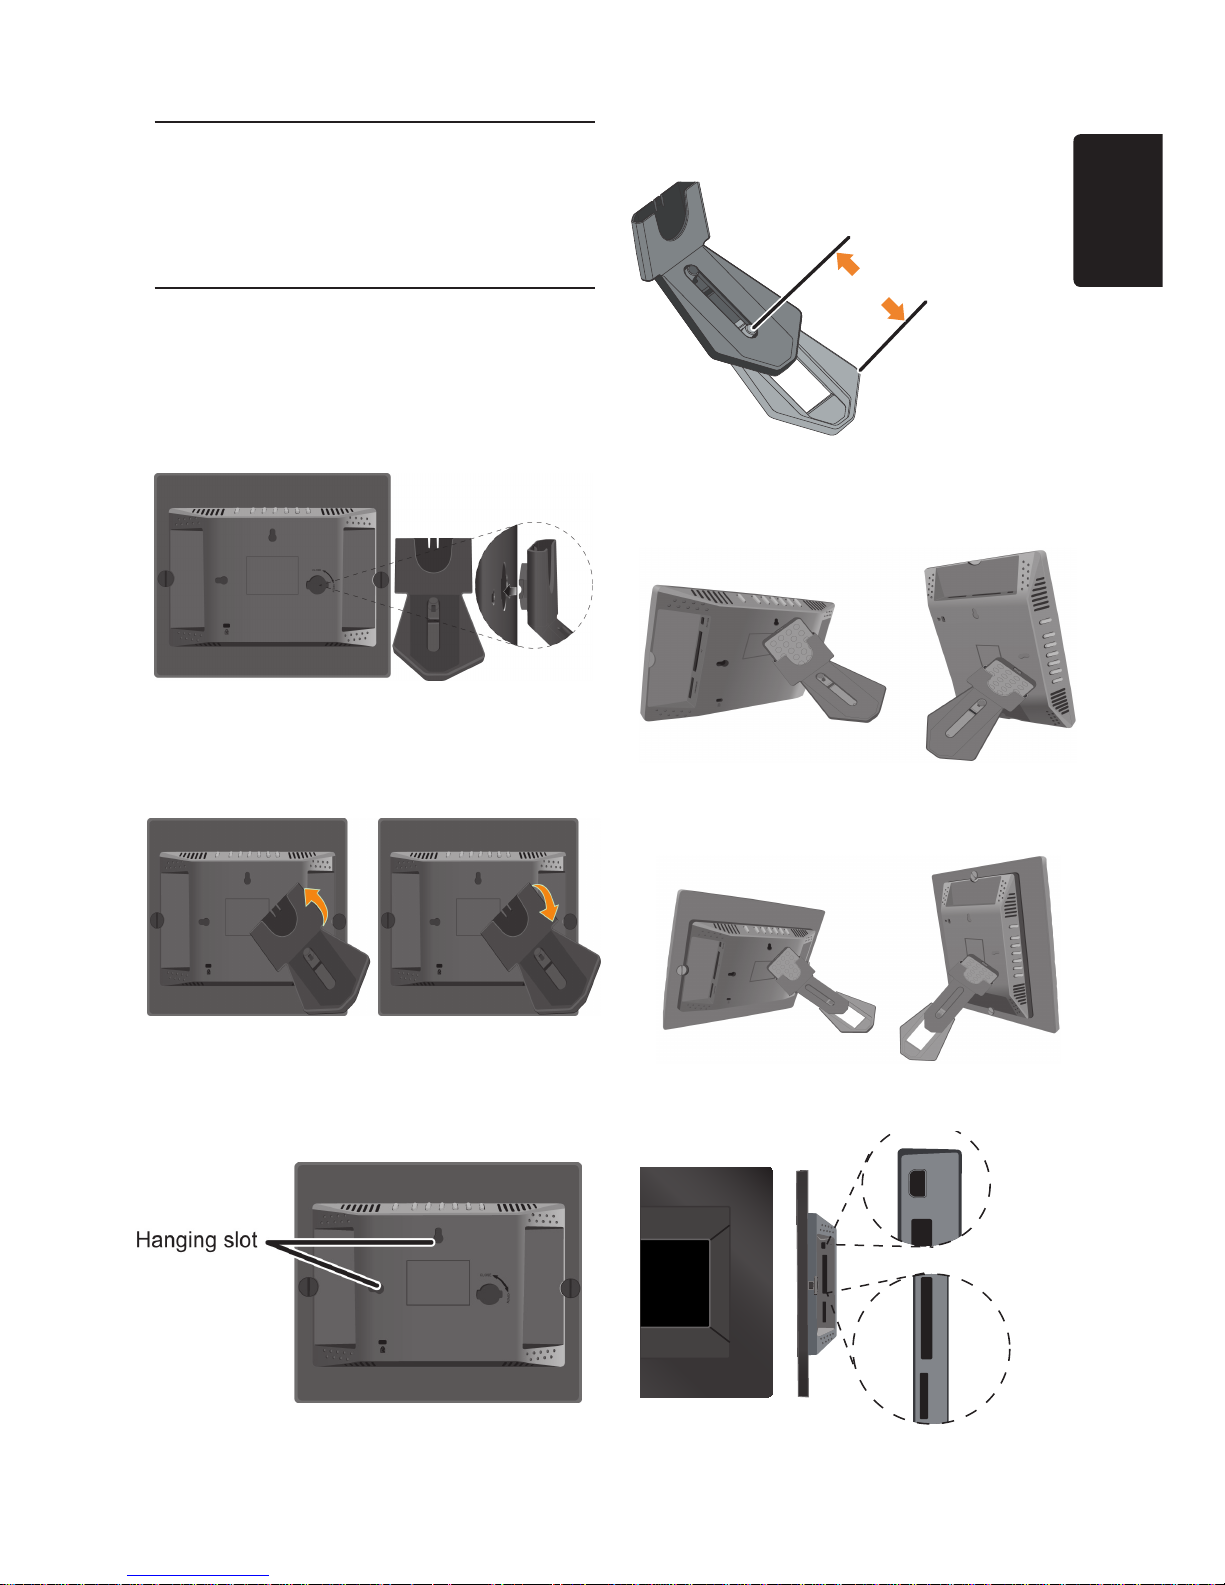
DPF overview3.1
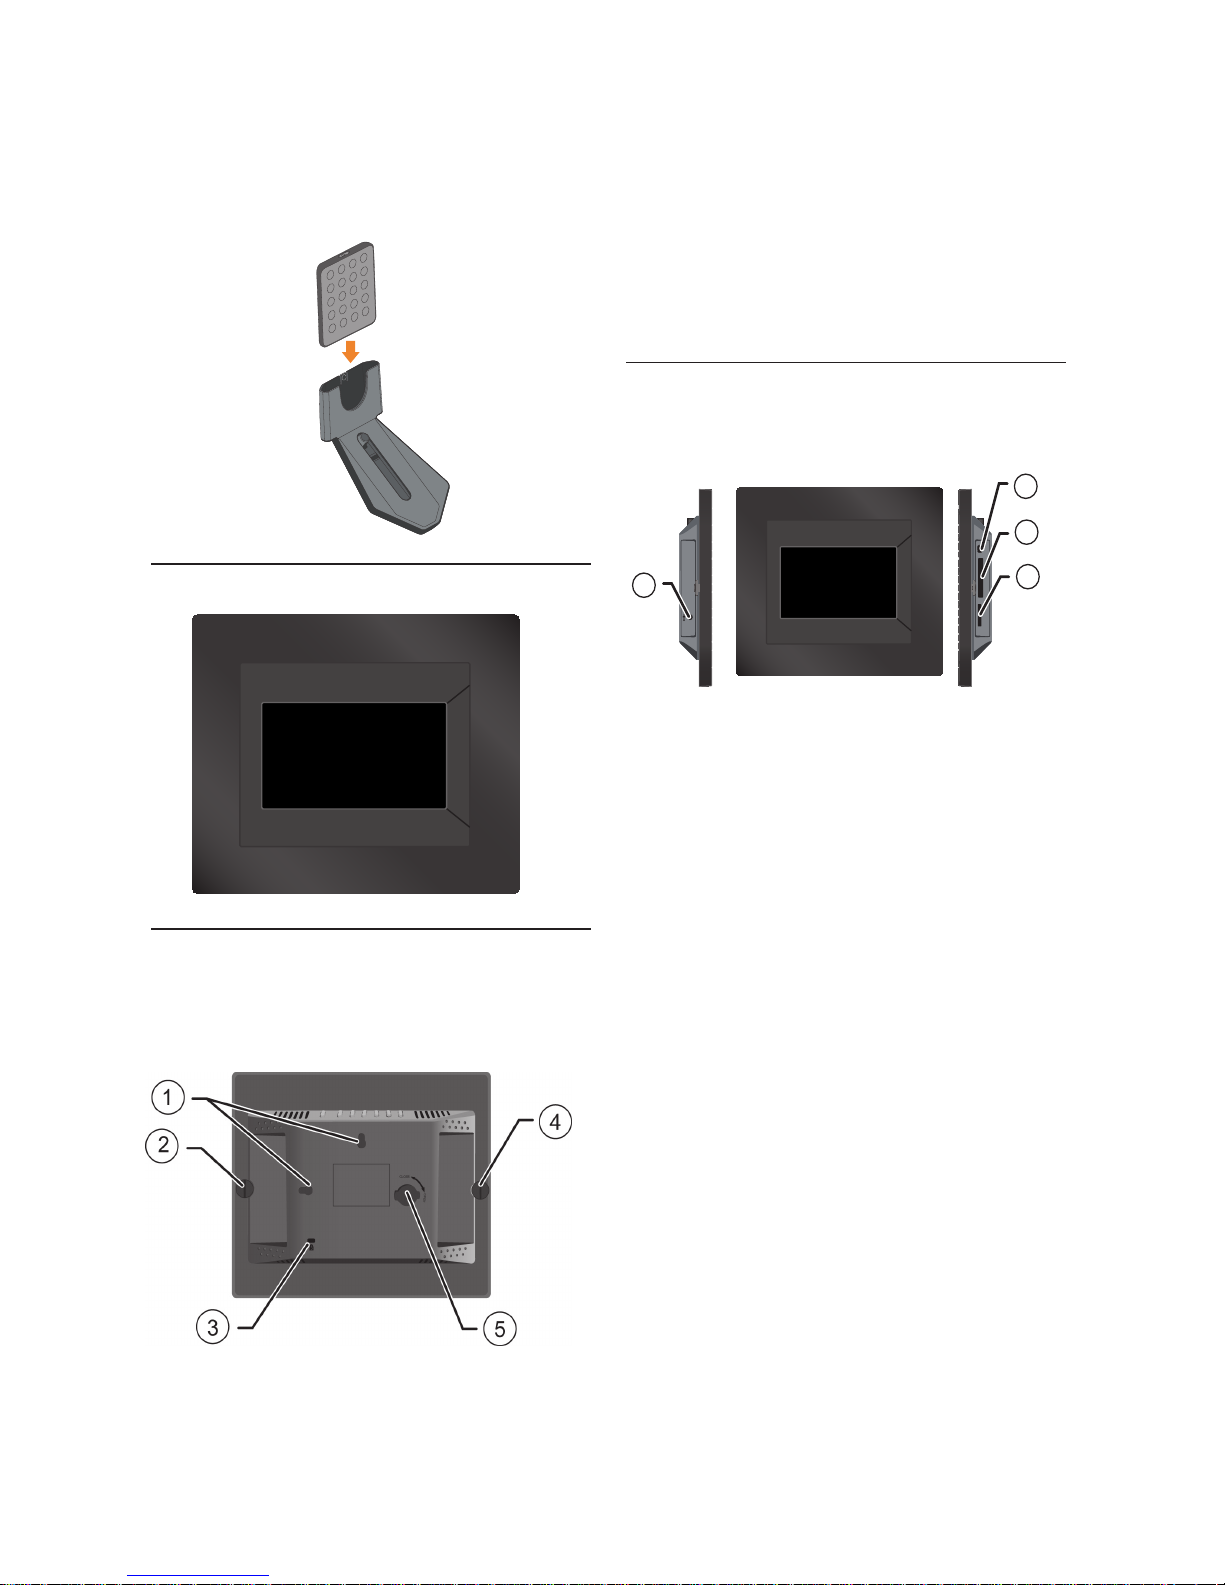
ttach the foot stand to
the lock slot on the
1.
back of the unit.
Rotate the foot stand counter-clockwise 2.
until it is secured to the digital photo frame.
Installing the foot stand.A
By using the hanging slot, you can hang the 3.
unit horizontally/vertically on a wall without
installing the foot.
Adjustable foot stand4.
Place this unit horizontally (recommended 5.
direction) or vertically.
5-1 Without Frame
5-2 With Frame
Use a memory card or USB flash drive6.
“Press the button” and PUSH
PULL
“Press the button” and PUSH
PULL
MINI USB CF SD/MS/MMC
MINI USB CF SD/MS/MMC/XD
MINI USB CF SD/MS/MMC
ENGLISH
Page 6
EN-6
Fit the remote controller into the top end of 7.
of the foot stand.
Front view3.2
Back View3.3
On the back of the unit
Wall-hanging holes1.
Frame mounting screw2.
Kensington slot3.
Frame mounting screw4.
Stand seat5.
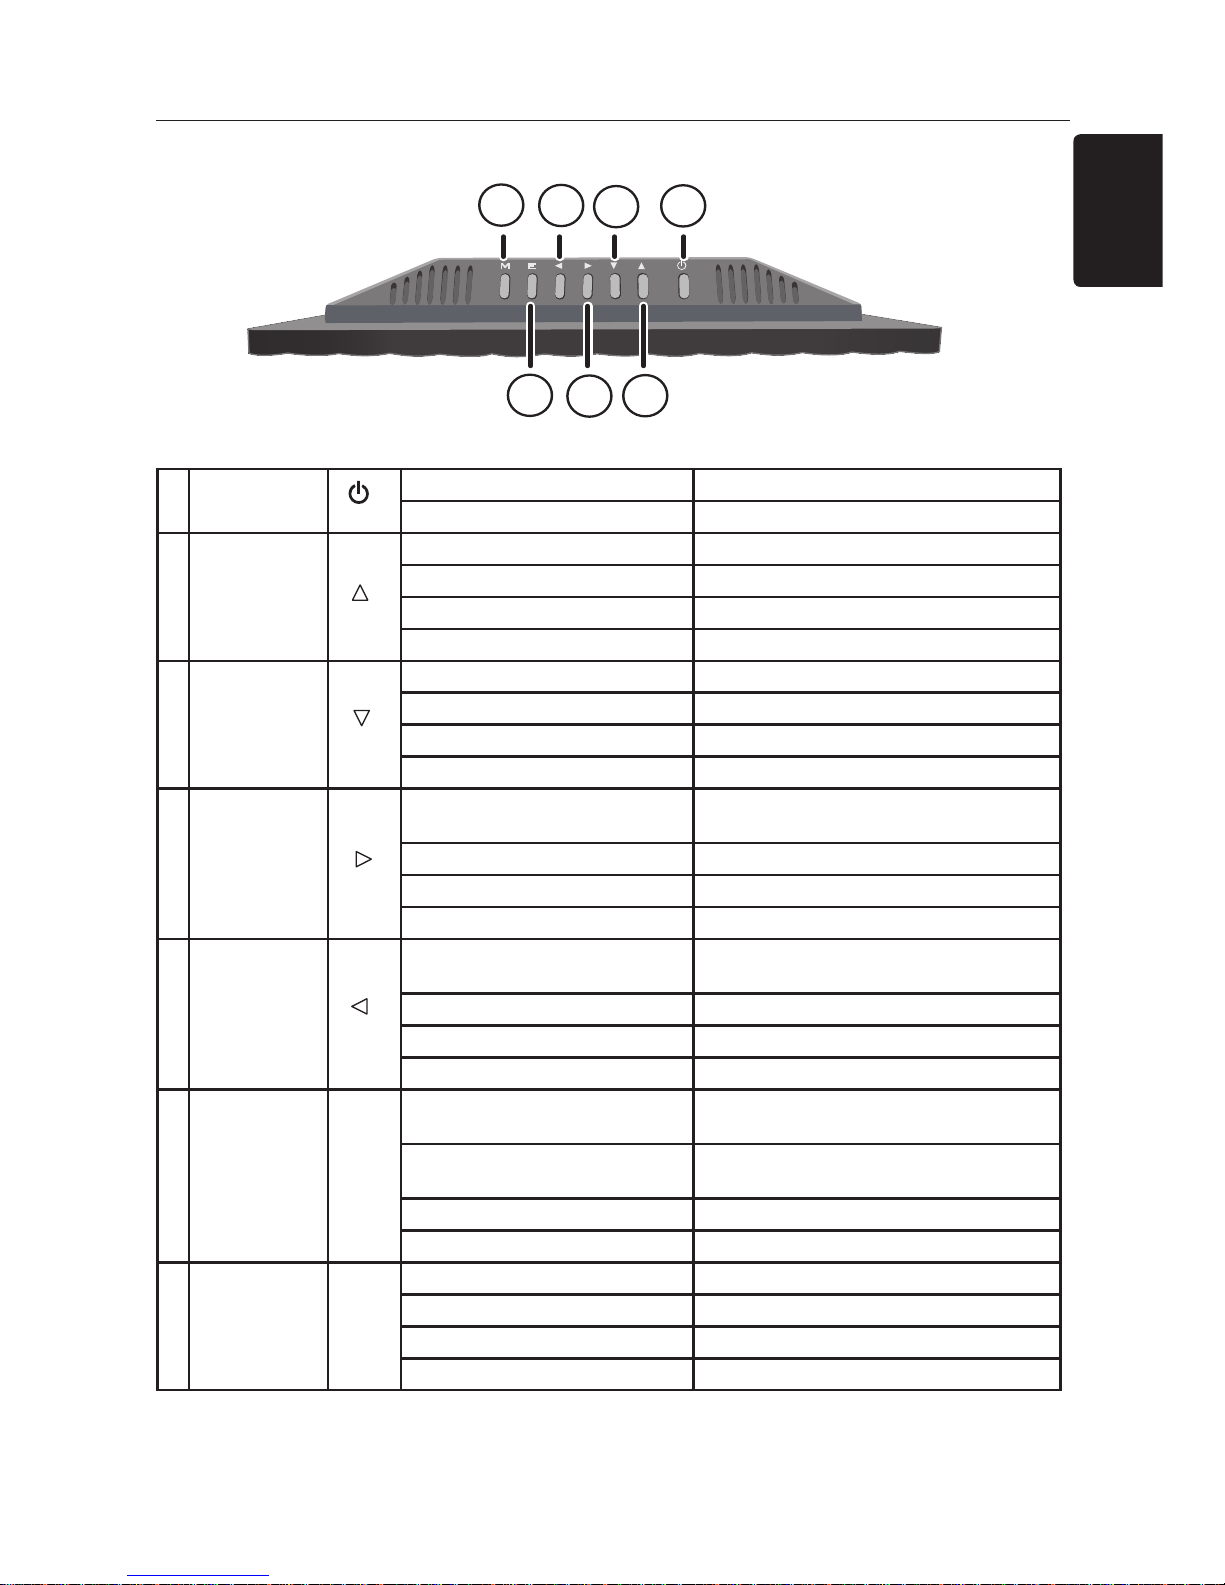
Side View3.4
UseamemorycardorUSBashdrive.
DC Power input1.
Mini USB connector2.
CF slot3.
SD/MS/MMC slot4.
MINI USB
DC 5V
CF SD/MS/MMC
1
2
3
4
Page 7
EN-7
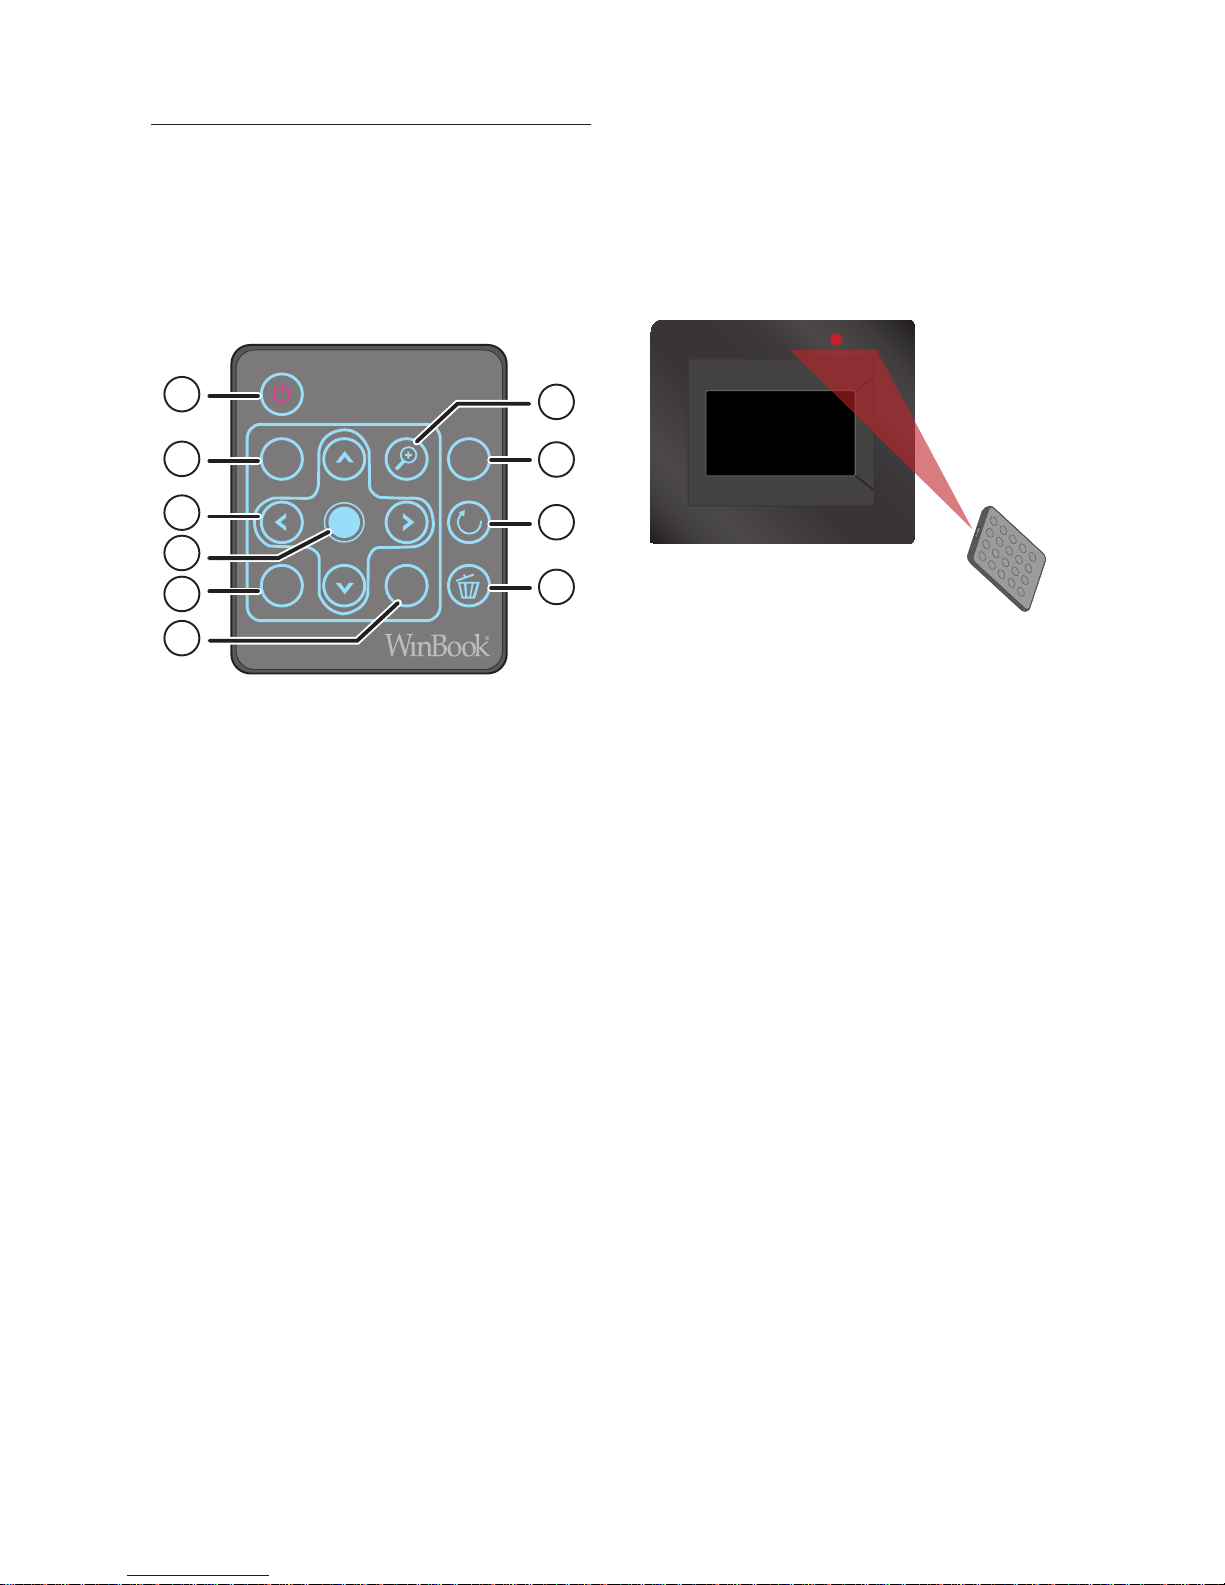
Top View3.5
1 Power Power off
Power on
2 Up OSD Menu mode Move to upside icon or item.
Slide Show Mode No function
Calendar Mode Last year.
Clock Mode No function
3 Down OSD Menu mode Move to down side icon or item.
Slide Show Mode Brightness adjust
Calendar Mode Next year.
Clock Mode No function
4 Right OSD Menu mode Move to right side icon or adjusting up.
Slide Show Mode No function
Calendar Mode Next month
Clock Mode No function
5 Left OSD Menu mode Move to left side icon or adjusting
down.
Slide Show Mode No function
Calendar Mode Last month
Clock Mode No function
6 Enter OSD Menu mode Go to lower levels menu or selection
item.
Slide Show Mode Go to short cut menu for Slide Show
Calendar Mode No function
Clock Mode No function
7 Mode OSD Menu mode Go to next Mode
Slide Show Mode Go to next Mode
Calendar Mode Go to next Mode
Clock Mode Go to next Mode
M
E
Turn off the Digital P oto Frame.h
7
1
6
5
4
3
2
ENGLISH
Turn o e Digital P oto Frame.hn th
Page 8
EN-8
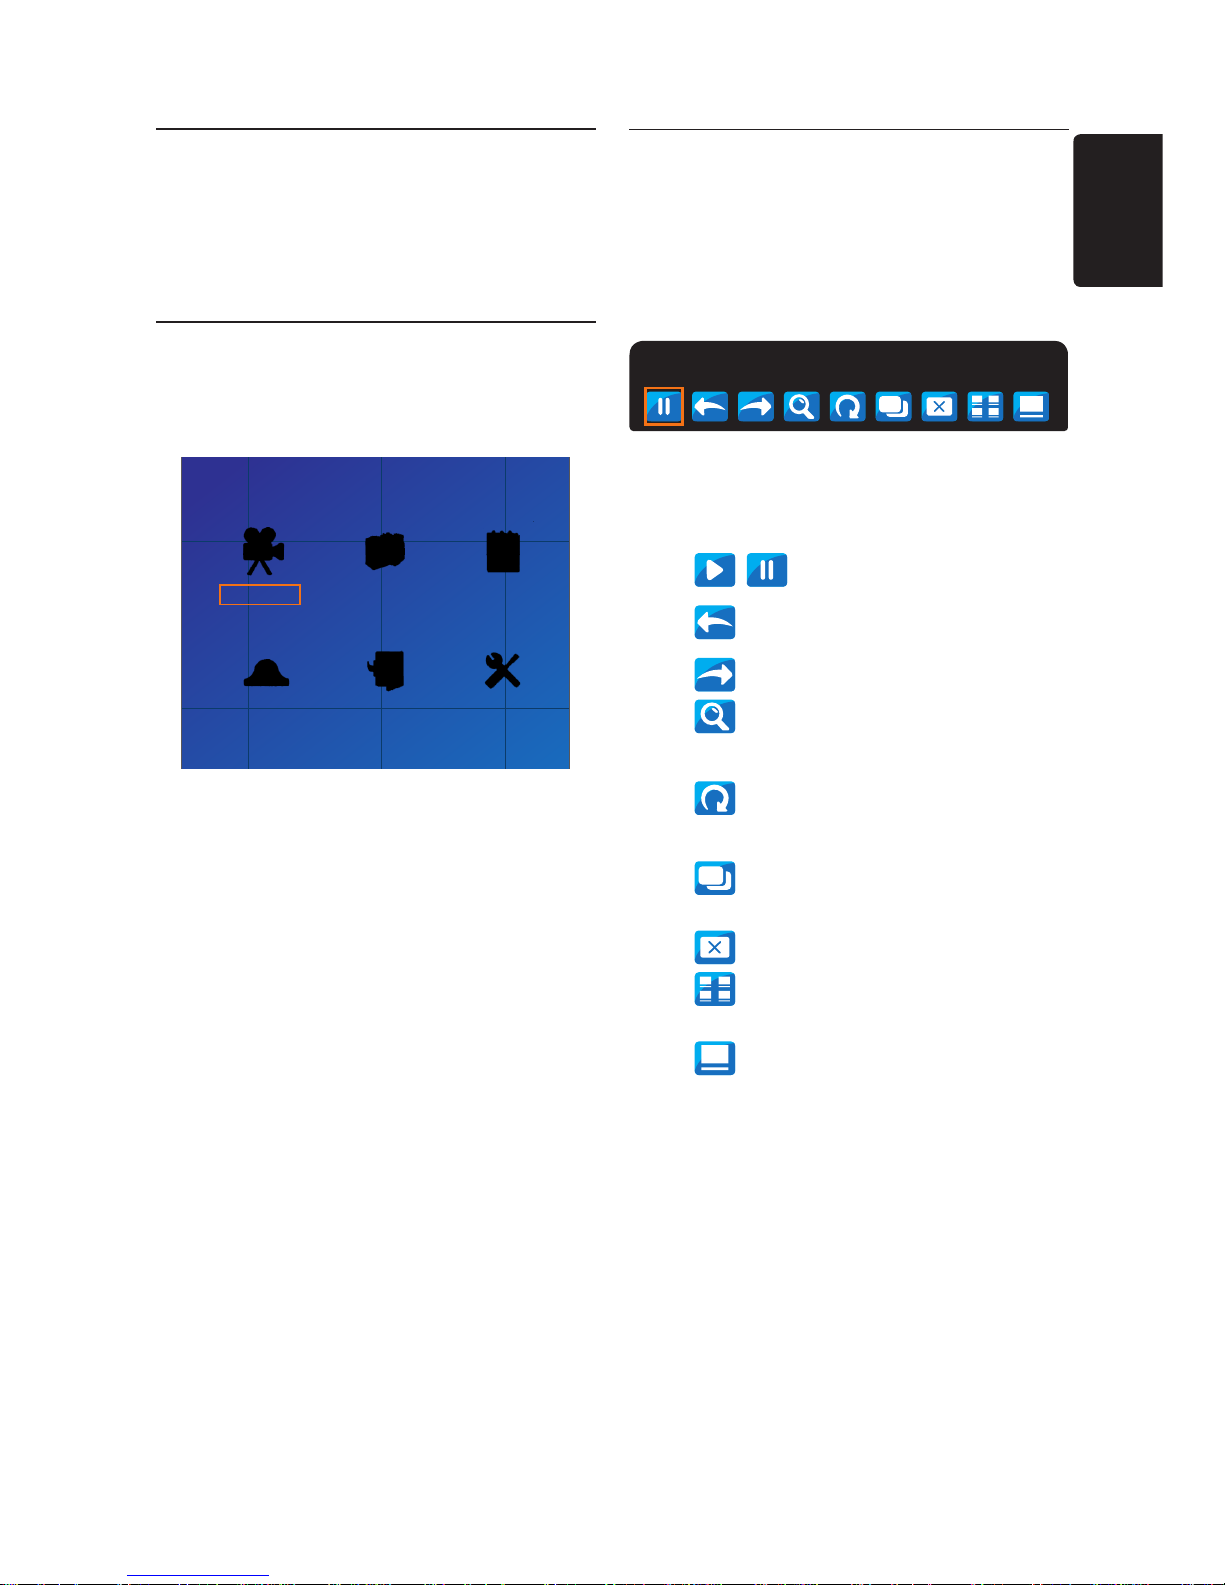
Rotate9.
Rotate the current image clockwise by 90
degree in slide show mode
Delete10.
Delete the current image
NOTE: Recommended DPF Remote Control
Operating Position
Remote control view3.6
Remote control keys
This section provides a detailed overview of
remote control features.
OK
Slideshow Zoom Copy
Rolate
DeleteMenu Mode
1
7
8
9
10
2
3
4
5
6
◎1. Power
Power on/off
Slideshow2.
Shortcut key for slide show mode
< / >, V 3. / Λ
Refer to the direction key definition on
navigation buttons
OK4.
Refer to the Enter key definition on
navigation buttons
Menu5.
Shortcut key for Main Menu
Mode6.
Refer to the Mode definition on navigation
buttons
Zoom7.
Change zoom ratio in slideshow mode
Copy8.
Copy the current image to Favorite in slide
show mode
Page 9
EN-9
Use the menus4.
On-screen menus help you install your Digital
photo frame, adjust picture and set other
features.
Access the Main menu4.1
Press 1. Mode to display the main menu.
The following menu displays:
Slideshow Source Calendar
Clock File Management Setup Menu
The main menu offers the following options:
Slideshow:• Use the Slideshow function to
profound the photos.
Source:• Use the Source function to view
which storage type you are using now.
Calendar:• Use the Calendar function to
show/display the year and moon on the
displayed.
Clock:• Use the Clock function to set the
time that will be displayed on the LCD
screen.
File Management:• Use the File
Management menu to browse, delete or
add a selected picture into My Favorite
folder.
Setup Menu: • Use the Setup Menu
function to adjust the system settings to
display system information.
Press 2. Mode to select other modes.
Access the Slideshow menu4.2
Press 1. Mode to enter the main menu and
select Slideshow.
Press 2. Enter key to access the Slideshow.
The Slideshow menu is displayed:
Pause 1x
The Slideshow menu offers the following
options:
• Pause (Play): Play/Pause
• Previous: Previous Image
• Next: Next Image
• Zoom: Change Zoom Ratio for the
Current Image
• Rotate: Rotate current image
clockwise by 90°
• Copy: Copy Current Image to
Favorite
• Delete: Delete Current Image
• Thumbnail: Thumbnail Browsing
Mode
• Wallpaper: Set as Background Image
Press 3. < or > to select a setting.
Press 4. Enter key to confirm.
Press 5. Mode to exit.
ENGLISH
Page 10
EN-10
Access the Source menu4.3
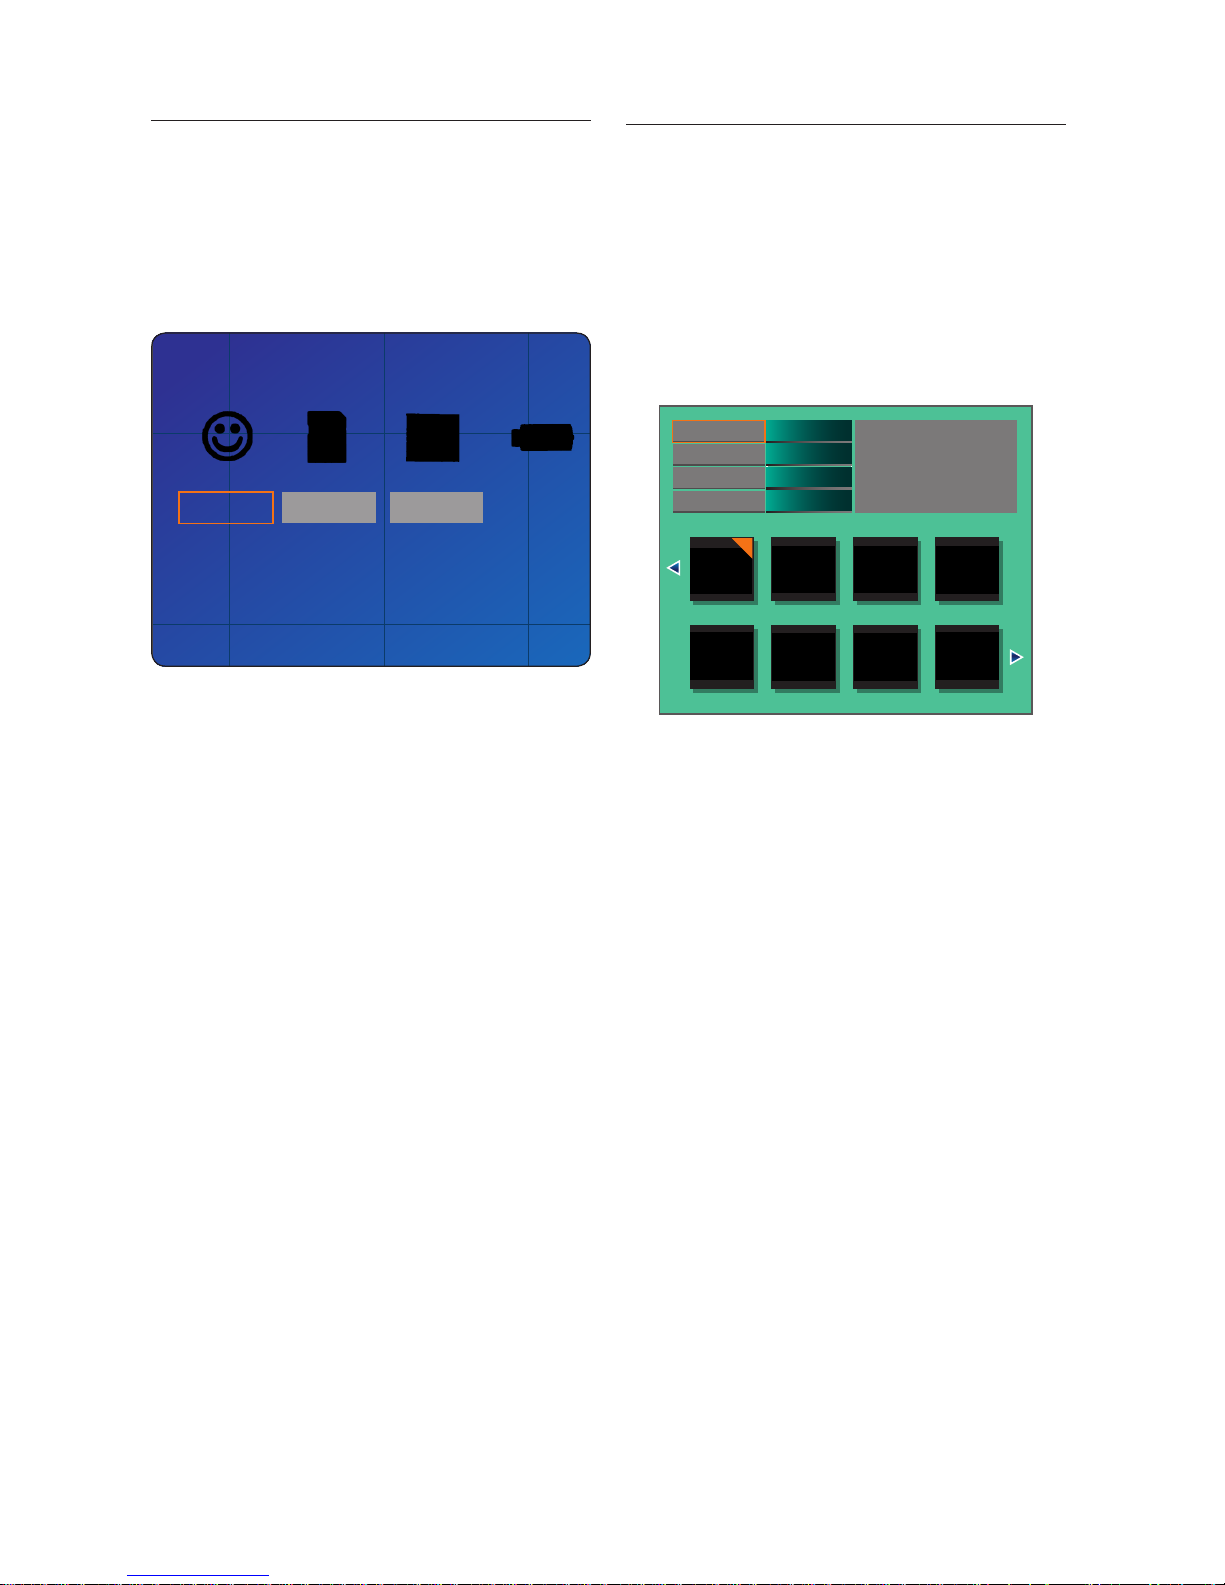
Press 1. Mode to access the main menu and
select Source.
Press 2. Enter key to access the Source.
The Source menu is displayed:
Favorite CFSD USB
The Source menu offers the following options:
Favorite:• Select Favorite as Source
SD:• Select SD (MS/ MMC ) as Source
CF:• Select CF as Source
USB: • Select USB as Source
Press 3. < or > to select a setting.
Press 4. Enter to confirm.
Press 5. Mode to exit.
Access the File Management 4.4
menu
Press 1. Mode to access the main menu and
select File Management:
Press 2. Enter key to access the File
Management menu.
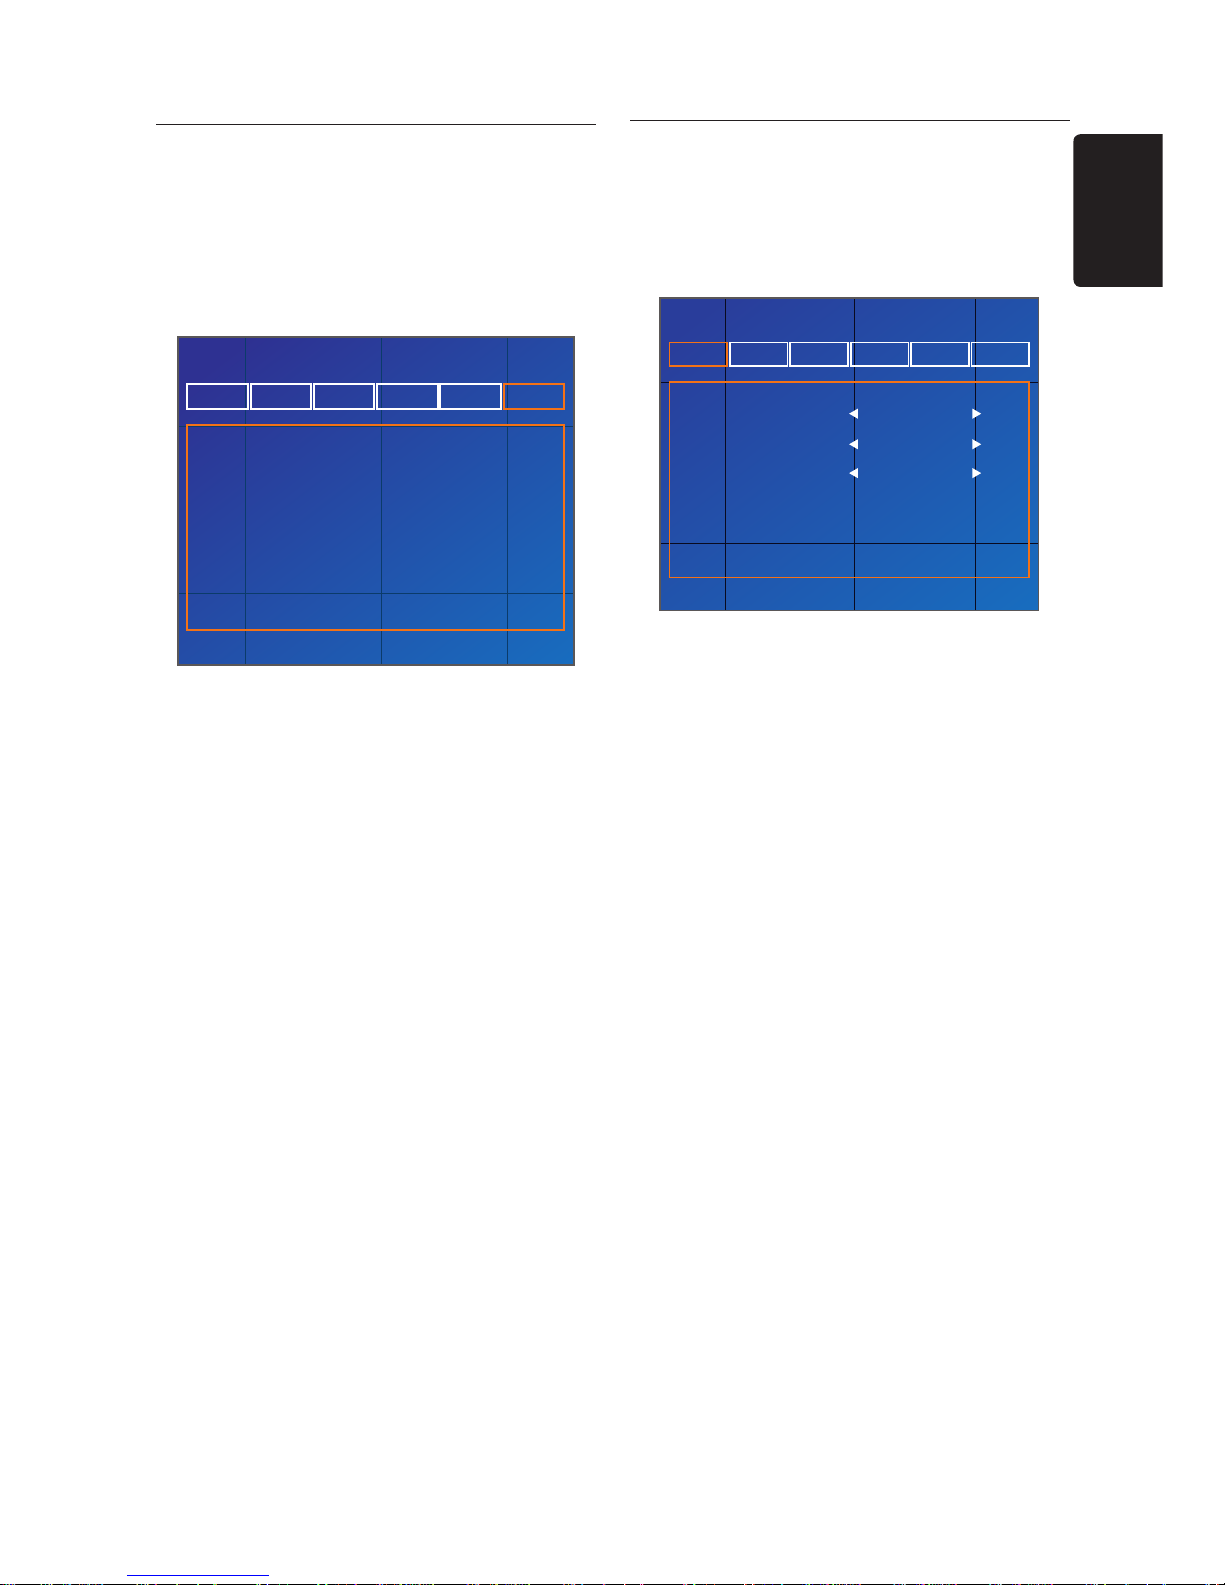
The File Management menu is displayed:
Copy To
Move To
Delete
Clear All Selection
Favorite
SD
CF
USB
The Slideshow menu offers the following
options:
Copy to:• Copy Selected Image to…
Move:• Move Selected Image to…
Delete:• Delete Selected Image
Clear All Selections:• Clear selected Image
Mark
Press 3. < or > to select a setting.
Press 4. Enter to confirm.
Press 5. Mode to exit.
Page 11
EN-11
4.5 Access the Setup Menu
Press 1. Mode to access the main menu and
select Setup Menu:
Press 2. Enter to access the Setup Menu.
The Setup Menu is displayed:
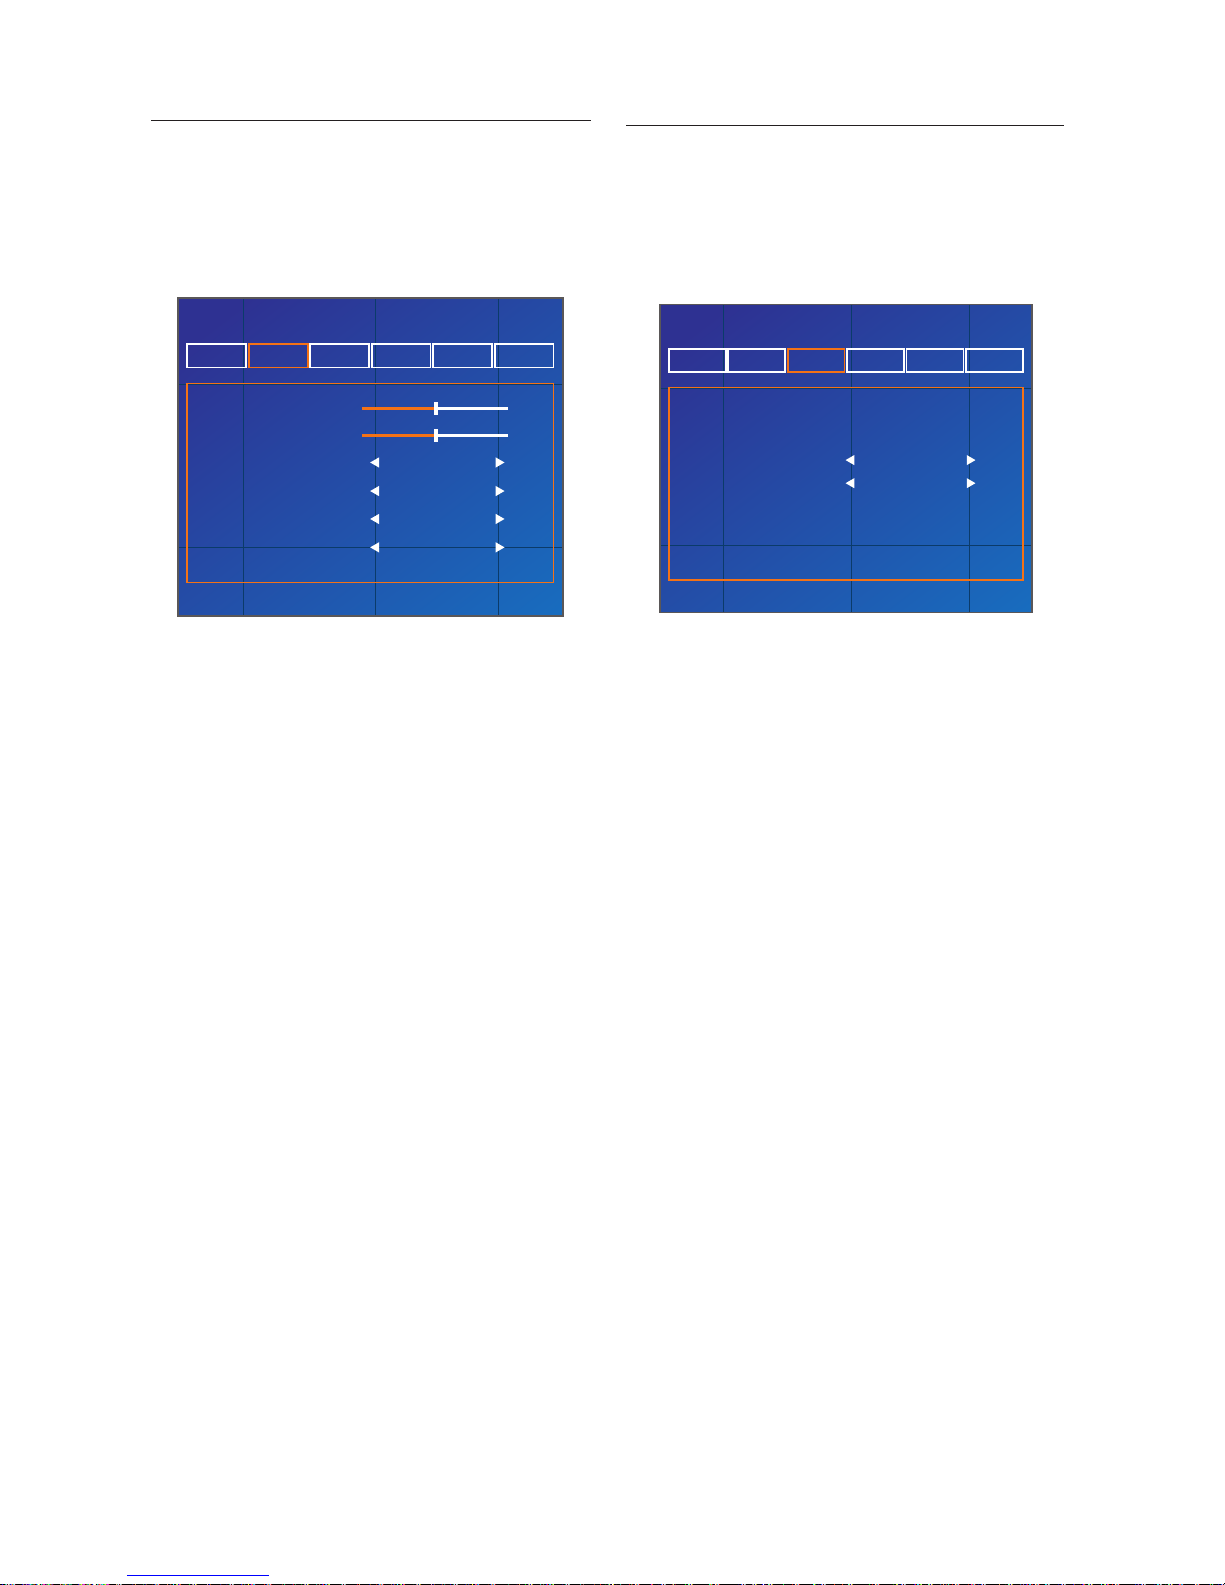
Slideshow Display Calendar Misc. Default Status
Free Momory Bytes
F/W
25038848
V0.37 V0.9C
The Setup Menu offers the following options:
Slideshow•
Display•
Calendar•
Misc.•
Default•
Status•
Press 3. < or > to select a setting.
Press 4. Mode to exit.
4.5.1 Adjust Slideshow settings
Press 1. Enter to access the Setup Menu and
select Slideshow.
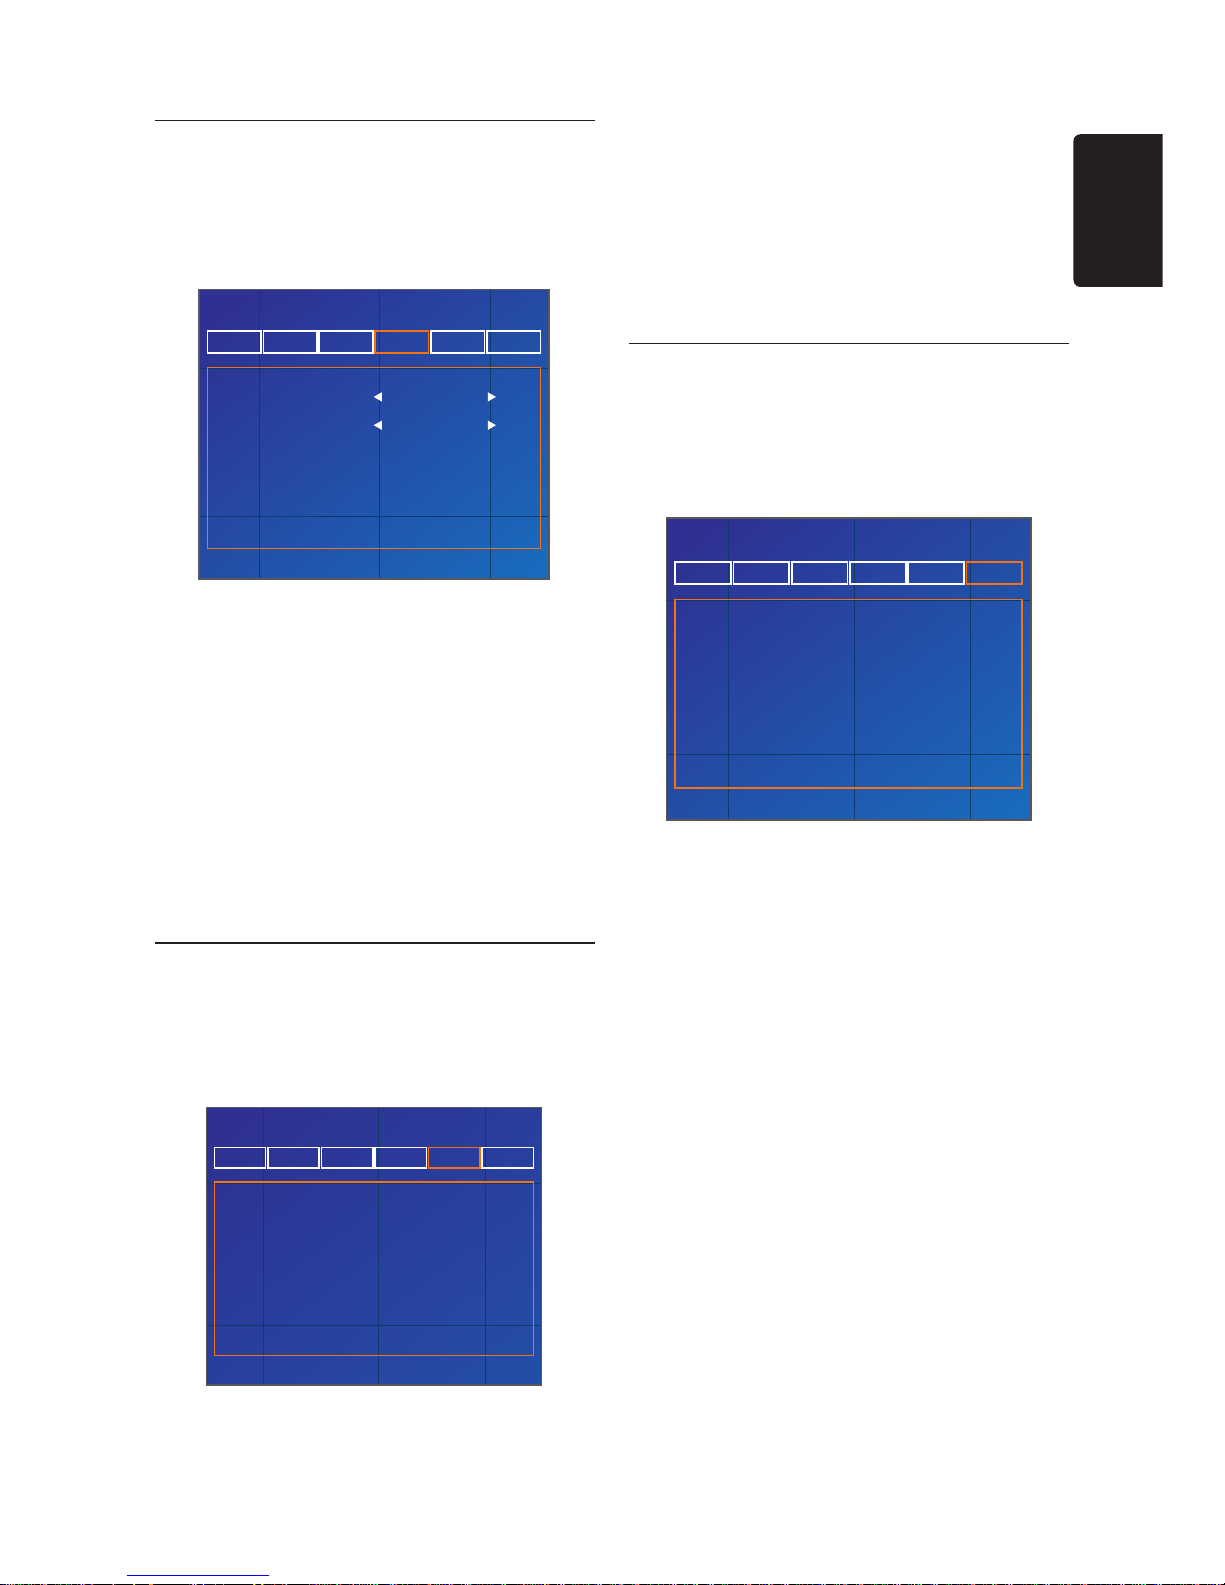
The Slideshow menu is displayed:
Play Mode
Interval
Transition effect
Sequential
5 Sec
Random
Slideshow Display Calendar Misc. Default Status
Description of Slideshow settings:
Play Mode:• Image Play Mode Selection
(Sequential, Random)
Interval:• Image Play Time Selection (OFF,
5 sec, 10 sec, 30 sec, 1min, 5min, 30min,
1hr, 4hr, 12hr, 1day).
Transition:• Image Transitions Selection
(None, Fade, Shutter, Cross comb, Mask,
Brick, Dissolve Bar, Random)
Press 2. < or > to confirm.
Please 3. V or Λ to select the setting.
Press 4. Mode to exit.
ENGLISH
Page 12
EN-12
4.5.2 Adjust Display settings
Press 1. Enter to access the Setup Menu and
select Display.
The Display menu is displayed:
Contrast
Brightness
Show Effect
Auto Tilt
Language
Wallpaper
No Effect
OFF
English
Default
Slideshow Display Calendar Misc. Default Status
Description of Display settings:
Contrast:• Contrast Ratio Adjustment.
Brightness:• Brightness Adjustment.
Show Effect:• Image Effects Selection
(None, Rich, Vivid, Black and White, Sepia).
Auto Tilt:• Image Auto Position
Adjustment Selection (On or Off).
Language:• Language Selection
(English, Français, Deutsch, Italiano,
Español,Русский,Brazilian Portuguese,
Portuguese).
Wallpaper:• Background Image Mode
Selection (Default, User).
Press 2. < or > to confirm.
Press3. V or Λ to select the setting.
Press 4. Mode to exit.
4.5.3 Adjust Calendar settings
Press 1. Enter to access the Setup Menu and
select Calendar.
The Calendar menu is displayed.
Date
Clock
Calendar Display Mode
Clock Display Mode
Power-on
Power-off
Alarm
Digital
Calendar + Picture
02 - 18 - 2008
17 : 46 : 43
12 : 00
12 : 00
12 : 00
OFF
OFF
OFF
Slideshow Display Calendar Misc. Default Status
Description of Calendar settings:
Date:• Date Adjustment (MM - DD -
YYYY).
Clock:• Clock Adjustment (HH: MM: SS).
Calendar Display Mode:• Calendar
Display Adjustment (Calendar+Picture /
Calendar+Clock).
Clock Display Mode:• Clock Display
Adjustment (Digital/ Graphic).
Power-On:• Auto Power-on time setting
(Off, On) - (HH: MM).
Power-Off:• Auto Power-off time setting
(Off, On) - (HH: MM).
Alarm:• Alarm Time Setting (Off, Once,
Everyday) - (HH: MM).
Press 2. < or > to confirm.
Please3. V or Λ to select the setting.
Press 4. Mode to exit.
Page 13
EN-13
4.5.4 Adjust Misc settings
Press 1. Enter to access the Setup Menu and
select Misc.
The Misc. menu is displayed:
Slideshow Display Calendar Misc. Default Status
Start-up mode
Beep
Slideshow
OFF
Description of Misc. settings:
Start-Up mode: • Display mode selection
for power on (Slideshow, Main menu,
Calendar, Clock).
Beep:• ON or OFF.
Press 2. < or > to confirm.
Please3. V or Λ to select the setting.
Press 4. Mode to exit.
4.5.5 Restore to Default settings
Press 1. Enter to access the Setup Menu and
select the Default.
The Default menu is displayed:
Slideshow Display Calendar Misc. Default Status
ON
Press 2. V or Λ to select the setting.
Press 3. Enter to confirm.
Select 4. Yes or No and press Enter.
System will restore to the default setting if 5.
Yes is selected.
Press 6. Mode to exit.
4.5.6 View Status
Press 1. Enter to access the Setup Menu and
select Status.
The Status menu is displayed:
Slideshow Display Calendar Misc. Default Status
Free Momory Bytes
F/W
25038848
V0.37 V0.9C
Description of Status settings:
Free Memory:• Free memory
F/W:• Firmware version
Press 2. Mode to exit.
ENGLISH
Page 14
EN-14
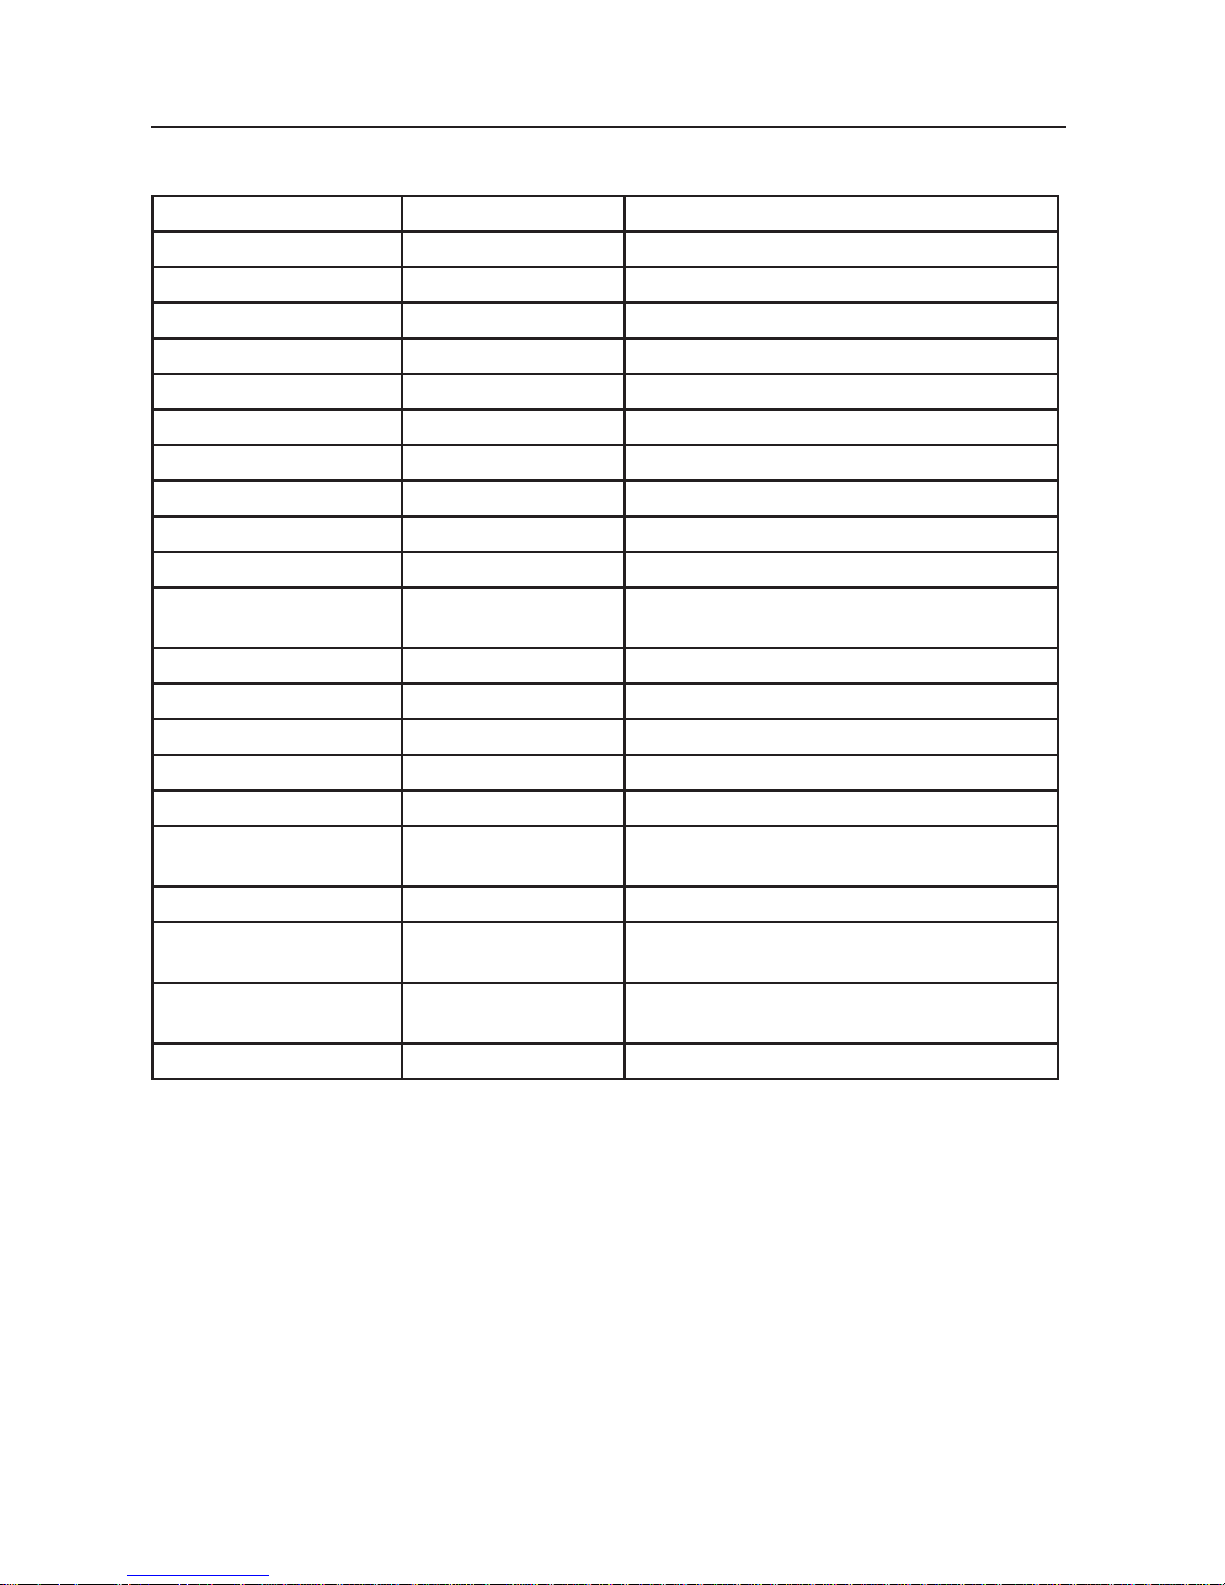
Specifications5.
LCD Panel Display Size/Type 10.2” W
Panel Resolution 1024x 600
Aspect 16:9
System Memory System 256MB
Firmware 7 MB
Available 249 MB
Local Keys Power Switch Key X 1
Key Control 6 keys
Connectivity USB 2.0 (OTG) 1
Card Reader SD/MS/MMC/CF
DC Power In 5V/2.5A
Photo Display Photo Display Single Picture/Thumbnails/Slideshow/Personal-
ized Frame
Supported Format JPEG
Display Orientation Portrait/Landscape
Other Features Automatic Pivot Auto Pivot
Clock Yes
Calendar Yes
Multi-language OSD
Support
English, Français, Deutsch, Italiano, Español,
Русский,BrazilianPortuguese,Portuguese.
GeneralSpecications Power Consumption 12.5 Watt (DC)
Dimensions
(without foot stand)
14.8" X 10.6" X 2.0"
(Width x Height x Depth)
Dimensions
(with foot stand)
14.8" X 10.6" X 5.3"
(Width x Height x Depth)
2.4 lbsNet Weight
 Loading...