


Table of Contents
Table of Contents……………………………………………………..………………………..… 2
Important Safety Precautions………………………………………..…………………….….… 3
Cleaning the LCD Screen
Cleaning the Digital Picture Frame
What
’
sintheBox…………………………………………………………………….
Identifying the Parts
Replacing Remote Control Battery …………………………….…………………………5
Product Specification…………………………………………….
Features
Specification
How to Use
Turning on and off
Connecting to PC……………………………………………….
Function Select Screen………………………………………….……………………….
Photo
Video……………………………………………………………………...
Music……………………………………………………………………...
Calendar………………………………………………………….……..……………... … . 9
File Manager
Setting
…………………………………………………………………………….....…….5
……………………………………………………………………………..
Yo ur
Digital Picture Frame…………………………….
……………………………………………………………………………………..
Slideshow Mode……………………………………………………….………………. 7
Thumbnail Mode
Single View Mode
Monthly Calendar
Calendar
Clock…………………………………………………………………………………..10
System Setup………………………………………………………………………..... 11
Photo Setup
Calendar Setup……………………………………………………………………. …. 11
Video Setup………………………………………………………………………..…. 11
Music Setup………………………………………………………………………. ….
…………………………………………………………………………...
…………………………………………………………………………...
…………………………………………………………………………………..
………………………………………………………………………..
...............................................................................................
.................................................................................
………..
……………………………………………………………………..
…………………………...
……………………….
………………………………………….………......
…………………
…………………………………………………………………...
…………………………………………………………………..…
…………………………………………………………………..
………….…..
...
……………..
……………. …
…..
…3
…4
…4
.… 5
…. 6
…. 6
….6
…. 6
….7
…. 7
…. 7
….. 8
.
.
…. 9
…. 10
…. 11
…. 11
…. 11
. 3
. 9
1
.7
1
About EzDisplay (Optional) …………………………………….
Install the Program
Install Device Driver
Progra m Working and Operating
Use of Application Program……………………………….
Program Status
Frequently Asked Questions………………………………………….………………….....….. 20
……………………………………………………………………
…………………….…
……………………...........17
.........12
.......19
...17
.

3
Important Safety Precautions
Always follow these basic safety precautionswhen using your Digital Picture Frame. This will
reduce the risk of fire, electric shock, and injury.
Warning:
Warning:
To
reduce the risk of fire or shock hazard, do not expose this product to rain or moisture.
To
prevent the risk of electric shock, do not remove the cover. There are no user-
serviceable partsinside. Refer all servicing to qualified personnel.
The Digital Picture Frame
Unplug the Digital
Do not block the ventilation holes on the back of the Digital Picture Frame at any time.
Keep your Digital Picture Frame out of direct sunlight and heat sources.
Protect the power cord. Route power cords so that they are not likely to be walked on or
pinched by items placed on or against them. Pay particular attention to the point where the
cord
is
attached to the Digital Picture Frame.
Only use theAC adapter included with the Digital Picture Frame. Using any other power
adapter will void your warran
Unplug the power cord from the outlet when the unit
is
for indoor use only.
Picture Frame before performing care and maintenance.
ty.
is
not in use.
Cleaning the LCD Screen
Treat the screen gently.
To
clean fingerprintsor dust from the LCD screen,itis
cloth such
as
a camera lens cloth to clean the LCD screen.
recommended to use a soft, non-abrasive
If you use a commercial LCD cleaning kit, do not apply the cleaning liquid directly to the LCD
screen. Clean the LCD screen with cleaning cloth moistened with theliquid.
Cleaning the Digital Picture Frame
Clean the outer surface of the Digital Picture Frame (excluding the screen) with a softcloth
dampened with water.
4
What’s inthe Box
DigitalPicture Frame
PowerAdapter
RemoteControl
USB cable
Stand
User
’sManual
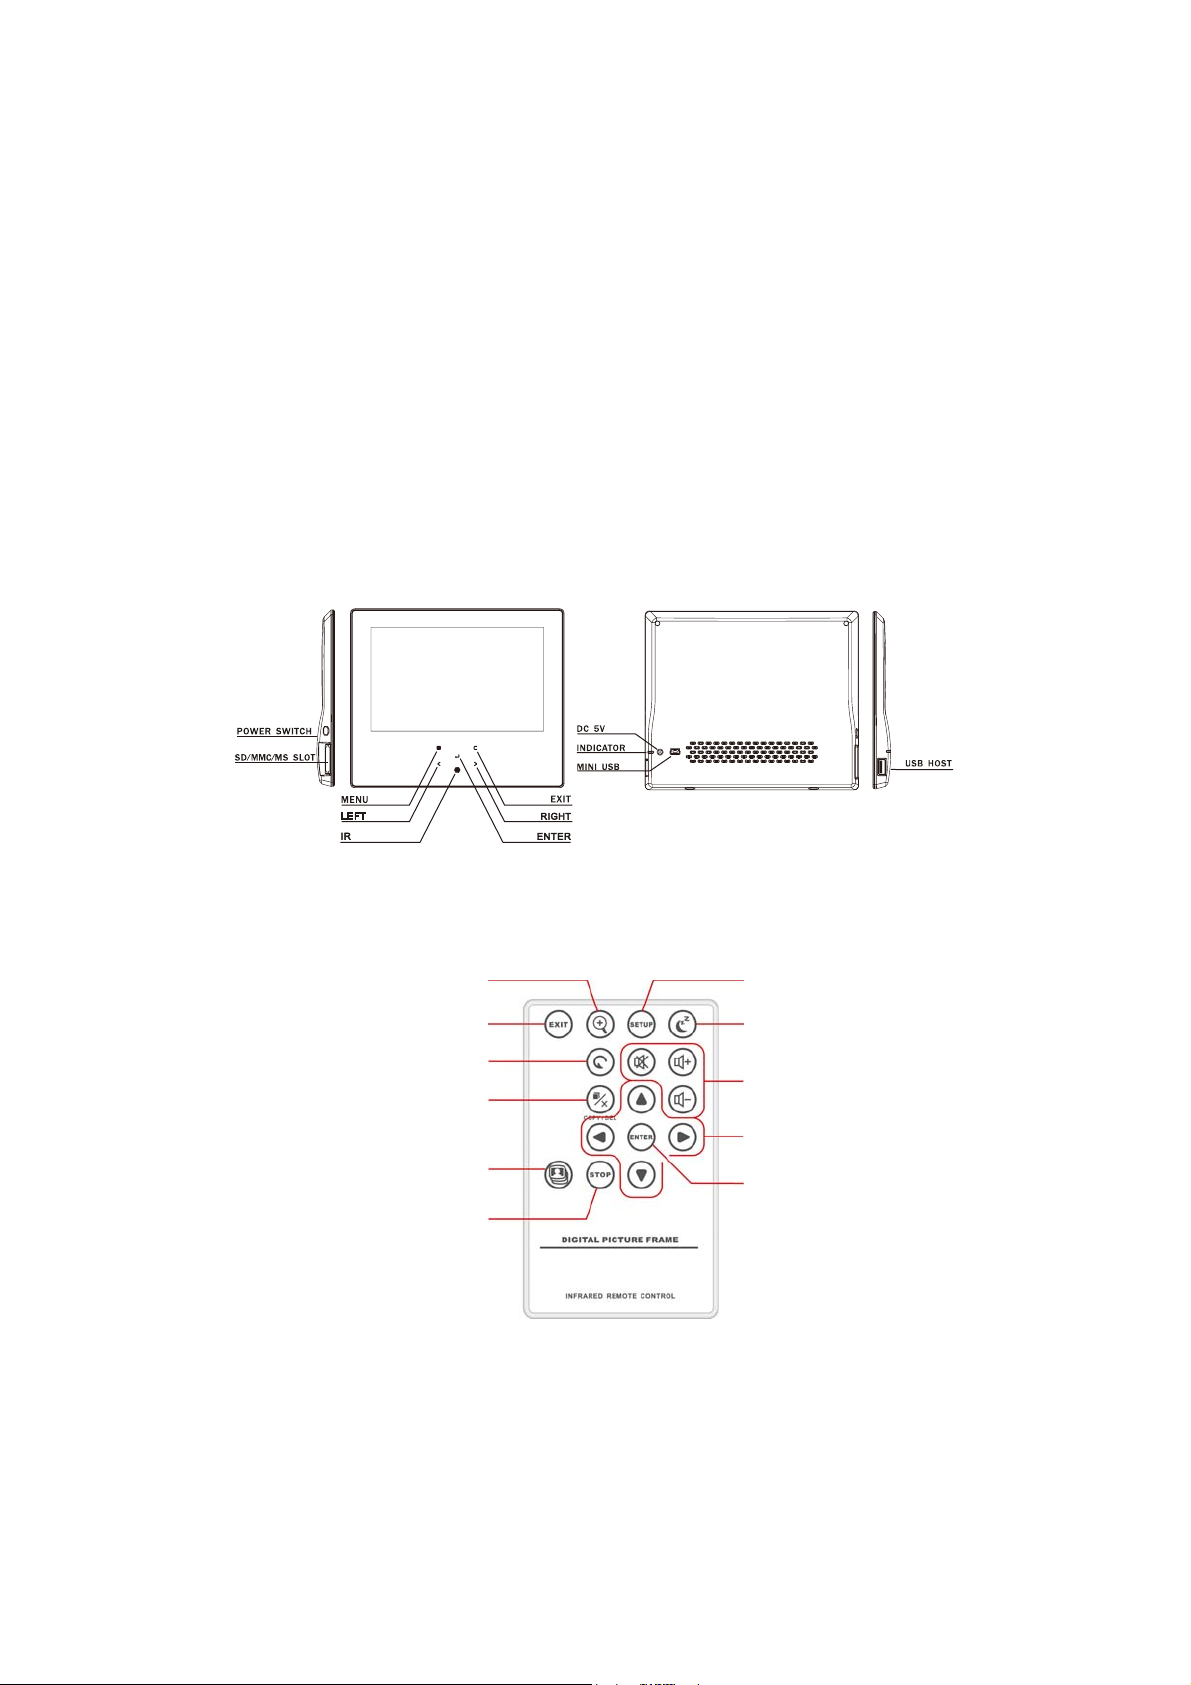
Identifying the Parts
=220 ,1
(;,7
527$7(
&23<'(/(7(
6/,'( 6+2:
6723
6(783
6/((3
92/80( &21752O
',5(&7,21 %877216
(17(5

5
Replacing Remote Control Battery
Warning
Battery may explode if mistreated. Do not recharge,
disassemble or dispose of in fire
If the remote control stops working or works improperly, replace the battery (CR2025 lithium
battery) with a new one.
1.
Pull out the battery holder.
2. Remove the old battery from the holder and then put a new battery with “+” facing up.
3. Insert the battery holder back to the remote control.
Notes
When the lithium battery becomes weak, the operating distance of the Remote Control
may shorten, or the Remote Control may not function properly. In this case, replace the
battery with a CR2025 lithium battery. Use of anotherbattery may present a risk of fire
or explosion.
Dispose the used batteries
Do not leave the Remote Control in a very hot and humid place.
Incorrect use of the battery may cause leaking and corrosion.
- When the Remote control will not be used for a long period of time, remove the
battery from the remote control to prevent leaking and corrosion.
- Incorrectly inserting, shorting, dismantling, or heating the battery, or throw
into a fire may cause the battery to rupture and leak.
as
specified by the local authorities.
Product Specification
Features
Support JPEG image formats
Zoom in, background music, and auto-slideshow with effects
Displays clock, monthly calendar
Auto-Crop
Auto-Resize
File Management
Supports USB update
ing
it
6
Specification
Product
Resolution
800x480pixel
Memory Card
Secure Digital™, Multi-Media Card™, Memory Stick™,
Image Formats
JPEG
AudioFormats
MP3
Video Formats
Motion JPEG,XVID,H.264
Sub-Display
Optional
USB Ports
USB 2.0 (Host) x 1, mini-USB x 1
PowerInput
AC100V~240V, 50~60Hz
PowerOutput
Internal
Certification
CE / FCC / RoHS
7’’Digital Photo Frame
Formats
Speakers
HowtoUse
Your
Turning on and off
To
turn the Digital Picture Frame on, just simply plug theACadapter toa wall outl
the Digital Picture Frame then switch the POWER switch to ON posit
POWERbutton, and the system will showsthe Function interface. *
Memory Stick Pro™, Memory Stick Duo™, Memory Stick Pro
Duo™ and USB flash drives
DC 5V / 1.5A
1W x 2
Digital PictureFrame
To
turn off theDigital Picture Frame, justswitch the POWERswitch to OFF po
press and hold the POWER button until the screen
* The power switch or the power button may vary from different models.
Connecting to PC
Atanytime connecting the Digital PictureFrame to thePC,itwill enter USB mode. The screen
will show themessage “connecting to PC”. In USB mode, the Digital Picture Frame functions
as
a
USB flash drive.
T
oexit USB mode, simply unplug the USB cable or pressESC key.
is
blackened. *
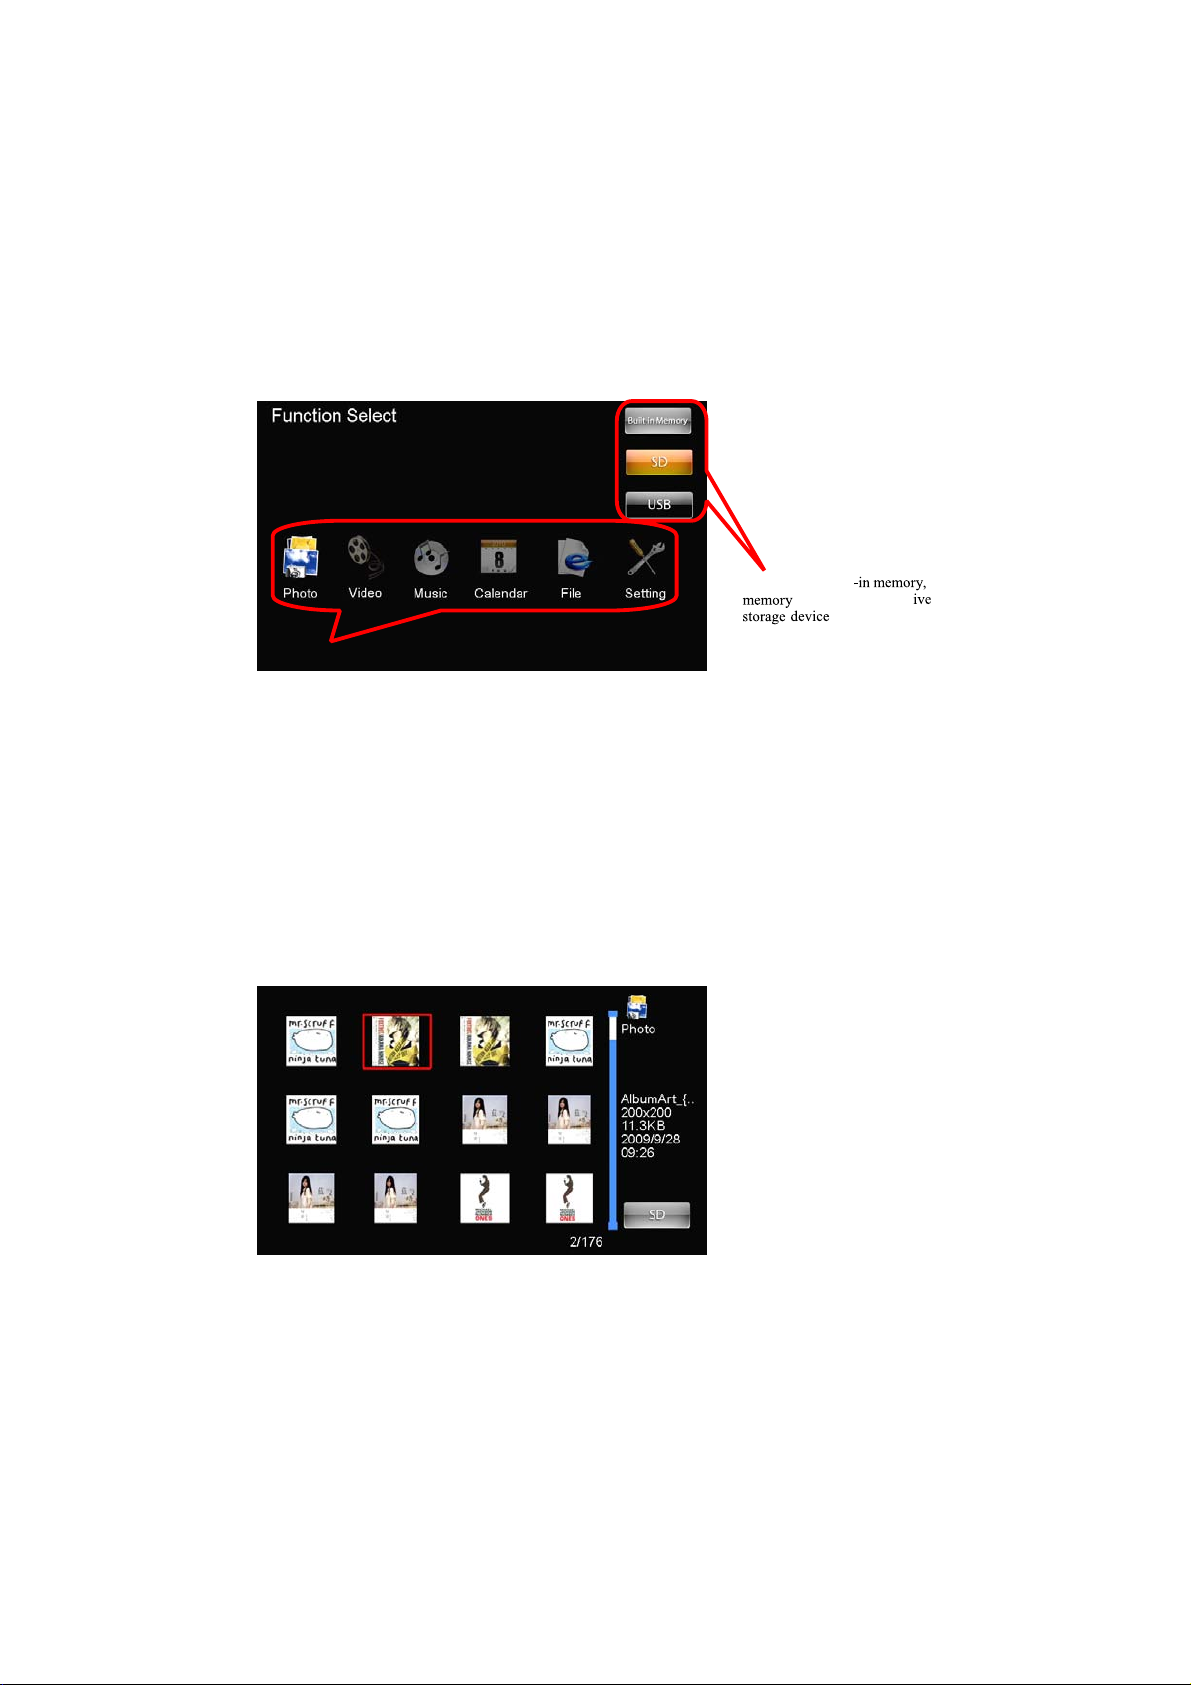
Function Select Screen
Feature Options
The Digital Picture Frame will enter the ode election creen when powered on. (The screen
may vary from differentmodels)
torage type: built
cards, or U mass
If there
is
no any operation for secondsin the ode election creen, the Digital Picture Frame
will start the slideshow automatically.
Photo
Sli esho o e the images are displayed one by one. Pressing the LID OW
button will start the slideshow.
display ratio in the etup menu by pressing TUP butto
ou can setup the display duration, effects, and image
n on the remote control. While
playing slideshow,press T R to switch from lide with music and lide photo
only .
is
hum nail o e the screen
split to portions the left portion shows the thumbnails
and the right portion displays the image information (image name, resolution, file size,
image created date etc)
Single ie o e select the desired image in Thumbnail mode and press T R to
display the image in full screen. The image will be displayed constantly. Press
L FT RI T button on the remote control to view last next image, or press C xit to
eturn to Thumbnail ode.
r

8
Vieo
utton
Function
TR
lideshow start slideshow music on(off)
TOP
xit to thumbnail
IT
xit to thumbnail
COP D L T
Copy Delete photos
elect ideo in Function elect creen will show the video file list.
File List
00.avi
Press T R to play the video file.
File Information
While playing the video, the playing time and the video length are shown
at
the bottom.

9
Music
Button
Function
EXIT
Exit to file list
LEFT
Backward
RIGHT
Fast forward
ENTER
Pause / Play
STOP
Stop the video
Button
Function
EXIT
Exit to Function Select Screen
LEFT
Last image
RIGHT
Next image
UP
Lastmonth
DOWN
Next month
Select Music in Function Select Screen and thescreen will show themusic filelist.
UseUP and DOWN buttons to select the file.
Press ENTER to play the music.
Calendar
Thereare 3 display modes: Monthly Calendar,Calendar and Clock.
A.Monthly Calendar
Theslideshow runs
January
at
right side
Sun Mon Tue
4 5 6 7 8 9 10
11 12 13 14 15 16 17
18 19 20 21 22 23 24
25 26 27 28 29 30 31
Wed Thu Fri Sat
1 2 3

. Calendar
The slideshow runs at right side
2010
IT
C. Clock
noitcnuFnottu
xit to Function elect creen
egamitsaLTFL
egamitxeTIR
htnomtsaLPU
htnomtxeWOD
IT
2010
noitcnuFnottu
xit to Function elect creen
htnomtsaLPU
htnomtxeWOD

File Manager
In Function Select Screen, select File Manager then press ENTER, the file list shows.
noitcnuFnottuB
EXIT Back to upper folder / Exit to Function Select Screen
elifdrawpuehttceleSPU
DOWN Select the downward file
COPY/DELETE Copy/Delete Files
mrifnoCRETNE
Setting
In Setting, you can setup the system, photo, calendar, video and music.
In the sub-setup menus, you can use below keys to change the settings.
noitcnuFnottuB
EXIT Back to upper folder / Exit to Function Select Screen
UP Select the upward setting
RIGHT Select the downward setting
LEFT/RIGHT
A. System Setup
Here you can adjust Backlight, Brightness, Gamma, Hue, Language,Auto-Power On/Off,
Auto-Power Frequency, and Reset.
B. Photo Setup
Here you can change the photo Display Mode,
Effect, Slideshow Repeat, Clock, Resize, Cu
C. Calendar Setup
Here you can change the calendar Display Mode
Alarm.
D. Video Setup
Display Mode and Play Mode can be modified here.
E. Music Setup
Music Effect and Play Mode can be modified here.
Change setting value
11

About EzDisplay (Optional)
EzDisplay is a PC software based on Windows (Windows XP™, Windows Vista™), with rich
your PC or Laptop. EzDisplay supports Unicode and Multi-Language according to your OS
configuration.
1. Install the Program
Double-click the icon of Ezdisplay Setup.exe to install program, see as following:
Step1
Step2
12

Step3
Step4
13

Step5
Step6
14

Step7
Step8
Plug DPF and connect device to the PC when
automatically install device driver .
Note
as following:
15

2. Install Device Driver
During installation, it needs two driver programs which are SubVGA driver (As
figure Step9 signs :reset the PC) and USB device driver(Automatically search the
program and unnecessary restart PC once USB device driver was connecting )
a. The SubVGA driver serves for external display (DPF as secondly monitor). You
would find the “Cordon Sub-Display” in the deskt
As following::
NOTE : Selected the “(Default Monitor) on Cordon Sub-Display”, then click the
“Extend my Windows desktop onto this monito
will display the same desktop of the PC unde
icon). In case of blank screen is showing on DPF, please check
Only under the particular situation: It needs quit the system if ava
it is unworkable.
b
. Install USB device driver is for getting through the connection by PC and DPF.
Please make correct connection of DPF and PC, and the driver can be well installed.
16
3. Program Working and Operating
3.1. Use of Application Program
At main menu
of DPF
to select “System setup”, click “ENTER”,
are three options at this step(Left/Right for choosing) .
A.Mass Storage
connected to PC.
B. Display:
monitor).
NOTE:
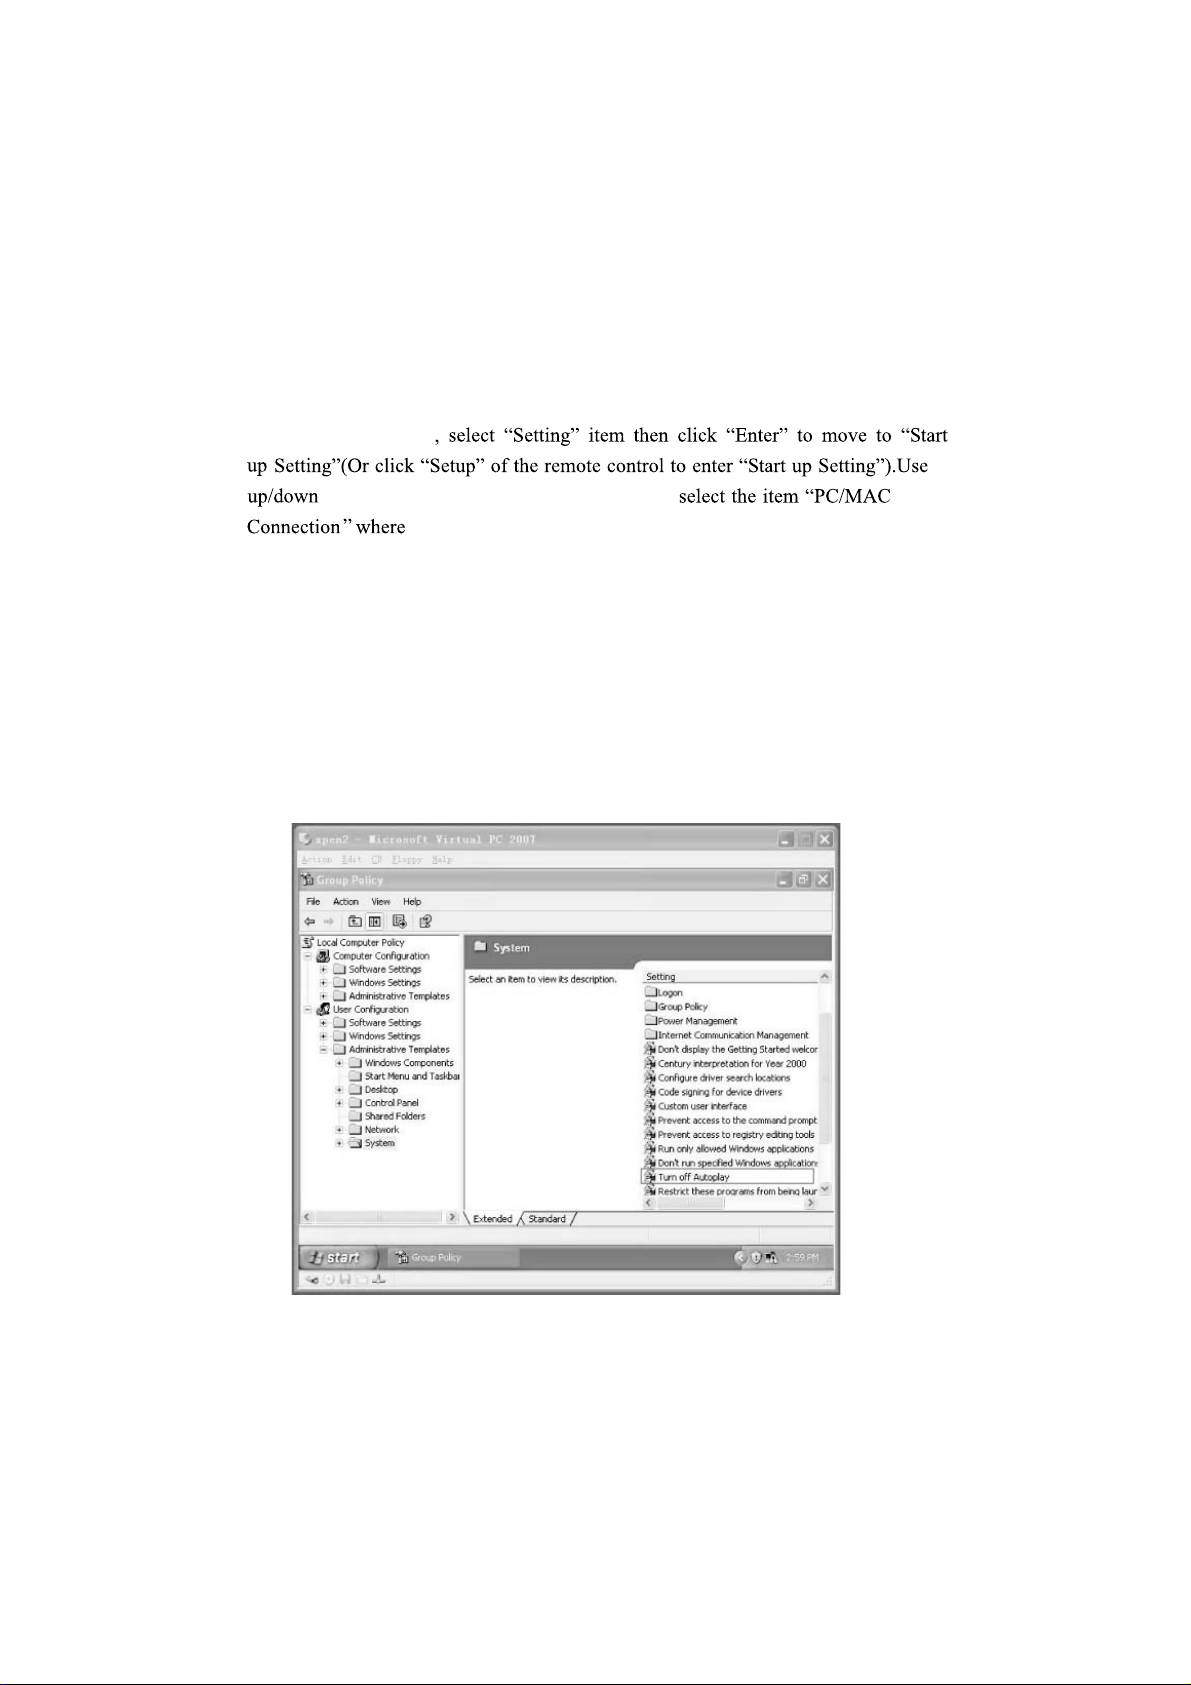
STAR-RUN-Input gpedit.msc to go to Group Policy to check the setting, see as
following:
TheAutomatic run function of PC should keep working, then enter into
: Select this function, DPF will become a memorizer after USB
Select this function, DPF will be an external display (DPF as secondly
Figure
1
17

Click the right button of the mouse, see as following::
Figure
Choose Attribute - click the left button of the mouse, see as following:
Figure 3

NOTE Automatic run function of PC
:If
C.Always Ask :
a questioning icon, click "up or down" to go
(DPF as secondly monitor).
Setup this function, once DPF is
ˊProgram Status
left side with two status: disconnecting or connecting. See as following:
Status of disconnecting
Status of connecting
19

Frequently Asked Questions
Q: How do I set up my Digital Picture Frame?
A: It is very simple to get you Digital Picture Frame out of the box and running in just a few
minutes. Just plug the power adapter into the Digital Picture Frame and into a standard wall
socket. Insert a memory card into the appropriate card slot on the side of the Digital Picture
Frame and turn it on. Your first slideshow will automatically start to play.
Q: What memory cards can the Digital Picture Frame read?
A: Compatible memory cards include Secure Digital™, Multi-Media Card™, Memory Stick™,
Memory Stick Pro™, Memory Stick Duo™, and Memory Stick Pro Duo™.
Q: I set up the Digital Picture Frame; why does it not turn on?
A: The adapter may be not securely connected to the Digital Picture Frame or wall socket, or
the Power Switch may not be on. Please check if the adapter is properly plugged to the
Digital Picture Frame and the wall socket.
Q: I have a memory card in the Digital Picture Frame; why can’t I view my photos?
A: First, check whether the memory card is one of listed above and the images are one of the
formats listed in the Specification on page 6. Second, turn the Digital Picture Frame off
and make sure that the memory is inserted all the way into the card slot and is facing the
correct direction. Third, turn the Digital Picture Frame on; you should see the Function
Select Screen. Press EXIT and the yellow Built in Memory icon on the right side enlarges.
Photo, the slideshow starts(factory default).
Note: Some digital cameras save images in other fo
your photo format is not listed in the specification.
Q: Why is the picture display slower with some pictures and faster with others?
A: Higher resolution pictures will be loaded slowly. Try to use lower resolution pictures or
down sampling your images. See your camera’s operating manual for
your photos.
Q: Does the Digital Picture Frame support all JPEG files?
A: No. The Digital Picture Frame supports the J
read all images files downloaded from the Internet or from other graphic applications.
20

Changes or modifications not expressly approved by the party responsible for
compliance could void the user's authority to operate the equipment.
This equipment has been tested and found to comply with the limits for a Class
B digital device, pursuant to Part 15 of the FCC Rules. These limits are
designed to provide reasonable protection against harmful interference in a
residential installation. This equipment generates uses and can radiate radio
frequency energy and, if not installed and used in accordance with the
instructions, may cause harmful interference to radio communications.
However, there is no guarantee that interference will not occur in a particular
installation. If this equipment does cause harmful interference to radio or
television reception, which can be determined by turning the equipment off and
on, the user is encouraged to try to correct the interference by one or more of
the following measures:
-- Reorient or relocate the receiving antenna.
-- Increase the separation between the equipment and receiver.
-- Connect the equipment into an outlet on a circuit different from that to which
the receiver is connected.
-- Consult the dealer or an experienced radio/TV technician for help
 Loading...