


Table of Contents
Table of Contents…………………………………………………………..2
Important Safety Precautions.......................................................3
Cleaning the LCD Screen………………………………………........3
Cleaning the Digital Picture Frame………………………………....3
What's in the Box…………………………………………………………...4
Identifying the Parts…………………………………………………..4
Replacing Remote Control Battery………………………………….5
Product Specification……………………………………………………...6
Features………………………………………………………………...6
Specification…………………………………………………………...6
Using the Digital Picture Frame……………………………………….....7
Select Mode…………………………………………………………….7
Card Selection………………………………………………………....7
Photo…………………………………………………………………….8
Music…………………………………………………………………….8
Video…………………………………………………………………….9
File Management……………………………………………………...9
Time…………………………………………………………………....10
Frequently Asked Questions…………………………………………....11

Important Safety Precautions
Always follow these basic safety precautions when using your Digital Picture
Frame. This will reduce the risk of fire, electric shock, and injury.
Warning: To reduce the risk of fire or shock hazard, do not expose this
product to rain or moisture.
Warning: To prevent the risk of electric shock, do not remove the cover.
There are no user-serviceable parts inside. Refer all servicing to
qualified personnel.
The Digital Picture Frame is for indoor use only.
Unplug the Digital Picture Frame before performing care and
maintenance.
Do not clock the ventilation holes on the back of the Digital Picture
Frame at any time.
Keep your Digital Picture Frame out of direct sunlight and heat sources.
Protect the power cord. Route power cords so that they are not likely
to be walked on or pinched by items places on or against them. Pay
particular attention to the point where the cord attaches to the Digital
Picture Frame.
Only use the AC adapter included with the Digital Picture Frame.
Using any other power adapter will void your warranty.
Unplug the power cord from the outlet when the unit is not in use.
Cleaning the LCD Screen
Treat the screen gently.
To clean fingerprints or dust from the LCD screen, it is recommended to use
a soft, non-abrasive cloth such as a camera lens cloth to clean the LCD screen.
If you use a commercial LCD cleaning kit, do not apply the cleaning liquid
directly to the LCD screen. Clean the LCD screen with cleaning cloth
moistened with the liquid.
Cleaning the Digital Picture Frame
Clean the outer surface of the Digital Picture Frame (excluding the
screen) with a soft cloth dampened with water.
3
What's In the Box
Digital Picture Frame
Power Adapter
Remote Control
USB Cable
User's Manual
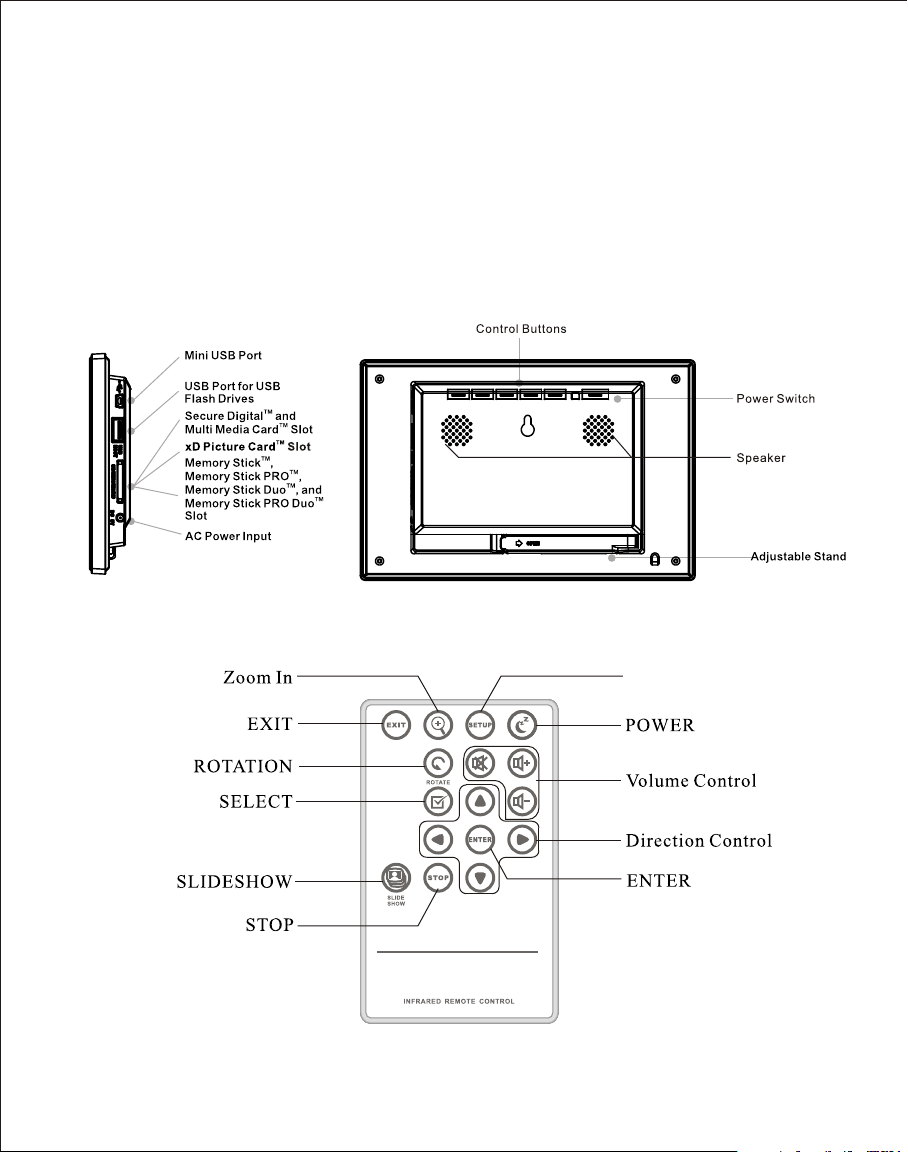
Identifying the Parts
DIGITAL PICTURE FRAME
4
SETUP

Replacing the Remote Control Battery
If the remo te contr ol stops working or works imprope rly, replace th e batter y
(CR2025 l ithium b attery) with a new one.
1. Pull out th e batter y holder.
2. Remove the old battery from t he holde r and then put a new battery with
“+” facin g up.
3. Insert the batter y holder b ack to the remote control.
Warning
Battery may explode if mistreated. Do not recharge,
disassemble or dispose of in fire
Notes
When the li thium ba ttery becomes weak, the operati ng dista nce of the
Remote Co ntrol may shorten, or the Remote Co ntrol ma y not function
properl y. In thi s case, replace the battery with a CR 2025 lit hium bat tery.
Use of another battery may present a risk of fir e or explosion.
Dispose t he used ba tteries as specified by the local a uthori ties.
Do not leav e the Remo te Control in a very hot and humid plac e.
Incorre ct use of th e battery may cause leaking and cor rosion .
- When the Re mote con trol will not be used for a long period o f time,
remove the battery from the remote c ontrol t o prevent leaking and
corrosion.
- Incorre ctly ins erting, shorting, dismantli ng, or hea ting the battery,
or throwi ng it into a fire may cause the battery t o ruptur e and leak.
5

Product Specification
Features
Support s JPEG and B MP ima ge forma ts
Image rot ation, z oom in, background music
Display f iles by na me or by date
ArcSoft ™ effects: Dyn amic Lig hting, Face Beautify, and Face Tracking
Specification
Product
Resolut ion
Memory Ca rd
Formats
Image For mats JPEG, BMP, PNG, GIF, TIFF
Audio For mats MP3, WAV, WMA, AAC
Video Formats MPEG1/2/4, M-JPEG, AVI, Divx
USB Ports USB 2.0 (Ho st) x 1, min i-USB x 1
Power Inp ut AC 100V~2 40V, 50~60Hz
Power Out put DV 5V / 2A
Interna l
Speaker s
Certifi cation
7” Digita l Photo Fr ame
800 x 600 pix el
Secure Di gital™ , Multi-Media Card™,
Memory St ick™, Me mory Stick Pro™,
Memory St ick Duo™ , Memory Stick Pro Duo™,
and USB fla sh drive s
0.5W x 2
CE / FCC / RoHS
6

Using the Digital Picture Frame
After the D igital P icture Frame is turned on, the slid e show sta rts automatically
after 2 sec onds. Pr ess EXIT butto n to Select Mode screen.
Select Mo de
In Select M ode, you w ill see below screen. There are 6 options: Card Selection ,
Photo, Mu sic, Video, Fi le Manag ement, and Time.
Card Photo Music Video File Time
Card Selection
If there is not any memory card inserted, “Internal Memory” shows.
When the memory card is inserted, ex. SD card, the icon will change to
SD; if the MS card is inserted, the icon will change to MS. The card also
can be selected by pressing ENTER on the Card Selection icon.
7

Photo
By pressi ng SETUP, there ar e option s of File Sorting, Copy Photo(mem ory
card to int ernal memory), Delete Photo (fr om inter nal memory), Factory
Default , Select Card, Display Image Size , Magic Wi ndow, Sli deshow
Transiti on, Slideshow Speed, ArcSoft™ Sc reen Effect, a nd Adjust L CD Color.
By pressi ng ZOOM or ENTER once, the single pho to displ ays.
- Press ENT ER to start or pause the slideshow.
- Press ZOO M to zoom in the image.
- Press ROTATE to rotate the image 90 ° counte rclock wise.
- Press SEL ECT to select or u nselec t the image(s).
The selected images can b e copied o r deleted at one time.
Music
In Music, s lidesh ow plays while the music is playing . The music informatio n
and the pla y time are shown at the right side of the s lidesh ow. The control
buttons a re at the bottom. to
By pressi ng SETUP, there ar e option s of File Sorting, Copy Music (memo ry
card to int ernal memory), Delete Music (fr om inter nal memory), Factory
Default , Select Card, Audio Playback Repe at, and Se t As Alarm Mus ic.
To show the music file list, move to the mo st right c ontrol button and press
ENTER.
8

Video
In Video, the fil e list wil l be on the left side and the preview wil l be on the
right sid e.
Press ENT ER to play the video, RIGHT to forward, LEFT to backward, UP
to play las t video, and DOWN to play next video.
By pressi ng SETUP, there ar e options of File Sorting, Copy Mov ie (memo ry
card to internal memory), Delete Movie (in ternal m emory), Factory Default,
Select Ca rd, and Video Pl ayback Repeat.
In File, th e file list will be on the left side and the image pr eviews w ill be
shown on th e right side. For video and music fil es, only t he file information
will be sho wn on the right side.
Press ENT ER on video/music files to play the v ideo/m usic. Press ENTER
on image fi les to vie w the image on full screen; press ENT ER again t o
start the slideshow.
Press SEL ECT to s elect th e files.
By pressi ng SETUP, there ar e option s of Copy Files (memory card to
interna l memory ), Delete Files (internal memor y), Fact ory Default, and
Select Ca rd.
9

Time
In time, th e slide show plays at the left side, ca lendar s hows at the right
side, and t he time is displayed at the bottom.
When the al arm is set, the red alarm icon shows.
The date of t oday wil l be shown as yellow.
Press SET UP to se tup alar m, clock, and date, as shown below.
-Set the ala rm time du ration at the first block. The alarm will be ringin g
for every 3 , 5, or 10 min utes.
-Set the ala rm for onc e or daily at the second block.
10

Frequently Asked Questions
Q: How do I set u p my Digital Picture Frame?
A: It is very s imple to get you Digital Picture Fr ame out of t he box and running in
just a few mi nutes. J ust plug the power adapter into the D igital P icture Frame
and into a st andard w all socket. Insert a memory card in to the app ropriate
card slot o n the side o f the Digital Picture Frame and tur n it on. Your fi rst
slidesh ow will au tomatically start to play.
Q: What mem ory cards can the Digital Picture Frame rea d?
A: Compat ible mem ory cards include Secure Digita l™, Mult i-Medi a Card™,
Memory St ick™, Me mory Stick Pro™, Memory S tick Duo ™, Memory Stick Pro
Duo™, and C ompact F lash™.
Q: I set up the D igital Picture Frame; why does it n ot turn on ?
A: The adapter may be not sec urely co nnected to the Digital Picture Fr ame or wal l
socket, o r the Powe r Switch may not be on. Please check if t he adapt er is
properl y plugge d to the Digital Picture Frame and th e wall soc ket.
Q: I have a mem ory card i n the Digital Picture Frame; why ca n't I view my photos?
A: First, c heck whether the memory card is one o f the list ed above a nd the images
are one of th e format s listed in the Specification on pa ge 6. Seco nd, turn the
Digital P icture F rame off and mak e sure that the memory card is facing t he
correct d irecti on and is inserted all the way into the c ard slot a nd. Th ird, tur n
the Digit al Pictu re Frame on; you should see the Selec t Mode Scr een. Follow
the instr uction o f Card Selection to selec t your mem ory card.
Note: Som e digita l cameras save images in other form ats. Ple ase refer to your
camera' s manual i f your photo format is not listed in th e Specif ication.
Q: Why is the p icture display slower with some picture s and fast er with others?
A: Higher r esolut ion pictures will be loaded slowly. Try to use lower resoluti on
picture s or down sa mpling your images. See your came ra's ope rating m anual
for detai ls on down sizing your photos.
Q: Does the D igital P icture Frame support all JPEG fil es?
A: No. The Digital Pictur e Frame su pports the JPEG files taken by a digi tal
camera. I t may not read all image files downloaded fro m the Inte rnet or from
other gra phic app lications.
11

FCC warning statement
This equipment has been tested and found to comply with the limits for a Class B
digital device, pursuant to part 15 of the FCC Rules. These limits are designed to
provide reasonable protection against harmful interference in a residential installation.
This equipment generates, uses and can radiate radio frequency energy and, if not
installed and used in accordance with the instructions, may cause harmful interference
to radio communications. However, there is no guarantee that interference will not
occur in a particular installation. If this equipment does cause harmful interference to
radio or television reception, which can be determined by turning the equipment off
and on, the user is encouraged to try to correct the interference by one or more of the
following measures:
• Reorient or relocate the receiving antenna.
• Increase the separation between the equipment and receiver.
• Connect the equipment into an outlet on a circuit different from that to which the
receiver is connected.
• Consult the dealer or an experienced radio/TV technician for help
WARNING:
Changes or modifications to this unit not expressly
approved by the party responsible for compliance could
void the user’s authority to operate the equipment.
 Loading...