


7’’
User Manual
Digital Picture Frame


TABLE OF CONTENTS
Introduction................................................. 1
Packaging Contents...................................... 2
Using the Remote Control............................. 4
Viewing Media............................................. 5
Setting the Viewing Options.......................... 11
Adding Pictures from a Computer.................. 13
Cleaning the Digital Picture Frame................. 17
Technical Specifications................................ 18
Troubleshooting........................................... 19
Important Safety Instructions........................ 21
Warranty Information................................... 22

Welcome to the wonderful world of Digital Picture Frames! Now you can display your
digital photos directly from your memory card, without a computer. Simply insert a
memory card into the Digital Picture Frame and turn on the power. It’s as easy as that.
You can also display individual photos, play video clips, and play background music with
your slide show.
The Digital Picture Frame includes these key features:
Displays digital photos (JPEG) without a computer•
Simply insert a compatible memory card into the digital picture frame to display •
photos, play music or supported video files( memory card not included).
Compatible memory cards include Secure Digital•
StickTM, Memory Stick ProTM, Memory Stick DuoTM, Memory Stick Pro Duo
TM
, Mutlimedia CardTM, Memory
TM
and
xD Card.
Instantly plays music (MP3) with the integrated speakers (not included in all •
models)
Digital photo slide show with music background•
Displays JPEG images and motion JPEG files (AVI) taken on digital camera (varies •
by model)
Supports up to 12 Mega Pixel image files (JPEG format)•
Control the main functions with buttons on the frame or with the included infrared •
remote control
Bright TFT LCD screen•
USB 2.0 high-speed connection to your PC•
USB 2.0 (host) for connecting to your digital camera•
Built in memory (varies by models)•
Package Contents
To learn more about your new Digital Picture Frame’s features, and to take full
advantage of them, please take a few minutes to read this User’s Manual.
1
Digital Picture Frame•
AC Power Adapter (5V, 2A)•
User’s Manual•
Remote Control•
USB Cable (may not be included with select models)•
Setting up the Digital Picture Frame
The Digital Picture Frame is easy to set up. Just follow these steps:
1. Plug the AC Power Adapter into the Digital Picture Frame and into a wall outlet.
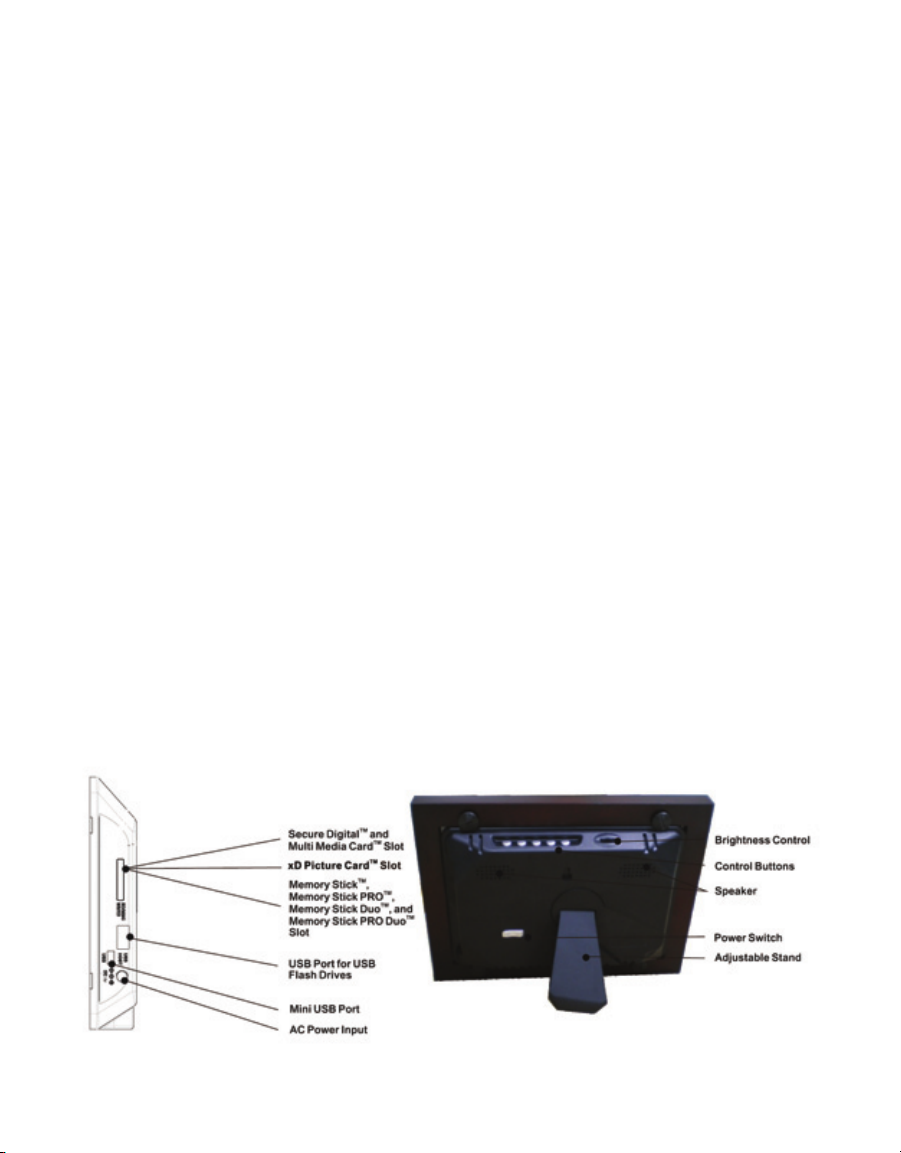
2. Insert a memory card into the appropriate slot.
Secure DigitalTM or Multimedia CardTM, Memory StickTM, Memory Stick ProTM,
Memory Stick DuoTM, Memory Stick Pro DuoTM, xD Picture Card
3. Pull out adjustable stand to adjust the viewing angle.
TM.
2

NOTE: The card will only fit in one direction; do not force it. The card should fit snugly
when properly inserted.
4. Slide the power switch to the “ON” position to turn the Digital Picture frame on. The
Digital Picture Frame will automatically start a slide show of the photos on the card.
5. To display photos individually, press the “EXIT” button to open the thumbnails screen.
Use the arrow buttons to choose a photo. Press the “PLAY” button (>/II) on top of
the Digital Picture Frame, or the “ENTER” button on the remote control.
NOTE: Pull the plastic tab sticking out of the remote control. It protects the battery and
the remote control with not work unless it is removed.
6. To restart the slide show, press the “PLAY” button(>/II) again or press the slide
show button on the remote control.
Using the Control Buttons and Remote Control
You can use all of the Digital Picture Frame’s features with either the buttons on top of
the frame or using the remote control.
Using the Control Buttons
The control buttons are located on top of the Digital Picture Frame. Their basic
functions are the same no matter what the current mode is.
Using the Remote Control
Installing and Replacing the Remote Control Battery
Button Action
<< Move the selection up or left, display the previous
photo, or select the previous file.
>II Select the highlighted option, start a slide show,
pause or play.
>> Move the selection down or right, display the next
photo or select the next file.
EXIT Exit the current display or go back a screen.
MENU Opens the OSD Menu MODE
3
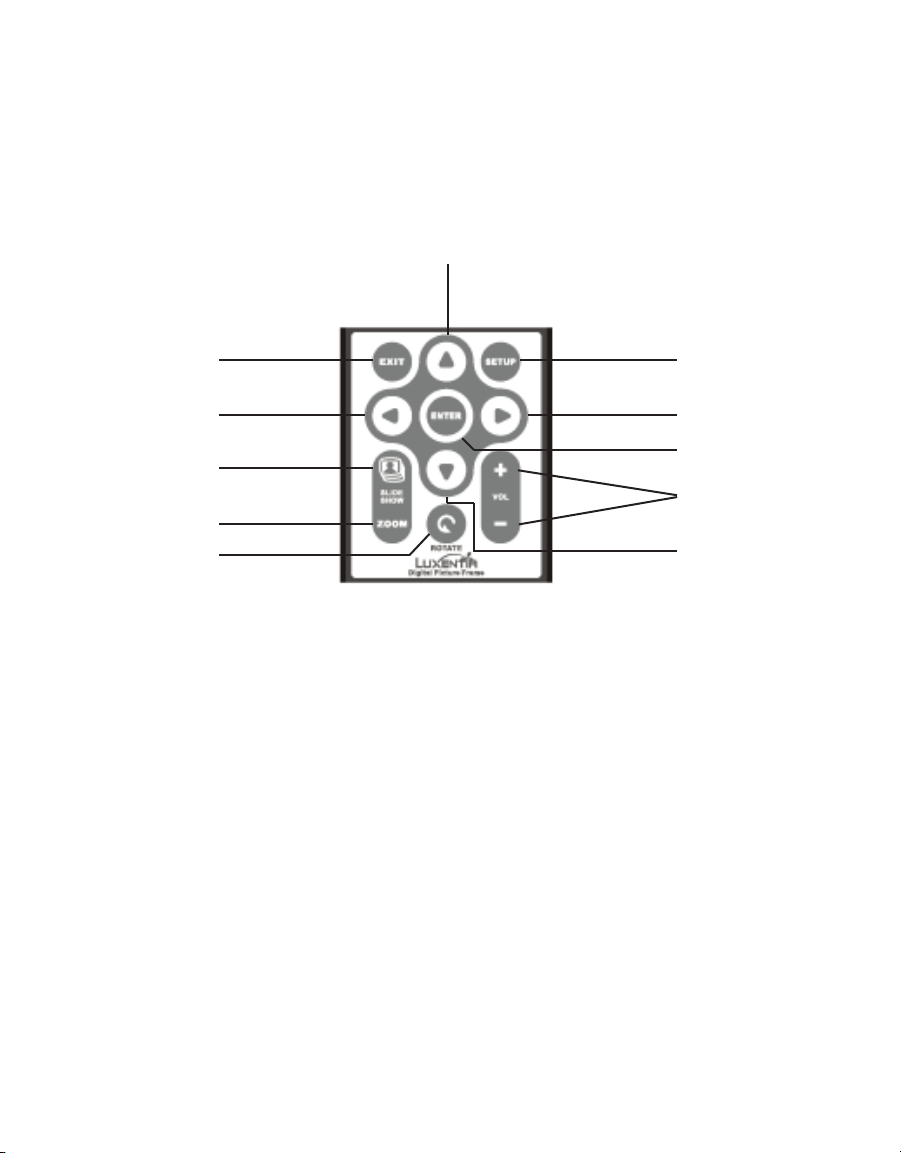
The remote control included with your Digital Picture Frame may look slightly different
from the one shown here, but it includes all of the same buttons and functions.
Up Arrow
Left Arrow
Slide Show
Zoom
Rotate
Exit
Setup
Right Arrow
Play/Pause/Enter
Volume +
Volume –
Down Arrow
1. Hold the remote control with the control buttons facing downward.
2. While pressing down the ridged area of the battery cover, pull the tray out.
3. Place a “CR2025” Lithium battery on the tray with the positive “+” end facing
towards you.
4. Close the tray.
4
You can control all of the Digital Picture Frame’s functions with the buttons on top of
the frame or with the remote control. To display the setup screen, you simply hold
down the “EXIT” button for a second, or press the “SETUP” button on the remote
control.
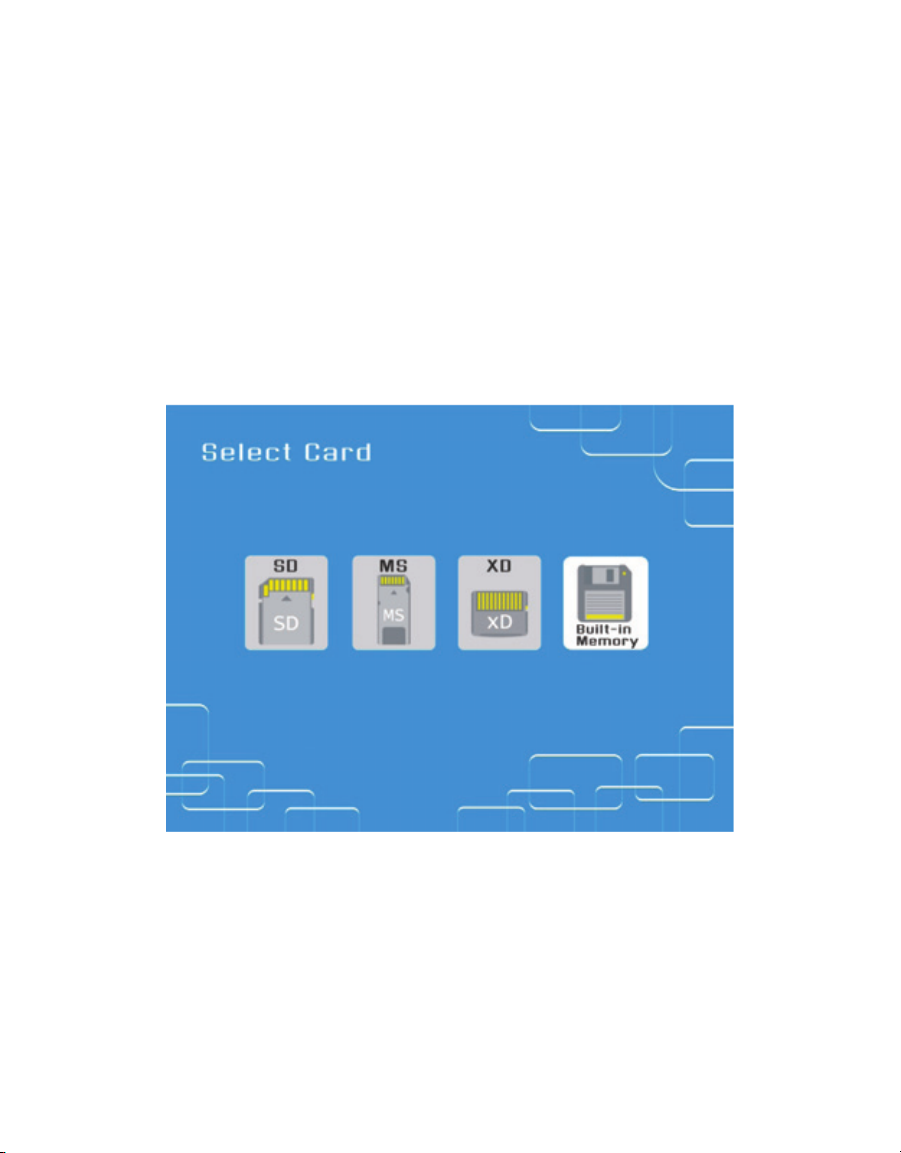
Card Selection Screen
Use the Card Selection menu to choose between memory cards and the built-in
memory (if its provided on your unit).
Mode Selection Screen
1. To open the card select menu, either insert a new card, or press the “EXIT” button
repeatedly to back through the screen until you see it.
2. Press the “LEFT” or “RIGHT” arrows to select the desired memory card or built in
memory.
3. Press “ENTER” to make the selection and to enter the “Mode Selection” screen.
4. The “built-in memory” icon only appears on models that come preloaded with
memory.
5
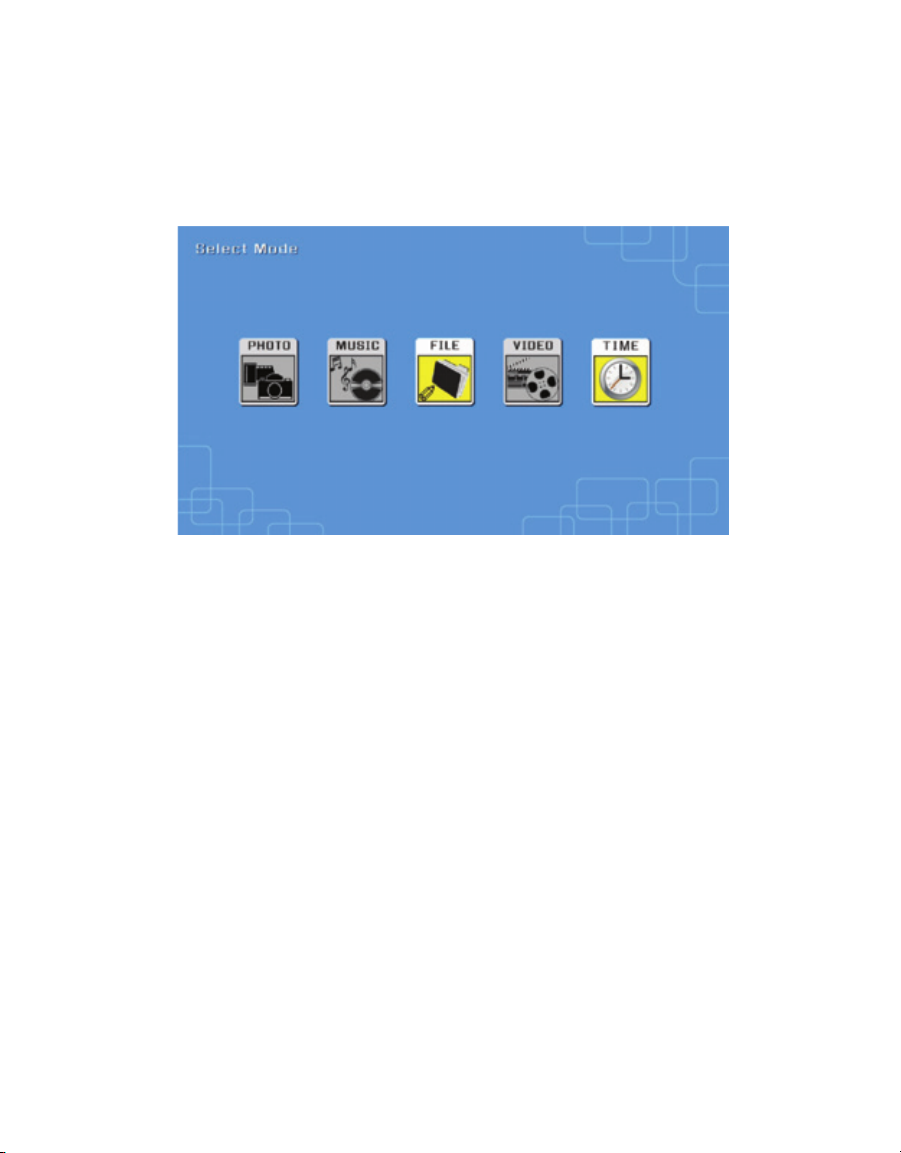
The Mode Selection Screen shows after you choose the memory source. Use it to
choose the type of files you wish to display.
Slide Show Run slide show
Photo Display JPEG still photos
Music Play audio files (varies by model)
Video Play motion JPEG AVI movies (varies by model)
Clock Clock and Calendar (varies by model)
1. Press the “LEFT” and “RIGHT” arrows using the buttons on the remote control or on
the Digital Picture Frame to select the mode.
2. Press “ENTER” to make the selection. If you selected PHOTO, the thumbnail screen
opens. It is described below.
NOTE: If you selected any of the other file types, a screen listing all of the files with
the chosen type will open. You simply select the files you want to play using the
arrow buttons and press “ENTER” to open the selected file.
3. To go back to the mode selection screen, press “EXIT”.
6

This screen shows thumbnail versions of all photos on the selected memory source; up
to 6 photos are displayed at a time. Use this screen to select a single photo to display,
or to start a slide show of all of the photos.
1. Press the arrow buttons on the remote control or on the Digital Picture Frame until
the desired photo is highlighted. The photo’s filename is displayed at the top of the
screen.
2. Press the “SLIDE SHOW” button to start a slide show.
3. To stop the slide show and return to the thumbnail screen, press the “EXIT” button.
Displaying a Single Photo
1. With the thumbnails screen displayed, press “ENTER” to display the selected photo
on the full screen.
2. Press the “LEFT” arrow to return to the previous photo.
3. Press the “RIGHT” arrow to display the next photo.
4. To stop the display and return to the thumbnail screen, press the “EXIT” button.
Controlling the Slide Show and Photo
The Digital Photo Frame provides many options for customizing the display and
managing files. These options are available when viewing the photos only.
Rotating a Photo
You can rotate a photo displayed full-screen using the remote control. Press the
“ROTATE” button to rotate the photo 90 degrees counterclockwise.
Enlarging a Photo
To magnify a photo displayed full-screen, press the “ZOOM” button.
The photo doubles in size each time you press the button until it is 16x its normal •
size. Then it will return to normal size
While the photo is in enlarged, use the arrow buttons to move the photos so you •
can see the portions that aren’t currently available.
7

Copying the Displayed Photo to the Built-In Memory
Use the remote control to copy the displayed photo from the memory card to the builtin memory. NOTE: This function is only available on models with built-in memory.
1. While vewing a photo, press the “SETUP” button.
2. Press the Up or Down arrow to select copy photo.
3. Press “ENTER”. A confirmation message is displayed.
4. Press “EXIT” to close the menu.
Deleting the Displayed Photo
Using the remote control to delete the currently displayed photo.
1. While viewing a photo, press the “SETUP” button.
2. Press the Up or Down arrow to select Delete Photo
3. Press “ENTER” and confirm the deletion.
CAUTION: The photo will be deleted immediately; you can not recover deleted photos.
4. Press “EXIT” to close the menu.
NOTE: You can also delete photos using the computer when the Digital Picture Frame
is connected to a computer. Simply delete unwanted files or photos off of the
internal memory (if available).
Adjusting the LCD Color
Choose this option to adjust the Brightness, Contrast, and color of the LCD display
while viewing a picture.
1. Press the “SETUP” button.
2. Press the “UP” or “DOWN” arrow to select adjust LCD color.
3. Press “ENTER”. A second menu should open.
4. Use the arrow buttons to select an option to adjust
5. When the display looks the way you want it to, press “EXIT” to close the menu.
8

Adding Music to the Slide Show
To add background music with a slide show copy audio files onto the same memory card
as your photos. The music will play as the slide show runs. See “Copying Files from a
computer” for details on copying files.
NOTE: Music files must be standard MP3 format.
NOTE:This function is only available on select models.
Copying the Displayed Photo to the Built-In Memory
1. When viewing a picture you wish to move to the built-in memory of the Digital Picture
Frame, press the “SETUP” button.
2. Using the up and down arrow buttons, select the “Copy Photo” option.
3. Press “ENTER” to confirm your selection.
4. Press “EXIT” to return to picture mode and to exit the menu.
NOTE: You can also delete photos from the thumbnail screen by pressing the “SETUP”
button and choosing the “Copy Photo” option.
NOTE: This function is only available on models with built-in memory.
Listening to Music
If there are music files on a memory card or in the built-in memory, you can play them on
the Digital Picture Frame.
1. Use the remote control to open the “SELECT MODE” screen and select “MUSIC”. A
new screen opens listing all of the music files on the selected card.
2. Use the left and right arrows to choose a file.
3. Press the “ENTER” button to play the file.
4. To stop the music and return to the music screen, press the “EXIT” button.
NOTE: This function is only available on select models.
9

Controlling the Volume
Use the remote control to adjust the volume by using the “Vol+” or “Vol-” buttons when
playing videos or audio files.
Watching a Video
You can watch video files on your Digital Picture Frame as well. It supports the Motion
JPEG (AVI) video format used by most digital cameras.
NOTE: This function is only available on select models. Please refer to the
product for specifications.
1. Insert a memory card with video files on it. When the “CARD SELECTION” screen
opens, select the appropriate memory source.
2. Press “ENTER” to open the “mode selection screen”.
3. Use the arrow keys to choose “video” and press “ENTER”. A screen listing all of the
video files will open.
4. Use the arrow buttons to select and play the desired video file.
5. Adjust the volume by using VOL+/VOL- on the remote control.
6. Press the arrow buttons to play the next or previous video file.
Setting the Clock and Calendar
The Digital Photo Frame supports the functions of a clock and calendar. Enter clock
mode and select “SETUP”. You will see the option “Set Current Time”.
NOTE: This function is only available on select models.
1. Press the Left/Right key to choose the hh-mm-MM-DD-YY, and press Up/Down key
to modify the date or time and press “ENTER” to save the time.
10

You can control all of the viewing options in the Setup Menu using the buttons of the
top of the frame or using the remote control. You can display the on-screen Setup
Menu any time the Digital Picture Frame is not displaying photos or videos, by pressing
the “SETUP” button.
1. To show the Setup menu during a photo or video, press the “EXIT” button, then the
“SETUP” button.
2. With the setup menu open, use the Up and Down arrows to choose a display option.
3. Press “ENTER” to select the option. A second menu opens, listing the available
settings.
4. Use the up and down arrows to choose the desired setting.
5. Press “ENTER” to select the setting.
6. You can make as many changes as you wish in the same manner. When you are
finished, press the “EXIT” button to close the settings menu and return to the
previous screen.
7. The table on the following page lists the display options in the setup menu, their
options, and a description of each.
11

OSD Menu Description and Function of Operation
Mosaic ViewTM On Turning off magic window will allow you to view pictures one at a time
Off during a slideshow.
Image Size This function allows you to adjust how the image fits on the screen.
“Original” retains the original aspect ration of the image. “Optimal”
optimizes the image to fit the screen.
Slide Show Effect This function allows you to choose the transition style of Slide Show.
Slide Show Speed This function allows you to choose the speed of the Slide Show.
Slide Show Shuffle This function allows images to be displayed in random order
and can be turned on or off.
Video Repeat This function selection allows video files to automatically repeat itself
when finished.
Copy File This function allows a file to be copied from a memory card into the
built-in memory.
Delete File This function allows an image to be deleted from the built-in memory.
Rotate This function allows a file to be rotated 90 degrees clock-wise.
Zoom This function allows you to zoom into a picture.
Set Favorite This function allows you to choose and select multiple images to
copy from the memory card to the built-in memory.
Reset Settings Resets all settings back to default.
Language Changes the OSD menu language to the following options: English,
Italian, German, French, Spanish, Portuguese, or Dutch.
On
Brightness/Contrast This function allows you to adjust the brightness of the screen
and adjust the contrast.
Color/Tint This function allows you to adjust the color and/or adjust the tint.
Set Current Time Clock & Calendar setting
NOTE: The menu features on your Digital Picture Frame may or may not be available depending on
your model.
12

Connecting the Digital Picture Frame (DPF) to a Computer
NOTE: This function is only available on models with built-in memory.
1. Connect the power adapter to the Digital Picture Frame and plug the other end
into a grounded power outlet.
2. Slide the Power Switch to the “ON” position.
3. Connect the smaller end of the USB cable to the USB port on the side panel of the
Digital Picture Frame and the larger end to your computer’s USB port.
4. A menu will appear asking what you would like Windows to do with the new
connected device. Click “Open folder to view files” and press OK. If this menu does
not appear, open up your file browser by double-clicking the “My Computer” icon in
the Windows Start Menu.
13

5. There will be up to five drive letters entitled “Removable Disk” – one for each of
the memory card slots on the Digital Picture Frame and one for the built-in memory.
Double-click the appropriate “Removable Disk” icon to access the built-in memory, or
any of the memory card slots.
6. To copy photos from your computer to the built-in memory, first locate the files on
your computer.
7. Select the file(s) you wish to copy. Under the Edit tab, select copy. Then go back
to the previous window and select the drive letter that corresponds to the built-in
memory.
8. Under the Edit tab of your computer’s file browser, click Paste.
NOTE: When the Digital Picture Frame is connected to a computer, it has the same
functionality of a multiple memory card reader.
14

Disconnecting the Digital Picture Frame from the Computer
1. Make sure that there are no files being transferred at this time.
2. In Windows, on the bottom task bar, right-click the icon and select
“Safely Remove Hardware.”
3. The “Safely Remove Hardware” dialog box will appear. Select “USB Mass Storage
Device” and click STOP.
4. On the next dialog box, click OK to remove the storage device.
5. On the final dialog box, select CLOSE and disconnect the USB cable from your
computer.
15

Connecting to a Macintosh
You can also copy files from your Macintosh Computer to your Digital Picture Frame.
1. Use the included USB cable to connect your Digital Picture Frame to your
Macintosh. Your Macintosh will recognize the Digital Picture Frame as an external
storage device.
2. Drag and drop files between the two devices as you normally move photo files.
3. To safely disconnect the Digital Picture Frame from your Macintosh, select the
Digital Picture Frame icon on your desktop and press Command-E to eject the disk.
When the icon is no longer on the desktop, it is safe to unplug the USB cable.
16

Cleaning the Digital Picture Frame
MAKE SURE THE DIGITAL PICTURE FRAME IS TURNED OFF. NEVER SPRAY OR POUR
LIQUIDS DIRECTLY ONTO THE SCREEN OR PLASTIC CASING.
To clean the screen:
1. Wipe the screen with a clean, soft, lint-free cloth. This removes dust and particles.
2. If it is still not clean, apply a small amount of non-ammonia, alcohol-free glass
cleaner on a clean, soft, lint-free cloth and wipe gently.
To clean the plastic casing:
1. Use a soft, dry cloth.
2. If it is still not clean, apply a small amount of non-ammonia,
alcohol-free, mild non-abrasive detergent to cloth and gently wipe surface.
To clean the frame:
1. Use a soft, dry cloth.
2. Gently wipe the surface.
Technical Specifications
LUXENTIA does not recommend the use of any ammonia or alcohol-based cleaners
on the LCD screen or plastic casing. Some chemical cleaners have been reported to
damage the screen and/or display case. LUXENTIA is not liable for damage resulting
from the use of any ammonia or alcohol-based cleaners.
17

Product: 7” LCD Digital Picture Frame
Resolution: 480 x 234 pixels
Input Formats: Secure Digital™, MultiMedia Card™, Memory
Stick™, Memory Stick PRO™, xD™, USB Flash Drives™,
Memory Stick PRO Duo™, Memory Stick Duo™
File Format: Standard JPEG; MJpeg, AVI (varies by model)
Features: Slide Show Mode
Multiple Transitional Styles for Slide Show
Variable Speed for Slide Show
Six Position Adjustable Stand for Optimum Viewing Angle
USB Port: USB 2.0 (Host) and USB 2.0 (varies by model)
Power: Input 100V-240V AC, 50~60HZ
Output 5V DC, 2A
Certification: CE/FCC/PSE(Adapter)/SGS/RoHS
Internal Memory: 128 MB (varies by model)
Internal Speakers: 2X1W (varies by model)
18

Q: What other media formats can the Digital Picture Frame support?
Why won’t it play all images or movie files?
A: The Digital Picture Frame will support JPEG and Motion JPEG AVI taken
from a digital camera. The Digital Picture Frame may not read all images or video
files downloaded from the Internet. Many of the video formats downloaded from the
Internet are not supported as well.
Q: I have a memory card in the Digital Picture Frame, but it’s not
reading the card. What should I do?
A: First, make sure that you are using a memory card that is supported by the
Digital Picture Frame. Second, ensure that the memory card is inserted all the way
into the correct slot. Third, press the Menu button until you reach the Card Select
page. If the memory card is properly inserted into the slot, the memory card icon will
be highlighted on the OSD.
NOTE: Some digital cameras save images into non-standard formats. Please refer to
your camera’s operating manual for specifics. Due to the slightly differing standards
and capacities there may be some USB Flash Drives which will not work on this
product.
Q: Why do some pictures load faster than others?
A: Higher resolution pictures load slower. Using a lower resolution when taking
pictures will speed up loading time.
Q: Why do some photos not show up on the Digital Picture Frame?
A: If you are trying to view a black and white photo, make sure the format is 24
bit grayscale RGB (as opposed to full scale black and white). Please note all photos
must be a JPEG file in RGB rather than CMYK format in order to be viewable.
Q: I have connected my Digital Picture Frame to my computer with
the USB cable, but I cannot find a drive letter for the internal
memory. What should I do?
A: After connecting the Digital Picture Frame to your computer, your computer
should display up to five drive letters entitled “Removable Disk” – one for each of the
memory card slots on the Digital Picture Frame and one for the internal memory.
However, if you have any mapped network drives, your computer may experience a
conflict in assigning drive letters to the Digital Picture Frame. As a workaround, it
is recommended that you assign the highest available drive letter to your mapped
network drive(s), such as X Y or Z.
19

Q: What memory cards can the Digital Picture Frame read?
A: Compatible memory cards include Secure DigitalTM, MultiMedia CardTM,
Memory StickTM, MemoryStick ProTM, Memory Stick DuoTM, Memory Stick Pro DuoTM,
and xD card.
Q: Can I insert multiple memory cards?
A: Yes. However, the digital picture frame will read only one memory card at
a time. If multiple memory cards are inserted, you have to choose the memory card
you would like to view pictures from via the on-screen menu.
20

Proper Handling of the Digital Picture Frame
Always handle the Digital Picture Frame with care. Avoid touching the LCD screen as
fingerprints may be difficult to remove. Always position the Digital Picture Frame on
a stable and level surface. Unstable surfaces can cause the DPF to topple and fall,
resulting in possible damage of the unit or personal injury.
Avoid exposing the Digital Picture Frame to direct sunlight or high temperatures.
This can lead to a malfunction or permanent damage of the unit. Do not place the
DPF near heat sources such as radiators, heat registers, or other appliances that
generate heat. Orient the DPF away from direct sunlight to reduce glare.
Avoid exposing the digital picture frame to rain, water, moisture, or high humidity. Do
not place it near basins or sinks where it may come into contact with water. Never
place heavy or sharp objects on the LCD panel, frame, or power cord.
Overloading Outlets
Do not overload electrical power sources when using the Digital Picture Frame.
Overloading wall outlets, circuits, or extension cords can result in overheating, fire,
or electric shock. Use only grounded or polarized outlets.
Power Cord Protection
Minimize wear on the power supply cord. The power supply cord should be routed
away from traffic and contact with other objects. Do not route the power cord under
rugs or carpeting. The cord should never be severely bent, pinched, or twisted.
Periodically inspect the power cord and each end of the cord from wear or damage.
Unplug and replace the cord if it is damaged.
Warranty
Ventilation
Slots and openings on the Digital Picture Frame are provided for ventilation purposes.
To ensure reliable operation of the product and to protect it from overheating, these
openings must not be blocked or covered. Keep the Digital Picture Frame a minimum
of four (4) inches away from any wall to assure sufficient airflow and ventilation.
Increased temperatures may cause fire or device failure.
To ensure proper ventilation, do not block the openings by placing the DPF on a bed,
sofa, rug or other similar surface. Do not place it in a built-in installation, such as a
bookcase or enclosed rack, unless proper ventilation is provided.
21

Other Notices and Precautions
Caution
Never remove the plastic casing. There are no end user serviceable parts inside. The
Digital Picture Frame contains high voltage parts. You may be seriously injured if you
touch them.
Do not attempt to personally repair the unit. The warranty does not cover repairs or
attempted repairs other than those authorized by LUXENTIA.
If the frame begins to emit smoke, abnormal noises, or a strange odor, immediately
turn it off. Contact LUXENTIA for service information at 877-678-7340.
Unplug the power cord if the DPF will not be used for an extended period of time.
This item is warranted to be free from defects in materials or workmanship for
a period of 1 year from the original date of purchase under normal conditions of
household use. Within the warranty period we will repair or replace the product upon
return of the product and presentation of sales receipt or other proof of purchase.
This warranty extends only to the original retail purchaser, and excludes any damage
to the product resulting from accident, misuse or attempted end-user repairs. The
product is not warranted when used in a commercial or business environment.
The above warranty is complete and exclusive. The warrantor expressly disclaims
liability for any special, incidental, indirect, or consequential damages in connection
with the purchase or use of this product or costs over the original purchase price.
Any implied warranties arising by operation of law shall be limited in duration to the
term of this warranty.
This warranty gives you specific legal rights and you may have other rights, which
vary by jurisdiction. This warranty is valid only within the United States of America
(USA).
For warranty claims or technical support, call toll free 877-678-7340 or email:
support@luxentia.com
22

This symbol is intended to alert the user of the presence of
non-insulated dangerous voltage within the product’s enclosure
that may be of sufficient magnitude to constitute
a risk of electric shock to a person.
This symbol is intended to alert the user of the presence
of important operation and maintenance instructions in the
Digital Picture Frame User Manual.
CAUTION
TO REDUCE THE RISK OF FIRE OR
ELECTRIC SHOCK, DO NOT EXPOSE
THIS UNIT TO RAIN OR MOISTURE.
TO REDUCE THE RISK OF ELECTRIC SHOCK, DO NOT REMOVE THE PLASTIC
CASE. NO SERVICEABLE PARTS ARE INSIDE. REFER SERVICING TO QUALIFIED
PERSONNEL.
CAUTION

Model: 7” Digital Picture Frame Rev 5a
© 2008 All Rights Reserved
Windows is a registered trademark of Microsoft Corporation.
Luxentia is a registered trademark of Tag Digital Media.
For warranty claims or technical support, call toll free 877-678-7340 or email:
support@luxentia.com
Printed in China

Changes or modifications not expressly approved by the party responsible for
compliance could void the user's authority to operate the equipment.
This equipment has been tested and found to comply with the limits for a Class
B digital device, pursuant to Part 15 of the FCC Rules. These limits are
designed to provide reasonable protection against harmful interference in a
residential installation. This equipment generates uses and can radiate radio
frequency energy and, if not installed and used in accordance with the
instructions, may cause harmful interference to radio communications.
However, there is no guarantee that interference will not occur in a particular
installation. If this equipment does cause harmful interference to radio or
television reception, which can be determined by turning the equipment off and
on, the user is encouraged to try to correct the interference by one or more of
the following measures:
-- Reorient or relocate the receiving antenna.
-- Increase the separation between the equipment and receiver.
-- Connect the equipment into an outlet on a circuit different from that to which
the receiver is connected.
-- Consult the dealer or an experienced radio/TV technician for help
 Loading...