

Page 1

PicoAPRS-Lite V1
Developed by Taner Schenker
DB1NTO
User manual
www.wimo.com - 1- ©Taner Schenker
Page 2

1. PicoAPRS-Lite...................................................................................................3
1.1 Safety instructions.......................................................................................4
1.2 Airborne usage in UK, Lettland und Romania............................................4
1.3 Considerations for the power supply...........................................................4
1.4 Energy saving functions..............................................................................6
2. Operation............................................................................................................6
2.1 Turn on.........................................................................................................6
2.2 Communication with the PicoAPRS-Lite....................................................6
2.3 Command overview.....................................................................................8
2.4 Commands in detail.....................................................................................8
*i* Output of device information and settings..............................................8
*M* Set MyCall............................................................................................9
*S* Set SSID................................................................................................9
*C* Set the beacon comment........................................................................9
*B* Send a status message.........................................................................10
*T* Set transmission interval.....................................................................10
*P* Set Powermode....................................................................................10
*X* Set APRS symbol................................................................................11
*R* Reset stored maximum altitude...........................................................11
*F* Set frequency.......................................................................................11
*W* Set TX power.....................................................................................12
3. LED status........................................................................................................12
4. Technical specifications....................................................................................13
5. Accessories.......................................................................................................13
6. Manufacturer Informationen............................................................................14
www.wimo.com - 2- ©Taner Schenker
Page 3

1. PicoAPRS-Lite
Congratulations on your purchase of the PicoAPRS Lite.
This little thing was developed due to the multiple requests and feedback from amateur radio
operators.
Although the PicoAPRS-Lite has been developed with a focus on small balloons (pico balloons
and stratospheric balloons) with amateur radio payload, the application is of course not limited to
these.
The PicoAPRS-Lite can also be used by pedestrians, cyclists or in the car etc.
In contrast to the PicoAPRS (without Lite), the Lite version has no display, housing, battery, etc.
This allows an extremely low weight and a much lower price for the Lite variant.
As "APRS Tracker" it is just like the PicoAPRS.
The PicoAPRS Lite weighs only about 7 grams (without antenna / power / housing) and has very
sophisticated power management options, which theoretically allow unlimited operation with a
solar cell and a buffer capacitor (in sunlight). It is sufficient already a small solar cell and a buffer
capacitor (see below).
Of course, operation with batteries or rechargeable batteries is just as possible as with a USB
power supply.
The GPS module works up to a height of 80km (262467 feet) and is therefore also ideal for
stratospheric balloons (only when using the APRS symbol balloon!).
The configuration is made easily via the integrated micro-USB port with a "terminal software" on
the PC. Then the PicoAPRS Lite works independently without a PC. Details can be found in the
chapter configuration.
Software Updates
As the software of the PicoAPRS and PicoAPRS-Lite is constantly being developed and
improved, we recommend checking for updates on a regular basis!
You can download the latest firmware and user manual at www.db1nto.de/downloads.html
and install it yourself. The update procedure is described on the website.
APRS & Mic encoders are registered trademarks of Bob Bruninga, WB4APR
www.wimo.com - 3- ©Taner Schenker
Page 4

1.1 Safety instructions
- The connections for power supply are not protected against
reverse polarity and overvoltage!
It is essential to observe the correct polarity and maximum operating voltage!
Damage due to reverse polarity and / or overvoltage is not covered by the
warranty.
Reverse polarity leads to the immediate destruction of several components!
- Never charge a connected battery via the USB interface. Risk of explosion!
- The device is not waterproof. Please use it only in a dry environment!
- The board is particularly thin for weight reasons (for balloons). Do not bend the
board. In particular, the ceramic GPS antenna can break! Mechanical damage is
not covered by the warranty.
- Observe the laws in the country in which the PicoAPRS-Lite is to be used. In
some countries broadcasting from the air (eg balloon) is not allowed! As the
operator of a radio system, you are responsible for complying with the laws of
each country. For the launch of balloons with payload, depending on the country
may require a take-off permit and appropriate insurance!
- Do not expose the device to excessive heat (such as a parked vehicle in direct
sunlight).
1.2 Airborne usage in UK, Lettland und Romania
Since amateur radio broadcasting in UK, Latvia and Romania is not allowed from the air, the
PicoAPRS-Lite does not broadcast in this region from a height of 2000 meters!
Since the internal memory for national borders is very limited, different coordinates are stored,
around which in a certain radius starting from 2000 meters height one does not send.
The national borders can therefore not be kept exactly!
1.3 Considerations for the power supply
The device requires an operating voltage between 3.3 and 5V, but has no voltage regulator /
charge controller: When operating with a solar panel and buffer capacitor, the operating voltage
will generally fall to zero overnight. At sunrise, however, the device should be ready for use as
soon as possible.
www.wimo.com - 4- ©Taner Schenker
Page 5

It is important that the device gets along with as little energy as possible. A voltage regulator
would have a voltage drop, which would be a hindrance at sunrise / sunset.
In order to limit the maximum permissible operating voltage, a balloon is automatically sent in
balloon solar operation when reaching approx. 5V and thus consumes the energy. Thus, the
maximum permissible operating voltage is not exceeded, even if the solar cell supplies too high a
voltage during idling.
'On the ground', the device can be operated from any voltage source between 3.3 and 5V, which
can deliver a peak current of 1A in the transmission case, eg a 5V (USB) power supply or from a
3.6V LiPo battery.
Never charge a possibly connected battery via the USB interface. NO CHARGER! Risk of
explosion!
Special feature in solar operation:
The device can also be operated from a small solar module with parallel buffer capacitor.
As long as the operating voltage is insufficient, the device is in power saving mode and consumes
only about 0.1mA. This ensures that even a relatively small solar module with e.g. 20mA can
charge a buffer capacitor until the energy for a beacon is sufficient!
We recommend e.g. the photovoltaic module MPT4.8-75 (flexible solar cell 4.8V at 50mA) from
PowerFilm. This module dispenses with a glass cover, is therefore flexible and weighs only 1.9
grams!
To buffer the energy, a supercapacitor of at least 1.5 farads should be used, e.g. 2 pieces. 3 Farad
/ 2.7V in series. In parallel, each switch a resistor with about 220K for even voltage distribution.
The two connections VCC and GND on the PicoAPRS-Lite are interconnected! (ie VCC with VCC
and GND with GND). You can e.g. connect the solar module on one side and the capacitors on
the other side.
Since the voltage of a solar module can rise above 5V you should not use too powerful a
solar module! Otherwise, the PicoAPRS may not keep the voltage low enough by sending
beacons and will be damaged.
Your solar module should therefore not deliver more than 100mA!
In turn, this means that the PicoAPRS consume the stored energy in the buffer capacitor when it
reaches the required operating voltage by its use and thereby prevent exceeding the operating
voltage!
www.wimo.com - 5- ©Taner Schenker
Page 6

1.4 Energy saving functions
The main power-saving features are only available when power is supplied through the VIC and
GND ports of the PicoAPRS-Lite. Do not supply your PicoAPRS Lite via USB if you want to use it
as efficiently as possible with batteries or solar energy! This is u.a. on the USB chip which is
supplied with power via the USB connection and is only required for configuration via USB.
2. Operation
2.1 Turn on
The PicoAPRS-Lite starts automatically as soon as a sufficient energy source is connected.
Depending on the configuration, this "starting voltage" is different. See details in chapter
Configuration under "Set Powermode".
2.2 Communication with the PicoAPRS-Lite
For communication and configuration of the PicoAPRS-Lite, a VCP (Virtual Com Port) driver for
the used USB chip (Silabs CP2102) has to be downloaded from the manufacturer.
You can find the suitable VCP driver for your operating system under the following link:
https://www.silabs.com/products/development-tools/software/usb-to-uart-bridge-vcp-drivers
Please install the driver according to the manufacturer's instructions on the mentioned website
and follow the installation instructions.
After successful installation the PicoAPRS-Lite is
recognized as a virtual COM port displayed in
Windows in the "Device Manager".
However, the PicoAPRS can also be configured
with Linux or Mac OS X.
If there are communication problems with Windows, it has been proven useful to set the
automatically assigned COM Port in the Device Manager to e.g. To change COM 2.
www.wimo.com - 6- ©Taner Schenker
Page 7

If the driver has been installed correctly, you can use a terminal program such as Hyperterminal of
Windows or a free alternative with the PicoAPRS simply text-based communicates and the device
can be configured.
The terminal program must send a line break with "carriage return" at the end of the command
(newline, carriage return). Communication takes place at 115200 baud.
It is normal for the PicoAPRS Lite to restart after a successful connection!
After startup, the PicoAPRS-Lite automatically displays a list of possible commands as well as the
current configuration and operating values. This looks e.g. as follows:
Starting...
Possible Commands:
*i*..... Print device info and settings
*M*..... Set MyCall like: *M*MYCALL
*S*..... Set SSID like: *S*11 (default 11)
*C*..... to set beacon comment. Example: *C*My New Comment
*B*..... Send status message now
*T*..... Set Intervall TIME like: *T*60 for 60 Seconds (in 5 second STEPS! min 10s max 1200s,
default 60s) only in Powermode BATTERY!
*P*..... Set Powermode (b = battery / s=solar / u=USB) example: *P*s
*X*..... Set APRS symbol. Example: *X*O . O means balloon, while *X*> means: Car.
*R*..... Reset Maximum altitude to 0
*F*..... Set frequency. *F*A for automatic or *F*144.8000 for 144.8000 MHz manual frequency
*W*..... Set TX power. *W*1 for 1 watt. *W*0 for 0.5 watt
PicoAPRS-Lite Device Informations
Version : Nov 4 2018 - 21:36:51
Comment : PicoAPRS-Lite
My Callsign : MYCALL-9
APRS Symbol : >
Powermode : Battery powered
TX interval : 60 Seconds
SAT in view : 9
SAT in use : 5
Altitude : 432m
MAX Altitude: 3168m
Your Region : Europe
Frequency : 144.8000MHz (Automatic frequency setting)
TX power : HIGH
Air pressure: 966.21hPa
Temperature : 26.40C
www.wimo.com - 7- ©Taner Schenker
Page 8

In the upper part you can see the possible commands that you can send to the PicoAPRS-Lite.
You will receive this list again at any time if you send any sign to the PicoAPRS Lite via the
terminal. If you need this list, it suffices e.g. simply to send a carriage return.
Reissue the current information by sending the * i * command through the terminal.
2.3 Command overview
• *i* Print device info and settings
• *M* Set MyCall like
• *S* Set SSID
• *C* to set beacon comment
• *B* Send status message now
• *T* Set Intervall TIME
• *P* Set Powermode
• *X* Set APRS symbol
• *R* Reset Maximum altitude
• *F* Set frequency
• *W* Set TX power
2.4 Commands in detail
*i* Output of device information and settings
Returns all operating status information as shown in the following example:
www.wimo.com - 8- ©Taner Schenker
Page 9

Note on temperature: Since the temperature sensor is influenced by the board, a higher
temperature can be displayed than the ambient temperature!
*M* Set MyCall
Hereby you can set your own call sign. This is the most important attitude you have to
make!
Example: *M*DB1NTO
*S* Set SSID
This will set your SSID
Example: *S*11
SSID 11 is the default.
The SSID distinguishes the APRS station types.
The convention for the SSID is (source: http://aprs.org/aprs11/SSIDs.txt)
-0 Your primary station usually fixed and message capable
-1 generic additional station, digi, mobile, wx, etc
-2 generic additional station, digi, mobile, wx, etc
-3 generic additional station, digi, mobile, wx, etc
-4 generic additional station, digi, mobile, wx, etc
-5 Other networks (Dstar, Iphones, Androids etc)
-6 Special activity, Satellite ops, camping or 6 meters, etc
-7 walkie talkies, HT's or other human portable
-8 boats, sailboats, RV's or second main mobile
-9 Primary Mobile (usually message capable)
-10 internet, Igates, echolink, winlink, AVRS, APRN, etc
-11 balloons, aircraft, spacecraft, etc
-12 APRStt, DTMF, RFID, devices, one-way trackers, etc
-13 Weather stations
-14 Truckers or generally full time drivers
-15 generic additional station, digi, mobile, wx, etc
*C* Set the beacon comment
Example: *C*PicoAPRS-Lite balloon flight
Under "Comment" you set a comment text, which is sent with each position package as a
comment.
Please note that the following values are automatically appended to your comment:
www.wimo.com - 9- ©Taner Schenker
Page 10

CTxx Sx xx.xxC xxxhPa x.xV
CT stands for counter and transmits the number of packets sent so far.
S stands for the number of satellites used for the position
C transmits the measured temperature in degrees ° C
hPa transmits the measured air pressure in hectopascals
V transmits the measured battery voltage in Powermode "Battery"!
*B* Send a status message
Immediately sends a status message with predefined text content
"PicoAPRS-Lite - by DB1NTO"
*T* Set transmission interval
Example: *T*60
Set the beacon intervals to 60 seconds (in 5 second steps! Min 5s max 1200s, default 60s) Only
relevant in Powermode battery / USB!
The beacon will be sent in this set interval even if the position does not change! This is desired
because herewith a landed balloon / rocket etc. can be found again!
*P* Set Powermode
With the Powermode you define the power supply of the PicoAPRS. Each setting has some
special features.
◦ b = battery / battery (default)
◦ s = solar (note notes below!)
◦ u = USB
Example: *P*u for power via USB.
In battery and USB mode, the set time interval is used for the beacon transmission.
In addition, the battery voltage is transferred as comment text (see Configuration of the comment
text with *C*)
Im USB Modus sind alle Energiesparfunktionen deaktiviert. Dies ermöglicht bessere Leistung des
GPS Moduls.
In solar mode, the PicoAPRS-Lite waits until the operating voltage is high enough and then starts
the GPS search or the beacon transmission. Depending on the solar module and solar radiation,
this can take a different amount of time. Therefore, the set interval does not matter! If you
www.wimo.com - 10- ©Taner Schenker
Page 11

supply the PicoAPRS-Lite in solar mode with battery via 5V or via USB, it will be sent every
5 seconds!
*X* Set APRS symbol
Here you set your own APRS symbol which should be displayed on other receivers.
Example: *X*>
NOTE: The maximum altitude configuration for 80km (Balloon mode) will only be activated if a
balloon has been set as icon (Character to be configured: O)
The primary table is always used!
The table of APRS symbols may e.g. can be downloaded at
http://wa8lmf.net/aprs/APRS_symbols.htm.
*R* Reset stored maximum altitude
Your PicoAPRS Lite stores the previously measured maximum amount in the internal memory.
This value can be read out by calling the device information with *i*. With this you can e.g. after a
balloon flight read out the maximum height even if not all APRS packets could be received. Use
the *R* command to reset the stored maximum altitude to 0.
*F* Set frequency
*F*A for automatic frequency adjustment *
Or e.g. *F*144.8000 for 144.8000 MHz manual and fixed frequency setting.
The Automatic Frequency setting uses an internal table with coordinates. Within a certain radius
around these coordinates then the respectively valid frequency is used. Therefore, no frequency
change can be made exactly at national borders!
The following frequencies are used in other parts of the world for 1200 Baud FM APRS:
USA: 144.390 MHz
Japan: 144.660 MHz
Europe: 144.800 MHz
Australia: 145.175 MHz
Thailand: 145.525 MHz
ISS (International Space Station): 145.825 MHz
OSCAR44 (Uplink): 144.828 MHz
The APRS path is set to WIDE1-1, WIDE2-2
If the altitude exceeds 5000m, the path is automatically changed to WIDE2-1.
In unknown regions, the frequency is set to the frequency of the ISS and the path to ARISS,
WIDE2-1 for automatic frequency selection.
The path is automatically configured. An adjustment by the user is not necessary and
therefore not possible.
www.wimo.com - 11- ©Taner Schenker
Page 12

*W* Set TX power
*W*1 for 1 Watt.
*W*0 for 0.5 Watt
Here you can switch the transmission power between 0.5 watts and 1Watt.
3. LED status
The LED indicates the current status by different flashes.
• LED lights up permanently No callsign configured, self-test OK→
• 1 x flashing processor is working (interval varies depending on energy management).→
• 2 x flashing Processor is working, GPS searching.→
• 3 x flashing Processor is working, GPS fix found.→
www.wimo.com - 12- ©Taner Schenker
Page 13
4. Technical specifications
Weight : 7,2 gram
Dimensions (W x H x D) : 28mm x 67mm x 5mm
Power supply : 3.3V – 5.0V DC / max 1A at 1 Watt TX
Baudrate USB communication : 115200 Baud
Frequency range : 144.000 MHz – 146.000 MHz
TX power : 0,5Watt / max 1 Watt
Modulation : AFSK
Baudrate APRS : 1200 Baud
Baurate USB (virtual serial COM) : 115200 Baud
Display : one LED (green)
Maximum Altitude od GPS Module : 80km (only if BALLON is set as APRS symbol!)
Sensor : BMP 280 pressure and temperature sensor
Anschlüsse : Micro-USB, alternative power supply
SMA connector (optional, part .Nr. 42907)
Temperature range(operation) : -20°C - +55°C
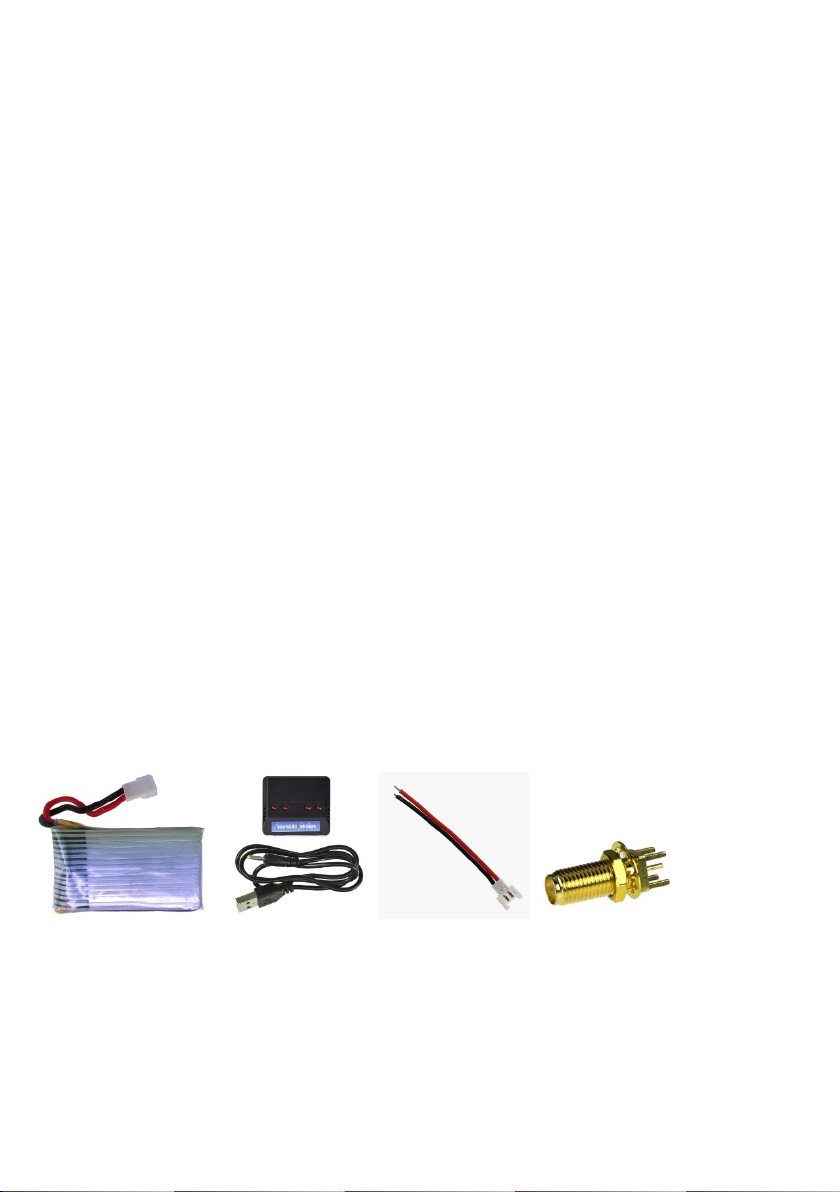
5. Accessories
42907 SMA-connector long, screw mount
35050 LiPO battery 3,6V/850mAh
35051 USB-charger with 4 batterie-ports
35052 Battery-cable
<?> Solar Power kit: Solar panel + 2 Supercaps + 2x 220K
www.wimo.com - 13- ©Taner Schenker
Page 14

6. Manufacturer Informationen
WiMo Antennen und Elektronik GmbH
Am Gäxwald 14
76863 Herxheim
Germany
Tel. +49 (0) 7276 9668-0
FAX +49 (0) 7276 9668-11
http://www.wimo.com
e-mail: info@wimo.com
www.wimo.com - 14- ©Taner Schenker
 Loading...