

Page 1
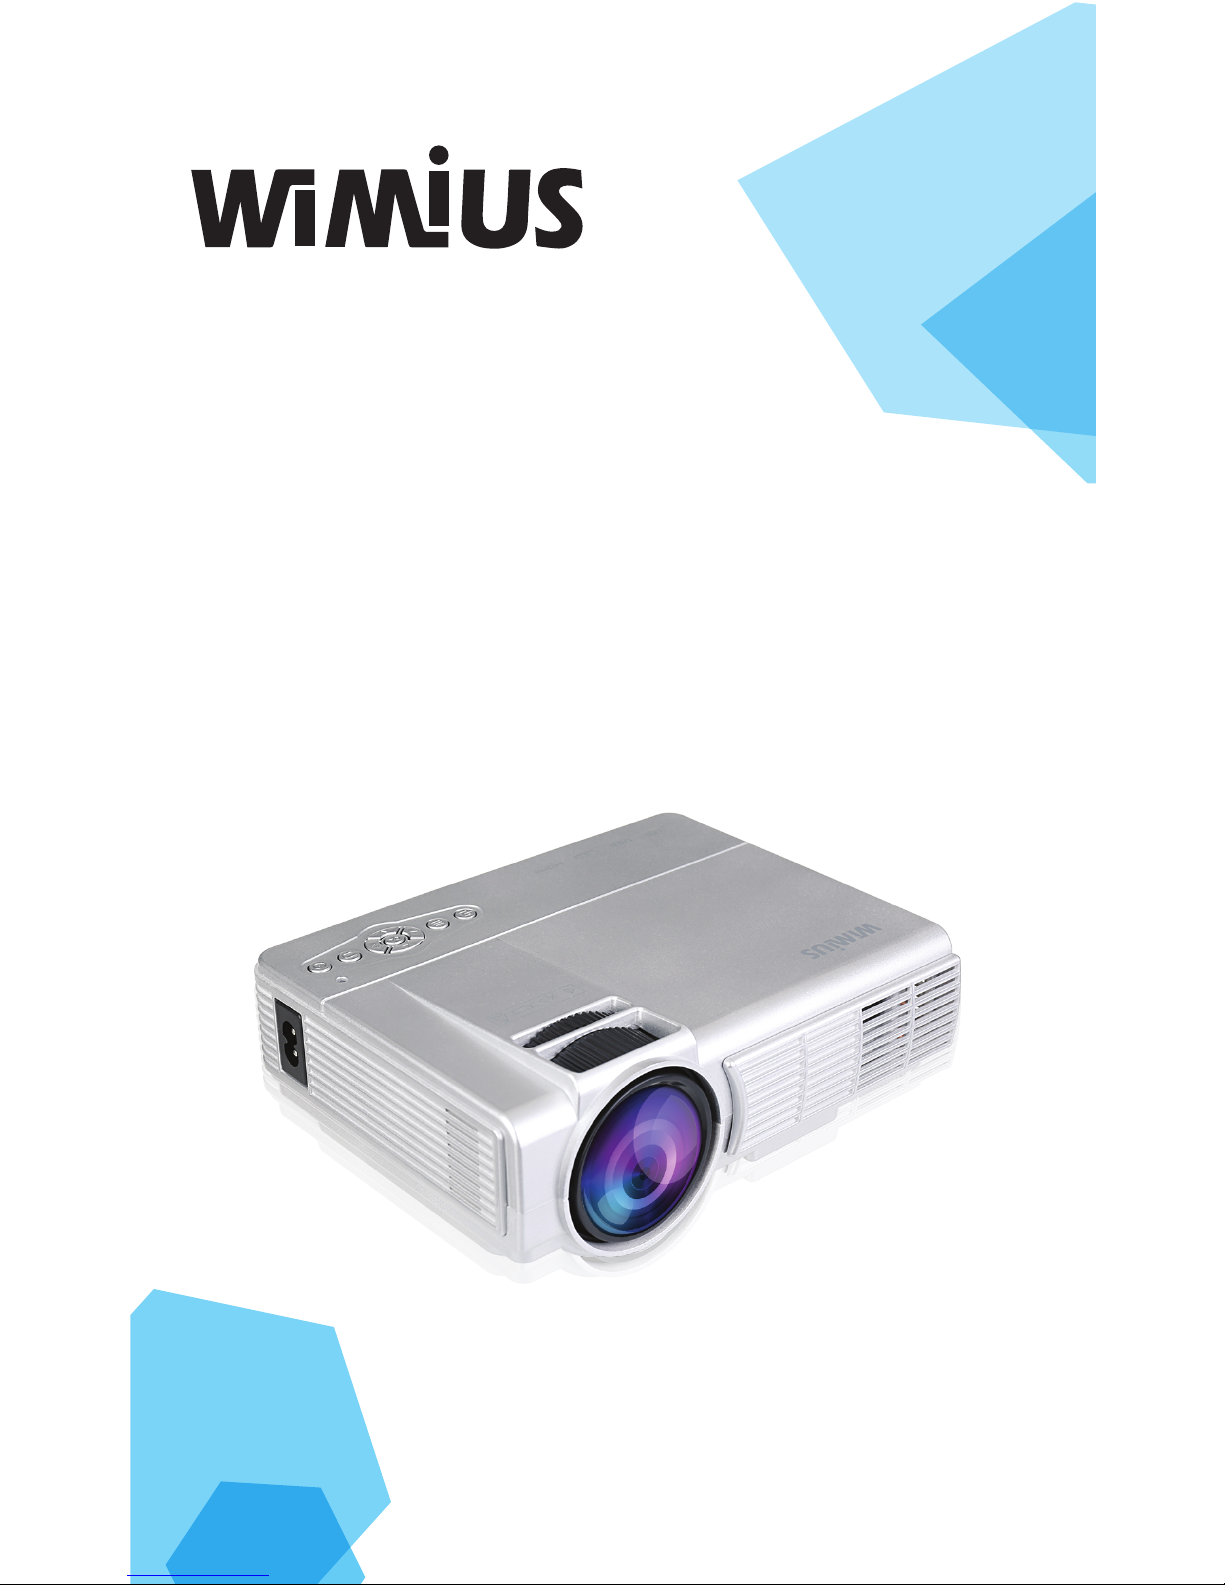
T3 Mini LED Projector
User Manual
Page 2

Mini LED projector
T3 user manual
Please read the manual carefully before using this product .The
powerful T3 using LCD projection technology, the latest generation
(bridgelux)LED light with low power consumption, fast response,vivid
color reduction processingmakes the color bright and clear, long life
(fifty thousand hours long life), high contrast (up to 1000: 1), resolution
800 * 480 .Fully enclosed dust and copper pipe cooling design, Make
the work noise lower .Support external TF card (maximum to 64G).
Directly read and projection the TXT files that stored in the machine .
Support the machine's memory or TF card to play high-definition video,
pictures and other multimedia files, full decode 480p, 720P. 1080P and
other HD sources .The OSD Language can be Select Simplified Chinese,
Traditional Chinese, English, Spanish, German, Italian, French, Russian
and other 20 kinds of international languages , support large capacity
mobile hard disk (500G-2T,mobile hard disk need external power supply)
One. Product Description
It can put the whole color video image signal processing into the big
screen for presentations or enjoyment,it is especially suitable for dance
halls, karaoke OK, home theater and business presentation.The projector
can use the remote control for full function remote control, you can use
the buttons on the body to operate. The whole machine adopts micro
computer intelligent control, can automatically control the switch
machine self-test, with anti misoperation shutdown,light source protection,
thermal protection, fan detection monitoring circuit, ad hoc brightness
AGC, clear image sharpness adjustment, optical keystone correction,
hand control, remote control receiver circuit, greatly improving the overall
stability and reliability.
The projector can be externally connected with 5 basic image signal sources:
a high definition VGA interface signal source
a HDMI HD input
a composite video signal source
a USB inputs
a SD card input
It can be easily connected to DVD players, VCD machines, video
recorders, cameras, game consoles, digital cameras and computer
karaoke machines and PCs
This series of projectors can be easily installed Front / Rear / hanging
cast .And it also has a projection screen 16: 9, 4: 3, two display modes
to meet your different preferences.This series of projectors with high
luminous efficiency optical engine system, including the use of precision
1
Page 3

1. Product Specifications:
Projection Type
Home Theater Projector
Display technology type
LCD technology
The type of light source
LED light source
Nominal Brightness
1200 lumens
Contrast
1000:1
Resolution
800*480
Diagonal screen size
37-100 inch
Projection Distance
1.16-3.0M
Installation method
Front, Rear, Ceiling, Desktop
Image size
37 inches /1.16 m
screen ratio
16:9/4:3
Uniformity of light source
brightness
90%
Focus
Manual
Projection Color
16770000
Light life
≥50000 hours
TF card (U disk) Maximum
support
64G
port
USB input * 1, TF card input * 1, AV * 1, HDMI input * 1, VGA
input * 1
Audio output
*1(L/R)
Power standard ≤60 W
Built-in speaker 2W/8ohm
HDMI/VGA/AV 576i、720P、720i、720P、1080i、1080P
Keystone correction ±15·
power supply 110V-220V
2
dozens of layers of reflective material professional optical reflector,
multi-slice mufti-specialty group of the projector lens, etc.,to make
the short-focus wide-screen precision optical systems.
Page 4
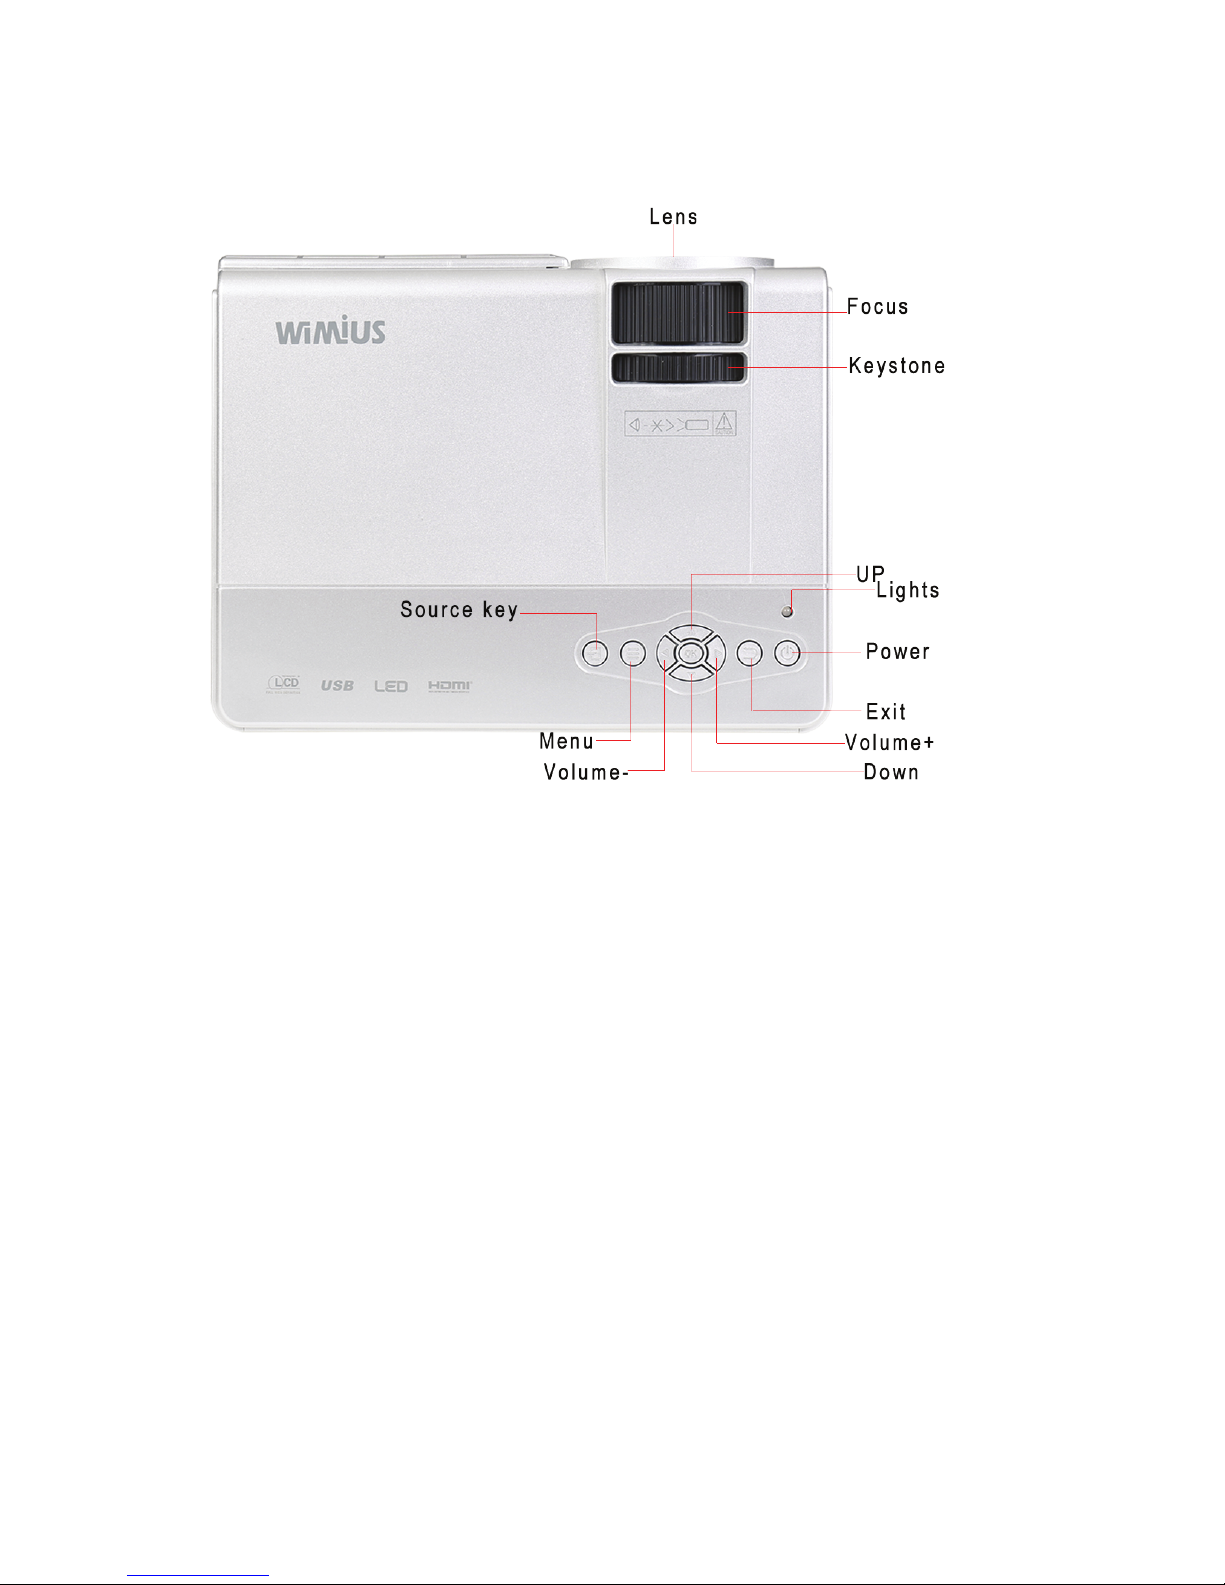
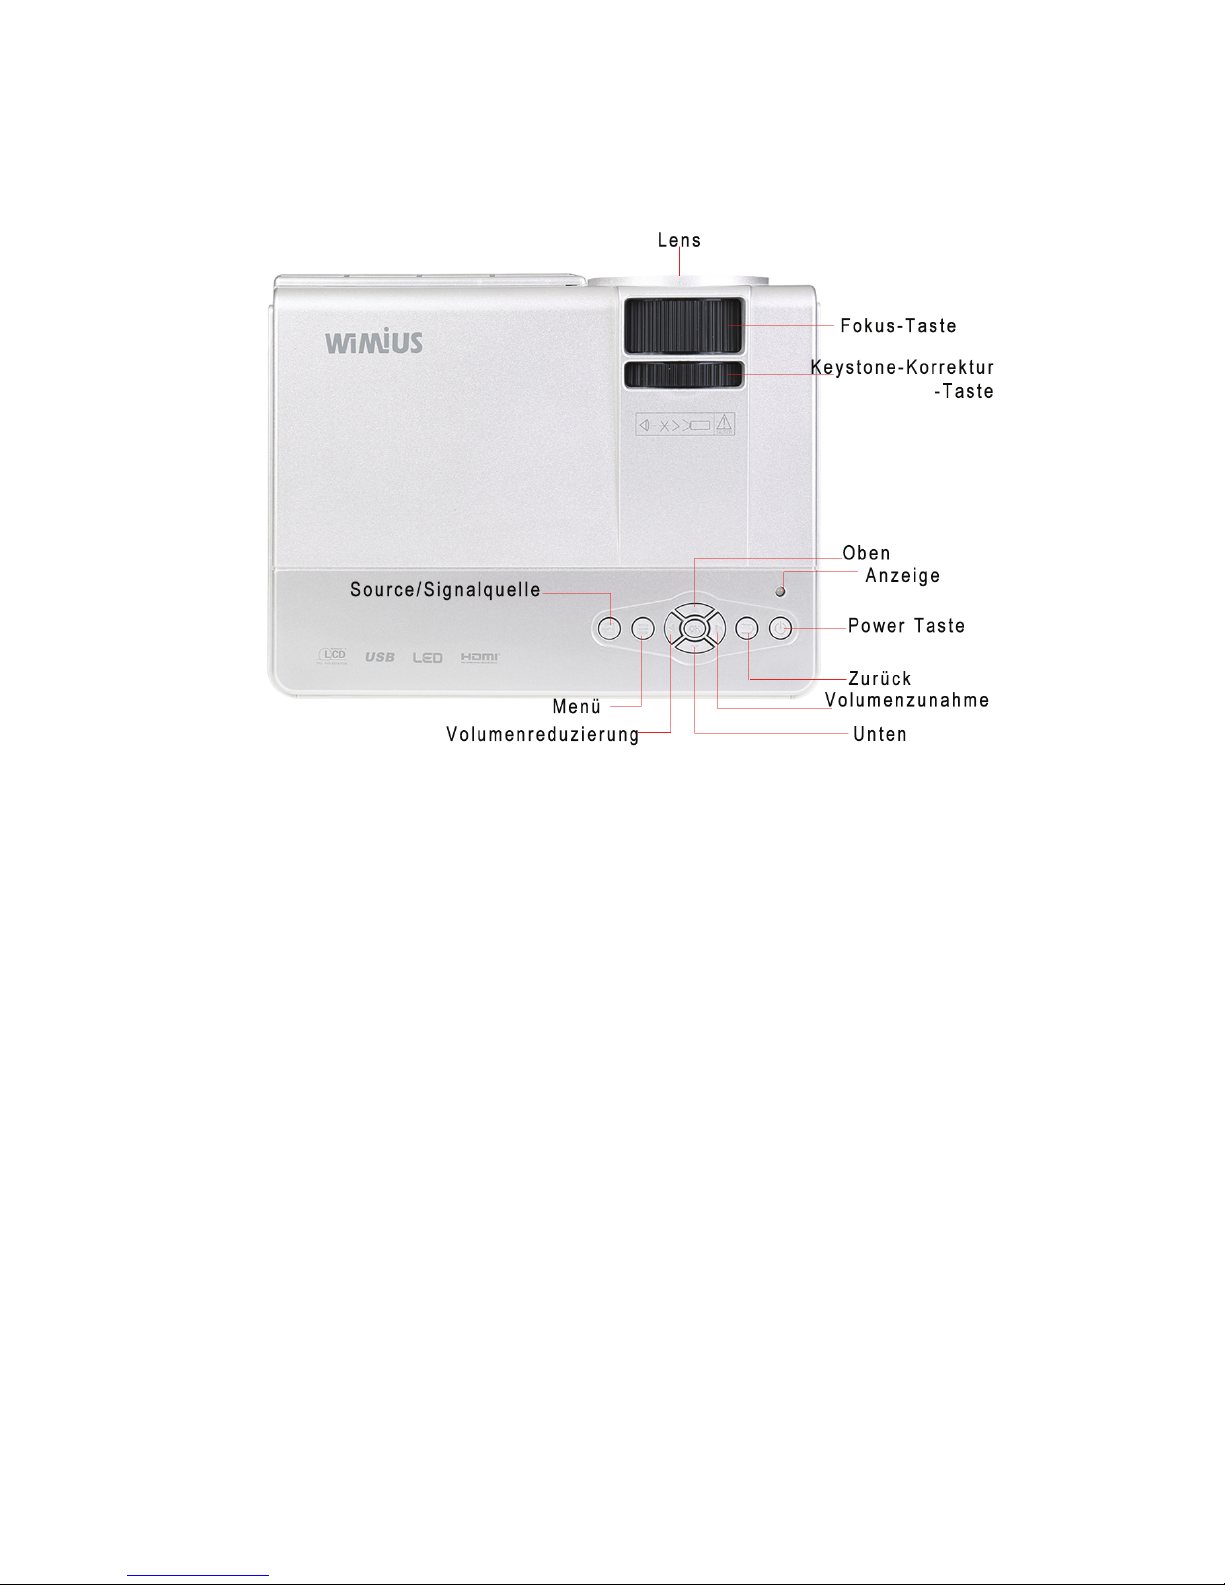
2.product appearance
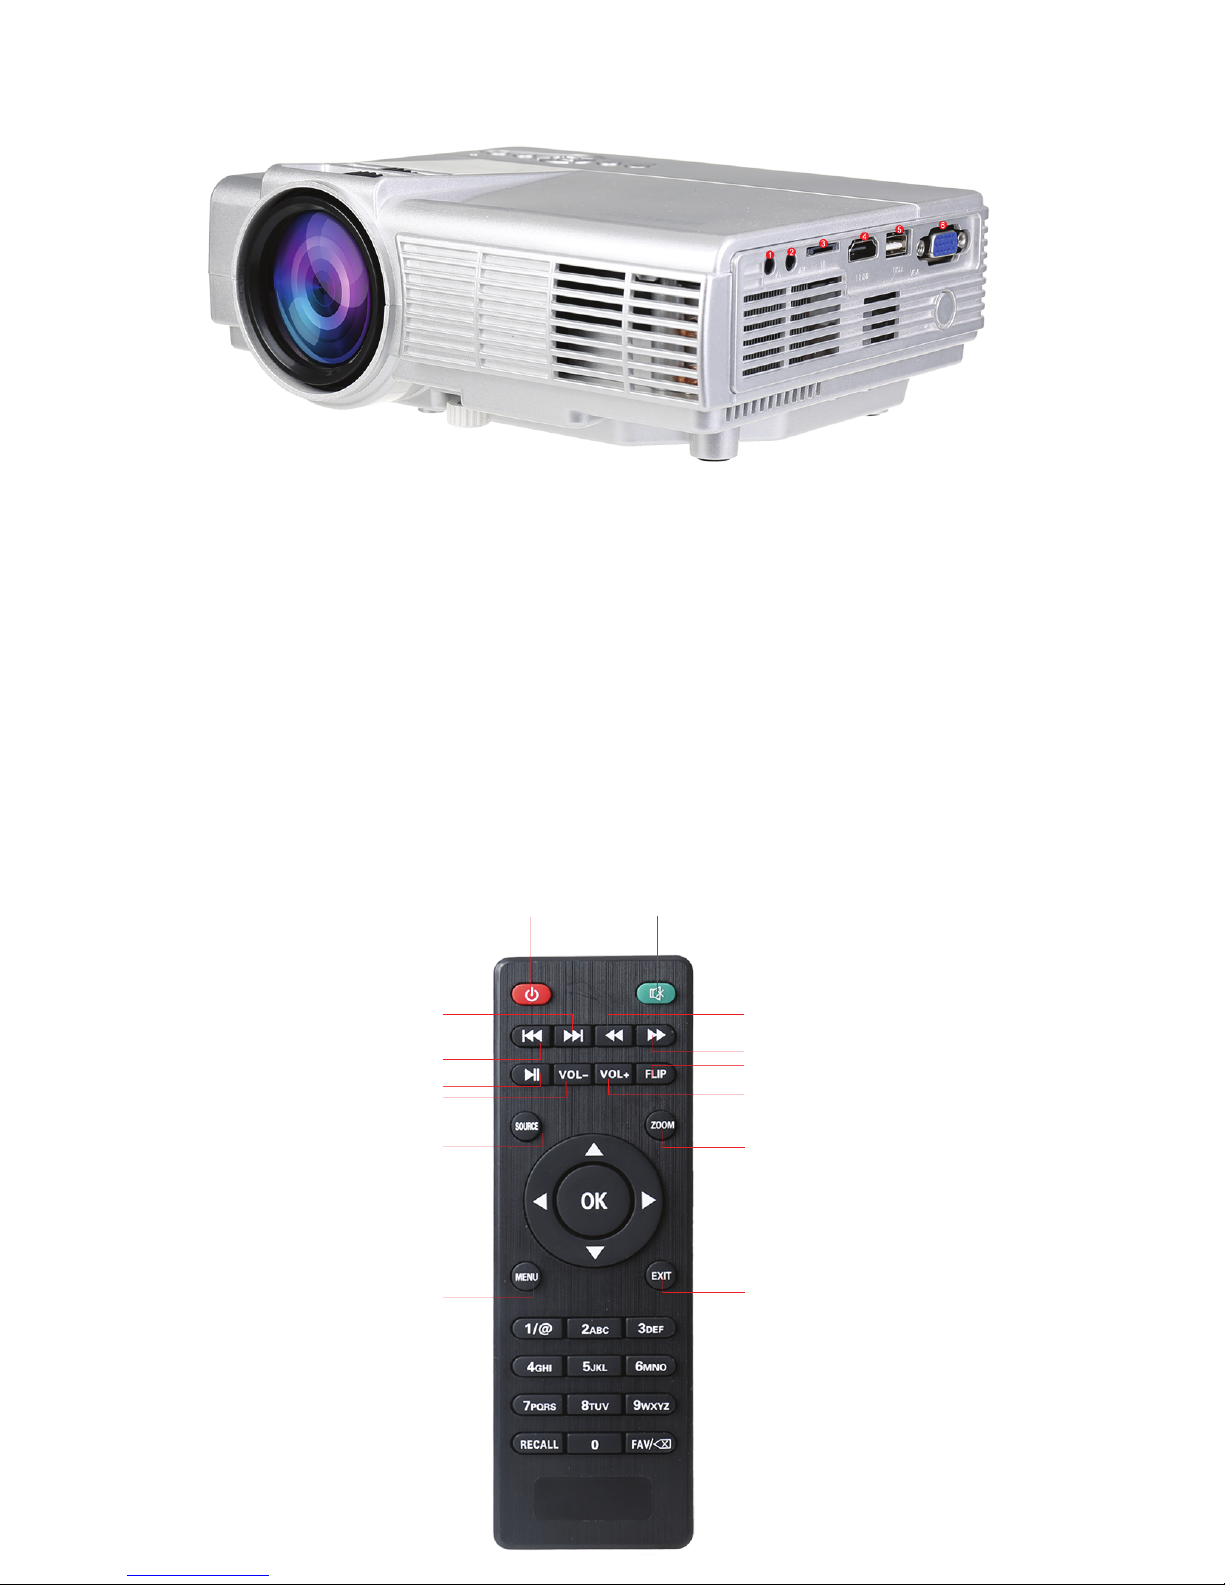
Power key: Press to open or close the projector, and as same as the
power button on the remote control. Volume plus,minus key: press
these two buttons can increase or decrease the volume, but also for
the left and right of eachmenu under the Project menu and move the
selection parameter adjustment.
Menu key: to call up the main menu or exit the system. Select the up
and down keys: press these two buttons can be moved up and down
to select the next menu item of each menu. Source selection keys: select
broadcasttelevision signal or an external video signal. Lens: Turn this
lens, you can adjust the focus state of each pixel in the image, changing
the clarity of the image.Inlet and outlet: inlet and outlet of the air-cooled
engine cooling system, the use of the process, it is never blocked or
clogged, so as not to burn the machine.
3
Page 5
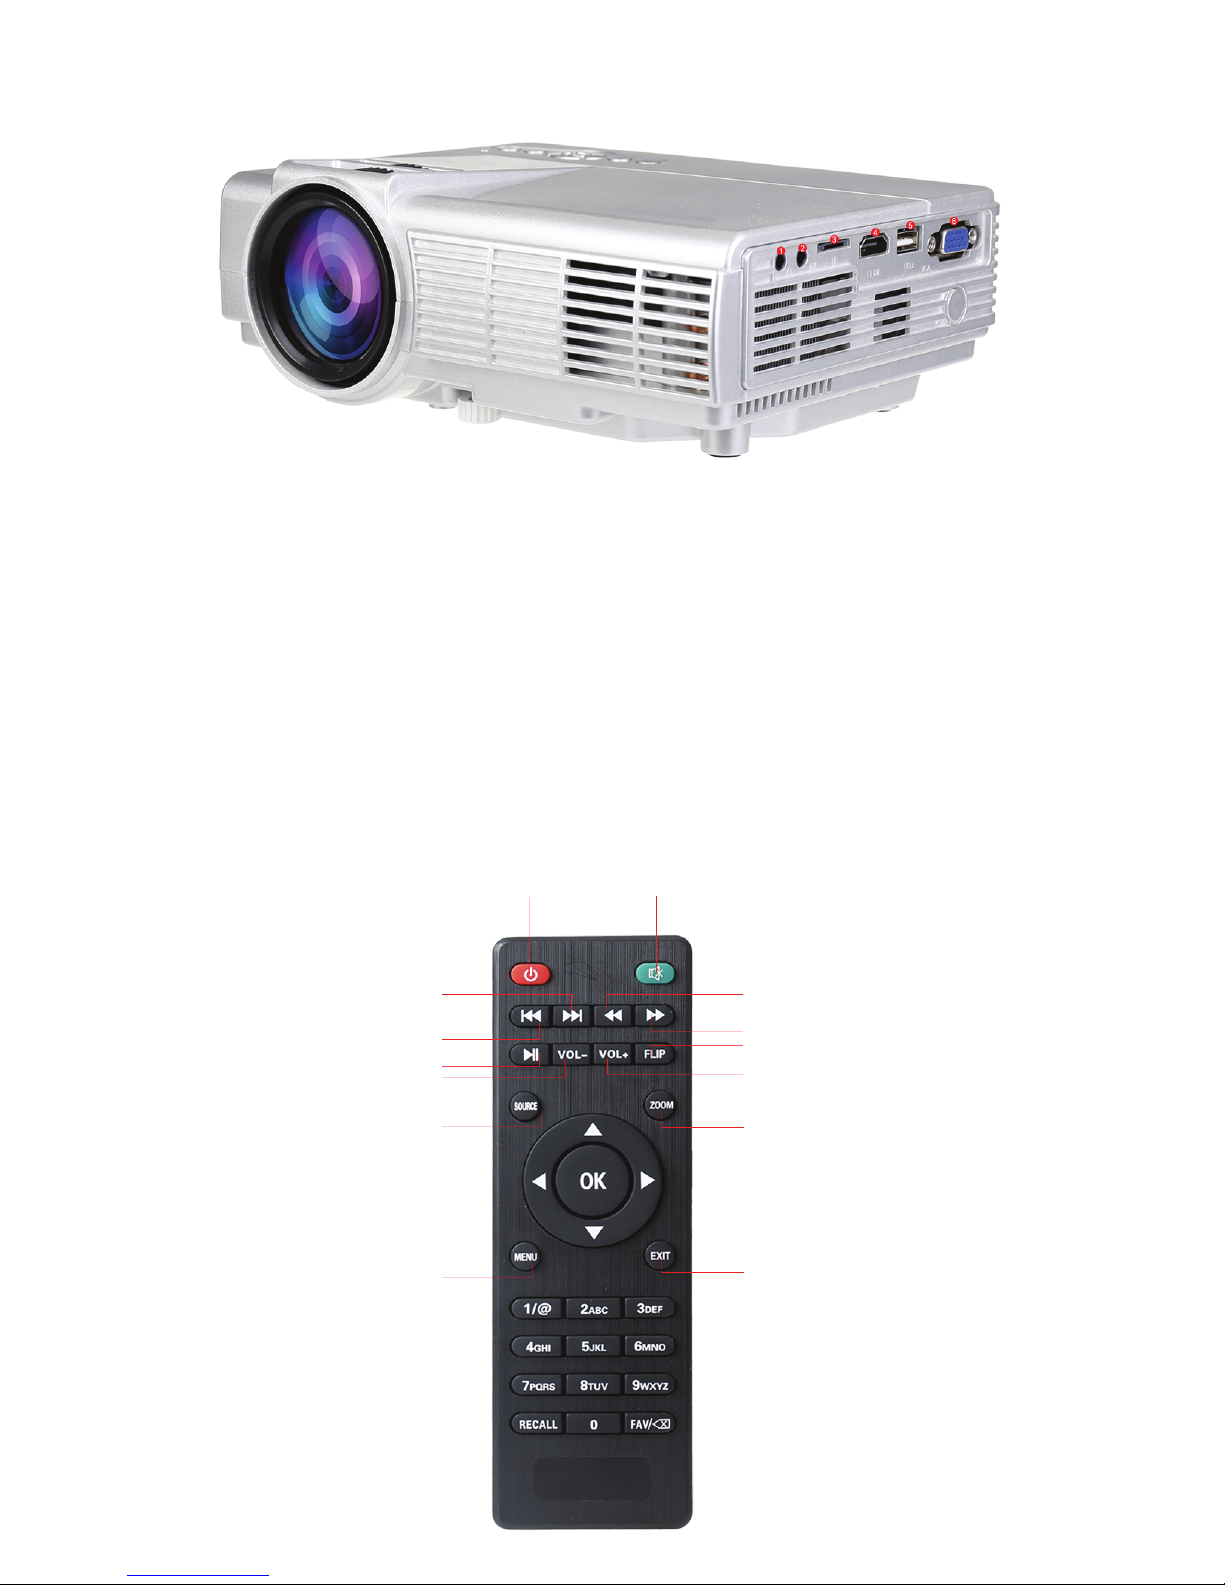
(1) Audio output headphone port seat, connect an external audio signal
amplifying device or headphones.(2) AV (video) input port.
(3) TF Card port, insert the TF card ,TF card can play audio, video and
picture files.
(4) HDMI port HD video signal, the computer connection, HDMI output signal
terminal of the DVD.
(5) USB port, insert U disk U disk can play audio, video and picture files.
(6) VGA (PC, PC) signal input port
3.Remote Control Key Names
4
Power Mute
Next
Last
Play/Pause
Voice-
Signal Souce
Menu
Backward
Forward
Flip
Voice+
Zoom
ESC
Page 6
Two.Installation Projector
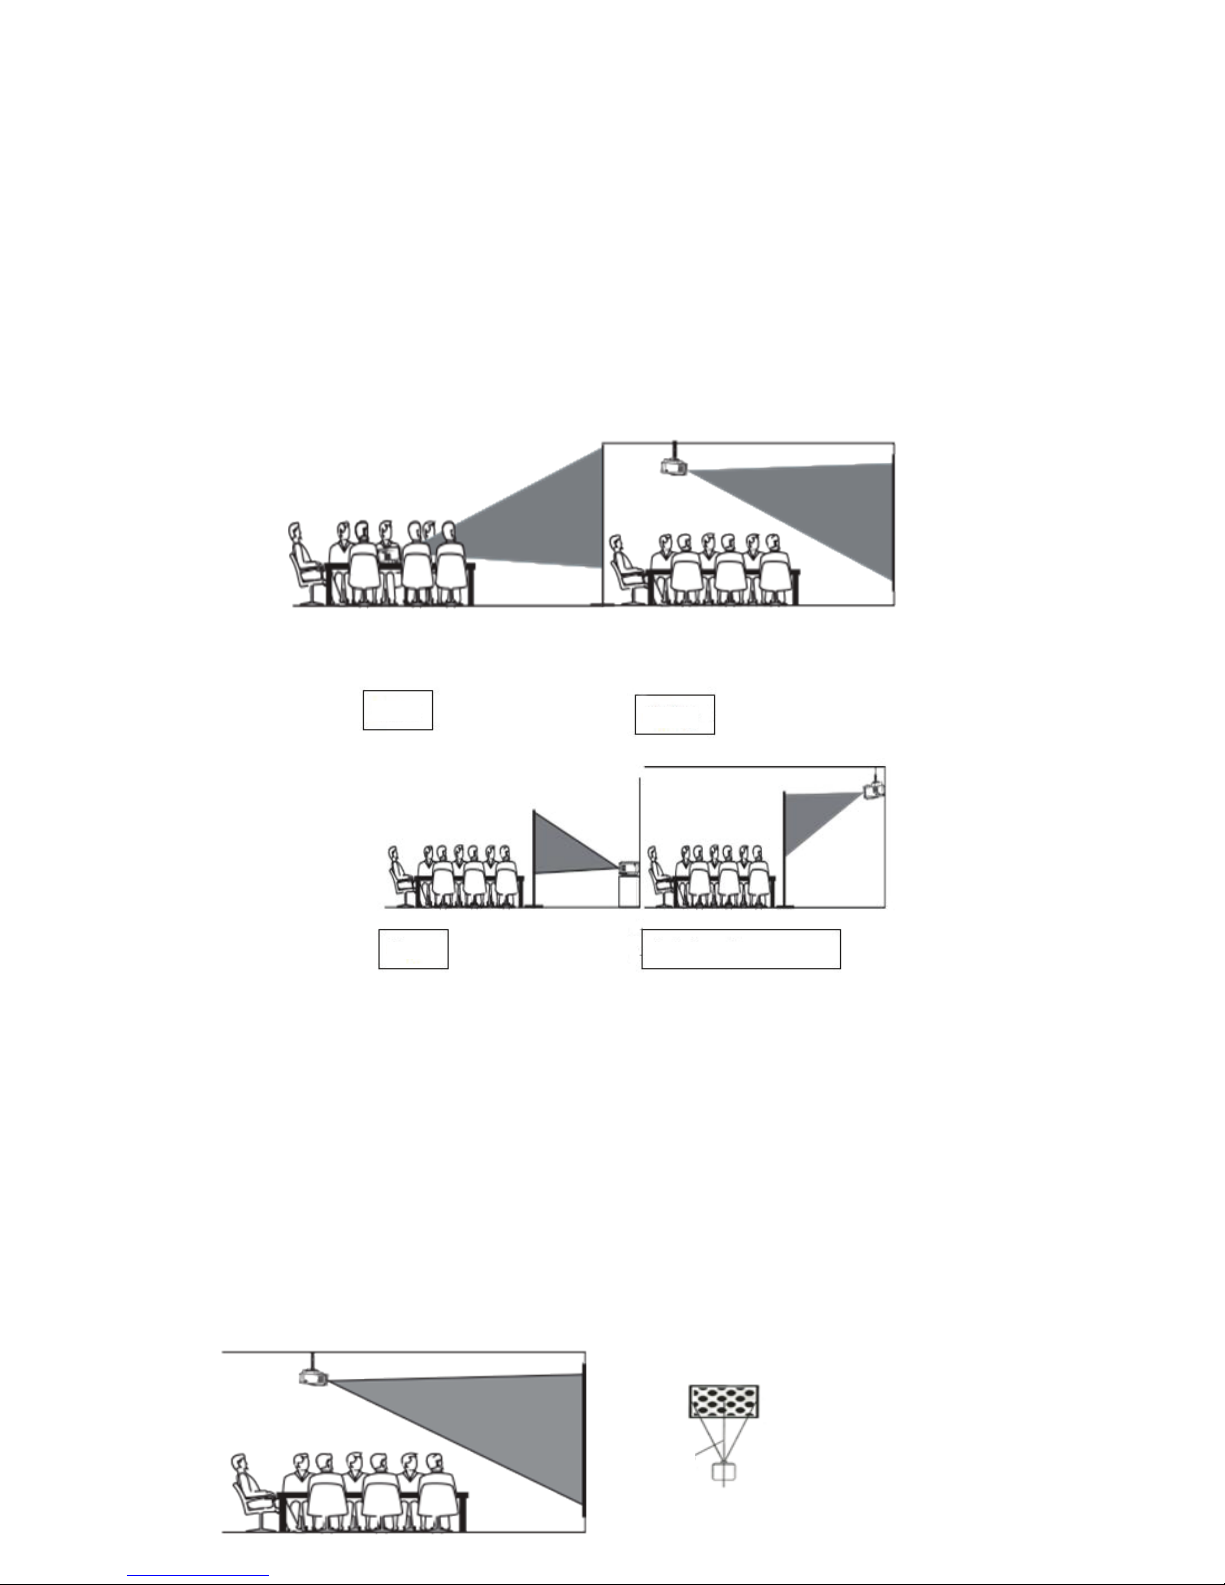
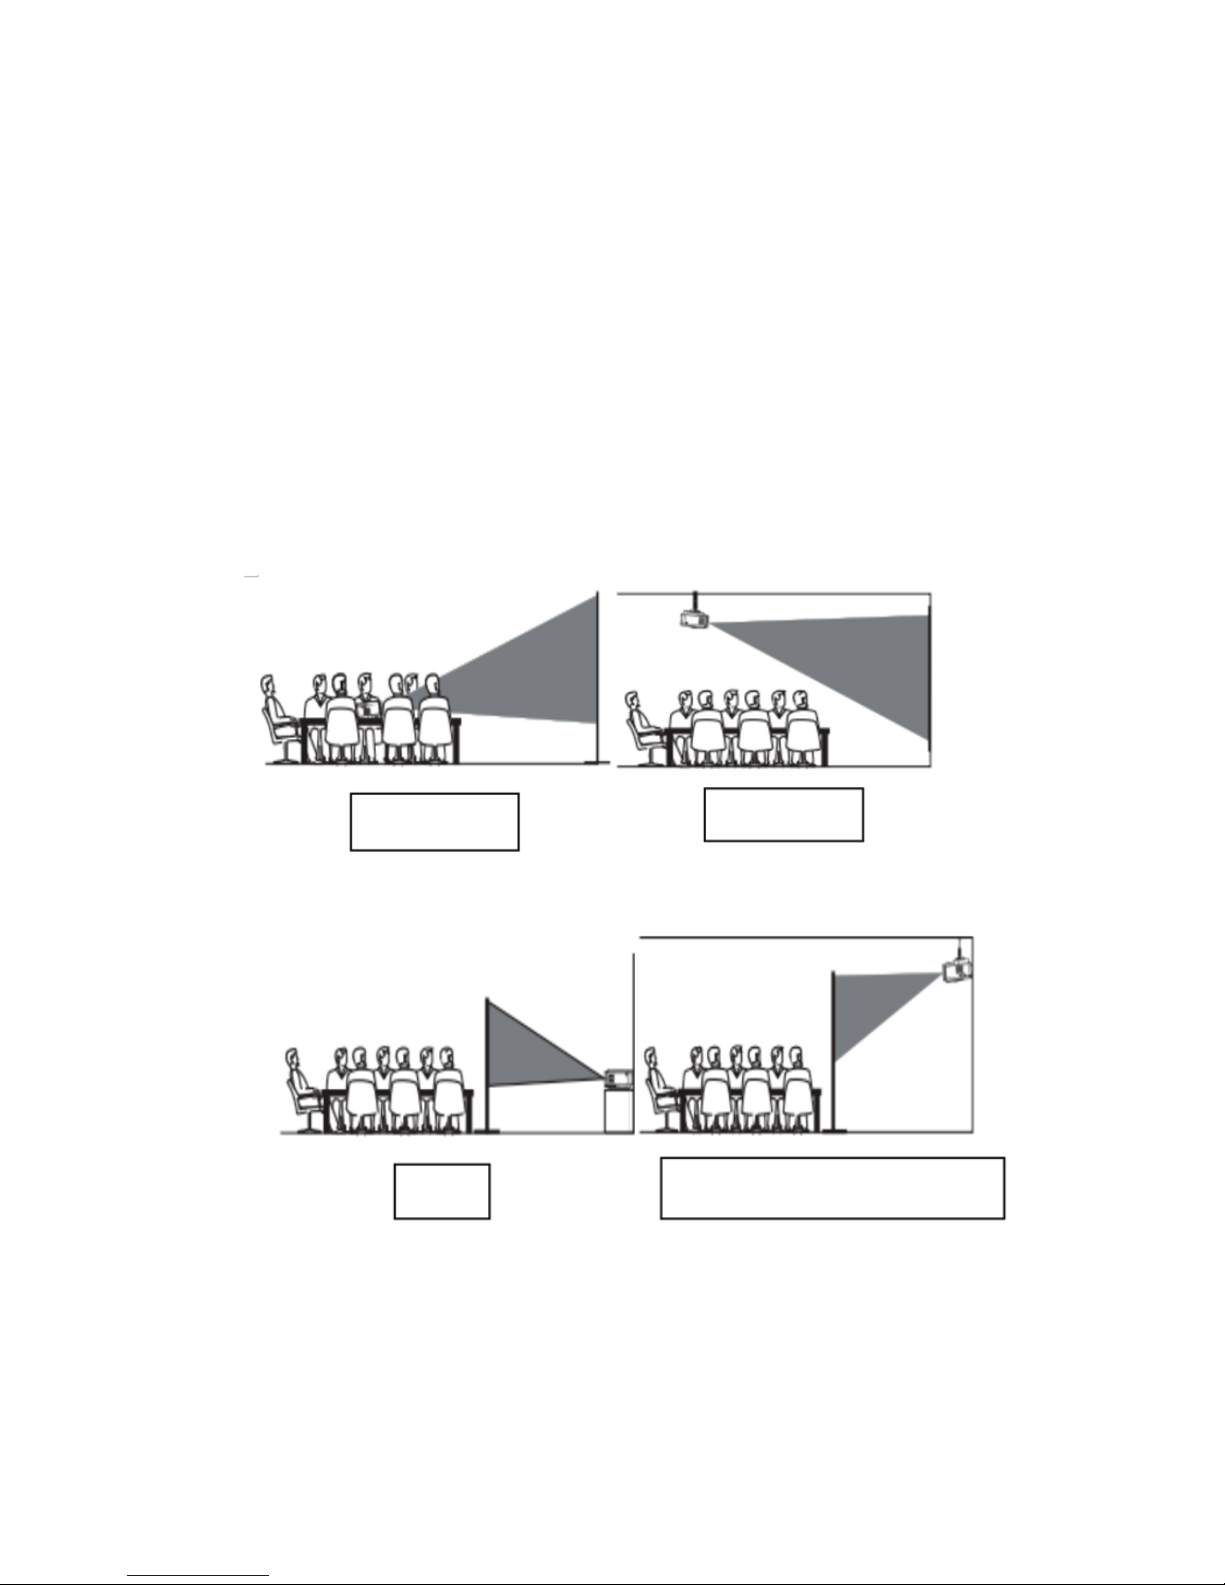
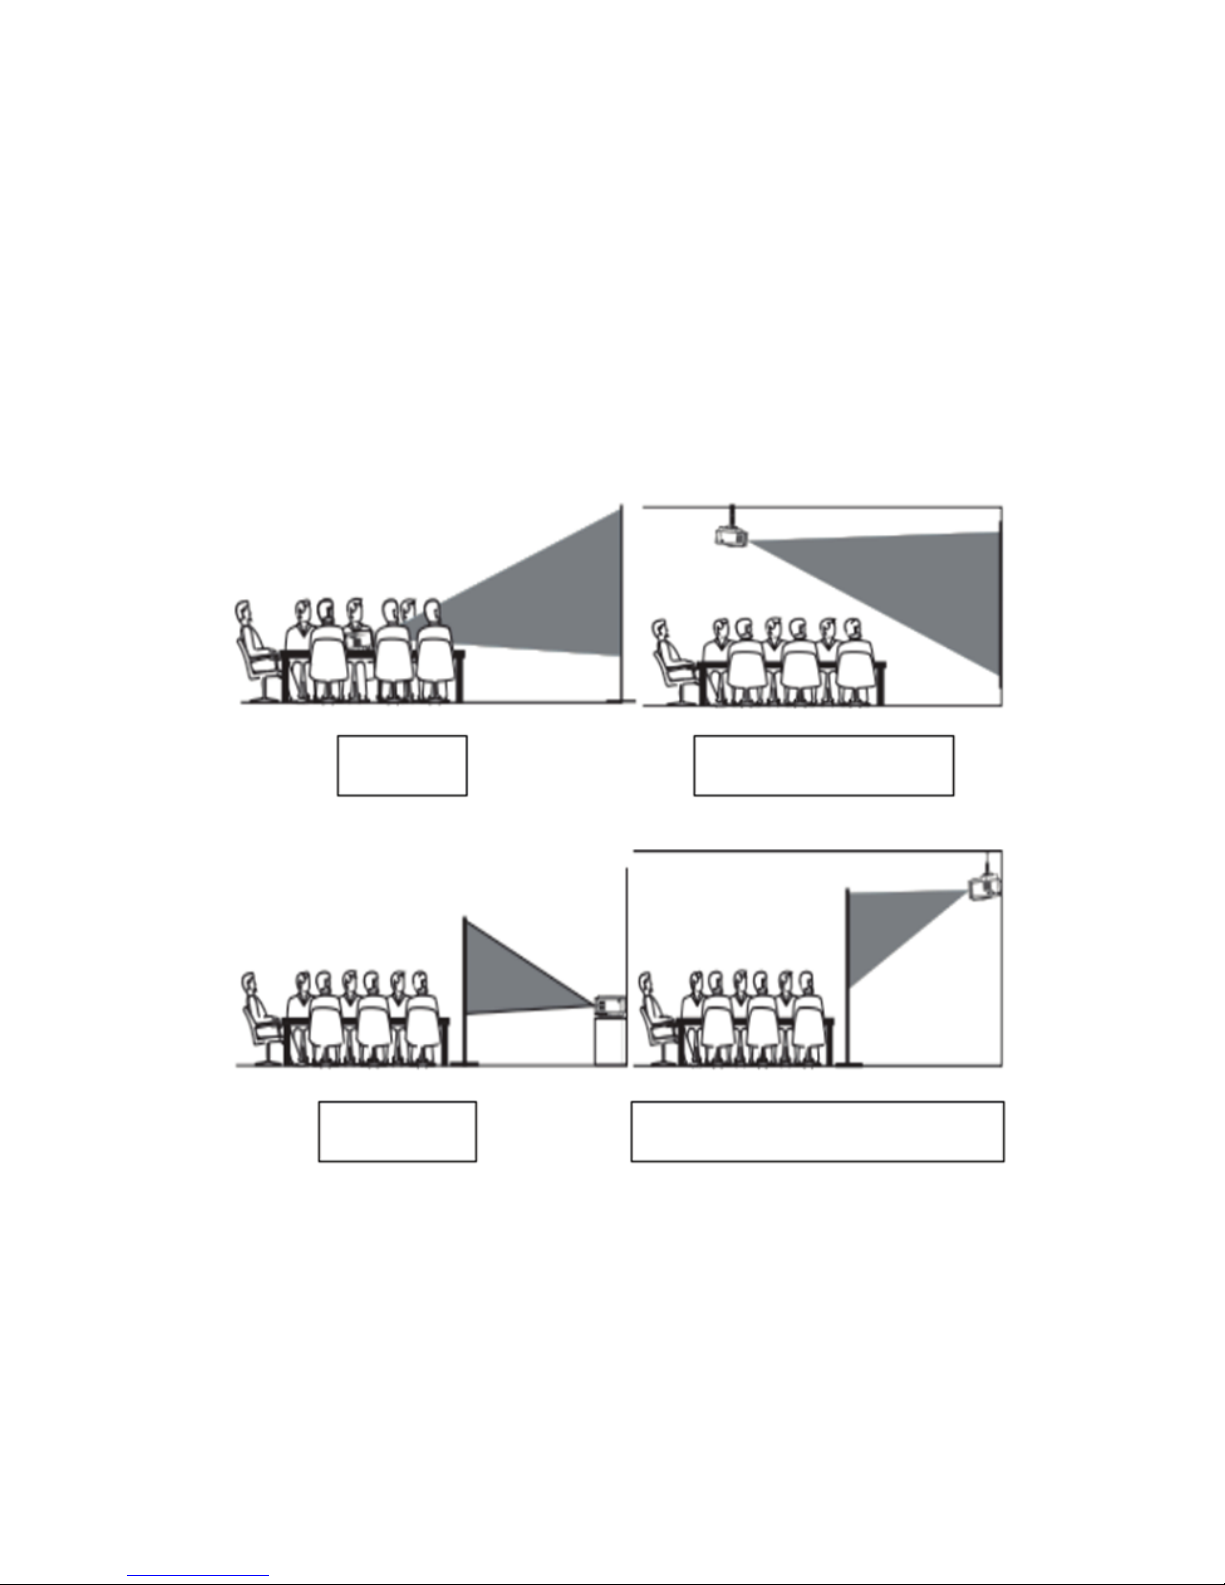
1.Installation method
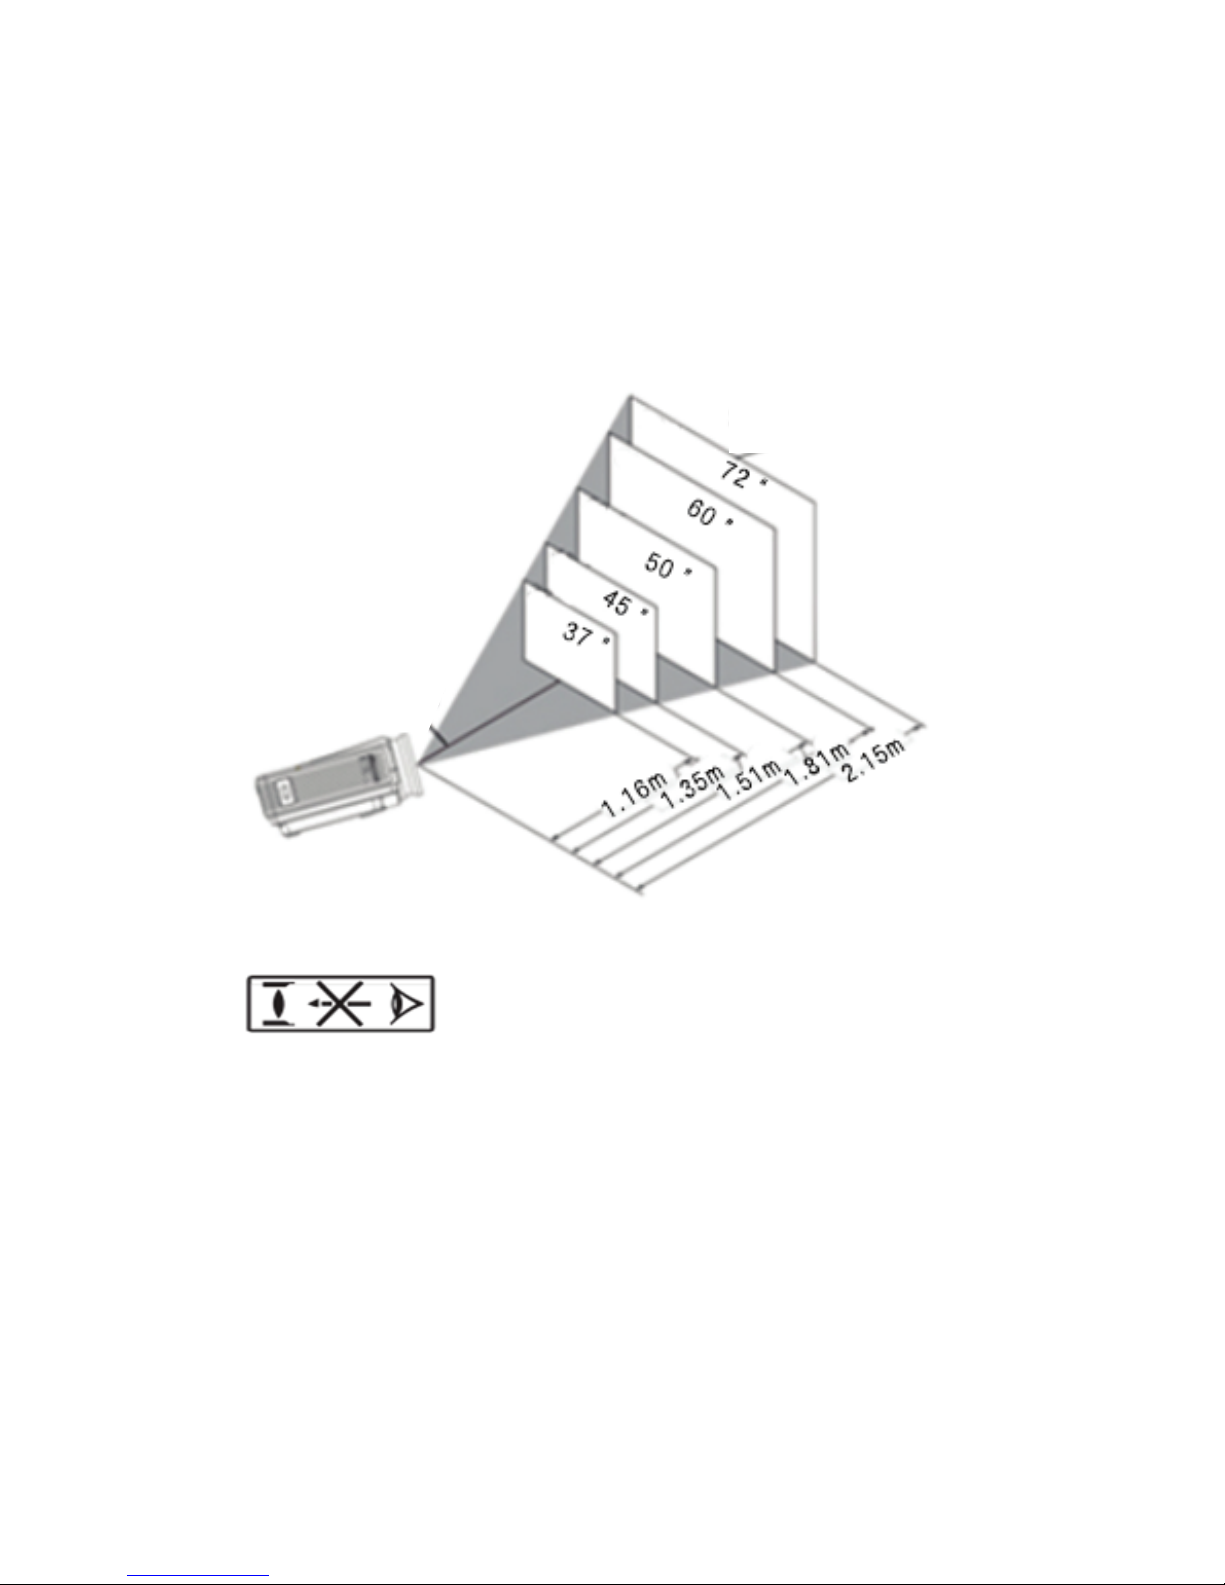
Place the projector on a solid, stable surface or hanger, surrounding
ventilation, do not block the vents or shelter, and no shelter vents
objects within 10CM. So that theprojector and screen to maintain an
appropriate distance from the projector and screen determines the size
of the projected image. Connect the projector's power cord to a power
outlet and the projector, and the other end is connected with the AC
ground. Depending on your needs, you can place the projector on a
stable counter top forward projected onto the screen, you can also
use special hangers will be fixed on the roof playing, can also be
used behind a screen, and cast from behind the screen image.
Installation Note: When forward lifting, the body can not be higher
than the projection on the edge of the screen, otherwise it will affect
the effect of adjusting the image or trapezoidal Please refer to "The
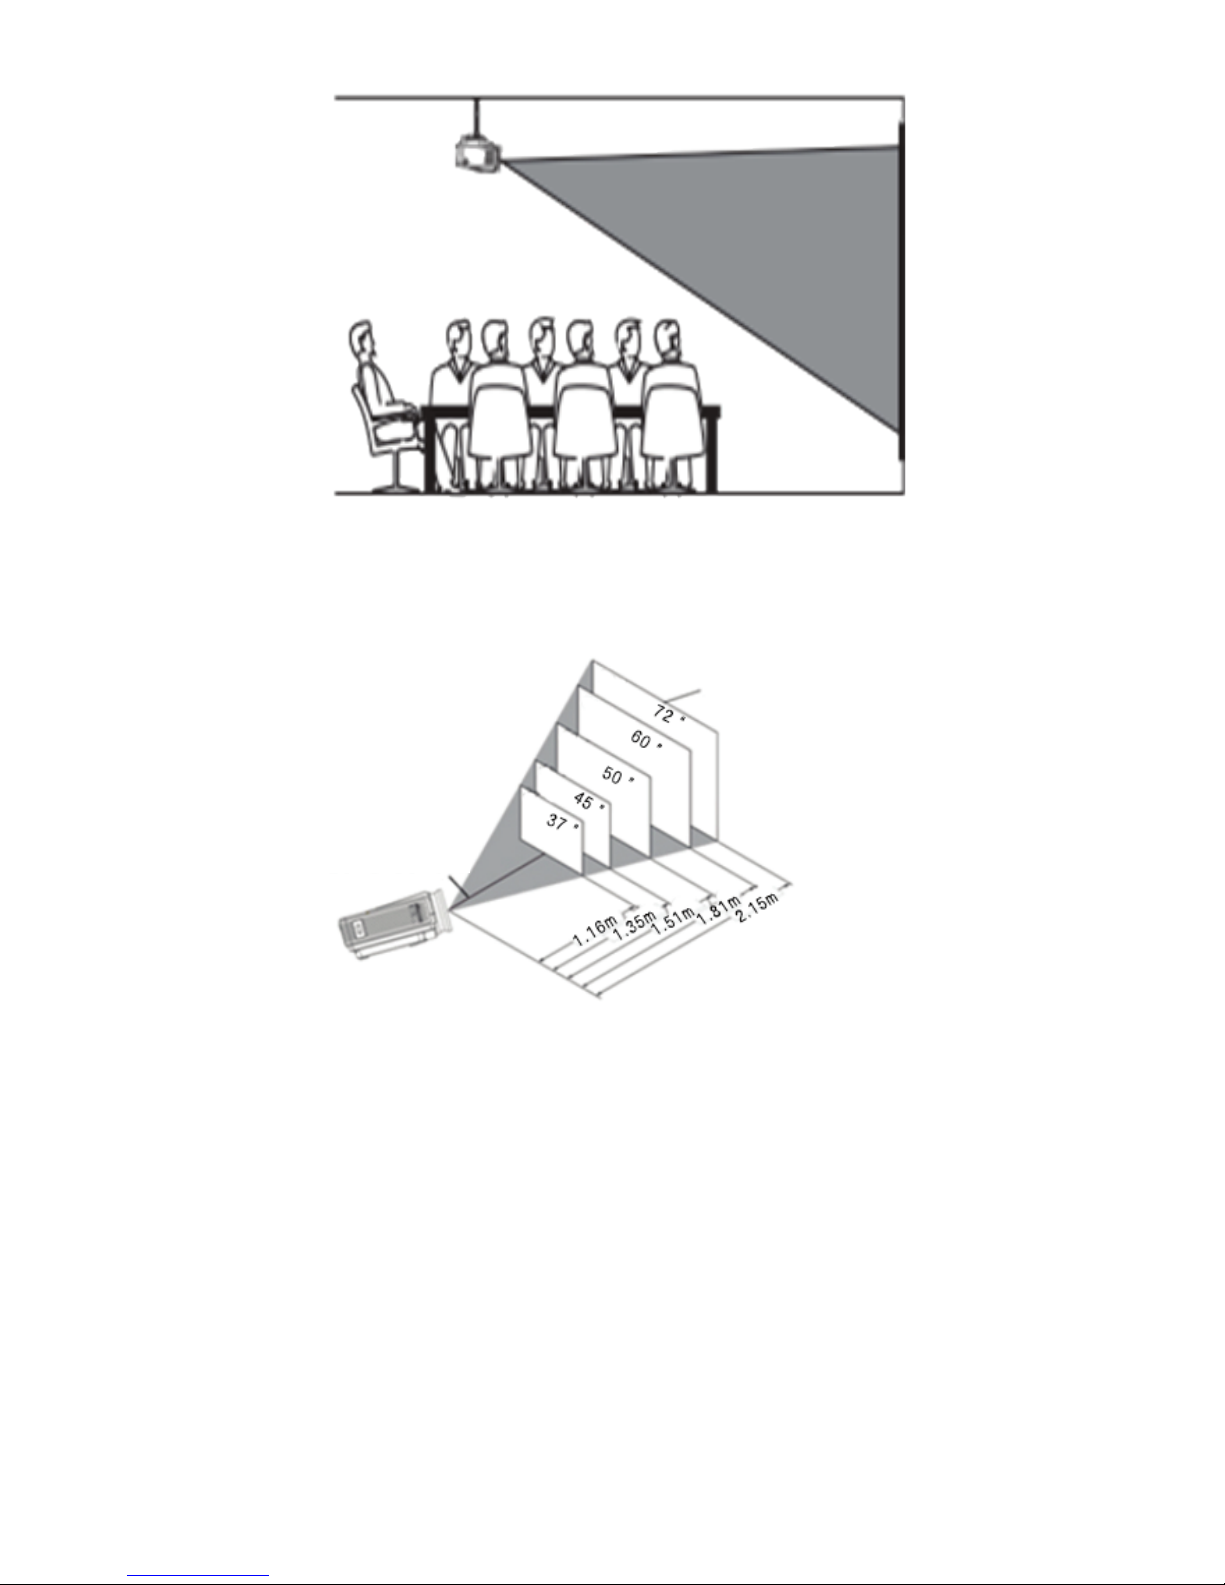
distance between the projector and the screen" section to determine
the size of the distance between the screen and the projector Place
the projector screen is on the axis of symmetry about the installation,
in order to avoid the image left and right trapezoidal distortion.
During installation, do not live operation, in order to avoid risk of
electric shock or burn the machine.Just packed projectors, the first
boot image may appear on the bottom was a trapezoidal distortion
and blur, see the "keystone correction and focus adjustment" section
later adjusted
5
Front
Ceiling
Rear
Install rear hanger
Square Image
The Curtain
The Projector
Axis of
symmetry
of the curtain
Page 7
Recommended use of Ceilingwith stentwhen Installed correctly, the
image ispositive square.
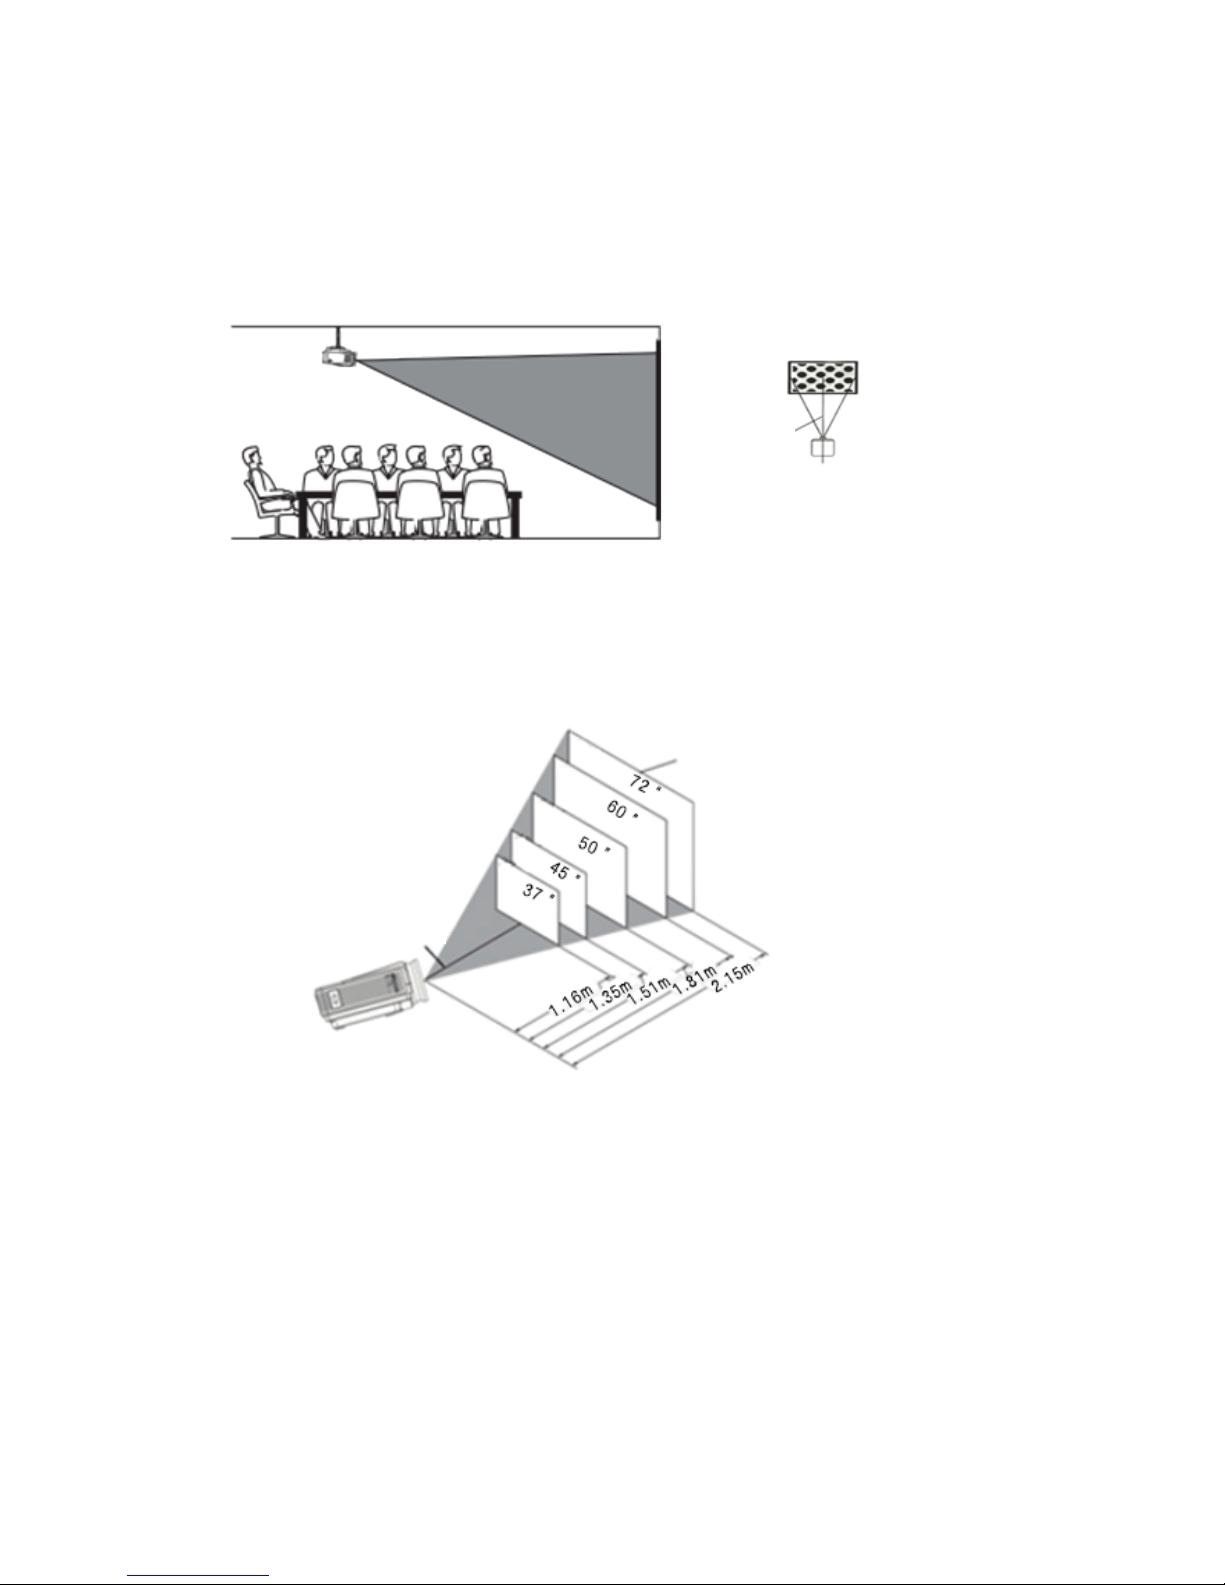
2. The distance between the projector and screen
3.Focus adjustment
Clockwise rotation of the lens, the lens all back into the machine, and
then slowly rotate the lens counterclockwise, and carefully observe the
pixels on the screen, the particles in the clearest image when Hou
(subject to the center of the image area), also It is the best focus
lens position.。
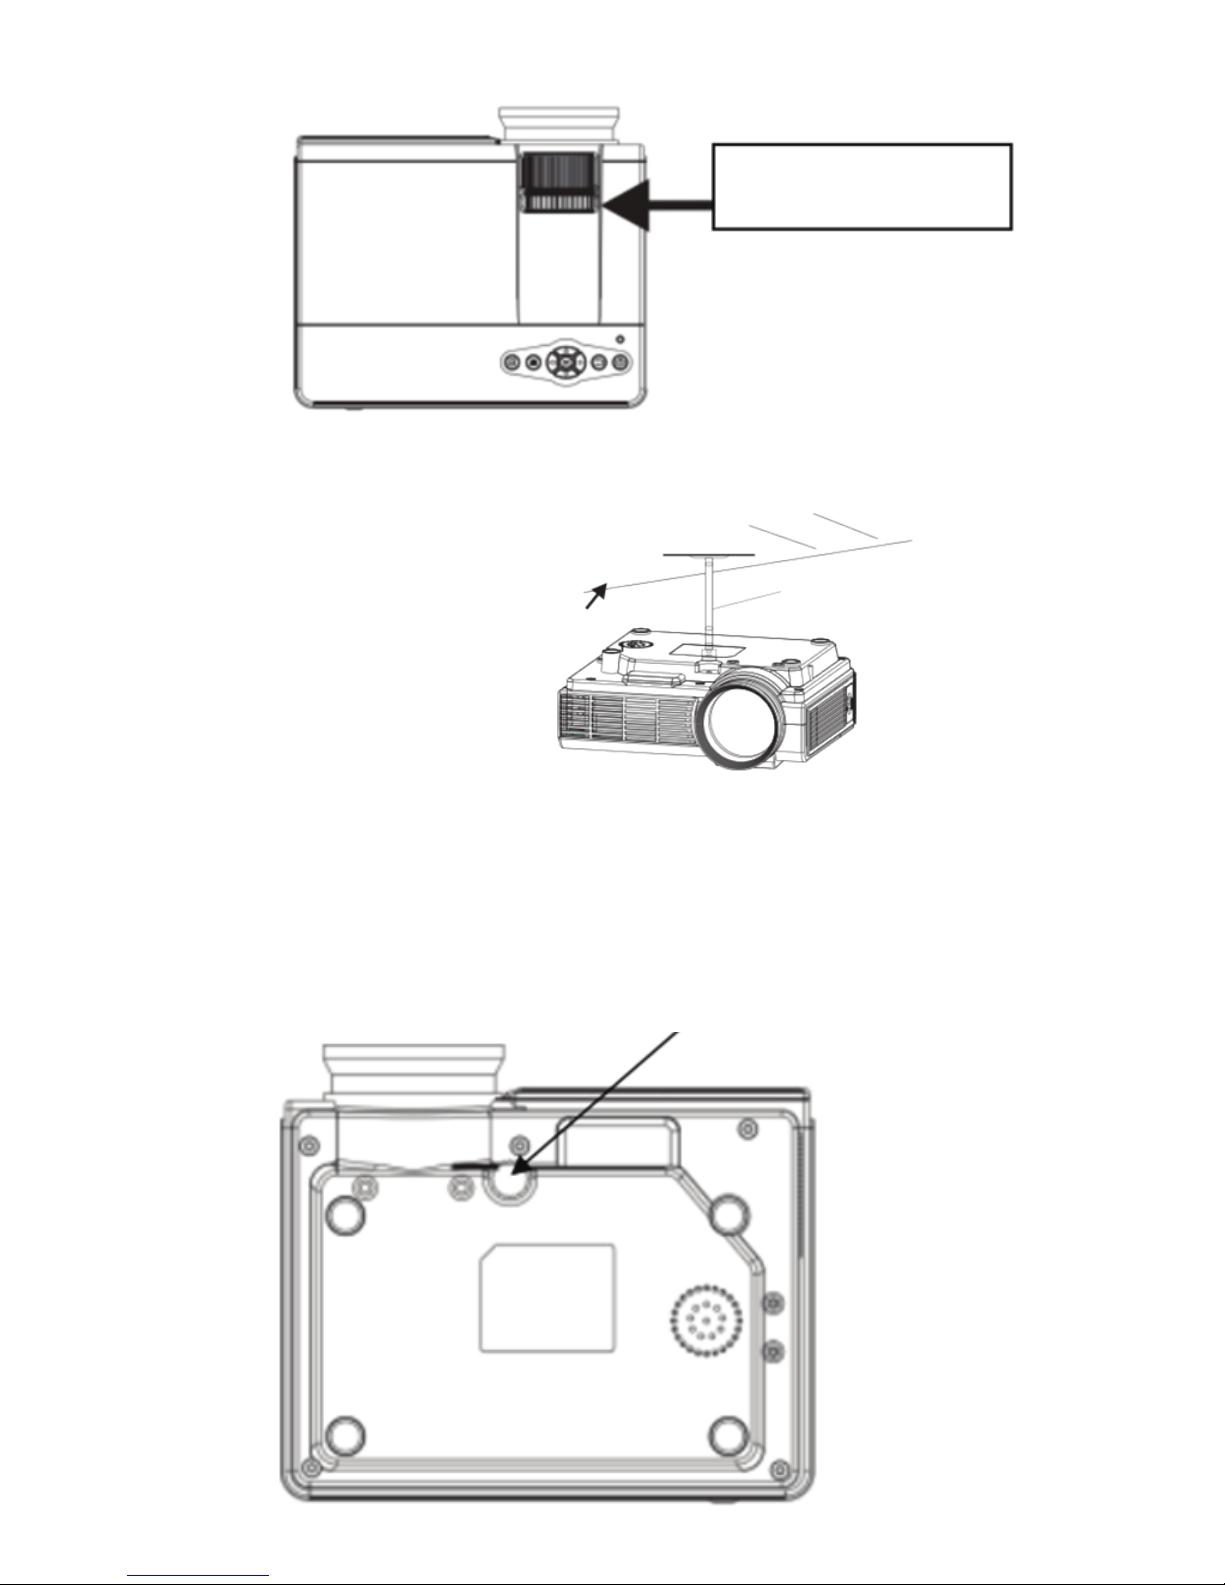
4.Keystone correction
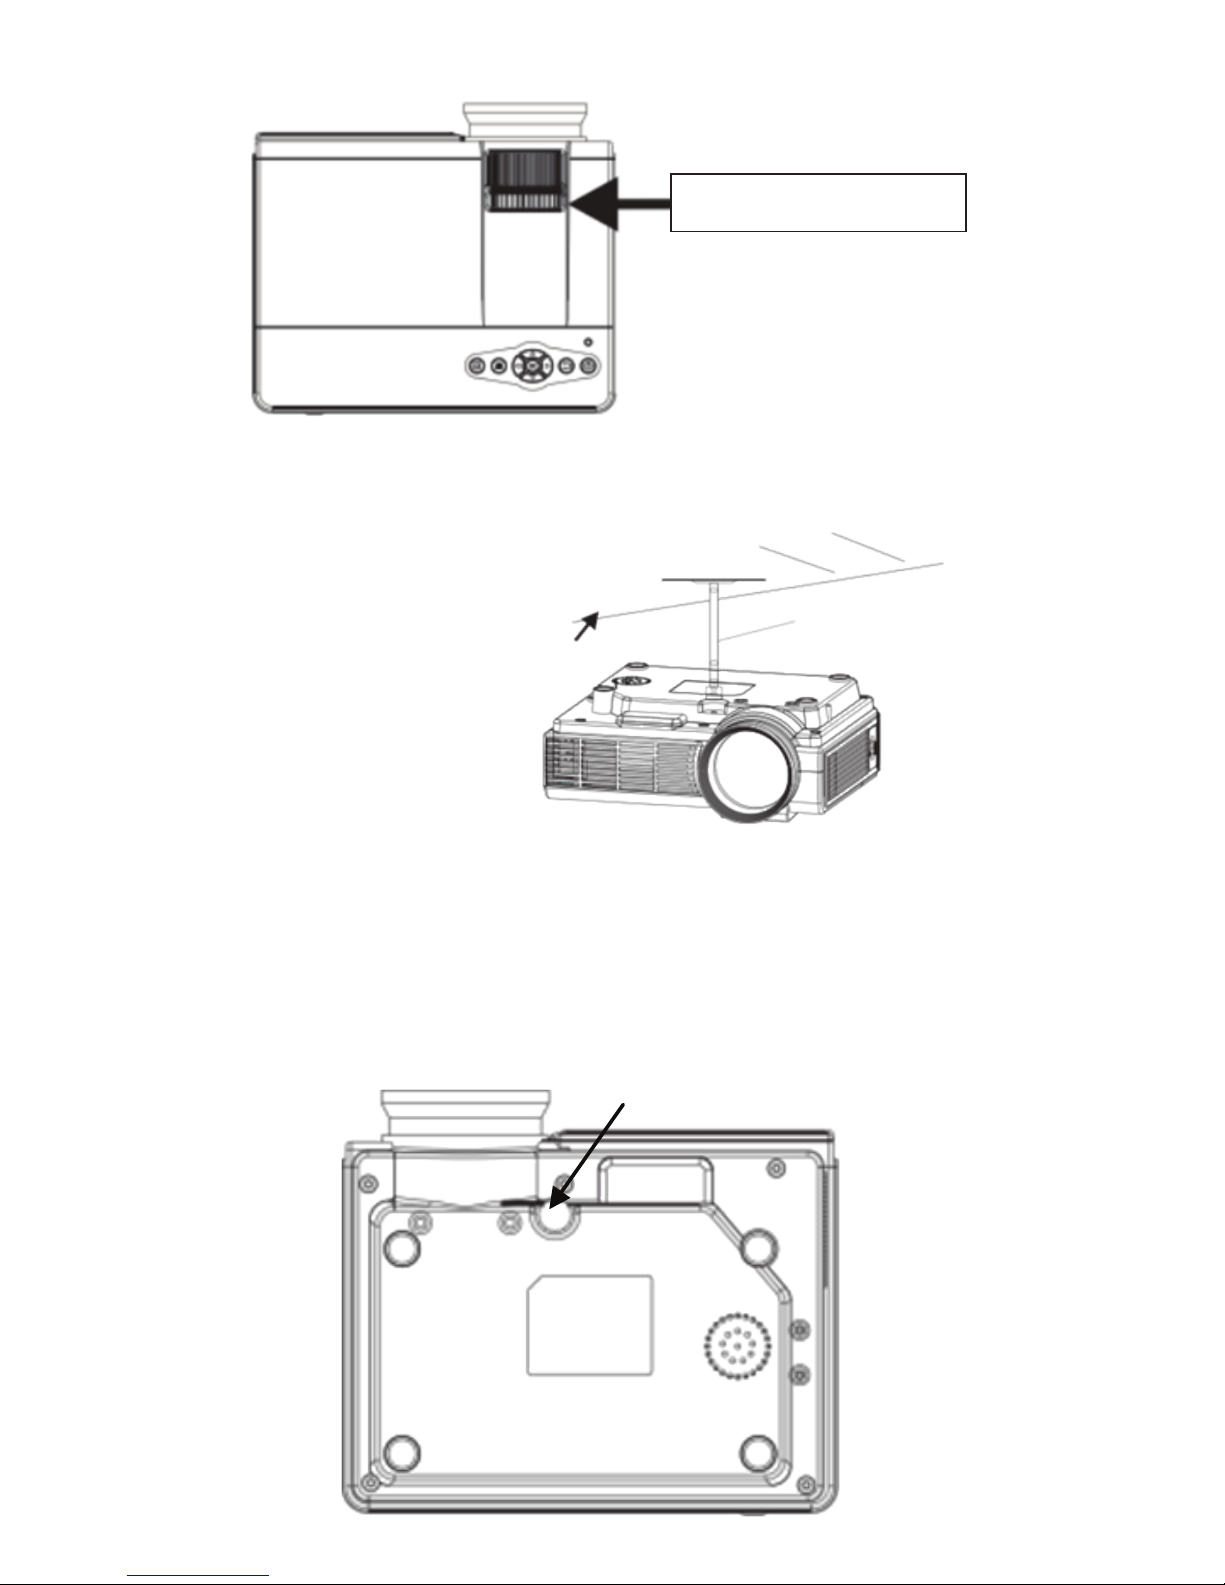
slowly slide Keystone (Fig. 3),until the border of the screen image has
become a regular square, adjust the keystone of the maximum amplitude
of ± 15 degrees. If the adjusted limit Keystone gear position does not
eliminate keystone, shorten the distance between the projector and
screen center in the vertical direction. If placed on the table mounted
projector, the bottom plate can be adjusted by rotating the wheel to
change the angle of the projection angle of the projector.
6
Lens center
Screen size
Warning:
Please do not stare or look directly at the light
cause it is of high brightness.
Especially children who are vulnerable to injury..
Page 8

Trapezoidal
Picture3
Please refer to the following illustration Projector Ceiling
Note: Do not place the projector near a heat source air conditioners
and heaters, otherwise the machine may overheat and shut down
automatically.When installing the projector, please choose those
adequate strength and hanger screws, so as to avoid quality time or
screw screwed into enough depth and occurs in the projector
falling accident.
Hanger fixing holes
Three.Signal linesConnection
1.Power input socket:when using, please insert the power adapter of
the machine accessories into theDC output terminal, and the other end
of the power adapter is inserted into the mains socket.
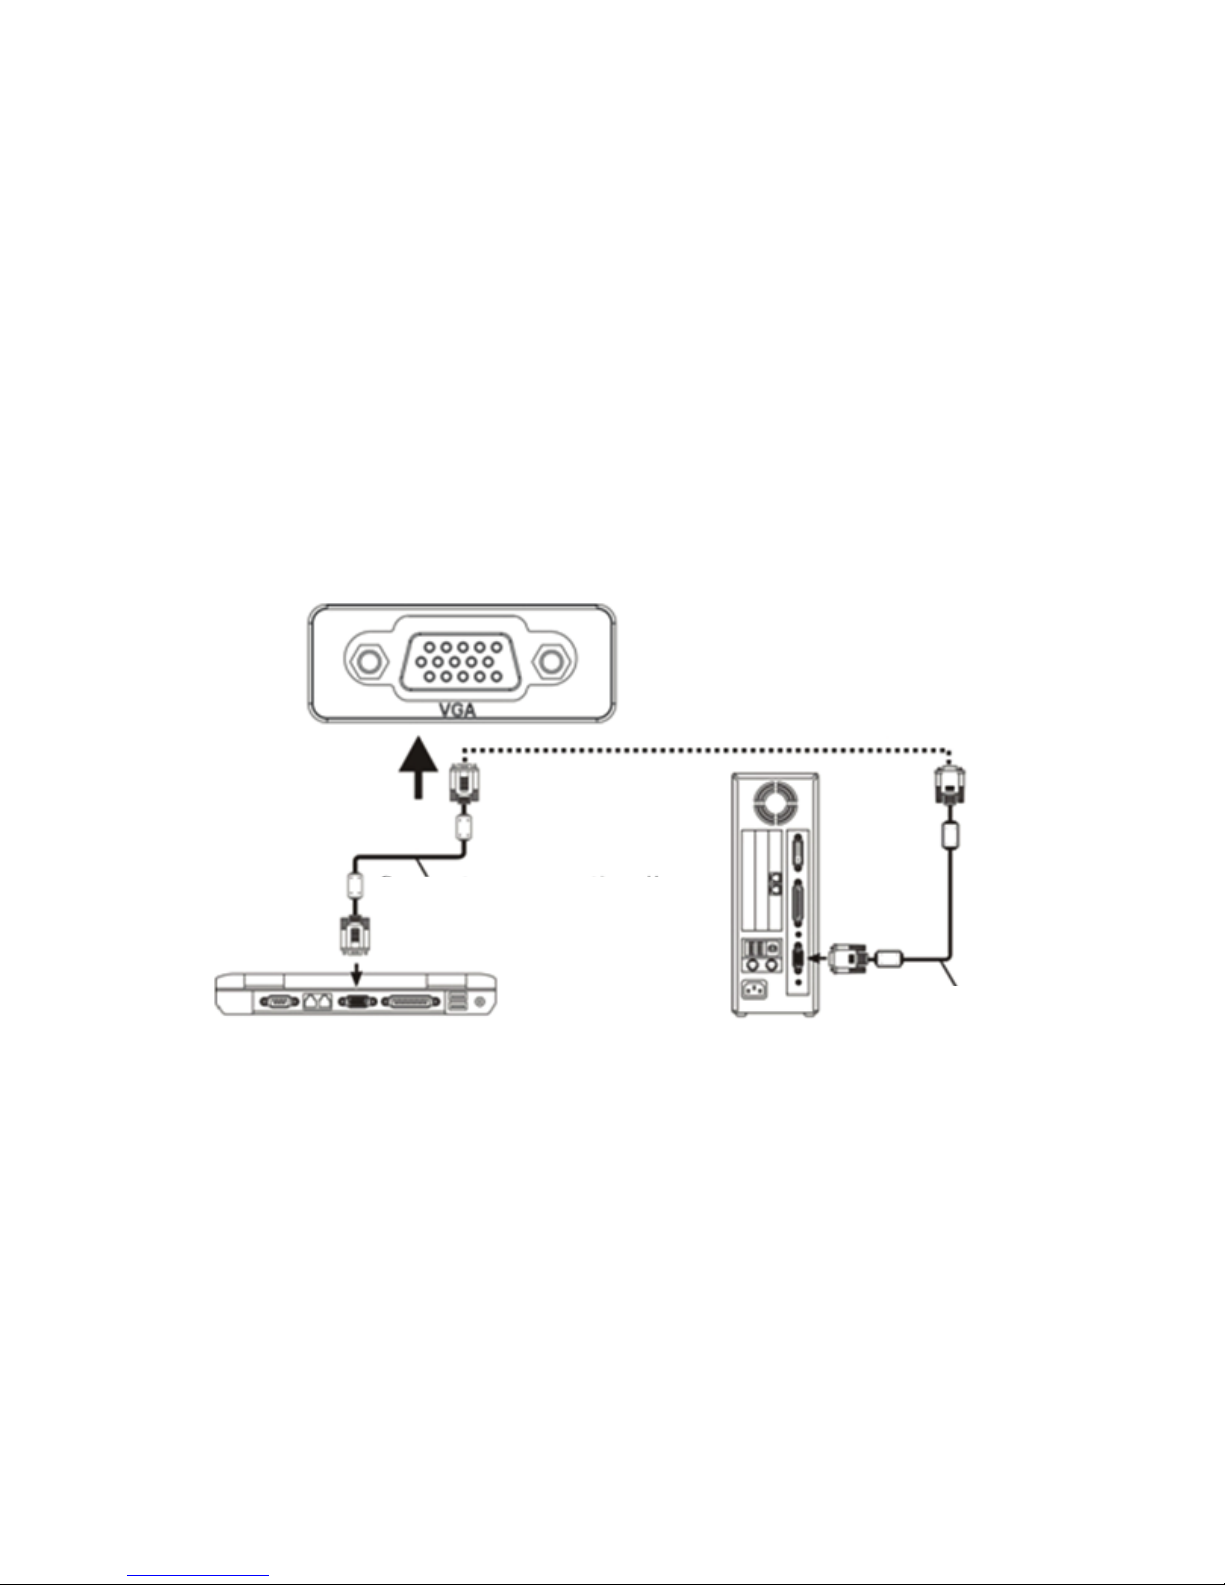
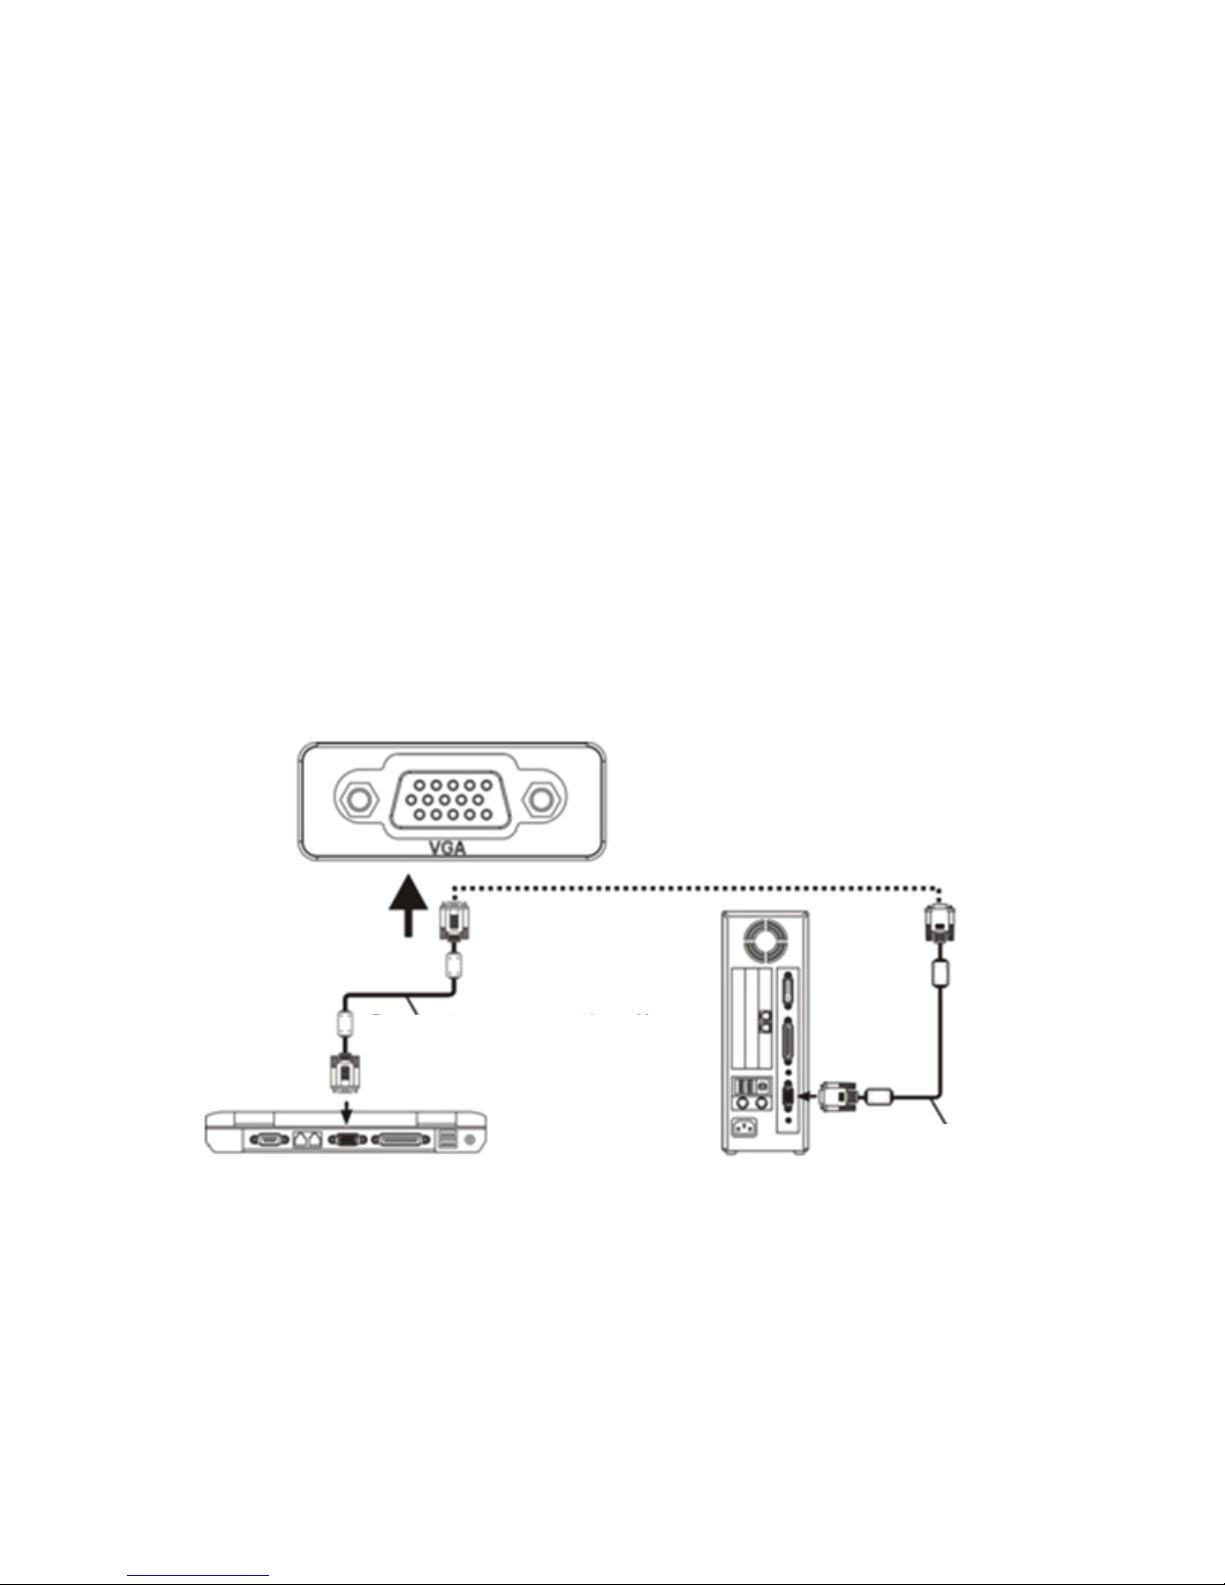
2.VGA input socket:with this port can be connected to a computer or
other output socket with VGA video signal.When the projector is
connected to the computer, you can use a VGA cable connection.
After connecting with a VGA cable projector and
7
Page 9
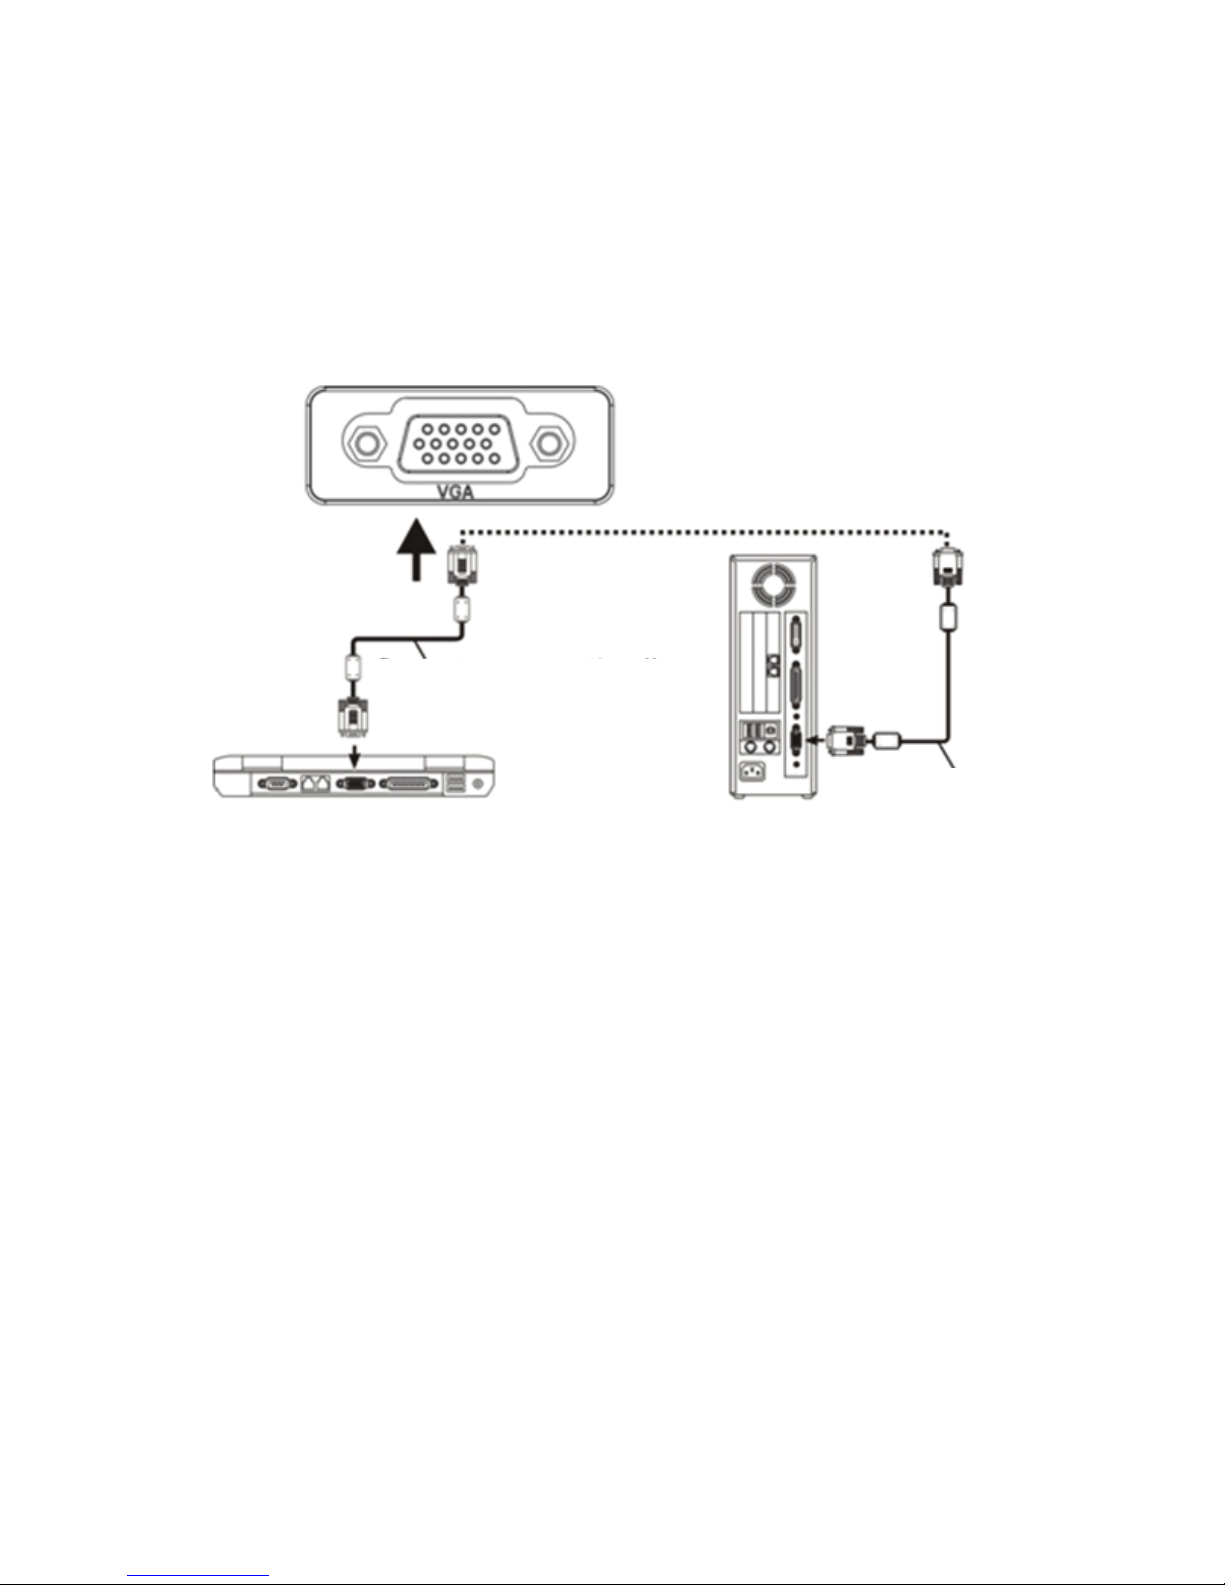
When the laptop connected to the projector, laptop required video
switch: Please use the original VGA cable to connect the notebook and
the projector, and the projector turned on, press the VGA button on the
remote control, or press the unit "Source" button, or the remote control
"Source" button, the projector is switched to VGA mode. Back to the
notebook side, press the switch key notebook "Fn + Fx", Fx represents
different models of notebook video switching keys F1-F10, similar to the
small TV icon. Press once the computer display, while the secondary is
pressed dual display, press three times the external display
(computer not shown). Since each brand of computer function key to
switch between different positions located, you control the following
according to your laptop's instructions to switch
Toshiba(Fn+F5) IBM(Fn+F7) HP(Fn+F4) Founder(Fn+F3)
samsung(Fn+F3) Panasonic(Fn+F3) NEC(Fn+F4) apple(Fn+F8)
sharp(Fn+F5) Hitachi(Fn+F7) Dell(Fn+F8) Acer(Fn+F5)
Lenovo(Fn+F3) BenQ(Fn+F7) ASUS(Fn+F9)
Win7 / Win8 system: Please use the original VGA cable to connect the
projector and notebook, then the projector is turned on, press the
machine "Source" button, or "Source" button on the remote control, the
projector will switch to VGA mode. Back side of the notebook, desktop,
right, screen resolution, connect the projector to display copy it.
computer equipment, connect the power cord or power adapter, turn
on the projector, press the "Source" button on the projector panel or
remote control, select the "PC (VGA)", press "OK" key to enter the
computer model, and then the computer's resolution setting and the
physical resolution of the projector consistent with the refresh rate
of 60Hz. (Actual use, most current computer systems do not support
800 * 480 resolution, this function is used to see the document class
will not see thefont, but for a computer to play images, pictures class
does not greatly affected).
8
Computer connection line
Laptop Desktop
Computer
connection line
Page 10
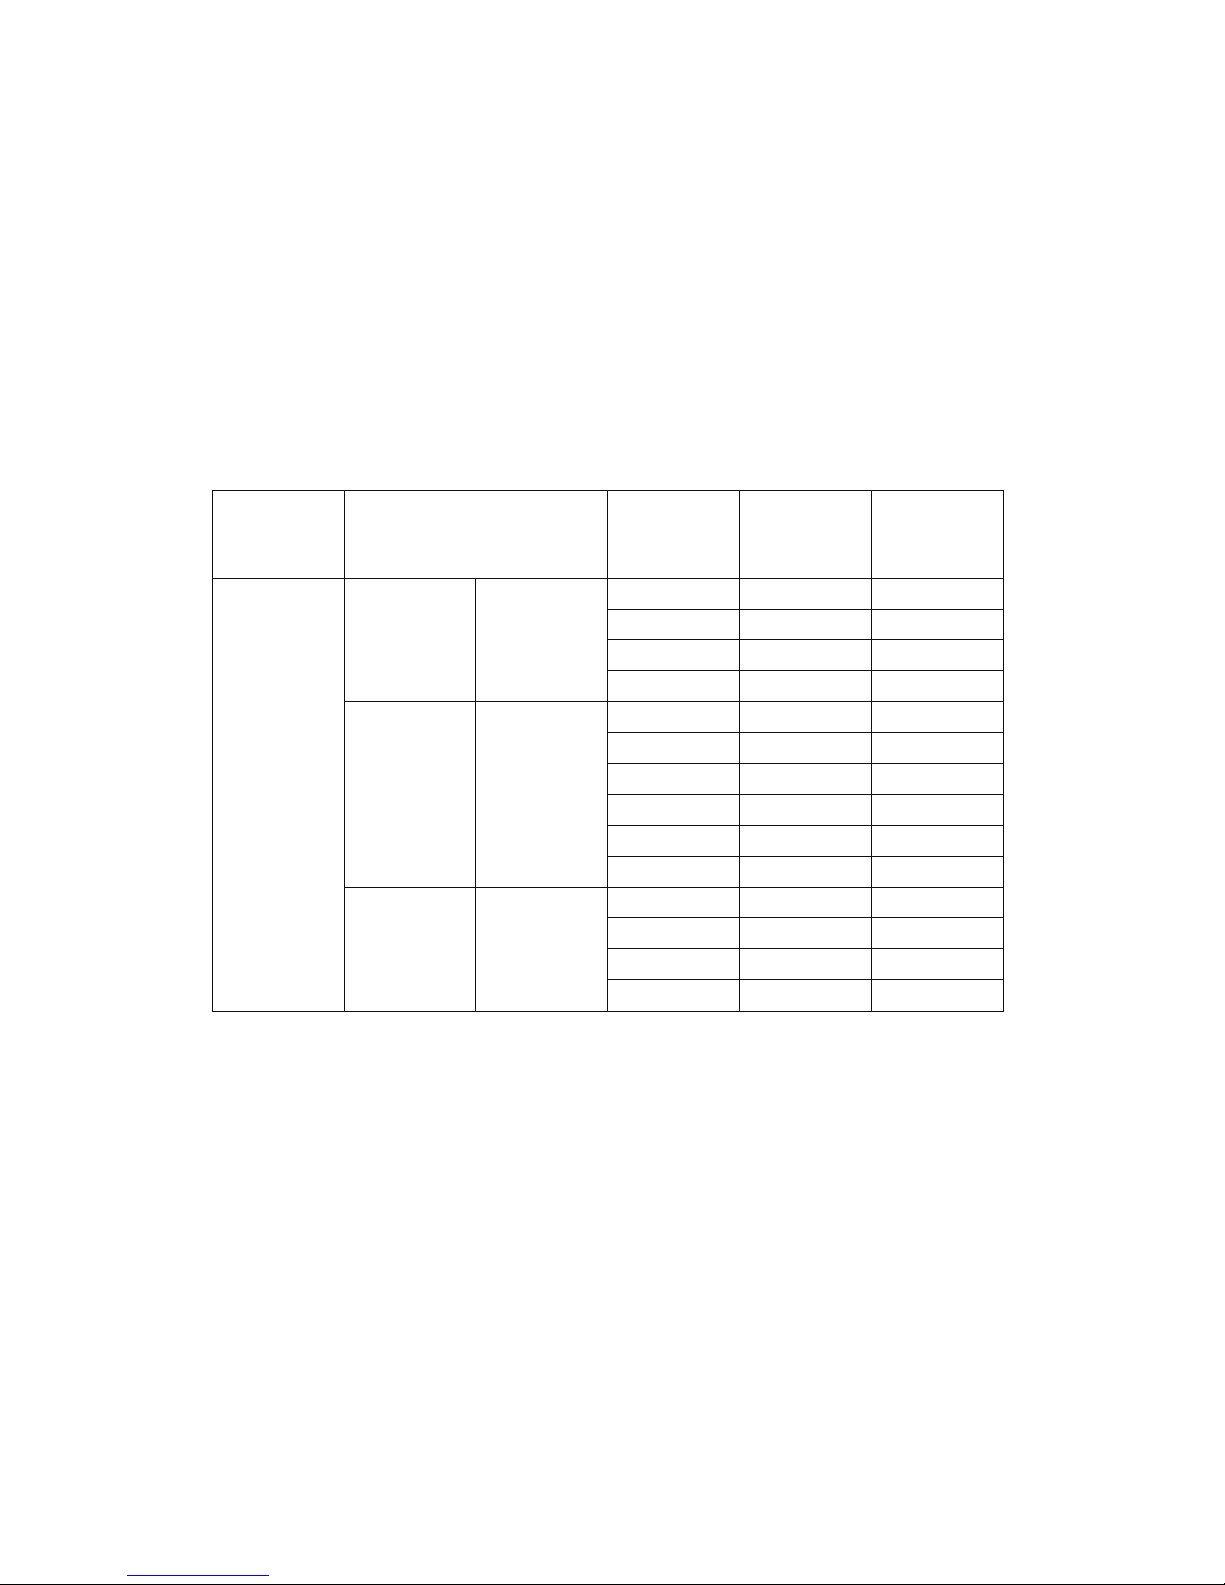
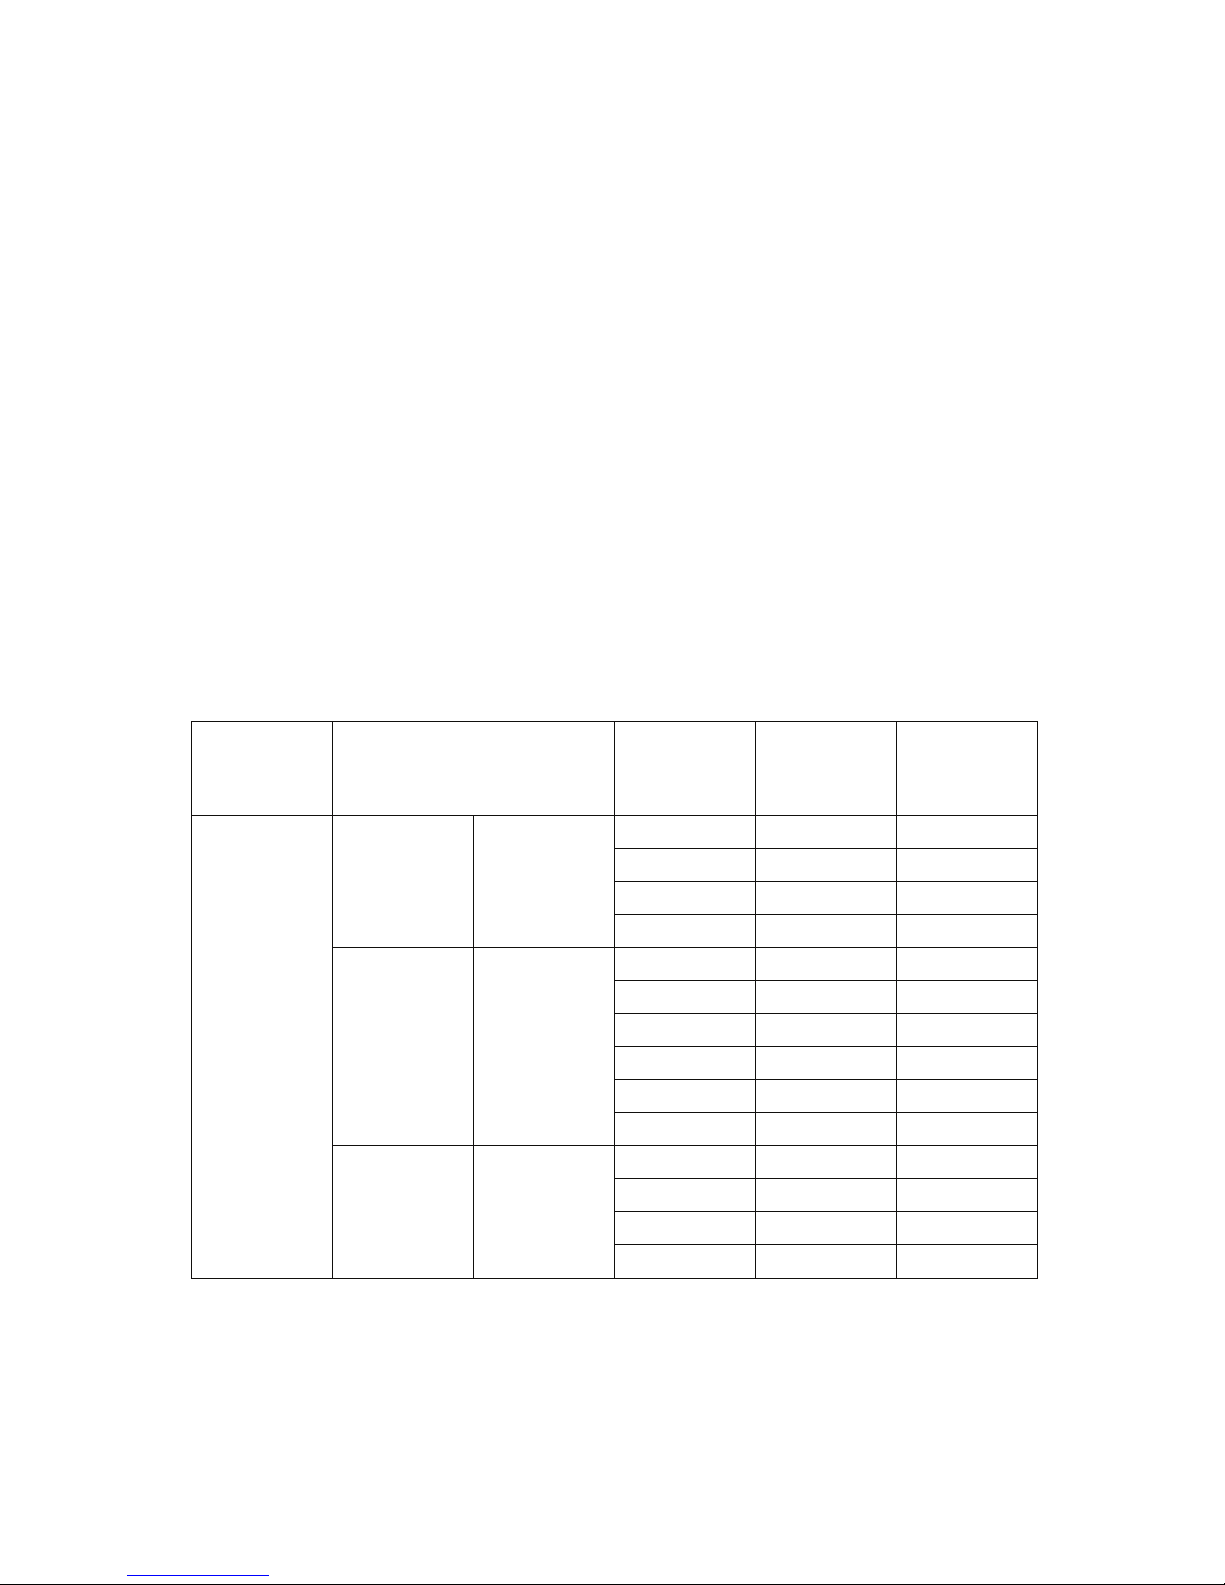
Refer to the follwering table parameters to adjust the output signal
from a computer
Note: when there is a computer connected to the projector and the image
can not bedisplayed simultaneously, please set the display properties of
the computer, select the output mode for the CRT.
3.Video input socket:This port can be connected to the LD players, DVD
players, cameras and other video player video (VIDEO), the audio
output socket.
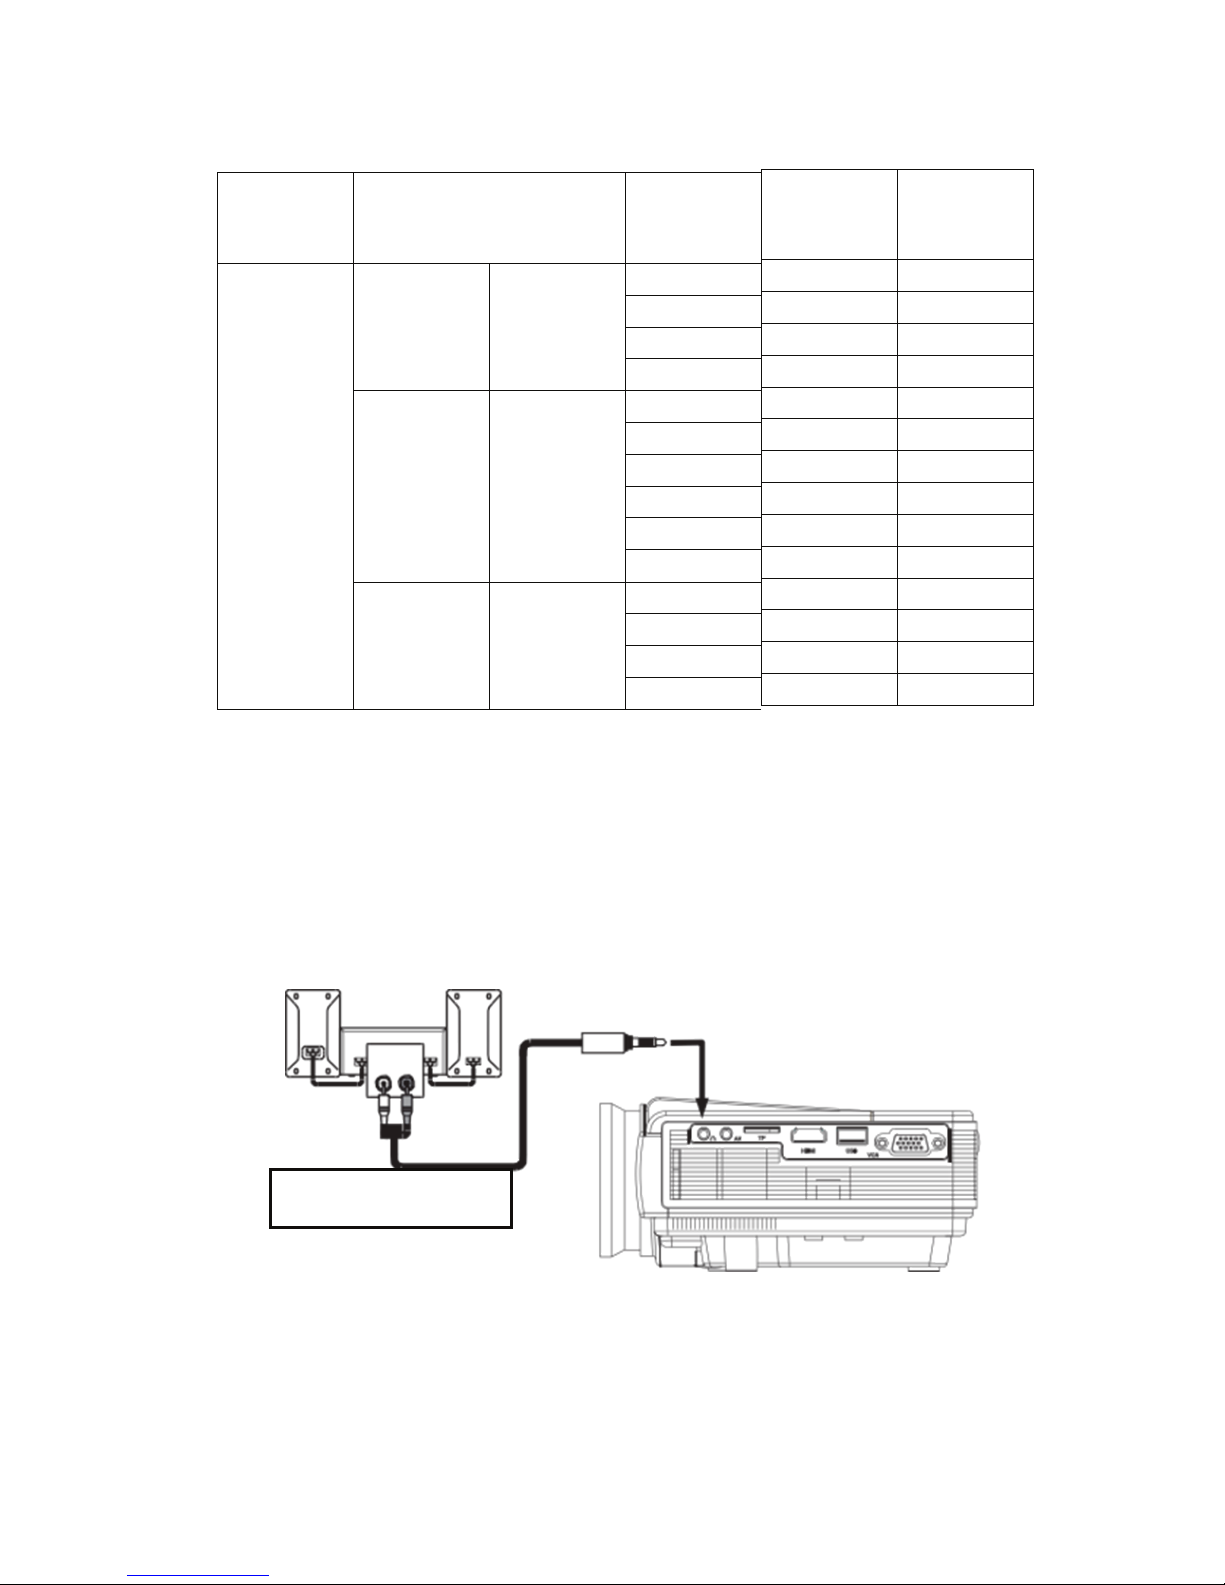
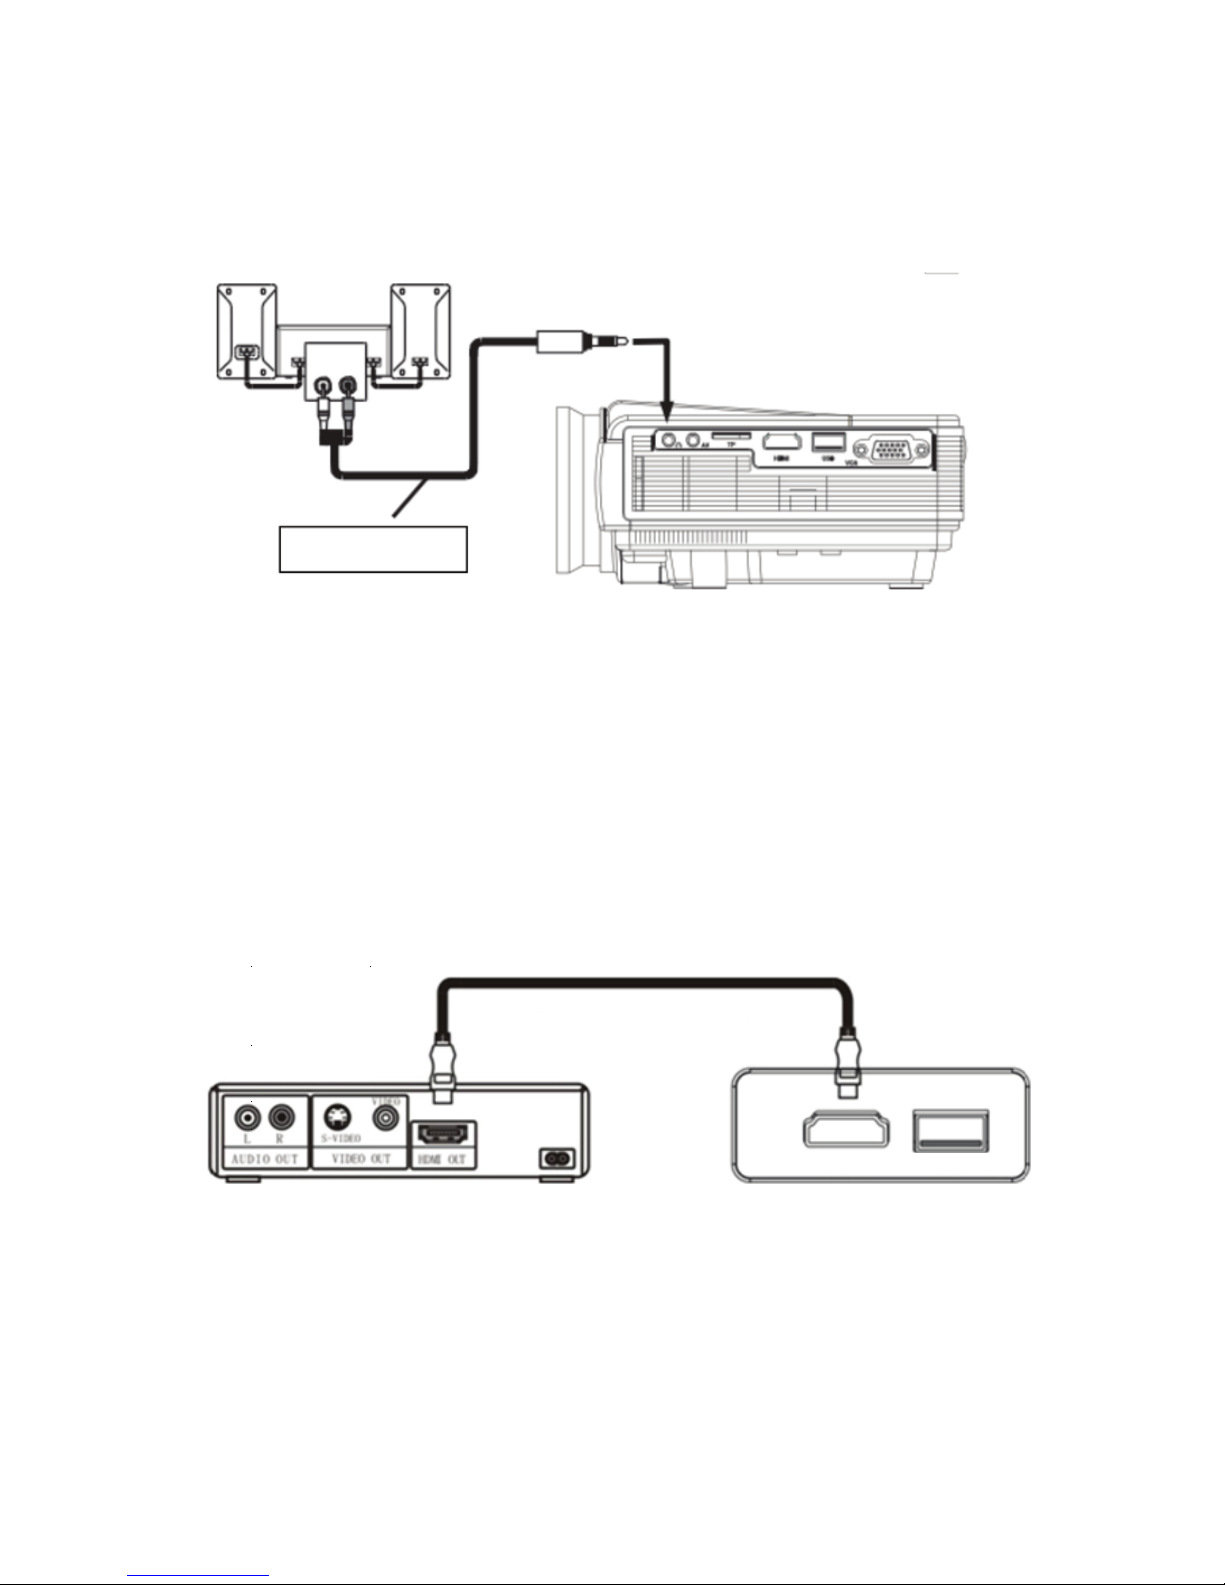
4.Audio output:Audio signal from the output port of the projector, such as
high power to play music, please connect to an external power amplifier
input.
Audio signal line
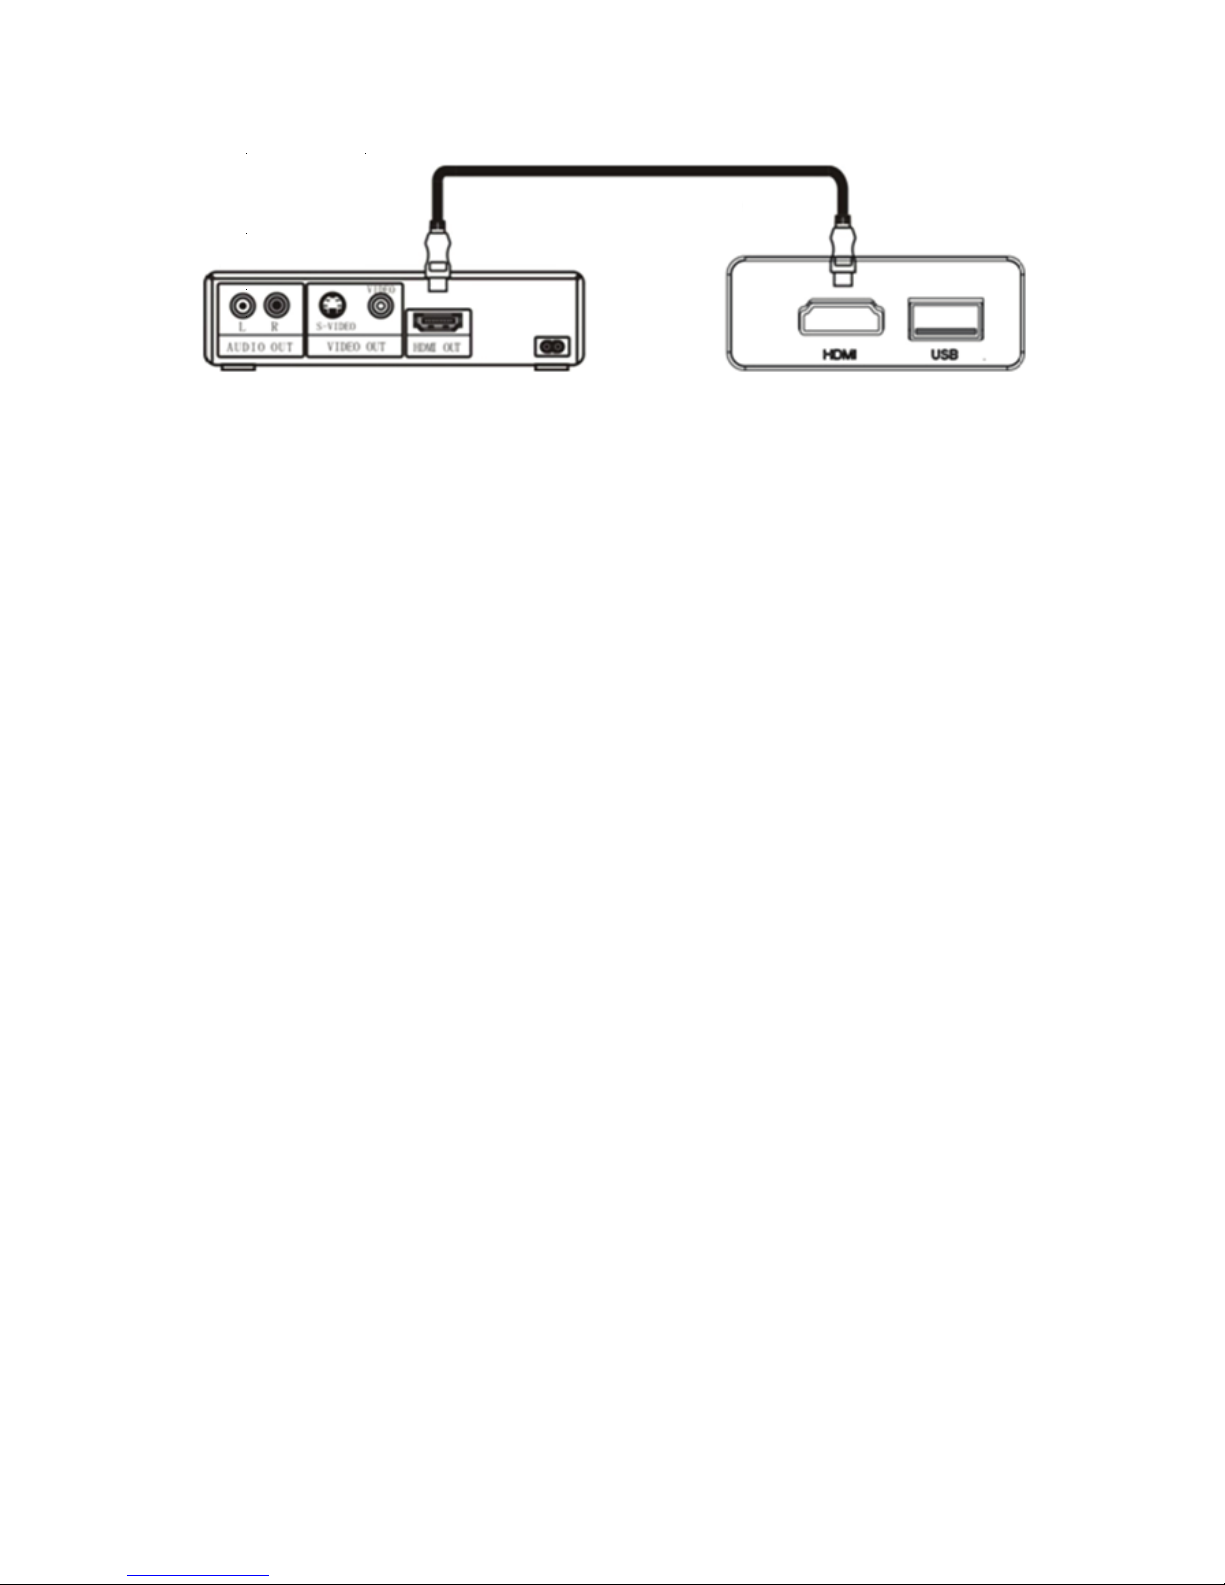
5.HDMI signal input:This interface can be connected to the output end
of a HDMI HD output player.When the projector connect to HD player, HD
set-top boxes, video games,hd (HDMI) signal connection can be used.
After connecting projectors and high-definition equipment with
high-definition cable (HDMI cable), connect the power cord or power
adapter, turn on the projector, press the "Source" button on the projector
9
Type
Resolution
Horizontal
Frequenc
y(KHz)
Field
frequency
(
Hz)
VESA
standard
PC
VGA
640×480
31.5
60
√
34.7
70
37.9
72
√
37.5
75
√
SVGA
800×600
31.4
50
35.1
56
√
37.9
60
√
46.6
70
48.1
72
√
46.9
75
√
XGA
1024×768
40.3
50
48.4
60
√
56.5
70
√
60.0
75
√
Page 11
6.Connect the U disk
Plug U disk into the "USB" port, or insert the TF card into the TF card slot,
press the "Source" button on the projector panel or remote control, select
the "multimedia (USB or TF)", press "OK "key to enter multimedia mode,
select a video or picture files into the video preview mode, press on the
remote control" play / pause "button to full screen.
Four.Operation and use of the projector
This chapter tells you how to use the projector, starting from the opening
of the projector, and gradually introduce the use of the projector, please
carefully read this chapter, a simple operation guide will enable you to
quickly master the operation of the projector.
1.Power /Shutdown
According to the projected image size / distance, fixed projectors, and
connected signal lines to corresponding projector interface as it requires.
According to the positive and negative polarity of the battery box remote
controller identifier into the battery. Insert the adapter DC into the DC
projector on the rear panel,when power indicator lights, the machine enters
the standby mode. Press the "power button" button on the remote controller
or panel to turn on the indicator light and enter the normal working condition..
After a few seconds, the system will be fully activated, the screen image will
appear. Press the "SOURCE" key on the remote control to select the signal
channel to be accessed. Newly installed projectors, first time image may
appear blurred or keystone state. When the image appears blurred, you
can adjust the machine in front of the lens, when the particle image is
clearest (subject to the intermediate region), is the best lens focus position.
When it comes to keystone distortion, please toggle back and forth slowly
ladder regulator on the machine so that the image on the screen was a
positive frame quadrilateral so far. If keystone adjustment transferred to
the best location, you can not eliminate the ladder frame, please adjust the
distance between the projector and screen center in the vertical direction.
After adjusting the image is clear,it can be watched.During the watching,
you can also set the parameters of the system according
to personal preferences, adjust the image's brightness, contrast, color
10
Video player
HDMI connection line
panel or remote control, select "(HDMI)" press "OK" button to enter the
HDMI mode.
Page 12
saturation, audio volume and image clarity and sharpness.Press the
"Power" button on the front panel or the remote control again to close
the light path and display systems, cooling fan automatically stops, the
projector into standby mode again.After shutdown, must wait until the
projector fan delay automatic stop, the total power can be cut off, so as
to avoid the machine stored in excess heat and affect the normal life of
the projector. To improve the quality of the projection screen, please use
the appropriate projection screen.When using the projector you should
reduce the ambient light, consider appropriate shading measures, try to
turn off the lights in the room, at least to ensure the lights do not
direct screen.Although the unit can be connected to a plurality of video
signals, but in actual use, we recommend that connect one transmission
signals to avoid signal interference, affect the playback of the projector.
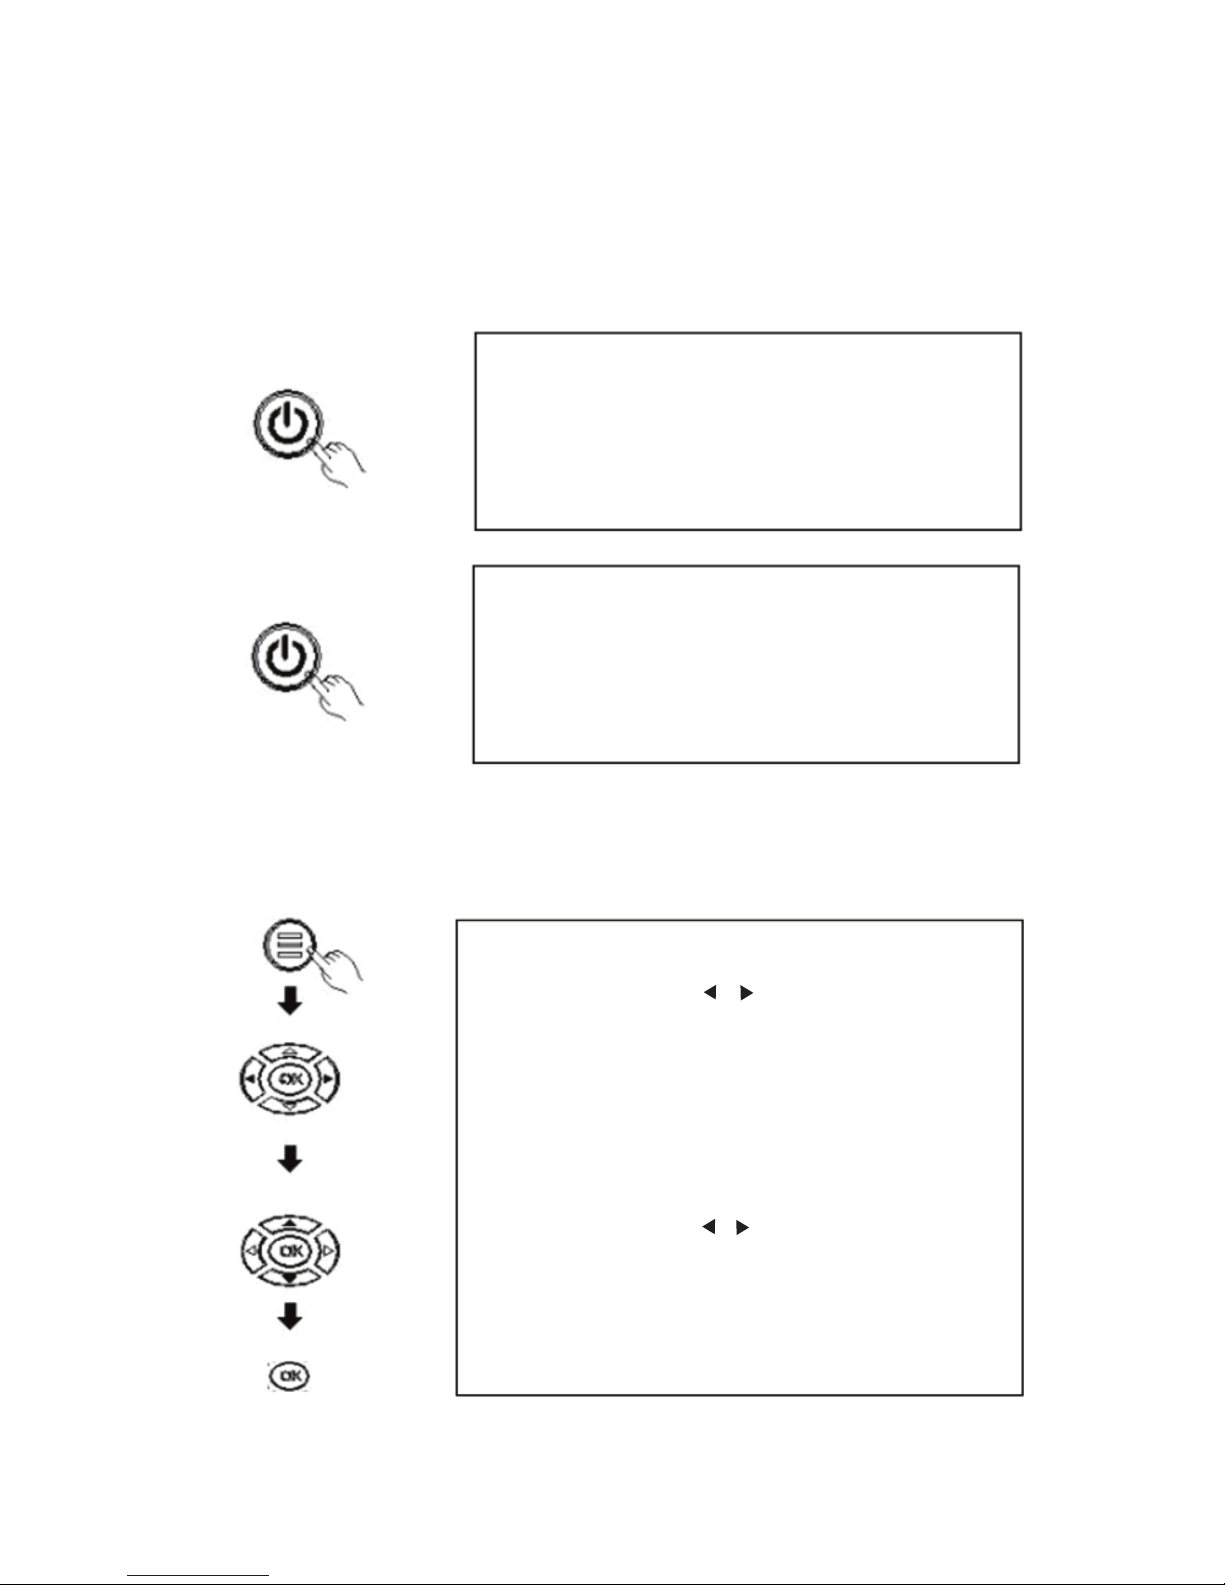
2.Menu operation
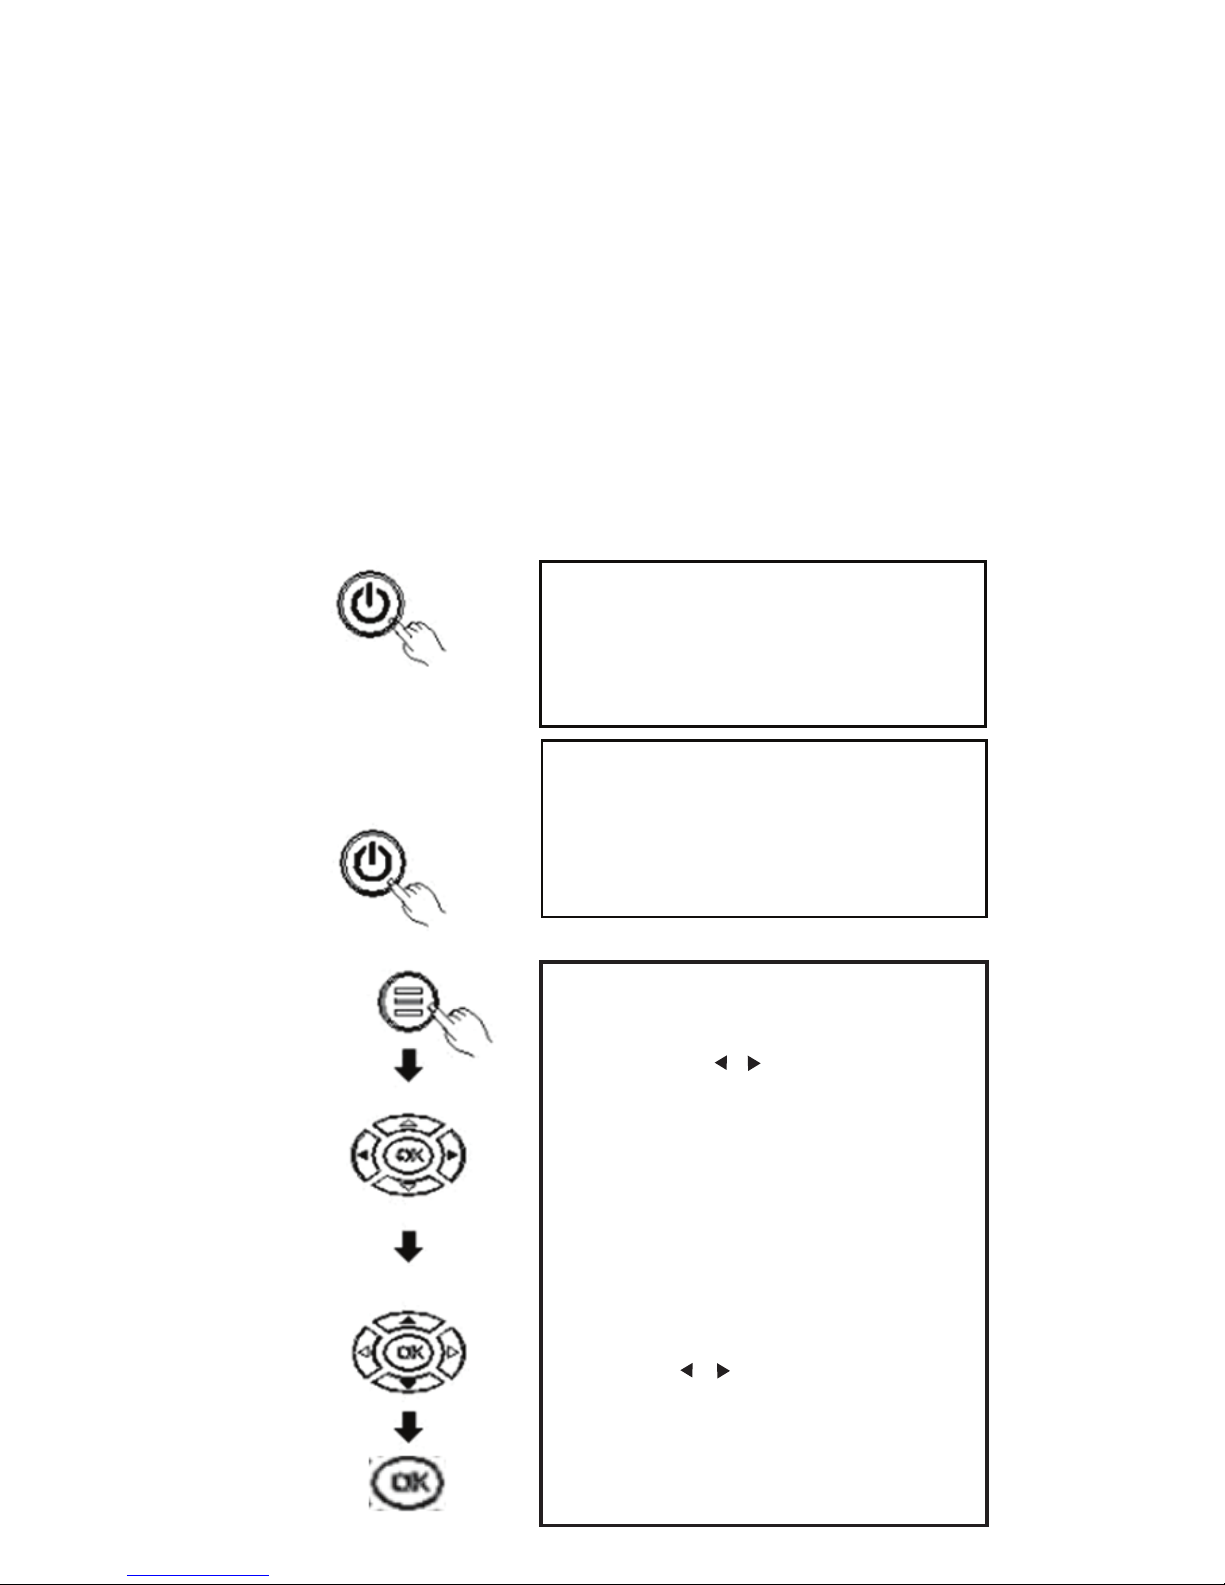
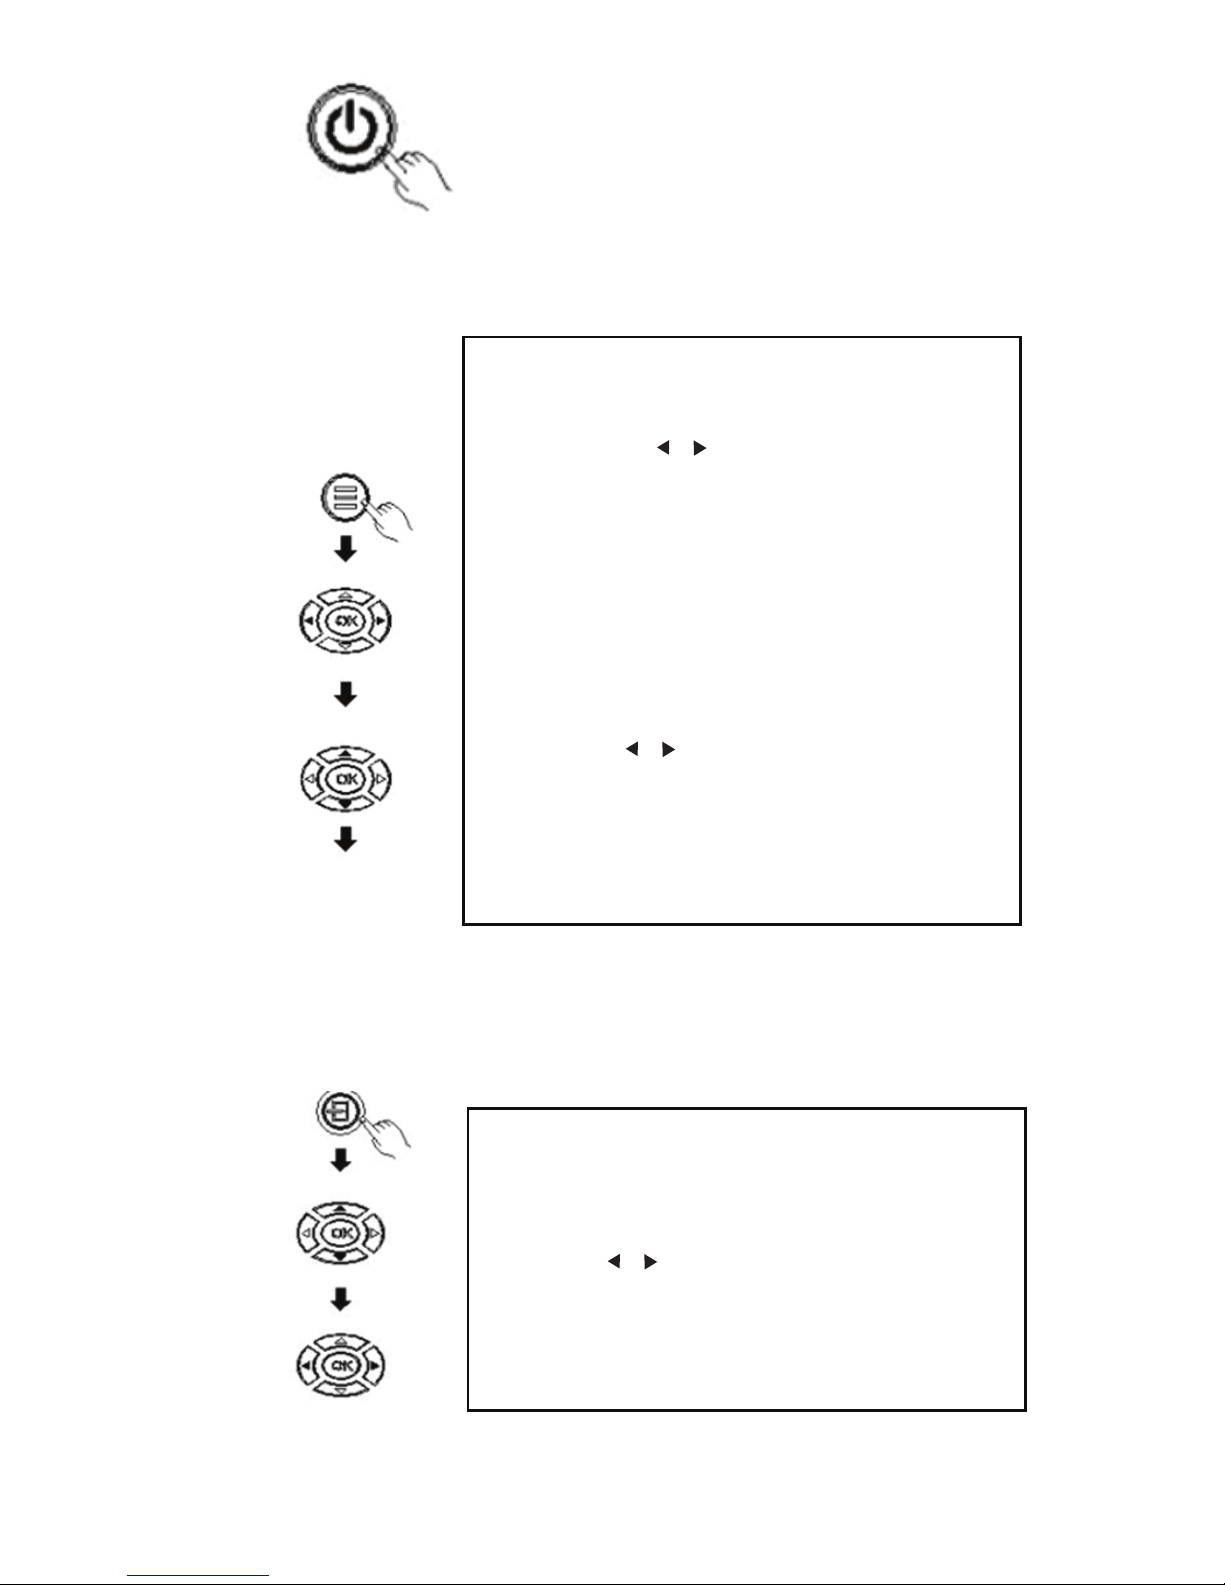
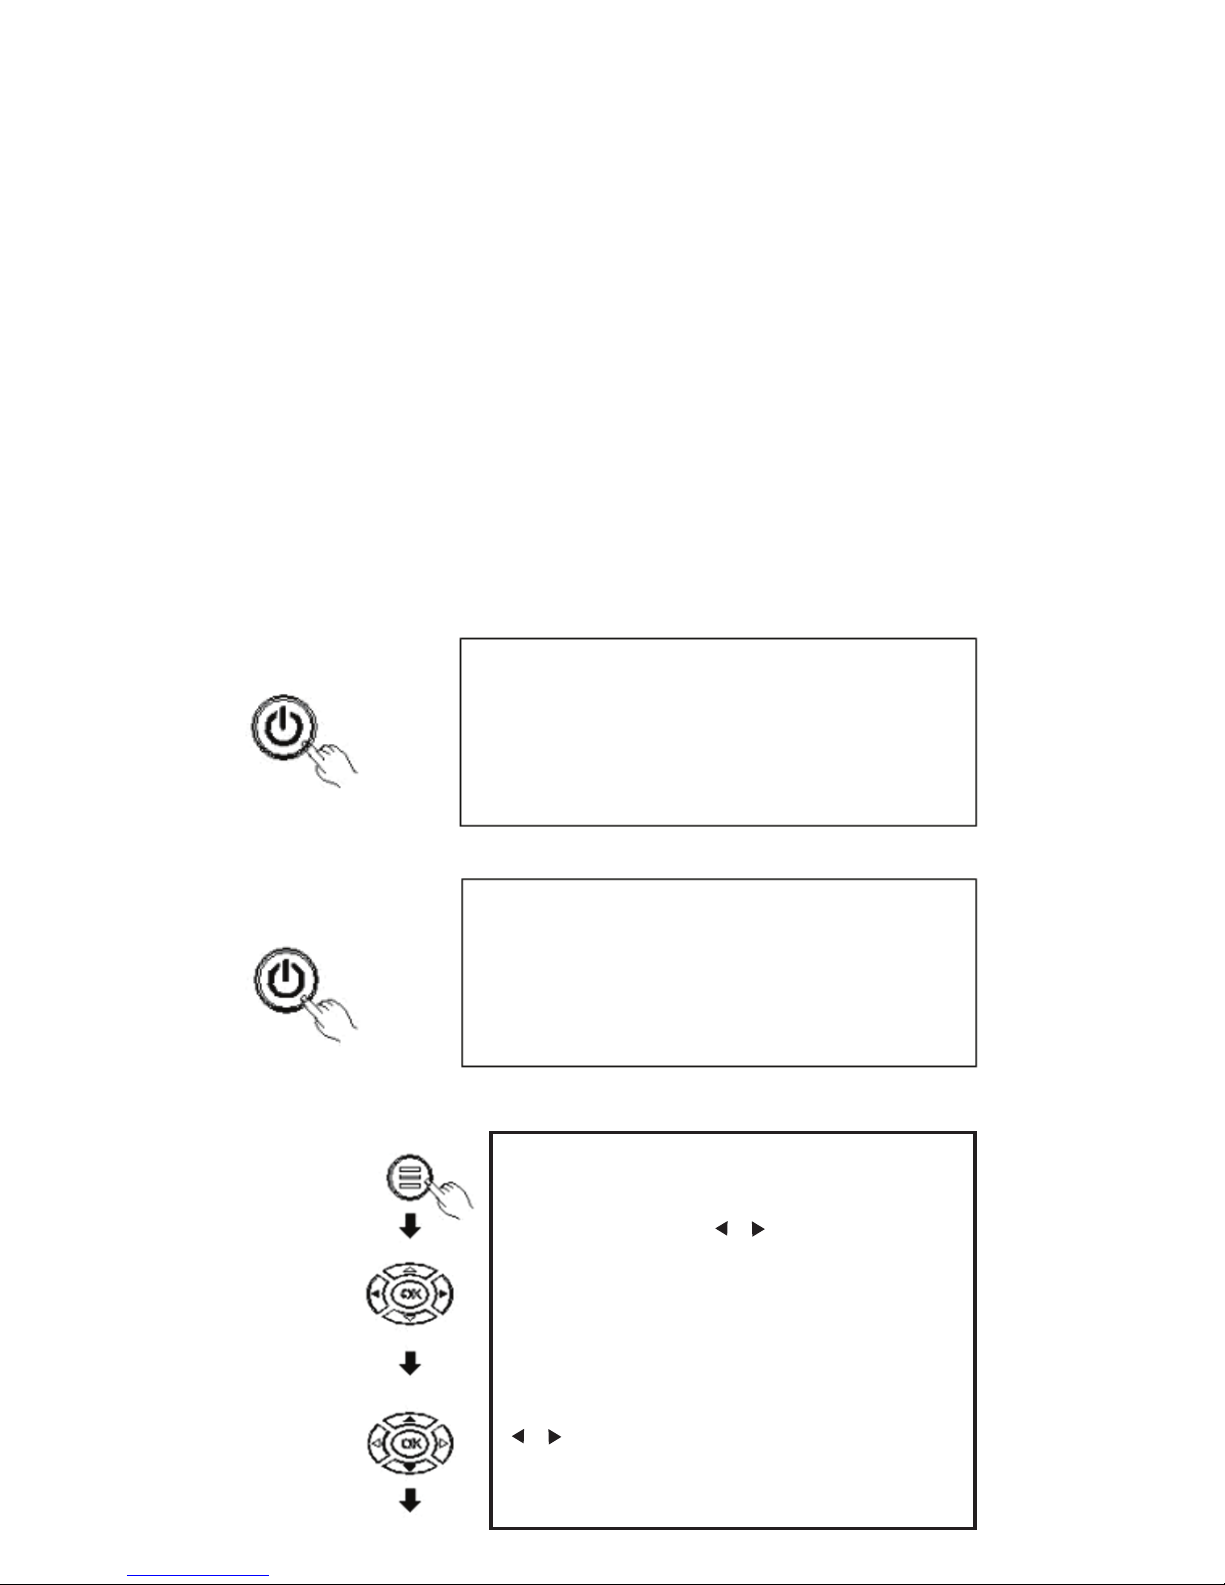
(1)power/off
(2)Menu-basic operations
11
Turn off the machine
Press the power key on the cover or
remote control again, and the machine
will enter the state of dormancy.
Turn on the machine
Press the power key on the cover or
remote control, the indicator turn color,
the machine into normal working
condition.
1.Press the Menu button on the
remote control or "MENU" on the
projector to display the menu screen.
2、Press the “ ”“ ”button on the
remote control or the projector to
select your need to adjust or set a
menu item, then the menu of the
selected icon will be highlighted.
3、Press the “ ▲”“ ▼”button on the
remote control or the projector on the
sub-menu to select the menu item you
need to adjust.
4、Then press the remote control or
"OK" button on the projector, activate
the selected icon sub-menu.
5、Press “ ”“ ”button, to adjust your
selected menu item parameter values.
6、Repeat the above second to fifth
procedure to adjust the other menu
items, or simply press the "MENU" or
"EXIT" key to exit the menu screen.
Press again
Page 13
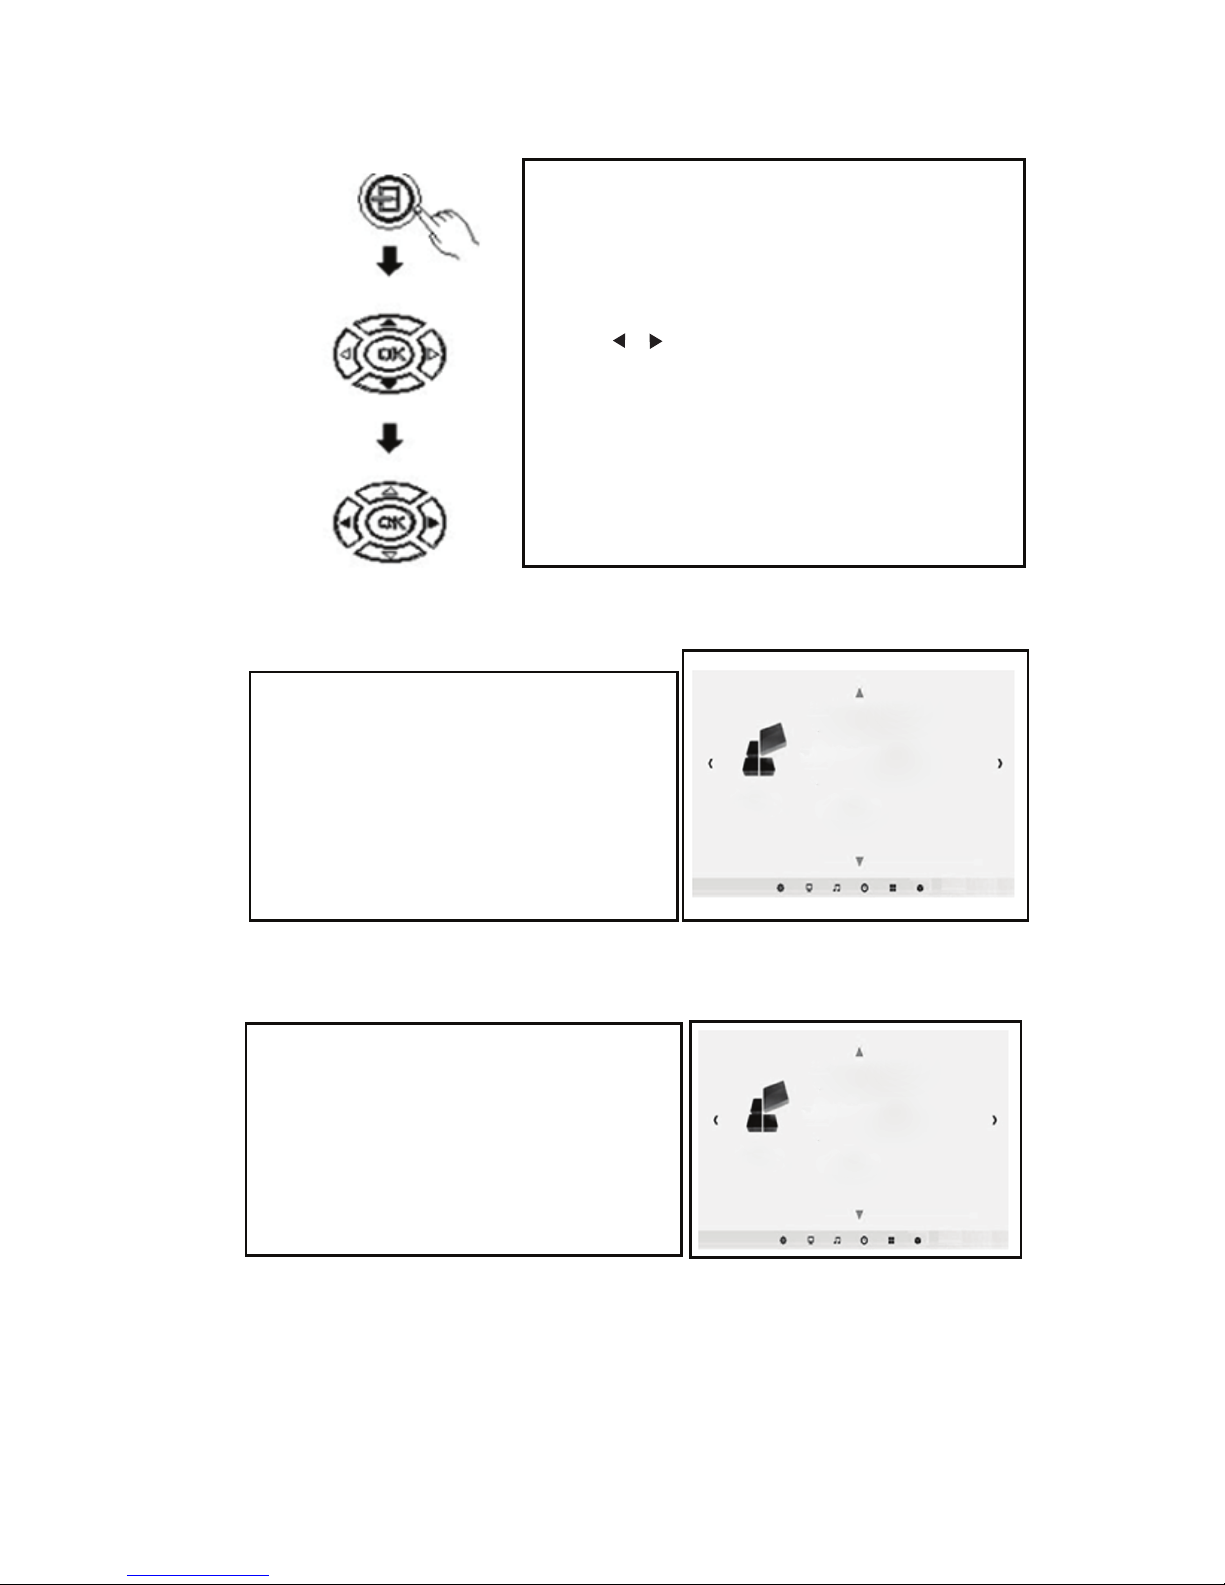
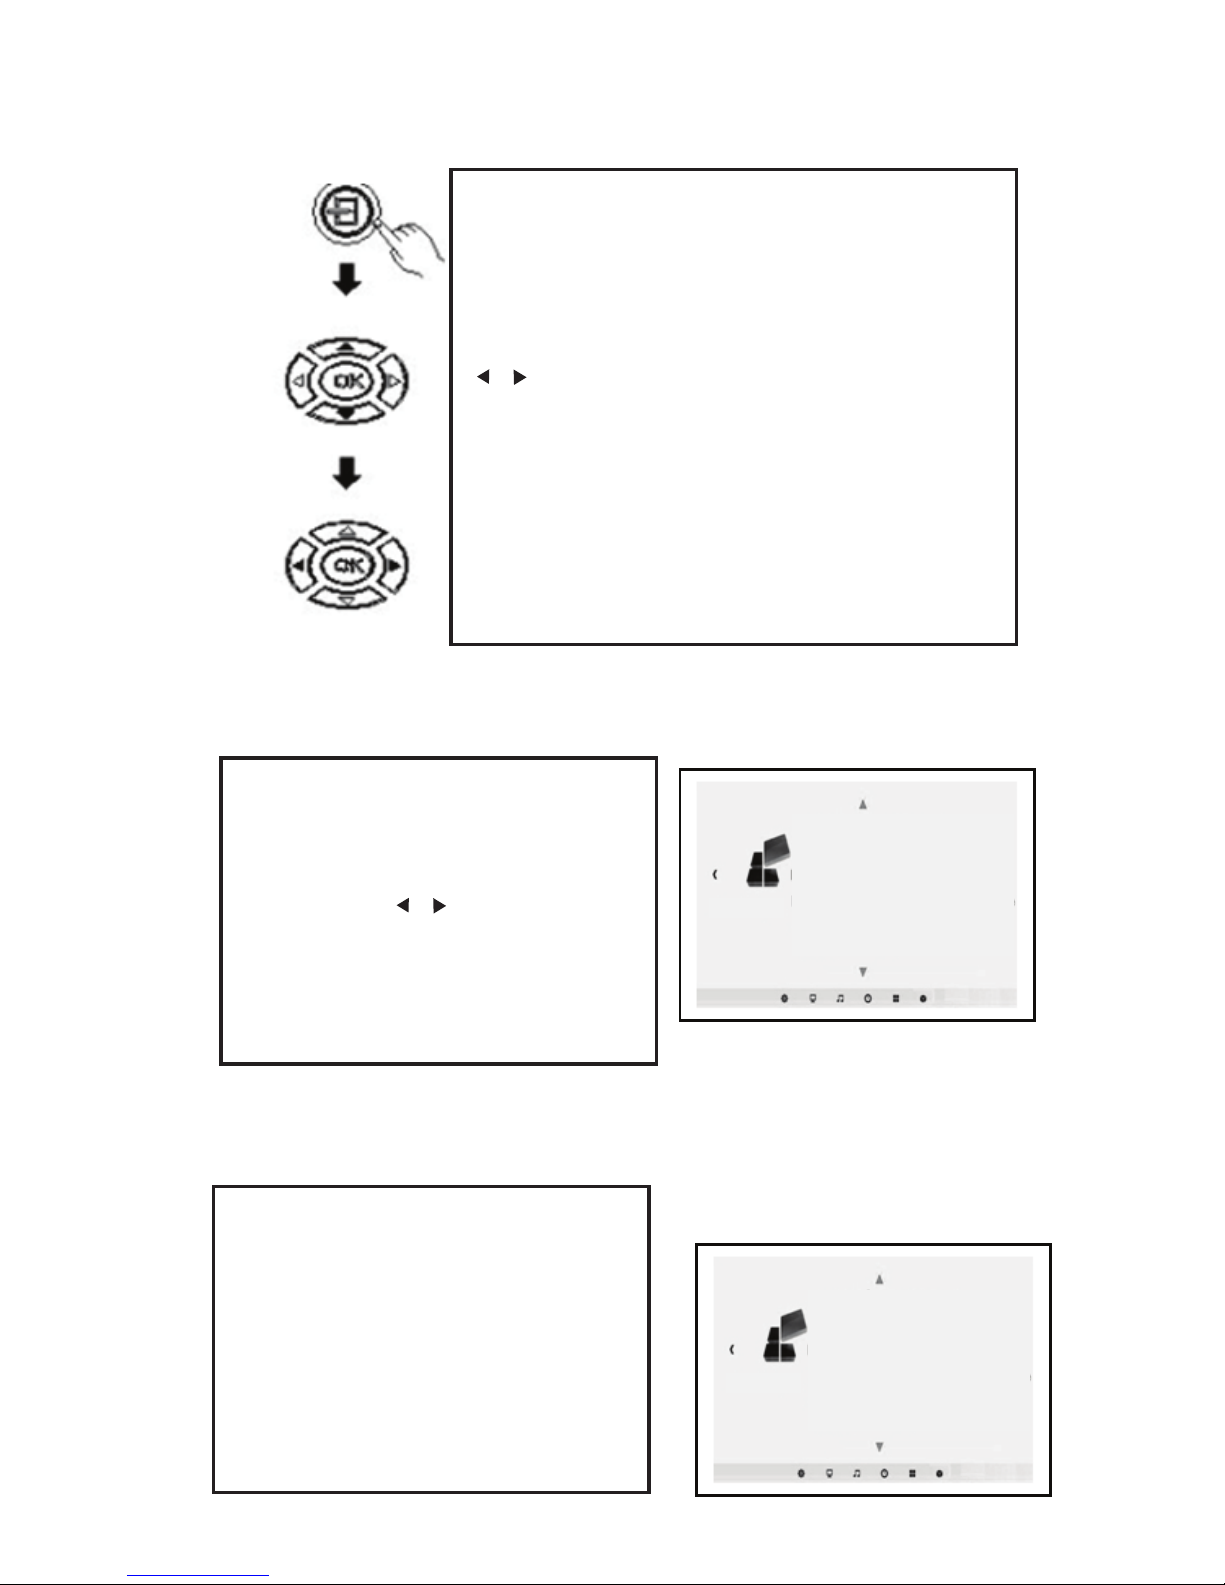
(3)Input Source Select
(4) Language selection
(5)Image flip
12
Press "SOURCE" button to enter the source
selection interface
Press "▲""▼" button to select your desired
input signal from PC, AV HDMI, SD, USB
Press “ ”“ ” button to confirm the type of
input signal。
PC:PC signal inputHDMI:HD signal input
AV:Video signal inputUSB:Multimedia
signal input
SD:Multimedia signal input
Refer to " Menu Basic Operation " section
to switch to the right of the menu screen,
and select a menu language.
Press the "OK" button to enterlanguage
options screen.Press "▲""▼" select
the language you want, and then press
the "MENU" button to accept the settings
and exit.
Setting
Setting
menu language
Restore factory settings
Menu transparency low
Menu display time close
Zoom 0
Image rollovers
menu language
Restore factory settings
Menu transparency low
Menu display time close
Zoom 0
Image rollovers
Refer to " Menu Basic Operation " section
to switch to the right of the menu screen,
and select a menu language.
Press "▲""▼" button to select image flip
Repeat press "OK" key to make the
screen up, down, left and right flip
Page 14
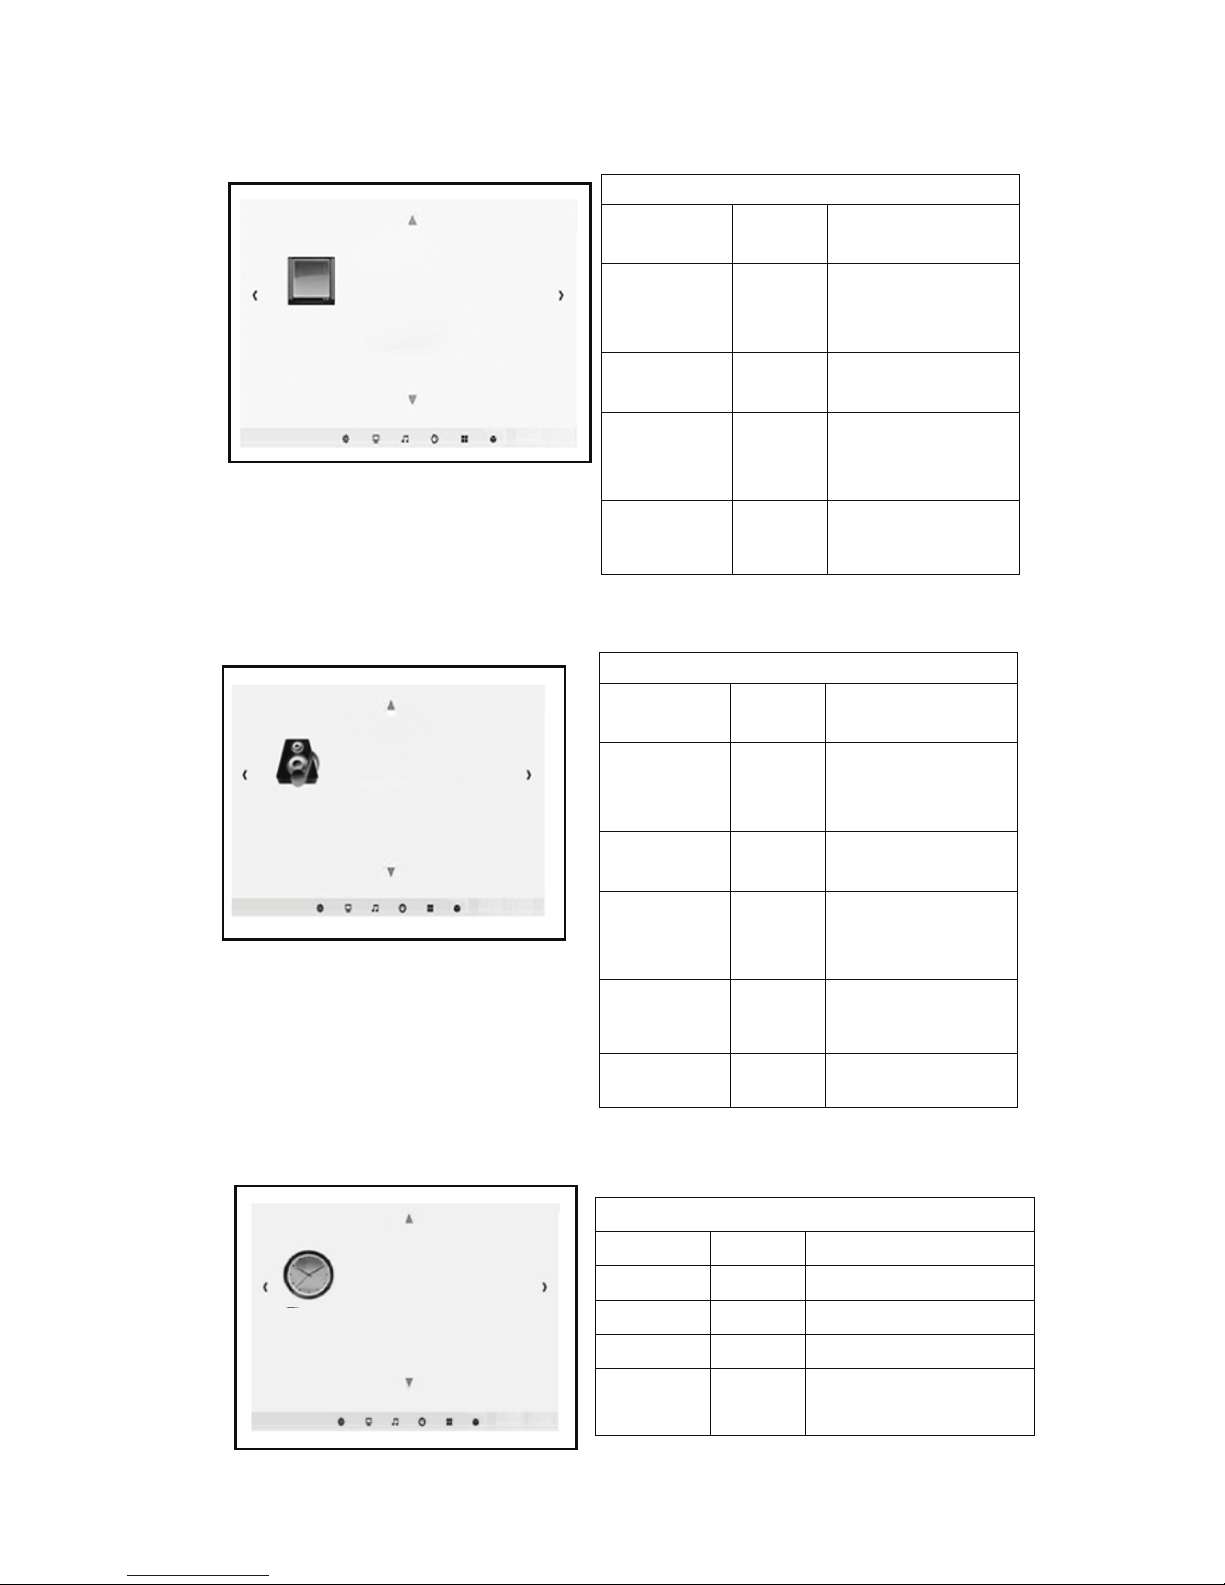
3.menu setting
picture menu
Sound menu
Clock menu
Time menu
Clock Set the current clock time
Off Time Off time setting
On time On time setting
Sleep timer
Sleep timer setting
Auto sleep
no signal automatic off
Setting
13
Image
Image mode standard
Color temperature standard
Zoom mode 16:9
Noise reduction middle
Computer settings
HDMI mode DVD
Sound
Sound mode standard
Balance 0
Automatic volume open
Surround sound close
Balance
Time
Clock
Shutdown time
Boot time
Sleep timer
Auto sleep
Menu picture
Picture Mode
Color
Temperature
Aspect Ratio
Noise
Reduction
PC Setting
standard
Picture display
mode adjustment.
Picture display
color temperature
adjustment.
Image 4: 3, 16: 9,
Zoom adjustments.
Picture display
NoiseReduction
adjustment.
Picture display
PC Setting
adjustment.
standard
Sound menu
Sound mode
balance
Auto Volume
Surround
Sound
Fiber mode
PCM
EQ
Sound output
mode ajustment
Audio output
level adjustment
Auto volume
setting adjustment
Surround Sound
setting adjustment
Fiber mode PCM
setting adjustment.
Audio equalizer
setting adjustment
Page 15
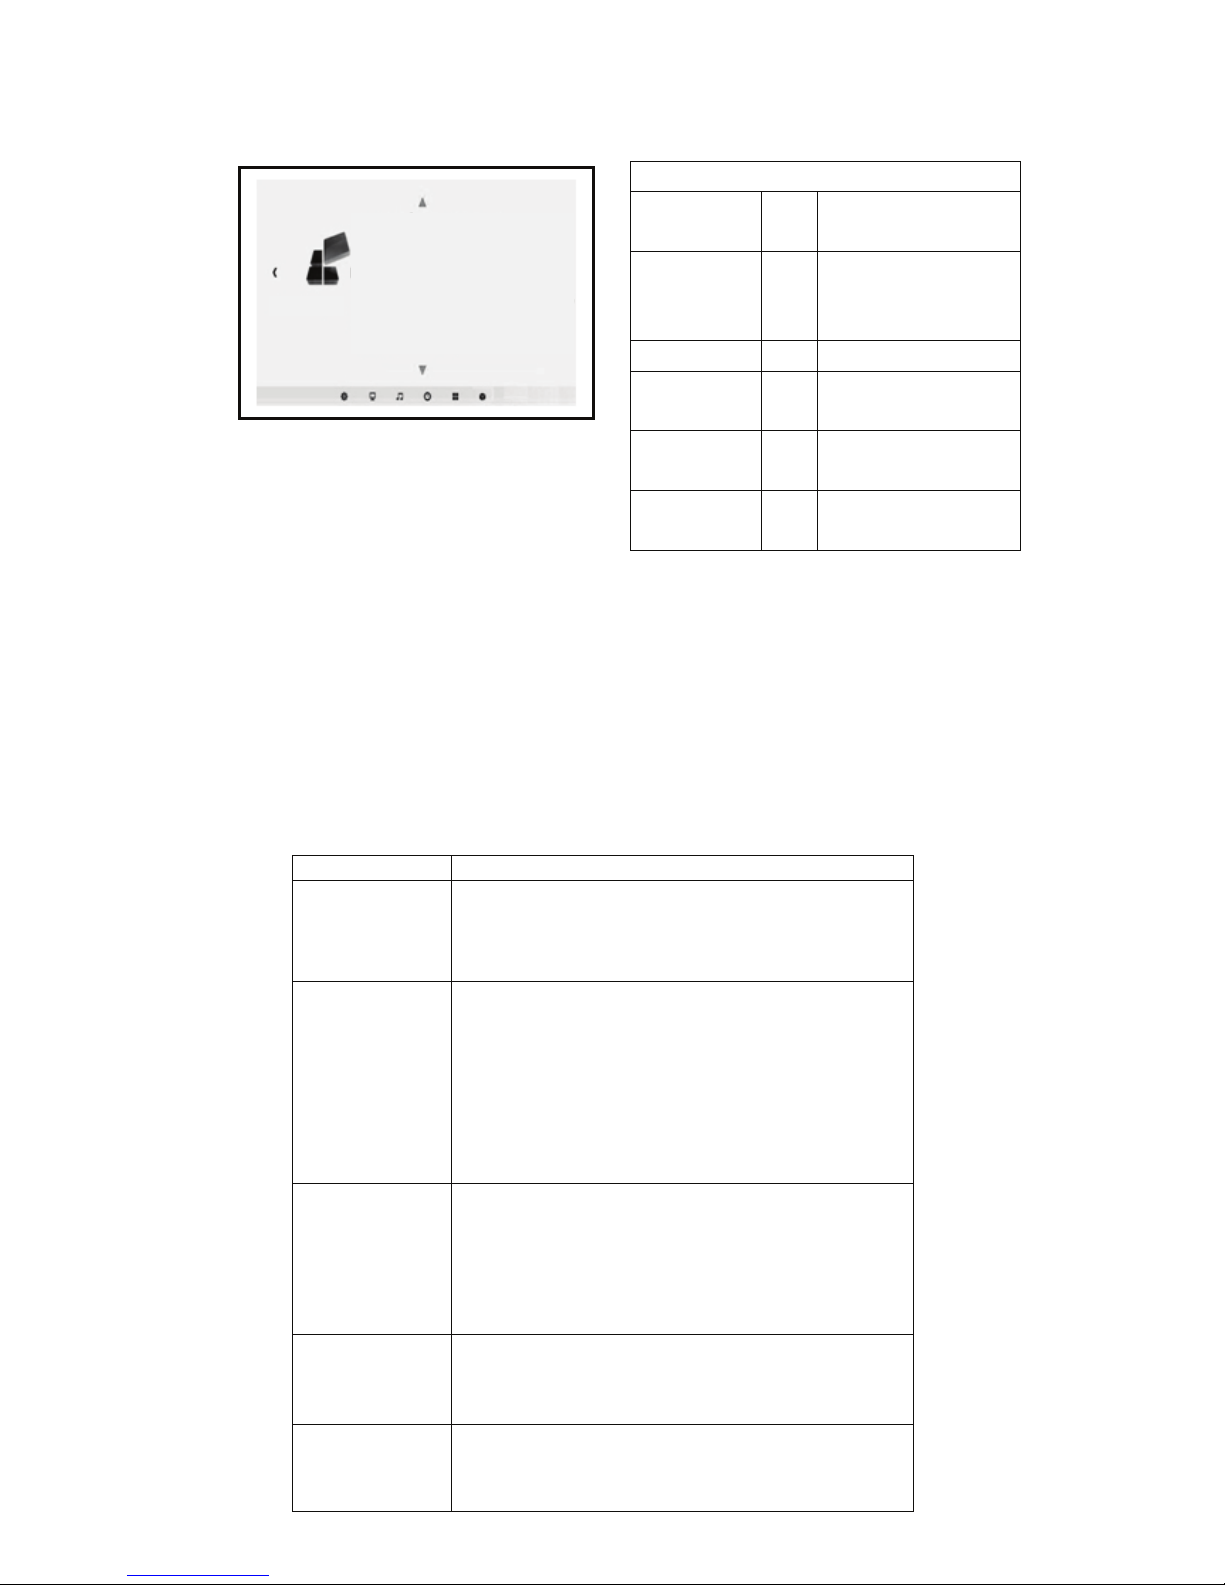
Menu setup
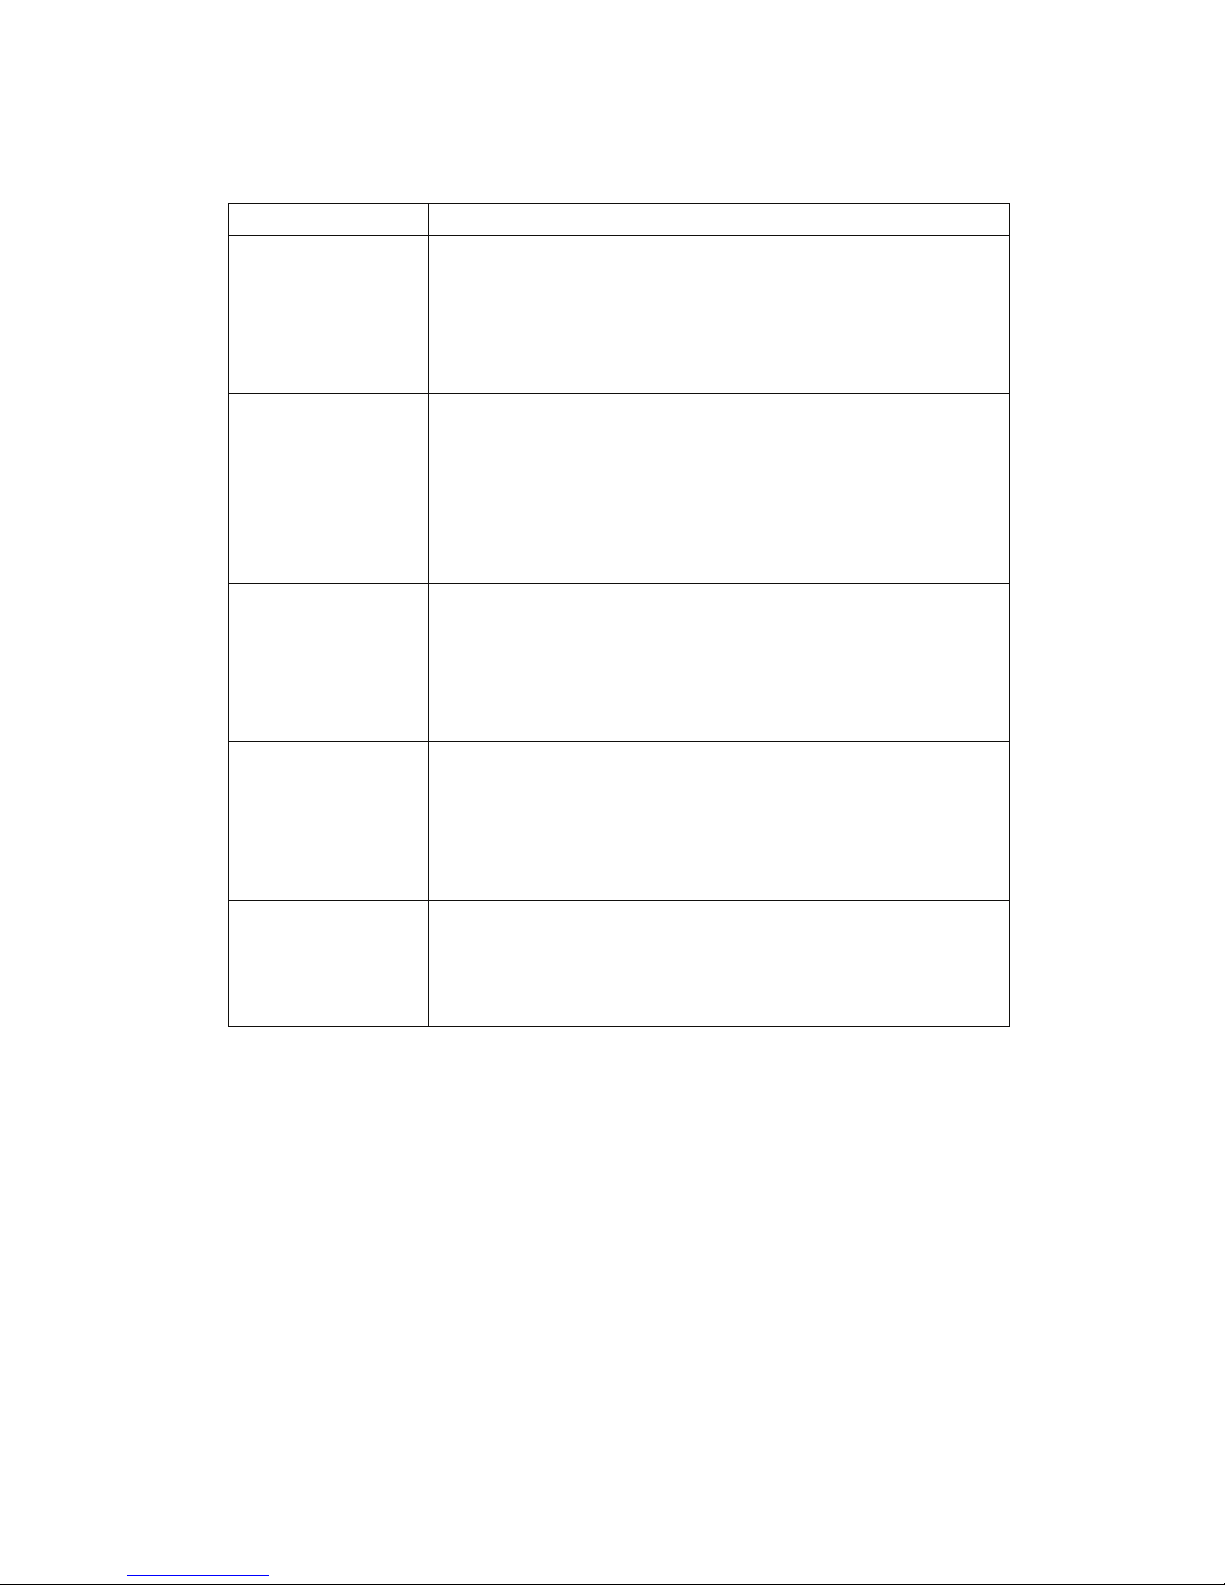
Five.Deal with simple faults
The operation of this machine is very easy, and the same as using of
an ordinary TV ,generally will not encounter any difficulty, but sometimes
the influence of some false failure phenomena appear because of using
the peripheral devices or mains, Please refer to the following instructions
before repairing the machine, for troubleshooting. After excluding the
following possible failure, the projector is still abnormal, please contact
the relevant technical staff.
14
Menu setup
OSD
Language
Adjust the display of
menu language
Restore
Factory
Default
Restore factory
settings.
Blending
Blending
setting
Osd Duration
OsdDuration setting
image flip
Image flip
mode adjustment
zoom
Image zooming
adjustment
Setting
menu language
Restore factory settings
Menu transparency low
Menu display time close
Image rollovers
Zoom 0
Failure phenomena
the cause of the fault may be
1.After turning the
power switch on
the side, the light
does not shine.
◇Does Power cord plug in?
◇Does the outlet have a normal mains voltage?
◇Does the power on the rear side of the board are open?
2.After turning on
the projector, no
image on the
screen.
◇ Does the volume of the projector turn to minimum?
◇ Is there a stereo audio signal output device?
◇ Does the volume of the sound equipment turn to
minimum ?
◇ Does the Signal path of the projector select correct ?
◇ Does the power source device turn on?
◇ Does the signal cable plug in?
◇ Does the signal cable insert in the wrong position?
◇ Under VGA input mode,does the computer display
refresh rate set too high?
◇When using a portable computer, does the output of
the computer have set to signal external display?
◇ Does the rear panel power of the projector have turn
on ?
◇ Whether the remote control battery is dead?
◇ Are there obstructions between the remote control
receiver window and the projector?
◇Does the operating distance of the remote control and
the projector too far?
◇ Is the air inlet of the projector blocked by other objects?
◇ Does this machine overheat protection?
5.Normal picture,
but no sound.
3.Press the power
button of the
remote control
can not turn up
4.After each boot
for a periodof time
automatic
shutdown
Page 16

Six.Safety Instructions
WARNING: To avoid the risk of fire or electric shock. Do not place
the projector to rain or moisture gas.
Warning: This is a Class A product in a domestic environment, this
product may cause radio interference. In this case, the user may be
required to take adequate measures.
Warning: In normal operation, the projector into standby mode, be
sure to use the switch button on the projector or remote control.
Before disconnecting the AC power cord, make sure the cooling fan has
stopped. Do not disconnect the normal operation of the AC power cord
to turn off the projector, as this may cause the machine to malfunction.
About (remote control) Battery Note: If the battery is installed in
reverse polarity (positive and negative reversed position), then the
battery will overheat and become damaged. To warn children not to
remove the battery or load. By an adult will be charged to the battery
in the remote control.
Warning
※Please use the power button on the remote control or on the cover ,
do not unplugged immediately after the main power off, that the
machine automatically cooling, otherwise it will affect the life of the
projector.
For safety, in addition to professional maintenance staff, no person
shall own overhaul projector.
In order to use the projector correctly, please read the following tips:
Please use the power of the projector labeled type, it is dangerous to
use other types of power supply.
Please use the supplied adapter to match the power supply, if you need
to change,please contact your dealer for replacement.
Please use the machine to match the AC power supply, voltage
fluctuation should be less than 10%。
Be sure to connect the power supply to the distribution system that
meets the requirements of the state.
To ensure the stability and security of the power supply unit, it is
recommended to use a separate power lines with protective measures
electrical outlet is not allowed in a line connected to a variety of
high-power electrical products, such as refrigerators, air conditioning,
electrical and so on.
Do not place this projector to rain or moisture to avoid electrical shock
hazard, the unit should be placed in ventilated dry, dust-free place to
avoid vibration, heat, radiation and frequent movement.
If the projector is not used in a long time, please pull out the power
cable from the mains socket.
15
Page 17

Projector side and the rear plate was slit projector vents ,protect the
normal use of the projector, to prevent overheating. Prior to use should
check the ventilation parts, to ensure its smooth, in the vicinity of the
projector, do not place flammable objects.Do not insert anything into the
slit of the projector, or it may produce a short circuit or an electric shock
to your device and cause damage.
Do not rotate the projector lens too much, so as not to fall off.
When the projector is working, do not straight to the projector lens, so
as not to hurt your eyes.
When installing the projector, you should choose those adequate
strength and hanger screws, so as to avoid screw quality or rotating
depth is not enough and projector falling accident.
16
Page 18
T3 Mini LED Projector
User Manual
Page 19
Deutsche Anleitung für T3
Power-Taste: Drücken Sie, um den Projektor zu einschalten oder ausschalten , und
genauso wie die Power-Taste auf der Fernbedienung schließen.
Volume Plus, Minus-Taste: Drücken Sie diese beiden Tasten, um die Lautstärke zu
erhöhen oder zu verringern, sondern auch für die links und rechts von jedem Menü
unter dem Projektor-Menü und bewegen Sie die Auswahl Parametereinstellung .
Menütaste : geben Sie das Hauptmenü ein oder das System verlassen.
Wählen Sie die oben und unten-Tasten: Drücken Sie diese beiden Tasten bewegt
werden kann, nach oben und unten den nächsten Menüpunkt jedes Menü auszuwählen.
Signalquelle tasten : Wählen Sie Broadcast-TV-Signal oder ein externes Videosignal .
Lens: dieses Objektiv drehen, können Sie den Fokus-Zustand jedes Pixel im
Bild anpassen, um die Klarheit des Bildes zu verändern.
Eingang und Ausgang: Einlass und Auslass der lugekühlten Motor-Kühlsystem ,
die Verwendung des Verfahrens, ist es nie blockiert oder verstop ist, so dass die
Maschine nicht zu verbrennen.
1
Page 20
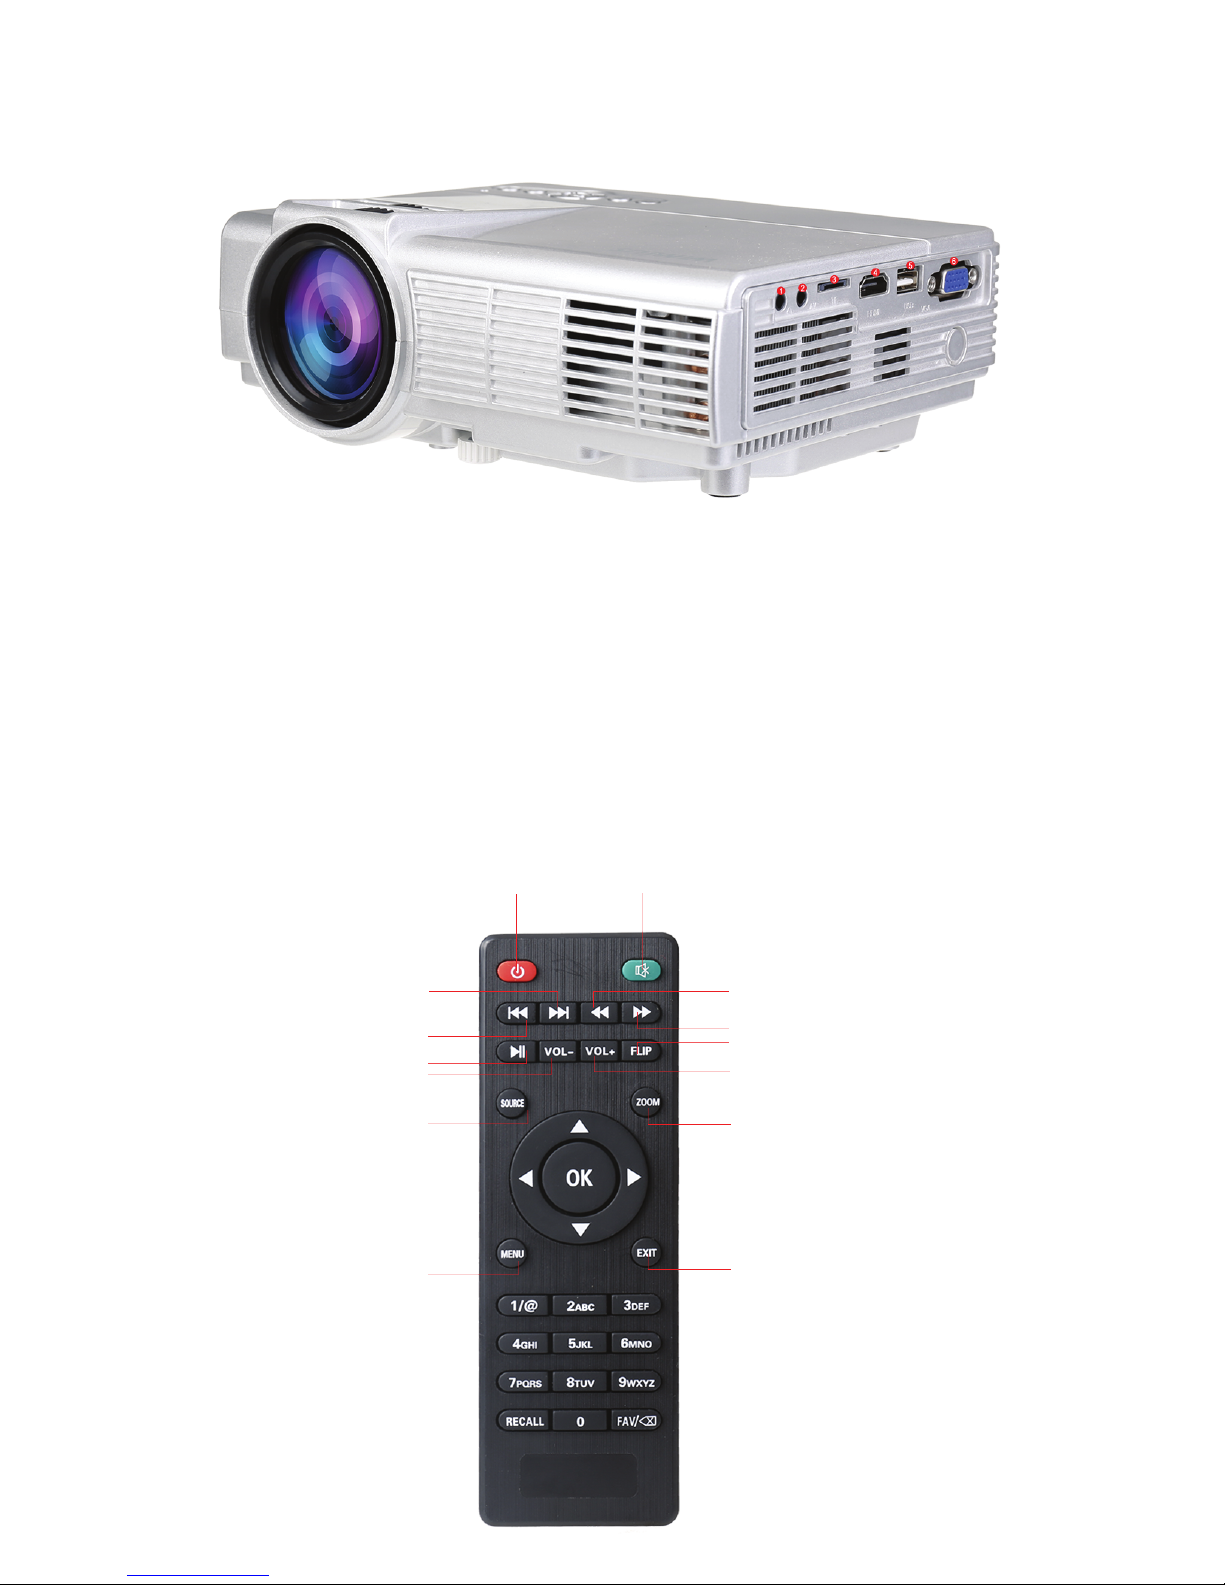
(1) Audio-Ausgang Kopöreranschluss Sitz, schließen Sie ein externes
Audiosignal Verstärkungseinrichtung oder Kopörer.
(2) AV (Video) Eingangsport.
(3) TF-Kartenhafen , legen Sie die TF-Karte ein, dann kann Audio, V
ideo- und Bilddateien von TF-Karte wiedergeben.
(4) HDMI-Anschluss HD-Videosignal , der Computer-Anschluss,
HDMI-Ausgangssignalanschluss der DVD.
(5) USB-Anschluss, legen Sie die USB-Stick ein, dann kann Audio ,
Video- und Bilddateien von USB-Stick wiedergeben.
(6) VGA (PC, PC) Signaleingang
2
Power Mute
Next
Last
Play/Pause
Voice-
Signal Souce
Menu
Backward
Forward
Flip
Voice+
Zoom
ESC
Page 21
Installationsprojektor
Installationsmethode
Stellen Sie den Projektor auf eine feste, stabile Oberäche oder Auänger,
umgebende Belüung, nicht blockieren Sie die Lüungsschlitze oder Obdach
und keine Zuucht Entlüungen Objekte innerhalb 10CM. Damit der Projektor
und der Bildschirm einen entsprechenden Abstand zwischen Projektor und
Leinwand bestimmt die Größe des projizierten Bildes zu erhalten. Schließen Sie
das Netzkabel des Projektors an eine Steckdose und dem Projektor, und das
andere Ende ist mit dem AC Masse verbunden. Je nach Bedarf können Sie den
Projektor auf einer stabilen Arbeitsplatte nach vorn auf den Bildschirm projiziert
platzieren, können Sie auch spezielle Auänger verwenden können, werden auf
dem Dach Spiel befestigt werden, kann auch hinter einem Bildschirm verwendet
werden, und gegossen von hinter dem Bildschirmbild.
Installation Hinweis: Wenn nach vorne anheben, der Körper nicht höher sein
kann als der Vorsprung am Rand des Bildschirms, sonst wird es den Eekt der
Einstellung des Bildes beeinussen oder trapez Bitte beachten Sie "Der Abstand
zwischen dem Projektor und dem Bildschirm", um die Größe des Abstandes
zwischen dem Bildschirm und dem Projektor, um zu bestimmen
3
VORDERSEIT
DECKNMONT
Hinter
Installieren hintere Aufhangung
Page 22
Stellen Sie den Projektor-Bildschirm ist auf der Symmetrieachse über die Installation,
um das Bild nach links und rechts Trapezverzerrung zu vermeiden. Während der
Installation Leben nicht Betrieb, um die Gefahr eines elektrischen Schlags zu
vermeiden, oder die Maschine zu brennen. Nur verpackt Projektoren kann das
erste Boot-Image angezeigt wurde später eine Trapez auf der unteren Verzerrung und
Unschärfe, nden Sie in der "Keystone-Korrektur und Bildschärfeeinstellung "
Abschnitt eingestellt
mpfohlene Verwendung von Stents Decken Bei korrekter Montage ist das
Bild positiv Quadrat
Der Abstand zwischen Projektor und Leinwand
Fokuseinstellung
Eine Drehung im Uhrzeigersinn der Linse, die Linse alle wieder in die Maschine,
und dann langsam drehen Sie das Objektiv gegen den Uhrzeigersinn und sorgfältig
die Pixel auf dem Bildschirm, die Partikel in der klarste Bild, wenn Hou
(vorbehaltlich der Mitte des Bildbereichs ) zu beobachten, auch ist es die beste
Fokuslinsenposition.
langsam Keystone schieben, bis die Grenze des Bildschirmbildes ein reguläres
Quadrat, stellen Sie die Trapez der maximalen Amplitude von ± 15 Grad geworden
ist. Wird der eingestellte Grenzwert Keystone Gangposition Trapez nicht beseitigen,
verkürzen den Abstand zwischen Projektor und Leinwand-Center in der vertikalen
Richtung. Wenn auf dem Tisch montierten Projektor platziert, kann die Bodenplatte
durch Drehen des Rades eingestellt werden, um den Winkel des Projektionswinkel
des Projektors zu ändern.
4
Square Image
The Curtain
The Projector
Axis of
symmetry
of the curtain
Lens center
Screen size
Page 23
Die Signalleitungen Anschluss
Bitte beachten Sie die folgende Abbildung Projektor Decken
Hinweis: Stellen Sie den Projektor nicht in der Nähe einer Wärmequelle Klimaanlagen
und Heizungen, da sonst das System überhitzen und schaltet sich automatisch aus.
Bei der Installation des Projektors bitte diese eine ausreichende Festigkeit und
Auänger Schrauben wählen, um Qualitätszeit zu vermeiden oder Schraube in
ausreichende Tiefe eingeschraubt und tritt in den Projektor fallen Unfall.
5
Keystone Korrektur Taste
Page 24
1, Netzbuchse : Bei Verwendung bitte das Netzteil der Maschinenzubehör in den
DC-Ausgangsklemme einlegen, und das andere Ende des Netzteils in die Steckdose
eingesteckt.
2, VGA-Eingangsbuchse : mit dieser Port kann mit einem Computer oder einem
anderen Ausgangsbuchse mit VGA-Videosignal angeschlossen werden.
Wenn der Projektor mit dem Computer verbunden ist, können Sie ein VGA-KabelVerbindung verwenden. Nach dem Anschluss mit einem VGA-Kabel Projektor und
Computerausrüstung , schließen Sie das Netzkabel oder das Netzteil , schalten Sie den
Projektor, drücken Sie die Taste "Source" am Bedienfeld des Projektors oder an der
Fernbedienung, wählen Sie den "PC (VGA)", drücken Sie "OK "Taste, um das
Computer-Modell eingeben, und dann die Auösung des Computers und die
physikalische Auösung des Projektors in Übereinstimmung mit der
Bildwiederholfrequenz von 60 Hz. (Die tatsächliche Nutzung, die meisten aktuellen
Computersystemen nicht unterstützt 800 * 480 Auösung, wird diese Funktion
verwendet, die Dokumentenklasse zu sehen, die Schri nicht sehen, aber für ein
Computerbilder zu spielen, Bilder Klasse betroen nicht stark).
Wenn der Laptop an den Projektor angeschlossen, benötigt Laptop-Video-Switch: Bitte
geben Sie die Original-VGA-Kabel verwenden, das Notebook und den Projektor, und
der Projektor eingeschaltet ist, drücken Sie die VGA-Taste auf der Fernbedienung,
oder drücken Sie die Einheit "Quelle", um eine Verbindung oder der Fernbedienung
Taste "Source", wird der Projektor den VGA-Modus umgeschaltet . Zurück zur
Notebook-Seite, drücken Sie die Schalttaste Notebook "Fn + Fx", stellt Fx verschiedene
Modelle der Notebook-Videotasten F1-F10, ähnlich dem kleinen TV-Symbol wechseln.
Drücken Sie einmal auf dem Computer-Display, während die sekundäre Dual-Display,
drücken Sie dreimal die externe Anzeige (Computer nicht dargestellt) gedrückt wird.
Da jede Marke von Schlüsselcomputerfunktion zwischen unterschiedlichen Positionen
angeordnet zu schalten, steuern Sie die folgenden gemäß den Anweisungen Ihres
Laptops zu wechseln.
6
Computer connection line
Laptop Desktop
Computer
connection line
Page 25
Toshiba(Fn+F5) IBM(Fn+F7) HP(Fn+F4) Founder(Fn+F3)
samsung(Fn+F3) Panasonic (Fn+F3) NEC(Fn+F4) apple(Fn+F8)
sharp(Fn+F5) Hitachi(Fn+F7) Dell(Fn+F8) Acer(Fn+F5)
Lenovo(Fn+F3) BenQ(Fn+F7) ASUS(Fn+F9)
Win7 / Win8 System: Bitte benutzen Sie das Original-VGA Kabel, um den Projektor
und Notebook anschließen, dann wird der Projektor eingeschaltet ist, drücken Sie
die Maschine Taste "Source" oder "Source" -Taste auf der Fernbedienung, der
Projektor den VGA-Modus wechseln . Die Rückseite des Notebooks, Desktop mit
der rechten, Bildschirmauösung , schließen Sie den Projektor zu kopieren, um sie
anzuzeigen.
Refer to the follwering table parameters to adjust the output signal from a computer
Type
Resolution
Horizontal
Frequency
(
KHz)
Field
frequency
(
Hz)
VESA
standard
PC
VGA
640×480
31.5
60
√
34.7
70
37.9
72
√
37.5
75
√
SVGA
800×600
31.4
50
35.1
56
√
37.9
60
√
46.6
70
48.1
72
√
46.9
75
√
XGA
1024×768
40.3
50
48.4
60
√
56.5
70
√
60.0
75
√
Hinweis: wenn es einen Computer an den Projektor und das Bild verbunden ist, kann
nicht gleichzeitig angezeigt werden, bitte die Anzeigeeigenschaen des Computers
festgelegt , wählen Sie den Ausgabemodus für die CRT.
3. Video-Eingangsbuchse : Dieser Port kann an LD Player, DVD-Player, Kameras und
andere Video-Player usw. doe Video (VIDEO), die Audio-Ausgangsbuchse ist, verbinden.
4. Audioausgang : Das Audiosignal vom Ausgang des Projektors, wie hohe Leistung,
Musik zu spielen, schließen Sie bitte an einen externen Leistungsverstärker -Eingang.
7
Page 26
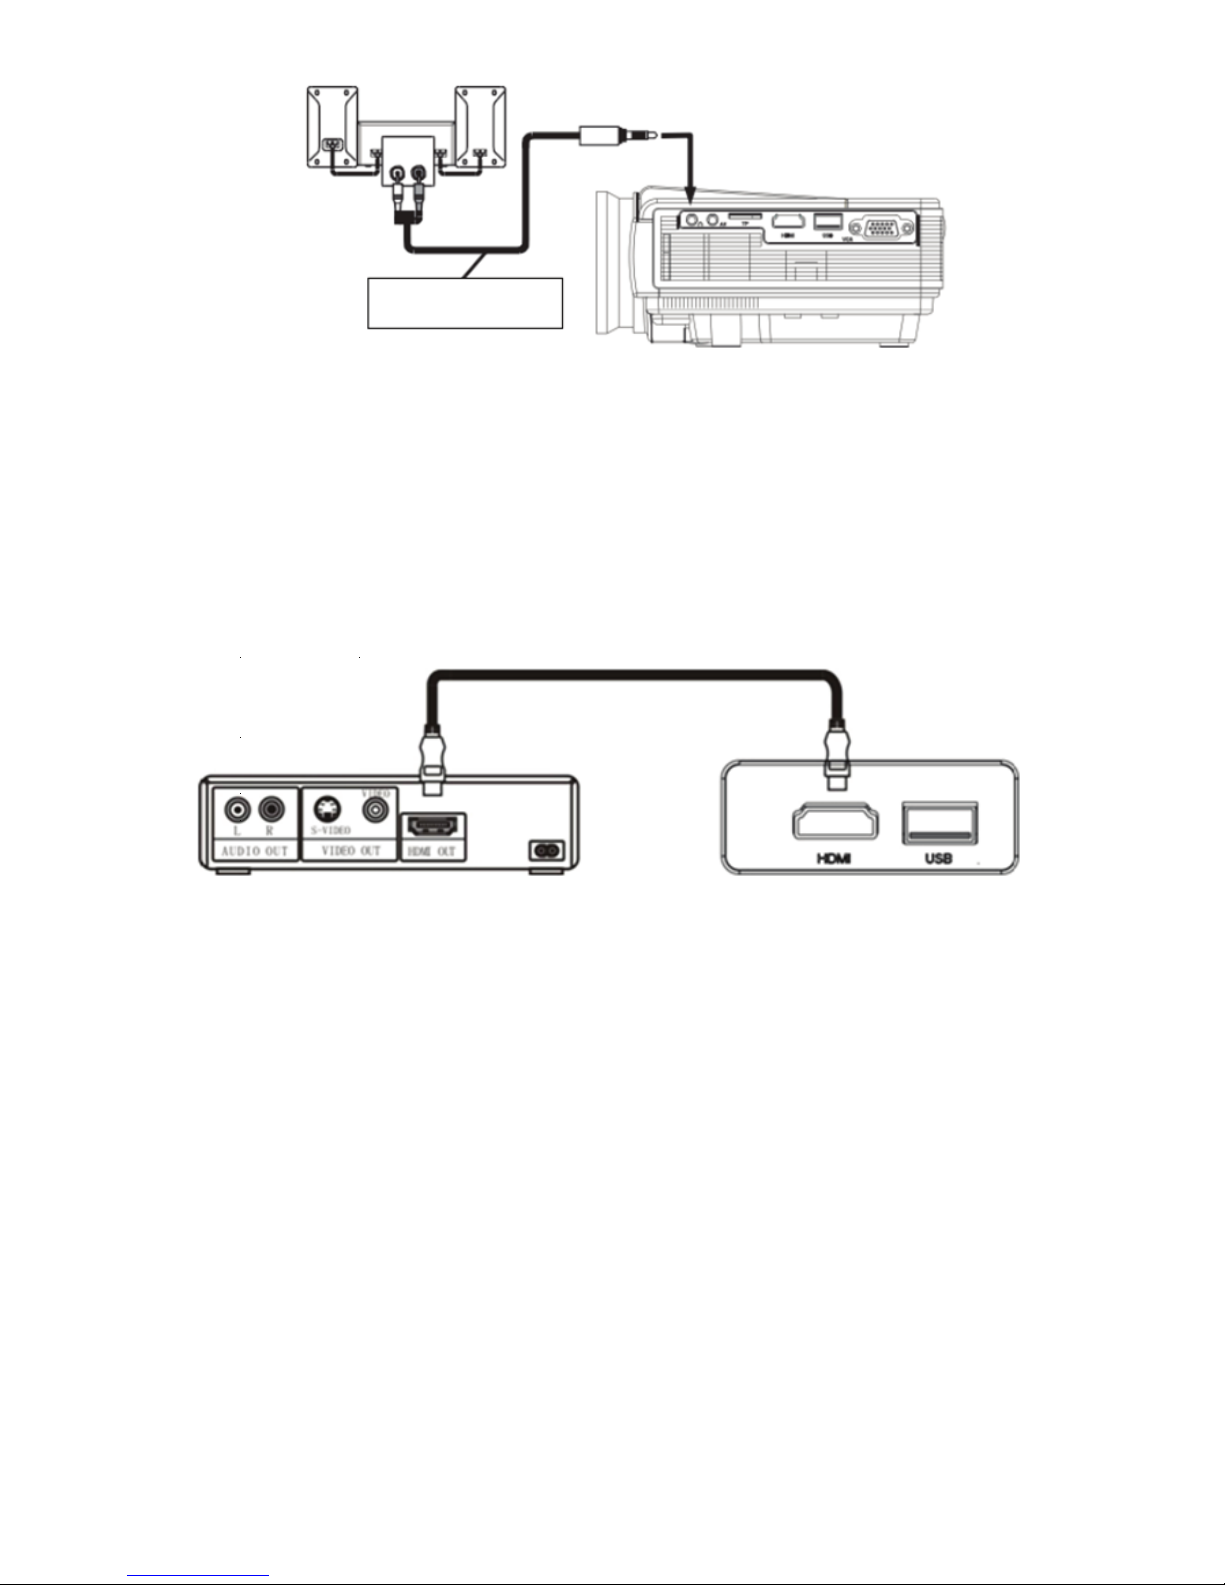
5. HDMI-Signaleingang : Diese Schnittstelle kann mit dem Ausgangsende eines HDMI
HD-Ausgang-Player angeschlossen werden.
Wenn der Projektor an HD-Player, HD-Set-Top-Boxen, Videospiele , HD (HDMI)
Signalverbindung verwendet werden kann, zu verbinden. Nach Projektoren und
High-Denition-Geräte mit High-Denition-Kabel (HDMI-Kabel) anschließen
möchten, schließen Sie das Netzkabel oder das Netzteil , schalten Sie den Projektor,
drücken Sie die Taste "Source" am Bedienfeld des Projektors oder an der Fernbedienung,
wählen Sie "(HDMI) "drücken Sie" OK ", um den HDMI-Modus aufzurufen.
6. Schließen Sie die USB-Disk
Plug-U-Disk in die "USB" Port, oder legen Sie die TF-Karte in den TF-Karten-Slot,
drücken Sie die Taste "Source" am Bedienfeld des Projektors oder an der
Fernbedienung, wählen Sie die "Multimedia (USB oder TF)", drücken Sie "OK"
Schlüssel Multimedia-Modus zu wechseln, eine Video- oder Bilddateien in den
Video-Vorschau-Modus, drücken Sie auf der Fernbedienung "Wiedergabe / Pause"
Taste auf Vollbild auswählen.
Betrieb und Verwendung des Projektors
1. Power/ Schalter
Nach Größe des projizierten Bildes / Abstand, feste Projektoren und verbunden
Signalleitungen zu den entsprechenden Projektor-Schnittstelle, wie es erforderlich ist.
Entsprechend der positiven und negativen Polarität des Batteriekastens
Fernbedienung Identikator in die Batterie. Setzen Sie den Adapter DC in den
DC-Projektor auf der Rückseite, wenn die Netzkontrollleuchte , die Maschine in
den Standby-Modus wechselt. Drücken Sie die "Power-Taste" Taste auf der
Fernbedienung oder Panel auf der Anzeigeleuchte einzuschalten und den normalen
Betriebszustand ein.
8
Video player
HDMI connection line
Audio-Signalleitung
Page 27

Nach einigen Sekunden wird das System vollständig aktiviert werden, wird das
Projektionsbild erscheint. Drücken Sie die "SOURCE" -Taste auf der Fernbedienung,
um die Signalkanal zu wählen zugegrien werden soll. Neu installierte Projektoren,
kann erstmals Bild unscharf oder eine Trapez Zustand erscheinen. Wenn das Bild
unscharf erscheint, können Sie das Gerät vor der Linse einzustellen, wenn die P
artikel Bild klarste (vorbehaltlich der Zwischenbereich ), so ist das beste Objektiv
Fokusposition .
Wenn es der Trapezverzeichnung kommt, bitte wechseln hin und her langsam
Regler auf der Maschine Leiter, so dass das Bild auf dem Bildschirm einen
positiven Rahmen Viereck so weit war. Wenn Trapez zu den besten Standort
übertragen Anpassung, können Sie die Leiterrahmen nicht beseitigen, benutzen
Sie bitte den Abstand zwischen Projektor und Leinwand Mitte in vertikaler
Richtung einzustellen.
Nach dem Einstellen des Bildes klar ist, kann es die Beobachtung werden
watched.During, können Sie auch die Parameter der systemaccording persönlichen
Vorlieben einstellen, stellen Sie die Bildhelligkeit, Kontrast, Farbsättigung ,
Lautstärke und Bildklarheit und Schärfe.
Drücken Sie die Taste "Power" auf der Frontplatte oder der Fernbedienung erneut
die Lichtweg und Anzeigesysteme zu schließen, Lüer automatisch stoppt, um den
Projektor in den Standby-Modus wieder.
Nach dem Abschalten muss, bis der Projektor Fan Verzögerung automatischer Stopp
warten, kann die Gesamtleistung abgeschnitten werden, um die Maschine in
überschüssige Wärme und wirken sich auf die normale Lebensdauer des Projektors
gespeichert zu vermeiden.
Um die Qualität des Projektionsschirms zu verbessern, verwenden Sie bitte den
entsprechenden Vorsprung screen.When den Projektor mit shoud Sie das
Umgebungslicht zu verringern, entsprechende Beschattungs Maßnahmen ins Auge
fassen, versuchen Sie, die Lichter im Raum auszuschalten, zumindest sicherzustellen,
dass die Lichter nicht Direkt Bildschirm.
Obwohl das Gerät kann auf eine Vielzahl von Videosignalen verbunden werden, aber
in der tatsächlichen Verwendung, wird empfohlen, eine Sendesignale verbinden
Signalstörungen zu vermeiden, wirken sich auf die Wiedergabe des Projektors.
Menübedienung
1, Ein/ausschalten
Schalten Sie das Gerät ein:Drücken
Sie die Power-Taste auf der Beamer
oder der Fernbedienung.
9
Page 28
Schalten Sie das Gerät aus: Drücken Sie nochmal
die die Power-Taste auf der Beamer oder
der Fernbedienung.
Menü-Grundoperationen
Eingangsquelle
10
Drücken Sie auf "SOURCE", um die Auswahl der
Quelle-Schnittstelle eingeben
Drücken Sie "▲""▼", um die gewünschte Eingangssignal
von PC zu wählen, AV HDMI, SD, USB
Drücken Sie “ ”“ ”, um die Art des Eingangssignals zu
bestätigen.
PC: PC-Signaleingang
HDMI: HD-Signaleingang
AV: Videosignaleingang USB: Multimedia-Signaleingang
1 Drücken Sie die Menü-Taste auf der Fernbedienung
oder "MENU" auf dem Projektor um das MenüBildschirm anzuzeigen.
2 Drücken Sie die “ ”“ ” -Taste auf der Fernbedienung
oder am Projektor Ihren Bedarf zu wählen einzustellen
oder einen Menüpunkt gesetzt, dann wird das Menü des
ausgewählten Symbols wird markiert.
3 Drücken Sie die "▲""▼" -Taste auf der Fernbedienung
oder am Projektor im Untermenü den Menüpunkt
auszuwählen, die Sie anpassen müssen.
4 Drücken Sie dann die Fernbedienung oder "OK" Taste
am Projektor, aktivieren Sie das gewählte Symbol
Untermenü.
5, Drücken Sie “ ”“ ” klicken, Ihre ausgewählten
Menüpunkt Parameterwerte einzustellen.
6 Wiederholen Sie den obigen zweiten bis fünen
Verfahren, um die anderen Menüpunkte einzustellen,
oder drücken Sie einfach die "MENÜ" oder "ZURÜCK"
Taste, um den Menübildschirm zu verlassen.
Page 29

Sprachauswahl
Siehe "Menü Grundbedienung " Abschnitt rechts des Menübildschirms zu wechseln,
und wählen Sie eine Menüsprache .
Drücken Sie die Taste "OK", um Sprachoptionen Bildschirm eingeben.
Drücken Sie "▲""▼" oder , wählen Sie die gewünschte Sprache, und drücken Sie
dann die Taste "MENU" um die Einstellungen zu übernehmen und beenden
Bilddrehung
Siehe "Menü Grundbedienung " Abschnitt rechts des Menübildschirms zu wechseln,
und wählen Sie eine Menüsprache .
Drücken Sie "▲""▼" Taste Bilddrehung zu wählen
Wiederholen Sie die Taste "OK" Taste, um den Bildschirm nach oben, unten, links und
rechts Flip zu machen
11
Failure
Phänomene
die Ursache des Fehlers
1. Nach dem
auf der Seite
des
Netzschalters ,
das Licht
nicht leuchten
◇ Hat Netzkabel anschließen?
◇ Hat der Ausgang eine normale Netzspannung ?
◇ Ist die Macht auf der Rückseite der Platte sind oen?
2.Nach dem
Einschalten des
Projektors, kein
Bild auf dem
Bildschirm.
◇ Hat der Signalweg des Projektors richtig auswählen ?
◇ Ist die Stromquelle Gerät einschalten?
◇ Ist das Signalkabel -Stecker in?
◇ Ist das Signalkabel in der falschen Position einfügen?
◇ Unter VGA-Eingangsmodus , wird der Computer
Bildwiederholfrequenz zu hoch eingestellt?
◇ Wenn einen tragbaren Computer verwenden, hat der
Ausgang des Computers festgelegt externe Anzeige zu
signalisieren?
3.Drücken Sie die
Power-Taste auf
der Fernbedienung
kann nicht wieder
auauchen
◇ Ist die Rückseite Stromversorgung des Projektors haben
einschalten?
◇ Prüfen Sie bitte,ob die Batterie der Fernbedienung leer
ist ?
◇ Sind es Hindernisse zwischen dem Fernbedienungsemp
fänger Fenster und dem Projektor?
◇ Ist die Reichweite der Fernbedienung und dem Projektor
zu weit?
4. Nach jedem
Neustart für einen
bestimmten
Zeitraum
automatische
Abschaltung
◇ Ist der Lueinlass des Projektors durch andere Objekte
blockiert?
◇ Hat diese Maschine überhitzen?
5.Normales Bild
aber kein Ton
◇ Gibt es ein Stereo-Audiosignal-Ausgabegerät?
◇ Ist die Lautstärke der Tonanlage wiederum auf ein
Minimum?
Störungssuche
Page 30
T3 Mini LED Projector
User Manual
Page 31
Projecteur Mini LED
Mode d'emploi T3
L'apparence du produit
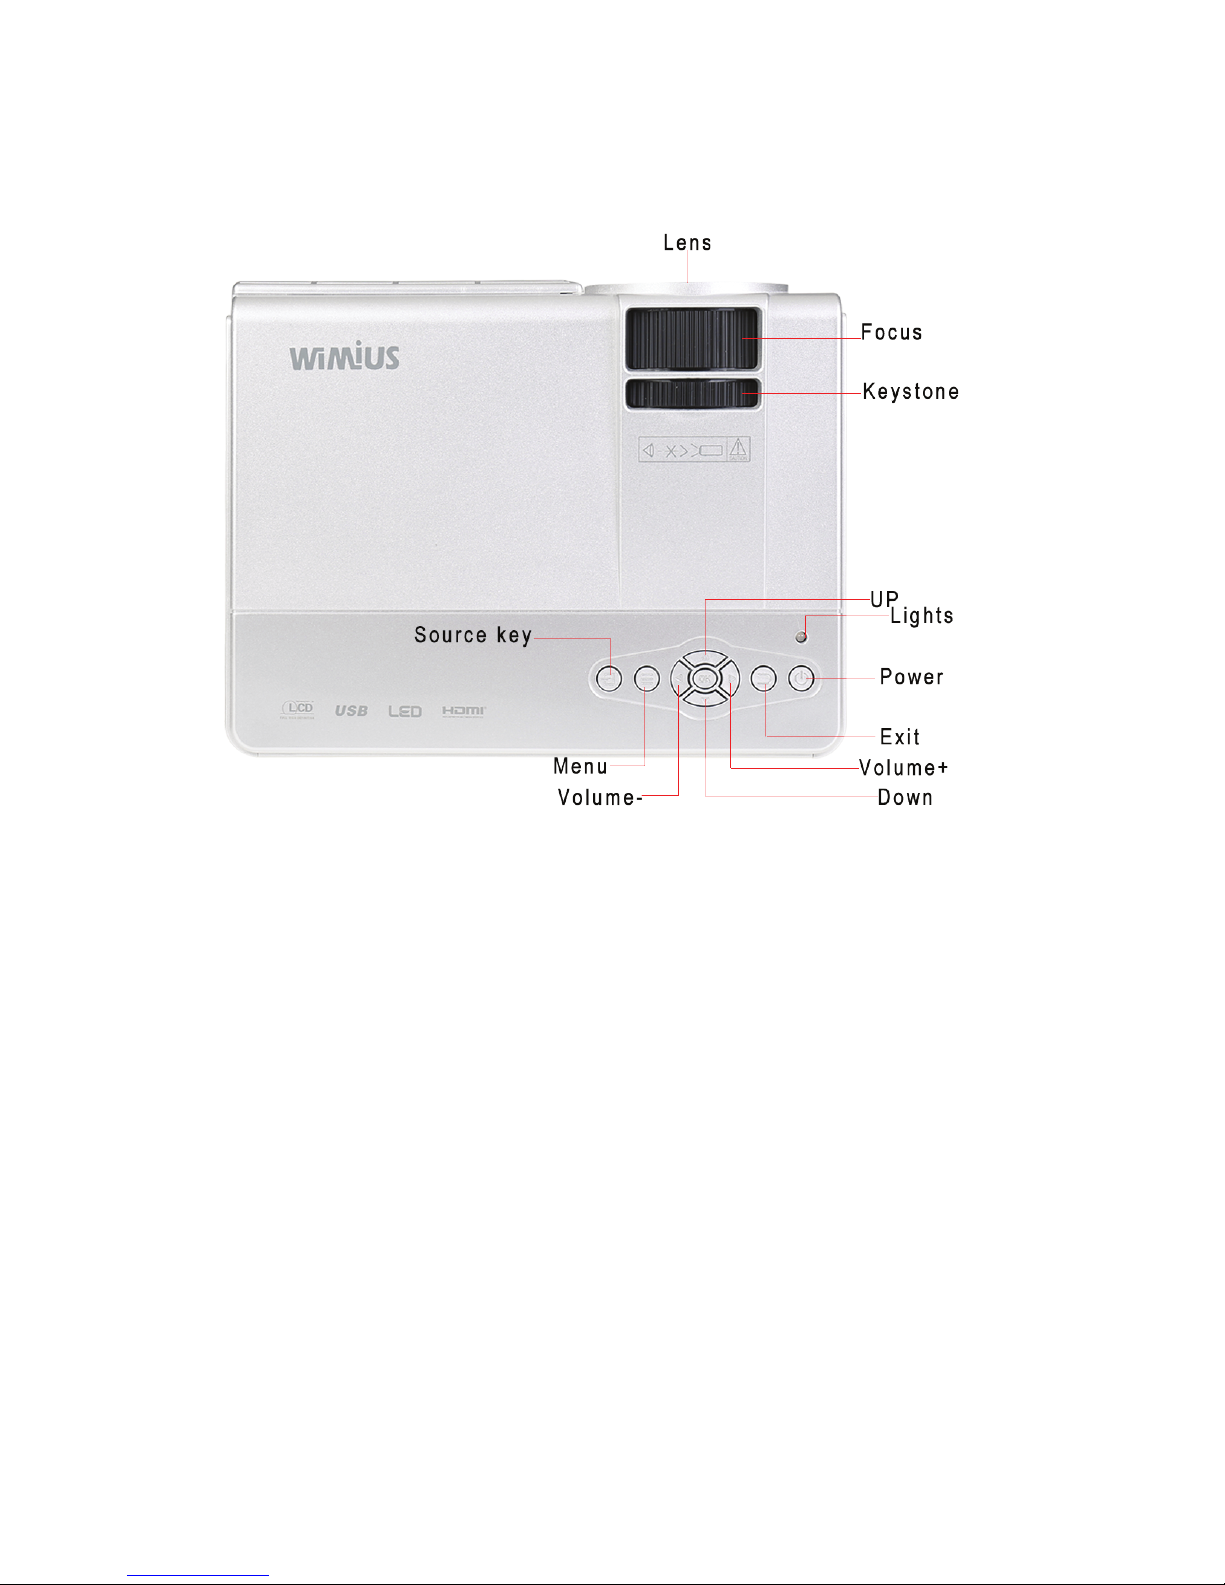
Bouton Power: Appuyez sur pour ouvrir ou fermer le projecteur, et que même que
le bouton d'alimentation de la télécommande.
Bouton volume plus/moins: appuyez sur ces deux boutons peuvent augmenter ou
diminuer le volume, mais aussi pour la gauche et à droite de chaque menu dans le
menu projet et déplacer le réglage des paramètres de sélection.
Touche Menu: pour appeler le menu principal ou quitter le système.
Les touches haut et bas: appuyez sur ces deux boutons peuvent être déplacés vers le
haut et vers le bas pour sélectionner l'élément de menu suivant de chaque menu.
Touches de sélection de source: signal de télévision de sélection de diusion ou d'un
signal vidéo externe.
Objectif: Mettre cet objectif, vous pouvez régler l'état de mise au point de chaque pixel
de l'image, en changeant la clarté de l'image.
Entrée et sortie: entrée et la sortie du système de refroidissement du moteur refroidi
à l'air, l'utilisation du processus, il est jamais bloquées ou obstruées, an de ne pas b
rûler la machine.
1
Page 32
1. Port audio du siège de sortie casque pour connecter un périphérique externe
d'amplication de signal audio ou un casque.
2. AV (vidéo) port d'entrée.
3. Port carte TF, insérez la carte TF carte de TF peut lire des chiers audio,
vidéo et image.
4. HDMI haute dénition port de signal vidéo connecté à l'ordinateur, HDMI
borne de sortie de signal du DVD.
5. Port USB, insérez le disque U disque U peut lire des chiers audio, vidéo et image.
6. VGA (PC, PC), le port d'entrée de signal
Noms des clésTélécommande
2
Power Mute
Next
Last
Play/Pause
Voice-
Signal Souce
Menu
Backward
Forward
Flip
Voice+
Zoom
ESC
Page 33
Projecteur d'installation
Méthode d'installation
Placez le projecteur sur une surface ou suspension solide et stable, ventilation
environnante, ne pas obstruer les orices de ventilation ou un abri, et aucun objet
évents de logement au sein de 10CM. De sorte que le projecteur et l'écran an de
maintenir une distance appropriée entre le projecteur et l'écran détermine la taille
de l'image projetée. Branchez le cordon d'alimentation du projecteur à une prise de
courant et le projecteur, et l'autre extrémité est reliée à la terre AC. Selon vos besoins,
vous pouvez placer le projecteur sur un comptoir stable avant projetée sur l'écran,
vous pouvez également utiliser des cintres spéciaux seront xés sur le jeu de toit,
peut également être utilisé derrière un écran, et de fonte de derrière l'écran image.
Installation Note: La levée de l'avant, le corps ne peut pas être supérieure à la
projection sur le bord de l'écran, sinon il aura une incidence sur l'eet de réglage
de l'image ou trapézoïdale. S'il vous plaît se référer à "La distance entre le projecteur
et l'écran" section pour déterminer la taille de la distance entre l'écran et le projecteur.
Placez l'écran du projecteur est sur l'axe de symétrie de l'installation, an d'éviter
l'image de gauche et de la distorsion trapézoïdale droite. Lors de l'installation, ne
vivent pas l'opération, an d'éviter tout risque de choc électrique ou de brûlure de la
machine. Juste emballé projecteur, lorsque vous démarrez d'abord l'image peut
apparaître sur le fond était une distorsion trapézoïdale et ou, voir la "correction du
trapèze et le réglage de mise au point" les chapitres suivants pour ajuster.
3
Avant
Montage au plafond
Arrière
Support plafond projection Arrière
Page 34
Utilisation recommandée de stents plafond
La distance entre le projecteur et l'écran
Focus adjustment
Rotation à droite de la lentille, la lentille tout dans la machine, puis tourner lentement
la lentille dans le sens antihoraire, et soigneusement observer les pixels sur l'écran,
les particules dans l'image la plus claire quand Hou (sous réserve du centre de la
zone d'image), Il est également la meilleure position de la lentille de mise au point.
Correction Keystone
Glisser lentement Keystone (Fig. 3), jusqu'à la frontière de l'image de l'écran est
devenu un carré régulier, régler la clé de voûte de l'amplitude maximale de ± 15
degrés. Si la position du train Keystone limite réglée ne supprime pas la distorsion
trapézoïdale, raccourcir la distance entre le projecteur et le centre de l'écran dans la
direction verticale. Si elle est placée sur le projecteur de table monté, la plaque de
fond peut être ajustée en faisant tourner la roue pour modier l'angle de l'angle
de projection du projecteur.
4
Lens center
Screen size
Page 35
S'il vous plaît se référer à l'illustration du projecteur au plafond suivant
Note: Ne pas placer le projecteur près d'une source de chaleur des climatiseurs et
des appareils de chauage, sinon la machine peut surchauer et arrêter automatiquement
Lors de l'installation du projecteur, s'il vous plaît choisir les vis adéquates de résistance
et de suspension, an d'éviter le temps de qualité ou à vis vissée dans une profondeur
susante et se produit dans le projecteur tombe accident.
5
Fig.3
Engrenage keystone
Trou à xation de support
Page 36
Connection des câbles de signal
Prise d'entrée d'alimentation: lors de l'utilisation, s'il vous plaît insérez l'adaptateur
d'alimentation des accessoires de la machine dans la borne de sortie DC, et l'autre
extrémité de l'adaptateur d'alimentation est inséré dans la prise de courant.
Prise d'entrée du VGA: ce port peut être relié à un ordinateur ou un autre connecteur
de sortie avec un signal vidéo VGA.
Lorsque le projecteur est connecté à l'ordinateur, vous pouvez utiliser une connexion
par câble VGA. Après la connexion avec un projecteur de câble VGA et du matériel
informatique, branchez le cordon d'alimentation ou l'adaptateur secteur, allumer
le projecteur, appuyez sur le bouton "Source" sur le panneau du projecteur ou de la
télécommande, sélectionnez le "PC (VGA)", appuyez sur "OK "pour entrer dans le
modèle informatique, puis réglage de l'ordinateur de la résolution et de la résolution
physique du projecteur compatible avec le taux de 60Hz de rafraîchissement.
(Utilisation réelle, la plupart des systèmes informatiques actuels ne prennent pas
en charge la résolution 800 * 480, cette fonction est utilisée pour voir la classe de
document ne verra pas la police, mais pour un ordinateur pour jouer des images, des
photos de classe n'a pas beaucoup touché).
Lorsque l'ordinateur portable connecté au projecteur, commutateur vidéo requis pour
ordinateur portable: S'il vous plaît utilisez le câble VGA d'origine pour connecter
l'ordinateur portable et le projecteur et le projecteur est allumé, appuyez sur le bouton
VGA de la télécommande, ou appuyez sur l'unité bouton "Source" , ou de la télécomman
de bouton "Source", le projecteur est en mode VGA. Retour vers le côté du portable,
appuyez sur la touche portable de commutation "Fn + Fx", Fx représente diérents
modèles de bloc-notes vidéo de commutation des touches F1-F10,
6
Computer connection line
Laptop Desktop
Computer
connection line
Page 37
similaire à l'icône de la télévision. Appuyez une fois sur l'écran de l'ordinateur, tandis
que le secondaire est pressé double achage, appuyez trois fois le moniteur externe
(ordinateur non représenté). Étant donné que chaque marque de touche de fonction
de l'ordinateur pour basculer entre les diérentes positions situées, vous contrôlez les
éléments suivants selon les instructions de votre ordinateur portable pour basculer
Toshiba(Fn+F5) IBM(Fn+F7) HP(Fn+F4) Founder(Fn+F3)
samsung(Fn+F3) Panasonic(Fn+F3) NEC(Fn+F4) apple(Fn+F8)
sharp(Fn+F5) Hitachi(Fn+F7) Dell(Fn+F8) Acer(Fn+F5)
Lenovo(Fn+F3) BenQ(Fn+F7) ASUS(Fn+F9)
Système Win7 / Win8: S'il vous plaît utilisez le câble VGA d'origine pour connecter
le projecteur et l'ordinateur, le projecteur est allumé, appuyez sur la machine bouton
"Source", ou le bouton "Source" sur la télécommande, le projecteur passe en mode
VGA . Face arrière de l'ordinateur portable, ordinateur de bureau, à droite, la résolution
de l'écran, connectez le projecteur pour acher le copier.
Reportez-vous aux paramètres de tableau ci-dessous pour régler le signal de sortie à
partir d'un ordinateur
Type
Résolution
Fréquence
horizontale
(KHz)
Fréquence
Champ(Hz
)
VESA
standard
PC
VGA
640×480
31.5 60
√
34.7
70
37.9
72
√
37.5
75
√
SVGA
800×600
31.4 50
35.1 56
√
37.9 60
√
46.6
70
48.1
72
√
46.9
75
√
XGA
1024×768
40.3 50
48.4 60
√
56.5 70
√
60.0
75
√
Remarque: quand il y a un ordinateur connecté au projecteur et l'image ne peut pas
être achée simultanément, s'il vous plaît dénir les propriétés d'achage de
l'ordinateur, sélectionnez le mode de sortie pour le CRT.
7
Page 38
Prise d'entrée vidéo: Ce port peut être connecté aux joueurs OLD, lecteurs de DVD, des
caméras et un autre lecteur vidéo vidéo (VIDEO), la prise de sortie audio.
Sortie audio: Le signal audio à partir du port de sortie du projecteur, comme une
puissance élevée à jouer de la musique, s'il vous plaît vous connecter à une entrée de
l'amplicateur de puissance externe.
Signal d'entrée HDMI: cette interface peut être reliée à l'extrémité de sortie d'un
lecteur de sortie HDMI HD.
Lorsque le projecteur se connecter au lecteur HD, HD set-top boxes, des jeux vidéo,
HD (HDMI) connexion de signal peut être utilisé. Après le raccordement des
projecteurs et des équipements de haute dénition avec câble haute dénition
(câble HDMI), branchez le cordon d'alimentation ou l'adaptateur secteur, allumer
le projecteur, appuyez sur le bouton "Source" sur le panneau du projecteur ou de la
télécommande, sélectionnez "(HDMI) bouton "appuyez sur" OK "pour entrer
dans le mode HDMI.
Branchez le disque U
Branchez le disque U dans le port "USB", ou insérez la carte de TF dans la fente
pour carte TF, appuyez sur le bouton "Source" sur le panneau du projecteur ou
de la télécommande, sélectionnez l'option "multimédia (USB ou TF)",
appuyez sur "OK" clé pour entrer en mode multimédia,
8
Video player
HDMI connection line
Ligne de signal audio
HDMIUSB
Page 39
sélectionnez une vidéo ou des chiers d'image dans le mode de prévisualisation
vidéo, appuyez sur la télécommande "/ play pause" pour plein écran.
Fonctionnement et utilisation du projecteur
Utilisation du menu
Alummer/Éteindre
Opérations du menu-base
9
Mettez la machine
Appuyez sur la touche d'alimentation sur la couverture
ou de la télécommande, la couleur du clignotant, la
machine en état de fonctionnement normal.
Eteignez la machine
Appuyez sur la touche d'alimentation sur la couverture
ou de la télécommande, et la machine passe à l'état de
dormance.
1. Appuyez sur le bouton menu de la télécommande ou
"menu" sur le projecteur pour acher l'écran de menu.
2. Appuyez sur la touche “ ”“ ”de la télécommande ou du
projecteur pour sélectionner votre besoin d'ajuster ou
régler un élément de menu, puis le menu de l'icône
sectionnée sérail mise en surbrillance.
3. Appuyez sur la touche “▲”“▼”sur la télécommande
ou le projecteur sur le sous-menu pour sélectionner
l'élément de menu que vous devez régler.
4. Ensuite, appuyer sur la télécommande ou le bouton
"OK" sur le projecteur, actives l'icône sous-menu sectionné.
5. Appuyez sur la touche “ ”“ ” , pour régler vos éléments
de menu des valeurs de paramètres sectionnés.
6. Répétez la deuxième ci-dessus à la cinquième procédure
pour régler les autres éléments de menu, ou appuyer
simplement sur la touche "EXIT" ou "MENU" pour quitter
l'écran menu.
Page 40
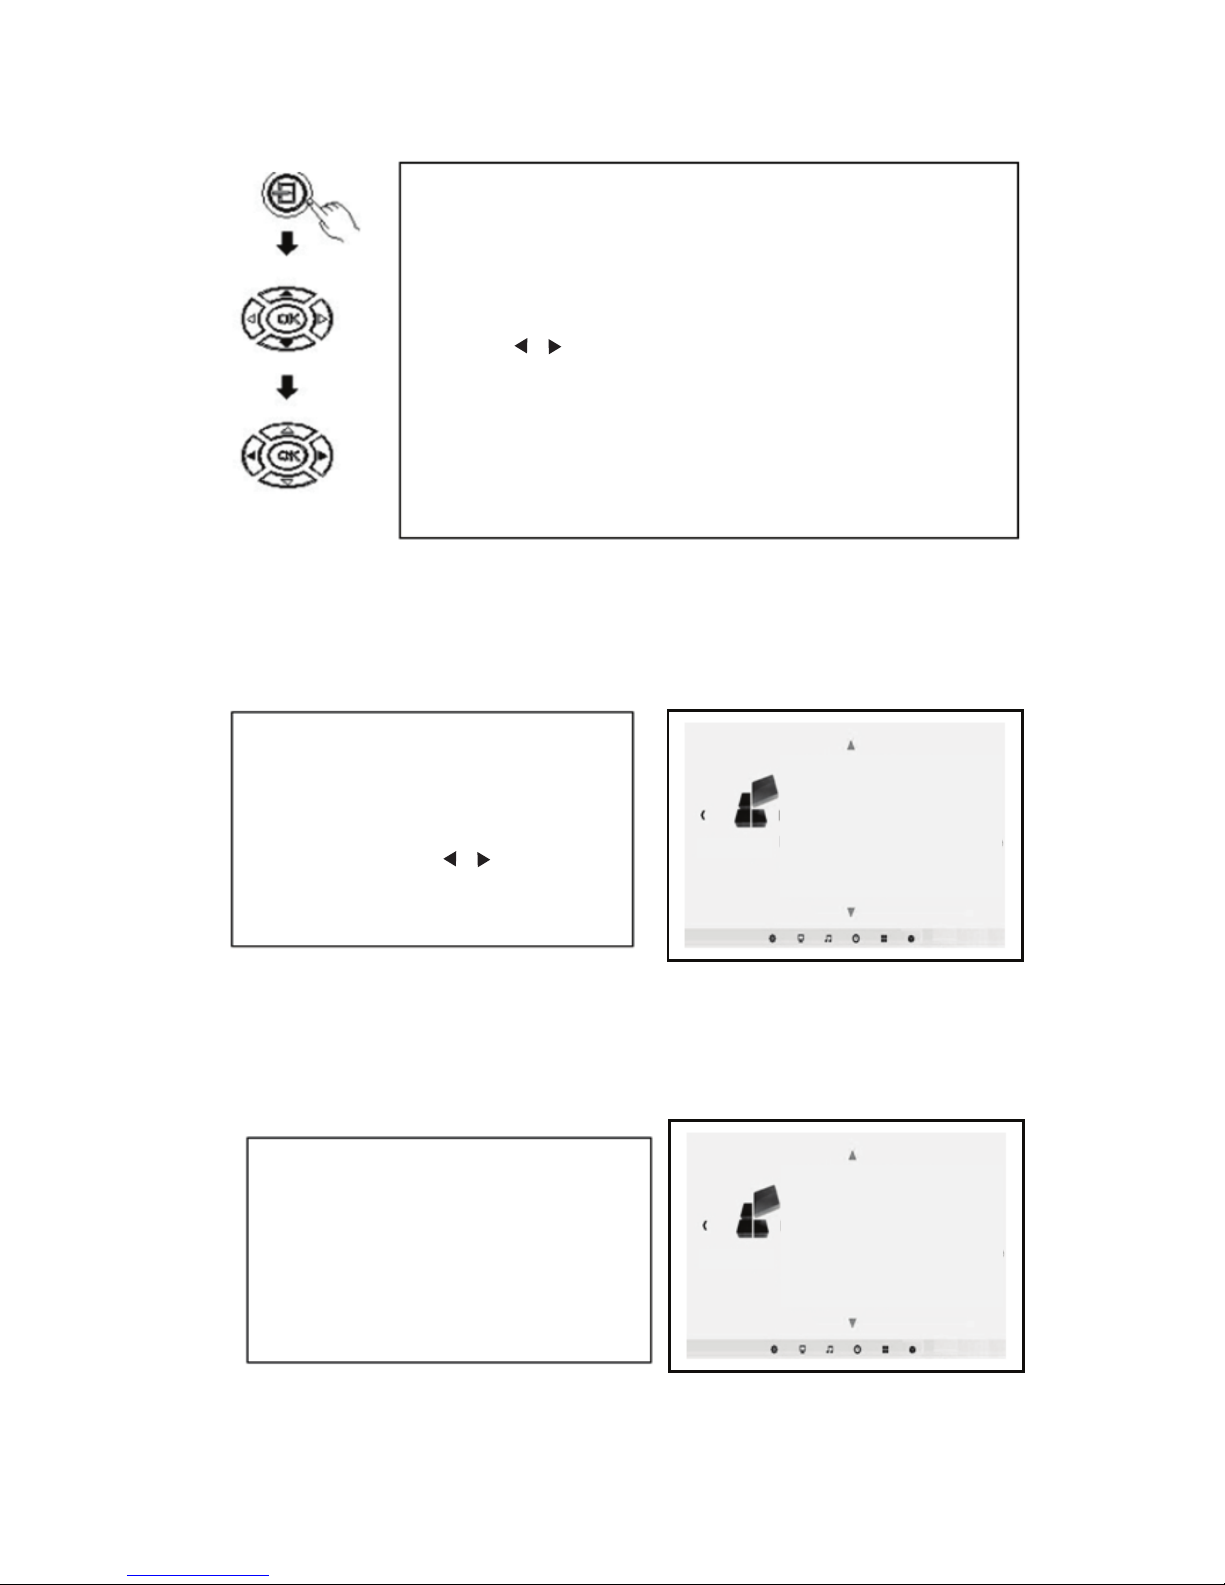
Input Source Select
Image ip
Sélection de la langue
10
Setting
menu language
Restore factory settings
Menu transparency low
Menu display time close
Image rollovers
Zoom 0
Setting
menu language
Restore factory settings
Menu transparency low
Menu display time close
Image rollovers
Zoom 0
Appuyez sur "SOURCE" pour entrer dans l'interface de sélection de la
source.
Appuyez sur "▲""▼"pour sélectionner le signal d'entrée souhaitée à partir
du PC, AV HDMI, SD, USB
Appuyez sur “ ”“ ” pour conrmer le type de signal d'entrée.
PC: Entrée de signal PC HDMI:Entrée de signal HD
AV: Entrée de signal vidéo USB: Multimedia entrée de signal
SD: Multimedia entrée de signal
Voir la section "Foncionnement du menu de
base" pour passer à la droite de l'écran de menu,
puis sélsectionez une langue de menu.
Appuyez sur le bouton "OK" écran des options
de langue pour entrer.
Appuyez sur "▲""▼" ou “ ”“ ”, sélectionnez la
langue que vous voulez, puis appuyer sur la
touche "MENU" pour accepter les paramètres
et la sortie.
Voir la section "" pour passer à la droite de l'écran
de menu, puis sélectionnez une langue de menu.
Appuyez sur "▲""▼"pour sélectionner l'image
bacule.
Répétez appuyez sur la touche "OK" pour rendre
l'écran vers le haut, vers le bas, à gauche et à
droite bascule
Page 41
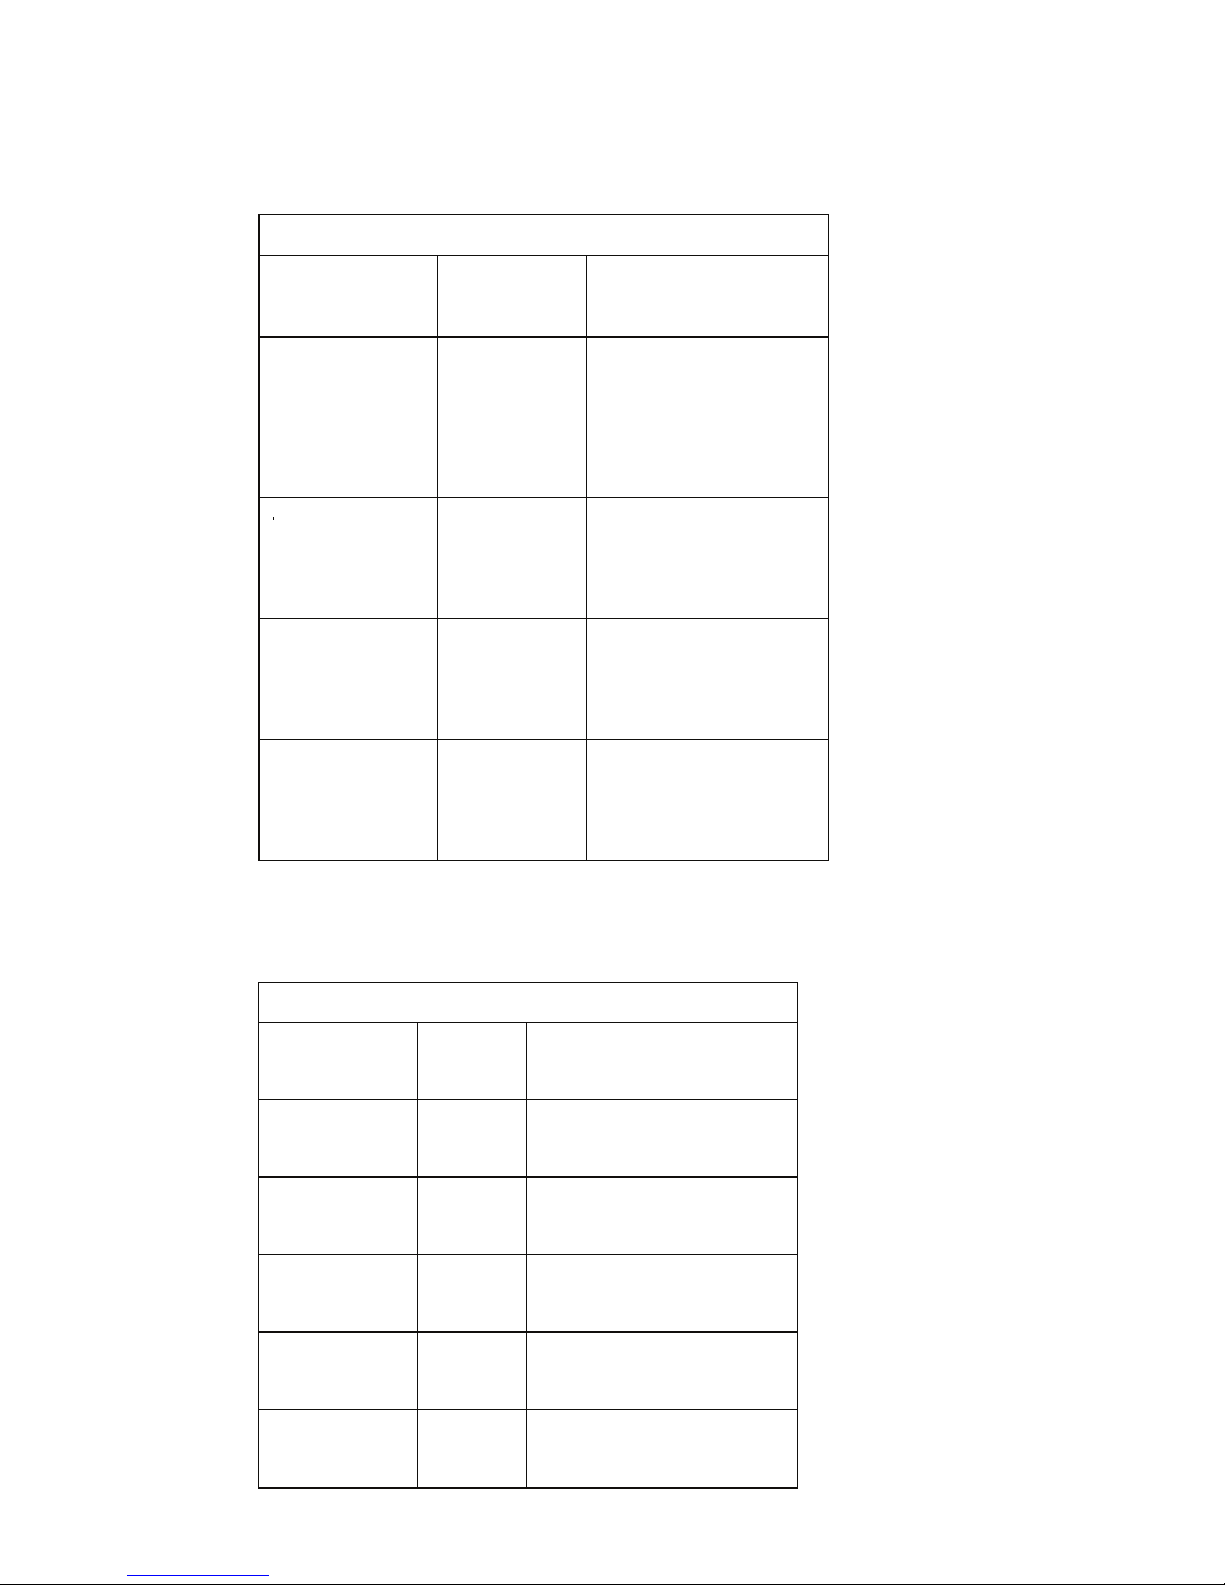
Réglage du menu
Photo Menu
Mode d'image
standard
Réglage du mode
d'affichage de l'image.
Température de
couleur
Affichage de l'image
de réglage de la
température de
couleur.
Ratio d'aspect
Image 4: 3, 16: 9,
Zoom ajustements.
Réduction de
bruit
Affichage de l'image
de réglage de
réduction du bruit.
Réglage PC
Affichage de l'image
de réglage PC de
réglage.
Menu son
Menu son
Mode sonore standard Réglage du mode de sortie
audio
équilibre
Réglage du niveau de sortie
audio
Volume auto
Réglage du volume de
réglage automatique
Son surround
Surround Sound réglage
Réglage
Mode Fiber
PCM
Mode fibre de réglage de
réglage du PCM.
EQ
égaliseur audio Réglage
réglage
11
Page 42
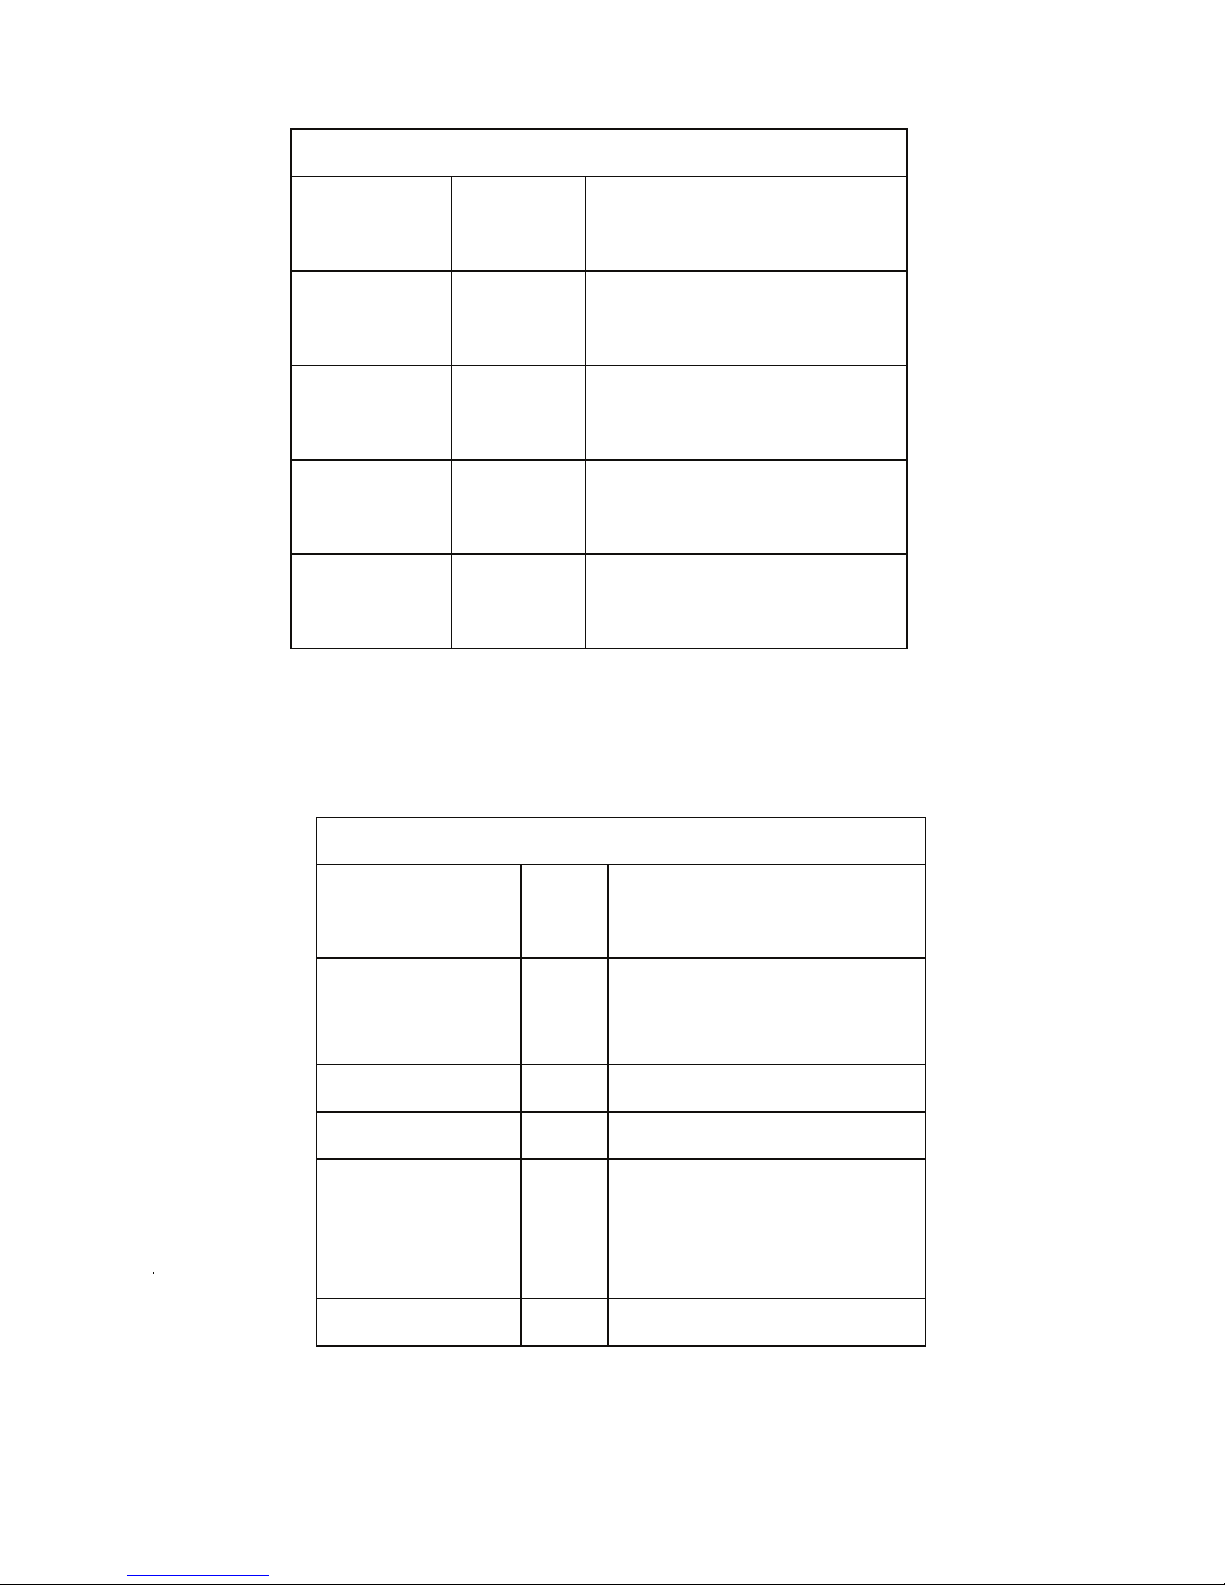
Menu Horloge
Horloge Réglez l'heure actuelle de
l'horloge
Le temps d’
éteindre
Off réglage de l'heure
Le temps
d’allumer
Le réglage de l'heure
Mise en
veille
Réglage de la minuterie de
mise en veille
Auto
sommeil
Aucun signal automatique
COMPENSATION
Conguration du menu
Langue OSD
Réglez l'affichage de la
langue du menu
Restaurer usine
par défaut
Rétablir les paramètres
d'usine.
Mélange
Paramètre blending
Osd Durée
Osd paramètre Durée
Image flip
Retournement de l'image
Ajustement du mode
zoom
Réglage de l'image zoom
12
Page 43
T3 Mini LED Projector
User Manual
Page 44
ミニLEDプロジェクター
簡易マニュアル
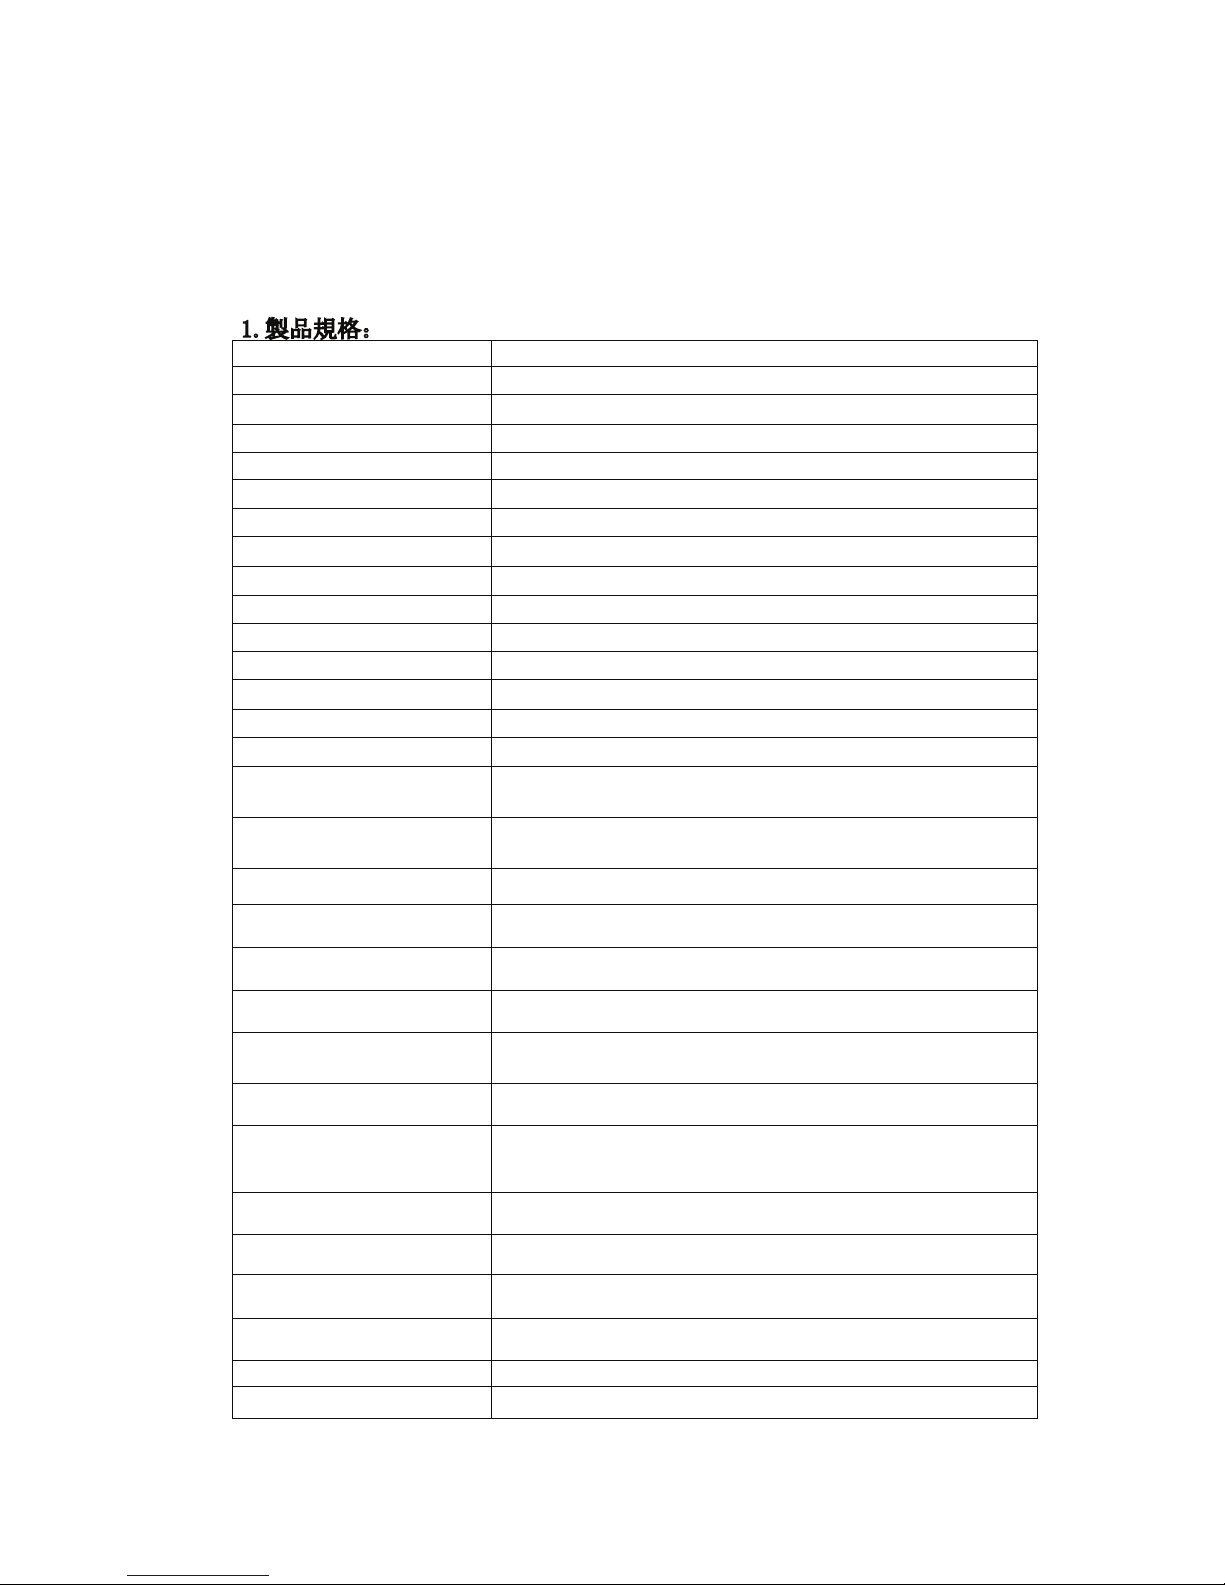
1.製品規格:
投影タイプ ホームシアター
デイスプレー LCD
光源 LED
明るさ 1200 ルーメン
対比度 1000:1
解像度 800*480
スクリーン対角線寸法 37-100 寸
投写距離 1.16-3.0M
組立方法 正面、リア、天吊、水平
画像サイズ 37 インチ/1.16m
スクリーンサイズ 16:9/4:3
光源明るさの均一性 90%
フォーカス マニュアル
投影色彩 1677 万
光源寿命 ≥50000 時間
TF カード(U デイスク)最大限
対応
64G
端子 USB 出力*1,TF カード出力*1,AV*1,HDMI 出力*1、VGA 出力*1
オーディオ出力 *1(L/R)
パワー標準 ≤60 W
内蔵スピーカー 2W/8ohm
HDMI/VGA/AV 576i、720P、720i、720P、1080i、1080P
台形補正 ±15·
電源 110V-220V
映像対応ファイル: MPEG1、MPEG2、MPEG4、RM、RMVB、MOV、MJPEG、Divx、VOB 、MKV。
音声対応ファイル: WMA、MP3、M4A (AAC)、APE、FLAC 、WAV。
画像対応ファイル:
JPEG、BMP、PNG,画像解像度 8544*6656 に対応
テキストファイル
Txt
作動温度
0℃~40℃(32℉~104℉)
貯蔵温度 -20℃~45℃(-4℉~113℉)
作動湿度
10%RH~80%RH
1
Page 45
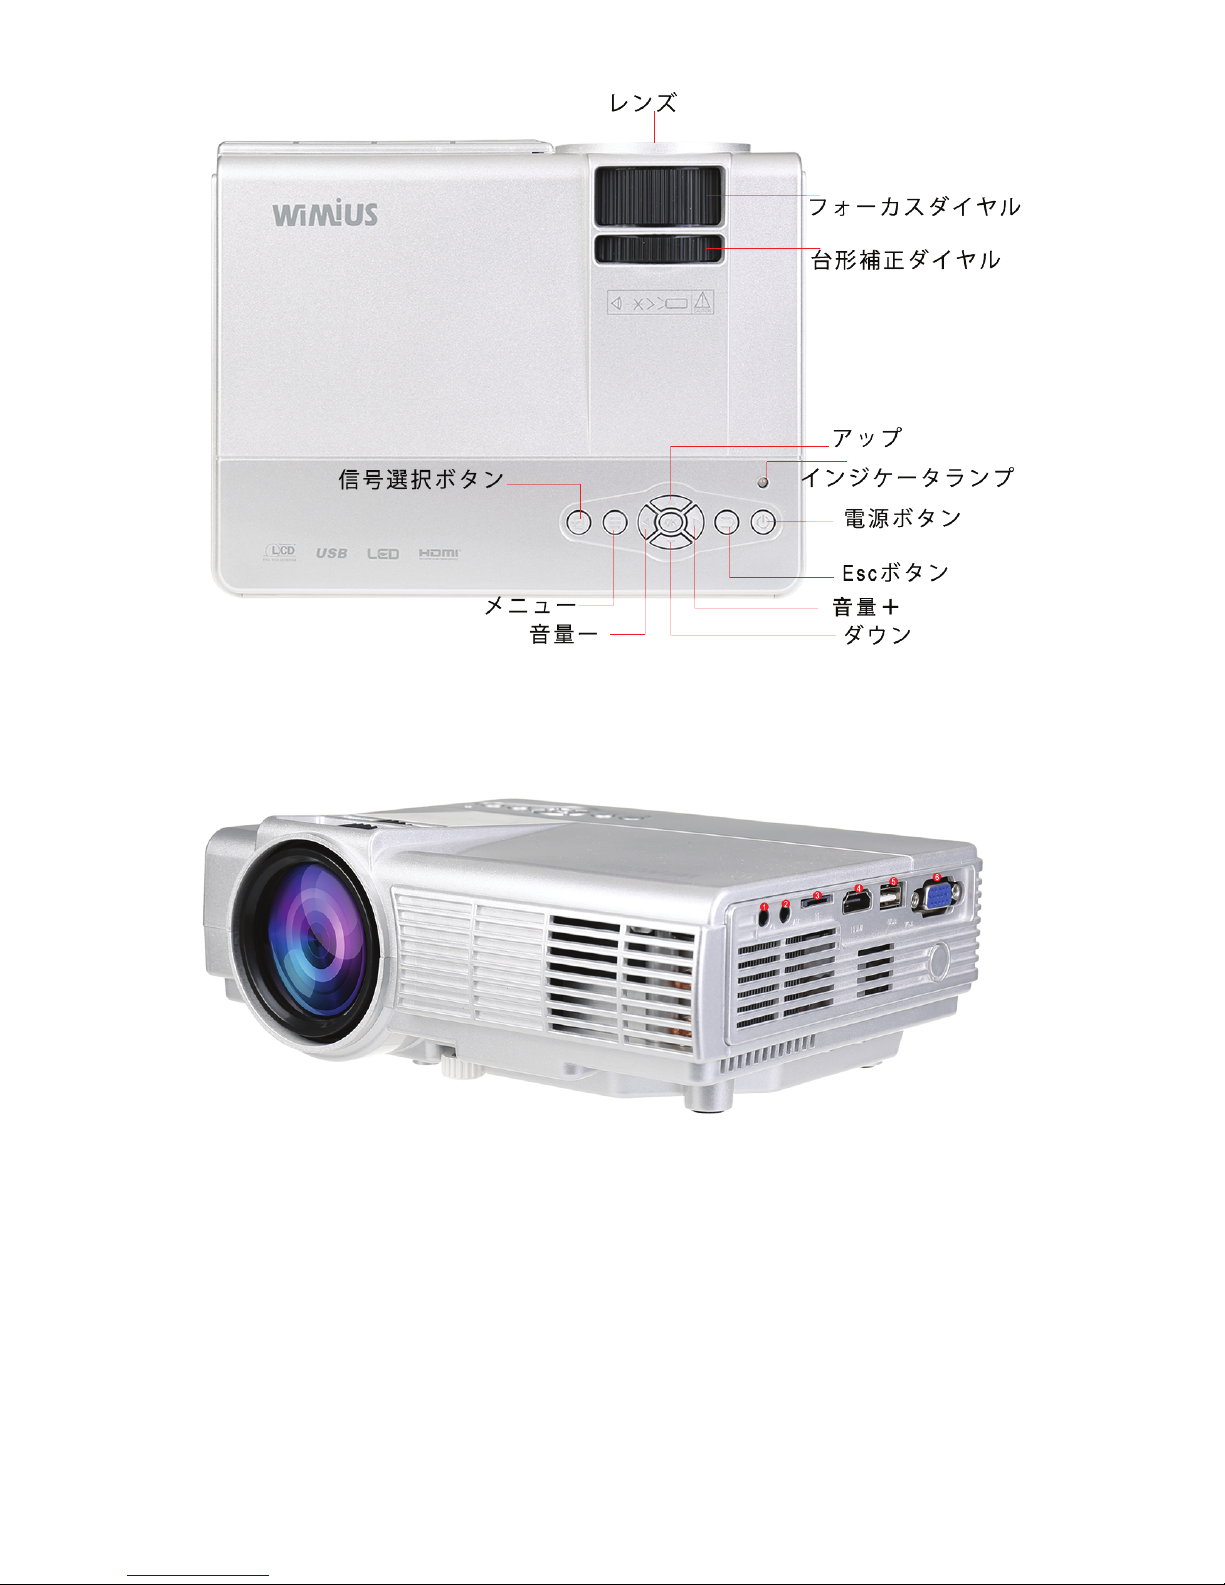
(1)オーディオ出力イヤホンジャック
(2)AVポート
(3)TFカード ポート
(4)HDMIポート
(5)USBポート
(6)VGAポート
2
Page 46
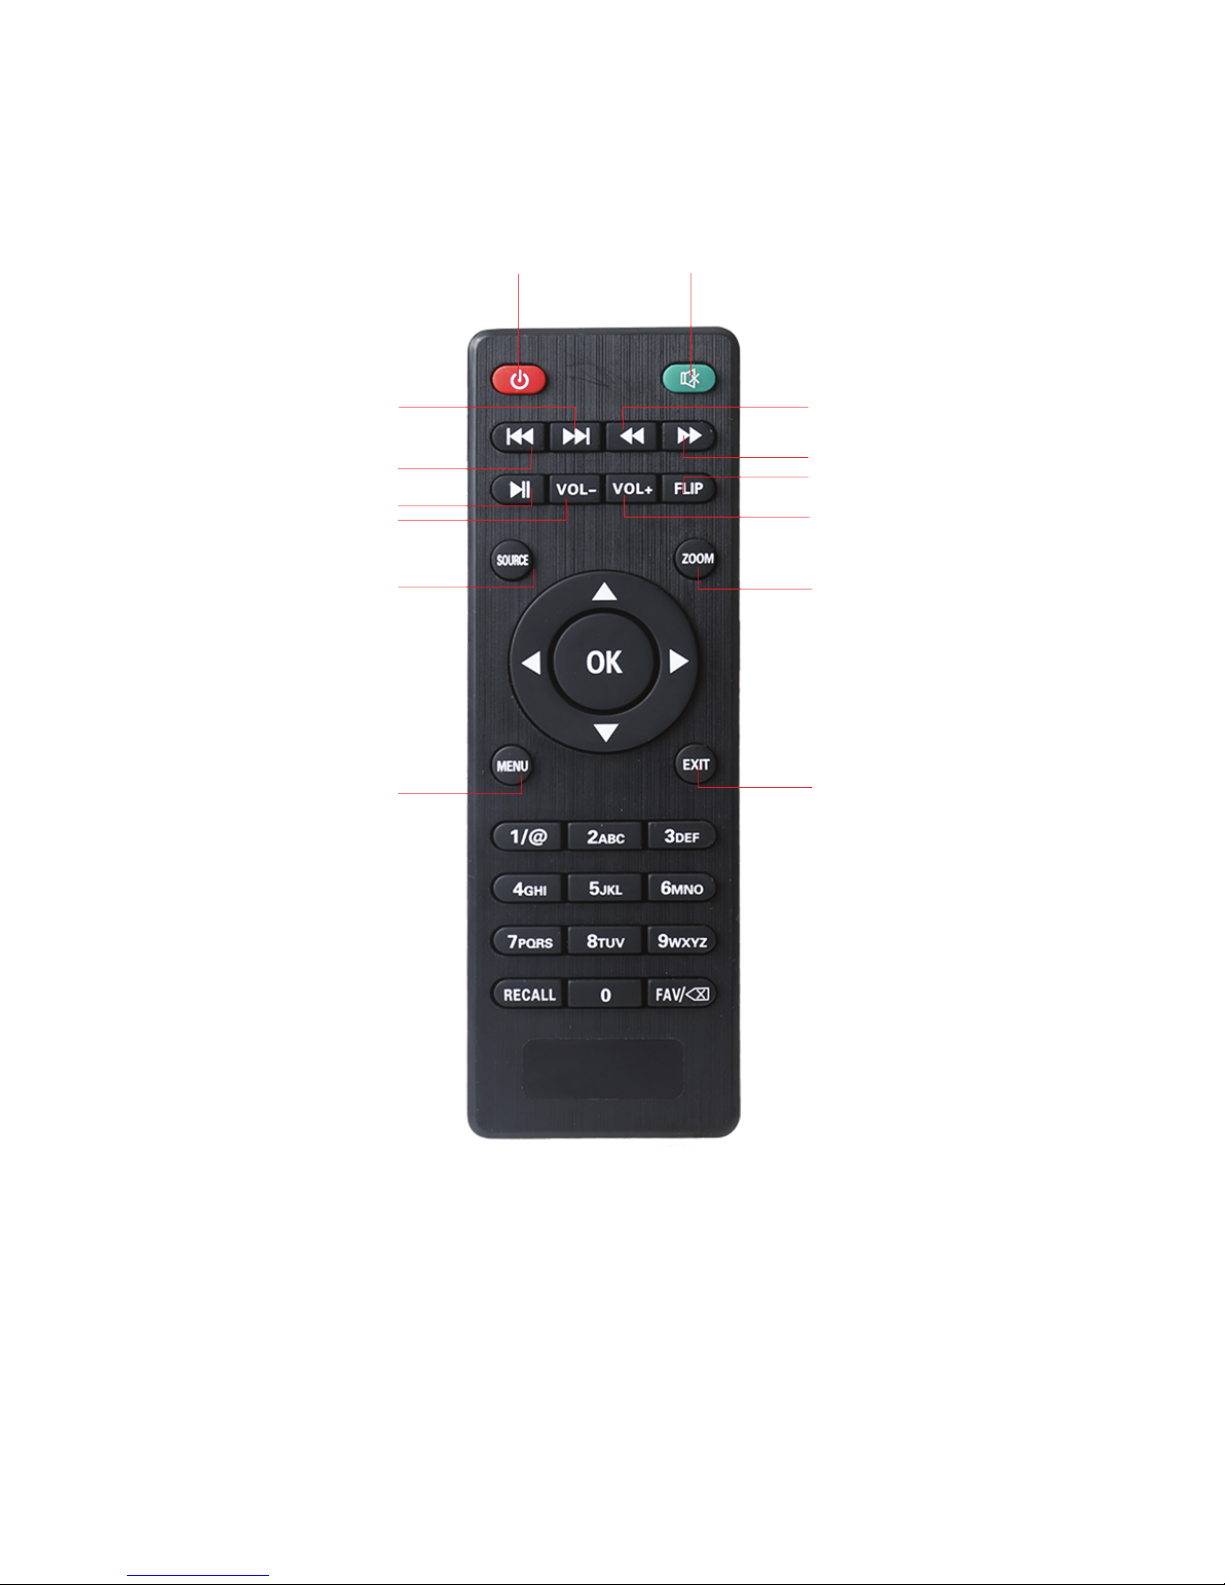
3.リモコンについて
3
Power Mute
Next
Last
Play/Pause
Voice-
Signal Souce
Menu
Backward
Forward
Flip
Voice+
Zoom
ESC
Page 47
二.プロジェクターの組立
一. 組立方法
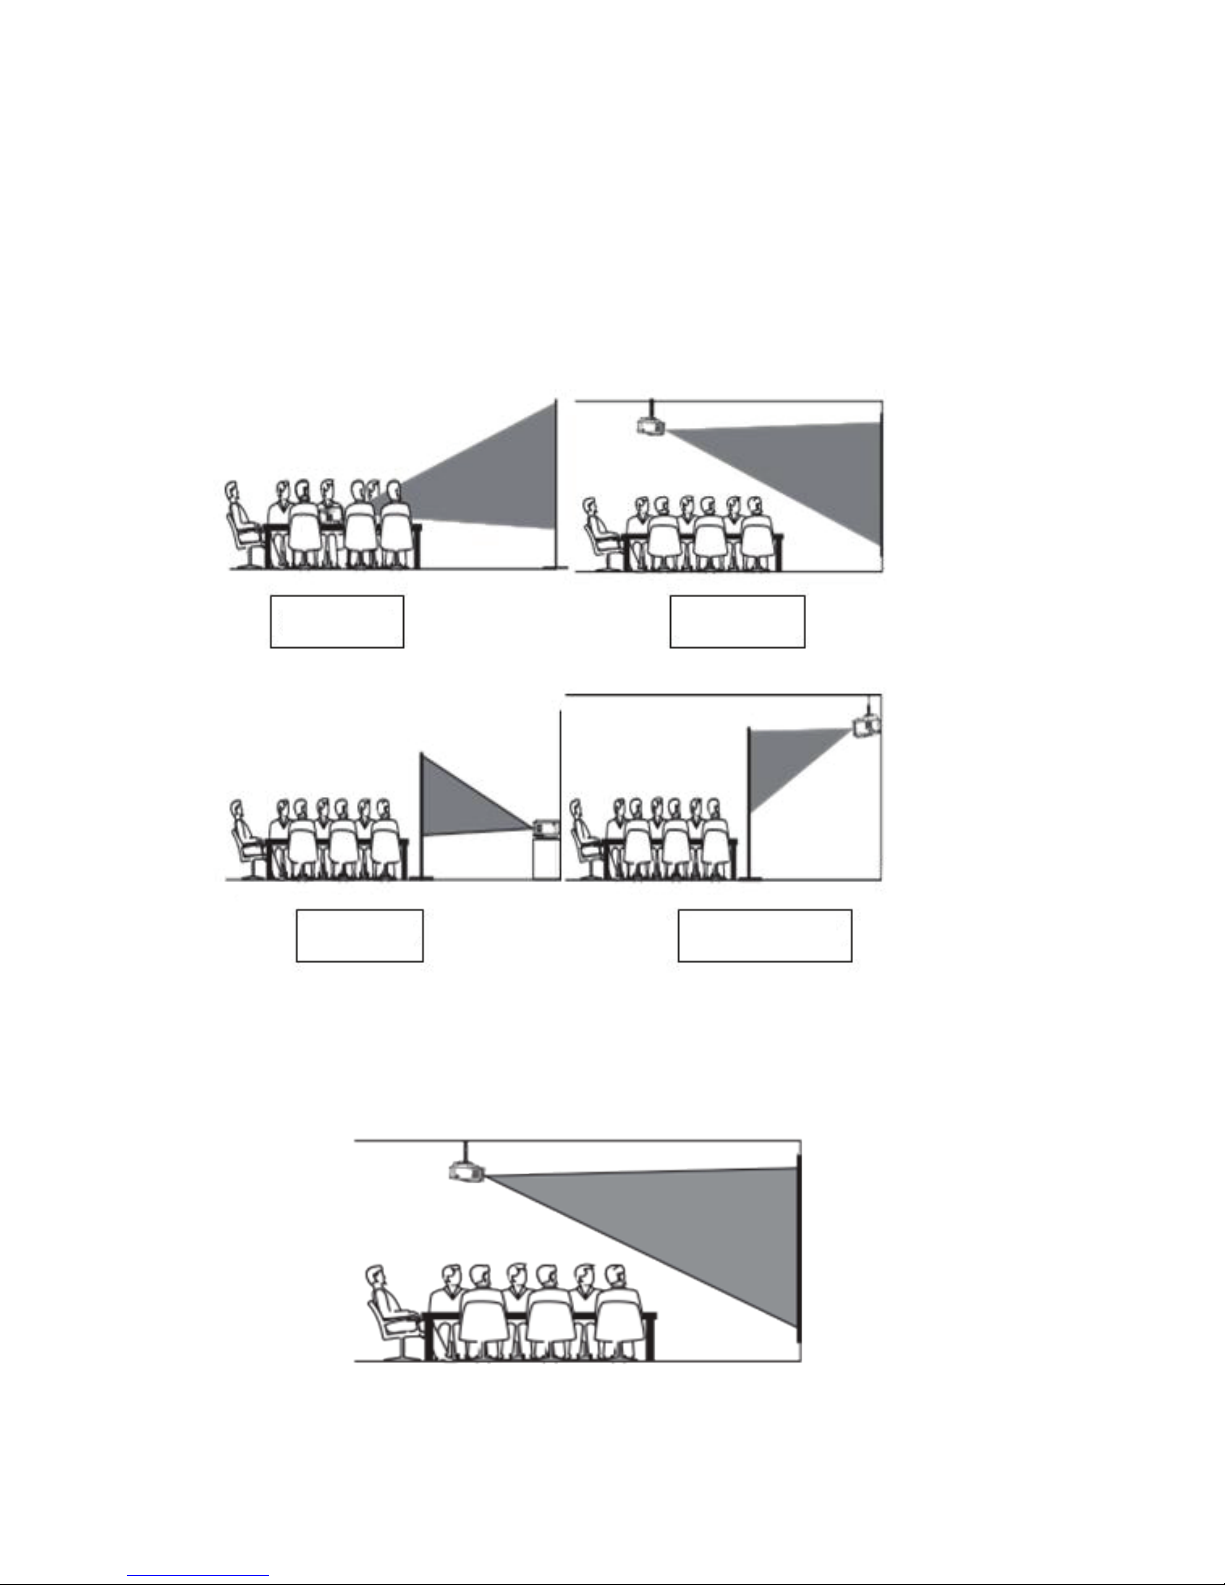
ご注意:天吊の場合はプロジェクター本体をスクリーンの上縁を超えない
でください。でないと、投影画面や台形調整に影響します。
本体をスクリーンの左右対称軸に向いて取り付けください。感電や本体燃や
しのため、電源付きで取り付けしないでください。
天吊金具をご使用ください投影画面は正方形で取り付け成功
4
正面投影
天吊
リア投影 リア投影天吊
Page 48
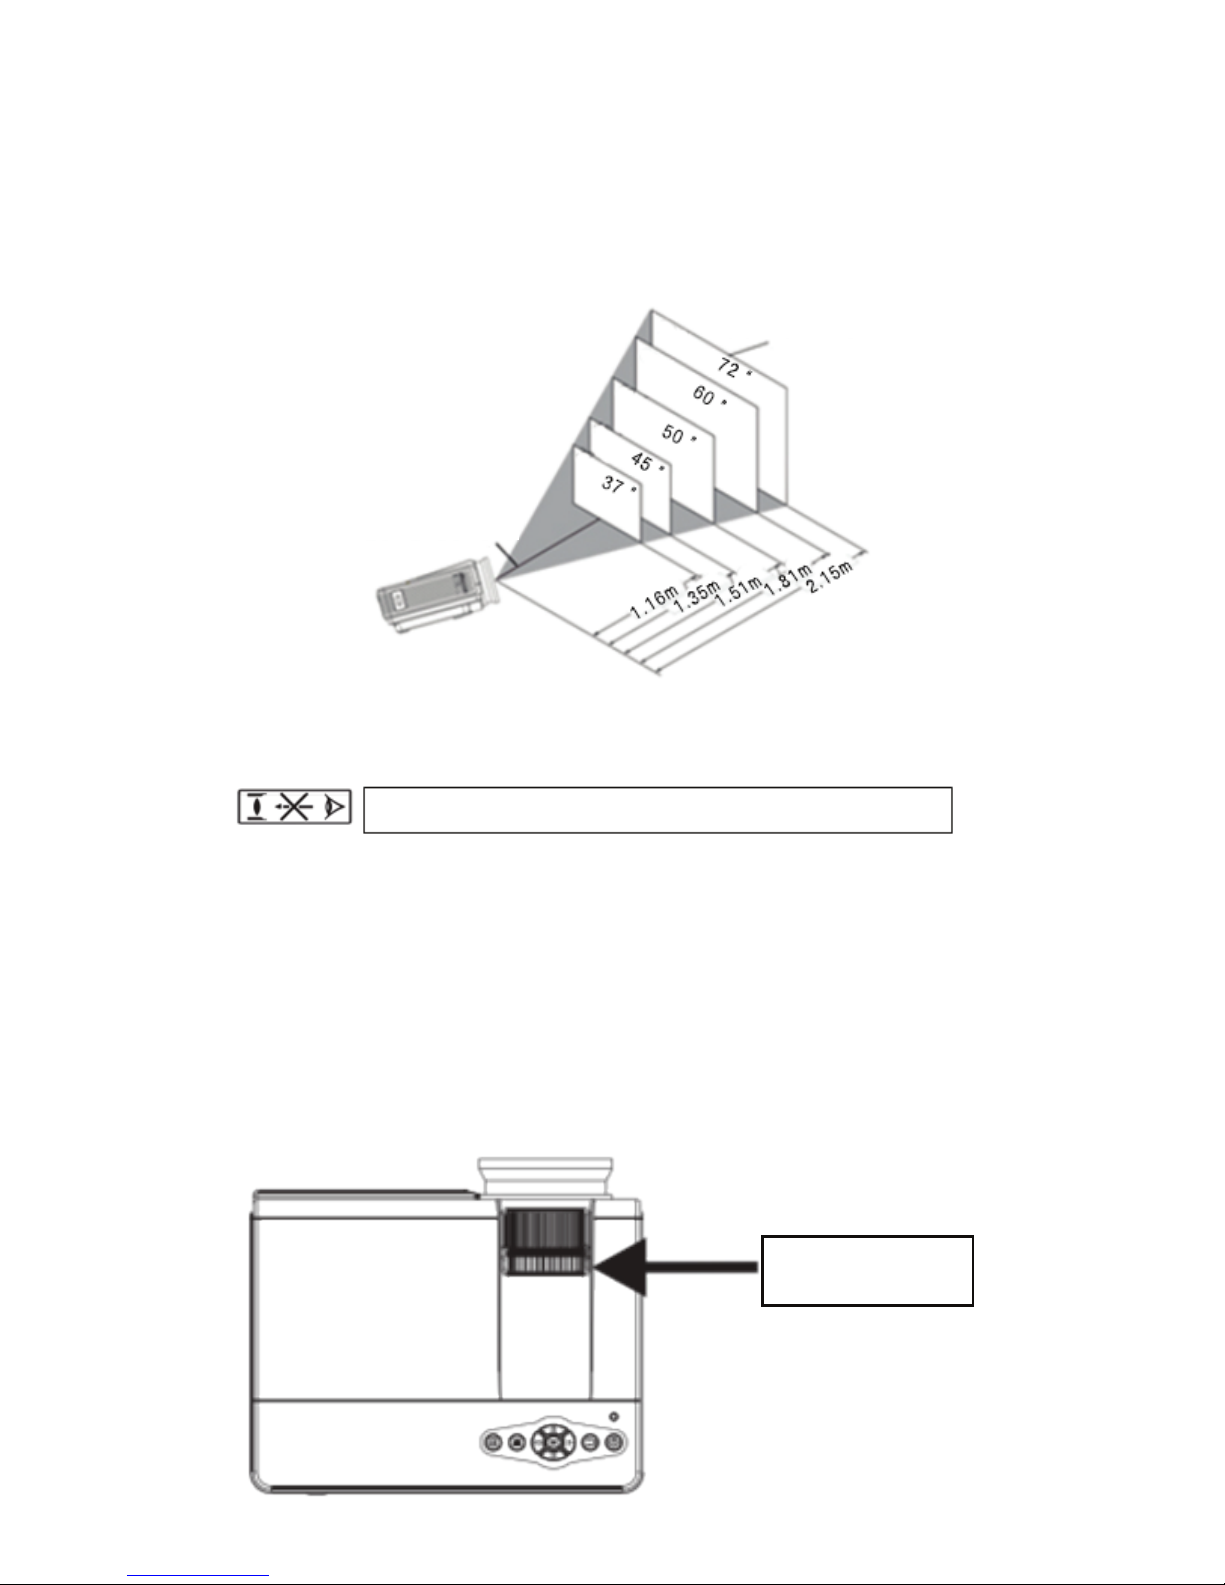
二. 投写距離
※注意
三、レンズ調整
レンズを右回りして調整してください。
四、台形補正
投影画面の縁が正方形になるまで台形補正ダイヤル(図3)をゆっくりと
回します。最大の補正幅度は±15度。制限まで調整しても台形が消え
ないなら、本体とスクリーンの距離を縮んでください。
台形補正ダイヤル
図3
5
Lens center
Screen size
高輝度の光源で光に直視しないでください。特に児童にこの光源にご注意ください。
Page 49
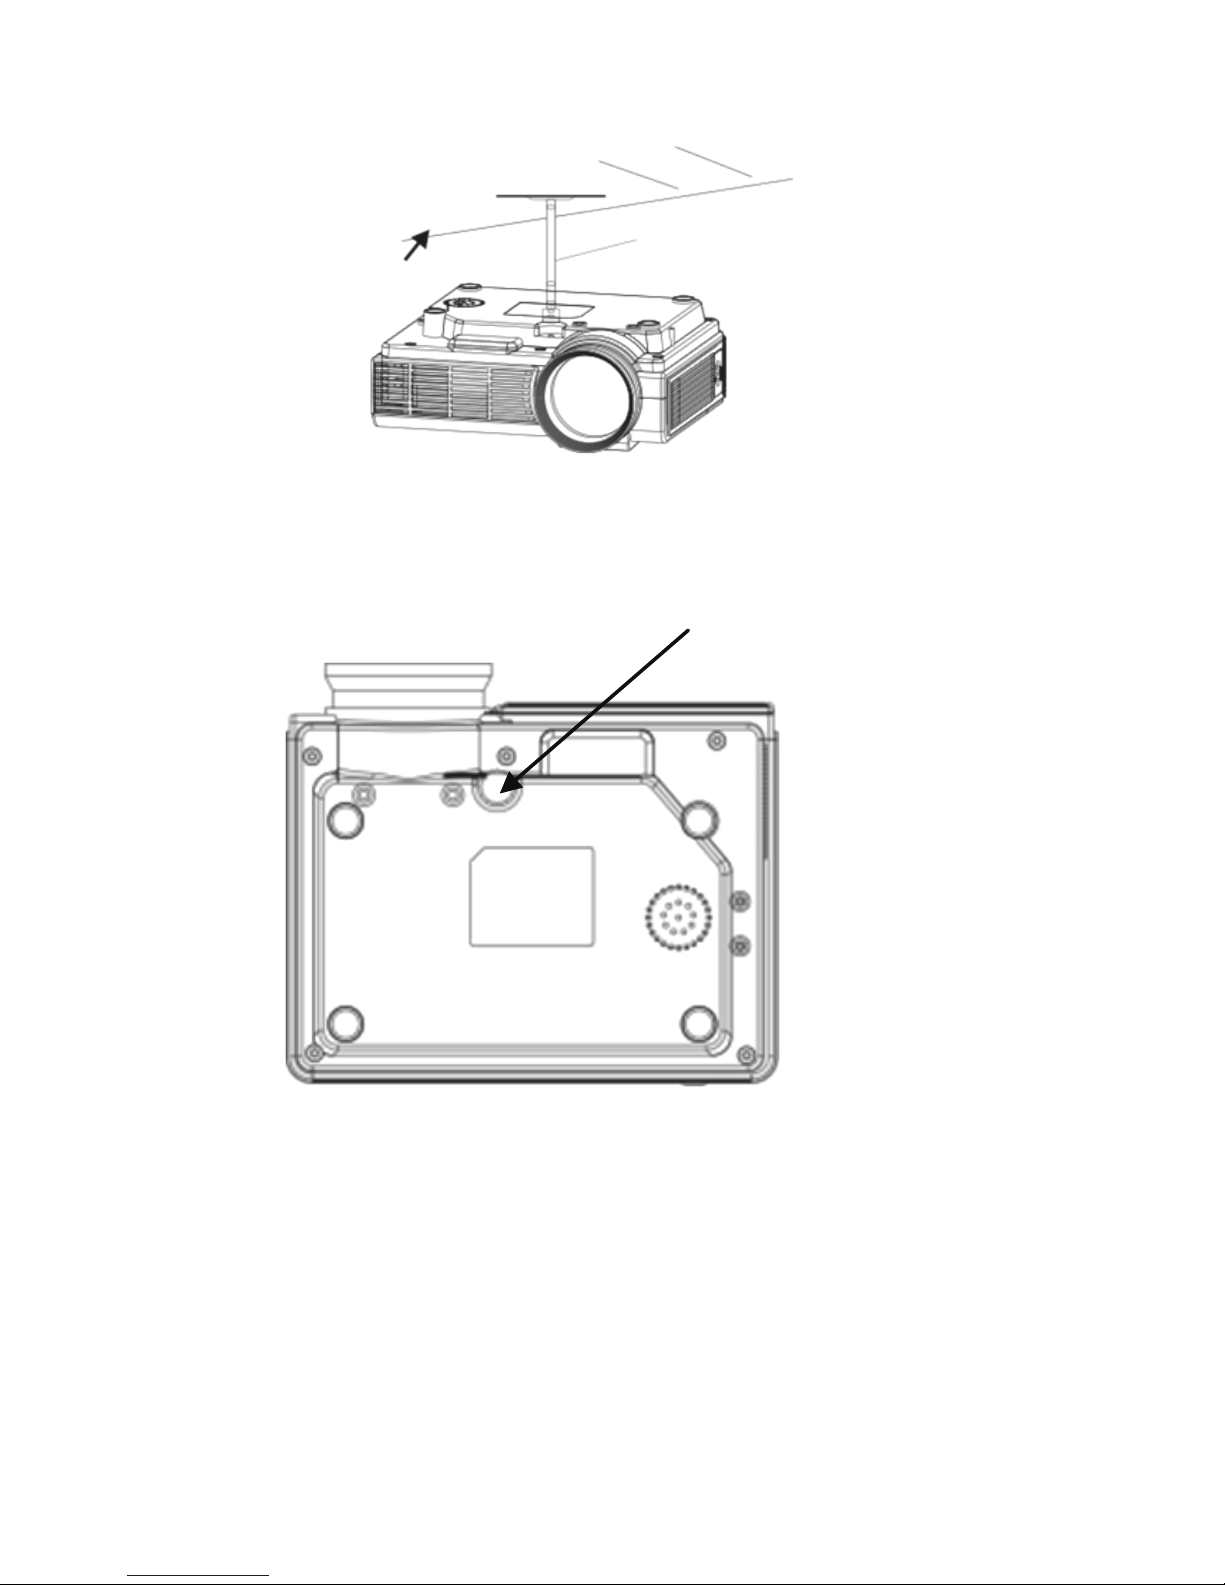
下記のようで天吊取り付けを行ってください。
本体をエアコンやヒーターなどの熱源の周りに置かないでください。
過熱で自動電源オフになる可能性があります。
頑丈な天吊金具をご使用ください。
天吊金具固定穴
三.信号ケーブルの接続
1.電源:付属の電源アダプターでコンセントに挿入してください。
2.VGA:
VGAケーブルでパソコンと接続します。本体は電源が入った後、本体或
いはリモコンの“Source”(ソース)ボタンを押して、パソコン(VGA)を選択し
てOKボタンで決定します。そしてパソコンモードに入ります。パソコンの解
像度をプロジェクターと同じように設定します。頻度を60Hzに設定します。
(実際に使う時は、殆どのパソコンは800*480の解像度に対応できません。
この機能はテキストファイルでは字があまり見えなくなりますが、画像では
問題なく使用できます。)
6
Page 50
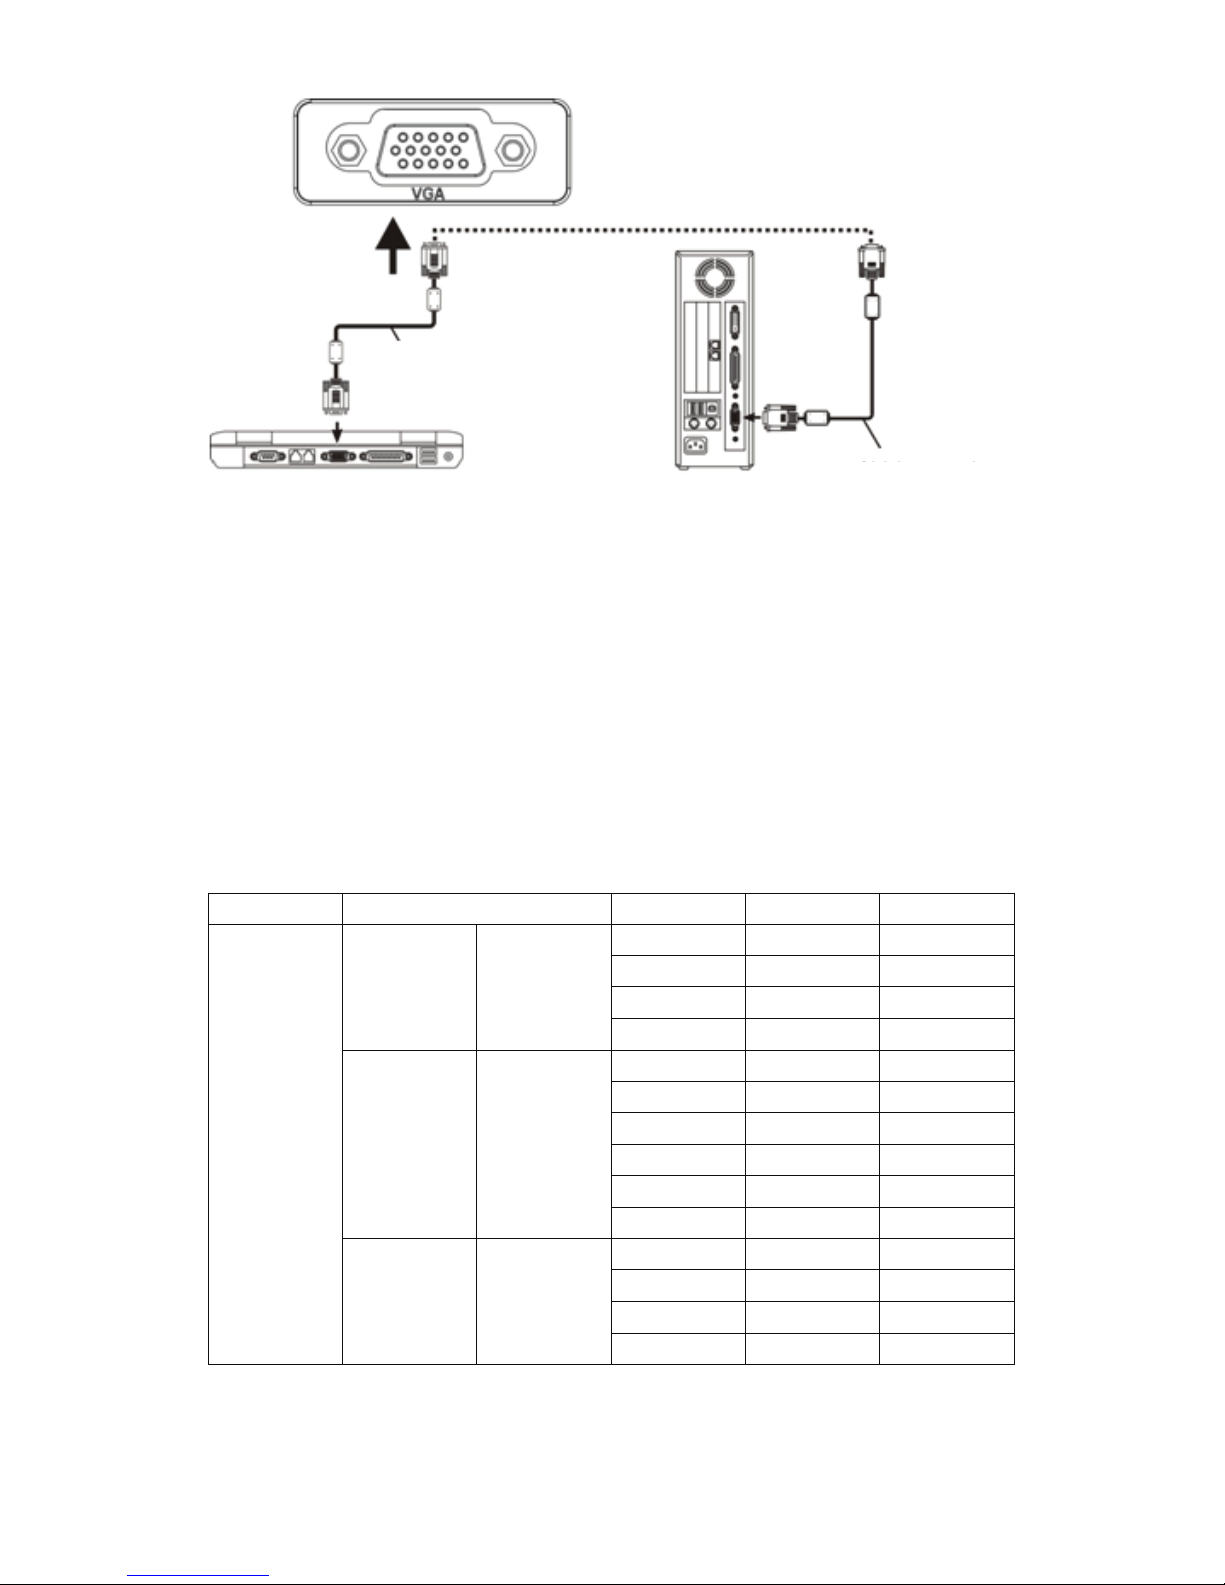
ノートパソコンと接続する場合は、PCでビデオ切り替えることが必要です。
PCの“Fn+Fx”ボタンを押します。つまりFnを押すと同時に、F1からF12ま
でのボタン一つだけ押してください。各ブランドのPCのボタンは以下とな
っています。
Toshiba(Fn+F5) IBM(Fn+F7) HP(Fn+F4) Founder(Fn+F3)
samsung(Fn+F3) Panasonic (Fn+F3) NEC(Fn+F4) apple(Fn+F8)
sharp(Fn+F5) Hitachi(Fn+F7) Dell(Fn+F8) Acer(Fn+F5)
Lenovo(Fn+F3) BenQ(Fn+F7) ASUS(Fn+F9)
下記表にあるパラメーターを参考してPC出力信号を調整してください。
タイプ 解像度
(KHz)
(Hz)
VESA標準
PC
VGA
640×480
31.5 60
√
34.7 70
37.9
72
√
37.5
75
√
SVGA
800×600
31.4 50
35.1 56
√
37.9
60
√
46.6
70
48.1 72
√
46.9
75
√
XGA
1024×768
40.3
50
48.4 60
√
56.5 70
√
60.0
75
√
※:PCとプロジェクターは同時に画面を表示されない場合はPCの表示
特性をCRT出力に設定してください。
7
PC接続ケーブル
デスクトップPC
パソコン
パソコン接続ケーブル
Page 51
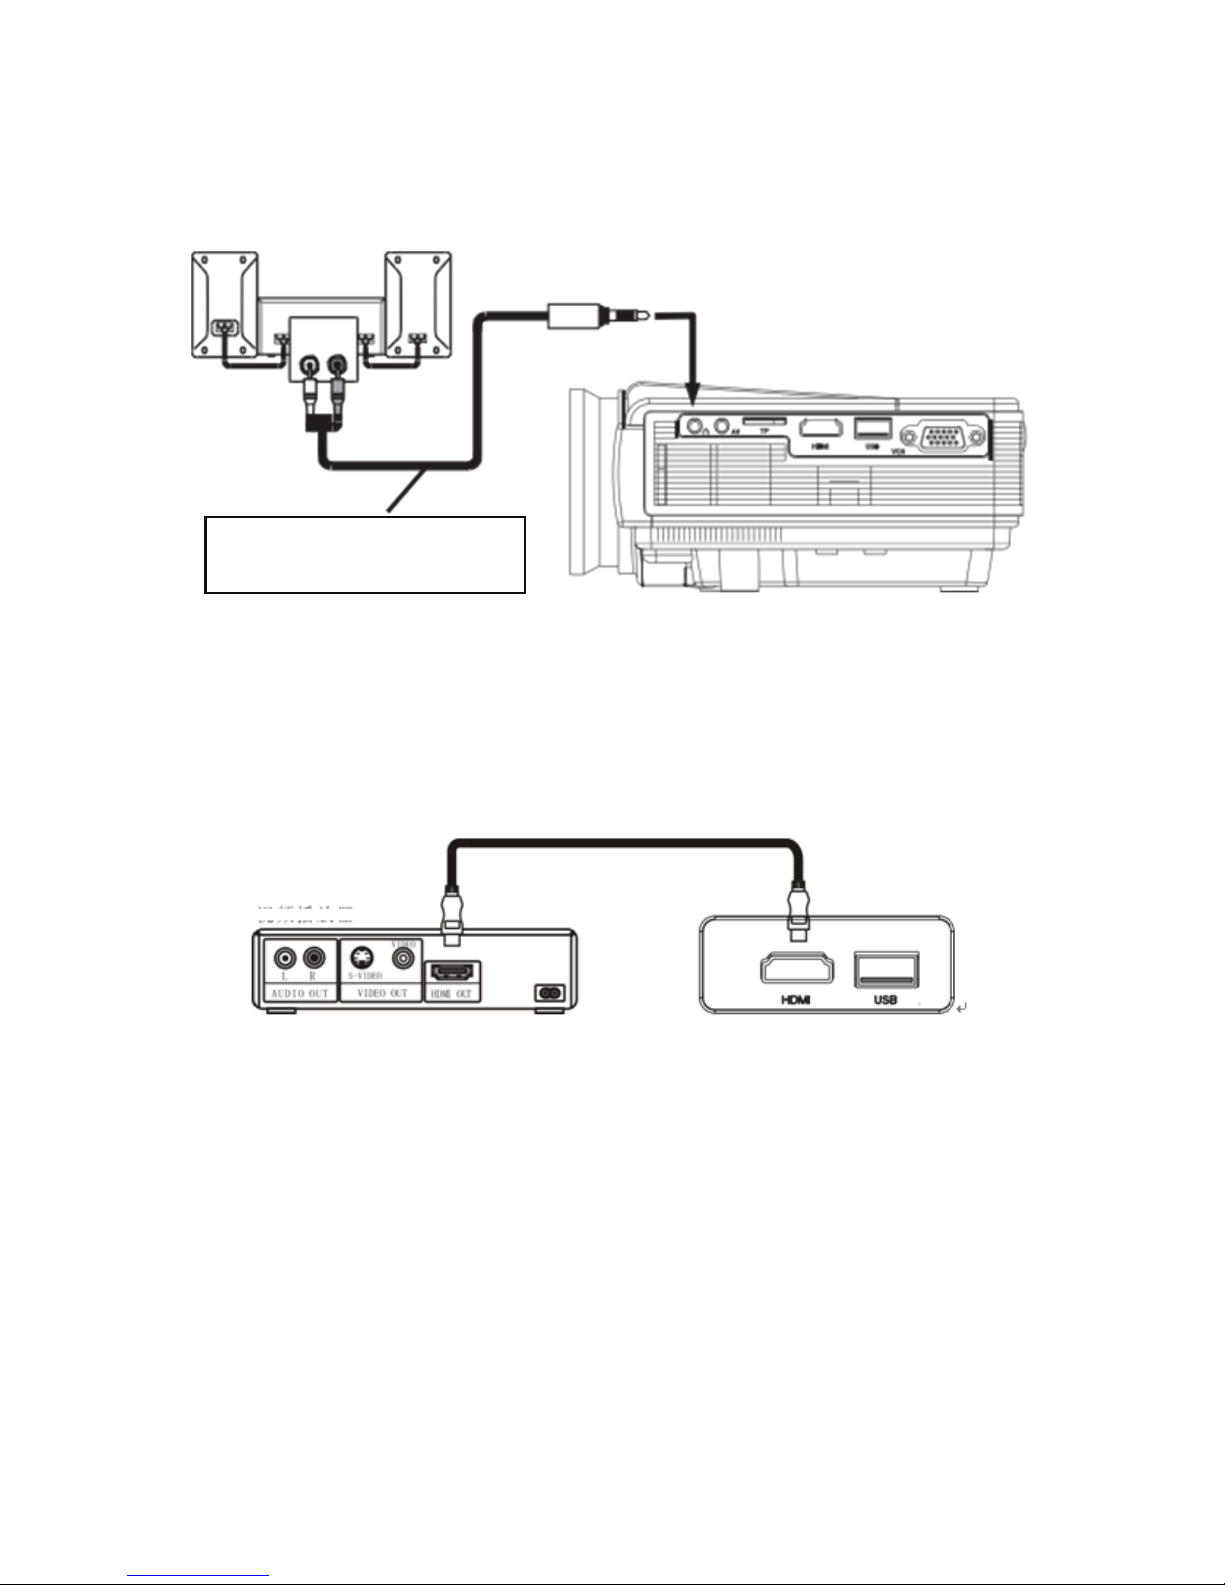
3.映像出力:このポートでLDプレーヤー、DVD、DVなどに接続できます。
4.オーディオ出力:このポートからオーディオ出力がでます。
オーディオ信号ケーブル
5.HDMI:
HDMIケーブルでプロジェクターをHDプレーヤー、HDTV セットトップ・ボッ
クス、ゲームなどに接続できます。電源入った後、本体或いはリモコンの
“Source”ボタンを押します。“HDMI”を選択して“OK”ボタンで決定して
HDMIモードに入ります。
6.Uデイスク
Uデイスクを“USB”ポートに差し込みます。或いはTFカードをTFカードポー
トに挿入します。本体或いはリモコンの“Source”ボタンを押して“マルチメデ
ィア(USB或いはTF)”を選択し“OK”ボタンで決定します。ビデオや写真を
選択して再生できます。リモコンの再生/一時停止ボタンを押せばフルス
クリーンにします。
8
ケーブル
Page 52
四.操作について
1.電源オン/オフ
信号ケーブルなどを接続して、電源アダプターをプロジェクターのDCコン
セントに挿入したら、電源インジケータランプが点灯し、待機モードに入りま
す。本体或いはリモコンの電源ボタンを押して、ランプが変色して投影画面
が出て、電源が入ります。本体或いはリモコンの “SOURCE”(ソース)ボタン
を押して出力信号を選択します。
本体或いはリモコンの電源ボタンを押して電源オフにします。
電源オフになった後は、プロジェクターの扇風機が完全に止まった後電源
切ることができます。機内に余計な熱を保ってプロジェクターの使用寿命に
影響しますから。
投影画面の質に影響しないように適当な投影幕をご使用ください。できる
だけ暗いところでお使いください。
2.メニュー操作について
(1)電源オン/オフ
(2)メニューの基本操作について
9
電源接続したら、本体或いはリモコンの電源
ボタンを 押します。インジケータランプ が 変色
mしてから電 源オンに なります。
本体或いはリモコンの電源ボタンをもう一
度押すと、電源オフになります。
リモコンの或いは本体の“MENU(メニュー
)”を押します。メニュー画面が出ます。
リモコン或いは本体の“”“”ボタンを押
してご希望の項目を選択します。
リモコン或いは本体の“▲”“▼”ボタンを
押してご希望の項目を選択します。
“OK”ボタンで決定します。
“”“”ボタンで選択します。上記二から五
の手 順で 繰り返して他 のメニュー に 入りま
す。或いは“MENU”または“EXIT”ボタンを押
してメニュー画 面 から戻ります。
Page 53
(3)入力信号選択
(4)言語
(5)画像回転
10
Setting
menu language
Restore factory settings
Menu transparency low
Menu display time close
Image rollovers
Zoom 0
Setting
menu language
Restore factory settings
Menu transparency low
Menu display time close
Image rollovers
Zoom 0
“SOURCE(ソース)”ボタンを押して信号源選択画面に入
ります。
“▲”“▼”ボタンを押してPC、AV、HDMI、SD、USB中からご
希望の信号を選択します。
“”“”ボタン押して決定します。
メニュー画面でメニュー言語に入ります。
“OK”ボタンを押して言語画面に入ります。
“▲”“▼”或いは“”“”ボタンを押してご
希望の言語を決定します。“MENU”ボタン
を押して設 定して戻ります。
メニュー画面で右の写真に切り替えます。
“▲”“▼”ボタンを押して画像回転を選択し
ます。
“OK”ボタンを繰り返して押して画像を上下
左右に回転します。
Page 54
五.故障処理
11
故障現象 可能原因
1.電 源 ス イ ッ チ を
オ ン に し た 後 ラ ン
プが点灯しない
◇ 電源プラグがちゃんと挿入できたか?
◇ コンセントの電圧が問題ないか?
◇ 電源スイッチがオンにしたか?
2.本 体 を オ ン に し
た後、投影画面が出
ない
◇ 信号が間違っていないか?
◇ 信号源デバイスの電源が入ったか?
◇ 信号ケーブルがちゃんと挿入できたか?
◇ 信号ケーブル挿入が間違っていないか?
◇ VGA では PC の頻度が高すぎるか?
◇ PC 接続する場合は PC の出力を外部表示に設定したか。
3.リ モ コ ン の 電 源
ボ タ ン で 本 体 を オ
ンにできない
◇ 本体の電源スイッチをオンにしたか?
◇ リモコンが電池切れ?
◇ リモコンレシーバーの前に障害物がないか?
◇ 本体から遠く離れたか?
4.一 時 使 用 し た 後
自 動 電 源 オ フ に な
る
◇ 本体のインレットは塞がれたか?
◇過熱保護したか?
5.画 像 は 正 常 だ が
音声なし
◇ 本体を最低音量に調整したか?
◇ スピーカーデバイスはオーディオ出力ができるか?
◇ スピーカーデバイスは最低音量に調整したか?
Page 55

 Loading...