

Wimberley WH-200-S User Manual
INSTRUCTIONS: Sidemount Wimberley Head (WH-200-S)
Page 4 Page 1
Wimberley, Inc. Phone: 1-434-529-8385
1750 Broadway St Toll Free: 1-888-665-2746 (USA & Canada)
Charlottesville, VA
22902 USA www.tripodhead.com info@tripodhead.com
NOTICE: This product is protected by one or more of the following Patents: #7478970 & #7600941
Wimberley, Inc. ©2018, All Rights Reserved Revised 180927
Made in USA
MAINTENANCE & TROUBLESHOOTING:
It is important to read these instructions.
Setting up this Head is not difficult, but reading these
instructions will allow you to get the most out of the product.
Removing the Head from your tripod:
Firmly tighten the pan knob, then turn the Head counterclockwise. It should loosen easily from the platform during the first rotation. If the
Head has been on the tripod for a while, more force may be necessary to remove it. If the Head is stuck, try using the leverage hole for
removal (see details at the bottom of page 1). The pan base screws do not tighten the Head to, or loosen it from, the tripod mount.
Thank You! Your observations and suggestions are welcome. We will continue to refine the Head and instructions in response to customer feedback.
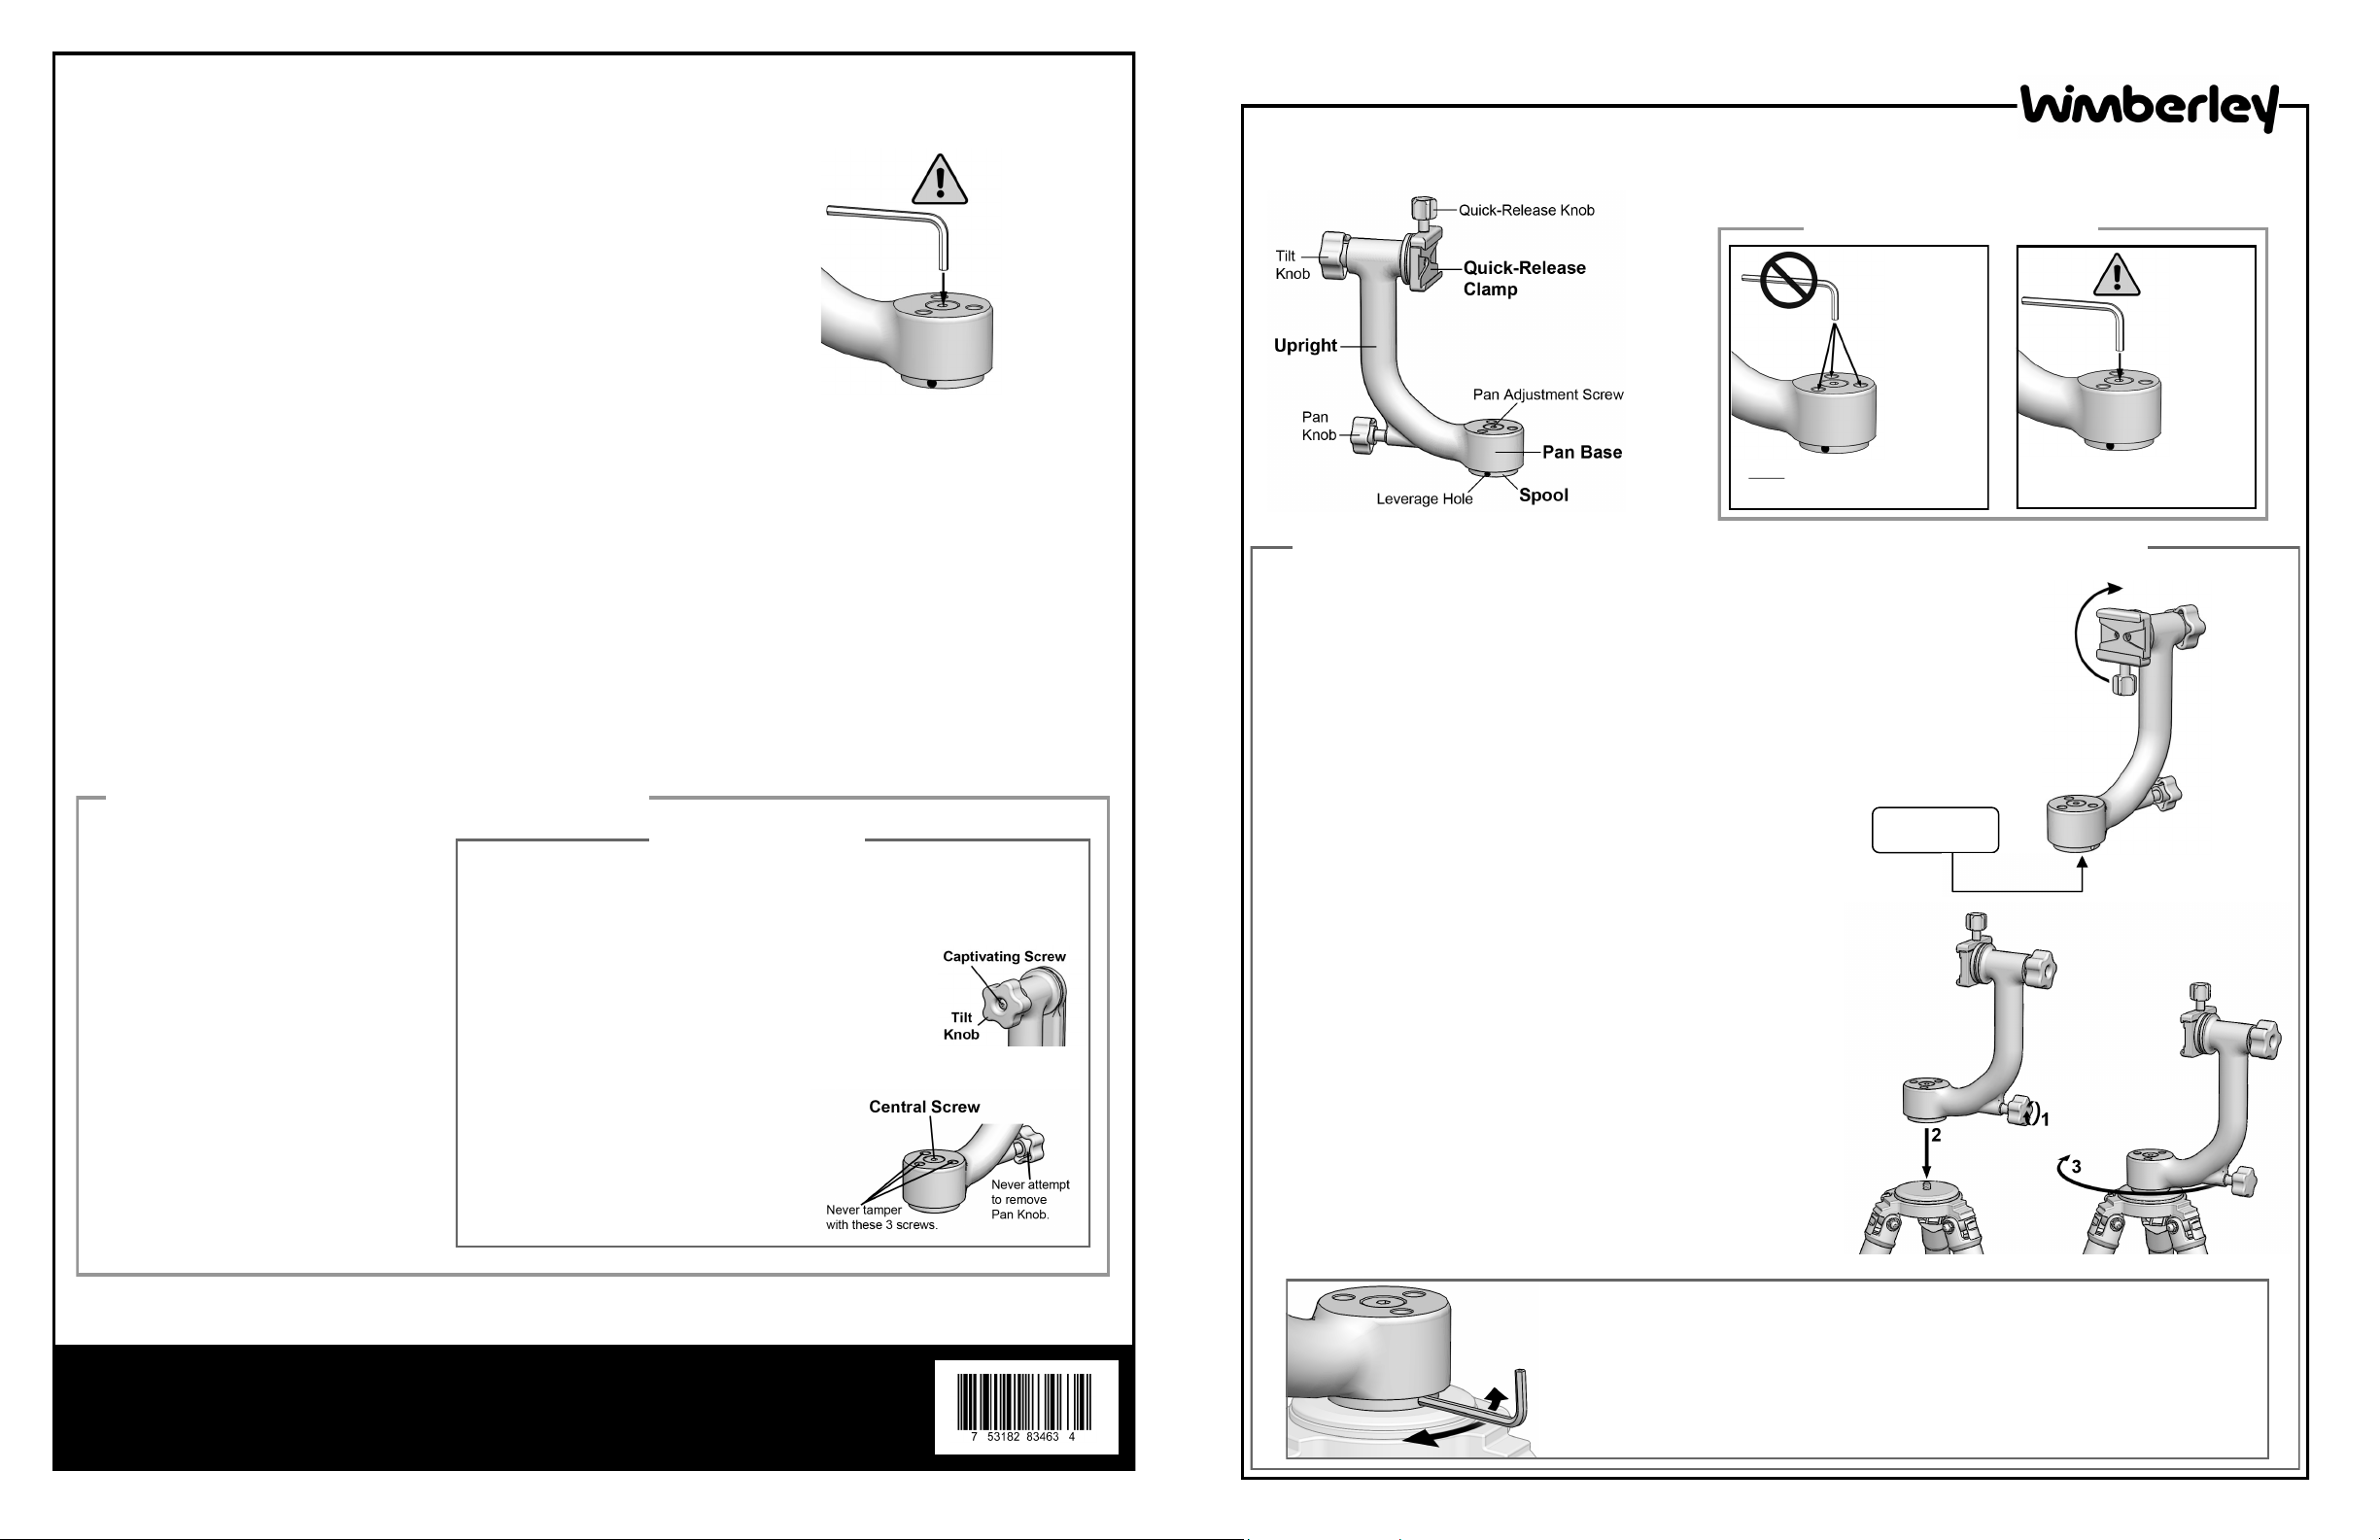
Step 1: Firmly tighten the lower (pan) knob.
Step 2: Position the Head with the spool mounting hole (located under the
spool) directly over the threaded tripod mounting stud. It is important
to keep the Head completely straight (vertical) over the stud to keep the
spool threads from cross-threading.
Step 3: Screw the Head clockwise onto the stud of your tripod until it seats
snugly against the tripod platform. There should be no space between
the bottom spool of the Head and the tripod mounting plate. Use the
leverage hole to achieve a tighter attachment if desired (see below).
Loosen the pan knob slightly and rotate the Head to check the security of
the mount. The spool should not loosen when you turn the Head
counterclockwise, and the Head should not wobble at all.
MOUNTING THE WH-200-S TO A TRIPOD:
If your tripod has a smaller ¼” mounting stud, check to see if it is a reversible stud with
a 3/8”-16 threaded section on the other end. If so, reverse the stud and use the 3/8” end of
the stud. If the ¼” stud is not reversible, you will need to use a reducer bushing to mount
the Head to the tripod. Robust brass bushings can be ordered through our website.
FINE TENSION ADJUSTMENT OF YOUR PAN BASE:
A 7/32 hex key fits the 3/8”-16 center screw on the top of the pan base of your Wimberley Head
(see figure at right). This screw applies pre-tension to the pan base (so there is no slop in the
mechanism), and adjusts the minimum drag for the pan base. You should not have to use this
adjustment on a regular basis. The minimum drag is the amount of resistance in the pan mechanism when the Head is un-tightened. We have set the minimum drag for your Head to a level that
we feel is optimal for field use. You should not need to adjust the screw unless you experience an
undesirable change in the Head’s minimum drag as the Head wears in. CAUTION: Only a very
small adjustment should be necessary; do not remove the screw or back it out excessively.
Doing so could compromise the screw’s ability to lock in place.
IMPORTANT WARNINGS!
Never loosen or remove the 3 small
screws on the top of the pan base.
Use caution when adjusting the
center screw (see page 4).
SETTING UP THE WIMBERLEY HEAD Tutorial videos available at www.tripodhead.com/support.cfm
PREPARING THE SIDEMOUNT WIMBERLEY:
The Sidemount Wimberley Head comes fully assembled and ready to use. We position the Quick-Release
Knob pointed down so that it is more compact for shipping, however, in use it will be pointed up (as shown
in the diagram above). Loosen the tilt knob, position the Quick-Release Knob pointing up, and tighten the
tilt knob to keep it in place.
RECORDING THE SERIAL NUMBER:
Before attaching your Head to a tripod, record the serial number (located on the
bottom of the Head). You will need this number to fill out your registration card or
register your unit online.
0XXXXX
Superficial Cleaning: follow the guidelines below
• Use a micro bristle brush to gently dislodge dirt, sand or debris that might be stuck in crevices.
• Vacuum out the loose dirt. DO NOT use canned air spray or an air compressor to remove dirt from screw holes and other crevices.
• Use plain water and a soft cloth to remove any stuck-on mud or dirt. Just spot clean if necessary.
Exposure to Moisture:
If the Head is exposed to extreme moisture: the plastic bearings may swell and cause stiffness in the tilt mechanism, this should disappear
after the parts dry. If exposed to salt water spray or sea air for any length of time, rinse the Head thoroughly with fresh water as soon as
possible and let it air dry. If it is immersed or washed in salt waves such that salt water is allowed to seep into the crevices, or it is used
primarily in a beach environment, please make arrangements to send it in for a thorough cleaning after exposure to prevent expensive
damage to your Head due to corrosion. Factory cleaning is relatively inexpensive.
Few things are likely to go wrong with the
Sidemount Wimberley Head, and there should
be almost no need for routine maintenance of
internal parts. However, if the Head is in need
of repair, we ask that you return the Head to us
for inspection and service. (International customers should contact the dealer who sold you
the Head).
If you need a Head for a trip or shoot, let us
know and we can send you one on loan while
yours is being repaired. If the Head is faulty, we
will fix it free of cost. If the problem arises from
extreme use, abuse or accident, we will repair
the Head for a reasonable fee.
We strongly discourage you from
disassembling this unit without direct
instruction from us. Any damage to the Head
resulting from disassembly will not be covered
by warranty. In special cases where an emergency repair is required, please refer to the
guidelines to the right.
IF YOU HAVE A PROBLEM WITH YOUR HEAD:
EMERGENCY REPAIRS:
In extreme situations where it is not feasible to send the Head in for repair, and you
wish to attempt to fix a problem yourself, you do so at your own risk; however, these
guidelines will help improve your odds of success and help you to avoid making the
situation worse. Note: any field repair should be followed up with a proper repair from
us as soon as possible.
Pan Mechanism. Remove ONLY the large
central fastener on top of the pan base to
disassemble the pan base. DO NOT loosen or
remove the three smaller screws, and do not
attempt to remove the pan knob. If you clean
the components of the pan mechanism, you
MUST apply oil to all mating surfaces before
reassembling, failure to do so could cause the
mechanism to gall and freeze-up permanently.
Tilt Mechanism: To disassemble the tilt mechanism, remove the
captivating screw and unscrew the tilt knob. If you need to
remove the grease in the mechanism, it is okay to use this
mechanism without grease until you have the opportunity to send
it in for us to refurbish.
Dimensions: (h,w,d): 9.5” x 2.5” x 7.9”
Weight: 2.3 lbs
There is a small hole on the side of the base of the Head that can be used to apply greater leverage
for removing the Head from your tripod. The hole is designed to accommodate a 5/32 hex key
(commonly used by our customers to attach quick-release plates to lenses & cameras). Note: The
hex key is only used as a leverage arm, it does not engage a fastener inside the leverage hole (the
hole is not threaded). If you do not have an appropriate sized hex key, any strong metal rod that will
fit into the hole can be used (e.g. a small screwdriver).
Using the Leverage Hole:
Page 2 Page 3
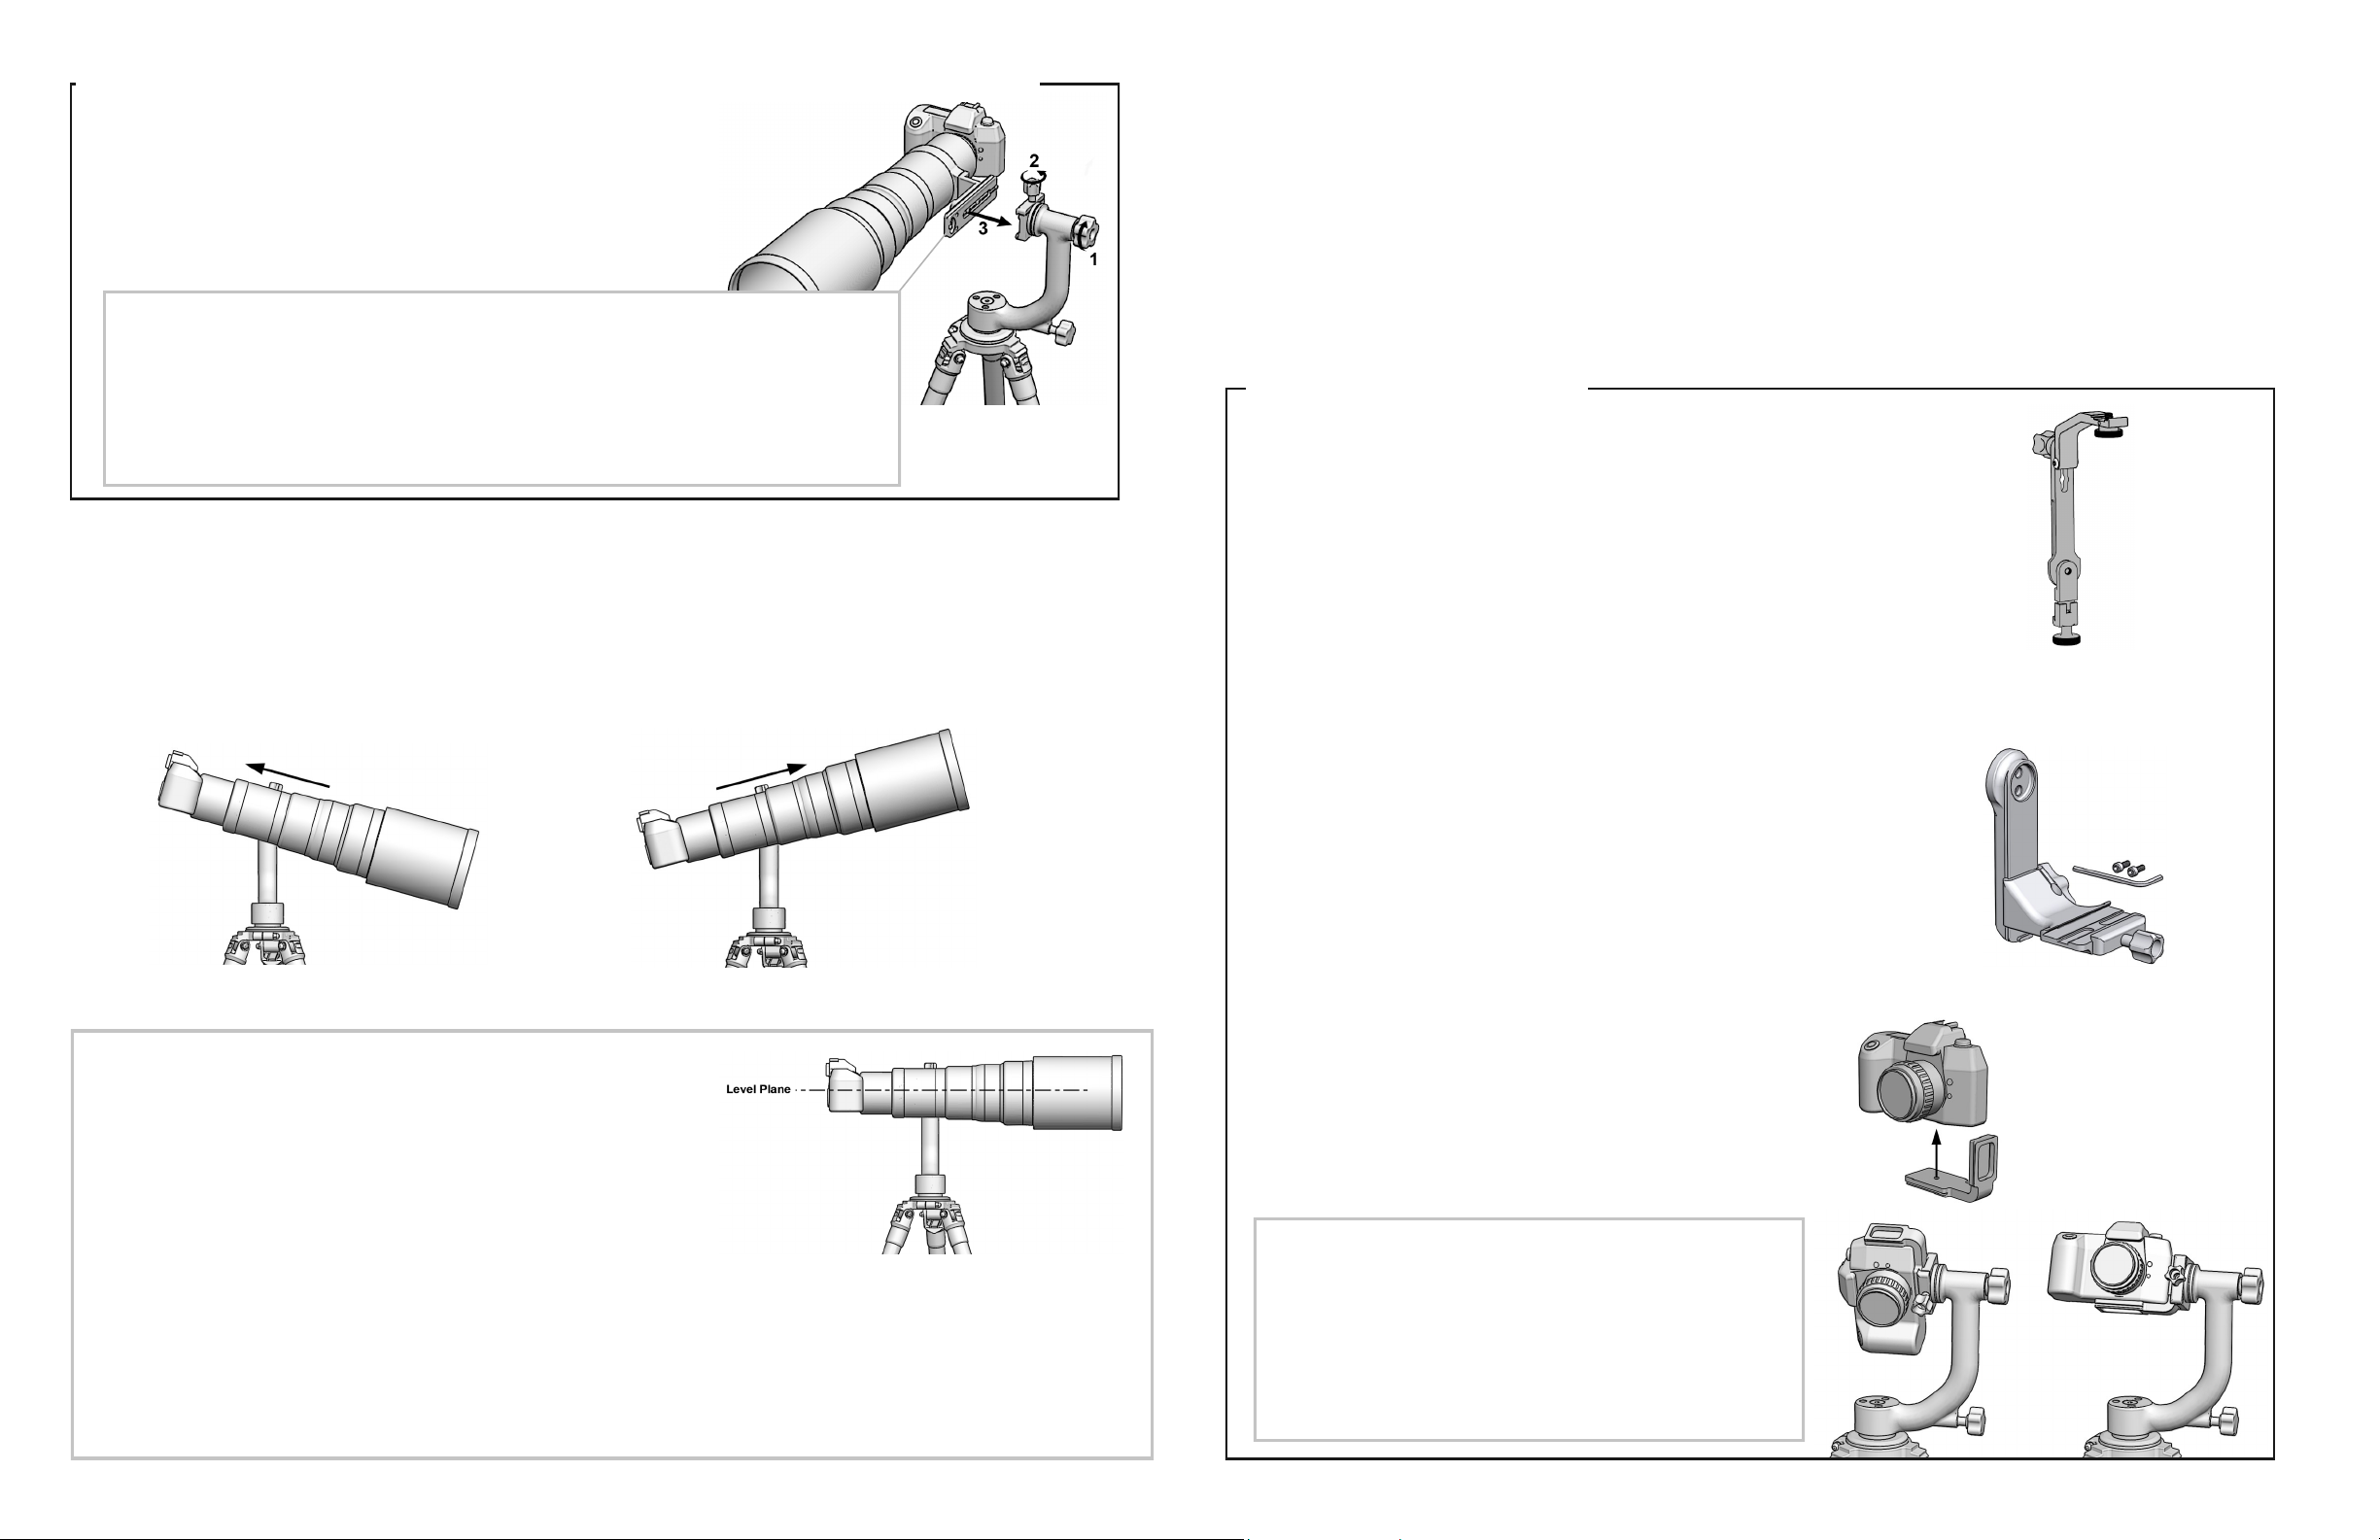
Step 1: Tighten the tilt knob of the swing arm.
Step 2: Open the jaws of the quick-release clamp wide enough so that the jaws
clear the entire width of the QR plate attached to the foot of your lens.
Step 3: While supporting your lens, insert the quick-release plate on your lens into
the jaws of the clamp and tighten the clamp securely. Make sure the
quick-release plate is seated properly and captive in the clamp jaws.
Wimberley F-9 Flash Bracket:
This bracket is commonly called the “Wimberley Head Bracket” but it works just as well with the Side-
mount Wimberley Head. It attaches to the Arca-Swiss Style plate on your lens. It curves 90 degrees around
the lens so that your flash is positioned above the lens when using a side-mount style gimbal head. Refer to
our product catalog or website for details (Product #: F-9).
Note: We suggest using Wimberley Plates if you plan to use our flash bracket system. Our plates have a
dovetail on the bottom and top surface of the plate (“Double-Dovetail”). This allows you to attach your flash
bracket to the top dovetail, leaving the entire bottom dovetail available to be attached and balanced properly
in the quick-release clamp of your Head. Refer to our product catalog or website for details.
USEFUL ACCESSORIES:
BALANCING YOUR LENS ON THE SIDEMOUNT WIMBERLEY HEAD:
See our website for a tutorial video.
Prerequisite: Arca-Swiss Style Lens Plate
In order to attach your lens to the Wimberley Sidemount Head, it must be fitted with an Arca -Swiss style quick-release plate or
foot (sold separately). We offer a line of such plates. For more information see our catalog or website: www.tripodhead.com
(click on “Lens Plates”). The Sidemount requires the same lens plates and adapters as work with the Sidekick.
We strongly recommend using Wimberley plates because we carefully match your lens with the appropriate size plate that will
allow you to properly balance your lens on a gimbal head. Our plates are also all equipped with safety stops which protect your
gear from accidentally slipping out of the quick-release clamp. If you use plates from other manufacturers you will need to
make sure that they are the proper length and proportion that we recommend for your lens. Compare the plate length
and profile to the recommended plate for your lens in our product catalog or on our web site.
ATTACHING YOUR LENS TO THE SIDEMOUNT HEAD: See our website for a tutorial video.
TIP: Once you are able to let go of the camera/lens combo in any position with the tilt and pan knobs loose and it stays in a balanced position
without moving at all, you may want to mark the exact position of your lens plate within the clamp, with a pencil, permanent ink marker or tape for
faster set up in the field.
Step 1: Mount your lens with camera body attached (see instructions above). Stand behind the lens/camera setup and grab the camera body
as if you are going to take a picture.
Step 2: Loosen the tilt knob of the Sidemount Head SLOWLY— stand ready to catch the lens or camera body should one end or the other
rapidly tilt down! Adjust the horizontal position of the lens forward or backwards depending on how the lens tips (see figures below). SAFETY
NOTE: Re-tighten the clamp after each adjustment, no matter how small! Use the two safety stop screws provided with your Wimberley lens
plate or replacement foot to prevent the lens/camera combo from sliding out of the clamp when loosened.
If the front of the lens tilts downward you will need to
slide the lens backward in the clamp toward you.
If the front of the lens tilts upward, you will need
to slide the lens forward away from you.
PROPER BALANCE
Adjust the position of the lens in small increments until it remains level when the Head’s
tilt knob is loose.
Note: because there is some damping friction in the tilt mechanism, the lens may stay
level even when it is slightly unbalanced. This is okay, but if you wish to fine tune the
balance even further, gently tilt the lens up 20 degrees from level and then down 20
degrees from level. If it’s easier to tilt the lens up, slide the lens slightly forward. If it’s
easier to tilt the lens down, slide the lens backward. Adjust in this manner until the
resistance is symmetric.
Simply loosen the pan and tilt knobs about a quarter turn and start shooting. If you have done everything properly, the lens should be very easy to
point, should stay pointed and should not tend to flop or creep. As you become more familiar with the Head you will probably be better able to make
fine adjustments in the balance of your setup. You can shoot with the knobs loose, or lock-in on a target by tightening the knobs. You should not need
to loosen the knobs more than a few turns to unlock the Head. Conversely, there should be no need to over-tighten the knobs. If things don’t feel right,
please contact us. Knob screws are captive and should not loosen or come off on their own.
The tilt and pan knobs should tighten with enough friction to keep the Head from moving on its own. The pan base and swing arm should
not move easily when the knobs are fully tightened. If significant force is applied, the Head will slip slightly on the spool when the panning knob is
tightened all the way. THIS IS NORMAL AND DOES NOT AFFECT PRODUCT PERFORMANCE. When using the Head, you can put a small amount
of friction on both the pan and tilt to hold the position of your lens and rotate it with a bit of force as needed. This is not going to damage your Head.
Only a single turn or two of the pan and tilt knobs should allow you to loosen and tighten the mechanisms for fluid motion or static shots.
You should avoid unscrewing any of the knobs all the way, and there should be no need to over-tighten them.
Tripod Levelers:
Unless the top of the tripod is level, the horizon does not stay true as you pan. This is not a problem for most users who leave the rotation
collar of their lens loose. Others would like a quick way to level the tripod, especially when shooting panoramic images. We sell tripod
levelers that solve this problem and that are sturdy enough to support any size lens. We recommend the Gitzo Tripod Leveler for use with
compatible Systematic Gitzo tripods (series 3, 4, or 5).
Situations where you will not be able to perfectly balance your lens on the Head:
If your lens/camera combination is significantly asymmetrical with respect to the center line of the lens, you will not be able to perfectly balance your
lens. For example, if your camera has a heavy vertical grip, your lens will be slightly bottom heavy (it will tend to want to return to a level position
when you tilt it and let go). This will be barely noticeable in the field and is not a major concern. However, if you are using flash (on a bracket or on
the hot shoe), your gear will be significantly top-heavy (it will want to keep going in the direction that you are tilting it). Even in this top-heavy scenario,
you will maintain most of the ease-of-use and fluid feel of a gimbal head; however, you will need to be careful to lock the Head before letting go of the
camera so that the rig doesn’t flop forward or backward.
Prerequisite: Your lens must be fitted with an Arca-Swiss style quick-release plate (see details below).
Your Sidemount Wimberley Head is now ready to use.
Convert your Sidemount Head into a full gimbal head:
The CK-200 Full Gimbal Conversion Kit allows you to replace the side-mounted clamp of the
Sidemount Wimberley Head (WH-200-S) with the arm and platform of the full Wimberley Head
(WH-200). This full converts the Sidemount Head (WH-200-S) into the Wimberley Head Version II
full gimbal (WH-200).
The procedure is simple and the only tool required is a 5/32 hex key (included with the kit). In fact, it
is so simple to convert the head, you can easily switch back to the Sidemount version in cases where
it is critical to have the lightest gear possible. Refer to our product catalog or website for details
(Product #: CK-200).
L-Brackets
(for mounting camera body directly to the Sidemount Wimberley Head):
An L-Bracket allows you to
mount your camera body to
the Sidemount Wimberley
Head vertically or horizontally
(see figure below).
You can mount your camera body on the Sidemount Wimberley Head with the
Wimberley P-5 Universal Camera Body Plate, but only in the vertical or portrait
orientation. To increase versatility, you can buy an L-Bracket for your camera body.
This allows you to attach your camera in either the vertical or horizontal orientation.
We do not sell L-Brackets, but you can get them from other manufacturers. We
recommend those made by Really Right Stuff or Kirk Enterprises. Also, Acratech
makes a universal L-Bracket that attaches to the existing camera plate and can be
easily attached or removed. If you attach your camera body to the Head, you will
need to level your tripod first (since there is no rotation collar). If you plan to mount
your camera body to the head on a routine basis, we recommend using a Tripod
Leveler (see details above).
Other alternatives for attaching the camera body to the
Sidemount Wimberley Head:
1. Carry a small ball head, attach a quick-release plate to the bottom of
it, and attach the ball head directly to the clamp on the Wimberley
Head. This eliminates the need to adjust the legs of the tripod to
level the horizon or to remove the Wimberley Head, but it can be
inconvenient to have to carry an extra head with you.
2. Use a small beanbag with the Head; you can set the beanbag on the
top of the Head itself, or on top of your big lens while it is still
attached to the Head.
CK-200 Full Gimbal
Conversion Kit
(Product #: CK-200)
F-9 Flash Bracket
(Product #: F-9)
 Loading...