

Wimberley F-1 User Manual
Wimberley, Inc.
Phone: 1
-434-529-8385
1750 Broadway St
Toll Free: 1
-888-665-2746 (USA & Canada)
Charlottesville, VA 22902 USA
www.tripodhead.com
info@tripodhead.com
5 Year Warranty
– for details see www.tripodhead.com/warranty.cfm
Package Contents:
M-3 Module:
Tilt Arm (Qty 1)
M-2 Module:
Upright (Qty 1)
M-1 Module:
Quick-release Arm (Qty 1)
Instructions on reverse >>
Wimberley, Inc. ©2017, All Rights Reserved Rev. 170622
Dimensions (overall L x W x H):
5.7” x 1.0” x 9.2” in Weight: 9.4 oz (267g)
Telephoto Flash Bracket
F-1 Flash Bracket
F-1
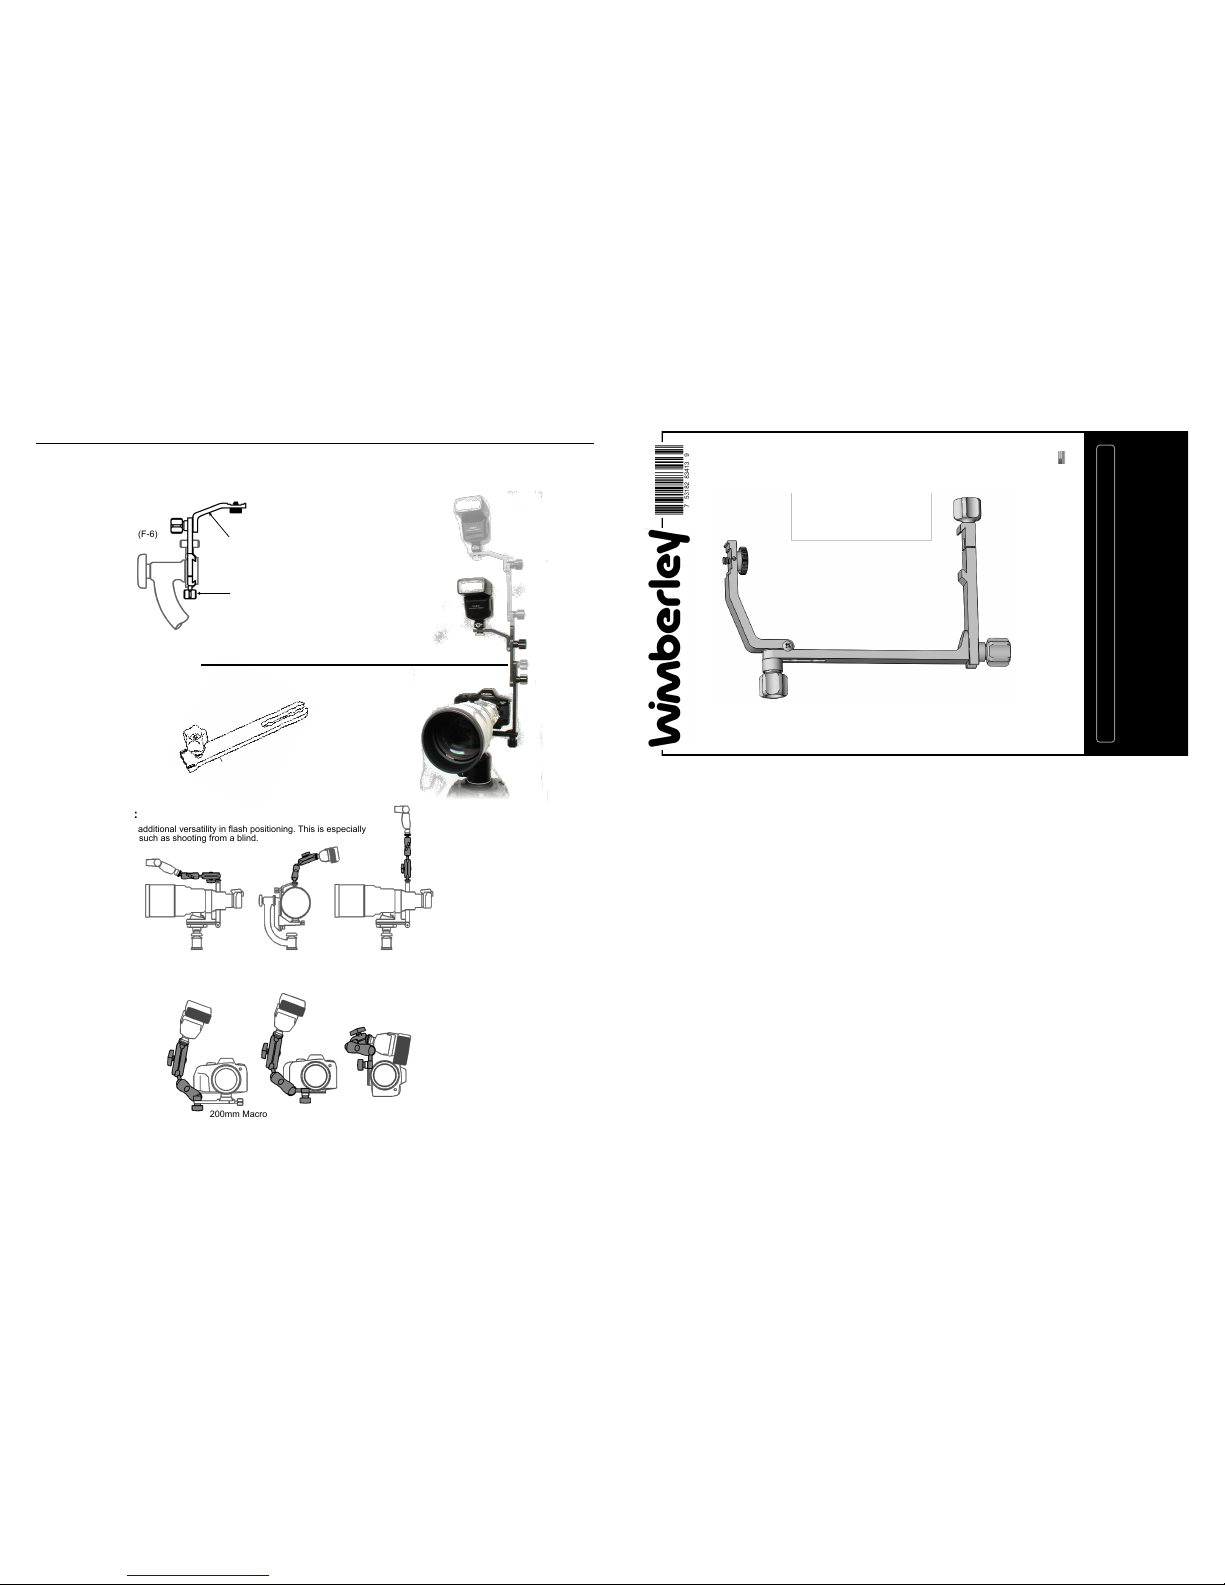
Sidekick Flash Bracket (F-6):
The F-1 can be converted into a compact bracket that works with the Wimberley Sidekick, Sidemount
Wimberley Head and other side-mount gimbal tripod heads. This is accomplished by removing the
upright and attaching the Tilt Arm (M-3) directly to the Quick-release Arm (M-1)
M-6
M-6 Extension Post Module:
This post extends the height of your flash by up to 5” which helps reduce red eye or “steel
eye” in your people or animal subjects. If you desire more extension, you can stack up to
three Extension Posts to get the height you need.
Thank you for your interest in Wimberley products. If you have any questions or comments please feel free to contact us.
Macro Arm (M-4):
Use the M-4 module for additional versatility in flash positioning. This is especially
useful in tricky situations such as shooting from a blind.
200mm Macro
Mounts on camera body
plate for small lenses
The Macro Arm (M-4) can also be used to connect directly to the Quick-Release Arm (M-1). This is commonly used in macro applications or with small cameras and lenses where the upright module is not necessary.
Other Uses and Add-ons:
Sidekick Flash Bracket (F-6)
M-1 Quick-release Arm
F-3 Tilt Arm
Made in USA
Wimberley, Inc. ©2017, All Rights Reserved Rev. 170622
M-1 Quick-release Arm Module
shown here in two positions (1) QR
clamp up and (2) QR clamp facing
down.
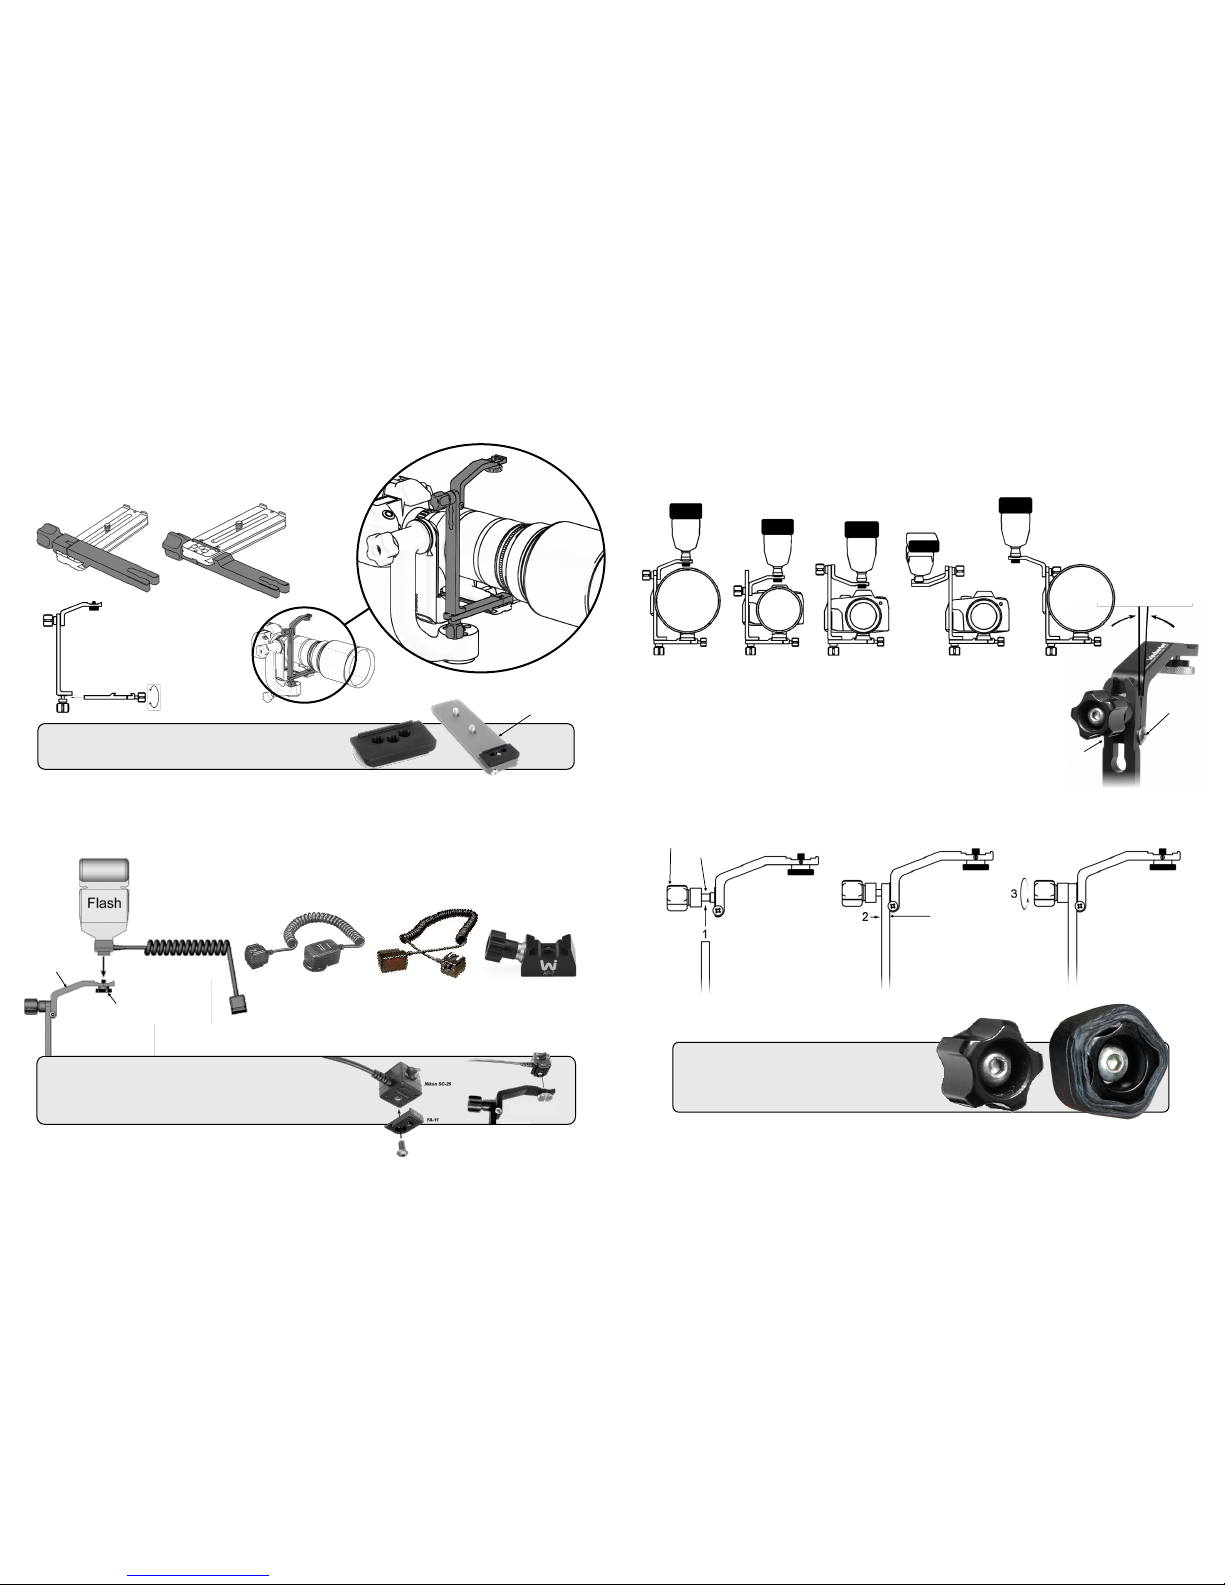
Attaching the Bracket to a Lens:
The F-1 bracket attaches to your Arca-Swiss style lens plate using a narrow
low-profile quick-release (QR) clamp.
The clamp on the bottom (M-1) module can be attached to the bottom or the top
dovetail of a double dovetail Arca-Swiss style plate.
Forward tilt
Stop Screw
600 f/4 300 f/2.8 200mm macro 200mm macro 600 f/4
Positioning your Flash:
The Modular Flash Bracket System design allows you to easily disassemble brackets for convenient storage. It also allows you to
adjust the size of the bracket to fit different sized lenses using the keyed slots of the upright module to increase or decrease the height
of the flash unit. Flip the Tilt Arm upside down to lower the flash even further. When the M-3 is used flipped upside down, the thumbscrew must also be flipped. Below are some of the possible configurations.
Positioning the tilt arm:
You can also swivel the Tilt Arm so that it tilts forward or backward. The Tilt Arm is fitted with two tilt
stop screws that restrain tilting movement. If you wish to tilt the flash simply unscrew the appropriate tilt
screw enough to give you the desired amount of rotation. If you are using a collared macro lens, flip
the Tilt Arm upside-down and in the highest position. In this orientation, the side stop screws do not
engage and the arm is completely free to tilt.
Note: For most telephoto applications no tilt is needed (even at the closest focusing distance).
At a maximum you may need up to 3 degrees of forward tilt. This can be accomplished using
the tilt arm stop screws or using the built-in feature on your flash unit if it so equipped.
Backward tilt
Stop Screw
Attach M-1 Quick Release to single dovetail plates: Use the AP-11 to
convert older, single dovetail plates made by Really Right Stuff and Kirk to
the double dovetail configuration for greater flexibility in bracket attachment.
Single dovetail
plate
AP-11
Connecting Flash Bracket Modules:
(The figure below shows the connection between M-3 and upright module; the same principle applies for other module connections.)
knob
cylindrical nub
Unscrew the knob so that
the upright module can fit
between the cylindrical
nub and the knob base
Forked end of
module
Slip the forked end of the module
over the exposed threads. Locate
one of the enlarged areas in the
forked end over the cylindrical nub.
Tighten the knob
securely.
Tip: if you find the metal knobs difficult to grip, try wrapping
several layers of self-fusing rubber grip tape (3M 2155) around
the knob to cushion it and make it easier to grip in the field.
Feel free to contact us if you have any questions.
Nikon SC-29 compatibility note:
The Nikon SC-29 cord requires the use our FA-11 Flash Cord Adapter (sold
separately) to attach the cord snugly to the bracket because the cord mounting foot is slightly too wide to fit properly in the slot on the flash arm.
Nikon Off-Camera Shoe Cord Canon Off-camera Shoe Cord
The AP-7 cold shoe adapter can be used to mount the Speedlight flash unit to the fl ash bracket’s mounting stud. The Nikon AS-20 can also be used.
Contact us if you have trouble mounting your flash to the bracket.
Attaching Your Flash Unit:
Wimberley Flash brackets have a 1/4”-20 mounting thumbscrew that attaches to an off-camera hot shoe cable or a cold shoe adapter
such as the Wimberley AP-7. We do not sell flash cords. Please follow camera and flash unit recommendations when purchasing
flash cords to ensure proper signal transmission.
Use the thumbscrew on the top of the M-3 Tilt Arm module to attach the shoe. Make sure the flash adapter
seats snugly into the bottom notch of the Tilt Arm module. There should be no need to over-tighten.
M-3
Thumbscrew
Off-Camera
Flash Cable
AP-7 Cold Shoe
 Loading...