

Page 1
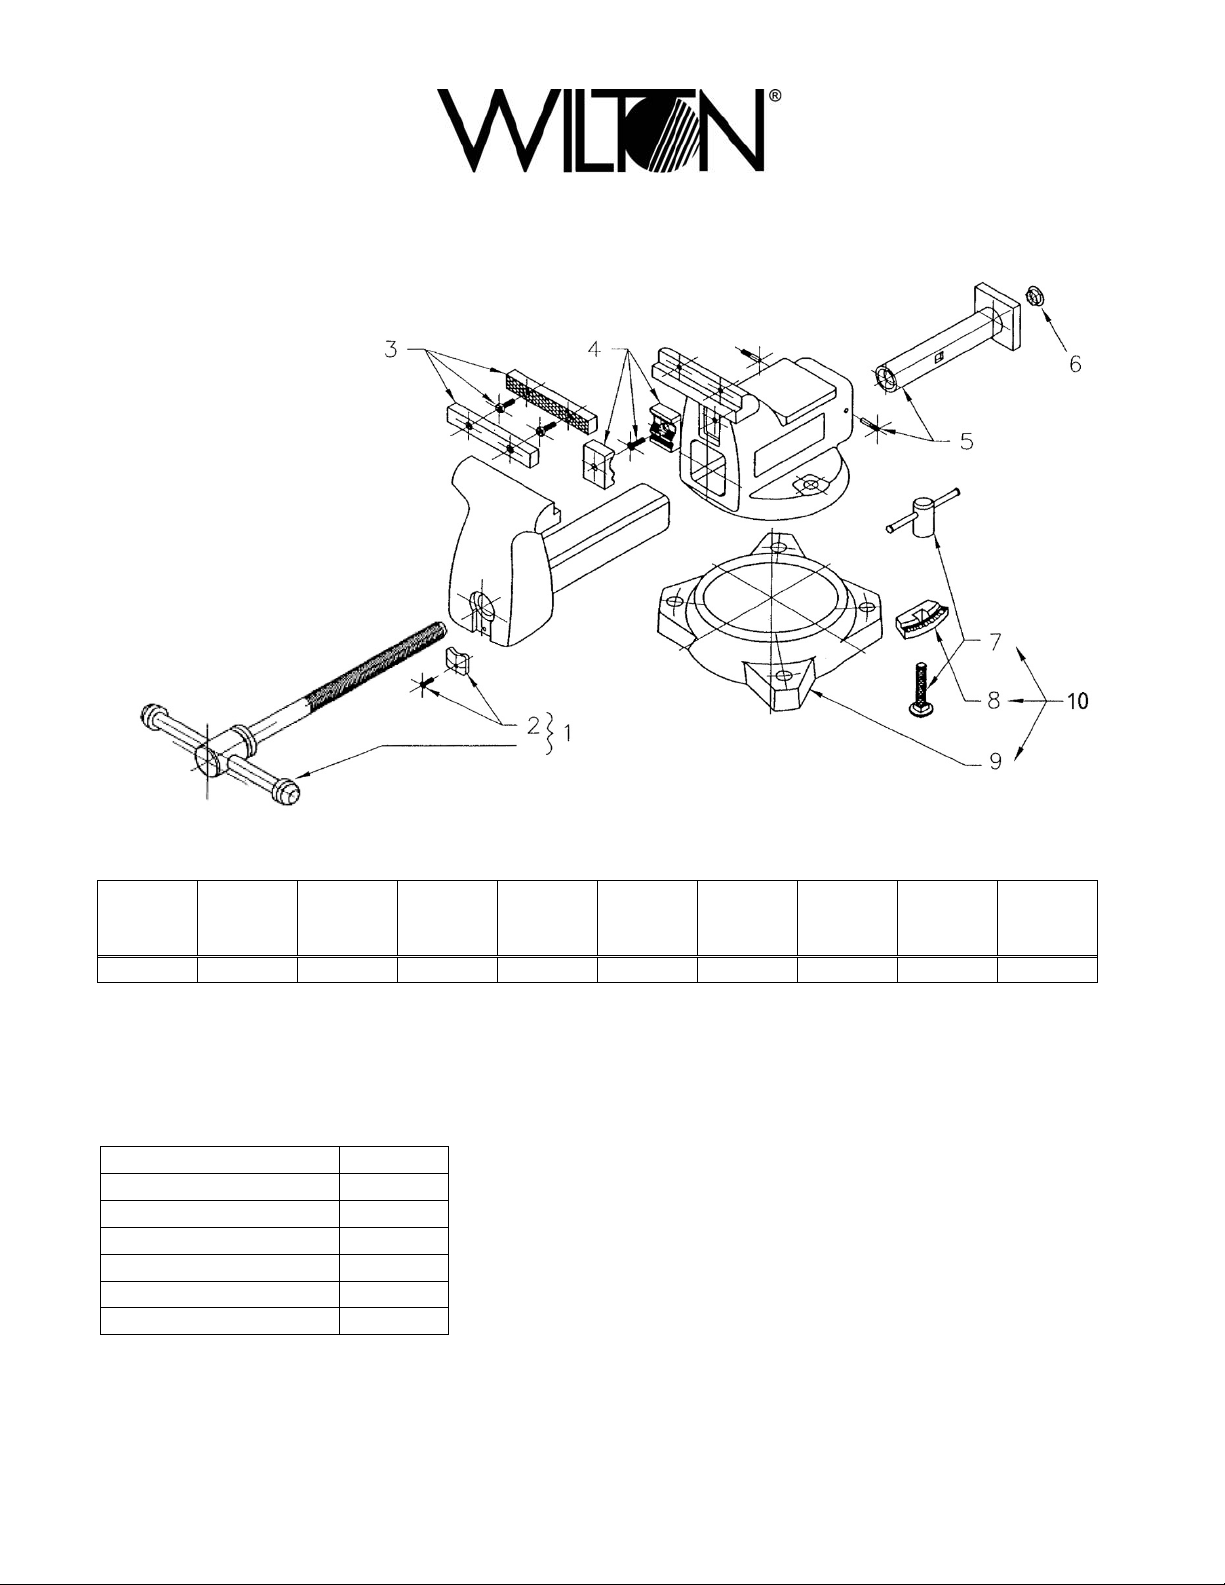
Stock No. 63188, High-Visibility Mechanics’ Vise (model 1560)
Replacement parts
Spindle and
Handle
Assembly
#1
21500-01 21500-02 21500-03 21500-04 21500-05 NA 21500-06 9040030 1013060 21500-08
To order parts or reach our service departm ent, call 1-800-274-6848 Monday through Friday, 8:00 a.m. to 5:00 p.m. CST. Having t he Model
Number and Serial Number of your t ool available when you call will allow us to serve you quic kly and accurately. Some parts are shown for
reference only, and may not be available individually.
Spindle
Retainer
w/ screw
#2
Jaw Insert
Assembly w/
four screws
#3
Pipe Jaws
w/ two
screws
#4
Casing Nut
w/ two pins
#5
End Plug
#6
Lock Nut
Assembly
#7
Locking
Pads (pair)
#8
Outer Ring
only
#9
Swivel Base
Assembly,
Complete
#10
Specifications
Stock no.
Model no. 1560
Jaw width (in.) 6
Maximum opening (in.) 5-3/4
Throat depth (in.) 4-1/8
Pipe jaw capacity (in.) 1/4 – 3-1/2
Net weight, approx. (lbs.) 69-1/2
WILTON
427 New Sanford Road
LaVergne, Tennessee 37086 Part No. M-63188
Ph.: 800-274-6848 Rev C 08/2018
www.wiltontools.com Copyright © 2014 WILTON, a Division of JPW Industries, Inc.
63188
Note: See reverse side for important safety instructions.
Page 2

• Ne jamais devisser le mors au-dela de l’ouverture maximum specifiee de
g
IMPORTANT SAFETY INSTRUCTIONS
• Misuse of vise can cause serious injury to eyes, hands, limbs, etc.
• To ensure safety, vise must be set up and used properly.
• Before setting up and using, read, understand, and follow all instructions
as outlined below.
When setting up vise:
• Use proper size bolts, nuts, lock and flat washers, in all base mounting
Holes. Never weld base of vise to any metal object.
• Only hand-tighten swivel base lock down nuts at the sides of the vise.
• Never use a pipe extension to tighten lock nut handles; this can cause
the handles to bend and overstress the lock down bolts.
• Make sure the bench top to which the vise is mounted is properly
secured.
When using vise:
• Always use vise of proper size and capacity to hold work object.
• Never use a hammer, pipe extension or cheater bar on spindle handle of
vise.
• Never unscrew moveable jaw beyond the maximum specified opening of
the vise.
• Never use vise as a press for assembly or disassembly of objects.
• Always wear eye and face protection when striking vise-held objects or
when using power tools with a vise.
• NOTE: The spindle handle (“tom my bar”) has been engineered to be nd if
excessive clamping pressure is applied, to prevent potential damage to
vise.
WARNING: This product c an expose you to chemicals includi ng
lead which is kno w n t o t he S tate of California t o cause cancer an d bi rth
defects or other reproductive harm. For more informati on go to http://
www.p65warnings.ca.gov.
CONSIGNES DE SECURITE IMPORTANTES
• Une utilisation incorrecte, de l’etau peut entrainer des blessures graves
aux yeux aux mains et a d’autres parties du corps.
• Pour guarantir la securite, lÉtau’doit installe et utilise corrÉctement.
• Avant installation et utilisation-lire, veiller a bien comprendre et suivre
toutes les instructions telles qu’elles sont donnees de chaque cote de
cette etiquette.
Installation de l’etau:
• Pour bloquer la base de l’etau, Útiliser des ecrous, boulons et rondelles
de la bonne taille dans tous les trous de fixation. ne jamais souder la
base de l’etau a Ún objet metallique quelconque.
• Pour un etau a base tournante, ne serrer qu’avec les doigts les poignees
des contre-ecrous sur les cotes de l’etau.
• Ne jamais utiliser une rallonge pour serrer les poignees des contreecrous-cela pourrait tordre les poignees.
• Assurez-vous que l'établi sur lequel est monté l'étau est correctement
fixé.
Utilisation de l'étau:
• Toujours utiliser un étau de taille et de capacité appropriées pour tenir
l’objet de travail.
• Ne jamais utiliser un marteau, une rallonge ni tout autre outil permettant
de faire levier sur la poingee de l’etau.
l’etau.
• Le jamais utiliser l’etau pour enfoncer un objet dans un autre ou l’en faire
sortir.
• Toujours porter des lunettes et un masque de protection pour frapper sur
un object ou utiliser un outillage electrÍque avec un etau.
• REMARQUE: La poignée de la bro ch e («b ar re de ser ra ge ») a été
conçue pour se plier si une pression de serrage excessive est appliquée,
afin d'éviter tout dommage potentiel à l'étau.
AVERTISSEMENT: Ce produit peut vous exposer à des produi ts
chimiques, y com pris le plomb qui est conn u par l'État de Californi e
pour causer le cance r et des malformations cong énitales ou d'autres
problèmes de reproduction. Pour plus d'informations, visitez
http://www.p65warnin
INSTRUCCIONES DE SEGURIDAD
IMPORTANTES
• El uso indebido del tornillo de banco puede causar lesiones graves en
los ojos, en las manos y en otras partes del cuerpo.
• Para asegurar la seguridad, el tornillo de banco debe configurarse y
utilizarse de forma debida.
• Antes de configurar y usar-lea, entie nd a y siga todas las instr uccio nes
indicadas en ambos lados de la etiqueta.
Al configurar el tornillo de banco:
• Para sujetar la base del tornillo de banco, use tuercas, pernos y
arandelas de presion del tamano adecuado en todos los agujeros de
montaje. No suelde nunca la base del tornillo de banco a ningun objeto
de metal.
• Para el tornillo de banco de base giratoria, apriete solamente a mano las
palancas de las contratuercas en los lados del tornillo de banco.
• No use nunca un tubo de extension para apretar las pal anc as en l as
contratuercas esto puede hacier que doblen las palancas.
• Asegúrese de que la parte superi or del ban co don de está mo nta do el
tornillo de banco esté bien asegurada.
Al usar el tornillo de banco:
• Use siempre un tornillo de banco del tamano y de la capacidad
adecuados para sujetar el objeto de trabajo.
• No use nunca un martillo, un tubo de extension o un Álargador en la
palanca del uso del tornillo de banco.
• No desatornille nunca la mordaza movil mas alla de la’abertura
especificada maxima del tornillo de banco.
• No use nunca el tornillo de banco para encajar un objeto en otro objeto o
desprenderlo de otro objeto.
• Lleve siempre protectores de los ojos y la cara al golpear o usar
herramientas as con un tornillo de banco.
• NOTA: El mango husillo (“bar Tommy”) ha sido diseñado para doblarse
si se aplica una presión de apriete excesivo, para evitar el daño
potencial a tornillo de banco.
ADVERTENCIA: Este producto puede exponerlo a productos
químicos, incluido de pl omo, que en el estad o de Californi a se conoce
como causantes de cáncer y defectos de nacimiento u otros daños
reproductivos. Para obtener más información, vaya a http://www.
p65warnings.ca.gov.
s.ca.gov.
The Wilton® lifetime warranty is for th e product’ s lifetime with no end date. T his warr anty cove rs manufac turer’s def ect onl y and does not
cover failures due dir ectly or indirectly to m isuse, abuse, negligen ce or accidents, normal wear-and-tear, im proper repair, alter ations or
lack of maintenance. For more information, please visit wiltontools.com.
when calling. If a product requires fur ther inspection, the Technical Service representative will explain and assist with an y additional action needed. W ilton has
Authorized Service C enters located throughout t he United States. For the nam e of an Authorized Service Cent er in your area call 1-800-27 4-6846 or use the
Service Center Locator on the Wilton website.
Wilton sells throu gh distributors only. The sp ecifications list ed in Wilt on printed materi als and on offici al Wilton bra nded website a re given as gen eral informati on
and are not binding. W ilton reserve s the ri ght to effe ct at an y time, witho ut prior noti ce, th ose alte rati ons to part s, fittings, a nd acc essor y equipm ent whic h the y may
deem necessary for any reason whatsoever.
NOTE: Wilton is a division of JPW Industries, Inc. References i n this docum ent to Wi lton also apply to JPW Industries, Inc., or any of its successors in int erest to
the Wilton brand.
Please contact Techni cal Serv ice by cal ling 1-80 0-274-6 846. Ple ase note that you will be aske d to provide proo f of initial purchase
How to Get Technical S u pp or t
Page 3
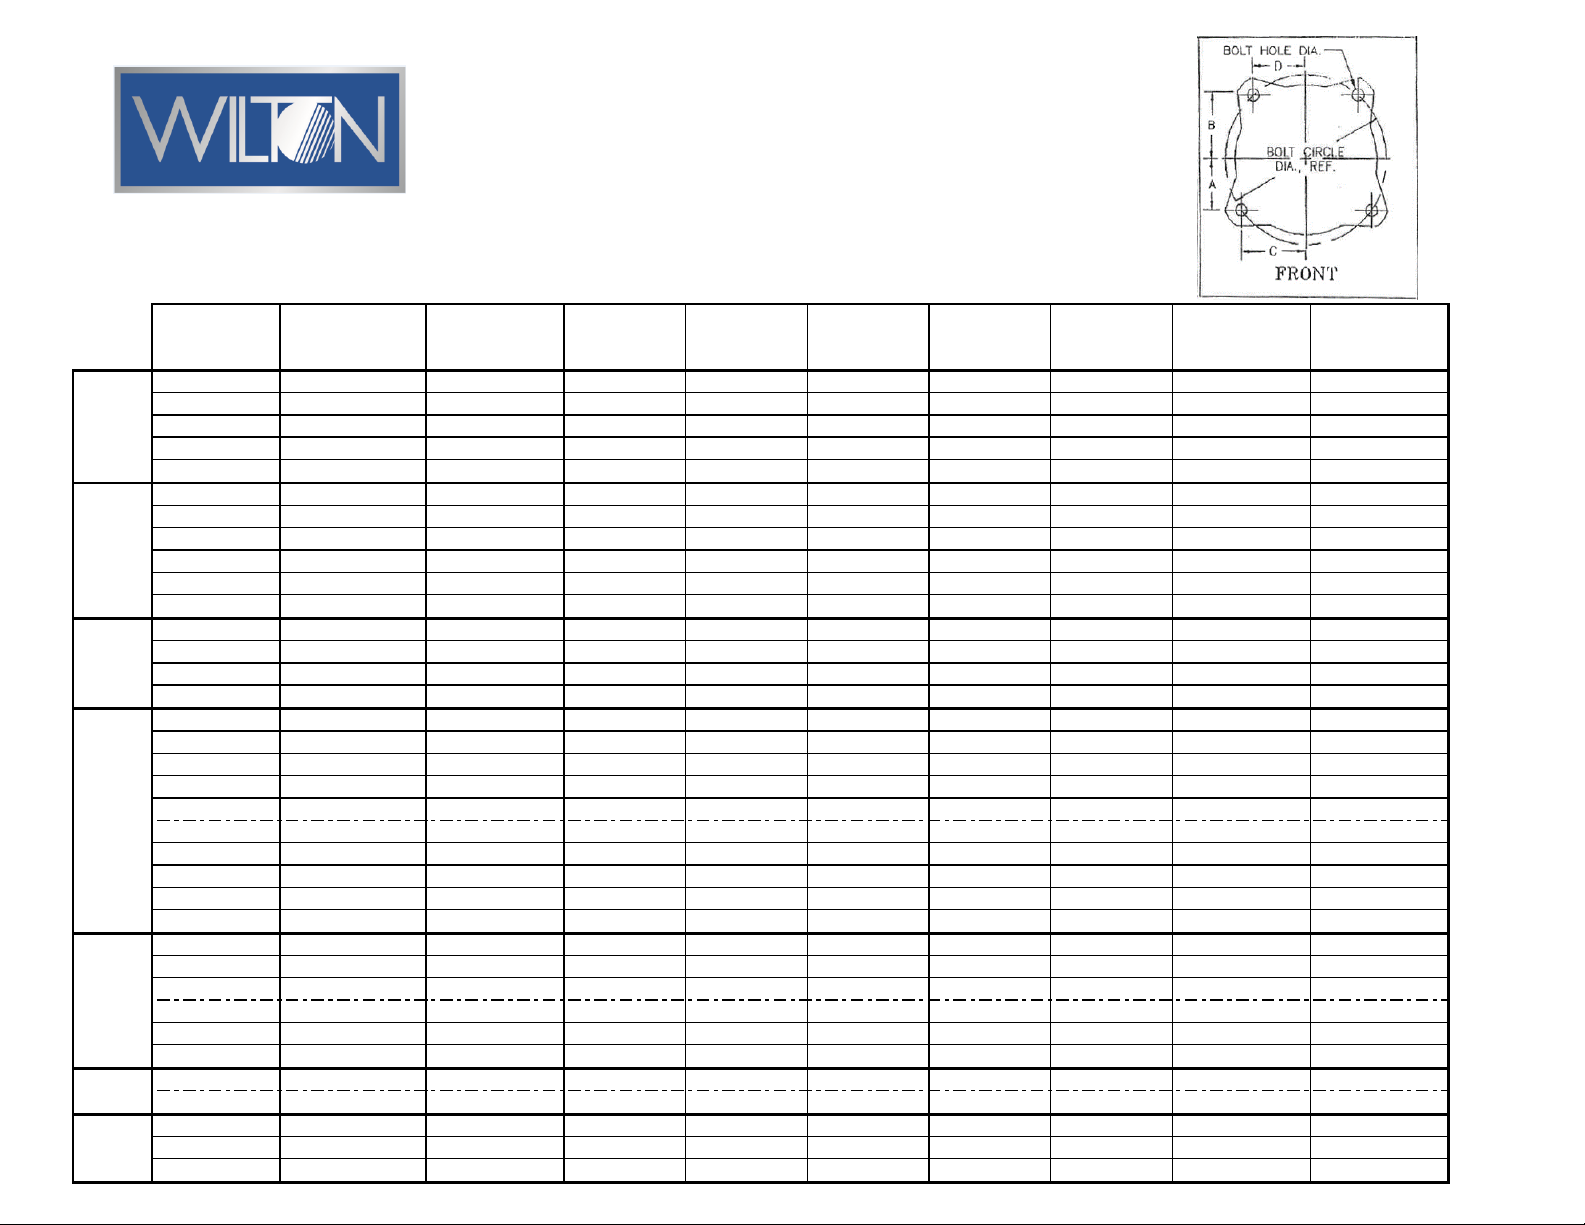
Stock No. Model Base Part No.
Dimension A
(in)
Dimension B
(in)
Dimension C
(in)
Dimension D
(in)
Bolt Circle
Diameter (in)
Bolt Hole
Diameter (in)
Mounting Bolt
Diameter (in)
28810
845M 744M-06
2 7/16” 2 14/16” 2 14/16” 2 7/16” 7 8/16” 1/2" 7/16"
28811 855M
745M-06
2 13/16” 3 6/16” 3 6/16” 2 13/16” 8 12/16” 1/2" 7/16"
28812 865M
745M-06
2 13/16” 3 6/16” 3 6/16” 2 13/16” 8 12/16” 1/2" 7/16"
28813 880M
748M-06
3 5/16” 3 15/16” 3 15/16” 3 5/16” 10 5/16” 11/16" 5/8"
28814 8100M
748M-06
3 5/16” 3 15/16” 3 15/16” 3 5/16” 10 5/16” 11/16" 5/8"
21300 744 21300-09
2 3/16” 2 14/16” 3 1/16” 2 7/16” 7 8/16” 9/16" 1/2"
21400 745 1011980
2 9/16” 3 5/16” 3 9/16” 2 13/16” 8 12/16” 11/16" 5/8"
21500 746 21500-09
2 13/16” 3 12/16” 4 ” 3 2/16” 9 12/16” 11/16" 5/8"
21800 748 1010840
2 13/16” 3 12/16” 4 ” 3 2/16” 9 12/16” 11/16" 5/8"
63187 1550/745 YEL. 1012060
2 9/16” 3 5/16” 3 9/16” 2 13/16” 8 12/16” 11/16" 5/8"
63188 1560/746 YEL. 1013060
2 13/16” 3 12/16” 4 ” 3 2/16” 9 12/16” 11/16" 5/8"
63300 WS4 310046WA
2 4/16” 2 4/16” 2 4/16” 2 4/16” 6 5/16” 9/16" 1/2"
63301 WS5 310056WA
2 8/16” 2 8/16” 2 8/16” 2 8/16” 7 ” 9/16" 1/2"
63302 WS6 310066WA
2 11/16” 2 11/16” 2 11/16” 2 11/16” 7 9/16” 9/16" 1/2"
63304 WS8 310086WA
3 2/16” 3 2/16” 3 2/16” 3 2/16” 8 13/16” 9/16" 1/2"
28818
674U 674U-05
1 14/16” 2 4/16” 2 4/16” 1 14/16” 5 14/16” 7/16" 3/8"
28819
675U 675U-05
2 1/16” 2 8/16” 2 8/16” 2 1/16” 6 7/16” 1/2" 7/16"
28820
676U 744M-06
2 7/16” 2 14/16” 2 14/16” 2 7/16” 7 8/16” 1/2" 7/16"
28815 656UHD
656W-05
3 2/16” 3 11/16” 3 11/16” 3 2/16” 9 11/16” 1/2" 7/16"
28816 648UHD
648W-05
3 2/16” 3 12/16” 3 12/16” 3 2/16” 9 12/16” 11/16" 5/8"
11126 D4/674 2900710
2 ” 2 ” 2 3/16” 1 13/16” NA 7/16" 3/8"
11127 D5/675 2900720
2 1/16” 2 1/16” 2 8/16” 2 ” NA 7/16" 3/8"
11128 D6/676 2900730
2 7/16” 2 7/16” 2 14/16” 2 5/16” NA 7/16" 3/8"
191 656
2656002
3 8/16” 3 8/16” 3 8/16” 3 8/16” 10 ” 5/8" 1/2"
11800 648 2648004
3 7/16” 3 7/16” 3 7/16” 3 7/16” 9 12/16” 11/16" 5/8"
28821 4550R
4500R-04
2 13/16” 3 6/16” 3 6/16” 2 13/16” 8 12/16” 1/2" 7/16"
28822 4650R
4600R-03
2 13/16” 3 6/16” 3 6/16” 2 13/16” 8 12/16” 1/2" 7/16"
28823 4800R
4800R-04
3 ” 3 9/16” 3 9/16” 3 ” 9 4/16” 9/16" 1/2"
14500 4500 11206S03
3 2/16” 3 2/16” 3 2/16” 3 2/16” 8 14/16” 9/16" 1/2"
14600
4600
11206S03
3 2/16” 3 2/16” 3 2/16” 3 2/16” 8 14/16” 9/16" 1/2"
14800
4800
14800S07
3 2/16” 3 2/16” 3 2/16” 3 2/16” 8 13/16” 9/16" 1/2"
28824 550P
550P-07
2 2/16” 2 9/16” 2 9/16” 2 2/16” 6 11/16” 1/2" 7/16"
69999 Multi-Purpose 5 n/a
2 7/16” 2 7/16” 2 7/16” 2 7/16” 6 14/16” 1/2" 7/16"
11104
89100 NA 2 9/16” 2 9/16” 2 9/16” 2 9/16” 5 2/16” 3/8" 5/16"
11105
89125 NA 3 5/16” 3 5/16” 3 5/16” 3 5/16” 6 10/16” 7/16" 3/8"
11106
89150
NA 3 14/16” 3 14/16” 3 14/16” 3 14/16” 7 12/16” 1/2" 7/16"
Multi-
Purpose
General
Purpose
Bench Vise Mounting Dimensions
Mechanics
Pro
Mechanics
Shop
Utility / Utility HD
Reversible
 Loading...